

Page 1
| 2 | 3
| 1
September 16, 2020_ V1 September 16, 2020_V1
September 16, 2020_ V1 September 16, 2020_ V1
PRODUCT
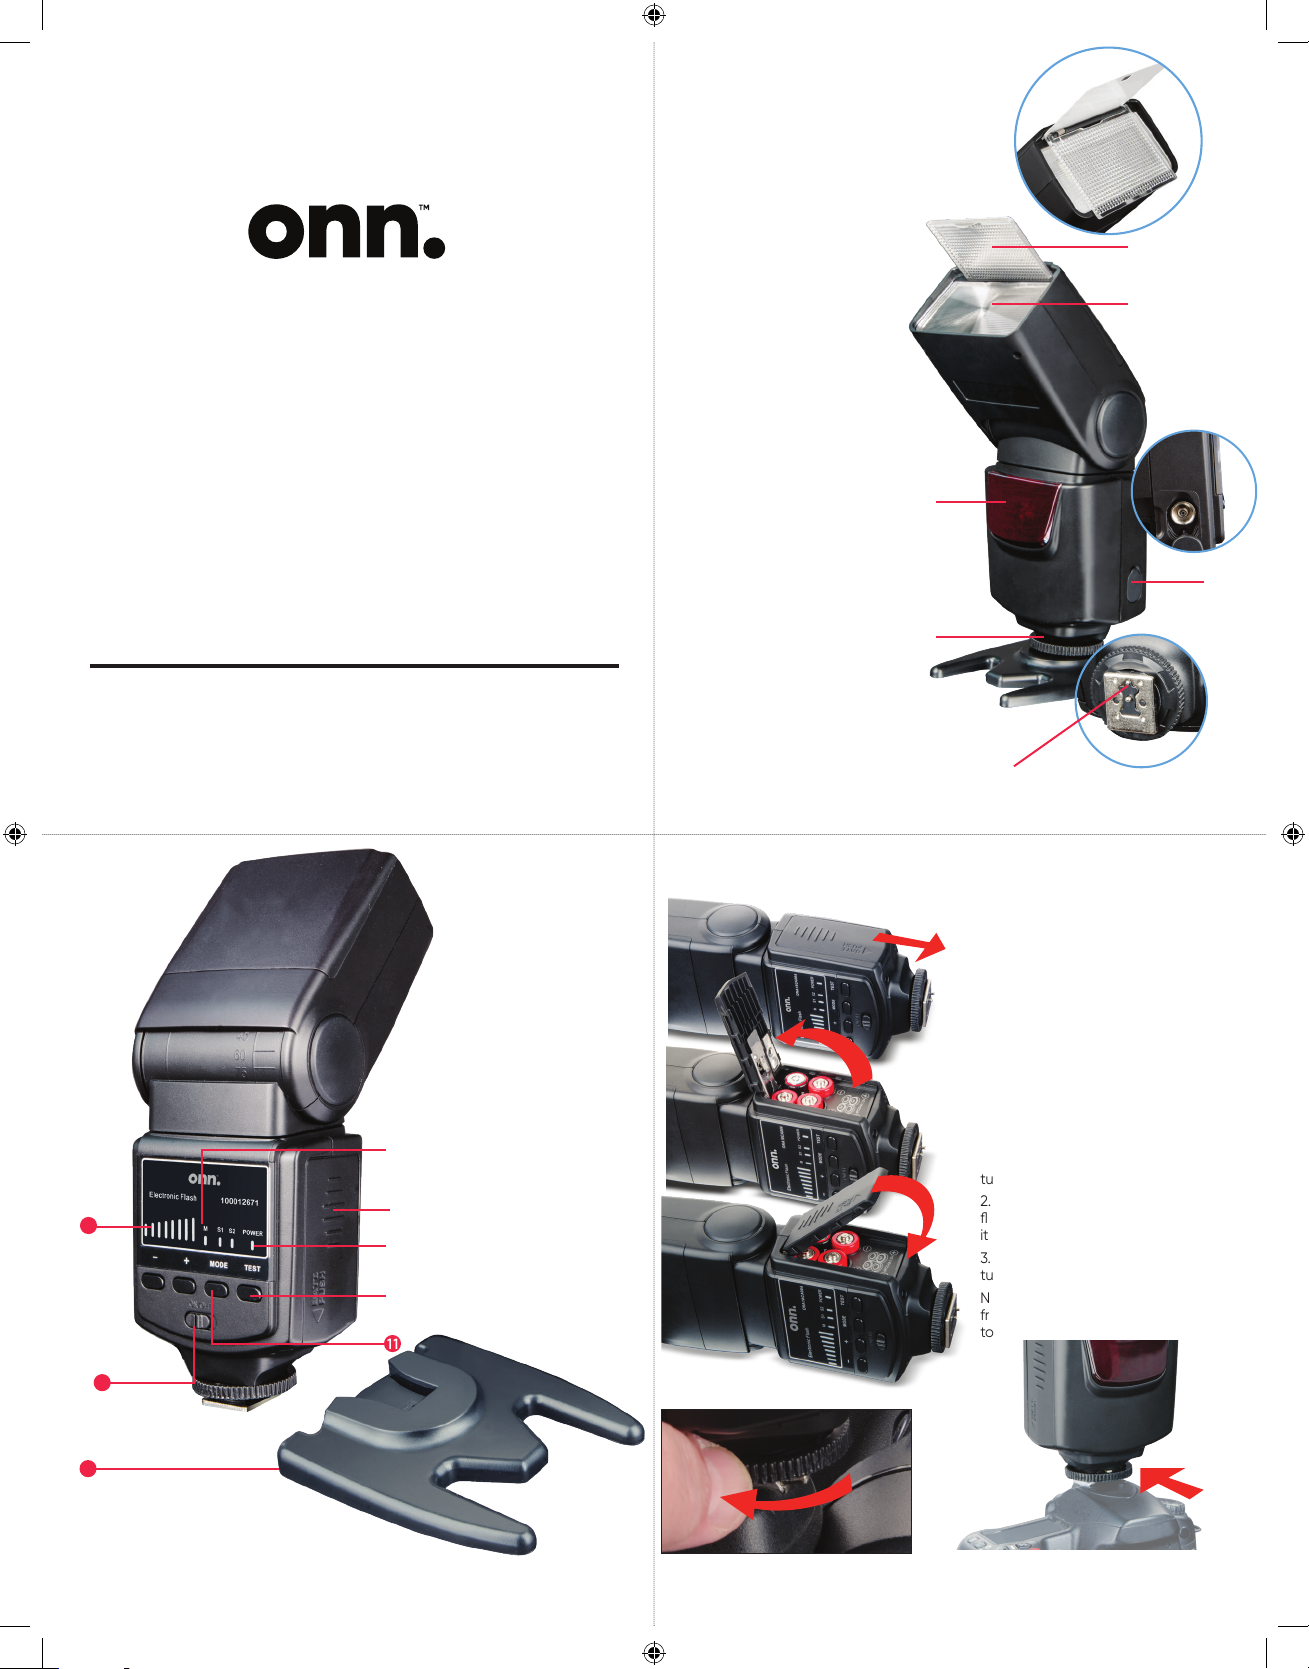
FEATURES
1. Flash diuser
2. Flash
À
Electronic Flash
3. Wireless sensor
4. SYNC port
5. Lock ring
6. Trigger
Õ
Ã
Õ
MODEL: 100012671
Œ
PRODUCT GUIDE
œ
–
12
7. Mode indicator (M, S1, S2)
8. Battery cover
9. Power indicator
10. Test shot button
11. Select button for modes
12. Brightness control indicator
13. Power On/O button
14. Hot-shoe stand
—
“
”
11
BATTERY INSTALLATION:
1. To install the batteries, open
the battery cover, slide the
battery bay cover in the
direction of the arrows to open.
2. Insert the batteries with
polarity according to the label
inside the battery bay. Make
sure the battery polarity is
inserted properly or it will not
turn on.
3. Close the battery cover then
slide it in the opposite direction
of the arrow to lock it.
FLASH INSTALLATION:
1. Unscrew the locking ring by
turning it all the way to the left.
2. Slide flash to top of camera
flash mount. Hold it to make sure
it does not fall o.
3. Tighten the locking ring by
turning it all the way to the right.
Note: Before removing the flash
from the camera, please be sure
to turn o the flash.
Œ
13
14
Page 2
| 6
| 4 | 5
September 16, 2020_ V1 September 16, 2020_ V1
September 16, 2020_ V1
FLASH OPERATION:
M MODE
In this mode, you can prioritize your flash brightness. Adjust camera settings by
pressing the shutter. The flashlight will flash under the camera synchronous signal.
FLASH INTENSITY CONTROL
The flash has 8 light intensity levels. 1/128, 1/64, 1/32, 1/16, 1/8, 1/4, 1/2, 1/1.
S1 MODE
This mode is also called “Pre-flash”. In this mode, the flash unit ignores a single
“Pre-flash” from the master flash and only fires in response to the recorded, actual
flash from the master flash. This mode can be used when using a TTL master flash
on the camera.
The flash output setting in slave triggering
mode is the same as that in manual mode.
Press the minus (-) button or the plus (+) button
to change the brightness. You can use your
mini stand to set the flash away from the
camera in S1 or S2 slave trigger mode.
Note: To enter S1/S2 mode from the main
mode, press the “Mode” button repeatedly
until the S1/S2 or indicator lights on the back
of the flash.
S2 MODE
This mode is also called “Preflash Cancel. “
In this mode, the flash unit ignores a single
“preflash” from the master flash and only fires in
response to the second, actual flash from the
master. This mode can be used when using a TTL master flash on the camera.
Note: To enter S1/S2 mode from the main mode, press the MODE button
repeatedly until the S1 or S2 indicator lights on the back of the flash.
The flash output setting in slave triggering mode is the same as that in manual
mode. Press the – button or + button to change the brightness. You can use your
mini stand to set the flash away from the camera in S1 or S2 Slave Trigger Mode.
TROUBLESHOOTING:
THE FLASH DOES NOT CHARGE
Make sure that the batteries are installed in the correct direction. If battery
appears and blinks on the back of the flash, replace the batteries immediately.
Install the batteries even when using an external power source. Make sure that you
are using Alkaline or NiMH AA batteries.
THE FLASH DOES NOT FIRE
Make sure that the flash’s mounting foot is securely connected to the camera’s hot
shoe. Wait until the flash is fully charged and the flash ready indicator is lit. Make
sure that the electrical contacts on the mounting foot and hot shoe are clean.
Make sure that the camera’s flash is turned on and the mode is active. If the flash
ready indicator does not light, replace the batteries. If battery appears and blinks
on the back of the flash, replace the batteries immediately. If the flash is used
in slave mode, make sure that the master flash on the camera is turned on and
active. If the flash is used in slave mode, make sure that there is a clear line of sight
between the optic slave sensor and the camera’s flash. If using a PC sync cable,
make sure your connections are secure.
Note: The over-temperature protection may have disabled the flash temporarily.
Wait for 10 minutes and try again.
CONTINUOUS FLASHING MAXIMUM TIMES
Power Level 1/1 or ½ = 20
Power level ¼ or 1/8 = 40
Power level 1/16 or 1/32 = 80
Power level 1/64 or 1/128 = 160
SPECIFICATIONS
Guide number = 33 (ISO 100/1M)
Power = 4 x AA batteries
Battery life = 110-1500 times (AA Alkaline batteries recommended)
Recycle time = 3 seconds
Flash mode = M, S1, S2
Color temperature = 5800K
Flash duration = 1/200 seconds – 1/2000 seconds
Flash control = Magnitude 8 brightness control levels (1/128 – 1/1)
Dimensions = 190 x 75 x 55mm
Net weight = 315g
USING BOUNCE FLASH
By pointing the flash head toward a wall or ceiling, the flash bounces o of the surface before
illuminating the subject. This can soften shadows behind the subject for a more natural-looking shot.
This is called bounce flash. Hold the flash head and turn it to the angle you want.
Need help? We’re here for you every day from 7 a.m. - 9.am. CST. Give us a call at 1-888-516-2630
1 YEAR WARRANTY:
onn. responsibility with regard to this warranty shall be limited solely to the repair or replacement, at its
option, of any product that fails during normal consumer use for a period of one year from the date of
purchase. This warranty does not extend to damage or failure resulting from misuse, neglect, accident,
alteration, abuse, or improper installation or maintenance. This warranty does not extend to equipment
used with the product. If at any time during the one year period following your purchase the product fails
due to defects in materials or workmanship, please contact us at TechSupport@Mizco.com to obtain an
RMA number and return shipping instructions. For fastest service, have a copy of your product receipt
available with the model number, date, and location of purchase. This warranty gives you specific legal
rights, and you may have other rights that may vary in certain states or provinces.
WARNING! IMPORTANT SAFETY INSTRUCTION!
Failure to read and follow these safety instructions could result in fire, explosion, electrical shock or other
hazard, causing serious and/or fatal injury and/or property damage.
1. Do not mix alkaline, standard (carbon-zinc) or rechargeable (ni-cad, ni-mh, etc.)
batteries
2. Do not modify, disa ssemble, open, drop, crush, puncture or sh red the product
3. Do not expose the prod uct to rai n or water
4. Keep the prod uct awa y from op en flam e or sun light to p revent heat build-up
5. Keep the prod uct awa y from ch ildre n. This produc t is not a toy.
6. Ens ure that all persons who use the product read and follow these warnings and
instructions.
This device complies with Part 15 of the FCC Rules. Operation is subject to the following two conditions:
(1) this device may not cause harmful interference, and (2) this device must accept any interference
received, including interference that may cause undesired operation.
Warning: Changes or modifications to this unit not expressly approved by the party responsible for
compliance could void the user’s authority to operate the equipment.
NOTE: This equipment has been tested and found to comply with the limits for a Class B digital device,
pursuant to Part 15 of the FCC Rules. These limits are designed to provide reasonable protection against
harmful interference in a residential installation. This equipment generates, uses and can radiate radio
frequency energy and, if not installed and used in accordance with the instructions, may cause harmful
interference to radio communications. However, there is no guarantee that interference will not occur in
a particular installation.
If this equipment does cause harmful interference to radio or television reception, which can be
determined by turning the equipment o and on, the user is encouraged to try to correct the
interference by one or more of the following measures:
• Reorient or relocate the receiving antenna.
• Increase the separation between the equipment and receiver.
• Connect the equipment into an outlet on a circuit dierent from that to which the receiver is
connected.
• Consult the dealer or an experienced radio/TV technician for help.
We ‘d love to hear from you. Scan
with your Walmart app and let
us know what you think.
September 16, 2020_ V1
 Loading...