

Page 1

SECURITY SYSTEM
User Manual
Page 2

SE
CURITY
History
Version Date Changes
2.0 2017-03-08
Page 3

Índice
INTRODUCTION ............................................................................................... 5
INTRUSION – interior, peripheral and partial zones .............................................. 5
SECURITY – 24 hour zones ............................................................................... 6
ONLY SECURITY SYSTEM UNITS ........................................................................ 7
FEATURES ....................................................................................................... 8
FUNCTIONALITIES ........................................................................................... 9
24-hour security .............................................................................................. 9
24-Hour alarm routines .................................................................................... 9
Intrusion........................................................................................................ 10
CONTROLS AND INDICATIONS ......................................................................... 11
KEYPAD OVERVIEW ......................................................................................... 13
CONFIGURATION ............................................................................................ 14
MASTER MENU ............................................................................................... 14
Master code ................................................................................................... 14
Adding user codes ........................................................................................... 15
Deleting user codes ......................................................................................... 15
Defining the duress code ................................................................................. 16
Switching on/off the Automatic arming at night .................................................. 16
Switching the presence simulator on/off ............................................................ 16
Switching on/off Confirmed Alarm ..................................................................... 16
Programming phone numbers ........................................................................... 17
Defining Time and Date ................................................................................... 17
Changing the master code ............................................................................... 18
Exit the master menu ...................................................................................... 18
SYSTEM OPERATION ....................................................................................... 19
Arm and disarm the alarm ............................................................................... 19
Night mode .................................................................................................... 19
Partial mode ................................................................................................... 20
Restore Water supply ...................................................................................... 20
Restore Gas supply ......................................................................................... 20
Presence simulator .......................................................................................... 21
Confirmed alarm ............................................................................................. 22
Adding remote controls.................................................................................... 22
Removing remote controls ............................................................................... 22
Adding expansion units .................................................................................... 23
Removing expansion units ............................................................................... 23
COMMAND THROUGH TELEPHONE .................................................................... 24
Call to security central ..................................................................................... 24
Functions with user code ................................................................................. 24
Functions with master code .............................................................................. 25
INTEGRATION WITH AUTOMATION SYSTEM ....................................................... 26
Scenario “Leaving home” ................................................................................. 26
Scenario “Night” ............................................................................................. 27
Page 4

SE
CURITY
Command “Partial” .......................................................................................... 27
Command “Close blinds” .................................................................................. 27
Command “Switch off lights” ............................................................................ 27
Programming of actions in case of alarm ............................................................ 28
Language selection ......................................................................................... 29
Adjusting the OLED display brightness ............................................................... 29
Software versions ........................................................................................... 29
Page 5

INTRODUCTION
The ONLY Security system allows you to enjoy your home
knowing that you are always protected against leakage of gas
or water, smoke or fire and intrusion. It also allows you to
control the major systems over the phone from wherever you
are.
If the security system is installed with ONLY automation, the
system allows a number of extra features thanks to its total
integration with the rest.
The system has the following features:
• 24 hour protection against smoke and water and gas leaks
• Automatic protection against intrusion at night
• Full protection in your absence with simulated people in the
house1)
• Manoeuvre to dissuade the intruder1)
• Button for personnel emergency telephone call
• Two-way communication through telephone with voice
messages
• Control by phone of gas and water valves.
• Control by phone of lights, blinds, air conditioning and
other functions1)
• Technical alarms
1) When installed with ONLY automation
This manual explains the features and how to use the system
from the standpoint of the user.
INTRUSION – interior, peripheral and partial zones
A good project of intrusion detection includes not only interior
protection but also peripheral protection. An intruder, once
inside the house already destroyed something and it is good
policy to avoid it.
The ONLY security and automation systems together offer the
possibility of dissuading the intruder because any security
detector can also command any output of the automation
system.
Page 6
SE
CURITY
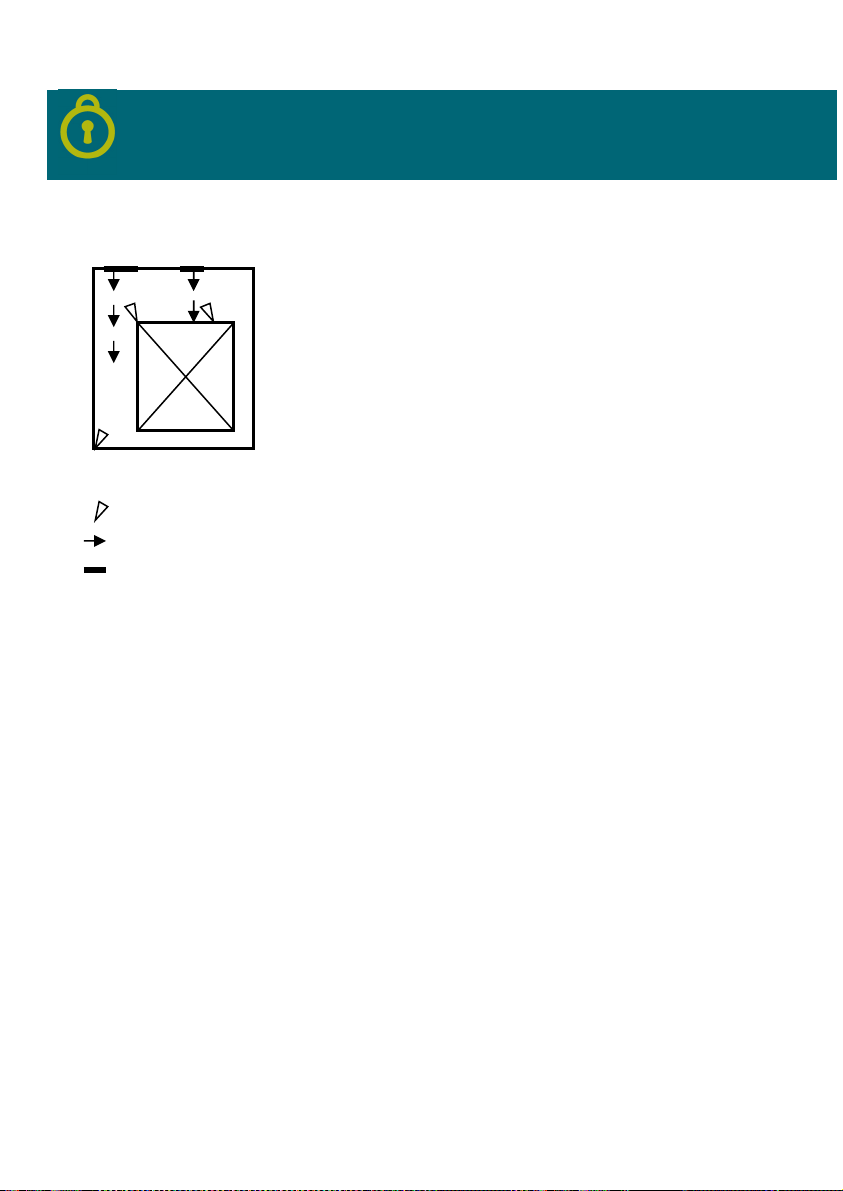
Movement detector
s
Entrance ways
Magnetic contacts on doors
Therefore, a detector can also turn on lights, switch on the
irrigation, close all shutters or gates, apart from the telephone
call to the owner or to the 24 hour security central.
For that, the project engineer must predict the zones likely to
be used by the intruder, protect them with detectors and plan
the dissuasion actions.
The ONLY security system divides the intrusion zones in
interior, peripheral and partial.
Interior zones are the zones that must be protected when
people are not at home. Besides, both kinds of zones are
divided in immediate and delayed zones. The delayed ones
are intended for zones of entry in the house, allowing the user
the necessary time to enter his code, opposed to the
immediate ones that immediately trigger the alarm.
Peripheral zones are all those that should be armed during
the night when people are at home and sleeping. It’s for
example the magnetic contacts or even volumetric detectors
of other zones of the house not visited during the night.
Partial zones are all those that must be protected even when
there are people at home. They are, for example, volumetric
detectors in garages or other outbuildings that usually are not
visited by people in the house during the day or night.
SECURITY – 24 hour zones
Security is not only intrusion detection; it is also protection of
goods and persons against accidental damage. A timely
warning of smoke can save lives as well as the closing of a
gas valve when leakage is detected.
The ONLY security central includes the command of the gas
and water valves to automatically avoid greater damage.
The smoke or fire detectors when triggered cause a very noisy
alarm calling all telephone numbers, besides opening all the
shutters in order to facilitate the escape if necessary.
Page 7
ONLY SECURITY SYSTEM UNITS
The ONLY security system is composed by 4 different types of
units:
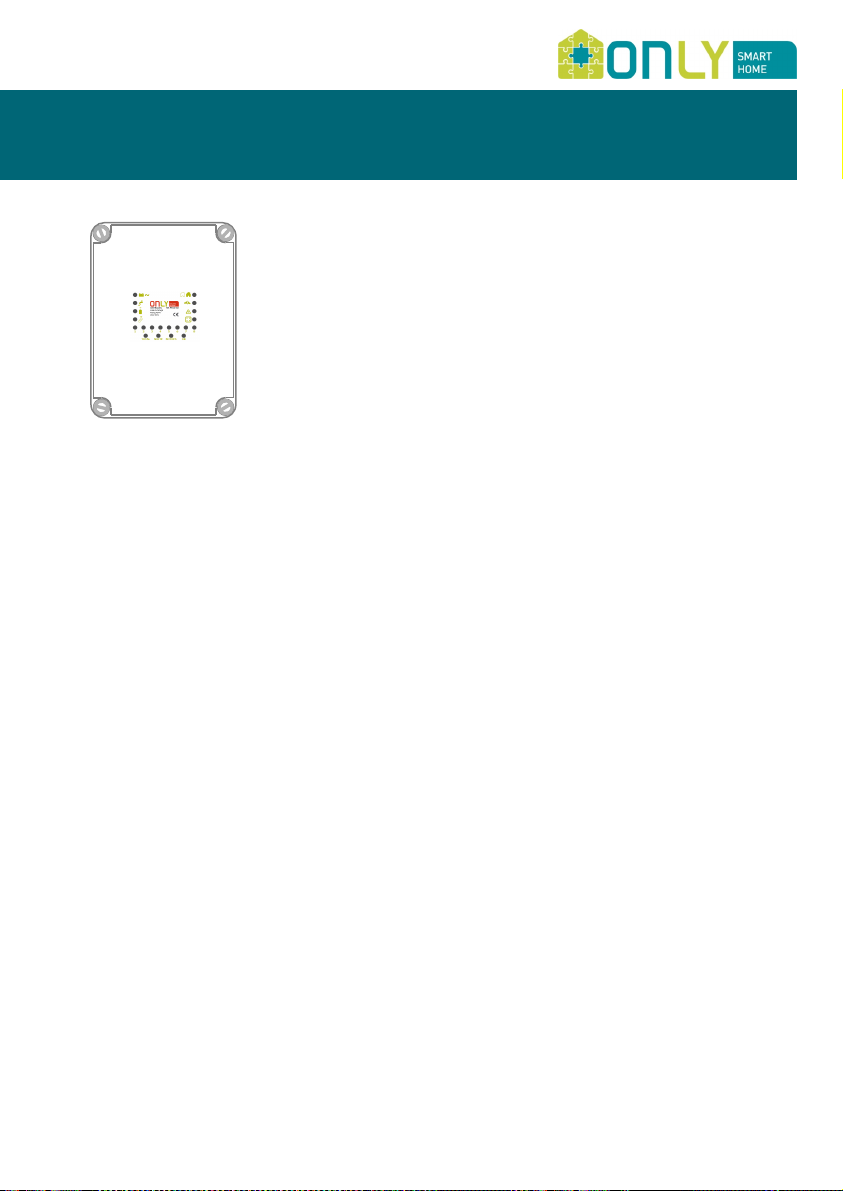
CENTRALSEC security central
C-4ZON-D-RF 4-zone expansion unit with RF receiver
OT-16SD security keyboard with OLED display
H-TX3B-RF RF remote-control
The CENTRALSEC is an 8-zone security central with telephone
dialler (PSTN), relays to drive valves to cut water and gas
supply as well as internal and external sirens. It features as
well an interface to the ONLY automation bus to allow
integration with domotics.
The C-4ZON-D-RF is a 4-zone expansion unit. It is intended
to connect up to 4 zone detectors and communicates with the
central through the security bus.
Up to 8 expansion units can be used in the system, totalling
up to 40 different zones. It is equipped with a RF receiver.
The OT-16SD is a security keyboard with OLED that allows
users to interface with the system. Through them it is
possible to arm and disarm the system, visualize certain
events, define new users or change some system
parameters.
The H-TX3B-RF is a key-chain RF remote-control intended to
arm and disarm the system. It may also generate a personal
emergency call via telephone or be used to control other
automation units.
Page 8

SE
CURITY
FEATURES
ONLY proposes a number of innovative features that improve
application and usability.
In order to avoid false alarms, ONLY proposes the function
confirmed alarm: the sirens only sound in case of two or
more detections. Still, the telephone communication takes
place at the first detection.
During the night, when no more movement is detected inside
the house, the system arms automatically in Night Mode,
arming only the peripheral zones. In the morning, as soon as
movement is detected in interior zones, the alarm disarms
automatically. During the night it is possible to leave the
house without disarming the alarm if at least one interior
detector detects movement, automatically rearming a bit
later.
When the house is also provided with the ONLY automation
system, the user can choose arming the alarm with or
without simulation of people at home. When activated, the
security central repeats the moves of the users made in the
house the day before, simulating the occupation. Obviously,
only the buttons defined by the user will be stored so that not
all the circuits of the house are used.
When power fails, it is impossible to open a motorized shutter
because the motor blocks the movement. For that reason, the
security system generates a special command that opens all
the shutters of the house in case of smoke or fire detection so
that escape is possible because it is likely to happen that
power goes off after a while. This function requires no
programming.
The telephone dialler allows not only the control and
verification of the state of the security system but also the
control of automation functions. The central can also be
connected to a 24-hour call centre using the Contact ID
protocol.
Page 9

FUNCTIONALITIES
The system was conceived to operate automatically as much
as possible.
It differentiates between security zones (active 24 hours) and
intrusion zones (active when alarm is armed).
24-hour security
The security central or the expansion units verify continuously
the state of all the security detectors connected and report
any change immediately.
The following alarm routines are executed on trigger:
24-Hour alarm routines
Smoke - all sirens sound
- all shutters are open (with automation)
- all phone numbers are dialled
- gas valve immediately closed
- water valve immediately open and water
detection is disabled
Gas - gas valve immediately closed
- telephone numbers dialled with message
“gas leakage detection”
Water - water valve immediately closed
- telephone numbers dialled with message
“water leakage detection”
Panic - call to 24-hour central and to telephone
number memorized on position 6 with
message “Personal emergency”
The security central also verifies the presence of mains
supply. The central makes a call 30 minutes after mains
failure with the message “mains failure”. On the contrary, it
also calls when the mains is back with the message “mains is
back”.
The alarm routines are interrupted when a valid user code or
remote control signal are detected.
Page 10

SE
CURITY
Intrusion
The security central and the expander units check at all times
the status of the attached detectors, reporting any changes to
the central.
In disarmed mode, no intrusion detection causes an alarm.
If the system is armed, the central identifies whether an
intrusion alarm is confirmed or not by analysing the number
of zones detected in a given time.
This information is reported to the user by voice message in
case of an alarm.
Upon determination of a single detection in a zone a non-
confirmed alarm is activated.
If the confirmed alarm function is activated, the alarm
routine is as follows:
Total Mode - call to all telephone numbers
- message “Intrusion detection”
Night Mode - call to all telephone numbers
- message “Intrusion detection”
Partial Mode - call to all telephone numbers
- message “Intrusion detection”
This routine lasts for a period of alarm time defined by the
installer, with a minimum of 3 minutes. If nobody switches the
alarm off (enter a valid code or pressing the disarm button on
the remote control) during this time, the alarm will repeat the
routine, but this time with activated sirens.
If in the meantime there is a detection in another zone a
confirmed alarm is activated:
Total mode - call to all telephone numbers
- message “Intrusion detection”
- switches on all sirens
Night mode - call to all telephone numbers
- message “Intrusion detection”
- switches on all sirens
Partial mode - call to all telephone numbers
- message “Intrusion detection”
The routine is interrupted if a valid user code is entered or a
disarm button on the remote control is pressed.
- switches on all sirens
Page 11
CONTROLS AND INDICATIONS
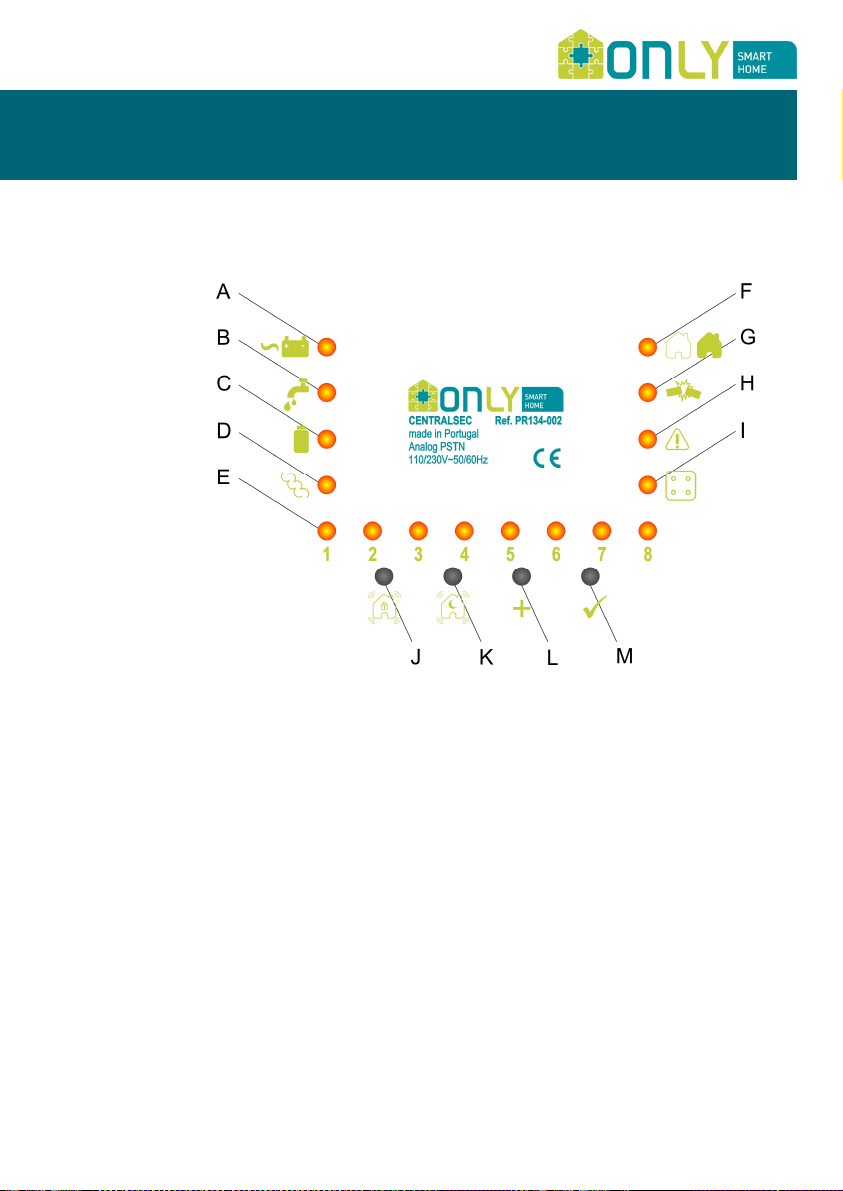
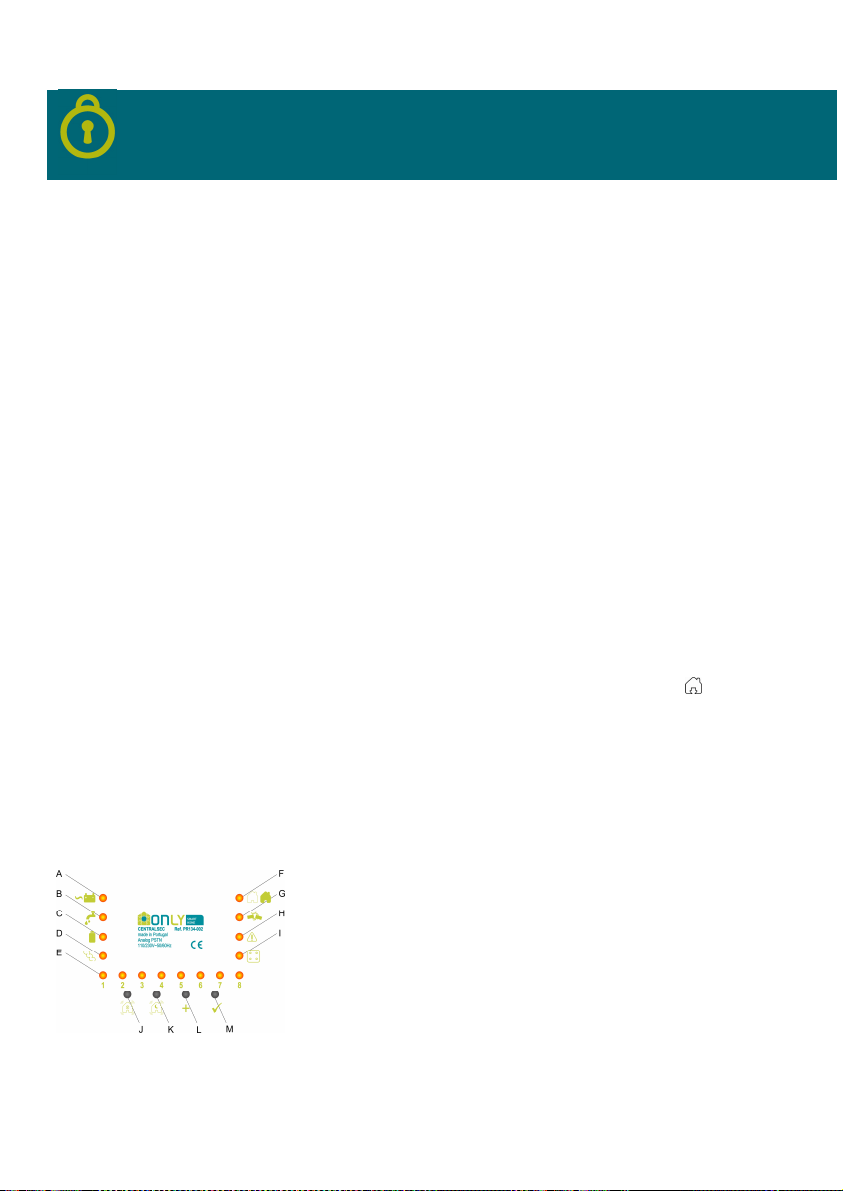
The CENTRALSEC is equipped with a number of keys and LEDs
that inform and enable controlling of some of the features of
the system.
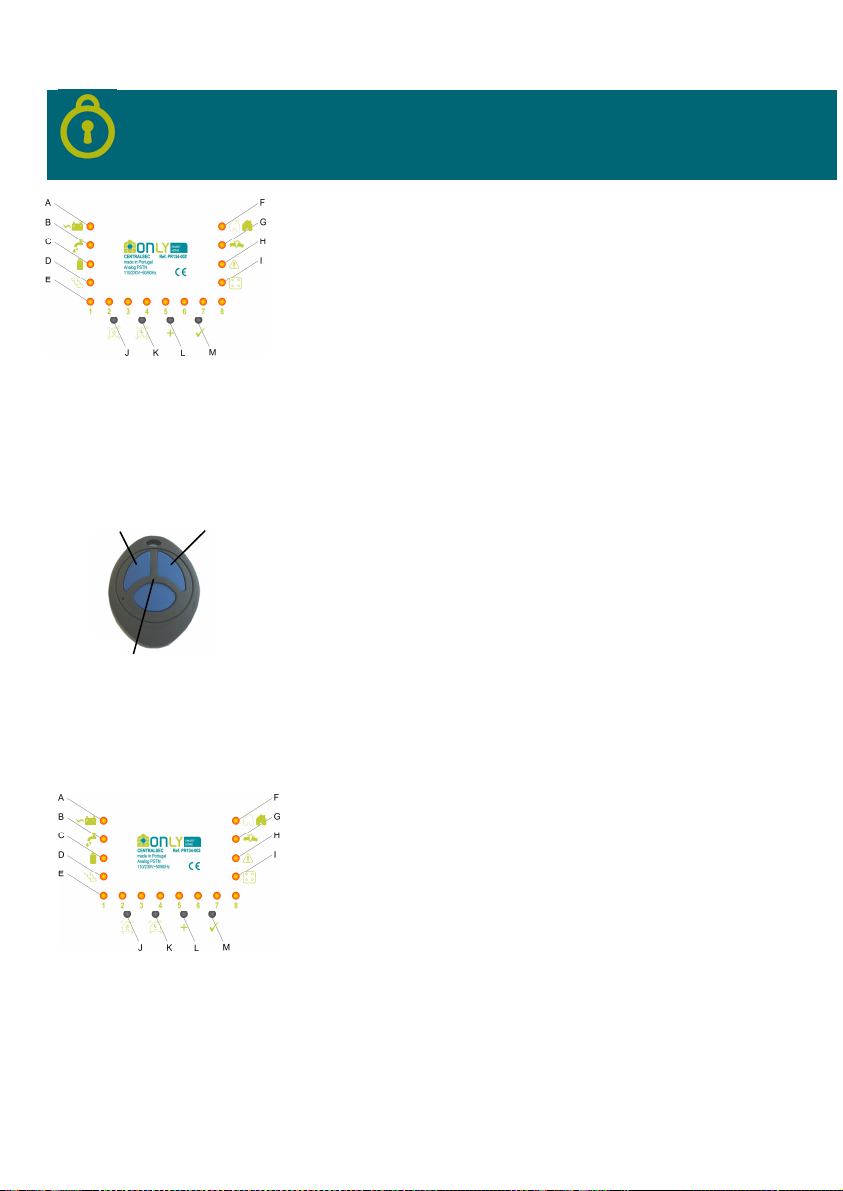
A – Power indication: green=230V, red=battery
B – Water indication: blinking red = OFF
C – Gas indication: blinking red = OFF
D – Smoke/Fire alarm indication: red = ALARM
E – Indication LEDs 1 to 8
F – Status indication: green=disarm, red=arm total,
orange=arm night
G – Tamper indication: red = Tamper
H – Fault indication: red = fault detected
I – Expansion unit indication: red = triggered
J – Total alarm scenario key
K – Night alarm scenario key
L – Add key to add expansion units or RF remotes
M – OK key, to acknowledge situations
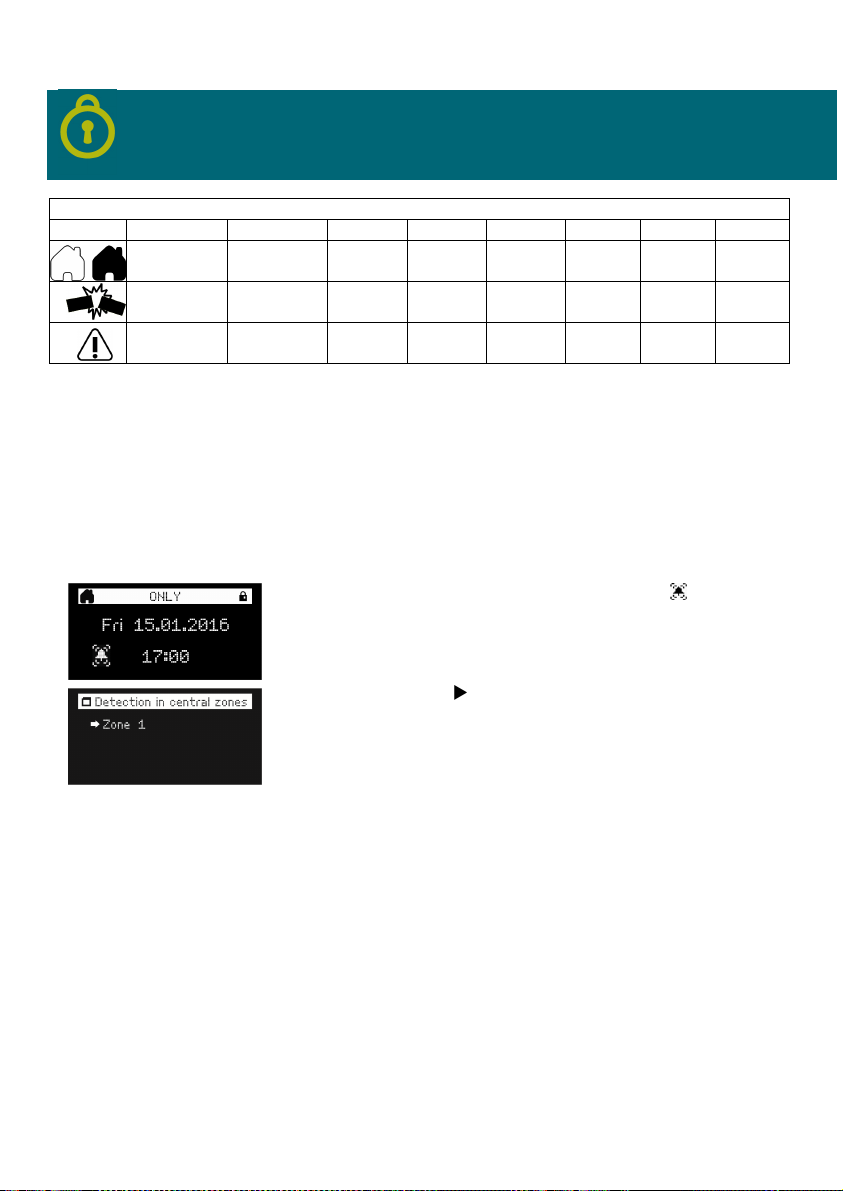
The LEDs 1 to 8 inform different things depending on the
situation according the following table:
Page 12
SE
CURITY
Keyboard
Indications
1 2 3 4 5 6 7 8
Zone 1
open
Centralsec
lid
Phone
line
Zone 2
open
Centralsec
zone
System
voltages
Zone 3
open
Expander
lost
Low
battery
In the case of an alarm, the CENTRALSEC keeps an indication
on the zone that triggered the alarm that will be shown to the
user after entering a valid code.
The CENTRALSEC has the following indications:
-When the alarm was caused on a local zone, the STATUS LED
blinks and the respective zone LED is ON.
-When the alarm was caused on an expansion zone, the
EXPANSION LED blinks and the respective unit number is
shown on LEDs 1 to 8.
On the keyboard, in case of an alarm, the icon is shown on
the display, simultaneously the internal beeper of the keypad
sounds.
The user will have to disarm the alarm with a valid code, and
later it is necessary to validate each one of the occurred
events with button before being able to rearm the alarm.
The example in the figure besides indicates an intrusion alarm
triggered by zone 1 of the control panel.
Zone 4
open
Expander
zone
Change
battery
Zone 5
open
lost
Memory
test
Zone 6
open
Date
time
Zone 7
open
- - -
- -
Zone 8
open
Page 13
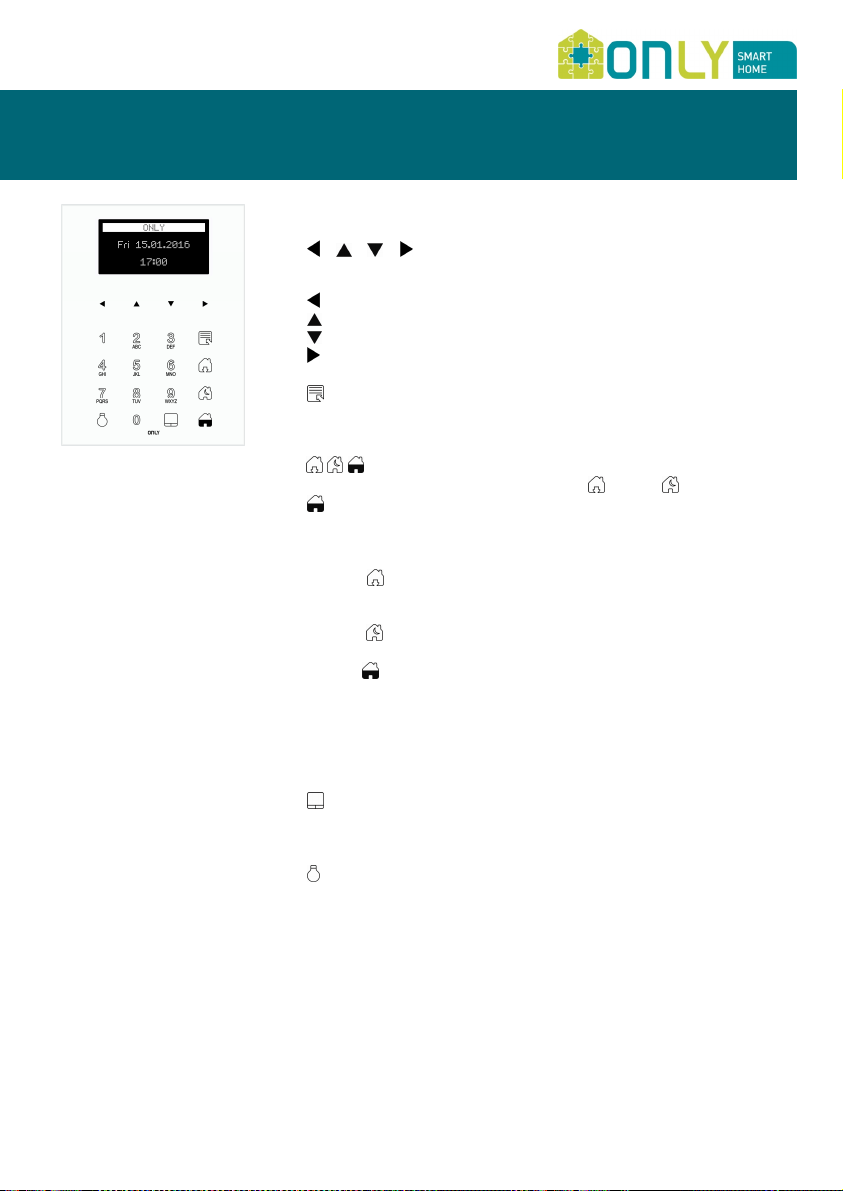
KEYPAD OVERVIEW
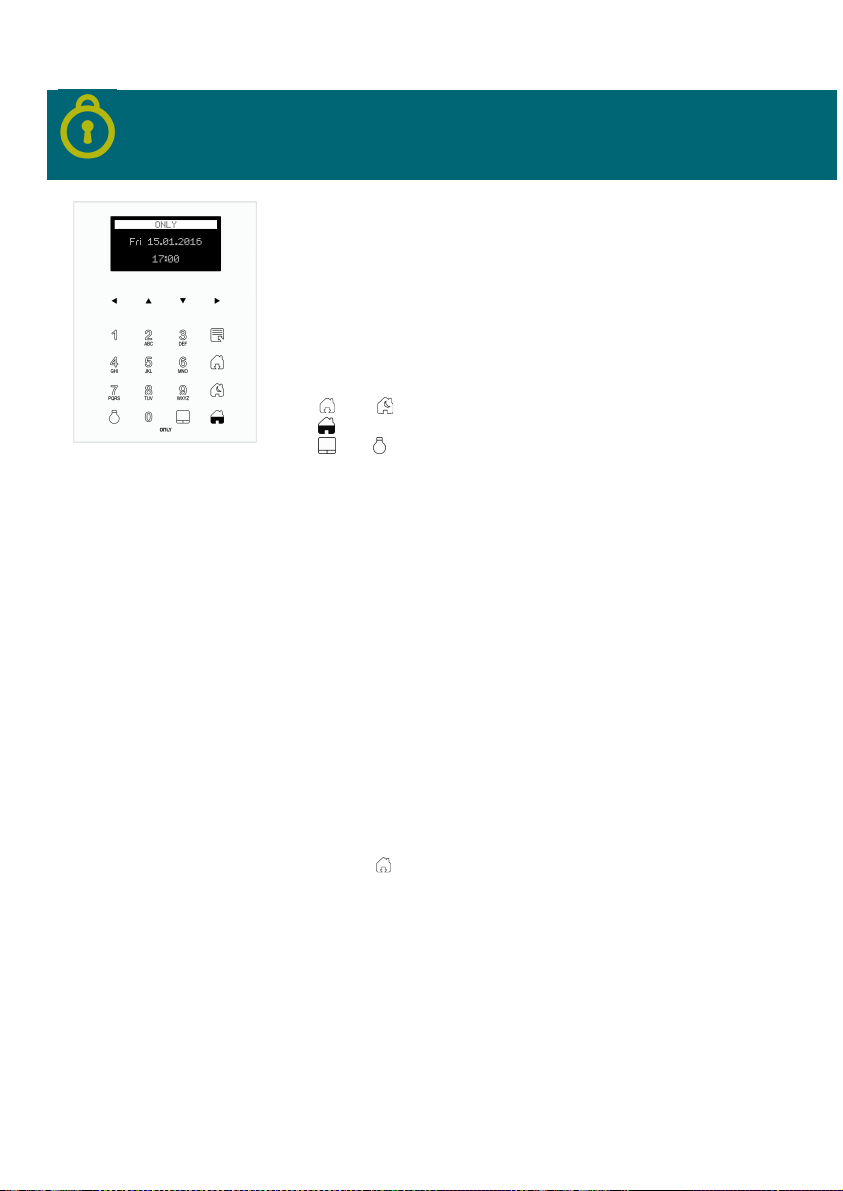
Navigation buttons inside menus.
Back
Up
Down
Next/Enter
Menu button for language selection, display brightness change
and software versions visualization.
Buttons to select the Arming mode - Total, Night e
Partial - pressed just after typing in the user code.
Arming in total mode does not requires to press the respective
button after the code.
Button is also used to configure the scenario activated
automatically when exit times finishes (e.g., switch-off lights,
move rolling shutters down, etc.).
Button can be used to activate a scenario like “arriving
home in the evening”.
Button sends a message ON/UP to the automation BUS that
can be used to switch on lights, move blinds or roller shutters
up or others.
0..9
Numeric buttons to introduce user, master or service code.
Button DOWN that can be used to configure a general
command blinds or roller shutters down.
Button OFF that can be used to configure a general command
to switch off all the lights.
Page 14
SE
CURITY
CONFIGURATION
All system configuration can be done using the keyboard (OT16SD). Zone configuration and other technical parameters
must be configured by the installer using the keyboard or
using a specific application installed on a computer via the
RS232 connector.
This chapter explains how to set up the user settings using the
keyboard.
The system can only be operated after a valid code has been
entered. The number of digits of this code grants access to
normal users or to the system manager.
From the factory, the system has the following definitions:
• Master code: 123456
• User code: 2580
Important note:
After installing the security system, factory codes must be
modified.
MASTER MENU
The master menu allows the responsible for the installation to
define the following parameters:
• add and delete user codes
• define the duress code
• turn on or off the automatic night arming
• turn on or off the confirmed alarm
• turn on or off the simulator of people at home
• change phone numbers
• define date and time
• change the master code
While navigating in the menus, the key cancels the action
and leaves the menu, the key confirms the action. Any
change already confirmed is kept.
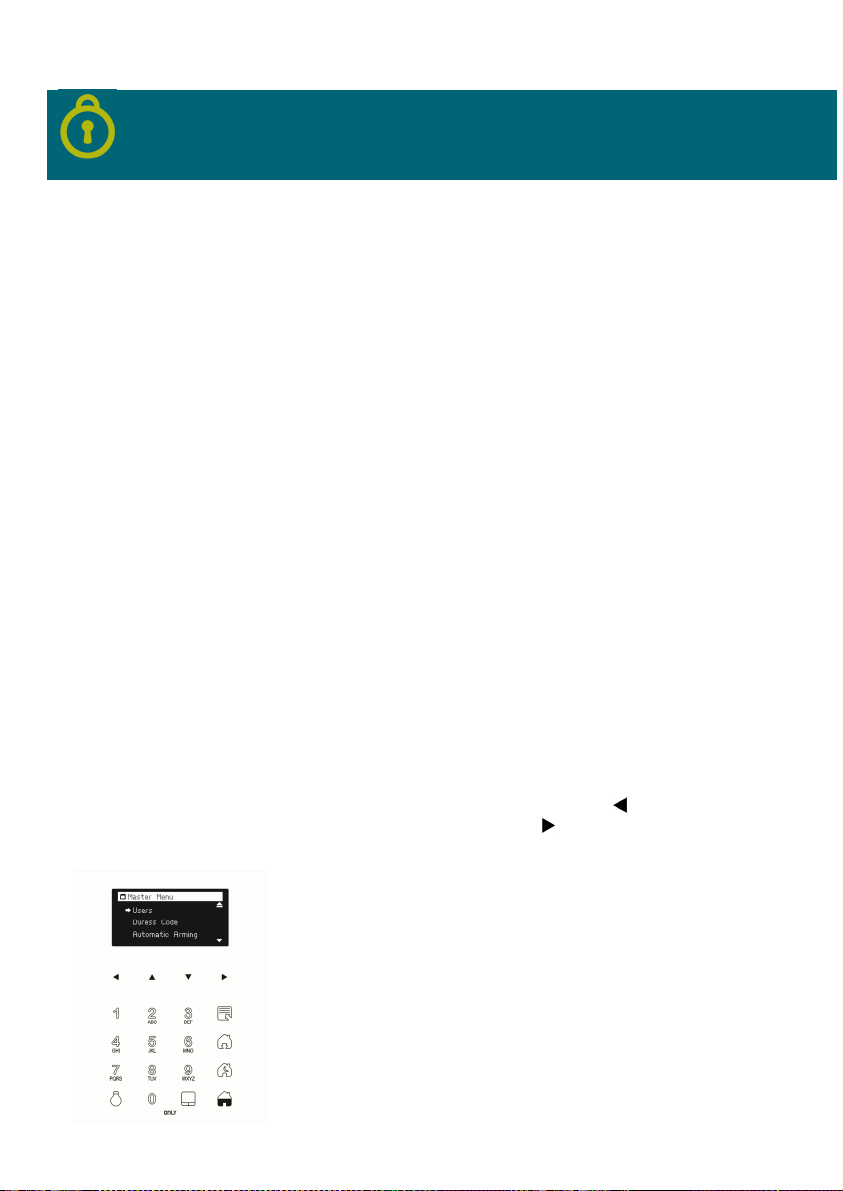
Master code
To access the master menu, enter the 6-digit master code as
follows: ex. 123456
The keyboard will sound a confirmation beep and the list of
possible options is shown:
• Users
• Duress code
• Automatic arming
• Simulator
Page 15
• Alarm confirmed
• Phone numbers
• Date and time
• Master code
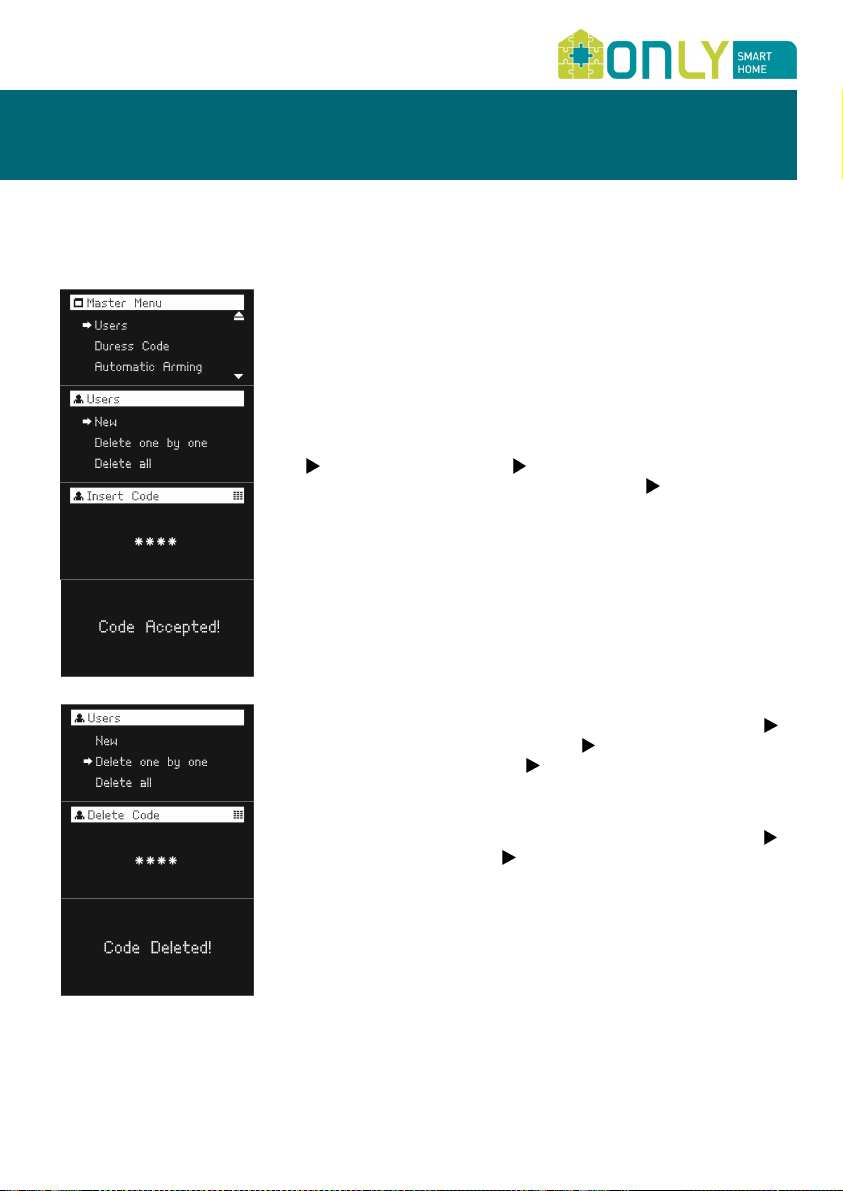
Adding user codes
If no user code is yet defined, the central has the code 2580.
When the first user code is defined, the default code 2580 no
longer works. This code is reserved and cannot be used.
You can add up to 32 user codes in order to be able to identify
the operation of different persons in the event register.
To add a new user code, select the option “Users”, press key
, select “New”, press key , type-in the desired 4-digit code
using the numeric keys in the keypad, press to accept and
enter the code once more to confirm. A confirmation beep is
played if both entries are equal and the message “Code
accepted!” is shown.
If the entered code is not the same or if the used digits are of
an already existing code, then the user is prompted to repeat
the process of a new code creation.
Deleting user codes
To delete a user code one by one, select “Users”, press key ,
select “Delete one by one”, press , enter the 4-digit code
you wish to delete, press , and repeat it once more to
confirm. A confirmation beep is played if the entry is correct
and the message “Code deleted!” is shown.
To erase all user codes, select “User codes”, press key ,
select “Delete all”, press , select “Yes”, a confirmation beep
is played and the message “Codes deleted!” is shown.
Page 16
SE
CURITY
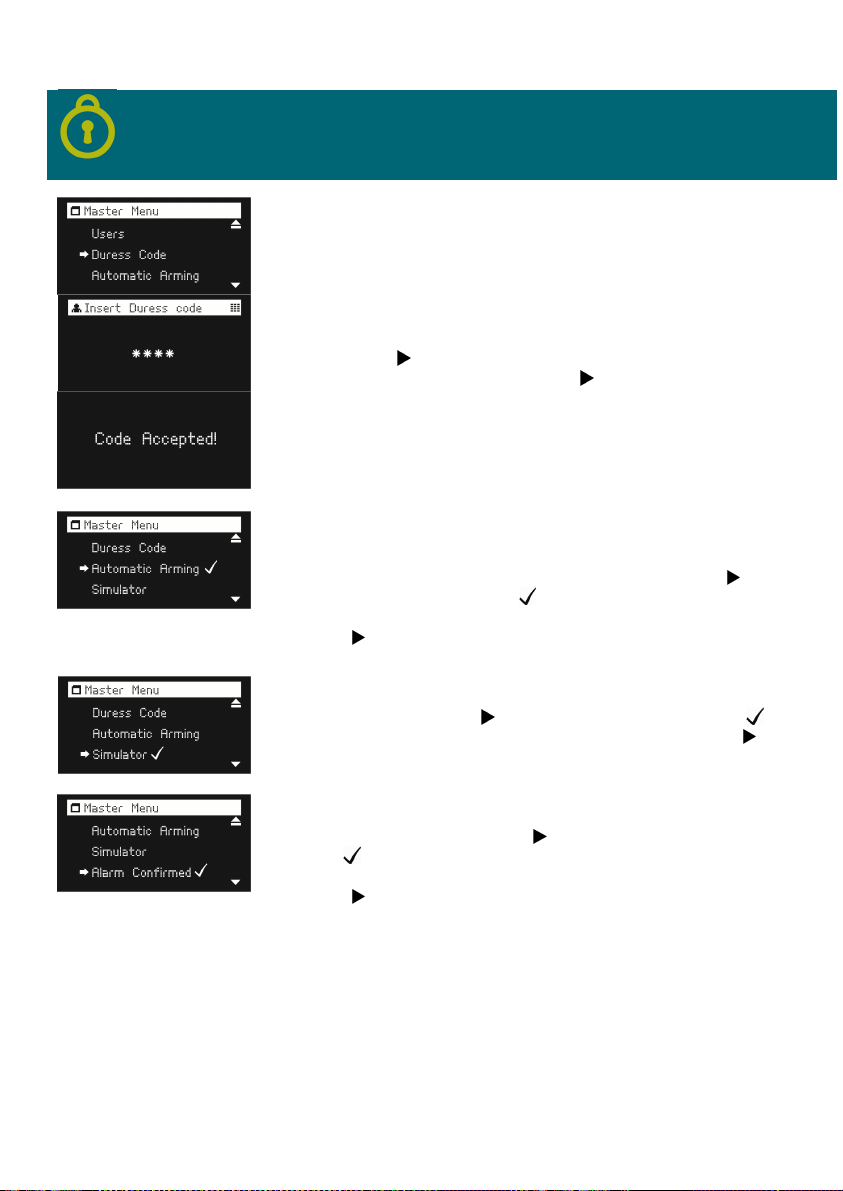
Defining the duress code
The duress code should be entered instead of the user code
when the user is under threat or when requiring personal
assistance. This code disarms the system and makes a
personal emergency call to the telephone number saved on
memory 6.
To define the duress code select the option “Duress code”,
press key , type-in the desired 4-digit code using the
numeric keys in the keypad, press to accept and enter the
code once more to confirm. If both entries are equal a
confirmation beep is played and the message “Code
accepted!” is shown.
Switching on/off the Automatic arming at night
Your installer can set the night period, usually between 00:00
and 06:00. To activate the function automatic arming at night,
select the option “Automatic arming”, press key , the
activation is signalized with
To deactivate this function, select “Automatic arming”, and
press
again.
Switching the presence simulator on/off
To activate the function presence simulator, select the option
“Simulator”, press key , the activation is signalized with
To deactivate this function, select “Simulator”, and press
again.
Switching on/off Confirmed Alarm
To activate the function confirmed alarm, select the option
“Alarm confirmed”, press key , the activation is signalized
with
.
To deactivate this function, select “Alarm confirmed”, and
press
again.
.
.
Page 17
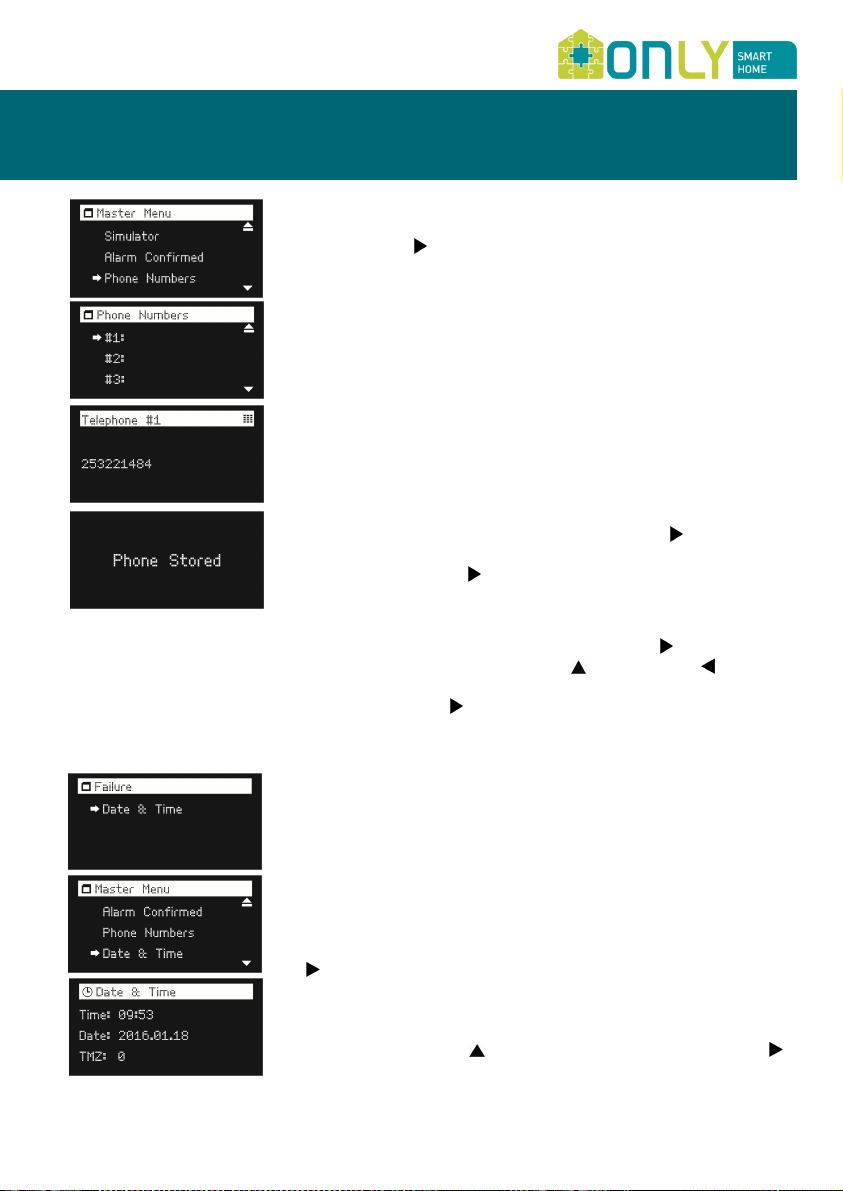
Programming phone numbers
To set or delete a phone number, select "Phone numbers" and
press the key .
In the Phone Numbers submenu, options 1, 2, 3, 4, 5, and
EMG are available representing the possible memories for
phone numbers.
Each memory location, already has a fixed call type as
follows:
• #1 - normal voice call
• #2 - normal voice call
• #3 - normal voice call
• #4 - normal voice call
• #5 - normal voice call
• EMG - normal voice call for emergency or panic
Select the desired memory location, press key and through
the alphanumeric keypad enter the phone number. To
confirm, press key and the message "Phone stored" is
shown.
If you want to delete an existing phone number, you have to
select the desired memory location, press key , scroll the
number till the last digit using key and press key to
delete the number digit by digit. When the number is totally
deleted, press key , the message “Phone stored” is displayed
to confirm the deletion.
Defining Time and Date
If the date and time is not defined, it is not possible to
register events, required to be able to verify what happened
behind. When arming the alarm without having defined date
and time, you will hear an error sound indicating the failure
and on the display, it will be shown the failure message “Date
and time”.
To set the date and time (e.g. January 8, 2016, 09:53), select
the “Date & time” option from the master menu and press key
. Enter the hour (e.g. 09) and minutes (e.g. 53) with 2digits, always in the 24H format. Enter now the 4-digit year
(e.g. 2016) followed by the 2-digit month (e.g. 01), then also
the 2-digit day (e.g. 08).
(GMT) using the key (e.g. 0 for Portugal) and press key
to finish.
Finally, set the desired time zone
Page 18
SE
CURITY
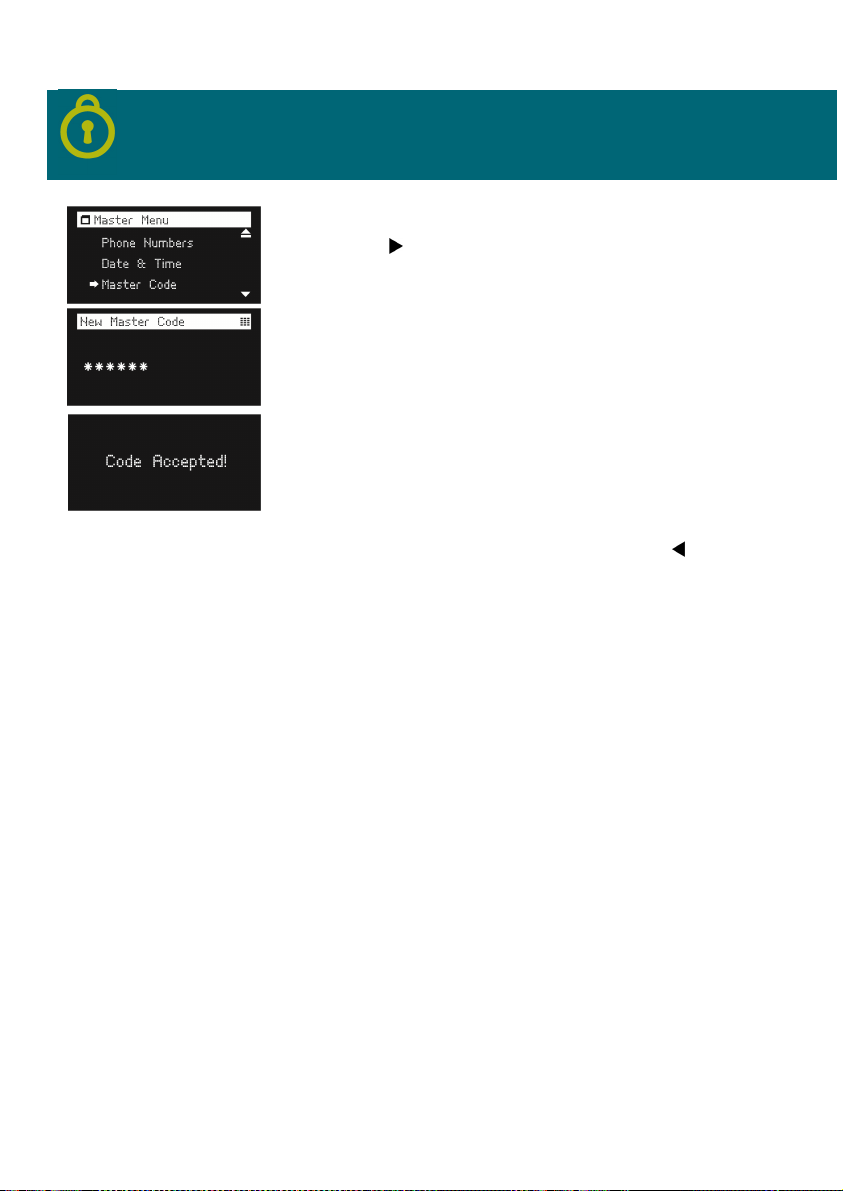
Changing the master code
To change the master code, select the "Master Code" option,
press key and enter the 6-digit code. Repeat the code to
confirm it. If correct, a confirmation beep will sound and the
message "Code Accepted!" is shown.
If the entered code is not the same, you will need to re-enter
the code until it is valid.
Exit the master menu
To exit the master menu at any point press key .
Page 19
SYSTEM OPERATION
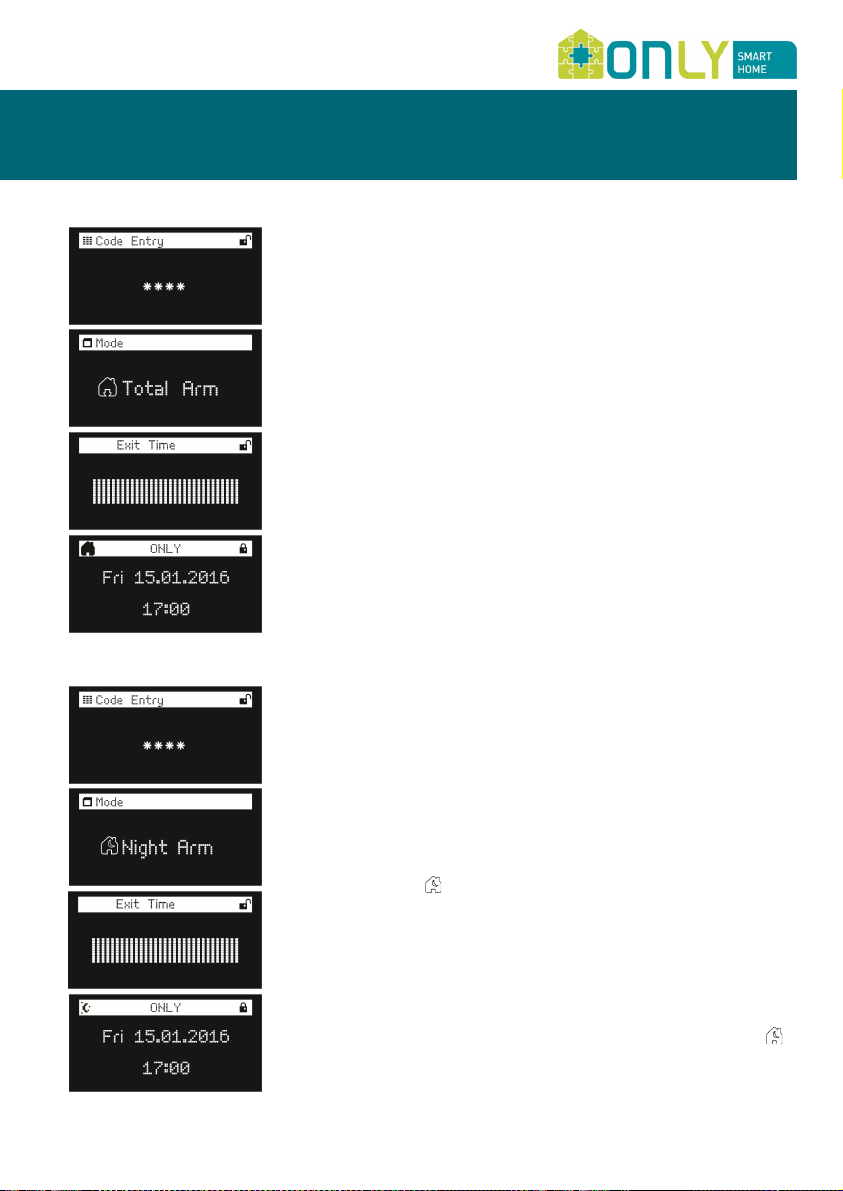
Arm and disarm the alarm
When the system is disarmed, enter a valid user code:
e.g.: 2580
A confirmation beep will sound and the exit time starts to run:
the keyboard will beep once per second while the counting
down time is shown on the display.
By default, this time is 40 seconds.
If you enter a valid user code during the exit time, then the
exit time stops and the system remains disarmed.
After the exit time finishes, the alarm arms in TOTAL mode.
If you arrive home and the alarm is armed, you will listen a
beep once per second: this is the entry time running.
By default, this time is 40 seconds.
You must enter a valid user code to stop the entry time and
disarm the alarm otherwise the intrusion alarm will trigger
when the entry time finishes.
Exit time and entry time are programmable by the OLED
keypad or by the PC application.
Night mode
The night mode allows protection of the house, arming only
the peripheral and partial zones, allowing the circulation inside
the house.
If the function Automatic Night Arm is enabled, you don’t
need any action: the alarm will arm during the defined night
period or after you go to bed. The night period is definable by
the PC application or by the OLED keypad and it is defined by
default as 0:00 to 06:00.
You can also arm the system in Night mode, at any time, if
you press the key right after entering the code. A more
discreet beep will sound and the exit timer will appear on the
OLED keypad until the alarm is armed.
If someone arrives home and the alarm is armed in Night
mode, it will start counting the entry time during which the
user has to enter his code.
The user may rearm the alarm immediately by pressing the
key right after entering the code. If the automatic arming is
enabled, then the alarm will rearm 10 minutes later.
Page 20
SE
CURITY
In the morning, the alarm remains armed in night mode even
after the night period as finished until the first interior
detection. After that the system automatically disarms.
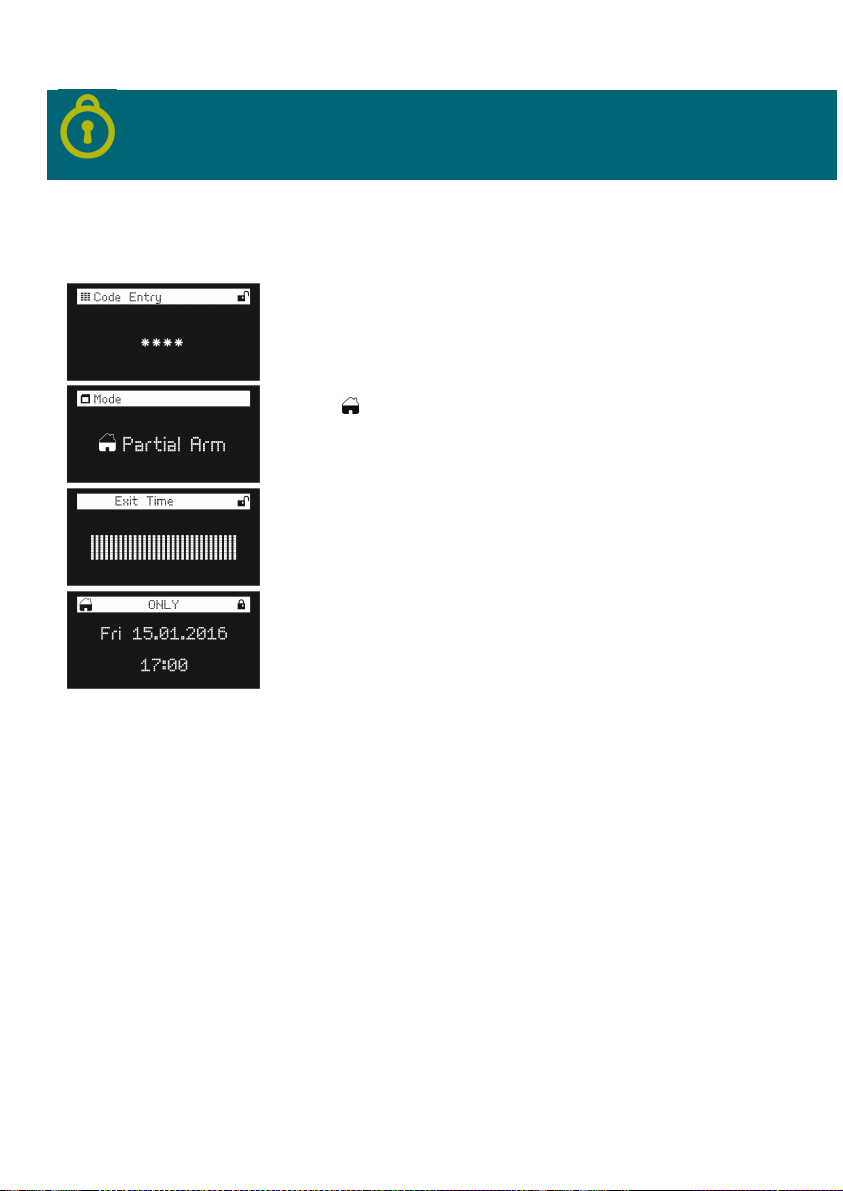
Partial mode
The partial mode, as the name suggests, allows partial
protection of the house, i.e. only certain areas of the house
will be protected when the alarm is activated (e.g. Garage).
To arm in partial mode, enter a valid user code, then press
key
within 2 seconds
until the alarm arms.
Restore Water supply
The water cut relay is activated when water leakage is
detected for more than 30 seconds. This time is necessary to
prevent the water supply to be cut when, for example,
cleaning the floor.
To restore water supply you must either restore it with a
phone call (see Command through telephone) or enter the
Master Code.
Restore Gas supply
The gas cut relay is activated automatically when a gas
leakage is detected.
VERY IMPORTANT: make sure you request assistance from
specialized personnel to solve this problem. Gas leakage has
a high risk of explosion.
Once a specialized technician has solved the leakage problem,
restore the gas supply by making a phone call (see Command
through telephone) or enter the Master Code.
. A more discreet beep will sound
Page 21

Presence simulator
The ONLY security system is capable of simulating presence of
people at home during your absence when combined with the
ONLY automation system.
For that, the system stores everyday the manoeuvres people
make with the buttons you previously assigned to the
Simulator, repeating them during your absence.
First you must assign buttons to the simulator. This is done as
follows:
- Press the + button on the security central 3 times: the
Status LED (F) blinks in Red and the LEDs 1, 2 and 3 light
up sequentially.
- Now go around the house and press the buttons you want
the system to store.
Note: you can add buttons controlling lights, shutters,
dimmers and sound devices (on/off button only).
- When you finish press the + again on the security
central.
From now on, the system will record everyday the
manoeuvres made on those buttons, storing the time that
each of them was made.
When the system is armed in total mode and the simulator is
switched on, the central will virtually press the same buttons
you assigned at the same time that you and your family
pressed the day before.
The simulator is a Master Menu setting. If active, arming the
alarm in Total mode will automatically start the simulator. The
simulator can be switched on and off via telephone (see
Command through telephone) or in the Master Menu.
Page 22
SE
CURITY
Disarm
Emergency
> 5 sec.
Arm
Confirmed alarm
The system can be configured to start the sirens only after 2
intrusion zones trigger instead of just one. This way, false
alarms are avoided.
Of course, once the first detection appears, the system starts
the alarm routine and the phone calls, only the sirens do not
sound.
Care should be taken with this feature that should be used
only in installations where 2 different zones cover the same
space.
This setting can be changed only in the Master Menu.
Adding remote controls
The alarm can be armed and disarmed by the ONLY
radiofrequency remote control H-TX3B-RF.
For this the remote control needs to be added to the system.
Proceed as follows to add the remote control:
- Press the button + (L) on the security central: the state
LED (F) blinks red.
- Now, introduce a valid user code on the keypad: you will
hear a confirmation beep.
- Press now one of the keys on the remote control: the
state LED (F) of the central switches to green and the
remote control is installed.
From now on, the upper right button arms the alarm, the
upper left button disarms it and the bigger round button
causes a personal emergency call when pressed for more than
5 seconds.
Removing remote controls
To remove a remote control from the system proceed as
follows:
- Press the button + (L) on the security central for more
than 2 seconds: the power LED (A) blinks red.
- Now, press a button on the remote control you wish to
remove: the LED switches to green and the remote
control no longer controls the central.
If you wish to remove all remote controls, proceed as follows:
- Press the button + (L) on the security central for more
than 2 seconds: the power LED (A) blinks red.
- Now, keep the + button pressed during 10 seconds: all
remote controls are now removed from the system.
Page 23
Adding expansion units
The expansion units must be added to the central so that they
will be monitored periodically.
Up to 8 expansion units can be added.
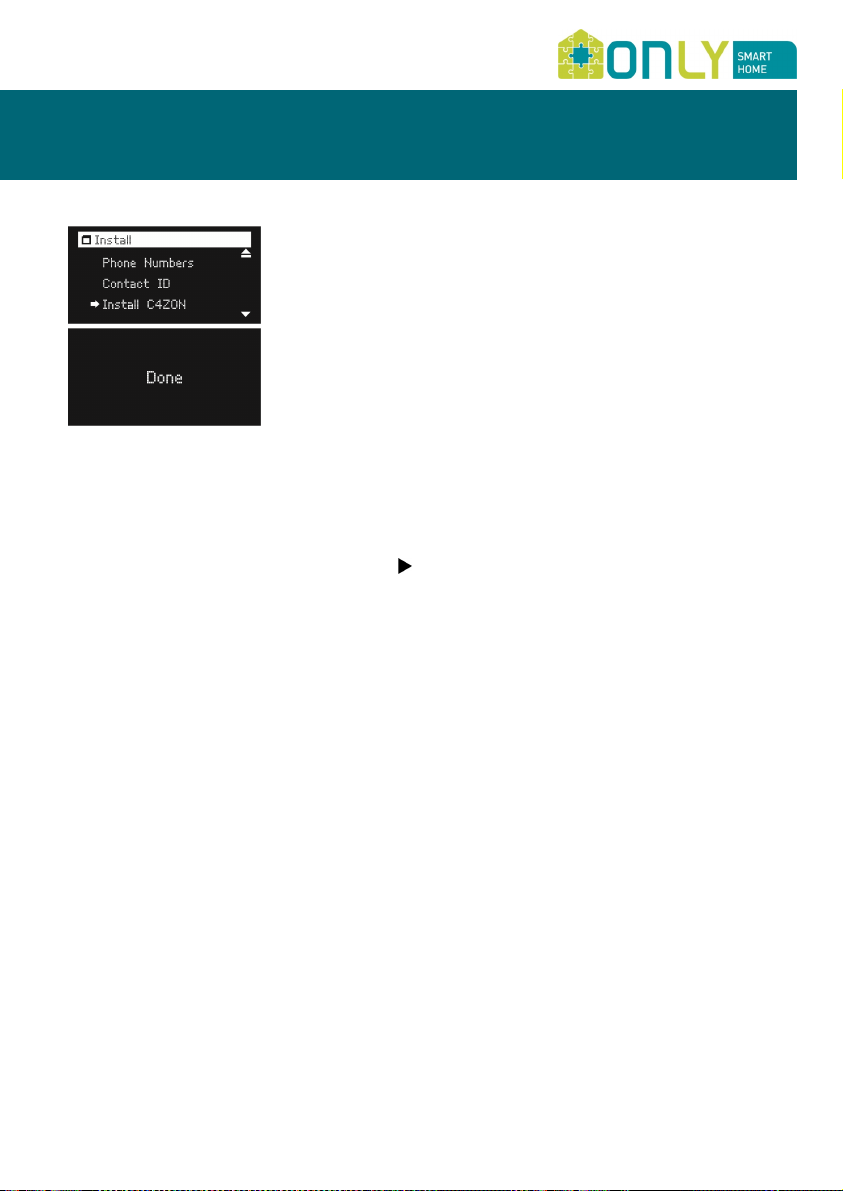
To add and expansion unit, proceed as follows:
- Press the button + (L) on the security central 2 times:
the state LED (E) blinks red and the expansion LED (I)
lights up.
- If there are already expansion units installed, the LEDs
of the occupied positions light up (possible positions 1 to
8).
- By pressing OK (M) you can successively select the
memory location of the new unit: the LED (1 to 8) blinks.
If the expansion unit it is already installed the Bus LED
(green) of the expansion unit also blinks and the OLED
keypad shows the serial number of the unit.
- Now enter the installer code (9-digit code) on the keypad
of the expansion unit, select the “Install C4ZON” option,
press , the message “Done” is shown. The unit is
installed in the selected position, replacing any unit that
was eventually installed on that position.
- To exit press repeatedly the key + (L) until the Power
LED (A) or State LED (E) become green.
Removing expansion units
The expansion units can be removed from the central if they
are no longer needed. For this proceed as follows:
- Press + (L) on the security central for more than 2
seconds: the power LED (A) blinks red.
- Press again + (L) on the central: the expansion LED (I)
lights up as well as the LEDs of the positions that are
already occupied.
- Choose the memory position of the unit you wish to
remove: the respective LED blinks as well as the bus LED
(green) on the unit.
- Now, press the PROG key on the unit you wish to
remove or keep the + (L) key pressed during 5 seconds:
the respective unit is removed.
- To exit press repeatedly + (L) until the LEDs Power(A) or
State (E) become green.
Page 24
SE
CURITY
COMMAND THROUGH TELEPHONE
The ONLY security system can be controlled by telephone
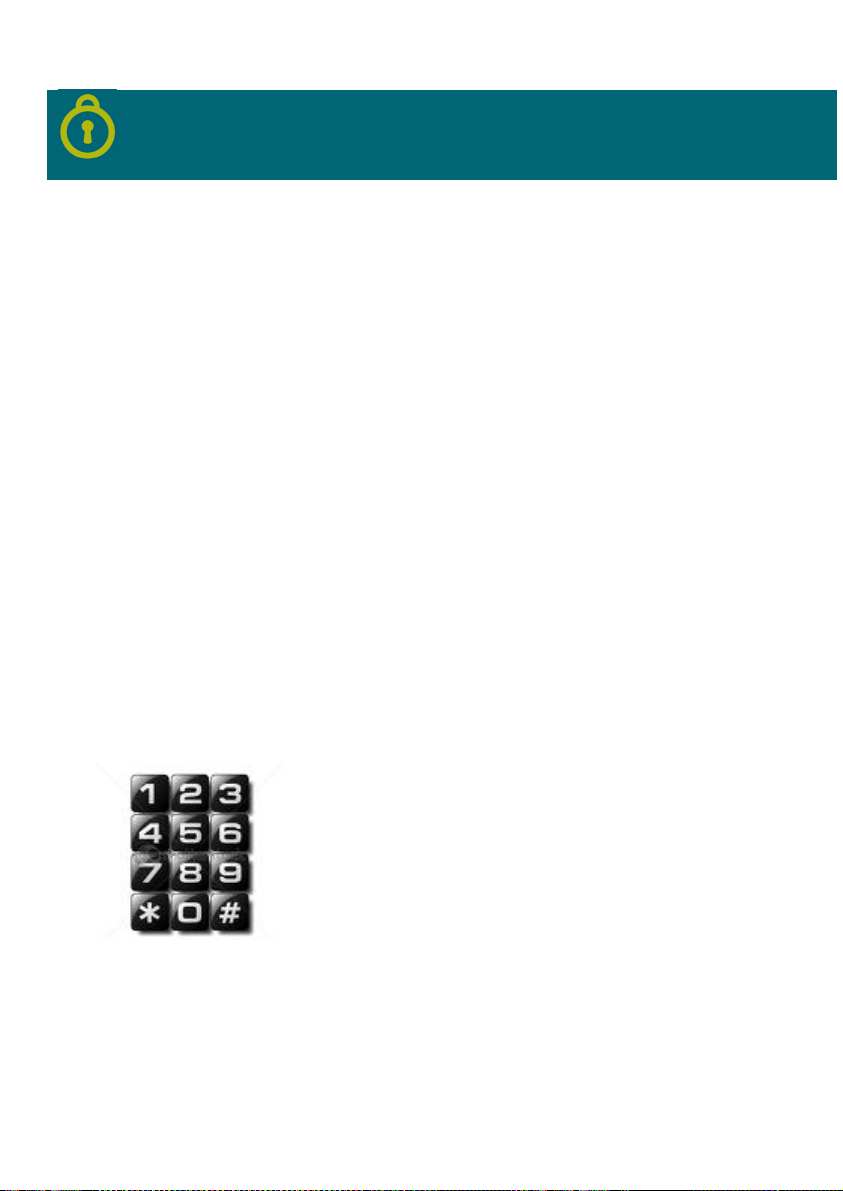
using the telephone keypad.
Call to security central
The security central will answer any incoming call after the
programmed number of rings, even if not all on the same call,
allowing therefore bypassing of answering or fax machines.
After answering the call the system will wait 30 seconds for a
valid code. This code must be typed on the telephone keypad
(DTMF) after which the call will be cancelled.
Depending on what you want to do, you must enter your user
code or the master code.
The user code enables direct command of a number of
features (see below). The master code allows you to hear and
record some voice messages for some of the automation keys
or the identification of the installation.
Important: In case you typed in a wrong digit, just wait 3
seconds and restart entering your code.
If 2 wrong codes are entered, the system will hang-up. You
can make a second call and try again 2 times. After that the
system will not answer external calls for at least 15 minutes.
Functions with user code
After a valid user code is received the telephone keyboard has
the following function:
Key 1: Open/Close the water valve
Key 2: Open/Close the gas valve
Key 3: Lights On/Off
Key 4: Open/Close the shutters
Key 5: Climatization On/Off
Key 6: Generic On/Off
Key 7: Generic On/Off
Key 8: Generic On/Off
Key 9: Simulation On/Off
Key 0: Disarm alarm
Key #: Arm alarm (TOTAL only)
Key *: Diagnosis
Each key returns a message reporting the state of the
respective function. Pressing it again causes the opposite
state to be selected.
The zone diagnosis returns a message that depends on the
state of the zones.
Page 25

Functions with master code
The master code can be entered via telephone as follows:
• Call your house and wait until you do not hear the call
signal anymore.
• Press #
• Type in the master code. Ex: 123456
• Press # again: the identification message starts to be
played over and over again.
Now you can select the messages you wish to record:
0 – identification message (6 seconds)
5 – message for key 5 (3 + 3 seconds)
6 – message for key 6 (3 + 3 seconds)
7 – message for key 7 (3 + 3 seconds)
8 – message for key 8 (3 + 3 seconds)
The other messages are fixed and cannot be changed.
The messages for keys 5 to 8 have 2 parts, one for ON and
one for OFF. Each of them has 3 seconds.
The message 0 is 6 seconds long and is played in all voice
calls made by the central alternatively with the event
message.
To record a new identification message proceed as follows:
• Press 0: the identification message is played over and
over again
• Press # to start recording: speak your message into the
telephone. After 6 seconds the recorded message is
played back over and over again.
If you wish you can record the message again by pressing #
to start over.
To record a message for keys 5 to 8 proceed as follows:
• Press the respective key (e.g. 5): the respective
message is played over and over again.
• Press # to start recording: Speak the ON message into
the phone (e.g. “Watering switched on”).
• After the time for the ON part finishes (~3 seconds) you
will hear a beep.
• Speak now the OFF message into the phone (e.g.
“Watering switched off”)
• After the time for the OFF part finishes you will hear both
the on and the off messages over and over again (e.g.
“Watering switched on” “Watering switched off”).
If you have finished recording, press * to stop the call or
hang-up your phone.
Page 26
SE
CURITY
INTEGRATION WITH AUTOMATION SYSTEM
The security system ONLY permits integration with the ONLY
automation system since they share the same communication
protocol.
For example, when arming the system, you can also close the
shutters and switch off all lights or when starting the intrusion
alarm routine open all shutters and turn on all the lights.
For both systems to work together it is necessary that an
automation bus line is connected to the security central.
The keys have a pre-programmed factory preset:
-
and
- sends the command Switch On/Up
- and send the command Switch Off/Down
In a scenario you can select a certain combination of states
of several outputs in the house, such as closing all the
shutters on one side of the house and switch off all the lights,
leaving the shutters on the other side open and one or
another light turned on.
The commands switch off/down or switch on/up are
commands that define a specific state of the outputs they
control.
The outputs actuated by these buttons can be programmed in
the same way as all buttons of the automation system:
• Press the PROG key on the modules controlling the
• Then press the button: the outputs are now associated to
• To memorize a scenario, put all outputs in the desired
send the command Scenario
outputs you wish to command and select the outputs you
wish to associate to the desired button
the button.
mode and then press the button Scenario during 6
seconds.
Scenario “Leaving home”
The key sends the command scenario “leave home” when
pressed, regardless of the security keypad on which it is
pressed. The same command is also sent by the security
central at the end of the exit time when arming the alarm in
Total mode.
This command lets you set up the house so that when leaving,
for example, everything switches off, shutters close, etc.
This key has a different function during the 2 seconds after
entering a user code. In this case, it allows the selection of
the arming Total mode.
Page 27

Scenario “Night”
The key sends the command scenario “Night” when being
pressed, regardless of the security keypad on which it is
pressed.
It facilitates the arrival at home at night where normally we
need to switch on a number of lights.
This key has a different function during the 2 seconds after
entering the user code. In this case it allows the selection of
arming the Night mode.
Command “Partial”
The key sends the command Switch ON/UP when being
pressed, regardless of the security keypad on which it is
pressed.
This command allows, for instance, at the arrival at home to
switch on a number of lights or to open all the shutters or
blinds.
This key has a different function during the 2 seconds after
entering a user code. In this case, it allows the selection of
arming the Partial mode.
Command “Close blinds”
The key sends the command Switch Off/Down when being
pressed, regardless of the security keypad on which it is
pressed. It is intended to centralize the closing of all the blinds
in the house.
Command “Switch off lights”
The key sends the command Switch Off/Down when being
pressed, regardless of the security keypad on which it is
pressed.
It is intended to centralize switching off all lights in the house.
NOTE: all the keys described here are for free programming,
and as such all the outputs you want can be associated to
them.
The proposed functions are the most common for these keys
given their position in the house.
The only differences between these keys and others in the
ONLY system is that these keys are independent of the
keypad where they are installed and the associated command
is not configurable.
Page 28
SE
CURITY
Programming of actions in case of alarm
In the case of an intrusion alarm, the security central sends a
scenario command to the automation system that can be
used to open blinds, turn on lights, etc., in other words to
select a set of states of the various outputs of the system.
The system provides two different scenarios, one in case the
alarm is armed in Night or Partial mode and one for the
Total mode.
In the case of a Total alarm, there are several possible
situations:
1. The system is not disarmed, and is automatically rearmed
at the end of the alarm routine:
In this case, when the system rearms the command
Close/Switch off is sent which will turn off the lights and
close the blinds that are associated to the scenario.
2. The system is disarmed locally with a user code or by
remote control:
In this case no command is sent, and the actions to
switch off and/or close blinds are reserved for the user.
3. The system is disarmed by telephone:
In this case the system sends the command Close/Switch
off which will turn off the lights and close the blinds
associated to the scenario. Note that pressing # to arm
the system causes the sending of the scenario “Leaving
Home” which is the same as pushing the key on a
security keypad.
In case of an alarm in the night or partial mode, since it allows
users at home it is not sent any command when disarming the
alarm assuming that the action is made by the occupant in the
house.
The programming is done by following these steps:
• Press the PROG key on the modules that switch the
outputs you wish to associate to the scenario, by
selecting the respective outputs.
• Then press the button Scenario Total (J) on the security
central: the outputs are not associated to the scenario
total.
• Select the desired state in case of an alarm of all the
outputs associated to the scenario: lights on; other lights
switched off; blinds totally open, partly open or
completely closed; etc.
• Now, press the button Scenario total (J) on the central
during 7 seconds: the scenario is memorized.
Page 29
• Repeat the procedure for the night or partial scenario,
pressing of course the button Scenario Night/Partial (K)
instead of the Scenario total (J) button.
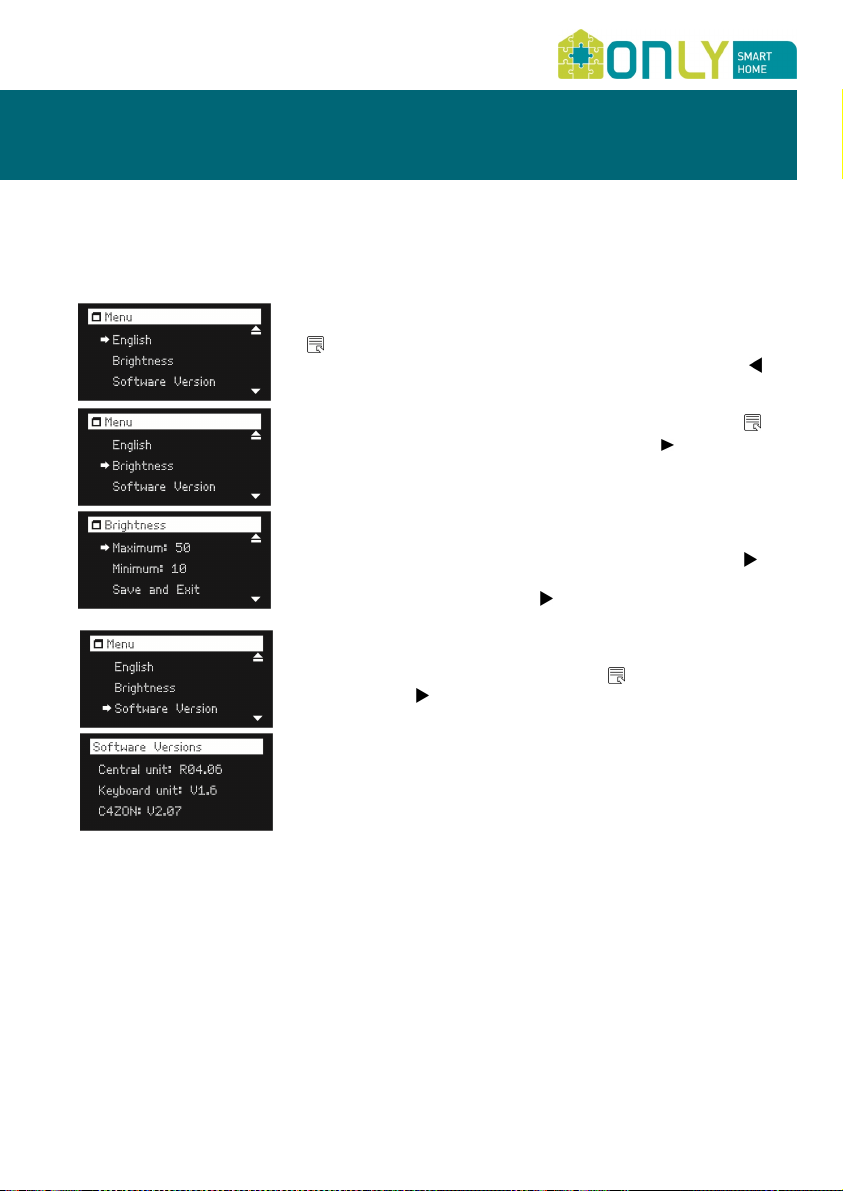
Language selection
To change the language, enter Menu by pressing key
and select the desired language. To save the selected
language you must exit the menu by pressing the key .
Adjusting the OLED display brightness
To adjust the brightness level of the OLED, press key to
access Menu, select “Brightness” and press .
You can adjust the desired maximum and minimum levels.
The maximum level refers to the brightness that the OLED
display has when we are handling the keyboard; on the
other hand, the minimum level refers to the level that the
OLED display has in steady-state.
Select “Maximum” or “Minimum” and use the key to
increase or decrease the respective brightness.
Select “Save” and press key to keep the definitions.
Software versions
To view the software version of the security central,
keypad and C-4ZON, press the key to enter the Menu
and with key select the "Software Versions" option.
 Loading...