

Page 1
Climatization
User Manual
Page 2

ENANCER Electrónica S.A. Page 2 of 13
Rua Max Grundig 9
4705-820 Braga Portugal [email protected]
Tel: +351 253 221 484 www.only-smartbuildings.com
Historical
Version
Date
Author
Changes
1.0
2011-10-21
-
2.0
2015-04-03
Minor changes
3.0
2018-09-13
LLA
Branding actualization
Índex
Historical .................................................................................................................................................................... 2
Índex .......................................................................................................................................................................... 2
INTRODUCTION ....................................................................................................................................................... 3
EQUIPMENT ............................................................................................................................................................. 3
CONTROLS AND INDICATIONS .............................................................................................................................. 3
CONFIGURATION VIA THE OTC-CLIMA ................................................................................................................. 4
1. Setting the date and time ................................................................................................................................... 4
2. Setting the cycle ................................................................................................................................................ 5
3. Winter programme ............................................................................................................................................. 5
4. Summer programme .......................................................................................................................................... 6
5. Installation of OTC-TERMO ............................................................................................................................... 7
6. Removing an OTC-TERMO ............................................................................................................................... 7
Ideal temperatures – OTC-CLIMA .............................................................................................................................. 8
Ideal summer temperature ........................................................................................................................................ 8
Ideal winter temperature ............................................................................................................................................ 8
CONFIGURATION OF THE OTC-TERMO ............................................................................................................... 8
Ideal temperatures ..................................................................................................................................................... 8
Ideal winter temperature ............................................................................................................................................ 9
Ideal summer temperature ........................................................................................................................................ 9
Selection of Winter and Summer cycle ...................................................................................................................... 9
OPERATION ............................................................................................................................................................ 10
OTC-CLIMA ............................................................................................................................................................. 10
Automatic operation ................................................................................................................................................. 10
OTC-TERMO ........................................................................................................................................................... 11
Manual operation ..................................................................................................................................................... 11
Automatic operation ................................................................................................................................................. 11
INTEGRATION WITH DOMOTICS ......................................................................................................................... 12
Association with Scenarios ...................................................................................................................................... 12
Association with ON or OFF .................................................................................................................................... 12
Association of outputs to climatization..................................................................................................................... 12
FACTORY DEFAULT .............................................................................................................................................. 13
Page 3
ENANCER Electrónica S.A. Page 3 of 13
Rua Max Grundig 9
4705-820 Braga Portugal [email protected]
Tel: +351 253 221 484 www.only-smartbuildings.com
INTRODUCTION
Climatization is the main source of comfort of a home but also of costs.
The temperature control in each dependency is not only more comfortable but more
economical because it connects only when necessary. For example, it makes no
sense to heat a bedroom at 18:00 if we are only going to bed at 23:00 hrs.
The ONLY engineers designed a climatization system that ensures maximum
comfort with minimal human intervention and with seamless integration with the
automation system.
The system offers:
• Temperature control of each dependence of the house
• Three operating periods with respective temperature for each day of the week
• Independent programmes for summer and winter
• Multiple control options for central heating, heat pumps, fan coil units, air
conditioning, floor heating, etc.
• Remote control (on/off) by telephone
Since design and comfort is a priority for ONLY, the operation is done via touch
panels of the ONLY TOUCH line in total harmony with the rest of the commands in
the house.
EQUIPMENT
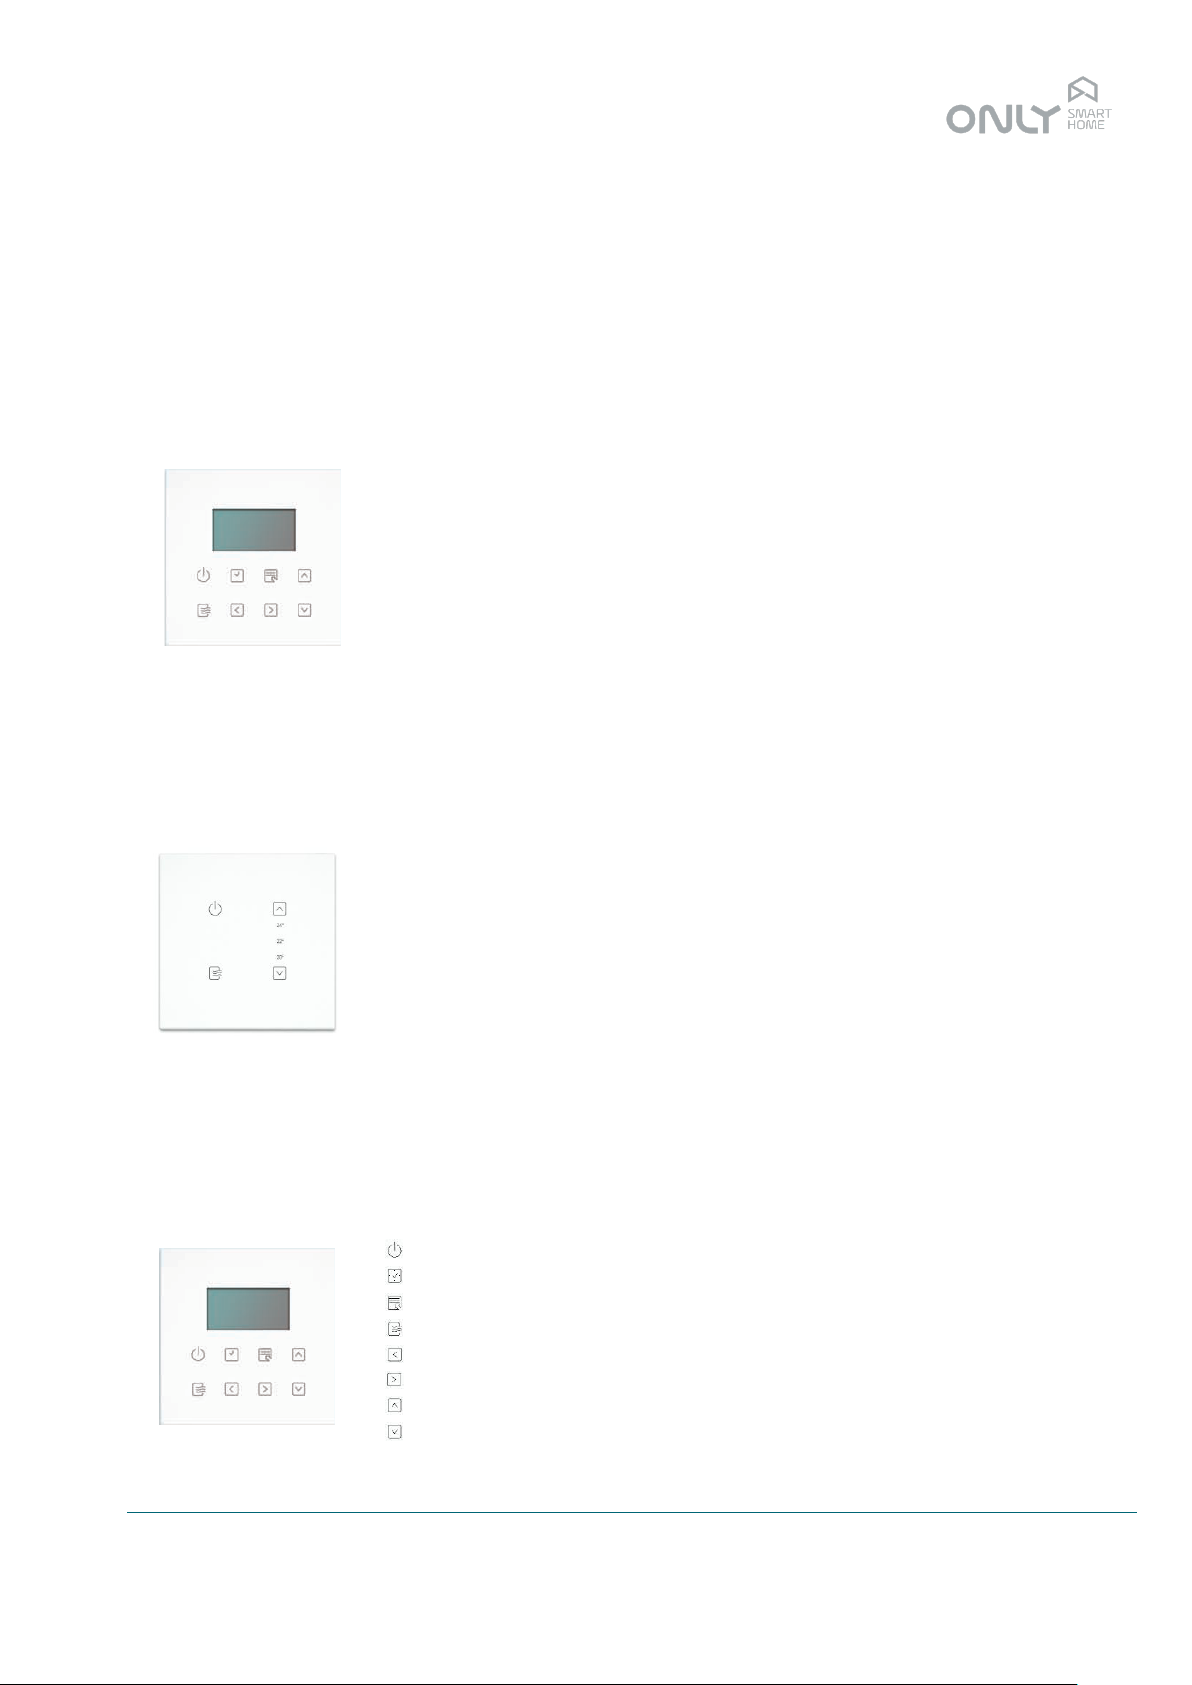
In your house you will probably find two types of climate control units:
• one with an LCD display – OTC-CLIMA
• one or various without LCD – OTC-TERMO
Both are programmable thermostats that can manage independently the
temperature of the room it is in. For this there is a thermal sensor on the bottom part
of the panel that measures constantly the ambient temperature, comparing it with the
programmed temperature for that moment. If necessary, the heating or cooling is
switched on.
CONTROLS AND INDICATIONS
The ONLY climate control units have illuminated touch sensors that function as
buttons. They allow the following functions:
- Turns the unit on and off
- Displays the date
- Allows access to the programming menus
- Indicates the operation and allows control of the fan speed
- Allows navigation to the left in the setup menus
- Allows navigation to the right in the setup menus
- Allows increasing the target temperature or navigation in the menus.
- Allows decreasing the target temperature or navigation in the menus
OTC-CLIMA
OTC-TERMO
Page 4
ENANCER Electrónica S.A. Page 4 of 13
Rua Max Grundig 9
4705-820 Braga Portugal [email protected]
Tel: +351 253 221 484 www.only-smartbuildings.com
The LCD indicates the room temperature, the time and the day of the week.
The days of the week are indicated by the numbers 1 to 7
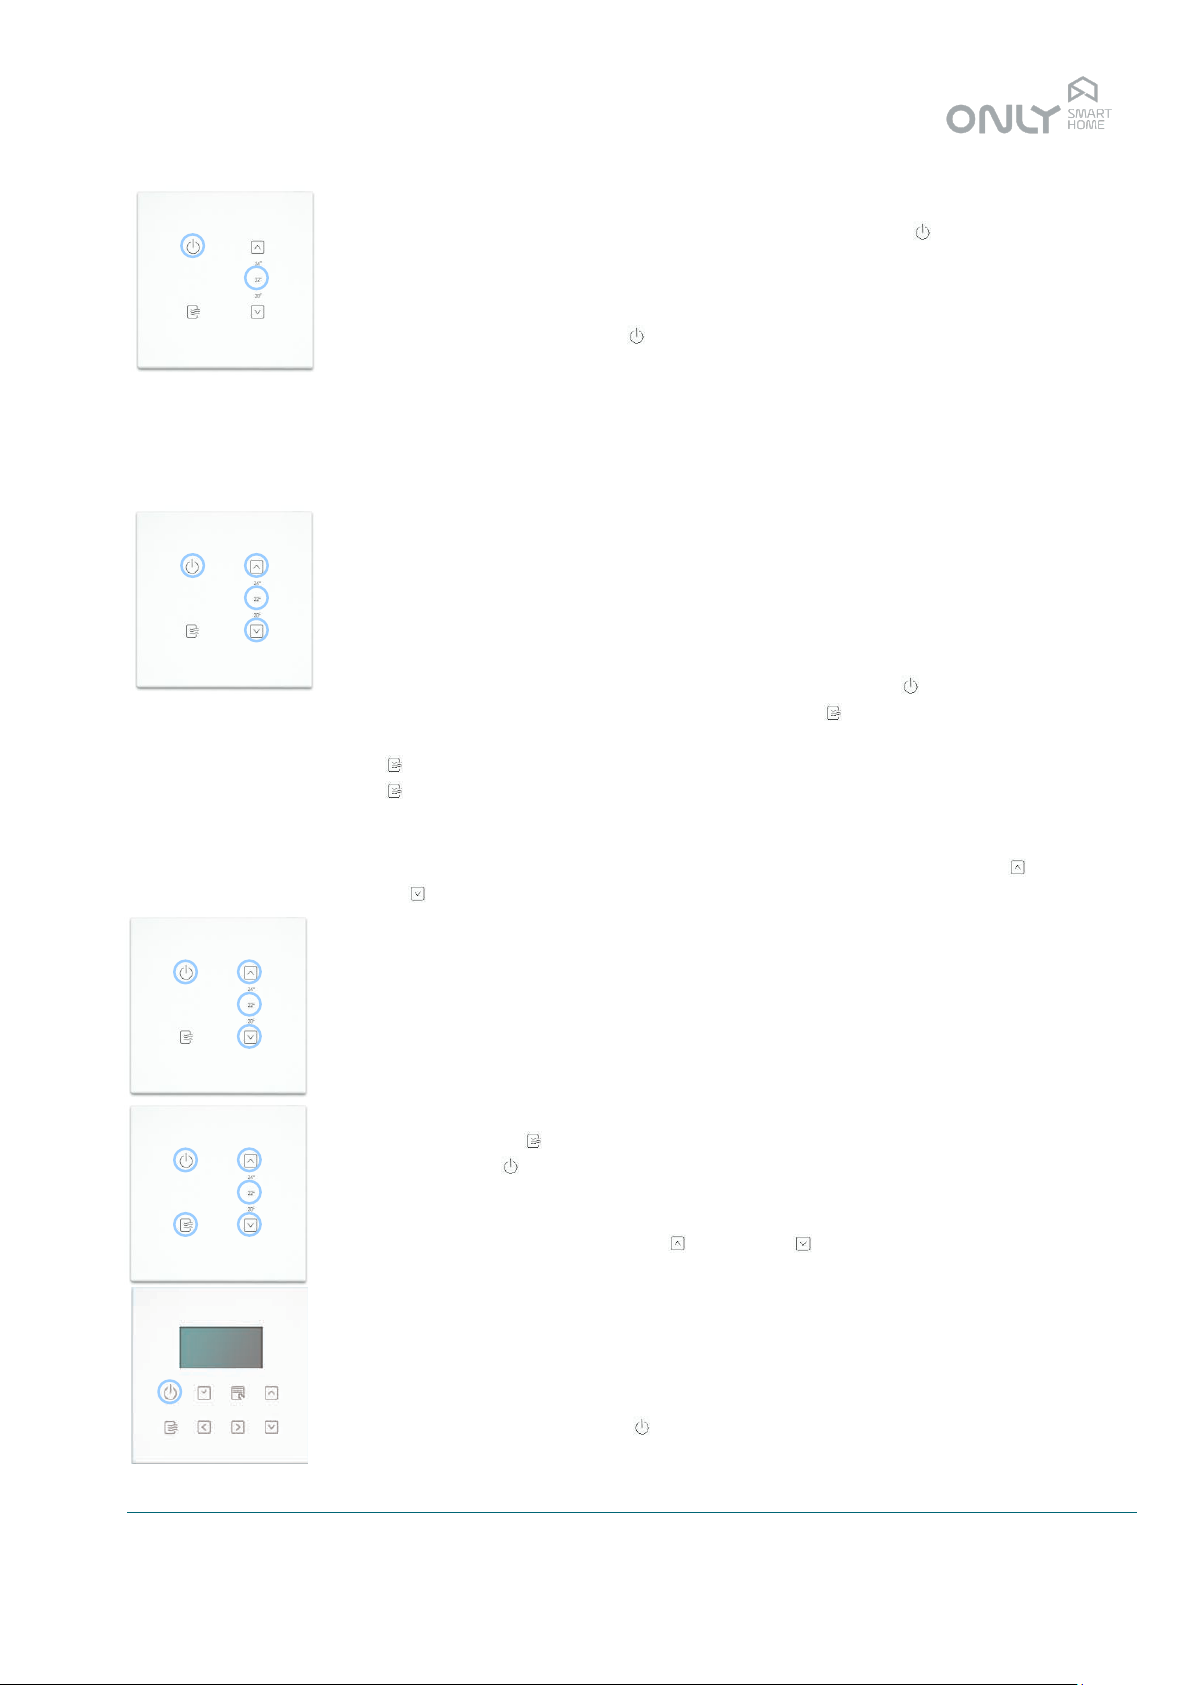
On the OTC-TERMO the LEDs 20º, 22º and 24º indicate the room temperature. In
case the target temperature is changed, these LEDs show the selected temperature
for 2.5 seconds and then return to showing the room temperature.
When two LEDs light up (e.g. 20º and 22º) this means that the temperature is
between them (e.g. 21º). If the room temperature is higher as 24º or lower than 20º
the respective LEDs blink.
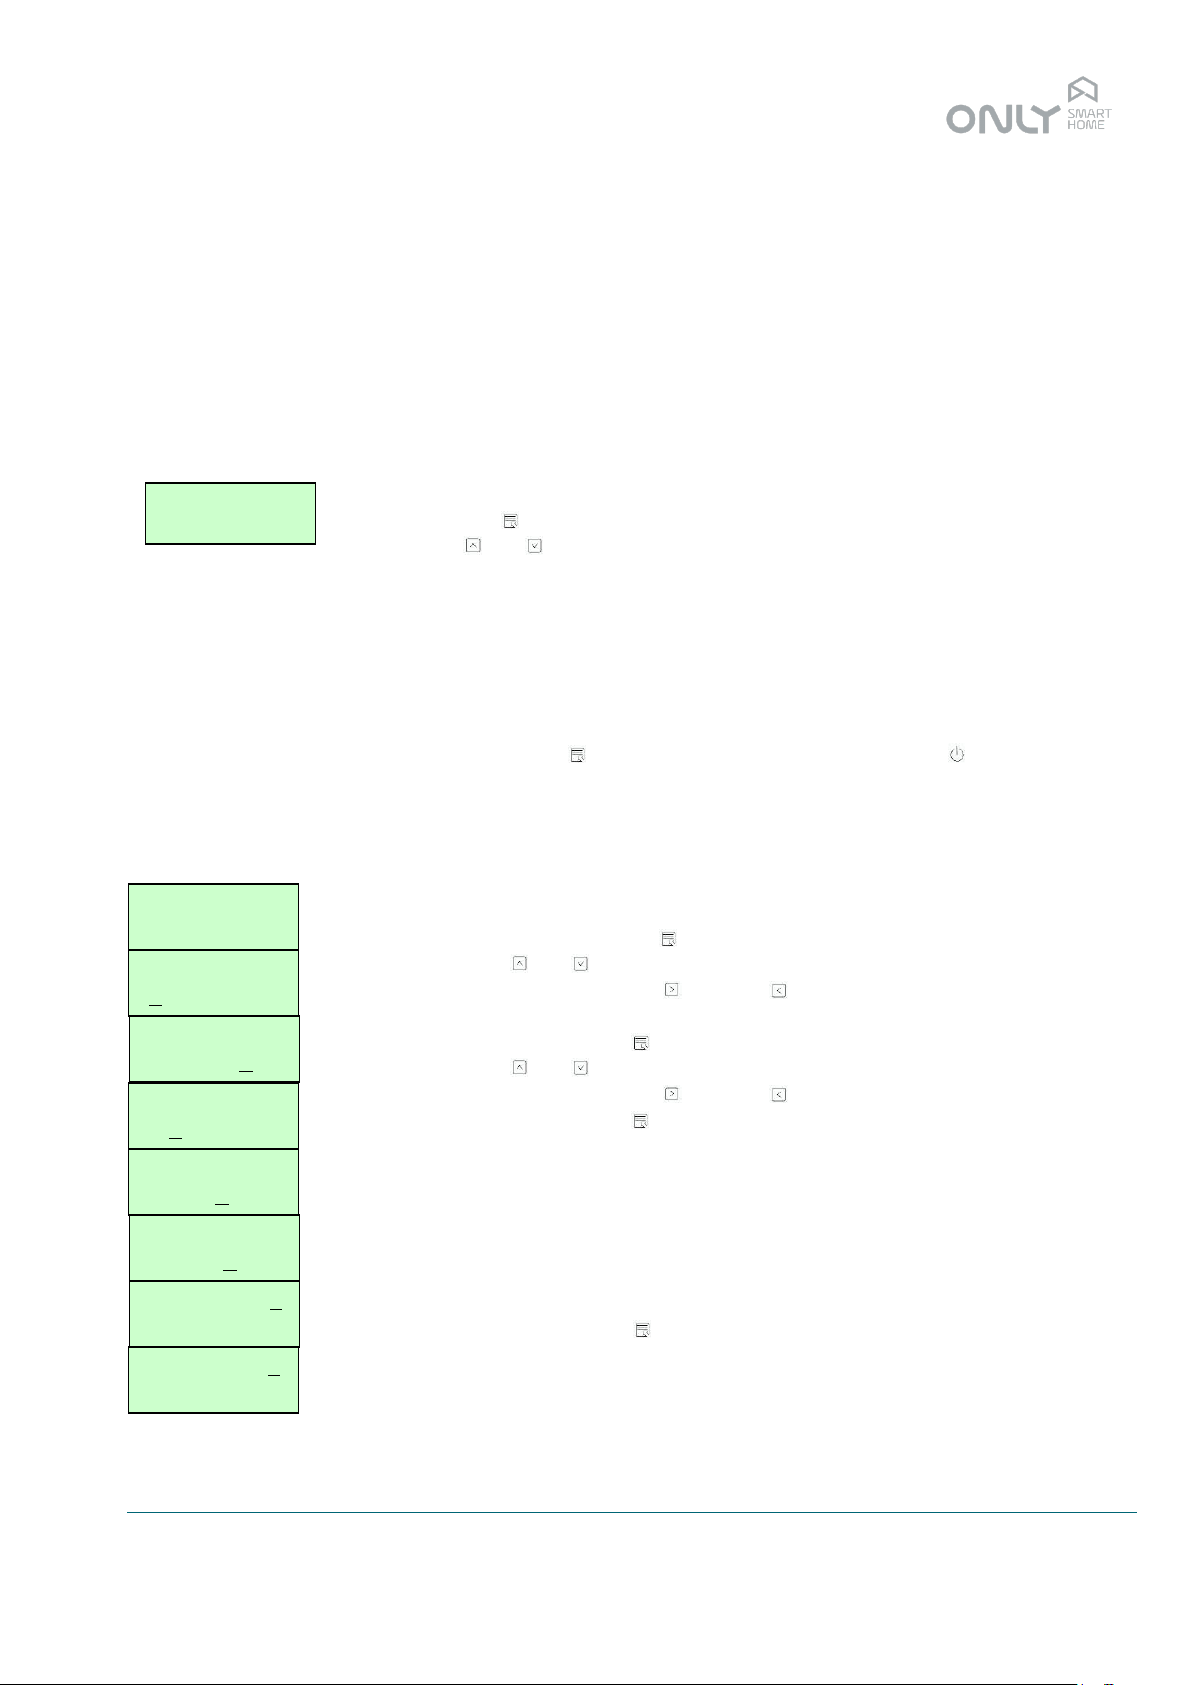
CONFIGURATION VIA THE OTC-CLIMA
The OTC-CLIMA allows adjustment of several parameters both local and of other
OTC-TERMO units scattered throughout the house.
Pressing the key enters the setup menu.
With the and keys you can navigate in the menu between the other menu
options. Possible options are:
1-DATA - set the date and time
2-CICLO - cycle selection – summer or winter
3-INVERN - definition of winter programme
4-VERAO - definition of summer programme
5-INSTAL - installation of OTC-TERMO
6-REMOVE - removal of OTC-TERMO
Within the menu the button lets you select the option and the button lets you
exit the current menu and go back to the former.
1. Setting the date and time
The ONLY climate control units have illuminated touch sensors that function as
buttons. They allow the following functions:
To set the date and time press within the option 1-DATE.
With the keys and you select the digit you want.
To move to the next digit press , or press to go to the previous digit. The date
format is DD-MM-YY.
When the date is set, press to validate and move to the time adjustment.
With the keys and you select the digit you want.
To move to the next digit press , or press to go to the previous digit.
When the time is set, press to validate and move to the time zone adjustment.
The zone set to “_” means that the automatic adjustment of summer and winter time
is not active.
If the time zone is set to any other value, automatic adjustment of summer and
winter time is active. This adjustment is done at the same time at 01:00 hrs on the
last Sunday in March and at 02:00 hrs on the last Sunday in October.
For continental Portugal, the zone is 0 because we are in the GMT (Greenwich Main
Time) time zone.
After setting the zone press to validate. The menu returns to the beginning.
The weekday is automatically adjusted. The days of the week are indicated as
follows:
1 = Monday
2 = Tuesday
3 = Wednesday
1234567
1-DATA
1234567
1-DATE
1234567
30-12-14
1234567
30-12-14
1234567
09:50
1234567
09:52
1234567
ZONE 0
1234567
1-DATE
1234567
09:52 21º
Page 5
ENANCER Electrónica S.A. Page 5 of 13
Rua Max Grundig 9
4705-820 Braga Portugal [email protected]
Tel: +351 253 221 484 www.only-smartbuildings.com
4 = Thursday
5 = Friday
6 = Saturday
7 = Sunday
Press to exit the menu.
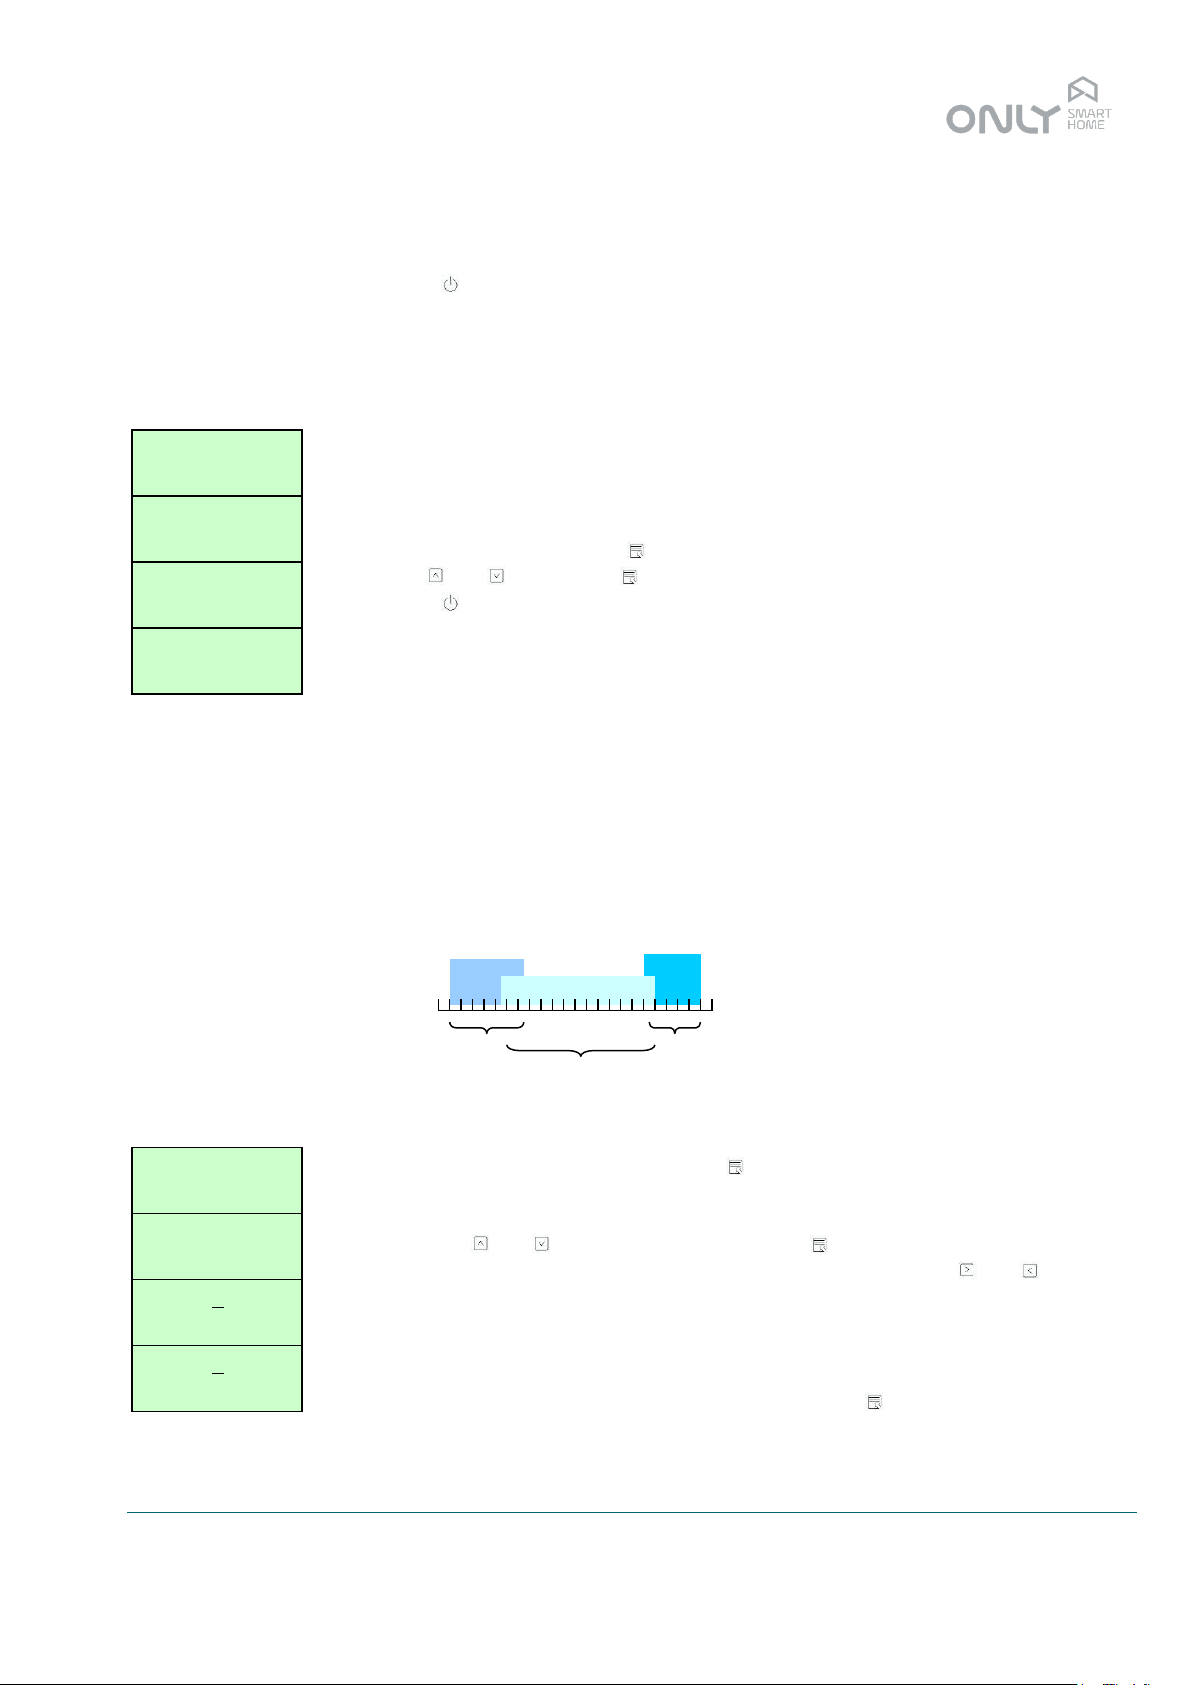
2. Setting the cycle
The cycle defines the operation of the unit. In summer mode, the climatization is
turned on if the room temperature is higher than the target temperature, while in
winter it is turned on when the room temperature is lower than the target
temperature.
To define the cycle press within the option 2-CYCLE. Select the desired mode
with and . Then press to validate.
Press to leave the menu.
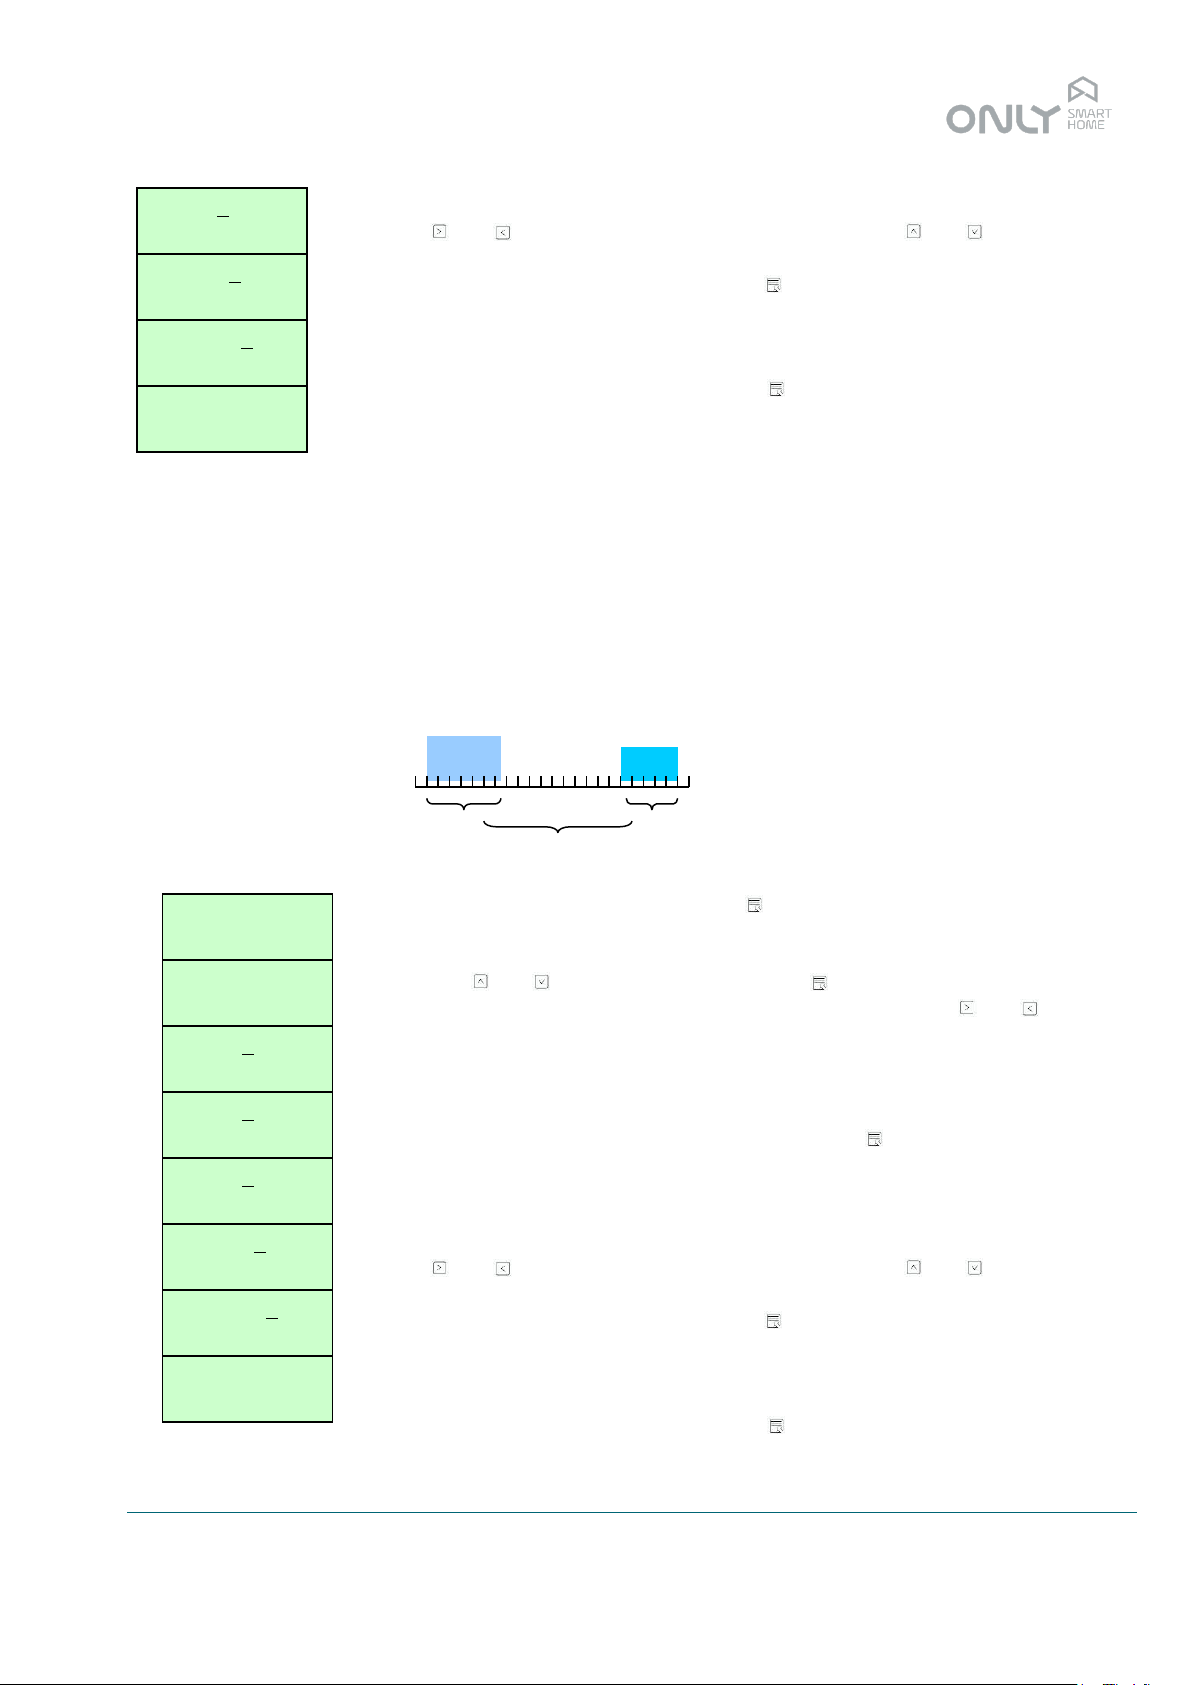
3. Winter programme
The winter programme defines the operating hours of the climatization and its
respective target temperatures.
It is possible to define, for each day of the week, 3 operating periods. You can, for
the same day of the week, define overlapping periods, where the higher temperature
prevails.
The starting time of a period has to be before the end time.
Period 1 does not have to start before period 2 or 3.
To adjust the winter programme press within the option 3-WINTER.
The option LOCAL allows you to define the programme on the local unit. If there are
OTC-TERMO’s installed you can choose here which unit you wish to programme
using the and keys, and validating with the key.
You can now select the day of the week you wish to edit with the and keys.
Going to the right, you can select all days of the week, only Monday to Friday or only
the Weekend. In this case of multiple days of the week you cannot edit the
programme that was already defined for one particular day, always starting the same
programme pattern.
If you select a single day of the week and validate with you will see the 1st
programme of this day on the display. The bar below the 1 blinks indicating the
programme number.
1234567
2-CYCLE
1234567
WINTER
1234567
SUMMER
1234567
2-CYCLE
0 6 12 18 24
1234567
3-WINTER
1234567
LOCAL
1234567
DAYS
1234567
_ _-_ _-_ _º
Page 6
ENANCER Electrónica S.A. Page 6 of 13
Rua Max Grundig 9
4705-820 Braga Portugal [email protected]
Tel: +351 253 221 484 www.only-smartbuildings.com
If there is no programme defined “_” will appear on all positions. This is also the way
to delete a programme from a day, by selecting “_” in all digits.
With and select the digit you wish to change and with and you can select
the desired value.
When the period is defined, validate it with , repeating the steps for the remaining
periods.
It is not mandatory to define 3 periods for a particular day of the week. It is also
possible not to define any programme for some days.
Once the 3rd programme is finished, press to save.
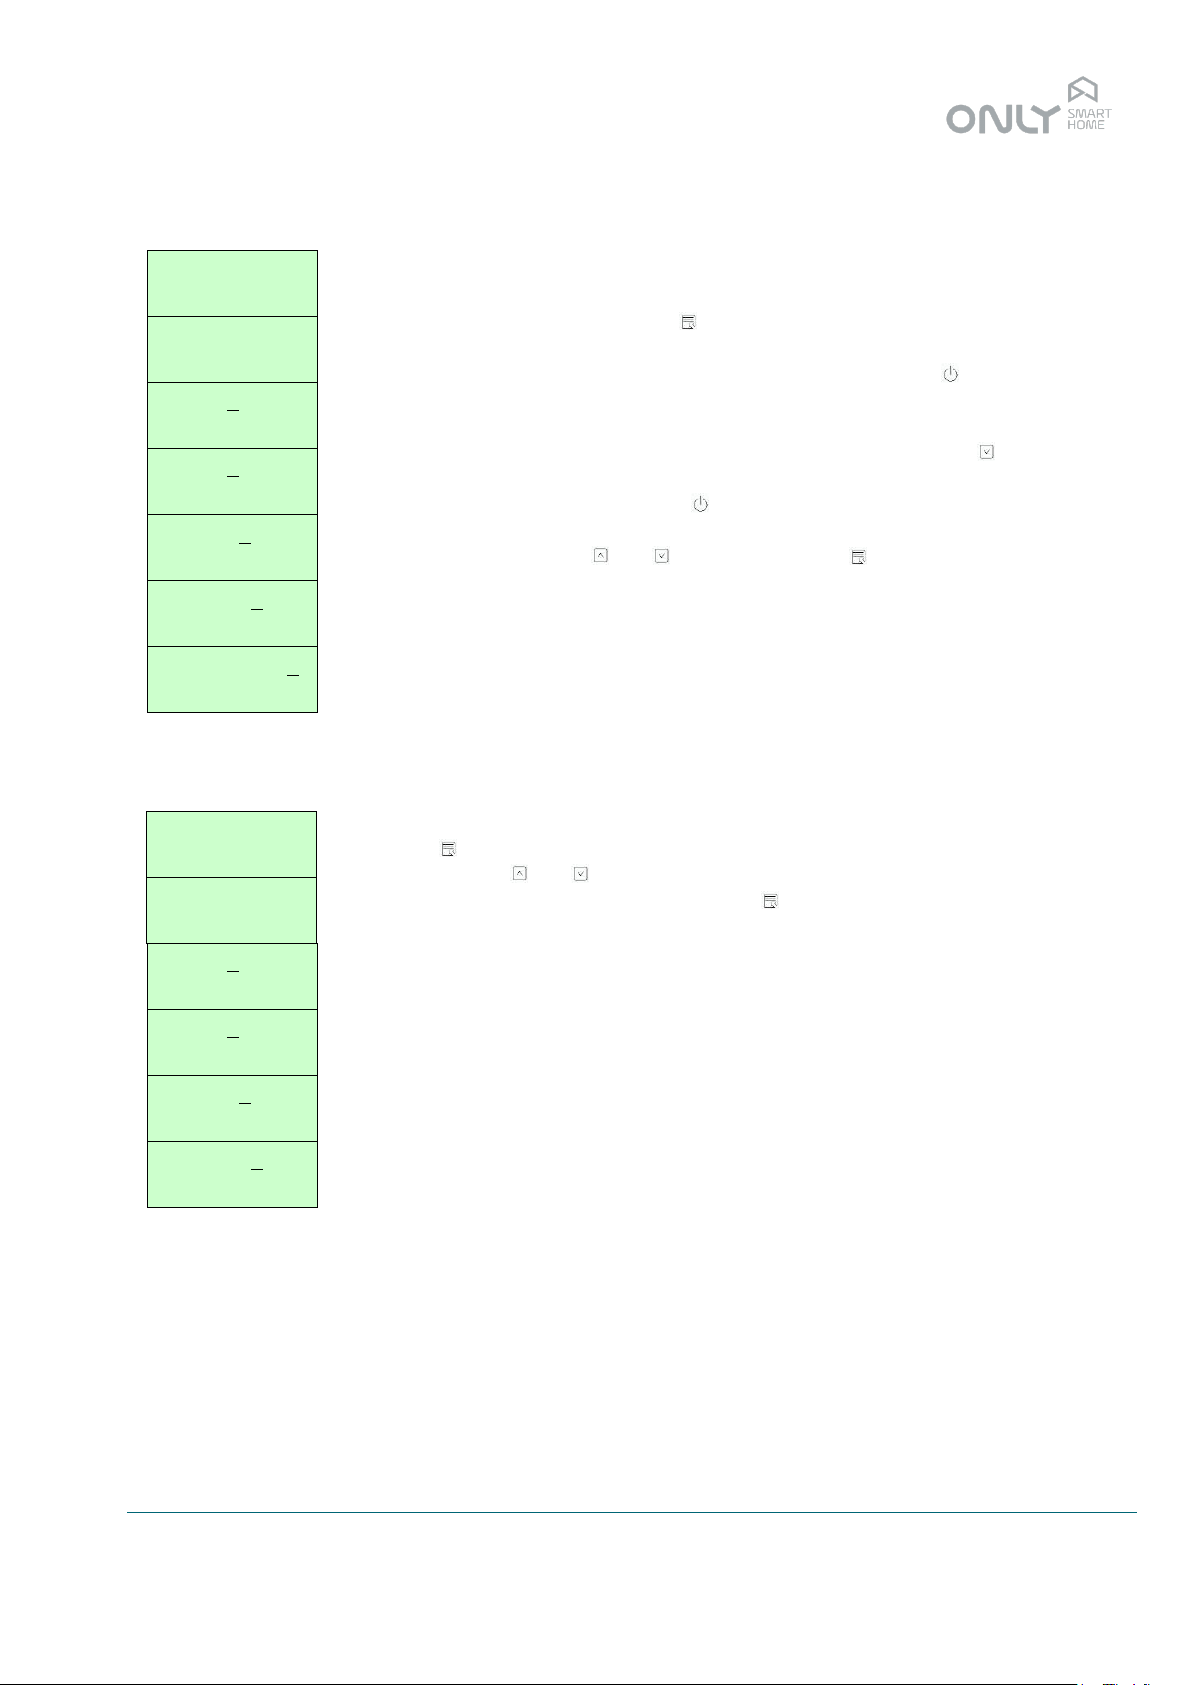
4. Summer programme
The summer programme defines the operating hours of the climatization and its
respective target temperatures.
It is possible to define, for each day of the week, 3 operating periods. You can, for
the same day of the week, define overlapping periods, where the lower temperature
prevails.
The starting time of a period has to be before the end time.
Period 1 does not have to start before period 2 or 3.
To adjust the summer programme press within the option 4-SUMMER.
The option LOCAL allows you to define the programme on the local unit. If there are
OTC-TERMO’s installed you can choose here which unit you wish to programme
using the and keys, and validating with the key.
You can now select the day of the week you wish to edit with the and keys.
Going to the right, you can select all days of the week, only Monday to Friday or only
the Weekend. In this case of multiple days of the week you cannot edit the
programme that was already defined for one particular day, always starting the same
programme pattern.
If you select a single day of the week and validate with you will see the 1st
programme of this day on the display. The bar below the 1 blinks indicating the
programme number.
If there is no programme defined “_” will appear on all positions. This is also the way
to delete a programme from a day, by selecting “_” in all digits.
With and select the digit you wish to change and with and you can select
the desired value.
When the period is defined, validate it with , repeating the steps for the remaining
periods.
It is not mandatory to define 3 periods for a particular day of the week. It is also
possible not to define any programme for some days.
Once the 3rd programme is finished, press to save.
1234567
01H07H20º
1234567
06H18H18º
1234567
18H23H18º
1234567
3-WINTER
0 6 12 18 24
1234567
4-SUMMER
1234567
LOCAL
1234567
DAYS
1234567
_ _-_ _-_ _º
1234567
01H07H24º
1234567
06H18H25º
1234567
18H23H22º
1234567
4-SUMMER
Page 7
ENANCER Electrónica S.A. Page 7 of 13
Rua Max Grundig 9
4705-820 Braga Portugal [email protected]
Tel: +351 253 221 484 www.only-smartbuildings.com
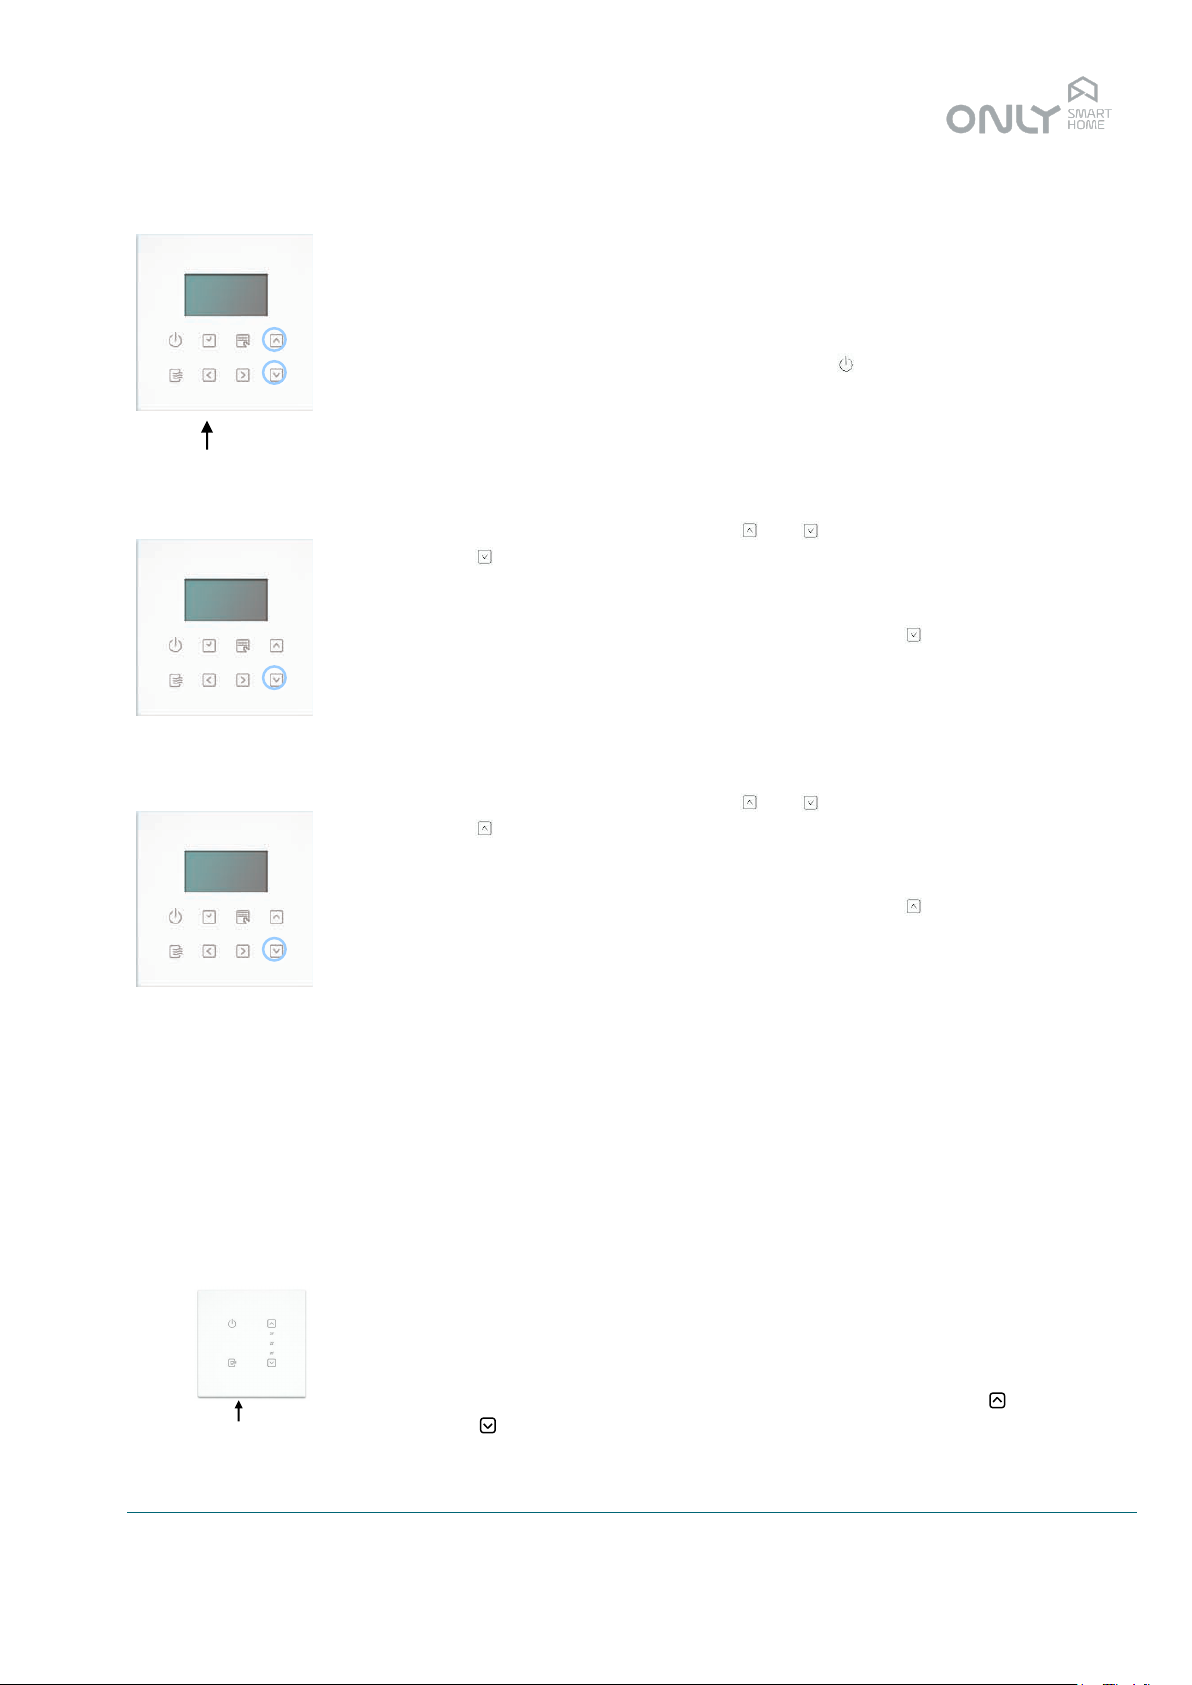
5. Installation of OTC-TERMO
The OTC-TERMO units do not have an LCD but can be programmed using the OTCCLIMA. For this the OTC-TERMO must be installed on the OTC-CLIMA.
To install an OTC-TERMO press within the option 5-INSTAL.
The display shows T01 (Termo 01).
Now you should go to the first OTC-TERMO and press the key . This makes the
OTC-TERMO send a command and as such stay associated to the OTC-CLIMA.
On the display of the OTC-CLIMA appears T01 OK.
If you wish to install more units you should now select T02 with the key and repeat
the procedure, this time with the new unit.
When installation is finished press to leave the menu.
To set the programme for the OTC-TERMO units you should select the respective
number (e.g. T01) with and , and validate it with . The definition of the
programme is now exactly the same as the local unit, except that the programme is
afterwards stored in the respective unit.
Note: If a name was assigned to the OTC-TERMO (only possible with a computer)
this name will appear instead of T01.
6. Removing an OTC-TERMO
It may be necessary to remove an OTC-TERMO from an OTC-CLIMA. In this case
press within the option 6-REMOVE.
With the keys and you can navigate between the installed units. Once you have
selected the one you wish to delete, press to validate.
This unit is now removed, and you are no longer able to edit its programme.
1234567
5-INSTAL
1234567
T01
1234567
T01 OK
1234567
T02
1234567
T02 OK
1234567
5-INSTAL
1234567
09:58 23º
1234567
6-REMOVE
1234567
T01
1234567
T02
1234567
T01
1234567
6-REMOVE
1234567
09:58 23º
Page 8
ENANCER Electrónica S.A. Page 8 of 13
Rua Max Grundig 9
4705-820 Braga Portugal [email protected]
Tel: +351 253 221 484 www.only-smartbuildings.com
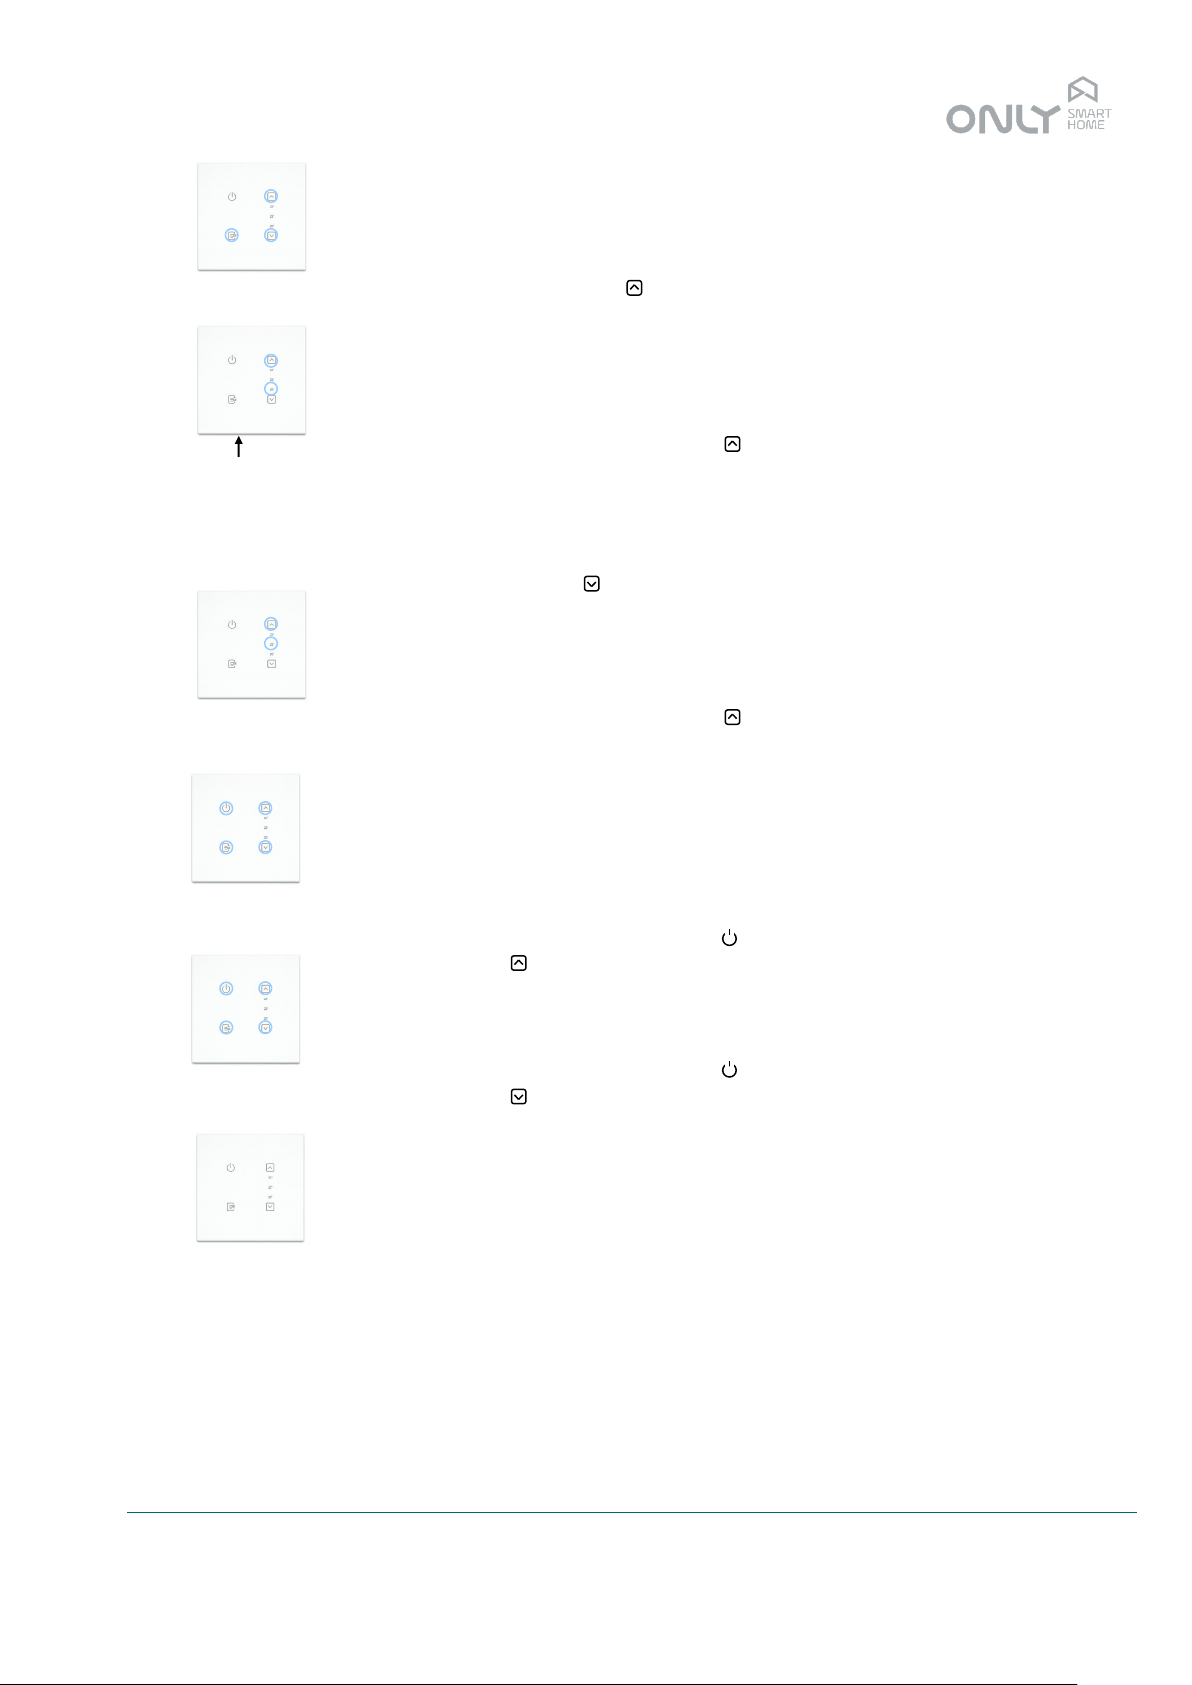
Ideal temperatures – OTC-CLIMA
You must have an ideal temperature for summer and winter. This temperature is
selected as the target when climatization is switched on outside the periods defined
in the programme.
This can happen for example when you return home earlier than usual.
In this case you wish to turn on climatization without having to change the
programme. To do this, simply switch it on with the key and the ideal temperature
is automatically selected as target temperature.
Ideal summer temperature
Adjustment of the summer temperature is done by pressing PROG for 2 seconds:
- when touching the panel only the keys and light up.
Press the key to adjust the summer temperature.
On the LCD you will see the selected temperature. You can select between 18º and
29º pressing successively the PROG key.
Once the desired value is selected, you can confirm it with .
Ideal winter temperature
Adjustment of the winter temperature is done by pressing PROG for 2 seconds:
- when touching the panel only the keys and light up.
Press the key to adjust the winter temperature.
On the LCD you will see the selected temperature. You can select between 18º and
29º pressing successively the PROG key.
Once the desired value is selected, you can confirm it with .
CONFIGURATION OF THE OTC-TERMO
There are some parameters that can be adjusted directly on the OTC-TERMO.
These are:
- ideal winter temperature
- ideal summer temperature
- operating cycle
Ideal temperatures
The OTC-TERMO is a programmable thermostat with three periods of operation for
each day of the week. During these operation periods the temperature is controlled
in accordance with the programme. Outside the operating periods the climatization is
switched off.
Even so, the user can switch on climatization by pressing the button in winter or
the button in summer. The target temperature is the ideal temperature which is
defined as follows:
1234567
23º
PROG
1234567
24º
1234567
24º
PROG 2s
1.
Page 9
ENANCER Electrónica S.A. Page 9 of 13
Rua Max Grundig 9
4705-820 Braga Portugal [email protected]
Tel: +351 253 221 484 www.only-smartbuildings.com
Ideal winter temperature
1. Keep the key PROG pressed during 2 seconds.
2. Now press the button : The LED of the temperature scale light up indicating
the actually selected temperature. If two LEDs (e.g. 20º and 22º) light up; this
means that the selected temperature is in the middle, e.g. 21º.
3. Press PROG to select the next temperature. Pressing PROG repeatedly
increases the temperature until the turnaround point and return to the lowest
temperature. You can select a temperature from 19ºC until 24ºC in 1ºC steps.
4. Confirm the selection by pressing .
Ideal summer temperature
- Keep de key PROG pressed during 2 seconds.
- Press the button : The LED of the temperature scale light up indicating the
actually selected temperature.
- Press PROG to select the next temperature. Pressing PROG repeatedly
increases the temperature until the turnaround point and return to the lowest
temperature. You can select a temperature from 20ºC until 25ºC in 1ºC steps.
- Confirm the selection by pressing .
Selection of Winter and Summer cycle
The OTC-TERMO can work during winter (heating control) as well as during summer
(cooling control).
To select the Winter mode, proceed as follows:
1. Switch on the unit with the button .
2. Keep the key pressed during 6 seconds: you will hear a beep to indicate that
the mode was selected.
To select the Summer mode, proceed as follows:
- Switch on the unit with the button .
- Keep the key pressed during 6 seconds: you will hear a beep to indicate that
the mode was selected.
PROG…
3.
4.
2.
On
6s
Winter
Summer
6s
Page 10

ENANCER Electrónica S.A. Page 10 of 13
Rua Max Grundig 9
4705-820 Braga Portugal [email protected]
Tel: +351 253 221 484 www.only-smartbuildings.com
OPERATION
OTC-CLIMA
When the OTC-CLIMA is switched off, touching the panel will only light up the LED
of the key. This means that the only possible operation is switching the unit on or
off.
To switch on the unit press : you will hear two beeps indicating that the unit is on
and the LEDs of some other keys light up.
Manual operation
The OTC-CLIMA can operate in automatic and manual mode. To operate in
automatic mode it is necessary that the unit has the date and time adjusted. If this is
not the case, the unit can only function in manual mode.
If the display shows only the temperature, this means that there is no date and time
adjusted.
In this case, when you switch on the unit with the key, it automatically goes to
manual mode. This is indicated by the LED of the key that blinks or lights up.
blinks - unit switched on but climatization switched off
lights up - unit switched on and climatization switched on
In this last case the LCD indicates if it is cooling or if it is heating up.
During manual operation the ideal temperature is the one that is previously adjusted
for the respective season.
If desired, you can edit the target temperature by pressing the keys to increase or
to decrease.
Automatic operation
If the date and time are adjusted, the display shows the time. In this case, when you
switch on the unit it goes to automatic mode.
If the actual time is outside of any defined operating period the unit stays in
STANDY, waiting for an operating period to start.
In this case the key does not light up, indicating that the climatization is switched
off.
Pressing the key switches the unit on in manual mode. The target temperature is
the defined ideal temperature. Climatization is switched on if necessary.
As an alternative, you can press in winter or in summer. In this case
climatization is always switched on being the target temperature the actual
temperature plus (winter) or minus (summer) 1º.
When the time reaches an operating period, the defined target temperature of that
period is selected and the unit switches to automatic mode.
When the program ends, climatization is switched off.
To switch off the unit, press for more than 1 second.
1234567
23º
1234567
23º
1234567
10:12 23º
1234567
23º
Page 11
ENANCER Electrónica S.A. Page 11 of 13
Rua Max Grundig 9
4705-820 Braga Portugal [email protected]
Tel: +351 253 221 484 www.only-smartbuildings.com
OTC-TERMO
When the OTC-TERMO is switched off, only the LED of the key lights up when the
panel is touched. This means that the only possible operation is switching the unit on
or off.
To switch on the unit press : you will hear two beep tones indicating that the unit is
switched on and the LEDs of some more keys light up.
Manual operation
The OTC-TERMO can operate in automatic and manual mode.
To operate in automatic mode it is necessary that the unit receives the date and
time. If this is not the case, the unit can only function in manual mode.
Since the OTC-TERMO does not have its own clock (there is no display for it) you
can receive the time signal from other units in the system. The ONLY units that send
time signals are the D-BUSDRV and the CENTRALSEC..
As such, when at least one of these units is placed in the system and the date and
time are adjusted, the OTC-TERMO receives the time signal.
If this is not the case, when you switch on the unit with the key, it goes directly to
manual mode. This is indicated by the LED of the key that lights up or starts
blinking.
blinking - unit switched on but climatization switched off
lights up - unit and climatization switched on
During manual functioning the ideal temperature is the one previously adjusted for
the respective season.
If desired you can change the target temperature by pressing the keys to increase
or to decrease the temperature.
Automatic operation
If the unit receives a time signal it goes to automatic operation when it is switched
on.
If the actual time is outside any defined operating period, the unit stays in STANDY
until an operating period starts.
In this case the key stays off, indicating that climatization is switched off.
Pressing the key switches the unit on in manual operation and the target
temperature is the defined ideal temperature. If necessary, climatization is switched
on.
As an alternative you can press in winter or in summer. In this case
climatization is always switched on being the target temperature the actual
temperature plus (winter) or minus (summer) 1º.
When the time reaches an operating period, the defined target temperature of that
period is selected and the unit switches to automatic mode.
When the program ends, climatization is switched off.
To switch off the unit, press for more than 1 second.
1234567
23º
Page 12
ENANCER Electrónica S.A. Page 12 of 13
Rua Max Grundig 9
4705-820 Braga Portugal [email protected]
Tel: +351 253 221 484 www.only-smartbuildings.com
INTEGRATION WITH DOMOTICS
The units of the ONLY climatization can be integrated with the rest of the
automation. It may for instance be an advantage in an office to associate the
opening of a blind or switching on a light to switching on climatization. In this way the
user configures the office with the use of just one button. When switching on the light
or opening a blind, climatization is switched on. When switching off the light or
closing a store, climatization is switched off.
For this, the association is done in the same way as any other output of the ONLY
system.
To associate a unit to a button, proceed as follows:
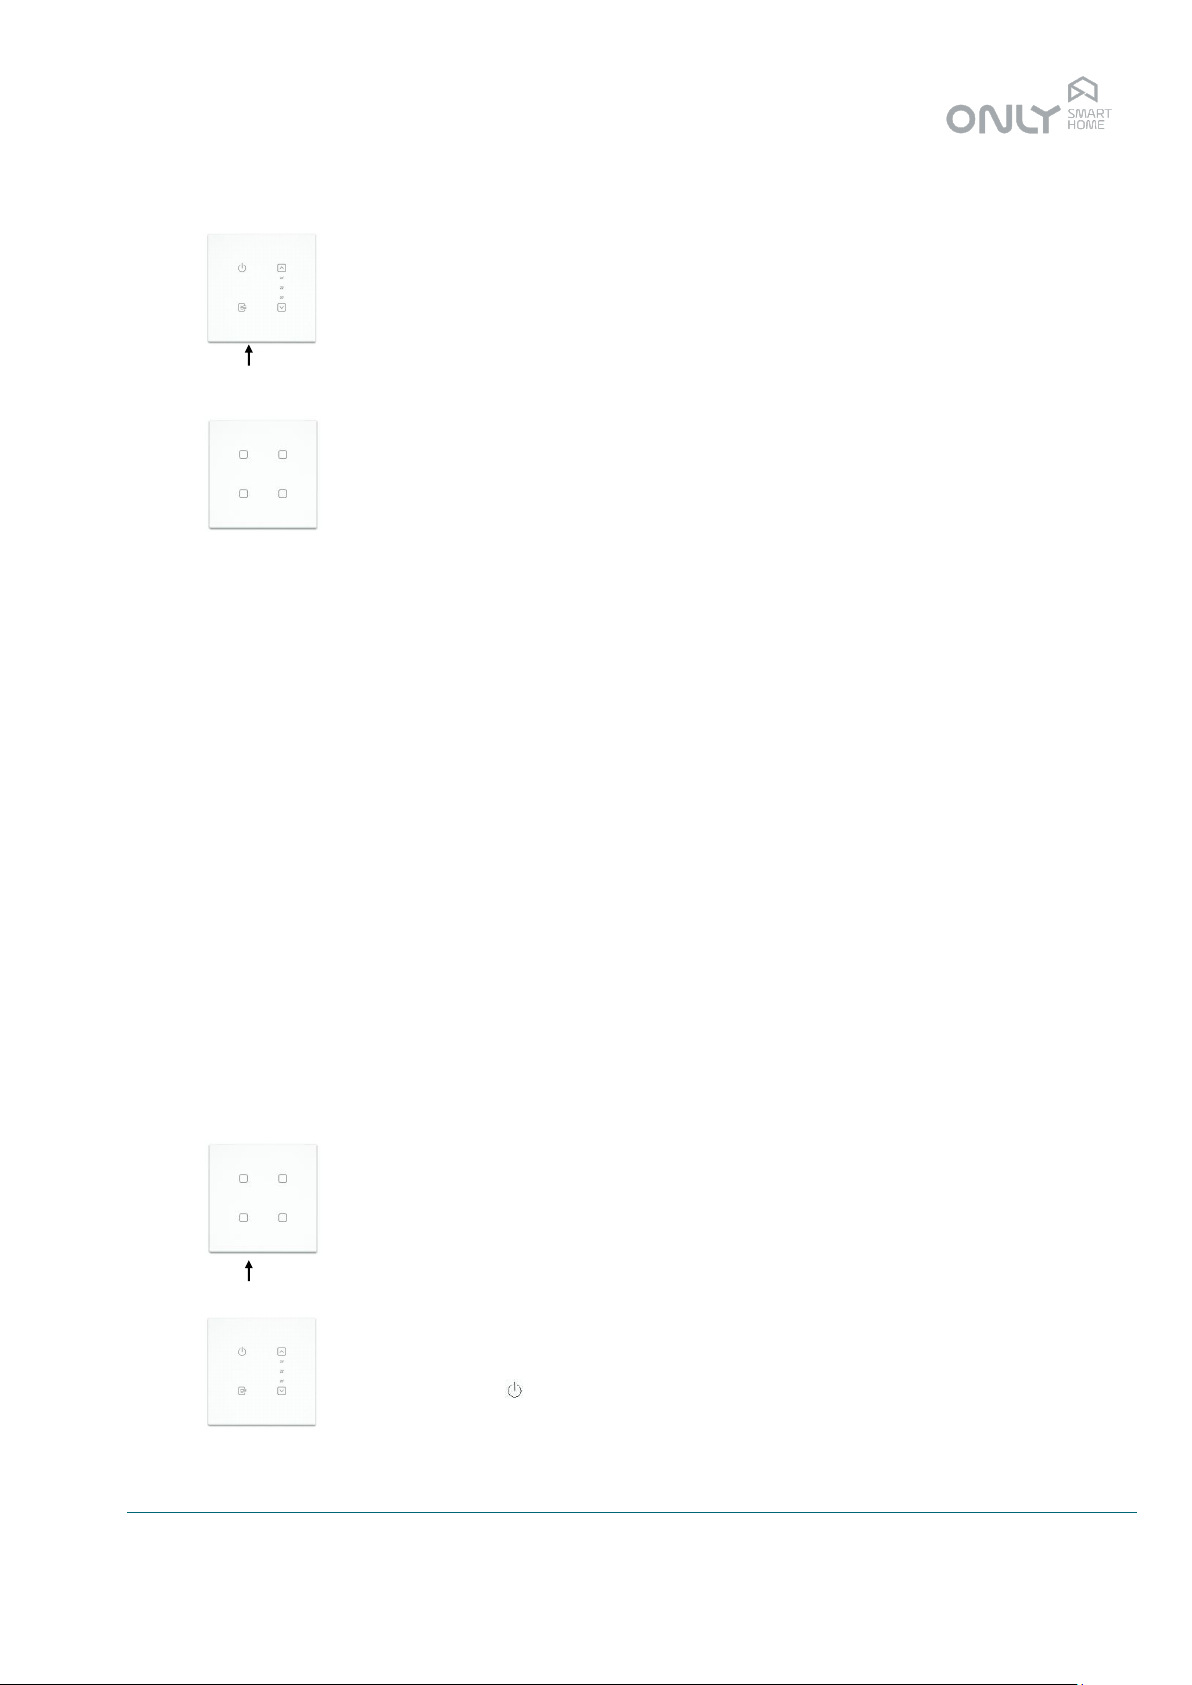
1. press PROG on the OTC-TERMO or OTC-CLIMA
2. then press the automation button that you wish to associate.
To remove the button from the unit:
1. press PROG on the OTC-TERMO or OTC-CLIMA
2. press PROG again for more than 1 second to switch to the mode APAGAR
3. then press the automation button you wish to remove.
Association with Scenarios
The SCENARIO commands are commands that allow the combination of different
states of multiple outputs.
The climatization units can be linked to these scenarios, like the other units.
For the scenario the status of the unit is memorized:
- switched off
- automatic mode
- manual mode
The unit will enter the respective mode when the SCENARIO command is received.
Association with ON or OFF
The commands ON and OFF are commands that define a specific state. Therefore,
the climatization units execute them literally.
As such the command ON switches climatization on independent of the state it was
in. The command OFF switches climatization off, as well as it switches the unit off.
Association of outputs to climatization
It might be necessary to associate automation outputs to the climatization units. This
is for instance the case when you wish to command a boiler with an ON/OFF output
via any ONLY module that is installed near it.
The intention is that this output is switched on if at least one climatization unit is
heating, and switched off otherwise. Therefore, this output must me associated to
the climatization units.
To do this, proceed as follows:
1. press PROG on the output module
2. then press on the climatization unit.
Repeat this for further climatization units.
From now on, the output is turned on when at least one of the associated units is
ON.
PROG
1.
2.
1.
PROG
2.
Page 13

ENANCER Electrónica S.A. Page 13 of 13
Rua Max Grundig 9
4705-820 Braga Portugal [email protected]
Tel: +351 253 221 484 www.only-smartbuildings.com
FACTORY DEFAULT
VERY IMPORTANT:
The ONLY climatization units have to be configured according to the installation in
which they are used. This configuration should be done by the installer because it
depends on the installation architecture and the physical connections made.
Therefore, you should never reset to the factory default settings, because the unit
will no longer function.
To reset the unit to the factory default, press PROG for more than 10 seconds. At the
end you will hear a long BEEP.
 Loading...