

Page 1
Manual of 1303
Read Me Before Usage!
Page 2

Chapter 1 Content Description
—1
Section 1 On-Lap Monitor and Accessories —1
Section 2 Notices of On-Lap Monitor —3
Section 3 Safety Precautions —4
Section 4 Safety Instructions —4
Section 5 Product Maintenance —4
Section 6 LCD Pixel Statement —4
Section 7 Disposal of Electronic Equipment —5
Chapter 2 Installation Instructions
—5
Section 1 Cover Stand and VESA 100 Kit Assembly —5
Section 2 Connect the Video Cable and USB Touch and
Power Cable
—7
Chapter 3 Power On and Off the On-Lap Monitor
—8
Section 1 Power On and Off the On-Lap Monitor —8
Section 2 Monitor Display Setting —8
Section 3 Windows 10/ 8.1/ 7 Touchscreen Setting —9
Section 4 Windows 8.1/ 10 Touch Gesture Description —10
Chapter 4 Hot Keys and OSD Instructions
—10
Section 1 Hot Keys & LED lights Description —10
Section 2 OSD Description —11
Section 3 Low Power Protection Warning —13
Chapter 5 Specification
—13
Section 1 Plug and Play —13
Section 2 Pin Assignment —13
Section 3 Specification —15
Section 4 Troubleshooting —16
Table of Contents
English
Page 3
2. .
1.
.
.
目 次
Page 4
Chapter 1 Content Description
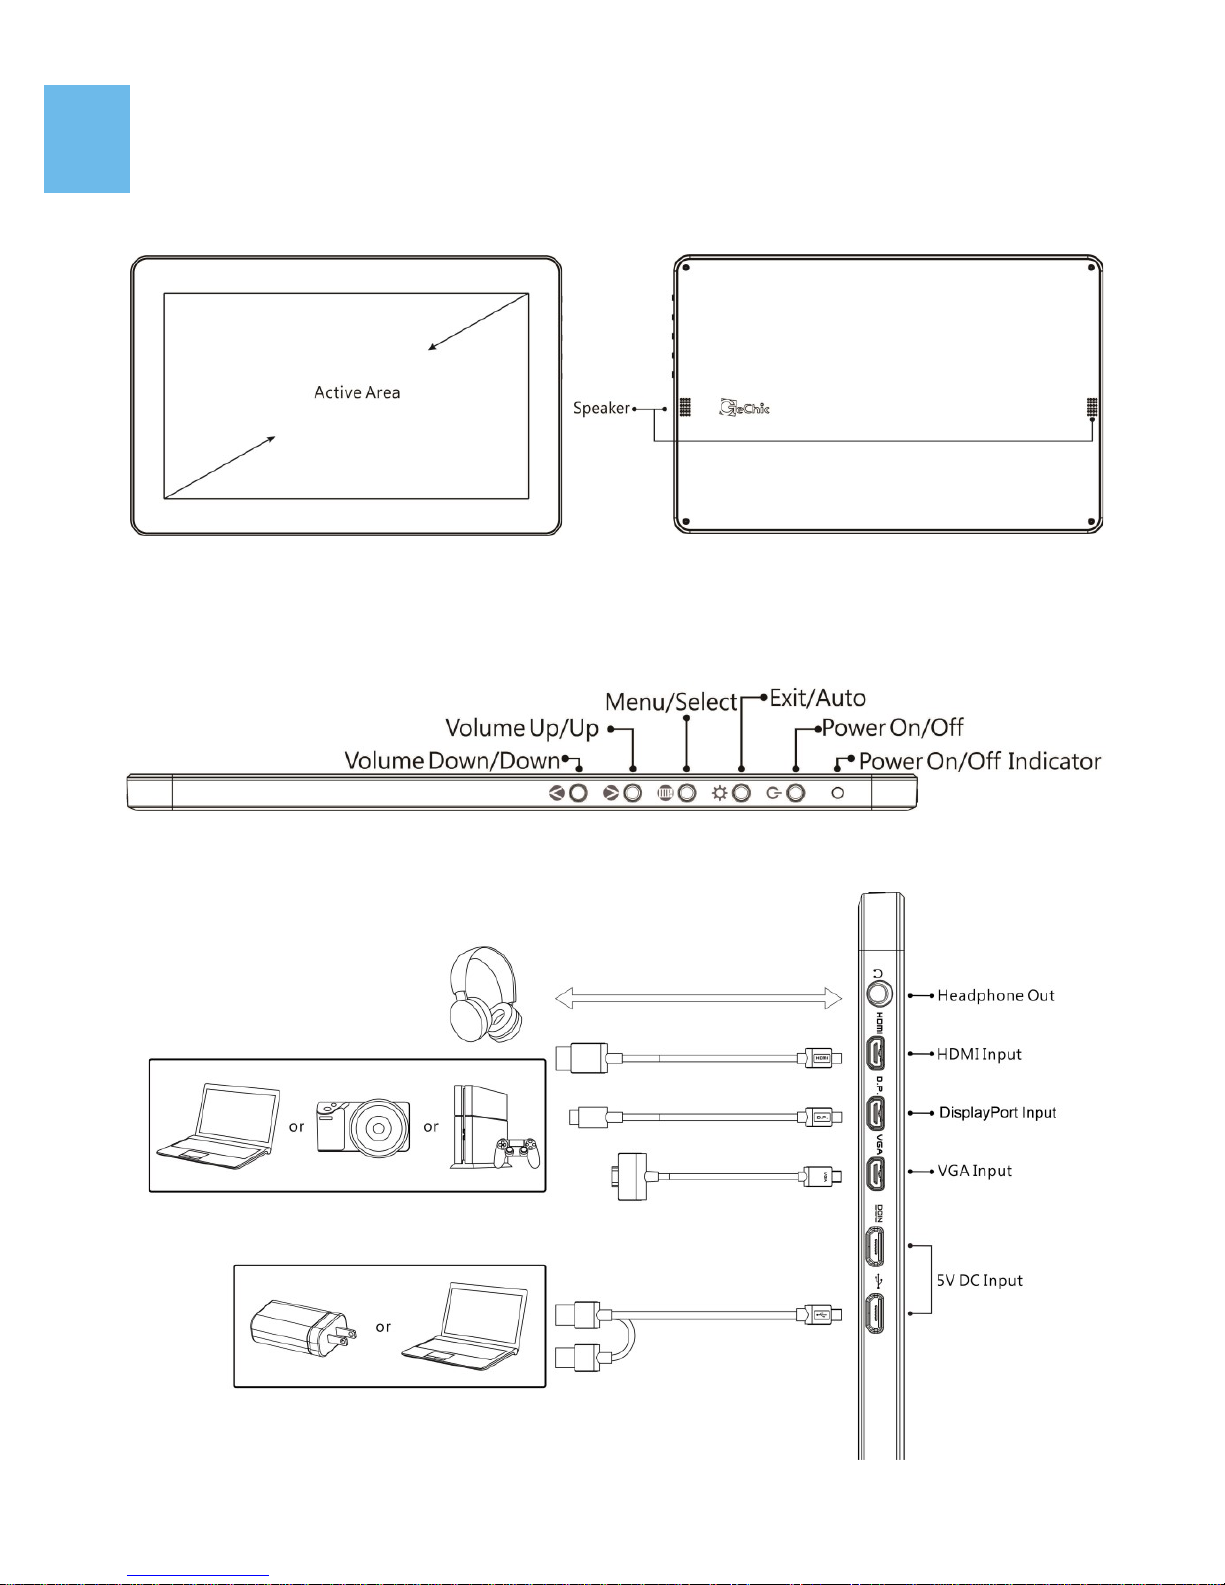
Section 1 On-Lap Monitor and Accessories
1. Parts Description
1
Fig.: On-Lap 1303 Front & Back
Fig.: 1303 buttons and LED light Description
Fig.: On-Lap 1303H & 1303A Input & Output ports
Page 5
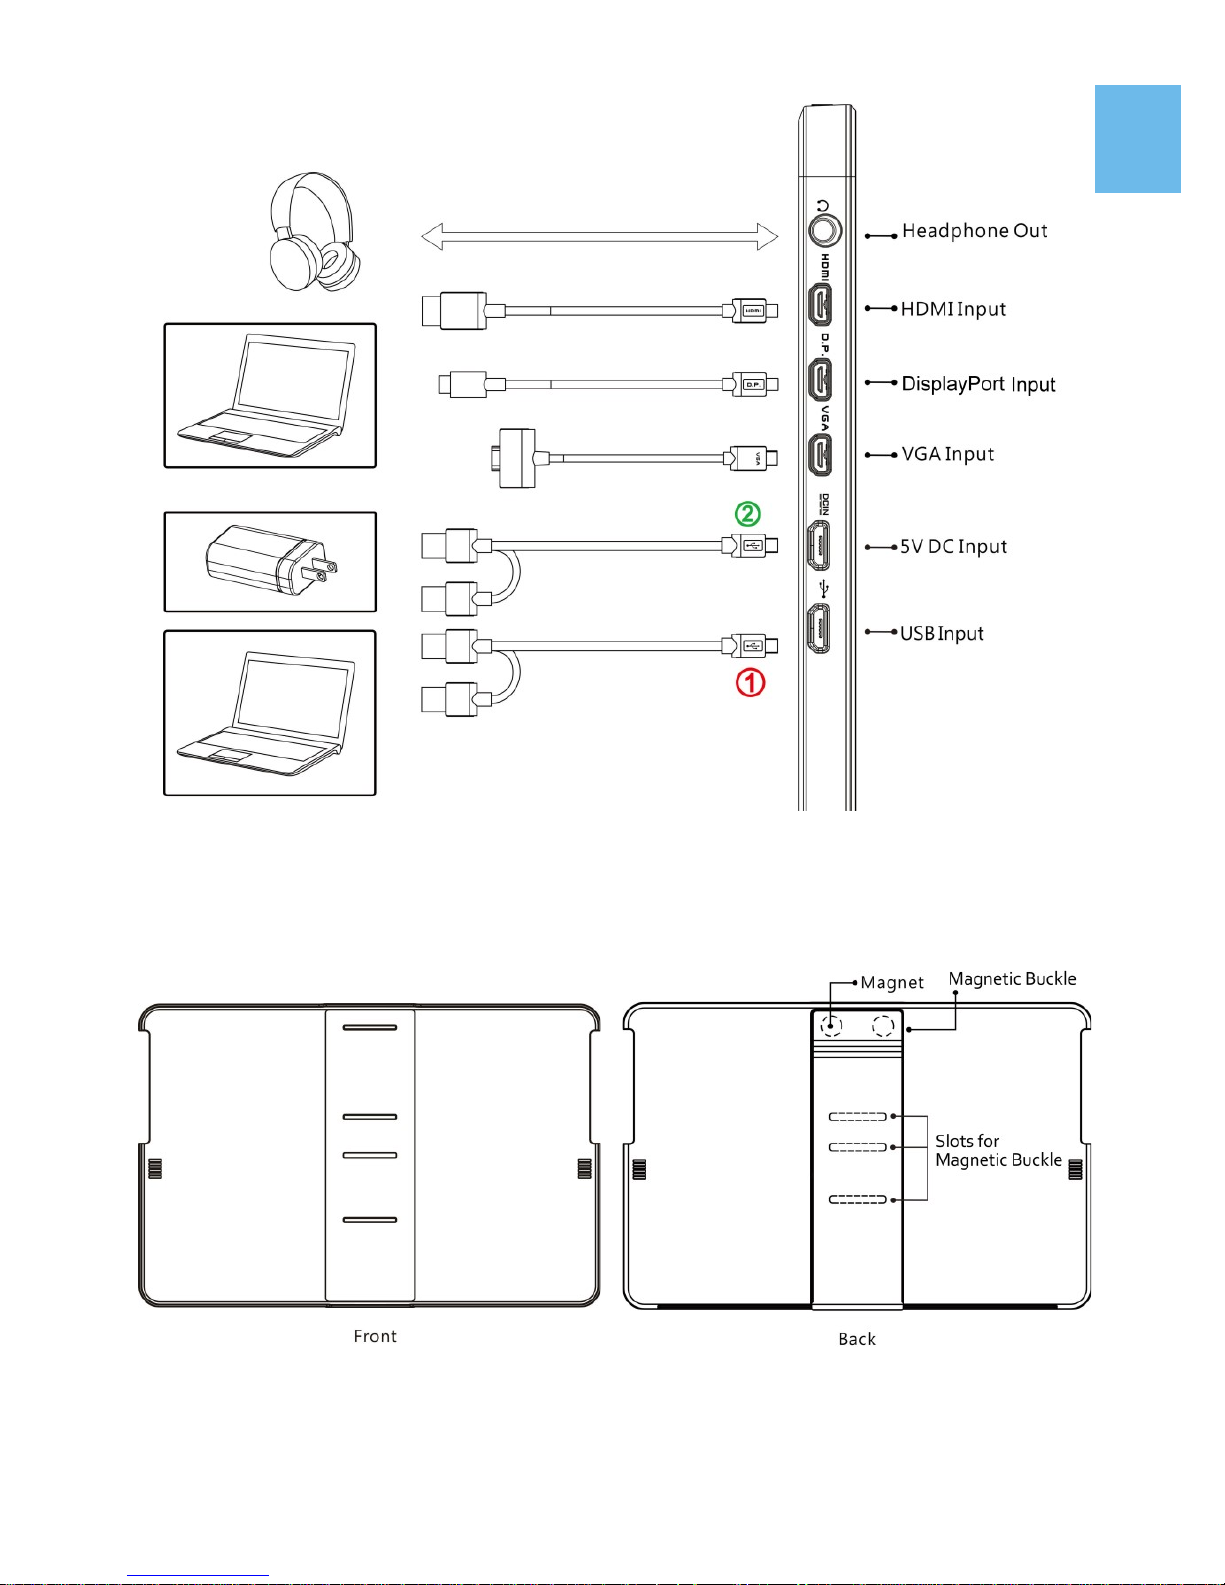
Fig.: Parts Description of Protective Cover
2
Fig.: On-Lap 1303I Input & Output ports
Page 6

2. Package & Accessories
Section 2 Notice of On-Lap Monitor
1. When plugging out the cables, do make sure the aspect of plug is horizontally—do not shake the port or plug forcefully. Any damage caused
by wrong plug inserting is not included in warranty coverage.
2. The power input specification for On-Lap monitor is 5V 2A DC current。
Input power over than 5V will cause breakdowns on monitor and this
damage is not included in warranty coverage. It is suggested to connect
both plugs of USB power cable to computer’s USB ports or manufacturer’s 5V-2A adapter.
3. Unstable power input will interfere with touch signal, resulting inaccurate
or failed touch function. If some high power consumption equipment
share the power in the same electricity network, it may cause acute electricity fluctuation. It is suggested to use the USB port on laptop or manufacturer’s 5V-2A charger.
4. Do not put touch monitor near to light blub, electric cord, or anything
with great electromagnetic wave which may disturb projective capacitive
touch monitor and cause touchscreen function abnormal.
3
Accessories 1303I 1303H 1303A
USB-A to micro-USB power and touch signal
cable (1.2m)
Yes(2 pcs) Yes(1 pcs) Yes (1 pcs)
HDMI-A to Micro-HDMI Video Cable (1.2m) Yes Yes Yes
On-Lap proprietary mini-Displayport cable Optional Optional Optional
On-Lap proprietary VGA cable (1.2m) Optional Optional Optional
Adapter(5V,Max.2A) 1 pcs Yes Yes No
Cover1 pcs Yes Yes Yes
Manual 1 pcs Yes Yes Yes
HDMI-A to micro-HDMI Video Cable (2.1m) Optional Optional Optional
Mini-HDMI to micro-HDMI Video Cable
(2.1m)
Optional Optional Optional
On-Lap proprietary DisplayPort Cable (2.1m) Optional Optional Optional
USB-A to micro-USB power and touch signal
cable (2.1m)
Optional Optional Optional
1303 VESA 100 kit Optional Optional Optional
Stand 4 Optional Optional Optional
Page 7

5. Please do not use sharp objects o touch the screen. Gently use the finger
to touch or swipe on the screen. While touching the screen, please keep
finger clean and dry. Do not press the screen forcefully.
6. Notice for Monitor Clean
Disconnect power input before cleaning. Please use soft cloth to clean
touch screen monitor. If something is hard to wipe off, please wet the
cloth and wipe again. Please do not use chlorine, alcohol, ammonia, deter-
gent or other corroding solvents. These solvents may cause damage to the
touch screen monitor or leave unremovable residue.
7. Notice for Monitor Operation
Avoid to expose the monitor directly under sunlight for long, which may
result in damage. When monitor displays different images, image brightness may become slightly uneven.
Section 3 Safety Precautions
1. The Product may be severely damaged from overturning or falling. Please
do not place on a shaky or unstable table, cupboard or trolley. Do not use
the On-Lap Monitor on a moving vehicle.
2. Do not place the items on a vibrating surface, vibration may cause dam-
age to the internal components.
3. The product is not waterproof. Do not use the Product at or near a place
with water.
4. Do not insert any object into the Product’s slots or gaps.
5. Loudness warning! Avoid volume levels that may be harmful to your
hearing. Please check the volume setting before you use the Audio Jack.
6. Please notice the plug in the box is applicable to its AC adapter only.
Section 4 Safety Instructions
Please read this Manual carefully and observe the operation instructions and
precautionary notes. Do retain this document for future reference.
Section 5 Product Maintenance
Do not attempt to repair the Product yourself. Should any of the following
conditions occur, please contact our maintenance personnel for service:
1) Unable to operate the Product after following the instructions in the
Manual.
2) The Product falls and the outer casing is damaged.
3) Power cable or video cables is damaged.
4) Liquid infiltrated into the Product.
Any normal wear and misuse, including but not limited to product failure due to normal
usage, is not covered under warranty. Accident, damage, software or hardware changes,
force majeure, or become in contact with liquid that result in product malfunction is not
covered under warranty.
Section 6 LCD Pixel Statement
The On-Lap Monitor uses a high quality LCD panel. Nevertheless, there might
be instances where defective pixels may occur; however, this will not affect the
normal functioning of the Product.
4
Page 8
Section 7 Disposal of Electronic Equipment
The electronic equipment and batteries should not be disposed of
with household waste but should be left at an appropriate collection
point for recycling.
Chapter 2 Installation Instructions
Section 1 Cover Stand and VESA 100 Kit Assembly
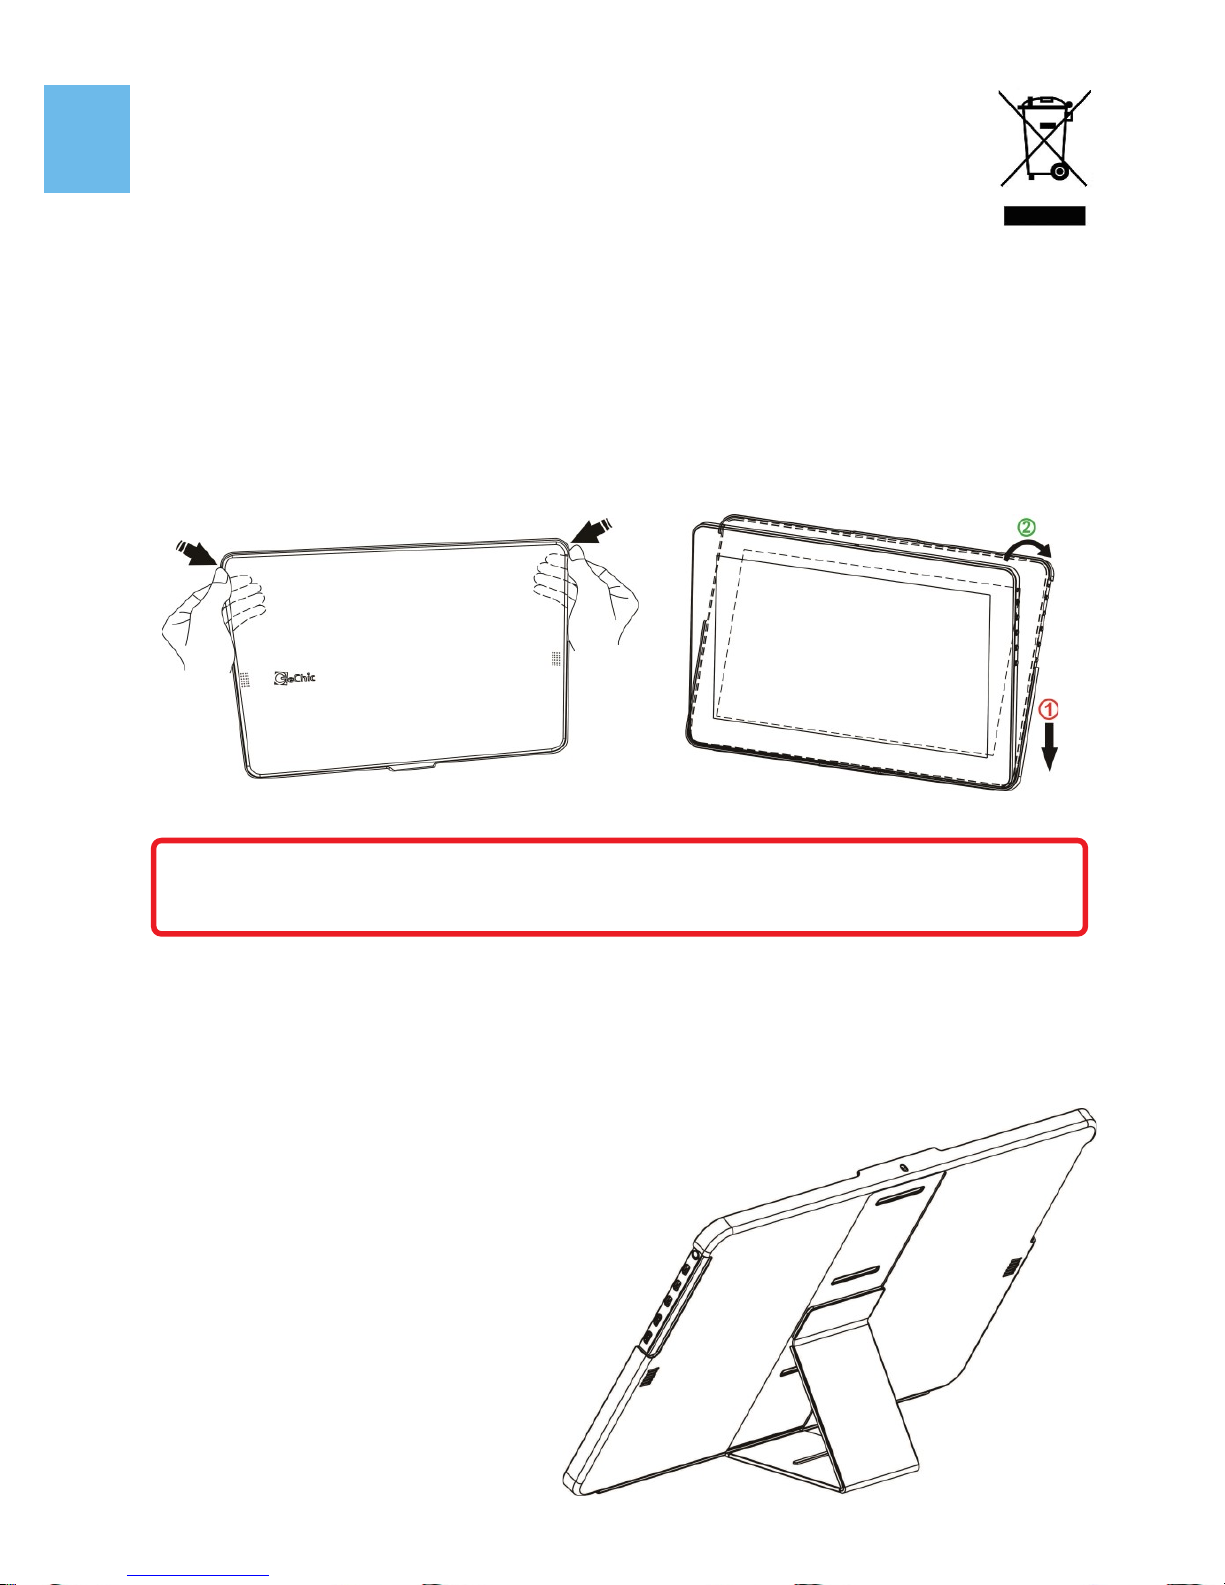
1 Install Cover Stand
1-1 Take Monitor out: Hold both sides of the cover’s rim by thumbs and then
push the monitor from back by the fingers. When putting the monitor
back to the Cover Stand, first put the bottom of Monitor in and then push
the top part of monitor into the cover.
1-2 Take the magnetic buckle off first. There are 4 slots for the magnetic buck-
le on the back of Cover Stand. Put Magnetic Buckle in one of the slots
and the Cover Stand is set.
Fig : Take Monitor out from Cover Stand
5
Caution: In order to avoid dropping or breaking the monitor, please keep
the back of monitor outward the cover Stand when not in usage.
Fig : Put Monitor in Cover Stand
Fig : Put Magnetic Buckle in slot
to set the Cover Stand
Page 9
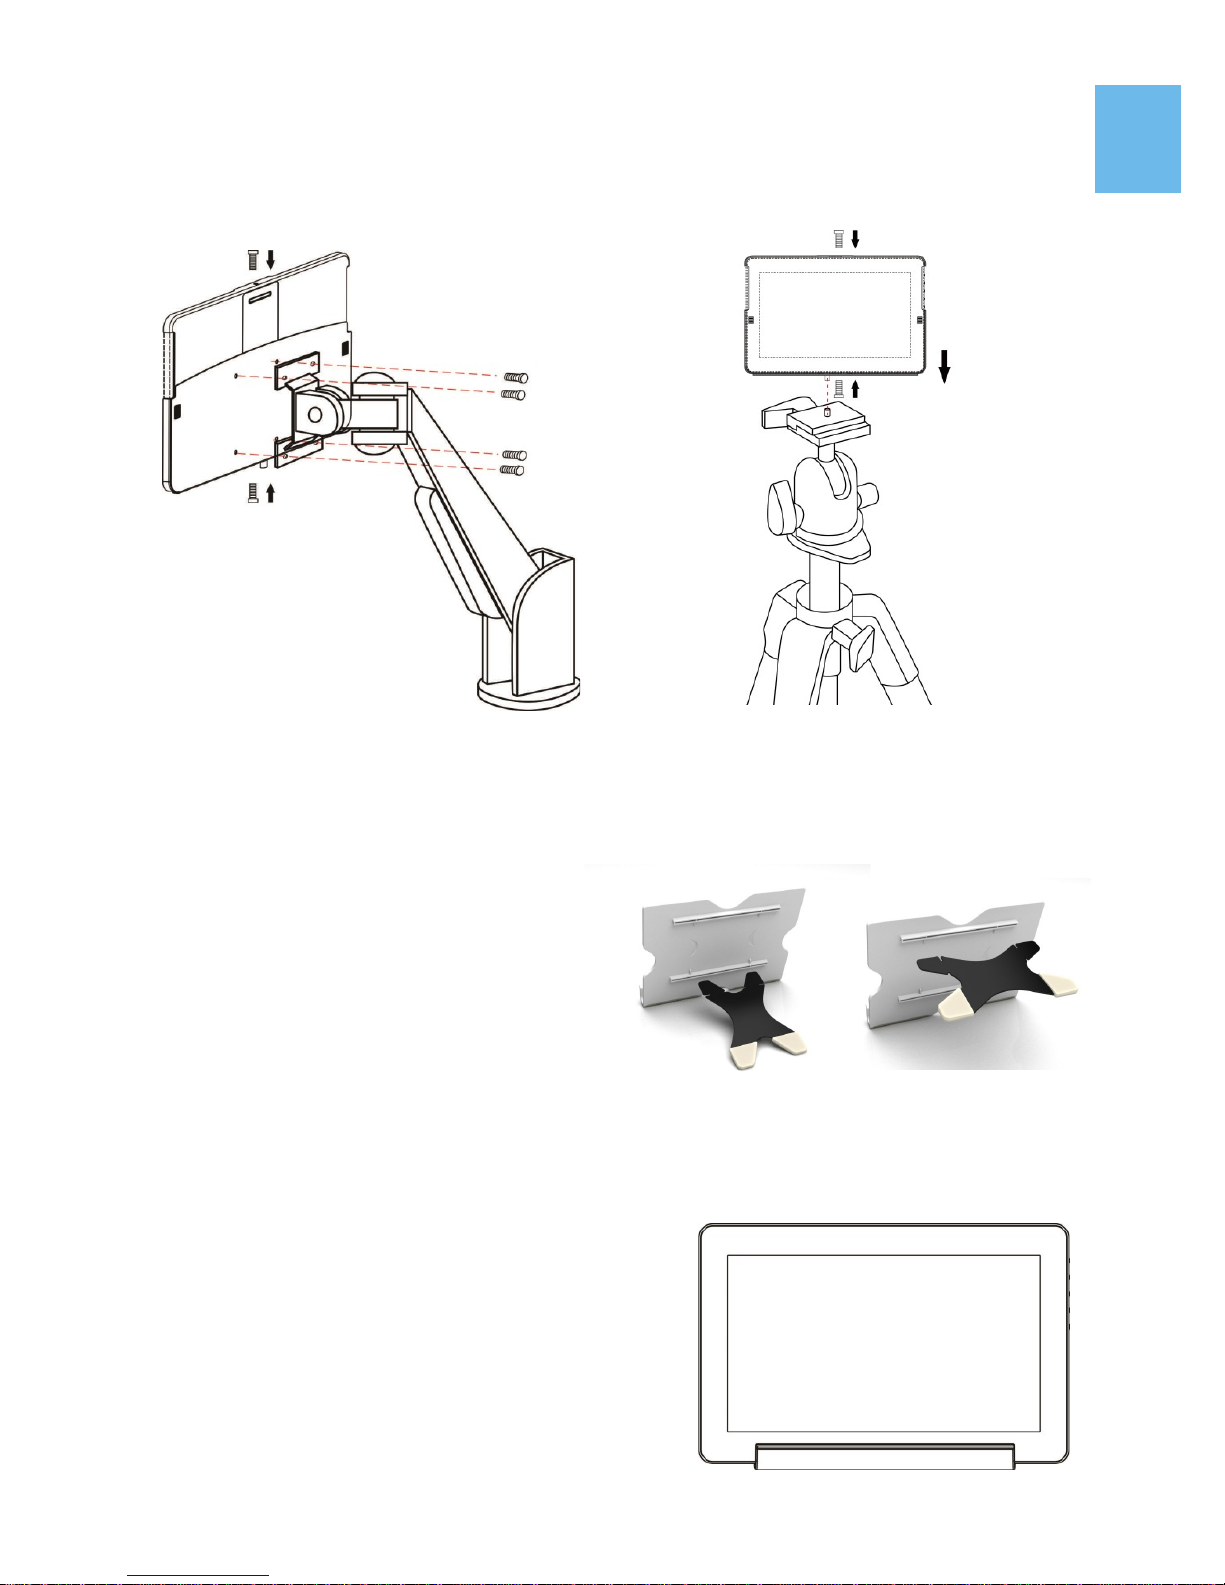
2 VESA 100 Kit Installation (Optional)
First Screw the VESA100 Kit in VESA100 arm or camera cradle head/ tripod.
Place the Monitor into VESA 100 Kit, as shown in Fig, and secure the Monitor
by screwing in.
3 Install Stand 4 (optional)
Step 1 Assemble Stand 4
Select the desired angle placement
to assemble Stand 4. During assembly, check if X plate is properly
inserted onto slot.
Step 2 Place On-Lap monitor onto Stand 4.
Stand 4 is positioned at the bottom center of
monitor.
6
Fig : Screw the VESA100 kit in VESA
arm. Put the Monitor in and secure it
by screws.
Fig : Screw the VESA100 kit in camera
cradle head. Put the Monitor in and
secure it by screws.
Fig : Install Stand 4
Fig : Place 1303 in Stand 4
Page 10
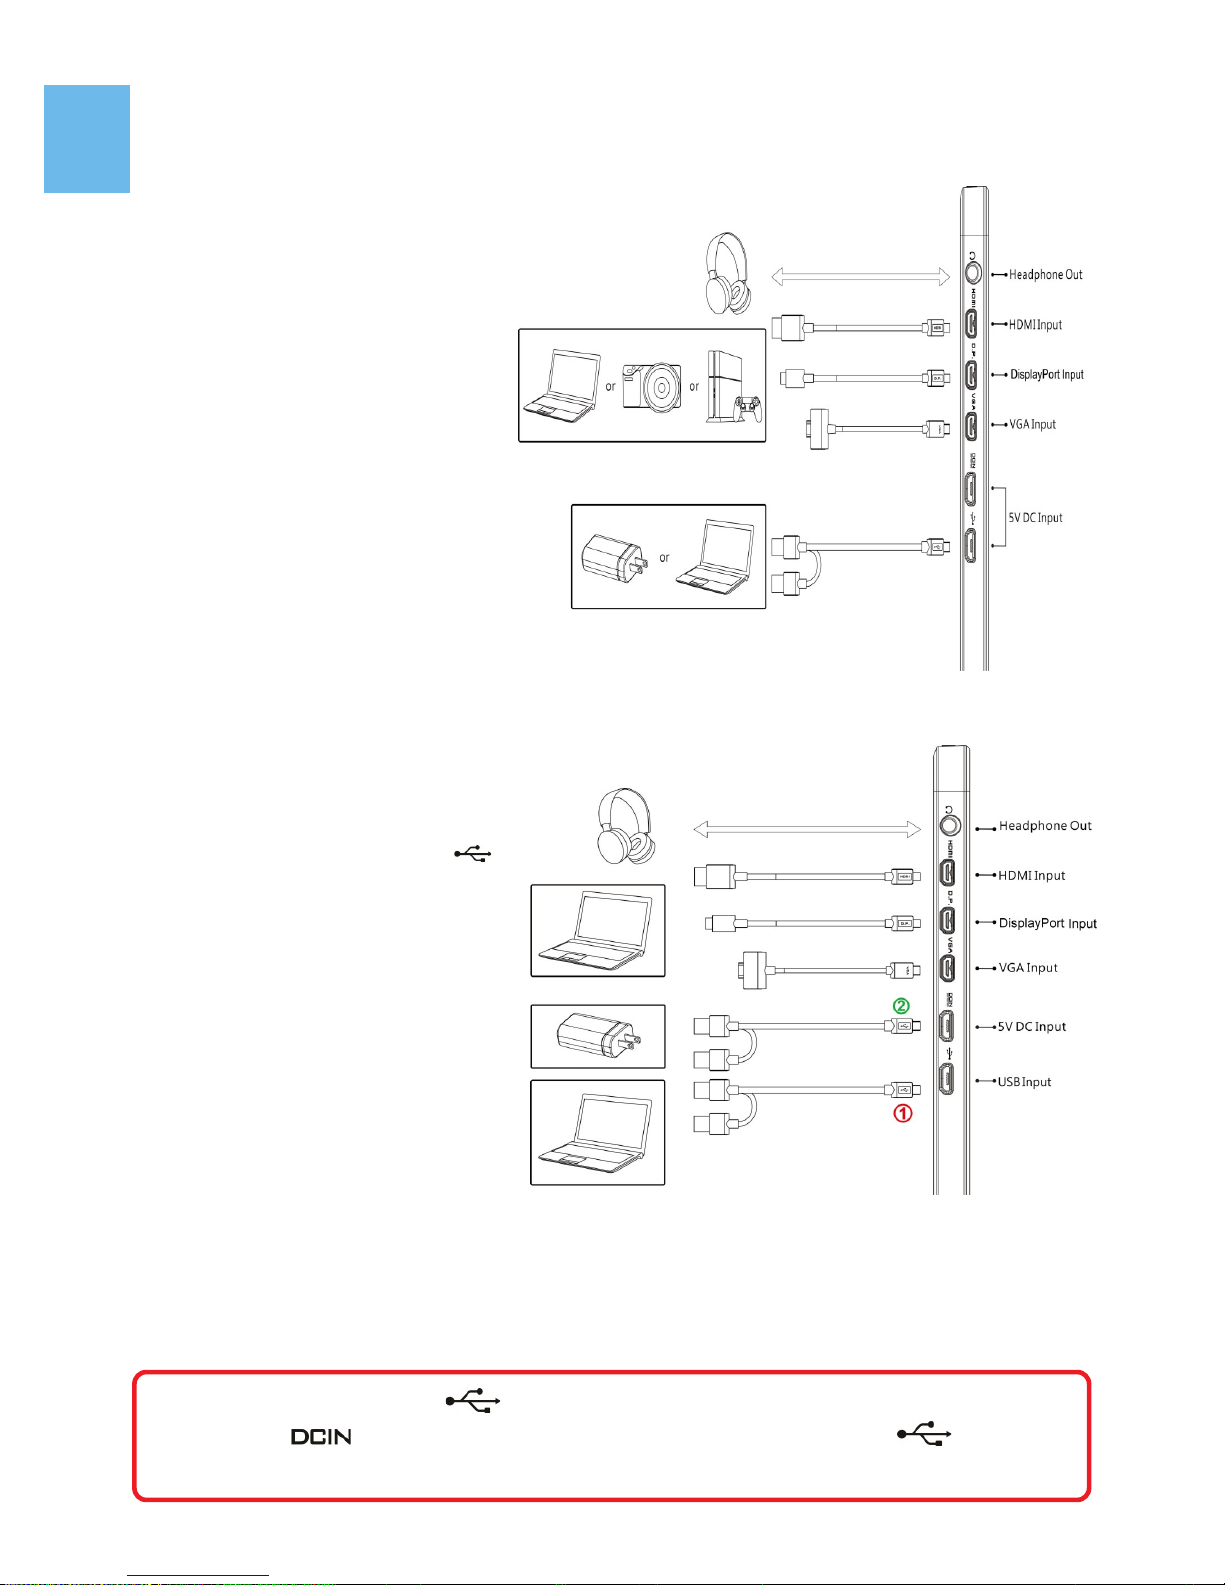
Section 2 Connect the Video Cable and USB Touch Power Cable
1. Connection method for On-Lap 1303H & 1303A
Connect USB Power cable first
and then connect Video cable. USB power Cable can be
connected to USB port of
laptop or 5V 2A USB charger.
Voice is transmitted by microHDMI or DisplayPort ports.
VGA does not support voice
transmission.
PS: if one USB port of laptop
does not supply enough
power. Please insert another
USB plug to laptop, which
supply double power.
2. Connection method for On Lap 1303I
○1Connect USB Touch Output
and Power Cable’s Micro USB
(B type) connector to On-Lap
1303I’s Micro USB port.
Connect the other end, USB
connector to USB port of laptop. With this connection,
laptop will provide power and
touch signal to On-Lap 1303I.
If one USB port on laptop is
unable to provide enough
power, please connect the two
USB connectors to two USB
ports on laptop, this can pro-
vide double power.
○
2
Or connect the second USB power cable to the 5V 2A charger.
After then connect Video cable. Only when micro-HDMI or DisplayPort is
connected will the Monitor have sound. VGA does not support voice transmis-
sion.
Caution: Micro USB port can transmit both touch signal and power , but
Power port can only transmit power. If Micro USB port is not connect to USB port of laptop, touch function can not be enabled.
7
Page 11
Chapter 3 Power On and Off the On-Lap Monitor
Section 1 Power On and Off the On-Lap
1. From Off state to On state: Press Power Button to activate On/Off.
2. First time use: When Micro USB to USB touch signal and power connect
to USB port on computer or 5V DC Charger, On-Lap will automatically
start and detect video signal to automatically display video. (Connection
method shall refer to Chapter 2 Section 2)
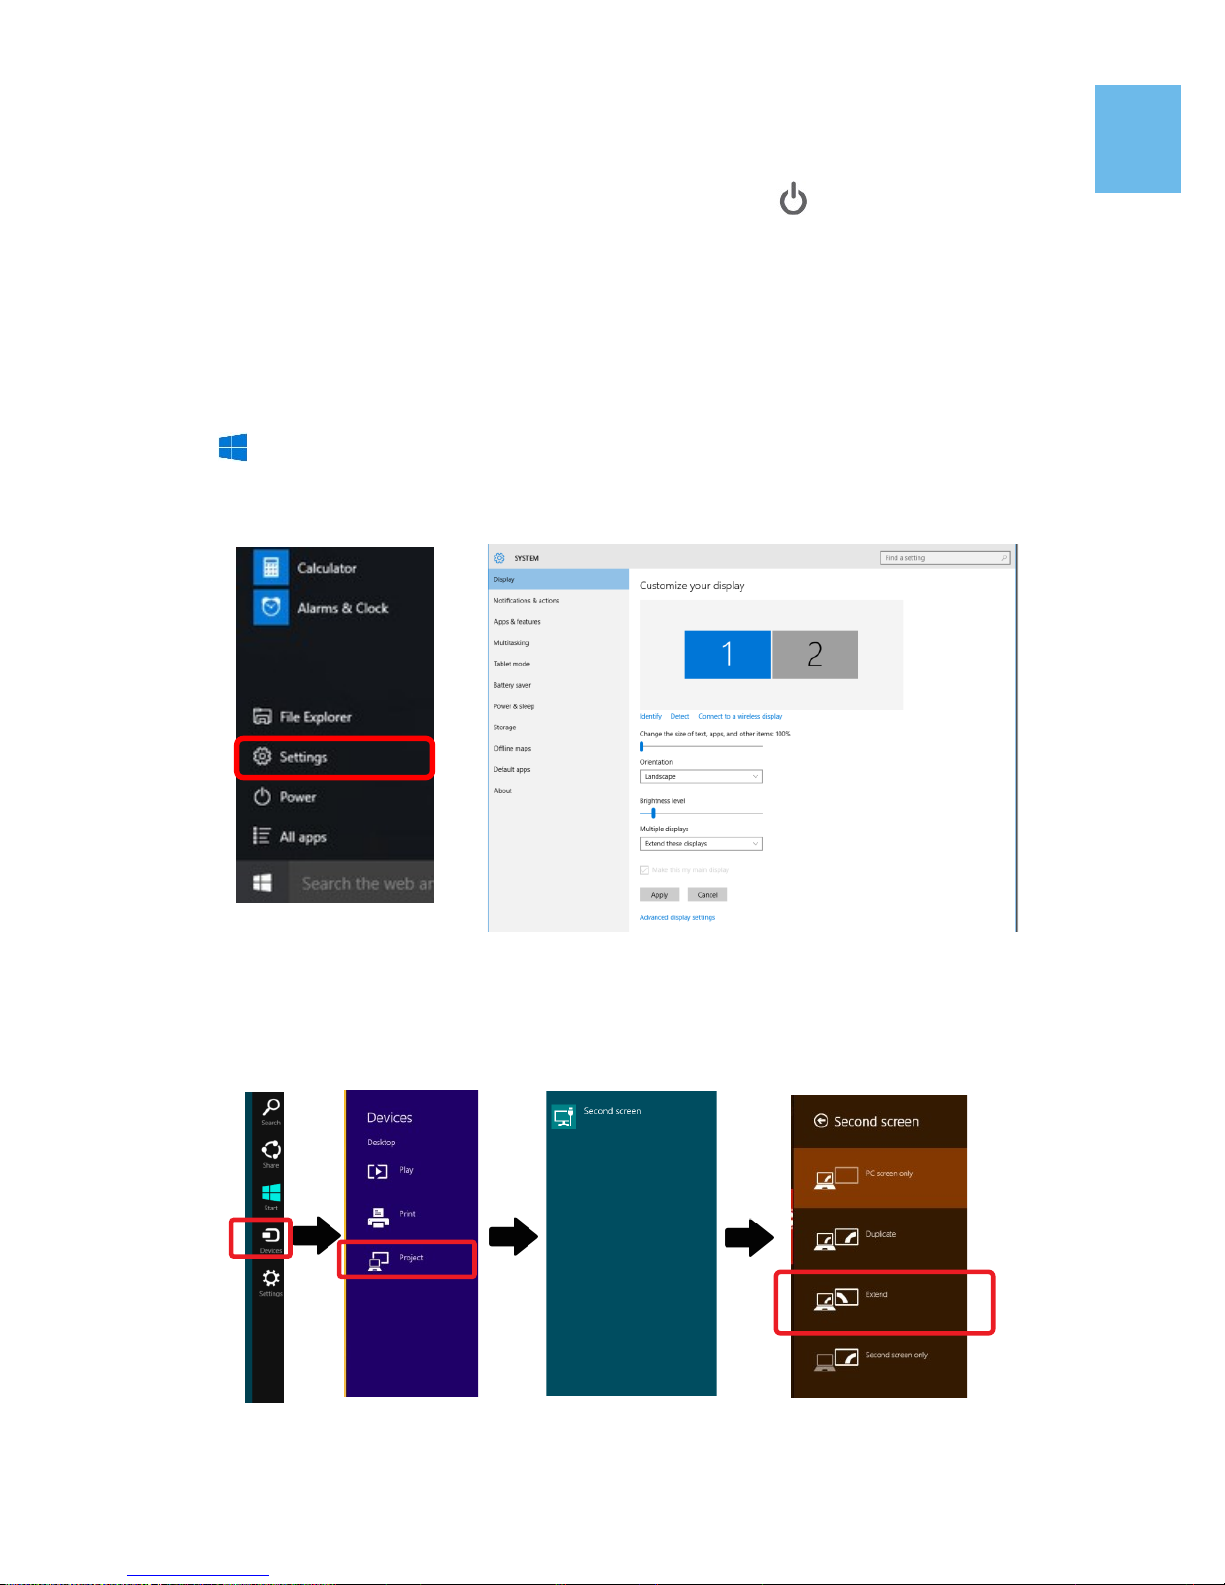
Section 2 Monitor Display Setting
1. Set Extended Display Mode-Windows 10 System
Press
and choose “Settings”> select”System”>select“Display”.
Then choose”Extend these displays” at Multiple displays.
Refer to 3.Set Extended Display Mode-Windows 7 System for resolution.
2. Set Extended Display Mode-Windows 8.1 System
Select directly from right side of screen [Devices] ->select [Project]->select
[2nd Monitor] -> select [Extend Mode]
For screen resolution setting please refer to the followings.
8
Page 12

9
3. Set Extended Display Mode-Windows 7 System
● Click on icon
● Click on Control Panel > Appearance and Personalization
● Click on Display > Connect to an external display.
Normally Display ① is the laptop’s monitor, Display ② is the external mon-
itor. Click on Detect if you are unsure.
● At Display, select “2.HDMI” (digital video) or “2. display device:
VGA” (analog video) for Display
● Select Resoluton“1920x1080”
for 1303H& 1303I. Select Reso-
lution “1366x768” for 1303A.
● Select "Landscape" or "Portrait"
for Orientation.
● Select "Extend these displays" for
Multiple display, and drag Display 2 to the right side of Display
1. For Duplicated mode, select
"Duplicate these displays".
● Select OK and exit after saving
the settings.
Section 3 Windows 10/8.1/7 Touchscreen Setting
(Notice: Only 1303I supports Touch Function)
If you find the cursor acts wrongly, please calibrate the monitors at Windows
system. Please connect 1303I to laptop first, if not, the calibration can’t be
begun.
In Windows10, search”calibration” at ‘Settings’,select ‘Calibrate the
screen for pen or touch input’
In Windows8.1/7, Select ‘Tablet PC Setting’of Control Panel to calibrate
touch input.
As Fig., please select “Setting (S)”, when Windows message appears on the
screen of On-Lap 1303I, follow the direction to touch the screen and the
setting is complete.
Page 13

Section 4 Windows 8.1/ 10 Touch Gesture Description
Common Touch Gesture Introduction:
1. Use finger to swipe in from edge:
○1Swipe in from the right edge of
the screen (Arrow 1) : Open the five
charms – Search, Share, Start, De-
vices, and Settings
○2Swipe in from the left edge of
the screen (Arrow 2) : Switch be-
tween apps
○3Swipe in from the left edge of
the screen then out toward the left
edge of the screen (Arrow 3): Display all apps
○4○5Swipe in from the top edge (Arrow 4) or bottom edge (Arrow 5):
Display commands of app, like Add New, Reminder, etc.
○6With touch, drag the app from the top edge of screen (Arrow 6) to the
bottom of the screen: Close app
2. Select item: Tap on the item to open. This function is similar to clicking on
mouse.
3. Press and hold the item for a few seconds then release: Display item
information. This function is similar to right-clicking on mouse.
4. Zoom in and out: Touch the item with two fingers then move fingers
toward each other (pinch) or away from each other (stretch).
5. Slide finger on the screen, horizontally or vertically, to move through
content. This function is similar to scrolling with a mouse.
Chapter 4 Hot Keys and OSD Instructions
Section 1 Hot Keys and LED Light Description
*Notice: If need to adjust “Increase/up” or “Decrease/down” continuously , press
the button and hold. Do not press two buttons at the same time, due it may cause no
response or fault response.
LED Lights Description :
It shows green light when turn on On-Lap Monitor and shows red light when
stand by.
10
Notice of operation system compliance
On-Lap 1303I supports Windows10/8.1/7 . You can plug & touch on Windows 10/8.1/7 without any driver installation
For Windows 8/8.1 before 2015/10/15, which contains different touch oder,
may not recognize 1303I. Please upgrade your Windows, or email Gechic for
1303I firmware change.
For Linux and Android developer, please active”HID multitouch panels”
while establishing kernel, and the external touch monitor can be supported.
Or email Gechic for Linux driver for setting in Linux/Android system.
Page 14

Hot Keys Description
Power: Press the Power Button can power on/off the Monitor.
Exit/Auto Adjustment: In the OSD panel, press the Exit Button to exit and
back to the previous page. When there is no OSD menu, press this
Button will activate automatic adjustment function (only pertains to analog
VGA signal)
Menu/Select: Press the Menu Button to launch OSD panel.
Increase Volume/UP: Press this Button to increase the volume of speakers.
If the OSD menu is launched, press this button will move up or move left the
list. Press and hold for automatic continuous increase.
Decrease Volume/Down: Press this Button to decrease the volume of
speakers. If the OSD menu is launched, press this button will move down or
move right the list. Press and hold for automatic continuous decrease.
Section 2 OSD Description
1. Basic Button Operation
Press button to launch the OSD panel. Press or to view the
functions. To adjust a certain function, press to launch it. If the selected function consists of sub-menu, press or again to view the submenu. When the desired function is highlighted, press to launch it.
Press or to change the setting. To exit, press to exit. Repeat the
preceding steps to adjust other setting.
2. Display Settings
As shown in Fig., after Display Settings is launched, can adjust Brightness,
Contrast, and Sharpness.
11
Page 15

3. Color Setting
As show in Fig., after Color Settings is launched,
can adjust Color Temp and Color Effect to adjust
screen color setting.
Hue setting can make the image color lean toward green or purple
Saturation setting can make saturation more
vivid or more black and white.
At Color Temperature, select “User”, can adjust
RGB color setting, please refer to Fig. Select
“Cool” can increase the blue saturation of the
image. Select “Warm”can increase the red
saturation of the image. At Color Effect, select
“Standard”, “Game”, “Movie”, “Photo” or
“Vivid”
Select “Standard” can adjust the Hue and Satu-
ration of Red/Blue/Green/Cyan/Yellow/Magenta
4. Aspect Ratio
Please refer to Fig. Suggested setting is 16:9.
When HDMI image is 4:3 format, can select 4:3, make image not enlarge to
16:9 and change shape. Using VGA image input
won’t have this function
Notice: When use 4:3 setting, the left and right
sides of On-Lap 1303 will show black frame. Be-
cause its not full screen image display, thus image
location and press signal location will not be the
same, will not be able to press the correct loca-
tion
Overscan: Only when input HDMI Video signal
(ex. 1080P/720P) , can use such function. Use this
function can adjust the image scan area.
5. Manual Image Adjust
Auto Adjust: Only when input VGA signal can use
such function. Will automatically adjust VGA
setting
H.Position: Moves the display area left and right .
V.Position: Moves the display area up and down
Clock: Adjust the pixel clock for user's preference
Phase: Adjust the pixel phase for user's prefer-
ence
12
Page 16

Section 3 Low Power Protection Warning
If the volume setting is too high, the power requirement may be greater than
the power provided by computer or external 5V DC Charger. At this time, the
Low Power Protection Warning will appear. Please reduce the volume immediately. Connect the two USB connectors of Micro USB Touch and Power Cable to
the two USB ports on computer. If the volume is not reduced in time, the Monitor will
decrease the volume and brightness auto-
matically.
Fig.: Low voltage warning shown at upper
right corner on screen.
Chapter 5 Specification
Section 1 Plug and Play
The On-Lap Monitor conforms to VESA DDC standard and supports VESA
DDC2. DDC2B is a bi-directional data channel based on I2C protocol. The host
can request EDID information over the DDC2B channel. The On-Lap Monitor is
able to inform the host system of its identity, and depending on the level of
DDC used, communicate additional information about its display capabilities.
Section 2 Pin Assignment
1. HDMI Connector Pinout
Fig.: HDMI-A Connector
(Connect to HDMI port)
13
6. Audio: Adjust volume or select mute
7. OSD Menu
OSD Timer: Adjust OSD Time
OSD H. POS: Moves OSD left and right
OSD V. POS: Moves OSD up and down
OSD Transparency: Makes OSD transparent
Language: Select OSD language
Reset: Restore to factory setting
8. Input Source: Select VGA signal source, HDMI signal, DisplayPort signal
or Auto Detect
9. Information: Display factory version
Page 17

2. mini-DisplayPort Connector Pinout
3. VGA Connector Pinout
4. USB Connector Pinout
14
Pin Name Pin Name Pin Name
1 GND 8 GND 15 ML_Lane2(p)
2 Hot Plug Detect 9 ML_Lane1(p) 16 AUX_CH(p)
3 ML_Lane0(p) 10 ML_Lane3(p) 17 ML_Lane2(n)
4 CONFIG1 11 ML_Lane1(n) 18 AUX_CH(n)
5 ML_Lane0(n) 12 ML_Lane3(n) 19 GND
6 CONFIG2 13 GND 20 DP PWR
7 GND 14 GND
Pin : mini-DisplayPort Connector
(Connect mini-DisplayPort)
Pin No. Name Pin No. Name Pin No. Name
1 RED 6 RGND 11 NC
2 GREEN 7 GGND 12 SDA
3 BLUE 8 BGND 13 HSYNC
4 NC 9 +5V 14 VSYNC
5 GND 10 SGND 15 SCL
Fig.: VGA connector
(connect to PC’s
VGA port)
Pin No. Name
1 Vcc (+5V)
2 D+
3 D-
4 Ground
Fig .: USB Connector
Pin Name Pin Name
1 TMDS Data2+ 11 TMDS Clock Shield
2 TMDS Data2 Shield 12
TMDS Clock –
3 TMDS Data2 – 13
CEC
4 TMDS Data1+ 14
Reserved
5 TMDS Data1 Shield 15 SCL (I²C Serial Clock for DDC)
6 TMDS Data1 – 16 SDA (I²C Serial Data Line for DDC)
7 TMDS Data0+ 17 DDC/CEC Ground
8 TMDS Data0 Shield 18 +5 V Power
9 TMDS Data0 – 19 Hot Plug Detect
10 TMDS Clock+
Page 18

Section 3 Specification
15
Model On-Lap1303I On-Lap1303H On-Lap1303A
Panel
13.3" TFT IPS(16:9
Wide) LED Backlight
13.3" TFT IPS(16:9
Wide)LED Backlight
13.3" TFT TN(16:9
Wide)LED Backlight
Resolution/
Color depth
1920x1080/
16.7M colors
1920x1080/
16.7M colors
1366x768/
262K colors
Viewing Angle
(Typical)
178° (H)/178° (V) 178° (H)/178° (V)
45° /20° /45° /45°
(Up/Down/Left/Right)
Contrast Ratio
(Typical)
700:1 700:1 500:1
Response Time
(Typical)
14(ms) 14(ms) 8(ms)
Touch
Technology
Projected capacitive
touch screen;
10-point multitouch; Input by
fingers。
Support Win-
dows10/8.1,Win7
No touch screen
Screen coating
Touch screen hardness≧7H
No touch screen
Resolution
Specification
1920*1080(60Hz/50Hz),1600*900(60Hz),1440*900
(60Hz),1366*768(60Hz),
1280*1024(60Hz),1280*960(60Hz),1280*800
(60Hz/50Hz),1280*768(60Hz/50Hz),
1280*720(60Hz/50Hz),1024*768(60Hz),
HDMI Video
Display
Capabilities
1080P(60Hz/50Hz);1080i(30Hz/25Hz);
720P(60Hz/50Hz); (HDCP Compliant)
Speakers 2x 1.0W(Max.) (Rated Impedance 4 Ω at 2KHz)
Rating Voltage/
Current
5V 2A 5V 2A 5V 1.4A
Dimension
(Typical)
348mm*225mm*10.
8mm(Monitor)
354mm*231mm*19.
5mm(Cover)
348mm*225mm*10.
5mm(Monitor)
354mm*231mm*19.
5mm(Cover)
348mm*225mm*10.5
mm(Monitor)
354mm*231mm*19.5
mm(Cover)
Weight(Typical)
900g (Monitor)
320g(Cover)
599g (Monitor)
320g(Cover)
599g (Monitor)
320g(Cover)
Safety
R53848
RoHS
Page 19

Section 4 Trouble Shooting
1. Image or Audio output troubles
2. The unavailability of “ Duplicate these displays” or “ Extend these
displays” in Display setting may be limited by the graphics chip of the
laptop or have the graphic chip features limited due to the power saving
mode of the laptop or have the graphic chip driver updated. Please consult your laptop manufacturer or graphic chip manufacturer.
16
Problem Solution
No response when finger
touches on the monitor
1. Check if USB Touch Power Cable plug is connected to computer’s USB port. The USB plug
of USB Touch Power Cable cannot transmit touch
signal. (Refer to Chapter 2> Section 2)
2. Check if the computer installs Window 10 or Win-
dows 7.
While touching On-Lap
1303I, the cursor works on
the main display, not 1303I.
Please set up from ”Tablet PC Setting” (Windows
10/ 7) to calibrate the touch monitor. (Refer to Chapter 3> Section 3)
Touch function malfunc-
tions sometime. Function
recovers after restarting
USB signal transmission might be broken off because
USB port may not provide sufficient power. Please
connect both USB-A plugs into USB ports of laptop/
5V-2A adapter.
No image or OSD displays
“ No Signal” warning
1. Check if Power On/Off Indicator shows green light.
If not, it means no power connection. Please refer
to user manual instruction to connect power.
2. Check if VGA/HDMI Video Cable is connected
between On-Lap’s connector port and comput-
er’s connector port.
3. Check if Micro HDMI Video Cable connector is
accidently connected to the VGA port/ DisplayPort
port on On-Lap.
4. Please adjust “Brightness” and “Contrast” in
OSD setting.
Image flicks or blinks and
recover later
Please avoid pulling video cable. Please connect both
Y-type USB-A plugs into USB ports to make sure the
power supply is sufficient.
Image disappears ,too big,
too small, or can’t be
aligned center.
The problem normally happens via VGA input. Please
adjust phase, clock, V.Position, H..Position by OSD
setting.
Monitor has image but no
sound
1.Press “Up” button to increase audio level.
2.Use of VGA input will not have audio signal.
3. Check Sound Setting of the computer. Choose
output to HDMI device.
4. 1303 only supports audio out by phone jack. The
phone jack doesn’t support audio in function.
Page 20

第一章 内容物の解説
その1.モニタ本体と付属品
1. 各部の説明
図: On-Lap 1303 部位説明
図: On-Lap 1303H/J &1303A 入力ポート接続説明
図:On-Lap 1303 ボタンと LED ランプ説明
17
Page 21

図: On-Lap 1303 保護カバースタンド説明
図: On-Lap 1303I 入力ポート接続説明
18
Page 22

2. 内容物と付属品
アクセサリー 1303H/J 1303I 1303A
USB-A — Micro USB 電源&タッ
チ出力ケーブル(1.2m)
○
(1 pcs)
○
(2 pcs)
○
(1 pcs)
HDMI-A — Micro HDMI ビデオ
ケーブル(1.2m) *1
○ ○ ○
On-Lap 專用 mini-DisplayPort ビ
デオケーブル (1.2m)
別売 別売 別売
On-Lap 專用 VGA ビデオケーブル
(1.2m)v
○
別売 別売
AC アダプタ(5V,Max.2A) x1
○ ○
別売
保護カバースタンド x1
○ ○ ○
ユーザーガイド x1
○ ○ ○
1303 VESA 100 Kit 別売 別売 別売
Stand 4 別売 別売 別売
注意:1303I のみタッチパネル機能があります
注意:“1303H/J は VGA ビデオケーブルが付属しています”
19
その 2. モニタに関する注意事項
1. USB または映像入出力ケーブルを挿入する前に、挿入方向が正しいかどうか確
認してください。コネクタを抜く際は必ず USB ポートまたは映像入力ポート
の方向に従って水平に抜いてください。強い力でコネクタを揺らさないように
してください。反対方向(上下逆向き)に挿入したり、その他適切でない取扱
いによって USB ポートや映像入力ポートが破損した場合、保証期間中であっ
ても無償修理サービスは適用されません。
2. On-Lap モニタの電源入力規格は 5V 2A DC 電流です。5V 以上の電流を流す
とモニタの故障を引き起こすおそれがあります。この故障は保証対象外となり
ますのでご了承ください。PC の USB ポート x2 か当社製 5V 2A 充電器に接続
して電源供給することをお薦めいたします。
3. タッチモニタの電流入力には、必ず安定した 5V 直流電源を使用してください。
電源供給が不安定だと、モニタの損傷やタッチコントロール信号への干渉を引
き起こし、タッチ機能が正しく反応しないおそれがあります。また、同じ電力
供給元に電力消費の多い機器を接続していると、強烈な電磁波が起きてタッチ
機能に異常が生じる可能性があります。
4. タッチパネルを触る場合に、鋭利なものを使用することは避けてください。指
で優しくタッチ、スワイプ操作を行ってください。モニタを強い力で押さない
でください。タッチする時は手指の濡れていない清潔な状態を保つようにして
ください。
5. タッチスクリーンに汗や脂が付着している場合、タッチ機能の感度に問題が出
る場合があるため、画面を清潔に保つようにしてください。汚れが目立つ場合、
メガネ拭きのような柔らかい布でそっとふき取ってください。このとき、製品
本体から電源ケーブルは抜いてください。アルコール、シンナー、ベンジンな
どの溶剤を含む薬品等の使用は避けてください。
Page 23

7. 製品を長時間直射日光の下で使用することは避けてください。製品の変形や故
障に繋がる恐れがあります。タッチスクリーンモニタを電球、電線あるいはそ
の他電磁場を発散する物品に近づけてはいけません。電磁場は静電容量方式
タッチスクリーンモニタに干渉して、タッチスクリーン機能に影響する可能性
があります。
その3.安全に関する警告
1. 製品を転倒、落下させてしまうと故障の恐れがあります。不安定な場所や凹
凸のある場所に設置することは避けてください。また、乗り物での移動中に
本製品を利用することは避けてください。
2. 振動のある場所に製品を設置しないでください。内部の部品の損傷を招く恐
れがあります。
3. 耐水性ではありません。水に近い場所で使用しないようにしてください。
4. 製品表面の隙間やみぞに異物を入れないようにしてください。
5. スピーカの音量を上げ過ぎると、健康を損なう恐れがあります。オーディオ
ジャックを使用するまえにボリューム設定が適切か確認してください。
6. モニタが強い力や尖った物を受けると破裂することがあります。モニタを携
帯して外出する場合、必ず保護カバーでモニタのガラス面が内側に来るよう
に保護し、モニタが圧迫されたり物に触れないようにします。摩擦によるモ
ニタのパネル面の静電気発生を避けてください。大量の静電気がパネル面に
発生すると、モニタが正常に表示できなくなる場合があります。
7. AC アダプタの電源プラグ部分は本製品付属の AC アダプタ専用です。
その 4.安全に関する注意
使用前に本マニュアルをよくお読みになり、正しく製品をお使いください。本マ
ニュアルは大切に保管してください。
その5.製品のメンテナンスについて
お客様ご自身で製品の修理は行わないようにしてください。次のような場合に
は、お住まいの国のサービスプロバイダに連絡し、メンテナンスを受けてくださ
い。
1) マニュアルに沿って操作しても正しく動作しない
2) 製品を転倒、落下させてしまい破損させてしまった
3) 電源ケーブルやビデオケーブルが破損、断線した
4) 製品に水が浸入してしまった
製品の不適切なお取り扱いや自然災害、故意または過失による汚損・破損は製品
保証の対象とはなりません。より詳細な保証条件については保証規定をご確認く
ださい。
その 6.液晶のドットについて
液晶パネルはたいへん精密な技術により製造されています。しかしながら液晶パ
ネルには非常に多数の素子が存在するため、数点の程度で輝点(常時点灯する点)
や暗点(常時点灯しない点)が存在する場合がございます。
これは液晶パネルの性質によるもので、製品の不良ではありません。
本製品に関しては 5 点以下の輝点・暗点は保証規定適用の範囲外として
取り扱わせていただいておりますので、あらかじめご了承ください。
その7.電子機器の廃棄について
この製品は家庭廃棄物と混合することは、絶対にしないでください。廃
棄の際は地域の条例等の指示に従ってください。
20
Page 24

第二章 インストールガイド
その 1.保護カバースタンドと VESA100 スタンドの組立て
1.保護カバースタンドの取り付け
1-1 モニタを取り外す:まず手でカバースタンドを持って、また指で後方から
モニタを出します。
モニタを戻す:まずモニタの下半分を保護カバーに入れてから、次にモニタの上
半分を保護カバーにはめこみます。
1-2 指でマグネットラッチ上部の隙間に触れて、マ
グネットラッチを外します。保護カバーの裏に
金属の高さ調整口は 4 つありますので、マグ
ネットラッチを下の 3 つの調整口のいずれかに
はめこむと、保護カバーがスタンドに変わりま
す。
2. VESA 100 キットの取り付け(オプション)
VESA100 キットを VESA100 モニタのアームまたはカメラの三脚に固定した
ら、モニタを保護カバーに入れて上と下のネジをきつく締め、モニタを
VESA100 に固定します。モニタを動かす際は、VESA100 キットの金属部分を
押さえてください。モニタには力を加えないようにしてください。
図: モニタを保護カバースタンドーか
ら取り外す
注意:モニタの落下や破損を防ぐために、保護カバーを使用しないときはモニ
ターの裏側に取り付けておくことをお勧めします。
図: モニタを保護カバースタンドー
から取り外す
図: マグネットラッチを動かして、保
護カバーをスタンド型にします
21
警告:ネジを使わずにモニタを VESA100 キットに取り付けると、モニタが落下
して破損する恐れがあります。
Page 25

3. Stand4 取り付け(オプション)
3-1 図のようにお好みの使用角度で Stand4 を設置します。
取りつけ時には Stand4 の X 字パーツが確実にソケットに挿入されているこ
とを確認してください。
3-2 図のように、モニタを Stand4 の中に入れます。
スタンドの中央部分にモニタを置くようにします。
図: VESA100 スタンドを VESA100
のアームに取り付け、モニタをセッ
トしてネジを締める
図: VESA100 スタンドをカメラの三脚
に取り付け、モニタをセットしてネジを
締める
図: Stand4 組み付け
22
図: 1303 を Stand4 の中に入れます
Page 26

その 2.ビデオケーブル、USB タッチ出力/電源ケーブルの接続
1.On-Lap 1303H/J と OnLap1303A の接続方法
図のように、まず USB 電源
ケーブルを接続してから、映
像入力ケーブルを接続してく
ださい。電源入力は PC の
USB ポートまたは 5V 2A の
AC アダプタを使用できます。
**音声の入出力は、HDMI ケー
ブルと DisplayPort ビデオ
ケーブル使用時のみ行うこと
はできます。VGA ケーブルで
音声の入出力はできません。
1 本の USB ケーブルで給電が
不十分な場合は、ノート PC
の USB ポートをもうひとつ使
用して給電を行います。
図: USB タッチ出力/電源ケーブルの接続
2. On-Lap 1303I の接続方法
まず USB タッチパネル信号
電源ケーブルの Micro USB
を On-Lap1303I の Micro
USB 入力ポート に接続
してください。
ケーブルの反対側の端子を
ノート PC の USB ポートに接
続します。USB ケーブル 1 本
で給電とタッチ信号の伝送を
行うことができます。
1 本の USB ケーブルで給電が
不十分な場合は、ノート PC
の USB ポートをもうひとつ
使用して給電を行います。
最後に、ビデオケーブルを接
続します。**音声の入出力は、
HDMI ポートと DisplayPort
ポート使用時のみ行うこはで
きます。VGA ケーブルで音声の入出力はできません。
23
注:図のように、USB タッチパネル信号電源ケーブルの①コネクタ は、電
源とタッチパネルシグナルを同時に送信しています。そのため、①のコネクタ
が PC の USB ポートに接続されていない場合は、タッチパネル機能を使用でき
ません。"DC IN" ポートからは電源供給のみ行うことができます。
Page 27

第三章 On-Lap の起動
その1.On-Lap の電源 On/Off 手順
1.電源ボタンを押すことで On-Lap 1303 の電源を入/切できます。
2.はじめに USB ケーブルを On-Lap に接続したときには、On-Lap 1303 は自
動的に起動し、映像信号を検出します。
(接続方法については第二章その2.を参照してください)
その2.ディスプレイ設定
1. 拡張モード(Windows 10)
マークを押してから [設定] をクリック à[システ
ム]を選択 à[ディスプレイ]を選択 à「複数の
ディスプレイ」という項目から「表示画面を拡
張する」を選択します
2. 拡張モード(Windows 8.1)
画面右のメニューから直接選択します。 [デバ
イス] -> [セカンダリモニタ]
-> [拡張モード]
*モニタ解像度の調整方法は、本節の 2.を参照し
てください。
3. 解像度設定-Windows7
● スタートボタンをクリックします。
● コントロールパネルから[画面の解像
度の調整]を選択します。
● 通常プライマリモニタがノート PC
側、セカンダリモニタが On-Lap 側に
設定されます。
● 「ディスプレイ」の項目で On-Lap 側
を選択し、適切な解像度を設定しま
す。
On-Lap1303H/1303I の最適な解像
度設定は “1920*1080”です。On-
Lap 1303A の最適な解像度設定は
“1366*768”です。
● 利用方法に応じてモニタの向きを設定します。
● 表示領域を拡大したい場合は拡張モードを選択します。
● 2 画面に同じ表示を行う場合は、表示画面を複製するを選択します。
24
Page 28

その 3.Windows10/8.1/7 タッチスクリーンモニタ設定
(On-Lap 1303I にのみ適用されます)
タッチ機能の使用時にマウスカーソルが別のモニタに表示されてしまう場合は、
まずディスプレイとタッチスクリーンのペアリングを実行してください。先に
1303I と PC を接続する場合、PC の USB ポートが 1303I の USB 入力ポートに
正しく接続されていないと、ペアリングができません。
Windows10 の「設定」から「調整」と検索し、[ペン入力またはタッチ入力に合
わせた画面の調整]をクリックします。Windows8.1/7 の PC のコントロールパネ
ルの「タブレット設定」からタッチスクリーンの設定を行います。
下図のように「設定(S)」を選択して Windows のメッセージが On-Lap1303I モ
ニタに表示されたら、On-Lap1303I モニタをタッチして設定完了です。
その 4.Windows8.1/ 10 タッチ
ジェスチャに関する説明
1. タッチ操作全般の説明
タッチパネルの淵からスワイプして操
作します。
①右端からスワイプ(矢印 1)すること
でチャームが開きます。検索、共有、
スタート、デバイス、設定
②左端から中央に向けて(矢印 2)スワ
イプすることで app の切り替えを行い
ます。
③左端から中央に向けて(矢印 3)スワ
イプしそのまま左端に折り返してスワイ
プすると app を全て表示できます。
④⑤上端から中央に(矢印 4)、もしくは下端から中央に向けて(矢印 5)スワイプす
ると app のコマンドを表示できます。
⑥ app を上から下に向けてドラッグすると(矢印 6)app を閉じることができます。
2. アイテムの選択:アイコンをタップすることで選択できます
3. アイコンをしばらく押し続けて離すと、詳細を表示できます。
4. 二本の指を使用して拡大(ピンチ操作)、縮小(ストレッチ操作)ができます。
5. スクリーン上で指を滑らせることで、コンテンツ間の移動ができます。
図:タッチジェスチャについて
25
Page 29

第四章 ホットキー、LED、OSD 表示について
その 1.ホットキー、LED 表示について
*モニタ設定用のボタンはタッチボタンになっています。指で軽く触れて操作して
ください。ボタンを強い力で押し続けると、故障に繋がります。
▲ボタン、▼ボタンは、触れ続けることで連続的に操作することができます。複数
のボタンを同時に触ると、正しく操作できない場合があります。
LED ライトについて:
On-Lap の動作中には緑に点灯し、スタンバイは赤く点灯し、電源 OFF のときラ
イトは消灯します。
ホットキーの説明
電源ボタン:モニタの On/Off に使用します。
退出/自動設定ボタン: OSD メニューの操作時にこのボタンで一つ前のページ
に戻ることができます。OSD メニューが表示されていないときにこのボタンを押
すと、モニタの自動調整を行います(自動調整はアナログ VGA 入力時のみ有効)。
メニュー/セレクトボタン:このボタンで OSD メニューを呼び出すことができ
ます。
ボリューム Up/上移動ボタン: OSD メニューが表示されていないときはこの
ボタンでスピーカのボリュームを上げることができます。押し続けることで連続的
にボリューム操作ができます。OSD メニューが表示されているときはカーソルを
上/左移動するために使用します。
ボリューム Down/下移動ボタン: OSD メニューが表示されていないときはこ
のボタンでスピーカのボリュームを下げることができます。押し続けることで連続
的にボリューム操作ができます。OSD メニューが表示されているときはカーソル
を下/右移動するために使用します。
その 2. OSD の解説
1. ボタンによる基本的操作の説明
ボタンを押すと、OSD メニューが表示されます。 ・ を押して、メュー内容の
表示を上下に移動させます。調整機能を作動させたい場合は を押します。選択
した機能にサブメニューがある場合は ・ を押すと表示されます。調整したい
機能を選択するときは を押します。 ・ を押して選択した機能の設定を変更し
ます。終了するときは を押すと自動的に終了します。その他の機能を調整す
るときは上述のステップを繰り返して下さい。
26
OS の互換性についての説明
On-Lap1503I は Windows10/8.1/7 のタッチスクリーン機能に対応しているの
で、ドライバーを別途インストールせずに使用することができます。
2015/10/15 前の Windows8 や 8.1 の PC のタッチスクリーン対応ドライバー
は、Windows10 と異なる場合があり、1503I を認識しない可能性があります。
その場合は、OS のバージョンを更新するか、当社まで 1503I の設定を変更する
ソフトウェアについてお問い合わせください。
Linux、Android システムの開発者は、カーネル構築時に「HID multitouch
panels」を有効にしてください。外部タッチスクリーンがサポートされます。ま
たは、OS 内に構築する Linux ドライバーについて当社までお問い合わせくださ
い。
Page 30

2. 画面設定
図のように、”ディスプレイ設定”を開いた後、”輝
度”、”コントラスト”と”シャープネス”が調整で
きます。
3. 色設定
図のように、”色設定”を開いた後、”色温度(Color
Temp.)”と”カラーモード(Color Effect)”を使って、
モニタ色設定を調整できます。
色相(Hue)設定 は、映像の色を緑あるいは紫っぽくす
ることができます。
彩度(Saturation)設定 は、彩度を鮮やかに、あるいは
グレーに近づけることができます。
”色温度”で、”ユーザー設定”を選ぶと、RGB 色設
定を調整できます。図を参照してください。
”寒色”を選択すると、映像の中の青色が増えます。
”暖色”を選択すると、映像の中の赤色が増えます。
”カラーモード”で、”標準”、”ゲーム”、”映
画”、”写真”と”鮮明”等五種のプリセットモード
が選択できます。
”ユーザー ”を選択した時、赤緑藍青黄紫の色相と彩
度をそれぞれ調整できます。
4. アスペクト比設定
アスペクト比設定(Aspect Ratio):図を参考にします。
推奨される設定値は 16:9 です。入力された映像が 4:3
フォーマットの時、4:3 を選択でき、映像を 16:9 に引
き伸ばししないで表示することができます。VGA 入力
の場合、アスペクト比の設定はできません。
注意: 4:3 設定を使用する場合、On-Lap 1303 モニタ
の左右に黒い枠が表示されます。フルスクリーン表示
では無いため、画面表示位置とタッチスクリーン信号
位置が一致しません。正しい位置をタッチできないた
め、タッチスクリーンで操作を行う場合は 16:9 のフル
スクリーン表示を行ってください。
オーバースキャン(Overscan): HDMI Video 信号(たと
えば 1080P/720P 等)を入力する時だけ、この機能を
使用できます。この機能を使用すると、映像スキャン
表示範囲を調整できます。
5. 手動で調整
● 自動調整: VGA 信号を入力する時だけ、この機能を使
用できます。VGA 映像設定を自動調整できます。
● 水平位置(H.Position):モニタ映像を左右に移動します。
● 垂直位置(V.Position):モニタ映像を上下に移動します。
● クロック(Clock):水平スキャンのピクセル数量を調整し
ます。もしクロックが不正確なら、画面に垂直のしまが
表示され、画面の幅を正確に表示できません。
● 位相(Phase):ピクセルクロック信号の位相を調整しま
す。もし位相調整が間違っていれば、画面が明るい映像
を表示する時、水平なノイズが出現します。
27
Page 31

6. オーディオ設定(Audio):ボリュームの大きさを調整し、ミュートモードが選べ
ます。
7. OSD メニュー(OSD Menu)
● メニュー時間(OSD Timer): OSD 表示時間を調整します。
● 水平位置(OSD H. Pos.):OSD メニューを左右に移動させます。
● 垂直位置(OSD V. Pos.): OSD メニューを上下に移動させます。
● メニュー透明度(OSD Transparency): OSD メニュー背景を透明化します。
● 言語(Language): OSD メニュー表示言語を選択します。
● リセット(Reset): 出荷設定に戻します。
8. 入力源(Input Source): VGA アナログ信号源、HDMI デジタル、DisplayPort
デジタル信号源あるいは入力信号自動検知を選びます
9. 情報:出荷バージョンを表示します
その3.電力低下時の警告表示
スピーカのボリュームを大きく上げていると、消
費電力が供給電力より大きくなり、電力低下の警
告が表示されることがあります。この場合、ただ
ちにスピーカのボリュームを下げ、USB ケーブル
の二股コンピュータ側端子を 2 基の USB ポート
に接続して電力を確保してください。ボリューム
を下げずに使用し続けると、On-Lap は自動的に
ボリュームとディスプレイ輝度を下げます。
第五章 製品仕様
その 1. プラグアンドプレイ
On-Lap モニタは、VESA DDC に適合し VESA DDC2 に対応します。DDC2B
は I2C で定められる双方向バスに基づきます。PC は DDC2B を通じて EDID を
取得します。On-Lap モニタは、自己の情報を PC に伝え、DDC のレベルに基づ
き表示能力に関する情報も伝えることができます。
その 2. ピンアサインと初期設定について
1. HDMI コネクタのピン配列
図: HDMI-A コネクタ(HDMI 出力ポートに接続)
図:電力低下時の警告表示
ピン 名称 ピン 名称
1 TMDS Data2+ 11 TMDS Clock Shield
2 TMDS Data2 Shield 12
TMDS Clock –
3 TMDS Data2 – 13
CEC
4 TMDS Data1+ 14
Reserved
5 TMDS Data1 Shield 15 SCL (I ² C Serial Clock for DDC)
6 TMDS Data1 – 16 SDA (I ² C Serial Data Line for DDC)
7 TMDS Data0+ 17 DDC/CEC Ground
8 TMDS Data0 Shield 18 +5 V Power
9 TMDS Data0 – 19 Hot Plug Detect
10 TMDS Clock+
28
Page 32

2. mini-DisplayPort コネクタのピン配列
3. VGA コネクタのピン配列
4. USB 電源コネクタピン
ピン 名称 ピン 名称 ピン 名称
1
RED
6
RGND 11 NC
2
GREEN
7
GGND 12 SDA
3
BLUE
8
BGND 13 HSYNC
4
NC
9
+5V 14 VSYNC
5 GND 10 SGND 15 SCL
図: VGA(D-Sub)コネクタ
(D-Sub 出力ポートに接続)
図: USB ケーブルコ
ネクタピン(5V DC
電源に接続)
ピン 名称
1 Vcc(+5V)
2 NC
3 NC
4 Ground
ピン 名称 ピン 名称 ピン 名称
1 GND 8 GND 15 ML_Lane2(p)
2 Hot Plug Detect 9 ML_Lane1(p) 16 AUX_CH(p)
3 ML_Lane0(p) 10 ML_Lane3(p) 17 ML_Lane2(n)
4 CONFIG1 11 ML_Lane1(n) 18 AUX_CH(n)
5 ML_Lane0(n) 12 ML_Lane3(n) 19 GND
6 CONFIG2 13 GND 20 DP PWR
7 GND 14 GND
図: mini-DisplayPort コネクタ
(mini-DisplayPort 出力ポートに接続)
29
その 3.仕様詳細
規格 On-Lap 1303H/J On-Lap 1303I On-Lap 1303A
パネル種別 13.3”TFT IPS
(16:9)LED バックラ
イト
13.3”TFT IPS(16:9)
LED バックラ イト
13.3”TFT TN
(16:9)LED バック
ライト
解像度/色数 1920 x1080/
1677 万色
1920 x1080/
1677 万色
1366 x768/
262K 色
視野角(標準値) 178°(H)/178°(V) 178°(H)/178°(V) 45°/20°/45°/45°
(Up/Down/Left/
Right)
コントラスト比 700:1 700:1 500:1
応答速度 14 (ms) 14 (ms) 8 (ms)
Page 33

規格 On-Lap 1303H/J On-Lap 1303I On-Lap 1303A
タッチ方式/
対応 OS
タッチ機能は無し
投影型静電容量方式;
10 指マルチタッチ
Windows 7/ 10/ 8.1
サポート
タッチ機能は無し
スクリーン硬度
タッチスクリーン
は無し
タッチスクリーン
硬度≧ 7H
タッチスクリー
ンは無し
サポート解像度
1920*1080(60Hz/50Hz),1600*900(60Hz),1440*900
(60Hz),1366*768(60Hz),1280*1024(60Hz),1280*960(60Hz),
1280*800(60Hz/50Hz),1280*768(60Hz/50Hz),1280*720
(60Hz/50Hz),1024*768(60Hz)
(注意: コンピュータのビデオカードの仕様を超えている場合、
ビデオ解像度
1080P(60Hz/50Hz);1080i(30Hz/25Hz);
720P(60Hz/50Hz) (HDCP サポート)
スピーカ 2x 1.0W(Max.) (Rated Impedance 4Ω at 2KHz)
定格電圧/電流 5V 2A 5V 2A 5V 1.4A
サイズ(W/H/T)
348mm*225mm*10.
5mm(モニター)
354mm*231mm*19.
5mm
348mm*225mm*10.
8mm(モニター)
354mm*231mm*19.
5mm
348mm*225mm*1
0.5mm(モニター)
354m5*231mm*1
9.5mm(保護ふた)
重量
599g (モニター)
320g(保護ふた)
900g (モニター)
320g(保護ふた)
599g (モニター)
320g(保護ふた)
認証
30
R53848
RoHS
症状 対策
タッチ操作を行おうとして
も反応がありません。
1. Micro USB ケーブルが On-Lap 1303 の USB ポー
トに正しく接続されているか確認してください。
2. Micro USB ケーブルが誤って On-Lap 1303 の DC
IN ポートに接続されていないか確認してください。
DC IN ポートは電源供給のみに用いられ、タッチ信
号は伝送できません。
指でモニタをタッチしたの
に、カーソルがメインモニ
タ上にあり 1303I 上にない
場合
Windows10/7 コントロールパネルの「タブレット 設
定」からタッチパネルとモニタの配置設定を行いま
す。(第 3 章第 3 節をご参照ください)
タッチ機能が突然使用でき
なくなり、再起動すると正
常に戻る。
PC の USB ポートで十分な給電ができず、PC の USB
信号の伝達が中断されたことが原因です。USB タッチ
コントロール信号+電源入力ケーブルの 2 つの USB コ
ネクタを両方 USB ポートに接続してください。または
5V2A の AC アダプタに接続してください。
その4.トラブルシューティング
1. トラブルシューティング
Page 34

2. モニタの複製表示や拡張デスクトップ表示が選択できない場合、コン
ピュータのディスプレイアダプタの機能が制限されている可能性がありま
す。もしくはコンピュータが省電力モードになっている可能性がありま
す。こういった場合、ディスプレイアダプタのドライバを更新する必要が
ある可能性があるため、コンピュータの製造元、またはグラフィックカー
ドの製造元のサポートにお問い合わせいただくことをお勧めします。
31
症状 対策
画面が表示されません。
OSD で"No Signal"と表示
されます。
1. HDMI ケーブルもしくは VGA ケーブルによって
On-Lap とコンピュータが正しく接続されているか
確認してください。
2. Micro HDMI 映像出入力ケーブルが VGA ポートに
挿入されていないか確認します。
3. OSD で画面の明るさと画面比を調整して、デフォ
ルト値に再設定してください。
使用中に画面が突然消え
て、自動的に回復する
映像入力ケーブルを引っ張らないようにしてくださ
い。USB タッチ信号+電源ケーブルの 2 つの USB コネ
クタを両方 USB ポートに接続してください。または
5V2A AC アダプタに接続して、十分な電力供給を確保
してください。
表示が突然消えたり、画面
表示が大きすぎるあるいは
小さすぎる、正しく中央に
表示されない状態になって
います。
このような症状は一般に VGA 入力の場合に発生しま
す。OSD メニューで解像度や周波数、画面の水平位
置、垂直位置の調整を行ってください。
映像は表示されますが音声
が出力されません。
1. スピーカのボリュームが 0 になっていないか確認して
ください。
2. VGA 入力の場合は音声は伝送できません。PC の音声
設定を確認して、HDMI からの音声出力を選択しま
す。
3. ヘッドフォン出力 は音声出力のみとなり、音声入力は
できません。ヘッドフォンのみの接続となりますの
で、PC のオーディオ出力ケーブルを接続しないでくだ
電力低下の警告が表示され
ます。
消費電力が供給電力を上回っています。ボリュームと
輝度を下げてください。
また、二股になっている USB ケーブルのコンピュー
タ側端子を USB ポート 2 基にとなりますので、PC の
オーディオ出力ケーブルを接続してください。
あるいは別売の電源 アダプタを使用して電力を供給し
てください 。
Page 35

GeChic Corporation
5F-3, No. 138, Zhongming S. Rd.,
West Dist., Taichung, Taiwan (R.O.C.)
Customer Service: service@gechic.com
Rev. 2017/1/10
w w w . g e c h i c . c o m
Page 36

保証書
保証規定
当製品ご購入から 1 年間(12ヶ月)に限り、通常の使用状態におい
て、万が一故障した場合、該当製品を無償にて修理致します。
なお、修理が困難な場合、同等品との交換となる場合があります。
保証期間内であっても以下のような場合は有償修理となります。
・お客様の不適切な取扱が原因で故障、破損が生じた場合。
・火災、地震、水害、落雷、その他の天地異変などによる故障及び破
損の場合。
・弊社の修理部門以外で修理や改造などを行った製品。
・部品や付属品などの破損及び遺失等。
マニュアルをよく閲覧された上、製品をご使用ください。
より詳細な保証内容、条件、使用方法等につきましては、弊社のマニュ
アル及びホームページにてご確認ください。
【製品情報】
モデル: On-Lap1303 ノート型モニター
シリアル No :
購入日付:
販売店 :
1年
保証
(販売店のスタンプ)
 Loading...