

Page 1
X-EM26
CD Receiver System
Micro chaîne CD
Sistema receptor de CD
Register your product on / Enregistrez votre produit sur / Registre su producto en
http://www.pioneerelectronics.com (US)
http://www.pioneerelectronics.ca (Canada)
Operating Instructions
Mode d’emploi
Manual de instrucciones
Page 2
IMPORTANT
D3-4-2-1-1_A1_En
D3-7-13-69_En
1) Read these instructions.
2) Keep these instructions.
3) Heed all warnings.
4) Follow all instructions.
5) Do not use this apparatus near water.
6) Clean only with dry cloth.
7) Do not block any ventilation openings. Install in
accordance with the manufacturer’s instructions.
8) Do not install near any heat sources such as
radiators, heat registers, stoves, or other
apparatus (including amplifiers) that produce
heat.
9) Do not defeat the safety purpose of the polarized
or grounding-type plug. A polarized plug has two
blades with one wider than the other. A grounding
type plug has two blades and a third grounding
prong. The wide blade or the third prong are
provided for your safety. If the provided plug does
not fit into your outlet, consult an electrician for
replacement of the obsolete outlet.
10) Protect the power cord from being walked on or
pinched particularly at plugs, convenience
receptacles, and the point where they exit from
the apparatus.
The lightning flash with arrowhead symbol,
within an equilateral triangle, is intended to
alert the user to the presence of
uninsulated “dangerous voltage” within the
product’s enclosure that may be of
sufficient magnitude to constitute a risk of
electric shock to persons.
The exclamation point within an equilateral
triangle is intended to alert the user to the
presence of important operating and
maintenance (servicing) instructions in the
literature accompanying the appliance.
RISK OF ELECTRIC SHOCK
DO NOT OPEN
CAUTION:
TO PREVENT THE RISK OF ELECTRIC
SHOCK, DO NOT REMOVE COVER (OR
BACK). NO USER-SERVICEABLE PARTS
INSIDE. REFER SERVICING TO
QUALIFIED SERVICE PERSONNEL.
11) Only use attachments/accessories specified by
the manufacturer.
12) Use only with the cart, stand, tripod, bracket, or
table specified by the manufacturer, or sold with
the apparatus. When a cart is used, use caution
when moving the cart/apparatus combination to
avoid injury from tip-over.
13) Unplug this apparatus during lightning storms or
when unused for long periods of time.
14) Refer all servicing to qualified service personnel.
Servicing is required when the apparatus has
been damaged in any way, such as power-supply
cord or plug is damaged, liquid has been spilled
or objects have fallen into the apparatus, the
apparatus has been exposed to rain or moisture,
does not operate normally, or has been dropped.
IMPORTANT SAFETY INSTRUCTIONS
CAUTION: USE OF CONTROLS OR ADJUSTMENTS OR PERFORMANCE OF PROCEDURES OTHER THAN
THOSE SPECIFIED HEREIN MAY RESULT IN HAZARDOUS RADIATION EXPOSURE.
CAUTION: THE USE OF OPTICAL INSTRUMENTS WITH PRODUCT WILL INCREASE EYE HAZARD.
D58-5-1-2a_A1_En
This transmitter must not be co-located or operated
in conjunction with any other antenna or transmitter.
D8-9-2-5_A1_En
This equipment complies with IC radiation exposure
limits set forth for an uncontrolled environment and
meets RSS-102 of the IC radio frequency (RF)
Exposure rules. This equipment has very low levels
of RF energy that it deemed to comply without
maximaum permissive exposure evaluation (MPE).
But it is desirable that it should be installed and
operated keeping the radiator at least 20 cm or
more away from person’s body (excluding
extremities: hands, wrists, feet and ankles).
D8-9-2-7-3_A1_En
This device complies with Industry Canada’s
licence-exempt RSSs. Operation is subject to the
following two conditions: (1) this device may not
cause interference, and (2) this device must accept
any interference, including interference that may
cause undesired operation of the device.
This equipment complies with FCC radiation
exposure limits set forth for an uncontrolled
environment and meets the FCC radio frequency
(RF) Exposure Guidelines. This equipment has very
low levels of RF energy that it deemed to comply
without maximum permissive exposure evaluation
(MPE). But it is desirable that it should be installed
and operated keeping the radiator at least 20 cm or
more away from person’s body (excluding
extremities: hands, wrists, feet and ankles).
Le présent appareil est conforme aux CNR
d’Industrie Canada applicables aux appareils radio
exempts de licence. L’exploitation est autorisée aux
deux conditions suivantes : (1) l’appareil ne doit pas
produire de brouillage, et (2)l’utilisateur de l’appareil
doit accepter tout brouillage radioélectrique subi,
même si le brouillage est susceptible d’en
compromettre le fonctionnement.
CAUTION
Page 3
CAUTION
This product is a class 1 laser product classified
under the Safety of laser products, IEC 60825-1:2007.
CLASS 1 LASER PRODUCT
D58-5-2-2a_A1_En
WARNING
This equipment is not waterproof. To prevent a fire or
shock hazard, do not place any container filled with
liquid near this equipment (such as a vase or flower
pot) or expose it to dripping, splashing, rain or
moisture.
WARNING
To prevent a fire hazard, do not place any naked flame
sources (such as a lighted candle) on the equipment.
D3-4-2-1-3_A1_En
D3-4-2-1-7a_A1_En
VENTILATION CAUTION
When installing this unit, make sure to leave space
around the unit for ventilation to improve heat radiation
(at least 10 cm at top, 10 cm at rear, and 10 cm at
each side).
WARNING
Slots and openings in the cabinet are provided for
ventilation to ensure reliable operation of the product,
and to protect it from overheating. To prevent fire
hazard, the openings should never be blocked or
covered with items (such as newspapers, table-cloths,
curtains) or by operating the equipment on thick carpet
or a bed.
D3-4-2-1-7b*_A1_En
Operating Environment
Operating environment temperature and humidity:
+5 °C to +35 °C (+41 °F to +95 °F); less than 85 %RH
(cooling vents not blocked)
Do not install this unit in a poorly ventilated area, or in
locations exposed to high humidity or direct sunlight
(or strong artificial light)
D3-4-2-1-7c*_A1_En
Page 4

CAUTION
The switch on this unit will not completely shut off
all power from the AC outlet. Since the power cord
serves as the main disconnect device for the unit,
you will need to unplug it from the AC outlet to shut
down all power. Therefore, make sure the unit has
been installed so that the power cord can be easily
unplugged from the AC outlet in case of an accident.
To avoid fire hazard, the power cord should also be
unplugged from the AC outlet when left unused for a
long period of time (for example, when on vacation).
D3-4-2-2-2a*_A1_En
This product is for general household purposes. Any
failure due to use for other than household purposes
(such as long-term use for business purposes in a
restaurant or use in a car or ship) and which
requires repair will be charged for even during the
warranty period.
K041_A1_En
This device complies with Part 15 of the FCC Rules.
Operation is subject to the following two conditions:
(1) this device may not cause harmful interference,
and
(2) this device must accept any interference
received, including interference that may cause
undesired operation.
WARNING
Store small parts out of the reach of children and
infants. If accidentally swallowed, contact a doctor
immediately.
POWER-CORD CAUTION
Handle the power cord by the plug. Do not pull out the
plug by tugging the cord and never touch the power
cord when your hands are wet as this could cause a
short circuit or electric shock. Do not place the unit, a
piece of furniture, etc., on the power cord, or pinch the
cord. Never make a knot in the cord or tie it with other
cords. The power cords should be routed such that
they are not likely to be stepped on. A damaged power
cord can cause a fire or give you an electrical shock.
Check the power cord once in a while. When you find
it damaged, ask your nearest our authorized service
center or your dealer for a replacement.
S002*_A1_En
Radio wave caution
This unit uses a 2.4 GHz radio wave frequency, which
is a band used by other wireless systems (Microwave
ovens and Cordless phones, etc.). In this event noise
appears in your television image, there is the
possibility this unit (including products supported by
this unit) is causing signal interference with the
antenna input connector of your television, video,
satellite tuner, etc. In this event, increase the distance
between the antenna input connector and this unit
(including products supported by this unit).
• We are not responsible for any malfunction of the
compatible product due to communication
error/malfunctions associated with your network
connection and/or your connected equipment.
Please contact your Internet service provider or
network device manufacturer.
• A separate contract with/payment to an Internet
service provider is required to use the Internet.
Information to User
Alterations or modifications carried out without
appropriate authorization may invalidate the user’s right
to operate the equipment.
NOTE:
This equipment has been tested and found to comply
with the limits for a Class B digital device, pursuant to
Part 15 of the FCC Rules. These limits are designed to
provide reasonable protection against harmful
interference in a residential installation. This equipment
generates, uses and can radiate radio frequency
energy and, if not installed and used in accordance with
the instructions, may cause harmful interference to
radio communications. However, there is no guarantee
that interference will not occur in a particular
installation. If this equipment does cause harmful
interference to radio or television reception, which can
be determined by turning the equipment off and on, the
user is encouraged to try to correct the interference by
one or more of the following measures:
• Reorient or relocate the receiving antenna.
• Increase the separation between the equipment and
receiver.
• Connect the equipment into an outlet on a circuit
different from that to which the receiver is connected.
• Consult the dealer or an experienced radio/TV
technician for help.
(Symbol examples for batteries)
These symbols are only
valid in the European
Union.
Pb
K058c_A1_En
Page 5

The Safety of Your Ears is in Your
Hands
Get the most out of your equipment by playing
it at a safe level – a level that lets the sound
come through clearly without annoying blaring
or distortion and, most importantly, without
affecting your sensitive hearing. Sound can be
deceiving. Over time, your hearing “comfort
level” adapts to higher volumes of sound, so
what sounds “normal” can actually be loud and
harmful to your hearing. Guard against this by
setting your equipment at a safe level BEFORE
your hearing adapts.
ESTABLISH A SAFE LEVEL:
• Set your volume control at a low setting.
• Slowly increase the sound until you can hear
it comfortably and clearly, without distortion.
• Once you have established a comfortable
sound level, set the dial and leave it there.
BE SURE TO OBSERVE THE
FOLLOWING GUIDELINES:
• Do not turn up the volume so high that you
can’t hear what’s around you.
• Use caution or temporarily discontinue use in
potentially hazardous situations.
• Do not use headphones while operating a
motorized vehicle; the use of headphones
may create a traffic hazard and is illegal in
many areas.
S001a_A1_En
WARNING: Handling the cord on this product or
cords associated with accessories sold with the
product may expose you to chemicals listed on
proposition 65 known to the State of California and
other governmental entities to cause cancer and
birth defect or other reproductive harm.
Wash hands after handling.
D36-P5_B1_En
IMPORTANT NOTICE
THE MODEL NUMBER AND SERIAL NUMBER
OF THIS EQUIPMENT ARE ON THE REAR
OR BOTTOM.
RECORD THESE NUMBERS ON YOUR
ENCLOSED WARRANTY CARD AND KEEP IN
A SAFE PLACE FOR FUTURE REFERENCE.
Condensation
If the unit is moved suddenly from a cold place
into a warm room (in winter, for example) or if
the temperature in the room in which the player
is installed rises suddenly due to a heater, etc.,
water droplets (condensation) may form inside
(on operating parts and the lens). When
condensation is present, the player will not
operate properly and playback is not possible.
Let the player stand at room temperature for
1 or 2 hours with the power turned on (the time
depends on the extent of condensation). The
water droplets will dissipate and playback will
become possible.
Condensation can also occur in the summer if
the player is exposed to the direct wind from an
air-conditioner. If this happens, move the player
to a different place.
S005_A1_En
Page 6

Thank you for buying this Pioneer product.
Please read through these operating instructions so that you will know how to operate your model properly. After you
have finished reading the instructions, put them in a safe place for future reference.
Contents
01 Before you start
Introduction . . . . . . . . . . . . . . . . . . . . . . . . . . . . . . . . .7
What’s in the box . . . . . . . . . . . . . . . . . . . . . . . . . . . . .7
Loading the battery in the remote control . . . . . . . . . .7
02 Part names and functions
Overview of the main unit . . . . . . . . . . . . . . . . . . . . . .9
Overview of the remote control . . . . . . . . . . . . . . . . .10
03 Connections
Speaker connection . . . . . . . . . . . . . . . . . . . . . . . . . .11
FM antenna installation . . . . . . . . . . . . . . . . . . . . . . .12
Connect power . . . . . . . . . . . . . . . . . . . . . . . . . . . . . .12
04 Getting started
Turning on . . . . . . . . . . . . . . . . . . . . . . . . . . . . . . . . .13
APS mode . . . . . . . . . . . . . . . . . . . . . . . . . . . . . . . . . . 13
Setting the clock. . . . . . . . . . . . . . . . . . . . . . . . . . . . .13
Selecting a source . . . . . . . . . . . . . . . . . . . . . . . . . . .13
05 Playing
Playing a disc . . . . . . . . . . . . . . . . . . . . . . . . . . . . . . .14
Playing from a USB storage device . . . . . . . . . . . . . .14
Controlling playback. . . . . . . . . . . . . . . . . . . . . . . . . .14
Programming tracks . . . . . . . . . . . . . . . . . . . . . . . . . .15
For a CD . . . . . . . . . . . . . . . . . . . . . . . . . . . . . . . . . . .15
For MP3 files . . . . . . . . . . . . . . . . . . . . . . . . . . . . . . . . 15
Erasing the program . . . . . . . . . . . . . . . . . . . . . . . . . .15
06 Bluetooth® Audio playback
Music playback using Bluetooth wireless technology 16
Remote control operation. . . . . . . . . . . . . . . . . . . . . .16
Pairing with the unit (Initial registration) . . . . . . . . . . .16
Listen to music on the unit from a Bluetoo th capable d e-
vice. . . . . . . . . . . . . . . . . . . . . . . . . . . . . . . . . . . . . . .17
Radio wave caution . . . . . . . . . . . . . . . . . . . . . . . . . .17
Scope of operation. . . . . . . . . . . . . . . . . . . . . . . . . . . . 17
Radio wave reflections. . . . . . . . . . . . . . . . . . . . . . . . . 18
Precautions regarding connections to products supported
by this unit . . . . . . . . . . . . . . . . . . . . . . . . . . . . . . . . . . 18
07 Listening to the FM radio
Tuning to an FM radio station . . . . . . . . . . . . . . . . . .19
Programming radio stations . . . . . . . . . . . . . . . . . . . .19
Tuning to a preset radio station . . . . . . . . . . . . . . . . .19
Display RDS information . . . . . . . . . . . . . . . . . . . . . .19
08 Other features
Turn on automatically . . . . . . . . . . . . . . . . . . . . . . . . .20
Setting the sleep timer . . . . . . . . . . . . . . . . . . . . . . . .20
Routing audio from other devices . . . . . . . . . . . . . . .20
Through the AUDIO IN socket . . . . . . . . . . . . . . . . . . .20
USB 500 mA charge . . . . . . . . . . . . . . . . . . . . . . . . .20
Setting and deactivating the DEMO mode . . . . . . . . .20
09 Additional information
USB playability information . . . . . . . . . . . . . . . . . . . .21
Supported MP3 disc formats . . . . . . . . . . . . . . . . . . 21
RDS program types . . . . . . . . . . . . . . . . . . . . . . . . . 21
Troubleshooting . . . . . . . . . . . . . . . . . . . . . . . . . . . . 22
Cautions on use . . . . . . . . . . . . . . . . . . . . . . . . . . . . 23
When moving this unit. . . . . . . . . . . . . . . . . . . . . . . . . 23
Place of installation . . . . . . . . . . . . . . . . . . . . . . . . . . . 23
Do not place objects on this unit . . . . . . . . . . . . . . . . . 23
Cleaning the product. . . . . . . . . . . . . . . . . . . . . . . . . . 24
Cleaning the lens . . . . . . . . . . . . . . . . . . . . . . . . . . . . 24
Handling discs . . . . . . . . . . . . . . . . . . . . . . . . . . . . . 24
Storing. . . . . . . . . . . . . . . . . . . . . . . . . . . . . . . . . . . . . 24
Cleaning discs. . . . . . . . . . . . . . . . . . . . . . . . . . . . . . . 24
About specially shaped discs . . . . . . . . . . . . . . . . . . . 24
Specifications . . . . . . . . . . . . . . . . . . . . . . . . . . . . . . 25
6
En
Page 7
Before you start 01
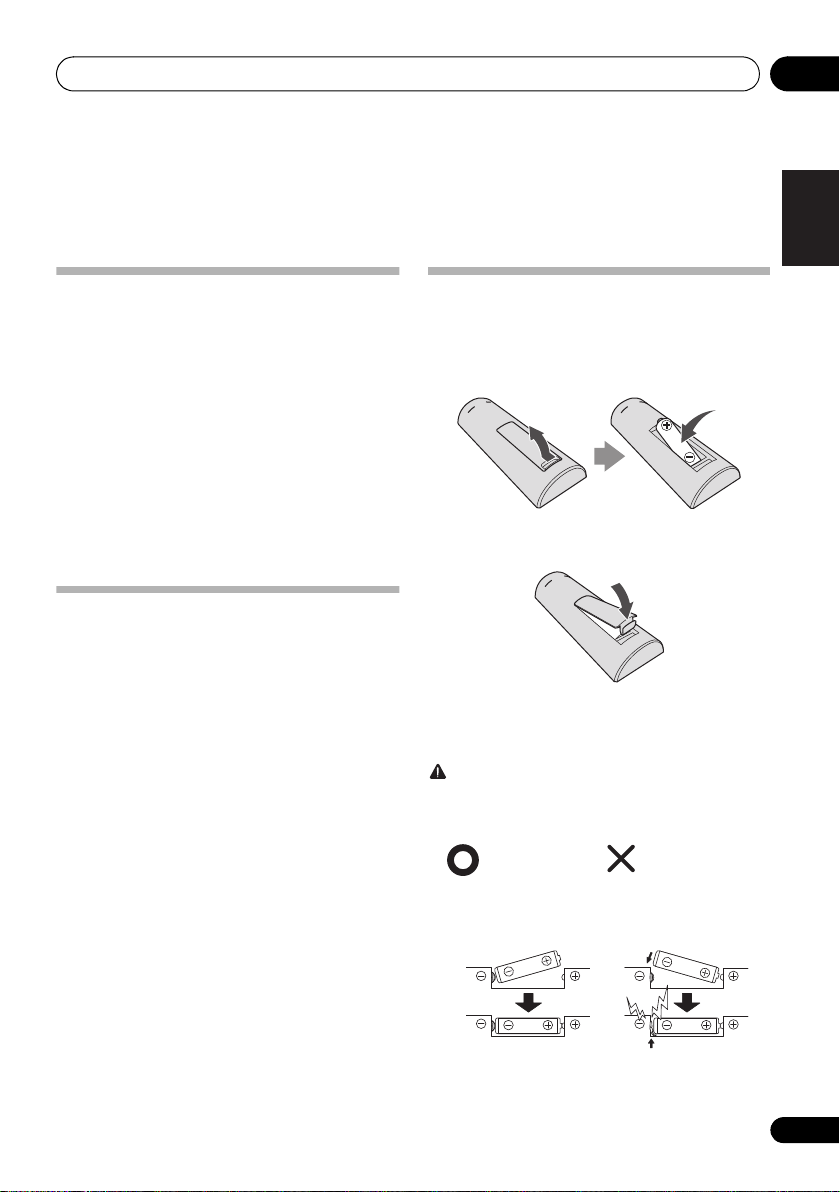
Insert the battery by
aligning the
*
pole
against the remote
control’s
*
terminal
If a battery pushes and
bends the
*
terminal out
of shape, there is
possibility of the alkaline
battery shorting out
The * terminal is bent out
of shape
Chapter 1:
Before you start
Introduction
With this system, you can:
• enjoy audio from discs, USB storage devices, and other
external devices
• listen to FM radio stations
• enjoy audio from Bluetooth wireless technology
enabled device
Playable media:
• Discs: CD-DA, CD-R, CD-RW, MP3-CD
• Files: .mp3
• USB storage device
– Compatibility: USB 1.1/2.0 (Full Speed)
– Class support: MSC (Mass Storage Class)
– File system: FAT12, FAT16, FAT32
– Maximum number of albums/folders: 99
– Maximum number of tracks/files: 999
– Maximum level of directory: 8
What’s in the box
Check and identify the contents of the package:
• Main unit
• Speaker unit x 2
• Remote control
• AAA battery (R03)
• Warranty card
• Operating Instructions (this document)
Loading the battery in the remote
control
1 Open the rear lid and load the battery as
illustrated below.
2 Close the rear lid.
The battery included with the unit has been provided to allow
you check product operation and may not last long. We
recommend using an alkaline battery that has a longer life.
CAUTION
• When inserting the battery, make sure not to damage
the spring on the battery’s * terminal. This can cause
the battery to leak or overheat.
English
Français Español
7
En
Page 8

Before you start01
• Do not use any battery other than the one specified.
• When loading the battery into the remote control, set it
in the proper direction, as indicated by the polarity
marks (+ and *).
• Do not heat the battery, disassemble it, or throw it into
flames or water.
• To prevent leakage of battery fluid, remove the battery
if you do not plan to use the remote control for a long
period of time (1 month or more). If the fluid should leak,
wipe it carefully off the inside of the case, then insert a
new battery. If a battery should leak and the fluid should
get on your skin, flush it off with large quantities of
water.
• When disposing of a used battery, please comply with
governmental regulations or environmental public
institution’s rules that apply in your country/area.
• WARNING
Do not use or store batteries in direct sunlight or other
excessively hot place, such as inside a car or near a
heater. This can cause batteries to leak, overheat,
explode or catch fire. It can also reduce the life or
performance of batteries.
8
En
Page 9
Part names and functions 02
Chapter 2:
Part names and functions
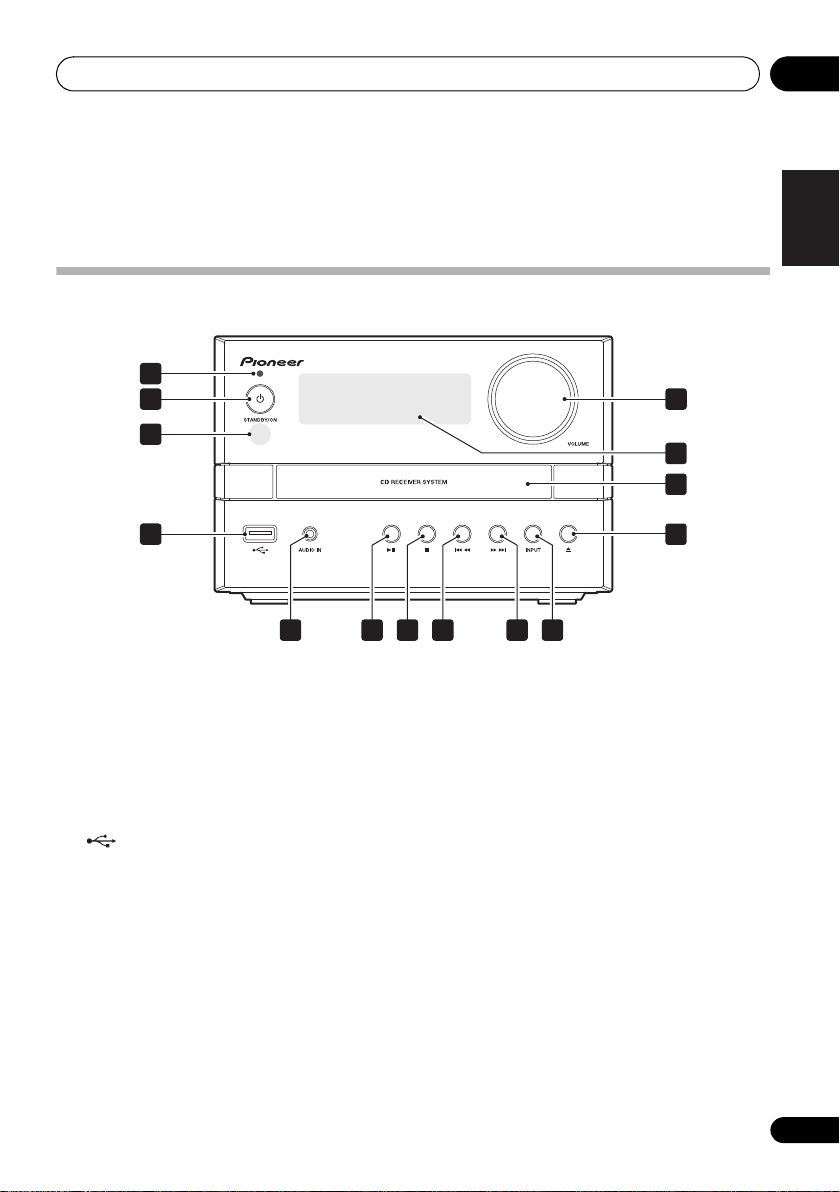
Overview of the main unit
1
2 14
3
4
5 6 7 8
1 Bluetooth indicator
2 Í STANDBY/ON
• Switch between standby and on.
3 Remote control sensor
• Point the remote control to this, and then operate it
within approximately 7 m. The product may have
trouble capturing remote control signals if there is a
fluorescent light nearby. If this happens, move the
product away from the fluorescent light.
4
• Connect to a USB storage device.
5
AUDIO IN
• Connect to the audio output socket (usually the
headphones socket) of an external device.
6
1;
• Use to play, pause, or resume playback.
7 ∫
• Use to stop playback.
8
:
• Skip to the previous track.
• Press and hold to play reverse quickly within a track.
• Tune to the previous radio station.
• Press and hold to search the previous radio station
automatically.
9
9
• Skip to the next track.
• Press and hold to play forward quickly within a track.
• Tune to the next radio station.
• Press and hold to search the next radio station
automatically.
10 INPUT
• Press repeatedly to select the input source.
11
<
• Open or close the disc tray.
12 Disc tray
• Place the disc with the label side up.
13 Main display
VOLUME
14
• Rotate to increase or decrease the volume level.
English
Français Español
13
12
11
9
10
En
9
Page 10

Part names and functions02
Overview of the remote control
1
2
3
4
5
6
7
8
1 Í STANDBY/ON
• Switch between standby and on.
2 Input function buttons
• Use to select the input source (DISC, BT, USB, AUDIO
IN, TUNER).
3
:
9
• Skip to the track.
• Press and hold to play quickly within a track.
• Tune to the station.
• Press and hold to search the radio station
automatically.
4/
• Skip to the previous or next album.
• Select a preset radio station.
10
11
12
13
14
15
16
5
VOLUME +/–
• Use to set the listening volume.
6
MUTE
• Use to mute or restore volume.
7
DIMMER/DISPLAY
• Display the current status or media information.
• Display the available ID3 information of MP3 tracks.
9
4
3
• Press and hold to dim or brighten the display. The
brightness can be controlled in three steps. However
the brightness cannot be controlled during FM entry.
• Display the available information of an RDS radio
station.
8
EQ
• Use to select EQ.
[FLAT] l [ROCK] l [CLASSIC] l [POP] l [JAZZ] l
(Back to beginning)
9<OPEN/CLOSE
• Open or close the disc tray.
10
1;
• Use to play, pause, or resume playback.
• Use to confirm actions.
11
REPEAT
• Use to select the repeat mode of each input source.
•[CD]/[BT]
Repeat 1 [REP ONE] l Repeat all [REP ALL] l ( Bac k
to beginning)
•[USB]
Repeat 1 [REP ONE] l Repeat album [REP ALB] l
Repeat all [REP ALL] l (Back to beginning)
12 ∫
• Use to stop playback.
13
SHUFFLE
• Shuffled order of track playback from a DISC, USB.
14
PROGRAM
• Use to program audio tracks.
• Use to program radio stations.
15
SLEEP/TIMER
• Set the sleep timer in the working mode.
• Set alarm timer in the standby mode.
16
CLOCK
• In the working mode or standby mode, press to display
the clock for a while.
• In the standby mode, press and hold to set the clock.
10
En
Page 11
Connections 03
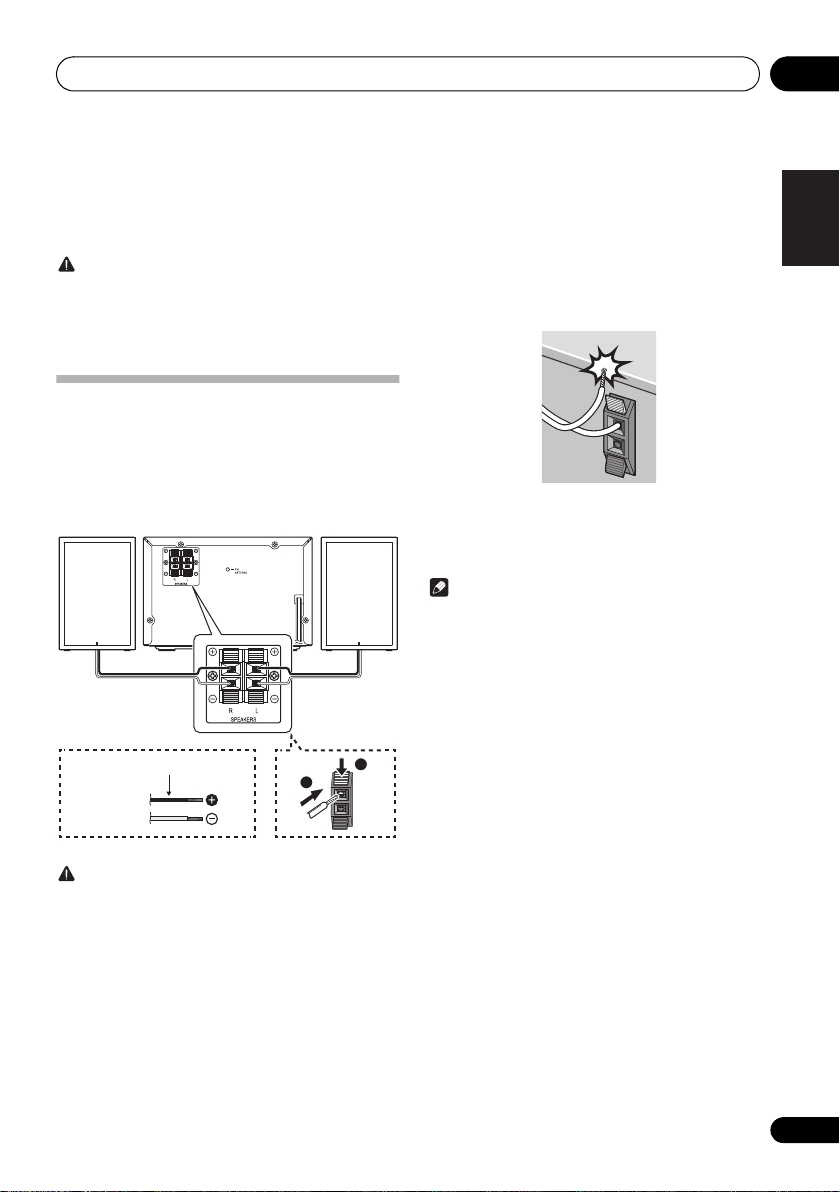
Right speaker
Left speaker
This unit
’
s rear panel
Red cord
Supplied
speaker wire
Chapter 3:
Connections
CAUTION
• Be sure to turn off the power and unplug the power cord
from the power outlet whenever making or changing
connections.
• Connect the power cord after all the connections
between devices have been completed.
Speaker connection
• Push open the tabs and insert exposed wire.
• Use the provided speaker wires to connect this unit with
the speakers. Connect the tip of the red wire to the (+)
terminal and the tip of the black wire to the (–) terminal.
• Both speakers can be used on either the right or the left
side.
• Make sure that the speaker cable cores do not become
exposed and make contact with other cable cores. This
may cause malfunction of the product.
• Do not allow the speaker cable core to come into
contact with the receiver body.
• If the speaker cable core comes into contact with any
metal portion of the receiver’s body, it may damage the
speakers and cause smoke and fire.
Insert speaker cables securely into the terminals and check
that the cable does not come out of easily.
Note
• There is no difference between L and R speakers.
English
Français Español
1
2
CAUTION
• These speaker terminals carry HAZARDOUS LIVE
voltage. To prevent the risk of electric shock when
connecting or disconnecting the speaker cables,
disconnect the power cord before touching any
uninsulated parts.
• Do not connect any speakers other than those supplied
to this system.
• Do not connect the supplied speakers to any amplifier
other than the one supplied with this system.
Connection to any other amplifier may result in
malfunction or fire.
• Do not attach these speakers to the wall or ceiling. They
may fall off and cause injury.
11
En
Page 12

Connections03
To the wall
outlet
FM antenna installation
Note
• The antenna on the back panel is used to improve
reception of FM. Extend this antenna and fix it to a position
with the best reception.
• Never tug strongly on the antenna line since damage of an
antenna may be caused.
• This product does not support MW (medium wave) radio
reception.
Connect power
Note
• Before you connect the AC power cord, make sure that
you have completed all other connections.
Connect the AC power cord to the wall outlet.
12
En
Page 13

Getting started 04
Chapter 4:
Getting started
CAUTION
• Use of controls or adjustments or performance of
procedures other than herein expressly specified may
result in hazardous radiation exposure or other unsafe
operation.
Always follow the instructions in this chapter in sequence.
Turning on
1
Press ÍSTANDBY/ON
This product switches to the last selected source.
APS mode
• After this product is kept inactive for 15 minutes, it
automatically switches to the standby mode.
Setting the clock
Note
• During setting, if no action is made within 90 seconds, the
system exits clock setting without saving earlier
operations.
• When power supply is restored after unit is plugged in
again or after a power failure, reset the clock.
1 In the standby mode, press and hold
CLOCK
to activate clock setting.
[24H] blinks.
2 Press :/9 to select [24H] or [12H] and
then press
The hour digits will blink.
3 Press :/9 to set the hour, and then
press
The minute digits blink.
4 Press :/9 to set the minute, and then
press
CLOCK
CLOCK
CLOCK
to confirm.
to confirm.
to confirm.
Selecting a source
Press INPUT repeatedly to select a source.
•[DISC]: the disc in the disc tray
•[BT]: Bluetooth capable device that is paired
•[USB]: .mp3 files stored on the connected USB storage
device
•[TUNER]: the FM radio
•[AUDIO IN]: the audio input through the AUDIO IN
socket
English
Français Español
13
En
Page 14

Playing05
Chapter 5:
Playing
Playing a disc
1 Press
repeatedly on the main unit to switch the source
to [
2 Press
3 Load a disc with the printed side facing up.
4 Press
Playback starts automatically after a few seconds.
• If playback does not start automatically, press 1; to
DISC
DISC
].
<
<
start playback.
on the remote control or
to eject the disc tray.
again to close the disc tray.
INPUT
Playing from a USB storage device
This system can play .mp3 files that are copied onto a
supported USB storage device:
• Flash drive
• Memory card reader
• HDD: hard disk drive (This product can detect only a
portable HDD with USB power peak current no more
than 500 mA.)
Note
• Pioneer does not guarantee compatibility with all USB
storage devices.
• NTFS (New Technology File System) file system is not
supported.
1 Connect the USB storage device to the
socket.
2 Press
USB
on the remote control or
repeatedly on the main unit to switch the source
USB
].
to [
Playback starts automatically.
If playback does not start automatically,
1 Press / to select an album.
2 Press
3 Press
:/9
1;
to select a track.
to start playback.
Controlling playback
During playback, follow the instructions below to control
playback.
Buttons Functions
1; Pause or resume playback.
∫ Stop playback.
Skip to the previous or next track.
:/9
/9
REPEAT
SHUFFLE
Press and hold to rewind a track or
search forward fast within a track.
Skip to the previous or next album
when no less than one album exists.
Select an available play mode.
• Repeat 1 [REP ONE]: repeat the
current track
• Repeat all [REP ALL]: repeat all
tracks
• Repeat album [REP ALB]: repeat
the current album (only USB
function)
Select an available play mode.
• Shuffle : play tracks randomly
Shuffle is unavailable for
programmed tracks.
USB
INPUT
14
En
Page 15

Playing 05
Programming tracks
Note
• You can program up to 20 tracks.
• During programming, if no operation is made within 20
seconds, the system returns to the stop mode without
saving earlier operations.
For a CD
1 Press ∫ to stop playback.
[[T0]], the total number of tracks, and the duration time are
displayed.
2 Press
programming.
[01 PR01] (the sequence number) are displayed with [01]
blinking.
3 Press :/9 to select a track.
4 Press
selected track.
5 Repeat steps 3 and 4 to program more
tracks.
6 Press
For MP3 files
1 Press ∫ to stop playback.
[FXX] (XX indicates the total number of albums) and [XXX]
(XXX indicates the total number of tracks) are displayed.
2 Press
programming.
[01 PR01] are displayed with [01] blinking.
3 Press /9 repeatedly to select an album.
[FXX] (XX indicates the album number) are displayed.
4 Press :/9 repeatedly to select a track.
[XXX] (XXX indicates the track number) are displayed.
5 Press
selected track.
6 Repeat steps 3 to 5 to program more tracks.
7 Press
PROGRAM
PROGRAM
1;
to start playback.
PROGRAM
PROGRAM
1;
to start playback.
to activate the
again to program the
to activate the
again to confirm the
English
Français Español
Erasing the program
1
To erase the program,
• Switch to another source.
15
En
Page 16
06
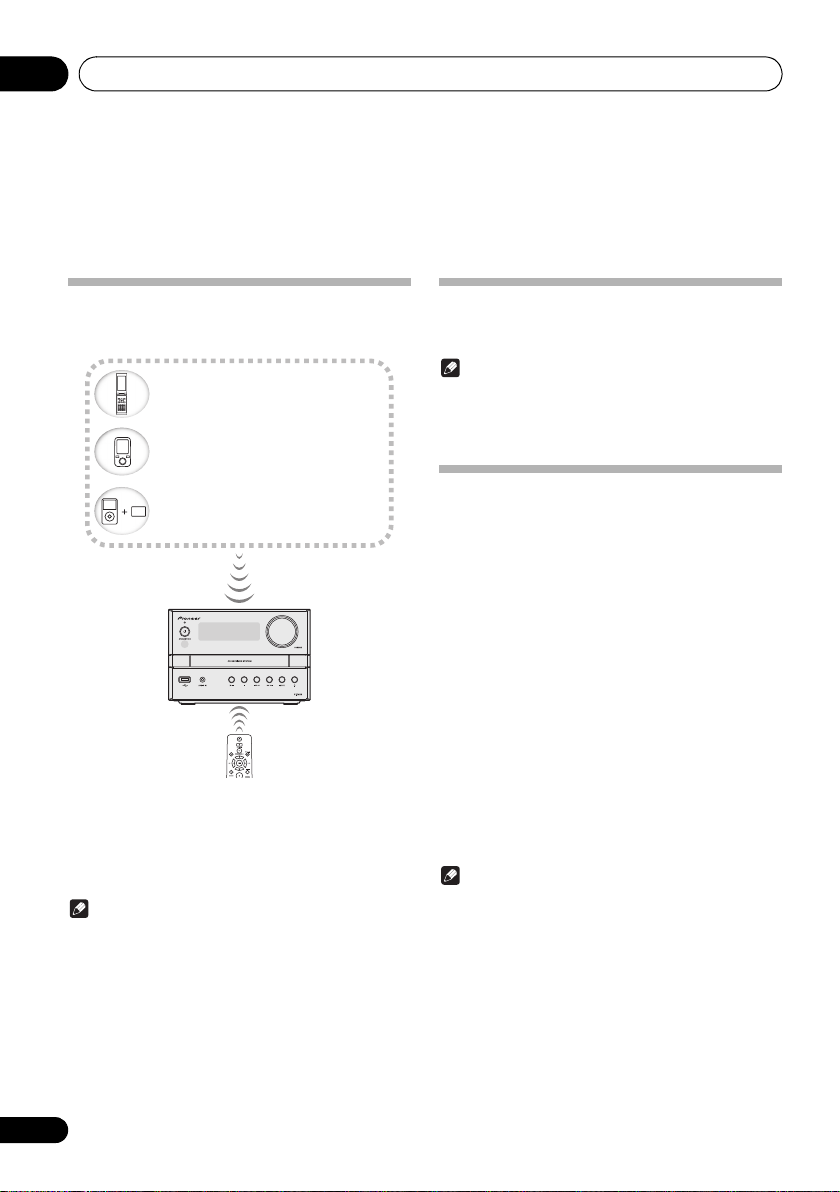
Music data
Device not equipped with Bluetooth
wireless technology:
Digital music player
+
Bluetooth
®
audio transmitter
(commercially available)
Bluetooth wireless technology
enabled device:
Digital music player
Bluetooth wireless technology
enabled device:
Cell phone
Bluetooth® Audio playback
Chapter 6:
Bluetooth® Audio playback
Music playback using
Bluetooth
wireless technology
The unit is capable of playing back music stored on
Bluetooth capable devices (cell phones, digital music players
etc.) wirelessly. You can also use a Bluetooth audio
transmitter (sold separately) to enjoy music from devices that
do not have Bluetooth functionality. Please refer to the user’s
manual for your Bluetooth capable device for more details.
Note
• The Bluetooth
trademarks owned by Bluetooth SIG, Inc. and any use
of such marks by PIONEER CORPORATION is under
license. Other trademarks and trade names are those of
their respective owners.
• The Bluetooth wireless technology enabled device
must support A2DP profiles.
• Pioneer does not guarantee proper connection and
operation of this unit with all Bluetooth wireless
technology enabled devices.
®
word mark and logos are registered
Remote control operation
The remote control supplied with this unit allows you to play
and stop media, and perform other operations.
Note
• The Bluetooth wireless technology enabled device
must support AVRCP profiles.
• Remote control operations cannot be guaranteed for all
Bluetooth wireless technology enabled devices.
Pairing with the unit (Initial
registration)
In order for the unit to playback music stored on a Bluetooth
capable device, pairing must first be performed. Pairing
should be performed when first using the unit with the
Bluetooth capable device, or when the pairing data on the
device has been erased for any reason.
Pairing is a step required to allow communication using
Bluetooth wireless technology to be carried out.
• Pairing is only performed the first time that you use the
unit and the Bluetooth capable device together.
• In order to allow communication using Bluetooth
wireless technology to take place, pairing must be
performed on both the unit and the Bluetooth capable
device.
1 Press
or
the source to [
The Bluetooth indicator blinks.
2 Turn on the power to the Bluetooth capable
device that you wish to pair with, and perform
pairing procedure on it.
• This unit will be displayed as “X-EM26” on all Bluetooth
Pairing will start.
• Place the Bluetooth capable device close to the unit.
• Please refer to the user’s manual for your Bluetooth
• When PIN code entry is requested, enter “0000.” (This
BLUETOOTH
INPUT
repeatedly on the main unit to switch
BT
Note
capable devices that you have.
capable device for details on when pairing can be
performed and the procedures required for pairing.
unit does not accept any PIN code setting other than
“0000.”)
on the remote control
].
16
En
Page 17
Bluetooth® Audio playback
06
3 Confirm on the Bluetooth capable device
that pairing has been completed.
• If pairing with the Bluetooth capable device has been
completed correctly, a beep will sound, and the
Bluetooth indicator will switch from blinking to staying lit.
• If the Bluetooth indicator will not switch from blinking to
staying lit, the pairing was not completed correctly so
please try pairing with the unit again.
• If paring has been completed correctly, you need not
repeat this procedure again.
Even devices that have already been paired with this unit will
not connect during pairing mode in the following cases.
In such cases, delete pairing history from the Bluetooth
wireless technology device and perform pairing again.
In order to pair with the unit, press and hold the 1; on the
unit for 3 seconds.
• Up to 8 pairing history can be recorded with this unit. If
connecting to a Bluetooth wireless technology device
over 8 units, the oldest pairing history will be deleted.
• If the settings are reset to the factory setting, all pairing
history will be deleted. In order to reset to factory
setting, press and hold the 1; on the unit for more
than 8 seconds.
Listen to music on the unit from a
Bluetooth
1 Press
or
the source to [
The unit will start using the BT function, and connect with a
Bluetooth capable device.
2A Bluetooth connection will be created
between the Bluetooth capable device and the
unit.
Procedures for connecting to the unit should be performed
from the Bluetooth capable device.
• Please refer to the user’s manual for your Bluetooth
3 Playback music from the Bluetooth capable
device.
• When Bluetooth capable devise is not connected and
capable device
BLUETOOTH
INPUT
repeatedly on the main unit to switch
BT
capable device for details of the connection procedures.
Note
no operations have been performed for more than 15
minutes, the unit will automatically power off.
on the remote control
].
Radio wave caution
This unit uses a 2.4 GHz radio wave frequency, which is a
band used by other wireless systems (see list below). To
prevent noise or interrupted communication, do not use this
unit nearby such devices, or make sure these devices are
switched off during use.
• Cordless phones
• Cordless facsimiles
• Microwave ovens
• Wireless LAN devices (IEEE802.11b/g)
• Wireless AV equipment
• Wireless controllers for game systems
• Microwave-based health aids
• Some baby monitors
Other, less common, equipment that may operate on the
same frequency:
• Anti-theft systems
• Amateur radio stations (HAM)
• Warehouse logistic management systems
• Discrimination systems for train or emergency vehicles
Note
• In the event noise appears in your television image,
there is the possibility that a Bluetooth wireless
technology enabled device or this unit (including
products supported by this unit) are causing signal
interference with the antenna input connector of your
television, video, satellite tuner, etc. In this event,
increase the distance between the antenna input
connector and the Bluetooth wireless technology
enabled device or this unit (including products
supported by this unit).
• If there is something obstructing the path between this
unit (including devices supported by this unit) and the
device equipped with Bluetooth wireless technology
(such as a metal door, concrete wall, or insulation
containing tinfoil), you may need to change the location
of your system to prevent signal noise and interruptions.
Scope of operation
Use of this unit is limited to home use. (Transmission
distances may be reduced depending on communication
environment).
In the following locations, poor condition or inability to
receive radio waves may cause the audio to be interrupted
or stopped:
• In reinforced concrete buildings or steel framed or iron-
framed buildings.
• Near large metallic furniture.
• In a crowd of people or near a building or obstacle.
• In a location exposed to the magnetic field, static
electricity or radio wave interference from radio
communication equipment using the same frequency
band (2.4 GHz) as this unit, such as a 2.4 GHz wireless
LAN device (IEEE802.11b/g) or microwave oven.
English
Français Español
17
En
Page 18

06
Bluetooth® Audio playback
• If you live in a heavily populated residential area
(apartment, townhouse, etc.) and if your neighbor’s
microwave is placed near your system, you may
experience radio wave interference. If this occurs, move
your unit to a different place. When the microwave is not
in use, there will be no radio wave interference.
Radio wave reflections
The radio waves received by this unit include the radio wave
coming directly from the device equipped with Bluetooth
wireless technology (direct wave) and waves coming from
various directions due to reflections by walls, furniture and
building (reflected waves). The reflected waves (due to
obstacles and reflecting objects) further produce a variety of
reflected waves as well as variation in reception condition
depending on locations. If the audio cannot be received
properly due to this phenomenon, try moving the location of
the device equipped with Bluetooth wireless technology a
little. Also note that audio may be interrupted due to the
reflected waves when a person crosses or approaches the
space between this unit and the device equipped with
Bluetooth wireless technology.
Precautions regarding connections to
products supported by this unit
• Complete connections for all devices supported by this
unit, including all audio cords and power cables before
connecting them to this unit.
• After completing connections to this unit, check the
audio and power cables to confirm that they not twisted
together.
• When disconnecting this unit, confirm that you have
sufficient working space in the surrounding area.
• When changing connections of audio or o ther cables for
products supported by this unit, confirm that you have
sufficient working space in the surrounding area.
18
En
Page 19

Listening to the FM radio 07
Chapter 7:
Listening to the FM radio
Tuning to an FM radio station
Note
• Make sure that you have connected and fully extended the
FM antenna.
1 Press FM on the remote control or
INPUT
repeatedly on the main unit to switch the source
to tuner.
2 Press and hold
:/9
until the frequency
starts to change.
• To tune to a station at a specific frequency, press
:/9 repeatedly until the desired frequency is
displayed.
Programming radio stations
Note
• You can program up to 30 preset radio stations.
• To overwrite a programmed radio station, store another
one with its sequence number.
1 Tune to a radio station.
2 Press
[XX] (XX indicates the sequence number) blinks.
3 Press / to allocate a sequence number
from 1 to 30 to this radio station, and then press
PROGRAM
The preset sequence number and the frequency of this radio
station are displayed.
4 Repeat steps 1-3 to program more stations.
• Press and holding PROGRAM will allow you to freely
PROGRAM
to activate programming.
to confirm.
Tip
select any radio station. The selected station will be saved
automatically.
Display RDS information
RDS (Radio Data System) is a service that allows FM
stations to show additional information. If yo u tune to an RDS
radio station, [RDS] and the station name are displayed.
1 Tune to an RDS radio station.
2 Press
through the available information:
• Station name
• Frequency
• Program type such as [NEWS] (news), [SPORT]
(sport), [POP M] (pop music)...
• Text messages
• CT (Clock Time)
DISPLAY
English
Français Español
repeatedly to scroll
Tuning to a preset radio station
• Press
/
preset radio station.
to select the sequence number of that
19
En
Page 20
Other features08
Chapter 8:
Other features
Turn on automatically
You can set a time for automatic power on.
Note
• Make sure that you have set the clock before this setup.
1 In standby mode, press the
display time and then press and hold
.
TIMER
[SOURCE] (time for auto power on) blinks.
2 Press :/9 to select [
3 Press
The hour digits blink.
SLEEP/TIMER
.
CLOCK
SOURCE
to
SLEEP/
].
4 Press :/9 to set the hour.
5 Press
The minute digits blink.
SLEEP/TIMER
again.
6 Press :/9 to set the minute.
7 Press
8 Press
9 Press
The clock time and [TIMER] are displayed.
• To deactivate the timer, display the time and then press
• The power cannot be turned on while the timer is being
SLEEP/TIMER
:/9
SLEEP/TIMER
SLEEP/TIMER again.
set. Finish setting the time, then turn on the power.
again.
to set the volume.
.
Setting the sleep timer
In the working mode, press SLEEP/TIMER repeatedly to
select a preset period (15, 30, 45, 60, 90 or 120 minutes).
When the sleep timer is activated, [SLEEP] is displayed on
the lower-right corner of the main display.
• To deactivate the sleep timer, press SLEEP/TIMER
repeatedly until [SLEEPOFF] is displayed.
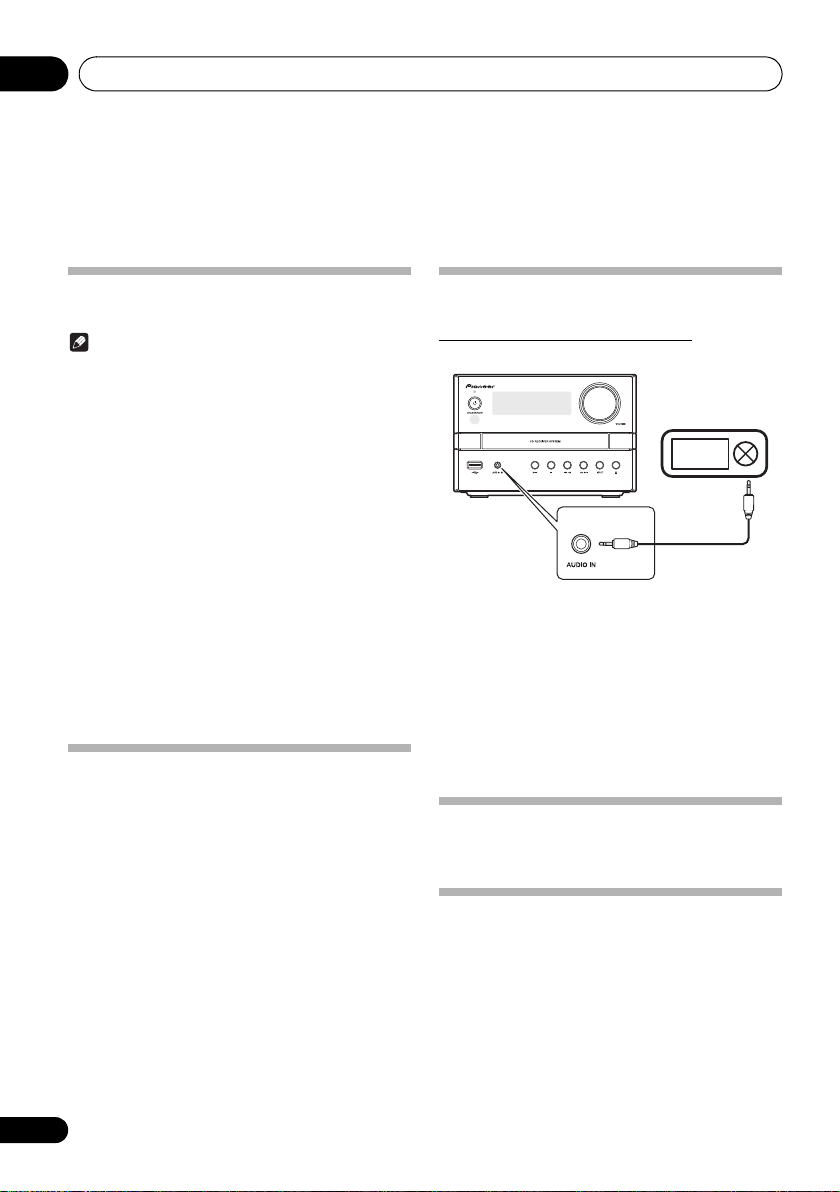
Routing audio from other devices
Through the AUDIO IN socket
1 Connect a stereo mini-plug cable
(commercially available) to
• the AUDIO IN socket on the front panel of the main unit,
and
• the headphones socket on the external device (for
example, an MP3 player).
2 Press
INPUT
source to [
3 Play the external device.
AUDIO IN
on the remote control or
repeatedly on the main unit to switch the
AUDIO IN
].
USB 500 mA charge
The USB terminal on this unit has a 500 mA output. A USB
device up to 500 mA can be connected and used/charged.
20
En
Setting and deactivating the DEMO
mode
You can set it to DEMO mode where the display scrolls the
words. When the power is off (standby mode) press and hold
∫. This will set the DEMO mode. To deactivate, press ∫
again.
Page 21

Additional information 09
Chapter 9:
Additional information
USB playability information
Compatible USB devices:
• USB flash memory (USB1.1/2.0 (Full Speed))
• USB flash players (USB1.1/2.0 (Full Speed))
• Memory cards (an additional card reader is required)
Supported formats:
• USB or memory file format FAT12, FAT16, FAT32
(sector size: 512 bytes)
• MP3 bitrates (data rates): 32 kbps to 320 kbps and
variable bitrates
• Directory nesting up to 8 levels
• Number of albums/folders: maximum 99
• Number of tracks/files: maximum 999 (depending on file
name length)
• ID3 tag v2.0 or later (Only English letters and numbers
are supported.)
• File name in Unicode UTF8 (maximum length: 16 bytes)
Audio files cannot be played depending on the encoding
software settings, USB device type, recording, other
conditions.
Unsupported formats:
• Empty albums: an album that does not contain MP3
files
• Unsupported file formats are skipped. For example,
Word documents (.doc) or MP3 files with extension.dlf
are ignored and not played.
• AAC, WAV, PCM audio files
• WMA files (.wav, .m4a, .m4p, .mp4, .aac)
RDS program types
NO TYPE No RDS programme type
NEWS News services
AFFAIRS Politics and current affairs
INFO Special information programs
SPORT Sports
EDUCATE Education and advanced training
DRAMA Radio plays and literature
CULTURE Culture, religion and society
SCIENCE Science
VARIED Entertainment programs
POP M Pop music
ROCK M Rock music
EASY M Light music
LIGHT M Light classical music
CLASSICS Classical music
OTHER M Special music programs
WEATHER Weather
FINANCE Finance
CHILDREN Children’s pr ograms
English
Français Español
Supported MP3 disc formats
• ISO9660, Joliet
• Maximum track/file number: 999
(depending on file name length)
• Maximum album number: 99
• Supported sampling frequencies: 32 kHz, 44.1 kHz,
48 kHz
• Supported bitrates: 32 kbps to 320 kbps, variable
bitrates
Audio files cannot be played depending on the encoding
software settings, USB device type, recording, other
conditions.
SOCIAL Social Affairs
RELIGION Religion
PHONE IN Phone In
TRAVEL Travel
LEISURE Leisure
JAZZ Jazz Music
COUNTRY Country Music
NATION M National Music
OLDIES Oldies Music
FOLK M Folk Music
DOCUMENT Documentary
TES Alarm Test
ALARM Alarm
21
En
Page 22
Additional information09
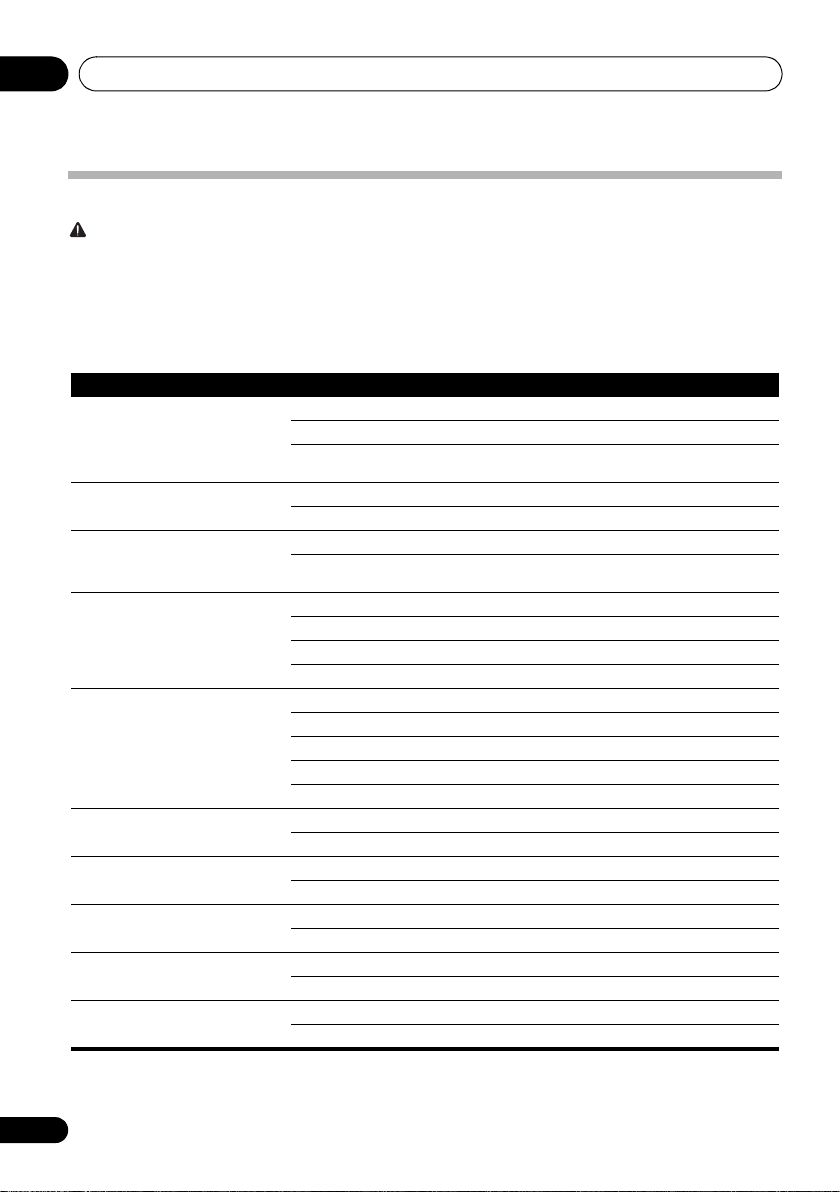
Troubleshooting
WARNING
• Never remove the casing of this apparatus.
Incorrect operation is often mistaken for trouble or malfunction. If you think that there is something wrong with this component,
check the points below. Sometimes the trouble may lie in another component. Inspect the other components and electrical
appliances being used. If the trouble cannot be rectified even after checking the points below, ask your nearest Pioneer
authorized service center or your dealer to carry out repair work.
• If the unit does not operate normally due to external effects such as static electricity, disconnect the power plug from the
outlet and insert it again to return to normal operating conditions.
Problem Solution
No power. Make sure that the AC power cord is connected proper ly.
Make sure that th ere is power at t he AC outlet.
With a power-saving feature, the system switches off automatically 15 minutes after the
system stays inactive.
No sound or poor soun d. Adjust the volume.
Make sure that th e speakers are c onnected correctly.
No response from the system. Reconnect the AC power plug, and t hen turn on the system again.
With a power-saving feature, the system switches off automatically 15 minutes after the
system stays inactive.
Remote control does not work. Reduce the distance between the remote control and the main unit.
Insert batter y with its polari ty (+/– signs) aligned as indi cated.
Replace the batt eries.
Aim the remote control directly at the sensor on the front panel of the main unit.
No disc is detected. Insert a disc.
Make sure that yo u place the disc with its label facing upwards.
Wait until the mois ture condensation at the lens has cleared.
Replace or clean t he disc.
Make sure that th e recordable disc is finalized and the format i s supported.
USB storage device is not supported. Make sure tha t the USB storage device is compatible with the syst em.
Is the USB stor age device connecte d properly? Make sure that the devi ce is firmly inserted.
Cannot play some fil es on the
USB storage device.
Radio reception is poor. Increase the distance between the sy stem and other elec trical appliances.
Timer does not work. Set the clock c orrectly.
Clock/timer setti ng is erased. Power has been interrupte d or the AC power cord has been disconnected.
Make sure that th e file format i s supported.
Make sure that th e file quantit y does not exceed the maximum. (page 21)
Fully extend the antenna.
Switch on the timer.
Reset the cl ock/timer.
22
En
Page 23

Additional information 09
When the
Problem
The Bluetooth wireless technology
device cannot be connected or operated.
Sound from the B luetooth wireless
technology devic e is not emitted or the
sound is interrupt ed.
Bluetooth
wireless technology device is connected or operated
Solution
Check that no object that emits electromagnetic waves in the 2.4 GHz band (microwave
oven, wireless LAN device or Bluetoo th wireless technology apparatus) is near the uni t. If
such an object is near the unit, set the unit far from it. Or, stop using the object emitting the
electromagnetic waves .
Check that the B luetooth wireless technology device is not too far from the uni t and that
obstructions are not set between the Blueto oth wireless technology dev ice and the unit . Set
the Bluetooth wire less technology device and the uni t so that the d istance between t hem is
less than about 1 0 m* and no obstructions exist bet ween them.
* The distance given is to be use d as a rough guide. The actual allowable distance between
devices may vary depen ding on conditio ns in the surrounding environment.
The Bluetooth wir eless technology device may not be set to the co mmunication mode
supporting the Bl uetooth wireless t echnology. Check the sett ing of the Blu etooth w ireless
technology device.
Cautions on use
When moving this unit
When moving this unit, be sure to first check that there is no
disc loaded. Then press Í STANDBY/ON, wait until
[GOOD BYE] disappears on main display to turn off, and
then unplug the power cord. Damage may occur if the unit is
transported or moved with a disc inserted, or when another
device is connected to the USB terminal, or AUDIO IN miniplug jack.
Place of installation
• Choose a stable place near the TV or stereo system
being used with this unit.
• Do not place this unit on top of a TV or color monitor.
Also, install it away from cassette decks and other
devices easily affected by magnetic forces.
Avoid the following locations:
• Places exposed to direct sunlight
• Humid or poorly ventilated places
• Extremely hot places
• Places exposed to vibrations
• Places in which there is much dust or cigarette smoke
• Places exposed to soot, steam, or heat (kitchens, etc.)
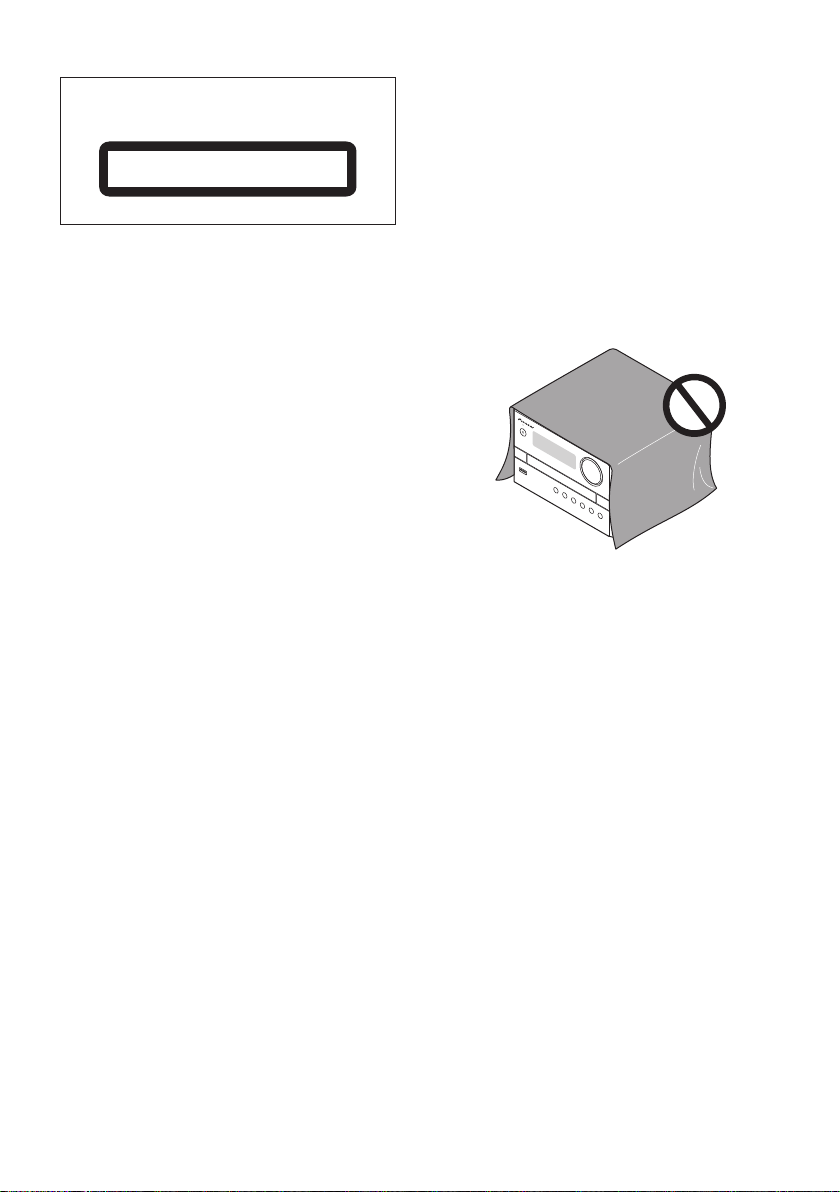
Do not place objects on this unit
Do not place any objects on top of this unit.
Do not obstruct the ventilation holes.
Do not use this unit on shaggy rugs, beds, sofas, etc., or
wrapped in cloth, etc. Doing so will prevent the heat from
dispersing, leading to damage.
Do not expose to heat.
Do not place this unit on top of an amplifier or other
components that generate heat. When rack mounting it, to
avoid the heat given off by the amplifier or other audio
components, place it on a shelf below the amplifier.
• Turn off the power of this unit when not using it.
• Depending on signal conditions, striped patterns may
appear on a TV screen and noise may enter the sound
of radio broadcasts when the power of this unit is on. If
this happens, turn off the power of this unit.
English
Français Español
23
En
Page 24
Additional information09
Cleaning the product
• Unplug the power cord from the power outlet when
cleaning this unit.
• Clean this unit using a soft cloth. For tough dirt, apply
some neutral detergent diluted in 5 to 6 parts water to a
soft cloth, wring out thoroughly, wipe off the dirt, and
then wipe again with a soft, dry cloth.
• Alcohol, thinner, benzene, insecticides, etc., could
cause the print or paint to peel off. Also, leaving rubber
or vinyl products in contact with this unit for long periods
of time could mar the cabinet.
• When using chemical-impregnated wipes, etc., read the
cautions included with the wipes carefully.
Cleaning the lens
• The lens of this unit should not become dirty in normal
use, but if for some reason it should malfunction due to
dust or dirt, consult your nearest Pioneer authorized
service center. Although lens cleaners for players are
commercially available, we advise against using them
since some may damage the lens.
Handling discs
Storing
• Always place discs in their cases and store them
vertically, avoiding hot, humid places, places exposed
to direct sunlight and extremely cold places.
• Be sure to read the cautions included with the disc.
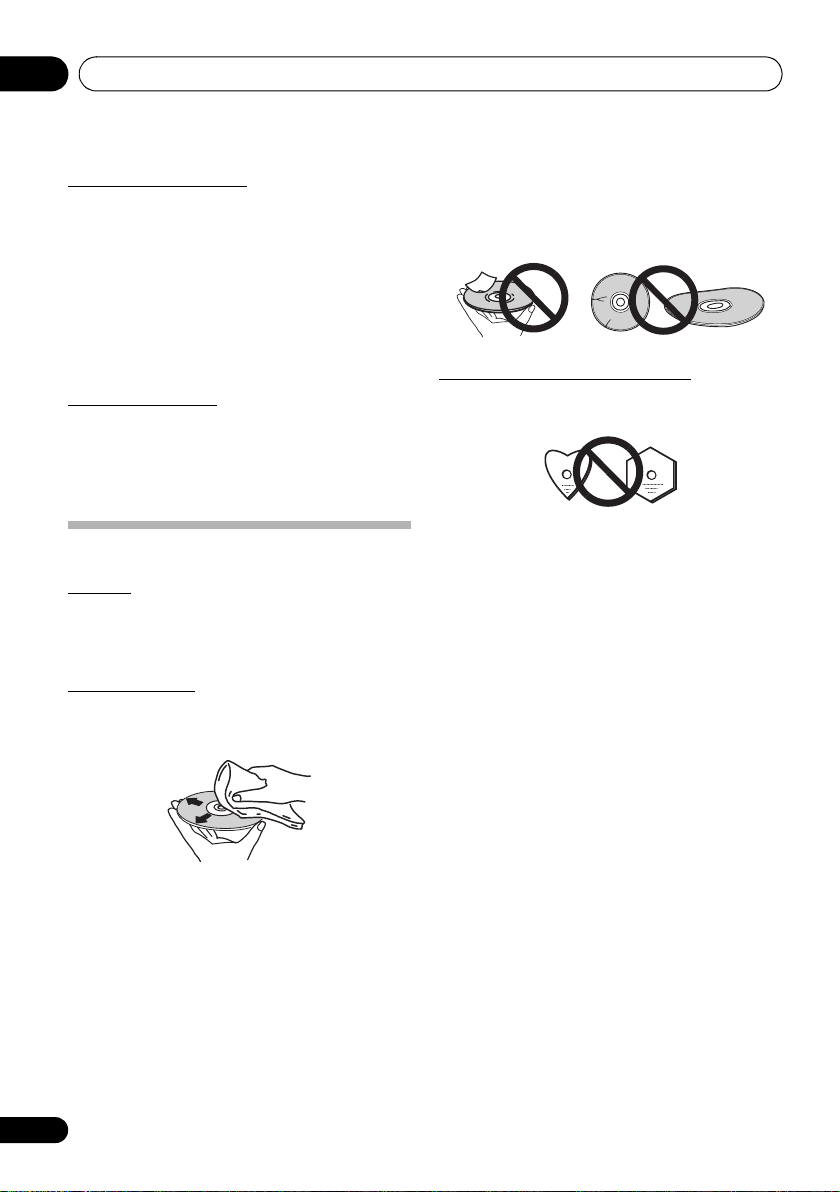
Cleaning discs
• Discs may not play if there are fingerprints or dust on
them. In this case, use a cleaning cloth, etc., to gently
wipe the disc from the inside towards the outside. Do
not use dirty cleaning cloths.
• Do not attach pieces of paper or stickers to discs. Doing
so could warp discs, making it impossible to play them.
Also, note that rental discs often have labels attached to
them, and the glue of the label may have oozed out.
Check that there is no glue around the edges of such
labels before using rented discs.
About specially shaped discs
Specially shaped discs (heart-shaped, hexagonal, etc.)
cannot be played on this unit. Do not attempt to play such
discs, as they could damage this unit.
• Do not use benzene, thinner or other volatile chemicals.
Also, do not use record spray or antistatic agents.
• For tough dirt, apply some water to a soft cloth, wring
out thoroughly, wipe off the dirt, and then wipe off the
moisture with a dry cloth.
• Do not use damaged (cracked or warped) discs.
• Do not let the signal surface of discs get scratched or
dirty.
24
En
Page 25

Additional information 09
Specifications
•Amplifier
Rated output power
All channels:
•Disc
Disc diameter. . . . . . . . . . . . . . . . . . . . . . . . . 12 cm, 8 cm
Support discs . . . . . . . . . CD-DA, CD-R, CD-RW, MP3-CD
Frequency response . . . . . . . . . 20Hz to 20kHz (44.1kHz)
• Tuner (FM)
Tuning range . . . . . . . . . . . . . . . . . . 87.5 MHz to 108 MHz
• Blue tooth
Version. . . . . . . . . . . . . . . Bluetooth Specification Ver. 4.0
Output . . . . . . . . . . . . . . . Bluetooth Specification Class 2
Estimated line-of-sight transmission distance*
. . . . . . . . . . . . . . . . . . . . . . . . . . . . . . . . . . . . . About 10 m
Frequency range . . . 2.4000 GHz to 2.4835GHz ISM Band
Modulation
. . . . . . . . . FH-SS (Frequency Hopping Spread Spectrum)
Supported Bluetooth profiles . . . . . . . . . . . A2DP, AVRCP
Supported Codec. . . . . . . . . . . . . . SBC (Subband Codec)
Supported contents protection. . . . . . . . . . . . . . . SMSC-T
* The line-of-sight transmission distance is an estimate.
Actual transmission distances supported may differ
depending on surrounding conditions.
• Speakers
Type. . . . . . . . . . . . . . . . . . . . . . . 1 way 1 speaker system
Speaker composition . . . . . . . . . . . . . . . . . 8 cm cone type
Speaker impedance. . . . . . . . . . . . . . . . . . . . . . . . . . . 8
• General information
AC power . . . . . . . . . . . . . . . . . . . . . . . . . . . . . 120V 60 Hz
Operation power consumption. . . . . . . . . . . . . . . . . . 12 W
Standby power consumption 0.5 W
USB Direct . . . . . . . . . . . . . . . . . USB 1.1/2.0 (Full Speed)
USB 5V Power 500 mA
Dimensions
– Main unit (W x H x D) . . . . 180 mm x 121 mm x 221 mm
– Speaker box (W x H x D) . 121 mm x 182 mm x 200 mm
Weight
– Main unit . . . . . . . . . . . . . . . . . . . . . . . . . . . . . . . . 1.3 kg
– Speaker box . . . . . . . . . . . . . . . . . . . . . . . . . . 1.1 kg x 2
Note
• The specifications and design of this product are subject
to change without notice.
• Corporation and product names mentioned herein are
trademarks or registered trademarks of the respective
corporations.
5 watts minimum continuous
power per channel, 8 ohm loads,
2 channels driven at 1 kHz, with a
maximum total harmonic
distortion of 10% (FTC)
2ch x 5 W (8
(IEC)
,, 1kHz, 2ch driven)
“Pioneer” is a trademark of Pioneer Corporation, and is
used under license.
© 2016 Onkyo & Pioneer Corporation.
All rights reserved.
English
Français Español
25
En
Page 26

Page 27

Page 28

2-3-12 Yaesu, Chuo-ku, Tokyo 104-0028 JAPAN
<U.S.A.>
18 PARK WAY, UPPER SADDLE RIVER, NEW JERSEY 07458, U.S.A.
Tel: 1-201-785-2600 Tel: 1-844-679-5350
<Germany>
Hanns-Martin-Schleyer-Straße. 35, 47877 Willich, Germany
Tel: +49(0)2154 913222
<UK>
Anteros Building, Odyssey Business Park, West End Road, South Ruislip, Middlesex, HA4 6QQ United
Kingdom
Tel: +44(0)208 836 3612
<France>
6, Avenue de Marais F - 95816 Argenteuil Cedex FRANCE
Tel :+33(0)969 368 050
Корпорация О энд Пи
2-3-12, Яэсу, Чуо-ку, г. Токио, 104-0028, ЯПОНИЯ
© 2016 Onkyo & Pioneer Corporation. All rights reserved.
© 2016 Onkyo & Pioneer Corporation. Tous droits de reproduction et de traduction réservés.
Printed in China / Imprimé en Chine / Напечатано в Китае
SN xxxxxxxx
Fxxxx-x
 Loading...