

Page 1
English
Universal Port Option
DAB Tuner
UP-DT1
Instruction Manual
Manuel d’instructions
Bedienungsanleitung
Gebruiksaanwijzing
Bruksanvisning
En
Fr
Français
Deutsch
Nederlands
Svenska
D
e
N
l
S
v
Page 2
Thank you for purchasing an Onkyo product. Please
read this manual carefully before making any connections or using this product. By following these
instructions, you’ll get the best audio performance
and the most listening pleasure from your Onkyo
product. Keep this manual for future reference.
En-2
WARNING:
TO REDUCE THE RISK OF FIRE OR ELECTRIC SHOCK, DO NOT
EXPOSE THIS APPARATUS TO RAIN OR MOISTURE.
CAUTION:
TO REDUCE THE RISK OF ELECTRIC SHOCK, DO NOT REMOVE
COVER (OR BACK). NO USER-SERVICEABLE PARTS INSIDE.
REFER SERVICING TO QUALIFIED SERVICE PERSONNEL.
WARNING
RISK OF ELECTRIC SHOCK
DO NOT OPEN
The lightning flash with arrowhead symbol, within an equilateral
triangle, is intended to alert the user to the presence of
uninsulated “dangerous voltage” within the product’s enclosure
that may be of sufficient magnitude to constitute a risk of electric
shock to persons.
The exclamation point within an equilateral triangle is intended
to alert the user to the presence of important operating and
maintenance (servicing) instructions in the literature
accompanying the appliance.
AVIS
RISQUE DE CHOC ELECTRIQUE
OUVRIR
NE PAS
Page 3

Important Safety Instructions
1. Read these instructions.
2. Keep these instructions.
3. Heed all warnings.
4. Follow all instructions.
5. Do not use this apparatus near water.
6. Clean only with dry cloth.
7. Do not block any ventilation openings. Install in accordance with the manufacturer’s instructions.
8. Do not install near any heat sources such as radiators,
heat registers, stoves, or other apparatus (including
amplifiers) that produce heat.
9. Do not defeat the safety purpose of the polarized or
grounding-type plug. A polarized plug has two blades
with one wider than the other. A grounding type plug
has two blades and a third grounding prong. The wide
blade or the third prong are provided for your safety. If
the provided plug does not fit into your outlet, consult
an electrician for replacement of the obsolete outlet.
10. Protect the power cord from being walked on or
pinched particularly at plugs, convenience receptacles,
and the point where they exit from the apparatus.
11. Only use attachments/accessories specified by the manufacturer.
12. Unplug this apparatus during lightning storms or when
unused for long periods of time.
13. Refer all servicing to qualified service personnel. Servicing is required when the apparatus has been damaged
in any way, such as power-supply cord or plug is damaged, liquid has been spilled or objects have fallen into
the apparatus, the apparatus has been exposed to rain
or moisture, does not operate normally, or has been
dropped.
14. Damage Requiring Service
Unplug the apparatus from the wall outlet and refer servicing to qualified service personnel under the following conditions:
A. When the power-supply cord or plug is damaged,
B. If liquid has been spilled, or objects have fallen into
the apparatus,
C. If the apparatus has been exposed to rain or water,
D. If the apparatus does not operate normally by fol-
lowing the operating instructions. Adjust only
those controls that are covered by the operating
instructions as an improper adjustment of other
controls may result in damage and will often
require extensive work by a qualified technician to
restore the apparatus to its normal operation,
E. If the apparatus has been dropped or damaged in
any way, and
F. When the apparatus exhibits a distinct change in
performance this indicates a need for service.
En-3
Page 4

Precautions
1. Recording Copyright—Unless it’s for personal use only,
recording copyrighted material is illegal without the
permission of the copyright holder.
2. Care—Occasionally you should dust the unit all over
with a soft cloth. For stubborn stains, use a soft cloth
dampened with a weak solution of mild detergent and
water. Dry the unit immediately afterwards with a clean
cloth. Don’t use abrasive cloths, thinners, alcohol, or
other chemical solvents, because they may damage the
finish or remove the panel lettering.
3. Never Touch this Unit with Wet Hands—Never handle
this unit or its power cord while your hands are wet or
damp. If water or any other liquid gets inside this unit,
have it checked by your Onkyo dealer.
4. Handling Notes
•If you need to transport this unit, use the original
packaging to pack it how it was when you originally
bought it.
•Do not leave rubber or plastic items on this unit for a
long time, because they may leave marks on the case.
•If you do not use this unit for a long time, it may not
work properly the next time you turn it on, so be sure
to use it occasionally.
En-4
Memory backup
The UP-DT1 uses a battery-less memory backup system in order to retain radio settings when it’s
unplugged or in the case of a power failure.
Page 5
Features
1
❑ Auto scanning (Band III/L-Band)
❑ 40 presets
❑ Through mode for connecting additional options
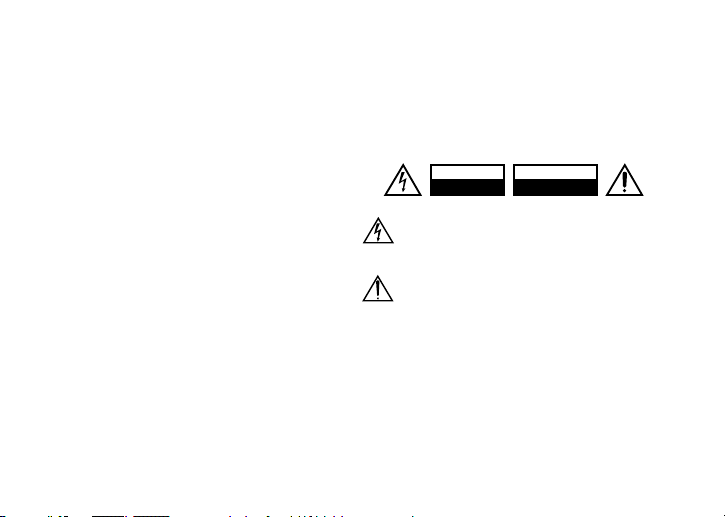
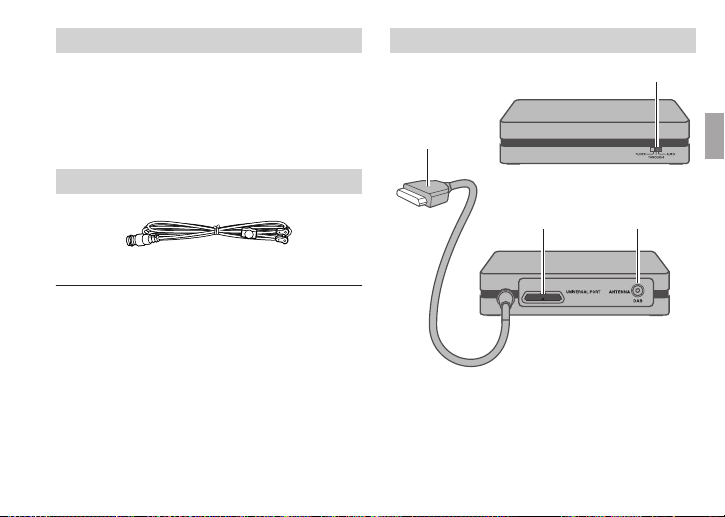
Supplied Accessories
About the UP-DT1
Front
2
DAB antenna
34
Rear
A Mode selector
2 Universal Port cable
3 UNIVERSAL PORT
4 DAB antenna jack
En-5
Page 6

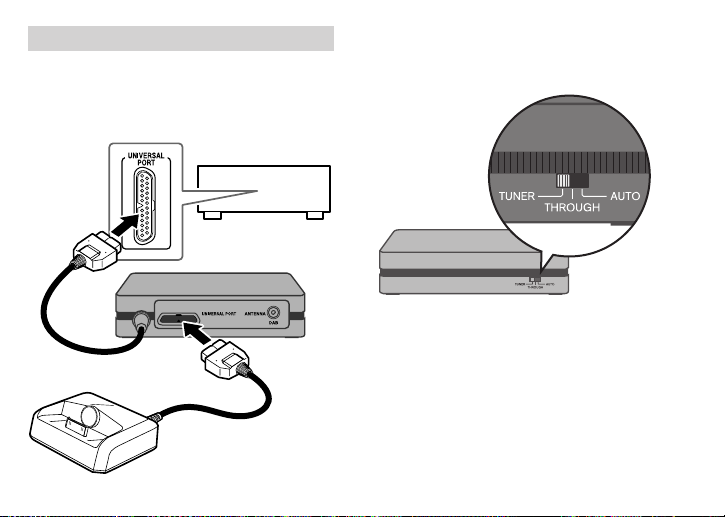
Connecting the UP-DT1
Turn off your Universal Port-compatible Onkyo product. Connect the UP-DT1 to its UNIVERSAL PORT. Set
the UP-DT1’s Mode selector.
Universal Portcompatible
Onkyo product
Onkyo Universal Port
dock, UP-A1, etc.
(optional)
En-6
Setting the Mode Selector
Turn off the Universal Port-compatible Onkyo product before setting the Mode selector.
• TUNER: Select this to listen to DAB Digital Radio.
• THROUGH: Select this to listen to the device connected to the UP-DT1’s Universal Port, for example, an iPod in a UP-A1 dock.
• AUTO: When AUTO is selected, the source is
selected automatically when the input source is
changed on the Universal Port-compatible Onkyo
product. For example, selecting the TUNER input
source selects the UP-DT1, while selecting the
Page 7
DOCK input source selects the dock (UP-A1, etc.)
connected to the UP-DT1’s Universal Port. Note
that some Universal Port-compatible Onkyo products do not support this functionality, in which
case you will need to set the Mode Selector manually.
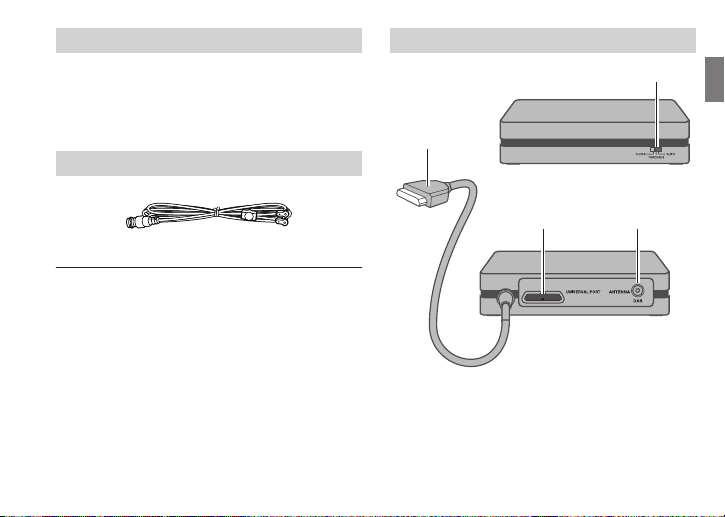
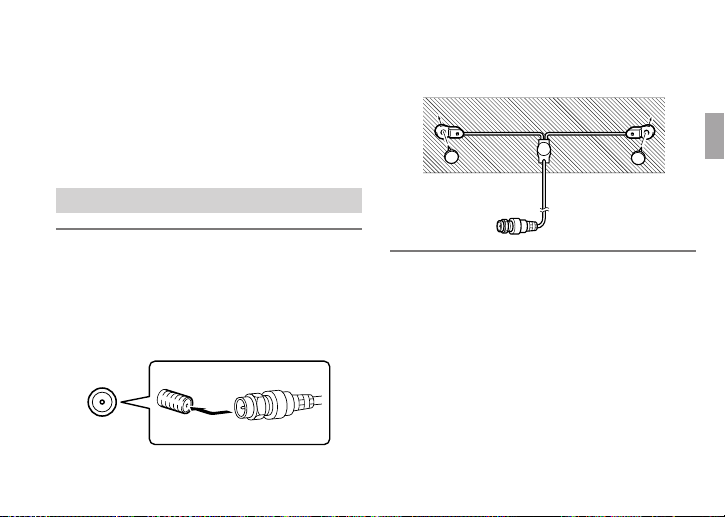
Connecting the DAB Antenna
1. Screw the supplied DAB antenna’s plug
onto the DAB ANTENNA jack.
Once the UP-DT1 is ready for use, you’ll need to
select a DAB station and adjust the position of the
DAB antenna to achieve the best possible reception.
2. Use thumbtacks or something similar to
fix the DAB antenna into position.
En-7
Page 8
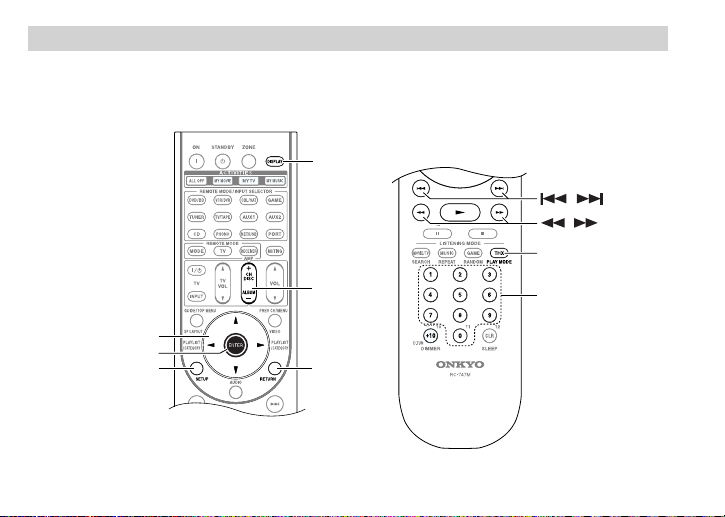
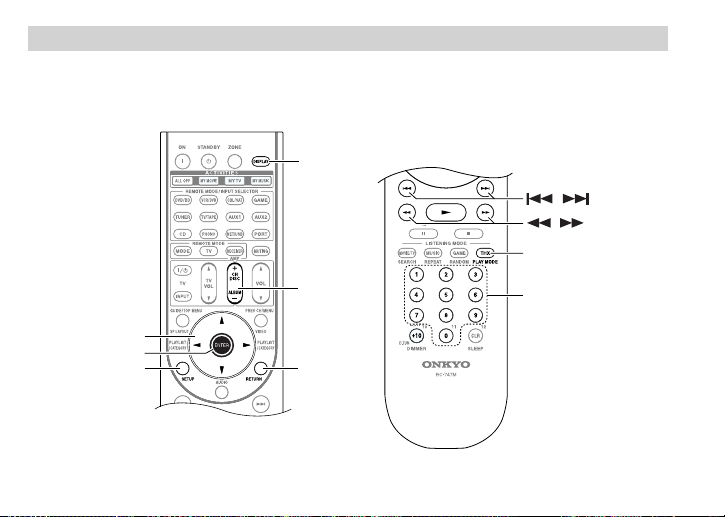
Remote Controller
You can control the UP-DT1 with your Universal Port-compatible Onkyo product’s remote controller. Aim it at
your Universal Port-compatible Onkyo product, not the UP-DT1. The layout of the remote controller’s buttons
varies depending on the Universal Port-compatible Onkyo product you are using.
DISPLAY
/
/
PLAY MODE
Arrow buttons
ENTER
SETUP
CH +/–
RETURN
(An Onkyo AV receiver’s remote controller is shown here.)
Number buttons
En-8
Page 9
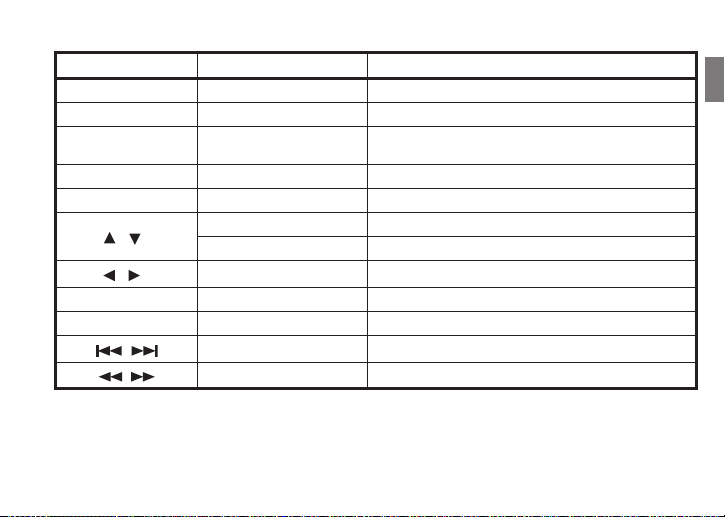
You can use the following buttons on your Universal Port-compatible Onkyo product’s remote controller.
Button Function Explanation
0–9 Preset Used to select radio presets by number.
DISPLAY Display Change Used to view various information on the display.
PLAY MODE Station Listing
SETUP Setup/Return Selects Setup mode.
RETURN Return Returns to the previous display.
Arrow [ ]/[ ] buttons
Arrow [ ]/[ ] buttons
ENTER Enter Used to confirm various functions and settings.
CH +/– Preset Up/Down Used to select radio presets.
/
/
Tuning Up/Down Used to select DAB station.
Setup Up/Down In Setup menu, used to select SCAN, DRC or Preset Write.
Setup Up/Down In Setup menu, used to adjust settings.
Preset Down/Up Used to select radio presets.
Tuning Down/Up Used to select DAB station.
Used to switch the listing mode: alphabetical order, multiplex
order, or active stations order.
En-9
Page 10
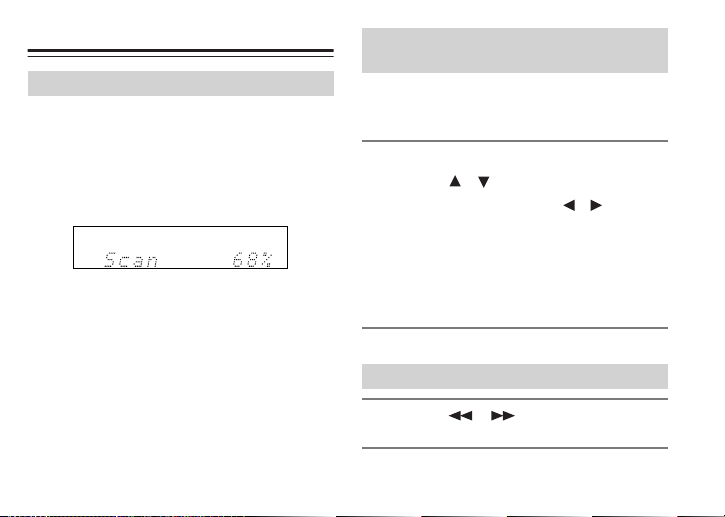
Listening to DAB Digital Radio
Selecting DAB for the Very First Time
Turn on the Universal Port-compatible Onkyo product which the UP-DT1 is connected. Press the [PORT]
remote mode button on your remote controller to
select the PORT input source. The UP-DT1 starts to
scan the stations in WorldWide mode automatically.
Scanning progress is shown on the display.
Once the scanning process is complete, the first station that was detected is selected.
En-10
Using the Auto Tuning Function Manually
If a new DAB station is introduced, or you move to a
new area, you can run the Auto Tuning function
again.
1. Press the [SETUP] button.
2. Use the [ ]/[ ] buttons to select “SCAN”.
3. Use the Left/Right Arrow [ ]/[ ] buttons
to select “U.K” or “WorldWide”.
U.K: Band III (10A to 13F).
WorldWide: Band III (5A to 13F) and L-Band (LA
to LW ).
4. Press the [ENTER] button to scanning
DAB station.
Selecting DAB Stations
1. Use the [ ]/[ ] buttons to select a
station.
Page 11
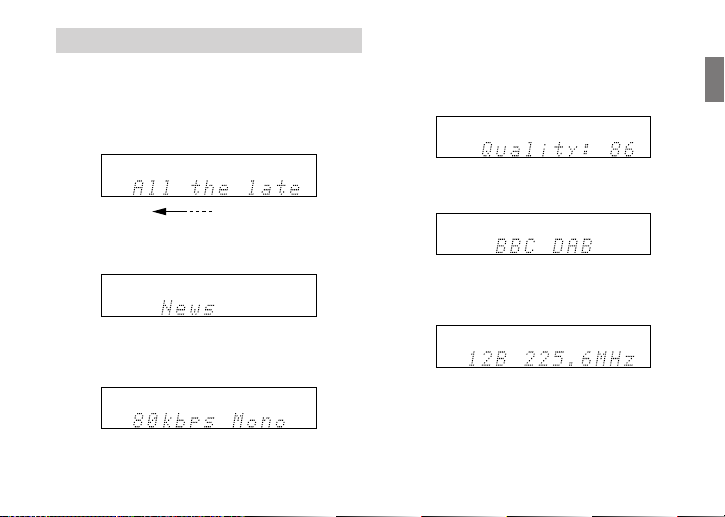
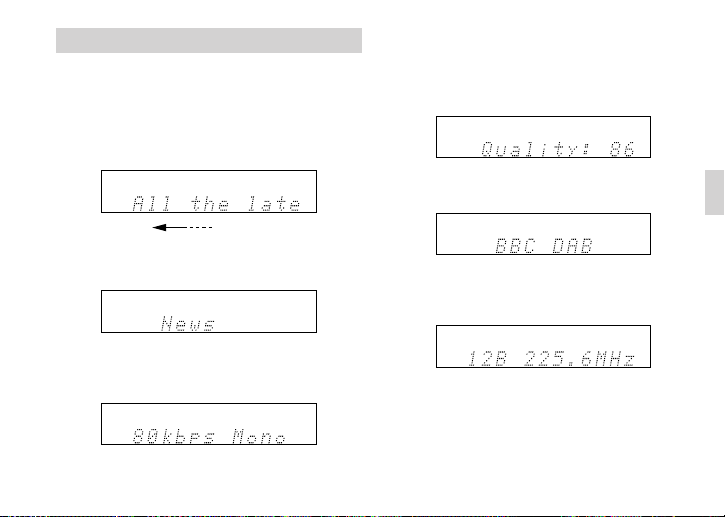
Displaying DAB Radio Information
Press the [DISPLAY] button repeatedly to display
more information about the current DAB station.
1. DLS (Dynamic Label Segment)
When tuned to a station that’s broadcasting DLS
text data, the text will scroll across the display.
(Scroll)
2. Program Type
Displays the type of program.
3. Bit Rate and Audio Mode
Displays the station’s bit rate and audio mode
(stereo, mono, or joint stereo).
4. Signal Quality
Displays the signal quality.
0–59: Poor reception
60–79: Good reception
80–100: Excellent reception
5. Multiplex Name
Displays the name of the current multiplex.
6. Multiplex Number and Frequency
Displays the number and frequency of the current multiplex.
En-11
Page 12
Selecting Tuning Mode (Station Listing) Selecting DRC Value
You can sort the available stations alphabetically, by
multiplex, or active stations.
Use the [PLAY MODE] button to select the following
options.
Alphabet: Sort stations alphabetically.
Multiplex: Sort stations by multiplex.
Active ST: Sort by active stations. Receivable sta-
tions appear at the top of the list. stations that cannot be received properly appear at the bottom of the
list.
With the DRC (Dynamic Range Control) setting, you
can reduce the dynamic range of DAB digital radio so
that you can still hear quiet parts even when listening at low volume levels—ideal for listening to the
radio late at night when you don’t want to disturb
anyone.
1. Press the [SETUP] button.
2. Use the [ ]/[ ] buttons to select “DRC”.
3. Use the Left/Right Arrow [ ]/[ ] buttons
to select following options.
0: DRC off.
1/2: Small reduction in dynamic range.
1: Large reduction in dynamic range.
En-12
Page 13
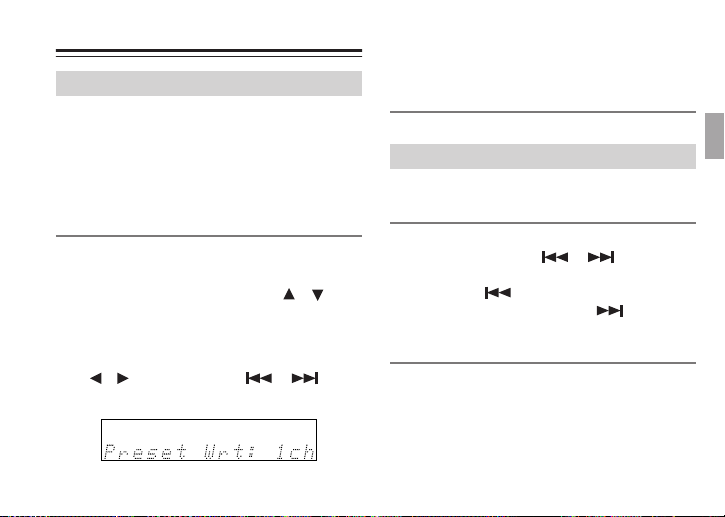
Using Presets
Presetting Your Favorite Stations
With the Preset Write function, you can preset individual DAB digital radio stations. Presets make it easy
to select your favorite stations and eliminate the
need to tune the radio manually each time you want
to change stations. You can store up to 40 stations as
presets.
1. Tune into the station you want to store as
a preset.
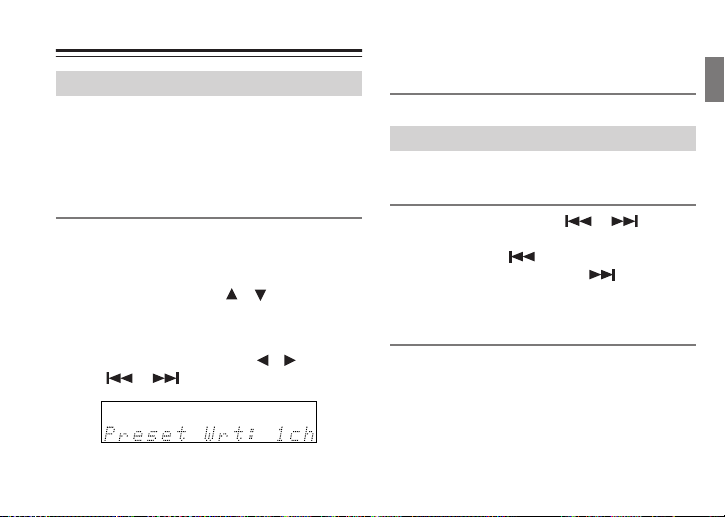
2. Press the [SETUP] button, and then use
the Up/Down Arrow [ ]/[ ] buttons to
select “Preset Write?”
3. Press [ENTER].
4. Use the Left/Right Arrow [ ]/[ ] buttons
or [ ]/[ ] buttons to select a preset.
5. To store the station, press [ENTER].
The preset is stored and “Complete“ appears on the
display.
Selecting Preset Stations
You must store some presets before you can select
them.
1. Use the CH [+] / [–] or [ ]/[ ] but-
tons to select a preset.
Press the CH [–] or [ ] buttons to select the previous preset. Press the CH [+] or [ ] buttons to
select the next preset.
You can also use the number buttons to select presets.
En-13
Page 14

Using a UP-A1 Dock Troubleshooting
When the UP-DT1’s Mode Selector is set to TUNER,
the iPod in the connected UP-A1 dock will not be
charged. If you change the Mode Selector from
TUNER to THROUGH while your Universal Port-compatible Onkyo product is in Standby mode, you must
remove and reinsert the iPod in the UP-A1 to start
charging.
*iPod is a trademark of Apple Inc., registered in the
U.S. and other countries.
If you have any trouble using the UP-DT1, look for a
solution in this section.
The UP-DT1 is not recognized by your Universal
Port-compatible Onkyo product
•Make sure the UP-DT1 is properly connected to
the UNIVERSAL PORT on your Universal Port-compatible Onkyo product.
•Turn off all devices before connecting to a UNIVERSAL PORT.
No sound
•Make sure your amplifier’s volume control is not
set to minimum.
• Check all connections and correct as necessary
(see page 6).
The UP-DT1 is connected to a Universal Port-compatible Onkyo product but doesn’t work
•Turn off all devices, and then set the UP-DT1’s
Mode selector to TUNER.
En-14
Page 15

Can’t control the UP-DT1 by using the buttons on
the front panel of the Universal Port-compatible
Onkyo product
•This is normal. The UP-DT1 can be controlled only
by using the Universal Port-compatible Onkyo
product’s remote controller. (However, some products can control using the front panel’s buttons.)
•Press the [PORT] remote mode button on your
remote controller to select the PORT remote
mode.
The displays shown in this manual differ to what’s
displayed on your Universal Port-compatible
Onkyo product
•The exact information displayed depends on your
Universal Port-compatible Onkyo product. The
displays shown in this instruction manual serve as
examples only.
If you can’t resolve an issue yourself, try resetting the
UP-DT1 as follows before contacting your Onkyo
dealer.
Connect the UP-DT1 to your Universal Port-compatible Onkyo product. On your Universal Port-compatible Onkyo product, select the PORT input source.
When the UP-DT1 has been recognized, while holding down the [PORT] button on the front panel of
the product, press the [STANDBY/ON] button on the
front panel of the product. (The reset procedure may
vary depending on your Universal Port-compatible
Onkyo product, so refer to its instruction manual as
well.)
Specifications
40 preset stations
Tuning frequency range:
Band III: 5A–13F, 174.93–239.20 MHz
L-Band: LA–LW, 1452.96–1490.62 MHz
Rating:
12 V, 300 mA
Dimensions (W x H x D):
140 x 32.5 x 110 mm (5-1/2" x 1-1/4" x 4-5/16")
Weight:
0.4 kg (0.9 lbs.)
En-15
Page 16
Nous vous remercions d’avoir opté pour un produit
Onkyo. Veuillez lire ce manuel d’instructions attentivement avant d’effectuer la moindre connexion et
d’utiliser ce produit. En suivant les instructions données, vous profiterez au mieux des possibilités de ce
produit Onkyo et de tout le plaisir qu’il peut procurer.
Conservez ce manuel afin de pouvoir le consulter
ultérieurement.
Fr-2
ATTENTION:
AFIN DE REDUIRE LES RISQUES D’INCENDIE ET DE DECHARGE ELECTRIQUE, NE PAS EXPOSER CET APPAREIL A LA PLUIE
OU A L’HUMIDITE.
DANGER:
AFIN D’EVITER TOUT DANGER DE DECHARGE ELECTRIQUE,
NE PAS OUVRIR LE BOITIER (OU L’ARRIERE) DE L’APPAREIL.
CONFIER TOUT TRAVAIL D’ENTRETIEN OU DE REPARATION A
UN TECHNICIEN QUALIFIE.
WARNING
RISK OF ELECTRIC SHOCK
DO NOT OPEN
Un symbole d’éclair fléché dans un triangle équilatéral est
destiné à attirer l’attention de l’utilisateur sur le fait que
certains organes internes non-isolés de l’appareil sont
traversés par un courant électrique assez dangereux pour
constituer un resque d’électrocution.
Un point d’exclamation dans un triangle équilatéral est destiné à attirer l’attention de l’utilisateur sur des instructions
importantes relatives à l’entretien et à l’utilisation du produit.
AVIS
RISQUE DE CHOC ELECTRIQUE
OUVRIR
NE PAS
Page 17

Remarques importantes pour votre sécurité
1. Veuillez lire ces instructions.
2. Veuillez conserver ces instructions.
3. Respectez tous les avertissements.
4. Suivez toutes les instructions.
5. Ne vous servez pas de cet appareil à proximité d’eau.
6. Essuyez le boîtier avec un chiffon sec uniquement.
7. Ne bloquez pas les orifices d’aération. Installez cet
appareil en suivant les instructions du fabricant.
8. Ne le placez pas à proximité de sources de chaleur telles
que radiateurs, chauffage, poêles ou autre dispositif (y
compris les amplificateurs) générateur de chaleur.
9. N’essayez pas de circonvenir le dispositif de sécurité que
représente une fiche polarisée ou une fiche avec mise à
la terre. Une fiche polarisée dispose de deux lames dont
l’une est plus large que l’autre. Une fiche avec terre est
munie de deux lames ainsi que d’une broche de mise à
la terre. La lame la plus large ou la broche assurent votre
sécurité. Si la fiche fournie ne peut être insérée dans la
prise murale, demandez à un électricien de remplacer la
prise.
10. Protégez le cordon d’alimentation en évitant qu’on ne
marche dessus et qu’il ne soit plié (notamment au
niveau des fiches, des cache-câbles et de la sortie de
l’appareil).
11. Servez-vous exclusivement des fixations/accessoires
préconisés par le fabricant.
12. Débranchez l’appareil durant un orage ou lorsqu’il reste
inutilisé longtemps.
13. Veuillez faire appel à un technicien qualifié pour l’entretien. Un entretien est indispensable si l’appareil a été
endommagé d’une façon ou d’une autre: cordon d’alimentation ou fiche endommagée, liquide renversé ou
chute de petits objets dans l’appareil, exposition à la
pluie ou à une humidité excessive, fonctionnement
anormal ou chute de l’appareil.
14. Dommages nécessitant réparation
Débranchez l’appareil du secteur et confiez-le à un
technicien qualifié lorsque:
A. Le câble d’alimentation ou sa fiche est endom-
magé(e).
B. Des objets ont pénétré ou du liquide s’est renversé
dans l’appareil.
C. L’appareil a été exposé à la pluie.
D. L’appareil ne semble pas fonctionner normalement
lorsque vous l’utilisez en respectant les instructions
données. N’effectuez que les réglages préconisés
dans le manuel car un mauvais réglage d’autres
commandes risque d’endommager l’appareil et
nécessitera un long travail de remise en état par un
technicien qualifié.
E. L’appareil est tombé ou son boîtier est endom-
magé.
F. Ses per formances semblent affectées.
Fr-3
Page 18

Précautions
1. Enregistrement et droits d’auteur—Sauf pour un
usage privé, tout enregistrement d’œuvres protégées
par des droits d’auteur est interdit sans l’accord préalable du détenteur de ces droits.
2. Entretien—Essuyez régulièrement le boîtier de l’appareil avec un chiffon doux et sec. Vous pouvez éliminer
les taches rebelles avec un chiffon légèrement imbibé
d’eau et de détergent doux. Essuyez ensuite l’appareil
avec un chiffon propre et sec. N’utilisez jamais de chiffons rêches, de dissolvant, d’alcool ou d’autres solvants
chimiques car ceux-ci pourraient endommager la finition ou faire disparaître la sérigraphie du boîtier.
3. Ne touchez jamais cet appareil avec des mains
mouillées—Ne manipulez jamais cet appareil ou son
cordon d’alimentation avec des mains mouillées ou
humides. Si de l’eau ou tout autre liquide pénètre à
l’intérieur de l’appareil, faites-le vérifier par votre revendeur Onkyo.
4. Remarques concernant la manipulation
• Si vous devez transporter cet appareil, servez-vous de
l’emballage d’origine pour l’emballer comme il l’était
lors de son acquisition.
• Ne posez pas d’objets en caoutchouc ou en plastique
à demeure sur cet appareil car ils risquent de laisser
des traces sur le boîtier.
• Si vous n’utilisez pas l’appareil durant une période
assez longue, il risque de ne pas fonctionner convenablement à la prochaine mise sous tension; veillez
donc à l’utiliser de temps en temps.
Fr-4
Sauvegarde des réglages
L’UP-DT1 contient un système de sauvegarde des
réglages sans pile qui conserve les réglages radio
quand vous débranchez l’appareil du secteur ou en
cas de panne de courant.
Page 19
Caractéristiques
1
❑ Recherche automatique (bande III/bande L)
❑ 40 mémoires de stations
❑ Mode “Through” permettant de brancher d’autres
options
Accessoires fournis
A propos de l’UP-DT1
Avant
2
Antenne DAB
34
Arrière
A Sélecteur de mode
2 Câble Universal Port
3 UNIVERSAL PORT
4 Prise d’antenne DAB
Fr-5
Page 20
Connexion de l’UP-DT1
Mettez votre produit Onkyo compatible Universal
Port hors tension. Branchez l’UP-DT1 à sa prise UNIVERSAL PORT. Réglez le sélecteur de mode de
l’UP-DT1.
Produit Onkyo compatible Universal Port
Dock Onkyo Universal Port,
UP-A1 etc. (en option)
Fr-6
Réglage du sélecteur de mode
Mettez le produit Onkyo compatible Universal Port
hors tension avant de régler le sélecteur de mode.
• TUNER: Choisissez ce réglage pour écouter la
radio numérique DAB.
• THROUGH: Choisissez ce réglage pour écouter la
source branchée à la prise Universal Port de
l’UP-DT1 (un iPod dans un dock UP-A1, par exemple).
• AUTO: Avec “AUTO”, la source est sélectionnée
automatiquement quand vous changez de source
d’entrée sur le produit Onkyo compatible Univer-
Page 21
sal Port. Le choix de la source d’entrée “TUNER”, par
exemple, sélectionne l’UP-DT1 tandis que le choix
de la source d’entrée “DOCK” sélectionne le dock
(UP-A1 etc.) branché à la prise Universal Port de
l’UP-DT1. Notez que certains produits Onkyo compatibles Universal Port ne reconnaissent pas cette
fonctionnalité: dans ce cas, réglez le sélecteur de
mode manuellement.
Connexion de l’antenne DAB
1. Vissez la fiche fournie de l’antenne DAB
dans la prise DAB ANTENNA.
Dès que l’ampli-tuner UP-DT1 est prêt pour l’utilisation, sélectionnez une station DAB et réglez
l’antenne DAB pour obtenir une réception optimale.
2. Fixez l’antenne DAB au mur à l’aide de
punaises, par exemple.
Fr-7
Page 22
Télécommande
Vous pouvez piloter l’UP-DT1 avec la télécommande du produit Onkyo compatible Universal Port. Orientez-la
vers le produit Onkyo compatible Universal Port et non vers l’UP-DT1. L’agencement des boutons de la télécommande varie selon le produit Onkyo compatible Universal Port que vous utilisez.
DISPLAY
/
/
PLAY MODE
Boutons fléchés
ENTER
SETUP
CH +/–
RETURN
(L’illustration montre la télécommande d’un ampli-tuner AV Onkyo.)
Boutons numériques
Fr-8
Page 23

Vous pouvez utiliser les boutons suivants de la télécommande du produit Onkyo compatible Universal Port.
Bouton Fonction Explication
0~9 Station mémorisée Permet d’entrer les fréquences des stations.
DISPLAY Changement d’affichage Affiche différentes informations.
PLAY MODE Liste de stations
SETUP Configuration/Retour Sélectionne la configuration.
RETURN Retour Retour à l’affichage précédent.
Recherche de stations
Boutons fléchés [ ]/[ ]
Boutons fléchés [ ]/[ ]
ENTER Entrée Confirmation de divers réglages et fonctions.
CH +/–
/
/
précédente/suivante
Réglage haut/bas
Réglage haut/bas Réglages de paramètres dans le menu “Setup”
Station mémorisée
précédente/suivante
Station mémorisée
précédente/suivante
Recherche de stations
(précédente/suivante)
Vous pouvez changer le mode d’agencement des stations: par
ordre alphabétique, par ordre de multiplex ou par ordre de
stations actives.
Sélection d’une station DAB.
Sélection de “SCAN”, “DRC” ou “Preset Write” dans le menu
“Setup”.
Sélection de stations mémorisées.
Sélection de stations mémorisées.
Sélection d’une station DAB.
Fr-9
Page 24

Ecouter la radio numérique DAB
Sélectionner ‘DAB’ pour la première fois
Mettez le produit Onkyo compatible Universal Port
auquel l’UP-DT1 est branché sous tension. Appuyez
sur le bouton de mode [PORT] de la télécommande
pour sélectionner la source d’entrée “PORT ”. L’UP-DT1
lance automatiquement une recherche de stations
en mode “WorldWide”.
La progression de la recherche est affichée à l’écran.
Une fois la recherche terminée, la première station
détectée est sélectionnée.
Fr-10
Utilisation manuelle de la recherche automatique
Si une nouvelle station DAB apparaît ou si vous
déménagez, vous pouvez relancer la recherche automatique de stations.
1. Appuyez sur le bouton [SETUP].
2. Choisissez “SCAN” avec les boutons [ ]/
[].
3. Servez-vous des boutons fléchés gauche/
droit [ ]/[ ] pour sélectionner “U.K” ou
“WorldWide”.
U.K: Bande III (10A~13F).
WordWide: Bande III (5A~13F) et bande L (LA~
LW ).
4. Appuyez sur le bouton [ENTER] pour
rechercher une station DAB.
Sélectionner des stations DAB
1. Utilisez les boutons [ ]/[ ] pour
sélectionner une station.
Page 25

Afficher les informations radio DAB
Appuyez plusieurs fois sur le bouton [DISPLAY] pour
afficher plus d’informations sur la station DAB sélectionnée.
1. DLS (Dynamic Label Segment)
Si vous écoutez une station émettant des données de texte DLS, le texte défile à l’écran.
(Défilement)
2. Type de programme
Affiche le type de programme.
3. Résolution en bits et mode audio
Affiche la résolution en bits de la radio et son
mode audio (stéréo, mono ou “joint stereo”).
4. Qualité du signal
Affiche la qualité du signal.
0~59: Mauvaise réception
60~79: Bonne réception
80~100: Réception excellente
5. Nom du multiplex
Affiche le nom du multiplex actuel.
6. Numéro et fréquence du multiplex
Affiche le numéro et la fréquence du multiplex
actuel.
Fr-11
Page 26

Sélectionner le mode de tri (Liste de stations)
Vous pouvez trier les stations disponibles par ordre
alphabétique, de multiplex ou de stations actives.
Appuyez sur le bouton [PLAY MODE] pour choisir
l’une des options suivantes:
Alphabet: Tri alphabétique des stations
Multiplex: Tri des stations par multiplex.
Active ST: Tri par stations actives. Les stations avec
une bonne réception apparaissent en tête de liste et
celles avec une mauvaise réception en bas de liste.
Fr-12
Sélection du réglage ‘DRC’
La fonction DRC (Dynamic Range Control) permet de
réduire la plage dynamique d’une station DAB de
sorte que les passages de faible niveau restent audibles à bas volume. Activez cette fonction pour écouter la radio tard en soirée sans déranger les voisins.
1. Appuyez sur le bouton [SETUP].
2. Choisissez “DRC” avec les boutons [ ]/
[].
3. Servez-vous des boutons fléchés gauche/
droit [ ]/[ ] pour sélectionner une des
options suivantes.
0: Fonction DRC désactivée.
1/2: La plage dynamique est légèrement
réduite.
1: La plage dynamique est fortement réduite.
Page 27
Utiliser les mémoires
Mémoriser vos stations préférées
La fonction “Preset Write” permet de mémoriser des
stations de radio numériques DAB individuelles.
Cette présélection facilite ensuite la sélection de vos
stations favorites et vous évite de recommencer une
recherche quand vous changez de station. Vous pouvez mémoriser jusqu’à 40 stations sous forme de présélections.
1. Recherchez la station à mémoriser.
2. Appuyez sur le bouton [SETUP] et utilisez
les boutons fléchés haut/bas [ ]/[ ]
pour choisir “Preset Write”.
3. Appuyez sur [ENTER].
4. Servez-vous des boutons gauche/droit
[ ]/[ ] ou des boutons [ ]/[ ] pour
sélectionner une mémoire.
5. Pour mémoriser la station, appuyez sur
[ENTER].
La présélection est mémorisée et “Complete” apparaît à l’écran.
Choix d’une présélection
Il faut mémoriser des stations avant de pouvoir choisir une présélection.
1. Choisissez une présélection avec les bou-
tons CH [+]/[–] ou [ ]/[ ].
Choisissez la présélection précédente avec les boutons CH [–] ou [ ]. Choisissez la présélection suivante avec les boutons CH [+] ou [ ].
Vous pouvez aussi choisir directement une présélection avec les boutons numériques.
Fr-13
Page 28

Utilisation d’un dock UP-A1 Dépannage
Si le sélecteur de mode de l’UP-DT1 est réglé sur
“TUNER”, l’iPod inséré dans le dock UP-A1 n’est pas
chargé. Si vous changez le réglage du sélecteur de
mode et passez de “TUNER” à “THROUGH” alors que
le produit Onkyo compatible Universal Port est en
veille, il faut extraire puis réinsérer l’iPod dans le
UP-A1 pour le charger.
*iPod est une marque déposée d’Apple Inc. aux
Etats-Unis et dans d’autres pays.
Si vous rencontrez des problèmes avec votre UP-DT1,
vous trouverez peut-être la solution dans cette section.
L’UP-DT1 n’est pas reconnu par votre produit
Onkyo compatible Universal Port
•Vérifiez si l’UP-DT1 est correctement branché à la
prise UNIVERSAL PORT de votre produit Onkyo
compatible Universal Port.
•Mettez tous les dispositifs concernés hors tension
avant d’établir une connexion UNIVERSAL PORT.
Pas de son
•Vérifiez si la commande de volume de l’amplificateur n’est pas réglée au minimum.
•Vérifiez toutes les connexions et corrigez-les si
nécessaire (voyez page 6).
L’UP-DT1 est branché à un produit Onkyo compatible Universal Port mais ne fonctionne pas
•Mettez tous les dispositifs hors tension puis réglez
le sélecteur de mode de l’UP-DT1 sur “TUNER”.
Fr-14
Page 29

Impossible de piloter l’UP-DT1 avec les boutons
en face avant du produit Onkyo compatible Universal Port
•C’est normal. Vous ne pouvez piloter l’UP-DT1
qu’avec la télécommande du produit Onkyo compatible Universal Port. (Certains produits peuvent
cependant être pilotés avec les boutons en face
avant.)
• Appuyez sur le bouton [PORT] de la télécommande pour la faire passer en mode “PORT”.
Les saisies d’écran illustrées dans ce mode
d’emploi n’indiquent pas ce qui est affiché à
l’écran de votre produit Onkyo compatible Universal Port
•Les information affichées dépendent de votre produit Onkyo compatible Universal Port. Les saisies
d’écran de ce mode d’emploi sont exclusivement
fournies à titre d’exemple.
Si vous ne parvenez pas à régler le problème, essayez
d’abord d’initialiser l’UP-DT1 de la façon suivante
avant de contacter votre revendeur Onkyo.
Branchez l’UP-DT1 à votre produit Onkyo compatible
Universal Port. Sur votre produit Onkyo compatible
Universal Port, sélectionnez la source d’entrée “PORT”.
Quand l’UP-DT1 a été reconnu, maintenez le bouton
[PORT] enfoncé en face avant du produit et appuyez
sur le bouton [STANDBY/ON] en face avant du produit. (La procédure d’initialisation peut varier selon
votre produit Onkyo compatible Universal Port; consultez donc également son mode d’emploi.)
Notez cependant que l’initialisation du UP-DT1
efface vos présélections de radio et vos réglages personnels.
Fiche technique
40 mémoires de stations
Plage de fréquences:
Band III: 5A~13F, 174.93~239.20 MHz
L-Band: LA~LW, 1452.96~1490.62 MHz
Alimentation:
12V, 300mA
Dimensions (L x H x P):
140 x 32,5 x 110mm
Poids:
0,4kg
Fr-15
Page 30

Vielen Dank für Ihre Entscheidung zum Kauf eines
Gerätes von Onkyo. Bitte lesen Sie sich diese Bedienungsanleitung vor Herstellen der Verbindungen
und der Inbetriebnahme sorgfältig durch. Befolgen
Sie bitte alle Hinweise, um mit Ihrem Onkyo-Gerät
die bestmögliche Audioqualität für einen optimalen
Hörgenuss zu erzielen. Bewahren Sie diese Bedienungsanleitung an einem sicheren Ort auf.
De-2
ACHTUNG:
UM FEUER UND STROMSCHLÄGE ZU VERMEIDEN, SOLLTE
DAS GERÄT WEDER REGEN NOCH FEUCHTIGKEIT
AUSGESETZT WERDEN.
VORSICHT:
UM STROMSCHLÄGE ZU VERMEIDEN, WEDER DAS GEHÄUSE
(NOCH DIE RÜCKSEITE) ÖFFNEN. NICHTS IM GEHÄUSE DARF
VOM BENUTZER GEWARTET WERDEN. WENDEN SIE SICH AN
DEN QUALIFIZIERTEN KUNDENDIENST.
WARNING
RISK OF ELECTRIC SHOCK
DO NOT OPEN
Das Blitzsymbol mit Pfeil innerhalb eines gleichseitigen
Dreiecks soll den Anwender auf das Vorhandensein von
“gefährlichen Spannungen” im Inneren des Gehäuses dieses
Produktes aufmerksam machen. Derartige Spannungen sind
hoch genug, um für Menschen gefährliche Schläge zu
bewirken.
Das Ausrufungszeichen innerhalb eines gleichseitigen
Dreiecks soll den Anwender auf das Vorhandensein von wichtigen Betriebs- oder Wartungshinweisen (Service) in der dem
Produkt beiliegenden Dokumentation hinweisen.
AVIS
RISQUE DE CHOC ELECTRIQUE
OUVRIR
NE PAS
Page 31

Wichtige Sicherheitshinweise
1. Lesen Sie sich diese Hinweise durch.
2. Bewahren Sie diese Hinweise auf.
3. Beachten Sie alle Warnungen.
4. Befolgen Sie alle Anweisungen.
5. Verwenden Sie dieses Gerät niemals in der Nähe von
Wasser.
6. Reinigen Sie das Gehäuse nur mit einem trockenen
Tuch.
7. Versperren Sie niemals die vorhandenen Lüftungsschlitze. Stellen Sie das Gerät immer den Anweisungen
des Herstellers entsprechend auf.
8. Stellen Sie das Gerät niemals in die Nähe einer Wärmequelle, z.B. eines Heizkörpers, Ofens bzw. anderen Gerätes, das viel Wärme erzeugt.
9. Versuchen Sie niemals, die Sicherheitsvorkehrung des
polarisierten oder Erdungsstiftes zu umgehen. Ein polarisierter Stecker weist zwei Stifte mit unterschiedlicher
Breite auf. Ein geerdeter Stecker weist zwei Stifte und
einen Erdungsstift auf. Der breitere Stift bzw. der
Erdungsstift dient Ihrer Sicherheit. Wenn der beiliegende Stecker nicht in Ihre Steckdose passt, müssen Sie
einen Elektriker bitten, neue Steckdosen zu installieren.
10. Sorgen Sie dafür, dass niemand auf das Netzkabel treten kann und dass es nicht abgeklemmt wird. Diese
Gefahr besteht insbesondere in der Nähe der Steckdose
oder des Kabelaustritts am Gerät.
11. Verwenden Sie nur Halterungen/Zubehör, die/das vom
Hersteller ausdrücklich empfohlen wird/werden.
12. Lösen Sie im Falle eines Gewitters oder wenn Sie das
Gerät längere Zeit nicht verwenden möchten, den Netzanschluss.
13. Überlassen Sie alle Wartungsarbeiten einer qualifizierten Kundendienststelle. Das Gerät muss zur Wartung
eingereicht werden, wenn es Schäden aufweist, z.B.
wenn das Netzkabel oder der Stecker beschädigt ist,
wenn Wasser oder Fremdkörper in das Geräteinnere
gelangt sind, wenn das Gerät Feuchtigkeit oder Regen
ausgesetzt war bzw. wenn es sich nicht normal verhält
oder wenn seine Funktionstüchtigkeit merklich nachgelassen hat.
14. Schäden, die eine Reparatur erfordern
Lösen Sie sofort den Netzanschluss und reichen Sie das
Gerät bei einer qualifizierten Kundendienststelle ein,
wenn:
A. Das Netzkabel bzw. dessen Stecker beschädigt ist;
B. Fr emdkörper oder Flüssigkeiten ins Geräteinnere
gelangt sind;
C. Das Gerät nass geworden ist (z.B. durch Regen oder
Wasser);
D. Das Gerät anhand der in dieser Anleitung gegebe-
nen Hinweise nicht erwartungsgemäß funktioniert.
Prinzipiell sollten Sie nur die Bedienelemente verwenden, die ausdrücklich erwähnt werden, weil
andere Handlungsabläufe zu so schweren Schäden
führen können, dass nur ein qualifizierter Wartungstechniker sie wieder beheben kann;
E. Das Gerät hingefallen ist bzw. das Gehäuse sicht-
bare Schäden aufweist;
F. Die Leistung des Gerätes merklich nachgelassen
hat – das sollte immer als Warnung gewertet werden, dass das Gerät überprüft werden muss.
De-3
Page 32

Vorsichtsmaßnahmen
1. Urheberrechte—Außer für private Zwecke ist das
Überspielen urheberrechtlich geschützten Materials
ohne die Zustimmung des Rechteinhabers strafbar.
2. Pflege—Hin und wieder sollten Sie das Gerät mit einem
weichen Tuch abstauben. Hartnäckige Flecken darf man
mit einem weichen und Tuch und etwas milder Reinigungslauge abwischen. Wischen Sie das Gehäuse gleich
im Anschluss mit einem sauberen Tuch trocken. Verwenden Sie niemals ätzende Produkte, Verdünner,
Waschbenzin oder chemische Lösungsmittel, da diese
die Lackierung angreifen oder die Beschriftung ablösen
können.
3. Berühren Sie das Gerät niemals mit nassen Händen—Fassen Sie das Netzkabel dieses Gerätes niemals
mit nassen oder feuchten Händen an. Wenn Wasser
oder andere Flüssigkeiten in das Geräteinnere gelangen, müssen Sie es sofort zur Wartung bei Ihrem OnkyoHändler einreichen.
4. Hinweise für die Handhabung
•Wenn Sie das Gerät transportieren müssen, packen
Sie es am besten wieder in den Original-Lieferkarton.
•Verwenden Sie niemals flüchtige Flüssigkeiten, z.B.
Insektensprays, in der Nähe dieses Gerätes. Lassen Sie
niemals Gummi- oder Plastikgegenstände auf dem
Gerät liegen, weil diese eventuell schwer entfernbare
Ränder auf dem Gehäuse hinterlassen.
• Nach Verwendung dieses Gerätes müssen alle Discs
entnommen werden. Schalten Sie das Gerät erst
danach aus.
De-4
Speicherpufferung
Der UP-DT1 verwendet einen Speicherpuffer ohne
Batterie für die Speicherung der Senderfrequenzen
bei Lösen des Netzanschlusses bzw. im Falle eines
Stromausfalls.
Page 33

Eigenschaften
1
❑ Automatische Sendersuche (Band III/L-Band)
❑ 40 Senderspeicher
❑ Through-Modus für die Verwendung optionaler
Funktionen
Lieferumfang
Über den UP-DT1
Frontplatte
2
DAB-Antenne
34
Rückseite
A Moduswahlschalter
2 Universal Port-Kabel
3 UNIVERSAL PORT
4 DAB-Antennenbuchse
De-5
Page 34

Anschließen des UP-DT1
Schalten Sie Ihr Universal Port-kompatibles OnkyoGerät aus. Verbinden Sie den UP-DT1 mit dessen
UNIVERSAL PORT. Stellen Sie den Moduswahlschalter des UP-DT1 ein.
Universal Port-kompatibles Onkyo-Gerät
Universal Port-Dock von
Onkyo, UP-A1 usw.
(Sonderzubehör)
De-6
Einstellen des Moduswahlschalters
Bevor Sie die Einstellung des Moduswahlschalters
ändern, müssen Sie das Universal Port-kompatible
Onkyo-Gerät einschalten.
• TUNER: Wählen Sie diese Einstellung, um sich
einen DAB-Digitalsender anzuhören.
• THROUGH: Wählen Sie diese Einstellung, um sich
das Signal des Geräts (iPod in einem UP-A1 usw.)
anzuhören, das mit dem Universal Port verbunden
ist.
• AUTO: Wenn Sie „AUTO” wählen, erfolgt die Quellenwahl automatisch, wenn Sie auf dem Universal
Page 35

Port-kompatiblen Produkt von Onkyo eine andere
Quelle wählen. Wenn Sie dort z.B. die TUNERQuelle wählen, wird der UP-DT1 als Quelle verwendet. Bei Anwahl der DOCK-Quelle wird dagegen das Dock (UP-A1 usw.), das mit dem Universal
Port des UP-DT1 verbunden ist, als Quelle gewählt.
Beachten Sie, dass bestimmte Universal Port-kompatible Geräte von Onkyo diese Funktion nicht
unterstützen. In dem Fall müssen Sie die Quelle
von Hand wählen.
Anschließen der DAB-Antenne
1. Verschrauben Sie den Stecker der DAB-
Antenne mit der DAB ANTENNA-Buchse.
Wenn der UP-DT1 betriebsfertig ist, müssen Sie
einen DAB-Sender suchen und anhand seiner Feldstärke die optimale Position für die DAB-Antenne
ermitteln.
2. Bringen Sie die DAB-Antenne mit Reiß-
zwecken an einer Wand oder einem
Schrank an.
De-7
Page 36

Fernbedienung
Der UP-DT1 kann mit der Fernbedienung des Universal Port-kompatiblen Onkyo-Geräts bedient werden. Richten Sie die Fernbedienung jedoch auf das Universal Port-kompatible Onkyo-Gerät statt auf den UP-DT1. Die
Funktionen der Fernbedienung richten sich nach dem verwendeten Universal Port-kompatiblen Onkyo-Gerät.
DISPLAY
/
/
PLAY MODE
Pfeiltasten
ENTER
SETUP
CH +/–
RETURN
(Hier sehen Sie die Fernbedienung eines AV-Receivers von Onkyo.)
Zifferntasten
De-8
Page 37

Folgende Tasten des Universal Port-kompatiblen Onkyo-Geräts können verwendet werden.
Taste Funktion Erklärung
0~9 Speicher Hiermit werden Senderspeicher gewählt.
DISPLAY Anzeigewahl Hiermit wählen Sie, was im Display angezeigt wird.
PLAY MODE Senderübersicht
SETUP Setup/Zurück Hiermit aktivieren Sie den „Setup”-Modus.
RETURN Zurück Erlaubt die Rückkehr zur vorigen Anzeige.
Sendersuche auf/ab Für die Anwahl von DAB-Sendern.
Pfeiltasten [ ]/[ ]
Pfeiltasten [ ]/[ ]
ENTER Bestätigung
CH +/– Speicher auf/ab Dienen zum Speichern von Sendern.
/
/
Einstellungen auf/ab
Einstellungen auf/ab Im „Setup”-Menü werden hiermit die Einstellungen geändert.
Speicher ab/auf Dienen zum Speichern von Sendern.
Sendersuche ab/auf Für die Anwahl von DAB-Sendern.
Hiermit kann die Anzeigereihenfolge gewählt werden: Alphabetische Reihenfolge, Multiplex-Reihenfolge bzw. Reihenfolge
der aktiven Sender.
Im „Setup”-Menü wählen Sie hiermit „SCAN”, „DRC” oder „Preset
Write”.
Hiermit können mehrere Funktionen und Einstellungen bestätigt werden.
De-9
Page 38

Anhören eines DAB-Digital-Radioprogramms
Erste Anwahl von ‘DAB’
Schalten Sie das Universal Port-kompatible OnkyoGerät, an welches der UP-DT1 angeschlossen ist, ein.
Drücken Sie die [PORT]-Taste der Fernbedienung,
um die „PORT”-Eingangsquelle zu wählen. Der
UP-DT1 sucht jetzt automatisch Sender im „WorldWide”-Modus.
Das Display zeigt an, wie weit die Suche gediehen ist.
Wenn die Suche beendet ist, wird der erste gefundene Sender gewählt.
De-10
Manuelle Verwendung der automatischen Sendersuche
Wenn ein neuer DAB-Sender verfügbar wird bzw.
wenn Sie den Wohnort wechseln, können Sie die
automatische Sendersuche erneut auslösen.
1. Drücken Sie die [SETUP]-Taste.
2. Wählen Sie mit den [ ]/[ ]-Tasten
„SCAN”.
3. Wählen Sie mit den Links/Rechts-Tasten
[ ]/[ ] „U.K” oder „WorldWide”.
U.K: Band III (10A~13F).
WordWide: Band III (5A~13F) und L-Band (LA~
LW ).
4. Drücken Sie die [ENTER]-Taste, um die
DAB-Sendersuche zu starten.
Anwahl von DAB-Sendern
1. Wählen Sie mit den Tasten [ ]/[ ]
einen Sender.
Page 39
Anzeige von DAB-Senderinformationen
Drücken Sie die [DISPLAY]-Taste wiederholt, um Infos
über den gewählten DAB-Sender anzufordern.
1. DLS (Dynamic Label Segment)
Wenn ein Sender mit DLS-Informationen
gewählt wird, läuft der empfangene Text durch
das Display.
(Durchlauf)
2. Program Type
Zeigt den Programmtyp an.
3. ‘Bit Rate’ und ‘Audio Mode’
Zeigt die Bit-Auflösung und den Audiomodus
(„Stereo”, „Mono” oder „Joint Stereo”) an.
4. Signal Quality
Zeigt die Signalqualität an.
0~59: Mangelhafter Empfang
60~79: Guter Empfang
80~100: Optimaler Empfang
5. Multiplex Name
Zeigt den Namen des aktuellen Multiplex’ an.
6. ‘Multiplex Number’ und ‘Frequency’
Zeigt die Nummer und Frequenz des aktuellen
Multiplex’ an.
De-11
Page 40

Moduswahl für die Sendersuche (Senderübersicht)
Die gefundenen Sender können alphabetisch, nach
Multiplex oder nach aktiven Sendern sortiert werden.
Drücken Sie die [PLAY MODE]-Taste, um eine der folgenden Optionen zu wählen.
Alphabet: Alphabetische Sortierung der Sender.
Multiplex: Sortierung der Sender nach Multiplex.
Active ST: Sortierung nach aktiven Sendern. Sender,
die empfangen werden, erscheinen ganz oben in der
Liste. Sender, die nicht empfangen werden, befinden
sich am Ende der Liste.
De-12
Einstellen des DRC-Wertes
Mit der DRC-Funktion („Dynamic Range Control”)
kann der Dynamikumfang von DAB Digital-Audiomaterial dahingehend geändert werden, dass leise
Passagen auch bei geringer Lautstärke hörbar sind.
So können Sie sich auch spät Abends noch ein Radioprogramm anhören, ohne die Nachbarn zu stören.
1. Drücken Sie die [SETUP]-Taste.
2. Wählen Sie mit den Tasten [ ]/[ ] „DRC”.
3. Wählen Sie mit den Links/Rechts-Tasten
[ ]/[ ] eine der folgenden Einstellungen.
0: DRC ist aus.
1/2: Geringfügige Reduzierung des Dyna-
mikumfangs.
1: Starke Reduzierung des Dynamikumfangs.
Page 41

Verwendung der Speicher
Speichern oft benötigter Sender
Mit der „Preset Write”-Funktion lassen sich digitale
DAB-Sender speichern. Die Senderspeicher haben
den Vorteil, dass Sie blitzschnell von einem Programm zu einem anderen wechseln können und die
Sender nicht erst zu suchen brauchen. Es können bis
zu 40 Sender gespeichert werden.
1. Suchen Sie den Sender, den Sie speichern
möchten.
2. Drücken Sie die [SETUP]-Taste und wäh-
len Sie mit den Tasten [ ]/[ ] „Preset
Write?”.
3. Drücken Sie [ENTER].
4. Wählen Sie mit den Links/Rechts-Tasten
[ ]/[ ] oder [ ]/[ ] einen Speicher.
5. Drücken Sie die [ENTER]-Taste, um die
Frequenz zu speichern.
Der Sender wird gespeichert und im Display
erscheint „Complete”.
Anwahl eines Senderspeichers
Es können nur Speicher gewählt werden, die bereits
eine Senderfrequenz enthalten.
1. Wählen Sie mit den Tasten CH [+]/[–] oder
[ ]/[ ] den gewünschten Senderspeicher.
Mit der Taste CH [–] oder [ ] wählen Sie den vorangehenden Senderspeicher. Mit der Taste CH [+]
oder [ ] wählen Sie den nächsten Senderspeicher.
Die Speicher können auch direkt über die Zifferntasten gewählt werden.
De-13
Page 42

Verwendung eines UP-A1 Docks Fehlersuche
Solange sich der Moduswahlschalter des UP-DT1 in
der „TUNER”-Position befindet, wird der iPod im
UP-A1-Dock nicht aufgeladen. Wenn Sie den Moduswahlschalter von „TUNER” zu „THROUGH” schieben,
während sich das Universal Port-kompatible OnkyoGerät im Bereitschaftsbetrieb befindet, müssen Sie
den iPod kurz aus dem UP-A1 ziehen und wieder
anschließen, damit er aufgeladen wird.
*iPod ist in den USA und anderen Ländern ein
Warenzeichen der Apple Inc.
Wenn sich der UP-DT1 nicht erwartungsgemäß verhält, sollten Sie zuerst folgende Punkte überprüfen.
Der UP-DT1 wird von Ihrem Universal Port-kompatiblen Onkyo-Gerät nicht erkannt
• Überprüfen Sie, ob der UP-DT1 ordnungsgemäß
an den UNIVERSAL PORT des Universal Port-kompatiblen Onkyo-Geräts angeschlossen wurde.
•Schalten Sie alle Geräte vor Herstellen einer UNIVERSAL PORT-Verbindung aus.
Das Gerät gibt keinen Ton aus.
• Die Lautstärke des Verstärkers darf nicht auf den
Mindestwert gestellt sein.
• Überprüfen Sie alle Verbindungen und korrigieren
Sie sie bei Bedarf (siehe Seite 6).
Der UP-DT1 ist zwar an ein Universal Port-kompatibles Onkyo-Gerät angeschlossen, funktioniert
aber nicht.
•Schalten Sie alle Geräte aus und stellen Sie den
Wahlschalter des UP-DT1 auf „TUNER”.
De-14
Page 43

Der UP-DT1 kann nicht mit den frontseitigen Tasten des Universal Port-kompatiblen OnkyoGeräts bedient werden.
• Das ist völlig normal. Der UP-DT1 kann nur mit der
Fernbedienung des Universal Port-kompatiblen
Onkyo-Geräts bedient werden. (Bestimmte Geräte
erlauben jedoch sehr wohl eine direkte Bedienung.)
• Drücken Sie die [PORT]-Taste der Fernbedienung,
um den PORT-Modus zu wählen.
Die in der Anleitung gezeigten Display-Seiten entsprechen nicht dem, was Sie auf Ihrem Universal
Port-kompatiblen Onkyo-Gerät sehen
• Die genaue Anzeige richtet sich nach dem Universal Port-kompatiblen Onkyo-Gerät. Die in der
Anleitung gezeigten Abbildungen haben nur Beispielcharakter.
Wenn Sie ein Problem nicht beheben können, sollten
Sie den UP-DT1 zuerst zurückstellen und sich (bei
Bedarf ) erst danach an Ihren Onkyo-Händler wenden.
Verbinden Sie den UP-DT1 mit Ihrem Universal Portkompatiblen Onkyo-Gerät. Wählen Sie auf dem Uni-
versal Port-kompatiblen Onkyo-Gerät die „PORT”Quelle. Sobald der UP-DT1 erkannt wurde, müssen
Sie die [PORT]-Taste auf der Frontplatte des kompatiblen Geräts gedrückt halten, während Sie die
[STANDBY/ON]-Taste betätigen. (Das genaue Verfahren für die Rückstellung richtet sich nach Ihrem Universal Port-kompatiblen Onkyo-Gerät. Siehe auch
dessen Bedienungsanleitung.)
Technische Daten
40 Senderspeicher
Einstellbarer Frequenzbereich:
Band III: 5A~13F, 174.93~239.20 MHz
L-Band: LA~LW, 1452.96~1490.62 MHz
Stromanforderungen:
12V, 300mA
Abmessungen (B x H x T):
140 x 32,5 x 110mm
Gewicht:
0,4kg
De-15
Page 44

Hartelijk dank voor de aanschaf van dit Onkyo-product. Lees de handleiding aandachtig door voordat
u het product aansluit en gebruikt. Door alle aanwijzingen nauwkeurig op te volgen, zult u een optimale
geluidsweergave en luisterplezier van uw Onkyoproduct verkrijgen. Bewaar de handleiding voor het
geval u deze in de toekomst nogmaals nodig hebt.
Nl-2
WAARSCHUWING:
OM BRAND OF ELEKTRISCHE SCHOKKEN TE VOORKOMEN
MAG DIT APPARAAT NIET AAN VOCHTIGHEID OF REGEN
BLOOTGESTELD WORDEN.
OPGELET:
OM ELEKTRISCHE SCHOKKEN TE VOORKOMEN MAG NOCH
DE BEHUIZING NOCH HET ACHTERPANEEL WORDEN GEOPEND. LAAT ONDERHOUD AAN PROFESSIONELE ONDERHOUDSMONTEURS OVER.
WARNING
RISK OF ELECTRIC SHOCK
DO NOT OPEN
Deze lichtflits met pijlpunt in een gelijkzijdige driehoek
dient de gebruiker er op attent te maken dat er nietgeïsoleerde “gevaarlijke spanning” in de behuizing van het
toestel is en personen bij een verkeerde behandeling een
elektrische schok op zouden kunnen lopen.
Het uitroepteken in een gelijkzijdige driehoek dient de
gebruiker er op attent te maken dat er belangrijke
aanwijzingen voor bediening en onderhoud (reparatie) in
de bij het toestel geleverde gebruiksaanwijzing is.
AVIS
RISQUE DE CHOC ELECTRIQUE
OUVRIR
NE PAS
Page 45

Belangrijke veiligheidsvoorschriften
1. Lees de handleiding.
2. Bewaar de handleiding.
3. Neem alle waarschuwingen in acht.
4. Volg alle aanwijzingen op.
5. Gebruik dit apparaat niet in de buurt van water.
6. Gebruik een droge doek om het apparaat schoon te
maken.
7. Zorg dat de ventilatie-openingen niet worden afgesloten. Stel het apparaat op overeenkomstig de aanwijzingen van de fabrikant.
8. Plaats het apparaat niet in de buurt van een warmtebron zoals een verwarmingsradiator, kachel, gasfornuis
of ander apparaat (inclusief een versterker) dat warmte
afgeeft.
9. Zorg dat u niet de veiligheidsvoorziening van de gepolariseerde netstekker of de geaarde netstekker teniet
doet. Een gepolariseerde stekker heeft twee ongelijke
pennen. Een geaarde stekker heeft twee pennen en
tevens een derde aardingspen. De brede pen of de
derde aardingspen is er voor uw veiligheid. Als de bijgeleverde stekker niet in uw stopcontact past, moet u contact opnemen met een elektricien om het oude stopcontact te laten vervangen.
10. Leid het netsnoer zodanig dat er niet over gelopen
wordt of dat het snoer klemgedrukt wordt. Vooral op de
plaats van de stekker, het stopcontact of het punt waar
het snoer uit het apparaat komt, moet u voorzichtig zijn.
11. Gebruik alleen hulpstukken/accessoires die door de
fabrikant worden aanbevolen.
12. Trek de stekker uit het stopcontact bij bliksem of wanneer u het apparaat geruime tijd niet denkt te gebruiken.
13. Laat alle onderhoudswerkzaamheden over aan bevoegd
onderhoudspersoneel. Laat het apparaat nakijken wanneer er beschadigingen worden vastgesteld, zoals een
beschadigd netsnoer of netstekker, wanneer er vloeistof
of voorwerpen in het apparaat terecht zijn gekomen,
wanneer het apparaat blootgesteld heeft gestaan aan
regen of vocht, wanneer het apparaat niet normaal
werkt of als het apparaat is gevallen.
14. Storingen die herstellingen vereisen
In de volgende gevallen moet u de stekker uit het stopcontact trekken en het apparaat door een bevoegd
onderhoudsmonteur laten nakijken:
A. Wanneer het netsnoer of de stekker beschadigd is;
B. Wanneer er vloeistof of een voorwerp in het appa-
raat is terechtgekomen;
C. Wanneer het apparaat in de regen heeft gestaan;
D. Wanneer het apparaat niet normaal werkt terwijl u
de instructies juist uitvoert. Gebruik alleen de rege-
laars die in de handleiding worden beschreven om
het apparaat te bedienen. Het maken van ongeoor-
loofde afstellingen e.d. kan resulteren in ernstige
beschadiging en vereist in veel gevallen een uitge-
breide herstelling door een bevoegd onderhouds-
monteur om het apparaat weer in de oorspronke-
lijke toestand terug te brengen;
E. Wanneer het apparaat gevallen is of de ombouw
beschadigd is;
F. Wanneer het apparaat niet naar behoren functio-
neert of wanneer de prestaties afnemen.
Nl-3
Page 46

Voorzorgsmaatregelen
1. Door auteursrecht beschermde opnamen—Uitge-
zonderd voor strikt persoonlijk gebruik, is het opnemen
van door auteursrechtelijk beschermd beeld- en
geluidsmateriaal bij de wet verboden, tenzij na uitdrukkelijke toestemming van de auteursrechthouder.
2. Onderhoud—Het is aanbevolen dit apparaat regelmatig af te stoffen met een zachte doek. Aanklevend vuil
kunt u verwijderen met een zachte doek die u licht
bevochtigt met wat mild zeepsop. Droog het apparaat
daarna onmiddellijk na met een schone droge doek.
Gebruik voor het schoonmaken nooit een schuurspons
of chemische middelen zoals spiritus of thinner, aangezien dergelijke middelen de afwerking kunnen aantasten of de opschriften van het voorpaneel kunnen verwijderen.
3. Raak dit apparaat nooit met natte handen
aan—Raak dit apparaat en het netsnoer niet aan wan-
neer uw handen nat op vochtig zijn. Mocht er water of
een andere vloeistof in het inwendige van het apparaat
terechtkomen, laat u het dan inspecteren door uw
plaatselijke Onkyo-handelaar.
4. Omgang met het apparaat
• Als u het apparaat moet vervoeren, verpakt u het dan
zo goed mogelijk in de oorspronkelijke verpakking,
zoals u het bij aflevering hebt aangetroffen.
•Gebruik geen spuitbusmiddelen, zoals haarlak of
insecticide, in de buurt van dit apparaat. Laat geen
plastic of rubber voorwerpen lang achtereen op het
Nl-4
apparaat liggen, want dat kan lelijke plekken op de
ombouw achterlaten.
• Na afloop van het gebruik dient u alle discs te verwijderen en het apparaat uit te schakelen.
Geheugen-backup
De UP-DT1 is voorzien van een geheugensysteem
zonder batterij voor de opslag van de radio-instellingen, wanneer u de aansluiting op het lichtnet verbreekt of wanneer de stroom uitvalt.
Page 47

Kenmerken
1
❑ Automatische zenderscan (band III/L-band)
❑ 40 geheugens
❑ Through-mode voor het gebruik van bijkomende
apparatuur
Bijgeleverde toebehoren
Over de UP-DT1
Voorkant
2
DAB-antenne
34
Achterkant
A Modekeuzeschakelaar
2 Universal Port-kabel
3 UNIVERSAL PORT
4 DAB-antenneconnector
Nl-5
Page 48

Aansluiten van de UP-DT1
Schakel uw Universal Port-compatibel Onkyo-apparaat uit. Sluit de UP-DT1 aan op diens UNIVERSAL
PORT. Stel de modekeuzeschakelaar van de UP-DT1 in.
Universal Portcompatibel
Onkyo-apparaat
Universal Port-dock van
Onkyo, UP-A1 enz. (optie)
Nl-6
Instellen van de modekeuzeschakelaar
Schakel het Universal Port-compatibele Onkyoapparaat uit alvorens de instelling van de
modekeuzeschakelaar te wijzigen.
• TUNER: Kies deze instellingen om een digitale
DAB-zender te beluisteren.
• THROUGH: Kies deze instelling om het signaal van
het apparaat te beluisteren, dat u op de Universal
Port van de UP-DT1 aangesloten hebt, zo bv. een
iPod in een UP-A1 dock.
• AUTO: Indien u “AUTO” kiest, wordt de bron automatisch geselecteerd, wanneer u op het Universal
Page 49

Port-compatibele Onkyo-apparaat een andere
ingangsbron kiest. Ziehier een voorbeeld: wanneer u de “TUNER”-bron kiest, wordt de UP-DT1
geselecteerd. Met “DOCK” kiest u het dock (UP-A1
enz.) dat op de Universal Port van de UP-DT1 aangesloten is. Sommige Universal Port-compatibele
Onkyo-apparaten ondersteunen deze functie niet.
In dat geval moet u de bron met de modekeuzeschakelaar selecteren.
Aansluiten van de DAB-antenne
1. Schroef de bijgeleverde DAB-antenne-
stekker op de DAB ANTENNA-connector.
Wanneer de UP-DT1 gereed is voor gebruik, moet u
een DAB-zender kiezen en de positie van de DABantenne bepalen waarbij een optimale ontvangst
wordt verkregen.
2. Maak de DAB-antenne met punaises of
iets dergelijks op de plaats vast.
Nl-7
Page 50

Afstandsbediening
De UP-DT1 kan ook met de afstandsbediening van het Universal Port-compatibele Onkyo-apparaat worden
bediend. Richt de afstandsbediening echter op het Universal Port-compatibele Onkyo-apparaat i.p.v. de
UP-DT1. De schikking van de toetsen op de afstandsbediening verschilt naar gelang het Universal Port-compatibele Onkyo-apparaat dat u gebruikt.
DISPLAY
/
/
PLAY MODE
Pijltoetsen
ENTER
SETUP
CH +/–
RETURN
(Deze afstandsbediening toont een AV-receiver van Onkyo.)
Cijfertoetsen
Nl-8
Page 51

U kunt de volgende toetsen op de afstandsbediening van een Universal Port-compatibel Onkyo-apparaat
gebruiken.
Toets Functie Verklaring
0~9 Geheugen Dienen voor de directe geheugenkeuze.
DISPLAY Weergavewijziging
PLAY MODE Zenderlijst
SETUP Instelling/Terug Gebruik deze toets om de instellingenfunctie in te schakelen.
RETURN Terug
Volgende/vorige zender Hiermee kiest u een DAB-zender.
Pijltoetsen [ ]/[ ]
Pijltoetsen [ ]/[ ]
ENTER Bevestiging
CH +/– Volgende/vorige geheugen Gebruik deze toetsen voor het kiezen van de zendergeheugens.
/
/
Instelling op/neer
Instelling op/neer In het “Setup”-menu kunt u hiermee instellingen wijzigen.
Volgende/vorige geheugen Gebruik deze toetsen voor het kiezen van de zendergeheugens.
Vorige/volgende zender Hiermee kiest u een DAB-zender.
Gebruik deze toets om verschillende inlichtingen in het display
weer te geven.
Hiermee kiest u een andere lijstmode: alfabetische volgorde, multiplex-volgorde of lijst van actieve zenders.
Gebruik deze toets om terug te keren naar de vorige display-aanduiding.
In het “Setup”-menu kunt u hiermee “SCAN”, “DRC” of “Preset Write”
kiezen.
Gebruik deze toetsen om de diverse functies en instellingen te
bevestigen.
Nl-9
Page 52

Luisteren naar DAB digitale radiozenders
Wanneer u de eerste maal DAB kiest
Schakel het Universal Port-compatibele Onkyoapparaat in waarop de UP-DT1 aangesloten is. Druk
op de [PORT]-toets van de afstandsbediening om de
PORT-ingangsbron te kiezen. The UP-DT1 zoekt automatisch zenders in de WorldWide-mode.
Het display houdt u op de hoogte van de vordering.
Zodra het zoeken is voltooid, wordt er afgestemd op
de eerste zender die gevonden is.
Nl-10
Handmatig gebruik van de automatische afstemfunctie
Als er een nieuwe DAB-zender wordt gestart of als u
naar een ander gebied verhuist, kunt u de automatische afstemfunctie opnieuw activeren.
1. Druk op de [SETUP] toets.
2. Kies met de [ ]/[ ]-toetsen “SCAN”.
3. Kies met de Links/Rechts-toetsen [ ]/[ ]
de instelling “U.K” of “WorldWide”.
U.K: Band III (10A~13F).
WordWide: Band III (5A~13F) en L-band (LA~
LW ).
4. Druk op de [ENTER]-toets om het zoeken
van DAB-zenders te starten.
Kiezen van DAB-zenders
1. Kies met de [ ]/[ ]-toetsen een zen-
der.
Page 53

Weergeven van DAB radio-informatie
Druk enkele malen op de [DISPLAY]-toets om meer
informatie over de gekozen DAB-zender te zien.
1. DLS (Dynamic Label Segment)
Wanneer op een zender is afgestemd, die DLS
tekstgegevens uitzendt, zal de tekst door het display rollen.
(Schuiven)
2. Programmatype
Toont het programmatype.
3. Bitrate en audiomode
Toont de bitrate van de zender en de audiomode
(stereo, mono of gemeenschappelijk stereo).
4. Signaalkwaliteit
Toont de signaalkwaliteit.
0~59: Slechte ontvangst
60~79: Goede ontvangst
80~100: Uitstekende ontvangst
5. Multiplexnaam
Toont de naam van de huidige multiplex.
6. Multiplexnummer en frequentie
Toont het nummer en de frequentie van de huidige multiplex.
Nl-11
Page 54

Kiezen van de afstemmingsmode (zenderlijst)
De zenders kunnen in alfabetische volgorde, volgens
multiplex of volgens actieve zenders worden gesorteerd.
Kies met de [PLAY MODE]-toets één van de volgende
opties.
Alphabet: Alfabetisch sorteren van de zenders.
Multiplex: Sorteren van de zenders volgens multi-
plex.
Active ST: Sorteren op actieve zenders. De ontvang-
bare zenders staan bovenaan de lijst en de zenders
die niet goed ontvangen kunnen worden staan
onderaan de lijst.
Nl-12
Kiezen van de ‘DRC’-waarde
Met de DRC (dynamiekbereikregeling) kunt u het
dynamisch bereik van de digitale DAB-radio verminderen, zodat u zachte partijen nog steeds kunt horen
bij het luisteren op laag volume – dit is gewenst wanneer u ‘s avonds laat naar de radio wilt luisteren zonder anderen te storen.
1. Druk op de [SETUP]-toets.
2. Kies met de [ ]/[ ]-toetsen “DRC”.
3. Kies met de Links/Rechts-toetsen [ ]/[ ]
één van de volgende opties.
0: DRC uit.
1/2: Kleine vermindering van het dynamisch
bereik.
1: Grote vermindering van het dynamisch
bereik.
Page 55

Gebruik van de geheugenafstemming
Uw favoriete zenders in het geheugen vastleggen
Met de “Preset Write”-functie kunt u de gewenste
digitale DAB-radiozenders opslaan. Geheugens hebben het voordeel dat u uw favoriete zenders kunt
opslaan om ze nadien vliegensvlug op te roepen. U
kunt maximaal 40 zenders opslaan.
4. Kies met de Links/Rechts-knoppen [ ]/
[] of [ ]/[ ] een instelling.
5. Druk op [ENTER] om een instelling op te
slaan.
De zender wordt opgeslagen en het display beeldt
de “Complete”-boodschap af.
1. Stem op de zender af die u in het geheu-
gen wilt vastleggen.
2. Druk op de [SETUP]-knop en kies met de
Op/Neer-knoppen [ ]/[ ] “Preset
Write?”.
3. Druk op [ENTER].
Zendergeheugens kiezen
Alvorens zendergeheugens te kunnen kiezen moet u
zenders opslaan.
1. Kies met de CH [+]/[–]- of [ ]/[ ]-
toetsen een zender.
Druk op de CH [–]- of [ ]-toets om het voorafgaande geheugen te kiezen. Druk op de CH [+]- of
[ ]-toets om het volgende geheugen te kiezen.
Voor het kiezen van de geheugens kunt u ook de
cijferknoppen gebruiken.
Nl-13
Page 56

UP-A1 dock gebruiken Verhelpen van storingen
Wanneer de modekeuzeschakelaar van de UP-DT1
op “TUNER” staat ingesteld, wordt de iPod in het
UP-A1 dock niet opgeladen. Wanneer u de instelling
van de modekeuzeschakelaar van “TUNER” naar
“THROUGH” wijzigt, terwijl het Universal Port-compatibele Onkyo-apparaat zich in de standby-mode
bevindt, moet u de iPod even verwijderen en
opnieuw in de UP-A1 insteken om het laden te starten.
*iPod is in de VS en andere landen een handelsmerk
van Apple Inc.
Raadpleeg dit hoofdstuk als u een probleem hebt
met uw UP-DT1.
De UP-DT1 wordt niet door het Universal Portcompatibele Onkyo-product herkend
•Controleer of the UP-DT1 naar behoren op de UNIVERSAL PORT van het Universal Port-compatibele
Onkyo-apparaat is aangesloten.
•Schakel alle apparaten uit alvorens iets op een
UNIVERSAL PORT aan te sluiten.
U hoort niets
•Controleer of de volumeregelaar van de versterker
eventueel in de minimumstand staat.
•Controleer alle aansluitingen en corrigeer ze,
indien nodig (zie blz. 6).
De UP-DT1 is weliswaar op een Universal Portcompatibel Onkyo-apparaat aangesloten, maar
werkt niet
•Schakel alle apparaten uit en stel de modekeuzeschakelaar van de UP-DT1 in op “TUNER”.
Nl-14
Page 57

De UP-DT1 kan niet met de knoppen op het frontpaneel van het Universal Port-compatibele
Onkyo-apparaat worden bediend
• Dit is volkomen normaal. De UP-DT1 kan alleen
met de afstandsbediening van het Universal Portcompatibele Onkyo-apparaat worden bediend.
(Sommige producten laten de bediening via de
knoppen op het frontpaneel echter toe.)
• Druk op de [PORT]-toets van de afstandsbediening om de PORT-mode te kiezen.
De displayboodschappen in deze handleiding
komen niet overeen met wat u op het Universal
Port-compatibele Onkyo-apparaat ziet
•Wat er precies wordt weergegeven verschilt naar
gelang het gebruikte Universal Port-compatibele
Onkyo-apparaat. De in deze handleiding
getoonde afbeeldingen zijn enkel als voorbeelden
bedoeld.
Indien u het probleem niet kunt oplossen, probeert
u het best eerst de UP-DT1 te resetten alvorens contact op te nemen met uw Onkyo-dealer.
Sluit de UP-DT1 aan op uw Universal Port-compatibele Onkyo-product. Kies, op het Universal Port-
compatibele Onkyo-apparaat, de PORT-ingangsbron. Indien de UP-DT1 wordt herkend, moet u de
[PORT]-knop op het frontpaneel van het apparaat
ingedrukt houden, terwijl u op de [STANDBY/ON]knop op het frontpaneel drukt. (De resetprocedure
verschilt naar gelang het Universal Port-compatibele
Onkyo-apparaat. Zie dus ook diens handleiding.)
Technische gegevens
40 zendergeheugens
Afstembereik:
Band III: 5A~13F, 174.93~239.20 MHz
L-Band: LA~LW, 1452.96~1490.62 MHz
Voeding:
12V, 300mA
Afmetingen (B x H x D):
140 x 32.5 x 110mm
Gewicht:
0,4kg
Nl-15
Page 58

Tack för att du köpt en produkt från Onkyo. Var god
läs igenom denna bruksanvisning noggrant innan
några anslutningar påbörjas eller apparaten tas i
bruk. Genom att följa anvisningarna är det möjligt
att erhålla så bra ljudprestanda och lyssningsupplevelse som möjligt från Onkyoprodukten. Spara
bruksanvisningen för framtida referensbehov.
Sv-2
VARNING:
FÖR ATT MINSKA RISKEN FÖR ELDSVÅDA OCH ELEKTRISKA
STÖTAR FÅR DEN HÄR APPARATEN INTE UTSÄTTAS FÖR
REGN ELLER FUKT.
OBSERVERA:
PÅ GRUND AV RISK FÖR ELEKTRISKA STÖTAR FÅR HÖLJET
(ELLER BAKPANELEN) INTE AVLÄGSNAS. DET FINNS INGA
DELAR INUTI APPARATEN SOM KAN REPARERAS AV KONSUMENTEN. ÖVERLÅT ALLT REPARATIONSARBETE TILL KVALIFICERAD PERSONAL
WARNING
RISK OF ELECTRIC SHOCK
DO NOT OPEN
Blixtpilen inom en liksidig triangel är avsedd att varna
användaren om att det finns oisolerad "farlig spänning"
inuti apparaten som kan vara tillräckligt stark för att ge
elektriska stötar med personskador som följd.
Utropstecknet inom en liksidig triangel är avsedd att
påminna användaren om att det finns viktiga användningsoch underhållsanvisningar i litteraturen som medföljer
apparaten.
AVIS
RISQUE DE CHOC ELECTRIQUE
OUVRIR
NE PAS
Page 59

Viktiga säkerhetsföreskrifter
1. Läs dessa anvisningar.
2. Spara dessa anvisningar.
3. Uppmärksamma alla varningar.
4. Följ alla anvisningar.
5. Använd inte apparaten i närheten av vatten.
6. Rengör endast med en torr trasa.
7. Blockera inga ventilationsöppningar. Installera apparaten i enlighet med tillverkarens anvisningar.
8. Placera inte apparaten i närheten av någon värmekälla,
såsom ett element, ett värmeregister, en spis eller någon
annan värmealstrande apparat (t.ex. en förstärkare).
9. Upphäv inga säkerhetssyften med en polariserad eller
jordningsanpassad stickkontakt. En polariserad stickkontakt har två blad, varav det ena är bredare än det
andra. En jordningsanpassad stickkontakt har två blad
och ett tredje jordningsstift. Det bredare bladet eller
jordningsstiftet utgör säkerhetsdetaljer. Om den medföljande stickkontakten inte passar i ett nätuttag, så
kontakta en elektriker för byte av det fasta nätuttaget.
10. Se till att skydda nätkabeln från att bli trampad på eller
klämd, särskilt vid kontakterna, vid nätuttaget och vid
nätintaget på apparaten.
11. Använd endast monteringsdelar/tillbehör i enlighet
med tillverkarens specifikationer.
12. Koppla loss nätkabeln vid åskväder eller när apparaten
inte ska användas under en längre tidsperiod.
13. Överlåt all service till en kvalificerad reparatör. Service
krävs efter att apparaten har skadats på något sätt, t.ex.
genom att nätkabeln eller någon kontakt har skadats,
vätska eller något fast föremål har trängt in i apparaten,
apparaten har utsatts för regn eller fukt, inte fungerar
normalt eller har tappats i golvet.
14. Skador som kräver reparation
Koppla loss apparaten från nätuttaget och överlåt reparation till en kvalificerad reparatör vid följande omständigheter:
A. När nätkabeln eller stickkontakten skadats.
B. Om vätsk a spillts eller föremål fallit in i apparaten.
C. Om apparaten utsatts för regn eller vatten.
D. Om apparaten inte fungerar som den ska, trots att
anvisningarna i bruksanvisningen följs. Andra
endast inställningen av de reglage som beskrivs i
bruksanvisningen. Felaktig inställning av andra reglage kan resultera i skador som ofta kräver ett
omfattande arbete av en kvalificerad tekniker för
återställning av apparaten till normal driftstillstånd.
E. Om apparaten tappats eller på annat sätt skadats.
F. När apparaten uppvisar en tydlig förändring av pre-
standa - detta tyder på ett behov av reparation.
Sv-3
Page 60

Säkerhetsåtgärder
1. Angående upphovsrätt—Så länge det inte endast är
för privat bruk är det förbjudet att kopiera upphovsrättsskyddat material utan upphovsrättsinnehavarens
tillstånd.
2. Vård—Torka då och då av utsidan på förstärkare med
en mjuk trasa. Använd en mjuk trasa fuktad i en svag
blandning av ett milt rengöringsmedel och vatten till
att torka bort svårborttagna fläckar med. Torka därefter
genast av förstärkare med en ren och torr trasa. Använd
inte slipande trasor, förtunningsmedel, alkohol eller
andra kemiska lösningar som kan skada ytbehandlingen eller skrapa bort text från höljet.
3. Vidrör aldrig förstärkare med våta händer—Hantera
aldrig förstärkare eller dess nätkabel med våta eller fuktiga händer. Låt en Onkyohandlare kontrollera förstärkare innan den används igen, om vatten eller någon
annan vätska har trängt in i förstärkare.
4. Angående hantering
• Om förstärkare behöver transporteras, så packa in
den i den ursprungliga förpackningen, på samma sätt
som den var förpackad när den först köptes.
•Anv änd inte flyktiga vätskor, t.ex. insektssprej, i närhe-
ten av förstärkare. Lämna inte gummi- eller plastföremål ovanpå förstärkare under lång tid, eftersom det
kan resultera i att märken uppstår på höljet.
•Töm skivfacket och stäng av förstärkare efter avslutad
användning.
Sv-4
Stödminne
I UP-DT1 används ett batterilöst minnesbackupsystem för att bibehålla radioinställningar när den är
urkopplad eller då ett strömavbrott inträffar.
Page 61

Egenskaper
1
❑ Automatisk genomsökning (Band III/L-Band)
❑ 40 snabbval
❑ Through-läge för anslutning av extra
komponenter
Medföljande tillbehör
Angående UP-DT1
Front
2
DAB-a ntenn
34
Baksida
A Lägesväljare
2 Universal Port-kabel
3 UNIVERSAL PORT
4 DAB-antennuttag
Sv-5
Page 62

Ansluta UP-DT1
Slå av den Universal Port-kompatibla Onkyoprodukten. Anslut UP-DT1 till dess UNIVERSAL PORT. Ställ in
UP-DT1:s lägesväljare.
Universal Portkompatibel
Onkyoprodukt
Onkyo Universal Portdocka, UP-A1 etc. (extra
tillbehör)
Sv-6
Ställa in lägesväljaren
Slå av den Universal Port-kompatibla Onkyoprodukten innan lägesväljaren ställs in.
• TUNER: Välj detta för att lyssna på DAB digitalradio.
• THROUGH: Välj detta för att lyssna på enheten
ansluten till Universal Port på UP-DT1, till exempel
en iPod i en UP-A1-docka.
• AUTO: När AUTO är valt, sker automatiskt val av
källan när ingångskällan ändras på den Universal
Port-kompatibla Onkyoprodukten. Om man till
exempel väljer TUNER som ingångskälla så väljs
Page 63

UP-DT1, medan om man väljer DOCK som
ingångskälla så väljs dockan (UP-A1 etc.) ansluten
till Universal Port på UP-DT1. Observera att vissa
Universal Port-kompatibla Onkyoprodukter inte
stöder denna funktion, och då måste du ställa in
lägesväljaren manuellt.
Ansluta DAB-antennen
1. Skruva fast den medföljande DAB-ant-
enns kontakt i antenningången DAB
ANTENNA.
När UP-DT1 är klar att användas är det nödvändigt
att välja en DAB-station och justera DAB-antennens
läge för att erhålla så bra mottagning som möjligt.
2. Använd häftstift e.dyl. till att fästa DAB-
antennen i lämpligt läge.
Sv-7
Page 64

Fjärrkontrollen
Du kan manövrera UP-DT1 med den Universal Port-kompatibla Onkyoproduktens fjärrkontroll. Rikta fjärrkontrollen mot den Universal Port-kompatibla Onkyoprodukten, inte mot UP-DT1. Var knapparna på fjärrkontrollen sitter, varierar beroende på vilken Universal Port-kompatibel Onkyoprodukt du använder.
DISPLAY
/
/
PLAY MODE
CH +/–
Sifferknappar
Navigeringsknappar
ENTER
SETUP
Sv-8
RETURN
(Fjärrkontrollen som visas här hör till en Onkyo AV-receiver.)
Page 65

Du kan använda följande knappar på den Universal Port-kompatibla Onkyoproduktens fjärrkontroll.
Knapp Funktion Förklaring
0–9 Snabbval Används för att välja snabbvalsstationer genom nummerval.
DISPLAY Ändra visning Används till att välja information i teckenfönstret.
PLAY MODE Stationslistning
SETUP Inställning/Återgå Används till att koppla in inställningsläget.
RETURN Återgå Används till att återgå till föregående visning.
Navigeringsknappar
[ ]/[ ]
Navigeringsknappar
[ ]/[ ]
ENTER Mata in Används till att bekräfta olika funktioner och inställningar.
CH +/– Snabbval upp/ner Används till att välja snabbvalsstationer.
/
/
Stationssökning upp/ner Används för att ställa in en DAB-station.
Inställning upp/ner
Inställning upp/ner
Snabbval ner/upp Används till att välja snabbvalsstationer.
Stationssökning ner/upp Används för att ställa in en DAB-station.
Används för att växla listningsläget: alfabetiskt ordning, multiplexordning, eller sortering efter aktiva stationer.
I inställningsmenyn används dessa knappar för att välja SCAN,
DRC eller Preset Write.
I inställningsmenyn används dessa knappar för att göra inställningar.
Sv-9
Page 66

Digital DAB-radiomottagning
Val av DAB första gången
Slå på den Universal Port-kompatibla Onkyoprodukten som är ansluten till UP-DT1. Tryck på fjärrlägesknappen [PORT] på fjärrkontrollen för att välja
ingångskällan PORT. UP-DT1 börjar söka efter stationer i WorldWide-läget automatiskt.
Genomsökningens förlopp visas i teckenfönstret.
När genomsökningen är klar ställs den först identifierade stationen in.
Sv-10
Manuell start av automatisk genomsökning
Om en ny DAB-station har etablerats eller om radiomottagaren har flyttats till ett nytt område, så kan
automatisk genomsökning utföras på nytt.
1. Tr yck på [SETUP].
2. Använd knapparna [ ]/[ ] för att välja
“SCAN”.
3. Använd navigeringsknapparna vän-
ster/höger [ ]/[ ] för att välja “U.K” eller
“WorldWide”.
U.K: Band III (10A till 13F).
WorldWide: Band III (5A till 13F) och L-Band (LA
till LW).
4. Tr yck på [ENTER] för att börja söka efter
DAB-stationer.
Val av DAB-stationer
1. Använd knapparna [ ]/[ ] för att
välja en station.
Page 67

Visning av DAB-radioinformation
Try ck upprepade gånger på [DISPLAY ] för att ta fram
mer information gällande vald DAB-station.
1. DLS (Dynamic Label Segment)-text
Vid mottagning av en station som sänder DLStextdata rullas texten fram i teckenfönstret.
(rullas)
2. Programtyp
Aktuell typ av program visas.
3. Bithastighet och ljudläge
Bithastighet och ljudläge (stereo, mono eller
sammanslagen stereo) för vald station visas.
4. Signalkvalitet
Aktuell signalkvalitet visas.
0–59: Dålig mottagning
60–79: Bra mottagning
80–100: Utmärkt mottagning
5. Multiplexnamn
Namnet på vald multiplex visas.
6. Multiplexnummer och frekvens
Numret på och frekvensen för vald multiplex
visas.
Sv-11
Page 68

Välja läge för stationsinställning (stationslistning)
Du kan sortera tillgängliga stationer alfabetisk, efter
multiplex eller aktiva stationer.
Använd knappen [PLAY MODE] för att välja något av
följande alternativ.
Alphabet: Stationer sorteras i alfabetisk ordning.
Multiplex: Stationer sorteras enligt multiplex.
Active ST: Stationer sorteras enligt aktiva stationer.
Mottagningsbara stationer placeras överst på listan
medan stationer med dåliga mottagningsförhållanden hamnar längst ner på listan.
Sv-12
Välja DRC-värde
Med hjälp av funktionen DRC (Dynamic Range Control) är det möjligt att minska dynamikomfånget för
digital DAB-radiomottagning, så att tysta partier kan
höras även vid ljudåtergivning på låg volymnivå.
Detta kan vara idealiskt för att undvika att störa
andra vid lyssning på radio sent på kvällen.
1. Tr yck på [SETUP].
2. Använd knapparna [ ]/[ ] för att välja
“DRC”.
3. Använd navigeringsknapparna vän-
ster/höger [ ]/[ ] för att välja något av
följande alternativ.
0: DRC urkopplat.
1/2: Dynamikomfånget minskas lite grann.
1: Dynamikomfånget minskas mycket.
Page 69

Användning av snabbval
Lagring av stationer i snabbvalsminnet
Med funktionen Preset Write kan du lagra DAB digitalradiostationer som snabbval. Snabbval gör det
enkelt att välja stationer som du ofta lyssnar på. Du
behöver inte heller ställa in radion manuellt varje
gång du vill byta station. Du kan lagra upp till 40 stationer som snabbval.
1. Ställ in en station som ska lagras i snabb-
valsminnet.
2. Tr yck på [SETUP] och använd sedan navi-
geringsknapparna upp/ner [ ]/[ ] för
att välja “Preset Write?”
3. Tr yck på [ENTER].
4. Använd navigeringsknapparna vän-
ster/höger [ ]/[ ] eller knapparna
[ ]/[ ] för att välja ett snabbval.
5. Tr yck på [ENTER] för att lagra stationen.
Snabbvalet lagras och “Complete” visas på displayen.
Välja snabbvalsstationer
Du måste lagra några snabbval innan det går att välja
dem.
1. Använd knapparna CH [+] / [–] eller
[ ]/[ ] för att välja ett snabbval.
Använd knapparna CH [–] eller [ ] för att välja
föregående snabbval. Använd knapparna CH [+]
eller [ ] för att välja nästa snabbval.
Du kan också använda sifferknapparna för att välja
snabbval.
Sv-13
Page 70

Använda en UP-A1-docka Felsökning
När UP-DT1:s lägesväljare är inställd på TUNER, sker
ingen laddning av iPod-spelaren som sitter i den
anslutna UP-A1-dockan. Om du ändrat lägesväljaren
från TUNER till THROUGH medan den Universal Portkompatibla Onkyoprodukten står i standby-läge,
måste du ta ur och sätta tillbaka iPod-spelaren i
UP-A1 för att laddningen ska påbörjas.
*iPod är ett varumärke tillhörande Apple Inc.,
registrerat i USA och övriga länder.
Om det skulle uppstå något problem vid användning av UP-DT1, så försök lösa problemet med hjälp
av anvisningarna i detta kapitel.
UP-DT1 identifieras inte av den Universal Portkompatibla Onkyoprodukten
• Kontrollera att UP-DT1 är ordentligt ansluten till
UNIVERSAL PORT på den Universal Port-kompatibla Onkyoprodukten.
• Slå av alla enheter före anslutning till en UNIVERSAL PORT.
Inget ljud
• Kontrollera att volymen på förstärkaren inte är
inställd på minimal nivå.
• Kontrollera alla anslutningar och rätta till efter
behov (se sid. 6).
UP-DT1 är ansluten till en Universal Port-kompatibel Onkyoprodukt men fungerar inte
• Slå av alla enheter och ställ sedan UP-DT1:s
lägesväljare på TUNER.
Sv-14
Page 71

Det går inte att manövrera UP-DT1 med knapparna på frontpanelen på den Universal Portkompatibla Onkyoprodukten
•Detta är helt normalt. UP-DT1 kan manövreras
endast med fjärrkontrollen till den Universal Portkompatibla Onkyoprodukten. (En del produkter
kan dock manövreras med frontpanelens knappar.)
•Tryck på fjärrlägesknappen [PORT] på fjärrkontrollen för att välja fjärrläget PORT.
Vad som visas i teckenfönstret i denna bruksanvisning skiljer sig från vad som visas på din egen Universal Port-kompatibla Onkyoprodukt
•Den exakta information som visas beror på vilken
Universal Port-kompatibel Onkyoprodukt som
används. Vad som visas i teckenfönstret i denna
bruksanvisning är endast exempel.
Om du inte kan lösa problemet själv, prova att återställa UP-DT1 enligt följande innan Onkyos återförsäljare kontaktas.
Anslut UP-DT1 till den Universal Port-kompatibla
Onkyoprodukten. På den Universal Port-kompatibla
Onkyoprodukten, välj ingångskällan PORT. När
UP-DT1 har identifierats, håll knappen [PORT] på
produktens frontpanel intryckt, och tryck på knappen [STANDBY/ON] på produktens frontpanel. (Hur
denna återställning görs kan skilja sig beroende på
den Universal Port-kompatibla Onkyoprodukten, så
vi hänvisar även till produktens bruksanvisning.)
Specifikationer
40 snabbvalsstationer
Frekvensomfång tuning:
Band III: 5A–13F, 174.93–239.20 MHz
L-Band: LA–LW, 1452.96–1490.62 MHz
Märkdata:
12 V, 300 mA
Mått (B x H x D):
140 x 32,5 x 110 mm
Vikt:
0,4 kg
Sv-15
Page 72

Sales & Product Planning Div. : 2-1, Nisshin-cho, Neyagawa-shi, OSAKA 572-8540, JAPAN
Tel: 072-831-8023 Fax: 072-831-8124
ONKYO U.S.A. CORPORATION
18 Park Way, Upper Saddle River, N.J. 07458, U.S.A.
Tel: 201-785-2600 Fax: 201-785-2650 http://www.us.onkyo.com/
ONKYO EUROPE ELECTRONICS GmbH
Liegnitzerstrasse 6, 82194 Groebenzell, GERMANY
Tel: +49-8142-4401-0 Fax: +49-8142-4401-555 http://www.eu.onkyo.com/
ONKYO EUROPE UK Office
Suite 1, Gregories Court, Gregories Road, Beaconsfield, Buckinghamshire, HP9 1HQ
UNITED KINGDOM Tel: +44-(0)1494-681515 Fax: +44(0)-1494-680452
ONKYO CHINA LIMITED
Unit 1&12, 9/F, Ever Gain PlazaTower 1, 88, Container Port Road, Kwai Chung,
N.T., HONG KONG Tel: 852-2429-3118 Fax: 852-2428-9039
http://www.ch.onkyo.com/
http://www.jp.onkyo.com/
I0907-1
SN 29400106
(C) Copyright 2009 ONKYO CORPORATION Japan. All rights reserved.
Sv-16
* 2 9 4 0 0 1 0 6 *
 Loading...