

Page 1

ItalianoEspañolEnglish
Deutsch
7.1ch Home Theater Speaker Package
SKS-HT530
SKF-530F FRONT SPEAKER
SKC-530C CENTER SPEAKER
SKM-530S SURROUND SPEAKER
SKB-530 SURROUND BACK SPEAKER
SKW-530 POWERED SUBWOOFER
Getting Started..................En-2
Primeros pasos
Guida introduttiva
Vorbereitungen
Installing & Using............. En-5
Instalación y utilización
Installazione e utilizzo
Aufstellung & Verwendung
..............................................De-5
................. Es-2
.............. It-2
..................De-2
... Es-5
...... It-5
Instruction Manual
Manual de instrucciones
Manuale di istruzioni
Bedienungsanleitung
Appendix
Apéndice
Appendice
Anhang
.................................De-7
.............................En-7
.............................. Es-7
............................. It-7
En
E
s
It
D
e
Page 2

WARNING:
TO REDUCE THE RISK OF FIRE OR ELECTRIC
SHOCK, DO NOT EXPOSE THIS APPARATUS
TO RAIN OR MOISTURE.
CAUTION:
TO REDUCE THE RISK OF ELECTRIC SHOCK,
DO NOT REMOVE COVER (OR BACK). NO
USER-SERVICEABLE PARTS INSIDE. REFER
SERVICING TO QUALIFIED SERVICE
PERSONNEL.
Important Safety Instructions
WARNING
RISK OF ELECTRIC SHOCK
DO NOT OPEN
The lightning flash with arrowhead symbol, within an
equilateral triangle, is intended to alert the user to the
presence of uninsulated “dangerous voltage” within
the product’s enclosure that may be of sufficient
magnitude to constitute a risk of electric shock to
persons.
The exclamation point within an equilateral triangle is
intended to alert the user to the presence of important
operating and maintenance (servicing) instructions in
the literature accompanying the appliance.
AVIS
RISQUE DE CHOC ELECTRIQUE
NE PAS
OUVRIR
1. Read these instructions.
2. Keep these instructions.
3. Heed all warnings.
4. Follow all instructions.
5. Do not use this apparatus near water.
6. Clean only with dry cloth.
7. Do not block any ventilation openings. Install in
accordance with the manufacturer’s instructions.
8. Do not install near any heat sources such as radiators, heat registers, stoves, or other apparatus
(including amplifiers) that produce heat.
9. Do not defeat the safety purpose of the polarized or
grounding-type plug. A polarized plug has two
blades with one wider than the other. A grounding
type plug has two blades and a third grounding
prong. The wide blade or the third prong are provided for your safety. If the provided plug does not
fit into your outlet, consult an electrician for
replacement of the obsolete outlet.
10. Protect the power cord from being walked on or
pinched particularly at plugs, convenience receptacles, and the point where they exit from the apparatus.
11. Only use attachments/accessories specified by the
manufacturer.
12.
Use only with the cart, stand,
PORTABLE CART WARNING
tripod, bracket, or table specified by the manufacturer, or
sold with the apparatus.
When a cart is used, use caution when moving the cart/
apparatus combination to
avoid injury from tip-over.
S3125A
13. Unplug this apparatus during lightning storms or
when unused for long periods of time.
14. Refer all servicing to qualified service personnel.
Servicing is required when the apparatus has been
damaged in any way, such as power-supply cord or
plug is damaged, liquid has been spilled or objects
have fallen into the apparatus, the apparatus has
been exposed to rain or moisture, does not operate
normally, or has been dropped.
15. Damage Requiring Service
Unplug the apparatus from the wall outlet and refer
servicing to qualified service personnel under the
following conditions:
A. When the power-supply cord or plug is damaged,
B. If liquid has been spilled, or objects have fallen
into the apparatus,
C. If the apparatus has been exposed to rain or
water,
D. If the apparatus does not operate normally by
following the operating instructions. Adjust only
those controls that are covered by the operating
instructions as an improper adjustment of other
controls may result in damage and will often
require extensive work by a qualified technician
to restore the apparatus to its normal operation,
E. If the apparatus has been dropped or damaged in
any way, and
F. When the apparatus exhibits a distinct change in
performance this indicates a need for service.
16. Object and Liquid Entry
Never push objects of any kind into the apparatus
through openings as they may touch dangerous voltage points or short-out parts that could result in a
fire or electric shock.
The apparatus shall not be exposed to dripping or
splashing and no objects filled with liquids, such as
vases shall be placed on the apparatus.
Don’t put candles or other burning objects on top of
this unit.
17. Batteries
Always consider the environmental issues and follow local regulations when disposing of batteries.
18. If you install the apparatus in a built-in installation,
such as a bookcase or rack, ensure that there is adequate ventilation.
Leave 20 cm (8") of free space at the top and sides
and 10 cm (4") at the rear. The rear edge of the shelf
or board above the apparatus shall be set 10 cm (4")
away from the rear panel or wall, creating a flue-like
gap for warm air to escape.
En-2
Page 3
Thank you for purchasing an Onkyo home theater speaker package. Please read this manual thoroughly
before using your new speakers. Following the instructions in this manual will enable you to obtain optimum performance and listening enjoyment from your speaker package.
Please retain this manual for future reference.
Precautions
1. AC Fuse
The fuse is located inside the chassis and is not userserviceable. If power does not come on, contact your Onkyo
authorized service station.
2. Care
From time to time you should wipe off the cabinet with a
soft cloth. For heavier dirt, dampen a soft cloth in a weak
solution of mild detergent and water, wring it out dry, and
wipe off the dirt. Following this, dry immediately with a
clean cloth. Do not use rough material, thinners, alcohol
or other chemical solvents or cloths since these may damage the finish or remove the panel lettering.
Use a vacuum cleaner to remove dust from hard-to-reach
grilles.
3. Power
WARNING
BEFORE PLUGGING IN THE UNIT FOR THE
FIRST TIME, READ THE FOLLOWING SECTION
CAREFULLY.
The voltage of the available power supply differs
according to country or region. Be sure that the power
supply voltage of the area where this unit will be used
meets the required voltage (e.g., AC 120 V, 60 Hz) written on the rear panel.
Auto standby function does not fully shutdown the
SKW-530. If you do not intend to use the SKW-530,
remove the power cord from the AC outlet.
For British models
Replacement and mounting of an AC plug on the power
supply cord of this unit should be performed only by
qualified service personnel.
IMPORTANT
The wires in the mains lead are coloured in accordance
with the following code:
Blue: Neutral
Brown: Live
As the colours of the wires in the mains lead of this
apparatus may not correspond with the coloured markings identifying the terminals in your plug, proceed as
follows:
The wire which is coloured blue must be connected to
the terminal which is marked with the letter N or
coloured black.
The wire which is coloured brown must be connected to
the terminal which is marked with the letter L or
coloured red.
IMPORTANT
The plug is fitted with an appropriate fuse. If the fuse
needs to be replaced, the replacement fuse must
approved by ASTA or BSI to BS1362 and have the same
ampere rating as that indicated on the plug. Check for
the ASTA mark or the BSI mark on the body of the fuse.
If the power cord’s plug is not suitable for your socket
outlets, cut it off and fit a suitable plug. Fit a suitable
fuse in the plug.
For European Models
Declaration of Conformity
We,
ONKYO EUROPE
ELECTRONICS GmbH
LIEGNITZERSTRASSE 6,
82194 GROEBENZELL,
GERMANY
declare in own responsibility, that the ONKYO product
described in this instruction manual is in compliance with the
corresponding technical standards such as EN60065,
EN55013, EN55020 and EN61000-3-2, -3-3.
GROEBENZELL, GERMANY
I. MORI
ONKYO EUROPE ELECTRONICS GmbH
■ Attaching and detaching the speaker grilles
Front and Center speakers have detachable grilles. Use the
following method to attach or detach the grilles.
1. While holding the bottom edge of the speaker grille
with your both hands, pull it gently toward you to
remove the bottom of the grille.
2. In the same way, gently pull the upper edge of the
speaker grille toward you to remove it from the main
unit.
3. To replace the grill, push the projections at the corners
into the grille plug holes on the speaker cabinet.
ReplacementRemoval
En-3
Page 4
Package Contents
Getting to know Your
Make sure your box contains all of the items below. If
anything is missing, contact the nearest Onkyo dealer.
• Front speakers
(SKF-530F)
• Center speaker
(SKC-530C)
• Surround speakers (SKM-530S/SKB-530)
• Speaker cables for surround speakers 9 m (30 ft.)
• Speaker cable for front
speakers 4.5 m (15 ft.)
(Red) (White)
• Speaker cable for center
speaker 3 m (10 ft.)
(Green)
Speaker Package
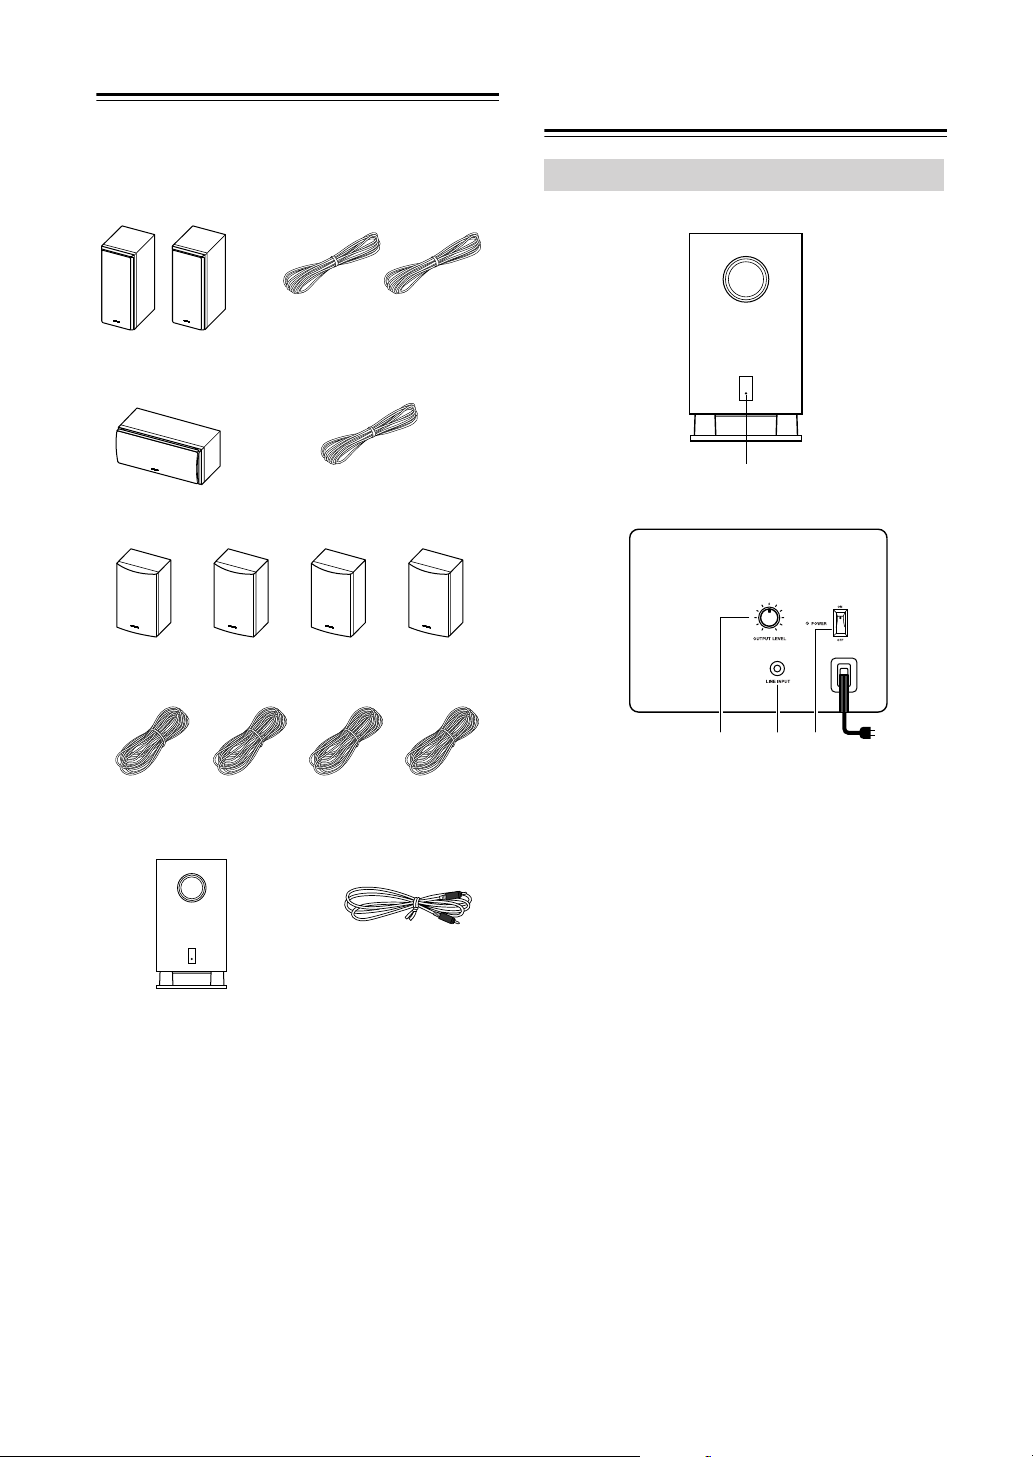
Subwoofer (SKW-530)
■ Front
1
■ Rear
MIN
MAX
(Blue) (Gray)
• Subwoofer (SKW-530)
The alphabet displayed at the end of the product name
found in catalogs and on package represents the color of
the system. Though the color varies, the specifications
and operations are the same.
(Brown) (Tan)
• RCA cable for subwoofer connection
2 3 4
To AC outlet
A STANDBY/ON indicator
Red: Subwoofer in standby mode
Green: Subwoofer on
With the Auto Standby function, the SKW-530
automatically turns on when an input signal is
detected in Standby mode. When there’s no input
signal for a while, the SKW-530 automatically
enters Standby mode.
B OUTPUT LEVEL control
This control is used to adjust the volume of the subwoofer.
C LINE INPUT
This RCA input should be connected to the subwoofer pre out on your AV receiver, amp, or other
receiver with supplied RCA cable.
D POWER switch
Press this switch to the ON position to turn on the
power. Press it to the OFF position to turn off the
power.
Note:
The Auto Standby function turns the subwoofer on when
the input signal exceeds a certain level. If the Auto
Standby function does not work reliably, try slightly
increasing or decreasing the subwoofer output level on
your receiver or amp.
En-4
Page 5
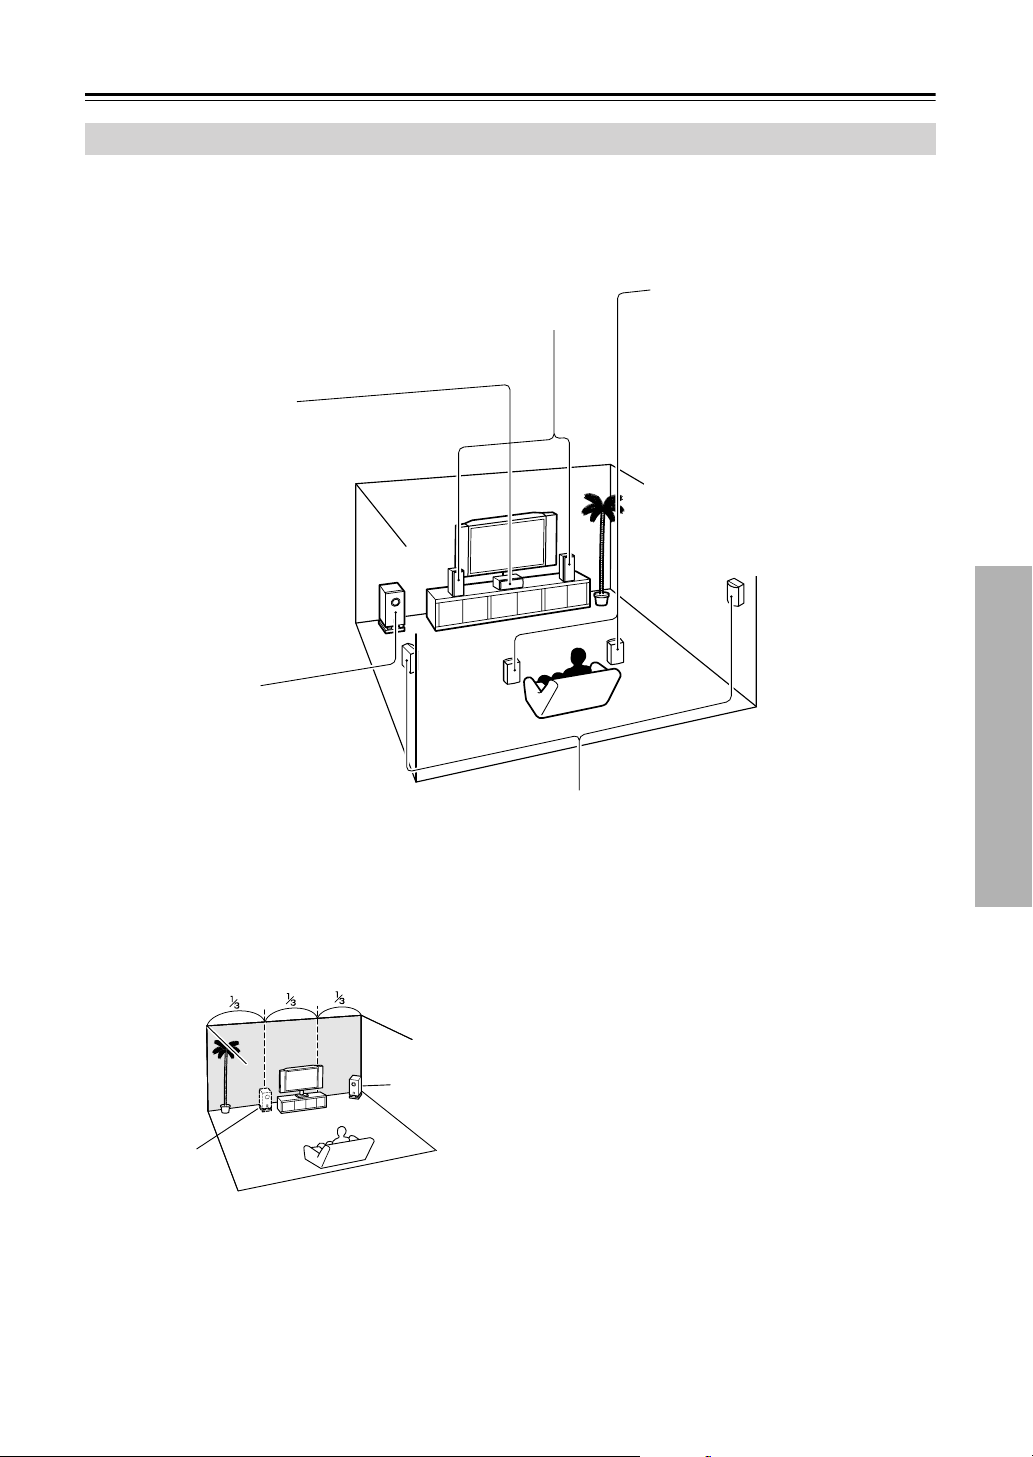
About Home Theater
Enjoying Home Theater
The Home Theater means that you can enjoy surround sound with a real sense of movement in your own home—just
like being in a movie theater or concert hall.
Front left and right speakers (SKF-530F)
These output the overall sound. Their role in a home theater is to provide
a solid anchor for the sound image. They should be positioned facing the
listener at about ear level, and equidistant from the TV. Angle them inward
so as to create a triangle, with the listener at the apex.
Center speaker (SKC-530C)
This speaker enhances the front
left and right speakers, making
sound movements distinct and
providing a full sound image. In
movies it’s used mainly for dialog.
Position it close to your TV facing
forward at about ear level, or at
the same height as the front left
and right speakers.
Put it somewhere where it won’t
slide around or fall.
Surround back left and right speakers (SKB-530)
These speakers further enhance the
realism of surround sound and
improve sound localization behind the
listener. They are necessary to enjoy
some listening modes (e.g. Dolby Digital EX, and DTS-ES). Position them
behind the listener about 60–100 cm
(2–3 feet) above ear level. Make sure
that the listening position is within the
range of the speaker.
Right
Subwoofer (SKW-530)
The subwoofer handles the
bass sounds of the LFE (LowFrequency Effects) channel.
The volume and quality of the
bass output from your subwoofer will depend on its position, the shape of your listening
room, and your listening position. In general, a good bass
sound can be obtained by
installing the subwoofer in a
front corner, or at one-third the
width of the wall, as shown.
1/3 room
length
Left
Corner
Surround left and right speakers (SKM-530S)
These speakers are used for precise sound positioning and to
add realistic ambience. Position them at the sides of the listener, or slightly behind, about 60–100 cm (2–3 feet) above
ear level. Ideally they should be equidistant from the listener.
Wall-mounting the surround speakers
If the surround speakers are to be wall-mounted, make sure
that the walls are strong enough to support the speaker’s
weight. The weight that mounting screws can support varies
greatly depending on the wall material and the position of the
reinforcing ribs embedded in the wall.
Use long screws with a head diameter of 6.3 mm (1/4 inch) or
less and a shank diameter of 3.5 mm (1/8 inch) or less. (We
recommend that you consult a home installation professional.)
En-5
Page 6

Connecting the Speakers
Power Cord Precautions
Read the following before connecting your speakers:
•Turn off your receiver or amp before making any connections.
•Pay close attention to speaker wiring polarity. Connect positive (+)
terminals to only positive (+) terminals, and negative (–) terminals
to only negative (–) terminals. If
the speakers are wired incorrectly,
the sound will be out of phase and
will sound unnatural.
• Be careful not to short the positive and negative wires.
Doing so may damage your amp.
Connecting the Speaker Cables
Use the supplied cables to connect each
1
speaker’s input terminals to the corresponding speaker output terminals on
your receiver or amp.
Match the color of each cable to the corresponding speaker terminal.
To make a connection, while
pressing the terminal lever,
insert the wire into the hole, and
then release the lever.
Make sure that the terminals are
gripping the bare wires, not the insulation.
• Before connecting the power cord, connect all of your
speakers and AV components.
•Turning on the SKW-530 may cause a momentary
power surge that might interfere with other electrical
equipment on the same circuit. If this is a problem,
plug the SKW-530 into a different branch circuit.
Adjustment
Setting the Subwoofer Level
To set the level of the subwoofer, use the OUTPUT
LEVEL control. Set it so that bass sounds are evenly balanced with the treble sounds from the other speakers.
Because our ears are less sensitive to very low bass
sounds, there’s a temptation to set the level of the subwoofer too high. As a rule of thumb, set the subwoofer
level to what you think is the optimal level, and then back
it off slightly.
MIN
OUTPUT LEVEL
MAX
Connecting the Subwoofer
Using the supplied RCA cable, connect
1
the subwoofer’s LINE INPUT to your AV
receiver’s SUBWOOFER PRE OUT.
En-6
PRE OUT
SUB
WOOFER
SKW-530
SKF-530FR
Ta n
Red
SKB-530LSKB-530R
SKC-530C
Green
Brown
SKM-530SR
SKF-530FL
White
Blue
Gray
SKM-530SL
Page 7

Operating Precautions
Placement
• The speaker cabinets are made out of wood and are
therefore sensitive to extreme temperatures and
humidity, do not put them in locations subject to direct
sunlight or in humid places, such as near an air conditioner, humidifier, bathroom, or kitchen.
• Do not put water or other liquids close to the speakers.
If liquid is spilled over the speakers, the drive units
may be damaged.
• Speakers should only be placed on sturdy, flat surfaces
that are free from vibration. Putting them on uneven or
unstable surfaces, where they may fall and cause damage, will affect the sound quality.
• Subwoofer is designed to be used in the upright vertical position only. Do not use it in the horizontal or
tilted position.
• If the unit is used near a turntable or CD player, howling or slipping of sound may occur. To prevent this,
move the unit away from the turntable or CD player
otherwise lower the unit’s output level.
Using Close to a TV or Computer
TVs and computer monitors are magnetically sensitive
devices and as such are likely to suffer discoloration or
picture distortion when conventional speakers are placed
nearby. To prevent this, the SKF-530F and SKC-530C
feature internal magnetic shielding. In some situations,
however, discoloration may still be an issue, in which case
you should turn off your TV or monitor, wait 15 to 30
minutes, and then turn it back on again. This normally
activates the degaussing function, which neutralizes the
magnetic field, thereby removing any discoloration
effects. If discoloration problems persist, try moving the
speakers away from your TV or monitor. Note that discoloration can also be caused by a magnet or demagnetizing
tool that’s too close to your TV or monitor.
Input Signal Warning
The speakers can handle the specified input power when
used for normal music reproduction. If any of the following signals are fed to them, even if the input power is
within the specified rating, excessive current may flow in
the speaker coils, causing burning or wire breakage:
1. Interstation noise from an untuned FM radio.
2. Sound from fast-forwarding a cassette tape.
3. High-pitched sounds generated by an oscillator, elec-
tronic musical instrument, and so on.
4. Amplifier oscillation.
5. Special test tones from audio test CDs and so on.
6. Thumps and clicks caused by connecting or discon-
necting audio cables (Always turn off your amplifier
before connecting or disconnecting cables.)
7. Microphone feedback.
Troubleshooting
Symptom Possible cause Remedy
There’s no sound coming
from certain speakers?
The subwoofer does not
turn on?
The subwoofer produces
no sound?
The subwoofer produces
hardly any sound?
A humming sound can be
heard from the subwoofer?
The speaker cables are not connected properly. Check the speaker cables and correct as necessary.
The speaker configuration is not set correctly. Check the speaker configuration.
The power plug is not fully inserted into the wall
outlet.
The OUTPUT LEVEL control is set to minimum. Turn up the OUTPUT LEVEL control.
The RCA cable is not properly connected to the
subwoofer’s LINE INPUT.
The level of the input signal was too low and the
subwoofer entered Standby mode.
The Subwoofer configuration is not set correctly. Check the subwoofer setting in the speaker configura-
The source material contain little or no bass content.
The RCA cable is not properly connected to the
subwoofer’s LINE INPUT.
External interference from a TV or other electronic device is being picked up.
Insert the power plug fully into the wall outlet.
Make sure that the RCA cable is properly connected to
the subwoofer’s LINE INPUT.
Slightly increase the subwoofer pre out output level on
your AV receiver.
tion on your AV receiver.
Choose source material with more bass content.
Make sure that the RCA cable is properly connected to
the subwoofer’s LINE INPUT.
Move the subwoofer and RCA cable away from the
interference source. Make sure your audio system is
grounded properly.
En-7
Page 8

Specifications
■ Powered Subwoofer (SKW-530)
Type: Bass-reflex
Input sensitivity/impedance: 330 mV / 100 kΩ
Maximum output power: 230 W (Dynamic Power)
Frequency response: 25 Hz–150 Hz
Cabinet capacity: 38.5 L (1.36 cubic feet)
Dimensions (W
Weight: 13.6 kg (30 lbs.)
Drivers unit: 25 cm (10 inch) Cone
Power supply: AC 230-240 V, 50 Hz
Power consumption: 134 W
Other: Auto Standby function
× H × D): 275 × 518 × 411 mm
(10-13/16" × 20-3/8" × 16-3/16")
Woofer
■ Front Speaker (SKF-530F)
Type: 2 Way Bass-reflex
Impedance: 8 Ω
Maximum input power: 110 W
Output sound pressure level:
Frequency response: 55 Hz–50 kHz
Crossover frequency: 4.5 kHz
Cabinet capacity: 8.7 L (0.31 cubic feet)
Dimensions (W
Weight: 3.9 kg (8.6 lbs.)
Drivers unit: 12 cm (5 inch) OMF Cone
Te r minal: Color-coded push type
Other: Magnetic shielding
× H × D): 157 × 434 × 200 mm
86 dB/W/m
(6-3/16" × 17-1/16" × 7-7/8")
Woofer
× 2
2.5 cm (1 inch) Balanced
Dome Tweeter
■ Center Speaker (SKC-530C)
Type: 2 Way Bass-reflex
Impedance: 8 Ω
Maximum input power: 110 W
Output sound pressure level:
Frequency response: 55 Hz–50 kHz
Crossover frequency: 4.5 kHz
Cabinet capacity: 8.7 L (0.31 cubic feet)
Dimensions (W
Weight: 3.9 kg (8.6 lbs.)
Speaker: 12 cm (5 inch) OMF Cone
Te r minal: Color-coded push type
Other: Magnetic shielding
× H × D): 434 × 157 × 200 mm
86 dB/W/m
(17-1/16" × 6-3/16" × 7-7/8")
Woofer
× 2
2.5 cm (1 inch) Balanced
Dome Tweeter
■ Surround Speaker (SKM-530S/SKB-530)
Type: 2 Way Bass Reflex
Impedance: 8 Ω
Maximum input power: 110 W
Output sound pressure level:
Frequency response: 60 Hz–20 kHz
Crossover frequency: 10 kHz
Cabinet capacity: 2.1 L (0.07 cubic feet)
Dimensions (W
Weight: 1.4 kg (3.1 lbs.)
Speaker: 8 cm (3-1/8 inch) Cone
Te r minal: Color-coded push type
× H × D): 175 × 265 × 102 mm
82 dB/W/m
(6-7/8"
× 10-7/16" × 4")
Woofer
2 cm (3/4 inch) Ceramic
Tw eeter
Specifications and appearance are subject to change
without prior notice.
En-8
Page 9

En-9
Page 10

ADVERTENCIA:
PARA REDUCIR EL RIESGO DE INCENDIOS O DE
DESCARGAS ELÉCTRICAS, NO EXPONGA ESTE
APARATO A LA LLUVIA NI A LA HUMEDAD.
PRECAUCIÓN:
PARA REDUCIR EL RIESGO DE DESCARGAS
ELÉCTRICAS, NO QUITE LA CUBIERTA (O PANEL POSTERIOR). EN SU INTERIOR NO EXISTE
NINGUNA PIEZA QUE PUEDA REPARAR EL
USUARIO. EN CASO DE AVERIA, SOLICITE LOS
SERVICIOS DE PERSONAL DE REPARACIÓN
CUALIFICADO.
Instrucciones de seguridad importantes
WARNING
RISK OF ELECTRIC SHOCK
DO NOT OPEN
El símbolo de rayo con cabeza de flecha, inscrito en
un triángulo equilátero, tiene la finalidad de avisar al
usuario la presencia de “tensiones peligrosas” no
aisladas dentro de la caja del producto que son de
magnitud suficiente como para constituir un riesgo de
descargas eléctricas a personas
El signo de exclamación, inscrito en un triángulo
equilátero, tiene la finalidad de avisar al usuario la
presencia de instrucciones importantes de operatión y
mantenimiento (reparación) en la literatura que acompaña a este producto.
AVIS
RISQUE DE CHOC ELECTRIQUE
NE PAS
OUVRIR
1. Lea estas instrucciones.
2. Guarde estas instrucciones.
3. Tenga en cuenta todas las advertencias.
4. Siga todas las instrucciones.
5. No use este aparato cerca del agua.
6. Límpielo únicamente con un paño seco.
7. No bloquee los orificios de ventilación. Instálelo
siguiendo las instrucciones del fabricante.
8. No lo instale cerca de radiadores, aparatos de calefacción, estufas ni ningún tipo de aparatos (incluyendo amplificadores) que generen calor.
9. Tenga en cuenta los fines de seguridad de los conectores con derivación a masa y / o polarizados. Los
conectores polarizados tienen dos contactos, uno de
mayor tamaño que el otro. Un conector con derivación a masa tiene dos contactos con un tercero para
derivar a masa. El contacto ancho o el tercer contacto se instalan con fines de seguridad. Si el conector del equipo no encaja en la toma de corriente
disponible, acuda a un técnico electricista cualificado para que le substituya la toma obsoleta.
10. Evite que el cable de alimentación pueda ser pisado
o atrapado, en especial en los conectores, y en los
puntos en que sale del aparato.
11. Use sólo los accesorios / conexiones especificados
por el fabricante.
12.
Use sólo el soporte, trípode,
abrazadera o mesa indicados
ADUERTENCIA PARA CARRITOS
CON RUEDAS
por el fabricante, o vendidos
junto con el aparato. Si utiliza una mesilla con ruedas,
tenga cuidado, al desplazar el
conjunto de mesilla / aparato,
ya que si se vuelca podría
recibir lesiones.
S3125A
13. Desconecte este aparato si hay tormenta o cuando
no vaya a ser utilizado por largos períodos de
tiempo.
14. Deje que el mantenimiento lo lleve a cabo personal
cualificado. Es necesario reparar el aparato cuando
ha recibido algún tipo de daño, como por ejemplo si
el cable de alimentación ha sufrido daños, si se ha
derramado algún líquido en el interior del aparato o
si éste ha quedado expuesto a la lluvia o humedad y
no funciona normalmente o si ha caído al suelo.
Es-2
15. Daños que requieren reparación
Desenchufe el aparato y solicite los servicios de
personal cualificado cuando:
A. El cable de alimentación o el enchufe esté
dañado.
B. En el interior del aparato hayan entrado objetos
sólidos o líquidos.
C. El aparato haya estado expuesto a la lluvia o al
agua.
D. El aparato parezca no funcionar adecuadamente
aunque se sigan las instrucciones de operación.
Ajuste solamente los controles indicados en el
manual de instrucciones, ya que un ajuste inadecuado podría resultar en daños, y podría requerir
el trabajo laborioso de un técnico cualificado
para devolver el aparato a su funcionamiento
normal.
E. El aparato haya caído o haya sufrido otros daños,
y
F. El aparato parezca no funcionar normalmente,
indicando que necesita reparación
16. Introducción de objetos sólidos y líquidos
No introduzca nunca ningún objeto a través de las
aberturas del aparato, ya que podrían tocar puntos
de tensión peligrosa o cortocircuitar partes, lo que
resultaría en un incendio o descargas eléctricas.
El equipo no se debería exponer a gotas ni a salpicaduras y nunca debería colocar objetos que contengan líquidos, como los floreros, encima de éste.
No coloque velas ni otros objetos incandescentes
encima de la unidad.
17. Baterías
Tenga en cuenta los aspectos ambientales y siga las
regulaciones locales a la hora de desechar las
baterías.
18. Si instala el aparato en una instalación empotrada,
como en una estantería o en una librería, asegúrese
de que esté bien ventilado.
Deje 20 cm de espacio libre por encima y por los
lados y 10 cm en la parte posterior. El borde posterior del estante o el tablero de encima del aparato
debería estar a unos 10 cm del panel posterior o de
la pared, de forma que deje un espacio libre para
que el aire caliente pueda circular.
Page 11

Muchas gracias por adquirir un equipo de altavoces home theater de Onkyo. Lea este manual con atención
antes de utilizar los altavoces. Si sigue las instrucciones de este manual, obtendrá una reproducción y una
escucha óptimas de su equipo de altavoces.
Guarde este manual para futuras referencias.
Precauciones
1. Fusible de CA
El fusible se encuentra en el interior del chasis y no debe
tocarlo. Si no se activa el equipo, contacte con un centro
de servicio Onkyo autorizado.
2. Mantenimiento
De vez en cuando debería limpiar el mueble con un paño
suave. Para la suciedad más persistente, después de
humedecer un paño suave con una solución de agua y de
detergente neutro, limpie la suciedad. A continuación,
séquelo inmediatamente con un paño limpio. No utilice
materiales fuertes, disolventes, alcohol ni otros
productos químicos ya que podrían dañar el acabado o
borrar las letras del panel.
Utilice un aspirador para extraer la suciedad de las
rejillas de difícil acceso.
3. Power
ATENCIÓN
ANTES DE CONECTAR EL EQUIPO POR
PRIMERA VEZ, LEA CON ATENCIÓN LA
SECCIÓN SIGUIENTE.
El voltaje de la alimentación disponible es distinto
según el país o la región. Asegúrese de que el voltaje de
la zona donde va a utilizar el equipo cumple con los
requisitos de voltaje (por ejemplo, 120 V de CA, 60 Hz)
indicados en el panel posterior.
La función auto standby no desactiva completamente el
SKW-530. Si tiene previsto no utilizar el SKW-530,
desconecte el cable de alimentación de la toma de CA.
Para los modelos europeos
Declaración de Conformidad
Nosotros,
de ONKYO EUROPE
ELECTRONICS GmbH
LIEGNITZERSTRASSE 6,
82194 GROEBENZELL,
ALEMANIA
declaramos, bajo nuestra propia responsabilidad, que el
producto de ONKYO que se describe en el presente manual de
instrucciones cumple con las normas técnicas EN60065,
EN55013, EN55020 y EN61000-3-2, -3-3.
GROEBENZELL, ALEMANIA
I. MORI
ONKYO EUROPE ELECTRONICS GmbH
■ Instalar y desinstalar las rejillas de los altavoces
Los altavoces frontales y centrales incorporan rejillas
extraíbles. Siga el procedimiento siguiente para instalar o desinstalar las rejillas.
1. Sujete la parte inferior de la rejilla del altavoz con las dos
manos, y tire con suavidad de ella hacia usted para extraer
la parte inferior.
2. De la misma forma, tire con suavidad de la parte superior
de la rejilla del altavoz hacia usted para extraerla de la
unidad principal.
3. Para volver a instalar la rejilla, introduzca las proyecciones
de las esquinas en los orificios para instalar la rejilla del
mueble del altavoz.
InstalaciónExtracción
Es-3
Page 12

Contenido del paquete
Descripción del equipo
Compruebe que la caja contiene los siguientes elementos. Si falta alguno, contacte con el distribuidor Onkyo
más cercano
• Altavoces frontales
(SKF-530F)
• Altavoz central
(SKC-530C)
• Altavoces Surround (SKM-530S/SKB-530)
•
Cable de altavoz para los
altavoces frontales de 4,5 m
(15 pies)
(Rojo) (Blanco)
• Cable de altavoz para el altavoz central de 3 m (10 pies)
(Verde)
de altavoces
Subwoofer (SKW-530)
■ Frontal
1
■ Posterior
MIN
MAX
•
Cable de altavoz para los altavoces surround de 9 m
(30 pies)
(Azul) (Gris)
• Subwoofer (SKW-530)
El alfabeto que aparece al final del nombre del producto
en los catálogos o en el paquete representa el color del
sistema. Aunque el color varíe, las especificaciones y las
funciones son las mismas.
(Marrón) (Tan)
•
Cable RCA para la
conexión del
subwoofer
2 3 4
A la toma
de CA
A Indicador STANDBY/ON
Rojo: El subwoofer está en modo standby
Verde: El subwoofer está activado
Con la función Auto Standby, el SKW-530 se activa
automáticamente cuando se detecta una señal de
entrada en el modo Standby. Cuando no existe señal
de entrada por un instante, el SKW-530 entra
automáticamente en modo Standby.
B Control OUTPUT LEVEL
Este control se utiliza para ajustar el volumen del
subwoofer.
C LINE INPUT
Esta entrada RCA debería conectarse a la presalida
del subwoofer en el receptor AV, amplificador, u
otro receptor con el cable RCA incluido.
D Conmutador POWER
Coloque este conmutador en la posición ON para
activar el equipo. Colóquelo en la posición OFF
para desactivar el equipo.
Nota:
La función Auto Standby activa el subwoofer cuando la
señal de entrada excede un nivel concreto. Si la función
Auto Standby no funciona correctamente, intente
aumentar o disminuir ligeramente el nivel de salida del
subwoofer del receptor o del amplificador.
Es-4
Page 13

Acerca del Home Theater
Disfrutar del Home Theater
El Home Theater representa poder disfrutar del sonido surround con una sensación real de movimiento en el hogar,
como si estuviera en un cine o en una sala de conciertos.
Altavoces frontales derecho e izquierdo (SKF-530F)
Éstos transmiten el sonido global. Su papel en un home theater es el de
proporcionar un soporte sólido para la imagen de sonido. Deben situarse
de cara al oyente a la altura de los oídos, y ambos a la misma distancia
del televisor. Sitúelos formando un ángulo cerrado para crear un triángulo, con el oyente en el vértice.
Altavoz central (SKC-530C)
Este altavoz realza los altavoces
frontales derecho e izquierdo, realizando movimientos de sonido distintos y proporcionando una imagen
de sonido total. En películas, se utiliza básicamente para los diálogos.
Sitúelo cerca del televisor, de frente,
al nivel de los oídos, o a la misma
altura que los altavoces frontales
derecho e izquierdo.
Sitúelo en algún lugar donde no
pueda tambalearse ni caerse.
Altavoces surround posteriores
derecho e izquierdo (SKB-530)
Estos altavoces aumentan aún más el
realismo del sonido surround y mejoran la localización del sonido detrás
del oyente. Son esenciales para disfrutar de ciertos modos de audición (por
ejemplo, Dolby Digital EX y DTS-ES).
Colóquelos detrás del oyente a unos
60~100 cm (2~3 pies) por encima del
nivel de los oídos. Asegúrese de que la
posición de audición está dentro del
intervalo del altavoz.
Derecha
Subwoofer (SKW-530)
El subwoofer gestiona los sonidos de bajo del canal LFE (“LowFrequency Effects”, o efectos de
baja frecuencia). El volumen y la
calidad de la salida de bajos del
subwoofer dependerá de su posición, de la forma de la sala de audición y de su posición de audición.
En general, se consigue un buen
sonido de bajos instalando el
subwoofer en una esquina frontal,
o a un tercio de la anchura de la
pared, tal como se muestra a continuación.
1/3 de la longitud de la sala
Izquierda
Esquina
Altavoces surround derecho e izquierdo (SKM-530S)
Estos altavoces se utilizan para un posicionamiento del sonido
preciso y para añadir realismo al ambiente. Sitúelos a los lados
del oyente o ligeramente detrás, a unos 60–100 cm (2–3 pies)
por encima del nivel de los oídos. Lo ideal es que ambos estén a
la misma distancia del oyente.
Montaje de los altavoces en la pared
Si desea montar los altavoces surround en la pared, asegúrese
de que la pared pueda resistir el peso del altavoz. El peso que
pueden resistir los tornillos de montaje cambia mucho según el
material de la pared y la posición de los refuerzos de la pared.
Utilice tornillos largos con una cabeza de un diámetro de 6,3 mm
(1/4 de pulgada) o menos y una punta de un diámetro de 3,5 mm
(1/8 de pulgada) o menos. (Le recomendamos que consulte con
un instalador profesional de productos domésticos).
Es-5
Page 14

Conectar los altavoces
Precauciones para el
Lea la siguiente sección antes de conectar los altavoces:
• Desactive el receptor o amplificador antes de realizar
las conexiones.
• Ponga especial atención a la polaridad de cableado del altavoz.
Conecte los terminales positivos
(+) sólo a los terminales positivos
(+), y los terminales negativos (–)
sólo a los terminales negativos (–).
Si los cables de los altavoces se
conectan de forma incorrecta, el
sonido sonará desfasado y poco natural.
• Procure no colocar los cables positivos y negativos de
forma que pudieran provocar un cortocircuito. Si lo
hace dañará el amplificador.
Conectar los cables de los altavoces
Utilice los cables incluidos para conectar
1
los terminales de entrada de cada altavoz
a los terminales de salida de altavoz correspondientes del receptor o amplificador.
Haga coincidir el color de cada cable con el terminal de altavoz correspondiente.
Para realizar la conexión, pulse
la palanca del terminal e inserte
el cable en el orificio, y a continuación suelte la palanca.
Compruebe que los terminales
sujeten los cables pelados y no la parte aislada.
cable de alimentación
• Antes de conectar el cable de alimentación, conecte
todos los altavoces y los componentes de AV.
• Al activar el SKW-530 es posible que se produzca una
subida de tensión momentánea que puede interferir
con otros equipos eléctricos o con el mismo circuito.
Si esto supone un problema, conecte el SKW-530 a un
circuito de una línea distinta.
Ajustes
Ajustar el nivel del subwoofer
Para ajustar el nivel del subwoofer, utilice el control
OUTPUT LEVEL. Ajústelo de modo que los sonidos
graves queden balanceados de manera uniforme con los
sonidos agudos de los otros altavoces.
Nuestros oídos son menos sensibles a los sonidos graves
muy bajos, por lo que siempre tenemos la tentación de
ajustar el nivel del subwoofer demasiado alto. Por regla
general, ajuste el subwoofer al nivel que considere
óptimo, y luego disminúyalo ligeramente.
MIN
OUTPUT LEVEL
MAX
Conectar el Subwoofer
Conecte la entrada LINE INPUT del
1
subwoofer a la presalida SUBWOOFER
PRE OUT del receptor AV, utilizando el
cable RCA incluido.
PRE OUT
SUB
WOOFER
SKW-530
SKF-530FR
Ta n
SKC-530C
Verde
Rojo
Marrón
SKF-530FL
Blanco
Azul
Gris
Es-6
SKB-530LSKB-530R
SKM-530SR
SKM-530SL
Page 15

Precauciones de funcionamiento
Colocación
• El mueble de los altavoces está fabricado con madera
y, por lo tanto, es sensible a las temperaturas extremas
y a la humedad. No los sitúe en ubicaciones sujetas a
la luz directa del sol o en sitios húmedos, como por
ejemplo, cerca de aires acondicionados,
humidificadores, baños o cocinas.
• No coloque los altavoces cerca de agua o de otros
líquidos. Si se vierte líquido encima de los altavoces,
las unidades de control podrían resultar dañadas.
• Los altavoces deberían colocarse únicamente en
superficies sólidas, planas y libres de vibraciones. Si
los coloca en superficies irregulares o inestables,
donde puedan caerse y causar daños, afectará a la
calidad del sonido.
• El subwoofer está diseñado para utilizarse únicamente
en posición vertical. No lo utilice en posición
horizontal ni inclinada.
• Si utiliza el equipo cerca de un plato giradiscos o de un
reproductor de CDs, es posible que se produzcan
interferencias o acoplamientos del sonido. Para
evitarlo, aleje el equipo del giradiscos o del
reproductor de CDs, o baje el nivel de salida del
equipo.
Aviso acerca de la señal de entrada
Los altavoces del pueden utilizar la potencia de entrada
especificada si se utilizan para la reproducción de música
normal. Si envía alguna de las siguientes señales a los
altavoces, aunque la potencia de entrada sea la
especificada, podría entrar demasiada corriente en las
bobinas de los altavoces, quemándolas o rompiendo los
cables:
1. Interferencias de una radio FM no sintonizada.
2. El sonido de avanzar rápidamente una cinta de
cassette.
3. Sonidos de alta intensidad generados por un
oscilador, instrumento musical electrónico, etcétera.
4. Oscilación del amplificador.
5. Tonos de prueba especiales provenientes de CDs
para pruebas de audio, etcétera.
6. Clics y ruidos secos de gran volumen causados al
conectar o desconectar cables de audio (desactive
siempre el amplificador antes de conectar o
desconectar cables.)
7. Feedback del micrófono.
Utilizar el equipo cerca de un televisor o de
un ordenador
Las televisiones y los monitores de ordenador son
dispositivos magnéticamente sensibles, y como tales
pueden verse afectados por decoloración o distorsión de
la imagen si se colocan altavoces normales cerca de ellos.
Para evitarlo, los altavoces del SKF-530F y SKC-530C
disponen de una protección magnética interna. Sin
embargo, en algunas situaciones es posible que se siga
produciendo la decoloración, en cuyo caso debería
desactivar el televisor o el monitor, esperar de 15 a 30
minutos y activarlos de nuevo. Normalmente se activa la
función de desmagnetización, que neutraliza el campo
magnético y elimina los efectos de decoloración. Si
persisten los problemas de decoloración, intente alejar los
altavoces del televisor o del monitor. Tenga en cuenta que
la decoloración también puede ser debida a un imán o a
una herramienta de desmagnetización que se encuentren
demasiado cerca del televisor o del monitor.
Es-7
Page 16

Solucionar Problemas
Síntoma Posible causa Solución
¿Algunos de los
altavoces no emiten
ningún sonido?
¿El subwoofer no se
activa?
¿El subwoofer no emite
sonido?
¿El subwoofer apenas
emite sonido?
¿El subwoofer emite
zumbidos?
Los cables de los altavoces no están conectados
correctamente.
La configuración de los altavoces no es correcta. Compruebe la configuración de los altavoces.
El conector de alimentación no está completamente
insertado en la toma de pared.
El control OUTPUT LEVEL está ajustado al mínimo.
El cable RCA no está conectado correctamente al
conector LINE INPUT del subwoofer.
El nivel de la señal de entrada era demasiado bajo y
el subwoofer ha entrado en el modo Standby.
La configuración del Subwoofer no es correcta. Compruebe el ajuste del subwoofer en la configu-
El material original apenas contiene sonidos graves,
o no los contiene en absoluto.
El cable RCA no está conectado correctamente al
conector LINE INPUT del subwoofer.
Se captan interferencias externas de un televisor o de
otro dispositivo electrónico.
Compruebe los cables del altavoz y corríjalos si fuera
necesario.
Inserte por completo el conector de alimentación en la
toma de pared.
Suba el control OUTPUT LEVEL.
Compruebe que el cable RCA esté conectado
correctamente al conector LINE INPUT del subwoofer.
Aumente ligeramente el nivel de salida del subwoofer
en el receptor AV.
ración de los altavoces del receptor AV.
Seleccione un material original que contenga más
sonidos graves.
Compruebe que el cable RCA esté conectado
correctamente al conector LINE INPUT del subwoofer.
Aleje el subwoofer y el cable RCA de la fuente de la
interferencia. Asegúrese de que el sistema de audio
esté derivado a masa correctamente.
Es-8
Page 17

Especificaciones
■ Subwoofer autoamplificado (SKW-530)
Tipo: Bass reflex
Sensibilidad/impedancia
de entrada: 330 mV / 100 kΩ
Potencia de salid máxima:
Respuesta de frecuencia: 25 Hz–150 Hz
Capacidad del mueble: 38,5 L
Dimensiones
(Anch.
× Alt. × Prof.): 275 × 518 × 411 mm
Peso: 13,6 kg (30 libras)
Unidad de control: Woofer cónico de 25 cm
Alimentación: 230-240 V de CA, 50 Hz
Consumo: 134 W
Otros: Función Auto Standby
230 W (Potencia dinámica)
(10-13/16" × 20-3/8" × 16-3/16")
■ Altavoz frontal (SKF-530F)
Tipo: Bass reflex de 2 vías
Impedancia: 8 Ω
Potencia de entrada máxima:
Nivel de presión del sonido
de salida: 86 dB/W/m
Respuesta de frecuencia: 55 Hz–50 kHz
Frecuencia de inversión: 4,5 kHz
Capacidad del mueble: 8,7 L
Dimensiones
(Anch.
× Alt. × Prof.): 157 × 434 × 200 mm
Peso: 3,9 kg (8,6 libras)
Unidad de control: Woofer OMF cónico de
Te r minal: Tipo presión por código de
Otros: Protección magnética
110 W
×
(6-3/16"
12 cm
2,5 cm balanceado y
redondeado (Agudos)
color
17-1/16" × 7-7/8")
× 2
■ Altavoz central (SKC-530C)
Tipo: Bass reflex de 2 vías
Impedancia: 8 Ω
Potencia de entrada máxima: 110 W
Nivel de presión del sonido
de salida:
Respuesta de frecuencia: 55 Hz–50 kHz
Frecuencia de inversión: 4,5 kHz
Capacidad del mueble: 8,7 L
Dimensiones
(Anch.
Peso: 3,9 kg (8,6 libras)
Unidad de control: Woofer OMF cónico de
Te r minal: Tipo presión por código de
Otros: Protección magnética
86 dB/W/m
× Alt. × Prof.): 434 × 157 × 200 mm
(17-1/16" × 6-3/16" × 7-7/8")
12 cm
× 2
2,5 cm balanceado y
redondeado (Agudos)
color
■ Altavoz Surround (SKM-530S/SKB-530)
Tipo: Bass reflex de 2 vías
Impedancia: 8 Ω
Potencia de entrada máxima: 110 W
Nivel de presión del sonido
de salida:
Respuesta de frecuencia: 60 Hz–20 kHz
Frecuencia de inversión: 10 kHz
Capacidad del mueble: 2,1 L
Dimensiones
(Anch.
Peso: 1,4 kg (3,1 libras)
Unidad de control: Woofer cónico de 8 cm
Te r minal: Tipo presión por código de
82 dB/W/m
× Alt. × Prof.): 175 × 265 × 102 mm
(6-7/8"
× 10-7/16" × 4")
Cerámico de 2 cm
(Agudos)
color
Las especificaciones y el aspecto están sujetos a cambio
sin previo aviso.
Es-9
Page 18

AVVERTIMENTO:
PER RIDURRE IL RISCHIO DI INCENDI O SCOSSE ELETTRICHE, NON ESPORRE QUESTO APPARECCHIO ALLA PIOGGIA O ALL’UMIDITÀ.
ATTENZIONE:
PER RIDURRE IL RISCHIO DI SCOSSE ELETTRICHE, NON RIMUOVERE IL RIVESTIMENTO (O
IL RETRO). ALL’INTERNO NON SONO PRESENTI PARTI RIPARABILI DALL’UTILIZZATORE.
PER LE RIPARAZIONI RIVOLGERSI A PERSONALE DI ASSISTENZA QUALIFICATO.
Istruzioni importanti per la sicurezza
WARNING
RISK OF ELECTRIC SHOCK
DO NOT OPEN
Il simbolo del fulmine, racchiuso in un triangolo
equilatero, serve ad avvisare l’utilizzatore della
presenza di “tensioni pericolose” non isolate
all’interno del rivestimento del prodotto che possono
essere di intensità sufficiente da costituire un rischio
di scosse elettriche alle persone.
Il punto esclamativo all’interno di un triangolo equilatero serve ad avvisare l’utilizzatore della presenza di
importanti istruzioni per l’impiego e la manutenzione
(riparazione) nei manuali allegati al prodotto.
AVIS
RISQUE DE CHOC ELECTRIQUE
OUVRIR
NE PAS
1. Leggere queste istruzioni.
2. Conservare queste istruzioni.
3. Prestare attenzione a tutti gli avvertimenti.
4. Seguire tutte le istruzioni.
5. Non utilizzare questo apparecchio vicino all’acqua.
6. Pulire solo con un panno asciutto.
7. Non ostruire qualsiasi apertura per la ventilazione.
Installare seguendo le istruzioni del fabbricante.
8. Non installare vicino a qualsiasi fonte di calore,
come ad esempio radiatori, convogliatori di calore,
stufe, o altri apparati (inclusi gli amplificatori) che
producono calore.
9. Non trascurare la funzione di sicurezza delle spine
elettriche di tipo polarizzato o con presa di terra.
Una spina polarizzata ha due lamelle, una più larga
dell’altra. Una spina del tipo con presa di terra ha
due lamelle più una terza punta per la messa a terra.
La lamella larga o la terza punta vengono fornite per
la vostra sicurezza. Se la spina fornita non corrisponde alla vostra presa di corrente, consultare un
elettricista per la sostituzione della presa elettrica di
vecchio tipo.
10. Proteggere il cavo di alimentazione dall’essere calpestato o schiacciato, in particolar modo le spine, le
prese di corrente, e il punto dove i cavi escono
dall’apparecchio.
11. Usare solo gli attacchi/accessori specificati dal fabbricante.
12. Usare solo con il carrello,
supporto, treppiede, staffa, o
AVVERTIMENTO CARRELLI
PORTATILI
tavolo specificato dal fabbricante, o venduto con l’apparecchio. Se viene utilizzato
un carrello, fare attenzione
quando si sposta l’insieme
carrello/apparecchio, per
evitare ferite a causa di
S3125A
rovesciamento.
13. Scollegare questo apparecchio durante i temporali o
quando non viene utilizzato per lunghi periodi di
tempo.
14. Per qualsiasi tipo di assistenza tecnica, riferirsi al
personale tecnico di assistenza qualificato. L’assistenza tecnica si richiede quando l’apparecchio è
danneggiato in qualsiasi modo, come ad esempio il
cavo di alimentazione o la spina sono danneggiati,
all’interno dell’apparecchio sono stati versati liquidi
It-2
o sono caduti oggetti, l’apparato è stato esposto a
pioggia o umidità, non funziona normalmente,
oppure è caduto.
15. Danni che richiedono riparazioni
Scollegare l’apparecchio dalla presa di corrente e
rivolgersi per riparazioni a personale tecnico qualificato nelle seguenti condizioni:
A. Quando il cavo di alimentazione o la sua spina
sono danneggiati,
B. Se liquidi sono stati rovesciati o oggetti sono
penetrati nell’apparecchio,
C. Se l’apparecchio è stato esposto alla pioggia o
all’acqua,
D. Se l’apparecchio non funziona normalmente
quando si seguono le istruzioni per l’uso. Usare
solo i comandi indicati nelle istruzioni per l’uso
perché regolazioni improprie di altri comandi possono causare danni e spesso richiedono riparazioni
laboriose da parte di tecnici qualificati per riportare l’apparecchio al funzionamento normale,
E. Se l’apparecchio è caduto o è stato danneggiato
in qualsiasi modo, e
F. Quando l’apparecchio mostra un netto cambia-
mento nelle prestazioni: questo indica la necessità di riparazioni.
16. Penetrazione di oggetti o liquidi
Non inserire oggetti di qualsiasi tipo nell’apparecchio attraverso le aperture, perché potrebbero toccare parti ad alta tensione o cortocircuitare parti,
con il rischio di incendi o scosse elettriche.
L’apparecchio non deve essere esposto a sgocciolii
o schizzi d’acqua, e sull’apparecchio non deve
essere collocato nessun oggetto riempito con
liquidi, come ad esempio vasi.
Non posizionare le candele o gli altri oggetti infiammabili sopra questa apparecchio.
17. Batterie
Per lo smaltimento delle batterie, considerare sempre i problemi di carattere ambientale e seguire i
regolamenti locali.
18. Se si installa l’apparecchio all’interno di un mobile,
come ad esempio una libreria o uno scaffale, assicurarsi che ci sia un’adeguata ventilazione.
Lasciare uno spazio libero di 20 cm sopra e ai lati
dell’apparecchio, e 10 cm sul retro. Il lato posteriore
dello scaffale o il ripiano sopra l’apparecchio
devono essere regolati a 10 cm di distanza dal pannello posteriore o dal muro, creando un’apertura per
la fuoriuscita dell’aria calda.
Page 19

Grazie per aver scelto questo sistema di altoparlanti per home theater Onkyo. Prima di utilizzare gli altoparlanti, leggete attentamente questo manuale. Seguendo le istruzioni contenute in questo manuale, potrete ottenere il massimo delle prestazioni e del divertimento dal vostro nuovo sistema di altoparlanti per home theater.
Vi consigliamo di conservare questo manuale per future consultazioni.
Precauzioni
1. Fusibile CA
Il fusibile si trova all’interno del telaio e non è riparabile
dall’utilizzatore. Se l’apparecchio non si accende, contattare un centro assistenza Onkyo autorizzato.
2. Cura
Pulire periodicamente i pannelli anteriore e posteriore e
il rivestimento con un panno morbido. Per sporco resistente, inumidire un panno morbido con una soluzione
leggera di detergente delicato ed acqua, strizzarlo bene e
usarlo per pulire. Asciugare poi immediatamente con un
panno pulito. Non usare materiali ruvidi, diluenti per vernici, alcool o altri agenti chimici o panni speciali perché
potrebbero danneggiare la finitura e cancellare le scritte
dal pannello.
Per rimuovere la polvere dalle griglie, utilizzate un aspirapolvere.
3. Alimentazione
AVVERTIMENTO
PRIMA DI COLLEGARE L’APPARECCHIO AD
UNA PRESA DI CORRENTE PER LA PRIMA
VOLTA, LEGGERE ATTENTAMENTE LA
SEGUENTE SEZIONE.
Il valore della tensione di rete varia in funzione del
paese o della regione. Accertarsi che tale valore nella
regione in cui verrà utilizzata l’unità (es., CA 120 V
60 Hz) corrisponda a quello indicato sul pannello posteriore.
La funzione Auto Standby non spegne completamente
l’SKW-530. Se avete intenzione di non utilizzare
l’SKW-530 per un lungo periodo di tempo, staccate il
cavo dell’alimentazione dalla presa CA.
Per i modelli per l’Europa
Dichiarazione di Conformità
Noi,
ONKYO EUROPE
ELECTRONICS GmbH
LIEGNITZERSTRASSE 6,
82194 GROEBENZELL,
GERMANIA
dichiariamo sotto la nostra responsabilità che il prodotto
ONKYO descritto in questo manuale di istruzioni è in
conformità con i corrispondenti standard tecnici: EN60065,
EN55013, EN55020 e EN61000-3-2, -3-3.
GROEBENZELL, GERMANIA
I. MORI
ONKYO EUROPE ELECTRONICS GmbH
■ Montaggio e smontaggio delle griglie degli
altoparlanti
Gli altoparlanti anteriori e quello centrale sono dotati di griglie rimovibili. Utilizzate la seguente procedura per montarle
e smontarle.
1. Per rimuovere la parte inferiore della griglia dell’altopar-
lante, afferrate questa parte con entrambe le mani e tiratela
gentilmente verso di voi.
2. Allo stesso modo, per rimuovere la parte superiore della
griglia dell’altoparlante, tirate gentilmente questa parte
verso di voi.
3. Per montare nuovamente la griglia, premete le sporgenze
che ci sono ai lati e inseritele nei fori del cabinet dell’altoparlante.
MontaggioSmontaggio
It-3
Page 20

Contenuto dell’imballo
Informazioni sugli
Assicuratevi che l’imballo contenga i seguenti oggetti.
Se dovesse mancare qualcosa, rivolgetevi al vostro rivenditore Onkyo.
• Altoparlanti anteriori
(SKF-530F)
• Altoparlante centro
(SKC-530C)
• Altoparlante surround (SKM-530S/SKB-530)
•Cavo per altoparlanti
anteriori da 4,5 m
(Red) (White)
•Cavo per altoparlante
centro da 3 m
(Verde)
altoparlanti
Subwoofer (SKW-530)
■ Frontale
1
■ Posteriorerear
MIN
MAX
•Cavo per altoparlante surround da 9 m
(Blu) (Grigio)
• Subwoofer (SKW-530)
La lettera visualizzata alla fine del nome del prodotto
riportata nei cataloghi e sulla confezione, rappresenta il
sistema. Sebbene il colore possa variare, le specifiche
tecniche e le funzioni sono le stesse.
(Marrone) (Tangente)
•Cavo RCA per il
collegamento del
subwoofer
It-4
2 3 4
Ad una presa
a muro
A Indicatore STANDBY/ON
Rosso: Subwoofer in standby
Verde: Subwoofer acceso
La funzione Auto Standby fa sì che, quando l’SKW530 è in standby e viene rilevato un segnale di
ingresso, l’apparecchio sui accenda automaticamente. Se non vengono rilevati segnali di ingresso
per un certo periodo di tempo, l’SKW-530 entra
automaticamente in standby.
B Controllo OUTPUT LEVEL
Questo controllo serve per regolare il volume del
subwoofer.
C LINE INPUT
Questo ingresso RCA deve essere collegato
mediante il cavo RCA fornito in dotazione alla preuscita del subwoofer del ricevitore AV, dell’amplificatore o di un altro ricevitore.
D Interruttore POWER
Posizionate l’interruttore su ON per accendere
l’apparecchio. Posizionatelo su OFF per spegnere
l’apparecchio.
Note:
La funzione Auto Standby accende il subwoofer quando
il segnale d’ingresso va oltre un certo livello. Se la funzione Auto Standby non funziona correttamente, provate
a diminuire o ad aumentare leggermente il livello di
uscita del subwoofer del ricevitore o dell’amplificatore.
Page 21

Informazioni sul sistema Home Theater
Come utilizzare il sistema Home Theater
L’Home Theater vi permette di riprodurre a casa vostra sonoro surround con vero senso di movimento come quello del
cinema o di sale per concerti.
Altoparlanti anteriori sinistro e destro (SKF-530F)
Questi altoparlanti emettono il suono generale. Il loro ruolo in un sistema
home theatre è di fornire un solido punto d’appoggio per l’immagine
sonora. Dovrebbero essere posizionati davanti all’ascoltatore all'altezza
delle orecchie ed equidistanti dalla TV. Regolate la loro angolazione in
modo da creare un triangolo con al vertice l’ascoltatore.
Altoparlante centro (SKC-530C)
Questo altoparlante migliora la resa
degli altoparlanti anteriori sinistro e
destro, rendendo distinti i movimenti
sonori e offrendo un’immagine
sonora piena. Nei film è principalmente utilizzato per il dialogo.
Posizionatelo vicino alla TV rivolto
verso l’ascoltatore all’altezza delle
orecchie o alla stessa altezza degli
altoparlanti anteriori sinistro e destro.
Posizionatelo in modo tale da non
farlo scivolare o cadere.
Altoparlanti surround posteriori
sinistro e destro (SKB-530)
Questi altoparlanti aumentano il realismo del sonoro surround e migliorano
la localizzazione sonora alle spalle
dell’ascoltatore. Sono essenziali per
alcuni modi di ascolto (per es. Dolby
Digital EX e DTS-ES). Posizionateli
alle spalle dell’ascoltatore a circa
60~100 cm al di sopra dell'altezza
delle orecchie. Assicuratevi che la
posizione di ascolto rientri nel campo
d’azione dell’altoparlante.
Destra
Subwoofer (SKW-530)
Il subwoofer si occupa dei
suoni di basso del canale LFE
(Low-Frequency Effects). Il
volume e la qualità dell’uscita
dei bassi dal subwoofer
dipende dalla sua posizione,
dalla forma della stanza
d’ascolto e dalla posizione di
ascolto. In generale si ottiene
un buon suono di basso installando il subwoofer in un angolo
anteriore o a un terzo della larghezza del muro, come mostra
la figura.
1/3 della lunghezza della
stanza
Sinistra
Angolo
Altoparlanti surround sinistro e destro (SKM-530S)
Questi altoparlanti servono per ottenere un posizionamento
sonoro preciso e per aggiungere realismo all’ambienza. Posizionateli a lato dell’ascoltatore o leggermente spostati indietro
a circa 60~100 cm al di sopra dell’altezza delle orecchie. Idealmente dovrebbero essere equidistanti dall’ascoltatore.
Montaggio degli altoparlanti surround su una parete
Se volete montare gli altoparlanti surround su una parete,
accertatevi prima che la parete sia abbastanza spessa da
sopportarne il peso. Il peso che le viti di montaggio possono
sostenere varia a seconda del materiale della parete e della
posizione dei rinforzi che vi sono all’interno.
Utilizzate viti lunghe che abbiano un diametro di testa di
6,3 mm o inferiore e un diametro di codolo di 3,5 mm o inferiore. (Vi consigliamo di contattare un operaio specializzato.)
It-5
Page 22

Come collegare gli altoparlanti
Leggete ciò che segue prima di collegare gli altoparlanti:
• Prima di eseguire qualsiasi collegamento spegnete il
ricevitore o l’amplificatore.
•Fate attenzione alla polarità dei
cavi degli altoparlanti. Collegate i
terminali positivi (+) solo ai terminali positivi (+) e i terminali negativi (–) solo ai terminali negativi (–
). Se gli altoparlanti sono collegati
in modo scorretto, il suono risulta
fuori fase e innaturale.
•Fate attenzione a non mandare in cortocircuito i fili
positivi e negativi. Così facendo potreste danneggiare
l’amplificatore.
Come collegare i cavi degli altoparlanti
Utilizzate i cavi in dotazione per collegare
1
i terminali di ingresso di ogni altoparlante
ai corrispondenti terminali di uscita
dell’altoparlante del ricevitore o
dell’amplificatore.
Fate corrispondere il colore di ogni cavo con quello
del terminale dell’altoparlante corrispondente.
Per effettuare un collegamento
premete la leva del terminale e
inserite il cavo nella fessura
dopodiché rilasciate la leva.
Assicuratevi che i terminali facciano presa sui fili e non sull’isolante.
Collegamento del subwoofer
Utilizzando il cavo RCA fornito in dota-
1
zione, collegate LINE INPUT del subwoofer LINE INPUT a SUBWOOFER PRE OUT
del ricevitore AV.
PRE OUT
SUB
WOOFER
SKW-530
SKF-530FR
Tangente
Rosso
SKB-530LSKB-530R
SKC-530C
Verde
Marrone
SKM-530SR
Grigio
SKF-530FL
Bianco
Blu
SKM-530SL
Precauzioni riguardanti il cavo dell'alimentazione
• Prima di collegare il cavo di alimentazione, collegate tutti gli altoparlanti e i dispositivi AV.
• Quando accendete il SKW-530 potrebbe esserci una sovratensione transitoria che potrebbe interferire con altre apparecchiature elettriche presenti sullo stesso circuito. Se questo dovesse rappresentare un problema, collegate il
SKW-530 a un ramo diverso del circuito.
Regolazione
Impostazione del livello del subwoofer
Per impostare il livello del subwoofer, utilizzate il controllo OUTPUT LEVEL. Impostatelo in modo che i suoni bassi
e quelli acuti provenienti dagli altri altoparlanti siano bilanciati.
Dato che l’udito è meno sensibile ai suoni molto bassi, si tende a impostare il livello del subwoofer
su valori troppo alti. Come regola, impostate il livello del subwoofer su un valore che vi sembra
ottimale e poi diminuitelo leggermente.
MIN
OUTPUT LEVEL
It-6
MAX
Page 23

Precauzioni durante il funzionamento
Posizionamento
•Visto che i cabinet degli altoparlanti sono costruiti in
legno, sono sensibili a temperature estreme e umidità.
Evitate quindi di posizionarli in luoghi direttamente
esposti alla luce solare, in luoghi umidi come vicino a
un condizionatore, a un umidificatore, al bagno o alla
cucina.
• Non posizionate acqua o altri liquidi vicino agli altoparlanti. Se vengono versati liquidi sugli altoparlanti,
le unità drive potrebbero venir danneggiate.
• Gli altoparlanti devono essere posizionati solo su
superfici solide e piatte non soggette a vibrazioni. Se
li posizionate su superfici irregolari e instabili da cui
potrebbero cadere e procurare danni, la qualità del
suono potrebbe risentirne.
• Il subwoofer è progettato per essere utilizzato unicamente in posizione verticale. Non utilizzatelo in posizione orizzontale o inclinata.
• Se utilizzate l’apparecchio vicino a un giradischi o a
un lettore CD, potrebbe verificarsi della retroazione o
il suono potrebbe saltare. Per evitare che ciò avvenga,
allontanate l'apparecchio dal giradischi o dal lettore
CD, altrimenti abbassate il livello di uscita dell’apparecchio.
Avvertenza sul segnale in ingresso
Gli altoparlanti supportano la potenza d’ingresso specificata quando vengono utilizzati per la semplice riproduzione di musica. Se, nonostante la potenza di ingresso sia
all’interno dell'intervallo specificato, viene trasmesso
agli altoparlanti uno dei seguenti segnali, l’eccesso di
corrente può fluire negli induttori degli altoparlanti causando la rottura o la fusione dei fili:
1. Rumore causato dalla sintonizzazione di una sta-
zione radio FM.
2. Suono causato dall'avanzamento veloce di una cas-
setta.
3. Suoni ad alta intonazione generati da un oscillatore,
da uno strumento musicale elettronico, ecc.
4. Oscillazione di un amplificatore.
5. Suoni di prova generati da audio CD di prova, ecc.
6. Tonfi e schiocchi causati dal collegamento e scolle-
gamento di cavi audio (prima di collegare o di scollegare i cavi spegnete sempre l’amplificatore).
7. Feedback di microfono.
Come utilizzare gli altoparlanti vicino a una
TV o a un computer
Le TV e i monitor dei computer sono dispositivi sensibili
al magnetismo e di conseguenza possono essere soggetti
a scolorimento o distorsione delle immagini quando nelle
vicinanze vengono posti degli altoparlanti. Per evitare che
questo avvenga, gli SKF-530F e SKC-530C sono dotati di
schermatura magnetica interna. In alcune situazioni tuttavia potrebbe comunque notarsi dello scolorimento. In tal
caso dovreste spegnere la TV o il monitor, aspettare 15-30
minuti e poi accenderli di nuovo. Questa operazione di
solito attiva la funzione di demagnetizzazione che neutralizza il campo magnetico rimuovendo eventuali scolorimenti. Se sussistono problemi di scolorimento, provate ad
allontanare gli altoparlanti dalla TV o dal monitor. Sappiate che lo scolorimento può anche essere causato da una
calamita o da uno strumento demagnetizzante posto
vicino alla TV o al monitor.
It-7
Page 24

Risoluzione dei problemi
Problema Causa possibile Soluzione
Alcuni altoparlanti non
emettono suoni?
Il subwoofer non si
accende?
Il subwoofer non produce
alcun suono?
Il subwoofer non produce
quasi alcun suono?
Il subwoofer produce un
suono ronzante?
I cavi degli altoparlanti non sono collegati correttamente.
Gli altoparlanti non sono configurati correttamente.
La spina della corrente non è inserita sino in
fondo nella presa a muro.
Il controllo OUTPUT LEVEL è impostato sul
minimo.
Il cavo RCA non è collegato correttamente a
LINE INPUT del subwoofer.
Il livello del segnale di ingresso era troppo basso
e quindi il subwoofer è entrato in standby.
Il subwoofer non è configurato correttamente. Controllate l’impostazione del subwoofer nella confi-
Il materiale d’origine contiene pochissimi bassi o
non ne contiene affatto.
Il cavo RCA non è collegato correttamente a
LINE INPUT del subwoofer.
C’è dell’interferenza causata da un apparecchio
televisivo o da un altro dispositivo elettronico.
Controllate i cavi degli altoparlanti e apportate i cambiamenti necessari.
Controllate la configurazione degli altoparlanti.
Inserite sino in fondo la spina della corrente nella presa
a muro.
Aumentate il valore del controllo OUTPUT LEVEL.
Accertatevi che il cavo RCA sia collegato correttamente a LINE INPUT del subwoofer.
Aumentate leggermente il livello di uscita della preuscita del subwoofer del ricevitore AV.
gurazione degli altoparlanti del ricevitore AV.
Scegliete un materiale d’origine che contenga più
bassi.
Accertatevi che il cavo RCA sia collegato correttamente a LINE INPUT del subwoofer.
Allontanate il subwoofer e il cavo RCA dalla sorgente
dell’interferenza. Accertatevi che il sistema audio
abbia una corretta messa a terra.
Caratteristiche tecniche
■ Subwoofer amplificato (SKW-530)
Tipo: Bass-reflex
Sensibilità e impedenza
in ingresso: 330 mV / 100 kΩ
Potenza di uscita massima: 230 W (Potenza dinamica)
Risposta in frequenza: 25 Hz–150 Hz
Capacità del cabinet: 38,5 L
Dimensioni (L
Peso: 13,6 kg
Unità drive: Woofer a cono da 25 cm
Alimentazione: AC 230-240 V, 50 Hz
Consumo: 134 W
Altro: Funzione Auto Standby
■ Altoparlante anteriore (SKF-530F)
Tipo: 2 vie bass reflex
Impedenza: 8 Ω
Potenza di ingresso massima: 110 W
Livello di pressione del suono
in uscita
Risposta in frequenza: 55 Hz–50 kHz
Frequenza di transizione: 4,5 kHz
Capacità del cabinet: 8,7 L
Dimensioni (L
Peso: 3,9 kg
Unità drive: Woofer a OMF cono da
Te r minale: Tipo a incastro con codi-
Altro: Schermatura magnetica
× A × P): 275 × 518 × 411 mm
:
86 dB/W/m
× A × P): 157 × 434 × 200 mm
12 cm
× 2
Tw eeter balanced-dome
da 2,5 cm
fica dei colori
■ Altoparlante centro (SKC-530C)
Tipo: 2 vie bass reflex
Impedenza: 8 Ω
Potenza di ingresso massima: 110 W
Livello di pressione del
suono in uscita
Risposta in frequenza: 55 Hz–50 kHz
Frequenza di transizione: 4,5 kHz
Capacità del cabinet: 8,7 L
Dimensioni (L
Peso: 3,9 kg
Altoparlante: Woofer a OMF cono da
Te r minale: Tipo a incastro con codi-
Altro: Schermatura magnetica
:
86 dB/W/m
× A × P): 434 × 157 × 200 mm
12 cm
× 2
Tw eeter balanced-dome
da 2,5 cm
fica dei colori
■ Altoparlante surround (SKM-530S/SKB-530)
Tipo: 2 vie bass reflex
Impedenza: 8 Ω
Potenza di ingresso massima: 110 W
Livello di pressione del
suono in uscita
Risposta in frequenza: 60 Hz–20 kHz
Frequenza di transizione: 10 kHz
Capacità del cabinet: 2,1 L
Dimensioni (L
Peso: 1,4 kg
Altoparlante: Woofer a cono da 8 cm
Altro: Tipo a incastro con codi-
:
82 dB/W/m
× A × P): 175 × 265 × 102 mm
Tw eeter in ceramica da 2 cm
fica dei colori
It-8
Le specifiche tecniche e le caratteristiche sono soggette
a cambiamenti senza preavviso.
Page 25

It-9
Page 26

ACHTUNG:
UM FEUER UND STROMSCHLÄGE ZU
VERMEIDEN, SOLLTE DAS GERÄT WEDER
REGEN NOCH FEUCHTIGKEIT AUSGESETZT
WERDEN.
VORSICHT:
UM STROMSCHLÄGE ZU VERMEIDEN, WEDER
DAS GEHÄUSE (NOCH DIE RÜCKSEITE) ÖFFNEN.
NICHTS IM GEHÄUSE DARF VOM BENUTZER
GEWARTET WERDEN. WENDEN SIE SICH AN
DEN QUALIFIZIERTEN KUNDENDIENST.
Wichtige Sicherheitshinweise
WARNING
RISK OF ELECTRIC SHOCK
DO NOT OPEN
Das Blitzsymbol mit Pfeil innerhalb eines
gleichseitigen Dreiecks soll den Anwender auf das
Vorhandensein von “gefährlichen Spannungen” im
Inneren des Gehäuses dieses Produktes aufmerksam
machen. Derartige Spannungen sind hoch genug, um
für Menschen gefährliche Schläge zu bewirken.
Das Ausrufungszeichen innerhalb eines gleichseitigen
Dreiecks soll den Anwender auf das Vorhandensein
von wichtigen Betriebs- oder Wartungshinweisen
(Service) in der dem Produkt beiliegenden Dokumentation hinweisen.
AVIS
RISQUE DE CHOC ELECTRIQUE
NE PAS
OUVRIR
1. Lesen Sie sich diese Hinweise durch.
2. Bewahren Sie diese Hinweise auf.
3. Beachten Sie alle Warnungen.
4. Befolgen Sie alle Anweisungen.
5. Verwenden Sie dieses Gerät niemals in der Nähe
von Wasser.
6. Reinigen Sie das Gehäuse nur mit einem trockenen
Tuch.
7. Versperren Sie niemals die vorhandenen
Lüftungsschlitze. Stellen Sie das Gerät immer den
Anweisungen des Herstellers entsprechend auf.
8. Stellen Sie das Gerät niemals in die Nähe einer
Wärmequelle, z.B. eines Heizkörpers, Ofens bzw.
anderen Gerätes, das viel Wärme erzeugt.
9. Versuchen Sie niemals, die Sicherheitsvorkehrung
des polarisierten oder Erdungsstiftes zu umgehen.
Ein polarisierter Stecker weist zwei Stifte mit unterschiedlicher Breite auf. Ein geerdeter Stecker weist
zwei Stifte und einen Erdungsstift auf. Der breitere
Stift bzw. der Erdungsstift dient Ihrer Sicherheit.
Wenn der beiliegende Stecker nicht in Ihre Steckdose passt, müssen Sie einen Elektriker bitten, neue
Steckdosen zu installieren.
10. Sorgen Sie dafür, dass niemand auf das Netzkabel
treten kann und dass es nicht abgeklemmt wird.
Diese Gefahr besteht insbesondere in der Nähe der
Steckdose oder des Kabelaustritts am Gerät.
11. Verwenden Sie nur Halterungen/Zubehör, die/das
vom Hersteller ausdrücklich empfohlen wird/werden.
12. Verwenden Sie nur Wagen,
VORSICH MIT SCHRÄNKEN
Ständer, Halterungen und
Unterlagen, die entweder
vom Hersteller empfohlen
werden oder zum Lieferumfang das Gerätes gehören.
Seien Sie bei Verwendung
eines Wagens vorsichtig.
Dieser darf beim Transport
S3125A
nicht umfallen, weil das zu schweren Verletzungen
führen kann.
13. Lösen Sie im Falle eines Gewitters oder wenn Sie
das Gerät längere Zeit nicht verwenden möchten,
den Netzanschluss.
14. Überlassen Sie alle Wartungsarbeiten einer qualifizierten Kundendienststelle. Das Gerät muss zur
Wartung eingereicht werden, wenn es Schäden aufweist, z.B. wenn das Netzkabel oder der Stecker
De-2
beschädigt ist, wenn Wasser oder Fremdkörper in
das Geräteinnere gelangt sind, wenn das Gerät
Feuchtigkeit oder Regen ausgesetzt war bzw. wenn
es sich nicht normal verhält oder wenn seine Funktionstüchtigkeit merklich nachgelassen hat.
15. Schäden, die eine Reparatur erfordern
Lösen Sie sofort den Netzanschluss und reichen Sie
das Gerät bei einer qualifizierten Kundendienststelle
ein, wenn:
A. Das Netzkabel bzw. dessen Stecker beschädigt ist;
B. Wenn Fremdkörper oder Flüssigkeiten ins
Geräteinnere gelangt sind;
C. Wenn das Gerät nass geworden ist (z.B. durch
Regen oder Wasser);
D. Das Gerät anhand der in dieser Anleitung gegebe-
nen Hinweise nicht erwartungsgemäß funktioniert.
Prinzipiell sollten Sie nur die Bedienelemente verwenden, die ausdrücklich erwähnt werden, weil
andere Handlungsabläufe zu so schweren Schäden
führen können, dass nur ein qualifizierter Wartungstechniker sie wieder beheben kann;
E. Das Gerät hingefallen ist bzw. das Gehäuse
sichtbare Schäden aufweist;
F. Wenn die Leistung des Gerätes merklich nachge-
lassen hat—das sollte immer als Warnung gewertet werden, dass das Gerät überprüft werden muss.
16. Flüssigkeiten und Fremdkörper
Achten Sie darauf, dass weder Flüssigkeiten noch
kleine Gegenstände über die Öffnungen in das
Geräteinnere gelangen. Das könnte zu Stromschlägen oder sogar Brand führen.
Sorgen Sie dafür, dass keine Flüssigkeit auf das
Gerät tropft bzw. gespritzt wird und stellen Sie niemals Wasserbehälter (z.B. Vasen) darauf.
Stellen Sie keine Kerzen oder andere brennenden
Gegenstände auf dieses Gerät.
17. Batterien
Beachten Sie beim Entsorgen erschöpfter Batterien
immer die in Ihrer Gegend geltenden Umweltvorschriften oder -empfehlungen.
18. Achten Sie bei Aufstellung des Gerätes in einem
Schrank oder Bücherbord auf eine einwandfreie
Lüftung.
An der Oberseite und den Seiten muss ein Freiraum
von 20 cm gelassen werden. An der Rückseite müssen mindestens 10 cm frei sein. Zwischen der Rückseite des Schranks oder Bücherbords muss ein
Freiraum von mindestens 10 cm gelassen werden,
um die Abfuhr der Warmluft zu gewährleisten.
Page 27

Herzlichen Glückwunsch zum Kauf eines Heimkino-Boxensystem von Onkyo. Bitte lesen Sie sich diese
Bedienungsanleitung vor Einsatz Ihrer neuen Lautsprechers sorgfältig durch. Befolgen Sie die Hinweise
und Anweisungen dieser Bedienungsanleitung, um alle Funktionen kennen und optimal nutzen zu lernen.
Bitte bewahren Sie diese Bedienungsanleitung an einem sicheren Ort auf.
Vorsichtsmaßnahmen
1. Netzsicherung
Die Sicherung befindet sich an der Chassisinnenseite
und darf vom Anwender nicht selbst ausgewechselt werden. Überlassen Sie dies einer von Onkyo anerkannten
Kundendienststelle.
2. Pflege
Ab und zu sollten Sie die Front- und Rückseite sowie das
Gehäuse mit einem weichen Tuch abwischen. Bei hartnäckigem Schmutz können Sie das Tuch mit einer milden
Seifenlauge und Wasser anfeuchten, es dann auswringen
und den Schmutz wegwischen. Verwenden Sie niemals
ätzende Stoffe, Verdünner, Waschbenzin oder chemische
Lösungsmittel, weil diese das Gehäuse angreifen und/
oder die Beschriftung entfernen könnten.
Staub auf schwer zugänglichen Frontbespannungen
kann mit einem Staubsauger entfernt werden.
3. Stromversorgung
WARNUNG
LESEN SIE SICH FOLGENDE ABSCHNITTE
DURCH, BEVOR SIE DAS GERÄT DAS ERSTEMAL ANS NETZ ANSCHLIESSEN.
Die an den Steckdosen anliegende Netzspannung ist
von Land zu Land bzw. Gegend zu Gegend unterschiedlich. Schließen Sie das Gerät immer nur an eine Steckdose mit der geeigneten Spannung an (z.B., AC 120 V
60 Hz). Siehe die Angaben auf dem Typenschild (Geräterückseite).
Der SKW-530 wird durch die „Auto Standby”-Funktion
nicht vollständig ausgeschaltet. Wenn Sie den SKW-530
nicht verwenden möchten, sollten Sie das Netzkabel
lösen.
Modelle für Europa
Konformitätserklärung
Wir,
ONKYO EUROPE
ELECTRONICS GmbH
LIEGNITZERSTRASSE 6,
82194 GROEBENZELL,
GERMANY
erklären in eigener Verantwortung, daß das ONKYO-Produkt,
das in dieser Betriebsanleitung beschrieben wird, mit den
folgenden technischen Normen übereinstimmt: EN60065,
EN55013, EN55020 und EN61000-3-2, -3-3.
GROEBENZELL, GERMANY
I. MORI
ONKYO EUROPE ELECTRONICS GmbH
■ Anbringen und Abnehmen der Frontbespannungen
Die Frontbespannungen der Frontboxen und der Mittenbox
sind abnehmbar. Zum Anbringen und Abnehmen der Frontbespannung gehen Sie wie folgt vor.
1. Greifen Sie mit beiden Händen die untere Kante der Front-
bespannung und ziehen Sie sie behutsam zu sich hin, um
sie zu lösen.
2. Um die Frontbespannung abzunehmen, ziehen Sie auch
die obere Kante behutsam heraus.
3. Zum Anbringen der Frontbespannung müssen Sie sie mit
ihren Eckzapfen in die entsprechenden Aussparungen am
Boxengehäuse drücken.
AnbringenAbnehmen
De-3
Page 28

Lieferumfang
Erkundung des
Bitte schauen Sie zuerst nach, ob der Lieferkarton folgende Gegenstände enthält. Wenn etwas fehlt, wenden
Sie sich bitte an Ihren Onkyo-Händler.
• Front-Lautsprechers (SKF-530F)
• Center-Lautsprecher (SKC-530C)
• Surround-Lautsprecher (SKM-530S/SKB-530)
• Lautsprecherkabel für die
Front-Lautsprechers (4,5 m)
(Rot) (Weiß)
• Lautsprecherkabel für die
Center-Lautsprecher (3 m)
(Grün)
Lautsprechersystems
Subwoofer (SKW-530)
■ Frontplatte
1
■ Rückseite
MIN
MAX
• Lautsprecherkabel für die surround-Lautsprecher (9 m)
(Blau) (Grau)
• Subwoofer (SKW-530)
Der Buchstabe am Ende der Produktbezeichnung (siehe
unsere Kataloge und Verpackungen) verweist auf die
Farbe der system. Bis auf die Farbe gibt es jedoch keine
Unterschiede: die Bestückung und Bedienvorgänge sind
für alle Versionen gleich.
(Braun) (Hellbraun)
• RCA-Kabel für den
Subwoofer
2 3 4
An eine
Netzsteckdose
A STANDBY/ON-Anzeige
Rot: Der Subwoofer ist im Bereitschaftsbetrieb.
Grün: Der Subwoofer ist eingeschaltet.
Die „Auto Standby”-Funktion schaltet den SKW530 automatisch aus dem Bereitschaftsbetrieb ein,
sobald ein Eingangssignal erkannt wird. Liegt ein
Weile lang kein Signal am Eingang an, wechselt der
SKW-530 automatisch in den Bereitschaftsbetrieb.
B OUTPUT LEVEL-Regler
Hiermit können Sie die Lautstärke des Subwoofers
einstellen.
C LINE INPUT
Dieser RCA-Eingang muss mit dem SubwooferVorverstärkerausgang eines AV-Receivers, Verstärkers oder anderen Receivers verbunden werden.
Verwenden Sie dafür das beiliegende RCA-Kabel.
D POWER-Schalter
Stellen Sie diesen Schalter auf ON, um das Gerät
einzuschalten. Stellen Sie ihn auf OFF, um das
Gerät auszuschalten.
Note:
Die „Auto Standby”-Funktion schaltet den Subwoofer
ein, sobald das Eingangssignal einen bestimmten Pegel
überschreitet. Wenn diese Funktion zu oft bzw. zu selten
anspringt, müssen Sie auf dem Receiver bzw. Verstärker
einen höheren (oder geringeren) Subwoofer-Ausgangspegel einstellen.
De-4
Page 29

Heimkinobetrieb
Die Freuden des Heimkinos
Unter „Heimkino” versteht man Surround-Anwendungen, durch die Sie zuhause eine überzeugende Nachempfindung
der Akustik eines Kinos oder Konzertsaals erzielen.
Linke und rechte Front-Lautsprecher (SKF-530F)
Diese Lautsprechers geben die wichtigsten Signale wieder. Im Heimkino
dienen sie als Anhaltspunkte für das Schallfeld. Richten Sie sie auf die
Hörer, und zwar auf Ohrhöhe, und achten Sie auf einen gleich großen
Abstand zum Fernseher. Drehen Sie sie nach innen, um ein Dreieck zu
erzielen, an dessen Unterseite sich der Hörer befindet.
Center-Lautsprecher (SKC-530C)
Diese Lautsprecher unterstützt die linke und rechte
Front-Lautsprecher, indem sie Schallbewegungen
verstärkt und das Schallbild „füllt”. Bei Filmen gibt
sie den Hauptdialog wieder.
Stellen Sie sie so nahe wie möglich
an den Fernseher (eventuell sogar
darauf). Sie muss sich auf derselben
Höhe befinden wie die linke und
rechte Front-Lautsprecher.
Stellen Sie das Gerät so auf, dass es
weder verrutschen noch umfallen
kann.
Linke und rechte hintere SurroundBox (SKB-530)
Diese Boxen verstärken dank einer
besseren Schallortung hinter dem
Hörer den Realismus des SurroundEindrucks. Für bestimmte Wiedergabemodi (z.B. Dolby Digital EX oder
DTS-ES) sind sie unerlässlich. Stellen
Sie sie etwa 60~100cm über Ohrhöhe
hinter der Hörposition auf. Richten Sie
die Boxen auf die Hörposition.
Rechts
Subwoofer (SKW-530)
Der Subwoofer gibt die
tieffrequenten Signale des
LFE-Kanals („Low-Frequency
Effects”) wieder. Der Pegel und die
Intensität der Basswiedergabe sollte
sich nach der Hörposition, der Form
des Hörraums und dem Aufstellungsort des Tieftöners richten. Im
allgemeinen ist die Basswiedergabe
dann optimal, wenn man den Subwoofer in einer vorderen Ecken bzw.
etwas zur Mitte versetzt aufstellt.
Siehe die Abbildung.
1/3 der
Raumlänge
Links
Ecke
Linke und rechte Surround-Lautsprecher (SKM-530S)
Diese Lautsprechers dienen für die Wiedergabe exakter Schallpositionen und zum Optimieren einer realistischen Akustik. Sie
sollten sich neben oder knapp hinter dem Hörer und ca. 60~100
cm über Ohrhöhe befinden. Im Idealfall befinden sich beide
Lautsprechers in gleicher Entfernung zum Hörer.
Wandmontage der Surround-Boxen
Überprüfen Sie vor Montage, ob die betreffende Wand das
Gewicht der Boxen auch wirklich aushält. Die tatsächliche Tragkraft der Montageschrauben kann stark variieren und richtet
sich nach der Wandbeschaffenheit und der Lage der
Wandverstärkungen.
Die Schrauben sollten einen Kopfdurchmesser von 6,3mm oder
weniger und einen Schaftdurchmesser von 3,5mm oder weniger haben. (Am besten überlassen Sie die Installation einem
Fachmann.)
De-5
Page 30

Anschließen der Lautsprechers
Lesen Sie sich vor dem Anschließen der Lautsprechers
folgende Hinweise durch:
• Schalten Sie Ihren Receiver bzw. Verstärker vor Herstellen der Verbindungen aus.
• Achten Sie genau auf die Polarität
der Lautsprecherkabel. Will heißen: Verbinden Sie den Pluspol (+)
eines Anschlusses mit dem Pluspol
(+) der Lautsprecher und den
Minuspol (–) eines Anschlusses mit
dem Minuspol (–) der Lautsprecher. Wenn Sie die Polarität vertauschen, tritt eine
Phasendrehung auf, welche die Klangqualität beeinträchtigt.
•Vermeiden Sie außerdem Kurzschlüsse des Plus- und
Minuspols durch hervorstehende Adern. Andernfalls
könnte der Verstärker beschädigt werden.
Anschließen der Lautsprecherkabel
Verwenden Sie die beiliegenden Kabel zur
1
Verbindung der Boxeneingänge mit den
Receiver- bzw. Verstärkerausgängen.
Das Kabel und die Anschlussklemme müssen
immer die gleiche Farbe aufweisen.
Drücken Sie die Klemme nach
unten, schieben Sie die Adern in
die Öffnung und geben Sie die
Klemme wieder frei.
Sorgen Sie dafür, dass nur die
Adern, nicht aber der Kabelmantel, festgeklemmt
werden.
Anschließen des Subwoofers
Verbinden Sie den LINE INPUT des Sub-
1
woofers über das beiliegende RCA-Kabel
mit dem SUBWOOFER PRE OUT ihres AVReceivers.
PRE OUT
SUB
WOOFER
SKW-530
SKF-530FR
Hellbraun
Rot
SKB-530LSKB-530R
SKC-530C
Grün
Braun
SKM-530SR
SKF-530FL
Weiß
Blau
Grau
SKM-530SL
Vorsicht mit dem Netzkabel
•Vor Herstellen des Netzanschlusses müssen die AV-Geräte und Boxen angeschlossen werden.
• Bei Einschalten des SKW-530 kommt es vorübergehend zu einer Spannungsspitze, die andere elektrische Geräte
beeinträchtigen könnte. Wenn Sie das als störend empfinden, müssen Sie den SKW-530 an einen anderen Stromkreis
anschließen.
Einstellung
Einstellen des Subwoofer-Pegels
Drehen Sie am OUTPUT LEVEL-Regler, um den Subwoofer-Pegel einzustellen. Die Basswiedergabe sollte zur
Höhenwiedergabe der anderen Lautsprecher ein möglichst ausgeglichenes Verhältnis haben.
Da das menschliche Ohr gegenüber Tiefbassklängen weniger empfindlich ist, passiert es leicht,
dass man einen übertriebenen Subwoofer-Pegel einstellt. Wenn Sie glauben, die optimale Einstellung gefunden zu haben, sollten Sie den Pegel in der Regel noch ein klein wenig zurücknehmen.
De-6
MIN
OUTPUT LEVEL
MAX
Page 31

Vorsichtsmaßnahmen
Aufstellung
• Das Gehäuse der Lautsprechers ist aus Holz. Stellen
Sie sie daher nicht an Orten auf, die direktem Sonnenlicht oder Feuchtigkeit (z.B. in der Nähe einer Klimaanlage oder eines Luftbefeuchtigers, im Badezimmer
oder in der Küche) ausgesetzt sind.
• Nach Möglichkeit sollte sich kein Wasser oder andere
Flüssigkeit in der Nähe der Lautsprechers befinden.
Wenn Flüssigkeit auf die Lautsprecher tropft, könnten
die Lautsprecher beschädigt werden.
• Stellen Sie Boxen auf eine stabile, ebene Oberfläche,
die keinen Vibrationen ausgesetzt ist. Wenn Sie die
Boxen auf einer schrägen oder wackligen Oberfläche
aufstellen, könnten sie umfallen und Verletzungen verursachen. Außerdem lässt die Klangqualität dann zu
wünschen übrig.
• Der Subwoofer wurde ausschließlich für eine aufrechte Aufstellung konstruiert. Legen Sie ihn nicht auf
die Seite bzw. kippen Sie ihn nicht.
•Wenn das Gerät in der Nähe eines Platten- oder CDSpielers betrieben wird, kann es zu Rückkopplung und
Aussetzern kommen. Stellen Sie das Gerät dann weiter vom Platten- oder CD-Spieler entfernt auf oder
verringern Sie den Ausgangspegel des Geräts.
Aufstellung neben einem Fernseher oder
Computer
Fernseh- oder Computerbildschirme sind empfindlich
gegenüber Magnetfeldern. Wenn Sie herkömmliche SKF530F und SKC-530C in ihrer Nähe aufstellen, kommt es
zu Farbänderungen und Bildverzerrungen. Um dies zu
verhindern, sind die
Lautsprecher
s magnetisch abge-
schirmt. In einigen Situationen kann es dennoch zu Bildverfärbungen kommen. Wenn das bei Ihnen der Fall ist,
müssen Sie den Fernseher oder Computerbildschirm ausschalten, 15~30 Minuten warten und ihn dann wieder einschalten. Normalerweise wird dabei die
Entmagnetisierungsfunktion aktiviert, so dass keine Bildverfärbungen mehr auftreten. Wenn der Bildschirm dann
jedoch immer noch Verfärbungen aufweist, müssen Sie
die
Lautsprecher
s etwas weiter entfernt aufstellen.
Beachten Sie, dass Bildverfärbungen auch durch andere
magnetische Gegenstände hervorgerufen werden können,
die sich in der Nähe des Bildschirms befinden.
Vorsicht bei der Signaleingabe
Diese Lautsprechers eignen sich nur für die angegebene
Ausgangsleistung, solange Musik wiedergegeben wird.
Folgende Signaltypen können die Lautsprecher selbst
dann beschädigen, wenn die Ausgangsleistung die
Belastbarkeit eigentlich nicht übersteigt:
1. Störgeräusche eines UKW-Radiosenders bei
schlechtem Empfang.
2. Der Ton, der beim Vorspulen einer Kassette ausgege-
ben wird
3. Hochfrequente Signale, die von einem Oszillator,
einem elektronischen Musikinstrument o.ä. ausgegeben werden.
4. Oszillieren des Verstärkers.
5. Bestimmte Testtöne von Test-CDs usw.
6. Die Signale, die bei Herstellen oder Lösen von
Audio-Verbindungen auftreten. (Schalten Sie den
Verstärker aus, bevor Sie Verbindungen herstellen
oder lösen.)
7. Rückkopplung eines Mikrofons.
Fehlersuche
Symptom Mögliche Ursache Abhilfe
Bestimmte Boxen geben
kein Signal aus.
Der Subwoofer kann nicht
eingeschaltet werden.
Der Subwoofer gibt keine
Signale aus.
Der Subwoofer gibt nur
ein minimales Signal aus.
Der Subwoofer gibt einen
Brummton von sich.
Die Boxen sind nicht richtig angeschlossen. Kontrollieren Sie die Verbindung der Lautsprecherka-
Die Boxenkonfiguration wurde nicht richtig eingestellt.
Der Netzstecker ist nicht vollständig in die Steckdose eingeschoben.
Der OUTPUT LEVEL-Regler wurde auf den
Mindestwert gestellt.
Das RCA-Kabel ist nicht ordnungsgemäß mit
dem LINE INPUT des Subwoofers verbunden.
Das Eingangssignal ist so schwach, dass der
Bereitschaftsbetrieb des Subwoofers aktiviert
wurde.
Die Subwoofer-Konfiguration ist falsch eingestellt.
Das abgespielte Material enthält kaum oder gar
keinen Bassanteil.
Das RCA-Kabel ist nicht ordnungsgemäß mit
dem LINE INPUT des Subwoofers verbunden.
Der Fernseher oder ein anderes elektronisches
Gerät verursacht eine Störeinstreuung.
bel und berichtigen Sie sie bei Bedarf.
Kontrollieren Sie die Boxenkonfiguration.
Schieben Sie den Netzstecker so weit wie möglich in
die Steckdose.
Drehen Sie den OUTPUT LEVEL-Regler auf.
Verbinden Sie das RCA-Kabel ordnungsgemäß mit
dem LINE INPUT des Subwoofers.
Stellen Sie auf dem AV-Receiver einen etwas höheren
Subwoofer-Ausgangspegel ein.
Überprüfen Sie die Subwoofer-Einstellung in der
Boxenkonfiguration Ihres AV-Receivers.
Versuchen Sie es mit Material, das einen höheren Bassanteil aufweist.
Verbinden Sie das RCA-Kabel ordnungsgemäß mit
dem LINE INPUT des Subwoofers.
Platzieren Sie den Subwoofer und das RCA-Kabel in
größerem Abstand zu Störquelle. Überprüfen Sie, ob
Ihre Anlage ordnungsgemäß geerdet ist.
De-7
Page 32

Technische Daten
■ Aktiver Subwoofer (SKW-530)
Typ: Bassreflex
Eingangsempfindlichkeit
und Impedanz: 330 mV / 100 kΩ
Max. Ausgangsleistung: 230 W (Dynamikleistung)
Frequenzgang: 25 Hz–150 Hz
Gehäusevolumen: 38,5 L
Abmessungen (B
Gewicht: 13,6 kg
Lautsprecher: 25 cm-Konustieftöner
Stromversorgung: AC 230-240 V, 50 Hz
Leistungsaufnahme: 134 W
Sonstiges: Auto Standby-Funktion
× H × T): 275 × 518 × 411 mm
■ Front-Lautsprechers (SKF-530F)
Typ: 2-Wege Bassreflex
Impedanz: 8 Ω
Maximale Eingangsleistung: 110 W
Ausgegebener Schalldruck
Frequenzgang: 55 Hz–50 kHz
Übergangsfrequenz: 4,5 kHz
Gehäusevolumen: 8,7 L
Abmessungen (B
Gewicht: 3,9 kg
Lautsprecher:
:
86 dB/W/m
× H × T): 157 × 434 × 200 mm
12 cm-OMF-Konustieftöner
× 2
Anschlussklemme: Farblich kodierte Druckk-
Sonstiges: Magnetisch abgeschirmt
2,5 cm-Kalottenhochtöner
lemmen
■ Center-Lautsprecher (SKC-530C)
Typ: 2-Wege Bassreflex
Impedanz: 8 Ω
Maximale Eingangsleistung: 110 W
Ausgegebener Schalldruck
Frequenzgang: 55 Hz–50 kHz
Übergangsfrequenz: 4,5 kHz
Gehäusevolumen: 8,7 L
Abmessungen (B
Gewicht: 3,9 kg
Lautsprecher:
:
86 dB/W/m
× H × T): 434 × 157 × 200 mm
12 cm-OMF-Konustieftöner
× 2
Anschlussklemme: Farblich kodierte Druckk-
Sonstiges: Magnetisch abgeschirmt
■ Surround-Lautsprecher (SKM-530S/SKB-530)
Typ: 2-Wege Bassreflex
Impedanz: 8 Ω
Maximale Eingangsleistung: 110 W
Ausgegebener Schalldruck
Frequenzgang: 60 Hz–20 kHz
Übergangsfrequenz: 10 kHz
Gehäusevolumen: 2,1 L
Abmessungen (B
Gewicht: 1,4 kg
Lautsprecher: 8 cm-Konustieftöner
Anschlussklemme: Farblich kodierte Druckk-
× H × T): 175 × 265 × 102 mm
Änderungen der technischen Daten und Funktionen
ohne vorherige Ankündigung vorbehalten.
2,5 cm-Kalottenhochtöner
lemmen
:
82 dB/W/m
2 cm-Keramikhochtöner
lemmen
Sales & Product Planning Div. : 2-1, Nisshin-cho, Neyagawa-shi, OSAKA 572-8540, JAPAN
Tel: 072-831-8023 Fax: 072-831-8124
ONKYO U.S.A. CORPORATION
18 Park Way, Upper Saddle River, N.J. 07458, U.S.A.
Tel: 201-785-2600 Fax: 201-785-2650 http://www.us.onkyo.com/
ONKYO EUROPE ELECTRONICS GmbH
Liegnitzerstrasse 6, 82194 Groebenzell, GERMANY
Tel: +49-8142-4401-0 Fax: +49-8142-4401-555 http://www.eu.onkyo.com/
ONKYO EUROPE UK Office
Suite 1, Gregories Court, Gregories Road, Beaconsfield, Buckinghamshire, HP9 1HQ
UNITED KINGDOM Tel: +44-(0)1494-681515 Fax: +44(0)-1494-680452
ONKYO CHINA LIMITED
Units 2102-2107, Metroplaza Tower I, 223 Hing Fong Road, Kwai Chung,
N.T., HONG KONG Tel: 852-2429-3118 Fax: 852-2428-9039
http://www.ch.onkyo.com/
SN 29344068
(C) Copyright 2005 ONKYO CORPORATION Japan. All rights reserved.
De-8
HOMEPAGE
http://www.onkyo.com/
I0505-1
* 2 9 3 4 4 0 6 8 *
 Loading...