

Page 1
Instruction Manual
En
POWERED SPEAKER
GX-30ARC
Page 2
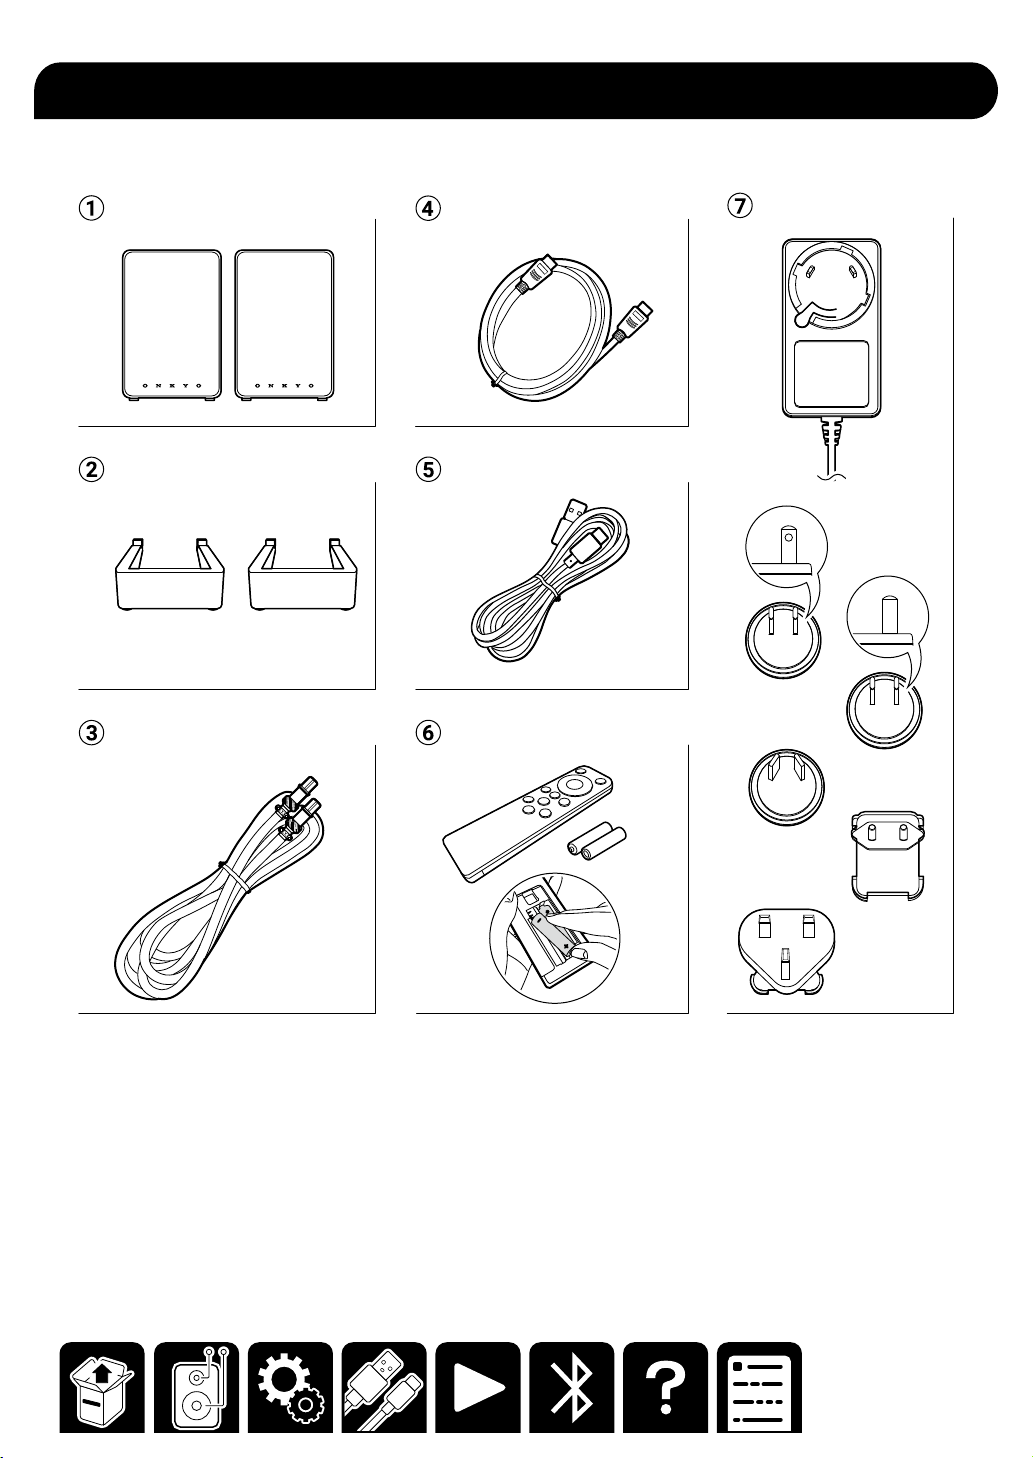
What's in the box
A Speakers (2)
B Speaker stands (2)
C Speaker cable (1)
D HDMI cable (1)
E USB cable (1)
F Remote controller (RC-993S) (1)
*Batteries (AAA/R03) (2)
G AC adapter and plug adapter
• Initial Setup Guide (1)
• Safety Information (1)
• Warranty: For North America (1) and Europe (1)
2
Page 3
Part Names
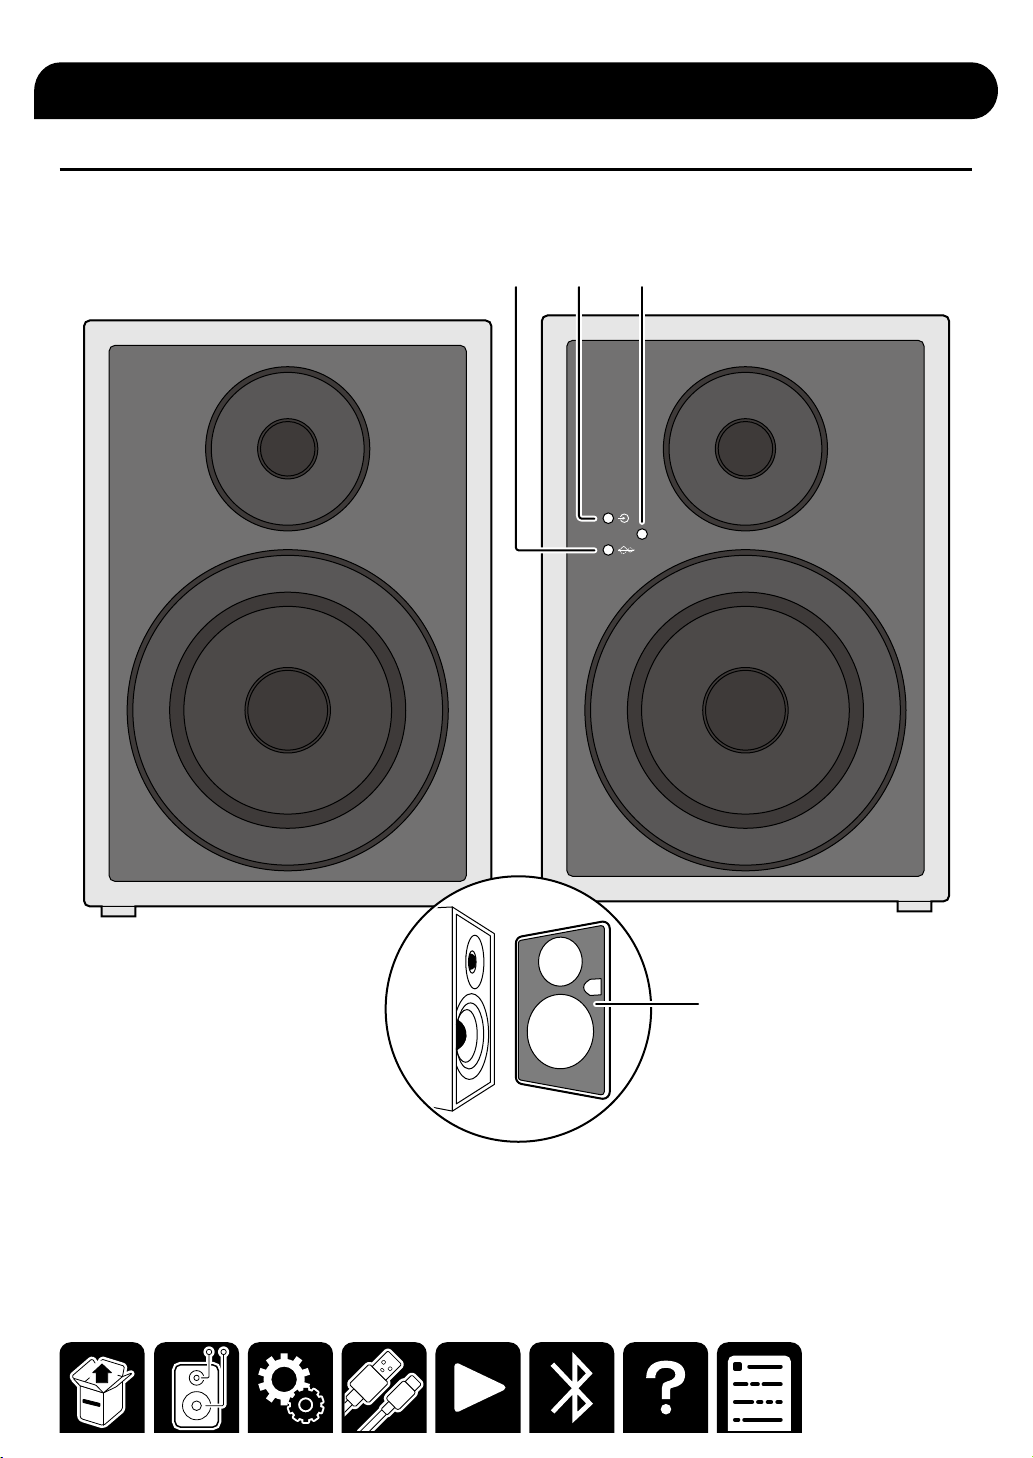
Front Panel
SECONDARY
SPEAKER
PRIMARY
SPEAKER
A 2 3
A LED Flat sound mode Indicator
B LED Source Indicator
C Remote control sensor
D Speaker grill
4
3
Page 4
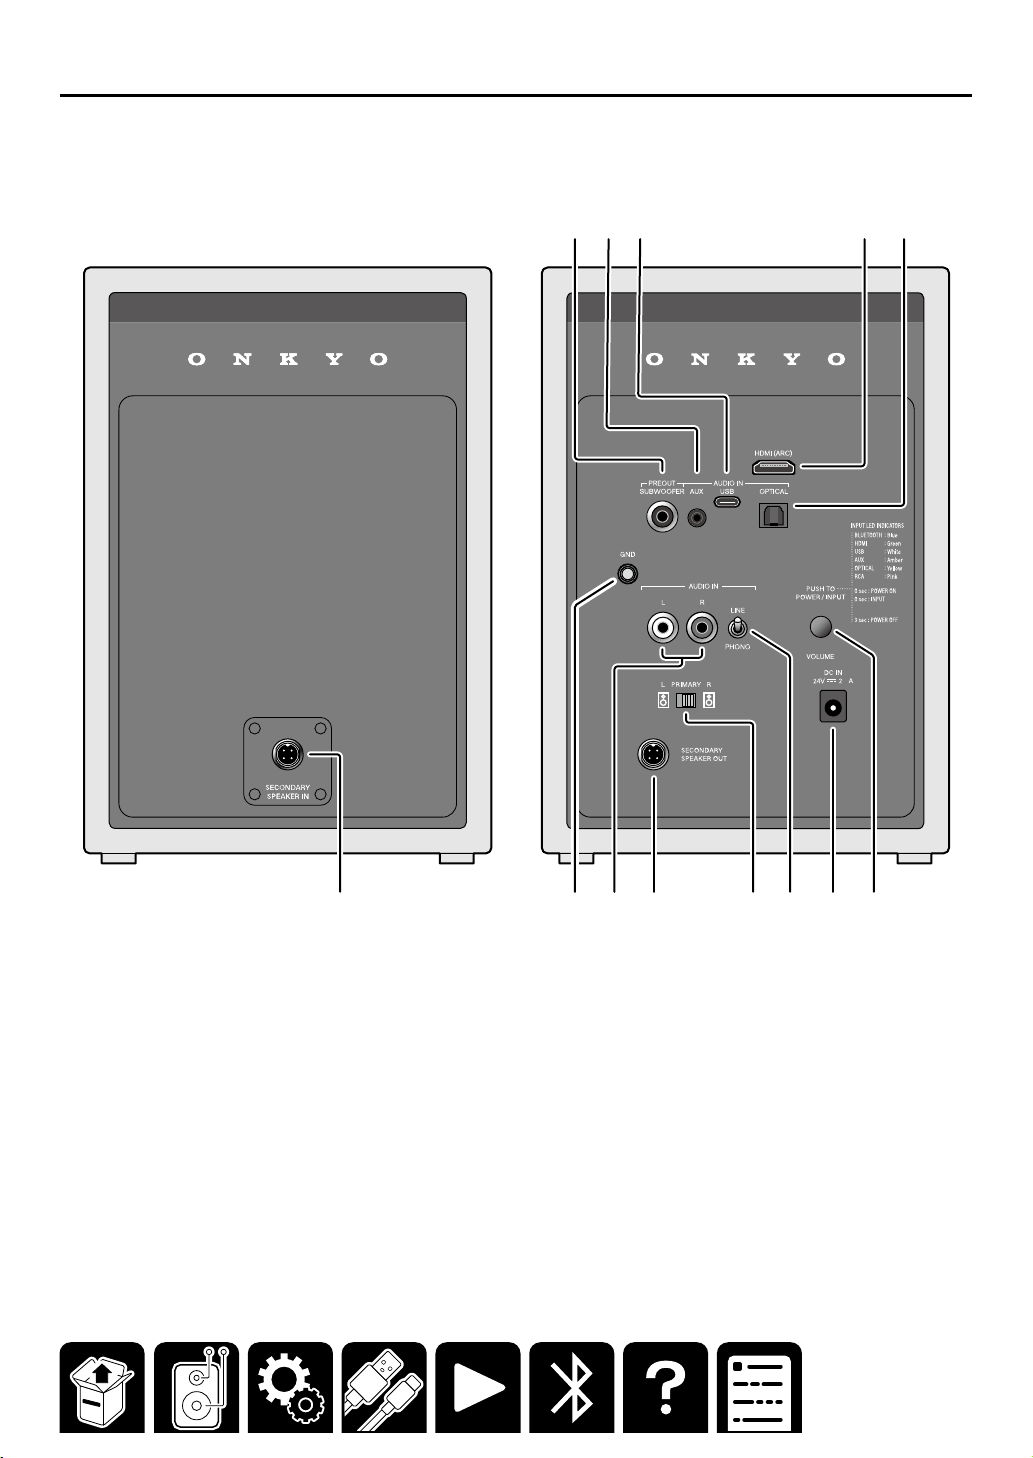
Rear Panel
SECONDARY
SPEAKER
A 2 3
PRIMARY
SPEAKER
4 5
.7
6 7
A PREOUT SUBWOOFER terminal
B AUDIO IN AUX terminal (φ3.5mm stereo mini plug terminal)
C USB Type-C terminal
D HDMI terminal
E Optical digital input terminal
F Speaker terminal (SECONDARY)
G GND terminal
H AUDIO IN LR terminals (RCA stereo terminals)
I Speaker terminal (PRIMARY)
J L/R selector switch
K LINE/PHONO selector switch
L DC IN terminal
M POWER/INPUT switch
VOLUME dial
8 9 J K L M
4
Page 5
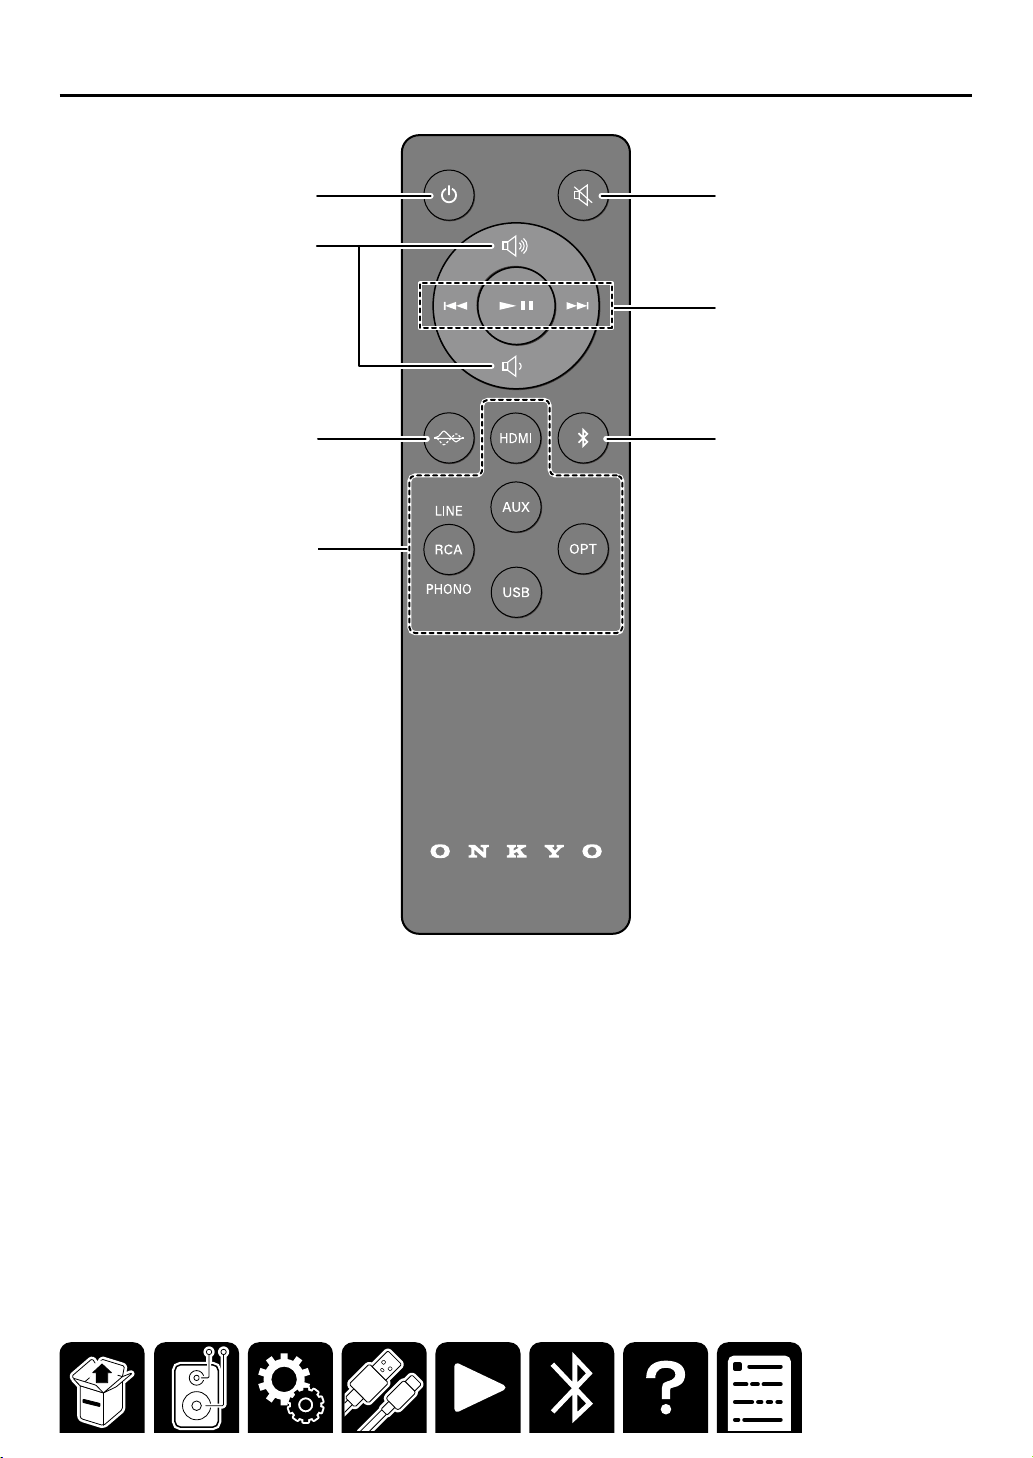
Remote Controller
A
2
3
4
5
6
7
A ON/STANDBY button
B Volume UP/DOWN buttons
C Flat sound mode button
D Input selector buttons
E Mute button
F Play operation buttons
G BLUETOOTH
®
button
5
Page 6
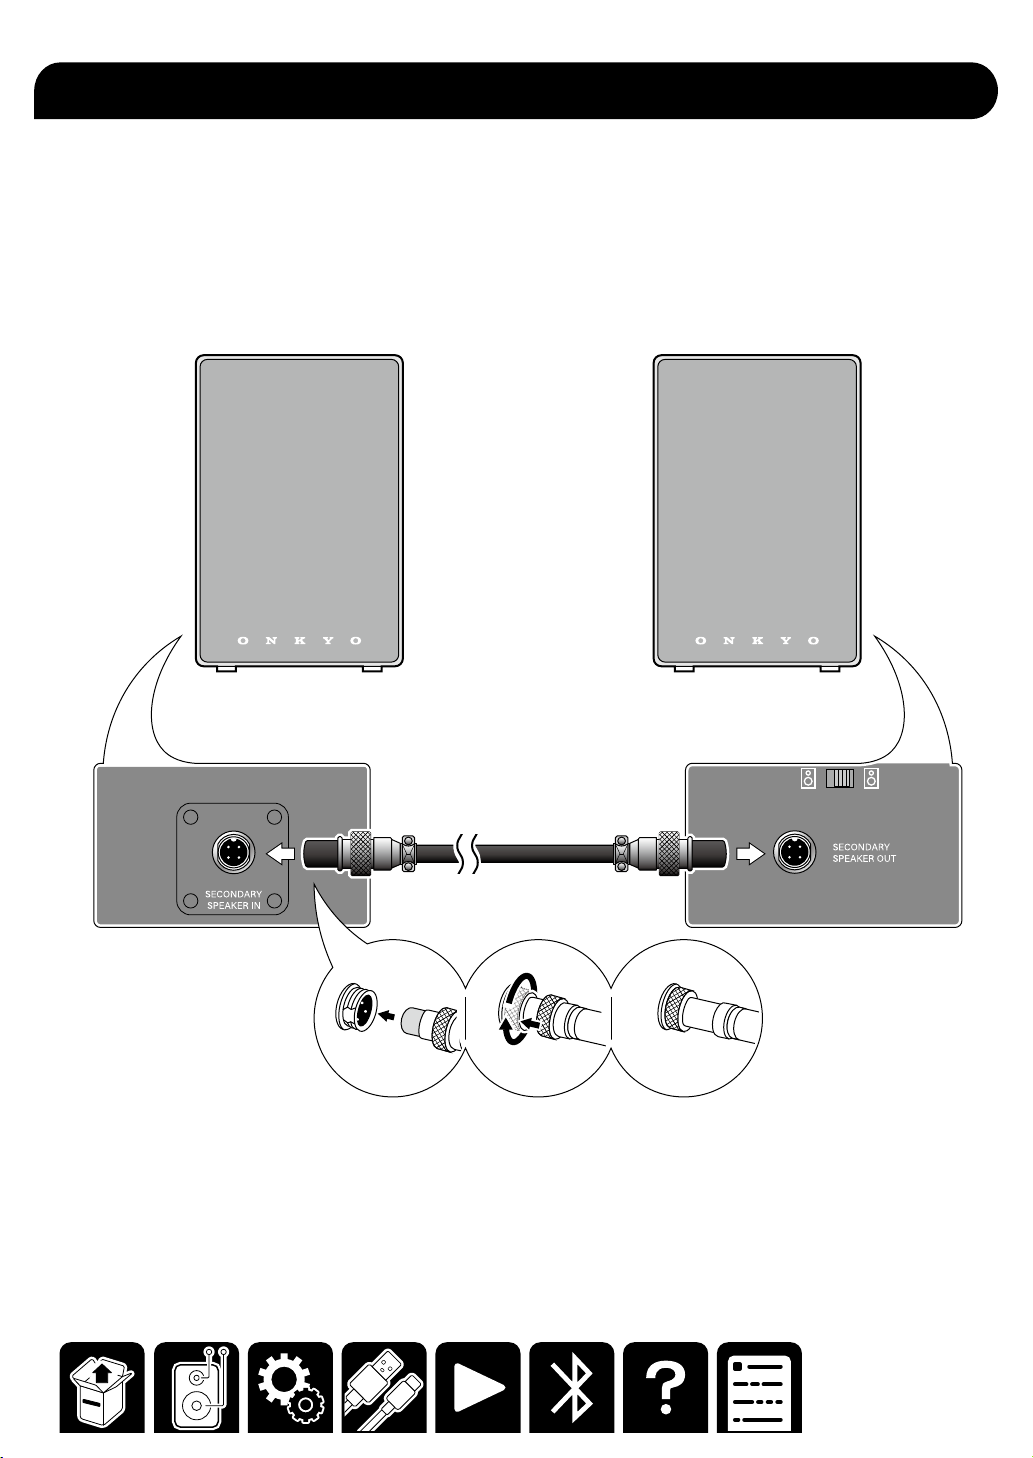
Setup
■ Connecting the speaker cable
SECONDARY
SPEAKER
PRIMARY
SPEAKER
6
Page 7
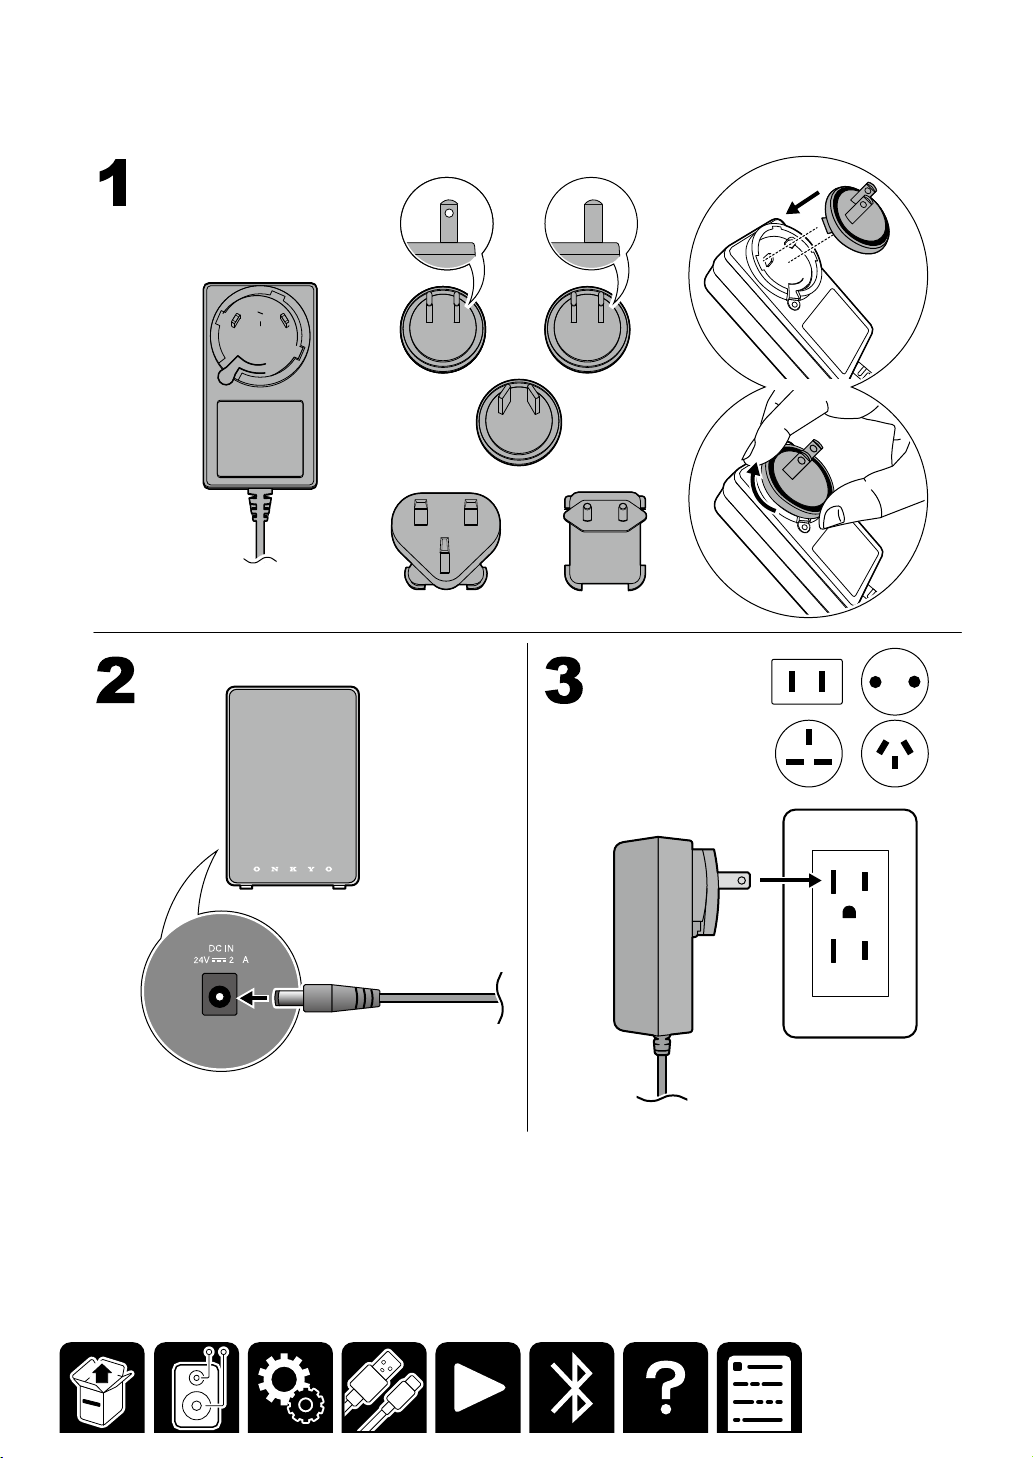
■ Assembling and connecting the AC adapter
.7
7
Page 8
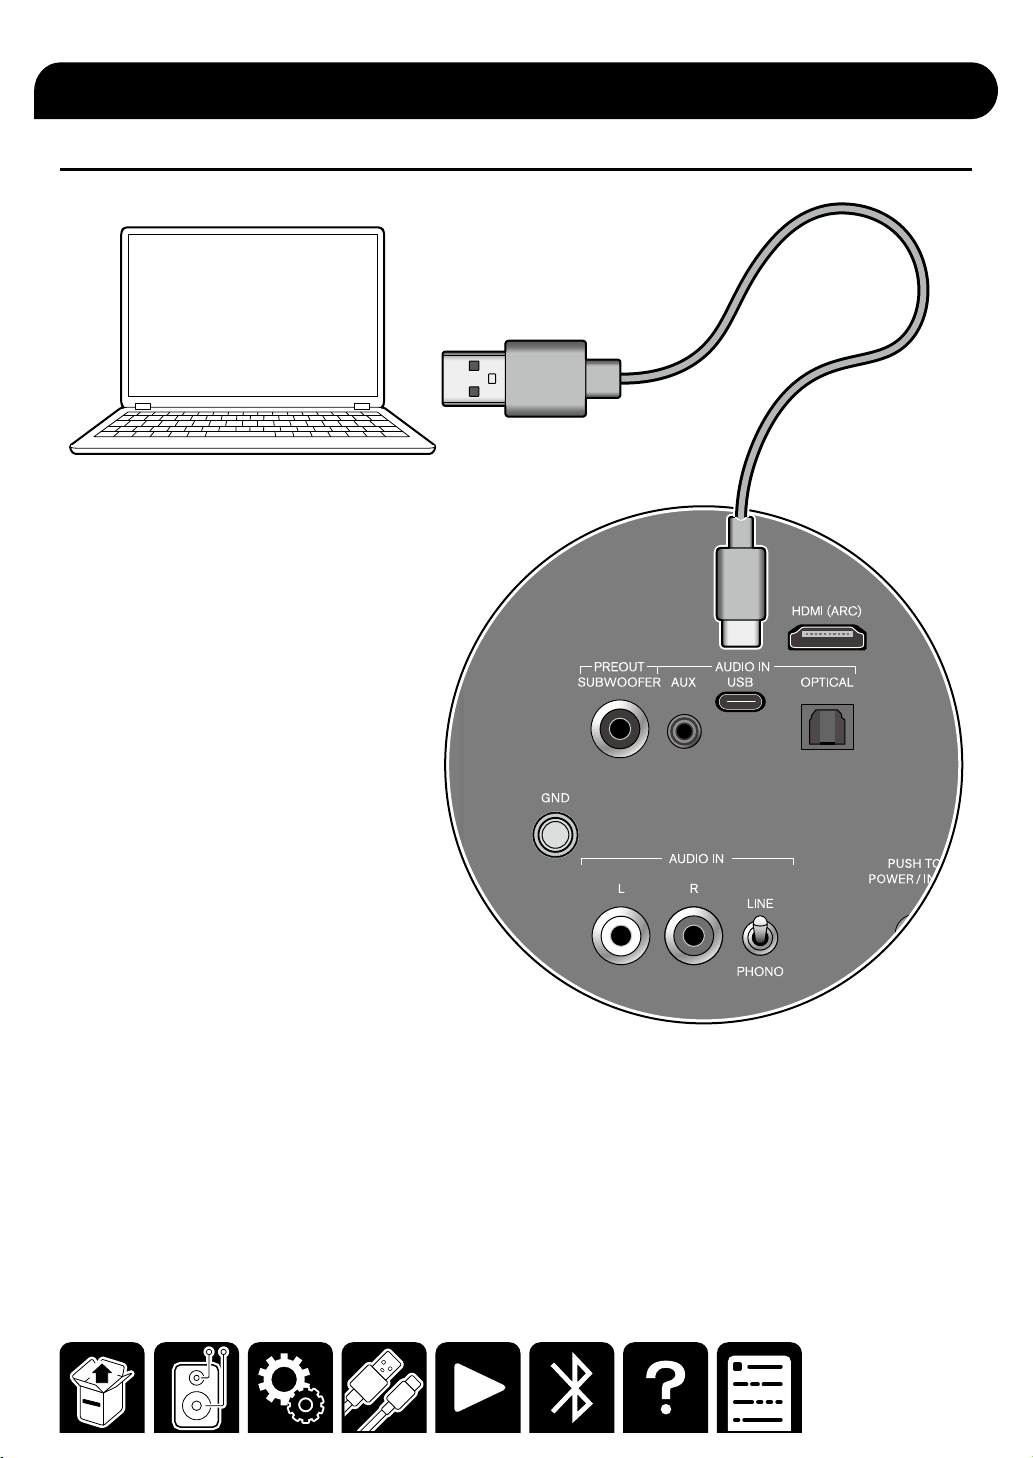
Connections
Connecting a PC
a
a USB cable
Connection location
This unit: AUDIO IN USB terminal (USB Type-C terminal)
Tips
Supported OS: Windows10 or later
8
Page 9
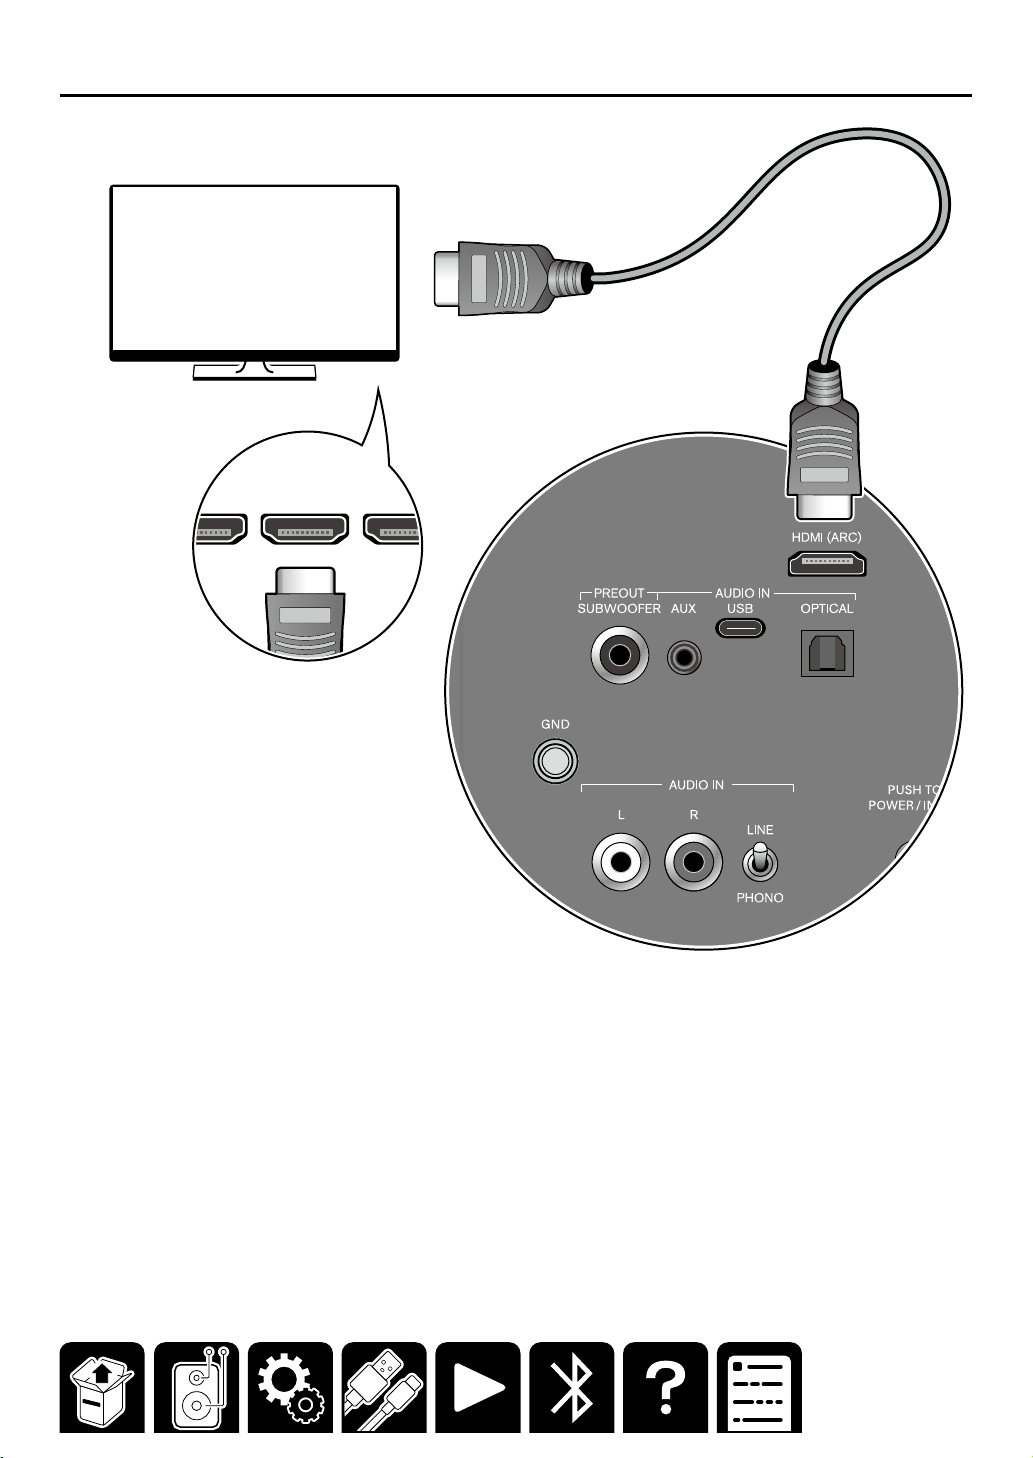
Connecting an ARC-supported TV
HDMI IN
(
ARC
)
HDMI INHDMI IN
a
a HDMI cable
*Be sure to insert the HDMI cable all the way in.
Connection location
This unit: HDMI (ARC) terminal
TV: HDMI (ARC) terminal
Tips
The HDMI (ARC) terminal of this unit supports 2-ch PCM signals only. Set the digital audio output setting of the
TV to "PCM".
9
Page 10
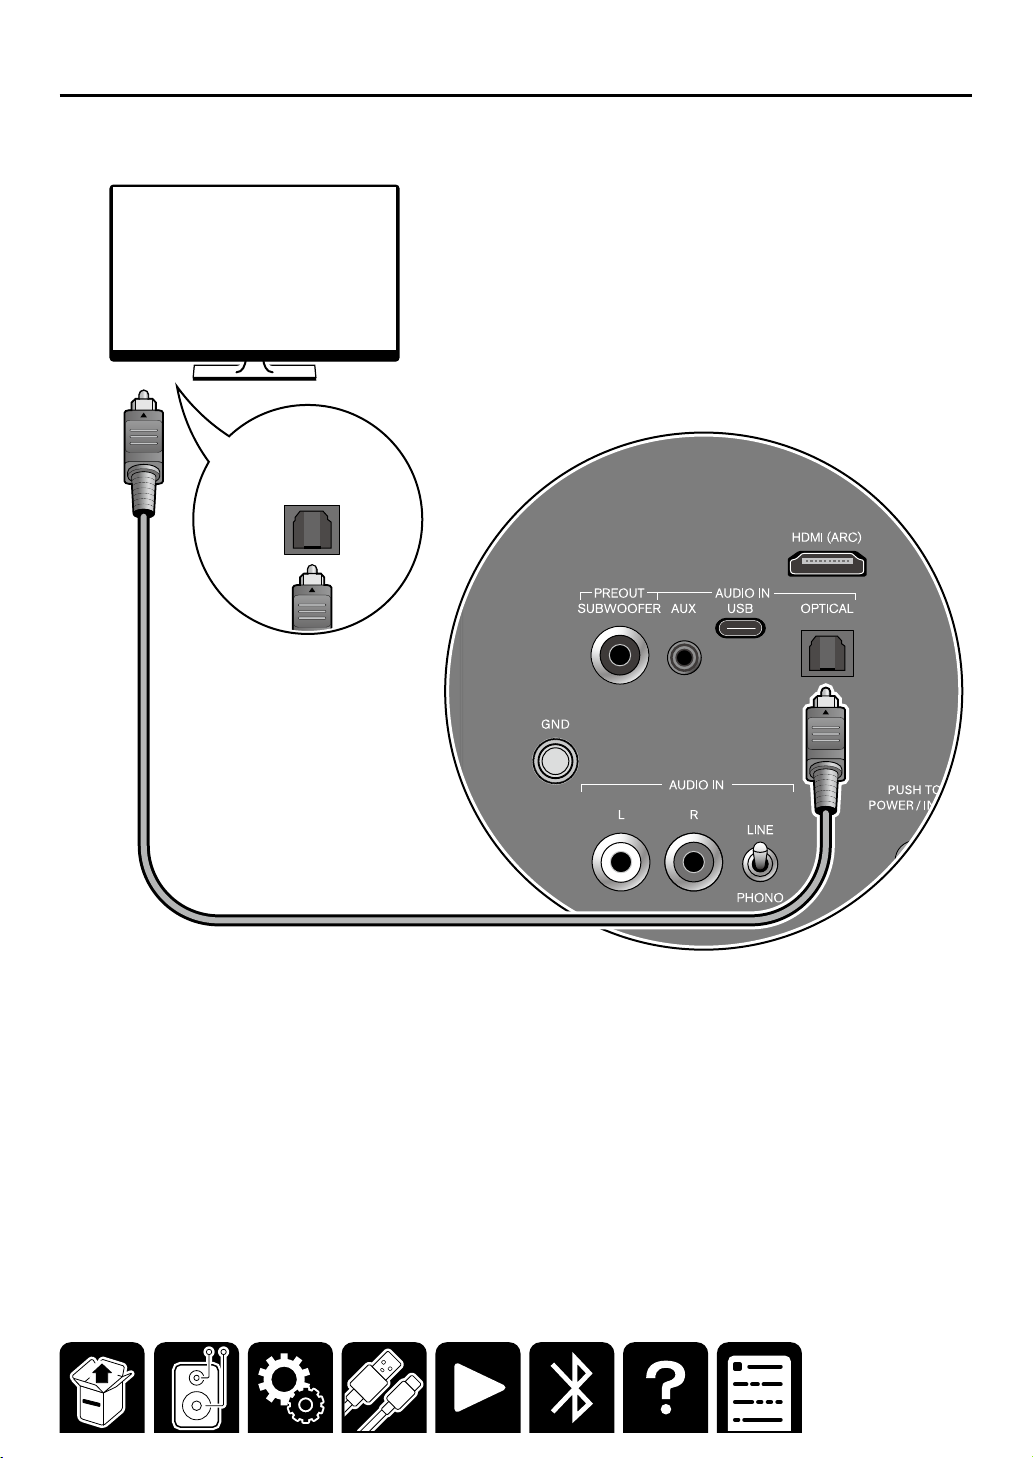
Connecting an ARC-unsupported TV
DIGITAL
OPTICAL
OUT
a
a Digital optical cable
Connection location
This unit: AUDIO IN OPTICAL terminal
TV: Optical digital output terminal
Tips
The AUDIO IN OPTICAL terminal of this unit supports 2-ch PCM signals only. Set the digital audio output setting
of the TV to "PCM".
10
Page 11
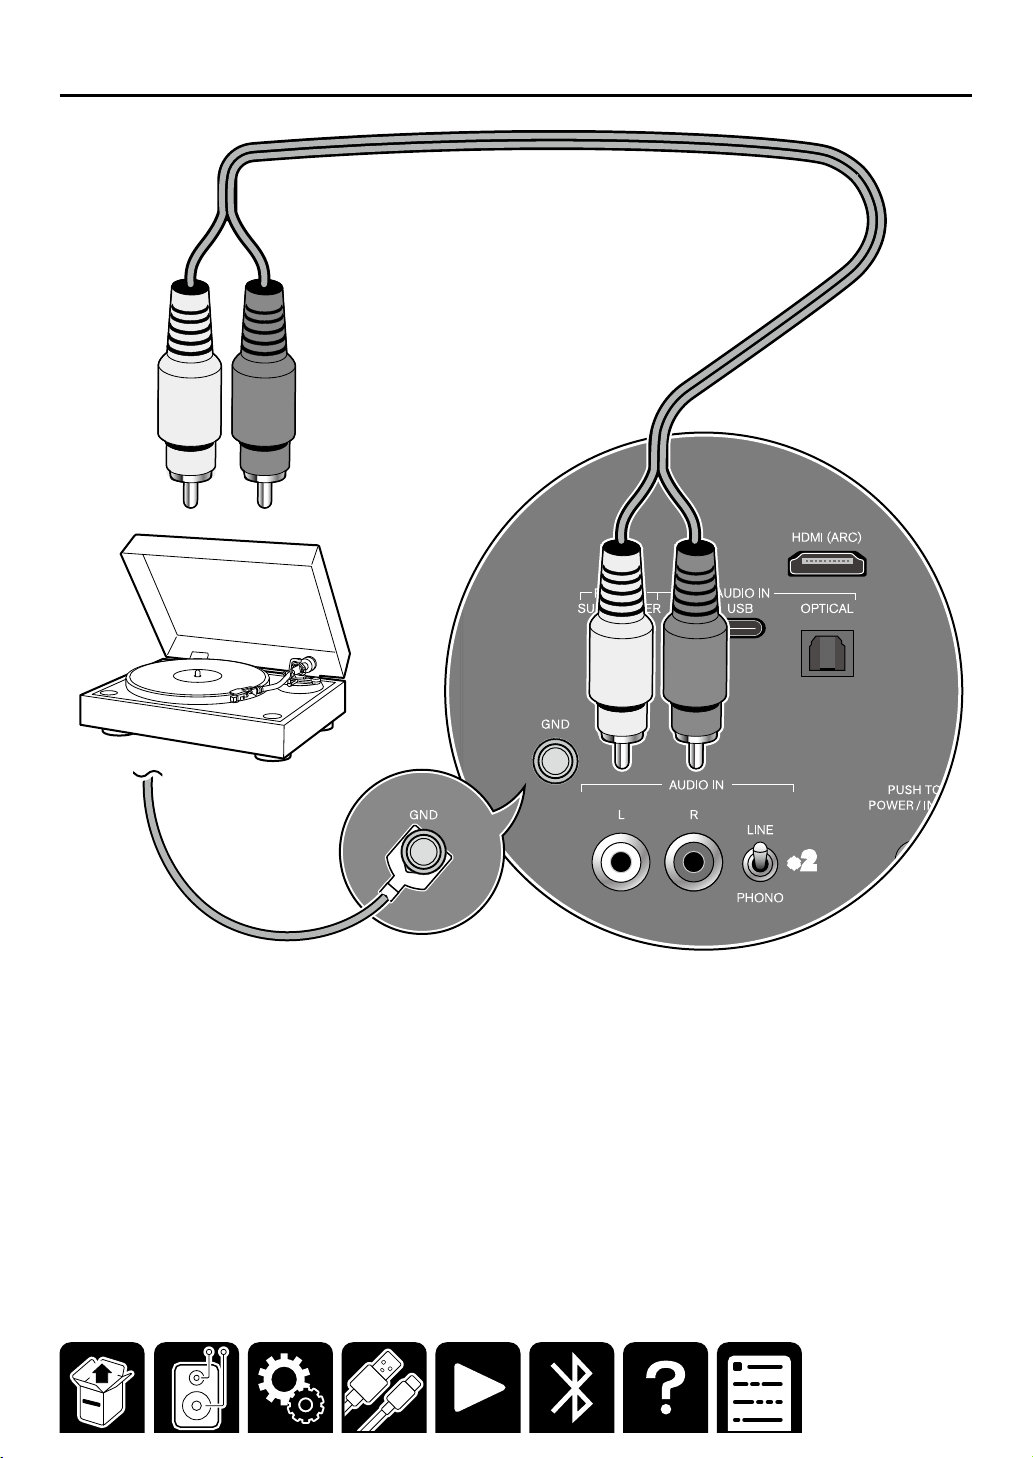
Connecting a Turntable
a
*1
a Analog audio cable
Connection location
This unit: AUDIO IN LR terminals (RCA stereo terminals)
*1 When the turntable has a ground wire, connect it to the GND terminal.
*2 When connecting a turntable that does not have a built-in phono equalizer, set the LINE/PHONO selector switch to "PHONO".
*2
11
Page 12
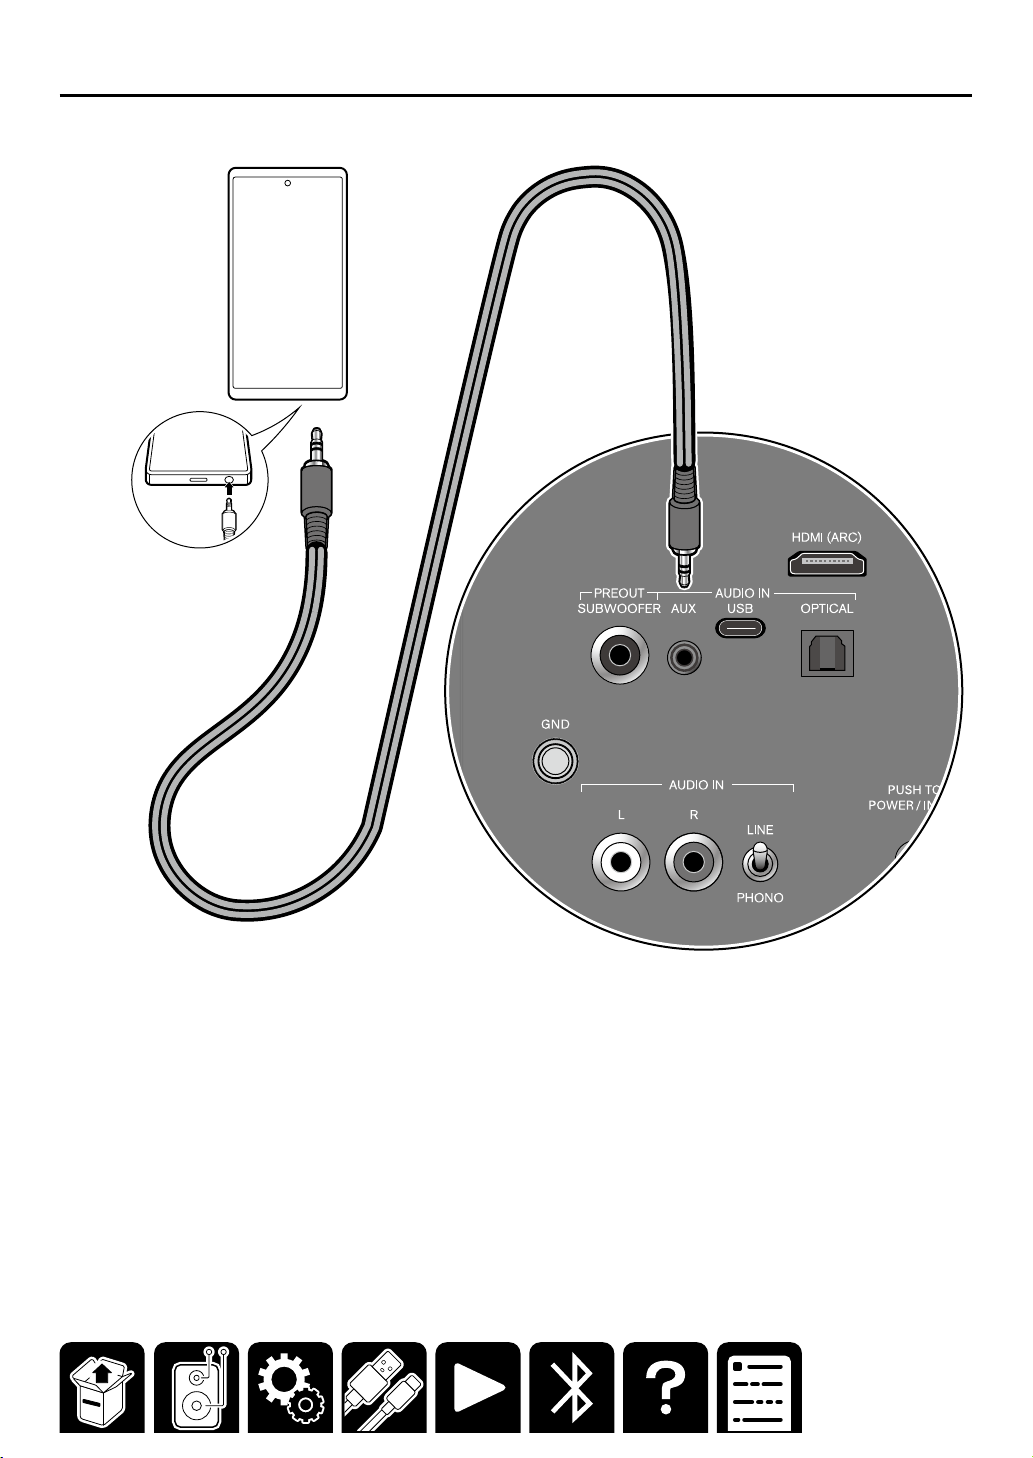
Connecting Devices Using a Stereo Mini Plug Cable
a
a Stereo mini plug cable
*Use a stereo mini plug cable with no resistance.
Connection location
This unit: AUDIO IN AUX terminal (φ3.5mm stereo mini plug terminal)
External devices: Headphone terminals of smartphone, PC, digital audio player, etc.
12
Page 13
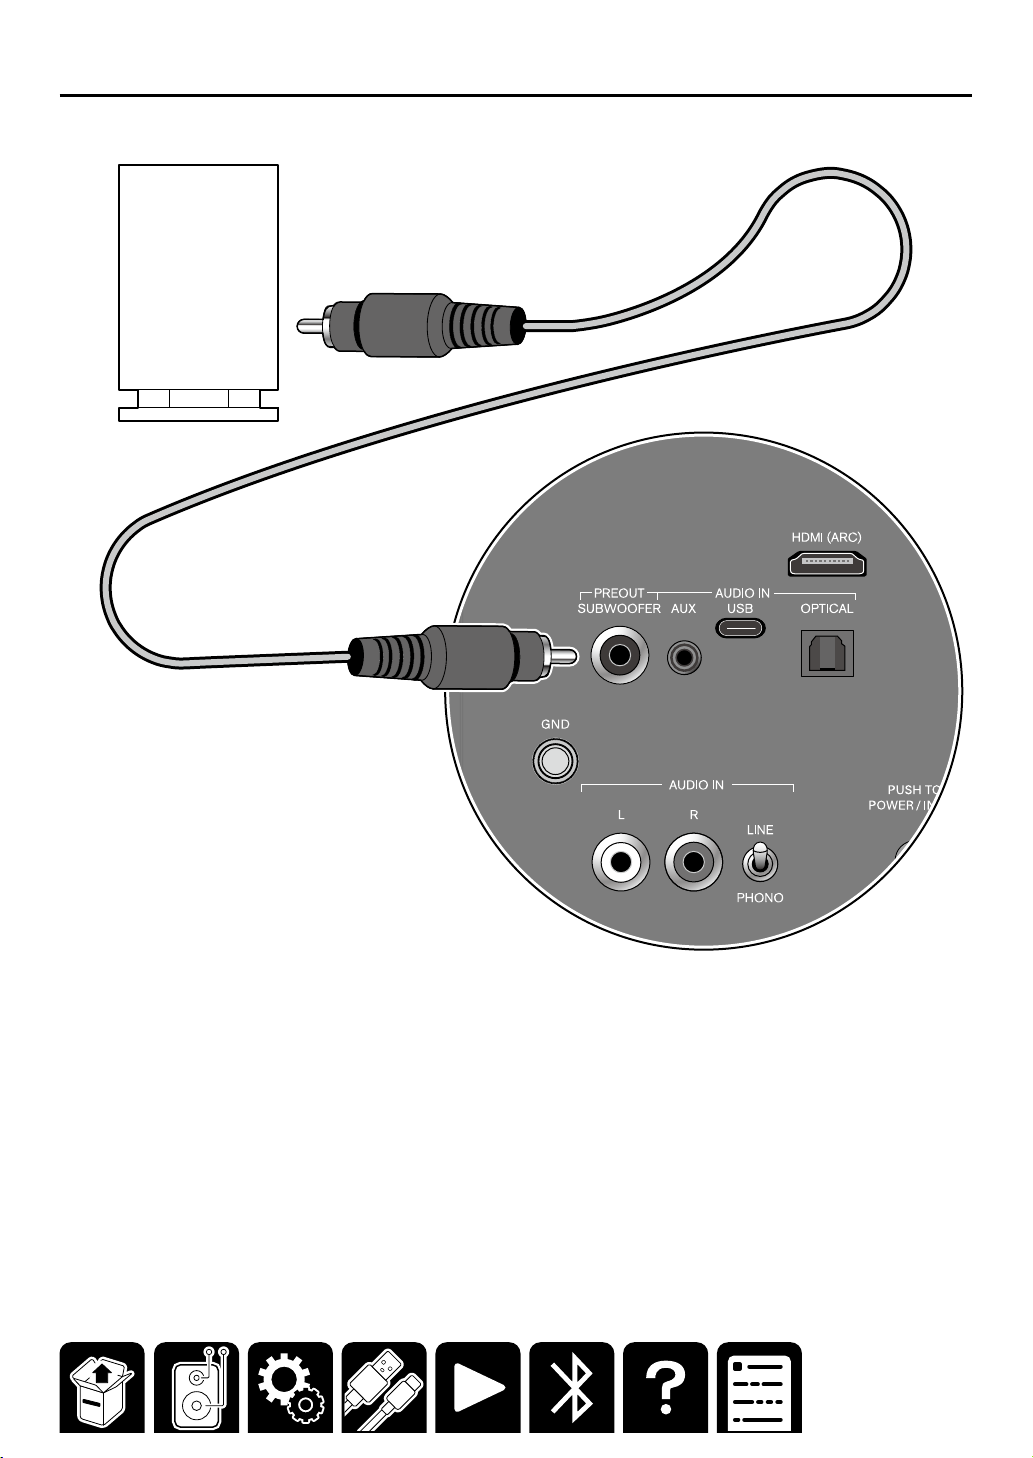
Connecting a Subwoofer
a
a Subwoofer cable
Connection location
This unit: PREOUT SUBWOOFER terminal (RCA monaural terminal)
13
Page 14
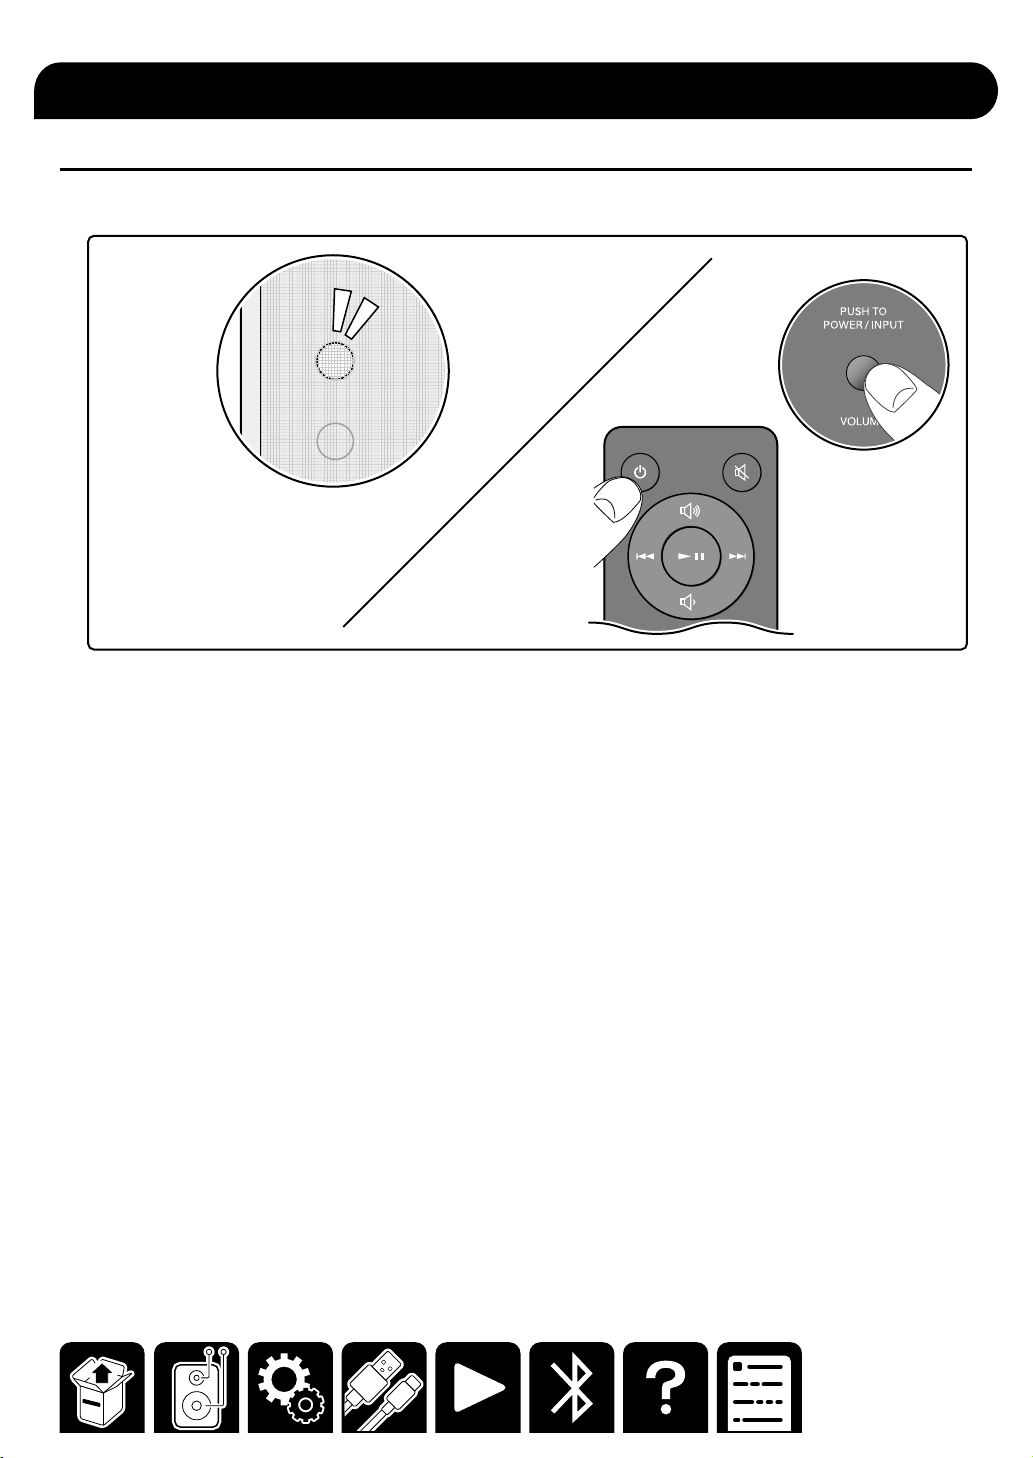
Playback
Basic Operations
■ On/Standby
When operating with the remote controller
Press the ON/STANDBY button.
When operating with the main unit
On : Press the POWER/INPUT switch.
Standby : Press and hold the POWER/INPUT switch for three seconds.
Tips
When no signal is detected for 15 minutes or longer, the unit automatically enters the standby mode.
14
Page 15
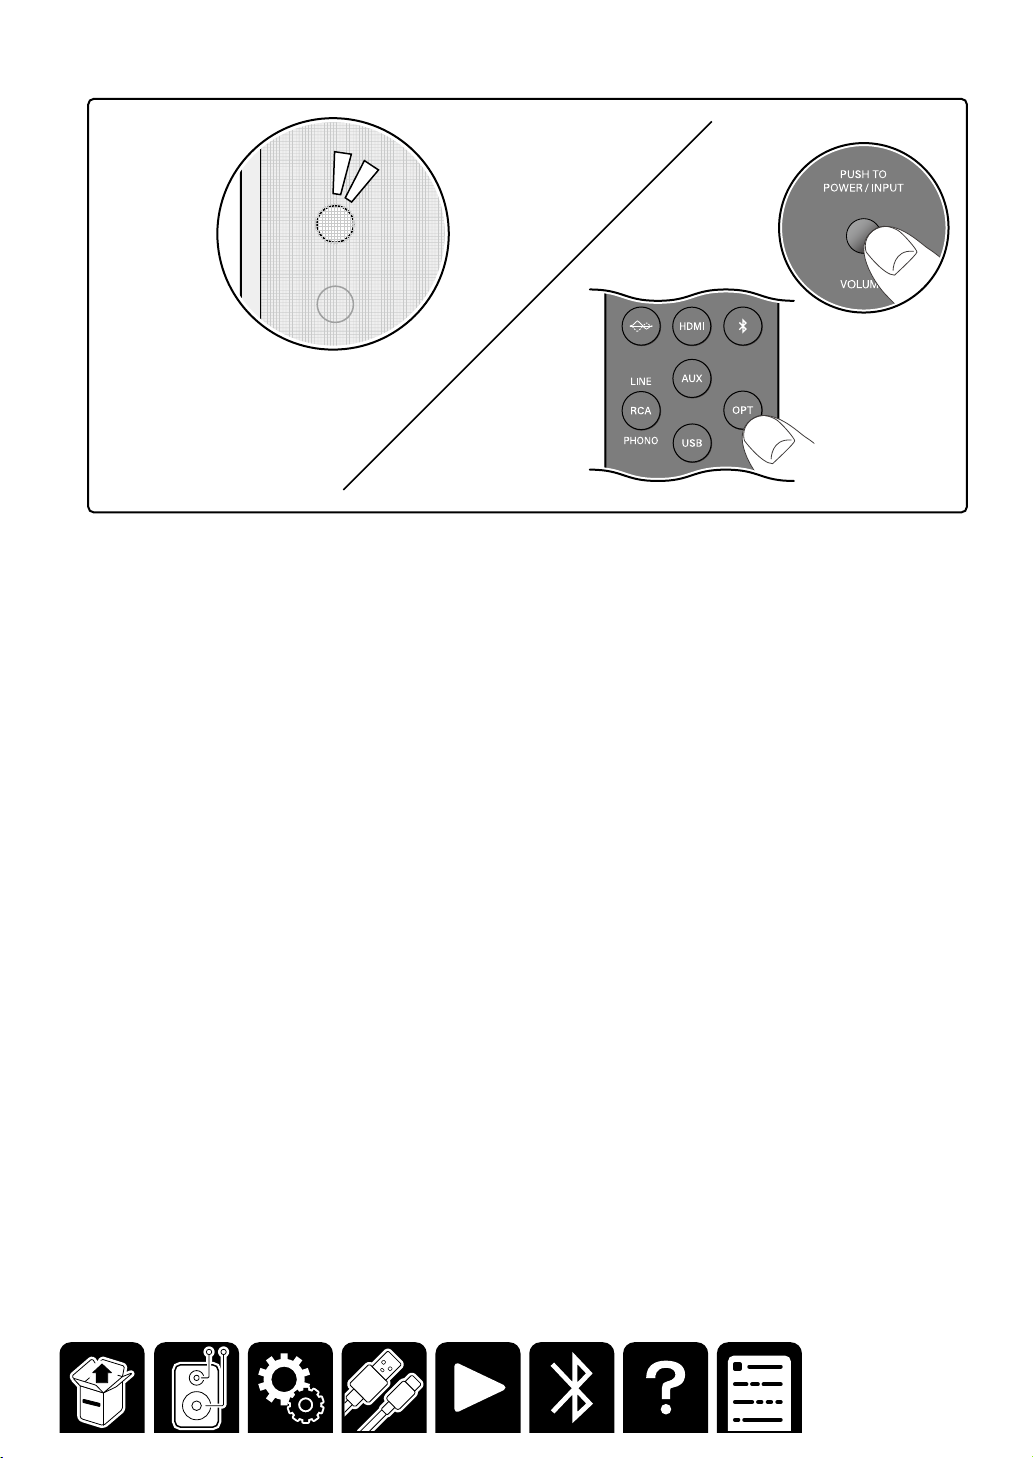
■ Switching the input source
When operating with the remote controller
Press any of the input selector buttons.
When operating with the main unit
Press the POWER/INPUT switch repeatedly.
The color of the LED Source Indicator changes depending on the selected input source.
BLUETOOTH : Blue
HDMI : Green
USB : White
AUX : Amber
OPTICAL : Yellow
RCA : Pink
15
Page 16
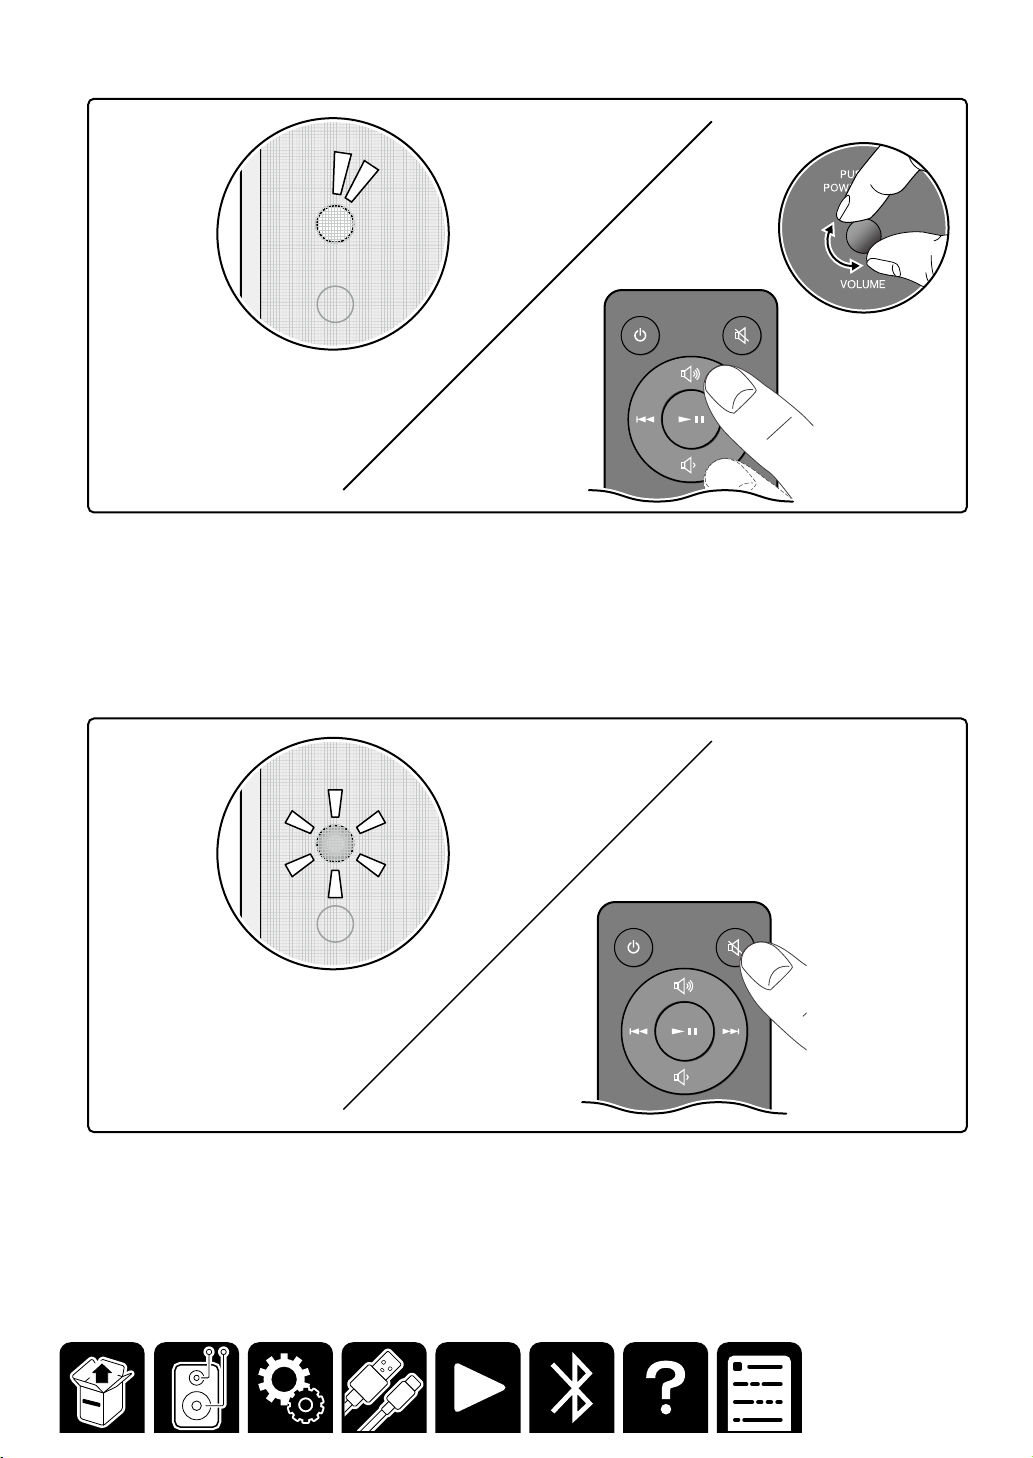
■ Adjusting the volume
When operating with the remote controller
Press the Volume UP/DOWN buttons.
When operating with the main unit
Turn the VOLUME dial.
■ Mute
Press the Mute button.
In the mute state, the LED Source Indicator blinks in red.
16
Page 17
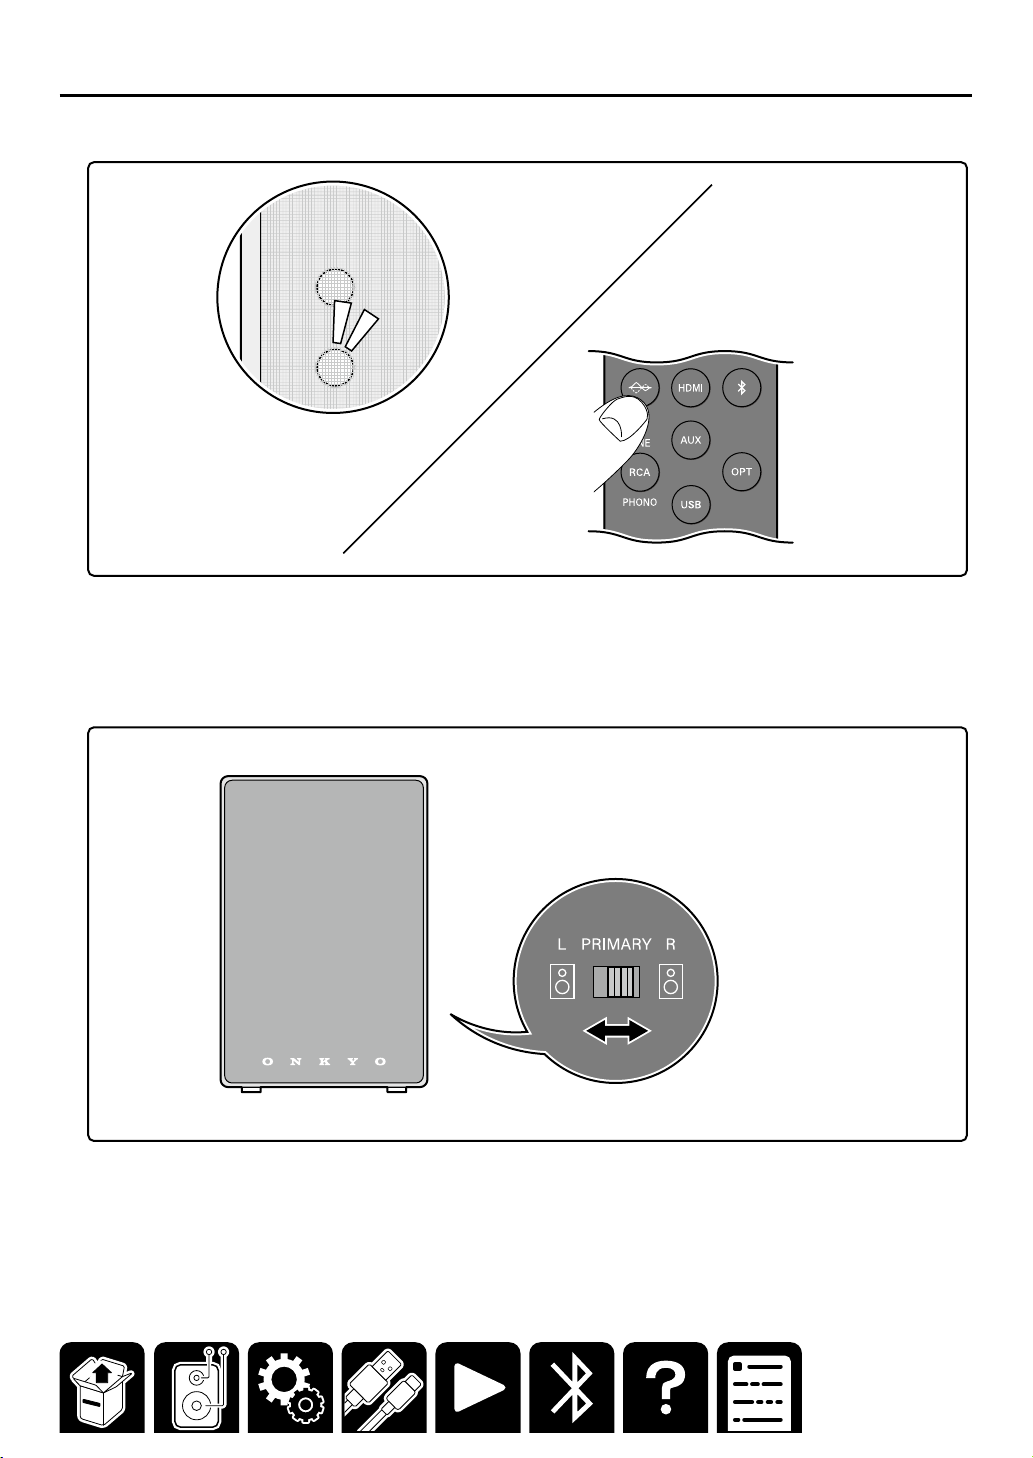
Advanced Operations
■ Setting the flat sound mode to On/Off
Off (default) : Bass and treble are enhanced to reproduce sound with inflection.
On : Flat sound is reproduced without enhancing bass and treble.
■ Switching between right and left
17
Page 18
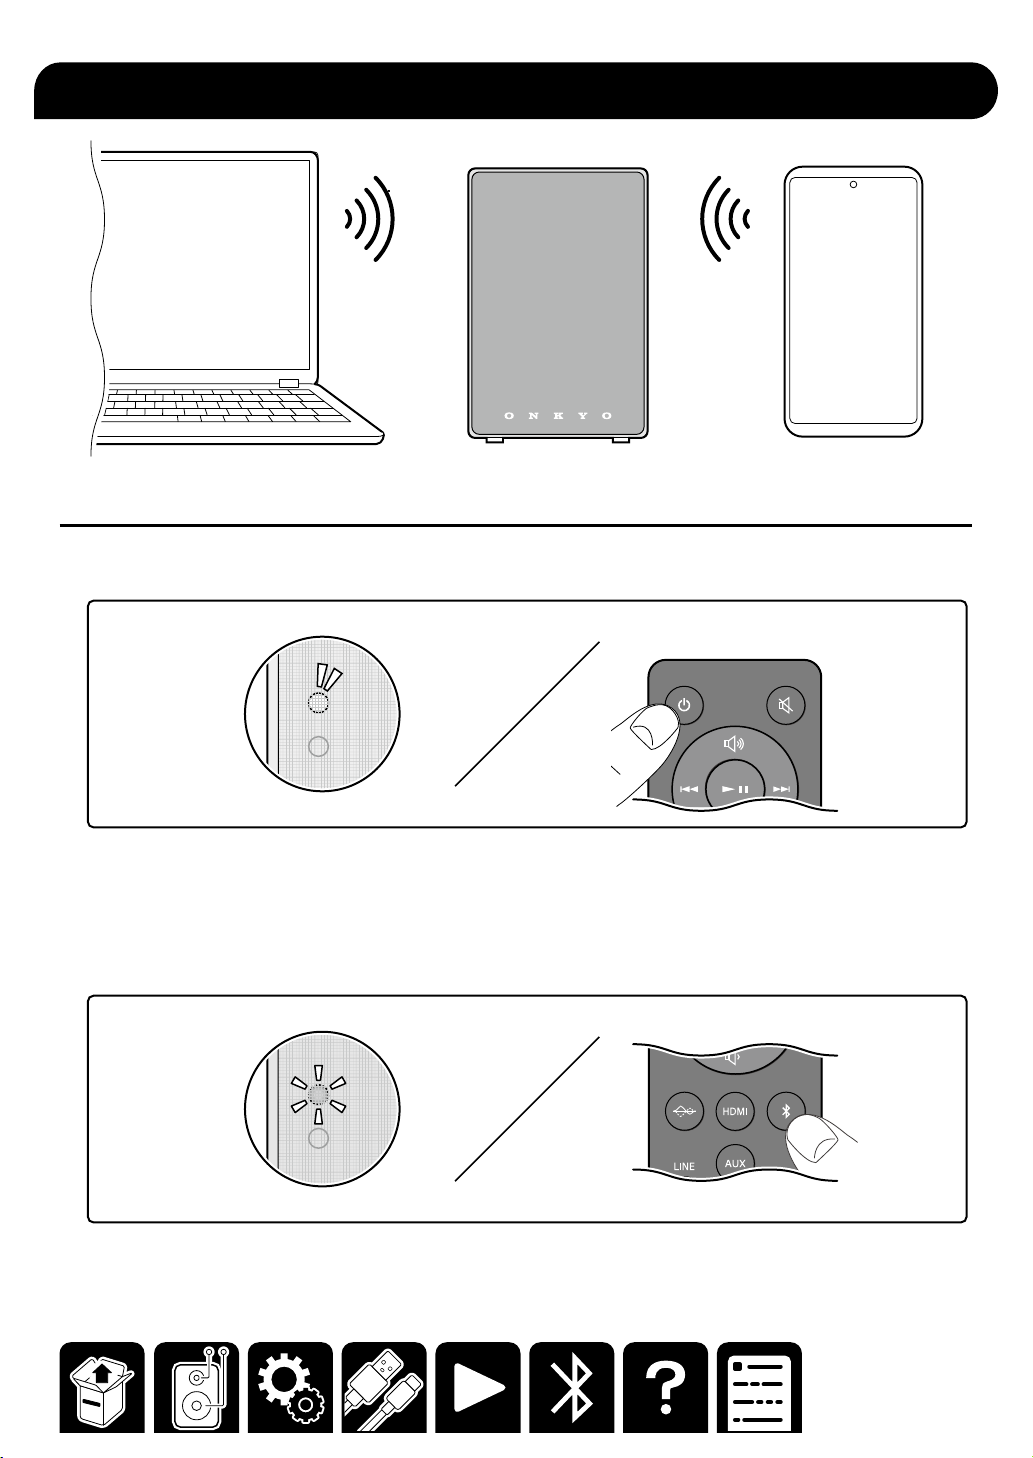
BLUETOOTH® Playback
Pairing
1. Press the ON/STANDBY button to turn on the unit.
2. Press the BLUETOOTH button.
The LED Source Indicator blinks in blue, which shows the unit has entered the pairing standby mode.
・ When a BLUETOOTH-supported device has already been connected, cancel the connection, or press and
hold the BLUETOOTH button of the remote controller for three seconds. Then the unit enters the pairing
standby mode again.
18
Page 19
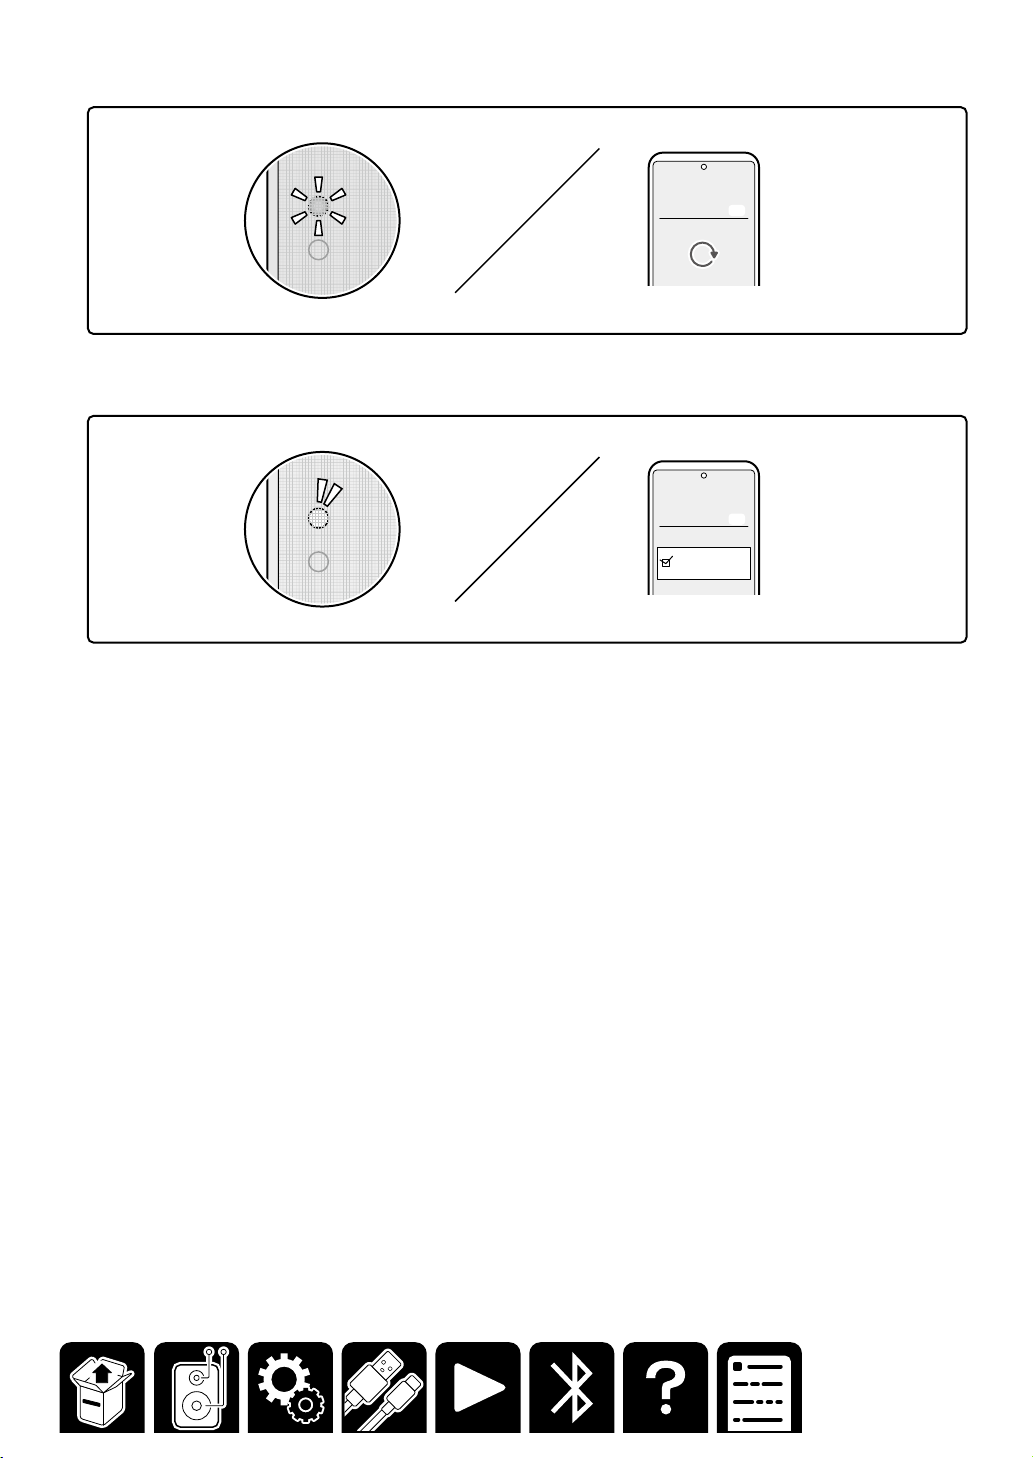
3. Turn on the BLUETOOTH function of the BLUETOOTH-supported device.
Bluetooth
Bluetooth Off
4. Operate the BLUETOOTH-supported device, and select this unit.
Bluetooth
Bluetooth Off
GX-30xxxx
On
On
・ When connecting multiple BLUETOOTH-supported devices, cancel the current connection, or press and hold
the BLUETOOTH button of the remote controller for three seconds to let the unit enter the pairing standby
mode. Then turn on the BLUETOOTH function of the next device.
・This unit can store the pairing information of up to 8 paired devices.
19
Page 20
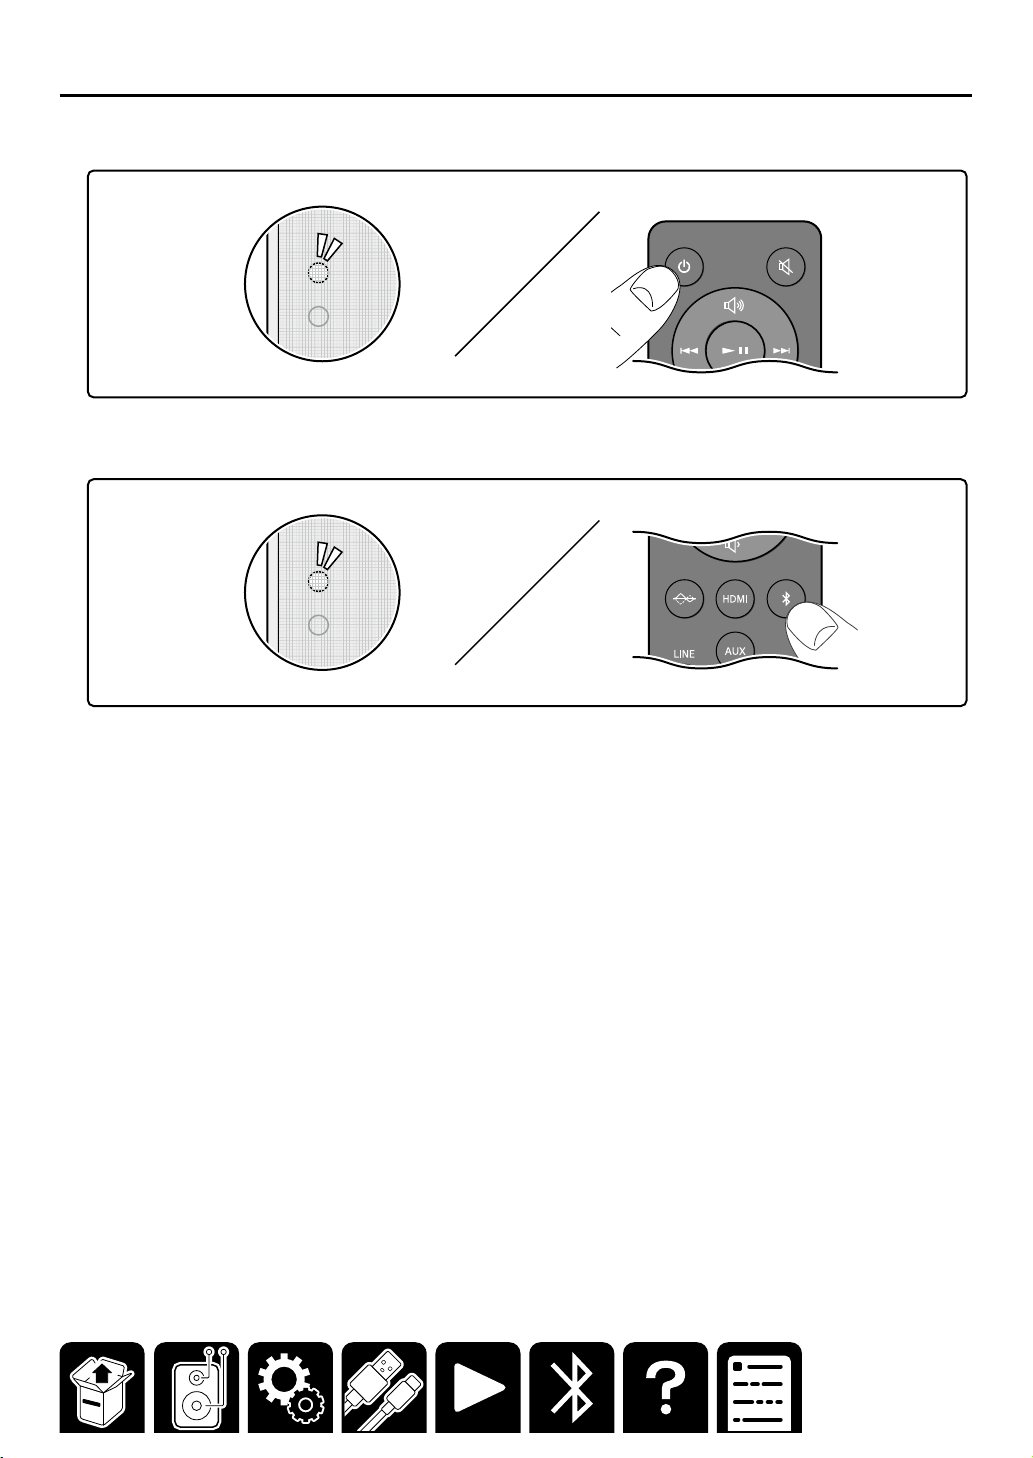
Playing Back
1. Press the ON/STANDBY button to turn on the unit.
2. Press the BLUETOOTH button.
3. Operate the BLUETOOTH-supported device, and play music.
Tips
・ The unit automatically turns on by operating the BLUETOOTH-supported device in standby mode to play music,
etc.
・When no signal is detected for 15 minutes or longer, the unit automatically enters the standby mode.
20
Page 21
Troubleshooting
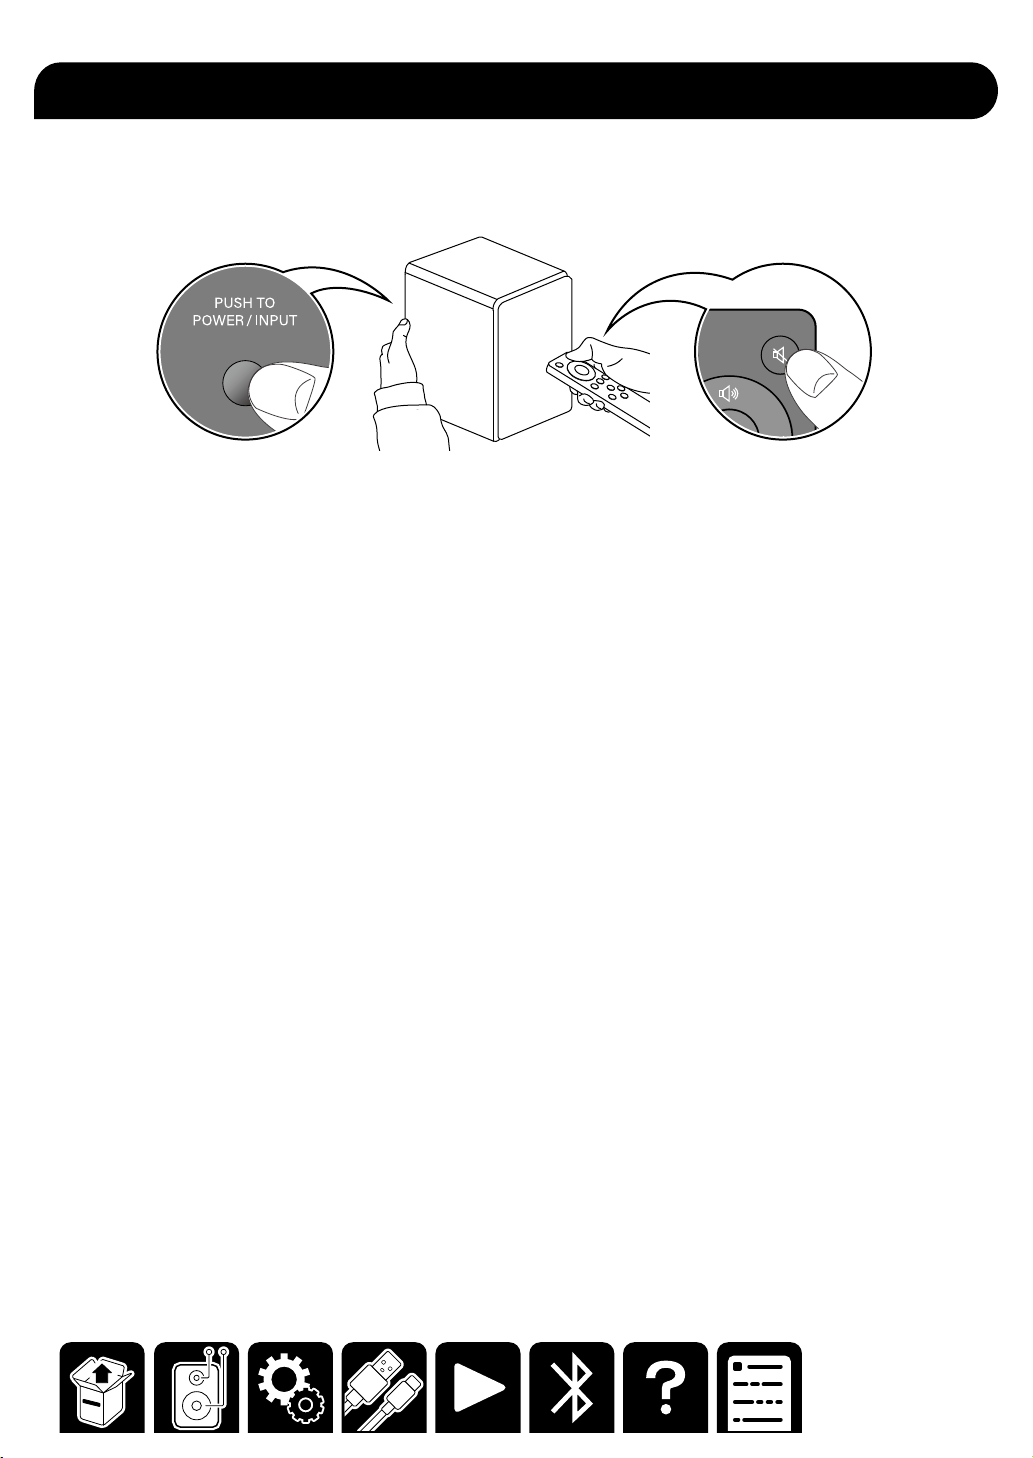
Resetting the unit
Turn on the unit. While pressing down the POWER/INPUT switch on the rear panel, press and hold the Mute
button on the remote controller.
The LED Source Indicator turns off, and turns on again. Then resetting is complete.
Failure judgment: The LED Source Indicator lights up in red, and the unit
does not turn on.
The protection circuit may be functioning.
According to the following procedure, restart the unit, and reconnect the cable.
1. Remove the AC adapter from the unit, and wait at least 10 minutes.
2. Remove the speaker cable connecting the right and left speakers, and reconnect it.
3. Reconnect the AC adapter.
4. Press the ON/STANDBY button, and check if the unit turns on.
When the unit does not turn on or the LED lights up in red again, the unit may be malfunctioning.
Failure judgment: No sound is reproduced from the right or left speaker.
According to the following procedure, check whether the state of no sound is caused by this unit or the external
device.
1. Turn off the unit, and set the L/R selector switch on the rear panel to L (or R).
2. Turn on the unit, and play the connected external device. Then check if the sound is reproduced.
– No sound is reproduced from the speaker even after the switch is switched.
The unit may be malfunctioning.
– When the switch is switched, the sound is reproduced from the speaker that has reproduced no
sound, and no sound is reproduced from the speaker that has reproduced the sound.
When the external device has been connected to this unit with an analog cable, contact failure or
disconnection of the cable may have occurred. Reconnect the cable or replace the cable with another one to
see how it works.
When the external device has been connected to this unit with a digital cable, check the audio output setting of
the external device.
21
Page 22

Failure judgment: Pairing with a BLUETOOTH-supported device cannot be
established.
According to the following procedure, delete the information of the BLUETOOTH-supported device, and perform
pairing again.
1. Turn on the unit, and press and hold the BLUETOOTH button on the remote controller at least 10 seconds.
Pressing and holding the button for 10 seconds or longer will delete the information of the BLUETOOTHsupported device stored in the unit.
2. Open the setting screen of the BLUETOOTH-supported device (smartphone, PC, etc.), and delete the
information of this unit (device name) that has been registered.
*For more information, refer to the instruction manual of the BLUETOOTH-supported device.
Repairing
1. Turn on the unit, and press the BLUETOOTH button on the remote controller.
2. Confirm that the LED Source Indicator blinks in blue. Then operate the BLUETOOTH-supported device, and
perform pairing again.
3. When the pairing is successful and the LED Source Indicator lights up, play music, etc. to check if the sound is
reproduced.
Failure judgment: No sound is reproduced from PC.
When the PC is connected using a USB cable
According to the following procedure, confirm the PC settings.
1. While this unit is connected, right-click the speaker symbol at the bottom right of the PC screen, and select
"Sound setting".
2. Select "Output" - "Choose where to play sound" and set this unit.
If no sound is reproduced even after the setting is complete, or if this unit is not displayed on the setting screen,
change the connection location of the USB terminal, and see how it works.
If no sound is reproduced even after the connection location is changed, the unit may be malfunctioning.
Failure judgment: No sound is reproduced from TV.
When the TV is connected using an HDMI cable
・ Check if the HDMI terminal of the TV supports the ARC function.
A supporting HDMI terminal indicates "ARC" on it.
・ Check if the ARC function is turned on in the TV settings.
Some TVs require operation to switch audio output between from TV and from audio equipment.
When the TV is connected using an optical digital cable
・ Check if the digital audio output setting of the TV is set to "PCM".
This unit supports PCM signals. It does not support Dolby Digital or AAC.
22
Page 23

General Specications
■Type
PRIMARY SPEAKER: Built-in amplifier, 2-way bass reflex type, detachable speaker grill
SECONDARY SPEAKER: 2-way bass reflex type, detachable speaker grill
■Speakers used
Woofer:4inch(101.60mm), Tweeter : 3/4inch (19mm)
■Amplifier configurations
Bi-Amplifier
■Power Output
2 ch × 25 W(HF:8W + LF: 17W) at 8 ohms, HF:10 kHz, 2 ch driven of 1% THD, LF:100 Hz, 2 ch driven of 1% THD
■Input terminals
Analog
・AUX terminal (φ3.5mm stereo mini plug) ×1
・RCA stereo terminal (LINE/PHONO) ×1
Digital
・Optical digital terminal (PCM 2ch/32kHz, 44.1kHz, 48kHz) ×1
・USB Type-C terminal ×1
・HDMI (ARC) terminal ×1
■Output terminal
HDMI ARC terminal
SUBWOOFER terminal
■Other terminals
Speaker terminal
GND terminal
■BLUETOOTH Section
Communication system
・Bluetooth Specification version 5.3 + dual mode
Frequency band
・2.4GHz (2.402-2.480GHz)
Modulation method
・FHSS (Frequency Hopping Spread Spectrum)
Compatible BLUETOOTH profiles
・A2DP 1.3.2, AVRCP 1.6.2, HFP1.8, HSP 1.2, SPP 1.2
Supported Codecs
・SBC
Transmission range (A2DP)
・20 Hz - 20 kHz (Sampling frequency 44.1kHz)
Maximum communication range
・ Line of sight approx. 15 m(*)
(*)The actual range will vary depending on factors such as obstacles between devices, magnetic fields around
a microwave oven,static electricity, cordless phone, reception sensitivity, antenna's performance, operating
system, software application, etc.
Maximum radio-frequency power transmitted in the frequency band(s)
・2400 MHz - 2483.5 MHz (20 dBm (e.i.r.p))
23
Page 24

■USB Section
®
USB Ver.2.0, Type-C
■HDMI Section
ARC compatible audio format: PCM
■General
Power Supply
・AC 100 - 240 V, 50/60 Hz
Power Consumption
・10 W
Standby mode
・BLUETOOTH : 0.3 W
・HDMI : 0.3 W
・USB : 0.3 W
・AUX : 0.3 W
・OPTICAL : 0.3 W
・RCA : 0.3 W
*In this mode, when there is no signal output, the idle power consumtion is 0.3 W after 15 minutes.
Dimensions (W × H × D)
・PRIMARY SPEAKER : 146 mm × 224 mm × 188 mm (including speaker grilles and protrusions on the back)
・SECONDARY SPEAKER : 146 mm × 224 mm × 180 mm (including speaker grilles and protrusions on the back)
Weight
・PRIMARY SPEAKER : 2.8 kg (including speaker grill)
・SECONDARY SPEAKER : 2.6 kg (including speaker grill)
■License and Trademark
The terms HDMI and HDMI High-Definition Multimedia Interface, and the HDMI Logo are trademarks or registered
trademarks of HDMI Licensing Administrator,Inc. in the United States and other countries.
The BLUETOOTH® word mark and logos are registered trademarks owned by
BLUETOOTH SIG, Inc.
All other trademarks are the property of their respective owners.
24
Page 25

SN 29404187A_EN
© Copyright 2025 Premium Audio Company Technology Center K.K. All rights reserved.
© Copyright 2025 Premium Audio Company Technology Center K.K. Tous droits de reproduction et de traduction réservés.
O2503-1
 Loading...