

Page 1

Enjoyment
Guide
for the
RS1000
Loudspeaker
with
2150 W. 6th Ave. • Suite L • Broomfield, CO 80020 • Toll Free 1-877-543-7500 • e-mail : info@av123.com
R-DES
Yours exclusively through
Page 2
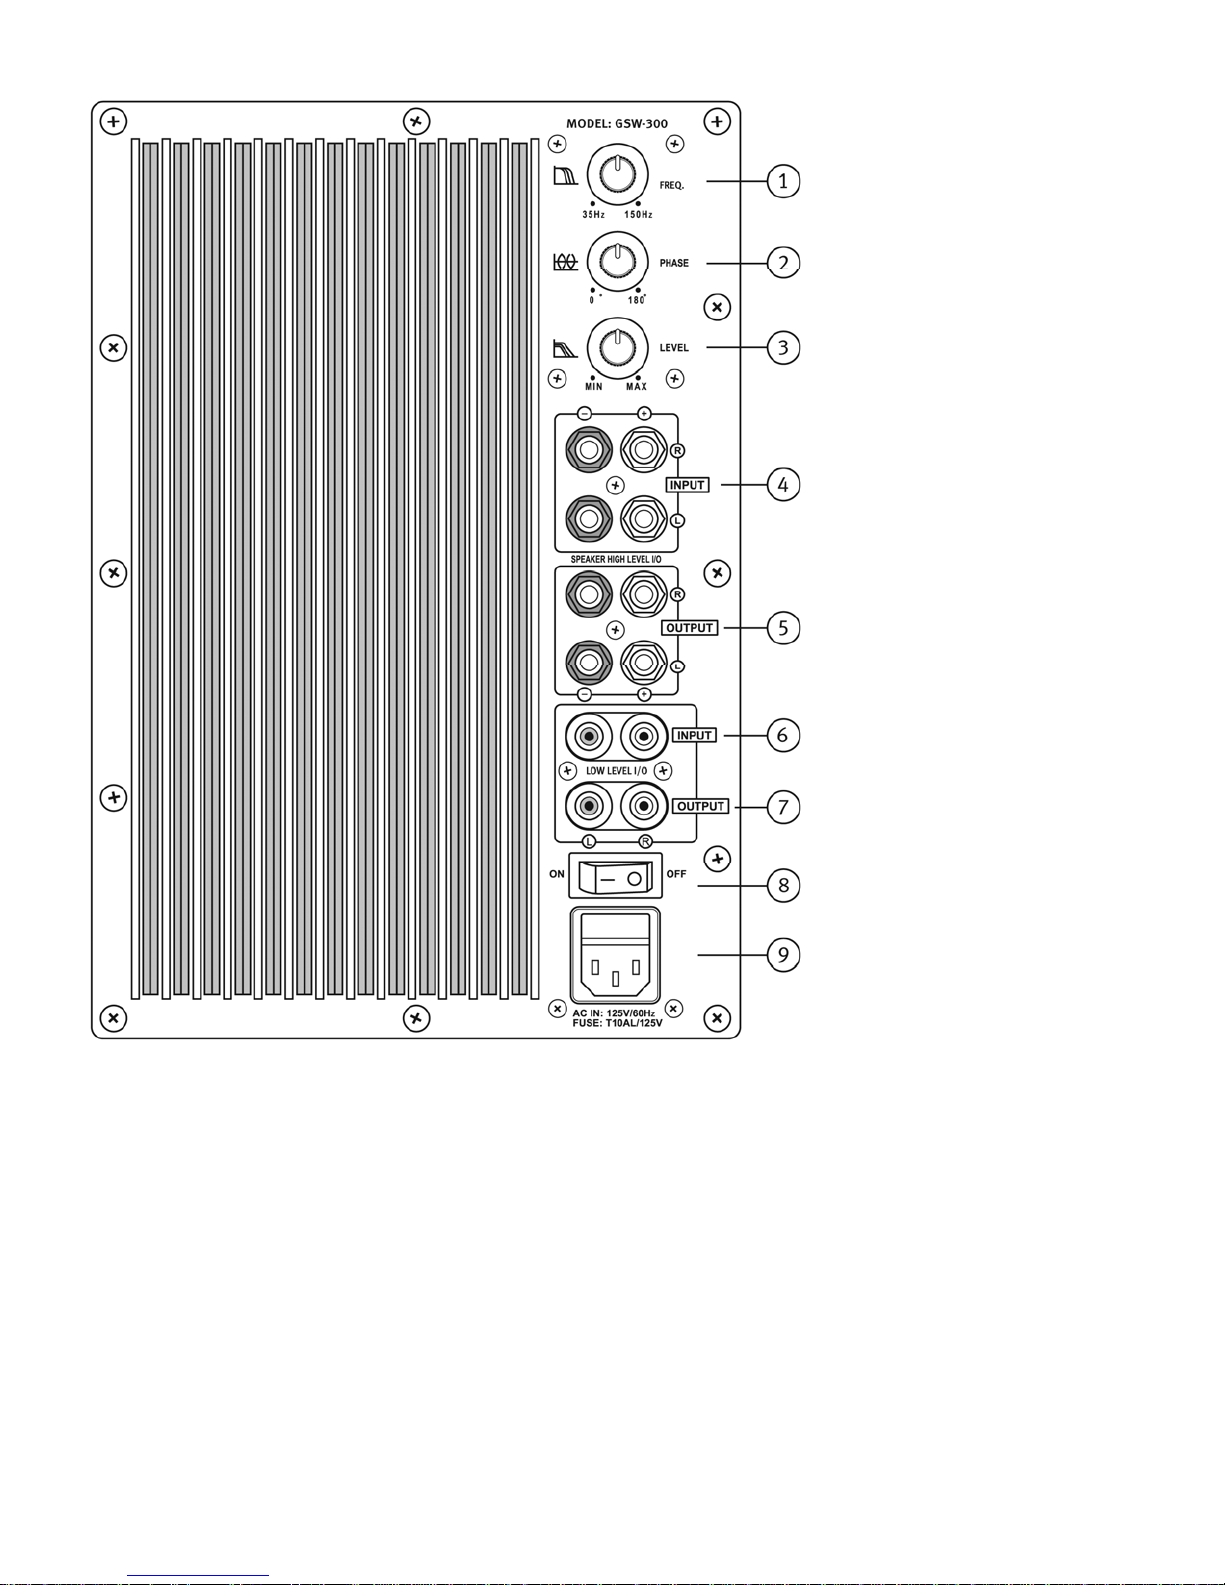
1 - Crossover. Where you set this
dial indicates the highest frequency that will be output by the
woofer.
2 - Phase. This controls the phase
of the woofer.
3 - Level. This controls the gain
of the amplifier / the SPL level of
the woofer.
4 - High level input. These accept
a speaker level signal.
5 - High level output. These output a speaker level signal.
6 - Low level input. These accept
a low level or line level signal.
7 - Low level output. These output a low level or line level signal.
8 - Power switch.
9 - IEC power cord inlet. Above
contains the fuse for the
amplifier.
Depending on when you purchased your RS1000’s, your amplifier may not look exactly like the one
shown here. The amps are essentially the same but early versions have the high level and low level
input and output positions reversed. Additionally, the power cord inlet and fuse are in a different
location.
Page 3

The RS1000 is very versatile and offers
many methods of connection. Below we
detail how to connect the RS1000 to systems with and without a subwoofer in use.
Later in this manual, we integrate R-DES
(Rocket Digital Equalization System). You
can also design your own connection
scheme; you are not limited to those listed
General Receiver / Processor Configuration
Option one:
Set your receiver or pre/pro to MAIN speakers =
LARGE. You may need to adjust the SUB setting in
your receiver or pre/pro to say ENHANCED or MAINS +
SUB or something to that effect. This ensures your
subwoofer still receives the information encoded in the
LFE channel. If you are not using a sub, set SUB = NO.
Option two:
If your receiver or pre/pro offers very low crossover
points to the sub, you can try setting your MAIN speakers as SMALL but with a 30-40Hz crossover. Set your
SUB to YES. Do not use this method without a subwoofer. This will give you a lot of low bass in your
RS1000s but not the lowest of the low. You may prefer
this to option one but it's user dependant.
Either option works, try them both and use what you
prefer. If you tend to play your system at reference
levels (very loud!), this is probably your best option.
Option three:
Some prefer just to add in mid-bass slam or impact to
their system. To do this, set your MAIN speakers to
SMALL with an 80Hz crossover. Set SUB = YES. Adjust
the crossover dial on the RS1000 amplifier to whatever
you like but generally between 120-150Hz. Do not use
this method without a subwoofer.
If you have a subwoofer...
Option one:
Take the speaker cable from your amplifier or receiver
and plug it into EITHER the left or right input on the
back of the RS1000 amplifier (4). Next take the supplied jumper cable and go from the output terminals
on the amp (5) to the binding posts above the amp on
the back of the speaker. If you used the LEFT inputs,
you must use the LEFT output. Same if you used
RIGHT.
Option two:
Take the speaker cable from your amplifier or receiver
and plug it into the top-most binding posts on the back
of the speaker. These are located above the amplifier.
Next connect those binding posts to either the left or
right input terminals on the RS1000 amplifier (4). Using the supplied jumper cable consisting of banana
plugs on one end and spades on the other, insert the
banana plug end into the left or right high level input
on the RS1000 amplifier. Place the spade end onto the
binding post and tighten down. If your speaker cable is
terminated with spades as well, it is OK to ‘piggyback’
the two spades on top of each other. If your speaker
cable is terminated with banana plugs, you can simply
insert it into the end of the binding post.
If you do not have a subwoofer and are using the speakers for home theater...
If you have only one sub/LFE out, split the signal with
a Y-splitter (available from AV123) and run one cable
to each RS1000 amplifier. Connect the cable to either
the LEFT or RIGHT input (6).
Set your receiver or pre/pro MAIN = LARGE or SMALL,
it's your choice. I would try small. Set SUB = YES. If
you set your MAIN = LARGE, you may need to adjust
the SUB setting to say ENHANCED or MAINS + SUB or
something to that effect.
If you do not have a subwoofer and are using the speakers for two channel or multi
channel music...
Option one:
Take the speaker cable from your amplifier or receiver
and plug it into EITHER the left or right inputs on the
back of the RS1000 amplifier (4). Next take the supplied jumper cable and go from the output terminals
on the amp (5) to the binding posts above the amp on
the back of the speaker. If you used the LEFT inputs,
you must use the LEFT output. Same if you used
RIGHT.
Page 4

Option two:
Take the speaker cable from your amplifier or receiver
and plug it into the top-most binding posts on the back
of the speaker. These are located above the amplifier.
Next connect those binding posts to either the left or
right input terminals on the RS1000 amplifier (4). Using
the supplied jumper cable consisting of banana plugs on
one end and spades on the other, insert the banana plug
end into the left or right high level input on the RS1000
amplifier. Place the spade end onto the binding post
and tighten down. If your speaker cable is terminated
with spades as well, it is OK to ‘piggyback’ the two
spades on top of each other. If your speaker cable is
terminated with banana plugs, you can simply insert it
into the end of the binding post.
Either option works, try them both and use what you
prefer.
Set your receiver or pre/pro to MAIN speakers = LARGE.
SUB = NO.
Adjust the RS1000 controls the same for any of the
connection methods:
Adjust the controls on the back of the RS1000 amp to
your liking. The top-most knob is frequency. This controls the highest frequency that the woofer will be playing. Most like it around 120Hz but experiment and see
what you like.
The center knob is phase. A basic setting here is 90 degrees (12 o'clock). To properly set this, you need to perform a frequency sweep. If you don't know how to do
this, the procedure is detailed later in this manual.
The final knob is gain (volume). Set this so that you get
a nice 'foundational' bass lift but not too much that it's
over powering. Start around 12 o’clock and adjust from
there. Play several different CDs and DVDs. You want
the system to sound balanced with a seamless blend between the main part of the speaker and the woofer.
Using R-DES
The goal here is to get the line level or pre-out signal to
R-DES and then to the RS1000 amplifier.
If you have a pre/pro, on the LEFT MAIN pre-out, install
a male to female-female Y-splitter (available from
AV123). This will allow you to split the pre-out signal
across two cables. Run one cable to your amplifier as
you normally would. Run the other cable to the LEFT
input on the back of the R-DES device. Run another cable from the LEFT output on the back of the R-DES device to the LEFT low-level input on the RS1000 amplifier
(6). Repeat for the RIGHT.
If you have a receiver, you do essentially the same thing
but you do not need the Y-splitter. Simply run the cable
from your pre-out to R-DES and continue as described
above. If you do not have pre-outs available on your
receiver or if your receiver shuts down the internal amplifier when a cable is connected to the pre-out, you can
not run R-DES in this manner. You can however run a
cable from your subwoofer out to an input on the R-DES
device. If you are running a subwoofer along with the
RS1000’s, you will likely need the aforementioned Ysplitter unless you have multiple sub outs.
There are many ways to install R-DES into a system with
RS1000’s with and without subs. See the next pages in
this manual for wire layouts of various methods. Remember, you can design your own connection scheme;
you are not limited to those shown here!
Page 5

Performing a Frequency Sweep
Though there are a number of ways to perform an accurate frequency sweep, we’ve detailed the steps involved
in the most basic method below.
a. Sit in your favorite seat and hold your Radio
Shack SPL meter at a 45-degree angle half way
between horizontal and vertical.
b. The meter should be placed at ear level when
seated in the primary listening position, and is
best if supported by a stationary object such as
an end table or tripod.
c. Set the control on the meter to ‘C-weighting’
and ‘slow’.
d. Assuming you have already calibrated all chan-
nels to reference level (see the owner’s manual
for your main speakers or receiver/processor for
how to do this), the RS1000 should be calibrated
to 75dB (or 85dB if your receiver/processor uses
that standard).
e. Play a 31.5Hz track from the R-DES installer/test
tone CD, and record BOTH the frequency, which
corresponds to the track on the test disc, and
the sound pressure level (volume) as shown on
the meter.
f. Next, play the tracks from 31.5 to 120Hz and
record the sound pressure level for each frequency played.
Important Note: The Radio Shack sound meter uses Cweighting which compensates for the lower sensitivity
of the human ear at low frequencies. We want to measure the actual SPL. If you use a test disc that does not
automatically compensate for this (such as the R-DES
disc), a correction key is needed to ensure proper response before your final measurements are plotted. We
suggest gathering your data using the readings on the
meter and then correcting your results with the compensation coefficients shown at the end of this manual.
If you are utilizing the Onix Graph Paper program included with R-DES, it has an option to compensate for
C-weighting.
Phase Adjustment
The phase dial controls the relative phase of the woofer
to best reinforce the rest of the speaker. Adjustments
to this control will change the woofer’s interaction with
the rest of your speaker system, providing the least cancellation, and thus the best response in any room. With
SPL meter in hand (or, better yet, on a tripod), at the
listening position, play an 80Hz tone (for this exercise
the receiver or pre-pro’s crossover point must be set to
80Hz). Be sure not to play your system too loud. Start
with the phase control in the "0" position. Record the
reading on your SPL meter. Repeat with the dial in the
9 o’clock position (45 degrees), 12 o’clock (90 degrees),
3 o’clock (135 degrees) and 180 degrees. Select 0, 45,
90, 135 or 180 based on which position results in the
biggest peaks in sound pressure levels (i.e. reads highest
on the meter). This setting indicates the least amount
of bass wave cancellation, and should be held constant
until the subwoofer or other speakers in your room are
moved, or placement is altered in any way. You may
very well find the "90" setting to be optimum. If you
want to tweak the system for best performance, instead
of only recording the readings at 80Hz, you should play
test tones from 31.5Hz through 120Hz with the phase set
to 0, 45, 90, 135 and 180. The best setting is the one
that results in the biggest peaks in sound pressure levels
(i.e. reads highest on the meter) as well as the flattest
response across the range of frequencies.
Page 6

Table of Contents
You may jump ahead to the setup Illustration that
best matches your intended configuration.
Illustration #1 - Stereo with sub. R-DES controls the sub.
Illustration #2 - Stereo with sub. R-DES controls the sub and
RS1000’s.
Illustration #3 - Multichannel with sub setup. Includes outboard
crossover. Two R-DES units are used.
Illustration #4 - A variation of the Illustration #3 using Y-cables.
Illustration #5 - A variation on Illustration #4. Using F-Mod inline
filters.
Illustration #6 - Multichannel with sub(s) setup. One R-DES controls
the sub(s) and RS1000’s.
Illustration #7 - Same as Illustration #6 but with two R-DES units.
Illustration #8 - Multichannel with sub(s) setup. Utilizes the Outlaw
ICBM bass manager.
Page 7

Here and on the following pages we have illustrated various connection schemes. In the following pages, you will
see a reference to the acronym ‘PMA’. This refers to ‘Progressive Matrix Array’. This is the type of crossover
used in the RS1000 loudspeaker. If you are asked to connect your speaker cable to the PMA, this simply means
connect to the binding posts on the back of the speaker (above the amplifier). If you are asked to turn on your
PMA’s amplifier, this means turn on your main amplifier or receiver used to power your RS1000’s.
ILLUSTRATION #1
What will happen:
1. The RS-1K's PMA will receive a full range signal.
2. The RS-1K's woofer, powered by the on board plate
amplifier will receive a full range signal. You will use
the plate amplifier's variable crossover (1) to select a
roll off point for the woofers, It has been suggested to
select a lower crossover point for the woofers
(approximately 40-50 Hz) to minimize any overlap of the
PMA, woofer and subwoofer. This is a reasonable starting point, but experimentation with the crossover point
is the best advice.
3. The subwoofer(s) will receive both Left and Right full
range signal, through R-DES, which will give you the
ability to design curves with or without a subsonic high
pass filter and boost and cut filters to smooth out the
low frequency response or to contour a curve that suits
your listening pleasure. It is suggested that you should
use the low pass filter of your R-DES instead of the
crossover on your subwoofer's plate amplifier. In this
case, you should disable the subwoofer's crossover or
dial it up all the way to it's highest frequency.
This is a basic, straight forward connection scheme of a
stereo RS-1K system with a subwoofer, in which R-DES
controls the signal being fed to the subwoofer via a
pair of 'Y' jacks. The other side of each 'Y' jack feeds
the Left and Right amplifiers which feed a speaker level
signal to the RS-1K woofer's speaker level input (4). You
then use the jumper cable (supplied with the RS-1K) to
connect the RS-1K's plate amplifier speaker level output
(5) to the PMA speaker terminals.
An optional version of this connection scheme requires
you to connect the Left and Right amplifier speaker wire
to the RS-1K's PMA terminals and then use the jumper
to connect the PMA terminals to the RS-1K plate amplifier speaker level input (4).
4. A final tweak of relative phase reconciliation should
always be included with any system that combines 2 or
more low frequency producing speakers.
In this scheme, you should have that option on your subwoofer and you have a continuously variable phase control (2) on the RS-1K's plate amplifier. Turn off your
subwoofer, play a test tone at 75 dB SPL that matches
the crossover point you selected on the RS-1K's plate
amplifier (1) and dial in the highest SPL reading of the
phase control, then turn on the subwoofer amplifier and
repeat the process. This should give you a great place
to start creating EQ curves with R-DES.
Page 8
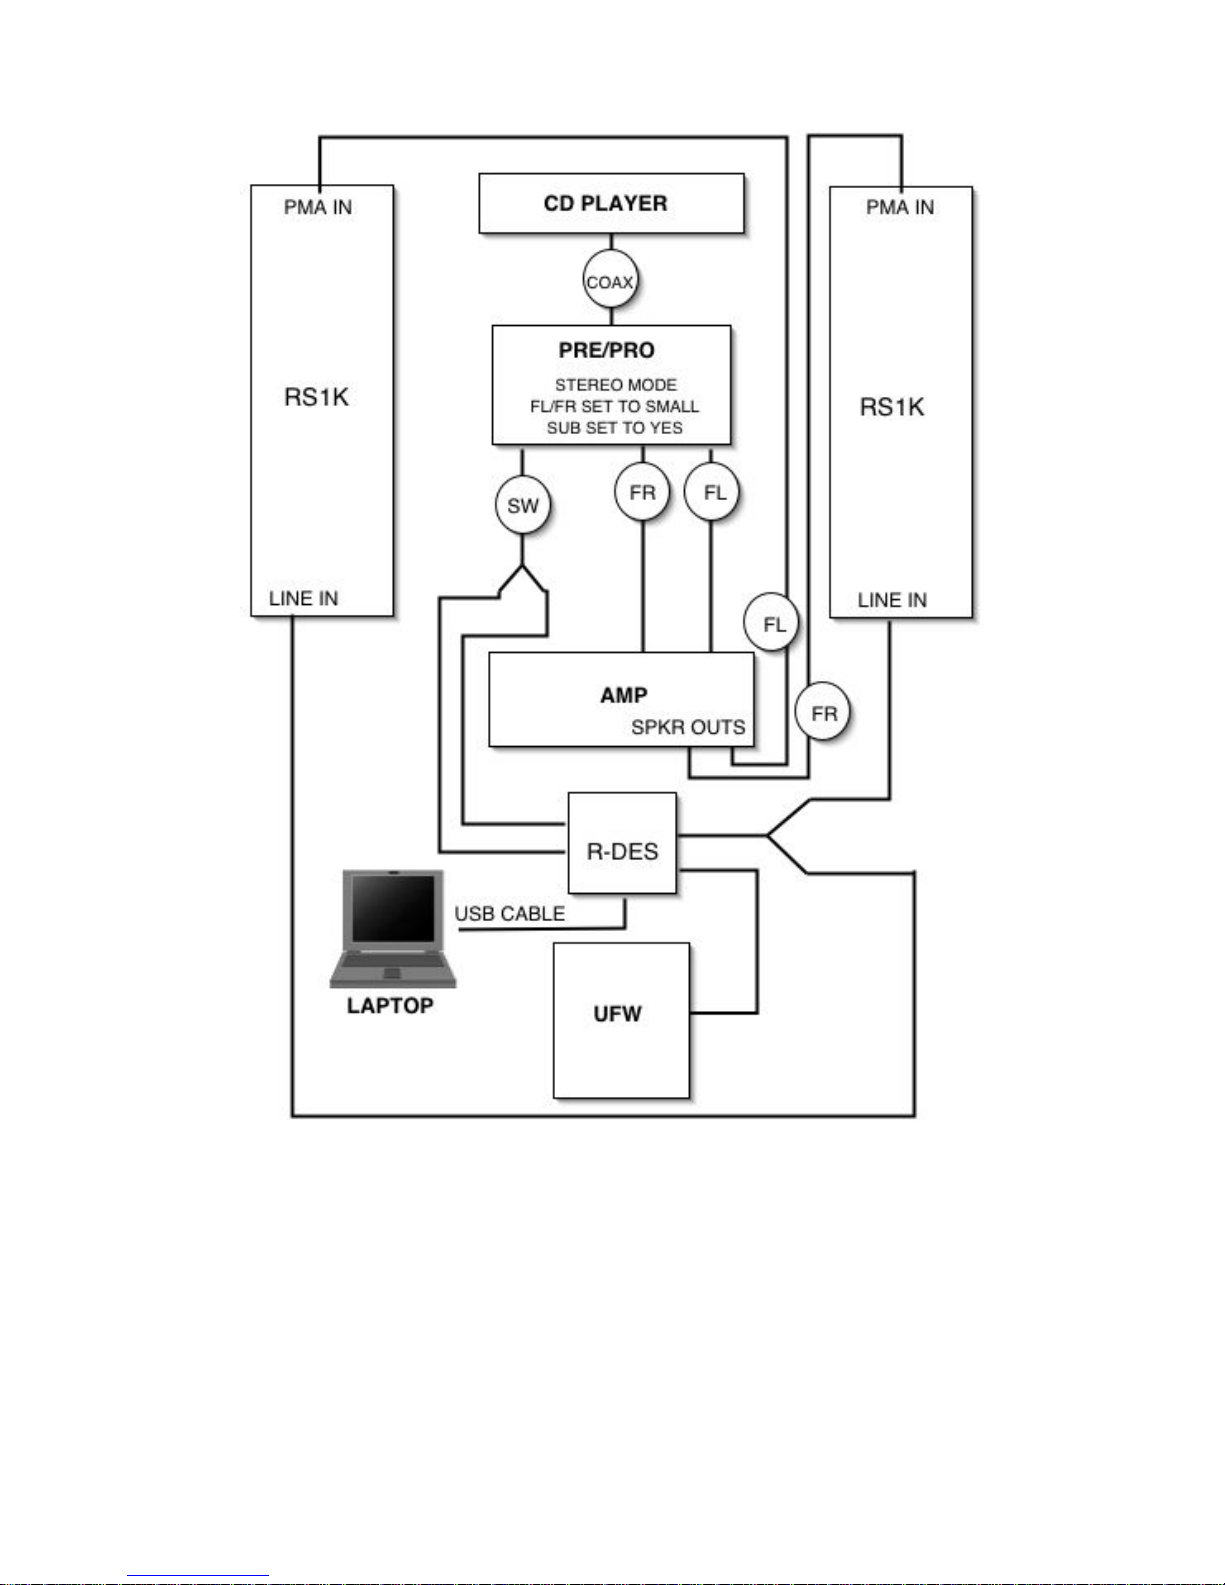
ILLUSTRATION #2
In this connection scheme, we have a stereo setup, with a subwoofer, being fed
signal by a preamp/processor whereby the RS-1Ks woofers and the subwoofer are
controlled by a single R-DES.
Set the FL/FR speakers to 'SMALL' (the size settings of the other speakers is moot,
as this is a stereo system configuration).
Select a crossover point in the preamp's menu.
Connect the FL/FR amplifier's speaker wire connection to the respective RS-1K
PMA terminals.
From the preamp's SW output jack, connect a 'Y' jack which will feed both inputs of
R-DES which then controls the low frequencies to the RS-1K woofers and the
subwoofer.
Follow the same phase tweak procedure as outlined in illustration #1.
Page 9

ILLUSTRATION #3
This connection scheme utilizes an outboard, stereo 2-way crossover to filter the
high frequencies away from the RS1K's built-in plate amplifier/woofer and to filter
the low frequencies away from the RS-1K's PMA, at a user-defined crossover point.
This is the setup construction:
Player: All speakers 'LARGE', SW='YES'
Preamp: FL/FR 'LARGE', SL/SR/CC 'SMALL'
What will happen:
The low frequencies that are redirected from the SL/SR/CC (because they are set
to 'SMALL') will be sent to the subwoofer.
The full range FL/FR signals will be sent to the outboard crossover where you will
choose the crossover point that you prefer, sending the frequencies above the
selected crossover point to the RS-1K's PMA (HP OUTS) and sending the
frequencies below the selected crossover point to the RS-1K's plate amplifier/
woofer (LP OUTS).
The subwoofer, or subwoofers (dual subs can be connected by inserting a 'Y' jack
as shown in the diagram) will receive the LFE signal, if any, along with the
redirected bass from the satellites that are set to 'SMALL'.
Adjust the levels and relative phase per steps 1-13 in the Setup For Illustration #6
NOTE: You will now have 2 R-DES equalizers to coordinate, so you might want to
name each curve you create with a tag of SW and RS-1K respectively, to avoid
confusion down the road. You should also devise a curve with the idea of creating
a complimentary curve in the 2nd R-DES and name the 2 curves the same, with the
only difference being the tag. This is only a suggestion to help avoid dialing up 2
different EQ curves that may work against each other when utilizing 2 R-DES units
in the same system.
Page 10
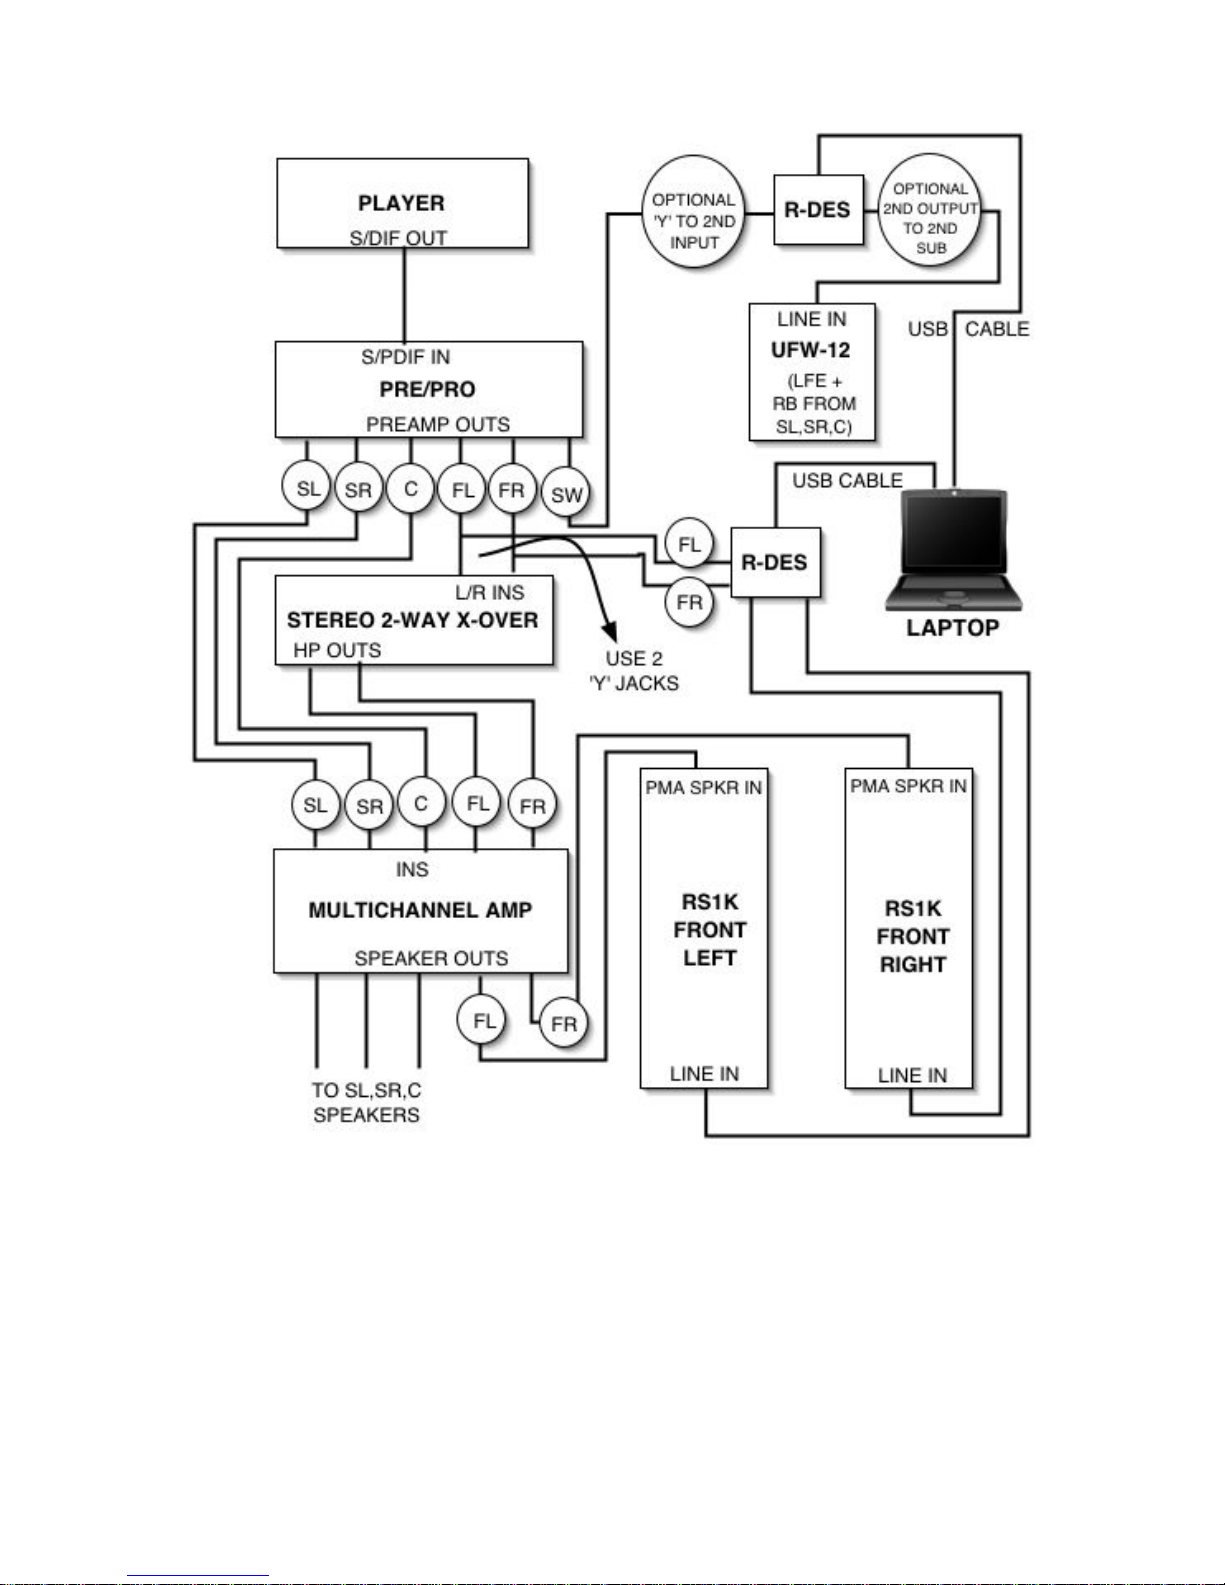
ILLUSTRATION #4
This is also a connection scheme that utilizes an outboard stereo, 2-way crossover.
The difference in this scheme is that you are using 'Y' jacks at the FL and FR
preamp outputs to send a signal from each channel to both the outboard cros sover
and R-DES.
This scheme will allow you to set different crossover points for the RS-1K's PMA
and it's woofer by selecting the high pass point in the outboard crossover and the
low pass point in R-DES.
Everything else about this scheme is the same as Illustration #3, and can be
referenced in setup for illustration #3.
Adjust the levels and relative phase by referring to steps 1-13 of the Setup For
Illustration #6.
Page 11
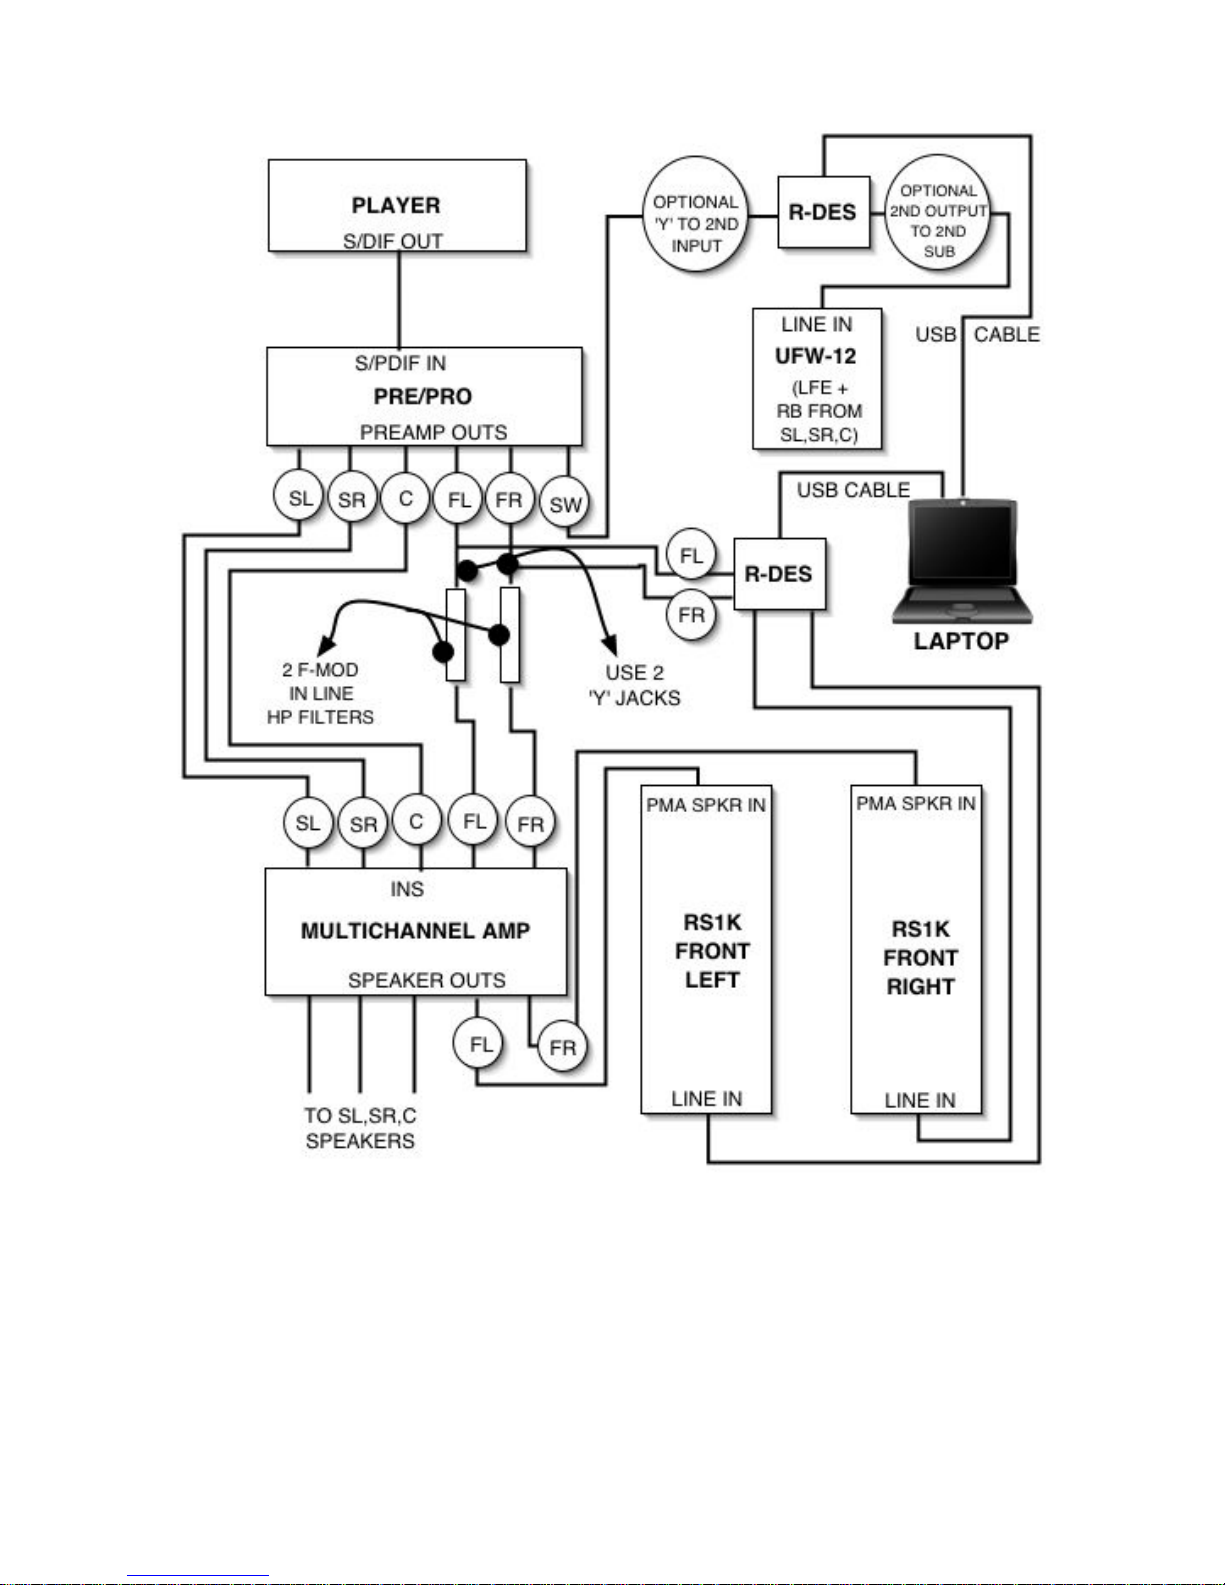
ILLUSTRATION #5
In this connection scheme, we are exactly duplicating the scheme that utilizes an
outboard stereo, 2-way crossover described in Illustration #4. The only difference
is that we are using in-line analog high pass filters to send only the signal content
which is above the frequency of the analog filters (called F-Mod, a specific brand
of in-line analog filters, in the diagram). The setup and results are the same in
this and the case of the outboard stereo 2-way crossover shown in Illustration #4
and can be referenced there for all other aspects of this schemes setup.
Calibrate levels and relative phase by referring to steps 1-13 of the Setup For
Illustration #6.
Page 12

ILLUSTRATION #6
This is the primary recommended connection scheme when using model RS1000 loudspeakers and 1 or multiple subwoofers and R-DES, whereby all of the system's low frequencies will be under the user's control.
Page 13

Receiver / Processor Configuration:
Set all speakers to 'SMALL' and subwoofer to 'YES'. Select
the desired crossover point for satellites and
subwoofer(s) (in the case of this exercise, set the crossover to 80 Hz.). The 8" powered woofers in the RS1000’s will share the duties of playing back both the redirected bass from all of the satellites summed with the
LFE signal with the subwoofer(s).
Setup:
(Perform this after all of the connections shown in the
diagram have been properly made and R-DES has been
successfully installed onto your computer and RS-1K PMA
only and center, surround and surround back speakers
have been calibrated to some reference level)
1. Turn both of the RS-1K's onboard plate amps 'OFF'. (8)
2. Turn the RS-1K's onboard crossover all the way to the
right to 150 Hz. (1)
3. Turn your subwoofer's amplifiers 'OFF' (See owner's
manual of your subwoofer).
4. Play an 80 Hz tone through the RS-1K's PMA and record the SPL reading on
your meter (adjust the preamp/processor's master volume until the reading is 75 dB at the listening position,
then leave the master volume and meter set at these
positions throughout the tutorial).
5. Turn the amplifiers that are supplying power to the
RS-1K's PMA’s 'OFF'.
6. Turn the RS-1K's on-board amplifiers 'ON'.
7. Play the 80 Hz. tone again and level the volume using
the plate amplifier's gain control (3) until it reads 3 dB
less than your PMA's reading (in this case, 72 dB on
the SPL meter).
8. Turn your PMA's amplifiers 'ON' (leaving the RS1K's
plate amplifiers 'ON' also).
9. Play the 80 Hz. tone and slowly adjust the RS-1K's
plate amplifier's phase control (2) from the '0' position to
the right until the reading on your meter is the
highest dB SPL.
10. Turn the amplifiers that are supplying power to the
RS-1K’s and the RS-1K's plate amplifiers 'OFF'.
11. Turn your subwoofer's amplifiers 'ON'.
12. Play the 80 Hz tone and adjust the level to read the
same as the RS-1Ks woofers (72 dB in this case) using the
subwoofer(s) amplifier's gain control, NOT the preamplifier's calibration menu's SW volume control.
13. Turn everything 'ON' and adjust the subwoofer(s)
phase control as you did the
RS-1K's woofer's phase in step 9. above.
COOL! Now you're ready to run sweeps and adjust your
R-DES Equalizer to affect a curve, or curves, that will
suit your room and your listening pleasure.
REMEMBER!:
1. Do not change the levels of your woofers or your subwoofers during any room correction exercise with R-DES.
After you complete your room correction exercise, you
may then feel free to change woofer and/or subwoofer
levels to suit your tastes. In that case, remember that
you can use R-DES to affect any such boosts or cuts on a
frequency specific basis. This way, the settings are
saved and named and you may switch to another setting
and come back to that exact setting at a future time,
which is impossible to do if you are simply changing levels in your preamp/processors trim menu or by using the
RS-1K's and/or subwoofer's plate amplifier's gain
controls.
2. If you find that your woofers and/or subwoofer(s) are
suffering under the strain of playing back any certain
source material at the volume you prefer to listen at, RDES has a high pass/subsonic filter that you can use to
protect from that ever happening.
You can even name the particular curve as a reference
to the particular source that causes the distress to your
system. This way you don't have to remember to turn
down the volume, or if you forget to, suffer damage to
your system.
3. This is a great place to start and a very general calibration point for launching
into the vast areas an RS1000/UFW/R-DES system affords
you to explore. Always remember that the AV123 Forums
have great people with great advice and
expertise in these areas and is a great place to bring
your questions for thorough answers.
Page 14

ILLUSTRATION #7
This is the same scheme as Illustration #6 above, except there are 2 R-DES units
controlling all of the low frequencies in a multi channel system. You should exactly
follow the instructions in Illustration #6 for calibration and phase tweaking.
The option here is that you will have the opportunity and challenge of using 2
curves in the same system. Please read the NOTE: in Illustration #3 concerning use
of 2 R-DES units.
Calibrate the levels and relative phase by referring to steps 1-13 of the Setup For
Illustration #6.
Page 15

ILLUSTRATION #8
This scheme is for all of you multi channel lovers who prefer analog connections
from the player vs digital for all multi channel 5.1 formats.
This scheme utilizes the Outlaw Audio ICBM Analog Bass Manager with Onix
Rocket RS-1000 up front and dual Rocket UFW-12 subwoofers which affords the
luxury of 2 included R-DES units, certainly one of the most versatile multi channel
audio systems ever devised.
Page 16

System Setup (after all connections have been made as
shown and 2 R-DES units have been successfully installed
on your computer): Player: All speakers set to 'LARGE',
SW to 'YES'. ICBM: Choose your crossover for all 5 satellites, which include the RS-1K's PMA’s. All connections
made as shown in the diagram and Both R-DES units
successfully installed on your computer.
What will happen:
1. The player will send only the .1 channel to your subwoofer(s) through the R-DES unit that is supplied with
your UFW-12. The level isn't controlled by your preamp's
master volume so it must be adjusted in the player's
calibration menu with the UFW-12's gain control at
around 1 O'clock.
2. The ICBM will redirect all the satellite's low frequencies, below the selected crossover point(s) to the RS-1K's
woofers, through the 2nd R-DES unit.
3. The ICBM will filter the low frequencies away from
the RS-1K's PMAs per the selected crossover point. You
also have the option to use only 1 R-DES unit by connecting the player's SW output through the preamp and
ICBM, in which case you would use 1 or 2 'Y' jacks out of
the 1 R-DES unit's outputs, running 2 cables to the RS1K's and 1 or 2 cables to the subwoofer or subwoofers,
whichever the case may be. This will send an identical,
summed redirected bass and LFE signal to both the RS1K's woofers and your subwoofer(s). If you are using 2
R-DES units, please refer to the NOTE in the Setup For
Illustration #3 for suggestions on how to avoid running 2
conflicting curves at once, and adjust the levels and
relative phase of the RS-1K's woofers and the
subwoofer(s) as instructed in steps 1-13 of the Setup For
Illustration #6.
Proper Care and Feeding
Your Rocket RS1000 does not need much exterior main-
tenance other than an occasional dusting. Please use
care with the gloss black finish or real wood veneer and
treat it as you would a car or piano finish. The gloss
black can be waxed with automotive carnauba wax if
desired. For general dust removal, we recommend the
3M Yellow Detail Cloth (part # 39016) or Meguiar’s Ultimate Wipe Detailing Cloth (part# 29910) as it will not
scratch the black surface or real wood veneer. Additionally, the durable matte finish on the wood veneer
requires only some dusting, or can be wiped off with a
water dampened soft cloth if needed.
Above all, listen and enjoy!
AV123 Warranty Policy and Registration
All products sold through AV123 carry a limited manufacturer's parts and labor warranty. All Rocket Outdoor Series loudspeakers are guaranteed to be free from manufacturer's defects for a period of one year from the date
of purchase.
Get an extra two years of warranty coverage free!
When you go online to www.av123.com and register your
product, we will extend the warranty by an additional
two years - that's three years total. This extended warranty is free simply for registering within 60 days of your
purchase. We urge you to take advantage of this offer.
Warranties apply to the original owner only and are nontransferable. AV123 will exchange all defective merchandise, including shipping charges, to the original
shipment destination at no charge for up to 60 days after the date of purchase.
After 60 days the product must be returned to AV123 for
repair only and return shipping costs are the responsibility of the customer. All questions should be directed to
customer service.
Page 17

Speaker Specifications
System: Multi-way, seven-driver direct-radiating system,
vented enclosure with two rear-firing flared ports
Drivers: Vifa Ring Radiator tweeter, four custom 5.25"
long-throw aluminum cone woofers, one custom 4" aluminum cone midrange and one custom 8" sealed sidefiring woofer with built-in 350 watt amplifier for the 8"
woofer only.
Crossover: Tweeter at 6.0KHz, progressive array, variable slope.
Frequency Response: 29Hz—20KHz +/- 3 dB
Impedance: 6 ohms nominal
Sensitivity: 90.5dB (1w/1M)
Size: 51.5" H x 15.6" D (add 1.75" for amp protrusion) x
11.8" W
Other Features:
R-DES digital EQ system
8” woofer is high passed at 28Hz
0-180 phase adjustment, gain, and
crossover adjustments (40Hz-150Hz)
Auto-on / standby mode
Radio Shack Compensation Chart
The below shows the correction values for the SPL meter
mentioned earlier in this manual. For any number read
(left column) from this meter, it is necessary to add the
correction value (right column) before plotting actual
results.
Frequency
(Hz)
Gain
(dB)
20 +7.5
25 +5
32 +3
40 +2.5
50 +1.5
63 +1.5
80 +1.5
100 +2
Page 18

Special Thanks for assistance in creating this guide go out to
Brad Judy, Walter Norton, Eric Lilleor and Stephen Job.
Extra Special Thanks goes out to Dave ‘bossobass’ Prunczik
for supplying the illustrations and the accompanying text.
2150 W. 6th Ave. • Suite L • Broomfield, CO 80020 • Toll Free 1-877-543-7500 • e-mail: info@av123.com
Thank you for your support!
 Loading...