

Page 1
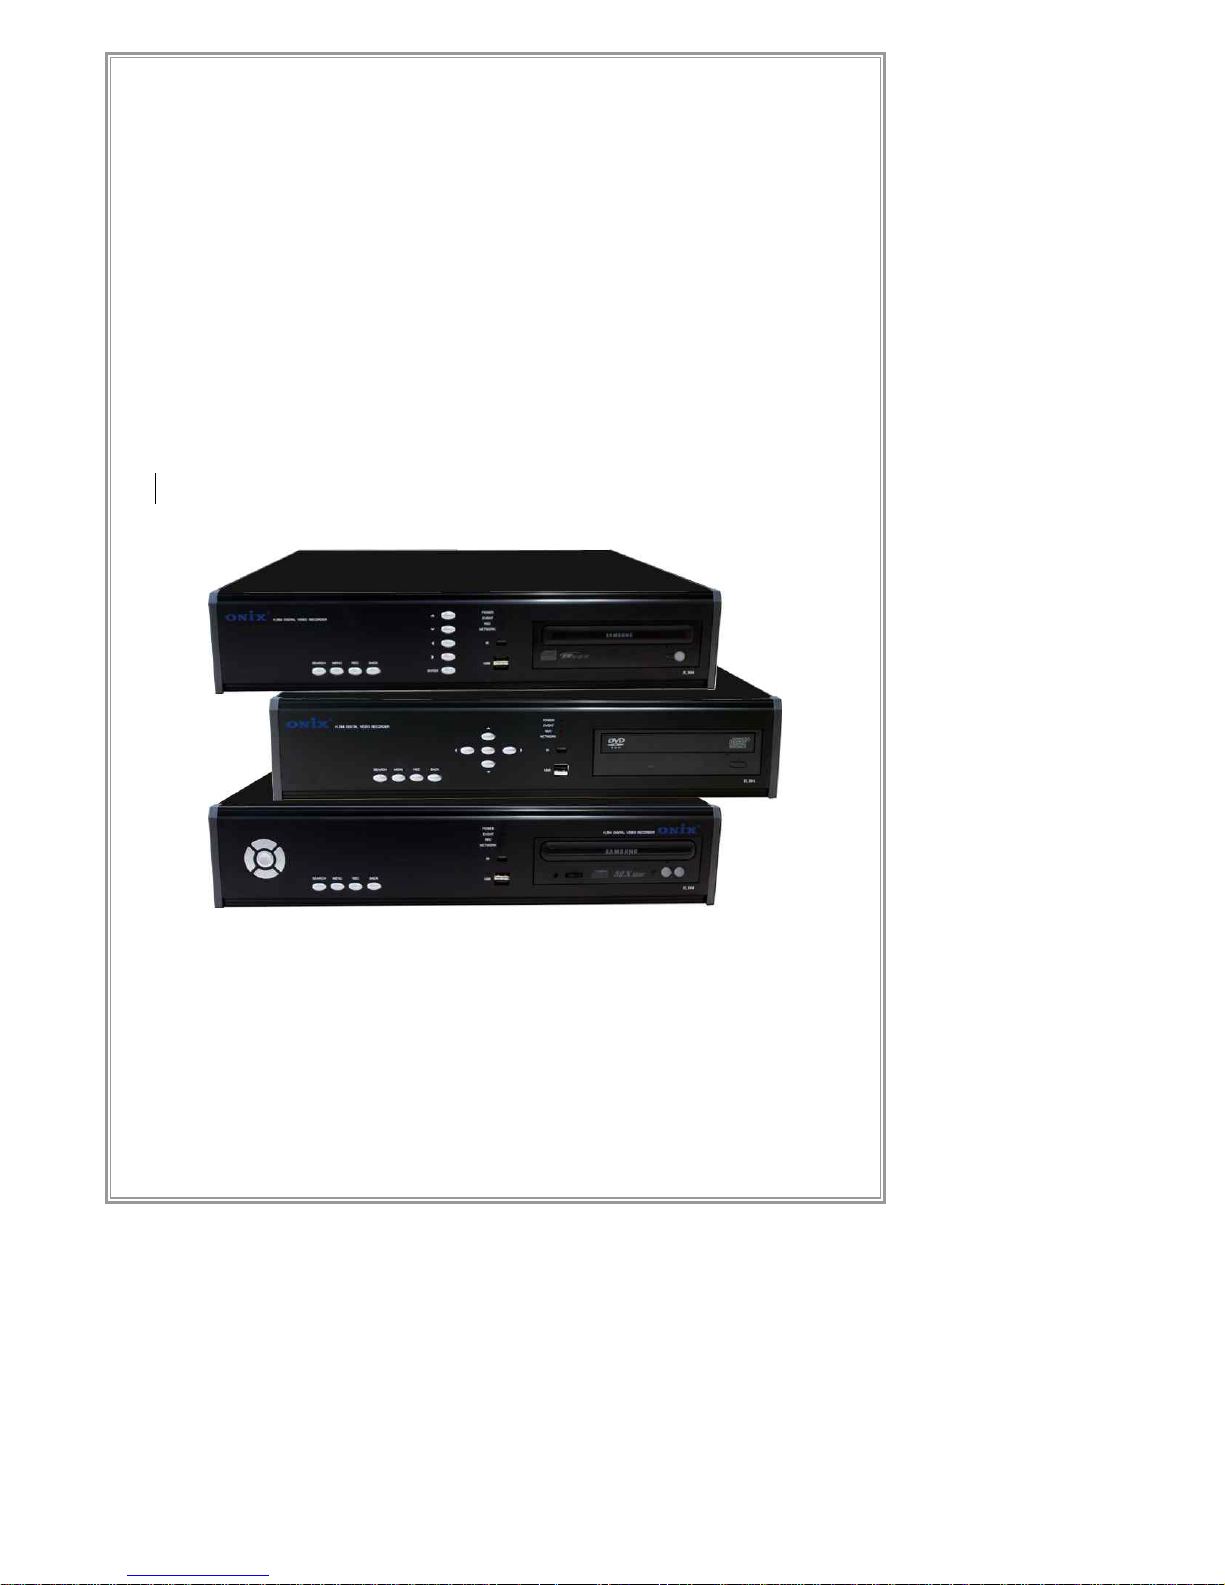
N Series
(N4120 , N8240 , N1648)
User Manual
Network Standalone DVR
Standalone DVR Manual v2.1
Page 2

Page 3

1
Contents
CONTENTS 1
NOTICE BEFORE USING PRODUCT 7
SAFETY WARNING & PRECAUTION 8
PRODUCT DESCRIPTION 오류! 책갈피가 정의되어 있지 않
습니다.
PRODUCT SPECIFICATION 12
Package Contents 14
Front Panel Layout 15
LED Status Lights 15
USB Port 15
CD/DVD-RW (Optional Type) 15
Front Panel Buttons 15
Rear Panel 16
Remote Control Unit Layout 17
PRODUCT INSTALLATION 18
CONNECTION OUTLINE (4CH CASE) 18
VIDEO CONNECTION 19
Input 19
Output 19
AUDIO CONNECTION 20
Input 20
Output 20
Page 4

2
ALARM/SENSOR/PTZ CONNECTION 21
Alarm 21
Sensor 21
PTZ 21
NETWORK CONNECTION 22
HARD DISK DRIVE 22
POWER CONNECTION 22
SYSTEM INSTALLATION COMPLETE 22
STANDALONE DVR SET MANUAL 23
STARTING THE SYSTEM 23
SURVEILLANCE MODE 23
Main Screen 23
Video Screen 24
Control Panel 25
Split Screen Modes 27
PLAYBACK MODE 33
SEARCH MODE 35
Quick Search Mode 36
Search 37
MENU MODE 44
Initial Menu 45
SEARCH MENU 46
Recording Configuration 47
PTZ Configuration 54
System Configuration 55
System Information 69
Backup 71
Log Viewer 72
Page 5

3
STANDALONE CLIENT 74
CONFIGURATION 75
GUI Main Feature 75
Display Configuration 76
Storage Space Setup 78
Creating Recording Repositories 80
Device List Configuration 82
Device Configuration 84
MD (Motion Detection) Configuration 85
Bookmark Configuration 86
Network Event Configuration 87
Recording Configuration by Events 88
Recording Duration Configuration by Events 89
Recording / Schedule Configuration 91
PTZ(Pan/Tilt/Zoom) Configuration 92
Preset Configuration 93
Network Configuration 94
System Configuration (General Tab) 95
System Configuration (Account Tab) 96
System Configuration (Version Tab) 97
STANDALONE CLIENT FUNCTION MANUAL 98
MAIN GUI FEATURE 99
Information Panel 100
Menu Display Bar 101
Server/ Device List 102
Bookmark 103
Control Panel 104
PTZ Control Panel 105
Page 6

4
2-Way Audio Control Panel 107
I/O control Panel 108
Playback Control Panel 109
Event List Panel 111
Display 112
Floating Bar 113
SURVEILLANCE SCENARIO 114
Login Process 114
Assigning & Moving Server/Device List 116
Disconnecting / Removing Assigned Channels 118
Connection Fail of the registered video channels 120
Controlling selected surveillance video channels 121
Enhanced Function for Server List/Surveillance Area 122
OSC(On Screen Command) Function 123
E-MAP CONFIGURATION 124
EVENT LIST/ REALTIME EVENT VIEW 125
Event List/ Search Event View 126
RECORD 127
Continuous Recording (On / Off) 127
MD(Motion Detection) Recording 128
Emergency Recording Command Button 129
PLAYBACK 130
Playback Mode 130
Search Filter Button 130
REMOTE SEARCH 132
To execute Remote Search 132
To end Remote Search 132
BACKUP 133
Backup Manager 134
Backup Viewer 139
Page 7

5
WEBCLIENT OPERATION ENVIRONMENT & INSTALLATION
149
MINIMAL SPEC. OF PC REQUIRED TO OPERATE WEBCLIENT 149
CONNECTION & INSTALLATION OF WEBCLIENT 149
Web Browser-Based Connection of WebClient 149
Install ActiveX – 1st Stage 150
Install ActiveX – 2nd Stage 150
3rd Stage 151
4th Stage (Win Vista, Win7) 152
HOW TO USE WEBCLIENT 153
LIVE MODE (LIVE SURVEILLANCE) 153
Selection of Channel Split Mode 154
PTZ Control 154
Audio Control 155
Add-in Functions 155
SEARCH 155
Selection of Replay Time 156
Replay Control 157
SETUP 157
Streaming Setup 157
Recording Setup 158
MOBILE DVR VIEWER MANUAL 159
INSTALLATION BY USING ITUNES 160
DIRECT INSTALLATION FROM IPHONE 162
UNINSTALLATION 163
CONSTITUTION OF MAIN SCREEN 164
Page 8

6
ADD SERVER 165
SETUP CHANNELS 166
DELETE CHANNEL 167
DELETE SERVER LIST 168
CONSTITUTION OF LIVE SCREEN 169
PROCEDURE OF PERFORMANCE OF RECORDED VIDEO 170
Page 9

7
Product Description
Notice before Using Product
Please beware of the following precautions before installing the DVR.
① Please avoid placing the system near moisture or dust
② Please avoid placing the system near direct sunlight or heat
source
③ Please place the system on a solid surface without any
vibrations and away from magnetic appliances
④ Please place the system in a room temperature environment
(Recommended room temperature of 5℃ ~ 40℃)
⑤ Please make sure no foreign metallic/magnetic objects enter
through the ventilation openings of the unit
⑥ Please place the system in a well ventilated area
⑦ Some Radio or TV signals may interfere with system, please
place the system away at least 3 feet from home electronic
appliances such as Radio/Stereo/Television/Projectors
⑧ Never place any heavy objects on top of the unit
⑨ Never disassemble the product, electronic shock may result
in serious injury or death
Notice before Using Product
Page 10
8
Product Description
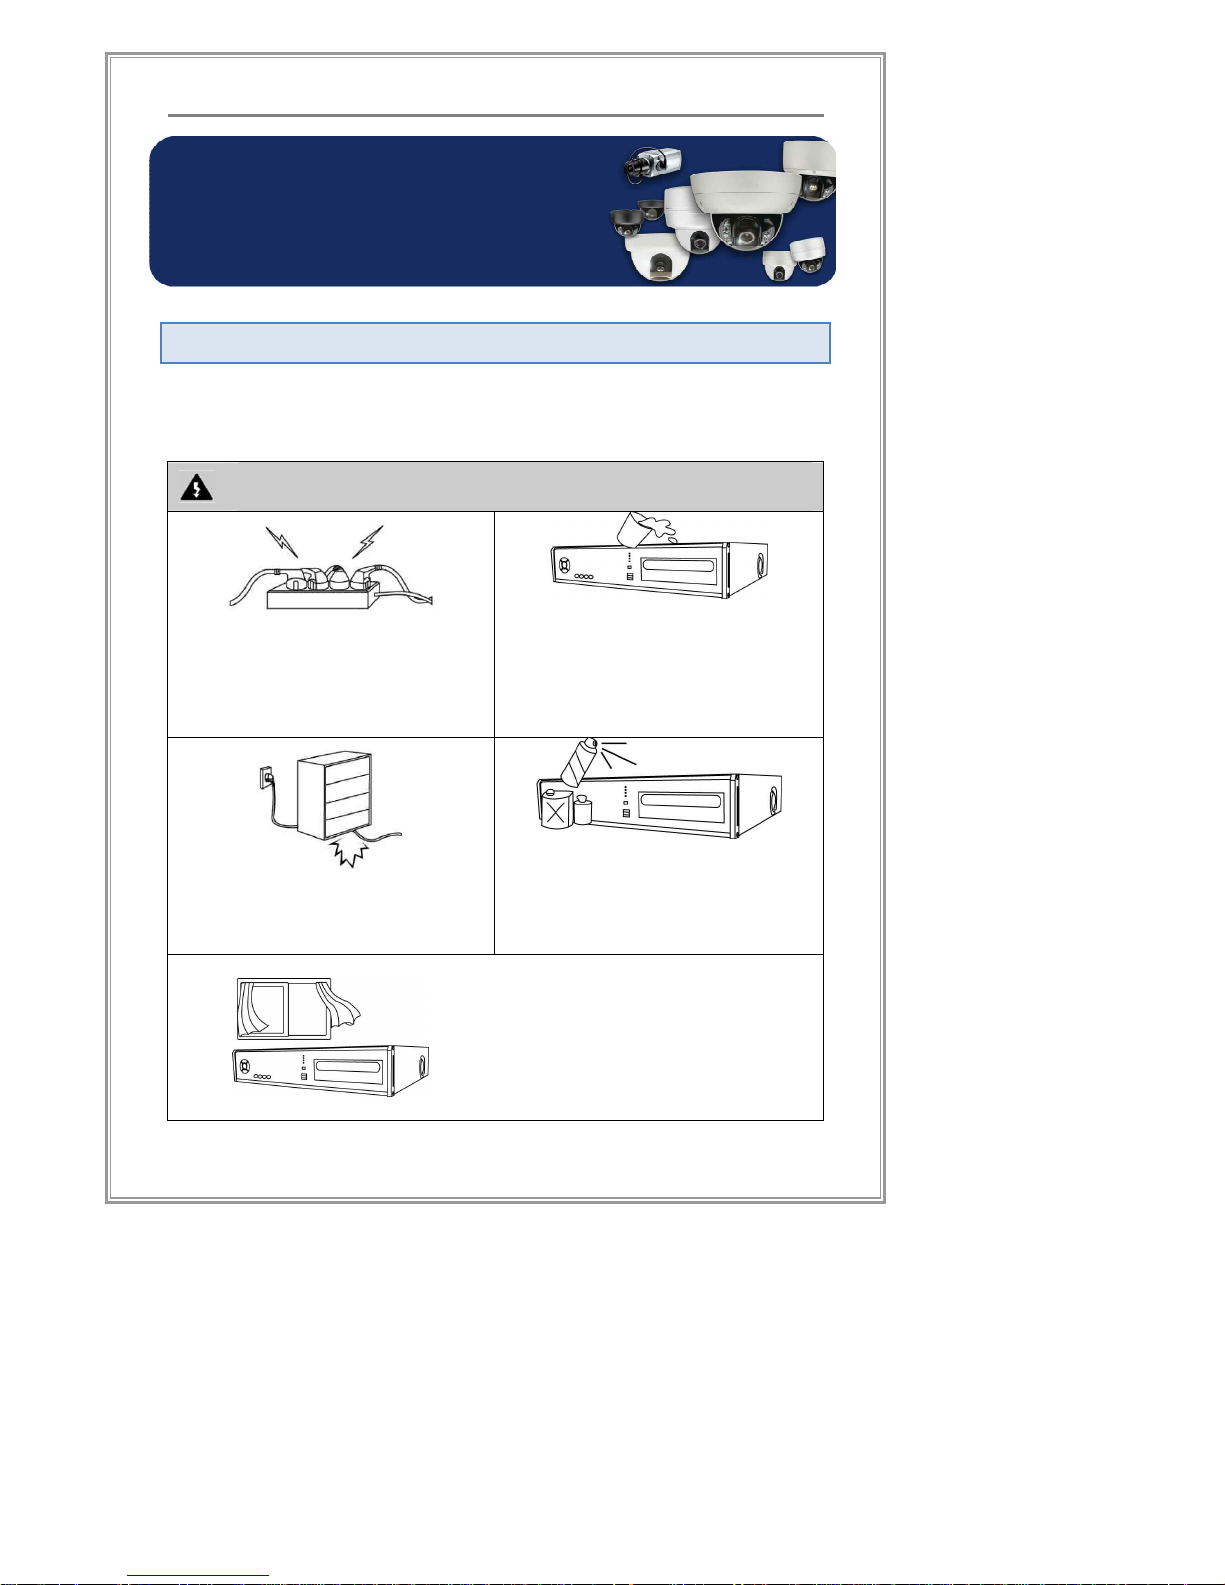
Safety Warning & Precaution
The following warnings and cautions are for your own safety and to
prevent damage of the DVR system and/or other properties.
Warning (Review these warnings or you may be seriously
injured or killed)
Turn off the system before installing
the system. Do not plug in several
electric devices to the same outlet.
[This may cause heating, fire, or
electric shock]
Do not place any liquid container
on the system, such as water,
coffee, or beverage
[If liquid is poured onto the system,
it can cause system breakdown or
cause fire]
Prevent power cable from being
severely bent or pressed by a
heavy object.[This may cause fire]
Clean the dust around the system
on regular basis. When cleaning
the system, always use dry cloth.
[This may cause system
breakdown or electric shock]
Install the system in a place with
sufficient air ventilation.
[Keep at least 15cm distance
between the back of the system
and a wall]
Safety Warning & Precaution
Page 11
9
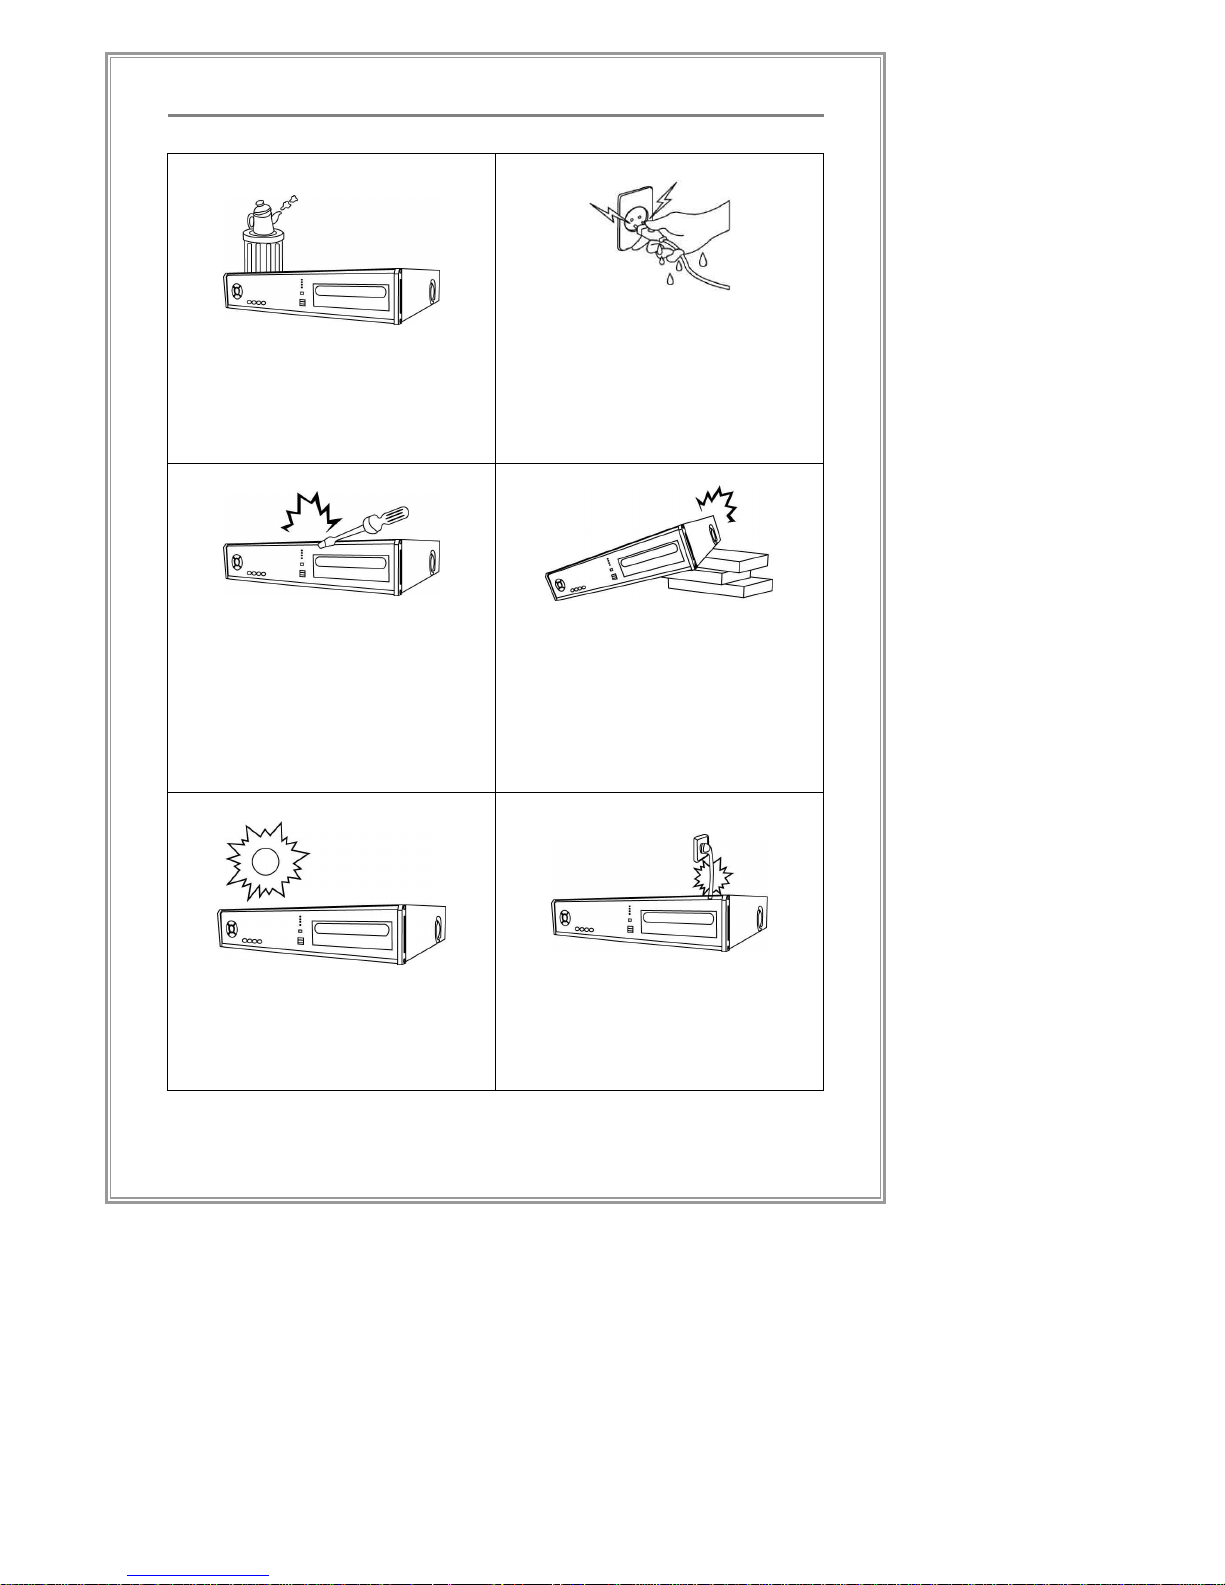
Product Description
Avoid any place with moisture, dust,
or soot.
[This can cause fire or electric shock]
When pulling the power cable from
the plug, do so gently. Do not touch
the plug with wet hands and avoid
using the plug if the holes on the
outlet are too loose.
[This may cause fire or electric shock]
Do not attempt to disassemble,
repair, or modify the system on
your own. It is extremely
dangerous due to high voltage
running through the system.
[This may cause fire, electric
shock, or serious injuries]
Install the system on a plain
surface with sufficient air
ventilation. Do not place the
system on elevated surface.
[This may cause system break
down or serious Injuries]
Install the system in a cool place
without direct sunlight and always
maintain room temperature.
[This may cause fire]
Avoid using aged old power
cables or long extensions.
[This may cause fire]
Page 12
10
Product Description
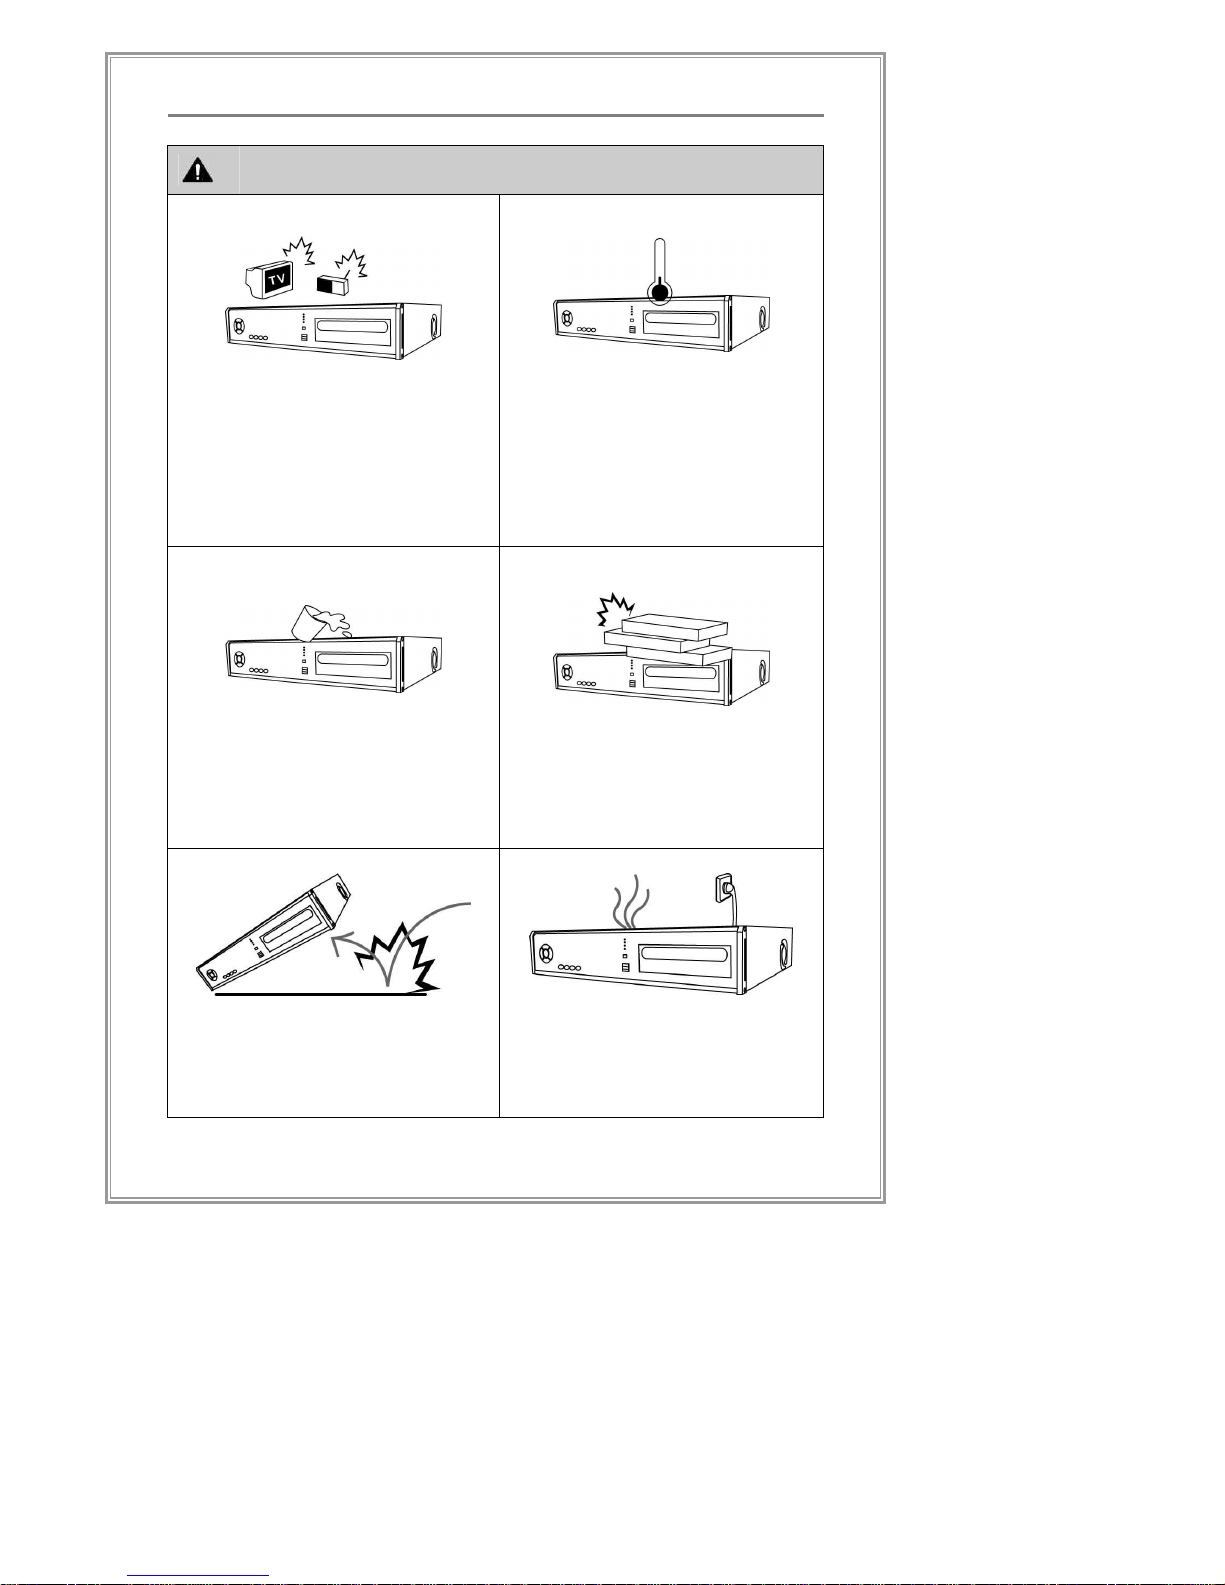
Caution (Review these cautions or you may be seriously
injured or cause property damage)
Do not install the system in a place
with high magnetic, electric wave, or
wireless devices such as radio or TV
[Install the system in a place
without magnetic objects, electric
frequencies, or vibration]
Install the system in a place
with appropriate moisture and
temperature level
[Avoid installing the system with
high (over 40℃) or low (under
5℃) temperature]
Prevent any substances from
being inserted into the system
[This may cause system
breakdown]
Do not place any heavy object
on the system
[This may cause system
breakdown]
The system can be damaged
from a strong impact or vibration
[The system may not operate
properly]
If there is strange sound or smell, un
plug the power cable immediately
and contact the service center.
[This may cause fire or electric shock]
Page 13
11
Product Description
Product Description
Product Overview
“Standalone DVRs" are Standalone DVRs that support H/W
compression, Realtime Display, and Two-way Audio function. Their
stability was maximized by adopting Embedded Linux as the
Operating System. By supporting strong Remote Surveillance and
Remote Playback through network, they can be the optimized
security solutions for IP Surveillance Generation.
Product Description
Page 14

12
Product Description
Product Specification
Specification
N4120
N8240
N1648
Video Input
4 8 16
Video
H.264
CODEC
Audio
ADPCM
Video Output
[BNC x 1, RCA x 1] CVBS, [BNC] SPOT x 1,
VGA x 1
Video Signal
NTSC/ PAL
Operating System
Embedded Linux
Pentaplex Function
Live Display, Recording, Playback,
Backup & Remote access
Interface Control
Unit’s Frontal Buttons, Remote Controller,
Mouse
Audio In(RCA)
4 4 4
Audio Out
1 Port RCA, LINE Level (Functional Live
Audio)
Sensor Input
(Type - NC/NO)
4 4 4
Alarm Output
(Type - NC/NO)
1 1 1
ODD
CD-RW, DVD-RW(SATA) x 1ea
(Optional)
Storage
MaxHDD
SATA x2ea
(w/o ODD)
SATA x2ea
(w/o ODD)
SATA x2ea
(w/o ODD)
CIF
120/100 240/200 480/400
2CIF
120/100 240/200 240/200
Video
Recording
(NTSC/PAL)
D1
120/100 120/100 120/100
Motion Detection
Can be selected / 1 Channel has
selection of 44x30 blocks with H/W based
motion detection
Recording Modes
Manual, Motion Detection, Schedule,
Sensor
Page 15

13
Product Description
Function
Watermark, Pre-recording, Dual Streaming, 2-way
Front LED
Record, Alarm, Network
Backup Media
DVD-RW, USB Memory Stick
Firmware Upgrade
DVD-RW, USB Memory Stick, Network
Search Modes
Calendar, Event, Quick, Specific Time
Watch Dog
Hardware Watchdog Support
PTZ Connection
1 Port Terminal Block, RS-485
PTZ Protocol
Pelco-D, Samsung SCC-641 and approx.
90 protocols support
Network
1 Port Ethernet 10/100 Base-T
Network Protocol
TCP/IP, HTTP, FTP, DHCP, PPPoE, DDNS,
SMTP
DDNS
www.neodhs.com/ www.dyndns.com
DVR Recovery Mode
System Auto Restart, Network Auto
Reconnect
CMS (Optional)
Max. 128CH CMS/ NDVR Support
Communication Port
RS232, RS485, Ethernet, 2USB(Mouse/
Backup)
Storage Temp. 20 ~ 60℃ / 20~95% RH
Operation Temp. 5 ~ 40℃ / 20~80% RH
Power
110-220V / 60-50Hz
Dimension
360mm(W) x 236mm(D) x 60mm(H)
Weight
2Kg (w/o storage)
Remote Software StaNet™ (NetClient), WebClient Support
EMC Certificate
CE, FCC, KCC
Page 16
14
Product Description
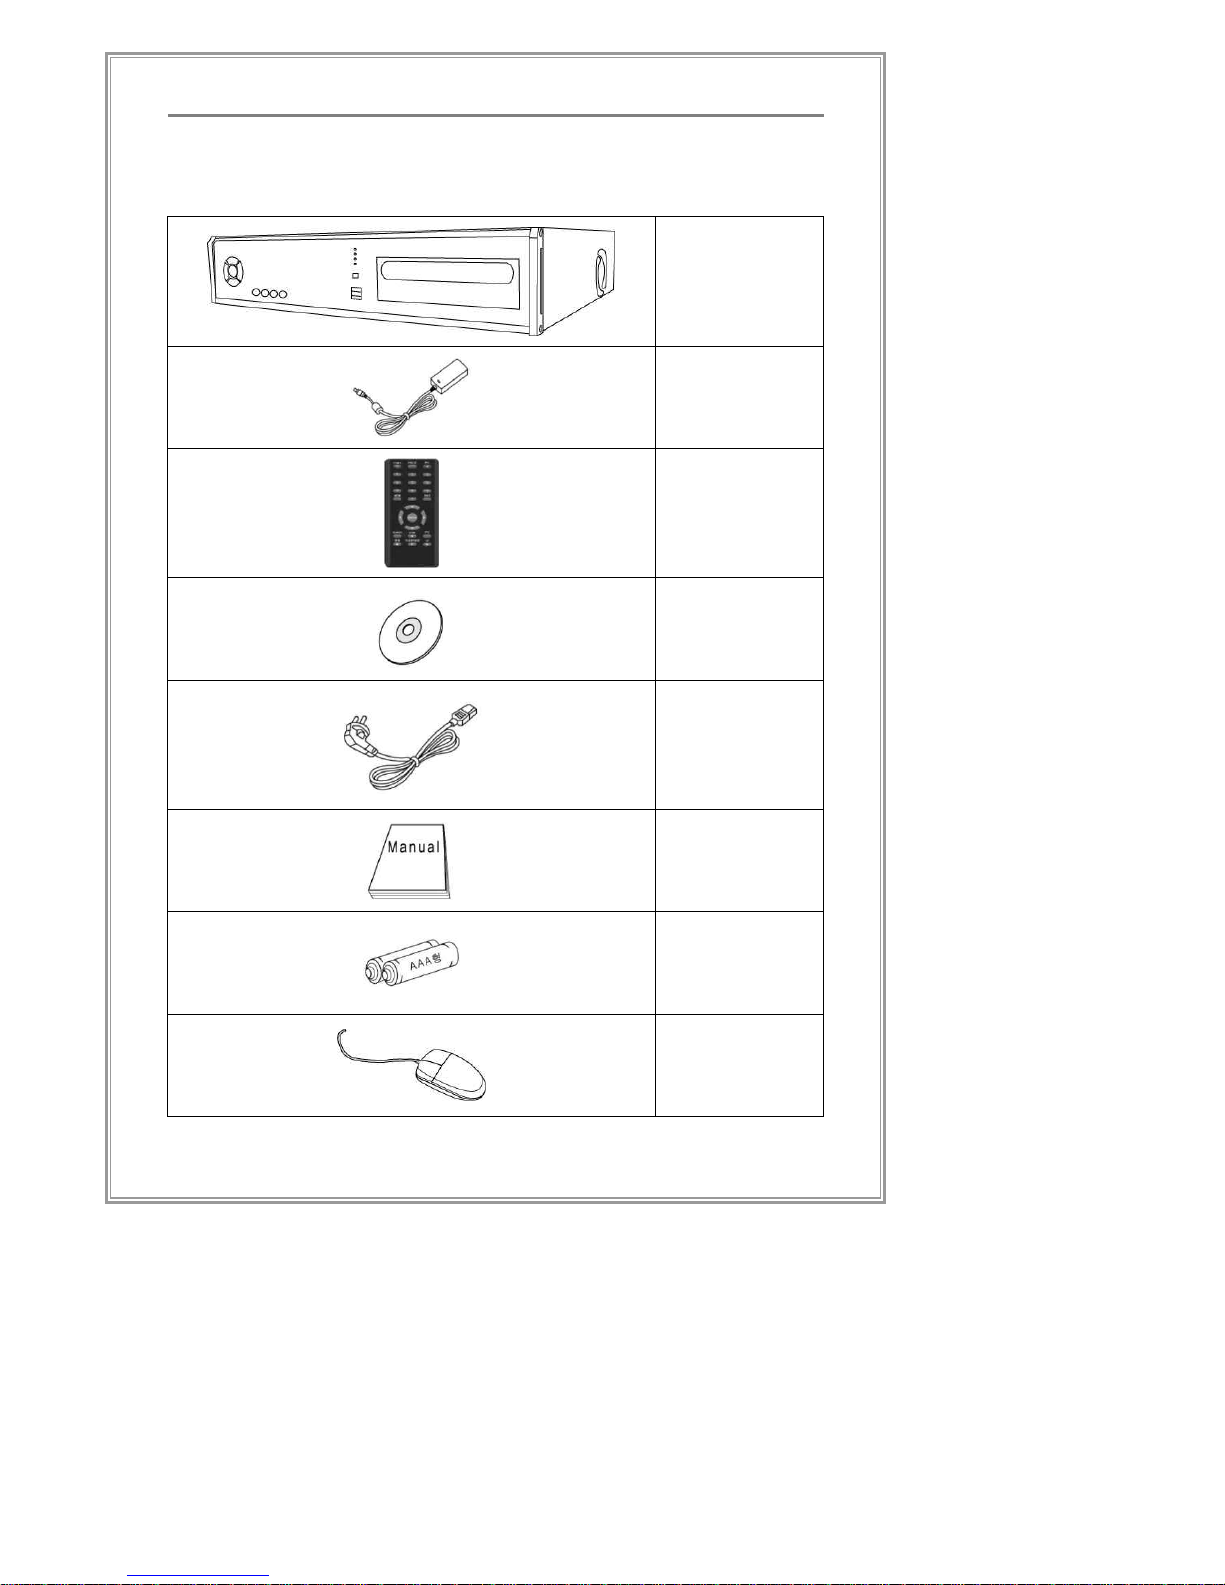
Package Contents
DVR System
Adapter
Remote
Control Unit
S/W
Installation
CD
Power Cable
(Option)
User Manual
(Option)
Batteries
(AAA)
(Option)
Mouse
(Option)
Page 17
15
Product Description
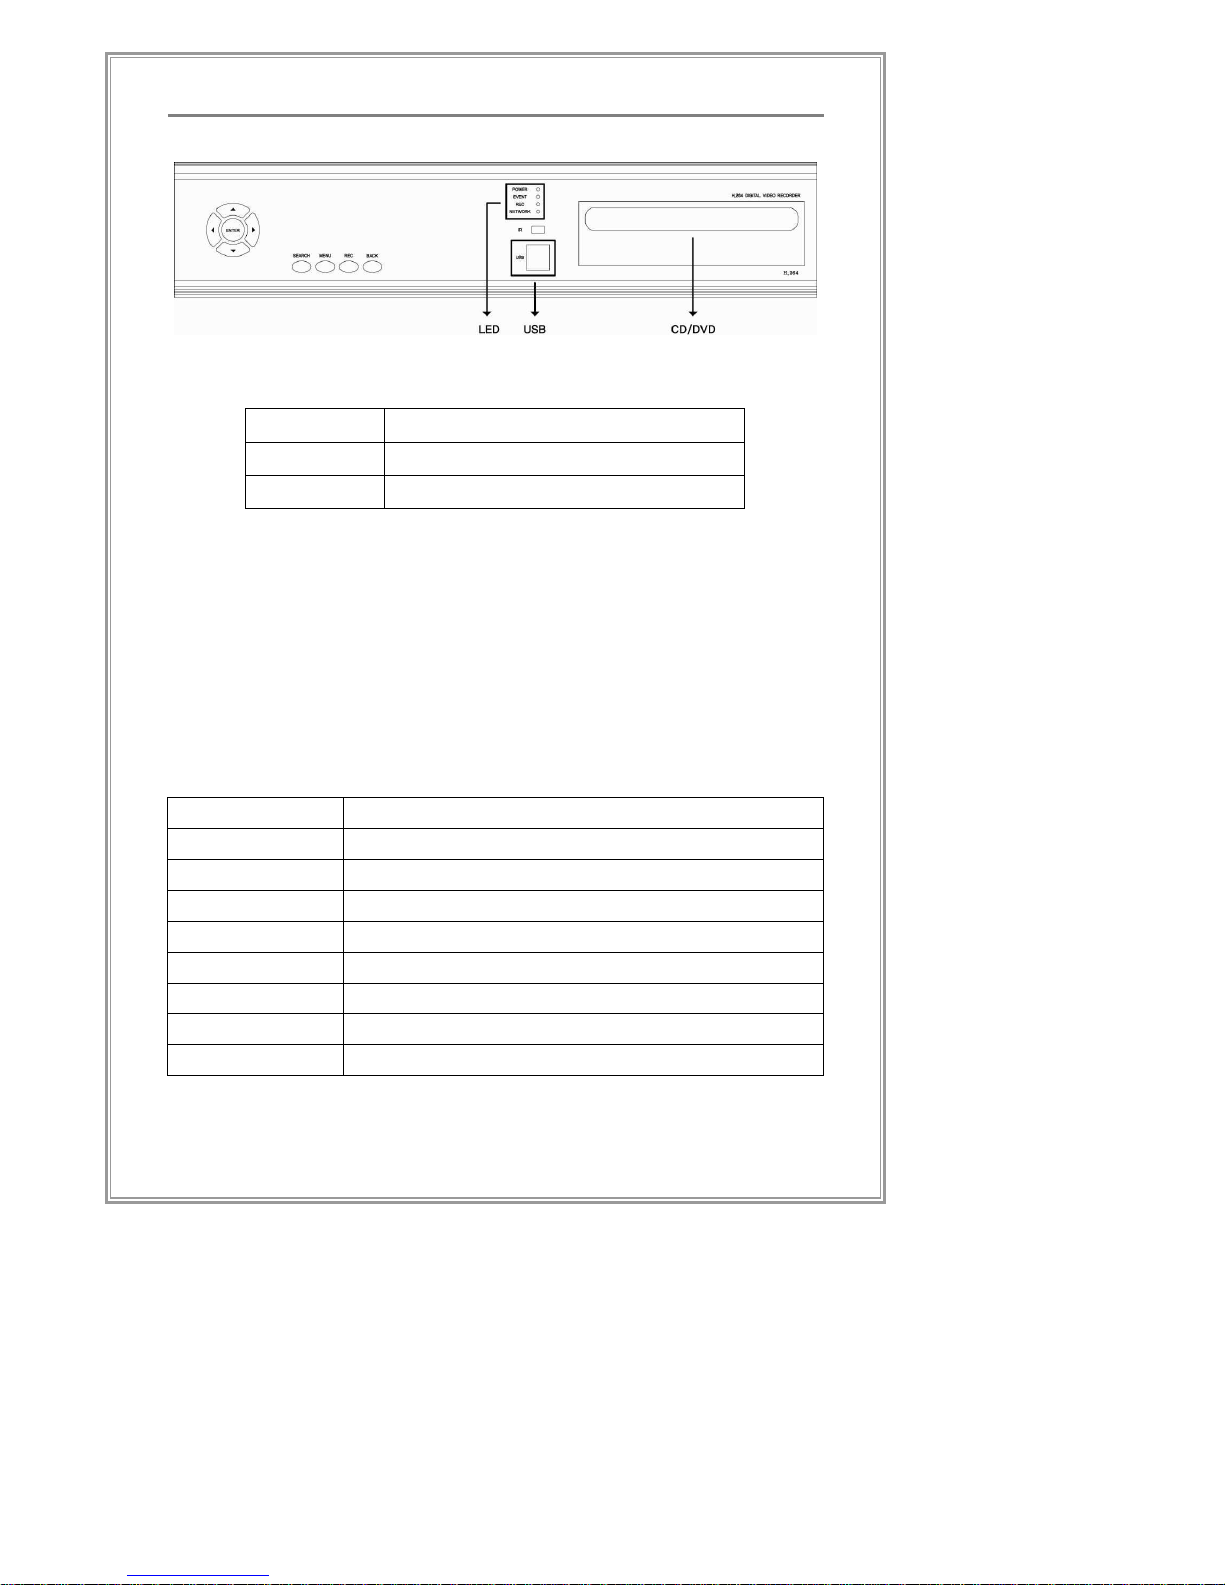
Front Panel Layout
LED Status Lights
REC LED on when recording
EVENT LED on when events occur
NET LED on when network is connected
USB Port
USB Storage can be connected for backup and F/W upgrade
purposes.
CD/DVD-RW (Optional Type)
Blank DVD/CD (depending on the optical drive type) can be
inserted to back up data or to upgrade the firmware.
Front Panel Buttons
SEARCH
Launch the search function
MENU
Launch the system menu
REC
Start Recording
Back
Back from the current action
▲(Up)
Move up within split video channels or menu items
▼(Down)
Move down within split video channels or menu items
◀(Left)
Move left within split video channels or menu items
▶(Right)
Move right within split video channels or menu items
Enter
Select a channel or a menu item
Page 18
16
Product Description
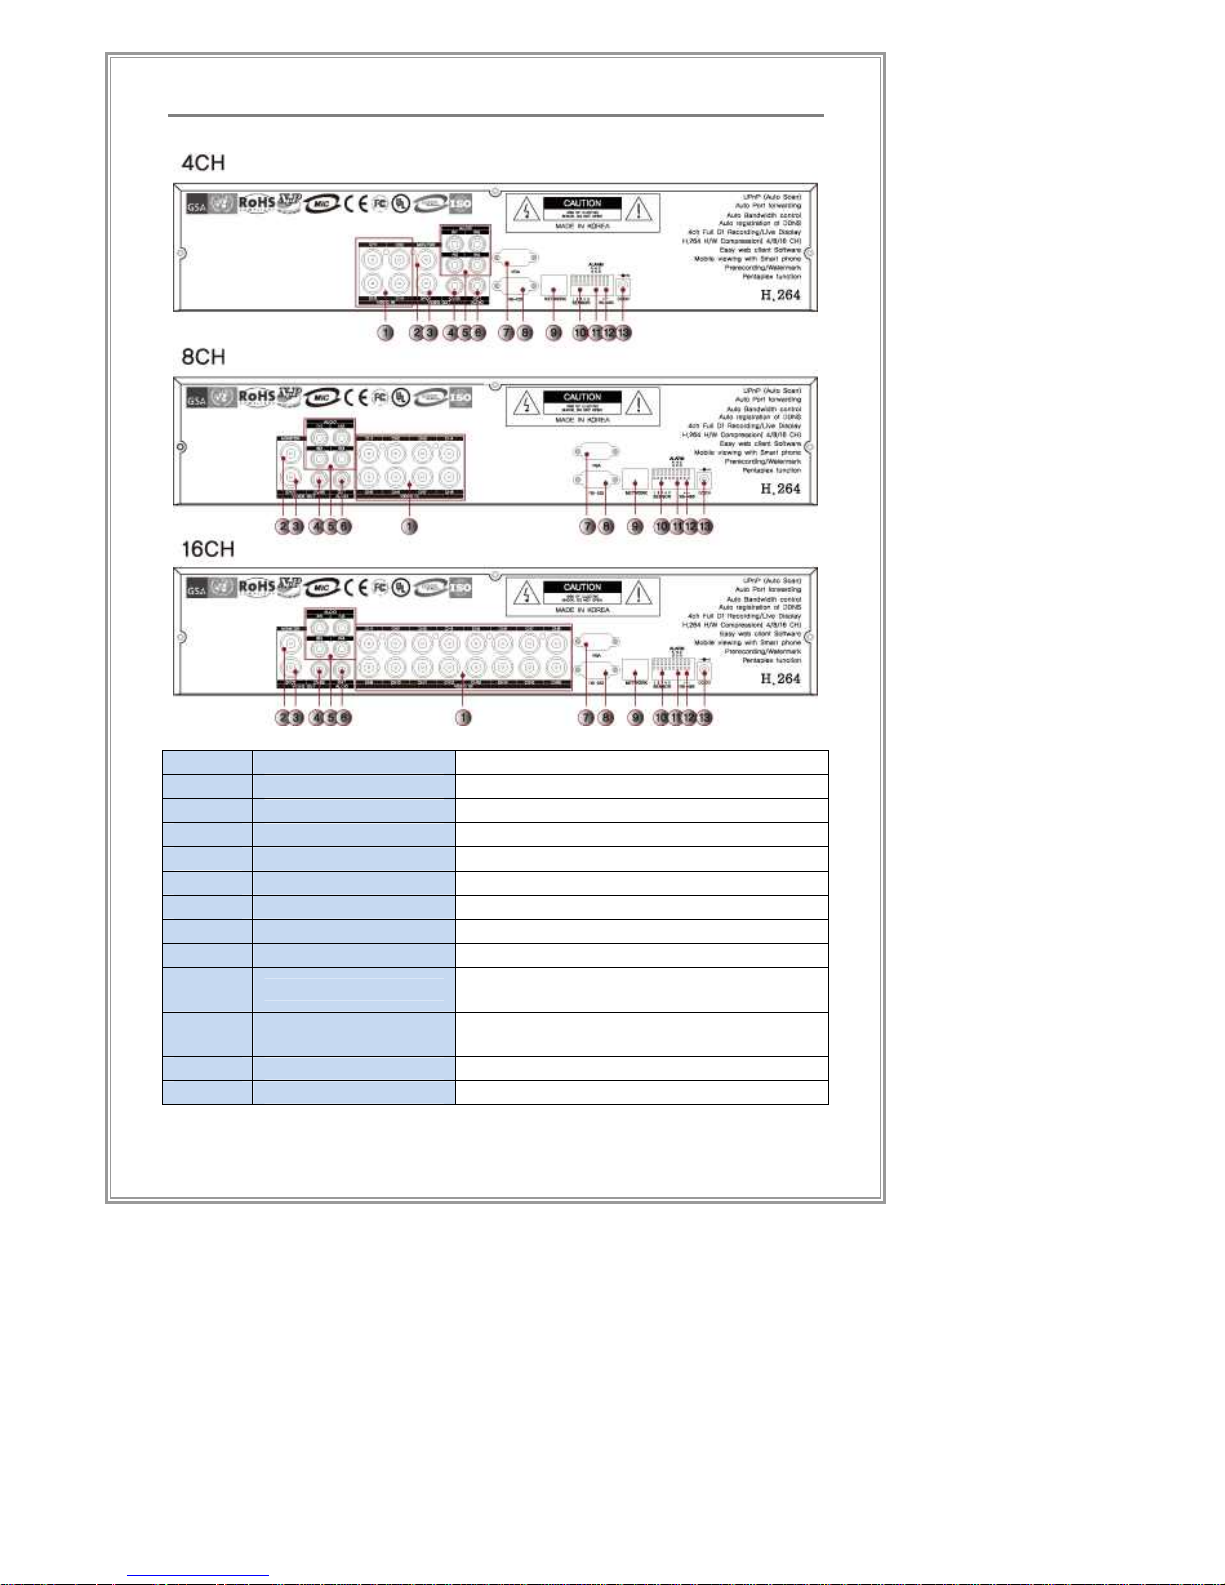
Rear Panel
①
Video In
[BNC]Camera Input
②
CVBS Out
[BNC]Main Composite Video Out
③
SPOT Out
[BNC]SPOT Out
④
CVBS Out
[RCA]Main Composite Video Out
⑤
Audio In
[RCA]LINE(MIC) Audio In
⑥
Audio Out
[RCA]Audio Out
⑦
VGA Out
VGA Output
⑧
RS-232
RS-232 Serial COM Port
⑨
Network Port
[RJ-45]Ethernet Port
⑩
Sensor In
Sensor Connection
(Non Powered Type)
⑪
Alarm Out
Alarm Connection
(Non Powered Type)
⑫
RS-485
RS485 for PTZ Control
⑬
Power In
Adapter Power (DC12V)
Page 19

17
Product Description
Remote Control Unit Layout
POWER
Power ON/OFF
FREEZE
Pauses live view
screen for quick
scan/review of event
REC
Start Recording
MENU
Launches the menu
BACK
Back from the current
action
Navigate through
menus.
Select the item.
SEARCH
Launches the search
STOP
Stop playback
PTZ
Launches the PTZ
setup
REW
Rewind playback
PLAY/PAUSE
Play/Pause playback
FF
Fast forward playback
Page 20
18
Product Description
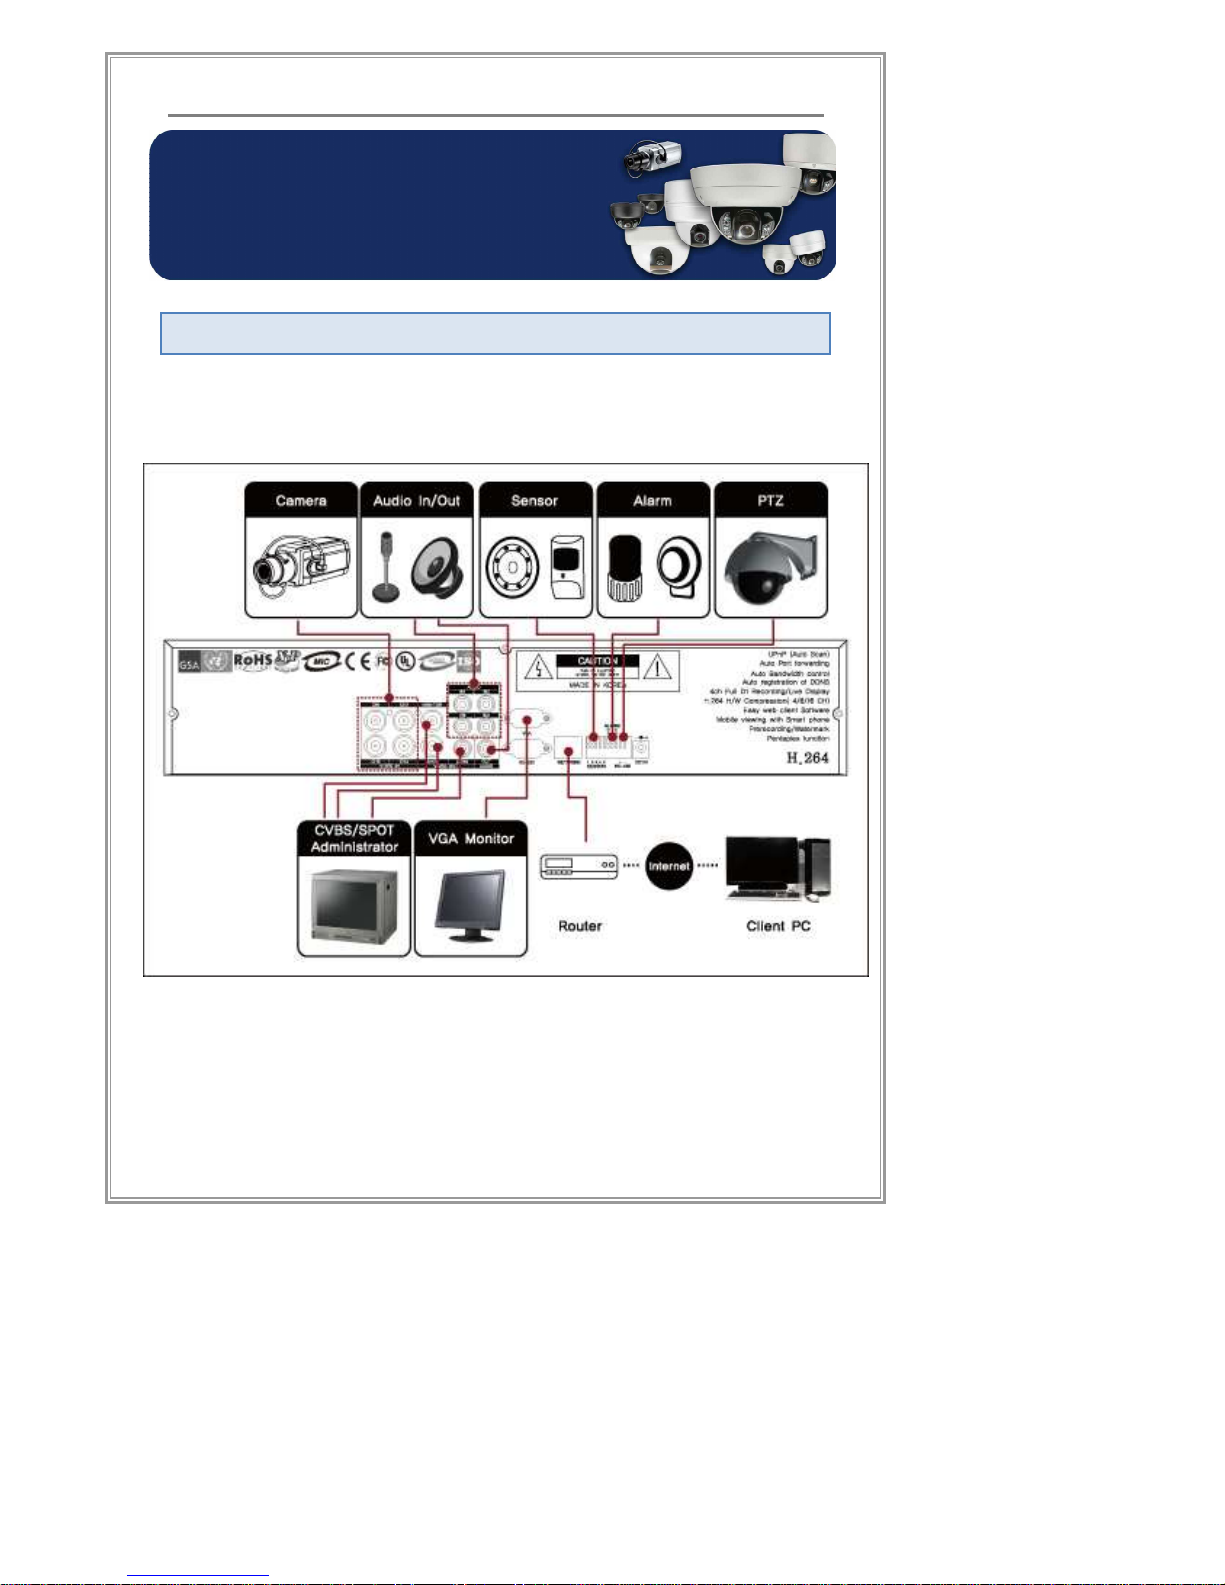
Product installation
Connection Outline (4CH case)
Product installation
Page 21

19
Product Description
Video Connection
Input
This series of DVR systems have a total of 16 camera inputs for
recording. Either NTSC or PAL video signal cameras maybe used
in this system and will be set in the system configuration menu.
Please do not mix different video signal types into 16 channels. All
16 must either be NTSC or PAL. (※ Max Video Input number varies
by each products.)
Output
① CVBS: Composite video signal will be sent through the BNC
port for video output. Standard CCTV monitor may be used
for video output connection.
② VGA: Composite video signal will be sent through the VGA
port for video output. Standard 15 PIN VGA monitor maybe
used for video output connection.
③ SPOT: All cameras will be sent full screen to the port with
sequence mode. Uses BNC video connection.
Page 22

20
Product Description
Audio Connection
Input
① LINE (MIC) Input: This DVR supports up to 4 audio inputs.
Please refer to the back panel of the DVR for input locations.
② Default audio input signal level is Line-In. An additional
device should be installed to use MIC-In level of audio input.
Output
This DVR has 1 output for audio out. Either TV’s internal audio
input can be connected directly to DVR’s audio output or an
externally powered speaker can be connected to the audio output for
sound.
Page 23

21
Product Description
Alarm/Sensor/PTZ Connection
Alarm
This product does not supply power to an alarm internally. The alarm
type that should be used is Dry Contact Type. Up to 1 alarms can be
connected.
① Use two wires for connection.
② Depending on type of Alarm used, please choose the right
type from DVR’s Alarm Menu.
NO Normal Open
Info
NC Normal Close
Sensor
This product only supports sensors that act as simple mechanical
switches (dry-contact type sensors.) Up to 4 sensors can be
connected.
① Of the two wires from the sensor equipment, connect one of
the wires to the C (Common) terminal in the terminal block.
Then connect the other wire to the terminal of the
corresponding channel (1~4).
② Access the DVR Menu and setup each sensor to either NO /
NC.
PTZ
① Using RS485 Connection, PTZ cameras should be
connected using D+ and D- port in the rear of the system.
PTZ control signal can be daisy chained for multiple PTZ
devices
② Before using the PTZ, an appropriate PTZ protocol must be
selected in the PTZ menu.
Page 24
22
Product Description
Network Connection
DVR has an Ethernet port in the rear for standard RJ45 cable
connection.
Hard Disk Drive
DVR System supports only SATA (Serial ATA) connection. Hard
drives must be SATA and up to 2 hard drives may be connected.
① Turn off the power after system shutdown
② Open the top casing cover.
③ Please make sure the hard drive is properly seated in the
hard drive rail
④ Install SATA cable/power cable properly to the hard drive.
Please double check the connections.
⑤ Close the top casing cover.
Attention!
At least one HDD must be installed for DVR’s normal operation.
Power Connection
DVR system requires a 110-220V/ 50~60Hz power input. Please be
sure to connect right power to the rear power port.
System Installation Complete
You have successfully installed the DVR system.
Page 25
23
Standalone DVR Set Manual
Standalone DVR Set Manual
Starting the System
Please make sure the power cord in the rear is firmly connected.
Press the power button in front of unit for initial start. At initial power-up,
the system will start automatically when the power cord is connected.
Main screen should come up with connected video screens.
Surveillance Mode
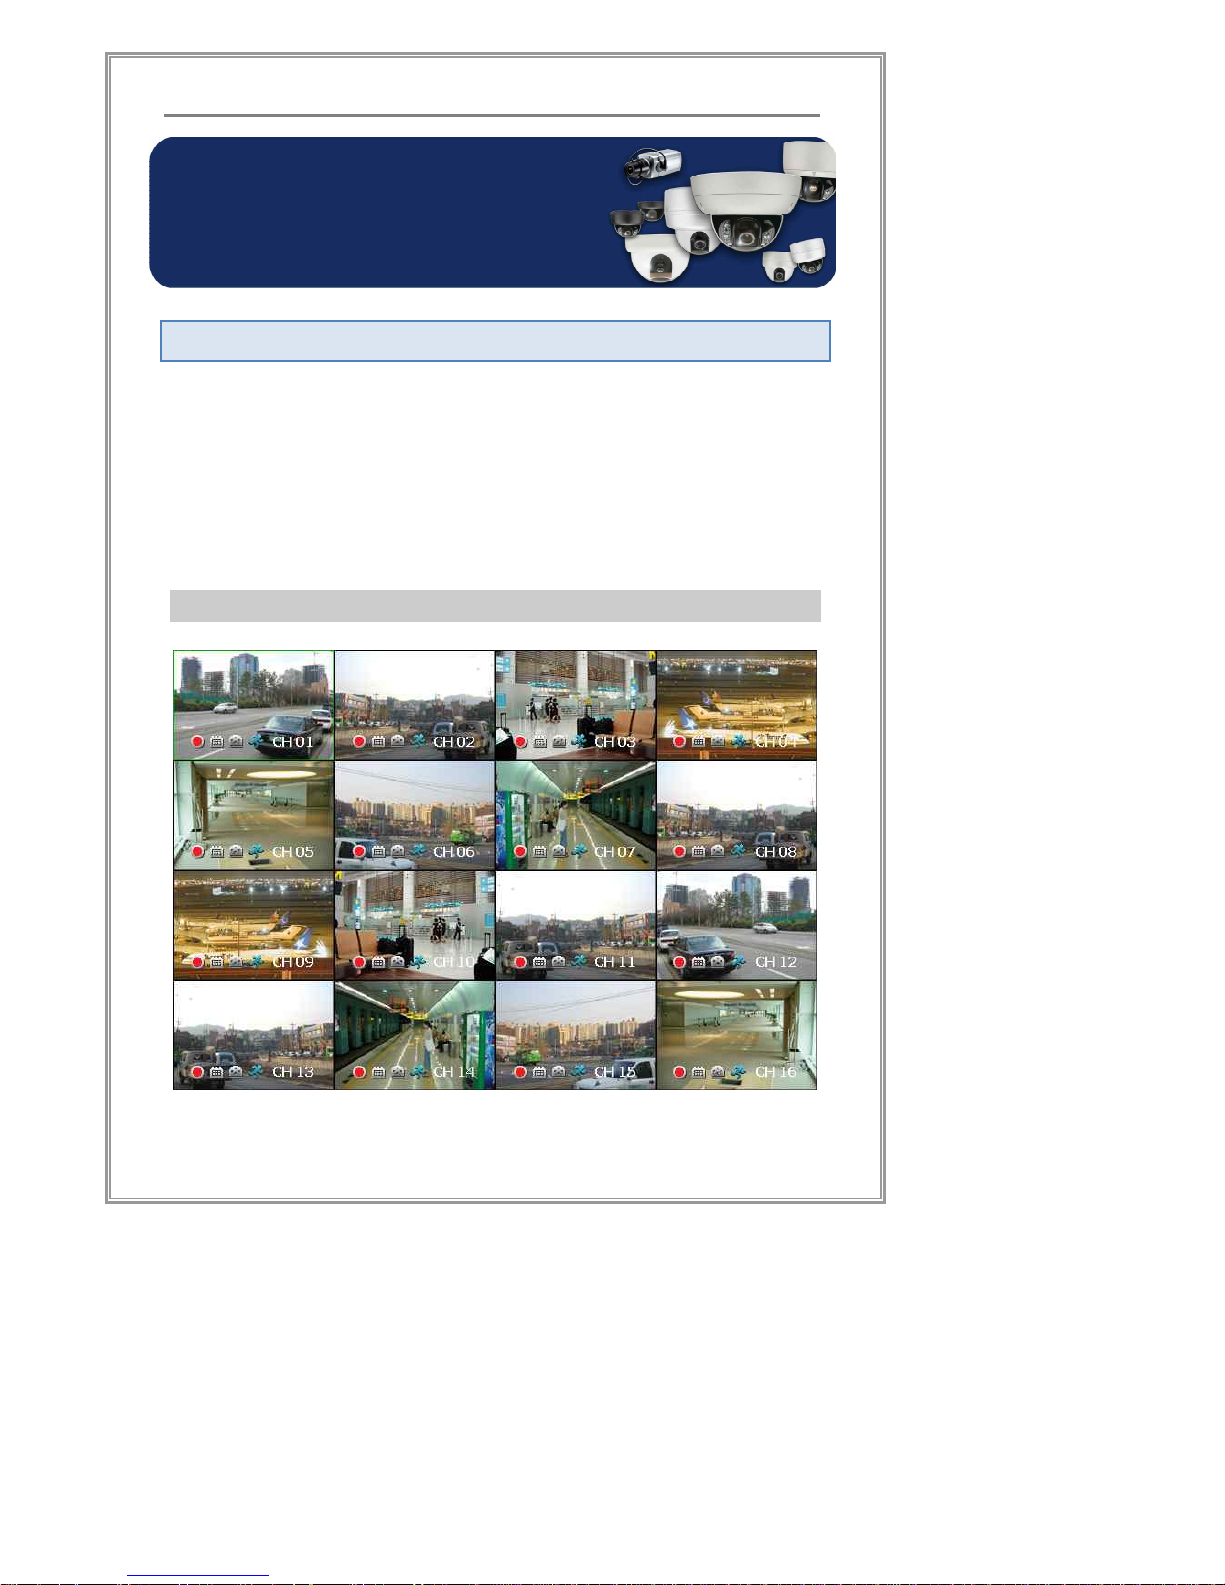
Main Screen
[Screen 2-1] Main Screen (16CH Case)
Standalone DVR Set Manual
Page 26
24
Standalone DVR Set Manual
(Surveillance screen may differ from model to model)
Video Screen
[Screen 2-1] A single screen will appear upon startup, which will
include all the video input into one single video output.
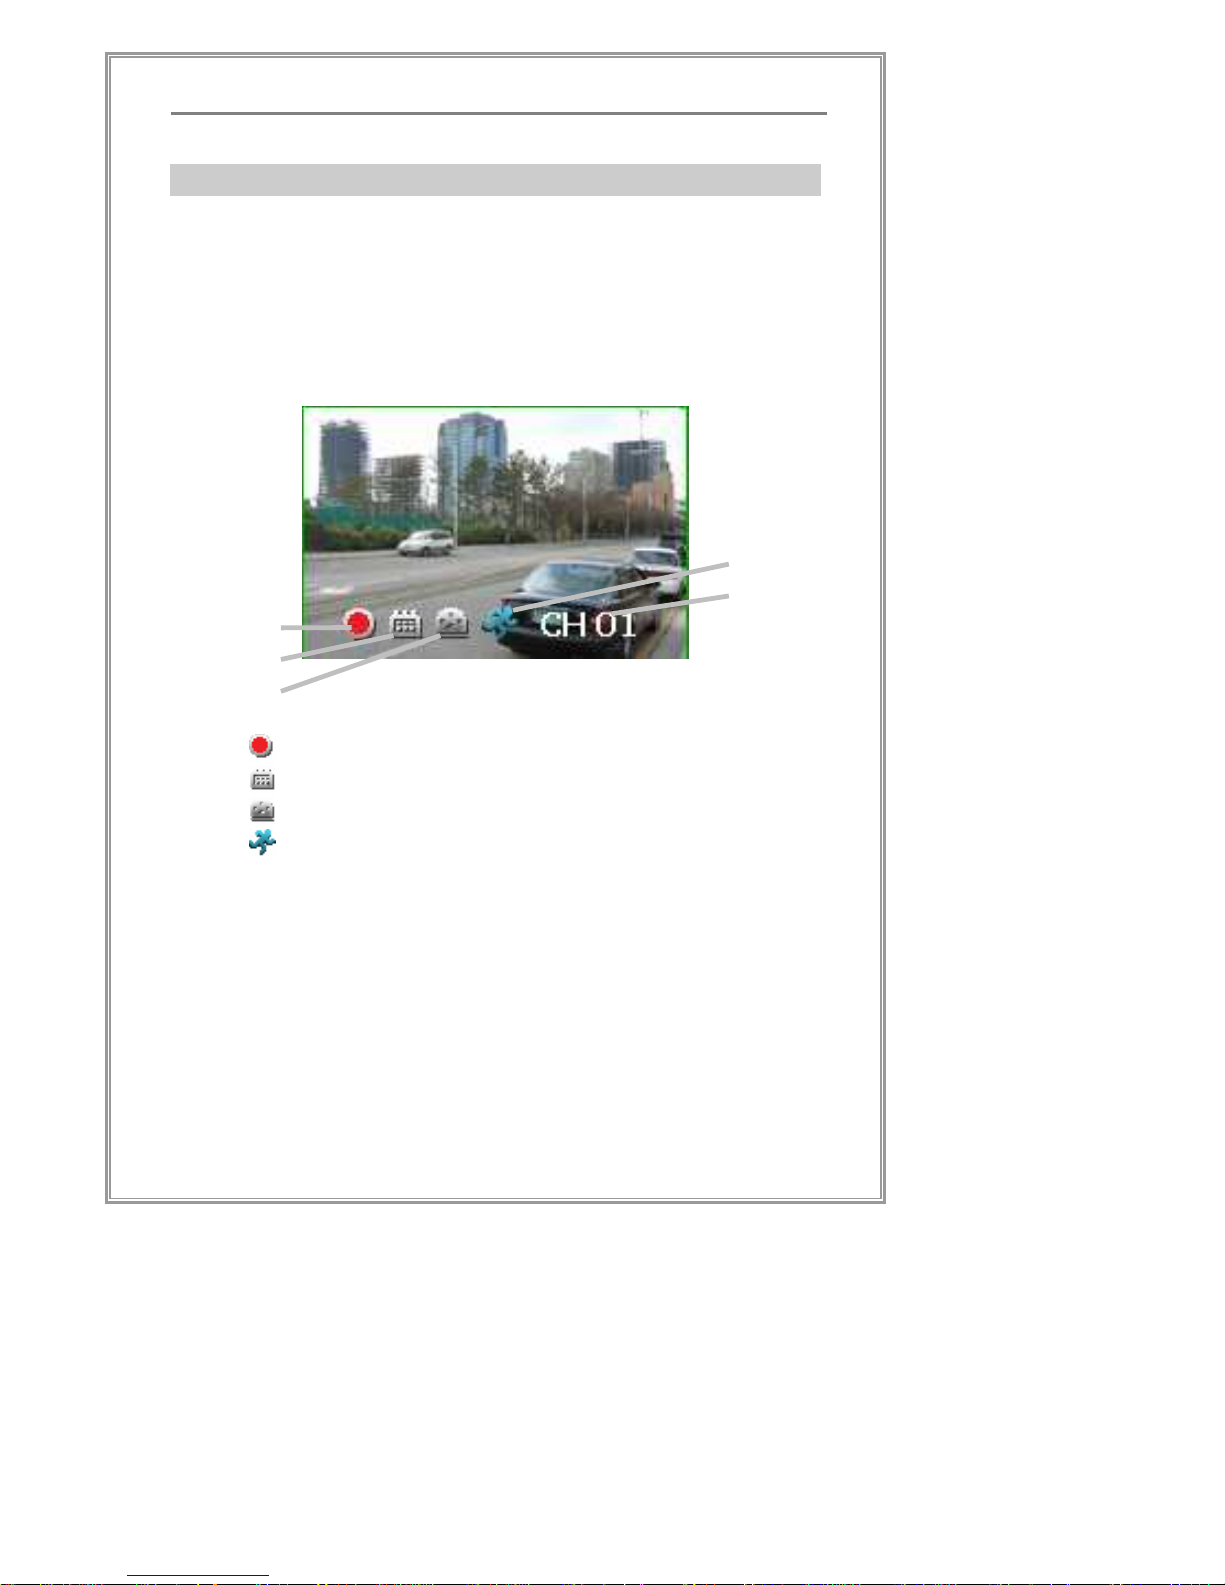
[Screen 2-2] Each camera channel will show a status caption above
the actual video image. This makes viewing of each camera status
very easily accessible.
The status panel is the below as [Screen 2-2],
[Screen 2-2] Status Panel
Status icon is explained in the following:
① Recording is in progress
② Scheduled recording mode is active
③ Sensor input has been triggered
④ Motion detection has been triggered
⑤ CH-01: Channel name / Camera name
Each channel is selectable from the split screen view for more
detailed picture and controls.
① Watching a single channel with full screen mode.
② Controlling PTZ
③ Enlarging surveillance video with the digital zooming function
‚
ƒ
„
…
Page 27
25
Standalone DVR Set Manual
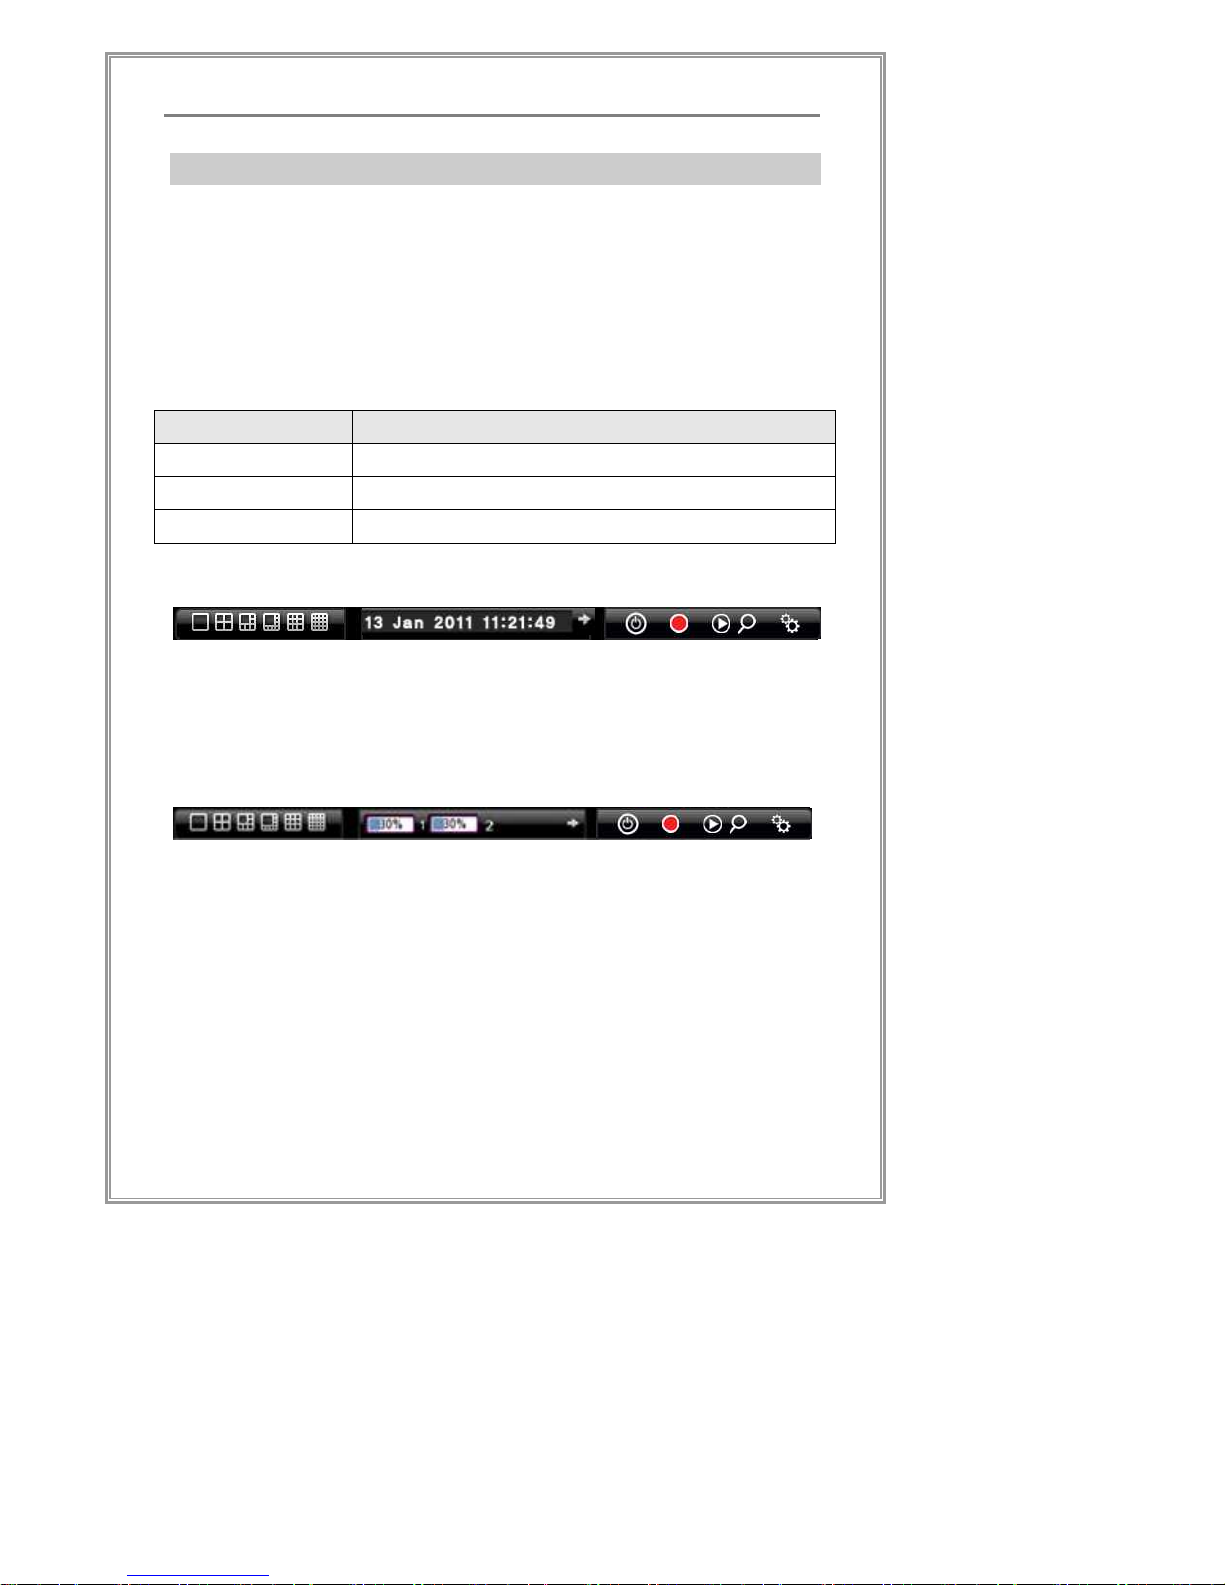
Control Panel
At the bottom of main screen, a convenient DVR control panel is
located. The DVR buttons and control is grouped into 3 types of
controls, depending on the current mode, the grouping will come in
handy.
The following is quick overview. The control panel provides 3
functions by each categories.
Locations Description
Left Split screen modes
Center A collection of general functions on DVR
Right Main features shortcut menu buttons
Basic
<Split screen mode> <Current time> <DVR function shortcut>
As shown above, the default control panel features split screen
buttons, displays the current time, and DVR function shortcuts.
HDD Usage Display
<HDD Usage Indicator>
Click on “è” button to show the HDD usage display panel on the center
panel. The panel provides the overall storage consumption status of the
HDDs installed in the system.
Page 28

26
Standalone DVR Set Manual
PTZ Control
<PTZ Control>
Click on “è” button to change the center side of panel to the PTZ
control panel. This control panel provides PTZ control function to a video
channel at which PTZ configuration is set.
Playback Control
<Playback date and time > <Playback Command>
When in playback mode, the screen will indicate new tools at the
bottom right side the panel.
The control panel provides playback controlling functions for speed
and direction of all channels.
※ Refer to the next page for the detailed explanation of the control
panel.
Page 29
27
Standalone DVR Set Manual
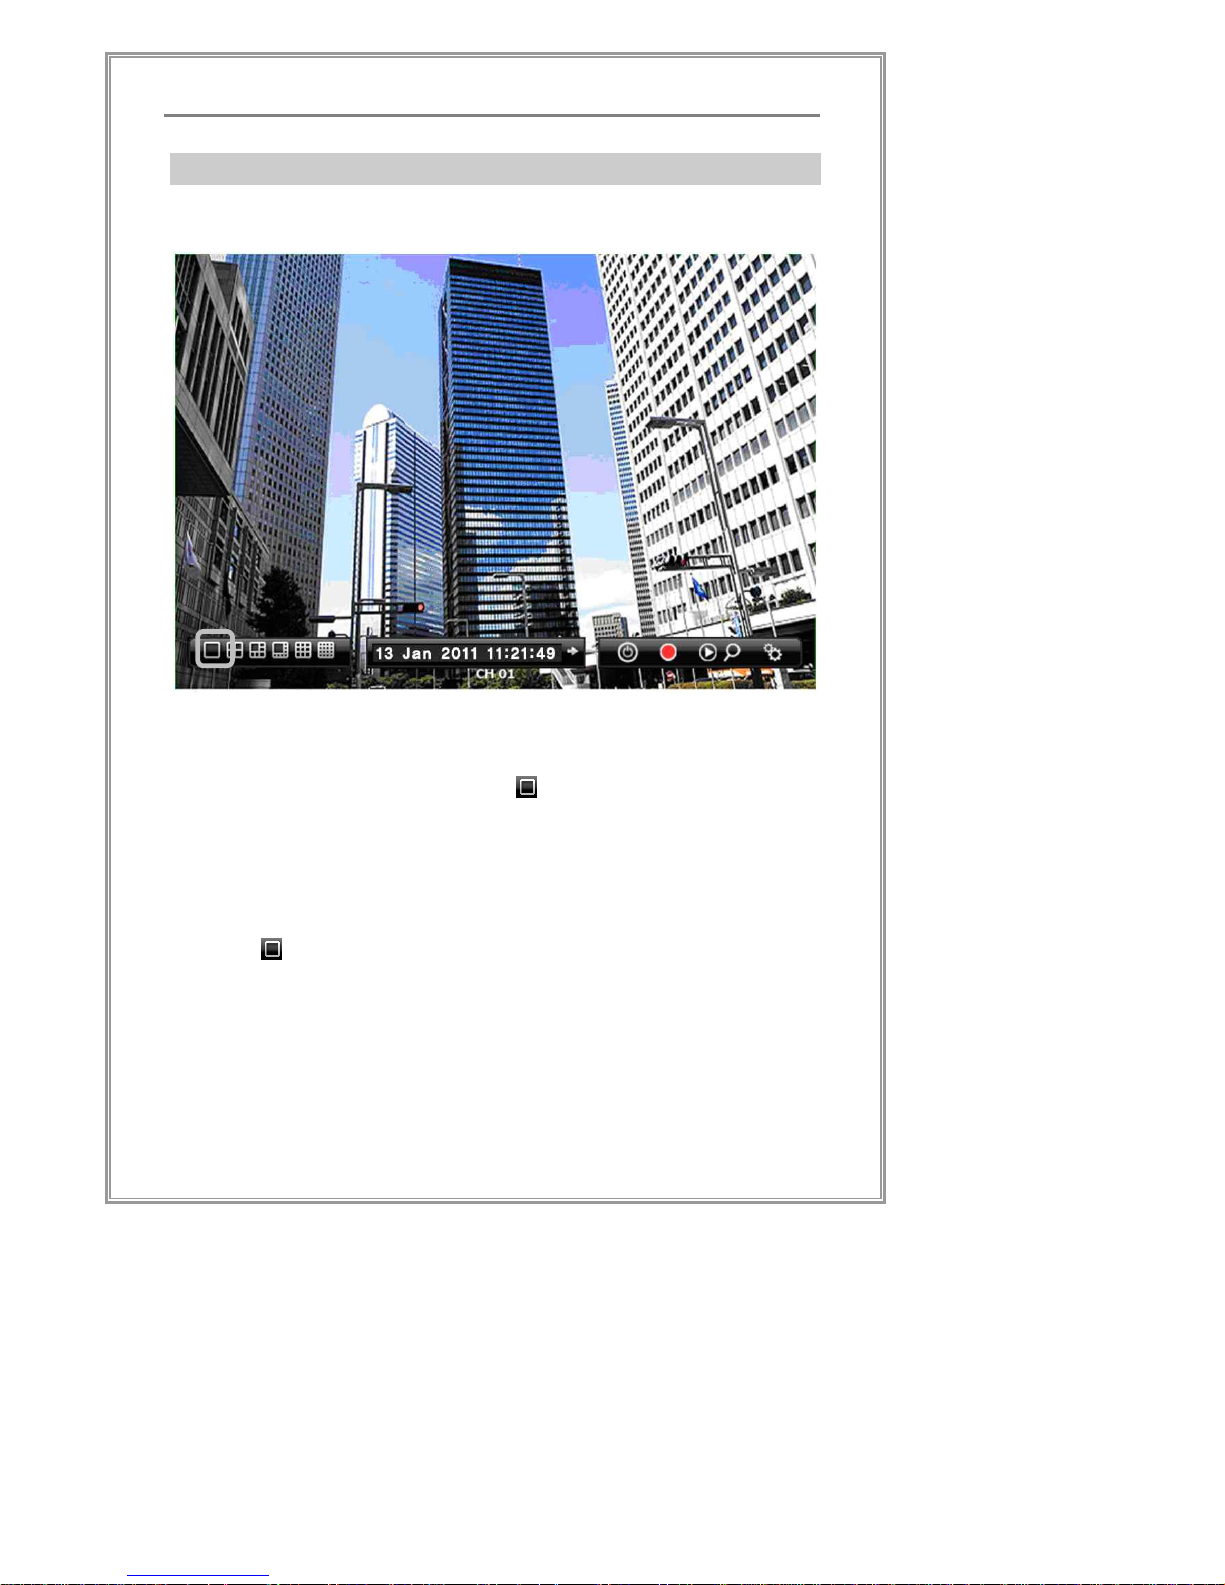
Split Screen Modes
Full Screen View
[Screen 2-3] Full Screen View
View a channel in full screen, by double clicking on a channel
[Screen 2-3]. Alternatively, click on button to full-size a selected
channel.
Double clicking on the screen while in full screen mode will turn back
to previous split screen mode
Clicking button once more will switch to the next available
channel.
Page 30
28
Standalone DVR Set Manual
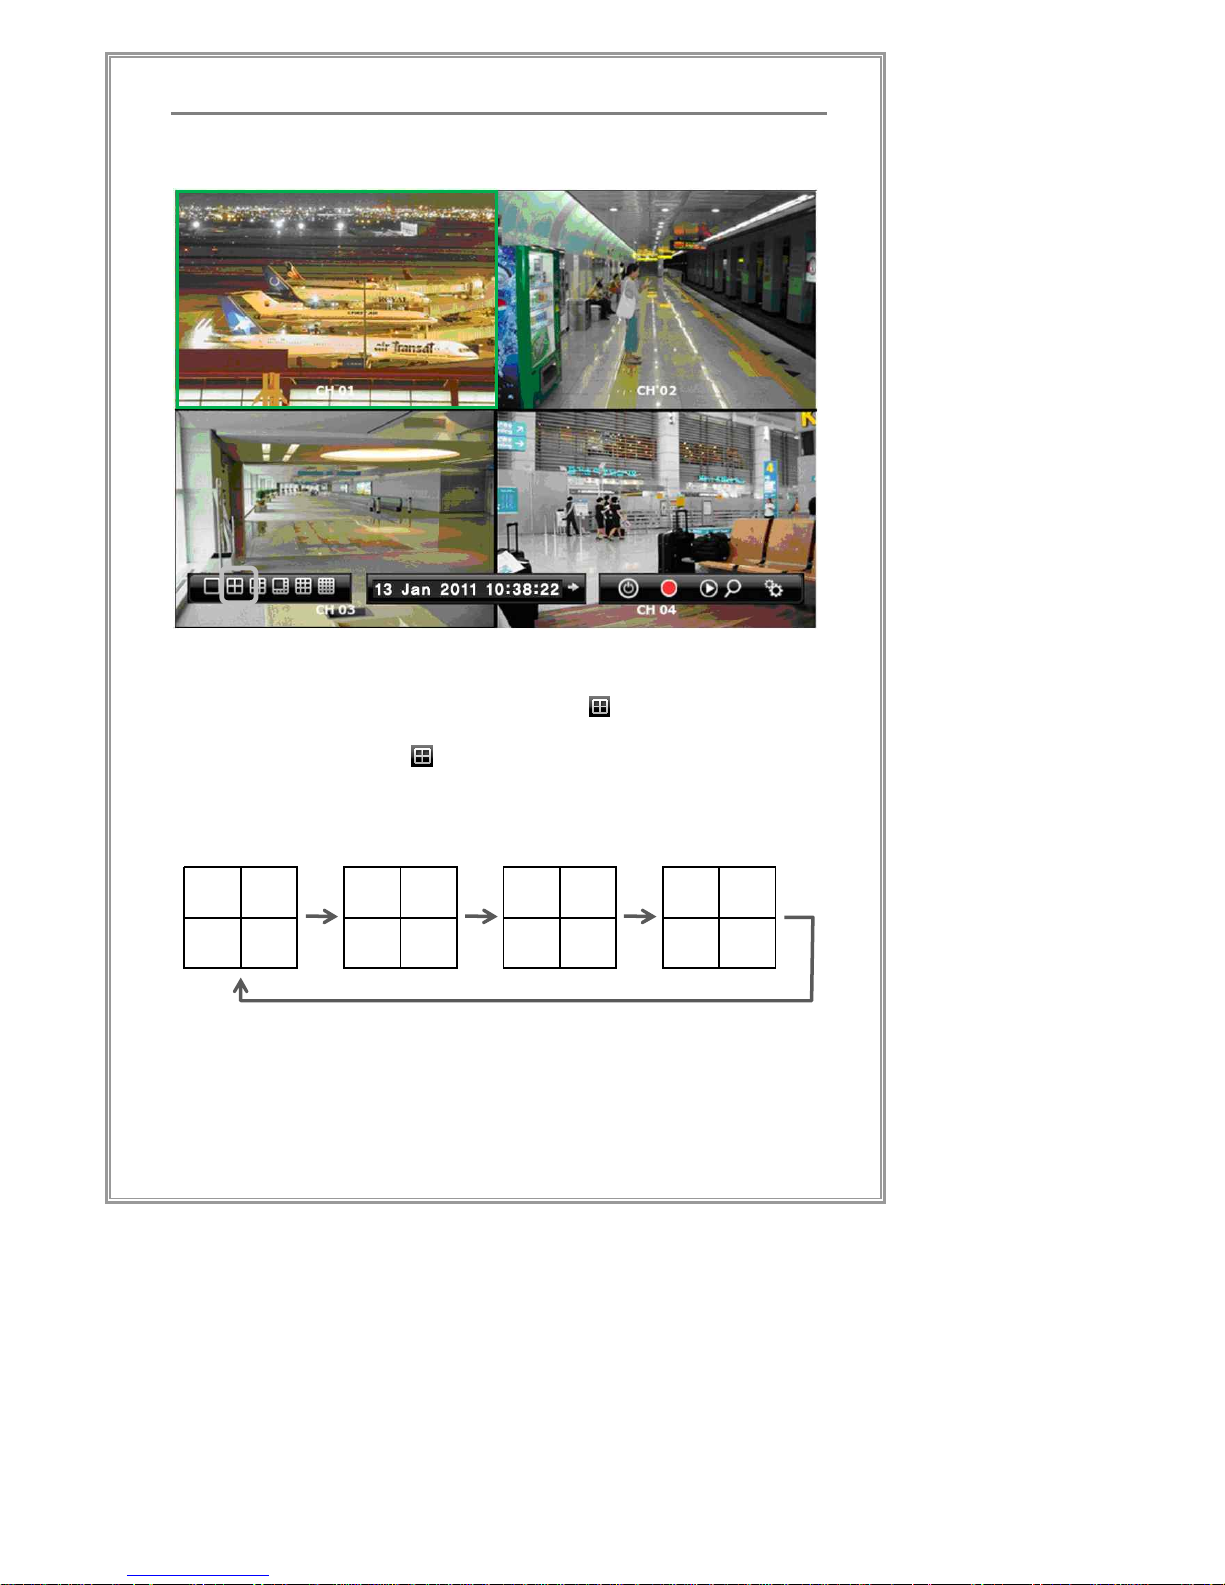
4 Split Screen View
[Screen 2-4] 4 Split Screen View
To view the DVR in 4 channel division, click button. [Screen 2-4]
In addition, by clicking button once more, the next 4 set of
channels will be shown and so on.
1
2
3
4
5
6
7
8
9
10
11
12
13
14
15
16
Page 31

29
Standalone DVR Set Manual
6 Split Screen View
[Screen 2-5] 6 Split Screen View
To view the DVR in 6 channel division, click button. [Screen 2-5]
In addition, by clicking button once more, the next 6 set of
channels will be shown and so on.
7
8
9
101112
1
2
3
456
13
14
15
16
In the above diagram, the ‘X’ indicates channels which will not be
shown.
Page 32

30
Standalone DVR Set Manual
8 Split Screen View
[Screen 2-6] 8 Split Screen View
To view the DVR in 8 channel division, click button. [Screen 2-6]
In addition, by clicking button once more, the next 8 set of
channels will be shown and so on.
.
1
2
3
4
567
8
9
10
11
12
131415
16
Page 33

31
Standalone DVR Set Manual
9 Split Screen View
[Screen 2-7] 9 Split Screen View
To view the DVR in 9 channel division, click button. [Screen 2-7]
In addition, by clicking on button once more, the next 9 set of
channels will be shown and so on.
123
456
789
101112
131415
16
In the above diagram, the ‘X’ indicates channels which will not be
shown.
Page 34

32
Standalone DVR Set Manual
16 Split Screen View
[Screen 2-8] 16 Split Screen View
To view the DVR in 16 channel division, click button.
[Screen 2-8]
Page 35

33
Standalone DVR Set Manual
Playback Mode
DVR is able to playback any recorded data with many different
function modes of playback. In this section, each playback mode and
search function is documented for usage.
[Screen 3-1] Playback Screen
Initial playback screen will show [Screen 3-1] with status bars at the
bottom of the screen. Each bar and function is detailed as follows:
Split Screen Modes
Left bottom side of the status bar will have screen split controls
※ Refer to the ‘Split Screen Modes’ section for operation
1 4 6 8 9
16
Page 36

34
Standalone DVR Set Manual
Playback Date and Time
It shows the current date and time of the video that is being played
back. The speed of playback time will vary depending on the speed
of playback.
Playback Controls
Controls for playback are located at the bottom right of the status bar.
Fast forwarding and fast rewind is up to 64 times the normal
playback.
① : Reverse Playback. Press repeatedly to speed up backwards
② : Stop
③ : Pause
④ : Play
⑤ : Fast Forward. Press repeatedly to speed up.
① ② ③ ④ ⑤
Page 37

35
Standalone DVR Set Manual
Search Mode
[Screen 4-1] Shortcut to the search
During surveillance mode, the buttons on the bottom right will
enable 4 types of search mode.
[Search Mode]
① Quick Search. This button plays playback the latest
recorded video 1 minute before.
② Click to enter the Search. Then click to run
Calendar Search
③ Click to enter the Search. Then click to run Event
Search
④ Click to enter the Search. Then click to run Specific
Time Search
Page 38

36
Standalone DVR Set Manual
Quick Search Mode
Clicking button will activate quick playback of latest video that was
recorded.
※ Please go back to “Playback Mode” page for reference on how
to use the playback mode.
Page 39

37
Standalone DVR Set Manual
Search
While in the main screen, click on button to enter the search
menu. [Screen 4-2].
[Screen 4- 2] Search
Page 40

38
Standalone DVR Set Manual
Calendar Search
[Screen 4-2] On the left side of the search menu, click on
button to start calendar search. [Screen 4-3].
[Screen 4- 3] Calendar Search
[Screen 4-3] On the top right side of search screen, click on
button to start calendar search.
A calendar will open. Dates with available data will be marked in red
rectangles [Screen 4-3]. Click on a date.
Time bar indicator will open. Hours with available data will be
indicated by red bars. Click on the time bar to select an hour.
Click to select hour
Recorded data
Page 41

39
Standalone DVR Set Manual
[Screen 4- 4] Time bar Indicator (Minute)
In the time bar indicator for minutes, minutes with available data will
be indicated by colored bars. Select a minute, and click
button to start playback. [Screen 4-4].
※ Please go back to “Playback Mode” page for reference on how
to use the playback mode
Using the Calendar Search (How To)
① Click button to open the search calendar.
② Select a date with searchable data.
③ HOUR indicates from 0 hour to 23 hour. Searchable data will
be indicated in red.
④ MIN indicates from 0 minute to 59 minutes. Searchable data
will be indicated in red.
⑤ Select the hour and minute, and click button to start
play back.
※ Please go back to “Playback Mode” page for reference on
how to use the playback mode.
Selection
Page 42

40
Standalone DVR Set Manual
Calendar Search – DST(Daylight Saving Time)
[Screen 4- 5] DST(Daylight Saving Time)
① DST(Daylight Saving Time)
§ In countries that use daylight savings time, the last day of
daylight savings time will be recorded as a 25 hour day.
§ On the last day of daylight savings time, the recorded data
at the end of the day - which contains the extra 1 hour of
data - will be marked in blue
§ The data marked in blue - which contains 2 hours of data -
can be searched by either choosing 1 hour right before, or 1
hour right after daylight savings time ends.
§ Click on the blue time. A dialog box for selecting the search
time will open.
② DST Popup
§ Click on the blue time. A dialog box for selecting the search
time will open.
§ Use the dialog box to search the hour right before and after
the end of daylight savings time.
§ DST time configuration will be applied automatically when
selecting specified time zone.
①
②
Page 43

41
Standalone DVR Set Manual
Event Search
On the left side of search screen [Screen 4-2], click on button to
start the event search. Event search [Screen 4-6] will be shown.
[Screen 4- 6] Event Search
A database of all the events occurred is kept along with the date and
time. Easily search for video footage from specific events.
Using the Event Search (How To)
① Select the channel to search.
② Select type of event: VIDEO LOSS, MOTION DETECT, and
SENSOR.
③ Select Start and End Date/Time for which days/hours to
search.
④ Click button to start searching for events.
①
②
④
③
⑤
Page 44

42
Standalone DVR Set Manual
⑤ Search results will be shown in [Screen 4-7]
⑥ Choose an event from the result and click button,
the display mode will be changed to playback mode, and
then playback will be started from the time that the selected
event was stamped .
※ Please go back to “Playback Mode” page for reference on
how to use the playback mode.
[Screen 4- 7] Event Search List
Page 45

43
Standalone DVR Set Manual
Specific Time Search
[Screen 4-2] On the left side of search screen, click on button
to start the time search. Time search [Screen 4-8] will be shown.
[Screen 4- 8] Time Search
Use time search to jump right to a specific time to watch recorded
video.
Using Time Search (How To)
① Input the date into DATE field
② Input the time into TIME field: Hour, Minute, Second
③ Click or button, the display mode will be
changed to playback mode and it will start playing from the
selected time .
※ Please go back to “Playback Mode” page for reference on
how to use the playback mode
③
④
②
①
Page 46

44
Standalone DVR Set Manual
Menu Mode
[Screen 5- 1] Menu Mode
On the surveillance screen click the (Setup) button to access the
menu mode.
Page 47

45
Standalone DVR Set Manual
Initial Menu
[Screen 5- 2] Initial Menu
Initial Menu screen will open when button is clicked.
Page 48

46
Standalone DVR Set Manual
Search Menu
Indicated above is the search mode button in the main menu..
Please refer to “Search Mode”.
Page 49

47
Standalone DVR Set Manual
Recording Configuration
User can set the DVR to record video with specified perimeters. The
DVR will start recording in the following cases:
① When user presses the button in the system front panel
for manual emergency recording
② When user clicks on button from the control panel in the
surveillance screen for manual emergency recording.
③ If schedule is set up to record at certain times of the day.
④ When motion detection mode is enabled. Recording will
start when any change is detected in channel pixel frames
⑤ When a sensor is triggered
⑥ When a ‘Video Loss’ is triggered (The other channels will
start recording)
In Recording Setup ‘Record Configuration’ of the main menu, a
series of configuration screens is provided. The user can use this
menu to configure the DVR to start recording in different types of
situations.
Page 50

48
Standalone DVR Set Manual
Record Configuration
[Screen 5- 3] Record Configuration
Configure the recording options as follows:
① OVERWRITE: Enable overwrite to allow new data to be
overwritten over the oldest data when storage space is full..
② ENABLE LIVE AUDIO: Enable to output recording audio.
③ PRE: Pre-recording configuration to record before an event
has been occurred.
④ POST: Post-recording configuration to record after an event
has been occurred.
⑤ Recording Quality configuration table is as follows,
②
①
③
④
⑤
Page 51

49
Standalone DVR Set Manual
ALL
When selected, same settings will be applied to all
channels
CH
Channel specific setting
ON
Select to turn on/off recording of a channel
VBR
Recording size varies by motion with this setting. More
motion takes more disk space to record.
SIZE
Adjust video resolution
QUALITY
Adjust video quality
AUDIO
Select ON to record audio
FRAME
Adjust frame rate (fps) for smoother playback
PRE
Set Pre-recording Duration (Unit Seconds)
POST
Set Post-recording Duration (Unit Seconds)
Page 52

50
Standalone DVR Set Manual
Record Schedule Configuration
[Screen 5- 4] Record Schedule Configuration
Configure recording schedule
① Select a channel to schedule
② Select type of event to schedule
③ Click and drag using mouse cursor to select the specific time
schedule. Schedule may be selected hour by hour.
①
②
③
Page 53

51
Standalone DVR Set Manual
Event & Alarm Configuration
[Screen 5- 5] Event & Alarm Configuration
Select which events will trigger which type of notification in this
configuration screen.
① Select a channel to configure.
② Select which of the event triggers would activate an event.
③ Configure preset settings for each event.
④ Select the response (type of notification) of DVR system to
the events selected in ②.
⑤ Specify the duration time that an alarm stops automatically.
①
②
④
③
⑤
Page 54

52
Standalone DVR Set Manual
Sensor In & Alarm Out Configuration
[Screen 5- 6] Sensor In & Alarm Out Configuration
Configure SENSOR In or ALARM Out box to configure settings for
SENSOR In or ALARM Out. In the above picture, each rows mean
Video channels and each columns mean the channel of Sensor or
Alarm. It’s available to configure multiple Sensors or Alarms to a
Video channel and to configure multiple Video channels to a Sensor
or Alarm channel.
① Select one item to configure Sensor or Alarm
② In the O/X table, configure which Sensor device or Alarm
device to connect to which video channel.
‘O’ means Sensor of Alarm is assigned to a video channel,
‘X’ means Sensor of Alarm is NOT assigned to any video
channel.
③ Set up sensor (alarm in) type and alarm (alarm out) type on
the bottom.
※ NC: Normal Close
NO: Normal Open
①
②
③
Page 55

53
Standalone DVR Set Manual
Alarm Schedule Configuration
[Screen 5- 7] Alarm Schedule Configuration
Configure alarm schedule
① Enables alarm schedule configuration.
② Select a schedule option.
‘’NORMAL’, the alarm is schedule to normal action.
’ALARM ON’, the alarm is schedule to always active.
’ALARM OFF’, the alarm is schedule to always inactive.
③ Click and drag using mouse cursor to select the specific time
schedule. Schedule may be selected hour by hour.
①
②
③
Page 56

54
Standalone DVR Set Manual
PTZ Configuration
[Screen 5- 8] PTZ Configuration
Configure PTZ protocol for each channel,
① Select channel to setup PTZ
② To activate a PTZ, please click PTZ ENABLE
③ Select the appropriate PTZ PROTOCOL.
④ Select the right PTZ Address ID (1-255)
⑤ Move PTZ camera direction to a position.
⑥ Save PTZ preset number by pressing the “SAVE” button
after setting the “PRESET” number.
⑦ Set PTZ command time interval.
⑧ Click “Apply” or “OK” to save changes.
⑤
①
②
③
④
⑥
⑦
⑧
Page 57

55
Standalone DVR Set Manual
System Configuration
OSD(On Screen Display) Configuration
[Screen 5- 9] OSD Configuration
Configure OSD of the live surveillance video channels.
The following table is a detailed explanation of OSD setting.
ITEM DESCRIPTION
DATE TIME
Center date/time status bar ON/OFF
HDD GAUGE
Center HDD status bar ON/OFF
MD PREVIEW
Motion preview box grid ON/OFF
SHOW MD
MD status icon ON/OFF
SHOW SENSOR
SENSOR status icon ON/OFF
SHOW VIDEO LOSS
VIDEO LOSS status icon ON/OFF
ENABLE DIGITAL
ZOOM
Enable/Disable Digital Zoom for cameras even do not
support zooming function (Refer to the next page)
ENABLE AUTO HIDE
FLOATINGBAR
Enable/Disable auto-hide function for the
Floating bar on the live display mode
SPOT,LIVE SEQUENCE
Spot/ live sequence dwell time
LANGUAGE
Language setup
@-BLENDING
Transparency configuration
Page 58

56
Standalone DVR Set Manual
Digital Zoom
[Screen 5- 10] Enabling Digital Zoom
In the screen, It enables Digital Zoom function by checking the
Enable Digital Zoom check box. Digital Zoom function is for enlarging
the Video Image for cameras even do not support zooming function.
As the above screen, Digital Zoom icon will be displayed when
moving the mouse pointer over the selected channel. Mouse clicking
the icon, Digital Zoom will be activated as the screen of the following
page.
Page 59

57
Standalone DVR Set Manual
[Screen 5- 11] Digital Zoom Mode
The video image moves when mouse clicking to a point to move on
the screen with Digital Zoom mode as the above screen.
Click the Digital Zoom icon to quit Digital Zoom mode.
Page 60

58
Standalone DVR Set Manual
Camera Configuration
[Screen 5- 12] Camera Configuration
Adjust color settings for each channel, and other channel/camerarelated setting
① Select a channel to configure (Indicated with Yellow)
② Configure HUE, SATURATION, BRIGHTNESS, CONTRAST
for video channels.
③ Recall the factory default configuration.
④ Configure channel caption
⑤ COVERT / CAMERA OFF:
§ COVERT: The channel will be hidden in the live screen, but
if the channel is configured to record in the record settings,
the channel will be recorded.
§ CAMERA OFF: The channel will be hidden in the live screen,
and even if the channel is configured to record in the record
settings, the channel will not be recorded.
①
②
④
⑤
⑥
③
⑦
⑧
⑨
Page 61

59
Standalone DVR Set Manual
⑥ Camera Type: Select camera video signal by regions.
⑦ Configure motion detection area with mouse dragging or
arrow buttons & OK button of the remote control unit(RCU).
⑧ Clicking “CLEAR” button unsets the entire area of motion
detection area. Clicking “ALL” button sets the entire video
area to motion detection area.
⑨ Configure motion detection sensitivity.
Page 62
60
Standalone DVR Set Manual
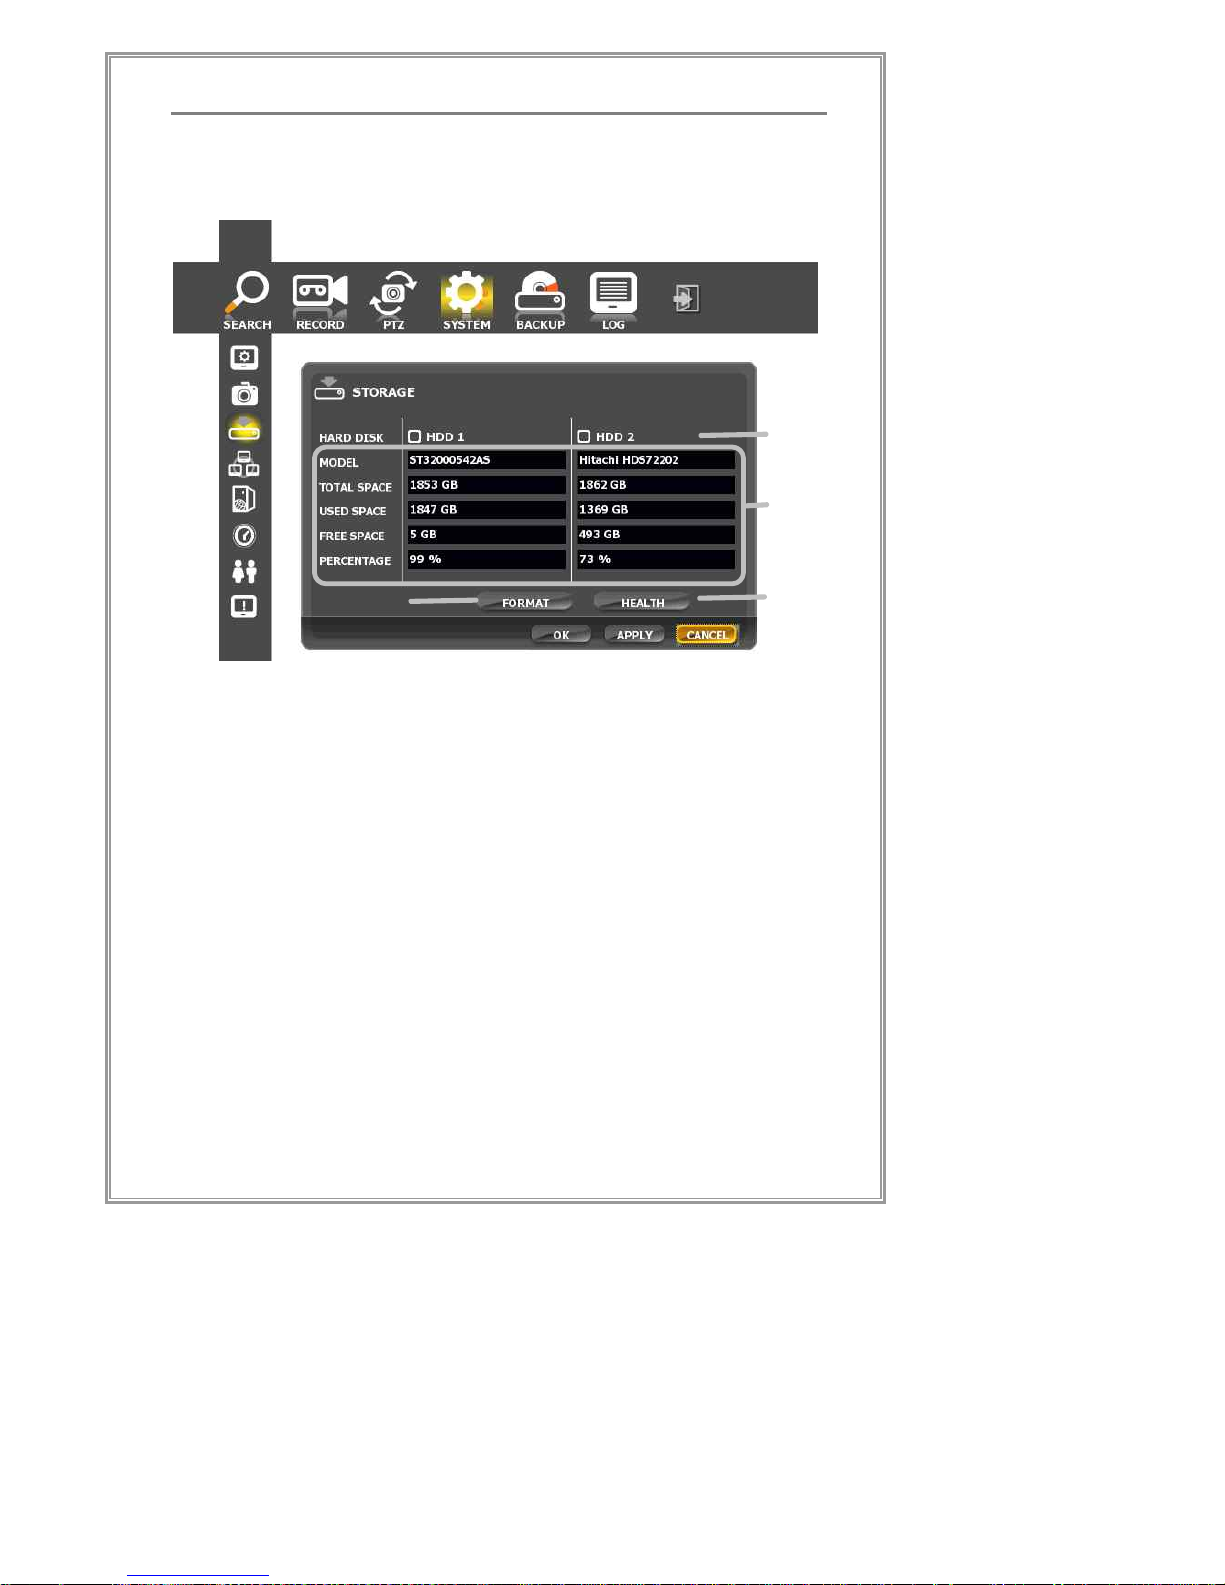
Storage Configuration
[Screen 5- 13] Storage Configuration
Recording space can be chosen and status of each hard drive can
be checked in this menu
① Select a storage to format
② Display storage usage status
③ Format the selected storage by ①
④ Check health status to the selected HDD by the above ①.
②
①
③
④
Page 63

61
Standalone DVR Set Manual
Network Configuration
[Screen 5- 14] Network Configuration
Configure network connection,
① Network settings allow Static IP, Dynamic IP, PPPoE
② The form to input setting values for Static IP
③ The form to input setting values for PPPoE.
④ DDNS is supported by NeoDHS and DynDNS
⑤ The form to input setting values for DDNS by ④.
④
⑤
②
①
③
Page 64

62
Standalone DVR Set Manual
Streaming Configuration
[Screen 5- 15] Streaming Configuration
Configuration streaming environment,
① Streaming/ Remote Setup/ Web Port No. : Configure network
ports for Standalone Client and TWC(Thin Web Client)
▪ The default value for streaming: 2000
▪ The default value of remote setup: 2001
▪ The default value of Web port: 2002
② Configuration for streaming add-on functions
▪ AUTO SCAN
This option enables the DVR set to support uPnP
function so that some client software like Windows
Explorer can find the DVR set easily in a LAN
environment.
①
②
③
Page 65

63
Standalone DVR Set Manual
▪ AUTO PORT
This option enables the DVR set to configure Port
Forwarding setting of an IP router automatically when
the DVR set is connected to an IP router in a LAN
environment.
It sets the network port number for both the DVR set
and an IP router side by the setting value ① without
additional configuring an IP router.
▪ AUTO B/W (Automatic Bandwidth)
It sets the DVR streaming bandwidth with the value of
user configuration.
To make the streaming bandwidth within the bandwidth
of a network, it configures FPS and Image Quality
settings automatically.
▪ TWO WAY AUDIO
It enables bi-directional audio between a net client and
the DVR set.
▪ REMOTE SETUP GUIDE
It enables the DVR operator can monitor remote
configuration with real time.
③ Video Resolution, quality, audio, and frame rate table is as
follows,
ALL
Apply the same settings to all channels
CH
Channel specific setting
ON
Select to turn on/off recording of a channel
VBR
Network bandwidth for streaming video varies by
motion with this setting. More motion takes more
network bandwidth.
RESOLUTION
Adjust video resolution
QUALITY
Adjust video quality
AUDIO
Select ON to record audio
FRAME
Adjust frame rate (fps) for the streaming speed of
the selected channel
Page 66

64
Standalone DVR Set Manual
Date & Time Configuration
[Screen 5- 16] Date & Time Configuration
Configure system date & time setup,
① Check and configure the local time zone.
② Configure the time difference and location.
③ Change current date. Click on section to open calendar
[Screen 5-17]. Select the day, month, year, hour, minute,
second with the mouse.
④ Select hour, minute, or second with mouse clicking and set
the time by clicking the up/down arrows or by turning the
mouse wheel up or down.
⑤ Click “APPLY” or “OK” to save setting.
※ Changing time zone changes the current GMT time automatically.
Calendar
②
①
④
③
⑤
Page 67

65
Standalone DVR Set Manual
[Screen 5- 17] Date Setup
⑥ Move from month to month by clicking ç, è
⑦ Select a date by clicking on a day in the calendar.
⑧ Click "Apply" or "OK" to save changes.
⑧
⑥
⑦
Page 68

66
Standalone DVR Set Manual
User Management Configuration
[Screen 5- 18] User Management
Configuration user management,
① Select user level to configure [ADMIN, MANAGE, USER1~4]
※ Warning: The factory default setting value for the password
of the “ADMIN” account is empty.
② Edit user email address
③ Configure the account level (the available user functions) for
each user.
④ Password: Settings will be applied only if the correct
password is entered in "Current Password."
⑤ If this box is checked, enable the user email address edit
box.(②)
⑥ A pop up window for configuring e-mail server information
⑧
⑤
②
①
③
④
⑥
⑦
⑨
Page 69

67
Standalone DVR Set Manual
will open..
⑦ Login Enable/Disable: If this box is checked, the login
window will not pop up when opening the menu.
⑧ Login Timeout: After the most recent login, the login window
will not pop up for certain time duration.
The time is in seconds, and the default value is 60 seconds.
⑨ Click "APPLY" or "OK" to save settings
Page 70

68
Standalone DVR Set Manual
User Management – Mail Server Configuration
[Screen 5- 19] Mail Server Configuration
Click SETUP button in the above screen to configure e-mail server
information.
① SETUP: Click to open a pop up window for configuring e-
mail server information.
② Input e-mail server address
③ Input e-mail server port number.
④ If this box is checked, login necessary at the time of set of
the e-mail server
⑤ Input e-mail user ID
⑥ Input e-mail password.
⑦ Click OK to save settings.
⑧ Click to test the e-mail notification function.
③
②
④
⑤
⑦
①
⑧
⑥
Page 71
69
Standalone DVR Set Manual
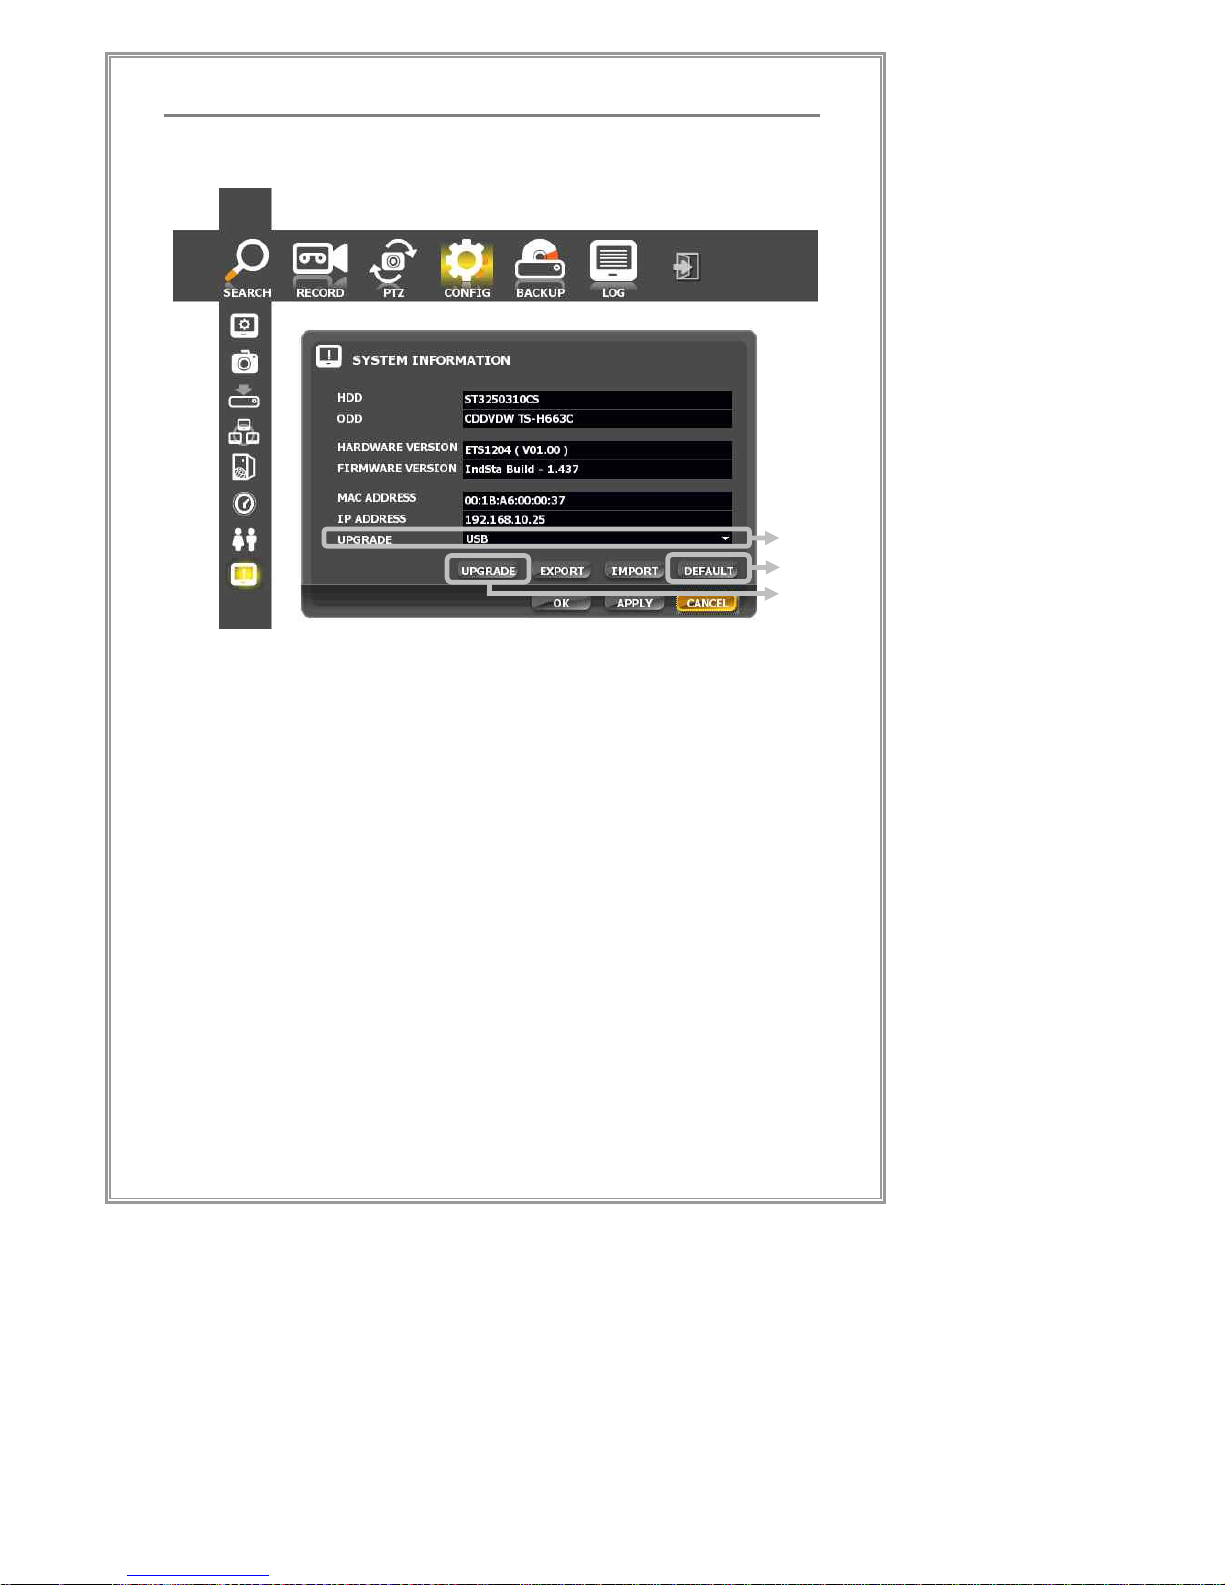
System Information
[Screen 5- 20] System Information
In system information menu, a number of system information is
displayed, and user can also upgrade the DVR firmware.
① Upgrade
▪ Select the storage medium which contains the upgrade
firmware
▪ Press the upgrade button to start upgrading the
firmware
▪ If the storage medium contains a multi-national
language pack or the web client pack, they will be
upgraded altogether.
② Default: Reset all settings to the factory default values.
③ Click “UPGRADE” to start upgrade.
The system will reboot automatically when upgrade is finished.
①
③
②
Page 72

70
Standalone DVR Set Manual
※ CAUTION: In case of upgrade with a USB memory stick, it’s
strongly recommended to remove a USB memory stick just after
executing “Safely Remove Hardware” in Windows Operating
system when copying a F/W file to the USB memory stick.
Unless it can cause a severe problem when upgrade.
Page 73

71
Standalone DVR Set Manual
Backup
[Screen 5- 21] Backup
Record data backup with the menu,
① Select the backup channel
② Select backup medium (CD-ROM, USB Storage)
③ Select the type of backup data.
④ Specify Start of backup date, time
⑤ Specify End of backup date, time
(Remember to review and write down which data to backup
from search mode)
⑥ Click on to start backup process
②
①
③
④
⑤
⑥
Page 74

72
Standalone DVR Set Manual
Log Viewer
[Screen 5- 22] Log Viewer
Search system logs,
① Select the channel
② Select the event
③ Start date, time
④ End date, time
⑤ Click "SEARCH"
Results will be displayed in the following screen.
①
③
④
②
⑤
Page 75

73
Standalone DVR Set Manual
[Screen 5- 23] Log View Searched Results
Page 76

74
Standalone Client
Standalone Client
Standalone Client
This chapter explains standalone client.
Page 77

75
Standalone Client
Configuration
GUI Main Feature
① Configuration List Tab
All configuration items are located on the Top Configuration
Bar. Click a configuration icon to move to another
configuration window.
② Configuration Window
Detailed configuration settings for each configuration item
are located here.
③ Common Command Button
▪ Virtual Keyboard : View Virtual KeyBoard Window
▪ ALL CHANNEL : apply All Channel
▪ OK: Close window after applying changes.
▪ Cancel: Close window without applying changes.
▪ Apply: Keep window open after applying changes.
①
②
③
Page 78

76
Standalone Client
Display Configuration
① RGB/YUV2/UYVY: Select an Overlay Surface type
▪ Color format depends on the graphic card
▪ Default Setting is YUV2
② Fit To Screen: Select to fit standalone client window size to
the monitor resolution
③ Use Windows Lock : Enable/Disable windows Lock
④ Show Connection: Enable/Disable showing connection
information in the display area
⑤ Status Bar: Select whether to keep the status bar visible
▪ Auto Hide: hide it automatically in the display area
▪ Show Only: always keep the status bar visible
▪ Hide Only: always keep the status bar hide
⑥ OSD Color: Set the text color for the information OSD
character on the display panel.
▪ TEXT COLOR: Configure text color of OSD
▪ BORDER COLOR: Configure border color of channels
④
⑤
①
②
⑥
⑧
⑨
⑩
⑦
③
Page 79

77
Standalone Client
⑦ Example: An example of OSD character that will be shown
on the panel.
⑧ Sequential Switch: Set the time interval for Sequential Video
Channel Switching
⑨ E-Map File: Select an E-Map background picture file
▪ If not selected, default background in use.
▪ Recommended file size: 1024x768(resolution)
▪ Supported file format: JPG, JPEG
⑩ Language: Select the language standalone client
Page 80

78
Standalone Client
Storage Space Setup
※ Important The standalone client requires selecting the
storage space before running the program. It MUST be
designated a storage and once the storage is created,
data will only be recorded on that storage space.
① Overwrite: When the space is full in created banks,
standalone client will overwrite the banks in order of oldest
banks first.
※ If “Overwrite” is not selected, standalone client does not
overwrite when the banks are full
② Meta Data Path: Select a local folder for storing the Meta
Data when recording (Default Location recommended)
※ Meta data(Meta Information): Additional information
about the recorded data. It contains links between the
recorded events and video, and the actual storage files.
③ Local Volume List: Select the local repositories for recording.
Multiple Repositories can be set.
▪ Space(Total space): Total space of HDD
①
⑤
③
④
⑦
⑧
⑨
②
⑥
Page 81

79
Standalone Client
▪ Remain(Remaining space): Number of storage
space(bank) that can be created in the remaining HDD
space.
▪ Created: Number of created storage spaces(banks)
▪ Unused: Number of storage spaces(banks) that have
not been used yet.
④ Bank Command: Controllers for Creating/ Changing/
Deleting each selected repositories
⑤ Bank Count: Set the number of Filebanks to be used as
recording repository.
The maximum Filebank count will be displayed for the
default value and the value can be modified with mouse
dragging.
⑥ Create Bank: Creating Recording Repositories
⑦ Delete Bank: Deleting Recording Repositories
⑧ Select Bank: Selecting Recording Repositories
※ What Bank Is…
A bank is a storage space for recording in standalone
client. One bank consists of 32MB of disk space. Data
is recorded only in the banks created by the user.
⑨ Storage Graph: Displays the status of the selected storage
with a pie-graph.
Page 82

80
Standalone Client
Creating Recording Repositories
① Select a HDD Drive for creating recording repositories.
② Set the number of banks to create.
HDD & Filebank Information
Modified HDD &
Filebank information
①
②
Page 83

81
Standalone Client
③ Create banks by clicking “CREATE BANK” button.
④ Select a Local Drive in which Filebanks were created.
Filebank creation status
Filebank creation completed
③
④
Page 84

82
Standalone Client
Device List Configuration
Device Input Table: A grid configuration table to configure added
devices.
① Add: Add a device with the information entered in the Input
Form.
② Added Device List
▪ Type: Device Type (ex: VS01, ST04, F3)
▪ Name: Input device name
▪ IP: Input network IP address for device
▪ Port: Input network port for device
※ Default Streaming Port No: 20408(PC-DVR),
2000(Standalone DVR), 80(Video Server)
③ ID/ PASSWORD: Input network ID and Password for device
④ Queried Device list
⑤ Device add/remove button
▪ Import: Import by selecting an XML configuration file
exported from other standalone clients.
Add
Device
List
Queried
Device
List
①
②
③
④
⑤
Page 85

83
Standalone Client
▪ Export: Export all configuration setting values to an
XML-typed file.
▪ Add Sel: Click to add selected device. All available
devices are queried by network and displayed the
below grid table in figure ②
▪ Remove: Remove selected device from the device
input grid table in figure ①
Page 86

84
Standalone Client
Device Configuration
Remote Configuration of Each Device
※ This Device Configuration window does not support all Video
Servers and IP cameras.
① Resolution: Video resolution
② FPS: Number of video frames per second(1~30)
③ Audio Enable: Choose whether to enable audio (ON/OFF)
④ Sensor Enable: Choose whether to enable sensors (ON/OFF)
⑤ Sensor Type: Choose sensor type *NO/ NC
*NO: Normal Open / *NC: Normal Close
⑥ Sensor Alarm: Choose whether to turn on the alarm when a
sensor event occurs (ON/OFF)
⑦ MD Enable: Turn Motion Detection ON/OFF
⑧ MD Sensitivity: Configure the sensitivity of the Motion
Detection (Different devices have different sensitivity
ranges.)
⑨ MD Alarm: Choose whether to turn on the alarm when
motion is detected
① ② ③ ④ ⑤ ⑥ ⑦ ⑧ ⑨
Page 87

85
Standalone Client
MD (Motion Detection) Configuration
① Device List: The entire list of registered cameras in all servers
② Device Information: Displays information about the selected device
③ MD Area
▪ Configure the MD area with the mouse by click-and-drag
ⓐ Area selected for MD
ⓑ Area being selected for MD by clicking-and-
dragging the mouse
④ MD Tool
▪ Fill: Add MD area
▪ Invert: Invert the MD area
▪ Erase: Erase MD area
▪ Copy: Copy the current MD area setting
▪ Paste: Paste the temporarily stored MD area setting on
to the current screen
▪ Fill All: Configure the entire screen as MD area
▪ Erase All: Erase all MD area in the screen
①
②
④
③
ⓐ
ⓑ
Page 88

86
Standalone Client
Bookmark Configuration
① Bookmark List
▪ When selecting an added bookmark by mouse clicking, all
relevant device names will be displayed at Device List at②
② Device List: Device Lists of a selected bookmark at ①
③ Device List: All registered device lists
④ Add: Add Bookmark
⑤ Remove: Delete Bookmark
⑥ <<: Register all devices to a bookmark
⑦ <: Register selected devices to a bookmark
⑧ >: Unregister devices from a bookmark
⑨ >>: Unregister all devices from a bookmark
※ Bookmark: A function similar to the Bookmark
(Favorites) of Internet Explorer. Specific channels can be
selected into a group for easy access.
④
⑤
① ② ③
⑥
⑦
⑧
⑨
Page 89

87
Standalone Client
Network Event Configuration
① Select a CH to configure a network event
▪ Network Event Information
ⓐ CH: Channel name
ⓑ Transmit Type: Select a data format that will be
transmitted to panel. (All: Video, Audio and Event
altogether)
ⓒ Event: Name of the channel that will output the
events that occurred in CH.
ⓓ Audio: Name of the channel that will output the
audio transmitted from CH.
② Select the Transmit Type by double-clicking(ALL: Video +
Audio + Event or EVENT ONLY)
③ Select a CH (EVENT) that will show the current CH’s event data.
④ Select a CH (AUDIO) that will output the current CH’s audio data.
⑤ Click Apply to finish
⑤
①
②
③ ⓐ ④
ⓑ ⓒ ⓓ
Page 90

88
Standalone Client
Recording Configuration by Events
① CHANNEL: Currently registered camera list of a server
② EVENT: Enable/ Disable event
③ LIVE POPUP: Enable/ Disable live display channel popup
when configured event occurs
④ EMAP POPUP: Enable/ Disable channel popup on the E-map
window when configured event occurs
⑤ SOUND: Enable/ Disable Event warning sound when configured
event occurs
⑥ ALARM: Enable/ Disable Alarm Out when configured event occurs
⑦ PRESET: Enable/ Disable Preset when configured event occurs
⑧ Alarm selection menu
⑨ Preset setting menu when events occur
⑩ Camera list of the server uses preset when events occur
⑪ Preset number of preset for events
※ All configuration values can be set with mouse double
click except Event or Preset configuration.
①
② ③ ④ ⑤ ⑥
⑦
⑧
⑨
⑪
⑩
Page 91

89
Standalone Client
Recording Duration Configuration by Events
① Enable MD Recording Function: Enable/ Disable recording by
Motion Detection. Set recording duration by moving the slide bar
or inputting a number directly. (1sec~30min)
② Enable Sensor Recording Function: Enable/ Disable recording
by sensor detection. Set recording duration by moving the slide
bar or inputting a number directly. (1sec~30min)
③ View MD Area: Enable/ Disable displaying MD Box for Motion
Detection. Set display duration by moving the slide bar or
inputting a number directly.(1sec~30min)
④ View Intelligent Area: Enable/ Disable displaying event area for
intelligent events. Set display duration by moving the slide bar or
inputting a number directly. (1sec~30min)
⑤ View Alarm Icon: Enable/ Disable displaying Alarm Icon for
Alarm out. Set display duration by moving the slide bar or
inputting a number directly. (1sec~30mins)
⑥ Enable Sound Output: Enable/ Disable sound out when events
①
②
③
⑥
④
⑤
⑫
⑧
⑩
⑪
⑦
⑨
Page 92

90
Standalone Client
occur. Set display duration by moving the slide bar or inputting a
number directly. (1sec~60sec)
⑦ Enable Live Popup: Enable/ Disable live displaying popup when
events occur. Set display duration by moving the slide bar or
inputting a number directly. (1sec~60sec)
⑧ Output control: Operating mode for alarm outputs.
▪ Cut Output: Enable/ Disable stopping Alarm out signal
after 1 second.
▪ Keep Output: Enable/ Disable keeping Alarm out signal
⑨ Enable / Disable the function that turns the digital output state to
“OFF” state when a channel is selected.
⑩ Enable Ignore MD Event Delay: Enable/ Disable and set duration
between motion detection events. Set delay duration by moving
the slide bar or inputting a number directly. (1sec~200sec)
⑪ Enable Auto Light Return to Normal: Enable/ Disable Automatic
turning off lights for PTZ cameras. Set delay duration by moving
the slide bar or inputting a number directly. (1sec~200sec)
⑫ Event duration.
※ Sec : second / 1800s (30minutes)
Page 93

91
Standalone Client
Recording / Schedule Configuration
① Enable the Schedule: Enable/ disable schedule recording
② All: Click to turn all schedule types, days, and hours ON or OFF
③ Enable *Switching Schedule: Enable/ disable switching
schedule recording
④ Ch: Recording channel when switching schedule
⑤ Minute: Time of switching schedule Event
⑥ Apply All: Apply current settings to all channels
⑦ Schedule Type ON/OFF: Click tab to turn the schedule
type ON or OFF for the day
⑧ Day ON/OFF: Click tab to turn all schedule types ON or OFF
for the selected day
⑨ Hour ON/OFF: Click tab to turn all schedule types ON or
OFF for the selected hour
※ Switching Schedule: Function that allows taking turns
recording different channels. Designate the channels
and recording duration and it will switch recording
channels.
①
②
⑥
⑧
⑦
⑨
③ ④ ⑤
Page 94
92
Standalone Client
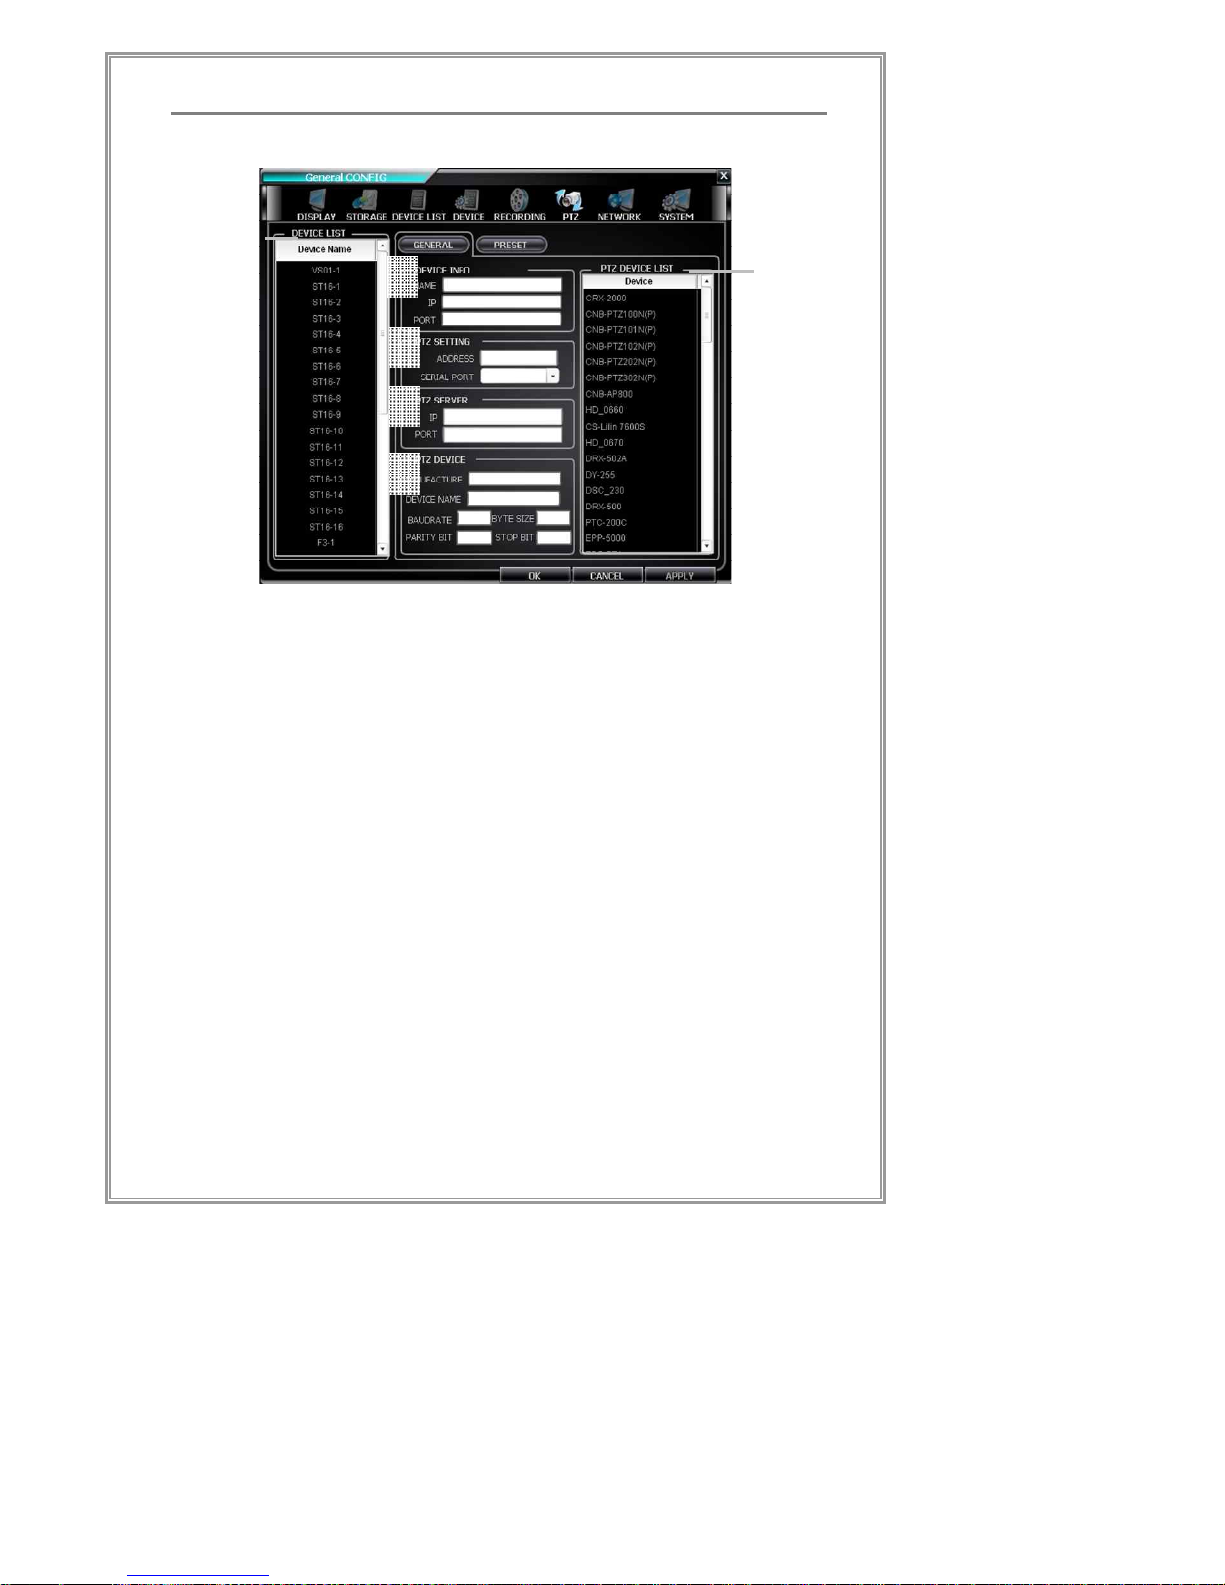
PTZ(Pan/Tilt/Zoom) Configuration
① Device List: The entire list of registered cameras in all servers
② PTZ Device List: List of supported PTZ protocols(standalone
client basically supports over 75 PTZ devices)
③ Device Information: Displays information about the selected device
④ PTZ Setting: Input PTZ setting values
▪ Address: Input PTZ address
▪ Serial Port: Select serial port number when using a
local PTZ device
⑤ PTZ Server: Information about a central PTZ server where
more than one PTZ device are connected. (When using a
PTZ server - the PTZ command is sent to the PTZ server via
network; the PTZ address is used to distinguish between
each PTZ devices; and the serial port number is not
supported.)
▪ IP: IP address of the PTZ server
▪ Port: Port number of the PTZ server
⑥ PTZ Device: Displays information about the selected PTZ
protocol
①
②
④
③
⑥
⑤
Page 95

93
Standalone Client
Preset Configuration
① Device List: All registered device lists
② PTZ Configuration of Selected device
③ Preset: Preset number
④ Save: Preset position
⑤ Move: PTZ direction control
⑥ Preview: Preset preview
⑦ Scenario List: List of the registered presets.
After a scenario starts, it will move from the top of the list to
the bottom, stopping at each preset for the designated ⑧
delay time, and move on the next preset.
⑧ Delay Time: Delay time for each preset in a scenario
⑨ Add, Modify, Remove buttons: Scenario direct control
⑩ Scenario Repeat, start/ stop, pause/ resume function.
①
⑦
③
⑥
⑤
②
⑧
④
⑨
⑩
Page 96

94
Standalone Client
Network Configuration
① Network Information: Displays information about the network
adaptor(LAN Card) and MAC address(PC’s LAN Card ID) of
the current system
② IP Address: IP address of the current system
③ Connect Management : reconnect delay and retry count
setting
①
②
③
Page 97

95
Standalone Client
System Configuration (General Tab)
① SYSTEM INFORMATION: Displays basic information about
the current system
② CONFIG BACKUP & RESTORE
§ BACKUP: Back-up system configuration to an XML file
§ RESTORE: Restore system configuration from a backup file
(.XML )
APPLICATION START
③ OMIT DIAGNOSIS DIALOG: Select to skip the *diagnosis
dialog at program startup
④ CONNECT AUTOMATICALLY: Select to connect automatically
to all registered servers at startup
LOG INFORMATION
⑤ USE LOG: Select to use logs
⑥ E-Map: Select a number for monitor of the e-map display
⑦ Event List: Monitor number for event list
①
②
③
⑤
④
⑥
⑦
Page 98

96
Standalone Client
System Configuration (Account Tab)
① Use Auto Login: Select this option to automatically log in
when standalone client is run.
② Use Auto Logout: Select to automatically log out if there has
been no activity for several minutes (Select the desired
time on the right)
③ List of registered accounts
④ Local Policy: Select the local functions that the selected
account can access
⑤ Account Input Form: Input the ID and Password for an
existing account or a new account
⑥ Button group for account Add/ Modify/ Remove functions
④
⑥
①
②
③
⑤
Page 99

97
Standalone Client
System Configuration (Version Tab)
① Module Name: Name of the engine used by standalone client
② BuildDate: Date that the engine was created
③ ModifiedDate: Date that the engine was modified
④ Version: Engine version
⑤ Path: Path to the directory that the engine was installed
①
②
③ ④ ⑤
Page 100

98
Standalone Client
Standalone Client Function Manual
Standalone Client Function Manual
In this chapter, it explains for functions of standalone client.
 Loading...