

Page 1
Multimedia Player
Instruction Manual • Model Number mp4-p13
After Sales Support
TEL: 1300 886 649
N13275
Page 2

Multimedia Player
What your 1 year warranty means
Congratulations on choosing to buy a ONIX product.
All products brought to you by ONIX
and safety, and, as part of our philosophy of customer service and satisfaction, are backed by our
comprehensive 1 Year Warranty.
We hope you will enjoy using your purchase for many years to come.
are manufactured to the highest standards of performance
1
After Sales Support TEL: 1300 886 649
Page 3

Contents
1 What your 1 year warranty means
3 Feature list
4 Locating the controls
Basic Operation
5 Keys operation
6 Play music
Record voice
7 Play recorded les
How to use FM
8 Browsing JPEG
System setting
9 List of menus
11 USB Disk
Convert video les into AMV
13 FAQ’s
14 Specication
2
After Sales Support TEL: 1300 886 649
Page 4

3
The Media Player is a new generation digital portable device, supporting multiple music formats including
MP3, WMA, WAV and more. Its perfect sound quality, great reliability and exquisite appearance makes it a
masterpiece.
Unique Features
• MTV lm function
• Function to browse JPEG pictures
• Exquisite Appearance
Unique appearance designed and comfortable for handling
• Multi-Code Player
Supporting MP3, WMA and WAV formats
• FM Function
You may easily listen to FM stations and set your favourite stations by using Auto Preset or Manual Preset.
• Record/ Replay
The player supports recording through a built-in microphone and saves as WAV and ACT formats. Meanwhile it
supports real digital A-B replay or comparison replay.
• 7 Preset EQ
Natural, Rock, Pop, Classic, Soft, Jazz and DBB
• Multiple Repeat Mode
Normal, Repeat One, Folder, Repeat Folder, Repeat All, Random, Intro.
• Power O
You may set Sleep Timer or O Time mode at your own convenience.
Declaration
• Thank you for your purchase. Please read this manual carefully before using your new player. Contents in this
manual may change for better service. We have the right to make changes to this manual without notice. If the
actual operations of your player is not the same as the instruction in this manual, please visit our
website for the latest product information.
NOTE:
• Before charging player, please make sure the power is switched to the ON position.
• Please don’t press any buttons while charging the player, otherwise the charging will be stopped automatically.
• Please charge the battery only after it has run out, otherwise it will shorten the life of the battery.
• Use the USB Charger to charge the battery, the battery must be charged for at least 4 hours to be fully charged.
After Sales Support TEL: 1300 886 649
Page 5
Locating the Controls
4
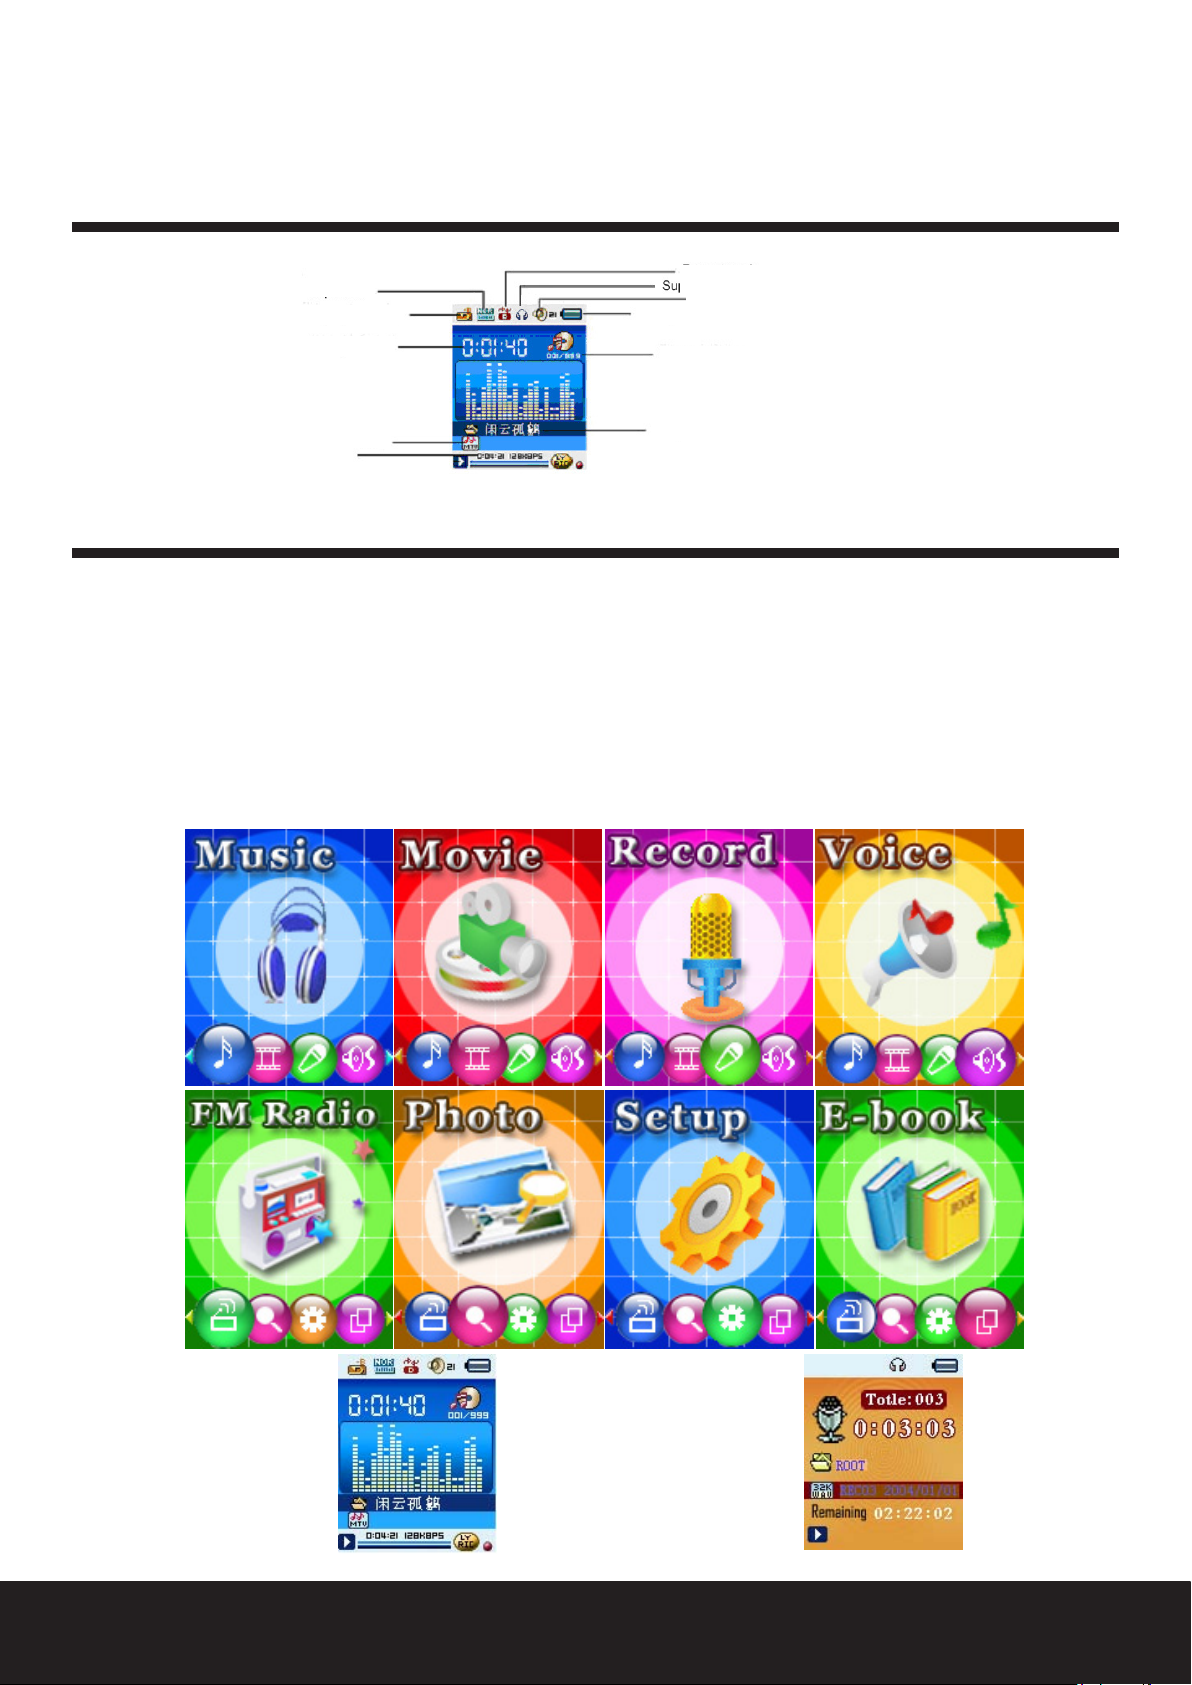
Display screen
Equalizer
Replay mode
Play times
File format
Bit
Repeat mode
Speaker
Battery
Song numbers
Song name
Basic Operation
• Entering Menu System:
Pressing the Menu button will enter into the menu system, including main menu (long press of menu key at Stop
mode), submenu at Play mode (press to enter) and submenu at stop mode (press to enter).
• Browsing.
• Fast forward or rewind when playing music.
• Entering Dierent Modes.
You may enter dierent modes from the main menu.
Main menu: (long press of the Menu button).
Music mode:
Record mode:
After Sales Support TEL: 1300 886 649
Page 6

5
Voice mode:
Browsing picture mode:
USB mode when connecting to a PC:
FM mode:
Setting mode:
• Volume Control.
First press “VOL”, then press “Pre”/“Next” button to decrease/increase Volume.
• Play & Stop (Pause when recording).
Press “Play”.
You may press the Play button to fast exit from setup submenu interfaces.
Keys Operation
1. Start/Play/Pause/Stop, press “Play” button.
2. “Power”: turn on or turn o the Digital Media Player.
3. “Menu” enters in the main menu or submenu.
4. “VOL + NEXT / VOL - PRE”: Increases or decreases the volume.
to the next or speed play
5.
the previous or skip backward.
6.
After Sales Support TEL: 1300 886 649
Page 7

6
Play Music
• Basic Operation
1. Connect the earphones
2. Press the PLAY button to turn on the player and enter the Music mode. Press the play button again to play music.
3. To select music:
: to select the previous song
: to select the next song
4. To adjust the volume
First press “VOL”, then press “Pre”/“Next” button to decrease/increase the Volume.
• EQUALIZER Mode
1. Playing music status
2. Press the Menu button to enter the Play Submenu
3. Push the Next switch to select Equalizer menu
4. Press the Menu button to enter EQUALIZER selection Menu.
5. Push the
button to select, and press the Menu button to conrm selection.
Record Voice
Make sure that the battery is not in the status of “low battery”.
• Start recording in Record Mode
1. Enter main menu.
2. Push the
3. Press the Menu button to enter Record mode.
4. Press the Play button to start recording.
5. Press the Play button to pause recording. (The time icon ickers)
Press Play button to continue recording.
Hold the Play button for a few seconds to stop recording.
NOTE: The recorded le is saved in the current folder set in “Record/Voice”. If “Overow” is displayed on the
screen, the player’s memory is full. Please delete other les to make some space available.
If “over record” is displayed on the screen, the current folder has already had 99 recording les.
Please switch to another folder.
• Select Recording Type
1. On the status of Stop Recording.
2. Press Menu button to enter the Record Submenu.
3. Press
4. Press Menu to enter this option.
5. Press
6. Press Menu to conrm the type selected.
7. Press Play to start recording.
switch to select recording mode.
to select REC Type option.
to select desired recording type.
• Recording Type:
After Sales Support TEL: 1300 886 649
Page 8

Play Recorded Files
1. Enter main menu.
2. Push Next to select “Voice mode”.
3. Press Menu button to enter Voice mode interface.
4. Press Play to start playing.
5. Select recorded les.
Pre: to select the previous recorded le.
Next: to select the next recorded le.
How to use FM
1. Enter main menu.
2. Push Next switch to select FM Mode.
3. Press Menu button to enter FM mode.
4. Press Menu button to enter FM mode submenu.
5. FM submenu options Introduction.
7
Auto Search function:
When selecting Auto search function, the player can auto scan frequency between 87.5MHZ and 108MHZ
and save to scanned station.
Save
To save a station it is manually scanned in sequence, US Band and Japan Band can save a maximum of 20 stations
respectively.
Delete
To delete a station is also the function to exit.
Select band.
At the FM submenu, push the
again press the Menu button to conrm.
button to choose Normal Band (FM87 - 108MHz) or Japan Band (FM76-90MHz),
After Sales Support TEL: 1300 886 649
Page 9

Browsing JPEG
a. File selection:
Enter the le selection.
Press the “play” button and browse JPEG.
Press the “ /Last” button to select the next/last le.
Press the “mode” button, enter the stop submenu.
1. Local folder 2.play set 3.delete 4.exit
Play set: manual play and auto play.
Auto play: you can set the page turning time from 2 sec. to 10 sec.
b. Browse picture:
8
Enter the browsing picture:
Press the “
Hold the “Menu” button down to enter previous menu.
” button to play the next/Pre picture.
System Setting
Entry Settings:
You can set system performances here, options may vary in dierent rmware versions.
1. Enter main menu.
2. Push
3. Press “Menu” to enter.
Scrolling into “Settings”.
After Sales Support TEL: 1300 886 649
Page 10

Options introduction:
System Time Setting date and time when saving recorded le
REC type Sets the format which voice will be recorded on.
LCD set Screensaver and brightness setting
Language Choosing dierent languages
Power o Setting a count down time in minutes, the player will shut o when time out.
Replay Mode Setting repeat status
Online Mode Options for ‘Secret Space’
Memory info Check memory space and usage status
Firmware Version Version of player’s rmware
Upgrade Firmware Use for upgrade rmware
Exit Exit from Setting interface
List of menus
9
• REC type setting
1. On Setting submenu, press Next choosing REC type, then press MENU to enter;
2. Press Next / Last choosing dierent record type.
Voice les recorded on MP3 format will be played on MP3 music mode.
• LCD Set
Press “Menu” enter screensaver setting;
Push
After setting, press “Menu” to exit.
for choosing (Last for previous)
After Sales Support TEL: 1300 886 649
Page 11

• Language Setting
This player has multi-languages.
Press “Menu” to enter ‘Language’ interface
10
Push
After setting, press “Menu” to exit.
• Power o Setting
NOTE: You can set the time in seconds on ‘O time’ mode, allow the player to shut down automatically when
NOTE: Sleep mode is valid only once after setting, you have to set it again if you want to use it next time.
• Replay Settings
Operating steps refer to Equalizer Setting.
Manual Replay means that at A-B Replay Mode the endpoint B can be set manually only.
Auto Replay means that at A-B Replay Mode the endpoint B can be set automatically. (Especially for English
Reading les without music).
• Online mode “Setting”
Some operation systems (Windows 2K SP4 or prior) may not recognize a USB disc with two symbols. Therefore,
you have to choose an active disk here when using ‘Secret Space’ function, only the active disk can be found in PC.
• Memory info
You can check the total memory space and the percentage of usage.
to scrolling.
player becomes idle for the period you have set.
You can set the time in minutes on ‘Sleep mode’, allow the player to shut down automatically when the
player becomes idle (regardless of current status) for the period you have set. It is designed for listening
to music before you sleep.
• Firmware version
You can nd the player’s rmware version.
• Firmware upgrade
Use to upgrade player’s rmware.
TIPS: After pressing Menu button to select options, you may press Play button to exit from menu directly.
The operation on Play button for direct exit is valid to all menus.
After Sales Support TEL: 1300 886 649
Page 12

USB Disc
The player supports standard USB disc function with operating system Windows98 (driver needed),
Windows 2K and above (driver free), Mac OS 10.3 and above.
The player supports power supply through USB. At Standby Mode, press Mode to quit to main menu,
then select to enter desired mode.
The player also supports Suspend Mode.
How to connect to PC? Turn on the player and plug in the USB cable to enter the following Mode.
The player may display three modes after connecting to PC:
1. Standby State.
2. Downloading state.
3. Uploading Mode.
Convert Video les into AMV
Installing the software:
11
1. Open the folder “MP3 Player Utilities 4.18” in the player.
2. Double-click the le “Setup.exe” .
3. Read through the information displayed, then click on the “Next>” Button.
4. Use the default install directory, or click “Browse” to specify a dierent directory.
Click the circle next to “Everyone” or “Just me” to select a user install option.
Optional: Click “Disc Cost” to see a preview of the software’s disk usage after installation.
Click Next.
5. Continue to read the displayed information and press next until the software is installed.
6. After the software installs, click “Close”.
This program is used to convert video les into AMV format, currently only AMV format is supported.
For AMV Converter, please make sure you have installed Microsoft DirectX 9.0 or above.
When to convert Real Media, QuickTime, MPEG2 format video les, please install related DirectShow lter rst.
Otherwise, the AMV Converter can not work normally.
1. Run “AMV Convert Tools”, click
folder where the original les are.
to choose the folder where to save the AMV les, then click to select the
After Sales Support TEL: 1300 886 649
Page 13

2. Select unprocessed AMV les, then click the icon will be highlighted into and a dialog box will
appear. Choosing Pixels of AMV to “176*128” and Frames per second to “middle”, then click OK to conrm.
12
3. Click to start converting.
4. After convert, the AMV les will be played automatically.
After Sales Support TEL: 1300 886 649
Page 14

FAQ’s
No Power. Check whether the battery has been charged properly.
Check whether the player is turned ON.
No sound is heard from the
headphones.
Characters in LCD are corrupt. Check whether the right language has been selected.
FM Reception is poor. Adjust the position of the headphones and player.
Download of music les fail. Check whether USB cable is damaged and is connected properly.
Check whether Volume is set “0” and connect the headphone plugs rmly.
Check whether the headphone plug is dirty.
Corrupted MP3 may make a static noise and the sound may cut o.
Make sure that the music les are not corrupted.
Turn o the power of other electrical devices near the player.
The headphones must be used as the antenna.
Check whether driver is installed correctly.
Check whether the player’s memory is full.
13
After Sales Support TEL: 1300 886 649
Page 15

Specications
Weight 38g
LCM Window 1.8”
PC connection High-speed USB2.0
Flash memory 4GB
Battery Max Play time: 4-6 hours
Record Sample rate 8KHz
Recording format WAV (32K bps), ACT (8K bps)
Recording time 35 hours (ACT, 128M Flash)
MP3, WMA Max output of headphone (L) 10mW + (R) 10mW (32Ohm)
MP3 bit rate 8K bps – 320K bps
WMA bit rate 5K bps – 384K bps
Frequency response 20Hz to 20KHz
SNR 85dB
Distortion < 0.05%
FM radio Receiving frequency range 76MHz – 96MHz / 87MHz – 108MHz
Stations saved 20
Max output of headphones (L)10mW + (R) 10mW (32Ohm)
SNR
Music format MP3,WMA,WAV
Working temperature -5 to 40 °C
45dB
14
NOTE: Product design and specication may change without notice
.
After Sales Support TEL: 1300 886 649
Page 16

15
After Sales Support TEL: 1300 886 649
 Loading...