

Page 1
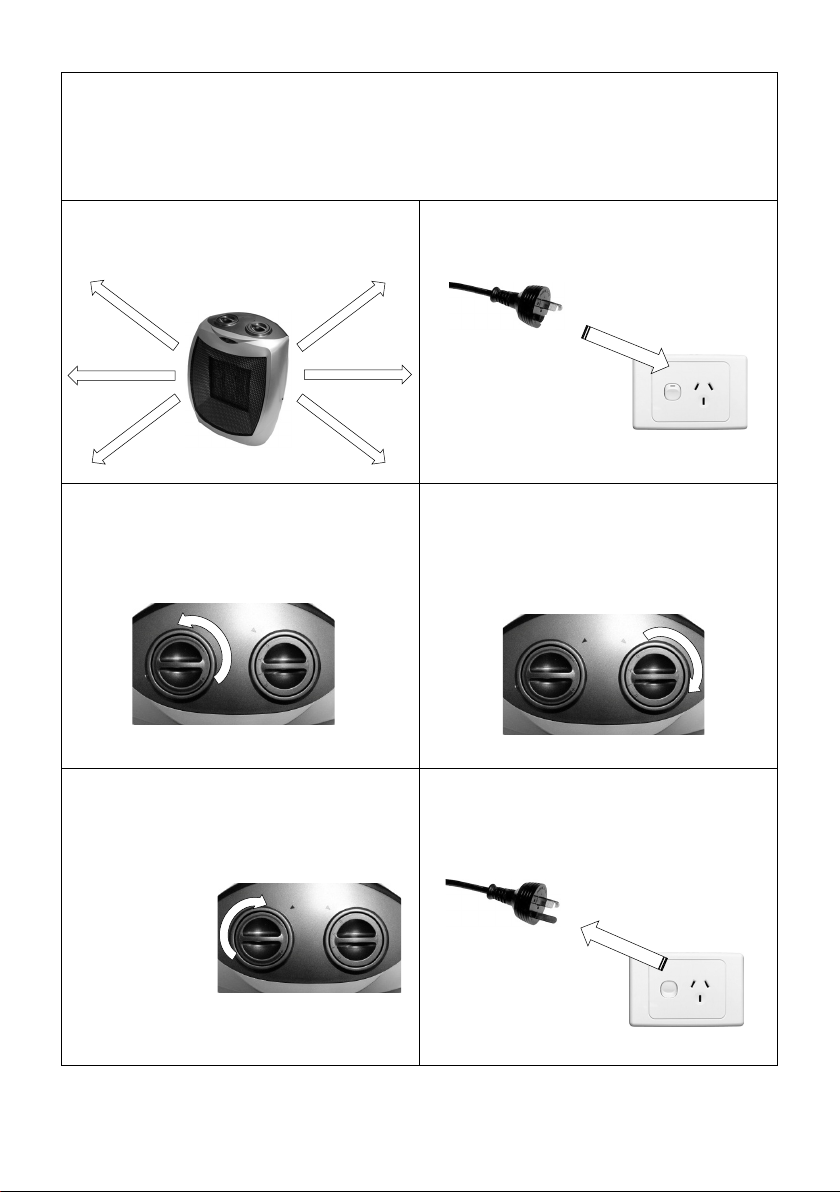
Quick Start Guide
1. Place heater on a flat surface ensuring there
2. Insert Plug into Power Point and switch on.
5. With the Heat Selector Switch set to either “I”
(clockwise) until you hear it click On. The
heater will now start to heat. Adjust up or
6. Do not operate while unattended.
Ceramic Fan Heater
is at least 30cm clearance all around and
over the top of the heater. Do Not place
items on or against the heater.
3. Turn the Thermostat control down
(anticlockwise) until you hear it click off.
4. Rotate the Heat Selector switch to position:
for Fan Only
“I” for Low Heat
“II” for High Heat
“O” for OFF
or “II”, turn the Thermostat control up slowly
down to your desired temperature setting.
Note: As the
thermostat
maintains room
temperature it
will switch on
and off.
As it switches
on and off, you may notice a blue flash from
inside the heater. This is NOT dangerous and
is no cause for alarm.
Turn the selector switch to position “O” (off)
then Turn power off and Unplug.
Always Unplug when not in use.
Page 2
Ceramic Fan Heater
User Manual
FH102A-S
220 - 240Va.c. 50Hz
1500W
Rev 1
Note: The specifications and/or components of this appliance are subject to change without prior notice.
Page 2 of 12
Page 3

1 Important Safeguards ............................................................4
2 Component Diagram .............................................................6
3 Before Use ............................................................................7
4 Tip Over Switch .....................................................................7
5 Operation ...............................................................................8
5.1 Controls ............................................................................................. 8
6 Safety Cut-Off Device ...........................................................9
7 Cleaning ................................................................................9
8 Schematic Wiring Diagram ................................................. 10
9 When the Appliance is Not in Use ...................................... 10
10 Troubleshooting ................................................................... 11
11 Warranty Against Defect ...................................................... 12
Page 3 of 12
Page 4

1 Important Safeguards
When using electrical appliances, basic safety precautions should always be followed,
including the following:
• Carefully read this instruction manual before using appliance.
• Keep appliance out of reach of young children.
• This appliance is not intended for use by persons (including children) with reduced
physical, sensory or mental capabilities, or lack of experience and knowledge, unless they
have been given supervision or instruction concerning use of the appliance by a person
responsible for their safety.
• Children should be supervised to ensure that they do not play with the appliance.
• Ensure children and babies do not play with plastic bags or any packaging materials.
• Care should be taken when moving it. Do not pull along using the power cord. Turn off and
unplug before moving.
• Let the heater cool before moving
• Do not attempt to modify this product in any way.
• This heater is hot when in use. To avoid burns, do not let bare skin touch hot surfaces.
• Keep combustible materials such as furniture, pillows, bedding, papers, clothes and
curtains, etc. at least 90cm from the top and all sides of the heater.
• Do not place anything in close proximity directly in front of the heater. Keep a safe
operating distance of at least 120cm
• Do not drape laundry or any other items over the heater.
• VERY IMPORTANT:
Ensure that appliance does not get wet (water splashes etc.).
Do not use appliance with wet hands.
Do not immerse appliance in water or other liquids or use near sinks, baths or showers.
• Always operate the appliance from a power source of the same voltage, frequency and
rating as indicated on the product identification plate.
• Do not use with extension leads, power boards or double adaptors, etc.
• Position the power supply lead properly so that it will not be walked on, pinched by items
placed on or against it or have the appliance resting on it.
• Use appliance only for its intended use. Appliance is intended for household use only and
not for commercial or industrial use.
• Do not use appliance if it has been dropped or any part of appliance (including cord or
plug) has been damaged. Take appliance to your nearest authorised service centre or
qualified dealer for inspection or repair.
Page 4 of 12
Page 5

• Use only accessories recommended or supplied by an authorised service centre or
qualified dealer. The use of accessories not intended for use with this appliance may cause
injuries to the user or damage to the appliance.
• Always unplug the heater when not in use
• Do not install the unit on other appliances, on uneven surfaces or where it could be subject
to direct sunlight, excessive dust or mechanical vibrations.
• Appliance should not be used outdoors, placed near a hot gas or electrical burner.
• Unplug this appliance before cleaning or storing or when unused for long periods of time.
• Any type of servicing, apart from ordinary cleaning, must be carried out by an authorised
service centre or qualified dealer. There are no user serviceable parts in this appliance.
• If this appliance is used by a third party, please supply the instruction manual with it.
• Do not misuse the cord. Never pull the appliance by the cord or pull to disconnect it from
the outlet. Instead, grasp the plug and pull to disconnect.
• This heater is not intended for use in bathrooms, laundry areas or similar moist indoor
locations.
• Never locate the heater where it may fall into a bathtub or other water containers.
• Do not use this heater in the immediate surroundings of a bath, shower or swimming pool.
• Do not run the power cord under carpeting or cover the cord with throw rugs, runners or the
like. Arrange the cord away from traffic areas and where it will not be tripped over.
• Do not place the cord over any part of the heater.
• To disconnect the heater, set controls to OFF then remove the plug from the outlet.
• Do not insert or allow foreign objects to enter any ventilation or exhaust opening as this
may cause an electric shock, fire or could damage the heater.
• This heater has hot electrical parts inside. DO NOT use it in areas where petrol, paint or
flammable liquids are used or stored.
• Alway s fully uncoil the power cord before applying power.
• This product must always be used in the upright position.
• Never leave the product unattended when in use.
• The heater must not be located immediately below or in front of a power socket outlet.
• Warning: In order to avoid overheating, do not cover the heater or restrict the air flow.
• No liability can be accepted for any damage caused by non-compliance with these
instructions or any other improper use or mishandling of appliance.
• This product has not been designed for any uses other than those specified in this manual.
Read and Save These Instructions
Page 5 of 12
Page 6

2 Component Diagram
Item
Description
1
Carry Handle at Rear
2
Fan / Heat Control Switch
3
Hot Air Outlet Grille
4
Tip Over Switch under base
5
Power Indicator Light
6
Adjustable Room Thermostat
1 3 5 6 4
2
NOTE: Never Leave the Heater unattended when in use.
Page 6 of 12
Page 7

3 Before Use
Remove all packaging and dispose of thoughtfully.
Congratulations on the purchase of your new heater.
Before first using your new heater, it is most important that you read and follow the
instructions in this instruction manual, even if you feel you are quite familiar with this type
of product.
Your attention is drawn particularly to the section dealing with “IMPORTANT
SAFEGUARDS”.
Find a place and keep this manual handy for future reference.
Your heater is easy and safe to use. It has been designed to function quietly and safely
under normal circumstances.
Read all instructions to ensure safe and efficient use.
NOTE: Keep combustible materials such as furniture, pillows, bedding, papers, clothes
and curtains, etc. at least 90cm from the top and all sides of the heater.
DO NOT place anything directly in front of the heater. Keep a safe operating distance of at
least 120cm.
DO NOT drape clothes, towels etc. over the heater.
4 Tip Over Switch
This heater is fitted with a “Tip Over Switch” built into the base of the heater, so in the
event that the heater may be knocked over, power to the heater is immediately turned off.
As soon as the heater is stood up again and the base is rested on a hard flat horizontal
surface, the heater will switch back on.
Do not use on long carpet or the like.
Under no circumstances should the Tip Over Switch be
tampered with or bypassed.
Page 7 of 12
Page 8

5 Operation
5.1 Controls
• Ensure the Fan control is set to the “O” (Off) position.
• Fully unwind the power cord then plug into the powerpoint and switch on.
• When first setting up the temperature setting, turn the Fan / On-Off / Heat Control
Switch to Maximum Power “II” and turn the Adjustable Room Thermostat fully
clockwise to maximum.
• The Indicator light will illuminate indicating the element is heating.
• When the room reaches the desired temperature, slowly turn the Adjustable Room
Thermostat down (anticlockwise) until you hear it “Click” off. The indicator light will turn
off.
• Leave the Adjustable Room Thermostat in this position and the heater will now cycle
on and off and maintain the desired room tem perature.
Note: The indicator light will turn on and off as the heating element turns on and off.
As the thermostat maintains room temperature it will switch on and off.
As it switches on and off, you may notice a blue flash from inside the heater. This is
NOT dangerous and no cause for alarm
• At the same time, you may turn the Fan / On-Off / Heat Control Switch down to the
Low Heat setting “I” to reduce the power consumption. This will however increase the
amount of time it takes to reheat.
• On very cold days this may not be practical, as heat losses can exceed the heat
generated by your heater. Larger rooms and open space areas may also find the low
or medium heat setting ineffective.
• You will need to experiment with this heater to establish the exact setting required for
any particular room or space.
• Best performance and efficiency is achieved with an insulated home, closed windows
& doors and with drapes closed.
Page 8 of 12
Page 9

CAUTION: Even after the heater has been turned off, the heater will remain very hot
for some time after. DO NOT touch the hot surfaces during heating or after turned off.
• If you wish to just recirculate the room air without heating, turn the Fan / On-Off / Heat
Control Switch to position “
• To turn the heat and/or fan off, turn the Fan / On-Off / Heat Control Switch to position
“
O“
”.
Note: Keep children away from the heater at all times.
Always Turn off and unplug when not in use.
6 Safety Cut-Off Device
This heater is fitted with a Safety Cut-out Device to prevent injury or damage should the
internal temperature exceed the safe operating temperature.
• Should the heater turn off unexpectedly, first unplug the appliance from the wall power
point and let cool. It is more than likely that the thermal Cut-Off device has activated
• This may have been caused by either the Rear Air Inlet grille being blocked (or
partially block), the fan stopping due to a foreign object being inserted into the fan, the
front air outlet grill being blocked (or partially blocked) or a build up of dust and fluff
etc, inside the appliance.
• The appliance cannot be reset and must be taken to your nearest electrician for
repairs.
Please note: The Therm al Cut-Off device will not activate during normal use. Refer to
the notes in “Important Safeguards” to prevent this from happening.
7 Cleaning
Before any maintenance or cleaning work is carried out, DISCONNECT the appliance
from the ELECTRICITY supply.
Wipe the outer surfaces with a slightly moistened cloth.
Note: Do not use detergents, abrasive powders, highly perfumed cleaning products, wax
polishes or products containing alcohol, etc. as these may damage the unit.
Dry the appliance thoroughly.
Any dust build up in the grille can be vacuumed out. DO NOT place any objects into the
grille.
Page 9 of 12
Page 10

8 Schematic Wiring Diagram
9 When the Appliance is Not in Use
When the appliance is not in use or is not going to be used for a long period, disconnect
from the electricity supply and store in a dry safe place.
Page 10 of 12
Page 11

Symptom
Cause
Remedy
The Power Plug may not be
into the powerpoint correctly and
The heater has overheated
The heater has overheated
“II”.
The room temperature has been
thermostat.
Turn the thermostat to a higher
temperature setting, (rotate
clockwise)
the element.
10 Troubleshooting
BEFORE contacting a service agent, check the following points:
Ensure the power plug is inserted
switch on.
Ensure there is power to the power
point. Test with another appliance
such as a table lamp.
Ensure the heater is sitting on a
hard flat horizontal surface.
Refer to the section “Safety Cut-Out
Device”
Call the service department.
Turn the Fan / On-Off / Heat Control
Switch to the heating position “I” or
Turn the Fan / On-Off / Heat Control
Switch to the heating position “I” or
“II”.
Allow appliance to heat up and the
smell will disappear over a short
period.
This is not dangerous and is no
cause for alarm. This is normal for
this type of Thermostat.
No power to the appliance
Power is available but not
heating
Fan is blowing cold air and
not heating
Burning Smell when first
turned on.
Occasional Blue Flashes
from Inside the Heater
plugged in to the power point and
switched on.
There may be no power to the
power point
The heater is not sitting on a hard
flat surface, which is preventing the
Tip Over Switch from resetting.
internally and tripped the safety
over-temperature device
internally and blown the Over-Temp
thermal fuse
The Fan / On-Off / Heat Control
Switch is not switched on.
reached for the setting of the
The Fan / On-Off / Heat Control
Switch is not switched onto the heat
positions.
This is normal for first use or for first
use after storing away for some
time. It is the fine dust burning off
This is the thermostat switching on
and off while it maintains the room
temperature.
If after the above checks there is still a fault, contact Customer Support for assistance.
If in warranty, customers should ensure that the above checks have been made before
sending for repair, as fees may be levied if the fault is not a mechanical or electrical
breakdown or deemed to be caused by misuse.
Page 11 of 12
Page 12

11 Warranty Against Defect
WHAT’S COVERED?
5.2 Our goods come with guarantees that cannot be
(where permitted under law) expressly
WHAT IS NOT COVERED?
WHAT WE WILL DO
exclude all prior and other discussions,
free call 1800 079 124 or via email
WARRANTY COSTS
GENERAL
6.2 This warranty is valid with the presentation of the
1.1 H.E. Group Pty Ltd (“us” “we” or “our”)
warrants this good for a full replacement or
refund for a period of twelve months from
the date of purchase.
1.2 This warranty covers materials and
workmanship defects only.
2.1 This good is for household use only and if
used in any way other than as detailed in
the instruction manual will void this
warranty.
2.2 This warranty does not apply to defects
arising from abuse, alteration, unauthorised
or unreasonable use of the good, nor does
it cover general deterioration due to usage.
2.3 This warranty does not apply to accessories
3.1 We will replace the good or provide a
4.1 Once we have received the goods and you
4.2 No responsibility will be taken for goods
due to general deterioration or acts beyond
human control.
refund to the value of the purchase price, if
a defect is discovered in the good during
the warranty period of twelve months
subject to verification of defect or
malfunction and the date and proof of
purchase and purchase price.
have complied with the warranty, our costs
associated with the warranty claim will be
borne by us.
lost, mislaid or damaged whilst in transit.
excluded under Australian Consumer Law. You
are entitled to a replacement or refund for a
major failure and compensation for any other
reasonably foreseeable loss or damage.
You are also entitled to have the goods repaired
or replaced if the goods fail to be of acceptable
quality and the failure does not amount to a
major failure.
5.3 Notwithstanding 5.1, except as provided for in
this warranty, all express and implied warranties
and conditions under statute or general law as
to the merchantability, description, quality,
suitability or fitness of the goods for any
purpose, or as to design, assembly, installation,
materials or workmanship or otherwise are
excluded.
5.4 To the extent permitted by law, our total liability
for loss or damage of every kind related to the
good in any way whatsoever is limited to the
amount paid to the retailer by you for the good
or the value of the good.
5.5 These terms and conditions supersede and
representations (contractual or otherwise) and
arrangements relating to the supply of the goods
or any part of the goods. This includes
representations not made by us relating to the
performance of the goods or any part of the
goods or the results that ought to be expected
from using the good.
CUSTOMER CARE
6.1 To claim under this warranty, you must first
contact our friendly customer service team on
info@hegroup.com.au and explain the basis of
your claim. Our customer service team will then
provide you with directions on how to make your
claim under this warranty.
5.1 The benefits of this warranty are additional
to any other rights and remedies you may
have under law.
Address:
Phone No:
Email:
HE Group Pty Ltd, 47 Stephenson Street, Cremorne, Victoria 3121
1800 079 124 (free call)
info@hegroup.com.au
Page 12 of 12
original proof of purchase receipt or tax invoice
originating from the store of purchase for the
product showing the retailer’s name, date of
purchase and amount paid, by you, for the
good.
April 2011
Edition
 Loading...