

Page 1
Instruction Manual
1300 886 649
Model: ASP4-014
Customer Helpline
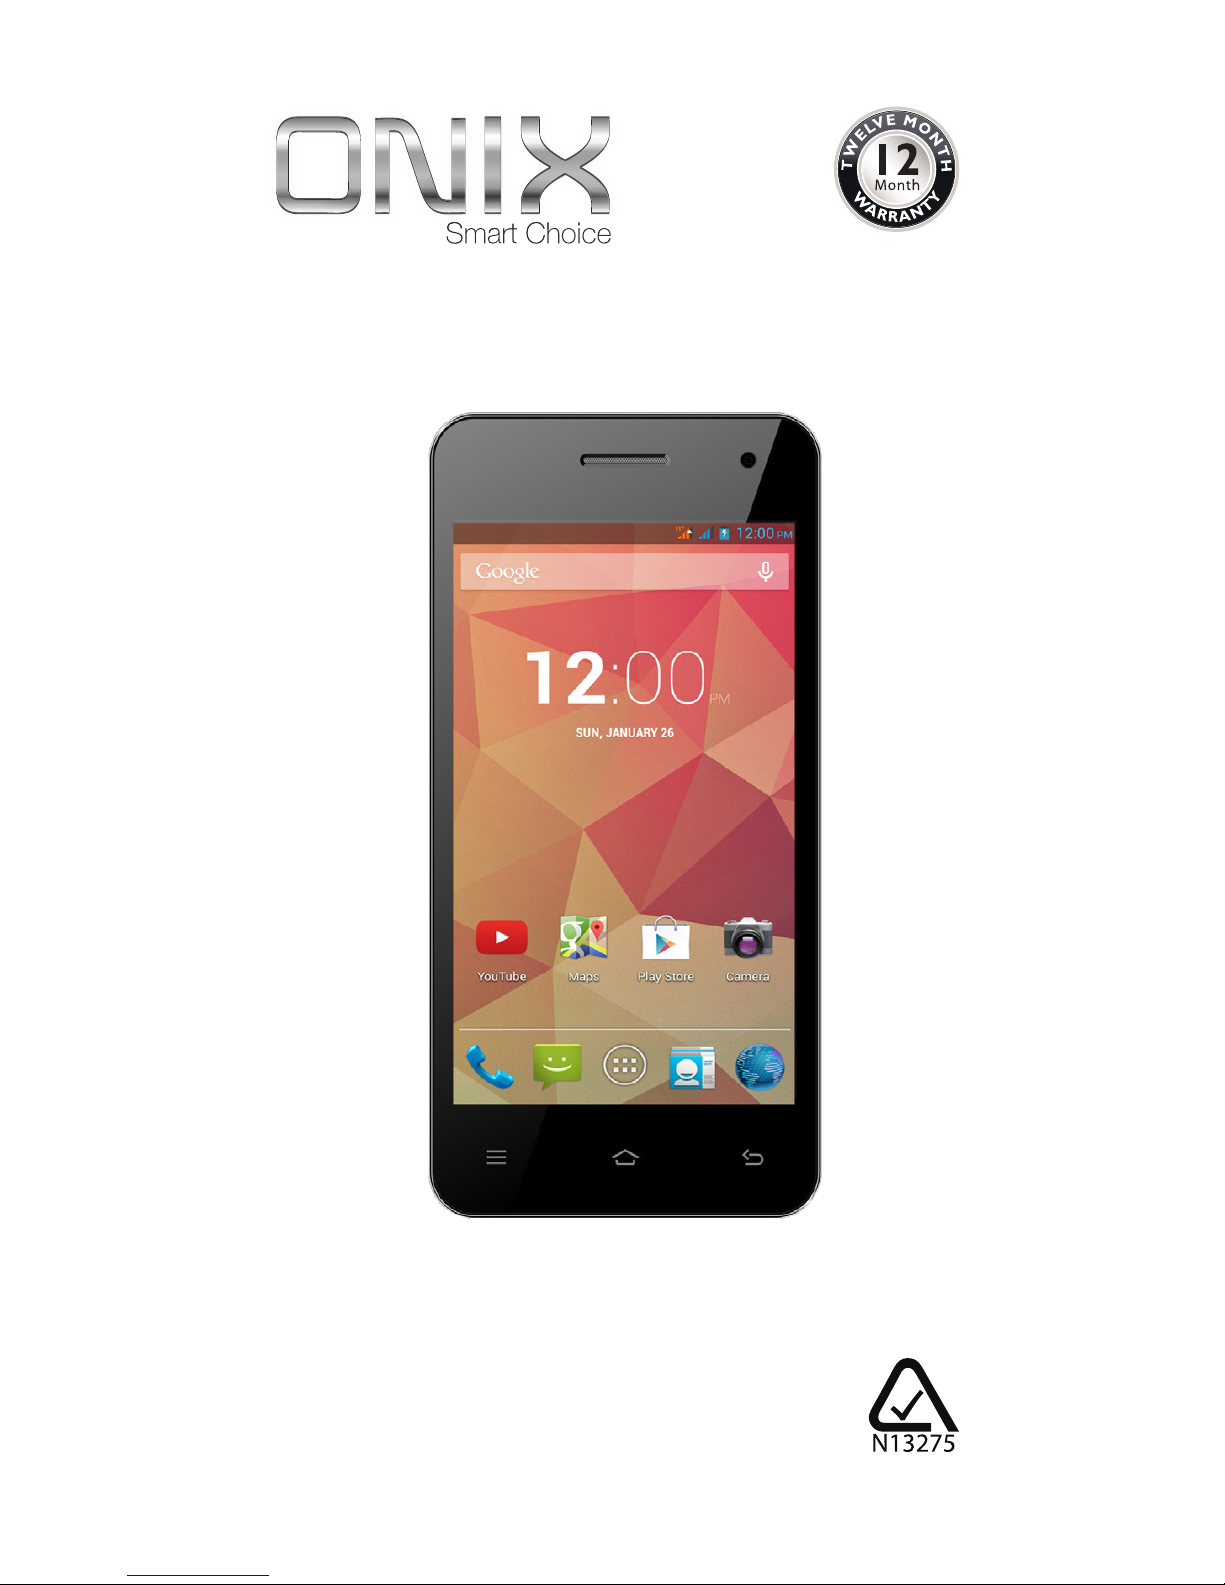
4” Dual SIM
Smart Phone
Page 2

Contents
Warranty Details 3
Welcome 4
General Safety Instructions 5
Product Overview
Getting Started 9
• Before first use, Micro SD Card, Inserting the SIM card(s) and battery 9
• Charging, Buttons, Switch on/off, Turn on/off the screen 10
• Linking with your Google account 11
• SIM management 12
Operation
• Entering your PIN, Screen operation 13
• Phone calls 16
• Contacts 21
• Messaging 22
• Applications and widgets 23
• Add and manage desktop icons 24
• Connect with computer 26
• Browser 27
• Screen compatibility, Background applications 28
• Get and install applications 29
• Uninstall applications, Play Store and calendar error messages 30
Settings
• Wireless and networks 31
• Bluetooth 34
• Device 35
• Personalisation 37
• System, Camera, Downloaded files management 41
• Radio
42
Specifications
43
Repair and Refurbished Goods or Parts Notice
44
Page 3
3
After Sales Support
Telephone: 1300 886 649
Email: info@tempoaustralia.com.au
Warranty Details
The product is guaranteed to be free from defects in workmanship and parts
for a period of 12 months from the date of purchase. Defects that occur
within this warranty period, under normal use and care, will be repaired,
replaced or refunded at our discretion, solely at our option with no charge for
parts and labour. The benefits conferred by this warranty are in addition
to all rights and remedies in respect of the product that the consumer
has under the Competition and Consumer Act 2010 and similar state and
territory laws.
Our goods come with guarantees that cannot be excluded under the
Australian Consumer Law. You are entitled to a replacement or refund for
a major failure and for compensation for any other reasonably foreseeable
loss or damage. You are also entitled to have the goods repaired or
replaced if the goods fail to be of acceptable quality and the failure does
not amount to a major failure.
4” Dual SIM Smartphone
Page 4

4
After Sales Support
Telephone: 1300 886 649
Email: info@tempoaustralia.com.au
Congratulations on choosing to buy a ONIX product.
All products brought to you by ONIX are manufactured to the highest standards of
performance and safety and, as part of our philosophy of customer service and satisfaction,
are backed by our comprehensive 1 Year Warranty. We hope you will enjoy using your
purchase for many years to come.
Welcome
Page 5

5
After Sales Support
Telephone: 1300 886 649
Email: info@tempoaustralia.com.au
Read this manual thoroughly before first use and keep it in a safe place for future
reference, along with the completed warranty card, purchase receipt and carton. The safety
precautions enclosed herein reduce the risk of fire, electric shock and injury when correctly
adhered to.
Handling and maintenance
• Water: Ensure that this product does not get wet, protect it from water splashes, rain,
excessive humidity and sweat. Contact with water will cause the phone to short-circuit,
corrode or cause electric shock. Do not use it where it can fall into water (such as near
a pool, pond, bath etc.). Do not use it with wet hands. Do not immerse it in water. Do
not turn it on if it is wet. Do not try to dry it in a microwave oven.
• Handling: To avoid damaging the phone, battery or charger, do not drop it or shake it vigor-
ously as this may cause device or battery failure, fire or explosion.
• Repair: This device is a high precision electronic product. It contains no user-
serviceable parts inside. Do not try to dismantle, modify or repair the device or charger
yourself. Any modifications could void your warranty.
Usage environment
• Environment: Do not use this product where it is excessively hot, cold, dusty or
humid, or where it is exposed to strong magnetic fields or long periods of sunshine.
Exposure to very low or very high temperatures may cause device or battery failure,
fire or explosion.
• Heat sources: Do not leave the product near any heat sources, stoves, ovens or other
appliances (including amplifiers) that produce heat.
• Interference: Do not use the phone near other electronic devices that use radio
frequency signals. Avoid using it within a 15cm range of a pacemaker (if you have a
pacemaker, do not carry the phone in a breast pocket).
Safety
• Road safety: Obey all local laws and regulations on the use of mobile devices in the
area where you drive. Give full attention to driving and the road. Keep your hands free
to operate the vehicle at all times; use hands-free operation if phone usage is required.
• Health facilities: Observe relevant rules or regulations regarding mobile phone use in
health facilities. Turn off the phone in the vicinity of medical devices and wherever directed
to do so by posted signs. Mobile phone radiation may interfere with pacemakers, hearing
aids and other medical equipment.
• Aircraft: Turn off the smartphone when boarding an airplane in order to avoid
interference with aircraft radio signals.
• Magnetic equipment: Stay away from magnetic equipment to avoid the risk of
interfering with or erasing the information stored on the device.
• Volume: Always select the appropriate volume when using the music or video function.
The volume should not be too loud when using earphones.
• Explosive environments: Turn off the phone in blasting areas and in any potentially
explosive environment (such as at a petrol station or other refuelling points).
• Back-up: To avoid loss of data, we recommend always backing up any important
information, especially before upgrading the hardware. We assume no liability for any
damage and/or data loss due to lack of back-up.
• Flashlight: Do not use the flashlight close to the eyes of people or pets.
Accessories
• Accessories: Only use the device with the Micro USB cable and battery charger
supplied. Use of other accessories not recommended in this manual may cause
damage to the unit and void your warranty.
• Battery charger: Only use the charger provided. Do not use the phone while it is
charging. Do not drop or cause an impact to the charger.
• Battery handling: Do not expose the battery to high temperatures. Take care when
General Safety Instructions
Page 6

6
After Sales Support
Telephone: 1300 886 649
Email: info@tempoaustralia.com.au
General Safety Instructions (Cont.)
handling a charged battery, particularly when placing it inside your pocket, purse or
other container with metal objects.
• Power cord: Do not bend or damage the cable of the battery charger.
• Damage: Do not use the charger if the cable or plug are damaged. In case of damage,
contact the after sales support line for advice.
• Disconnect: Grip the plug when disconnecting the charger; do not pull on the cord.
• Memory card: Always handle the phone’s memory card(s) with care. Protect the card(s)
from static electricity and strong shocks.
Usage conditions and restrictions
• Packaging: Plastic packaging materials can present a suffocation hazard for young
children and babies. Keep all packaging materials out of children’s reach to ensure they
do not play with these.
• Personal usage: Do not use this product for anything other than its intended purpose,
and only use it as described in this manual.
• Restricted usage: The equipment is not intended for use by persons (including
children) with reduced physical, sensory or mental capabilities, or lack of experience and
knowledge, unless they have been given supervision or instruction concerning use of the
equipment by a person responsible for their safety.
• Children: This phone is not a toy. Keep the phone, battery and charger away from
young children. Supervise young children when the phone is going to be used by or
near young children.
• Cleaning: Clean the housing of the device lightly with a dry cotton cloth. Do not use
alcohol, thinners, benzene or any other chemical cleaning solutions.
• Lost phone: We recommend you inform your telecommunications service provider to
block your SIM card(s) when your phone is lost. You may also want to ask them to block
the phone’s IMEI number(s), these are printed on a label inside the phone underneath
the battery. (Alternatively, the number(s) will be included on a label with the packaging.)
Please note down these numbers so you have them handy in case your phone is lost.
• Disposal: When discarding this device, observe local regulations and dispose of it
appropriately for recycling. Never dispose of the battery in a fire. Contact your local
authorities for advice on facilities.
• Noncompliance: We accept no liability for any damage caused by noncompliance with
these instructions or any other improper use or mishandling.
Page 7
7
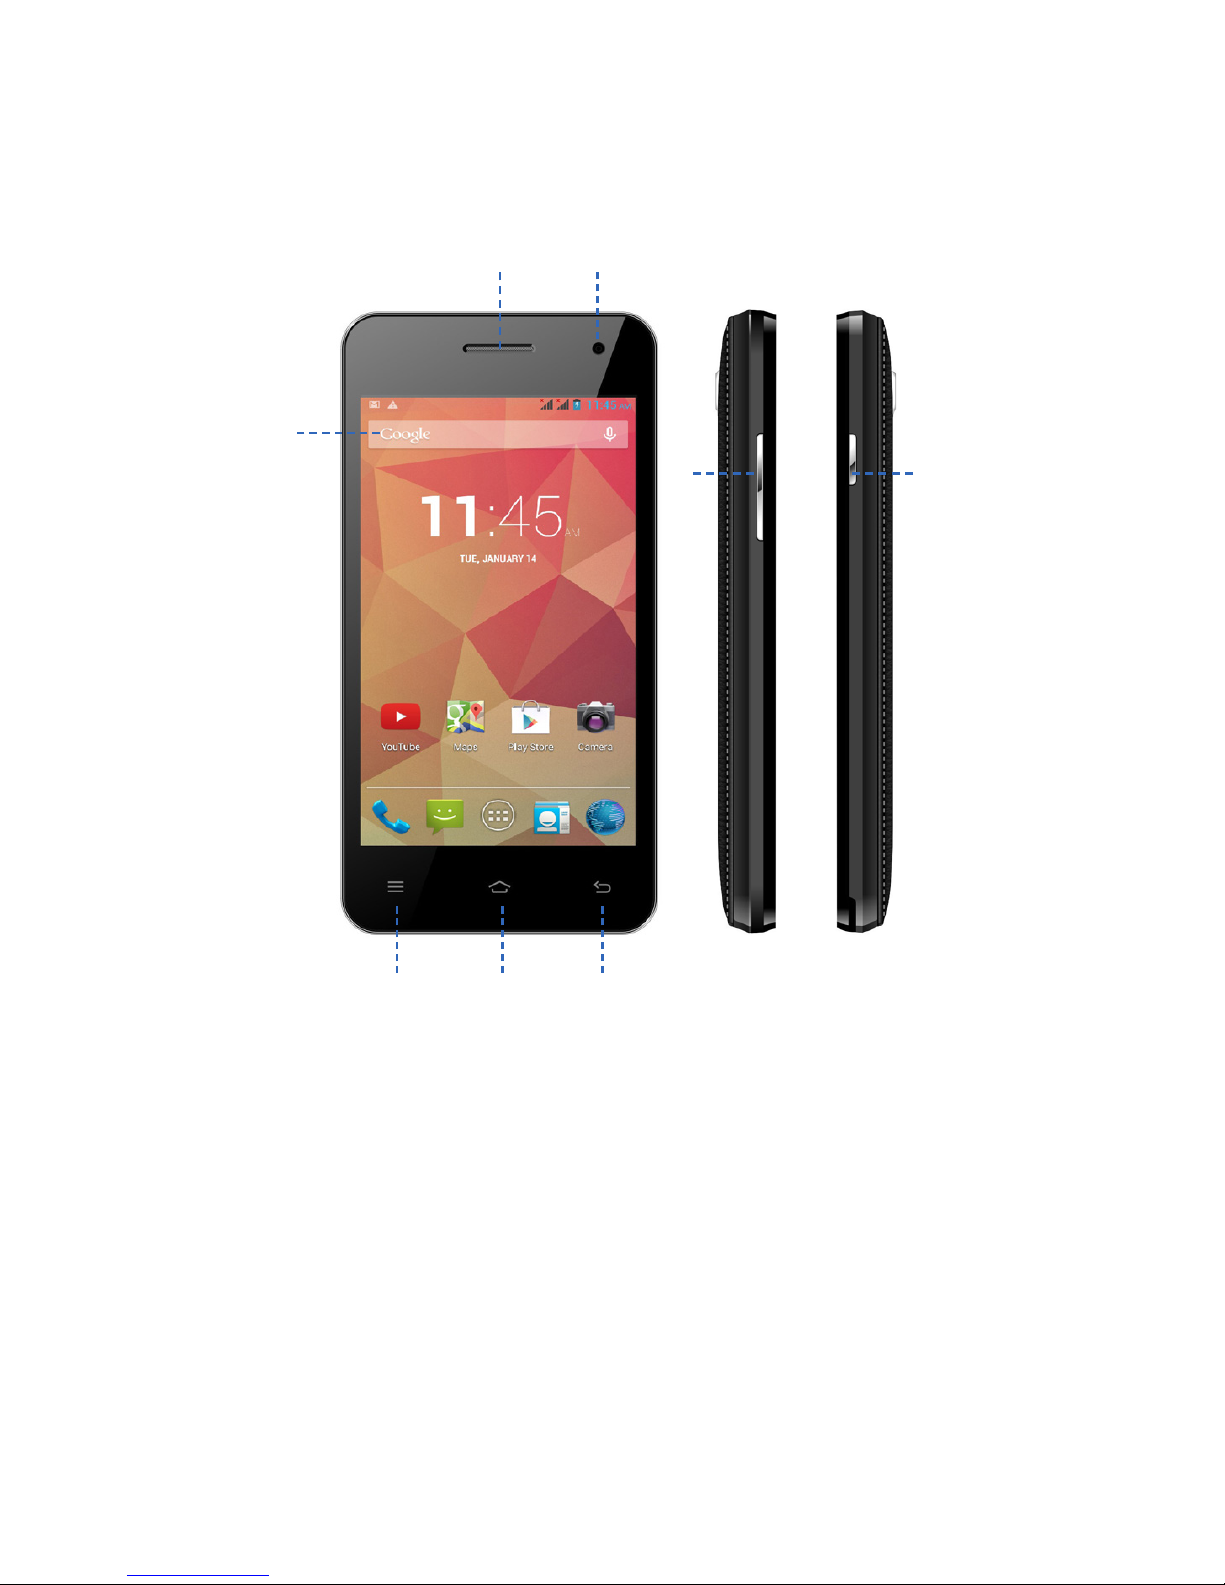
Product Overview
1 Display
2 Earpiece
3 Front Camera
4 Volume Up / Down Button
5 Power Button
6 Recent Apps/Options Menu
7 Home
8 Back/Return
1
2 3
6 7 8
4 5
Page 8
8
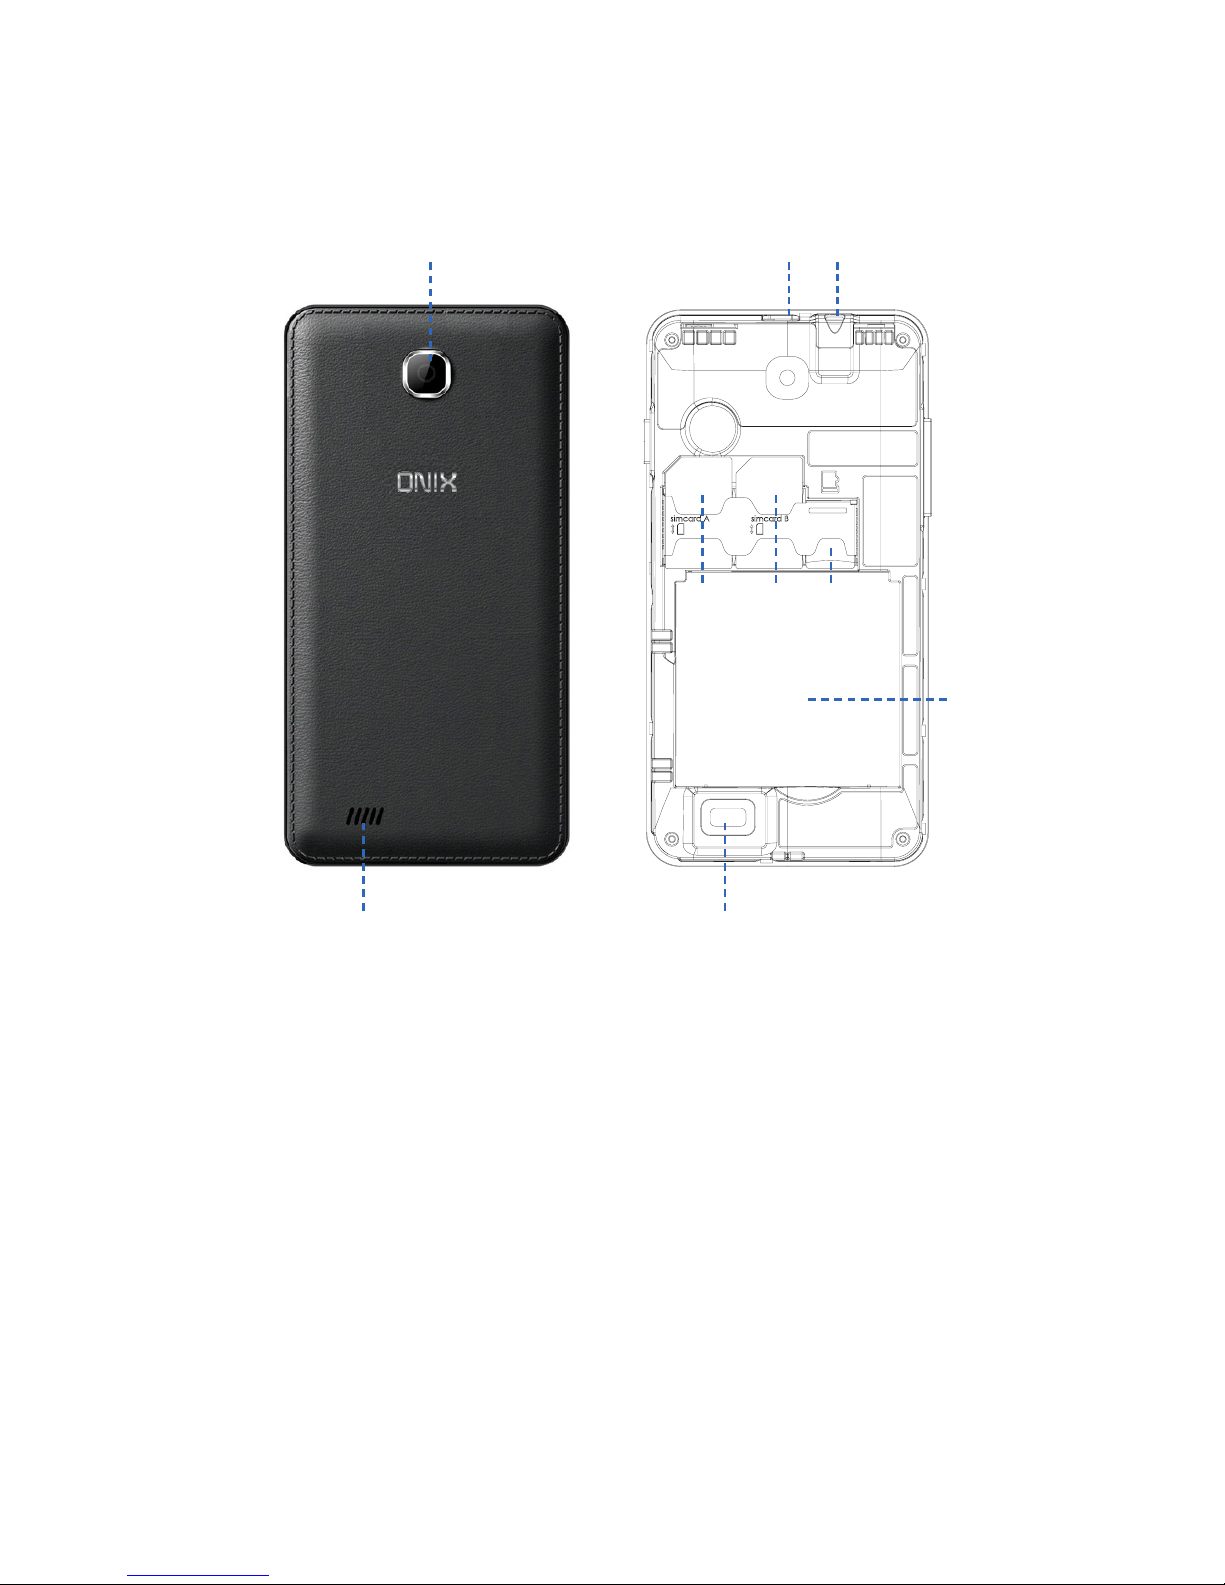
Product Overview (Cont.)
9 Rear Camera
10 Micro USB Charging Port
11 3.5mm Hands Free Port
12 SIM Slot 1
13 SIM Slot 2
14 Micro SD Card Slot
15 Battery Bay
16 Loud Speaker
9 10
12 13 14
15
1616
11
Page 9
9
Before first use
• Unpack the product but keep all packaging materials until you have made sure your
new 4” Smartphone is undamaged and in good working order. Plastic wrapping can be
a suffocation hazard for babies and young children, so ensure all packaging materials
are out of their reach.
• Unwind the USB cable and battery charging adaptor and inspect them for damage. Do
not use the cables or the charger if any part is damaged. In case of damage, contact
our after sales support line for advice on examination, repair or return of the damaged
product
• Read this manual to familiarise yourself with all the features and operating principles
of your new 4” Smartphone. Pay particular attention to the safety instructions on the
previous pages.
Micro SD Card
• Your Bauhn 4” Smartphone is compatible with Class 10 Micro SDHC cards, up to
32GB in capacity.
• Power off your Phone, then insert your Micro SD card into the SD slot on the rear of
the Phone, making sure the gold contacts are facing to the front of the Phone.
• To remove the SD card, power off the Phone and remove the battery, then gently pull
the SD card out.
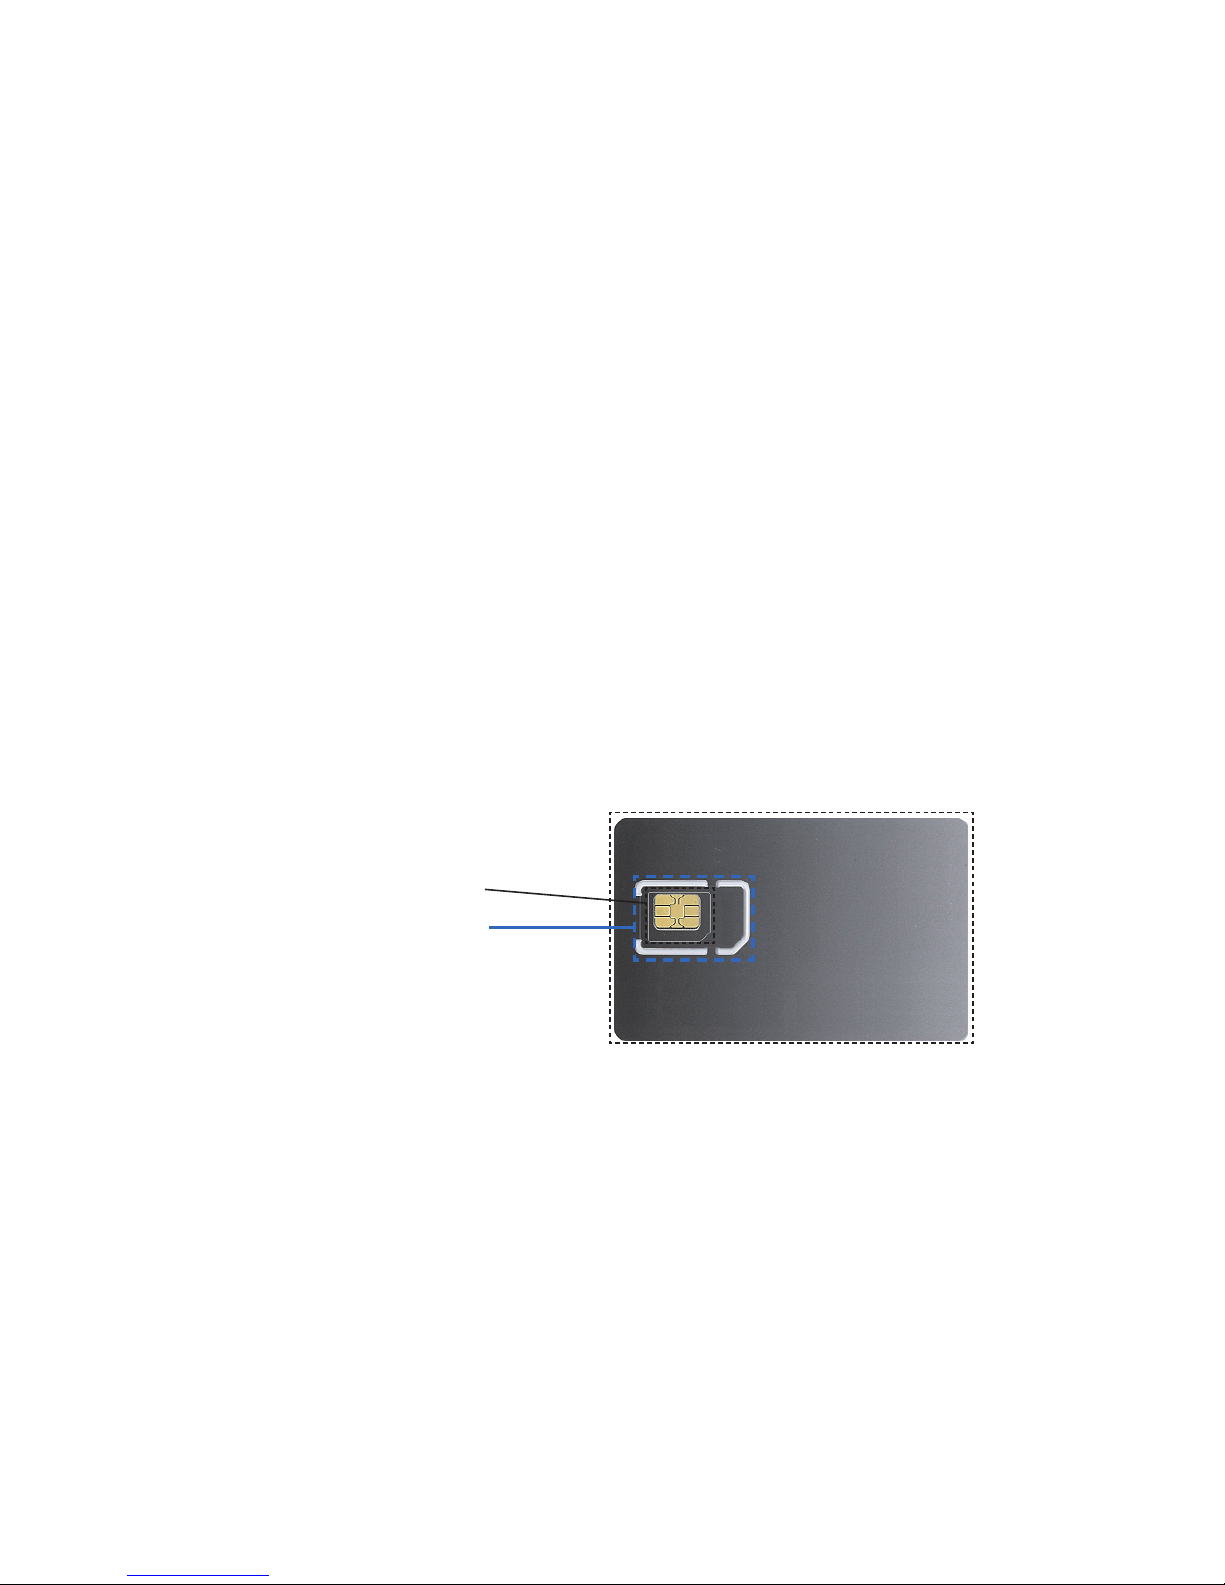
SIM Card (2G/3G)
• Your new Bauhn 4” Smartphone is compatible with Mini SIM cards.
Note: SIM card size adaptors should not be used as they may cause damage or
become stuck.
Inserting the SIM card(s) and battery
• Place you finger in the small recess in the corner of the mobile phone and with you
fingernail, carefully prise it open and lift off the back cover.
• If the battery is in place, remove it.
• Insert your SIM card(s) into the dedicated bays. If required, insert a micro SD card into
its dedicated space.
• Once the SIM and SD cards are securely in place, insert the battery (supplied) into the
phone, making sure to align the pins with the contacts.
• Reinstall the back cover. It will lock into place.
NOTE: Some SIM cards require a PIN number to be entered before use. This PIN may
be printed on the SIM card packaging, or you may have to contact your service
provider for the number.
Getting Started
Micro SIM
Mini SIM
Page 10

10
Getting Started (Cont.)
Charging
The battery has been partially charged at the factory. To perform all functions, we
recommend you fully recharge it as follows:
• To charge the device with the battery charger, plug the large end of the USB cable into
the charging adaptor and the smaller end into the micro USB port on the 4” Smartphone.
Plug the charger into your mains power supply.
• To charge the device using the USB cable and computer, plug the large end of the
USB cable into a USB port on your computer and the smaller end into the micro USB
port on the 4” Smartphone. Ensure your computer is turned on.
• When the phone indicates a full charge (the battery status icon is located in the top right
corner of the display), disconnect the charger or USB cable.
• Follow one of these charging procedures whenever your 4” Smartphone indicates a low
battery charge.
Switch on/off
Power button
• Long press to turn on.
• When in power-on state, press to turn on or off the screen.
• When in power-on state, long press to display the power off menu.
NOTE: If phone becomes unresponsive, remove and reinsert the battery
Switch on
• While in power-off state, press and hold the power button for 2 seconds and the device
will start up.
Switch off
• Press and hold the power button for 2 seconds: an options list will appear on the
screen.
• Choose to switch off the device.
Turn on/off the screen
The screen will automatically turn off when in idle time
• After a period of inactivity the screen will automatically turn off to save battery power.
This can be set using the “Sleep” setting from the display menu in the device settings
menu.
• If after a long time in sleep state the screen does not turn on, remove then reinsert the
battery. Then press the power button to turn on again.
Turn on the screen
• If the screen is off, press the power button to turn it back on.
Volume
• To adjust the ringer volume, press the Volume Up or Volume Down buttons on the right
side of the 4” Smartphone to the desired level. While adjusting the ringer volume, a
window will appear on the screen displaying the volume levels.
Page 11

11
Getting Started (Cont.)
Linking with your Google account
When you turn on the phone for the first time, you can sign in to your Google Account so
you can synchronise Gmail/Google Mail, Calendar and Contacts between your phone and
the web. You also need to sign into a Google Account to use Google Apps such as Google
Talk™ and Play Store.
• On your phone go to “Settings” and tap ‘Add Account’>’Google’>’Existing’.
• Tap “Sign in”, enter your user name and password and then tap “Sign in”. After signing
in, all emails, contacts, and calendar events on your Google Account will automatically
synchronise with your phone.
NOTE: Tap “Create” if you do not have a Google Account yet.
Google Account password
If you cannot remember your Google Account password, follow the steps below to retrieve
it:
• On your computer, open your browser and go to http://google.com/accounts.
• On the right side of the page, tap “Can’t access your account”.
• In the “Having trouble signing in?” section, select “I don’t know my password”.
• Follow the procedure on how to recover your password.
Page 12
12
Getting Started (Cont.)
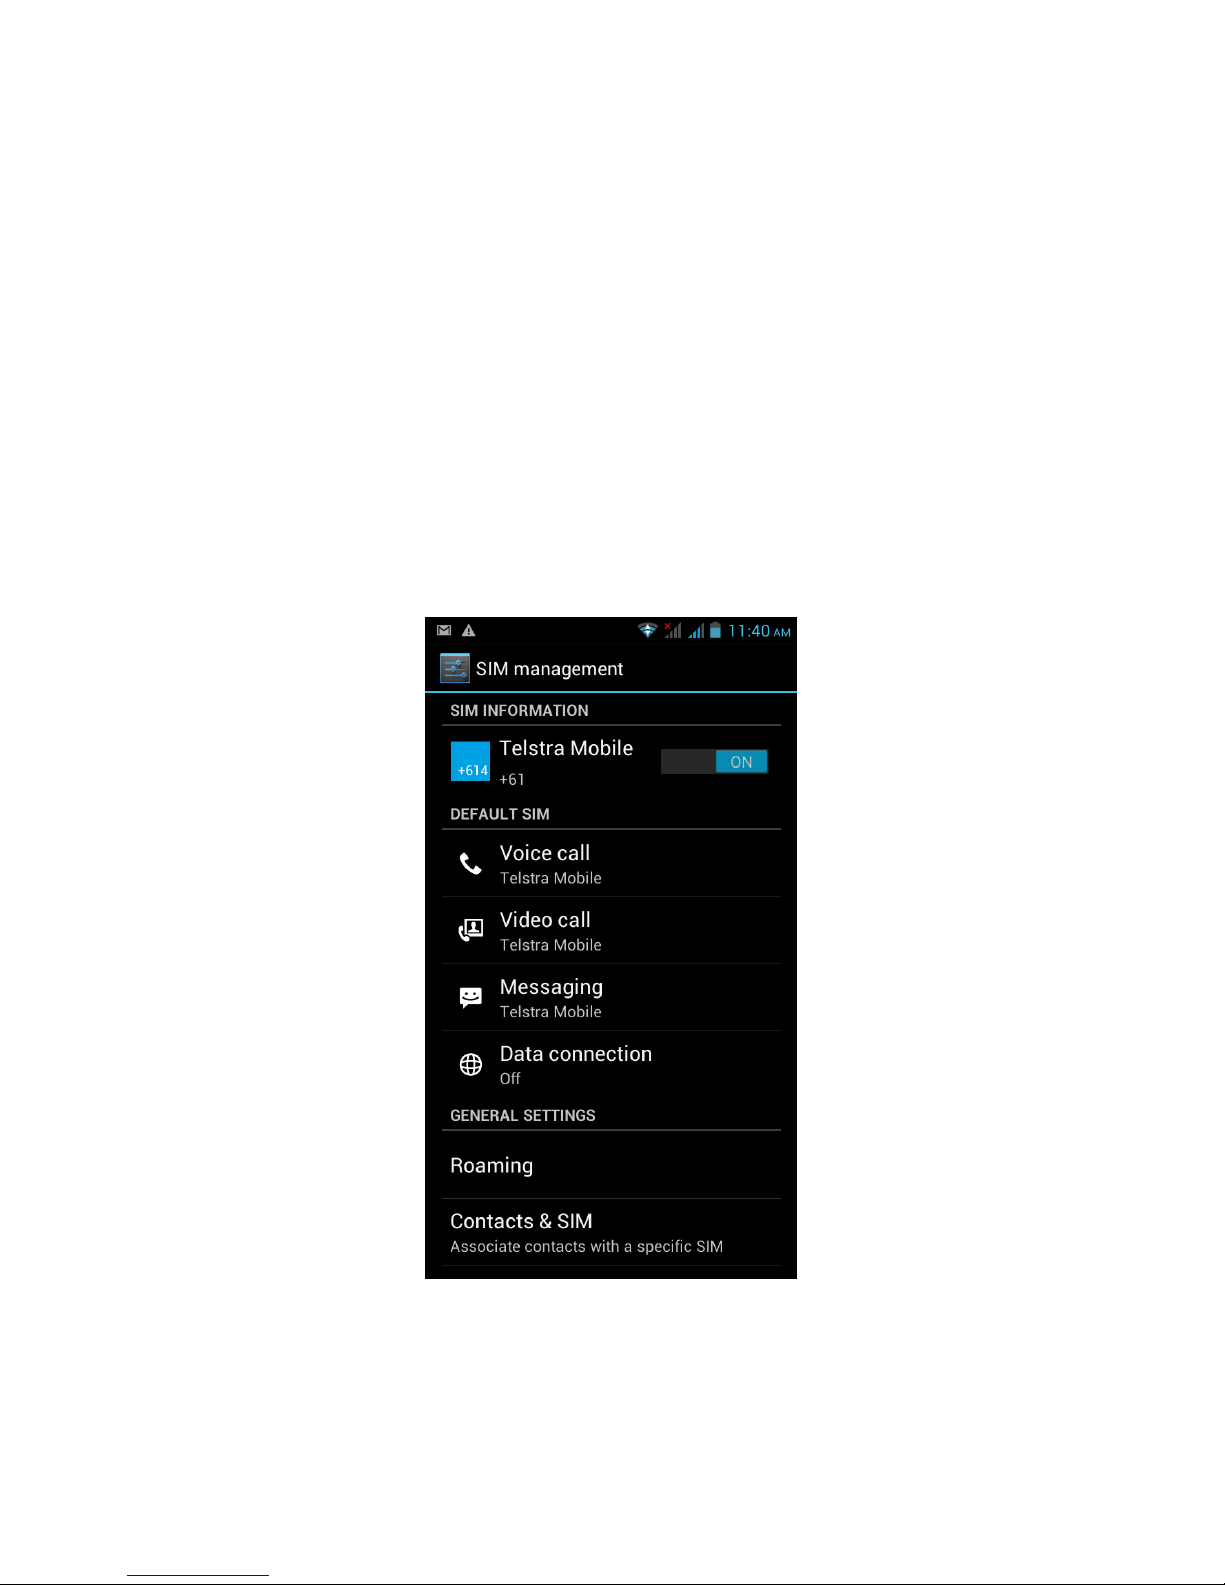
SIM management
This 4” Smartphone can be used with two SIM cards: When you have two SIM cards
inserted, you can choose to use either SIM1 or SIM2, or both of them. Unless you have
determined use of one particular SIM card as your default card in the settings, you will be
prompted to choose an appropriate SIM card every time you want to make a call or send a
message.
NOTE: Only SIM card bay number 1 supports 3G data connection.
SIM Information
Tap the check box to choose enable or disable a SIM card, or tap a SIM card to change its
information.
Default SIM
You could choose the default SIM card for your voice calls, video calls, messages or
connection.
General settings
You could change roaming settings or associate contacts with a specific SIM.
Page 13
13
Operation
Entering your PIN
If you want to use a SIM card that is preset with a PIN (personal identification number), you
will have to enter the PIN to proceed. Just follow the prompts to enter the SIM PIN and then
tap “OK”.
Screen operation
Click / Short Press
When using the on-screen keyboard, opening an application or
selecting items
Long Press
Press and hold for several seconds on an item (such as a text
box or web page link) to display the action or submenu for an
item, if available.
Slide or
Rapid Slide
Sliding or fast sliding means vertical or horizontal drag action.
Drag
When dragging, you must hold the icon with your finger and
keep pressure until it reaches destination.
Display Rotation
For most of the screens, the content will change between
landscape and portrait mode, according to the device
orientation.
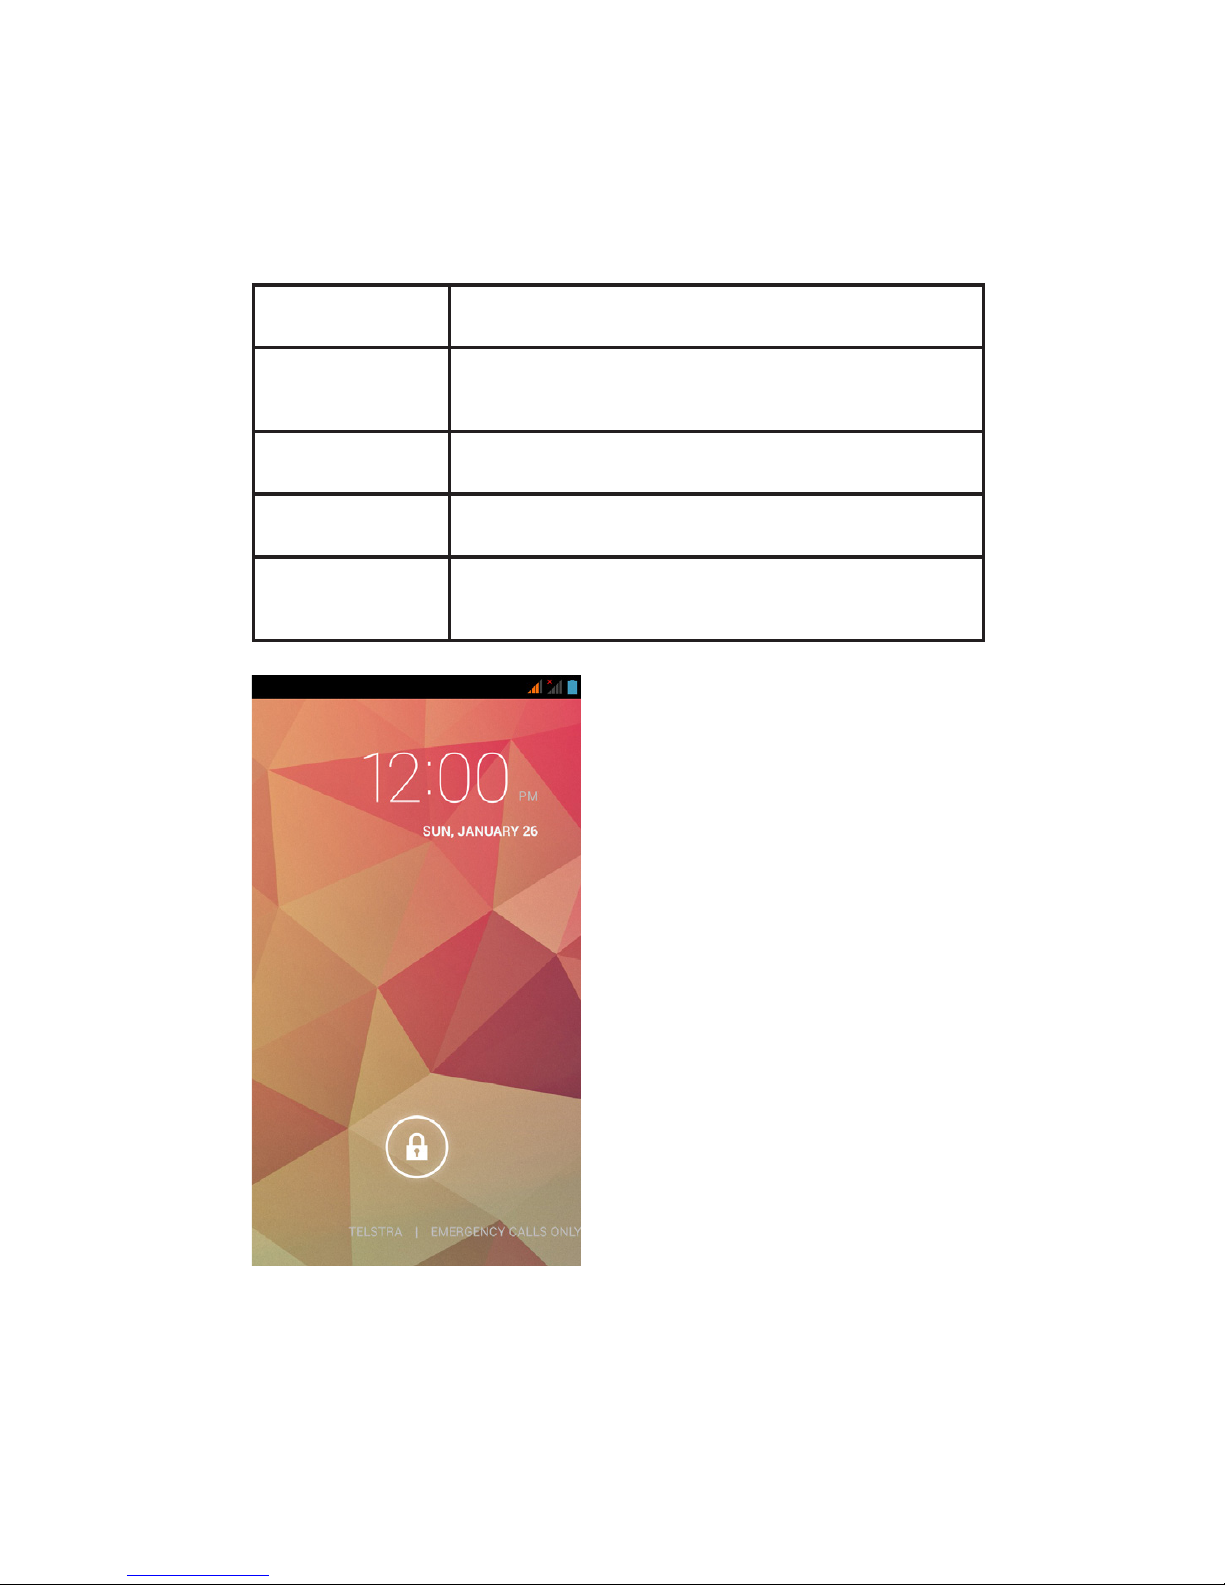
Unlocking the main screen
• Drag the lock to the right side to unlock
the screen.
• After unlocking the screen, you will see the
last item you had open or the main screen,
which has five windows or pages. You can
view the pages by dragging your finger left
and right across the screen.
• To return quickly to the main screen, press
the Home button.
Page 14
14
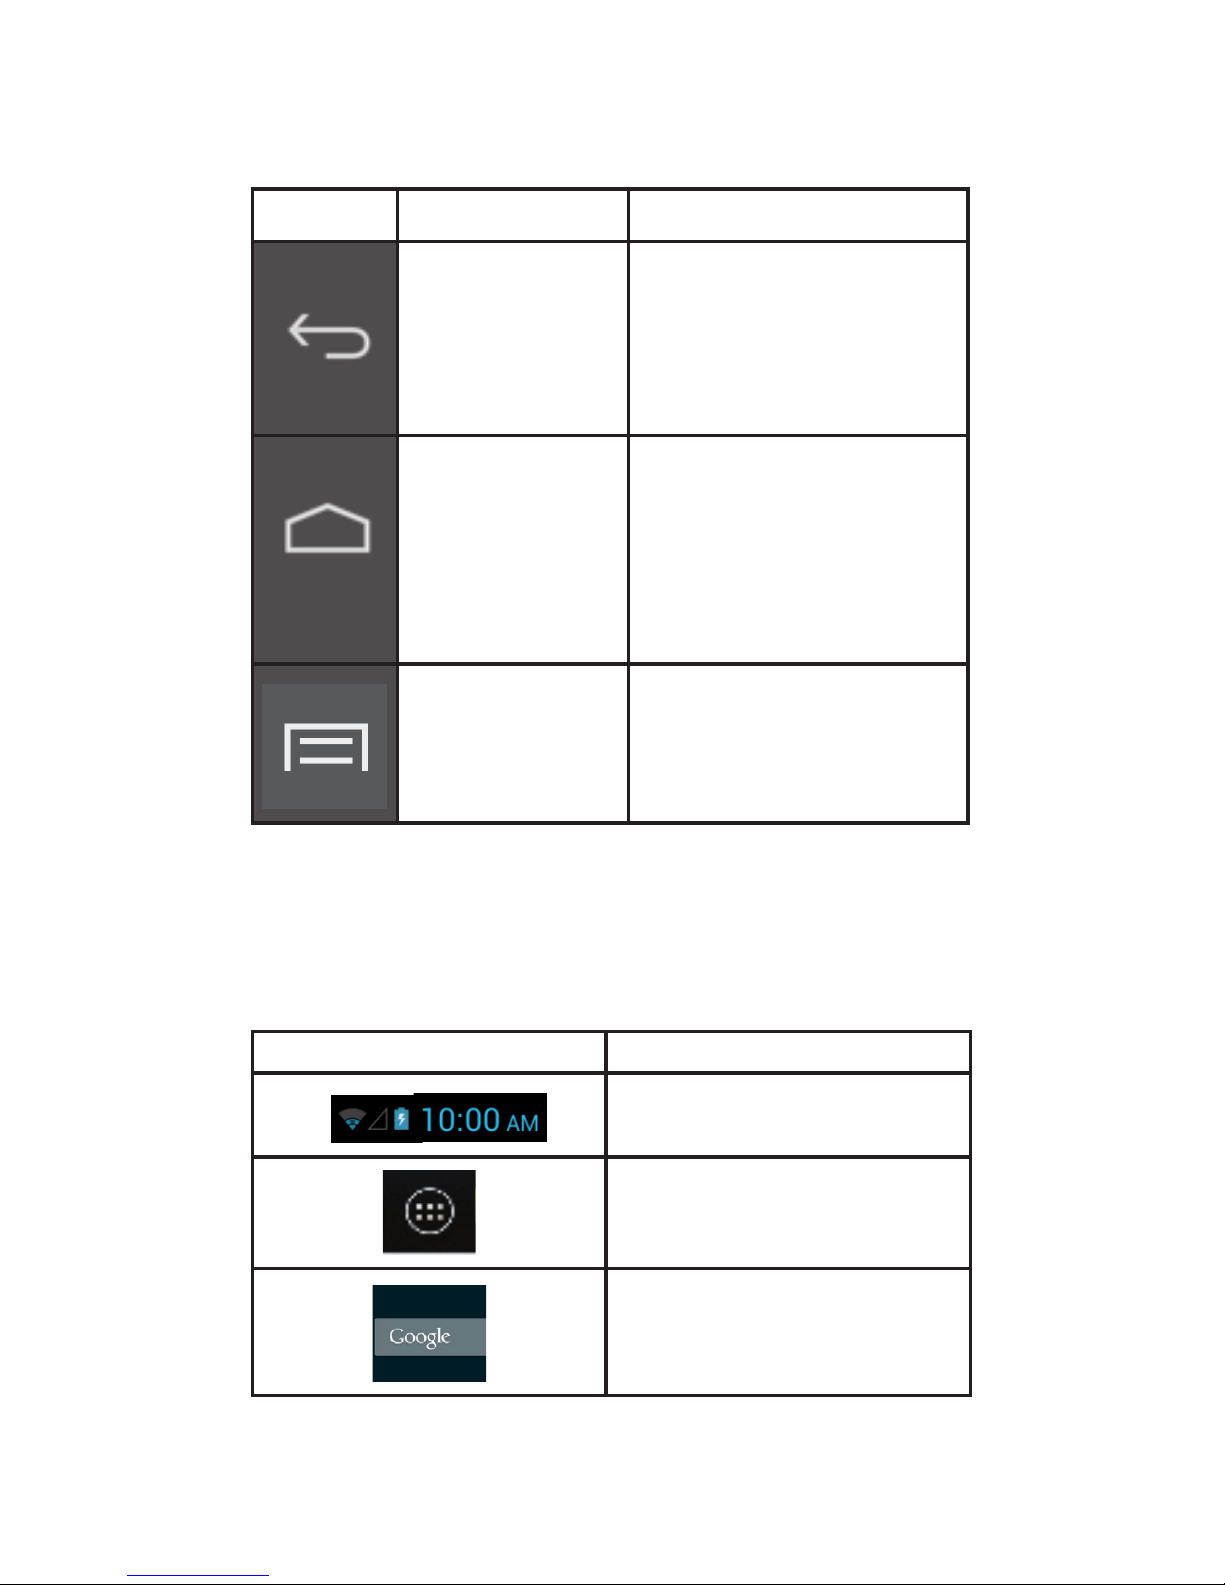
Screen buttons
There are three buttons at the bottom of the screen. No matter what functions you are
using, you can return to the last page or main screen by using these buttons.
Button Name Description
Back
Go to the last page (even in another
application). When returned to the
main screen, you cannot go to the last
page again.
Home
(Google Now)
• One key to return to the main
page (the middle page among
the five pages)
• Long press to display Google
Now Windows
Recent applications
(Options menu)
• Display a list of recently used
applications/background
applications
• Long press to display options/
settings menu when in apps
Operation (Cont.)
Icons Description
From left to right: Wi-Fi Signal Status, SIM
Signal Status, Battery Status, current time
(depends on current applications).
Click to display a list of all applications
and widgets.
Click to search for a file or application
on the 4” Smartphone, or to search the
internet.
Page 15

15
Operation (Cont.)
Notifications
The notification bar shows you at a quick glance the status of your phone. It can be
expanded to show more information and quick access to settings.
Notification icons inform you of the receipt of new messages, calendar events, set alarms
and ongoing settings for things such as active call forwarding or the current call status.
Below is a description of their meanings. Click on the column box to open the notification
list.
Expanding and closing the notifications panel
• To expand the notifications bar to see all the options, place your finger on the
notification bar then swipe/drag in a downward motion.
• To hide the notification bar, press the back button.
File being downloaded Bluetooth
Play Store No SD card
Connected with PC Wi-Fi connected
GSM signal Common notification
Alarm clock on Not enough Micro SD space
Uploading/downloading To-do events
Download finished Charging
Data Synchronisation 3G
Page 16

16
Operation (Cont.)
Phone calls
Making a call
You can make a phone call a number of different ways.
Calling using the dialler
• Tap (call/phone) at the bottom of the screen to enter the dialler screen.
• In dialler mode, when you input a number, you have two options to make a call.
1. Directly tap “Call” on the keyboard and then choose which SIM card you want to use
(if you have two SIM cards inserted).
2. Slide to the right to choose the number in your call history.
NOTE: * If you have only one SIM card inserted, you cannot use another SIM card to make a
call. When one SIM card is used for a call, the other is temporarily unavailable.
Calling a phone number in a text message
While viewing a text message, you can place a call to a number that is in the body of the
message.
• Tap the message with the phone number.
• Tap the number you want to call on the “Select action” screen. The dialler screen then
opens with the phone number automatically filled in and ready to be dialled.
• To place the call, tap “Call” (and select the SIM card you want to use, if appropriate).
Calling a phone number in contacts
• To call a number from your contacts, enter the contacts list and select the contact, then
tap the “Call” icon behind the number you want to call.
Making an emergency call
• Dial the appropriate emergency number (000 or 112 in Australia), and then tap “Call”.
• If your phone is locked with a pass code, you may still be able to make an emergency
call. On the “Enter pass code” screen, tap “Emergency call”, then enter the emergency
number and tap the call button.
Page 17

17
Operation (Cont.)
Incoming phone calls
• Receiving a phone call from a contact: When you receive a phone call from a
contact, the incoming call screen appears, displaying the caller ID icon, name and
phone number of the calling party.
• When you receive a phone call from someone else (whose contact details are not
stored in your contacts), only the default caller ID icon and phone number will appear
on the incoming call screen.
Answering a call
Slide the “Call” icon across the screen to answer an incoming call.
Rejecting a call
Slide to the “End call” icon to reject.
Muting the ring sound
To mute the ring sound without rejecting the call, press the Volume Down button or Power
button. You can also mute the ring sound by first tapping “Menu”, then “Mute”.
In-call options
When a call is in progress, you can still operate key options. Tap the available buttons to put
a call on hold, dial another contact for a phone conference, mute the phone microphone,
and more.
NOTE: When the phone is dialling, only the “End call” and “Speaker on” icons are available.
Page 18

18
Operation (Cont.)
Muting the microphone
• Tap “Mute” to turn the microphone on or off. When the microphone is turned off, the
“Mute” icon appears in the status bar.
Putting a call on hold
• Tap “Hold” to put the call on hold. When you put a call on hold, the “Hold call” icon
appears in the status bar. Tap “Unhold” to resume the call.
Turning the speakerphone on/off
• When you are on a call, tap “Speaker” to toggle between turning the speakerphone
on or off. The “Speakerphone” icon appears in the status bar when the
speakerphone is on.
• WARNING! Protect your hearing! Do not hold the phone against your ear when the
loudspeaker is turned on.
Ending a call
You have two options to end a call:
•Tap“Endcall”.
•Ifyouareusingawiredheadset,pressandholdthebuttontoendthecall.
Video calls
Use this function when you want to see as well as hear the person you are phoning, if that
person’s mobile phone supports this function.
NOTE: Not all mobile phones and networks support video calling. Contact your service
provider for details. Video calling may incur extra charges.
Page 19

19
Operation (Cont.)
Call log tab
Enter the dial number and slide to the right to the call log. Then select to:
• Tap the name or number in the list to phone the contact.
• Tap the contact icon of a name or number in the list to display the options menu where
you can choose from the following options: “View contact information” (if the number
is stored in your contacts list), “Edit number before call”, “Send text message”, or
“Remove from call log”.
Phone settings
You can adjust the phone settings of your phone such as your voice mail number, or enable
additional call services from your network service provider.
To open the phone settings menu, select SIM1 or SIM2 as appropriate, then tab “Home” >
“Menu” and then tap “Settings” > “Call settings”.
Options Description
Fixed dialling numbers Restrict outgoing calls to a fixed set of num-
bers. To enable this feature you must know your
SIM card’s PIN 2 code.
Voice mail Specify another voice mail number aside from
the voice mail number on your SIM card.
Auto answer 1 ring, 2 ring, 3 ring, Never Answer (default)
Call forwarding Select how you want your phone to handle
calls when busy, unanswered and unreachable.
You can also set call forwarding options for all
incoming calls.
Call barring Select barring outgoing or incoming calls.
Contact your network service provider(s) to
activate this function.
Additional call settings Enable or disable operator services such as caller
ID and call waiting.
Page 20

20
Airplane mode
To enable/disable airplane mode, choose one of the following options:
• Press “Home” > “Menu”, then tap “Settings” > “Wireless controls”.
• Press and hold the Power button and then tap “Airplane mode”.
• In the notification bar, tap the “Airplane mode” shortcut to turn airplane mode on or off.
NOTE: When you disable airplane mode, the phone function is turned back on and the
previous Bluetooth and Wi-Fi states are restored.
Operation (Cont.)
Call settings
Voice call
Select this option to change settings for your voice mail service and number, voice call
forwarding, voice call barring, phone number and call waiting settings.
Video call
Select this option to change your video call settings such as set a picture to display when
the camera not in use, size of peer video and local video, etc.
Internet call
Select this option to log into an Internet call account.
Other settings
Select this option to manage fixed dialling numbers, call cost information, mobile broadcast
settings and minute reminder.
Page 21

21
Contacts
The contacts application lets you manage your phone, messaging and email
communications with the contacts in your contacts list. If you are synchronising contacts
with your Google account via your PC tools, any contacts stored in those accounts will
displayed.
Contacts list
Adding a new contact
• On the Contacts list screen, press the button, then tap “Create contact”.
• Enter the contact information in the fields provided.
• Scroll to the bottom of the screen and tap “Save”.
Searching for a contact
• Press the button to enter the search menu, a search bar will appear at the top
of the Contacts list screen.
• Enter the first few letters of the first or last name of the contact you are searching,
matching contacts will be displayed.
NOTE: If the list of matching contacts is long, tap to hide the on-screen keyboard to view
more results.
Deleting a contact
• On the Contacts list screen, press “Menu” and then tap “Delete contact”.
• On the Delete screen, you can select “Multiple choice”, or “Mark all”.
• WARNING: This operation will permanently delete the contact. Take care when using it.
Display options
Choose this setting to customise your display options, including default and Gmail account
display options.
NOTE: After synchronising contacts with your Google account, add the contact to the phone
and select “All other contacts” in your Gmail account display options to display the
contacts in the list.
Operation (Cont.)
Page 22

22
Operation (Cont.)
Messaging
Messaging lets you compose and send text (SMS) and multimedia messages (MMS) to other
mobile phones.
Creating and sending SMS and MMS messages
• Any text (SMS) messages you compose that contain up to 160 characters will be
delivered as one message. If your message contains more than 160 characters, it
will still be delivered as one but it will count as more than one message. Your service
provider may charge you extra for such linked (concatenated) messages.
• Multimedia (MMS) messages can contain text and a picture, a recorded voice, an
audio or video file or a picture slide show.
• Tocreateandsendatextmessage, tap “Create” on the All messages screen and
enter the phone number of the message recipient in the To field on the Compose
screen. Any matching contacts will appear on the screen. Tap a recipient or continue
entering the recipient’s phone number. Tap the text box that contains the text “Type
message”, and then start composing your message. When done, tap “Send” to send
the message.
NOTE:
• As you compose the message, a counter in the top right corner of the text box will
keep track of the number of characters. Once you go over 160 characters, a new
message is created but automatically linked into one when received.
• To receive delivery reports and notifications when a text message is received, press
“Menu” and then tap “Settings” on the All threads screen. In the SMS settings
section, select the “Delivery reports” check box.
Page 23

23
Operation (Cont.)
Applications and widgets
Enter applications
Click to enter the list of all applications and widgets.
Click on the APPS tab in the top left corner.
• This window will display a list of the applications.
• As you install more applications, the first page will fill up and the application icons will
automatically spread onto other pages.
• Swipe left and right to see the other pages.
Page 24

24
Operation (Cont.)
Add and manage desktop icons
Add desktop icons
At the application list or widget list, long press any application or widget and the device will
shift into desktop, then drag the icon to any place on the desktop.
Desktop shortcuts management
To create a folder on the main screens, just drag and overlay any icon onto another icon, then
release. A new folder will be created containing the two applications. It will appear as a black
circle with small icons of your apps on top.
Page 25

25
Operation (Cont.)
Then you can view the folder contents by clicking on the folder icon and it will display as
pictured below.
You can change the icon positions inside the folder by long pressing them, then dragging to
the new position.
If you want to remove an icon from the folder, long press the icon and drag to outside the
folder.
To change the folder name, click on the folder, then tap “Unnamed folder”. A keyboard will
appear. Type the new name, then tap “Enter” to apply it.
Page 26

26
Operation (Cont.)
Connect with computer
Connect the device to a computer with a USB cable. When connected with a computer, a
message will appear in the notification bar which will describe which USB mode the Phone
is in.
Gallery Choose from the
pictures stored on
your 4” Smartphone
camera gallery
or any pictures
downloaded onto
the device.
Wallpaper Choose from the
default wallpapers.
Live Wallpaper Choose a moving
wallpaper
Video Wallpaper Choose a video to as
your wallpaper
There are 4 options available to choose from.
• USB Storage
• Media Device (MTP)
• Camera (PTP)
• Charge only
Some devices or computers may only be able to detect the tablet if ‘USB Storage’ is
selected. After choosing an option, you may need to disconnect the USB cable, then
reconnect it. When ‘USB Storage’ mode is selected, you will need to click on “Turn on USB
storage” when the message appears.
NOTE: USB Storage mode will only show the contents of the Micro SD card (if inserted).
If the message does not appear when you connect the tablet to your computer with a USB
cable, or if the device does not appear on your computer, try the following.
• Check and ensure that you have turned the tablet on. Check and ensure that your
computer is turned on.
• Unplug the USB cable, then reconnect it to the same USB port.
• If your computer has USB ports on the rear, try connecting to one.
• Try a different USB cable.
Page 27

27
Browser
Tap to open the browser.
Operation (Cont.)
Tap to open a new browser window.
Tap to close the current browser window.
When the internet signal is poor and the web page does not load, tap “Refresh” in
the menu to try loading the web page again. There are many useful advanced options
in “Settings”.
Page 28

28
Operations (Cont.)
Screen compatibility
When the device is installed with programs designed for small screen and cannot show in
full screen, a screen zoom menu will pop up. You must confirm it to open those programs.
Background applications
Tap the “background applications” (recent applications) on-screen button to show all
programs running in the background. Tap an item to re-open it.
Drag the items to the left or right to close and remove the application from the list.
Page 29

29
Operations (Cont.)
Get and install applications
There are two ways to get applications software: download through this device or copy from
a computer.
Option 1: Download using a “Market” or ‘“Store” application
Download applications software using applications such as Google’s “Play Store”. Below are
photos showing the process of downloading “Angry birds” from “Play Store”.
After downloading, the application will automatically install the software.
NOTE: Some applications may not be compatible due to hardware requirements or
geographic location limitations of the application.
Option 2: Copy installation file from computer
Copy an application install file (APK) from a computer to the storage of the 4” Smartphone,
then find and install them using “File manager”. Tap on the file to install it.
Page 30

30
Uninstall applications
• Open the applications window and tap , then tap on “Apps” from the menu on
the left.
• Use the tabs at the top and scroll up and down through the list of applications until you
find the application you wish to uninstall.
• Click on the application, then an App info page will appear.
• Click on the Uninstall button and the application will be removed.
Operations (Cont.)
Play Store and Calendar error messages
Occasionally when linking a new Google account to your 4” Smartphone, you may receive
various error messages such as “...error (-101)...” in the Play Store, or your Calendar
appointments and events may not appear.
To fix this issue and re-syncronise the 4” Smartphone with your Google account, please
follow the steps below.
1. Open the applications window and tap , then tap on “Apps” from the menu on
the left.
2. In the window on the right-hand side, tap the “All” tab at the top.
3. Scroll up and down through the list of applications until you find “Google. Services.
Framework” and click on it.
4. Tap the “Clear data” icon.
5. Click on “Yes”.
6. Press and hold the Power button for 2 seconds.
7. Tap “Yes” to agree to turn off the 4” Smartphone.
8. Once the phone has finished shutting down, turn the phone back on.
9. Open the “Play Store” app and wait for the images to load. Once they have finished
loading, press the Back button.
10. Wait for 30 seconds then reopen ‘Play Store’ app.
11. You may now open “Calendar” and check your entries are there, or open “Play Store”
and download the application you that was giving the error message.
Page 31

31
The setting function on this 4” Smartphone is like that on a computer control panel. You can
access the settings page from the notifications bar or “Setting” icon in the applications list.
Wireless and networks
The “Mobile Networks” section is located under the “More” option.
• To activate data using your SIM card select “Data connection”.
• The remaining settings should be left with default values unless your local service
provider advises you otherwise.
Settings
Page 32

32
Settings (Cont.)
• Tap “Wi-Fi” to open the Wi-Fi function.
• To the right of the “Wi-Fi” label is the button to enable and disable Wi-Fi.
• Press the On/Off button to turn the Wi-Fi function on or off
• Click on the network you wish to connect to.
Connecting Wi-Fi
When the Wi-Fi network is not protected, it will connect with the device automatically. For
information security reasons, be careful using unprotected Wi-Fi sources. When you click on
a protected Wi-Fi, a window will pop up to input a password.
Page 33

33
Settings (Cont.)
There are more useful advanced Wi-Fi settings when you choose to “Show advanced
options”.
Page 34

34
Bluetooth
Enable or disable bluetooth
1. Tap “Settings” at the main menu or applications list.
2. In the “Wireless & networks” menu, tap “Bluetooth”.
3. Tap the On/Off button in the menu on the left to turn Bluetooth on or off.
Change Bluetooth device name
By default, the Bluetooth device will have a name. To make your devices more easily
identifiable, you can rename it as follows.
1. Go to “Settings” > “Wireless & networks” and make sure Bluetooth is on.
2. Choose “Bluetooth”.
3. Input the new name.
Pair with other Bluetooth device
1. Tap “Search for devices”, the device will scan for all available Bluetooth devices. If it
cannot find the one you want, check if the other device Bluetooth is on.
2. Tap a Bluetooth ID to pair. If it is password protected, input the password at both
devices.
Settings (Cont.)
Page 35

35
Device
Audio profiles
Set all sound options here.
Click on “Volumes” to change the volume levels for multimedia players and applications,
and also for notifications and alarms.
Display
You can set brightness, wallpaper, auto-rotate, and font size options.
Settings (Cont.)
Page 36

36
Storage
Internal storage: space for installation of applications (APK software)
External SD: storage space on the removable SD card (if inserted)
Battery
Show battery balance and consumption.
Applications
Here you can manage applications, such as uninstall them or clear application data.
Settings (Cont.)
Page 37

37
Settings (Cont.)
Personalisation
Location access
Allows you to enable or disable the various location services such as GPS.
Page 38

38
Settings (Cont.)
Security
The security menu contains many useful options for securing your 3G Smartphone and
data.
Screen lock: Change or set a protection method for locking the screen.
Owner info: Enter text that will be displayed on the lock screen. This is a message that
others can see without having to unlock the phone.
Encrypt phone:
Apply encryption to all data on the 4” Smartphone. Also requires you to enter a PIN or
password to use your phone each time you turn it on.
WARNING: Data cannot be recovered if you forget the PIN or password you set!
Unknown Enable this if you wish to install applications (APK files) that
sources: are not from the “Play Store”.
NOTE: If you forget the screen lock password, PIN or pattern, you must perform a firmware
reset on the device. Passwords cannot be recovered.
Page 39

39
Language and input
In this area you can change the system language and change settings for the keyboard.
Keyboard
Some applications can open the keyboard automatically; others require you to click in an
input field/area first.
You can hide the keyboard by holding down the Back button.
Settings (Cont.)
Page 40

40
Settings (Cont.)
Text selection - Copy, Share, Find
• Press and hold on one of the words you wish to select. The word will highlight in blue
and a blue tab will appear at both ends.
• Press and drag the blue tabs to highlight the text you wish to select.
• Choose the task you wish to perform from the menu that appears at the top of the
screen.
Text selection - Paste
• Once you have used the above method to copy text to the clipboard, press and hold on
a field in an application or area of a document where you wish to input the copied text.
• A blue tab will appear, drag it to the position you want the text inserted, then click
‘Paste’.
Other operations
To input capital letters:
• Press the Shift button or keep pressing on Shift while inputting
letters.
To switch to capital letters:
• Press and hold the shift button while in lower case mode, the icon will change
into . Press again to switch back to lower case mode.
• Figures and numbers:
• Press the “?123” button. You can then press the “~\{” button for more choices.
Frequently used symbols:
• Press and hold a symbol button to enter the alternate symbol displayed in grey above
it.
• Press Shift and click the special symbol which is shown in grey at the corner
of any letters to input the symbol.
Mouse/trackpad
This allows you to adjust the pointer speed of any attached mouse or trackpad device, such
as a Bluetooth mouse.
Backup and reset
Reset to factory settings: When some applications or the phone itself do work properly,
you can use this function to return the 4” Smartphone to factory default settings. But you
will lose all user installed applications and data. It is therefore important that you back up
important data first.
Page 41

41
Settings (Cont.)
System
Date and time
Contains options for setting the time zone, date and time.
Accessibility
Contains settings for easy use of applications and services (if installed).
About
Displays some information about the device.
Camera
The camera has photo-taking and video-recording functions. There are two cameras on
the phone.
You can find your camera photos and video footage at > Applications > Gallery, or see
camera videos and all other video files at > Applications > Video Player
Click to take photos.
• The first time you open the Camera application a short animation will play showing you
how to use the camera options..
Downloaded files management
When downloading files, you can check download status, view, reopen or delete them using
“Download management”.
Manage downloaded files
• Applications > Downloaded files .
• Tap any one to open it.
• Choose any file you want to share with others, then tap “Sharing” , then
choose a way to share.
• Choose any file you want to delete by tapping .
• Click “By size” or “By date” to array the files.
Page 42

42
After Sales Support
Telephone: 1300 886 649
Email: info@tempoaustralia.com.au
Settings (Cont.)
Radio
To use your 4” Smartphone to listen to the radio, first inset the earphones, then tap “FM
Radio”.
Selectable channel
• Tap “OK” to select the or icon to scan through the frequency band
or fine-tune a channel.
Adjust the volume
• Tap “Menu”, then select “Mute” to mute the sound; select “Mute” again to restore the
sound.
• With the earphones disconnected, tap “Menu”, then select “Speaker” to listen to the
radio volume through the external speaker.
Scan and save
• Press the Setting button and select “Scan & save”.
• If you tap “OK”, all presets will be removed and the radio will scan for available
channels.
Page 43

43
After Sales Support
Telephone: 1300 886 649
Email: info@tempoaustralia.com.au
Specifications
CPU
MTK6572M Dual Core 1GHz
OS
Android 4.2
Display
Diagonal 4”
Resolution
480 x 800 WVGA
Internal memory
Built-in 4GB
RAM
1GB
Touchscreen
Capacitive screen (2 points)
Battery
Built-in 1100mAh (removable)
WiFi
IEEE 802.11b/g/n single band
Bluetooth
Version 3.0 with A2DP
SIM
Dual SIM / Standby
2G / 3G module
2G: GPRS/EDGE, 3G: WCDMA/HSPA
Frequency
2G: 850/900/1800/1900 MHz
3G: 850/2100 MHz
GPS
Built-in GPS module
G sensor
Screen Rotation sensor
Cameras
Front: 0.3MP, rear: 2MP Fixed Focus
Micro SD
Supports up to 32GB Micro SDHC class 10 cards
Microphone
Built-in microphone
I/O Ports
1 x 3.5mm Handsfree Headphone socket
1 x Micro USB
1 x Micro SD Card
2 x Mini SIM Card
Page 44

44
After Sales Support
Telephone: 1300 886 649
Email: info@tempoaustralia.com.au
Repair and Refurbished
Goods or Parts Notice
Unfortunately, from time to time, faulty products are manufactured which
need to be returned to the supplier for repair.
Please be aware that if your product is capable of retaining usergenerated data (such as files stored on a computer hard drive, telephone
numbers stored on a mobile telephone, songs stored on a portable
media player, games saved on a games console or files stored on a USB
memory stick) during the process of repair, some or all of your stored
data may be lost. We recommend you save this data elsewhere prior
to sending the product for repair.
You should also be aware that rather than repairing goods, we may
replace them with refurbished goods of the same type or use refurbished
parts in the repair process.
Please be assured though, refurbished parts or replacements are
only used where they meet ALDI’s stringent quality specifications.
If at any time you feel your repair is being handled unsatisfactorily, you
may escalate your complaint. Please telephone us on 1300 886 649 or
write to us at:
Tempo (Aust) Pty Ltd ABN 70 106 100 252
PO BOX 6056 Frenchs Forest, Sydney, Australia NSW 2086
Telephone: 1300 886 649 (Aust) - Fax: (02) 9975 2688
Tempo Help Desk: 1300 886 649 (Aust)
(Operating Hours: Mon-Fri 08:30am to 06:00pm EST)
Email: info@tempoaustralia.com.au
4” Dual SIM Smartphone
 Loading...