

Page 1
Instruction Manual
Model: ABVM-014
Digital Video Baby Monitor
1300 886 649 Model: ABVM-014 Product Code: 49335 02/2015
www.tempo.org
AUS
Page 2

2
1300 886 649 Model: ABVM-014 Product Code: 49335 02/2015
www.tempo.org
AUS
Welcome
Congratulations on choosing to buy an ONIX product.
All products brought to you by ONIX are manufactured to the highest
standards of performance and safety and, as part of our philosophy of
customer service and satisfaction, are backed by our comprehensive
1 Year Warranty.
We hope you will enjoy using your purchase for many years to come.
Page 3
3
1300 886 649 Model: ABVM-014 Product Code: 49335 02/2015
www.tempo.org
AUS
Welcome 2
Important Safety Instructions 4
Product Overview 6
Getting Started 8
Instructions 12
FAQs 15
Technical Specifications 16
Repair and Refurbished Goods or Parts Notice 19
Contents
Page 4

4
1300 886 649 Model: ABVM-014 Product Code: 49335 02/2015
www.tempo.org
AUS
Important Safety Instructions
READ CAREFULLY AND KEEP FOR FUTURE REFERENCE
This baby monitor complies with the relevant standards regarding
electromagnetic elds and is safe to use when handled as described in
this instruction manual. It is therefore important that you read carefully
all instructions and warnings in this manual before using the device.
Read this manual thoroughly before first use, even if you are familiar with this
type of product. Keep the manual in a safe place for future reference, along
with the purchase receipt, warranty material and carton. If applicable, pass
these instructions on to the next owner.
Electrical safety
• Only use the power adaptors provided.
• Do not kink, squash or damage the cords of the power adaptors. Do not
let a cord hang over the edge of a table or benchtop. Do not let it touch hot
surfaces. Do not place anything on top of the cord. Do not pull on the cord
when disconnecting the power adaptor.
• Do not touch the plug contacts with sharp or metal objects.
• Do not use the baby monitor near water or near a heat source.
Setup
• Adult installation/setup is required.
• Do not place this product on an unstable table, shelf, stand or other
unstable surface.
• Do not place the baby unit or cables in the cot or within arm’s reach of the
baby (at least 1 metre away).
• Other electronic products may cause interference with your baby video
monitor. Try installing your video and audio monitor as far away from these
electronic devices as possible: wireless routers, radios, mobile phones,
intercom systems, room monitors, televisions, personal computers, kitchen
appliances and cordless phones.
Usage conditions and restrictions
• This baby monitor is intended as an aid. It is not a substitute for
responsible adult supervision. It is not intended for use as a medical
monitor.
• This product is not a toy. Do not allow children to play with it.
• Keep all cords out of reach of children at all times.
Page 5

5
1300 886 649 Model: ABVM-014 Product Code: 49335 02/2015
www.tempo.org
AUS
Important Safety Instructions (Cont.)
• This appliance is not intended for use by persons (including children) with
reduced physical, sensory or mental capabilities, or lack of experience
and knowledge, unless they have been given supervision or instruction
concerning use of the appliance by a person responsible for their safety.
• Regularly examine all components for damage. Do not use the unit if
damaged. Contact our after sales support centre for advice.
• Test the sound reception every time when you turn on the units.
• This product has no user-serviceable parts contained inside. Do not
attempt to open the units.
• Be aware of possible loss of privacy while using public airwaves.
Conversations may be picked up by other nursery monitors, cordless
phones, scanners and similar equipment.
• We assume no liability for any eventual injury or damages due to improper
use or incorrect handling, or noncompliance with these instructions.
Page 6
6
1300 886 649 Model: ABVM-014 Product Code: 49335 02/2015
www.tempo.org
AUS
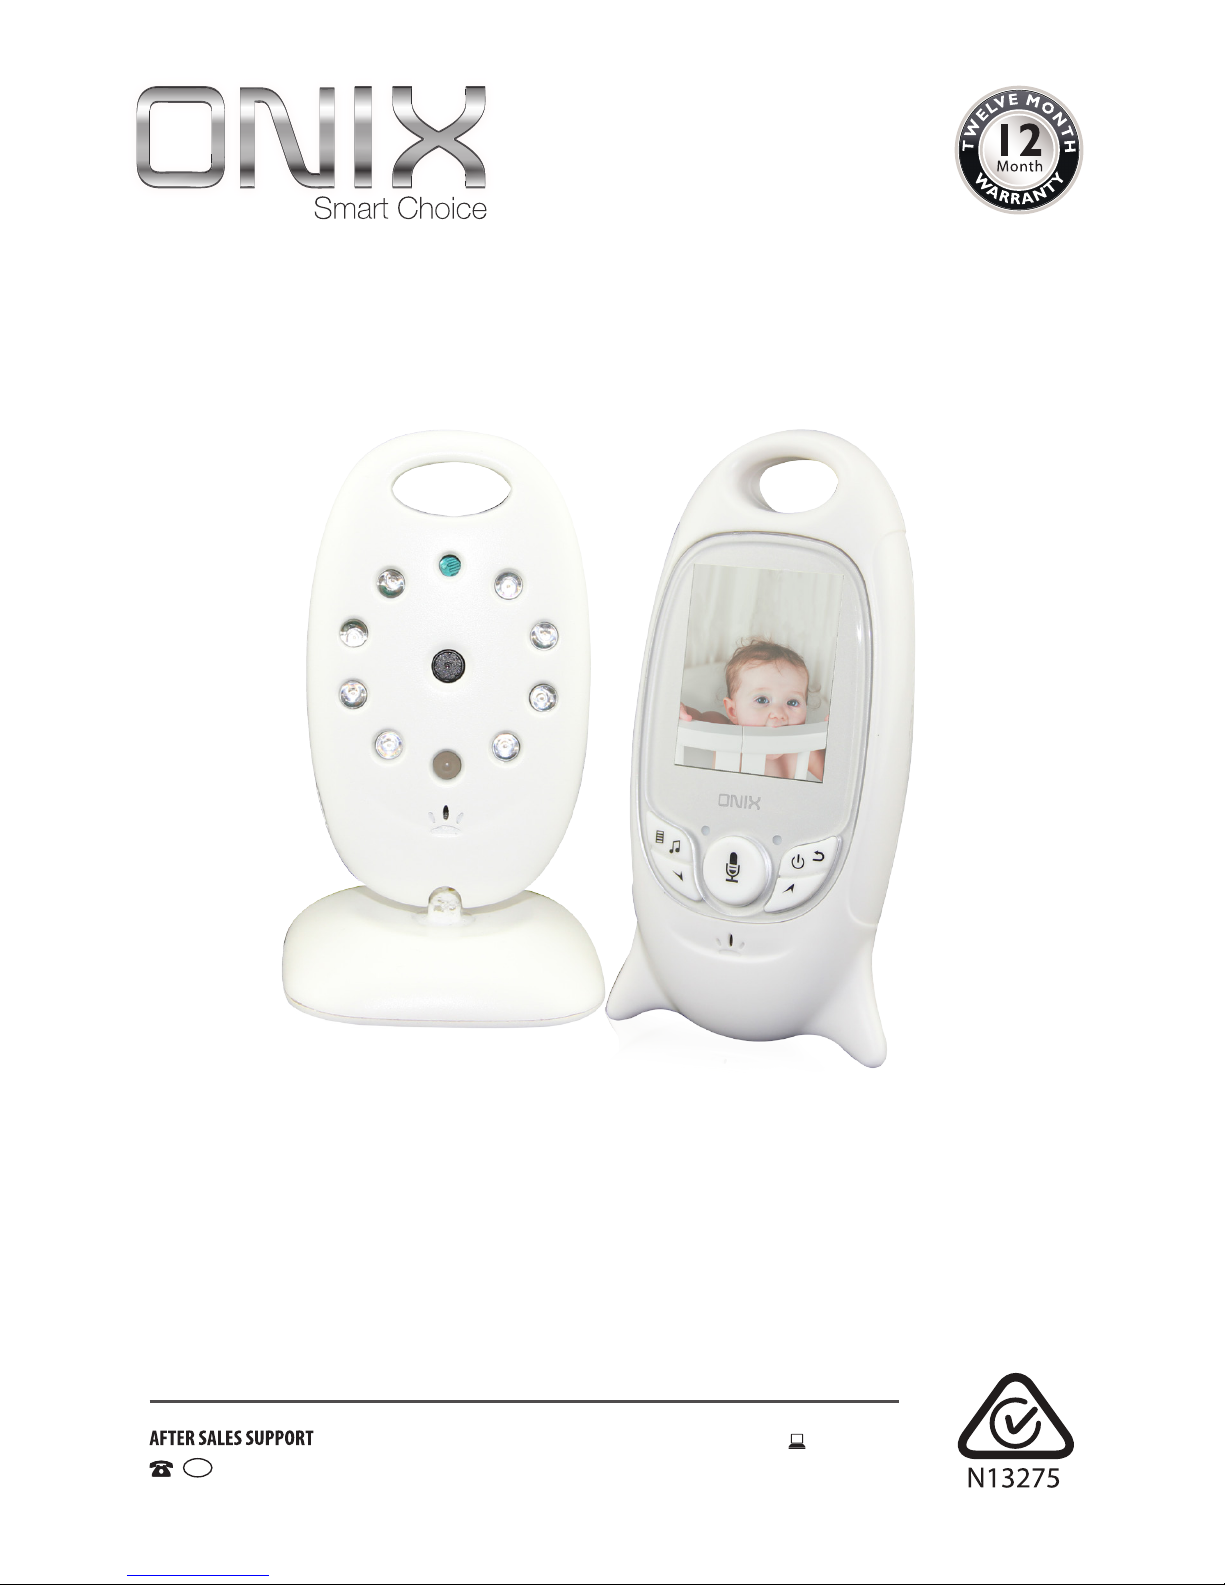
Product Overview
1 LCD screen - displays the video image and menu screen operations
2 Signal reception indicator LED - illuminates blue when receiving images
from the camera
3 Power indicator LED - illuminates red when the receiver unit is powered on
4 Menu button - press to access the menu options
Music button - press and hold to start lullaby music player
5 Power button - press and hold to turn the receiver unit on or off
Return button - press to go back to the previous page when navigating
menu options
6 Volume – button - press to decrease the volume
Down button - press to navigate down on the menu screen
7 Volume + button - press to increase the volume
Up button - press to navigate up on the menu screen
8 Push To Talk button- press and hold the ‘push to talk’ button to talk
back to baby
9 Microphone
10 Speaker
11 Mini USB power adaptor socket - insert the adaptor cord for charging
12 Stand - fold out to stand up the unit
Receiver (Parent) Unit
1
10
11
12
2
4
6
8
9
7
5
3
Page 7

7
1300 886 649 Model: ABVM-014 Product Code: 49335 02/2015
www.tempo.org
AUS
Product Overview (Cont.)
1 Light sensor
2 Infrared LEDs - back-up light for night vision
3 Camera lens
4 Power LED - illuminates green when the unit is powered
5 Microphone
6 Speaker
7 Pair button - press during the re-registration process (not necessary for
initial use)
8 Temperature sensor
9 Mini USB power adaptor socket - insert the adaptor cord for powering
Camera (Baby) Unit
1
2
6
8
7
9
3
4
5
Page 8
8
1300 886 649 Model: ABVM-014 Product Code: 49335 02/2015
www.tempo.org
AUS
Getting Started
Unpacking
• Recycle packaging: This product has been packaged to protect it against
transportation damage. Unpack the appliance but keep all packaging
materials until you have made sure your new Digital Video Baby Monitor is
undamaged and in good working order. The carton is recyclable. Whenever
possible, reuse the carton and recycle it when disposing of the packaging
materials.
• Dispose safely: Plastic wrapping can be a suffocation hazard for babies
and young children, so ensure all packaging materials are out of their
reach. Dispose of any plastic wrapping safely.
• Inspect: Unwind the cord of the power adaptor and inspect it for damage;
do not use it for charging the product if there are any signs of damage. In
case of damage, contact our after sales support centre for advice.
• Read: Make sure you have read and understood all instructions and
warnings in this manual. Refer to the Product Overview on pages 6-7 to
familiarise yourself with the product and its buttons and functions.
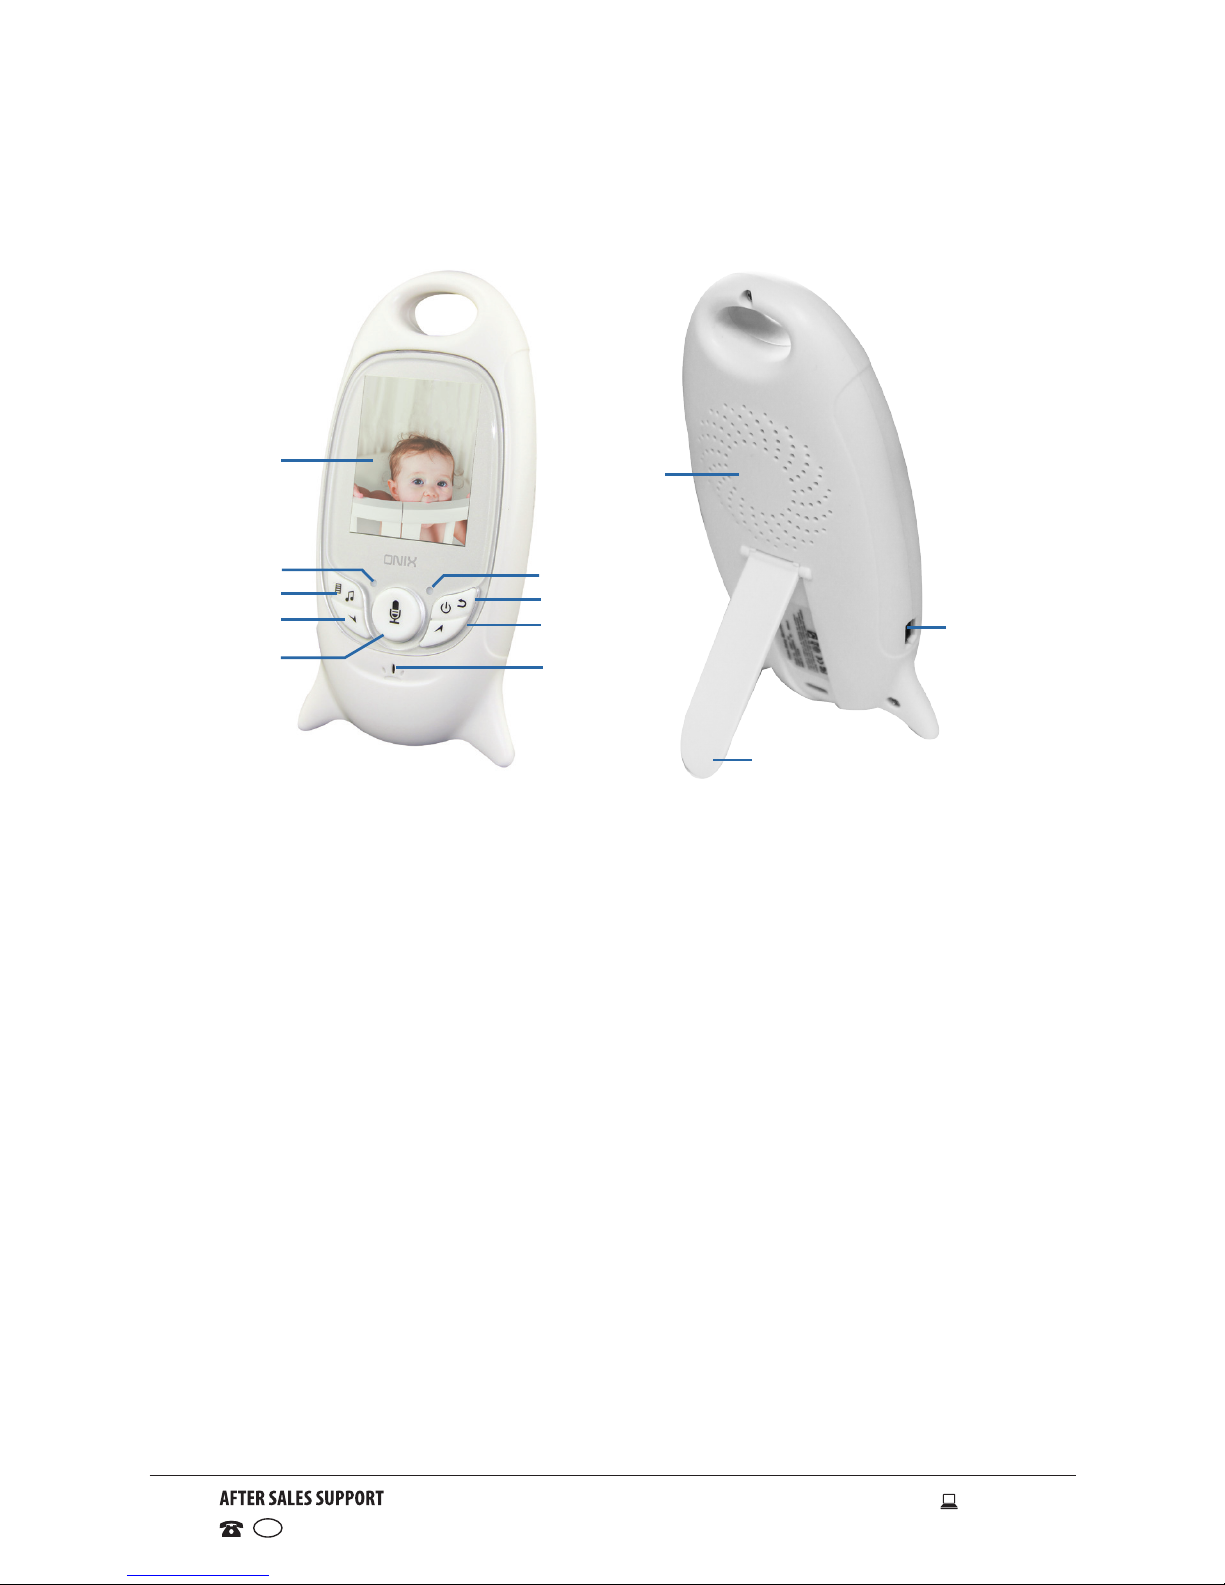
Setting up the camera (baby) unit
• Connect the Mini USB jack of the power adaptor to the camera unit and
the other end to the mains power socket. A green LED light will display to
indicate the baby unit is turned on.
NOTE
Only use the
power adaptor
provided.
Page 9

9
1300 886 649 Model: ABVM-014 Product Code: 49335 02/2015
www.tempo.org
AUS
Getting Started (Cont.)
• Place the camera unit in a convenient location (e.g. on a table) and point
the camera lens towards the area you want to monitor. Alternatively, mount
the unit to a wall, as described below.
• Adjust the camera unit until you are satisfied with the image in the parent
unit.
NOTE
Do not place the baby unit within baby’s reach! If there is interference
on the picture or sound, try moving the units to different locations, and
ensure they are not close to other electrical equipment.
Wall-mounting instructions
• Use the template on the right to mark
the wall in the correct places to drill
holes for wall-mounting screws.
• Insert 4mm head screws (not supplied)
into the holes and tighten the screws.
Then align the baby unit with the
screws and push it down.
• Point the camera lens towards the area
you want to monitor. Adjust the baby
unit until you are satisfied with the
image in the parent unit.
Page 10

10
1300 886 649 Model: ABVM-014 Product Code: 49335 02/2015
www.tempo.org
AUS
Setting up the receiver (parent) unit
• Connect the Mini USB jack of the power adaptor to the receiver unit and
the other end to the mains socket. A red LED light will display to indicate
the parent unit is turned on. The LCD will illuminate and the unit will start
charging the battery.
NOTE
• Both units are registered (paired) at the factory so you do not need
to do anything when using the unit for the first time; the receiver will
automatically pick up the video. If the units fail to find each other,
power both units off to reset, or re-register them (see page 13).
• If the baby unit is out of range, the receiver unit will display
“Connecting...”. Move the receiver unit close to the camera unit.
Getting Started (Cont.)
• You can power up the receiver unit by connecting it to AC power or by
using the internal rechargeable battery.
• Press and hold the Power/Return button for at least 3 seconds to
turn on the parent unit.
• When the receiver unit turns on, it will automatically search and pair with
the camera unit.
NOTE
Only use the
power adaptor
provided.
Page 11

11
1300 886 649 Model: ABVM-014 Product Code: 49335 02/2015
www.tempo.org
AUS
Getting Started (Cont.)
Testing the video and audio monitor before use
It is important to check the camera and receiver units are working properly
when you are first setting it up, and at regular times thereafter. Also ensure
you test the units if they have not been used for a long time, or when you
suspect they are defective. To test:
• Place the receiver unit and the camera unit in the same room. Make sure
the camera unit is at least 1 metre away from the parent unit to avoid any
audio feedback. If you still experience audio feedback, move the parent
unit and the baby unit further apart.
• Turn on the camera unit and then the receiver unit. Wait until the receiver
unit pairs with the camera unit and the receiver unit displays the image
from the camera unit.
• Adjust the position and angle of the camera unit until you are satisfied with
the image on the receiver unit.
NOTE
• For better image quality, do not place the camera unit too far away
from your baby.
• You may need to turn the speaker volume louder on the receiver unit by
pressing the Volume +/Up button to hear the sounds transmitted from
the camera unit.
• The operating range of the video and audio monitor is up to 300m in
an open area. The actual operating range may vary depending on the
environmental conditions and other interference such as walls, doors
and other obstructions.
Page 12

12
1300 886 649 Model: ABVM-014 Product Code: 49335 02/2015
www.tempo.org
AUS
Instructions
Playing lullabies
Press and hold the Menu/Music button for at least 3 seconds to turn on
the music player and play lullabies through the baby unit (camera); press and
hold again to turn it off.
Talking to baby
Press and hold the Push To Talk button on the receiver unit to talk to
your baby through the camera unit’s speaker. The ‘microphone’ symbol will
be displayed in the bottom left corner of the LCD screen when the Push To
Talk function is active.
Adjusting the volume
When in video playing mode, press the Volume –/Down button to
decrease the volume or the Volume +/Up button to increase volume.
The display will show the current volume for 5 seconds.
Night vision
The baby unit has 8 high-intensity infrared LEDs for picking up clear images
in the dark.
LCD screen icons
1 Signal strength indicator
2 Temperature in the baby’s room
3 Lullaby is playing
4 Alarm is activated
5 Battery power indicator
6 Push To Talk function is activated
7 Date and time (DD/MM HH:MM AM/PM)
7
6
21 3 4 5
Page 13
13
1300 886 649 Model: ABVM-014 Product Code: 49335 02/2015
www.tempo.org
AUS
Instructions (Cont.)
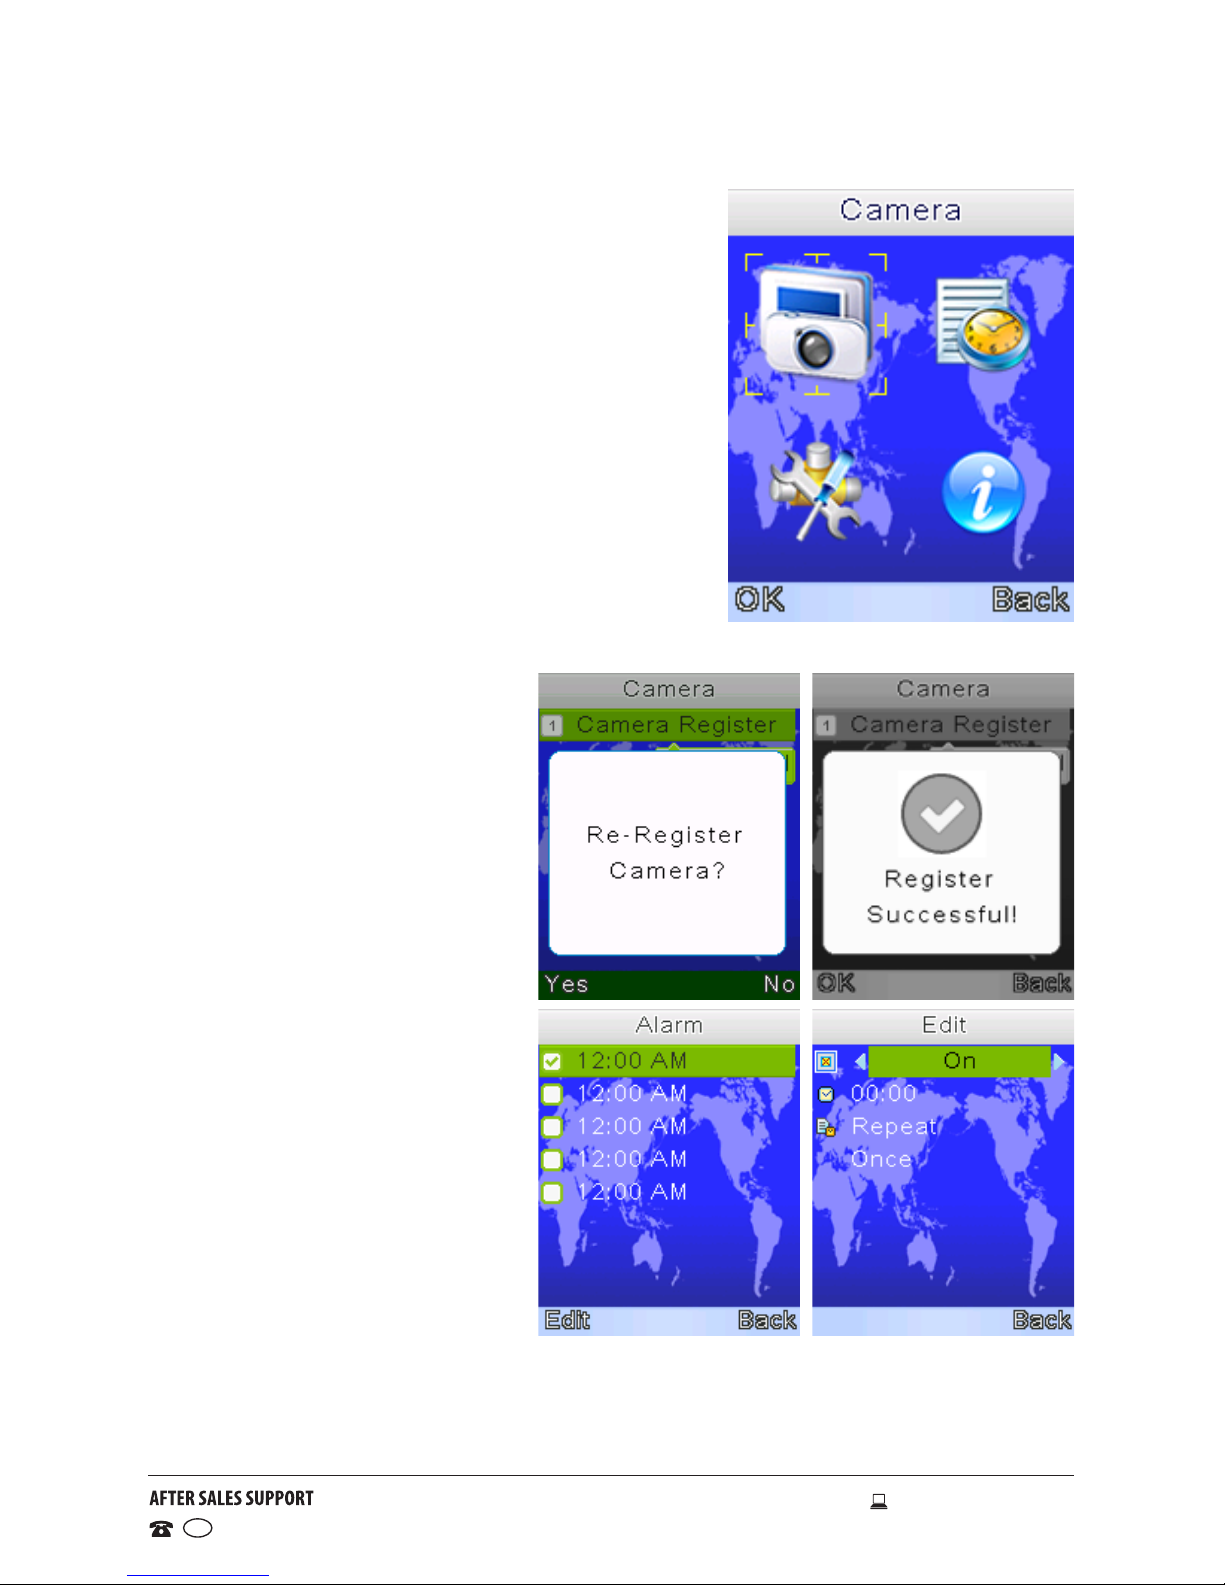
Menu options
• Press the Menu button to enter the main
menu; it contains 4 items: Camera, Alarm,
Settings and Systems Info.
• Press the Up/Down button to move the
cursor to select an item; press Menu again
to enter the submenu you selected.
• Press the Return button to go back to the
monitoring screen.
Camera re-registration
• Press the Menu button to start the reregistration process.
• Press the Return button to cancel the
operation; press Menu to begin re-registering.
• Press the Pair button on
the back of the camera unit
within 10 seconds to register
the camera.
Alarm
• Press the Menu button to
edit an alarm.
• Press the Push To Talk
button to turn on/off the
alarm.
• Press the Down button to
edit the alarm time.
• Press the Up button to
change the hour and minute,
press the Push To Talk button
to switch between hour and
minutes.
• Press the Down and then the
Menu button to change the
repeat option.
• Press the Up/Down button to select the repeat option and press Menu to
confirm.
• Press the Return button to save the alarm.
Page 14

14
1300 886 649 Model: ABVM-014 Product Code: 49335 02/2015
www.tempo.org
AUS
Instructions (Cont.)
Settings
Language: Here you can choose your on-screen display language from the
following options: English / French / Spanish / Italian / German.
Time and date: Here you can set the time, date and date format:
• Press the Down button to
choose the next item.
• Press the Push To Talk
button to move the
cursor.
• Press the Up button to
change values.
Temperature unit: Here
you can switch the unit to
display the temperature in
degrees Celsius or Fahrenheit.
Anti-flicker: Here you can adjust the frequency (50/60Hz) to suit your lighting
for anti-flicker.
System mode: Here you can choose the working mode from the following
options: Normal mode / VOX mode.
VOX sensitivity: Here you can switch the Vox sensitivity level to Low /
Medium / High. The VOX (Voice Operated Transmission) sound detection
causes the system to start transmitting automatically from the camera unit to
the receiver unit as soon as a voice or sound is detected.
NOTE: If the level is set at its highest, the display on
the receiver unit MAY remain on.
LCD backlight: Here you can adjust the LCD
brightness for comfortable viewing and set
the ‘active’ time for the LCD backlight in menu
operation.
System info
Here you can check system information such as
software version, hardware version, build date etc.
Page 15

15
1300 886 649 Model: ABVM-014 Product Code: 49335 02/2015
www.tempo.org
AUS
FAQs
How do I know the camera unit is turned on?
About 5 seconds after connecting the camera unit to power, the green power
LED will come on.
How do I know the receiver unit is turned on?
• About 5 seconds after connecting the receiver unit to power, the display
will turn on in power saving mode and red power LED will come on.
• Press and hold the Power button for 3 seconds to turn on the unit.
The receiver unit shows "Connecting..." message on the display. What should
I do?
• Make sure the camera unit is connected to power.
• Move the receiver unit closer to the camera unit.
• Re-register the camera by following instructions on page 13.
• Disconnect the camera unit from power, wait for 10 seconds and
reconnect to power.
• Power off the receiver unit, wait for 10 seconds and turn the power on.
I cannot hear any sound. What should I do?
• Increase the volume level on the receiver unit.
• Increase the VOX sensitivity in the settings menu (see page 13)
• Move away from any electronic devices that may cause interference.
• Move closer to the camera unit as both devices may be out of range.
The video is lagging or breaking up.
To improve reception, move closer to the camera unit.
My receiver unit’s screen goes blank after 20 seconds. Why is that?
The receiver unit is set to VOX system mode and the LCD backlight timer
is set to 20 seconds, which will cause the LCD screen to turn off after 20
seconds. To keep the LCD screen always on, change the system mode to
‘Normal’ via settings menu (see page 14).
Is the video recorded so I can play it back later?
No, the unit does not record video; it only transmits it in real time.
Page 16

16
1300 886 649 Model: ABVM-014 Product Code: 49335 02/2015
www.tempo.org
AUS
Technical Specications
Camera unit power adaptor
Input: 100-240V AC ~50/60Hz
Output: 5V DC @ 500mA
Receiver unit power adaptor
Input: 100-240V AC ~50/60Hz
Output: 5V DC @ 500mA
Camera 0.3MP
LCD display
2” Colour LCD
(176x220 pixels @ 20fps)
Transmission frequency
Camera unit 2.4GHz
Receiver unit 2.4GHz
Operating range 300m in an open area
Night vision distance 5m
Page 17

17
1300 886 649 Model: ABVM-014 Product Code: 49335 02/2015
www.tempo.org
AUS
This page has been left blank intentionally.
Page 18

18
1300 886 649 Model: ABVM-014 Product Code: 49335 02/2015
www.tempo.org
AUS
This page has been left blank intentionally.
Page 19

19
1300 886 649 Model: ABVM-014 Product Code: 49335 02/2015
www.tempo.org
AUS
Unfortunately, from time to time, faulty products are manufactured which need to
be returned to the supplier for repair.
Please be aware that if your product is capable of retaining user-generated data
(such as files stored on a computer hard drive, telephone numbers stored on
a mobile telephone, songs stored on a portable media player, games saved on
a games console or files stored on a USB memory stick) during the process of
repair, some or all of your stored data may be lost. We recommend you save this
data elsewhere prior to sending the product for repair.
You should also be aware that rather than repairing goods, we may replace them
with refurbished goods of the same type or use refurbished parts in the repair
process.
Please be assured though, refurbished parts or replacements are only used
where they meet Tempo’s stringent quality specications.
If at any time you feel your repair is being handled unsatisfactorily, you may
escalate your complaint. Please telephone us on 1300 886 649 or write to us at:
Tempo (Aust) Pty Ltd ABN 70 106 100 252
PO BOX 6056 Frenchs Forest, Sydney, Australia NSW 2086
Telephone: 1300 886 649 Fax: (02) 8977 3765
Tempo Help Desk: 1300 886 649 (Aust)
(Operating Hours: Mon-Fri 08:30AM to 06:00PM EST)
Email: info@tempo.org
Digital Video Baby Monitor
Repair and Refurbished
Goods or Parts Notice
Page 20

Model: ABVM-014 Product Code: 49335 02/2015
www.tempo.org
1300 886 649
AUS
Warranty returns
Should you for any reason need to return this product
for a warranty claim, make sure to include all accessories
with the product.
Product does not work?
If you encounter problems with this product, or if it fails
to perform to your expectations, make sure to contact
our After Sales Support Centre on 1300 886 649 before
returning it to the store for a refund.
 Loading...