

Page 1
Instruction Manual
Model: AAC-114
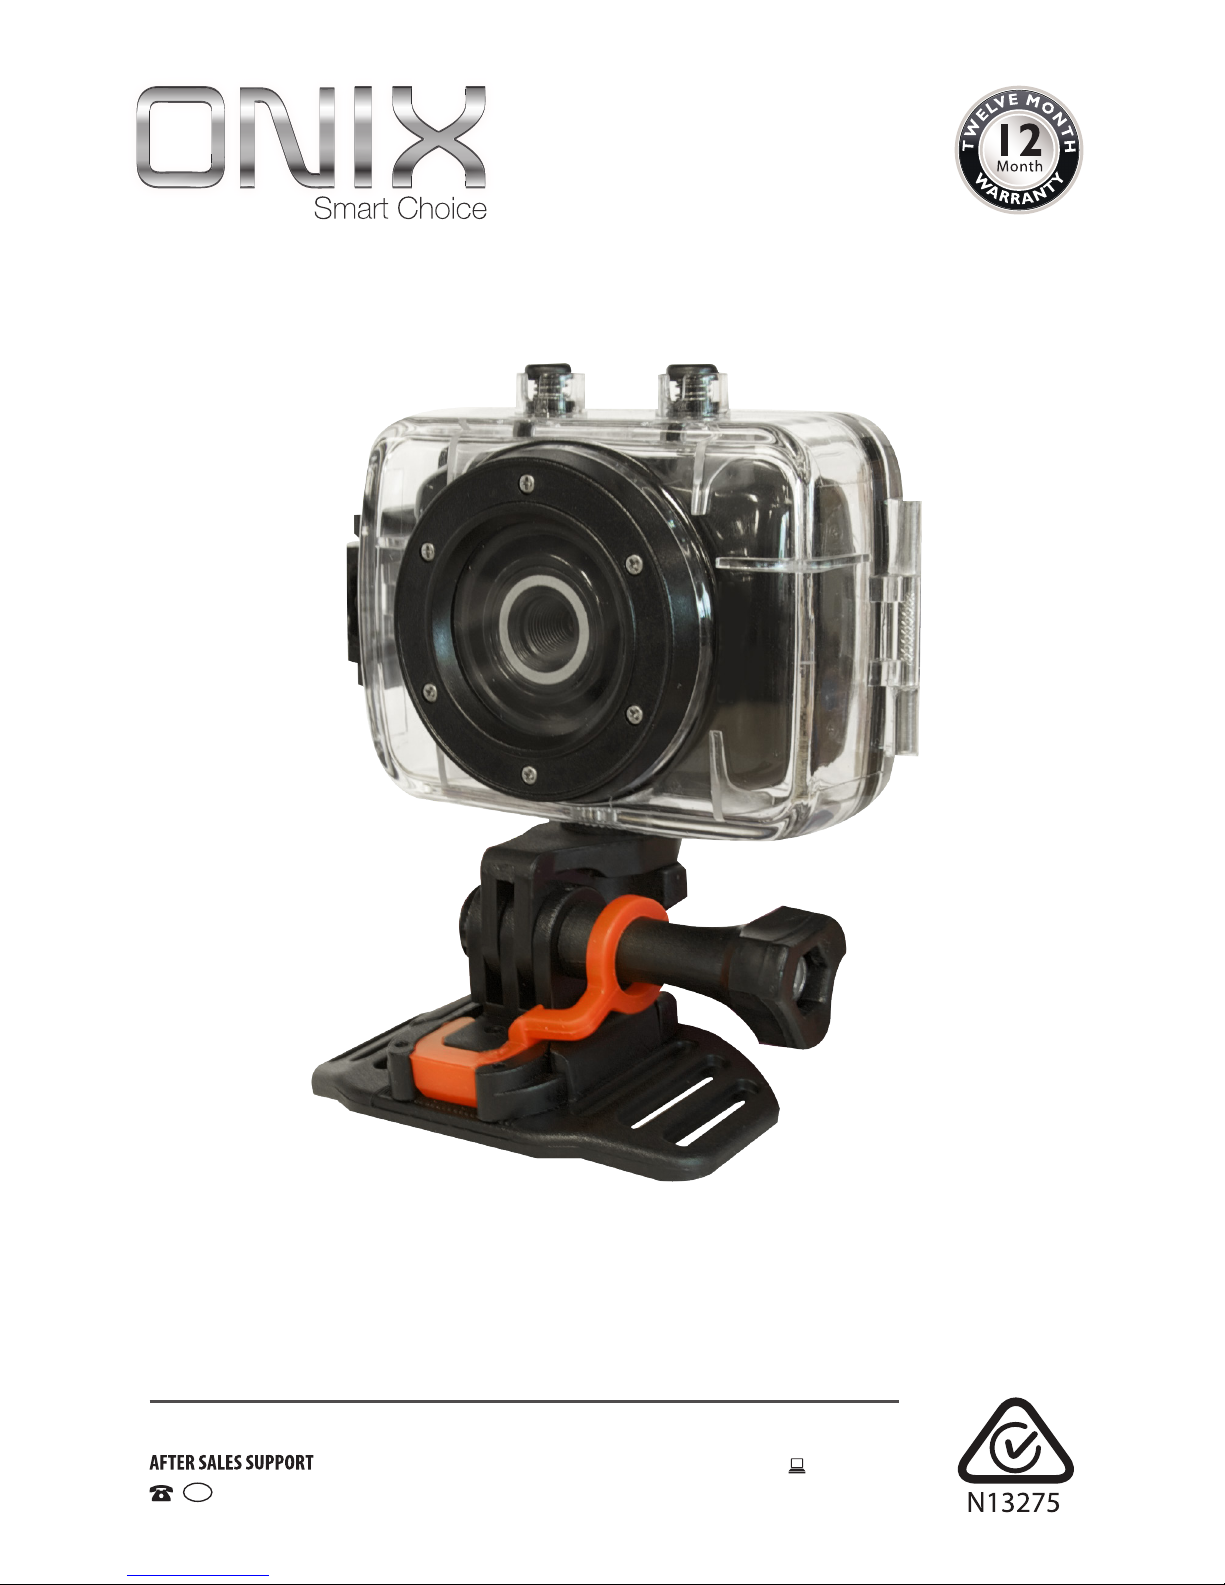
Action Camera
1300 886 649 Model: AAC-114 Product Code: 48463 12/2014
www.tempo.org
AUS
Page 2

2
1300 886 649 Model: AAC-114 Product Code: 48463 12/2014
www.tempo.org
AUS
Welcome
Congratulations on choosing to buy an ONIX product.
All products brought to you by ONIX are manufactured to the highest
standards of performance and safety and, as part of our philosophy of
customer service and satisfaction, are backed by our comprehensive 1 Year
Warranty. We hope you will enjoy using your purchase for many years to
come.
Page 3

3
1300 886 649 Model: AAC-114 Product Code: 48463 12/2014
www.tempo.org
AUS
Welcome 2
General Information & Safety Instructions 4
Features 5
Product Overview 6
Getting Started 8
Instructions 11
Other Useful Information 22
Repair and Refurbished Goods or Parts Notice 23
Contents
Page 4

4
1300 886 649 Model: AAC-114 Product Code: 48463 12/2014
www.tempo.org
AUS
General Information & Safety Instructions
Read this manual thoroughly before rst use and keep it in a safe place
for future reference, along with the completed warranty card, purchase
receipt and carton. The safety precautions enclosed herein reduce the
risk of re, electric shock and injury when correctly adhered to.
Follow all instructions and take notice of all warnings to reduce the risk
of re or electric shock.
Usage conditions and restrictions
• Shooting brightness: This camera is designed for use under suitable light
conditions. Do not aim it directly at the sun and other strong light sources
in order to avoid damaging the optical parts. Do not store the camera in
strong direct sunlight.
• At the beach: Water, sand, dust or particles containing salt may damage
the camera. Therefore, take care when using the camera at the beach or
near water, to avoid water or sand entering the camera. In areas where
water could enter the camera, always use the waterproof housing. If sand
has settled on the camera or lens, gently blow it off.
• Storage conditions: Store the camera in a cool and dry place with good
ventilation. Avoid storage in areas that are excessively hot or humid.
• Dust: Do not use the product in environments with high dust density to
avoid dust settling on the camera lens or other components.
• Cleaning: In case dirt, dust or sand has accumulated on the camera, blow
off any lose particles and then clean the camera with a soft, clean and dry
cloth, suitable for cleaning optical instruments. If needed, use a specific
lens cleanser. Do not clean the camera with an organic solution. Never
touch the lens surface with your finger.
• Usage restrictions: This product is not intended for use by persons
(including children) with reduced physical, sensory or mental capabilities,
or lack of experience and knowledge, unless they have been given
supervision or instruction concerning use of the product by a person
responsible for their safety.
• Children: Supervise children to ensure they do not play with the product.
• Damage: This camera contains no parts you can repair yourself. Do not
attempt to disassemble, repair or modify it. In case of damage, contact
our after sales support line for advice on repair or replacement, or refer
servicing to qualified personnel only.
• Liability: We assume no liability for any eventual damages or injury caused
by misuse of the product or noncompliance with these instructions.
Page 5

5
1300 886 649 Model: AAC-114 Product Code: 48463 12/2014
www.tempo.org
AUS
Features
This ONIX Action Camera AAC-114 is equipped with the following features
and functions:
• High definition video recording with strong continuous dynamic images
• Supports AVI video format
• Supports VGA (640 x 480) and HD (1280 x 720) capturing
• Compact size and design for easy portability
• Waterproof up to 3m
• Four image sizes (8MP, 5MP, 3MP, 1MP) optional
• Supports time and date watermark function, and time and date can be
synchronously displayed while recording
• Supports high-speed USB2.0
• Supports max. 32GB Micro SD card
• Loop coverage recording capability (where the new recording automatically
covers former video clips, achieving an endlessly rolling recording)
• On-site replay function, which lets you check the video recorded on-site
with the display.
Page 6
6
1300 886 649 Model: AAC-114 Product Code: 48463 12/2014
www.tempo.org
AUS
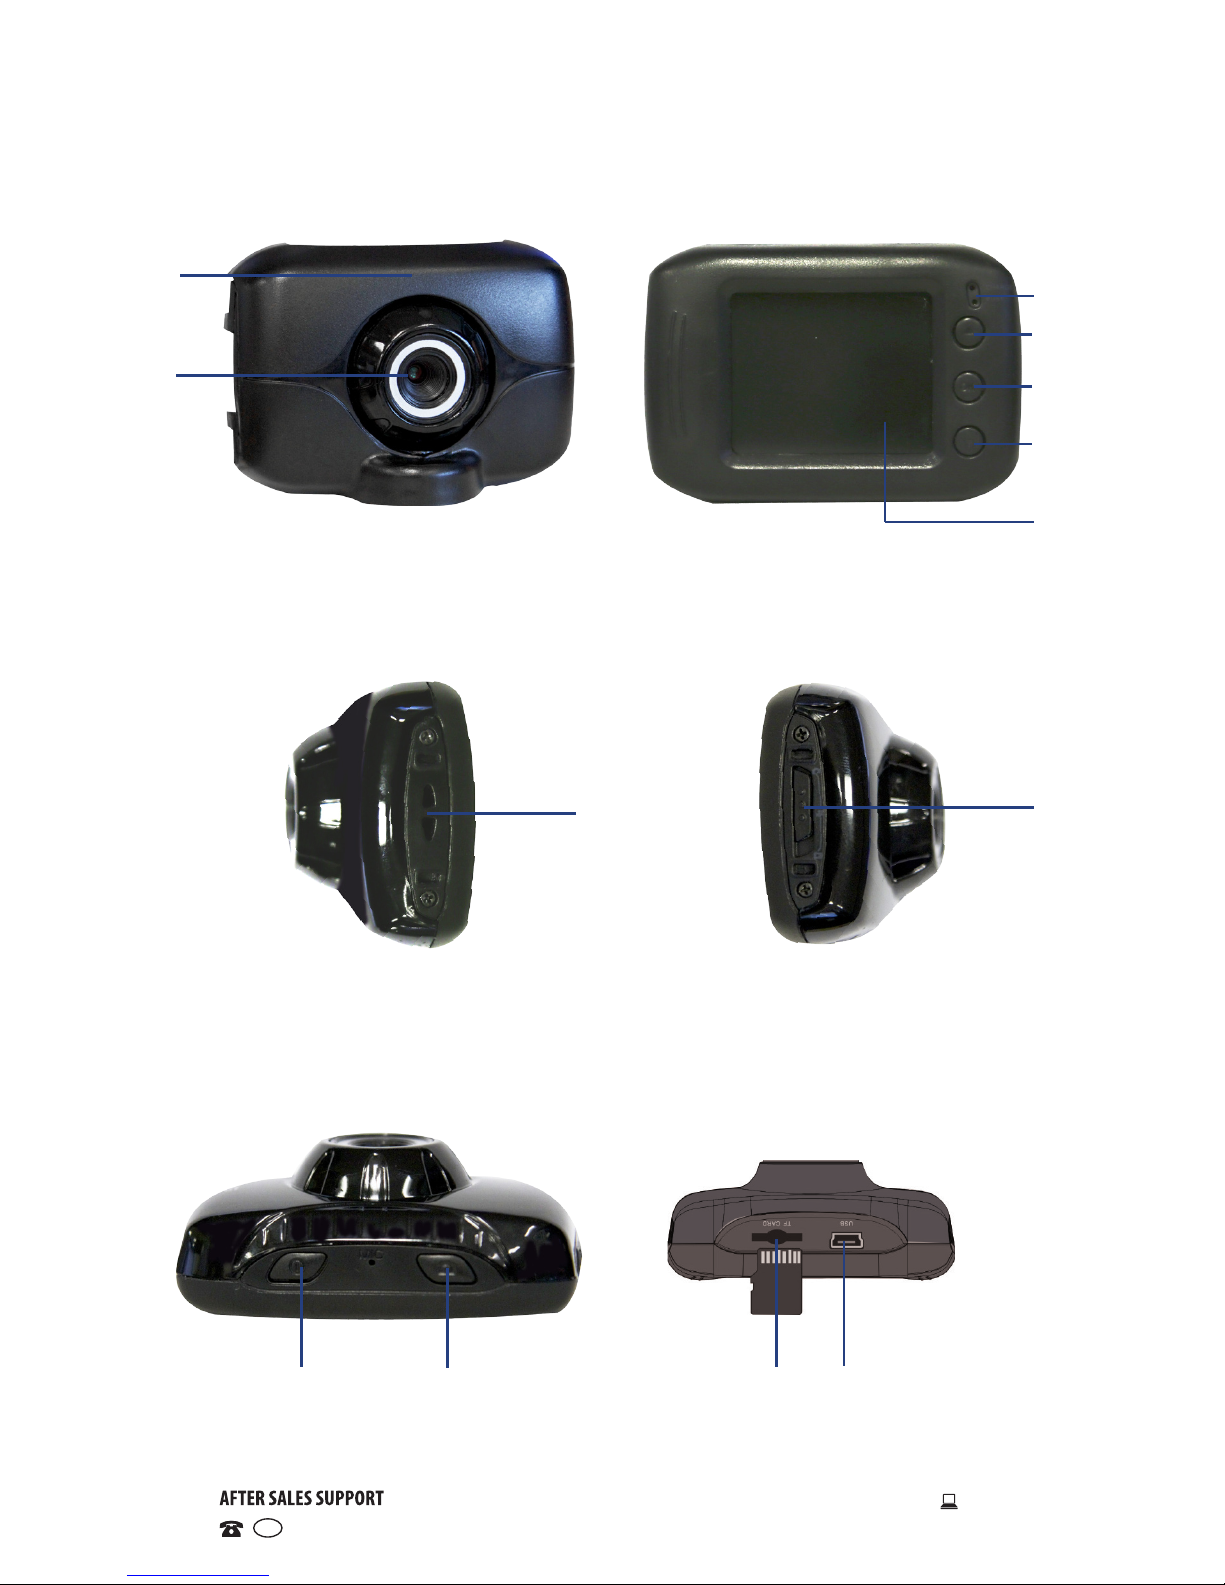
Product Overview
Front
Back
Right side
Left side
Top
Bottom
1
3
4
5
6
7
8
9
10
11 12 13
2
Page 7
7
1300 886 649 Model: AAC-114 Product Code: 48463 12/2014
www.tempo.org
AUS
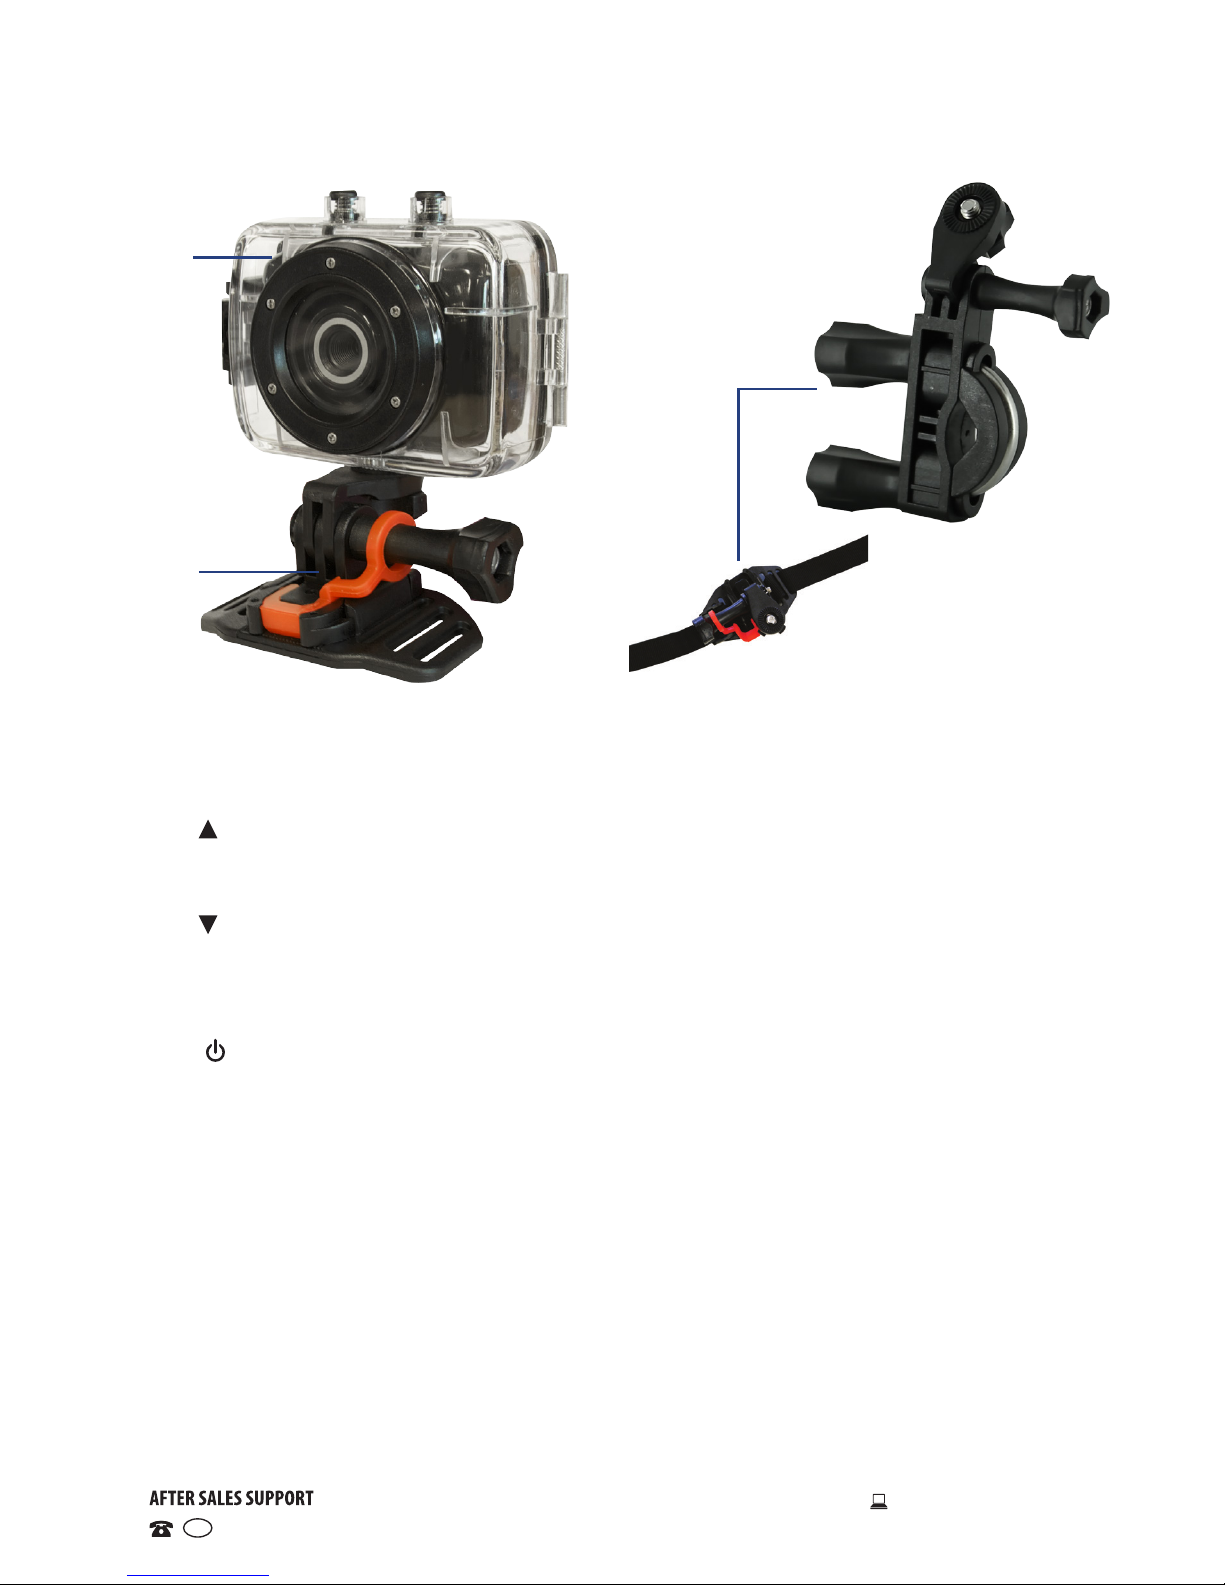
Product Overview (Cont.)
14
15
1 Mounting shield: affix to the front of the camera
2 Lens: aim at the image/scene to be captured/recorded
3 Charging/Operation indicator: see page 11 for details
4 UP button: zoom in (video & picture-taking modes); menu selection;
pause/play (playback mode)
5 OK button: open/exit from menu; stop playback (playback mode)
6 DOWN button: zoom out (video & picture-taking modes); menu selection
7 LCD display: displays the parameters relevant to the current mode
8 Lanyard through-holes: attach a wrist strap (not supplied)
9 MODE switch: select video recording, picture taking or playback mode
10 ON/OFF switch: power on/off; switch between tabs in setup menu
(menu operation)
11 SHUTTER button: start/stop (video recording mode); take a still picture;
play the video (playback mode)
12 SD card slot: insert a micro SD card (see page 9 for details)
13 Mini USB port: attach the USB cable for connection to a computer
14 Waterproof housing: see page 11 for details
15 Helmet mount: use the helmet mount (or mounting strap) to fix the
camera on a ventilated helmet
16 Bicycle mount, mounting strap, mini USB cable (not pictured): use the
bicycle mount to fix the camera securely onto a handlebar, and the USB
cable for connection of the camera to a computer for file transfer or use
as a web cam
16
Page 8
8
1300 886 649 Model: AAC-114 Product Code: 48463 12/2014
www.tempo.org
AUS
Getting Started
Before first use
• Unpack the product but keep all packaging materials until you have
made sure your new Action Camera is undamaged and in good working
order. Plastic wrapping can be a suffocation hazard for babies and young
children, so ensure all packaging materials are out of their reach.
• Inspect the supplied USB cable and ensure it is undamaged. Do not use it
for charging the product if the cable is damaged.
• Read this manual to familiarise yourself with the product, its buttons
and functions and all accessories. Pay particular attention to the safety
instructions on the previous pages.
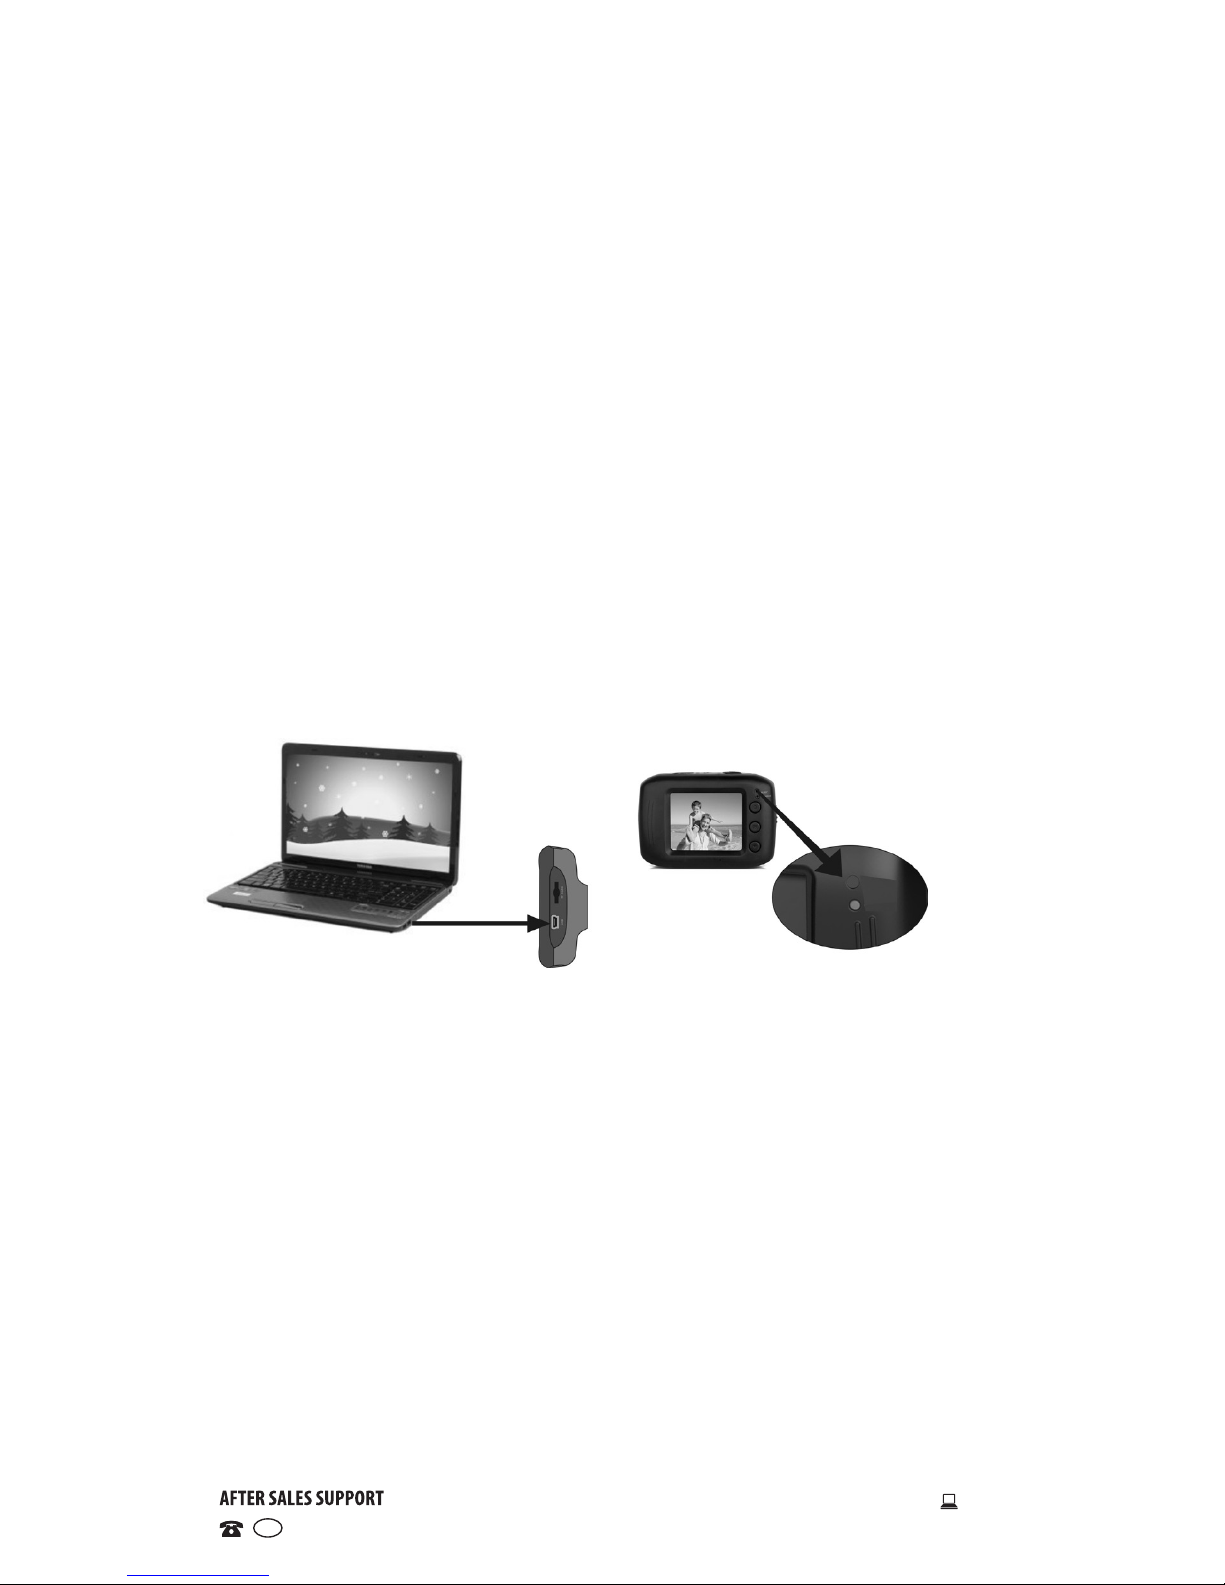
Charging the built-in lithium battery
• The battery has been partially charged at the factory. To perform all
functions, we recommend you fully recharge it before using the camera for
the first time.
• Make sure the camera is switched off, then connect it to a computer for
charging, using the supplied USB cable.
• The charging indicator illuminates during charging. It will turn off once the
battery is fully charged.
• A full charge generally takes about 2-4 hours.
Connect via
USB cable
Charging indicator
illuminates during
charging
Page 9
9
1300 886 649 Model: AAC-114 Product Code: 48463 12/2014
www.tempo.org
AUS
Getting Started (Cont.)
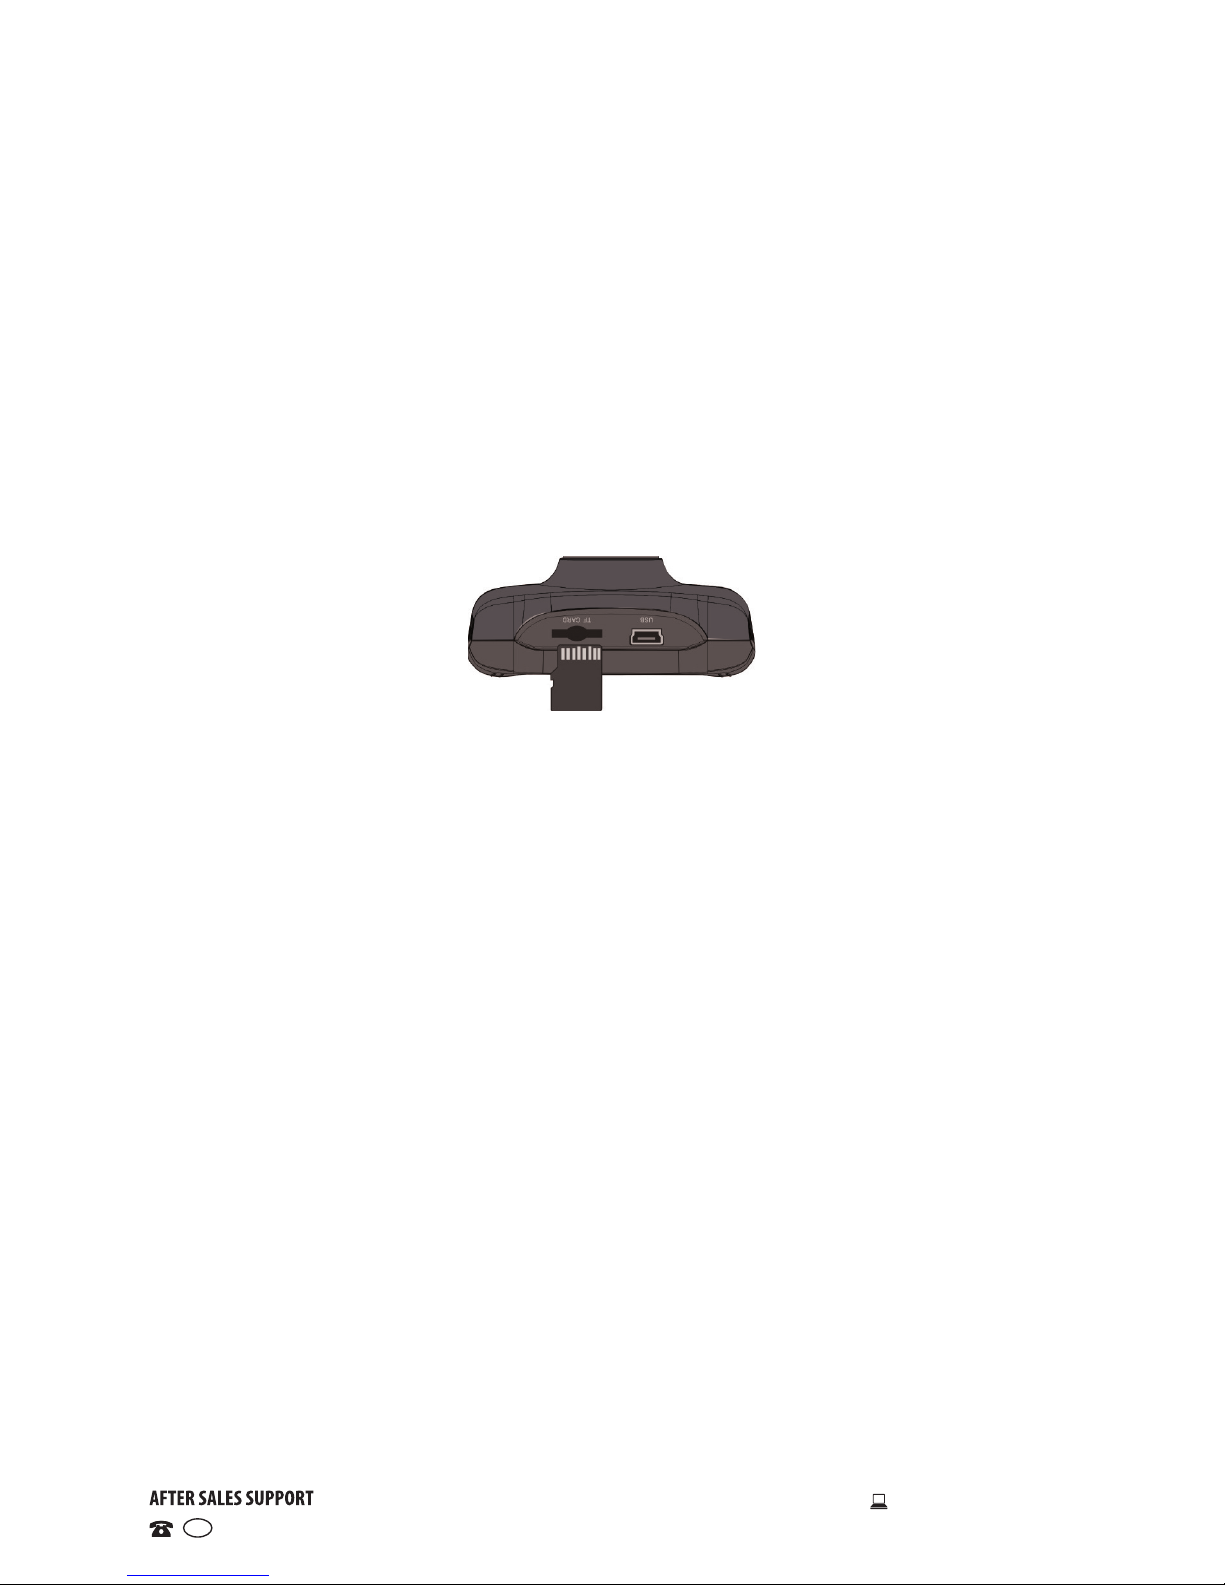
Installing a memory card
The camera is NOT equipped with a built-in memory, and thus a memory
card is required. Before using the Action Camera for recording video or taking
photos, make sure you have installed an appropriate micro SD (TF) card with
a maximum storage capacity of 32GB.
• Make sure the camera is switched off before inserting a memory card.
• Insert a micro SD card into the SD slot, as illustrated on the bottom of the
camera next to the card slot. Make sure the card is fully inserted.
• To remove the SD card out, gently press the end of the memory card
inwards and the card will eject out of the slot.
Memory card precautions
A Micro SD card is a precision electronic component. Always handle it with
care. Protect the card from static electricity and strong shocks.
If you are installing a previously used memory card into the camera, make
sure to back up any data stored on the card, to avoid possible data loss due
to formatting the card.
Avoid the following situations, which may cause loss or damage of data
stored on the card:
• Improper use of the memory card
• Card bent, dropped or subjected to shock
• Exposure to high temperature, high humidity or direct sunlight
• Exposure to static fields or nearby electromagnetic fields
• Removal of the memory card, or interference with the camera power
supply, while the memory card is in use (being read, written to or
formatted).
• Contact of the memory card’s metal surface with a finger or metal object.
• Usage of the memory card beyond its lifespan.
We strongly recommend you back up all data on the SD card to another
storage device so you do not risk losing any data in case of an unexpected
device failure or accident. We do not assume liability for any loss of data
due to misuse or malfunction. Data backup is your personal responsibility.
Page 10

10
1300 886 649 Model: AAC-114 Product Code: 48463 12/2014
www.tempo.org
AUS
Waterproof housing
The camera comes supplied with a transparent waterproof housing, which
allows you to take video footage or photos in wet conditions, even in or under
water, up to a depth of 3 metres.
To use the camera with the waterproof housing, proceed as follows:
• Select the desired mode (photo or video).
• Select the desired menu options.
• Place the camera in the waterproof housing and close it carefully using the
locking clip located at the right side of
the case.
• Once the camera is securely installed,
you can use the ON/OFF and SHUTTER
buttons by pushing the push buttons
located on top of the waterproof
housing.
WARNING: Once the camera is installed in the case, make sure that all seals
are in place to prevent water intrusion.
Getting Started (Cont.)
Before using the camera in wet conditions
• Before sealing the case, ensure the camera housing’s rubber seal is clean
— a single hair or grain of sand can cause a leak. You can test by closing
the case without inserting the camera. Submerge the case completely
in water for about a minute. Remove the case from the water, dry off its
exterior with a towel, then open the case. If the entire interior is dry, the
case is safe for use under water.
• Remember to select which mode you would like to record in by using the
MODE switch before inserting the camera into the waterproof case. There
is no external button for the MODE switch.
• After every use in salt water, rinse the outside of the housing with non-salt
water and dry. Not doing this can eventually cause corrosion of the hinge
pin and salt build-up in the seal, which can cause failure.
• WARNING: Do not use aggressive substances such as acetone to clean
the case, which can cause permanent damage.
• To clean the seal, rinse in fresh water and shake dry (drying with a cloth
may cause lint to compromise the seal). Re-install the seal into the grooves
in the back door of the housing.
Locking
Clip
Page 11
11
1300 886 649 Model: AAC-114 Product Code: 48463 12/2014
www.tempo.org
AUS
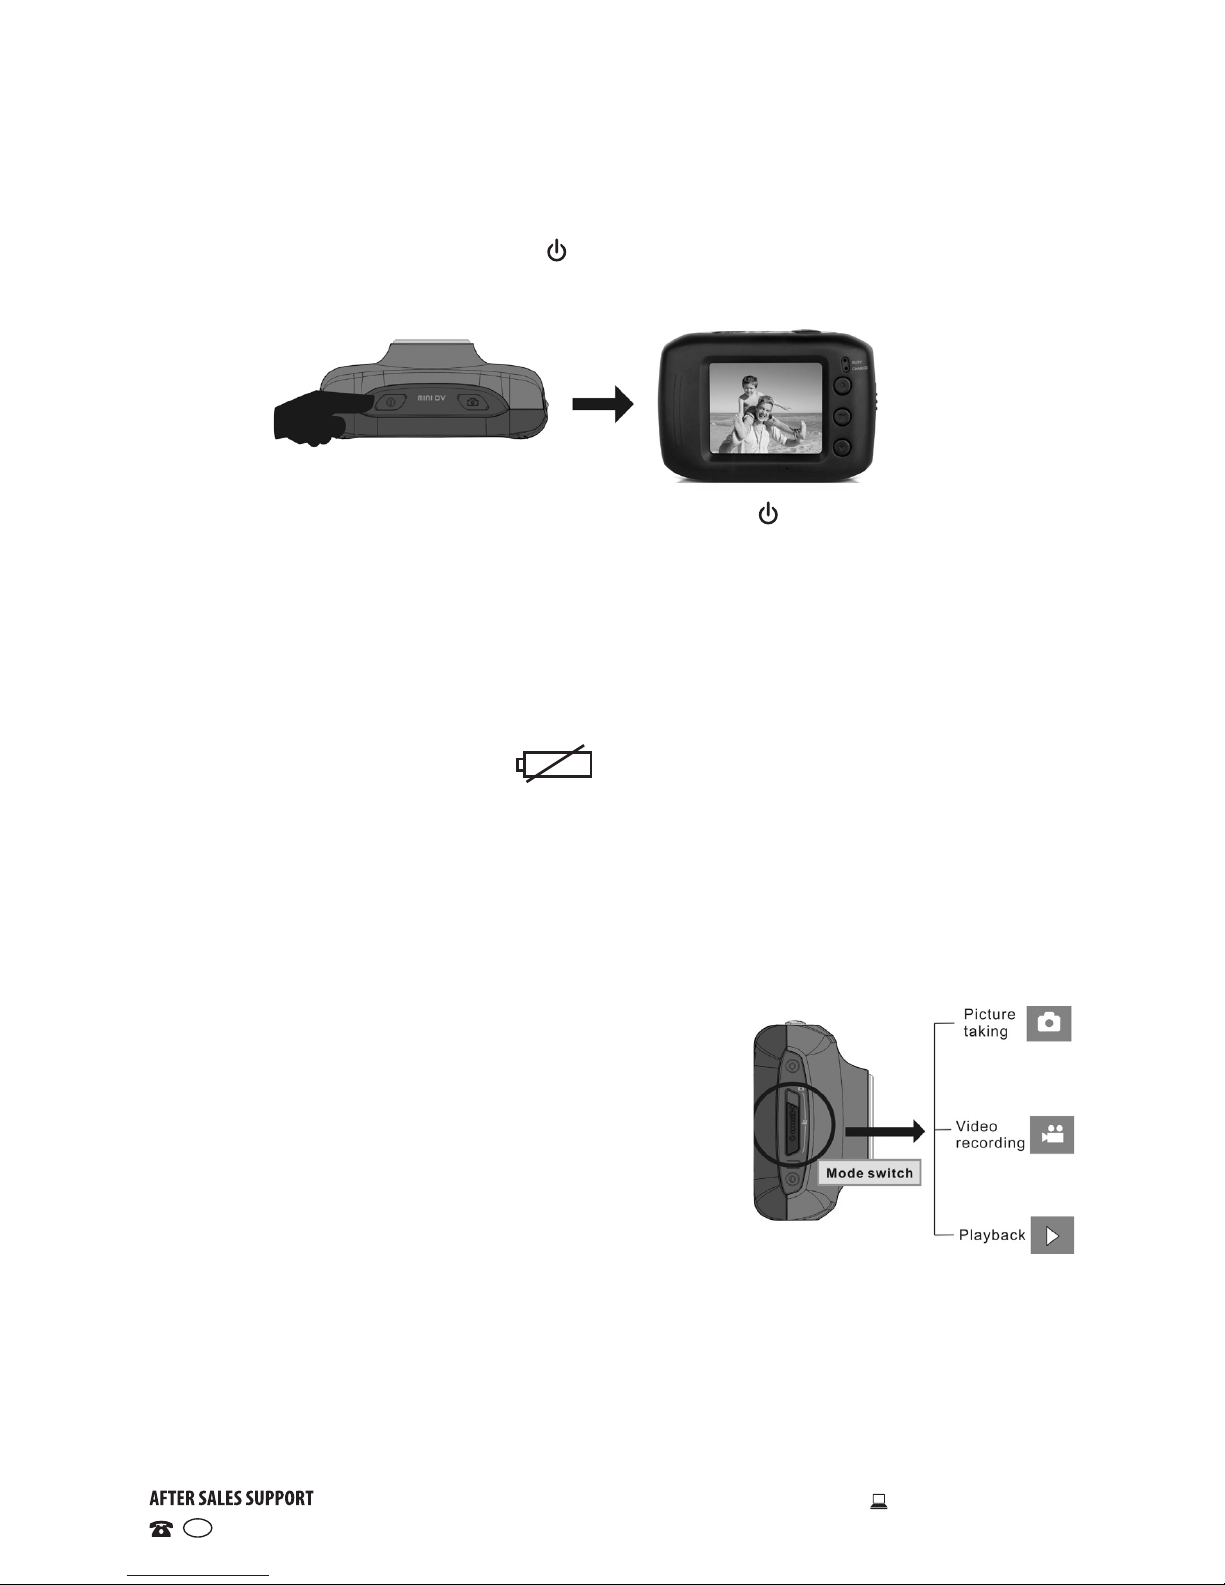
Powering On/Off
• Power-on: Press and hold the ON/OFF switch for about 3 seconds, the
screen starts up and the camera enters standby state.
• Power-o: In idle state of the camera, press the ON/OFF switch briefly
to turn the camera off.
• Automatic power-o: When the camera has been idle for a certain
amount of time, it will switch off automatically to save power.
• The idle time can be set to your preference, the default automatic poweroff time is 5 minutes.
• Power-o due to low battery: If the camera’s battery power has dropped
to extremely low levels, the icon appears on the LCD screen and
you will have to recharge the battery. When the icon turns red and flashes,
the camera will automatically power off.
Selecting a mode
The camera is equipped with three modes: image capture, video recording
and playback. After powering the unit on, use the MODE switch to select the
appropriate mode.
• Image capture: Take pictures
• Video recording: Record video, timed video
recording (5min, 3min, 1min)
• Playback: Play back picture and video files
Indicators
• Charging indicator: The upper (charging)
indicator signals that the camera is being charged.
• Operation indicator: The lower (operation) indicator signals that the
camera is working (e.g. recording video, taking pictures or automatic
screen turn-off). It flashes once when taking a photo and remains
illuminated when connected to a computer.
Instructions
Page 12

12
1300 886 649 Model: AAC-114 Product Code: 48463 12/2014
www.tempo.org
AUS
Recording video
• Slide the MODE switch to the middle setting to enter standby status in
video mode.
• Press the SHUTTER button to start recording video.
• While recording, press the SHUTTER button to stop recording. (Video
recording will stop automatically if there is no space left on the memory
card, or if the battery is flat.)
• In video mode the LCD displays the following icons:
Mode: Indicates that the current mode is video recording.
00:00:01 Time meter: Indicates that 1 second of video footage has been
recorded.
Timed loop video recording: Indicates that the currently set video
recording time is 3 minutes.
Movie size: Indicates that the current movie size is 720P.
SD card: Indicates that a memory card is currently inserted.
Digital zoom: Indicates that the current zoom magnification is 1.84.
Press the or buttons to adjust the zoom from 1x to 4x.
Battery: Indicates the current battery level.
White balance: Indicates that white balance is set to automatic.
Metering: Indicates that the metering perspective is set to multi-
points.
Instructions (Cont.)
Page 13

13
1300 886 649 Model: AAC-114 Product Code: 48463 12/2014
www.tempo.org
AUS
Video menu setup
• Press the OK button to open the video setup menu, then use the or
buttons to select a menu item. The background of the selected menu item
will be highlighted once selected.
• Press the OK button to enter the submenu, then use the or buttons to
select an option. Press OK to confirm and return to the main menu. In the
main menu, press SHUTTER to exit the menu.
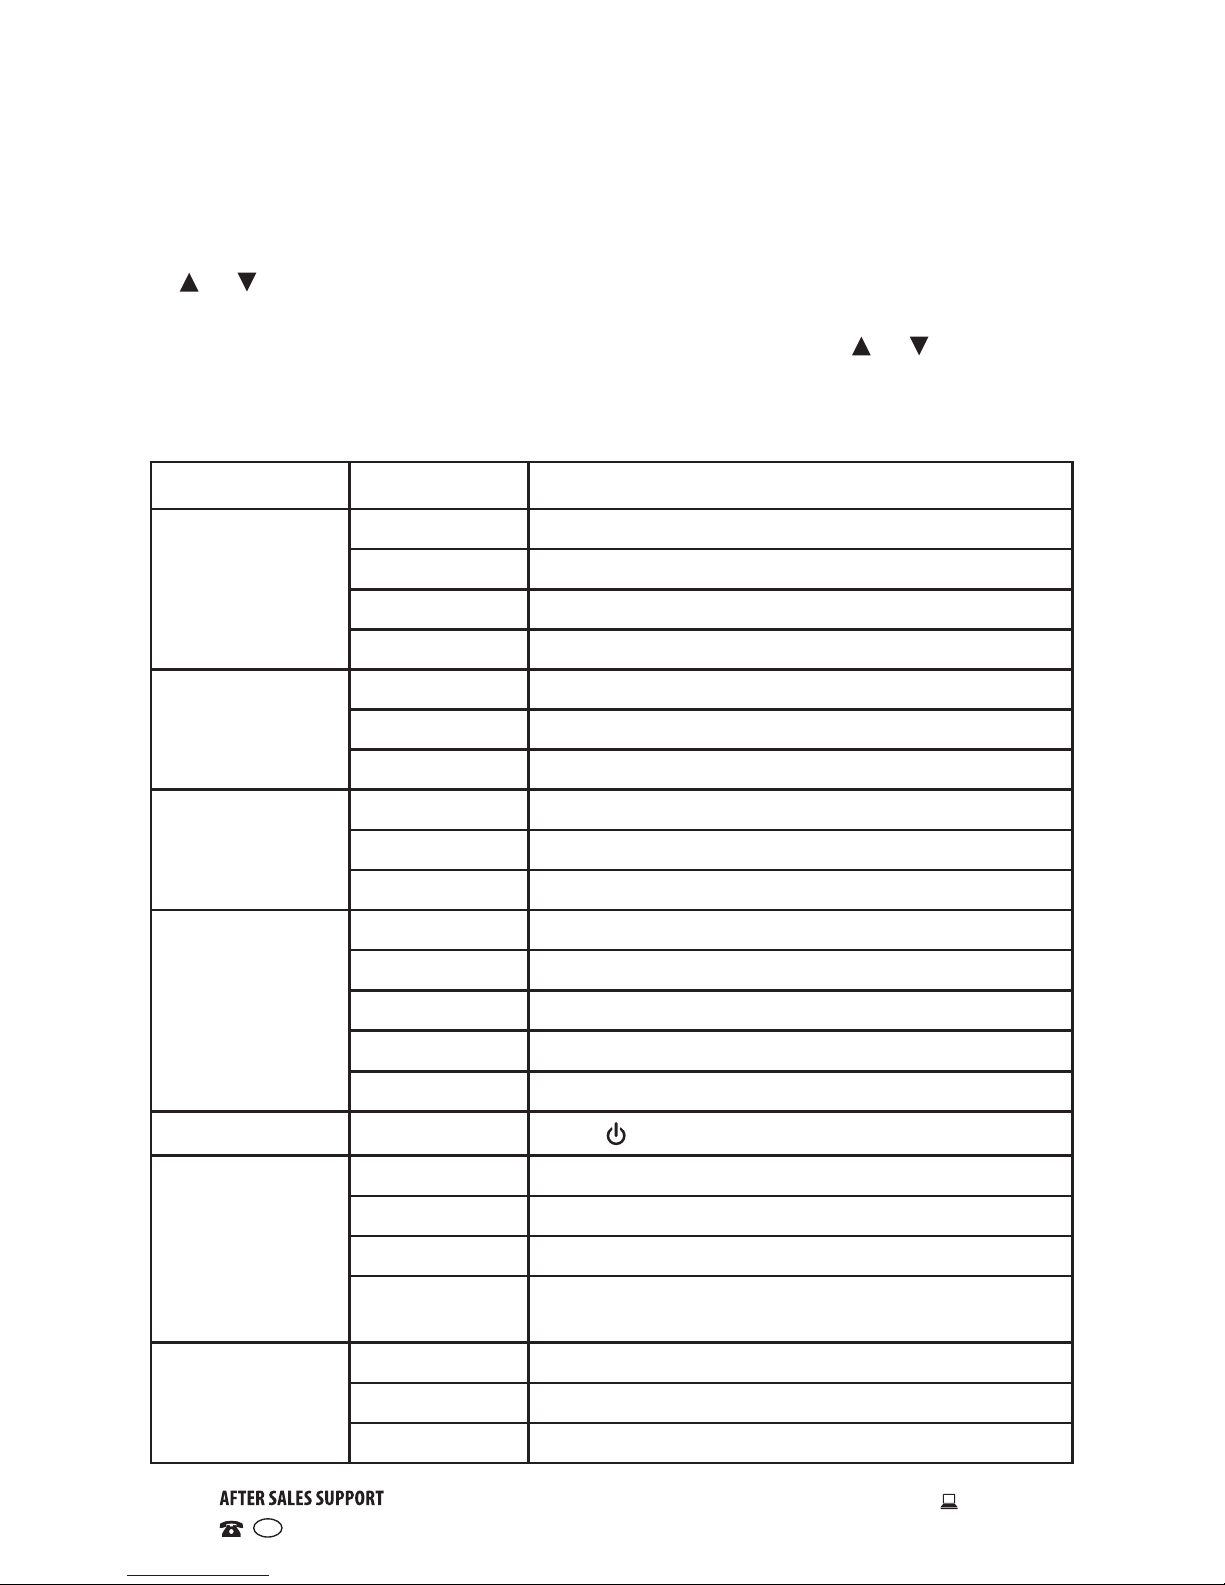
Main menu Submenu Description
Movie Size
1280 x 720 High resolution (HD) format
640 x 480 Medium resolution (VGA) format
Timed loop
video recording
Off No recording time set
1min Records for 1 minute, stops and then starts a
new 1 minute recording, and so on
3min Records for 3 minutes, as a repeating phase
5min Records for 5 minutes, as a repeating phase
Metering
Centre Metering subject to the central area
Multi Metering subject to multiple points
Spot Metering subject to one point
White balance
Auto Suitable for most situations
Daylight Suitable for daylight environments
Cloudy Suitable for cloudy environments
Fluorescent Suitable for fluorescent light source environments
Tungsten Suitable for tungsten light source environments
Special effect
Normal Normal effect
B&W Black and white effect
Sepia Sepia effect
Negative Negative film effect
Red Reddish effect
Green Greenish effect
Blue Bluish effect
Date stamp
Off No date/time stamp printed on the file
Date Date printed in the corner of the photo/video file
Date and time Date and time printed in the corner of the file
Instructions (Cont.)
Page 14

14
1300 886 649 Model: AAC-114 Product Code: 48463 12/2014
www.tempo.org
AUS
Instructions (Cont.)
Open video recording
menu
Select recording time
and press OK to confirm
Exit from menu and
press SHUTTER to start
timed video recording
Timed video recording
• Slide the MODE switch to the middle setting to enter standby status in
video mode.
• Press the OK button to open the video mode menu, then use the button
to select the “REC Interval” menu.
• Press the OK button to enter the submenu, then use the or buttons to
choose the desired option from the following: “1min”, “3min”, 5min”
• After pressing OK for confirmation, press the SHUTTER button to exit from
the menu.
• Press the SHUTTER button to start the timed video recording. The camera
will automatically stop recording video after the set time (1min, 3min, 5min)
and immediately start the next section of video recording.
Important information about loop coverage
When the memory card is full, the earliest recorded section of the video
le will be deleted automatically to make room for further recordings. As
new recordings automatically cover older ones, make sure to save all
recordings you want to keep when the message “Full memory” appears on
the screen, otherwise the latest footage will erase the oldest.
NOTE: After selecting OFF in the “REC interval” menu, the camera returns to
normal video recording, and it will not stop recording until the memory
card is full.
Page 15
15
1300 886 649 Model: AAC-114 Product Code: 48463 12/2014
www.tempo.org
AUS
Instructions (Cont.)
Taking pictures
• Slide the MODE switch to the top setting to enter standby status in image
capture mode.
• Press the SHUTTER button to take a still picture.
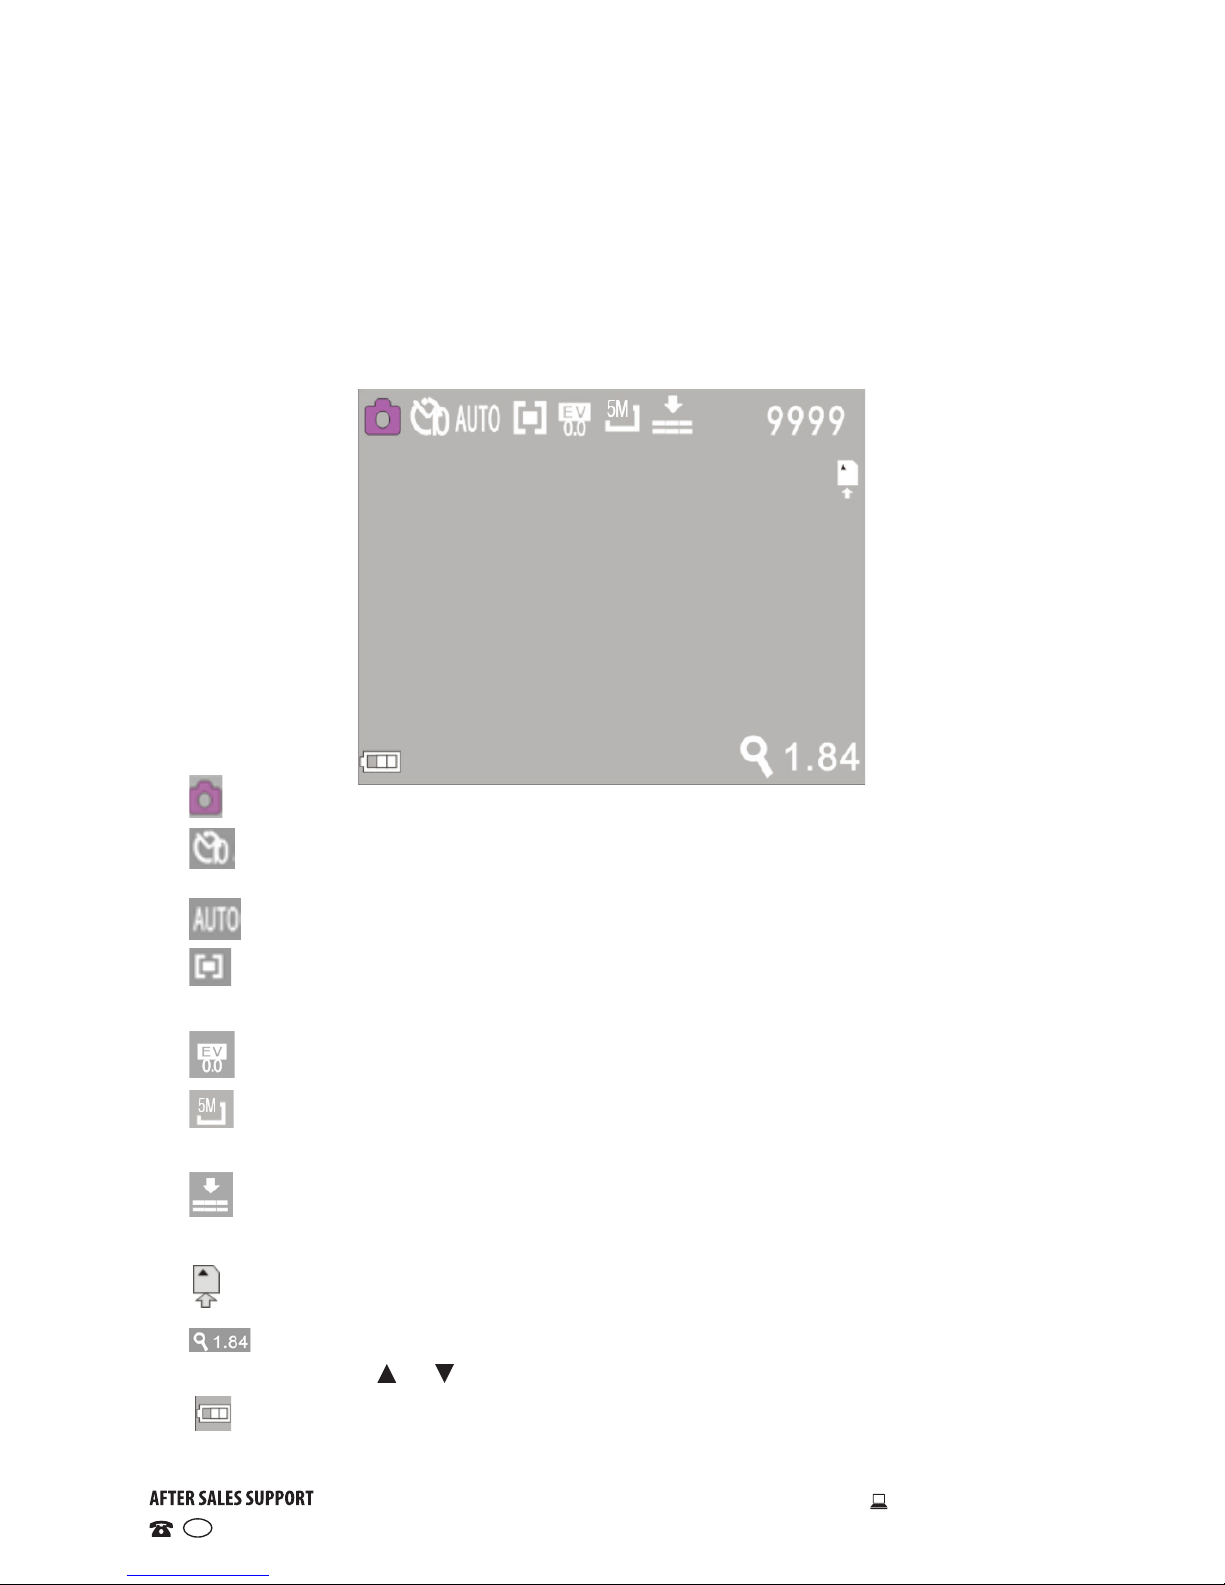
• In image capture mode the LCD displays the following icons:
Mode: Indicates that the current mode is image capture.
Self-timer: Indicates that the current self-timer mode is set to 10
seconds.
White balance: Indicates that white balance is set to automatic.
Metering: Indicates that the metering perspective is set to multi-
points.
Exposure: Indicates that the current exposure has been set to 0.0.
Image resolution: Indicates that the current image resolution is set
to 5MP.
Quality: Indicates picture quality level.
9999 Counter: Indicates the number of pictures available to be taken.
SD card: Indicates that a memory card is currently inserted.
Digital zoom: Indicates that the current zoom magnification is 1.84.
Press the or buttons to adjust the zoom from 1x to 4x.
Battery: Indicates the current battery level.
Page 16
16
1300 886 649 Model: AAC-114 Product Code: 48463 12/2014
www.tempo.org
AUS
Instructions (Cont.)
Image capture menu setup
• Press the OK button to open the image capture setup menu, then use the
or buttons to select a menu item. The background of the selected
menu item will be highlighted once selected.
• Press the OK button to enter the submenu, then use the or buttons to
select an option. Press OK to confirm and return to the main menu. In the
main menu, press SHUTTER to exit the menu.
Main menu Submenu Description
Resolution
1280 x 720 1 MP (megapixel) resolution
2048 x 1536 3 MP (megapixel) resolution
2592 x 1944 5 MP (megapixel) resolution
3264 x 2448 8 MP (megapixel) resolution
Quality
Super Fine Best image quality
Fine Good image quality
Normal General image quality
Metering
Centre Metering subject to the central area
Multi Metering subject to multiple points
Spot Metering subject to one point
White balance
Auto Suitable for most situations
Daylight Suitable for daylight environments
Cloudy Suitable for cloudy environments
Fluorescent Suitable for fluorescent light source environments
Tungsten Suitable for tungsten light source environments
Exposure /
Press switch and OK to adjust light exposure.
Self-timer
Off No self-timer, general single shot mode
2s Two-second delay self-timer mode
10s Ten-second delay self-timer mode
Continuous Continuous picture taking mode while holding
the shutter button
Effect
Normal / B&W Normal effect / Black & White effect
Sepia / Negative
Sepia effect / Negative film effect
Red/Green/Blue
Reddish / greenish / bluish effect
Page 17
17
1300 886 649 Model: AAC-114 Product Code: 48463 12/2014
www.tempo.org
AUS
Instructions (Cont.)
Playback mode
• Slide the MODE switch to the bottom setting to enter standby status in
playback mode.
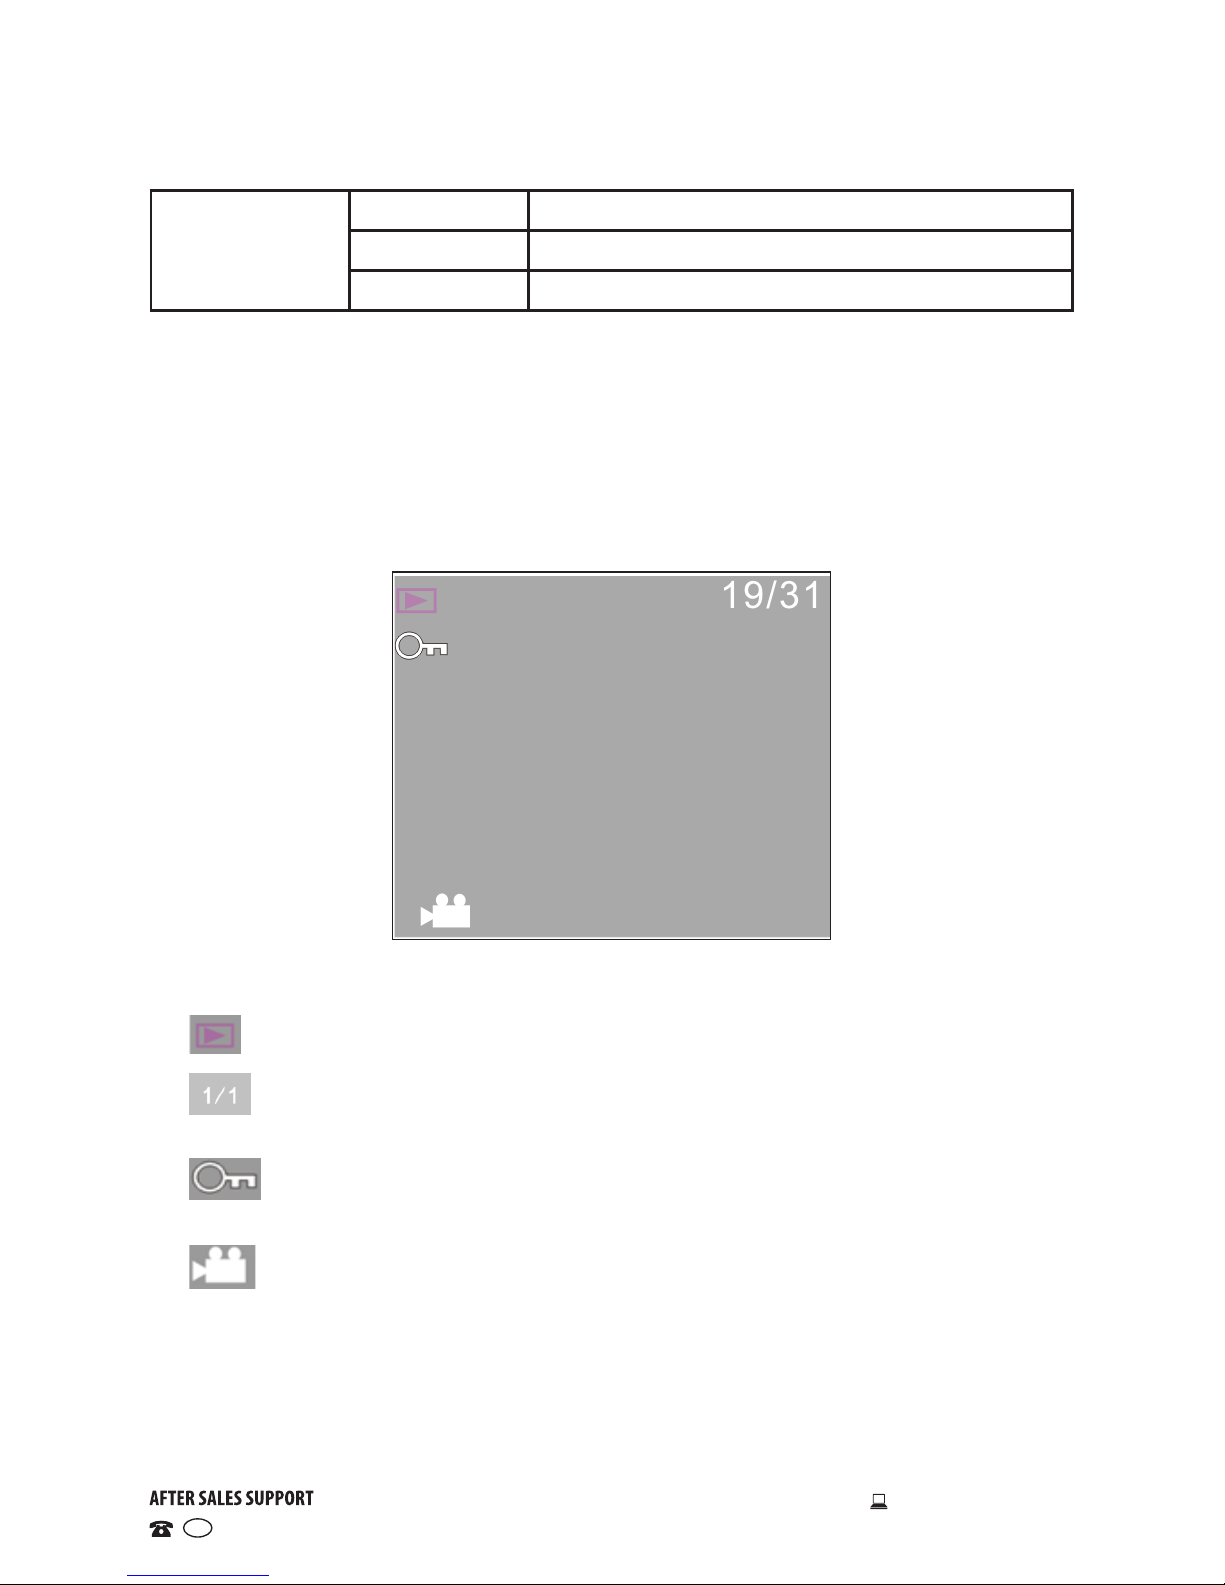
• In playback mode the LCD displays the following icons:
Mode: Indicates that the current mode is playback.
Files/folders: Indicates that currently there are 19 files in 31 folders.
Lock: Indicates that the current folder is locked.
File type: Indicates the current file is a video file.
Date stamp
Off No date/time stamp printed on the file
Date Date printed in the corner of the photo/video file
Date and time Date and time printed in the corner of the file
Page 18
18
1300 886 649 Model: AAC-114 Product Code: 48463 12/2014
www.tempo.org
AUS
Instructions (Cont.)
Main menu Submenu Description
Lock
Lock/unlock
this file
Lock/unlock this file
Lock all Lock all files
Unlock all Unlock all files
Delete
One Delete the current file
All Delete all files
Slide Show
Start Start playing the slide show
Interval
1sec.~10sec.
Repeat Yes/No
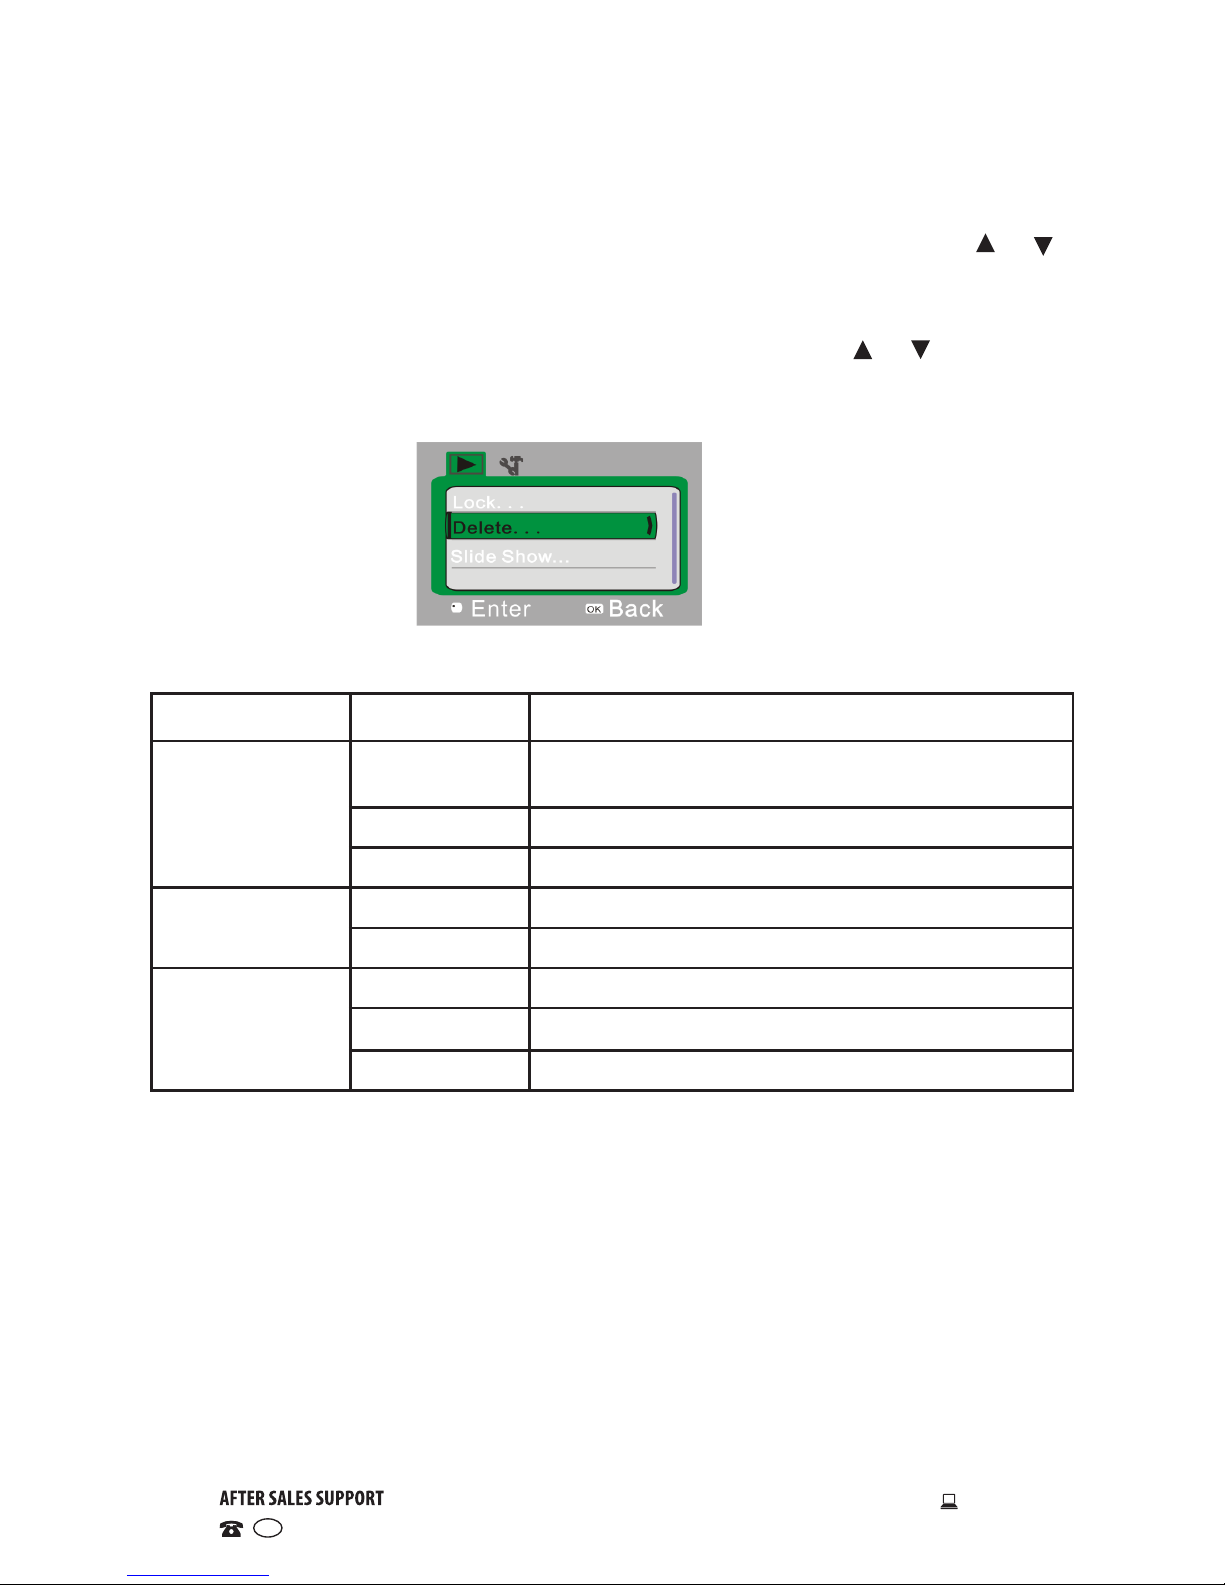
Playback menu setup
• Press the OK button to open the playback menu, and then use the or
buttons to select a menu item. The background of the selected menu item
will be highlighted once selected.
• Press the OK button to enter the submenu, then use the or buttons to
select an option. Press OK to confirm and return to the main menu. In the
main menu, press SHUTTER to exit the menu.
Page 19
19
1300 886 649 Model: AAC-114 Product Code: 48463 12/2014
www.tempo.org
AUS
Instructions (Cont.)
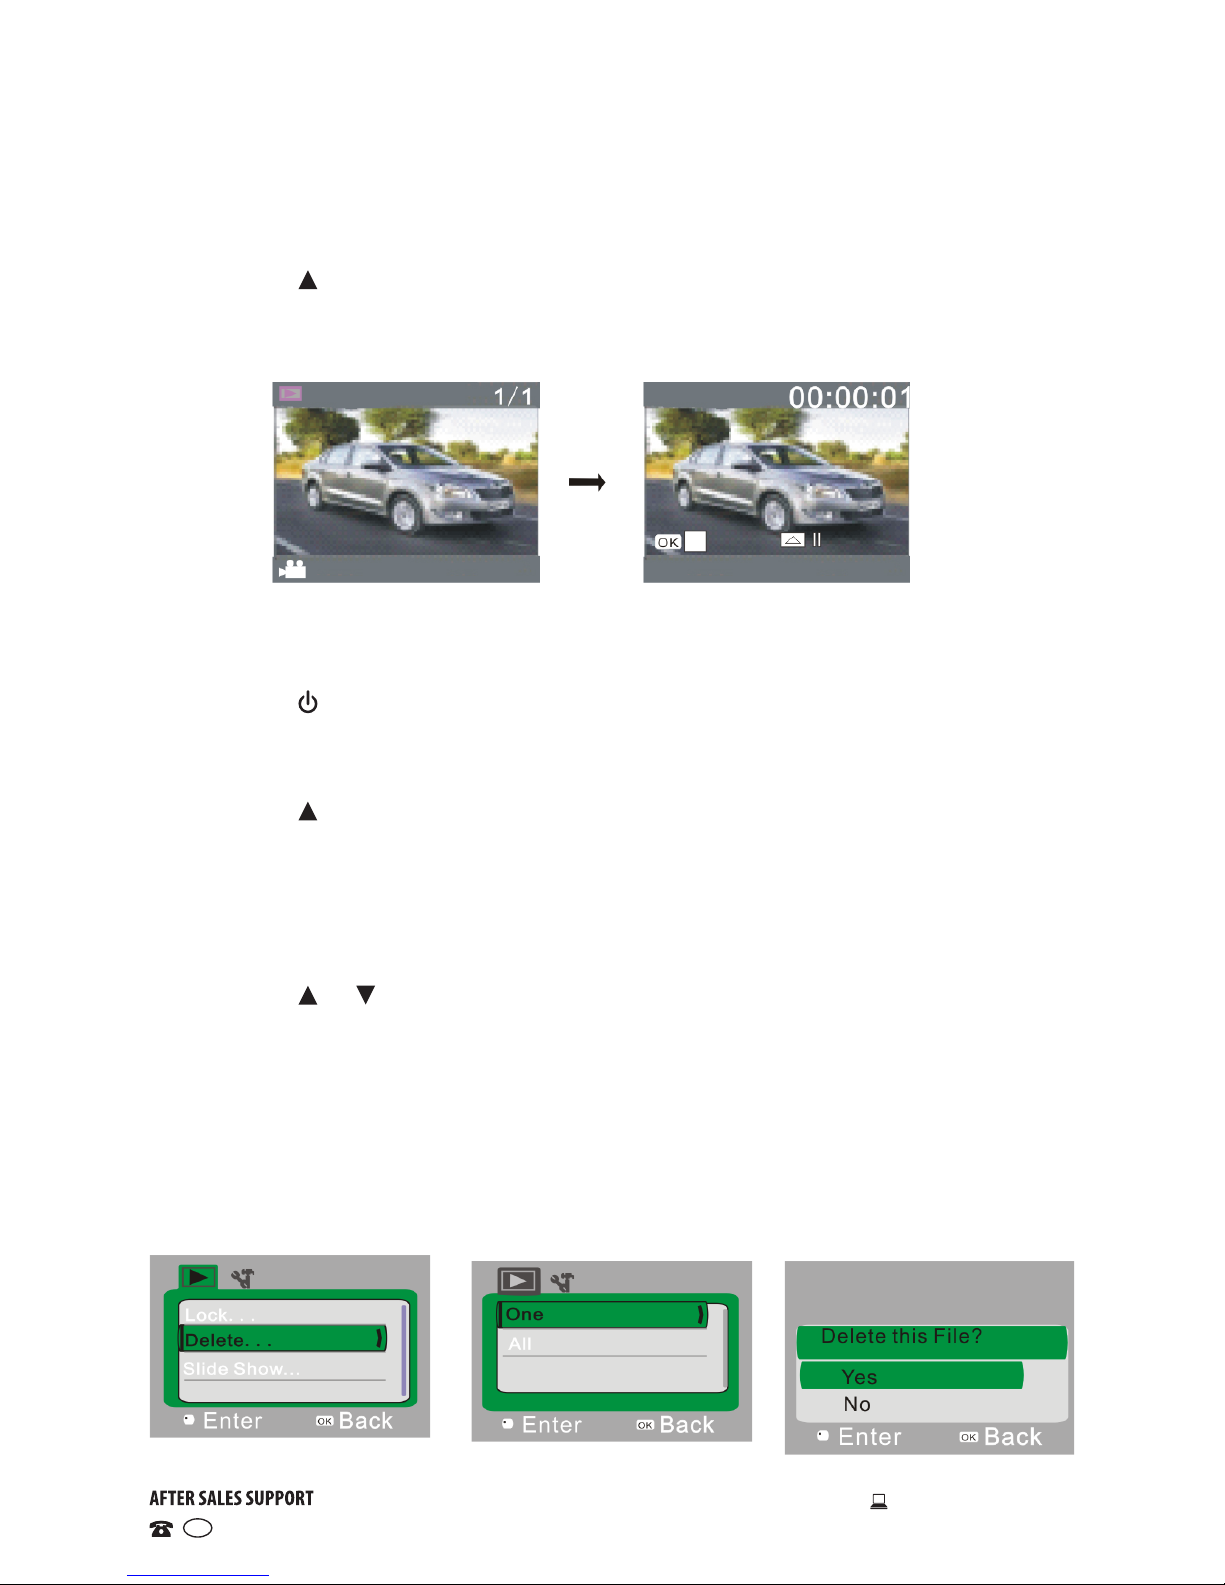
Playing a movie clip
• Press the SHUTTER button to start playback.
• Press the button to pause playback.
• Press the OK button to stop playback.
Deleting a file
• After selecting the file to be deleted, open the menu.
• Press the or buttons to select “Delete”.
• Press the OK button to enter.
• After selecting “One”, press the OK button to confirm (alternatively, select
“All” to delete all files). You will be prompted to confirm whether you want
to delete this file.
• After selecting “Yes”, press the OK button to delete the file.
• When the file is deleted, press the SHUTTER button to exit from the menu.
Playing a timed video recording
• Press the ON/OFF switch to change to playback mode for timed video
recordings. The icon at the bottom of the screen will change to a ‘car’ icon.
• Press the SHUTTER button to start playback.
• Press the button to pause playback.
• Press the OK button to stop playback.
Page 20
20
1300 886 649 Model: AAC-114 Product Code: 48463 12/2014
www.tempo.org
AUS
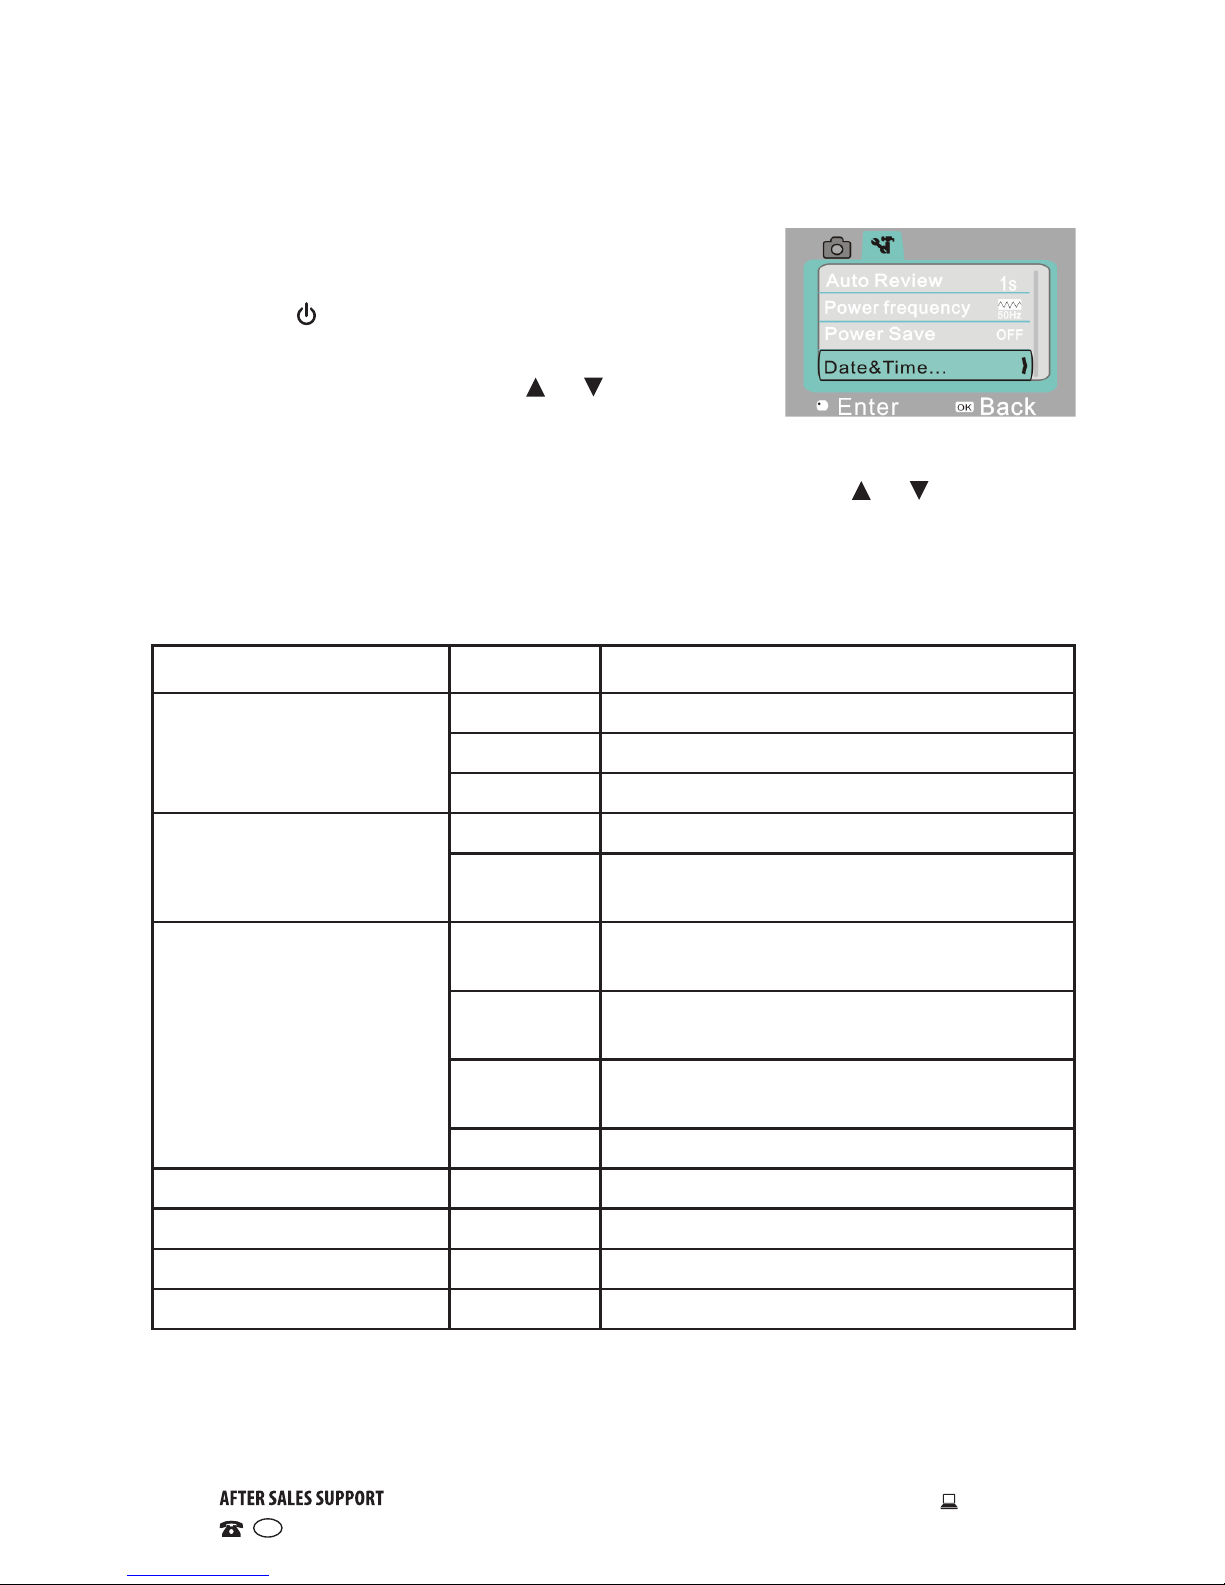
System setup menu
• In capture, video recording or playback mode,
press the OK button to open the menu, and then
press the ON/OFF switch to switch over to the
setup menu.
• In the setup menu, press the or buttons
to select a menu item. The background of the
selected menu item will be highlighted once selected.
• Press the OK button to enter the submenu, then use the or buttons to
select an option. Press OK to confirm and return to the main menu.
• In the main menu, press SHUTTER to exit the menu.
Main menu Submenu Description
Auto review
Off No playback performed after capture
1 second Playback performed 1 second after capture
3 seconds Playback performed 3 seconds after capture
Power frequency
50Hz Set to 50Hz light source frequency
60Hz Set to 60Hz Playback performed 1 sec-
ond later after capture
Power save
1 minute Automatic shutdown performed after 1
minute idle time
3 minutes Automatic shutdown performed after 3
minutes idle time
5 minutes Automatic shutdown performed after 5
minutes idle time
OFF Cancel automatic shutdown
Date and time / Set up date and time format
Language / Set up language
Format Yes/No Format memory card
Reset all Yes/No Back to factory setting
Instructions (Cont.)
Page 21
21
1300 886 649 Model: AAC-114 Product Code: 48463 12/2014
www.tempo.org
AUS
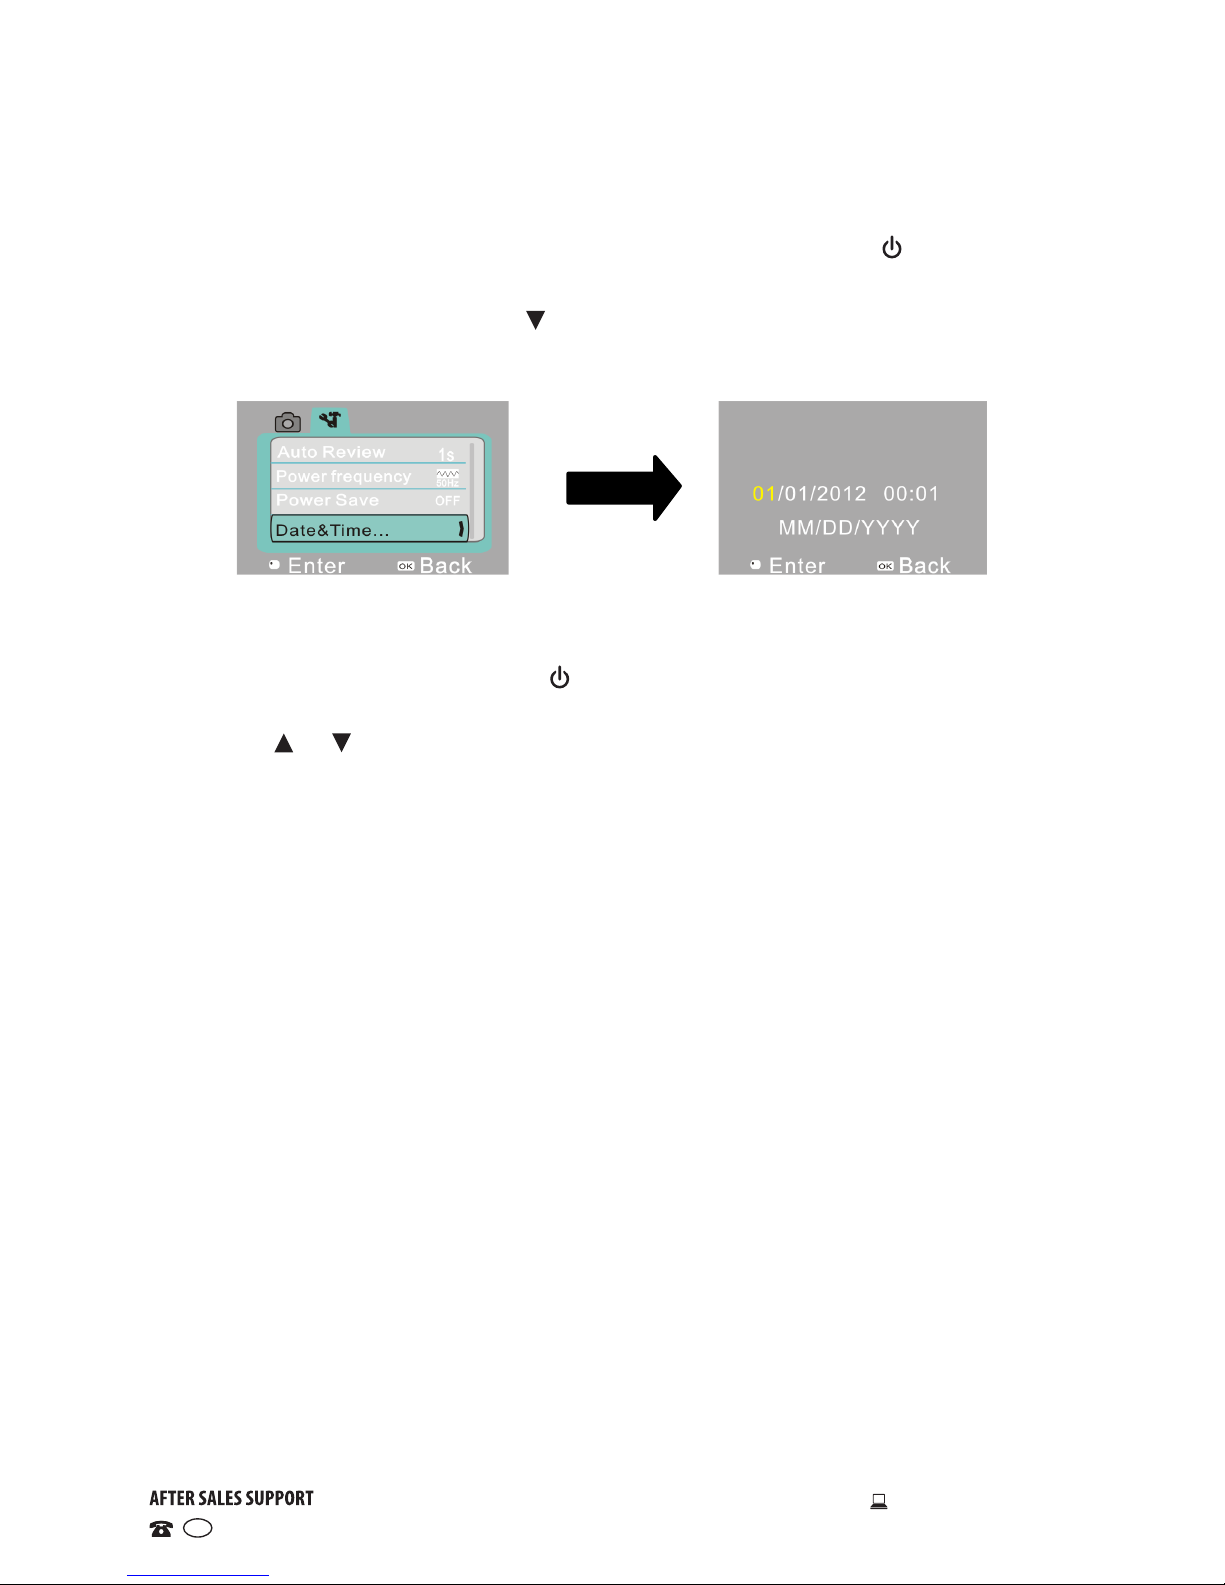
Setting date and time
• Press the OK button to open the menu, and then press the ON/OFF
switch to switch over to the setup menu.
• In the setup menu, press the button to select “Date&Time”, and then
press the OK button to enter the setup window.
• In the setup window, press the ON/OFF switch to select the item to be
adjusted (date, time). The selected item will be highlighted in yellow. Then
use the or buttons for adjustment.
• At completion of adjustment, press the OK button to confirm, or press the
SHUTTER button to cancel the setup and return.
• Finally press the SHUTTER button to exit from setup mode.
Connecting with a PC
The camera features a Plug & Play function, which means you can use it as a
memory reader without need for installation of extra software.
• First connect the camera to a computer with a USB cable, then select the
appropriate portable hard disk mode in the “My Computer” window. The
portable hard disk icon will be displayed.
• Still pictures or video footage shot by you will be stored in the portable
hard disk folder I:\DCIM\100MEDIA (“I” indicates portable hard disk).
Using the computer camera function
• After connecting the camera with the computer, press the OK button on the
camera to enter camera mode. The camera is now ready for use as a web
cam.
• Consult your software user manual for instructions how to use it with a web
cam.
Instructions (Cont.)
Page 22

22
1300 886 649 Model: AAC-114 Product Code: 48463 12/2014
www.tempo.org
AUS
Image sensor
1.3 megapixels (CMOS)
Function mode
Video, image capture, playback, portable disk,
PC cam
Lens
F3.1 f=9.3mm 45º angle
Digital zoom
4x
Shutter
Electronic shutter
LCD display
1.77”TFT screen
Image resolution
1MP (1280×720), 3MP (2048×1536),
5MP (2592×1944), 8MP (3264×2448)
Video resolution
VGA: 640x480 (60 frames/second)
720P: 1280x720 (30 frames/second)
White balance
Automatic / Sunny / Cloudy / Fluorescent light /
Tungsten light
Exposure
-2.0 ~ +2.0
File format
Video AVI
Image JPEG
Storage medium
Micro SD card (max. support 32GB)
USB interface
High-speed USB 2.0 interface
Power supply
Built-in 3.7V chargeable lithium battery
Dimensions
(LxWxH)
67 x 48 x 29mm
Weight
Roughly 48g
Other Useful Information
Technical specications
Responsible disposal
At the end of its working life, do not throw this product out with your
household rubbish. Electrical and electronic products contain substances
that can have a detrimental effect on the environment and human health
if disposed of inappropriately. Observe any local regulations regarding the
disposal of electrical consumer goods and dispose of it appropriately for
recycling. Contact your local authorities for advice on recycling facilities in
your area. Never throw the product or battery into a fire.
Page 23

23
1300 886 649 Model: AAC-114 Product Code: 48463 12/2014
www.tempo.org
AUS
Action Camera
Repair and Refurbished
Goods or Parts Notice
Unfortunately, from time to time, faulty products are manufactured which need to
be returned to the supplier for repair.
Please be aware that if your product is capable of retaining user-generated data
(such as files stored on a computer hard drive, telephone numbers stored on
a mobile telephone, songs stored on a portable media player, games saved on
a games console or files stored on a USB memory stick) during the process of
repair, some or all of your stored data may be lost. We recommend you save this
data elsewhere prior to sending the product for repair.
You should also be aware that rather than repairing goods, we may replace them
with refurbished goods of the same type or use refurbished parts in the repair
process.
Please be assured though, refurbished parts or replacements are only used
where they meet Tempo’s stringent quality specications.
If at any time you feel your repair is being handled unsatisfactorily, you may
escalate your complaint. Please telephone us on 1300 886 649 or write to us at:
Tempo (Aust) Pty Ltd ABN 70 106 100 252
PO BOX 6056 Frenchs Forest, Sydney, Australia NSW 2086
Telephone: 1300 886 649 Fax: (02) 8977 3765
Tempo Help Desk: 1300 886 649 (Aust)
(Operating Hours: Mon-Fri 08:30AM to 06:00PM EST)
Email: info@tempo.org
Page 24
1300 886 649 Model: AAC-114 Product Code: 48463 12/2014
www.tempo.org
AUS
Warranty returns
Should you for any reason need to return this product
for a warranty claim, make sure to include all accessories
with the product.
Product does not work?
If you encounter problems with this product, or if it fails
to perform to your expectations, make sure to contact
our After Sales Support Centre on 1300 886 649 before
returning it to the store for a refund.
 Loading...