

Page 1

Onity
HT24W / HT28 Smart
Version 5.2 User Manual
Page 2

Contacting Onity
Worldwide Headquarters
Atlanta, GA USA
1-770-497-3949
1-800-424-1433
moreinfo@onity.com
North America
1-770-935-4228
1-800-424-1433
NORAM@onity.com
Europe / Middle East / Africa
34-943-448-300
EMEA@onity.com
Latin America
55-11-3031-1909
LAM@onity.com
Asia / Pacific
+8862 2719 2665
ASPAC@onity.com
The information contained within this manual is subject to change without notice. In no way does Onity,
Inc. warrant that the operation of this system will be entirely error free or perform precisely as described
within this documentation, or that the functions and features of this system will meet your specific
requirements.
Windows is a registered trademark of Microsoft Corporation
All information contained in this documentation is the sole property of Onity, Inc. Unauthorized use and
reproduction is strictly prohibited. Documentation © 2011 Onity, Inc.
Page 3

Contents
Contacting Onity ........................................................................................................................ ii
Introduction 1
Who is Onity .............................................................................................................................. 1
Problems with Metal Key Systems ............................................................................................ 1
Benefits of Onity Electronic Locking Systems .......................................................................... 1
About this Manual ..................................................................................................................... 2
What's New ................................................................................................................................ 2
Worldwide Headquarters ............................................................................................. ii
North America ............................................................................................................. ii
Europe / Middle East / Africa ...................................................................................... ii
Latin America .............................................................................................................. ii
Asia / Pacific ............................................................................................................... ii
Software - HT24W / HT28 Smart 3
General ....................................................................................................................................... 3
HT24W vs. HT28 Smart ............................................................................................................ 3
HT24W ........................................................................................................................ 3
HT28 Smart ................................................................................................................. 3
Reception Menu (F10) ............................................................................................................... 4
New Guest Check-In (F5) ........................................................................................... 4
Copy Guest (F6) .......................................................................................................... 7
Check-Out (F7) .......................................................................................................... 10
Single Opening Card (F8) ......................................................................................... 11
Read a Card (F3) ....................................................................................................... 14
Erase a Card (F4) ....................................................................................................... 15
Hotel Information (F2) .............................................................................................. 16
Groups ....................................................................................................................... 18
Peripheral Openings .................................................................................................. 23
Logout / Login (F9) ................................................................................................... 25
Exit ............................................................................................................................ 25
Masters Menu .......................................................................................................................... 26
Revalidation............................................................................................................... 26
Master Users (F11) .................................................................................................... 27
Master Canceling Card .............................................................................................. 38
Special Cards Menu ................................................................................................................. 40
Encode Guest Canceling Card ................................................................................... 40
Encode Blocking Card ............................................................................................... 40
Encode Diagnostic Card ............................................................................................ 41
Encode Spare Cards ................................................................................................... 41
Encode Safe Emergency Card ................................................................................... 42
Maintenance Menu .................................................................................................................. 43
Load Portable Programmer ........................................................................................ 43
Peripheral Diagnosis .................................................................................................. 48
Station Diagnosis ....................................................................................................... 50
Onity HT24W / HT28 Smart Contents • iii
Page 4

Room Out of Service ................................................................................................. 50
Mastering Changes .................................................................................................... 51
Backup Data .............................................................................................................. 53
Emphasized Authorizations Data .............................................................................. 54
Move to Historic ........................................................................................................ 56
Security Menu .......................................................................................................................... 58
System Auditor .......................................................................................................... 58
Lock Openings .......................................................................................................... 61
Door Transactions ..................................................................................................... 61
Card Activity Report ................................................................................................. 64
Lock Status Report .................................................................................................... 66
Operators ................................................................................................................... 68
Operator Levels Required .......................................................................................... 71
XPP Mastering .......................................................................................................... 71
Configuration ........................................................................................................................... 73
Language ................................................................................................................... 73
Change Date and Time .............................................................................................. 73
Station Configuration ................................................................................................ 73
Change Encoder ........................................................................................................ 75
Config. Emergency Reval. ........................................................................................ 75
Check-Out Warning................................................................................................... 76
PMS Enabled ............................................................................................................. 76
Show PMS Communications ..................................................................................... 76
Hardware 77
HT24W / ADVANCE (Magnetic) System Components ........................................................ 77
HT24 Magnetic Stripe Lockset .................................................................................. 77
Magnetic Cards .......................................................................................................... 80
HT24 Card Readers ................................................................................................... 82
Encoders .................................................................................................................... 83
HT28 / ADVANCE Dual Smart System Components ........................................................... 87
HT28 Dual / ADVANCE Dual Technology Lockset ................................................ 87
Smart Cards ............................................................................................................... 90
Smart Card Encoder .................................................................................................. 91
HT Proximity, HT RFID and Advance RFID™ System Components .................................... 94
Lock Configurations .................................................................................................. 94
Lock Operating Modes .............................................................................................. 96
Light & Audible Indications ...................................................................................... 97
Time Tables ............................................................................................................... 98
Daylight Savings Time .............................................................................................. 98
Battery Operation ...................................................................................................... 98
Lock Auditor ............................................................................................................. 99
Keycards & Tokens ................................................................................................... 99
HT22iP Encoder (HT Proximity Only) ................................................................... 102
HT22P Encoder (ADVANCE RFID / HT RFID Only) ........................................... 104
General Components ............................................................................................................. 106
Portable Programmer ............................................................................................... 106
Extended Portable Programmer (XPP) .................................................................... 110
Communications Distributor ................................................................................... 115
Terminal Mode Encoders ....................................................................................................... 117
Online Revalidator ................................................................................................................. 119
Revalidator Options ................................................................................................. 119
Using the Revalidator .............................................................................................. 121
Emergency Mode - Revalidator ............................................................................... 122
iv • Contents Onity HT24W / HT28 Smart
Page 5

Quick Reference Guide 124
Lockset Light Indications ...................................................................................................... 124
HT24W / HT28 Smart Software Icons .................................................................................. 125
HT24W / HT28 Smart Shortcut Function Keys ..................................................................... 126
What to Do If … .................................................................................................................... 127
A staff member has lost a master card … ................................................................ 127
Our PMS interface is down … ................................................................................ 127
Power is out and our encoders don't work … .......................................................... 128
A guest needs a late check-out time … ................................................................... 128
Daylight Savings Time is next week … .................................................................. 128
We want to provide our own cards … ..................................................................... 128
We want to punch holes in our master cards to wear them on a chain … ............... 129
When should we replace our cards … ..................................................................... 129
Troubleshooting ..................................................................................................................... 129
Guest card will not open the door – red light .......................................................... 129
Guest card will not open the door – flashing red light ............................................. 129
Guest and staff cards will not open the door – flashing red and green lights .......... 129
Guest and staff cards will not open the door – solid green, flashing red light ......... 130
Card has broken in lock ........................................................................................... 130
The programmer will not turn on ............................................................................ 130
The programmer beeps, but the screen is blank ....................................................... 130
The screen on our encoder is blank ......................................................................... 130
We get encoding errors when making cards ............................................................ 130
Our PMS says that Onity is not responding ............................................................. 131
Appendix A – Certifications 132
Advance RFID ....................................................................................................................... 132
HT RFID ................................................................................................................................ 133
Appendix B – Import Users 134
Add User Command .............................................................................................................. 134
Glossary of Terms 137
Index 139
Onity HT24W / HT28 Smart Contents • v
Page 6

Page 7

Introduction
Who is Onity
Onity, (formerly TESA Entry Systems), the leading global provider of electronic
locking systems, offers innovative technological solutions and services for the
Hospitality, Corporate, Education, Government and Marine markets. The company’s
ever-expanding family of electronic solutions today includes electronic locks, related
Smart card & Proximity technology, in-room safes, and Senercomm energy
management systems. Onity has global R&D and manufacturing operations, as well
as an extensive sales and service network that spans more than 115 countries around
the globe. With innovative solutions specially designed to meet clients’ changing
needs, Onity continues to provide real progress — technological advancements in
facility management and maintenance for unparalleled convenience and time and
cost savings.
Problems with Metal Key Systems
Traditional metal key lock systems are vulnerable in a variety of ways. A guest may
simply keep a key or have a copy made so that he can return to the room at a later
time. When keys are missing, the locks are often not re-keyed due to the cost and
time requirements. An experienced criminal can study several keys or look inside the
key cylinders and decode the key system, allowing him to create a grand master key
to the property.
Benefits of Onity Electronic Locking Systems
Onity locks do not require re-keying if a guest keeps a card. Each new guest card
issued automatically re-keys the lock to prevent access by the previous guests, so
your guests are secure. Additionally, the guest cards will expire at the date and time
designated during check-in. There are no mechanical parts able to be deco ded that
will allow criminals into the rooms; the lock is unlocked only through an encrypted
code. Onity locks also store the most recent openings in non-volatile memory,
allowing the hotelier to know exactly who has been in the room, and when.
Onity HT24W / HT28 Smart Introduction • 1
Page 8

About this Manual
This manual is a guide to help you understand the Onity system, including locks,
software, and peripherals. The system is very flexible and can utilize traditional
magnetic stripe cards as well as the latest in smart card technology.
There are many smart and proximity cards available today. Onity has selected
several cards with features that most benefit the hospitality industry. These cards are
detailed later in this manual and are available from Onity.
Throughout this manual, the term 'smart card' will refer to any contact type memory
cards or microprocessor cards, ‘proximity card’ will refer to contactless type
memory or microprocessor cards and RFID will refer to Mifare cards. Though there
are many technical differences between the types of available cards, the Onity
system handles the differences transparently to the user. In cases where the
differences are notable, detailed explanations will point out the differences.
A Word about Maintenance
Your Onity locking system is an important part of an overall security system for your
guest’s safety.
What's New
The Onity lock will provide years of service when properly maintained. However,
the lock is a single element of a door system that must also be maintained. Onity can
provide you with full services for the door lock, but it is the properties’ responsibility
to maintain the door and its associated hardware. The lock will not work as
effectively if the door itself is not professionally maintained.
According to Facilitiesnet.com typical failures with doors are: hinges, closers, door
misalignment, and weather stripping. For example, doors can become misaligned
due to the shifting or settling of the walls. Also, they can become misaligned as the
result of the damage to the door frame from luggage carts or maid carts.
Onity recommends that you contract with a professional door maintenance company
and set up a preventive maintenance program for doors and associated hardware.
Note: Onity’s warranty does not cover issues caused by warped doors, misalignment,
dragging edges, or dragging weather stripping, closer issues or sagging / out of
square frames.
ADVANCE (Magnetic lock)
ADVANCE RFID lock
HT22P encoder
HT RFID lock
Onity’s ADVANCE is a revolutionary locking solution that combines the proven
reliability of the world's most trusted name in electronic locking with a fresh new
aesthetic that is designed to meet the needs of the demanding hospitality
environment
2 • Introduction Onity HT24W / HT28 Smart
Page 9

H
D
Software - HT24W / HT28 Smart
General
The HT24W / HT28 Smart system is a revolutionary step in locking systems. The
following sections will take you step by step through all of the features and functions
of the software. Some features are only available in the HT28 Smart system that
uses smart cards.
Available only with
T28 Smart!
esigned for keyboard use!
• In this manual, the Smart only features will be indicated with this symbol in the
left-hand margin.
• The front desk functions that are used most frequently have been designed so
that the operator can quickly complete the process without requiring the mouse.
The keyboard image shown to the left indicates the functions designed for
keyboard use.
HT24W vs. HT28 Smart
This manual applies to the software and hardware that makes up the HT24W and
HT28 Smart systems. The systems are identical in many ways, but there are several
important differences.
HT24W
The HT24W system uses Windows based software to manage and control the HT24
series magnetic stripe locks,HT Proximity Locks, HT RFID locks, ADVANCE locks
and ADVANCE RFID locks. .
HT28 Smart
The HT28 Smart system uses Windows based software to manage and control HT28
dual technology, smart card and magnetic stripe, locks and/or HT Proximity Locks.
There are several features in the software that can only be u s ed wit h HT28 locks and
smart cards. The primary feature difference is that card transactions can be stored on
the smart card.
Onity HT24W / HT28 Smart Software - HT24W / HT28 Smart • 3
Page 10
D
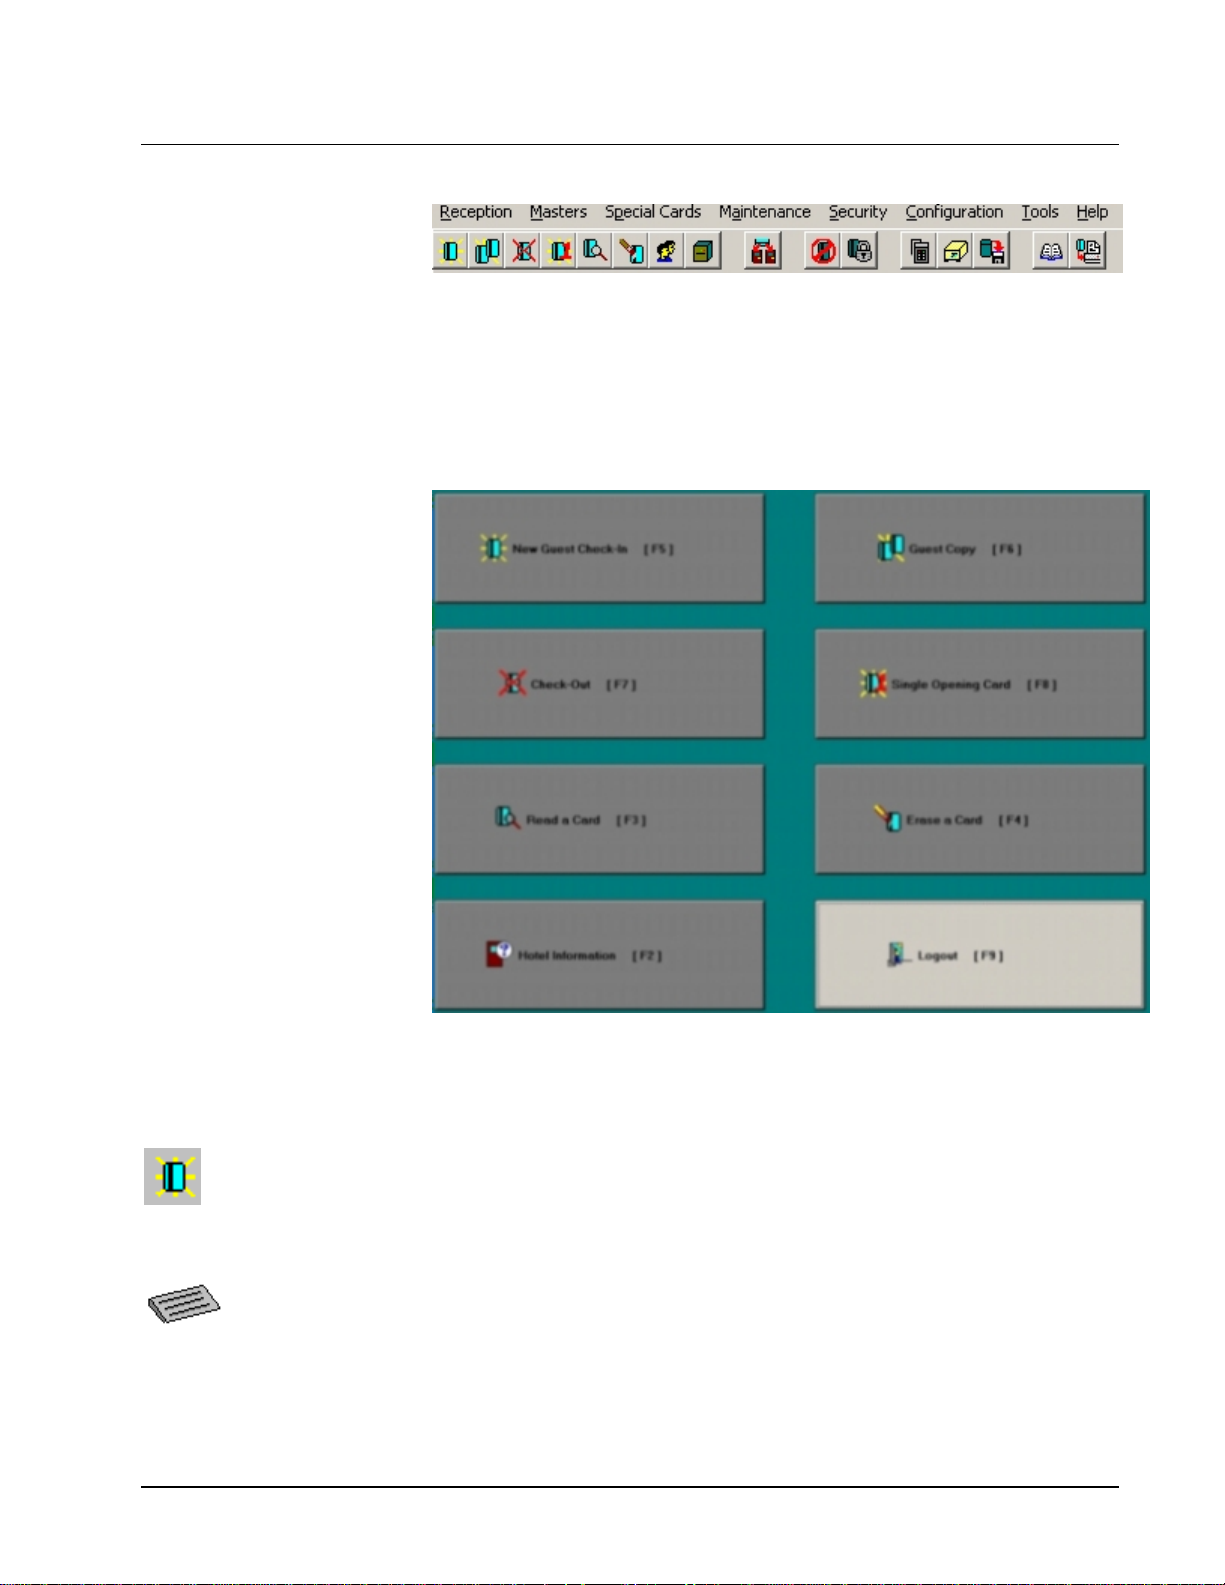
Reception Menu (F10)
The Reception Menu includes the most frequently used functions, including New
Guest Check-In, Copy Guest and Check-Out. Many functions on the Reception
Menu have been designed to be used without the use of a mouse. Although a mouse
can be used in these functions, the operations will be completed more quickly by
using only the keyboard.
The primary functions of the Reception Menu can be accessed from the main screen
through the Hot Buttons. These buttons are shown in the figure b elow. For quick
access to the full Reception Menu, press the F10 key.
New Guest Check-In (F5)
This function is used when a new guest is to be checked into a room. When the
New Guest Check-In
esigned for keyboard use!
4 • Software - HT24W / HT28 Smart Onity HT24W / HT28 Smart
new card is used in the lock, the card of the previous guest will automatically be
canceled.
The New Guest Check-In function of the system allows you to make guest cards
that will work in up to four guestroom doors, depending on the type of encoder
used to make the card. The HT24 motorized encoder can encode up to four
rooms. Manual insertion encoders can encode a maximum of three rooms on
one card. As an example, if a family checked into the hotel, and the parents
requested one room for themselves and another room for the children, the cards
can be made to work in both locks.
Page 11
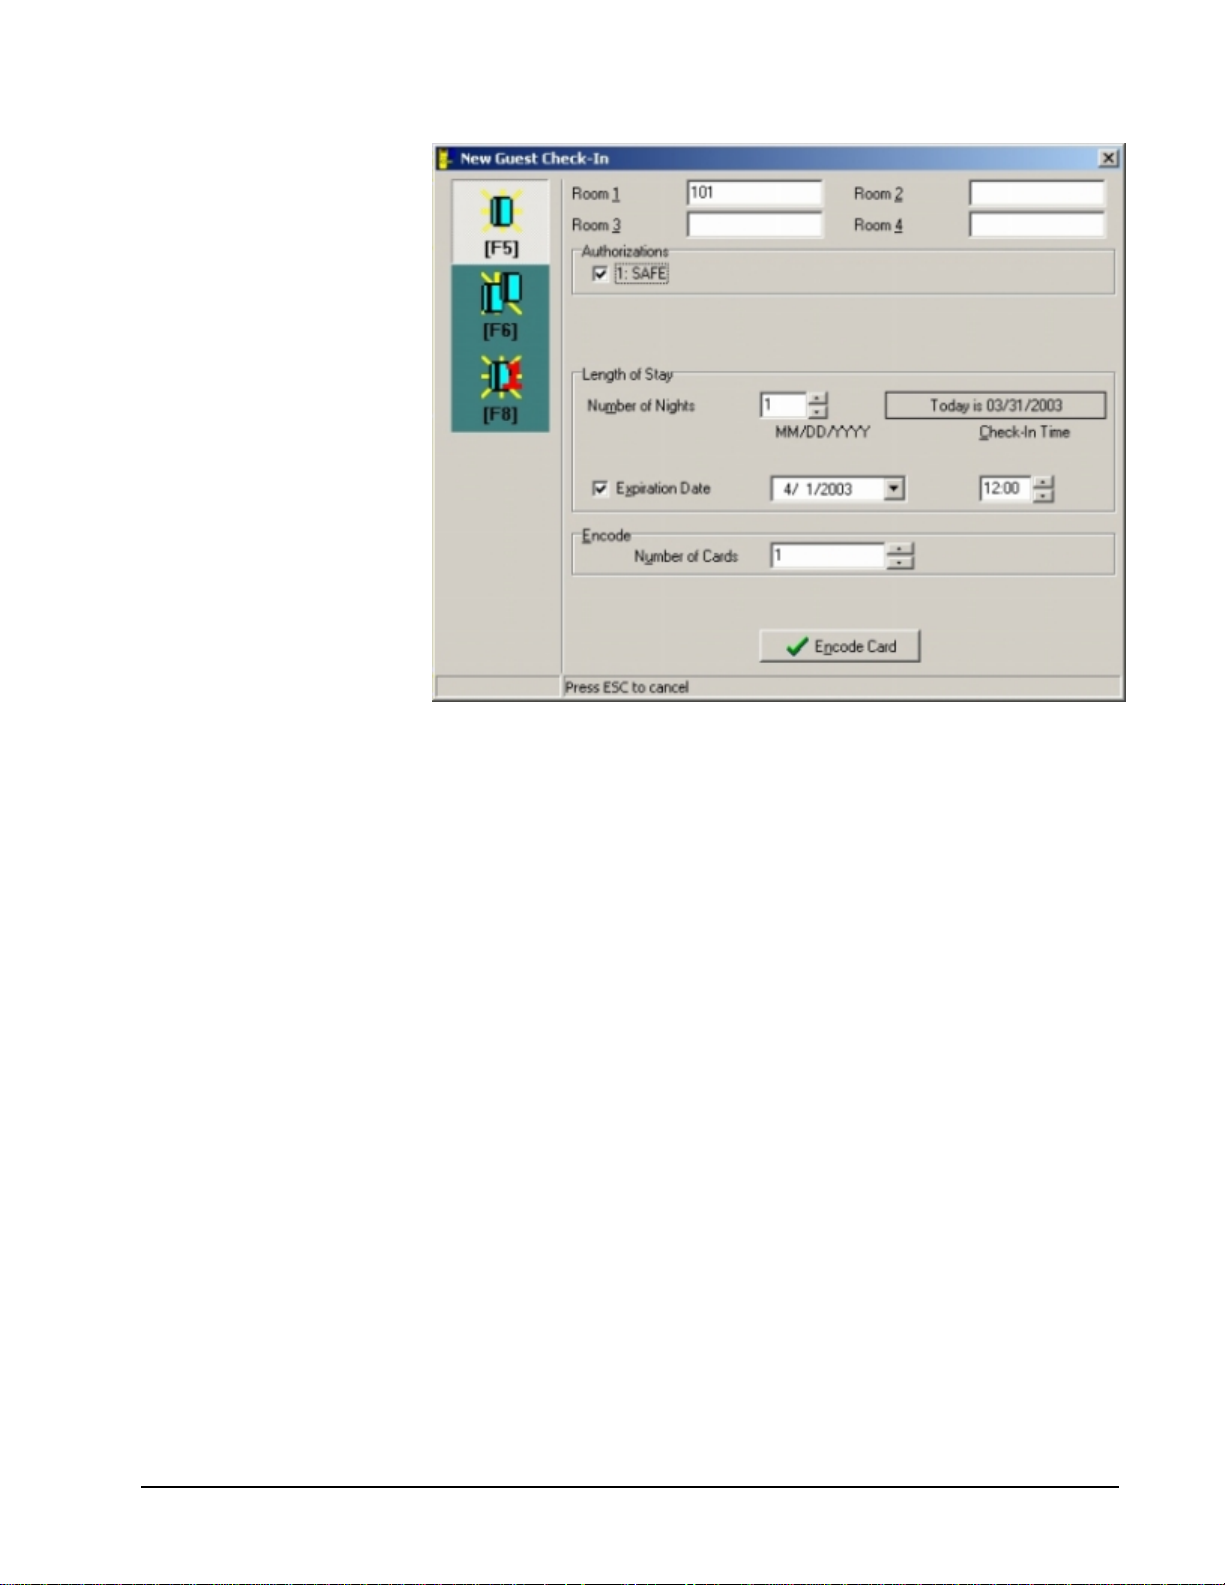
To check in a new guest, perform the following steps:
1. From the Reception Menu, click on New Guest (Check-In), press F5, or
click on the New Guest Check-In Tool.
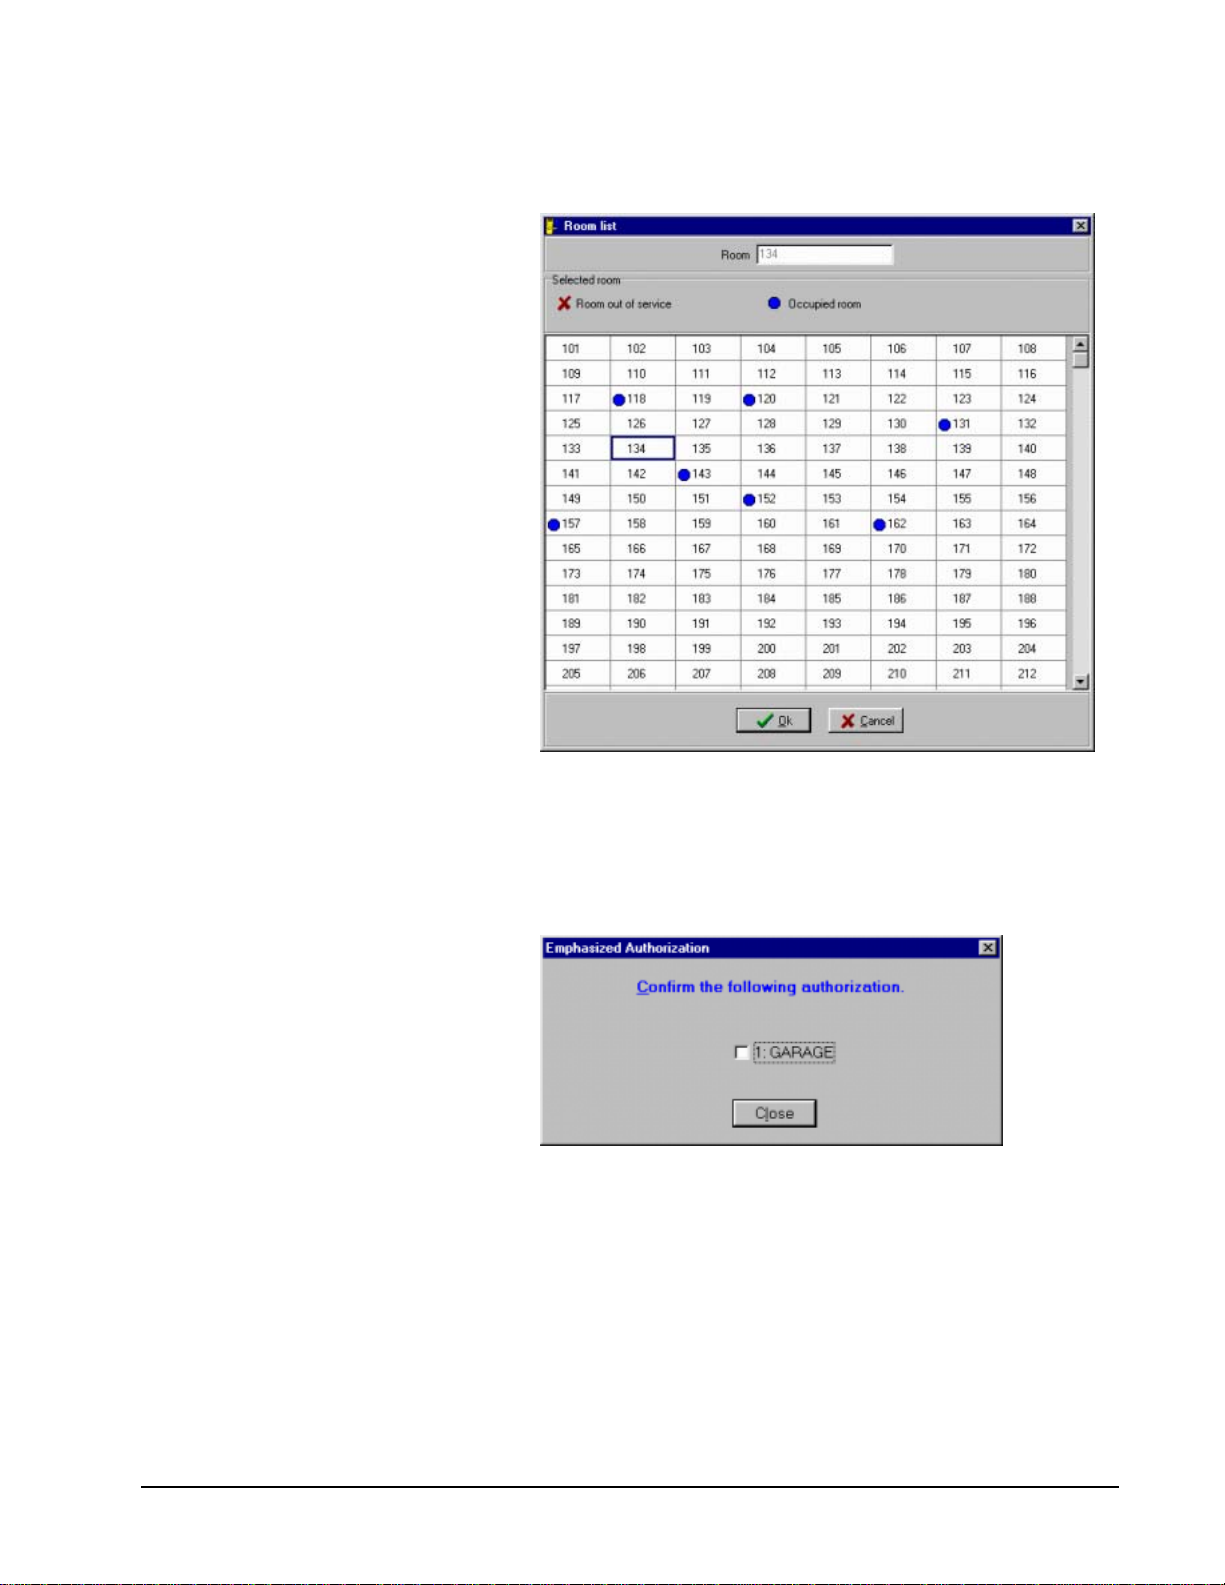
2. Enter a room number, and press the ENTER key. The cursor will move
to the next Room field in the display, and allow you to enter a second
room number. By pressing the F2 key, you can select a room from a
pick screen that shows vacant, occupied and out of service rooms.
Simply use the ARROW keys to select a room from this list and press
Onity HT24W / HT28 Smart Software - HT24W / HT28 Smart • 5
Page 12
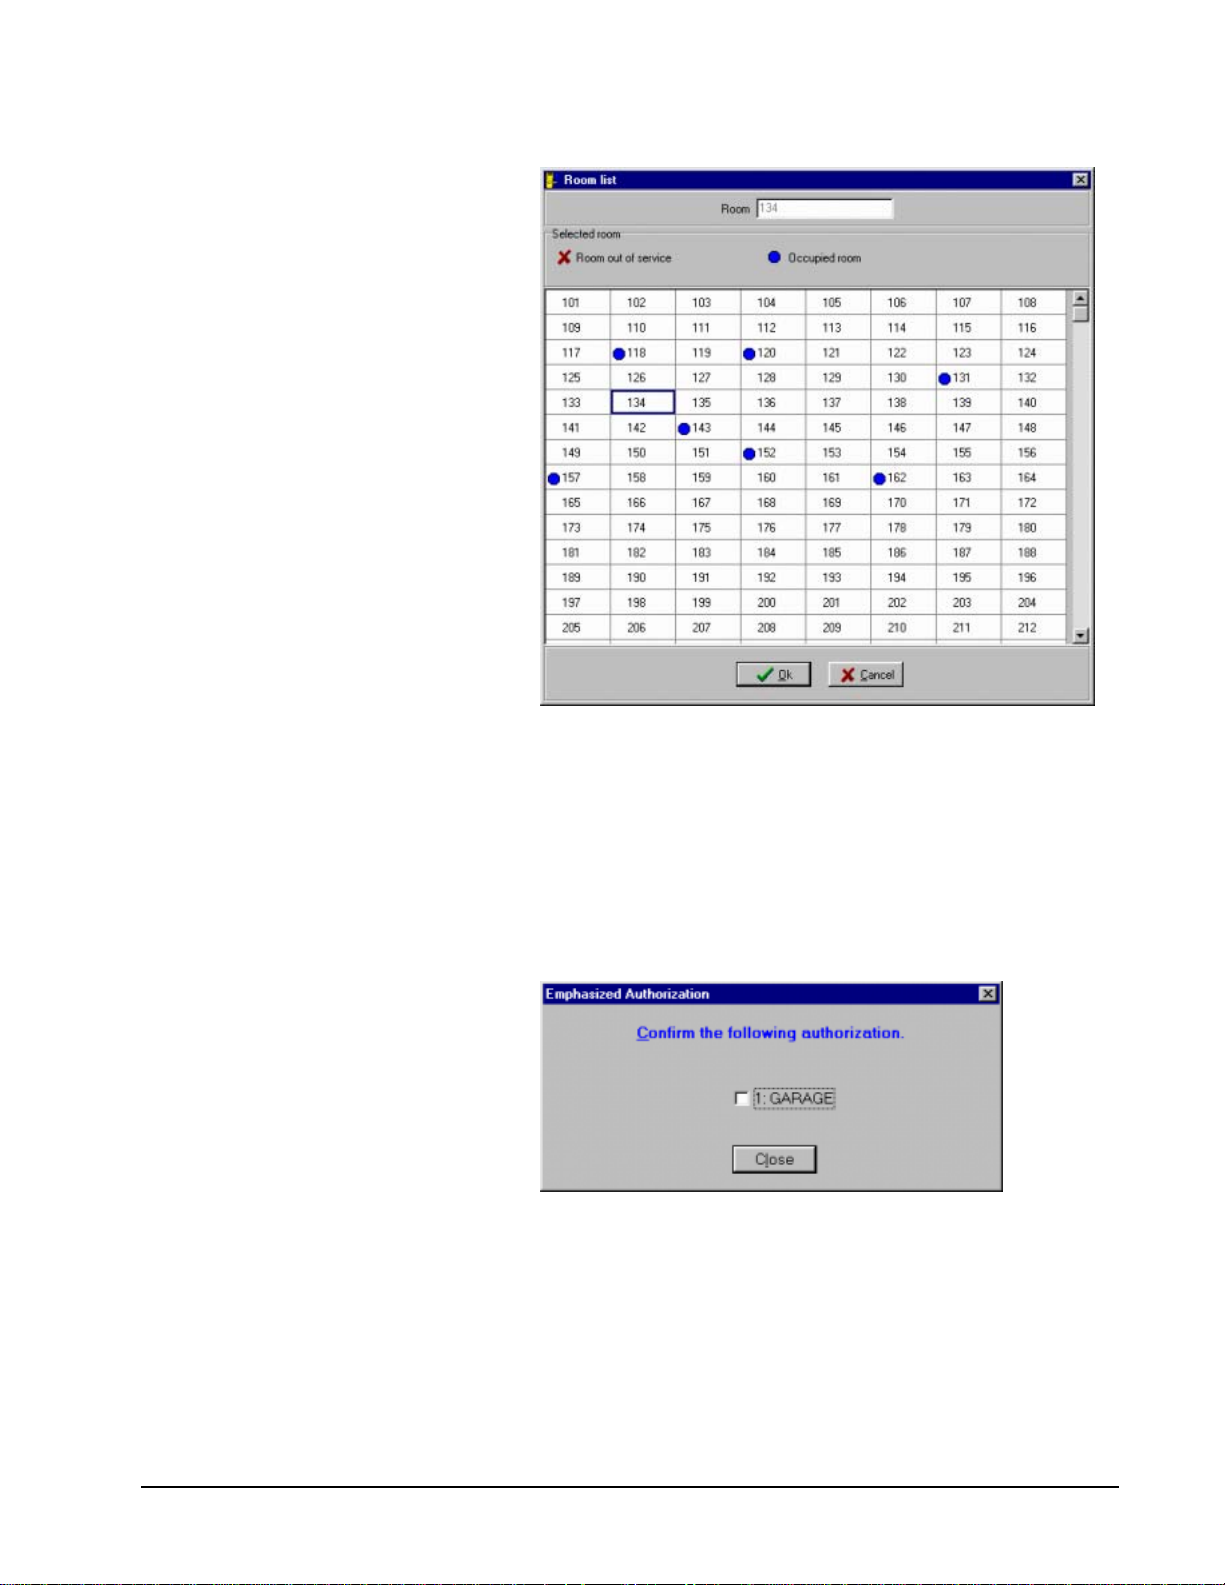
the SPACE BAR or double click with the mouse to confirm.
3. The cursor will move to the next Room field in the display and allow
you to enter another room number, or select from the list. If you do not
want to add another room to the card, press ENTER again. Repeat this
step until you have entered all of the rooms you want to encode on this
card. When you are finished entering all of the rooms, press the
ENTER key again to continue to authorizations.
4. If your property is using Emphasized Authorizations to promote the
sale of amenities such as the use of an in-room safe, a message box will
appear asking you to confirm this authorization. To select the
authorization, press the SPACE BAR and press the ENTER key to
continue.
5. If your property offers optional authorizations for other amenities, such
as access to the pool or covered parking, you will be given the
opportunity to either grant or deny the use of these items , as shown
below:
Use the UP/DOWN ARROW keys to navigate through the list of
available authorizations. By pressing the SPACE BAR you can grant
or deny each authorization and press the ENTER key to continue to the
length of stay.
6 • Software - HT24W / HT28 Smart Onity HT24W / HT28 Smart
Page 13

D
6. Once the authorizations section is completed, the cursor will move to
the area of the screen to enter the number of nights the guest will be
staying.
Type a number or use the UP/DOWN ARROW keys to set the number
of nights for the stay and press the ENTER key.
7. If your property uses a starting date on guest cards, the cursor will
highlight the start date. The default start date is today. You can use the
number pad to set the starting date of the card. To change the starting
time, press the TAB key to move the cursor to the time and use the
number keys to change the time. Press ENTER to continue to the
Expiration date and time.
8. The software will convert the number of nights into the expiration date.
You may make any changes you wish to the check-out date and time by
using the number keys to enter the new hour, day, month or year. Press
ENTER to continue to Track 1 and 2 data.
9. If you are using magnetic cards and a motorized encoder, you are able
to encode information on tracks 1 and 2 of your card. This information
is not needed to operate the Onity locks, but is commonly used for
Point Of Sale (POS) systems. Track 1 data can contain letters or
numbers and track 2 data can contain only numbers.
Copy Guest
esigned for keyboard use!
10. The last thing to do before encoding your cards is to tell the software
how many cards your guest will need. You can type the number or use
the UP/DOWN ARROW keys. When you are ready to encode the
cards, press the ENTER key.
A message will appear on the screen instructing you to insert the card.
When encoding is complete, a message will instruct you to take the
card.
If more than one card was requested, the screen will repeat the prompts
until all of the requested cards are made. When you are finished making
cards, select another function, or press the F9 key to log out of the
system.
Copy Guest (F6)
This function is used to encode extra cards for an occupied guestroom after the initial
check-in procedure. These cards will not affect the use of the existing guest card.
WARNING: Never make a copy of a guest card if the guest has LOST their card.
Make a NEW GUEST CARD to void out a lost card.
Onity HT24W / HT28 Smart Software - HT24W / HT28 Smart • 7
Page 14
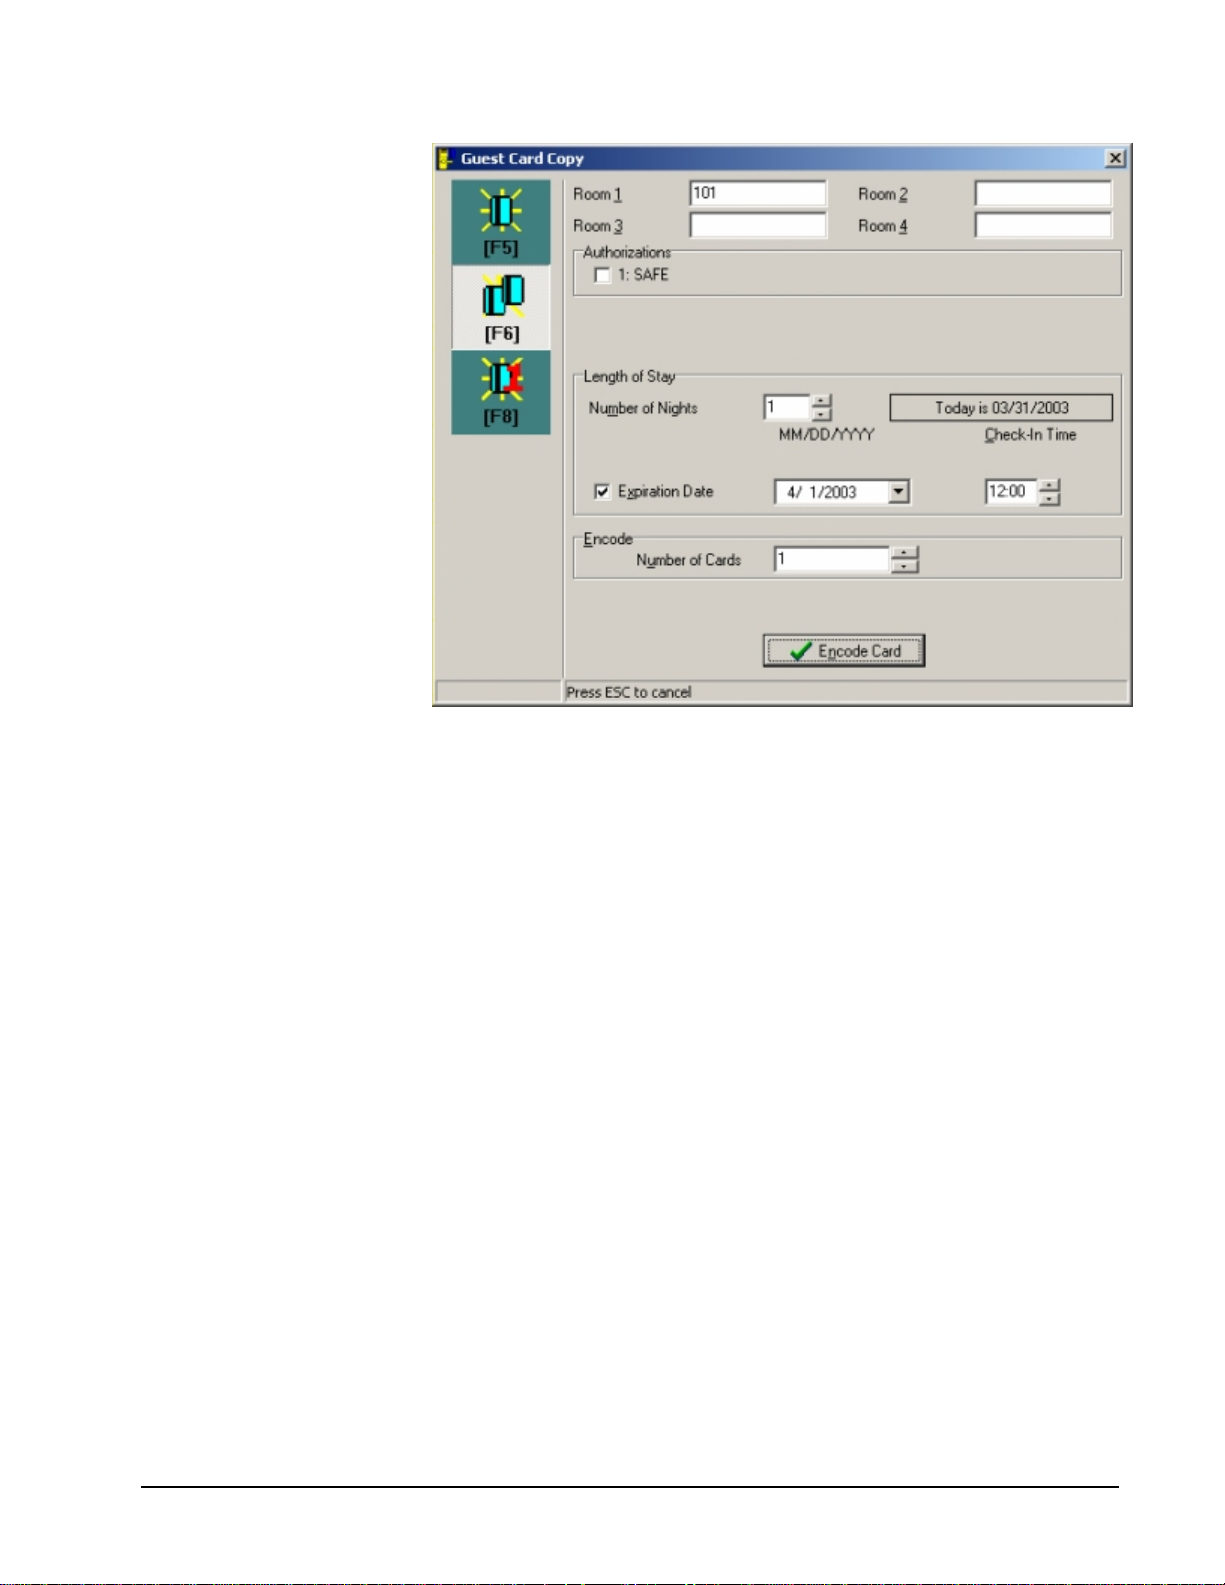
To encode a copy of a guest card, perform the following steps:
1. Select Copy Guest from the Reception Menu, press F6, or click on the
Copy Guest Tool.
2. Enter a room number, and press the ENTER key. The cursor will move
to the next Room field in the display, and allow you to enter a second
room number. By pressing the F2 key, you can select a room from a
pick screen that shows vacant, occupied and out of service rooms.
Simply use the ARROW keys to select a room from this list and press
8 • Software - HT24W / HT28 Smart Onity HT24W / HT28 Smart
Page 15

the SPACE BAR or double click with the mouse to confirm.
3. The cursor will move to the next Room field in the display and allow
you to enter another room number, or select from the list. If you do not
want to add another room to the card, press ENTER again. Repeat this
step until you have entered all of the rooms you want to encode on this
card. When you are finished entering all of the rooms, press the
ENTER key again to continue to authorizations.
4. If your property is using Emphasized Authorizations to promote the
sale of amenities such as the use of an in-room safe, a message box will
appear asking you to confirm this authorization. To select the
authorization, press the SPACE BAR and press the ENTER key to
continue.
5. If your property offers optional authorizations for other amenities, such
as access to the pool or covered parking, you will be given the
opportunity to either grant or deny the use of these items , as shown
below:
Use the UP/DOWN ARROW keys to navigate through the list of
available authorizations. By pressing the SPACE BAR you can grant
or deny each authorization and press the ENTER key to continue to the
length of stay.
Onity HT24W / HT28 Smart Software - HT24W / HT28 Smart • 9
Page 16
D
6. Once the authorizations section is completed, the cursor will move to
the area of the screen to enter the number of nights the guest will be
staying.
Type a number or use the UP/DOWN ARROW keys to set the number
of nights for the stay and press the ENTER key.
7. If your property uses a starting date on guest cards, the cursor will
highlight the start date. The default start date is today. You can use the
number pad to set the starting date of the card. To change the starting
time, press the TAB key to move the cursor to the time and use the
number keys to change the time. Press ENTER to continue to the
Expiration date and time.
8. The software will convert the number of nights into the expiration date.
You may make any changes you wish to the check-out date and time by
using the number keys to enter the new hour, day, month or year. Press
ENTER to continue to Track 1 and 2 data.
9. If you are using magnetic cards and a motorized encoder, you are able
to encode information on tracks 1 and 2 of your card. This information
is not needed to operate the Onity locks, but is commonly used for
Point Of Sale (POS) systems. Track 1 data can contain letters or
numbers and track 2 data can contain only numbers.
Check-Out
10. The last thing to do before encoding your cards is to tell the software
how many cards your guest will need. You can type the number or use
the UP/DOWN ARROW keys. When you are ready to encode the
cards, press the ENTER key.
A message will appear on the screen instructing you to insert the card.
When encoding is complete, a message will instruct you to take the
card.
If more than one card was requested, the screen will repeat the prompts
until all of the requested cards are made. When you are finished making
cards, select another function, or press the F9 key to log out of the
system.
Note: The original and 4 copies can be uniquely identified in the audit record of
the lock. If you encode more than 5 cards, the audit report will indicate that a
'Redundant Card' was used.
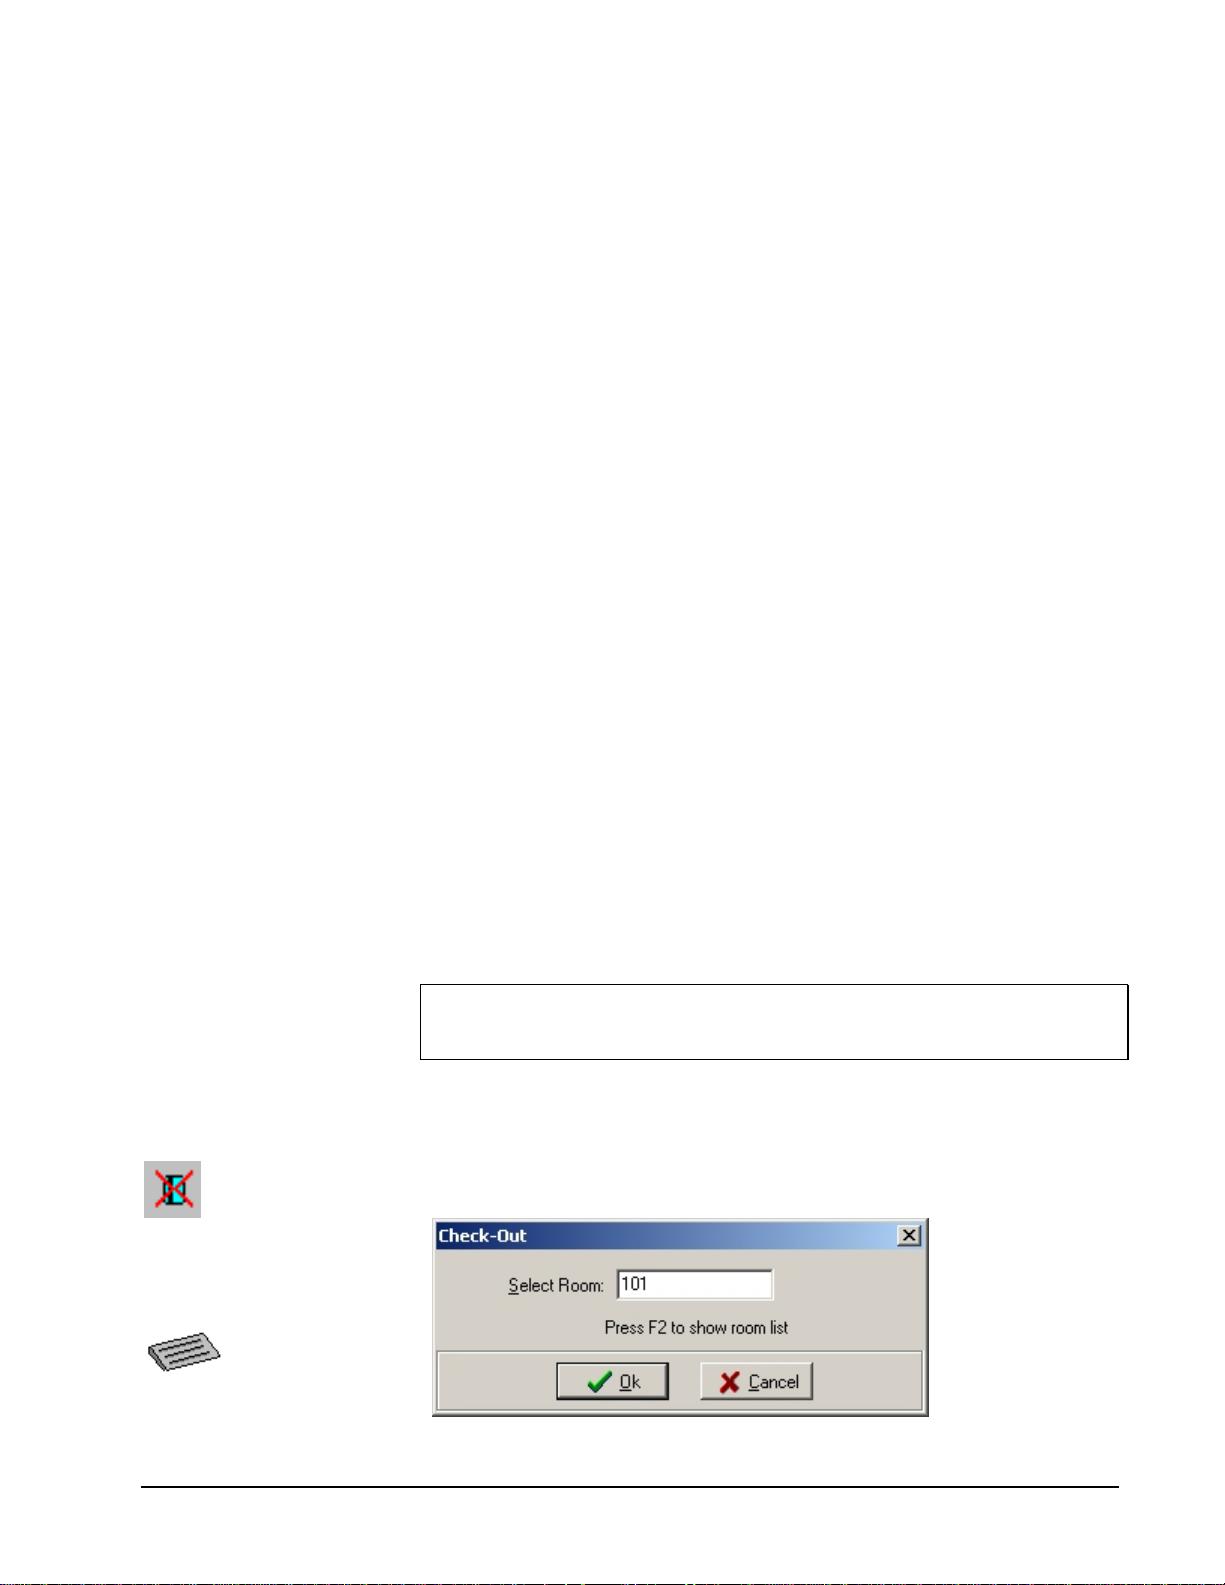
Check-Out (F7)
The Check-Out function is used at the end of a guest's stay to indicate that the room
is now vacant and available for use by a new guest.
esigned for keyboard use!
10 • Software - HT24W / HT28 Smart Onity HT24W / HT28 Smart
Page 17
D
Single Opening Card
esigned for keyboard use!
To check a guest out of a room, perform the following steps:
1. Select Check-Out from the Reception menu, press the F7 key or click
on the Check-Out Tool.
2. The screen will prompt you to enter the room number for the guest to
be Checked-Out. Type in the room number or select it from the list.
3. Once the room number has been selected, press the ENTER key to
complete the operation.
4. When the Check-Out is complete, select another function or press F9 to
log out.
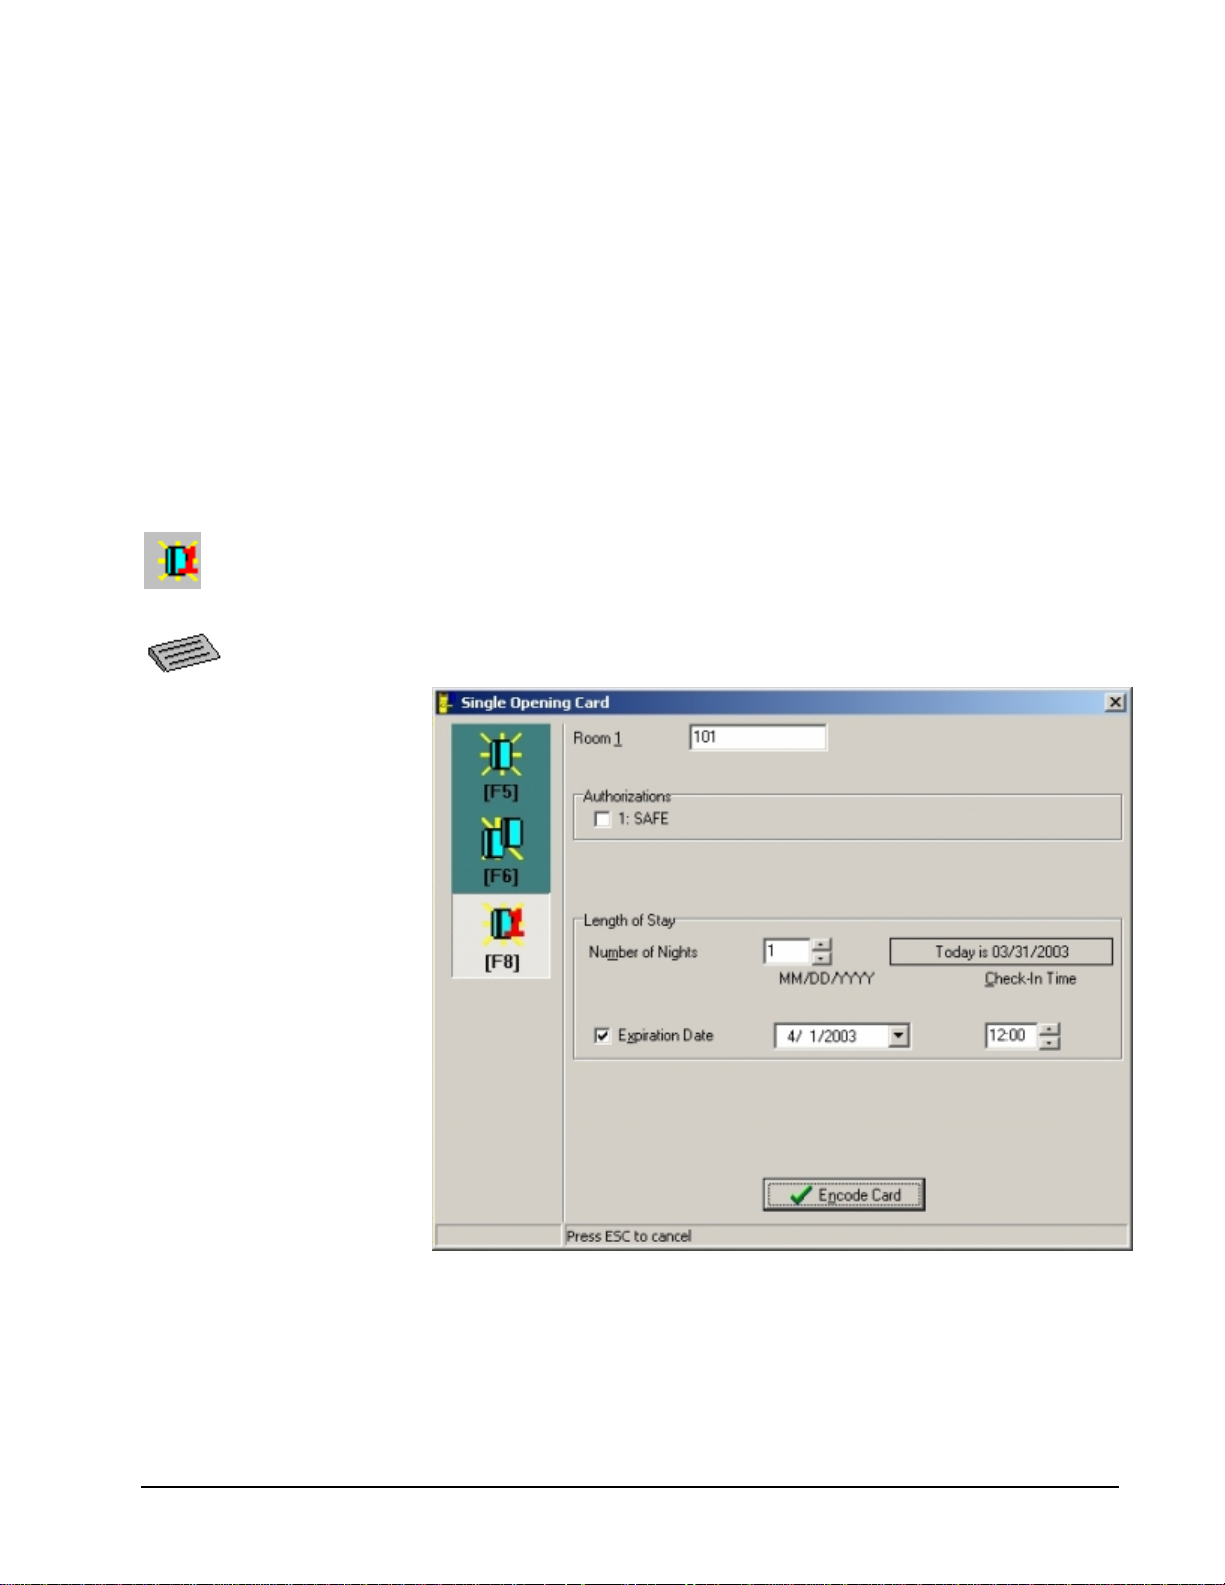
Single Opening Card (F8)
This function is used to make a card that will work in a guestroom lock only once.
The single opening card is commonly used by the hotelier to allow a guest to
preview a room, or to allow a vendor to place an item inside of a room. Once the
card is used in the lock, it is no longer valid. A maximum of four Single Opening
Cards may be made for a single guestroom between new guest Check-Ins.
To make a single opening card, perform the following steps:
1. From the Reception Menu, click on Single Opening Card, press F8, or
click on the Single Opening Card Tool
2. Enter a room number, and press the ENTER key. The cursor will move
to the next Room field in the display, and allow you to enter a second
room number. By pressing the F2 key, you can select a room from a
Onity HT24W / HT28 Smart Software - HT24W / HT28 Smart • 11
Page 18
pick screen that shows vacant, occupied and out of service rooms.
Simply use the ARROW keys to select a room from this list and press
the SPACE BAR or double click with the mouse to confirm.
3. Note: Unlike other cards, a single opening card can only b e encoded
for one room.
4. If your property is using Emphasized Authorizations to promote the
sale of amenities such as the use of an in-room safe, a message box will
appear asking you to confirm this authorization. To select the
authorization, press the SPACE BAR and press the ENTER key to
continue.
5. If your property offers optional authorizations for other amenities, such
as access to the pool or covered parking, you will be given the
opportunity to either grant or deny the use of these items , as shown
below:
Use the UP/DOWN ARROW keys to navigate through the list of
available authorizations. By pressing the SPACE BAR you can grant
or deny each authorization and press the ENTER key to continue to the
length of stay.
6. Once the authorizations section is completed, the cursor will move to
the area of the screen to enter the number of nights the guest will be
12 • Software - HT24W / HT28 Smart Onity HT24W / HT28 Smart
Page 19

staying.
Type a number or use the UP/DOWN ARROW keys to set the number
of nights for the stay and press the ENTER key.
7. If your property uses a starting date on guest cards, the cursor will
highlight the start date. The default start date is today. You can use the
number pad to set the starting date of the card. To change the starting
time, press the TAB key to move the cursor to the time and use the
number keys to change the time. Press ENTER to continue to the
Expiration date and time.
8. The software will convert the number of nights into the expiration date.
You may make any changes you wish to the check-out date and time by
using the number keys to enter the new hour, day, month or year. Press
ENTER to continue to Track 1 and 2 data.
9. If you are using magnetic cards and a motorized encoder, you are able
to encode information on tracks 1 and 2 of your card. This information
is not needed to operate the Onity locks, but is commonly used for
Point Of Sale (POS) systems. Track 1 data can contain letters or
numbers and track 2 data can contain only numbers.
When you are ready to encode the card, press the ENTER key.
A message will appear on the screen instructing you to insert the card. When
encoding is complete, a message will instruct you to take the card. When you are
finished making the card, select another function, or press the F9 key to log out of
the system.
Onity HT24W / HT28 Smart Software - HT24W / HT28 Smart • 13
Page 20
D
Read a Card
esigned for Keyboard Use!
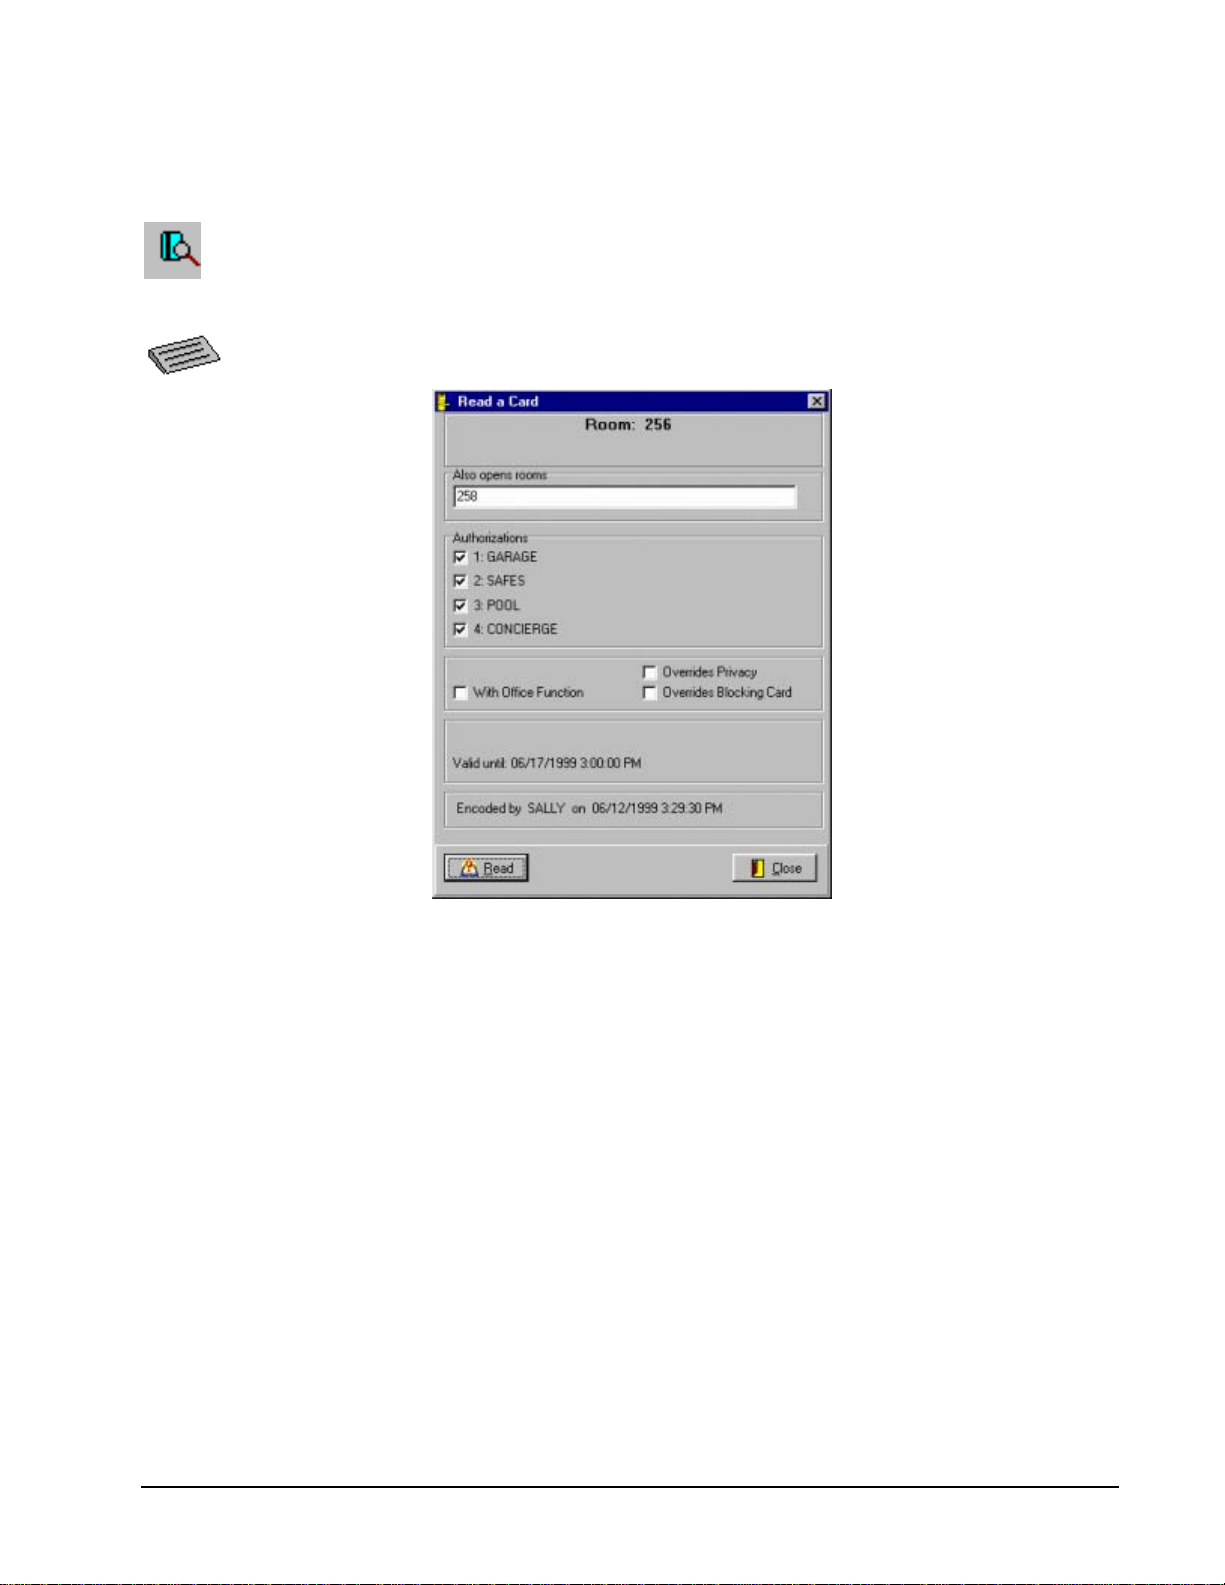
Read a Card (F3)
This function is used to identify an unknown card and to examine the information
encoded on the card.
To read a card, perform the following steps:
1. From the Reception menu, click Read, press the F3 key, or click on the
Read Card Tool.
2. The screen will prompt you to insert the card. Insert and remove the
card in the encoder.
3. Once the card has been read, the screen will display all of the guest
information encoded on the card, such as the authorizations and the
expiration date and time. In the example in the figure above, the card is
for room 256 and 258, and it is the original card (not a copy). The card
was authorized to operate the guestroom safe, garage, pool, and the
concierge lounge. This card will not override guest privacy or the
blocking card, and it cannot place a door into office mode. The card
will expire at 3:00 p.m. on June 17, 1999 and was encoded by Sally on
June 12 at 3:30 PM.
You may read another card by pressing the READ button located in the
bottom left of the window. When you are finished reading cards, press
the ESCAPE key and select another function, or press the F9 key to log
out of the system.
14 • Software - HT24W / HT28 Smart Onity HT24W / HT28 Smart
Page 21
D
Erase a Card
esigned for Keyboard Use!
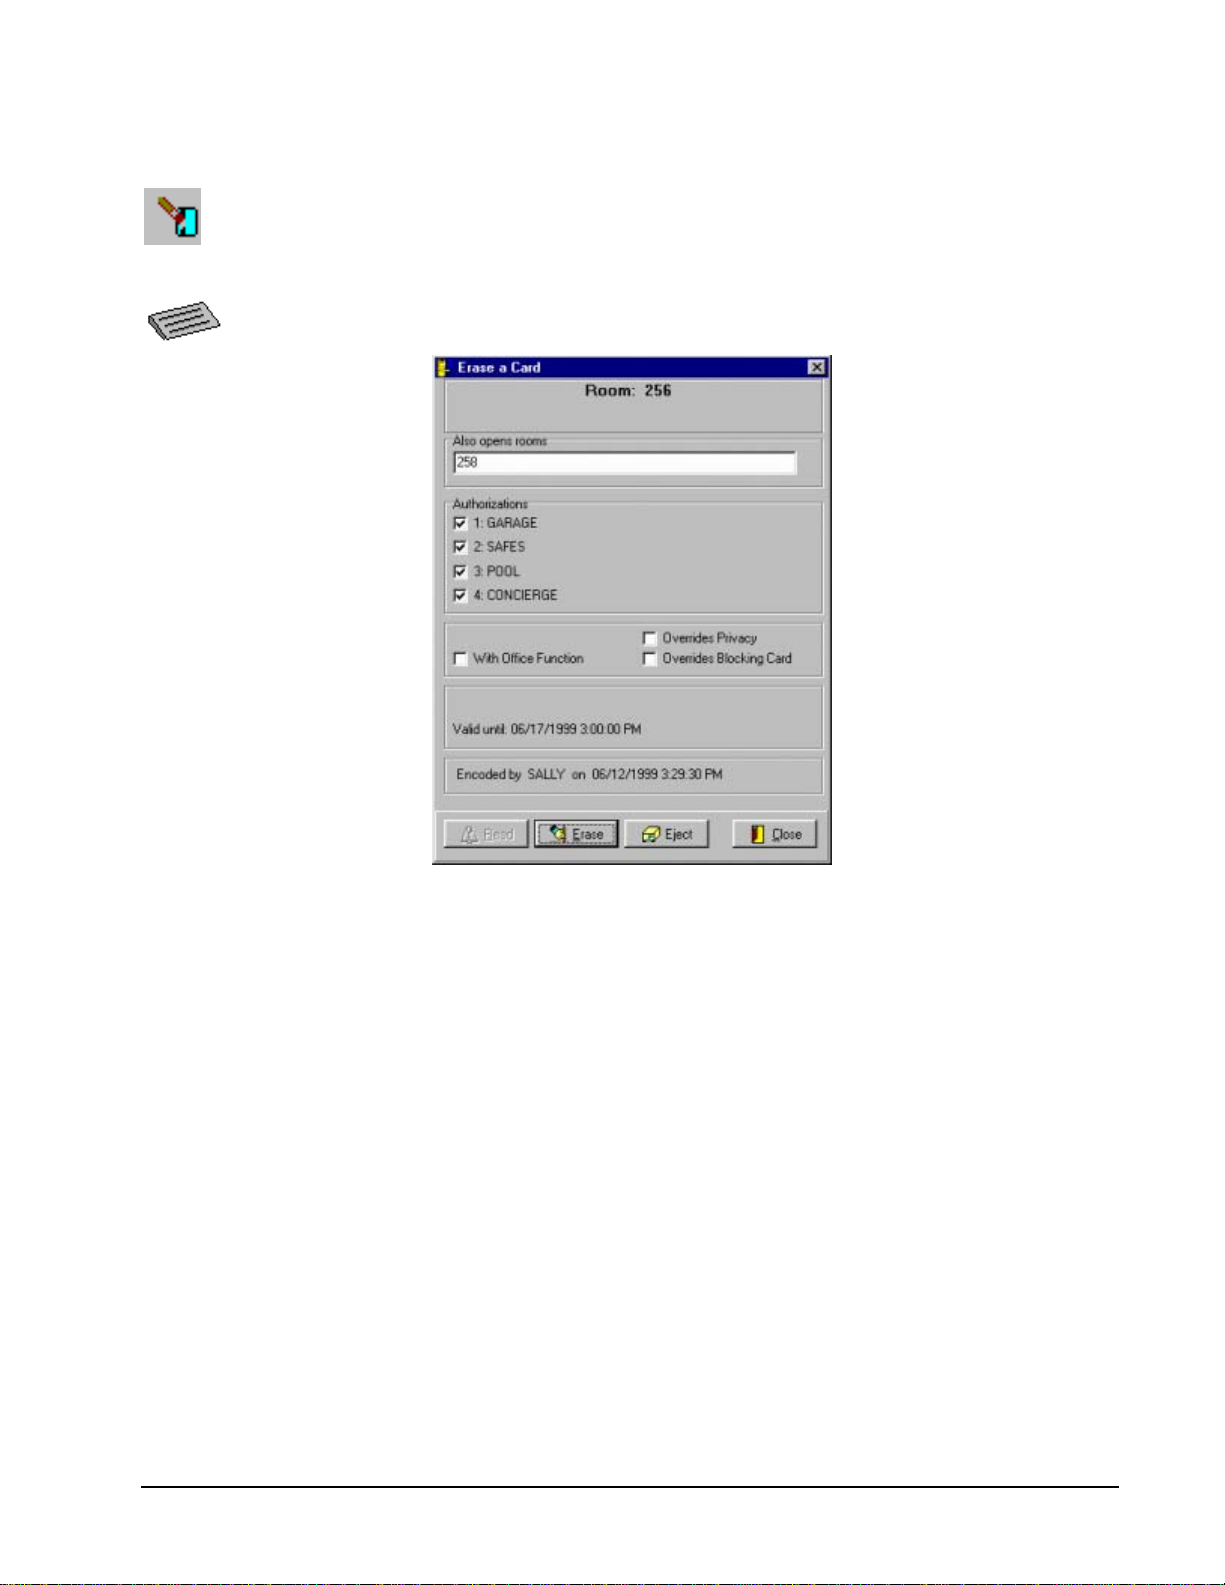
Erase a Card (F4)
This function will read a card, erase it, and check out the room if the card is still
valid. Use this function if a group of cards is left at the front desk by the guests or the
housekeeping staff for Check-Out. This feature can be used to enhance the hotel’s
Express Check-Out function.
To use the Read and Erase a Card function, perform the following steps:
1. From the Reception menu click Erase Card, press F4, o r clic k on the
Erase Card Tool.
2. The screen will prompt you to insert the card.
3. Once the card has been read, the screen will display all of the guest
information encoded on the card, such as the authorizations and the
expiration date and time. In the example in the figure above, the card is
for room 256 and 258, and it is the original card (not a copy). The card
was authorized to operate the guestroom safe, garage, pool, and the
concierge lounge. This card will not override guest privacy or the
blocking card, and it cannot place a door into office mode. The card
will expire at 3:00 p.m. on June 17, 1999 and was encoded by Sally on
June 12 at 3:30 PM.
4. If you wish to erase the card, click on the Erase button at the bottom of
the window. The screen will prompt you to insert and remove the card.
Insert and remove the card in the encoder. Once this is done, the card
is now erased and may be re-used in the system at any time.
After a card is erased, the system will ask you if you wish to perform a
Check-Out for this room. If you select yes, the room will appear vacant
in the rooms list and can be used again. After a Check-Out, you can
read another card, press ESCAPE and select another function, or log
Onity HT24W / HT28 Smart Software - HT24W / HT28 Smart • 15
Page 22
out of the system by pressing F9.
If you do not want to erase the card, press ESCAPE or click the eject
button at the bottom of the window.
5. You may read another card by pressing the READ button located in the
bottom left of the window. When you are finished reading cards, press
the ESCAPE key and select another function, or press the F9 key to log
out of the system.
Hotel Information (F2)
This function allows the property to display the status and availability of all
guestrooms. This screen also shows the attributes of the last cards encoded for the
room, including authorizations, starting date and expiration date.
To view the State of Rooms, click State of Rooms from the Reception menu, or press
the F2 key.
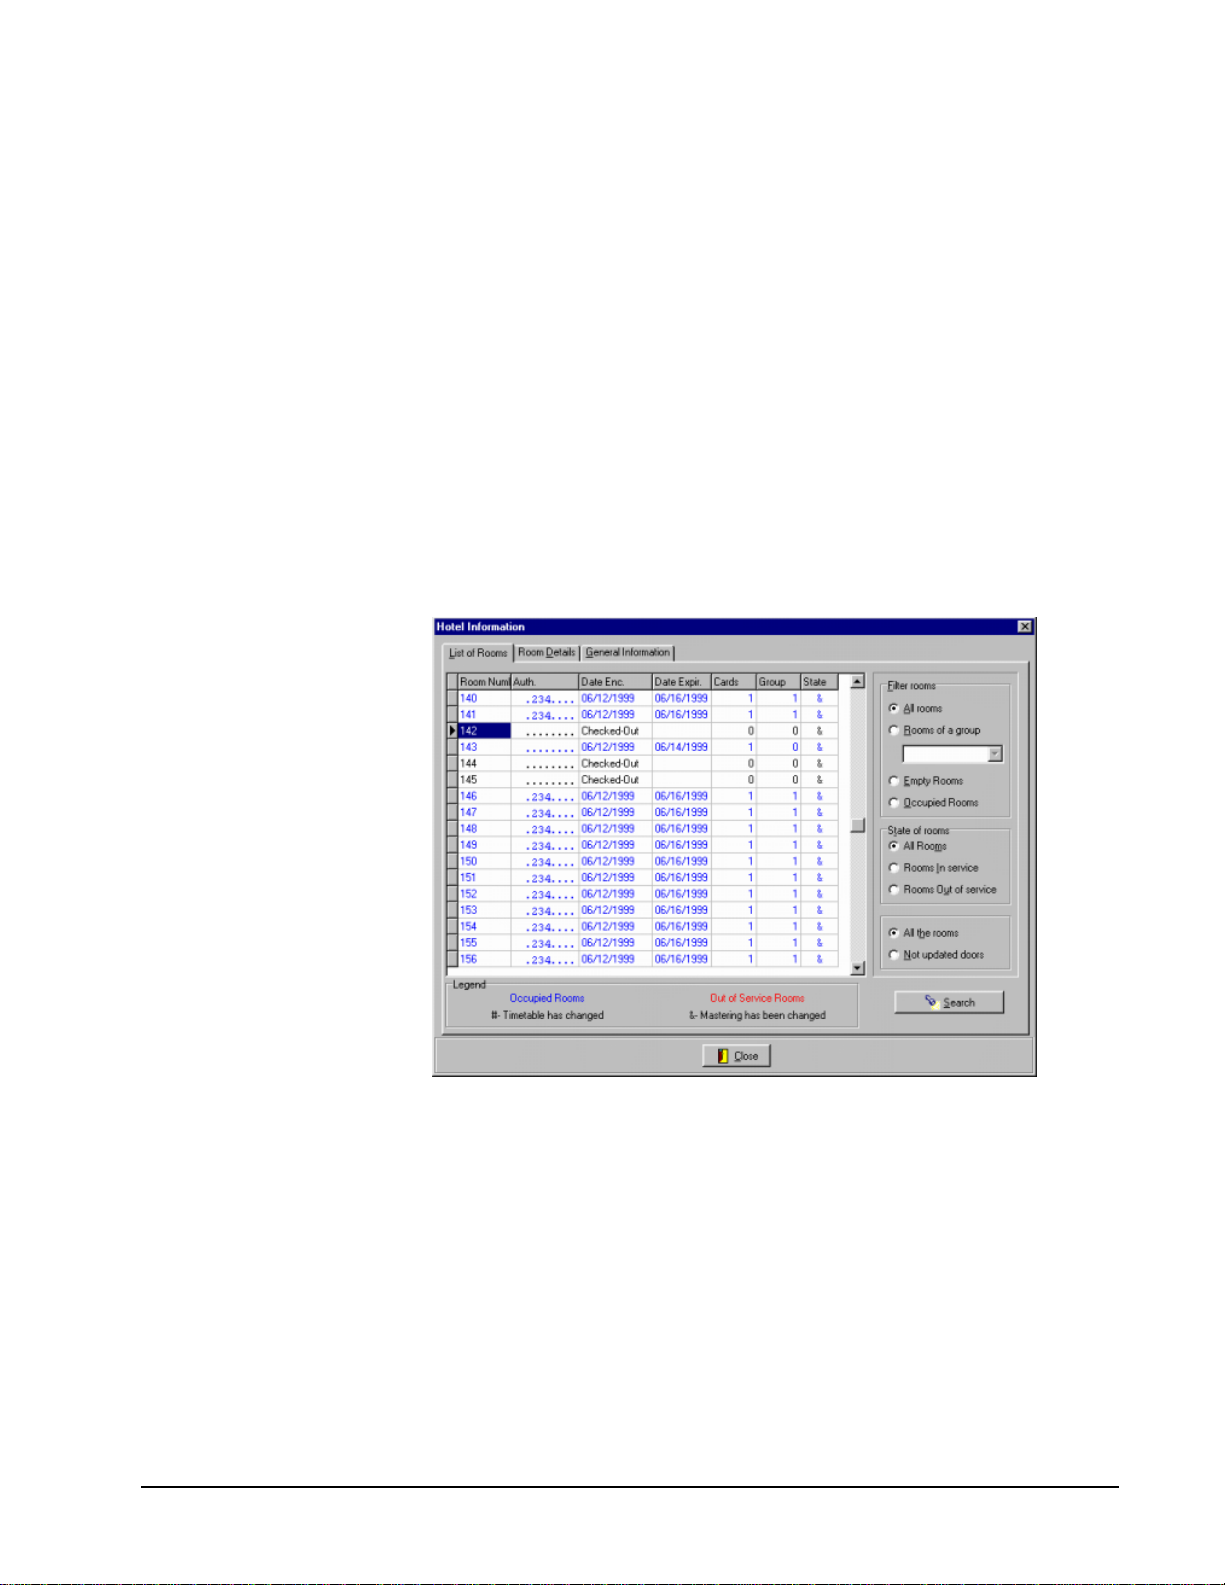
Room List Tab
The Hotel Information window is divided into three (3) tabs. The leftmost tab shows
the list of rooms in a table with columns for important information about each room.
Use the UP/DOWN ARROW keys to navigate through the rooms. To rapidly move
through the table, you can use the PAGE UP/DOWN, or click on the slider to the
right of the table. You can also use the Search button to jump directly to a room if
you know the room number.
The information includes the authorizations encoded on the cards, when the room
was last Checked-In, when the cards expire, how many valid cards are encoded for
the room, if the guests are a part of a group, and if the room has been placed out of
service or is occupied. Occupied rooms appear in blue and rooms that are out of
service appear in red. To see even more details about the highlighted room, click on
the center tab labeled ‘Room Details’ or press ALT+D.
16 • Software - HT24W / HT28 Smart Onity HT24W / HT28 Smart
Page 23
N
N
Tip: You can use the filters to
limit the rooms in the list.
ote that the Search button
cannot find a room that is
hidden by a filter.
You can use the filtering boxes on the right of the Room List tab if you want to
limit the rooms you see by certain criteria. For example, you may wish to view
only the rooms that are occupied. Or, perhaps you wish to see a list of rooms that
need to be updated with the portable programmer. The state column of the table
will show the reason a room needs updating.
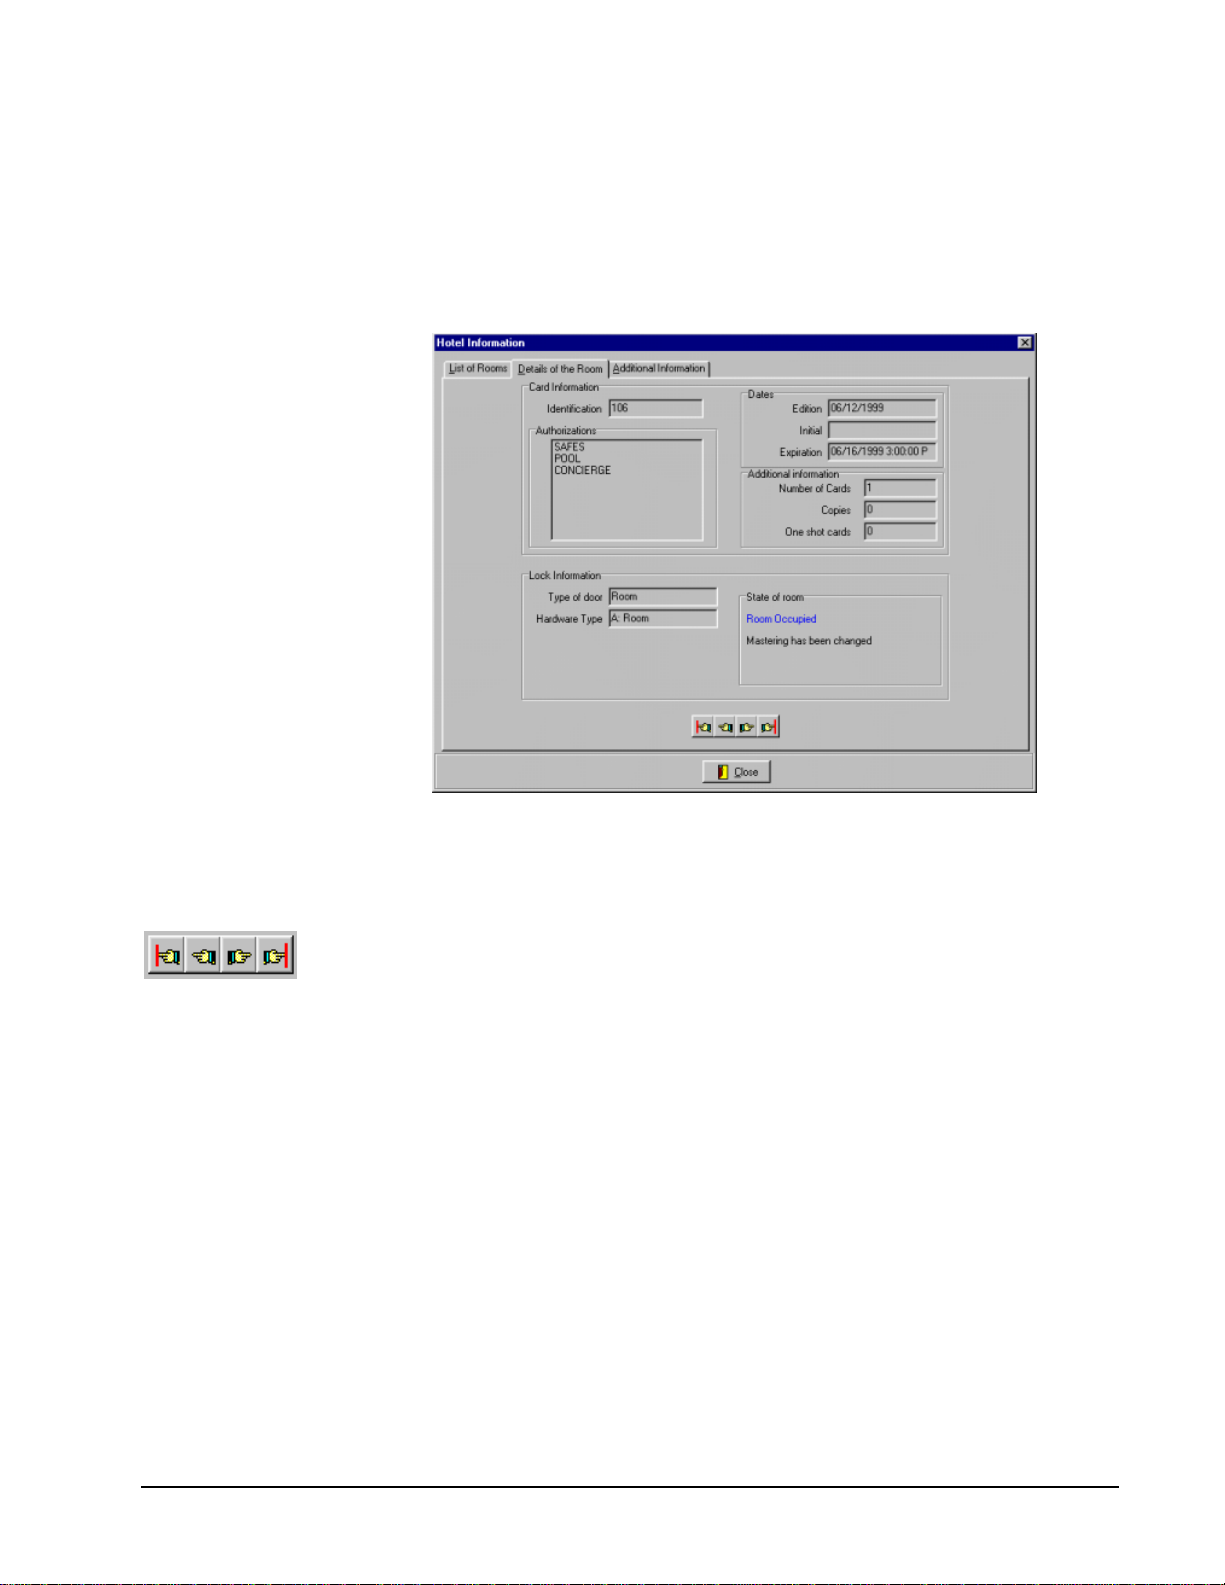
Room Details Tab
avigation Buttons
The Room Details tab shows all of the information from the room list table as well as
the starting date, if any single opening cards have been encoded, what type of lock
hardware is installed, and which mastering scheme is being used. Multiple
mastering schemes are optional, so your property may not display this information.
If you wish to see details of other rooms, you can return to the room list or use the
navigation buttons at the bottom of the window. From left to right, the buttons
perform the following task: view the first room in the list, view the previous room in
the list, view the next room in the list, and view the last room in the list.
Onity HT24W / HT28 Smart Software - HT24W / HT28 Smart • 17
Page 24
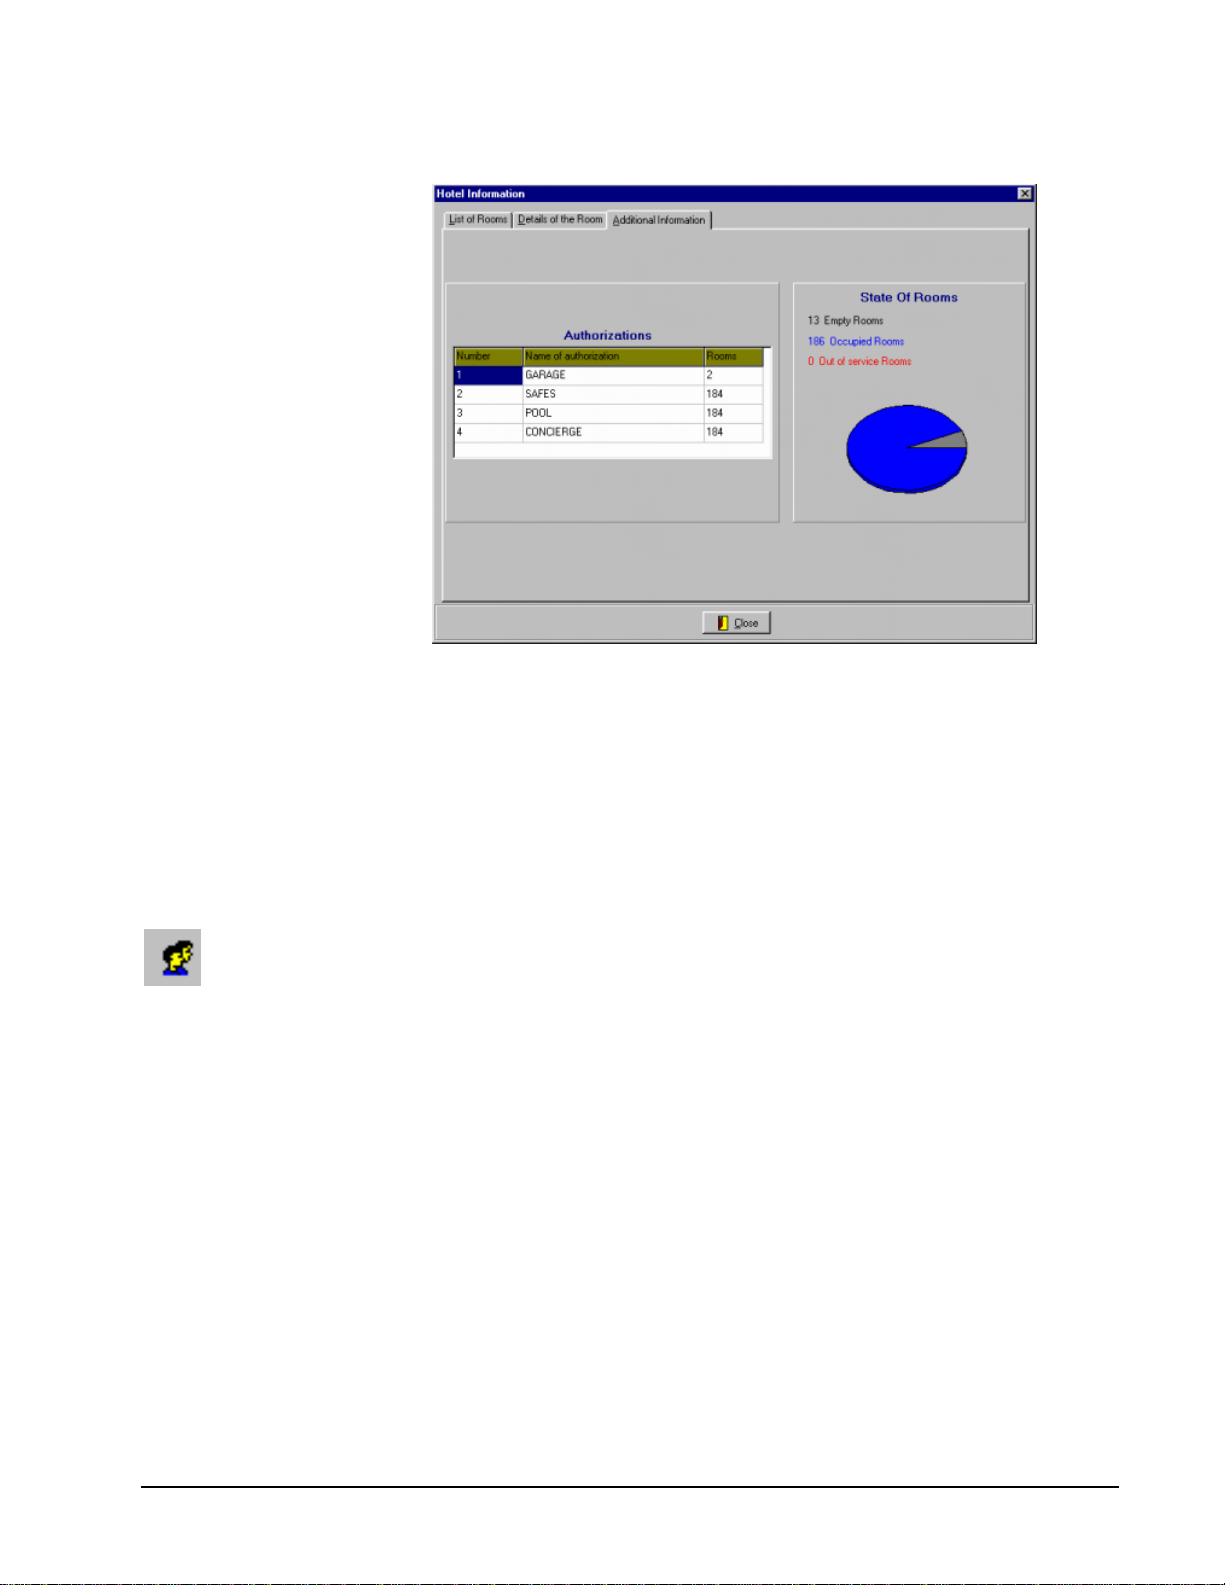
Additional Information Tab
The right tab of this window shows general information about your property. At
times, it may be useful to know the number of guests that have access to a particular
amenity. The Additional Information tab shows each of the authorizations declared
for your property and how many valid guest cards are encoded with access to these
authorizations. This tab also shows a chart with the percentage occupancy and the
percentage of rooms that are out of service.
When you have finished viewing the room information, click the close button at the
bottom of the window, or press the ESCAPE key.
Groups
This function provides a convenient method of encoding cards for a large group of
Groups
guests in advance so that the group is not delayed by this operation when they arrive.
Group cards are encoded with a special code so that the new group cards do not
cancel current cards, and group cards will not affect the ability to replace lost cards
of current guests.
To manage groups, select Groups from the Reception menu or click on the Groups
Tool.
18 • Software - HT24W / HT28 Smart Onity HT24W / HT28 Smart
Page 25
N
Tip: Make Group cards in
advance so large groups don’t
have to wait when they arrive.
There are several steps necessary to successfully manage groups of guests. First, a
group must be created and given a name. Attributes and rooms must be assigned.
Then, the cards must be encoded. Finally, once the group arrives at your property,
everything is ready for Check-In.
ew Group Button
Creating New Groups
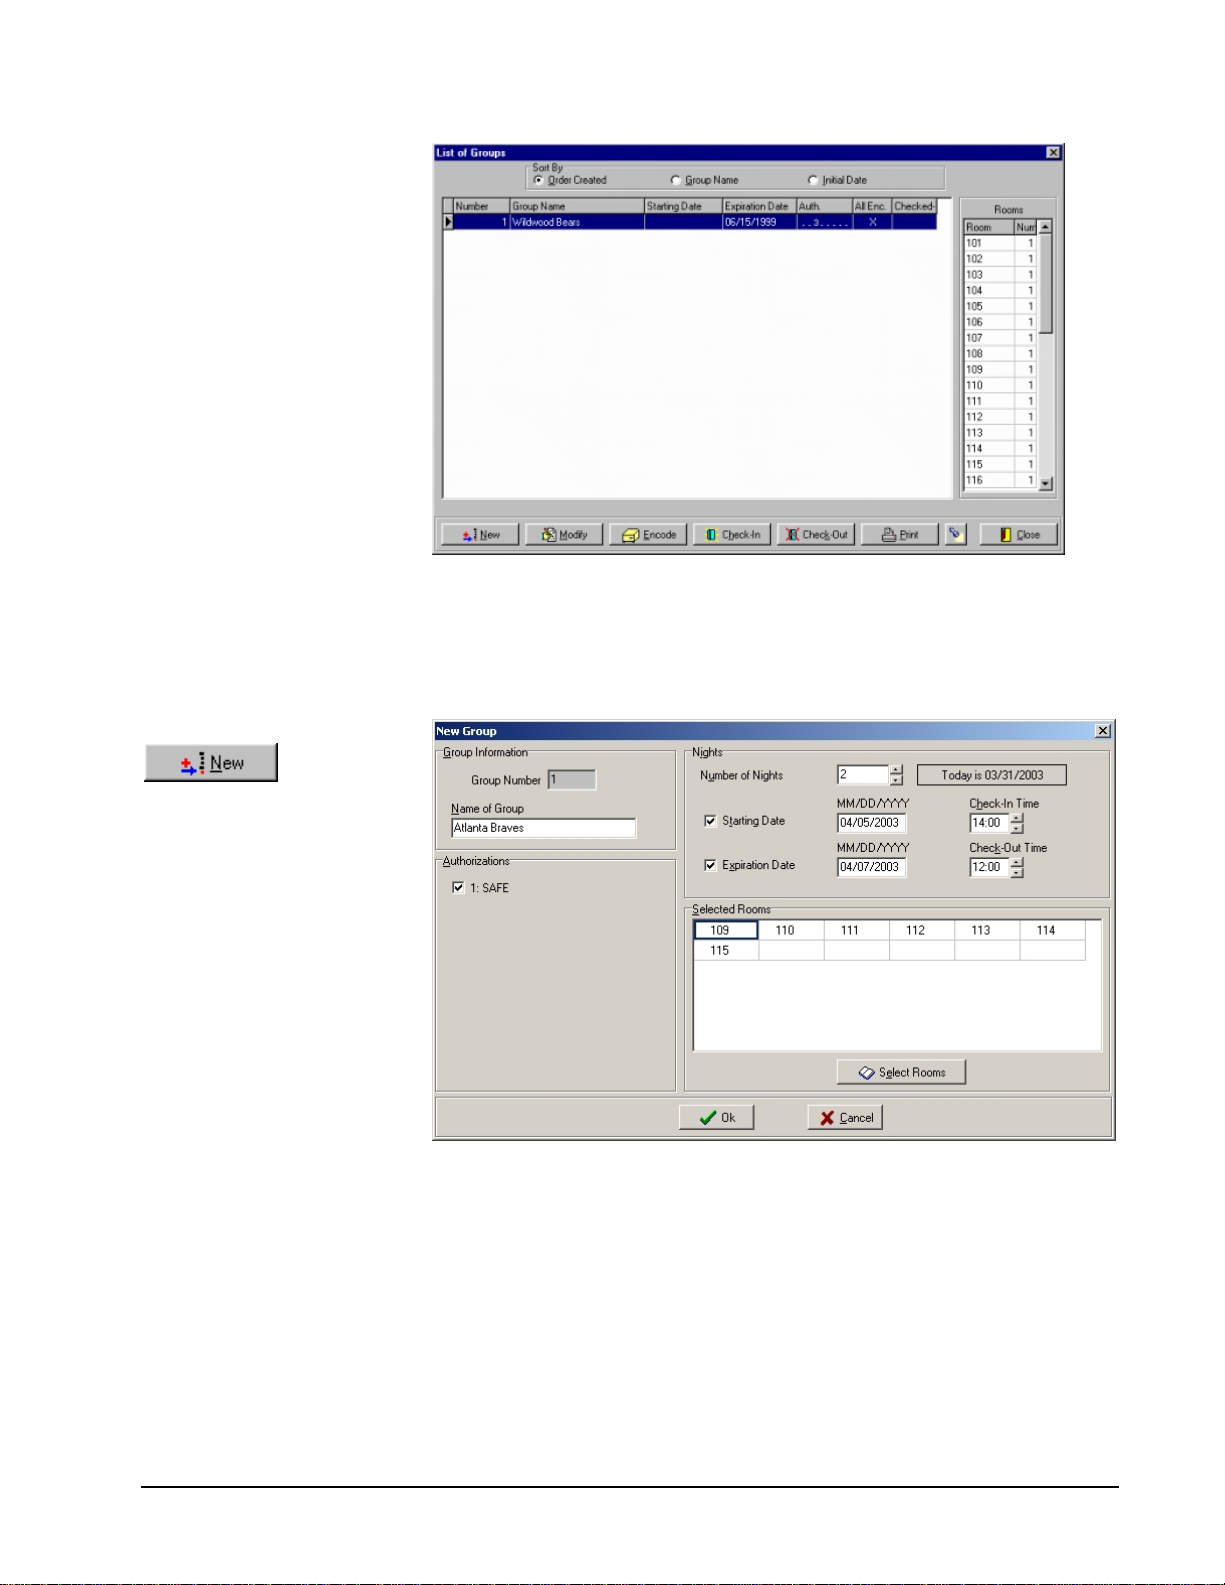
To create a New Group, follow these steps:
1. Click the New button.
2. The New Group window is where you will enter all of the group
information. The first piece of information that you should enter is a
group name. If you make your group names meaningful, it will help to
manage them later. Once you have entered the group name, press
ENTER to continue.
If you are using Emphasized Authorizations, message boxes will
appear prompting you to promote these amenities. Press the SPACE
bar or click the check box to select access to this amenity. After the
Onity HT24W / HT28 Smart Software - HT24W / HT28 Smart • 19
Page 26
Emphasized Authorizations are finished, you can select any standard
authorizations the guests may need. Press ENTER when you are
finished selecting authorizations.
3. Now it is time to enter the number of nights this group will be staying
at your property. Set the Starting Date to the expected arrival date of
this group. By checking the starting date, you can be sure that any
group cards made in advance will not work until the day the group is
expected to arrive.
Once the starting date is set, the expiration date will automatically be
calculated based on the number of nights you selected. You can always
manually set the expiration date, if you prefer.
4. Press ENTER when you have finished entering the dates.
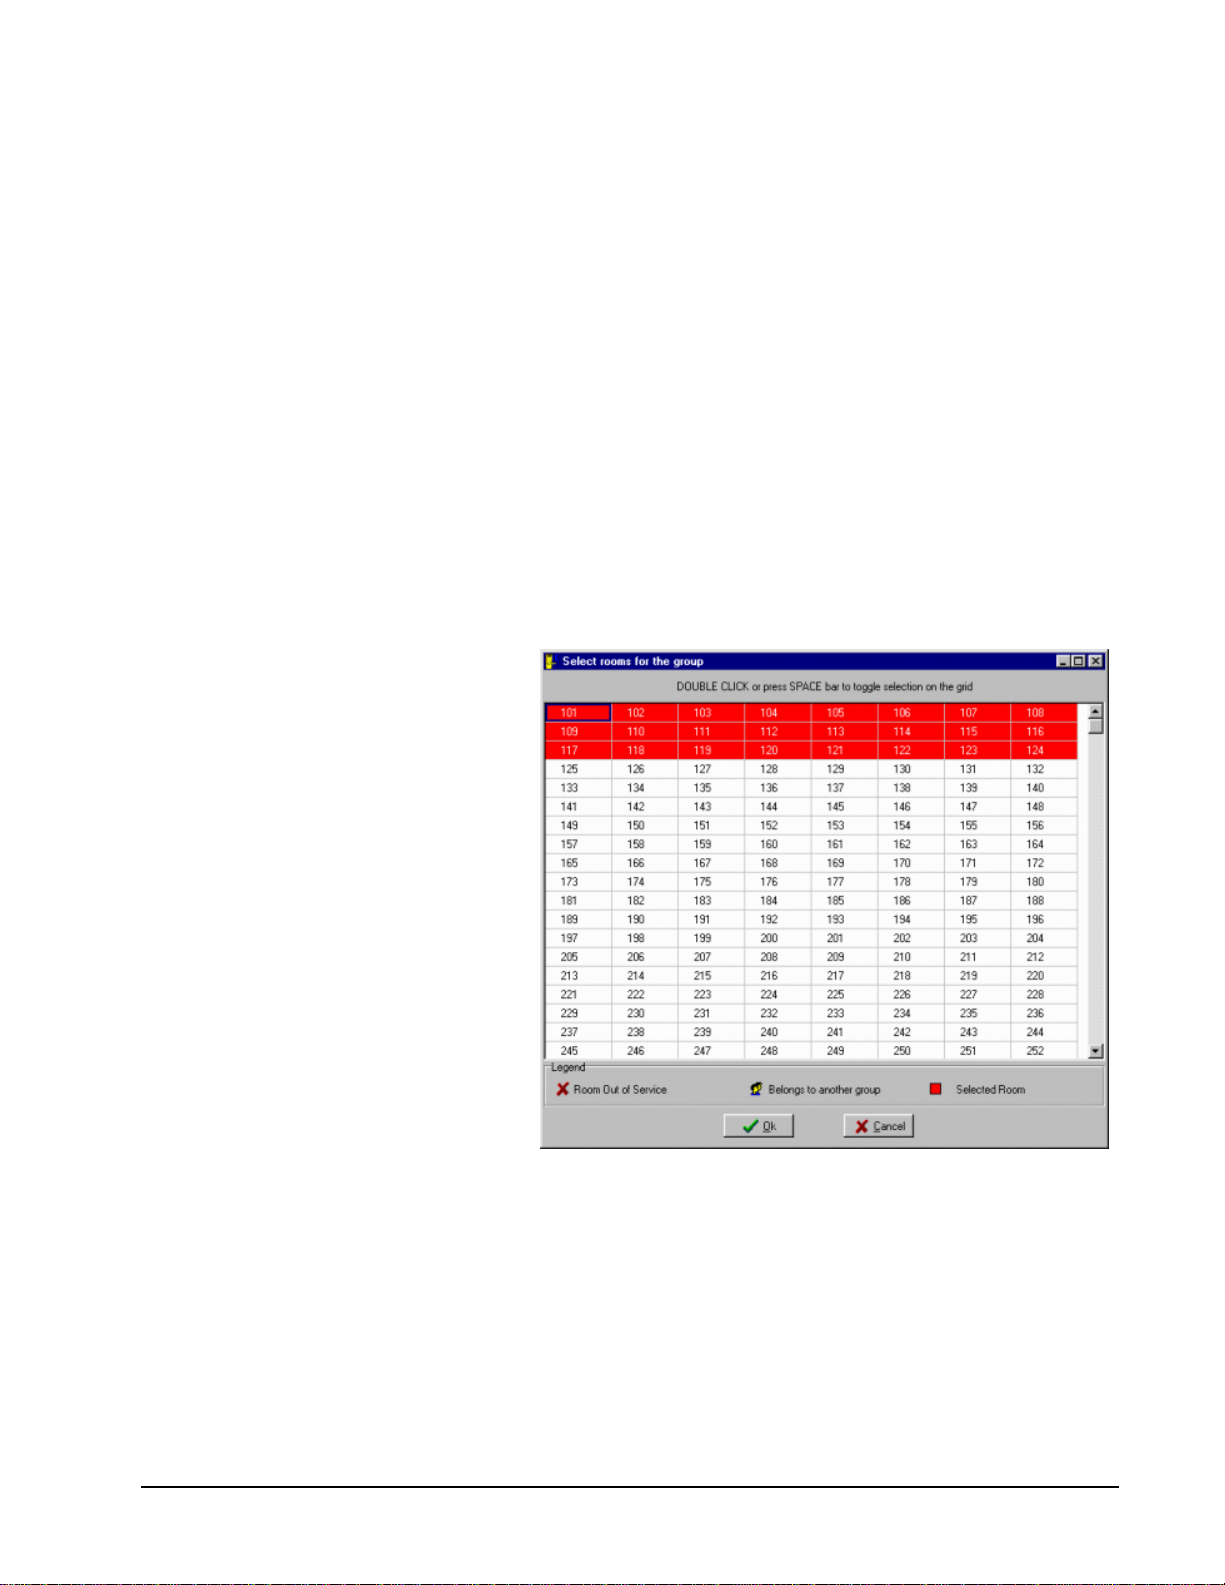
5. To select the rooms for the group, click on the Select Rooms button or
press ALT+E. When the room list appears, you can select individual
rooms by Double Clicking or pressing the SPACE bar.
6. To select several rooms, hold the left mouse button and drag the mouse
to create a rectangular block of rooms. Press the SPACE bar to select
the highlighted rooms. Selected rooms will be colored red.
There are a few rules to be aware of when selecting rooms.
• If a room is out of service, you will be warned, but you will be
allowed to proceed.
• If the room has been reserved by another group that has not arrived
yet, you are not allowed to select these rooms for a new group.
• If the room is currently occupied by a regular guest, it is OK to
select this room for a group. When the group arrives and is
Checked-In, all other guest cards will be voided.
20 • Software - HT24W / HT28 Smart Onity HT24W / HT28 Smart
Page 27
M
E
R
7. When you are finished selecting rooms, click on the OK button. If you
are not sure which rooms you want to select, click on the Cancel
button.
After you have selected rooms click the OK button to save the group. If you choose
not to select rooms now, save the group now and come back later to select the rooms.
If you decide not to finish creating this group, click the Cancel button.
Modifying Groups
odify Group Button
ncode Group Card Button
emember that once the first
card for a group is encoded,
the group can no longer be
modified.
To modify an existing group, select a group from the list and click the Modify
button or Double Click the group.
The steps to modify an existing group are exactly the same as creating a new one.
Any detail of the group can be modified until you encode the first card for the
group. Refer to the steps for creating a new group to see details about group
features.
Encoding Group Cards
Cards can be encoded well in advance of Check-In so large groups of guests are not
inconvenienced by having to wait for cards. Since you will not be handing the cards
to the guest right after encoding, you must take care to keep the cards organized.
Place the cards in marked envelopes or sleeves when you encode them. The time
you take to stay organized now will prevent you from upsetting guests who are using
the wrong card in the door.
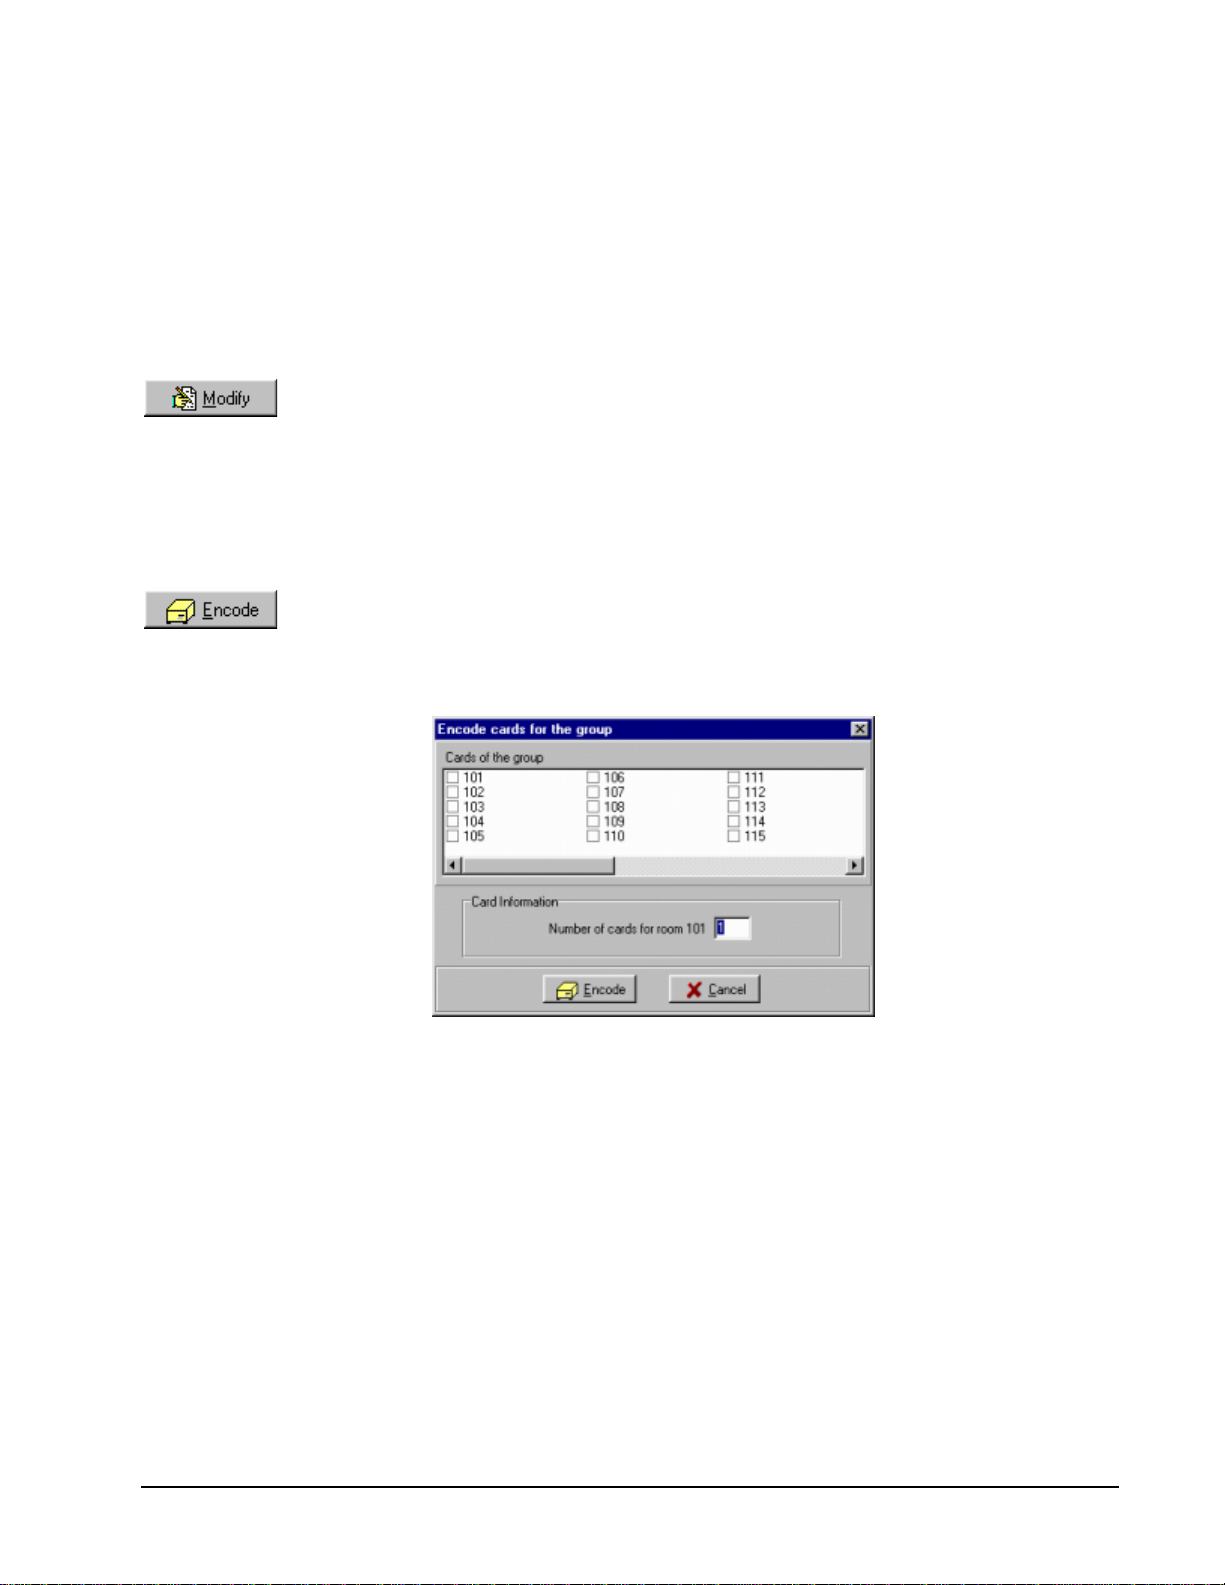
Follow these steps to encode the cards for this group.
1. Select the group from the list and click on the Encode button. A screen
will appear with a list of the rooms assigned to this group. Each room
has a box beside it that indicates if cards have been encoded for this
room. To help you stay organized, the rooms are listed in order. There
is no way to encode cards out of order.
2. Enter the number of cards to make for this room. The default is one
card. If you make multiple cards for a room, the next room in the list
will go back to the default of one card. Press the ENTER key until the
screen appears prompting you to insert a card.
3. Insert and remove the card in the encoder.
Continue encoding cards until all of the rooms in the list have check marks beside
them. All of the cards do not have to be encoded at one time, but they must be
encoded before the group can Check-In.
Onity HT24W / HT28 Smart Software - HT24W / HT28 Smart • 21
Page 28
A
E
Group Check-In
Group Check-In Button
Group Check-Out Button
The Group Check-In process is very important. Remember that pre-encoding group
cards will not affect your ability to make new guest cards for a room because groups
use a special ‘Advanced’ code. If group cards are given to guests without
performing the Check-In operation, you may disrupt the encoding system and
subsequent guest cards will fail to operate the guest room locks.
Note: Always remember to perform the Check-In operation at the time the
cards are given to the guests.
If you find that you have cards that do not operate the guest room locks because you
have accidentally given group cards to guests without performing the Check-In
operation, simply Check-In the group to realign the HT24 system. New guest cards
must be made for any subsequent guest who is having card troubles.
Follow these steps to Check-In a group:
1. Select a group from the list.
2. Click the Check-In button. If all cards have been encoded, you will get
a confirmation message. If you have not encoded cards for all of the
assigned rooms, a message will appear on the screen telling you that
some of the cards have not been encoded. Encode all the cards and try
the Check-In process again.
Group Check-Out
The Group Check-Out process is a simple operation to help organize your list of
groups. When a group leaves or cancels before arrival, there is no need to keep the
group in your list. The Check-Out process removes the group from the list and
clears the occupied status of the rooms in the Rooms List.
utomatic Group Function
xecution Button
You can Check-Out any group at any time. The cards do not need to be encoded,
and the group does not need to be Checked-In. This can be useful if a group cancels
a stay before arrival.
To Check-Out a group, perform the following step s:
1. Select a group from the list.
2. Click the Check-Out button. A confirmation box will appear on the
screen; therefore, you can’t accidentally Check-Out a group. Click Yes
to finish the Check-Out operation.
After the Check-Out another message box will appear confirming the success of the
operation.
Automatic Group Function Reminders
When you log on to the software, the system will check to see if there are any
operations that need to be performed. If there are any operations pending, a
window will appear with a list of all these operations. To perform these
operations, select one and click the Execute button. You will receive
confirmation that the operation was completed.
22 • Software - HT24W / HT28 Smart Onity HT24W / HT28 Smart
Page 29
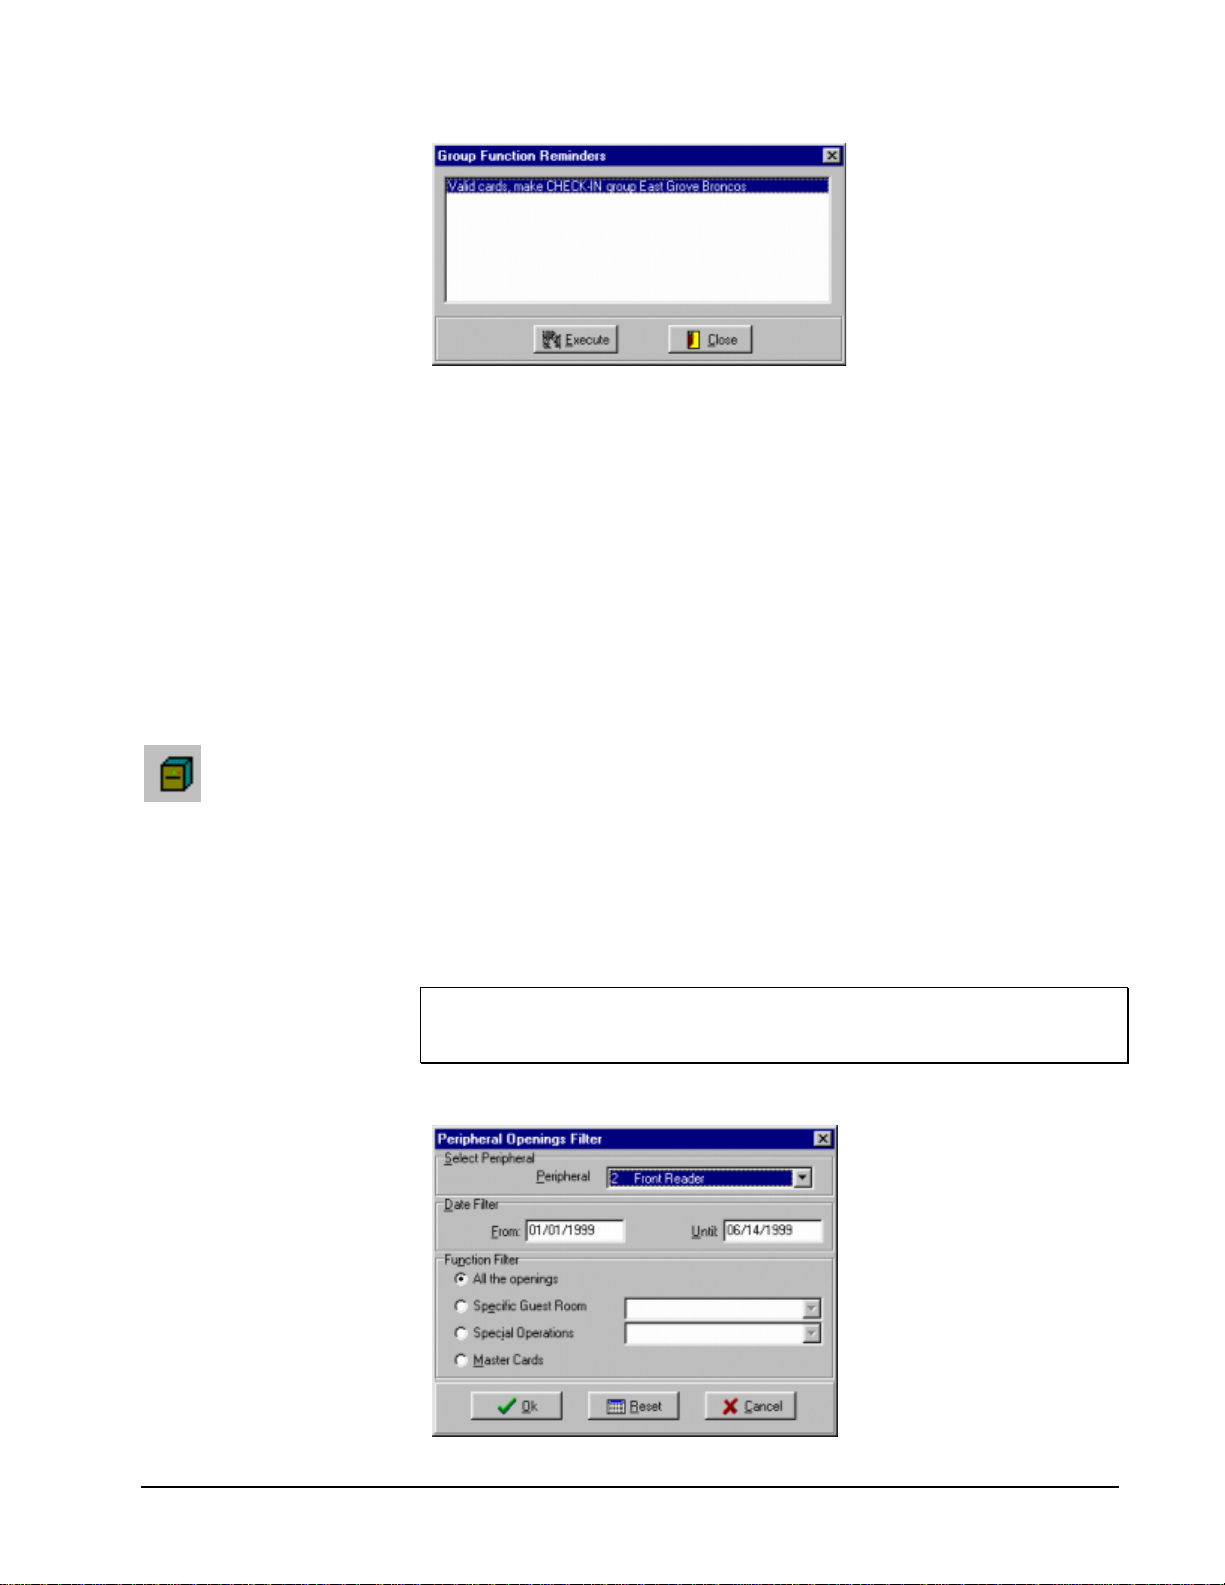
If you prefer not to perform the operation, click the Close button or press the
ESCAPE key. You will be prompted every time you log in until th e operation is
performed.
Operations that will prompt the reminder screen include:
• Check-In a group that has all cards encoded and the starting date is
today. Remember to double check the Starting Date of your groups
before you begin encoding cards. Once you encode a single card, this
information cannot be changed.
• Check-Out a group that has expired. If cards were encoded with a date
that has passed and the group has not been check ed out, the group will
be listed in the reminder list.
Peripheral Openings
Peripheral Openings
The purpose of the Peripheral Openings window is to allow a quick and easy way
to see the number of times a particular guest used a particular door or amenity.
For example, you may wish to have front desk operators examine this list at
Check-Out and charge the guest based on the number of trips to the sauna.
The Peripheral Openings function will display or print the openings from any on-line
card reader, a door whose auditor has been collected by the portable programmer, or
an insertion identifier.
To view this list, select Peripheral Openings from the Reception Menu, or click the
Peripheral Openings Tool.
The Peripheral Openings List will not include invalid access attempts. If you wish
to view the full audit recorded in an on-line reader, including invalid attempts,
select Door Transactions from the Security menu.
Filtering the Peripheral Openings Report
Onity HT24W / HT28 Smart Software - HT24W / HT28 Smart • 23
Page 30
Follow these steps to set up the definition of the openings you wish to see:
1. Select Peripheral Openings from the Reception Menu, or click on the
Peripheral Openings Tool.
2. Using the date filter, you can limit the openings you see to only those
in the time frame that interests you. The default dates are the beginning
of this year and today, but you can set these limits to any dates you
choose. Type a date or use the UP/DOWN ARROW keys to change the
dates to limit your search. Only those openings that fall between the
dates will be shown.
3. The Function Filter can further limit your search to only those openings
that interest you. You can view all openings, only the openings for a
particular guest room card, special operations, or openings of a
particular master card. Special operations include the use of the Exit
Button, Spare Cards, Programming Cards, Canceling Cards, and othe r
operations that might interest you.
4. When you are satisfied with your filter criteria, click the OK button to
view the openings. If the list of openings does not contain the event
you were searching for, you can modify your filter at any time. To
reset all the filters back to the default, click the Reset button.
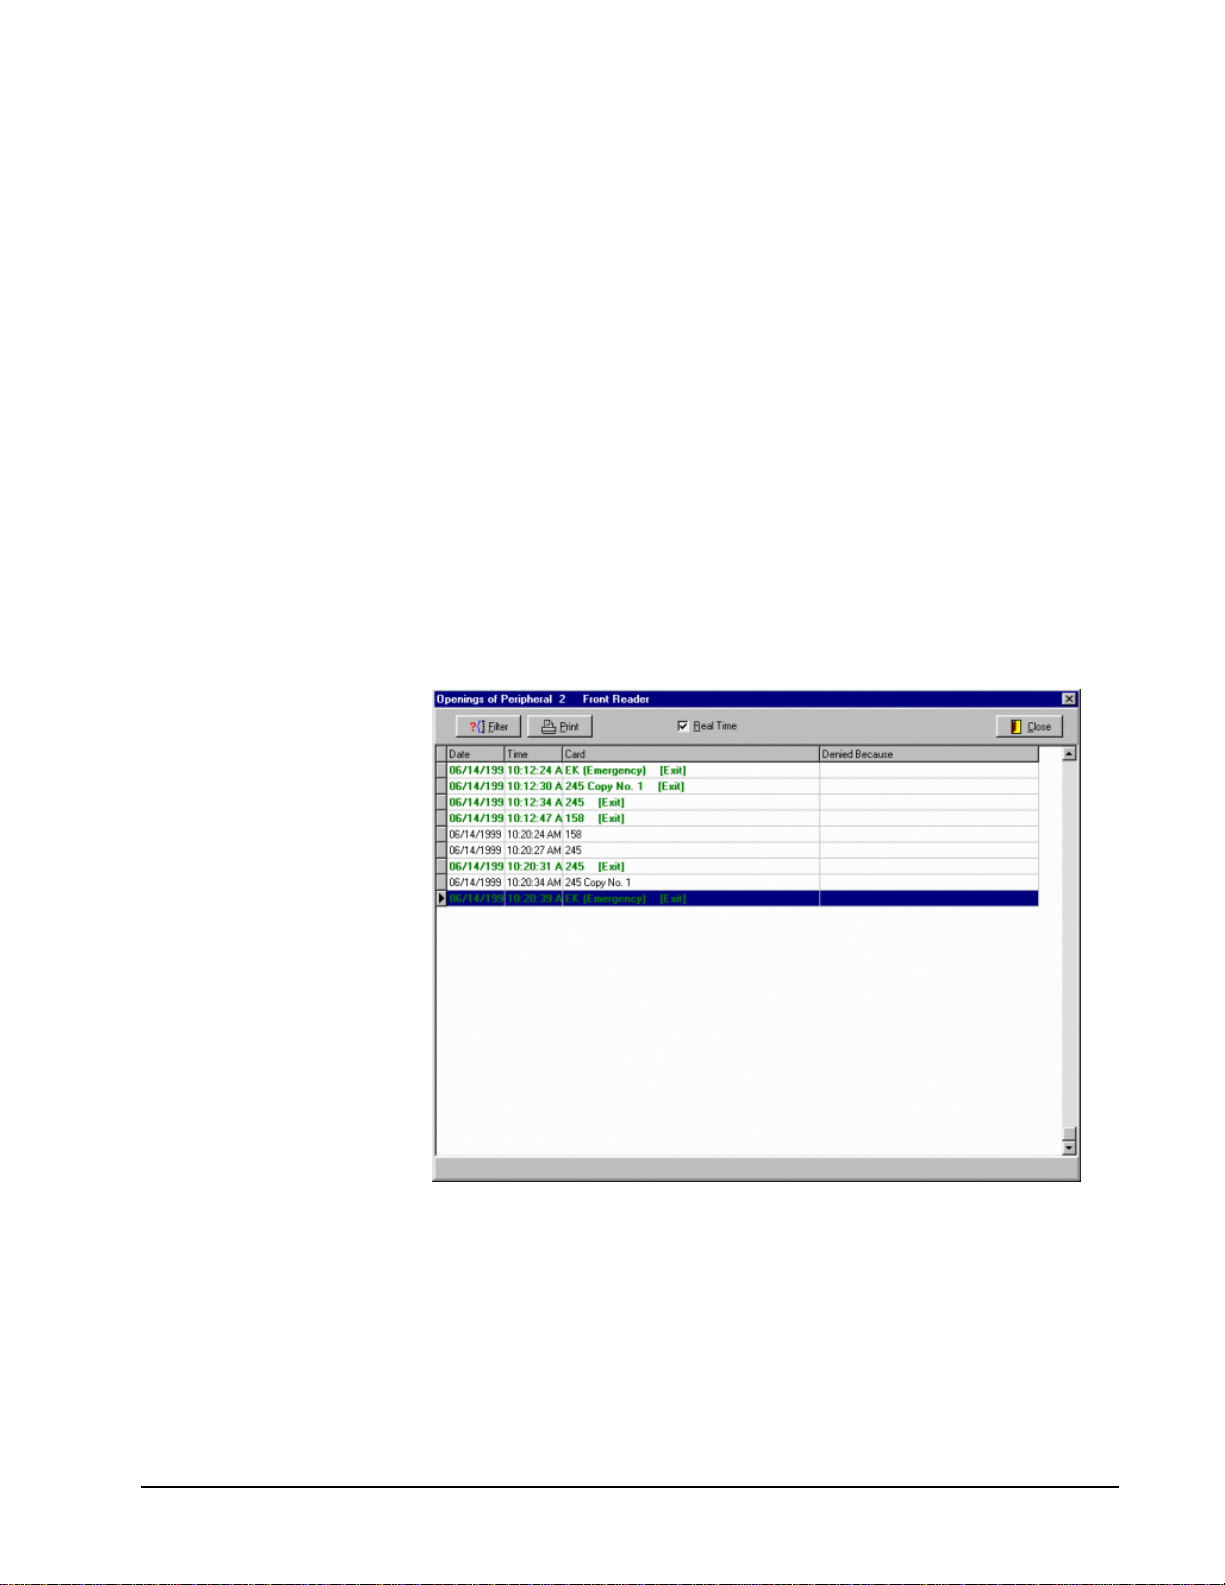
Valid uses of an entrance
reader appear in black, and
valid uses of an exit reader
are in green.
The Openings List
The openings list is a table showing all of the openings from the selected peripherals
or doors that match your filter criteria. The table shows the date, time, and which
card was used.
The table shows the openings in Real Time. This means that if someone uses their
card in an online peripheral, you will see a record of the opening within moments of
the actual event. The system will scan the peripheral every few seconds and any new
openings will be added to the bottom of the list. If your list is long, you may wish to
turn this feature off while you look at your list so that the list is not changing. To
turn off the Real Time feature, click the check box at the top of the window so that
there is no check in the box.
24 • Software - HT24W / HT28 Smart Onity HT24W / HT28 Smart
Page 31

N
D
avigation Buttons
esigned for keyboard use!
With the Real Time feature turned off, you can use the special navigation buttons to
move to the first record at the top of the list, to the previous record, to the next
record, or to the last record at the bottom of the list.
To print your list, click on the Print button at the top of the window.
Logout / Login (F9)
This function logs the current operator out of the system and locks the system so that
an operator must enter a valid password before any new function can be performed.
Workstations, terminal encoders and other on-line devices will still function properly
while no one is logged in to the software on the server.
When logged out, this function key is used to login an operator. Simply press F9 and
enter your password to log into the system.
To logout of the software, press the F9 key or select Logout from the Reception
Menu.
Exit
This function logs the current operator out and closes the software. PC workstations
will still function properly if this function is performed on the server, but terminal
encoders and the PMS interface are shut down.
Task List
If there is a task running in an encoder, such as a PMS command waiting for the desk
clerk to perform the operation, the system will display them before you exit the
software. You can complete these tasks or discard them. This warning is to prevent
you from accidentally losing information or commands from the PMS
Onity HT24W / HT28 Smart Software - HT24W / HT28 Smart • 25
Page 32

Masters Menu
Managing master cards is one of the most important tools to keeping tight security at
any facility. A lost master card is dangerous because it can open many, if not all, of
the doors at a facility. There are three features of the Onity system that reduce the
risk of a lost master card – sequential encoding, master canceling cards, and
expiration dates.
• Sequential encoding means that an old card is locked out by using any
new card in a lock. This is the same principle that works with the guest
cards.
• Master canceling cards will also lock out a lost master card. To be sure
that a lost master cannot be used, make a canceling card and dip it in all
the locks and readers. The canceling card will not unlock the doors, it
will only cancel the appropriate master type.
• The expiration date is an easy way to limit the risk of a lost master. If a
master expires in a few hours you may feel that a notification to all
employees and a watchful eye will get you through those hours.
The software makes managing masters simple and allows various levels of risk
management. This section explains all of the details about managing master cards,
master users and the security of your facility.
Revalidation
Revalidation is a new feature in the system that allows you to manage your master
users simply and effectively while maintaining the security of your facility. This
section will explain the basic philosophy of revalidation and the flexibility it offers.
First we will briefly discuss the traditional method of managing master cards.
Traditionally, master cards are encoded with an expiration date that will allow the
card to operate for several months. If a card is lost it poses a significant threat
because the card can enter all or nearly all of the doors in a hotel. To prevent an
incident the management must cancel the card using a master canceling card in all of
the Onity locks and by encoding new master cards for all users who hold that type of
card. For example, if a housekeeping master (HK) is lost, a canceling card should be
used in all of the locks, and all staff members who carry an HK master card must be
located to have their cards re-encoded. This process is time consuming and
inconvenient because all of the users must be found and their cards updated or they
will be locked out of the guest rooms.
To reduce some of the logistical problems you could issue daily cards to your staff.
These cards would work for only one day and then they expire. This reduces some
of the problems because everyone gets a new card at the same time each day, but
someone must encode all of those cards.
Suppose that each employee encoded their own card each day – automatically. That
is what the revalidation system does. Every day when an employee arrives for work
he inserts his card into the revalidation unit which reads the card and identifies the
user. If the user is still employed, the card is re-encoded, or revalidated, to operate
26 • Software - HT24W / HT28 Smart Onity HT24W / HT28 Smart
Page 33

Master Users
for one more day. If a card is lost it can be canceled as usual and the new
information automatically gets encoded on the proper cards the next morning.
With the flexibility of the revalidation system you can set the cards to work for a
week at a time or only a few hours. The choice is yours. Revalidating more
frequently obviously offers more security, but it may also be more inconvenient for
your staff. Revalidating daily at the beginning of the work day is a compromise that
does not cause much inconvenience and maintains a very high level of security.
Revalidation is not only about expiration dates and security. Because the users must
update their cards on a regular basis, the revalidation system provides a simple way
to distribute information about assignments, schedules, or special events. This is
also a convenient way to change an employee's shift or other attributes such as office
mode.
The following sections will provide details about how to set up the parameters for
revalidation. See page 85 for additional information.
Note: The parameters for revalidation can be different for each master user.
Master Users (F11)
The Master Users List is a table that shows many of the attributes of your master
users and the cards they hold. From this screen, you can perform all of the
functions necessary to manage all of your master card holders. These functions,
create, modify, encode, update and cancel, are accessed with the buttons at the
bottom of the screen.
To view this list, Select Master Users List from the Masters menu or click the Master
Users List Tool to open the Masters window.
Master Users List Details
The Master User list provides an overview of the parameters assigned to every
master user. This section explains each field in the list.
• ID – The software assigns each master an ID number for easy
reference.
Onity HT24W / HT28 Smart Software - HT24W / HT28 Smart • 27
Page 34

• User Name – This field should hold the name of the person who has
been issued a card. It is this name that is displayed in the lock audit
report to indicate who has entered a room.
• User Type – The user type field indicates the function and locking plan
of the master user. For example, a GM template typically has access to
all or most of the doors on a property, while a Floor Master template
will only have access to doors on one floor.
• Up-to-date – If a master user has been modified since the time the card
was encoded, the card is not considered up-to-date. The next time the
card is revalidated, the card will be encoded with the new parameters.
An X indicates that the card is up-to-date.
• Enabled – An X indicates that this master user is allowed to revalidate
if there is an X in this column.
• Authorization – All authorizations that are granted to this master user
are listed in this column.
• Date Encoded – This is the most recent date that a card has been issued
to this user.
• Expiration Date – The card will no longer operate the locks after this
date.
• Copy – The number of copies of that have been made for this user.
User Toolbar
When the main Users screen is displayed, there are several icons available which
allow for quick navigation to a specific task. They are briefly explained now, and
covered in detail in the pages that follow.
•
•
•
•
•
New – Used to create a new user.
Edit – Used to Edit an existing user.
Cancel / Reactivate – Used to cancel an active user, or reactivate
a previously canceled user.
Encode – Used to encode a user card.
View – Used to view the details of a user without the ability to
change any details.
•
Enable / Disable – Used to enable or disable the ability of a user
to revalidate.
•
Delete / Undelete – Used to delete a user, or undelete a
previously deleted user.
28 • Software - HT24W / HT28 Smart Onity HT24W / HT28 Smart
Page 35

• Update – Enters the revalidation screen to allow users to update
their cards at the computer.
•
•
•
•
•
Batch Edit – Allows the modification of several users at the same
time.
Print – Used to print the user list.
Filter – Used to filter the user list.
Find – Used to search for a user.
Mastering – Shows the keying information for a user.
Filter – How to Show Only a Few Master Users
The filter screen allows you to select which masters appear in the Master Users List.
If you have a lot of master users you may find that this is a handy tool. For example,
you can use the filter to see which users have expired cards, or cards that need to be
re-encoded because of a change in a shift or some other parameter.
Note: The top of the master users list will indicate if a filter is being applied.
Find – How to Search for a Specific User
To save time searching for a specific user, use the Find icon. Click on the icon, then
type in the full user name, or a portion of the name and click the ‘Find First’ button.
If there is more than one match, click the ‘Find Next’ button to go to the next match.
You can also perform exact match and case sensitive searches by checking the
appropriate boxes.
Onity HT24W / HT28 Smart Software - HT24W / HT28 Smart • 29
Page 36

Mastering – Which Doors Can This Card Enter?
It is challenging to remember which master cards can access which doors, especially
in larger hotels. To easily see which doors a master card can enter, simply highlight a
master user on the Master Users list and click the Mastering button.
If the list of doors is lengthy, you can check a particular door by typing it in the text
box and clicking the Search button. If this master can enter that door, the list will
jump to that door and highlight it. A message will be shown if this master cannot
open that door.
New – Create New Master Users
30 • Software - HT24W / HT28 Smart Onity HT24W / HT28 Smart
When new employees come in to work to fill new positions, you need to create new
master users. These users will have access to doors based on the template you
choose for them.
The New Master screen is divided into two tabs – General and Revalidation. The
General tab contains the standard master user information such as card type, shift,
and other attributes. The Revalidation tab allows you to set and manage the
revalidation attributes for this user. Each user can have different revalidation
attributes.
Page 37

General Tab
1. Enter the name of this user. Entering the full and correct name will
help you to find this user in the list in the future when you need to
encode a new card or cancel this user.
2. The Master Template determines where this master card can be used.
For example, a master template called 2
nd
FLOOR HM, would be used
to access guest rooms and housekeeping closets on the second floor.
3. Now you must select a shift for this Master User. The shift limits the
time that a card will work in the locks to a specific time window. Enter
shift number 0 to allow 24 hour access or refer to your property
paperwork to select the appropriate shift number for this user.
4. Next, you can choose if this Master User has certain special privileges.
To select a privilege, click the appropriate option button or press the
space bar when the option is hi-lighted. All special privileges are
explained below.
• Override Privacy – This privilege allows the card to enter guest
rooms even if a guest has activated the privacy indicator.
• With Office Function – This privilege allows the Master User to
place certain doors into Office Mode so that they remain unlocked.
• Override Blocking – This privilege allows the master card to enter
a room that has been blocked by the Blocking Card.
5. Now, select any authorizations that this user will have. Authorizations
allow access to amenity areas, such as pools or exercise facilities.
Onity HT24W / HT28 Smart Software - HT24W / HT28 Smart • 31
Page 38

6. Next, choose a time at which point the user card will be active. This
option will only appear if you are using user card activation dates.
7. Finally, if you want the master card to expire make sure the Use
Expiration Date box is checked and the date is the way you want it. By
default, the card will expire in one day.
Note: Onity recommends that you encode all master cards with an expiration date.
This can be the best way to reduce the threat of a lost card.
Revalidation Tab
The Revalidation tab contains the settings for using the revalidation system. If you
are not using this system in your facility the information on this tab is not
important.
1. The PIN information section applies when the master user uses a
revalidation terminal. If your facility is not using the revalidation
function, leave the PIN Information section completely blank.
• PIN – This is the Personal Identification Number that may be
required for the user to use a re-validation terminal.
• Ask PIN to revalidate card – If this box is checked, the user will be
required to enter the PIN to use the re-validation terminal.
• User MUST modify PIN – This box indicates that a user must
change his or her PIN during the next use of the revalidator.
• User CAN modify PIN – If this box is checked, the user has the
option to change his or her PIN durin g the n e xt reval i dat i o n
session.
32 • Software - HT24W / HT28 Smart Onity HT24W / HT28 Smart
Page 39

2. The Revalidation Information section contains parameters used to
determine when the card will expire and what will happen when the
card is encoded again.
• Increment – This field is used in the revalidation process. It
indicates the length of time the expiration date of a card will be
extended the next time it is revalidated.
• If the increment is set in days or months the card always expires at
the same time of day. If the expiration time set on the general
information tab is set to 6 PM for example, it does not matter if a
user revalidates at 8 AM or 3 PM. The card will always expire at 6
PM.
• If the increment is set in hours, the revalidator acts as a 'recharger'
and the card is encoded so that it will expire in X hours. If the
setting is 24 hours, a user revalidating at 8 AM will extend her
expiration until tomorrow at 8 AM.
Note: All expiration times are on the hour. When the card is
revalidated, the time is rounded to the nearest hour. For example,
when the revalidation increment is set to 1 hour and a card is
revalidated at 9:15, the new expiration time will be 10:00. If the card
is revalidated at 9:45, the new expiration time will be 11:00.
• Expiration Date – The expiration date encoded on the current
master card is displayed below the Increment field. Use this
information to determine when a lost card will expire.
• Next Expiration Date – This would be the expiration date if the
master user revalidated her card right now.
• Enable revalidation – If this check box is not checked, the master
user is not allowed to revalidate the card. This is commonly used
to temporarily prevent a user from using the card. To permanently
prevent usage, cancel the master.
Note: Even though revalidation has been disabled for a user, the card will
operate normally until it expires.
• Revalidation Shift – If you wish, you can limit the time of day that
the master users can revalidate their cards. To do this, simply enter
the beginning and end times that they are allowed to revalidate.
By default, these times are set to 00:00 and 24:00 so users can
revalidate at any time.
3. Message for the user – This section is again used in the revalidation
system. You can enter a message in this section that will be displayed
to the master user each time the card is revalidated, for the number of
times indicated. The message text can be printed from the revalidation
terminals with the printer option enabled.
4. When you have finished making all of your selections, click the OK
button at the bottom of the window. If you choose not to finish
creating this user, click the Cancel button.
Import Users
It is possible to import users into the system using a plain text file. Refer to
Appendix A for details on this function.
Onity HT24W / HT28 Smart Software - HT24W / HT28 Smart • 33
Page 40

N
Modify – Edit Master User Data
ote: Changes do not take effect
until the card is encoded or
updated.
From time to time, you may wish to change the shift, authorizations, or other
attributes of a master user. You may modify the attributes of a Master User at any
time. The steps and the screen to modify a user are exactly the same as those to
create a user.
Because most of the master user attributes are stored on the card, most changes will
not take effect until you encode a new card for this user.
Batch Edit – Master User Data
To modify the data of more than one user at the same time, use the Batch Edit
function.
Note: Be very careful using this function. Improper use will cause undesired
results
To use the Batch Edit function, choose Batch Edit from the Tools menu of the Users
screen or click on the Batch Edit icon.
Select the users you wish to edit. To select multiple users in the list, hold down the
CTRL key and click on the desired users. To select a range of users, click on the
first user in the range, then hold down the SHIFT key and click on the last user on
the range. When you have selected the desired users, click the single arrow key.
To select all the users of a particular master type, click on the Select button in the
Master section.
34 • Software - HT24W / HT28 Smart Onity HT24W / HT28 Smart
Page 41

Now choose the desired master type to select all the users that carry that master card.
The selected users will be moved to the list box on the right side of the screen. Click
OK to continue.
Onity HT24W / HT28 Smart Software - HT24W / HT28 Smart • 35
Page 42

Now select the options you wish to change and set the parameters of that option.
Remember, this change will be made to all the users selected. When finished, click
OK to accept the changes.
Cancel – Disable Master Cards
There are many reasons you may wish to cancel a master card. The most
36 • Software - HT24W / HT28 Smart Onity HT24W / HT28 Smart
Page 43

H
b
int: All canceled master cards
are shown in RED in the Master
Users List.
common reason is a lost card. When a card is lost, you need to cancel the lost
card in the guest room locks. There are three ways to do this.
• Let the card expire. To check the expiration date of a lost card, highlight the
master user in the list and click the View button. The expiration date is on the
Revalidation tab.
• Cancel the lost card and create new master cards that lock out the lost card.
• Encode a canceling card and use it in all of the locks. See the next section for
details about canceling cards.
Canceling a master affects every user that has this type of master card. Let us
say, for example, that Sandra, a GM type master card holder, loses her card and
you wish to cancel it. Follow these steps:
1. Highlight the lost master card in the list – in this example, Sandra.
2. Click the Cancel button.
3. Answer Yes to confirm that you wish to cancel this user.
A name in red letters indicates that she is canceled in the systems and no new
cards can be made for her. But to cancel her in the locks, either a GM card with the
updated code or the master canceling card must be inserted in the locks. You must
update the cards for all of the other GM type master users, or one of them might
get locked out of a room. Use the Update function to re-encode the other GM
master cards with the new code. If you are using the revalidation system, the cards
will be updated the next time they are revalidated.
Since Sandra lost her card and is still an employee, she needs a new card to
continue working. You must re-activate her to encode a new card.
1. Highlight Sandra in the list and click the Cancel/Reactivate
button to
reactivate the user.
2. Use the Encode
button to make a new card for her.
Encode – Create or Copy Master Cards
When you create new master users or re-activate canceled users, a new card must
e made. Simply highlight the user and click the Encode button to make a card for
a new or re-activated user.
If your system allows copies of master cards, you can use the Encode button to
make copies. Note that copies of master cards make it impossible to tell which
card has been in a room, because all copies are assigned to the same user.
Never make a copy of a Master card that was lost. Always cancel the user,
re-activate and issue new cards. Master copies are exact duplicates and
cannot be individually identified.
Onity HT24W / HT28 Smart Software - HT24W / HT28 Smart • 37
Page 44

Update – Encode Master Cards With New Data
The Update function is a simple way to bring existing cards up-to-date with any
attribute changes or a new expiration date. The following steps explain how the
update function operates.
1. Click the Update button.
2. Press any key to begin.
3. Insert and remove the card. If you are using smart cards, insert the card and
leave it in. This step reads the information on the card to see if there are any
changes.
4. If you require a PIN, you must enter the correct PIN when prompted.
5. If the card is not up-to-date, insert the card again to re-encode the card with the
new data.
6. If there is a message for the user, it is displayed along with a list of the new data.
View – Show Master User Data
It may be useful for some operators to be able to see the attributes given to a master
user, but not be able to make changes. For example, anyone could answer "When
does my card expire?", but only a few operators could actually change that attribute.
The View screen allows operators to see everything about a master user, but no
changes can be made.
Disable/Enable – Deny/Allow Card Updates
If you disable a master user, that user will not be allowed to revalidate the card.
Disabling a master user does not prevent you from encoding cards or making
privilege modifications.
You may want to disable a user if you want the user to see a manager before he is
able to revalidate.
Delete - Remove a User from the List
To remove unneeded users from the list, highlight the canceled user and click on the
Delete icon. This will remove the user from the view. If necessary, you can recover
a deleted user. First select ‘View Deleted Users’ from the View menu. Highlight the
user to be undeleted and click the Delete icon to reinstate the user.
Note: Deleted users are not actually removed from the database. This is done to
keep the integrity of the lock audit reports. If you reach the limit of users allowed in
the system (5,000) you will be prompted to overwrite a deleted user the next time a
new user is added.
Master Canceling Card
This function is used to cancel a lost master card in the locks. When a master is lost,
cancel the master user in the Master Users List (F11) and then encode a master
canceling card for that type of master. Insert the master canceling card into each
lock that can be accessed by the lost master. Once the master card is canceled in the
locks, you must modify the master user that was canceled to reinstate the master
38 • Software - HT24W / HT28 Smart Onity HT24W / HT28 Smart
Page 45

user, then re-encode the master cards for all cardholders with that type of master. If
using revalidation, users cards not canceled will be re-encoded upon revalidation.
The lower portion of the screen will indicate which master users need new cards.
To encode a master canceling card, select Master Canceling Card from the Masters
menu. Select a master template from the list. The lower list will show all the active
users holding a copy of the master. All of these people will need a new card once
you encode and use the canceling card. If these users revalidate their cards, they will
be encoded automatically – unless the master user has been canceled in the Master
Users List.
When you have selected the master you want to cancel, click the Encode Card
button.
Onity HT24W / HT28 Smart Software - HT24W / HT28 Smart • 39
Page 46

Special Cards Menu
Encode Guest Canceling Card
This function is used to encode a guest canceling card. The guest canceling card is
Encode Guest
Canceling Card
a card with a special code that will lock the current guest card out of a guestroom
lock. Once the guest canceling card has been used in a lock, the guest must receive
a new guest card in order to get into the room.
To encode a guest canceling card, perform the following steps:
1. Select Encode Guest Canceling Card from the Special Cards menu or
click on the Canceling Card Tool.
2. The screen will prompt you to decide if the code of the card should be
changed, or if a copy of the existing code should be used. Make a
selection by clicking one of the option buttons and press the ENTER
key or click the OK button.
Using a guest cancelling card with a new code in a lock will void any
previous guest cancelling cards
Encode Blocking Card
3. You will be prompted to insert a card into the encoder. When you have
finished encoding the card, your canceling card is ready to use.
4. Insert this card into any guest room lock where you wish to invalidate
the cards of the current guest.
Encode Blocking Card
This function is used to encode a blocking card. The blocking card is used to take a
room out of service for an off season or to seal a room after a criminal incident.
When a blocking card is used in a lock, no other card will operate that lock, unless
it has the blocking override privilege. Typically, only high level master cards have
the blocking override privilege. The lock is restored to normal operation by using
the blocking card a second time in the lock.
1. Select Encode Blocking Card from the Special Cards menu or click on
the Blocking Card Tool.
2. The screen will prompt you to decide if the code of the card should be
changed or if a copy of the existing code should be used. Make a
selection by clicking one of the option buttons and press the ENTER
key or click the OK button.
Using a blocking card with a new code in a lock will void any
previous blocking cards
3. You will be prompted to insert a card into the encoder. When you have
finished encoding the card, your blocking card is ready to use.
40 • Software - HT24W / HT28 Smart Onity HT24W / HT28 Smart
Page 47

R
P
y
Encode Diagnostic Card
This function is used to encode a Diagnostic Card. The diagnostic card is a card that
is used to check the batteries and read head of a lock. The card is encoded with a low
magnetic level and a special code that the locks will recognize. The lock will respond
with a quick green light if it is functioning normally, a solid green light and flashing
red light if the batteries are low, or a delayed red light if the read head is inoperative.
The diagnostic card will not open any doors.
To encode a diagnostic card, perform the following steps:
1. Select Encode Blocking Card from the Special Cards menu.
2. You will be prompted to insert a card into the encoder. When you have
finished encoding the card, your diagnostic card is ready to use.
Encode Spare Cards
emember that when you
need the Spare Cards or a
rogramming Card urgently,
ou will not be able to
encode them.
This function is used to encode Spare Cards. Spare Cards are used in conjunction
with the programming cards to allow new guests to check in to a room in the event
that the front desk card issuing system is completely down. The spare cards must be
pre-encoded and stored in a safe place that is accessible to the front desk staff in the
event of an emergency, such as a power outage. Spare cards are not assigned to a
room until the programming card is used. Continue reading for further operating
instructions.
Remember that when you need the Spare Cards or a Programming Card urgently,
you will not be able to encode them.
Encoding Programming and Spare Cards
The programming card is used to enable the spare cards in the locks in the event that
the front desk card issuing system is completely down. It is very important to keep
the programming cards and spare cards together in a safe place that is accessible to
the front desk staff in the event of an emergency, such as an extended power failure
in the hotel.
To encode programming and spare cards, perform the following steps:
1. Select Encode Spare Cards from the Special Cards menu.
2. You must decide if you need to encode new programming cards or if
you only need spare cards. To encode programming cards, click on the
check box and enter the number of cards in the appropriate field. Make
as many copies as you think you will need because making new
programming cards invalidates any existing programming cards.
3. Then enter the number of spare cards you want to encode and press the
ENTER key or click the OK button.
4. You will be prompted to encode programming cards first. When you
have encoded all the programming cards you selected, you will be
prompted to encode the spare cards.
Onity HT24W / HT28 Smart Software - HT24W / HT28 Smart • 41
Page 48

Using the Spare Card System
Allowing a guest into a room is a very simple process. Once the spare card is
assigned to the door, the guest can continue using the spare card until a new guest
card is encoded for this guest or the next guest, or until a guest canceling card is
used.
To assign the Spare Card, a hotel employee, such as a bellman, must walk with the
guest to the proper room. The employee will insert and remove the Programming
Card. At this point, the Green and Red lights will both be on. The lock is now
programmed to accept a Spare Card. The employee then inserts the Spare Card into
the lock. If the Spare Card is accepted, only the Green light will be on. At this
point, the lock is now ready to use this Spare Card.
If a guest is staying in multiple rooms or a suite, all of the locks can be programmed
to accept the same Spare Card.
Note: You cannot program a lock to accept more than one Spare Card.
Encode Safe Emergency Card
This function allows you to make a temporary master card that will work in
conjunction with an existing guest card to open an OS600 Model guestroom safe in
the event that the guest has forgotten the PIN for the safe. Once the safe is opened
this way, the guest must be given a new guest card, and the guest must enter a new
PIN to use the safe.
To encode a Safe Emergency card perform the following steps:
1. Select Safe Emergency from the Special Cards menu.
2. You will be asked to confirm that you really wish to encode a Safe
Emergency Card. Press the ENTER key or click the OK button to
confirm.
3. Next, you will be prompted to insert a card in the encoder. When
encoding is finished, your Safe Emergency Card is ready to use.
Using the Safe Emergency Card
In the event that a guest forgets the PIN for a guestroom safe, simply accompany the
guest to the guestroom.
1. Insert the Safe Emergency card into the safe. The green and red lights
should illuminate.
2. While the lights are on, insert the guest card into the safe and the safe
will open.
3. Issue a new guest card and the guest can enter a new PIN and continue
using the safe normally.
42 • Software - HT24W / HT28 Smart Onity HT24W / HT28 Smart
Page 49

P
Maintenance Menu
The Maintenance Menu provides the most useful functions for monitoring and
maintaining the software and locks.
Load Portable Programmer
This function is used to transfer current data to the Portable Programmer (PP), or to
Load Portable
rogrammer
the Extended Portable Programmer (XPP). This device is then used to update the
data in the stand-alone locks.
When you select this option, you will be asked to select the type of programmer to
load.
Choose the appropriate option and then click OK.
Portable Programmer (PP)
To load the PP with current data from the front desk console, perform the
following steps:
Onity HT24W / HT28 Smart Software - HT24W / HT28 Smart • 43
Page 50

4. Connect the Portable Programmer and turn it on. See the System
Components section of this manual for details about connecting the
Portable Programmer.
5. Select Load Portable Programmer from the Maintenance menu or click
on the Load Portable Programmer tool and choose Regular
Programmer.
6. Before you load data into the programmer, you must decide what data
you need to load. You can choose one of three choices. To select one,
click on the option button beside your choice.
• All Doors – Loads data for all of the stand alone Onity locks for
your hotel, or as much data as the Portable Programmer can hold.
• Select Doors – Loads only the data for the doors you select. This
option can save you time if you only need to visit a few doors.
Click on the Select Doors button to pick from the list.
• Doors Needing Updates – Loads data for any doors that need
updating. Doors can need updates because of changes in mastering
schemes, changed master, blocking, or programming card codes, or
time changes.
7. The PP can be loaded with timetable and code information or only
timetable data. For example, if you only need to set the time in the
locks, for Daylight Savings Time or after changing batteries you only
need timetable data.
8. If you want to be able to open doors with the PP, select this option. If
selected, you must enter a four-digit password. This password may be
different every time you load the programmer. The password is used to
protect the Open function of the portable program mer from being used
by someone else should the PP be lost or stolen. Use the number keys
to enter a password which you will use to unlock doors and press the
ENTER key or click OK.
9. Loading the PP can take a few moments, so wait until the system
confirms that the PP is loaded before you disconnect it from the
computer.
44 • Software - HT24W / HT28 Smart Onity HT24W / HT28 Smart
Page 51

Extended Portable Programmer (XPP) – No XPP Operators
To load the XPP with current data from the front desk console, perform the
following steps:
1. Connect the XPP and turn it on. See the System Components section of
this manual for details about connecting the Extended Portable
Programmer.
2. Select Load Portable Programmer from the Maintenance menu or click
on the Load Portable Programmer tool and choose Extended Portable
Programmer.
3. Before you load data into the programmer, you must decide what data
you need to load. You can choose one of three choices. To select one,
click on the option button beside your choice.
• All Doors – Loads data for all of the stand alone Onity locks for
your hotel, or as much data as the Portable Programmer can hold.
• Select Doors – Loads only the data for the doors you select. This
option can save you time if you only need to visit a few doors.
Click on the Select Doors button to pick from the list.
• Doors Needing Updates – Loads data for any doors that need
updating. Doors can need updates because of changes in mastering
schemes, changed master, blocking, or programming card codes, or
time changes.
4. Now select the functions that the XPP will be allowed to perform. The
choices are as follows:
Onity HT24W / HT28 Smart Software - HT24W / HT28 Smart • 45
Page 52

• Update Locks – Allows locks to be updated by the XP P
• Initialize Locks – Allows locks to be initialized by the XPP
• Modifies State of Locks – This feature will allow the XPP user to
change the state of a lock, such as setting a lock to office mode.
This feature is not active as of the writing of this manual.
• Clear Data of XPP – Allows the XPP user to delete locking plan
information from the XPP. It is advisable to clear the XPP data
when you have finished using it. Doing so will protect the
property in the event the XPP is lost of stolen.
• Read Openings – Allows the XPP user to collect openings reports
from the locks.
• See Openings – Allows the XPP user to see the openings reports
on the XPP display.
• Open Locks – Allows the XPP user to open locks .
• Open All Locks – If the XPP is loaded with a selection of rooms
only, the XPP will still be able to open all the locks if this option is
selected.
• Auxiliary Lock 1 – Allows the XPP to open the Auxiliary lock for
a room, typically the in room safe if using safes.
5. If you have selected the Open function, you must enter a four-digit
password. This password may be different every time you load the
programmer. The password is used to protect the Open function of the
XPP from being used by unauthorized persons should the XPP be lost
or stolen. Use the number keys to enter a password which you will use
to unlock doors and press the ENTER key or click OK.
6. Loading the PP can take a few moments, so wait until the system
confirms that the PP is loaded before you disconnect it from the
computer.
46 • Software - HT24W / HT28 Smart Onity HT24W / HT28 Smart
Page 53

Extended Portable Programmer (XPP) – With Operators
If your system has set up XPP operators, you will have to option to load all
operators, or select the operators to load from the list.
If you do not intend to view
lock openings directly on
the XPP, deselect the View
Onity HT24W / HT28 Smart Software - HT24W / HT28 Smart • 47
Simply select the operators you wish to load and click OK. Now, choose whether or
not you want to be able to view lock openings reports directly on the XPP. If you do
not choose to view the openings, the xpp will load faster because it does not need to
Page 54

Openings check box. This
will decrease the time it
takes to load the XPP.
Peripheral Diagnosis
load user names. Click the Load button to load the XPP. The functionality of the
operator is given when the operator is set up. See Operators on page 68 for details
on setting up XPP operators.
Peripheral Diagnosis
This function is used to establish and monitor communications with all on-line
devices. There are four functions within the peripherals screen – Address, Change
Mode, Update, and Make it local. These three functions are used to keep the data
current and determine the operating parameters in the on-line devices. The
peripherals that may be connected to the System include insertion and motorized
encoders, guest card identifiers, revalidators, and on-line card readers.
The main peripherals window maintains a list of these units and their current status.
The list shows the peripheral name, type, address, communication status, and the
computer that the device is attached to. To open the peripherals window, select
Peripheral Diagnostics from the Maintenance menu, or click on the Peripheral
Diagnostics Tool.
The Address field shows the address of the device, and shows some visual
information about the device. First, there is a light that will show either Red,
Yellow, or Green. A Red light indicates that the device is offline, a yellow light
indicates that the device is connected to a different computer, and a Green light
indicates that the device is connected to the local computer and is communicating
properly. Next is a visual reference to the type of device: Encoder
, or Card Identifier .
, Wallreader
Addressing a Peripheral
This function is used to establish communications between the system and the
peripheral the first time it is connected.
To initialize a peripheral device, perform the following steps:
1. Prepare one unit to be initialized. Consult your unit’s technical manual
for instructions on proper wiring and preparations for initialization.
48 • Software - HT24W / HT28 Smart Onity HT24W / HT28 Smart
Page 55

There should be a message in the diagnostic messages box showing that
there is one peripheral asking for an address.
2. Select the peripheral from the list that corresponds to the unit you just
cleared. Click on the Address Peripheral button at the bottom of the
window.
3. If you are addressing an identifier, you will see a screen asking you to
enter the identifier password. This password prevents unauthorized
people from reading the information encoded on guest and master
cards. Press ESCAPE to load the Identifier without a password.
Updating a Peripheral
This function is used to transfer the current console data into an on-line reader
or identifier.
To update an on-line card reader or identifier, select a peripheral from the list and
click the Update Peripheral button. Updating can take a few moments for larger
hotels, so be patient.
Changing the Mode of an Encoder
This function is used to change the operational mode of the HT22 or HT24i terminal
encoders between Regular Encoder mode and Terminal Encoder mode (for a
description of these modes, see the section on Terminal Operation). It is also used to
set a device as a revalidator. This is useful in a system controlled by a PMS if the
PMS is not working properly. The hotel may change the encoders to Terminal
Encoder mode and continue to make cards on the terminal encoders until the PMS is
back on-line. Then they simply change back to the Regular Encoder mode to operate
with the PMS.
To change the operating mode of a workstation, select an encoder from the list and
click Change Prog.. In the type column of the list, regular encoders will be listed as
Reader/Writer and terminal encoders will be listed as Terminal.
Making the Encoder Local
There is a feature in the software that allows online devices like encoders and wall
readers to be connected to any Onity computer. Encoders connected to a workstation
computer can be terminal encoders or PMS controlled encoders. In previous systems,
a workstation computer could only control one encoder.
If an online device is connected to a workstation computer, it must be declared in the
peripheral diagnostic screen from the workstation. All of the devices are listed on the
screen, and the computer that controls the is listed in the right-hand column. Simply
highlight any encoder in the list and click Make It Local to transfer control to this
computer.
Note: This feature is optional and it may not be active in your installation.
This feature is useful in installations that have several large check-in areas with
multiple encoders. It can be less expensive to place a PC in each location than to
provide the cabling necessary to control all of the devices from the server computer.
Onity HT24W / HT28 Smart Software - HT24W / HT28 Smart • 49
Page 56

Station Diagnosis
The Station Diagnosis screen shows a list of all Onity computers. The list shows
which operator is logged in, the network address, if the station is communication
with its encoders, and the name of the computer. This information can be helpful
when troubleshooting problems.
When Onity technicians are making changes to the system, to add new doors for
example, the server must be the only computer accessing the files. This tool is useful
for determining which stations, if any, are logged in to the system.
Room Out of Service
This function is used to take a guestroom lock out of service for an indefinite period
of time. When the room is marked as Out of Service, cards cannot be encoded for
that guestroom. Once the room is placed back in service, cards may once again be
issued for that room. Taking a room out of service does not affect the operation of
the guestroom lock itself. Master cards will still operate the lock, allowing
renovations or repairs during the out of service peri o d.
50 • Software - HT24W / HT28 Smart Onity HT24W / HT28 Smart
Page 57

To take a room Out of Service or return a room to active service, perform the
following steps:
1. Select Rooms Out Of Service from the Maintenance menu.
2. You can use the ARROWS or the mouse to select a room. To take a
room out of service or to bring it back into service, Double Click or
press the SPACE bar. To select rooms in a rectangular block, hold
down the left mouse button or hold down the SHIFT key and press the
SPACE bar to toggle.
3. Press the ENTER key or click OK for the changes to take affect.
Mastering Changes
Your hotel may have different mastering schemes set up. Having different schemes
allows you to change the way your guest and master cards operate the locks. It is
easiest to understand the way mastering schemes work with a good example.
Example:
If you occasionally have important visitors at your hotel, you may wish to have a
mastering scheme that only allows guest keys and emergency keys to operate the
guestroom lock.
You may also wish to lock rooms down if they are out of service such that only the
maintenance staff can enter the room.
With these scenarios in mind, we could create the following mastering scheme.
A. Standard – Guest cards and master cards function normally.
B. VIP – Guest cards and the EK card are the only functioning cards.
C. Maintenance – Maintenance master cards are the only cards that
operate the lock.
You can have a maximum of 3 different mastering schemes and you can switch
between these modes of operation at any time without requiring any action from
Onity HT24W / HT28 Smart Software - HT24W / HT28 Smart • 51
Page 58

Onity. The schemes must be set up by Onity before they are available. If you do not
have mastering schemes set up and you would like to have this feature, call Onity.
To make a mastering change, follow these steps:
1. Select Mastering Changes from the Maintenance menu.
2. The Mastering Changes window shows all of the rooms in the hotel and
the current scheme for each room. The three schemes are labeled A, B,
and C and the description of each can be found in the legend at the
bottom of the window.
You can use the ARROWS or the mouse to select a room. To change
the mastering scheme, Double Click, press the SPACE bar, or press the
letter of the scheme. To select rooms in a rectangular block, hold down
the left mouse button or hold down the SHIFT key and press the
SPACE bar to toggle.
3. Press the ENTER key or click OK for the changes to take affect.
4. You will be asked to confirm that you really want to make the changes.
Click OK to confirm.
5. To inform the locks of the changes, you must load the PP with the new
information and update each lock. A message box will appear asking if
you want to load the PP at this time. If you say no, the changes will not
occur until you update the locks.
Note: You must update the locks with the PP before any changes will take affect.
52 • Software - HT24W / HT28 Smart Onity HT24W / HT28 Smart
Page 59

Backup Data
Backup Data
The Onity system requires many data files to function properly. If these files are
ever corrupted by a hardware failure of the computer system or some other anomaly,
it is important to have a recent backup copy of the data files. The software has a
built-in function to make it easy to maintain these files.
Onity recommends that you back up your data files every day to maintain the
performance of the system.
To use the Backup function, follow these steps.
1. Select Backup Data from the Maintenance menu or click on the Backup
Tool.
2. You can choose the directory that you want to put the backup file in by
clicking the Browse button, or you can use the default directory. If you
want to copy the files to a floppy disk, select 3½ Floppy from the
browse list. Regularly scheduled backups to a floppy disk are highly
recommended to prevent unnecessary down-time in the event of a
computer failure.
3. You can elect not to copy the system auditor in your backup because
this file can get very large over time. If you are copying to a floppy
disk, you probably don’t want to check this box because this file can
grow very large and ,may require several floppy disks.
4. When you have selected the directory, click the Copy button to initiate
the Backup process. The process may take a few moments and the
system will notify you when it is finished.
Automatic Backup
The Onity system may be configured to perform automatic backups of your data. To
have this option configured, contact Onity Technical Support or your Distributor.
When configured, the system will automatically backup your data to a specified
location, typically a different computer on the network, at specified intervals. In
addition, the system can be configured to warn you in the event that the backup is
unable to complete successfully.
When an automatic backup fails to complete successfully, the system will warn you
by putting a message on the task bar, and will also cause a pop up message when a
Onity HT24W / HT28 Smart Software - HT24W / HT28 Smart • 53
Page 60

Status Bar Warning
user logs into the system.
This error will occur if the destination directory is incorrect or inaccessible, or if
there are errors in the database. For help with this error, contact Onity Technical
Support or your Distributor.
Emphasized Authorizations Data
The sale of certain amenities provided by your hotel through the use of special
authorizations, called Emphasized Authorizations, can be tracked by the Onity
system. You can generate reports of ‘per day’ usage of these amenities based on
Check-In and Check-Out dates.
Generating Reports
To generate an Emphasized Authorization report, follow these instructions.
1. Select Emphasized Authorizations from the Maintenance menu.
2. Select one authorization from the list of Emphasized Authorizations for
your hotel.
3. Select the month and year of the data for the report.
4. Press the ENTER key or click OK.
54 • Software - HT24W / HT28 Smart Onity HT24W / HT28 Smart
Page 61

What it Means
The Emphasized Authorization report contains enough information to accurately
track the usage of an amenity on a ‘per day’ basis. Each line in the report shows:
• The Check-In date and time.
• The operator that ‘sold’ the amenity during the Check-In process.
• The room number of the card with the specified authorization.
• The expiration date and time of the card.
• The total number of nights the card was valid for the amenity.
If a guest leaves before the expiration date on the card, it is important to perform the
Check-Out operation. This will credit the guest for any unused nights. Early CheckOuts will be designated in red by a negative number of nights in the report.
The report can be printed or saved to a file so that it can be imported into another
system or examined at a later time.
Onity HT24W / HT28 Smart Software - HT24W / HT28 Smart • 55
Page 62

Move to Historic
If desired, certain auditor databases can be archived to text files by using the Move
to Historic feature. This will not only move the records to a text file, it will also
erase those records from the live database.
Select Move to Historic, then the type of data to move to historic.
Select the destination folder and name the file, then select the cut off date for moving
the data. All records previous to the data entered will be archived and deleted from
the live database.
Once a record has been moved to historic, it can still be viewed by selecting View
Historic from the Maintenance Menu; however, there is no indexing or filtering
capability on this data.
56 • Software - HT24W / HT28 Smart Onity HT24W / HT28 Smart
Page 63

Onity HT24W / HT28 Smart Software - HT24W / HT28 Smart • 57
Page 64

Security Menu
System Auditor
The Security Menu contains the functions most helpful in monitoring and
maintaining the security of the system and locks.
System Auditor
This function is used to view the transactions that have occurred on the computers.
The system records all the transactions that have occurred in the system, who made
them, and when they were made. These transactions may be viewed on the screen, or
printed out.
To view the System Auditor, click the System Auditor Tool.
System Auditor Filter
To generate an audit report, perform the following steps:
1. Select System Auditor from the Security menu or click on the System
Auditor Tool.
2. The software has the ability to show you only the audits you wish to
see. To select audits from a particular time period, enter the dates in
the Date Filter section. The default dates will show you the whole
history of your system.
58 • Software - HT24W / HT28 Smart Onity HT24W / HT28 Smart
Page 65

3. The Operator Filter section allows you to view the audits from a
particular system operator.
• All Operators shows you the operations performed by any
operator, current or deleted, on your system.
• Specific Operator will show only the operations performed by one
particular operator selected from the pick list.
• PMS shows any operations performed as a result of a Property
Management System request.
• Onity Maintenance shows any operations performed while a Onity
trainer or technician is logged into your system.
• Deleted Operators shows any actions perfor m ed by operators who
are no longer active in your system. This allows you to
immediately secure your system and analyze the auditor at a later
time.
4. With the Function Filter, you can view only the operations you wish to
see. For example, you may only wish to view the system history for
room 101.
• All Functions will show any operation made on the system.
• Specific Guest Room will show only operations regarding a
particular guest room, selected from the pick list.
• Special Operations shows operations that are not related to
guestrooms, such as encoding a programming card. Select a
specific operation from the pick list.
• Master Cards shows operations regarding any master card
function. Note that changing a generic master code and encoding
master canceling cards must be viewed with the Special Operations
option.
5. The Encoder Filter will allow you to view the transactions of a specific
workstation, terminal, or PMS encoder.
• All encoders will show transactions regardless of location.
• At Workstation PC - will show any transactions at a specific
workstation computer, selected from the pick list.
• At Terminal - will show any operations performed at a specific
HT22i or HT24i terminal encoder, selected from the pick list.
• By the PMS on encoder - will show operations of a specific PMS
encoder, selected from the pick list.
6. When all of your filters are selected, click the OK button and the
software will combine all of your criteria and display a report.
Onity HT24W / HT28 Smart Software - HT24W / HT28 Smart • 59
Page 66

N
R
System Auditor Report
ote: If you need to scroll
through a long list, turn the
eal Time feature off.
The System Auditor Report shows all of the transactions that matched the criteria set
up in the Filters window. If the list does not contain the information you are looking
for, you can adjust the filter at any time by clicking the Filter button.
The report shows the date, time, operator, operation, and location of each transaction.
If the transaction is a New Guest Check-In or a Guest Copy, the Details button will
show all the attributes of the card, including expiration date, authorizations, and
special privileges encoded on the card.
You can view a Real Time report of transactions if you check the Real Time check
box. As soon as a transaction takes place that fits your Filter criteria, an entry will
appear at the bottom of the list. The list will refresh every few seconds even if there
are no new events. After each refresh, the last transaction will be selected.
60 • Software - HT24W / HT28 Smart Onity HT24W / HT28 Smart
Page 67

Lock Openings
This function is used to display or print the audit trail from a guestroom lock or offline card reader. This data is retrieved from the locks using the portable programmer.
To view the openings of a lock, follow these steps:
1. Connect the portable programmer and turn it on.
2. Select Lock Openings from the Security menu.
3. A list will appear with all of the locks that have been read by the PP. If
you read a lock more than once, there will be two entries in this list.
Select one entry and press ENTER or click the Read button.
4. Now a window will appear with all of the recorded events from the
lock you selected. You can view the whole list on screen or print it for
inspection.
To view the openings record of another lock, click the Close button and return to
Step 3 above.
Door Transactions
This function is used to display or print the audit trail from an on-line card reader or
a lock whose auditor has been retrieved by the portable programmer. The audit trail
of the on-line reader will include both valid access entries and invalid access
attempts.
Onity HT24W / HT28 Smart Software - HT24W / HT28 Smart • 61
Page 68

Filter Icon
Filtering the Door Transactions Report
Follow these steps to set up the definition of the openings you wish to see:
62 • Software - HT24W / HT28 Smart Onity HT24W / HT28 Smart
Page 69

1. Select Door Transactions from the Security Menu. Then select the
Filter button
2. Use the drop down box next to Door to select the door or doors you
would like to see..
3. Using the date filter, you can limit the openings you see to only those
in the time frame that interests you.
4. The Function Filter can further limit your search to only those openings
that interest you. You can view all openings, only the openings for a
particular guest room, special operations, or openings of a particular
master card. Special operations include the use of the Exit Button,
Spare Cards, Programming Cards, Canceling Cards, and other
operations that might interest you. All available options are included in
the selection list.
5. Select whether you want to show all transactions, only openings, or
only events. Events include cards denied for many reasons. You can
select which types of events you want to see by checking the boxes to
the right of the screen.
6. When you are satisfied with your filter criteria, click the OK button to
view the openings. If the list of openings does not contain the event
you were searching for, you can modify your filter at any time. To
reset all the filters back to the default, click the Reset button.
The Openings List
The openings list is a table showing all of the openings from the selected peripheral
that match your filter criteria. The table shows the date, time, and which card was
used.
The table shows the openings in Real Time. This means that if someone uses their
card in this peripheral, you will see a record of the opening within moments of the
Onity HT24W / HT28 Smart Software - HT24W / HT28 Smart • 63
Page 70

N
H
actual event. The system will scan the peripheral every few seconds, and any new
openings will be added to the bottom of the list. If your list is long, you may wish to
turn this feature off while you look at your list so that the list is not changing. To
turn off the Real Time feature, click the check box at the top of the window so that
there is no check in the box.
avigation Buttons
Card Activity Report
Available only with
T28 Smart!
With the Real Time feature turned off, you can use the special navigation buttons to
move to the first record at the top of the list, to the previous record, to the next
record, or to the last record at the bottom of the list.
To print your list, click on the Print button at the top of the window.
Card Activity Report
When smart cards are used by guests or staff in an HT28 smart lock, the lock can
write information onto the smart card after each use. This is one of the most
powerful features of the HT28 smart locks. This information can be very useful in
recognizing problems in the locks or with the cardholders. The information includes
which doors the card has been used to open, when those doors were opened, and if
those doors had low batteries or other maintenance issues.
To see a report of all the collected card information select Card Activity Report from
the Security Menu or click the tool.
Filtering the Card Activity Report
The card activity report can be filtered to show only the data that is interesting to
you. You can view the activity of a particular master user, or the traffic through a
particular door, or any combination. The report can also be filtered by date so that
you get exactly what you want to see.
64 • Software - HT24W / HT28 Smart Onity HT24W / HT28 Smart
Page 71

The Report – What It Means
The Card Activity report shows a lot of useful data. Perhaps the most interesting is
the time and date that a user unlocked a door. This data is shown with the user's
name and the type of master card they used, the door name, and a lock status
indicator. If the lock status indicator shows 'Changed' you can view details of the
parameters stored inside the lock memory.
Lock Status Detail
The lock status indicator will show if anything has changed in the parameters stored
inside the lock. If all parameters are normal there are no details to show. Each
parameter is explained below.
• Office Mode status – reports whether the lock is in office mode or not.
• Blocked status – reports whether the door has been blocked with the
blocking card
• Battery status – reports if the battery level is good.
Onity HT24W / HT28 Smart Software - HT24W / HT28 Smart • 65
Page 72

H
• Code status - reports whether the card that was used has a new code or
the same code. When a lost master card is replaced, the new card gets a
new code.
• Guest status – reports whether a guest canceling card has been used in
the lock, if a spare card is currently being used, if a suite card is being
used, or if a normal guest card is being used.
Other Options – Real Time
If you are using several revalidation units around your property, the system
continually checks for updates from the devices. Each time an update occurs the
new information is placed at the bottom of the list.
If you want to scroll through the list be sure the Real Time box is unchecked so your
data will not be changing while you are browsing through it.
Other Options – Count
By clicking the Count button you can see the number of records that matched your
filter criteria.
Available only with
T28 Smart!
Lock Status Report
The lock status report will show you the most recent information about the locks in
your hotel based on the collection of all of the data on the smart cards carried by the
master users or guests.
Although in most cases you only need to see the most recently collected information,
this report will show you up to 9 records per lock. For example, you may want to
view more than one record to know if you have had low battery indications for
several days.
The report displays the following information:
• Room number
66 • Software - HT24W / HT28 Smart Onity HT24W / HT28 Smart
Page 73

• Office function status
• Blocking card status
• Battery level
• Guest status - reports whether a guest canceling card has been used in
the lock, if a spare card is currently being used, if a suite card is being
used, or if a normal guest card is being used.
• Reading Date – this is the most recent opening known to the system.
Onity HT24W / HT28 Smart Software - HT24W / HT28 Smart • 67
Page 74

Filtering the Lock Status Report
You can use this filter to view only the records with certain features, such as low
battery or only reports from this morning.
Unknown button
To narrow the view, check one or more of the filter boxes. Then select the records
you want to see from the list boxes on the right side of the screen. If a check box is
unchecked, the report will show all records for that category.
Unknown Rooms
In some cases there may be rooms that do not appear in the list so their status is
unknown. Maybe the rooms did not fit the filter criteria, or maybe the room is not
accessed very often and there is no reading in the system. If you want to see the
rooms that do not appear in the list, simply press the Unknown button.
Operators
This function is used to enter system operators, XPP operat ors, their passwords, and
their access levels into the system.
68 • Software - HT24W / HT28 Smart Onity HT24W / HT28 Smart
Page 75

Adding Operators
To add a new operator to the system, perform the following steps:
1. Select Operators from the Security menu.
2. Click the Append button at the bottom of the Operators window.
3. Enter the operator’s name in the appropriate. Each operator must have a
unique operator name because this name is recorded in the System
Auditor.
4. Enter a password for this operator. Each operator must have a unique
password. If you enter a password that matches an existing password
you will get an error message.
5. Select the type of operator to setup. If this operator will have access to
the system, choose System operator. If this operator will be an XPP
user, choose XPP operator. If this user will be both a system and an
XPP operator, choose System and XPP Operator.
6. Next, choose the Access level and Language for this operator.
7. If this operator is an XPP operator, choose the appropriate XPP group
and select the XPP functions this operator will have access to.
8. Click OK when finished.
Onity HT24W / HT28 Smart Software - HT24W / HT28 Smart • 69
Page 76

Modifying Operators
Click the Modify button to change the attributes of an existing operator. The steps to
change attributes are the same as those to add a new operator.
Deleting Operators
To delete an operator, select Operators List from the Security menu. Select an
operator from the list and click the Delete button. You cannot delete operators that
have the same level as you or a higher level. You may only delete operators with a
level lower than your own.
70 • Software - HT24W / HT28 Smart Onity HT24W / HT28 Smart
Page 77

p
Operator Levels Required
There are nine levels
available, but in the US most
roperties only use five.
Operators in the system are only allowed to access certain menu items or functions.
This control is managed by the level of the operator and the level of the function.
The level required to use each function can be customized by the hotel management.
To view or modify the operator levels required to perform functions, select Levels
Required from the security menu. Every function is listed with the current level
required to access it. The functions are listed in the order they appear on the menus
starting with the Reception menu and working down and then across. Also included
in the list are some function buttons that are not in menus. Create New Master is an
example of one of these function button items. To change the level required to use a
feature, simply highlight the feature and type a new number between 1 and 9.
XPP Mastering
Select the XPP Mastering menu option to set up XPP groups. Doing this will allow
you to set up XPP operators that only have access to a certain group of rooms.
To set up an XPP group, select XPP Mastering from the Security Menu, then click
the Insert button.
Onity HT24W / HT28 Smart Software - HT24W / HT28 Smart • 71
Page 78

On this screen, key in the Name of the group and a description in the appropriate
fields. Next, select the rooms that belong to this group and click the right arrow
button. These selection buttons are described below:
•
Use this button to select a single room, or to select all of the
highlighted rooms.
•
•
Use this button to select all rooms.
Use this button to deselect a single room, or to deselect all of the
highlighted rooms.
•
Use this button to deselect all rooms.
Once the XPP groups have been configured, you can assign XPP operators to a
specific group.
72 • Software - HT24W / HT28 Smart Onity HT24W / HT28 Smart
Page 79

Configuration
Language
The language option allows the system operator to view messages and screen text in
any of the loaded languages. To change the language of the system, simply select
the Language option from the configuration screen and pick a language from the list.
If a required language is not loaded with your system, contact a Onity representative
to check the list of available languages.
Change Date and Time
The locks in the system and most computers will adjust automatically for Daylight
Savings Time, but occasionally it may be necessary to update the time on your
computer. The Change Date and Time function will allow you to make updates
without exiting the system. Onity recommends that only high level operators have
access to this function because an incorrect time could prevent cards from opening
doors or prevent a PMS system from making cards at Check-In.
Station Configuration
There are a few parameters that must be set for your system to function properly.
These parameters can be adjusted by using the Station Configuration selection on the
Configuration Menu.
Onity HT24W / HT28 Smart Software - HT24W / HT28 Smart • 73
Page 80

• Auto Log-Off – This option lets you choose whether the system will
log users out after a certain period of not being used. If the Enable
Auto Log-Off check box is selected, the system will lock the screen
after the number of minutes entered in the box below.
• HTCOM Communication Port – This is the serial port that the system
uses to control any encoders, PPs or other online peripherals. Encoding
cards is impossible if this parameter is set wrong.
• PMS Communications Port – This setting defines how the PMS is
connected to the Onity system. The port type setting defines if the
connection is through an RS232 serial connection or through TCP/IP
over an Ethernet connection. If the connection is serial, the port and
baud rate must be set to match the settings of the PMS system. If the
setting is Ethernet, the PMS system will need to know the port setting
in order to communicate properly.
• XPP Communication Port – This is the serial port that the system uses
to communicate with the XPP. In addition to selecting the port, also
select the XPP Baud Rate. Typically, this is set to 115200.
74 • Software - HT24W / HT28 Smart Onity HT24W / HT28 Smart
Page 81

Change Encoder
There is a feature in the software that allows online devices like encoders and wall
readers to be connected to any Onity computer. Encoders connected to a workstation
computer can be terminal encoders or PMS controlled encoders. In previous systems,
a workstation computer could only control one encoder.
If using this system, you must declare which encoder each workstation will use
locally. Choose Change Encoder from the Configuration Menu, and select the
encoder to be used by the local workstation.
This encoder will be used when making keys from the workstation.
Config. Emergency Reval.
If your system uses the online revalidators, it is necessary to configure the way these
revalidators will operate in case of a system failure causing a loss of communication
between the PC and the revalidator.
To parameters that must be set are:
• Emergency Password – This is the password that must be entered at the
revalidator to enter emergency mode in the case of a loss of
communication with the PC. This password can be up to 8 alphanumeric characters long.
• Expiration Date Increment – If it is necessary to use the revalidators in
emergency mode, all users will use the same date increment. Choose
Onity HT24W / HT28 Smart Software - HT24W / HT28 Smart • 75
Page 82

an increment that works best for your property. This increment can be
a number of hours or a number of days.
• PIN – Finally, you must decide if users will be required to enter their
PIN when operating in emergency mode.
Once communication with the PC has been reestablished, the revalidators will
automatically exit emergency mode and begin working as normal. If you have
disabled any users manually on the revalidators, you must do so again on the PC, as
these changes do not automatically update the PC.
Note: It is imperative that the Emergency Password be remembered. There is
no alternative way to enter emergency revalidation if the password is forgotten,
and your user keys will have no way of being updated.
Check-Out Warning
The system can warn you if you are about to perform a New Guest Check-In for a
room that has not Checked-Out. If you would like to use this feature, select CheckOut Warning on the configuration Menu. If the feature is active, there will be a
check mark next to the menu item. To deactivate the feature, click again and the
check mark will disappear.
PMS Enabled
If your hotel has a Property Management System that is interfacing to Onity, the
PMS Enabled item on the Configuration menu must be checked. To change the
setting, simply click on the menu item.
Show PMS Communications
When troubleshooting a connection with a PMS, it is often useful to see the data that
flows between the systems. The Show PMS Communications window does this. All
of the valid commands that the system receives and all of the responses it sends to
the PMS are displayed here.
76 • Software - HT24W / HT28 Smart Onity HT24W / HT28 Smart
Page 83

Hardware
HT24W / ADVANCE (Magnetic) System Components
HT24 Magnetic Stripe Lockset
Onity HT24W / HT28 Smart Hardware • 77
Page 84

1. Rear View 8. Battery Access Cover
2. Side View 9. Battery Access Cover Screw
3. Front View 10. Portable Programmer Connection
4. Privacy Indicator Connection 11. Mounting Posts
5. Clear Button 12. Spindle
6. Light Indicators 13. Escutcheon Screws
7. Card Insertion Slot 14. Back Cover Screws
[HT24 shown above]
Modes of Operation and
Capabilities – HT24 Lock
and ADVANCE Magnetic
stripe lock
• Standard Guestroom
Mode / Suite Mode
The standard operation
of an ADVANCE
magnetic stripe lock /
HT24 lock is normal
guest room mode. In
this mode, a single guest
card code is allowed to
enter along with any
selected master cards.
To gain access, the card
must have the proper
site code, the correct
card code, any
applicable authorization,
and be within the
activation and
expiration dates.
[ADVANCE (Magnetic
Stripe lock )]
• Foyer Mode
A foyer lock does not keep an audit trail or card codes. To gain
78 • Hardware Onity HT24W / HT28 Smart
Page 85

access, the card must have the proper site code, any applicable
authorization, and be within the activation and expiration dates.
• Selective Mode
The selective lock is a combination of corridor and back-of-house locks
found in ADVANCE magnetic stripe lock / HT24 systems.
Essentially, a selective lock is a freely keyed lock that can accept as
many as 250 users with an audit trail, or 500 users without (when
equipped with the HT28 or HT24F locks). Guest room keys and staff
cards can be set to have access in the locking plan. To gain access, the
card must have the proper site code, the correct card code, any
applicable authorization, and within the activation and expiration dates.
Automatic Code Change – ADVANCE magnetic stripe lock /
HT24 Lock
The most important feature of the Onity electronic lock is that it changes its code
automatically for each new guest that checks into the room. Each new guest card
used in a lock will automatically void the previous guest card.
In a similar manner, the lock will also accept a new master card. Any new master
card used in a lock will automatically void the previous master card.
Battery Operation – ADVANCE magnetic stripe lock / HT24
Onity locks are powered by 4 AA size alkaline batteries. These batteries are expected
to last between 2 and 4 years, depending on a number of factors. Factors that can
shorten battery life are:
• The freshness of the batteries when they are purchased.
• The number of transactions per day.
• Extreme cold weather.
• Battery quality.
Onity recommends the use of major brand batteries in the locks, such as Energizer,
Duracell, and Panasonic batteries. In installations where the lock will be subjected to
extremely cold temperatures, use 4 AA size Lithium batteries. Both Alkaline and
Lithium batteries may be purchased through Onity.
A low battery indication is given to staff cards for approximately one month prior to
the batteries being completely dead. The hand-held Portable Programmer can also be
used to check the level of the batteries.
Audit Trail – ADVANCE magnetic stripe lock / HT24 Lock
Onity locks use non-volatile memory to store a record of the most recent openings.
The Onity HT24 lock records the last 100 openings. This means that the locks will
not lose the audit trail, even if the batteries are removed. Reading the lock will
produce a list of all cards used in the lock and the date and time they were used.
Real Time Clock – ADVANCE magnetic stripe lock / HT24
Lock
The Onity lock circuitry contains a "real time" clock. This means that the lock is able
to determine if a card should be admitted based not only on the code of the card, but
also the date and time.
Onity HT24W / HT28 Smart Hardware • 79
Page 86

Daylight Savings Time Change – ADVANCE magnetic stripe
lock / HT24 Lock
With the software, Onity locks can be loaded to automatically change for Daylight
Savings Time. The lock will remember the date of the next change. This means that
the lock must be loaded twice each year with the date of the next change.
Panic Operation – ADVANCE magnetic stripe lock / HT24
Lock
Onity locks feature panic retraction of the deadbolt from inside the guestroom.
Operation of the lever from inside the guestroom retracts both the deadbolt and the
latch, fulfilling the requirements of various building cod es, life safety codes, and the
ADA.
Magnetic Cards
The standard Onity magnetic keycard is an ISO standard three-track, low-coercivity,
flush mount magnetic stripe keycard. The card complies with the ABA requirements
for keycard dimensions and materials. The Onity information is encoded on track
three in an encrypted and proprietary format, leaving tracks one and two open for use
in another system, such as a point-of-sale system.
The card is re-usable. When the card is re-encoded with new information, the
previous information is destroyed, much like taping over an old movie on videotape.
If the card becomes dirty, scratched, or cracked, you must discard it. Dirty cards can
contaminate the heads in the locks and encoding equipment which will result in those
units requiring more maintenance. Scratched cards may not operate reliably. Cracked
cards might break off inside the locks or encoding equipment, again requiring
immediate maintenance and causing inconvenience to your guests.
Replacement keycards are available from Onity in both a generic format and with
custom graphics. Replacement keycards may also be purchased from another vendor
who can guarantee adherence to the ISO standards and the quality of the card. As a
benchmark indicator of keycard vendors, Onity rejects cards from over 90% of the
keycard vendors because of poor quality.
Card Care – Magnetic Card
Magnetic cards can be re-used many times without affecting the card. There are a
few precautions that can extend the life of the cards even further.
• Make sure the cards are clean. This is very important because dirt and
grime can scratch the surface of the magnetic stripe affecting the ability
of the lock to read the information. Dirty cards can also cause damage
to the reader of the lock and the encoding equipment.
• Make sure the cards are flat. The lock cannot read a card that has been
folded or creased.
• Keep the cards away from magnets. Because the information is
encoded on a magnetic stripe, magnets can destroy the data. Direct
contact with a small refrigerator magnet will erase all or part of a card.
In some instances powerful motors, such as the kind that drive some
elevators, can damage cards that are stored nearby.
80 • Hardware Onity HT24W / HT28 Smart
Page 87

• Throw away worn out cards. Eventually any card will become worn
out. The magnetic material will become thin and the information
cannot be properly encoded on the card.
Onity HT24W / HT28 Smart Hardware • 81
Page 88

HT24 Card Readers
HT24 Off-line readers
Off-line readers are stand-alone units that do not require connections to a central
computer. The off-line readers do require a 12-volt DC power supply to operate. The
off-line reader acts as a switch to control an electrical locking device, such as an
electric strike, magnetic lock, automatic door, or gate operator. In all other regards,
the off-line reader behaves like the stand-alone lock. The off-line reader can operate
in three modes – Standard mode, Selective mode, and Foyer mode.
• Standard Guestroom Mode / Suite Mode
The reader is declared as a door to a single room or suite. The reader
will only open to master cards or cards made specifically for its room
designation and will store the last 500 events.
• Selective Mode
The reader will recognize the individual codes for up to 1000 cards. If
there are 250 cards or less with access assigned, the reader will record
the last 500 events. If there are more than 250 cards, then no audit trail
will be kept by the reader.
• Foyer Mode
The reader is declared as a common entrance door for a section of the
property. The reader will check the card for valid site data, proper
authorizations (if any), valid time shift, and expiration date. If the card
meets these criteria, then the reader will allow access to the property.
Off-line readers can be set up to perform actions automatically. At pre-specified
times, the reader may lock and unlock the door it controls. As an example, the reader
may be programmed to unlock the lobby doors at 6:00a.m. and lock the lobby doors
at 11:00p.m. Cards with the office attribute may also be used to toggle the off-line
reader from locked to unlocked, and back again.
HT24 On-line readers
On-line readers are devices that are connected to the front desk main console for
instantaneous update and audit capability. Each reader is connected to a controller,
which in turn is connected through the Onity HTCOM network to the front desk
main console. All Check-In and Check-Out information is immediately relayed to
the reader, so that access privileges can be granted or denied on a minute-by-minute
basis.
82 • Hardware Onity HT24W / HT28 Smart
Page 89

The on-line reader acts as a switch to control an electrical locking device, such as an
electric strike, magnetic lock, automatic door, or gate operator. If the locking device
requires 12VDC power, and draws less than one Amp of cur rent, the internal power
supply of the reader control unit may be used to power the locking device.
The on-line reader has a much larger capacity for data than the stand-alone locks.
The on-line reader can recognize the codes for up to 8000 rooms and masters, and
will store the last 8000 openings. If communication with the front desk console is
interrupted, the on-line controller continues operating normally with the last access
data received from the front desk console. Once communications are restored, the
front desk console will update the on-line reader with any changes made during the
interruption.
The on-line reader has a feature called anti-passback. This feature allo ws c onnect i o n
of a second reader to the controller. The second reader is used to record exits. Antipassback only allows cards to re-enter an area if the card was used to exit the area.
As an example, if an on-line reader was used to control the gates in a parking deck,
users may freely enter the deck the first time. Once they use their card to exit the
deck, they may re-enter at a later time. However, if they were to enter the deck, then
give the card to a friend to allow them to park in the deck, the card will not allow the
second entry, because no exit has been recorded. This feature is optional; it is not
active unless requested at the time of setup.
Encoders
Encoders are used to create working guestroom and master cards for your Onity
locks. They can operate with a Property Management system or directly from the
software. There are several varieties of encoder available from Onity, each with
different features, but they all serve the same basic purpose.
HT22 Encoder
The HT22i insertion encoder is a single-track manual insertion encoder. No
information can be encoded on track 1 or 2. When use d wi t h the HT2 4 W/ HT28
system, the HT22i insertion encoder is controlled directly by a PC or through
HTCOM in a PMS network. In addition, the HT22i can use the onboard display and
keypad to function as a terminal on the HTCOM network. From an HT22i in
terminal mode, users can create new keys and perform other transactions directly
with only one PC acting as the server. Refer to the section of this manual about
Terminals for details.
The HT22M has an internal 3-track motorized encoding deck with integrated smart
card encoder. This deck is capable of encoding HICO, LOCO, and Smart cards.
This encoder can encode information on all 3 tracks of a magnetic stripe card when
connected to the PC based system.
HT22 Display and keypad
The display on the HT22 encoder provides instructions and messages to the front
desk operator. The eight-line display is back-lit when messages are displayed for
easy viewing. The characters on the display can be made lighter or darker by
adjusting the contrast knob under the left rear ledge of the unit.
Onity HT24W / HT28 Smart Hardware • 83
Page 90

HT22 Connections
The DB9 connectors (8 and 9) are used to connect the encoder to the communication
distributor through the HTCOM network
.
1. Not Used With This System 6. On/Off Switch
2. HTCOM Connection – AB Format 7. N ot Used Wi t h This Sy stem
3. Firmware Update Connection 8. HTCOM Connection
4. 12VDC Power Input 9. HTCOM Connection
5. Strain Relief
HT24+ Motorized Encoder
The Onity motorized encoder is a three-track magnetic stripe card encoder. It
records Onity information in a secure proprietary format on track 3 and can encode
information in ISO standard format for other systems on tracks 1 and 2. This
84 • Hardware Onity HT24W / HT28 Smart
Page 91

information can be entered by the desk clerk at the time of check-in or it can be
specified by the Property Management System. Limited default information,
including room number and expiration date, can also be encoded on track 1 or 2.
The Onity motorized encoder can be controlled by a PC running the software as a
server or as a workstation. The motorized encoder can also be controlled through
HTCOM in a PMS network.
• Light Indications
The red LED (1) is illuminated when the unit is turned on
The green light (2) is illuminated when the encoder is waiting for a card
to be inserted for reading or writing. Once the card is inserted, this LED
will go out.
The other red light (3) is illuminated when the encoder returns the card
after finishing a read and/or write operat i on.
• Switches
The red power setting switch (7) is used to select the type of power that
is being supplied at the site; either 115VAC or 220VAC. Installations
within the United States will use the 115VAC setting. For information
about the power supplied to your property, please contact your local
electric utility company.
The Power switch on the back of the unit (11) is used to turn power to
the unit on or off. Inside the switch housing is a small compartment that
contains the main power fuse and one spare.
If you have the High Coercivity model, the encoding mode selector
switch (12) is used to select either High Coercivity or Low Coercivity
encoding. High Coercivity encoding uses either 2750 Oersted or 400 0
Oersted magnetic stripe cards. Low Coercivity encoding uses 300
Oersted magnetic stripe cards.
• HT24+ Connections
The DB9 connectors (9 and 10) are used to connect the encod er to the
communication distributor through the HTCOM network.
Onity HT24W / HT28 Smart Hardware • 85
Page 92

1. Red Light (Power) 7. Power Selection Switch – 110/220 V AC
2. Green Light (Begin Operation) 8. Rear Ejection Port
3. Red Light (Operation Complete) 9. HTCOM Connection
4. Card Insertion Slot 10. HTCOM Connection
5. Clear Button 11. On/Off Switch and Fuse
6. Card Encoding Unit 12. Encoding Mode Selector – HiCo/LoCo
86 • Hardware Onity HT24W / HT28 Smart
Page 93

HT28 / ADVANCE Dual Smart System Components
HT28 Dual / ADVANCE Dual Technology Lockset
1. Rear View 8. Battery Access Cover
2. Side View 9. Battery Access Cover Screw
3. Front View 10. Portable Programmer Connection
4. Privacy Indicator Connection 11. Mounting Posts
5. Clear Button 12. Spindle
6. Light Indicators 13. Escutcheon Screws
7. Card Insertion Slot 14. Back Cover Screws
[HT Dual shown above]
Onity HT24W / HT28 Smart Hardware • 87
Page 94

[ADVANC E Dual sh ow n]
Modes of Operation and Capabilities HT28 Dual / ADVANCE
Dual
• Standard Guestroom Mode / Suite Mode
The standard operation of an HT28 Dual / ADVANCE Dual lock is
normal guest room mode. In this mode, a single guest card code is
allowed to enter along with any selected master cards. To gain access,
the card must have the proper site code, the correct card code, any
applicable authorization, and within the activation and expiration dates.
• Foyer Mode
A foyer lock does not keep an audit trail or card codes. To gain access,
the card must have the proper site code, any applicable authorization,
and within the activation and expiration dates.
• Selective Mode
The selective lock is a combination of corridor and back-of-house locks
found in HT24 systems. Essentially, a selective lock is a freely keyed
lock that can accept as many as 250 users with an audit trail, or 500
users without. Guest room keys and staff cards can be set to have
access in the locking plan. To gain access, the card must have the
proper site code, the correct card code, any applicable authorization,
and within the activation and expiration dates.
Automatic Code Change – HT28 Dual / ADVANCE Dual
The most important feature of the Onity electronic lock is that it changes its code
automatically for each new guest that checks into the room. Each new guest card
used in a lock will automatically void the previous guest card.
88 • Hardware Onity HT24W / HT28 Smart
Page 95

In a similar manner, the lock will also accept a new master card. Any new master
card used in a lock will automatically void the previous master card.
Battery Operation – HT28 Dual / ADVANCE Dual
Onity locks are powered by 4 AA size alkaline batteries. These batteries are expected
to last between 2 and 4 years, depending on a number of factors. Factors that can
shorten battery life are:
• The freshness of the batteries when they are purchased.
• The number of transactions per day.
• Extreme cold weather.
• Battery quality.
Onity recommends the use of major brand batteries in the locks, such as Energizer,
Duracell, and Panasonic batteries. In installations where the lock will be subjected to
extremely cold temperatures, use 4 AA size Lithium batteries. Both Alkaline and
Lithium batteries may be purchased through Onity.
A low battery indication is given to staff cards for approximately one month prior to
the batteries being completely dead. The hand-held Portable Programmer can also be
used to check the level of the batteries.
Audit Trail – HT28 Dual / ADVANCE Dual
Onity locks use non-volatile memory to store a record of the most recent openings.
The Onity HT28 Dual / ADVANCE Dual records the last 500 openings. This means
that the locks will not lose the audit trail, even if the batteries are removed. Reading
the lock will produce a list of all cards used in the lock and the date and time they
were used.
Real Time Clock – HT28 Dual / ADVANCE Dual
The Onity lock circuitry contains a "real time" clock. This means that the lock is able
to determine if a card should be admitted based not only on the code of the card, but
also the date and time.
Daylight Savings Time Change – HT28 Dual / ADVANCE
Dual
With the software, Onity locks can be loaded to automatically change for Daylight
Savings Time. The lock will remember the date of the next change. This means that
the lock must be loaded twice each year with the date of the next change.
Panic Operation – HT28 Dual / ADVANCE Dual Onity locks feature panic
retraction of the deadbolt from inside the guestroom. Operation of the lever from
inside the guestroom retracts both the deadbolt and the latch, fulfilling the
requirements of various building codes, life safety codes, and the ADA.
Onity HT24W / HT28 Smart Hardware • 89
Page 96

Smart Cards
In addition to traditional magnetic stripe cards, the HT28 lockset will read and write
to microprocessor cards and memory cards. Smart cards can store a great deal more
data than magnetic stripe cards, and magnets or small scratches that will destroy the
information on a magnetic card cannot damage smart cards.
A variety of smart cards are available on the market today and all of them have
different features and capabilities. The Onity HT28 Smart system can work with
several different types of smart cards and memory cards – each with its own features
and costs. The section below offers a brief description of the cards offered and
approved by Onity.
Memory Cards
Memory cards, like magnetic cards, can be freely written or read. Data on the card is
not password protected. Because of the lack of special security features, memory
cards are usually less expensive than microprocessor cards. It is for this reason that
memory cards should only be used for guest cards, NE VER for staff cards.
Microprocessor Cards
Microprocessor cards are really 'smart' cards. They are equipped with a tiny
microprocessor chip that can perform fairly complicated tasks such as password
protection and data encryption. Microprocessor cards can typically handle a much
larger amount of data than memory cards. Microprocessor cards are the only cards
that should be used for staff cards.
Card Care – Smart Card
Smart cards have the benefit of having powerful electronics in a convenient package,
and they should last for many uses. However, cards may become damaged quickly
without proper care. A smart card is a small computer and needs to be treated with
reasonable care.
• Make sure the cards are clean. Dirt and grime can scratch the gold
colored contacts on the card. If the readers and encoders cannot make
proper contact with the card, no data can be transferred.
90 • Hardware Onity HT24W / HT28 Smart
Page 97

• Make sure the cards are flat. The contacts of the card can become loose
or completely separated from the plastic if the cards are bent
excessively. . For example, storing the card in an overstuffed wallet and
then sitting on the wallet will cause damage over time.
• Keep the cards away from static electricity. Although the internal
electronics of smart cards are well protected from the elements, there is
a chance that static electricity will damage the card. This is, after all, a
very tiny computer inside the card.
• Do not keep the smart card on a key chain with metal keys. The metal
keys may damage the chip by constantly rubbing against it.
• If the card is used constantly throughout the day, consider the use of a
neck lanyard with a plastic pouch for the card. This will keep the card
close and handy for quick use, and also protect it at the same time.
• Educate the cardholder. Each cardholder needs to be educated on the
proper care of the smart card to avoid misuse and damage to the card.
Note: Magnets cannot damage or erase smart cards.
Smart Card Encoder
If using the HT22M encoder, there is no need for additional equipment to encode the
Smart Cards. If using the HT22i encoder, an additional piece of equipment is needed
to allow for the encoding of the smart cards.
The HT22i insertion encoder uses an external encoder to encode smart cards.
Connections – External Smart Card Encoder
The external encoder connects to the RS-232 port on the rear of the HT22i encoder.
Onity HT24W / HT28 Smart Hardware • 91
Page 98

Power Requirements for the External Smart Card Encoder
The external encoder requires a separate 5 VDC power transformer. The transformer
plugs into the DB9 connector at the rear of the HT22i.
92 • Hardware Onity HT24W / HT28 Smart
Page 99

Encoding Smart Cards
Smart cards can hold a very large amount of data, so the encoding process is longer
than with magnetic cards. The security features used by microprocessor cards can
also lengthen the encoding time. Overall, the time to encode a smart card is still only
a few seconds.
Because of the memory structure of smart cards, brand new cards require an
initialization process to claim an area of memory for use by Onity. This process,
called personalization, may take a few seconds.
If using the HT22M encoder, the process for encoding the smart card is the same as
for encoding the magnetic stripe cards. Insert the smart card into the encoding deck
of the HT22M with the chip facing up.
If using the external smart card encoder, the cards are inserted into the external
encoder as shown in the picture below, with the gold contacts facing the GCR410
logo.
Onity HT24W / HT28 Smart Hardware • 93
Page 100

HT Proximity, HT RFID and Advance RFID™ System
Components
HT RFID (left) and
Lock Configurations
Five operating configurations are availabl e for the ADV A NC E RF ID , H T RFID
andHT Prox lock:
• Room (Standard)
When the lock is programmed as a standard room lock, a single guest
code is allowed to operate the lock as well as any valid master keys.
To gain access to the room, the key must have a valid site code, room
or master code, any applicable authorizations & overrides, be within
the date and time restraints.
In this mode, any new guest key will void the previous guest key; and
any new master key will void the previous master key of the same type.
The type of users that may be configured in the keying section of the
setup program to access this type of lock are Masters only.
ADVANCE RFID (right) Lock
• Suite and SubSuite
The ADVANCE RFID, HT RFID and HT Prox locks can be specially
configured to work together to secure a suite of rooms. Within a suite,
94 • Hardware Onity HT24W / HT28 Smart
 Loading...