

Onfloor Propel Operating Manual

Operating Manual
PROPEL
Striker 2840 Parts List - PN 220868 - Printed in USA 03/18/08

TM
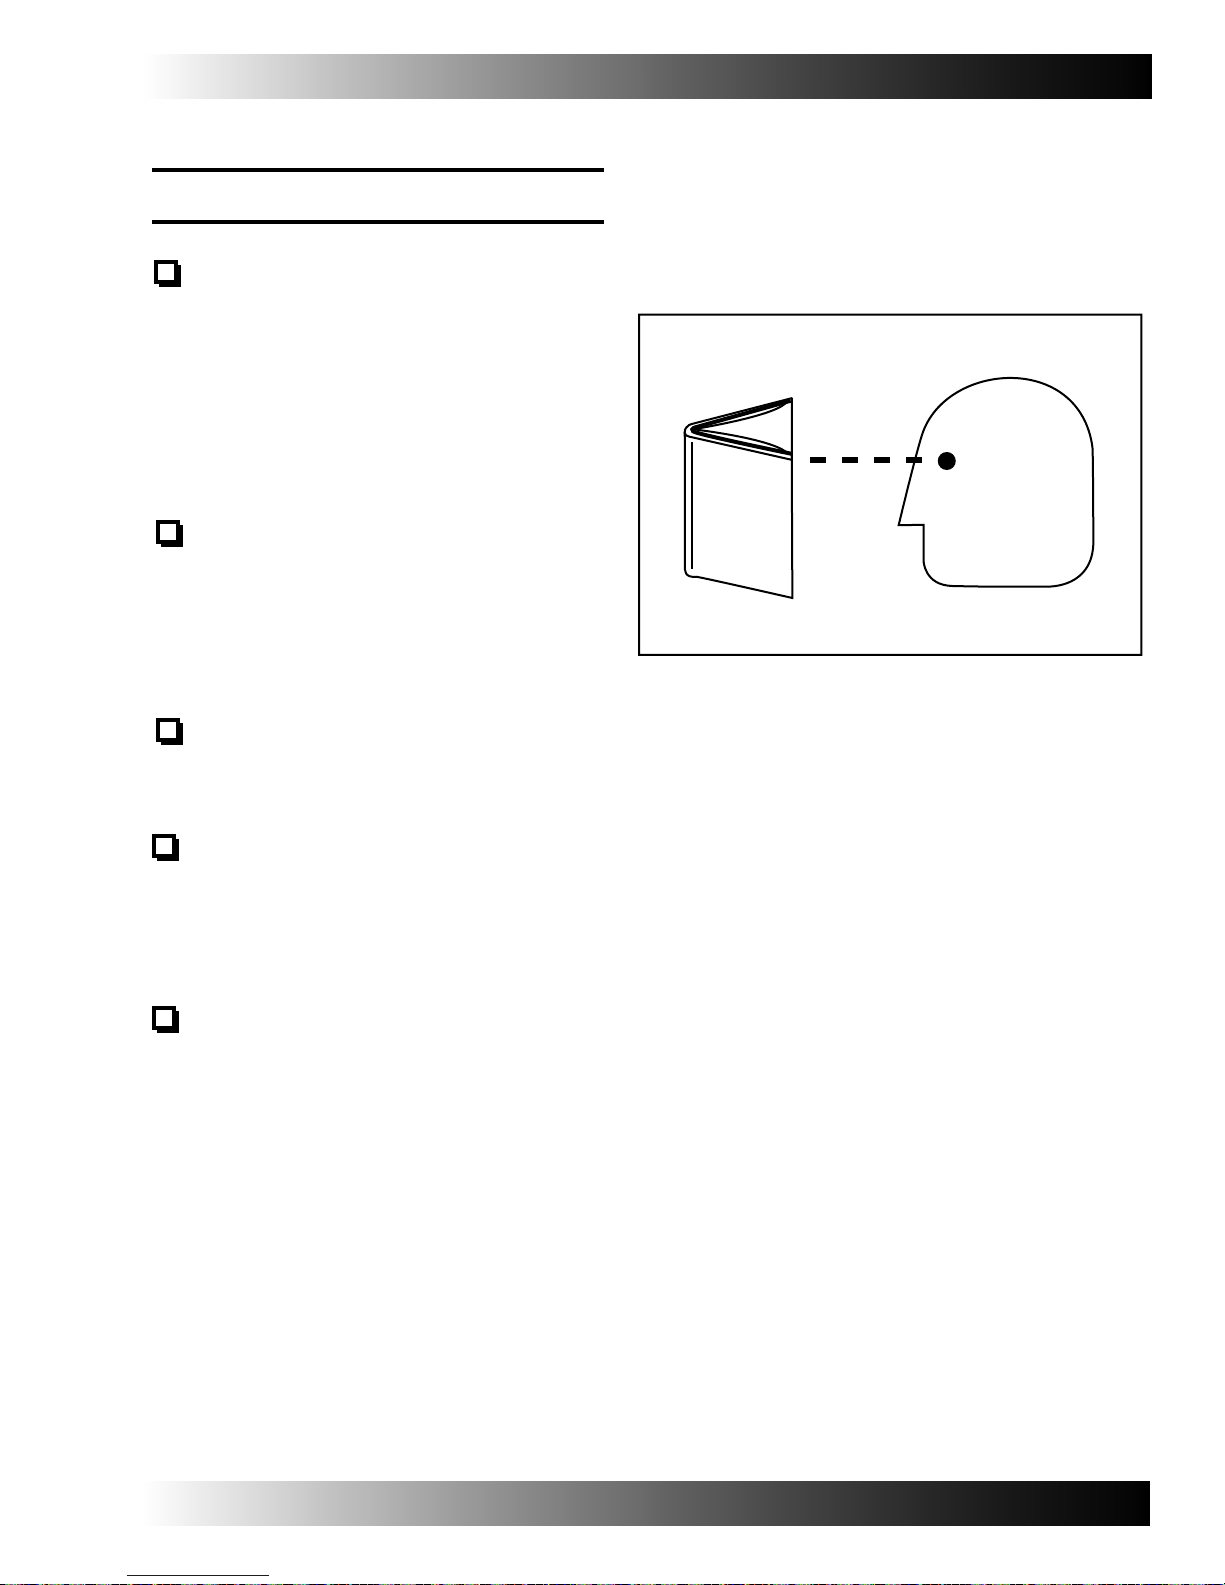
This manual is furnished with each new ONFLOOR. It provides necessary operating and preventive
maintenance instructions. Read this manual completely and understand the machine before operating
or servicing the machine.
This machine will provide excellent service. However, the best results will be obtained at minimum
costs if:
The machine is operated with reasonable care.
The machine is maintained regularly by following maintenance instructions provided.
The machine is maintained with ONFLOOR supplied parts.
Copyright © 2007 ONFLOOR

RADIAL AT OPERATOR MANUAL
TABLE OF CONTENTS
Page
SAFETY PRECAUTIONS
OPERATION
OPERATOR RESPONSIBILITY
COMPONENT LOCATION
ATTACHING THE SWEEPER TO THE FORKLIFT
GENERAL SWEEPING AND BRUSH INFORMATION
SWEEPING
MAIN BROOM ADJUSTMENT
SIDE BROOM ADJUSTMENT
EMPTYING THE HOPPER
REMOVING THE SWEEPER FROM THE FORKLIFT
SWEEPER TROUBLESHOOTING
MAINTENANCE
REPLACING THE MAIN BROOM
2-6
7
7
8
9-11
12
13-14
15
16
17-19
20-21
22
23
23-24
ADJUSTING THE MAIN BROOM TAPER
REPLACING THE SIDE BROOMS
HOPPER DUST FILTER
REPLACING THE HOPPER DUST FILTER
SKIRTS AND SEALS
BEARINGS
V-BELT TENSION
STATIC DRAG CHAIN
HOPPER SKID BLOCK
TIRES
FORKTUBE PIVOT BOLT
TRANSPORTIN THE MACHINE
MACHINE JACKING
SPECIFICATIONS
25
26
27
28
29-32
32
32
32
32
33
33
33
34
35
1

SAFETY PRECAUTIONS
SAFETY PRECAUTIONS
The following precautions illustrated herein are
imperative for safe machine operation:
WARNING: To warn of hazards or
unsafe practices which could result
in severe personal injury or death.
FOR SAFETY: Identify actions
that must be followed for safe
operation of sweeper and forklift
equipment.
The machine is suited to sweep and collect
disposable debris. Do not use the machine in
ways other than described in this Operator
Manual. The machine is not designed for use
on public roads.
The following information signals potentially
dangerous conditions to the operator or
equipment.
WARNING: Forklift emits noxious gases.
Operating in unventilated environments may
result in respiratory damage or asphyxiation.
For exposure limits, contact your regulatory
authorities. Keep engine tuned properly.
WARNING: Raised hopper may fall.
Stay clear of hopper.
WARNING: Moving belt and pulleys.
Keep away from belt drive.
FOR SAFETY:
1. Do not operate sweeper or forklift:
- Unless properly trained and authorized.
- Unless operator manual is read and
understood.
- If it is not in proper operating
condition.
- In flammable or explosive areas.
- In areas with possible falling objects
unless equipped with overhead guard.
3. When using machine:
- Go slow on inclines and slippery
surfaces.
- Do not carry passengers on
machine.
- Use care when reversing machine.
- Use brakes to stop machine.
- Move machine with care when
hopper is raised.
- Make sure adequate clearance is
available before raising hopper.
- Always follow safety and traffic
rules.
- Report machine damage or faulty
operation immediately.
4. Before leaving or servicing machine:
- Stop on level surface.
- Set parking brake.
- Turn off machine and remove key.
5. When servicing machine:
- Avoid moving parts. Do not wear
loose clothing.
- Block machine tires before jacking
machine up.
- Jack machine up at designated
locations only.
- Use hoist or jack that will support
the weight of the machine.
- Wear eye and ear protection when
using pressurized air or water.
6. When loading/unloading machine
onto/off truck or trailer:
- Use truck or trailer that will
support the weight of the machine.
- Block machine tires.
- Tie machine down to truck or
trailer.
2
FOR SAFETY
1. Do Not Operate Machine:
-Unless Trained And Authorized.
-Unless Operation Manual Is Read.
And Understood.
-In Flammable Or Explosive Areas.
-In Poorly Ventilated Areas.
2. Do Not Raise Hopper:
-Unless Machine Is On A Level
Surface.
-Unless Sweeper Is Positioned Directly In
Front of Forklift And Inline With Forklift.
3. Do Not Use Flammable Cleaning
Agents.
4. Go Slow On Grades And Slippery
Surfaces.
5. Before Leaving Machine:
-Stop On Level Surface.
-Turn Off Key And Set Parking
Brake.
-When Parking Remove Key.
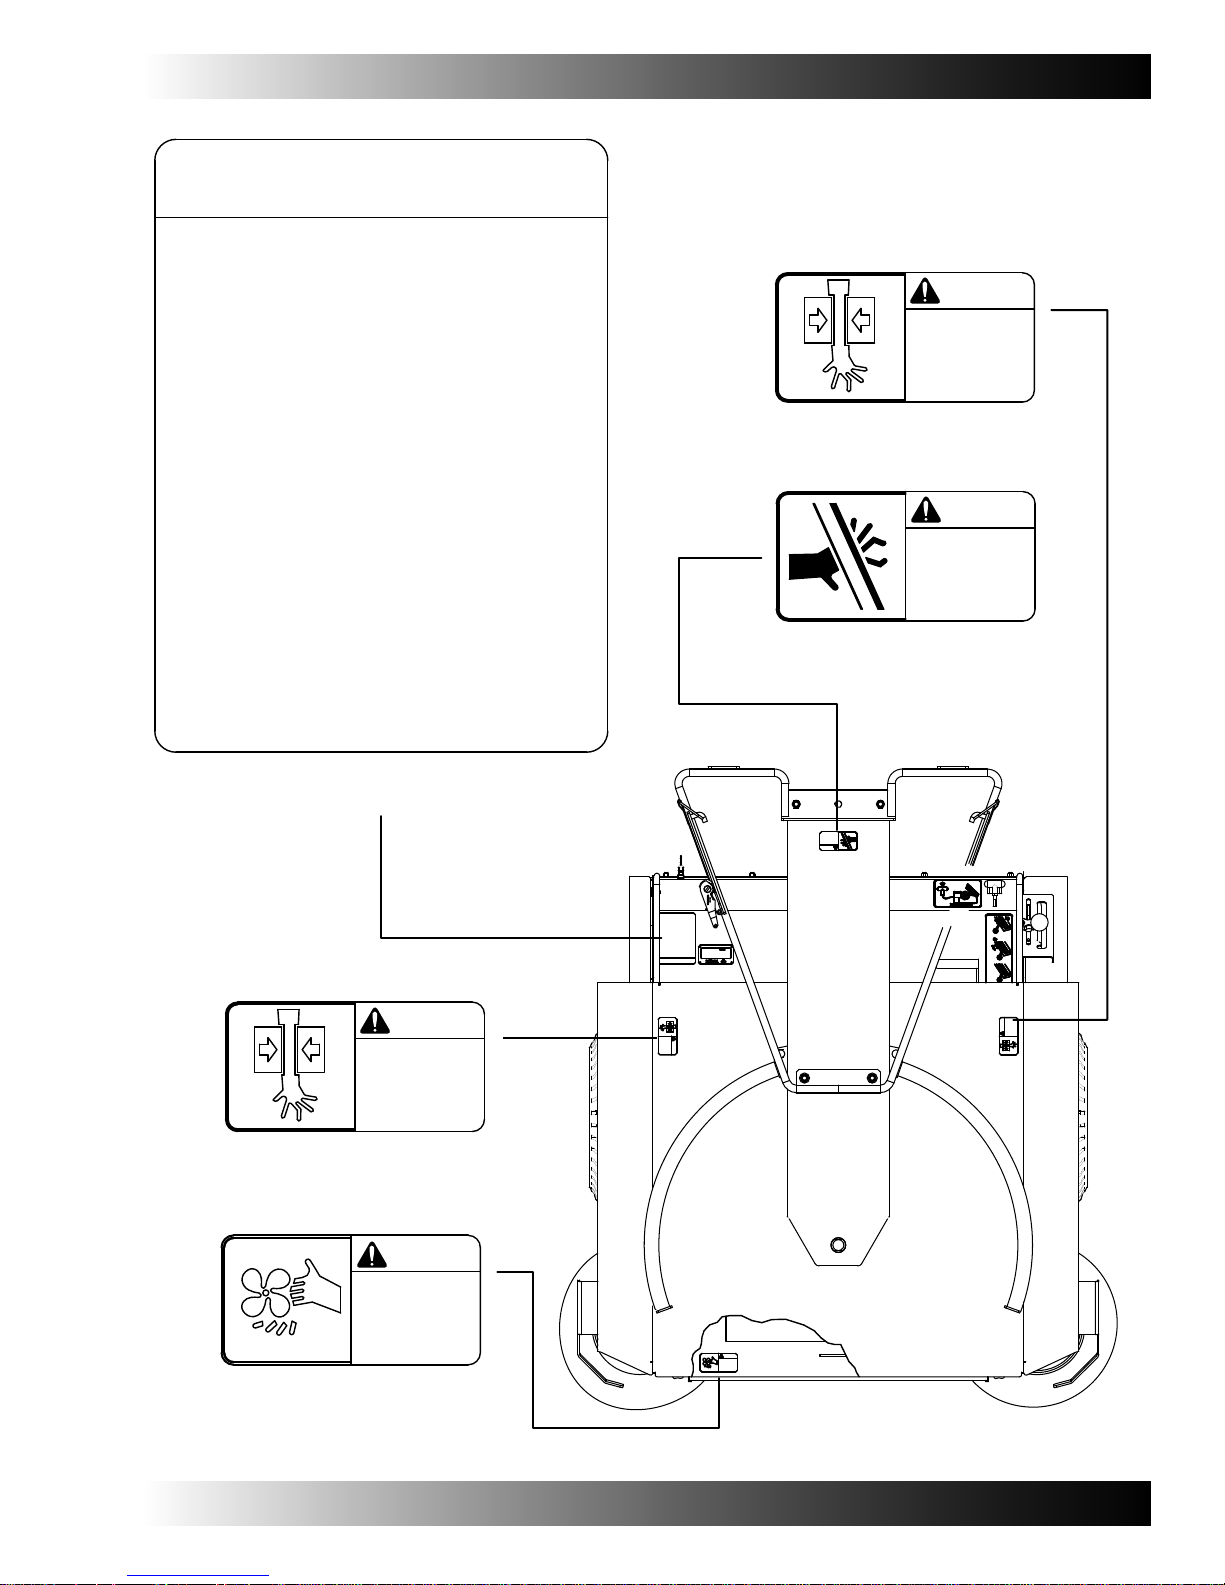
SAFETY PRECAUTIONS
The following safety labels are mounted on the
machine in the locations indicated. If these or
any label becomes damaged or illegible, install
a new label in its place.
WARNING
Keep Limbs
Clear Of
Pinch Point
DECAL, PINCH POINT WARNING
WARNING
Stay Clear
Of Swinging
Tube
DECAL, SWINGING TUBE WARNING
6. Contact Your Dealer For Manufactures Original
Or Equivalent Replacement Parts.
DECAL, FOR SAFETY
WARNING
Keep Limbs
Clear Of
Pinch Point
DECAL, PINCH POINT WARNING
WARNING
90-88004
Tube
Of Swinging
Stay Clear
WARNING
90-88024
Equivalent Replacement Parts.
6. Use Trex Company Supplied Or
-When Parking Remove Key.
Brake.
-Turn Off Key And Set Parking
-Stop On Level Surface.
5. Before Leaving Machine:
Surfaces.
4. Go Slow On Grades And Slippery
Agents.
3. Do Not Use Flammable Cleaning
Front of Forklift And Inline With Forklift.
-Unless Sweeper Is Positioned Directly In
Surface.
-Unless Machine Is On A Level
2. Do Not Raise Hopper:
-In Poorly Ventilated Areas.
OLATHE, KS 66062
-In Flammable Or Explosive Areas.
19925-A W.161ST STREET
And Understood.
GROSS WT.__________LBS.__________KG.
-Unless Operation Manual Is Read.
-Unless Trained And Authorized.
SERIAL NO.
1. Do Not Operate Machine:
MODEL NO.
FOR SAFETY
Keep Limbs
Pinch Point
Clear Of
WARNING
3
2
1
WARNING
Clear Of
Pinch Point
Keep Limbs
Keep Away
From Fan
Inlet
DECAL, FAN WARNING
WARNING
Keep Away
From Fan
Inlet
3
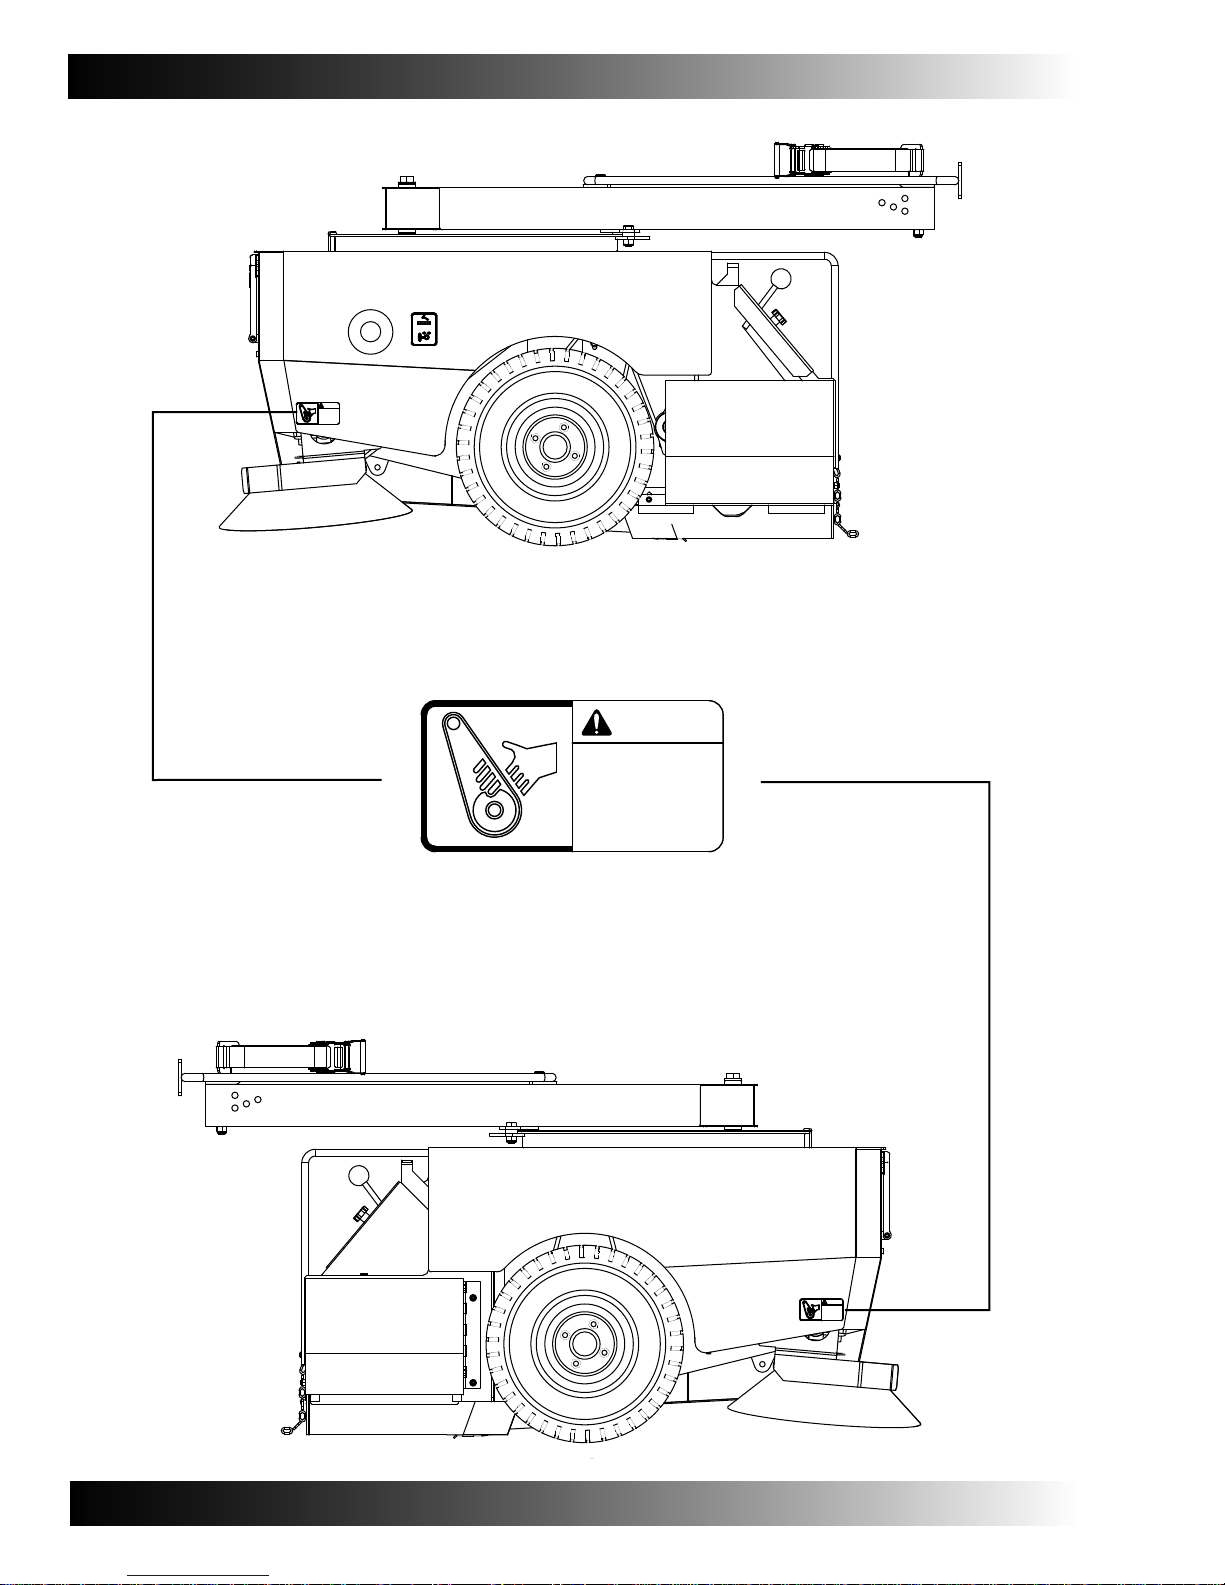
SAFETY PRECAUTIONS
WARNING
Keep Away
From
Belt Drive
90-88008
WARNING
Keep Away
From
Belt Drive
DECAL, BELT WARNING
WARNING
Keep Away
From
Belt Drive
4
WARNING
Stay Clear
Of Hopper
SAFETY PRECAUTIONS
DECAL, HOPPER WARNING
WARNING
Keep Away
From
Belt Drive
DECAL, BELT WARNING
WARNING
Stay Clear
Of Hopper
90-88006
WARNING
Keep Away
From
Belt Drive
WARNING
Keep Away
From
Belt Drive
WARNING
Stay Clear
Of Hopper
DECAL, HOPPER WARNING
90-88006
WARNING
Stay Clear
Of Hopper
WARNING
Keep Away
From
Belt Drive
DECAL, BELT WARNING
5
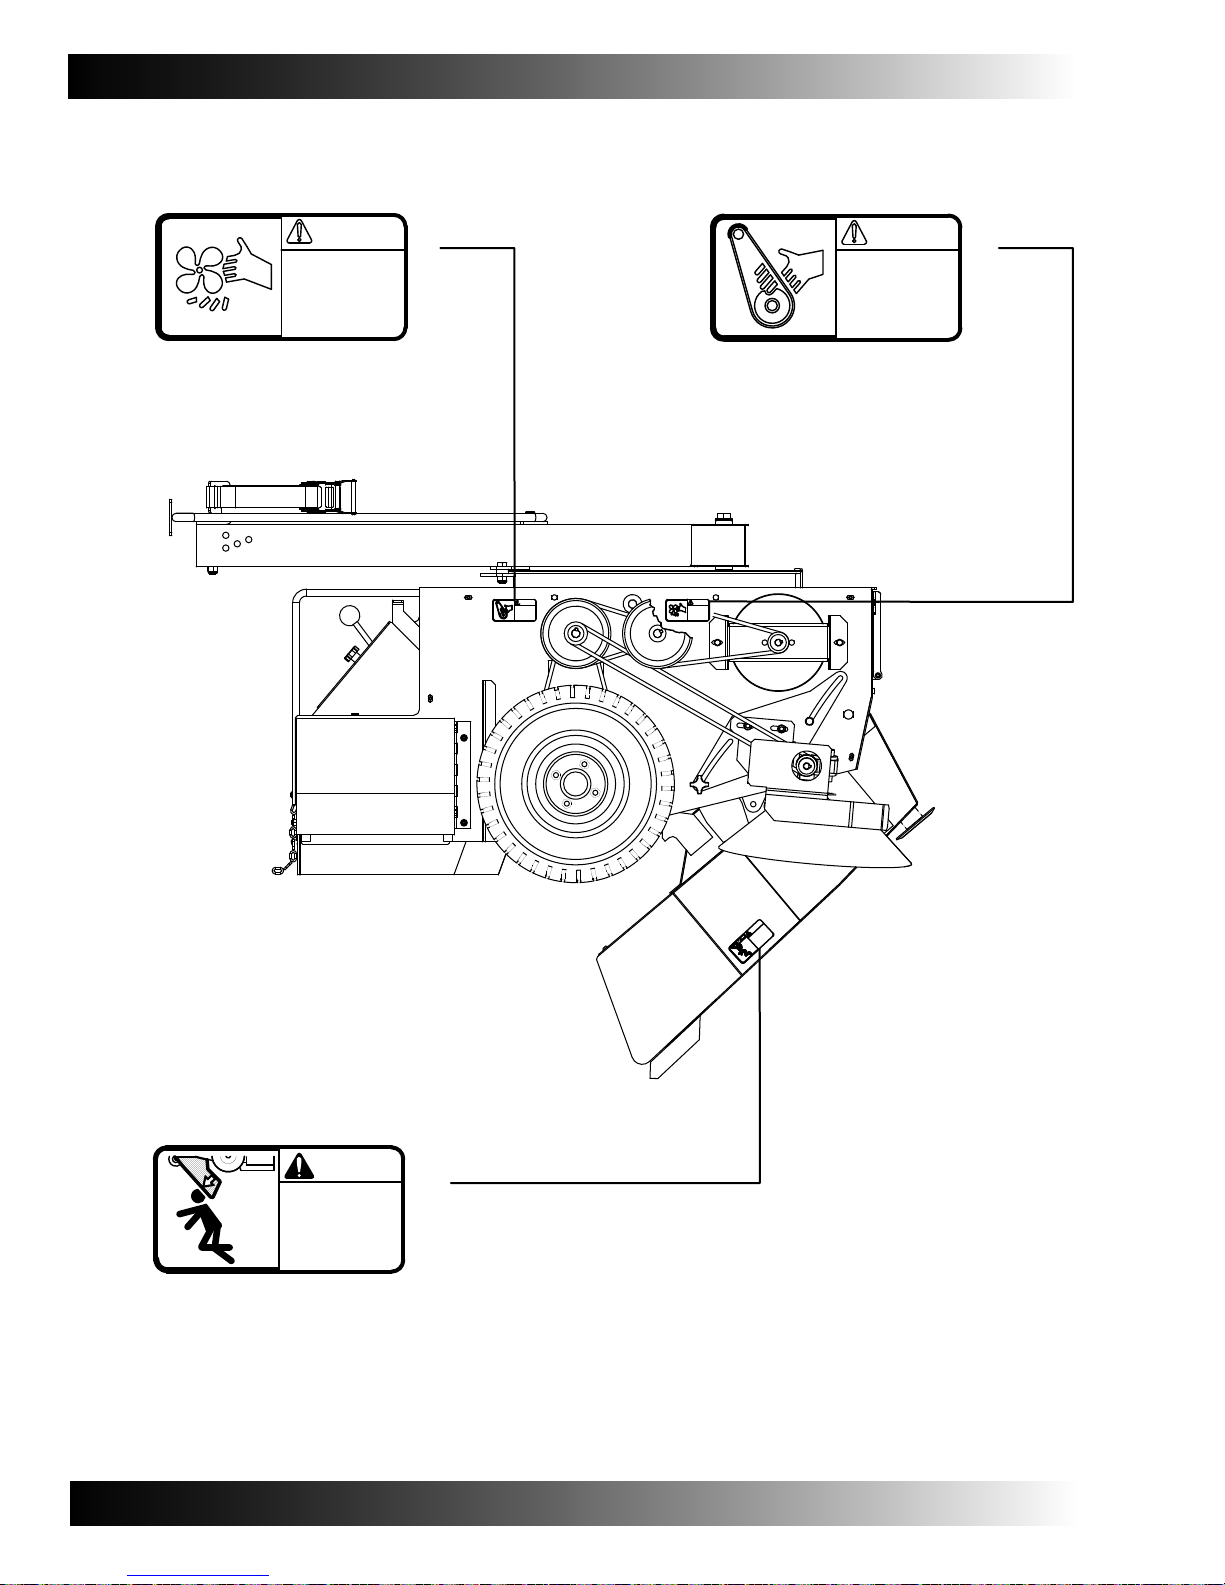
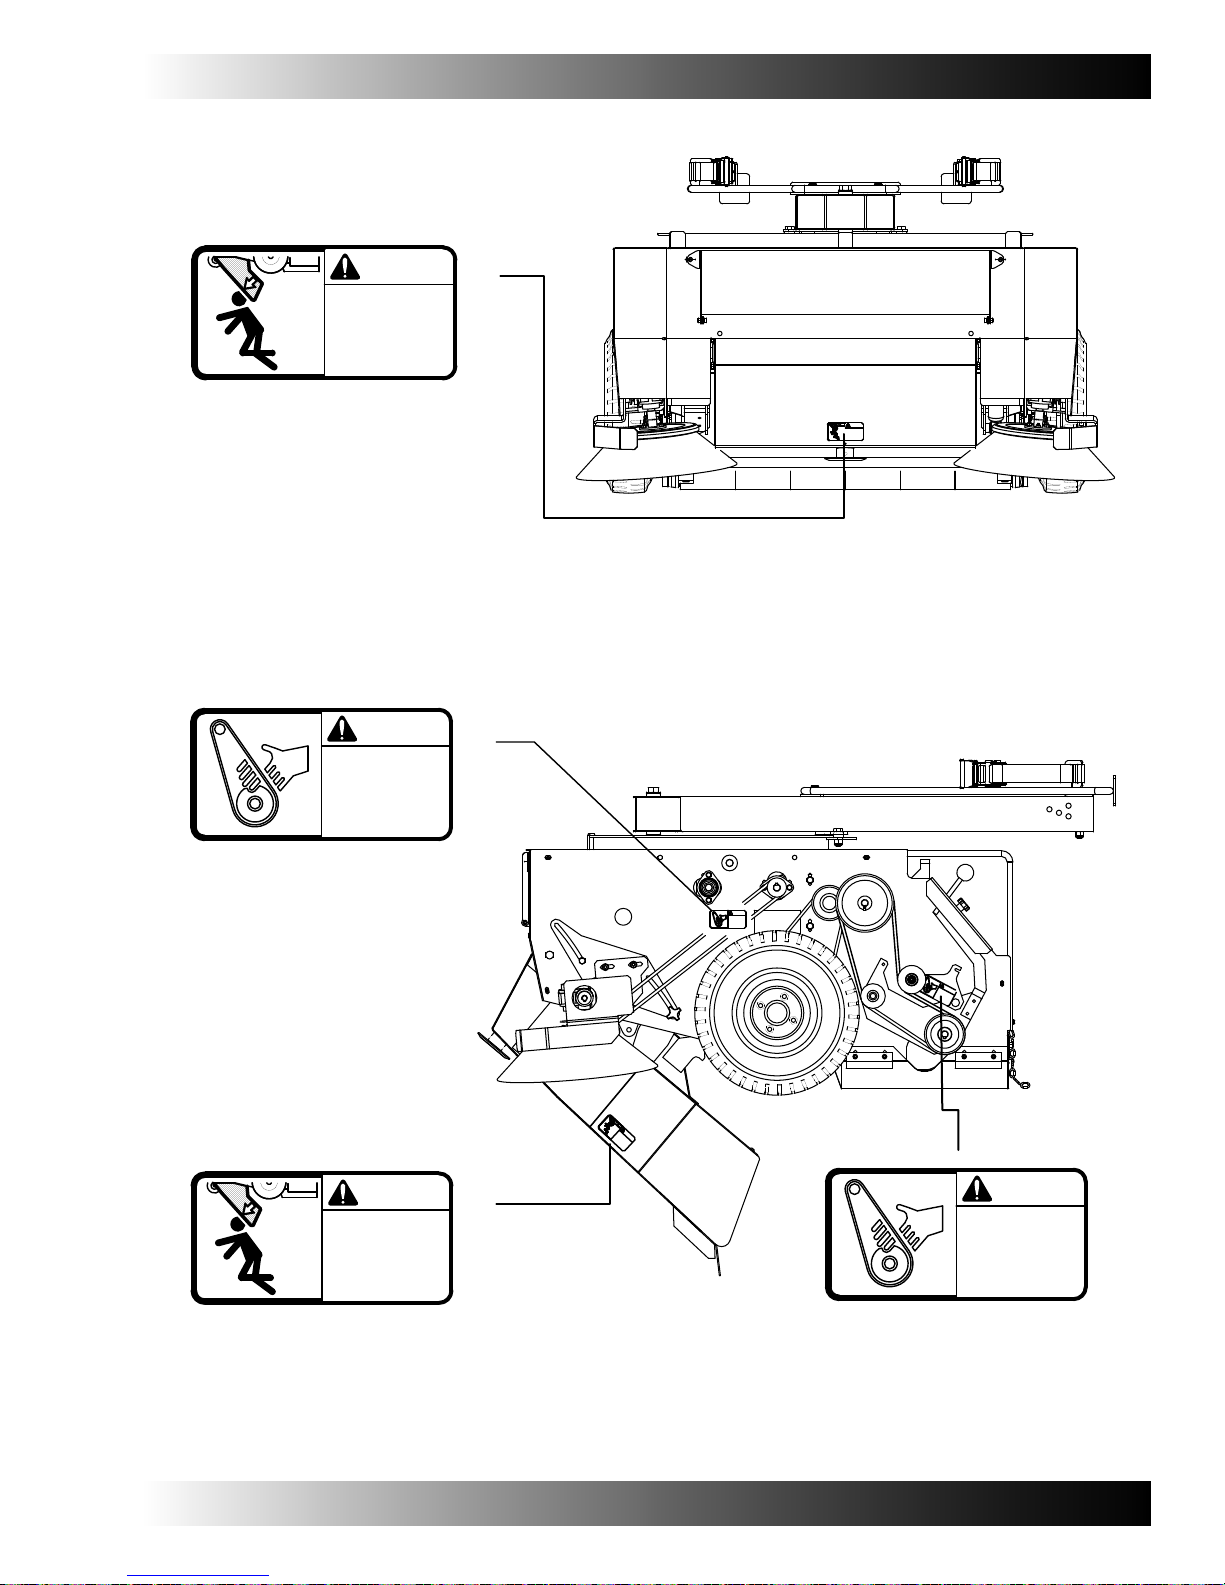
SAFETY PRECAUTIONS
WARNING
Keep Away
From Fan
Inlet
DECAL, FAN WARNING
WARNING
Keep Away
From
Belt Drive
DECAL, BELT WARNING
WARNING
Keep Away
From
Belt Drive
WARNING
Keep Away
From Fan
Inlet
WARNING
Stay Clear
Of Hopper
DECAL, HOPPER WARNING
WARNING
Stay Clear
Of Hopper
90-88006
6
OPERATOR RESPONSIBILITY
The operator’s responsibility is to oversee
daily maintenance and checkups of the
machine to ensure safe and effective
mechanical operation. The operator
is expected to inform service personnel
when required maintenance schedules
occur as stated in the MAINTENANCE
section of this operators manual.
Read manual carefully before operating
this equipment.
FOR SAFETY: Do not operate machine,
unless operation manual is read and
understood.
OPERATION
Check the machine for shipping damage.
Check to make sure machine is complete
per shipping instructions.
Keep you machine regularly maintained by
following the maintenance information in this
manual. We recommend taking advantage of
a regularly scheduled service contact from
your authorized dealer.
Order parts and supplies directly from your
authorized representative. Use the parts
manual provided when ordering parts.
7
OPERATION
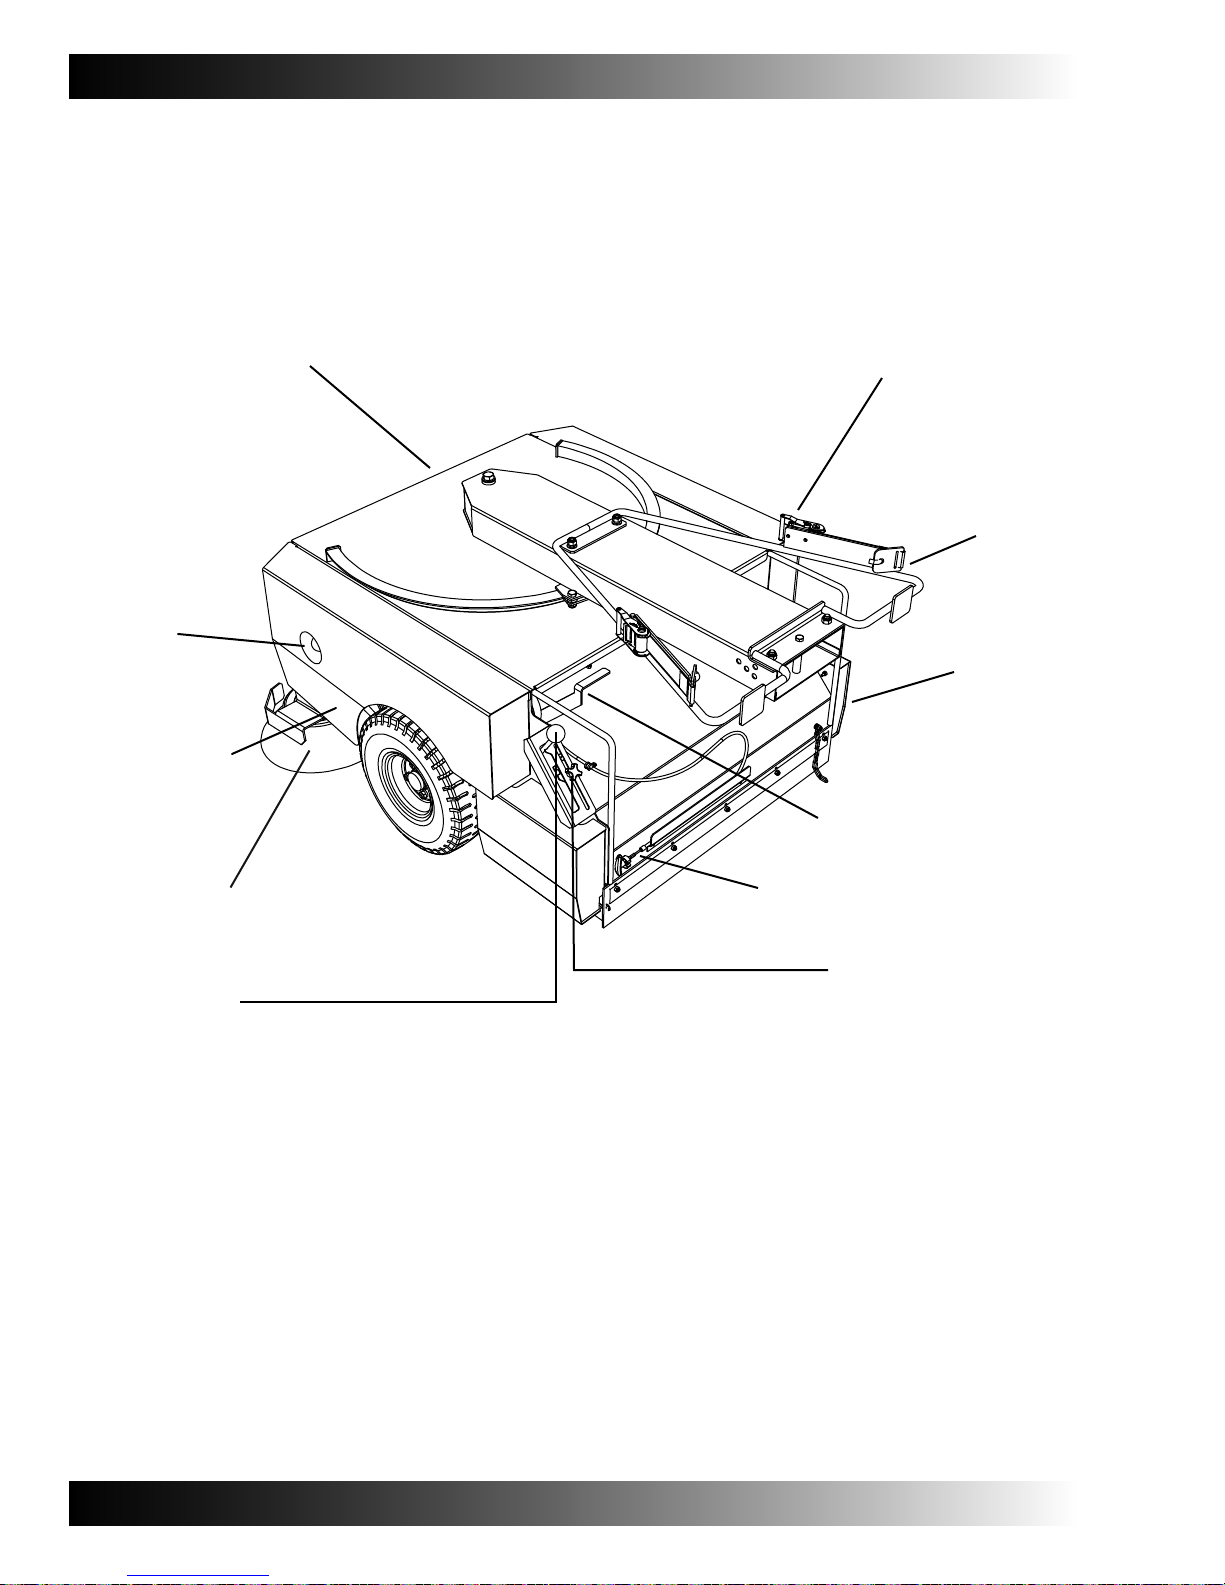
&),4%2!##%33$//2
&),4%2
3(!+%2
3)$%
"2//-
!$*534-%.4
+./"
3)$%"2//-
2%4!).).'
342!02!4#(%4
2%4!).).'
342!0
MAIN
BROOM
DOOR
(/00%2,!4#(,%6%2
(/00%22%,%!3%4(!.$,%
-!)."2//,)&4,%6%2
8
-!)."2//-,%6%2
34/0!33%-",9

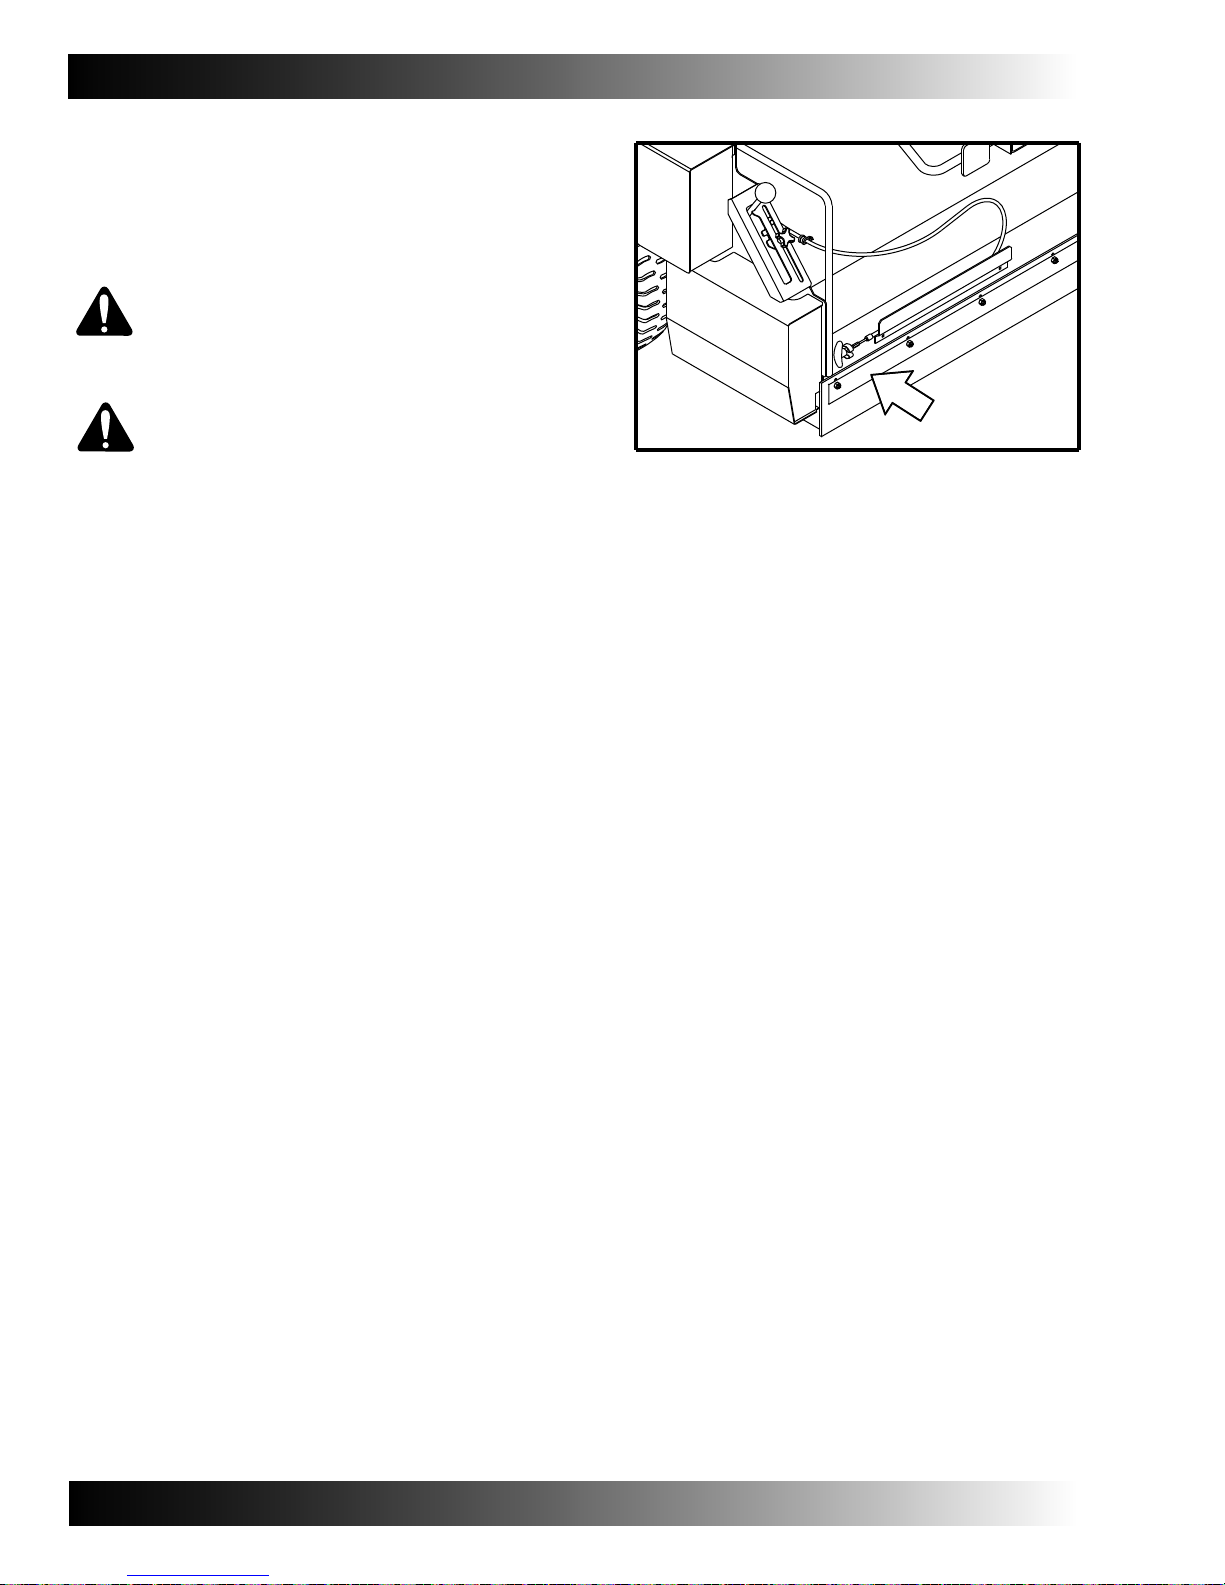
ATTACHING THE SWEEPER TO THE FORKLIFT
NOTE: Do not use this sweeper on forklifts
with forks that are more than 1219mm
(48 in.) long.
FOR SAFETY: When not in use, the
sweeper must be stored on a flat, level
surface. The wheels must be chocked to
prevent movement of the sweeper.
NOTE: If the sweeper is being installed on
a different forklift than the forklift previously
used, reposition the horizontal pin into the
highest hole in the mounting tube as shown.
1. The forklift forks must be centered
and positioned with approximately a
25mm (1 in.) space between the forks.
2. Position and level the forks so that they
are in line with the inlet of the sweeper
mounting tube.
OPERATION
3. Drive the forklift slowly forward so that
the forks slide easily into the sweeper
mounting tube. If there is any resistance
when sliding the forks into the tube, or
there is a tendency to push the sweeper
out of position, stop the forklift and
reposition the forks so that they slide
easily into the mounting tube.
4. Stop the forward movement of the
forklift when the two vertical plates on
the sweeper mounting tube contact the
fork mounting rack of the forklift.
5. Lower forks until they lay flat on the
bottom of the sweeper mounting tube.
FOR SAFETY: Before leaving the forklift,
stop on a level surface, set the forklift
parking brake, turn off the forklift and
remove the key.
6. Position the horizontal pin into the lowest
hole possible, above the forklift forks as
shown. If the pin does not slide easily
over the forks, use the next higher hole
position. Lock pin in position by inserting
hair spring pins.
9

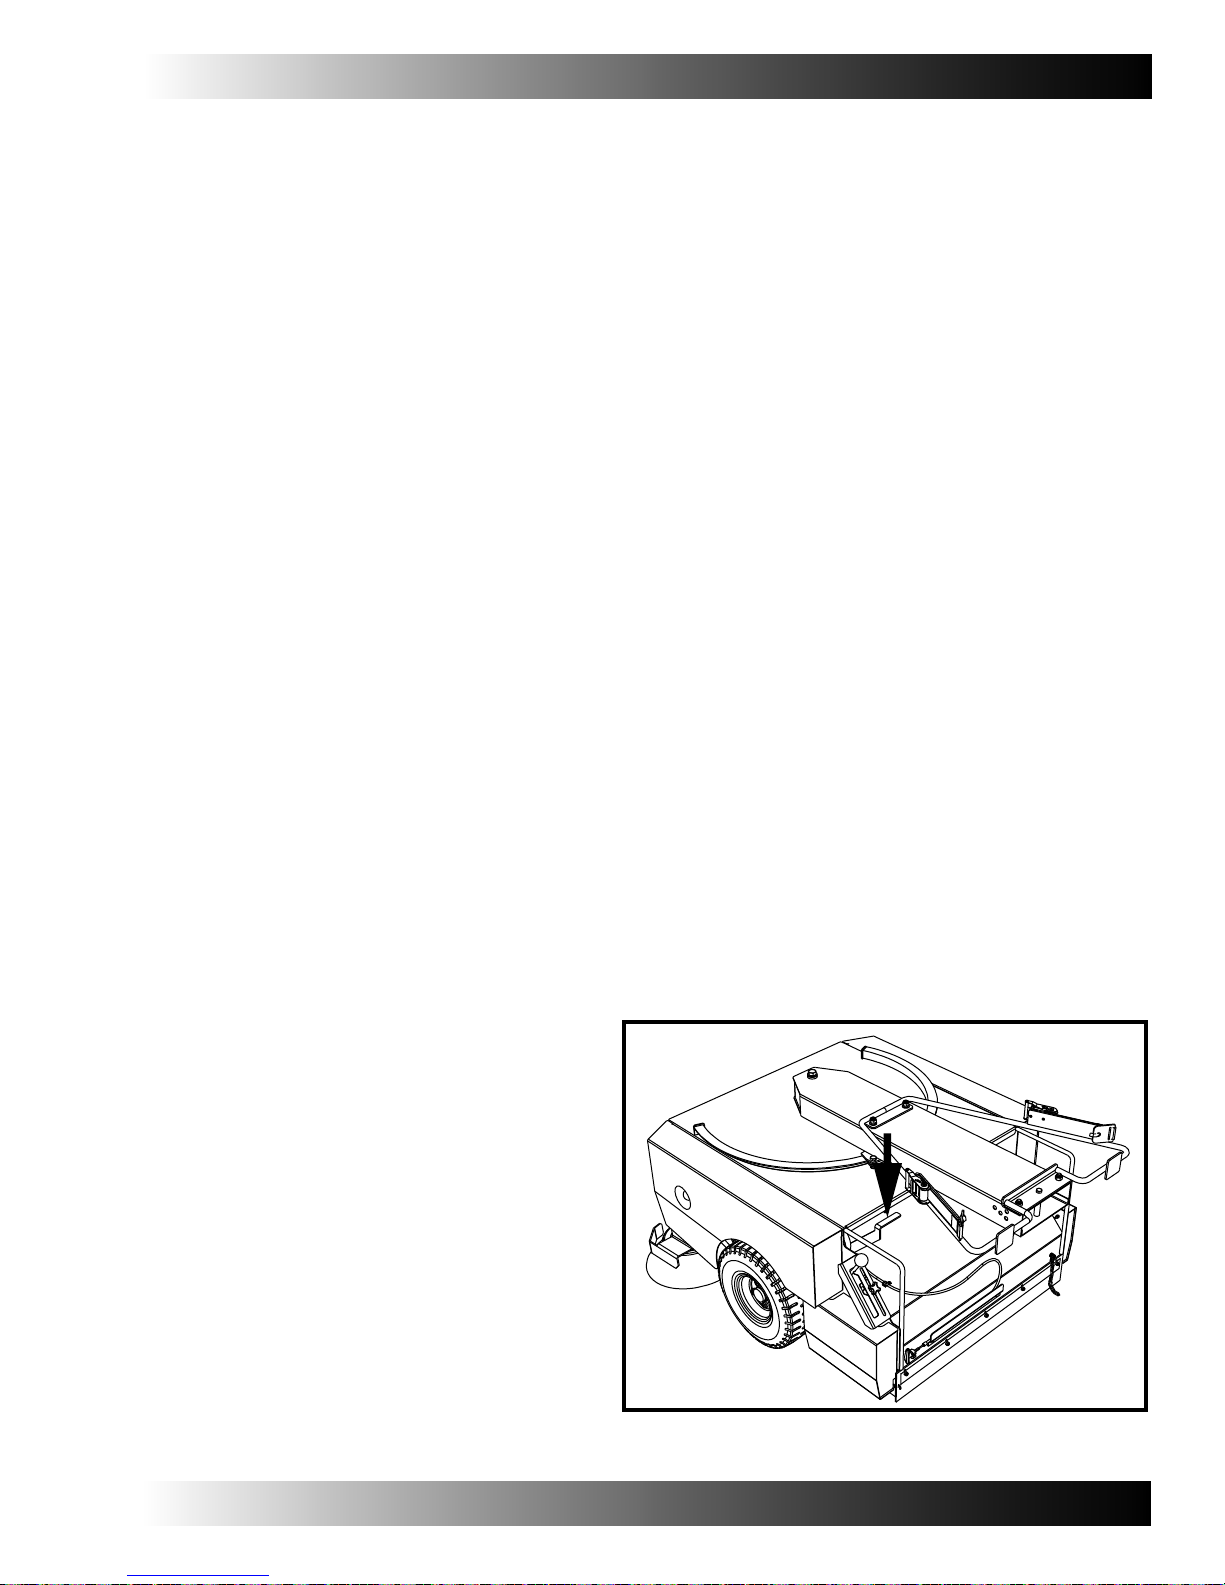
OPERATION
7. Be sure that the two vertical plates on the
sweeper mounting tube are in contact
with the fork mounting rack of the forklift.
8. Perform the following steps using both
mounting straps.
9. Fully open the ratchet handle, as shown,
to unlock the restraining strap.
10. Pull out a short length of the strap.
Note: Pulling out an excessive amount of
strap may result in the strap coming off
of the ratchet drum. To reattach the strap
onto the ratchet drum, thread the free end
of the strap through, then one inch past
the slot in the ratchet drum. Be sure that
the free end of the strap remains one inch
past the drum as you operate the ratchet
handle. Continue until the strap makes at
least one full wrap around the drum.
11. Wrap the strap around the forklift fork
mounting rack as shown and hook the
metal strap end onto the retaining pin.
12. Operate the ratchet handles to tighten
the restraining strap. Tighten the strap
until the slack is removed, then continue
tightening one more ratchet tooth (click).
Do not over tighten the straps.
13. Raise the sweeper only high enough to
clear the ground.
FOR SAFETY: Do not raise the sweeper
off of the ground unless the body of the
sweeper is in line and centered with the
fork tube.
Note: Raise the sweeper off of the ground
before driving the forklift in reverse.
Attempting to drive the forklift in reverse
with the sweeper on the ground may
result in damage to the sweeper.
10
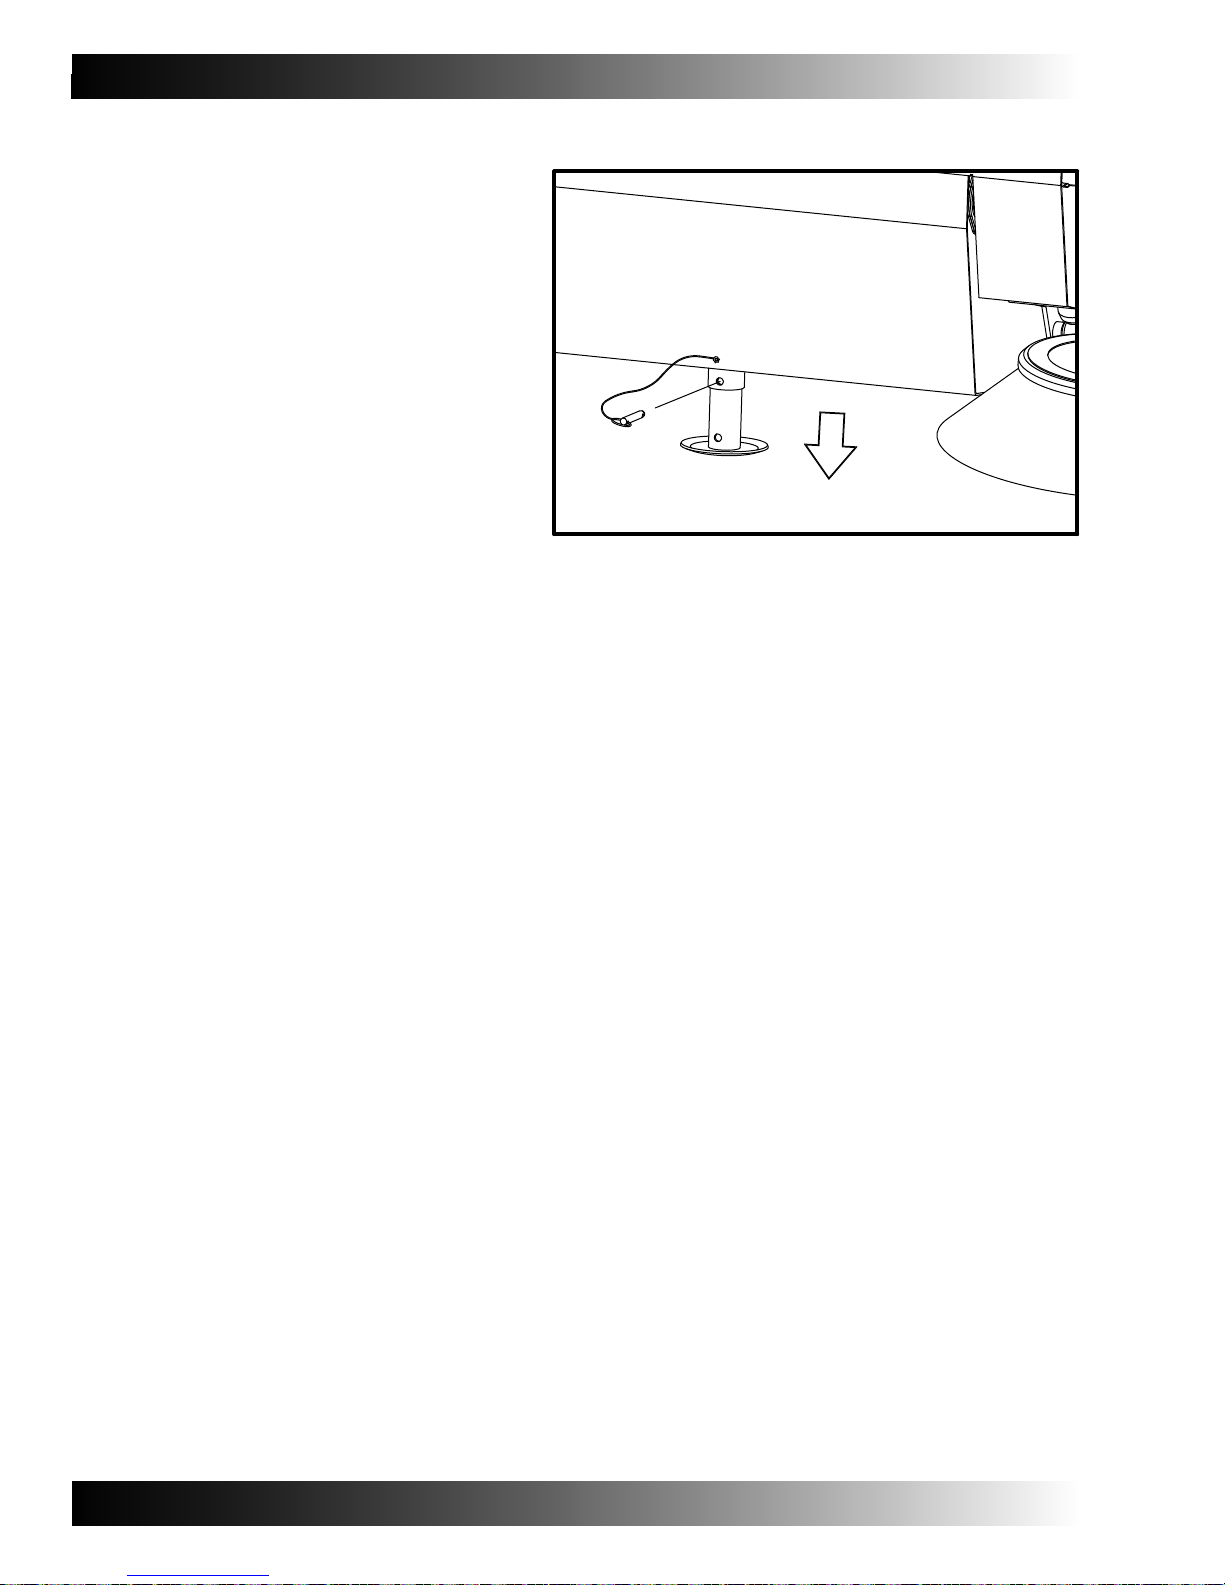
14. Remove the retaining pin from the
front support leg, raise the support
leg, and reinstall the retaining pin.
15. Drive slowly to the sweeping area.
OPERATION
11

OPERATION
GENERAL SWEEPING AND BRUSH INFORMATION
Pick up oversized debris before sweeping. Flatten or remove large boxes from aisles before
sweeping. Pick up long pieces of wire, string, twine, etc., which can become entangled in the
brooms or broom hubs.
For the most efficient operation, plan your sweeping in advance. Arrange long runs with a
minimum of stopping and starting. Move debris from areas where the sweeper cannot go, into
larger aisles ahead of time. Sweep an entire floor or section at one time. Overlap the sweeping
paths. Avoid hitting posts or scraping walls.
Avoid turning the steering wheel too sharply when the machine is in motion. The sweeper is
very responsive to the movement of the steering wheel. Avoid sudden turns, except in
emergencies.
It is not necessary to push the sweeper at high speed. The sweeper is designed to sweep with
maximum efficiency when driven at 2-3 mph, the speed of a brisk walk.
For the best sweeping results, use the correct broom type for your sweeping application. Chose
your sweeping brooms from the following list of brooms and applications:
Poly & wire 6-double row main broom
This broom is ideal for most applications. The wire bristles loosen lightly compacted debris.
The polypropylene bristles sweep general debris with excellent hopper loading.
Nylon 6-double row main broom
This broom is good for general sweeping. The nylon bristles have the longest life of the various
bristle types. This broom provides good hopper loading.
High density nylon 18-row main broom
This broom is good for heavy dust conditions on rough surfaces. This broom provides good
pick and excellent life.
Stiff poly & wire 6-row main broom
This broom is good for heavier compacted debris. The wire bristles loosen compacted debris.
The polypropylene bristles sweep general debris with excellent hopper loading.
Poly side broom
This side broom is ideal for most applications, including light to medium debris in both indoor
and outdoor applications.
Nylon side broom
A longer life, general purpose broom, recommended for rough surfaces.
12

SWEEPING
1. Raise the sweeper only high enough to
clear the ground and drive slowly to the
sweeping area.
FOR SAFETY: Do not raise the sweeper
off of the ground unless the body of the
sweeper is in line and centered with the
fork tube.
OPERATION
Note: Raise the sweeper off of the
ground before driving the forklift
in reverse. Attempting to drive the
forklift in reverse with the sweeper
on the ground may result in damage
to the sweeper.
2. Slowly lower the sweeper to the ground.
3. Tilt the forklift forks until the body of the
sweeper is level (parallel to the ground).
“QUICK LEVEL”
“Quick level” is a simple method for
leveling the sweeper. To “quick level”
the sweeper, check the positions of the
sides brooms and the rear skirt.
The side brooms should have correct
contact the ground (not lifted off the
ground or pushed into the ground).
“Quick level” allows the operator to
adjust the tilt of the sweeper, even while
sweeping, from the operator position.
#ORRECT
)NCORRECT
#ORRECT
After the initial adjustment, simply check
the rear skirt and adjust the fork height as
necessary.
4. Adjust main broom and sidebroom.
NOTE: In order for “quick level “to be effective,
the side brooms and rear skirt
must be properly adjusted.
)NCORRECT
13

OPERATION
FOR SAFETY: Before leaving the
forklift, stop on a level surface, set
the forklift parking brake, turn off
the forklift and remove the key.
5. Lower the main broom lever into the
locking slot.
6. Begin sweeping.
OPERATION ON INCLINES
Drive the sweeper slowly on inclines.
Warning: Forklift may tip over.
Do not turn the machine on
inclines. Do not drive the machine
across inclines. Drive only
straight up or straight down
inclines.
14

MAIN BROOM
The main broom sweeps debris into the
debris hopper.
Check the main broom daily for damage
or wear. Remove any debris found
tangled on the main broom or main
broom hubs.
Check the main broom daily for proper
adjustment.
For maximum life, the main broom
should be turned end-for-end after
every 50 hours of use.
The main broom should be replaced
when the bristles are worn to 50mm
(1.50 in.) in length, or when the main
broom no longer sweeps effectively
in your application.
OPERATION
ADJUSTING THE MAIN BROOM
The sweeper must be mounted to the
forklift, on the ground, and leveled.
FOR SAFETY: Before leaving the
forklift, stop on a level surface, set the
forklift parking brake, turn off the
forklift and remove the key.
1. Loosen the knob on the main broom
locking assembly. Note that the locking
assembly has two fingers that extend into
the main broom lever slot.
2. Slide the locking assembly to the bottom
of the slot.
3. Move the main broom lever from the
“broom up” top position and lower it
until the main broom contacts the floor.
4. Raise the locking assembly until the top
finger touches the main broom lever.
Tighten the knob on the locking assembly.
5. Position the main broom lever between
the two fingers of the locking assembly.
The main broom is now in the optimum
position for sweeping.
15
OPERATION
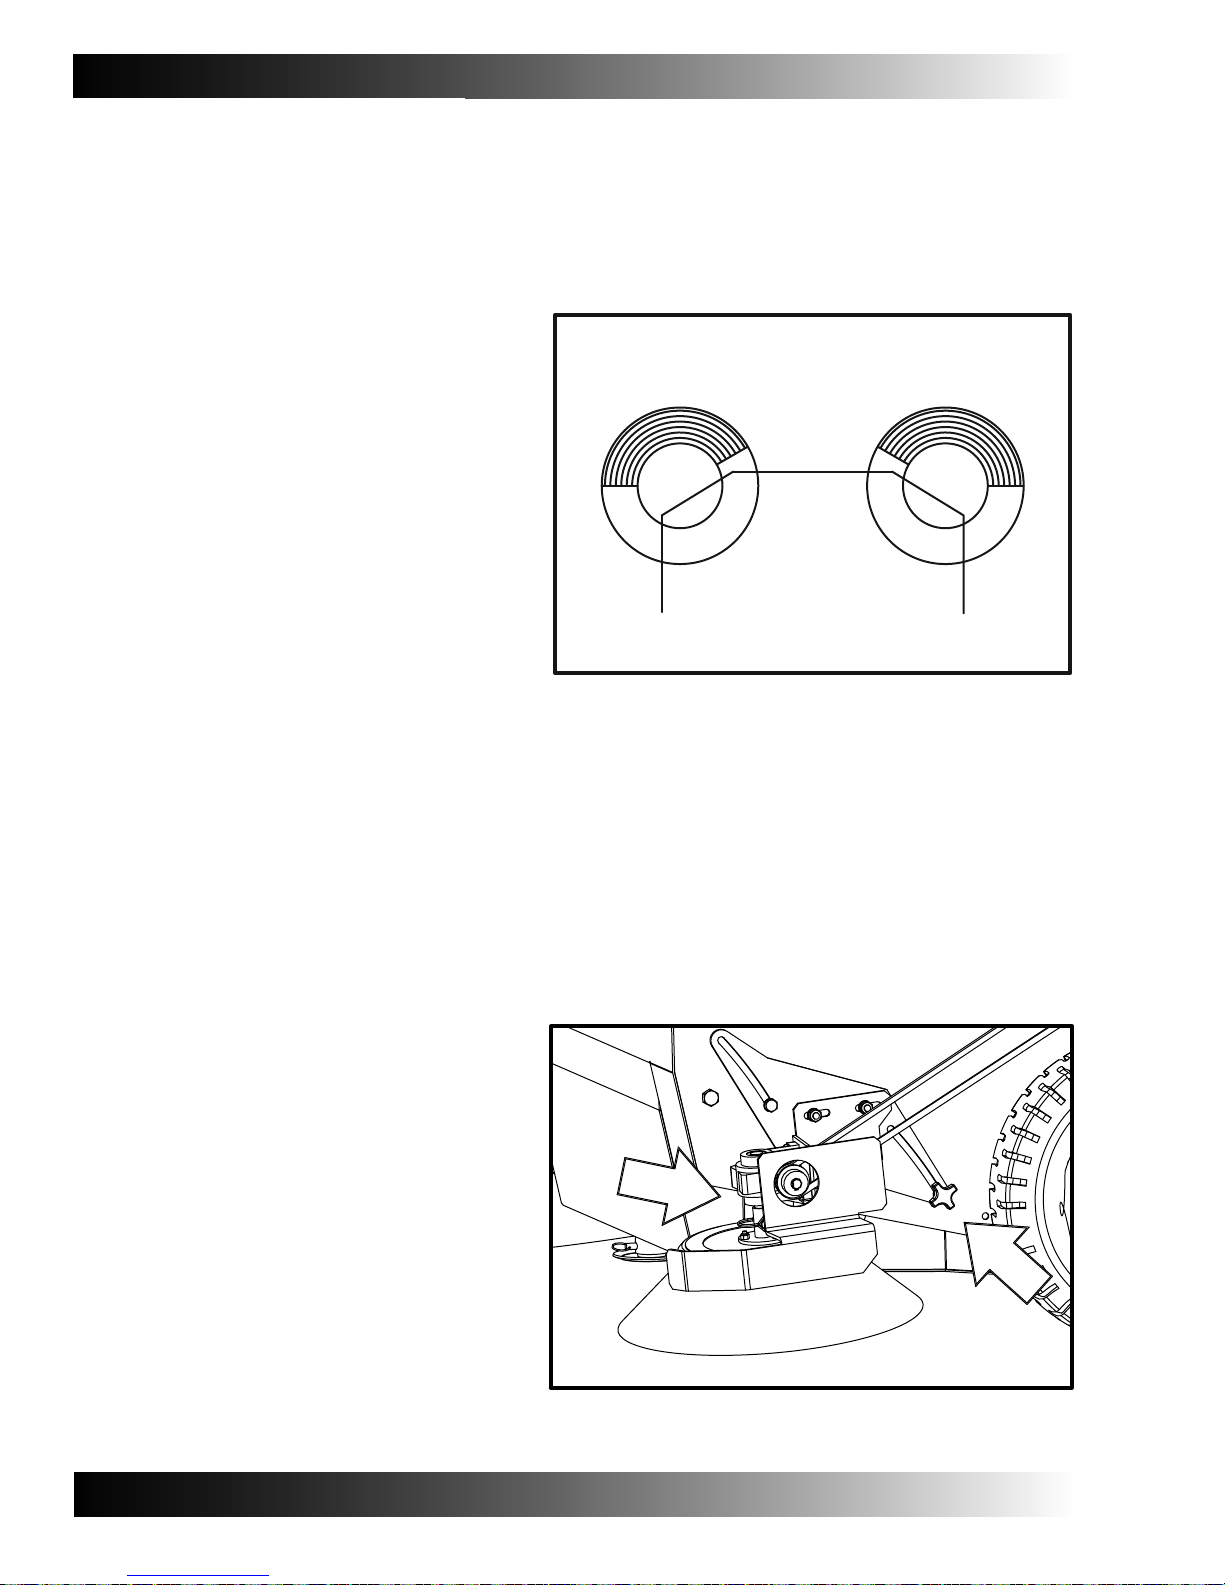
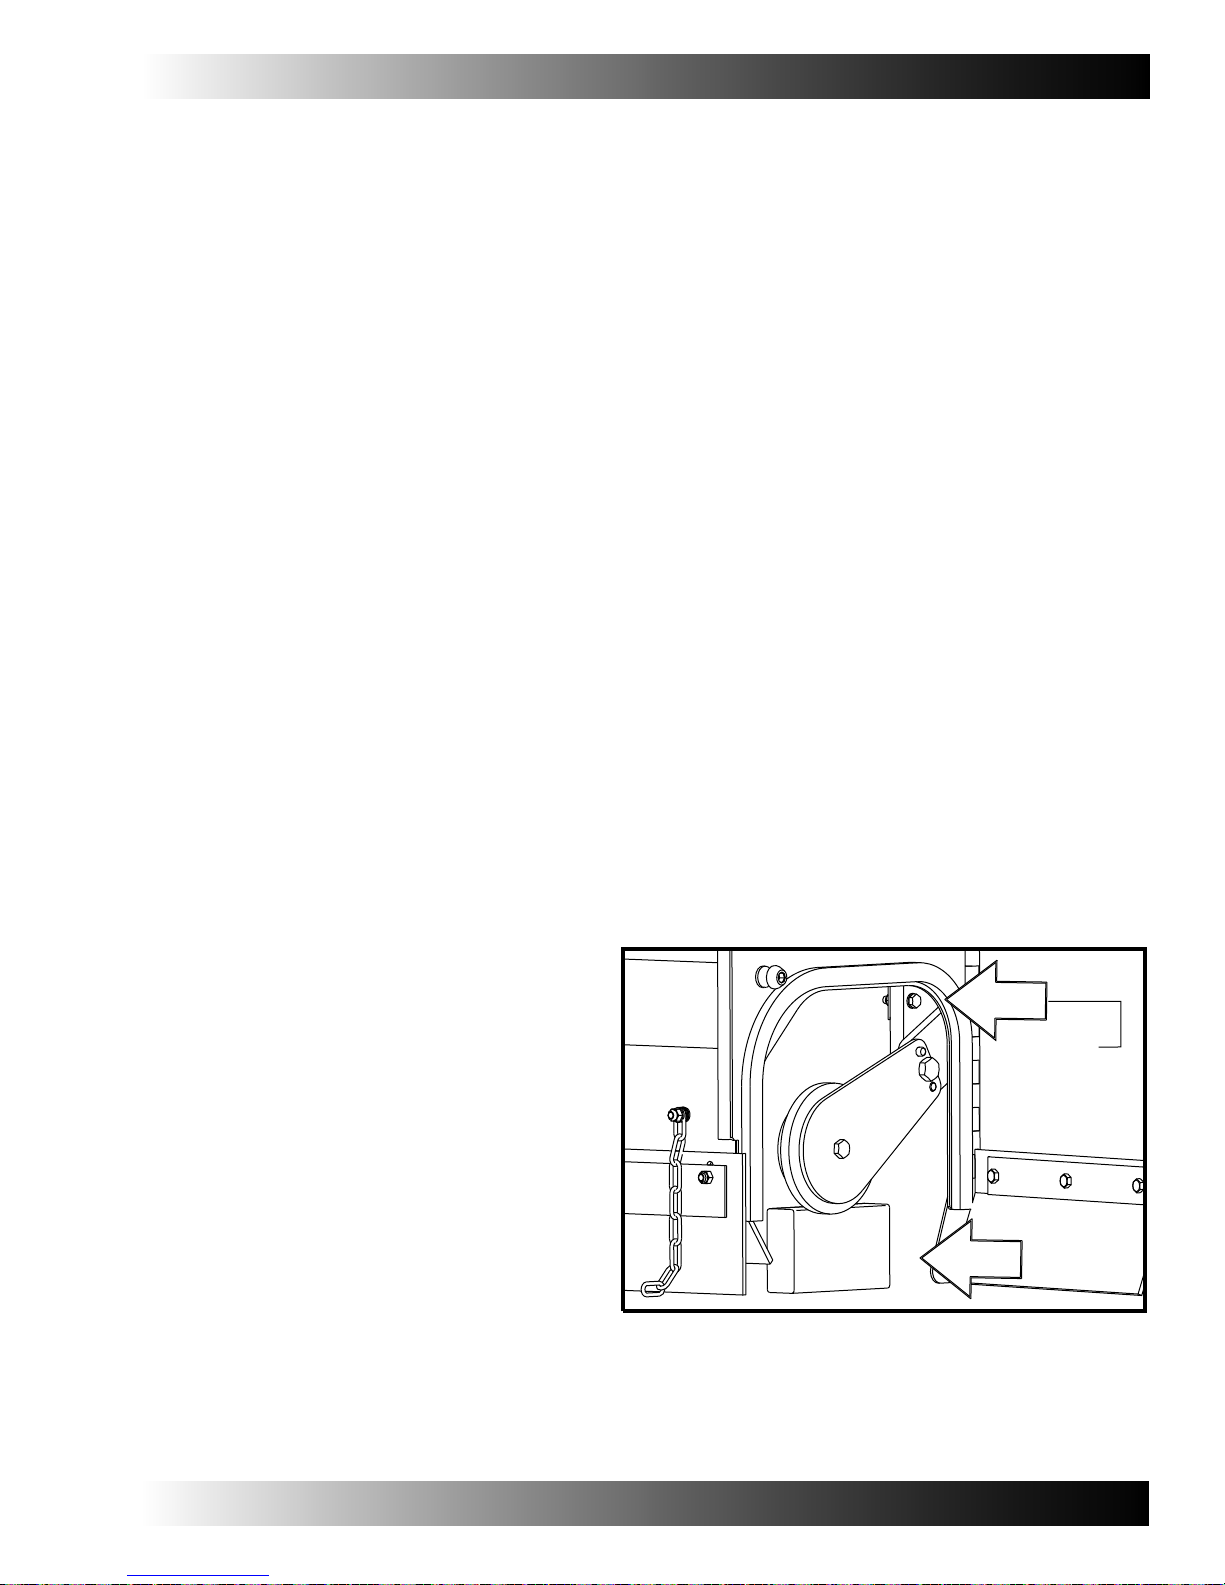
SIDE BROOMS
The side brooms move debris from the
edges of the sweeping area into the path
of the main broom.
Check the side brooms daily for damage
or wear. Remove any debris found tangled
on the side brooms or side broom drive hubs.
Check the side brooms daily for proper
adjustment. The right side broom should
contact the floor from a 10 o’clock to
3 o’clock pattern. The left side broom
should contact the floor from a
9 o’clock to 2 o’clock pattern.
For maximum life, the side brooms should
be swapped (from one side to the other)
after every 50 hours of use.
The side brooms should be replaced when
the bristles are too short to sweep effectively
in your application.
ADJUSTING THE SIDE BROOM
The sweeper must be mounted to the
forklift, on the ground, and leveled.
FOR SAFETY: Before leaving the
forklift, stop on a level surface, set
the forklift parking brake, turn off
the forklift and remove the key.
,%&43)$%"2//-
6)%7%$&2/-!"/6%
3)$%"2//-#/.4!#47)4(4(%&,//2
2)'(43)$%"2//-
6)%7%$&2/-!"/6%
WARNING: Moving belts and pulleys.
Do not attempt to adjust the side broom
when the sweeper is in motion.
1. Loosen the side broom adjustment knob.
2. Raise or lower the side broom to the
correct position. The side broom
assembly can be easily adjusted by
grasping the front of the side broom
gearbox housing with one hand, and
the horizontal plate behind the gearbox
with the other hand. Pull up and
toward the front, or push down
and toward the rear.
3. Tighten the side broom adjustment knob.
It is not necessary to adjust the side broom
drive belt when adjusting the side broom
height.
16

EMPTYING THE HOPPER
1. Slowly move the sweeper forward until the sweeper
is positioned over the debris container or debris
dumping site.
FOR SAFETY: Do not raise the sweeper off
of the ground unless the body of the sweeper
is in line and centered with the fork tube.
OPERATION
FOR SAFETY: When using machine,
Make sure adequate clearance is available
before raising sweeper.
2. Pull and Push the filter shaker knob
to clean the hopper dust filter. Return
the knob to the full-in storage position.
FOR SAFETY: Before leaving the
forklift, stop on a level surface, set
the forklift parking brake, turn off
the forklift and remove the key.
3. Slowly raise the sweeper until the tires
of the sweeper just clear the debris
container, or, if there is no container,
raise the sweeper until the bottom of
the sweeper is approximately 1meter
(three ft.) above the debris dumping site.
#/22%#4
).#/22%#4
17
OPERATION
4. Dismount the forklift.
FOR SAFETY: Before leaving the forklift,
stop on a level surface, set the forklift parking
brake, turn off the forklift and remove the key.
WARNING: Moving hopper may cause
injury or death. Be sure that the area
under and around the hopper is clear
before emptying the hopper.
WARNING: Hopper may fall. Do not
go under raised sweeper.
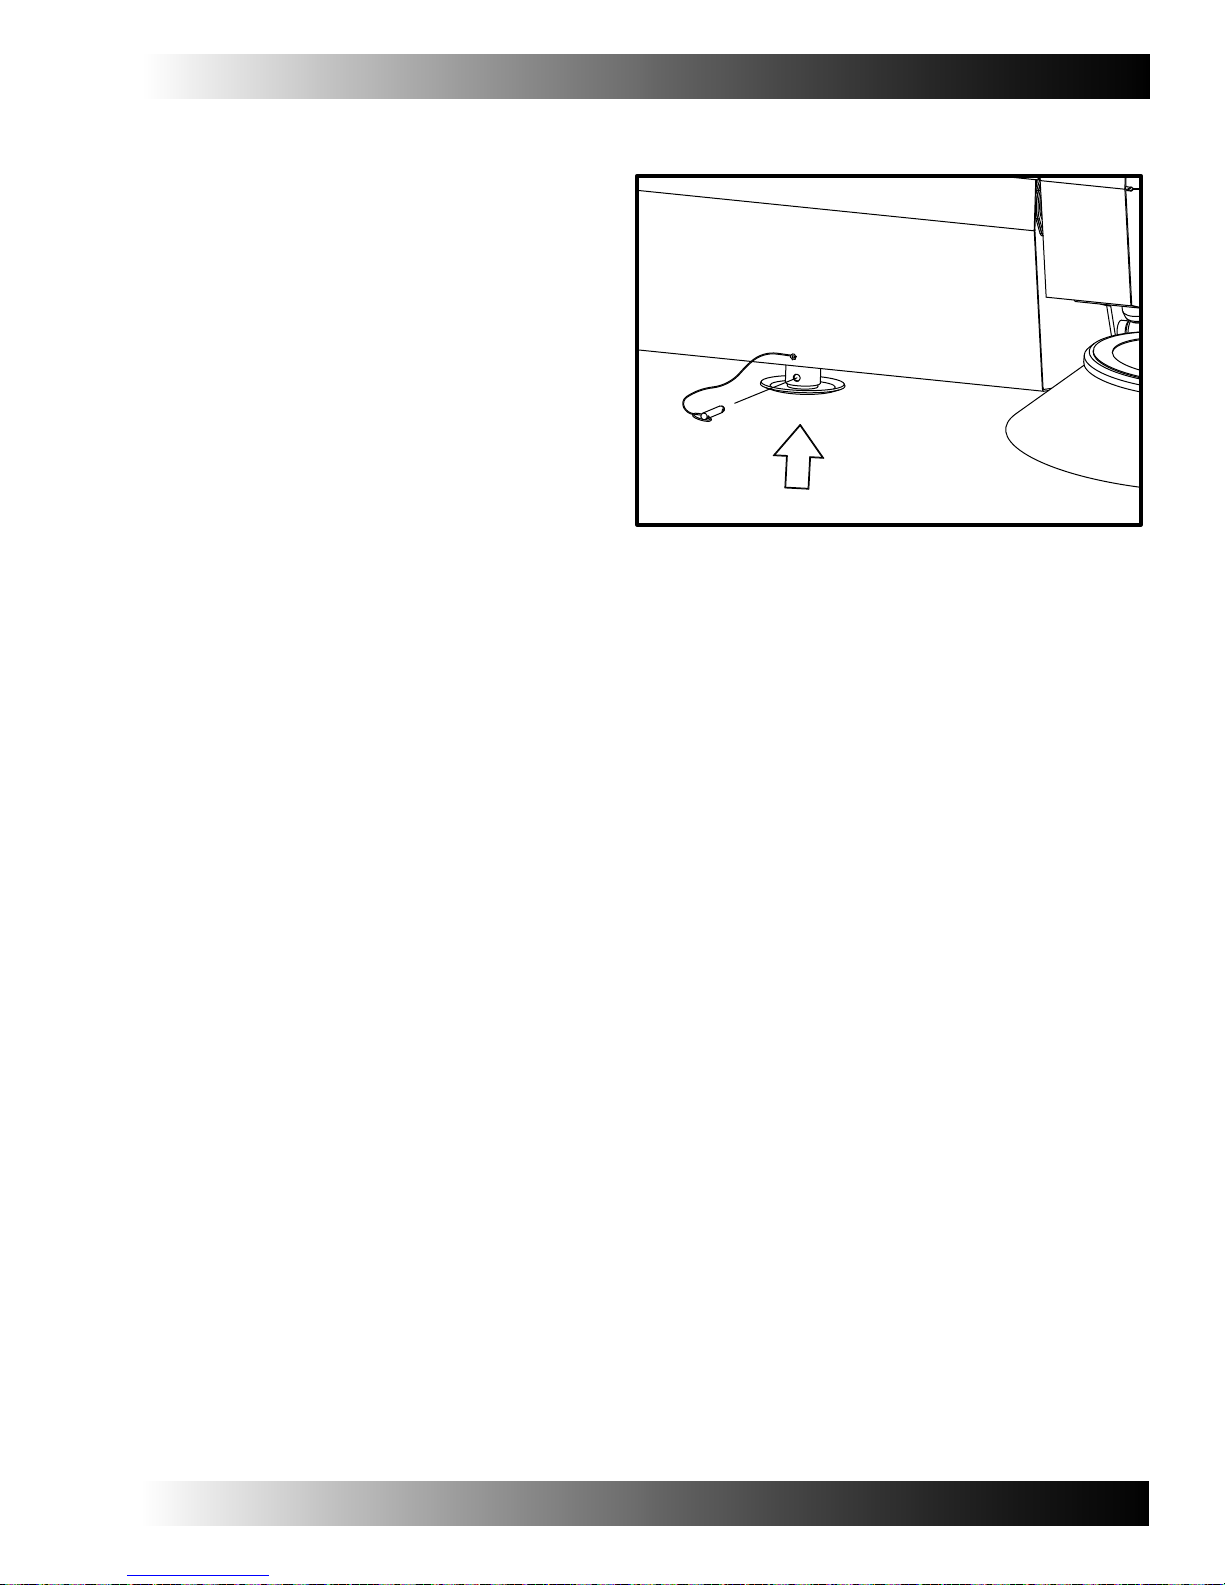
5. Remove the hopper release T-Handle from the
retaining clip, and lift the release cable from
the channel.
6. Stand clear of the sweeper.
7. Release the hopper by pulling the T-handle of the
hopper release cable.
18
8. Place the release cable into the channel,
and replace the hopper release T-handle
into its retaining clip.
9. Raise the sweeper enough so that the
lowered hopper will clear the top of
the debris container.
10. Slowly back the sweeper away from
the debris dumping site.
FOR SAFETY: When using machine,
use care when driving in reverse.
11. Slowly lower the sweeper until the
low end of the hopper is approximately
30.5cm (12 in) above the ground.
12. While slowly moving the sweeper
forward, lower the sweeper the
remaining distance to the ground.
OPERATION
NOTE: Failure to move the forklift
forward while lowering the hopper
may cause damage to the hopper lip
skirts.
13. Dismount the forklift.
FOR SAFETY: Before leaving the
forklift, stop on a level surface, set
the forklift parking brake, turn off
the forklift and remove the key.
14. Push down the hopper latch lever until
the hopper locks into the “sweeping”
position.
19
OPERATION
REMOVING THE SWEEPER FROM THE FORKLIFT
1. Remove the retaining pin from the front
support leg, lower the support leg, and
reinstall the retaining pin.
2. Position the raised sweeper over the sweeper
storage location.
FOR SAFETY: When not in use, the
sweeper must be stored on a flat, level
surface. The wheels must be chocked
to prevent movement of the sweeper.
3. Slowly lower the sweeper to the ground.
FOR SAFETY: Before leaving the
forklift, stop on a level surface, set the
forklift parking brake, turn off the
forklift and remove the key.
Perform the following steps with both
mounting straps.
4. Fully open the ratchet handle, as shown,
to unlock the restraining strap.
5. Loosen the strap and remove the metal
strap end from the retaining pin.
6. Disconnect the strap from the forklift fork
mounting rack.
7. Store the retaining strap by hooking the
metal strap end onto the retaining pin.
8. Operate the ratchet handles to tighten the
restraining strap. Tighten the strap until the
slack is removed.
Do not over tighten the straps.
9. Drive the forklift slowly backwards so that
the forks slide easily out of the sweeper
mounting tube. If there is any resistance
when sliding the forks out of the tube, or
there is a tendency to pull the sweeper out of
position, stop the forklift and reposition the
forks so that they slide easily out of the
mounting tube.
FOR SAFETY: Before leaving the
forklift, stop on a level surface, set the
forklift parking brake, turn off the forklift
and remove the key.
20

10. Chock the sweeper tires to prevent
movement of the sweeper.
11. Raise the main broom lever into the
“broom up” (top) position. This will
raise the main broom off of the floor,
and prevent flat spots from forming
on the main broom.
OPERATION
21

OPERATION
SWEEPER TROUBLESHOOTING
Problem
Poor Sweeping Performance
Cause
Worn Broom(s)
Main and side brooms
adjusted properly
Main broom drive failure
Side broom drive failure
Debris wound around
main broom hub(s)
Hopper full
Skirts or seals out of
adjustment, worn or
damaged
Wrong sweeping broom
Remedy
Replace Broom(s)
Adjust main and side
brooms
Check and replace faulty
belt(s) or gearbox
Check and replace faulty
belt(s) or gearbox
Free main broom hub(s)
of debris
Empty hopper
Replace or adjust
skirts or seals
Contact dealer
Representative
Excessive Dusting
Side brooms stirring up
dust
Hopper dust filter
clogged
Hopper dust filter
incorrectly installed
Hopper dust filter not
shaking clean
Vacuum impeller failure
Skirts or seals out of
adjustment, worn or
damaged
Filter access door partialy
or completely open
Raise or remove side
brooms
Shake and/or clean or
replace dust filter
Install dust filter inside
all three filter locators
Remove dust filter and
clean by hand - replace
filter shaker wipers if worn
Check and replace faulty
belt(s)
Replace or adjust skirts
or seals
Close and latch filter access
door
22

REPLACING THE MAIN BROOM
1. When replacing the main broom, raise
the main broom lever into the “broom up”
(top) position. When rotating the broom
end-for-end, leave the locking assembly
in place, and lower the main broom lever
until it contacts the top edge of the
locking assembly.
2. Open the main broom door by grasping
the end of the broom door and pulling
sharply.
MAINTENANCE
3. Remove the broom mounting plate bolt.
-!)."2//-$//2
-/5.4).'0,!4%
-/5.4).'0,!4%"/,4
23

MAINTENANCE
4. Remove the broom mounting plate.
5. Grasp the broom core and pull the
broom out of the broom chamber.
6. Slide the new brush, or the existing
brush, turned end-for-end, into the
broom chamber.
7. Push the main broom onto the drive hub.
Push and rotate the broom, until it fully
engages the drive hub.
8. Replace the broom mounting plate by
lining up the two outer holes in the
mounting plate with the two pins on the
sweeper frame.
-!)."2//-
-/5.4).'0,!4%
9. Replace and tighten the broom mounting
plate bolt
10. Close the main broom door.
11. Adjust the main broom before sweeping.
24
30!#%2
",/#+
"%!2).'
",/#+
"/,43
ADJUSTING THE MAIN BROOM TAPER
Main broom taper (one end of the main
broom wears more, and so is smaller in
diameter than the other end). This can be
eliminated by adjusting the main broom
bearing blocks.
The sweeper must be on a smooth surface,
and leveled.
1. Remove the main broom.
2. Obtain two equal-size spacer blocks
and place one below the main broom
drive hub.
3. Lower the main broom lever until the
drive hub rests on the spacer block.
4. Replace the main broom mounting plate
and tighten the retaining bolt.
MAINTENANCE
5. Position the second spacer block under
the main broom idler hub.
6. If both broom hubs are in contact with
the spacer blocks then no adjustment
is required. If one of the broom hubs is
in contact with the spacer block, but
the other hub is not, an adjustment is
required.
7. Loosen the two bolts that hold the main
broom bearing block to the adjustment
bracket.
8. Move the bearing blocks up or down
until both broom hubs are in contact
with the spacer blocks.
9. Tighten the two bearing block bolts.
10. Remove the spacer blocks.
11. Reinstall the main broom.
12. Close the main broom.
13. Adjust the main broom.
25
 Loading...