

Page 1
P1
Page 2

Overview
Congratulations! On purchasing this Electronic Weather Station
with Radio Controlled Clock. The Weather Station displays indoor
and outdoor temperature and humidity, barometric pressure,
weather forecast, moon phase, time and date. When the Weather
Station is within range of a RCC signal, the time will be automatically
corrected. The Weather Station can also be used as an Alarm
Clock with two alarm settings.
A small screen on the outdoor unit displays the outdoor temperature (in °C)
and humidity.
What’s Included
Main unit
Stand for main unit
Remote Unit
P2
Page 3
P3
Page 4
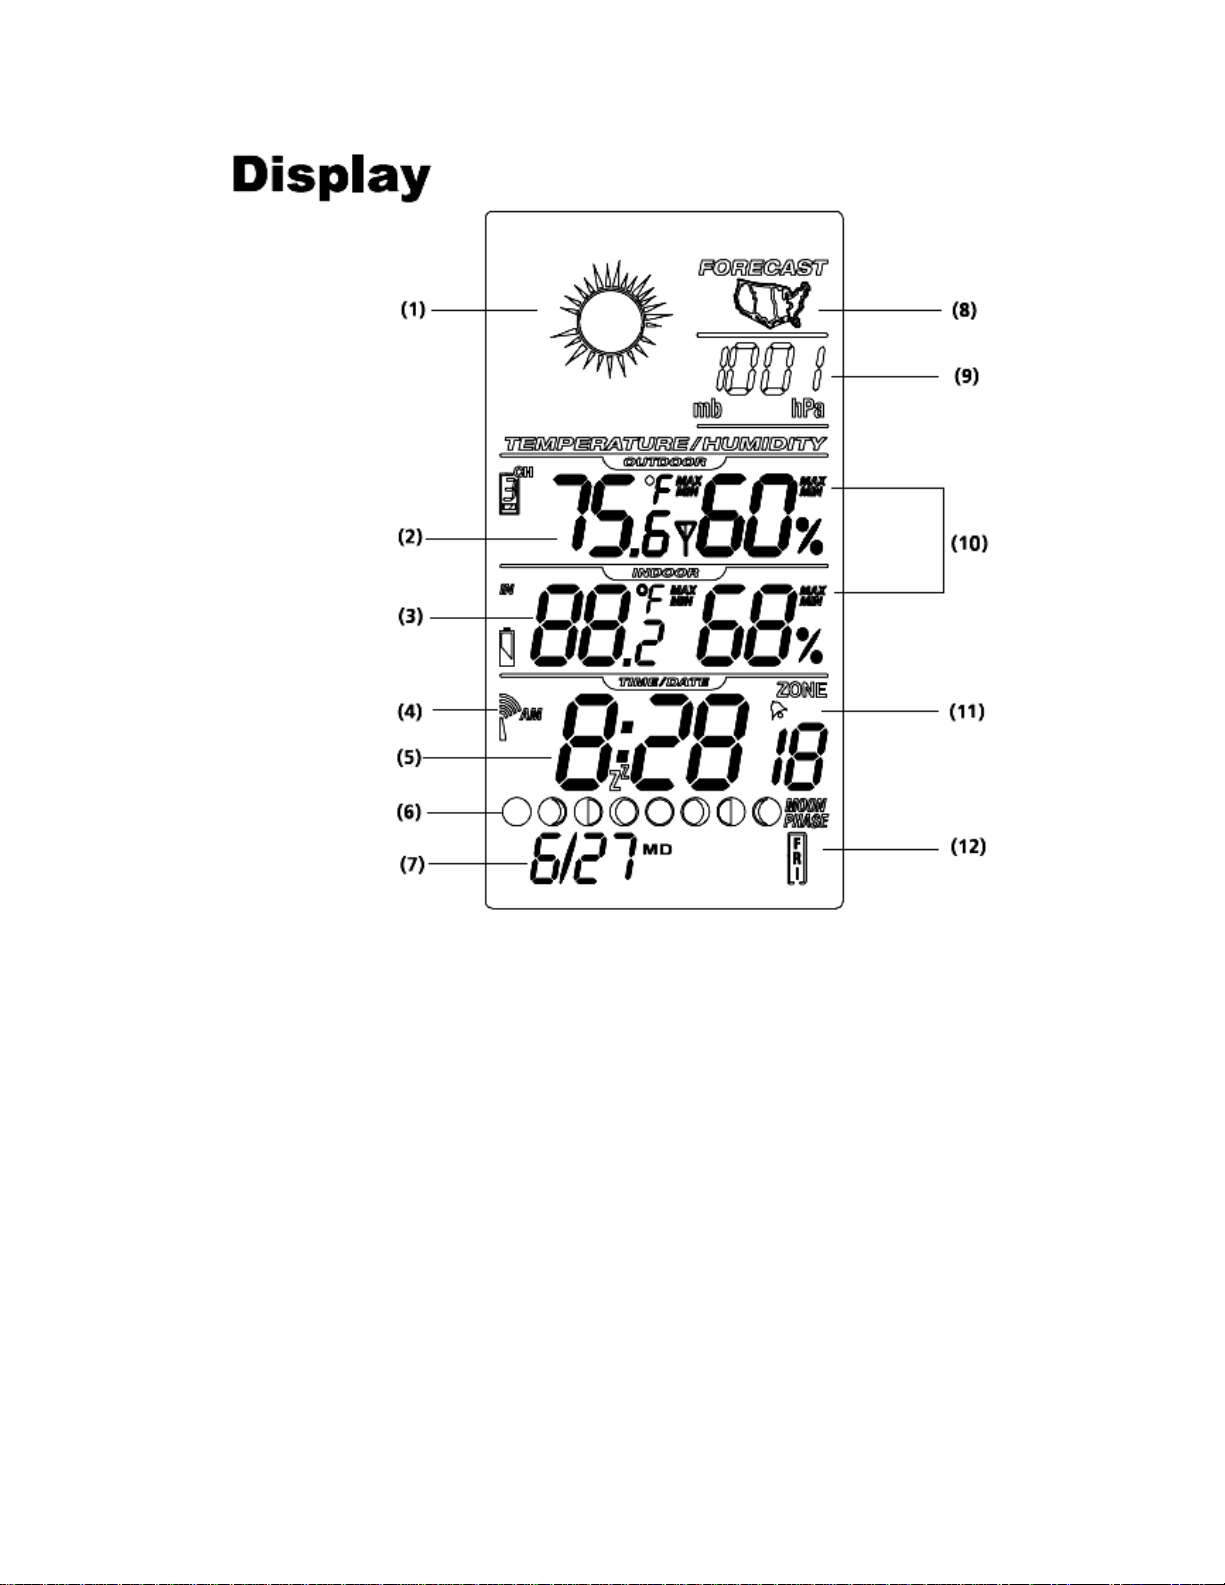
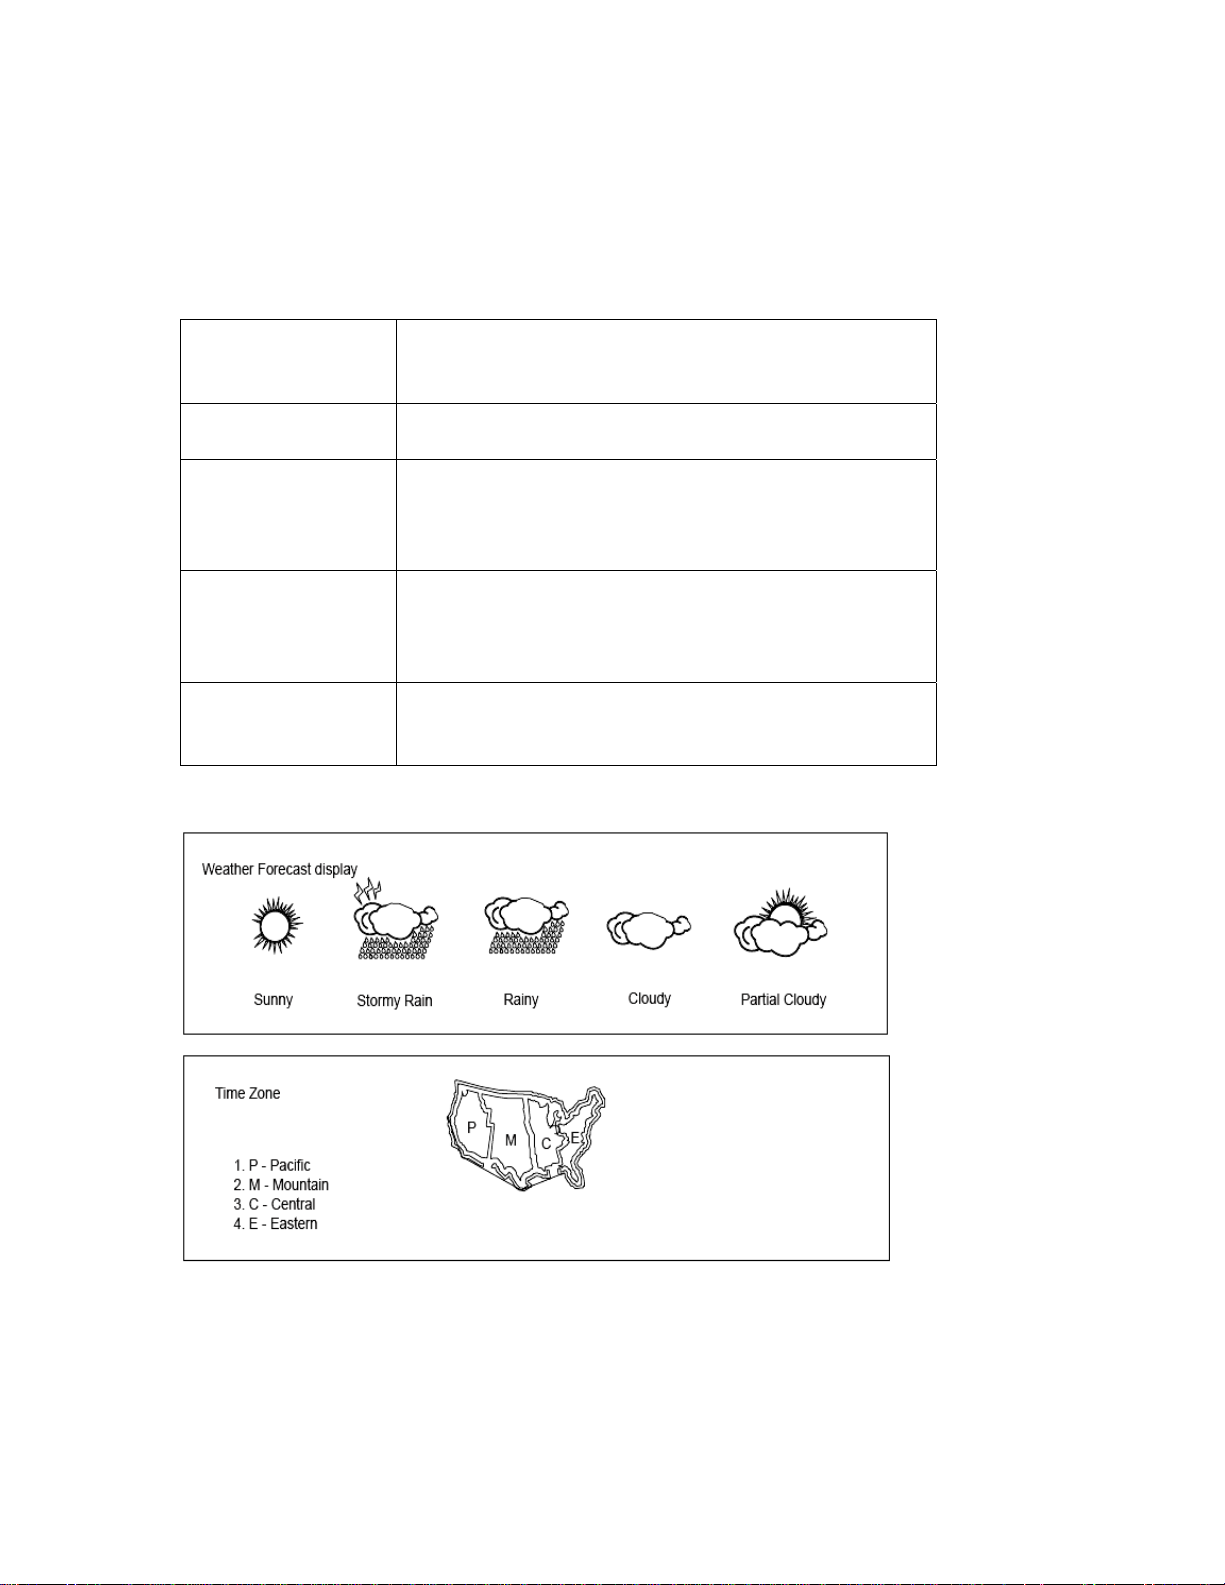
(1) Weather forecast display (partial sunny, sunny, stormy rain, rainy and cloudy)
(2) Outdoor temperature (in C/ F), outdoor relative humidity and outdoor sensor
connection status
(3) Indoor temperature (in °C/° F) and relative humidity
(4) Clock reception signal status
(5) Time display in 12 hour or 24 hour format
(6) Moon phase animated display
(7) Date display
(8) Time zone display in US
(9) Barometric pressure reading
(10) MAX/ MIN memory
(11) Alarm display
(12) Day of week display
P4
Page 5

Operation Conditions
Temperature:
Main Unit: 5 C to 45 C
Remote unit: -10 C to 50 C (-4 – 140 F)
Humidity: 30 – 90% RH
CAUTION Keep all batteries away from children.
Batteries are small objects and could be ingested.
If swallowed, contact a physician at once. Do not
open battery, dispose of in fire, or attempt to
recharge. Immediately dispose of used batteries
safely.
Please read the instruction carefully before use
Do not mix used and new batteries for operation
Modification is not approved by the party responsible
for compliance could void user’s authority to
operate the equipment.
Care & Maintenance
Clean the unit with the dry cloth only. Don’t use
the detergent or corrosive substance to clean the
unit. Don’t immerse the unit into water.
P5
Page 6

Setting Up
Setting up your Weather Station
This Weather Station has an indoor display unit and an
remote unit. The two units are linked wirelessly
with a maximum clear line-of-sight range of approximately
25 meters. Walls and electrical wiring may reduce this
range. The signal between the two units is encoded to
avoid interference with other Weather Station operating
nearby. Please follow the instructions to wirelessly link the
two parts of your Weather Station together.
The main unit requires 3 x AA batteries and the remote
unit requires 2 x AAA batteries (batteries not included). The
battery compartments are found on the back of each of the
units, the battery compartment on the remote unit is
secured with four screws.
Fit the batteries to the indoor unit first, then immediately fit
the batteries to the remote unit. The indoor unit will initially
show “ - - “ flashing in the outdoor temperature and humidity
display area. The Weather Station will connect with the
remote unit within a few minutes and the temperature will
be displayed in the place of the “ - -“.
If the “- -“ stops flashing (it searches for 3 minutes) before
establishing a wireless data connection with the remote
unit, you will need to reinitiate the search procedure by
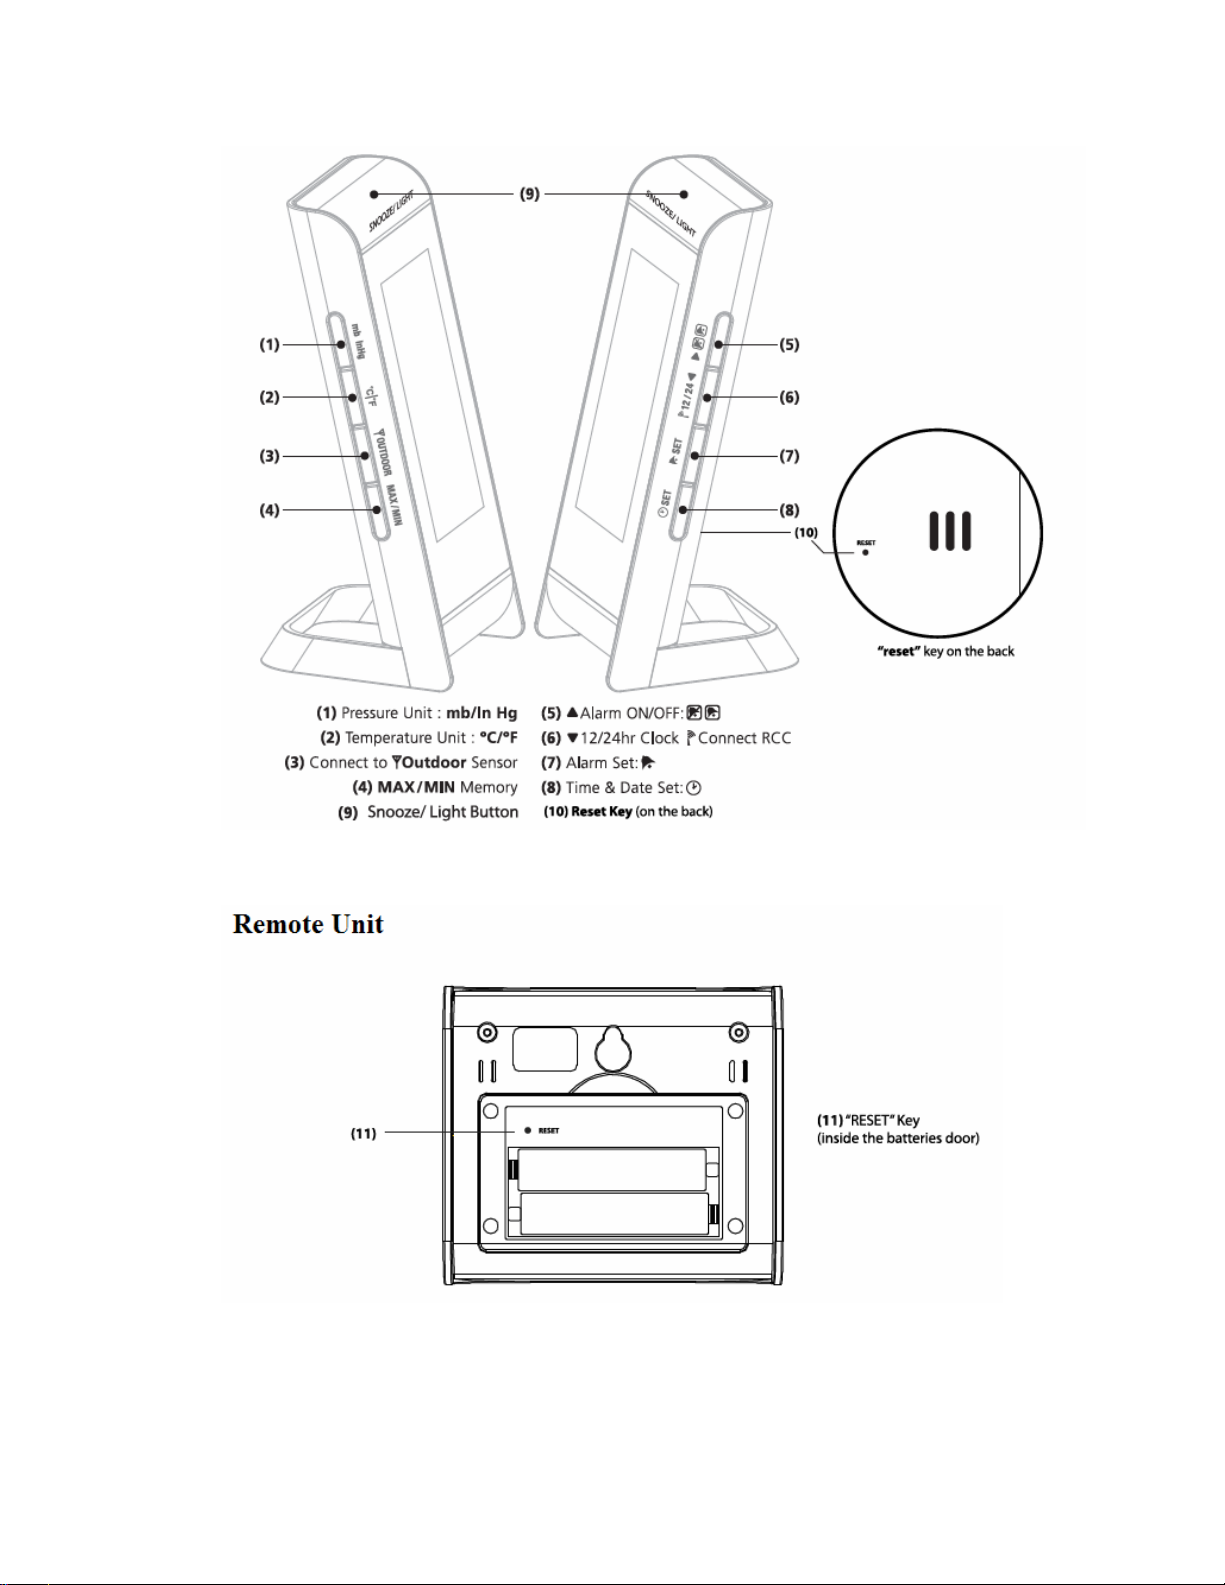
pressing and holding the “OUTDOOR” key (3) for 3
seconds.
P6
Page 7

We recommend that the remote unit is located in a shaded
location, sheltered from rainfall.
The outdoor temperature display on the indoor unit will be
updated every 2~3 minutes.
Transmitter connection set up with indoor main unit
If the wireless connection between the remote unit
and the indoor main unit is failed to link after battery installation,
reset the main unit firstly by using the paper clip to press
“RESET” key (10) on the back. After the unit is reset, wait for
around 20seconds until pressure reading displays. Then,
reset the remote unit to press the “RESET” key (11)
inside the batteries door. The connection will be searched
again to link up the main unit with remote unit.
The weather Station stores maximum and
minimum temperatures for both the indoor and
remote unit. Press the “MAX/MIN” key (4) to
show maximum recorded temperature, press
again for minimum temperatures and a further
press of the key returns you to the current
temperature display.
The temperatures can be shown in either degrees
Fahrenheit or degree Celsius. Use the “ °C/ °F” key
(2) to switch the display. The barometric pressure
can similarly be adjusted between inches of mercury (InHg)
and millibars (MB) using the “InHg/mb” key (1)
p7
Page 8
Radio Controlled Clock
WWVB-60 generated from the atomic clock in Fort Collins,
Colorado. The radio signal range is 3219km (2000 miles).
The strength of the signal depends upon your location.
The signal will penetrate most buildings, but a metal clad
building or a basement location may shield the signal and
electrical devices such as television and computer monitors
may interfere with the signal. The signal is strongest at
night time and the Weather Station is programmed to
update the date and time during the night.
DST (Daylight Saving Time)
Depending on the time of year, you need to adjust the time
of clock. If you live in the time zone, your clock will automatically
readjust to summer time or wintertime.
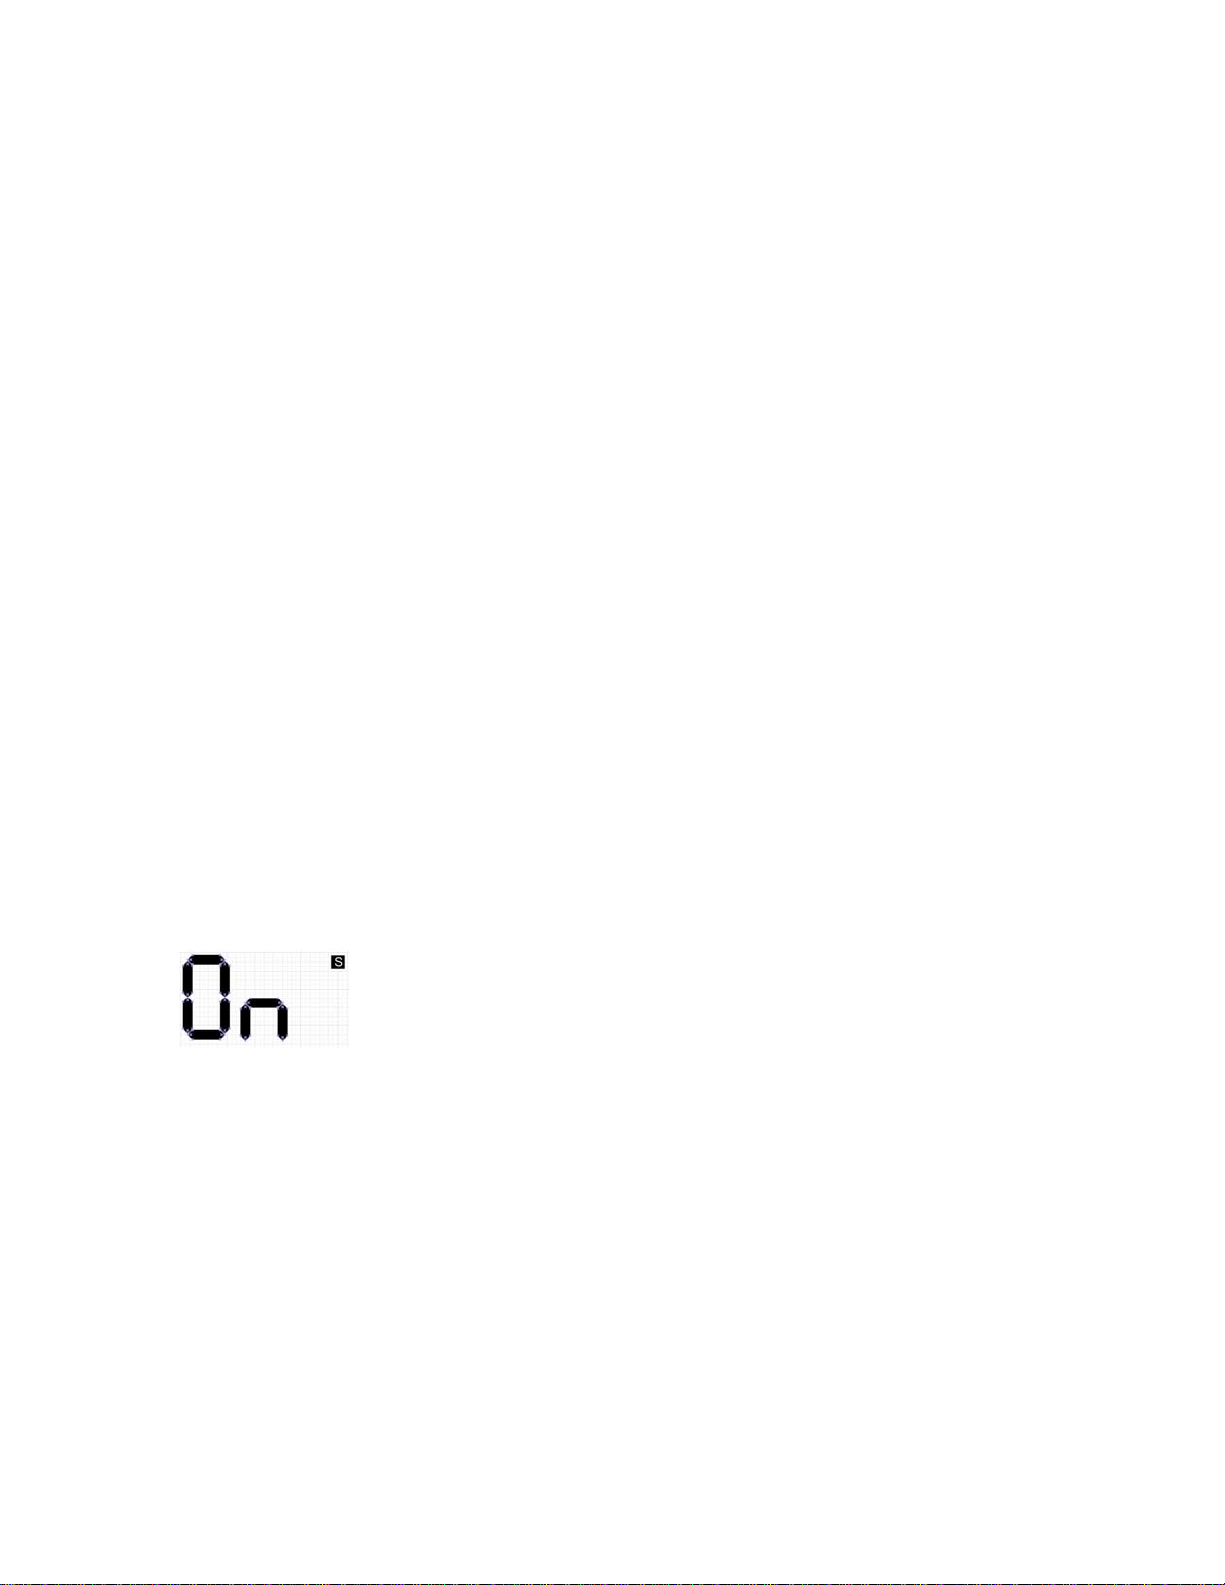
Turn on / off DST of your Weather Station
In clock mode, after finishing the minutes setting, it will
enter the DST On/ Off selection. Press “Alarm On Button “
or “12/24” button to toggle between On/ Off of DST setting.
The LCD wording will be flashing as below:
P8
Page 9

To set the time
If you are located within the range of the WWVB-60
broadcasts, you don’t need to manually set the time
and date, but you may need to set the Time Zone. To
initiate a search of the signal, press and hold the
“DOWN” key (6) for 3 seconds. Please note that it may
take 2 ~ 3 minutes to update. If the signal is weak, it
may take 8 ~ 10 minutes. If you cannot connect to the
signal during daylight hours, try again during the hours
of darkness, when the radio signal may be stronger.
To manually set the time and date, press and hold the
“Time” key (8) until the unit beeps. The Year will be
flashing, use the “UP” and “DOWN” keys (5&6) to
select the correct year and then press “Time” (8). After
completing the year setting, it will enter the MD/ DM
selection. MD icon will start flashing. Just press “UP”
and “DOWN” keys (5&6) to toggle between MD and
DM format. The default setting is Month/Date of calendar.
Press “Time” key (8) again after selection, then
the month will start flashing, use the “UP” and
“DOWN” keys (5&6) to select the correct month.
Repeat this for the date, the hour and the minutes.
Finally set the time zone for your location. If you are
within the default Pacific Time Zone, the zone
displays. If setting the time is 4:00AM, the clock will
show 4:00AM in P Zone after time setting. When the
user locates in other time zone, ie. Eastern Time
P9
Page 10
Zone and want to set 4:00AM local time. They can set the
time 1:00AM and press the “Time” key (8) once to change
the zone display from Pacific Time Zone to Eastern Time
Zone. The clock will show 4:00 AM. Your clock is now set.
The Wireless Weather Station is capable of displaying time
in either 12 hr (am/pm) or 24 hr format. Use the “12/24”
key (6) to set your preference.
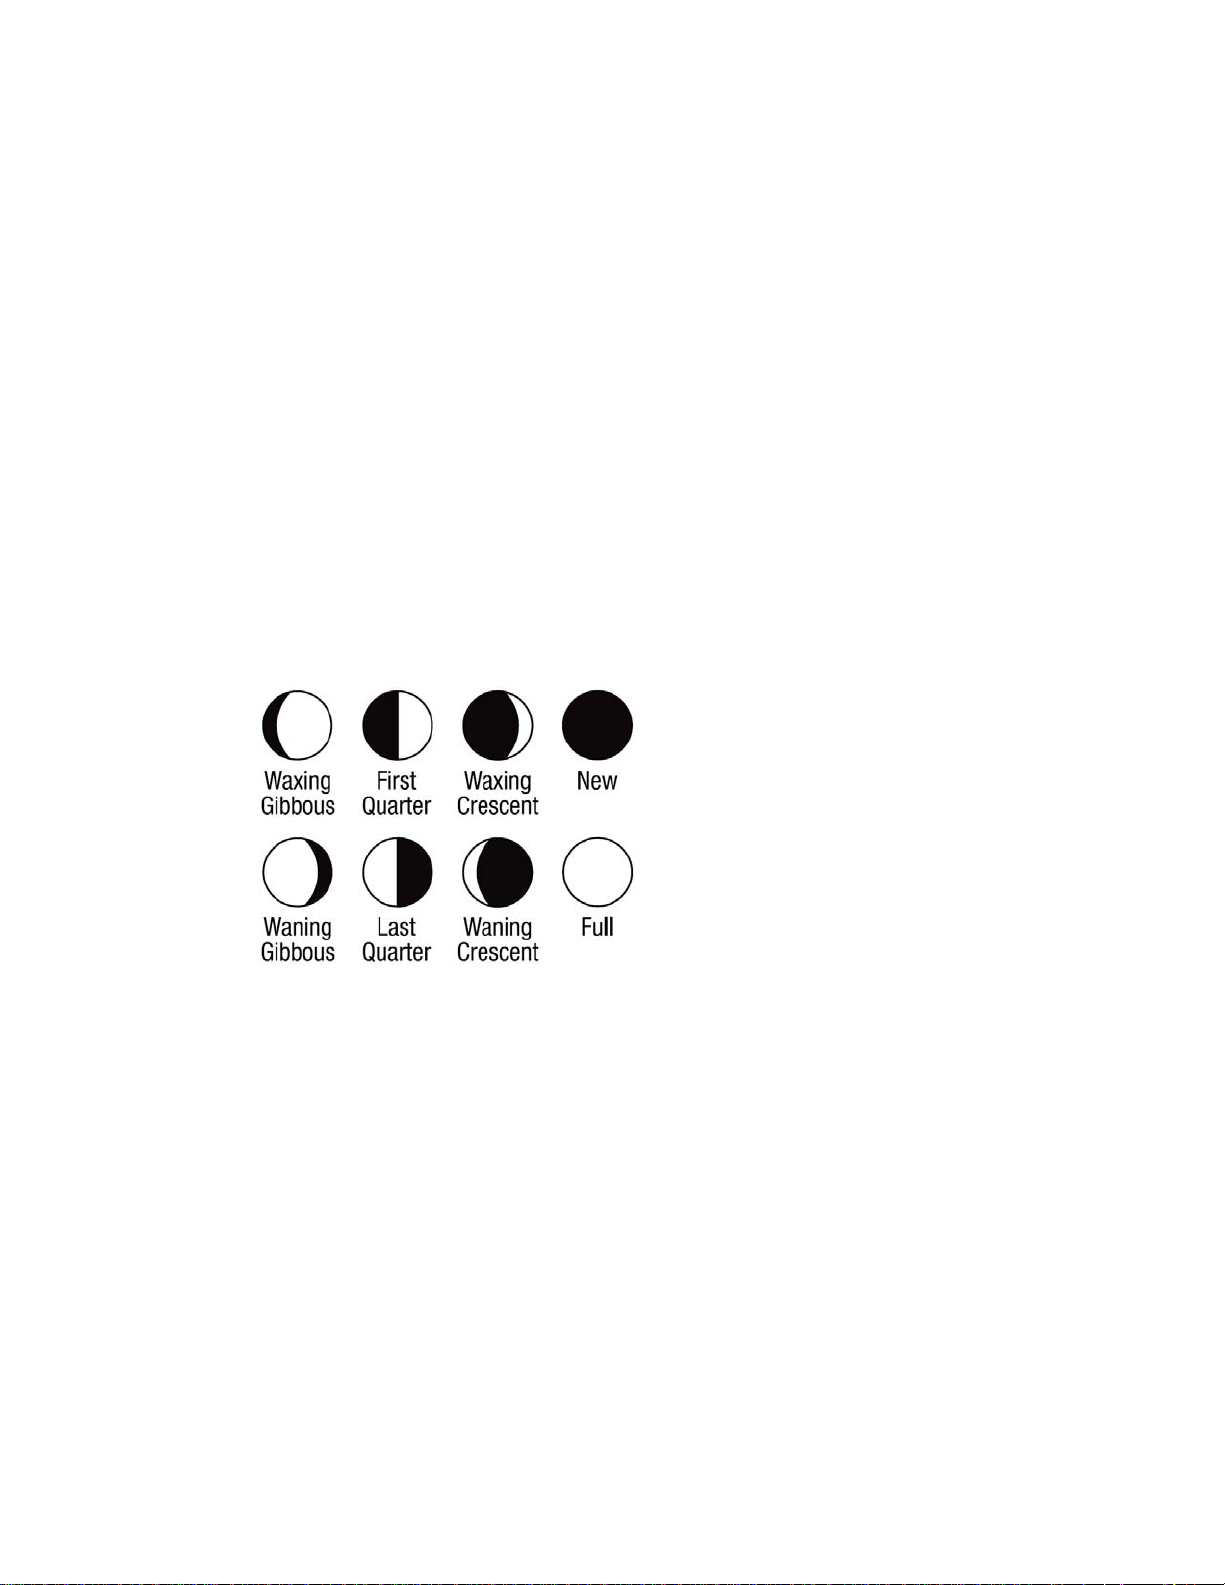
Moon phase display
The Weather Station has a sequential moon phase display.
Each phase of the moon is displayed in turn, and pauses
at the current moon phase. The moon phase is calculated
from the date set in the unit, no setting up is necessary.
P10
Page 11

Alarms
The Weather Station comes with two alarms.
Press the “ALARM” key (7) once to view the
“Alarm 1” time. Press “ Alarm” key again to show “
Alarm 2” time. To adjust the alarm time, first press
the “ALARM” key (7) until the alarm you wish to
adjust is displayed (either Alarm 1 or Alarm 2).
Then press and hold the “Alarm” key until the
hour begins to flash. Use “UP” and “DOWN” keys
(5&6) to adjust the hour, then press “ALARM”.
Use the “UP” and “DOWN” keys to adjust the
minutes, then press “ ALARM”. The alarm is
automatically set (indicated by a bell symbol on
the display). To switch the alarms on and off, use
the “UP” key – repeatedly pressing the key will
cycle through Alarm 1, Alarm 2, Alarm 1 & 2 and
Alarm off modes.
At the stop of the Weather Station is a “snooze”
key (9). Pressing this will activate the display
backlight and pressing this key when the alarm is
sounding will silence the alarm for 5 minutes.
Batteries
Replace batteries when the battery symbol is
displayed. Always use Alkaline or Lithium batteries.
Do not mix old and new batteries.
P11
Page 12

After battery replacement, the main unit will need to
re-establish a wireless data connection with the remote
unit. Press and hold the “OUTDOOR” key (3) for 3
seconds to initiate this connection process.
Very Low Temperatures
Alkaline batteries do not work well at very low temperatures.
This may cause the outdoor unit to stop working and
display “- -“. When the temperature rises, you may need to
re-establish the wireless data connection by pressing and
holding the “OUTDOOR” key (3) for 3 seconds. In areas
with winter temperatures below freezing (0 C , 32 F) , we
recommend the use of Lithium batteries for the remote
unit.
P12
Page 13
Technical Specifications
Resolution
Accuracy Temperature: +/- 2 °C at 5 °C to 45 °C
Remote unit data
transmission
RCC Data Range: Within 1500 km from signal source
Battery Main unit: 4.5V (3 x AA
Temperature 0.1 °C (0.2° F)
Humidity 1 % RH
Humidity: +/- 8 % at 5° C to 45 °C and 30 – 90%
RF frequency: 433.9 MHz (ASK Modulation)
Range: 25 meters (no obstructions)
Noted: The remote unit can only display
Centigrade temperature.
Receive time: Once per day – 1:02AM, 2:02AM,
3:02AM, 4:02AM
Remote unit: 3.0V (2 x AAA)
P13
Page 14

Troubleshooting
Outdoor temperature and humidity not displayed
• Check the remote unit has a working battery – if the
screen on the remote unit is blank, or the battery symbol
is displayed, the battery needs replacement. Some types
of batteries do not work at very low temperatures. We
recommend Lithium batteries in these conditions.
• Your remote unit may be out of range of the Weather
Station. Test this by reducing the distance between the two
units and re-initiating the bonding process (see below).
• To initiate the establishment of a wireless data connection
between the indoor display and the remote
unit, press and hold the “OUTDOOR” button (3) for 3
seconds. This must be done each time batteries are
replaced or if the Weather Station is moved out of range of
the remote unit.
Clock will not update with the signal
• The Radio Control will not work outside US
• The radio signal will not work inside a metal-clad building
or in a basement
• The radio signal is strongest during your geographical
position.
• Try to move the Weather Station to a different position in
your home.
• Press and hold the “DOWN” key (6) for 3 seconds to
force the Weather Station to acquire the signal.
Time has updated, but the hour is not correct.
• The time zone has not been correctly set. Please refer to
the section “To set the time” earlier in this instruction
manual
p14
Page 15

FCC Information
Caution: users that modifications not approved by the party
responsible for compliance could void user authority to operate
the equipment.
“NOTE: This main unit and remote unit has been tested and found to comply
with the limits for a Class B digital device, pursuant to Part 15 of
the FCC Rules. The main unit only receive the radio signal
and don’t have any radio signal transmitting function.
These limits are designed to provide reasonable
protection against harmful interference in a residential installation.
This equipment generates, uses and can radiate radio
frequency energy and, if not installed and used in accordance
with the instructions, may cause harmful interference to radio
communications.
However, there is no guarantee that interference will not occur in
a particular installation. If this equipment does cause harmful
interference to radio or television reception, which can be
determined by turning the equipment off and on, the user is
encouraged to try to correct the interference by one or more of
the following measures:
• Reorient or relocate the receiving antenna.
• Increase the separation between the equipment and the
receiver.
• Connect the equipment into an outlet on a circuit different from
that to which the receiver is connected.
• Consult the dealer or an experienced radio/TV technician for
help.”
P15
Page 16
P16
 Loading...