

Page 1
Blood
Glucose
Monitoring
S
ystem
ink the Effects of Food to Glucose Results
L
Abbreviated Procedure Guide
Getting started
With the meter off, press and hold for two seconds to access the MAIN
MENU. Whenever the meter is on, press and hold for two seconds to
turn the backlight on or off.
efore using your meter for the first time, you should check and update
B
basic settings.
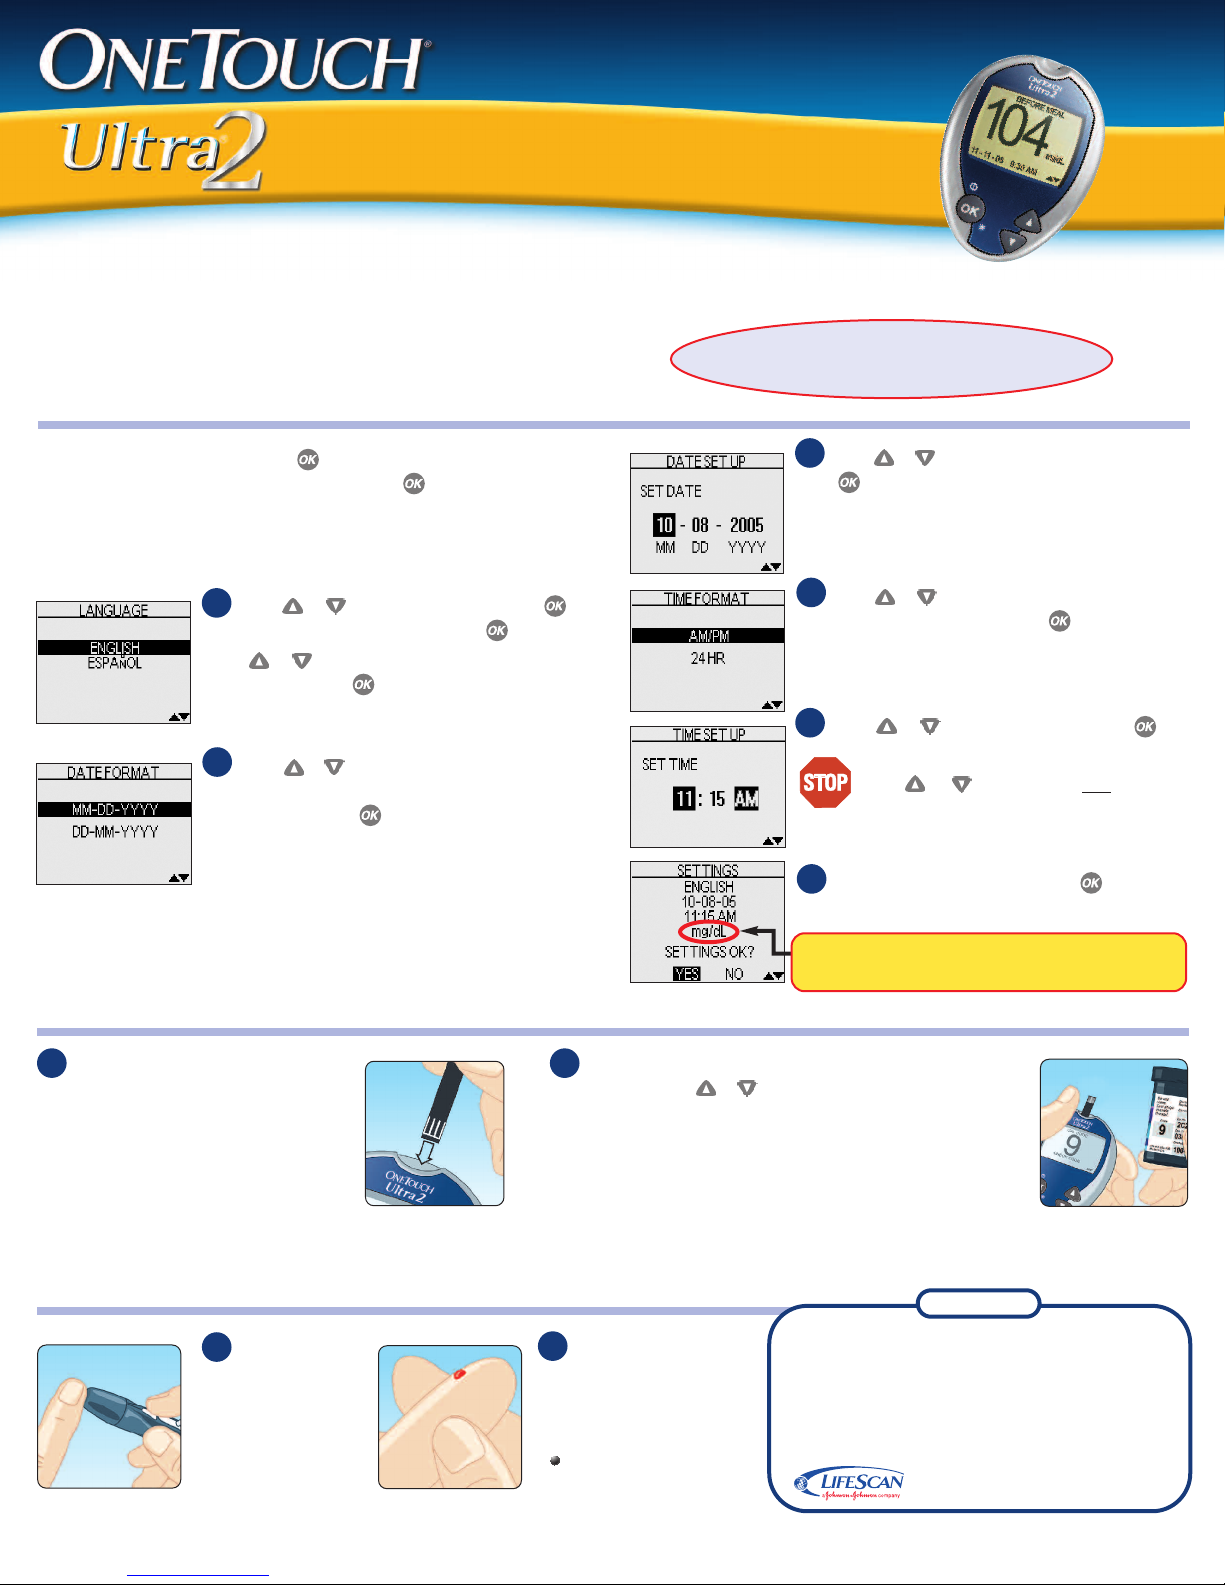
1
Press or to select SET UP and press .
Then select
Press or to highlight the desired display
language and press .
METER SETTINGS and press .
IMPORTANT: Read detailed instructions and other
important information in your owner’s booklet.
3
Press or to change the first value and
press . Follow the same procedure to change the
second and third values.
4
Press or to select the preferred time
format—AM/PM or 24 hour. Press .
2
Press or to highlight the desired date
format—month first (MM-DD-YYYY) or day first
(DD-MM-YYYY). Press .
Coding the meter
1
With the meter off, insert a test strip
into the test port. The three contact bars
should be facing you. The meter will turn
on and display the code from your last
test. If you are using the meter for the
first time, a flashing “––” appears
instead of a code.
2
If the code on the meter does not match the code on the
test strip vial, press or to match the code number on the
test strip vial. The display will then advance to the APPLY BLOOD
screen.
The meter is now ready to perform a blood glucose test.
If the
match, remove the test strip and re-start from step 1.
Getting a blood sample from your fingertip
5
.Press or to set the hour and press .
Check AM/PM. If not correct, continue to
press or until the hour and “AM” or
“PM” are correct.
Repeat this step to set the minutes.
6
If your settings are correct, press to confirm
and save your settings.
m WARNING: If the display does not show mg/dL,
act Customer Service.
ont
c
APPLY BLOOD screen appears before you are sure the codes
Need help?
1
After loading a
lancet into the
OneTouch®UltraSoft
Blood Sampler, press
it firmly against the
side of your finger.
Press the release
button.
®
2
Gently squeeze
and/or massage your
fingertip until a round
drop of blood
ast one microliter
e
l
( actual size)
on your fingertip.
of at
forms
Call Customer Service toll-free,
24 hour
English 1
Rev. date: 12/05
800 227-8862
ays a week
, 7 d
y
a
a d
s
• Español 1
,
r
O
Visit us at www.lifescan.com
© 2005 LifeScan, Inc. Milpitas, CA 95035
800 381-7226
086-133-01A
W
A
Page 2
Getting a blood sample from your forearm or palm
Abbreviated Procedure Guide
The OneTouch®Ultra®2
eter allows you to
M
sample blood from your
fingertip, forearm or
palm. Before using your
forearm or palm for
sampling, please
speak to your
healthcare professional
and refer to the owner’s
ooklet for complete
b
instructions.
1
Replace the blue
neTouch
O
Blood Sampler cap with the
OneTouch®UltraClear®Cap.
®
U
ltraSoft
®
2
hoose your sample site.
C
orearm
F
Choose a fleshy area of the forearm away from bone,
visible veins, and hair.
alm
P
Choose a fleshy area on the palm below the thumb or pinky
inger. Select a spot with no visible veins and away from
f
deep lines.
3
Press and hold the sampler against your forearm or
alm for a few seconds. Press the release button. Keep
p
holding the sampler against your skin until a round drop of
blood forms under the cap. Maintain pressure until the
drop of blood is
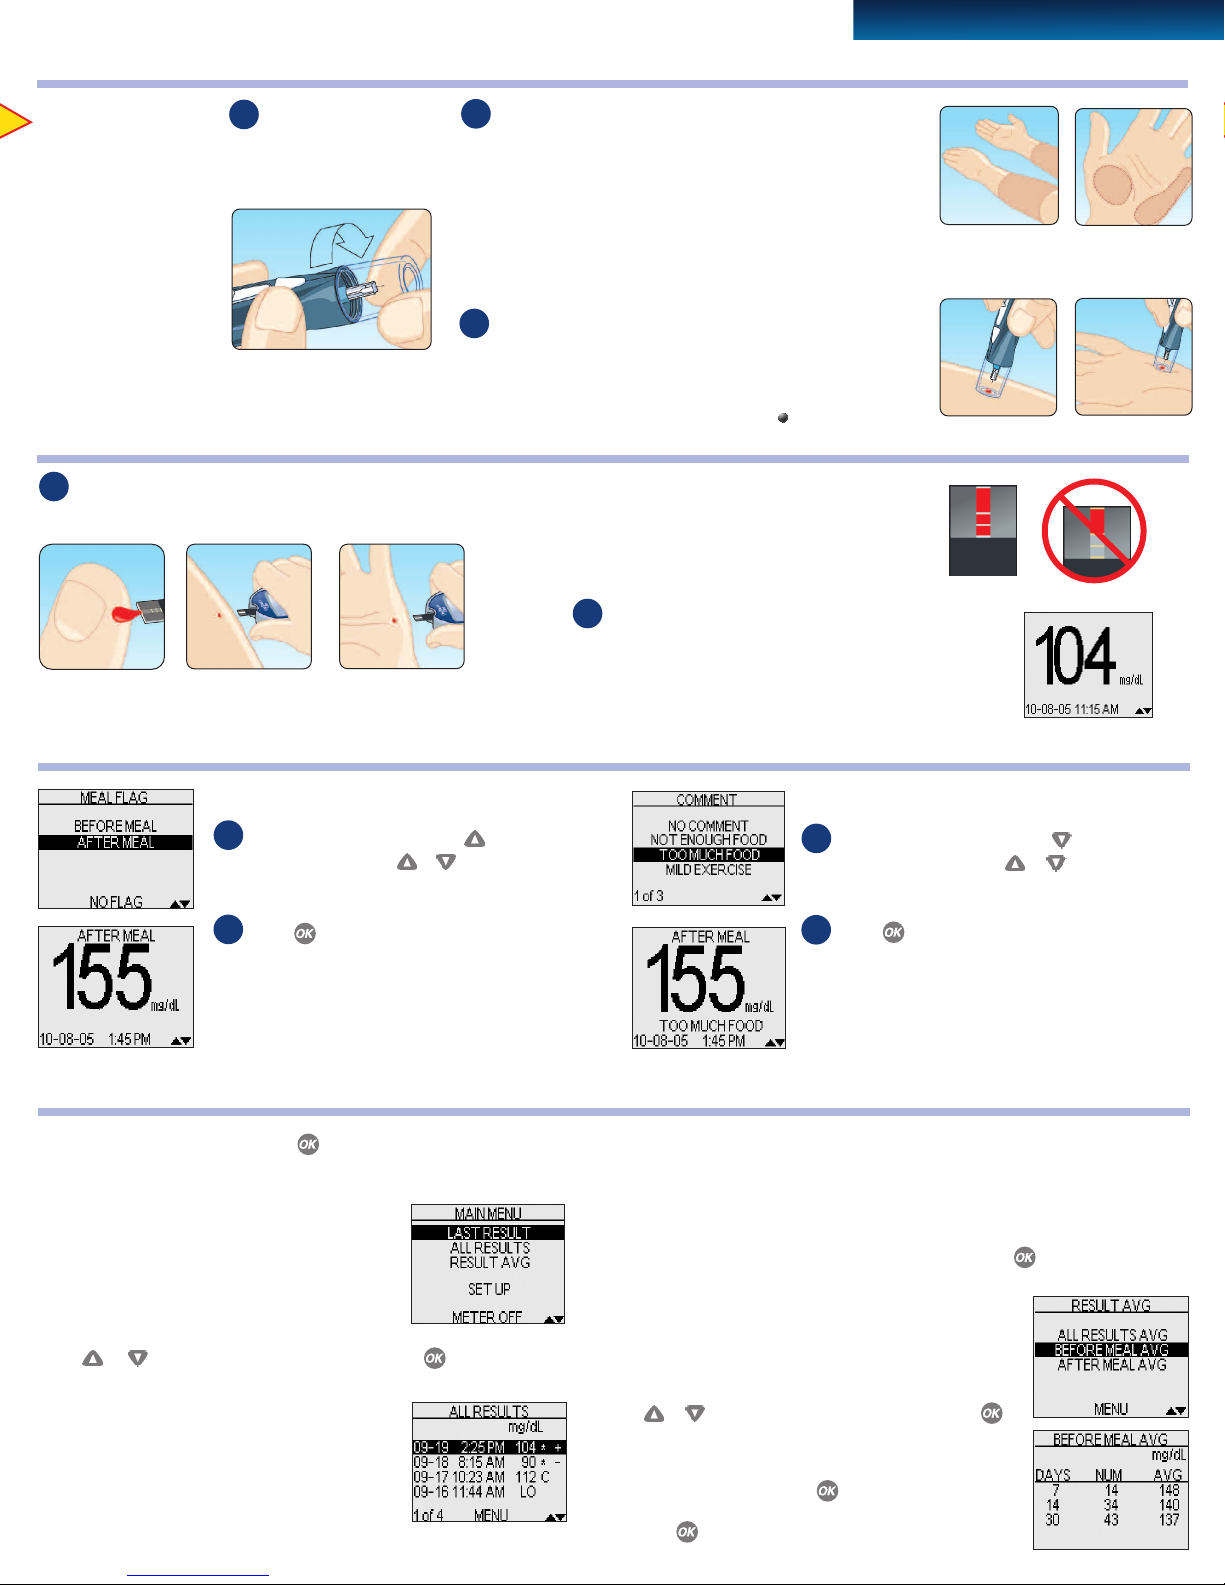
Applying the blood sample
1
When the APPLY BLOOD screen appears, touch and hold the
drop of blood to the narrow channel in the top edge of the test strip.
Fingertip Forearm
Palm
of at least one microliter ( actual size).
eep holding the drop of blood to the top edge
K
the test strip until the confirmation window
of
is full.
2
After the meter counts down from 5 to 1, your blood
glucose result appears on the display, along with the
unit of measure, and the date and time of the test.
Forearm Palm
Forearm Palm
Attaching a meal flag or comment
MEAL FLAG
1
While viewing a result, press to display the
MEAL FLAG screen. Press or to highlight
BEFORE MEAL or AFTER MEAL.
2
Press . Your meal flag will appear above
your result.
Reviewing past results and averages
With the meter off, press and hold for two seconds to turn the
meter on.
reen you can choose:
om the
Fr
•
• ALL RESULTS to review up to 500 of your most
•
Press or to highlight your selection and press .
Last Result
Displays your most recent result.
All Results
Displays all results in order, four at a time.
MAIN MENU s
LAST RESULT to view your most recent test result
ults
s
e
r
ent
ec
r
T AVG
SUL
RE
averages
t
c
ect one of three types of result
o sel
COMMENT
1
While viewing a result, press to display
COMMENT screen. Press or to highlight
the
an appropriate comment.
2
Press . Your comment will appear below
your result.
The following symbols may also appear:
HI Result was above 600 mg/dL LO Result was below 20 mg/dL
omment added to the result
* C
– Result flagged BEFORE MEAL + Result flagged AFTER MEAL
To return to the main menu, highlight MENU and press .
Result Averages
Displays three types of test averages:
• average of all test results
• average of all before-meal results
• average of all after-meal results
Press or to highlight your selection and press .
For each of the prior 7-, 14-, and 30-day periods, the
s the number of results (NUM) and average
y
a
l
p
s
er di
met
sults (AVG). Press to return to the
e
se r
tho
of
VG
creen. To return to the main menu, highlight
A
s
and press .
ontrol solution test
C C
SUL
RE
MENU
T
 Loading...