

Page 1

Getting you
up to speed.
Quick Reference Guide
cyan magenta yellow black
Client Animas
Job name/description 627019 - OTP QRG - CAN
Page 2

See your Owner’s Booklet for complete instructions including important safety information.
CAUTION: Federal (U.S.) law restricts this device to sale by, or on order of, a physician.
Intended Use
Your OneTouch® Ping® Glucose Management System is indicated for the treatment of insulin-requiring
diabetes and for the quantitative measurement of glucose in fresh capillary whole blood.
Your OneTouch® Ping® Insulin Pump is indicated for continuous subcutaneous infusion of insulin for
the treatment of insulin-requiring diabetes.
Your OneTouch® Ping® Meter-remote Blood Glucose Monitoring System is intended to be used for
the quantitative measurement of glucose in fresh capillary whole blood. When used together with
the OneTouch® Ping® Insulin Pump, it also functions as a wireless (RF) remote control to deliver insulin
from the pump. Your OneTouch® Ping® Meter-remote Blood Glucose Monitoring System is intended for
use for self-testing outside the body (in vitro diagnostic use) by people with diabetes at home and by
healthcare professionals in a clinical setting as an aid to monitor the effectiveness of diabetes control.
Your OneTouch® Ping® Meter-remote Blood Glucose Monitoring System is specifically indicated for
use on the finger, forearm or palm. It should not be used for the diagnosis of diabetes or testing of
newborns.
Customer Service (U.S., Canada and Puerto Rico) 1-877-937-7867
2
Page 3

Table of Contents
OneTouch® Ping® Insulin Pump 4
OneTouch® Ping® Pump Startup Overview 4
Changing the Battery 5
Home Screen Overview 6
Main Menu 7
Pump 8
Bolus Menu 9
Basal Menu 10
History 11
Suspend/Resume 11
Prime/Rewind 12
Changing the Insulin Cartridge and Priming Your Pump 13-15
OneTouch® Ping® Meter-Remote 16
Meter Home Screen/Main Menu Screen 17
Changing the Batteries/Coding Your Meter-Remote 18-19
Options After Taking a BG Test 19
OneTouch® Ping® System 20
Using Your Meter-Remote and Pump Together as a System 20
Activating RF and Pairing On Your Meter-Remote and Pump 20-22
Deactivating RF On Your Meter-Remote and Pump 23-24
Pump Home and Meter Home Screens On Your Meter-Remote 24-25
Main Menu Screen 25
Calculating and Delivering a Bolus 26-28
Checking Pump and Meter-Remote Status 29-30
3
Page 4
4
Congratulations! You have chosen one of the most advanced diabetes
management systems available today. Your
OneTouch® Ping® Glucose
Management System will play an integral part in the blood glucose
management and continuous insulin delivery regimen you established with
your healthcare professional.
Pump Startup Steps
1. Insert Battery
2. Update Time/Date and Battery Type on Verification Screen
3. Confirm Verification Screen
4. Proceed to Rewind/Prime Procedure (See page 12)
NOTE: Refer to the Owner’s Booklet that came with your OneTouch
®
Ping® Insulin
Pump for further instructions on proper usage.
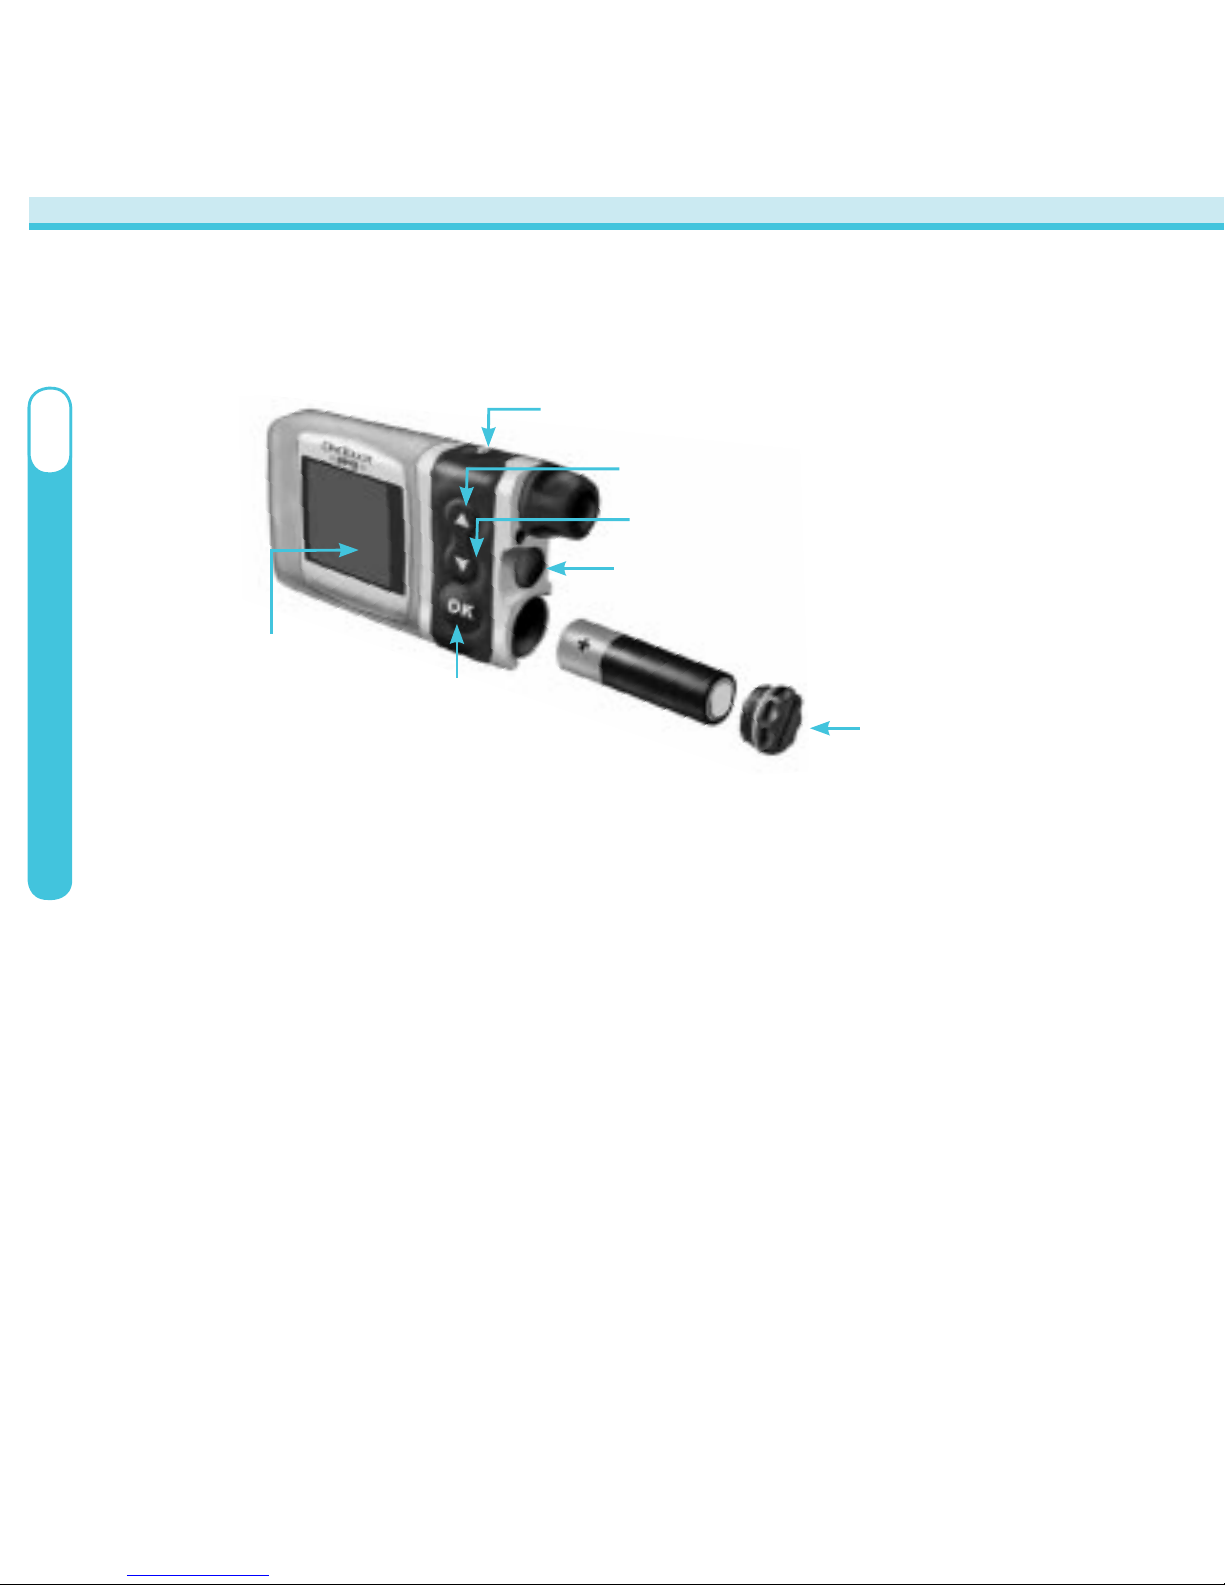
OneTouch® Ping® Pump Startup Overview
Display Screen
Contrast button
Audio bolus/ezBolus™ button
Up button
Down button
OK button
Battery Cap
I
OneTouch
®
Ping
®
Insulin Pump
Page 5

Changing the Battery
1. Unscrew the battery cap with a counter-clockwise motion.
2. Insert a Lithium AA (1.5V) battery, positive (+) end first, into the battery compartment.
3. Replace the battery cap by turning clockwise until snug. Do Not over tighten, as this
can cause the pump case to crack. Cracks, chips, or damage to your pump may affect
the battery contact and/or the waterproof feature of your pump.
NOTE: Every time you change the battery:
• A full rewind and prime sequence is necessary (see next section).
• The IOB calculation starts over at zero.
• The Combo Bolus settings return to the factory-set default duration and splits.
• You should review your basal program settings.
5
OneTouch
®
Ping
®
Insulin Pump
I
Energizer® Lithium L91 AA battery
Close
Open
Page 6
I
OneTouch
®
Ping
®
Insulin Pump
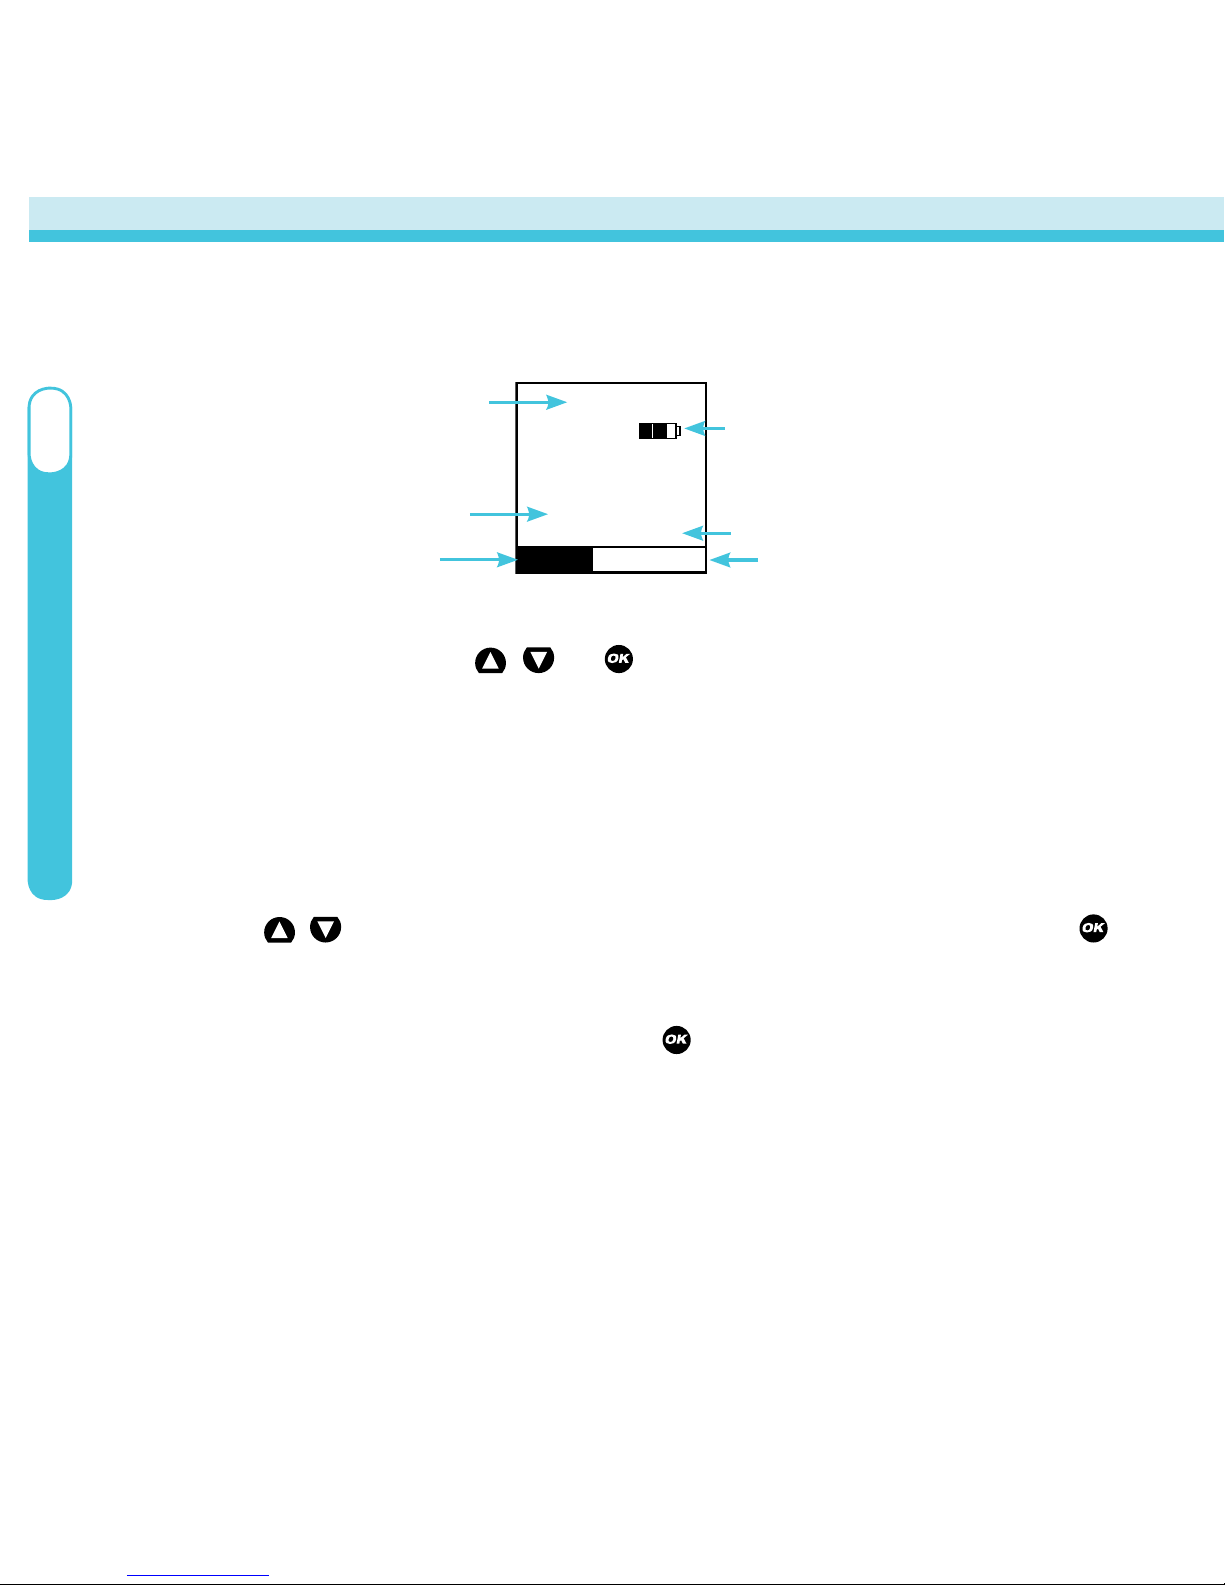
Home Screen Overview
The first screen that is displayed when you “wake up” your pump after set up
is the Home screen. Press
, , or button to wake up your pump.
The Home Screen might show additional content if any of the following
features are active:
• Extended bolus • Temp basal • Suspend
TIPS:
• Use the
/ buttons to scroll to the desired selection and press the
button to select. If the cursor is flashing, it means your pump is in Edit Mode
and by scrolling up or down, you can edit the flashing field.
• Once you have finished editing, press
to confirm your entry and to exit
the Edit Mode.
2 : 27
PM
Status
Basal Rate
0.025U/Hr
Insulin: 105U
Menu
Time of Day
Battery Life Indicator
Insulin Remaining in Cartridge
Main Menu Shortcut
Status Screens Shortcut
Current Basal Rate
6
Page 7
OneTouch
®
Ping
®
Insulin Pump
I
Bolus - Takes you to the Normal Bolus screen, or the Bolus
Menu if you have activated Advanced Bolus features. From the Bolus Menu you
can select the bolus type, program and deliver the bolus dose.
Suspend/Resume - Suspend stops all insulin delivery and
Resume restarts basal delivery.
History - Allows you to review history of boluses, total daily dose (TDD), alarms,
primes, suspend and basal information.
Basal - Allows you to access and program your basal rate.
Setup - Allows you to personalize the settings and features of your pump, as
well as enable advanced features on the pump.
Prime/Rewind - Enables you to properly load the cartridge as well as prime your
infusion set tubing and fill your cannula or needle.
Status - Displays your current/most recent settings and pump deliveries.
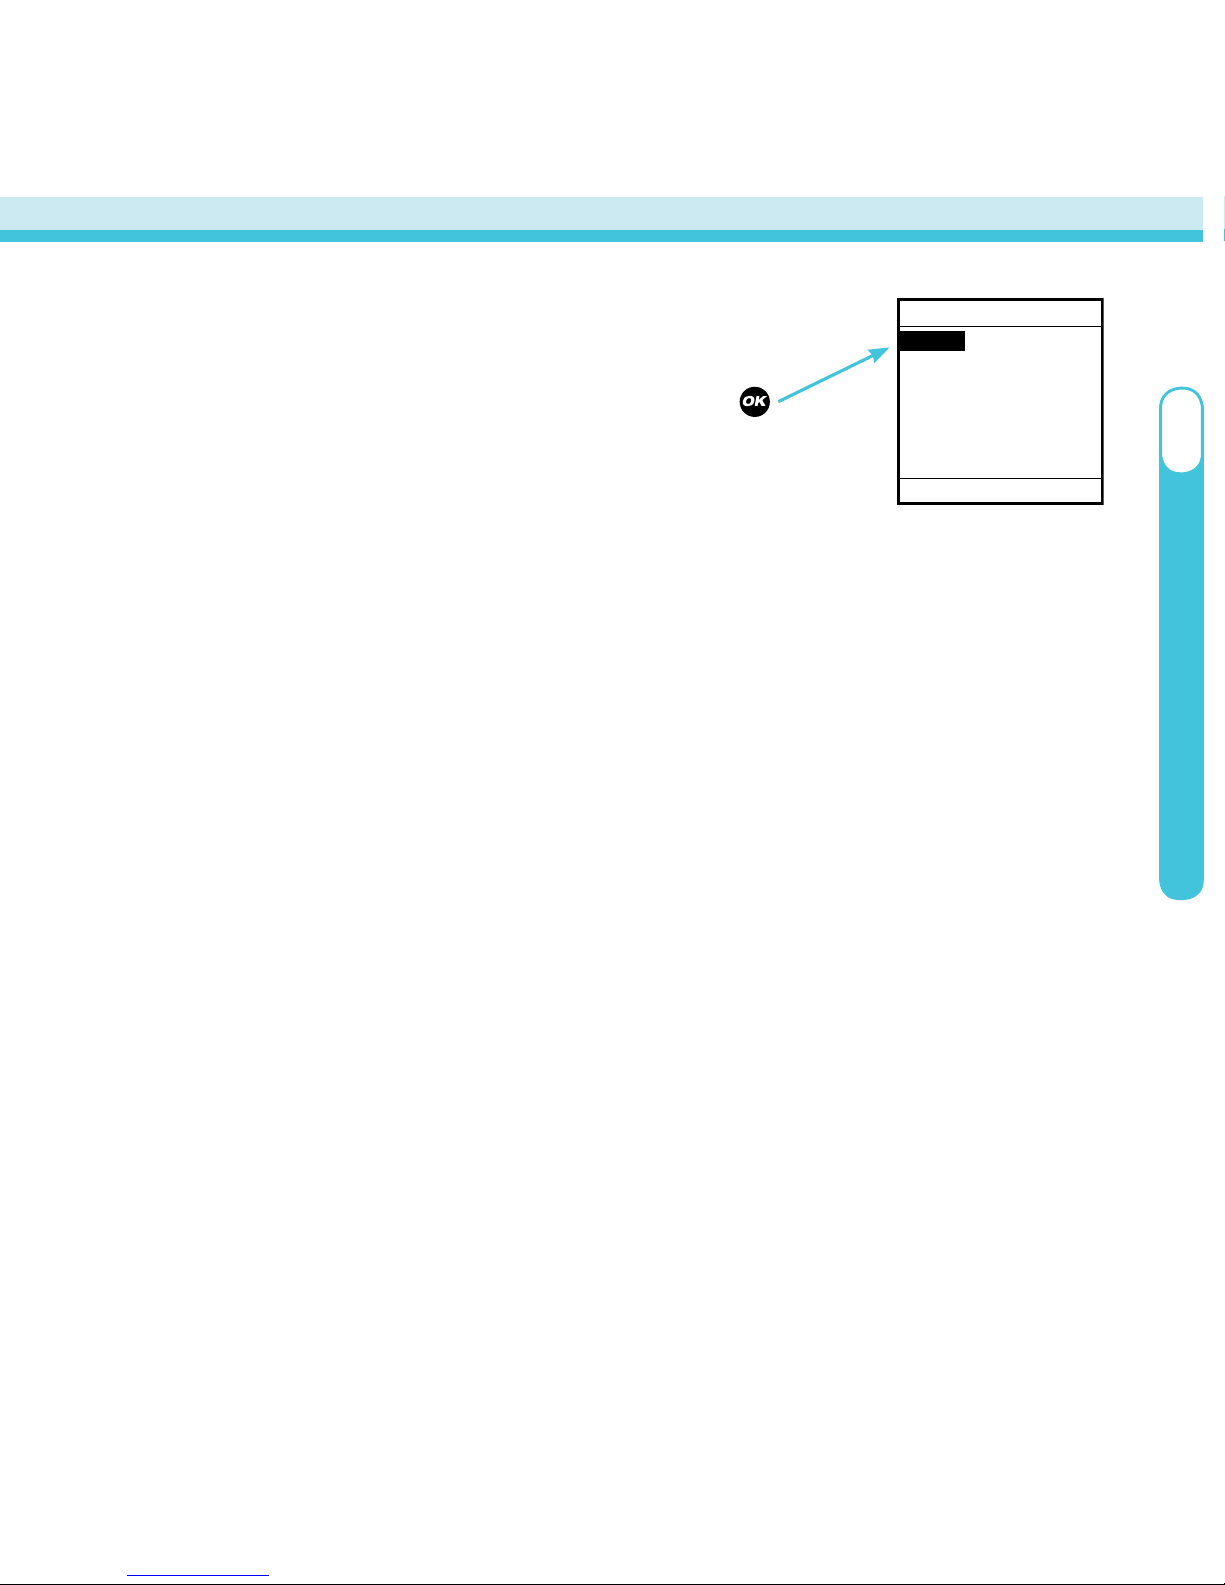
Main Menu
7
MAIN MENU
Home
Bolus
Suspnd/Resum
History
Basal
Setup
Prime/Rewind
Status
Highlight the desired option and press
to access pump functions.
Page 8

8
Pump
Time/Date: Allows you to set the current time and date.
Sound: Allows you to adjust sounds for pump-related
functions.
• Normal Bolus • Audio Bolus • Temp Basal • Alert
• Reminder • Warning • Alarm
Pump sounds may be set to:
• Vibrate (Vib) • Low Volume (L) • Medium Volume (M)
• High Volume (H) • No Sound (OFF)
For safety reasons, some sounds cannot be turned off.
Advanced: Allows you to activate additional features on your pump to help you
manage your diabetes.
• Audio Bolus
• Advanced Bolus and Multiple Basal Programs
• Insulin Limits
• Language Setup, Display Timeout, Contrast and Battery Type
• Auto-OFF
• Low Cartridge Warning Setting and Occlusion Sensitivity Setting
• Personal Settings (Insulin to Carb (I:C) Ratios; Insulin Sensitivity Factor (ISF);
BG Target Ranges)
• Insulin on Board (IOB) Setting
• Sick Day Guidelines
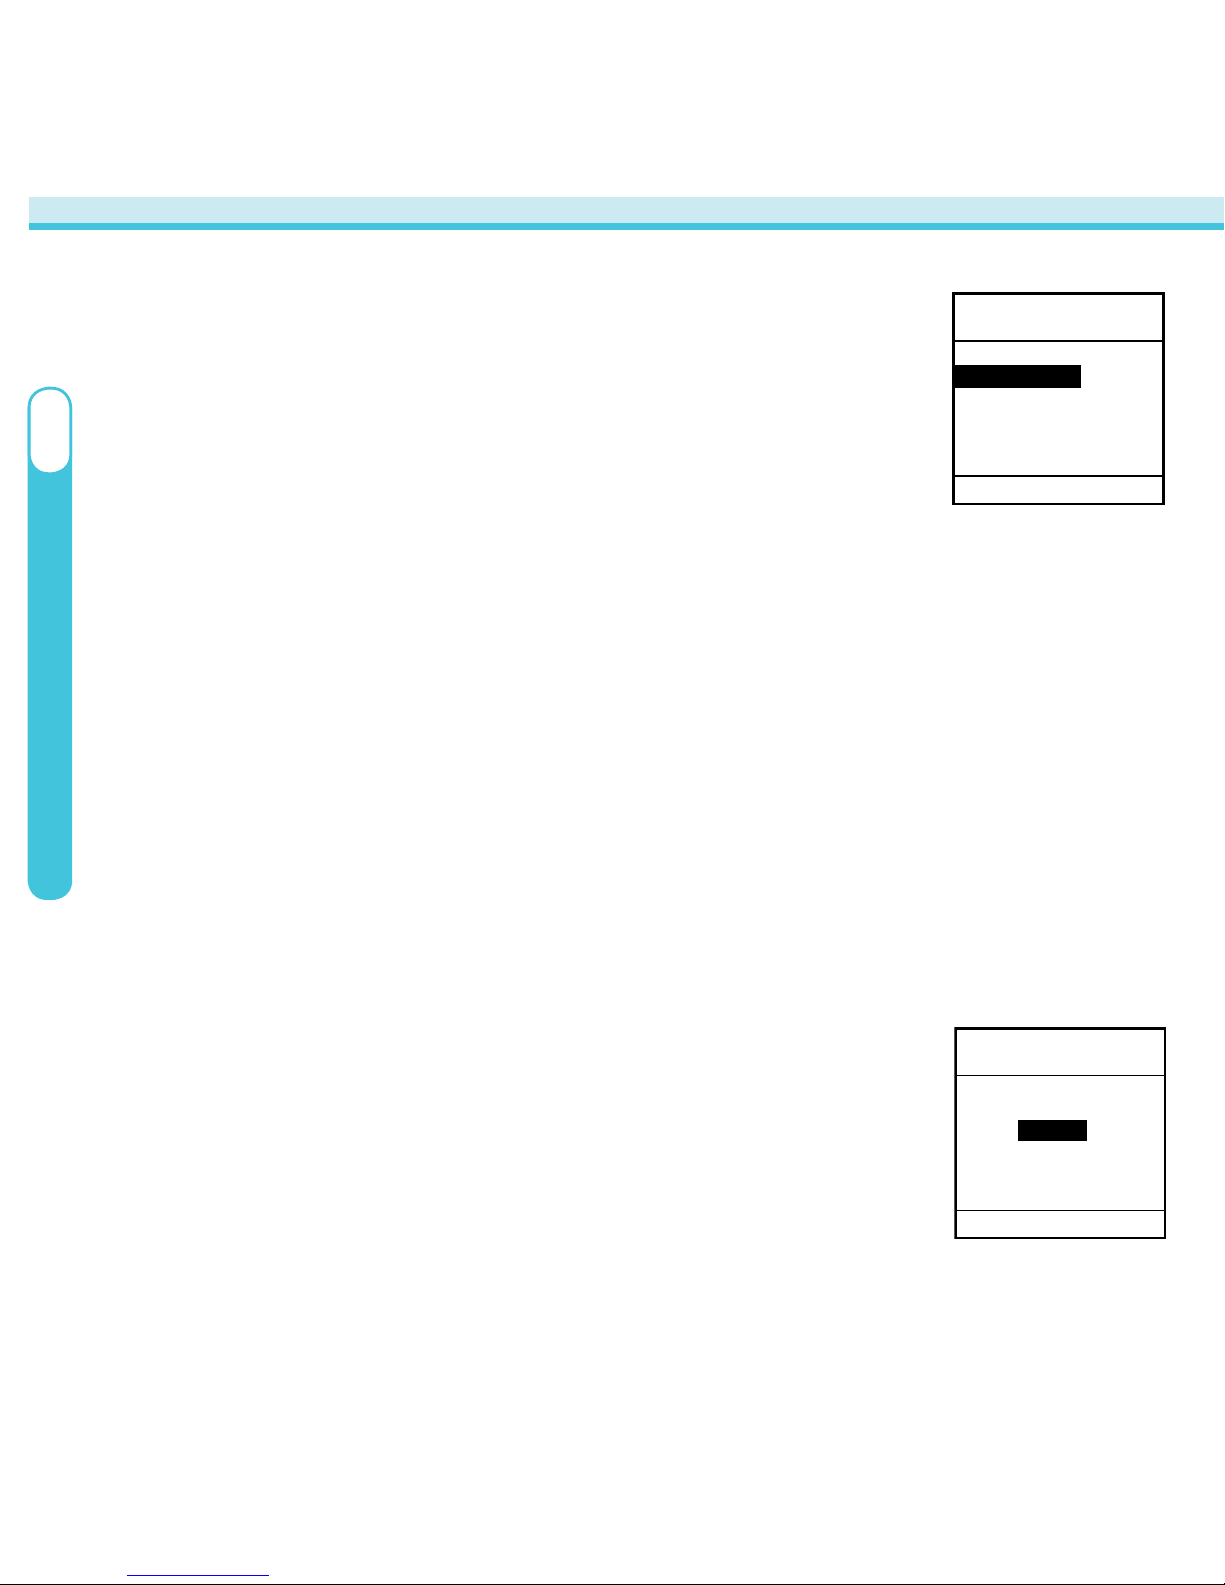
SETUP
Main Menu
Time/Date
Sound
Advanced
I
OneTouch
®
Ping
®
Insulin Pump
Page 9

9
OneTouch
®
Ping
®
Insulin Pump
I
Bolus Menu
Normal Bolus
Normal - Program an insulin dose for immediate delivery.
Advanced Bolus Features
• ezCarb - Calculate and then deliver a suggested insulin dose to account for
carb intake. ezCarb Boluses can be delivered as a Normal or Combo Bolus.
• ezBG - Calculate and then deliver a suggested insulin dose to cover a high BG.
• Combo Bolus - Program an insulin dose to be delivered over an extended
period of time.
• Reminders - Set reminders to program your bolus or check your BG at a
certain time after each bolus.
TIPS:
• Advanced Bolus features allow access to the ezCarb, ezBG, and Combo Bolus.
All Advanced Bolus features are activated in the Setup Advanced Menu.
• ezCarb also allows a BG Bolus to be added to an ezCarb bolus.
• The pump will automatically calculate your bolus dose, based on the I:C ratio,
ISF and BG Target range entered in the Setup Advanced Menu for the current
time of day.
BOLUS MENU
Main Menu
Normal
ezCarb
ezBG
Combo Bolus
Reminders
Page 10
10
Setting a Basal Program
Each basal program can be set with up to 12 different basal
rates in a 24-hour period.
The BASAL MENU displays the following:
• Total basal insulin programmed for the 24-hour period.
• Temp (if you wish to program a Temporary Basal rate).
• An “A” with active basal program in all upper case letters indicates the
active program.
TIPS:
• If you have activated multiple basal programs in the Setup Advanced menu,
all 4 basal program options will be displayed as shown above.
• The pump will not deliver any temporary basal set below 0.025 U/Hr. Any
temporary basal rate set below 0.025 U/Hr will automatically be re-set to
0.025 U/Hr.
Temp Basal Features
This feature allows you to increase your active basal delivery
rate for events such as sick days or decrease for events such as
exercise.
• Decrease basal rate by 90% (in 10% decrements) or
increase basal rate up to 200% (in 10% increments). Temp Basal also can be
set to OFF.
• Duration up to 24 hours in half-hour increments.
Basal Menu
BASAL MENU
Main Menu
Total 0.00
U
Temp
A1-WEEKDAY
2-other
3-weekend
4-exercise
A1-WEEKDAY
Main Menu
TEMP BASAL
Go
0%
4.0 Hr
Change:
Duration:
I
OneTouch
®
Ping
®
Insulin Pump
Page 11

11
OneTouch
®
Ping
®
Insulin Pump
I
History Menu
Suspend/Resume
View and Access Important Records
TIPS:
• In order to navigate through the records, scroll up to
highlight the “Record” field and press
to activate
Review Mode. Use
/ buttons to scroll through records.
• Record 1 indicates the most recent record.
• Suspending the pump allows insulin delivery to be stopped
temporarily.
• Resuming the pump restarts the basal delivery of insulin.
TIPS:
• Suspend cancels delivery of any Temp Basal or Bolus, including Combo Bolus
that may be currently active.
MAIN MENU
Home
Bolus
Suspnd/Resum
History
Basal
Setup
Prime/Rewind
Status
BOLUS
History Menu
Record 1
NORMAL (P)
ezCarb
Mar 23, 2007
1:13PM
2.80U of 2.80U
COMPLETED
Page 12

12
Prime/Rewind: Enables you to properly align the cartridge
and piston rod as well as prime your infusion set tubing and
fill your cannula or needle before connecting to your pump.
CAUTION: NEVER PRIME THE TUBING OR TIGHTEN THE
CARTRIDGE CAP WHILE INFUSION SET IS CONNECTED TO YOUR BODY.
ezPrime
• Rewind - Retracts the piston to allow a new cartridge to be installed.
• Load Cart - Prepares the cartridge and piston to deliver insulin.
• Prime - Removes air from the infusion set by filling it with insulin.
• Fill Cannula - Removes air from the cannula by filling it with insulin.
TIPS:
• The Fill Cannula step is not required for your pump to operate. For example,
when you prime your pump after a battery change and you are not inserting a
new infusion set, this step is not necessary.
• Use the arrows on the bottom of the pump screen to navigate through status
screens.
Prime/Rewind
ezPrime
Main Menu
Rewind
Load Cart
Prime
Fill Cannula
o
o
o
o
I
OneTouch
®
Ping
®
Insulin Pump
Page 13

13
Changing the Insulin Cartridge
1. Disconnect infusion set from your body.
2. Remove infusion set from your skin and discard.
3. Unscrew the cartridge compartment cap using a
counter-clockwise motion. Leave tubing
connected to the cartridge.
4. Pull cartridge straight out.
5. Disconnect tubing from cartridge and discard
cartridge.
6. Fill new cartridge according to Instructions for
Use included with your cartridge.
7. Remove infusion set tubing cap from Luer
connector. (Not all infusion sets have these
caps.)
8. Thread the Luer connector of the infusion set
through the smaller opening of the cartridge
compartment cap.
9. Remove cap from the filled cartridge tip.
10. Attach infusion set Luer connector to
cartridge tip using clockwise motion until
snug. Then twist another quarter turn.
Changing the Insulin Cartridge and Priming Your Pump
Correctly threaded through cap
Connect infusion set
to cartridge here
Luer connector
of infusion set
Top of cartridge
compartment cap
Close
Open
OneTouch
®
Ping
®
Insulin Pump
I
Page 14

14
I
OneTouch
®
Ping
®
Insulin Pump
Priming Your Pump
1. Disconnect your infusion set from your body. Leave the
infusion set disconnected until the prime is complete.
2. On the MAIN MENU screen, highlight “Prime/Rewind”
and press
.
3. Highlight “Rewind” on the ezPrime menu screen and
press
.
4. Highlight “Go Rewind” on the REWIND MOTOR screen
and press
.
Your pump will vibrate as it performs a self-test and will then
rewind the piston rod. Wait for the rewind action to finish.
5. Your pump will beep once and the REWIND COMPLETE
screen will appear.
6. Insert the cartridge and screw the cartridge compartment
cap back on the pump using a clockwise motion until
snug. With “Continue” highlighted, press
.
ezPrime
Main Menu
Rewind
Load Cart
Prime
Fill Cannula
o
o
o
o
REWIND MOTOR
Cancel
Disconnect
infusion set
from your body!
Go Rewind
REWIND
COMPLETE
Cancel
Load U100
cartridge.
Attach cap.
Select Continue.
Continue
Page 15

15
OneTouch
®
Ping
®
Insulin Pump
I
7. The LOAD CARTRIDGE ACTIVE screen will appear as your
pump aligns the piston rod with the cartridge. Wait for
the alignment action to finish.
8. Your pump will beep once and the Prime screen will
appear. With “Continue” highlighted, press
.
9. The DELIVER PRIME screen will appear. With “Go Prime”
highlighted, press and hold
until you see 5 drops of
insulin come out the end of your infusion set. This means
your tubing is primed.
The PRIMING ACTIVE screen will appear followed by the
PRIMING DONE screen.
10. On the ezPrime menu screen, press
with “Fill
Cannula” highlighted.
11. The FILL CANNULA screen will appear. Use the
/
buttons to enter the cannula fill amount and press
.
Refer to your Instructions for Use included with your
infusion set for the correct fill amount.
12. With “Go” highlighted, press
to fill the cannula and
return to the Home screen.
PRIME
Cancel
Be sure set is
disconnected
from your body.
Then select
Continue.
Continue
Insulin: 200U
DELIVER
PRIME
Cancel
Press AND HOLD
OK button
while priming
tubing.
Go Prime
Insulin: 200U
ezPrime
Main Menu
Rewind
Load Cart
Prime
Fill Cannula
n
n
n
o
FILL CANNULA
Main Menu
Amount
Go
0.00
U
Page 16

Test strip port
LED indicator light
High contrast
color display
USB data port
SmartChip
®
port
Up and Down buttons
Back button
OK button
This is the
pre-set unit of
measure.
OneTouch® Ping® Meter-Remote
OneTouch
®
Ping
®
Meter-remote
16
II
Page 17

Meter Home Screen
The Meter Home screen appears whenever you turn your meterremote on, and displays your most recent BG test result, along
with your average BG test results for the current meal period.
Once you begin using your meter-remote and pump together as a system, your meterremote will display either the Meter Home screen or the Pump Home screen (see next
chapter).
• Press to go to the Main Menu screen.
Main Menu Screen
The Main Menu screen provides access to most meter-remote
functions.
•
Bolus – calculate and deliver a bolus from your pump.
•
FastFacts – view on-screen summaries of historical BG test results.
•
Meter Settings – program meter-remote settings for your personal use.
•
Add Logbook Entry – record health-related data to your meter-remote memory.
•
System Status – review and troubleshoot meter-remote, pump, and RF operations.
NOTE: You will not be able to deliver a bolus from your pump, or review and troubleshoot
pump operations, until you begin using your meter-remote and pump together as a
system (see next section).
Meter Home
Last BG
Jun 19-06
7:40am
10:32 am
6.1
5.5
Aft Brkft
Avg.
14 days
Main Menu
Bolus
FastFacts
Meter Settings
Add Logbook Entry
System Status
OneTouch
®
Ping
®
Meter-remote
II
17
• Highlight the desired option and press to access meter-remote functions.
Page 18

Coding Your Meter-Remote
Code numbers are used to calibrate your meter-remote with your test strips. Every time
you open a new vial of test strips, you will need to match the code on your meter-remote
with the code on your test strip vial.
1. Insert a test strip into the meter-remote. When the Test/
Match Code screen appears, it will display the code number
from your last test.
Changing the Batteries
1. Remove the battery compartment cover by pressing the tab to
the right and then lifting the cover.
2. Lift both batteries out by pulling up on the ribbon.
3. Take the plus (+) end of one battery and insert it underneath
the plastic tab at the plus (+) end of one of the battery
compartments. Then push down on the minus (-) end until the
battery clicks into place.
4. Repeat these steps with the second battery.
5. Replace the battery compartment cover by inserting the two
compartment tabs into the matching holes and then pushing
down on the cover until it clicks into place.
NOTE: You must insert the plus (+) end of each battery before
the minus (-) end for the batteries to be installed correctly.
Plastic Tab
18
OneTouch
®
Ping
®
Meter-remote
Test
Match Code
25
II
Page 19

2. Verify that the code number on your meter-remote matches
the code number on the test strip vial. If the codes do not
match, press
until the codes match.
3. Press
when the codes match. You will go to the Test/
Apply Blood screen where you can perform a BG or control
solution test.
Test
Match Code
25
Test
Apply Blood
p
q
19
OneTouch
®
Ping
®
Meter-remote
II
Options After Taking a BG Test
Once your BG test result appears on the meter-remote display, you
can choose to:
• Calculate and deliver a bolus from your pump (see next
section).
• Add a comment to your BG test result (see Adding Comments
to Glucose Test Results in your Owner’s Booklet).
• Go to the meter-remote Main Menu screen.
• Compare the current BG test result with your previous result,
and your average for the current meal period.
With your BG test result displayed, highlight the desired option
and press
.
Jun 19-06 10:32 am
Comment
Bolus
mmol/L
5.8
Jun 19-06 10:32 am
Compare Result
Main Menu
mmol/L
5.8
Page 20

Using Your Meter-Remote and Pump Together
as a System
Your meter-remote and pump are designed to work together as a system. This allows you
to access certain pump functions directly from your meter-remote, and use the current BG
test result on your meter-remote in ezCarb and ezBolus calculations.
Before you can use your meter-remote and pump together as a system, both devices
must be paired with RF activated. When you activate pairing on your meter-remote, RF is
automatically activated. RF and pairing must be activated separately on your pump.
Activating RF and Pairing on Your Meter-Remote and
Pump
You will need access to both devices when you activate RF and pairing, and you must
keep both device displays turned on during the procedure.
Activating RF and Pairing on Your Pump
Use your pump display and buttons for the next 3 steps.
1. Highlight “Setup” on the MAIN MENU screen and press
.
Then highlight “Advanced” and press
. Scroll through the
SETUP ADV screens until the SETUP ADV 10 screen appears.
20
SETUP ADV 10
Home
METER
RF
Search
Channel
Next
OFF
– – – –
Auto
OneTouch
®
Ping
®
System
III
Page 21

2. Highlight the “RF” field and press . Use the
/
buttons to set the “RF” field to “ON” and press to activate
RF on your pump.
3. With the “Search” field highlighted, press
. Use the
/
buttons to set the “Search” field to “ON” and press
to activate pairing on your pump. “[Searching]” will appear
on the display as your pump searches for a meter-remote
within RF range.
SETUP ADV 10
Home
METER
RF
Search
Channel
Next
ON
– – – –
Auto
SETUP ADV 10
Home
METER
RF
Search
Channel
Next
ON
ON
Auto
[Searching]
Cancel
21
Activating RF and Pairing on Your Meter-Remote
Use your meter-remote display and buttons for the next 2 steps.
1. Highlight “Meter Settings” on the Main Menu screen and press
. Then highlight
“RF” and press
. Highlight “Pairing” and press .
RF Set-up
RF on/off
RF Channel
Pairing
RF Test
Meter Settings
Basic
Customize
Lock Buttons
RF
Alerts
OneTouch
®
Ping
®
System
III
Page 22

2. Highlight “Start Pairing” and press
to activate pairing on
your meter-remote. Your meter-remote will search for an
insulin pump within RF range.
Confirming Pairing on Your Pump and Meter-Remote
1. When your pump finds a meter-remote, the serial number
on the back of your meter-remote will appear on the
pump display. Confirm that this is the correct serial number.
With “Confirm” highlighted, press
to confirm pairing
on your pump.
2. When your meter-remote finds a pump, the serial number
on the back of your pump will appear on the meter-remote.
Confirm that this is the correct serial number. With
“Accept” highlighted, press
to confirm pairing on your
meter-remote.
3. Press
to confirm the Notification that reminds you that
the bolus calculator settings on your meter-remote have been
replaced by those last set and saved on your pump.
22
OneTouch
®
Ping
®
System
III
SETUP ADV 10
Home
METER
RF
Search
Channel
Next
ON
OFF
7
[ABCD
12
34
]
Confirm
Pump Display
Pairing
1.Activate Pairing-Mode
on pump
2.Select <Start Pairing>
Start Pairing
Cancel
Pairing
Searching for insulin pump
Found Pump:
SN: 123456789
Accept
Cancel
Meter-Remote Display
Stored meter calculator
settings will be
overwritten by settings
from pump.
Notification
Confirm
Meter-Remote Display
Page 23

Deactivating RF on Your Meter-Remote and Pump
There are times when you might need to deactivate RF on your devices, such as when
you are on an airplane. When you deactivate RF on your devices, they will no longer be
paired, and you will not be able to use your meter-remote to deliver a bolus from your
pump.
Deactivating RF on Your Meter-Remote
Use your meter-remote display and buttons for the next 5 steps.
1. Highlight “Meter Settings” on the Main Menu screen and
press
.
2. Highlight “RF” and press
.
3. Highlight “RF on/off” on the RF Setup screen and press
.
4. With “RF off” highlighted, press
.
5. With “Confirm” highlighted, press
to deactivate RF on your
meter-remote.
RF Set-up
RF on/off
RF Channel
Pairing
RF Test
23
RF communication
deactivated.
Notification
Confirm
RF on/off
The RF is active. Caution!
RF off
Cancel
All communication to
connected RF devices will
be stopped with RF off!
OneTouch
®
Ping
®
System
III
Page 24

Pump Home and Meter Home Screens on Your
Meter-Remote
When RF is activated on both devices and they are paired, the Pump Home screen will
appear whenever the meter-remote is turned on. The Pump Home screen displays a current
snapshot of insulin delivery, along with the units remaining in your pump cartridge.
Deactivating RF on Your Pump
Use your pump display and buttons for the next 2 steps.
1. Highlight “Setup” on the MAIN MENU screen and press
.
Then highlight “Advanced” and press
. Scroll through the
SETUP ADV screens until the SETUP ADV 10 screen appears.
2. Highlight the “RF” field and press
. Use the
/
buttons
to set the “RF” field to “OFF” and press
to deactivate RF on
your pump.
24
OneTouch
®
Ping
®
System
III
SETUP ADV 10
Home
METER
RF
Search
Channel
Next
ON
OFF
7
[ABCD1234]
SETUP ADV 10
Home
METER
RF
Search
Channel
Next
OFF
– – – –
Auto
Page 25

Press
to go to the Meter Home screen which displays your most recent BG test result,
and your average BG test results for the current meal period.
NOTE: Whenever the devices are paired, the Home screens on the meter-remote will
show an RF symbol indicating signal strength.
• Press
to switch between the Pump Home screen and Meter Home screen.
• Press
on either the Pump Home screen or Meter Home screen to go to the Main
Menu screen on your meter-remote.
Main Menu Screen
The Main Menu screen on your meter-remote gives you access to most meter-remote
functions, including those that let you deliver a bolus from your pump.
See page 21 for more information on the Main Menu screen.
25
OneTouch
®
Ping
®
System
III
Page 26

Calculating and Delivering a Bolus
To begin the steps for calculating and delivering a bolus from your meter-remote,
highlight “Bolus” on the Main Menu screen and press
. Then highlight the desired
bolus option on the Bolus Menu screen and press
. You may also choose to calculate
and deliver a bolus right after taking a BG test on your meter-remote. If your devices
become unpaired or if there is a problem with RF communication, you will only be able
to use your meter-remote to calculate (but not deliver) the bolus. See your Owner’s
Booklet for more information.
Normal Bolus
1. Press
to enter the desired bolus amount on the Normal Bolus screen and press .
With “Go” highlighted, press
to deliver the bolus, or press any meter-remote
function button to stop it.
ezCarb
1. Press to manually enter the desired carb amount on the ezCarb
Home screen and press
. Highlight the “I:C” field if you need to
make changes, or highlight “Show Result” and press
.
Bolus Menu
Normal
ezCarb
ezBG
Combo Bolus
Main Menu
JLSmith
Normal Bolus
Amount U
Go
Main Menu
0.00
ezCarb Home
Main Menu
Carbs:
I:C=
Food List
Review Total
Add BG
Show Result
34g
1U:15g
26
OneTouch
®
Ping
®
System
III
Page 27

2. On the Bolus Total screen, choose to deliver the suggested
amount or a different amount. Press
to enter the desired
amount and press .
3. Deliver the ezCarb Bolus as a Normal or Combo Bolus by
setting the desired option in the “Type” field and press
.
With “Go” highlighted, press
to deliver the ezCarb Bolus.
NOTE: Instead of manually entering carb amounts, you may
choose to enter carb amounts from the Food Database by
highlighting “Food list” and pressing
.
Adding a BG Bolus to an ezCarb Bolus
On the ezCarb Home screen, you can choose to add a BG correction bolus to your ezCarb calculation.
1. Highlight “Add BG” on the ezCarb Home screen and press .
On the BG Correct screen, press
to make changes to your
current (Actual) BG level and press . Do the same with your
Target BG and/or your ISF values and press
after each
change.
2. With “Show Result” highlighted, press
. You will return to
the Bolus Total screen, with the calculated BG correction units
appearing in the “BG” field.
Bolus Total
Main Menu
Carb
BG
IOB
Total
2.25U
+ 2.70U
––.––U
= 4.95U
Go
Type Normal
0.00 U
27
Bolus Total
Main Menu
Carb
BG
IOB
Total
2.25U
+ 2.70U
––.––U
= 4.95U
Go
Type Normal
4.95 U
BG Correct
Main Menu
Actual
Target
=
IS Factor
Show Result
12.2 mmol/L
-6.6 mmol/L
+5.6 mmol/L
2.1 mmol/L
BG Correct
Main Menu
Actual
Target
=
IS Factor
Show Result
12.2 mmol/L
-6.6 mmol/L
+5.6 mmol/L
2.1 mmol/L
OneTouch
®
Ping
®
System
III
Page 28

ezBG
1. On the ezBG screen, highlight the “Actual,” “Target,”
and/or “IS Factor” fields if you need to make changes, and
press
after each change. With “ Show Result” highlighted,
press
to display the ezBG Total screen with the suggested
bolus amount.
2. Press
to enter the desired bolus amount and press
.
With “Go” highlighted, press
to deliver the ezBG Bolus.
ezBG
Actual
Target
=
IS Factor
Show Result
Main Menu
12.4 mmol/L
-6.6 mmol/L
+5.8 mmol/L
2.1 mmol/L
ezBG Total
BG
IOB
Total
Go
Main Menu
2.80U
––.––U
2.80U
2.80U
=
+
Combo Bolus
1. Press
to enter the desired bolus amount on the Combo
Bolus screen and press . Highlight the “Duration” or
“Norm:Ext” fields if you need to make changes and press
after each change.
2. With “Go” highlighted, press
to deliver the Combo Bolus.
Combo Bolus
Total
Duration
Norm:Ext
Go
Main Menu
8.50U
0.5Hr
0 : 100%
0.00 : 8.50U
Combo Bolus
Total
Duration
Norm:Ext
Go
Main Menu
8.50U
0.5 Hr
30 : 70%
2.55 : 5.95U
28
OneTouch
®
Ping
®
System
III
Page 29

29
Checking Pump and Meter-Remote Status
You can review the status of various pump functions directly on your meter-remote. You
can also verify your meter-remote serial number and software version number.
Checking Pump Status
1. Highlight “System Status” on the Main Menu screen and press
.
2. Highlight “Pump Status” and press
to access a series of
insulin delivery status screens.
3. Press
while any status screen number is highlighted and
flashing to go to the next status screen.
Status Screen 1 –
Current (active) basal
Status Screen 2 –
Last bolus and IOB
Status Screen 3 –
Total basal and bolus units
for the current day
System Status
Pump Status
Meter Status
Status
Active Basal
A1-WEEKDAY
24-Hr Total 13.60U
0.675 U/Hr
Insulin 100U
Main Menu
1
Status
IOB= 00U
Last Bolus
Main Menu
N 3.30U
8:35 am
2
Jun 19-06
Status
Delivery Today U100
Main Menu
Temp
Suspend
Bolus
Basal
Total
No
No
9.400U
0.200U
9.600U
3
OneTouch
®
Ping
®
System
III
Page 30

Status Screen 4 –
Last Combo Bolus
Status Screen 5 –
Last Temp Basal
Status Screen 6 –
Pump serial number and software
version number
Checking Meter-Remote Status
1. Highlight “Meter Status” on the System Status screen and
press
.
Your meter-remote serial number and software version
number will appear.
System Status
Pump Status
Meter Status
Status
Temp Basal
Main Menu
Start
End
Change
4:00pm
6:00pm
-50%
5
Jun 19-06
ACTIVE
Status
Combo Bolus
Main Menu
Start time
End time
Delivered
12:00pm
2:00pm
8.50 / 8.50U
4
COMPLETED
Jun 19-06
Status
Codes
Main Menu
REV=XXX.XX.XX
S/N# 76543-21
6
30
OneTouch
®
Ping
®
System
III
Page 31

Inside back cover - blank.
Page 32

Customer Service is available
24 hours a day, 7 days a week.
U.S., Canada and Puerto Rico:
1 877 YES-PUMP (937-7867)
Visit us at www.Animas.ca
© 2010 Animas Corporation. All rights reserved.
Covered by U.S. patent 6,656,148, other patents pending.
OneTouch® Ultra® is a trademark of Johnson & Johnson.
Energizer
®
is a trademark of the Eveready Company.
P/N: 410-181-51 Rev. A
Rev. Date: 09/2010
410-181-51
Distributed in Canada by:
200 Whitehall Drive
Markham, ON L3R 0T5, Canada
Tel: 1-866-406-4844
Fax: 1-866-406-4033
Email: CustomerCare@Animas.ca
200 Lawrence Drive
West Chester, PA 19380, USA
Manufactured by:
 Loading...