

Page 1
r
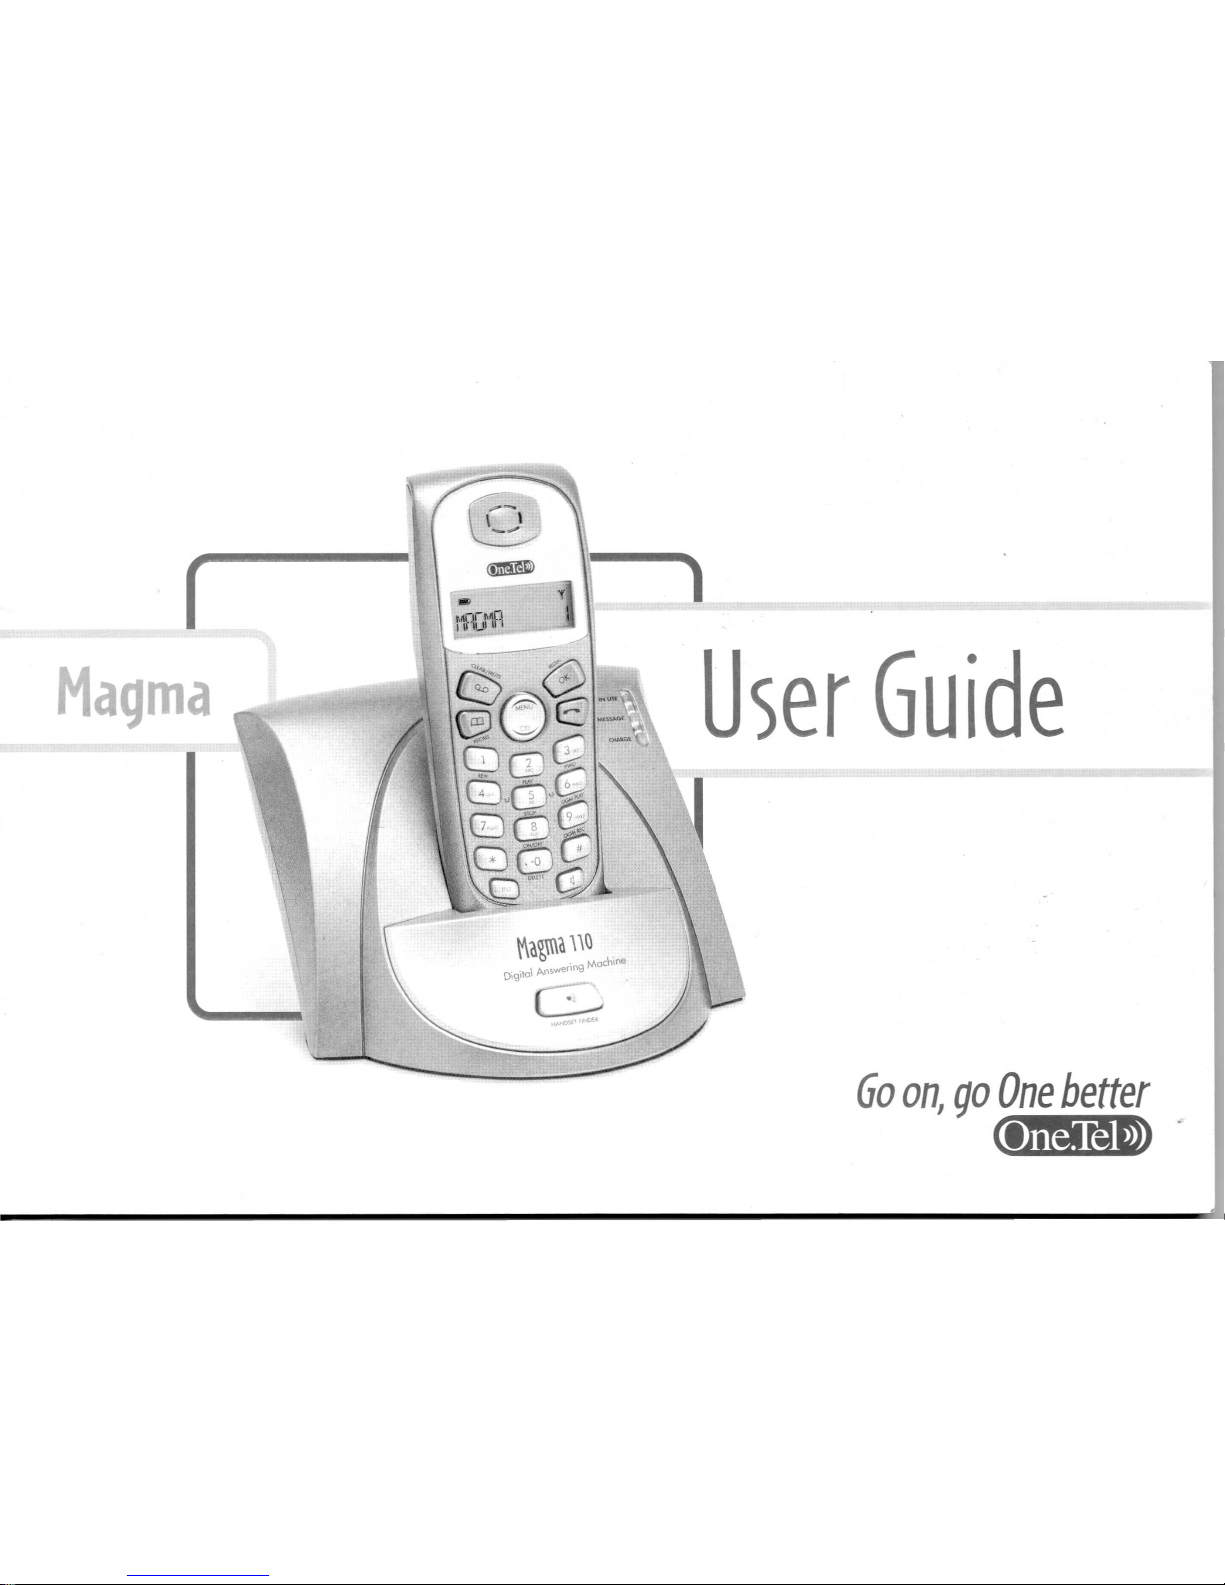
Magma
User Guide
Go
on
go Onebetter
<mID ~
Page 2
Welcome ...
Introducing your Magma Digital Cordless
Telephone with Answering Machine
from One.Tel
• Crystal clear digital sound quality
• Caller ID, to see who's calling before you pick up
the phone
• 10 Last number redial
• 40 Name and number phonebook, to store and dial your
most frequently used numbers.
• Answering machine with remote operation facility
This user guide will show you how to use any of the
following models: Magma 110, Magma 210, Magma 310
or Magma 410. It contains all the information you need,
explained simply to help you get the most from your phone.
Helpline
0845 226 7794
(local call rate)
What's in the box:
• Magma handset
• Magma base
• 2 x AAA NiMH rechargeable batteries (1.2v 650 mAh)
• Battery cover
• Power supply
• Telephone line cord
For
each
additional handset,
you
will have the following:
• Magma additional handset
• Magma charger
• 2 x AAA NiMH rechargeable batteries (1.2v 650 mAh)
IMPORTANT
This equipment is not designed for making c'l1ergency calls when
the power foils. Alternative arrangements s, ould be mode for
access to emergency services.
Page 3
Contents
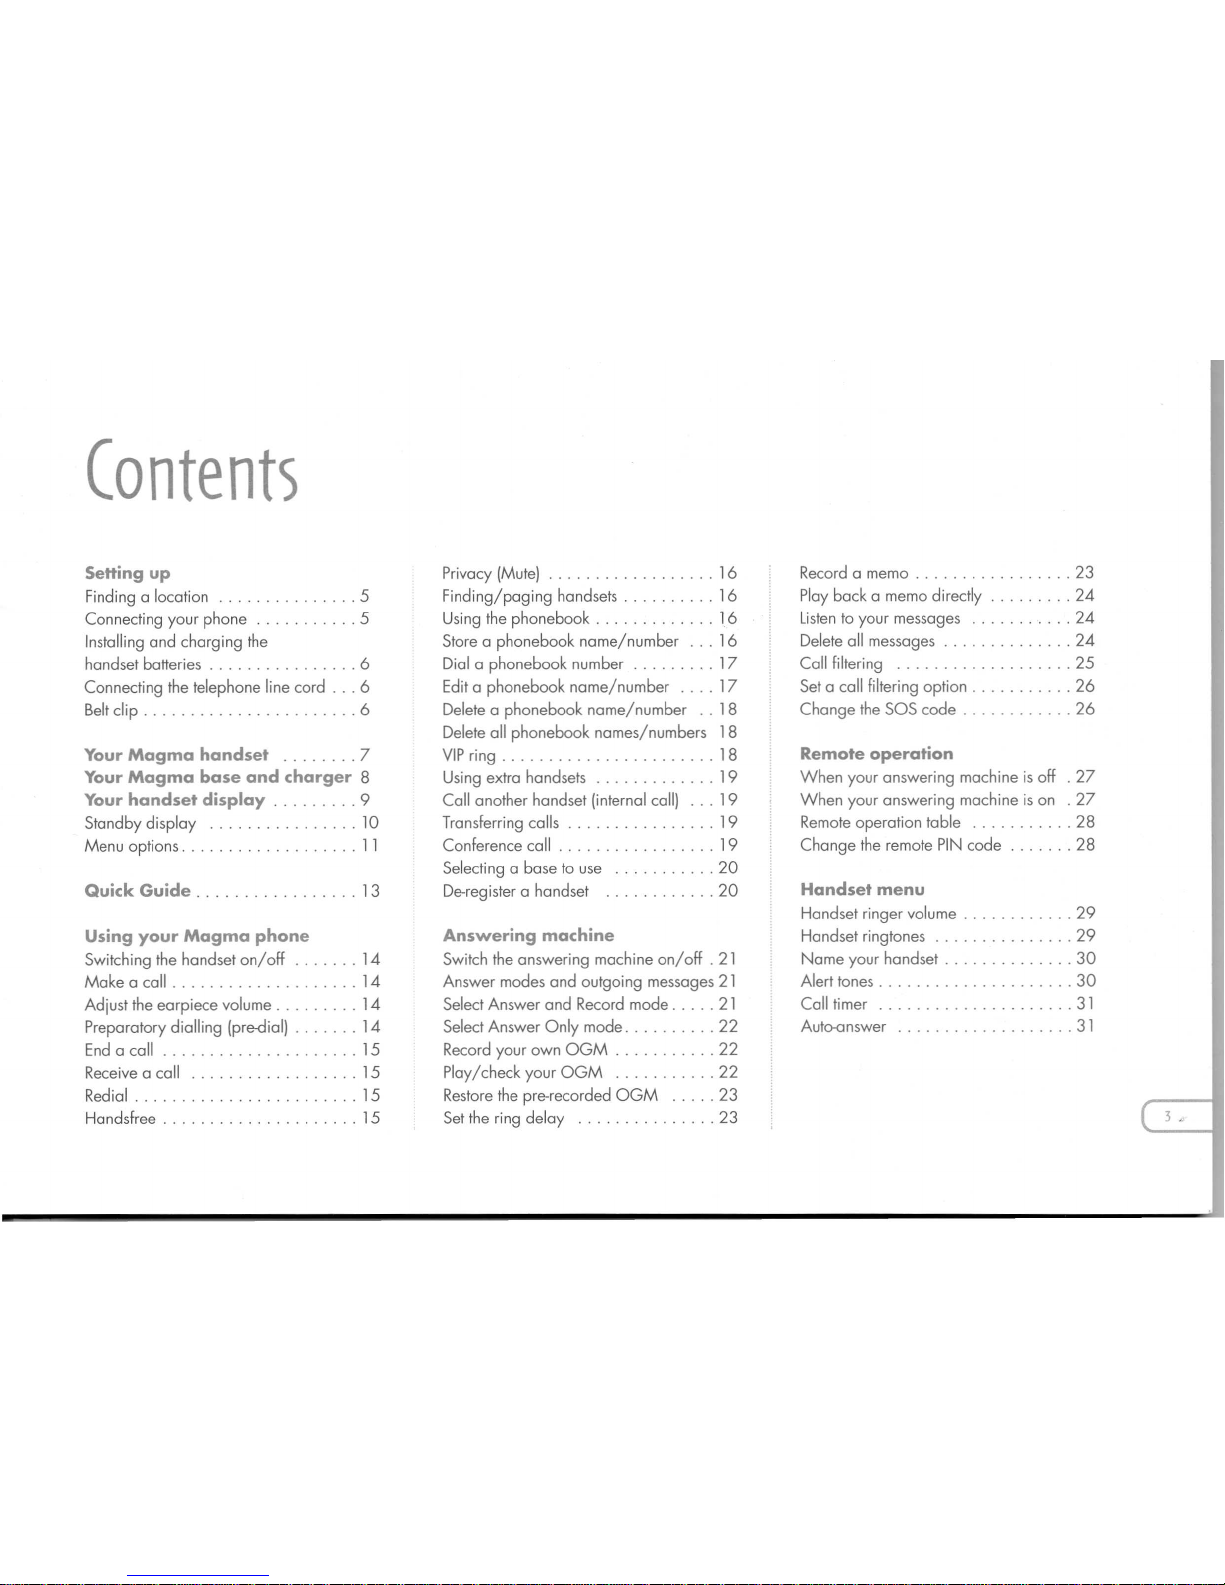
Setting up
Finding a lacation 5
Connecting your phone 5
Installing and charging the
handset batteries 6
Connecting the telephone line cord 6
Belt clip 6
Your Magma handset ... . .. 7
Your Magma base and charger 8
Your handset display 9
Standby display 10
Menu options 11
Using your Magma phone
Switching the handset on/off 14
Make a call 14
Adiust the earpiece volume. .. . 14
Preparatory dialling (pre-dial) 14
End a call 15
Receive a call 15
Redial 15
Handsfree . . . . . . . . . . . . . 15
Privacy (Mute) 16
Finding/paging handsets 16
Using the phonebook 16
Store a phonebook name/number 16
Dial a phonebook number 17
Edit a phonebook name/number 17
Delete a phonebook name/number .. 18
Delete all phonebook names/numbers 18
VIP ring 18
Using extra handsets 19
Call another handset (internal call) 19
Transferring calls 19
Conference call 19
Selecting a base to use 20
De-register a handset 20
Answering machine
Switch the answering machine on/off. 21
Answer modes and outgoing messages 21
Select Answer and Record mode. .. 21
Select Answer Only mode 22
Record your own OGM 22
Play/check your OGM 22
Restorethe pre-recorded OGM 23
Set the ring delay 23
Record a memo . 23
Play back a memo directly 24
Listento your messages 24
Delete all messages 24
Call filtering 25
Set a call filtering option. . 26
Change the SOS code 26
Remote operation
When your answering machine is off . 27
When your answering machine is on . 27
Remote operation table 28
Change the remote PIN code 28
Handset menu
Handset ringer volume 29
Handset ringtones 29
Name your handset 30
Alert tones. . . . . . . . . . . . . . . . 30
Call timer 31
Auto-answer . 31
Page 4
Contents
Setting up
Finding a location 5
Connecting your phone . . . . . .. 5
Installing and charging the
handset batteries 6
Connecting the telephone line cord 6
Belt clip 6
Your Magma handset
7
Your Magma base and charger
8
Your handset display
9
Standby display 10
Menu options. .. . 11
Using your Magma phone
Switching the handset on/off . .. .. 14
Make a call. . . . . . 14
Adjust the earpiece volume 14
Preparatory dialling (pre-dial). . 14
End a call 15
Receive a call .......•.. 15
Redial 15
Handsfree 15
Privacy (Mute) 16
Finding/paging handsets 16
Using the phonebook 16
Store a phonebook name/number 16
Dial a phonebook number 17
Edit a phonebook name/number 17
Delete a phonebook name/number .. 18
Delete all phonebook names/numbers 18
VIP ring. . 18
Using extra handsets 19
Call another handset (internal call) 19
Transferring calls . . . . . . . . . . . 19
Conference call . . . . .. 19
Selecting a base to use ..... 20
De-register a handset .. 20
Answering machine
Switch the answering machine on/off. 21
Answer modes and outgoing messages 21
Select Answer and Record mode. . .. 21
Select Answer Only mode 22
Record your own OGM 22
Play/check your OGM 22
Restorethe pre-recorded OGM 23
Set the ring delay 23
Record a memo. . 23
Play back a memo directly 24
Listento your messages 24
Delete all messages 24
Call filtering . .. 25
Set a call filtering option. . 26
Change the SOS code 26
Remote operation
When your answering machine is off
When your answering machine is on
Remote operation table ....
Change the remote PIN code
.27
.27
.28
....... 28
Handset menu
Handset ringer volume 29
Handset ringtones 29
Name your handset 30
Alert tones 30
Call timer 31
Auto-answer 31
Page 5
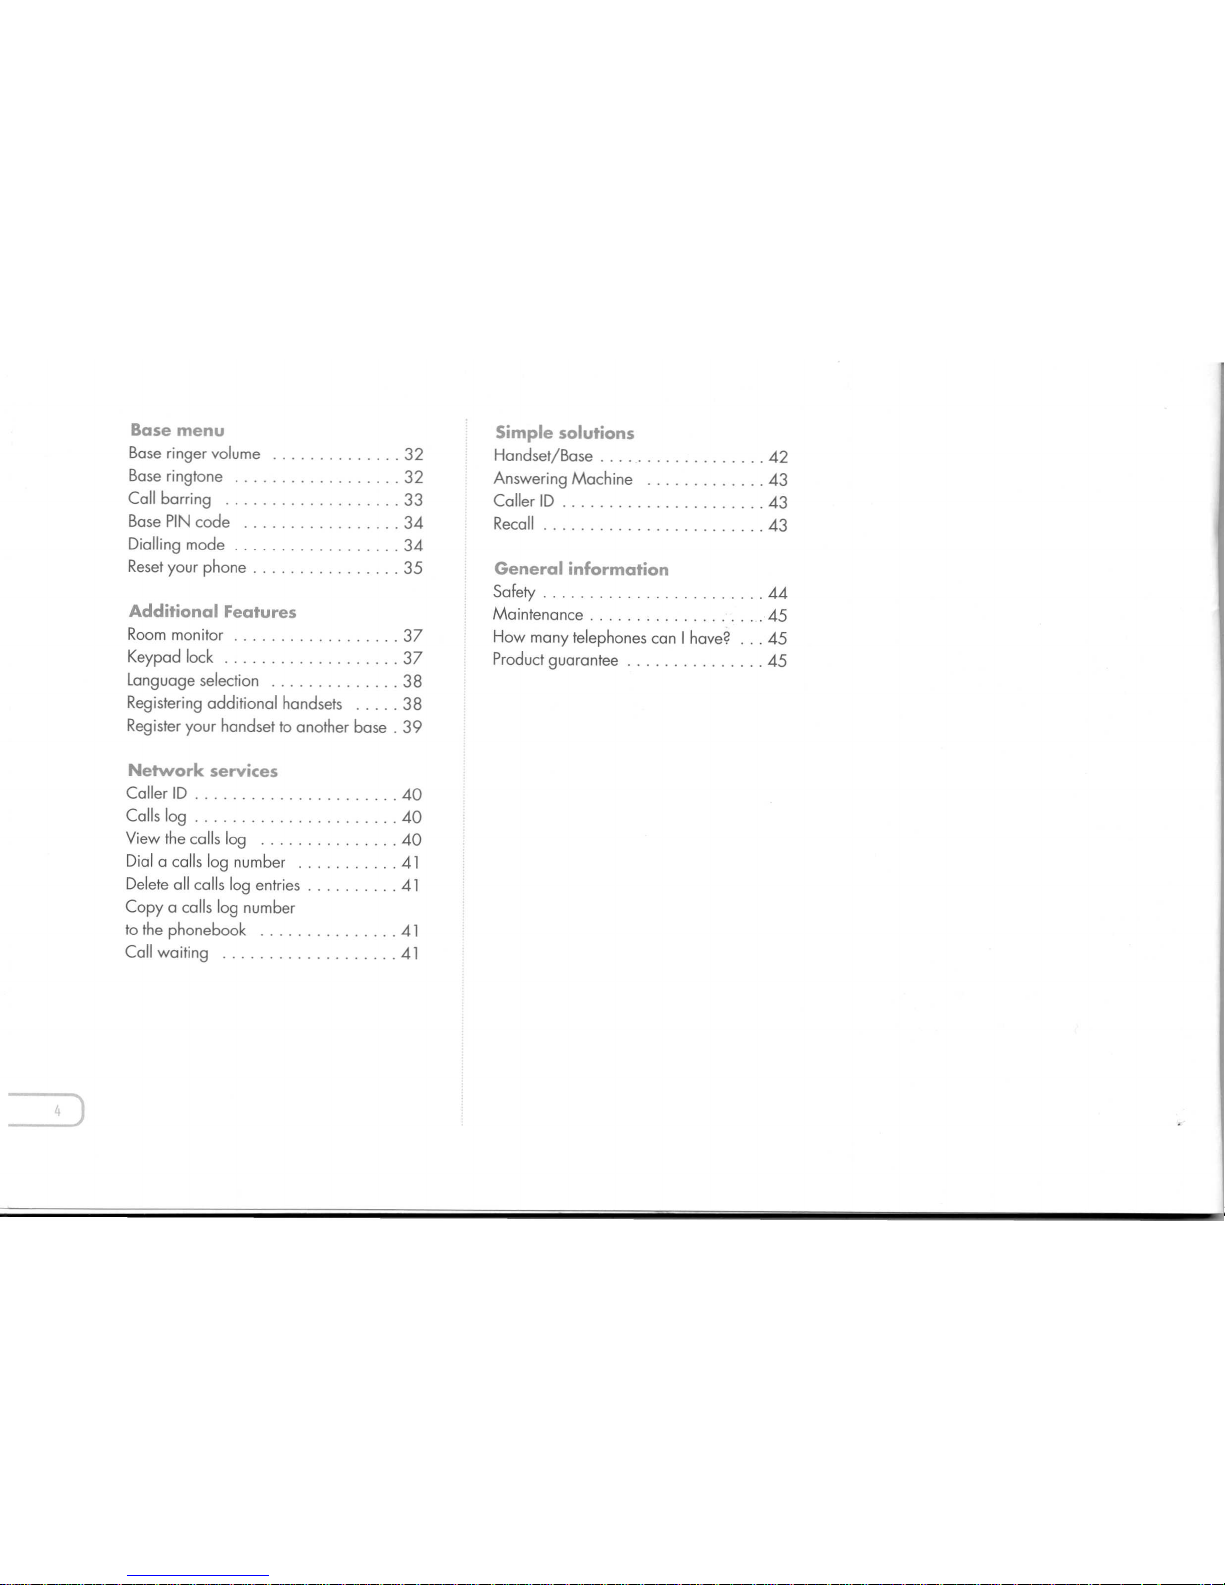
Base menu
Base ringer volume 32
Base ringtone 32
Call barring 33
Base PIN code 34
Dialling mode 34
Resetyour phone 35
Additional Features
Room monitor 37
Keypad lock . 37
Language selection 3B
Registering additional handsets 38
Register your handset to another base. 39
Network services
Caller ID 40
Calls log 40
View the calls log 40
Dial a calls log number 41
Delete all calls log entries 41
Copy a calls log number
to the phonebook 41
Call waiting 41
4 )
Simple solutions
Handset/Base 42
Answering Machine 43
Caller ID 43
Recall . . . . . . . . . . . . . . . . .. 43
General information
Safety . . . 44
Maintenance 45
How many telephones can I have? 45
Product guarantee . . . . 45
Page 6
Setting
up
Follow these simple steps to prepare your
phone(s) ready for use.
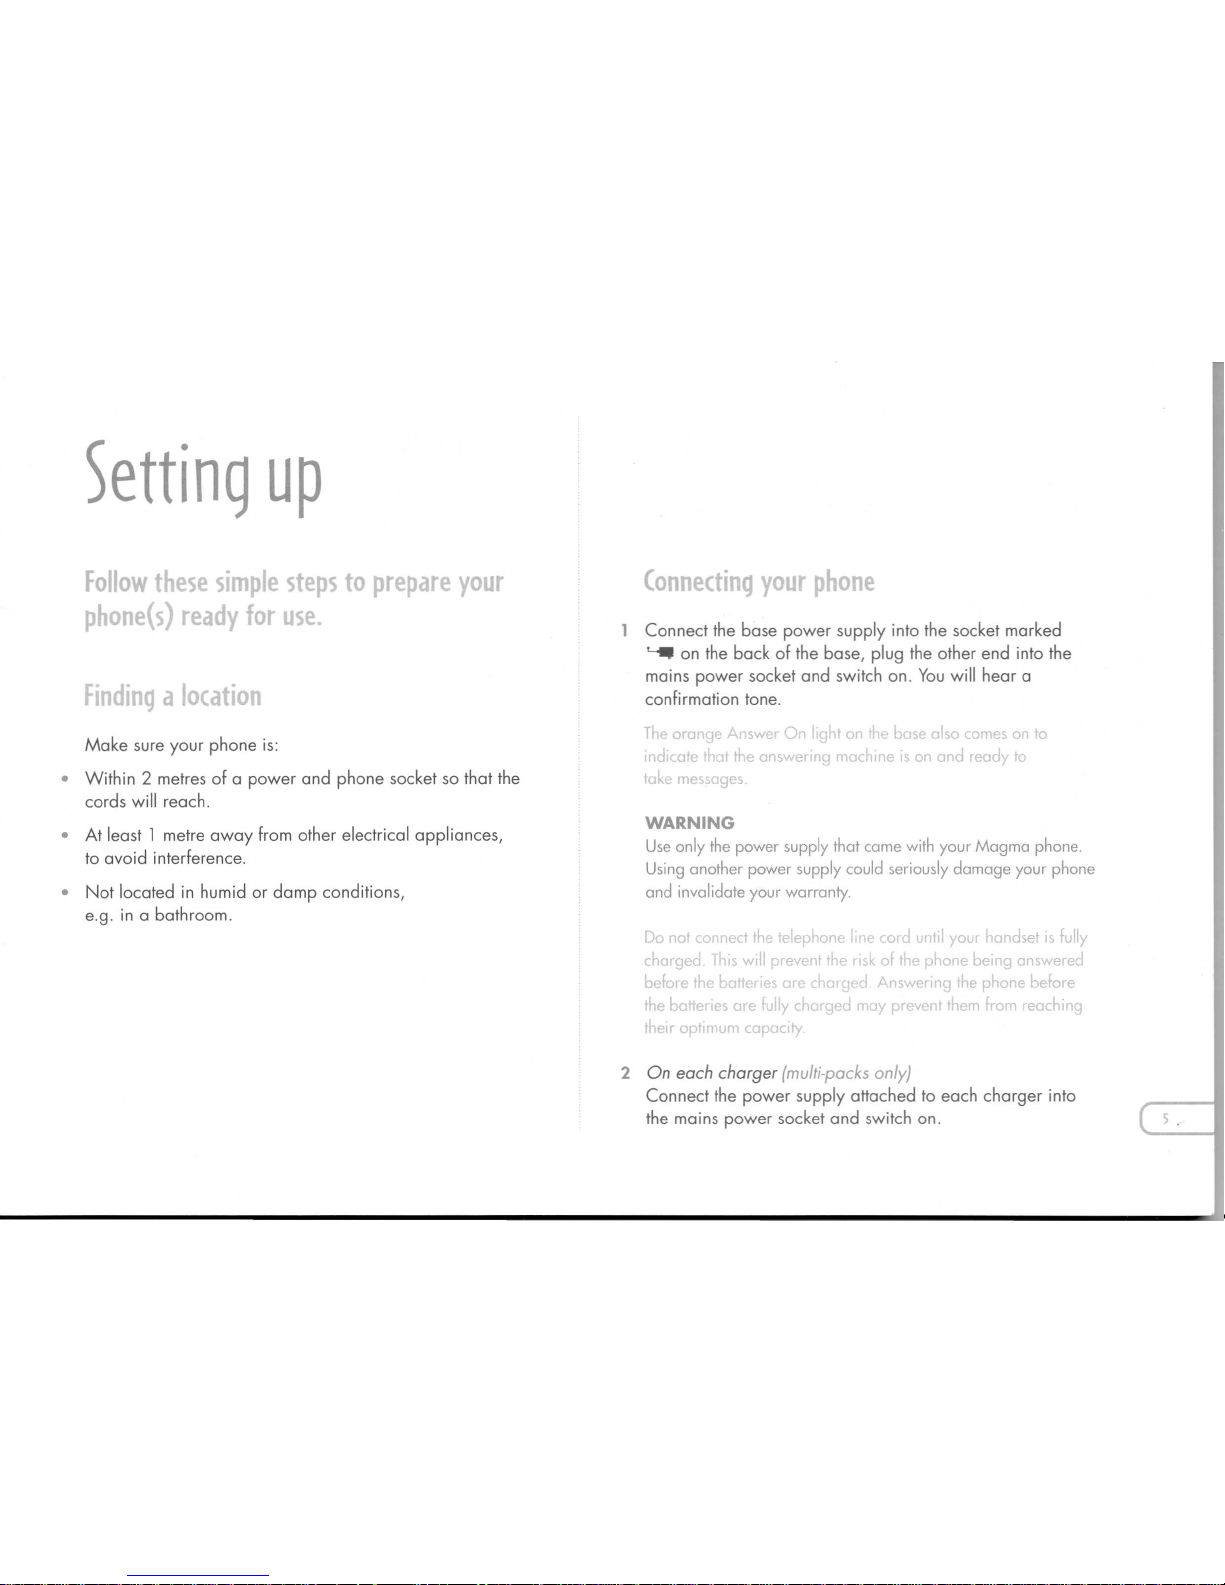
Connecting your phone
Finding a location
Connect the base power supply into the socket marked
'-" on the back of the base, plug the other end into the
mains power socket and switch on. You will hear a
confirmation tone .
Make sure your phone is:
• Within 2 metres of a power and phone socket so that the
cords will reach.
• At least1metre away from other electrical appliances,
to avoid interference.
.h orc...::Je,...,.swel _. lig lt on
I
1('
base olso comes on
'0
indicate t~at
'le
answerlllg Mach leISon o"d ready to
tak<)messages.
• Not located in humid or damp conditions,
e.g. in a bathroom.
WARNING
Use only the power supply that came with your Magma phone.
Using another power supply could seriously damage your phone
and invalidate your warranty.
Do not ("rmeet the IElepnonc
'le
cOld mtil your handset) fully
c~orged r~ls will prevent
"le
,k01t~" phon" belr g answered
before 'he be••e' ~s ore c~or~ec A".werl11g the phone before
'he ba ,>rlesore 'ully (hor~€'d nay prev€'lt'h>onfron reaching
t
elr apt''l1UM capac')'
2 On
each charger (multi-packs only)
Connect the power supply attached to each charger into
the mains power socket and switch on.
Page 7
Preparingthe handsets
Battery Performance
The handset may become warm during charging, this is normal
On a single charge your handset will give approx.12t,ours talk
time and 130 hours stondby time.
i'lew NiMH battenes do 'lot read- thel full capacity until they
have been In use fa! several days
Over time, a' the Oattene< woo out, the charge capacity will
reduce, so 'educlng thE'talklsta 1dby t'me of the handset
EventuallyIley w' 'led to be rEplaced
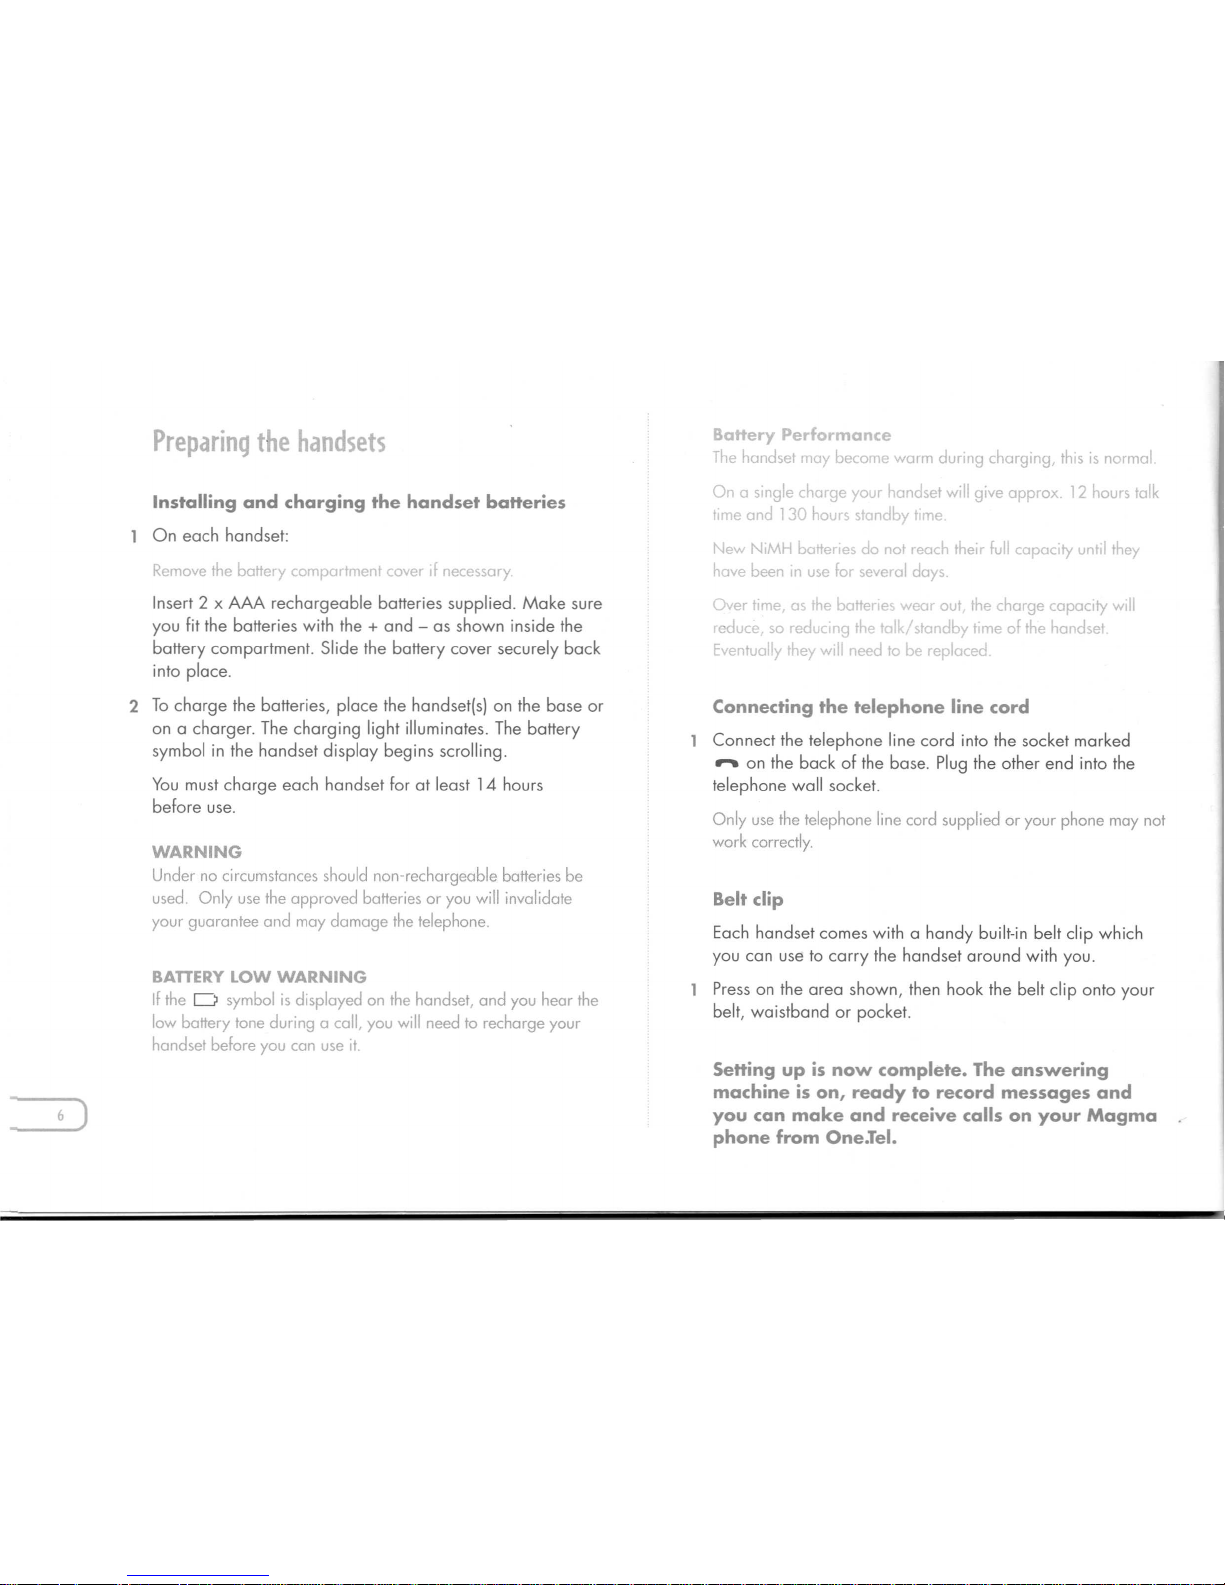
Installing and charging the handset batteries
On each handset:
Remove the battery COlp<tmen :over f necessary.
Insert 2 x AAA rechargeable batteries supplied. Make sure
you fit the batteries with the+and - as shown inside the
battery compartment. Slide the battery cover securely back
into place.
2 To charge the batteries, place the handset(s) on the base or
on a charger. The charging light illuminates. The battery
symbol in the handset display begins scrolling.
You must charge each handset for at least 14 hours
before use.
WARNING
Under no circumstances should non-rechargeable batteries be
used. Only use the approved batteries or you will invalidate
your guarantee and may damage the telephone.
Connecting the telephone line cord
Connect the telephone line cord into the socket marked
- on the back of the base. Plug the other end into the
telephone wall socket.
Only use the telephone line cord supplied or your phone may not
work correctly.
BATTERYLOW WARNING
If the 0 symbol is displayed on the handset, and you hear the
low battery tone during a call, you will need to recharge your
handset before you can use it.
Belt clip
Each handset comes with a handy built-in belt clip which
you can use to carry the handset around with you.
Press on the area shown, then hook the belt clip onto your
belt, waistband or pocket.
Setting up is now complete. The answering
machine is on, ready to record messages and
you can make and receive calls on your Magma
phone from One.Tel.
Page 8
Your
Magma handset
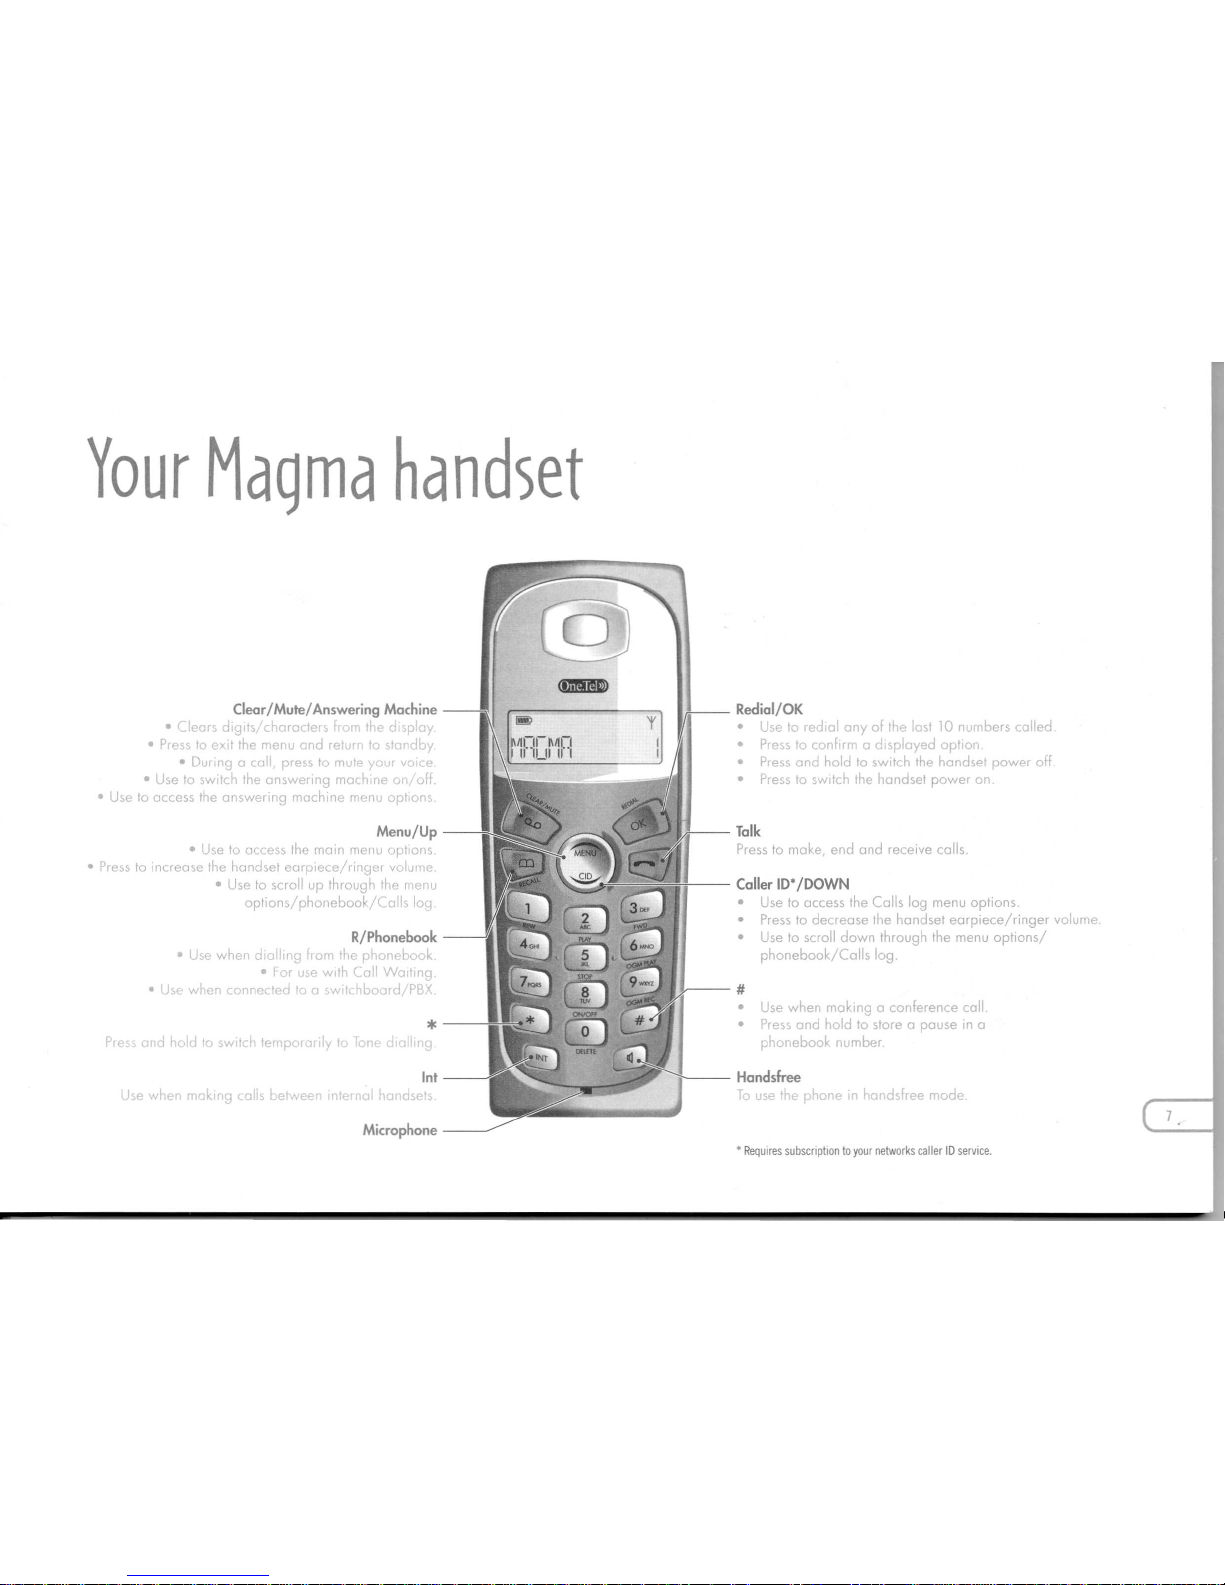
Clear/Mute/Answering Machine
• r.leol
digits,
Ira tel
• P'ess le, ,,,;1 the menu and reurr te c
tly
• DUring a call press to mute
y)1l1 VOI
:e
• Use to sWitch the answering mach, le ai/oH .
• Use to access the answering machine menu option'
Menu/Up
• Use to access the malO menu options
• Press to increase the handset earpiece/ringer volume
• Use to scroll up through the menu
options/phonebook/Calls log
R/Phonebook
• Use when dl' dlir 8 from the pi onebook
• For use w,tI Call HaltIng
• USE woen connected to 0 sw le '::>0"d 'PB:'
Use when making a conference call
Press and hold to store a pause in a
phonebaak number
~
~Handsfree
US"
the r hi le m hnndsfree mode
Redial/OK
Use to redial any of the last 10 nl mbers called
Press to confirm a displayed option
Press and hold la switch the handset power oH
Press to SWitch the handsel power on .
Talk
Press to make, end and receive calls .
Caller ID' /OOWN
Use to access the Calls log menu options.
Press to decrease the handset earpiece/ringer volume.
Use to scroll down through the menu options/
phonebook/Calls log .
Page 9
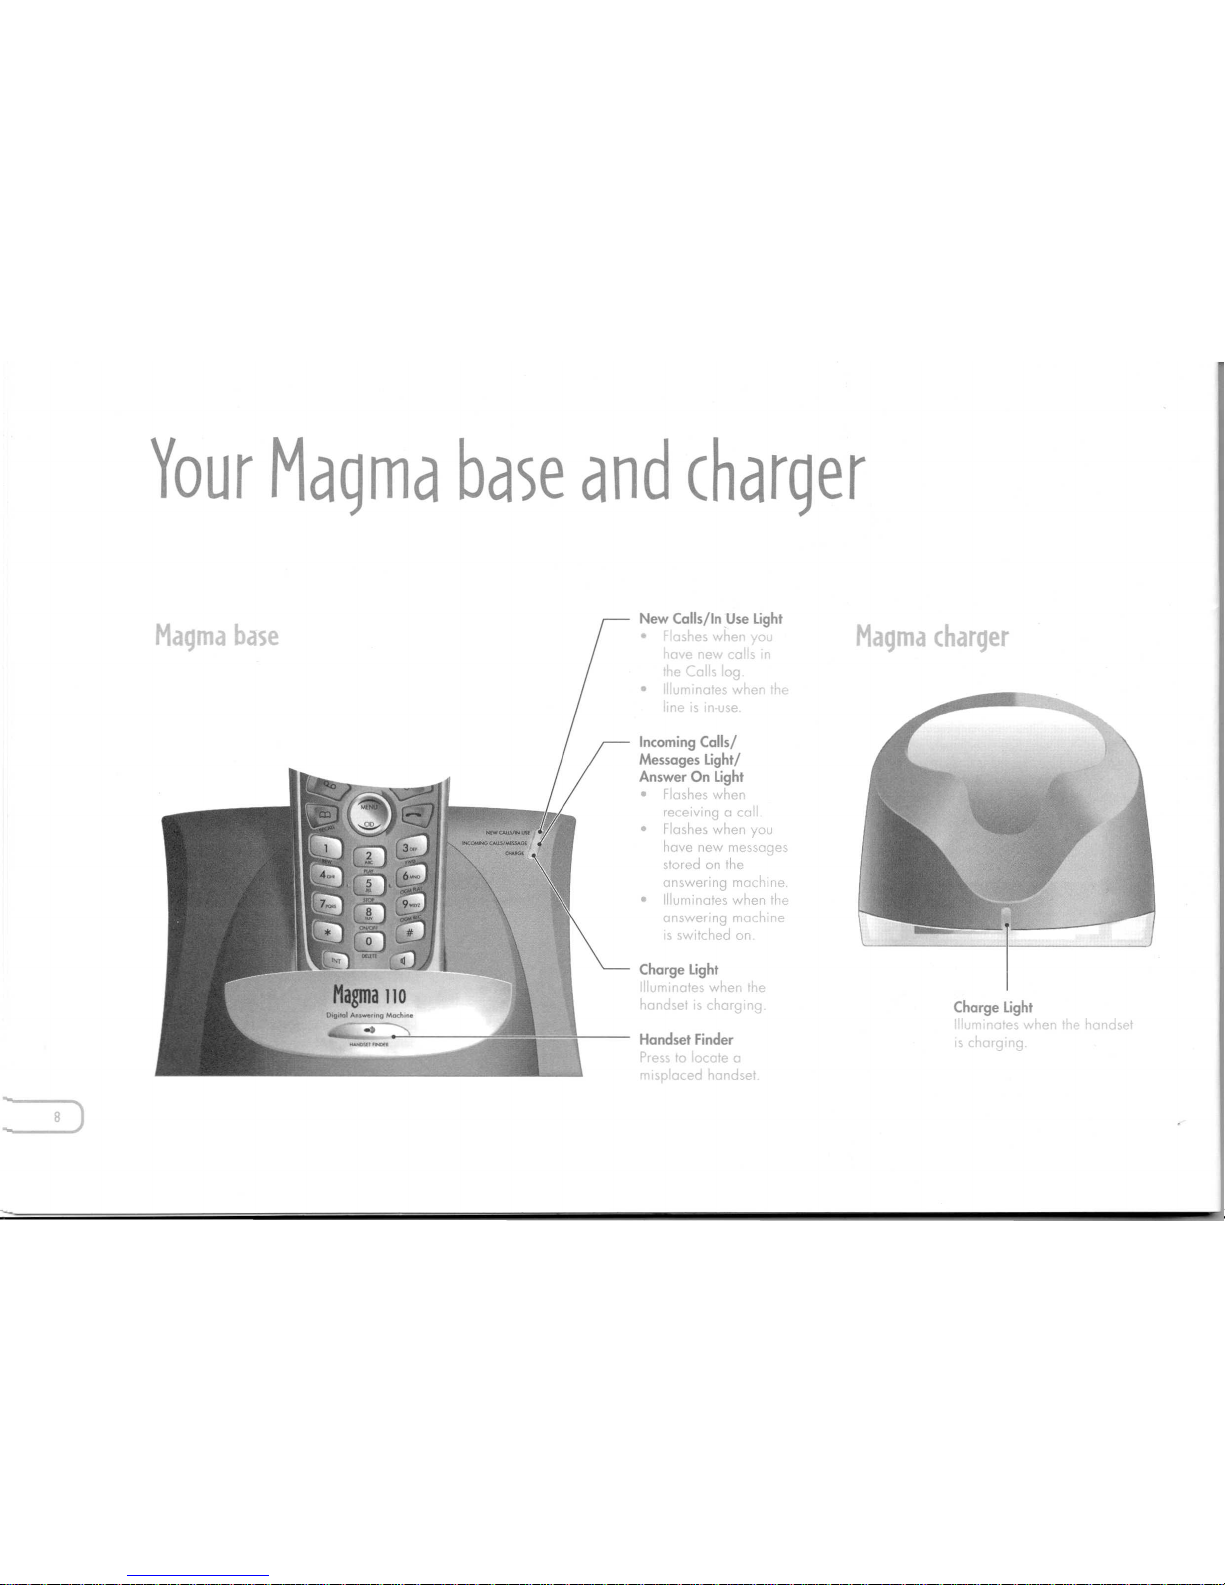
Your Magma base and charger
Magma base
New Calls/In Use light
le
a
,"€
Col,
log
Iu InQtp$w en th
If
Incoming Calls/
Messages light/
Answer On Light
• Fa .he' when
receiving a col
_"'""'~ • Flashes when you
~QlUJ=
have new messages
"''l
stored on the
answering machine.
• illuMinates when th,
answer;ng ma' hine
s ·"itched on.
Chorge Light
m at, whel he
Handset Finder
te
u
IT I )JUl"
t:'d
L I L ;el
Magma charger
Chorge Light
~te
- :-:'ling
Page 10
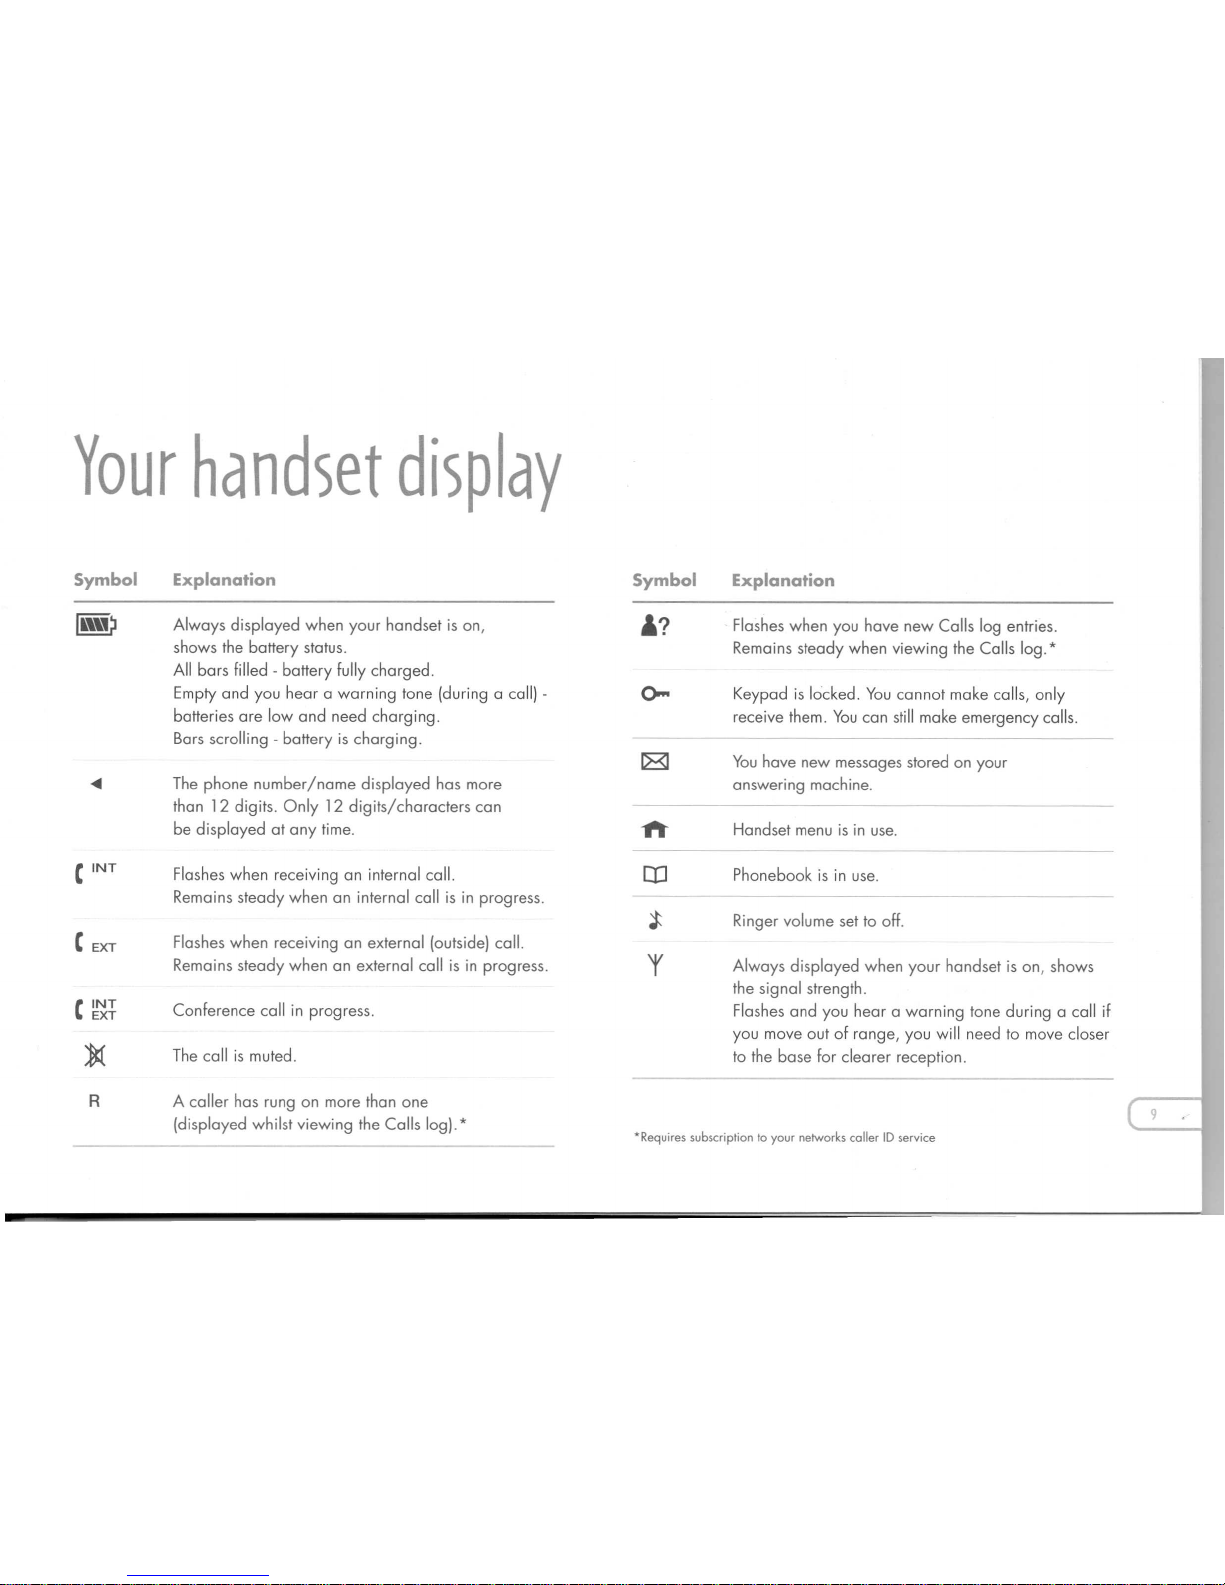
Your
handset display
Always displayed when your handset is on,
shows the battery status.
All bars filled - battery fully charged.
Empty and you hear a warning tone (during a call)-
batteries are low and need charging.
Bars scrolling - battery is charging.
The phone number/name displayed has more
than 12 digits. Only 12 digits/characters can
be displayed at any time.
Flashes when receiving an internal call.
Remains steady when an internal call is in progress.
Flashes when receiving an external (outside) call.
Remains steady when an external call is in progress.
A caller has rung on more than one
(displayed whilst viewing the Calls log). *
Flashes when you have new Calls log entries.
Remains steady when viewing the Calls log. *
Keypad is locked. You cannot make calls, only
receive them. You can still make emergency calls.
You have new messages stored on your
answering machine.
Always displayed when your handset is on, shows
the signal strength.
Flashes and you hear a warning tone during a call if
you move out of range, you will need to move closer
to the base for clearer reception.
Page 11
10 )
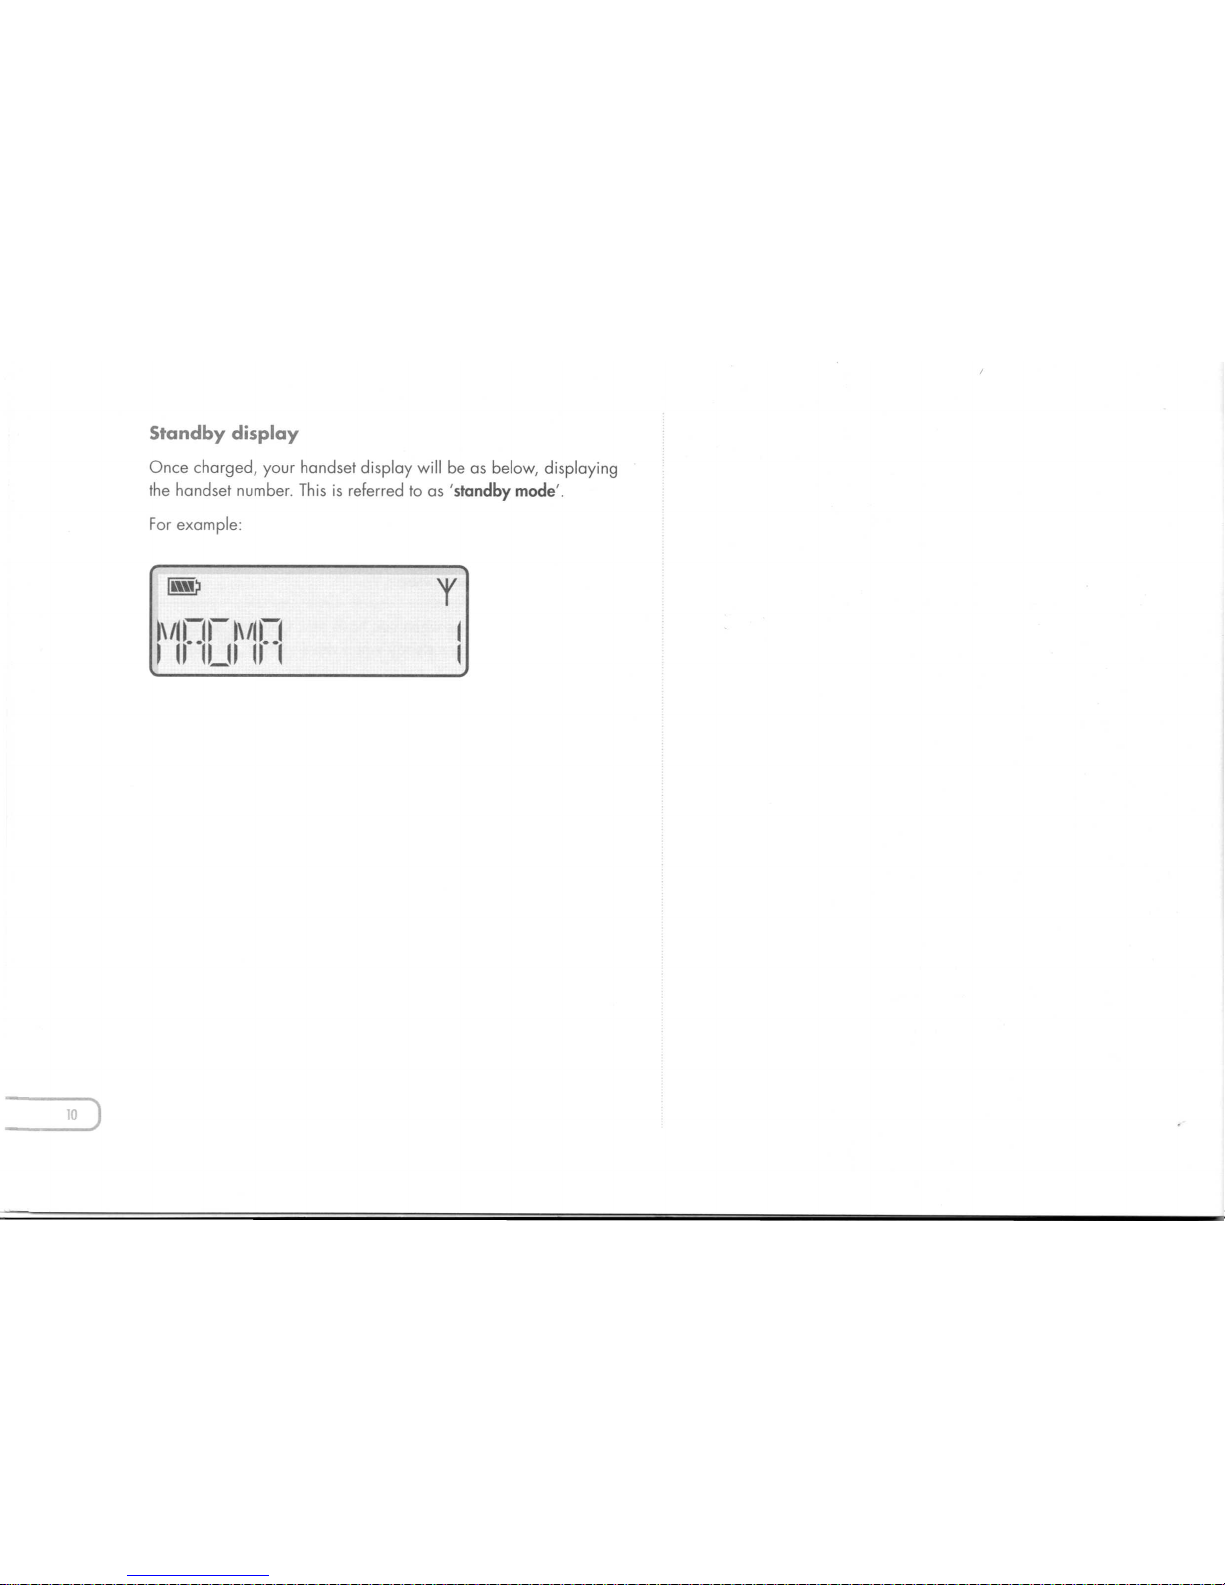
Standby display
Once charged, your handset display will be as below, displaying
the handset number. This is referred to as
'standby
mode'.
For example:
Page 12
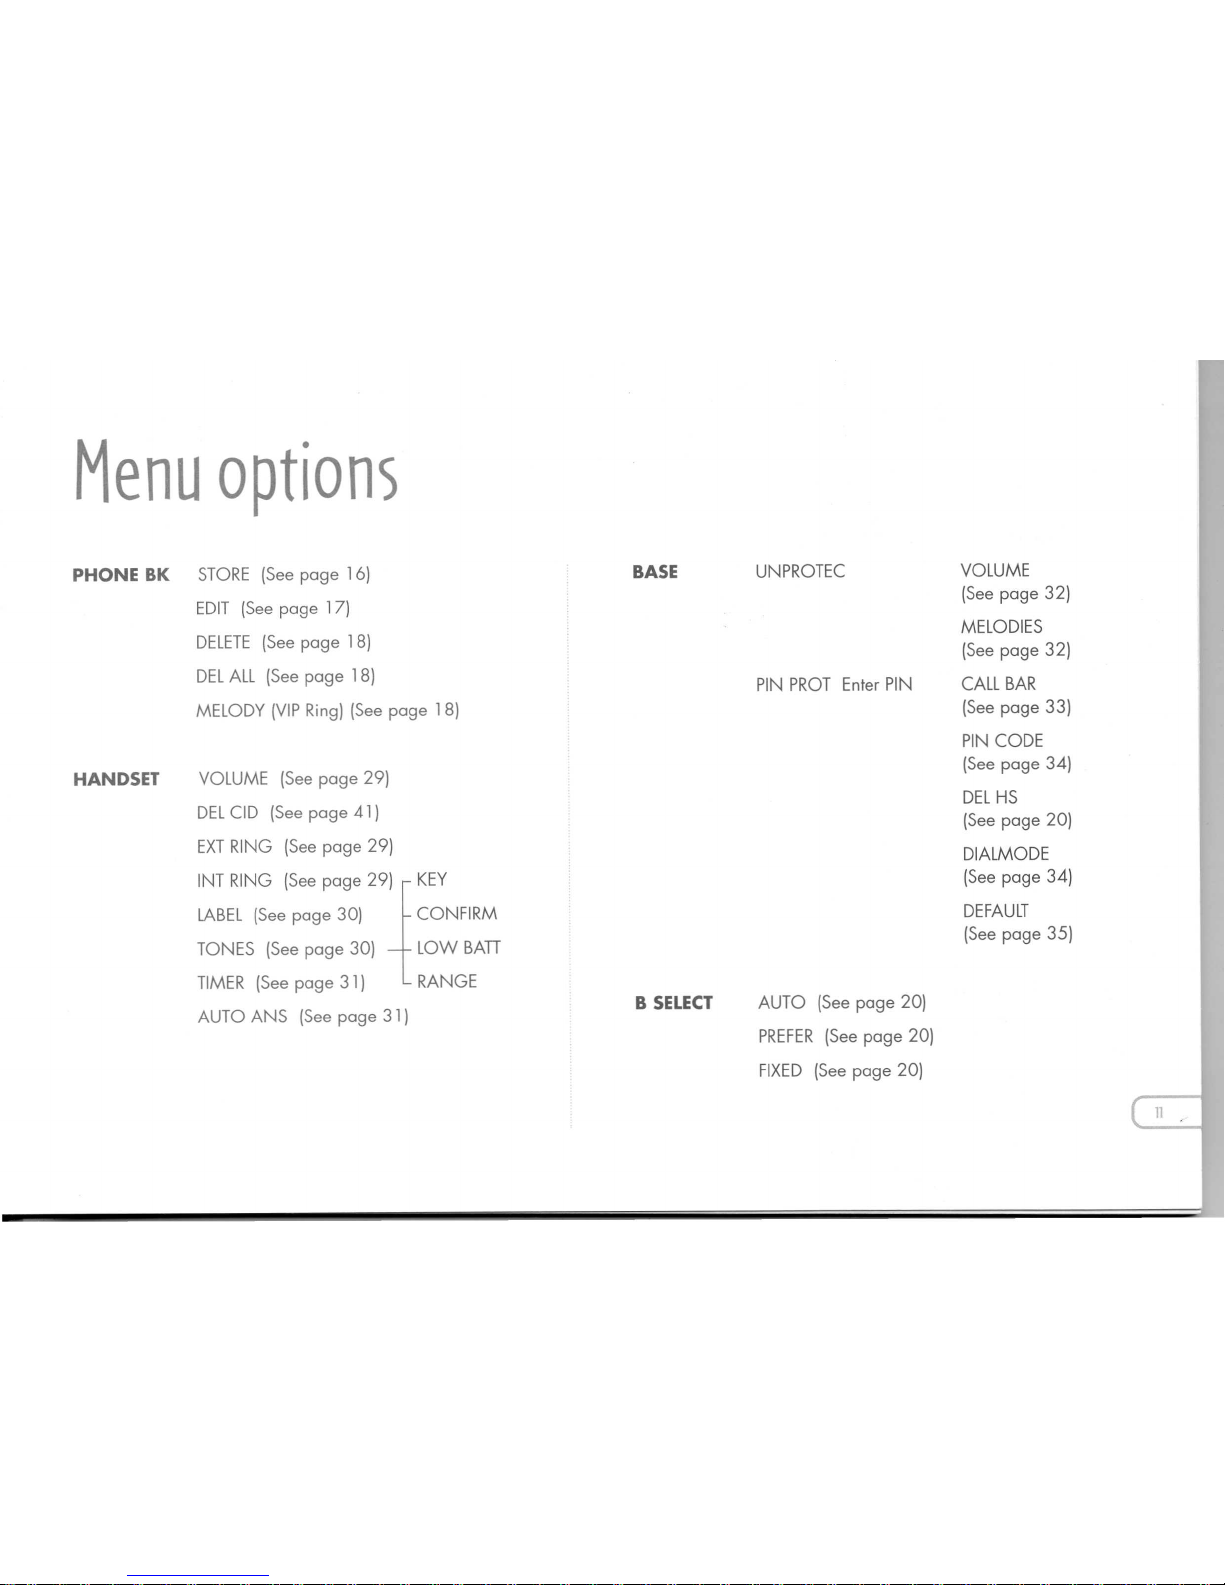
Menu options
PHONE BK
STORE (See page 16)
EDIT (See page 17)
DELETE (See page 18)
DELALL (See page 18)
MELODY (VIP Ring) (See page 18)
HANDSET
VOLUME (See page 29)
DELCID (See page 41)
EXT RING (See page 29)
INT RING (See page
291
KEY
LABEL (See page 30) CONFIRM
TONES (See page 30) LOW BAD
TIMER (See page 31) RANGE
AUTO ANS (See page 31 )
UNPROTEC VOLUME
(See page 32)
MELODIES
(See page 32)
PIN PROT Enter PIN CALL BAR
(See page 33)
PIN CODE
(See page 34)
DEL HS
(See page 20)
DIALMODE
(See page 34)
DEFAULT
(See page 35)
AUTO (See page 20)
PREFER (See page 20)
FIXED (See page 20)
Page 13
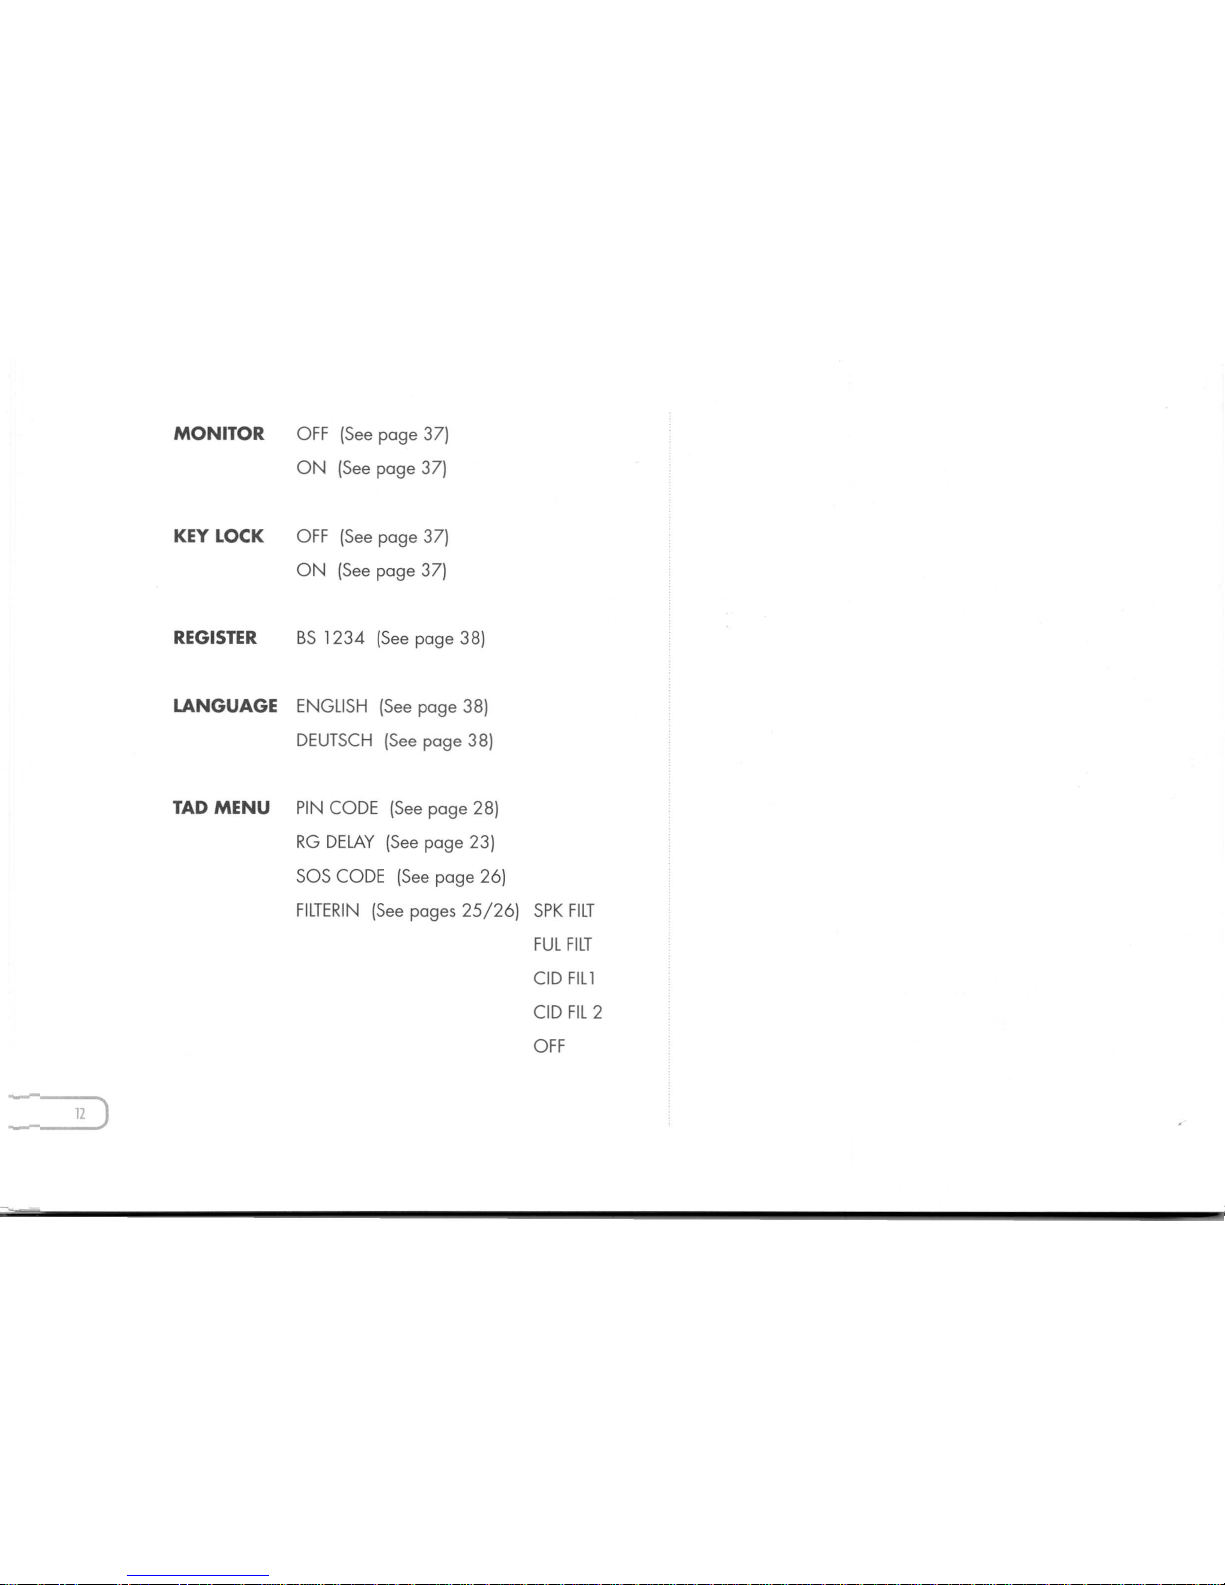
MONITOR
OFF (See page 37)
ON (See page 37)
KEY LOCK
OFF (See page 37)
ON (See page 37)
LANGUAGE
ENGLISH (See page 38)
DEUTSCH (See page 38)
TAD MENU
PIN CODE (See page 28)
RG DELAY (See page 23)
SOS CODE (See page 26)
FILTERIN (See pages 25/26) SPK FILT
FUL FILT
CID FIL1
CID FIL 2
OFF
=
12)
Page 14
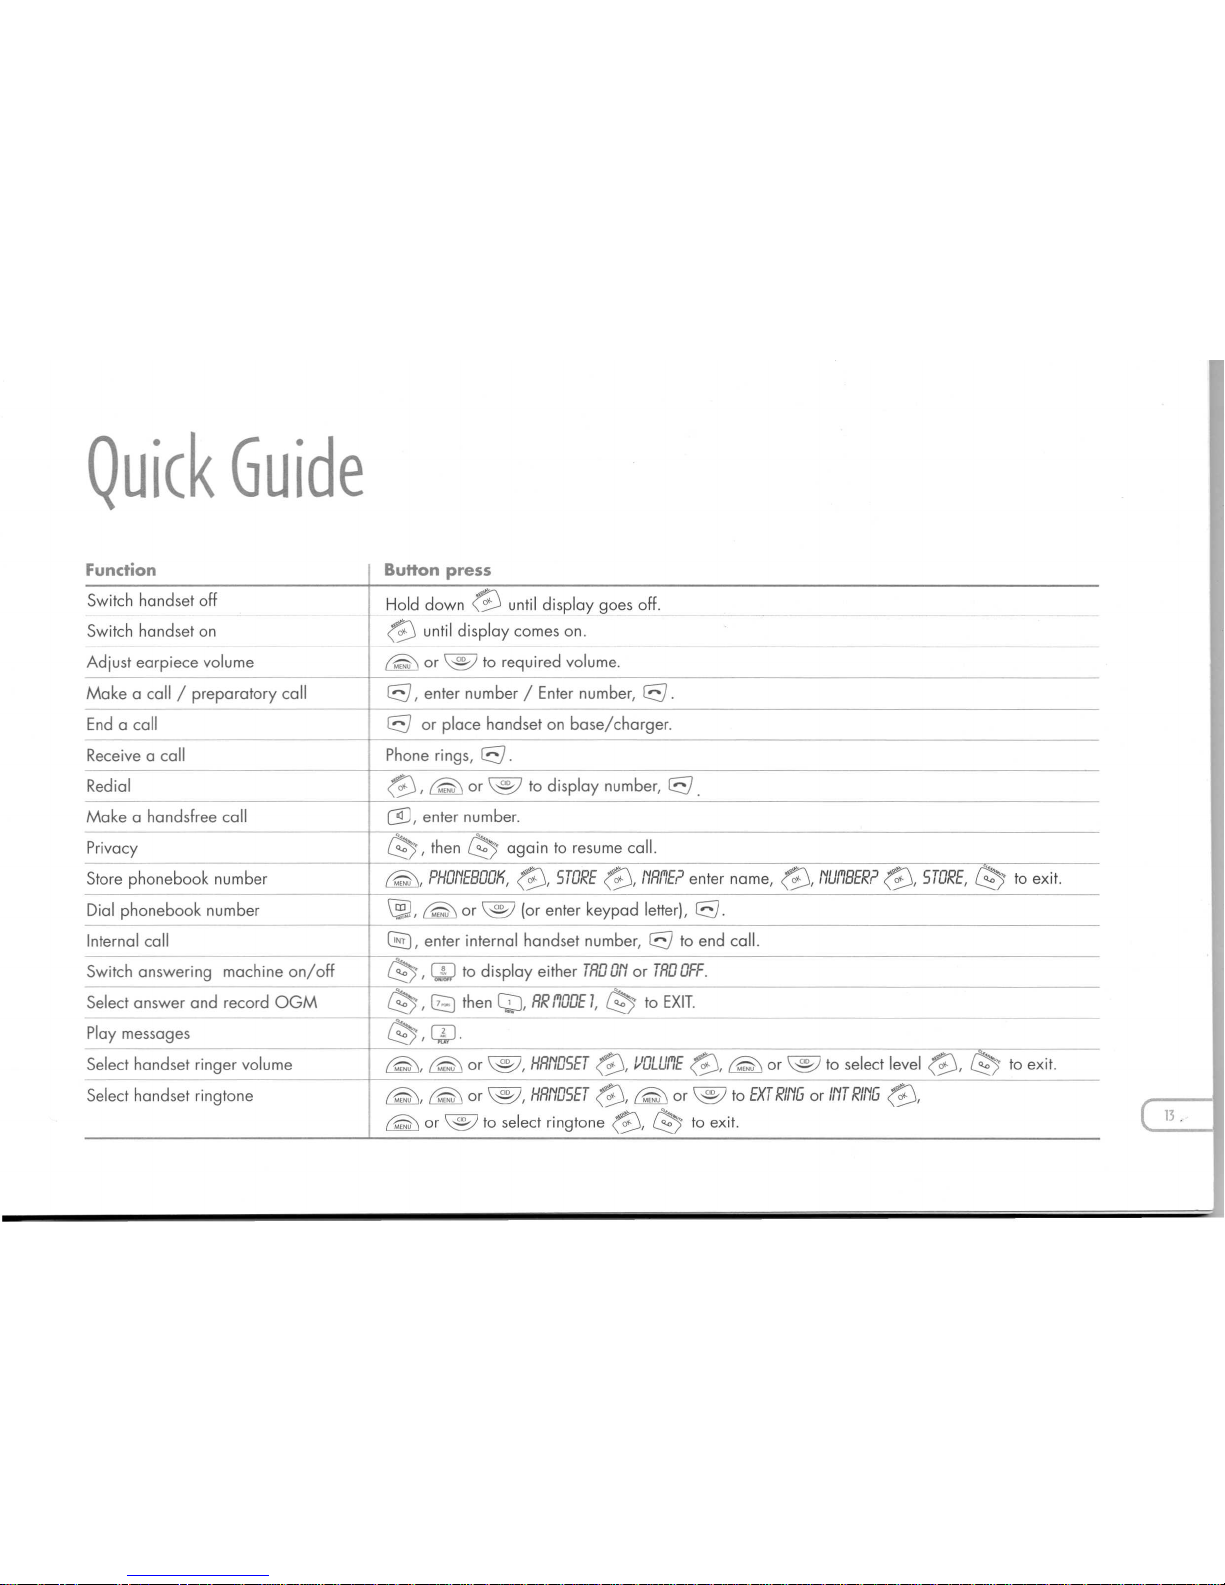
Quick Guide
Function Button press
Switch handset off
Hold down
@
until display goes off.
Switch handset on
@
until display comes on.
Adjust earpiece volume
~ or
@
to required volume.
Make a call / preparatory call
8,
enter number / Enter number,
8.
End a call
8
or place handset on base/charger.
Receive a call Phone rings,
8.
Redial
@, ~
or
@
to display number,
8.
Make a handsfree call
(3],
enter number.
Privacy
t'!;),
then
t'!;)
again to resume call.
Store phonebook number
~, PHONEBOOK,
@,
STORE@,NR/'IE?
enter name,
@,
NU/'IBER?@,STORE,
G!J
to exit.
Dial phonebook number ~, ~ or
@
(or enter keypad letter),
8.
Internal call
GD,
enter internal handset number,
8
to end call.
Switch answering machine on/off
t'!;) ,
UJ
to display either
TROONorTROOFF.
Select answer and record OGM
t'!;) ,
C8
then
CD,
RR /'lODE "
t'!;)
to EXIT
Play messages
t'!;),
QJ.
Select handset ringer volume
~, @
or
@,
HRNOSET@,IJOLU/'IE
@,
@
or
@
to select level
@,
G';)
to exit.
Select handset ringtone ~, ~ or
@,
HRNDSET
@,
@
or
@
to
EXT RINGorINT RING
@,
@
or
@
to select ringtone
@,
t'!;)
to exit.
Page 15
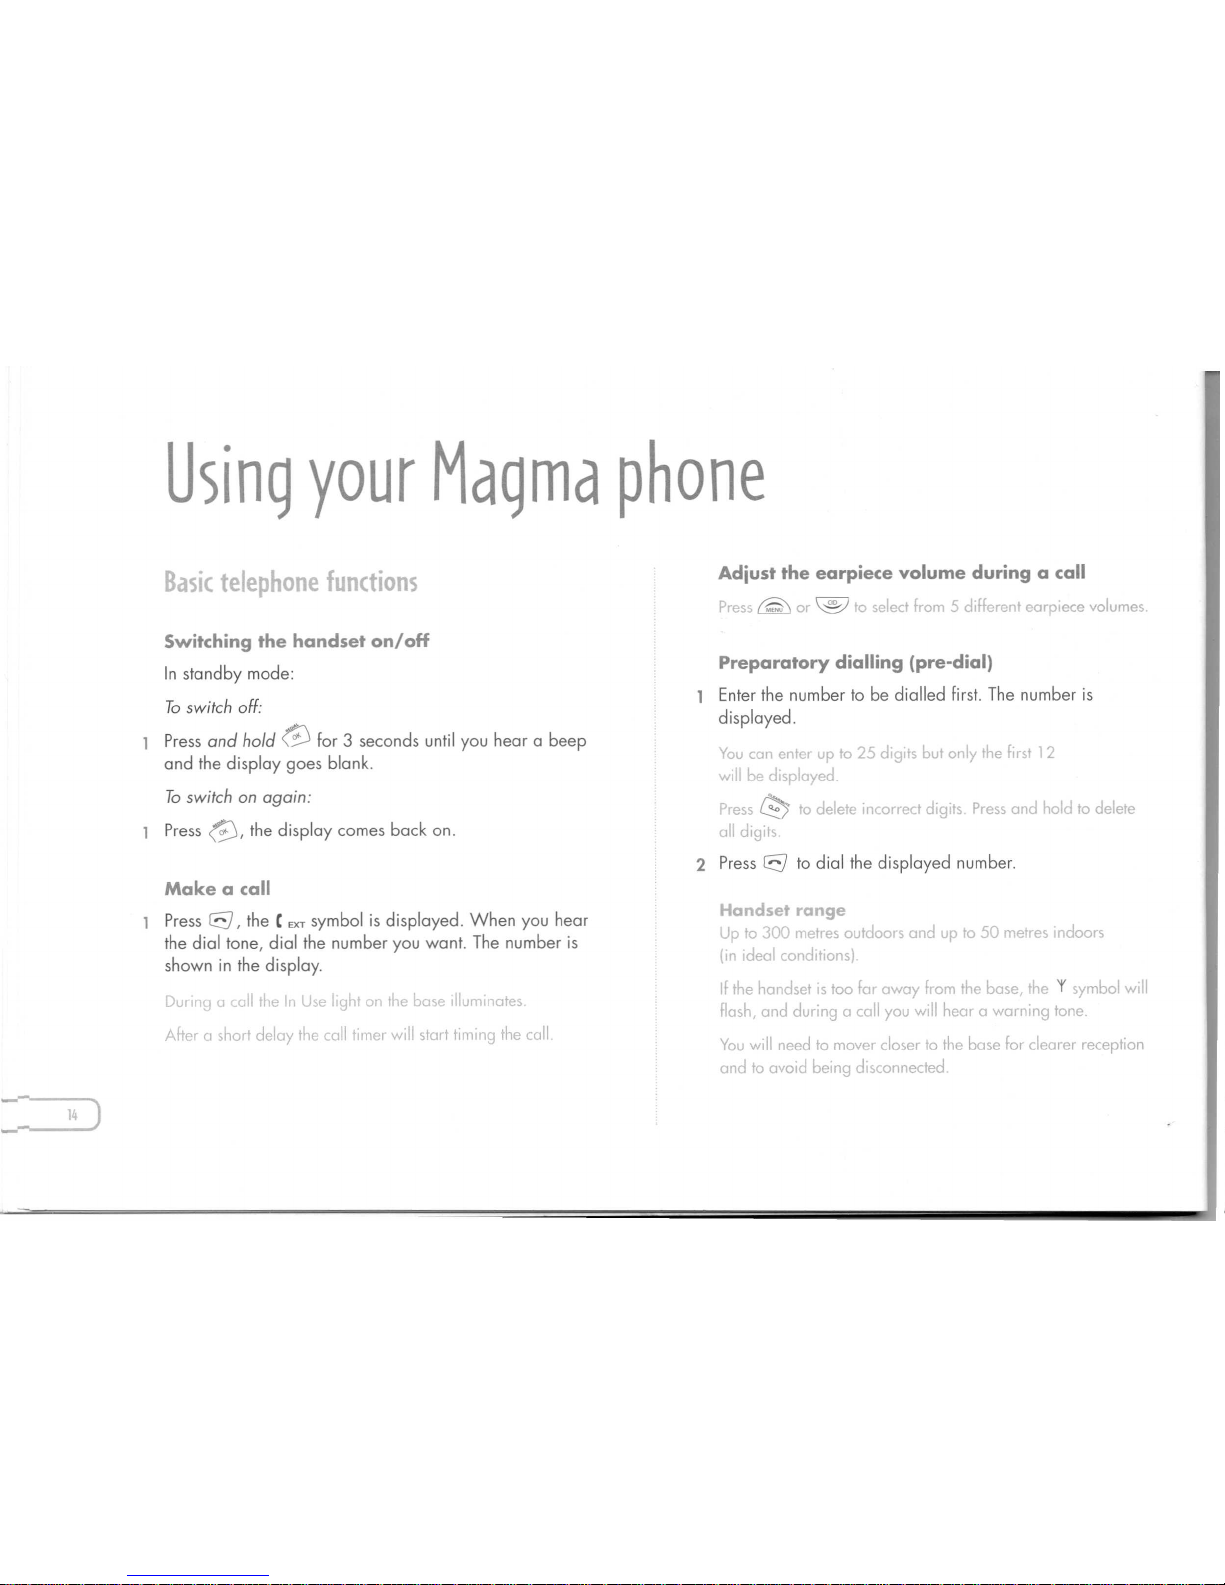
Using your Magma phone
Basic telephone functions
Adjust the earpiece volume during a call
Press
(Q')
or
@
ro select from 5 different earpiece volumes.
Switching the handset on/off
In standby mode:
Toswitch off:
Press
and hold
@
for 3 seconds until you hear a beep
and the display goes blank.
To switchonagain:
Press
@,
the display comes back on.
Preparatory dialling (pre-dial)
Enter the number to be dialled first. The number is
displayed.
You can enter up to 25 digits but only the first 12
WI
be displayed.
Press
0;)
to delete incorrect digits. Pressand hold to delete
all digits
2 Press8to dial the displayed number.
Make a call
Press
8,
the C
EXT
symbol is displayed. When you hear
the dial tone, dial the number you want. The number is
shown in the display.
Dunn\;j
U
<.011
the In Use light on the base Ilumlnates.
After0short delay the coli timer will start timing the call
Handset range
Up to 300 metres outdoors and up to 50 metres indoors
(In Ideal conditions)
If the handset IStoo far away from the base, the'fsymbol will
flash, and during0coli you will hear0warning tone.
You will need to mover closer to the base for clearer reception
and to ovoid being disconnected
Page 16
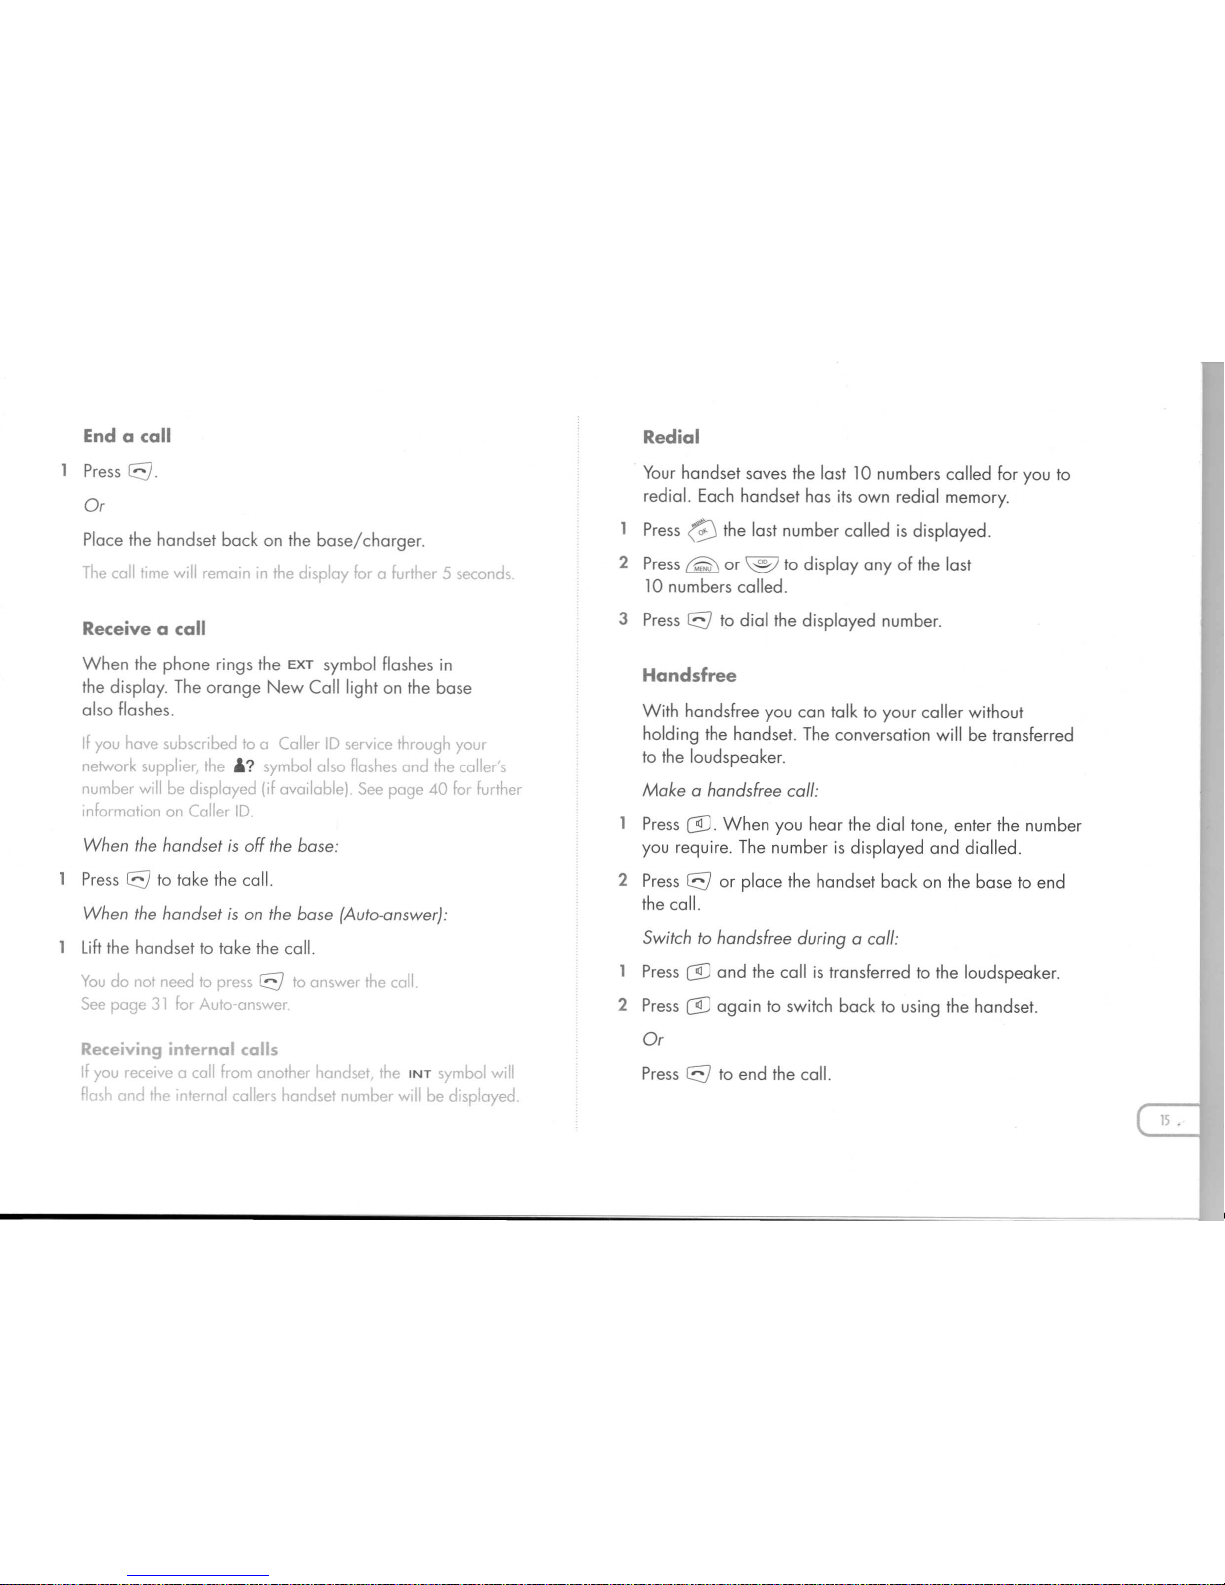
End a call
Press
e.
Or
Place the handset back on the base/charger.
The call lime will remain in the display far a further 5 seconds.
Receive a call
When the phone rings the EXT symbol flashes in
the display. The orange New Call light on the base
also flashes.
If you have subscribed to a Caller ID service through your
network supplier, the
I.?
symbol also flashes and the caller's
number will be displayed (if available) See page 40 for further
information on Caller
ID.
When the handsetisoff the base:
Presseto take the call.
When the handset isonthe base (Auto-answer):
Lift the handset to take the call.
You do not need to presseto answer the call.
See page 31 for Auto-answer
Receiving internal calls
If you receive a call from another handset, the
INT
symbol will
flash and the internal callers handset number will be displayed.
Your handset saves the last 10 numbers called for you to
redial. Each handset has its own redial memory.
Press
@
the last number called is displayed.
2 Press ~ or
@
to display any of the last
10 numbers called.
3 Presseto dial the displayed number.
With handsfree you can talk to yaur caller without
holding the handset. The conversation will be transferred
to the loudspeaker.
Makeahandsfree call:
Press
C~J.
When you hear the dial tone, enter the number
you require. The number is displayed and dialled.
2 Presseor place the handset back on the base to end
the call.
Switch to handsfree duringacall:
Press
(§.:;
and the call is transferred to the loudspeaker.
2 Press
(§.:;
again to switch back to using the handset.
Or
Press
e
to end the call.
Page 17
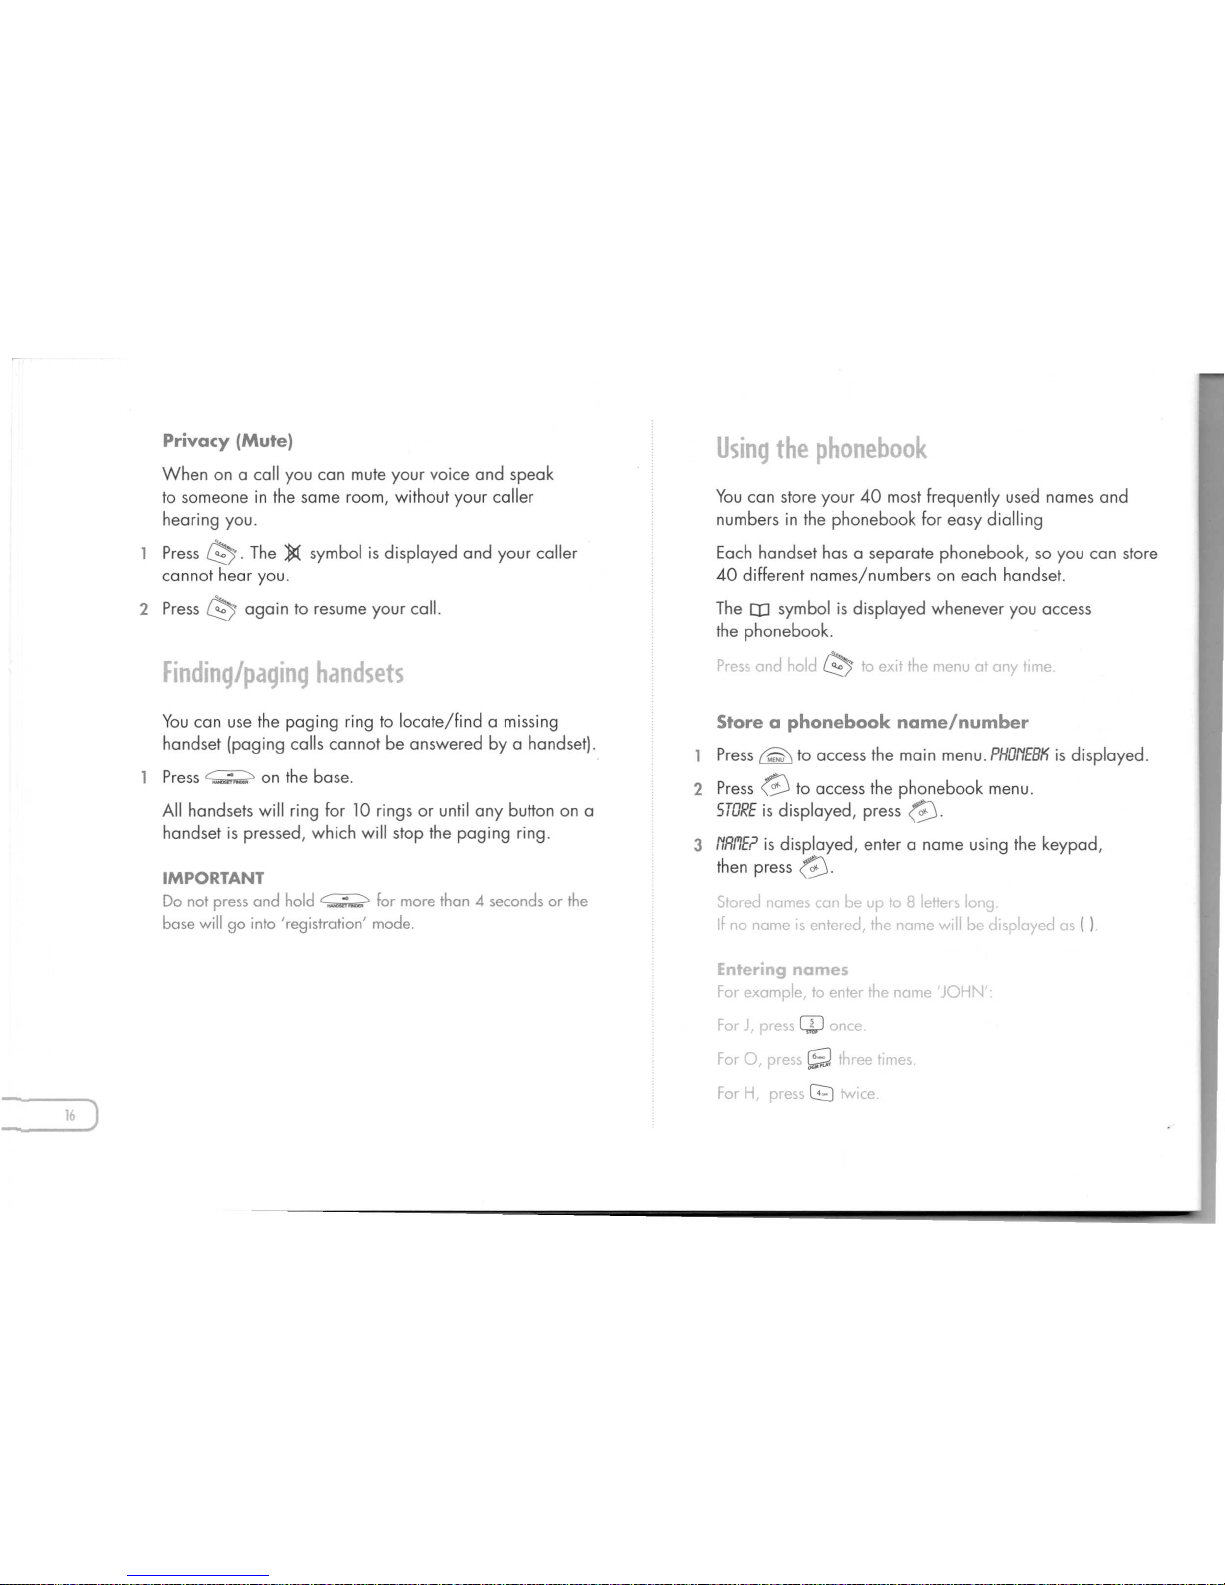
Privacy (Mute)
When on a call you can mute your voice and speak
to someone in the same room, without your caller
hearing you.
Press
e.
The )( symbol is displayed and your caller
cannot hear you.
2 Press
e
again to resume your call.
Finding/paging handsets
You can use the paging ring to locate/find a missing
handset (paging calls cannot be answered by a handset).
Press e:;;;;,;;;;;:,on the base.
All handsets will ring for 10 rings or until any button on a
handset is pressed, which will stop the paging ring.
IMPORTANT
Do not press and hold e:;;;;,;;;;;:,for more than 4 seconds or the
base will go into 'registration' mode.
16 )
Using the
phonebook
You can store your 40 most frequently usea names and
numbers in the phonebook for easy dialling
Each handset has a separate phonebook, so you can store
40 different names/numbers on each handset.
TheCDsymbol is displayed whenever you access
the phonebook.
Pressand hold
e
to eXit the menu at any time.
Stare a phonebook name/number
Press
fQ\
to access the main menu.
PHONEBK
is displayed.
2 Press
@
to access the phonebook menu.
STORE
is displayed, press
@.
3 ,",'RflE?
is displayed, enter a name using the keypad,
then press
@.
Stored lames ca be up to 8 letters long.
If no name is entered, the name will be displayed as ( )
Enteringnames
For example to enter the name 'JOHN'
For J, pressQ)once.
For0,pressSthree times.
For H press8fwlce.
Page 18
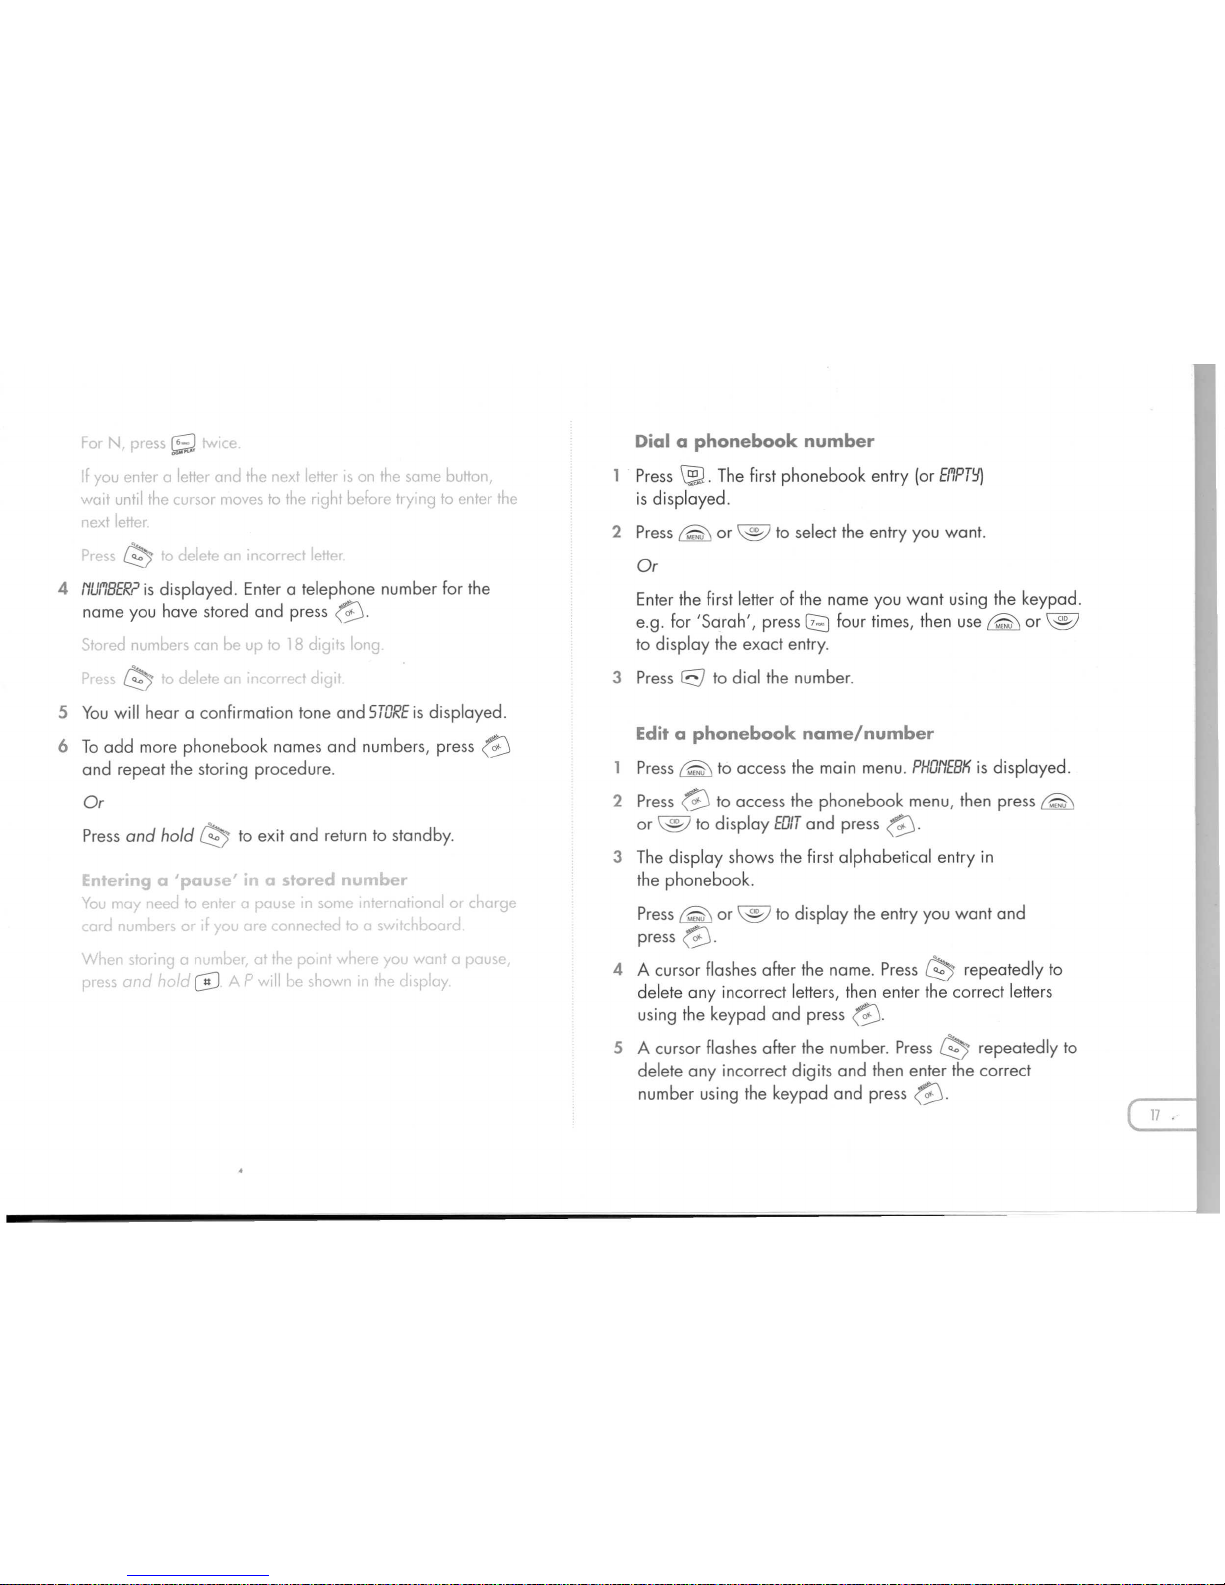
For N, press
S
I'Ilce.
If you enter a letter and the next letter IS on the same button,
wait until the cursor moves to the right before trying to enter the
next letter
4 NUflBER?
is displayed. Enter a telephone number for the
name you have stored and press (;J.
Stored numbers can be up to18dIgit long
t'!;)
10
del -_•••• d,~'
5 You will hear a confirmation tone and
STORE
is displayed.
6 To add more phonebook names and numbers, press (;J
and repeat the storing procedure.
Or
Press and hold
t'!;)
to exit and return to standby.
Enteringa 'pause' in a stored number
You may reetl to entEr a pause in some. lternatlonal or charge
c.ard '1L.mbes or If you are c.onnected to a sw [~':loa d
When storirg a .er, at the POint w'1ere you war,! a pause,
press and hold
GJ
A P will be shown II' thE display
Dial a phonebook number
Press ~. The first phonebook entry (or
EflPTYj
is displayed.
2 Press
fQ\
or
@
to select the entry you want.
Or
Enter the first letter of the name you want using the keypad.
e.g. for 'Sarah', press
C!3
four times, then use
rQ\
or
@
to display the exact entry.
3 Press
rE)
to dial the number.
Edit a phonebook name/number
Press
fQ\
to access the main menu.
PHONEBK
is displayed.
2 Press (;J to access the phonebook menu, then press
fQ\
or
@
to display
EDIT
and press (;J.
3 The display shows the first alphabetical entry in
the phonebook.
Press
fQ\or@
to display the entry you want and
press
@.
4 A cursor flashes after the name. Press
t'!;)
repeatedly to
delete any incorrect letters, then enter the correct letters
using the keypad and press
@.
5 A cursor flashes after the number. Press
t'!;)
repeatedly to
delete any incorrect digits and then enter the correct
number using the keypad and press
@.
Page 19
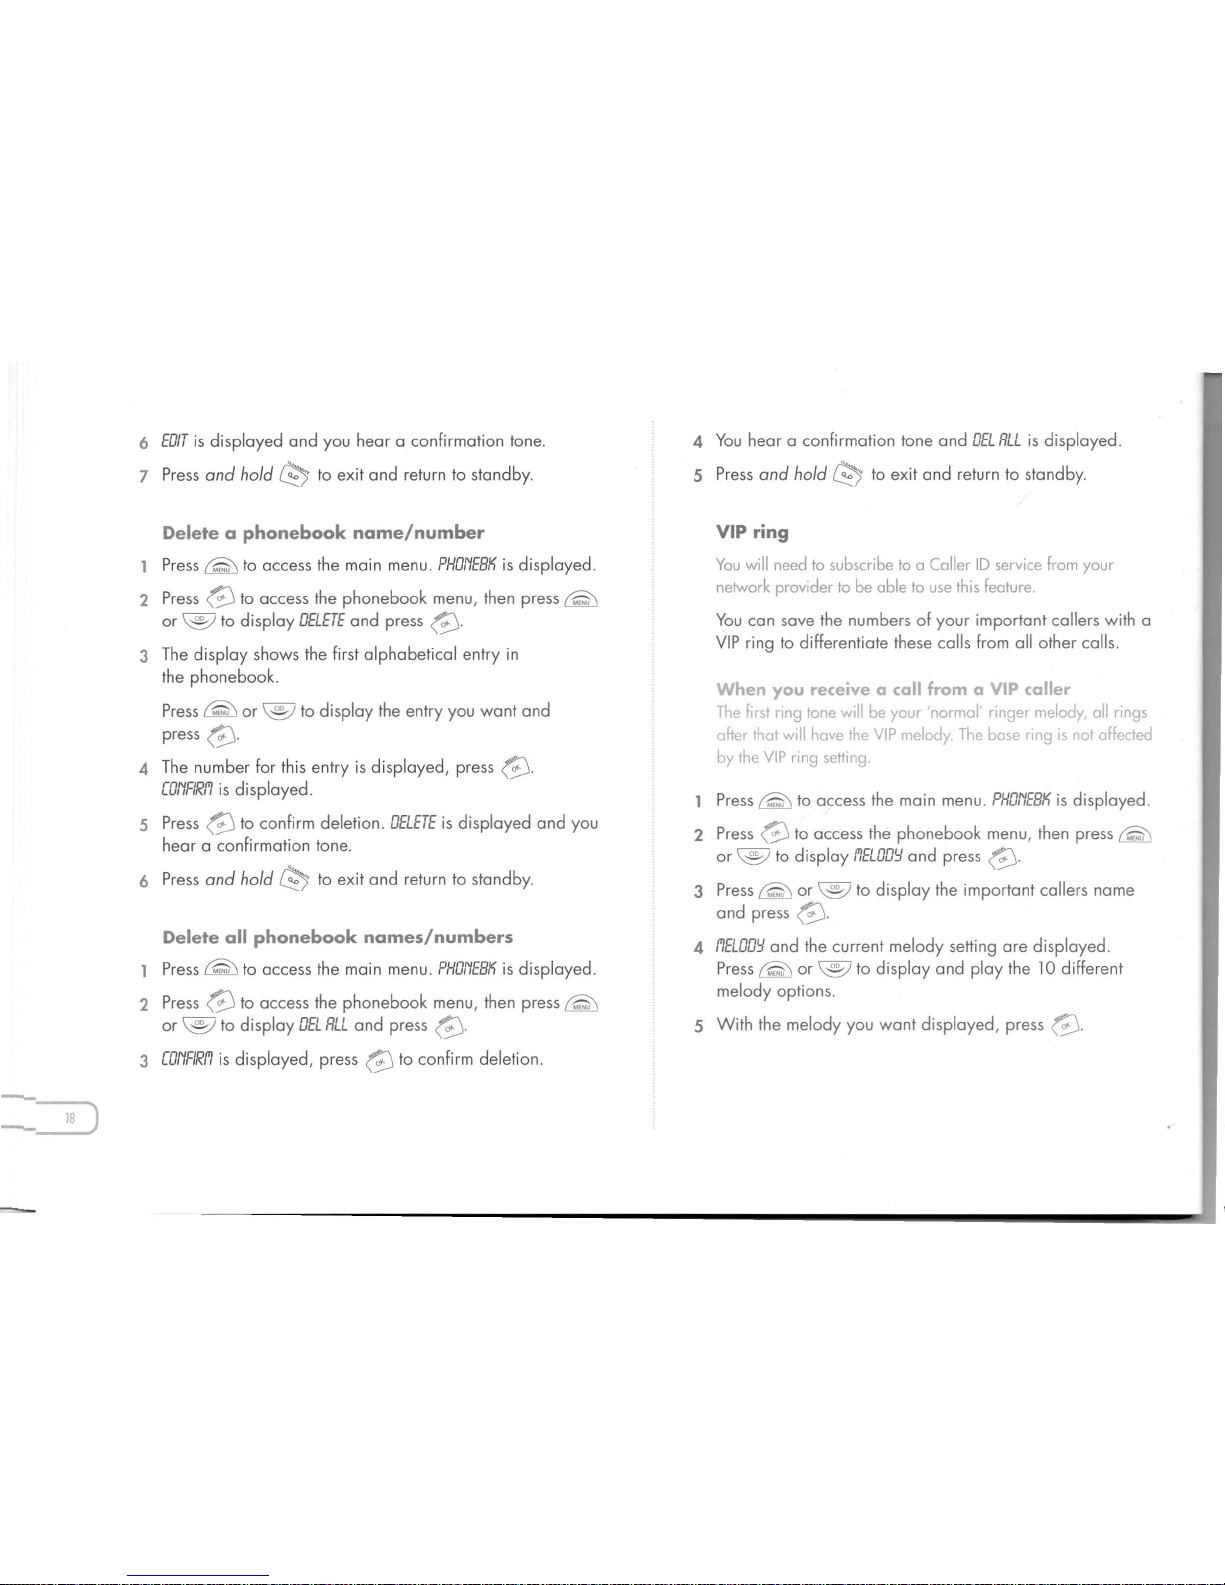
6
EDIT
is displayed and you hear a confirmation tone.
7 Press and hold
0?;
to exit and return to standby.
Delete a phonebook name/number
Press
rQ\
to access the main menu.
PHGNEBK
is displayed.
2 Press
G
to access the phonebook menu, then press
rQ\
or
@
to display
GELETE
and press
G.
3 The display shows the first alphabetical entry in
the phonebook.
Press
rQ\or@
to display the entry you want and
press
G.
4 The number for this entry is displayed, press
G.
CONFIR/'l
is displayed.
5 Press
G
to confirm deletion.
GELETE
is displayed and you
hear a confirmation tone.
6 Press and hold
0?;
to exit and return to standby.
Delete all phonebook names/numbers
Press
{Qj
to access the main menu.
PHGNEBK
is displayed.
2 Press
G
to access the phonebook menu, then press
rQ\
or
@
to display
GEL RLL
and press
G.
3 CONFIR/'l
is displayed, press
G
to confirm deletion.
4 You hear a confirmation tone and
GEL RLL
is displayed.
5 Press and hold
0?;
to exit and return to standby.
VIP
ring
You will need to subscribe to a Caller ID service from your
network provider to be able to use this feature.
You can save the numbers of your important callers with a
VIP ring to differentiate these calls from all other calls.
When you receive a call from a VIP caller
The first ring tone will be your 'normal ringer melody, all rings
after that will have the VIP melody. The base ring is not affected
by the VIP ring setting.
Press
rQ\
to access the main menu.
PHOl'lEBK
is displayed.
2 Press
G
to access the phonebook menu, then press
@
or
@
to display
/'lEWD'::!
and press
G.
3 Press
{Qj
or
@
to display the important callers name
and press
G.
4 l'lEWD'::!
and the current melody setting are displayed.
Press
{Qj
or
@
to display and play the 10 different
melody options.
5 With the melody you want displayed, press
G.
Page 20
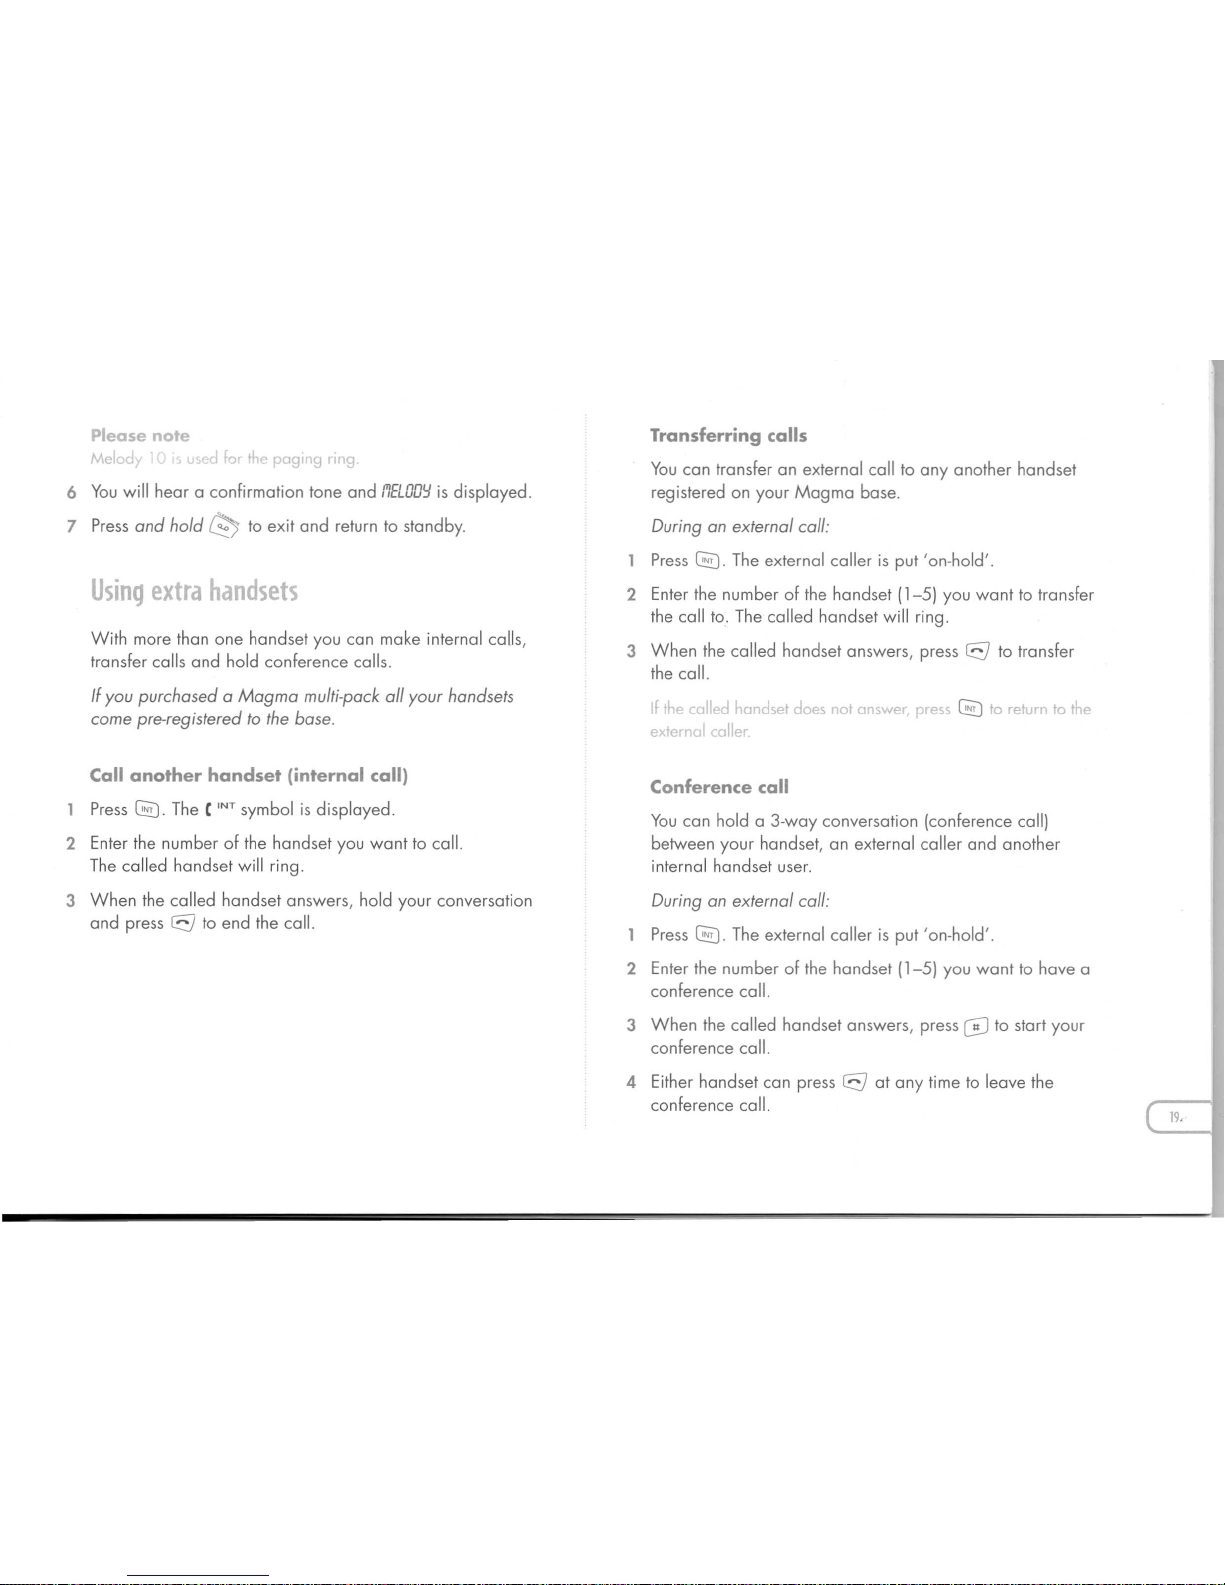
Please note
Melod
r
b
le ag',g n
lq
6 You will hear a confirmation tone and
,"/ELOO':J
is displayed.
7 Press
and hold
0;y
to exit and return to stand by.
Using extra handsets
With more than one handset you can make internal calls,
transfer calls and hold conference calls.
Ifyou purchasedaMagma multi-pack all your handsets
come
pre-registered to the base.
Call another handset (internal call)
Press G). The CINTsymbol is displayed.
2 Enter the number of the handset you want to call.
The called handset will ring.
3 When the called handset answers, hold your conversation
and press
8
to end the call.
Transferring calls
You can transfer an external call to any another handset
registered on your Magma base.
Duringanexternal call:
Press G). The external caller is put' on-hold'.
2 Enter the number of the handset (1-5) you want to transfer
the call to. The called handset will ring.
3 When the called handset answers, press
8
to transfer
the call.
If "le ~a,led handset does not answer, press G) to return to the
ex'ernal caller
Conference call
You can hold a 3-way conversation (conference call)
between your handset, an external caller and another
internal handset user.
Duringanexternal call:
Press G). The external caller is put' on-hold'.
2 Enter the number of the handset (1-5) you want to have a
conference call.
3 When the called handset answers, press
l3J
to start your
conference call.
4 Either handset can press
8
at any time to leave the
conference call.
Page 21
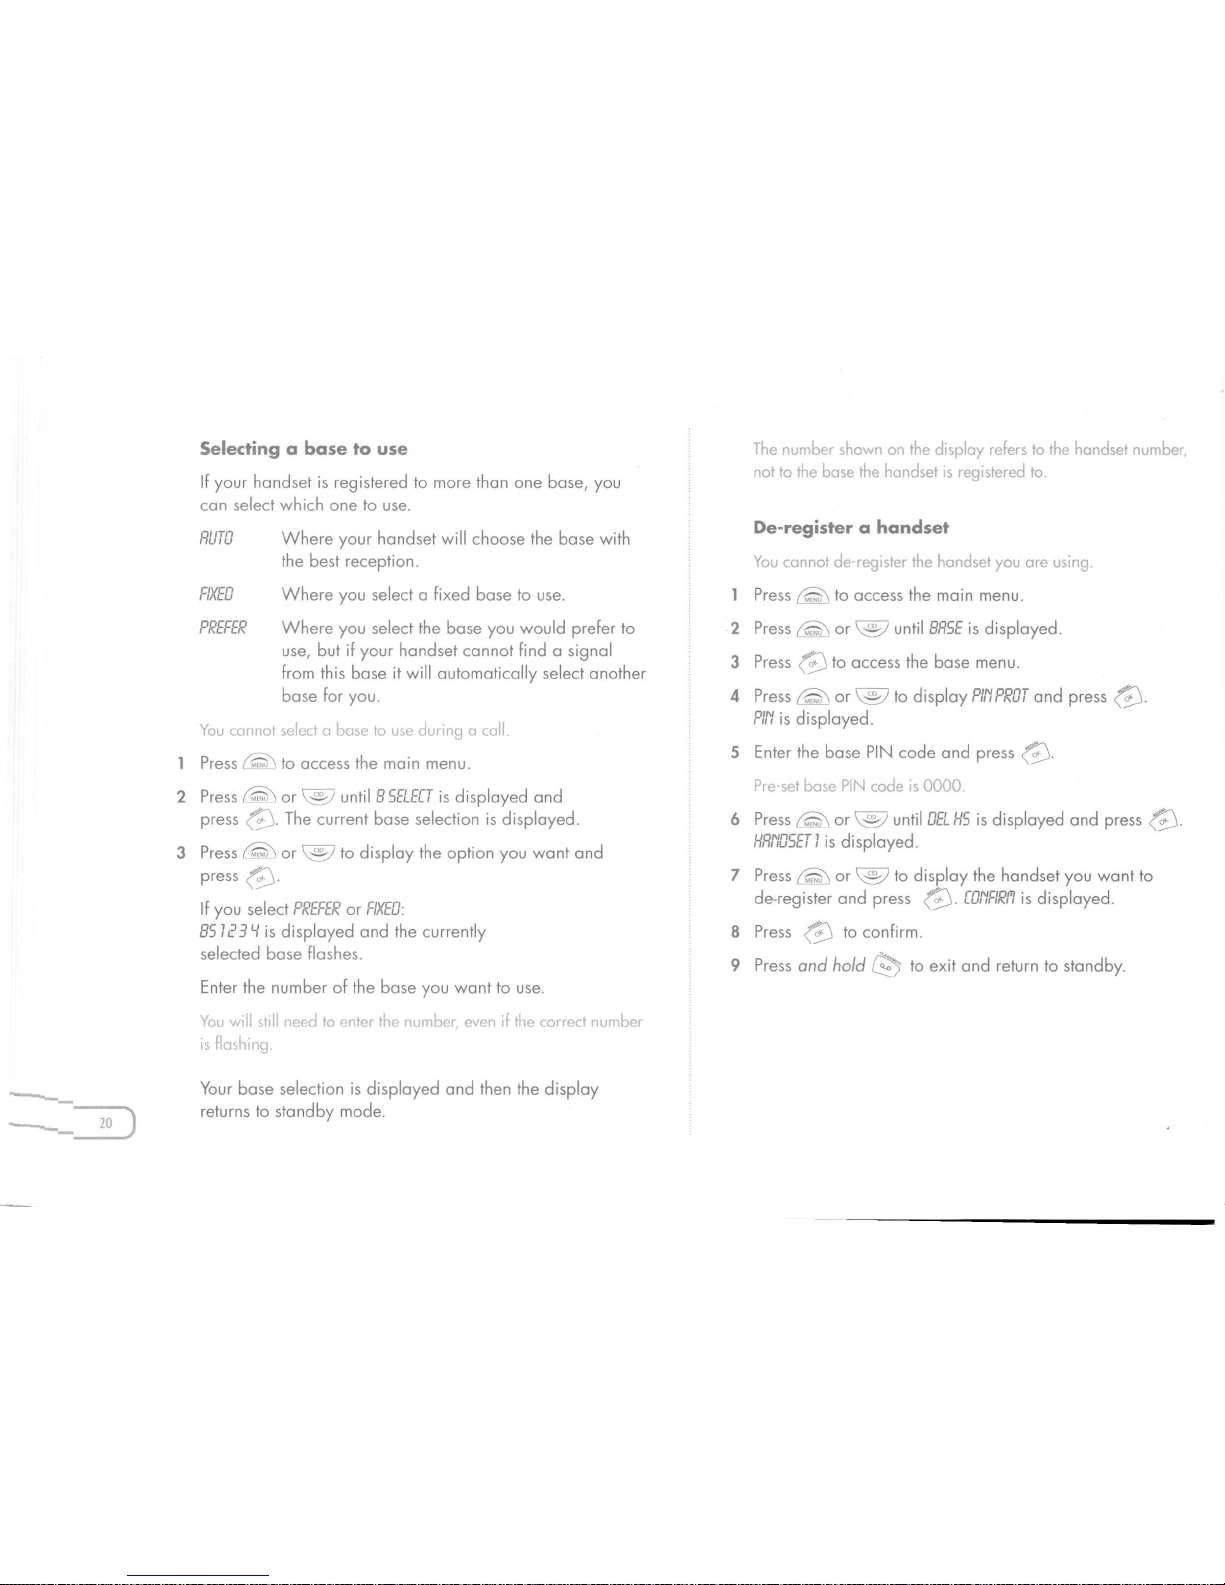
Selecting a base to use
If your handset is registered to more than one base, you
can select which one to use.
Where your handset will choose the base with
the best reception.
Where you select a fixed base to use.
Where you select the base you would prefer to
use, but if your handset cannot find a signal
from this base it will automatically select another
base for you.
You cannot select a base to use during a call.
Press
@
to access the main menu.
2 Press ~ or @ until
B SELECT
is displayed and
press
@.
The current base selection is displayed.
3 Press ~ or @ to display the option you want and
press
@.
If you select
PREFERorFIXED:
BS
123'-1 is displayed and the currently
selected base flashes.
Enter the number of the base you want to use.
You will still need to enter the number, even If the correct number
is flashing.
---
--~
Your base selection is displayed and then the display
returns to standby mode.
The number shown on the display refers to the handset number,
not to the base the handset is registered to.
You cannot de-register the handset you are using.
Press
(Q:j
to access the main menu.
2 Press
@
or @ until
BRSE
is displayed.
3 Press
@
to access the base menu.
4 Press ~ or @to display
PIl'!PROT
and press
@.
PI,''!
is displayed.
5 Enter the base PIN code and press
@.
Pre-set base PIN code is 0000.
6 Press
(Q:j
or @ until
OEL
HS is displayed and press
@.
HRNOSETl
is displayed.
7 Press
(Q:j
or @ to display the handset you want to
de-register and press
@.
CONFIRl'I
is displayed.
8 Press
@
to confirm.
9 Press and hold
0?J
to exit and return to standby.
Page 22
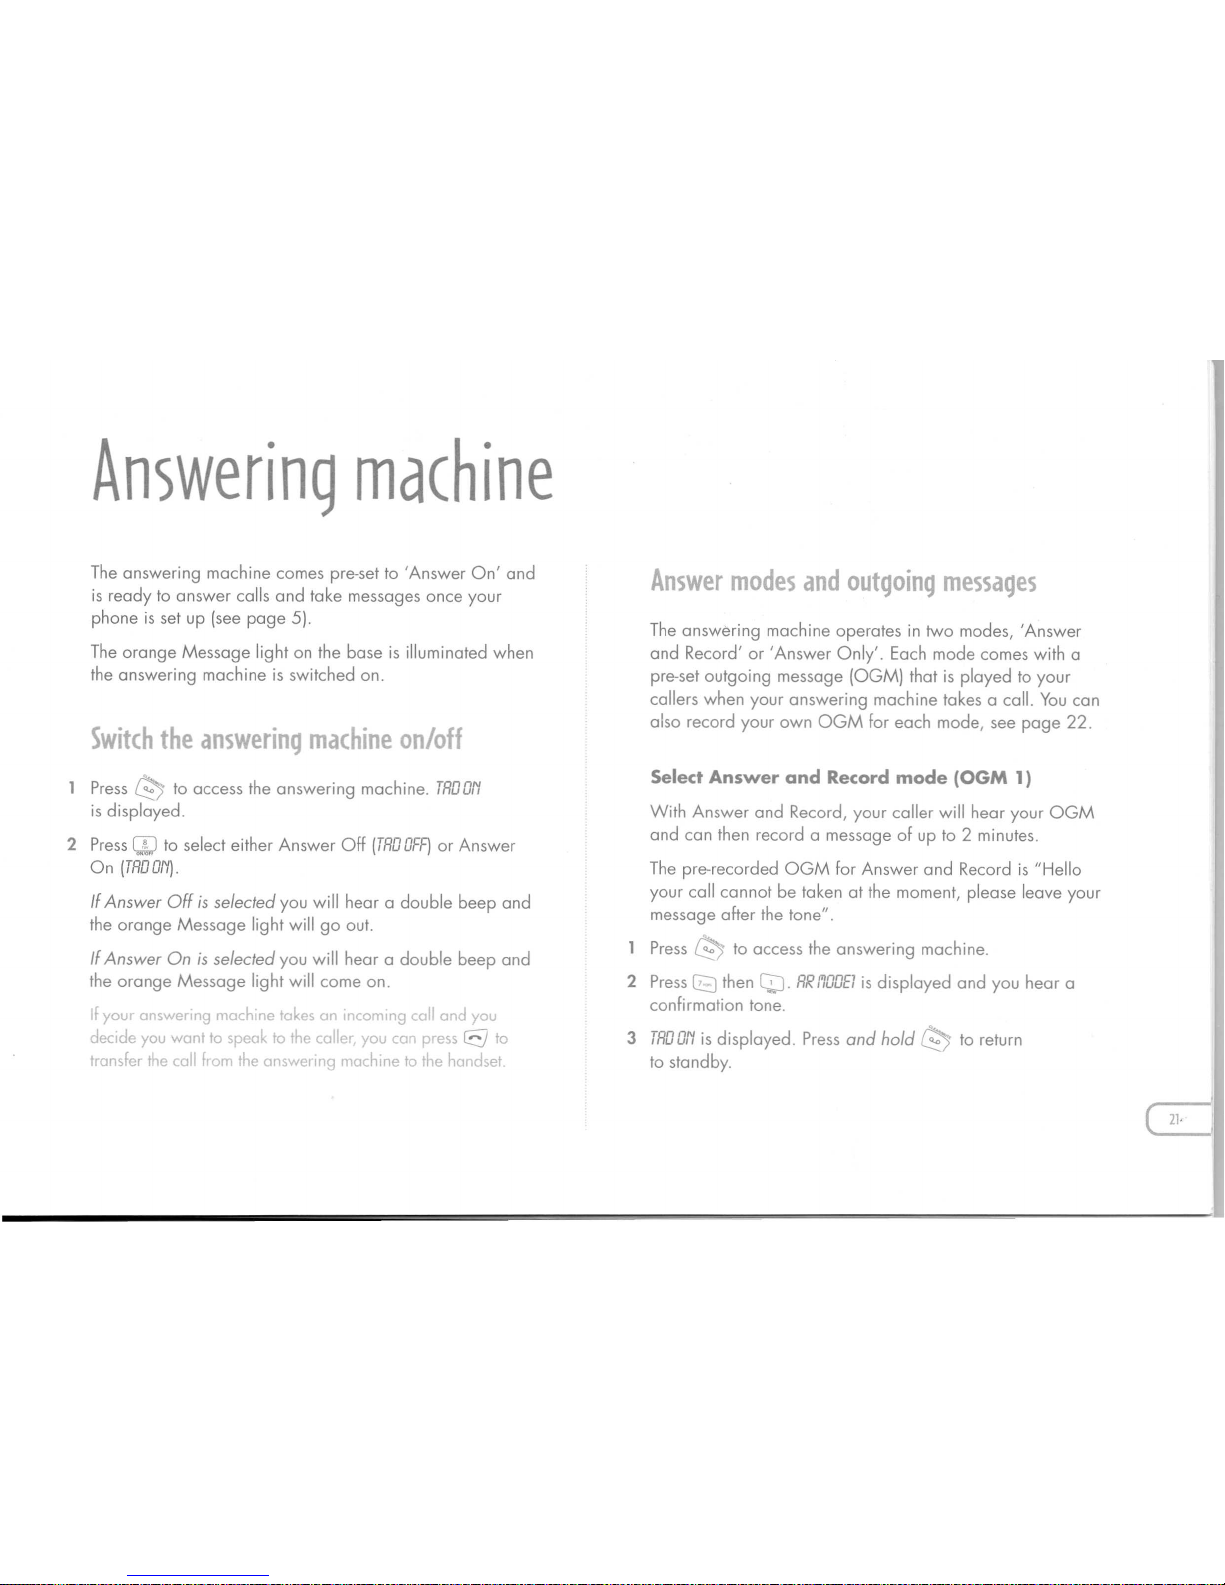
Answering machine
The answering machine comes pre-set to 'Answer On' and
is ready to answer calls and take messages once your
phone is set up (see page 5).
The orange Message light on the base is illuminated when
the answering machine is switched on.
Switchthe answering machine on/off
Press
0;)
to access the answering machine.
TAo ol'!
is displayed.
2 Press
Q:J
to select either Answer Off
(TRo OFF)
or Answer
On
(TAooN).
IfAnswer Off is selected
you will hear a double beep and
the orange Message light will go out.
IfAnswer On ;s selected
you will hear a double beep and
the orange Message light will come on.
If you answenng machine takes on Incoming call and you
decide you want to speak to the caller, you can press8to
transfer the call from the answenng machine to the handset
Answer modes and outgoing messages
The answering machine operates in two modes, 'Answer
and Record' or 'Answer Only'. Each mode comes with a
pre-set outgoing message (OGM) that is played to your
callers when your answering machine takes a call. You can
also record your own OGM for each mode, see page 22.
Select Answer and Record mode (OGM 1)
With Answer and Record, your caller will hear your OGM
and can then record a message of up to 2 minutes.
The pre-recorded OGM for Answer and Record is "Hello
your call cannot be taken at the moment, please leave your
message after the tone".
Press
0;)
to access the answering machine.
2 PressC8then
Q:J.
RI?rlooEI
is displayed and you hear a
confirmation tone.
3 TAo 0,":
is displayed. Press
and hold
0;)
to return
to standby.
Page 23
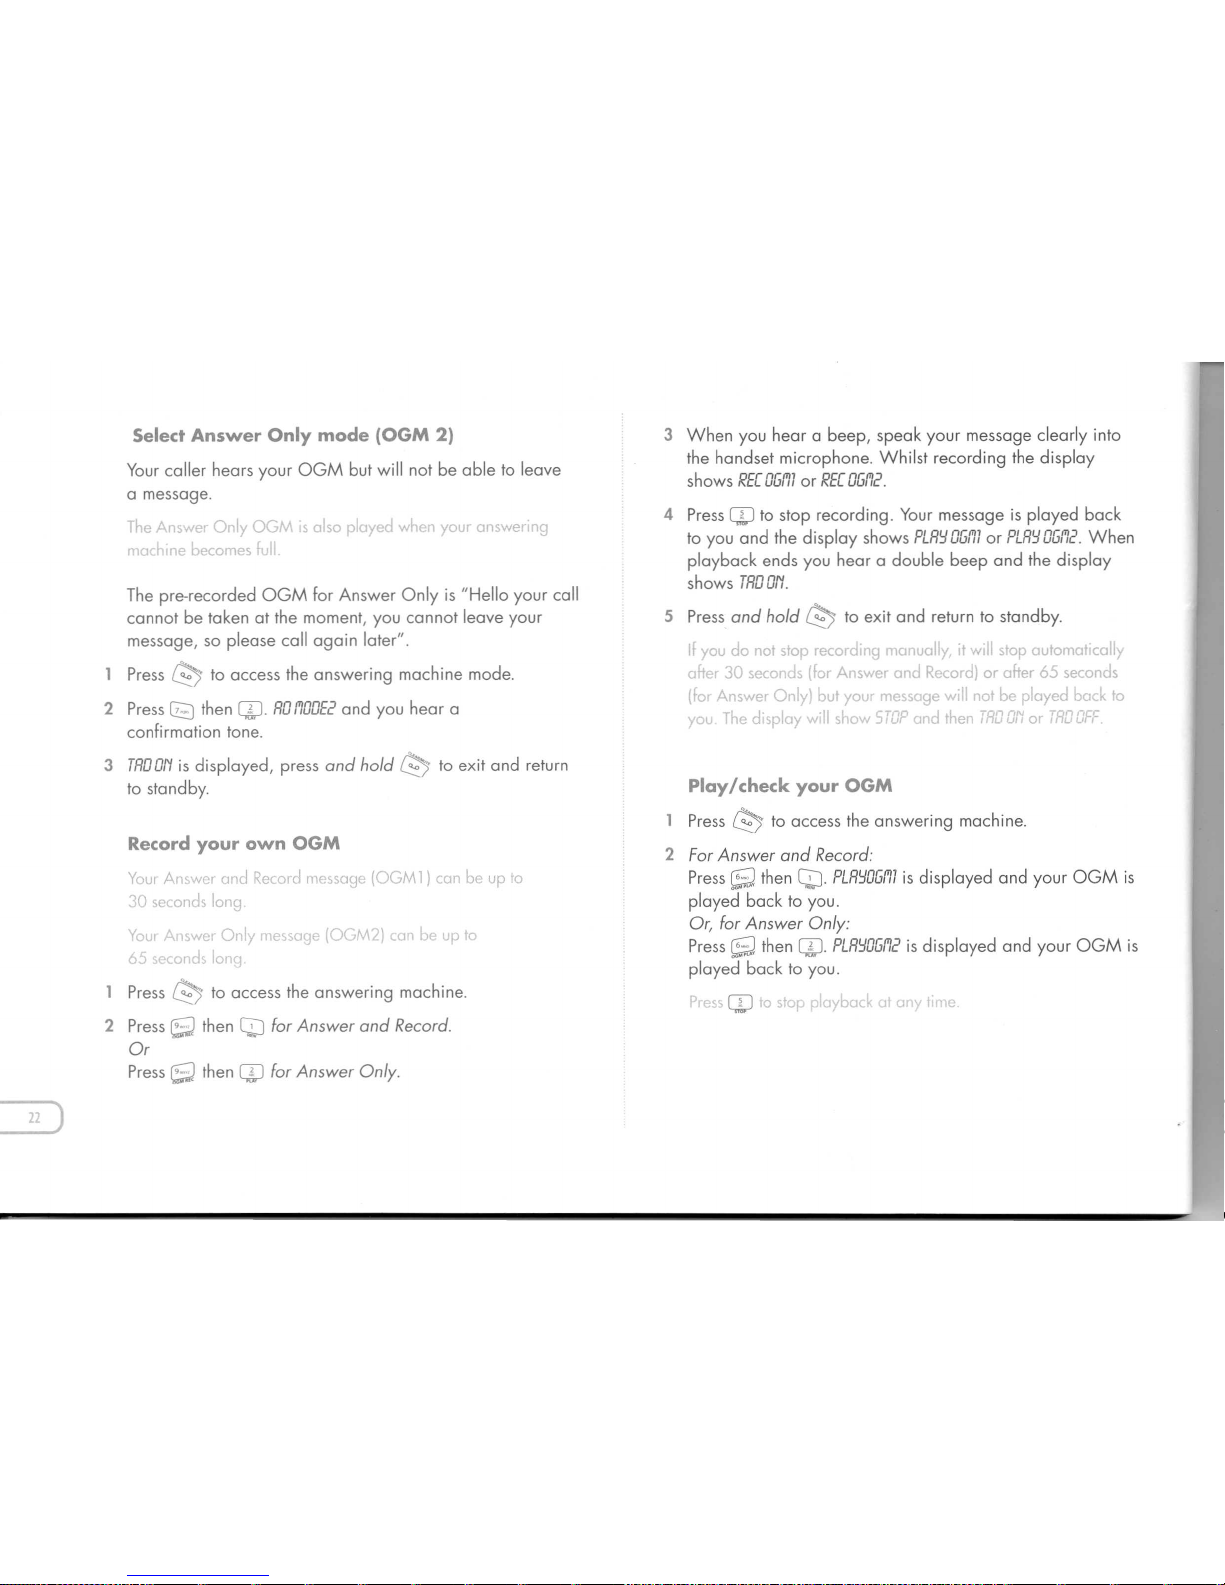
Select Answer Only mode (OGM 2)
Your caller hears your OGM but will not be able to leave
a message.
:he A 'er Oily OGM s also played when your answenng
rl"'+
"le
becomes
~II
The pre-recorded OGM for Answer Only is "Hello your call
cannot be taken at the moment, you cannot leave your
message, so please call again later".
Press
0;)
to access the answering machine mode.
2 PressC8then
c:D.
RO 1'I0DE2
and you hear a
confirmation tone.
3 TAO Ol'!
is displayed, press and hold
0;)
to exit and return
to standby.
Record your own OGM
Your Answer and Record message (OGM 1) can be up to
30 seconds long.
Your Answel Only ne<~age (OGM2) ,un be up to
~Ol
M
b:3
Press
0;)
to access the answering machine.
2 PressSthen
CD
for Answer and Record.
Or
PressSthen
c:D
for Answer Only.
3 When you hear a beep, speak your message clearly into
the handset microphone. Whilst recording the display
shows
REC OG{'IlorREC OG{'I2.
4 PressQJto stop recording. Your message is played back
to you and the display shows
PLRY OG,"/lorPLRY OG,"/2.
When
playback ends you hear a double beep and the display
shows
TRO Ol'!.
S Press and hold
0;)
to exit and return to standby.
I
you do not STOp"eCOI
19. _..
Jail' . wil STOpautomal'cally
after 30 seconds ('or Answer and Record) or after 65 seconds
(for Answer Only\ but your mes~age will not be played back to
you The display will sf.ow
STOP
and then
TRO or:orTRO OFF
Play/check your OGM
Press
0;)
to access the answering machine.
2 For Answer and Record:
PressSthen
CD.
PLRYOG{'Il
is displayed and your OGM is
played back to you.
Or, for Answer Only:
PressSthen
c:D.
PLRYOm2
is displayed and your OGM is
played back to you.
Page 24
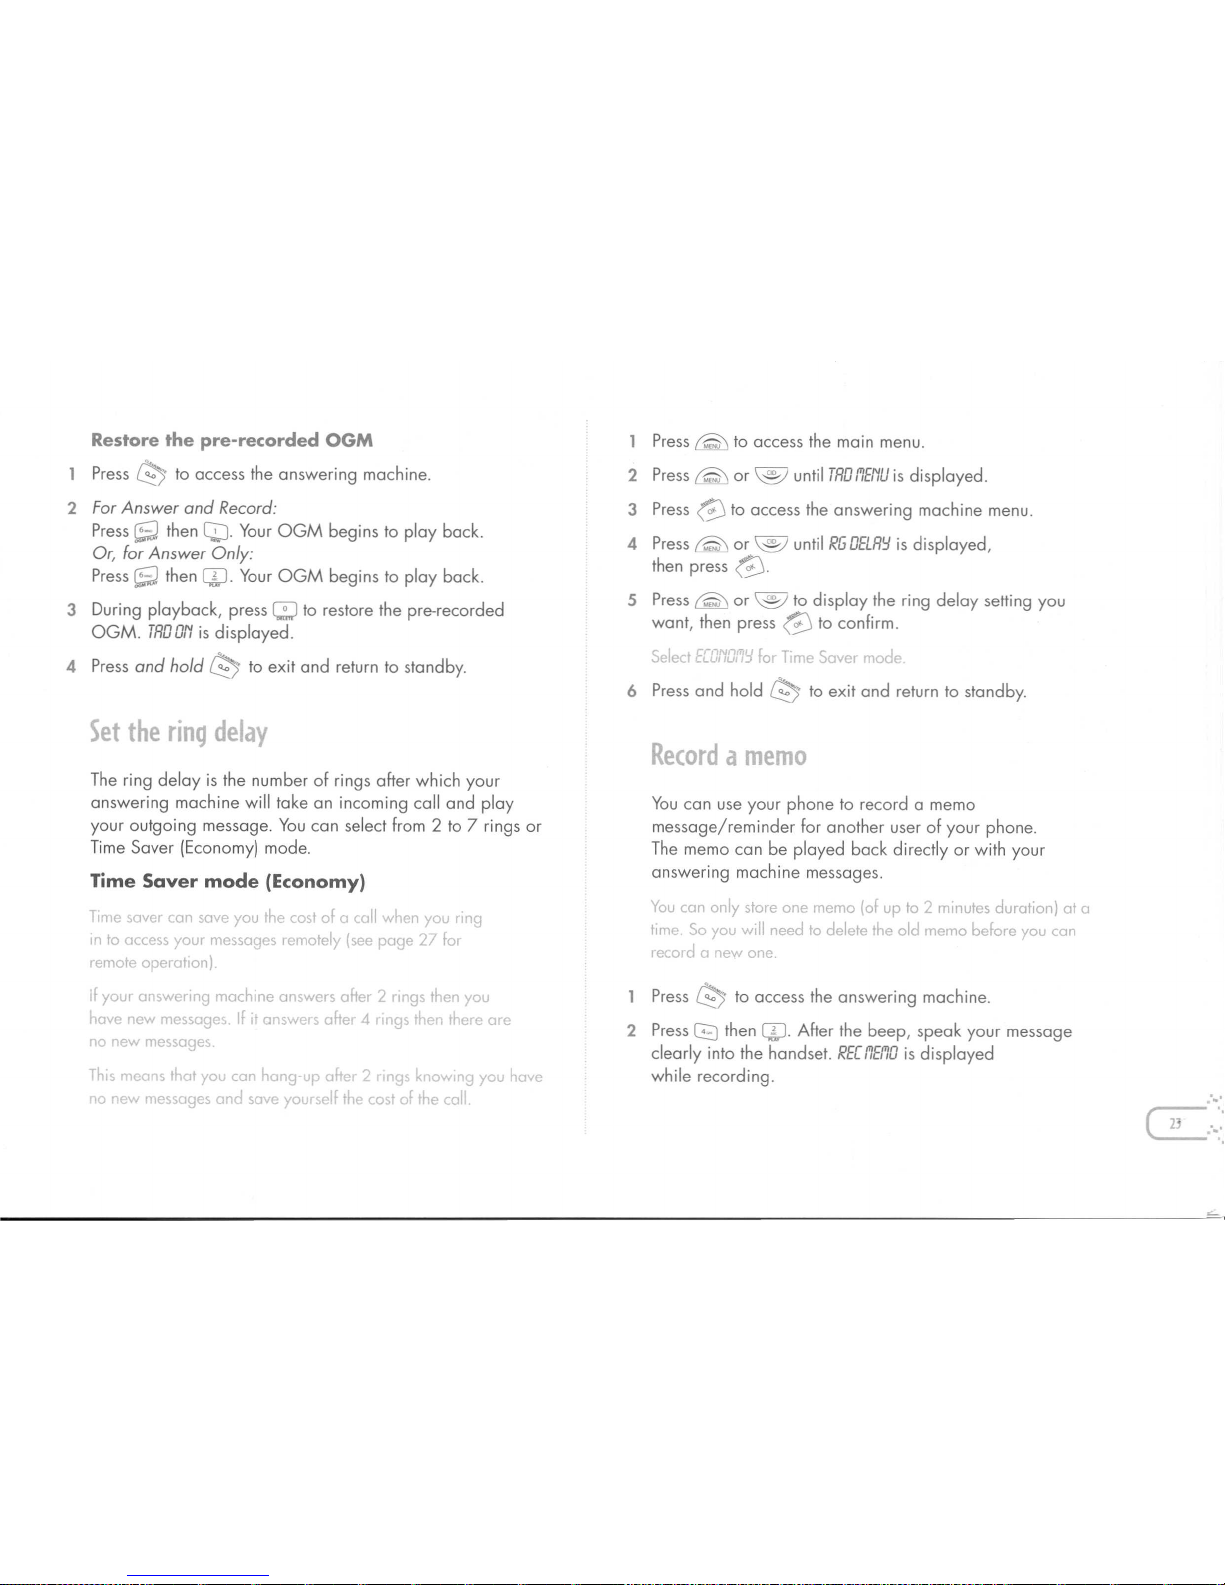
Restore the pre-recorded OGM
Press
0';)
to access the answering machine.
2 For Answer and Record:
PressSthen
QJ.
Your
OGM
begins to play back.
Or, for Answer Only:
PressSthen
Q;J.
Your
OGM
begins to play back.
3 During playback, press ~ to restore the pre-recorded
OGM.
TADDN
is displayed.
4 Press and hold
0';)
to exit and return to stand by.
Set the ring delay
The ring delay is the number of rings after which your
answering machine will take an incoming call and play
your outgoing message. You can select from 2 to 7 rings or
Time Saver (Economy) mode.
Time Saver mode (Economy)
Time saver can save you the cost of a call when you ring
In to access your messages remotely (see page 27 for
remote operation).
If your answering machine answers after 2 rings then you
have new messages. If it answers after 4 rings then there are
ro new messages.
This rrears that you can hang up aitE' 2 rings knOWing you have
no new messages and save yourself the cost of the call
2 Press ~ or
@
until
TAD I'IENU
is displayed.
3 Press
@
to access the answering machine menu.
4 Press
@
or
@
until
RGDELR':i
is displayed,
then press
@.
5 Press
@
or
@
to display the ring delay setting you
want, then press
@
to confirm.
SI
lee
ECi.'''!Oi"'::I
Foirme Sewer m Ide.
You can use your phone to record a memo
message/reminder for another user of your phone.
The memo can be played back directly or with your
answering machine messages.
You can only store one memo (of up to 2 minutes duration) at a
time So you will need to delete the old memo before you can
record a new one.
Press
e
to access the answering machine.
2 Press
(2)
then
Q;J.
After the beep, speak your message
clearly into the handset.
REUIEl'lD
is displayed
while recording.
Page 25
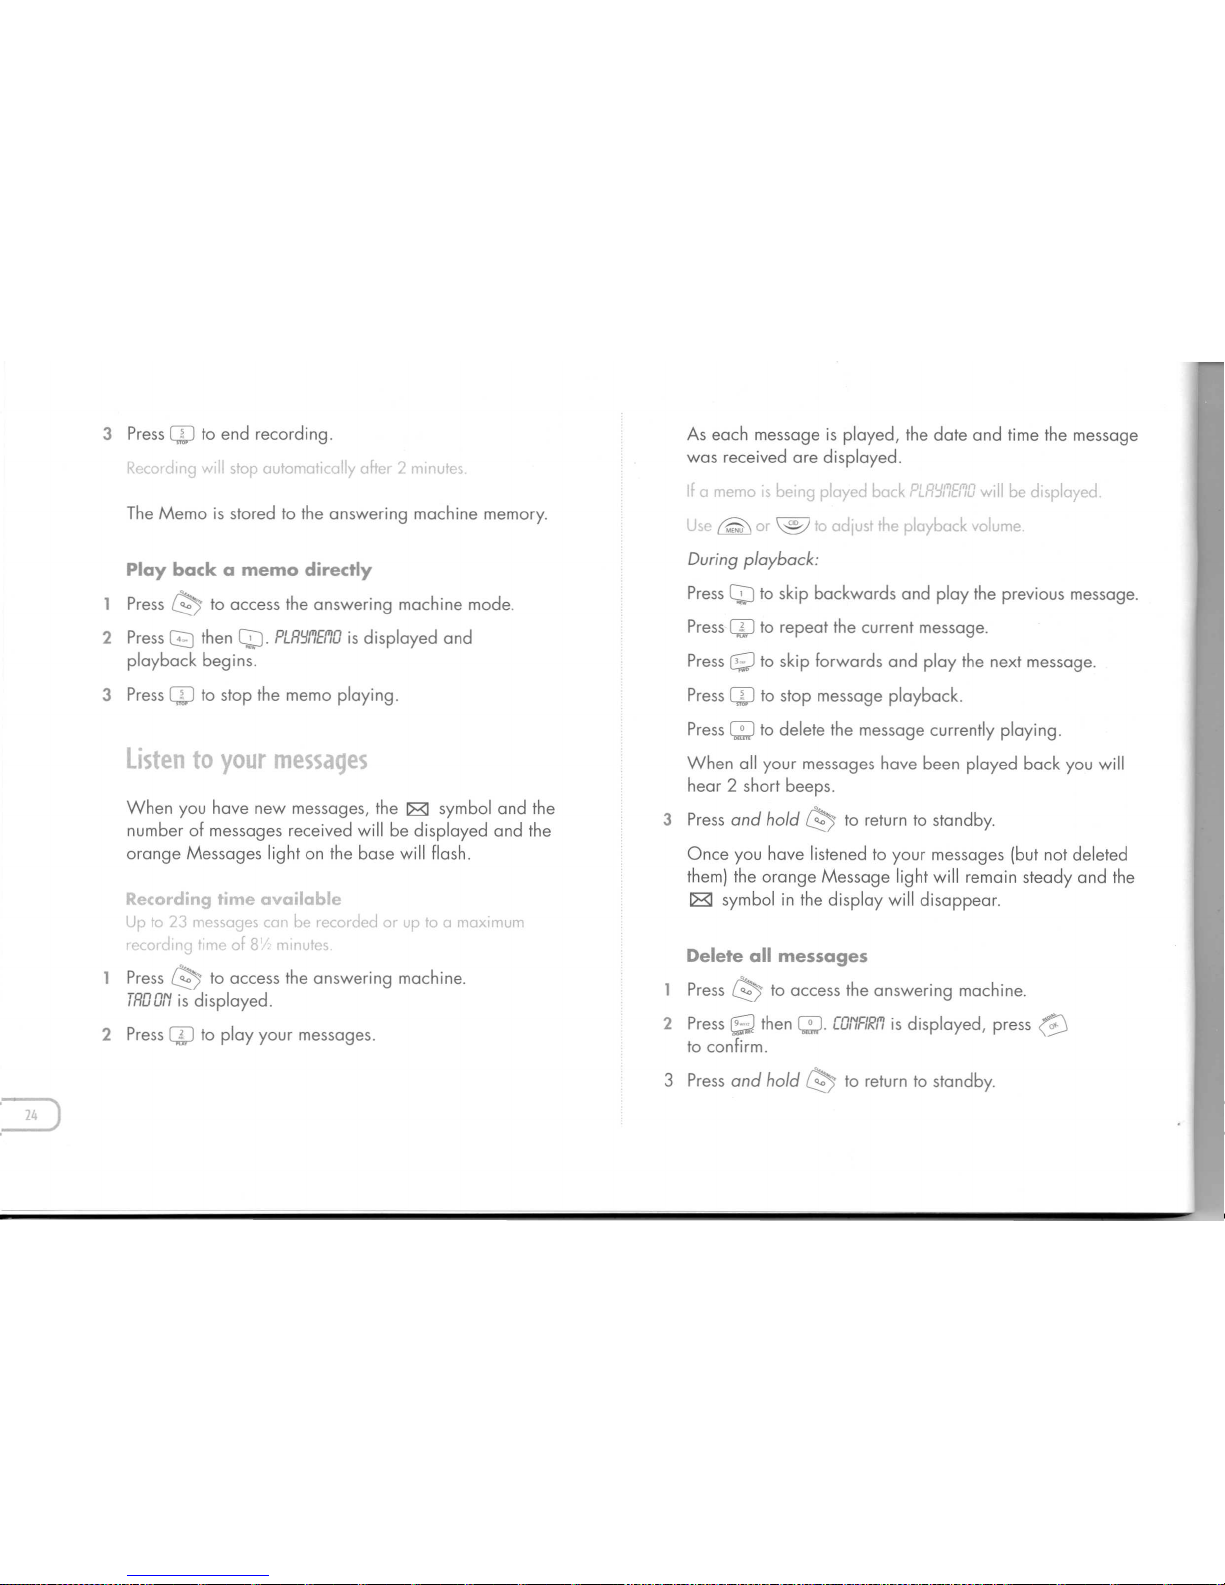
3 Press
Q,J
to end recording.
. _c ~lng
",.11
stop automatically after 2 minutes.
As each message is played, the date and time the message
was received are displayed .
f a memo is being pi, 'yed back
.oLR':J,''1El'lO
will be displayed.
U
(Q:\or@
to adjust the playback volume.
During playback:
Press
Q:J
to skip backwards and play the previous message.
Press
Q;J
to repeat the current message.
Press ~ to skip forwards and play the next message.
Press
c:D
to stop message playback.
Press
c:D
to delete the message currently playing.
When all your messages have been played back you will
hear 2 short beeps.
3 Press
and hold
0;)
to return to standby.
Once you have listened to your messages (but not deleted
them) the orange Message light will remain steady and the
~ symbol in the display will disappear.
Play back a memo directly
Press
0;)
to access the answering machine mode.
2 PressGJthen
Q:J.
PLR':Jl'lEl'lO
is displayed and
playback begins.
3 Press
c:D
to stop the memo playing.
listen to your messages
When you have new messages, the ~ symbol and the
number of messages received will be displayed and the
orange Messages light on the base will flash.
Recording time available
Up to 23 messages can be recorded or up to a maximum
'ol'ding timE' of 8 minute"
Press
0;)
to access the answering machine.
TROON
is displayed.
2 Press
Q;J
to play your messages.
Delete all messages
Press
0;)
to access the answering machine.
2 PressSthen
c:D.
fONFfRl'l
is displayed, press
@
to confirm.
3 Press
and hold
0;)
to return to standby.
Page 26
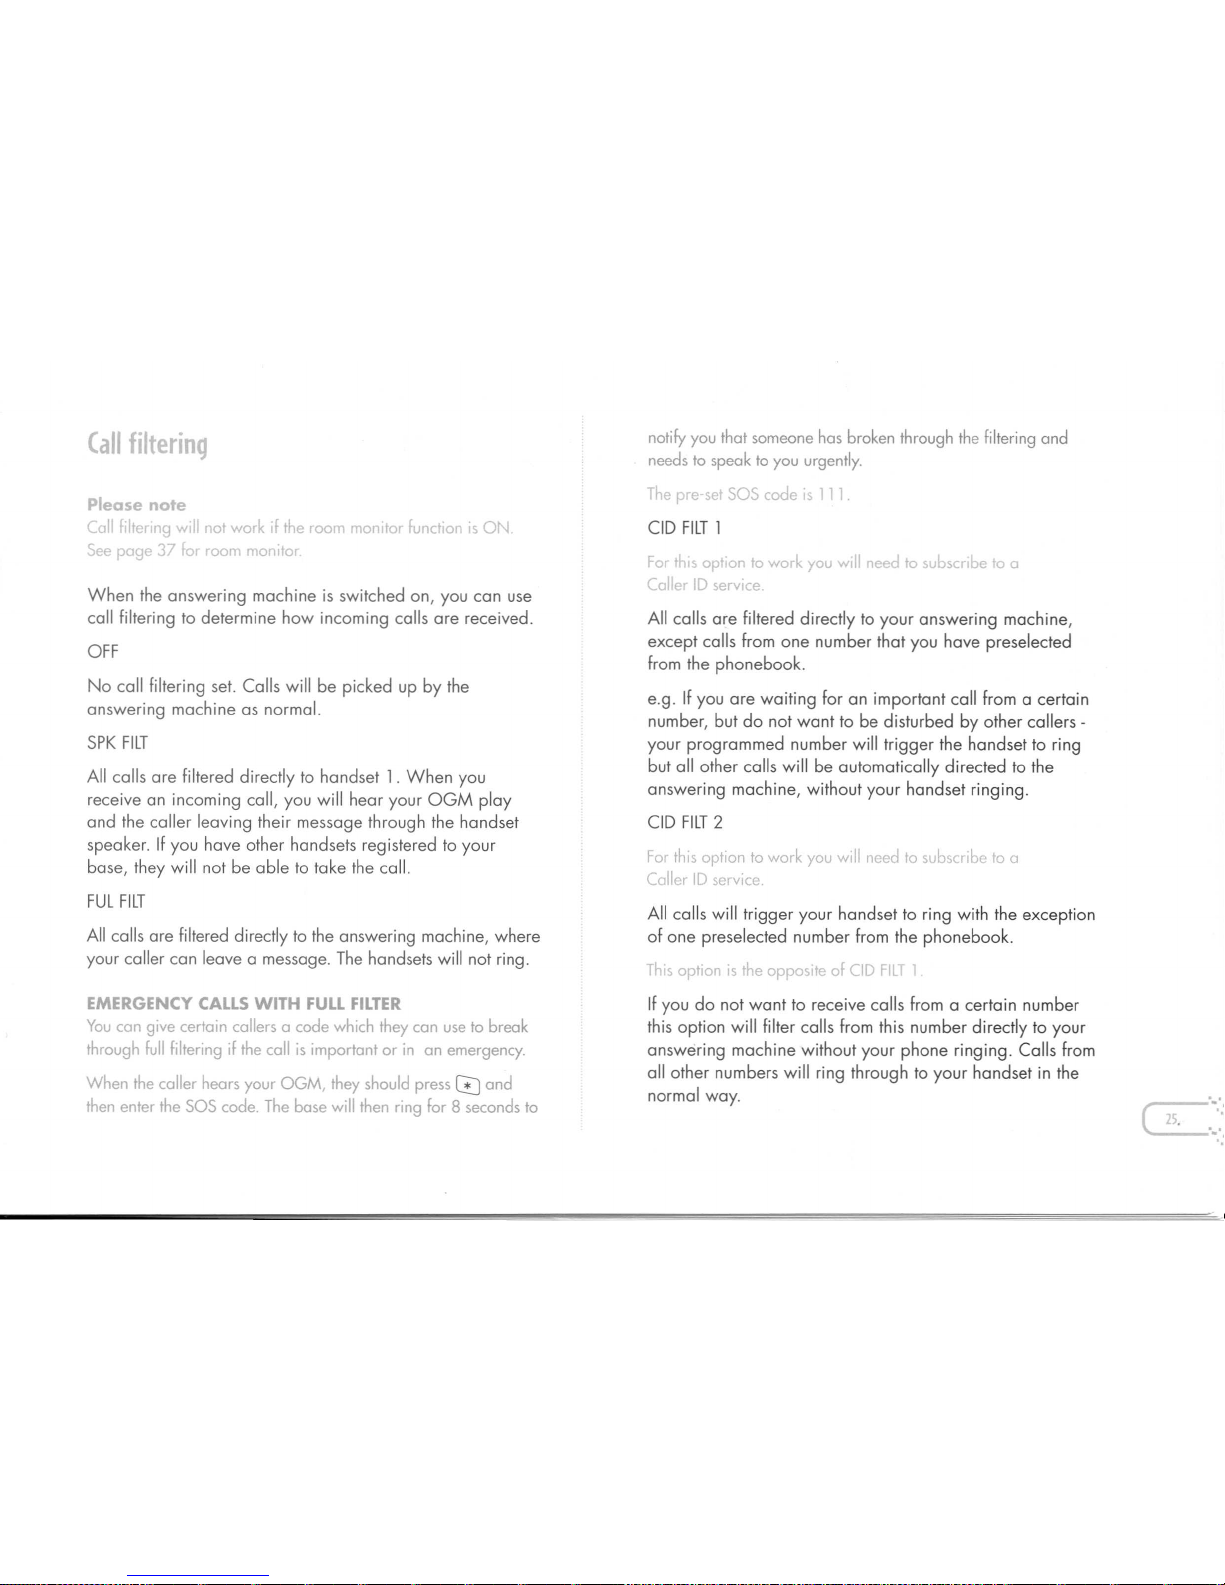
Call filtering
notify you that someone has broken through the filtering and
needs to speak to you urgently.
Th pre' ,et SOS code's
Please note
Call f' 'ef'ng will not work f the roofY! rron tor function is ON
See oaqe 37
for
room monitor
When the answering machine is switched on, you can use
call filtering to determine how incoming calls are received.
.or "". opllon to work you will need to subscribe to a
Ca ' ID service.
All calls are filtered directly to your answering machine,
except calls from one number that you have preselected
from the phonebook.
e.g. If you are waiting for an important call from a certain
number, but do not want to be disturbed by other callers -
your programmed number will trigger the handset to ring
but all other calls will be automatically directed to the
answering machine, without your handset ringing.
No call filtering set. Calls will be picked up by the
answering machine as normal.
All calls are filtered directly to handset 1. When you
receive an incoming call, you will hear your OGM play
and the caller leaving their message through the handset
speaker. If you have other handsets registered to your
base, they will not be able to take the call.
FUL FILT
For this option to work you will need to subscribe to a
Caller ID service.
All calls are filtered directly to the answering machine, where
your caller can leave a message. The handsets will not ring.
All calls will trigger your handset to ring with the exception
of one preselected number from the phonebook.
T~ls option is the opposite of CID I
If you do not want to receive calls from a certain number
this option will filter calls from this number directly to your
answering machine without your phone ringing. Calls from
all other numbers will ring through to your handset in the
normal way.
EMERGENCY CALLS WITH FULL FILTER
You can give certain callers a code which they can use to break
through full filtering if the call is important or in an emergency.
When the caller hears your OGM, they should pressCDand
then enter the SOS code. The base will then ring for 8 seconds to
Page 27
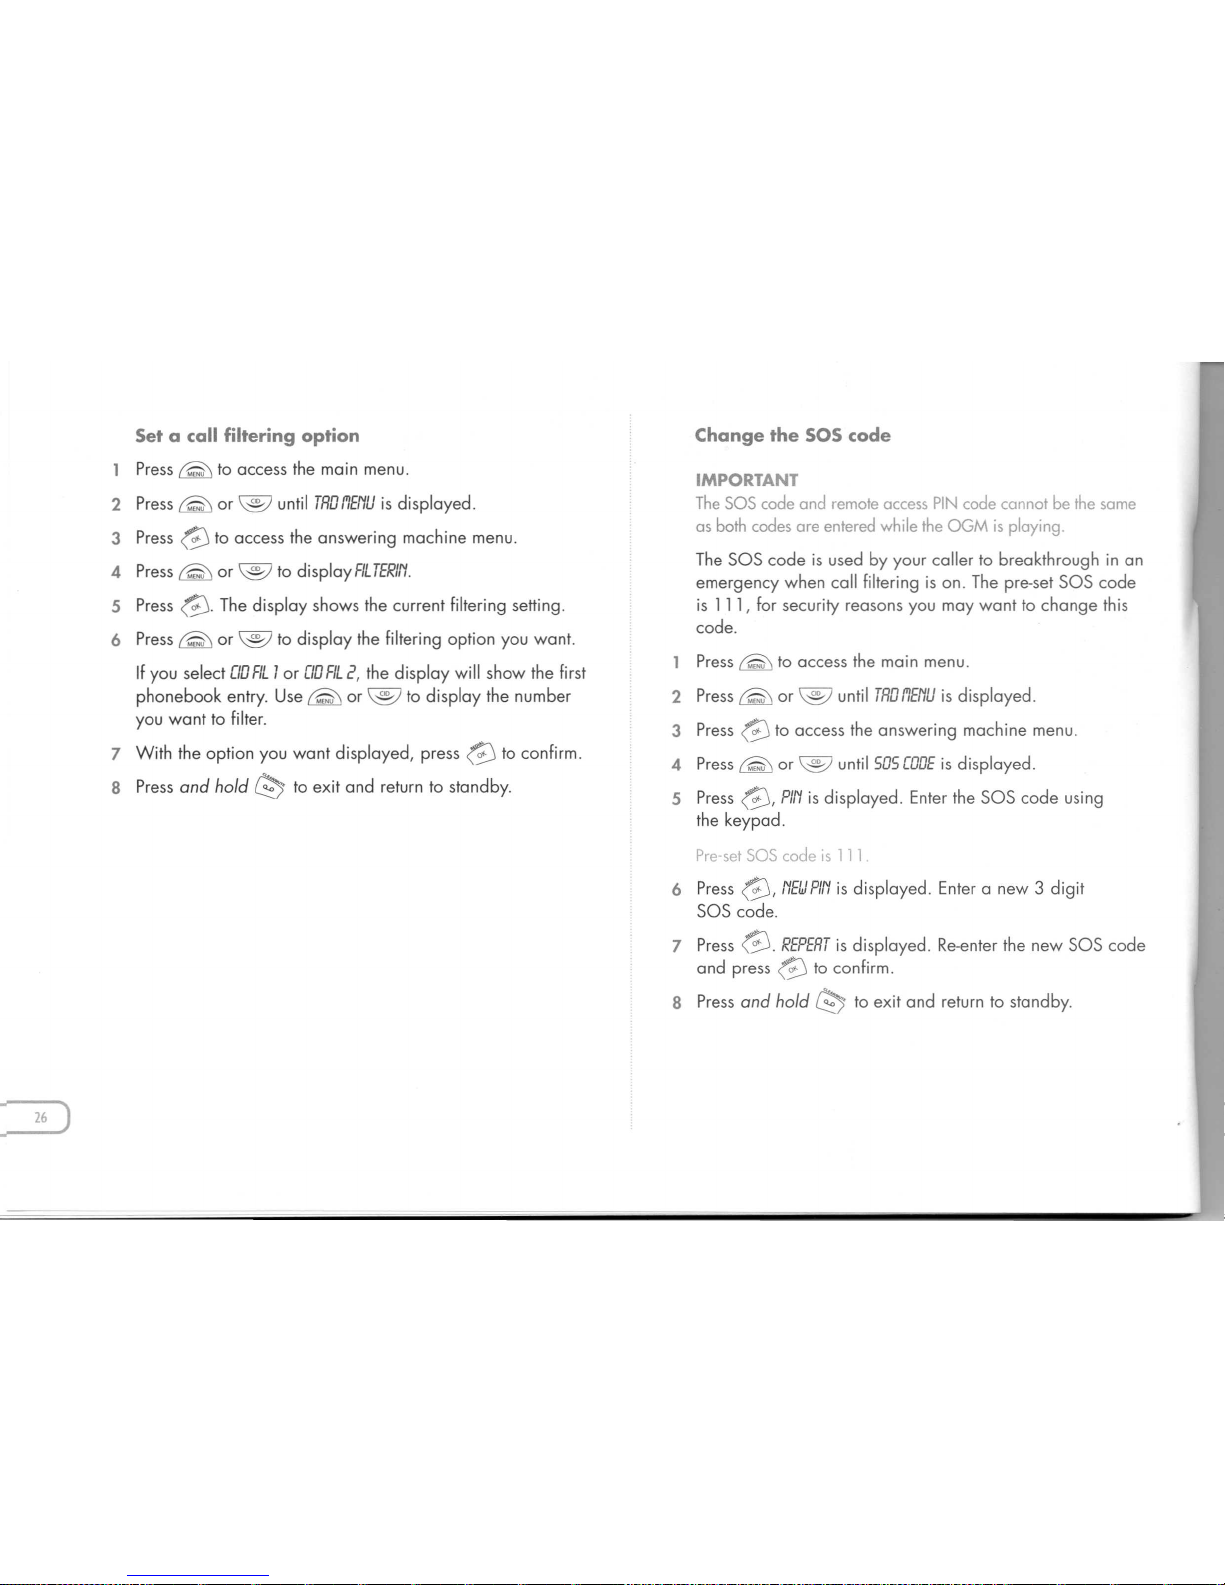
Set a call filtering option
Press
(Q\
to access the main menu.
2 Press
rS\
or @ until
TRDflENU
is displayed.
3 Press
@
to access the answering machine menu.
4 Press @or @to
displayFILTERlrl.
5 Press
@.
The display shows the current filtering setting.
6 Press @ or @ to display the filtering option you want.
Ifyou select
CIDFIL
1or
CIDFIL
2, the display will show the first
phonebook entry. Use ~ or @ to display the number
you want to filter.
7 With the option you want displayed, press
@
to confirm.
S Press and hold
0;)
to exit and return to standby.
IMPORTANT
The SOS code and remote access PINcode cannot be the same
as both codes are entered while the OGM is playing.
The SOS code is used by your caller to breakthrough in an
emergency when call filtering is on. The pre-set SOS code
is 111, for security reasons you may want to change this
code.
2 Press
rS\
or @ until
TRDflENU
is displayed.
3 Press
@
to access the answering machine menu.
4 Press
(Q\
or @ until 505
CODE
is displayed.
5 Press
@,
PIN
is displayed. Enter the SOS code using
the keypad.
Pre-set SOS code is 111
6 Press
@,
NELlPIN
is displayed. Enter a new 3 digit
SOS code.
7 Press
@.
REPERT
is displayed. Re-enter the new SOS code
and press
@
to confirm.
S Press and hold
0;)
to exit and return to standby.
Page 28
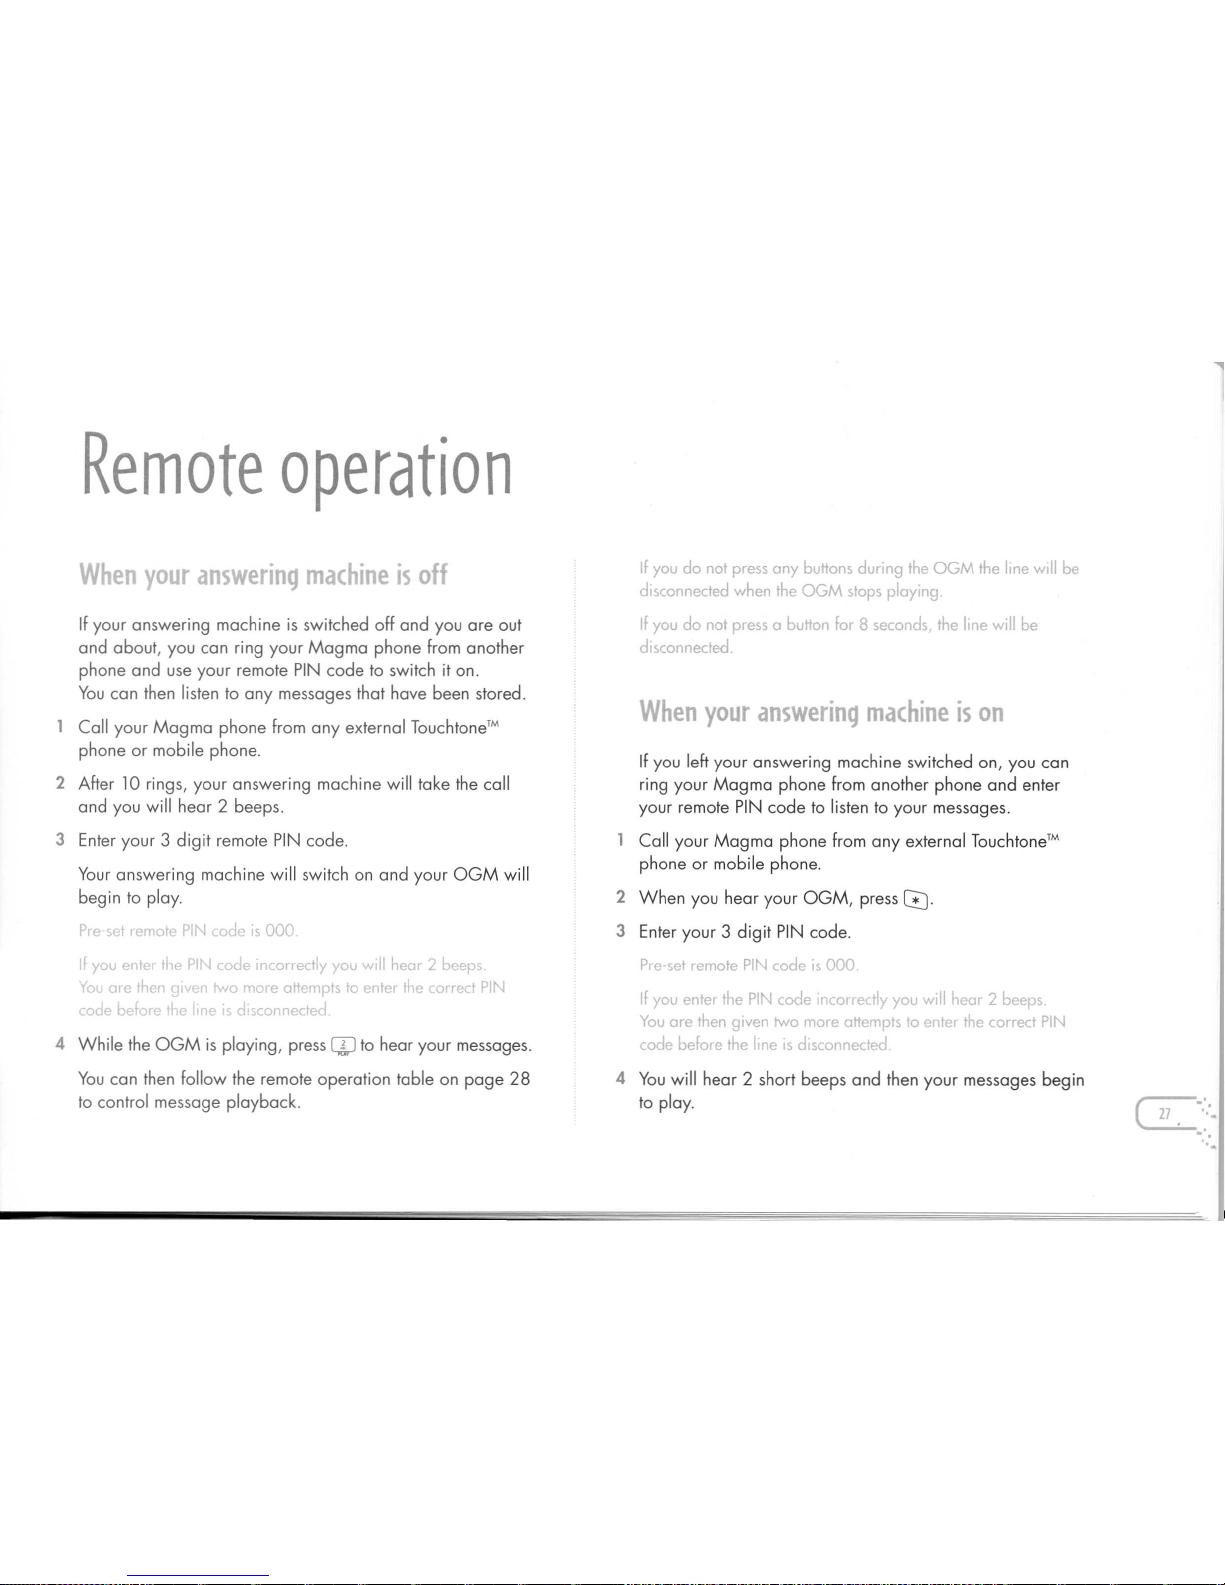
Remote operation
When your answering machine is off
If your answering machine is switched off and you are out
and about, you can ring your Magma phone from another
phone and use your remote PIN code to switch it on.
You can then listen to any messages that have been stored.
Call your Magma phone from any external Touchtone™
phone or mobile phone.
2 After10rings, your answering machine will take the call
and you will hear 2 beeps.
J
Enter your 3 digit remote PIN code.
Your answering machine will switch on and your OGM will
begin to play.
Dre mote PIN code is 000.
If you entel the PIN ~ode incorrectly you will hear 2 beeps
You are t~en giVEr two more attempt. to ~nter I,e correclPIN
,
4 While the OGM is playing, pressQJto hear your messages.
You can then follow the remote operation table on page 28
to control message playback.
If you do not press any buttons during the OGM the line will be
disconnected when the OGM stops playing
If you do not press a button for 8 seconds, the Itne will be
disconnected.
When your answering machine is on
If you left your answering machine switched on, you can
ring your Magma phone from another phone and enter
your remote PIN code to listen to your messages.
Call your Magma phone from any external Touchtone™
phone or mobile phone.
2 When you hear your OGM, press
[D.
J
Enter your 3 digit PIN code.
Pre-set remote PIN code is 000
If you enter the PIN code incorrec11yyou will hear 2 beeps.
You are then given two more attempts to enter the correct PIN
code before the Itne is disconnected.
4 You will hear 2 short beeps and then your messages begin
to play.
~.::
.
.
'
,
'.
Page 29
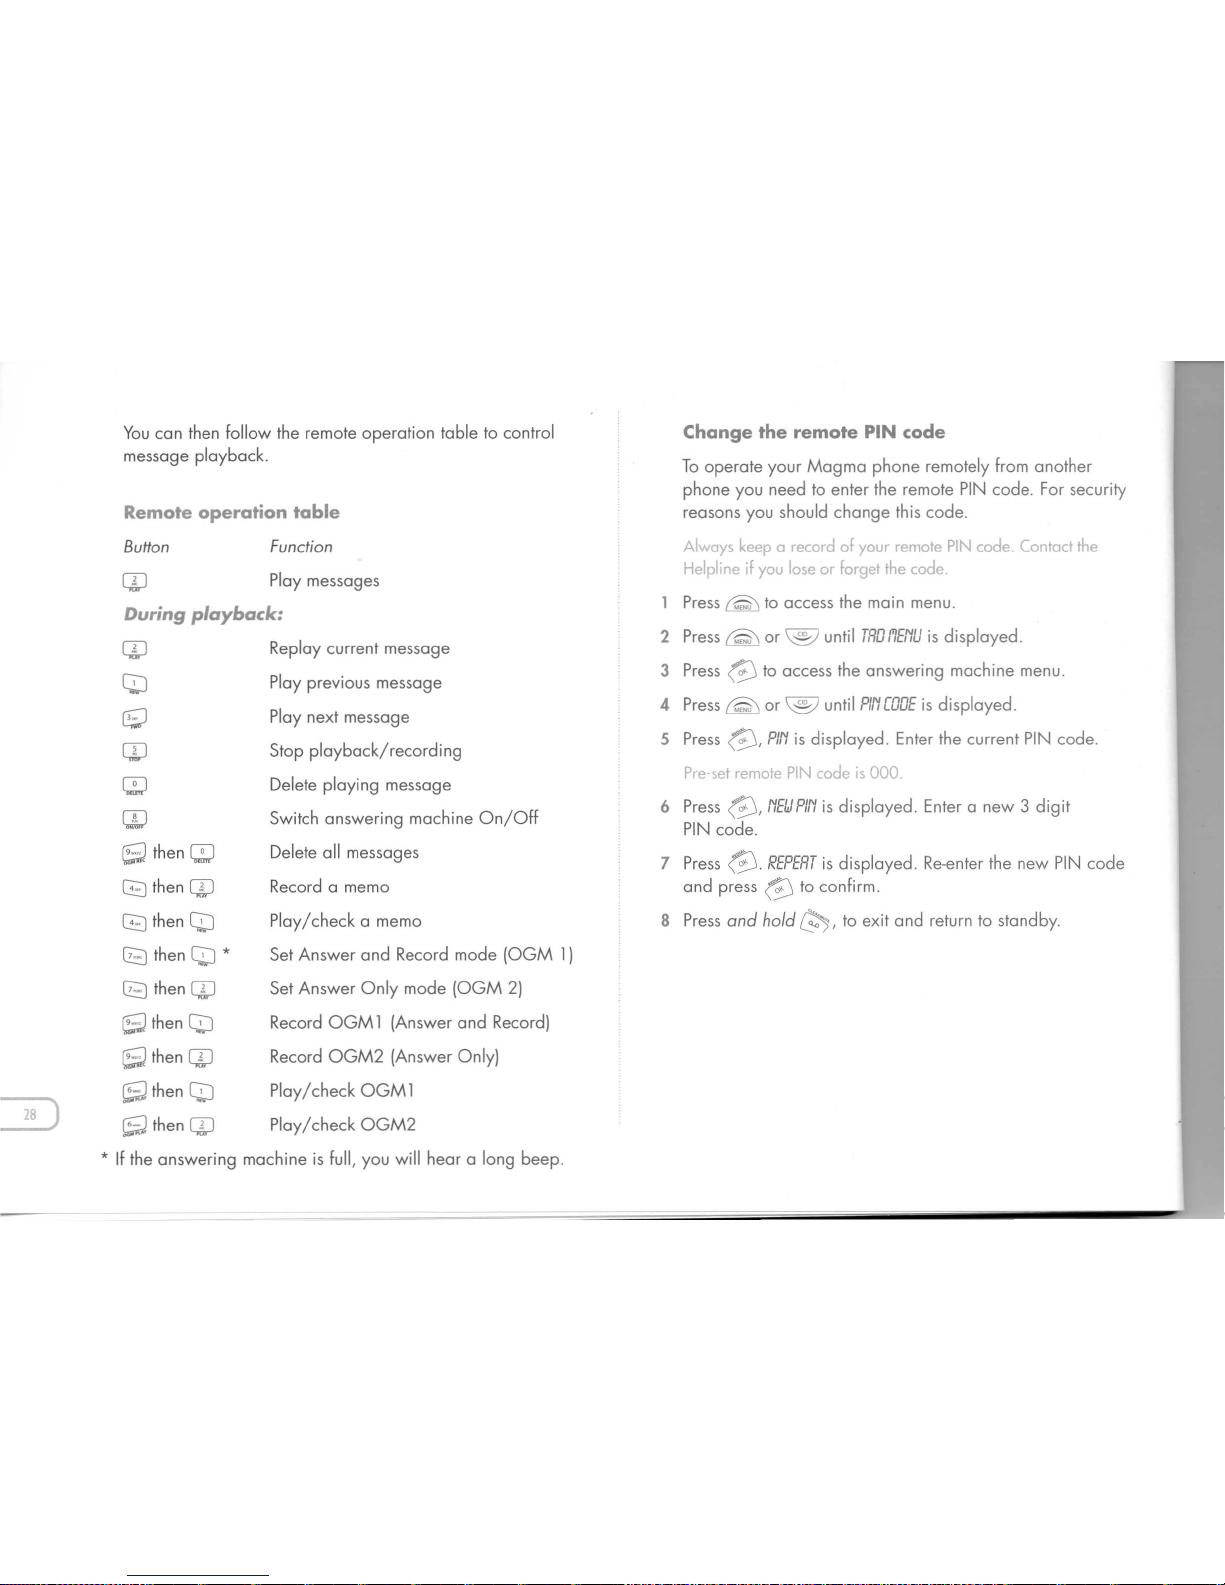
You can then Follow the remote operation table to control
message playback.
QJ
CD
~
CD
CD
C!l
(SI
then
CD
GJthen QJ
GJthen
CD
G3
then
CD
*
G3
then QJ
CD
(£I
then
CD
(£I
then QJ
Replay current message
Play previous message
Play next message
Stop playback/recording
Delete playing message
Switch answering machine On/Off
Delete all messages
Record a memo
Play/check a memo
Set Answer and Record mode (OGM 1)
Set Answer Only mode (OGM 2)
Record OGM 1 (Answer and Record)
Record OGM2 (Answer Only)
Play/check OGM 1
Play/check OGM2
Change the remote PIN code
To operate your Magma phone remotely From another
phone you need to enter the remote PIN code. For security
reasons you should change this code.
Press
to access the main menu.
2 Press @or
until
TRDf'lE,''!U
is displayed.
3 Press
to access the answering machine menu.
4 Press ~ or
until
PINCDDE
is displayed.
5 Press
PI,''!
is displayed. Enter the current PIN code.
6 Press
NEUPIN
is displayed. Enter a new 3 digit
PIN code.
7 Press
G.
REPERT
is displayed. Re-enter the new PIN code
and press
G
to conFirm.
S Press and hold ~, to exit and return to standby.
Page 30
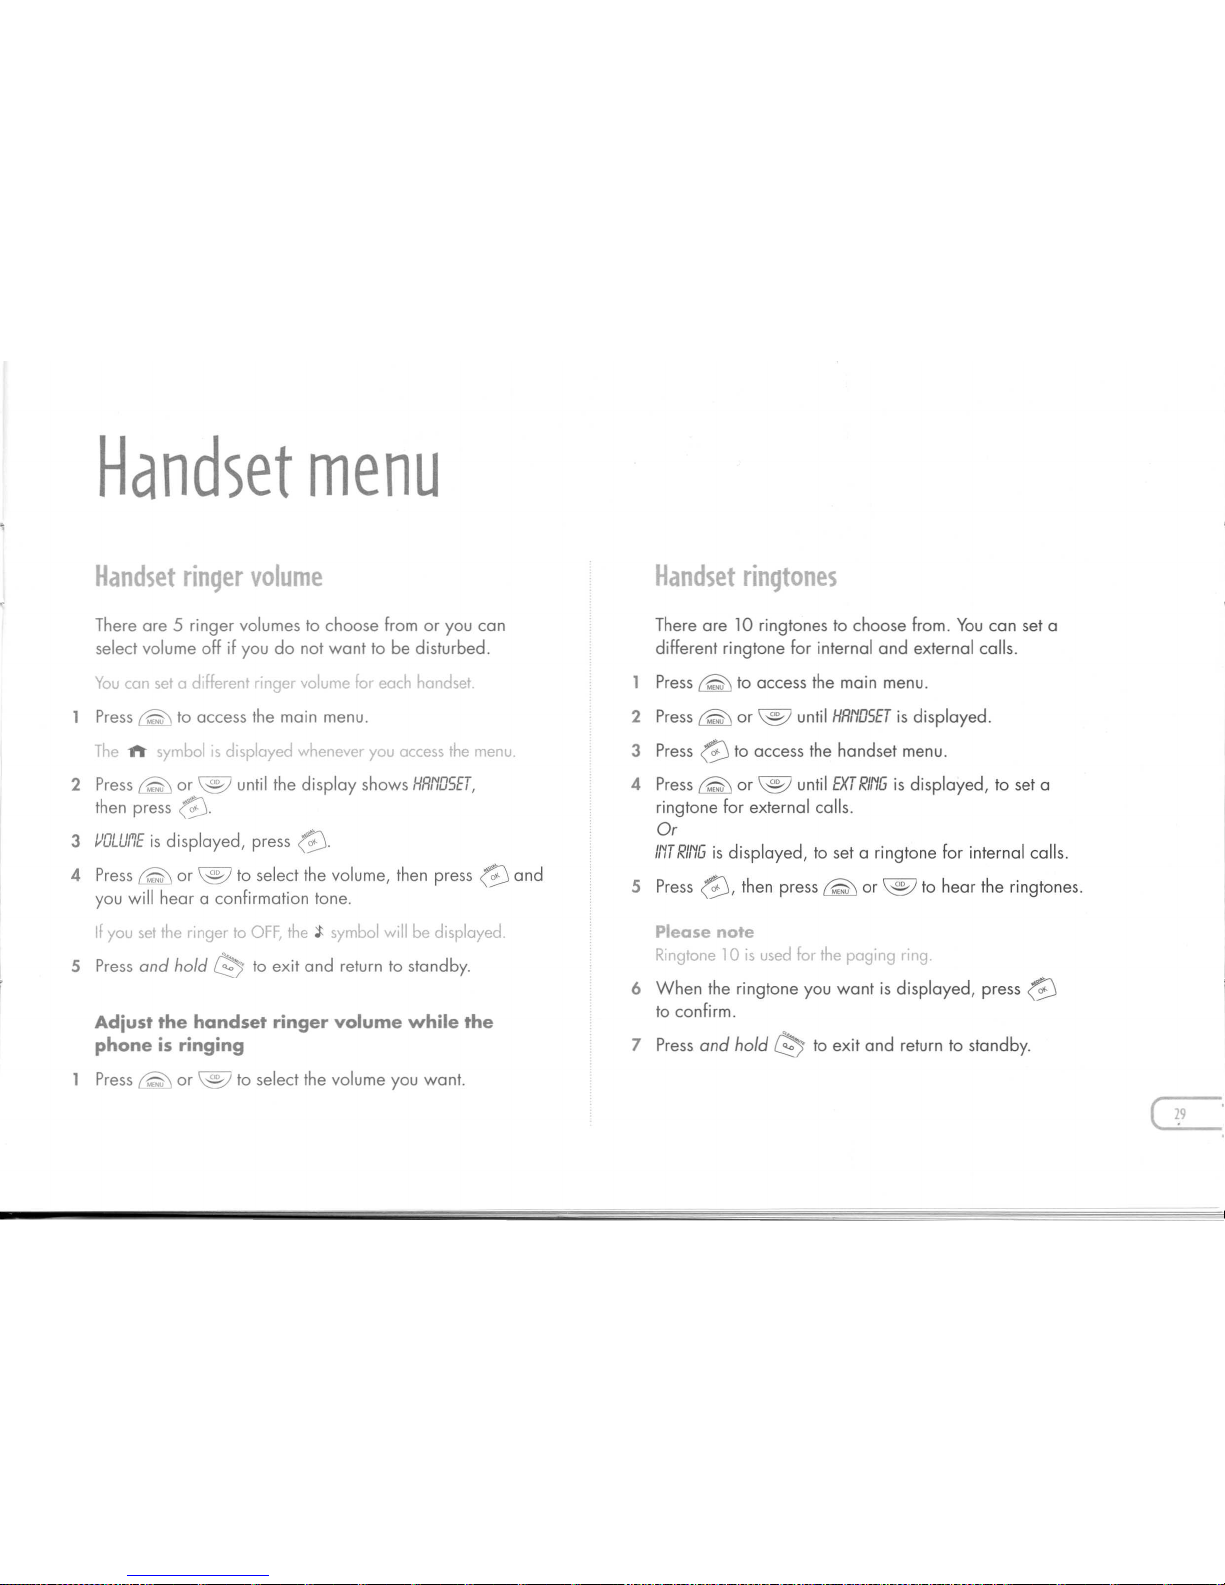
Handset menu
Handset ringer volume
There are 5 ringer volumes to choose from or you can
select volume off if you do not want to be disturbed.
You can set a different ringer volume for each handset.
Press
(Q\
to access the main menu.
The
1'l
symbol IS displayed whenever you access the menu.
2 Press
(Q\or@
until the display shows
HRNDSET,
then press
@.
3 IJDLUflE
is displayed, press
@.
4 Press
(Q\or@
to select the volume, then press
@
and
you will hear a confirmation tone.
If you set the ringer to OFF, the ;t symbol will be displayed.
5 Press and hold
e
to exit and return to standby.
Adjust the handset ringer volume while the
phone is ringing
Press ~ or
@
to select the volume you want.
Handset ringtones
There are 10 ringtones to choose from. You can set a
different ringtone for internal and external calls.
Press
rQ\
to access the main menu.
2 Press
rQ\or@
until
HRNDSET
is displayed.
3 Press@to access the handset menu.
4 Press
rQ\
or
@
until
EXT RING
is displayed, to set a
ringtone for external calls.
Or
INT RING
is displayed, to set a ringtone for internal calls.
5 Press
@,
then press
(Q\
or
@
to hear the ringtones.
Please note
Ringtone 10 is used for the paging ring.
6 When the ringtone you want is displayed, press
@
to confirm.
7 Press and hold
e
to exit and return to standby.
( 29
Page 31
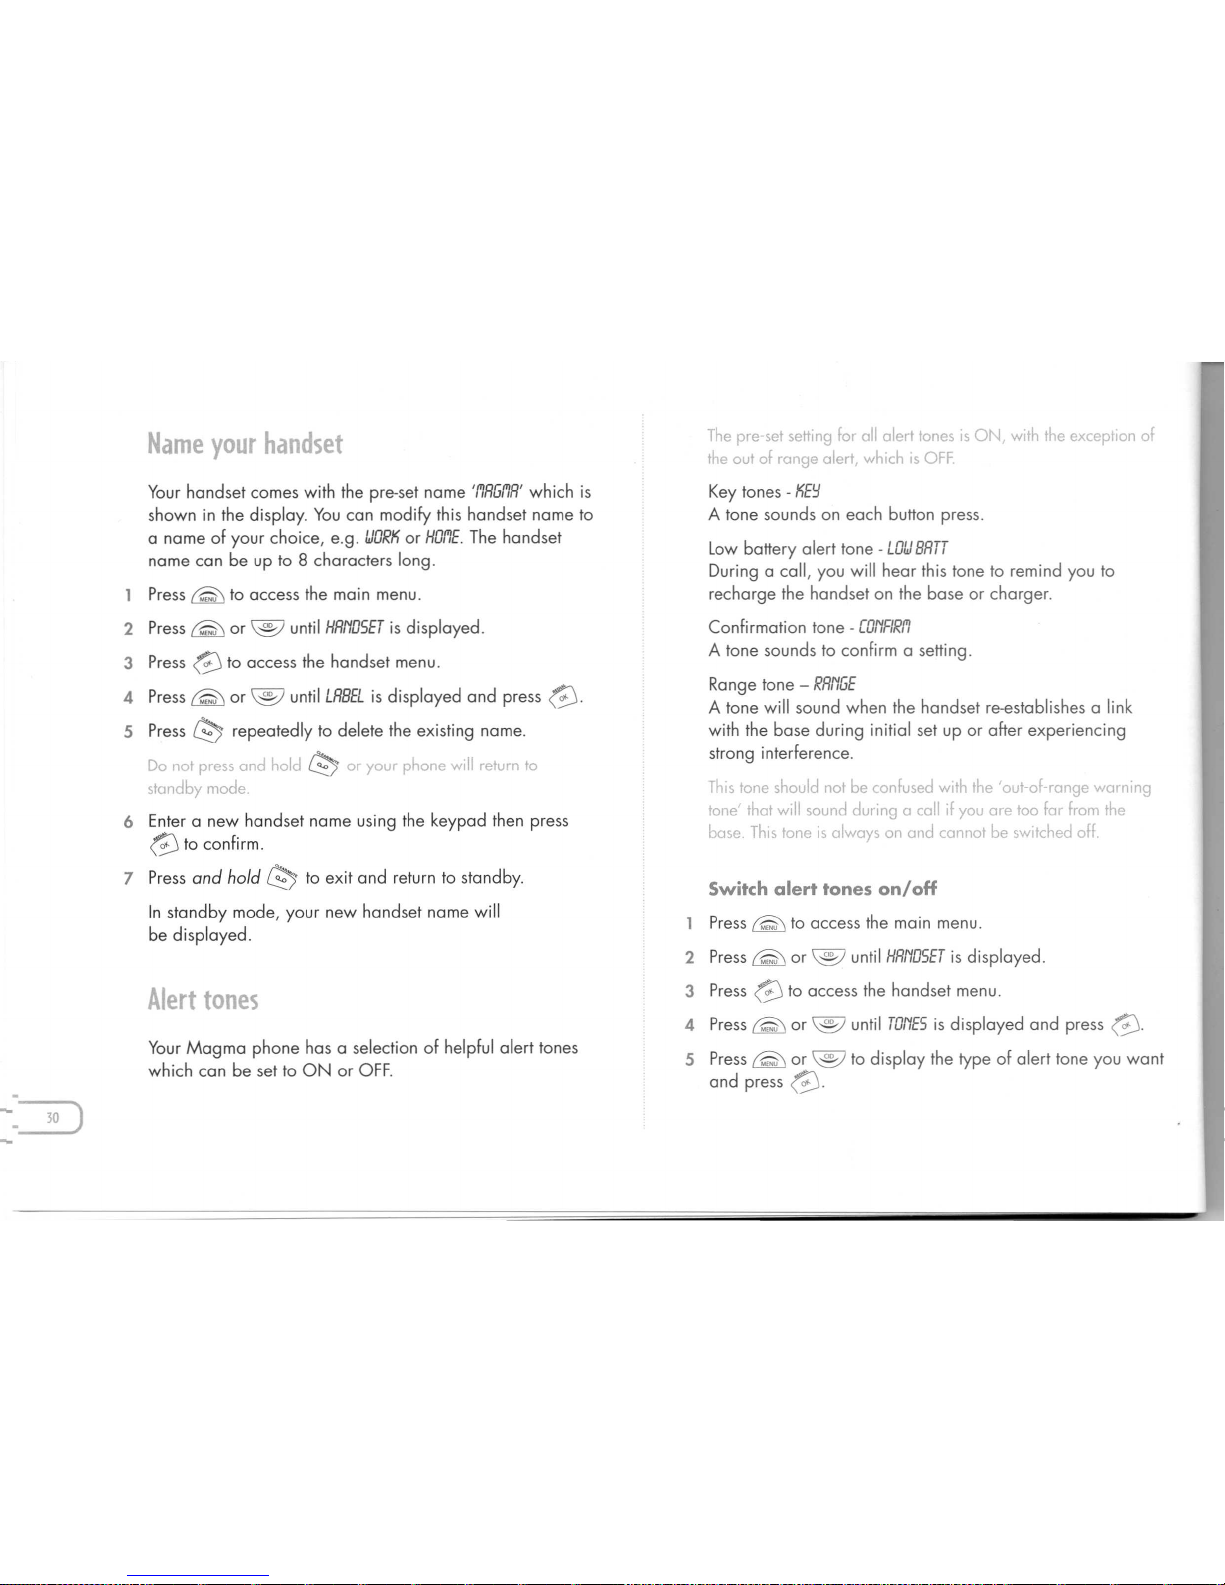
which is
shown in the display. You can modify this handset name to
fJORK
or
rQ\
2 Press
rQ\
HRNOSET
is displayed.
3 Press
G
4 Press
rQJor@
G.
5 Press
t2J
t2J
6 Enter a new handset name using the keypad then press
7 Press
Key tones -
KE'::J
A tone sounds on each button press.
LOfJ BRTT
recharge the handset on the base or charger.
Confirmation tone -
CONFIRf'l
A tone sounds to confirm a setting.
Range tone -
RRNGE
with the base during initial set up or after experiencing
strong interference.
2 Press
(Qj
or
@
until
HRNDSET
is displayed.
3 Press
G
to access the handset menu.
4 Press
(Qj
or
@
until
TONES
is displayed and press
G.
5 Press
rQ\
or
@
and press
G.
Page 32
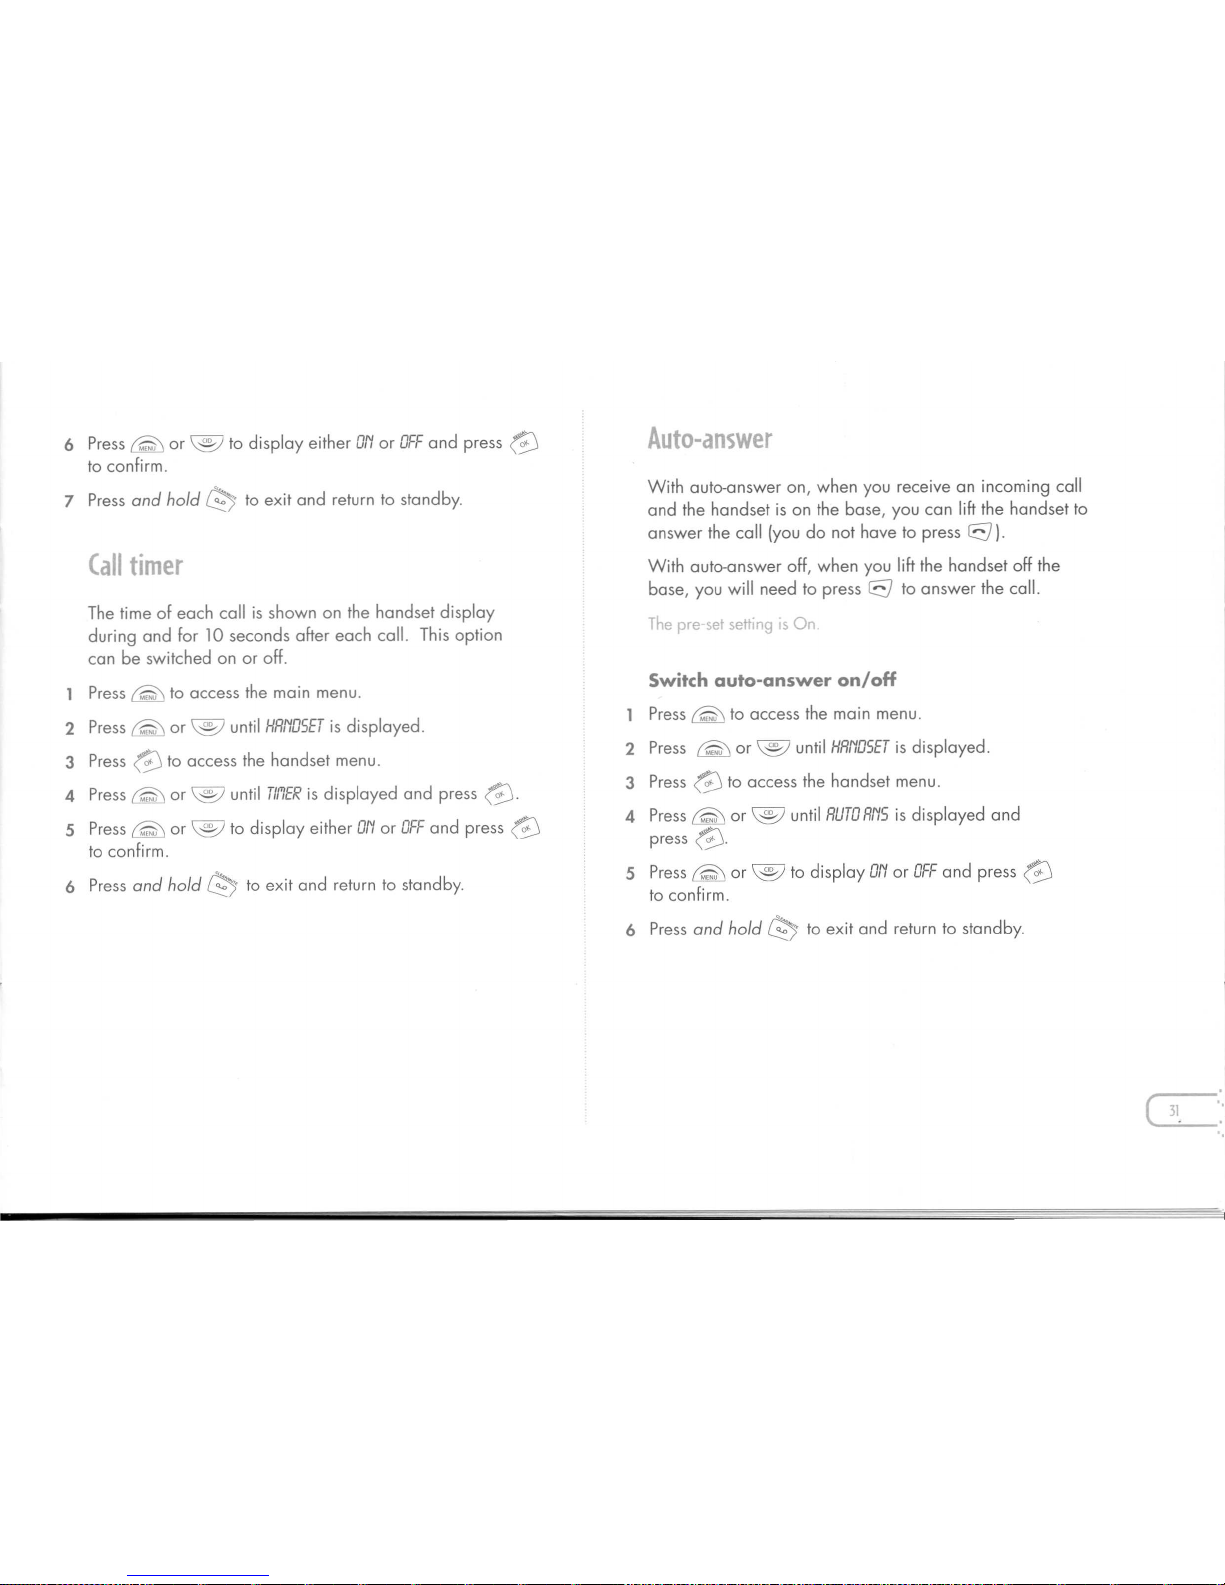
6 Press
@
or
@
to display eitherONor
OFF
and press
@
to confirm.
7 Press and hold
0;)
to exit and return to stand by.
The time of each call is shown on the handset display
during and for 10 seconds after each call. This option
can be switched on or off.
Press
(Q\
to access the main menu.
2 Press
(Q\or@
until
HRt/DSET
is displayed.
3 Press@to access the handset menu.
4 Press
(Q\or@
until
Tll'lER
is displayed and press
@.
5 Press
(Q\or@
to display eitherONor
OFF
and press
@
to confirm.
6 Press and hold
0;)
to exit and return to stand by.
With auto-answer on, when you receive an incoming call
and the handset is on the base, you can lift the handset to
answer the call (you do not have to press
8).
With auto-answer off, when you lift the handset off the
base, you will need to press
8
to answer the call.
Switch auto-answer on/off
Press
@
to access the main menu.
2 Press
@
or
@
until
HRNDSET
is displayed.
3 Press
@
to access the handset menu.
4 Press
(Q\or@
until
RUTDRNS
is displayed and
press
@.
5 Press
(Q\or@
to displayONor
OFF
and press
@
to confirm.
6 Press and hold
0;)
to exit and return to standby.
Page 33
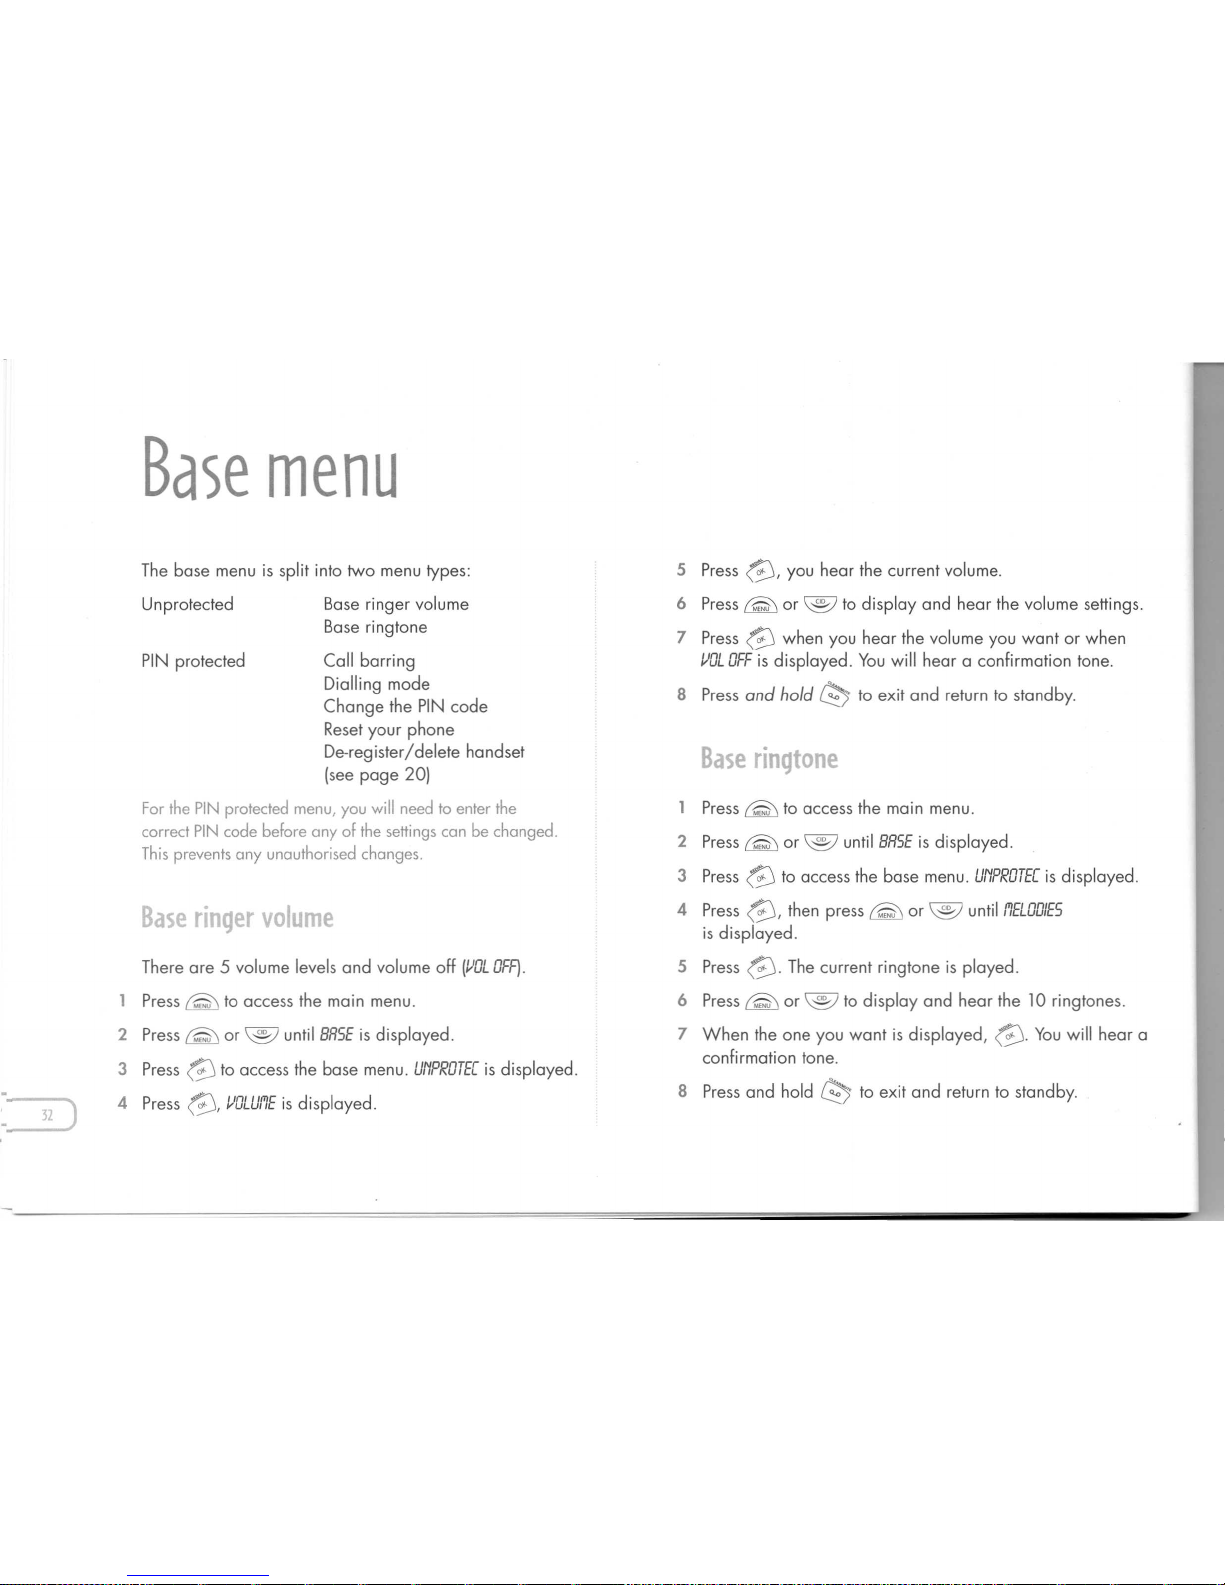
Base ringer volume
Base ringtone
Call barring
Dialling mode
Change the PIN code
Reset your phone
De-register/delete handset
(see page 20)
Base ringer volume
until
BRSE
is displayed.
ta access the base menu.
UNPROTEC
is displayed.
/,JOLU17E
is displayed.
you hear the current volume.
rS\
or
®
to display and hear the volume settings.
(8
when you hear the volume you want or when
/,JOL OFF
is displayed. You will hear a confirmation tone.
to exit and return to stand by.
Base ringtone
or
until
BRSE
is displayed.
(8
to access the base menu.
UNPROTE[
is displayed.
then press !Q\ or
until17ELOOIES
is displayed.
or
to display and hear the 10 ringtones.
confirmation tone.
to exit and return to stand by.
Page 34
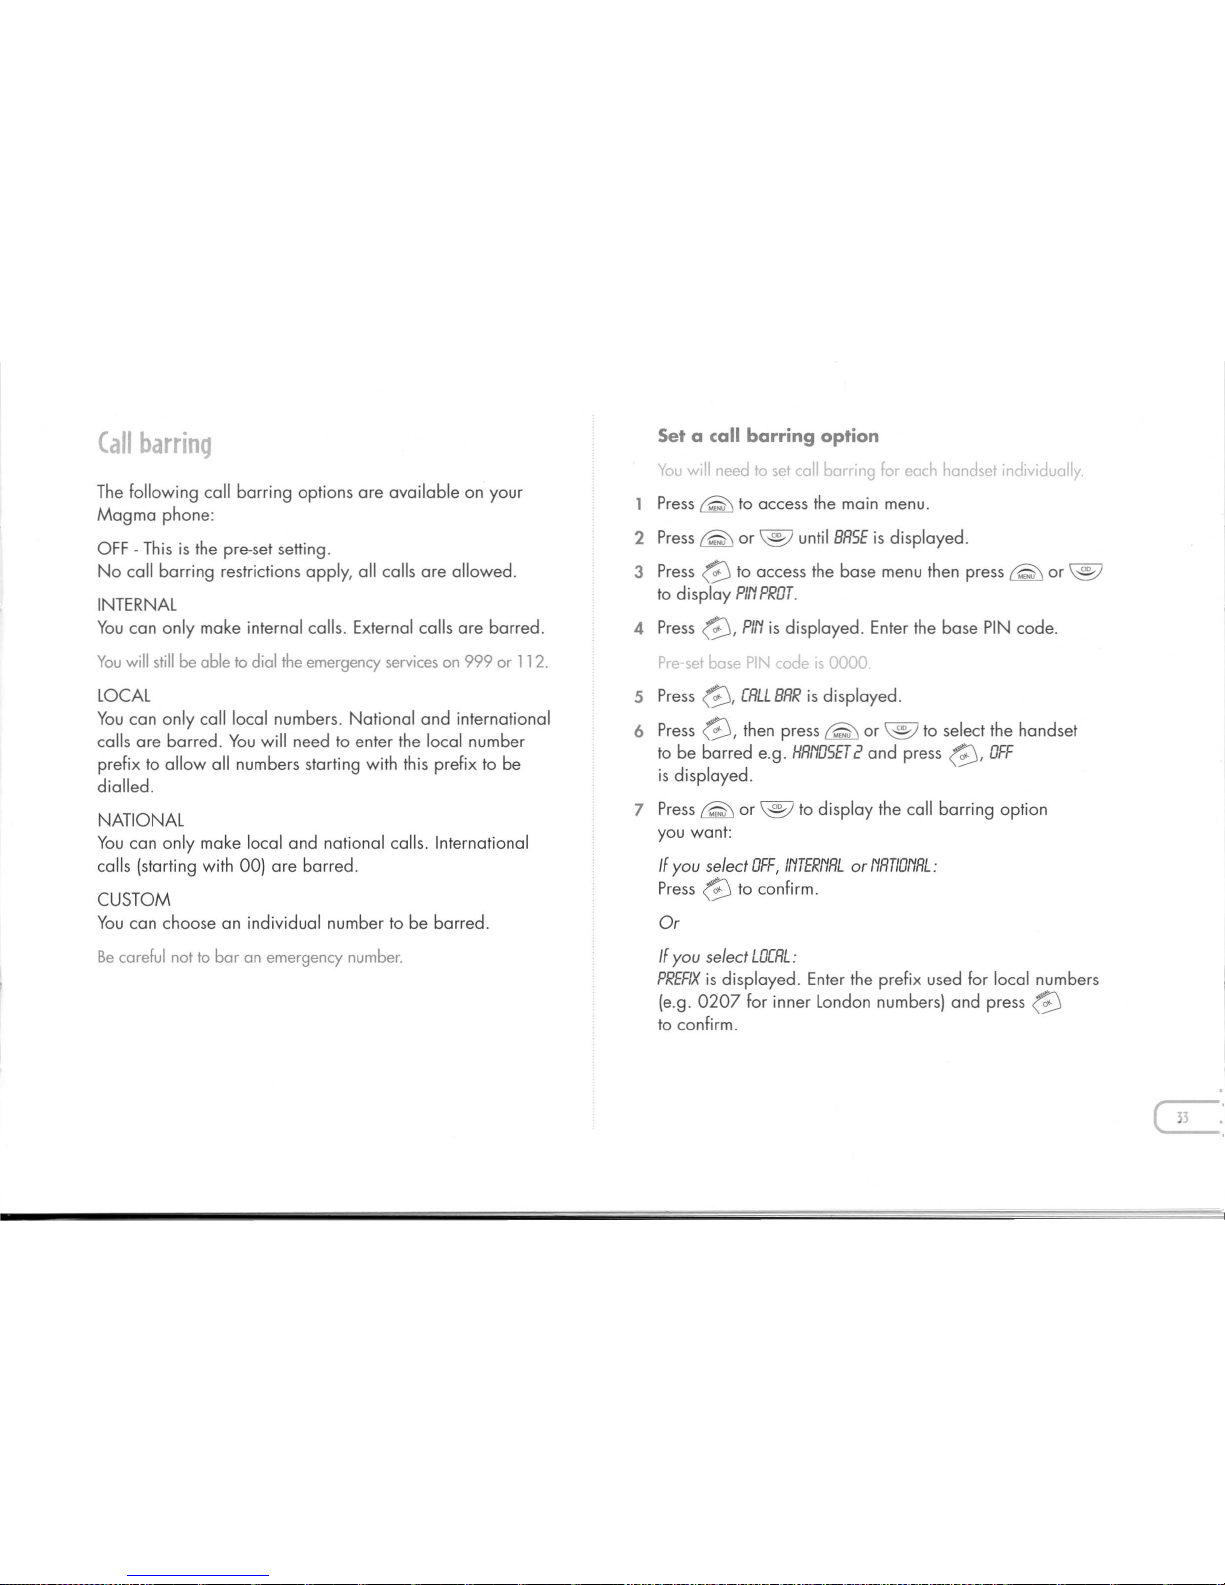
(all barring
OFF - This is the pre-set setting.
Youwill still be oble to dial the emergency services on 999 or 112.
calls are barred. You will need to enter the local number
Set a call barring option
You will need to set call barring for each handset individually.
2 Press ~ or @ until
3 Press
@
4 Press
@,
Pre-set base PIN code IS 0000
5 Press
@,
is displayed.
6 Press
@,
@,
7 Press ~ or @ to display the call barring option
@
you
is displayed. Enter the prefix used for local numbers
@
Page 35
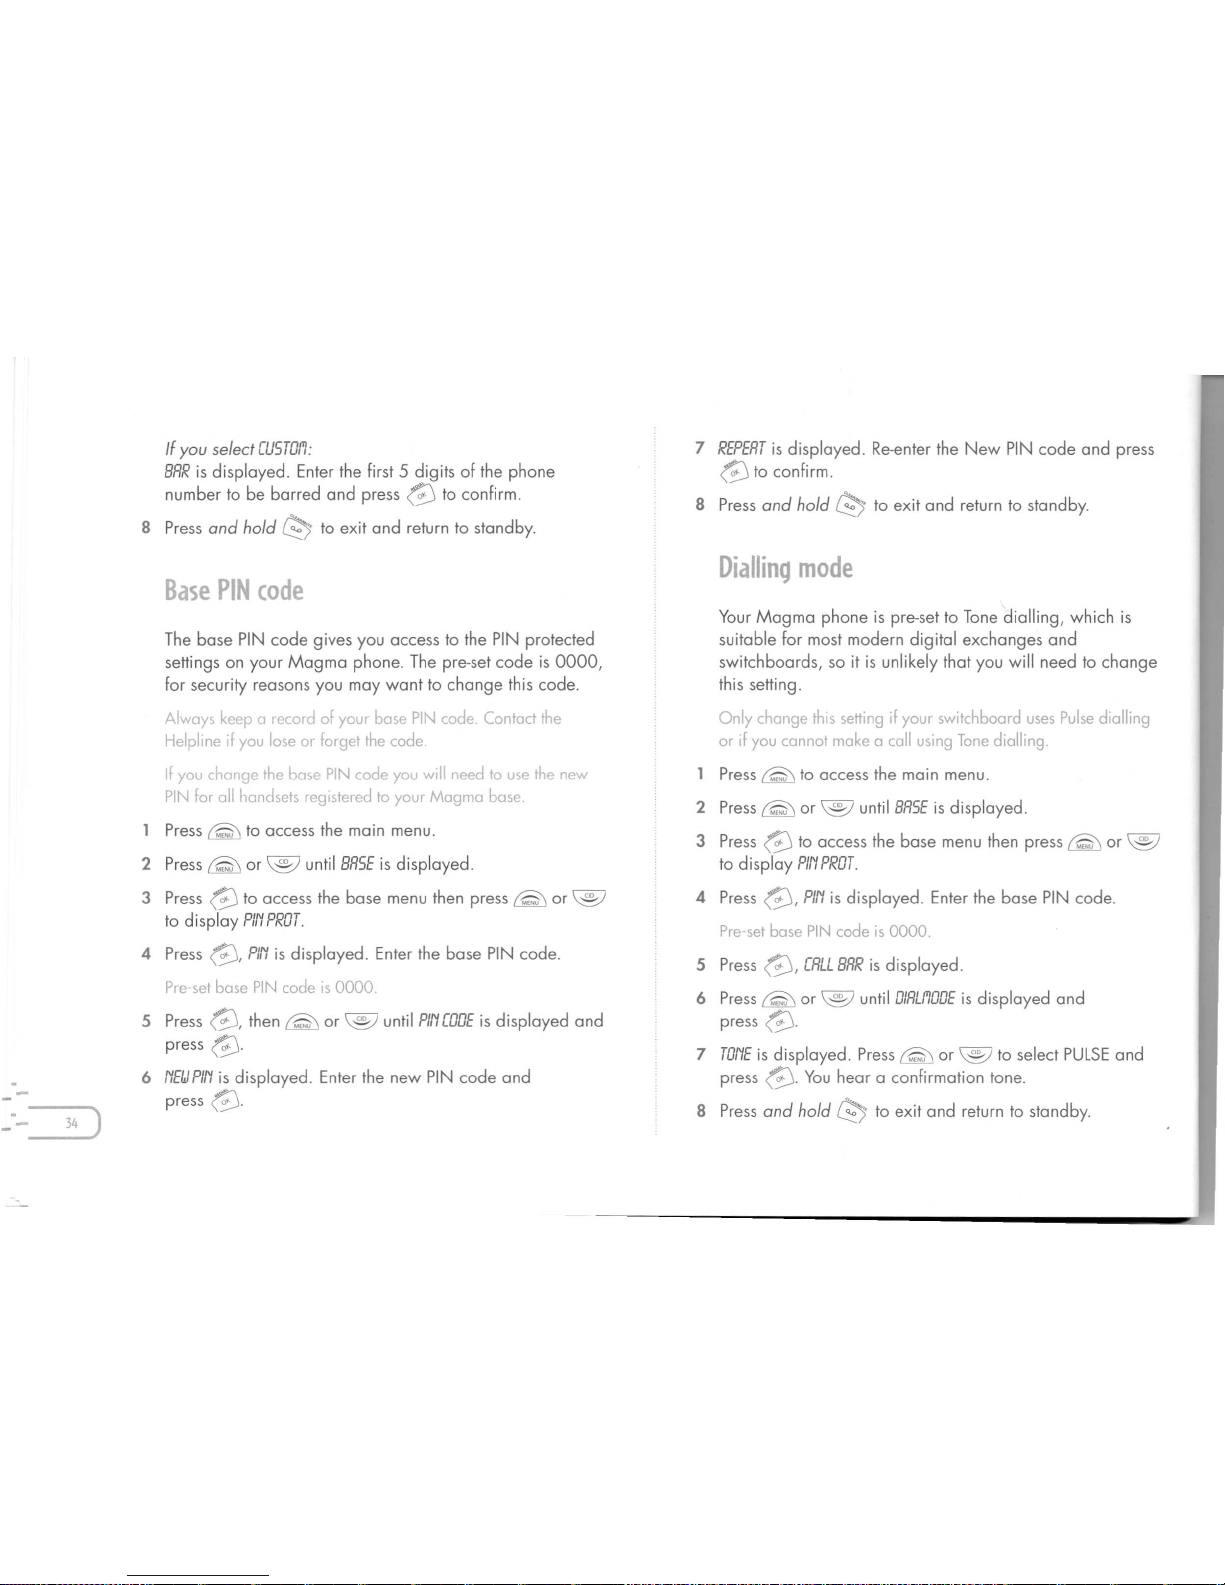
If
you
select WSTDf'I:
BRR
is displayed. Enter the first 5 digits of the phone
number to be barred and press
to confirm.
S Press and hold
to exit and return to standby.
The base PIN code gives you access to the PIN protected
settings on your Magma phone. The pre-set code is 0000,
for security reasons you may want to change this code.
Always keep a record of your base PIN code. Contact the
Helpline if you lose or forget the code.
If you change the base PIN code you will need to use the new
PIN for all handsets registered to your Magma base.
Press ~ to access the main menu.
2 Press
rQ\or@
until
BRSE
is displayed.
3 Press
to access the base menu then press
or
to display
PIN PRDT.
4 Press
Plrl
is displayed. Enter the base PIN code.
Pre-set base PIN code is 0000.
5 Press
then
or
until
PIN CODE
is displayed and
press
6 NEU PIN
is displayed. Enter the new PIN code and
press
34 )
7 REPERT
is displayed. Re-enter the New PIN code and press
to confirm.
S Press and hold
to exit and return to stand by.
Your Magma phone is pre-set to Tone dialling, which is
suitable for most modern digital exchanges and
switchboards, so it is unlikely that you will need to change
this setting.
Only change this setting if your switchboard uses Pulsedialling
or if you cannot make a call using Tone dialling.
Press
to access the main menu.
2 Press
or
until
BRSE
is displayed.
3 Press
to access the base menu then press
or
to display
PIN PRDT.
4 Press
PIN
is displayed. Enter the base PIN code.
Pre-set base PIN code is 0000.
5 Press
CALL BRR
is displayed.
6 Press
or
until
DIRLf'lDDE
is displayed and
press
7 TONE
is displayed. Press
or
®
to select PULSE and
press
You hear a confirmation tone.
S Press and hold
to exit and return to standby.
Page 36
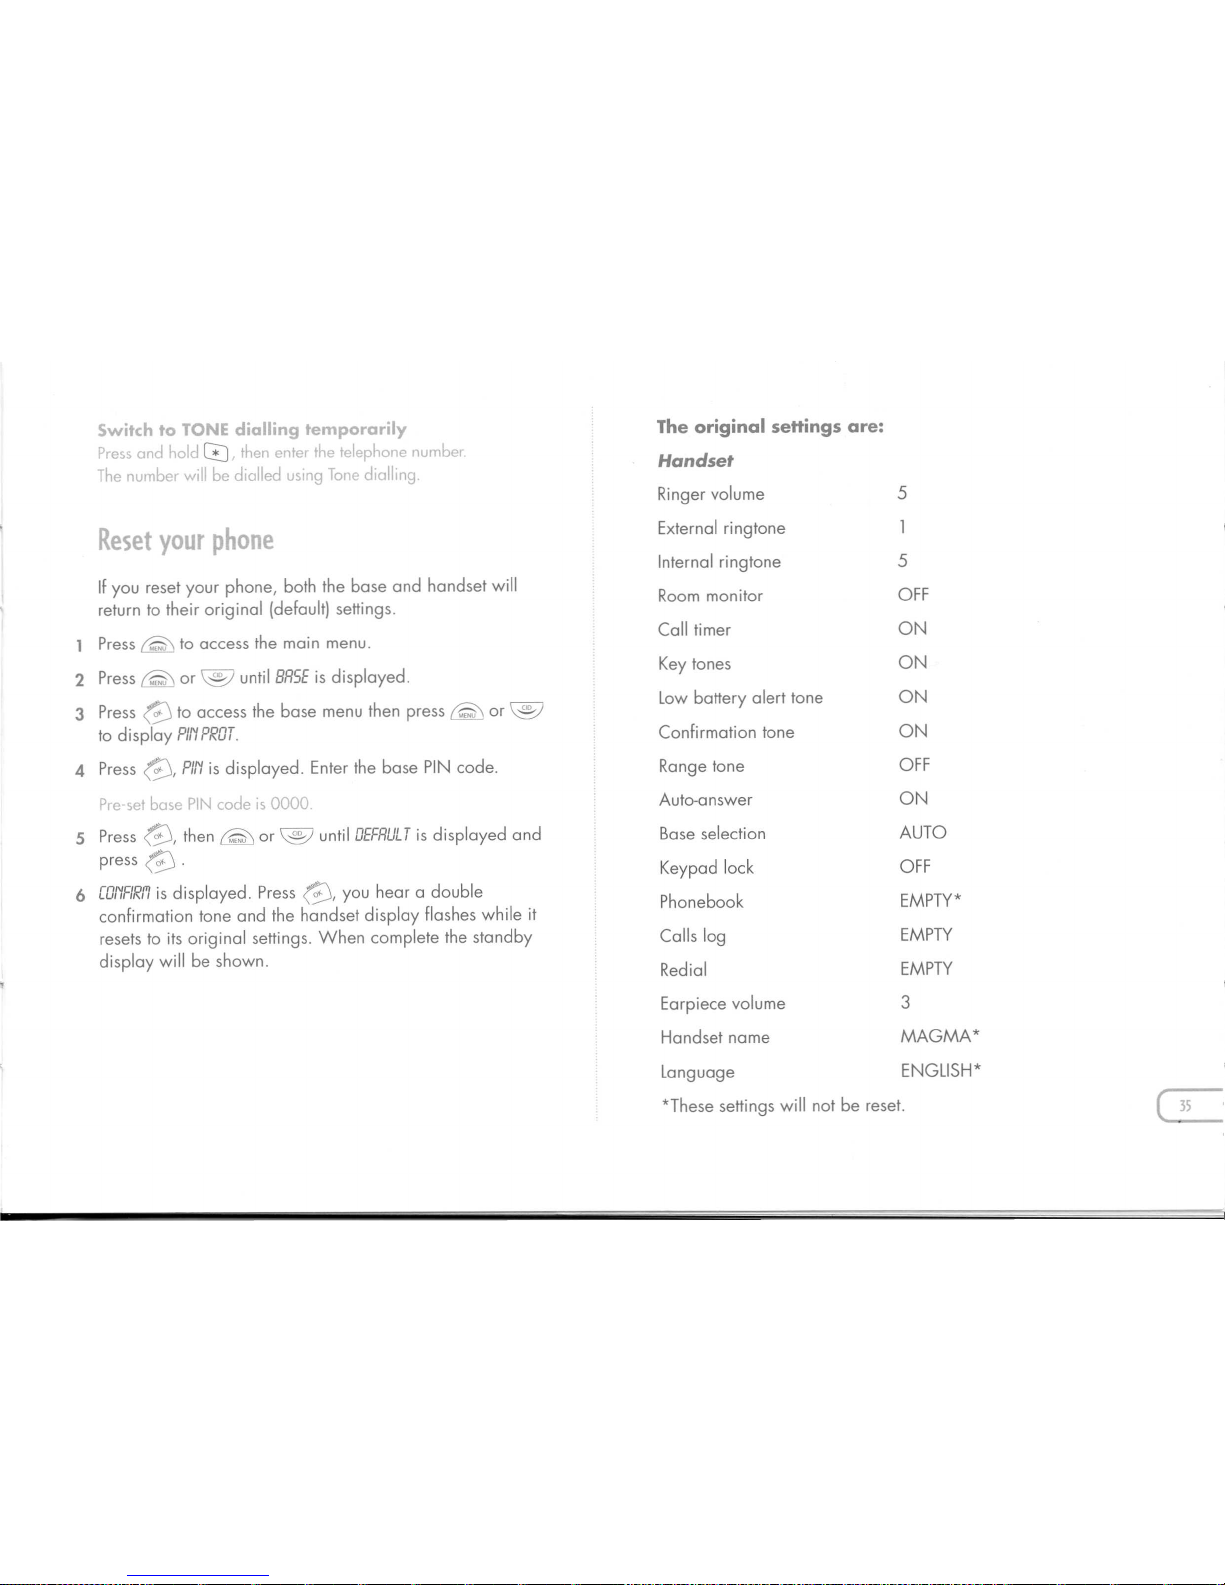
Reset your phone
Low battery alert tone
Auto-answer
Phonebook
EMPTY
EMPTY
Earpiece volume
Switch to TONE dialling temporarily
Pressond hold
GJ
then enter the telephone number.
The number will be dialled uSing Tone dialling.
If you reset your phone, both the base and handset will
@
or
®
3 Press
G
@
@
G,
Pre-set bose PIN code is 0000.
5 Press
G,
@
@
@.
6
is displayed. Press
G,
Page 37
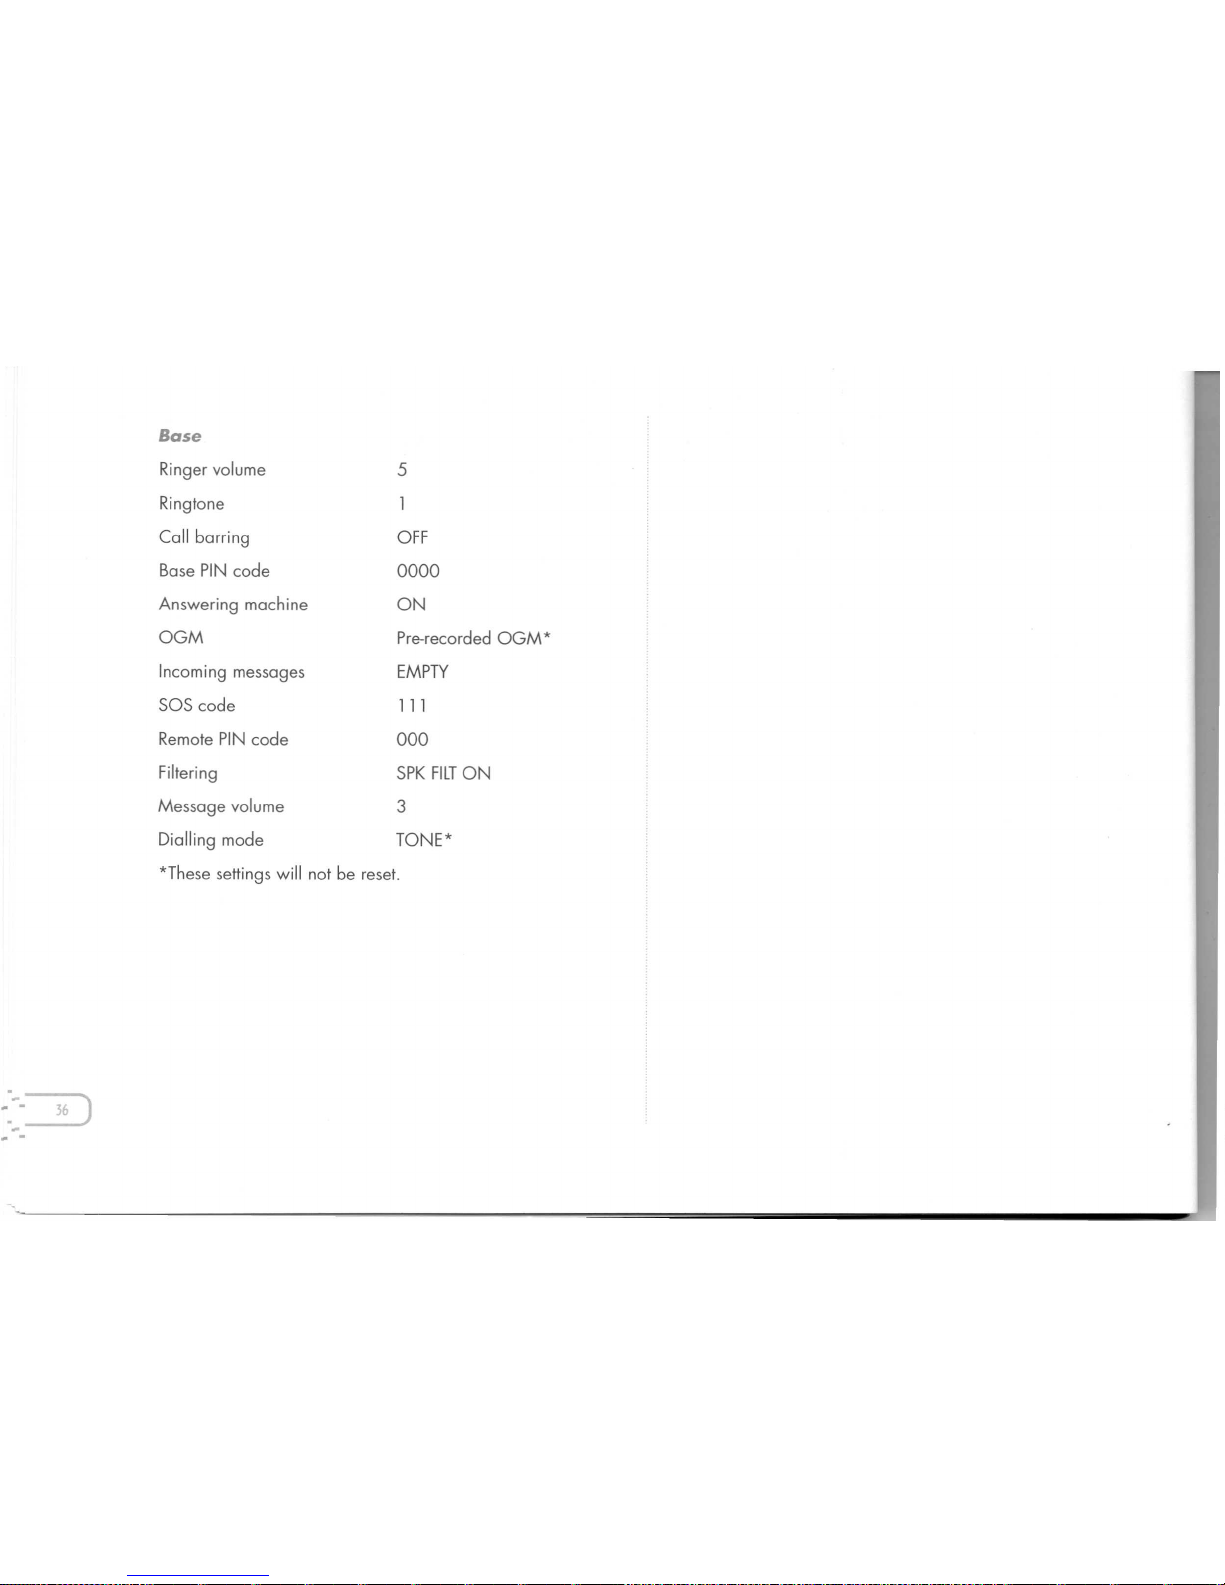
Base
Ringer volume
5
Ringtone
Call barring
OFF
Base PIN code
0000
Answering machine
ON
OGM
Pre-recorded OGM *
Incoming messages
SOS code
Remote PIN code
000
SPK FILTON
Message volume
3
Dialling mode
Page 38
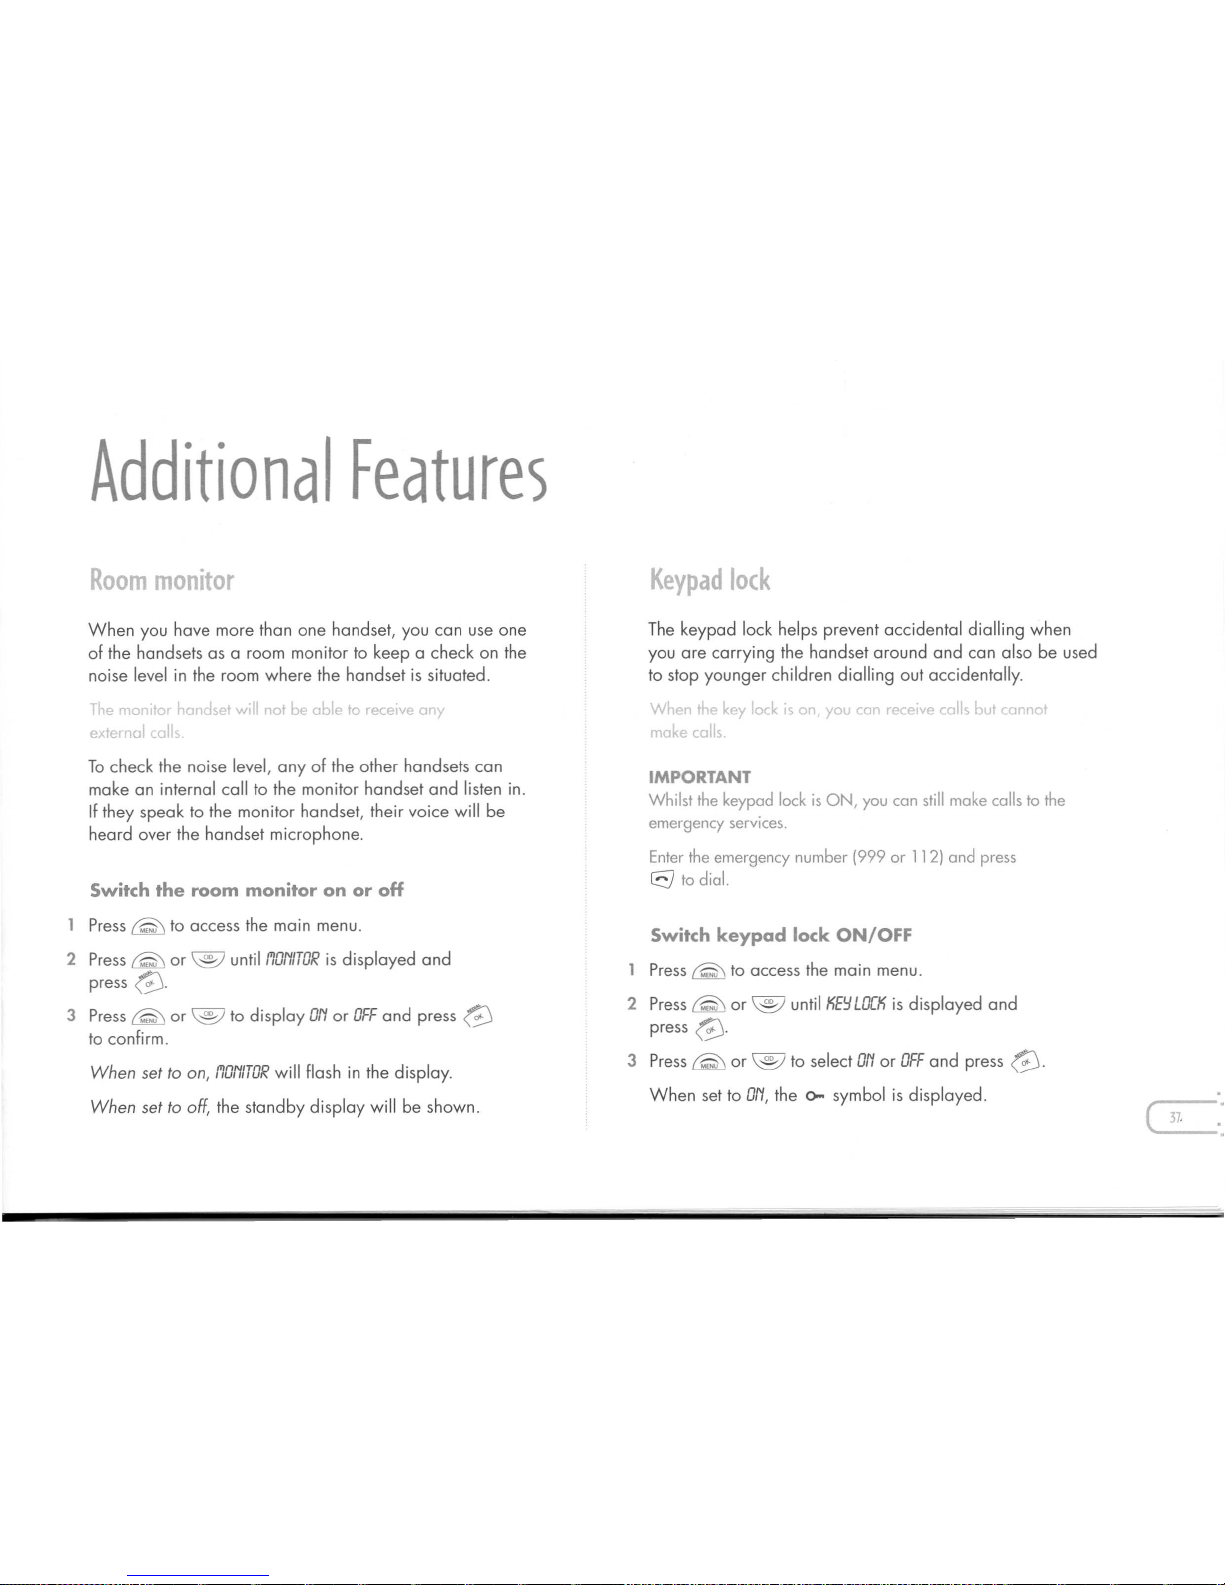
Additional Features
When you have more than one handset, you can use one
of the handsets as a room monitor to keep a check on the
noise level in the room where the handset is situated.
. e MO _ ,a
._.e
Ni. no. ble0receive ar ,
ex emal
11
To check the noise level, any of the other handsets can
make an internal call to the monitor handset and listen in.
If they speak to the monitor handset, their voice will be
heard over the handset microphone.
2 Press ~ or
until
flaN/TOR
is displayed and
press
to displayONor
OFF
and press
to confirm.
When set to on,
flaN/TOR
will flash in the display.
When set to off,
the standby display will be shown.
Keypadlock
you are carrying the handset around and can also be used
to stop younger children dialling out accidentally.
W t'le key lock ,sv,IOU
COl
rec ~
Cl.",
bvt cal"lO
make calls
rE}
2 Press
or
®
until
KEY LOCK
is displayed and
press
3 Press
r'SJ
or
®
to selectONor
OFF
and press
ON,
the<>symbol is displayed.
( 37.
Page 39
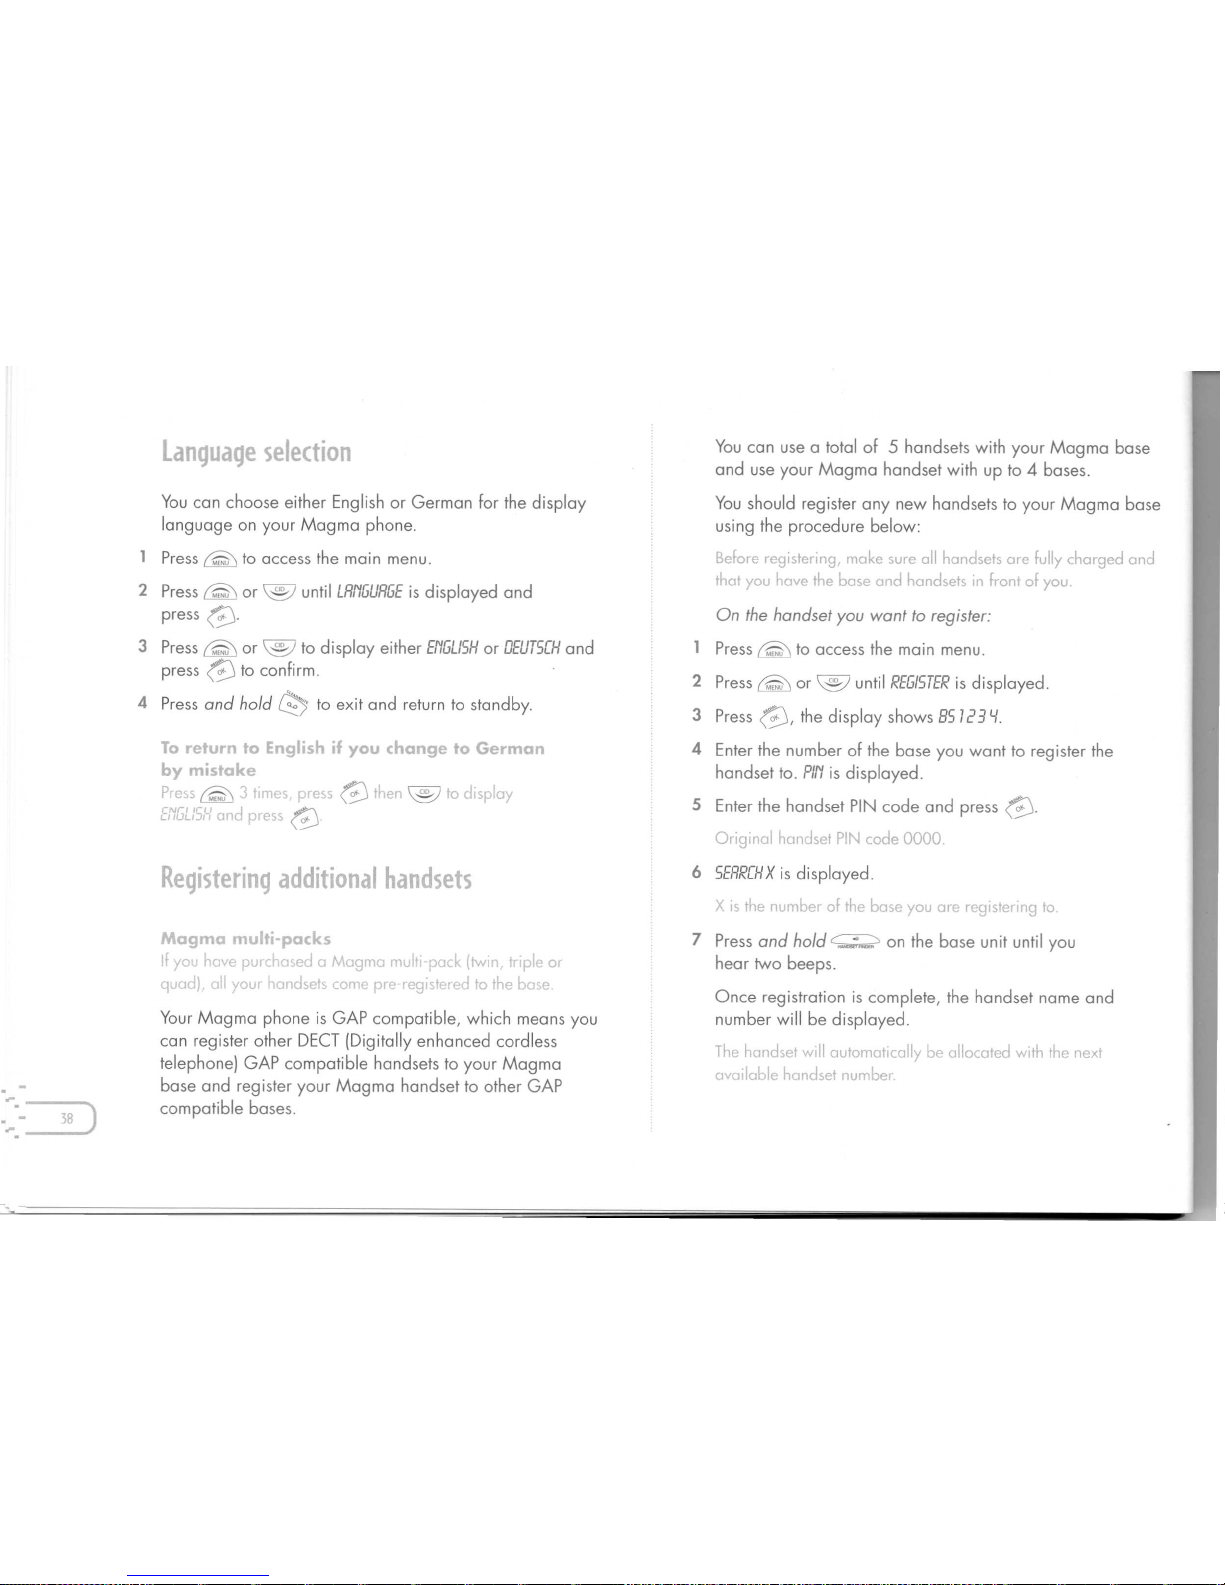
language on your Magma phone.
@
2 Press ~ or
@
3 Press ~ or
@
@
4 Press and hold
0
to exit and return to standby.
@
@
@
2 Press
@
@
3 Press
@,
5 Enter the handset PIN code and press
@.
6
Page 40
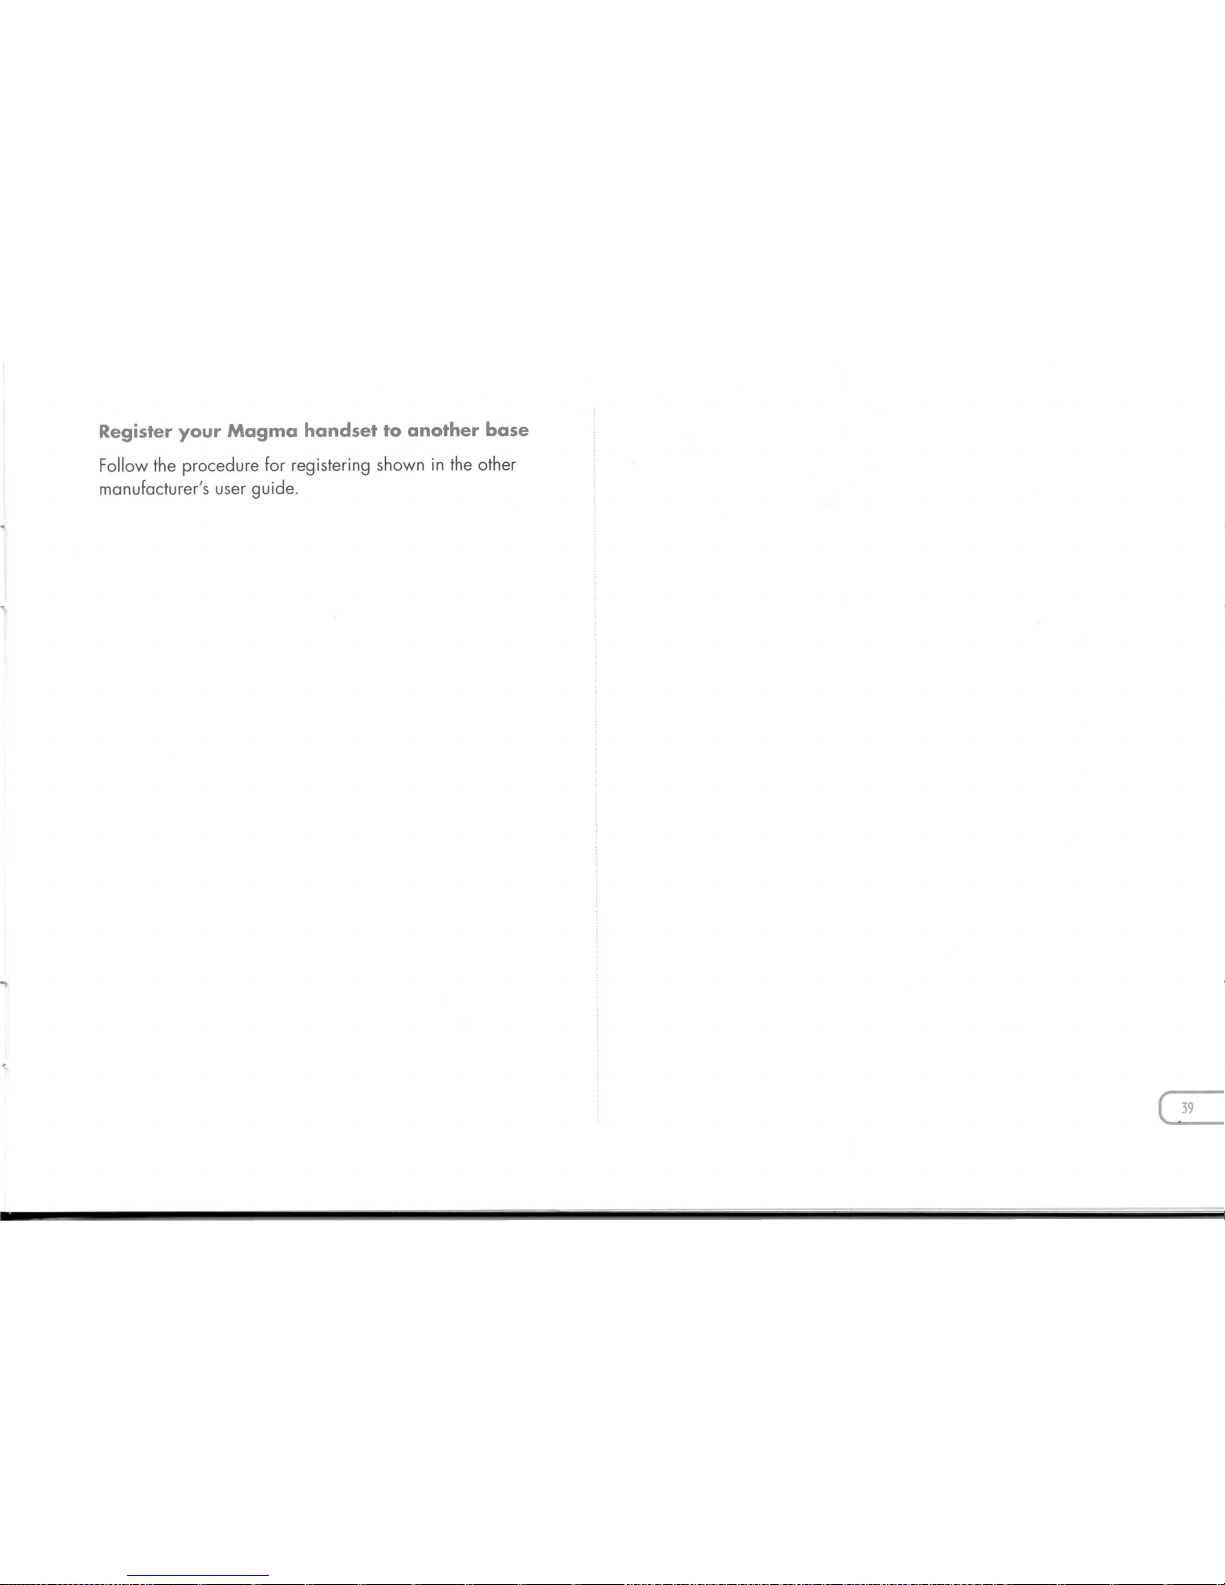
Register your Magma handset to another base
Follow the procedure for registering shown in the other
manufacturer's user guide.
( 39
Page 41
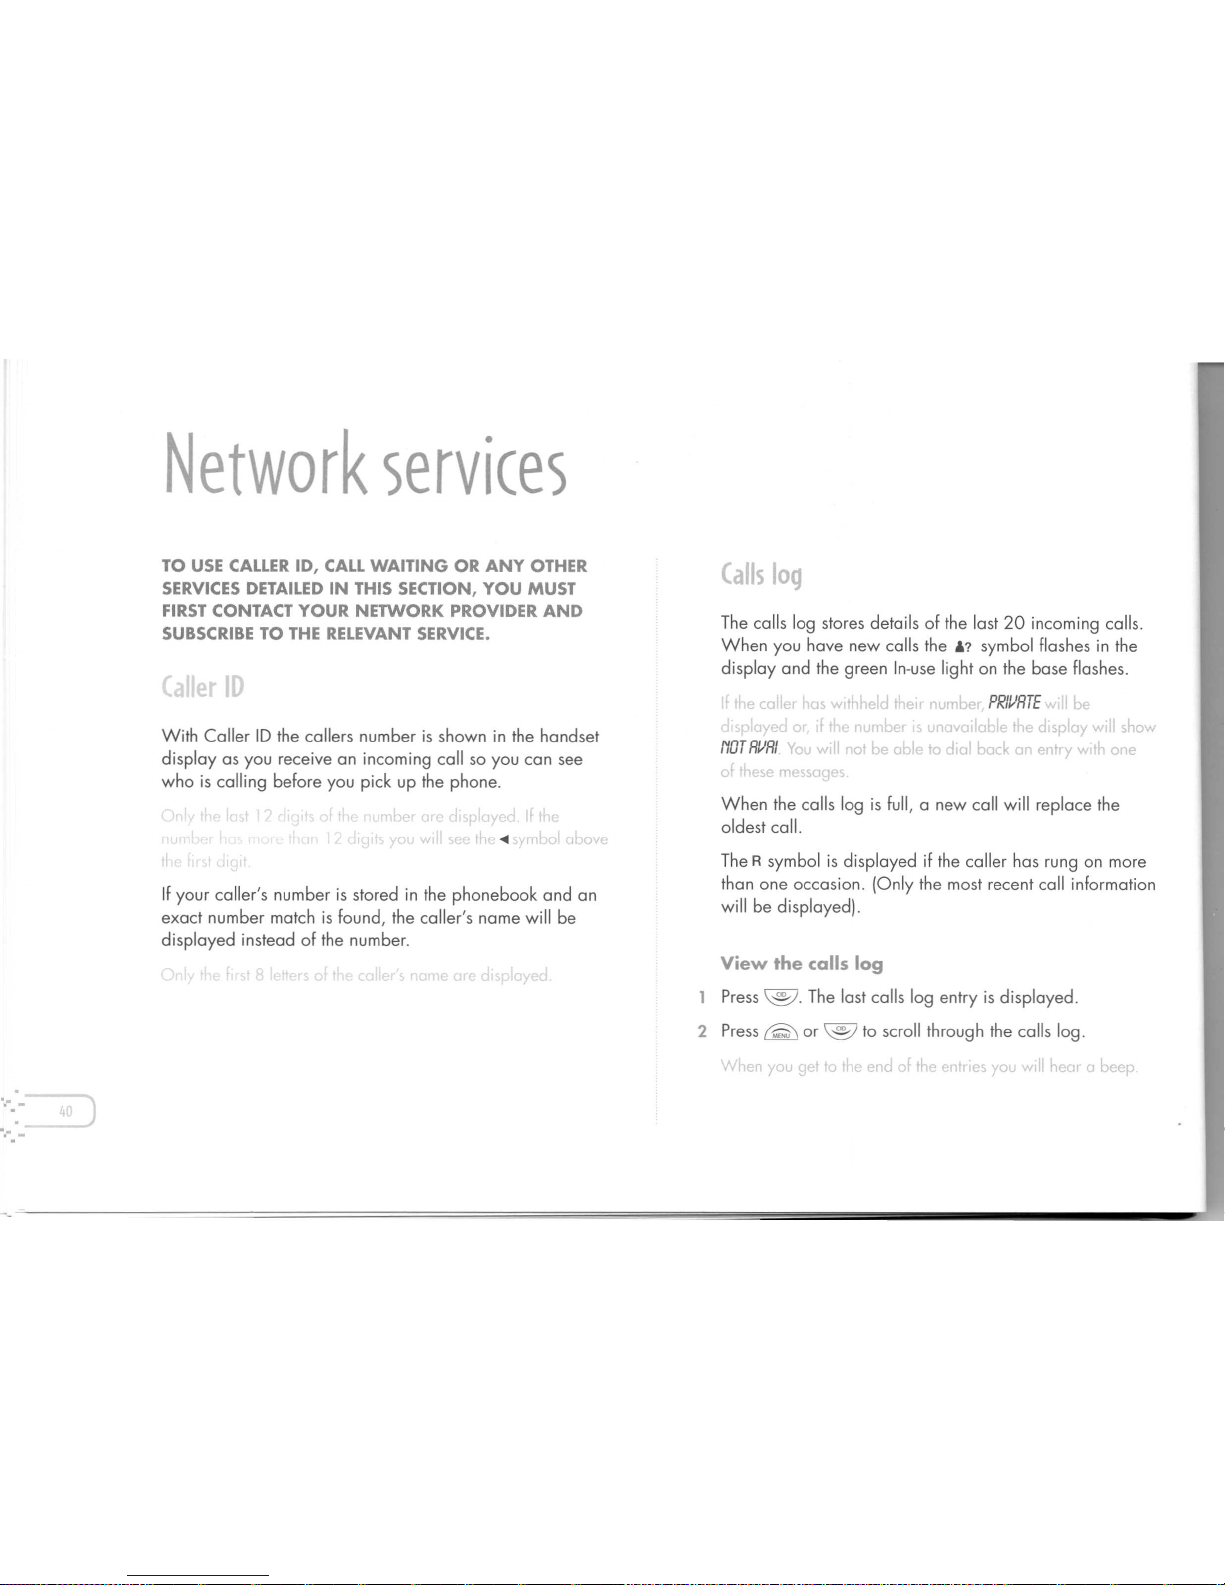
Network services
TO USE CALLER ID, CALL WAITING OR ANY OTHER
SERVICES DETAILED IN THIS SECTION, YOU MUST
FIRST CONTACT YOUR NETWORK PROVIDER AND
SUBSCRIBE TO THE RELEVANT SERVICE.
With Caller ID the callers number is shown in the handset
display as you receive an incoming call so you can see
who is calling before you pick up the phone.
If your caller's number is stored in the phonebook and an
exact number match is found, the caller's name will be
displayed instead of the number.
The calls log stores details of the last 20 incoming calls.
When you have new calls the
I.?
symbol flashes in the
display and the green In-use light on the base flashes.
PRIIIRTE
NOT RIIRI
When the calls log is full, a new call will replace the
oldest call.
TheRsymbol is displayed if the caller has rung on more
than one occasion. (Only the most recent call information
will be displayed).
View the calls log
Press
@.
The last calls log entry is displayed.
2 Press~ or
@
to scroll through the calls log.
Page 42
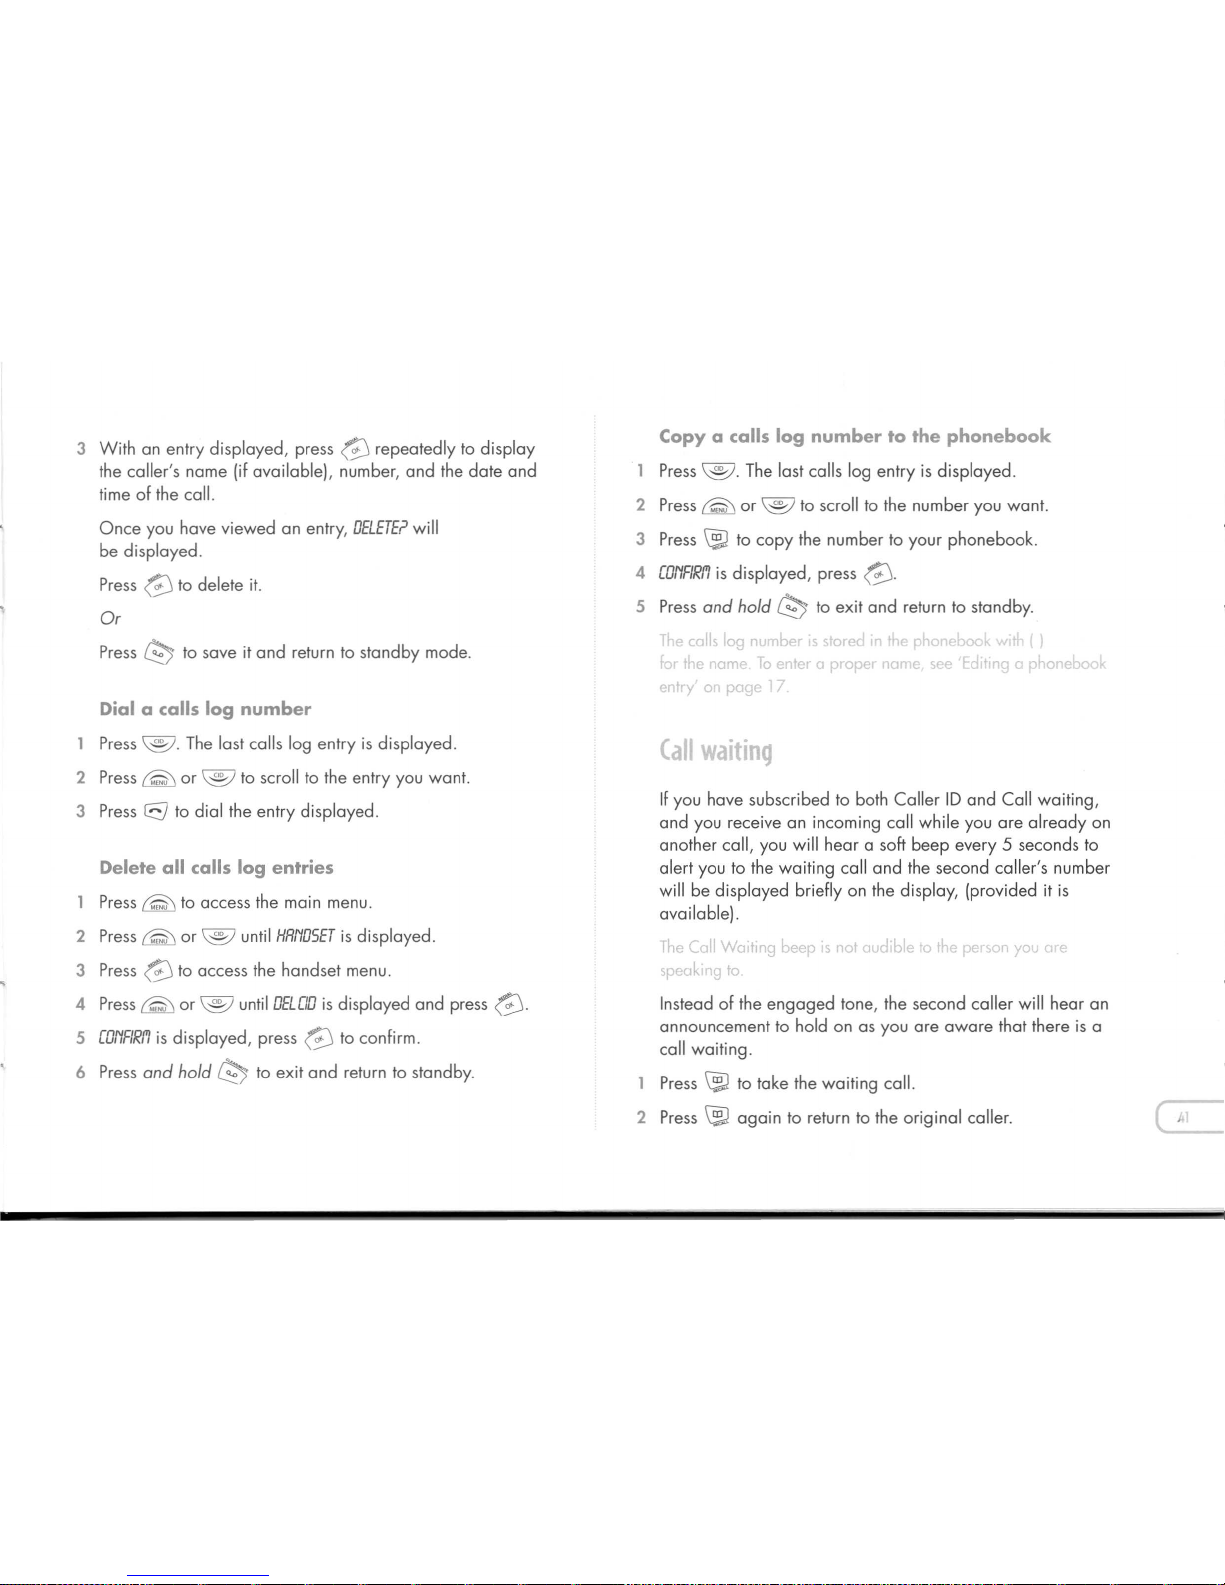
3
With an entry displayed, press
@
repeatedly to display
Copy0calls log number to the phonebook
the caller's name (if available), number, and the date and
Press @. The last calls log entry is displayed.
time of the call.
2
Press @or @to scroll to the number you want.
Once you have viewed an entry,
DELETE?
will
3
PressWto copy the number to your phonebook.
be displayed.
Press
@
to delete it.
4
CONFIRfl
is displayed, press
@.
Or
5
Press
and hold
0?J
to exit and return to standby.
Press
0?J
to save it and return to standby mode.
Dial a calls log number
Press @. The last calls log entry is displayed.
2
Press
rQ\
or @ to scroll to the entry you want.
3
Presseto dial the entry displayed.
If you have subscribed to both Caller ID and Call waiting,
and you receive an incoming call while you are already on
another call, you will hear a soft beep every 5 seconds to
Delete all calls log entries alert you to the waiting call and the second caller's number
Press
rQ\
to access the main menu.
will be displayed briefly on the display, (provided it is
available).
2
Press
rQ\
or @ until
HRNDSET
is displayed.
3
Press
@
to access the handset menu.
4
Press@ or @ until
DELClD
is displayed and press
@.
Instead of the engaged tone, the second caller will hear an
5
CONFIRfl
is displayed, press
@
to confirm.
announcement to hold on as you are aware that there is a
call waiting.
6
Press
and hold
0!!J
to exit and return to standby.
PressWto take the waiting call.
2
Press
W
again to return to the original caller.
Page 43
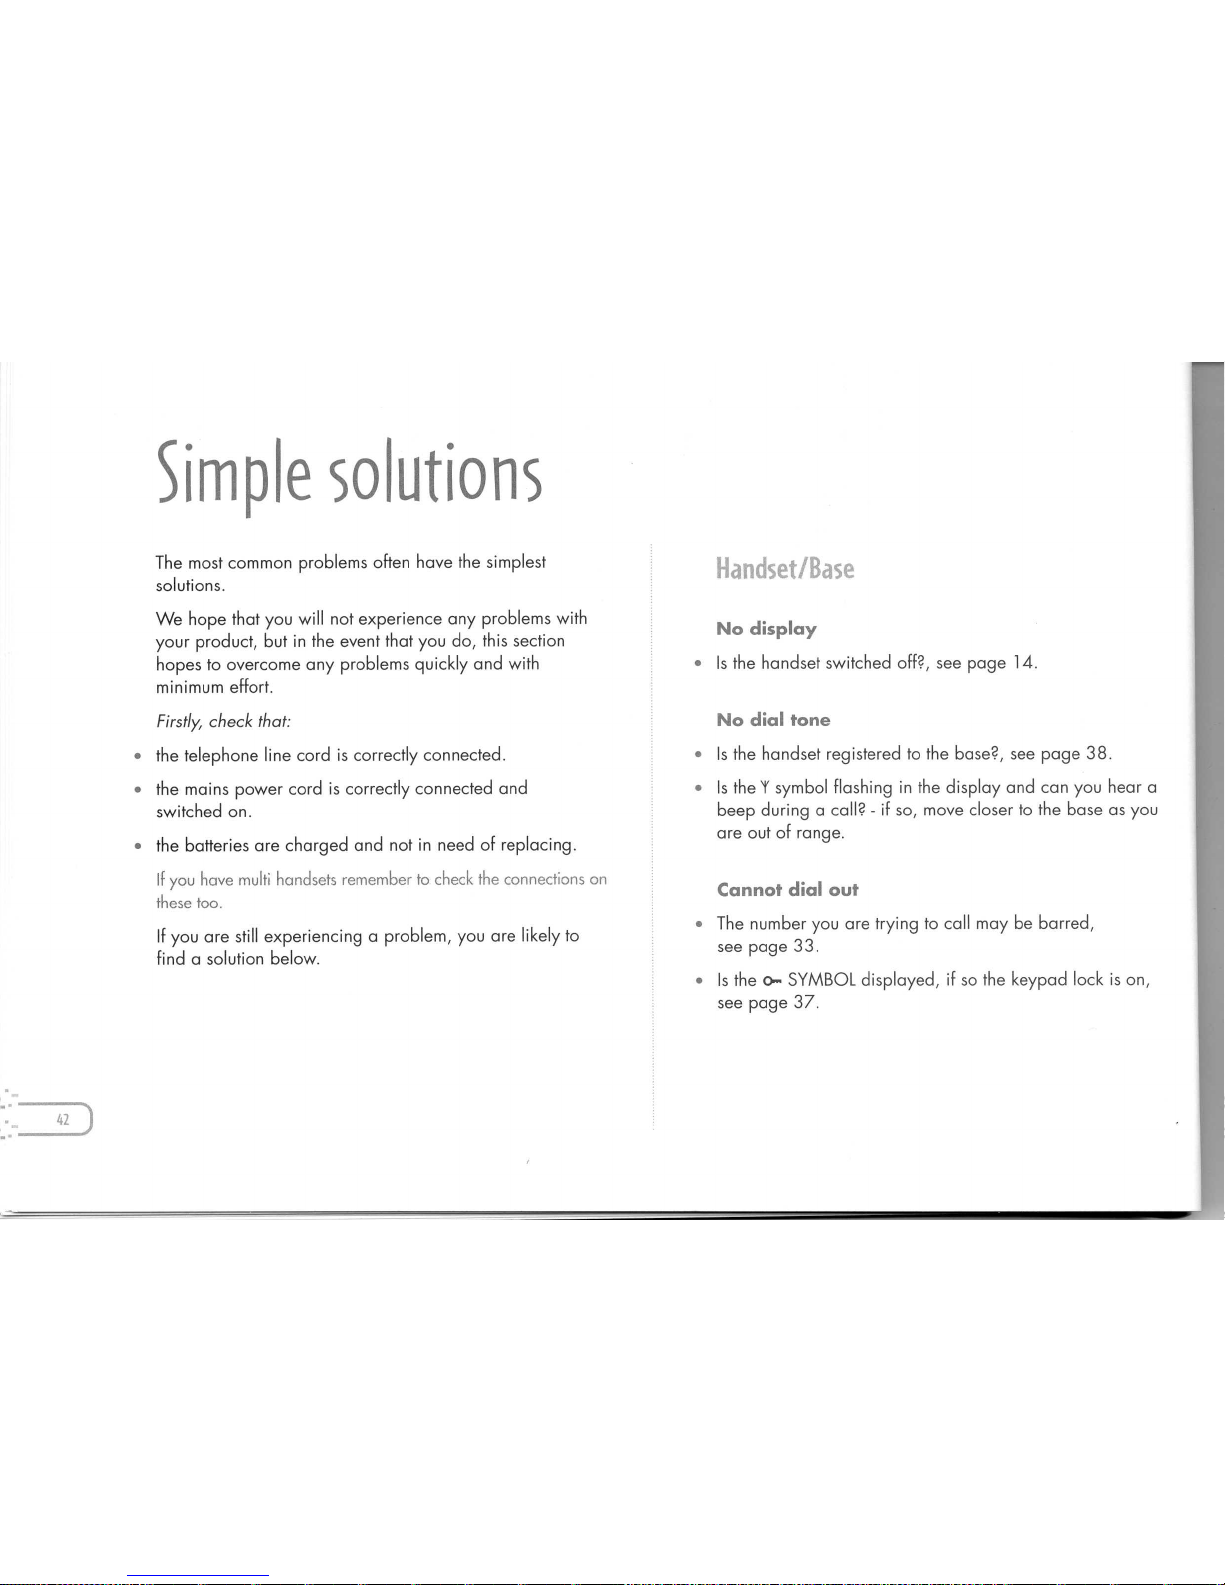
Simple solutions
The most common problems often have the simplest
solutions.
We hope that you will not experience any problems with
your product, but in the event that you do, this section
hopes to overcome any problems quickly and with
minimum effort.
Firstly, check that:
• the telephone line cord is correctly connected.
• the mains power cord is correctly connected and
switched on.
• the batteries are charged and not in need of replacing.
If you have multi handsets remember to check the connections on
these too.
If you are still experiencing a problem, you are likely to
find a solution below.
42 )
No display
• Is the handset switched off?, see page 14.
• Is the handset registered to the base?, see page 38.
• Is the 'I' symbol flashing in the display and can you hear a
beep during a call? - if so, move closer to the base as you
are out of range.
• The number you are trying to call may be barred,
see page 33.
• Is the0-SYMBOL displayed, if so the keypad lock is on,
see page 37.
Page 44
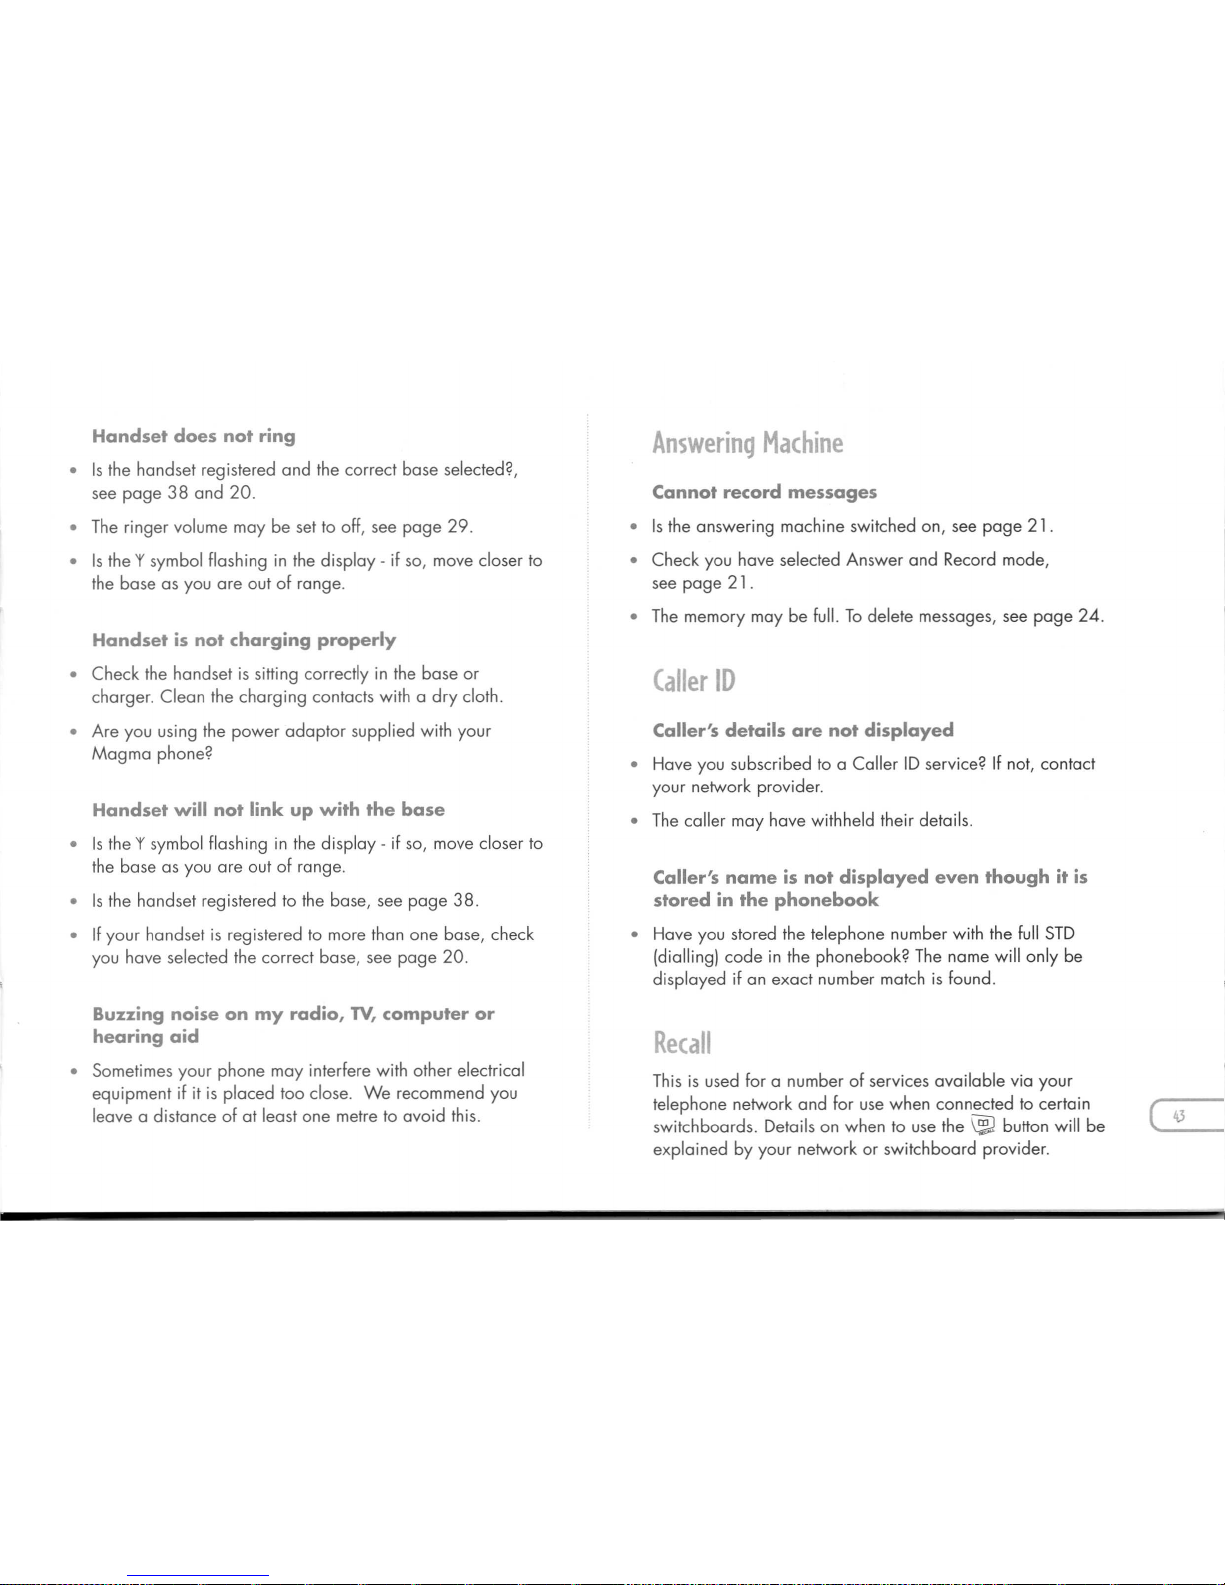
Handset does not ring
• Is the handset registered and the correct base selected?,
see page 38 and 20.
• The ringer volume may be set to off, see page 29.
• Is the'fsymbol flashing in the display - if so, move closer to
the base as you are out of range.
Handset is not charging properly
• Check the handset is sitting correctly in the base or
charger. Clean the charging contacts with a dry cloth.
• Are you using the power adaptor supplied with your
Magma phone?
Handset will not link up with the base
• Is the'fsymbol flashing in the display - if so, move closer to
the base as you are out of range.
• Is the handset registered to the base, see page 38.
• If your handset is registered to more than one base, check
you have selected the correct base, see page 20.
Buzzing noise on my radio, TV, computer or
hearing aid
• Sometimes your phone may interfere with other electrical
equipment if it is placed too close. We recommend you
leave a distance of at least one metre to avoid this.
Answering Machine
Cannot record messages
• Is the answering machine switched on, see page 21.
• Check you have selected Answer and Record mode,
see page 21.
• The memory may be full. To delete messages, see page 24.
Caller's details are not displayed
• Have you subscribed to a Caller ID service? If not, contact
your network provider.
• The caller may have withheld their details.
Caller's name is not displayed even though it is
stored in the phonebook
• Have you stored the telephone number with the full STD
(dialling) code in the phonebook? The name will only be
displayed if an exact number match is found.
This is used for a number of services available via your
telephone network and for use when connected to certain
switchboards. Details on when to use the ~ button will be
explained by your network or switchboard provider.
( 43
Page 45
General information
This equipment is not designed For making emergency telephone
calls when the power Foils.
Alternative arrangements should be made Foraccess to
emergency services.
I
r to
OrlfllQglJe pL
blic
votew'rf,>JOc.
ds .,
''le
• Only use the power supply that came with the product.
Using an unauthorised power supply will invalidate your
guarantee and may damage the telephone.
• Do not open or tamper with the handset, base or charger
(other than to change the batteries). You could expose
yourselF to high voltages or other risks.
Contact the Helpline 0845 226 7794 (local call rate) For
all repairs.
• Radio signals transmitted between the handset and base
may cause interFerence to hearing aids.
44 )
• DO NOT use your phone
- near emergency/intensive care medical equipment.
- iFyou have a pacemaker Fitted.
- during an electrical storm.
• DO NOT position your product
- less than one metre away From other electrical appliances,
e.g.Nand radio sets, clock/alarms and computers, or
you risk interFerence.
- on antique/veneered wood (as the product may become
warm during charging).
- on carpets or other surFaces which generate Fibres.
Always ensure Free flow of air over the products surfaces.
• DO NOT expose your product
- to water (or use it in damp conditions, such as
in bathrooms).
- to fire, explosive or other hazardous conditions.
- to direct sunlight.
• DO NOT dispose batteries with ordinary domestic refuse.
There is a risk of the release of highly toxic chemicals.
Page 46
Wipe the handset, base and charger with a damp (not
wet) cloth, or an anti-static wipe. Never use a dry cloth
as this may cause a static shock.
Never use household polish as this will damage
the product.
Your Magma phone has a REN of 1 (even with additional
handsets and chargers registered to your base).
All items of telephone equipment have a Ringer
Equivalence Number (REN), which is used to calculate the
number of items which may be connected to anyone
telephone line. The total REN on one line is 4.
This product has a warranty of 12 months and is therefore
guaranteed to be free from defects in materials and
work-manship during that period. If you experience
a problem within that time, simply call our Helpline on
0845 226 7794 (local call rate).
If your problem cannot be solved by our Helpline, you will
need to return your product to the place it was purchased.
Remember to take your receipt as proof of purchase as it
must be produced before the warranty can be honoured.
The product must have been used only for the intended
purpose and not been subjected to wilful or accidental
damage. This warranty does not cover damage caused by
excessive voltage, lightning or faults on the telephone line.
If the product has been tampered with in any way, the
warranty shall be considered null and void.
This guarantee does not affect your statutory rights.
Over time, as the handset batteries wears out, the talk and
standby times after charging will reduce. The battery pack
will eventually need replacing.
Inserting new batteries:
Remove the battery compartment cover and the
old batteries.
the batteries with the + and - as shown inside the battery
compartment. Replace the battery compartment cover.
Page 47
2004©One.Tel. All fights reserved.
This documentISfor gUIdance only and does not form part
of any contract.ItIS
subject to change without
notIce.
Helpline
(local call rate)
0845 226 7794
Goon go
Onebetter
(;BD) "
 Loading...