

Page 1

One Systems, Inc. offers a variety of U-Brackets for use with its Platinum Hybrid loudspeaker
systems. U-Brackets provide an easy way to achieve a vertical or horizontal wall mounting, or
a ceiling parallel mount for loudspeaker systems."
Special Note: All U-Brackets for standard One Systems products are made with 316grade stainless steel and are listed below.
Caution should be exercised when attaching One Systems Marine grade products and
Marine grade rigging to other metallic, non 316-grade stainless steel surfaces (dissimilar
metals). The potential for galvanic corrosion is high in marine environments where the
One Systems enclosures and rigging are specified or required. Compatible metals and
appropriate anode-to-cathode area ratios must be maintained. A structural engineer
with galvanic corrosion experience should be consulted prior to installation of marine
grade products, or ANY One Systems products in marine environments.
The following One Systems models may be mounted using a U-Bracket:"
##✓ 104.HTH* (U-Bracket included with the speaker)"
##✓ 106.HTH* (U-Bracket included with the speaker)"
##✓ 108.HSB"
##✓ 108.HTC"
##✓ 108/HTH"
##✓ 208.HTC"
##✓ 112.HTH"
##✓ 118.HSB"
##✓ 212.HC"
##✓ 312.HC"
##✓ CFA2.HTH"
Important Note: All products used in direct weather installations can be subjected to
high wind speeds. For wind speed exposure over 74 miles per hour (119.1 kilometers per
hour, 64.3 knots), the loudspeaker enclosure, bracket and safety chain must be
inspected for signs of damage or fatigue!
© 2020 One Systems, Inc, All rights reserved
One Systems, Inc.## www.onesystems.com tel:+1-615-823-1655 fax: +1-615-261-1429
1
U-BRACKET INSTALLATION GUIDE
Page 2
© 2020 One Systems, Inc, All rights reserved
One Systems, Inc.## www.onesystems.com tel:+1-615-823-1655 fax: +1-615-261-1429
WARNING: All local and national codes must be observed when suspending One Systems
products. Consult a professional rigging specialist and structural engineer experienced in
suspension of these types of products. Consult a professional rigger familiar with the
appropriate local and national codes."
WARNING: All mating surfaces (i.e. walls, ceiling, etc) must be capable of supporting the
U-Bracket and loudspeaker weight, and associated safety factors as required by local and
national codes."
WARNING: Do not substitute the specified U-Bracket. Do not use the specified U-Bracket
on any enclosure except for the enclosure(s) specified. Do not suspend the enclosure with
any U-Bracket except for its specified U-Bracket."
WARNING: All associated rigging is the responsibility of others.
INSTALLATION INSTRUCTIONS
112.HTH and 212.HC (Use 112.HTH.UM bracket)
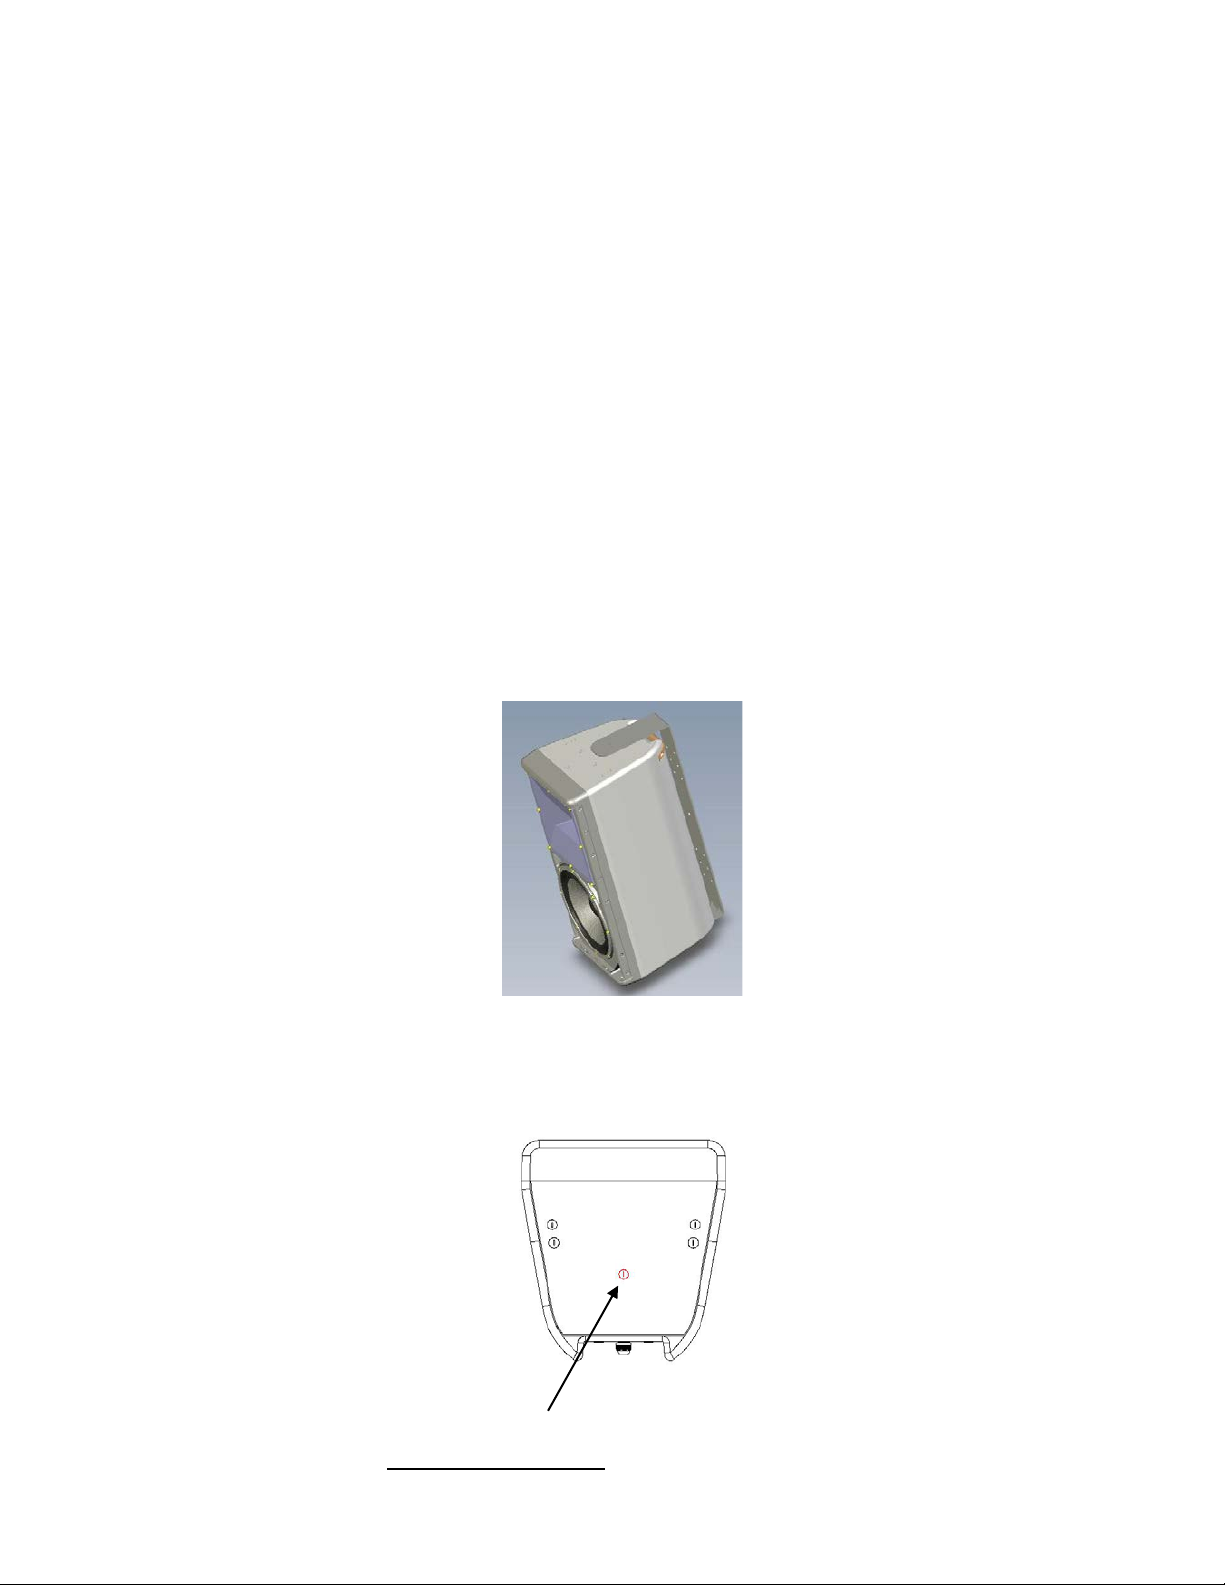
1. See the product view below:"
2
2
2. Remove the two M10 plastic covers from the positions as shown where the U-Bracket
attaches to the enclosure. The mounting point shown in red is the ONLY U-Bracket attach
point with one point on the bottom of the enclosure and one on the top.
2
Page 3
© 2020 One Systems, Inc, All rights reserved.
3. Mount the 112.HTH.UM U-Bracket to the wall or ceiling surface. Insure that the bracket is
properly and securely mounted. The mounting surface MUST be capable of supporting the
necessary weight to achieve a safe working load. This must be done by a professional rigger
or structural engineer familiar with all local and national codes."
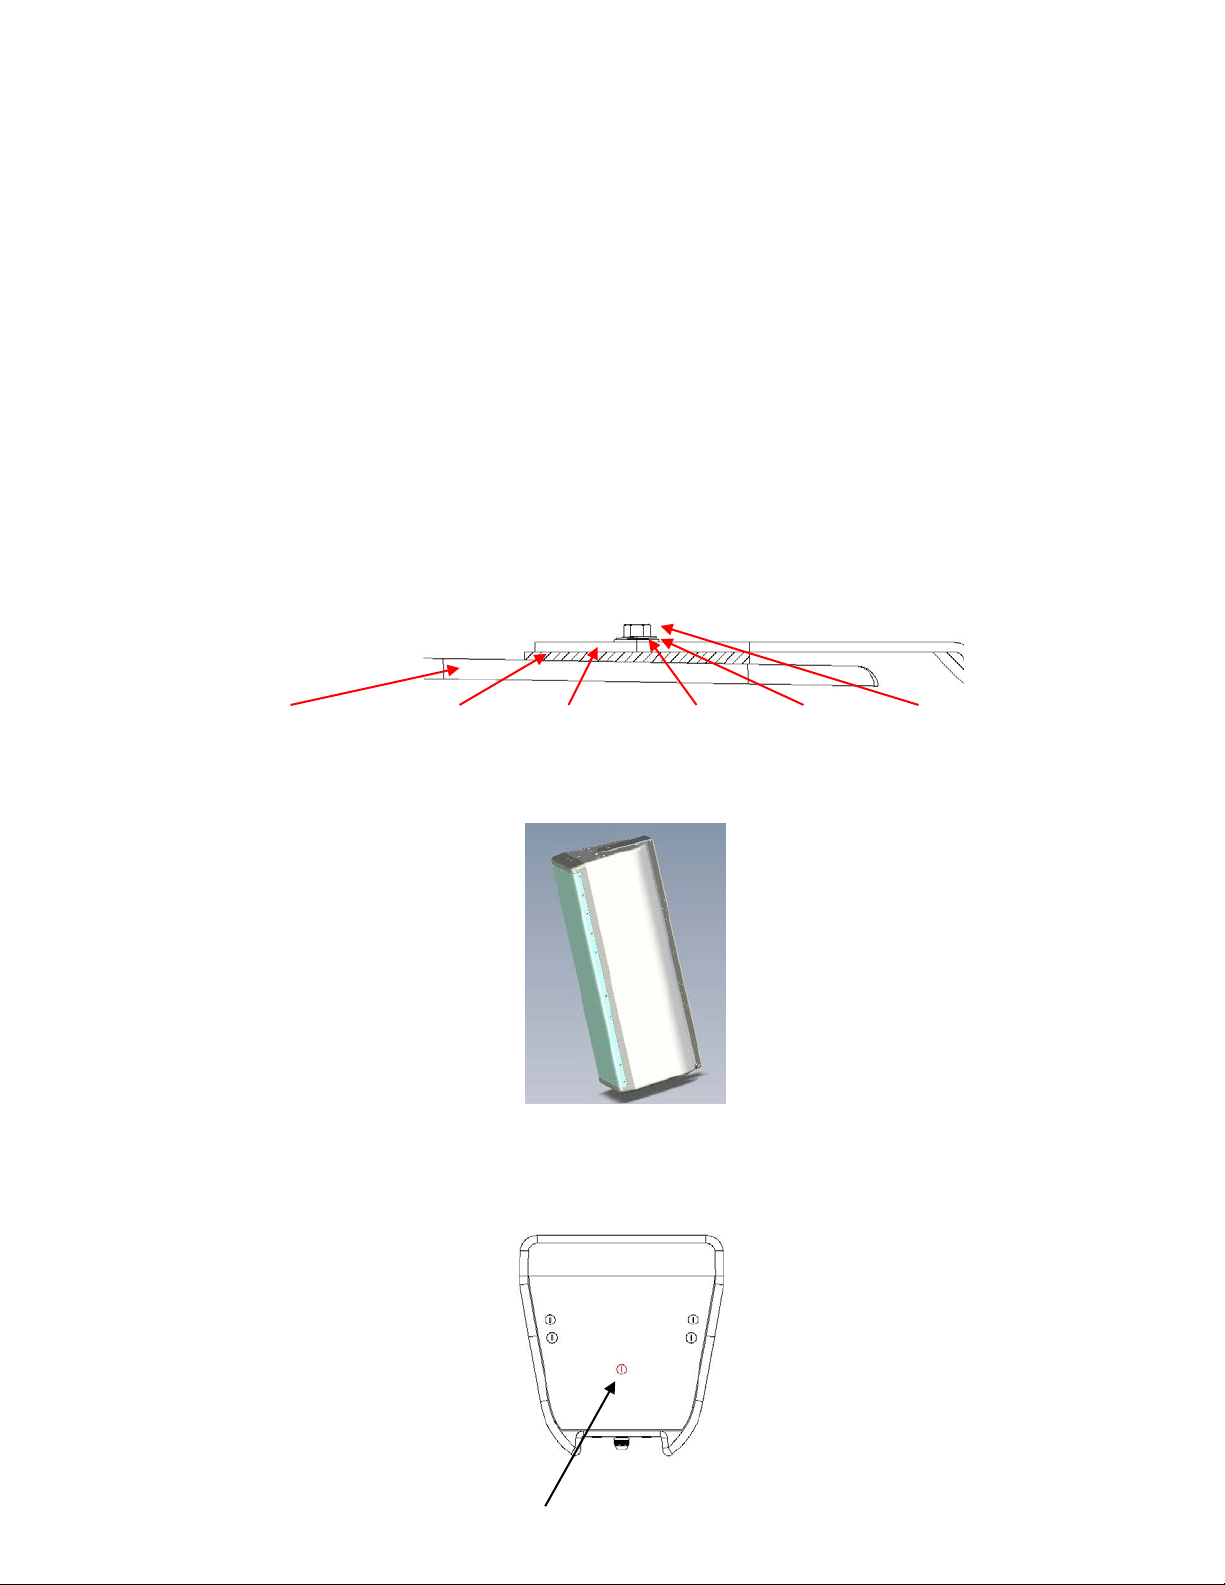
4. Place the rubber washers (1 each) over each mounting hole between the enclosure and the"
U-Bracket."
WARNING: Do not hang or otherwise suspend any other objects from the loudspeaker and
U-Bracket assembly!"
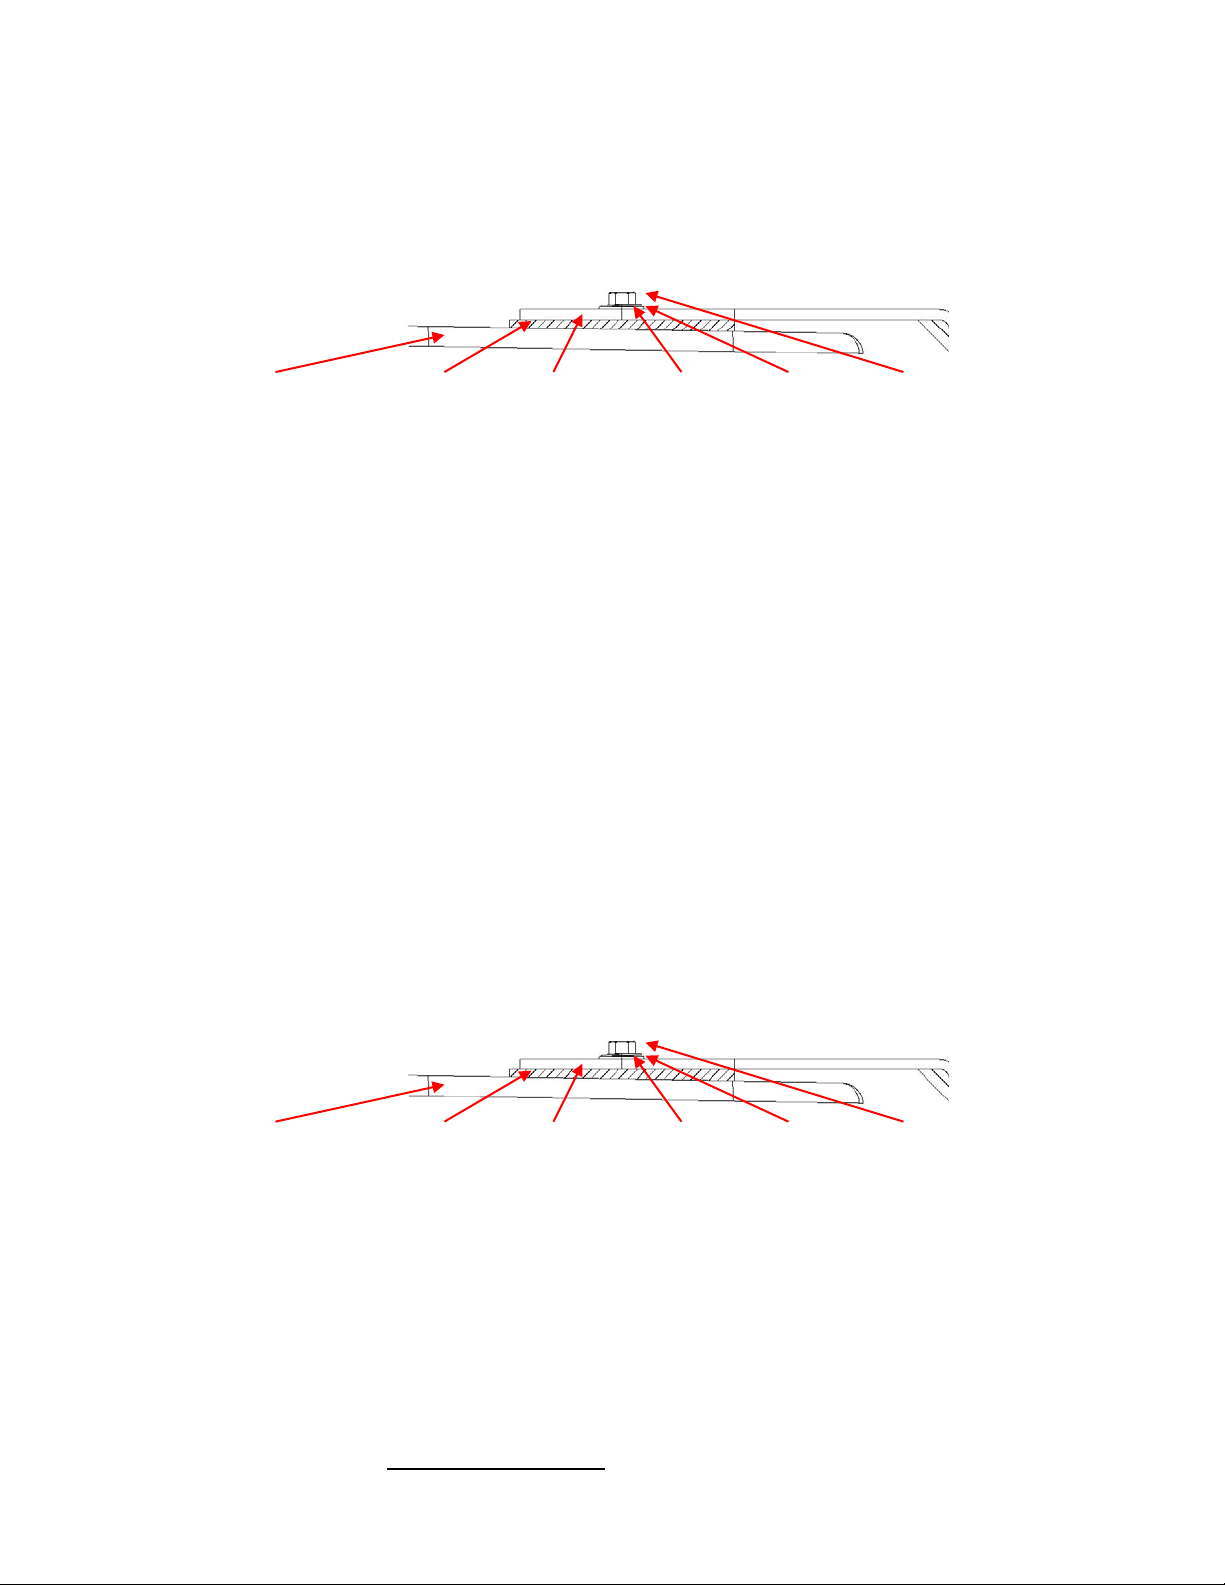
5. Position the enclosure between the U-Bracket ends. Install the two M10 bolts, flat washer
and lock washers, one set on each side. This operation should be performed by at least two
people. Once the enclosure is safely mounted, adjust to the desired angle and tighten the M10
bolts."
6. A secondary safety cable (not supplied) is always recommended.
3
washers, one set on each side. This operation should be performed by at least two people. Once
the enclosure is safely mounted, adjust to the desired angle and tighten the M10 bolts.
312.HC (use 312.HC.UM bracket)
1. See product view below (Figure 1)
3
2. Remove the two M10 plastic covers from the positions as shown where the U-Bracket
attaches to the enclosure. The mounting point shown in red is the ONLY U-Bracket attach point
with one point on the top of the enclosure and one on the bottom.
2
3
Page 4
© 2020 One Systems, Inc, All rights reserved
One Systems, Inc.## www.onesystems.com tel:+1-615-823-1655 fax: +1-615-261-1429
3. Mount the U-Bracket to the wall or ceiling surface. Insure that the bracket is properly and
securely mounted. The mounting surface MUST be capable of supporting the necessary weight
to achieve a safe working load. This must be done by a professional rigger or structural
engineer familiar with all local and national codes."
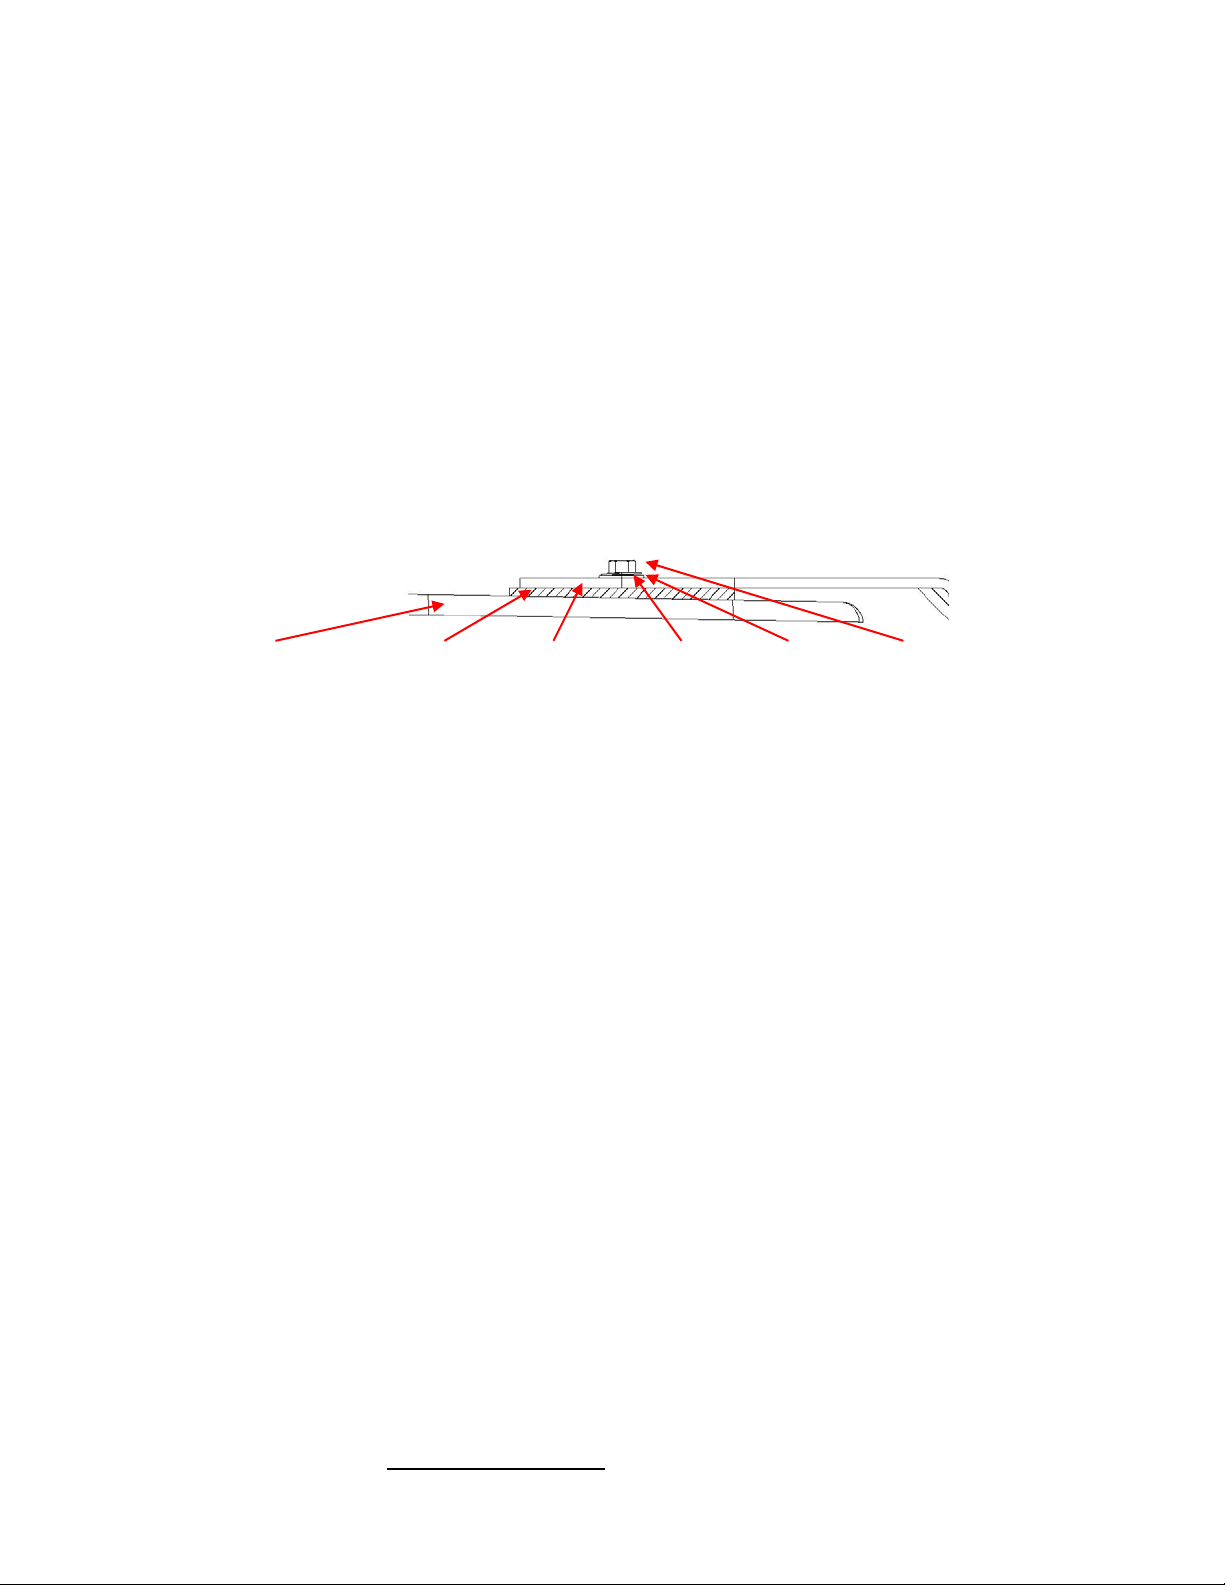
4. Place the rubber washers (1 each) over each mounting hole, as shown where the U-Bracket
and the enclosure meet."
WARNING: Do not hang or otherwise suspend any other objects from the loudspeaker and
U-Bracket assembly!"
5. Position the enclosure between the U-Bracket ends. Install the two M10 bolts, flat washers
and lock washers, one each side as shown in Figure 3. This operation should be performed by
at least two people. Once the enclosure is safely mounted, adjust to the desired angle and
tighten the M10 bolts."
6. A secondary safety cable (not supplied) is always recommended.
4
108.HTH and 208.HTC (use 108.HTH.UM bracket)
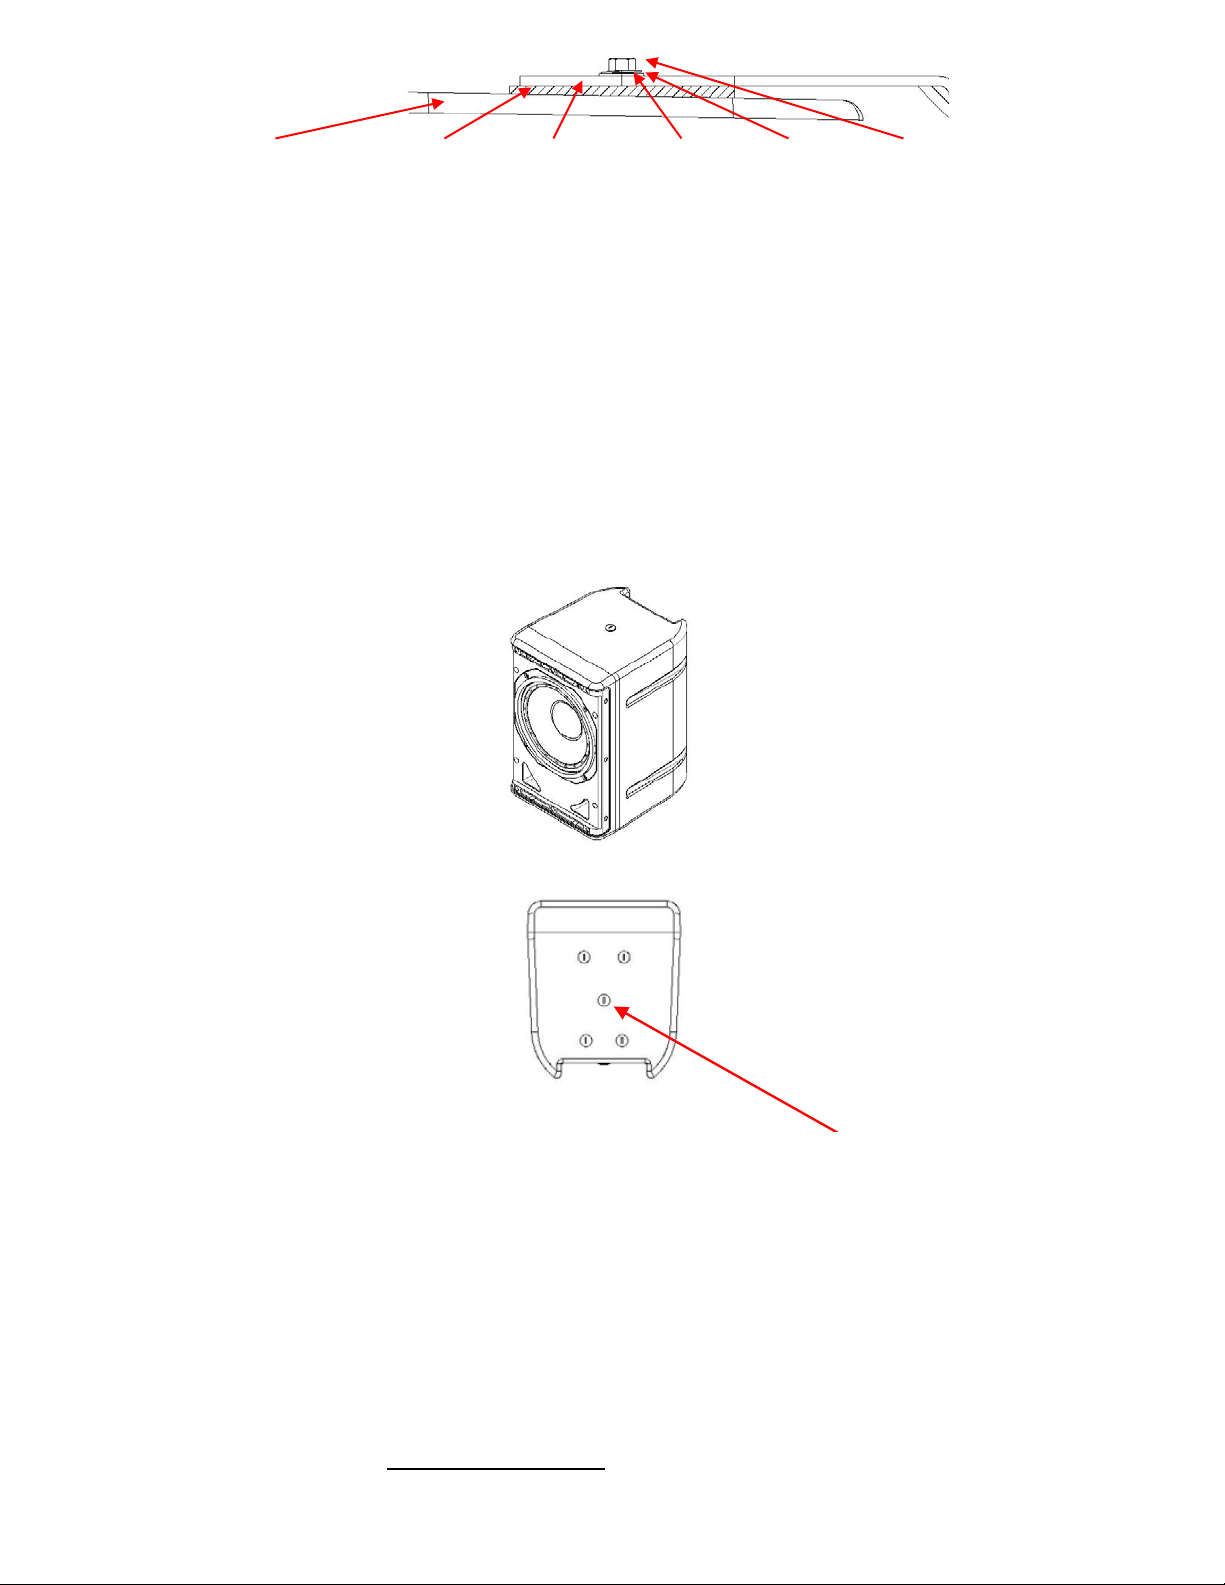
1. Remove the two plastic plugs from the position shown below, one plug from the top of the
enclosure and the second plug from the bottom of the enclosure."
NOTE: The U-Bracket MUST be mounted to the rigging points shown below. DO NOT USE
THE OTHER M8 LOCATIONS FOR MOUNTING THE U-BRACKET!"
2. U-Bracket to the wall or ceiling surface. Insure that the bracket is properly and securely
mounted. The mounting surface MUST be capable of supporting the necessary weight to
achieve a safe working load. This must be done by a professional rigger or structural engineer
familiar with all local and national codes."
3. Place the rubber washers over the top and bottom U-Bracket mounting holes"
WARNING: Do not hang or otherwise suspend any other objects from the loudspeaker and
U-Bracket assembly!"
4. Position the 108.HTH or 208.HTC between the U-Bracket ends. Install the two M8 bolts, flat
washers and lock washers, one set on each side. This operation should be performed by at
least two people. Once the enclosure is safely mounted, adjust to the desired angle and
tighten the M8 bolts.
3
washers, one set on each side. This operation should be performed by at least two people. Once
the enclosure is safely mounted, adjust to the desired angle and tighten the M10 bolts.
Page 5
© 2020 One Systems, Inc, All rights reserved.
One Systems, Inc.## www.onesystems.com tel:+1-615-823-1655 fax: +1-615-261-1429
5
washers, one set on each side. This operation should be performed by at least two people. Once
the enclosure is safely mounted, adjust to the desired angle and tighten the M10 bolts.
5. A secondary safety cable (not supplied) is always recommended. "
108.HTC (use 108.HTC.UM bracket)
1. Remove the two plastic plugs from the position shown below, one plug from the top of
the enclosure and the second plug from the bottom of the enclosure."
NOTE: The U-Bracket MUST be mounted to the rigging points shown below. DO NOT USE
THE OTHER M8 LOCATIONS FOR MOUNTING THE U-BRACKET! "
The image below shows the top of the 108.HTC. Use this location for attaching the U-
Bracket.
5
The image above shows the bottom of the 108.HTC. Use this location only for the "
U-Bracket. "
2. Mount the 108.HTC.UM U-Bracket to the wall or ceiling surface. Ensure that the bracket
is properly and securely mounted. The mounting surface MUST be capable of supporting
the necessary weight to achieve a safe working load. This must be done by a professional
rigger or structural engineer familiar with all local and national codes."
3. Place the rubber washers over the top and bottom U-Bracket mounting holes
Page 6
© 2020 One Systems, Inc, All rights reserved
One Systems, Inc.## www.onesystems.com tel:+1-615-823-1655 fax: +1-615-261-1429
WARNING: Do not hang or otherwise suspend any other objects from the loudspeaker and
U-Bracket assembly!"
4. Position the 108.HTC between the U-Bracket ends. Install the two M8 bolts, flat washers and
lock washers, one set on each side. This operation should be performed by at least two people.
Once the enclosure is safely mounted, adjust to the desired angle and tighten the M8 bolts.
3
washers, one set on each side. This operation should be performed by at least two people. Once
the enclosure is safely mounted, adjust to the desired angle and tighten the M10 bolts.
5. A secondary safety cable (not supplied) is always recommended. "
NOTE: These directions also apply to the One Systems 108.STC and its included structural
steel U-Bracket. "
104.HTH and 106.HTH (brackets supplied with enclosure). All SILVER SERIES MODELS
including 104.STH and 106.STH (structural steel U-Brackets supplied with the enclosures)
1. Remove the U-Bracket from the enclosure."
2. Mount the 104 or 106 model’s U-Bracket to the wall or ceiling surface. Insure that the
bracket is properly and securely mounted. The mounting surface MUST be capable of
supporting the necessary weight to achieve a safe working load. This must be done by a
professional rigger or structural engineer that is familiar with all local and national codes."
3. Place the rubber washers over the top and bottom of the enclosure if they have fallen off."
4. Position the 104 or 106 model between the U-Bracket ends. Install the two bolts, flat"
washers and lock washers, one set on each side. Once the enclosure is safely mounted, adjust
to the desired angle and tighten the bolts.
3
washers, one set on each side. This operation should be performed by at least two people. Once
the enclosure is safely mounted, adjust to the desired angle and tighten the M10 bolts.
5. A secondary safety cable (not supplied) is always recommended."
WARNING: Do not hang or otherwise suspend any other objects from the loudspeaker and
U-Bracket assembly!
6
Page 7
One Systems, Inc.## www.onesystems.com tel:+1-615-823-1655 fax: +1-615-261-1429
CFA2.HTH - use CFA2.UM bracket
Read the CFA2.HTH installation manual, downloadable on the CFA2.HTH’s product page at
www.onesystems.com."
WARNING: Do not hang or otherwise suspend any other objects from the loudspeaker and
U-Bracket assembly!"
A secondary safety cable (not supplied) is always recommended."
118.HSB (use 118.HSB.UM bracket)
For installations where mounting the 118.HSB with the optional U-Bracket (118.HSB.UM),
please refer to the 112.HTH installation instructions on page two of this manual. However, in
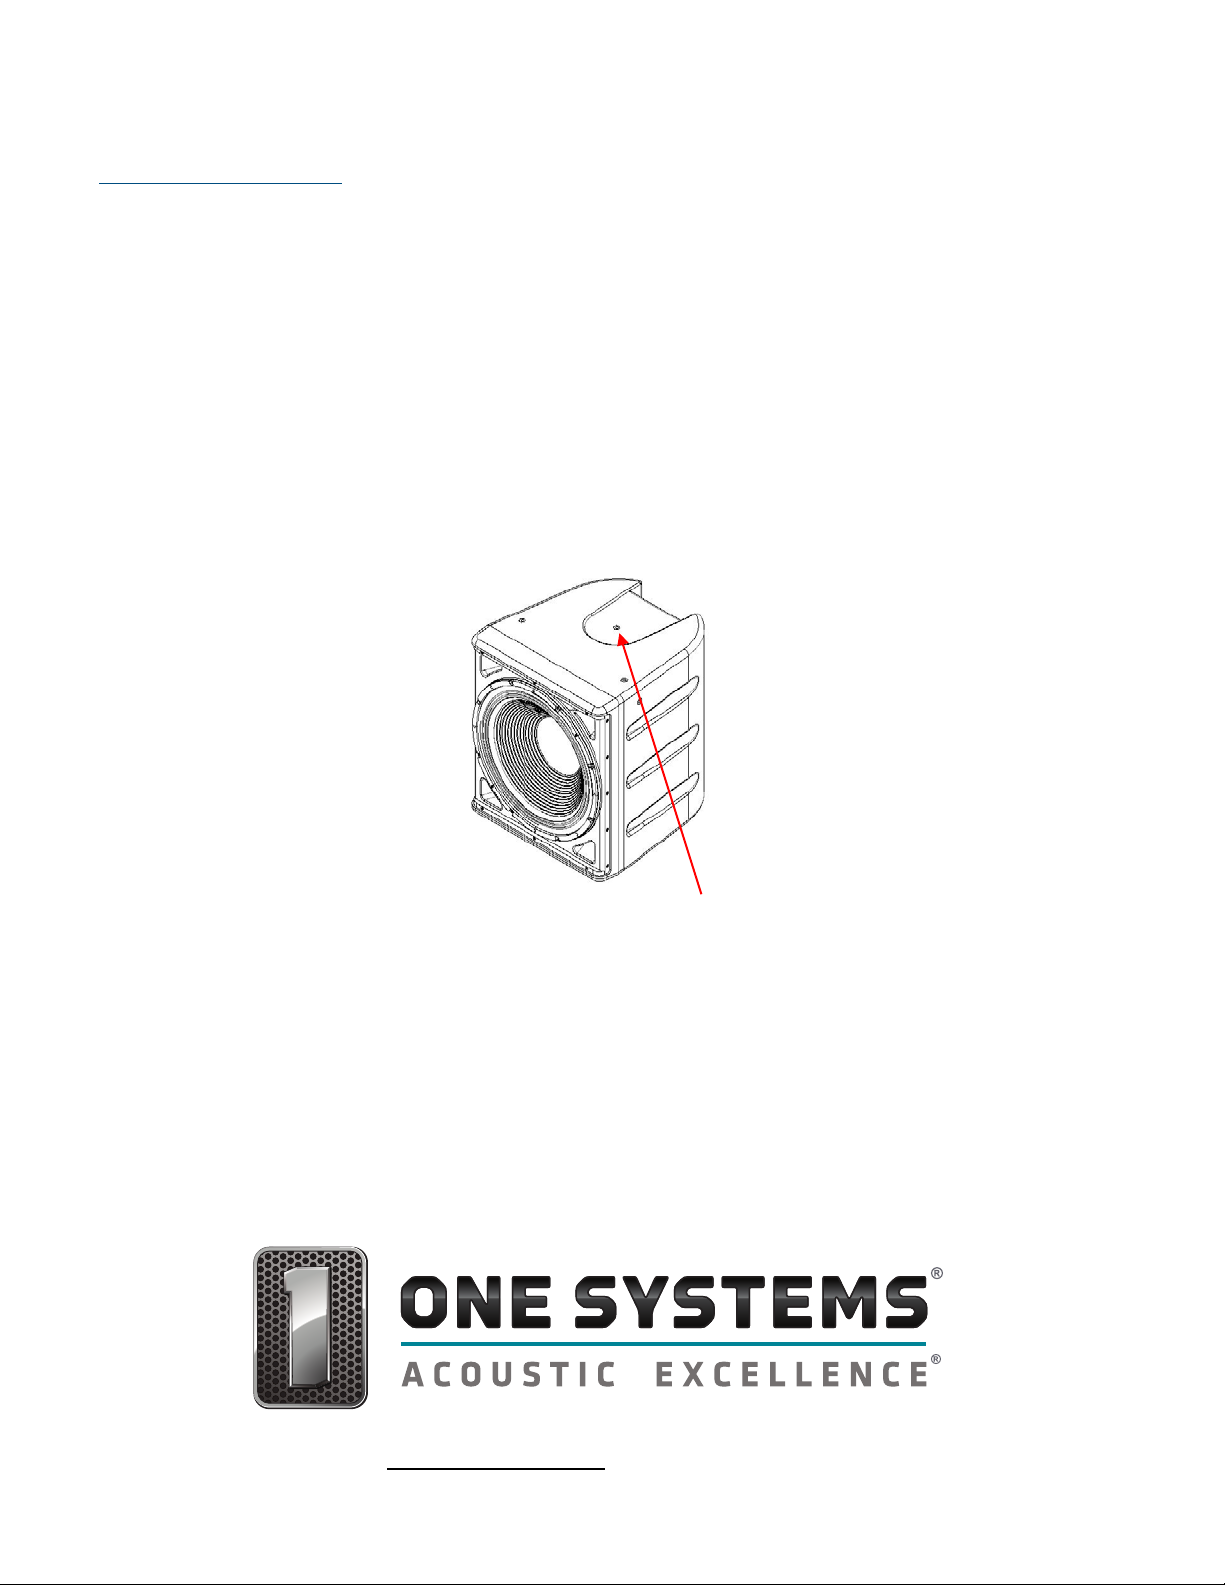
the case of the 118/HSB, the mounting points are on top and the bottom of the enclosure as
shown below. Use these mounting points ONLY for the 118.HSB with 118.HSB.UM U-Bracket!
7
# # Use these points on the top and bottom ONLY for U-Bracket mounting"
WARNING: Do not hang or otherwise suspend any other objects from the loudspeaker and UBracket assembly!"
A secondary safety cable (not supplied) is always recommended."
The products referenced in this manual are in conformity with the following standards or
other normative documents: Machinery Directive 2006/42/EC
7
© 2020 One Systems, Inc, All rights reserved
 Loading...