

Page 1
DIGITAL WEATHER STATION
Model
96754
SET UP AND OPERATING INSTRUCTIONS
Diagrams within this manual may not be drawn proportionally.
Due to continuing improvements, actual product may differ slightly from the product described herein.
Distributed exclusively by Harbor Freight Tools®.
3491 Mission Oaks Blvd., Camarillo, CA 93011
Visit our website at: http://www.harborfreight.com
Read this material before using this product.
Failure to do so can result in serious injury.
SAVE THIS MANUAL.
Copyright© 2007 by Harbor Freight Tools®. All rights reserved. No portion of
this manual or any artwork contained herein may be reproduced in any shape
or form without the express written consent of Harbor Freight Tools.
For technical questions or replacement parts, please call 1-800-444-3353.
Page 2
SAVE THIS MANUAL
Keep this manual for the safety warnings and precautions, assembly, operating,
inspection, maintenance and cleaning procedures. Write the product’s serial number in
the back of the manual near the assembly diagram (or month and year of purchase if
product has no number). Keep this manual and the receipt in a safe and dry place for
future reference.
IMPORTANT SAFETY INFORMATION
In this manual, on the labeling, and all other
information provided with this product:
This is the safety alert symbol. It is used to alert you to potential
personal injury hazards. Obey all safety messages that follow this
symbol to avoid possible injury or death.
DANGERDANGER
WARNINGWARNING
CAUTIONCAUTION
NoticeNotice
CAUTIONCAUTION
DANGER indicates a hazardous situation
which, if not avoided, will result in death or
serious injury.
WARNING indicates a hazardous situation
which, if not avoided, could result in death
or serious injury.
CAUTION, used with the safety alert
symbol, indicates a hazardous situation
which, if not avoided, could result in minor
or moderate injury.
NOTICE is used to address practices not
related to personal injury.
CAUTION, without the safety alert symbol,
is used to address practices not related to
personal injury.
Page 2SKU 96754 For technical questions, please call 1-800-444-3353.
Page 3

GENERAL SAFETY RULES
WARNING! Read all instructions
Failure to follow all instructions listed below may result in electric shock,
re, and/or serious injury.
SAVE THESE INSTRUCTIONS
This product is not a toy. Keep it out of reach of children.
1.
Keep children away while operating the Digital Weather Station. Keep
2.
children out of the work area.
Stay alert. Do not operate the Digital Weather Station while tired or under the
3.
inuence of drugs, alcohol, or medication.
Do not rely on the Digital Weather Station as the primary source for
4.
determining weather in situations where precise technical information is
required such as in ying or sailing.
Maintain the Digital Weather Station with care.
5.
Maintain tools with care. Make certain that the Digital Weather Station has
6.
fresh batteries.
Do not use the Digital Weather Station:
7.
If the batteries are low
a.
Near any explosive gasses or fumes
b.
If the Battery Cover is open
c.
Batteries must be disposed of properly. Do not incinerate. Batteries may
8.
burst, causing personal injury and/or property damage. Contact your local
hazardous waste disposal authority for proper disposal.
Make certain that the batteries are installed with the positive and negative
9.
poles as indicated.
Page 3SKU 96754 For technical questions, please call 1-800-444-3353.
Page 4

SPECIFICATIONS
Operating
Temperature
Storage
Temperature
32° F~122° F/ 0°C~50° C
14°F~140°F/-10° C~60° C
Power Source (3) “AAA” 1.5 DC batteries (not included)
Temperature
Range
14°F~140°F/-10° C~60° C
Features: Celsius or Fahrenheit, minimum or maximum temperature
reading, minimum or maximum relative humidity, calendar, alarm
clock, time-date-day-month settings, moon phase and weather
icons.
UNPACKING
When unpacking, check to make sure that the item is intact and undamaged. If
any parts are missing or broken, please call Harbor Freight Tools at the number shown
on the cover of this manual as soon as possible.
SET UP INSTRUCTIONS
Read the ENTIRE IMPORTANT SAFETY INFORMATION section at the
beginning of this manual including all text under subheadings therein
before set up or use of this product.
Note: For additional information regarding the parts listed in the following pages, refer
to the Assembly Diagram near the end of this manual.
Page 4SKU 96754 For technical questions, please call 1-800-444-3353.
Page 5

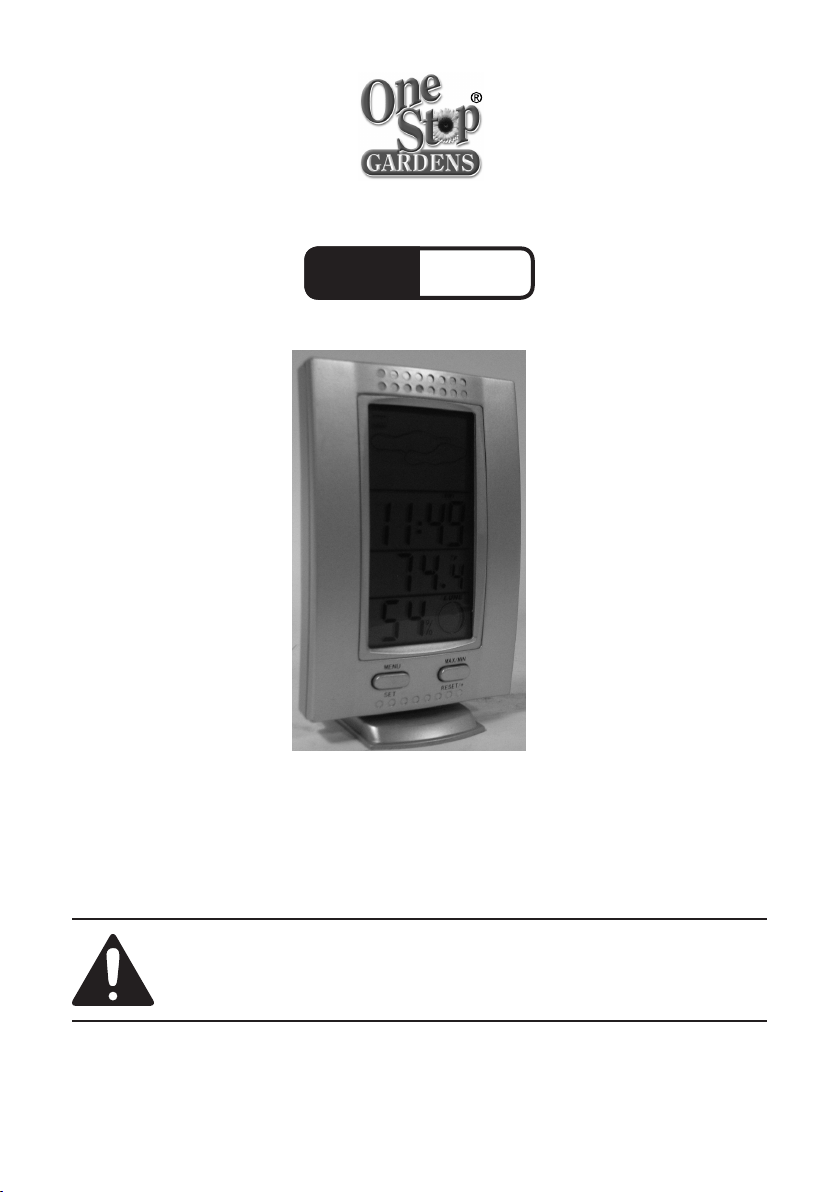
Functions
Figure 1
weather inclination
weather forecast icons
day of the week
clock
inside temperature
inside humidity
phase of the moon
Menu/Set button Maximum/Minimum
button
OPERATING INSTRUCTIONS
Read the ENTIRE IMPORTANT SAFETY INFORMATION section at the
beginning of this manual including all text under subheadings therein
before set up or use of this product.
General operating instructions
Press the Menu-Set Button for 3 seconds to access the main menu. Then press
1.
the Menu-Set Button again to scroll through each function as follows: 12 hour or
24 hour function, clock set-up, alarm clock, temperature and high/low humidity
function.
Once you have accessed the function that you desire, (for example, the 12 hour
2.
or 24 hour function) press the Menu-Set Button for 3 seconds. This will allow
you to set the function as desired.
To set the correct clock: Locate the 12/24 hour function as outlined above.
3.
Press the Menu-Set Button to access the function. Press the Max.-Min. Button
to select the desired reading for the clock, 24 hours or 12 hours. Press the
Page 5SKU 96754 For technical questions, please call 1-800-444-3353.
Page 6

Menu-Set Button to conrm your selection. Press the Max-Min Button to set
the clock to the correct hour. Press the Menu-Set Button again to select the
minutes. Press the Max-Min Button to set minutes.
Note: When setting the time, there is only a p.m. display. If the p.m. is not
displayed on the readout, then the time indicated is a.m.
4.
To set the alarm clock: Scroll through the Menu until you arrive at the Alarm
Clock setting. Press Menu-Set. Press the Max-Min Button to select ON or
OFF. Press the Menu-Set Button to conrm. Press the Max.-Min. Button to set
the time for the alarm clock to ring. Press the Menu-Set Button once again to
conrm your setting.
5.
To set the temperature function: Scroll through the Menu until you arrive at the
temperature function. Press Menu-Set to access the function. The temperature
showing on the Digital Weather Station will ash. Press the Max.-Min. Button to
set to either Centigrade or Fahrenheit or to shift between the two.
6.
To set for high/low temperature/humidity alarm notice: Press Menu-Set to
access the function. Max/Off-Min/Off will ash. Press the Max-Min Button to set
temperature for notication. Press Max-Min to set to “ON”.
Note: If the temperature and/or humidity exceed the specied alarm limit, a
buzzer will beep and the Max icon will ash.
7.
To set the calendar use the Menu-Set Button to select year, month and date.
Press the Max-Min Button to conrm selection.
8.
Using the Snooze function with Alarm function: When the alarm goes off, it will
ring for one minute. Press the Max-Min Button for a 5-minute delay. You can
repeat the snooze function up to 5 times.
9.
Determining the phase of the Moon: In the calendar mode, press the Menu-
Set Button for any date of the year and the phase of the Moon icon will change
accordingly.
10.
The Digital Weather Station has seven different weather icons which it will
display depending on the weather prediction. The Weather Station will predict
weather for a four hour time range. The icons are as shown in Fig. 2, on the
next page.
Page 6SKU 96754 For technical questions, please call 1-800-444-3353.
Page 7

When the relative humidity is less than 45%, ‘Sunny’ will be displayed. ‘Partly
cloudy’ will be displayed for relative humidity between 45% and 55%. ‘Cloudy’
will be displayed for relative humidity from 55% to 65%. And if relative humidity
goes above 65%, the rain icon will be displayed. The ‘Snow’ icon will be
displayed for temperatures below 2 degrees centigrade.
Figure 2
Sunny
Cloudy
The Weather Indicator arrows will point upward if the temperature has gone
11.
up by .5 degree and/or the humidity has increased by 3% within 30 minutes. A
right arrow indicates same status. A downward indicator means a temperature
decrease of .5 degree and/or humidity down by 3%.
Clear night
Rain
Partly
Cloudy night
Snow
Installing and Replacing the Battery
Figure 3
Battery
Compartment
Battery Cover
Remove the Battery Cover from the battery compartment-see Figure 3.
1.
Install three “AAA” batteries (not included). Make certain that the batteries are
2.
installed according to the indicated polarity.
Snap the Battery Cover back into place.
3.
Page 7SKU 96754 For technical questions, please call 1-800-444-3353.
Page 8

Installing the Stand
Figure 4
rear of Weather
Station
Stand
The Digital Weather Station comes with a Stand which can be attached to the
1.
bottom of the Weather Station. With the larger bracket toward the back of the
Weather Station, gently snap the Stand onto the Weather Station-see Figure 4.
The Digital Weather Station can also be hung on a at surface by setting the
2.
mounting hole on the rear of the Weather Station onto a nail or screw (not
included). When drilling, using nails or screws (hardware not included), make
certain that there are no hidden electrical lines, cables, or wires beneath the
mounting surface.
MAINTENANCE AND SERVICING
Cleaning, maintenance, and lubrication
BEFORE EACH USE, inspect the general condition of the Weather Station.
1.
Check for loose screws, cracked or broken parts and any other condition that
may affect its safe operation.
AFTER USE, clean external surfaces of the tool with a clean, moist cloth.
2.
Periodically inspect the batteries for any sign of leakage. Replace batteries in
3.
sets of 3 pcs.
Discard used batteries properly. Do not incinerate or throw batteries in re.
4.
PLEASE READ THE FOLLOWING CAREFULLY
The manufacturer and/or distributor has provided the parts list and assembly diagram in this manual as a reference
tool only. Neither the manufacturer or distributor makes any representation or warranty of any kind to the buyer
that he or she is qualied to make any repairs to the product, or that he or she is qualied to replace any parts of
the product. In fact, the manufacturer and/or distributor expressly states that all repairs and parts replacements
should be undertaken by certied and licensed technicians, and not by the buyer. The buyer assumes all risk and
liability arising out of his or her repairs to the original product or replacement parts thereto, or arising out of his or
her installation of replacement parts thereto.
Page 8SKU 96754 For technical questions, please call 1-800-444-3353.
 Loading...