

Page 1

CAST
User Manual
Page 2

Page 3

www.acoemgroup.com
Copyright ©
This document is the property of 01dB-Metravib. No part of this publication may be duplicated,
reprinted or transmitted by electronic, mechanical, photographic or other means, or recorded,
translated, edited, abridged or expanded without the prior written consent of the owner
Document Reference : DOC3014 June 2013 C
Name : CAST User Manual
CAST
User Manual
Page 4

TABLE OF CONTENTS
1 Introduction ....................................................................................................... 5
2 Installation ......................................................................................................... 6
2.1 Minimum requirements .................................................................................. 6
2.2 Microsoft Framework 2.0 installation ............................................................. 6
2.3 Installing OneProd-CAST .............................................................................. 7
3 Using CAST: General points .......................................................................... 10
3.1 Privileges ..................................................................................................... 10
3.2 Connection to MVX...................................................................................... 11
4 Communication Tools ..................................................................................... 14
4.1 Ping test : .................................................................................................... 15
4.2 Retrieving the MVX MAC address ............................................................... 15
4.3 Looking for an IP address on the network ................................ ................... 15
5 Visual display of information ......................................................................... 16
5.1 Display of information specific to each MVX ................................................ 16
5.2 Display of channel and defect status ........................................................... 17
5.3 Display of logical input status ...................................................................... 18
5.4 Internal processing information ................................................................... 19
5.5 TAT time diagram ........................................................................................ 20
6 Configuration of IP addressing ...................................................................... 21
6.1 Configuration of a MVX with fixed IP ........................................................... 21
6.2 Configuration of a MVX with dynamic IP ..................................................... 22
7 Setting the RS485 interface ............................................................................ 23
8 Modifications to the firmware ......................................................................... 24
8.1 Modification of the MVX licence .................................................................. 24
8.2 Upgrading the firmware ............................................................................... 25
8.2.1 Upgrading the firmware to MVX 5.1: important note ............................. 25
8.2.2 Upgrading the firmware to MVX V4.x: important note ........................... 25
8.2.3 Select the source directory ................................................................... 26
8.2.4 Launching the upgrade ......................................................................... 26
9 Miscellaneous .................................................................................................. 27
9.1 Retrieval of log files ..................................................................................... 27
9.2 Retrieval of parameter file lists .................................................................... 29
9.3 Complete deletion of a configuration ........................................................... 30
9.4 Time setting of MVX .................................................................................... 30
9.5 Init of the particle counter “CGI” .................................................................. 31
9.6 Init of HTTPS port (expert user only!) .......................................................... 32
9.7 Changing MVX communication password ................................................... 33
Page 5

5
Brand of ACOEM
1 Introduction
Thank you for purchasing the OneProd
MVX
monitoring and predictive maintenance
system.
This product is delivered with a “toolbox” designed to perform various start-up and
maintenance operations on MVX: OneProd
CAST
OneProd
CAST
can be used to:
View internal installation parameter specific to each MVX (serial number,
licence number, version of the embedded software (firmware), fixed IP
address, etc).
View defects detected by MVX
View the status of logical inputs and outputs on MVX
View the values of operating condition parameters
View and print log files of MVX.
Change addressing parameters for MVX (IP addresses)
Change the licence granted to MVX (upgrade)
Upgrade the internal software (firmware)
OneProd
CAST
is not intended for common operating of MVX but only for start-up and
maintenance operations.
The present manual is typically suited for 5.1 firmware MVX versions.
Warning
Using the Expert mode of CAST allows acting on MVX internal parameters and
can then lead to intentionally or unintentionally stopping programmed
monitoring.
The use of CAST is then restricted to well-informed operators.
Page 6

6
Brand of ACOEM
2 Installation
2.1 Minimum requirements
Pentium III (or equivalent) processor, 700 MHz
Operating system: Windows 2000 or Windows XP
RAM: 256 MB minimum, 512 MB recommended
Display: 1024 x 780 minimum
1 Ethernet network port, 100 Mbits
This software needs Microsoft.NET Framework 2 to be already installed on your
computer.
Microsoft.NET Framework 2 is included into the MVX package.
2.2 Microsoft Framework 2.0 installation
You have first to check if Microsoft.NET Framework 2 is already installed on your
computer or not.
In order to do that, you can use the “Add or Remove Programs” menu of the
Windows Control Panel.
If Microsoft.NET Framework 2 is not listed, you have to install it before launching the
CAST installation. Please run the “dotnetfx.exe” program located in subdirectory
CSM+VIO_ 3.x.x.x \ Install .NET Framework 2.0 on the OneProd
MVX
CD-ROM.
Page 7
7
Brand of ACOEM
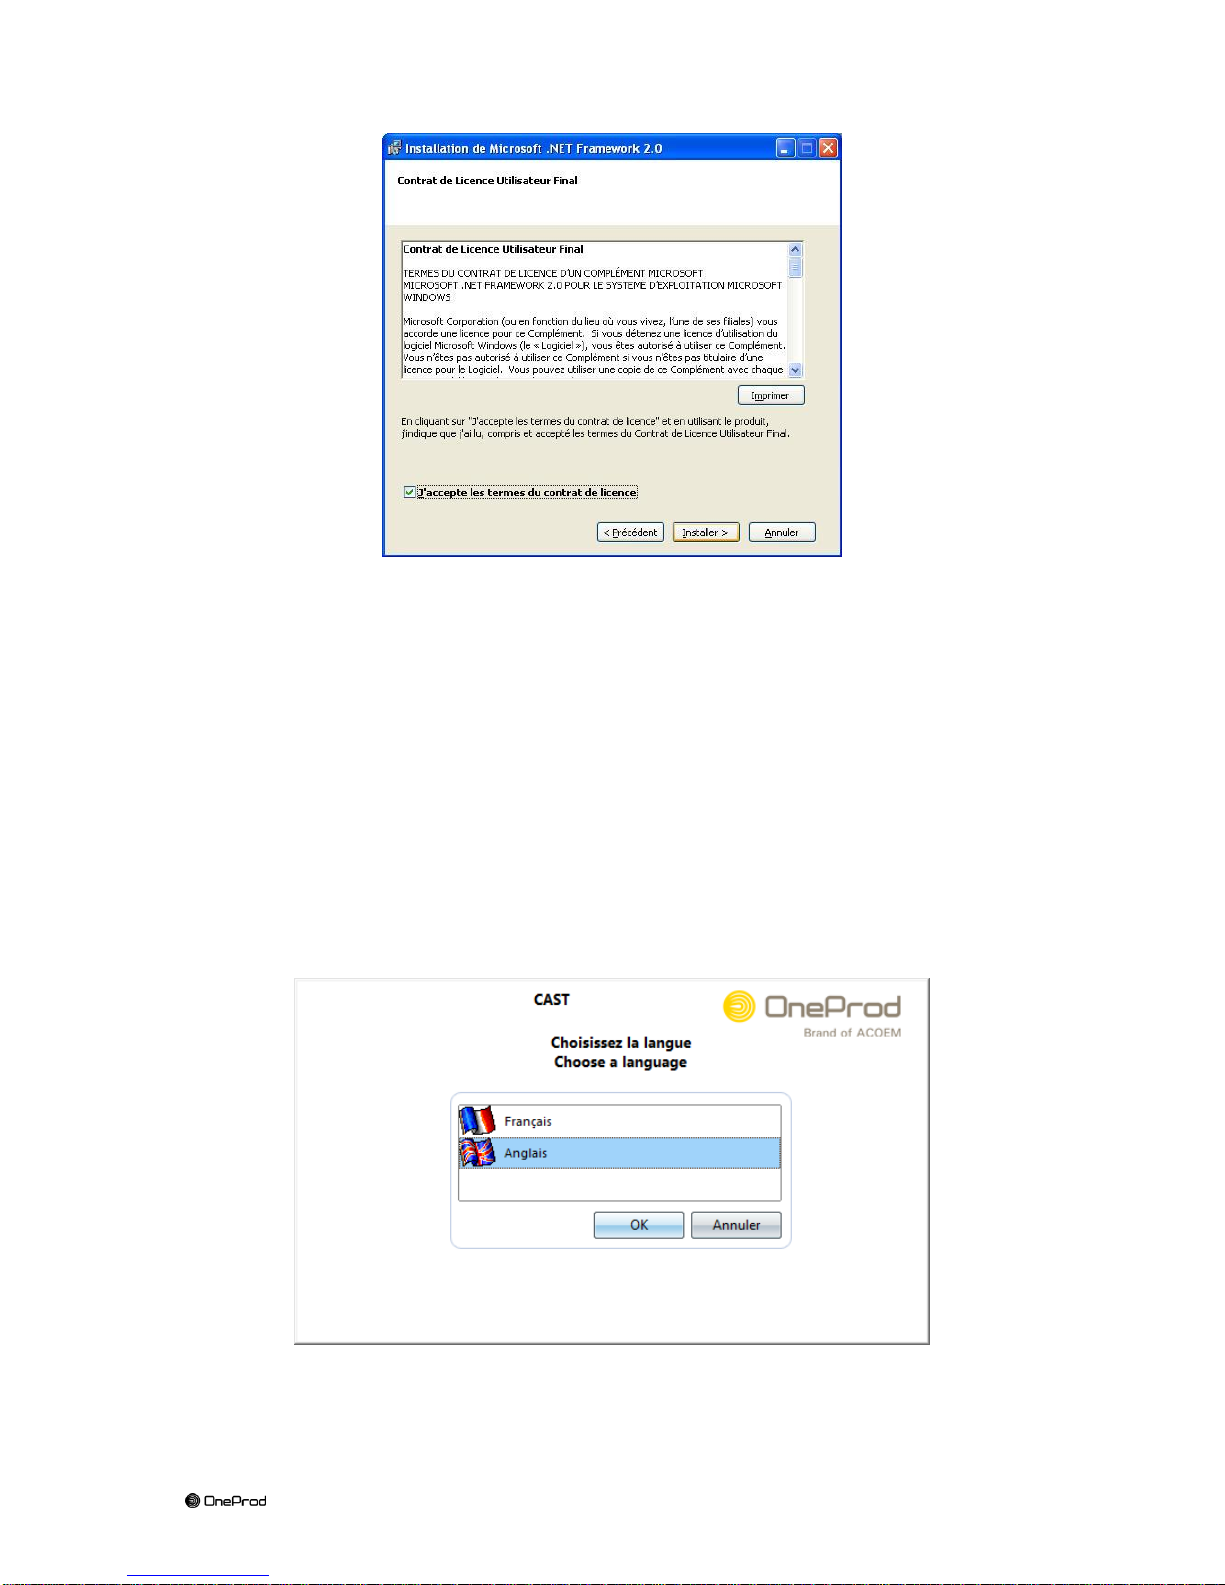
Click on “Next” in the first screen, then on “Install” in the second screen, after reading
and accepting the terms of the licence.
Microsoft.NET Framework 2.0 installation only takes a few minutes.
When this installation is completed then you can start installing CAST.
2.3 Installing OneProd-CAST
Run Install.exe from subdirectory CAST_3.5.3 on the CDROM provided with
OneProd
MVX
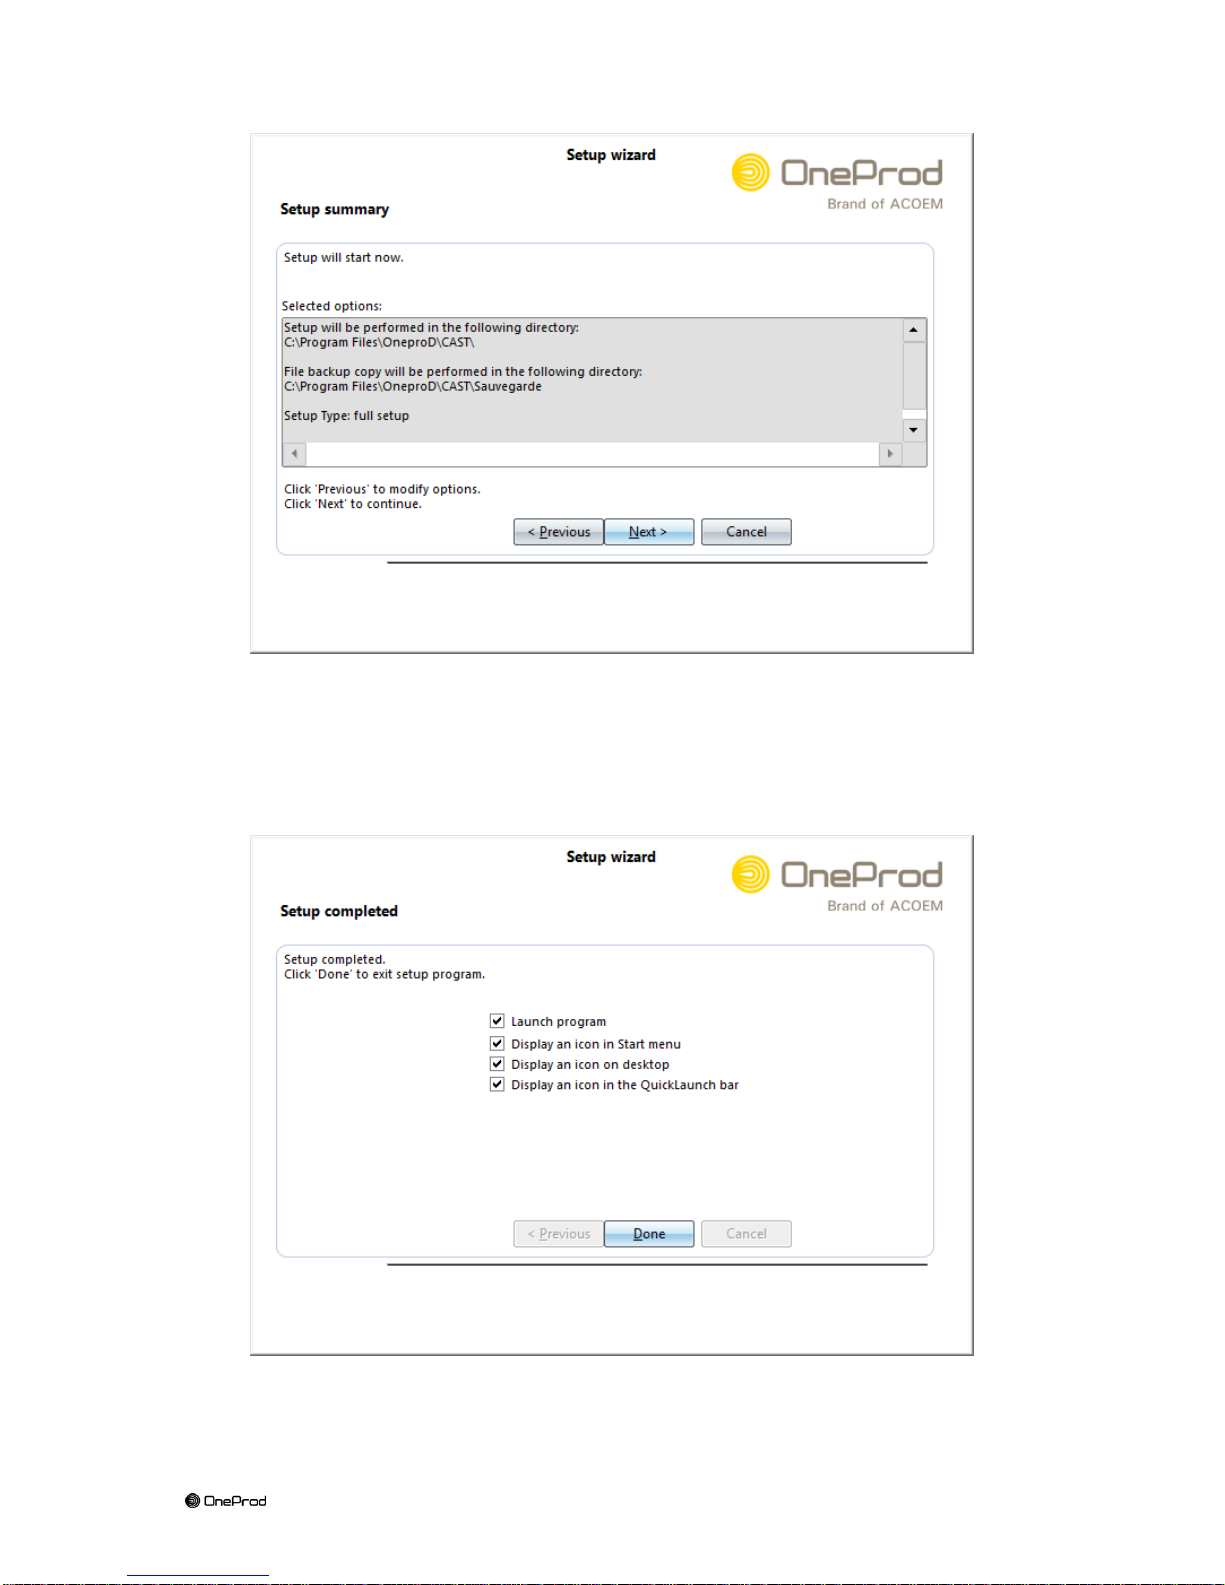
Select the language for the installation program and confirm by clicking on “OK”.
The installation folder can be selected in the second screen.
Page 8

8
Brand of ACOEM
Validate the following two screens:
Page 9
9
Brand of ACOEM
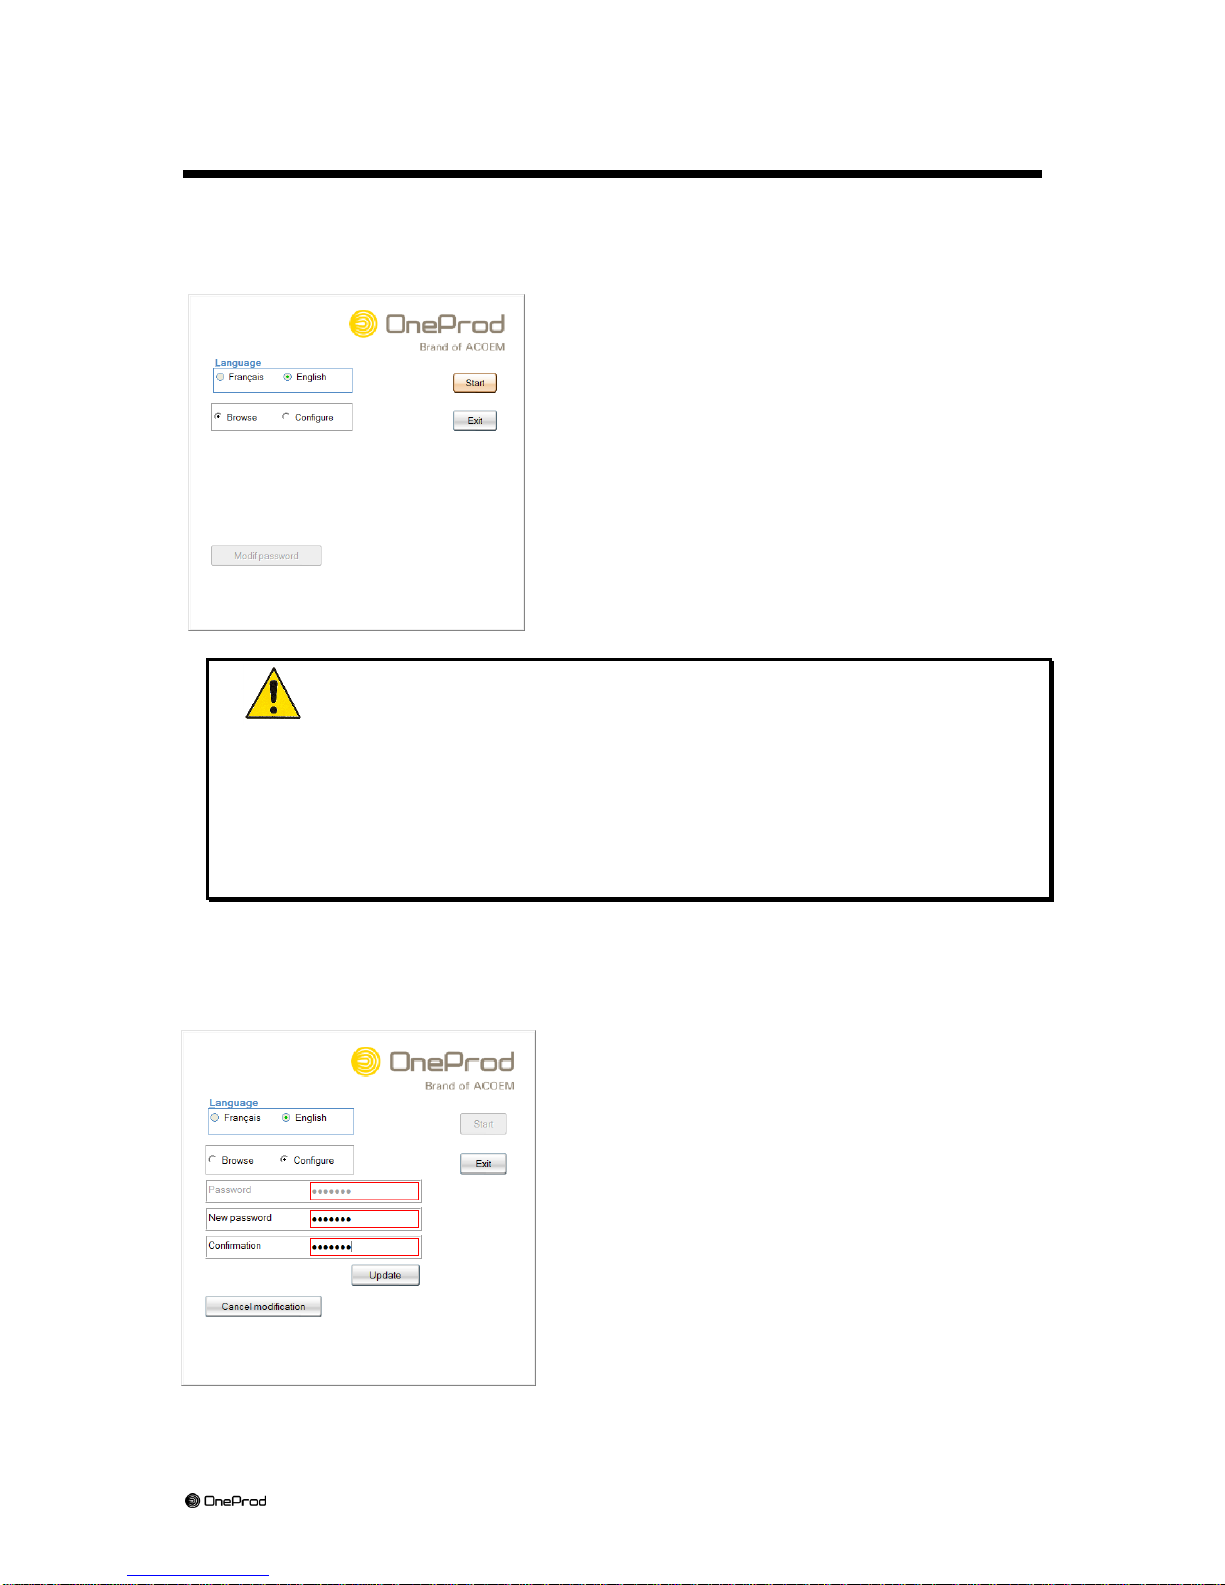
The last screen is used to select some final installation options:
Click on “Finish” to complete the installation of CAST.
Page 10
10
Brand of ACOEM
3 Using CAST: General points
3.1 Privileges
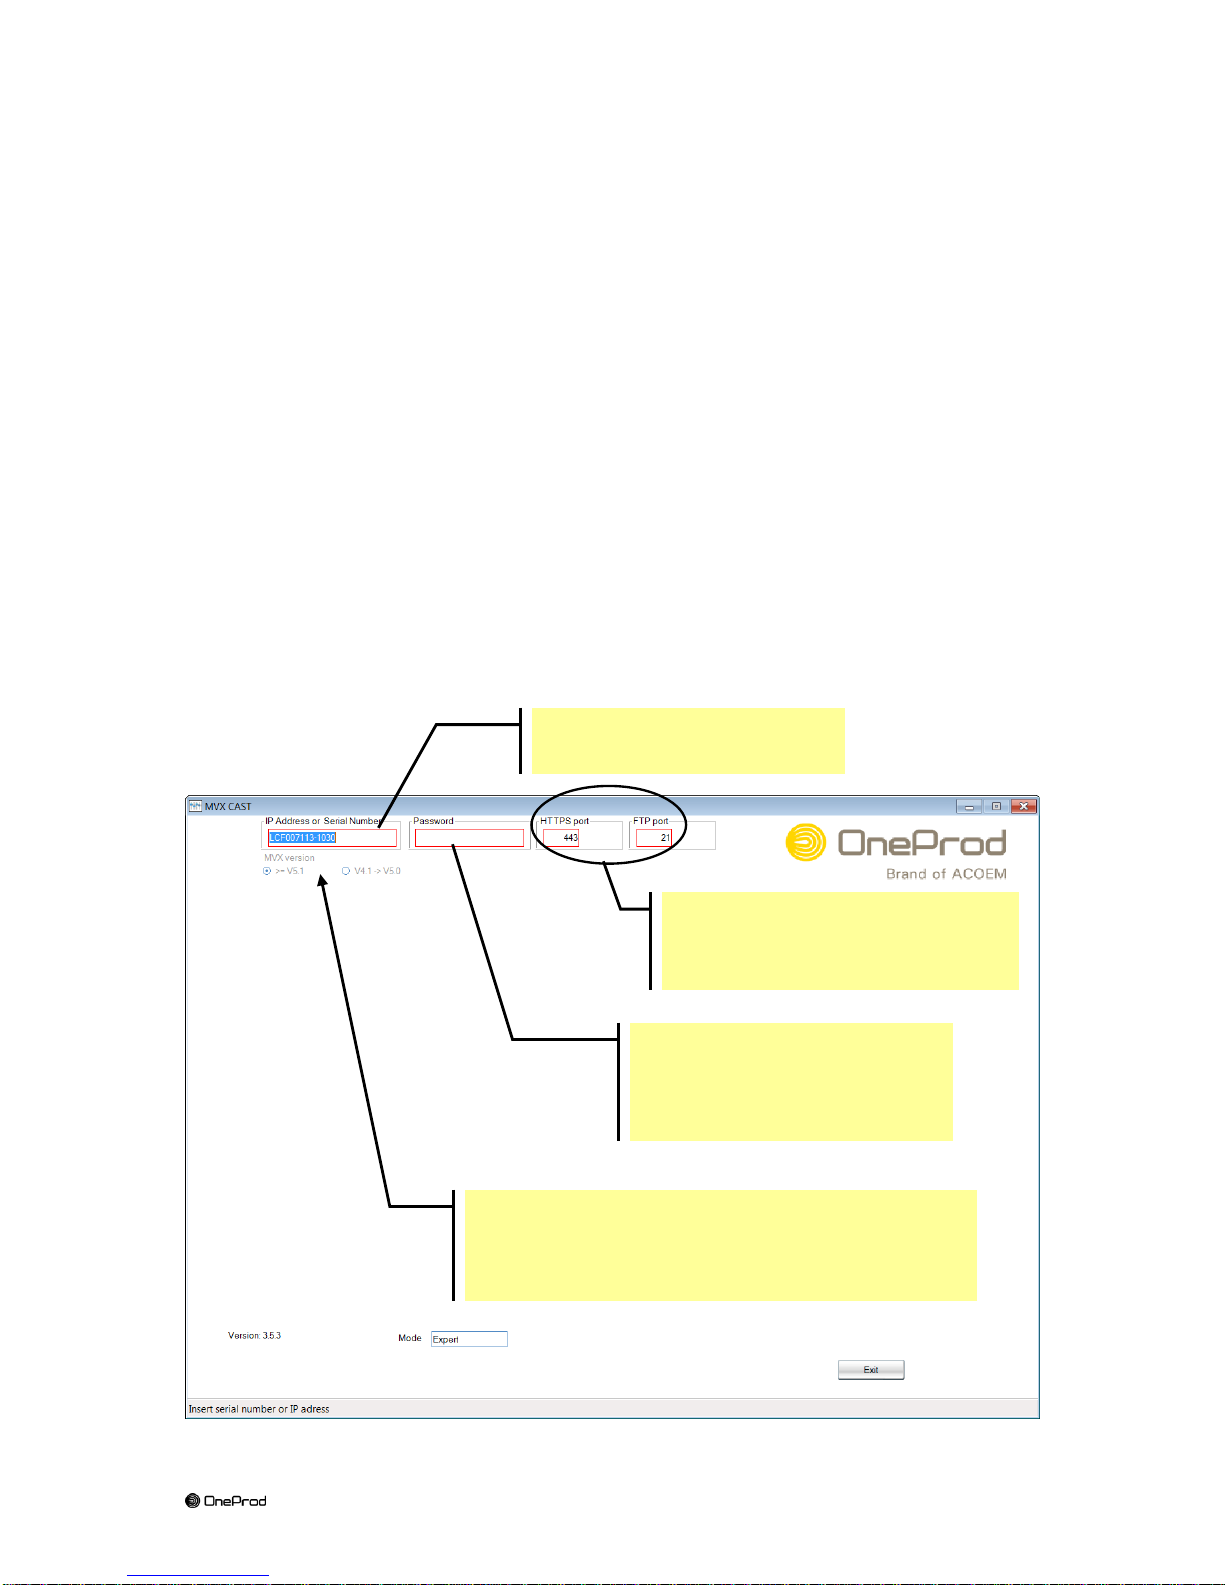
Upon launching of the program, a screen is displayed that allows to select the
language and the operating mode of CAST:
After selecting the language, please select the
operating mode you want to launch:
Browse mode: free access but does not allow
any change: click on “Browse”.
Expert (Configure) mode: access is
password-protected which allows to act on
MVX: click on “Configure”.
Warning
Using the Expert mode of CAST allows acting on MVX internal parameters
and can then lead to intentionally or unintentionally stopping programmed
monitoring.
The use of CAST is then restricted to well-informed operators.
This is the reason why the Expert mode is password-protected.
We strongly recommend that the default password be changed.
The default password is: OneproD (use lower and upper-case letters as indicated).
To change the password, please:
Enter the initial password
Click on “Modif password”
Enter the new password
Confirm the new password
Click on “Update”
Page 11
11
Brand of ACOEM
3.2 Connection to MVX
After selection of the CAST operating mode, the program displays a blank home
page.
The first operation to carry out when using CAST consists in specifying the MVX to
which to connect.
To do so, enter in the corresponding field:
Either the serial number of the MVX (if dynamic IP network)
Or the IP address of the MVX (if fixed IP network)
Simply by clicking in the input area, one can display a pull-down list including the
MVX instruments specified last.
One just needs then to select an IP address or a serial number in this list.
4 – Select the firmware version present in MVX
(V4.1 -> V5.0 before updating and > = V5.1 after.
For earlier versions use the corresponding version
of CAST).
1 – Please specify the MVX
to which to connect.
3 – Enter the MVX
communication password
Default password is : MVX
2 – Let 443 et 21
Except when MVX is connected
through a router modem
Page 12

12
Brand of ACOEM
This password is property of the MVX you want to communicate with. It is necessary
for any kind of communication.
By default, this password is factory-set to MVX. It can be modified using CAST (2nd
tab).
Once you have blanked the box or once you begin to enter a password, a complete
first tab page opens.
There are 8 or 9 tabs, depending on the mode you’re using.
(Tab “Firmware installation” does not exist in consultation mode)
Page 13
13
Brand of ACOEM
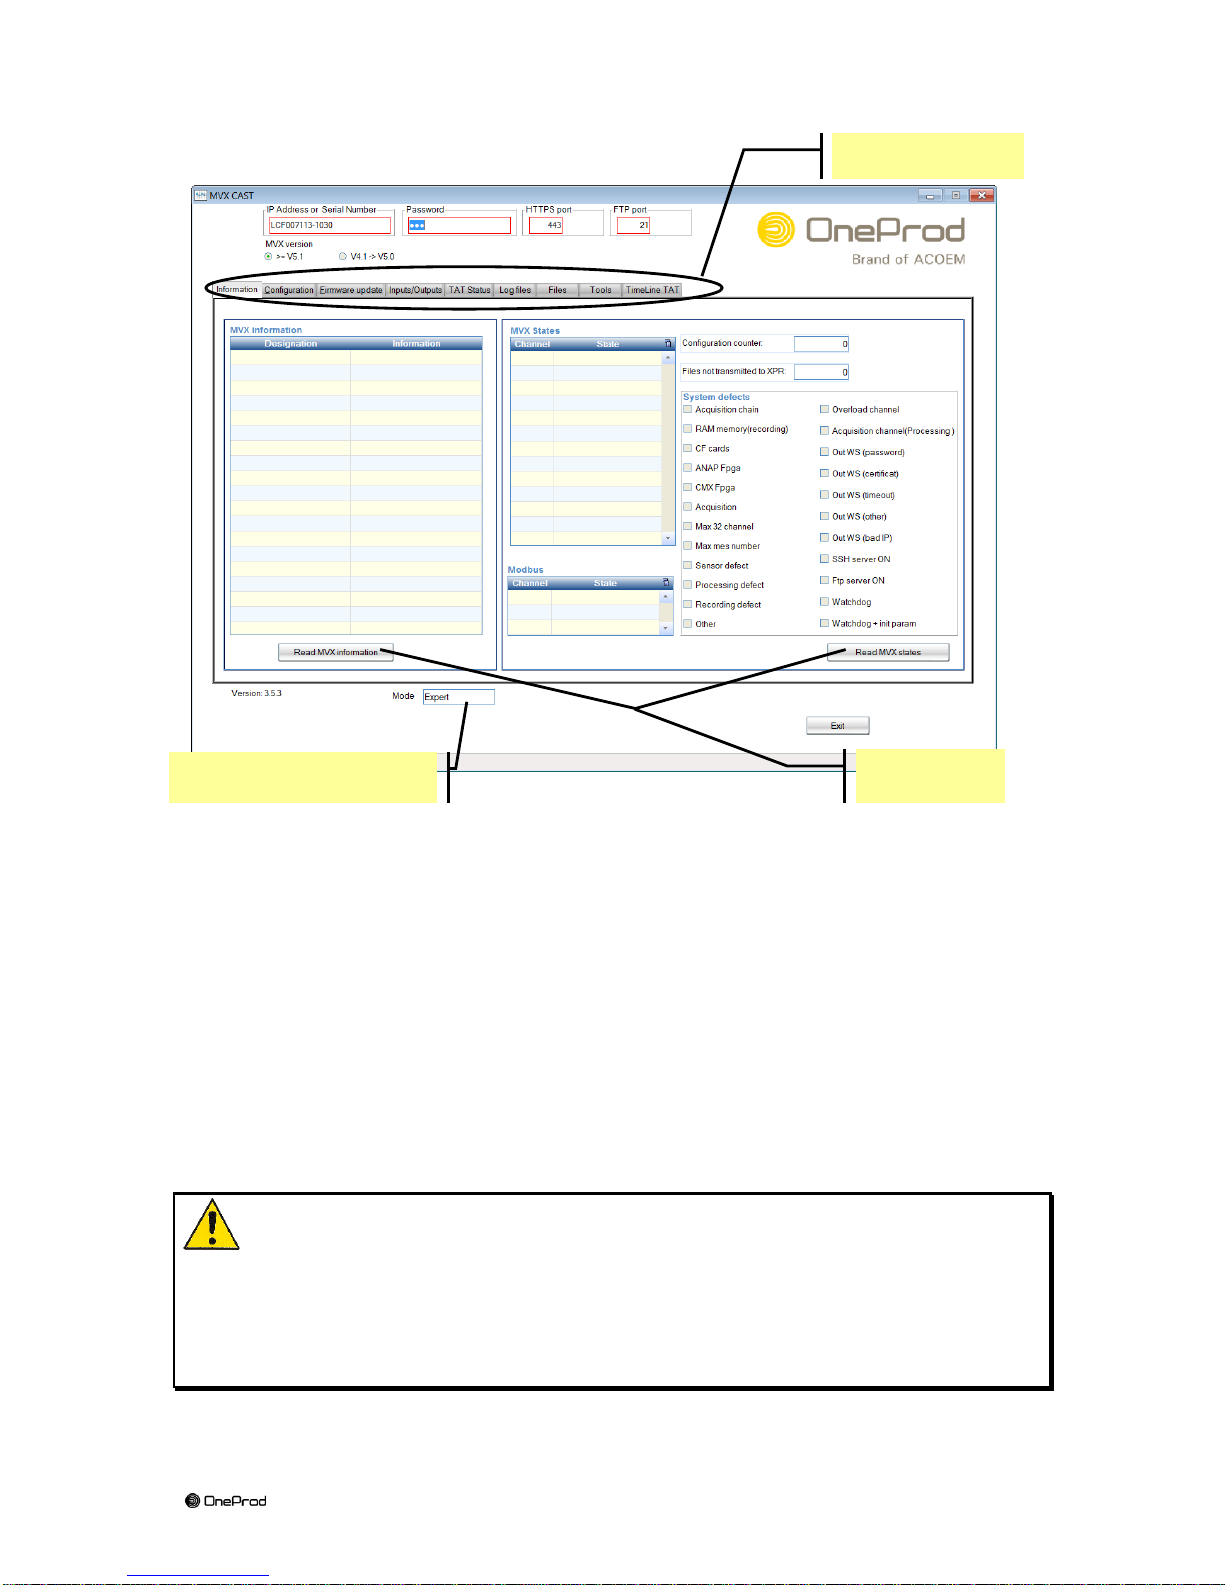
The first operation to begin with consists in pointing out the MVX that you want to
reach.
In order to do that, please type on the top side of the page:
Either the MVX serial number (in the case of a dynamical IP network),
Or directly the MVX IP address (in the case of a fixed IP address network).
In clicking into the IP address zone, you can see the scrolling list of the last MVX that
have been reached with CAST.
Then you just have to choose an IP address or a serial number in the list.
Each time CAST is connected to a « new » MVX, it is strongly
recommended to begin with a « ping » test, in order to verify that an Ethernet
communication is possible with that MVX.
Once that test is successful, then it is recommended to display the MVX
information (§5.1) and to verify it before launching any other operation.
Browse or Expert mode
Select tab
Commands
Page 14
14
Brand of ACOEM
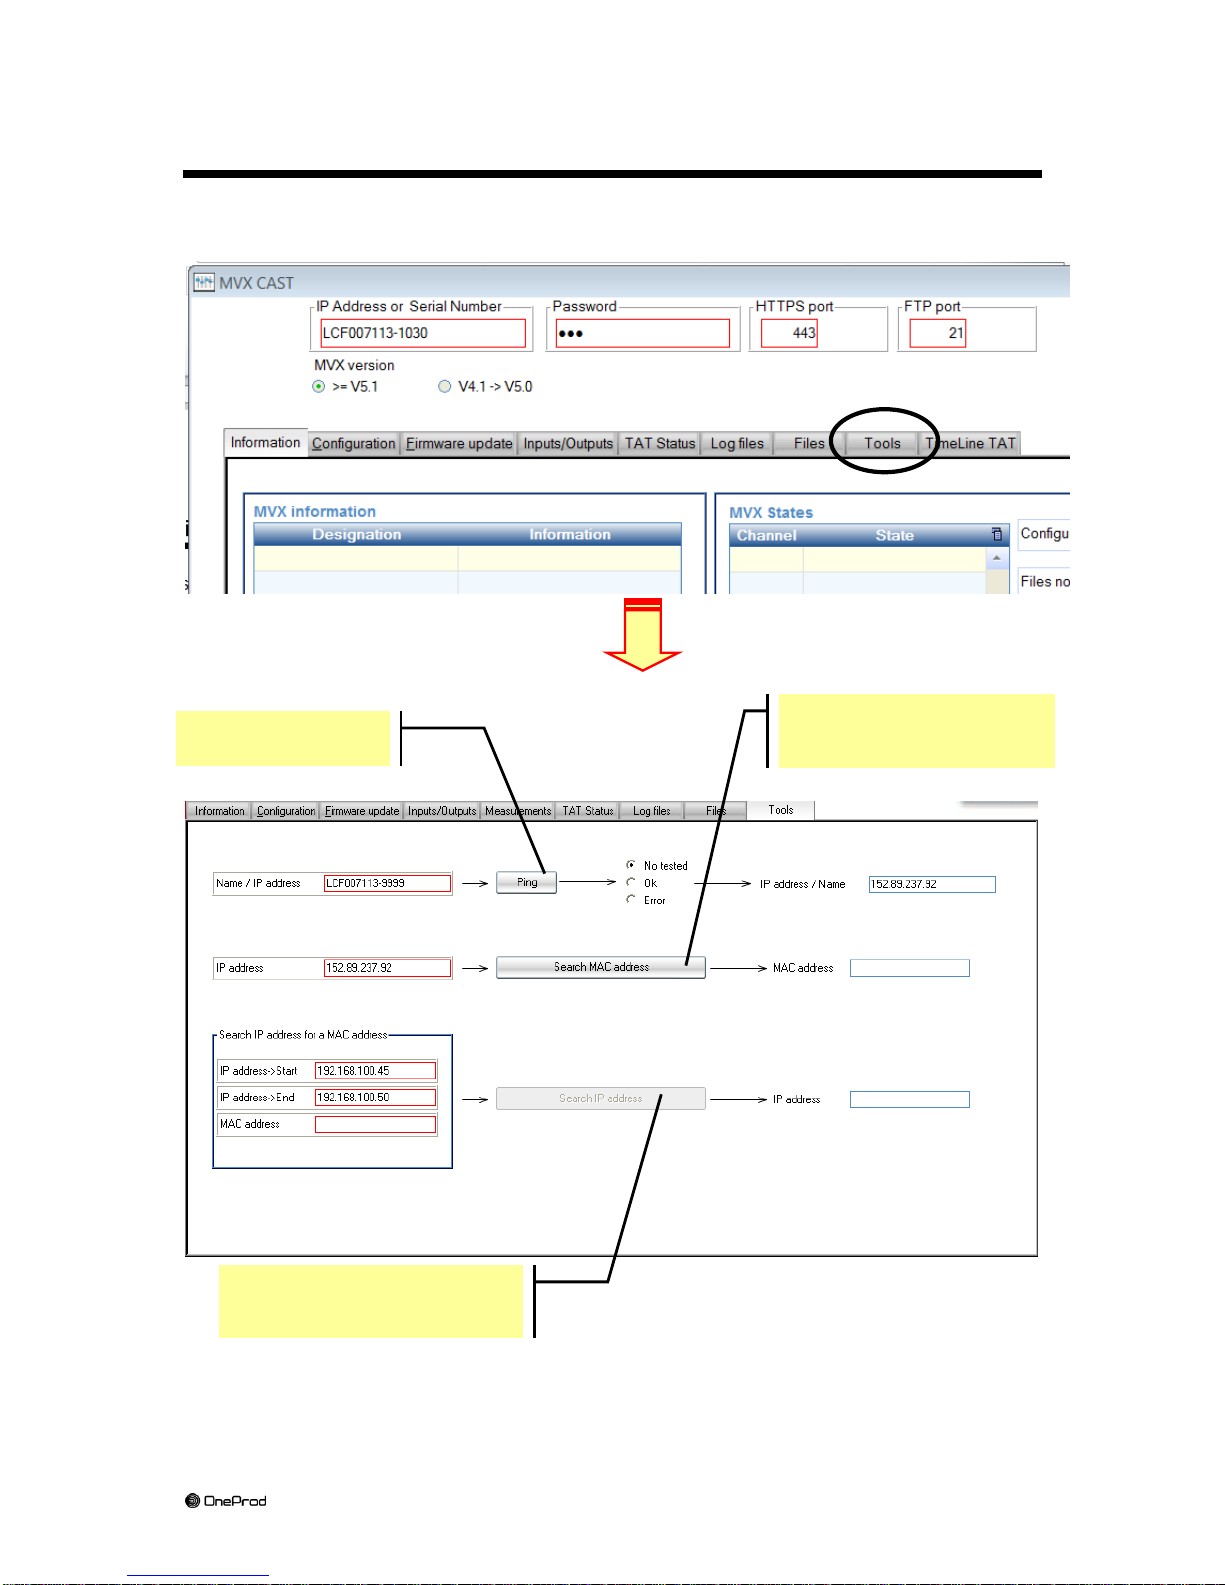
4 Communication Tools
Please first click on the « Tools » tab as below:
4.1: Ping test
4.2: Retrieving the MVX
MAC address
4.3: Looking for an IP
address on the network
Page 15

15
Brand of ACOEM
The « Tools » tab of CAST allows to run 3 different functions:
4.1 Ping test :
The « Ping » test verifies that a target (answering to a request) does exist on the
network.
It and also allows:
o To retrieve an IP address if you know the Hostname (serial number of an
MVX).
(or)
o To retrieve the Hostname (serial number of an MVX) if you know its IP
address.
Please first type the serial number on the left (into the red rectangle) and then click
on the “Ping” button.
Note 1: This test can’t guarantee that the target which answers is currently an MVX.
Note 2: The communication password isn’t required for the « Ping » test.
4.2 Retrieving the MVX MAC address
MAC address corresponds to the physical address of an Ethernet port.
There are 2 MAC addresses for an MVX: one for each Ethernet port.
Each MVX has different MAC addresses, which permits to distinguish them on a
network.
This function allows to retrieve an MVX MAC address once you know its IP address.
Please first type the IP address on the left (into the red rectangle) and then click on
the “Search MAC address” button.
4.3 Looking for an IP address on the network
This is a scanning function: CAST looks for a particular MAC address on the
network.
Beforehand you have to type the MAC address and to restrict the research into a
fork: two IP addresses.
Please enter the correct values into the red rectangles and click on the “Search IP
address” button.
Note that this test may take several tens of seconds to be achieved.
Page 16
16
Brand of ACOEM
5 Visual display of information
5.1 Display of information specific to each MVX
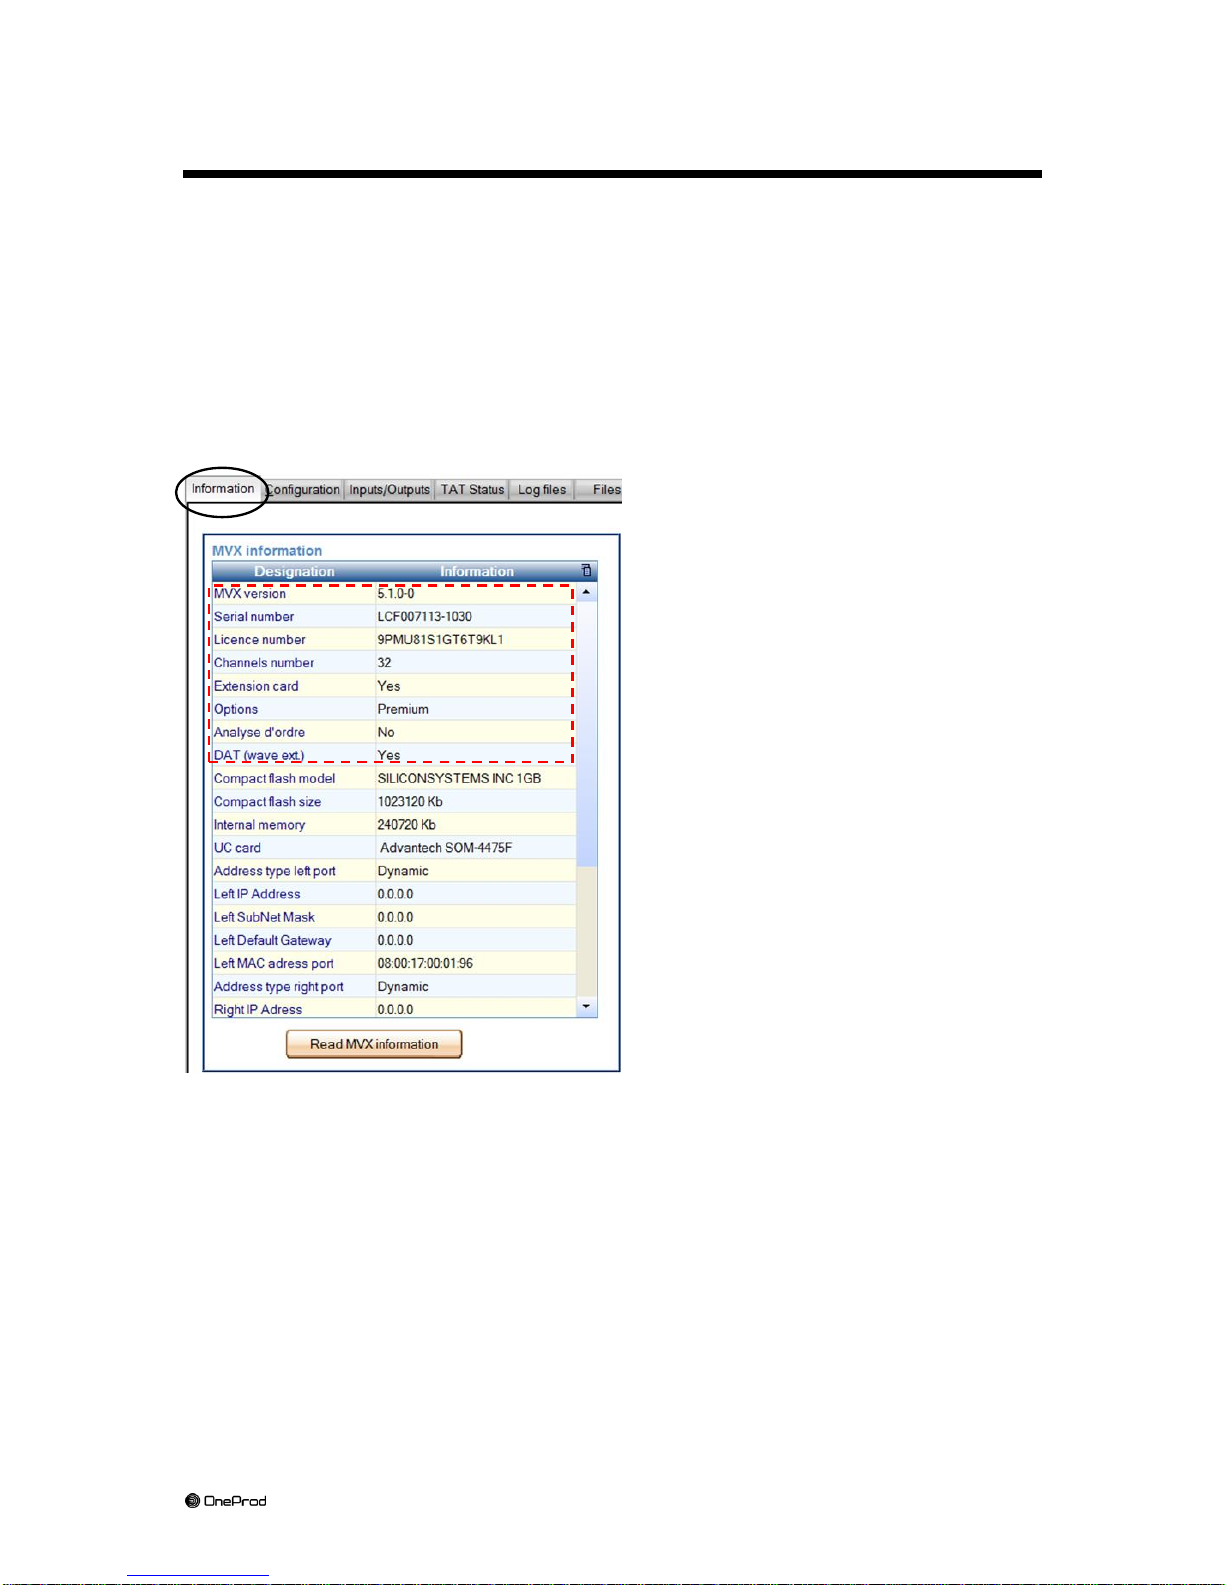
The display of this information is a basic operation, with which one should start each
time CAST is used with a given MVX.
Click on button “Read information” in the first tab: after a few seconds, the
corresponding table is filled out:
A quick view on this table allows
checking for essential elements:
Receiving information evidences
that the MVX is correctly addressed
and can respond.
With fixed IPs, once can check that
the expected MVX (which is
identified through its serial number)
responds at the specified IP
address.
One can check the rights granted to
the MVX (number of channels,
possible options)
One can check the MVX firmware
version: i.e. 5.0.0.23 here.
We suggest that the date and time
be checked also.
Page 17
17
Brand of ACOEM
5.2 Display of channel and defect status
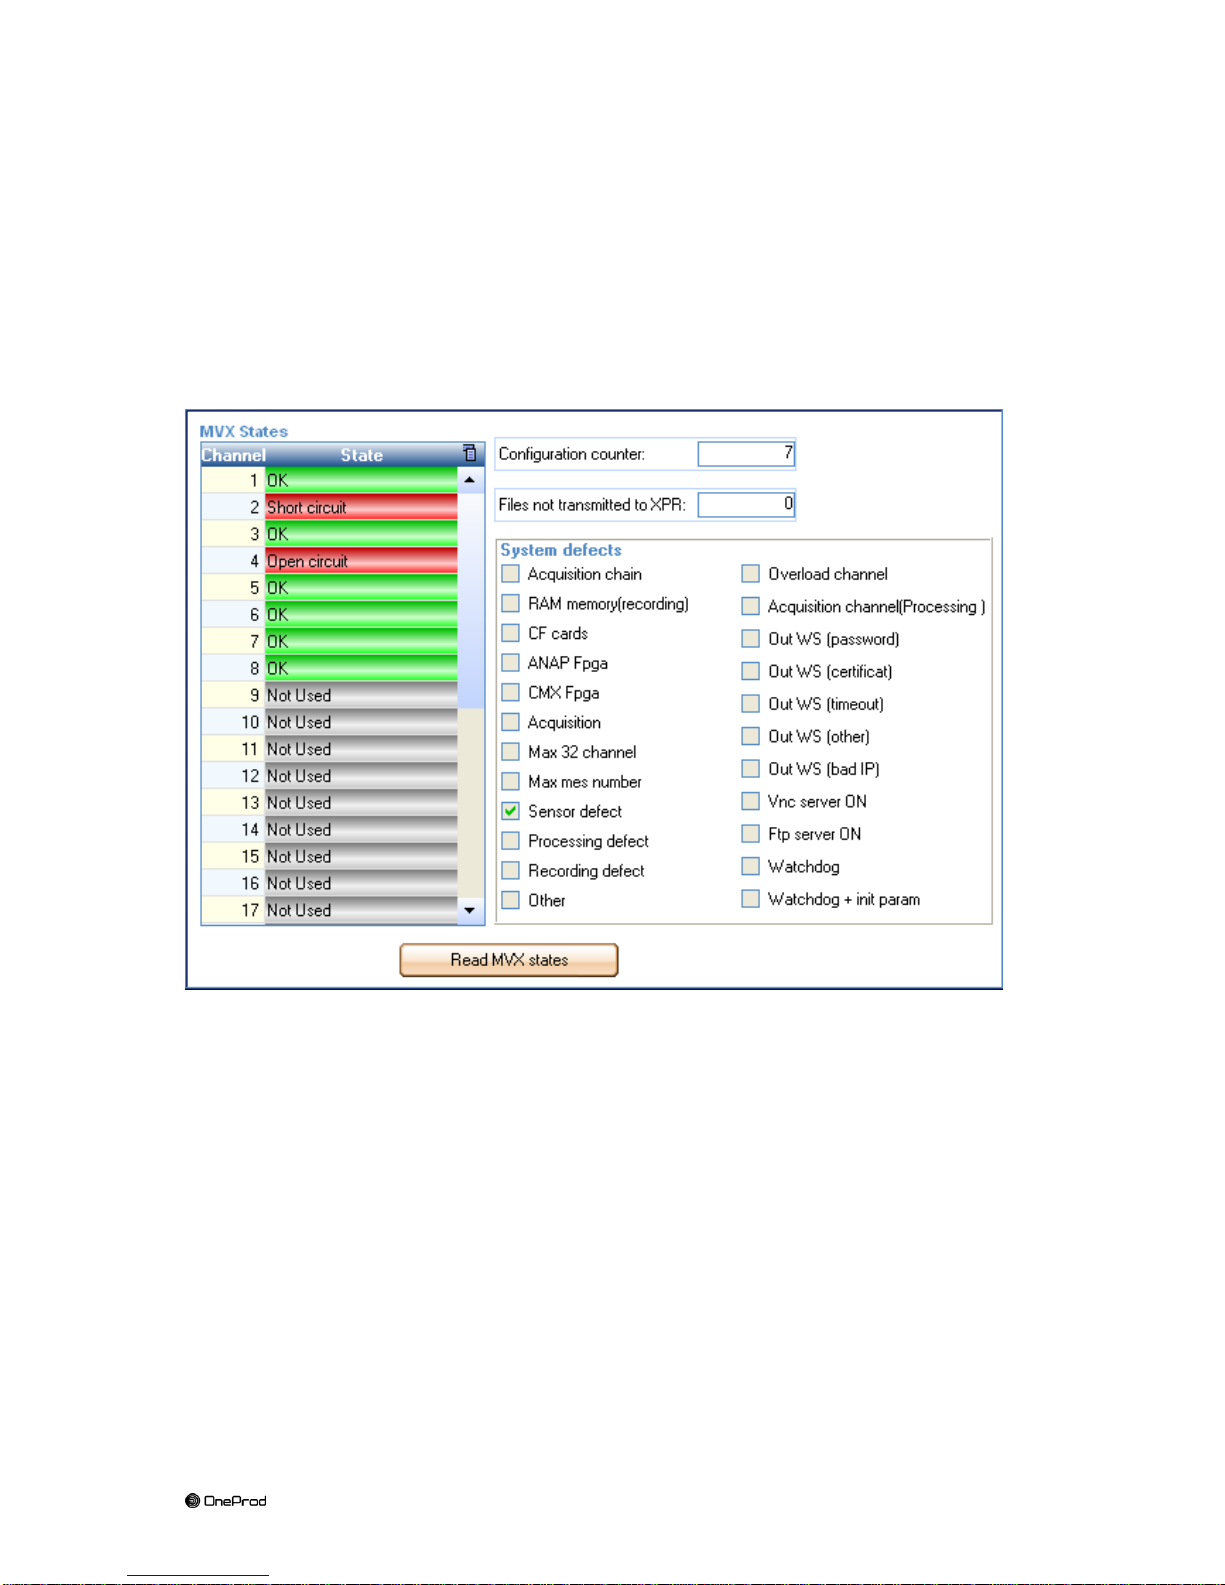
In the first tab, the second section, “MVX states”, allows viewing the possible status
of defects for each channel, and globally for the MVX.
Click on “Read MVX states” in the first tab.
In the example below:
The global status is:
The MVX is Sensor defect”,
The MVX is loaded with settings defining channels 1 to 8,
Channel 2 is in Short-circuit mode,
Channel 4 is in Open-circuit mode,
Channels 1, 3, 5 to 8 are OK,
Channels 9 to (32) have not been defined in the set-up file loaded in MVX.
Page 18
18
Brand of ACOEM
5.3 Display of logical input status
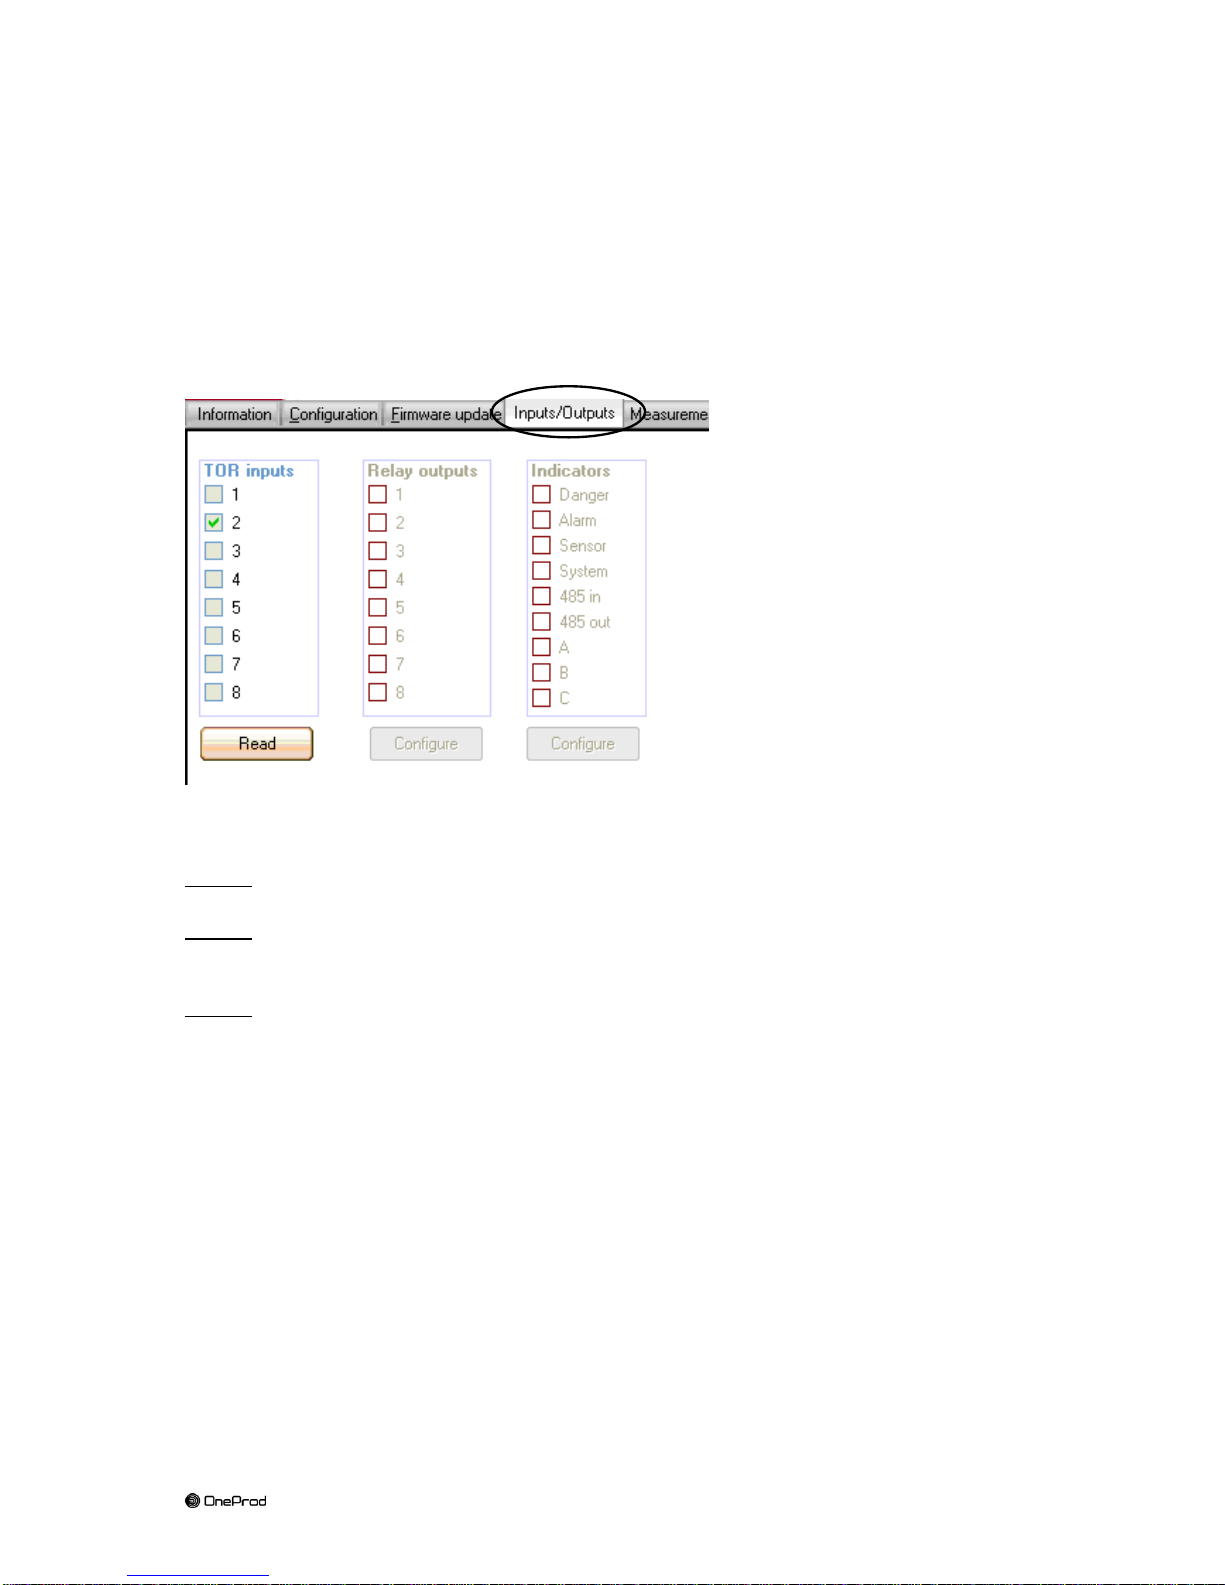
In the “Inputs/Outputs” tab, one can view the status of the 4 logical inputs of a
MVX-160 or of the 8 logical inputs of a MVX-320.
To do so, click on the “Read” button.
In the above example, logical input #2 is active.
Note 1: Click again on “Read” to refresh the screen.
Note 2: In the case of MVX-160, it is normal that the 4 inputs that are not available
are displayed as active.
Note 3: Fields “Relay outputs” and “Indicators” are neither accessible, nor
significant.
Page 19
19
Brand of ACOEM
5.4 Internal processing information
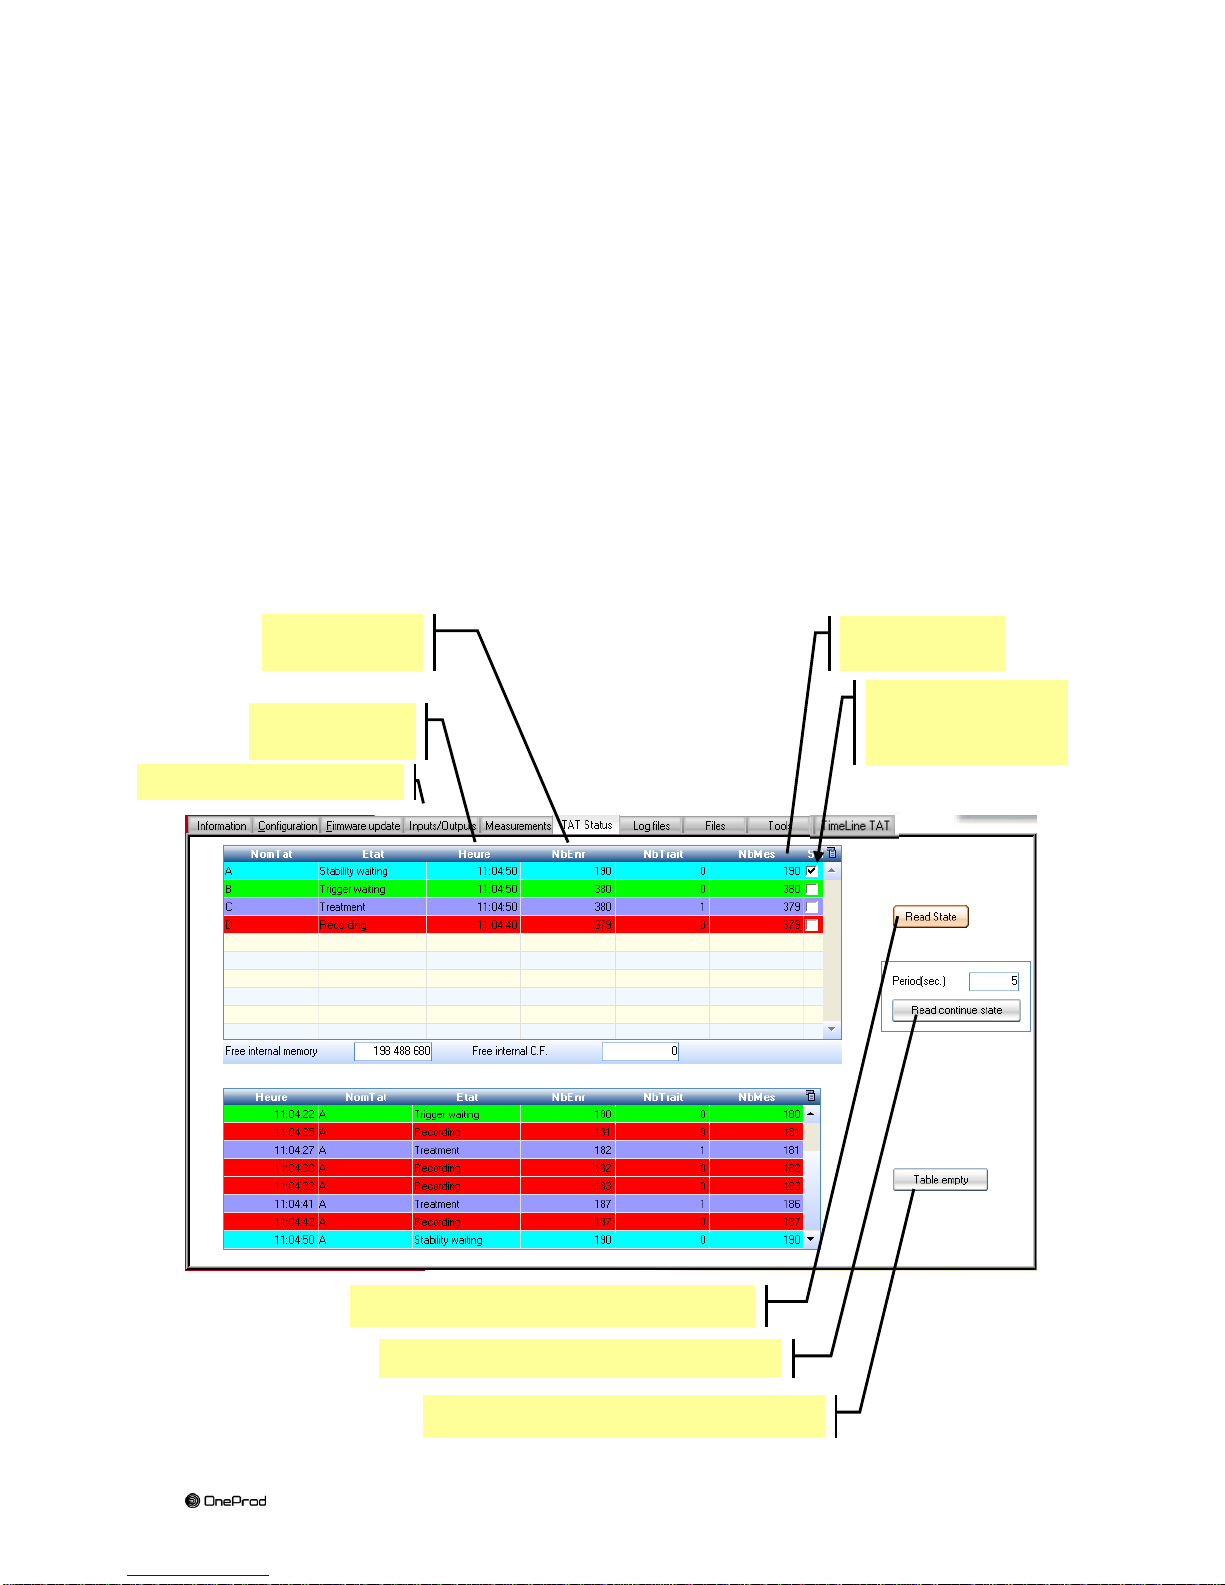
This tab can be used to visualize live the internal processing of MVX.
It allows well informed operators to verify that the different operating conditions are
rightfully detected and how often they appear.
This can be useful in order to optimise the monitoring strategy in the case of complex
or no irregular cycle machineries.
In the upper table, each line shows one Acquisition & Processing Task (TAT) that is
active in MVX at the instant of reading.
In the lower table, each line matches with a status change for the task that has been
selected in the upper table.
Time of the last
status change
Click to empty the table
Click for automatic reading
Click for one-shot reading
Number of
recording files
Number of
measurement
Select here the task
you want to monitor
(in the second table)
Déclenchement de la tâche
Page 20
20
Brand of ACOEM
5.5 TAT time diagram
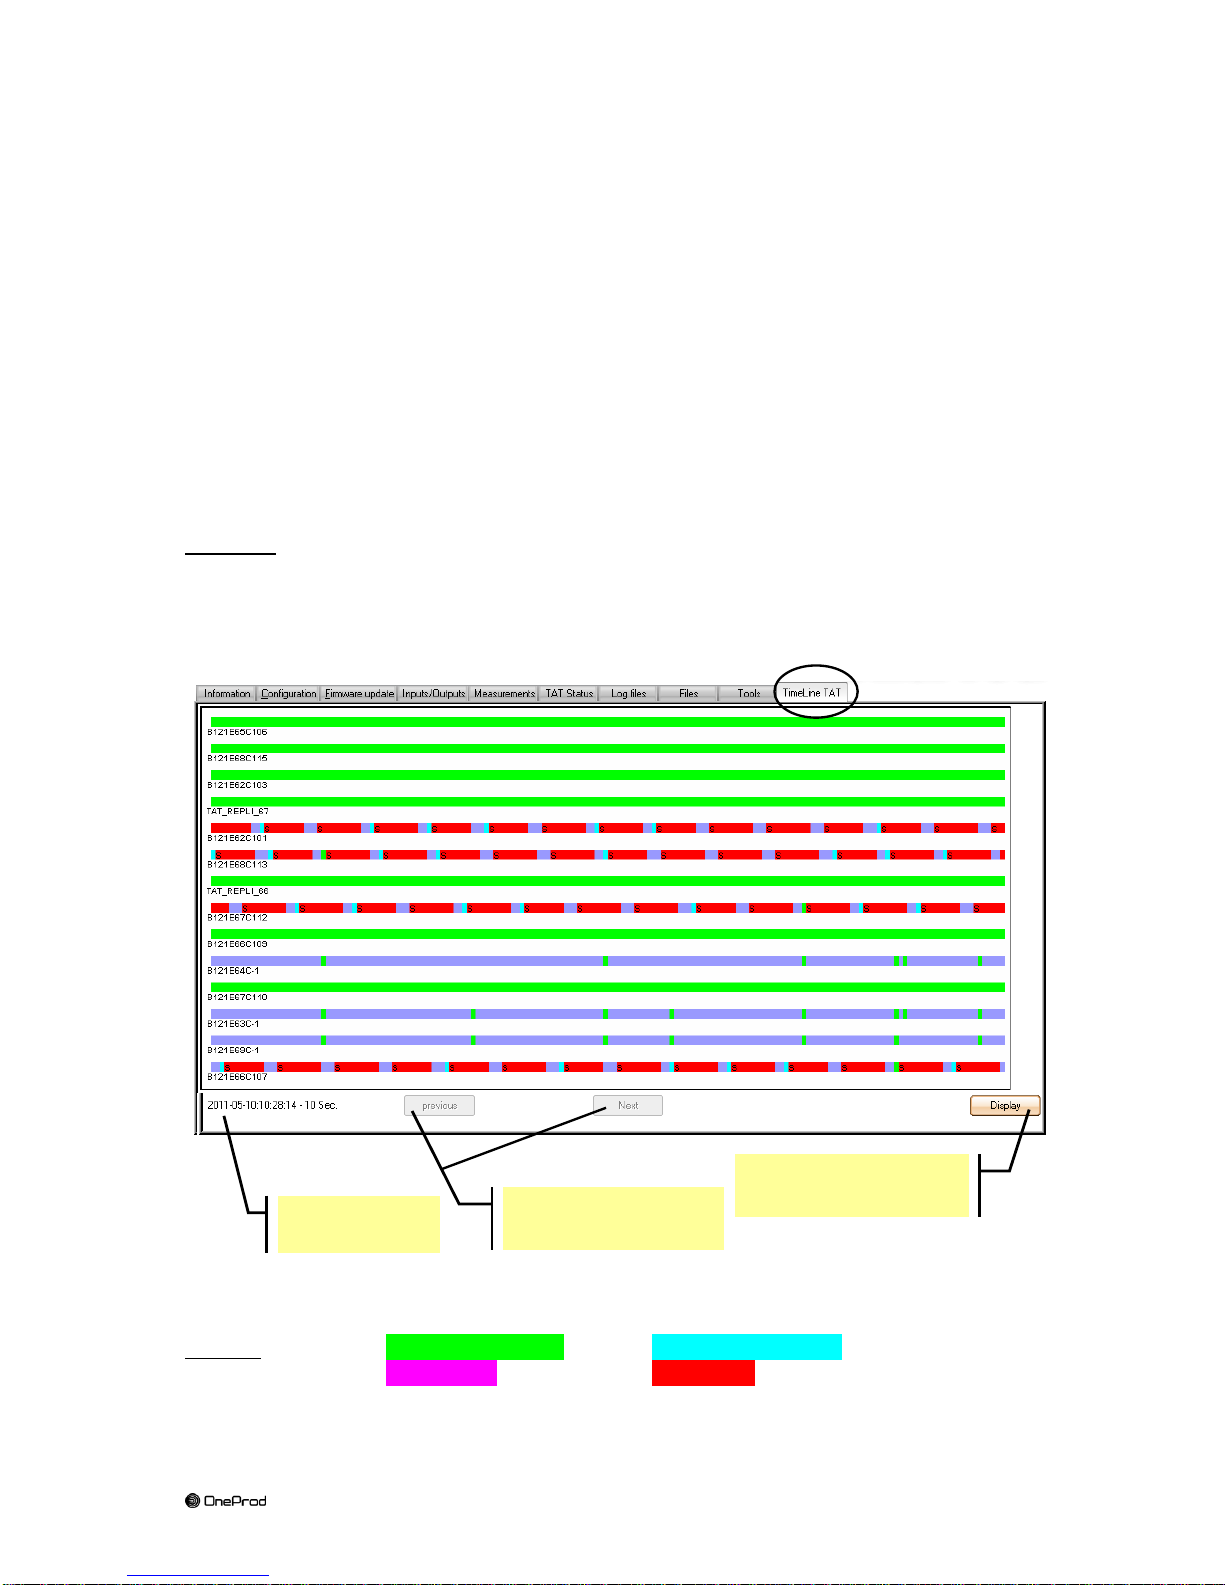
This tab allows drawing live status evolution of the different tasks that MVX should
perform.
Such advanced function us useful to optimise MVX setup in the worsts use cases :
complex operating conditions machine (wind turbine), several machines with multiple
conditions each, etc.
Drawing of the diagrams starts when clicking on “Display” (or “Afficher”) and it stops
when clicking on “Stop” (or “Arreter”).
One diagram may include several pages
Warning: Re-starting a diagram causes the preVIOus one to be deleted
Moving the mouse cursor on a task allows displaying (on the left and below) the
precise triggering time and the task duration.
Legend: Waiting for trigger Waiting for stability
Processing Recording
Browse the different
pages of the diagram
Start/ Stop displaying
the diagram evolution
Data about the
selected task
Page 21
21
Brand of ACOEM
6 Configuration of IP addressing
Rules for the use of Ethernet ports:
1 - It is recommended to use preferably the port B. This port can handle the
communication with the software OneProd (XPR, CAST, MSC, VIO) and PLC via
Modbus TCP.
2 - If Modbus PLC is on a different network then connect it on port A
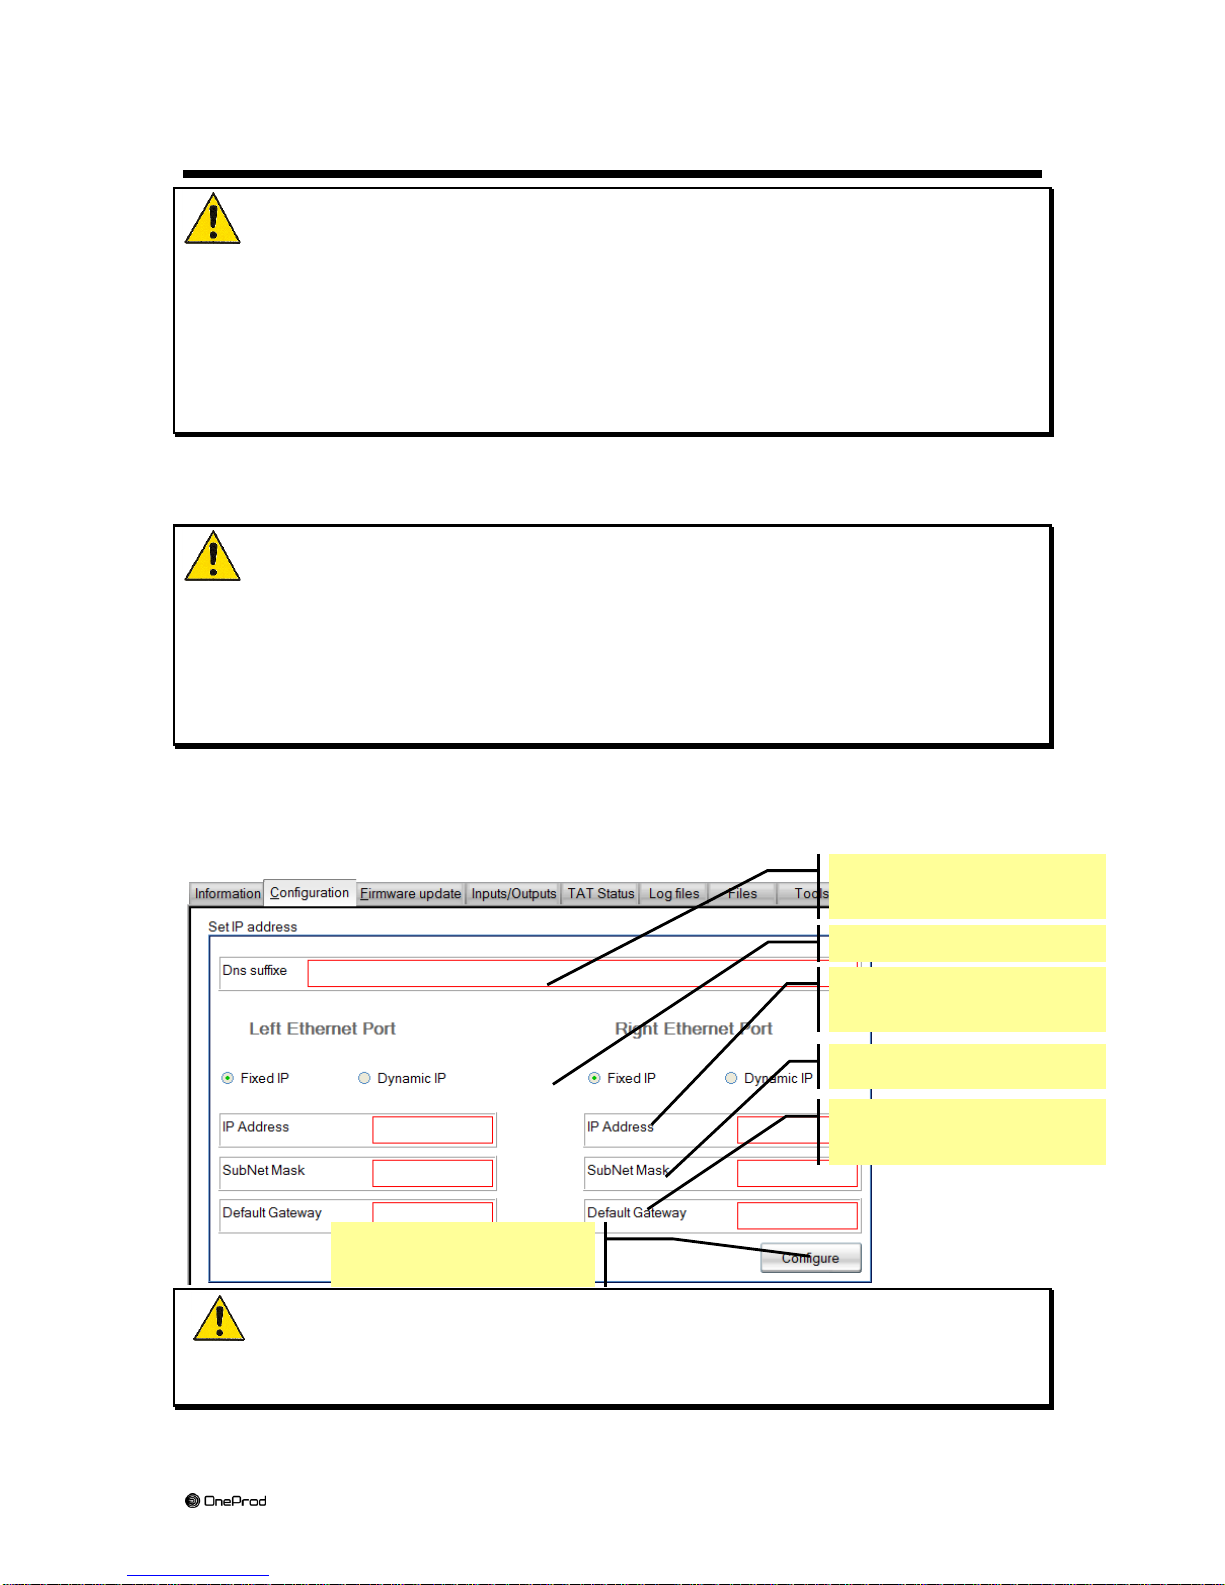
6.1 Configuration of a MVX with fixed IP
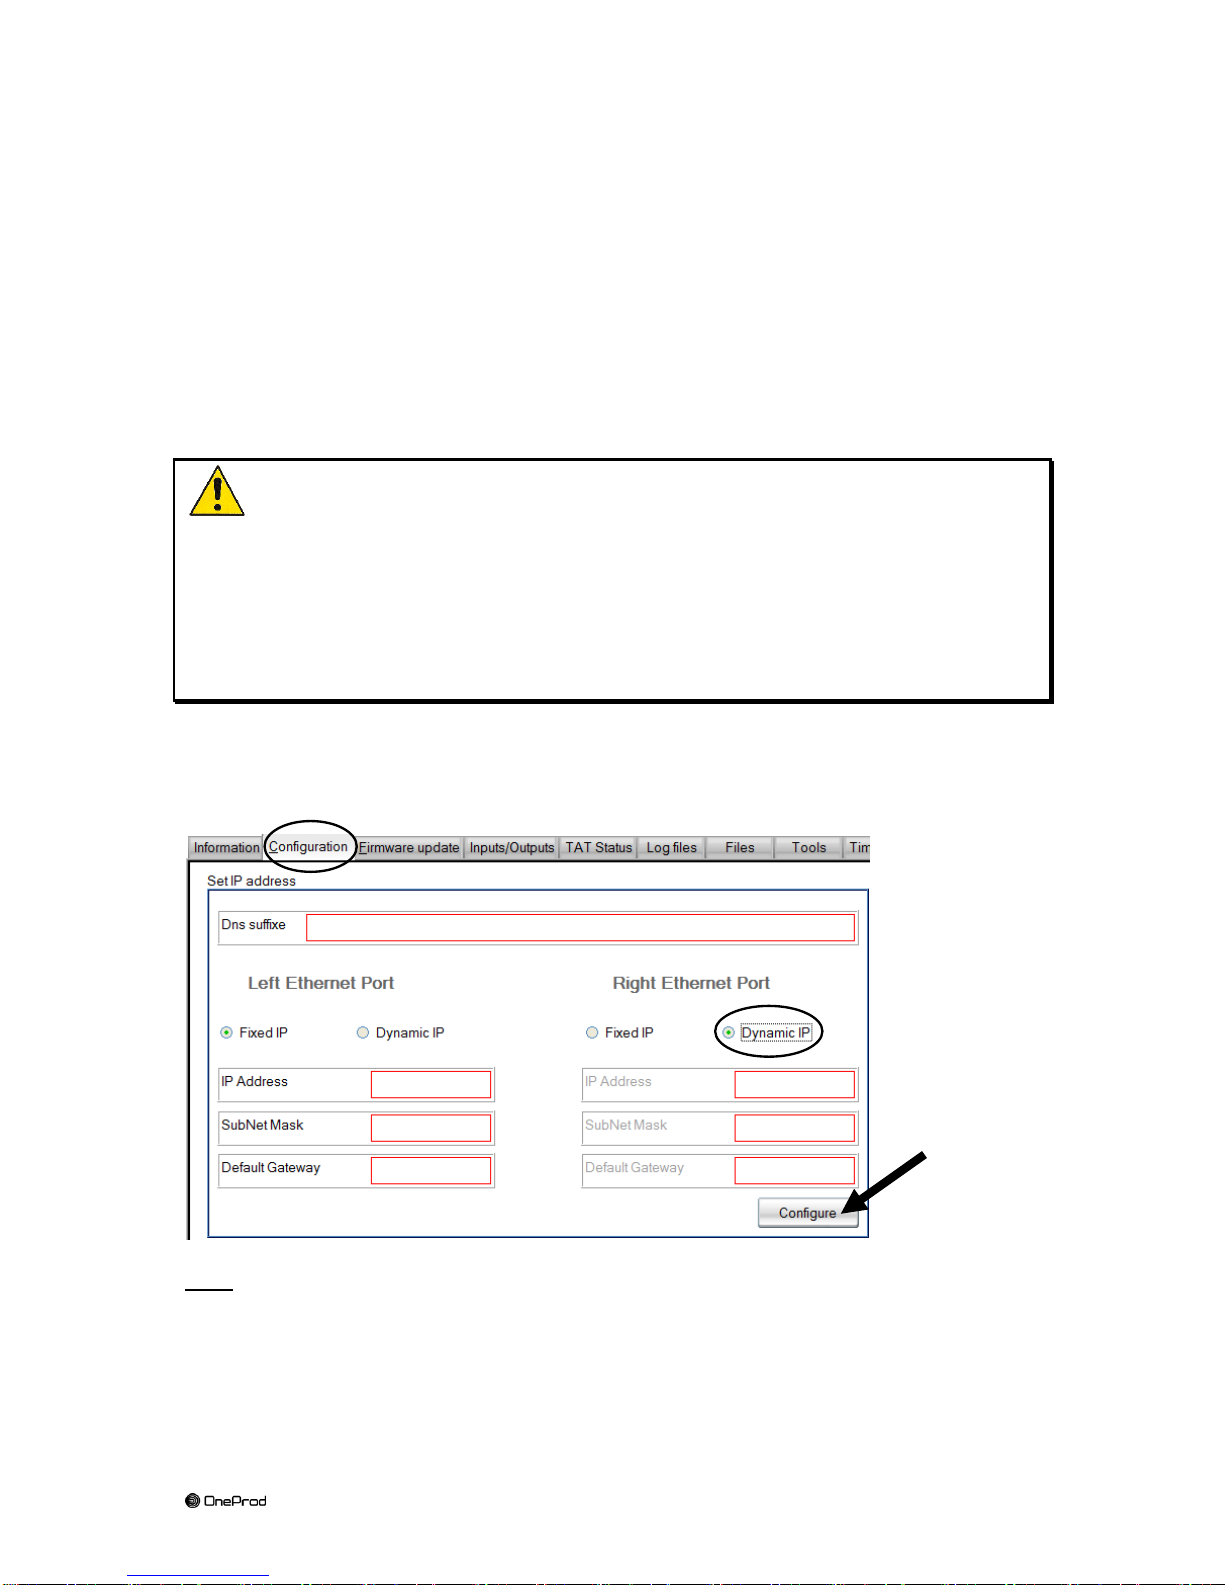
The second tab “Configuration” includes a section to define the fixed IP of a MVX.
MVX addressing on an Ethernet network can sometimes prove a delicate
operation to implement. It must be carried out in collaboration with your
computer specialists.
The user is strongly urged to refer to Chapter 7 (connection of MVX to an
Ethernet network) in the MVX user manual prior to any operation on the
addressing mode.
The configuration of MVX IP is not available in consultation mode.
To configure a MVX with a fixed IP address, follow the instructions below:
Clicking on button “Configure” results in the MVX being restarted and
changes the way in which it shall be addressed after this restart.
1 – Netwok DNS suffixe
(optional)
5 – Click on button
“Configure”
2 – Select : Fixed IP
3 – Enter the fixed IP
address of MVX
4 – Enter subnet mask
5 – Enter default gateway
if required
Page 22
22
Brand of ACOEM
6.2 Configuration of a MVX with dynamic IP
Reminder:
MVX Version ≧ V5.1: By default, upon delivery, MVX starts with a dynamic IP
and sets itself to IP addresses within the range 169.254.x.y in the absence of
DHCP server.
MVX Version < V5.1: before update to V5.1, in the absence of DHCP server
addresses are fixed to 192.168.1.100 and 192.168.1.101.
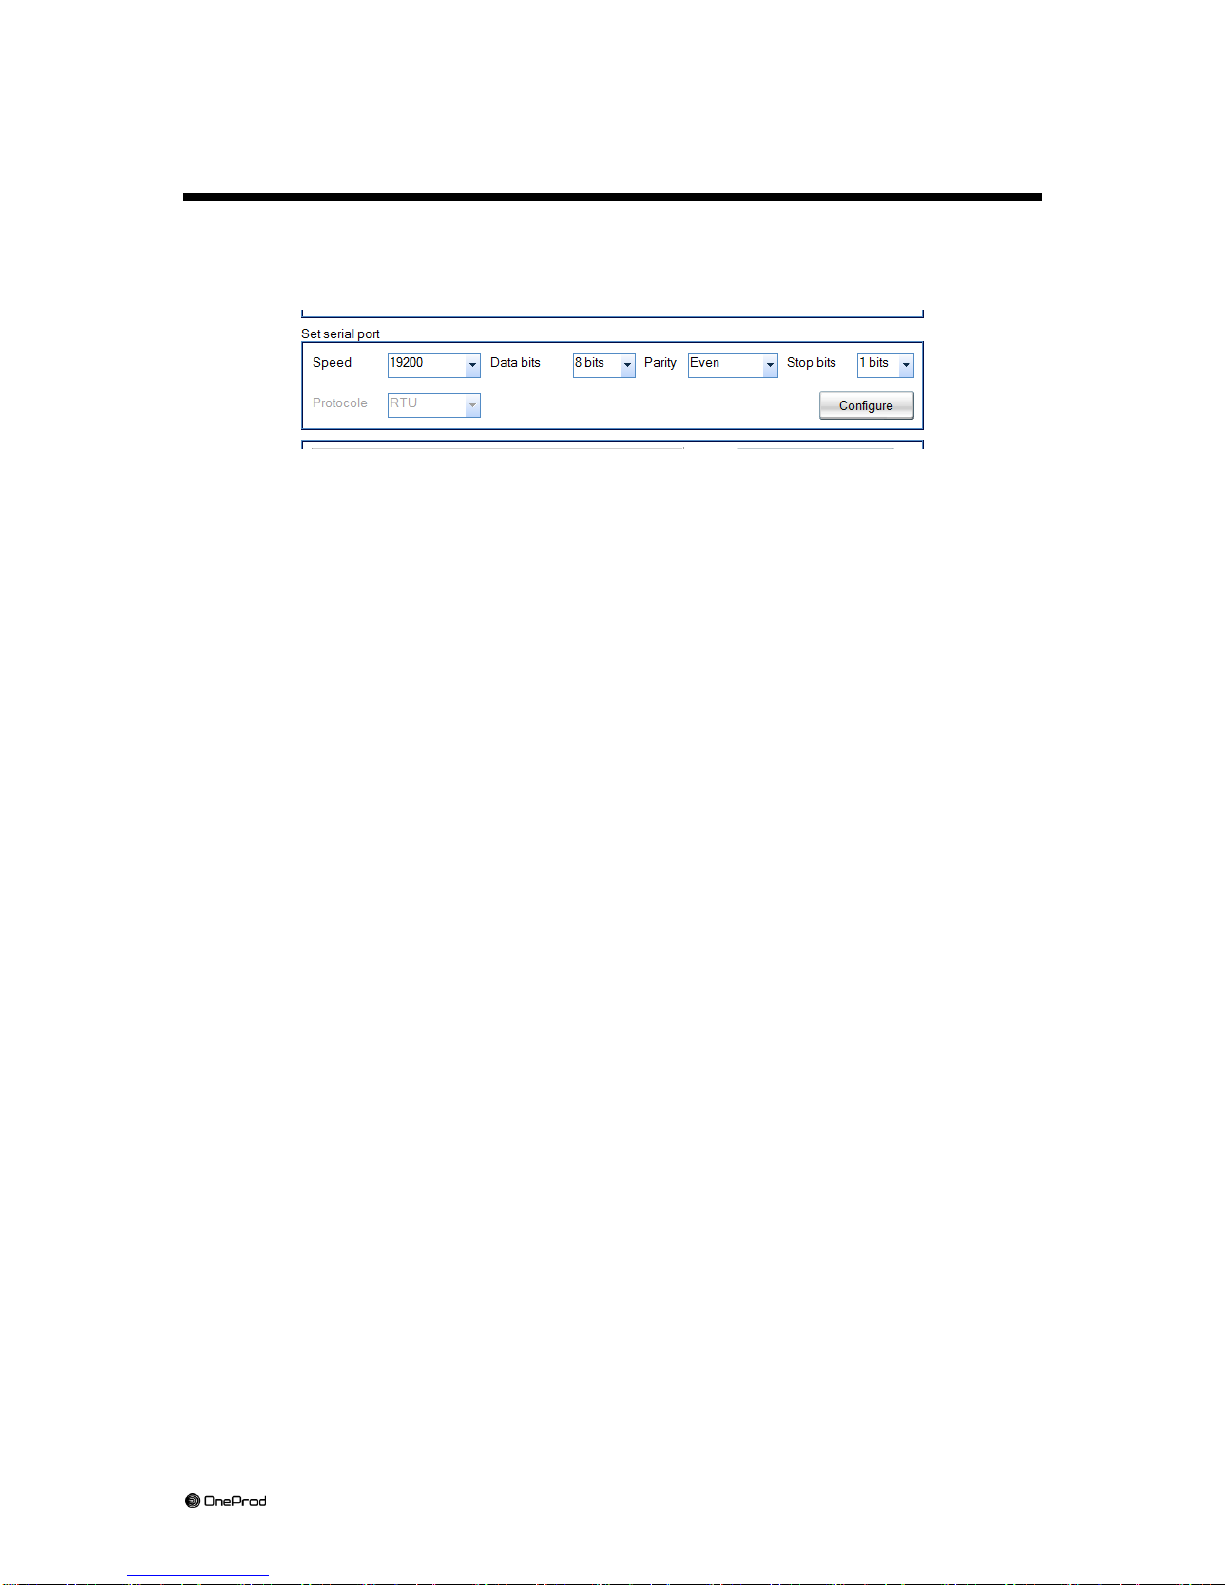
The second tab “Configuration” includes a button allowing to reconfigure the MVX
with a dynamic IP address.
MVX addressing on an Ethernet network can sometimes prove a
delicate operation to implement. It must be carried out in collaboration with
your computer specialists.
The user is strongly urged to refer to Chapter 5 (connection of MVX to an
Ethernet network) in the MVX user manual prior to any operation on the
addressing mode.
The configuration of MVX IP is not available in consultation mode.
To configure a MVX with a dynamic IP address, just click on button “Configure
dynamic IP address” in the second tab of CAST.
Note: To carry out this operation, the fixed IP address of MVX must be known first.
If this fixed IP address is lost, you must reset the MVX : see § 7.4 of MVX user
manual.
Click
Page 23
23
Brand of ACOEM
7 Setting the RS485 interface
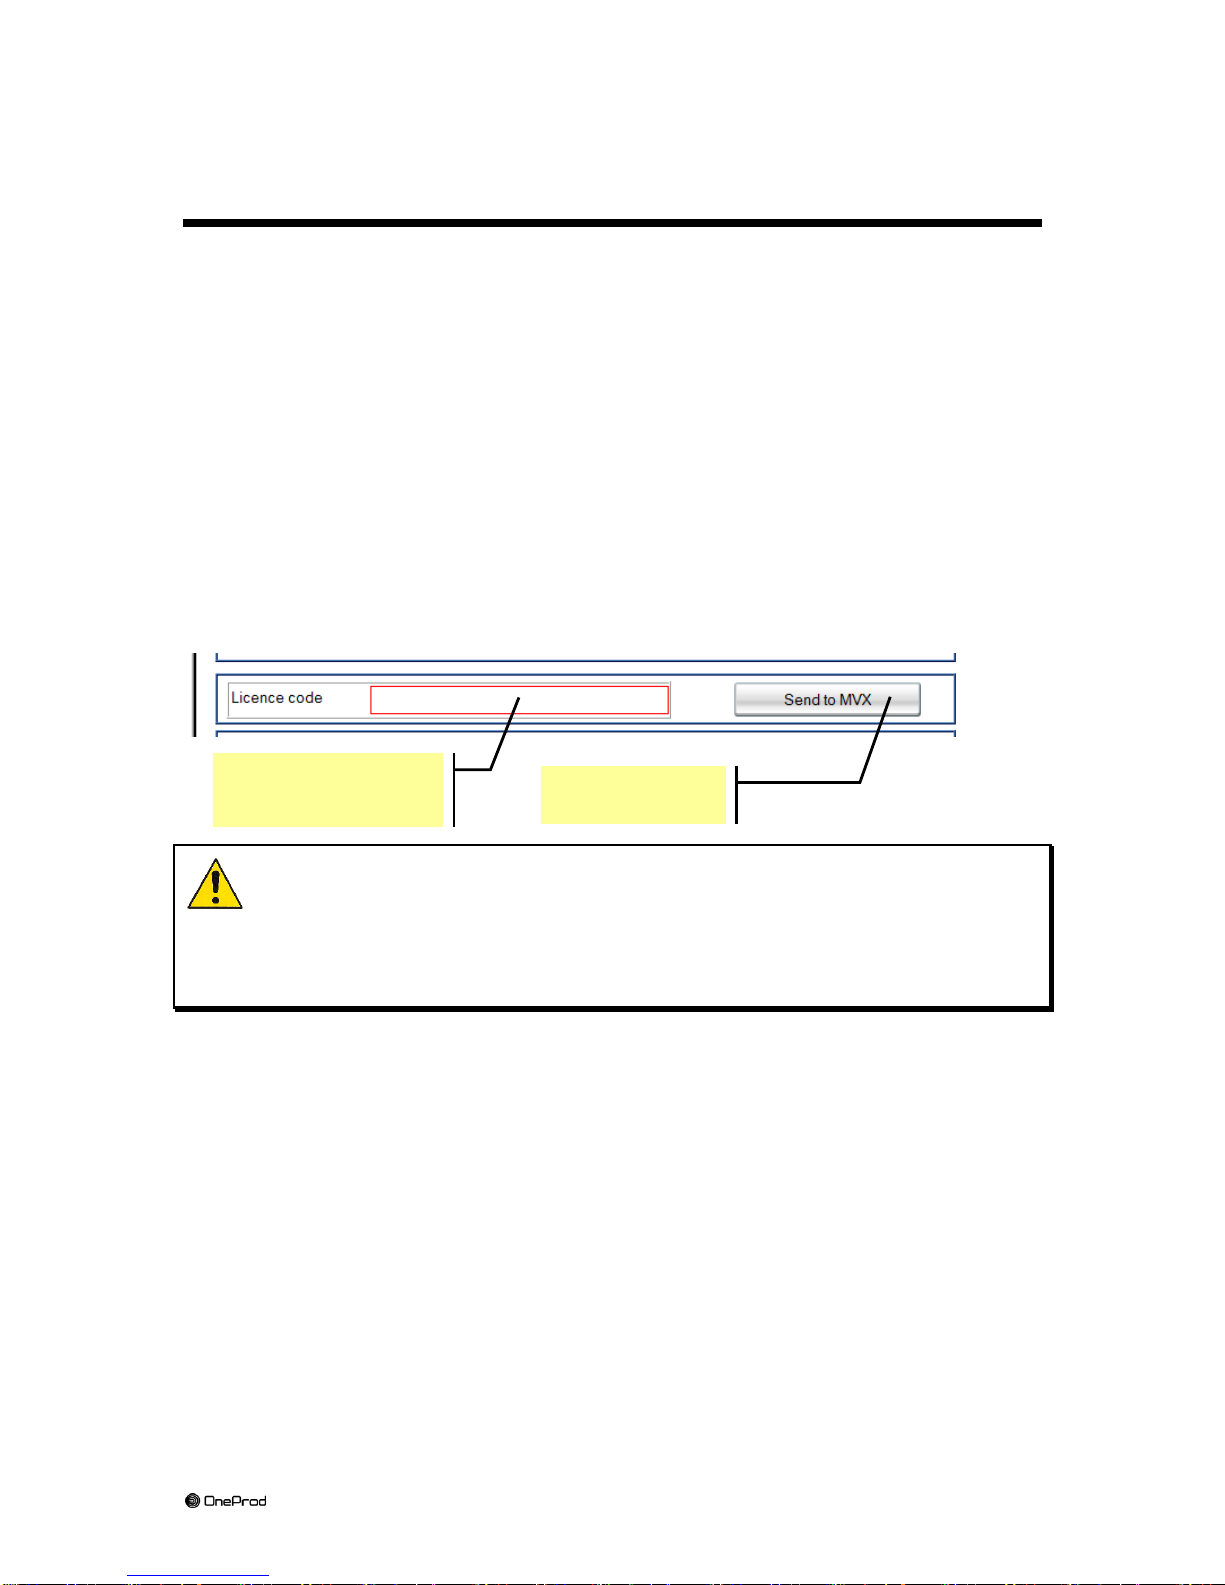
The RS485 interface is used to communicate with the MVX using Modbus RTU
protocol. It is possible to adjust the settings from the second tab "Configuration":
Recommended configuration:
Speed : 19200 or 9600
Data : 8 bits
Parité : Even
Stop bit : 1
Page 24
24
Brand of ACOEM
8 Modifications to the firmware
8.1 Modification of the MVX licence
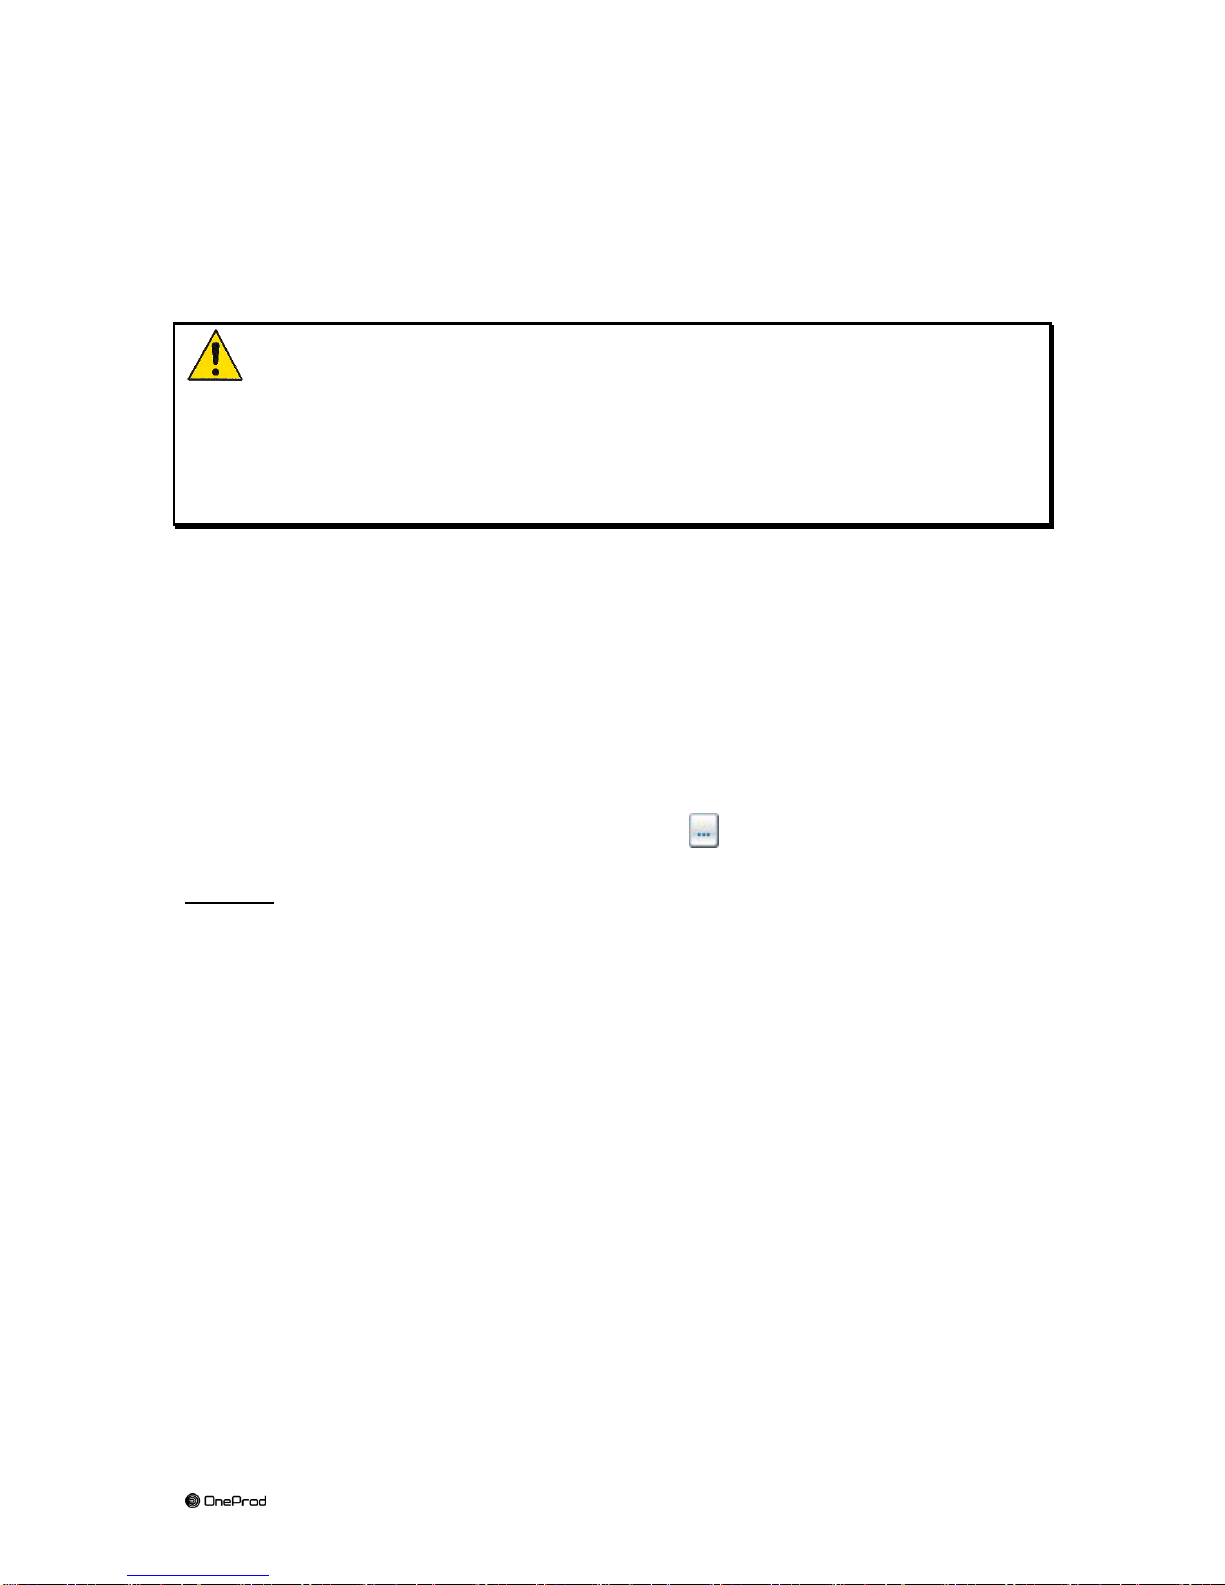
The licence number of a MVX can be changed. This function is available in Expert
mode only.
This operation allows changing rights granted to a MVX:
Maximum number of channels for MVX,
Function levels (Easy or Premium),
Possible options.
A licence number is valid for a single MVX, which is defined by its serial number.
In the second tab "Configuration", enter the licence number and click on “Send to
MVX”.
CAUTION
Changing the licence number will cause the MVX to restart.
The monitoring will then be interrupted for about 2 minutes.
When this operation is completed and after restart of the MVX, it is recommended to
go back to the first tab and check that the licence number and allocated rights have
been updated by clicking on button “Read information”.
1 – Enter licence
number here
2 – Click here
Page 25

25
Brand of ACOEM
8.2 Upgrading the firmware
8.2.1 Upgrading the firmware to MVX 5.1: important note
After updating to version V5.1, MVX cannot be "downgraded" to a previous
version without factory return. This is due to the new management of Ethernet
ports.
Modification of default IP address :
o MVX Version ≧ V5.1: By default, upon delivery, MVX starts with a
dynamic IP and sets itself to IP addresses within the range 169.254.x.y
in the absence of DHCP server.
o MVX Version < V5.1: before update to V5.1, in the absence of DHCP
server addresses are fixed to 192.168.1.100 and 192.168.1.101.
8.2.2 Upgrading the firmware to MVX V4.x: important note
CAST allows upgrading MVX firmware in most of the situations, except when MVX is
currently in a V1, V2 or V3 version and you want to upgrade it to V4.
In fact, V4 firmware is based on a new operating system.A specific software (MVX
Updater) is required to upgrade MVX firmware from an operating system to the
other.
Illustration :
« Current »
version
« New »
version
Software to be used for upgrade operation
V1.x
V1.x
CAST
V1.x
V2.x
CAST
V2.x
V2.x
CAST
V2.x
V3.x
CAST
V3.x
V3.x
CAST
V3.x
V4.x
MVX Updater
V3.x
V5.x
Upgrade in 2 phases :
First V3 >>V4 (MVX Updater) then V4 >>V5 (CAST)
V4.x
V4.x
CAST
V4.x
V5.x
CAST
We recommend consulting the specific user manual of MVX Updater before trying to
perform an upgrade.
(The following instructions are applicable only for CAST)
Page 26
26
Brand of ACOEM
8.2.3 Select the source directory
Upgrading the firmware can prove useful if one wants to benefit from improvements
and new functions as soon as they are available.
Before upgrading the MVX firmware, make sure that it is compatible
with the respective versions of XPR, CSM & VIO that are currently being used.
Please notice in particular that 2.x MVX firmware versions can only be used
with 2.x CSM & VIO versions, and with version 4.0 of XPR.
Upgrade is available in Expert mode only. The corresponding tab “Firmware
installation” does not exist in Consultation mode.
To upgrade the firmware of a MVX, a copy of the firmware must be present on a
computer station connected to MVX, i.e., on the station from which CAST is used.
The firmware copy can originate from the hard disk or from the CD-ROM.
It is not recommended that a firmware copy be used directly from a network drive. In
this case, it should be copied onto the PC first.
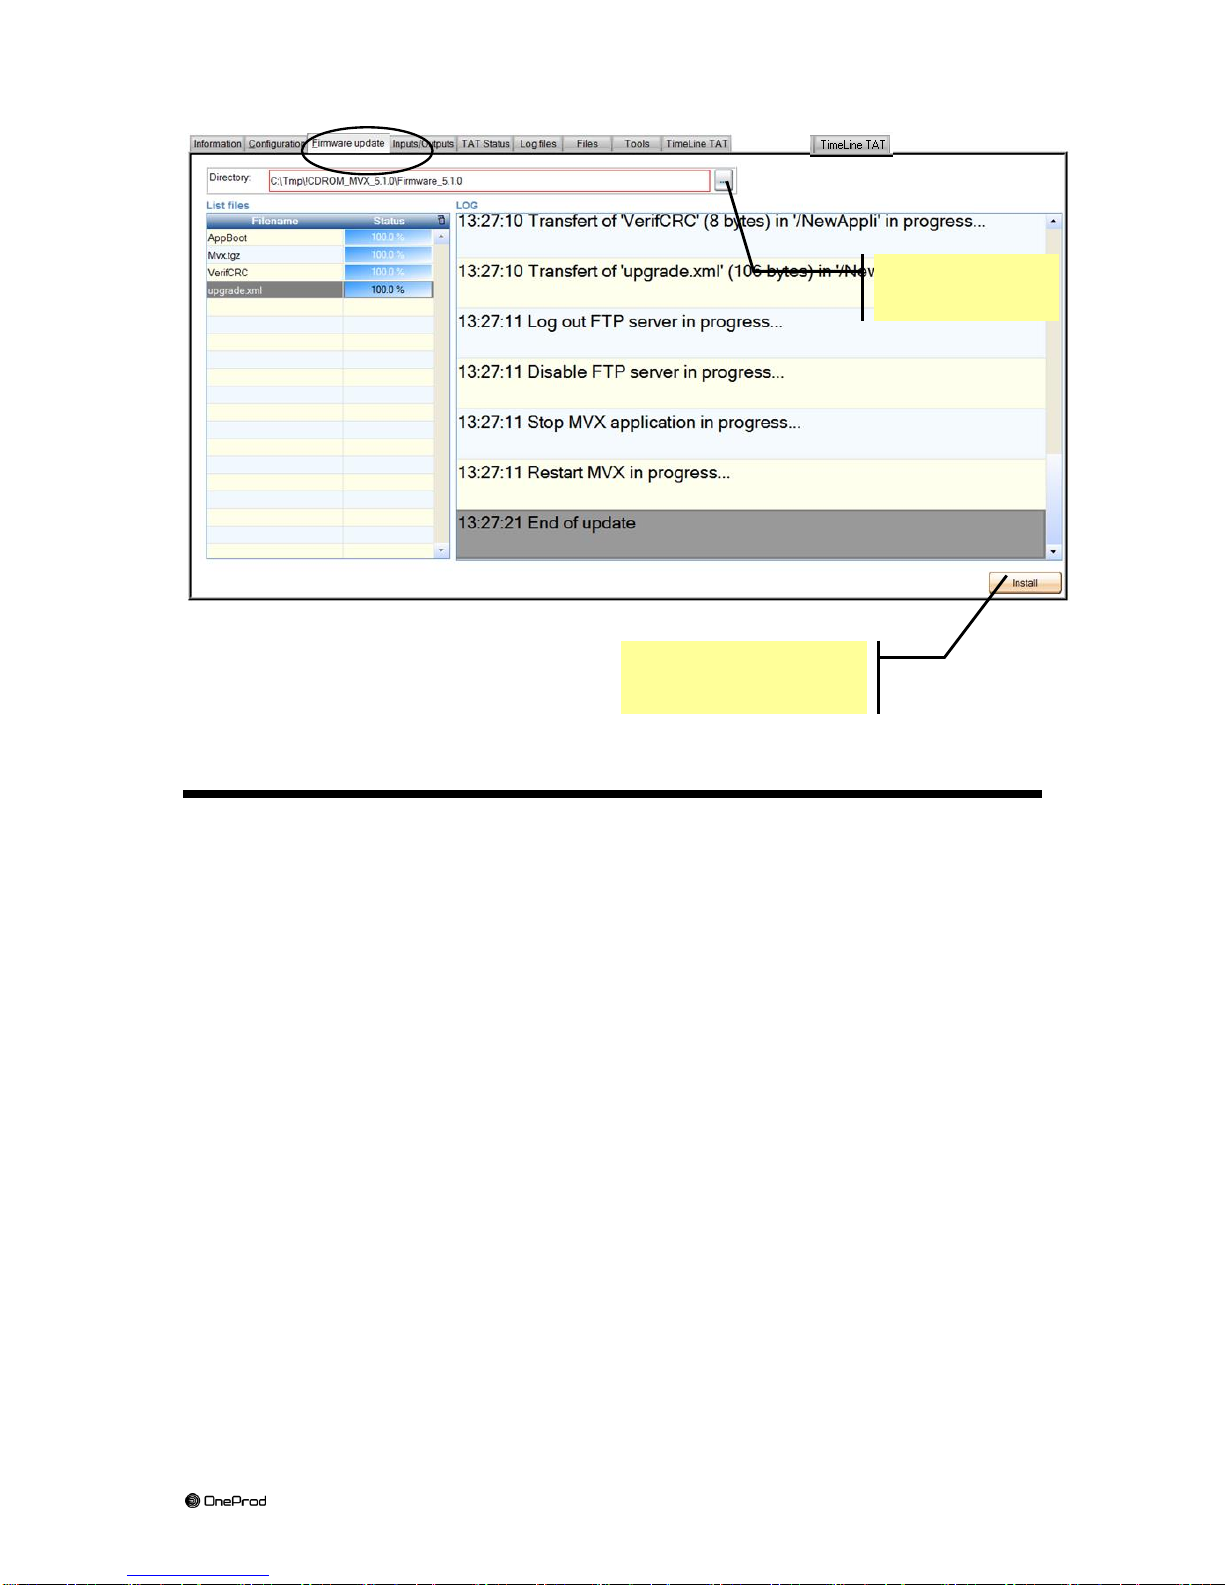
In the “Firmware installation” tab, click on button and select the directory
containing the firmware version to install in MVX.
Example: directory “Firmware_5.1.0”.
8.2.4 Launching the upgrade
After notching the corresponding options “Install OS” and “Fixed IP address” boxes,
please click on “Install” to launch the upgrading operation.
MVX must remain connected during the entire upgrading phase.
The progress of file transfer can be monitored using the table below (“Status” column).
Transfer is completed when the user regains control of the program.
Simple firmware upgrade duration is about 30s, plus MVX boot time.
Complete firmware + OS upgrade duration is about 3 minutes, plus MVX boot time.
Nevertheless monitoring tasks are assumed until reboot.
Page 27
27
Brand of ACOEM
9 Miscellaneous
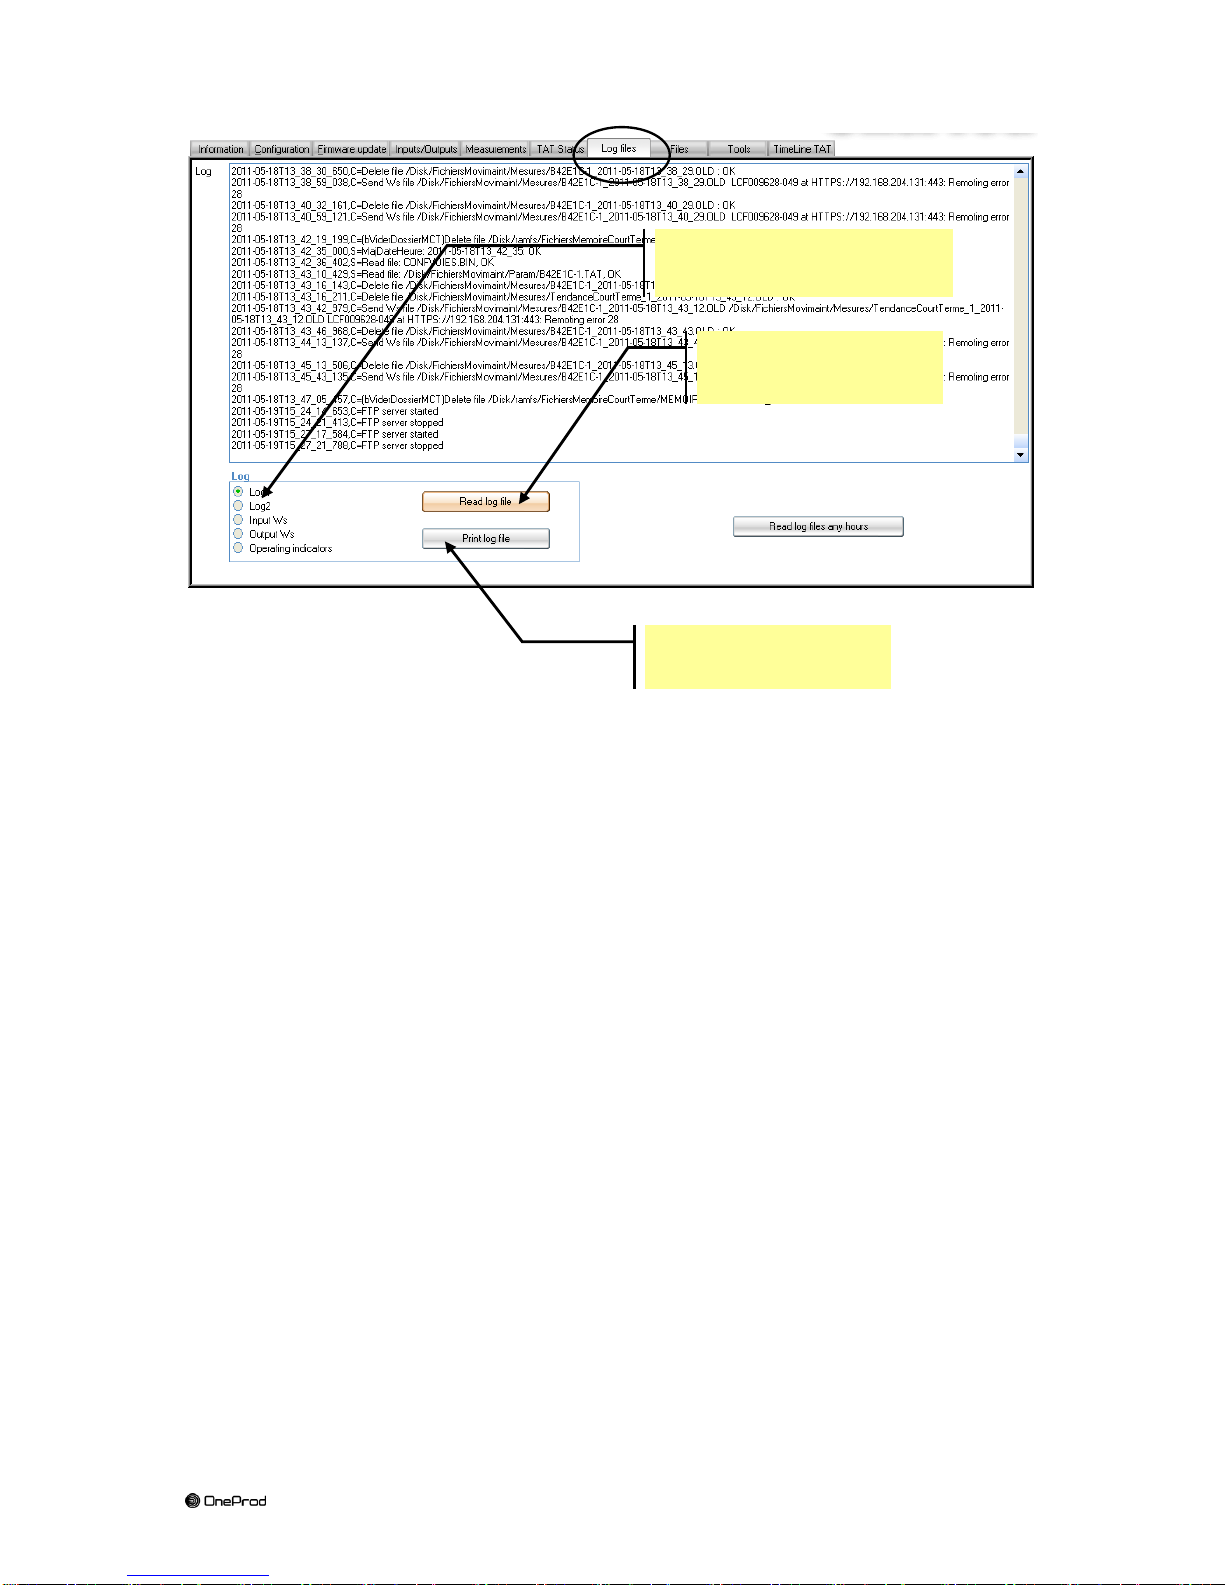
9.1 Retrieval of log files
Log files are files in which MVX records various dated events as they come along.
File “Log Ws” is devoted to information transfer between MVX and the user’s
computer station.
CAST allows reading these files or printing them in order for Acoem specialists to
analyse possible dysfunctions.
CAST also allows reading internal functional indicator levels (*):
CPU load for RT indicators
Available RAM memory
Available Compact-Flash memory
…
(*): only with version V5.x MVX firmware version.
Note: interpretation of log files data may require Acoem assistance
1 – Select
directory
2 – Click here to
launch upgrade
Page 28
28
Brand of ACOEM
2 – Click here to
upload the file
1 – Choose the file
to be uploaded
3 – Click here to
access printing menu
Page 29
29
Brand of ACOEM
9.2 Retrieval of parameter file lists
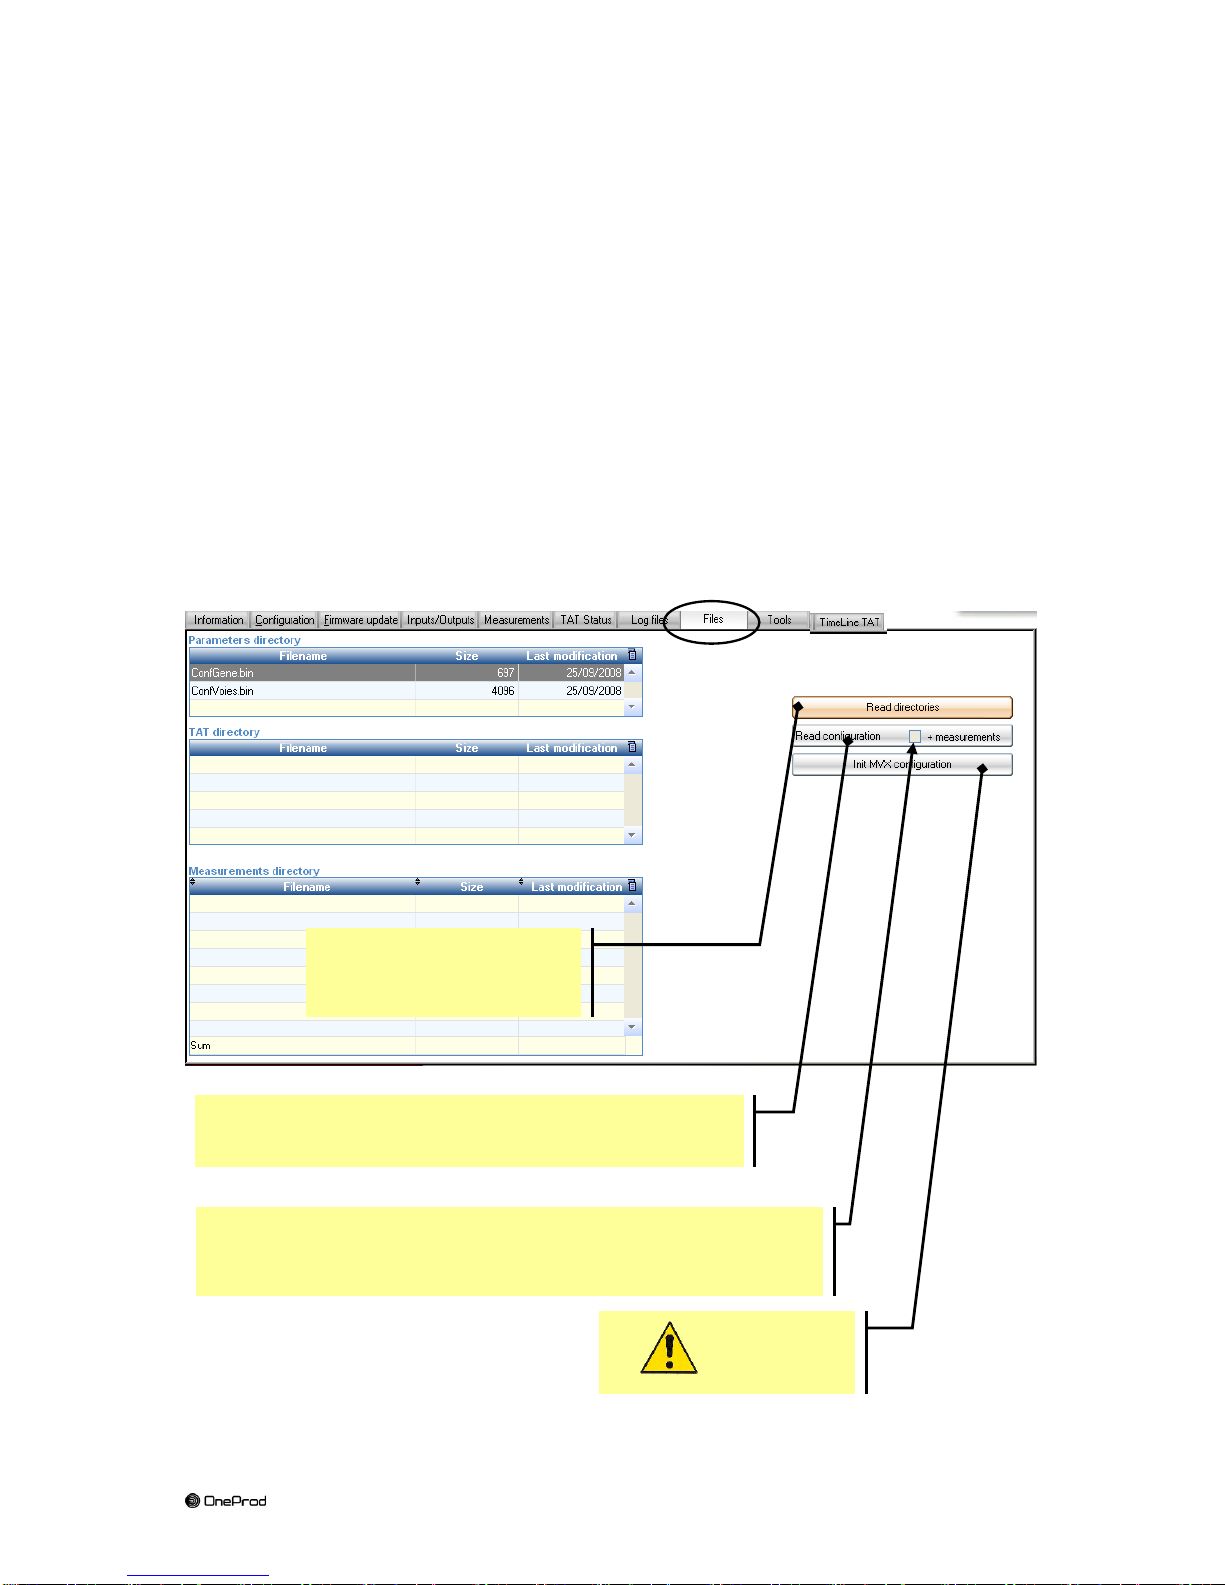
CAST allows reading the list of files that constitute the application settings of MVX,
as well as its measurement files, in order to allow Acoem specialists to analyse
possible dysfunctions.
To do so, click on button “Read directories” in the last tab “Files”.
The Parameters directory usually contains two files: “ConfGene.bin” and
“ConfVoies.bin”
The TAT directory contains one file per operating condition of each machine
The Measurements directory contains files that have yet to be retrieved by
XPR. It is generally empty if CSM has been used to set up MVX.
Usual operations:
Click here to access to
the 3 files lists
See § 9.3
Click here in order to upload the files on your PC
>C:\Program Files\OneproD\CAST\[IP @ or serial number]
Click here in order to also upload the measurement (result) files on
your PC
>C:\Program Files\OneproD\CAST\[IP @ or serial number]
Page 30
30
Brand of ACOEM
9.3 Complete deletion of a configuration
CAST also allows deleting MVX settings completely:
Clicking on button “Erase configuration” (see above) will delete the parameter
settings.
CAUTION
Deleting the configuration is a MAJOR operation that causes the MVX
MONITORING TO STOP!
9.4 Time setting of MVX
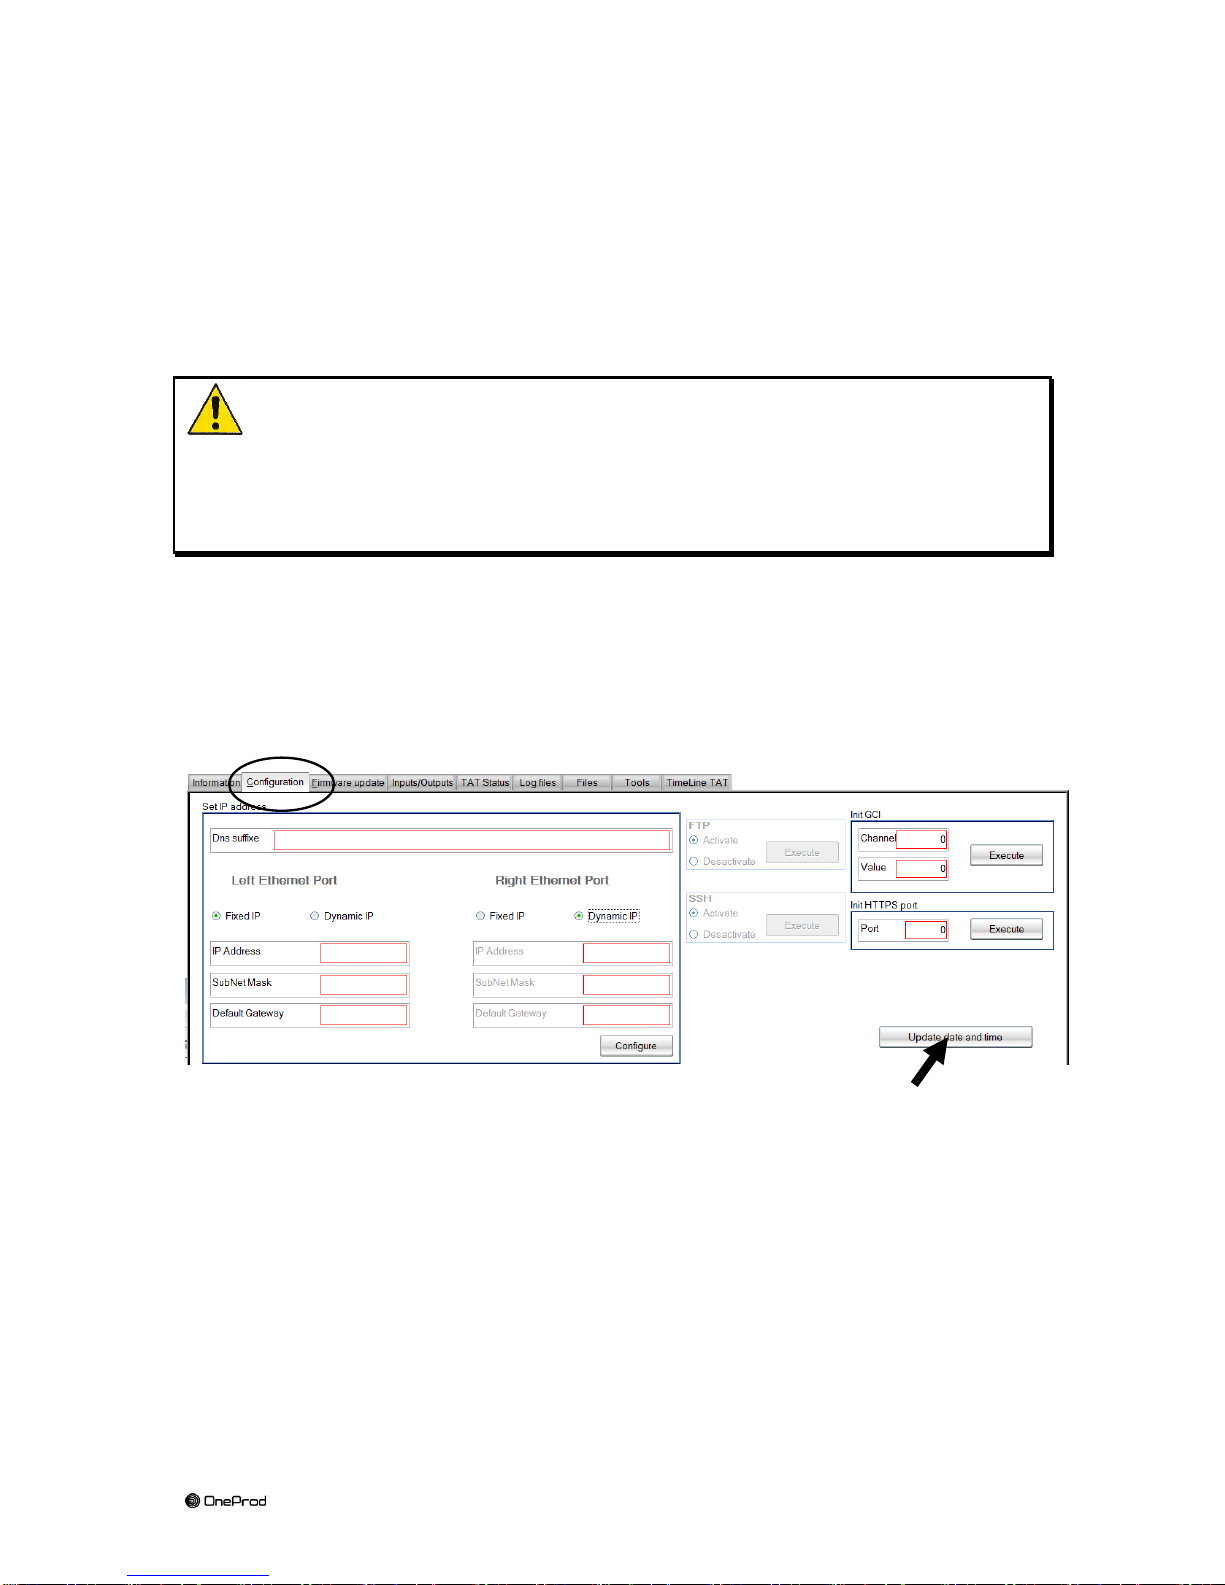
Select the second tab “Configuration” and click on button “Update date and time”.
MVX will be set to the same date and time as the PC hosting CAST.
This operation is not available in “Browse” mode.
Time setting is instantaneous. It is recommended to go back to the first tab and
check that date and time have been properly updated by clicking on button “Read
information”.
Click
Page 31
31
Brand of ACOEM
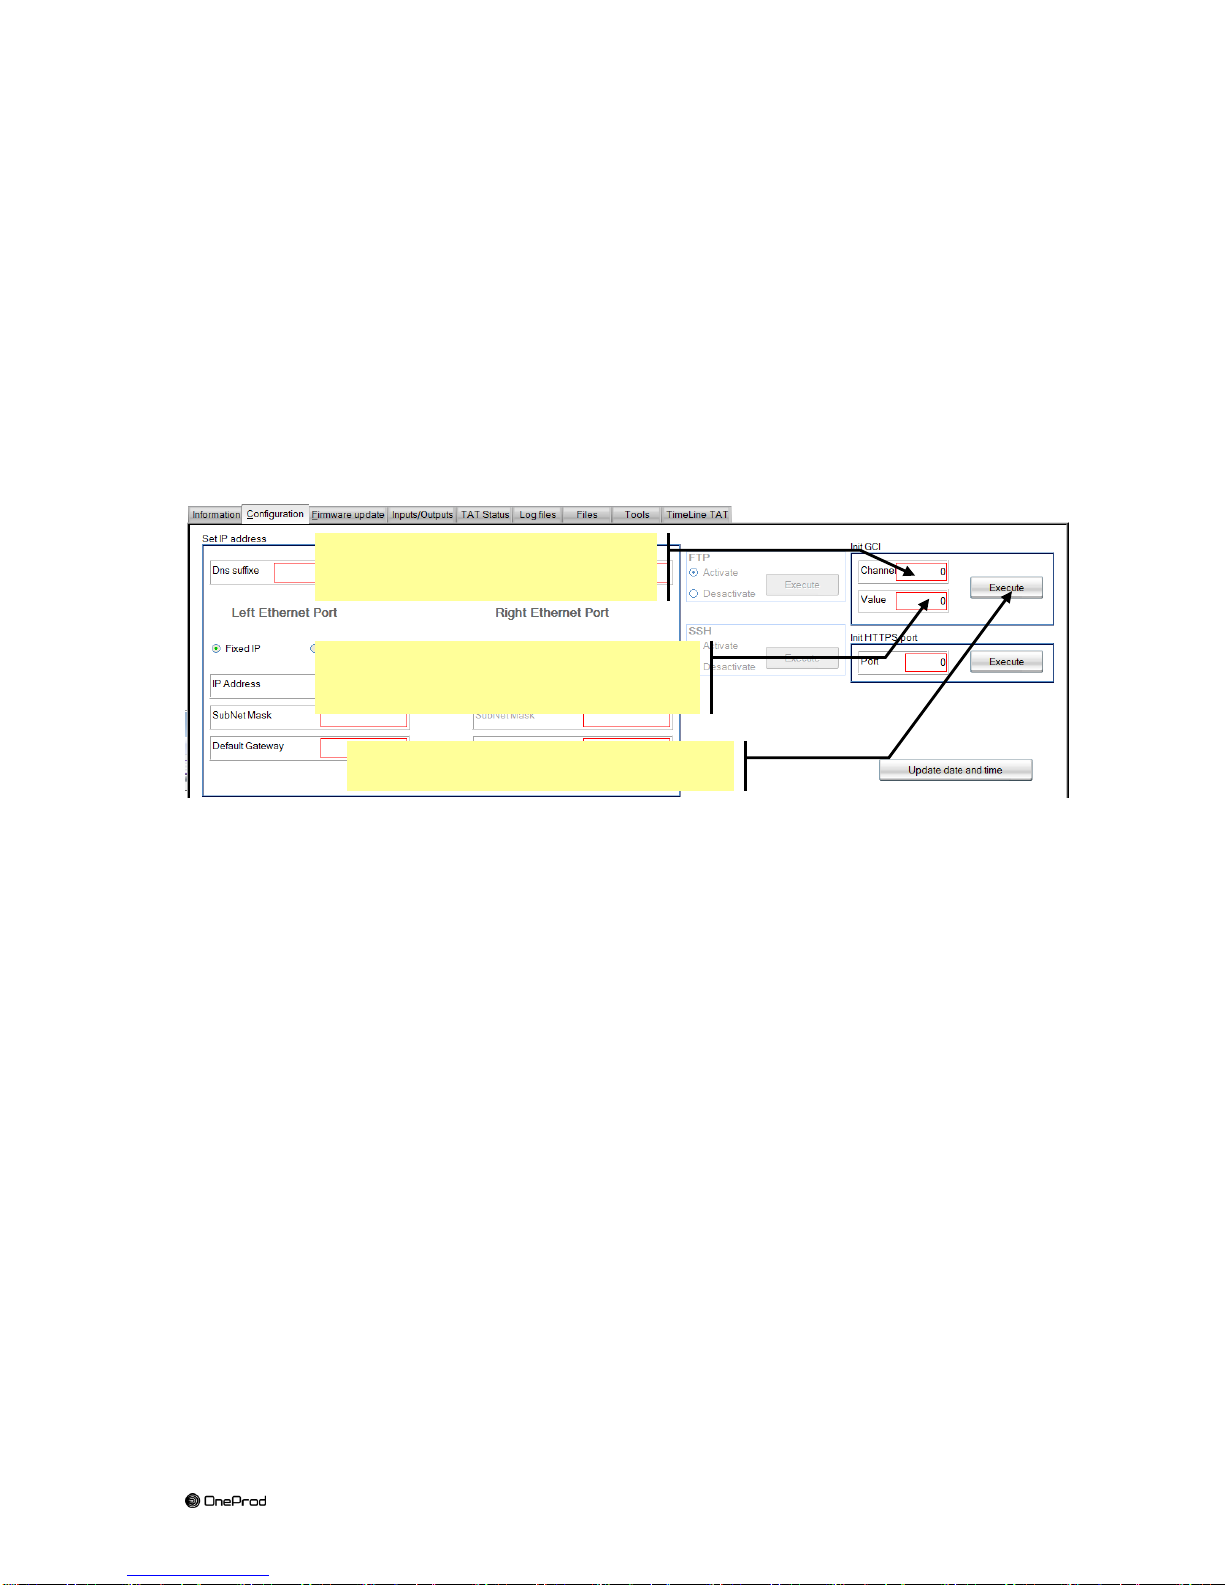
9.5 Init of the particle counter “CGI”
This feature allows for setting a GCI indicator (particle counter) to zero or to a
specific value.
In a general way, one set a particle counter to zero just after a major maintenance
operation on the corresponding machine.
Setting a GCI counter to a specific value car be useful in the case where an MVX has
been replaced. Such possibility allows for downloading the old count to the new
MVX.
1 – Please type the channel
number of the GCI index
2 – Then type the value you want
to set GCI
3 – Launch setup of the GCI value
Page 32
32
Brand of ACOEM
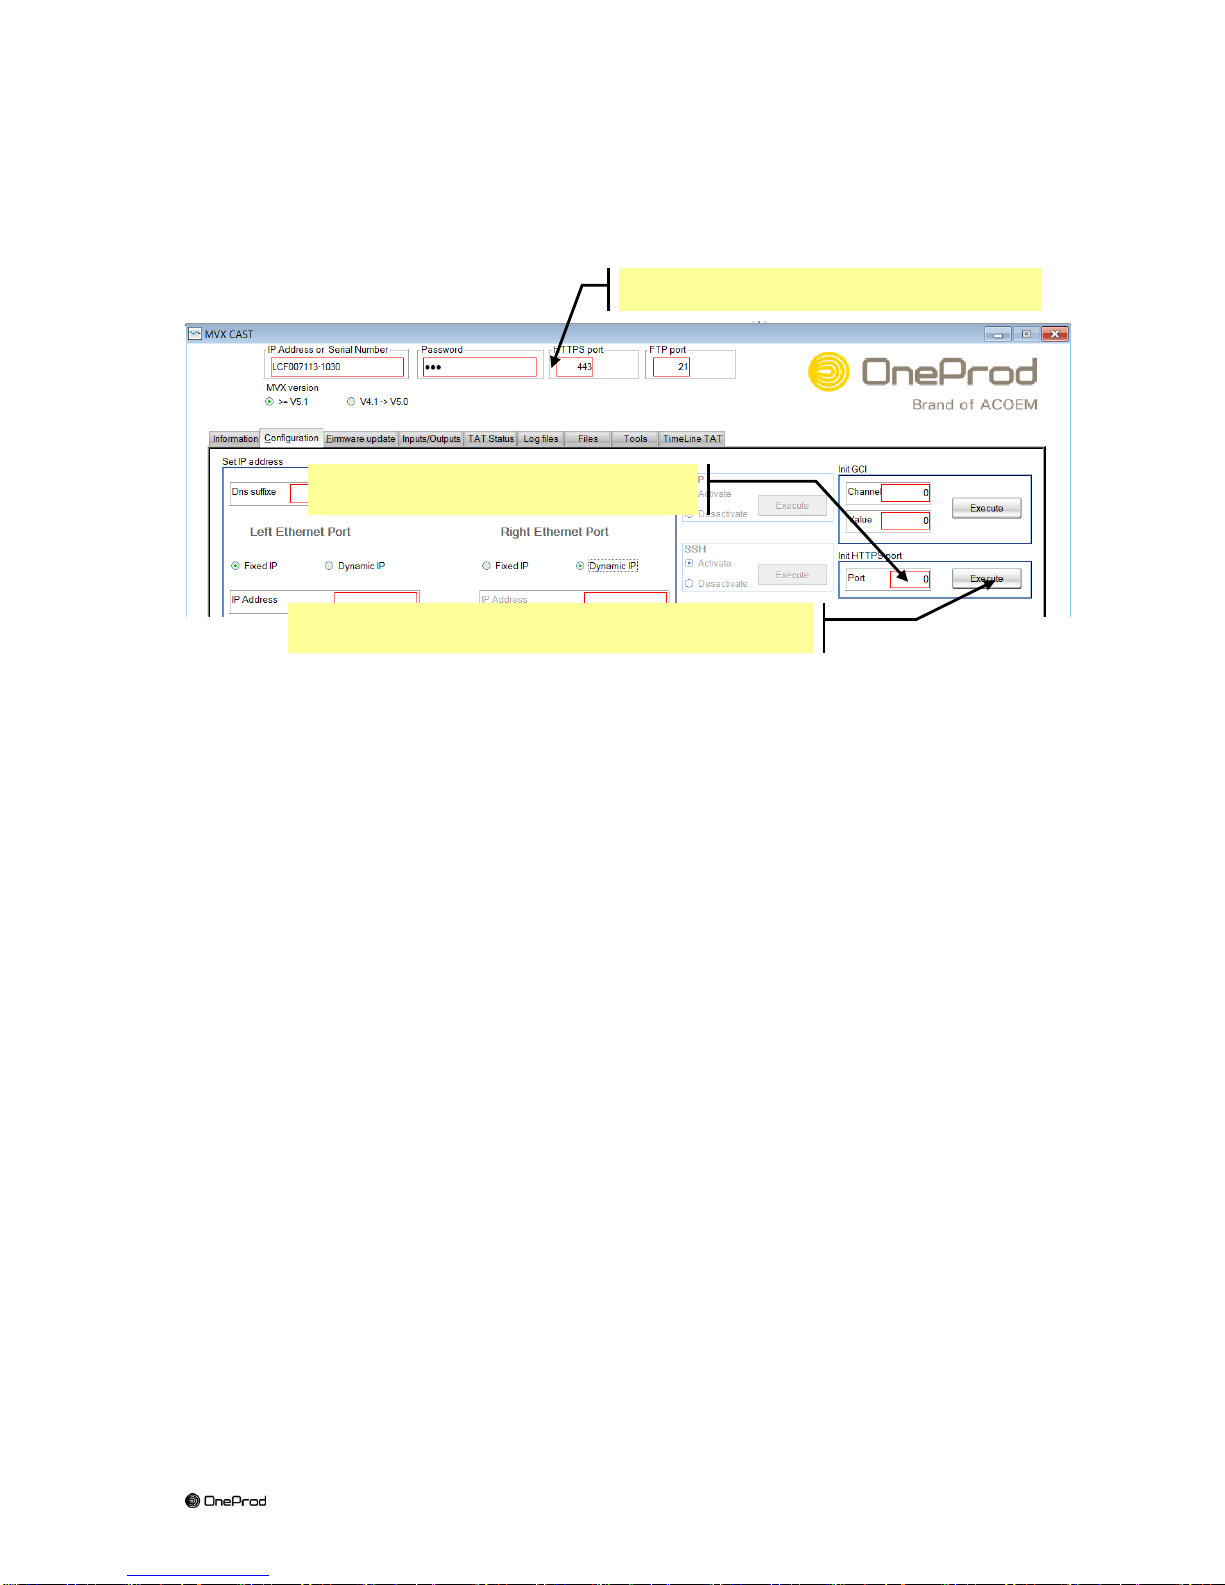
9.6 Init of HTTPS port (expert user only!)
This feature allows for changing HTTPS current working port on the target MVX.
This change causes MVX to reboot.
After MVX reboot, one should update “HTTPS port” field in the upper CADST
banner.
A Hard Reset of MVX returns to port 443: see MVX user manual § 7.4
1 – Please type the old HTTPS port
2 – Type here the new HTTPS port
3 – Launch the changing of HTTPS port
Page 33
33
Brand of ACOEM
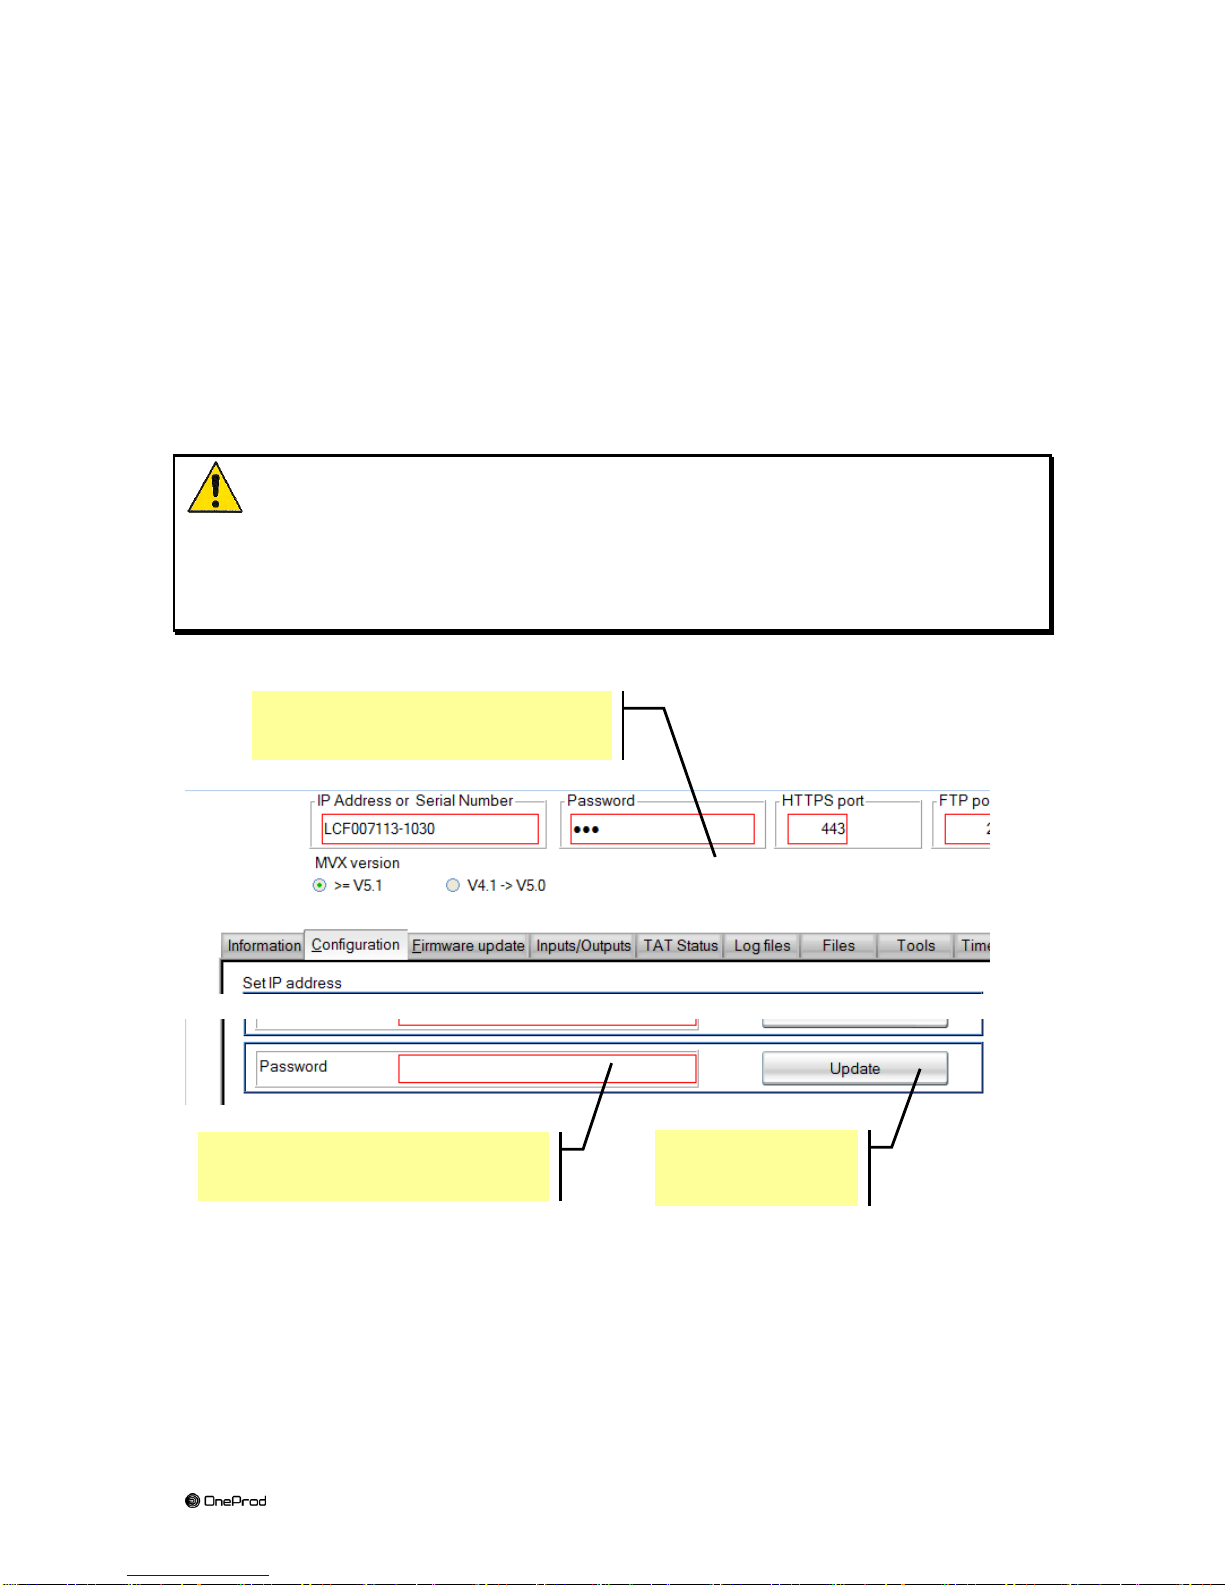
9.7 Changing MVX communication password
As written in chapter 3.2 each MVX has its own communication password.
This password is requisite for all the communications with MVX, as well as they
operate from XPR, CSM, VIO or CAST.
By default this parameter is factory-set to MVX.
Customising this password is possible with CAST, using the “Configuration” tab.
Warning
Changing MVX communication password must be also done in VIO, CSM and
XPR, otherwise all the communication would abort.
1 - Please enter here the old
MVX communication password
2 - Please enter here the new
MVX communication password
3 - Launch
password update
Page 34

34
Brand of ACOEM
ACOEM
Smart monitoring, diagnosis & solutions
ACOEM offers comprehensive products and services comprising smart monitoring, diagnosis and
solutions, drawing upon its unique expertise in the field of vibrations and acoustics.
ACOEM contributes to the improvement of:
quality of life and risk prevention in urban and industrial environments
productivity and the reliability of industrial processes
the design of robust and high-performance products with low noise levels
protection of sites, vehicles and people in hostile environments.
With its 01dB, METRAVIB and ONEPROD brands, ACOEM works with decision-makers in
industry, defence and the environment throughout the world.
For more information, visit our website at www.acoemgroup.com
200 chemin des Ormeaux
69578 LIMONEST – FRANCE
Tel.: +33 (0)4 72 52 48 00
www.acoemgroup.com
Asia
Tel. +66 (2) 7112 293 – Fax +66 (2) 7112 293
South America
Tel. + 55 (11) 5089 6460 – Fax +55 (11) 5089 6454
 Loading...