

Page 1
Environment Monitor
User’s Manual Model: GLOCO-500
Important! Please read carefully and save this document.
This user’s manual contains important information about your Environment Monitor’s operation.
If you are installing this alarm for use by others, you must leave this manual (or a copy of it) with the end user.
Installed On
Replace By
Page 2

2
Table of Contents
Welcome 3
Basic Safety Information 4
How Your Alarm and Monitor Works 5 - 6
Installation as a CO Alarm and Monitor 7
Where this Product Should Not be Installed 8
Set-Up & Installation 9
How to Install This CO Alarm 9 - 10
If Your CO Alarm Sounds 11
Silencing Your Alarm 11 - 12
Weekly Testing 13
Regular Maintenance 14 - 15
Understanding Your Alarm/Monitor 15 - 16
What You Need to Know About CO 17
Finding The Source of CO After an Alarm 18
Potential Sources of CO in The Home 18 - 19
How Can I Protect My Family from CO Poisoning 20
Regulatory Information 21 - 22
Troubleshooting Guide 23
General Limitations of CO Alarms 24
Compliance Statements 25 - 26
Limited Warranty 27
Page 3
3
Welcome
Thank you for choosing First Alert for your safety needs. In addition to the alarm sounds,
you can receive notifications in case of a CO emergency, low level CO, or changes in
temperature and humidity to help provide information or warning while you are home
or away. Please take time to read this manual and make this monitor an integral part
of your family’s safety plan. Visit www.firstalert.com for additional information.
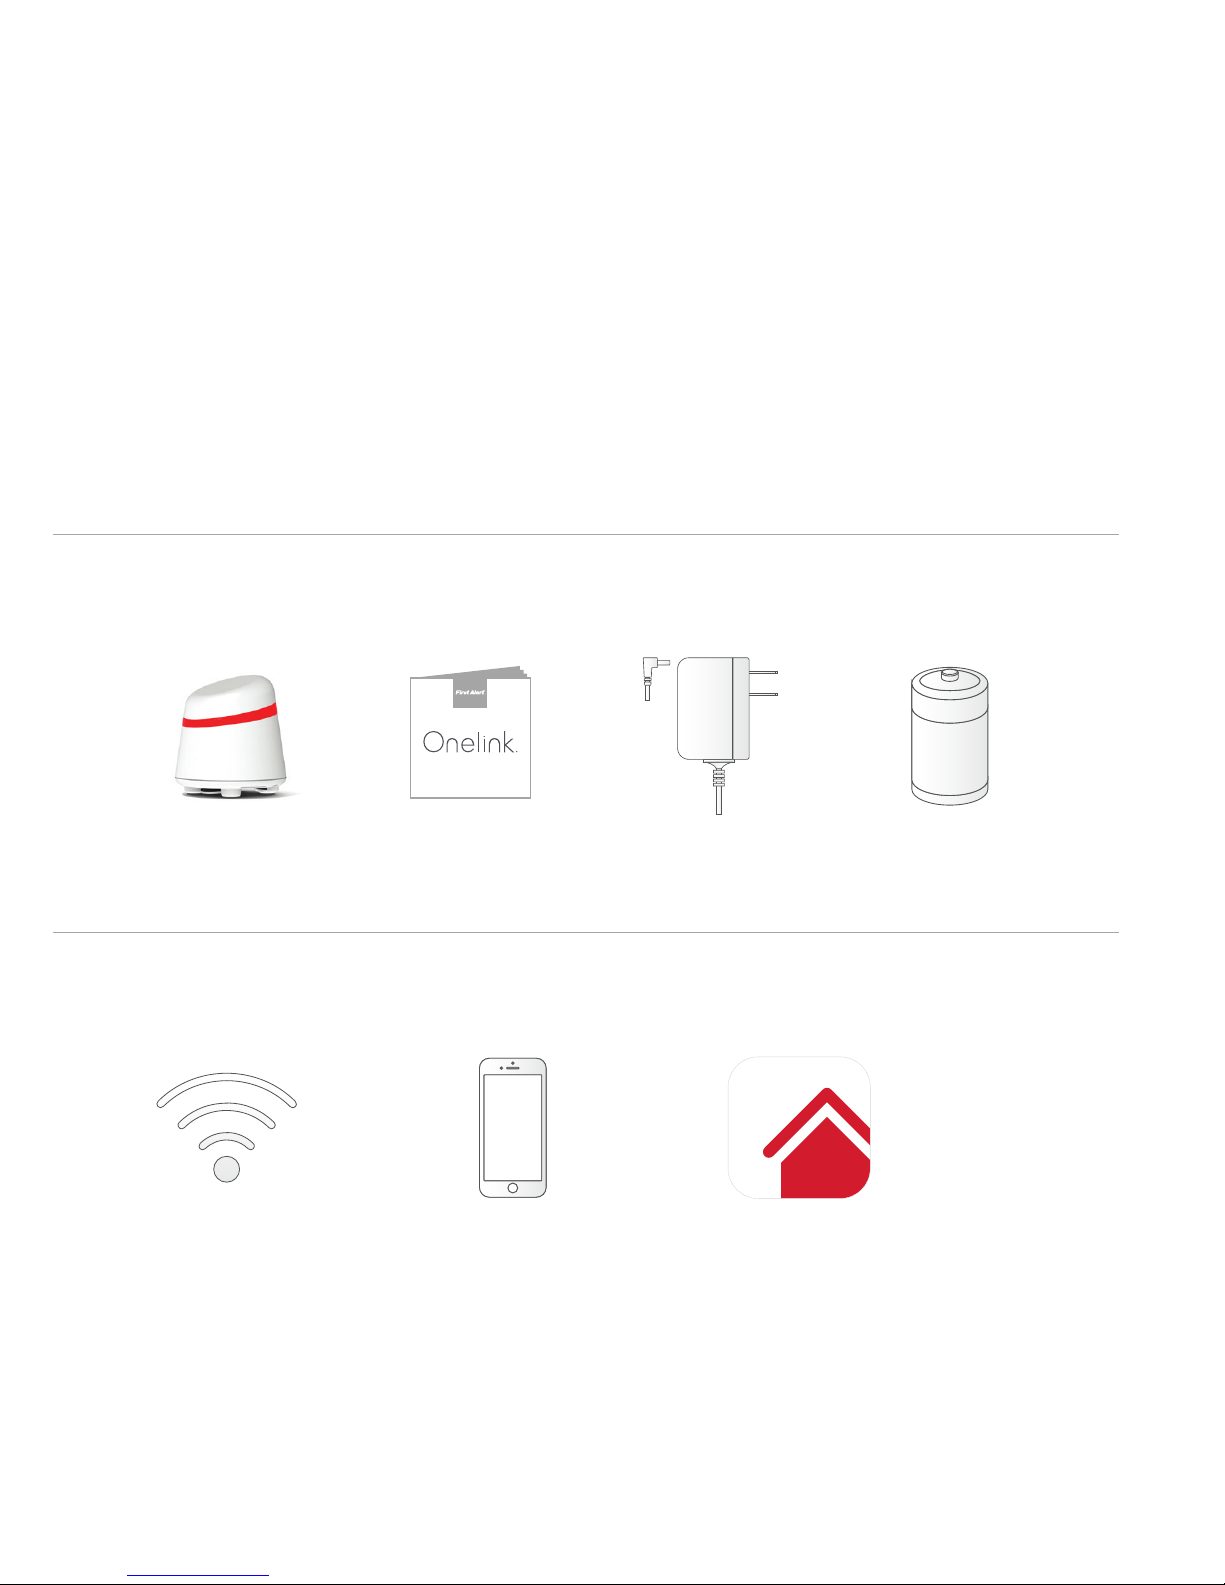
Contents
Environment
Monitor
User’s
Manual
Adapter
Plug
CR2 Battery
(pre-installed)
System Requirements
Wi-Fi Network iOS Device Onelink App
For best results,
recommended to use with
a 802.11 b/g/n router.
HomeKit™ requires an iPhone®, iPad®,
or iPod touch® with iOS 9.3 or later.
*Not compatible with Android®.
Search and download
Onelink Home app
from the App store
Page 4
4
Basic Safety Information
!
IMPORTANT: Dangers, Warnings, and Cautions alert you to important operating
instructions or to potentially hazardous situations. Pay special attention to these items.
!
CAUTION: The CO Alarm is not designed to detect fire or any other gas. It will only indicate the
presence of carbon monoxide gas at the sensor. Carbon monoxide gas may be present in other
areas. Do not stand too close to the unit when the alarm is sounding. It is loud to wake you in an
emergency. Exposure to the horn at close range may harm your hearing. Do not paint over the unit.
Paint may clog the openings to the sensing chambers and prevent the unit from operating properly.
!
WARNING: This unit must be powered by a 24-hour circuit. Be sure the circuit cannot be turned
off by a switch, dimmer, or ground fault circuit interrupter. Failure to connect this unit to a 24-hour
circuit may prevent it from providing constant protection. This Alarm must have AC or battery
power to operate. If AC power fails and the battery is dead or missing, the alarm cannot operate.
Test the Alarm once a week. If the Alarm ever fails to test correctly, have it replaced immediately!
If the Alarm is not working properly, it cannot alert you to a problem. This Carbon Monoxide Alarm
is intended for residential use and is not suitable for use in hazardous locations as defined in the
National Electrical Code. This product is intended for use in ordinary indoor locations of family living
units. It is not designed to measure CO levels in compliance with Occupational Safety and Health
Administration (OSHA) commercial or industrial standards. Individuals with medical conditions
that may make them more sensitive to carbon monoxide may consider using warning devices
which provide audible and visual signals for carbon monoxide concentrations under 30 ppm. For
additional information on carbon monoxide and your medical condition contact your physician.
Page 5
5
How Your Alarm and Monitor Works
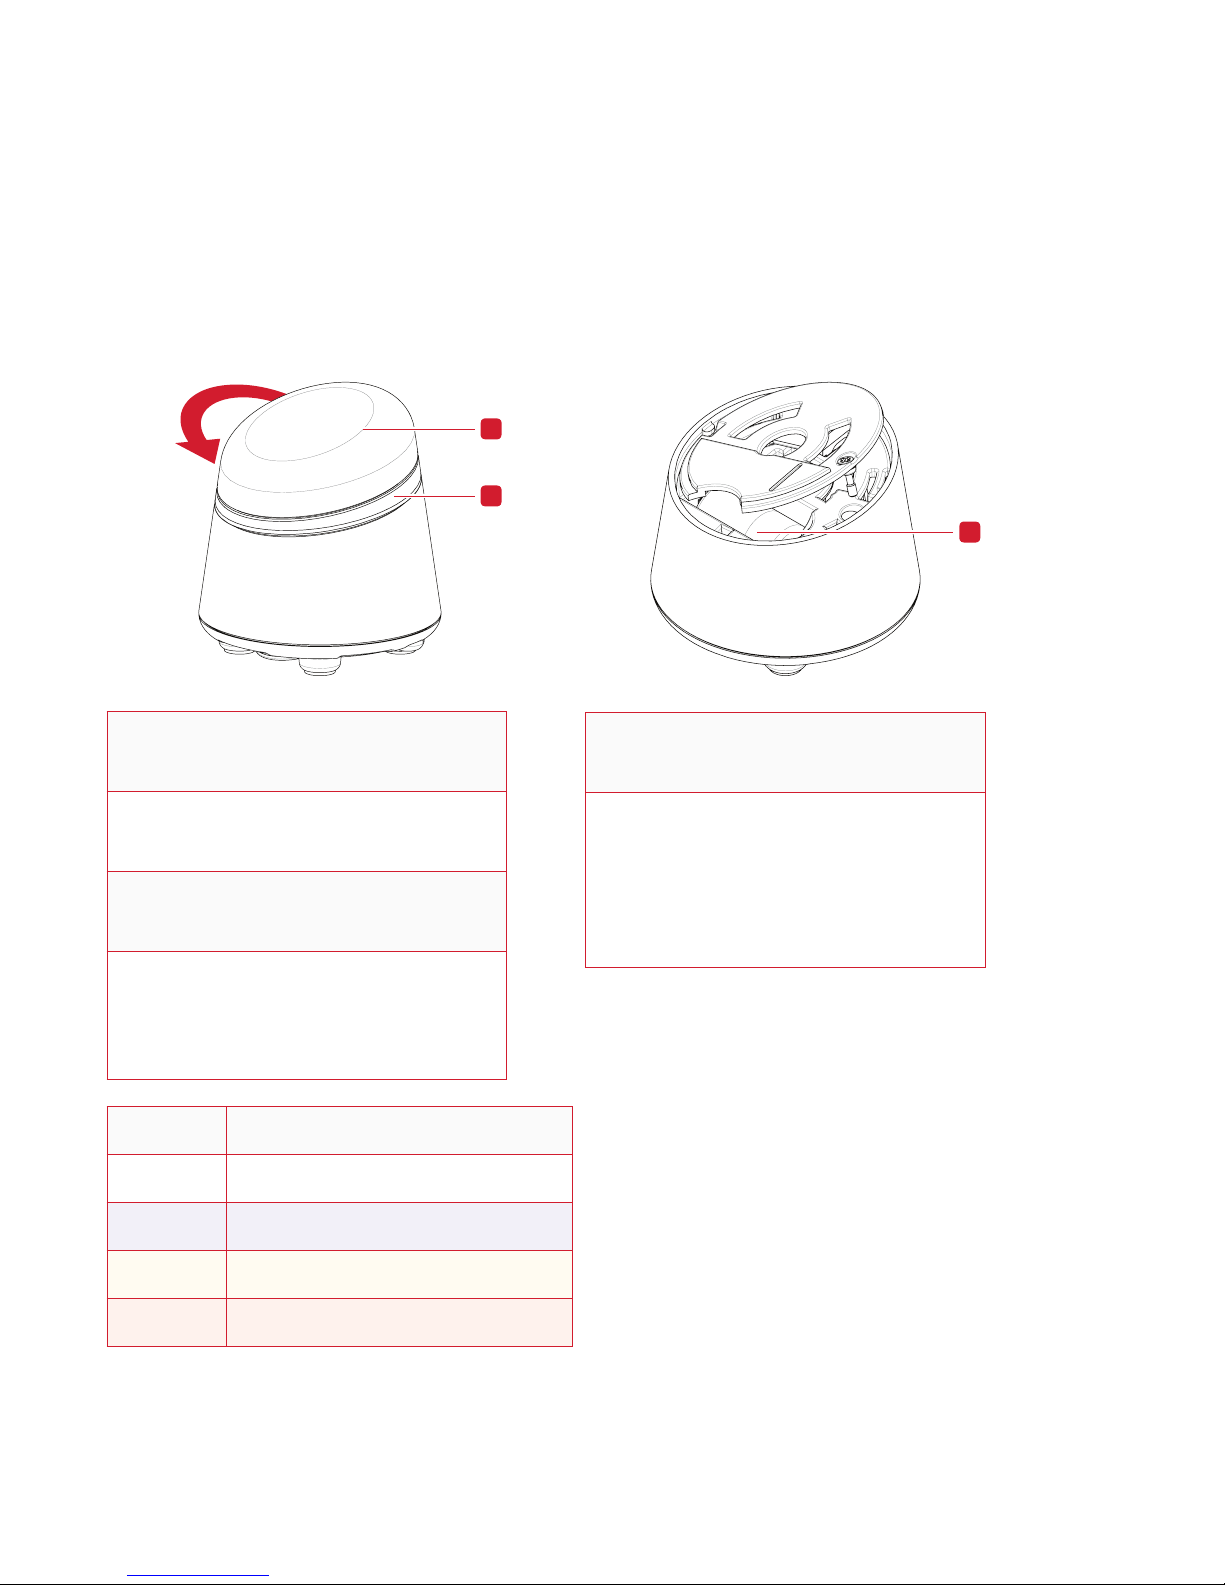
3
3. Battery Compartment
Unscrew battery compartment
door and lift to replace battery.
NOTE: Unplug device from power
adapter before replacing battery.
1. Cap
Remove for battery replacement.
2. LED Light Ring
Indicates changes in temperature
and CO alarm. Desired temperature
ranges can be set within the app.
LED Color Condition
White
Room is at preset temperature.
Blue
Room is cooler than preset temperature.
Amber
Room is warmer than preset temperature.
Red
Emergency CO levels detecte d.
Twist left
to remove
1
2
Page 6
6
How Your Alarm and Monitor Works (Continued)
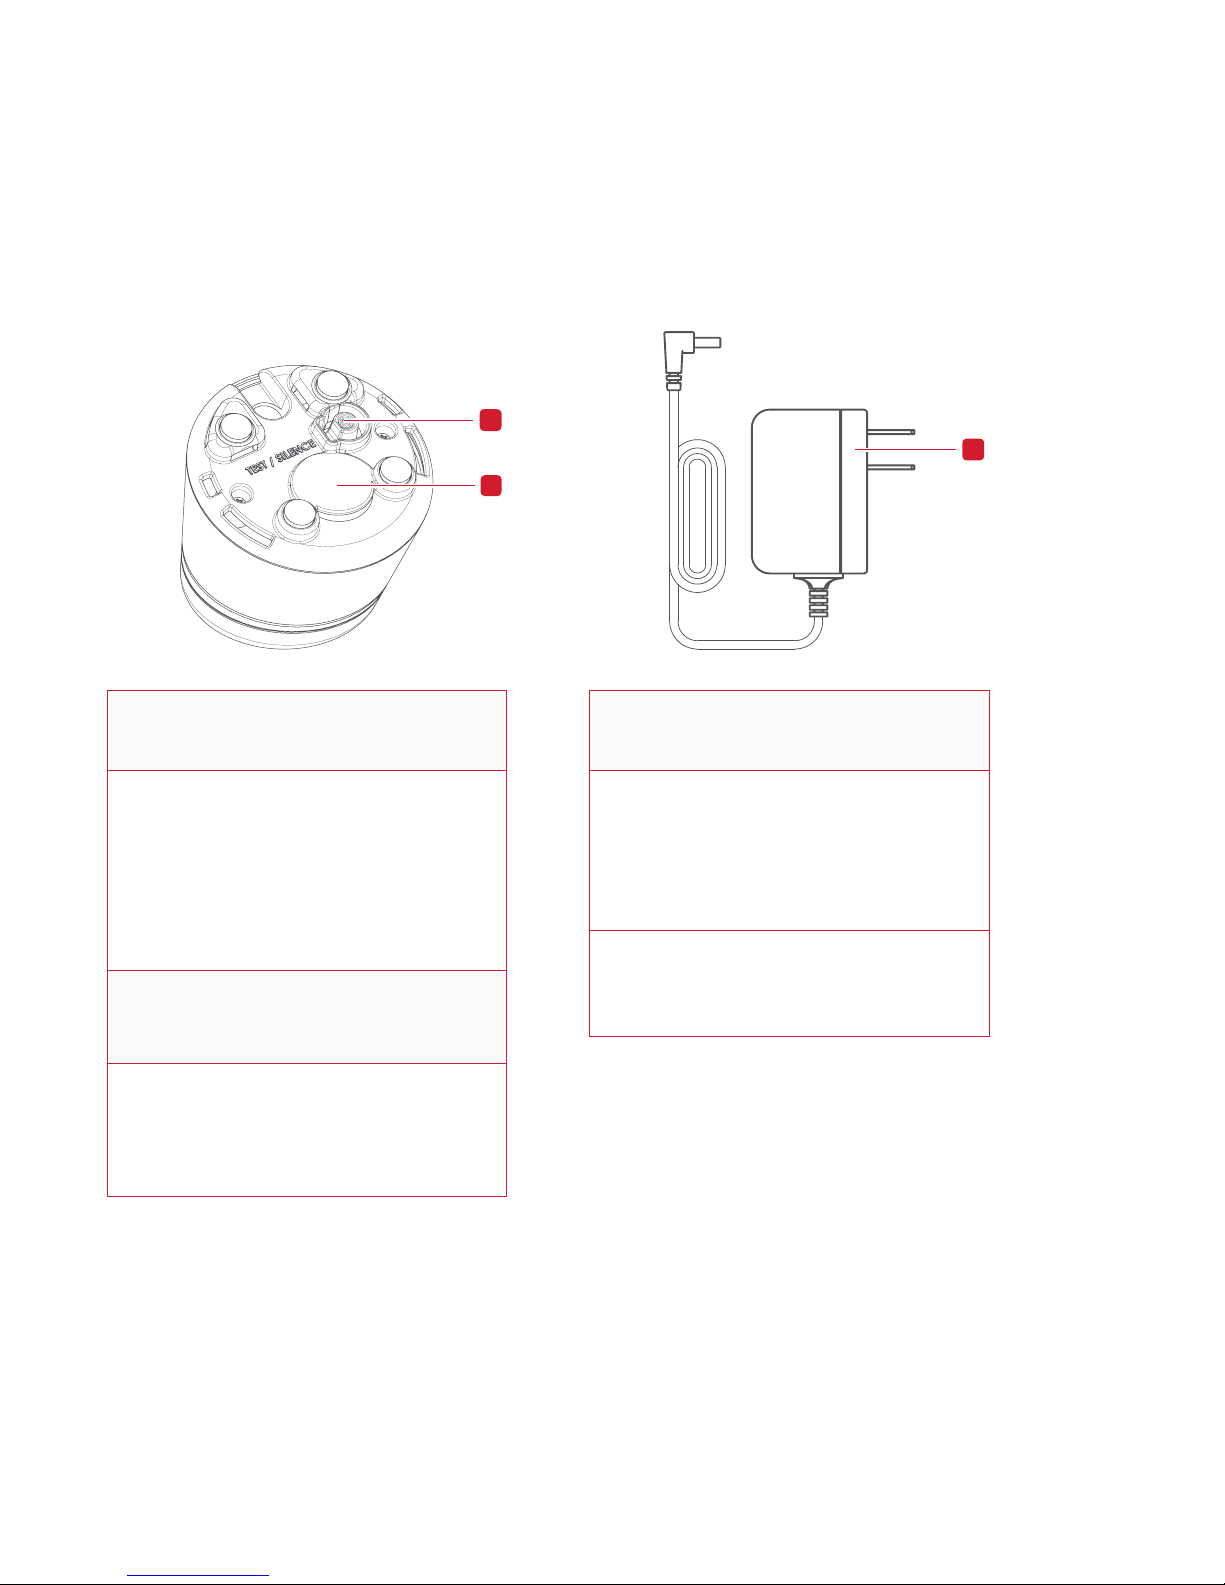
6. Adapter Plug
This device is meant to be
powered using the adapter plug.
The batter y is for back up use
in the event of power loss.
Electrical Rating:
120V AC, 60 HZ, 0.09A
6
4. Test/Silence Button
Press and hold to activate test or
to silence the alarm. Test/Silence
is located on bottom of alarm.
NOTE: For convenience, you may
test/silence in the Onelink Home app.
5. Alarm Horn (Under the Cover)
85 dB audible alarm for test,
alarm, end of life warning, and
unit malfunction warning.
5
4
Page 7
7
Installation as a CO Alarm and Monitor
Where to Install This Alarm
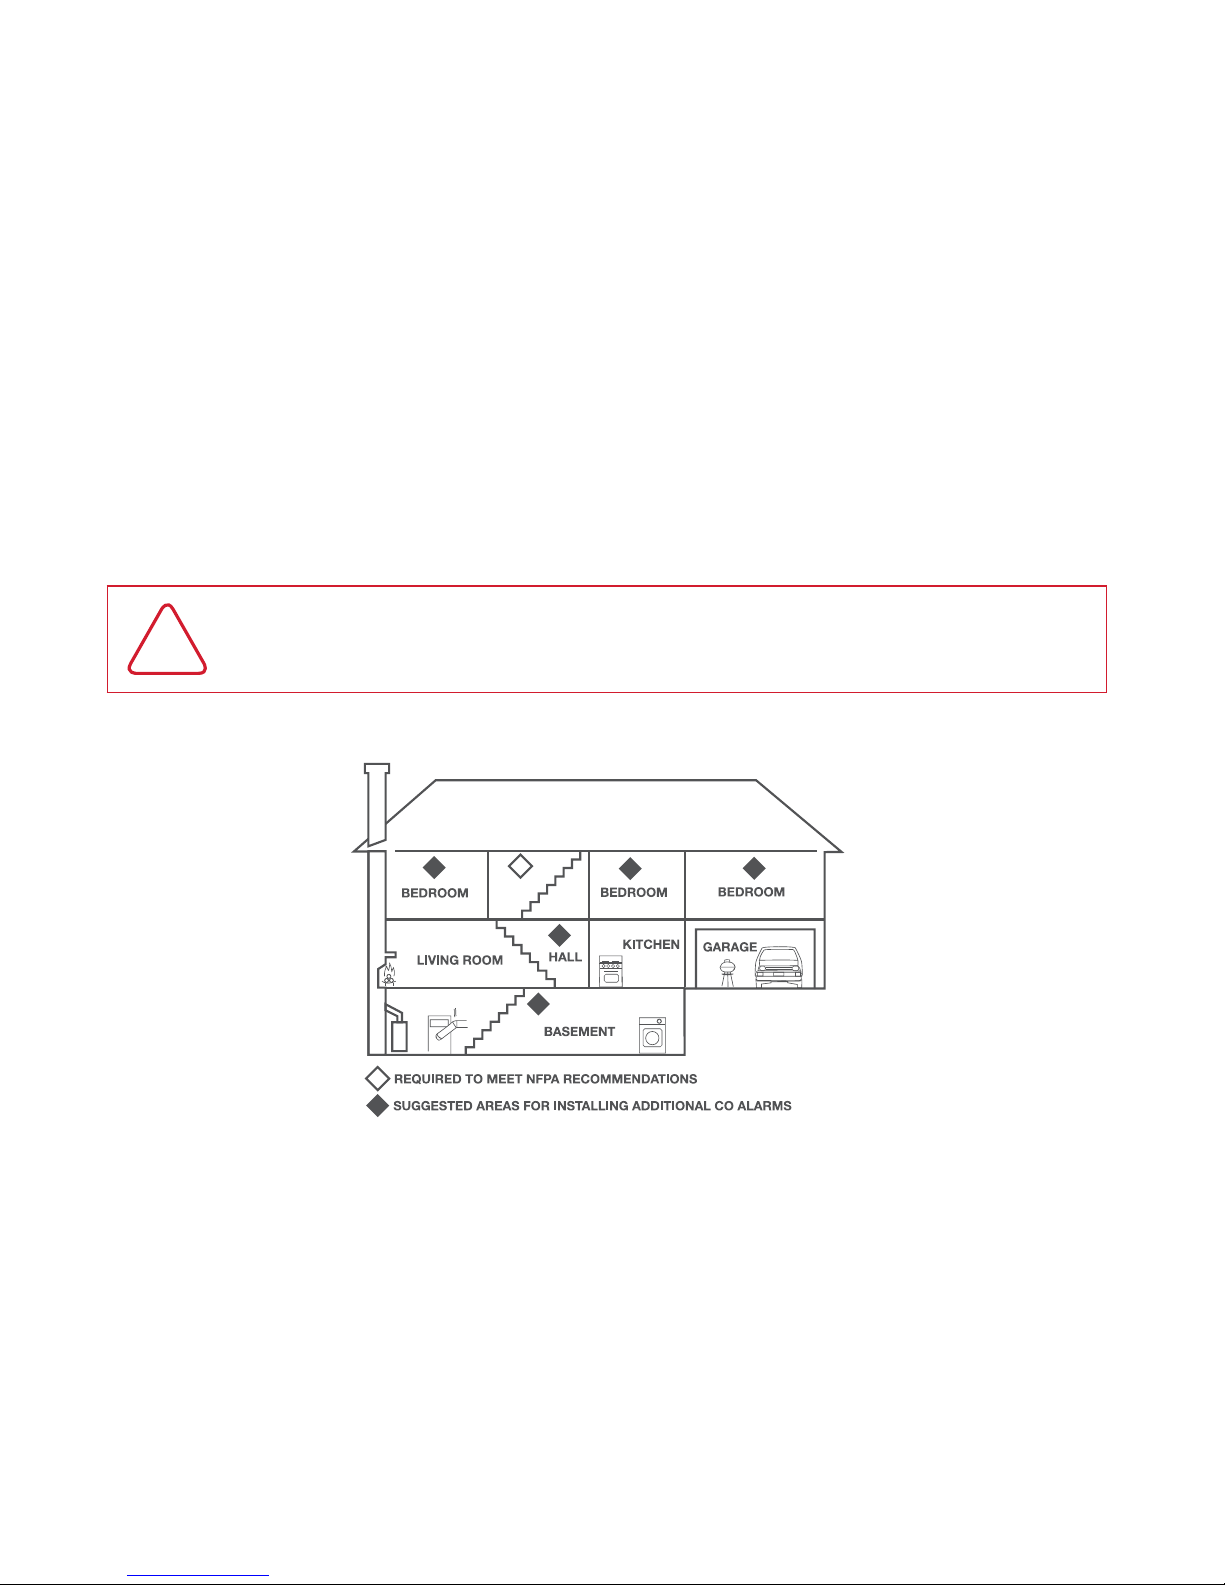
The National Fire Protection Association (NFPA) recommends that a CO Alarm should be centrally
located outside of each separate sleeping area in the immediate vicinity of the bedrooms. For added
protection, install additional CO Alarms in each separate bedroom, and on every level of your home.
In general, install Carbon Monoxide Alarms:
• Where you can hear the alarm from all sleeping areas.
• In or near bedrooms and living areas or wherever you suspect a CO exposure is likely.
• On each level of a multi-level home.
!
IMPORTANT: Improper location can affect the sensitive electronic components
in this Alarm. Please see “Where this Alarm Should Not Be Installed”.
Recommended Placement
NOTE: For any location, make sure no door or other obstruction could
keep carbon monoxide from reaching the Alarm.
Location Requirements
After choosing a location to install the Alarm, it is recommended that the connected
power supply cord is in close proximity (within 6 feet) to an outlet. This will prevent the
cord from pulling and ensure that the Alarm remains level while in service.
Page 8

8
Where this Product Should
Not be Installed
To avoid causing damage to the unit, to provide optimum protection, and to
prevent unnecessary alarms, Do NOT locate this Alarm:
• In garages, kitchens, crawl spaces and unfinished attics. Avoid extremely dusty, dirty or greasy areas
Installation in these areas could lead to nuisance alarms, may expose the sensor to substances that could
damage or contaminate it, or the Alarm may not be heard by persons
in other areas of the home, especially if they are sleeping.
• In the garage, vehicle exhaust can contain some carbon monoxide. These levels are higher
when the engine is first started. Within hours of starting a vehicle and backing it out of the
garage, the levels present over time can activate the Alarm and become a nuisance.
• In the kitchen, some gas appliances can emit a short burst of CO upon start-up. This is normal. If your
CO Alarm is installed too close to these appliances, it may alarm of ten and become a nuisance.
• Keep units at least 20 feet (6 meters) from the sources of combustion particles (stove, furnace,
water heater, space heater) if possible. In areas where a 20-foot (6m) distance is not possible
– in modular, mobile, or smaller homes, for example – it is recommended the Alarm be placed
as far from these fuel-burning sources as possible. The placement recommendations are
intended to keep these Alarms at a reasonable distance from a fuel-burning source, and thus
reduce “unwanted” alarms. Unwanted alarms can occur if an Alarm is placed directly next to
a fuel-burning source. Ventilate these areas as much as possible. If you must install the Alarm
near a cooking or heating appliance, install at least 5 feet (1. 5 meters) from appliance.
• In extremely humid areas. This Alarm should be at least 10 feet (3 meters) from a shower, sauna,
humidifier, vaporizer, dishwasher, laundry room, utility room, or other source of high humidity.
• In direct sunlight.
• In turbulent air, like near ceiling fans or open windows. Blowing
air may prevent CO from reaching the sensors.
• In areas where temperature is colder than 40˚ F (4.4˚ C) or hotter than 100˚
F (37.8˚ C). These areas include non-airconditioned crawl spaces, unfinished
attics, uninsulated or poorly insulated ceilings, porches, and garages.
• Less than 12 inches (305 mm) away from fluorescent lights. Electrical “noise” can interfere with the sensor.
Avoiding Dead Air Spaces
“Dead air” spaces may prevent CO from reaching the Alarm. To avoid dead air spaces, stay at least 4 inches
(102 mm) away from corners where walls or ceilings and walls meet.
Page 9
9
Set-Up & Installation
!
WARNING: Make sure the alarm is not receiving excessively noisy power. Examples of noisy power could
be major appliances on the same circuit, power from a generator or solar power, light dimmer on the same
circuit or mounted near fluorescent lighting. Excessively noisy power may cause damage to your Alarm.
Find the pair of self-adhesive labels included with this CO Alarm.
• On each label write in the phone number of your emergency responder
(like 911) and a qualified appliance technician.
• Place one label near the CO Alarm, and the other label in the “fresh
air” location you plan to go if the alarm sounds.
How to Install This CO Alarm
!
IMPORTANT: Read all instructions before using this product. Your Environment Monitor works with
the Onelink Home app, compatible with iOS products. Download the app from the App store. You will
need the app to provision the device and utilize the Environment Monitoring capabilities. If you do not
download the app or provision the device, the Environment Monitor still acts as a UL Certified Carbon
Monoxide alarm. In a CO emergency, the device’s LED ring will flash Red and the horn will sound.
Provisioning Instructions
Step 1 Determining the Best Location
Determine the best location for your CO Alarm. Do not set
this alarm on carpet; a flat, even surface is required.
NOTE: If Alarm is placed on a tabletop, be sure the Alarm is no more than
3 feet (0.9 meters) from the floor to minimize the risk of causing permanent
damage to the Alarm in the event that it is accidentally knocked to the ground.
Step 2 Downloading the App
Download the Onelink Home app from the App store.
NOTE: Make sure you ‘Allow’ push notification when prompted.
Page 10
10
How to Install This CO Alarm (Continued)
Step 3 Plugging Alarm into an Outlet
Plug in the adapter plug directly into a wall
outlet to power on the device.
!
IMPORTANT: This Alarm can be plugged directly
into a wall outlet located close to the floor.
a. Choose a standard UNSWITCHED 120V AC outlet.
b. Plug Alarm into an outlet.
Step 4 Activating the Battery Back-up
Within the app, add the device. Follow the in app
instruction to activate the battery and pair to Wi-Fi.
!
IMPORTANT: Activate the battery back-up by
removing the plastic pull tab. The battery is for back-up
only and is not intended to power the Alarm for an
extended period of time in the absence of AC power.
Step 5 Testing the Alarm
a. After adding the device to the app and pairing to Wifi, you
are ready to test the alarm. Make sure the Alarm is receiving
AC power. Under normal operation, the White LED will shine
continuously. If the White LED light does not light, recheck
connections. If connections are correct and the White LED
still does not light, the unit should be replaced immediately.
b. Press and hold the test button until the alarm sounds. You will
hear the signal that indicates the presence of carbon monoxide.
When testing the Alarm, have someone else check that the
Alarm can be heard easily from the sleeping areas. The unit
should be located where it can wake you if it alarms at night.
Page 11
11
If Your CO Alarm Sounds
What To Do if Carbon Monoxide is Detected
!
WARNING: Actuation of your CO Alarm indicates the presence of carbon monoxide (CO)
which can kill you. In other words, when your CO Alarm sounds, you must not ignore it!
If The CO Alarm Sounds
1. Operate the Test/Silence button.
Call your emergency services, fire department or 911. Write
down the number of your local emergency service here:
_______________________________________________________________
2. Immediately move to fresh air—outdoors or by an open door or window. Do a head count to check that all
persons are accounted for. Do not re-enter the premises, or move away from the open
door or window until the emergency services responder has arrived, the premises
have been aired out, and your CO Alarm remains in its normal condition.
3. After following steps 1-3, if your CO Alarm reactivates within a 24-hour period, repeat steps 1-3 and call
a qualified appliance technician to investigate for sources of CO from fuel-burning equipment and
appliances, and inspect for proper operation of this equipment. If problems are identified during this
inspection have the equipment serviced immediately. Note any combustion equipment not inspected by
the technician, and consult the manufacturers’ instructions, or contact the manufacturers directly, for
more information about CO safety and this equipment. Make sure that motor vehicles are not, and have
not, been operating in an attached garage or adjacent to the residence. Write down the number of a
qualified appliance technician here:
_______________________________________________________________
Silencing Your Alarm
!
WARNING: NEVER disconnect the power to your Alarm to silence the
horn - use the Silence Feature. Disconnecting the Alarm removes your protection!
• The Silence Feature is intended to temporarily silence the horn while you identif y and correct the problem.
• To use the Silence Feature, press the Test/Silence button until the horn is silent.
• If the Test/Silence button is pressed while the Alarm is in the
silence mode, the alarm will start sounding again.
Page 12
12
Silencing Your Alarm (Continued)
When The CO Alarm Is Silenced
The CO Alarm will remain silent for up to 4 minutes. While the Alarm is silenced, it will continue to monitor
the air for CO. After 4 minutes, if CO levels remain potentially dangerous the horn will start sounding again.
!
IMPORTANT: The Silence Feature is intended to temporarily
silence the Alarm horn. It will not correct a CO problem.
NOTE: You can only silence CO alarm from the app if you are on the same local Wifi as the device.
Silencing The Low Battery Warning
This Silence Feature can temporarily quiet the low battery warning “chirp” for up to 8 hours if AC
power is present. You can silence the low battery warning “chirp” by pressing the Test/Silence
button under the alarm until you see the White LED flicker, acknowledging the button-press.
The Alarm will silence for 8 hours while the low battery warning “chirp” silence feature is activated. After 8
hours, the low battery “chirp” will resume. The Alarm will continue to operate as long as AC power is supplied.
However, replace the battery as soon as possible, to maintain protection in event of a power outage.
Silencing The End of Life Signal
This silence feature can temporarily quiet the End of Life warning “chirp” for up to 8 hours.
You can silence the End of Life warning “chirp” by pressing the Test/Silence button. The
horn will chirp, acknowledging that the End of Life feature has been activated.
After approximately 8 hours, the End of Life “chirp” will resume.
Accessing CO History
The CO alert history can be accessed in the event log located in the app. CO events are stored by date.
Within the 24 hour time period before the unit automatically resets, be sure to write down the peak level.
Page 13
13
Weekly Testing
!
WARNING: NEVER use an open flame of any kind to test this unit. You might accidentally damage or set
fire to the unit or to your home. The built-in test switch accurately tests the unit’s operation as required
by Underwriters Laboratories, Inc. (UL). NEVER use vehicle exhaust! Exhaust may cause permanent
damage and voids your warranty. DO NOT stand close to the Alarm when the horn is sounding. Exposure
at close range may be harmful to your hearing. When testing, step away when horn starts sounding.
!
CAUTION: It is important to test this unit every week to make sure it is working
properly. Press the Test/Silence button on the Alarm cover until alarm sounds.
Testing the alarm with your app:
Step 1
Open the Onelink Home app and select your accessory.
Step 2
You will be brought to the device page where temperature, humidity and CO readings
are listed. Press and hold in the circle that says “ Press and hold to test” to test for CO.
If the Alarm does not test properly:
Step 1
Make sure the AC power is applied and battery is fresh and installed correctly.
Step 2
Test the unit again.
If the Alarm is still not working properly, replace it immediately.
Refer to the “Limited Warranty” at the end of this manual.
!
WARNING: If there is still a problem, do not try to fix the Alarm yourself. This will void your warranty!
Page 14
14
Regular Maintenance
This unit has been designed to be as maintenance-free as possible, but there
are a few simple things you must do to keep it working properly:
• Test it at least once a week.
• Clean the Alarm at least once a month; gently vacuum the outside of the Alarm
using your household vacuum’s soft brush attachment. Test the Alarm. Never
use water, cleaners or solvents since they may damage the unit.
• Relocate the unit if it sounds frequent unwanted alarms.
See “ Where This Alarm Should Not Be Installed” for details.
• When the battery back-up becomes weak, the Alarm will “chirp” about once a
minute (the low battery warning). You should replace the battery immediately to
continue your protection. This Alarm must have AC or battery power to operate. If
AC power fails, and the battery is dead or missing, the Alarm cannot operate.
Choosing a replacement battery:
This CO Alarm requires one CR2 battery. The following battery is acceptable as a
replacement: Duracell CR2. This battery is available at many local retail locations.
!
WARNING: Always use the exact batteries specified by this User’s
Manual. DO NOT use rechargeable batteries. Clean the battery contacts
and also those of the device prior to battery installation. Install batteries
correctly with regard to polarity (+ and -). Please dispose of or recycle
used batteries properly, following any local regulations. Consult your
local waste management authority or recycling organization to find
an electronics recycling facility in your area.
DO NOT DISPOSE OF
BATTERIES IN FIRE. BATTERIES MAY EXPLODE OR LEAK.
!
WARNING: Keep battery out of reach of children. In the
event a battery is swallowed, immediately contact your poison
control center, your physician, or the National Battery Ingestion
hotline at
202-625-3333 as serious injury may occur.
!
IMPORTANT: Actual battery service life depends on the Alarm and
the environment in which it is installed. All the batteries specified above
are acceptable replacement batteries for this unit. Regardless of the
manufacturer’s suggested battery life, you MUST replace the battery
immediately once the unit starts “chirping” (the “low battery warning”).
Page 15
15
Regular Maintenance (Continued)
!
WARNING: DO NOT spray cleaning chemicals or insect sprays directly on or near the
Alarm. DO NOT paint over the Alarm. Doing so may permanently damage the Alarm.
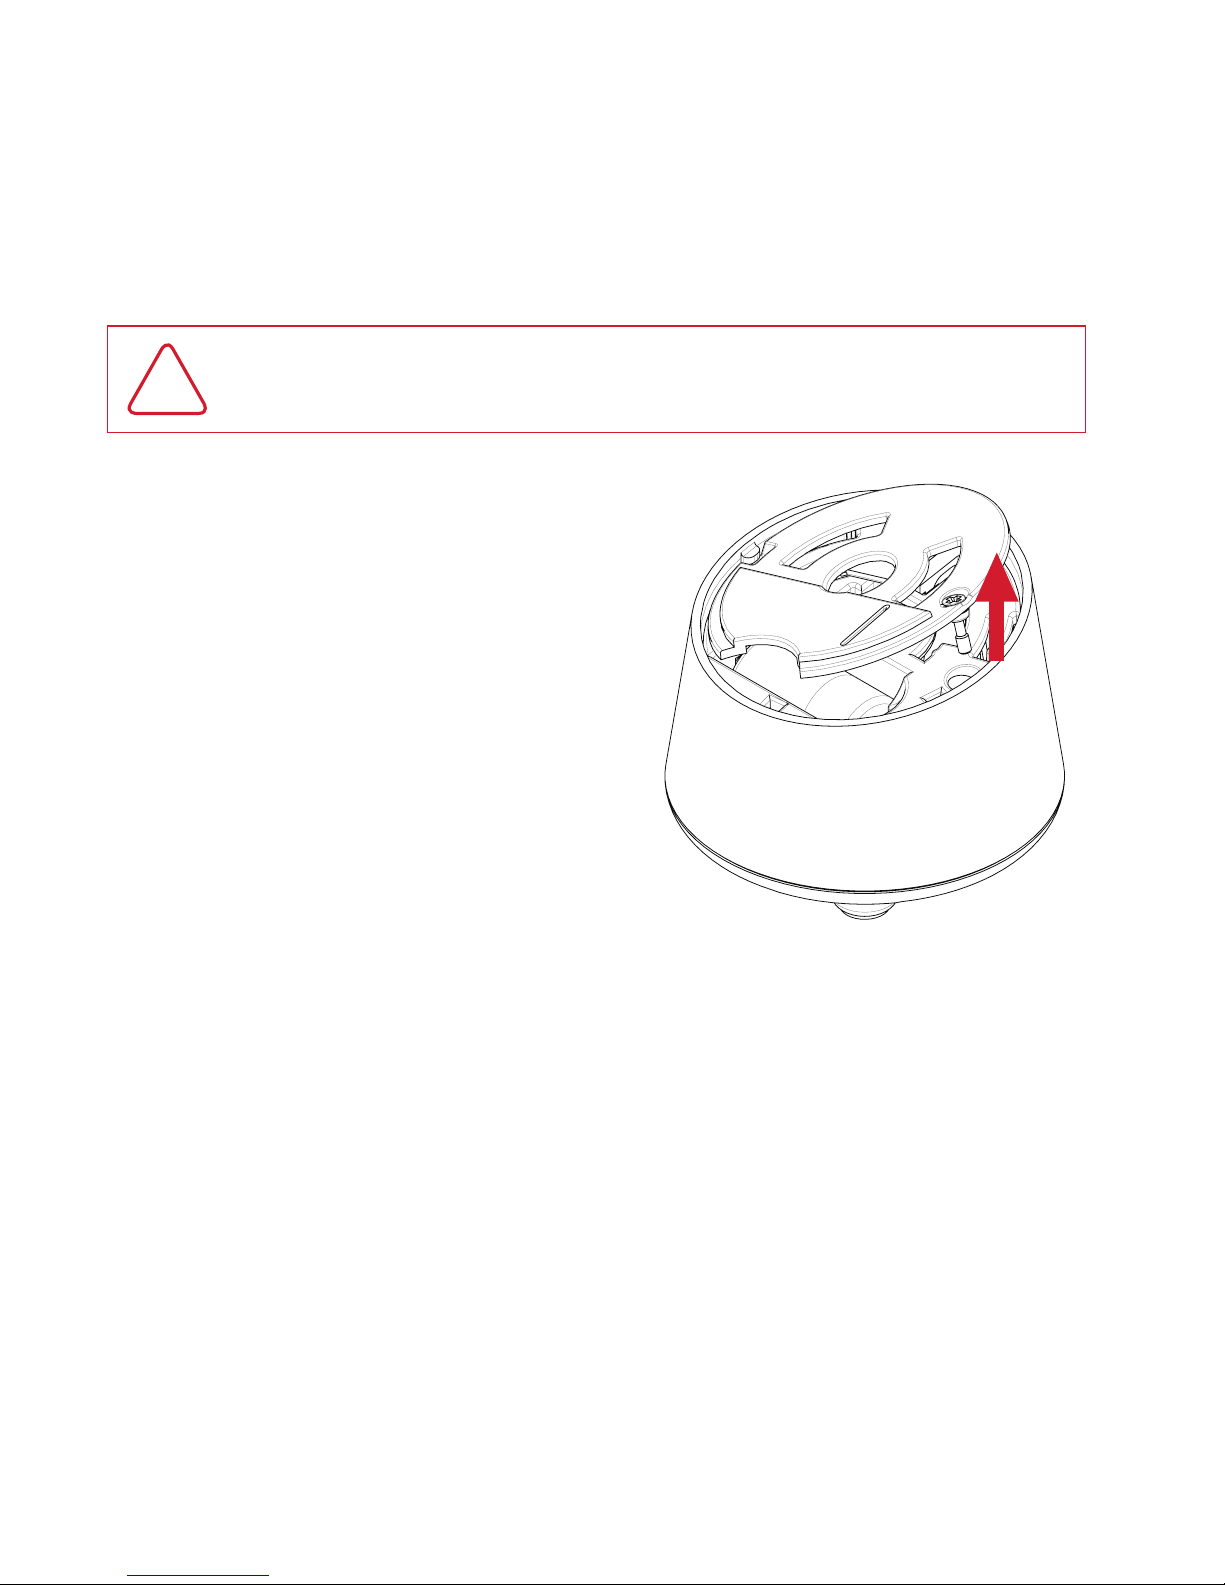
Replacing the battery:
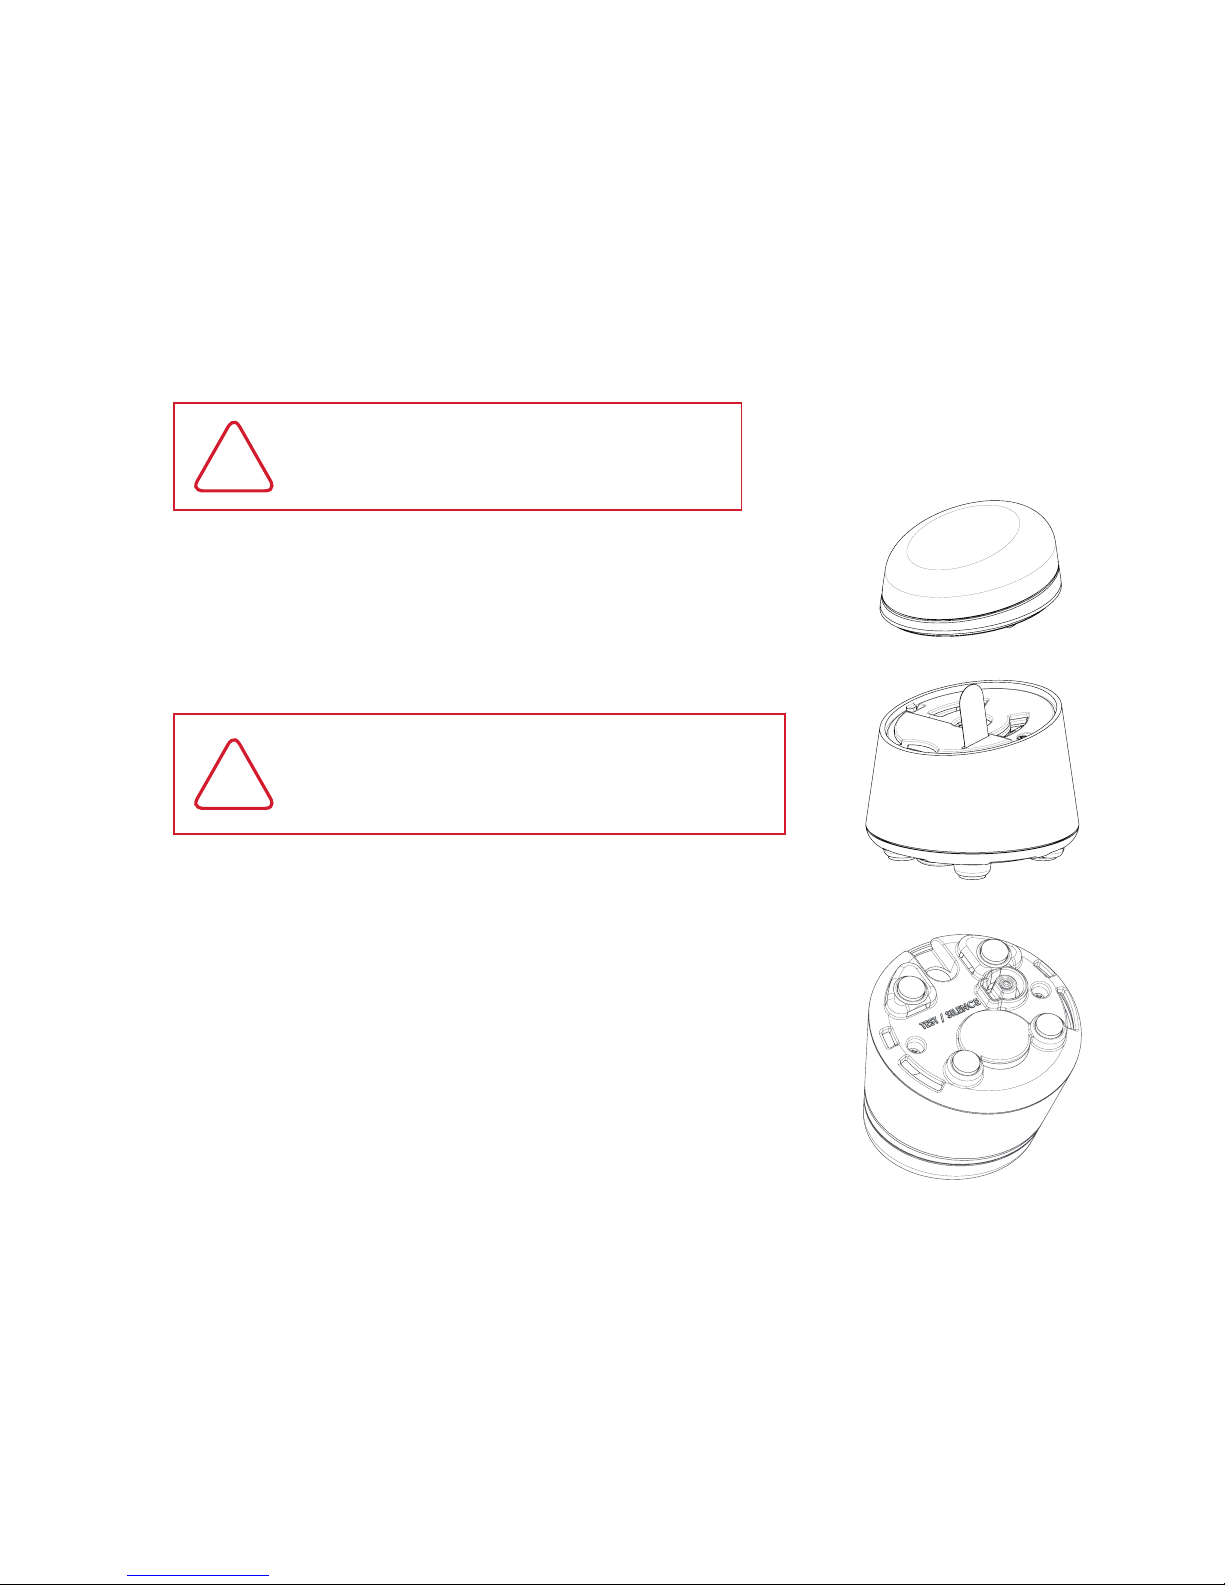
Step 1
Unplug device from power adapter.
Step 2
Turn the top of the alarm counterclockwise
and pull up gently to remove.
Step3
Turn screw counterclockwise to loosen
and gently remove cover as shown.
Step 4
Replace battery with CR2 battery and
properly attach battery cover with screw.
Step 5
Place top back on the alarm and
gently turn clockwise until it clicks
into place. Plug back into adapter.
Step 6
Press and hold test button
to test the alarm.
Resetting the device:
In the event you need to reset the device, push the test/silence button five times. The device
will need to be paired again when it is reset. The app will instruct you when to reset the
device if necessary. Force close the app before trying to re-pair with the device.
Understanding Your Alarm/Monitor
LED light will reflect temperature: White for desired temperature range, Amber for temperature
too warm and Blue for temperature too cold. Temperature ranges can be set within the
Onelink Home app. The default temperature range of 68°– 79° F is preset in the app.
Page 16

16
Understanding Your Alarm/Monitor (Continued)
Condition App LED Horn
Normal AC Power
Normal functionality. LED color based on tempe rature . Silent.
Battery Back-Up Power
No device settings can be
adjusted on bat tery back-up
power. Wifi won’t be
enabled on the device on
battery back-up powe r.
LEDs are off. Silent.
During Testing
Push & hol d the “push and hold to
test” b utton with in the app o r push &
hold the button on th e bottom of th e
device to tes t. App will s ay “testing”.
LED flashes Red in sync
with the horn, simulating
an Alar m condition.
The CO alarm horn pattern
(4 beeps, pause, 4
beeps) is issued.
Low Battery
Low battery push notification. Amber.
A chirp is is sued about
every minute.
CO Alarm
CO alarm Push notificati on,
app scre en will be Red.
LED flashes Red in
sync with horn.
Repeating 4 beeps, pause.
Malfunction Signal
Device malfun ction
push notification, app
screen will be Amber.
LED flashing Amber 3 times
in sync with 3 chirps .
3 chirps eve ry min ute.
Low Battery Silence
Normal functionality. LED color based on tempe rature . Silent.
End of Life
Device end of life push
notification, app screen
will be Amber.
LED flashing Amber 5 times
in sync with 5 chirps .
5 chirps eve ry min ute.
Low Level CO
Low level CO push notification,
app scre en will be yellow.
LED color based on tempe rature . Silent.
Temperature
Out of Range
Push Notification.
LED will be White for de sired
tempe rature range, Blue for
tempe rature too cold, Amber
for temp erature too warm .
Silent.
Page 17
17
What You Need to Know About CO
What is CO?
CO is an invisible, odorless, tasteless gas produced when fossil fuels do not burn completely, or
are exposed to heat (usually fire). Electrical appliances typically do not produce CO.
These fuels include: Wood, coal, charcoal, oil, natural gas, gasoline, kerosene, and propane.
Common appliances are often sources of CO. If they are not properly maintained, are improperly ventilated, or
malfunction, CO levels can rise quickly. CO is a real danger now that homes are more energy efficient. “Air-tight”
homes with added insulation, sealed windows, and other weatherproofing can “trap” CO inside.
Symptoms of CO Poisoning
These symptoms are related to CO POISONING and should be discussed with ALL household members.
Mild Exposure: Slight headache, nausea, vomiting, fatigue (“flu-like” symptoms).
Medium Exposure: Throbbing headache, drowsiness, confusion, fast heart rate.
Extreme Exposure: Convulsions, unconsciousness, heart and lung failure.
Exposure to Carbon Monoxide can cause brain damage, death.
!
IMPORTANT: This CO Alarm measures exposure to CO over time. It alarms if CO levels are extremely
high in a short period of time, or if CO levels reach a certain minimum over a long period of time.
The CO Alarm generally sounds an alarm before the onset of symptoms in average, healthy adults.
Why is this important? Because you need to be warned of a potential CO problem while you can still
react in time. In many reported cases of CO exposure, victims may be aware that they are not feeling
well, but become disoriented and can no longer react well enough to exit the building or get help.
Also, young children and pets may be the first affected. The average healthy adult might not feel
any symptoms when the CO Alarm sounds. However, people with cardiac or respiratory problems,
infants, unborn babies, pregnant mothers, or elderly people can be more quickly and severely affected
by CO. If you experience even mild symptoms of CO poisoning, consult your doctor immediately!
Page 18
18
Finding The Source of CO After an Alarm
Carbon monoxide is an odorless, invisible gas, which often makes it difficult to locate the source of CO
after an alarm. These are a few of the factors that can make it difficult to locate sources of CO:
• House well ventilated before the investigator arrives.
• Problem caused by “backdrafting.”
• Transient CO problem caused by special circumstances.
Because CO may dissipate by the time an investigator arrives, it may be difficult to locate the source of CO.
BRK Brands, Inc. shall not be obligated to pay for any carbon monoxide investigation or service call.
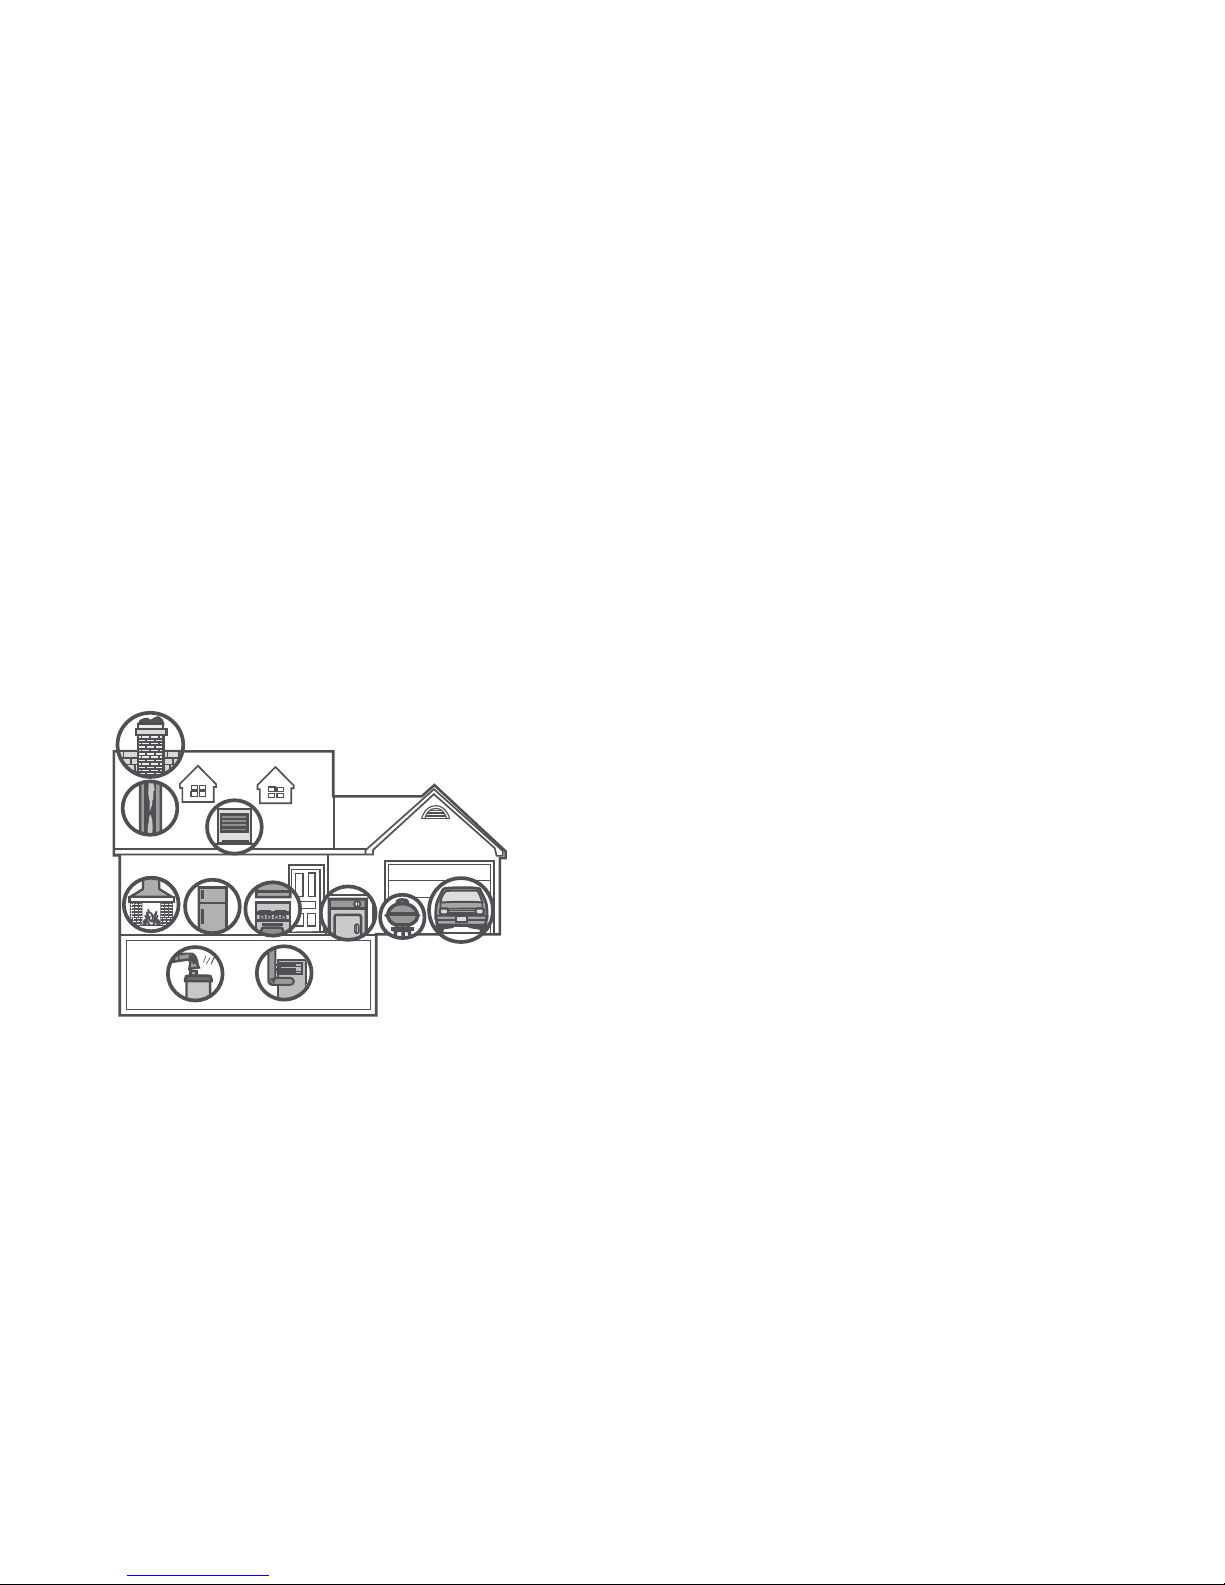
Potential Sources of CO in The Home
Fuel-burning appliances like: portable heater, gas or wood burning
fireplace, gas kitchen range or cooktop, gas clothes dryer.
Damaged or insufficient venting: corroded or disconnected water heater vent pipe, leaking
chimney pipe or flue, or cracked heat exchanger, blocked or clogged chimney opening.
Improper use of appliance/device: operating a barbecue grill or vehicle
in an enclosed area (like a garage or screened porch).
Transient CO Problems: “transient” or on-again-off-again CO problems can be
caused by outdoor conditions and other special circumstances.
Page 19

19
Potential Sources of CO in The Home (Continued)
The following conditions can result in transient CO situations:
1. Excessive spillage or reverse venting of fuel appliances caused by outdoor conditions such as:
• Wind direction and/or velocity, including high, gusty winds. Heavy air in the vent pipes
(cold/humid air with extended periods between cycles).
• Negative pressure differential resulting from the use of exhaust fans.
• Several appliances running at the same time competing for limited fresh air.
• Vent pipe connections vibrating loose from clothes dryers, furnaces, or water heaters.
• Obstructions in or unconventional vent pipe designs which can amplify the above situations.
2. Extended operation of unvented fuel burning devices (range, oven, fireplace).
3. Temperature inversions, which can trap exhaust close to the ground.
4. Car idling in an open or closed attached garage, or near a home.
These conditions are dangerous because they can trap exhaust in your home. Since these
conditions can come and go, they are also hard to recreate during a CO investigation.
Page 20

20
How Can I Protect My Family
from CO Poisoning?
A CO Alarm is an excellent means of protection. It monitors the air and sounds a loud alarm
before Carbon Monoxide levels become threatening for average, healthy adults.
A CO Alarm is not a substitute for proper maintenance of home appliances.
To help prevent CO problems and reduce the risk of CO poisoning:
• Clean chimneys and flues yearly. Keep them free of debris, leaves, and nests for proper air flow. Also, have
a professional check for rust and corrosion, cracks, or separations. These conditions can prevent proper air
movement and cause backdrafting. Never “cap” or cover a chimney in any way that would block air flow.
• Test and maintain all fuel-burning equipment annually. Many local gas or oil companies
and HVAC companies offer appliance inspections for a nominal fee.
• Make regular visual inspections of all fuel-burning appliances. Check appliances for excessive rust and
scaling. Also check the flame on the burner and pilot lights. The flame should be blue. A yellow flame
means fuel is not being burned completely and CO may be present. Keep the blower door on the furnace
closed. Use vents or fans when they are available on all fuel-burning appliances. Make sure appliances
are vented to the outside. Do not grill or barbecue indoors, or in garages or on screen porches.
• Check for exhaust backflow from CO sources. Check the draft hood on an operating
furnace for a backdraft. Look for cracks on furnace heat exchangers.
• Check the house or garage on the other side of shared wall.
• Keep windows and doors open slightly. If you suspect that CO is escaping into your home, open
a window or a door. Opening windows and doors can significantly decrease CO levels.
In addition, familiarize yourself with all enclosed materials. Read this manual in its
entirety, and make sure you understand what to do if your CO Alarm sounds.
Page 21
21
Regulatory Information for CO Alarms
What Levels of CO Cause an Alarm?
Underwriters Laboratories Inc. Standard UL2034 requires residential CO Alarms to
sound when exposed to levels of CO and exposure times as described below. They
are measured in parts per million (ppm) of CO over time (in minutes).
UL2034 Required Alarm Points*:
• If the alarm is exposed to 400 ppm of CO, IT MUST ALARM BETWEEN 4 and 15 MINUTES.
• If the alarm is exposed to 150 ppm of CO, IT MUST ALARM BETWEEN 10 and 50 MINUTES.
• If the alarm is exposed to 70 ppm if CO, IT MUST ALARM BETWEEN 60 and 240 MINUTES.
*Approximately 10% COHb exposure at levels of 10% to 95% Relative Humidity (RH).
The unit is designed not to alarm when exposed to a constant level of 30 ppm for 30 days.
!
IMPORTANT: CO Alarms are designed to alarm before there is an immediate
life threat Since you cannot see or smell CO, never assume it’s not present.
• An exposure to 100 ppm of CO for 20 minutes may not affect average, healthy
adults, but after 4 hours the same level may cause headaches.
• An exposure to 400 ppm of CO may cause headaches in average, healthy
adults after 35 minutes, but can cause death after 2 hours.
Standards: Underwriters Laboratories Inc. Single and Multiple Station carbon monoxide alarms UL 2034.
According to Underwriters Laboratories Inc. UL2034, Section 1-1.2: “Carbon monoxide alarms covered by these
requirements are intended to respond to the presence of carbon monoxide from sources such as, but not limited
to, exhaust from internal-combustion engines, abnormal operation of fuel-fired appliances, and fireplaces. CO
Alarms are intended to alarm at carbon monoxide levels below those that could cause a loss of ability to react
to the dangers of Carbon Monoxide exposure.” This CO Alarm monitors the air at the Alarm, and is designed to
alarm before CO levels become life threatening. This allows you precious time to leave the house and correct
the problem. This is only possible if Alarms are located, installed, and maintained as described in this manual.
Gas Detection at Typical Temperature and Humidity Ranges: The CO Alarm is not formulated to alarm at CO levels
below 30 ppm typically. Low level CO notifications and levels will only be provided in the Onelink Home app.
Audible Alarm: 85 dB minimum at 10 feet (3 meters).
NOTE: CO levels above 500ppm will be registered on the app as “greater than 500ppm”.
Page 22
22
Regulatory Information
Federal Communications Commission (FCC) Compliance Statement
NOTE: This equipment has been tested and found to comply with the limits for a Class B digital
device, pursuant to Part 15 of the FCC Rules. These limits are designed to provide reasonable protection
against harmful interference in a residential installation. This equipment generates, uses and can
radiate radio frequency energy and, if not installed and used in accordance with the instructions, may
cause harmful interference to radio communications. However, there is no guarantee that interference
will not occur in a particular installation. If this equipment does cause harmful interference to radio
or television reception, which can be determined by turning the equipment off and on, the user
is encouraged to try to correct the interference by one or more of the following measures:
• Reorient or relocate the receiving antenna.
• Increase the separation between the equipment and receiver.
• Connect the equipment into an outlet on a circuit different from that to which the receiver is connected.
• Consult the dealer or an experienced radio/T V technician for help.
!
WARNING: Changes or modifications to this unit not expressly approved by the party
responsible for compliance could void the user’s authority to operate the equipment.
This device complies with Part 15 of the FCC Rules. Operation is subject to the following two conditions:
(1) this device may not cause harmful interference, and (2) this device must accept any interference
received, including interference that may cause undesired operation. This portable transmitter with its
antenna complies with FCC/IC RF exposure limits for general population / uncontrolled exposure.
Page 23

23
Troubleshooting Guide
App FAQ
If the App... Problem... You Should...
Is unab le to be downloade d or installed .
You cannot download or install the Ap p.
(Only work s with iOS devices, not
supported by An droid).
Conta ct Consumer Affairs Division at
1-800-323-9005.
Alarm FAQ
If the Alarm... Problem... You Should...
White light is OFF. Unit will not alarm when
you press the Test/Silence button .
Unit may not be receiving any power.
Check the AC power supply. Make sure fresh
battery is installed to power the battery back-up*.
White light flashes ON, once a
minute (horn is sil ent).
Alarm is not receiving AC power.
Unit is op erating on battery back-up.
Check the AC power supply.
The horn “chirps” once a min ute.
Low battery warning.
Batte ry is low.
Remove device from power ada pter before
replacing bat tery. Replace th e battery.
The horn sounds 3 “chirps” after installing. Batte ry isn’t activated within initial setup.
Activate batter y by pulling the pull tab located
under the cap. Twist and pull cap to remove.
There is a timeout period during setup.
Once a minute, the alarm so unds 3 “chirps”,
and the Amber light flash es three times .
MALFUNCTION SIGNAL. Based on its
Self Test diagnostics, the unit has detecte d a
malfunction. The unit nee ds to be replaced.
Units under wa rrant y should be retur ned to
manufactu rer for replacement. See
“Limited Warra nty” for details.
The light flashes Amber. The horn sounds
5 “chirps” every minute.
END OF LIFE SIGNAL.
CO Alarm needs to be replaced.
Imme diately replace the CO Alarm.
The horn sounds constantly with no
pattern and ca nnot be silenced.
Unit malfunction. Unit needs to be replaced.
Units under wa rrant y should be retur ned
to manuf acturer for replacem ent. See
“Limited Warra nty” for details.
Alarm goes back into alarm after you
pressed the Test/Silence button.
CO levels are still pote ntially dangerous.
Refer to “If Your CO Alarm Sounds” for details on
how to respo nd to an alarm. If anyo ne is feeling ill,
EVACUATE your hom e immediately and call 911.
Alarm sounds frequently even though no high
levels of CO are reveale d in an investigatio n.
The Ala rm may be improperly located.
Refer to “ Where to Install This Alarm.”
Relocate your al arm. If frequent alarms continue,
have home rechecked for potential problems. You
may be expe riencing an intermittent CO problem.
*For a lis t of acceptable replace ment batteries, see “Regular Maintenance.”
NOTE: This alarm contains new Wi-Fi and HomeKit technology that is not wirelessly compatible with previously branded Onelink wireless alarms.
If you have questions that cannot be answered by reading this manual, contact Consum er Aff airs at [email protected] or 1-800-323-9005.
Page 24

24
General Limitations of CO Alarms
This CO Alarm is intended for residential use. It is not intended for use in industrial applications
where Occupational Safety and Health Administration (OSHA) requirements for Carbon Monoxide
Alarms must be met. This device is not intended to alert hearing impaired residents.
CO Alarms may not waken all individuals. If children or others do not readily waken to the
sound of the CO Alarm, or if there are infants or family members with mobility limitations,
make sure that someone is assigned to assist them in the event of an emergency.
This CO Alarm will not sense CO that does not reach the sensors. It will only sense CO at the sensor. CO may
be present in other areas. Doors or other obstructions may affect the rate at which CO reaches the sensors.
CO Alarms may not be heard. The alarm horn loudness meets or exceeds current UL standards of 85 dB at 10 feet
(3 meters). However, if the CO Alarm is installed outside the bedroom, it may not wake up a sound sleeper or one
who has recently used drugs or has been drinking alcoholic beverages. This is especially true if the door is closed
or only partly open. Even persons who are awake may not hear the alarm horn if the sound is blocked by distance
or closed doors. Noise from traf fic, stereo, radio, television, air conditioner, or other appliances may also prevent
alert persons from hearing the alarm horn. This CO Alarm is not intended for people who are hearing impaired.
This CO Alarm is not a substitute for life insurance. Though this CO Alarm warns
against increasing CO levels, BRK Brands, Inc. does not warrant or imply in any way that
they will protect lives. Homeowners and renters must still insure their lives.
This CO Alarm is not foolproof. Like all other electronic devices, this CO Alarm has
limitations. It can only detect CO that reaches the sensors. It may not give early warning
if the source of CO is in a remote part of the home, away from the alarm device.
This CO Alarm has a limited life. Although this CO Alarm and all of its parts have passed many stringent
tests and are designed to be as reliable as possible, any of these parts could fail at any time. Therefore, you
must test this device weekly. The unit should be replaced immediately if it is not operating properly.
Low Level CO Detection. This device monitors CO at low levels (9-30ppm) for those who may be at
greater risk, such as infants. You will receive a push notification if your device monitors low levels of CO.
This Environment Monitor measures exposure to Carbon Monoxide over time. The alarm will sound if CO
levels become extremely high in a short period of time or reach a certain minimum over a long period
of time. The CO monitor generally sounds an alarm before the onset of symptoms in healthy adults.
!
IMPORTANT: This product is designed to detect carbon monoxide levels
above 9ppm. If extremely low levels of carbon monoxide (0-9ppm) are
detected, the display function of the app will show “less than 9ppm.”
According to some medical research, ongoing exposure to carbon monoxide
levels as low as 9ppm for eight hours during light or moderate exercise can
generate carboxyhemoglobin levels above 2.5%, which can affect health.
For more information about low levels of CO visit www.firstalert.com.
Page 25

25
Industry Canada (IC)
Compliance Statement
ENGLISH
This device complies with Industry Canada License-exempt RSS standard(s). Operation is subject
to the following two conditions: (1) this device may not cause interference, and (2) this device must
accept any interference, including interference that may cause undesired operation of the device.
Under Industry Canada regulations, this radio transmitter may only operate using an antenna of a type
and maximum (or lesser) gain approved for the transmitter by Industry Canada. To reduce potential
radio interference to other users, the antenna type and its gain should be so chosen that the equivalent
isotropically radiated power (e.i.r.p.) is not more than that necessary for successful communication.
FRENCH
Le présent appareil est conforme aux CNR d’Industrie Canada applicables aux appareils radio
exempts de licence. L’exploitation est autorisée aux deux conditions suivantes: (1) l’appareil
ne doit pas produire de brouillage, et (2) l’utilisateur de l’appareil doit accepter tout brouillage
radioélectrique subi, même si le brouillage est susceptible d’en compromettre le fonctionnement.
Conformément à la réglementation d’Industrie Canada, le présent émetteur radio peut fonctionner
avec une antenne d’un type et d’un gain maximal (ou inférieur) approuvé pour l’émetteur par Industrie
Canada. Dans le but de réduire les risques de brouillage radioélectrique à l’intention des autres utilisateurs,
il faut choisir le type d’antenne et son gain de sorte que la puissance isotrope rayonnée quivalente
(p.i.r.e.) ne dépassepas l’intensité nécessaire à l’établissement d’une communication satisfaisante.
Page 26

26
Modular Devices FCC and Industry
Canada Compliance Statements
OEM Responsibilities to comply with FCC and Industry Canada Regulations
The AW-CU30 0 Module have been certified for integration into products
only by OEM integrators under the following condition:
1. The transmitter module must not be co-located or operating in
conjunction with any other antenna or transmitter.
As long as the condition above is met, further transmitter testing will not be required. However, the OEM
integrator is still responsible for testing their end-product for any additional compliance requirements
required with this module installed (for example, digital device emissions, PC peripheral requirements, etc.).
IMPORTANT NOTE: In the event that these conditions cannot be met (for certain configurations or
co-location with another transmitter), then the FCC and Industry Canada authorizations are no longer
considered valid and the FCC ID and IC Certification Number cannot be used on the final product.
In these circumstances, the OEM integrator will be responsible for re-evaluating the end product
(including the transmitter) and obtaining a separate FCC and Industry Canada authorization.
End Product Labeling
The AW-CU30 0 Module are labeled with their own FCC ID and IC Certification Number. If the FCC ID
and IC Certification Numbers are not visible when the module is installed inside another device, then the
outside of the device into which the module is installed must also display a label referring to the enclosed
module. In that case, the final end product must be labeled in a visible area with the following:
“Contains Transmitter Module FCC ID: TLZ-CU300”
“Contains Transmitter Modules IC: 6100A-CU300”
or
“Contains FCC ID: TLZ-CU300”
“Contains IC: 6100A-CU300”
The OEM of the AW-CU300 Module must only use the approved antenna(s) listed above,
which have been certified with this module. The OEM integrator has to be aware not to
provide information to the end user regarding how to install or remove this RF module
or change RF related parameters in the user manual of the end product.
To comply with FCC and Industry Canada RF radiation exposure limits for general
population, the antenna(s) used for this transmitter must not be co-located or
operating in conjunction with any other antenna or transmitter.
Page 27

27
Limited Warranty
BRK Brands, Inc., (“BRK”) the maker of First Alert® brand products warrants that for a period of ten years from
the date of purchase, this product will be free from defects in material and workmanship. BRK, at its option,
will repair or replace this product or any component of the product found to be defective during the warranty
period. Replacement will be made with a new or re-manufactured product or component. If the product is
no longer available, replacement may be made with a similar product of equal or greater value. This is your
exclusive warranty. This warranty is valid for the original retail purchaser from the date of initial retail purchase
and is not transferable. Keep the original sales receipt. Proof of purchase is required to obtain warranty
performance. BRK dealers, service centers, or retail stores selling BRK products do not have the right to alter,
modify or any way change the terms and conditions of this warranty. This warranty does not cover normal
wear of parts or damage resulting from any of the following: negligent use or misuse of the product, use on
improper voltage or current, use contrary to the operating instructions, disassembly, repair or alteration by
anyone other than BRK or an authorized service center. Further, the warranty does not cover Acts of God, such
as fire, flood, hurricanes and tornadoes or any batteries that are included with this unit. BRK shall not be liable
for any incidental or consequential damages caused by the breach of any express or implied warranty. Except
to the extent prohibited by applicable law, any implied warranty of merchantability or fitness for a particular
purpose is limited in duration to the duration of the above warranty. Some states, provinces or jurisdictions
do not allow the exclusion or limitation of incidental or consequential damages or limitations on how long an
implied warranty lasts, so the above limitations or exclusion may not apply to you. This warranty gives you
specific legal rights, and you may also have other rights that vary from state to state or province to province.
How to Obtain Warranty Service
Service: If service is required, do not return the product to your retailer. In order to obtain warranty service,
contact the Consumer Affairs Division at [email protected] or 1-800-323-9005. To
assist us in serving you, please have the model number and date of purchase available when calling.
For Warranty Service return to: 1301 Joe Battle, El Paso, TX 79936
Disposal: Waste electrical products should not be disposed of with regular household waste.
Please recycle where facilities exist. Check local requirements for disposal of Lithium powered
electronic devices. The Alarm should be deactivated before disposal. See page 14, “Permanently
Deactivating the Alarm”. You can also return your Alarm to us for disposal. For return address
see above. Please include a note confirming the product is being returned for disposal.
This product is intended for non-professional do it yourself installation. If you would like information
about a professionally installed and monitored system, please contact First Alert Professional
at 1-800-921-6025. First Alert Professional is not affiliated with BRK Brands, Inc.
Communication distance between alarms may vary from home to home depending
on environment, construction materials and size of structure. The quantity of
alarm required will depend on these factors. See manual for details.
Page 28

©2016 BRK Brands, Inc. All rights reserved. • Distributed by BRK Brands, Inc.
BRK Brands, Inc. is a subsidiary of Newell Brands Inc. (NYSE:NWL)
First Alert® is a registered trademark of The First Alert Trust.
3901 Liberty Street Road, Aurora, IL 60504-8122
Consumer Affairs: (800) 323-9005. • www.firstalert.com
8/16 • Printed in USA • M08-0545-152975_Manual, Users GLOCO-500
 Loading...