

Page 1

5-Device Universal
Remote Control
with Learning
Control Remoto Universal
de 5 Dispositivos con
Aprendizaje
OARN05G User’s Guide • Guía del Usuario
Contents
Step 1: Install your batteries ...................... 2
Step 2: Program your remote .................... 2
Auto Code Search .................................... 3
Brand Code Search .................................. 4
Direct Code Entry .................................... 6
Manual Code Search ............................... 7
Tour of the Remote .................................... 9
Advanced Functions ................................. 10
Assigning the AUX Key ......................... 10
Reassigning the DVD•VCR Key
to Control a VCR ................................. 10
Volume Punch-Through ........................ 10
Transport Key Punch-Through .............. 11
Channel Lock ......................................... 11
Code Retrieval ....................................... 11
Learning ................................................. 12
Macros .................................................... 14
Troubleshooting ....................................... 15
Limited Lifetime Warranty ...................... 32
Contenido
Paso 1: Instale las baterías ....................... 17
Paso 2: Programe el control remoto ....... 17
Búsqueda Automática de Códigos ....... 18
Búsqueda de Códigos por Marca.......... 19
Entrada Directa de Códigos .................. 21
Búsqueda Manual de Códigos .............. 22
Recorrido del control remoto .................. 24
Funciones Avanzadas ............................... 25
Cómo Asignar la Tecla AUX .................. 25
Cómo Reasignar la Tecla DVD•VCR
para Manejar una VCR ....................... 25
Irrupción de Volumen ........................... 25
Irrupción de Teclas de Transporte ........ 26
Bloqueo de Canales ............................... 26
Recuperación de Códigos ..................... 26
Aprendizaje ........................................... 27
Macros .................................................... 29
Resolución de Problemas ......................... 30
Garantía Limitada
Durante la Vida Útil del Producto ........ 32
Page 2

Step 1: Install your batteries
Your universal remote requires three AAA alkaline batteries
(not included).
To install the batteries:
1. Remove the battery compartment cover.
2. Insert the batteries, matching the (+) and (–) marks inside
the battery compartment.
3. Push the battery cover back into place.
Battery Precautions:
• Do not mix old and new batteries.
• Do not mix alkaline, standard (carbon-zinc) or
rechargeable (nickel-cadmium) batteries.
• Always remove old, weak or worn-out batteries promptly
and recycle or dispose of them in accordance with Local
and National Regulations.
Battery Saver
Your universal remote control saves battery power by
automatically turning off if any key is pressed for more than
60 seconds. This saves your battery life should your remote
get stuck in a place where the keys remain depressed, such as
between sofa cushions.
Step 2: Program your remote
To use this universal remote with your home entertainment
system, first you need to program it to control your devices.
There are four ways you can program the universal remote to
operate your devices:
• TheAuto Code Search goes automatically through all the
codes for the device you’re trying to control. It’s the easiest
method, but it can sometimes take longer than some of the
other programming methods.
• TheBrand Code Search searches through the codes for
select brands of devices. It’s not as easy as the auto code
search, but it can be faster.
• TheDirect Code Entry lets you enter a code from the
accompanying code list for your brand of device. It’s not as
easy as the other methods, but it’s potentially the fastest
method. Note: Direct Code Entry is usually the best method
to use for audio devices.
• TheManual Code Search lets you manually go through all
the codes for the device you’re trying to control.
Care and Maintenance
• Keep the remote dry. If it gets wet, wipe it dry immediately.
• Use and store the remote only in normal temperature
environments.
• Handle the remote gently and carefully. Don’t drop it.
• Keep the remote away from dust and dirt.
• Wipe the remote with a damp cloth occasionally to keep it looking
new.
• Modifying or tampering with the remote’s internal components
can cause malfunction and invalidate its warranty.
2
Page 3

3
English
Auto Code Search
The Auto Code Search goes automatically through all the codes
for the device you’re trying to control. When you find the one
that operates your device, you can stop the search and store
that code.
TIPS: To program the AUX key, you must rst assign it to a
device type. See the Assigning the AUX Key section.
Each device key is associated with a type of device—the TV is
preset to search for TVs, SAT•CBL•DTC for satellite receivers,
digital TV converters, or cable boxes, DVD•VCR for DVD
players, and AUDIO for audio receivers. To program the
DVD•VCR key to control a PVR or VCR, see the Reassigning the
DVD•VCRKeytoControlaVCR section.
To control combo devices, like TV/DVDs and TV/VCRs, you need
to program each key separately. Each key will control that part
of the combo device.
If the original remote control that came with your device has
separate ON and OFF keys (instead of a single POWER key),
the Auto Code Search might not work with that device. Try the
Direct Code Entry method described later in this manual.
To exit without saving a new code at any point in the Auto
Code Search, press the EXIT key.
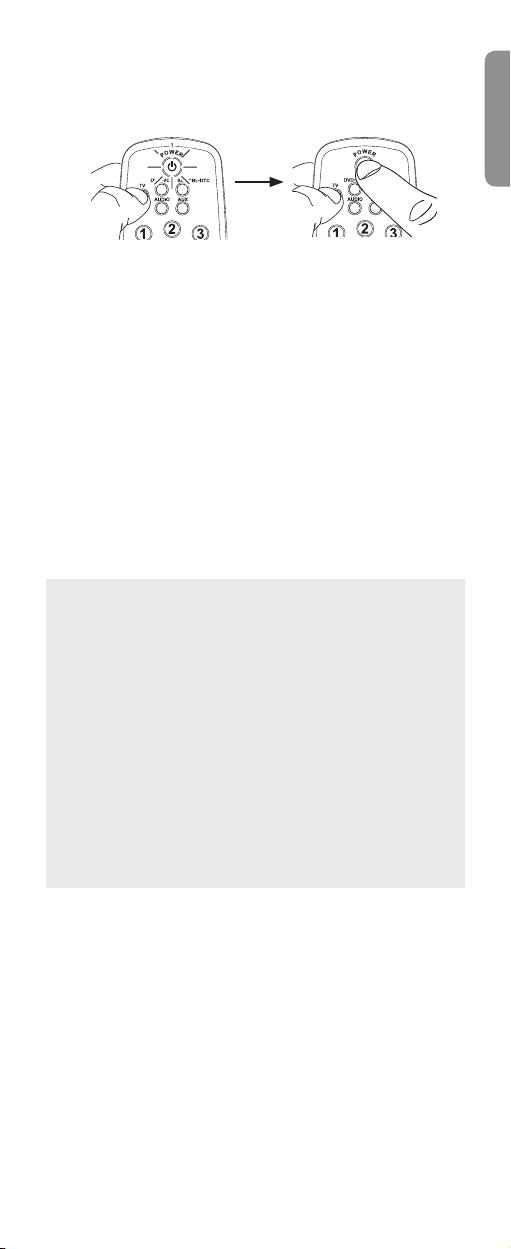
1. Manually turn on the device you want to control.
2. Press and hold the device key you want to program (the
POWER key illuminates). While you’re holding down the device
key, use your other hand to press and hold the remote’s POWER
key at the same time (the POWER key turns off).
3. Wait until the POWER key comes on and stays on. Then
release both keys.
4. Point the remote directly at the front panel of the device you
want to control. Press SLOW on the remote and wait 5 seconds.
The remote is testing a batch of 10 codes on your device.
Did your device turn off?
YES: Go to step 5.
NO: Press SLOW again. The remote tests the next batch of
10 codes.
Keep pressing SLOW every 5 seconds until your device turns
off.
5. When your device turns off, press the SKIP BACK key on the
remote and wait at least 2 seconds. The remote tries the
last of the previous ten codes.
Did your device turn on?
YES: Press the OK key. You’re done! You’ve programmed
this device key.
NO: Press SKIP BACK again. The remote tests the next code
in the batch.
Keep pressing SKIP BACK every 2 seconds until your device
turns back on. When it does, press OK.
Note: If you accidentally press the SKIP BACK key after your
device turns on, press the SKIP FWD key. Then, wait two seconds
to see if your device turns off again.
NOTES: Throughout the programming of each key, be sure
to keep the remote pointed at the IR sensor of the device you
are currently programming the remote to control.
Page 4

Test the remote with the device to make sure the device
key is programmed with the correct code for maximum
functionality. If some features don’t work, try a different
code. See the “Testing the Code for Maximum Functionality”
section below for more information.
During the Auto Code Search, the remote ignores keypresses
that aren’t part of the search.
The search times out after two minutes (the POWER key blinks
four times and the last programmed code under that device
key is retained).
The POWER key blinks four times when the remote has gone
through all the codes. The remote exits the Auto Code Search.
If your device hasn’t turned off yet, try a different search
method.
Testing the Code for Maximum Functionality
1. Try a variety of the device’s functions with the remote. If
some device features don’t work, go to the next step to try
a different code.
2. Repeat the Auto Code Search Method from the beginning.
When your device turns off, do not stop searching. Instead,
with the unit now off, continue to press the SLOW key
every 5 seconds until the unit turns back on.
3. Once the unit turns back on, press the SKIP BACK key on
the remote every 2 seconds until your device turns off
again. When your device turns off again, press the OK key.
4. Test the key’s functionality again by attempting to control
a variety of the device’s functions. If the code that has
been stored controls the majority of the device’s functions,
programming is complete. If the code stored does not give
maximum functionality, try another code.
Brand Code Search
The Brand Code Search goes through only the codes for one of
the select brands listed in the accompanying code list. If your
brand of device is listed, this search can be very quick and easy.
IMPORTANT: The Brand Code Search works for TVs, VCRs, DVD
players, satellite receivers, cable boxes and audio devices. The
Brand Code Search does not work for programming this remote
to control DVRs and digital TV converter boxes. Use a different
programming method for these kinds of devices.
TIPS: To program the AUX key, you must rst assign it to a
device type. See the Assigning the AUX Key section.
Each device key is associated with a type of device—the TV is
preset to search for TVs, SAT•CBL•DTC for satellite receivers,
digital TV converters, or cable boxes, DVD•VCR for DVD
players, and AUDIO for audio receivers. To program the
DVD•VCR key to control a PVR or VCR, see the Reassigning the
DVD•VCRKeytoControlaVCR section.
To control combo devices, like TV/DVDs and TV/VCRs, you
need to program each key separately. Each key will control
that part of the combo device.
If the original remote control that came with your device has
separate ON and OFF keys (instead of a single POWER key),
the Brand Code Search might not work with that device. Try
the Direct Code Entry method described later in this manual.
To exit without saving a new code at any point in the Brand
Code Search, press the EXIT key.
1. Manually turn on the device you want to control.
2. Find your device’s brand in the Brand Code list section of
the accompanying code list. Circle the number for your
brand and keep the list handy.
4
Page 5
5
English
3. Press and hold the device key you want to program (the
POWER key illuminates). While you’re holding down the
device key, use your other hand to press and hold the
remote’s POWER key at the same time (the POWER key
turns off).
4. Wait until the POWER key comes on and stays on. Then
release both keys.
5. Look at the numbers you circled for your device’s brand
code. Press those numbers on the remote keypad.
Note: For single-digit brand codes, press the 0 key rst (for
example, 0-5 for 5).
6. Point the remote directly at the front panel of the device
you want to control. Press SKIP FWD on the remote and
wait 2 seconds. The remote is testing a single code for
your device’s brand.
Did your device turn off?
YES: Press the OK key to store the code. You’re done!
You’ve programmed this device key.
NO: Press SKIP FWD again. The remote tests the next code
for your brand.
Keep pressing SKIP FWD every 2 seconds until your device
turns off. When it does, press OK.
NOTES: Throughout the programming of each key, be sure
to keep the remote pointed at the IR sensor of the device you
are currently programming the remote to control.
Test the remote with the device to make sure the device
key is programmed with the correct code for maximum
functionality. If some features don’t work, try a different
code. See the “Testing the Code for Maximum Functionality”
section below for more information.
During the Brand Code Search, the remote ignores keypresses
that aren’t part of the search.
The search times out after two minutes (the POWER key blinks
four times and the last programmed code under that device
key is retained).
The POWER key blinks four times when the remote has gone
through all the codes. The remote exits the Brand Code
Search. If your device hasn’t turned off yet, try a different
search method.
Testing the Code for Maximum Functionality
1. Try a variety of the device’s functions with the remote. If
some device features don’t work, go to the next step to try
a different code.
2. Repeat the Brand Code Search from the beginning. When
the device turns off for the first time, don’t press the
OK key, which would store the same code. Instead, with
the unit now off, continue to press the SKIP FWD key
repeatedly until the unit turns back on.
3. Once the unit turns back on, you have found another code
that operates the device. Press the OK key.
4. Test the key’s functionality again by attempting to control
a variety of the device’s functions. If the code that has
been stored controls the majority of the device’s functions,
programming is complete. If the code stored does not give
maximum functionality, try another code.
Page 6

Direct Code Entry
Direct Code Entry lets you enter a code from the accompanying
code list for your brand of device. It’s not as easy as the other
methods, but it’s potentially the fastest method.
TIPS: To program the AUX key, you must rst assign it to a
device type. See the Assigning the AUX Key section.
Each device key is associated with a type of device—the TV is
preset to search for TVs, SAT•CBL•DTC for satellite receivers,
digital TV converters, or cable boxes, DVD•VCR for DVD
players, and AUDIO for audio receivers. To program the
DVD•VCR key to control a PVR or VCR, see the Reassigning the
DVD•VCRKeytoControlaVCR section.
To control combo devices, like TV/DVDs and TV/VCRs, you
need to program each key separately. Each key will control
that part of the combo device.
1. Manually turn on the device you want to control.
2. Find the Code List that came with the remote. Locate the
section for the type of device you’re trying to program, and
find your brand in that section. Circle the codes for your
brand and keep them handy.
3. Press and hold the device key you want to program (the
POWER key comes on).
While you’re holding down the device key, use your other
hand enter the first five-digit code for your brand in the
code list (the POWER key goes off after the first digit).
4. When you’ve finished entering the five-digit code, keep
holding down the device key and look at the POWER key.
Is the POWER key illuminated?
YES: You’re done! You’ve programmed this device key.
NO, it blinked four times and turned off: You have
either entered a code number that is not in the code lists or
missed a step in the code entry procedure. Try step 3 again.
NOTES
Test the remote with the device to make sure the device
key is programmed with the correct code for maximum
functionality. If some features don’t work, try a different code
in the list.
Remember to enter the code for future reference in the box
provided in the Code Retrieval section of this manual.
If your brand isn’t listed in the code list, use one of the Code
Search methods to program the remote control. (Refer to the
Auto and Manual Code Search methods.)
If you release the device key any time during the Direct Code
Entry procedure, the POWER key blinks four times and the
process is exited. The last programmed code under the device
key is retained.
6
Page 7

7
English
Manual Code Search
The Manual Code Search takes you one-by-one through all the
codes for the device you’re trying to control. When you find the one
that operates your device, you stop the search and store that code.
TIPS: The Manual Code Search method may take a long time
because the remote searches through all of the codes in its
memory one-by-one. If your brand is listed in the Brand Codes
or the Code Lists, rst try the Brand Code Search or the Direct
Code Entry method.
To program the AUX key, you must rst assign it to a device
type. See the Assigning the AUX Key section.
Each device key is associated with a type of device—the TV is
preset to search for TVs, SAT•CBL•DTC for satellite receivers,
digital TV converters, or cable boxes, DVD•VCR for DVD
players, and AUDIO for audio receivers. To program the
DVD•VCR key to control a PVR or VCR, see the Reassigning the
DVD•VCRKeytoControlaVCR section.
To control combo devices, like TV/DVDs and TV/VCRs, you
need to program each key separately. Each key will control
that part of the combo device.
To exit without saving a new code at any point in the Manual
Code Search, press the EXIT key.
1. Manually turn on the device you want to control.
2. Press and hold the device key you want to program (the
POWER key illuminates). While you’re holding down the
device key, use your other hand to press and hold the
remote’s POWER key at the same time (the POWER key
turns off).
3. Wait until the remote’s POWER key comes on and stays on.
Then release both keys.
4. Point the remote directly at the front panel of the device you
want to control. Press SKIP FWD on the remote and wait 2
seconds. The remote is testing a single code for your device.
Did your device turn off?
YES: Press the OK key to store the code. You’re done!
You’ve programmed this device key.
NO: Press SKIP FWD again. The remote tests the next code
for your device.
Keep pressing SKIP FWD every 2 seconds until your device turns
off. When it does, press OK.
TIP: Because there are so many codes, you may have to press
the SKIP FWD key many times—possibly hundreds of times.
Page 8

NOTES
Throughout the programming of each key, keep the remote
pointed at the IR sensor of the device you are programming
the remote to control.
Test the remote with the device to make sure the device
key is programmed with the correct code for maximum
functionality. If some features don’t work, try a different
code. See the “Testing the Code for Maximum Functionality”
section below for more information.
During the Manual Code Search, the remote ignores
keypresses that aren’t part of the search.
The search times out after two minutes (the POWER key blinks
four times and the last programmed code under that device
key is retained).
The POWER key blinks four times when the remote has gone
through all the codes. The remote exits the Manual Code
Search. If your device hasn’t turned off yet, try a different
search method.
Testing the Code for Maximum Functionality
1. Try a variety of the device’s functions with the remote. If
some features of your devices don’t work, go to the next
step to try a different code.
2. Repeat the Manual Code Search and Entry Method from
the beginning. When the device turns off for the first time,
don’t press the OK key, which would store the same code.
Instead, with the unit now off, continue to press the SKIP
FWD key repeatedly until the unit turns back on.
3. Once the unit turns back on, you have found another code
that operates the device. Press the OK key.
4. Test the key’s functionality again by trying a variety of
functions. If the code controls the majority of the device’s
functions, programming is complete. If the code stored
does not give maximum functionality, try another code.
8
Page 9
9
English
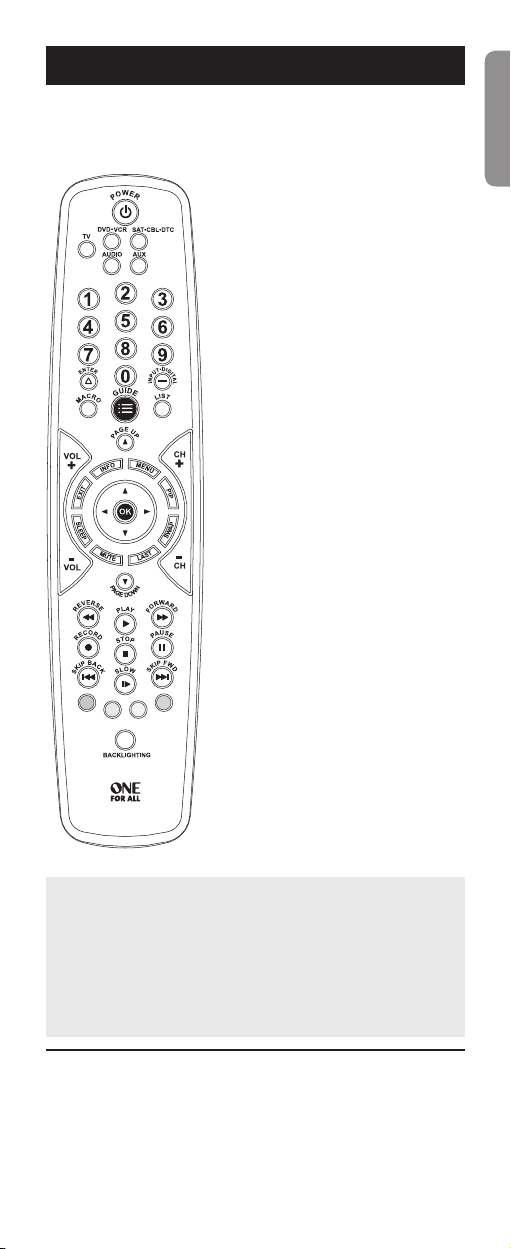
Tour of the Remote
In most cases, the keys on this remote perform the same
functions as the keys on your original remotes once you’ve
programmed this remote to operate your components. Many
keys on this remote have other functions as well.
Illuminated POWER key serves
as an indicator light to provide
feedback.
Device keys (TV, SAT•CBL•DTC,
DVD•VCR, AUDIO, AUX) put
the remote in the right mode to
control your device.
BACKLIGHTING key turns
backlighting on/off.
GUIDE and MENU put the
remote in menu/guide mode;
they also access the same features
as the keys on your original
remotes.
EXIT exits remote programming;
it also performs the same
functions as on your original
remotes.
Arrow keys act as navigation
keys in device guides and menu
systems.
OK key selects your menu
choices.
The MACRO key, along with the
number keys 1–8, let you store
and execute multi-step actions
(macros) in a single keypress
The INPUT and — (dash) key has
three functions: (1) it toggles
through all the video or audio
sources connected to your TV or
audio device; (2) when the remote
is in VCR mode, this button toggles
between VCR and the TV input;
(3) when you’re entering digital
channel numbers directly, this
button lets you separate the main
channel number from the subchannel number (such as 59.1).
Actual model may vary from illustration
IMPORTANT
Because this remote controls more than one device, you must
rst “tell” the remote which device you wish to operate. That
means, if you wish to operate your TV, you must rst press the
TV key to put the remote in the TV Mode. The remote stays
in that device mode until you press a different device key.
For example, if your remote is in TV Mode and you want to
operate the DVD player, you must press the DVD•VCR key to
change device modes.
Backlighting
Backlight illumination helps you see the remote control keys
better in the dark. You can turn backlight illumination on or off
by pressing the BACKLIGHTING key. Backlighting stays on as
long as keys are being pressed and turns off four seconds after
the last keypress. Once the backlight time has timed out, any
keypress will reactivate it. If the backlight illumination is on,
and you press the backlight key, the backlight turns off.
Page 10

Advanced Functions
Assigning the AUX Key
To program the AUX key, you must first assign it to a device type.
1. Press and hold the AUX key. The POWER key turns on.
2. While holding down the AUX key, press and release the number
key on the keypad for the device you want to control (the
POWER key turns off):
Additional TV press 1
VCR or DVR press 2
Additional DVD press 3
Additional audio device press 4
Additional satellite receiver, press 5
cable box, or DTV converter
3. Release the AUX key. The POWER key blinks four times and
then turns off. The AUX key is now set to control the device
type you selected.
4. Follow the directions in the auto, brand, direct entry, or manual
code search to program the AUX key.
Reassigning the DVD•VCR Key to
Control a VCR
TheDVD•VCRkeydefaultstocontrolaDVDplayer.Ifyouwant
theDVD•VCRkeytocontrolaVCR,youmustreassignit.
1.PressandholdtheDVD•VCRkey.ThePOWERkeyilluminates.
KeepholdingdowntheDVD•VCRkey.
2.WhileholdingdowntheDVD•VCRkey,pressandreleasethe
number 2 key on the keypad. The POWER key turns off.
3.ReleasetheDVD•VCRkey.ThePOWERkeyblinksfourtimesand
thenturnsoff.TheDVD•VCRkeyisnowsettocontrolaVCR.
4. Follow the directions in the auto, brand, direct entry, or manual
codesearchtoprogramtheDVD•VCRkeyforyourVCR.
Volume Punch-Through
Volume Punch-Through allows the VOL and MUTE keys,
whenpressedinSAT•CBL•DTCorDVD•VCRmodes,to“punch
through” to either TV or AUDIO, whichever was accessed last.
Volume Punch-Through occurs automatically and allows you
to control the volume without exiting the current mode. (If
the AUX key has been programmed with a TV or AUDIO code,
volume can punch through to these devices as well.)
Note: Volume Punch-Through does not occur in cases where
the component code has its own volume/mute controls, such as
some satellite receivers.
Advanced Punch-Through
Volume punch-through as described above occurs automatically.
Advanced punch-through lets you specify one device for all
volumecommandsforeachnon-audiomode(SAT•CBL•DTCor
DVD•VCR).YoucanspecifyeithertheTVorAUDIOdevice(oran
AUX key operating a TV or Audio device).
1. Press and hold the key whose volume commands you want
to send to the TV or audio device. The POWER key turns on.
2. While holding down the device key, press and hold the VOL
up key. The POWER key turns off.
3. After holding down both keys for 3 seconds, the POWER key
turns on and stays on. Release both keys.
4. Press and release the device key you want the Volume
Punch-Through to be directed to from the selected mode
(TV, AUDIO or AUX key). The POWER key flashes.
Note: The device key pressed in step 4 must be programmed
with a TV or AUDIO component. If an invalid key is pressed, the
POWER key ashes four times, then turns off.
Important: Once you have programmed any device with a
specied Volume Punch-Through, the Volume Punch-Through
for all other devices defaults to AUDIO. If you do not want
other components’ Volume Punch-Through to default to
AUDIO, you must manually program them, using steps 1-4.
10
Page 11

11
English
Transport Key Punch-Through
Transport Key Punch Through allows the transport keys
(REVERSE, PLAY, FORWARD, RECORD, STOP, PAUSE, SKIP FWD,
SKIP BACK, and SLOW), when pressed in TV, SAT, CABLE and
AUDIOmodes,to“punchthrough”toDVD•VCRorCDmode,
whichever was accessed last. Transport Key Punch-Through occurs
automatically and allows you to use the transport keys without
exiting the current mode. For example, if the transport keys were
last used in DVD mode and accessed again after pressing the TV
key, they will punch through to the DVD. The default Transport
Key Punch Through is set to DVD for TV, SAT, CABLE and AUDIO.
Note: Transport Key Punch Through does not occur in cases
where the component code has its own transport key data, such
as a satellite receiver with a built-in DVR.
Channel Lock
Channel lock automatically sends channel commands, like the
CH, LAST, and 0–9 number keys, to your satellite receiver, cable
box, or digital TV converter when you’re in TV mode. This can
save you keypresses if you use a device other than your TV to
change channels.
To turn channel lock on:
1. Press and hold the device key for the device you use to
change channels. While you’re holding down this device
key, use your other hand to press and hold the remote’s CH
up key at the same time.
2. Wait until the remote’s POWER key comes on and stays on.
Then release both keys.
3. Press ENTER to lock channel commands to this device.
To turn channel lock off:
1. Press and hold the TV key. While you’re holding down the
TV key, use your other hand to press and hold the remote’s
CH down key at the same time.
2. Wait until the remote’s POWER key comes on and stays on.
Then release both keys.
3. Press ENTER to start changing channels with your TV.
Code Retrieval
Once you’ve programmed the remote to control your devices, you
may want to record the codes for future reference. If you used
the Direct Code Entry method, this is easy. Just find the codes you
entered and make a note of them in the boxes below. If you used
one of the Code Search methods to program your remote or if
you used the Direct Entry method but don’t remember the code,
you will need to retrieve each device’s five-digit code. Retrieving
the actual code and writing it down will save you time if you ever
need to program the remote again. If the codes are recorded, you
can use the Direct Entry method to reprogram your remote to
control your devices, which is quick and easy.
TIPS: All TV codes start with the number 1; all VCR and DVR
codes start with the number 2; all DVD player codes, the
number 3; all audio device codes, the number 4; and all satellite
receiver, cable box, and digital TV converters, the number 5.
To exit the Code Retrieval Mode at any time, press the EXIT key.
If you press an invalid key during the Code Retrieval process,
the remote will not respond. If you do not press a valid Code
Retrieval key (TV, SAT•CBL•DTC, DVD•VCR, AUDIO, AUX, INFO,
EXIT), Code Retrieval times out after 15 seconds. The POWER
key blinks four times, and then turns off.
continues on next page...
Page 12

1. Pressandholdthedevicekey(TV,SAT•CBL•DTC,DVD•VCR,
AUDIO, or AUX) whose code you wish to retrieve. The
POWER key illuminates. Keep pressing the device key.
2. While holding the device key down, press and hold the
INFO key. The POWER key illumination turns off. After
holding down both keys for three seconds, it turns back on.
3. Release both keys. The POWER key remains illuminated.
4. Starting with the number 1 key, press and release each
number key on the keypad in the following order: 1-9, then
0. The number that causes the POWER key to blink is the
first number of the code. As you find each number of the
code, write it down for future reference. Then start with the
number 1 key again.
5. Repeat step 4 until you have retrieved all five numbers in
the code. After the fifth number is retrieved, the POWER
key blinks briefly, then turns off.
Quick Code Reference
Device Type Code
Learning
Codes from the Code Lists include basic functionality for each
component they control. Once you have programmed in the
code for your specific component, you can customize the
universal remote to include certain functions from your original
remote(s) that were not embedded in the preset code. Your
universal remote has the ability to learn and store commands
from your original remote(s) under the mode(s) of your choice.
The universal remote can store up to 50 key commands.* Only
one original remote can be learned under any one mode (e.g.,
the universal remote can learn commands for one TV remote,
one VCR remote, etc.).
* Some learned signals require more memory than others. In
these cases, fewer key commands can be learned.
Before First-Time Learning
Before you start learning keys for the first time, clear any
stored learning information that might be in the remote. This
lets you begin with a clean slate.
1. Press and hold the EXIT key (the POWER key illuminates).
While you’re holding down the EXIT key, use your other
hand to press and hold the POWER key (the POWER key
illumination turns off).
2. Wait until the POWER key comes on and stays on. Then
release both keys. The remote is now in the Master Clear
mode.
3. Press the OK key to confirm the Clear operation. The
POWER key remains on for 2 seconds, then turns off. All
Learned functions for all components are now cleared; all
other programming remains intact.
12
Page 13

13
English
Learning From Your Original Remotes
1. Place your original remote and the learning remote on a
flat surface as shown below. Point the top of your original
remote at the top of the learning remote. The IR LED on
the original remote should be pointing directly at the
learning remote’s learning sensor, located on the top of the
remote. The remotes should be 1–2 inches apart.
1–2”
2. On the learning remote, press and hold
the device key you want to use the
learned function in (the POWER key
turns on and remains on). While holding
down the device key, use your other
hand to press and hold the RECORD key
(the POWER key illumination turns off).
3. Wait until the POWER key turns on and
stays on. Then release both keys. The
remote is now in Learning mode.
4. On the learning remote, press the
key you want to use for the learned
function. The illuminated POWER key
blinks once, then remains on.
5. On the original remote, press and hold the key you want
to teach to the universal remote. Wait until the POWER key
on the learning remote blinks once, then release the key
on the original remote. The learning remote has finished
learning this key.
Note: If a problem occurs during the Learning process, the
illuminated POWER key blinks four times, but the unit remains
in the Learning mode. If this occurs, adjust the distance
between the remotes slightly and repeat from step 4.
6. To learn another key for this device mode: Repeat steps
4 and 5 for the key you want to learn.
To learn keys in a different device mode: Repeat steps
2–5 for the next device mode.
To save learned keys and exit learning: press the SLEEP
key on the learning remote.
Learning Tips
• Make sure the batteries in both the learning and original
remote(s) are fresh.
• Incandescent or low-energy light can cause interference
with IR transmissions. When using the Learning function,
keep remotes at least three feet away from such light
sources.
• Make sure the original remote is in the same mode as the
universal remote so that the Learned key is assigned to
the correct mode.
• You cannot learn any commands under the MACRO,
SLEEP, or BACKLIGHTING keys.
• If you use the VOL+/- keys to learn new functions, the
volume control will not adjust the volume in the Volume
Punch Through mode.
• To exit Learning mode at any time, press the SLEEP key.
• The remote exits Learning mode if it has run out of
memory to store new learned keys.
• To ensure that your units are compatible and to increase
your familiarity with the Learning process, experiment
by learning two or three keys initially. Then, carry out
a Master Clear before learning all the desired functions
from your original remote.
Page 14

Macros
The Macro feature lets you execute a sequence of commands
with one keypress. Any sequence of commands that you
regularly perform (up to a maximum of 15 per macro) can be
stored as a Macro under one of the 1–8 number keys (up to 8
macros).
Programming a Macro
Important: Before you start, make sure your remote is
programmed to control your devices and that you’ve learned all
the keys you want to learn from your original remotes.
1. Press and hold the MACRO key until
the POWER key turns on and remains
on. The remote is now in Macro
Programming mode.
2. Press the number key (1–8) you want
to use for this macro. The POWER key
blinks once, then remains on.
Note: If you do not press a macro number
key within 15 seconds (or if you press a
macro number key that already has a
macro programmed), the POWER key
blinks four times and turns off. The remote
exits macro programming mode, and no
changes are made to existing Macros.
3. Press the device key for the first device you use in the
macro. The POWER key blinks once and remains on.
4. Press each key you want to use in this Macro, in the exact
order the keys would be pressed if you were executing the
sequence yourself. The POWER key blinks each time a key is
pressed. Continue this process for all keys to be included in
the Macro sequence under the given component mode.
Important: If you are using different devices in this macro, you
must press each device key before you start pressing the keys
for that device. For example, if you’re turning on the TV, then
playing a DVD, you must press the TV key, then POWER, then
DVD•VCR, then PLAY.
5. Once you are finished programming the Macro, press the
MACRO key to save it. The POWER key illumination turns
off, and the Macro is now ready to use.
Notes: To exit Macro programming at any time, press the
EXIT key. The POWER key blinks four times, then turns off. No
changes are made to existing Macros.
If you press a key that has a Learned function, the Learned
function is assigned to the Macro sequence.
If you program all 15 keys into a Macro, the Macro is
automatically saved after the 15th keypress.
The commands within a Macro must be programmed in
sequential order. A delay of 0.5 seconds is used between
sending each command in a programmed Macro sequence.
You cannot program a Macro within a Macro.
Using a Macro
1. Press the MACRO key.
2. Press the number key assigned to the Macro sequence you
want to execute. The POWER key blinks once, then remains
on.
As the remote sends each command in the Macro sequence,
the POWER key blinks once. After the remote sends the last
command in the Macro sequence, the POWER key illumination
turns off.
14
Page 15

15
English
An Example Macro
Thisexampleshowsan“allon”macroforahometheater
with a TV, DVD player, and satellite receiver.
1. Press and hold the MACRO key until the POWER key turns
on and remains on.
2. Press the 1 key to tell the remote where to store the macro.
3. Press the TV key to put the remote in TV mode.
4. Press the POWER key to turn the TV on.
5.PresstheDVD•VCRkeytoputtheremoteinDVDmode.
6. Press the POWER key to turn on the DVD player.
7.PresstheSAT•CBL•DTCkeytoputtheremoteinthatmode.
8. Press the POWER key to turn on the satellite receiver.
9. Press the MACRO key to save.
To execute the Macro, press the MACRO key. Press the 1 key.
Your TV, DVD player, and satellite receiver should all power on.
Deleting a Macro
1. Press and hold the MACRO key until the POWER key turns
on and remains on.
2. Press the EXIT key. The POWER key blinks once, then
remains on.
3. Press the number key (1–8) where the macro you want to
delete is stored. The POWER key blinks once, then remains
on.
4. Press the OK key to confirm the Macro Clear operation.
The POWER key stays on for 2 seconds, then turns off. The
selected Macro is deleted.
Note: If you do not press the OK key within 15 seconds (or if
you press a different key), the POWER key blinks four times
and turns off. The remote exits macro deletion mode, and no
changes are made to existing Macros.
5. Repeat steps 1-4 for any other existing Macros to be
cleared.
Troubleshooting
Problem: The remote does not operate your device.
• Makesuretheremoteisinthecorrectmodebypressingthe
correspondingdevicekey(TV,SAT•CBL•DTC,DVD•VCR,AUDIO,AUX).
This tells the remote which device to operate.
• Removeanyobstaclesbetweentheremoteandthedevice.Makesure
you’re aiming the remote at the device’s IR sensor.
• Makesurethebatteriesarefreshandareproperlyinstalled.Replace
the batteries with three new AAA batteries, if necessary (see the
Battery Installation section).
Problem: The remote can’t be programmed to operate your device.
• Ifyouaretestingtheremotewhileprogrammingit,youmaybe
too far away from the device or at a wrong angle. There must be
an unobstructed path between the remote and the IR sensor on the
device. Move closer and make sure you point the remote at the device
you’re trying to control.
• Ifyou’reusingtheDirectEntryprogrammingmethodtoenterthe
codes for your brand and the unit is still not functioning properly, try
the auto, brand, or manual search method.
• Tocontrolcombounits,likeTV/VCRsorTV/DVDs,youmustprogram
the individual corresponding device keys to control each part of the
combo unit. Once programmed successfully, the TV key controls the TV
functions,andtheDVD•VCRkeycontrolstheDVDorVCRfunctions.
• Makesurethebatteriesarefreshandareproperlyinstalled.
Problem: The remote doesn’t perform commands properly.
• Makesuretheremoteisinthecorrectmodebypressingthe
correspondingdevicekey(TV,SAT•CBL•DTC,DVD•VCR,AUDIO,AUX).
This tells the remote which device to operate.
Page 16

• Makesuredeviceisready(forexample,theDVDplayerhasadisc
loaded).
• Youmayhavepressedaninvalidkeyforthemodetheremoteisin.
• Ifyou’retryingtoenterachannelnumberdirectly,trypressingthe
ENTER key after entering the channel number as this is a requirement
of certain models and brands.
• Thereisapossibilitythataprogrammedcodemayonlybeableto
control some of your device features (for example, only turns a device
on and off). To confirm that the device key is programmed with the
correct code for maximum functionality, test the device. Attempt to
control a variety of the device’s functions with the remote. If some of
the features of your devices don’t work, try programming the remote
with a different code in the list using the Direct Code Entry Method,
until you find the code that allows the remote to control the majority
of your device’s functions. Different codes can provide different levels
of functionality.
Problem: The POWER key does not illuminate when you press a key.
• Youmayhavepressedaninvalidkeyforthemodetheremoteisin.
• Makesuretheremoteisinthecorrectmodebypressingthe
correspondingdevicekey(TV,SAT•CBL•DTC,DVD•VCR,AUDIO,AUX).
This tells the remote which device to operate.
• Makesurethebatteriesarefreshandareproperlyinstalled.Replace
the batteries with three new AAA batteries, if necessary (see the
Battery Installation section).
Problem: The remote will not change channels on device.
• Makesuretheremoteisinthecorrectmodebypressingthe
correspondingdevicekey(TV,SAT•CBL•DTC,DVD•VCR,AUDIO,AUX).
This tells the remote which device to operate.
• PresstheENTERkeyafteryouenterachannelnumber.
• Removeanyobstaclesbetweentheremoteandthedevice.Makesure
to aim the remote at the IR sensor on the device.
Problem: The device’s menu does not appear on the TV screen.
• MakesureyouhaveconnectedthedevicetoyourTVproperlyand
selected the correct input. (See your devices’ Owner’s Manuals for
proper connection procedures.)
• Makesuretheremoteisinthecorrectmodebypressingthe
correspondingdevicekey(TV,SAT•CBL•DTC,DVD•VCR,AUDIO,AUX).
This tells the remote which device to operate.
• Menuaccessisn’tsupportedforallbrands.Youmayneedtouseyour
original remote control to access menu functions for some devices.
Problem: The Learning process cannot be completed successfully.
• Replacebatteriesinboththelearningremoteandtheoriginalremote.
• Makesurethedistancebetweentheremotesisapproximately1–2inches.
• DonotconducttheLearningprocessnearanincandescentlamp.
• Thelearningremote’smemorycapacitymaybefull(50Learned
commands).
• TheoriginalremotemaynotbecompatiblewiththeLearning
procedure.
For more information, please visit www.oneforall.com
Consumer Help Line: 1 (800) 315-0990
Additional Information
ONE FOR ALL® is the registered trademark of Universal Electronics Inc.
Audiovox Accessories Corporation is the Licensee of the ONE FOR ALL® brand
for North America.
© 2010 by Universal Electronics Inc. No part of this publication may be
reproduced, transmitted, transcribed, stored in any retrieval system, or
translated to any language, in any form or by any means, electronic,
mechanical, magnetic, optical, manual, or otherwise, without the prior
written permission of Universal Electronics Inc.
The One For All® 5-Device Universal Remote Control is compatible for use in
North America, excluding Mexico.
This One For All® 5-Device Universal Remote Control is covered by one or
more of the following US Patents:
6,587,067 6,496,135 5,515,052 5,959,751 6,587,067 5,481,256
OARN05G 1/10
16
Page 17

Paso 1: Instale las baterías
El control remoto necesita tres baterías alcalinas AAA (no
suministradas).
Para instalar las baterías:
1. Retire la tapa del compartimiento de las baterías.
2. Inserte las baterías, cerciorándose de que las polaridades
(+) y (–) correspondan con el diagrama que aparece en el
compartimiento de las baterías.
3. Vuelva a colocar la tapa del compartimiento de las baterías en su
posición.
Precauciones sobre las Baterías:
• No combine baterías nuevas y viejas.
• No combine diferentes tipos de baterías: alcalinas, estándar
(carbón-zinc) o recargables (níquel-cadmio).
• Siempre remueva de inmediato baterías viejas, débiles o
desgastadas, y recíclelas o deséchelas según lo disponen las normas
locales y nacionales.
Ahorro de Batería
Su control remoto universal ahorra la potencia de las baterías al
apagar automáticamente cualquier tecla que se oprima por más de
60 segundos. Esta acción prolonga la vida útil de las baterías en caso
de que el control remoto quede pillado en un lugar donde las teclas
permanezcan oprimidas, tal como entre los cojines de un sofá.
Paso 2: Programe el control remoto
Para utilizar este control remoto universal con su sistema de
entretenimiento en el hogar, necesitará primero programarlo para manejar
sus dispositivos. Para programar el control remoto universal para manejar
sus dispositivos, utilice uno de los cuatro métodos a continuación.
• La Búsqueda Automática de Códigos recorre
automáticamente todos los códigos del dispositivo que desea
manejar. Éste es el método más fácil, pero a veces toma más
tiempo que algunos de los demás métodos de programación.
• La Búsqueda de Códigos por Marca busca a través de los
códigos según la marca de dispositivos seleccionada. No es tan
fácil como la búsqueda de códigos automática, pero muchas
veces puede ser más rápida.
• La Entrada Directa de Códigos le permite ingresar un
código de la lista de códigos suministrada para la marca de
su dispositivo. No es tan fácil como los otros métodos, pero es
posiblemente el más rápido. Aviso: Por lo general, la Entrada
Directa de Códigos es el mejor método para utilizar con
dispositivos de audio.
• La Búsqueda Manual de Códigos le permite recorrer
manualmente todos los códigos del dispositivo que desea
manejar.
Cuidado y Mantenimiento
• Mantenga el control remoto seco. Si se moja, séquelo
inmediatamente.
• Utilice y almacene el control remoto únicamente en entornos de
temperatura normal.
• Maneje el control remoto de forma cuidadosa. No lo deje caer.
• Mantenga el control remoto resguardado del polvo y la
suciedad.
• Limpie el control remoto con un paño húmedo de vez en
cuando para mantenerlo en buenas condiciones de operación.
• Modicar o sabotear los dispositivos internos del control
remoto podría ocasionar desperfectos y anular la garantía.
Español
17
Page 18

Búsqueda Automática de Códigos
La Búsqueda Automática de Códigos recorre automáticamente todos
los códigos del dispositivo que desea manejar. Cuando encuentre el que
maneja su dispositivo, puede detener la búsqueda y guardar el código.
CONSEJOS: Para programar la tecla AUX, necesitará primero
asignarla a un tipo de dispositivo. Consulte la sección Cómo
Asignar la Tecla AUX.
Cada tecla de dispositivo está asociada a un tipo de dispositivo—TV
está congurada para buscar TV, SAT•CBL•DTC para receptores de
satélite, convertidores de TV digital o aparatos de cable, DVD•VCR
para lectores de DVD y AUDIO para receptores de audio. Para
programar la tecla DVD•VCR manejar una PVR o VCR, consulte la
sección Cómo Reasignar la Tecla DVD•VCR para Manejar una VCR.
Para manejar dispositivos de combinación tales como TV/DVD y
TV/VCR, necesitará programar cada tecla por separado. Cada tecla
manejará dicha parte del dispositivo de combinación.
Si el control remoto original incluido con su dispositivo incluye
teclas ON y OFF separadas (en lugar de una sola tecla POWER),
la Búsqueda Automática de Códigos quizá no funcione con ese
dispositivo. Intente el método de Entrada Directa de Códigos
descrito más adelante en este manual.
Para salir en cualquier momento de la Búsqueda Automática de
Códigos sin guardar un código nuevo, oprima la tecla EXIT.
1. Encienda manualmente el dispositivo que desea manejar.
2. Oprima y sostenga la tecla de dispositivo que desea programar
(la tecla POWER se ilumina). A la vez que sostiene la tecla
de dispositivo, utilice la otra mano para oprimir y sostener
simultáneamente la tecla POWER del control remoto (la tecla
POWER se apaga).
3. Espere hasta que la tecla POWER se ilumine y permanezca
iluminada. Luego, suelte ambas teclas.
4. Mantenga el control remoto apuntado directamente al panel
frontal del dispositivo que desea manejar. Oprima la tecla SLOW
del control remoto y espere 5 segundos. El control remoto está
probando un grupo de 10 códigos para el dispositivo.
¿Se apagó el dispositivo?
SÍ: Vaya al Paso 5.
NO: Oprima SLOW nuevamente. El control remoto prueba el
próximo grupo de 10 códigos.
Continúe oprimiendo SLOW cada 5 segundos hasta que el
dispositivo se apague.
5. Cuando el dispositivo se apague, oprima la tecla SKIP BACK del
control remoto y espere por lo menos 2 segundos. El control
remoto prueba el último código del grupo anterior de 10 códigos.
¿Se encendió el dispositivo?
SÍ: Oprima la tecla OK. ¡Listo! La tecla de dispositivo está
programada.
NO: Oprima SKIP BACK nuevamente. El control remoto prueba
el próximo código en el grupo de códigos.
Continúe oprimiendo SKIP BACK cada 2 segundos hasta que el
dispositivo se encienda. Cuando se encienda, oprima STOP.
Aviso: Si oprime accidentalmente la tecla SKIP BACK luego
de que el dispositivo se encienda, oprima la tecla SKIP FWD.
Luego, espere dos segundos para ver si su dispositivo se vuelve
a apagar.
NOTAS: A través de la programación de cada tecla, asegúrese
de mantener el control remoto apuntado directamente al sensor
infrarrojo del dispositivo que está actualmente programando con
el control remoto.
18
Page 19

19
Español
Pruebe el control remoto con el dispositivo para asegurarse que
la tecla de dispositivo esté programada con el código correcto y
garantizar así su máxima funcionalidad. Si no puede utilizar alguna
de las funciones, intente con otro código. Para obtener mayor
información, consulte la sección “Cómo Probar el Código para
Obtener Máxima Funcionalidad” a continuación.
Durante la Búsqueda Automática de Códigos, el control remoto
ignora la opresión de teclas que no son parte de la búsqueda.
La búsqueda se detendrá luego de dos minutos (la tecla POWER
parpadea cuatro veces, y se retiene el último código programado
bajo la tecla de dispositivo).
La tecla POWER parpadea cuatro veces cuando el control remoto
ha recorrido todos los códigos. El control remoto sale del método
de Búsqueda Automática de Códigos. Si su dispositivo aún no se ha
apagado, intente un método de búsqueda diferente.
Cómo Probar el Código para Obtener Máxima Funcionalidad
1. Pruebe una variedad de funciones del dispositivo con el control
remoto. Si no puede utilizar alguna de las funciones del
dispositivo, vaya al próximo paso e intente un código diferente.
2. Repita la Búsqueda Automática de Códigos desde el comienzo.
Cuando su dispositivo se apague, no detenga la búsqueda. En
vez, con la unidad apagada, continúe oprimiendo la tecla SLOW
cada 5 segundos hasta que la unidad se vuelva a encender.
3. Cuando se vuelva a encender la unidad, oprima la tecla SKIP
BACK en el control remoto cada 2 segundos hasta que el
dispositivo se vuelva a apagar. Cuando el dispositivo se vuelva a
apagar, oprima la tecla OK.
4. Nuevamente, pruebe la funcionalidad de la tecla intentando
controlar una variedad de funciones del dispositivo. Si el código
que se ha almacenado controla la mayoría de las funciones del
dispositivo, entonces habrá concluido la programación. Si el
código guardado no brinda una máxima funcionalidad, intente
otro código.
Búsqueda de Códigos por Marca
La Búsqueda de Códigos por Marca recorre sólo los códigos de una
de las marcas seleccionadas que aparecen en la lista de códigos
suministrada. Si la marca del dispositivo aparece en la lista,
posiblemente la búsqueda se llevará a cabo de manera fácil y rápida.
IMPORTANTE: La Búsqueda de Códigos por Marca funciona con
televisores, VCR, lectores de DVD, receptores de satélite, dispositivos
de audio y aparatos de cable. La Búsqueda de Códigos por Marca no
funciona para programar este control remoto con el n de manejar
unidades DVR y convertidores de TV digital. Utilice un método de
programación diferente para estos tipos de dispositivos.
CONSEJOS: Para programar la tecla AUX, necesitará primero
asignarla a un tipo de dispositivo. Consulte la sección Cómo
Asignar la Tecla AUX.
Cada tecla de dispositivo está asociada a un tipo de dispositivo—TV
está congurada para buscar TV, SAT•CBL•DTC para receptores de
satélite, convertidores de TV digital o aparatos de cable, DVD•VCR
para lectores de DVD y AUDIO para receptores de audio. Para
programar la tecla DVD•VCR manejar una PVR o VCR, consulte la
sección Cómo Reasignar la Tecla DVD•VCR para Manejar una VCR.
Para manejar dispositivos de combinación tales como TV/DVD y
TV/VCR, necesitará programar cada tecla por separado. Cada tecla
manejará dicha parte del dispositivo de combinación.
Si el control remoto original incluido con su dispositivo incluye
teclas ON y OFF separadas (en lugar de una sola tecla POWER),
la Búsqueda de Códigos por Marca quizá no funcione con ese
dispositivo. Intente el método de Entrada Directa de Códigos
descrito más adelante en este manual.
Para salir en cualquier momento de la Búsqueda de Códigos por
Marca sin guardar un código nuevo, oprima la tecla EXIT.
1. Encienda manualmente el dispositivo que desea manejar.
2. Encuentre la marca del dispositivo en la sección de Códigos por
Marca de la lista de códigos suministrada. Marque con un círculo
el número de la marca y mantenga la lista a mano.
continúa en la página siguiente...
Page 20

3. Oprima y sostenga la tecla de dispositivo que desea programar
(la tecla POWER se ilumina). A la vez que sostiene la tecla
de dispositivo, utilice la otra mano para oprimir y sostener
simultáneamente la tecla POWER del control remoto (la tecla
POWER se apaga).
4. Espere hasta que la tecla POWER se ilumine y permanezca
iluminada. Luego, suelte ambas teclas.
5. Fíjese en los números que marcó para los números de código de
la marca del dispositivo. Oprima dichos números en el teclado
del control remoto.
Aviso: Para los códigos de marca de un solo dígito, oprima la
tecla 0 primero (por ejemplo, 0-5 para 5).
6. Mantenga el control remoto apuntado directamente al panel
frontal del dispositivo que desea manejar. Oprima la tecla SKIP
FWD del control remoto y espere 2 segundos. El control remoto
está probando un código para la marca del dispositivo.
¿Se apagó el dispositivo?
SÍ: Oprima la tecla OK para guardar el código. ¡Listo! La tecla de
dispositivo está programada.
NO: Oprima SKIP FWD nuevamente. El control remoto prueba el
próximo código para su marca.
Continúe oprimiendo SKIP FWD cada 2 segundos hasta que el
dispositivo se apague. Cuando se apague, oprima OK.
NOTAS: A través de la programación de cada tecla, asegúrese
de mantener el control remoto apuntado directamente al sensor
infrarrojo del dispositivo que está actualmente programando con
el control remoto.
Pruebe el control remoto con el dispositivo para asegurarse que
la tecla de dispositivo esté programada con el código correcto y
garantizar así su máxima funcionalidad. Si no puede utilizar alguna
de las funciones, intente con otro código. Para obtener mayor
información, consulte la sección “Cómo Probar el Código para
Obtener Máxima Funcionalidad” a continuación.
Durante la Búsqueda de Códigos por Marca, el control remoto
ignora la opresión de teclas que no son parte de la búsqueda.
La búsqueda se detendrá luego de dos minutos (la tecla POWER
parpadea cuatro veces, y se retiene el último código programado
bajo la tecla de dispositivo).
La tecla POWER parpadea cuatro veces cuando el control remoto
ha recorrido todos los códigos. El control remoto sale del método
de Búsqueda de Códigos por Marca. Si su dispositivo aún no se ha
apagado, intente un método de búsqueda diferente.
Cómo Probar el Código para Obtener Máxima Funcionalidad
1. Pruebe una variedad de funciones del dispositivo con el control
remoto. Si no puede utilizar alguna de las funciones de sus
dispositivos, vaya al próximo paso e intente un código diferente.
2. Repita la Búsqueda de Códigos por Marca desde el comienzo.
Cuando el dispositivo se apague por primera vez, no oprima la
tecla OK, con la cual quedaría guardado el mismo código. En
vez, con la unidad apagada, continúe oprimiendo la tecla SKIP
FWD repetidamente hasta que la unidad se vuelva a encender.
3. Si se vuelve a encender la unidad, habrá encontrado otro código
que puede manejar ese dispositivo. Oprima OK.
4. Pruebe la funcionalidad de la tecla nuevamente intentando
una variedad de funciones. Si el código controla la mayoría
de las funciones del dispositivo, entonces habrá concluido la
programación. Si el código guardado no brinda una máxima
funcionalidad, intente otro código.
20
Page 21

21
Español
Entrada Directa de Códigos
La Entrada Directa de Códigos le permite ingresar un código de la lista
de códigos suministrada para la marca de su dispositivo. No es tan fácil
como los otros métodos, pero es posiblemente el más rápido.
CONSEJO: Para programar la tecla AUX, necesitará primero
asignarla a un tipo de dispositivo. Consulte la sección Cómo
Asignar la Tecla AUX.
Cada tecla de dispositivo está asociada a un tipo de dispositivo—TV
está congurada para buscar TV, SAT•CBL•DTC para receptores de
satélite, convertidores de TV digital o aparatos de cable, DVD•VCR
para lectores de DVD y AUDIO para receptores de audio. Para
programar la tecla DVD•VCR manejar una PVR o VCR, consulte la
sección Cómo Reasignar la Tecla DVD•VCR para Manejar una VCR.
Para manejar dispositivos de combinación tales como TV/DVD y
TV/VCR, necesitará programar cada tecla por separado. Cada tecla
manejará dicha parte del dispositivo de combinación.
1. Encienda manualmente el dispositivo que desea manejar.
2. Encuentre la Lista de Códigos suministrada con el control
remoto. Encuentre la sección para el tipo de dispositivo que
desea programar, y localice la marca en esa sección. Marque con
un círculo los códigos para la marca y manténgalos a mano.
3. Oprima y sostenga la tecla de dispositivo que desea programar
(la tecla POWER se ilumina).
Mientras oprime la tecla de dispositivo, ingrese con la otra
mano el primer código de cinco dígitos para la marca de la lista
de códigos (la tecla POWER se apaga luego del primer dígito).
4. Cuando haya ingresado el código de cinco dígitos, continúe
oprimiendo la tecla de dispositivo y observe la tecla POWER.
¿Se iluminó la tecla POWER?
SÍ: ¡Listo! La tecla de dispositivo está programada.
No, parpadeó cuatro veces y se apagó: Ha ingresado un
número de código que no se encuentra en las listas de códigos
u omitió un paso en el procedimiento de entrada de códigos.
Intente el paso 3 nuevamente.
NOTAS
Pruebe el control remoto con el dispositivo para asegurarse que
la tecla de dispositivo esté programada con el código correcto y
garantizar así su máxima funcionalidad. Si no puede utilizar alguna
de las funciones, intente con otro código de la lista.
Recuerde ingresar el código para referencia futura en el recuadro
provisto en la sección Recuperación de Códigos de este manual.
Si la marca de su dispositivo no aparece en la lista de códigos,
utilice uno de los métodos de Búsqueda de Códigos para
programar el control remoto. (Consulte los métodos de Búsqueda
Automática y Manual de Códigos.)
Si suelta la tecla de dispositivo en cualquier momento durante el
proceso de Entrada Directa de Códigos, la tecla POWER parpadea
cuatro veces, y se sale del proceso. Se retendrá el último código
programado bajo la tecla de dispositivo.
Page 22

Búsqueda Manual de Códigos
La Búsqueda Manual de Códigos le permite recorrer uno por uno
todos los códigos del dispositivo que desea manejar. Cuando
encuentre el que maneja su dispositivo, puede detener la búsqueda y
guardar el código.
CONSEJOS: El método de Búsqueda Manual de Códigos podría
tomar más tiempo porque el control remoto busca a través de
todos los códigos en su memoria uno por uno. Si su marca aparece
en las Listas de Códigos por Marca o Listas de Códigos, intente
primero la Búsqueda de Códigos por Marca o el método de
Entrada Directa de Códigos.
Para programar la tecla AUX, necesitará primero asignarla a un
tipo de dispositivo. Consulte la sección Cómo Asignar la Tecla AUX.
Cada tecla de dispositivo está asociada a un tipo de dispositivo—TV
está congurada para buscar TV, SAT•CBL•DTC para receptores de
satélite, convertidores de TV digital o aparatos de cable, DVD•VCR
para lectores de DVD y AUDIO para receptores de audio. Para
programar la tecla DVD•VCR manejar una PVR o VCR, consulte la
sección Cómo Reasignar la Tecla DVD•VCR para Manejar una VCR.
Para manejar dispositivos de combinación tales como TV/DVD y
TV/VCR, necesitará programar cada tecla por separado. Cada tecla
manejará dicha parte del dispositivo de combinación.
Para salir en cualquier momento de la Búsqueda Manual de
Códigos sin guardar un código nuevo, oprima la tecla EXIT.
1. Encienda manualmente el dispositivo que desea manejar.
2. Oprima y sostenga la tecla de dispositivo que desea programar
(la tecla POWER se ilumina). A la vez que sostiene la tecla
de dispositivo, utilice la otra mano para oprimir y sostener
simultáneamente la tecla POWER del control remoto (la tecla
POWER se apaga).
3. Espere hasta que la tecla POWER se ilumine y permanezca
iluminada. Luego, suelte ambas teclas.
4. Mantenga el control remoto apuntado directamente al panel
frontal del dispositivo que desea manejar. Oprima la tecla SKIP
FWD del control remoto y espere 2 segundos.
¿Se apagó el dispositivo?
SÍ: Oprima la tecla OK para guardar el código. ¡Listo! La tecla de
dispositivo está programada.
NO: Oprima SKIP FWD nuevamente. El control remoto prueba el
próximo código para su dispositivo.
Continúe oprimiendo SKIP FWD cada 2 segundos hasta que el
dispositivo se apague. Cuando se apague, oprima OK.
CONSEJO: Debido a la gran cantidad de códigos, quizás necesite
oprimir la tecla SKIP FWD varias veces-posiblemente cientos de veces.
22
Page 23

23
Español
NOTAS
A través de la programación de cada tecla, mantenga el control
remoto apuntado directamente al sensor infrarrojo del dispositivo
que está programando con el control remoto.
Pruebe el control remoto con el dispositivo para asegurarse que
la tecla de dispositivo esté programada con el código correcto y
garantizar así su máxima funcionalidad. Si no puede utilizar alguna
de las funciones, intente con otro código. Para obtener mayor
información, consulte la sección “Cómo Probar el Código para
Obtener Máxima Funcionalidad” a continuación.
Durante la Búsqueda Manual de Códigos, el control remoto ignora
la opresión de teclas que no son parte de la búsqueda.
La búsqueda se detendrá luego de dos minutos (la tecla POWER
parpadea cuatro veces y se retiene el último código programado
bajo la tecla de dispositivo).
La tecla POWER parpadea cuatro veces cuando el control remoto
ha recorrido todos los códigos. El control remoto sale del método
de Búsqueda Manual de Códigos. Si su dispositivo aún no se ha
apagado, intente un método de búsqueda diferente.
Cómo Probar el Código para Obtener Máxima Funcionalidad
1. Pruebe una variedad de funciones del dispositivo con el control
remoto. Si no puede utilizar alguna de las funciones del
dispositivo, vaya al próximo paso e intente un código diferente.
2. Repita el Método de Búsqueda Manual de Códigos desde el
comienzo. Cuando haya encontrado el código que vuelva a
encender el dispositivo, no oprima la tecla OK, con la cual
quedaría guardado el mismo código. En vez, con la unidad
apagada, continúe oprimiendo la tecla SKIP FWD repetidamente
hasta que la unidad se vuelva a encender.
3. Si se vuelve a encender la unidad, habrá encontrado otro código
que puede manejar ese dispositivo. Oprima la tecla OK.
4. Nuevamente, pruebe la funcionalidad de la tecla intentando
controlar una variedad de funciones del dispositivo. Si el código
que se ha almacenado controla la mayoría de las funciones del
dispositivo, entonces habrá concluido la programación. Si el
código guardado no brinda una máxima funcionalidad, intente
otro código.
Page 24

Recorrido del control remoto
En la mayoría de los casos, las teclas del control remoto desempeñan
las mismas funciones que las teclas de los controles remotos originales
una vez programa este control remoto para manejar los componentes.
La mayoría de las teclas de este control remoto tienen otras funciones.
POWER iluminada sirve
La tecla
de luz indicadora para ofrecer
retroalimentación.
Las teclas de dispositivo (
SAT•CBL•DTC, DVD•VCR, AUDIO,
AUX
) ponen el control remoto en
el modo correcto para manejar el
dispositivo.
La tecla
BACKLIGHTING (luz de fondo)
enciende y apaga la luz de fondo.
GUIDE y MENU ponen el control
remoto en el modo menú/guía; además
logran acceso a las mismas funciones
que las teclas de los controles remotos
originales.
EXIT sale de la programación del
control remoto; además, desempeña las
mismas funciones que en los controles
remotos originales.
Las teclas de flechas se utilizan para
navegar a través de los sistemas de
menús y guías de los componentes
La tecla OK selecciona sus opciones de
menú.
La tecla
MACRO, conjuntamente con
las teclas numéricas 1 a 6, le permite
guardar e integrar pasos (macros) de
un procedimiento compuesto en una
sola tecla.
La tecla
INPUT y — (guión) tiene tres
funciones: (1) alterna entre todas las
fuentes de video o de audio conectadas
al televisor o al dispositivo de audio; (2)
cuando el control remoto se encuentra
en el modo VCR, este botón alterna
entre la entrada VCR y TV; (3) cuando
ingresa directamente números de
canales digitales, este botón le permite
separar el número del canal principal
del número del canal secundario (tal
como 59.1).
El modelo actual puede ser
diferente al ilustrado
IMPORTANTE
Dado que este control remoto maneja más de un dispositivo,
deberá primero “indicarle” al control remoto cuál dispositivo
desea manejar. En otras palabras, si desea manejar el televisor,
deberá primero oprimir la tecla TV para poner el control remoto
en el Modo TV. El control remoto permanece en ese modo de
dispositivo hasta que oprima una tecla de dispositivo diferente. Por
ejemplo, si el control remoto se encuentra en el Modo TV y desea
manejar el Lector de DVD, deberá oprimir la tecla DVD•VCR para
cambiar los modos de dispositivo.
TV,
Luz de fondo
La iluminación de fondo le ayuda a ver mejor las teclas del control
remoto en la oscuridad. Puede encender y apagar la iluminación
de fondo oprimiendo la tecla BACKLIGHTING. La luz de fondo
permanece encendida siempre y cuando se continúe oprimiendo
teclas y se apaga cuatro segundos luego de la última opresión
de una tecla. Una vez se apague la luz de fondo, puede volver a
activarla oprimiendo cualquier tecla. Si la iluminación de fondo está
encendida, y oprime la tecla de fondo, la luz de fondo se apagará.
24
Page 25

25
Español
Funciones Avanzadas
Cómo Asignar la Tecla AUX
Para programar la tecla AUX, necesitará primero asignarla a un tipo
de dispositivo.
1. Oprima y sostenga la tecla AUX. La tecla POWER se enciende.
2. Mientras sostiene la tecla AUX, oprima y suelte la tecla numérica
en el teclado para el dispositivo que desea manejar (la tecla
POWER se apaga):
TV adicional oprima 1
VCR o DVR oprima 2
Lector de DVD adicional oprima 3
Dispositivo de audio adicional oprima 4
Receptor de satélite, aparato oprima 5
de cable o convertidor de DTV adicional
3. Suelte la tecla AUX. La tecla POWER parpadea cuatro veces y luego
se apaga. La tecla AUX se encuentra ahora lista para manejar el
tipo de dispositivo que usted seleccionó.
4. Observe las instrucciones de la búsqueda de códigos automática, por
marca, manual o entrada directa para programar la tecla AUX.
Cómo Reasignar la Tecla DVD•VCR para
Manejar una VCR
LateclaDVD•VCRvienepreestablecidadefábricaparamanejarun
LectordeDVD.SideseaquelateclaDVD•VCRmanejeunaVCR,
deberá reasignarla.
1.OprimaysostengalateclaDVD•VCR.LateclaPOWERseencenderá.
ContinúesosteniendolatecladeDVD•VCR
2.MientrassostienelateclaDVD•VCR,oprimaysueltelatecla
numérica 2 en el teclado. La tecla POWER se apagará.
3. SueltelateclaDVD•VCR.LateclaPOWERparpadeacuatroveces
yluegoseapaga.LateclaDVD•VCRestáahoraconguradapara
manejar una VCR.
4. Observe las instrucciones de la búsqueda de códigos automática,
por marca, manual o entrada directa para programar la tecla
DVD•VCRparasuVCR.
Irrupción de Volumen
Irrupción de Volumen le permite a las teclas VOL y MUTE, cuando se
oprimenenlosmodosSAT•CBL•DTCoDVD•VCR,“irrumpir”alTV
o al AUDIO, el último que se haya accedido. Irrupción de Volumen
ocurre automáticamente y le permite controlar el volumen sin tener
que salir del modo actual. (Si la tecla AUX ha sido programada con
un código de TV o AUDIO, el volumen puede irrumpir también a
estos dispositivos.)
Aviso: Irrupción de Volumen no ocurre en casos donde el código
del componente tiene sus propios controles de volumen/silencio, tal
como algunos receptores de satélite.
Irrupción de Volumen Avanzada
Según se describió arriba, la Irrupción de Volumen ocurre
automáticamente. La Irrupción de Volumen avanzada le permite
especificar un dispositivo para todos los comandos de volumen para
cadamodoquenoseadeaudio(SAT•CBL•DTCoDVD•VCR).Usted
puede especificar el dispositivo de AUDIO o TV (o una tecla AUX que
maneje un dispositivo de Audio o TV).
1. Oprima y sostenga la tecla cuyos comandos de volumen desea enviar
al televisor o dispositivo de audio. La tecla POWER se enciende.
2. Mientras sostiene la tecla de dispositivo, oprima y sostenga la tecla
VOL + (arriba). La tecla POWER se apaga.
3. Luego de sostener ambas teclas durante 3 segundos, la tecla POWER
se encenderá y permanecerá encendida. Suelte ambas teclas.
4. Oprima y suelte la tecla de dispositivo a la cual desea que la Irrupción
de Volumen sea dirigida desde el modo seleccionado (tecla TV,
AUDIO o AUX). La tecla POWER parpadeará.
Aviso: La tecla de dispositivo oprimida en el paso 4 deberá
programarse con un componente de TV o AUDIO. Si se oprime una
tecla inválida, la tecla POWER parpadeará cuatro veces.
Importante: Una vez haya programado cualquier dispositivo con
una Irrupción de Volumen especicada, la Irrupción de Volumen
para el resto de los dispositivos cambiará por defecto a AUDIO. Si
no desea que la Irrupción de Volumen del resto de los componentes
cambie por defecto a AUTO, deberá programarlos manualmente,
siguiendo los pasos 1-4.
Page 26

Irrupción de Teclas de Transporte
La Irrupción de Teclas de Transporte les permite a las teclas de
transporte (REVERSE, PLAY, FORWARD, RECORD, STOP, PAUSE, SKIP
FWD, SKIP BACK, y SLOW), cuando se oprimen en los modos TV, SAT,
CABLEyAUDIO,“irrumpir”alosmodosDVD•VCRoCD,cualquiera
que sea el último que se haya accesado. La Irrupción de Teclas de
Transporte ocurre automáticamente y le permite utilizar las teclas
de transporte sin tener que salir del modo actual. Por ejemplo, si
la última vez que se utilizaron las teclas de transporte fue en el
modo DVD y se accesaron nuevamente luego de oprimir la tecla
TV, éstas irrumpirán al DVD. La Irrupción de Teclas de Transporte
predeterminada se configura en DVD para TV, SAT, CABLE y AUDIO.
Aviso: La Irrupción de Teclas de Transporte no ocurre donde el
código del componente tenga su propia información de tecla de
transporte, tal como un receptor de satélite con un DVR integrado.
Bloqueo de Canales
Bloqueo de Canales envía automáticamente comandos de canal,
tales como CH, LAST y las teclas numéricas 0-9, a su receptor de
satélite, aparato de cable o convertidor de TV digital cuando se
encuentra en el modo TV. Esto puede ahorrarle opresiones de teclas
si utiliza un dispositivo diferente a su televisor para cambiar canales.
Para activar el bloqueo de canales:
1. Oprima y sostenga la tecla de dispositivo para el dispositivo
que utiliza para cambiar canales. A la vez que sostiene esta
tecla de dispositivo, utilice la otra mano para oprimir y sostener
simultáneamente la tecla CH arriba del control remoto.
2. Espere hasta que la tecla POWER del control remoto se ilumine
y permanezca iluminada. Luego, suelte ambas teclas.
3. Oprima ENTER para bloquear los comandos de canal para este
dispositivo.
Para desactivar el bloqueo de canales:
1. Oprima y sostenga la tecla TV. A la vez que sostiene la tecla TV,
utilice la otra mano para oprimir y sostener simultáneamente la
tecla CH abajo del control remoto.
2. Espere hasta que la tecla POWER del control remoto se ilumine
y permanezca iluminada. Luego, suelte ambas teclas.
3. Oprima ENTER para comenzar a cambiar canales con su televisor.
Recuperación de Códigos
Una vez haya programado el control remoto para manejar sus
dispositivos, se recomienda anotar los códigos para futura referencia.
Si utilizó el método de Entrada Directa de Códigos, es muy sencillo.
Simplemente encuentre los códigos que ingresó y anótelos en los
recuadros a continuación. Si utilizó uno de los métodos de Búsqueda
de Códigos para programar el control remoto o si utilizó el método
de Entrada Directa pero no recuerda el código, necesitará recuperar
el código de cinco dígitos de cada uno de los dispositivos. Recuperar y
anotar el código real le ahorrará tiempo si alguna vez necesita volver a
programar el control remoto (por ejemplo, si se pierde la programación
cuando cambia las baterías). Si anota los códigos, puede utilizar el
método de Entrada Directa para volver a programar el control remoto a
fin de manejar otros dispositivos, un proceso rápido y sencillo.
CONSEJOS: Todos los códigos de TV comienzan con el número 1;
todos los códigos de VCR y DVR comienzan con el número 2; todos
los códigos de lectores de DVD, con el número 3; todos los códigos
de dispositivos de audio, con el número 4; y todos los códigos de
receptores de satélite, aparatos de cable, y convertidores de TV
digital, con el número 5.
Para salir del Modo de Recuperación de Códigos en cualquier
momento, oprima la tecla EXIT.
Si oprime una tecla inválida durante el proceso de Recuperación de
Códigos, el control remoto no responderá. Si no oprime una tecla
de Recuperación de Códigos válida, (TV, SAT•CBL•DTC, DVD•VCR,
AUDIO, AUX, INFO, EXIT), la Recuperación de Códigos se detendrá
al cabo de 15 segundos. La tecla POWER parpadea cuatro veces y
luego se apaga.
26
Page 27

27
Español
1. Oprimaysostengalatecladedispositivo(TV,SAT•CBL•DTC,
DVD•VCR,AUDIOoAUX)cuyocódigodesearecuperar.Latecla
POWER se encenderá. Continúe oprimiendo la tecla de dispositivo.
2. Mientras sostiene la tecla de dispositivo, oprima y sostenga
la tecla INFO. La tecla POWER se apagará. Luego de sostener
ambas teclas durante tres segundos, la tecla POWER se
encenderá nuevamente.
3. Suelte ambas teclas. La tecla POWER permanece encendida.
4. Comenzando con la tecla numérica 1, oprima y suelte cada tecla
numérica en el teclado en el siguiente orden 1-9, luego 0. El
número que hace que la tecla POWER parpadee es el primer
número del código. Mientras encuentra los números del código,
anótelos para referencia futura.
5. Repita el paso 4 hasta haber recuperado los cinco números del
código. Luego de recuperar el quinto número, la tecla POWER
parpadea brevemente, y luego se apaga.
Referencia Rápida de Códigos
Tipo de Dispositivo Código
Aprendizaje
Los códigos de las Listas de Códigos incluyen funcionalidades
básicas para cada uno de los componentes que manejan. Una vez
que haya programado el código para el componente específico,
puede personalizar el control remoto universal para agregar ciertas
funciones incluidas en su control o controles remotos originales que
no fueron integradas en el código preestablecido. Su control remoto
universal tiene la capacidad de aprender y guardar comandos de
su control o controles remotos originales bajo los modos que usted
seleccione. El control remoto universal puede guardar hasta 50
comandos de tecla.* Sólo puede aprenderse un control remoto
original bajo cualquiera de los modos (por ejemplo, el control
remoto universal puede aprender comandos para un control remoto
de televisor, un control remoto de VCR, etc.).
* Algunas señales aprendidas requieren más memoria que otras. En
estos casos, se aprenden menos comandos de tecla.
Antes del Primer Aprendizaje
Antes de comenzar a aprender teclas por primera vez, borre
cualquier información de aprendizaje que pueda estar guardada
en el control remoto. Esto le permite empezar de cero.
1. Oprima y sostenga la tecla EXIT (la tecla POWER se ilumina).
A la vez que sostiene la tecla EXIT, utilice la otra mano para
oprimir y sostener la tecla POWER (la tecla POWER se apaga).
2. Espere hasta que la tecla POWER se ilumine y permanezca
iluminada. Luego, suelte ambas teclas. El control remoto se
encuentra ahora en el modo Borrar Maestro.
3. Oprima la tecla OK para confirmar la operación Clear (Borrar).
La tecla POWER permanece iluminada por 2 segundos y
luego se apaga. Ahora se han borrado todas las funciones
Aprendidas para todos los componentes; el resto de la
programación no cambia.
Page 28

Aprendizaje de los Controles Remotos Originales
1. Coloque el control remoto original y el control remoto de
aprendizaje sobre una superficie plana según se muestra abajo.
Apunte la parte superior del control remoto original hacia la
parte superior del control remoto de aprendizaje. El LED IR
del control remoto original debe apuntar directamente hacia
el sensor de aprendizaje del control remoto de aprendizaje,
ubicado en la parte superior del control remoto. Los controles
remotos deben quedar a 2.5–5cm de distancia entre sí.
2.5–
5cm
2. En el control remoto de aprendizaje, oprima y
sostenga la tecla de dispositivo en la cual desea
utilizar la función de aprendizaje (la tecla
POWER se ilumina y permanece iluminada).
A la vez que sostiene la tecla de dispositivo,
utilice la otra mano para oprimir y sostener la
tecla RECORD (la tecla POWER se apaga).
3. Espere hasta que la tecla POWER se ilumine y
permanezca iluminada. Luego, suelte ambas
teclas. El control remoto se encuentra ahora
en el modo Aprendizaje.
4. En el control remoto de aprendizaje, oprima
la tecla que desea utilizar para la función
aprendida. La tecla POWER iluminada parpadea
una vez y luego permanece iluminada.
5. En el control remoto original, oprima y sostenga la tecla que
desea que el control remoto universal aprenda. Espere hasta que
la tecla POWER del control remoto de aprendizaje parpadee una
vez, y luego suelte la tecla en el control remoto original. El control
remoto de aprendizaje ha terminado de aprender esta tecla.
Aviso: Si ocurre algún problema durante el proceso de
Aprendizaje, la tecla POWER iluminada parpadeará cuatro
veces, pero la unidad permanecerá en el modo Aprendizaje.
Si esto ocurre, ajuste un poco la distancia entre los controles
remotos y repita el procedimiento desde el paso 4.
6. Para aprender otra tecla para este modo de dispositivo:
Repita los pasos 4 y 5 para la tecla que desea aprender.
Para aprender teclas en un modo de dispositivo distinto:
Repita los pasos 2 a 5 para el próximo modo de dispositivo.
Para guardar las teclas aprendidas y salir del aprendizaje:
oprima el botón SLEEP del control remoto de aprendizaje.
Consejos sobre el Aprendizaje
• Asegúrese que las baterías en el control remoto de aprendizaje
y el control o controles remotos originales sean nuevas.
• La iluminación incandescente o de baja energía puede ocasionar
interferencia con las transmisiones infrarrojas. Cuando utilice
la función Aprendizaje, mantenga los controles remotos como
mínimo 1m de distancia de dichas fuentes de iluminación.
• Asegúrese que el control remoto original se encuentre en el
mismo modo que el control remoto universal, de manera que se
haya asignado la tecla Aprendizaje al modo correcto.
• No puede aprender comandos bajo las teclas MACRO, SLEEP o
BACKLIGHTING.
• Si utiliza las teclas VOL+/- para aprender nuevas funciones, el
control de volumen no ajustará el volumen en el modo Irrupción
de Volumen.
• Para salir del modo Aprendizaje en cualquier momento, oprima
la tecla SLEEP.
• El control remoto sale del modo Aprendizaje si no tiene espacio
en la memoria para guardar las nuevas teclas aprendidas.
• Para asegurarse que sus unidades son compatibles, y para
familiarizarse aún más con el proceso de Aprendizaje,
experimente primero con dos o tres teclas. Luego, ejecute la
función Master Clear (Borrar Maestro) antes de aprender todas
las funciones que desea desde su control remoto original.
28
Page 29

29
Español
Macros
La función Macro le permite ejecutar una secuencia de comandos
con una sola tecla. Cualquier secuencia de comandos que lleve
a cabo normalmente (hasta un máximo de 15 por macro) puede
guardarse como una Macro bajo una de las teclas numéricas 1 a 8
(hasta un máximo de 8 macros).
Cómo Programar una Macro
Importante: Antes de comenzar, asegúrese que el control remoto
esté programado para manejar los dispositivos y que usted haya
aprendido todas las teclas que desea aprender de los controles
remotos originales.
1. Oprima y sostenga la tecla MACRO
hasta que la tecla POWER se ilumine
y permanezca iluminada. El control
remoto se encuentra ahora en el modo
Programación de Macro.
2. Oprima la tecla numérica (1 a 8) que
desea utilizar para esta macro. La tecla
POWER parpadea una vez y luego
permanece iluminada.
Aviso: Si no oprime una tecla numérica
para macro antes de transcurrir 15
segundos (o si oprime una tecla numérica
para macro que tiene una macro
programada), la tecla POWER parpadeará
cuatro veces y se apagará. El control
remoto sale del modo de programación
de macro, y no se efectúan cambios a las
3. Oprima la tecla de dispositivo para el primer dispositivo que
utiliza en la macro. La tecla POWER parpadea una vez y
permanece iluminada.
4. Oprima cada tecla que desea utilizar en esta Macro, en el orden
exacto en que se oprimirían las teclas si usted mismo estuviera
ejecutando la secuencia. La tecla POWER parpadea cada vez
que se oprime una tecla. Continúe este proceso con todas las
teclas que se incluirán en la secuencia de Macro bajo el modo de
componente específico.
Importante: Si utiliza diferentes dispositivos en esta macro,
debe oprimir cada tecla de dispositivo antes de comenzar a
oprimir las teclas para dicho dispositivo. Por ejemplo, si va a
encender el televisor y luego reproducir un DVD, debe oprimir
la tecla TV, luego POWER, después DVD•VCR y, por último, PLAY.
5. Una vez haya terminado de programar la Macro, oprima la tecla
MACRO para guardarla. La tecla POWER se apaga, y la Macro
está lista para usar.
Notes: Para salir de la programación de Macros en cualquier
momento, oprima la tecla EXIT. La tecla POWER parpadea cuatro
veces y luego se apaga. No se efectúan cambios a las Macros
existentes.
Si oprime una tecla con función Aprendida, la función Aprendida
se asigna a la secuencia de Macro.
Si programa las 15 teclas en una sola Macro, la Macro se guardará
automáticamente luego de que las teclas se opriman quince veces
Los comandos de una Macro deben programarse según una
secuencia. Entre el envío de cada comando en una secuencia de
Macro hay un retraso de 0.5 segundos.
No puede programar una Macro en otra Macro.
Macros existentes.
Cómo Utilizar una Macro
1. Oprima la tecla MACRO.
2. Oprima la tecla numérica asignada a la secuencia de Macro
que desea ejecutar. La tecla POWER parpadea una vez y luego
permanece iluminada.
A la vez que el control remoto envía los comandos en la secuencia de
Macro, la tecla POWER parpadea una vez. Luego de que el control
remoto envía el último comando en la secuencia de Macro, la tecla
POWER se apaga.
Page 30

Ejemplo de Una Macro
Esteejemplomuestraunamacro“completamentehabilitada”
para un sistema de teatro en casa con un televisor, Lector de DVD y
receptor de satélite.
1. Oprima y sostenga la tecla MACRO hasta que la tecla POWER se
ilumine y permanezca iluminada.
2. Oprima la tecla 1 para indicarle al control remoto dónde
guardar la macro.
3. Oprima la tecla TV para poner el control remoto en el modo TV.
4. Oprima la tecla POWER para encender el televisor.
5.OprimalateclaDVD•VCRparaponerelcontrolremotoenel
modo DVD.
6. Oprima la tecla POWER para encender el Lector de DVD.
7.OprimalateclaSAT•CBL•DTCparaponerelcontrolremotoen
dicho modo.
8. Oprima la tecla POWER para encender el receptor de satélite.
9. Oprima la tecla MACRO para guardar.
Para ejecutar una Macro, oprima la tecla MACRO. Oprima la
tecla 1. Su televisor, Lector de DVD y receptor de satélite deberán
encenderse.
Cómo Borrar una Macro
1. Oprima y sostenga la tecla MACRO hasta que la tecla POWER se
ilumine y permanezca iluminada.
2. Oprima la tecla EXIT. La tecla POWER parpadea una vez y luego
permanece iluminada.
3. Oprima la tecla numérica (1 a 8) donde se encuentra guardada
la macro que desea borrar. La tecla POWER parpadea una vez y
luego permanece iluminada.
4. Oprima la tecla OK para confirmar la operación Macro
Clear (Borrar Macro). La tecla POWER permanece iluminada
por 2 segundos y luego se apaga. Se ha borrado la Macro
seleccionada.
Aviso: Si no oprime la tecla OK antes de transcurrir 15 segundos (o si
oprime una tecla diferente), la tecla POWER parpadeará cuatro veces
y se apagará. El control remoto sale del modo borrar macro, y no se
efectúan cambios a las Macros existentes.
5. Repita los pasos 1 a 4 para cualquier otra Macro que desee
borrar.
Resolución de Problemas
Problema: El control remoto no maneja su dispositivo.
• Asegúresequeelcontrolremotoseencuentreenelmodocorrecto
oprimiendolatecladedispositivocorrespondiente(TV,SAT•CBL•DTC,
DVD•VCR,AUDIO,AUX).Estoleindicaalcontrolremotoeldispositivo
que debe manejar.
• Retirelosobstáculosubicadosentreelcontrolremotoyeldispositivo.
Asegúrese de apuntar el control remoto directamente al sensor
infrarrojo del dispositivo.
• Asegúresequelasbateríasesténcargadasydebidamenteinstaladas.
Reemplace las baterías con tres baterías AAA nuevas, de ser necesario
(consulte la sección Instalación de las Baterías).
Problema: El control remoto no puede programarse para manejar
su dispositivo.
• Siestáprobandoelcontrolremotomientrasloestáprogramando,
podría estar demasiado alejado del dispositivo o en un ángulo
incorrecto. Deberá haber una trayectoria sin obstáculos entre el control
remoto y el sensor infrarrojo del dispositivo. Acérquese más y asegúrese
de apuntar directamente al dispositivo que está intentando manejar.
• SiestáutilizandoelmétododeprogramacióndeEntradaDirectapara
ingresar los códigos para su marca y la unidad aún no funciona debidamente,
intente el método de búsqueda automática, por marca o manual.
• ParamanejarunidadesdecombinacióntalescomoTV/VCRoTV/DVD,
deberá programar las teclas de dispositivo correspondientes individuales para
manejar cada parte de la unidad de combinación. Una vez programadas
de manera exitosa, la tecla TV maneja las funciones del televisor, y la tecla
DVD•VCRmanejalasfuncionesdelLectordeDVDodelaVCR.
• Asegúresequelasbateríasesténcargadasydebidamenteinstaladas.
Problema: El control remoto no ejecuta los comandos debidamente.
• Asegúresequeelcontrolremotoseencuentreenelmodocorrecto
oprimiendolatecladedispositivocorrespondiente(TV,SAT•CBL•DTC,
DVD•VCR,AUDIO,AUX).Estoleindicaalcontrolremotoeldispositivo
que debe manejar.
30
Page 31

31
Español
• Asegúresequeeldispositivoseencuentrelisto(porejemplo,elLector
de DVD tenga un disco cargado).
• Puedehaberoprimidounateclainválidaparaelmodoenquese
encuentra el control remoto.
• Siestátratandodeingresardirectamenteunnúmerodecanal,intente
oprimir la tecla ENTER luego de ingresar el número del canal ya que
algunas marcas y modelos requieren esta acción.
• Existelaposibilidaddequeuncódigoprogramadopuedamanejar
únicamente algunas de las funciones del dispositivo (por ejemplo, sólo
enciende y apaga un dispositivo). Para confirmar que la tecla de dispositivo
ha sido programada con el código correcto para obtener máxima
funcionalidad, pruebe el dispositivo. Intente manejar una variedad de
funciones del dispositivo con el control remoto. Si algunas de las funciones
de sus dispositivos no trabajan, intente programar el control remoto con
un código diferente en la lista a través del Método de Entrada Directa de
Códigos hasta que encuentre el código que le permita al control remoto
manejar la mayoría de las funciones del dispositivo. Diferentes códigos
pueden proporcionar diferentes niveles de funcionalidad.
Problema: La tecla POWER no se ilumina cuando oprime una tecla.
• Puedehaberoprimidounateclainválidaparaelmodoenquese
encuentra el control remoto.
• Asegúresequeelcontrolremotoseencuentreenelmodocorrecto
oprimiendolatecladedispositivocorrespondiente(TV,SAT•CBL•DTC,
DVD•VCR,AUDIO,AUX).Estoleindicaalcontrolremotoeldispositivo
que debe manejar.
• Asegúresequelasbateríasesténcargadasydebidamenteinstaladas.
Reemplace las baterías con tres baterías AAA nuevas, de ser necesario
(consulte la sección Instalación de las Baterías).
Problema: El control remoto no cambia canales en el dispositivo.
• Asegúresequeelcontrolremotoseencuentreenelmodocorrecto
oprimiendolatecladedispositivocorrespondiente(TV,SAT•CBL•DTC,
DVD•VCR,AUDIO,AUX).Estoleindicaalcontrolremotoeldispositivo
que debe manejar.
• OprimalateclaENTERluegodehaberingresadounnúmerodecanal.
• Retirelosobstáculosubicadosentreelcontrolremotoyeldispositivo.
Asegúrese de apuntar el control remoto directamente al sensor IR del
dispositivo.
Problema: El menú del dispositivo no aparece en la pantalla del
televisor.
• Asegúresedehaberconectadodebidamenteeldispositivoaltelevisor
y haber seleccionado la entrada correcta. (Consulte el Manual del
Propietario de los dispositivos para informarse sobre los procedimientos
de conexión correctos.)
• Asegúresequeelcontrolremotoseencuentreenelmodocorrecto
oprimiendolatecladedispositivocorrespondiente(TV,SAT•CBL•DTC,
DVD•VCR,AUDIO,AUX).Estoleindicaalcontrolremotoeldispositivo
que debe manejar.
• Elaccesoalosmenúsnoesrespaldadoportodaslasmarcas.
Posiblemente sea necesario utilizar el control remoto original para
lograr acceso a las funciones de menú de algunos dispositivos.
Problema: El proceso de Aprendizaje no puede completarse con éxito.
• Reemplacelasbateríasdelcontrolremotodeaprendizajeydelcontrol
remoto original.
• Asegúresequeloscontrolesremotosquedenaunadistanciade2.5a5
cm entre sí.
• NolleveacaboelprocesodeAprendizajecercadeunalámpara
incandescente.
• Lacapacidaddememoriadelcontrolremotodeaprendizajepuede
estar llena (50 comandos Aprendidos).
• Elcontrolremotooriginalquizánoseacompatibleconel
procedimiento de Aprendizaje.
Para obtener mayor información, visite www.oneforall.com
Línea de Ayuda para el Cliente: 1 (800) 315-0990
Información Adicional
ONE FOR ALL® es la marca comercial registrada de Universal Electronics Inc.
Audiovox Accessories Corporation es la concesionaria de la marca ONE FOR
ALL® para EE.UU. y Canadá.
Copyright 2010 por Universal Electronics Inc. Ninguna parte de esta
publicación puede ser reproducida, transmitida, transcrita, almacenada en
ningún sistema de recuperación, o traducida a cualquier idioma, en ninguna
forma o medio, ya sea electrónico, mecánico, magnético, óptico, manual o de
otro tipo, sin el consentimiento previo por escrito de Universal Electronics Inc.
El Control Remoto Universal One For All® para 5 dispositivos es compatible
para su uso en América del Norte, excepto México.
Este Control Remoto Universal One For All® para 5 dispositivos está cubierto
por una o más de las siguientes patentes estadounidenses:
6,587,067 6,496,135 5,515,052 5,959,751 6,587,067 5,481,256
OARN05G 1/10
Page 32

Code Lists /
Liste des codes/
Lista de Códigos
Brand Code List
Brand Codes are used for programming using the Brand Code
Search method outlined in the User’s Guide.
Liste des codes de marque
Les codes de marques sont utilisés pour la programmation
à l’aide de la recherche du code de marque décrite dans le
Guide de l’utilisateur.
Lista de Códigos de Marcas
Los códigos de las marcas son utilizados para programar
utilizando el método de búsqueda de códigos de marcas,
resaltado en la guía del usuario.
Code/
Código
01
02 Hitachi Apex JVC
03 Insignia Insignia
04 JVC JVC Mitsubishi
05 LG LG Panasonic
06
07 Mitsubishi Memorex Sharp
08 Panasonic Panasonic Sony
09 Samsung Pioneer TIVO
10 Sanyo Samsung Toshiba
11 Sharp Sanyo
12 Sony Sharp
13
14 Toshiba Sylvania
15 Vizio Toshiba
TV DVD VCR
RCA, GE,
PROSCAN
Magnavox,
Philips
Sylvania,
Emerson
RCA, GE,
PROSCAN
Magnavox,
Philips
Sony
RCA, GE,
PROSCAN
Magnavox,
Philips
Samsung
Code/
Código
01 RCA, GE, PROSCAN RCA, GE, PROSCAN
02 Motorola Denon
03 DirecTV Harmon Kardon
04
05
06 Hughes Network Systems Pioneer
07
08 Magnavox, Philips Yamaha
09 Amino, ADB
10 Panasonic
Admiral ....................................................................... 10093, 10463
Advent .................................................................................... 10761
Akai ................................................................. 10812, 11675, 10702
AOC ..................................................... 11365, 11589, 12014, 12087
Apex Digital .................................................... 10156, 10767, 12397
Audiovox ............................... 10451, 10802, 10846, 10875, 11284,
............................................................. 11937, 11951, 11952, 12413
Aventura ................................................................................. 10171
Axion ....................................................................................... 11937
Broksonic ................................................................................ 10463
Carver ..................................................................................... 10054
Celebrity ................................................................................. 10000
Coby ....................................... 12306, 12315, 12340, 12343, 12344,
............................................................. 12345, 12347, 12348, 12350
Commercial Solutions ............................................... 11447, 10047
Crosley ........................................................................ 10000, 10054
Curtis ........................................................................... 12352, 12466
Curtis Mathes ........................ 10047, 10054, 10451, 10093, 10702,
............................................................. 10145, 11661, 11147, 11347
Daewoo ........................................................... 10451, 11661, 10661
Dell .................................................................. 11264, 11080, 11863
Denon ..................................................................................... 10145
Dish Network System ............................................................ 11948
Durabrand ...................................................... 10463, 10178, 10171
Dynex ...................................... 11780, 11785, 11810, 12049, 12184
Electroband ............................................................................ 10000
Electrograph ........................................................................... 11755
Electrohome ........................................................................... 10463
Element ................................................................................... 12183
Emerson ............................................ 11864, 10451, 10463, 10178,
................................................. 10171, 11661, 11394, 11944, 11963
SAT/CBL AUDIO
Dish Network System/
Echostar
General
Instruments
Scientific
Atlanta, Cisco
TV
Insignia
Panasonic
Sony
Emprex ................................................................................... 11422
Envision .................................. 10813, 11365, 11589, 12014, 12087
ESA ..................................................... 10812, 10171, 11944, 11963
Fujitsu ..................................................................................... 10809
Funai ................................................... 10000, 10171, 11271, 11963
Gateway ...................................................................... 11755, 11756
GE ............................................ 11447, 10047, 10451, 10178, 11347
GFM ............................................................................ 10171, 11963
GoldStar ................................................................................. 10178
Haier .................................................... 11748, 11749, 11753, 12309
Hallmark ................................................................................. 10178
Hannspree .................................................................. 11348, 11745
Harman/Kardon ...................................................................... 10054
Havermy ................................................................................. 10093
Helios ...................................................................................... 10865
Hello Kitty ............................................................................... 10451
Hewlett Packard ......................................................... 11494, 11502
Hisense ............................................... 11314, 12098, 12355, 12419
Hitachi ............................................................. 11643, 11145, 10145
HP ................................................................................ 11494, 11502
iLo ............................................................................... 11684, 11990
Infinity ..................................................................................... 10054
Initial ....................................................................................... 11990
Insignia .................................. 11423, 11564, 10171, 11517, 11780,
................................................. 11892, 11963, 12002, 12049, 12417
JBL .......................................................................................... 10054
JCB .......................................................................................... 10000
Jensen .................................................................................... 10761
JVC ...... 10463, 10053, 10650, 10731, 11253, 11601, 11774, 12271
KDS ......................................................................................... 11498
KLH .......................................................................................... 10767
LG ................................ 11423, 11265, 10178, 10856, 12358, 12424
LXI ....................................................... 10047, 10054, 10156, 10178
MAG ........................................................................................ 11498
Magnavox .............................. 11454, 11866, 10054, 10802, 11254,
................................................. 11365, 11944, 11963, 11990, 12372
Marantz ....................................................................... 11454, 10054
Matsushita .................................................................. 10250, 10650
Maxent .................................................................................... 11755
Megatron .................................................................... 10178, 10145
Memorex ............................................ 10463, 10150, 10178, 11892
MGA ............................................................................ 10150, 10178
Midland ................................................................................... 10047
Mintek ..................................................................................... 11990
Mitsubishi ........................................... 11250, 10093, 10150, 10178
Motorola ................................................................................. 10093
NAD ..................................................... 10156, 10178, 10866, 11156
NEC ............................................................................. 11704, 11797
NetTV ...................................................................................... 11755
Nexus Electronics .................................................................. 12183
Nikko ....................................................................................... 10178
Norcent ....................................................................... 11365, 11589
Olevia .................................................. 11610, 11144, 11240, 11331
Optimus ...................................................................... 10250, 10650
Optoma ................................................................................... 11348
Optonica ................................................................................. 10093
Orion ....................................................................................... 10463
Panasonic ....... 11480, 10250, 11457, 10650, 11271, 11941, 11946
PARK ....................................................................................... 12104
Penney ................................................ 10047, 10156, 10178, 11347
Petters ..................................................................................... 11523
Philco ...................................... 10054, 10171, 11271, 11394, 11963
Philips ......................... 11454, 11866, 10054, 10690, 11867, 12372
Pioneer ................................................ 11457, 10679, 10866, 11260
Polaroid ............................................. 11523, 10865, 11276, 11314,
............................................................. 11498, 11766, 12002, 12121
Portland ...................................................................... 10451, 11661
Prima ........................................................................... 10761, 11785
Proscan ................................... 11447, 10047, 11347, 12147, 12256
Proton ..................................................................................... 10178
Proview ................................................................................... 11498
Quasar ........................................................................ 10250, 10650
RadioShack ................................................................. 10047, 10178
RCA .... 11547, 11447, 10047, 10093, 10679, 11047, 11147, 11247,
............. 11347, 11781, 11948, 11953, 12002, 12187, 12247, 12434
Realistic .................................................................................. 10178
Sampo .................................................................................... 11755
Samsung ........ 10812, 10702, 10178, 10650, 10766, 11060, 12051
Sansui ................................................. 10463, 10171, 11409, 11892
Sanyo .......................................................................... 10054, 11142
Sceptre ........................................................................ 11360, 11599
Scotch ..................................................................................... 10178
Scott ............................................................................ 10178, 11711
Sears ....................................... 10047, 10054, 10156, 10178, 10171
Sharp .......................................................................... 10818, 10093
Sheng Chia ............................................................................. 10093
Sherwood ............................................................................... 11399
Sony ............................................................................ 10810, 10000
Soundesign ............................................................................ 10178
Sova ........................................................................................ 11952
Soyo ............................................................................ 11520, 11826
Spectroniq .............................................................................. 11498
Squareview ............................................................................ 10171
SunBrite .................................................................................. 12337
Superscan ....................................................... 10093, 10864, 11944
Supreme ................................................................................. 10000
SVA ............................................................................. 10865, 11963
Sylvania ................................. 11864, 10054, 10171, 11271, 11314,
............................................................. 11394, 11886, 11944, 11963
Symphonic ................................................................. 10171, 11944
Syntax ................................................. 11610, 11144, 11240, 11331
Tandy ...................................................................................... 10093
Tatung ..................................................................................... 11756
Technics .................................................................................. 10250
Techview ................................................................................. 10847
Teknika ........................................................................ 10054, 10150
Telefunken .............................................................................. 10702
TMK ......................................................................................... 10178
Toshiba ...................... 11524, 10156, 11256, 11265, 10650, 10845,
..................................... 11156, 11356, 11656, 11704, 11945, 12006
TVS .......................................................................................... 10463
Venturer .................................................................................. 11865
Victor ....................................................................................... 10053
Vidikron .................................................................................. 10054
Vidtech .................................................................................... 10178
Viewsonic .................. 11755, 10857, 10864, 10885, 11330, 11578,
................................................. 11627, 11640, 11742, 12014, 12087
Viore ................................................................ 11684, 12104, 12352
Vizio .................................................... 11758, 10864, 10885, 11756
Wards .................................................. 10054, 10178, 10866, 11156
Waycon ................................................................................... 10156
Westinghouse ................................... 11712, 10451, 10885, 10889,
......................................................................... 11282, 11300, 11577
White Westinghouse ................................................. 10463, 11661
Wyse ....................................................................................... 11365
Zenith ..................................... 10000, 11423, 10047, 10463, 11265,
............................................................. 10178, 11145, 10145, 11661
CD Players / Lecteurs CD / Lectores CD
Aiwa ........................................................................................ 40157
Arcam ..................................................................................... 40157
California Audio Labs ............................................................ 40029
Carver ..................................................................................... 40157
DMX Electronics .................................................................... 40157
Harman/Kardon ...................................................................... 40157
Integra ..................................................................................... 40101
JVC .......................................................................................... 40072
Kenwood .................................................................... 40626, 40190
Krell ......................................................................................... 40157
Linn ......................................................................................... 40157
Magnavox ............................................................................... 40157
Marantz ........................................................... 40626, 40029, 40157
MCS ........................................................................................ 40029
Mission ................................................................................... 40157
Myryad .................................................................................... 40157
NSM ........................................................................................ 40157
Onkyo ...................................................................................... 40101
Optimus .................................................................................. 40087
Panasonic ................................................................... 40029, 40752
Philips ......................................................................... 40626, 40157
Pioneer .................................................................................... 41087
Polk Audio .............................................................................. 40157
Proton ..................................................................................... 40157
QED ......................................................................................... 40157
Quad ....................................................................................... 40157
Quasar .................................................................................... 40029
Rotel ........................................................................................ 40157
SAE ......................................................................................... 40157
Sansui ..................................................................................... 40157
Sanyo ...................................................................................... 40087
Sonic Frontiers ....................................................................... 40157
Sony ............................................................................ 40100, 41364
TAG McLaren ......................................................................... 40157
Technics .................................................................................. 40029
Victor ....................................................................................... 40072
Wards ...................................................................................... 40157
Yamaha ................................................................................... 40036
Audio Accessories / Accessoires de audio
Altec Lansing .......................................................................... 42251
Apple ....................................................................................... 41115
Denon ..................................................................................... 42502
DLO ......................................................................................... 41155
GPX ......................................................................................... 42113
iHome ..................................................................................... 42152
/ Accessorios de audio
iLive......................................................................................... 42113
Philips ..................................................................................... 42327
Polk Audio .............................................................................. 42228
Vizio ........................................................................................ 42454
Yamaha ........................................................... 42021, 42116, 42458
Audio — Receiver / Récepteur / Receptor
Aiwa ........................................................................................ 41641
Alco ......................................................................................... 41390
AMC ........................................................................................ 41077
Anam ...................................................................................... 41609
Arcam ..................................................................................... 41189
Audiotronic ............................................................................. 41189
Audiovox ................................................................................ 41390
Bose ................................................................ 41629, 41841, 41933
Carver ..................................................................................... 41189
Denon ................................................. 42857, 41360, 41142, 42279
Harman/Kardon .............................................. 41304, 41306, 42443
Insignia ................................... 41030, 41077, 42169, 42175, 42474
Integra ............................................................. 41298, 41320, 41805
JBL .......................................................................................... 41306
JVC ...................................................... 41374, 41495, 42239, 42331
Kenwood ................................................................................ 41570
KLH .......................................................................................... 41390
LG .................................................................... 41293, 42197, 42284
Magnavox ....................................................... 41189, 41269, 41514
Marantz ........................................................... 41189, 41269, 41289
McIntosh ................................................................................. 41289
Micromega ............................................................................. 41189
Myryad .................................................................................... 41189
Onkyo .................................................. 41298, 41320, 41531, 41805
Panasonic .......................................... 41308, 41275, 41288, 41316,
............................................................. 41548, 41763, 42452, 42967
Philips ..................................... 41189, 41269, 41266, 42311, 42459
Pioneer ........................................................................ 41384, 41935
Polk Audio .................................................................. 41289, 42270
Proscan ................................................................................... 41254
RCA ......................................... 41609, 41254, 41390, 41511, 42041
Samsung ........................................................ 41304, 41500, 41868
Sherwood ....................................................... 41077, 41905, 42169
Sherwood Newcastle ............................................................ 42169
Sony ........................... 41759, 41058, 41441, 41258, 41622, 41558,
..................................... 41658, 41758, 41822, 41858, 42172, 42522
Teac ......................................................................................... 41390
Technics .................................................................................. 41308
Thorens ................................................................................... 41189
Venturer .................................................................................. 41390
Yamaha .................................. 40376, 41176, 41276, 41331, 41375,
................................................. 41376, 41815, 42061, 42455, 42471
Zenith ...................................................................................... 41293
Audio — Amplifier / Amplificateur /
Amplificador
Denon ..................................................................................... 42134
Marantz ....................................................................... 41892, 42138
VCR-DVR / Magnétoscope - DVR
Accurian .................................................................................. 20000
Admiral ................................................................................... 20048
Adventura ............................................................................... 20000
Aiko ......................................................................................... 20278
Aiwa ............................................................................ 20037, 20000
Allegro .................................................................................... 20039
America Action ...................................................................... 20278
American High ....................................................................... 20035
Audiovox .................................................................... 20037, 20278
Calix ........................................................................................ 20037
Canon ...................................................................................... 20035
Carver ..................................................................................... 20081
CCE .......................................................................................... 20278
Citizen ......................................................................... 20037, 20278
Craig ........................................................................................ 20037
Crosley ........................................................................ 20081, 20000
Curtis Mathes ..................................... 20060, 20035, 20162, 20278
Daewoo ....................................................................... 20045, 20278
Denon ..................................................................................... 20042
DirecTV ....................................................................... 20739, 20740
Durabrand .................................................................. 20039, 20038
Dynatech ................................................................................. 20000
Electrohome ............................................................... 20037, 20043
Electrophonic ......................................................................... 20037
Emerex .................................................................................... 20032
Emerson ..................... 20037, 20000, 20043, 20278, 20593, 21593
Fuji .............................................................................. 20035, 20033
Funai ............................................................... 20000, 20593, 21593
Garrard ................................................................................... 20000
GE .................................................................... 20060, 20035, 20202
GFM ........................................................................................ 21593
Go Video ................................................................................. 20614
GoldStar ..................................................................... 20037, 20038
Gradiente ................................................................................ 20000
Harley Davidson ..................................................................... 20000
Harman/Kardon .......................................................... 20081, 20038
Headquarter ........................................................................... 20046
Hitachi ......................................................................... 20000, 20042
Hughes Network Systems ............................. 20739, 20042, 20740
Humax .................................................................................... 20739
Instant Replay ........................................................................ 20035
JVC .......................................................................................... 20067
KEC .............................................................................. 20037, 20278
Kenwood .................................................................... 20067, 20038
Kodak .......................................................................... 20035, 20037
Lloyd’s ..................................................................................... 20000
LXI ........................................................................................... 20037
Magnasonic ............................................................................ 20593
Magnavox ................... 20035, 20039, 20081, 20000, 20593, 21593
Marantz ....................................................................... 20035, 20081
Marta ....................................................................................... 20037
Matsushita .................................................................. 20035, 20162
MEI .......................................................................................... 20035
Memorex ........ 20035, 20162, 20037, 20048, 20039, 20000, 20046
MGA ........................................................................................ 20043
Minolta .................................................................................... 20042
Mitsubishi ................................................................... 20067, 20043
Motorola ..................................................................... 20035, 20048
Page 33

MTC ......................................................................................... 20000
Multitech ................................................................................. 20000
NEC ............................................................................. 20067, 20038
Nikko ....................................................................................... 20037
Olympus ................................................................................. 20035
Optimus .................................. 21062, 20162, 20037, 20048, 20593
Panasonic ............................... 21062, 20035, 20162, 20614, 20616
Penney ................................................ 20035, 20037, 20042, 20038
Pentax ..................................................................................... 20042
Philco ...................................................................................... 20035
Philips ................................................. 20739, 20035, 20081, 20618
Pilot ......................................................................................... 20037
Pioneer .................................................................................... 20067
Polk Audio .............................................................................. 20081
Portland .................................................................................. 20278
Presidian ................................................................................. 21593
Proscan ....................................................................... 20060, 20202
Pulsar ...................................................................................... 20039
Quarter .................................................................................... 20046
Quartz ..................................................................................... 20046
Quasar ........................................................................ 20035, 20162
RadioShack ............................................................................. 20000
Radix ....................................................................................... 20037
Randex .................................................................................... 20037
RCA ..................................................... 20060, 20042, 20202, 20880
Realistic .................................. 20035, 20037, 20048, 20000, 20046
ReplayTV .................................................................... 20614, 20616
Runco ...................................................................................... 20039
Samsung .................................................................... 20739, 20045
Sanky .......................................................................... 20048, 20039
Sansui ......................................................................... 20000, 20067
Sanyo ...................................................................................... 20046
Scott ............................................................................ 20045, 20043
Sears ....................................... 20035, 20037, 20000, 20042, 20046
Sharp .......................................................................... 20048, 20848
Sonic Blue .................................................................. 20614, 20616
Sony ........................................ 20032, 20035, 20033, 20000, 20636
STS .......................................................................................... 20042
Sylvania ...................... 20035, 20081, 20000, 20043, 20593, 21593
Symphonic ..................................................... 20000, 20593, 21593
Tashiko .................................................................................... 20037
Teac ......................................................................................... 20000
Technics ...................................................................... 20035, 20162
Teknika ............................................................ 20035, 20037, 20000
Thomas ................................................................................... 20000
Tivo ..................................................... 20739, 20618, 20636, 20740
Toshiba ........................................................... 20045, 20043, 21008
Totevision ............................................................................... 20037
Vector ...................................................................................... 20045
Vector Research ..................................................................... 20038
Video Concepts ...................................................................... 20045
Videomagic ............................................................................ 20037
Villain ...................................................................................... 20000
Wards .......................... 20060, 20035, 20048, 20081, 20000, 20042
XR-1000 ...................................................................... 20035, 20000
Yamaha ................................................................................... 20038
Zenith .................................................. 20037, 20039, 20033, 20000
Accurian .................................................................................. 30675
Aiwa ........................................................................................ 30641
Akai ......................................................................................... 30695
Alco ......................................................................................... 30790
Allegro .................................................................................... 30869
Apex Digital ................ 30672, 30794, 30796, 30797, 31056, 31061
Audiovox ........................................................ 30790, 31041, 31071
Axion ....................................................................................... 31071
Bel Canto Design ................................................................... 31571
Blue Parade ............................................................................ 30571
Broksonic ................................................................................ 30695
California Audio Labs ............................................................ 30490
Cinea ....................................................................................... 30831
CineVision .............................................................................. 30869
Citizen ..................................................................................... 30695
Coby ........................................ 30778, 31086, 31107, 31177, 31628
Craig ........................................................................................ 30831
Curtis Mathes ......................................................................... 31087
CyberHome ............................................................................ 30816
Daewoo ........................................................... 30869, 31169, 31172
Denon ............................................................. 30490, 30634, 32258
Disney ......................................................................... 30675, 31270
Emerson ..................................................................... 30591, 30675
Enterprise ............................................................................... 30591
Funai ....................................................................................... 30675
GE ................................................................................ 30522, 30815
GFM ........................................................................................ 30675
Go Video ..................... 30744, 30715, 30741, 30869, 31044, 31075
Go Vision ................................................................................ 31071
GoldStar ..................................................................... 30741, 30869
Grundig ................................................................................... 30539
Harman/Kardon .............................................. 30582, 30702, 31229
Hello Kitty ............................................................................... 30831
Hitachi ......................................................................... 30573, 30664
Hiteker ..................................................................................... 30672
Insignia ............................................... 30675, 32095, 32428, 32596
Integra ................................................. 30571, 31769, 30627, 32147
JBL .......................................................................................... 30702
JVC .............................. 30558, 30623, 30867, 31164, 31550, 32365
Kawasaki ................................................................................. 30790
Kenwood .................................................................... 30490, 30534
KLH .......................................................................................... 30790
LG .................................................................... 30591, 30741, 30869
Logitech .................................................................................. 32639
Magnavox ....... 30503, 30539, 30646, 30675, 31177, 31354, 31506
Marantz ....................................................................... 30539, 32414
Memorex ............................................ 30695, 30831, 31270, 32213
Microsoft .................................................................... 30522, 32083
Mitsubishi ............................................................................... 31521
NAD ......................................................................................... 30741
Norcent ................................................................................... 31107
Olevia ...................................................................................... 32331
Onkyo .................................................. 30503, 31769, 30627, 32147
Oppo ....................................................................................... 30575
Panasonic ............................... 30490, 30503, 31579, 31641, 31762
Philco ...................................................................................... 30675
Philips ........................ 30503, 30539, 32056, 32084, 30646, 30675,
................................................. 31267, 31340, 31354, 31506, 32434
DVD
Pioneer ........................ 30525, 30571, 30142, 30631, 31571, 32442
Polaroid ...................................................................... 31061, 31086
Polk Audio .............................................................................. 30539
Presidian ................................................................................. 30675
Proceed ................................................................................... 30672
Proscan ................................................................................... 30522
ProVision ................................................................................ 30778
RCA ............................. 30522, 30571, 31769, 30790, 30822, 32213
Rio ........................................................................................... 30869
Rotel ........................................................................................ 30623
Samsung ................... 30490, 30573, 30199, 30820, 31044, 31075,
................................................. 31470, 32069, 32329, 32489, 32556
Sansui ..................................................................................... 30695
Sanyo .......................................................................... 30695, 30873
Schneider ............................................................................... 30646
Sharp .............................................................. 30630, 30675, 32250
Sherwood ............................................................................... 31043
Shinsonic ................................................................................ 30533
Sonic Blue .............................................................................. 30869
Sony ................ 31633, 30533, 30864, 31033, 31070, 31431, 31516
Sylvania .................................................................................. 30675
Symphonic ............................................................................. 30675
Teac ......................................................................................... 30790
Technics .................................................................................. 30490
Theta Digital ........................................................................... 30571
Toshiba ............................................... 30503, 31769, 30695, 31154
..................................................................................... 32006, 32277
Urban Concepts ..................................................................... 30503
Venturer .................................................................................. 30790
Viore ........................................................................................ 32553
Vizio ........................................................................................ 32563
Xbox ............................................................................ 30522, 32083
Yamaha ........... 30490, 30539, 30646, 30545, 30497, 30817, 32298
Zenith .................................................. 30503, 30591, 30741, 30869
Denon ..................................................................................... 32258
Insignia ........................................................... 30675, 32428, 32596
Integra ......................................................................... 31769, 32147
JVC .......................................................................................... 32365
LG ............................................................................................ 30741
Magnavox ............................................................................... 30675
Marantz ................................................................................... 32414
Microsoft ................................................................................ 32083
Olevia ...................................................................................... 32331
Onkyo .......................................................................... 31769, 32147
Panasonic ............................................................................... 31641
Philips ......................................................................... 32084, 32434
Pioneer ........................................................................ 30142, 32442
RCA ......................................................................................... 31769
Samsung ................................................................................ 30199
Sharp ...................................................................................... 32250
Sony ........................................................................................ 31516
Sylvania .................................................................................. 30675
Toshiba ................................................................................... 31769
Viore ........................................................................................ 32553
Vizio ........................................................................................ 32563
Xbox ........................................................................................ 32083
Yamaha ................................................................................... 32298
Blu-ray
Bell ExpressVu ....................................................................... 50775
Crossdigital ............................................................................ 51109
DirecTV .......... 51377, 50392, 50566, 50639, 51142, 50247, 50749,
..................................... 51749, 51856, 51076, 51109, 51442, 51609
Dish Network System .................................... 50775, 51505, 51775
Dishpro ........................................................... 50775, 51505, 51775
Echostar .......................................................... 50775, 51505, 51775
Expressvu ................................................................... 50775, 51775
GE ............................................................................................ 50566
General Instrument ................................................................ 50869
GOI .............................................................................. 50775, 51775
HTS ............................................................................. 50775, 51775
Hughes Network Systems ................. 51142, 50749, 51749, 51442
Jerrold .................................................................................... 50869
JVC .............................................................................. 50775, 51775
Mitsubishi ............................................................................... 50749
Motorola ................................................................................. 50869
Next Level ............................................................................... 50869
Panasonic ................................................................... 50247, 50701
Philips ..................................... 51142, 50749, 51749, 51076, 51442
Proscan ....................................................................... 50392, 50566
RadioShack ............................................................................. 50869
RCA ..................................................... 50392, 50566, 50855, 50143
Samsung ................................ 51377, 51276, 51109, 51442, 51609
Sony ........................................................................................ 50639
Star Choice ............................................................................. 50869
Tivo ............................................................................. 51142, 51442
Toshiba ........................................................... 50749, 51749, 50790
Voom ....................................................................................... 50869
Zenith ...................................................................................... 51856
Amino ......................................................................... 51602, 51822
Bright House .............................................................. 51376, 51877
Cable One ................................................................... 51376, 51877
Cablevision ..................................................... 51376, 51877, 51006
Charter ............................................................ 51376, 51877, 52187
Cisco ............................................................... 51877, 50877, 51982
Comcast .............................................. 51376, 51877, 51982, 52576
Cox .............................................................................. 51376, 51877
Digeo ........................................................................... 51187, 52187
Director ................................................................................... 50476
General Instrument ................................................................ 50476
i3 Micro ................................................................................... 51602
Insight ......................................................................... 51376, 51877
Jerrold .................................................................................... 50476
Knology .................................................................................. 51877
Mediacom ................................................................... 51376, 51877
Motorola ............................................. 51376, 50476, 51187, 51982
Myrio ........................................................................... 51602, 51822
Pace ................................................................. 51376, 51877, 51982
Panasonic ............................................................................... 51982
Pioneer ........................................................................ 51877, 50877
Rogers ..................................................................................... 51877
Scientific Atlanta ........................................................ 51877, 50877
Sejin ........................................................................................ 51602
Shaw ....................................................................................... 51376
Satellite/Satélite
Cable / Câble
Sony ........................................................................................ 51006
Suddenlink ................................................................. 51376, 51877
Time Warner ................................................... 51376, 51877, 52187
Tivo ......................................................................................... 52576
WideOpenWest ...................................................................... 51877
Video Accessories (Media Centers, Videogames, etc.) /
Accessoires de vidéo (centres de médias, jeux vidéo, etc.) /
Accessorios de vídeo (Centros de entretenimiento,
Access HD ............................................................................... 52185
ADB ......................................................................................... 52254
Airlink 101 ............................................................................... 52491
Alpha Digital ........................................................................... 52185
Amino ......................................................................... 51481, 52482
AMTC ...................................................................................... 52185
Apex Digital ............................................................................ 52478
Apple ....................................................................................... 52615
Artec ........................................................................................ 52490
AT&T ....................................................................................... 50858
CASTi ...................................................................................... 52305
Channel Master ...................................................................... 52365
Cisco ....................................................................................... 52345
Coby ........................................................................................ 52667
Coship ..................................................................................... 52487
Daewoo ................................................................................... 52338
Daytek ..................................................................................... 52305
Digital Stream ........................................................................ 52303
Dish Network System ............................................................ 52470
Echostar .................................................................................. 52470
Epson ...................................................................................... 51563
GE ............................................................................................ 52450
Goodmind .............................................................................. 52450
Gridlink ................................................................................... 52348
Insignia ................................................................................... 51415
KoolConnect ........................................................................... 51481
Lasonic .................................................................................... 52348
LG ............................................................................................ 51415
Magnavox ............................................................................... 51563
Memorex ................................................................................ 52486
MicroGEM .............................................................................. 52489
Microsoft ................................................................................ 52049
Motorola ..................................................................... 50858, 52378
Philco ...................................................................................... 51563
RCA ................................................................. 50799, 52325, 52454
Roku ........................................................................................ 52371
Samsung ................................................................................ 52592
Sansonic ................................................................................. 52348
Scientific Atlanta ........................................................ 50858, 52345
Sling Media ............................................................................ 52612
Sunkey .................................................................................... 52695
SureWest ................................................................................ 51481
Sylvania .................................................................................. 51563
Tivax ........................................................................................ 52185
Ventura ................................................................................... 52454
Venturer .................................................................................. 52454
videoconsolas, etc.)
Verizon .................................................................................... 52378
Vudu ........................................................................................ 52298
Western Digital....................................................................... 52558
Winegard ................................................................................ 52454
Xbox ........................................................................................ 52049
Zenith ...................................................................................... 51415
Zentech ................................................................................... 52491
Zinwell .................................................................................... 52488
ADB ......................................................................................... 52254
Amino ......................................................................... 51481, 52482
AT&T ....................................................................................... 50858
Cisco ....................................................................................... 52345
Motorola ..................................................................... 50858, 52378
Scientific Atlanta ........................................................ 50858, 52345
Verizon .................................................................................... 52378
Digital TV Converter Boxes / Boîtes de conversion pour
TV numérique / Convertidores Digitales
Access HD ............................................................................... 52185
ADB ......................................................................................... 52254
Airlink 101 ............................................................................... 52491
Alpha Digital ........................................................................... 52185
Amino ......................................................................... 51481, 52482
AMTC ...................................................................................... 52185
Apex Digital ............................................................................ 52478
Apple ....................................................................................... 52615
Artec ........................................................................................ 52490
AT&T ....................................................................................... 50858
CASTi ...................................................................................... 52305
Channel Master ...................................................................... 52365
Cisco ....................................................................................... 52345
Coby ........................................................................................ 52667
Coship ..................................................................................... 52487
Daewoo ................................................................................... 52338
Daytek ..................................................................................... 52305
Digital Stream ........................................................................ 52303
Dish Network System ............................................................ 52470
Echostar .................................................................................. 52470
Epson ...................................................................................... 51563
GE ............................................................................................ 52450
Goodmind .............................................................................. 52450
Gridlink ................................................................................... 52348
Insignia ................................................................................... 51415
KoolConnect ........................................................................... 51481
Lasonic .................................................................................... 52348
LG ............................................................................................ 51415
Magnavox ............................................................................... 51563
Memorex ................................................................................ 52486
MicroGEM .............................................................................. 52489
Microsoft ................................................................................ 52049
Motorola ..................................................................... 50858, 52378
Philco ...................................................................................... 51563
RCA ................................................................. 50799, 52325, 52454
Roku ........................................................................................ 52371
IPTV
Samsung ................................................................................ 52592
Sansonic ................................................................................. 52348
Scientific Atlanta ........................................................ 50858, 52345
Sling Media ............................................................................ 52612
Sunkey .................................................................................... 52695
SureWest ................................................................................ 51481
Sylvania .................................................................................. 51563
Tivax ........................................................................................ 52185
Ventura ................................................................................... 52454
Venturer .................................................................................. 52454
Verizon .................................................................................... 52378
Vudu ........................................................................................ 52298
Western Digital....................................................................... 52558
Winegard ................................................................................ 52454
Xbox ........................................................................................ 52049
Zenith ...................................................................................... 51415
Zentech ................................................................................... 52491
Zinwell .................................................................................... 52488
© 2010 Audiovox Accessories Corporation
Trademark(s) ® Registered / Marque(s) de commerce déposée(s)® /
Marca(s) Registrada(s)
UEI_2010_64K_Codes_00
 Loading...