

Page 1
Universal Touch Screen Remote . . . . . . . . . . . . . P.2
URC-9990
F
D
UK
Page 2

User guide p.2
Bedienungsanleitung S.44
Mode d’emploi p.86
ONE FOR ALL MOSAIC URC-9990
DD-0201
701571
Page 3

Table Of Contents
INTRODUCTION. . . . . . . . . . . . . . . . . . . . . . . . . . . . . . . . . . . . . . . . . . . . . . . . . . . . . . . . . . . . . 3
INSTALLING BATTERIES. . . . . . . . . . . . . . . . . . . . . . . . . . . . . . . . . . . . . . . . . . . . . . . . . . . . . . . 3
LOW-BATTERY INDICATOR. . . . . . . . . . . . . . . . . . . . . . . . . . . . . . . . . . . . . . . . . . . . . . . . . . . . . 3
USING THE TOUCH SCREEN . . . . . . . . . . . . . . . . . . . . . . . . . . . . . . . . . . . . . . . . . . . . . . . . . . . 4
DEVICE SET-UP . . . . . . . . . . . . . . . . . . . . . . . . . . . . . . . . . . . . . . . . . . . . . . . . . . . . . . . . . . . .
B
Y BRAND. . . . . . . . . . . . . . . . . . . . . . . . . . . . . . . . . . . . . . . . . . . . . . . . . . . . . . . . . . . . . 5
B
Y SEARCH . . . . . . . . . . . . . . . . . . . . . . . . . . . . . . . . . . . . . . . . . . . . . . . . . . . . . . . . . . . . 7
B
Y CODE. . . . . . . . . . . . . . . . . . . . . . . . . . . . . . . . . . . . . . . . . . . . . . . . . . . . . . . . . . . . . . 8
D
ELETE. . . . . . . . . . . . . . . . . . . . . . . . . . . . . . . . . . . . . . . . . . . . . . . . . . . . . . . . . . . . . . . 9
N
EW CODES (IN CASE OF UPGRADE) . . . . . . . . . . . . . . . . . . . . . . . . . . . . . . . . . . . . . . . . . . . . 10
PERSONALIZATION . . . . . . . . . . . . . . . . . . . . . . . . . . . . . . . . . . . . . . . . . . . . . . . . . . . . . . . . . . .
M
ACROS . . . . . . . . . . . . . . . . . . . . . . . . . . . . . . . . . . . . . . . . . . . . . . . . . . . . . . . . . . . . . 12
M
OVE KEY. . . . . . . . . . . . . . . . . . . . . . . . . . . . . . . . . . . . . . . . . . . . . . . . . . . . . . . . . . . . 19
L
EARN . . . . . . . . . . . . . . . . . . . . . . . . . . . . . . . . . . . . . . . . . . . . . . . . . . . . . . . . . . . . . . 22
L
ABEL KEYS . . . . . . . . . . . . . . . . . . . . . . . . . . . . . . . . . . . . . . . . . . . . . . . . . . . . . . . . . . . 25
K
EY MAGIC . . . . . . . . . . . . . . . . . . . . . . . . . . . . . . . . . . . . . . . . . . . . . . . . . . . . . . . . . . . 27
V
OLUME LOCK. . . . . . . . . . . . . . . . . . . . . . . . . . . . . . . . . . . . . . . . . . . . . . . . . . . . . . . . . . 30
V
IEW/DELETE . . . . . . . . . . . . . . . . . . . . . . . . . . . . . . . . . . . . . . . . . . . . . . . . . . . . . . . . . . 32
H
OME THEATER . . . . . . . . . . . . . . . . . . . . . . . . . . . . . . . . . . . . . . . . . . . . . . . . . . . . . . . . . 33
SYSTEM. . . . . . . . . . . . . . . . . . . . . . . . . . . . . . . . . . . . . . . . . . . . . . . . . . . . . . . . . . . . . . . . . . .
U
PGRADE (ADDING NEW CODES) . . . . . . . . . . . . . . . . . . . . . . . . . . . . . . . . . . . . . . . . . . . . . . . 36
LCD . . . . . . . . . . . . . . . . . . . . . . . . . . . . . . . . . . . . . . . . . . . . . . . . . . . . . . . . . . . . . . . 37
S
OUND ON/OFF . . . . . . . . . . . . . . . . . . . . . . . . . . . . . . . . . . . . . . . . . . . . . . . . . . . . . . . . . 38
L
OCK SETTINGS . . . . . . . . . . . . . . . . . . . . . . . . . . . . . . . . . . . . . . . . . . . . . . . . . . . . . . . . . 39
U
SER RESET. . . . . . . . . . . . . . . . . . . . . . . . . . . . . . . . . . . . . . . . . . . . . . . . . . . . . . . . . . . 40
L
ANGUAGE . . . . . . . . . . . . . . . . . . . . . . . . . . . . . . . . . . . . . . . . . . . . . . . . . . . . . . . . . . . . 41
A
BOUT . . . . . . . . . . . . . . . . . . . . . . . . . . . . . . . . . . . . . . . . . . . . . . . . . . . . . . . . . . . . . . 42
CUSTOMER SERVICE . . . . . . . . . . . . . . . . . . . . . . . . . . . . . . . . . . . . . . . . . . . . . . . . . . . . . . . . 43
CODES . . . . . . . . . . . . . . . . . . . . . . . . . . . . . . . . . . . . . . . . . . . . . . . . . . . . . . . . . . . . . . . . . . .
T
ELEVISION. . . . . . . . . . . . . . . . . . . . . . . . . . . . . . . . . . . . . . . . . . . . . . . . . . . . . . . . . . . 128
V
IDEO RECORDERS . . . . . . . . . . . . . . . . . . . . . . . . . . . . . . . . . . . . . . . . . . . . . . . . . . . . . . 135
S
ATELLITE RECEIVERS . . . . . . . . . . . . . . . . . . . . . . . . . . . . . . . . . . . . . . . . . . . . . . . . . . . . 138
C
ABLE CONVERTERS . . . . . . . . . . . . . . . . . . . . . . . . . . . . . . . . . . . . . . . . . . . . . . . . . . . . . 141
V
IDEO ACCESSORIES . . . . . . . . . . . . . . . . . . . . . . . . . . . . . . . . . . . . . . . . . . . . . . . . . . . . . 141
CD/M
INI DISC . . . . . . . . . . . . . . . . . . . . . . . . . . . . . . . . . . . . . . . . . . . . . . . . . . . . . . . . 141
P
HONO . . . . . . . . . . . . . . . . . . . . . . . . . . . . . . . . . . . . . . . . . . . . . . . . . . . . . . . . . . . . . 142
H
OME AUTOMATION. . . . . . . . . . . . . . . . . . . . . . . . . . . . . . . . . . . . . . . . . . . . . . . . . . . . . . 142
A
MPLIFIERS . . . . . . . . . . . . . . . . . . . . . . . . . . . . . . . . . . . . . . . . . . . . . . . . . . . . . . . . . . 142
A
MP/TUNERS . . . . . . . . . . . . . . . . . . . . . . . . . . . . . . . . . . . . . . . . . . . . . . . . . . . . . . . . . 142
C
ASSETTE PLAYERS. . . . . . . . . . . . . . . . . . . . . . . . . . . . . . . . . . . . . . . . . . . . . . . . . . . . . . 143
L
ASER DISC . . . . . . . . . . . . . . . . . . . . . . . . . . . . . . . . . . . . . . . . . . . . . . . . . . . . . . . . . . 143
D
AT . . . . . . . . . . . . . . . . . . . . . . . . . . . . . . . . . . . . . . . . . . . . . . . . . . . . . . . . . . . . . . . 143
D
VD. . . . . . . . . . . . . . . . . . . . . . . . . . . . . . . . . . . . . . . . . . . . . . . . . . . . . . . . . . . . . . . 143
2 www.oneforall.com
Page 4
www.oneforall.com 3
Introduction
Your ONE FOR ALL MOSAIC is designed to let you use one remote to operate your Video and Audio
equipment;any device designed to be operated by an infrared signal.This also includes those devices
which operate over 100 kHz.You can choose any combination of 15 devices you would like to operate.
The ONE FOR ALL MOSAIC comes available with the world’s largest and most efficient database of
infrared codes for device compat ibility.It is further enhanced by ONE FOR ALL’s patented upgradeability. Also,what makes the MOSAIC even more unique is the "Learning" feature which allows you
to customise any of the special functions of your original remote control onto the key pad of your new
ONE FOR ALL.
The following pages explain in simple steps how to customize the ONE FOR ALL MOSAIC to your
home entertainment needs.
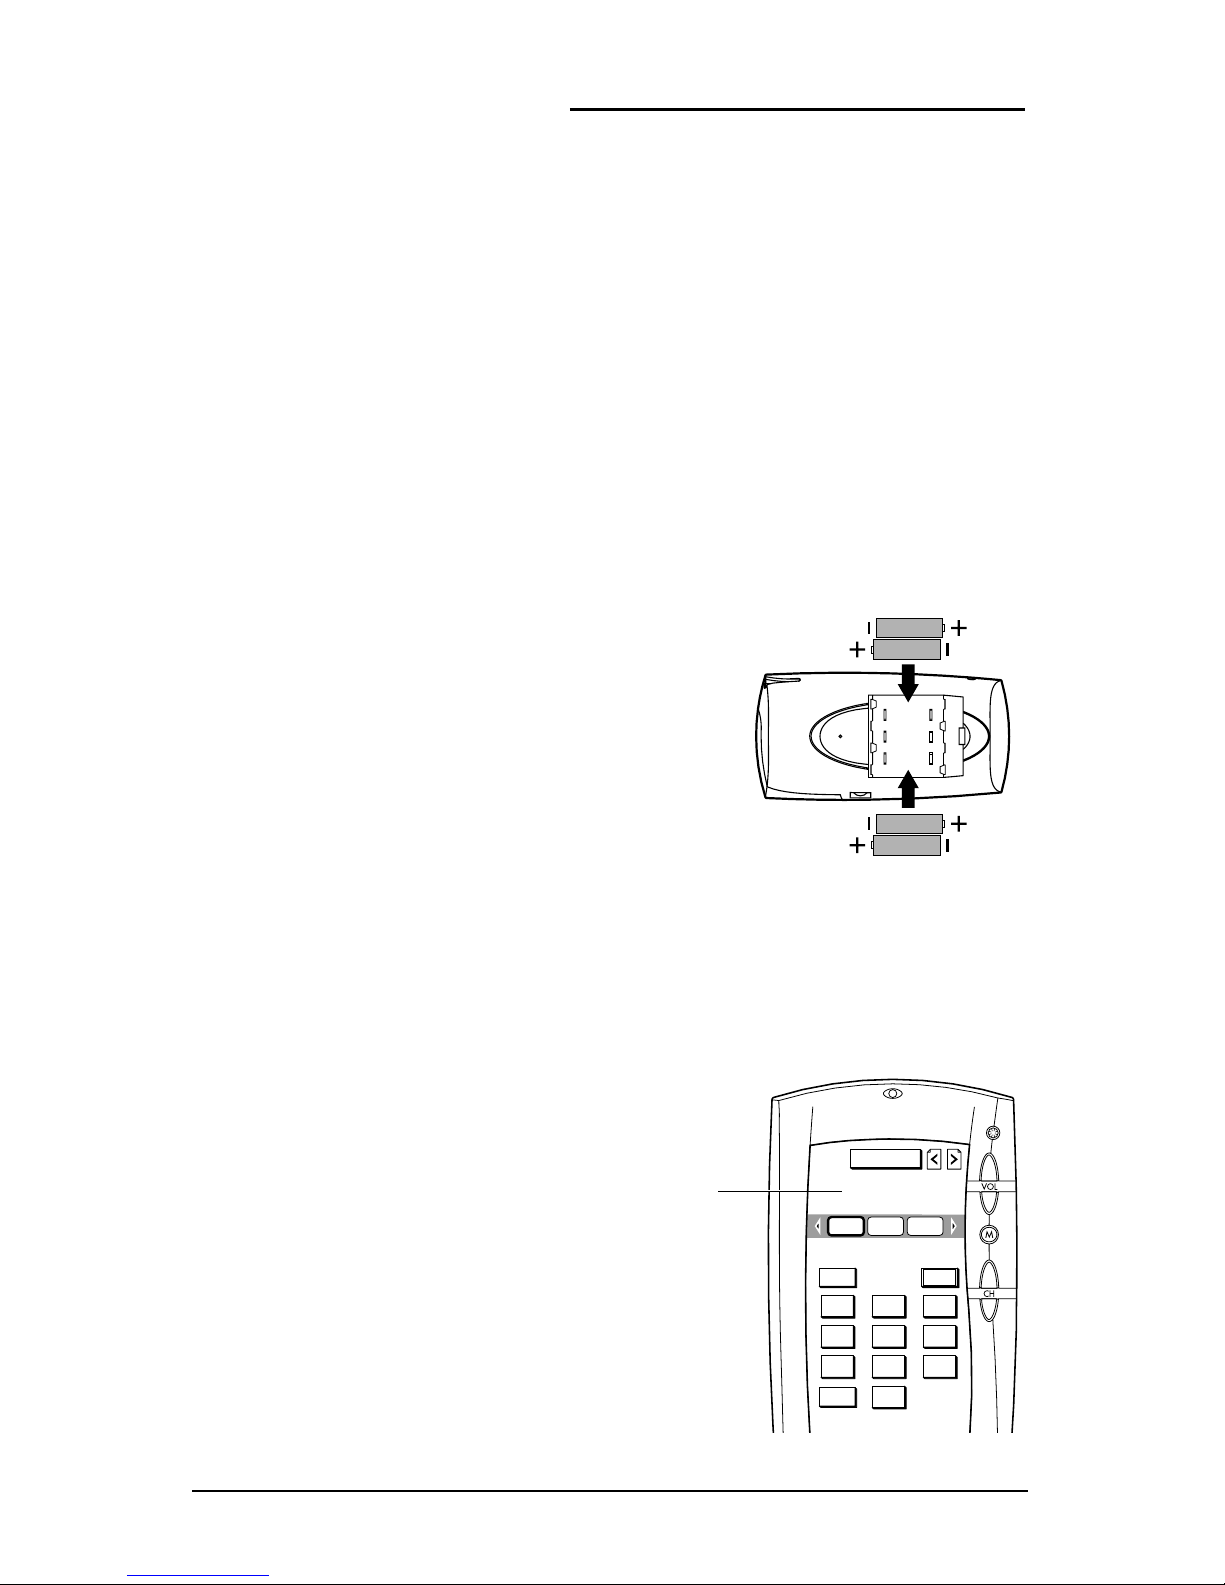
Installing Batteries
Your MOSAIC needs 4 new "AA/LR6" alkaline batter ies .
1. Remove the battery cover from the back ofthe ONE
FOR ALL MOSAIC by pressing down on the tab.
2. Match the batteries to the + and – marks inside the
battery case,then insert the batteries.
3. Press the batter y cover back in place.
Low-Battery Indicator
Whenever the batter ies need replacement,
the MOSAIC will emit a "beep sound" (even ifthe
sound is turned off).The MOSAIC will indicate this
as well on the top port ion of the screen with a
"Battery Low" message.
At this point,only the control functions will work
and all of the MOSAIC’s DEVICE SETUP and PER-
SONALIZATION parameters will be disabled to prevent a c c i d e nt al los s of any e nt e red com m a n d s
should the batter ies run out.
Simply replace the batteries as soon as possible.
Press any IR key and the MOSAIC will be restored
to its full functionality,complete with your favourite
settings.
Low Battery
Indicator
1 2 3
4 5 6
7 8 9
0
-/--
AV PWR
CBLTV VCR
THEATERSetup
|| Battery Low ||
Page 5
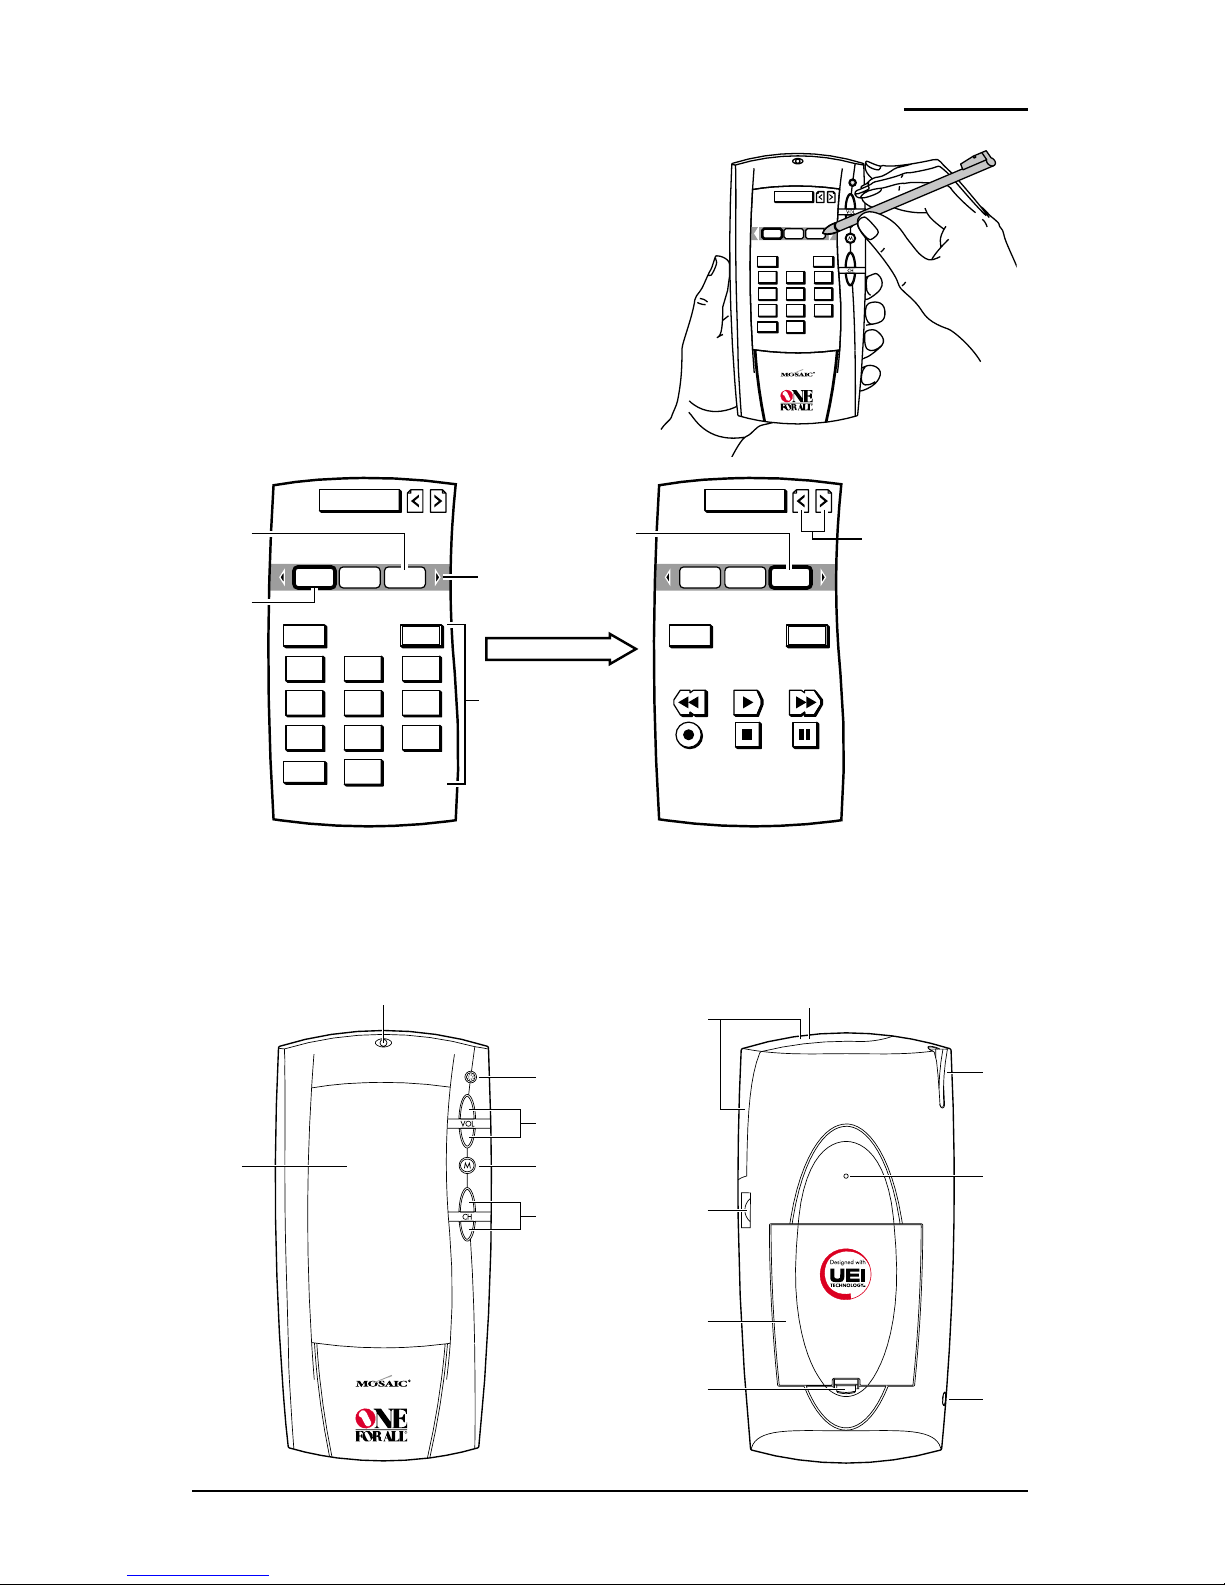
Using the touch screen
MOSAIC features a Touch Screent h at resp ond s to tou ch
commands,whether you use the supplied Stylus or your
finger tip.Each time you tap on the screen,you’ll see the
LED blink and hear a beep tone,which serve as visual
and audio confirmation of your command.
After 20 seconds ofinactivit y,MOSAIC will turn off the
LCD screen to conserve battery life.
NOTE:By pressing the ? key you w i ll obtain additional infor mat ion about
the displayed menu.
1 2 3
4 5 6
7 8 9
0
-/--
AV PWR
CBLTV VCR
THEATERSetup
R
URC - 9990
1 2 3
4 5 6
7 8 9
0
-/--
AV PWR TV/VCR PWR
CBLTV VCR CBLTV VCR
THEATERSetup THEATERSetup
Tap on
next
device.
Current
active
device
Current
active
device
Tap on scroll arrow
to see other devices.
Remote Control
Keys for active
device
Tap on pages
to see more
Remote Control
Keys.
Phono Jack
(for future
computer
connection)
Stylus
and
Housing
IR Signal
Emitters
Piezo Speaker
(for Audio
Confirmation)
Contrast
Control
(for
Touch Screen)
Battery
Cover
Tab
(to release
Battery Cover)
IR Learning
Eye
R
URC - 9990
LED
(for Visual Confirmation)
VOLUME
Up/Down
MUTE
On/Off
Touch Screen
(Soft Keys)
(Hard Keys)
BACKLIGHT
On/Off
CHANNEL
Up/Down
4 www.oneforall.com
Page 6
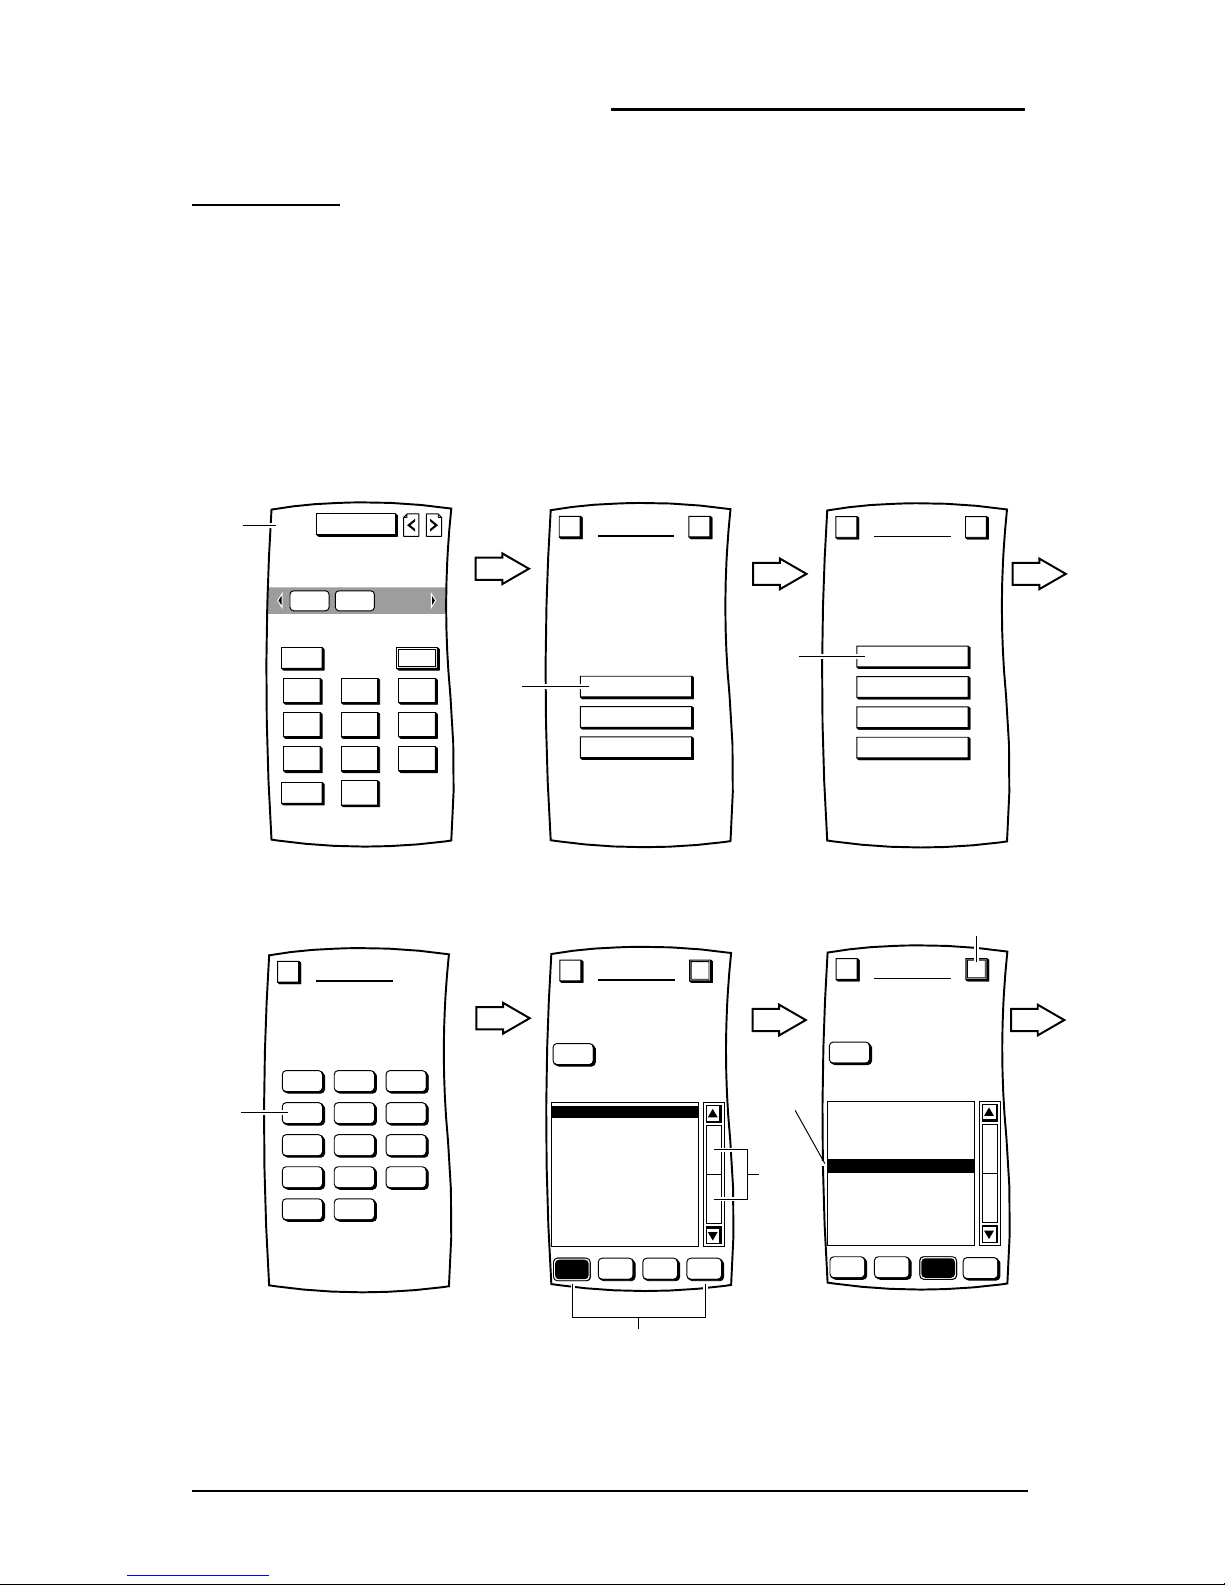
Device Setup
BY BRAND
The easiest way to add devices to MOSAIC is to perform a setup by manufacturer brand.With this
method you select a device to add,select the brand you own,and MOSAIC automatically finds the
correct manufacturer’s code to correctly control the device.
Example:to Set-Up your Video Recorder (brand: Nokia):
NOTE:To return to a previous menu,tap on the ESC key.To return to last-displayed Device
Screen,press down on ESC or MUTE for at least 2 seconds.For help,tap the ? ke y.
1 2 3
4 5 6
7 8 9
0
-/--
AV PWR
THEATERSetup
Tap on
CBL
VCR
DEVICE SETUP
PERSONALIZATION
SYSTEM
SETUP
Welcome to Setup!
What would you like to configure?
Esc ?
Tap on
BY BRAND
BY SEARCH
BY CODE
DELETE
DEVICE SETUP
Welcome to Device Setup!
What method
would you like to use?
Esc ?
Tap on
CBL SATTV
DVD LDVCR
AMP CDTUN
DAT PHOTAPE
HOMEV.ACC
BRAND SET
Select the device.
Esc
Tap on
OTHER
A-E F-M N-R S-ZA-E
ASAAdventura
AVP
Adelsound
Adventura
Adyson
Aiwa
Akai
Akiba
Akura
Alba
BRAND SET
VCR
Use the letters or the bar
to scroll to your brand.
Esc OK
Scroll
Bars
Alphabet Keys
OTHER
A-E F-M
S-Z
F-MN-R
NEC
Neckermann
Nesco
Nikkia
Nokia
Nordmende
Oceanic
Okano
Olympus
Optimus
BRAND SET
VCR
Use the letters or the bar
to scroll to your brand.
Esc OK
First,
tap on
brand
Then, tap on
www.oneforall.com 5
Page 7
• To relabel the device key,tap on the YES key and you will see the LABEL Menu (see explanation
on page 25 step 6).
• To keep the label the same,tap on the NO key.
You will see a confirmation screen that says the key has been successfully programmed.To
program another device,tap on the ESC key.To return to the Device Screen,press on ESC or
MUTE for at least 2 seconds.
To test remote control of the newly-added device,tap on its key on the Device Selection Strip.Tr y
using the Hard Keys to adjust volume a nd ch ange cha nn els .Try tapping on th e Page Arrows to acce ss
other remote control functions and then try tapping on the soft keys on each page to test them.
NOTE:Remember to press the correct device key before operating your device.Only one device
(CD,amplifier,cassette,etc.) can be assigned to a device key. Ifyour original remote operates
more than one dev ice (for example,a receiver,CD player and cassette player in one remote),
you need to set up each device separately.
6 www.oneforall.com
Test
1
PWR
VCR 1
VCR 2
VCR 3
VCR 4
VCR 5
VCR 6
BRAND SET
Nokia
Your brand has multiple
types; use the scroll bars
to try each one in turn.
Esc OK
ADD
REPLACE
BRAND SET
Would you like to
ADD the device or REPLACE
it with an existing one?
Esc ?
Tap on
if 1st VCR
Tap on
if 2nd VCR
Press OK to confirm.
BRAND SET
Esc OK
CBL VCR VCR
Tap on
Relabel the device?
BRAND SET
CBL VCR VCR
YES NO
Page 8
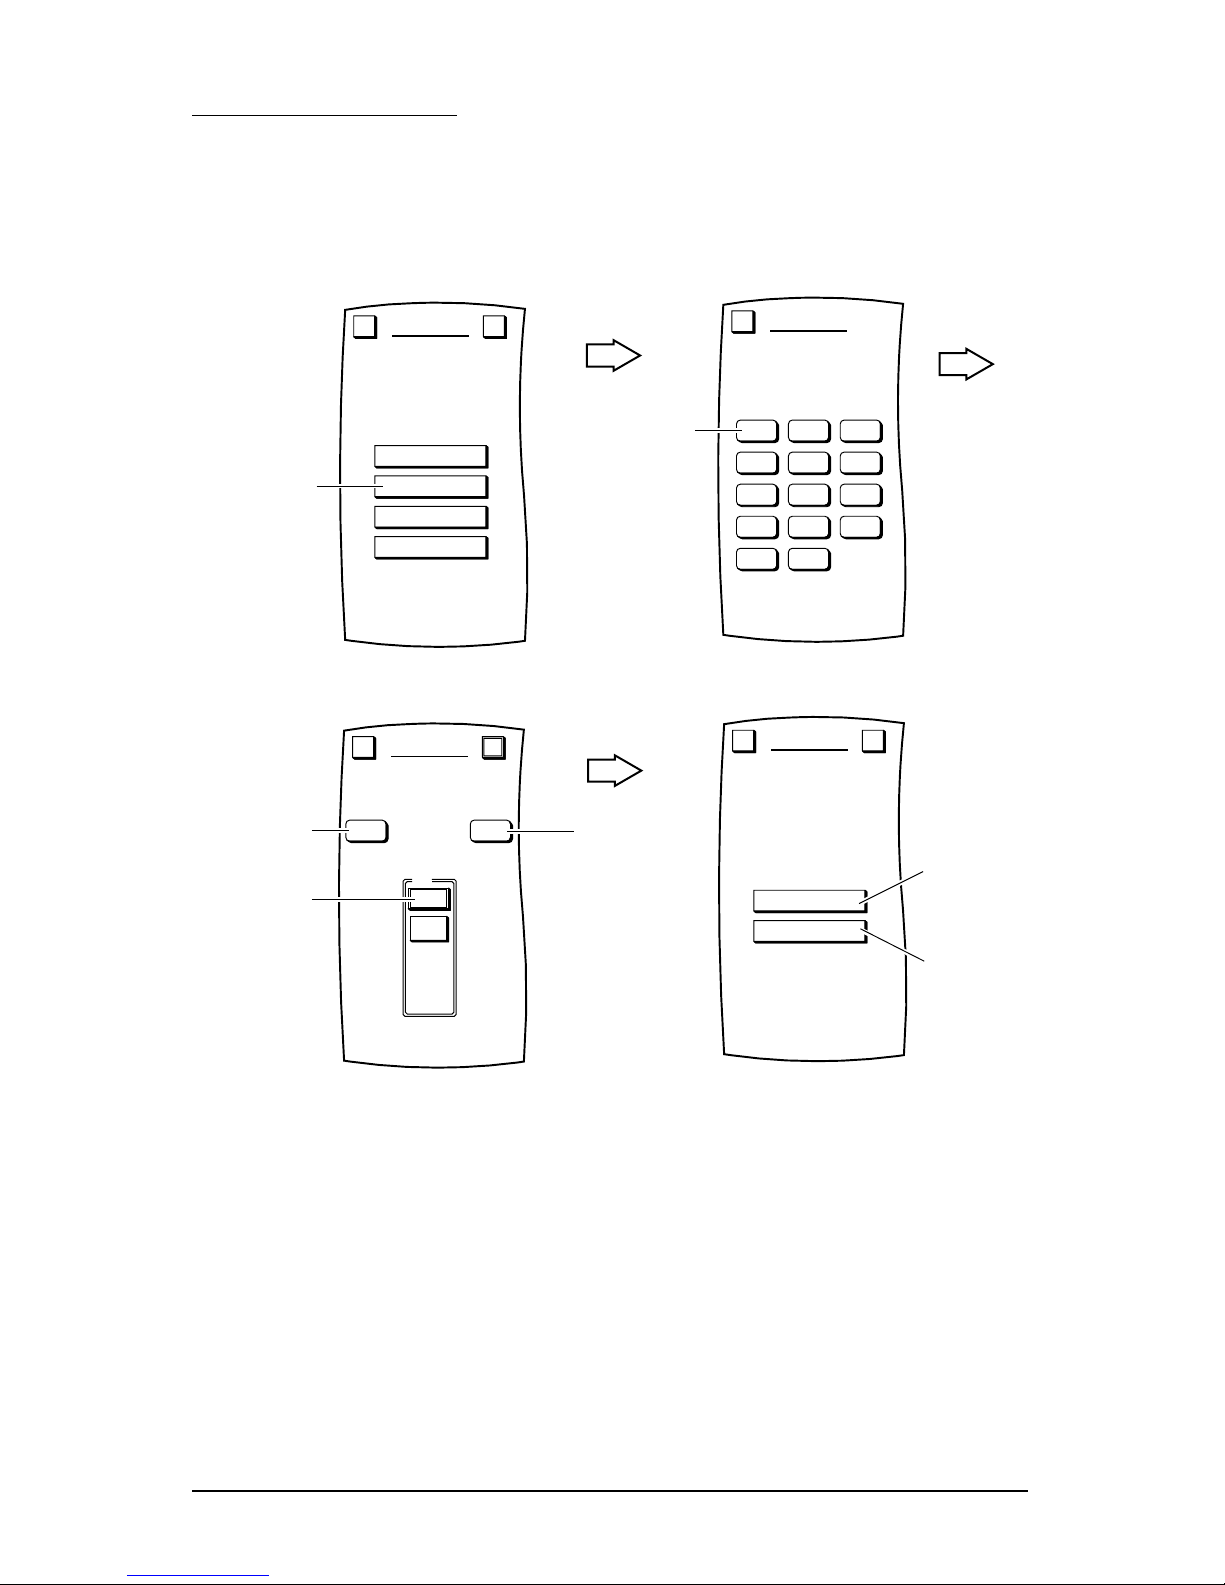
SETUP BY SEARCH
As an alternative method,you can use MOSAIC’s search prog ram to find the correct manufacturer’s
codes to set up your entertainment devices.With this method you first select a device you want to
add,then you perform a code test,advancing through one or more types,to find the one that works.
Example:to use the search method for your television:
Tap on the OK key to confirm your choice.MOSAIC will ask if you want to relabel the newly-added
device.
• To relabel it,tap on the YES key and you will see the LABEL Menu (see explanation on page 25
step 6).
• To keep the label the same,tap on the NO key.
You will see a confirmation screen that says the key has been successfully programmed.To
program another device,tap on the ESC key.To return to the Device Screen,press on ESC or
MUTE for at least 2 seconds.
To test remote control of the newly-added device,tap on its key on the Device Selection Strip.Tr y
using the Hard Keys to adjust volume a nd ch ange cha nn els .Try tapping on th e Page Arrows to acce ss
other remote control functions and then try tapping on the soft keys on each page to test them.
www.oneforall.com 7
CBL SATTV
DVD LDVCR
AMP CDTUN
DAT PHOTAPE
HOMEV.ACC
SEARCH
Select the device.
Esc
Tap on
BY BRAND
BY SEARCH
BY CODE
DELETE
DEVICE SETUP
Welcome to Device Setup!
What method
would you like to use?
Esc ?
Tap on
ADD
REPLACE
SEARCH
Would you like to
ADD the device or REPLACE
it with an existing one?
Esc ?
Tap on
if 1st TV
Tap on
if 2nd TV
PREV NEXT
Test
1
PWR
SEARCH
Use the test keys to find
your device type.
Press OK to save.
Esc OK
TV
First, tap on
To check
previous code,
tap on
If device does not
respond, tap and
repeat test.
Page 9
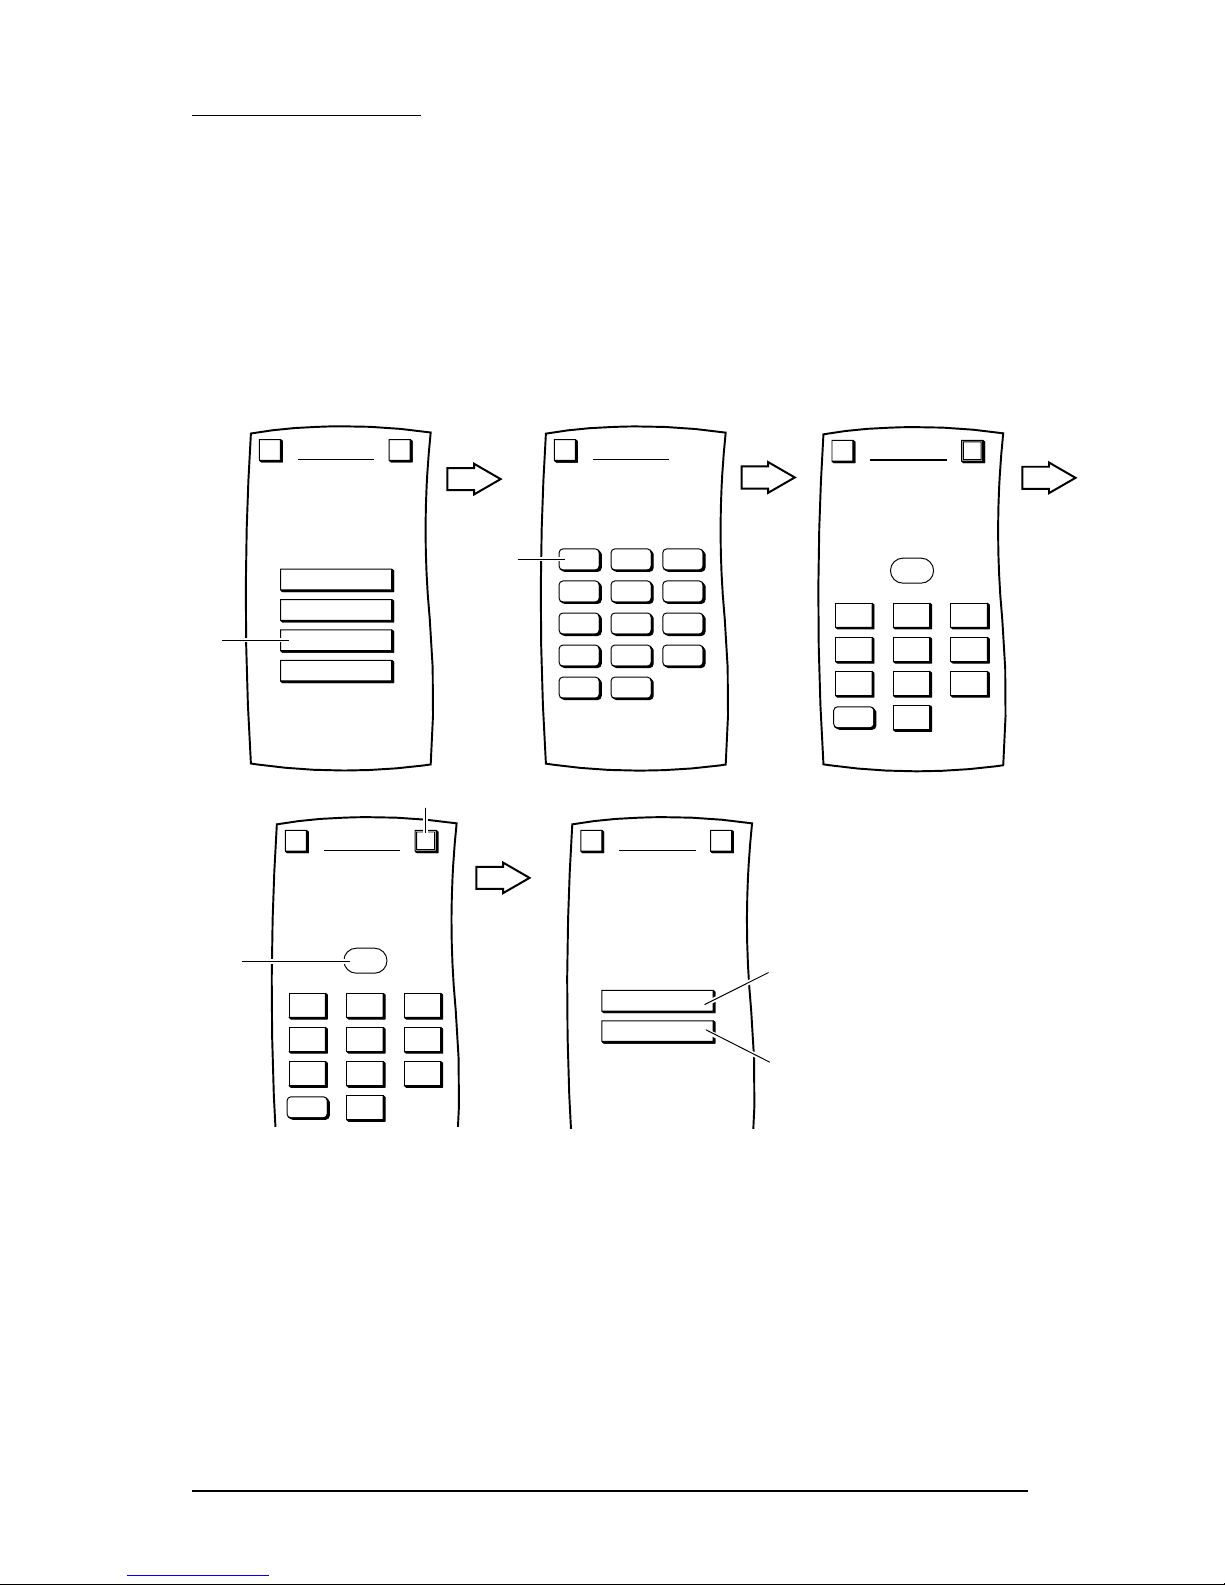
SETUP BY CODE
Find the code for your device in the Set-Up Code section (starting on page 128).Codes are listed by
device type and brand name.The most popular code is listed first.Make sure your device is switched
on (not in standby).Newly captured Manufacturer’s codes are available for customer access on our
web site www.oneforall.com.
1. Tap on Setup key (upper lef t corner).
2. Tap on DEVICESETUP.
NOTE:To return to a previous menu,tap on the ESC key.To return to last-displayed Device
Screen,press down on ESCor MUTE for at least 2 seconds.For help,tap the ? key.
3. Tap on the OK key to confirm your choice.MOSAIC will ask if you want to relabel the newly-added
device.
• To relabel it,tap on the YES key and you will see the LABEL Menu (see explanation on pag e 25 s tep 6).
• To keep the label the same,tap on the NO key.
You will see a confirmation screen that says the key has been successfully programmed.To
program another device,tap on the ESC key.To return to the Device Screen,press on ESC or
MUTE for at least 2 seconds.
To test remote control of the newly-added device,tap on its key on the Device Selection Strip.Tr y
using the Hard Keys to adjust volume a nd ch ange cha nn els .Try tapping on th e Page Arrows to acce ss
other remote control functions and then try tapping on the soft keys on each page to test them.
CLEAR
CODE SETUP
Device Code
1234
Enter the 4 digit code,
press OK to save.
Esc OK
1 2 3
4 5 6
7 8 9
0
Then tap on
First,
enter
code.
page 128-143
CLEAR
CODE SETUP
Device Code
_
Enter the 4 digit code,
press OK to save.
Esc OK
1 2 3
4 5 6
7 8 9
0
ADD
REPLACE
CODE SETUP
Would you like to
ADD the device or REPLACE
it with an existing one?
Esc ?
Tap on
if 1st TV
Tap on
if 2nd TV
CBL SATTV
DVD LDVCR
AMP CDTUN
DAT PHOTAPE
HOMEV.ACC
CODE SETUP
Select the device.
Esc
Tap on
BY BRAND
BY SEARCH
BY CODE
DELETE
DEVICE SETUP
Welcome to Device Setup!
What method
would you like to use?
Esc ?
Tap on
8 www.oneforall.com
Page 10
DELETING A DEVICE
If you no longer use a certain device or it has been incorrectly added to the Device Selection Strip,use
the following procedure to delete it from MOSAIC’s memory.
1. Tap on Setup key (upper lef t corner).
2. Tap on DEVICESETUP.
NOTE:To return to a previous menu,tap on the ESC key.To return to last-displayed Device
Screen,press and hold down ESC for at least 2 seconds.For help,tap the ? key.
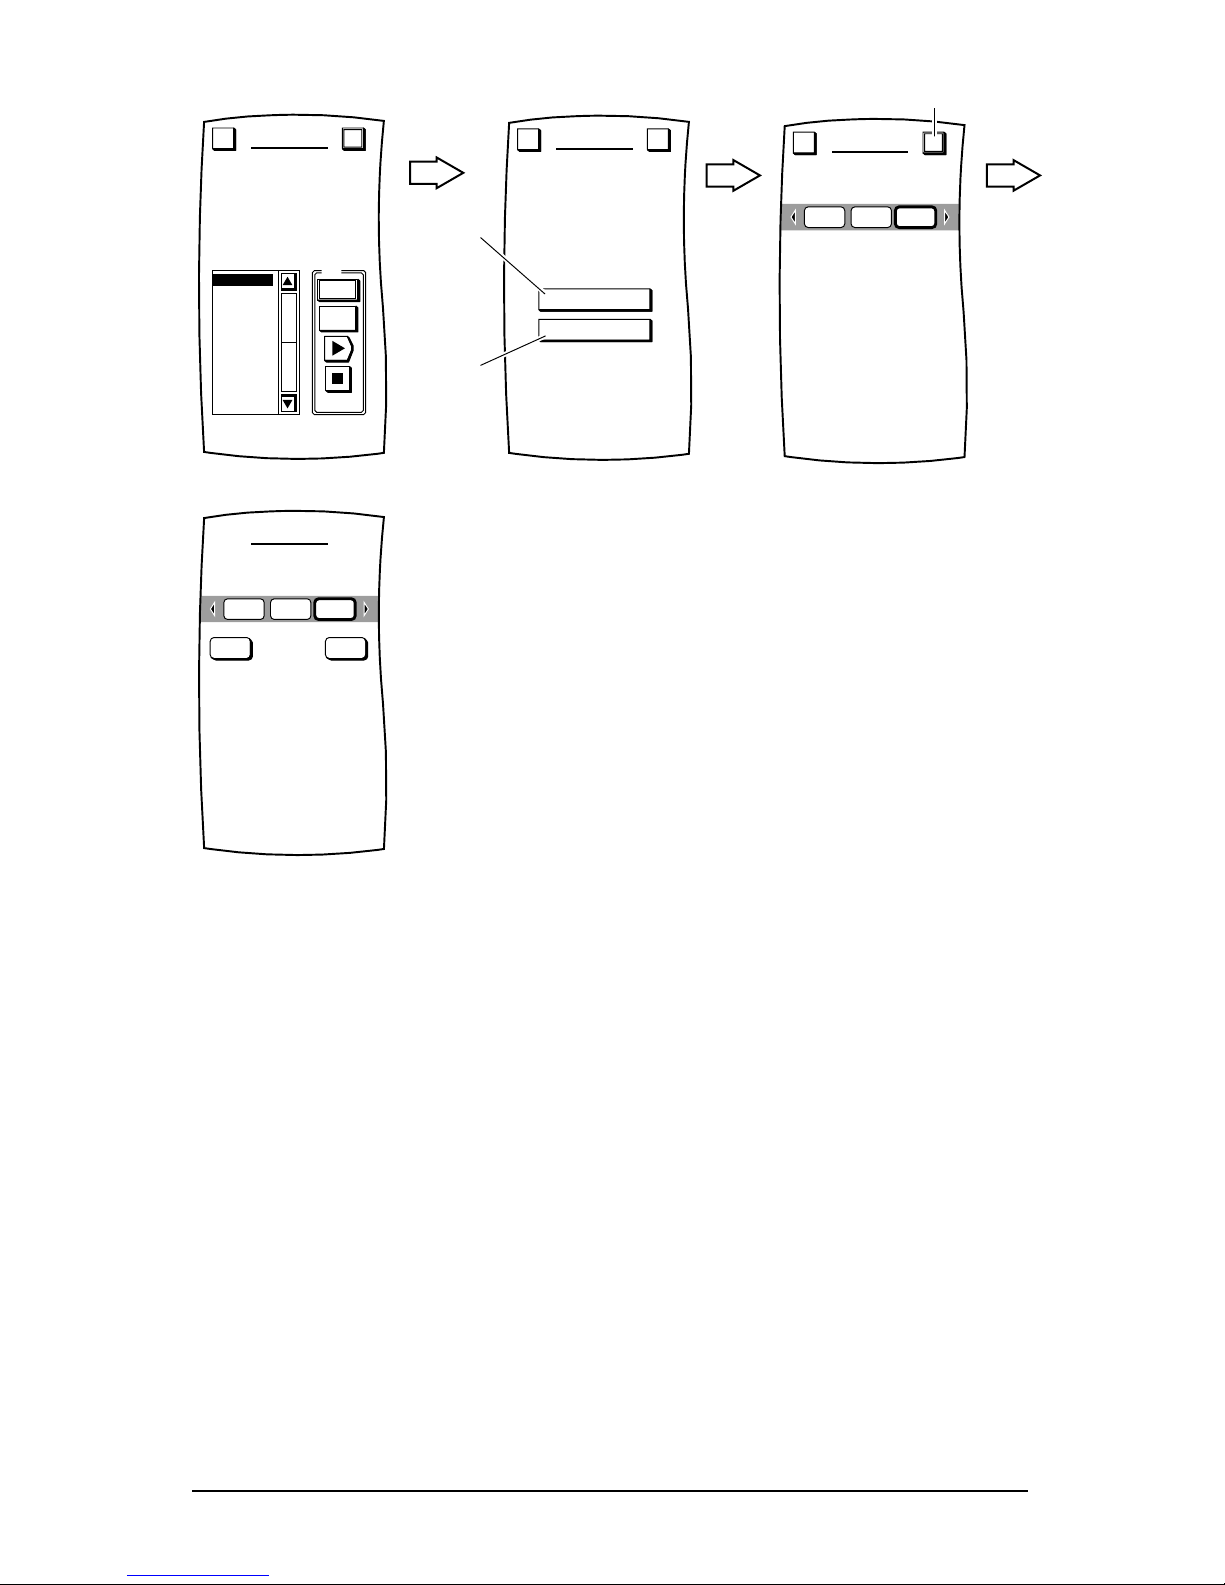
3. Tap on the DELETEkey.You will see the DELETE DEVICE Menu which shows the current
Device Selection Strip.
4. Using the Device Selection Strip,tap the device key you want to delete.If needed,tap the
left/right scroll arrows to display other device choices.When you have selected a device,it will
become highlighted as YESand NO keys a p p ear.
• To delete the selected device,tap on the YES key.You will see a confirmation screen that says
the key has been successfully deleted.To delete another device,tap on the ESC key to return to
the DELETE DEVICE Menu,or press down on ESC or MUTE for at least 2 seconds to return to
the last-displayed Device Screen.
• To cancel deleting the selected device,tap on the NOkey.MOSAIC will return to the Device
Selection Strip with no devices selected to start the process over.If you’re done,tap on the ESC
to return to t he DEVICE SETUPMenu,or press down on ESCor MUTEfor at least 2 seconds
to return to the last-displayed Device Screen.
Which device would you
like to delete?
DELETE DEVICE
Esc OK
CBLTV VCR
BY BRAND
BY SEARCH
BY CODE
DELETE
DEVICE SETUP
Welcome to Device Setup!
What method
would you like to use?
Esc ?
Tap on
www.oneforall.com 9
Page 11
NEW CODES
NOTE:This section only applies after you have performed a download ofnew dev ice codes
(see SYSTEM– UPGRADE on page 36).
NOTE:Make sure the device you want to add is turned on (not in standby).
After downloading,MOSAIC will store the new device codes in memory.An additional soft key,
labelled NEWCODES,w ill appear on the DEVICE SETUP Menu which you will use to find a work ing
code for a selected device.
1. Tap on Setup key (upper lef t corner).
2. Tap on DEVICESETUP.
3. Tap on the NEW CODES key.You will see the UPGRADE Test Menu.
NOTE:To return to a previous menu,tap on the ESC key.To return to last-displayed Device
Screen,press and hold dow n ESC for at least 2 seconds.For help,tap the ? key.
4. Tap on the first code in the list (e.g.,TV 1),aim MOSAIC at the desired device (e.g.,television),
and tap on the PWR key. The device should turn off.If it does not respond,tap on the next code
in the list (e.g.,TV 2),then tap on the PWR key again.If the device still does not respond,repeat
this process by testing each code until you find one that works.
NOTE:Depending on your dow nload, the code list may include more than one device ty pe .
5. To save a code that works,tap on the OK key.You will see the UPGRADE ADD/REPLACE menu
that lists two choices.
Test
1
PWR
TV1VCR 2
TV2
TV3
TV4
TV5
VCR1
VCR2
VCR3
VCR4
VCR5
UPGRADE
Use the scroll bar to try
each one in turn.
Esc OK
Tap on
BY BRAND
BY SEARCH
BY CODE
DELETE
NEW CODES
DEVICE SETUP
Welcome to Device Setup!
What method
would you like to use?
Esc ?
Tap on
10 www.oneforall.com
Page 12
• Use the ADD key when setting up a new device (e.g.,a DVD player) that is not currently on
the Device Selection Strip (ifneeded,refer to USING THE TOUCH SCREEN– on page 4).The
remaining instructions assume you will b e adding a new device.
• Use the REPLACE key when replacing a device (e.g.,a T V set) that is currently on the
Device Selection Strip.
6. Tap on the ADD key to add the device to MOSAIC’s memory.You will see the default device label
being added to the Dev ice Selection Strip.
NOTE:Ifyou tap on the REPLACE key instead,MOSAIC will ask you to select the device to be
replaced and,after your selection,if you want to relabel it.However,if the dev ice to be
replaced has programmed keys,MOSAIC will first ask if you want to keep or clear the settings.
7. Tap on the OK key to confirm your choice.MOSAIC wil l ask if you want to relabel the newlyadded device.
• To relabel it,tap on the YES key and you will see the LABEL Menu (see explanation
on page 25 step 6).
• To keep the label the same,tap on the NO key.
8. You will see a confirmation screen that says the key has been successfully programmed.To program a function of the same type,tap on the ESC ke y.To re t urn t o the Dev ice Screen,press on
ESC or MUTE for at least 2 seconds.
9. To test remote control of the newly-added device,t ap on its key on the Device Select ion Strip.Try
using the Hard Keys to adjust volume and change channels.Try tapping on the Page Arrows to
access other remote control functions and then try tapping on the soft keys on each page to test
them.
10. If desired,repeat all steps to add other devices that appeared in the new codes list ofstep 3.
Test
1
PWR
TV1VCR 2
TV2
TV3
TV4
TV5
VCR1
VCR2
VCR3
VCR4
VCR5
UPGRADE
Use the scroll bar to try
each one in turn.
Esc OK
Tap on
ADD
REPLACE
UPGRADE
Would you like to
ADD the device or REPLACE
it with an existing one?
Esc ?
www.oneforall.com 11
Page 13

Personalization
MACROS
MOSAIC includes a powerful Macro feature that memorizes and plays back a series of key strokes at
any time with the tap ofone key.Up to 21 macros can be defined,each containing a maximum of32
keystrokes.Once defined,a macro must be placed on a Device Screento be used.MOSAIC allows
placement ofup to four “global”macro keys across the top ofevery Dev ice Screen.Also,you may place
additional macros in specific Device Screensusing empty locations or by overriding existing key functions.
ADDING A MACRO
As an inst r uction aid,we’ll create an example “Pow er O n”macro that turns on the Cable Box and TV
power and then tunes in a favorite channel in this exact order :
1. Select the Cable Box and power it on.
2. Add a 2-second delay.
3. On the Cable Box,select channel 28.
4. Select the TV and power it on.
6. Add a 1-second delay.
7. On the TV,select channel 3 to view the modulated signal from the Cable Box.
Each command counts as one macro keystroke,except when selecting a device key which counts as
two.In this example,the total keystroke count is eleven.
NOTE:Adding delays allow devices to power up to their full operating state.In most cases,1 to
2seconds is sufficient,but MOSAIC will accept up to 8 seconds and only count it as one keystroke.
12 www.oneforall.com
Page 14
1. Tap on Setup key (upper lef t corner).
2. Tap on PERSONALIZATION.
NOTE:To return to a previous menu,tap on the ESC key.To return to last-displayed Dev ice
Screen,press down on ESC or MUTE for at least 2 seconds.For help,tap the ? key.
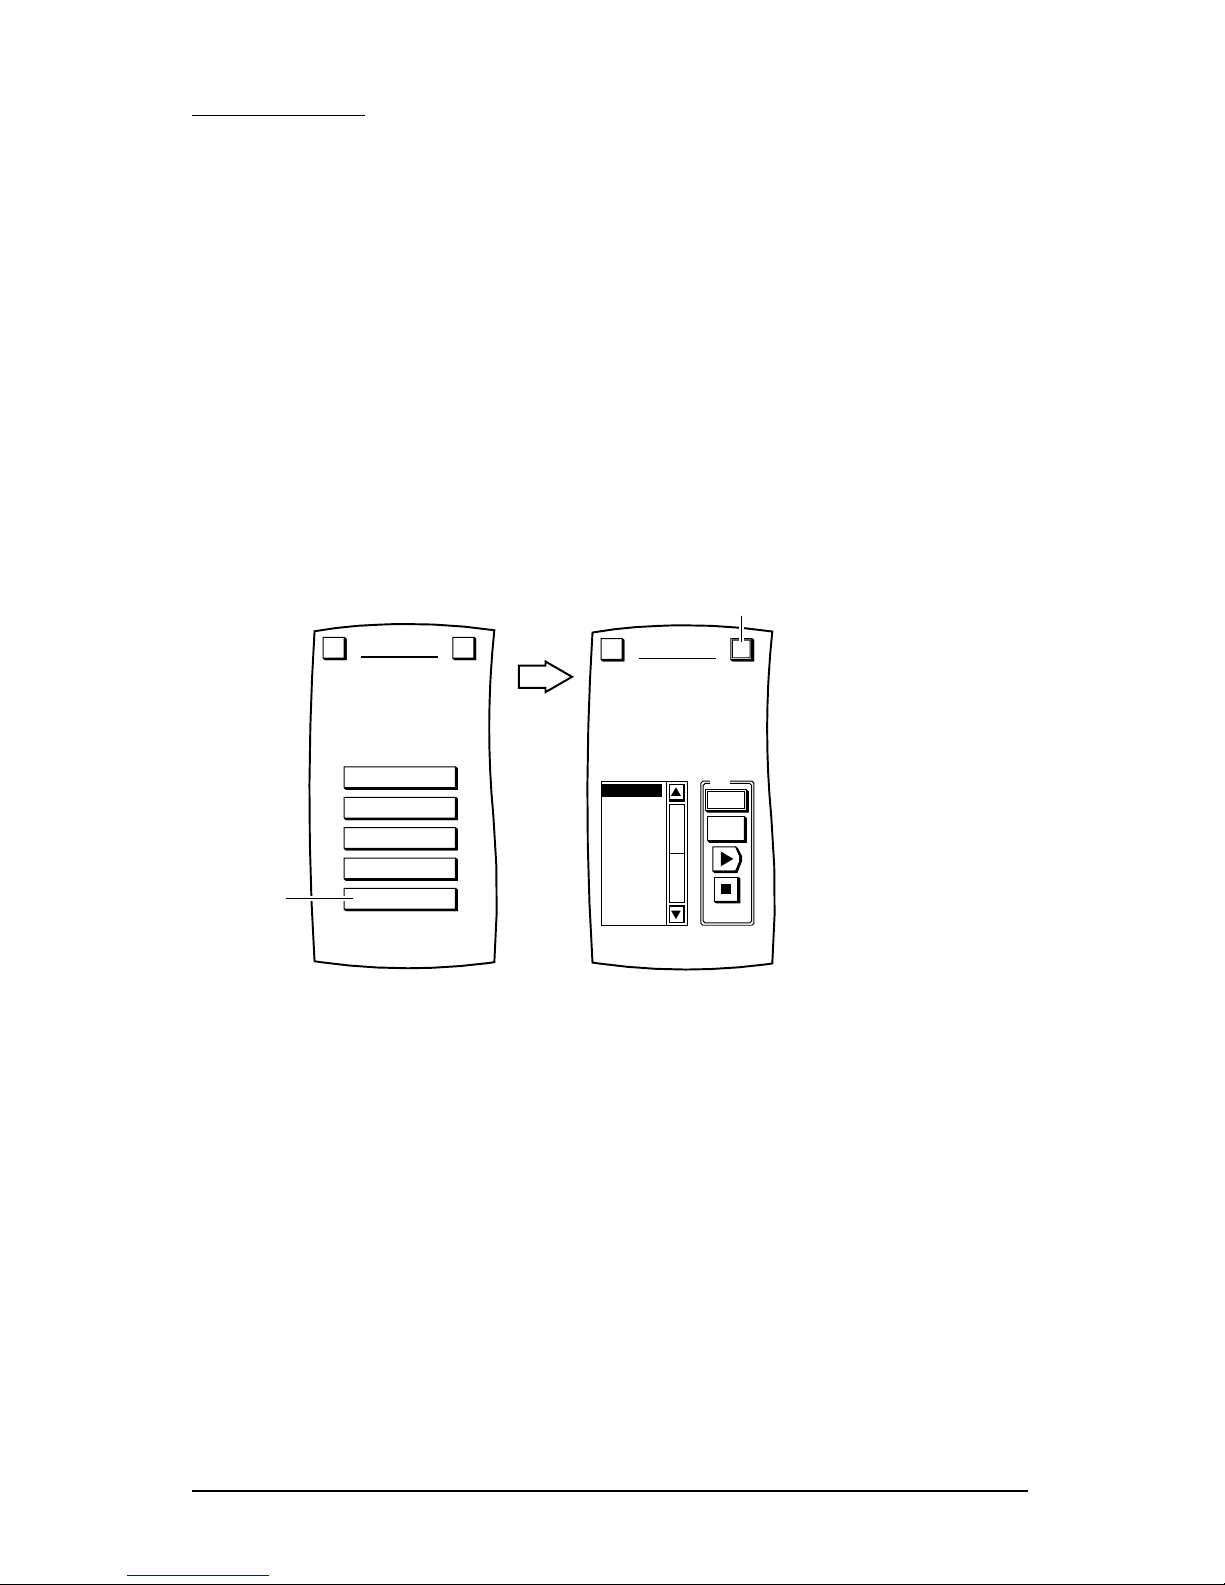
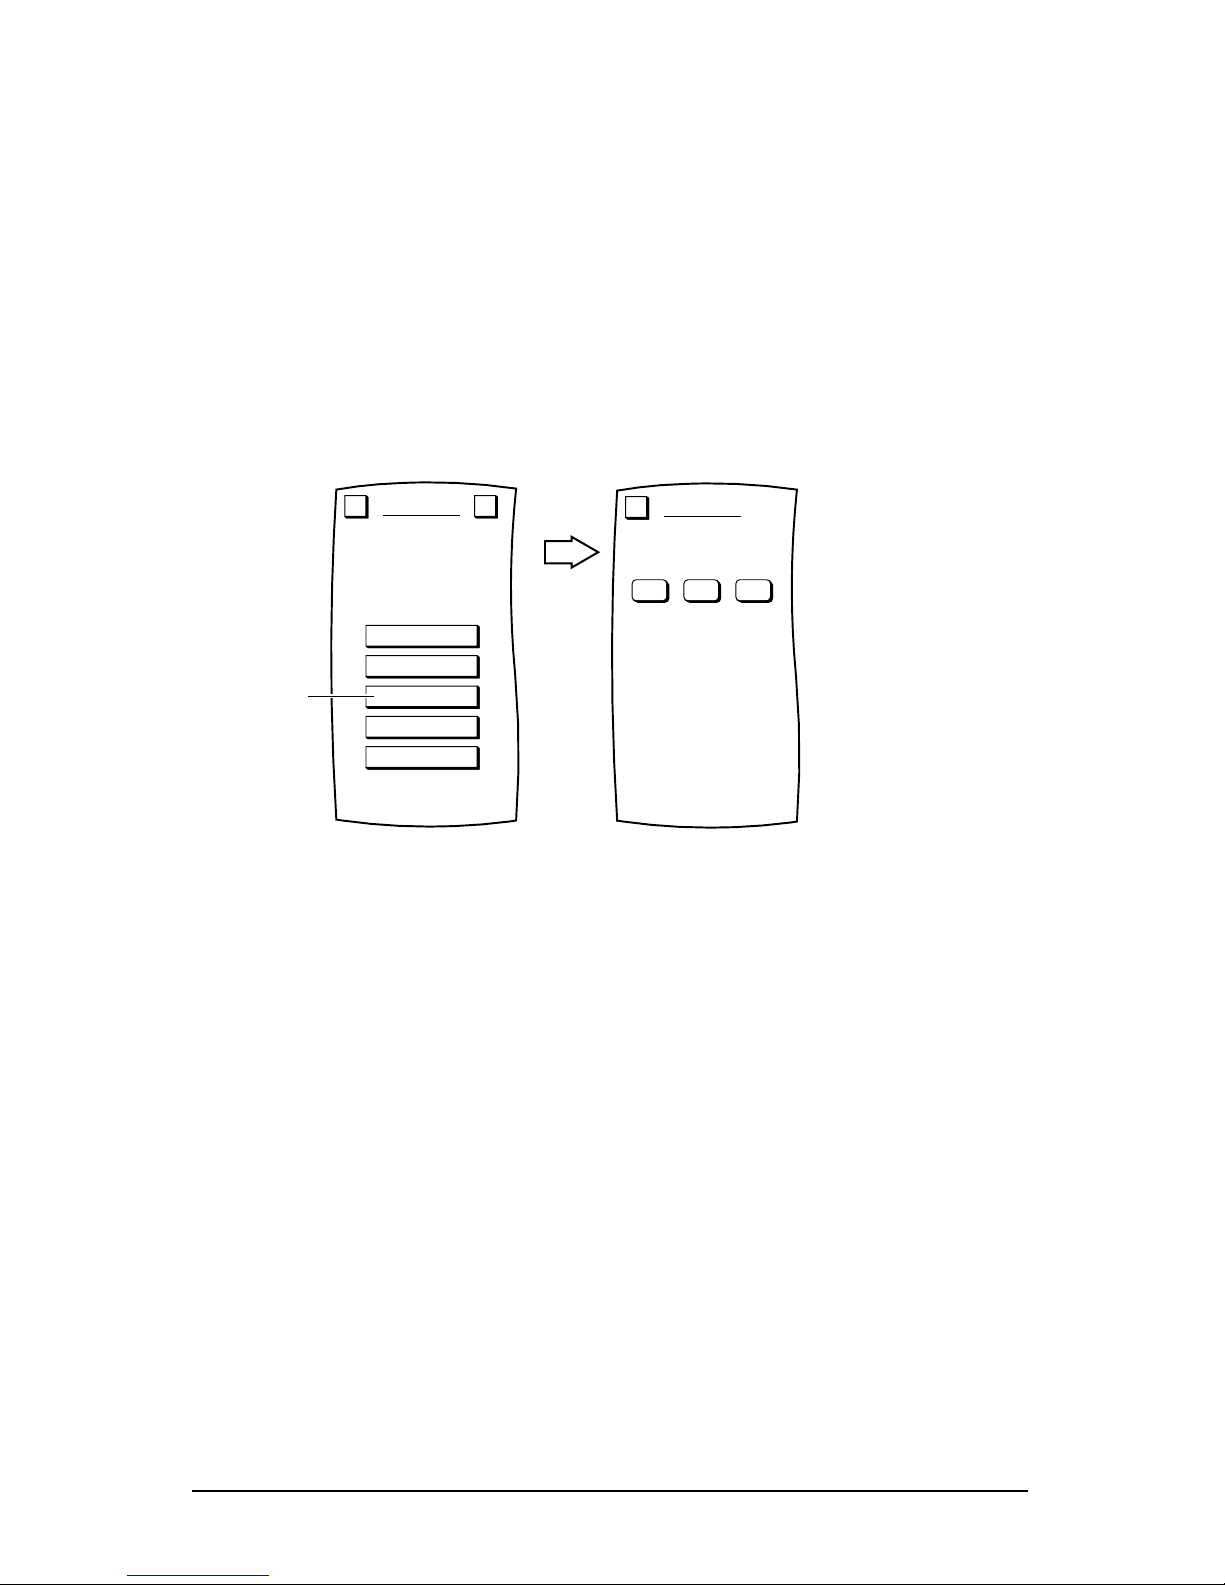
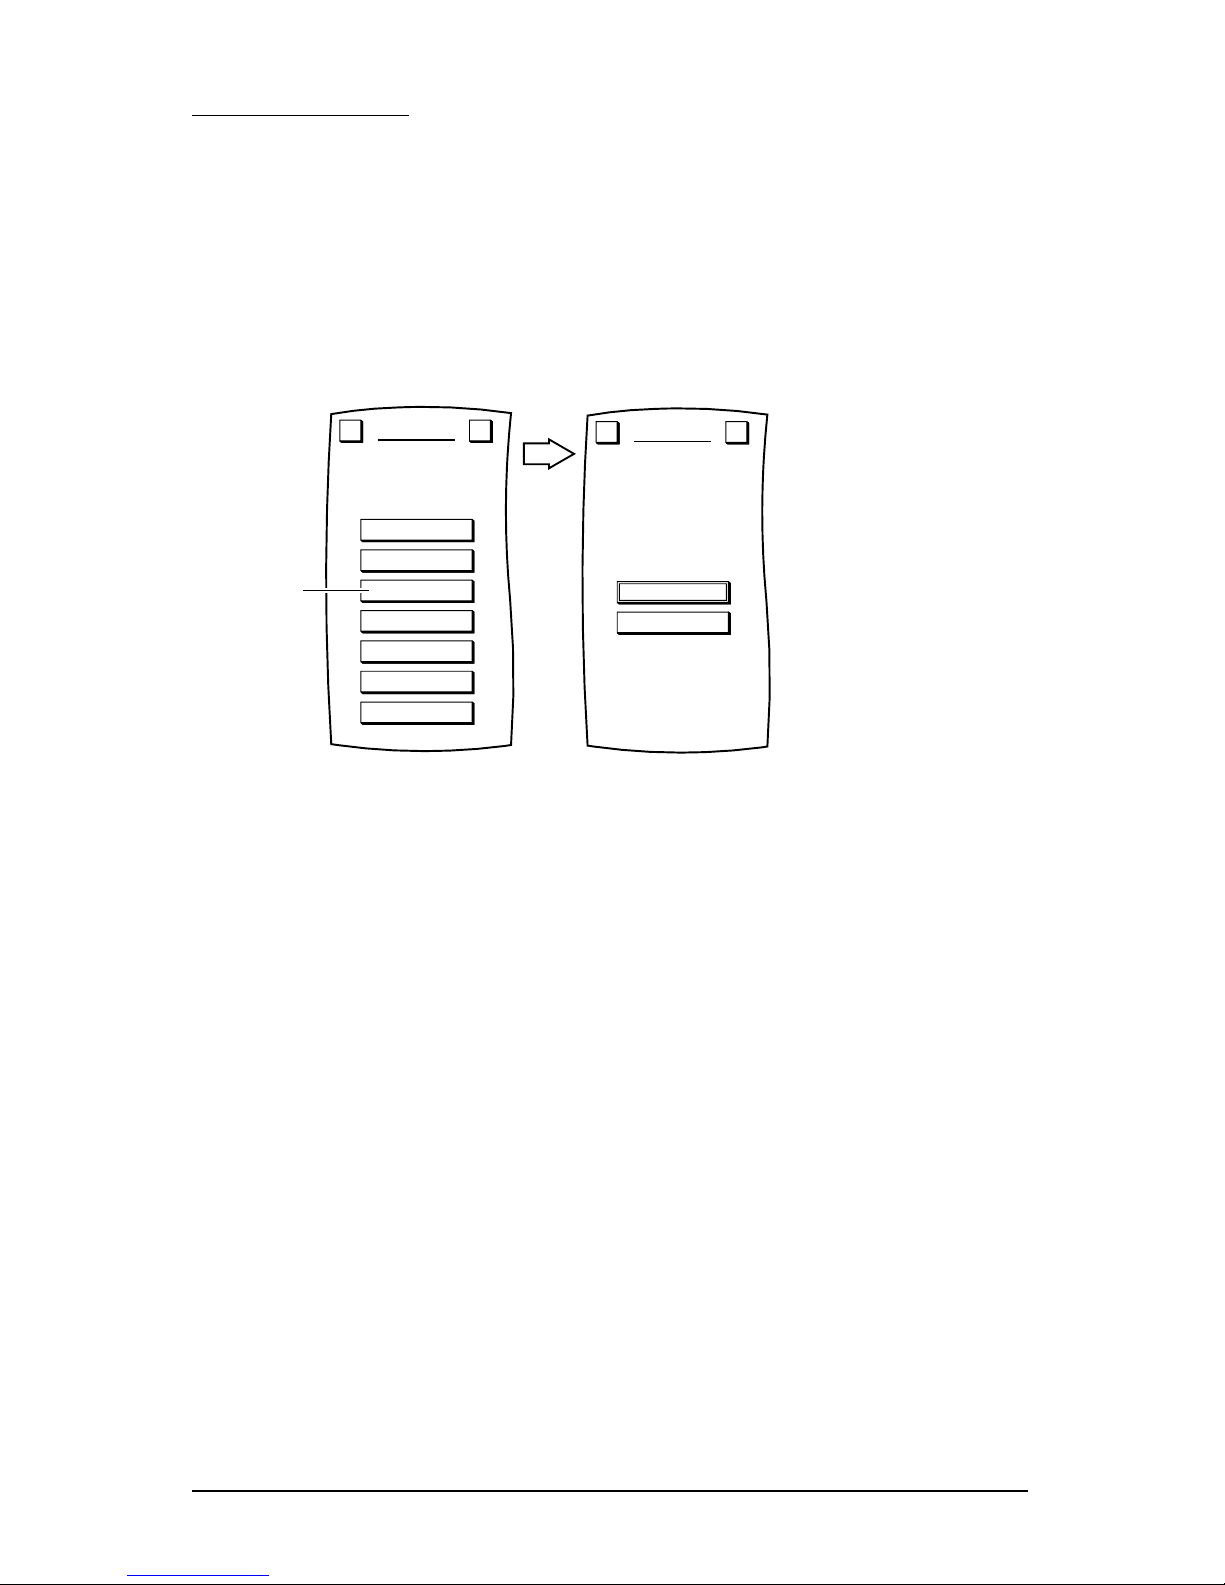
3. Tap on the MACROS key.You will see the MACROS Menu.
4. Tap on the ADD key. You will see the ADD MACROS Menu.
5. Tap on an open Macrokey (i.e.,a macro key that is not labelled).You will see the ADD MACROS
Screen(as shown below) which looks similar to a Device Screen.
6. At this point,we’ll record the example keystrokes listed on page 12.But first make sure the Cable
Box and TV are turned off(in standby).
a. Tap on the CBL key on the Dev ice Selection Strip.
b. Tap on the PWR key.
c. Tap on the DELAY key twice for 2-second delay.
NOTE:Each DELAY keystroke is equal to 1 second.
d. Tap on the 2ke y f o llowed by the 8 key to enter channel 28.
e. Tap on the TVke y on th e Device Selection Strip.
f. Tap on the PWR key .
g. Tap on the DELAY key once for 1-second delay.
h. Tap on the 0 key fo llowed by the 3 key to e nter ch an ne l 3.
i. Aim MOSAIC at the Cable Box/TV and tap on the TEST key.You should see the LED blink as
commands are sent to power on the Cable Box and tune it to channel 28,followed by T V power
on and tuning it to channel 3.Ifthe macro did not work correctly,tap on the CLEAR key an d
repeat steps 6a through 6i.
ADD MACROS
Select a Macro key.
Esc
Tap on
an open
key
ADD
VIEW
COPY
DELETE
DELETE ALL
MACROS
Program a sequence of
keystrokes onto one key.
Esc ?
Tap on
1 2 3
4 5 6
7 8 9
0
-/--
AV PWR
ADD MACROS
Begin recording the
keystrokes.
Esc
CBLTV VCR
www.oneforall.com 13
Page 15
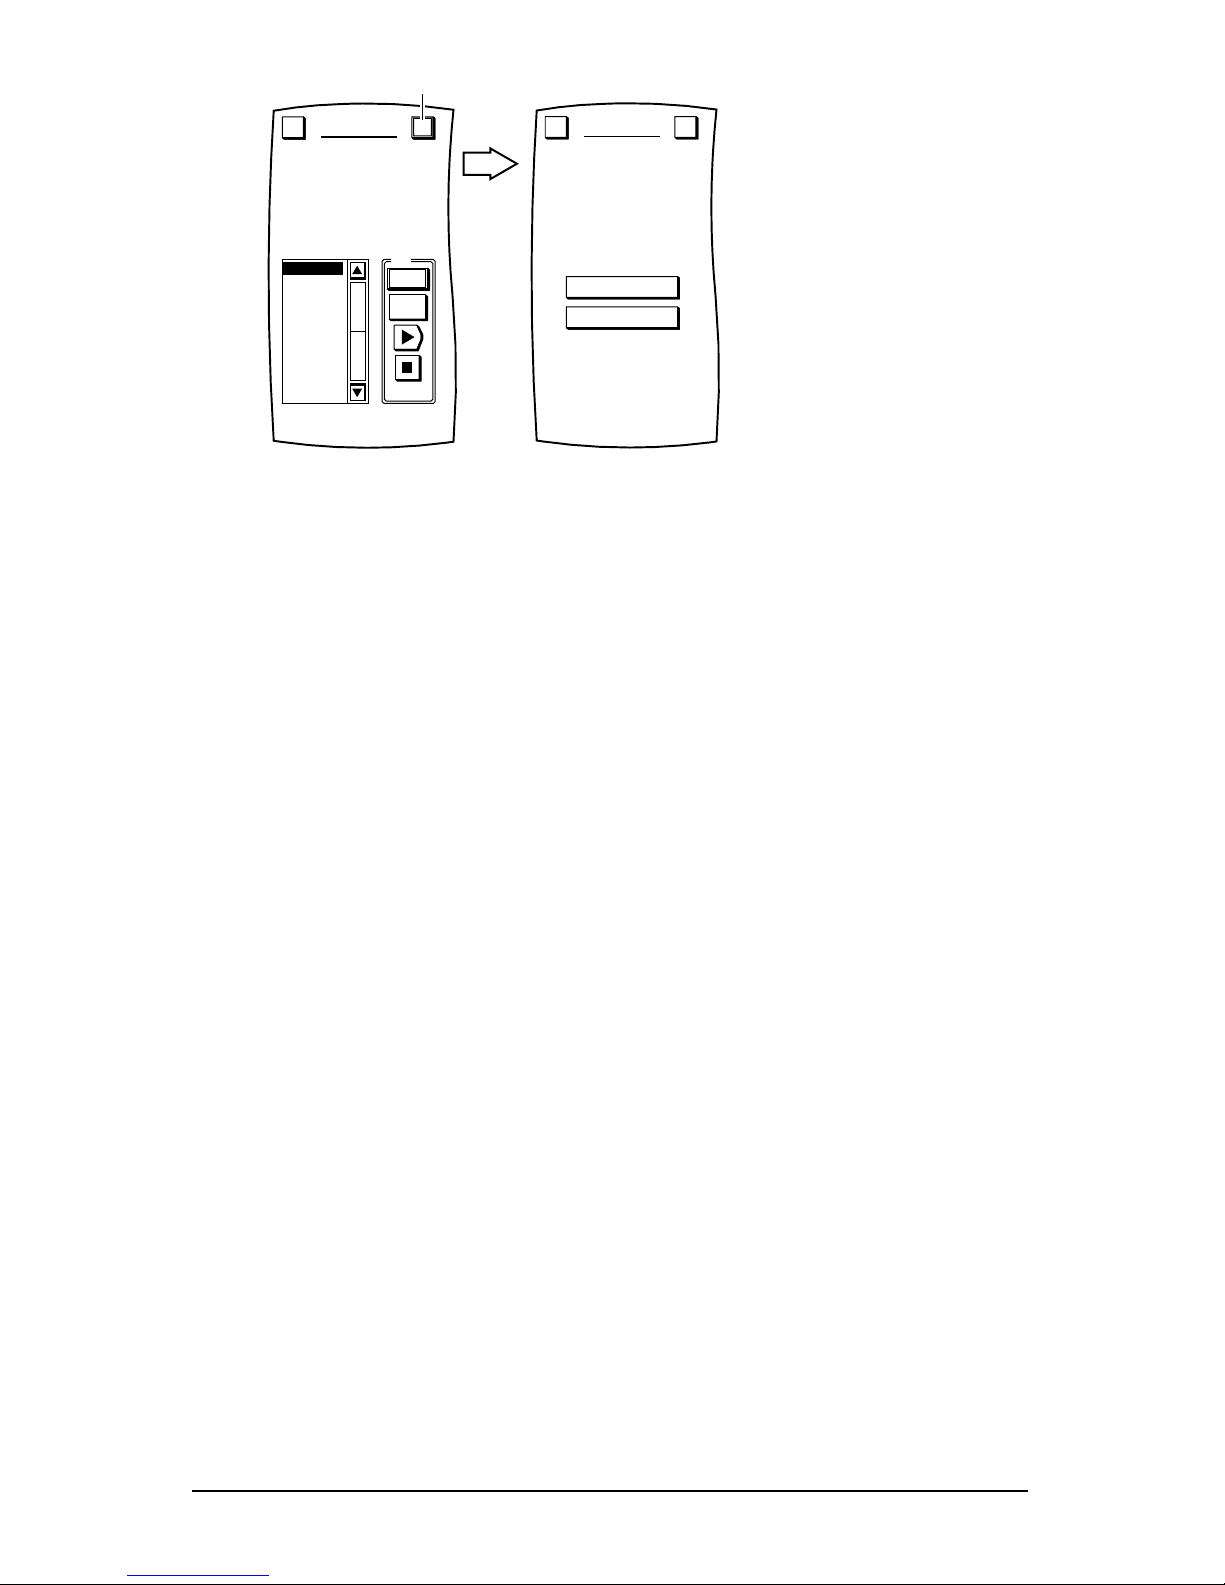
7. To save the macro,tap on the OK key.You will see the ADD MACROS Screen(as shown below).
8. To label the saved macro,tap on the YES key.You will see the ADD MACROS Label Screen.
Follow the procedure that is similar to the one starting with step 3 on page25 to label the macro
as TV On and tap the OK key when you’re d o n e .
NOTE:Ifyou tap on the NO key, the macro will be labelled using the default labeling system
which labels macros in ascending numerical order (e.g.,M1,M2, M3,etc.).
9. MOSAIC will ask you where you want to copy the macro.
• To have it appear on all Dev ice Screens,tap on the ALL DEVICES key. You will see a row of up to
four empty keys appear which correspond to the space directly below Device Selection Strip.Tap
on any empty key to assign it or tap on an existing one to over ride it.MOSAIC will display a confirmation screen.
• To have it appear on a specifi c Device Screen,tap on the SPECIFIC DEVICE key.You will see the
last-display ed Device Screen.Using the Device Selection Strip,tap on the desired device key.If need-
ed,tap on le ft/right s c roll a rrows to view other de vice choices.The De vice Screen will display all
keys on all pages for the selected device.Tap on any empty key.MOSAIC will display a confirmation screen.
NOTE:To return to a previous menu,tap on the ESC key.To return to last-displayed Dev ice
Screen,press down onESC or MUTE for at least 2 seconds.For help, tap the ? key.
10. Repeat steps 1 through 9 for each new macro you want to create.
1 2 3
4 5 6
7 8 9
0
-/--
AV PWR
DELAY TEST CLEAR
ADD MACROS
Press TEST to check
the macro, OK to save
or CLEAR to start over.
Esc
OK
CBLTV VCR
T
YES NO
ADD MACROS
Relabel the key?
14 www.oneforall.com
Page 16

VIEWING MACROS
To see what commands are stored in a macro,perform the following steps:
1. On the Device Screenin the upper left corner,tap on Setup.You will see the main SETUP Menu
that greets you and asks,“What would you like to config ure?”
2. Tap on the PERSONALIZATION key.You will see the PERSONALIZATION Menu.
NOTE:To return to a previous menu,tap on the ESC key.To return to last-displayed Dev ice
Screen,press down on ESC orMUTE for at least 2 seconds.For help, tap the ? key.
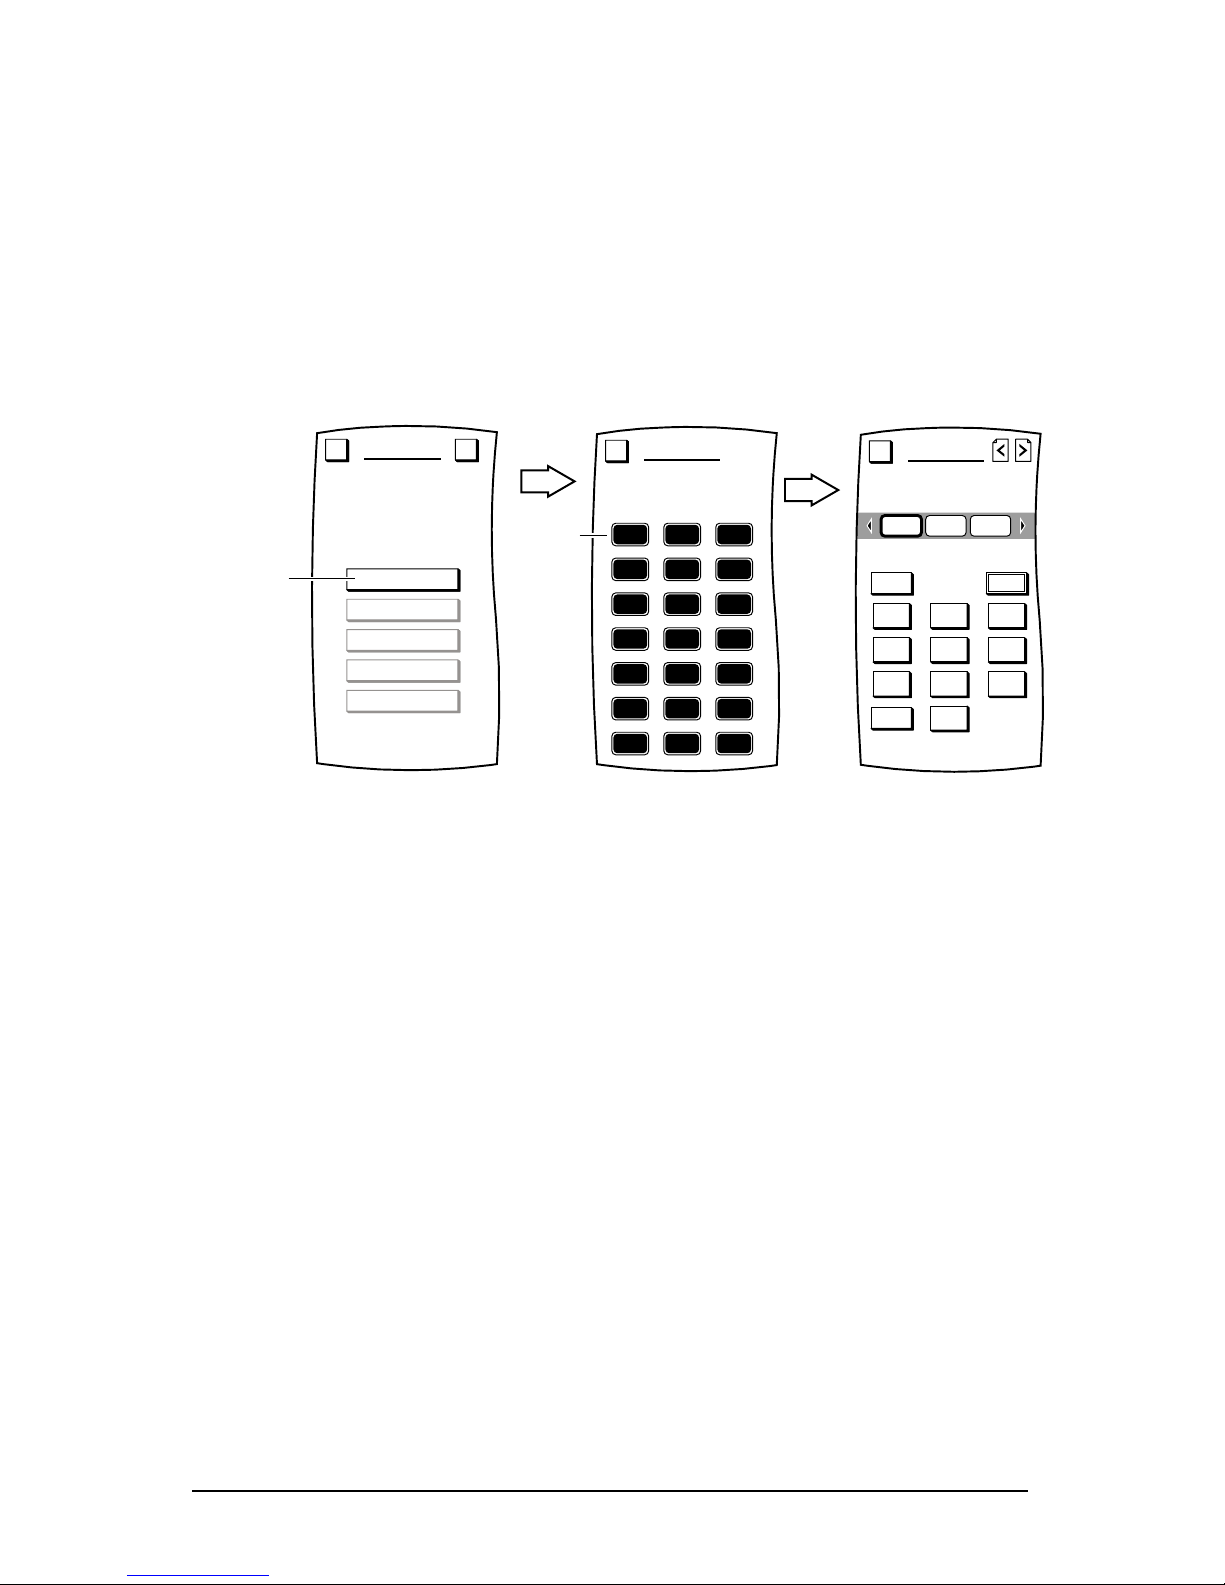
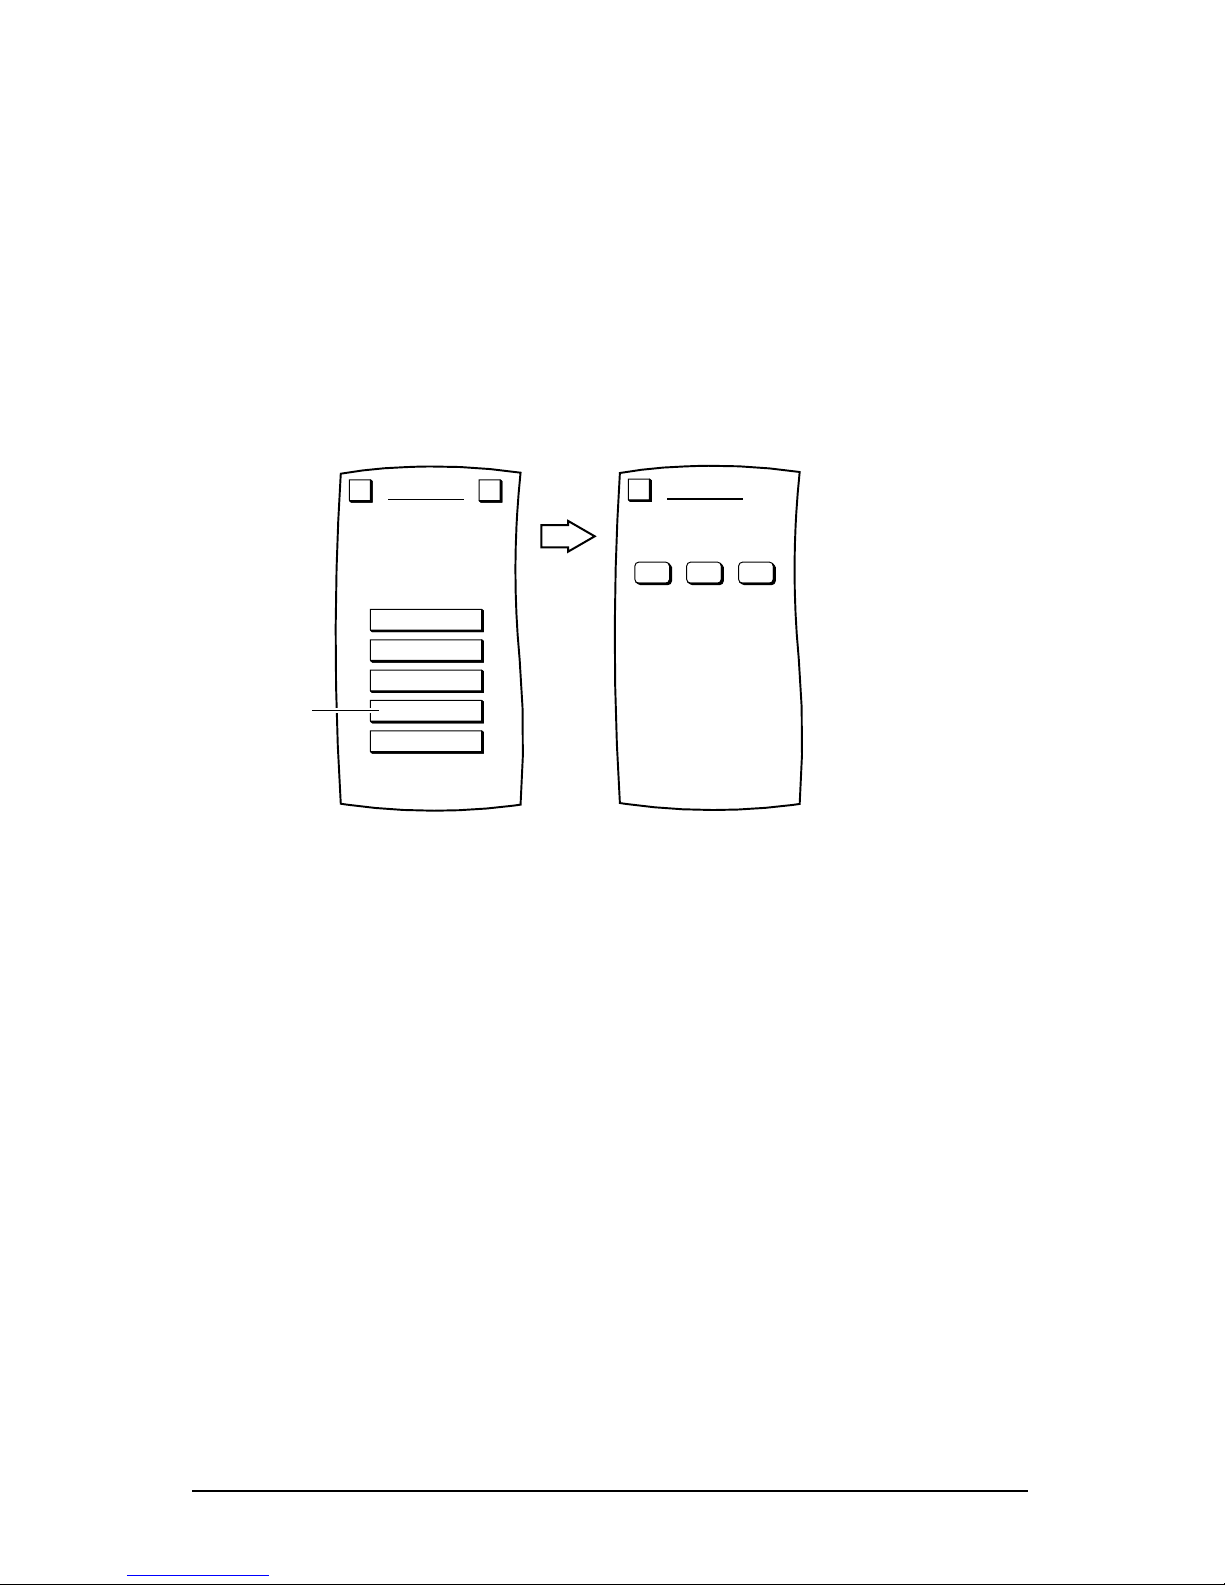
3. Tap on the MACROS key. You will see the main MACROS Menu.
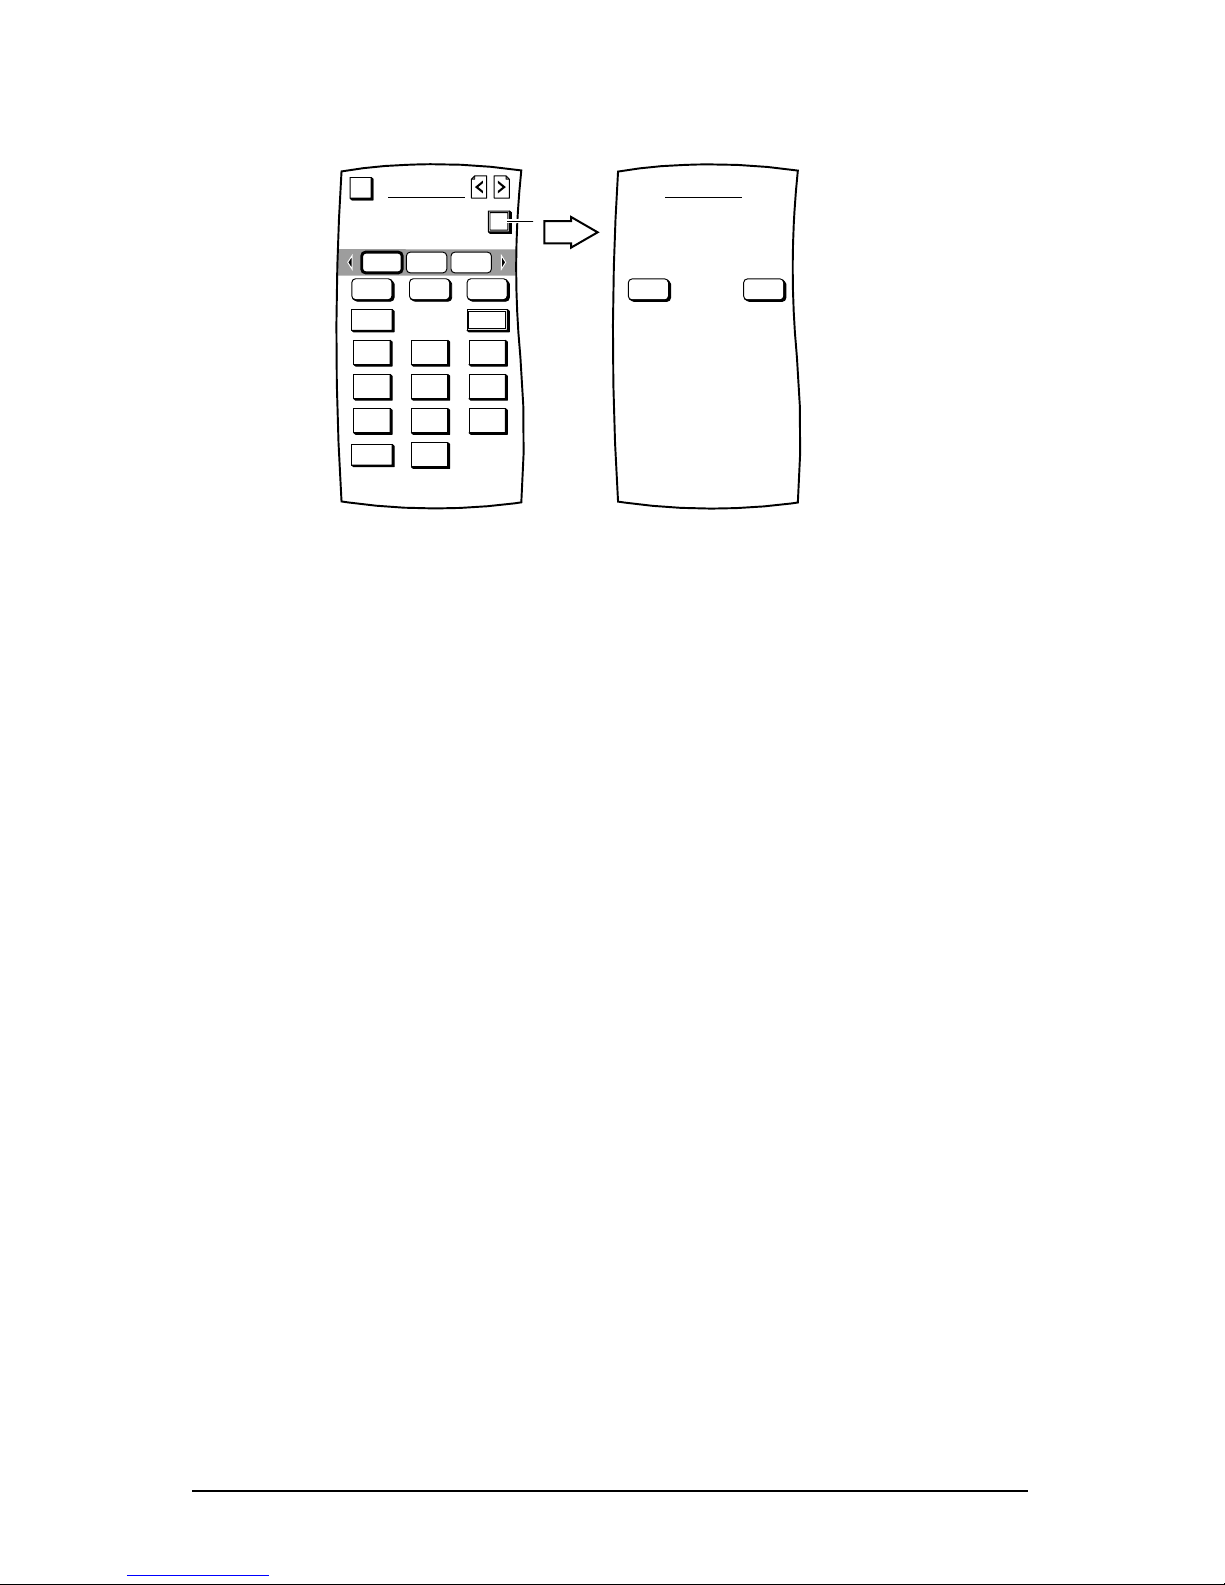
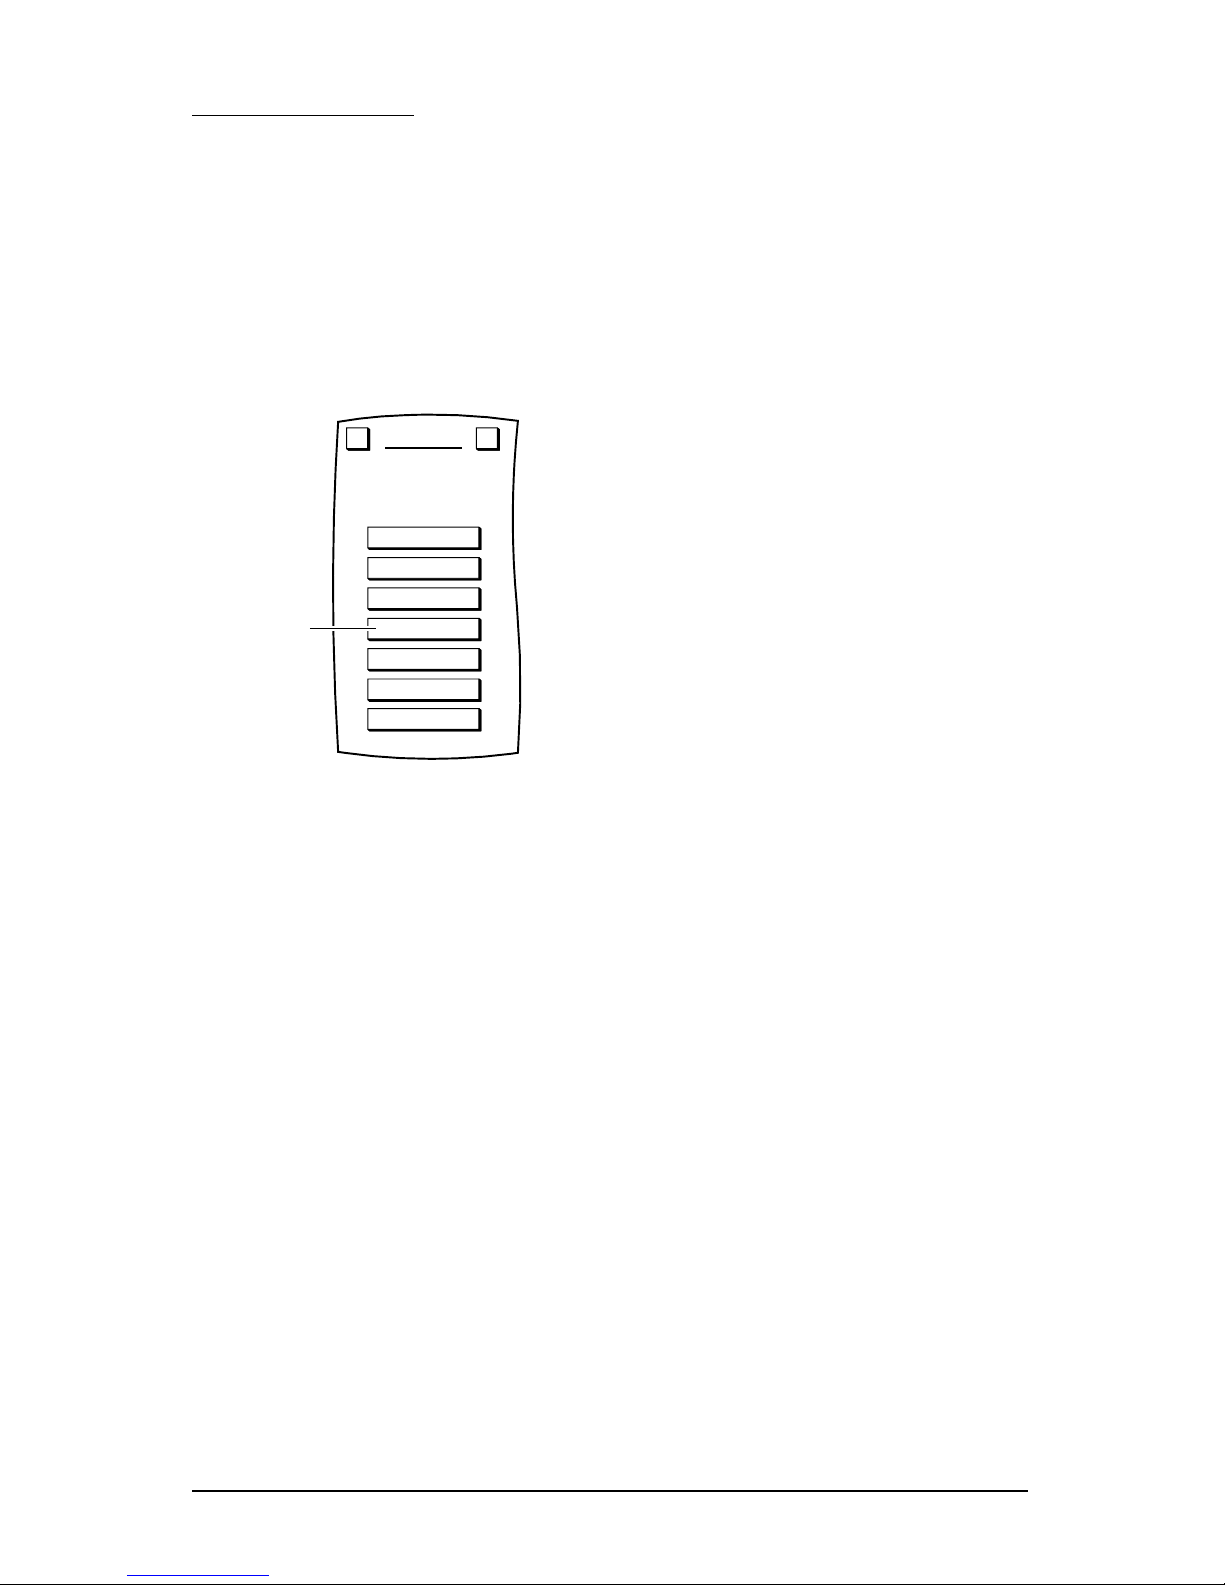
4. Tap on the VIEW key.You will see the VIEW MACROS Menu.
5. Tap on any displayed Macro key (e.g.,M1,M2,etc.).You will see the commands that make up
the selected macro.To return to previous menu,tap on the
ESC key.To return to the Device
Screen,press down on
ESC or MUTE for at least 2 seconds.
ADD
VIEW
COPY
DELETE
DELETE ALL
MACROS
Program a sequence of
keystrokes onto one key.
Esc ?
Tap on
M 1 M 2 M 3
VIEW MACROS
Select a Macro key.
Esc
www.oneforall.com 15
Page 17
COPYING MACROS
To copy a macro,perform the following steps:
1. On the Device Screenin the upper left corner,tap on Setup.You will see the main SETUP Menu
that greets you and asks,“What would you like to config ure?”
2. Tap on the PERSONALIZATION key.You will see the PERSONALIZATION Menu.
NOTE:To return to a previous menu,tap on the ESC key.To return to last-displayed Dev ice
Screen,press down on ESC or MUTE for at least 2 seconds.For help,tap the ? key.
3. Tap on the MACROS key. You will see the main MACROS Menu.
4. Tap on the COPYkey.You will see the COPY MACROS Menu.
5. Tap on the macro key you want to copy.MOSAIC will ask you where you want to copy the macro.
• To have it appear on all Device Screens,tap on the ALL DEVICESkey. You will see a row ofup
to four empty keys appear which correspond to the space directly below Device Selection Strip.
Tap on any empty key to assign it or tap on an existing one to over ride it.MOSAIC will display a
confirmation screen.
• To h ave it appear on a sp e cific Dev ice Screen,tap on the SPECIFIC DEVICEkey.You will see the
last-displa yed Device Screen.Using the Device Select ion Strip,tap the desired device key.If needed,
tap the left/right scroll arrows to view other device choices.The Device Screen will display all keys
on all pages for the selected device.Tap on any empt y key and MOSAIC will display a confirma-
tion screen.
NOTE:To return to a previous menu,tap on the ESC key.To return to last-displayed Dev ice
Screen,press down on ESC or MUTE for at least 2 seconds.For help,tap the ? key.
ADD
VIEW
COPY
DELETE
DELETE ALL
MACROS
Program a sequence of
keystrokes onto one key.
Esc ?
M 1 M 2 M 3
COPY MACROS
Select a Macro key.
Esc
16 www.oneforall.com
Page 18
DELETING A MACRO
To delete a single macro,perform the follow ing steps:
1. On the Device Screenin the upper left corner,tap on Setup.You will see the main SETUP Menu
that greets you and asks,“What would you like to config ure?”
2. Tap on the PERSONALIZATION key.You will see the PERSONALIZATION Menu.
NOTE:To return to a previous menu,tap on the ESC key.To return to last-displayed Dev ice
Screen,press down on ESC or MUTE for at least 2 seconds.For help,tap the ? key.
3. Tap on the MACROS key. You will see the main MACROS Menu.
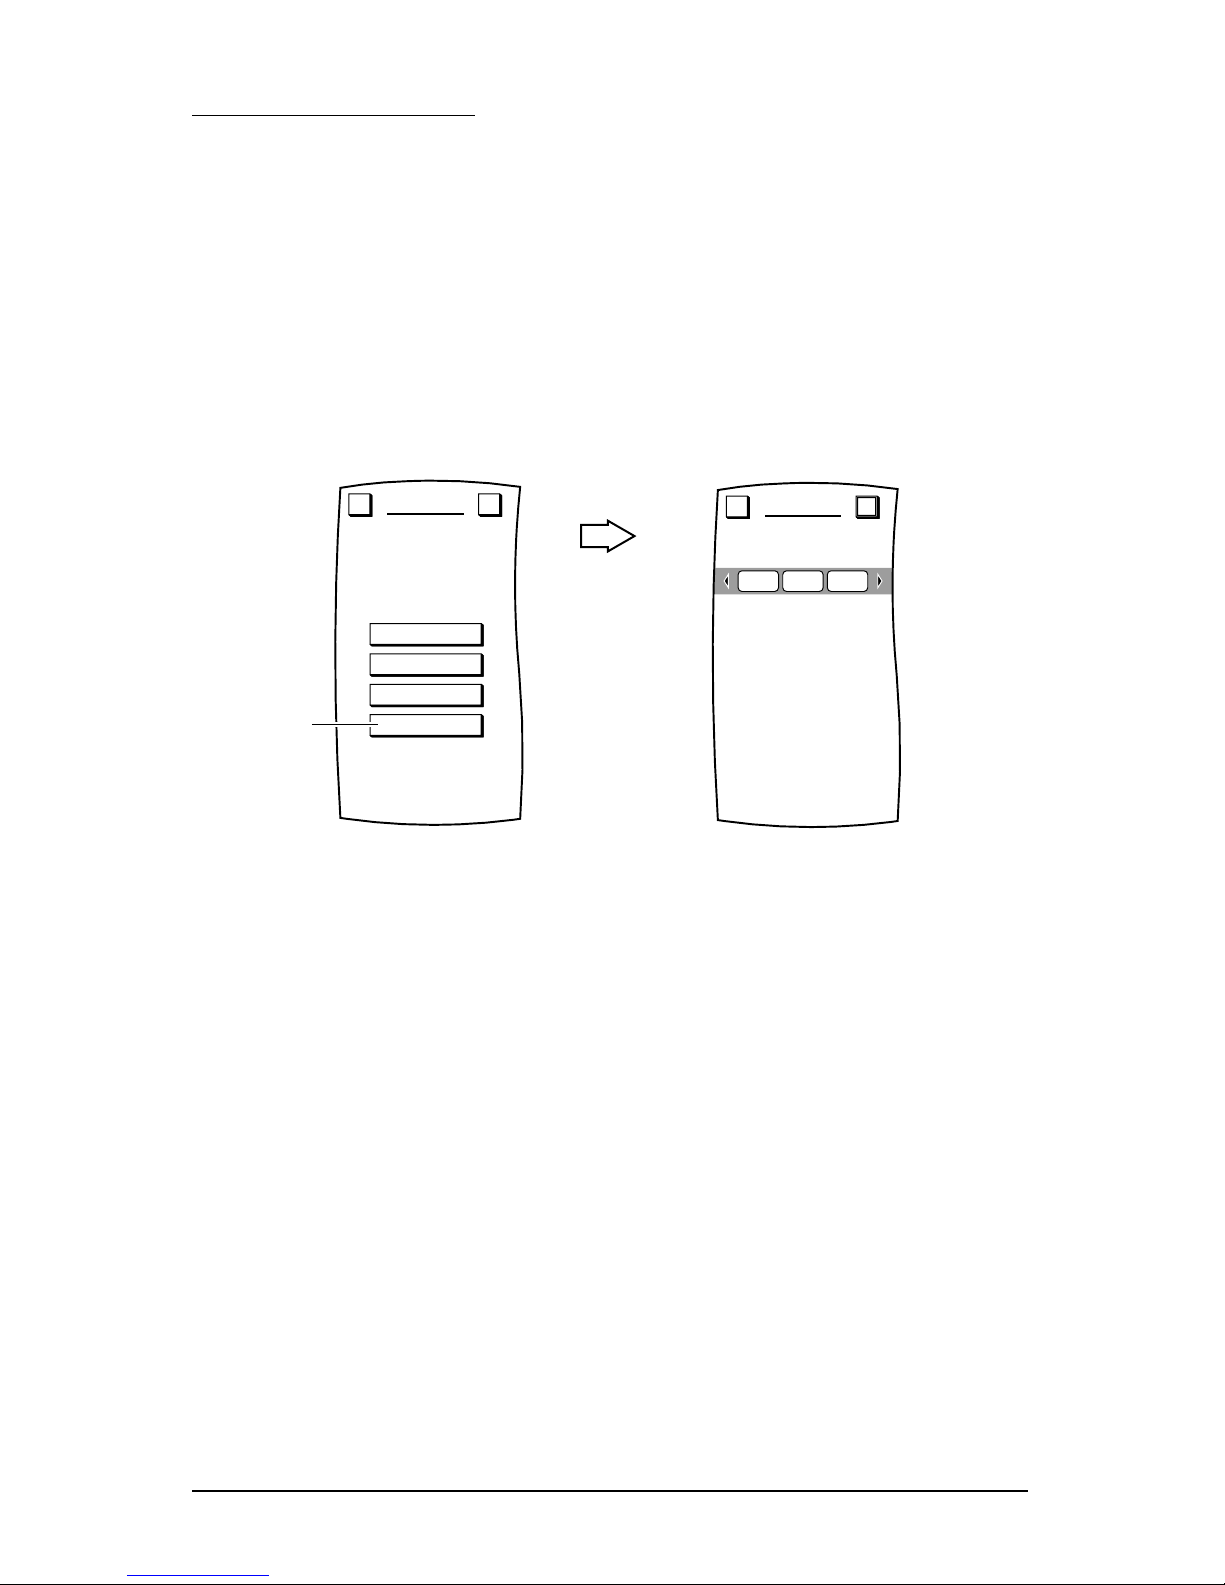
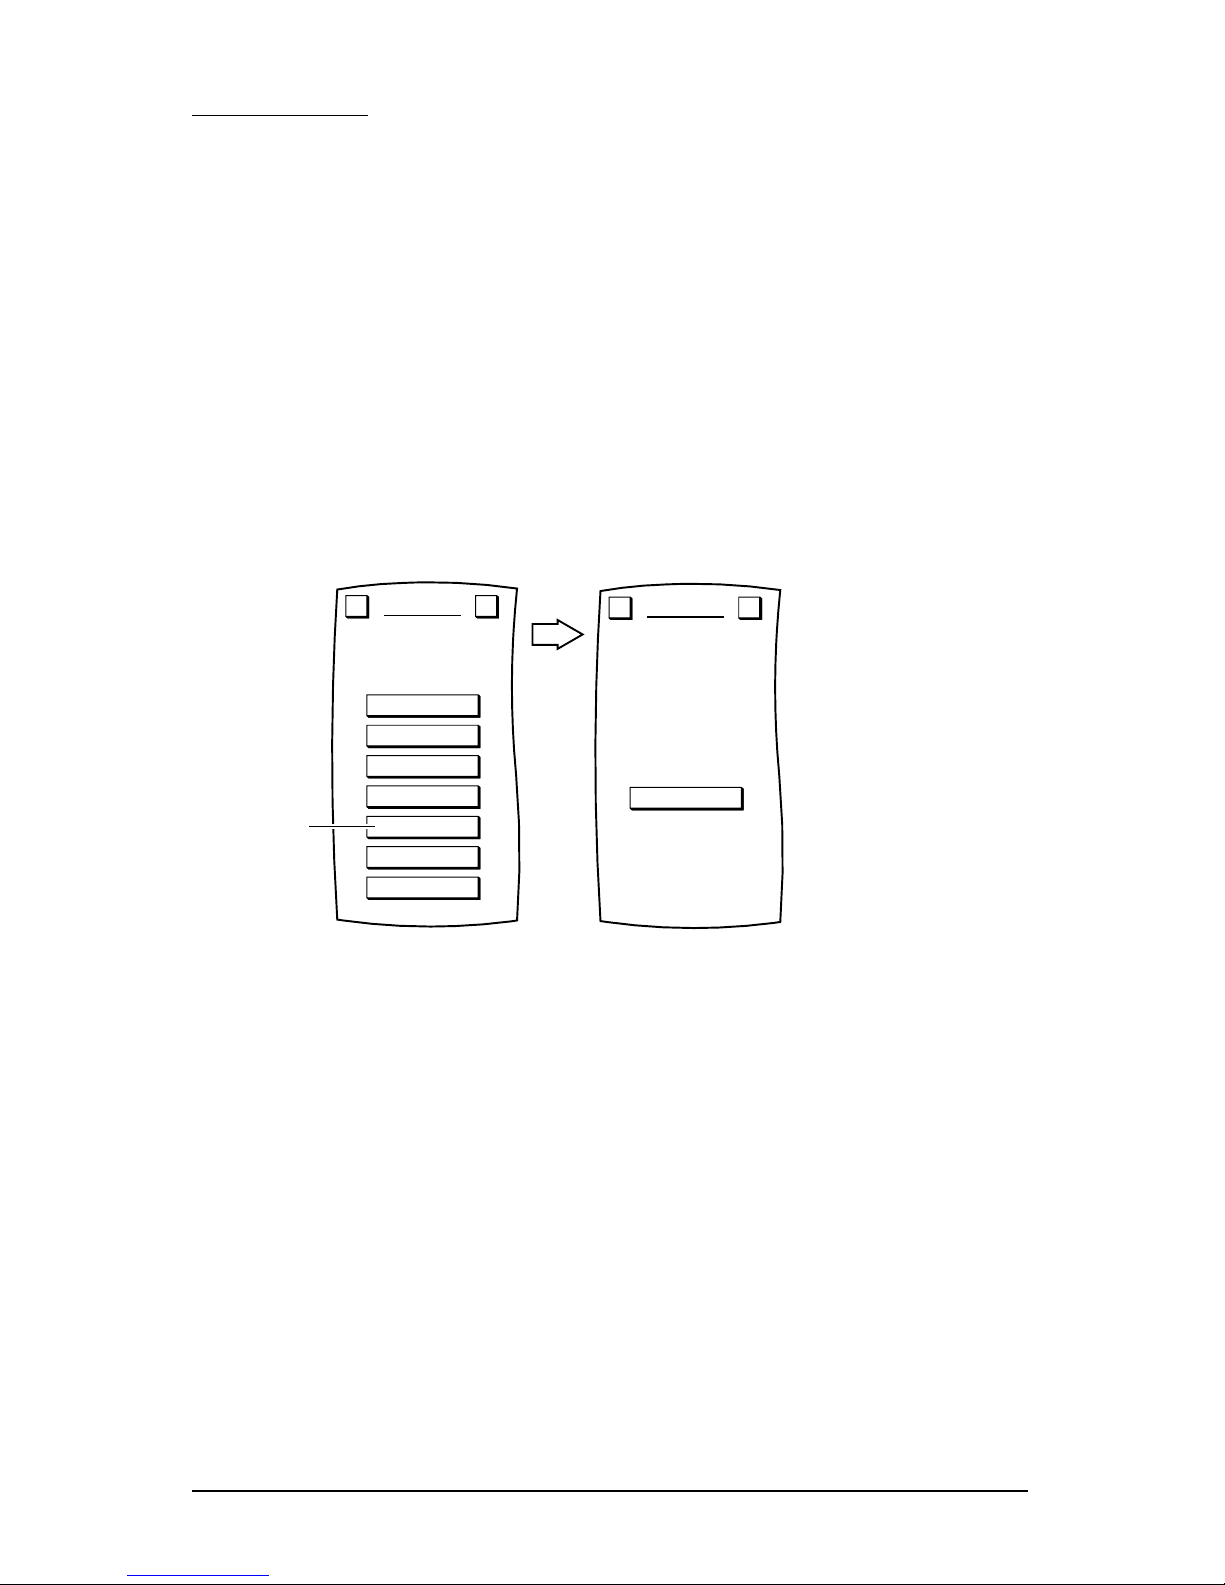
4. Tap on the DELETE key.You will see the DELETE MACROS Menu.
5. Tap on the Macro key you want to delete. You will see a confirmation screen that says the macro
key has been successfully deleted from all device screens and the main MACROS Menu.
NOTE:Use VIEW/DELETE (see PERSONALIZ ATION – VIEW/DELETEon page32) to delete
macros from Device Screens but keep them intact on the main MACROS Menu for future copying.
To delete another macro key,tap on the ESC key to return to t he DELETE MACROS Menu, or press
down on
ESC or MUTE for at least 2 seconds to retur n to the last-displayed Device Screen.
ADD
VIEW
COPY
DELETE
DELETE ALL
MACROS
Program a sequence of
keystrokes onto one key.
Esc ?
Tap on
M 1 M 2 M 3
DELETE MACROS
Select a Macro key.
Esc
www.oneforall.com 17
Page 19
DELETING ALL MACROS
To delete all macros,perform the following steps:
1. On the Device Screenin the upper left corner,tap on Setup.You will see the main SETUP Menu
that greets you and asks,“What would you like to config ure?”
2. Tap on the PERSONALIZATION key.You will see the PERSONALIZATION Menu.
NOTE:To return to a previous menu,tap on the ESC key.To return to last-displayed Dev ice
Screen,press down on ESC or MUTE for at least 2 seconds.For help,tap the ? key.
3. Tap on the MACROS key. You will see the main MACROS Menu.
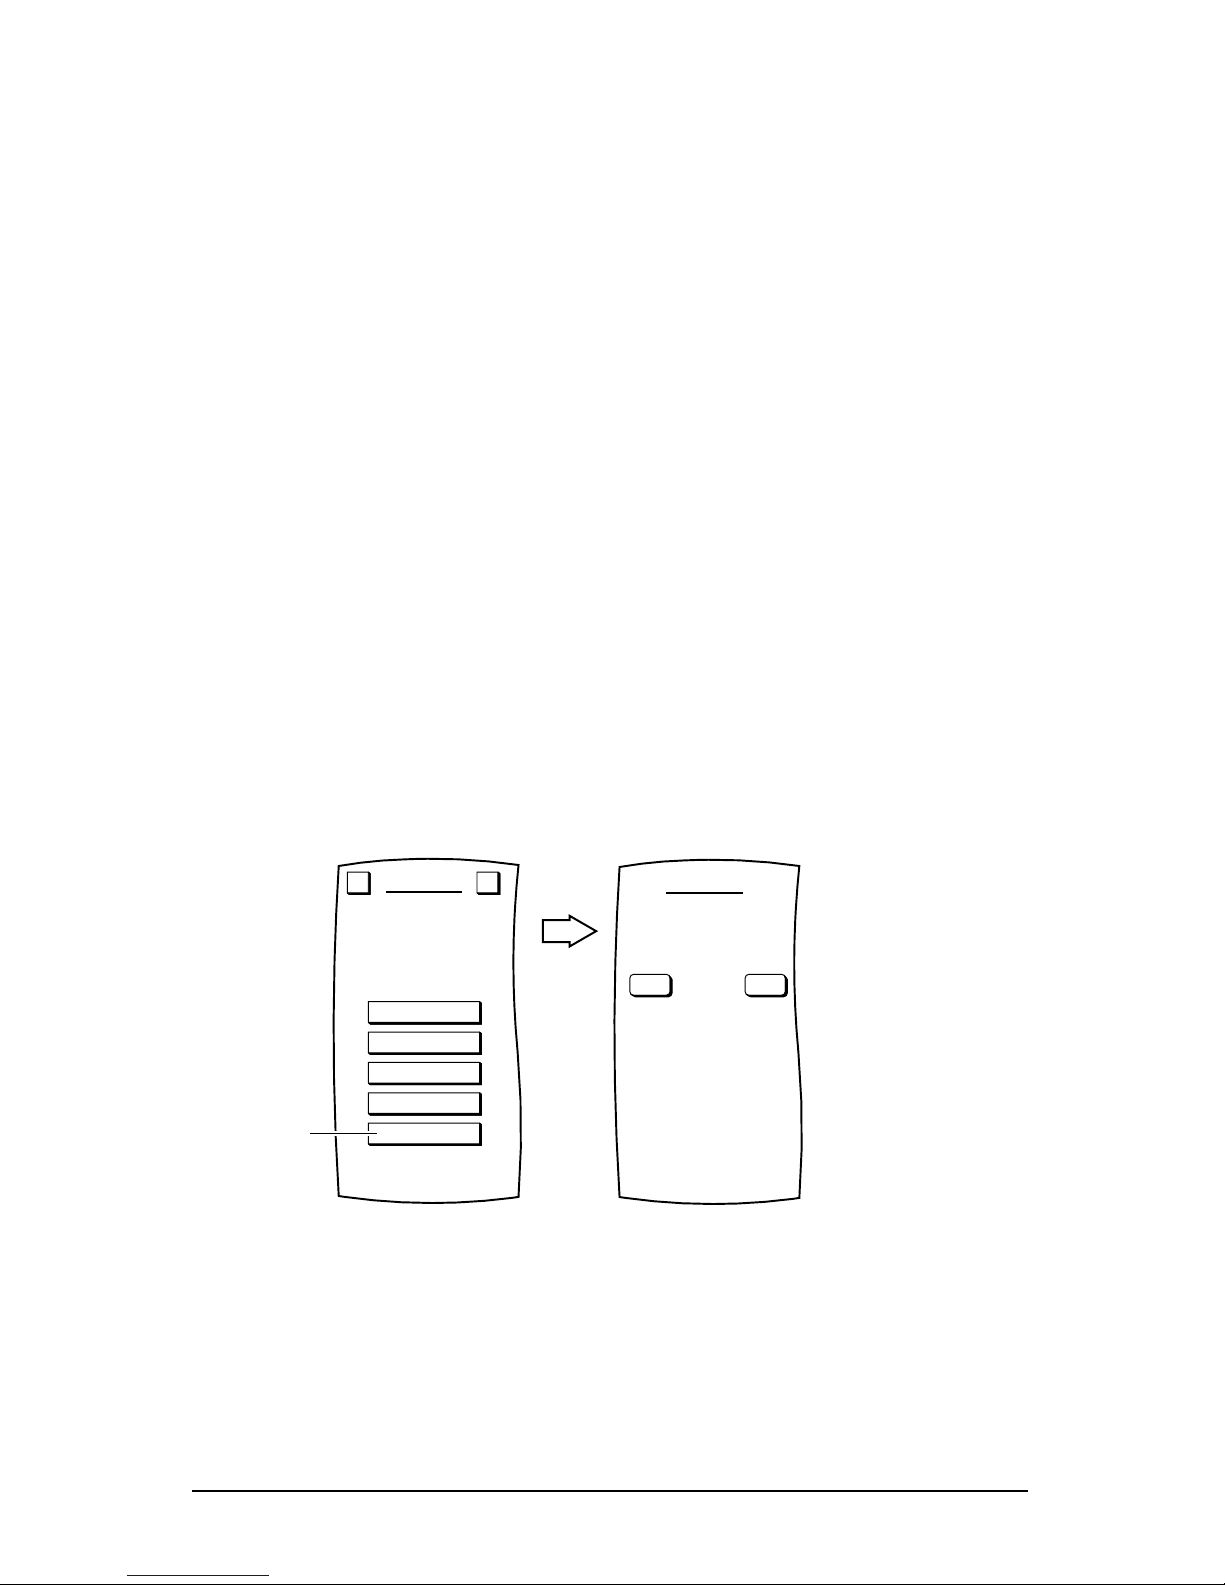
4. Tap on the DELETE ALLkey.MOSAIC will ask you to confirm your choice.
• To delete all macros,tap on the YES key.You will see a confirmation screen that says all macros
have been successfully deleted on all device screens and the main MACROS Menu.Tap on the
ESC key to return to the DELETE MACROS Menu.
NOTE:Use VIEW/DELETE(see Personalizat ion - View/Delete on page 32) to delete macros
from Device Screens but keep them intact on the main MACROS Menu for future copy ing.
• To cancel deletion of all macros,tap on theNO key.MOSAIC wil l return to the main MACROS
Screen.If you want to delete a single macro,see the previous section,Deleting A Macro on page
17,or see View/Delete on page 32.
NOTE:To return to a previous menu,tap on the ESC key.To return to last-displayed Device
Screen,press down on ESCor MUTE for at least 2 seconds.For help,tap the ? key.
ADD
VIEW
COPY
DELETE
DELETE ALL
MACROS
Program a sequence of
keystrokes onto one key.
Esc ?
Tap on
YES NO
MACROS
Are you sure you want to
DELETE ALL?
18 www.oneforall.com
Page 20
MOVE KEY
MOSAIC also includes our patented Key Mo v er fe at u re t h at a llows keys to be cop ied from one d e vice to
another,or to a different position in the same device mode.However,there are some considerations:
• A moved key is actually a copy of the original key.The original key cannot be deleted.
• A moved key will always be rectangular,even though the original version may be a different
shape.
• A moved key retains the original label,but it can be relabelled.
• The Key Mo v er feat u re on ly work s on IR f u n c tion keys.
Example:we’ll create an example that copies the AV key from TV Device Screen
and adds it to the CBL Device Screen.
1. On the Device Screenin the upper left corner,tap on Setup.You will see the main SETUP Menu
that greets you and asks,“What would you like to config ure?”
2. Tap on the PERSONALIZATION key.You will see the PERSONALIZATION Menu.
NOTE:To return to a previous menu,tap on the ESC key.To return to last-displayed Dev ice
Screen,press down on ESC or MUTE for at least 2 seconds.For help,tap the ? key.
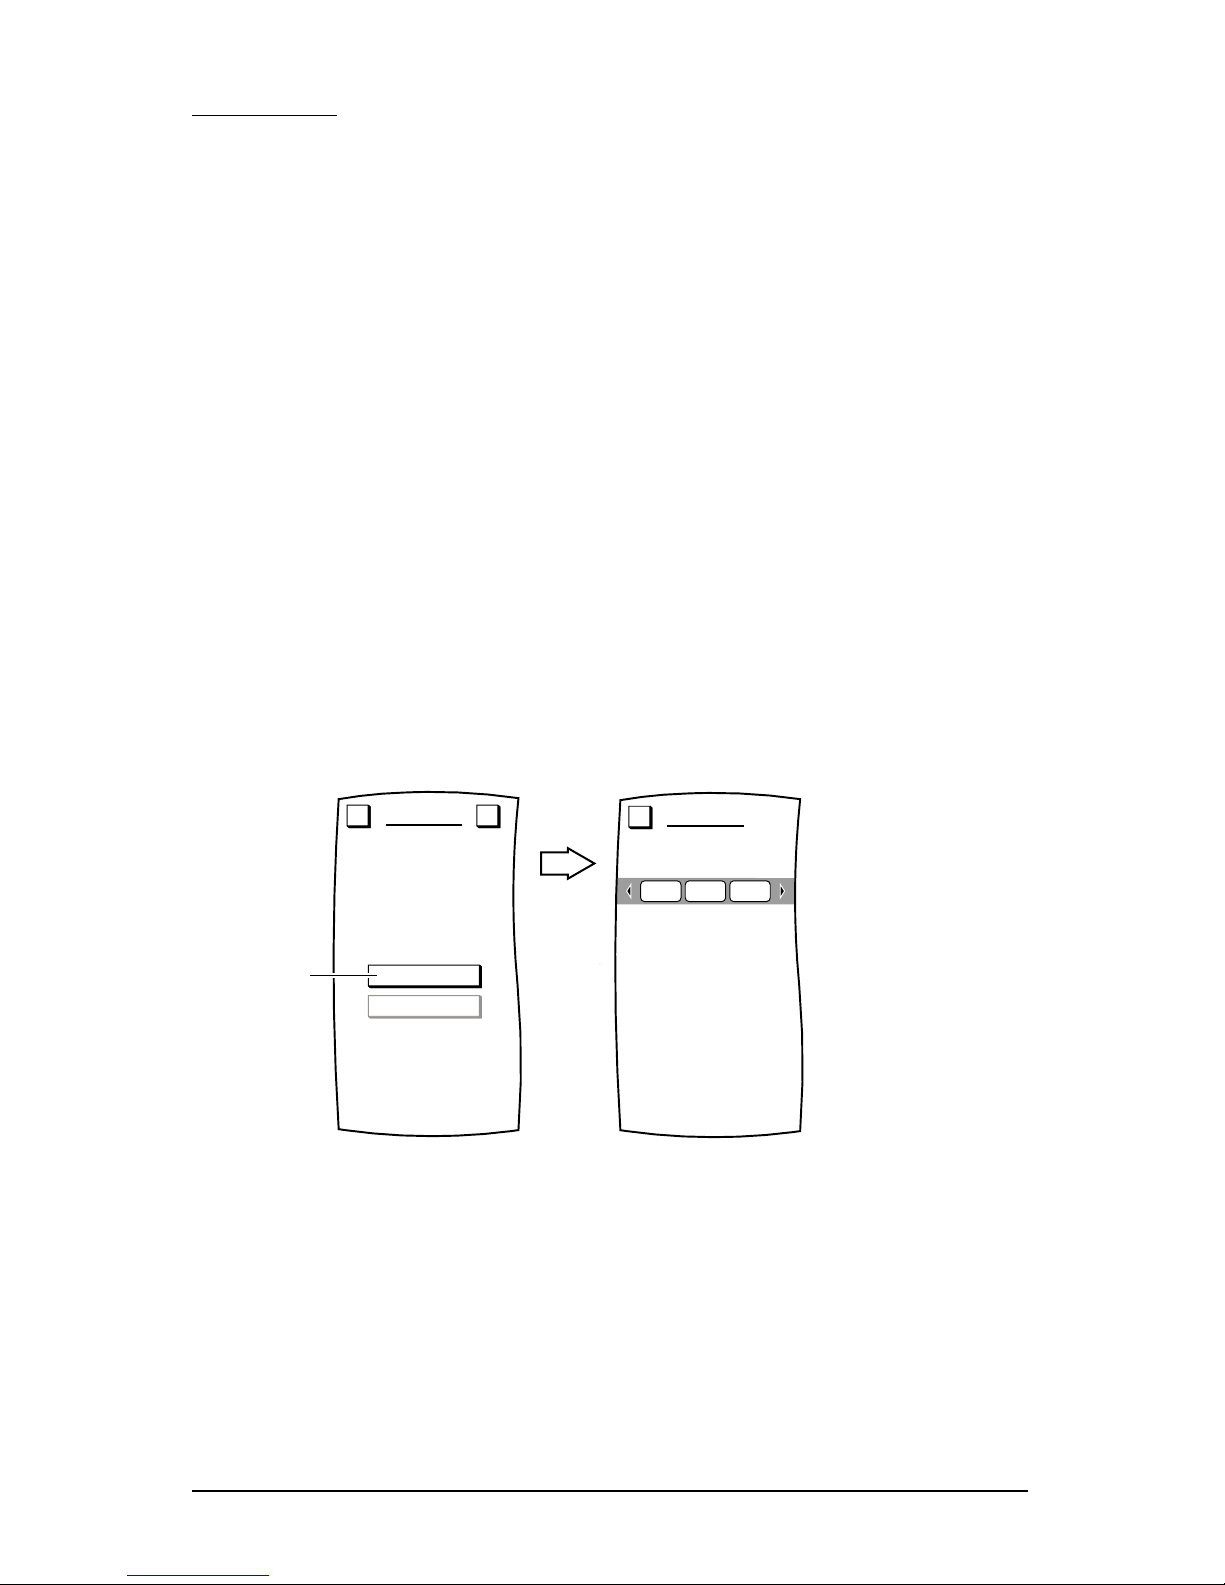
3. Tap on the MOVE KEY key.You will see the MOVEKEY Menu.
4. Tap on the MOVE key.You will see the Device Selection Strip and MOSAIC asks you to choose a
device f rom w hi ch to move a key.
5. Tap on a desired device key.For our example,tap on the TV key.MOSAIC will ask you to choose
a key to be move d.
6. Tap on the key you want moved.If needed,tap on the Page Arrow keys to v iew other pages for the
selected device.For our example,tap on the AV key.Again you will see the Device Selection Strip,
but this time MOSAIC asks you to choose a device where the key will be moved to.
7. Tap on a desired device key.For our example,tap on the CBL key.MOSAIC will ask you to
choose a key.
MOVE
DELETE ALL
MOVE KEY
Select the below functions
to rearrange keys within
or across devices.
Esc ?
Tap on
From which device?
MOVE KEY
Esc
CBLTV VCR
www.oneforall.com 19
Page 21
8. Tap on an empty key.If needed,tap on the Page Arrow keys to view other pages for the selected
device.For our example,tap on the empty key located between the A/B and PWR keys. You will
see the copied key pasted in place of the empty key.
9. To confirm your choice,tap on the OK key.To cancel the move,tap on the ESC key.
10. After confirming the move,MOSAIC will ask if you want to relabel the moved key.
• To keep the label the same,tap on the NO key.In our example,we’ll keep the same label,AV.
• To relabel the copied key,tap on the YES key.You will see the MOVE KEY Label Screen.Follow
the procedure that is similar to the one starting with step 3 on page 25 to relabel the key and tap
the OK key when you’re don e .
11. You will see a confirmation screen that says the key has been successfully programmed.To pro-
gram a function of the same type,tap on the
ESC key.To return to the Dev ice Screen,press on
ESC or MUTE for at least 2 seconds.
MOVE KEY
To which key?
Esc OK
1 2 3
4 5 6
7 8 9
0
A/B PWR
CBLTV VCR
Tap on
an open
key
MOVE KEY
Press OK to confirm.
Esc OK
1 2 3
4 5 6
7 8 9
0
A/B PWRAV
CBLTV VCR
20 www.oneforall.com
Page 22

DELETING ALL MOVED KEYS
1. On the Device Screenin the upper left corner,tap on Setup.You will see the main SETUP Menu
that greets you and asks,“What would you like to config ure?”
2. Tap on the PERSONALIZATION key.You will see the PERSONALIZATION Menu.
NOTE:To return to a previous menu,tap on the ESC key.To return to last-displayed Dev ice
Screen,press down on ESC or MUTE for at least 2 seconds.For help,tap the ? key.
3. Tap on MOVE KEY.You will see the MOVE KEY Menu.
4. Tap on the DELETE ALL key.MOSAIC will ask you to confirm your choice.
• To delete all moved keys,tap on the YES key.You will see a confirmation screen that says all
moved keys have been successfully delete d.Tap on the ESC key to retur n to t he MOVE KEY
Screen.
• To cancel deletion ofall moved keys,tap on the NO key.MOSAIC will return to the MOVE KEY
Screen.If you want to delete a sing le moved key,see VIEW/DELETEon page 32.
NOTE:To return to a previous menu,tap on the ESC key.To return to last-displayed Dev ice
Screen,press down on ESC or MUTE for at least 2 seconds.
www.oneforall.com 21
Page 23

LEARN
Like all sophisticated remote controls,MOSAIC includes a Learning feature so you can easily add a
function from another remote control,assign it to a special key,label that key,and place it on the
screen ofyour choice.
However,there are some considerations:
• Learning is allowed only for device function keys,not system keys.
• A learned key can replace an existing pre-defined key or a blank key.
• A learned key can be learned onto a soft or hard key.
NOTE:Although a learned key can be learned onto a hard key,it wil l interfere with the original function ofthat ke y.Only make this choice when a hard key is not being used by a device
(e.g.,VOL keys for a CD Changer).
• A learned key will always be rectangular,even though the original version may be a different
shape.
• If desired,a learned key can be relabelled.
LEARNING A FUNCTION
1. On the Device Screenin the upper left corner,tap on Setup.You will see the main SETUP Menu
that greets you and asks,“What would you like to config ure?”.
2. Tap on the PERSONALIZATION key.You will see the PERSONALIZATION Menu.
NOTE:To return to a previous menu,tap on the ESC key.To return to last-displayed Dev ice
Screen,press down on ESC or MUTE for at least 2 seconds.For help,tap the ? key.
3. Tap on the LEARN key. You will see the LEARN Menu.
4. Tap on the LEARN key again.You will see the Device Selection St r ip and MOSAIC asks you to
choose a device that will be taught.
LEARN
DELETE ALL
LEARN
Teach the remote a new
function.
Esc ?
Tap on
Which device?
LEARN
Esc
CBLTV VCR
22 www.oneforall.com
Page 24

5. Tap on a desired device key. You will see its Dev ice Screen and MOSAIC asks you to select a
function key that will be learned onto.If needed,tap on the Page Arrow ke y s t o view o t h er
pages for the selected device.
6. Tap on a desired function key – it can be pre-defined or blank.A LEARN key will appe a r and
MOSAIC will ask you to place your original remote control,head-to-head,within 5 cm (2 inch-
es) of MOSAIC,as shown below.
NOTE:Please make sure to aim the your original remote to the arrow indicated on the front of
your MOSAIC.
7. Tap on the LEARN key.MOSAIC will turn on its LED and display a Learning message.On the
original remote control,press and hold down the key you want learned.When the LED turns off,
a confirmation message w i ll appear stating that the IR codes from your original remote control
were succe s s f ully ca p t u re d .
NOTE:If you hear a dual-tone audio beep,MOSAIC will display an error message stating that
the IR codes were not captured.MOSAIC will ask you to repeat the procedure again.
8. Tap on the OK key to accept the capture.MOSAIC will ask you if want to relabel the function
key (as selected in step 6).
• To relabel the function key,tap on the YES key.You will see the LEARN Label Screen.Follow the
procedure that is similar to the one starting with step 3 on page 25 to relabel the key and tap the
OK key when you’re don e .
• To keep the label the same,tap on the NO key.
9. You will see a confirmation screen that says the key has been successfully programmed.To pro-
gram a function of the same type,tap on the
ESC key.To return to the Dev ice Screen,press on
ESC or MUTE for at least 2 seconds.
NOTE:Be sure to test the learned function to see if it works.If not,repeat the procedure.
www.oneforall.com 23
5 cm
(2”)
Page 25

DELETING ALL LEARNED FUNCTIONS
1. Tap on Setup key (upper lef t corner).
2. Tap on PERSONALIZATION.You will see the PERSONALIZATION Menu.
NOTE:To return to a previous menu,tap on the ESC key.To return to last-displayed Dev ice
Screen,press down on ESC or MUTE for at least 2 seconds.For help,tap the ? key.
3. Tap on the LEARN key. You will see the LEARN Menu.
4. Tap on the DELETE ALL key.MOSAIC will ask you to confirm your choice.
• To delete all lear ned keys,tap on the YES key.You will see a confirmation screen that says all
learned keys have been successfully deleted.Tap on the ESC key to return to the LEARN Screen.
• To cancel deletion of all learned functions,tap on the NO key.MOSAIC will return to the
LEARN Screen.If you want to delete a single le arne d key,see VIEW/DELETEon page 32.
NOTE:To return to a previous menu,tap on the ESC key.To return to last-displayed Dev ice
Screen,press down on ESC or MUTE for at least 2 seconds.
24 www.oneforall.com
Page 26

LABEL KEYS
LABELLING DEVICE KEYS
1. On the Device Screenin the upper left corner,tap Setup. You will see the main SETUP Menu
that greets you and asks,“What would you like to config ure?”
2. Tap on the PERSONALIZATION key.You will see the PERSONALIZATION Menu.
NOTE:To return to a previous menu,tap on the ESC key.To return to last-displayed Dev ice
Screen,press down on ESC or MUTE for at least 2 seconds.For help,tap the ? key.
3. Tap on the LABEL KEYS key.You will see the LABEL Menu.
4. Tap on the DEVICE KEYS key.You will see the Device Selection Str ip,and MOSAIC asks you to
choose a device you want to relabel.
5. Tap on a desired device key.You will see the LABEL Screen,as shown on the next page.
6. Enter a desired label using the alphanumeric keypad.Depending on the characters being
entered,the label can be as short as one or as long as eight characters.
• For uppercase letters,tap on the SHIFT or CAPS LOCK key .
• To access the total offour pages ofsymbols,tap on the Page Arrow key.
• Ta p on the SPACE key to enter a space.
• To reenter a character,tap on the <– key.
7. To save your device label,tap on the OK key.MOSAIC will show a confirmation message sayi ng
that the label was successfully programmed.
NOTE:To return to a previous Menu,tap on the ESC key.To return to last-displayed Device
Screen,press down on ESC or MUTE for at least 2 seconds.
MACROS
MOVE KEY
LEARN
LABEL KEYS
KEY MAGIC
VOLUME LOCK
PERSONALIZATION
Welcome to Personalization!
What feature
would you like to program?
Esc ?
Tap on
T
DEVICE KEYS
FUNCTION KEYS
LABEL
Change what type of label?
Esc ?
Tap on
From which device?
LABEL
Esc
CBLTV VCR
Tap on
a device.
Enter the label, press OK to save.
LABEL
Esc
_
1 2 3 4 5
6 7 8 9 0
a b c d e
f g h i j
k l m n o
p q r s t
u v wzx y
Caps Lock
<
–
Shift Space
www.oneforall.com 25
Page 27
LABELLING FUNCTION KEYS
1. On the Device Screenin the upper left corner,tap on Setup.You will see the main SETUP Menu
that greets you and asks,“What would you like to config ure?”
2. Tap on the PERSONALIZATION key.You will see the PERSONALIZATION Menu.
NOTE:To return to a previous menu,tap on the ESC key.To return to last-displayed Dev ice
Screen,press down on ESC or MUTE for at least 2 seconds.For help,tap the ? key.
3. Tap on the LABEL KEYS key.You will see the LABEL Menu.
4. Tap on the FUNCTION KEYS key.You will see the Device Selection Strip,and MOSAIC asks you
to choose a device that contains the function key(s) you want to relabel.
5. Tap on a desired device key.You will see its Device Screen.
6. Tap on a desired function key. You will see the LABEL Screen.
7. Enter a desired label using the alphanumeric keypad.Depending on the characters being
entered,the label can be as short as one or as long as eight characters.
• For uppercase letters,tap on the SHIFT or CAPS LOCK key .
• To access the total offour pages ofsymbols,tap on the Page Arrow key.
• Tap on the SP ACE key to enter a space.
• To reenter a character,tap on the <– key.
8. To save your funct ion label,tap on the OK key.MOSAIC will show a confirmation message saying that the label was successfully programmed.
NOTE:To return to a previous Menu,tap on the ESC key.To return to last-displayed Device
Screen,press down on ESC or MUTE for at least 2 seconds.
From which key?
LABEL
Esc
CBLTV VCR
1 2 3
4 5 6
7 8 9
0
-/--
AV M 1 PWR
Tap on
a key
(e.g.,M1).
From which device?
LABEL
Esc
CBLTV VCR
Tap on
a device
(e.g., TV).
Enter the label, press OK to save.
LABEL
Esc
_
1 2 3 4 5
6 7 8 9 0
a b c d e
f g h i j
k l m n o
p q r s t
u v wzx y
Caps Lock
<
–
Shift Space
MACROS
MOVE KEY
LEARN
LABEL KEYS
KEY MAGIC
VOLUME LOCK
PERSONALIZATION
Welcome to Personalization!
What feature
would you like to program?
Esc ?
Tap on
DEVICE KEYS
FUNCTION KEYS
LABEL
Change what type of label?
Esc ?
Tap on
26 www.oneforall.com
Page 28

KEY MAGIC
MOSAIC provides users with an alternative way to add func tional codes to keys throug h our patented
Key Magic feature. A lthough MOSAIC includes the world’s largest infrared code library,you may find
an advanced function that is not available on MOSAIC,yet still exists on your original remote cont rol.
Using Key Mag ic and our Web site (see SY STEM – ABOUTon page 42),you can obtain a code that you
can use to add the advanced feature to the device screen.
However,there are some considerations:
• Use the Key Magic feature if you don’t have access to the ori g i na l remote control.O t herwise,u se
Learning (see LEARN on page 22) and the or ig inal remote control to learn the missing function
onto MOSAIC.
• A Key Ma gic key will always be rectangular even thoug h the original version may be a different
shape.
• A Key Magic key retains its original Key Mag ic number,but it can be relabel le d.
• The Key Magic feature on ly wor k s on I R f u nction keys .
ADDING A KEY MAGIC FUNCTION
1. On the Device Screenin the upper left corner,tap on Setup.You will see the main SETUP Menu
that greets you and asks,“What would you like to config ure?”
2. Tap on the PERSONALIZATION key.You will see the PERSONALIZATION Menu.
NOTE:To return to a previous menu,tap on the ESC key.To return to last-displayed Dev ice
Screen,press down on ESC or MUTE for at least 2 seconds.For help,tap the ? key.
3. Tap on the KEY MAGIC key.You will see the KEY MAGIC Menu,as shown below.
MACROS
MOVE KEY
LEARN
LABEL KEYS
KEY MAGIC
VOLUME LOCK
VIEW/DELETE
HOME THEATER
PERSONALIZATION
Welcome to Personalization!
What feature
would you like to program?
Esc ?
ADD
DELETE ALL
KEY MAGIC
Program a new key function.
Esc ?
Tap on
www.oneforall.com 27
Page 29

4. Tap on the ADD key. You will see the KEY MAGICDe v ice Selection Strip.
5. Tap on a desired device.MOSAIC wil l ask you to enter the 3-digit Magic Code,as shown on the
next page.
6. Make a note ofthe 4-digit code listed under the selected device and call our customer support group
(see page 43).You will be supplied with the correct 3-digit code for the function you want to add.
7. Using the keypad,enter the 3-digit code.MOSAIC will ask you to test the Key M agic function.
Aim MOSAIC at the selected device and tap on the TEST key.
8. Ifthe device responds correc tly,tap on the OK key.You will see the KEY MAGIC Device Selection
Strip and MOSAIC will ask on which device you want to store the new function.
9. Tap on a desired device.You will see its Device Screen and MOSAIC will ask on which key you
want to store the new function.
10. To assign the function,tap on any desired key.To accept the change,tap on the OK key.MOSAIC
will ask if you want to relabel the function key.
• To relabel it,tap on the YES key and you will see the LABEL Menu (see explanation on page 25
step 6).
• To keep the label the same,tap on the NO key.
11. You will see a confirmation screen that says the key has been successfully programmed.To
program a function ofthe same t y pe,tap on the
ESC key.To return to the Dev ice Screen,
press on
ESC or MUTE for at least 2 seconds.
Select a source device.
If your remote has key magic
support, see the ABOUT page to
obtain key magic information.
KEY MAGIC
Esc
CBLTV VCR
02760556 0081
Tap on
a device
(e.g., TV).
Enter 3-digit Magic code.
KEY MAGIC
Esc
Magic Code
CBLTV VCR
02760556 0081
1 2 3
4 5 6
7 8 9
0
CLEAR
28 www.oneforall.com
Page 30

DELETING ALL KEY MAGIC FUNCTIONS
1. On the Device Screenin the upper left corner,tap on Setup.You will see the main SETUP Menu
that greets you and asks,“What would you like to config ure?”
2. Tap on the PERSONALIZATION key.You will see the PERSONALIZATION Menu.
NOTE:To return to a previous menu,tap on the ESC key.To return to last-displayed Dev ice
Screen,press down on ESC or MUTE for at least 2 seconds.For help,tap the ? key.
3. Tap on the KEY MAGIC key.
4. Tap on the DELETE ALL key.MOSAIC will ask you to confirm your choice.
• To delete all Key Magic keys,tap on the YES key.You will see a confirmation screen that says all
Key Magic keys have been successfully deleted.Tap on the
ESC key to return to t he KEY MAGIC
Screen.
• To cancel deletion ofall Key Magic keys, tap on the NO key.MOSAIC will return to the KEY
MAGIC Screen.If you want to delete a single Key Magic key,see VIEW/DELETEon page 32.
NOTE:To return to a previous menu,tap on the ESC key.To return to last-displayed Device
Screen,press down on ESC or MUTE for at least 2 seconds.
www.oneforall.com 29
Page 31

VOLUME LOCK
In its default state,MOSAIC allows each device to control its own volume.However,using our Volume
Lockfeat ure,you can set MOSAIC to conveniently control volume ofone or more devices (e.g.,Cable
Box and VCR) through a single device (e.g.,TV).
1. On the Device Screenin the upper left corner,tap on Setup.You will see the main SETUP Menu
that greets you and asks,“What would you like to config ure?”
2. Tap on the PERSONALIZATION key.You will see the PERSONALIZATION Menu.
NOTE:To return to a previous menu,tap on the ESC key.To return to last-displayed Dev ice
Screen,press down on ESC or MUTE for at least 2 seconds.For help,tap the ? key.
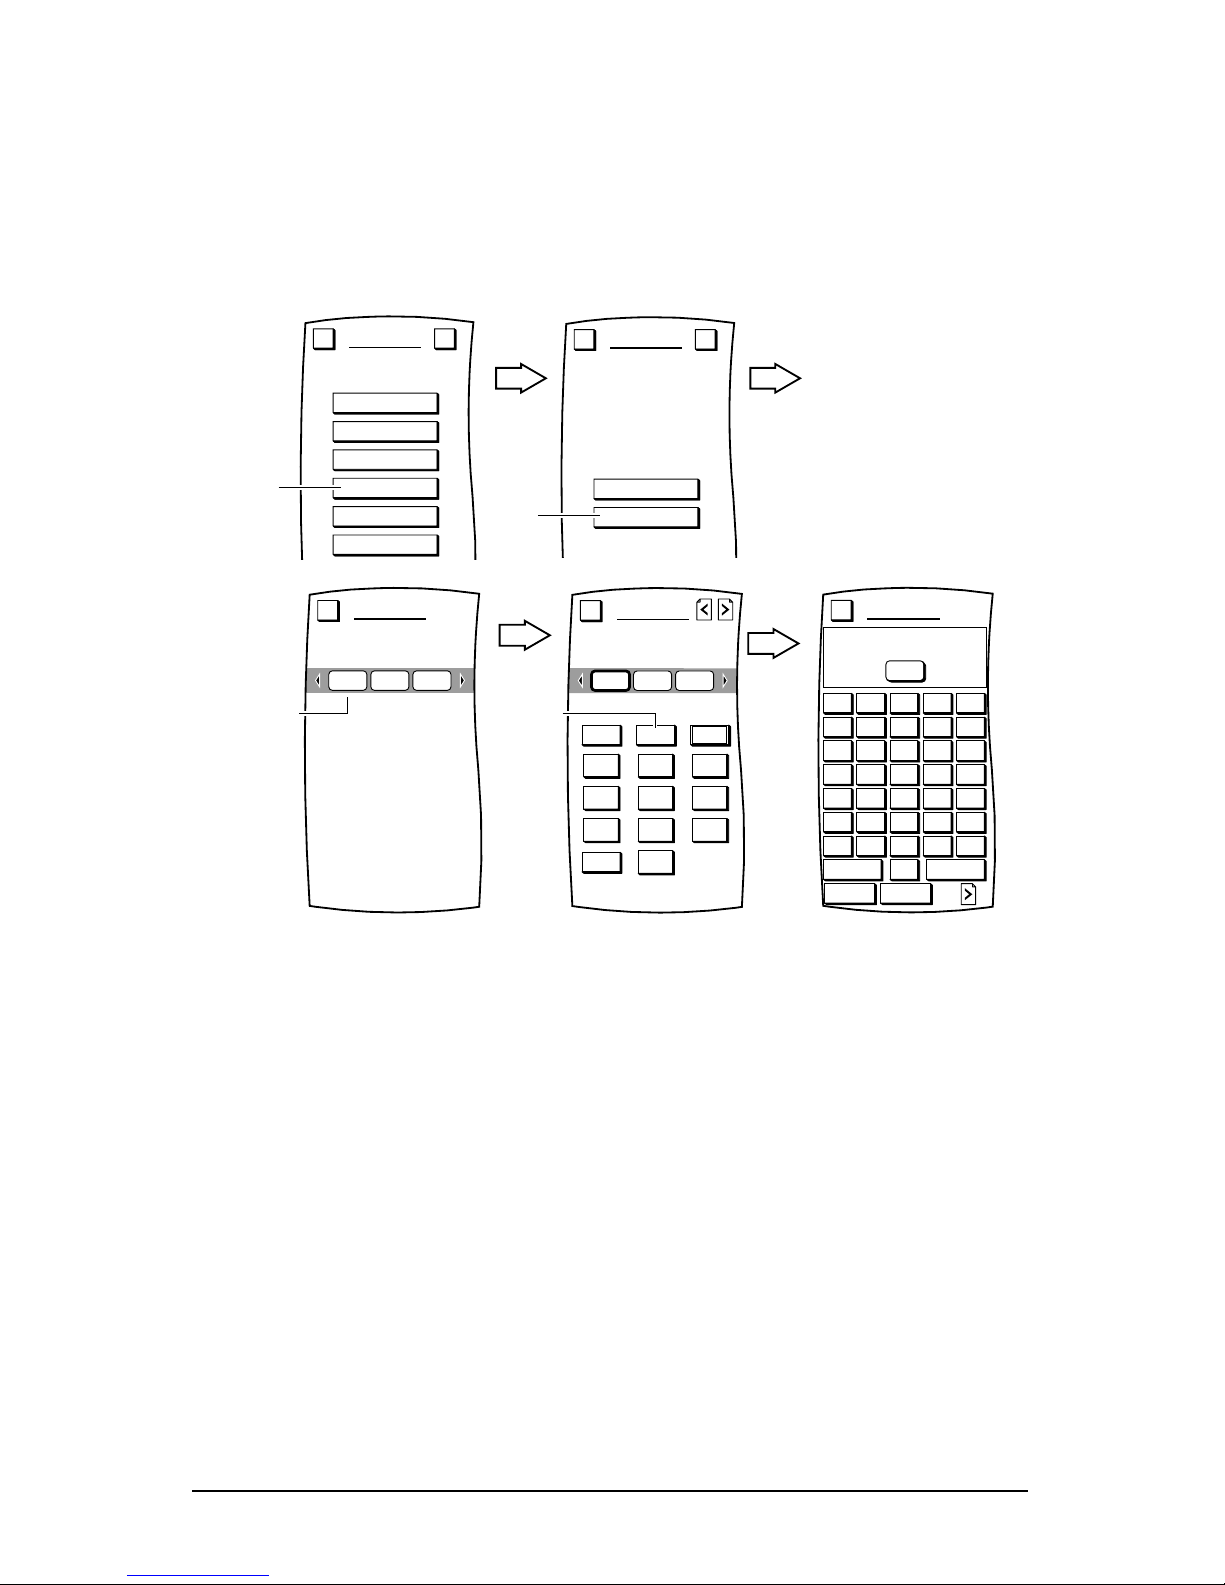
3. Tap on the VOLUME LO CK key.You will see the VOLUME LOCK Menu.
4. On the Device Selection St r ip,tap on the device you want as main volume source (e.g.,TV) for a
group ofrelated devices (e.g.,VCR and CBL).You will see a message stating that the TV volume
is currently unlocked.
NOTE:If the TV volume is locked,tap on another device or unlock the selected device (see
“Unlocking the Volume”on page 31).
5. Tap on the SELECT key.You will see the Device VOLUME LOCK Menu.
6. In the left column,tap on a device you want locked (e.g.,VCR) to the main volume source (e.g.,
TV) originally selected in step 4.You will see the device (e.g.,VCR) being added to t he Locked
Deviceslist on the right.
NOTE:To remove a device from the Locked Devices list,tap again on the device in the left column.
7. Repeat step 6 for each additional device (e.g.,CBL) you want locked to the main volume source.
If needed,use the scroll up/down arrows in the left column to view additional devices.
8. To save your select ions,tap on the OK key.MOSAIC will show a confirmation message saying
that your Volume Lock fu n c tion was suc ce ssf u lly progr am m e d.
NOTE:To return to the previous menu,tap on the ESC key.To return to last-displayed Dev ice
Screen,press down on ESC or MUTE for at least 2 seconds.
MACROS
MOVE KEY
LEARN
LABEL KEYS
KEY MAGIC
VOLUME LOCK
VIEW/DELETE
HOME THEATER
PERSONALIZATION
Welcome to Personalization!
What feature
would you like to program?
Esc ?
Tap on
SELECT
VOLUME LOCK
Select the device which will be
used as main volume source.
The volume is currently UNLOCKED.
Esc ?
CBLTV VCR
Tap on
CBL
VCR
VOLUME LOCK
Select the device(s)on the left
which will have volume locked to
TV
To deselect, simply press the
device again. Press OK to confirm.
Locked Devices
Esc OK
30 www.oneforall.com
Page 32

UNLOCKING THE VOLUME
1. On the Device Screenin the upper left corner,tap Setup. You will see the main SETUP Menuthat
greets you and asks, “Wh at would you li ke to conf igure?”
2. Tap on the PERSONALIZATION key.You will see the PERSONALIZATION Menu.
NOTE:To return to a previous menu,tap on the ESC key.To return to last-displayed Dev ice
Screen,press down on ESC or MUTE for at least 2 seconds.For help,tap the ? key.
3. Tap on the VOLUME LO CK key.You will see the VOLUME LOCK Menu.
4. Tap on the SELECT key.You will see the Device VOLUME LOCK Menu.
5. In the left column,tap on a device you want unlocked from the main volume source.You will see
the device being removed from the Locked Devices list on the right.
6. Repeat step 5 for each additional device you want unlocked from the main volume source.If
needed,use the scroll up/down arrows in the left column to view additional devices.
7. To save your select ions,tap on the OK key.MOSAIC will show a confirmation message saying
that your Volume Lock fu n c tion was suc ce ssf u lly progr am m e d.
NOTE:To return to the previous menu,tap on the ESC key.To return to last-displayed Dev ice
Screen,press down on ESC or MUTE for at least 2 seconds.
www.oneforall.com 31
Page 33

VIEW/DELETE
To help you review what personalized changes have been made,MOSAIC includes a program that
allows you to view the functions by device and to selectively delete any one.
1. On the Device Screenin the upper left corner,tap on Setup.You will see the main SETUP Menu
that greets you and asks,“What would you like to config ure?”
2. Tap on the PERSONALIZATION key.You will see the PERSONALIZATION Menu.
NOTE:To return to a previous menu,tap on the ESC key.To return to last-displayed Dev ice
Screen,press down on ESC or MUTE for at least 2 seconds.For help,tap the ? key.
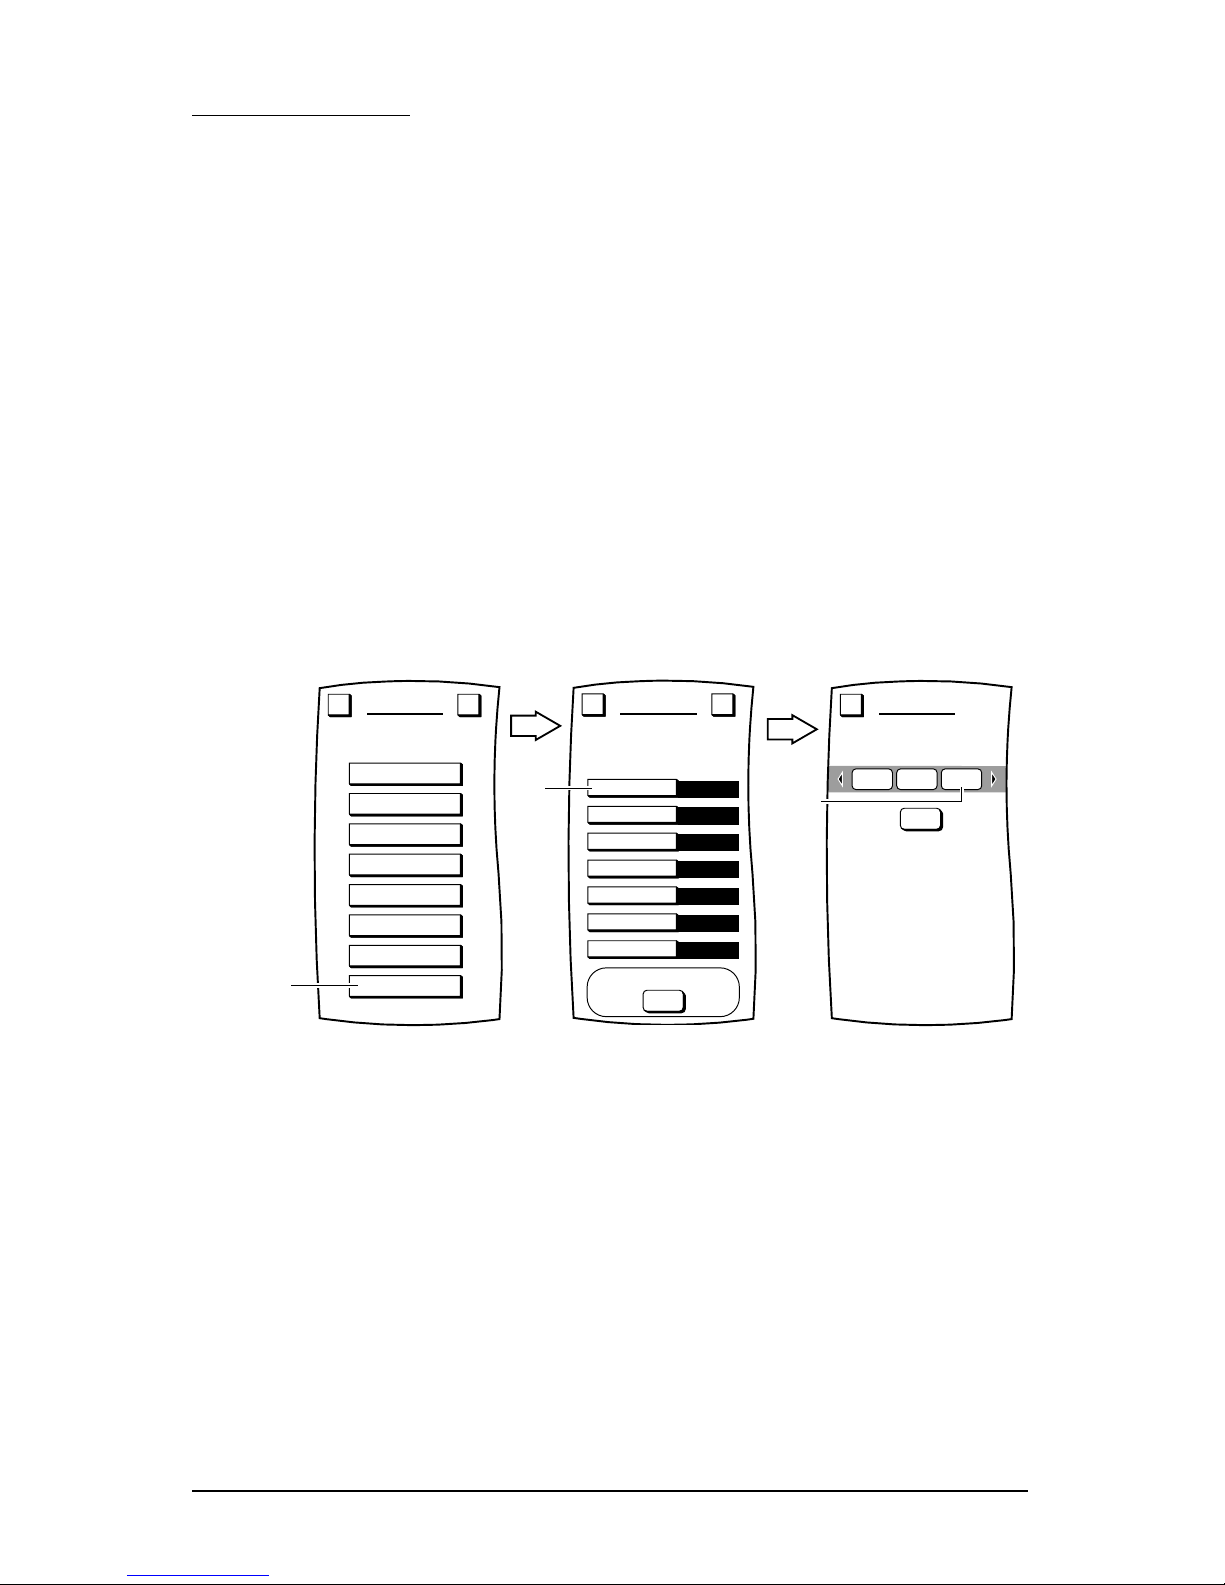
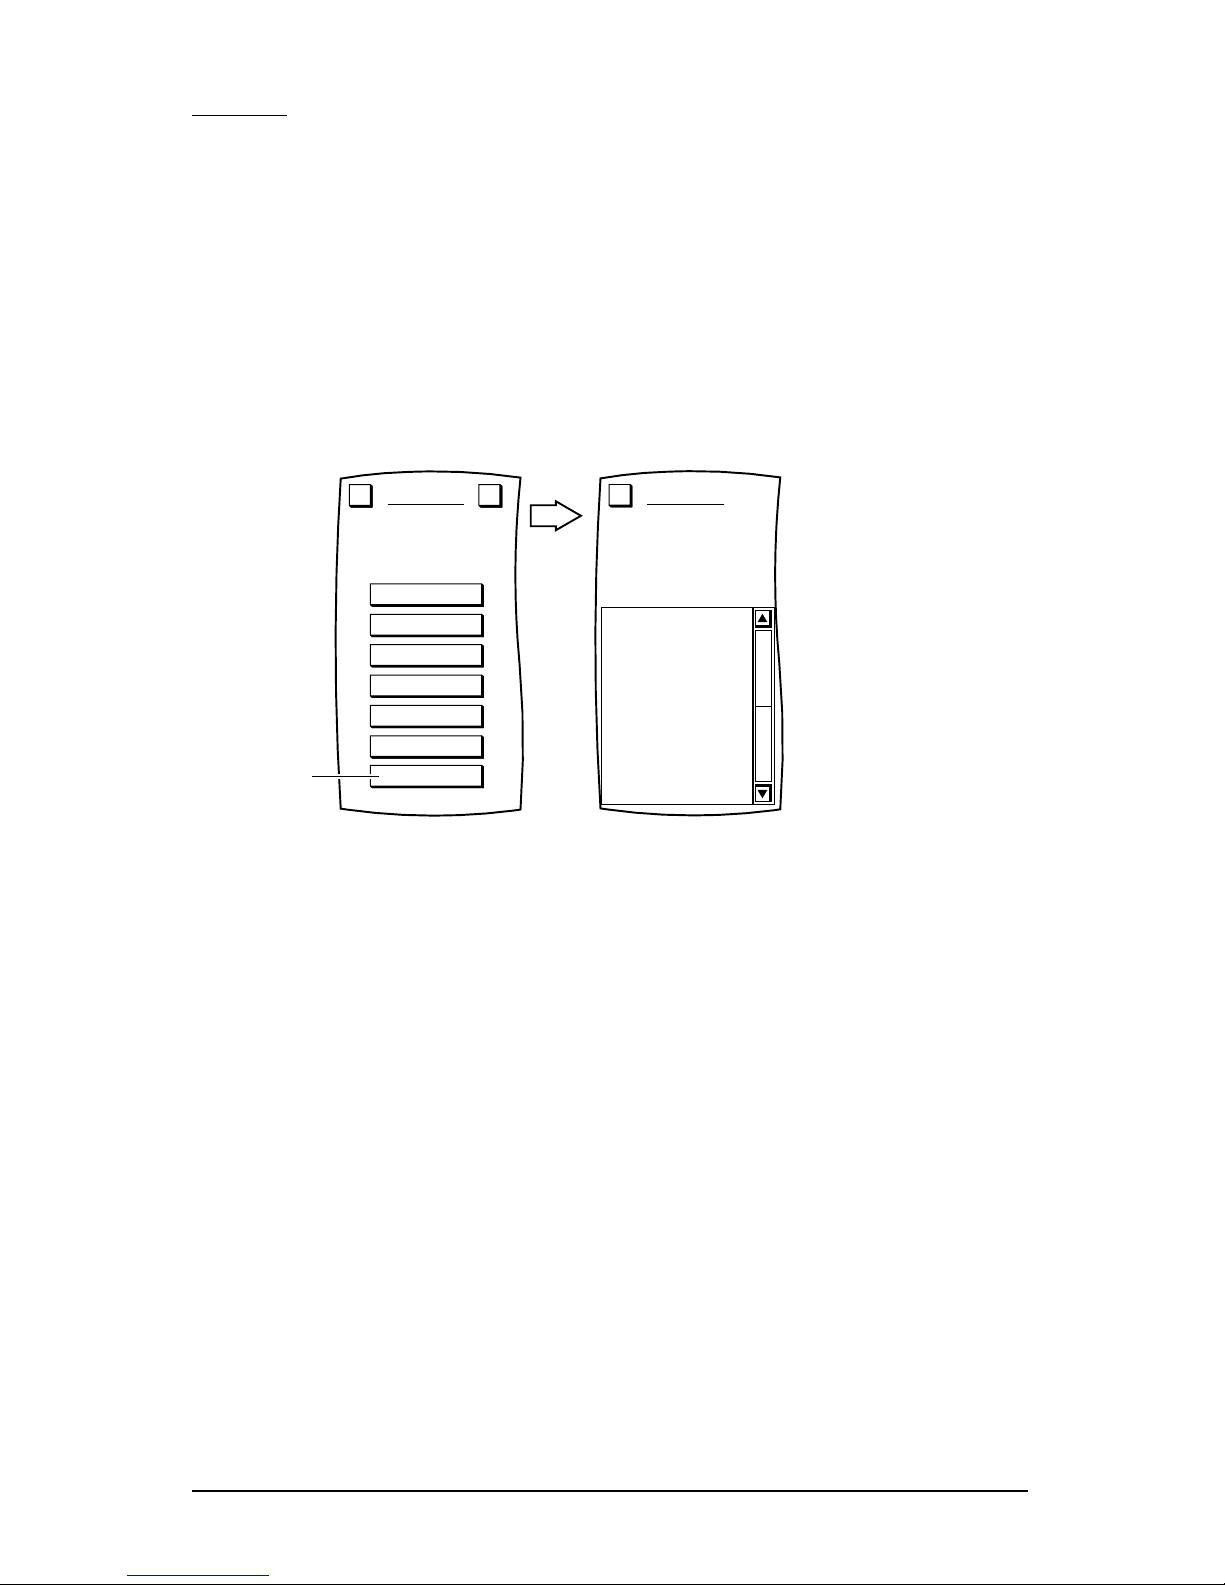
3. Tap on the VIEW/DELETE key.You will see the VIEW/DELETE De v ice Selection Strip.
4. Tap on a desired device.You will see all personalized functions for the device.In the illustration
above,M1 is an example macro key that was created in the section,Adding A Macro,starting on
page 12.
5. The View/Delete program w i l l l i st a l l Macrosand Moved,Learned,and Key M a gic ke ys.Tap on
any key to v iew a description.In the following illustration,tapping on M1shows the recorde d
keys used to create the example macro key in Adding A Macr o,starting on page 12.
• To delete a personalized function,tap on the DELETE key.MOSAIC will delete it and show a con-
firmation message saying that you have successfully programmed your personalization function.
• To kee p a p e rson a l iz e d f u n c t i on ,t ap on t he ESC or MUTE key.MOSAIC will return to the
View/Delete Screen.
MACROS
MOVE KEY
LEARN
LABEL KEYS
KEY MAGIC
VOLUME LOCK
VIEW/DELETE
HOME THEATER
PERSONALIZATION
Welcome to Personalization!
What feature
would you like to program?
Esc ?
Tap on
VIEW/DELETE
Which key would you like
to view its type?
Esc ?
CBLTV VCR
M 1
Tap on
VIEW/DELETE
M 1
Key macro function.
1
2
3
4
5
6
7
8
9
Esc
PWR
PWR
2
CBL
DELETE
TV
3
8
Dly 2s
Dly 1s
32 www.oneforall.com
Page 34
HOME THEATER
Although you may think Home Theater is an independent dev ice mode,it is actually a programmed
composite of the most-frequently-used home-theater f unc tions taken from the devices config ured in
MOSAIC.This composite screen is accessed via a dedicated soft key,labelled THEATER,at the top of
of all Device Screens.When it is tapp ed,MOSAIC will display your selected functions including any
related macros.
Home Theater also allows you to prog ram a separate “Power On”macro that will power on all your
favorite home theater dev ices with the tap of a single key.
PROGRAMMING HOME THEA TER DEVICES
1. On the Device Screenin the upper left corner,tap on Setup.You will see the main SETUP Menu
that greets you and asks,“What would you like to config ure?”
2. Tap on the PERSONALIZATION key.You will see the PERSONALIZATION Menu.
NOTE:To return to a previous menu,tap on the ESC key.To return to last-displayed Dev ice
Screen,press down on ESC or MUTE for at least 2 seconds.For help, tap the ? key.
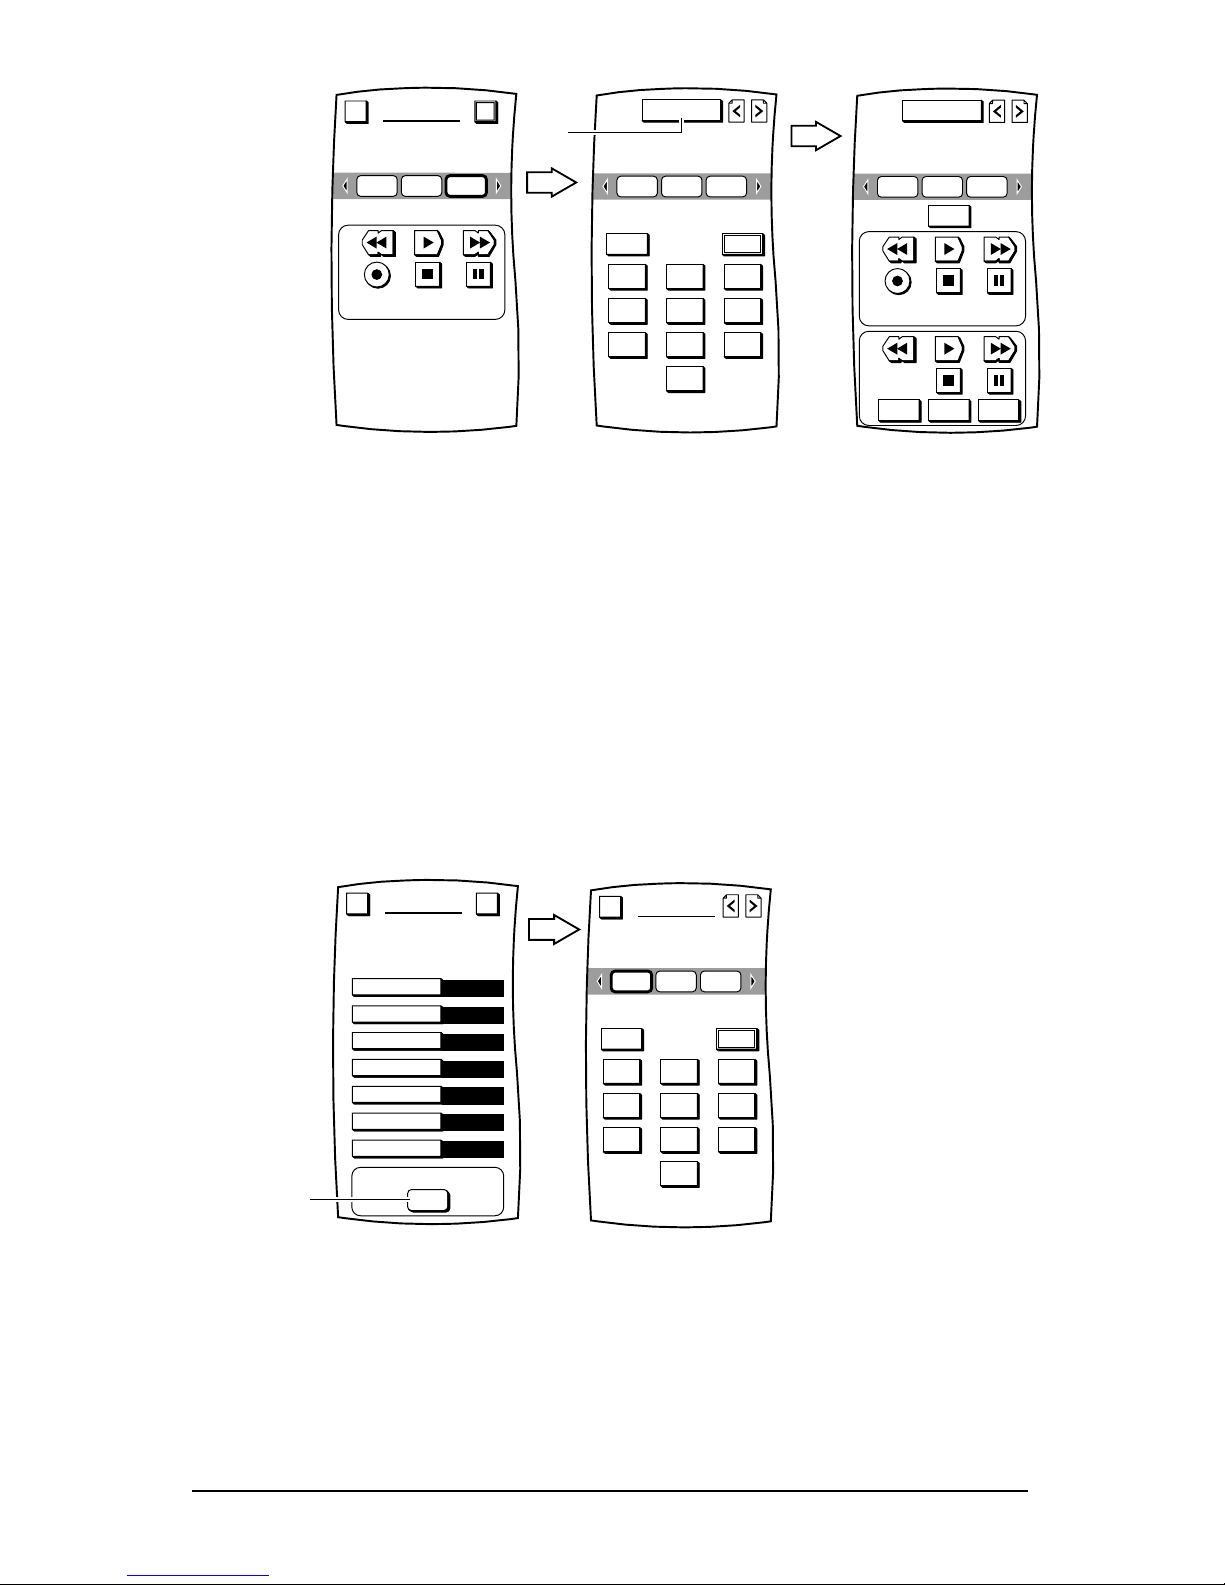
3. Tap on the HOME THEATER key.You will see seven device categories listed in the THEATER
SETUP Menu.
4. Tap on the Vide o Pl a yba ck key.You will see the THEATER SETUPDevice Selection Strip,as
shown on the next page.
5. Tap on the device you want to set up as your video playback device (e.g.,VCR).If you select a
device that has a transport (e.g.,VCR),necessary control keys will be added to the display.To
make a different selec tion,tap on the ESC key and repeat this step.
6. To save your select ion,tap on the OK key. MOSAIC will return to the Theater Setup Screen.
7. Repeat steps 4 through 6 for all remaining device categor ies.When you’re finished,continue onto
the next section to program a Home Theater “Power On”macro.
NOTE:To return to a previous menu,tap on the ESC key.To return to last-displayed Dev ice
Screen,press down on ESC or MUTE for at least 2 seconds.
MACROS
MOVE KEY
LEARN
LABEL KEYS
KEY MAGIC
VOLUME LOCK
VIEW/DELETE
HOME THEATER
PERSONALIZATION
Welcome to Personalization!
What feature
would you like to program?
Esc ?
Tap on
Video Playback
Audio Playback
Menu Source
Audio Source
Pro-Logic
Channel Source
PIP
NEW
THEATER SETUP
Configure the remote control
to match your Home Theater.
What device is used for:
Program Power Macro
Esc ?
Tap on
CLEAR
THEATER SETUP
Which device you use for
Video Playback.
Esc
CBLTV VCR
Tap on
device
(e.g.,VCR).
www.oneforall.com 33
Page 35
8. If you want to test Home Theater,press down on ESC or MUTE for at 2 seconds to return to the
last-displa yed Device Screen.Then tap on the THEATERKey to see the composite screen (see
example).
NOTE:Depending on the devices you program,the Home Theater composite screen on your
MOSAIC may look different than the one shown in the example above.
PROGRAMMING THE HOME THEATER POWER MACRO
1. If necessary,perform steps 1 through 3 ofthe previous section (Programming Home Theater
Devices on page 33) to view the Theater Setup Menu.
2. In the Program Power Macro sub-menu,tap on the NEW key.You will see the THEATER SETUP
Device Selection Strip.
NOTE:Tapping on the NEW key will also override any previously-prog rammed Power Macro.
3. Using a procedure similar to the one described in Adding A Macro(starting on page 12),tap on
successive devices and their functions to program the macro.
4. After you have programmed the macro,aim MOSAIC at your Home Theater system and tap on
the TEST key.If the devices respond incorrectly,tap on the CLEAR key and repeat steps
3 and 4.
1 2 3
4 5 6
7 8 9
0
TV/VCR PWR
CBLTV VCR
THEATERSetup
Tap on
Vid Out
Shuffle Track+Track-
CBLTV VCR
V
C
R
C
D
THEATERSetup
THEATER SETUP
Press OK to save.
Esc OK
CBLTV VCR
V
C
R
NEW
Video Playback
VCR
Channel Source
CBL
Audio Playback
CD
Menu Source
PIP
Audio Source
Pro-Logic
THEATER SETUP
Configure the remote control
to match your Home Theater.
What device is used for:
Program Power Macro
Esc ?
Tap on
1 2 3
4 5 6
7 8 9
0
TV/VCR PWR
THEATER SETUP
Begin recording the
keystrokes.
Esc
CBLTV VCR
34 www.oneforall.com
Page 36

5. Ifthe devices do respond cor rectly,then tap the OK key to save the macro.MOSAIC will ask you
if you want to relabel the macro.
• To relabel the macro,tap on the YES key.You will see the THEATER SETUP Label Screen.Follow
the procedure that is similar to the one starting with step 3 on page 25 to relabel the macro and
tap the OK key when you’re d on e .
• To keep the macro labelled as PWR,tap on the NO key.
6. MOSAIC will return to the THEATER SETUP Menu.To return to the Personalization Menu,tap
on the ESC ke y.To re t urn t o the Dev ice Screen,press on ESC or MUTE for at least 2 seconds.
VIEWING THE HOME THEATER POWER MACRO
1. If necessary,perform steps 1 through 3 of Programming Home Theater Devices (on page 33) to
view the Theater Setup Menu.
2. In the Program Power Macro sub-menu,tap on the VIEW key.You will see the VIEW MACROS
Menuwhich will display the contents ofthe current Power Macro,as shown in the below example.
3. To return to the Previous Menu,tap on the
ESC key.To return to the Dev ice Screen,press on ESC
or MUTE for at least 2 seconds.
DELETING THE HOME THEATER POWER MACRO
1. If necessary,perform steps 1 through 3 of Programming Home Theater Devices (on page 33) to
view the Theater Setup Menu.
2. In the Program Power Macro sub-menu,tap on the DELETE key.MOSAIC will clear the current
Power Macro and display a NEW key to create a new macro.
NEW DELETEVIEW
Video Playback
VCR
Channel Source
CBL
Audio Playback
CD
Menu Source
PIP
Audio Source
Pro-Logic
THEATER SETUP
Configure the remote control
to match your Home Theater.
What device is used for:
Program Power Macro
Esc ?
Tap on
VIEW MACROS
PWR
1
2
3
4
5
6
7
8
9
10
11
Esc
PWR
PWR
2
CBL
TV
8
Dly 2s
3
Dly 1s
PWR
VCR
www.oneforall.com 35
Page 37

System
UPGRADE
Although MOSAIC includes the world’s largest infrared code library (which is compatible with virtual-
ly every infrared device being made),there may come a time when MOSAIC will require an upgrade,
especially when you purchase a new device.Fortunately,MOSAIC includes electro-magnetic coupling
technology that allows downloading by modem for an “in home”consumer upgrade using your PC
speakers or telephone.For help upgrading your MOSAIC:http://www.oneforall.com.
LCD
UPGRADE
SOUND ON/OFF
LOCK SETTINGS
USER RESET
LANGUAGE
ABOUT
SYSTEM
Welcome to System Setup!
What action
would you like to perform?
Esc ?
Tap on
DOWNLOAD
UPGRADE
The LCD and Backlight will be
turned off during downloading.
Press DOWNLOAD when you’re ready.
Press MUTE to abort download
anytime.
Esc ?
DEVICE SETUP
PERSONALIZATION
SYSTEM
SETUP
Welcome to Setup!
What would you like to configure?
Esc ?
Tap on
36 www.oneforall.com
Page 38

LCD
After MOSAIC has been used a while,a soft key may no longer pro duce a response when you tap
inside a key’s boundary,yet it still works when you tap outside it.To compensate for this drift,
MOSAIC includes a utility program that you can use to align the LCD back to factory specifications.
1. On the Device Screenin the upper left corner,tap on Setup.You will see the main SETUP Menu
that greets you and asks,“What would you like to config ure?”
NOTE:If the LCD is so misaligned,if by tapping on S etup you do not see the main SETUP
Menu,skip steps 1 through3 and instead press the CH–,MUTE,and VOL + hard keys,all at
the same time.This will cause MOSAIC to go directly to the LCD Alignment Menu.Then start
with step 4 on the next page.
2. Tap on the SYSTEM key.You will see the SYSTEM Menu.
NOTE:To return to a previous menu,tap on the ESC key.To return to last-displayed Device
Screen,press down on ESC or MUTE for at least 2 seconds.For help,tap the ? key.
3. Tap on the LCD key.You will see the LCD Alignment Menu.Following the instructions,tap on
the X on each of the three screens show n below. When the procedure is complete,the LCD will
be aligned and MOSAIC will return to the Syst e m Menu .
NOTE:To cancel the procedure at anytime,press the MUTE ke y.
X
<
---
Press here
Touch Screen Alignment
Press the MUTE key to
cancel this function.
Tap on
Press here
---
>
X
Touch Screen Alignment
Press the MUTE key to
cancel this function.
Tap on
LCD
UPGRADE
SOUND ON/OFF
LOCK SETTINGS
USER RESET
LANGUAGE
ABOUT
SYSTEM
Welcome to System Setup!
What action
would you like to perform?
Esc ?
Tap on
LCD
UPGRADE
SOUND ON/OFF
LOCK SETTINGS
USER RESET
LANGUAGE
ABOUT
SYSTEM
Welcome to System Setup!
What action
would you like to perform?
Esc ?
To test alignment
Press here
---
>
X
Tap on
www.oneforall.com 37
Page 39
SOUND ON/OFF
MOSAIC is set at the factory to emit a beep and blink the LED each time you tap a key.To turn the
beep sound off(or back on),perform the following procedure:
1. On the Device Screenin the upper left corner,tap on Setup.You will see the main SETUP Menu
that greets you and asks,“What would you like to config ure?”
2. Tap on the SYSTEM key.You will see the SYSTEM Menu.
NOTE:To return to a previous menu,tap on the ESC key.To return to last-displayed Dev ice
Screen,press down on ESC or MUTE for at least 2 seconds.For help, tap the ? key.
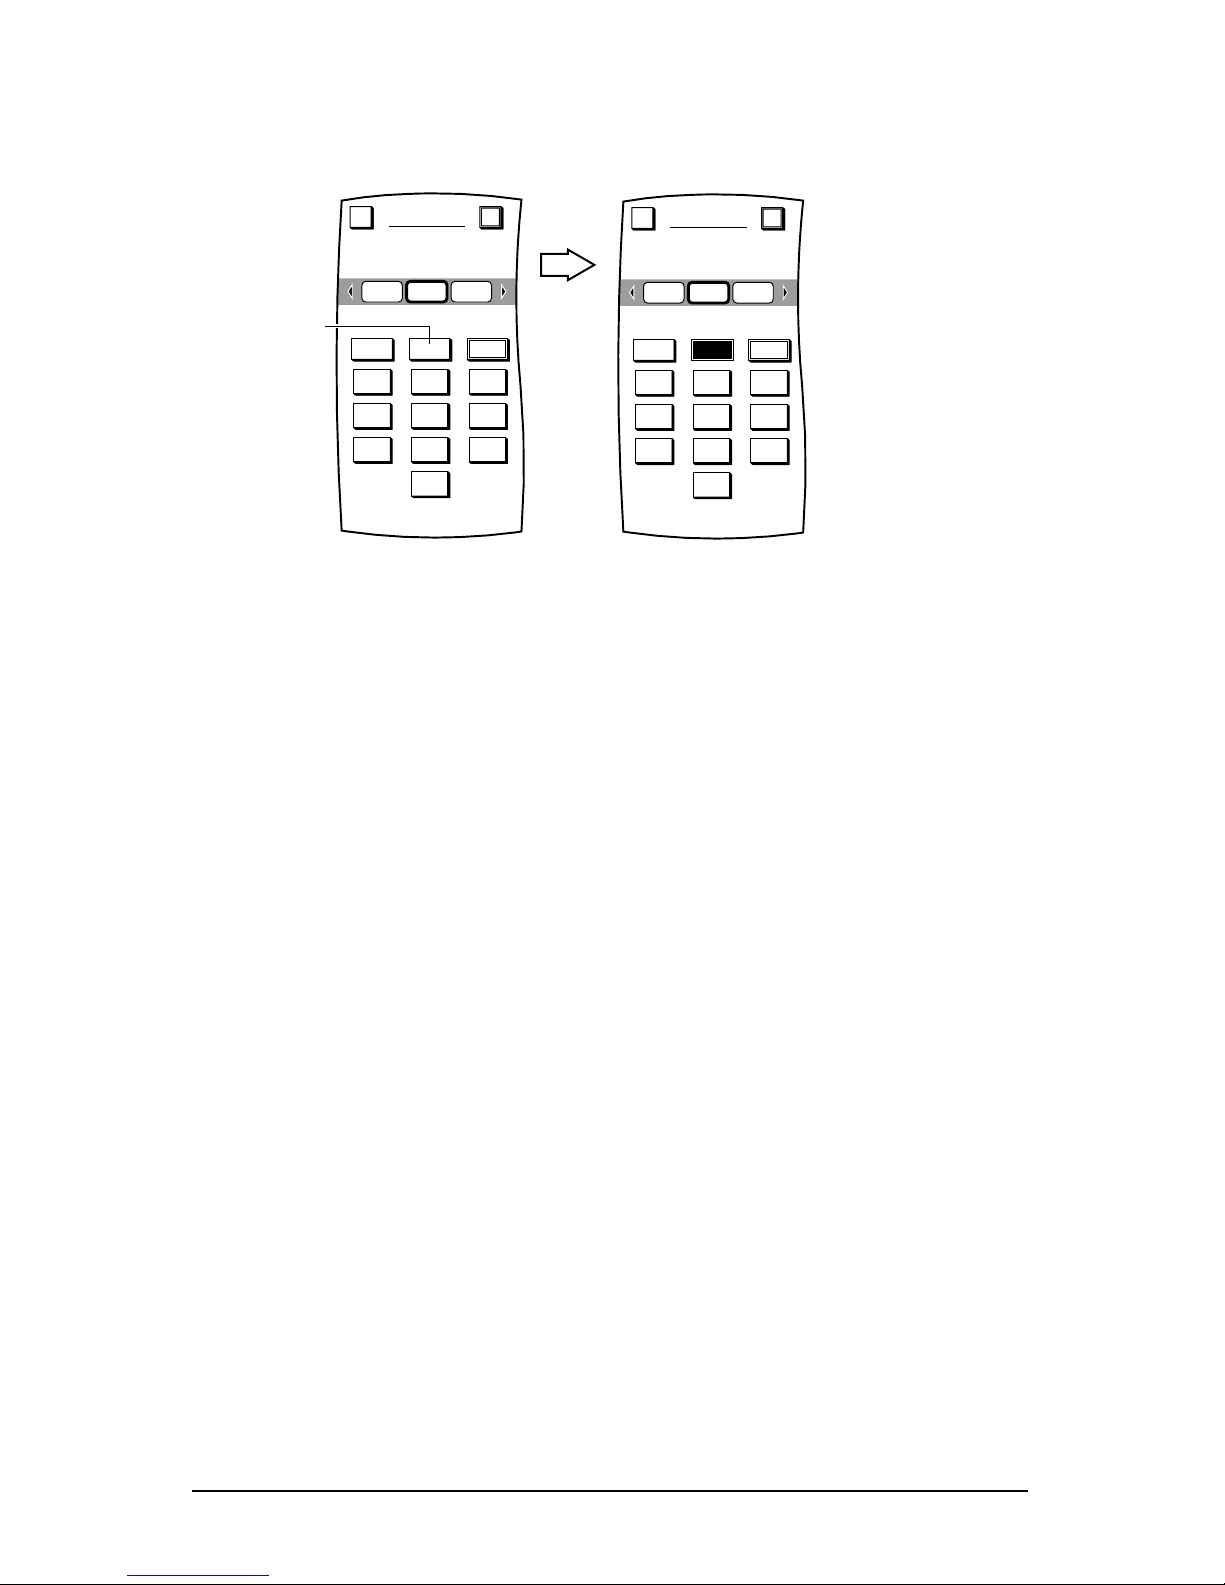
3. Tap on the SOUND ON/OFFkey.You will see the SOUND Menuw ith the current setting denoted by a thicker outline.
• To turn off the beep sound,tap on the OFFkey.MOSAIC will turn off the beep sound and return
to the Sy s t em Men u .
• To turn on the beep sound,tap on the ONkey.MOSAIC will turn on the beep sound and return
to the Sy s t em Men u .
NOTE:As an additional low-battery warning,MOSAIC will emit a beep sound even if the
sound is turned off(see page 3).
LCD
UPGRADE
SOUND ON/OFF
LOCK SETTINGS
USER RESET
LANGUAGE
ABOUT
SYSTEM
Welcome to System Setup!
What action
would you like to perform?
Esc ?
Tap on
OFF
ON
SOUND
The sound is currently ON.
Esc ?
38 www.oneforall.com
Page 40
LOCK SETTINGS
MOSAIC is set at the factory with settings unlocked.After setting up MOSAIC,we recommend locking
the new settings to keep them from being inadvertently erased or changed.
1. On the Device Screenin the upper left corner,tap on Setup.You will see the main SETUP Menu
that greets you and asks,“What would you like to config ure?”
2. Tap on the SYSTEM key.You will see the SYSTEM Menu.
NOTE:To return to a previous menu,tap on the ESC key.To return to last-displayed Dev ice
Screen,press down on ESC or MUTE for at least 2 seconds.For help,tap the ? key.
3. Tap on the LOCK SETTINGS key.You will see the LOCK SETTINGS Menu with the current
setting denoted by a thicker outline.
• To lock the settings,tap on the LOCK key.MOSAIC will lock the settings and return to the
last-displa yed Device Screen.
• To unlock the settings,tap on the UNLOCK key.MOSAIC will unlock the settings and return to
the SYSTEM Menu.
LCD
UPGRADE
SOUND ON/OFF
LOCK SETTINGS
USER RESET
LANGUAGE
ABOUT
SYSTEM
Welcome to System Setup!
What action
would you like to perform?
Esc ?
Tap on
www.oneforall.com 39
Page 41
USER RESET
Ifyou have updated your entertainment devices or want to completely start over,MOSAIC offers a user
reset function so you can clear settings using a single command.
IMPORTANT:User Reset does not affect downloaded codes or Device Setup settings.To reset only
all user settings including Macros, Moved Keys,Lear ned Keys, Labelled Keys, and Key Magic
functions,as well as all settings for Home Theater, Sound On/Off,Volume Lock,and Lock to their
orig inal default values , perform the fol low ing ste ps:
1. On the Device Screenin the upper left corner,tap on Setup.You will see the main SETUP Menu
that greets you and asks,“What would you like to config ure?”
2. Tap on the SYSTEM key.You will see the SYSTEM Menu.
NOTE:To return to a previous menu,tap on the ESC key.To return to last-displayed Dev ice
Screen,press down on ESC or MUTE for at least 2 seconds.For help,tap the ? key .
3. Tap on the USER RESETkey.You will see the USER RESET Menu.
4. To erase all user settings,tap on the RESET key. You will hear a beep as MOSAIC clears all settings.After a few seconds,MOSAIC will show a confirmation message say ing that you have successfully programmed your personalization function.
NOTE:To return to a previous Menu,tap on the ESC key.To return to last-displayed Device
Screen,press down on ESC orMUTE for at least 2 seconds.
LCD
UPGRADE
SOUND ON/OFF
LOCK SETTINGS
USER RESET
LANGUAGE
ABOUT
SYSTEM
Welcome to System Setup!
What action
would you like to perform?
Esc ?
Tap on
RESET
USER RESET
All user settings including
moved keys, macros, learned
keys and labelled keys will be
erased if this option is selected.
Esc ?
40 www.oneforall.com
Page 42

LANGUAGE
The ”Help text”(? key) can be displayed in three languges.
1.
Tap on the Setupkey.
2. Tap on SYSTEM.
3. Tap on LANGUAGE.
4. Tap on the language that you wish to select for the ”help text”.
ENGLISH
DEUTSCH
FRANCAIS
LANGUAGE
Which language
would you prefer for help text?
Esc
www.oneforall.com 41
Page 43
ABOUT
The About Screen lists MOSAIC’s software version,the amount offree memory,and contact informa-
tion for ad d it i ona l h elp.
1. On the Device Screenin the upper left corner,tap on Setup.You will see the main SETUP Menu
that greets you and asks,“What would you like to config ure?”
2. Tap on the SYSTEM key.You will see the SYSTEM Menu.
NOTE:To return to a previous menu,tap on the ESC key.To return to last-displayed Dev ice
Screen,press down on ESC or MUTE for at least 2 seconds.For System help,tap the ? key.
3. Tap on the ABOUT key. You will see the ABOUT Menu.
LCD
UPGRADE
SOUND ON/OFF
LOCK SETTINGS
USER RESET
LANGUAGE
ABOUT
SYSTEM
Welcome to System Setup!
What action
would you like to perform?
Esc ?
Tap on
ABOUT
MOSAIC
Touch Screen Control Device
VERSION NUMBER
A12.S11.R10.LEML2.H01.BEMS1.P11
FREE MEMORY: 100%
Esc
For Help in Upgrading your
Mosaic and Key Magic
codes:
http://www.oneforall.com
42 www.oneforall.com
Page 44

Customer Service
If you still have questions about the operation ofyour One For All MOSAIC universal remote and you
could not find the answer(s) in the manual,you may want to contact the customer service department for assistance.
You may care to visit our Internet-site:
www.oneforall.com
- 24 hours access - page for Frequently Asked Questions
- no waiting time - info about the ONE FOR ALL pro duct range
Before contacting us,by Fax,E-mail or Phone,make sure you have the required information
available by filling in the table below.
Model :URC-9990 Date of purchase (...............-...............-...............)
Helpcode(*) Device Brand Device Remote SET -UP
model nr. model nr. code
1910805 TV Sony KVX-2950B RMT-V131B 0505 (example)
In the UK In Ireland In Australia
e-mail:ofahelp@uebv.com e- mail :ofahelp@uebv.com e- mail:ofahelp@uebv.com
fax:+31 53 432 9816 fax:+31 53 432 9816 fax:+31 53 432 9816
tel.:0808-1000306(*) tel.:1-800 553199 (*) tel.:1-800 064472
In South Afri ca In New Zealand
e- mail:support@oneforall.co.za e- mail:ofahelp@uebv.com
fax:011 298 2302 fax:(06) 878 2760
tel.:0860 100551 / tel.:011 298 2300 tel.:0508 ONE 4 ALL (663 4 255)
(*) When you call us you will be asked to enter your help code(s).You only have to enter the helpcode(s) ofthose devices you have a problem with.
The helpcode is a 7-digit code,which defines the ONE FOR ALL-model you have,the device ty pe and
the brand ofyour device.This helpcode can be found in the first column ofthe setup code list.
www.oneforall.com 43
Page 45

128 www.oneforall.com
Televisions
Fernseher
Téléviseurs
1910991 A.R. Systems 0037
1911306 Accent 0037
1912089 Acec 0012
1910010 Admiral 0087 0093 0418
0264
1910012 Adyson 0217 0216
1911080 Agashi 0216 0264
1910015 AGB 0516
1910997 Agef 0087
1910017 Aiko 0216 0009 0037
0371 0433 0072
0361 0191 0264
0217
1910018 Aim 0037
1910020 Akai 0361 0208 0371
0037 0433 0191
0009 0072 0218
0163 0516 0602
0556 0581 0480
0217 0631 0216
0264 0448 0178
0377 0606
1910021 Akiba 0218 0282 0455
0037
1910022 Akito 0037
1910023 Akura 0218 0282 0009
0412 0264 0037
0493 0668
1911267 Alaron 0216
1910024 Alba 0218 0235 0009
0418 0370 0355
0371 0037 0216
0247 0163 0581
0487 0036 0668
0579
1910029 Allorgan 0206 0294 0217
1910032 Allstar 0037
1910041 Amplivision 0217 0400 0370
1910042 Amstrad 0177 0009 0516
0264 0218 0371
0433 0412 0037
0648
1911094 Anam 0037 0009
1911268 Anam National 0037
1910044 Anglo 0009 0264
1910045 Anitech 0009 0264 0037
1910047 Ansonic 0370 0292 0102
0009 0037 0374
0163 0411 0259
0247 0012
1910050 Apollo 0473
1910053 Arc en Ciel 0109 0196 0198
1910054 Arcam 0216 0217
1911307 Ardem 0486
1910057 Aristona 0037 0556 0012
1910059 Arthur Martin 0163 0400
1910060 ASA 0105 0346 0070
0104 0087
1910062 Asberg 0037
1911095 Asora 0009
1910070 Asuka 0218 0264 0216
0282 0217
1910072 Atlantic 0037 0216 0206
0259
1910074 Atori 0009
1910075 Auchan 0163 0400
1910080 Audiosonic 0037 0109 0217
0370 0264 0218
0486
1910081 Audioton 0217 0486 0370
0264
1910085 Autovox 0087 0206 0217
0247 0336
1911156 AWA 0011 0036 0009
0374 0412 0037
0216 0606
1911081 Ayomi 0238
1910091 Baird 0109 0193 0190
0072 0073 0217
0208
1910093 Bang & Olufsen 0565 0087
1910094 Barco 0163
1910097 Basic Line 0218 0009 0374
0037 0163 0282
1910098 Bastide 0217
1910099 Baur 0303 0195 0512
0037 0191 0361
0505 0010
1911082 Bazin 0217
1911079 Beaumark 0178
1910103 Beko 0370 0486 0037
0606
1910105 Beon 0037 0418
1910106 Best 0370
1910107 Bestar 0037 0370 0374
1910108 Binatone 0217
1910110 Black Star 0247
1910111 Blacktron 0282
1910112 Blackway 0282
1910113 Blaupunkt 0191 0195 0200
0327 0328 0448
1910114 Blue Sky 0218 0282 0455
0037 0487 0668
1910115 Blue Star 0282
1910118 Bondstec 0247
1910119 Boots 0217
1910121 BPL 0282 0037
1910123 Brandt 0109 0196 0198
0335 0625
1910126 Brinkmann 0418 0037
1911030 Brionvega 0037 0087
1910128 Britannia 0216 0217
1911444 Brother 0264
1910133 Bruns 0087
1910134 BSR 0163 0294
1910138 BTC 0218
Page 46

www.oneforall.com 129
1910139 Bush 0218 0235 0163
0009 0036 0282
0037 0355 0371
0374 0264 0361
0487 0208 0581
0294 0217 0668
1910149 Capsonic 0264
1911455 Carad 0610 0037
1910150 Carena 0455 0037
1910151 Carrefour 0036 0070
1910153 Carver 0170
1910998 Cascade 0009 0037
1910154 Casio 0037
1910155 Cathay 0037
1911231 CCE 0037 0217
1910160 Centurion 0037
1910161 Century 0087 0247 0238
1910162 CGE 0074 0084 0247
0163 0418 0370
1910167 Cimline 0009 0235 0218
1910169 City 0009
1911073 Clarivox 0418 0070
1910172 Clatronic 0218 0264 0370
0371 0217 0247
0037 0009 0102
0579
1911308 CMS hightec 0217
1910186 Concorde 0009
1910187 Condor 0216 0247 0282
0037 0370 0009
0102 0411 0418
1910191 Contec 0216 0009 0011
0036
1910192 Continental
Edison 0109 0196 0198
0487
1910194 Cosmel 0009
1910196 Crosley 0087 0247 0074
0084 0163
1910197 Crown 0009 0370 0486
0037 0579 0418
0208 0487 0053
1910200 CS Electronics 0247 0216 0218
1910201 CTC 0247
1910202 Curtis Mathes 0093 0166
1910203 Cybertron 0218
1910205 Daewoo 0009 0037 0216
0374 0218 0217
0624
1910206 Dainichi 0218 0216
1910207 Dansai 0037 0264 0216
0009
1911160 Dansette 0412
1911083 Dantax 0370 0486
1911102 Datsura 0208
1910209 Dawa 0037
1910210 Daytron 0009 0374 0037
1910216 de Graaf 0208 0044 0163
1910214 Decca 0072 0516 0037
0217
1911459 Deitron 0037
1910999 Denko 0264
1911103 DER 0193 0190
1910220 Desmet 0037
1911000 Diamant 0037
1911310 Digiline 0037
1910232 Dixi 0009 0037 0247
0217
1911255 Drean 0037
1910239 DTS 0009
1910240 Dual 0217 0259 0336
0037 0303 0163
1910243 Dumont 0087 0104 0102
0217 0070 0072
1911162 Dux 0037 0012
1910247 Dynatron 0037
1910252 Elbe 0435 0238 0259
0292 0370 0163
0037 0218 0191
0411 0610
1910254 Elcit 0087 0247 0516
0102 0163
1910255 Elekta 0264 0282
1912093 ELG 0037
1910259 Elin 0216 0037 0105
0104 0361 0448
0163 0009
1910260 Elite 0218 0037
1910261 Elman 0102
1910263 Elta 0009 0264 0216
1910265 Emerson 0177 0087 0178
0247 0037 0371
0070 0282
1910267 Emperor 0282
1910271 Erres 0037 0012
1910272 ESC 0037
1910273 Etron 0037 0009 0163
1911632 Eurofeel 0264
1910278 Euroman 0216 0264 0037
0217 0370
1910279 Europa 0037
1910280 Europhon 0037 0516 0102
0217 0247 0163
1910291 Expert 0206 0400 0259
0163
1911001 Exquisit 0037 0247
1910294 Fenner 0374 0009
1910296 Ferguson 0073 0190 0335
0238 0193 0109
0625
1910299 Fidelity 0193 0216 0371
0163 0264 0037
1911164 Filsai 0217
1910301 Finlandia 0208 0346 0361
1910302 Finlux 0105 0104 0037
0346 0217 0072
0163 0516 0070
0087 0102 0411
0631 0480
1910304 Firstline 0294 0321 0216
0037 0374 0247
0009 0163 0102
0217 0411 0238
0072 0235 0668
0208 0624
Page 47

130 www.oneforall.com
1910305 Fisher 0104 0217 0036
0208 0370 0045
0087 0361 0163
0303 0072
1910307 Flint 0037 0455 0072
0218
1911002 FNR 0102
1910308 Forgestone 0193
1910309 Formenti 0087 0216 0163
1910310 Fortress 0093 0087
1910313 Fraba 0370 0037
1911106 Friac 0009 0037 0102
1910319 Frontech 0247 0264 0448
0217 0009
1910322 Fujitsu 0206 0072 0102
0217 0163 0009
1911457 Fujitsu General 0009 0217
1910323 Funai 0264 0294
1910326 Galaxi 0102 0037
1910327 Galaxis 0370 0418 0037
0102
1910331 GBC 0163 0009 0374
0218
1910333 GE 0109 0178 0282
0335
1911003 Geant Casino 0163 0400
1910335 GEC 0072 0163 0361
0516 0037 0217
1910336 Geloso 0247 0009 0163
0374
1910337 General 0109
1910338 General
Technic 0009
1910339 Genexxa 0218 0037 0412
0493
1910345 Goldhand 0216
1910347 GoldStar 0037 0370 0290
0009 0377 0217
0247 0216 0163
0178 0361 0044
1910349 Goodmans 0036 0072 0037
0009 0264 0516
0290 0374 0487
0371 0556 0235
0480 0217 0624
0335
1910350 Gorenje 0370
1910351 GPM 0218
1911248 Gradiente 0037 0053 0170
1910352 Graetz 0361 0371
1910353 Granada 0037 0400 0226
0356 0012 0045
0072 0108 0208
0217 0036 0516
0473 0335
1910354 Grandin 0282 0218 0400
0037 0009 0163
0455 0579 0610
1911107 Gronic 0102 0217
1910355 Grundig 0195 0191 0487
0070 0037 0556
1910359 Halifax 0264 0216 0217
1910360 Hampton 0216 0217
1911108 Hanimex 0294
1910362 Hanseatic 0037 0292 0282
0163 0361 0370
0009 0294 0217
0087
1910363 Hantarex 0009 0037 0102
1910364 Hantor 0037
1911084 Harwood 0009 0412 0037
1911678 Hauppauge 0037
1910370 HCM 0264 0009 0282
0412 0217 0218
0418 0037
1910372 Hema 0217 0009
1910374 Hifivox 0109 0196
1911682 Highline 0264 0037
1911110 Hikona 0218
1910377 Hinari 0208 0036 0037
0218 0009 0163
0355 0443 0487
0235 0294
1910380 Hisawa 0282 0218 0400
0455
1911004 Hit 0087
1910381 Hitachi 0225 0036 0356
0044 0473 0163
0578 0196 0198
0217 0194 0516
0072 0481 0037
0563 0105 0178
0556
1911684 Hitachi Fujian 0108
1911170 Hitsu 0009 0455 0218
1911085 Hornyphone 0037 0012
1910384 Hoshai 0218 0455
1911086 Huanyu 0374 0216
1910388 Hygashi 0217 0216
1910389 Hyper 0009 0216 0217
0247
1910390 Hypersonic 0361
1910391 Hypson 0037 0264 0217
0282 0455 0400
0238
1911005 Iberia 0037
1910393 ICE 0264 0217 0037
0371 0218 0216
0009
1911006 Ices 0218 0216
1910395 Imperial 0037 0247 0370
0418 0163 0074
0084 0196
1910397 Indiana 0037
1911343 Ingelen 0487 0610
1910398 Ingersoll 0009
1910401 Inno Hit 0009 0072 0037
0218 0290 0217
0516 0247
1911312 Interactive 0411
1910404 Interbuy 0009 0264 0247
1910405 Interfunk 0037 0012 0087
0512 0327 0163
0361 0370 0109
1911113 Internal 0037
Page 48

www.oneforall.com 131
1910408 Intervision 0282 0217 0455
0037 0371 0377
0448 0486 0370
0487 0218 0102
0163 0264 0247
1910410 Irradio 0009 0037 0218
0247 0290
1910412 Isukai 0218 0037 0282
1910413 ITC 0217
1910414 ITS 0037 0371 0218
0282 0264 0216
1910415 ITT 0163 0480 0361
0473 0193 0346
0208
1910416 ITT Nokia 0361 0163 0473
0480 0346 0208
0606 0610 0631
1910417 ITV 0264 0037 0247
1911314 Jean 0036
1910425 JVC 0653 0053 0094
0190 0036 0193
0371 0218 0606
1910427 Kaisui 0218 0282 0037
0216 0455 0217
0009
1910428 Kamp 0216
1910429 Kapsch 0206 0163 0361
0259 0104
1910430 Karcher 0037 0370 0282
0102 0610 0264
1911283 Kawasho 0216
1911177 KB Aristocrat 0163
1910432 Kendo 0235 0247 0102
0037 0370 0411
0610 0377
1910433 Kennedy 0206 0163 0435
1910437 Kingsley 0216
1910438 Kneissel 0435 0259 0292
0370 0238 0037
0411 0610
1910441 Kolster 0037 0102
1910442 Konka 0218 0371 0037
1911315 Kontakt 0487
1910443 Korpel 0037
1910444 Korting 0087 0370
1910445 Kosmos 0037
1911181 Kotron 0412 0264
1911350 Kraking 0238
1911287 KTV 0217
1911117 Kyoshu 0264 0412 0418
1910451 Kyoto 0163
1911451 Lemair 0411
1910454 Lenco 0009 0104 0163
0037
1910456 Lenoir 0009
1910458 Lesa 0247
1910461 Leyco 0264 0072 0037
0294 0579
1911072 LG 0037 0370 0290
0009 0377 0217
0247 0216 0163
0178 0361
1911008 Liesenkotter 0037 0327 0328
0012
1910463 Lifetec 0009 0264 0037
0374 0218 0668
0512
1911240 Lloyd's 0009
1910472 Loewe 0512 0037 0087
0292 0370
1910474 Logik 0011 0193 0371
1911456 Logix 0668
1910478 Luma 0206 0037 0163
0259 0411 0374
0009
1911009 Lumatron 0206 0037 0163
0259 0361 0217
0264 0073
1910481 Lux May 0037 0009
1910485 Luxor 0194 0290 0480
0361 0208 0356
0163 0346 0473
1911241 LXI 0178
1911316 Madison 0037
1910490 Magnadyne 0087 0247 0516
0102 0163
1910491 Magnafon 0516 0102 0216
1910492 Magnavox 0036 0037
1911071 Magnum 0648
1910495 Mandor 0264
1910496 Manesth 0037 0235 0217
0264 0294
1910497 Manhattan 0037 0668
1910500 Marantz 0037
1910503 Marelli 0087
1910504 Mark 0037 0217 0216
0374 0009
1911342 Masuda 0218 0009 0371
1910508 Matsui 0235 0177 0009
0355 0011 0072
0036 0037 0556
0487 0217 0294
0371 0433 0443
0579 0455 0516
0163 0208 0045
0195 0191 0335
1910517 Mediator 0037 0556 0012
1910518 Medion 0037 0668
1911121 Megas 0610
1911291 Megatron 0178
1910487 Melectronic 0346 0037 0512
0109 0247 0105
0104 0374 0009
0217 0480 0216
0411
1911010 Melvox 0400
1910520 Memorex 0009 0178 0250
1910521 Memphis 0072 0009
1910522 Mercury 0037 0009
1910525 Metz 0087 0195 0191
0367
1910526 MGA 0178
1911317 Micromaxx 0037 0668
1910531 Minerva 0487 0195 0070
0191
Page 49

132 www.oneforall.com
1910532 Minoka 0412 0037
1910535 Mitsubishi 0108 0512 0037
0093 0178 0087
0036 0193
1910538 Mivar 0292 0290 0291
0370 0216
1911186 Monaco 0009
1910540 Morgan's 0037
1911297 Motorola 0093
1910543 MTC 0370 0512 0216
1911187 Multibroadcast 0193
1910545 Multistandard 0102
1911452 Multitec 0037 0668
1910547 Multitech 0217 0009 0216
0247 0102 0486
0370 0037
1910551 Murphy 0104 0216 0072
0163
1911791 Musikland 0218
1910553 NAD 0361 0166 0178
1911124 Naiko 0037
1911125 Nakimura 0374 0037
1912099 NAT 0226
1910562 National 0226
1910564 NEC 0170 0036 0455
0009 0374 0217
0037 0011
1910565 Neckermann 0037 0191 0370
0505 0010 0200
0556 0163 0327
0418 0087 0247
0217 0411
1910566 NEI 0037 0371
1910567 Nesco 0247
1911292 Netsat 0037
1911012 Neufunk 0037 0009 0556
0610
1910572 New Tech 0037 0009 0556
0217 0448
1910571 New World 0218
1910574 Nicamagic 0216
1910576 Nikkai 0072 0218 0037
0217 0264 0216
0009 0036
1910577 Nikko 0178
1911249 Noblex 0037 0264
1910578 Nobliko 0102 0070 0216
1910579 Nogamatic 0109 0196
1910580 Nokia 0361 0163 0480
0473 0208 0374
0631 0606 0346
1910582 Nordmende 0109 0196 0198
0195 0037 0335
1911013 Novatronic 0037 0105 0374
1910588 Oceanic 0163 0400 0361
0294 0208 0563
1912100 Odeon 0264
1910590 Okano 0370 0037 0264
0072
1911014 Omega 0264
1910595 Onwa 0371 0218 0433
0581
1910596 Opera 0037
1910598 Optimus 0250 0166
1911299 Optonica 0093
1910599 Orbit 0037
1910602 Orion 0235 0294 0177
0355 0011 0037
0009 0321 0102
0443 0556 0264
0412
1911015 Orline 0037 0218
1911192 Ormond 0668
1910605 Osaki 0072 0218 0217
0264 0493 0037
0412 0374
1911193 Osio 0037
1910607 Oso 0218
1910608 Osume 0072 0036 0218
1910610 Otto Versand 0010 0505 0036
0093 0512 0037
0556 0195 0191
0361 0235 0109
0294 0226 0247
0303 0217
1910614 Pael 0216
1910616 Palladium 0370 0037 0191
0505 0010 0200
0418 0556 0247
0327 0087 0163
0217 0411
1911129 Palsonic 0264 0412 0037
0217 0377
1910619 Panama 0009 0217 0264
0216 0037 0247
1910620 Panasonic 0226 0650 0250
0126 0361 0367
0516 0037 0163
1910622 Panavision 0037 0411
1910628 Pathe Cinema 0163 0238 0216
0400 0292
1910629 Pathe Marconi 0109 0196 0198
1910631 Pausa 0009
1910632 Perdio 0072 0163 0037
1910633 Perfekt 0037
1911460 Pershin 0400
1910634 Philco 0087 0084 0074
0418 0247 0163
0370 0037
1910635 Philharmonic 0217
1910636 Philips 0037 0556 0012
0191 0087 0193
0374
1910639 Phoenix 0037 0087 0486
0370 0216 0163
0072
1910640 Phonola 0037 0556 0012
0087 0193 0216
1910642 Pioneer 0166 0037 0370
0361 0109
1911132 Pionier 0370 0486
1910644 Plantron 0037 0264 0009
1911066 Playsonic 0217
1910647 Poppy 0009
1910648 Portland 0374
1911846 Powerpoint 0487
Page 50

www.oneforall.com 133
1910650 Prandoni-
Prince 0247 0516 0361
1910651 Precision 0217
1910655 Prima 0009 0264
1910656 Prinz 0072 0194
1910658 Profex 0009 0163
1910660 Profitronic 0037 0102
1910662 Proline 0321 0072 0037
0012 0625
1910664 Prosonic 0037 0216 0370
0374 0579 0371
0668
1910665 Protech 0037 0217 0009
0247 0102 0264
0418 0668
1910667 Proton 0178
1910669 Provision 0037
1910672 Pye 0037 0374 0556
0012 0087
1910673 Pymi 0009
1911067 Quadra Vision 0400
1910677 Quasar 0247 0250
1910678 Quelle 0037 0010 0011
0109 0512 0191
0361 0036 0217
0247 0074 0084
0327 0070 0104
0105 0195 0200
0264 0290 0668
1910679 Questa 0036
1910680 R-Line 0037
1910682 Radialva 0109 0218 0163
0037
1910684 Radiola 0037 0556 0012
1910685 Radiomarelli 0087 0516 0247
0037
1911088 RadioShack 0037 0178
1910686 Radiotone 0009 0037 0370
0579 0418 0264
0412 0648
1910690 Rank 0070
1910691 RCA 0625 0335 0093
1910693 Realistic 0178
1911016 Recor 0037
1912101 Rectiligne 0037
1910695 Rediffusion 0361 0036
1911017 Redstar 0037
1911018 Reflex 0037
1910698 Revox 0037 0370
1910699 Rex 0206 0411 0247
0163 0259
1910700 RFT 0087 0292 0370
0072 0264
1911338 Rhapsody 0216
1910701 Roadstar 0009 0264 0218
0418 0037
1910703 Robotron 0087
1911197 Roxy 0448
1910711 Royal Lux 0370 0412
1910715 Saba 0087 0163 0109
0516 0361 0196
0198 0335 0625
1910718 Sagem 0455 0610 0282
1910720 Saisho 0235 0516 0177
0009 0011 0217
0163 0264
1910722 Salora 0290 0194 0163
0356 0361 0516
1910723 Sambers 0516 0102
1910724 Samsung 0037 0556 0587
0009 0217 0178
0448 0370 0264
0216 0290 0072
0208 0644
1910726 Sandra 0216 0217
1911139 Sanela 0238
1910727 Sansui 0037 0371
1912102 Santon 0009
1910729 Sanyo 0208 0292 0036
0011 0370 0072
0216 0217 0104
0045 0009 0163
0037
1911318 Save 0037
1910743 SBR 0037 0556 0012
1910745 Schaub Lorenz 0606
1910746 Schneider 0037 0556 0012
0303 0336 0259
0217 0247 0371
0218 0361 0163
0668 0648
1910750 Scott 0178
1911324 Sears 0178
1910753 SEG 0217 0264 0009
0247 0036 0102
0163 0037 0216
0668 0487
1910754 SEI 0087 0102 0010
0163 0516 0294
0206 0037
1910756 Seleco 0206 0259 0163
0411
1910757 Sencora 0009
1910759 Sentra 0218 0009
1911265 Serie Dorada 0178
1911019 Serino 0455 0610
1910762 Sharp 0093 0036 0294
0653 0053 0094
0193
1910769 Shorai 0294
1911263 Siam 0037
1910772 Siarem 0163 0087 0102
1910773 Siemens 0191 0200 0195
0327 0328 0037
1911916 Siera 0037 0556 0012
1910776 Siesta 0370
1910780 Silva 0216 0037
1910781 Silver 0036 0361
1910782 Singer 0087 0102 0247
0400 0435 0009
0037
1910783 Sinudyne 0177 0087 0235
0102 0294 0163
0361 0516 0010
0206 0037
1910784 Skantic 0356
Page 51

134 www.oneforall.com
1911298 Sky 0037
1910797 Solavox 0361 0072 0163
1911927 Sonawa 0218
1910801 Sonitron 0208 0370 0217
1911035 Sonneclair 0037
1910802 Sonoko 0037 0009 0264
0282 0217
1910803 Sonolor 0208 0163 0400
0505 0010 0361
1910804 Sontec 0037 0370 0294
1910805 Sony 0505 0010 0011
0036 0102 0074
1910806 Sound & Vision 0102 0218 0374
1910807 Soundesign 0178
1910809 Soundwave 0037 0418
1911143 Ssangyong 0009
1910813 Standard 0218 0009 0217
0037 0374
1910817 Starlite 0009 0163 0037
0264
1910822 Stenway 0282 0218
1910823 Stern 0206 0259 0163
1911020 Strato 0037 0264 0009
1910828 Sunkai 0294 0355 0321
0455 0218 0235
0037 0487
1910831 Sunstar 0371 0037 0009
0579
1910833 Sunwood 0037 0009
1910835 Superla 0516 0216
1910838 SuperTech 0009 0037 0216
0556 0218
1910839 Supra 0374 0009
1910840 Susumu 0335
1910841 Sutron 0009
1911319 Swissline 0247
1910842 Sydney 0216 0217
1911021 Sytong 0216
1910849 Tandberg 0367 0411 0109
0196 0361
1910850 Tandy 0218 0072 0217
0247 0093
1910852 Tashiko 0036 0217 0170
0216 0163
1910853 Tatung 0072 0516 0217
0037 0011
1910854 Teac 0037 0512 0455
0264 0009 0412
0178
1910855 TEC 0217 0009 0247
0335 0259
1911320 Tech Line 0037 0668
1912107 Techica 0218
1910857 Technics 0250
1911453 Tedelex 0217
1911978 Teiron 0009
1910866 Teleavia 0109 0196
1910870 Telecor 0037 0163 0218
0217 0259
1910872 Telefunken 0109 0074 0084
0101 0335 0262
0073 0196 0037
0486 0625
1911213 Telefusion 0037
1910874 Telegazi 0037 0163 0259
0218 0264
1910878 Telemeister 0037
1910882 Telesonic 0037
1910883 Telestar 0037
1910884 Teletech 0009 0247 0037
0668
1910885 Teleton 0217 0206 0163
0259 0036
1910887 Televideon 0163 0216
1911022 Televiso 0400
1910889 Temco 0294
1911334 Tempest 0009 0037
1910891 Tensai 0104 0218 0037
0217 0294 0009
0105 0374 0371
0377 0247
1911023 Tenson 0009
1911461 Tevion 0037 0648 0668
1910892 Texet 0217 0374 0009
1910895 Thomson 0109 0335 0196
0198 0037 0625
1910897 Thorn 0193 0073 0190
0238 0074 0084
0037 0104 0335
0512 0374
1911329 TMK 0178
1910900 Tokai 0072 0037 0448
0163 0217 0374
0009
1910901 Tokyo 0216 0448
1910902 Tomashi 0282 0218
1910905 Toshiba 0508 0036 0070
0102 0217
1910906 Towada 0102 0217
1912109 Toyoda 0009
1912110 Trakton 0264
1910908 Trans
Continens 0217 0037
1912111 Transonic 0037 0455 0587
0512
1912008 Transtec 0216
1910913 Trident 0516 0217
1910915 Tristar 0218 0193
1910916 Triumph 0177 0516 0346
0556 0037
1910919 Uher 0037 0206 0303
0374 0418 0486
0370 0259
1910920 Ultravox 0087 0102 0374
0247 0216 0163
0037
1911024 Unic Line 0037 0473
1911215 United 0037
Page 52

www.oneforall.com 135
1910929 Universum 0346 0105 0195
0473 0361 0247
0480 0370 0200
0418 0011 0512
0294 0036 0070
0163 0264 0104
0037 0411 0290
0074 0327 0328
0010 0505 0217
0109 0177 0631
0668
1910930 Univox 0087 0037 0163
0238
1910937 Vestel 0037 0163 0217
1910938 Vexa 0009 0037
1910939 Victor 0053
1910942 Videologique 0216 0218 0217
1910943 VideoSystem 0037
1910944 Videotechnic 0216 0217 0374
1911025 Videoton 0356 0163
1911322 Vidikron 0102
1911330 Vidtech 0036 0178
1910949 Visiola 0216
1910950 Vision 0037
1910954 Vistar 0206 0361
1910956 Vortec 0037
1910957 Voxson 0087 0037 0418
1910958 Waltham 0217 0356 0418
0037
1910959 Watson 0037 0163 0218
0579 0009 0668
1910960 Watt Radio 0102 0163 0216
1910961 Wega 0036 0087 0037
1911026 Wegavox 0009
1910963 Weltblick 0037
1911245 Wharfedale 0037
1910967 White
Westinghouse 0216 0037
1911264 Winco 0412
1911027 Windstar 0282
1910976 Xrypton 0037
1910979 Yamishi 0282 0455 0218
0037 0217
1910980 Yokan 0037
1910981 Yoko 0217 0037 0218
0264 0009 0370
0216 0247
1910983 Yorx 0218
1910984 Zanussi 0206 0217
Video Recorders
Videorecorder
Magnétoscopes
1921028 Adelsound 0004
1920012 Adyson 0072
1920019 Aiwa 0307 0000 0041
0348 0352 0037
1920020 Akai 0106 0315 0041
0020 0352 0240
1920021 Akiba 0072
1920023 Akura 0072 0041
1920024 Alba 0278 0072 0352
0020 0000 0315
0348
1920029 Allorgan 0240
1920032 Allstar 0081
1920037 Ambassador 0020
1920042 Amstrad 0000 0278 0072
1920045 Anitech 0072
1920047 Ansonic 0004
1920057 Aristona 0081
1920060 ASA 0037 0081
1920070 Asuka 0072 0037 0081
0000 0038
1920080 Audiosonic 0278
1920081 Audioton 0020
1921156 AWA 0037 0278 0043
1920091 Baird 0106 0278 0104
0041 0000
1920093 Bang & Olufsen 0499
1920097 Basic Line 0278 0020 0072
1920107 Bestar 0278 0020
1920109 Black Panther 0278
1920113 Blaupunkt 0226 0081 0162
0195
1920114 Blue Sky 0037 0348 0072
0352
1920118 Bondstec 0020 0072
1920123 Brandt 0041 0320 0321
0493
1920126 Brinkmann 0348
1920139 Bush 0072 0278 0315
0352 0000 0348
1920150 Carena 0081
1920151 Carrefour 0045
1920154 Casio 0000
1920155 Cathay 0278
1920156 Catron 0020
1920162 CGE 0041 0000
1920167 Cimline 0072
1920172 Clatronic 0020 0072
1920180 Combitech 0352
1920187 Condor 0020 0278
1920197 Crown 0278 0072 0020
1920205 Daewoo 0278 0020 0045
0352
1920207 Dansai 0072 0278
1920210 Daytron 0278
1920216 de Graaf 0042 0081 0104
0048
1920214 Decca 0000 0041 0081
0008 0067 0348
1921459 Deitron 0278
1920999 Denko 0072
1921000 Diamant 0037
1920240 Dual 0041 0081 0278
0000
1920243 Dumont 0000 0081 0104
1920252 Elbe 0278 0038
1920253 Elcatech 0072
Page 53

136 www.oneforall.com
1920259 Elin 0240
1921031 Elsay 0072
1920263 Elta 0072 0278
1920265 Emerson 0072 0045
1920272 ESC 0278 0240 0020
1920274 Etzuko 0072
1920280 Europhon 0020
1920294 Fenner 0020
1920296 Ferguson 0041 0320 0321
0493 0000 0278
1920299 Fidelity 0000 0072 0240
1920301 Finlandia 0104 0081 0042
0000 0048
1920302 Finlux 0000 0081 0104
0042
1920304 Firstline 0072 0348 0043
0037 0045 0042
0278
1920305 Fisher 0104 0038 0020
1920319 Frontech 0020
1920322 Fujitsu 0000
1920323 Funai 0000
1920326 Galaxi 0000
1920331 GBC 0020
1920335 GEC 0081
1920337 General 0020
1920338 General
Technic 0348
1920339 Genexxa 0104
1920345 Goldhand 0072
1920347 GoldStar 0037 0000
1920349 Goodmans 0000 0072 0240
0278 0037 0020
0081 0348
1921248 Gradiente 0008
1920352 Graetz 0041 0104 0240
1920353 Granada 0104 0048 0081
0240 0037 0226
0042 0000
1920354 Grandin 0072 0037 0020
0000 0278
1920355 Grundig 0195 0081 0347
0226 0320 0348
1921108 Hanimex 0352
1920362 Hanseatic 0037 0278 0081
1920364 Hantor 0020
1921084 Harwood 0072
1920370 HCM 0072
1920377 Hinari 0004 0072 0352
0041 0278
1920380 Hisawa 0352
1920381 Hitachi 0042 0041 0000
0240 0081 0004
0104
1921085 Hornyphone 0081
1920391 Hypson 0072 0278 0352
1920394 Impego 0020
1920395 Imperial 0000 0240
1920398 Ingersoll 0004 0240
1920401 Inno Hit 0020 0240 0278
0072
1920404 Interbuy 0037 0072
1920405 Interfunk 0081 0104
1921113 Internal 0278
1921114 International 0278
1920408 Intervision 0000 0278 0037
0348
1920410 Irradio 0072 0037 0081
1920415 ITT 0106 0041 0104
0240
1920416 ITT Nokia 0048
1920417 ITV 0278 0037 0020
1920425 JVC 0041 0067 0008
1920427 Kaisui 0072
1920430 Karcher 0278
1920432 Kendo 0106 0315 0348
0072 0037
1920434 Kenwood 0041 0038
1920438 Kneissel 0352 0348 0037
1920443 Korpel 0072
1922095 Kuwa 0226
1920451 Kyoto 0072
1920461 Leyco 0072
1921072 LG 0037 0000 0278
1920463 Lifetec 0348
1920472 Loewe 0081 0037 0004
0162 0454
1920474 Logik 0004 0240 0072
0106
1921009 Lumatron 0278
1920485 Luxor 0106 0043 0072
0104 0048
1920492 Magnavox 0081
1920496 Manesth 0072 0045 0081
1920500 Marantz 0081 0038
1920504 Mark 0278 0020
1920508 Matsui 0004 0348 0037
0240 0352 0000
1920517 Mediator 0081
1920518 Medion 0348 0352
1920487 Melectronic 0000 0037 0038
1920520 Memorex 0104 0000 0037
0048
1920521 Memphis 0072
1920525 Metz 0195 0347 0081
0162 0454 0226
1921323 Micormay 0348
1920529 Migros 0000
1920531 Minerva 0195
1920535 Mitsubishi 0043 0067 0081
1920547 Multitech 0000 0072 0020
0104
1920551 Murphy 0000
1920553 NAD 0104
1920562 National 0226 0162
1920564 NEC 0041 0038 0067
0104 0037
1920565 Neckermann 0041 0081
1920567 Nesco 0072 0000 0352
1920576 Nikkai 0020 0072 0278
1920580 Nokia 0104 0106 0315
0041 0278 0240
0048 0042 0081
1920582 Nordmende 0041 0320 0321
0067 0493
Page 54

www.oneforall.com 137
1920588 Oceanic 0000 0048 0106
0081 0104 0041
1920590 Okano 0315 0348 0072
0278
1920602 Orion 0004 0352 0348
1920604 Orson 0000
1920605 Osaki 0000 0037 0072
1920610 Otto Versand 0081
1920616 Palladium 0072 0315 0037
0041 0004 0240
1921129 Palsonic 0072 0000
1920620 Panasonic 0162 0454 0226
1920628 Pathe Cinema 0004 0043
1920629 Pathe Marconi 0041
1920632 Perdio 0000
1920634 Philco 0038 0072
1920636 Philips 0081
1920640 Phonola 0081
1920642 Pioneer 0067 0081 0042
1920648 Portland 0020 0278
1920656 Prinz 0000
1920660 Profitronic 0081 0240
1920662 Proline 0000 0320 0321
1921194 Prosco 0278
1920664 Prosonic 0278 0000
1920665 Protech 0081
1920669 Provision 0278
1920672 Pye 0081
1920678 Quelle 0081
1920682 Radialva 0037 0072 0081
0048
1920684 Radiola 0081
1920690 Rank 0041
1920699 Rex 0041
1920700 RFT 0020 0072
1920701 Roadstar 0240 0072 0037
0278
1920710 Royal 0072
1920715 Saba 0041 0320 0321
0278
1920720 Saisho 0004 0348
1920722 Salora 0043 0106 0104
1920724 Samsung 0240
1920725 Samurai 0020
1920727 Sansui 0041 0067 0106
0072 0348
1920728 Sanwa 0004
1920729 Sanyo 0104 0048 0067
1920742 Saville 0352 0278 0240
1920743 SBR 0081
1921200 Scan Sonic 0240
1920745 Schaub Lorenz 0041 0104 0000
0106 0315
1920746 Schneider 0072 0000 0037
0081 0278 0240
1922103 Seaway 0278
1920753 SEG 0072 0240 0278
1920755 Sei-Sinudyne 0004 0081
1920756 Seleco 0041 0008 0020
0037
1921250 Semivox 0045
1920759 Sentra 0072 0020
1921910 Setron 0072
1920762 Sharp 0048 0037
1920766 Shintom 0072 0104
1920768 Shivaki 0037
1920769 Shorai 0004
1920773 Siemens 0195 0037 0104
0081
1921916 Siera 0081
1920780 Silva 0037
1920781 Silver 0278
1920783 Sinudyne 0004 0081
1920797 Solavox 0020
1921035 Sonneclair 0072
1920802 Sonoko 0278
1920803 Sonolor 0048
1920804 Sontec 0037
1920805 Sony 0033 0032 0106
1920809 Soundwave 0037
1921143 Ssangyong 0072
1920813 Standard 0278
1920817 Starlite 0037 0104
1920823 Stern 0278
1920828 Sunkai 0348 0278
1920831 Sunstar 0000
1920832 Suntronic 0000
1920833 Sunwood 0072
1920839 Supra 0037 0240
1920843 Symphonic 0000 0072
1920847 Taisho 0004
1920849 Tandberg 0278
1920852 Tashiko 0000 0048 0240
0081 0037
1920853 Tatung 0000 0041 0081
0048 0043 0348
0352
1920854 Teac 0041 0000 0278
0037 0081 0307
1920855 TEC 0020 0278 0072
1920859 TechniSat 0348
1920866 Teleavia 0041
1920872 Telefunken 0041 0320 0321
0493 0278
1920884 Teletech 0072 0278 0000
1921334 Tempest 0020
1920890 Tenosal 0072
1920891 Tensai 0000 0037 0072
0004
1921461 Tevion 0348
1920895 Thomson 0041 0320 0321
0493
1920897 Thorn 0041 0104 0037
1920900 Tokai 0072 0037 0041
0104
1922002 Tokiwa 0072
1920904 Topline 0348
1920905 Toshiba 0045 0041 0043
0081
1920906 Towada 0072
1922110 Trakton 0020
1920918 TVA 0020
1920919 Uher 0037 0240
1920920 Ultravox 0278
1920924 Unitech 0240
Page 55

138 www.oneforall.com
1920926 United
Quick Star 0278
1920929 Universum 0000 0081 0240
0037 0106 0348
0195
1920939 Victor 0008 0067
1920959 Watson 0081 0352
1920963 Weltblick 0037
1920979 Yamishi 0072 0278
1920980 Yokan 0072
1920981 Yoko 0037 0072 0020
0240
Satellite Receivers
Satellitenempfänger
Récepteurs satellites
1930994 ABsat 0832
1930013 Aegir 0520
1930016 AGS 0668
1930020 Akai 0515 0200
1931153 Akena 0668
1930024 Alba 0421 0515 0455
0613 0713
1930027 Aldes 0288 0520
1930030 Allsat 0200
1930031 Allsonic 0288 0369
1930033 Alltech 0713
1930034 Alpha 0668 0200
1930036 Altai 0396
1930039 Amitronica 0713
1930040 Ampere 0396 0829 0132
1930042 Amstrad 0345 0847 0252
0243 0713 0742
0396 0132 0885
0863
1930044 Anglo 0713
1930046 Ankaro 0288 0369 0713
1930049 Anttron 0421 0613
1930050 Apollo 0421
1930056 Arcon 0692
1930058 Armstrong 0243 0200
1930061 Asat 0200
1931154 ASLF 0713
1930064 AST 0351 0321
1930065 Astacom 0668 0710
1930068 Astra 0108 0243 0607
1930069 Astro 0173 0358 0520
0613 0369 0501
0658
1930071 Athena 0668
1930081 Audioton 0613
1931155 Austar 0863 0642 0283
0497 0879
1931037 Avalon 0396
1930088 Axiel 0668
1930089 Axis 0369
1930095 Barcom 0108
1930103 Beko 0455
1930106 Best 0369
1930113 Blaupunkt 0173
1930114 Blue Sky 0713 0885
1930117 Boca 0243 0794 0829
0132
1930122 Brain Wave 0692
1930130 Broco 0713
1931070 BskyB 0847
1931531 BT 0515 0668 0710
1931038 Bubu Sat 0713
1931039 BVV 0692
1930143 Cambridge 0515 0501
1930995 Canal Satellite 0853
1931458 Chess 0157 0605
1930170 CityCom 0818 0115 0607
1931099 Clark 0613
1930176 CNT 0520
1930177 Colombia 0668
1930183 Commlink 0288
1930185 Comtec 0288
1930187 Condor 0369 0607
1930189 Connexions 0396 0369
1930190 Conrad 0607 0573 0115
0369 0501
1930197 Crown 0243
1930198 Cryptovision 0455
1931092 D-box 0723 0873
1930205 Daewoo 0713 0421
1931040 Daumling 0794
1931161 Delfa 0863
1931300 Discoverer 0605
1930227 Discovery 0668
1931041 Diseqc 0710
1931352 Distratel 0084 0885
1930230 Distrisat 0200
1930233 DNR 0692
1930234 DNT 0200 0396
1931042 DST 0421
1930244 Dune 0369
1930248 Echostar 0396 0668 0713
0871 0853
1930251 Einhell 0243 0421 0288
0252 0713 0501
0794 0132
1930255 Elekta 0520
1930263 Elta 0421 0200 0369
1930264 Emanon 0421
1930266 Emme Esse 0369 0871
1931043 Engel 0713
1930268 EP Sat 0455
1930275 Eurieult 0136 0084 0885
1931044 Eurocrypt 0455 0108
1930279 Europa 0501 0200 0863
0607
1931045 European 0794
1930282 Eurosat 0243
1930283 Eurosky 0243 0369 0607
0132 0115
1930285 Eurostar 0607 0880
1930289 Exator 0421 0515 0613
1930294 Fenner 0668
1930296 Ferguson 0455 0711
1930299 Fidelity 0252 0501
Page 56

www.oneforall.com 139
1930301 Finlandia 0455 0108
1930302 Finlux 0455 0108 0573
1931165 Flair Mate 0713
1931301 Foxtel 0879 0720 0497
1930315 Fracarro 0421 0668 0871
1930317 Freecom 0421
1930320 FTE 0369 0713
1930321 Fuba 0369 0396 0421
0173 0573 0108
1930327 Galaxis 0288 0369 0692
0863 0283 0853
1930328 Galaxisat 0321
1931449 Gardiner 0818
1930344 GMI 0243
1931168 Goldbox 0853
1930349 Goodmans 0455
1930353 Granada 0108
1930354 Grandin 0084 0136
1930355 Grundig 0173 0847 0571
0750 0805 0345
0879 0885
1930362 Hanseatic 0605
1930364 Hantor 0421
1930365 Hanuri 0520
1931047 Hase & Igel 0692
1930371 Heliocom 0607
1930377 Hinari 0421
1930379 Hirschmann 0173 0573 0501
0396 0710
1930381 Hitachi 0455
1931171 HNE 0742
1930385 Houston 0668
1931172 Humax 0863 0283
1930387 Huth 0607 0288 0243
0794 0132
1930391 Hypson 0136
1931175 Imex 0084 0136
1931114 International 0132
1930407 Intertronic 0243
1930408 Intervision 0628 0607
1931345 Invideo 0871
1931302 Italtel 0871
1930416 ITT Nokia 0108 0573 0455
0873 0723
1930424 JOK 0690 0710
1930425 JVC 0515 0571
1931048 K-SAT 0713
1931176 Kamm 0880 0713
1930431 Kathrein 0358 0173 0200
0622 0658 0713
0613 0668 0818
1930436 Key West 0794
1932094 Kiton 0114
1930440 Kolon 0421
1931454 Konig 0607
1930446 KR 0613
1930447 Kreiselmeyer 0173
1930450 Kyostar 0421 0613
1931304 L&S Electronic 0369
1930453 Lasat 0520 0369 0607
0243 0115 0132
0157
1931049 Lemon 0692
1930454 Lenco 0421 0713 0692
0115 0369 0607
1930457 Lenson 0501
1930460 Lexus 0200
1930461 Leyco 0515
1930462 Lifesat 0605 0369
1930472 Loewe 0243
1930475 Lorenzen 0692 0794 0607
0742 0132
1930479 Lupus 0369
1930485 Luxor 0108 0345 0573
0873 0501
1930486 M&B1 0605
1931050 Manata 0710 0668 0136
0713
1930497 Manhattan 0455 0520 0710
0668
1930500 Marantz 0200
1930506 Maspro 0750 0713 0173
0571 0692
1930508 Matsui 0571 0710 0173
1930509 Max 0607
1930511 MB 0605
1931053 Mediabox 0853
1930515 Mediamarkt 0243
1930516 MediaSat 0501 0853
1930518 Medion 0713 0369
1931120 Medison 0713
1930519 Mega 0200
1930487 Melectronic 0818
1930524 Metronic 0421 0243 0613
0288 0520 0084
0136 0818 0885
1930525 Metz 0173
1931123 Micro 0607 0613
1931054 Micro
electronic 0713
1930527 Micro
Technology 0713
1931185 Microtec 0713
1930531 Minerva 0571
1930535 Mitsubishi 0455
1930540 Morgan's 0243 0200 0794
0713 0829 0132
1931305 Multichoice 0642 0879
1931452 Multitec 0157
1930550 Muratto 0321
1930552 Mysat 0713
1930569 Neuhaus 0501 0692 0713
0607
1930570 Neusat 0692 0713
1930573 NextWave 0732
1930577 Nikko 0243 0713 0723
1930580 Nokia 0108 0723 0573
0873 0455 0751
1023 0853
1930582 Nordmende 0455 0520 0421
1930589 Octagon 0421 0613
1930590 Okano 0243
1931069 OnDigital 0133 0241 0751
0137
1931447 Optus 0879
1930599 Orbit 0351
Page 57

140 www.oneforall.com
1930600 Orbitech 0501 0421 0548
0157
1930601 Origo 0497
1930606 OSAT 0345
1930611 Oxford 0515 0668
1930612 Pace 0455 0847 0791
0795 0241 0720
0497 0887
1931441 Packsat 0710
1930616 Palladium 0243 0571 0421
0501
1930617 Palsat 0501
1931130 Panasat 0879 0615
1930620 Panasonic 0455 0847
1930623 Panda 0455 0108 0607
0173
1930630 Patriot 0515 0668
1930636 Philips 0200 0455 0750
0710 0613 0805
0668 0853 0571
0173 0133 0818
1930641 Phonotrend 0288 0863
1930642 Pioneer 0853
1931133 Planet 0871
1930646 Polytron 0396
1930652 Predki 0421
1930653 Preisner 0243 0132 0396
0794
1931056 Premiere 0853 0873
1930661 Profile 0668
1930663 Prosat 0288 0628
1930664 Prosonic 0742
1930669 Provision 0520
1930672 Pye 0571
1930676 Quadral 0288 0369 0628
0668 0710
1930678 Quelle 0252 0607 0742
0115
1930684 Radiola 0200
1930687 Radix 0396
1930689 Rainbow 0613
1930694 Red Star 0369
1930700 RFT 0288 0200
1930701 Roadstar 0713
1930708 Rover 0628 0713
1930715 Saba 0520 0690 0710
0692 0885 0115
0607
1930716 Sabre 0455
1930718 Sagem 0820
1930722 Salora 0108
1930724 Samsung 0421 0853
1930731 SAT 0351 0321 0501
1930740 Sat Partner 0421 0520 0613
1931450 Sat Plus 0157
1930732 Sat Team 0713
1930734 Satcom 0605 0607
1930735 Satec 0713
1931057 Satelco 0369
1930738 Satline 0628
1931058 Schäcke 0613
1930746 Schneider 0805 0710
1930747 Schwaiger 0605 0732 0157
0607 0885 0692
1931442 SCS 0115
1930751 Sedea
Electronique 0421
1930752 Seemann 0396 0243 0515
1930753 SEG 0421 0369 0605
0742 0114
1930756 Seleco 0871
1931141 Servi Sat 0136
1930773 Siemens 0173
1930785 Skantin 0713
1931205 Skinsat 0501
1930787 SKR 0713
1931298 Sky 0856 0887 0847
1930789 Skymaster 0288 0605 0628
0713 0880 0157
1930790 Skymax 0200
1931206 SkySat 0157 0605
1930794 SL 0692 0132 0742
0243
1931207 Smart 0132
1930805 Sony 0847 0455 0853
1931443 Starland 0713
1930824 Strong 0421 0613 0369
0520 0879 0853
1930826 STVI 0136
1930827 Sumida 0243
1930829 Sunny Sound 0369
1930830 Sunsat 0713
1930831 Sunstar 0243 0369 0794
0132
1930851 Tantec 0455
1930853 Tatung 0455
1930859 TechniSat 0501 0548 0200
1930860 Technowelt 0607
1930862 Teco 0243
1930863 Telasat 0605 0115 0607
1930868 Teleciel 0613
1930869 Telecom 0713
1930872 Telefunken 0421 0710
1930875 Teleka 0243 0613 0396
0750 0692 0501
0607
1930876 Telemaster 0520
1930880 Telesat 0605 0607
1930883 Telestar 0501
1930884 Teletech 0880 0114
1930886 Televes 0455 0501
1930895 Thomson 0455 0713 0853
0115 0607 0820
0668 0710 1046
1930897 Thorn 0455
1930898 Tioko 0243
1930900 Tokai 0200
1930903 Tonna 0455 0668 0501
0713
1930905 Toshiba 0455 0137
1930992 TPS 0820
1930911 Triad 0351 0321 0372
1930912 Triasat 0501
1931061 Triax 0501 0115 0200
0396 0713 0853
Page 58

www.oneforall.com 141
1932019 UEC 0879
1930923 Unisat 0243 0200
1930929 Universum 0173 0571 0607
0115 0742
1930932 Variosat 0173
1930936 Ventana 0200
1930937 Vestel 0742
1932036 Videocrypt 0711 1014
1930952 Visiosat 0351 0690 0713
1930956 Vortec 0421
1930931 VTech 0351 0321 0690
0818
1930962 Wela 0713 0794 0132
1931091 Wetekom 0829 0157 0605
0501
1930966 Wewa 0455
1931217 Wibo 0243
1931062 Wintergarten 0288
1930969 Wisi 0638 0173 0321
0372 0690 0396
0455 0351 0501
0607
1930971 Woorisat 0520
1932113 Worldsat 0668 0710
1931151 XCOM 0832
1930976 Xrypton 0369
1930993 XSat 0832 0668 0713
1932070 Zaunkonig 0692
1930986 Zehnder 0321 0520 0369
0818 0742 0114
0115
1930987 Zenith 0856
1931064 Zeta
Technology 0200
1930989 Zodiac 0613
1930990 Zwergnase 0794 0243
Cable Converters
Kabelsignalumwandler
Décodeurs de câble
1930025 Alcatel 0896 0897
1931155 Austar 0276
1931531 BT 0105
1930141 Cabletime 0448 0665
1931564 Comcrypt 0443
1931641 Filmnet 0443
1930996 France
Telecom 0451 0817
1931076 General
Instruments 0276
1930421 Jerrold 0003 0276
1931341 Kabelvision 0003
1930489 Macab 0817
1931782 MNet 0443
1932098 Mr Zapp 0817
1932072 NTL Cabletell 0276
1931447 Optus 0276
1930612 Pace 1068
1930636 Philips 0451 0817
1931065 PVP
Stereo Visual 0003
1930718 Sagem 0817
1930748 Scientific
Atlanta 0277
1930864 Tele+1 0443
1930879 Telepiu 0443
1930917 Tudi 0286
1930925 United Cable 0003
1930945 Videoway 0250
1930951 Visiopass 0451 0817
1932055 Westminster 0105
Video Accessories
1961092 D-box 0804
1960416 ITT Nokia 0804
1960580 Nokia 0804
1961056 Premiere 0804
CD / Mini Disc
1940019 Aiwa 0124
1940024 Alba 0615
1941093 Alto 0625
1940054 Arcam 0157
1941228 Audio Research0157
1941097 Audiolab 0157
1941229 Audiomeca 0157
1940081 Audioton 0157
1942091 BAT 0157
1940139 Bush 0615
1940142 California
Audio Lab 0029
1941157 Cambridge
Audio 0625 0157
1941232 Craig 0615
1940204 Cyrus 0157
1940217 Denon 0003
1941234 DKK 0000
1940249 Eclipse 0625
1940299 Fidelity 0625
1941237 Gemini 0625
1940339 Genexxa 0000 0037 0032
1941438 Goldmund 0157
1940349 Goodmans 0625 0615
1940355 Grundig 0157
1940366 Harman/
Kardon 0173 0157
1940370 HCM 0625
1940378 Hiro 0625
1940425 JVC 0072
1940434 Kenwood 0037 0028
1941115 Krell 0157
1942096 Lansay 0625
1940466 Linn 0157
1940500 Marantz 0157
1940508 Matsui 0157
Page 59

142 www.oneforall.com
1941242 MCS 0029
1940520 Memorex 0032
1940523 Meridian 0157
1940528 Micromega 0157
1940534 Mission 0157
1940543 MTC 0625
1940553 NAD 0000
1940557 Naim 0157
1940585 NSM 0157
1940620 Panasonic 0029 0303
1940636 Philips 0157 0626
1940642 Pioneer 0032
1940667 Proton 0157
1940674 QED 0157
1940675 Quad 0157
1940686 Radiotone 0615 0625
1940698 Revox 0157
1940707 Rotel 0157
1940717 SAE 0157
1940727 Sansui 0157 0625
1940746 Schneider 0615
1940762 Sharp 0037 0861
1940773 Siemens 0157
1940805 Sony 0000 0490
1940838 SuperTech 0625
1941211 Synergy 0625
1940850 Tandy 0032
1940854 Teac 0625
1940857 Technics 0029 0303
1940896 Thorens 0157
1941227 Thule 0157
1940929 Universum 0157
1940939 Victor 0072
1940959 Watson 0615
1940977 Yamaha 0036
1940987 Zenith 0615
Phono
1970355 Grundig 0188
1970500 Marantz 0188
1970636 Philips 0188
1970929 Universum 0188
Home Automation
Heimgebrauch
Domotique
1961958 Superswitch 0451
1960593 X-10 home
automation 0167
Amplifiers
Audio-Verstärker
Amplificateur
1950019 Aiwa 0406 0010 0159
0404
1952091 BAT 0269
1950139 Bush 0269 0421
1950217 Denon 0160
1951438 Goldmund 0269
1950349 Goodmans 0421
1950355 Grundig 0269 0847
1960425 JVC 0073
1950466 Linn 0269
1950500 Marantz 0321 0269
1950504 Mark 0269
1950523 Meridian 0269
1950528 Micromega 0269
1950557 Naim 0269
1950620 Panasonic 0308
1950636 Philips 0269
1950642 Pioneer 0013 0269
1950675 Quad 0269
1950701 Roadstar 0847
1950727 Sansui 0321
1960805 Sony 0159 0010
1950854 Teac 0421
1950857 Technics 0308
1950872 Telefunken 0847
1950896 Thorens 0269
1950929 Universum 0269
1950977 Yamaha 0143 0354
Amp/Tuners
Verstärker/Tuner
Ampl./Tuner Audio
1950019 Aiwa 0121 0405 0158
1950020 Akai 0115
1950054 Arcam 0189
1950123 Brandt 0824
1951157 Cambridge
Audio 0189
1950153 Carver 0360
1950217 Denon 0004
1950305 Fisher 0360
1951438 Goldmund 0189
1950355 Grundig 1189 0189 0219
1950366 Harman/
Kardon 0110 0189
1950399 Inkel 0027 0491
1951078 JBL 0110
1950425 JVC 0074 0464
1950434 Kenwood 0027 0313 0314
1950466 Linn 0189
1950500 Marantz 1189 0189 0219
1950528 Micromega 0189
1950553 NAD 0320
1950594 Onkyo 0135
Page 60

www.oneforall.com 143
1950620 Panasonic 0309 0518 0763
1950636 Philips 1189 0189
1950642 Pioneer 0080 0289
1950698 Revox 0189
1950715 Saba 0824
1950727 Sansui 0189
1950729 Sanyo 0360 0219
1950746 Schneider 0110
1950762 Sharp 0262
1950764 Sherwood 0491
1950805 Sony 0158 1042
1950854 Teac 0110
1950857 Technics 0309 0518 0763
1950872 Telefunken 0824
1950895 Thomson 0824
1950896 Thorens 0189
1950929 Universum 0189
1950939 Victor 0074
1950977 Yamaha 0176
Cassette Players
Audio Cassetten Deck
Lecteurs Cassette
1980355 Grundig 0029
1980366 Harman/
Kardon 0029
1980492 Magnavox 0029
1980500 Marantz 0029
1980620 Panasonic 0229
1980636 Philips 0029 0229
1980698 Revox 0029
1980727 Sansui 0029
1980805 Sony 0170 0243
1980857 Technics 0229
1980896 Thorens 0029
1980929 Universum 0029
Laser Disc
1980153 Carver 0194
1980217 Denon 0059
1980355 Grundig 0059
1980366 Harman/
Kardon 0194
1980492 Magnavox 0194
1980500 Marantz 0194
1980535 Mitsubishi 0059
1980553 NAD 0059
1980636 Philips 0194
1980642 Pioneer 0059
1980872 Telefunken 0059
1980893 Theta Digital 0194
DAT
1980355 Grundig 0158
1980366 Harman/
Kardon 0158
1980500 Marantz 0158
1980636 Philips 0158
1980857 Technics 0158
DVD
1982085 3DLAB 0539
1980217 Denon 0490
1982092 Denzel 0665
1980222 Diamond 0651
1980347 GoldStar 0591
1980355 Grundig 0539
1980381 Hitachi 0665
1980434 Kenwood 0490
1981072 LG 0591
1980492 Magnavox 0503
1980500 Marantz 0539
1980508 Matsui 0651
1980528 Micromega 0539
1980594 Onkyo 0503
1980598 Optimus 0525
1980603 Oritron 0651
1980620 Panasonic 0490
1980636 Philips 0539 0503
1980642 Pioneer 0525 0571
1980662 Proline 0652
1981865 Raite 0665
1980724 Samsung 0573
1980753 SEG 0665
1980805 Sony 0533
1980857 Technics 0490
1980900 Tokai 0665
1980905 Toshiba 0503
1980929 Universum 0591
1980977 Yamaha 0490
1982067 Yamakawa 0665
1980987 Zenith 0503 0591
Page 61

 Loading...