

Page 1

Futterautomat
10030712
Page 2

Sehr geehrter Kunde,
wir gratulieren Ihnen zum Erwerb Ihres Gerätes. Lesen Sie die folgenden Anwendungshinweise sorgfältig durch und befolgen Sie diese, um möglichen Schäden vorzubeugen. Für
Schäden, die durch Missachtung der Hinweise und unsachgemäßen Gebrauch entstehen,
übernehmen wir keine Haftung.
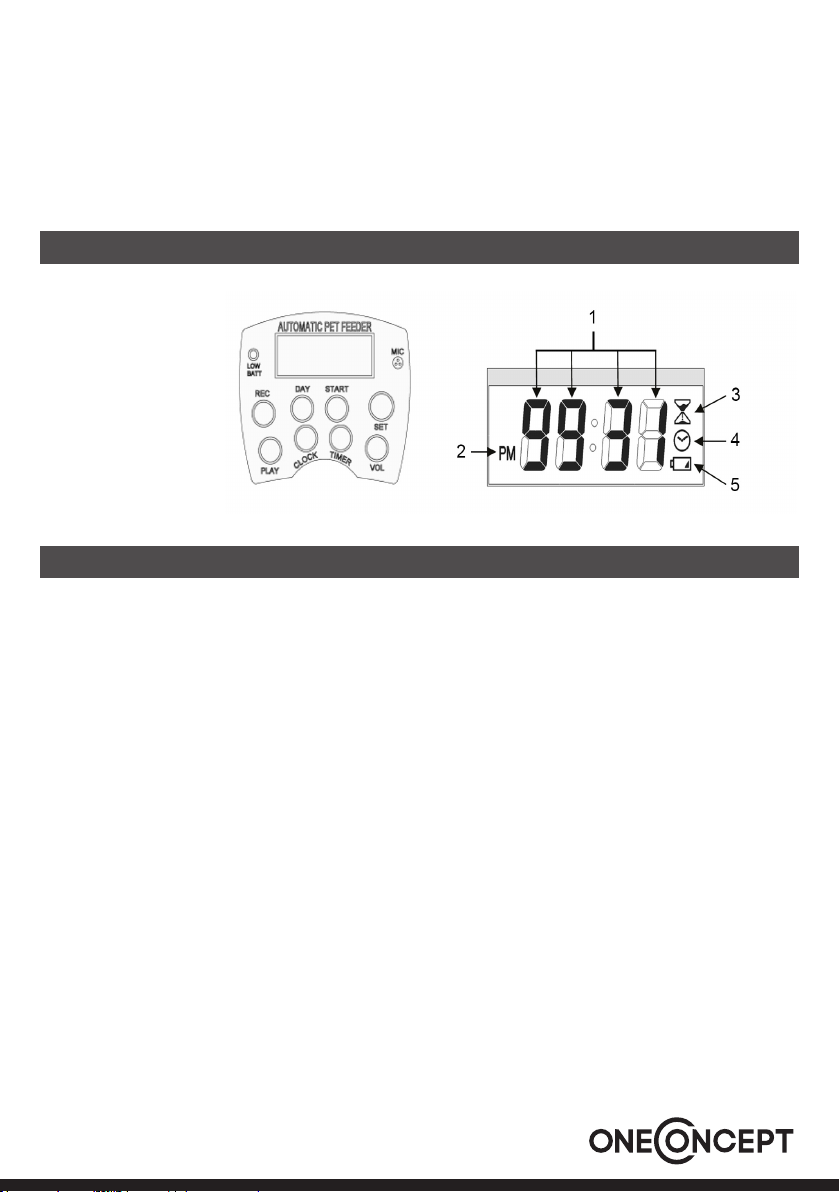
Bedienfeld und Display
1 Ziernanzeige
2 Tageszeit
3 Timer
4 Uhr
5 Batteriestand
Bedienung und Funktionen
Inbetriebnahme
1. Önen Sie das Batteriefach am Boden des Gerätes
2. Befüllen Sie das Batteriefach mit 4 Batterien der Größe D.
3. Schließen Sie das Batteriefach und betätigen Sie den ON-Schalter, um das Gerät einzuschalten.
4. Nach der Warmlaufphase wird die Uhrzeit (12:00) auf dem Display angezeigt werden.
5. Sie haben nun 90 Sekunden Zeit, um die aktuelle Uhrzeit einzugeben. Nach 90 Sekunden wird das Display „1 07“ anzeigen. Schalten Sie das Gerät ab und nach einer Minute
wieder an, um die Uhrzeit einzustellen.
Einstellung der aktuellen Uhrzeit
1. Drücken Sie CLOCK, um die Stunde einzustellen.
2. Drücken Sie TIMER, um die Minute einzustellen.
3. Drücken Sie SET, um die Eingabe zu bestätigen.
4. Drücken Sie CLOCK, um zwischen der 12- und der 24-Stunden-Anzeige zu wechseln.
5. Drücken Sie START, um Ihre Eingabe zu bestätigen.
6. Das Display wird nunmehr den Wert „1 07“ anzeigen und auf die Eingabe der Fütterungszeiten warten.
2
Page 3

Fütterungszeitpunkte denieren
1. Der Wert „107“ wird blinked angezeigt. Die erste Stelle dieses Wertes indiziert den
Speicherplatz der Fütterung. Die 3. und 4. Stelle weisen den Fütterungszeitpunkt aus.
2. Der Wert „1 07“ bedeutet also, dass eine Fütterung um 7 Uhr morgens vorgenommen wird.
3. Drücken Sie während „1 07“ blinkt 2 Sekunden lang SET bis die Stellen 3 und 4 blinken.
4. Drücken Sie TIMER, um den Fütterungszeitpunkt einzustellen. Das „P“ in der oberen linken
Ecke des Displays indiziert den Bezug der Uhrzeit auf die zweite Tagehälfte (PM-Uhrzeit).
5. Drücken Sie SET, um einen zweiten Fütterungszeitpunkt zu denieren.
6. Wiederholen Sie Schritt 4, um den zweiten Fütterungszeitpunkt zu denieren.
7. Drücken Sie nun, die START-Taste, falls Sie lediglich 2 Fütterungen pro Tag vornehmen
wollen.
8. Falls Sie mehr als 2 Fütterungszeitpunkte denieren wollen, wiederholen Sie Schritt 4
nach Belieben
HINWEIS: Falls Sie SET gedrückt haben, jedoch keinen weiteren Fütterungszeitpunkt de-
nieren wollen, drück Sie TIMER und halten Sie SET für 2 Sekunden gedrückt.
Einstellen der Portionsgröße
1. Drücken Sie VOl, um die Portionsgröße anzuzeigen.
2. Halten Sie die Taste SET für 2 Sekunden gedrückt bis das Display blinkt.
3. Drücken Sie VOL, um die gewünschte Portionsgröße einzustellen.
Der Wert „1“ bedeutet eine halbe Tassengröße.
Der Wert „2“ bedeutet eine Tassengröße.
Der Wert „3“ bedeutet eine Tassengröße etc..
Der Wert „0“ bedeutet 5 Tassengrößen.
4. Bestätigen Sie Ihre Auswahl durch Drücken von START.
Fütterungstage denieren
1. Drücken Sie DAY, um die Anzahl der Arbeitstage des Gerätes anzuzeigen. Der Wert „0“
ist voreingestellt und bedeutet, dass das Gerät täglich mit oenem Ende Futter ausgibt.
2. Um die Anzahl der Arbeitstage zu modizieren, drücken Sie zunächst DAY und dann 2
Sekunden lang die SET Taste bis das Display blinkend die Tage anzeigt.
3. Drücken Sie DAY, um den Wert zu ändern. Halten Sie DAY gedrückt, um schnell durch
die Zahlenreihe zu navigieren..
4. Bei Wert „0“ wird das Gerät kontinuierlich arbeiten. Sie müssen in diesem Modus lediglich Futter nachfüllen.
5. Nach einem abgeschlossenen Fütterungsintervall wird das Gerät um 6 Uhr des auf die
letzte Fütterung folgenden Tages ein akustisches Warnsignal emittieren.
6. Um nach einem abgeschlossenen Fütterungsintervall mit eben dem Fütterungsintervall
fortzufahren, betätigen Sie die START-Taste.
3
Page 4

Fütterungszeitpunkte etc. einsehen
1. Drücken Sie wiederholt TIMER, um durch die denierten Fütterungszeitpunkt e zu navigieren.
2. Drücken Sie VOL, um die Portionsgröße einzusehen
3. Drücken SIE DAY, um die Anzahl der verbleibenden Fütterungstage einzsuehen.
4. Drücken Sie CLOCK, um die aktuelle Uhrzeit einzublenden.
5. Wird 8 Sekunden keine Taste betätigt, weist das Display den nächsten Fütterungszeitpunkt mit blinkdenr TIMER-Anzeige aus.
Akustische Ansage aufnehmen
1. Halten Sie die REC-Taste gedrückt bis die rote LED leuchtet.
2. Sie haben nun 6 Sekunden Zeit, um eine Ansage aufzunehmen.
3. Drücken Sie REC erneut, um die Ansage abzuschließen.
Abspielen eines Ansage
1. Drücken Sie PLAY, um eine aufgenommene Ansage abszuspielen.
2. Eine einmal aufgenommene Ansage wird drei Mal vor der Fütterung eingespielt.
Manuelle Fütterung
Drücken Sie gleichzeitig auf SET und VOL.
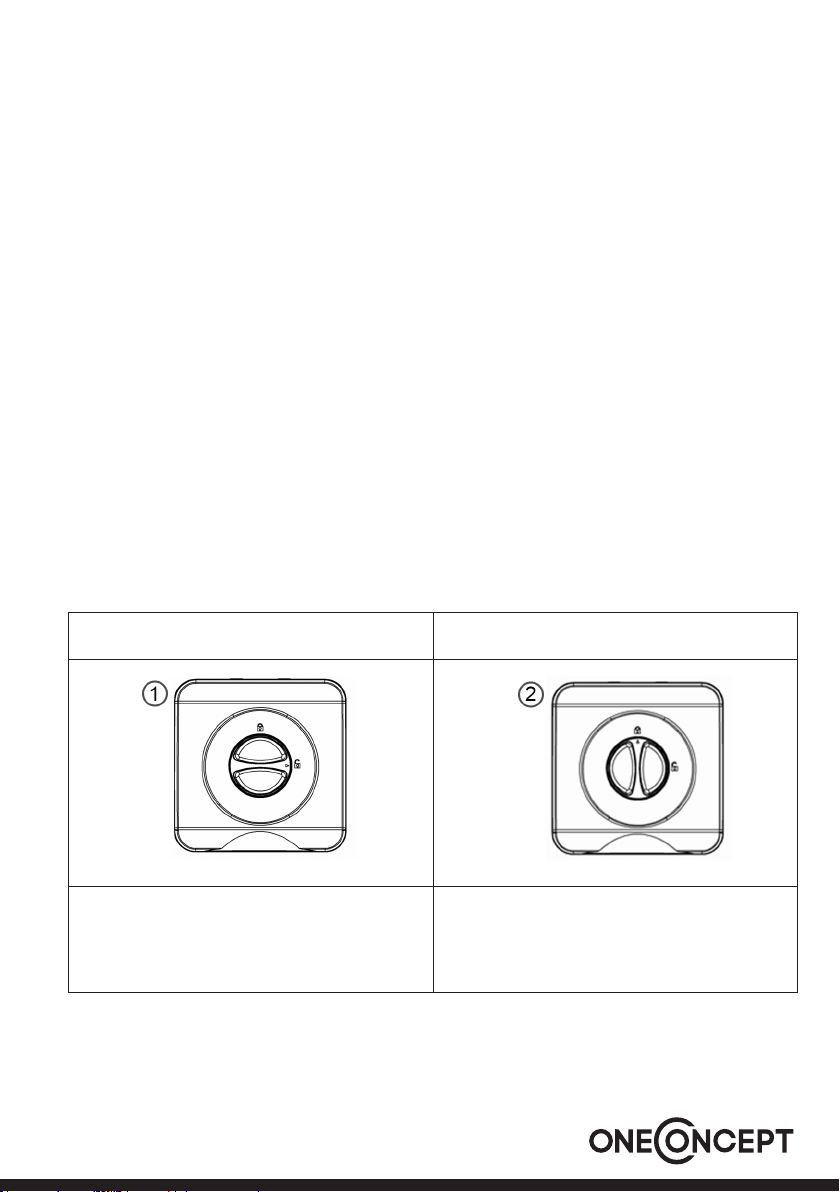
Futtertank önen und schließen
Önen Schließen
Drehen Sie den Deckel auf der Oberseite
des Tanks in Richtung des „oen“ Symbols und ziehen Sie den Deckel ab.
4
Legen Sie den Deckel auf die Önung
des Futtertanks und drehen Sie diesen in
Richtung des „geschlossen“ Symbols.
Page 5

Montage
Ziehen Sie die beiden Sicherungsverschlüsse an der Seite der Basis
nach oben, während Sie den Tank auf die Basis gleiten lassen.
Gehen Sie vorsichtig vor., damit sie sichnicht verletzen.
Demontage
Ziehen Sie die beiden Sicherungsverschlüsse an der Seite der Basis
(siehe Bild) nach oben, während Sie den Tank nach oben abziehen.
Gehen Sie vorsichtig vor, damit Sie sich nicht verletzen.
Allgemeine Hinweise
• Das Gerät wird mit folgenden Voreinstellungen ausgeliefert:
I) kontinuierliche Fütterung
II) 4 Fütterungen pro Tag
III) Portion: halbe Tasse
• Das Gerät wird bei der Futterausgabe ca. 15 Sekunden vibrieren, um das Futter auszu-
schütten.
• Sollte das Gerät eine akustische Warnung abgeben und sich die Futtertrommel nicht be-
wegen, ist die Futterausgabe verstopft.
• Vermeiden Sie es das Gerät sehr starker, direkter Sonneneinstrahlung auszusetzen. Die
Futterausgabe kann hierdurch kompromittiert werden
Fehlersuche und Fehlerbehebung
• Wenn das Symbol „OFF“ eingeblendet wird und alle Zahlen blinken, sind keine Fütte-
rungszeitpunkte gesetzt.
• Bei blinder Batterieanzeige sollten die Batterien zeitnah ausgewechselt werden.
• Wird der Syntax „Err“ eingeblendet, kann die Futterausgabe nicht geschlossen werden.
In diesem Fall:
I. Nehmen Sie das Gerät vom Stromnetz.
II. Entfernen Sie alles Futter aus dem Tank.
III. Reinigen Sie die Futterausgabe mit einem Pinsel oder ähnlichem.
IV. Nehmen Sie das Gerät wie gehabt in Betrieb.
5
Page 6

Hinweise zur Entsorgung
Bendet sich die linke Abbildung (durchgestrichene Mülltonne auf Rädern) auf dem Produkt, gilt die Europäische Richtlinie 2002/96/EG.
Diese Produkte dürfen nicht mit dem normalen Hausmüll entsorgt werden. Informieren Sie sich über die örtlichen Regelungen zur getrennten
Sammlung elektrischer und elektronischer Gerätschaften. Richten Sie
sich nach den örtlichen Regelungen und entsorgen Sie Altgeräte nicht
über den Hausmüll. Durch die regelkonforme Entsorgung der Altgeräte
werden Umwelt und die Gesundheit ihrer Mitmenschen vor möglichen
negativen Konsequenzen geschützt. Materialrecycling hilft, den Ver-
brauch von Rohstoen zu verringern.
Das Produkt enthält Batterien, die der Europäischen Richtlinie 2006/66/EG unterliegen und
nicht mit dem normalen Hausmüll entsorgt werden dürfen. Bitte informieren Sie sich über
die örtlichen Bestimmungen zu gesonderten Entsorgung von Batterien. Durch regelkonforme Entsorgung schützen Sie die Umwelt und die Gesundheit ihrer Mitmenschen vor negativen Konsequenzen.
Konformitätserklärung
Hersteller: CHAL-TEC GmbH, Wallstraße 16, 10179 Berlin, Deutschland.
Dieses Produkt entspricht den folgenden Europäischen Richtlinien:
2014/30/EU (EMV)
2011/65/EU (RoHS)
6
Page 7
Dear Customer,
Congratulations on purchasing this equipment. Please read this manual carefully and take
care of the following hints on use to avoid technical damages. Any failure caused by ignoring the mentioned items and cautions mentioned in the instructions are not covered by our
warranty and any liability.
Control Panel and Display
1 Digits
2 Daytime
3 Timer
4 Clock
5 Battery level
Operation and Functions
Getting Started
1. All digits should not be ashing
2. Press the CLOCK key to set the HOUR
3. Press the TIMER key to set the MINUTE
4. Press the SET key once to conrm the time
5. Now the display will show either 12 or 24 to indicate the display mode
6. Press the CLOCK key to change between 12 or 24-hour display mode
7. Press the START key to CONFIRM the clock setup
8. (1 07) will be ashing and you must now set the feeding times
Setting the Current Time
1. All digits should not be ashing
2. Press the CLOCK key to set the HOUR
3. Press the TIMER key to set the MINUTE
4. Press the SET key once to conrm the time
5. Now the display will show either 12 or 24 to indicate the display mode
6. Press the CLOCK key to change between 12 or 24-hour display mode
7. Press the START key to CONFIRM the clock setup
8. (1 07) will be ashing and you must now set the feeding times
7
Page 8

Setting the Feed Time and Number of Feedings per Day
1. (1 07) should now be ashing. Digit-1 is the feeding number (times per day), Digits-3
& 4 are the feeding time (in hours)
2. The display shows the 1st feeding time (1 07)=(1st feeding at 7am)
3. With (1 07) Flashing, Press and HOLD (for 2 seconds) the SET key until Digit-3 & 4 start
ashing (07)
4. Press the TIMER key to set the desired hour for feeding. Note the ( P ) in the top left
corner stands for PM when using 12 hour time
5. Press the SET key to conrm your setting and proceed to the 2nd feeding time
6. Repeat step-4 to set the desired hour for feeding the SECOND feeding time
7. At this point if you want to only feed 2 times per day Press the START key and you’re
nished
8. If you wish to feed a 3rd or 4th time each day do NOT press the START key and repeat
from step-4
Setting the Volume/Portion-Size
1. Press the VOL key to display feed-volume/portion-size
2. Press and hold (for 2 seconds) the SET key until Digit-4 blinks
3. Press the VOL key to set the desired volume
Note:
• A Feed-volume of 1 equals ½ cup (120cc) of food, 2 means 1 cup (240cc) of food, 3=1.5
cups (360cc) and so on.
• The number 0 represents 10 portions which is equal to 5 cups (1.2 liters).
• Press the START key to conrm the volume/portion size
Setting the Number of Days to Feed
• Press the Day key and the left side of the LCD shows the number of days your Automatic
Feeder will feed for until it stops. The default setting of (0)means the feeder will feed
continuously and never stop
• To change the number of days to feed, press the DAY key then Press and Hold the SET
key (for 2 seconds) until the days ash on the LCD
• Press the DAY key to change the number of days. Hold down the DAY key to speed
through the numbers
• Setting the DAY to 0 (zero) sets the feeder to continuous mode so it will never stop and
all you need to do is add food to the food tank when low
• If you set a number of days to feed (1 to 99 days) then at 6am after the last day the feeder
Alarm will start beeping to remind you your set number of feeding days has been reached
• To repeat the same schedule without any changes just press the START key.
8
Page 9
To review the Settings
1. Press the TIMER key to cycle through and view the feeding times.
2. Press the VOL key once to view the volume/portion-size and feeding day(s) remaining
3. Press the DAY key to display feeding day(s) remaining
4. Press the CLOCK key once to display the current time, the CLOCK icon will now turn ON
5. If no key is pressed for more than 8 seconds, the display will switch back to show the
next feeding time with the timer icon ashing.
Record Voice Message to be played at Feeding Times
1. Press and hold the REC key, the Red LED will turn on
2. Speak your message. You have up to 6 seconds
3. When nished, release the REC key
Play back recorded Voice Message
1. Press the PLAY key. Your recorded message will now play
3. At each Feeding your recorded message will play and repeat 3 times
To manually feed your Pet
Press the SET and VOL keys together, once.
Opening and Closing the Food Cover
Open Close
To open ( Unlock ) the food cover of your
PF-10 Automatic Pet Feeder, rotate the
round dial so the ARROW points towards
the Open Lock
To close ( Lock ) the food cover of your
PF-10 Automatic Pet Feeder, rotate the
round dial so the ARROW points towards
the Closed Lock
9
Page 10

Assembly
Line up the food tank with the feeder base, then press the locks out
with your thumbs so the food tank can seat onto the feeder base.
The locks are spring loaded so be careful not to pinch your ngers.
Make sure the locks securely lock into the food tank.
Disassembly
You need to open the spring loaded locks. Use both hands and your
thumbs to push both locks down to release the food tank. As you
push the locks down use your ngers to lift the food tank up.
The springs are very strong so be careful not to let the locks snap
back and hurt your ngers.
General Hints
• The clock can display in either 12 or 24-hour display format
• The feeding-days can be changed at any time but the previous schedule will be replaced
and will start from the 1st new feeding day set
• The feeding-times and feeding-volume can be changed at any time and the new settings
will be for the rest of the feeding day/s schedule
• Once the schedule has started, the DAYS displayed will be reduced by 1 every day at
0:00 (midnight) until the end is reached. It will then revert back to the original number of
set DAYS and the Feed Alarm will sound. Just press the START key to start your original
program/settings again
• If the timer-icon is OFF and all numbers are ashing then no feeding schedule has been
set. When the timer icon is ON and all numbers on the LCD display are not ashing then
the schedule has started
• When the Clock icon is ON the current time is displayed
Troubleshooting
• When the Red (LOW BATT) light FLASHES, the batteries are low and must be replaced
• Change all the batteries as soon as possible. You will have to reprogram all your set-
tings again when the batteries are changed
• When the LCD display shows ( Err ), the food delivery door is not closing properly. You
need to remove any food that jams the door.
1. Switch OFF the Auto Feeder, remove all food, turn your Auto Feeder upside down.
2. Clean both doors hinges with a soft brush.
3. After cleaning switch ON the Auto Feeder and rell with food.
• Note: You will have to reprogram all your original settings before you can use your
feeder again.
10
Page 11
Disposal Considerations
According to the European waste regulation 2002/96/EC this symbol
on the product or on its packaging indicates that this product may not
be treated as household waste. Instead it should be taken to the appropriate collection point for the recycling of electrical and electronic
equipment. By ensuring this product is disposed of correctly, you will
help prevent potential negative consequences for the environment and
human health, which could otherwise be caused by inappropriate waste handling of this product. For more detailed information about recycling of this product, please contact your local council or your household
waste disposal service.
Your product contains batteries covered by the European Directive. 2006/66/EC, which
cannot be disposed of with normal household waste. Please check local rules on separate
collection of batteries. The correct disposal of batteries helps prevent potentially negative
consequences on the environment and human health.
Declaration of Conformity
Producer: CHAL-TEC GmbH, Wallstraße 16, 10179 Berlin, Germany.
This product is conform to the following European Directives:
2014/30/EU (EMV)
2011/65/EU (RoHS)
11
 Loading...