

Page 1

Hundehütte
10030670 10030671
Page 2

Sehr geehrter Kunde,
wir gratulieren Ihnen zum Erwerb Ihres Gerätes. Lesen Sie die folgenden Anschluss- und
Anwendungshinweise sorgfältig durch und befolgen Sie diese, um möglichen technischen
Schäden vorzubeugen. Für Schäden, die durch Missachtung der Sicherheitshinweise und
unsachgemäßen Gebrauch entstehen, übernehmen wir keine Haftung.
Sicherheitshinweise
Bestimmungsgemäßer Gebrauch
• Dieses Gerät dient als Behausung für kleine Hunde. Es ist ausschließlich für diesen Zweck
bestimmt und darf nur zu diesem Zweck verwendet werden.
• Verwenden Sie die Gerätschaft nicht als Spielplatz für kleine Kinder.
• Kleine Kinder dürfen nicht mit dem Aufbau der Hundehütte beauftragt werden.
Montage
1. Verbindung der Vorder- und der Rückwand (lange Seiten) mit der linken Seitenwand (schmale Seite)
Setzen Sie das linke Seitenteil an die Vorder- und Rückwand. Legen Sie die passenden
Aluminiumwinkel an. Schrauben Sie das Seitenteil an die Vorder- und die Rückwand.
2. Einlegen des Bodens
Legen Sie den Boden in den Leistenrahmen der U-förmigen Konstruktion ein.
3. Anbringen der rechten Seitenwand
Schieben Sie die rechte Seitenwand von oben in die Winkel des Vorder- und des Rückteils. Schrauben Sie die rechte Seitenwand fest.
4. Einsetzen der Trennwand
Setzen Sie die Trennwand an den linken Winkel der Tür an. Schrauben Sie die Trennwand dort fest.
2
Page 3
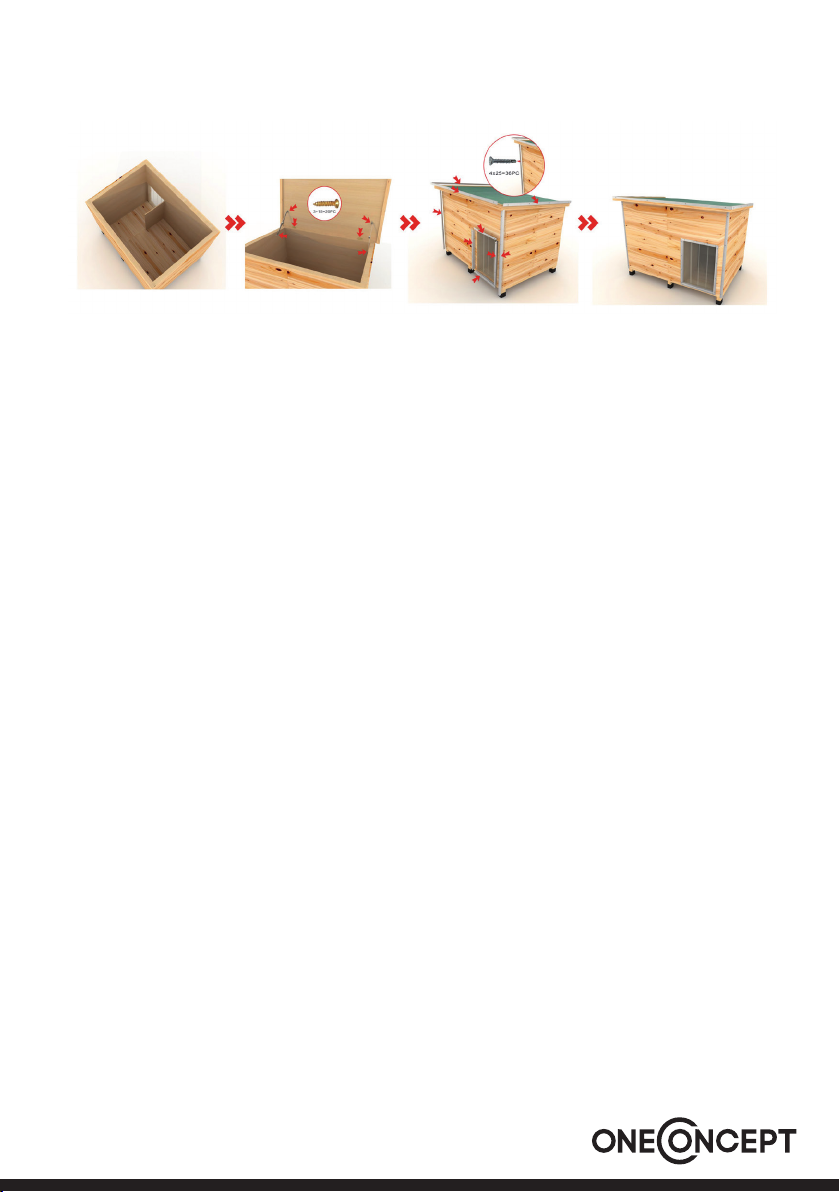
Nun ist die Konstruktion mit den Wänden und dem Boden fertig.
5. Montage des Daches
Setzen Sie das Dach auf die Konstruktion und schrauben Sie die Scharniere an.
Fertig ist die Hundehütte!
Hersteller: Chal-Tec GmbH, Wallstraße 16, 10179 Berlin, Deutschland
3
Page 4
Dear Customer,
Congratulations on purchasing this equipment. Please read this manual carefully and take
care of the following hints on installation and use to avoid technical damages. Any failure
caused by ignoring the items and cautions mentioned in the operation and installation
instructions are not covered by our warranty and any liability.
Security Instructions
Intended use
• This equipment is a habitation for small dogs. It is designed to be used this way and may
only be used in this manner.
• Do not use this equipment as a playground for children.
• Little children may not be requested to install the dog house.
Installation
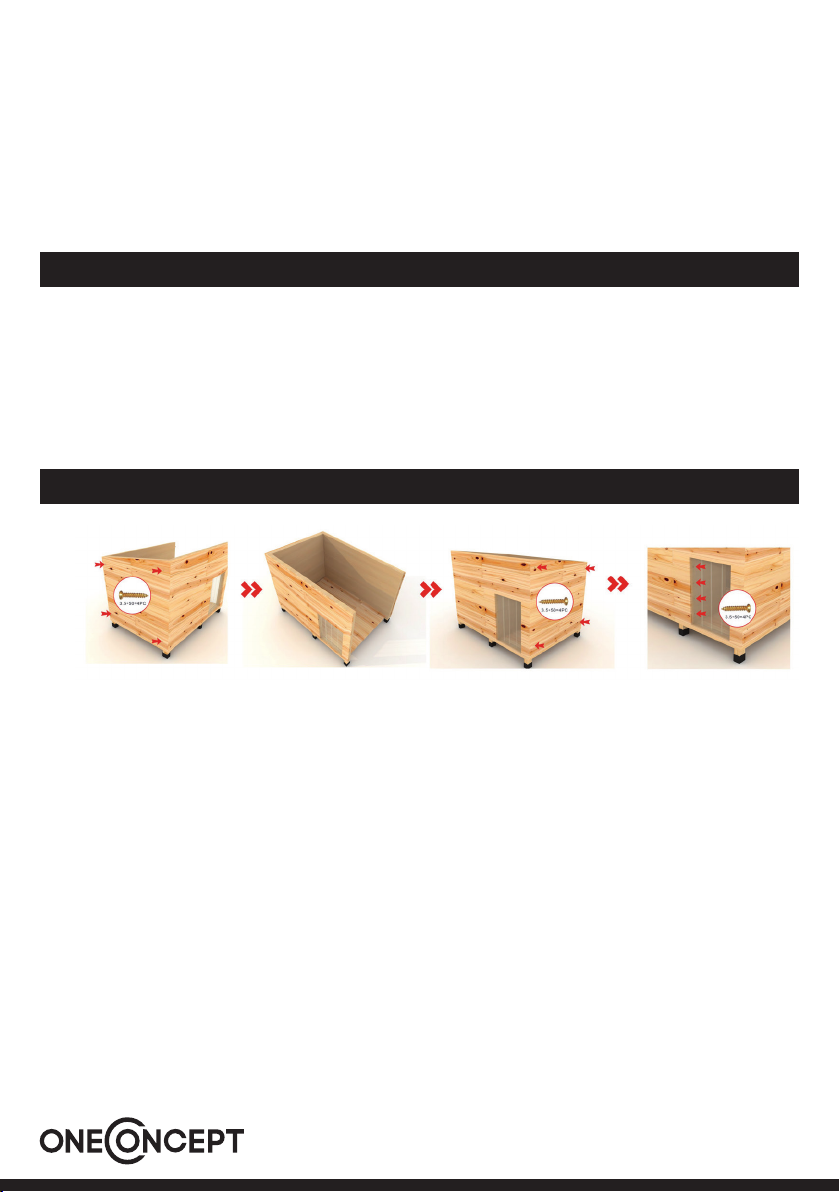
1. Connecting the front and back part (long sides) with the left side wall (short
side)
Hold the left side part to the front and back sides. Hold the corresponding wedges to
the sides. Fasten the side part to the front and back parts with the screws.
2. Insertion of the base plate
Insert the oor plate into the framework of the U-shaped structure.
3. Installation of the right sidewall
Shove the right sidewall from the top into the brackets of the front and back parts. Fix
the sidewall with screws.
4. Insertion of the partition
Place the partition wall on the left-side bracket of the door. Fix it there.
4
Page 5

Now the construction with the framework and the base plate is nished.
5. Mounting the roof
Place the roof on the construction and x the hinge with screws.
Now your doghouse is nished!
Producer: Chal-Tec GmbH, Wallstraße 16, 10179 Berlin, Germany
5
 Loading...