

Page 1
OneAccess One100 SX5E & One700 Gb5T 24V IAD User Guide | August 2016 Page 1
OneAccess One100 SX5E 2V-8V & One700 Gb5T 24V IAD User Guide
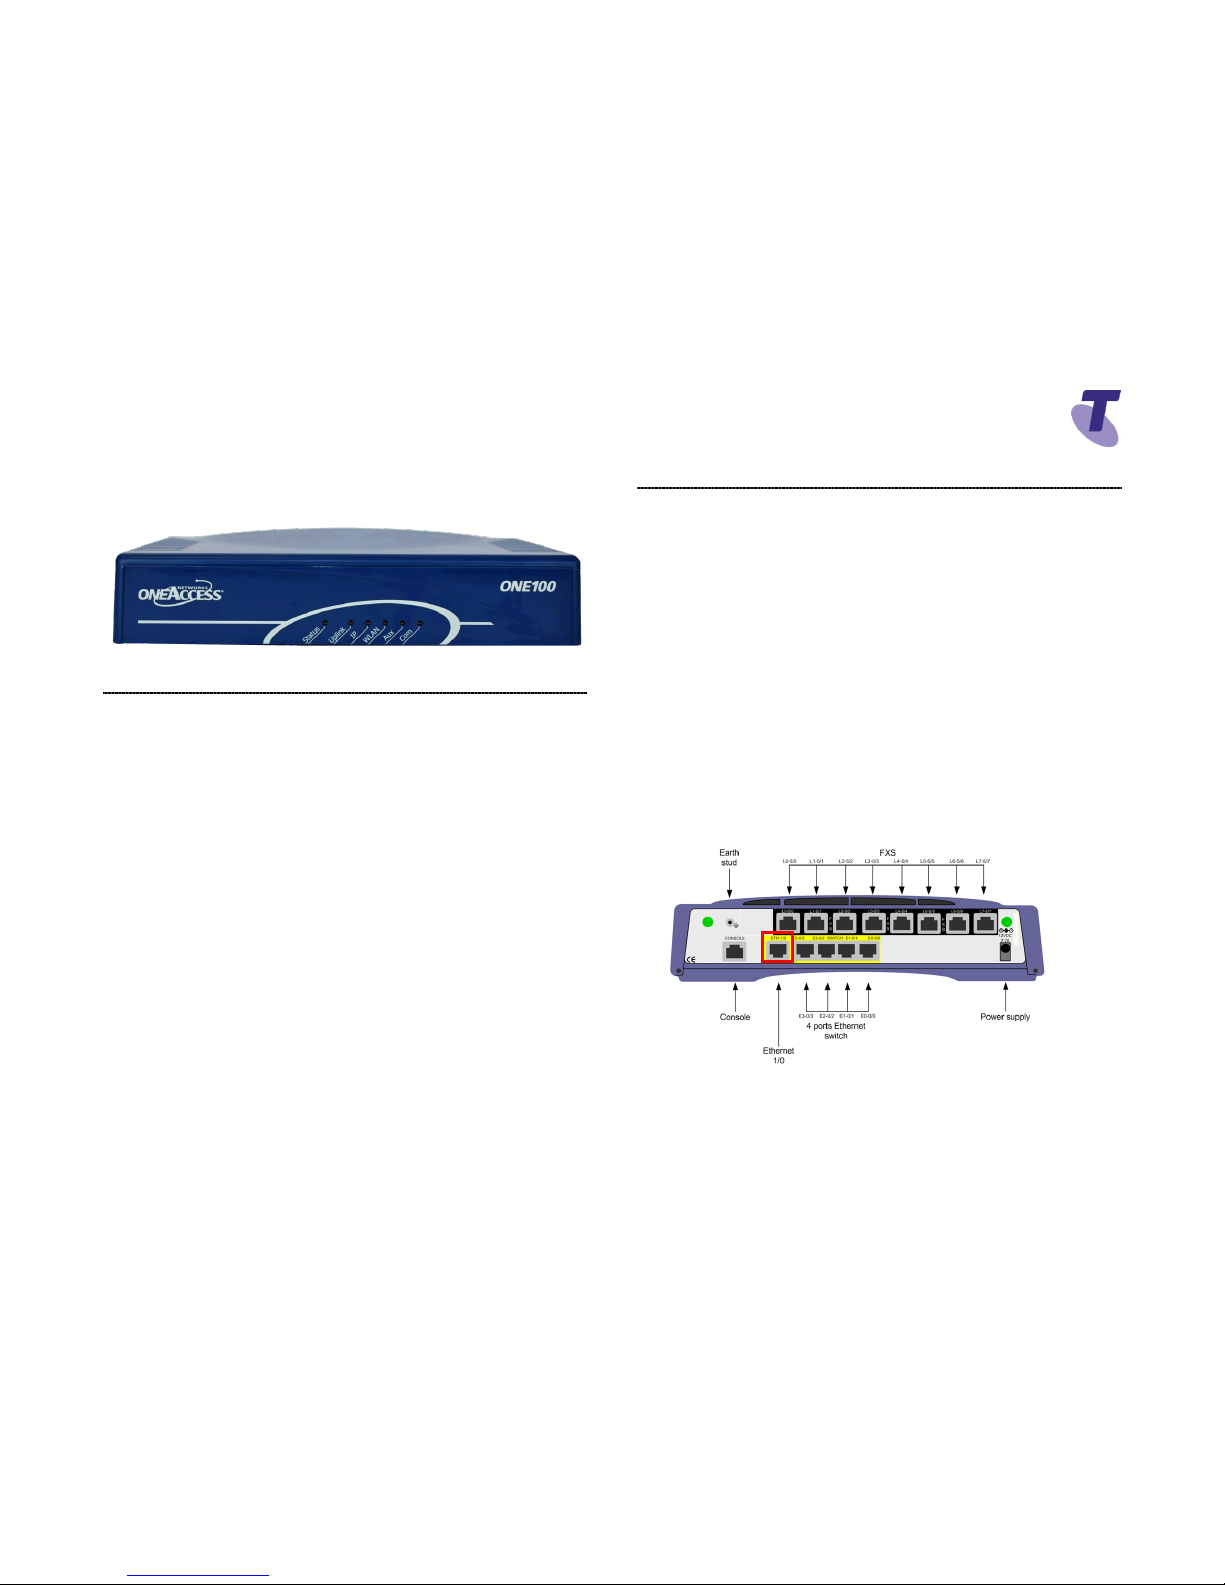
One100 SX5E 2V AND 8V – Front View
1. Overview
This document is intended to provide the detailed OneAccess IAD
(Integrated Access Device) configuration information necessary to
install and configure the OneAccess One100 SX5E 2V-8V &
One700 Gb5T 24V for connection to the TIPT IP Calling (VoIP)
platform within the Telstra Device Management Solution (DMS)
environment.
These devices are used to connect customers with analogue voice
ports (FXS) to TIPT. The conversion of DTMF signalling to SIP
signalling is performed by OneAccess IAD.
The One100 SX5E is a voice enabled router with Fast Ethernet
uplink with capability to connect phones, faxes, PABX and LAN
stations to the network.
This document covers the following topics:
Installing a OneAccess IAD
Configuring a OneAccess IAD using DMS
It is assumed that the audience has familiarity with TIPT.
2. Installation
To install and provision OneAccess IAD for Telstra TIPT services.
Physical Device Installation
The basic steps for connecting OneAccess IADs are:
1. Connect the Analogue Appliance (e.g. Phone, Fax or Key
System etc.) to the appropriate FXS interface on the rear of the
IAD.
2. For the 2 and 8 port IAD connect the power adaptor (12V, 2.2A)
to the back of the IAD. For the 24 port IAD connect the “Telco
Cable” that comes with the IAD.
Note: there is no On/Off switch.
3. Connect one end of the power cord to the power adaptor and
the other to the power outlet.
4. Connect the Ethernet cable (running from the switch) to the
Ethernet port 1/0 provided at the rear panel of the IAD.
5. Connect all analogue devices (PBX, Faxes, analogue phones
etc.) to FXS ports available starting from 5/0.
Page 2

OneAccess One100 SX5E & One700 Gb5T 24V IAD User Guide | August 2016 Page 2
OneAccess One100 SX5E 2V-8V & One700 Gb5T 24V IAD User Guide
Note: Devices must be installed within 2 metres of a
dedicated mains power outlet. Do not place the unit close to a
heat source (such as other electrical equipment) or in direct
sunlight. Avoid locations exposed to heavy soiling due to
exhaust from machinery, airborne particles from industrial
processes or excessive dust.
3. IAD CONFIGURATION
To configure IAD for TIPT services with auto provisioning: using the
auto-update feature obtaining the configuration file from the Device
Management Solution (DMS).
About OneAccess Auto-update Feature
The OneAccess auto-update feature enables IAD to automatically
acquire configuration parameters and update software/web
Configurator or any file stored in the OneOS-based router flash file
system. Auto-update uses HTTP / HTTPS protocol and the major
advantages of auto-update are easy implementation (no firewall
issues caused by DHCP) and open web based configurator
upgrade.
After the first boot, the device will automatically learn the URL of
the Device Management Solution (DMS) using DHCP Option 160
(URL based) to obtain the location of the device bootstrap
configuration. The device will then learn and obtain the bootstrap
configuration from the designated directory located on the Profile
Server (PS).
4. Provisioning
The following steps must be followed when provisioning the IAD
using Auto Provisioning:
Step
Action
1
Connect the IAD to the TIPT Telstra network
2
Power up the device
3
WAIT, once booted up, device will automatically download
configuration file from DMS bootstrap URL directory and then
reboot (Takes max 5 minutes)
4
Connect the PC to the IAD using an Ethernet cable to
connect to any LAN Ethernet port on the IAD
5
Your PC will automatically be assigned an IP address in the
192.168.1.xxx range
6
Open the web browser and enter the IP address 192.168.1.1
in the URL field
Username: admin
Password: admin
7
Go to the Auto Update page, enter the credentials provided
by the Telstra Commissioning team and click on the Apply
button. The device will contact DMS, download the
configuration file and reboot when it detects the downloaded
configuration is different to the one currently on the box.
8
After the device reboots (max 2 minutes), confirm IAD is
configured for the Telstra TIPT network (lines will be
registered).
Page 3

OneAccess One100 SX5E & One700 Gb5T 24V IAD User Guide | August 2016 Page 3
OneAccess One100 SX5E 2V-8V & One700 Gb5T 24V IAD User Guide
7.1 Web GUI Login
OneAccess has provided the customised Web GUI exclusively for
TIPT provisioning with limited view and management options. A
user can access the Web GUI using all of the common web
browsers, such as: Internet Explorer, Mozilla or Chrome.
7.2 PC Connection Details
Connect to any Ethernet LAN port on the IAD
Your PC will be automatically assigned an IP address in the
192.168.1.xxx range
Type 192.168.1.1 in the URL field of the web browser
Username: admin
Password: admin
 Loading...