

Page 1

FibreWire TV
Setup Guide
V3
onecomm.bm
05.25.2018
1
Page 2

What’s in your OneBox Kit?
1
Welcome Kit – Setup Guide, User
Guide and Channel Guide
2
4K OneBox Media Player (1)
3
Remote Control Unit (1)
4
Pack of AAA Batteries
for Remote Control Unit (1)
1
3
Setup Guide
User Guide
Channel Guide
5
HDMI Cord (1)
6
Power Adapter (1)
Safety Booklet (1)
7
2
4K
7
4
AAA
Safety Booklet
123
.#@abc def
456
ghi jklmno
789
pqrs tuv wxyz
onecomm.bm
5 6
0
Note: Components in the OneBox Media Player
kit are the property of One Communications.
Loss or damage to the equipment is subject to
an Equipment Recovery Charge. See
onecomm.bm/content/tv-rates-and-fees
for details.
2
Page 3

Before connecting your
!
1. Ensure that you have access to a working electrical outlet.
2. We recommend connecting your OneBox directly to your modem
using an Ethernet cable to access the internet. If you are unable
to connect with an Ethernet cable, a strong WiFi signal may be used.
More information supporting home WiFi connections can be found at
onecomm.bm/internet-support.
3. This setup process is required for each individual OneBox
media player.
new OneBox…
onecomm.bm
3
Page 4
Setup Instructions
Let’s begin powering up your new OneBox and connecting it to your TV.
1
Follow the TV cable connection from the outlet in your wall to your current set top
box. Unscrew the cable. Find the RF IN connection on the back of your OneBox.
Attach your cable to this connection.
Current Set Top Box
Disconnect by unscrewing
cable from here.
RF IN
CABLE
OUT
HDMI
onecomm.bm
Now connect new device by
attaching cable here.
OneBox
AUDIO
RF IN
HDMI
4
Page 5

Setup Instructions (Cont.)
Next, use the HDMI cable provided in the OneBox Kit to connect your
2
new media player to your TV.
OneBox
AUDIO
RF IN
Connect HDMI cable to HDMI port located
on your television and your OneBox.
HDMI 1 HDMI 2 HDMI 3
HDMI
Television
Input/Source: HDMI 1
Note: All HD TVs have HDMI ports for you to connect your OneBox media player. Contact us at 700.7700 if you
have an older TV that does not have an HDMI port. More details and instructions will be provided.
onecomm.bm
5
Page 6

Setup Instructions (Cont.)
Connect your OneBox Media player to your modem/router using an Ethernet cable.
3
If your OneBox is located away from your modem/router, use a WiFi network to
connect it to the Internet.
OneBox
onecomm.bm
Modem
RF IN
AUDIO
HDMI
ETHERNET
6
Page 7

Setup Instructions (Cont.)
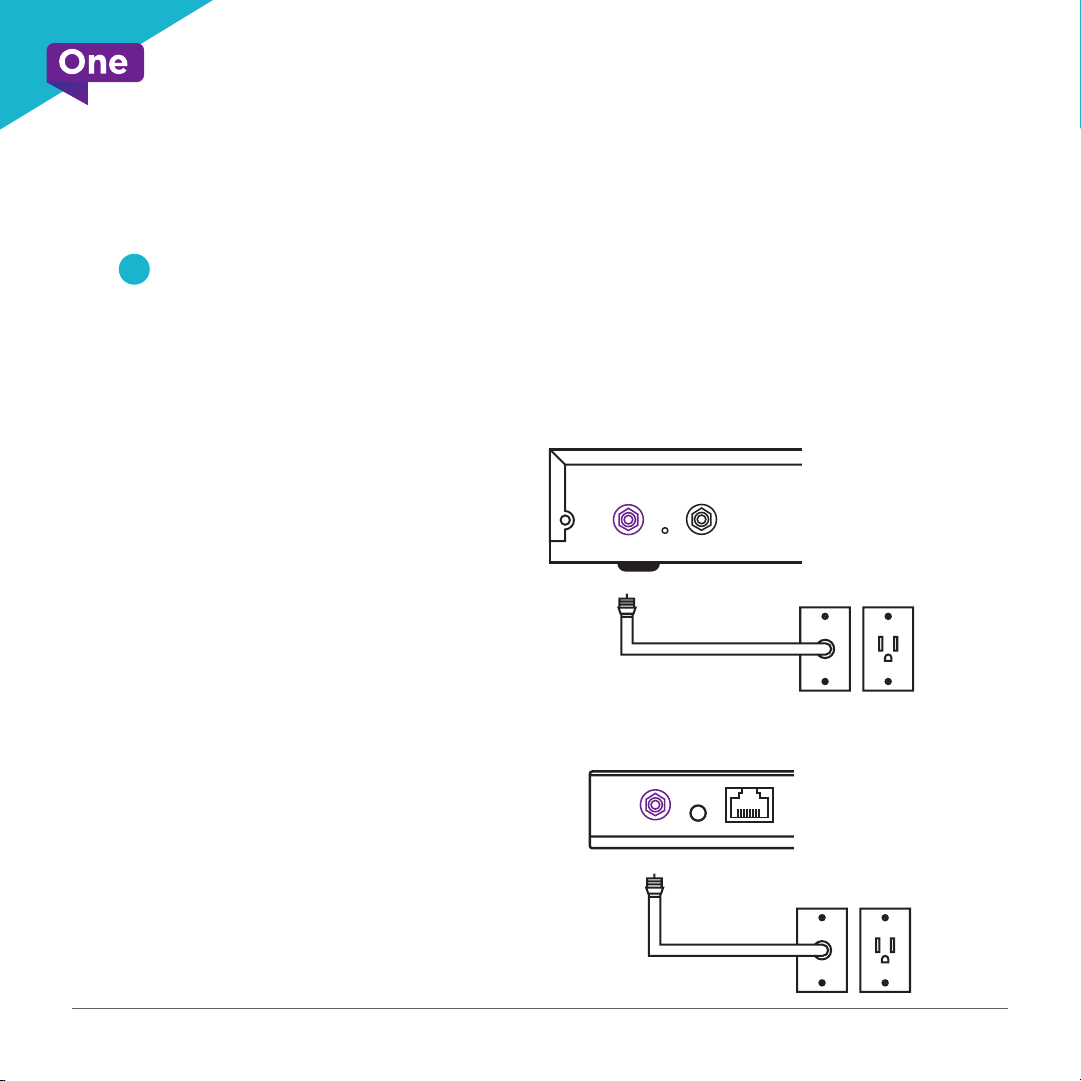
4
Attach the power cord to your OneBox, then plug it into a working electrical outlet.
OneBox
RF IN
AUDIO
HDMI
Electrical Outlet
onecomm.bm
7
Page 8

Programming Your OneBox
To enjoy the full range of FibreWire TV features on your OneBox, we
recommend using our FibreWire Internet service.
5 Insert two AAA batteries into your
remote control.
6 Power on your TV to pair your
Remote Control with your OneBox.
AAA
123
.#@abc def
456
ghi jklmno
789
pqrs tuvwxyz
0
onecomm.bm
8
Page 9

Connecting Your OneBox
to the Internet
We recommend connecting your OneBox media player to the Internet. This connection
allows us to better support your system and for you to experience additional FibreWire
TV features. If you are connected using an Ethernet cable (as depicted in Step 3), Press
Home (house icon), select ‘Settings’, then select ‘General’, scroll down to ‘Network
Conguration’, and choose “Ethernet”
7 If you are unable to connect using
an Ethernet cable
• Connect to your 5 GHz WiFi network*.
• If you do not see your WiFi network
as an available connection, or you
do not subscribe to Internet,
skip to step 16.
*FibreWire TV is supported by the 5 GHz
WiFi band to provide you with the best
overall experience.
8 Once your WiFi network has been
selected, you will be prompted to
enter your WiFi password. For
assistance with recovering your WiFi
password, visit our online support
page at:
https://onecomm.bm/internet-support.
onecomm.bm
9
Page 10

Programming Your OneBox
9 You may choose to connect your
OneBox to the Internet at a later
time by selecting Congure Later.
Select this option if you do not have
an internet subscription at your
home and/or you do not see your
home WiFi network listed.
10 Once your network option has
been selected, you will see a series
of screens checking your
connectivity, installing and
synchronizing channels.
onecomm.bm
10
Page 11

onecomm.bm
11
Page 12

onecomm.bm
#AllForYou
 Loading...