

Page 1

Contents
Unpacking ................................................................................... 2
Safety ........................................................................................... 2
Preface ......................................................................................... 2
Digital Satellite Services............................................................ 2
Conditional Access .................................................................... 3
Smart Card ................................................................................... 3
Inserting the Smart Card ......................................................... 3
The Integrated Receiver Decoder (IRD) ............................... 4
Display .......................................................................................... 4
Front Panel Keys .......................................................................... 4
Rear Panel Connections .............................................................. 4
Remote Control Unit................................................................... 5
Replacing Batteries in the RCU ................................................... 5
Getting Started............................................................................ 6
Installation of the satellite dish and cabling to the decoder......... 6
Installation Indemnity ............................................................. 6
Setting-up the System .................................................................. 6
Switching on the Decoder at the Mains ....................................... 6
Tuning your TV ............................................................................. 6
Adding a Modem .......................................................................... 7
Standby and Normal Modes......................................................... 7
Optional Decoder Connections .................................................... 8
Introduction.............................................................................. 8
Hints to Quality TV System Configurations ............................ 8
Satellite Decoder, TV (using SCART or RF
Interfaces) .......................................................................... 8
Decoder, TV (SCART or RF Interfaces), Hi-Fi........................ 9
Decoder, VCR, TV ,Hi-Fi......................................................... 10
Decoder, VCR, TV, Hi-Fi (using RCA Connectors)................ 11
Two Satellite Decoders, TV, (using AUX SCART and RF
Interfaces) ........................................................................... 12
RCU UHF Button Selection Functions .............................. 12
Bouquet Selection ...................................................................... 13
Selecting Specific Services .......................................................... 13
Selecting Services Directly ..................................................... 13
Stepping through Services ...................................................... 13
Stepping using the RCU.......................................................... 13
Stepping using the Decoder Front Panel Keys ...................... 13
Selecting Specific Services from the EPG ............................. 14
Selecting Services from the Information Bar .......................... 14
Controlling the Show ................................................................. 14
Volume Control using the RCU Keys...................................... 14
Volume Control using the Decoder Keys................................ 14
Mute......................................................................................... 14
Displaying Subtitles or Teletext ............................................... 14
Subtitles ............................................................................. 14
Teletext ............................................................................... 14
Clock........................................................................................ 14
Selecting Soundtracks ............................................................ 15
Power Reset ............................................................................ 15
Signal Source Selection .......................................................... 15
Open TV Electronic Programme Guide ............................... 15
Using the EPG ............................................................................... 15
Now/Next EPG......................................................................... 15
Extended EPG.......................................................................... 16
Theme Search ......................................................................... 16
Open TV Information Bar ........................................................ 17
Reminders ................................................................................... 17
Parental Guidance ...................................................................... 17
Menu Navigation Route ............................................................. 18
Using Menus ............................................................................... 19
Language Selection...................................................................... 19
Language Options in Guide & Menu ............................................ 19
Soundtrack Options...................................................................... 19
Parental Guidance........................................................................ 20
Setting the Parental Level ....................................................... 20
Changing the Parental Pin Code ............................................ 20
Information Box Display Period .................................................... 20
Organising Service ....................................................................... 20
Sort TV Services..................................................................... 21
Reset TV Services .................................................................. 21
Sort Audio Services ................................................................ 21
Reset Audio Services ............................................................. 21
Full Rescan .............................................................................. 21
Mail Messages .............................................................................. 21
Advanced Options ....................................................................... 22
Change Dish Installation .......................................................... 22
LNB Configuration .............................................................. 22
Set LNB Power ............................................................. 22
LNB Setup ..................................................................... 22
Signal Setup Alternatives................................................... 22
Tune IRD ............................................................................. 22
Reset to Factory Defaults .................................................. 23
Loop Through Mode ........................................................... 23
Signal Detection....................................................................... 23
Information ............................................................................... 23
IRD Status ........................................................................... 23
CA Status ........................................................................... 23
Loader Status..................................................................... 23
TV Installation .......................................................................... 23
TV Type .............................................................................. 23
Aspect Ratio....................................................................... 23
UHF Tuning ......................................................................... 24
Scart Source ...................................................................... 24
Scart Video Output ............................................................ 24
Change Modem Settings (if fitted) .......................................... 24
Local Time................................................................................ 24
DSD Upgrade........................................................................... 25
Troubleshooting....................................................................... 25
Specifications ............................................................................. 29
Hotlines....................................................................................... 30
Installation Settings ................................................................... 30
Notes ............................................................................................ 31
DSD 660 OPERATING INSTRUCTIONS 1
Page 2

UNPACKING
Ensure that the following items are included with the Integrated
Receiver Decoder (IRD):
1 x Remote Control Unit (RCU)
2 x AAA Batteries
1 x Flylead
1 x Mains Cable
1 x User Manual (Operating Instructions)
SAFETY
This decoder exceeds International Safety Standards. Please read
the following recommended safety precautions carefully.
PREF ACE
This manual provides full information on how to use the decoder and
enjoy the benefits of all its features.
The decoder is easy to use, even for those users unfamiliar with, or
intimidated by, modern technology. The more advanced and more
complex features can be avoided until you become comfortable with
the basic operation of the system.
The manual provides:
# Important safety precautions; please study them.
# Overview material; read only those parts that interest you. It is
not necessary to study the manual from cover to cover before
using the decoder.
MAINS SUPPLY: 98-265 V AC 50 Hz ONLY.
LIQUIDS: Keep liquids away from the decoder.
CLEANING: Before cleaning, disconnect the decoder from the wall
socket. Use a cloth lightly dampened with water (no solvents) to
clean the exterior.
VENTILATION: Do not block the decoder ventilation holes. Ensure
that free airflow is maintained around the decoder. NEVER stand the
decoder on soft furnishings or carpets. Do not use or store the
decoder where it is exposed to direct sunlight, or near a heater.
Never stack other electronic equipment on top of the decoder.
ATTACHMENTS: Do not use any attachment that is not
recommended by the manufacturer, as it may cause a hazard or
damage the equipment.
CONNECTION TO THE SATELLITE DISH LOW NOISE BLOCK
(LNB): The LNB connector cable has a voltage on its centre core. It
is therefore recommended that the decoder is disconnected from the
mains power before connecting or disconnecting this cable. FAILURE
TO DO SO COULD DAMAGE THE LNB.
SERVICING: Do not attempt to service this product yourself. Any
attempt to do so will make the warranty invalid. Refer all servicing to
a qualified service agent.
LIGHTNING: If the decoder is installed in an area subject to intense
lightning activity, protection devices for the decoder mains connector
and modem telephone line are essential. The individual
manufacturer’s instructions for safeguarding other equipment, such
as TV set, Hi-Fi, etc., connected to the decoder, must also be
followed during lightning storms.
EARTHING: The earth of the LNB cable MUST BE DIRECTLY
CONNECTED to the system earth for the satellite dish. The earthing
system must comply with local regulations.
Refer to the Installation Indemnity on pagexx .
# Step-by-step instructions on how to use the decoder and its
advanced features.
# Step-by-step instructions on how to install the decoder and
connect it to basic sound and TV systems. It is beyond the
scope of this manual to include all of the possible
configurations or installation procedures.
# Troubleshooting guide to assist you if you have difficulty with
operating the decoder correctly, or if technical problems occur.
The operation of the decoder can be upgraded using over-the-air
signals (typically in the morning). This manual and the menus
downloaded in the decoder are therefore subject to change at any
time.
This document and the information contained herein are the subject
of copyright and intellectual property rights under international
convention. All rights are reserved. No part of this document may be
reproduced, stored in a retrieval system or transmitted in any form by
any means, electronic, mechanical or optical, in a whole or in part,
without the prior written permission of UEC Technologiesl (Pty) Ltd,
the Manufacturer.
DIGITAL SATELLITE SERVICES
The decoder has been designed to receive and process digital
signals from PAS4, and Nilesat101 satellites, which act as mirrors in
the transmission process, beaming the Service Provider’s signals
back to your satellite dish. Compared to conventional TV (analogue),
digital technology presents higher quality pictures, sound comparable to that of a CD, and many more services.
Satellite technology also enables excellent reception of satellite TV
services in remote rural areas where good quality terrestrial
reception has never before been possible.
The term “Services” is used as well as “Channels” because
compressed digital TV and audio technology efficiently uses
available bandwidth, allowing several services to use the bandwidth of one channel.
In addition to the digital TV and audio signals, satellite signals also
contain data that the decoder extracts, processes and stores. This
provides up-to-date text information on the content and status of the
various services at the touch of a button. Convenient facilities are
also provided to manipulate received data in order to customise
viewing and listening preferences.
Due to the nature of compressed digital TV, many more features will
become available in the near future.
2 OPERATING INSTRUCTIONS DSD 660
Page 3
CONDITIONAL ACCESS
Although some satellite TV and audio services are free to air, most
TV and audio services are only available on a subscription basis and
can only be enjoyed via the conditional access components. These
are the removable Smart Card and a built-in conditional access
process already fitted into the system.
Smart Card
You should have purchased a Smart Card from the dealer when you
purchased the decoder. The Smart Card looks similar to a credit card
and is inserted into the slot behind the right-hand front flap of the
decoder.
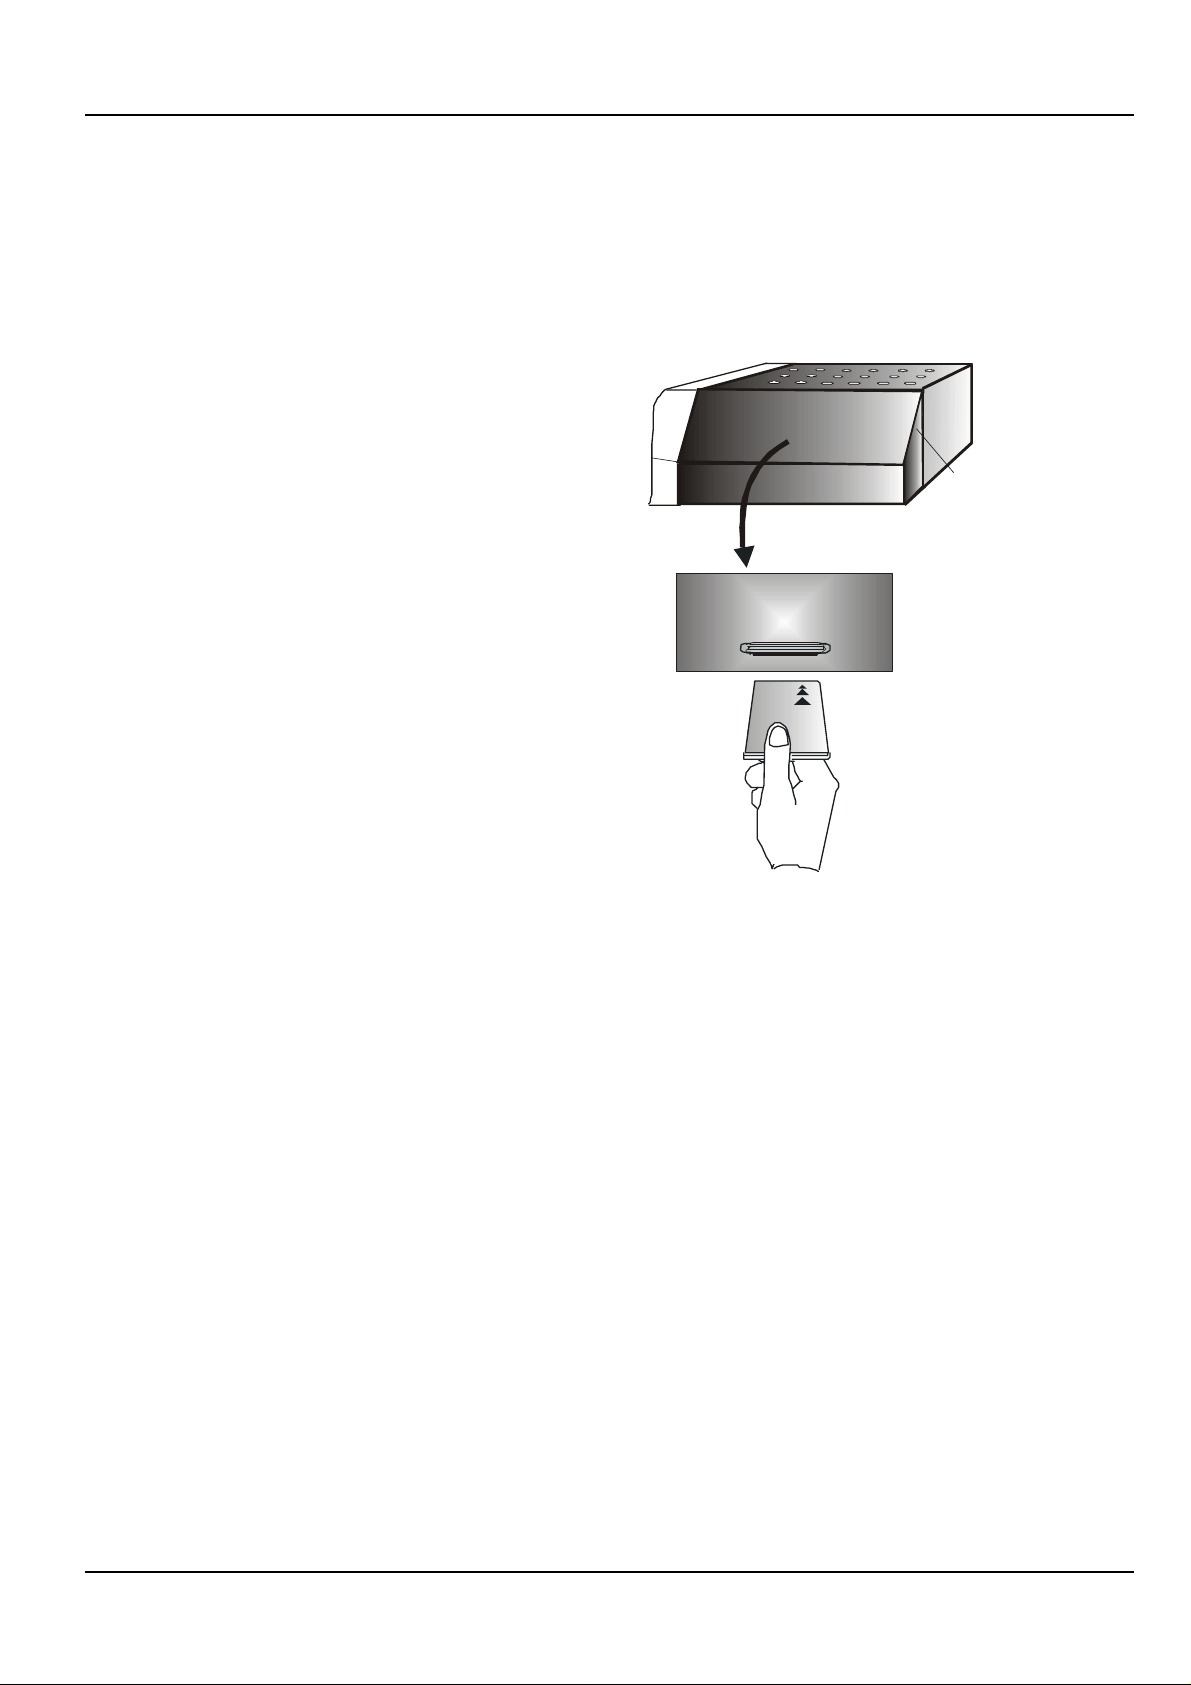
To insert the Smart Card, follow the instructions carefully.
1 Open the right hand flap on the front of the decoder (see
figure) Swing the flap downwards to expose the card slot to
the right of the row of keys.
2 Hold the Smart Card horizontally with the logo on top and the
three arrows pointed towards the front of the card. Insert the
card fully into the slot.
DECODER
A valid Smart Card entitles you to view and listen to all the services
you choose to subscribe to. Full details of subscription options are
supplied with the card.
Your subscription details are stored in the Smart Card.
Inserting the Smart Card
The Smart Card is the key to unlocking the decoder. The decoder will
not decode scrambled TV or audio services if the card is not inserted
or is incorrectly inserted.
Inserting the Smart Card into the decoder allows instant access to
all the services you subscribe to.
The Smart Card is not required for access to menus.
The Smart Card, which is supplied separately and forms part of your
subscription, is updated over-the-air when your subscription details
change, for instance, each time you purchase additional products
(details regarding these products will be announced in the future).
LOWER FLAP HERE
DSD 660 OPERATING INSTRUCTIONS 3
Page 4
THE INTEGRATED RECEIVER DECODER
A
V
V
V
(IRD)
The IRD combines a high quality MPEG-2 and DVB compliant satellite
receiver, with a sophisticated decoder in one package. The DSD
provides all that you need to exploit the exciting new satellite
services that are now available.
- DSD 660
/ P/ V
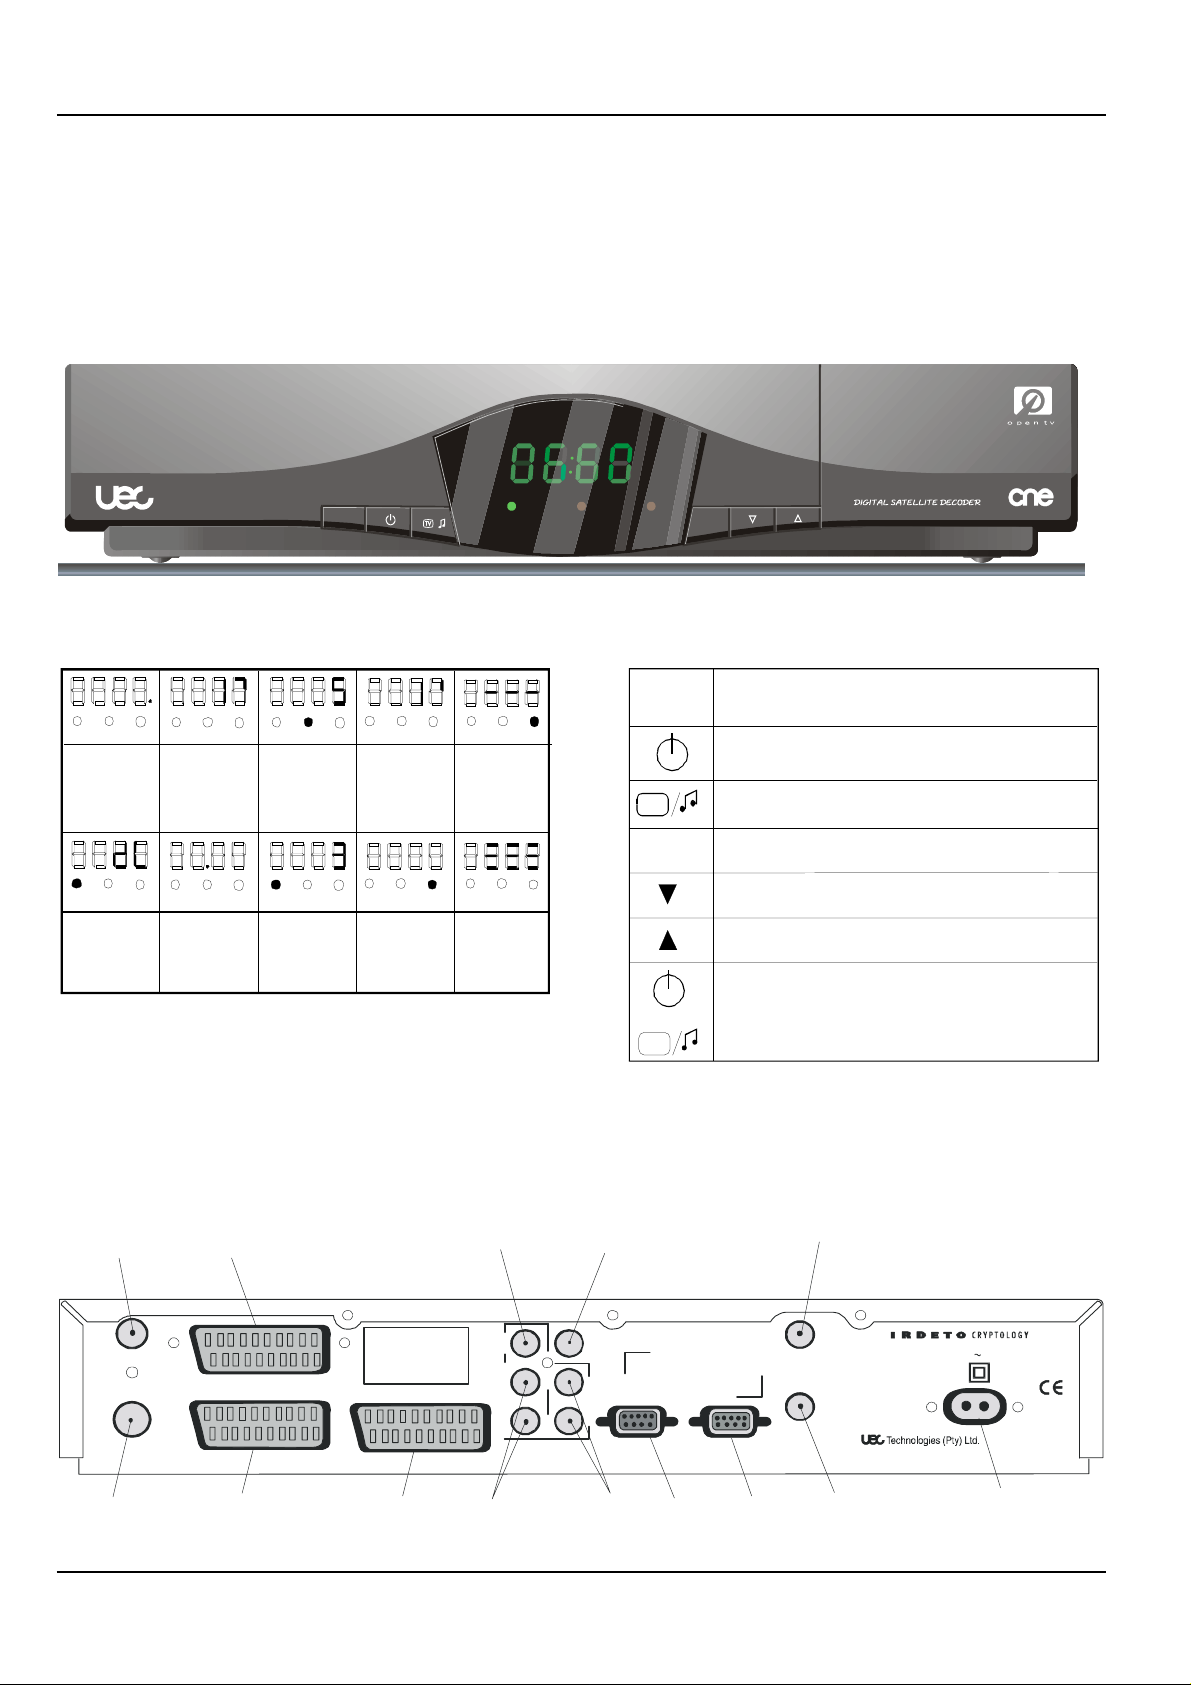
DISPLAY
Y
Gr een dot
DSD in Stan dby
mode
YGR
D o wnlo a d in
progress.
Steady yellow
light
G
R
YGR YG
Se rvi ce No. 17
selected
YGR YGR
Green dot
flashes when
RCU keys are
pressed
Gr een ligh t Au dio s e rvi ces
selected
Yell o w li g ht.
Mail message
waiti ng
REAR P ANEL CONNECTIONS
SCART CONNECTOR
TO TV/VCR
TO VCR
Y
R
GRYG
Rot a ting bar.
Searching for
service
inform ation
YGR YG
Red light
Error
indication
Three flashing
bars and red
light. Service
not found, or
signal of inferior
quality
Menu selected
AUDIO TO MONO
AMPLIFIER
(TV OR VCR)
FRONT P ANEL KEYS
Key
R
TV
P/V
R
Switche s the decoder between normal and standby
modes
Switches between TV and Audio services
Switches between programme selection and
volume control
Selects previous service on list (down) or decreases
volume level
Selects next service on list (up) or increases volume
level
When pressed si multaneously, reset the operation
of the decoder
Descrip tion
and
TV
IDEO TO
NON-SCART INPUT
(T
OR VCR)
SATELLITE
DISH CONNECTOR
RF OUT
RF IN
TERRESTRIAL
ANTENNA
CONNECTOR
VCR
TV
SCART
CONNECTOR
TO T
WARNING! High Voltage
NG ER! D o n o t o pen
D
Unauthorised opening
rend e r s warran ty in v a lid
Protect against moisture
AUX
SCART CONNECTOR
TO SECOND
RECEIVER
AU
Hi Fi
MONO
AUDIO
DIO TO
V
A
L
R
I
A
B
R
L
E
STEREO AUDIO
OUTPUTS
FOR STEREO
FIXED AUDIO
RECORDING
VIDEO
OUT
F
I
X
E
D
EXTERNAL MODEM
TO EXT.
MODEM
DAT A SER VICE
COMMS
PORT
LNB IN
400 mA max.
LNB OUT
TO SECOND
DECODER
220 / 240 V
Republic of South Af ric a
50Hz 30W
4 OPERATING INSTRUCTIONS DSD 660
MAINS INPUT
Page 5
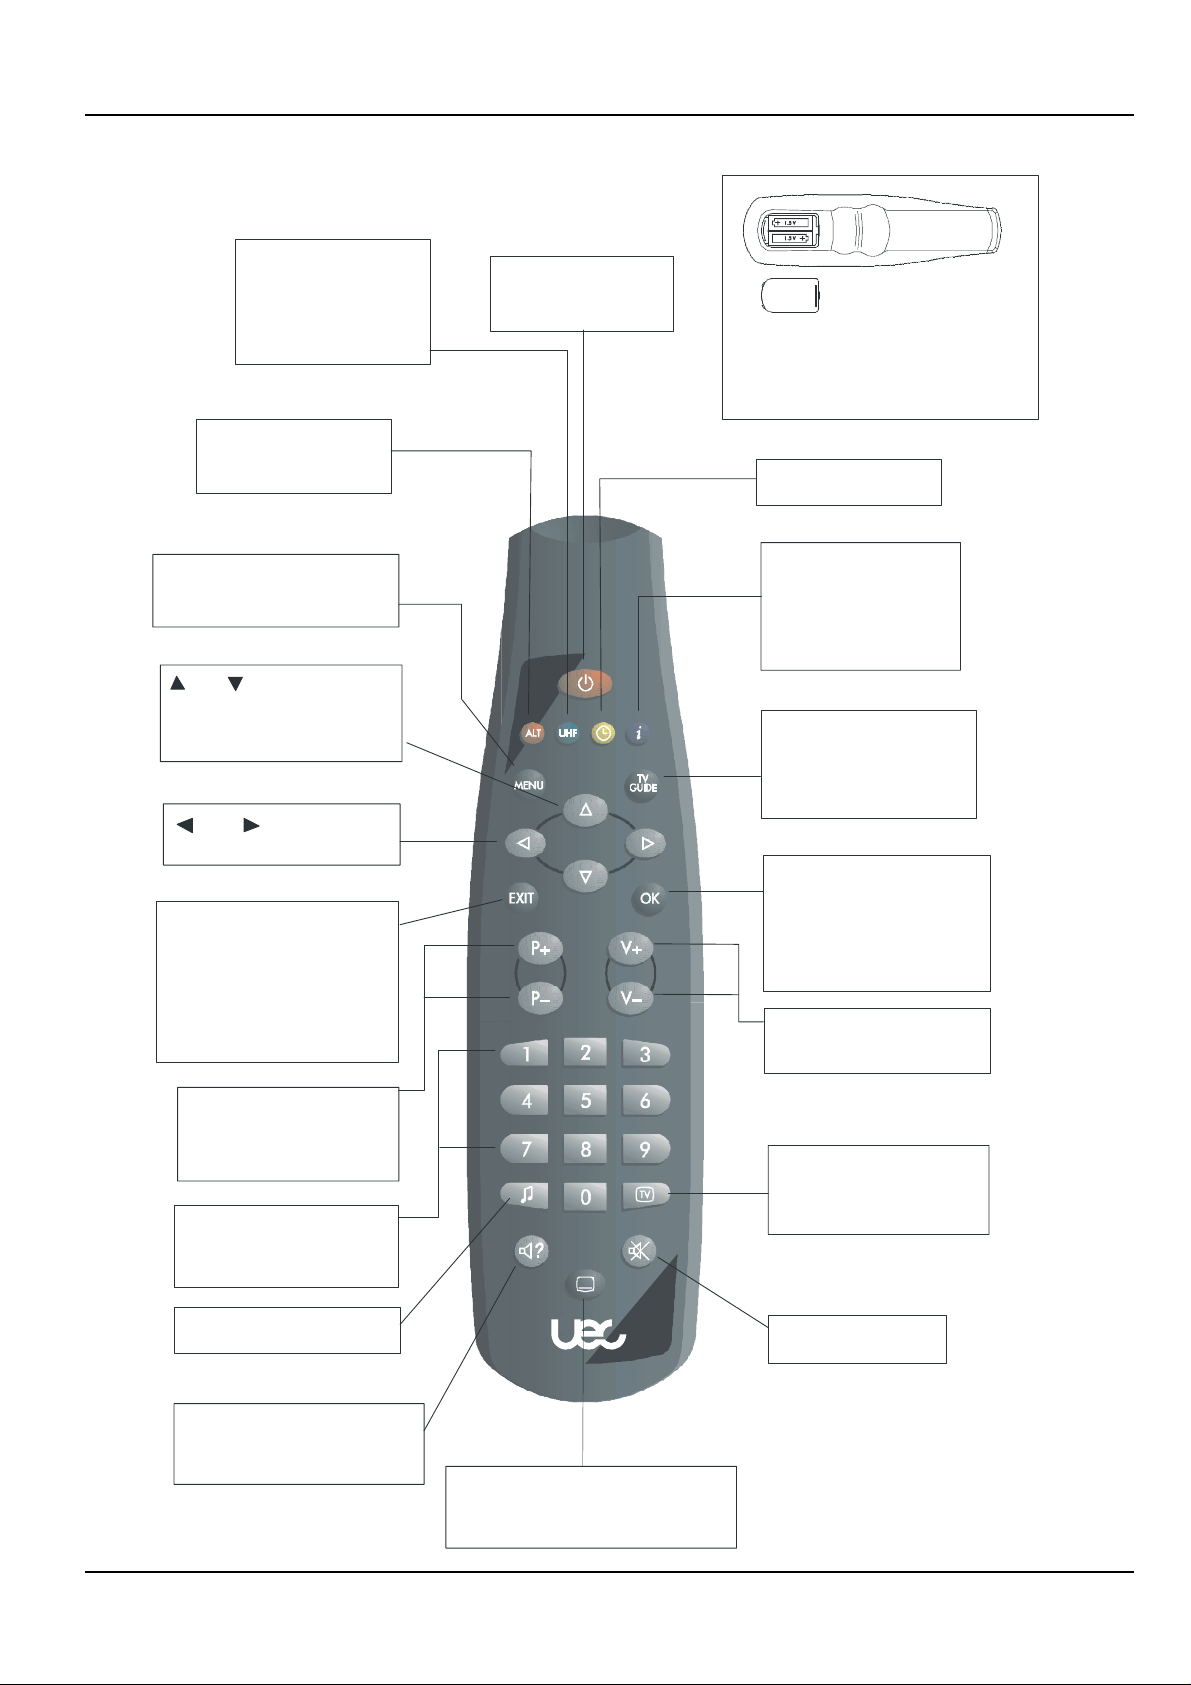
Remote Control Unit (RCU)
AAA
V
Toggles between signal
sources; VCR, TV, IRD.
When P ress ed and held
displays the UHF tuning
channel on decoder and
TV
When pressed, displays
the last viewed
programme
Puts the decoder into
standby or takes it out
of standby
Inserting/changing the batteries
- Never leave flat batteries in the remote control
- Only insert
- Make sure batteries are correctly positioned, or
remote will n ot w ork
Displays the local time
and date on the TV
size batte r ies
Displays the Main Menu, or,
if a menu is displayed, return
to the last vie wed
programme
and
arrow keys
Move the highlights up or down
the screen when a menu or
TV/Radio guide is
displayed
and arrow keys
Switches options in menus
Removes the TV/Radio guide
or informat i on from th e screen
and redisplays the last
programme you were
watching
If a menu is displayed,
pressing EXIT returns you to
the pr evious menu
P+ and P- keys
Steps through the
channels one at a time
(+ for next, - for previous)
Num ber keys 0 to 9
Selects programmes ,
or keys in
e.g, PIN number
numbers,
Displays a programme
s
information bar on the
screen for 5 seconds.
When pressed again,
displays extended event
information
Sele cts the
pro gramm e guide ( E P G)
which dis plays a l l t he
electronic
available TV and Radio
programmes
Selects a programme
when the EPG and selects
in
highlighted
in menus.
Saves any changed settings
options or values
in menus
+ and V- keys
Adjusts th
down
Switches to a TVchannel
from a
Displays available bouquets
on screen
volume up or
e
Radio channel.
Switches to a Radio channel
TV channel
from a
Displays soundtrack information
on the TV for 5 seconds.
Mutes the sound from
the TV
Where options are available, the
displ a y i d en t ifies the number s
DSD 660 OPERATING INSTRUCTIONS 5
Displ ays subtit le options (if available)
on the TV. When pressed again,
displays teletext on channels
where it is available
Page 6
GETTING STARTED
NOTE: Unless absolutely necessary, do not change
installation, connections or decoder setup, or carry out
any retuning on a working system. If changes are
made, note all changed settings in the table on page
30.
Installation of the satellite dish and cabling to the
DSD
Installation procedures for satellite dishes and cabling to DSDs are
outside the scope of this manual. Please refer to the information
provided with your satellite dish and associated equipment if you
decide to do the installation yourself.
NOTE: If the TV is not tuned to the channel chosen to
view the satellite services, the sequence is still
the same, but the TV will not display the scanning
screen. To tune the TV to the decoder services,
tune the TV as per Tuning Your TV.
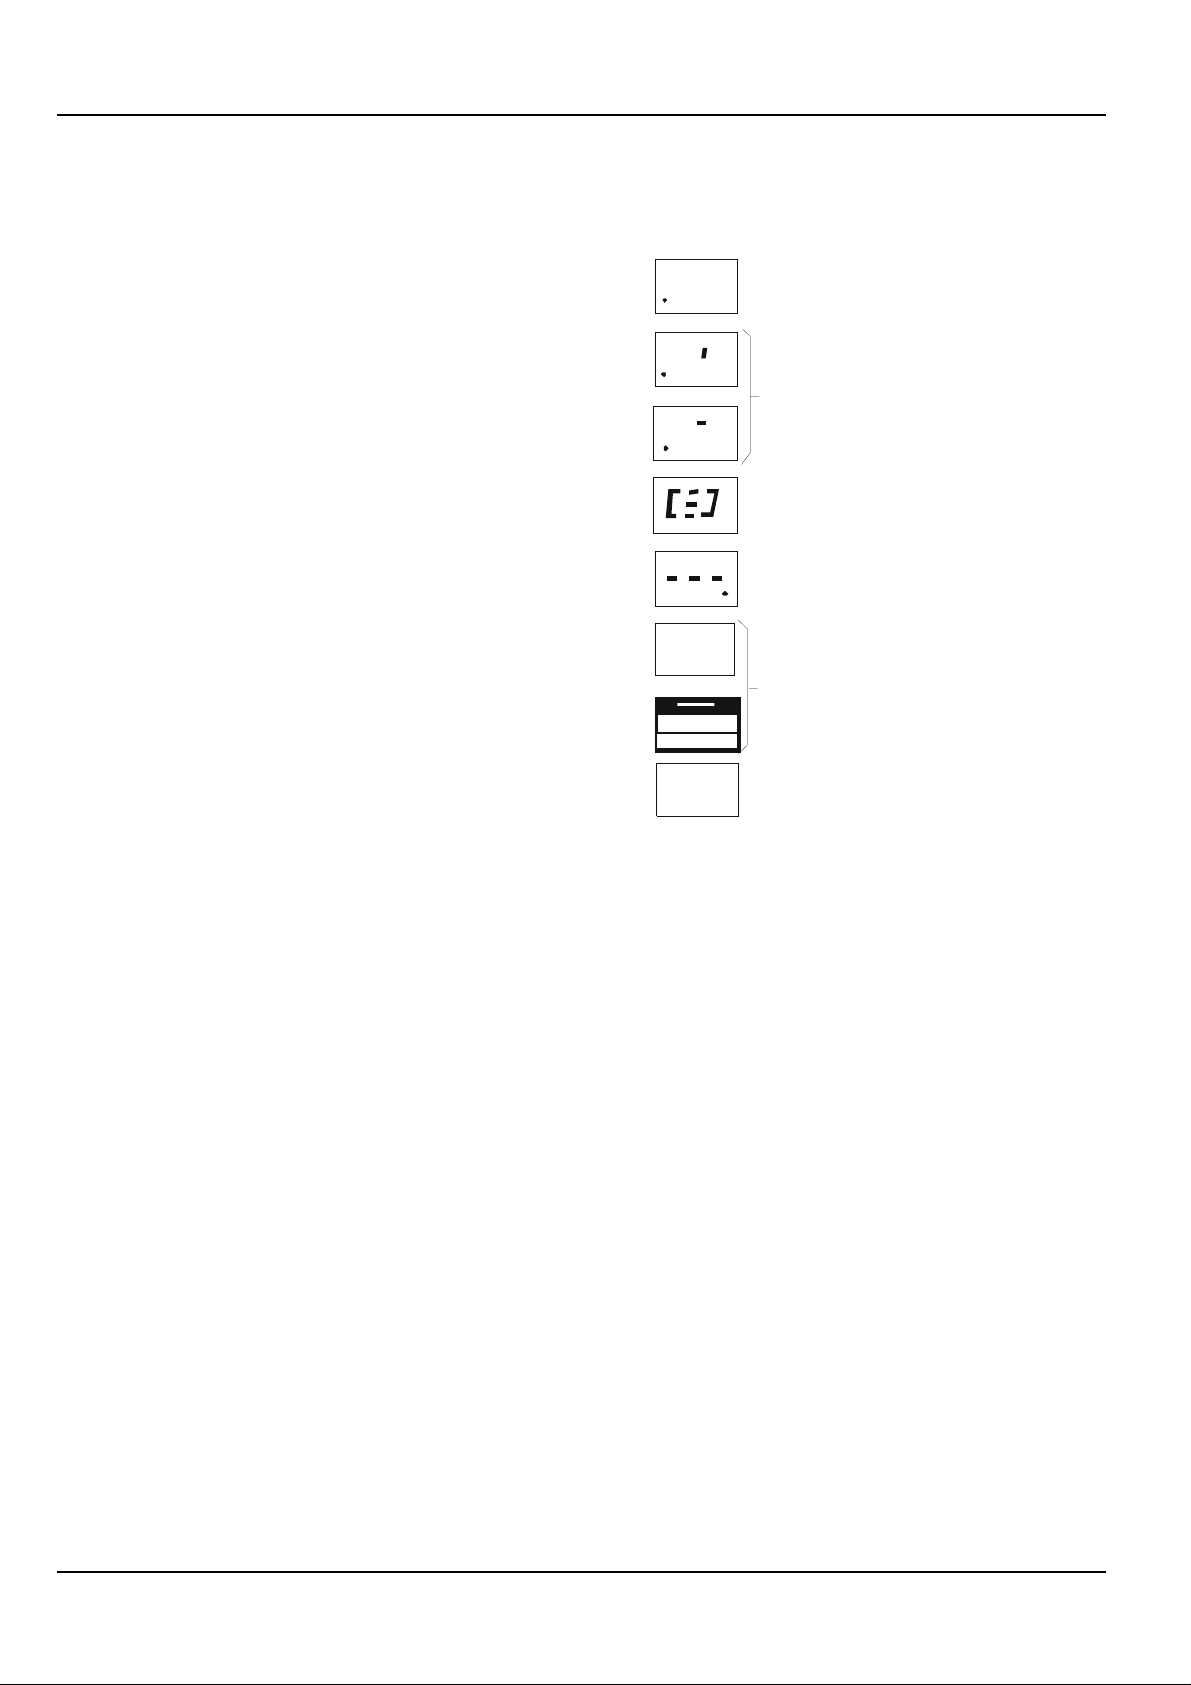
dL with yellow dot indicates
dL
I
software being down-loaded
Number 1 with rotating bar and
yell ow dot. I n dicat es decoding
process is in progress
I
Installation Indemnity
1 For the decoder to operate, it is required to correctly install and
align a satellite dish and a Low Noise Block (LNB) converter.
2 Each and every INSTALLER acts as an independent contractor
and is not a servant, sub-contractor or agent of the
manufacturer. The manufacturer is, therefore, not liable for any
loss or damage of any nature whatsoever caused by the
conduct of the installer, including but not limited to:
a. Any direct, indirect or consequential damages of
any nature or any loss of profit or other special
damages of any nature which the USER may
suffer as a result of any breach by the
INSTALLER of any of its obligations to the USER.
b. Any loss or damage to any property of the user or
any third party, situated on the USER’s premises
even if loss or damage arises out of any part of
the INSTALLER.
3 The manufacturer does not directly or indirectly warrant or
guarantee or make any representations whatsoever with
regard to any equipment, including, but not limited to any dish,
LNB, or cabling, used by the INSTALLER.
4 Subject to any express warrant or guarantee given by the
manufacturer, in writing, the manufacturer does not:
a. Give any warranty or guarantee or make any
representation whatever in respect of any work
carried out by the INSTALLER.
b. Accept any liability for any latent or other defect in
any work carried out by the INSTALLER.
Setting-up the System
1 Install and align satellite dish (installer).
Displa y fla shes briefly
Thr ee f la s h i n g bar s and re d dot
Inf
Inf (information) appears
at the same time as
Wai tin g for NI T acqui siti on
Press EXIT to cancel scanning
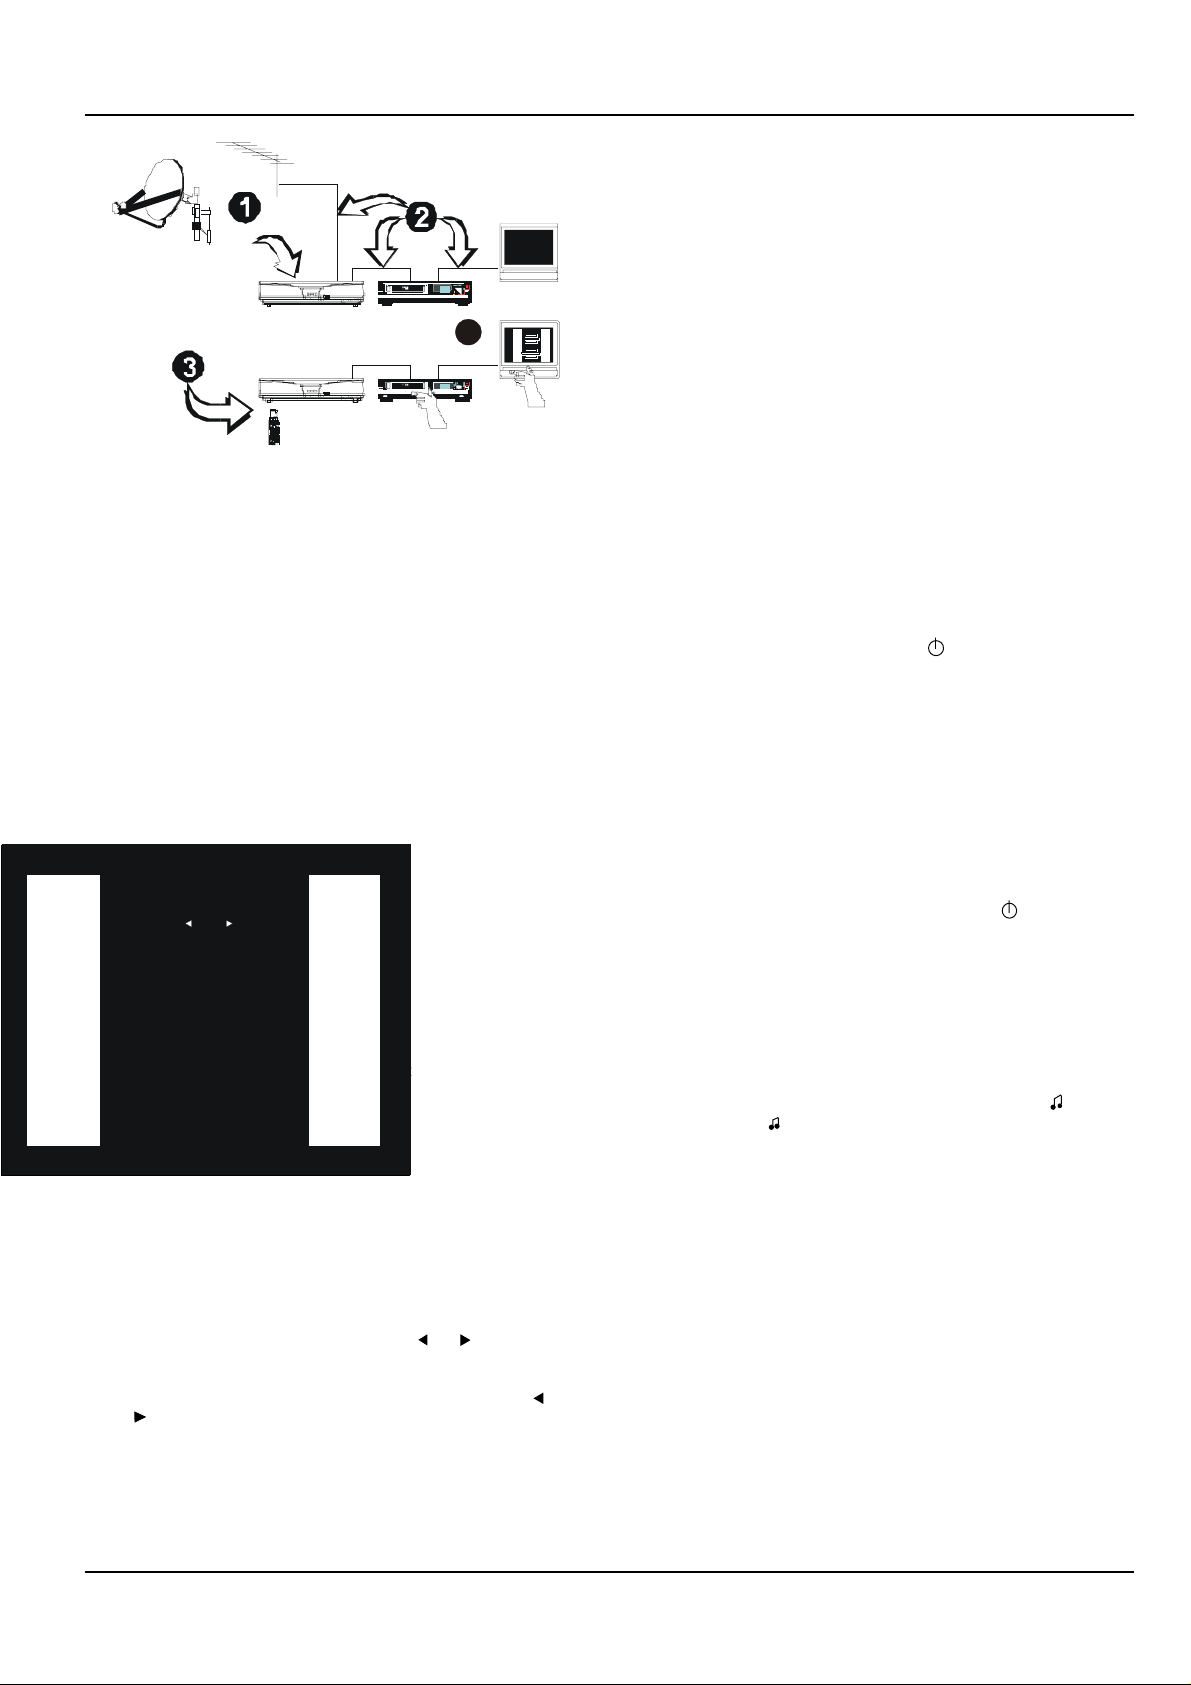
Scanning
7
If your TV has been tuned to accept the decoder
services, but your smart card has not been inserted
into the decoder, an error message will appear on your
TV screen.
If your decoder was in standby mode at mains power
switch off, the decoder will display a green dot when
mains power is restored. Press On/Off symbol to
restore signal.
If any other error message is displayed, consult
your installer or service provider.
T uning your TV
If your TV is not tuned to the decoder viewing channel, you will not
be able to view the satellite services. Your VCR, decoder and TV
can also interfere with each other unless they are tuned in
correctly. The output of the decoder can be tuned over the whole
UHF band using the following recommended method (refer to the
following figures):
scanning screen on TV
Number of last used
servic e appears
2 Connect the decoder to the TV set (either SCART to SCART or
RF OUT on the decoder to RF IN on the TV). (See Optional
Decoder Connections.)
Switching on the Decoder at the Mains
When you switch on the decoder at the mains, it goes through a
power-up sequence, then attempts to find a signal at the specific
factory-set frequency. During this process, various indications are
displayed on the decoder display and TV, as shown in the following
sequence of drawings:
6 OPERATING INSTRUCTIONS DSD 660
1 Connect the satellite dish and terrestrial antenna (installer).
2 Connect the installation as shown (if VCR installed).
3 Switch on the TV and select an unused channel to use with
your VCR.
4 Switch on your VCR, then set its test signal to ON (see VCR
instruction manual).
5 Tune the TV to the test signal from the VCR. Switch off the
VCR test signal.
Page 7
On the TV, retune the channel allocated to the decoder until
the decoder test pattern is clearly visible.
Repeat step 8 until interference on all channels is eliminated.
4
6 On the TV, select any unused channel on which you wish to
view your satellite programmes. Once selected, all your
satellite services will be viewed on this channel, selection of
the service being made using the RCU.
7 Press and hold UHF on the RCU for approx. 5 seconds until
UHF is displayed on the decoder display. Tune your TV set to
receive the decoder test signal display (see following figure).
NOTE: After changes have been made, the decoder must not
be switched off for at least 3 minutes to allow for the
new setting to be saved.
If interference is still present, it is recommended that good
quality screened cables (preferably double screened) are used
for interconnecting all other equipments to the decoder.
Adding a Modem
Many exciting interactive features will be available in the future
(Impulse Pay Per View, Video on Demand, etc.). The decoder is
ready for these features as it can accommodate an optional built-in
modem. A modem port for connection to your telephone line via an
external (faster) modem is provided on the rear panel.
Standby and Normal Modes
The decoder does not have a mains power on/off switch and it is
recommended that, for normal viewing, it remains connected to the
mains after installation. When the decoder is not in use, it should be
switched to the standby mode using the symbol on the front
panel or on the RCU.
The standby mode is indicated by a constant small green dot on the
right of the decoder display panel. To use the decoder after the initial
installation:
1 Switch on the TV and any other equipment included in the
system.
UHF Channel
50
UHF Frequency
703.25 MHz
A Channel number (initially 50) will be displayed on the
decoder front panel display.
Press UHF on the RCU to remove the test signal.
Press OK to save
Check that any noise from the decoder does not interfere with
Press EXIT to cancel
signals received on the VCR.
Check all tuned channels on the TV for interference.
8 If any interference is noticed, change the UHF channel number
as follows:
Press and hold UHF on the RCU to display UHF on the
decoder display and the UHF test screen on the TV.
Change the channel number to 2 more or 2 less than the
existing number (48 or 52) by pressing or twice on the
RCU.
Press OK to save. The following will happen as soon as or
is pressed:
2 Select the channel on the TV that you have allocated for
viewing the satellite services.
3 If the decoder is in the standby mode, press on either the
RCU or decoder front panel, to return to the normal viewing
mode. A service number will be displayed on the front panel
indicator.
4 Press TV on the RCU. A Bouquet selection box is then
displayed on the TV screen (see page 13). Select the bouquet
you have subscribed to (e.g., Middle East Programmes), then
press OK.
5 If you wish to select the Audio Services, press the key on
the RCU, or on the decoder front panel. If subscribed to, an
audio service will be heard, and the audio programme
information box will be displayed on the TV. A green indicator
on the front panel display is illuminated while the decoder is in
the Audio Services mode.
TV Services are restored by pressing TV on the RCU, or TV
on the decoder front panel.
NOTE: When switching from normal to standby then
back to normal, the decoder automatically returns
to the previously selected service.
If a SCART VCR is connected, it is not necessary
to take the decoder out of standby to view VCR
play back.
a. The TV display is lost because the TV is not tuned to the
new channel.
b. The new channel number is displayed on the front panel
of the decoder.
DSD 660 OPERATING INSTRUCTIONS 7
6 The decoder is set up to the local default settings by the
manufacturer. If it becomes necessary to change the
installation parameters consult your local installer.
The decoder is now ready for normal use.
Page 8
Optional Decoder Connections
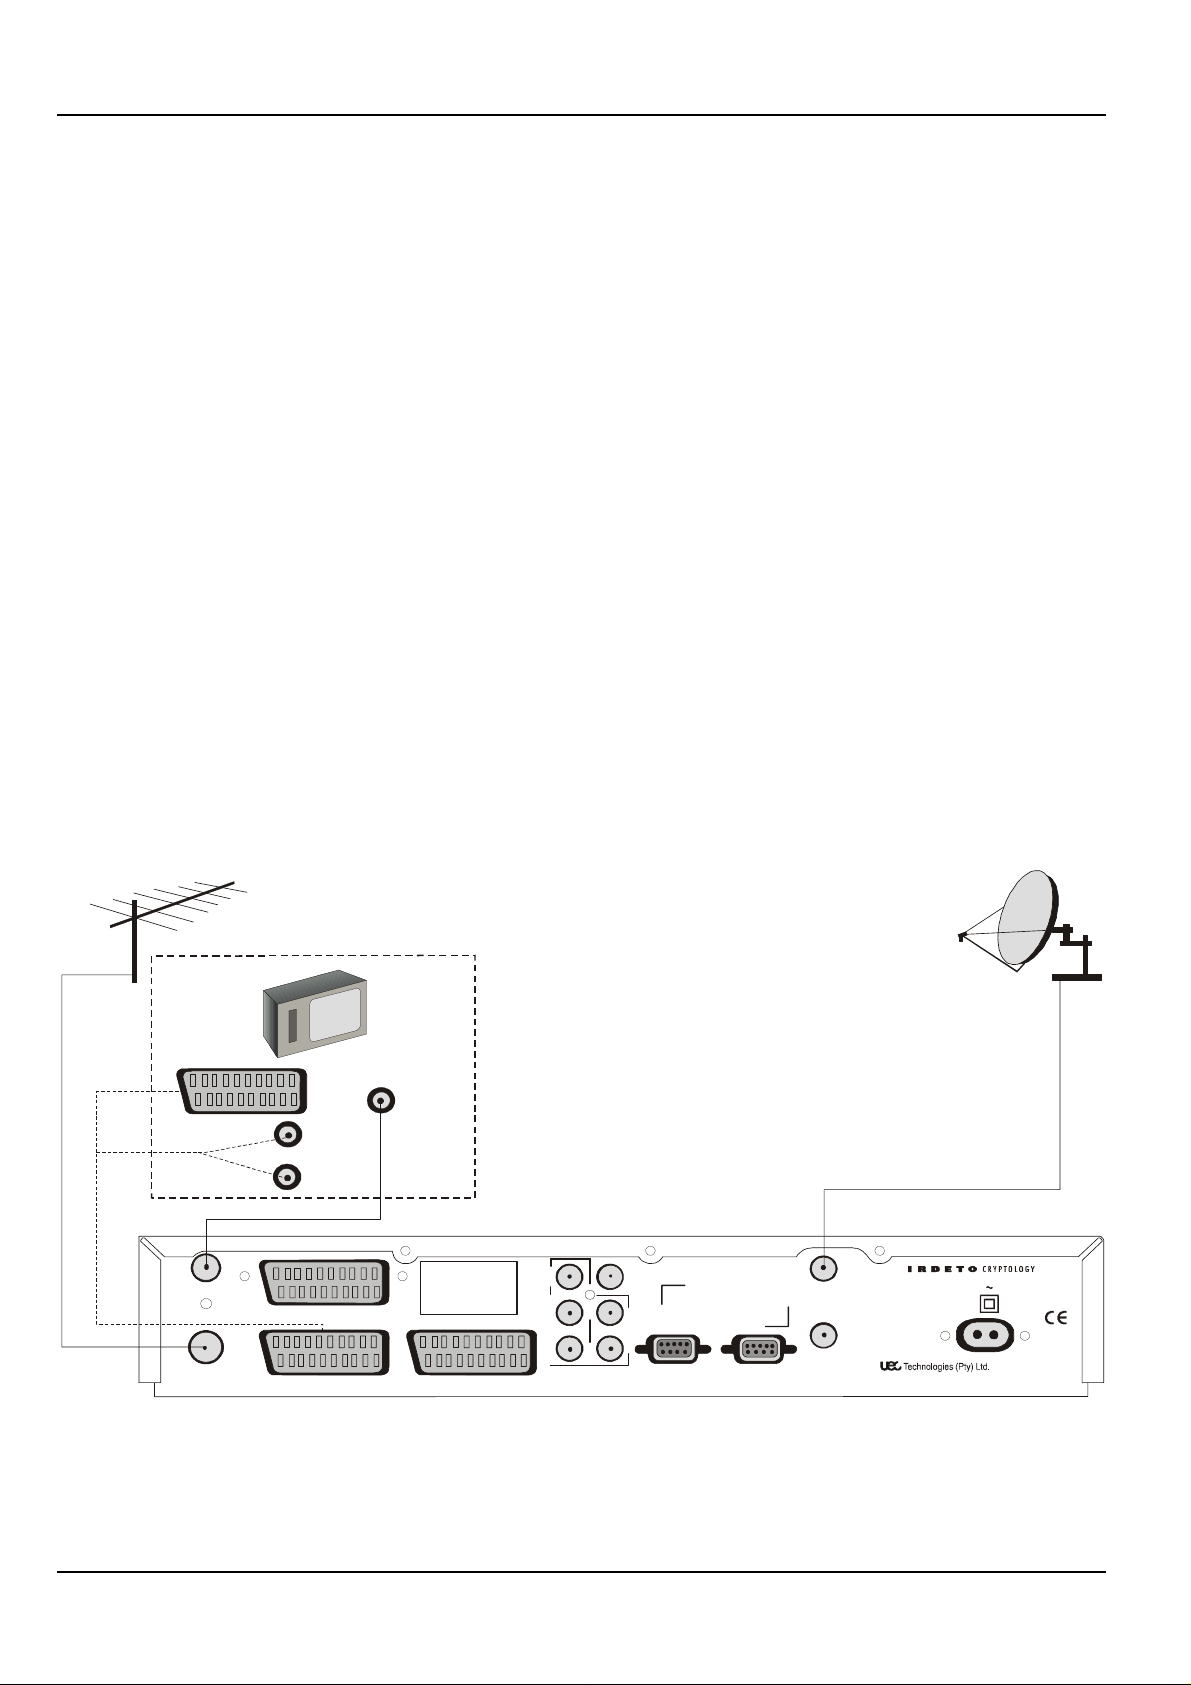
Satellite Decoder, VCR, TV (using SCART or RF Interface)
Introduction
There are several ways of connecting the decoder to an existing
entertainment system.
The following more common examples enable you to view satellite
services and terrestrial channels, record and playback from a VCR
and listen to CD quality stereo sound on a Hi-Fi.
Consult your local installer for assistance in setting up an audio/video
configuration best suited to your requirements.
Hints to Quality TV System Configurations
# Where possible, connect cables via audio/video outputs/inputs
(SCART or RCA) instead of RF connectors.
# Use an appropriate, correctly installed satellite dish system.
# Ensure that the system is properly earthed and protected
against lightning.
# Use high quality stereo TV and Hi-Fi equipment.
# Use high quality screened cables.
NOTE: When Video and Audio Inputs/Outputs are used, it may
be necessary to select a Video mode on the VCR and
TV in place of a TV mode.
NOTE: As the LNB carries a small voltage from the decoder on
its centre connector, it is recommended that the
decoder is switched off at the mains before connecting
or disconnecting the LNB.
1 Connect the terrestrial antenna connector to the RF IN
socket on the satellite decoder.
2 If a VCR is included in the installation, this is connected into
the system as per the diagram.
The following instruction applies if your TV has a SCART connector.
3 Using a SCART-to-SCART cable (not supplied), connect the
TV SCART socket on the decoder to the SCART socket on the
TV.
The following instruction applies if your TV does not have a SCART
connector.
4 Use the supplied flylead to connect the RF OUT socket on the
decoder to the RF IN socket on the TV.
5 Connect the coaxial cable connector from the LNB on the
satellite dish into the socket marked LNB IN on the decoder.
The connector on the coaxial cable should be turned until it is
finger tight.
SCART TO SCART
SCART TO RCA
RF OUT
RF IN
TV
AV CONNE CTIONS
VCR
RF IN
WARNING! High Voltage
DANGER! Do not open
Unauthorised opening
renders warranty i nvalid
Protect against moisture
TV
AUX
MONO
AUDIO
V
A
R
I
A
B
L
E
STEREO AUDIO
L
R
OUTPUTS
VIDEO
OUT
F
I
X
E
D
EXTERNAL MODEM
DATA S ERVI CE
LNB IN
400 mA max.
LNB OUT
220 / 240 V 50Hz 30W
Republic o f South Africa
REAR PANEL
8 OPERATING INSTRUCTIONS DSD 660
Page 9
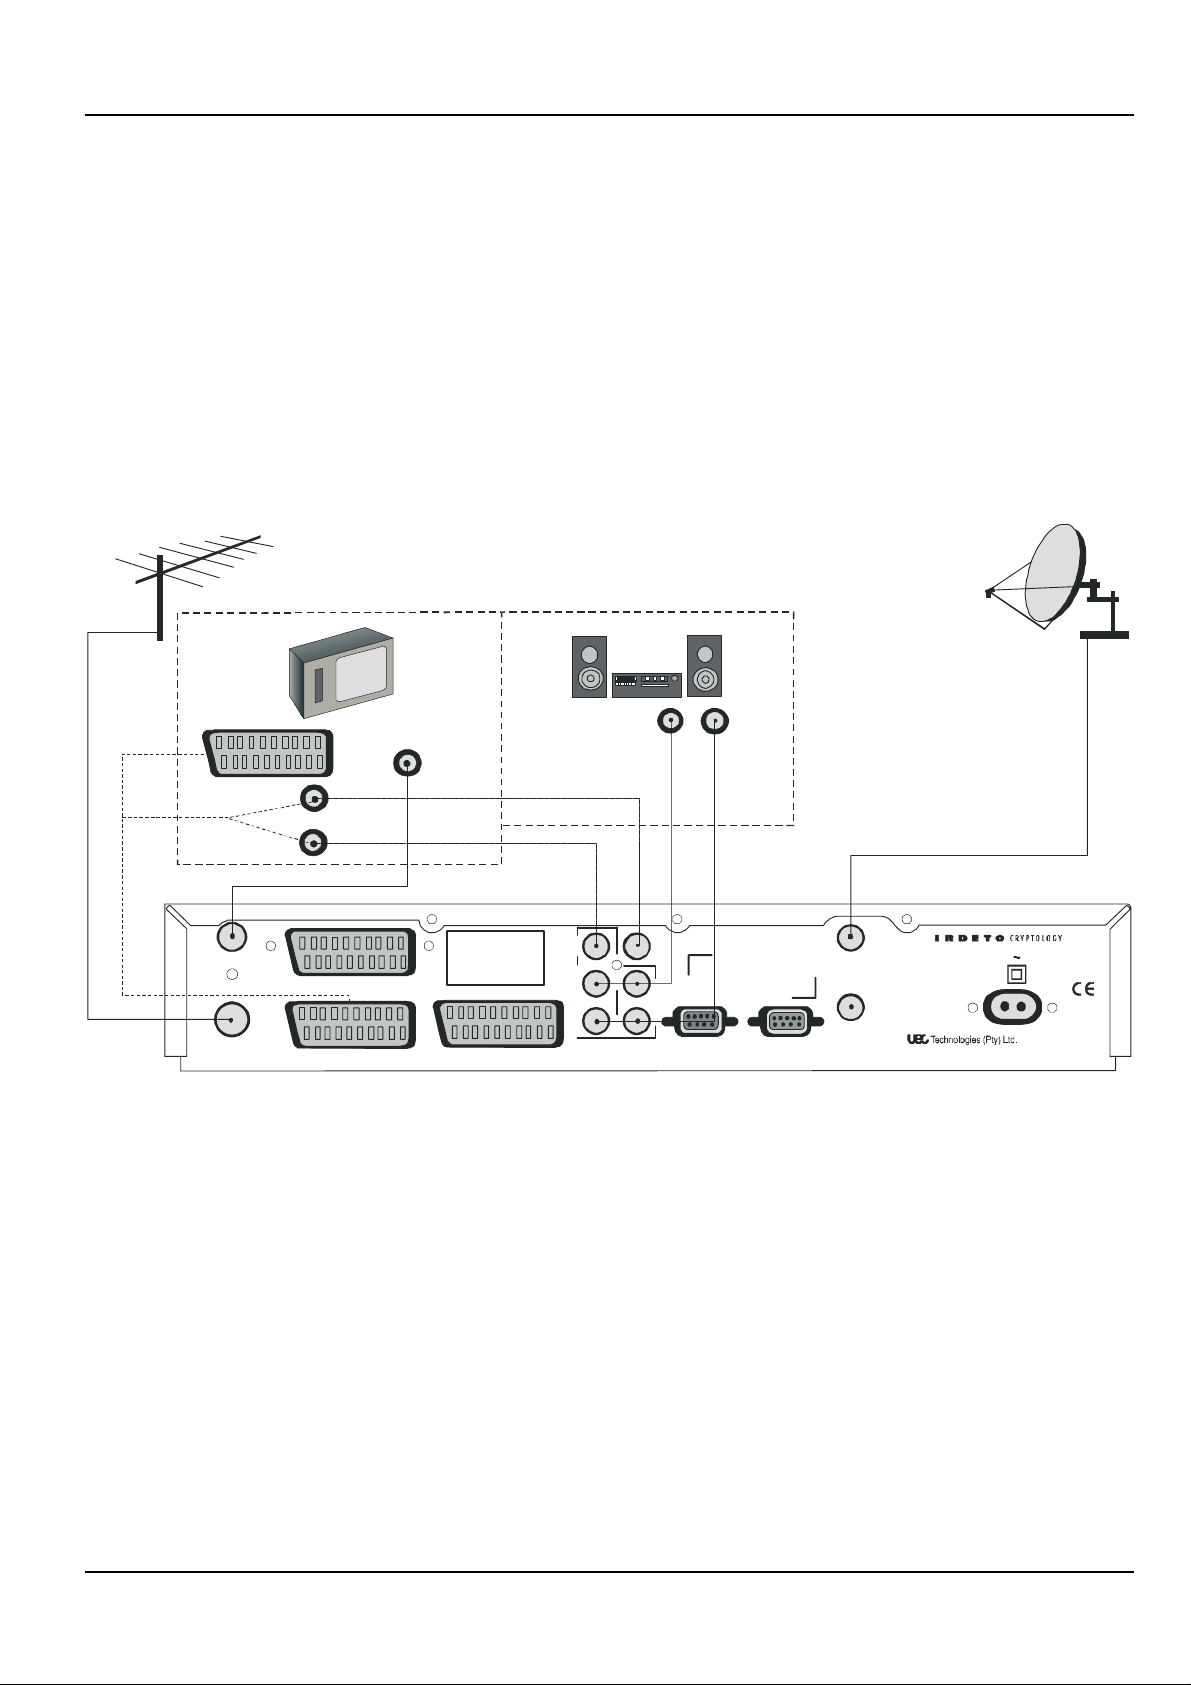
Decoder, TV (SCART or RF Interfaces), Hi-Fi
A
A
NOTE: It is recommended that you switch off the mains supply
to the decoder before connecting or disconnecting the
LNB connector.
1 Connect the terrestrial antenna connector to the RF IN socket
on the decoder.
2 Connect a flylead between the variable stereo sound outputs
on the decoder and the audio inputs on the Hi-Fi.
3 Connect the coaxial cable connector from the LNB on the
satellite dish into the connector marked LNB IN on the
decoder. The connector on the coaxial cable to the decoder
should be finger tight.
TV
SCART TO SCART
SCART TO RCA
VIDEO IN
AV CONNECTIONS
RF IN
AUDIO IN
4 Using a SCART-to-SCART cable (not supplied), connect the
TV SCART socket on the decoder to the SCART socket on the
TV.
5 If the TV does not have a SCART socket, use the supplied
flylead to connect the RF OUT connector on the decoder to
the RF IN connector on the TV.
BETTER QUALITY TV CAN BE OBT AINED IF THE RCA
CONNECTORS (AV ) ARE USED T O CONNECT THE TV TO
THE DECODER.
Hi-Fi
LR
UDIO
INPUT
RF OUT
RF IN
VCR
WARNING! High Voltage
NGER! Do not open
D
Unautho rised op enin g
renders warran ty inva lid
Prot ect agai nst moist ure
TV
AUX
MONO
AUDIO
V
A
R
I
A
B
L
E
STEREO AUDIO
L
R
OUTPUTS
VIDE O
OUT
F
I
X
E
D
EXTERNAL MODEM
DATA S ERVI CE
LNB IN
400 mA max.
LNB OUT
220/240V
Republic of South Africa
5
0Hz 30W
REAR PANE L
DSD 660 OPERATING INSTRUCTIONS 9
Page 10
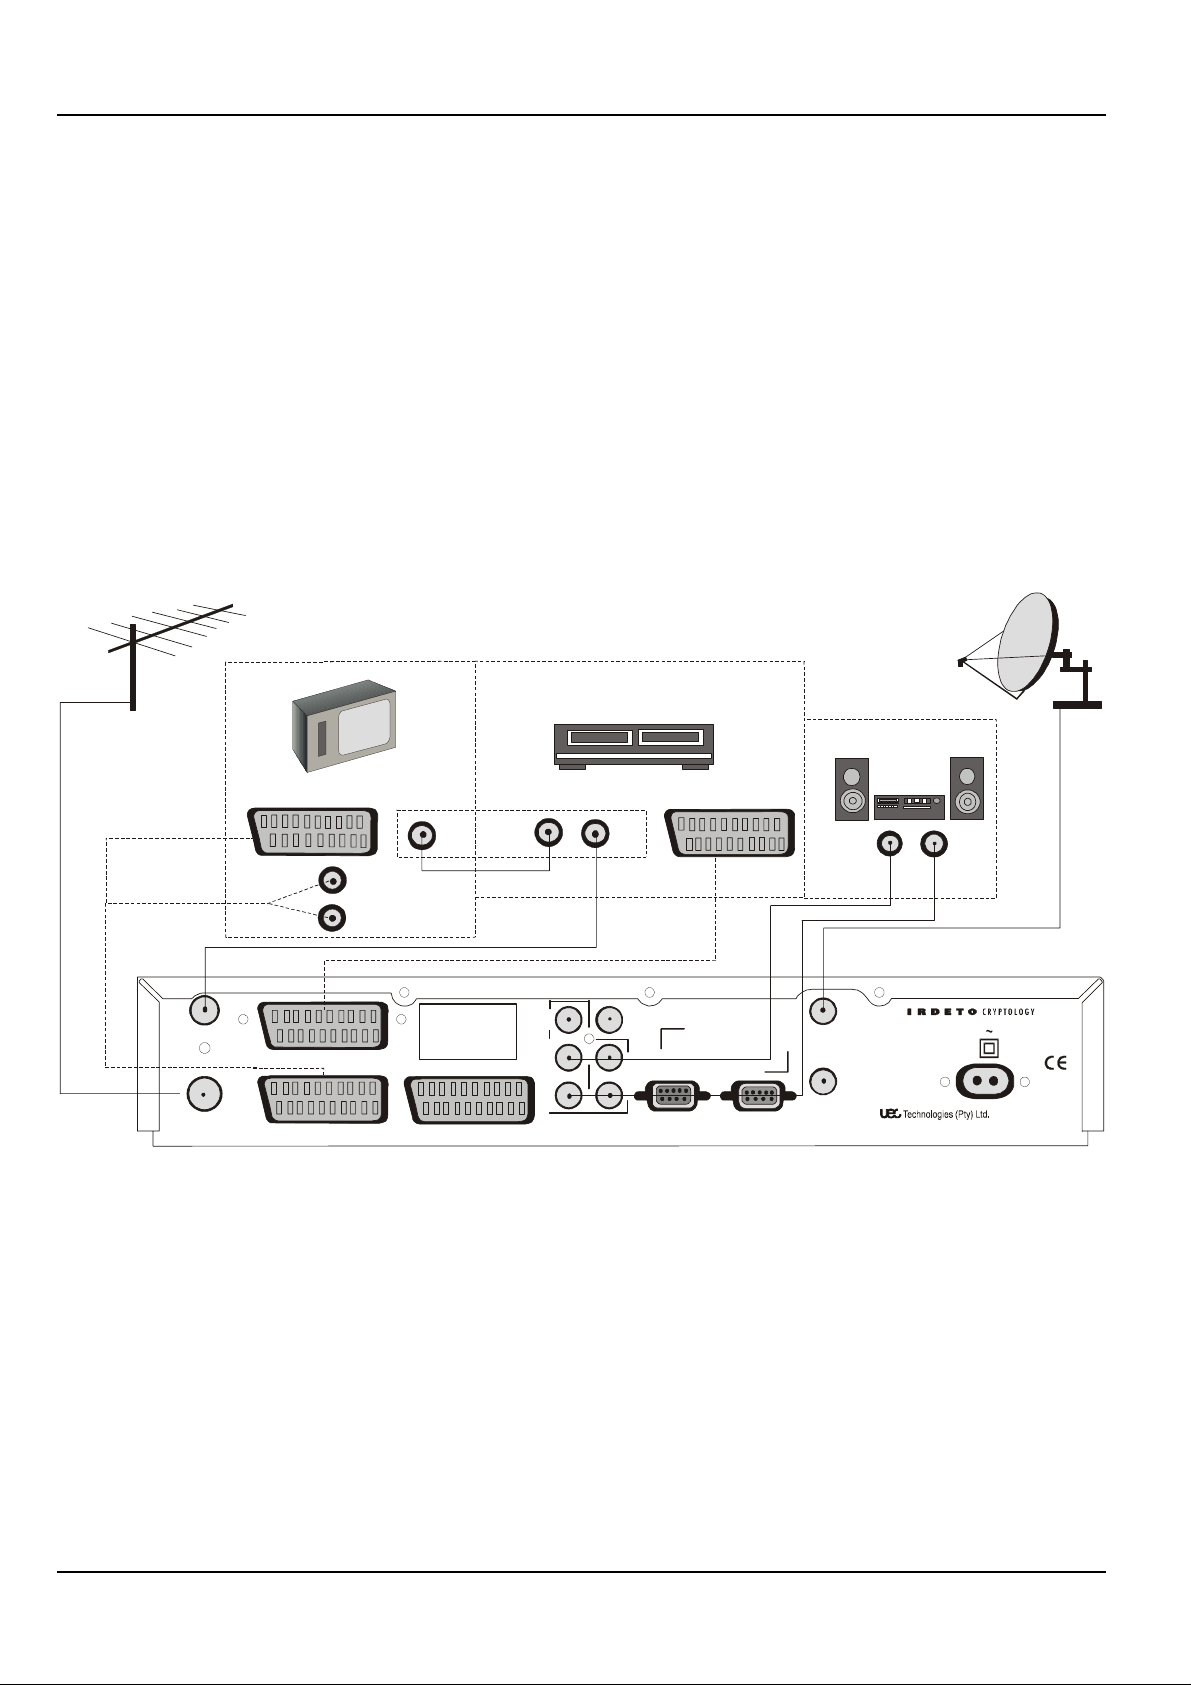
Decoder, VCR , TV, Hi-Fi
V
Follow steps 5 and 6 if you are using SCART connections
NOTE: It is recommended that you switch off the mains supply
to the decoder before connecting or disconnecting the
LNB.
1 Connect the terrestrial antenna connector to the RF IN socket
on the decoder.
Follow Steps 2 to 4 if you are not using SCART connectors
2 Using the supplied flylead, connect the RF OUT connector on
the decoder to the RF IN connector on the VCR.
3 Using the flylead supplied with the VCR, connect RF OUT on
the VCR to the RF IN on the TV
.
4 Connect the coaxial cable from the satellite dish to the LNB IN
connector on the decoder. Tighten the connector finger tight.
TV
5 Using a SCART-to-SCART cable (not supplied), connect the
TV SCART connector on the decoder to the SCART socket on
the TV.
6 Using another SCART cable, connect the VCR SCART on the
decoder to the SCART on the VCR.
7 Connect the VARIABLE LEFT and RIGHT HI-FI AUDIO OUT
connectors on the decoder to the LEFT and RIGHT AUDIO
INPUT connectors on the Hi-Fi.
8 Switch power on to the decoder.
9 Set the TV and VCR Scart Source and TV and VCR Scart
Video Output using the TV Installation menu. See page 23.
CR
SCART TO RCA
RF OUT
RF IN
TV SCART
VCR
Hi-Fi
CONNECTIONS IN BOX USED IF NO SCART CONNECTORS
RF IN
A
RF IN
VCR SCART
LR
AUDIO
INPUT
V
WARNING! High Voltage
DANGER! Do not open
Unauthorised opening
renders warranty invalid
Protect against moisture
TV
AUX
MONO
AUDIO
V
A
R
I
A
B
L
E
STEREO AU DIO
L
R
OUTPUTS
VIDEO
OUT
F
I
X
E
D
EXTERNAL MODEM
DATA SERVICE
LNB IN
400 mA max.
LNB OUT
220 / 240V 50Hz 30W
Republic of South A fric a
REAR PANEL
10 OPERATING INSTRUCTIONS DSD 660
Page 11

Decoder, VCR, TV, Hi-Fi (using RCA Connectors)
A
V
A
V
NOTE: It is recommended that you switch off the mains
supply to the decoder before connecting or
disconnecting the LNB.
5 If the TV and VCR have AV connectors, connect as shown in
the diagram.
6 Connect the VIDEO OUT connector on the decoder to the
VIDEO IN connector on the VCR.
1 Connect the terrestrial antenna to the RF IN socket on the
decoder.
2 Using the supplied flylead , connect the RF OUT on the
decoder to the RF IN on the VCR.
3 Using the flylead supplied with the VCR, connect the RF OUT
on the VCR to the RF IN on the TV.
4 Connect the coaxial cable connector from the LNB on the
satellite dish into the socket marked LNB IN on the decoder.
Tighten the connector finger tight.
T
RF IN
AV CONNECT IONS
7 Connect the MONO AUDIO socket on the decoder to the
AUDIO IN socket on the VCR.
NOTE: If your VCR has a stereo audio input, connect the
FIXED stereo audio outputs from the decoder to the
VCR stereo audio connector.
8 Switch the power on to the decoder.
VCR
Hi-Fi
RF IN
RF OUT
AUDIO
VIDEO
LR
UDIO
INPUT
RF OUT
RF IN
VCR
WARNING! High Voltage
D
NGER! Do not open
Unaut hor ised op enin g
renders warranty invalid
Protect against moisture
TV
AUX
MONO
AUDIO
V
A
R
I
A
B
L
E
STEREO A U DIO
L
R
OUTPUTS
VIDEO
OUT
F
I
X
E
D
EXTERNAL MODEM
DATA SERVICE
LNB IN
400 mA max.
LNB OUT
220 / 240
Republi c of South Africa
50Hz 30W
REAR PANEL
DSD 660 OPERATING INSTRUCTIONS 11
Page 12

Two Satellite Decoders, TV (using RF Connector)
The TV SCART connector on a second analogue or digital receiver
has audio, video (RGB) and composite video input connections that
can be used to view programmes. If a second receiver is connected,
signals from selected sources are automatically routed internally in
the decoder to the TV SCART connector.
1 Connect the terrestrial antenna connector to the RF IN socket
on the decoder.
5 On the first decoder, connect a second cable with F-type
connectors (not supplied), from the LNB OUT connector to
LNB IN connector on the second decoder.
6 Connect a second SCART to SCART connector between the
VCR SCART connector on the decoder and the TV
SCART on the second decoder.
RCU UHF Button Selection Functions
NOTE: It is recommended that you switch off the mains supply
to the decoder before connecting or disconnecting the
LNB
2 Using a SCART-to-SCART cable (not supplied), connect the
TV SCART socket on the decoder to the SCART socket on the
TV.
3 If the TV does not have a SCART connector, use the supplied
flylead to connect the RF OUT socket of the decoder to the
RF IN socket on the TV.
4 Connect the coaxial cable connector from the LNB on the
satellite dish into the socket marked LNB IN on the decoder.
The connector on the coaxial cable should be turned until it
is finger tight
Pressing UHF on the RCU with the second decoder connected and
operating, selects the TV viewing source in the sequence VCR, AU1,
TV and IRD. If AU1 is selected, the satellite picture is routed to the
TV and VCR from the second decoder.
If a second satellite decoder is being used, consult the installer as to
the menu setup requirements.
12 OPERATING INSTRUCTIONS DSD 660
Page 13

Bouquet Selection
Stepping through Services
The TV services are transmitted in packages called BOUQUETS,
each bouquet containing a series of services or programmes . The
decoder has provision for several bouquets, any of which can be
selected by pressing TV on the RCU, highlighting the required
bouquet using the up/down arrows on the RCU , then following the
on-screen instructions. If a selected bouquet is not subscribed to, a
message “E38 Service is not currently running” will appear on the
TV screen.
When a subscribed to bouquet is selected, the services in that
bouquet will be listed numerically in the Electronic Programme Guide
(see page 15).
Bouquet Selection
Middle East Programmes
Press OK to select
Press EXIT to cancel
Selecting Specific Services
Specific TV or Audio Services can be selected, either:
# Directly, using the RCU
# By stepping through services using the RCU or decoder front
panel keys
# By using the Open TV Electronic Programme Guide (EPG), or
# By using the Open TV Information Bar.
Stepping through services is possible using either the RCU or
decoder front panel keys.
Stepping using the RCU
To step through services using the RCU, do the following:
1 Select the type of service required, TV or audio ( )
2 Press P+ to step to the next service or P - to step to the
previous service in the list of available services.
After pressing P+ or P -, an information box is displayed at the
bottom of the TV screen with details of the service. After a few
seconds, the relevant service is displayed/heard.
3 If required, continue stepping by pressing P+ or P - until you
find the service you prefer. It is not necessary to wait for
services to be displayed/heard before stepping to the next or
previous service.
If you decide to watch or listen to a service you have stepped
to, wait for the service to be displayed/heard. The information
box will disappear after a short while or can be removed
immediately by pressing EXIT.
NOTE: When you reach the last available service in the list
and press P+ you are returned to the first service in the
list.
TIP: Use the convenient selecting and sorting facilities to
personalise the services list. After using these facilities, your
favourite services will be in your order of preference. Refer to
page 21.
Stepping using the Decoder Front Panel Keys
To step and select a specific service using the decoder front panel
keys, do the following:
1 Select the type of service required, by pressing TV/ to switch
between TV services and audio services. Selection of the
audio service is indicated by a green indicator on the front
panel display.
Selecting Services Directly
Services can only be selected directly using the RCU. To select a
specific service, do the following:
1 To select an audio service, press on the RCU. Press TV to
restore TV services.
2 Press the number of the required service on the RCU’s
numerical keypad.
The specific service will be heard/displayed after a few
moments accompanied by an information box at the bottom of
the TV screen with details of the selected service.
NOTE: To select services requiring two-digit numbers, i.e.,10-
99, press the first digit, then the second digit without
pausing.
TIP: When the key for the first digit is pressed on the RCU, the
corresponding number is displayed on the left of the front
panel numerical display on the decoder. After a few moments,
the number moves to the right. The second digit of two digit
numbers must be keyed in before this move takes place.
DSD 660 OPERATING INSTRUCTIONS 13
2 Press (up) to step to the next service or (down) to step
to the previous service in the list of available services.
After pressing or , an information box is displayed at the
bottom of the TV screen with details of the service. After a few
seconds the relevant service is displayed/heard.
3 Continue stepping, by pressing or until you find the service
you prefer. It is not necessary to wait for services to be
displayed/heard before stepping to the next or previous
service.
To view/listen to any service you have stepped to, wait for the
service to be displayed/heard. The information box will
disappear after a short while.
NOTE: When you reach the last service in the list, pressing
returns you to the first service in the list. The and
symbols have dual functions and cannot be used for
stepping while the volume control box is displayed on
the screen. This box is displayed when setting the
volume, see page 14.
Page 14

Selecting Specific Services from the EPG
NOTE: For a description of the Electronic Programme Guide
(EPG) refer to page 15.
Selecting Services from the Information Bar
NOTE: A description of the Information Bar is on page 17.
Controlling the Show
V olume Control using the RCU Keys
NOTE: It is recommended that you first select a terrestrial
channel, then set the volume on the TV to a
comfortable listening level.
NOTE: The mute function is disabled when the FIXED
STEREO audio outputs (Left and Right) on the
decoder are used. This ensures a fixed volume
level for recording purposes. The VARIABLE STEREO
audio outputs (Left and Right) of the decoder can,
however, be muted.
Displaying Subtitles or T eletext
Subtitles
If subtitles are available, they are normally displayed on the screen
as part of the program.
To remove a subtitle do the following:
1 Press symbol on the RCU. A box is displayed on
the TV screen as follows:
To change the volume level on the decoder, select your satellite
service, then press V+ to increase the volume level or V- to reduce
the volume level. The following is displayed on the TV screen when
adjusting volume:
The volume level is depicted by the length of the highlight bar.
NOTE: The Fixed Stereo Sound Outputs (Left and Right)
cannot be controlled with the volume control keys on
the RCU or on the front panel.
V olume Control using the Decoder Keys
To change the volume level, press P/V on the decoder. The following
is displayed for a brief time:
While the volume control window is displayed, press and release
or respectively to increase or reduce the volume level in separate
steps. The change in volume level is depicted by the changing length
of the highlight bar.
NOTE: The Variable Stereo Sound Outputs (Left and Right)
can be controlled using the volume control keys on
the RCU or on the front panel.
Mute
To mute the audio do the following:
1 Press on the RCU. The following window is displayed for
3 seconds and the audio muted:
1 of 2 Stop s ubtitle
Press OK to select
NOTE: If subtitles are not available, a “No subtitling” window
2 To restore the subtitles, press again. The following box
is displayed for 5 seconds. Press EXIT if required.
is displayed
2 of 2 (Language)
Press OK to select
Teletext
Some services (e.g., CNN) have a teletext service. This can be
selected as follows:
1 With the service selected, i.e., CNN, press symbol
twice on the RCU. The following box is displayed:
1 of 1 English
If teletext is not available, a “No teletext” window is displayed
for 5 seconds. If other languages are available keep pressing
the symbol until the language is selected.
2 To make the teletext transparent press the symbol
again.
3 To page up or down, press P+ or P- on the RCU. To change to
a distant page, select the page number on the RCU keypad,
then press OK
4 To clear the teletext , press EXIT on the RCU.
Clock
2 To restore the audio press again. The audio is
restored at the previous level and the volume control
window displayed for 3 seconds.
3 Adjust the volume level using V+ and V-.
14 OPERATING INSTRUCTIONS DSD 660
To view the time do the following:
1 Press on the RCU. The date and time are displayed for
a few seconds. If required press EXIT to clear.
Page 15

Selecting Soundtracks
Available soundtracks, included with programmes, can be heard
and selected at any time while watching a programme.
NOTE: Preferred soundtrack languages for automatic
selection can be set using the menu system. Refer to
Soundtrack Options (page 19).
To listen to and select available soundtracks, do the following:
1 Press ? on the RCU. The current soundtrack
language is displayed as follows:
OPEN TV ELECTRONIC PROGRAMME GUIDE
The decoder stores up-to-date information, received over the air, of
all the currently subscribed to TV Services and on-air Audio Services,
as well as the next and extended programmes scheduled for each TV
and Audio service. The information for each programme includes,
where appropriate:
# The service number and name
# Title of the programme
# Censorship classification of the programme
Selected English
?
Pressing OK selects the option listed.
2 Press the symbol again. If there are additional soundtracks
available, the next soundtrack option is listed in the window.
Continue pressing to cycle through all the available
soundtracks.
3 Press OK to select a soundtrack language. The soundtrack
window is displayed and the new soundtrack is heard.
Power Reset
If your TV picture freezes for a prolonged period, it is possible to
reset the decoder without unplugging it from the power supply.
Simultaneously press then release the and TV/ buttons on the
decoder front panel.
Signal Source Selection
Switching between signal source devices is automatic by using the
UHF button on the RCU. To select between the available signal
sources, a single press-release of the UHF button in normal running
mode (i.e., not in menu or EPG) switches to the next source. This is
an override selection in that it will switch to VCR even if a VCR is not
playing.
The signal source is indicated on the decoder front panel display. The
available options are:
! Decoder (IRD): This allows you to use your satellite services
and switches any other device (VCR, second decoder) to Off
or Standby.
! VCR: This allows you to view a program on the VCR. Press
Play on the VCR to view.
AUX (AU1): This allows you to use the services of a second
decoder. The LNB polarisation must be the same for both
decoders.
! TV (tv): This allows you to use the terrestrial TV channels.
# Brief information on the programme
# Start and finish times of the current programme
# Reminders
# Impulse Pay Per View symbol (when available)
Using the EPG
1 On the RCU, press TV GUIDE. An on-screen menu is
displayed as follows:
Services
Now/Next EPG
Extended EPG
Theme Search
Press OK to select
Press EXIT to cancel
NOTE: When pressing any of the arrow controls on the RCU,
Now/Next EPG
Selecting Now/Next EPG displays a programme guide, as shown in
the following diagram, that provides short text descriptions of the TV
and audio programmes contained in the selected bouquet, as well as
the next programmes scheduled for each TV and audio service.
NOTE: TV programmes are not displayed and audio not
Use the cursor keys or to scroll up or down the list, as only five
events are shown on the screen. When the last event is highlighted
and you press , five new events are displayed and the highlight is
put at the top of the list. This also works for scrolling up.
the colour of the displayed arrow in the EPG screens
darkens to indicate activity.
heard while the EPG screen is displayed.
The list is continuous, so after the last service the Guide starts
displaying service 1 again.
The current programmes are listed when NOW is selected and the
programmes to follow are listed when NEXT is selected.
DSD 660 OPERATING INSTRUCTIONS 15
Page 16

TV G uide
TV1 About You
3
Show
Nick
4
UKTV
5
Disc The Advent urers
6
8
FOX8
Mad
Time Cop
Scooby Doo
Black Adder
Absolutel y Fabulous
09:00
10:00
07:40
11:00
06:00
07:00
08:30
10:00
09:15
10:00
09:00
10:30
17/02/99
12:46:49
Audio
Guide
V
T
TV Guide
NOW
NEXT
Pressing on the RCU, selects the TV guide for tomorrow’s
programmes. Pressing and holding the button pages through
each day’s programme until the end of the 8 days.
Pressing and holding the button, returns you to today’s
programme guide.
Theme Search
Selecting Theme Search allows you to search for a particular type
of programme, as shown in the following diagram:
Middle East Programmes
Theme Searc h Set u p
16/5/99
16:00
24 Hours
Press the Info button for more information
Press OK to tu ne this programme
3 To move between the NOW or NEXT programmes, press
or on the RCU.
4 Select the highlighted programme to view/hear by pressing
OK.
NEXT programmes cannot be viewed before their start time.
Pressing OK with NEXT selected, sets a programme reminder
and a clock symbol appears under the programme time,
indicating a reminder. To remove the reminder press OK
again; the clock symbol disappears.
5 Additional information on the programme is displayed when i
on the RCU is pressed with a service on the the EPG selected.
Press EXIT to return to the EPG.
6 Press on the RCU to enter the Audio guide. The Audio guide
behaves exactly the same as the TV guide. Pressing TV on the
RCU takes you back to the TV guide.
7 Press OK to return to normal viewing/listening.
8 In all programme guides, additional information on the
programmes is displayed when i on the RCU is pressed while
the EPG is displayed and the programme highlighted.
Select the day
Select the time of day
Select the theme
Select the subtheme
Press OK to start the search
Press EXIT to quit
Today
Whole Day
Movies
Action
Scrolling down using the button transfers the highlight and left
and right arrows to the selected box. Pressing the arrows selects
various options.
Making a selection in the sub-theme box, then pressing OK presents
a display as per the following diagram:
Middle East Programmes
Today - Whole Day
Action
02:00 The Gypsy Moths
04:00 Action, (22) TNT
16/5/99
16:15
Fam
18
Extended EPG
Selecting Extended EPG provides a guide as to today’s programmes
and the next 7 days, as per the following diagram:
Press the INFO button for more event information
Press OK to tune to (22) TNT
Press EXIT to return to the setup screen
16 OPERATING INSTRUCTIONS DSD 660
Page 17

OPEN TV INFORMATION BAR
At any time whilst watching TV services or listening to radio
services, the viewer can obtain information about the current
programme and select available programmes via the Information Bar.
1 Press i on the RCU. The following window is displayed:
PARENTAL GUIDANCE
When the user has selected a service where there is a parentally
blocked programme, a “key” symbol is displayed in the Information
Bar (bottom right). The message above the Information Bar indicates
that the user should press OK to unblock the programme.
14:15
50 Science Frontiers
Disc Science
15:00 - 16:00
Fam
2 Use the cursor keys or to scroll up or down through titles
on other services, whilst simultaneously watching the current
service. The current programmes are listed when NOW is
selected and the programmes to follow are listed when NEXT
is highlighted.
Pressing i with the Information Bar displayed, provides
additional information on the programme.The local time will
also be displayed on the TV when the Information Bar is
displayed.
3 Move between the NOW or NEXT programmes by pressing
or on the RCU.
4 With NEXT selected, an Information Bar appears that displays
the next programme. Pressing OK sets the reminder and a
clock symbol appears in the Information Box. Pressing OK
again removes the reminder.
NEXT programmes cannot be viewed before their start time.
To exit the Information Box, press EXIT.
5 When viewing a programme, to tune to another programme
press the numbered keys on the RCU. The Information Bar will
be displayed for X seconds (see Information Box Display
Period, page 20).
REMINDERS
Press OK to unblock this programme
22
1 Press OK. A screen requiring the Parental PIN code is
displayed.
14:15
Enter your PIN code to unblock this programme
To retain the blocking, press EXIT
Timecop
22
Action starring Jean-Claude Van Damme
Hall
16
14:10 - 15:45
The procedure for setting and removing a reminder has already
been detailed.
Refer to Open TV Electronic Programme Guide or Open TV
Information Bar. At the right time a reminder message pops up. If you
intend to watch the booked programme, press OK on the RCU which
tunes the decoder to the new service. Otherwise press EXIT to
remove the message, while remaining tuned to the original service.
2 Enter your Parental PIN code using the keypad. Refer to
Parental Guidance Options page 19. The programme is
then unblocked.
DSD 660 OPERATING INSTRUCTIONS 17
Page 18

MENU NAVIGATION ROUTE
A
A
A
Language Selection Language Options in Guide & Menu
So undtrack Opt ions
Parental Guidance
C ens orship C lassification
Change PIN
Information Box Display Period
Organising Services
Display Period (seconds)
Sort TV Services
Reset TV Services
udio Services
Sort
R es et Audio Services
Full Rescan
Mail Messa ges Mail Message Box
Advanced Options
Change Dish
Installation
PIN Code
Change PIN Code- Old/New
Current Order List
C ur rent Or der List
PIN Code for
Installation
Relocate
Relocate
LN B Co nf igurat ion
Signal Setup
Main Menu
Soundtrack Options
Parental Guidance
Information Box Display Period
Organising Services
Mail Messa ges
Advanced Options
Press and to select option
Press OK to confirm option
Signal Detection
Coarse Tune
Fine Tune
Information
PIN Code for
Installation
Change Modem Settings
Local Time
DSD Upgrade
NOTE: The menu structure can be upgraded over the
Tune DSD
Reset to Fac tory
Defaults
Loop-T hrough Mode
Status
Status
C
Lo ader Status
TV TypeTV Installation
spect Rat io
U HF Tu ning
SCART Source
SCART Video
Output
air by the Service Provider and may differ slightly
from that shown in these instructions.
18 OPERATING INSTRUCTIONS DSD 660
Page 19

USING MENUS
To use the Menu system:
1 Ensure that the decoder is not in standby mode by pressing
if necessary.
2 Press MENU on the RCU. The following Main Menu is
displayed, which provides access to all other menus as shown
in the following figure:
Language Option in Guide and Menu
1 On selection the Language Options in Guide and Menu option
is highlighted.
2 Press OK.
The Language Menu containing a selection of languages is
displayed, as follows:
Language Options in Guide & Menu
Main Menu
Soundtrack Options
Parental Guidance
Information Box Display P eriod
Organising Services
Mail Messages
Advanced Options
Press and to select option
Press OK to confirm option
All the menus are navigated as follows:
1 Use or buttons to scroll the highlighted bar up or down in a
(sub)menu or a vertical list box.
2 Select a highlighted menu option and go one level lower within
the menu hierarchy by pressing OK on the RCU. This applies
to the Main Menu screen and all submenu screens.
In screens where parameters can be set, OK is used to save
the settings.
3 Use EXIT to return to the preceding menu (go one level higher
within the menu hierarchy).
In screens where the parameters can be set, EXIT is used to
cancel any settings that may have been entered without
saving.
Arabic
English
Press
and to select preferred language
Press OK to confirm this language
3 Use or arrows to highlight preferred language.
4 Press OK to select the desired language.
5 Press EXIT to return to the Main Menu or MENU to return to
the service.
The menu should now be presented in the language selected
Soundtrack Options
Soundtrack Options allows users to set the programme language of
the decoder, where one is available.
To select the text language of your choice do the following:
1 Press MENU on the RCU.
The Main Menu options list is displayed.
NOTE: On initial selection of the Main Menu, the default
setting is for Soundtrack Options.
2 Press OK to select Soundtrack Options. The following option
list is displayed:
4 Use and buttons to change the value of an input field
having preprogrammed values.
5 Use MENU to exit all menus and return to the TV or audio
programme.
6 Use numbered buttons to enter numerical values.
Language Selection
The Language Selection screen allows users to set the text
language of the decoder, if options are available. The text
language is set for the menus, EPG and Information Bar.
To select the text language of your choice, do the following:
1 Press MENU on the RCU.
The Main Menu screen is displayed with Language Selection
highlighted.
2 Press OK. The following option list is displayed:
DSD 660 OPERATING INSTRUCTIONS 19
Current opti ons :
1
Arabic
English
2
French
Other
Pres s and to se le t
Press to relo cate this language
Soundtrack Options
Language to relo ca te
preferredc
language
Page 20

3 On the RCU, press or arrows to highlight the preferred
language that you wish to relocate from the list.
4 Press to move the highlighted language option into the
relocation window.
NOTES: Only two languages can be relocated into
positions 1and 2.
5 Press OK to confirm your selection.
Parental Guidance
The decoder includes a Parental Guidance facility to control viewing
of age restricted programmes. Access to this facility is controlled
via the Parental PIN code.
TIP: The PIN is set at the factory to 1 2 3 4. If you intend to use
the Parental Guidance facility, please change the PIN as
soon as possible. Remember to keep a note of your new
PIN in a secure place. To unblock an event refer to page 17.
Parental Guidance can only be applied to scrambled programmes.
Setting the Parental Level
1 Press MENU on the RCU.
The Main Menu options list is displayed.
2 On the RCU, press to highlight Parental Guidance.
The Parental Guidance screen is then displayed with the
Censorship Classification option highlighted
5 Press or to highlight the preferred control option.
6 Select your choice by pressing OK on the RCU.
7 Press EXIT to return to the Main Menu or MENU to return to
the service.
Changing the Parental PIN Code
To change your existing PIN to a new number, carry out the
following:
1 Press MENU on the RCU. The Main Menu options list is
displayed.
2 Press to select the Parental Guidance option, then press
OK.
3 On the Parental Guidance menu, press to highlight Change
PIN, then press OK. The Change PIN screen is displayed.
4 Key in your old PIN code.
This automatically highlights the new PIN code to be entered.
5 Change the PIN to its new value. Instead of digits, crosses are
displayed for the PIN codes. When the new PIN code is
entered, a second box is highlighted requesting you to re-enter
the new code. This is a safeguard against an initial incorrect
entry.
6 The Parental Guidance menu is displayed.
7 Press EXIT to return to the Main Menu or MENU to return to
the service.
Parental Guid ance
Censorship Classification
Change PIN
Press and to select option
Press OK to confirm selection
3 Press OK. A Security Check screen is displayed, in which the
Parental PIN must be entered using the RCU.
4 On entering the correct PIN, a Parental Guidance submenu is
displayed, which is organised as follows:
NOTE: If the incorrect PIN is entered, the previous menu
(Security Check) is again displayed.
EXPLANATION
Can be viewed by all the family
Programmes classified as PG
can be viewed at parents discretion
Programmes unsuitable for
persons under 16
Programmes unsuitable for
persons under 18
No Programmes are restricted.
SELECT MENU OPTION
Family
Parental Guidance
16
18
No Block
Information Box Display Period
If the period of time that the Information Bar is displayed is either too
long or too short, change the Information Bar display time as follows:
1 Press MENU on the RCU.
The Main Menu options list is displayed.
2 On the RCU, press to highlight Information Box Display
Period.
3 Press OK.The Information Box Display Period screen is
displayed.
4 Press or to change the info display period (in seconds).
5 Press OK to confirm the new time or EXIT to cancel the
screen. The Main Menu is displayed.
6 Press EXIT or MENU to return to the service.
Organising Services
NOTE: Main Menu option “Organising Services” can only be
selected after successfully receiving programming
information over-the-air. Before this happens the
“Organisation Services” option is not displayed.
When the decoder receives digital satellite signals, it also receives
text information about the television and audio services that are being
broadcast. The decoder automatically stores this continually updated
information which you can view at any time.
The decoder also provides sort and reset features to allow you to
arrange the service lists according to your own personal preference.
20 OPERATING INSTRUCTIONS DSD 660
Page 21

The Organising Services menu is as shown in the following
diagram:
Organising Services
Sort TV Services
Reset TV Servi c es
Sort audio services
Reset audio services
Full Rescan
Press and to select option
Press OK to co n f irm selection
Reset TV Services
To reset the TV services to the order supplied by the Service
Provider, do the following:
1 Press MENU on the RCU.
The Main Menu options list is displayed.
2 On the RCU, press to highlight Organising Services.
3 Press OK to display Organising Services options list.
4 Press to highlight Reset TV Services.
5 Press OK to reset the services list to the list supplied by the
Service Provider.
A message “ Do you want to reset the TV services list?” is
displayed.
Sort TV Services
This feature allows you to sort your services into an order of your
choice. The sorting process defines the TV service you want on any
channel number. To sort the order, perform the following:
1 Press MENU on the RCU.
The Main Menu options list is displayed.
2 On the RCU, press to highlight Organising Services.
3 Press OK to display Organising Services options list.
4 The Sort TV Services option is highlighted.
5 Press OK. The Sort TV Services screen is displayed as
follows:
Sort TV services
Current order
TMMC
1
Hall
2
3
TNT
4
SS
5
SS2
6
ESPN
Press and to select a service
to relocate th is service
Press
Press OK to confirm or EXIT to cancel
Se rvic e t o reloc ate
6 Press OK.
The decoder then starts a rescan and on completion returns to
the previously selected service.
Sort Audio Services
Refer to “Sort TV Services” page 20. Select Sort Audio Services
instead of TV Services.
Reset Audio Services
Refer to “Reset TV Services” page 21. Select Reset Audio Services
instead of TV Services.
Full Rescan
This facility is used when a new service provider becomes available.
It is recommended that this facility is used on a weekly basis to
upgrade the services available to you .
1 Press MENU on the RCU.
The Mains Menu options list is displayed.
2 On the RCU, press to highlight Organising Services.
3 Press OK to display Organising Services options list.
4 On the RCU, press to highlight Full Rescan.
5 Press OK.
A message “Do you want to start a Full Rescan” is
displayed.
6 From the displayed list, choose the service that you wish to
move using or on the RCU.
7 Press to move this service into the service to relocate box.
8 Press or to highlight the position where you want the
service from the relocation box to be placed.
9 Using , move the service that is now in the relocation box
6 Press OK to confirm.
A scanning screen is displayed in which are listed the
operators, services and transport streams. After a period of
time, the previous service is automatically restored.
NOTE: The personal sort list is lost after a full rescan has
been performed.
Mail Messages
into the new position in the current order list.
10 Repeat steps 6 to 9 until all services are set as you wish.
11 Press OK to confirm your selections.
The Organising Services menu is displayed.
The Service Provider can send global or individual messages over
the air. When a message has been received, the yellow front panel
indicator will be illuminated and the symbol displayed on every
menu screen.
12 Press EXIT to return to the Main Menu or MENU to return to
the service.
DSD 660 OPERATING INSTRUCTIONS 21
Page 22

To read the message do the following:
1 Press MENU on the RCU.
The Mains Menu options list is displayed.
2 On the RCU, press to highlight Mail Messages.
NOTE: 9949 is the installation PIN code. A different PIN code is
required for the Parental Guidance PIN .
6 Press OK.
The LNB Configuration Menu is displayed, in which LNB Setup 1
highlighted.
3 Press OK. The Mail Messages screen is displayed.
4 Press OK to return to the Main Menu.
The front panel yellow indicator will be OFF and the mail symbol will
no longer be displayed.
Advanced Options
Selecting the Advanced Options on the Main Menu provides access
to important technical settings for the decoder and satellite dish
antenna.
Change Dish Installation
Important!
The installation settings should be set by a qualified person.
Do not change any installation settings before carefully noting
the value of the setting you want to change and ensuring that
the new and old values are written down on page 29. Incorrect
settings will prevent the decoder from operating correctly.
An installation PIN code must first be entered before the Change
Dish Installation and its sub-menus can be accessed. This measure
helps to prevent accidental changes to the set up. The PIN code is
9949. This number cannot be changed.
LNB Configurartion
Your decoder supports several LNB and network configuration
options. If your satellite dish installation does not include a Universal
(dual) LNB set up to the factory default settings, it is recommended
that you consult your installer as to your particular setup
requirements.
Information on these options for the installer can be found on the
Manufacturer’s website: http://www.uec.co.za in the subsection
named SUPPORT.
Set LNB Power
In most installations the correct setting for the LNB Power is “On”. Certain
special applications may require the setting to be “Off”.
To set the LNB Power “On” or “Off”, do the following:
1 Press MENU on the RCU.
The Main Menu options list is displayed.
2 On the RCU, press to highlight Advanced Options.
3 Press OK.
The Advanced Options Menu is displayed, in which the Change
Dish Installation option is highlighted.
4 Press OK.
The PIN Code for Installation screen is displayed.
5 Type the PIN code 9949 using the keypad on the RCU. See
Note. After successfully entering the installation PIN, the Change
Dish Installation Menu is displayed, in which the LNB
Configuration option is highlighted.
7 Press OK.
The Set LNB Power screen is displayed.
8 Press OK to save ON setting, or press to set the LNB power
to OFF.
9 Press OK to activate the setting.
The Change LNB Settings Menu is displayed.
10 Press EXIT to return to the previous menu or MENU to return to
the service.
LNB Setup
The LNB mode and frequency or frequencies must be appropriate for
the LNB installed on the satellite dish. The information is supplied with
the LNB. (The default setting is for a Universal (Dual) LNB.)
To set the frequency:
1 Repeat steps 1 to 6 of Set LNB Power (page 21).
2 Press to highlight LNB Mode.
3 Press to highlight LNB Lo frequency.
4 Press to highlight LNB Hi frequency.
5 Press OK.
The LNB Configuration menu screen is displayed. Press EXIT.
6 The Change Dish Installation menu screen is now displayed.
7 Press to highlight Signal Setup, then press OK.
8 Signal Setup 1 (home) is now highlighted on the Signal Setup
menu. Press OK.
9 The Signal setup screen displays the parameters for the particular
signal source, and also shows the configuration of the selected
LNB.
Signal Setup Alternatives
The factory preset values will normally not require changing. If, however,
it is necessary to insert values for other signal sources (other satellite
transponders), it is recommended that you contact your local installer.
Tune DSD
If the settings made in LNB Configuration and Signal Setup are
satisfactory, retune the decoder with these settings as follows:
1 Press to highlight Tune DSD.
2 Press OK.
A rotating bar on the decoder front panel indicator indicates that
it is searching for the default frequency. The decoder then returns
to the current service, and the Information Bar and Clock are
displayed for the preset period of time.
22 OPERATING INSTRUCTIONS DSD 660
Page 23

Reset to Factory Defaults
If difficulty is experienced in the functioning of the decoder, it may be
advisable to reset the factory defaults. This is achieved by selecting the
Reset Factory Defaults then pressing OK.
LoopThrough Mode
The Loop through Mode is used when the installation is using DiSEqC
control of LNBs. In a normal setup, it is not important whether this is
Enabled or Disabled. If a DiSEqC LNB is used, consult your installer.
Signal Detection
This facility is used to help final alignment of the satellite dish and to
confirm that a signal is being received from the satellite.
5 Press OK.
The Information Menu is displayed, in which the DSD Status
option is highlighted.
6 Press OK. The DSD Status screen is displayed
7 To exit the DSD Status information screen, press EXIT to return
to the previous menu or MENU to return to the service.
CA Status
1 Repeat steps 1 to 5 of the DSD Status screen.
2 Press to highlight CA Status.
3 Press OK. The CA Status screen is displayed.
NOTE: For LNB adjustment refer to the LNB installer. The
decoder signal detection facility is only useful for final
alignment of a dish that is already aimed roughly at the
satellite. If there is no signal the bars will not be present.
1 Press MENU on the RCU.
The Main Menu options list is displayed.
2 On the RCU, press to highlight Advanced Options.
3 Press OK.
The Advanced Options Menu is displayed.
4 Press to highlight Signal Detection.
5 Press OK.
The Signal Detection screen is displayed. The screen shows the
service provider name and the strength of the signal.
6 Adjust the alignment of the dish to obtain the maximum signal
strength as indicated by the bars on the screen. Press and
to toggle between the coarse and fine tuning.
7 Physically lock the dish into position, then re-check the signal
detection.
8 Press OK.
The Advance Options Menu is displayed.
9 Press EXIT to return to the Main Menu or MENU to return to the
service.
Information
The Information Menu has three sub-menus, DSD Status, CA Status
and Loader Status, which provide important diagnostic and version
information to technical personnel. These status screen are read-only
screens. You may be asked to read some of this information to Hot
Line personnel.
4 To exit the CA Status information screen, press EXIT to return to
the previous menu or MENU to return to the service.
Loader Status
1 Repeat steps 1 to 5 of the DSD Status screen.
2 Press to highlight Loader Status.
3 Press OK.
The Loader Status screen is displayed.
4 To exit the Loader S tatus information screen, press EXIT to return
to the previous menu or MENU to return to the service.
TV Installation
TV Type
Typical values are PAL I, PAL B, PAL G, PAL BG, etc. The TV type is
determined by the TV system used in the country of installation.
To set the TV Type:
1 Press MENU on the RCU.
The Main Menu options list is displayed.
2 On the RCU, press to highlight Advanced Options.
3 Press OK.
The Advanced Options Menu is displayed.
4 Press to highlight TV Installation.
5 Press OK.
A security check screen is displayed, in which you must enter
the installation PIN (9949).
The TV T ype option is automatically highlighted when the correct
PIN is entered.
To view the information do the following:
DSD Status
1 Press MENU on the RCU.
The Main Menu options list is displayed.
2 On the RCU, press to highlight Advanced Options.
3 Press OK.
The Advanced Options Menu is displayed.
4 Press to highlight Information.
DSD 660 OPERATING INSTRUCTIONS 23
6 Press OK.
A TV type list is displayed in which PAL I is highlighted.
Press to highlight any other TV type.
7 Press OK to activate the setting and leave the screen, or EXIT to
cancel the setting.
Aspect Ratio
The Aspect Ratio allows the user to select between a normal width TV
and a wide-screen TV.
1 Repeat steps 1 to 5 for setting the TV Type.
2 Press to highlight Aspect Ratio.
Page 24

3 Press OK.
The Aspect Ratio screen is displayed, in which the 4:3 aspect is
highlighted.
4 Press to select the 16:9 aspect ratio (4:3 is for normal TV,
16:9 for wide-screen TV).
5 Store the setting by pressing OK on the RCU.
UHF Tuning
The UHF Tuning application allows the user to select a particular UHF
channel for satellite viewing.
1 Repeat steps 1 to 5 for setting the TV Type.
2 Press to highlight UHF Tuning.
3 Press OK. The UHF Tuning screen is displayed and the decoder
front panel display shows the current UHF channel number.
4 Press or to increase or decrease the channel number.
If the channel number is changed, the TV picture is lost because
the TV is not tuned to the new channel. The changed channel
number is displayed on the decoder front panel.
5 Store the setting by pressing OK on the RCU.
6 Press MENU to exit from the menu.
7 Retune the TV set to the new decoder UHF channel.
5 Press or to set the video output type of the selected SCART .
The options are viewed by subsequent pressing of the button.
6 Store the setting by pressing OK on the RCU.
7 Press EXIT to return to the previous menu or MENU to return to
the service.
Change Modem Settings (if fitted)
If a modem is installed in the decoder, the Change Modem Settings
screen allows the user to select Pulse or Dial Tone for the modem, and
(if applicable) to define a prefix string for the modem.
1 Press MENU on the RCU.
The Main Menu options list is displayed.
2 On the RCU, press to highlight Advanced Options.
3 Press OK.
The Advanced Options Menu is displayed.
4 Press to highlight Change Modem Settings.
5 Press OK.
The Change Modem Settings screen is displayed.
6 Press or to highlight the field to be edited.
7 Edit the Pulse/Tone setting using and .
TIP: Pressing and holding down UHF (not in menu, Information Bar
or EPG mode) also causes the UHF Tuning screen to be
displayed.
NOTE: Pressing EXIT at any time while this screen is displayed
will return you to the service without saving any changes
made.
SCART Source
This screen allows the user to set the sources for the various SCART
connectors on the decoder (refer to page 15 for an explanation of the
SCART signal sources).
1 Repeat steps 1 to 5 for setting the TV Type.
2 Press to highlight SCART Source.
3 Press OK. The SCART Source options are displayed with TV
SCART Source highlighted. The other option is VCR SCART.
4 Press or to highlight the SCART source to be edited.
5 Press or to change the source of the selected SCART.
6 Store the setting by pressing OK on the RCU.
7 Press EXIT to return to the previous menu or MENU to return to
the service.
8 Edit the Prefix digits using the numbered buttons and as
backspace.
9 Press OK to activate the setting and leave the screen.
10 Press EXIT to return to the previous menu or MENU to return to
the service.
Local Time
Greenwich Mean Time is transmitted via the satellite signal and received
by the decoder. If you live in a different time-zone you must set up the
decoder to show the correct local time for your location during installation.
1 Press MENU on the RCU.
The Main Menu options list is displayed.
2 On the RCU, press to highlight Advanced Options.
3 Press OK.
The Advanced Options Menu is displayed.
4 Press to highlight Local Time.
5 Press OK.
The Local Time screen is displayed.
6 Press or to add or subtract offsets of 30 minutes until the
local time displayed shows the actual time for your location.
SCART Video Output
This screen allows the user to set the type of SCART video output for
the various SCART connectors on the decoder.
1 Repeat steps 1 to 5 for setting the TV Type (page 23).
2 Press to highlight SCART Video Output.
3 Press OK. The SCART Video Output screen is displayed.
4 Press or to highlight the SCART output to be edited.
24 OPERATING INSTRUCTIONS DSD 660
7 Press OK to save the setting and leave the screen.
8 Press EXIT to return to the previous menu or MENU to return to
the service.
Page 25

IRD Upgrade
Upgrades involve replacing the software (programs) in the decoder with
improved software, adding more features and improving the existing
operation of the decoder. This ensures that the decoder does not have
to be replaced each time advances in technology occur. By replacing
the software, you virtually get a new decoder.
Software upgrades normally take place automatically over-the-air. The
decoder can be upgraded when it is in standby or while it is switched to
a service. The decoder software cannot be upgraded if it is switched off
at the mains. It is strongly recommended that your decoder is left in
the standby mode when you are not using it.
The Mail Menu will usually warn you that a software upgrade will take
place. Software upgrades usually take place in the early morning and
last approximately 9 minutes, during which time normal satellite viewing
is not possible.
A facility is provided whereby you can check if new software is available
and you can then start the upgrade yourself. This is necessary if the
decoder has not been upgraded over-the-air due to, for instance,
prolonged power failures.
If, during an over-the-air download, the decoder fails to accept the
download or freezes, a forced download can be performed as follows:
# On the decoder front panel carry out the following procedure:
- Press STANDBY, ª, «, STANDBY in sequence .
A rotating bar on the decoder display indicates that a
download is taking place.
TROUBLESHOOTING
If any problems are encountered when operating the decoder, make
use of the following guidelines to assist in solving the problem. The
decoder will automatically detect and diagnose many decoder and
transmission related problems. Where possible, the errors will be
communicated via messages on the TV screen and/or the decoder
display panel.
Locate either the corresponding error number and message or the
description of your problem in the troubleshooting table and follow
the advice provided.
To upgrade the decoder software or check whether an upgrade is
available, carry out the following:
1 Press MENU on the RCU.
The Main Menu options list is displayed.
2 On the RCU, press to highlight Advanced Options.
3 Press OK.
The Advanced Options Menu is displayed.
4 Press to highlight DSD Upgrade.
5 Press OK.
The Upgrade screen is displayed with the message “Checking
for upgrade”. At this point, depending on whether an upgrade is
available or not, one of the following two messages appears on
your TV screen:
“Failure: no download found.”
or
“The upgrade will take approximately X minutes. Press OK to
continue or EXIT to cancel.”
(A download was found and it takes the specified amount of time
to do the download).
If an upgrade is not available, the decoder will automatically
return to the service.
6 If an upgrade is available but you do not wish to upgrade,
press EXIT to return to the previous menu.
If you have tried the appropriate remedy and still have difficulty in
operating your decoder, please call the appropriate hot line.
7 If you wish to upgrade the decoder, press OK. A message is
displayed:
“The upgrade is active and will take approximately X minutes.”
After the download is completed, the decoder will automatically
return to the current service.
NOTES: Downloads may change installation settings to
DSD 660 OPERATING INSTRUCTIONS 25
default values. If the decoder does not work after
a download, refer to Advanced Options page 22
and the values that should have been written
down on page 30, to restore the system.
Downloads also change sort preferences. Refer
to page 21 for help in restoring your preferences.
Page 26

TROUBLESHOOTING
Decoder
Front Panel
Blank display
Small green dot
No small flashing
green dot when
any b u tton on the
remote is pressed
Any programme
number
Me ssage/Disp la y on
TV Screen or Symptom
Any menu is displayed
Blank scree n (TV switched
on)
Blank scree n (TV switched
on)
Any display
No Audio/Noisy Audio
Terrestrial programme
displayed
Incomplete vide o recording
- a portion of the recorded
satellite programme has not
recorde d
Possible Cause
Normal operation. The decoder
is in menu mode
No mains power to the decoder
Normal operation. The dec oder
is in standby mode
Remote control does not work
PAL setting in corr ect
Incorrect TV channel selected
to view the satellite decod er
The decoder has been switched
to standby o r to a different
se rvice durin g the r ecordin g
Remedies
Press the MENU button on the
remote to return to normal vi e wing
Ensure that the m a ins lea d to the
decoder and mains power point is
securely plugged into the mains
outlet, and that the mains is
switched on
Press on the remote to return
to return to normal v iewi ng
Check that remote batteries are
correctly inserted.
Replace batteries and re-try
Restore correct TV type for
country of operation
On the TV, select the channel
allocated to view th e de coder
programmes
Do not make any adjustments
or selections with the remote
during recordings
Interrupted video recording.
Menus or other text appear
on the recorded satellite
programme, or the sound
level fluctuates
NOTE: The recording of any
channel is subject to copyright
laws
Blank display
Security check screen
followed by programme
blocking menu
Any programme
number
3 flashing dashes
an d error dot (red)
Any programme
Programme at incorr ect
programme blocking level
TV picture break s up an d
eventually NO SIGNAL
banner displayed
No audio or video
number
3 flashin g das hes
and error dot (red)
Error dot (red) E03 CA module failure
NO SIG NAL
or
SEARCHING FOR SIGNAL
AT XXXX MHZ
A button has been pressed on
the remote
Inc orrect P I N n umber entered
Pro gramme block i ng level
set inco rr ect ly
Heavy thunderstorm in progress
either loca lly or at transmission
point
SCART func ti onality incorrectly
set
Fa ulty ins tallation
Signal problem
Heavy rain (normal op erati on will
resume as soon as the rain
subsides
The CAM is malfunctioning
Do not make any adjustments
or selections with th e remote
during recordings
Refer to Programme Blocking
in this manual. If yo u ha v e
forgotten your PIN code
consult your service provider
Refer to Parental Guid an c e
section
Wait until storm subsides
Press UH F bu tton on remo te to
obtain IRD on front pa n el display
Check, r epair or r eplace cables
Check decoder installation settings
Real ign th e dish
Call the service provider
Cal l the service provider
26 OPERATING INSTRUCTIONS DSD 660
Page 27

TROUBLESHOOTING
Decoder
Front Panel
Error dot (red)
Error dot (red)
Error dot (red)
Error dot (red)
Error dot (red)
Error dot (red)
Error dot (red)
Error dot (red)
Message/Display on
Possible Cause
Remedie s
TV Scr een or Sym pt om
E04 Please insert Smart Card
E05 Unkno wn card
E06 Smart Card failure
E07 Checking Smart Card Th e decoder is br iefly c hecking
E08 CA Module failure The CAM is m alfunctioning
E09 CAD EEPROM error The Smart Card is malfunctioning Reinsert the Smart Card
E11 Updating CAD EEPROM
E12 CAM f ailure
The Smart Card is not inserted
The Smart Card is not applicable
to this system
Th e S m art Card is dam aged
the Smart Card
Th e decoder is br iefly c hecking
the Smart Card
The CAM is malf un ctioning
Reinsert the Smart Card
Call the service provider
Reinsert the Smart Card
Call the servi ce provider
Call the se rvice provider
If, after 30 seconds, t he
me ss age is still displayed,
reins ert the Smart Card.
Call the service provider
Call the service provider
Call the service provider
If, after 60 seconds, the
mess a ge is still disp layed,
re insert the Smart Card .
Call the servi ce provider
Call the se rvice provider
Error dot (red)
Error dot (red)
Error dot (red)
Error dot (red)
Error dot (red)
Error dot (red)
Error dot (red)
Error dot (red)
Error dot (red)
Error dot (red)
Error dot (red)
Error dot (red)
E13 CAM f ailure
E14 Service is c urrently
scrambled
E15 Smart Car d error
E16 Servic e is curren tly
scrambled
E1 7 Ser v ice is c ur re ntly
scrambled
E1 8 U n k n own Ca rd
E1 9 Ser v ice is c ur re ntly
scrambled
E2 0 Ser v ice is c ur re ntly
scrambled
E21 Service is currently
scrambled
Event Purchased
Preview period
E24 Servic e is c ur ren tly
scrambled
The CAM is malf un ctioning
Th ere is a pr oblem with the
transmission
Smart Ca rd damaged
Access to serv ice d enied C a ll the serv ice provider
Access to se r vice denied
Th e Smard Card is not applicable
to this system
Acce ss to service deni ed
Acce ss to service deni ed
Access to se r vice denied
Access to service denied
Call the servi ce provider
Wait for the resumption of
transmission
Call the servi ce provider
Call the service provider
Inse rt the correc t Smart Ca rd
Call the service provider
Call the service provider
Call the service provider
Call the se rvice provider
Call the service provider
Error dot (red)
Error dot (red)
Error dot (red)
DSD 660 OPERATING INSTRUCTIONS 27
E25 Event already purchased Attempt to re-purchase an event
E26 Event for sa le - cheap
E2 7 No fu rth e r pu rchase s
possible
Special of the day
Event limit r eached Call the service provider
Page 28

TROUBLES HO O TI NG
Decoder
Front Panel
Error dot (red)
Err or dot (red)
Error dot (red)
Error dot (red)
Error dot (red)
Error d ot (red)
Error dot (red)
Error dot (red)
Error d ot (red)
Error dot (red)
Mess age/Display on
TV Screen or Symptom
E28 Credit limit reached
E30 Service is currently
scrambled
E30 Service is currently
scrambled
E31 Service is currently
scrambled
E32 S er v i c e is c ur r e n t l y
scrambled
E34 Service is currently
scrambled
E35 Service is currently
scrambled
E37 S er v i c e unk n own
E38 Ser v i c e is no t c ur ren t l y
running
E39 Lo c ating se r v ic e
Possible Cause
En ti tl emen ts Cr e di t in Sm art
Ca r d ex hausted
Access to service denied
Access to service den ied
Access to service den ied
Access to service den ied
Access to service den ied
Access to service den ied
System error
The s ervice is be ing used fo r a
sp ec ia l ev e nt
The decoder is bu sy locating
a serv ice
Remedies
Ca l l the service provide r
Call the service provid er
Call t he ser vice prov ider
Call t he ser vice prov ider
Call t he ser vice prov ider
Call t he ser vice prov ider
Call the service provider
Ca ll t h e s er vice pr ovide r
Co ns u lt t h e E P G
Wait briefly while service is located
Error dot (red)
Error dot (red)
Error dot (red)
Error dot (red)
Error dot (red)
Error dot (red)
Error dot (red)
Error dot (red)
Error dot (red)
Error dot (red)
E40 IRD memory full System error
E41 Ser v i c e is no t c ur ren t l y
available
E42 Parental control lock
E45 Service no t allowed
E46 Reading s at ellite informat ion
E47 No s oundtrack availabl e
E49 LN B over lo ad dete c ted
E50 No service available
E 53 Incorrect PIN
E54 IPPV OK
The programm e has b een
bl oc k ed b y me a ns of Program
Blocking
The serv ice has been block ed
The s atellite dish is not r ec eiving
a signal
An unavailable l anguage has
been selected
Installation faulty Check installation for short
Ca ll t h e s er vice pr ovide r
Re - as s i gn blockin g l evel
R es e t bl o c k in g lev e l if req u i r ed
C he c k that the satel l ite fr equ e nc y
has been correctly set
Check the installation
Call t he s ervice pro vider
Select an available soundtrack
circuits
Co ns u lt installer
Error dot (red)
Error dot (red)
28 OPERATING INSTRUCTIONS DSD 660
E55 No ev ent inf orm a tio n f o u n d
E56 CA M no t c om p ati b l e
E64 Invalid tuning par ameter sErr or dot (red)
Page 29

SPECIFICATIONS
Due to continued product improvement, this specification is subject
to change without prior notice.
GENERAL
Front Panel Control Buttons On/St andby, TV/Audio, Programme/
Volume up/down
Reset On/Standby and TV/Audio
simultaneously
RCU Multi-button, infrared, battery operated
RCU.
Range 7 m, ± 45E in horizontal plane,
± 20E in the vertical plane.
Batteries; Type AAA
User Interface Full On-screen Display with point and
select menus for setup. TV viewing,
audio listening, teletext and future
interactivity
Subscription service facilities Smart Card, on-board CA software
and over-the-air upgradable software
Built-in modem (optional)
Data port
UHF Modulator PAL I, B, G or B G, Ch 21 to 6 9,
preset to Ch 42
Mains Voltage 210 - 250 V AC 50 Hz
Power Consumption 30 W Maximum
Dimensions 357 x 70 x 240 mm (W x H x D)
Weight Approx. 2.5 kg (unpacked)
Operating Conditions: Temperature 5 EC to 45 EC
Relative Humidity 5% to 80% <38 EC wet bulb
temperature
Altitude 0 to 2000 m
CONNECTORS
LNB input F-connector
LNB output F-connector
Terrestrial antenna input IEC 169 female
TV RF output IEC 169 male
TV SCART SCART
vCR SCART SCART
AUX SCART SCART
Variable left channel audio
output to TV/VCR RCA
Variable right channel audio
output to TV/VCR RCA
Fixed left and right audio
channels to Hi-Fi RCA
Mono audio to TV/VCR R C A
Internal modem (where fitted) RJ11
External modem port 9 pin D-type male
Data service port 9 pin D-type female
SATELLITE RECEIVER TUNER
Receiver Frequency Range 950 to 2150 MHz
Input Signal Level -20 dBm to -65 dBm
Polarisation Switching 13.5 - 18 V DC 350 mA maximum,
short circuit protection
DiSEqC Modulated onto 22 kHz
DEMODULAT OR
Type QPSK
Input Data Rate 2 to 30 Mb/s/
Error Correction DVB specified FEC code rates
DSD AUDIO
Decompression MPEG-1, MPEG-2 Layer II,
Musicam
Channels Single channel, joint stereo, stereo
Sampling Frequencies 32.0 kHz, 44.1 kHz and 48.0 kHz
REMODULATOR RF SIGNAL
Depth of Modulation 80 ±10%
Output Channel Range 21 to 69 (preset to channel 42)
Vision-to-sound ratio 14 dB
Vision-to-sound frequency
variance ± 20 kHz from nominal
Vision carrier frequency drift ± 10 kHz
RF output level 73 dBF V
Output spurii <-60 dB
RF stray radiation <20 dBF V at antenna input
Intermodulation -60 dBc
RF bypass bandwidth 47 MHz to 860 MHz
RF bypass insertion gain 2 dB
RF bypass channel tilt 1 dB
MEMORY
RAM 4 Mbyte
Flash - RAM 2 Mbyte
Non-volatile memory 8 kbyte
VIDEO SIGNAL
Output 1 V peak-to-peak, 75 S
Format PAL
Bandwidth 5 MHz
AUDIO SIGNALS
Output 1 V r.m.s. into 10 kS
Frequency range 20 Hz to 20 kHz at 44.1 kHz sampling
rate
Dynamic range 80 dB
Distortion ± 0.2% @ 1 kHz
Noise -80 dBF
L-R level difference 0.5 dB
Crosstalk -60 dB
EXTERNAL MODEM
Maximum data rate 19200 bits/s
DSD FACTOR Y SETTINGS
# Installation pin 9 9 4 9
# Remod Channel 50
# TV-Standard PAL B G
# TV Aspect Ratio 4 x 3
# LNB Power ON
# LNB mode dual
LNB Lo frequency 9750
LNB Hi frequency 10600
# Homing Channel
Frequency 11765
# Homing Channel
Polarisation Horizontal
# Homing Channel
Modulation QPSK
# Homing Channel
Symbol Rate 27500
# Homing Channel
FEC Rate 3/4
# Info Bar display
time 5 seconds
# Parental Level Unlocked
# Parental code 1 2 3 4
# Language option Arabic, English, French
DSD VIDEO MPEG-2
DSD 660 OPERATING INSTRUCTIONS 29
Page 30

HOTLINES
MANUFACTURERS WEBSITE: http://www.uec.co.za
Installation Settings (to be filled in by the installer)
DSD Serial No.
Smart Card Serial No.
Installer Name
UHF Channel Setting
LNB IN 1
LNB Power
LNB Mode
LNB Frequency
Lo Freq
Hi Freq
DiSEqC
Command
Tone B urs t
Signal Setup
number
Source Active
Date of Purchase
Work Order No.
Installer Tele No.
2
1
2
34
34
5
5
6
6
Frequency
Symbol Rate
Polarisation
FEC
LNB Selection
30 OPERATING INSTRUCTIONS DSD 660
Page 31

NOTES
DSD 660 OPERATING INSTRUCTIONS 31
Page 32

32 OPERATING INSTRUCTIONS DSD 660
 Loading...