

Page 1
Page 1 of 31
OnCommand® Link v1.3
User Guide
Page 2

Page 2 of 31
Contents
Version History OnCommand® Link Device .................................................................................................. 3
Notice ............................................................................................................................................................ 4
Introduction .................................................................................................................................................. 4
OnCommand® Link Package ......................................................................................................................... 5
Preparatory Steps ......................................................................................................................................... 5
Maximum Wi-Fi Reception Distances ........................................................................................................... 5
Installing OnCommand® Link on a Vehicle ................................................................................................... 6
Connecting Personal User Device to OnCommand® Link ............................................................................. 6
Connecting OnCommand® Link to Internet .................................................................................................. 8
Updating OnCommand® Link Firmware/Application Software .................................................................. 12
Programming Cummins Engine with OnCommand® Link ........................................................................... 13
Important points to note about updating calibrations on Cummins engines………………………………………….13
Detailed process to update/check calibrations on your Cummins-powered vehicle………………………………14
Rollback Calibration on Cummins Engine…………………………………….…………………………………….…………………..17
Programming with OnCommand® Link ....................................................................................................... 18
Switching between Write-up Tool Mode and OTA Mode .......................................................................... 24
Standard Health Reports ............................................................................................................................. 25
Troubleshooting .......................................................................................................................................... 27
Technical Assistance ................................................................................................................................... 28
OnCommand® Link End User License Agreement ...................................................................................... 29
1. Definition ............................................................................................................................................ 29
2. OBLIGATION ........................................................................................................................................ 29
3. Marking and Transmittal ..................................................................................................................... 29
4. NEED TO KNOW .................................................................................................................................. 30
5. EXCLUSIONS ........................................................................................................................................ 30
6. WARRANTY AND DAMAGES ................................................................................................................ 30
Page 3

Page 3 of 31
Version History
OnCommand® Link Device
Version
Release Date
Change Log
v1.1
May 2nd, 2016
This version of OnCommand® Link device supports Over-The-Air
programming for Navistar’s engine control modules only.
v1.1.19
May 23rd, 2016
This version sets the device SSID as last 9 digits of VIN by
default. It can be changed to last 8 of MAC address using a
checkbox option in application page (under MENU).
v1.2.24
June 22nd, 2016
This version sets the device SSID as last 8 digits of MAC address
by default. It can be changed to last 9 of VIN using an option in
application page (under MENU).
v1.2.27
July 8th, 2016
Rebranded to OnCommand Link, minor fixes and user interface
related changes
v1.2.31
July 26th, 2016
Added user interface to switch between Write-Up tool and
Over-The-Air Programming (OTA) mode
v1.2.39
Nov 7th, 2016
Added description to update OnCommand® Link devices when
a new firmware/application update is available. Also added
details for a YouTube channel where OnCommand® Link
support videos are hosted.
V1.2.42
Feb 2nd , 2017
OnCommand® Link devices support Calibration updates for
2017 Cummins Engines.
V1.3.279
June 12th, 2017
-Updates screenshots wherever applicable.
-Added error message when more than one device connects
OnCommand Link.
-Notification for Device Management server connection error.
-View latest Health Report in OnCommand Link Application.
-Notification for Unsupported calibration
-Proxy configuration support for Connecting OnCommand Link
to Internet.
V1.3.281
July 13th, 2017
- Description updates to section ‘Programming Cummins Engine
with OnCommand® Link’
V1.3.309
Nov 16th, 2017
- Description updates to section ‘Programming Cummins Engine
with OnCommand® Link’
V1.3.337
May 4th, 2018
- Body controller kernel version dependency for A26 calibration
updates
V1.3.366
Dec 18th, 2018
- Updated Cummins engine info
- Added Health Report state indicators (App led/beeps)
Page 4

Page 4 of 31
Notice
This document describes proper usage guidelines for use of the OnCommand® Link device and the
Navistar software loaded on it. Navistar is not responsible for damage caused as the result of tampering
with the device. Tampering with the device voids all warranties for both the OnCommand® Link device
and the vehicle.
Introduction
Navistar’s OnCommand® Link device performs Over-The-Air programming of engine control modules
(ECM), Aftertreatment Control Modules (ACM) and Doser Control Units (DCU). The OnCommand® Link
device also collects diagnostic or health data from International® vehicles and sends it to the Navistar
backend systems. Customers / dealers can view their vehicle’s health / diagnostic information from the
International® Service PortalSM or OnCommand™ Connection Portal. International® vehicles with the
following engine modules are supported:
Navistar Engines
Model Year
V8
I6
BB
2010 - 2012
Program
MaxxForce 7
MaxxForce DT 9/10
MaxxForce 13
Modules
ECM
ECM, DCU
ECM
2013
Program
MaxxForce 7
MaxxForce DT 9/10
MaxxForce 13
Modules
ECM
ECM, DCU
ECM
2014
Program N9/10
N13
Modules
ECM, ACM, DCU
ECM, ACM
2015
Program N9/10
N13
Modules
ECM, ACM, DCU
ECM, ACM
2016
Program N9/10
N13
Modules ECM, ACM
ECM, ACM
2017
Program N9/10
N13, A26
Modules ECM, ACM
ECM
Cummins Engines
Model Year
X15
B6.7
L9
2017 and above
Modules
ECM
ECM
ECM
Page 5

Page 5 of 31
OnCommand® Link Package
The package provided to you for the OnCommand® Link contains the following:
1. OnCommand® Link device
2. A label containing the device identification (SSID) and password
3. Welcome card
This User Guide will help you to:
1. Install OnCommand® Link, a smart device that plugs into a vehicle’s 9-pin diagnostic port.
2. Connect OnCommand® Link to a personal user device, such as a smartphone, tablet or laptop.
3. Connect OnCommand® Link to the Internet by connecting it to an available Wi-Fi access point
using device configuration.
4. Use OnCommand® Link to read data from the vehicle CAN bus, send data to the personal user
device, check for a calibration update, and perform an update (if applicable).
5. View Standard Health Reports generated by OnCommand® Link through the OnCommand™
Connection Portal or International® Service Portal. Check Standard Health Reports section for
details.
If you encounter any issues while performing these steps, please check the Technical Assistance section.
Preparatory Steps
To prepare for using OnCommand® Link, please do the following:
1. Choose a personal user device, such as a smartphone, tablet or laptop that will be used to
initiate programming operations and gather data for Standard Health Reports.
2. Check the vehicle’s battery voltage. A voltage of less than 10.5 volts or more than 15.5 volts will
prevent programming.
3. Allow for sufficient time to complete the setup and perform a calibration update – up to 30
minutes for setup and 15 to 25 minutes for performing a calibration update, if applicable.
4. Ensure that the vehicle is parked on a level surface in a safe, secure location.
5. Check Maximum Wi-Fi Reception Distances section to learn about appropriate Wi-Fi range
provided by OnCommand® Link devices.
Maximum Wi-Fi Reception Distances
Table below summarizes the expected maximum distances to be maintained from OnCommand® Link
devices and personal devices/Wi-Fi network.
Devices
Path
Expected Maximum
Distance
OnCommand® Link to Wi-Fi
Network
Unobstructed line of sight
200 to 250 feet
OnCommand® Link to Laptop
Unobstructed line of sight
170 to 200 feet
Page 6
Page 6 of 31
OnCommand® Link to mobile
hotspot (Phone included)
Unobstructed line of sight
30 to 35 feet
OnCommand® Link to Wi-Fi
Network
Wall between Network hotspot
and Truck
70 to 80 feet
OnCommand® Link to
Laptop/Tablet
Wall between laptop/tablet and truck
40 to 60 feet
Installing OnCommand® Link on a Vehicle
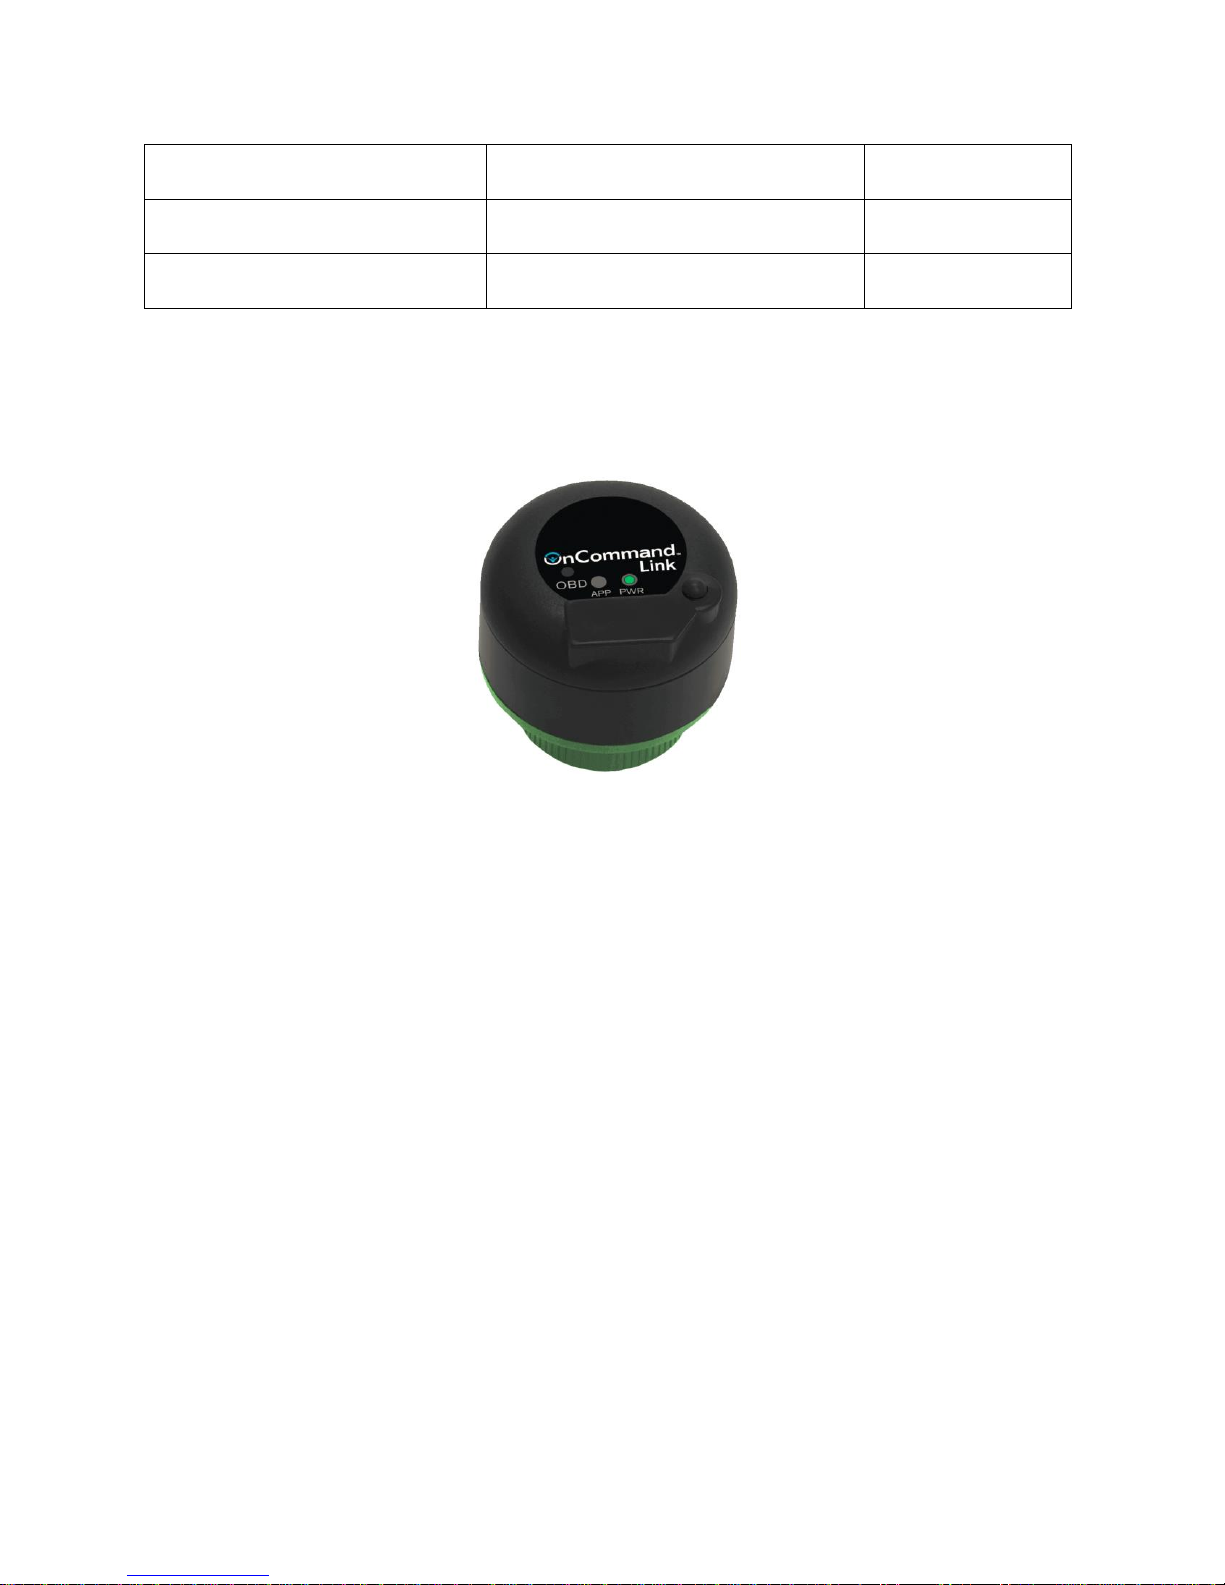
The OnCommand® Link device connects to the 9-pin diagnostic port connector in the vehicle’s cab.
Figure 1. OnCommand® Link Device
1. Turn Ignition ON.
2. Install the OnCommand® Link by connecting it to the 9-pin diagnostic port connector in the
vehicle.
3. If the collar is accessible, turn the collar of the OnCommand® Link clockwise to lock it into the 9-
pin connector. Confirm that the green PWR light is illuminated.
4. Wait 2 to 5 minutes for the OnCommand® Link to connect automatically to the vehicle’s CAN
bus. Successful connection to the CAN bus is indicated by two beeps and illumination of the
amber APP light.
Connecting Personal User Device to OnCommand® Link
Communication to the OnCommand® Link device to control programming is done through a personal
user device, such as a smartphone, tablet or laptop, with the following specifications:
• Supported browsers: Firefox, Chrome, Safari, Internet Explorer, Microsoft Edge
• Supported operating systems: Windows, iOS, Android
Note: The USB port located on the OnCommand® Link device does not serve any function at this time.
Page 7
Page 7 of 31
To establish communication between the personal user device and OnCommand® Link, perform the
following steps:
1. If using your phone/tablet, turn on Wi-Fi and scan for devices. When using a laptop, make sure
Wi-Fi is turned on and click Network Settings to view available devices.
2. When a personal user device has completed its scan for available networks, select the network
name containing the last 8 digits of device’s Serial Number (S/N) or MAC address (you can use
the last 8 digits (without colons) from the SSID on the OnCommand® Link’s label provided with
device packaging).
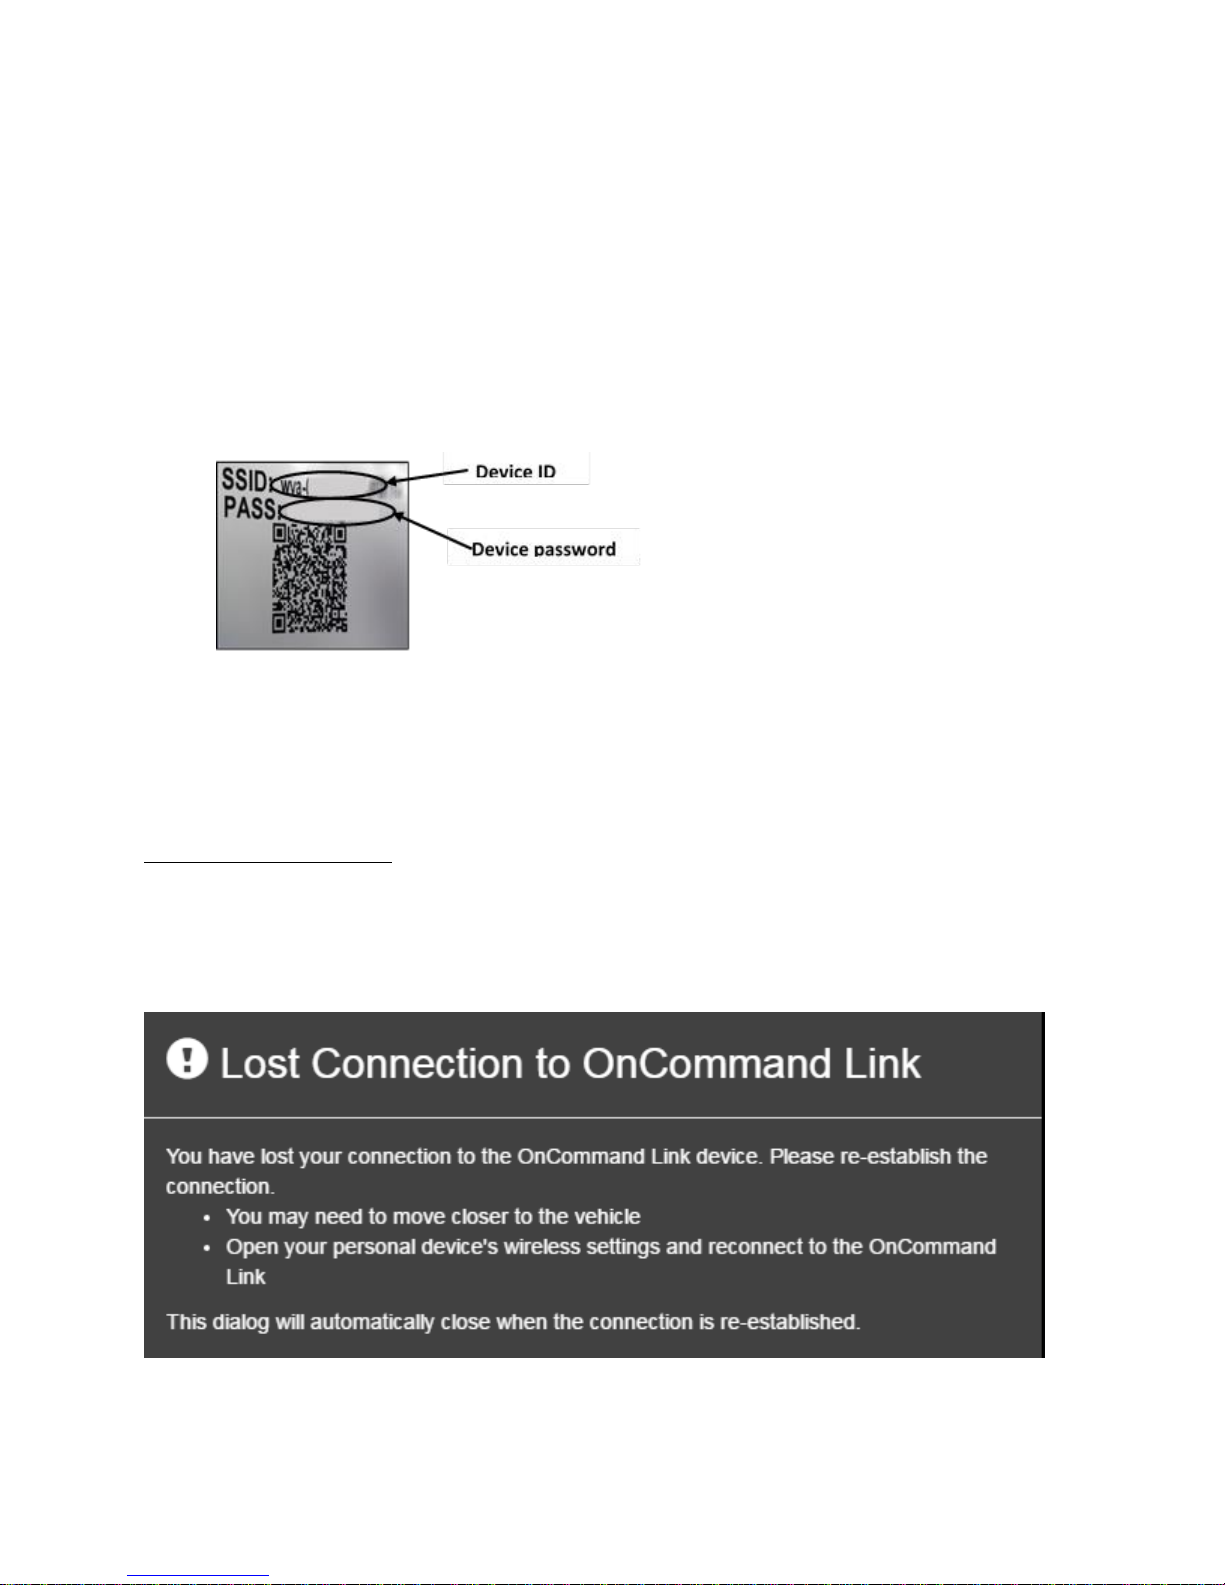
3. Enter the entire 14-character, alphanumeric password or PASS located on the OnCommand®
Link’s label. The device password is case sensitive.
Figure 2. OnCommand® Link SSID and Password
The personal user device should now be shown as connected to the OnCommand® Link in network
settings.
Re-establishing Connection
If the personal user device loses the connection to the Link device, a popup message will appear from
the application within 30 seconds. You will then be required to repeat this section to re-establish the
connection to the OnCommand® Link device. Once you have successful re-connected with the device,
this popup will be dismissed automatically.
Figure 3. Lost connection message
Page 8
Page 8 of 31
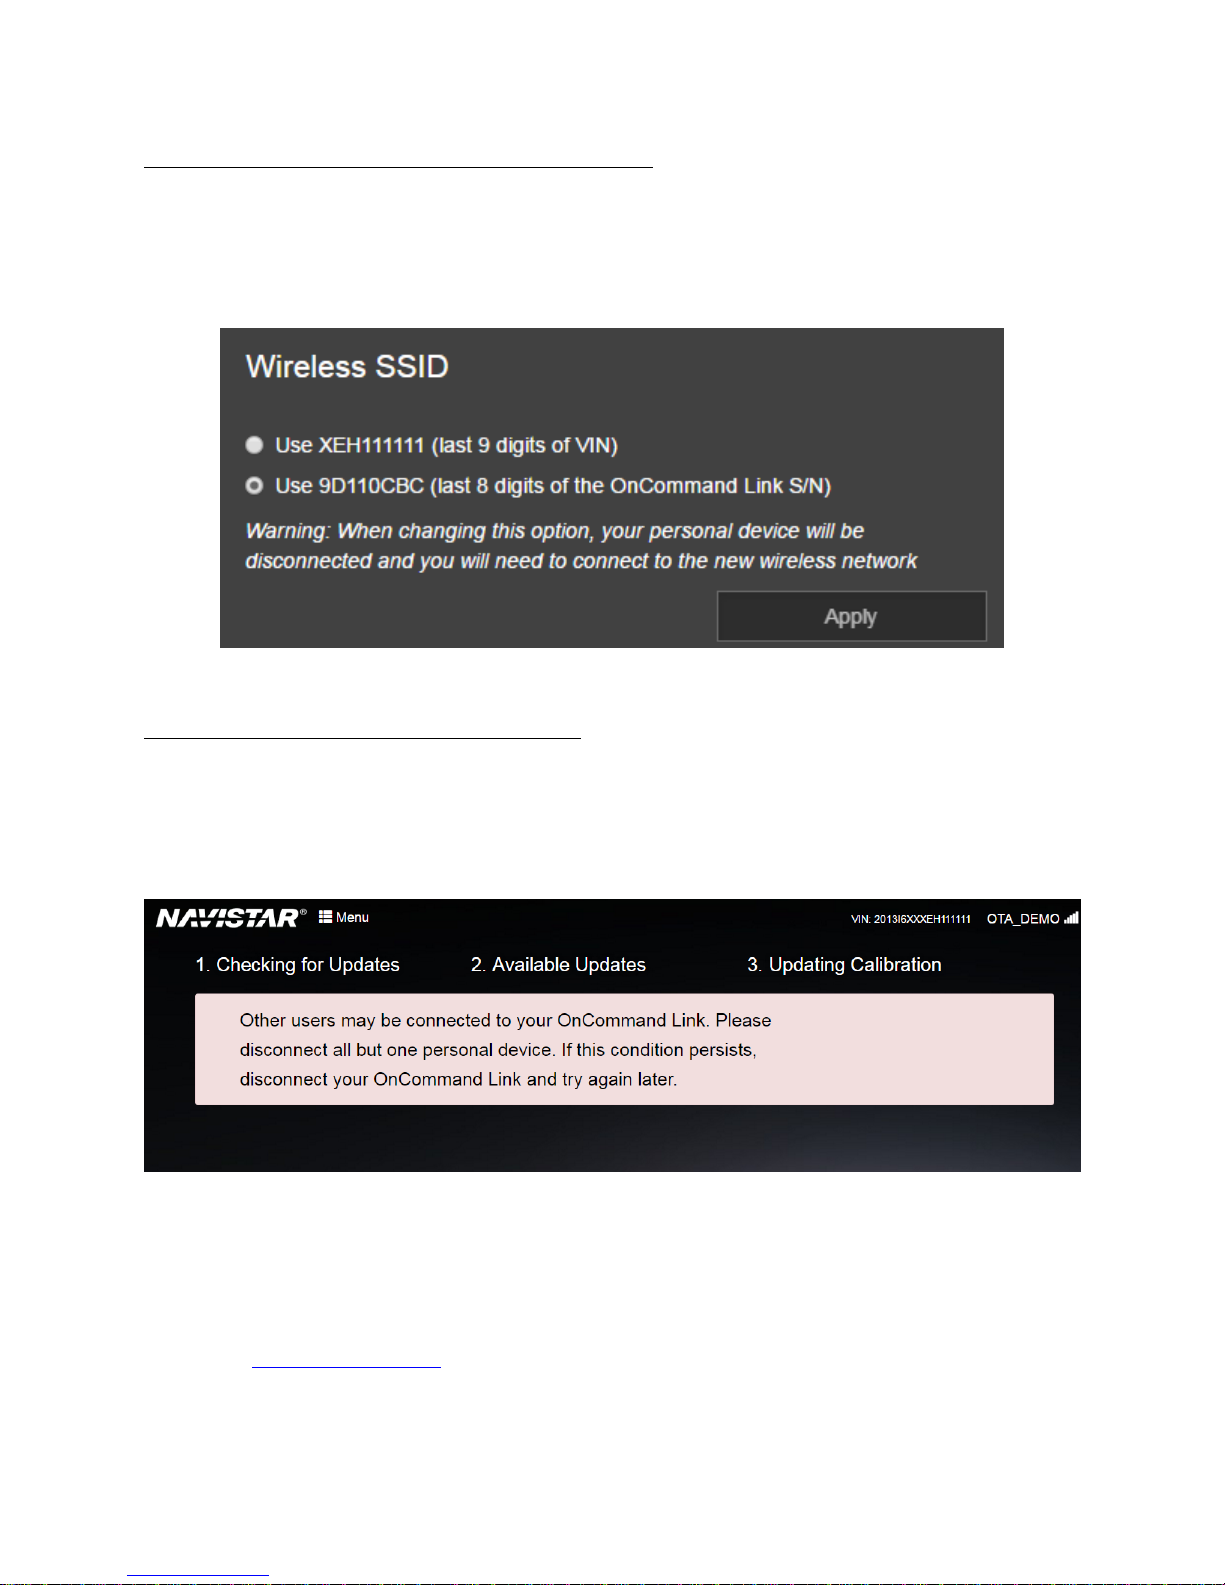
Changing the SSID to match the last 9 digits of your VIN
If you want to change the OnCommand® Link device’s SSID to match the last 9 digits of the VIN it is
connected to, go to MENU in the application and select last 9 digits of VIN, and click Apply.
Example: For a device with a Serial Number of 00:40:9D:8E:D4:DC, the SSID will be “9D8ED4DC” by
default. You will need to reconnect your personal device to the OnCommand® Link after changing the
SSID option in the Change SSID window (below).
Figure 4. Change SSID
Multiple users connected to OnCommand® Link
As a security measure, OnCommand® Link does not allow connections from multiple user devices at a
given time. If an attempt is made to connect to OnCommand® Link from multiple user devices,
application page shows the below error to all the connected user devices. The error goes away
automatically as soon as all but one user device remain connected.
Connecting OnCommand® Link to Internet
1. Open a supported browser window on the personal user device (smartphone, tablet or laptop).
2. Type in the following URL in the browser address field to open the device application page:
http://192.168.100.1
Page 9

Page 9 of 31
(If your browser prompts for authentication, that may be because your OnCommand® Link
Application version is old (1.2.xx or earlier). Try using http://192.168.100.1/navistar)
If the OnCommand® Link is already connected to a Wi-Fi network, the SSID will be displayed in the top
right corner of the device application page. At this point, skip the remaining part of this section and
follow procedure under ‘Programming with OnCommand® Link’ (For Navistar Engines) Or ‘Programming
Cummins Engine with OnCommand® Link’(For Cummins engines).
Figure 5. Connected to Wi-Fi network
If the OnCommand® Link is not already connected to a Wi-Fi network, No Network is shown at the top
right corner...
Figure 6. Not connected to Wi-Fi network
…. click the MENU button and then Network Settings to configure an available Wi-Fi network.
Figure 7. Application Menu
View Health Report
Click View Health Report under MENU, to view the latest health report on your personal user device.
Look at ‘Standard Health Report’ for more details on Health reports.
Page 10
Page 10 of 31
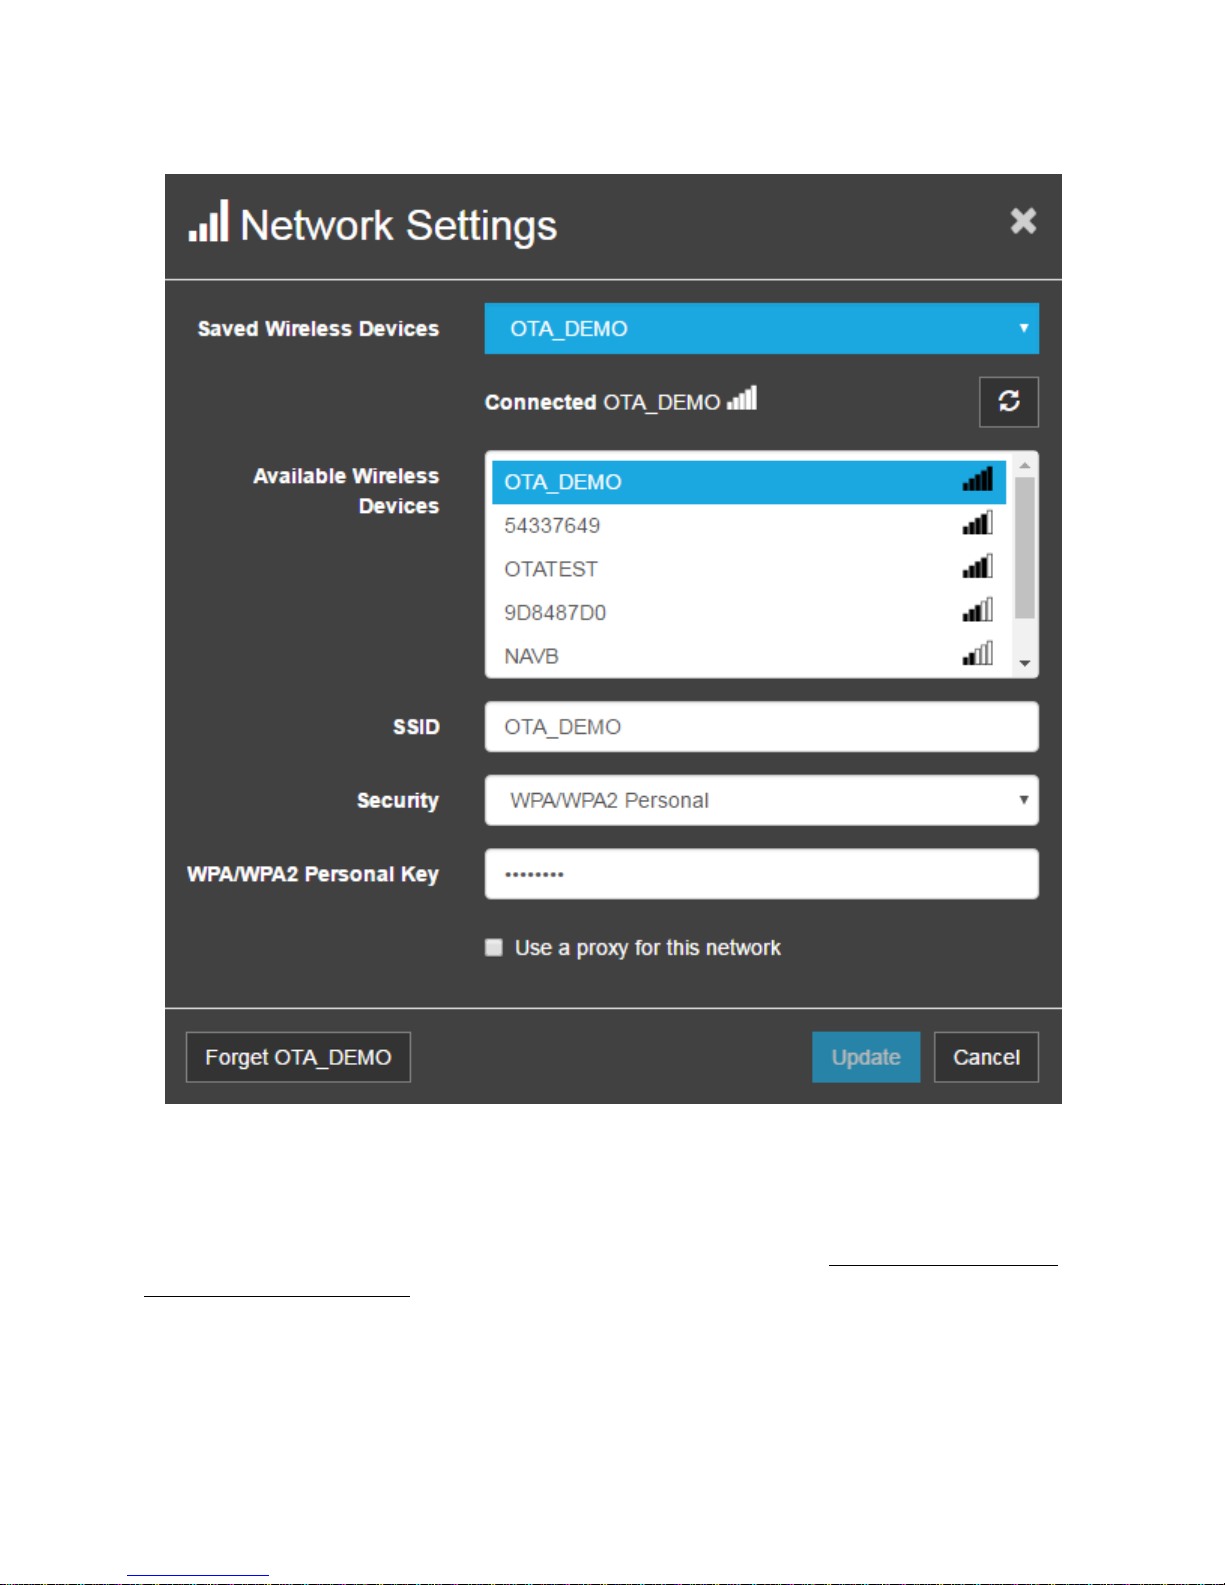
Figure 8. Network Settings
Select your network from the ‘Available Wireless Devices’, then enter the network key and click Save.
Security type will be auto-selected, but it can be changed manually if incorrect. You will need to reestablish connection between your personal device and OnCommand® Link (Connecting Personal User
Device to OnCommand® Link). Once connected, you should see the SSID displayed in the top right
corner of device application page.
Page 11

Page 11 of 31
OnCommand® Link will save your Wi-Fi hotspot information and will automatically connect to the saved
wireless network when in range. List of saved wireless networks can be viewed in ‘Saved Wireless
Devices’.
OnCommand® Link supports following wireless security protocols to connect to the local Wi-Fi hotspot.
Wireless security
protocol
Description
Open
Connection to Open wireless network does not need a
network key.
WEP
Wireless network that supports WEP (Wireless
Equivalent Privacy) would need a network key to
connect.
WPA/WPA2 Personal
Personal wireless network that supports WPA/WPA2
(Wi-Fi protected access) would need a network key to
connect.
WPA/WPA2 Enterprise
Enterprise wireless network that supports WPA/WPA2
(Wi-Fi protected access) would need a user id and
network key to connect.
To remove a network from the saved wireless network list, select a network from saved wireless list and
click Forget ‘Network name’.
Figure 9. Forget network successful
Proxy Settings
Page 12

Page 12 of 31
If your network needs proxy settings to connect to Internet, you can enable the checkbox that says ‘Use
a proxy for this network’ and enter proxy server information. Check with your IT department to know
more about your proxy server details.
Connection to OnCommand® Link device management server
When connected to internet, OnCommand® Link communicates with our device management server in
the background that helps Navistar support team to better maintain your device and helps in
troubleshooting. Your Wi-Fi network should allow outgoing traffic on TCP ports 3197 and 3199 for the
device to communicate with device management server.
You will notice the below warning message displayed when ports 3197 and 3199 are blocked in your WiFi network. Please contact your IT department to allow outgoing traffic on these ports.
Updating OnCommand® Link Firmware/Application Software
The OnCommand® Link device will update its firmware and application software automatically if it is
connected to Internet if there is no personal device (Laptop/Phone/Tablet etc) connected to the
OnCommand® Link.
If your personal device is connected to the OnCommand® Link and the Link device receives either a
firmware or application update package from the Navistar backend servers, you will see the below
screen:
Figure 10. New application/firmware available
You need to update the OnCommand® Link before proceeding to use the device for other purposes.
Click ‘Install Latest Version’ to start the installation procedure.
During the installation, the OnCommand® Link will reboot one or more times. When you hear the beep
and amber App light is illuminated, reconnect your personal device to the OnCommand® Link.
Page 13

Page 13 of 31
Programming Cummins Engine with OnCommand® Link
Important points to note about updating calibrations on Cummins engines
• The calibration update process for Cummins engines is divided into four phases. Each phase is
triggered when the OnCommand® Link is connected to the Internet. For the first three phases,
the OnCommand Link™ only needs to be connected to the Internet for a period of 5-10 minutes.
For the ‘Update Calibration’ phase, the OnCommand® Link device should stay connected to the
Internet until the user sees the message ‘Engine calibration up-to date’ on the application page.
• The simplest approach for obtaining updates to Cummins engines for the first time is to leave
the OnCommand® Link device on a vehicle for at-least 10 hours.
• If your OnCommand® Link has already completed a calibration update once on a given vehicle,
from next time onwards you will not be required to wait for 10 hours (as registration phases is a
one- time process as far as OnCommand® Link stays on the same vehicle) to perform a
calibration update. You would just need to occasionally connect OnCommand® Link to Internet
source with key ON/Engine running and it will automatically start with ‘Preparing update’ phase
when an update is available for your vehicle.
• If the OnCommand® Link device is connected to another vehicle, the 10 hours process will start
all over again.
• Calibration updates for Cummins engines are prepared based on data collected by the
OnCommand® Link from engine modules. This data is transmitted to the backend servers
whenever the OnCommand® Link is connected to the Internet. The data received from your
engine module is analyzed and used to determine if your engine module needs a calibration
update.
• If your engine needs a calibration update, a unique calibration file is prepared for your engine
based on the data received from the OnCommand® Link. The OnCommand® Link device
application page will indicate when a calibration update is available.
• Currently, Over-The-Air calibration updates are supported on 2017 or later Cummins engines
only. The below message is displayed when OnCommand® Link is connected to an incompatible
Cummins engine (2016 or earlier Cummins engine).
Page 14

Page 14 of 31
Detailed process to update/check calibrations on your Cummins-powered
vehicle
1. Device Registration phase (Triggered when the OnCommand® Link device is connected to the
Internet the first time on a new vehicle):
a. To update Cummins engines, the OnCommand® Link must first be registered with a
particular Cummins engine (by engine serial number). This process is initiated when
the OnCommand® Link is first connected to the Internet. Registration takes at-least
4 hours to complete. Once the OnCommand® Link application indicates that
egistration process is initiated, it does not need to remain connected to internet
source for 4 hours to complete this process. The registration phase completes on its
own in the background.
Figure 11. Device Registration phase
b. As long as the Link device remains on the same vehicle, the registration process is
performed only once for a given vehicle. The registration process must be repeated
each time an OnCommand® Link is connected to a different vehicle. During this
process, vehicle can be turned off.
2. Checking for Update phase (Triggered each time the OnCommand® Link connects to the
Internet after the “Device Registration phase” and key is ON/Engine Running):
a. The OnCommand® Link gathers engine data from your vehicle and sends it to the
backend for processing. The backend system processes this information to
determine if your engine needs a calibration update. This process takes at least 5
hours to complete. Once the OnCommand® Link application indicates that checking
for update process is initiated, it does not need to remain connected to internet
source for 5 hours to complete this process. The checking for updates phase
completes on its own in the background.
Page 15

Page 15 of 31
Figure 12. Checking for update phase
3. Preparing Update phase (Triggered when the OnCommand® Link device connects to the
Internet—after the “Checking for Update phase”):
a. Connect your personal device to the OnCommand® Link and open the application
page.
b. If your application displays ‘Engine calibration up-to date’, wait for 5 minutes. If you
still see ‘Engine Calibration up-to date’, your vehicle calibration is up-to date.
Figure 13. Preparing update phase: Engine calibration up-to date
c. If your vehicle needs a calibration update, the application will start preparing your
engine for the update. Preparing the engine takes about 30 minutes. The engine can
be prepared while the vehicle is in motion or in a KEY-ON, ENGINE-OFF state. If the
key is turned OFF, the engine preparation pauses and continues again after the key
is turned ON.
Page 16

Page 16 of 31
Figure 14. Preparing Update phase: Update available and preparation in progress
4. Update Calibration phase (Triggered when the OnCommand® Link connects to Internet—
after the “Preparing Update phase”):
a. Connect your personal device to the OnCommand® Link and open the OTA
application.
b. This phase is only required if your vehicle needs a calibration update.
c. Click on the ‘Update Calibration’ button to initiate the calibration update process.
Please read the warning message and click Accept and Update Calibration to
confirm that all mandatory conditions are satisfied before initiating a calibration
update.
This process takes 5 minutes to complete.
Note: If fault codes are noticed with flashing lights on the dash after calibration update, please perform
a key cycle (KEY OFF followed by KEY ON) and confirm that no further faults are seen on the dash. If
faults are still seen on the dash, please contact Technical Support
Figure 15. Update Calibration phase
Page 17

Page 17 of 31
Figure 16. Update Calibration phase: Calibration update in progress
Rollback Calibration on Cummins Engine
In cases where Cummins engine has been updated with an invalid calibration and needs to be reverted
back to an earlier calibration version, backend systems may trigger a rollback command. If you notice a
‘Rollback Calibration’ button on application page, this means backend systems have triggered a
calibration rollback for your engine. Click Rollback Calibration to initiate calibration rollback process.
Please read the warning message and click Accept and Update Calibration to confirm that all mandatory
conditions are satisfied before initiating a calibration rollback.
This process takes 5 minutes to complete.
Figure 17. Rollback Calibration
Page 18

Page 18 of 31
Programming with OnCommand® Link
To program a calibration update, perform the following:
1. Open a supported browser window on the personal user device (smartphone, tablet or
laptop).
2. Type in the following URL in the browser address box:
http://192.168.100.1
This address must be entered exactly as shown.
3. Application will check for available updates
This is the initial message displayed when the OnCommand® Link connects to and collects data from the
vehicle CAN bus.
Figure 18. Checking for Updates Screen
Calibration Update Available
This message means that the OnCommand® Link has detected that a calibration update is available for
this vehicle. Click the Update Calibration button to start the calibration update procedure.
Page 19

Page 19 of 31
Figure 19. Available Updates Screen
To complete the calibration programming operation, read and follow the instructions on the popup
screen to ensure safe operation, and click Accept and Update Calibration.
Page 20

Page 20 of 31
Figure 20. Calibration Update Pop-up Window
Updating Calibration
This message indicates that the OnCommand® Link is performing the calibration update operation,
including saving parameters, downloading the new calibration file, installing the new calibration file, and
restoring parameters.
A white/gray progress bar will be displayed and will start to fill in with blue as the update progresses.
The update will take from 15 to 25 minutes to complete. The progress bar represents an estimate of the
actual status of the calibration update.
Expect a series of beeps and flashing lights during the calibration update process at different times
based on certain operations performed by OnCommand® Link device. You may also see an Electrical
Fault on the dash, which is normal if it occurs during an update.
Figure 21. Updating Calibration Screen
Note: You will need to perform Key ON/Key OFF a few times during the calibration update process
whenever prompted on the application page.
Engine Calibration Up-to-Date
This message means the OnCommand® Link has read the CAN bus and the ECM calibration is up-to-date.
This message is also displayed after a completed OTA programming operation.
Page 21

Page 21 of 31
Figure 22. Calibration up-to-date Screen
Recovery
This message indicates that the update process did not complete. Click the Recover button to run the
recovery process and repeat the update.
Figure 23. Recovery Screen
Page 22

Page 22 of 31
Battery Error Message
This message indicates that the battery voltage is not within the required range.
Figure 24. Battery Voltage - Error Condition Screen
Connection Error Message
This message indicates that a network connectivity error has occurred. Please refer to the
Troubleshooting Section of this User Guide for further information or contact Technical Support.
Page 23

Page 23 of 31
Figure 25. No Internet Connection Error
Body controller version dependency for updating calibrations on A26 Engines
Updating calibrations on A26 engines needs body controller version to be updated to kernel 708 or
higher. OnCommand Link when connected to A26 engine, checks the body controller version first before
attempting to do a calibration update. It allows calibration update on A26 engine module only if body
controller version is 708 or higher, otherwise it shows an error message indicating that body controller
version need to be updated first. Diamond logic builder can be used to update the body controller
software.
Figure 26. Body controller software needs an update
Page 24

Page 24 of 31
Figure 27. Could not read body controller version
Switching between Write-up Tool Mode and OTA Mode
The OnCommand® Link device supports two applications. In OTA (Over-The-Air Programming) mode, it
performs calibration updates. In Write-up tool mode, it provides health reports to the Accelerator
mobile application. Users can configure the device to work in either mode.
To switch from OTA Mode to Write-Up Tool Mode, go to MENU and click Enter WUT Mode. Please wait
for the device to switch modes.
Figure 28. Switch to Write-up tool mode
To switch from Write-up tool mode to OTA mode, click Exit WUT Mode. Please wait for the device to
reboot (indicated by two beeps and illumination of the amber APP light). You may need to reconnect to
OnCommand® Link.
Page 25

Page 25 of 31
Figure 29. Switch to OTA mode
Standard Health Reports
OnCommand® Link is integrated with Navistar’s OnCommand™ Connection Portal to provide a Standard
Health Report containing over 130 parameter values showing the current health of a vehicle. Data for
Standard Health Reports is collected every 30 minutes and stored in the OnCommand® Link device.
When an internet connection is detected, stored reports are automatically uploaded to OnCommand™
Connection and deleted from device’s memory. Up to 500 reports can be stored by the device.
OnCommand® Link will be able to provide standard health reports from the vehicles supporting SAE
J1939 or J1708 protocol.
To view the Standard Health Reports created by your OnCommand® Link, go to
http://www.oncommandconnection.com
Or, if you are a Dealer, go to
https://evalue.internationaldelivers.com/service/service_info/
If you have not yet registered for an OnCommand™ Connection account, simply click the Enroll Now
button on the home page, select OnCommand® Link as your data provider, and follow the instructions
to create an account.
You can also view health report by connecting to OnCommand® Link and clicking on View Health Report
under MENU, to view the latest health report on your personal user device. As soon as this health report
is uploaded to Navistar’s backend (Wi-Fi range), it will immediately be available to view in OnCommand®
Connection.
Health report indicators on OnCommand® Link application page
The below icons indicate various status related to health reports:
Spinning arrows – Health report running currently
Page 26

Page 26 of 31
Blinking save icon – Health report is being processed and saved to the device
Blinking upload arrow – Health report is being uploaded to Navistar backend server
Number – Number of health reports currently stored on the device’s memory
Green check mark – All health reports were successfully uploaded to Navistar’s backend
Health report indicators - OnCommand® Link APP LED and Beep patterns
- APP LED
o Solid LED: Indicates all health reports have been successfully uploaded to backend.
o Triple Blink LED: Indicates that health report is generated and stored but not yet
uploaded to backend due to no internet connection available.
o Rapid Blink LED: Indicates failure to collect health report.
- Beeps
o Single Beep: Indicates heath report collected but cannot be uploaded to the backend or
failed to collect health report.
o Double beep: Indicates device has booted up and health report is successfully created
and saved on the device.
o Triple beep: Indicates health report was uploaded to backend systems.
Collecting health reports from multiple vehicles
Users can now quickly collect health reports from multiple vehicles by not having to wait for bootup
time when OnCommand® Link is used with Stay-Live battery. Health Reports are collected immediately
after connecting OnCommand® Link to the vehicle and APP LED/Beeps indicators would provide health
report state as defined above.
Without Stay-Live battery, users would still be able to collect health reports from multiple vehicles but
will have to wait every time for Link to bootup (~4 minutes).
Every time OnCommand® Link is connected to a new (different) vehicle, the first health report it creates
can be viewed in OnCommand® Connection immediately as soon as its uploaded to Navistar’s backend
systems.
Page 27

Page 27 of 31
Troubleshooting
Symptom
Action
The OnCommand® Link SSID does not
appear in personal device’s Network
Settings, or is not connected to the personal
user device
Repeat Steps 1 through 5 under Section Connecting
Personal User Device to OnCommand® Link
If you cannot see the last 8 digits of SSID on the label
in your personal device’s network settings, your device
might be setup to select last 9 of VIN as SSID. Check if
you can see last 9 of VIN in your personal device’s
network settings
Two beeps have not sounded, or the amber
APP light is not illuminated after connecting
the OnCommand® Link to the vehicle
• Pull out the OnCommand® Link.
• Plug the OnCommand® Link back in and make sure
the green power light is on
• Repeat Steps 1 through 4 under Section Installing
OnCommand® Link on a Vehicle
Checking for Updates … takes longer than 3
minutes
Updating… does not appear after clicking
the Update Calibration button
Progress bar freezes during update
• Refresh the web page
• Make sure the ignition key is in the ON position
• Make sure you are connected to the
OnCommand® Link device.
Refreshing the web page does not complete
the Checking for Updates … operation
Refreshing the web page does not unfreeze
the progress bar
• Disconnect and reconnect the OnCommand® Link
to the vehicle.
• Wait for both green and amber lights
• Follow instructions from ‘Connecting
OnCommand® Link to Internet’ to connect to Wi-Fi
network
Message: “No Internet connection detected”
• This could be due to non-availability of internet
connection. Please follow instructions in
‘Connecting OnCommand® Link to Internet’
Message: “Battery Voltage not in range
(10.5V to 15.5V)”
• Vehicle voltage too low or too high to perform the
update
Message: ‘Lost connection to OnCommand®
Link’ popup appears on the application page
Move closer to OnCommand® Link device.
Repeat ‘Connecting Personal User Device to
OnCommand® Link’
Message: ‘Failed to exit Write-up tool mode’
Unplug the device and plug it back into the truck.
Please follow instructions in:
‘Switching between Write-up tool mode and OTA
mode’
If fault codes are noticed on the dash after
calibration update is completed.
Perform Key cycle (Key OFF followed by Key ON)
and confirm that no more faults are seen.
Page 28

Page 28 of 31
Technical Assistance
If you need technical assistance with setting up the OnCommand® Link device.
Please contact:
Dealer Support: 800-336-4500 (7AM - 12AM CT, Mon-Sat)
Customer Support: 888-661-6272 (7AM - 12AM CT, Mon-Sat)
Email: OnCommandLink@navistar.com
For further assistance on functions with the OnCommand® Link device, please visit our YouTube Channel
for instructional videos.
Link to YouTube Channel: https://www.youtube.com/channel/UCuMg8hnqCuadCKwVstwVvuQ
Page 29

Page 29 of 31
OnCommand® Link End User License Agreement
Use of the OnCommand® Link for Over-the-Air Programming, health report data
collection, or otherwise logging into software on the device constitutes
acceptance of the following terms:
This Agreement is effective upon acceptance of the terms, between: NAVISTAR, INC., a Delaware
corporation, U.S.A., having its principal place of business at 2701 Navistar Drive, Lisle, IL 60532, and
wholly owned affiliates of Navistar, Inc. (hereinafter "NAVISTAR"), and the END USER of the
OnCommand® Link (hereinafter "END USER").
WHERAS, NAVISTAR has created Over-the-Air Programming (OTA) with OnCommand® Link which will
allow customers to have their vehicle onboard electronics remotely programmed using the
OnCommand® Link hardware, as well as allow for health report data collection (the OTA with
OnCommand® Link User Guide, and revisions to the user guide will be incorporated by reference into
this Agreement), and END USER wishes to utilize the OnCommand® Link for OTA, and
WHEREAS, NAVISTAR and END USER represent that they have certain proprietary information related to
light, medium, and heavy duty trucks, buses, and engines, or to onboard programming and associated
reports, vehicle telematics information, and telematics reports (the "Subject Area"). The parties are
disclosing the information for the purpose of the use of the OnCommand® Link (the "Purpose"), and are
willing to accept each other's information in accordance with the following terms and conditions.
NOW, THEREFORE, the parties agree as follows:
1. Definition
"Confidential Information" is defined as any confidential or proprietary information that is rightfully
possessed by NAVISTAR or END USER, relates to the Subject Area, and is disclosed under this
Agreement.
2. OBLIGATION
Unless otherwise expressly authorized by the other, the parties shall use reasonable care to hold in
confidence, not disclose to any third party and not use, duplicate, modify, or transfer for any purpose
other than the Purpose stated above, the received Confidential Information disclosed in accordance
with Paragraph 3 below for a period of five (5) years from the date of disclosure thereto. Such
reasonable care shall in no event be less than the same degree of care used by the party to restrict
disclosure and use of its own information of like importance.
3. Marking and Transmittal
The obligation of Paragraph 2 shall apply only to Confidential Information that is:
a) reduced to writing, drawings, or other tangible or electronic form, and bears a label or other
marking clearly identifying the information as "confidential" or "proprietary" as emanating from the
disclosing party, and received by the receiving party; or
b) electronically transmitted by or delivered on computer media by the disclosing party to the
receiving party; or
Page 30

Page 30 of 31
c) initially disclosed orally, if (i) the Confidential Information is designated as confidential or
proprietary prior to or at the time of such disclosure, (ii) the Confidential Information is
subsequently clearly summarized in writing, and (iii) the writing is transmitted to the receiving party
labeled as set out in Paragraph (a) above within thirty (30) days of the initial disclosure.
4. NEED TO KNOW
The receiving party agrees that any disclosure within its company will only be made to its employees and
consultants under a confidentiality obligation as are needed to perform work for the aforementioned
Purpose in accordance with this Agreement. END USER acknowledges that NAVISTAR through the use of
the OnCommand® Link hardware, or software, or Navistar’s OnCommand Connect Program may collect
telematics information from a number of customers and that NAVISTAR may release information to
vehicle component or system suppliers. NAVISTAR may also release the information to other third
parties in a compiled, aggregate, or conclusory form in such a way that END USER or its individual
information will not be individually identified. END USER acknowledges that Navistar may allow END
USER’s designated dealer(s) access to view END USER’s data.
5. EXCLUSIONS
Notwithstanding any other provisions of this Agreement, Confidential Information shall not include any
information that:
a) is or becomes publicly known through no wrongful act on the receiving party's part;
b) is already known to receiving party at the time of disclosure;
c) is rightfully received by the receiving party from a third party who is not under a confidentiality
obligation to the disclosing party;
d) is independently developed by the receiving party without reference to or use of the Confidential
Information;
e) is produced to a third party in response to a subpoena or order of a Court or administrative agency
provided that the disclosing party is notified sufficiently prior to disclosure to seek a protective
order regarding such production, unless prohibited by law; or
f) is explicitly approved for release by written authorization of the disclosing party.
6. WARRANTY AND DAMAGES
The disclosing party makes no representation or warranty to, and shall have no liability to, the receiving
party relating to the accuracy or completeness of the Confidential Information supplied by the disclosing
party or the sufficiency of the same for the Purpose of this Agreement or otherwise, except as may be
specifically agreed in a subsequent written agreement. Notwithstanding the above, each party to this
agreement warrants that it either owns or has the right to disclose the information that it discloses to
the other party. Navistar makes no representation or warranty to the accuracy or success of any overthe-air programming accomplished through use of the OnCommand® Link hardware. NEITHER PARTY
SHALL BE LIABLE FOR ANY PERSONAL INJURIES, EQUIPMENT DAMAGE, LOSS OF PROFITS, LOSS OF USE,
LOSS OF BUSINESS, INTERRUPTION OF BUSINESS, UNAVAILABILITY OF VEHICLES, DIRECT OR INDIRECT,
SPECIAL, INCIDENTAL, OR CONSEQUENTIAL DAMAGES OF ANY KIND THAT ARE INCURRED BY THE OTHER
PARTY RESULTING FROM THE USE OF CONFIDENTIAL INFORMATION DISCLOSED TO THE OTHER PARTY,
OR RESULTING FROM ANY USE OF OR TAMPERING WITH THE OnCommand® Link HARDWARE OR
SOFTWARE, ARISING UNDER THIS AGREEMENT OR THE BREACH THEREOF, WHETHER THE CLAIM IS IN
CONTRACT, TORT (INCLUDING NEGLIGENCE), STRICT LIABILITY OR OTHERWISE. IN ANY EVENT, NEITHER
PARTY’S LIABILITY TO THE OTHER FOR A CLAIM OF ANY KIND RELATED TO THIS AGREEMENT SHALL
EXCEED THE GREATER OF THE AGGREGATE OF FEES PAID TO NAVISTAR UNDER THIS AGREEMENT.
Page 31

Page 31 of 31
NAVISTAR DISCLAIMS ALL WARRANTIES, WHETHER DIRECT OR IMPLIED, ASSOCIATED WITH THE
OnCommand® Link HARDWARE OR SOFTWARE IN THE EVENT OF ANY TAMPERING WITH THE
OnCommand® Link HARDWARE OR SOFTWARE BY END USER OR ANYONE NOT SPECIFICALLY
AUTHORIZED IN WRITING BY NAVISTAR.
7. AMENDMENT
No modification or amendment to this Agreement shall be effective unless made in writing and signed
by duly authorized representatives of the parties.
8. TRANSFER
Neither party shall assign or transfer any right or obligation specified herein to a third party without
prior written consent of the other party.
9. TERM
Either party may terminate the agreement for any reason with 30 days written prior notice.
10. CHOICE OF LAW
This Agreement shall be governed by the laws of the State of Illinois without giving regard to choice of
law provisions of any jurisdiction.
 Loading...