

Page 1
Page 2
Blood Glucose Monitoring System
Self monitoring of blood glucose (SMBG) is an integral part of diabetes
care, but the high cost of testing can make this impossible. At ,
ACON
our goal is to provide high quality glucose monitoring at a price that
allows you to test as often as necessary. Together, we can better
manage your diabetes and help you live a longer and healthier life.
Welcome, and thank you for choosing the Blood
Glucose Monitoring System.
On Call Plus
The Blood Glucose
On Call Plus
®
®
Monitoring System will give you accurate blood glucose results in just a
few simple steps.
®
To ensure accurate results from your Blood Glucose
On Call Plus
Monitoring System, please follow these guidelines:
Read instructions before use.
Use the code chip that accompanies each box of test strips.
Use only Blood Glucose Test Strips with the
Plus
Blood Glucose Meter.
in vitro
For diagnostic use only. Your blood glucose monitoring
®®
On Call Plus On Call
system is to be used only outside the body for testing purposes.
For self testing and professional use.
Test only whole blood samples with the Blood
On Call Plus
®
Glucose Test Strips and Meter.
For self-testers, consult your physician or diabetes healthcare
professional before making any adjustments to your medication,
diet or activity routines.
Keep out of reach of children.
For help with any additional questions or issues, please contact
Customer Support at 1-800-838-9502.
By following the instructions outlined in this User's Manual, you will be
able to use your Blood Glucose Monitoring System to
®
On Call Plus
monitor your blood glucose and better manage your diabetes.
i
Page 3

Table of Contents
Getting Started .................................................................................... 1
Component Descriptions .............................................................. 2
®
On Call Plus
Blood Glucose Meter ........................................... 3
Meter Display ............................................................................... 4
®
On Call Plus
On Call Plus
Blood Glucose Test Strips .................................... 5
®
Glucose Control Solution ...................................... 8
Install the Battery .............................................................................. 10
Meter Setup Before Testing .............................................................. 11
Step 1 - Coding the Meter .......................................................... 11
Step 2 - Adjusting the Meter Settings ......................................... 12
Performing a Quality Control Test ................................................... 14
Testing Your Blood ............................................................................ 17
Step 1 - Getting a Drop of Blood ................................................ 17
Step 2 - Testing Blood Glucose .................................................. 22
"HI" and "LO" Messages ............................................................ 24
Using the Meter Memory ................................................................... 26
Viewing Stored Records ............................................................. 26
Clearing the Memory .................................................................. 27
Maintenance ....................................................................................... 28
Replacing the Battery ................................................................. 28
Caring for Your
®
On Call Plus
Blood Glucose Monitoring System ............................................. 28
Suggested Testing Times and Target Goals ................................... 29
Comparing Meter and Laboratory Results ...................................... 30
Troubleshooting Guide ..................................................................... 31
Specifications .................................................................................... 33
Warranty ............................................................................................. 34
Index ................................................................................................... 35
.
.
En
.
ii
Page 4
y
En
Getting Started
Component DescriptionsComponent Descriptions
En
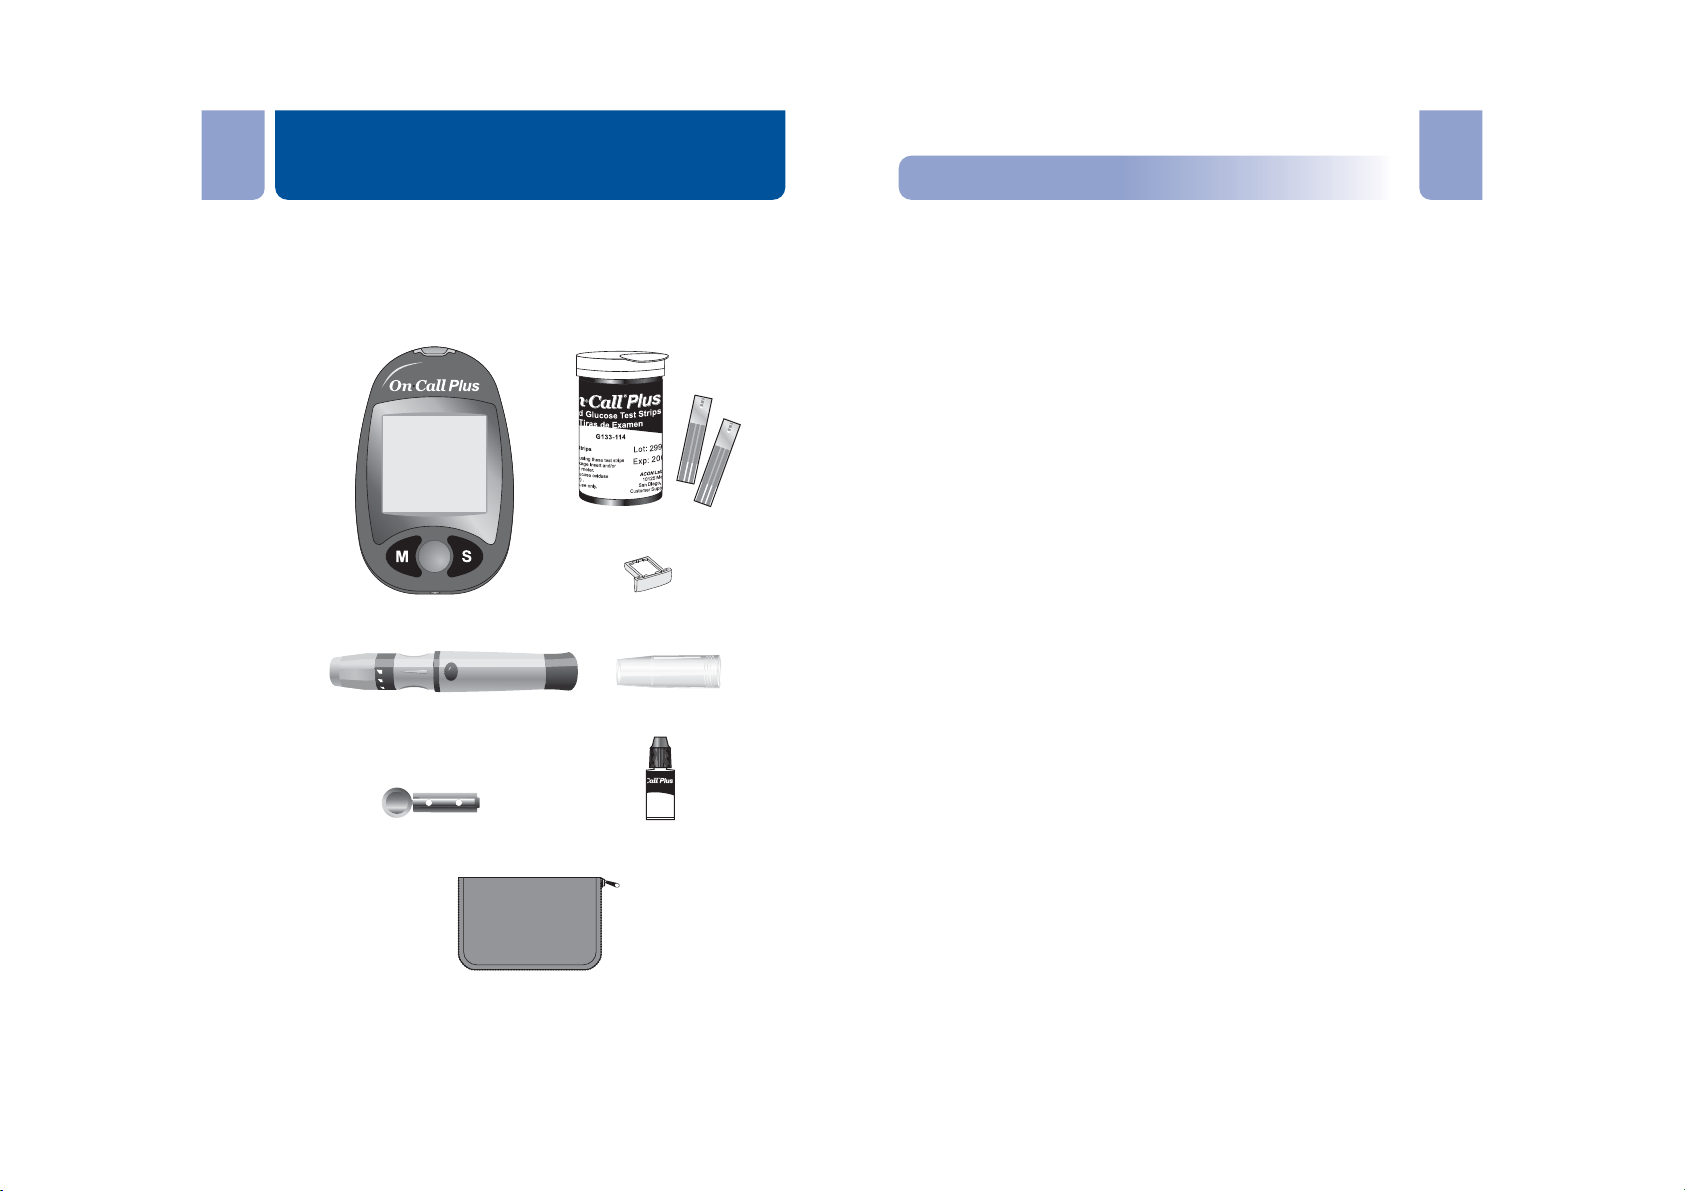
Before testing, read the instructions carefully and learn about all the
components of your Blood Glucose Monitoring System.
Depending on the product you purchase, some of the
On Call Plus
®
On Call Plus
®
components may need to be purchased separately. Please check the
list of contents on the outer box for details on which components are
included with your purchase.
Test Strips
135
Blood Glucose Meter
5
4
3
Lancing Device
Sterile Lancet
Code Chip
Clear Cap
ControlSolution
iónde Control
G123-311
diagnosticuse onl
O
-86F
NLaboratories,Inc.
125MesaRimRoad,
Diego,CA92121,USA
rSupport:1-800-838-9502
Control Solution
1. Blood Glucose Meter: Reads the test strips and displays the blood
glucose concentration.
2. Test Strips: Strips with a chemical reagent system used with the
meter to measure glucose concentration in blood.
3. Code Chip: Automatically calibrates the meter with the code number
when inserted into the meter.
4. Lancing Device: Used with sterile lancets to prick the fingertip, palm
(at the base of the thumb) or forearm for blood sample collection.
The packaged lancing device has multiple depth settings, allowing
users to adjust the depth of the puncture and minimize discomfort.
5. Clear Cap: Used with the lancing device and sterile lancet to draw
blood sample from the forearm and palm.
6. Sterile Lancets: Used with the lancing device to draw a blood
sample. Sterile lancets are inserted into the lancing device with
each blood draw and discarded after use.
7. Control Solution: Verifies the proper operation of the blood glucose
monitoring system by checking the test strips and meter against a
precalibrated control solution. Control Solution 1 is all you need
most of the time. Control Solution 2 is also available if you want to
do a level 2 test. The two levels of control solution, Control 1 and
Control 2, are available in the Glucose Control
On Call Plus
®
Solution package which is sold separately.
8. Carrying Case: Provides portability for blood glucose testing
wherever you go.
9. User's Manual: Provides detailed instructions on using the blood
glucose monitoring system.
10. Quick Reference Guide: Provides a brief overview of the blood
glucose monitoring system and testing procedures. This small guide
can be kept in your carrying case.
11. Quick Start Guide: A short set of instructions to get you started
testing with your new system.
12. Logbook: Allows users to record their blood glucose data and get a
better picture of their broader trends.
13. Warranty Card: Should be completed and returned to the warranty
center to qualify for the 5-year meter warranty.
Carrying Case
1 2
Page 5
En En
On Call Plus®Blood Glucose MeterOn Call Plus®Blood Glucose Meter Meter DisplayMeter Display
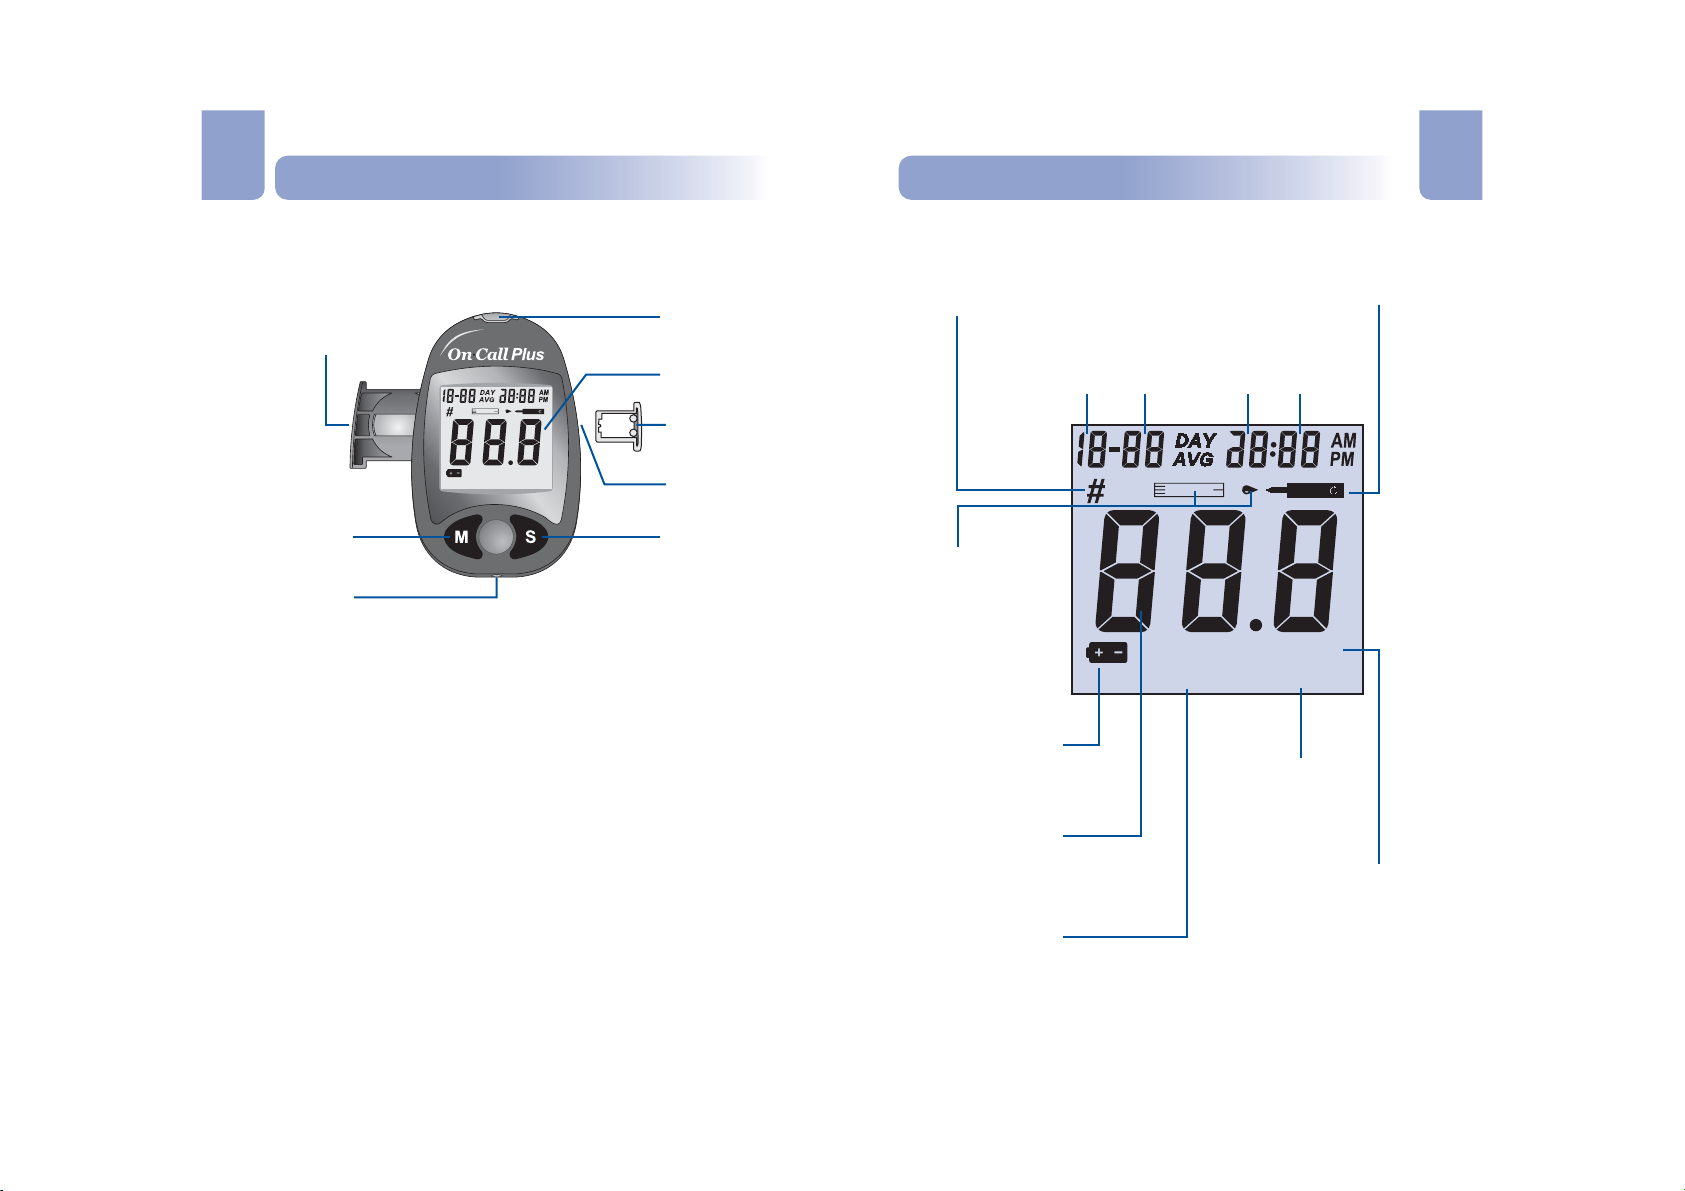
The meter reads the test strips and displays the blood glucose
concentration. Use this diagram to become familiar with all the parts of
your meter.
Strip Port
Battery Carrier
Liquid Crystal
Display (LCD)
Code Chip
o
m
dL
m
lLlmg
l
CODE
MEM
M Button
Code Chip Slot
S Button
Data Port
Liquid Crystal Display (LCD):
Shows your test results, and helps you
through the testing process.
M Button:
Recalls previous test results from the meter memory and
performs other menu selection functions.
S Button:
Selects meter settings, performs other menu selection
functions.
Strip Port:
Battery Carrier:
Code Chip Slot:
Code Chip:
Test strips are inserted into this area to perform a test.
The battery carrier is located on the back of the meter.
Insert the code chip here.
For coding the meter. A new code chip comes with every
box of test strips.
Data Port:
Not Currently Available for Use.
Pound Sign (#)
Appears with the control solution
test result or when you mark an
invalid result to prevent it from
being included in the averages.
Month Day Hour Minutes
Test Strip and Blood
Drop Symbols
These two symbols
appear at the same
time to tell you when
to apply the sample.
Battery Symbol
Warns when you
should replace the
battery.
Test Result Area
Indicates code
number and test
result.
MEM
Shows a test result
stored in memory.
Control Solution Symbol
Indicates a control test result. A
pound sign (#) will also be
displayed when control solution
symbol appears.
o
m
m
MEM
lLlmg
dL
l
CODE
CODE
Appears with the
code number of the
test strips.
Measurement Unit
Only one unit will be
displayed on your meter and
cannot be adjusted.
3 4
Page 6
Meter Use and Precautions
Blood Glucose Test Strips
Tiras de Examen
G133-114
135
mmol/L
mg/dL
CTRL 2
CODE
CTRL 1
mmol/L
mg/dL
14.9-19.8
268-356
4.5-6.7
81-121
En En
The meter is pre-set to display blood glucose concentration in
either millimoles per liter (mmol/L) or milligrams per deciliter
IMPORTANT: Apply sample only to the sample tip of the test strip. Do
not apply blood or control solution to the top of the test strip as this may
result in an inaccurate reading.
(mg/dL) depending on which unit of measure is standard in your
country. This unit of measure cannot be adjusted. The meter will
be set to mg/dL by default when sold in the United States.
Do not get water or other liquids inside the meter.
Keep the strip port area clean.
Keep your meter dry and avoid exposing it to extremes in
temperature or humidity. Do not leave it in your car.
Do not drop the meter or get it wet. If you do drop the meter or
get it wet, check the meter by running a quality control test.
Refer to on page 14 for instructions.
Quality Control Test
Do not take the meter apart. Taking the meter apart will void the
warranty.
Refer to the section on page 28 for
Caring for Your Meter
details on cleaning the meter.
Keep the meter and all associated parts out of reach of children.
Note: Follow proper precautions and all local regulations when
disposing of the meter and used batteries.
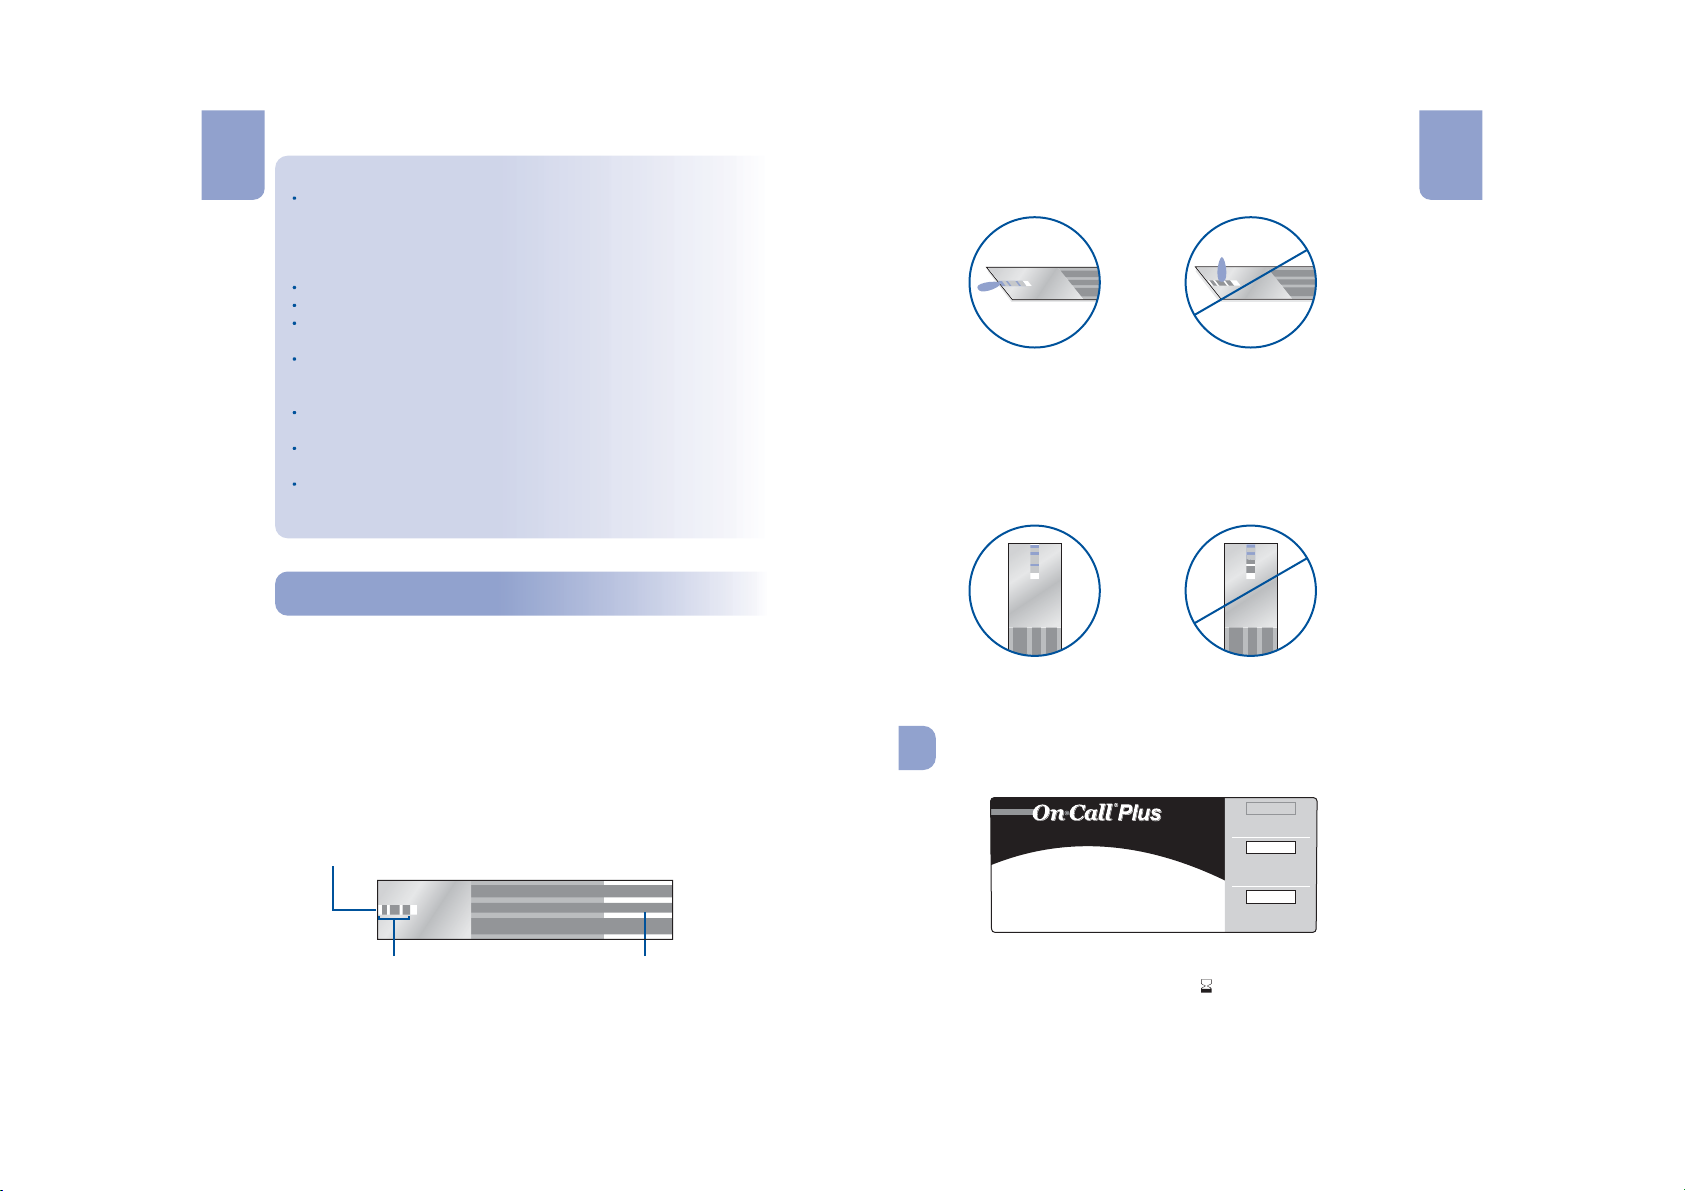
Hold the blood drop to the sample tip of the test strip until the check
window is full and until the meter begins to count down. If the check
window does not fill, do not add more blood to the test strip. You may
get an E-5 message or an inaccurate test result. Discard the strip and
retest. Even if the meter begins to countdown but the check window
does not fill, discard the strip and begin the test again with a fresh test
strip.
Correct Incorrect
On Call Plus®Blood Glucose Test StripsOn Call Plus®Blood Glucose Test Strips
®
On Call Plus
The Blood Glucose Test Strips are thin strips with a
chemical reagent which work with the Blood Glucose
Meter to measure the glucose concentration in whole blood. After the
strip is inserted into the meter, blood is applied to the sample tip of the
test strip, then automatically absorbed into the reaction cell where the
reaction takes place. A transient electrical current is formed during the
reaction and the blood glucose concentration is calculated based on the
electrical current detected by the meter, then the result is shown on the
meter display. The meter is calibrated to display plasma equivalent
results.
Sample Tip
Apply blood or control solution here.
®
On Call Plus
Correct Incorrect
Code Number
Contents: 10Test Strips
IMPORTANT: Before using these test strips
carefully read the Package Insert and/or
User's Manual for your meter.
Each strip contains Glucose oxidase
(from ) .
Aspergillus niger
For diagnostic use only.
in vitro
O
Store at 59-86 F
Lot:
2990001
Exp: 2008/01
ACONLaboratories, Inc.
10125Mesa Rim Road,
SanDiego, CA 92121, USA
CustomerSupport: 1-800-838-9502
Check Window
Check to confirm that sufficient
sample has been applied.
Contact Bars
Insert this end of the test strip
into the meter until it stops.
5
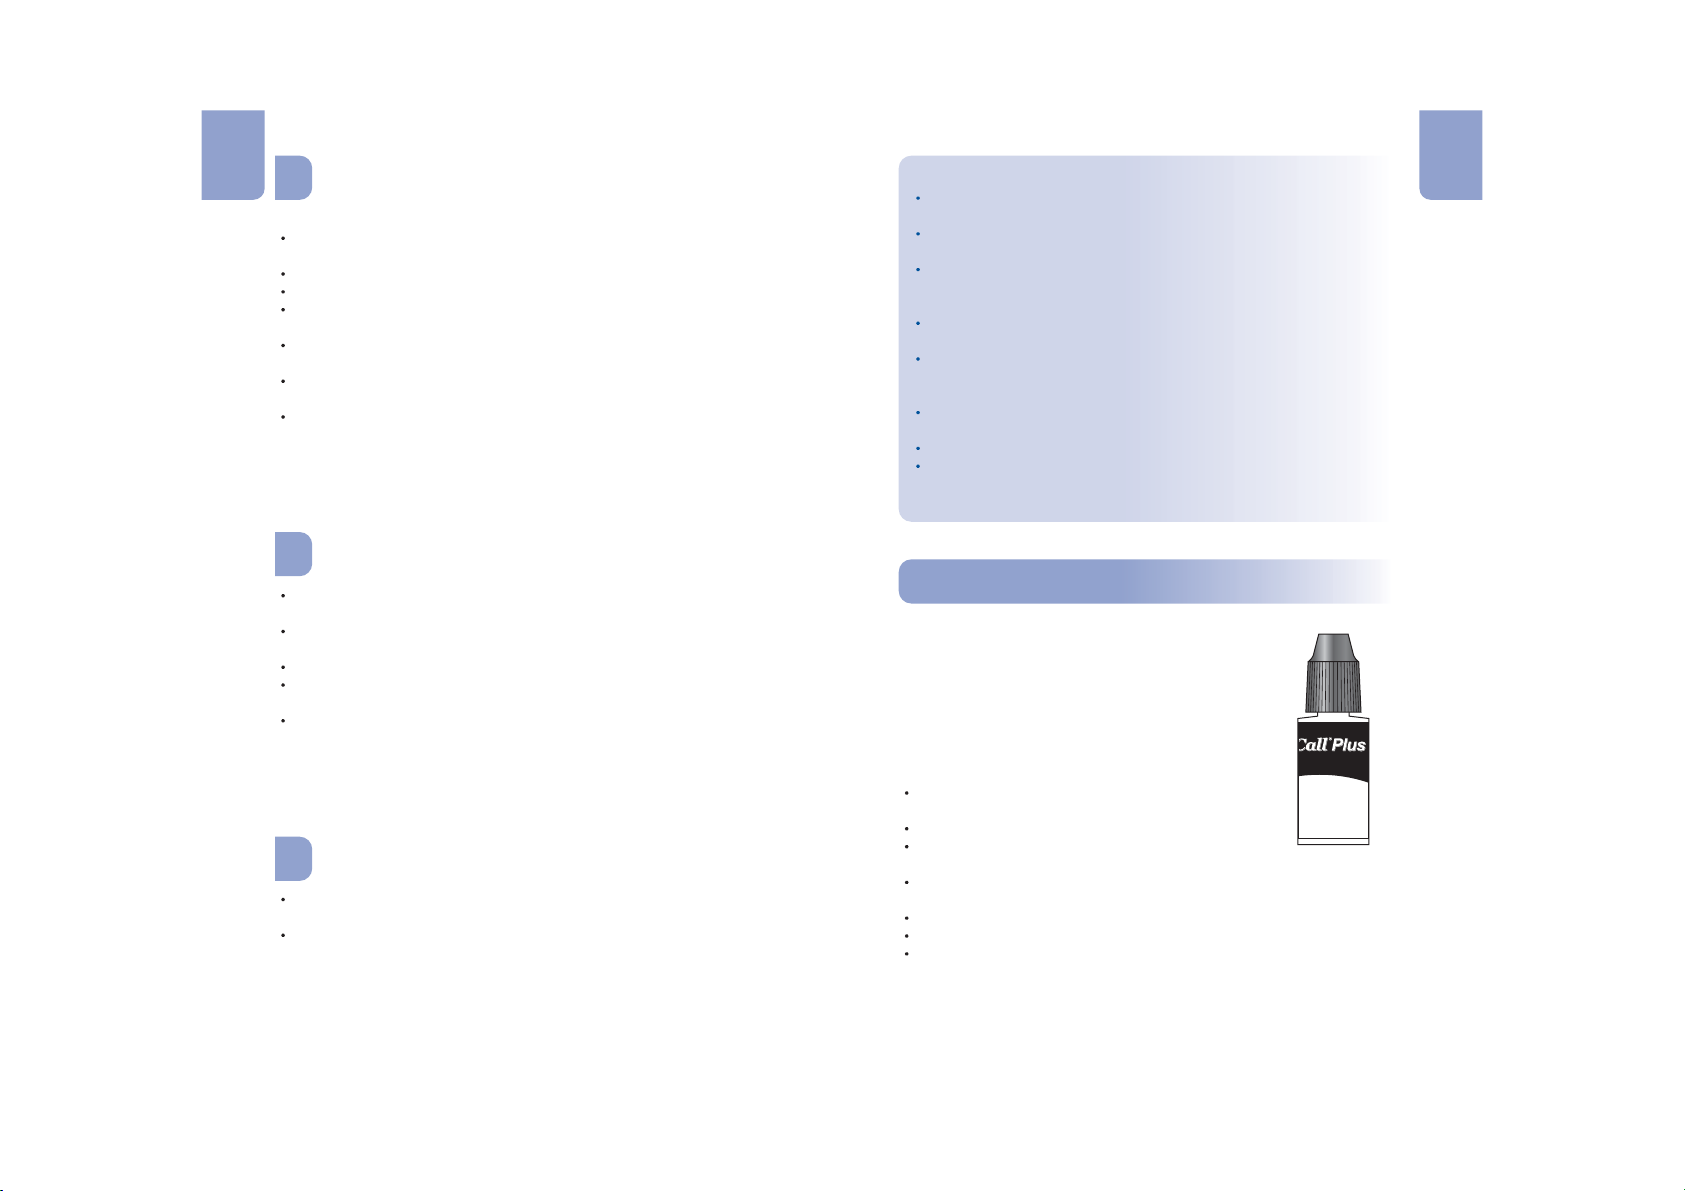
Each package of test strips is printed with a code number (CODE), lot
number (LOT), unopened expiration date ( ) and control range (CTRL1
and CTRL 2).
6
Page 7
En En
y
Storage and Handling
Please review the following storage and handling instructions:
Store test strips in a cool, dry place at room temperature, 59-86 F
o
(15-30 C). Store them away from heat and direct sunlight.
o
Do not freeze or refrigerate.
Do not store or use test strips in a humid place such as a bathroom.
Do not store the meter, the test strips or control solution near bleach
or cleaners that contain bleach.
Replace the cap on the test strip vial immediately after removing a
test strip.
The test strip should be used immediately after removing it from
container.
Do not use your test strips past the unopened expiration date
printed on the label. Using test strips past the unopened expiration
date may produce incorrect test results.
Note: The expiration date is printed in Year-Month format. 2008-01
means January, 2008.
Test Strip Precautions
in vitro
For diagnostic use. Test strips are to be used only outside
the body for testing purposes.
Do not use test strips that are torn, bent, or damaged in any way.
Do not reuse test strips.
Before running a blood glucose test, make sure that the code
number on the meter display matches the number shown on the
test strip vial or on the pouch.
Keep the test strip vial or the foil pouch away from children and
animals.
Consult your physician or healthcare professional before making
any changes in your treatment plan based on your blood glucose
test results.
Not intended for the diagnosis of or screening for diabetes
mellitus.
Not for use on neonates.
When testing alternative sites, test when in steady state only
(such as before eating, before taking medication, before
exercising, or 2 hours after eating).
Special Instructions for Test Strip in the Vial
Test strips should be stored tightly capped in their protective vial to
keep them in good working condition.
Do not store test strips outside their protective vial. Test strips must
be stored in the original vial with the cap tightly closed.
Do not transfer test strips to a new vial or any other container.
Replace the cap on the test strip vial immediately after removing a
test strip.
A new vial of test strips may be used for 3 months after first being
opened. The opened expiration date is 3 months after the date the
vial was first opened. Write the opened expiration date on the vial
label after opening. Discard the vial 3 months after you first open it,
usage after this period may result in inaccurate readings.
Special Instructions for Test Strip in Foil Pouch
Tear the pouch carefully starting from the tear gap. Avoid damaging
or bending the test strip.
Use test strip immediately after removing it from the pouch.
7 8
See the test strip insert for more details.
On Call Plus®Glucose Control SolutionOn Call Plus®Glucose Control Solution
On Call Plus
The Glucose Control Solution
contains a known concentration of glucose. It is
used to confirm that your Blood
Glucose Meter and Test Strips are working
together properly and that you are performing
the test correctly. It is important to run a quality
control test regularly to make sure you are
getting correct results.
You should run a quality control test:
Before you first use your meter, to
familiarize yourself with its operation.
Before using a new box of test strips.
When you suspect that the meter or test
strips are not working properly.
When you suspect that your test results are inaccurate, or if they
are inconsistent with how you feel.
When you suspect your meter is damaged.
After cleaning your meter.
At least once a week.
Refer to on page 14 for instructions on running a
quality control test.
Please review the following storage and handling instructions:
®
On Call Plus
Quality Control Test
®
Control Solution
ión de Control
G123-311
diagnostic use onl
O
-86 F
NLaboratories, Inc.
125Mesa Rim Road,
Diego,CA 92121, USA
rSupport: 1-800-838-9502
Page 8
En En
Storage and Handling
oo
Store the control solution at room temperature, .
Do not refrigerate or freeze.
If the control solution is cold, do not use until it has warmed to room
temperature.
Use before the unopened expiration date that is shown on the
bottle.
Note: The expiration date is printed in Year-Month format. 2008-01
means January, 2008.
59-86 F (15-30 C)
Install the Battery
Battery may not be preinstalled in the meter. One CR 2032 3.0V coin
cell battery is required. Please find the battery in your carrying case and
install it according to following steps:
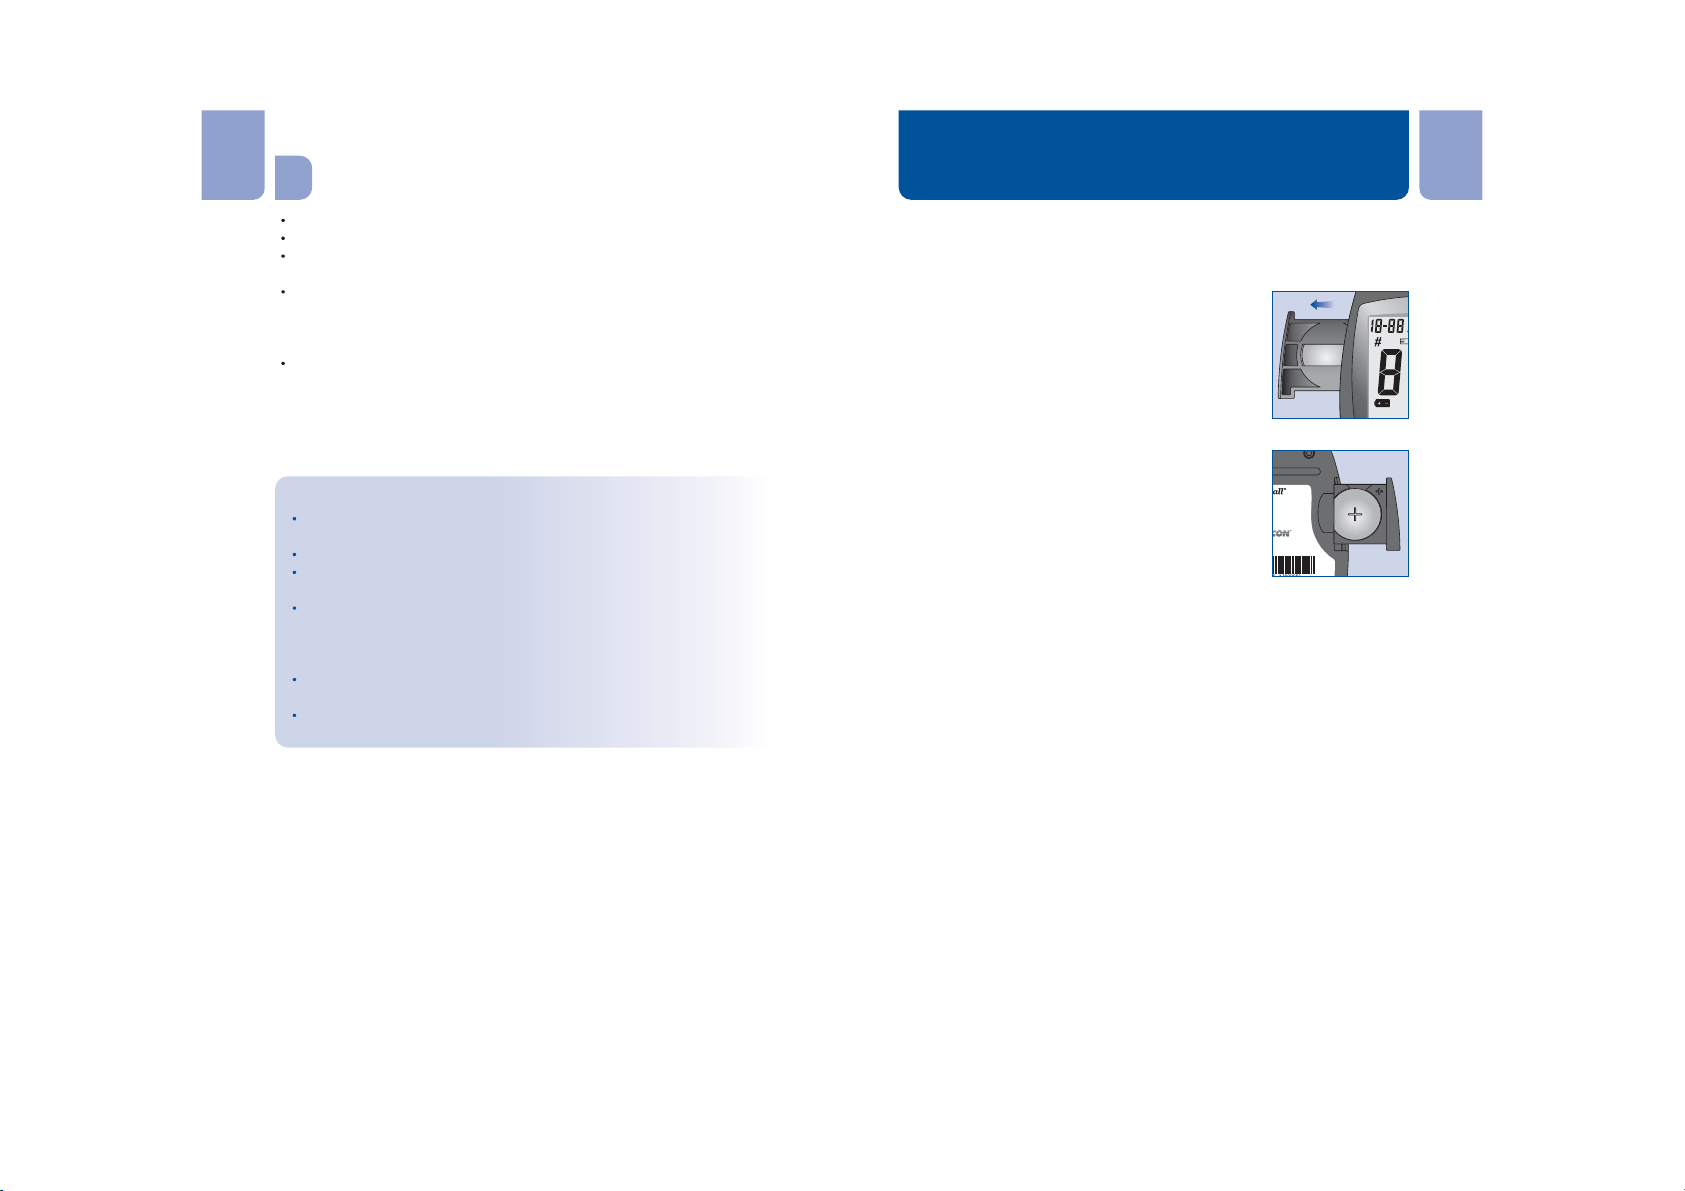
1. Pull the battery carrier on the left side of the
meter. The battery carrier should be easily
opened with your finger.
Each bottle of control solution can be used for 3 months after you
first open it. The control solution will expire 3 months after the bottle
is opened for the first time. Record this opened expiration date on
the bottle label.
2. Place a new CR 2032 3.0V coin cell battery.
Make sure it is aligned with the (+) side
Control Solution Precautions
in vitro
For diagnostic use. The control solution is for testing only
outside the body. Do not swallow or inject.
Shake well before using.
Control solution tests are specified to be accurate only when
tested between 59 and 104 F (15-40 C).
The control ranges shown on the test strip vial (or on the foil
pouch) are not recommended ranges for your blood glucose
level. Your personal blood glucose target ranges should be
oo
facing up in the battery carrier.
3. Close the battery carrier and make sure that
it snaps shut.
lucose
Glucosa
Chip
Codificador
iagnosticuse only.
oratories,Inc.
saRimRoad,
CA92121,USA
ort:1-800-838-9502
Plus
Meter
enSangre
determined by your diabetes healthcare professional.
Do not touch the test strip with the tip of the control solution
bottle.
Use only the same brand of control solution that was provided
with your kit.
Please contact Customer Support at 1-800-838-9502 for more
information on obtaining the control solution kit.
See the control solution insert for more details.
9 10
Page 9
En En
Meter Setup Before Testing
Step 2 - Adjusting the Meter SettingsStep 2 - Adjusting the Meter Settings
Before testing, the following steps should be followed:
Step 1 - Coding the MeterStep 1 - Coding the Meter
Simply insert the code chip to code the meter. Every time you change to
a new box of test strips, you need to insert the code chip packed with
the new box of test strips. You can see the code number appears on the
meter. Make sure this number matches the code number printed on the
test strip vial label (or on the foil pouch) and the number printed on the
code chip.
You can easily find a code chip in your starter kit box. This code chip is
used with the test strip packed in your carrying case when you first
open the carrying case. If there is already one code chip inserted,
remove it and insert the new code chip.
1. Take the code chip from the test strip box. Compare the code
number on the code chip with the code number printed on the test
strip vial label (or on the foil pouch). If the two numbers are not
identical, you may get inaccurate results. If the code number on the
code chip does not match the number on the vial or foil pouch of
strips with which it was packaged, please contact Customer
Support at 1-800-838-9502.
2. With your meter turned off, insert the new code chip into the code
chip slot of the meter. It should easily snap into place. The code
chip should remain in the meter, do not take it out until you change
to another new box of test strips.
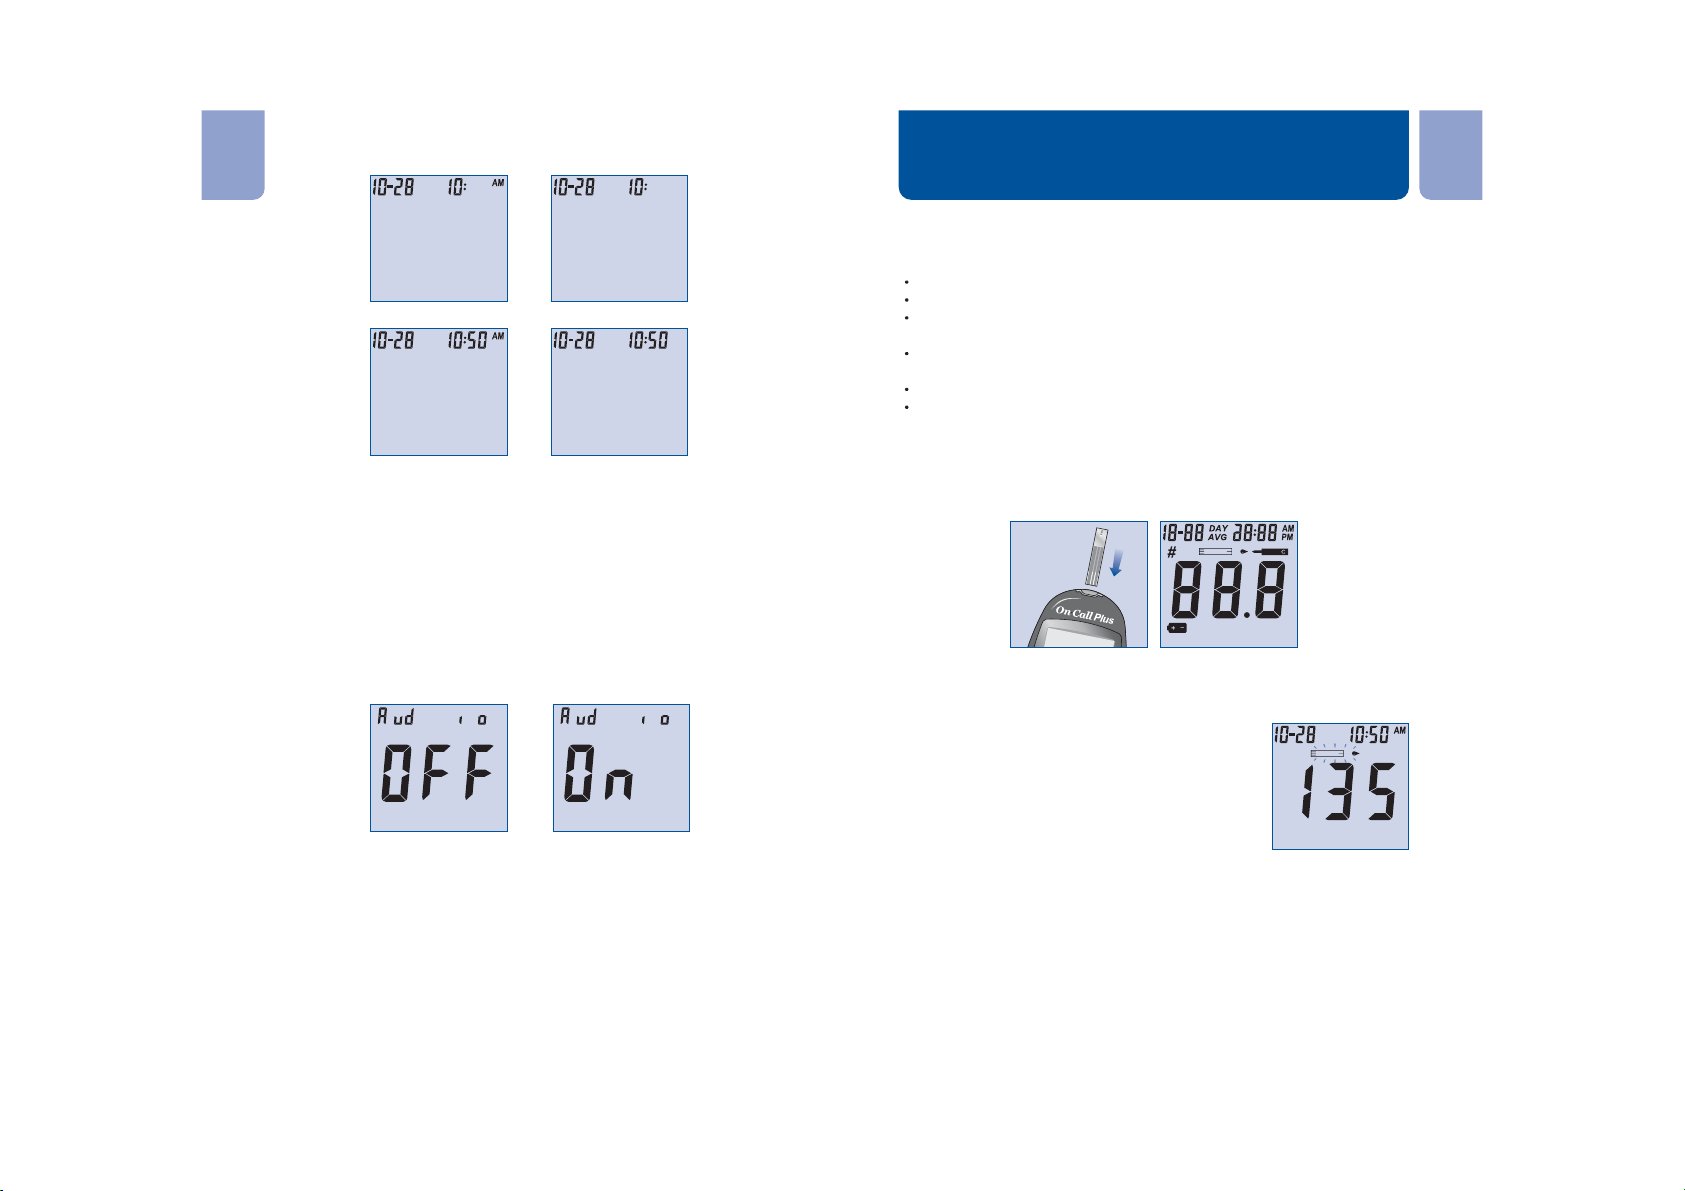
Adjust the meter settings to set the clock, ensuring that results stored in
the memory are shown with the correct date and time. You can also turn
the meter audio feature on or off. You need to adjust the meter settings
before you first use your meter.
You will need to set the clock settings after replacing the battery.
1. Press the S button to enter the meter setup mode. The meter will
automatically enter the setup mode when turned on for the first time
by any method.
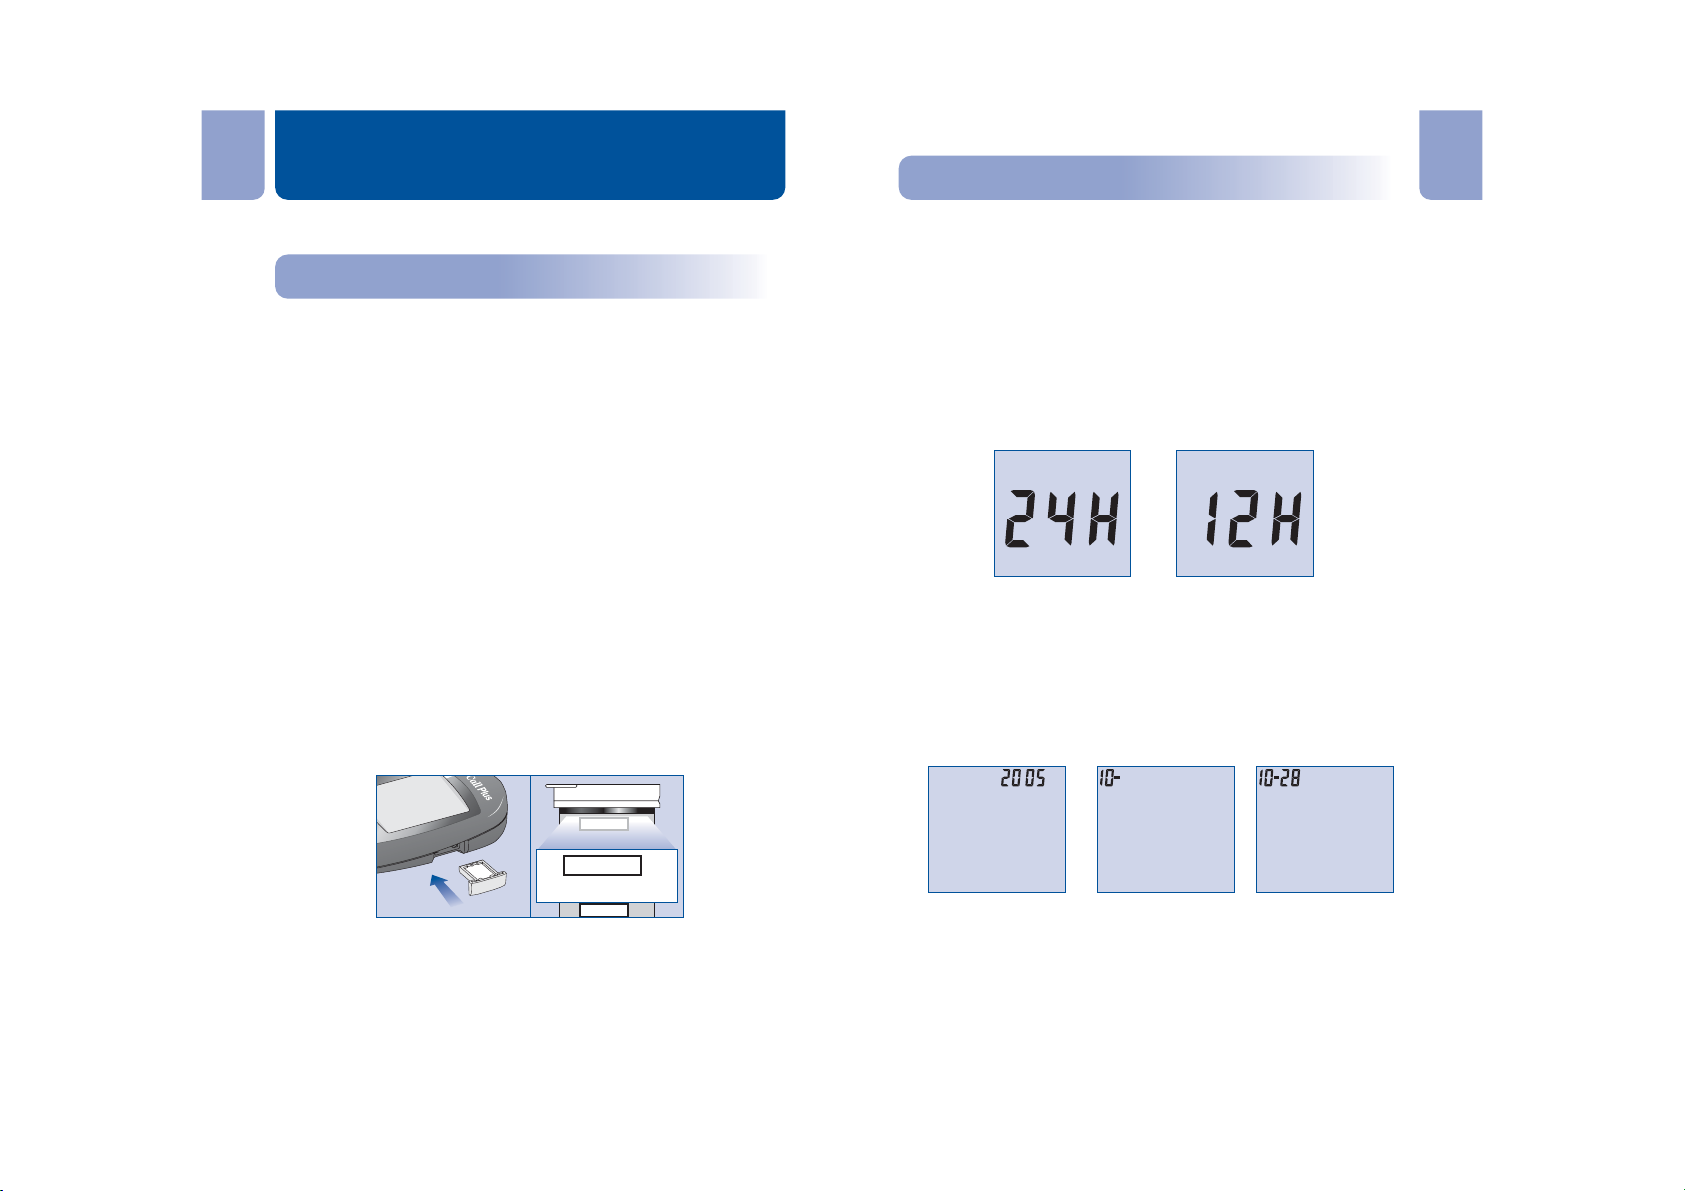
2. First, set the clock for either 12 or 24 hour mode. Press the M
button to switch between the two settings, then press the S button
to save your choice and start setting the year, month and date.
OR
3. The year will appear at the top of the display. Press the M button
until the correct year is displayed. Once you have selected the
correct year, press the S button to save your choice and start
setting the month. Press the M button until the correct month is
displayed, then press the S button to save your choice and start
setting the date. Press the M button until the correct date is
displayed, then press the S button to save your choice and start
setting the time.
Year Month Date
CODE
135
CODE
135
Note: If a test strip is inserted and no strip code is stored in memory, the
display will flash "- - - CODE".
11 12
135
CTRL 2
4. The hour will appear at the top of the display. Adjust the hour with
the M button until the correct hour is displayed. Press the S button
to save your choice and set the minutes. Press the M button to
change to the correct minute. Press the S button to save your
choice and move to set the audio feature.
Page 10
En En
Hour Hour
Performing a Quality Control Test
OR
Minutes Minutes
OR
5. Audio Feature
The meter comes with the meter audio feature enabled. The meter
will give one short beep when it is turned on, after sufficient sample
has been applied to the test strip and when the result is ready. The
meter will sound three short beeps to sound a warning when an
error has occurred. Please check the error number on the display to
confirm what kind of error has occurred.
Press the M button to switch between turning the meter beep "On"
and "Off". Press the S button to confirm your selection. Pressing S
at this point will end the setup mode and power off the meter.
OR
The quality control test confirms that the test strips and meter are
working together properly, and that you are performing the test correctly.
It is important to perform this test:
Before you first use your meter.
Before using a new box of test strips.
When you suspect that the meter or test strips are not working
properly.
When you suspect that your test results are inaccurate, or if they
are inconsistent with how you feel.
When you suspect your meter is damaged.
At least once a week.
1. Insert a test strip into the strip port, contact bars end first and facing
up, to turn on the meter and display all the display segments. If the
audio option is on, the meter will beep, signaling the meter is turned
on.
o
m
lLlmg
CODE
dL
l
m
MEM
2. Check the display to confirm that all the display segments turn on
(see display illustration above).
3. Following this display check, the system will
enter the test mode. The display will show the
date and time and the strip icon with the blood
sample icon blinking. The code number will be
displayed in the center of the screen. Make
sure that the code number that appears on
the display matches the code number (CODE)
on the test strip vial (or on the foil pouch). If
CODE
not, make sure to locate and insert the code chip that came with the
box of strips. If the codes still do not match, do not perform a test.
You will need a new package of test strips to perform a test.
The blinking test strip and blood drop icon indicates that the test
strip is inserted correctly and a drop of control solution can be
added.
Note: If the test strip has been inserted incorrectly, the meter will not
turn on.
13 14
Page 11
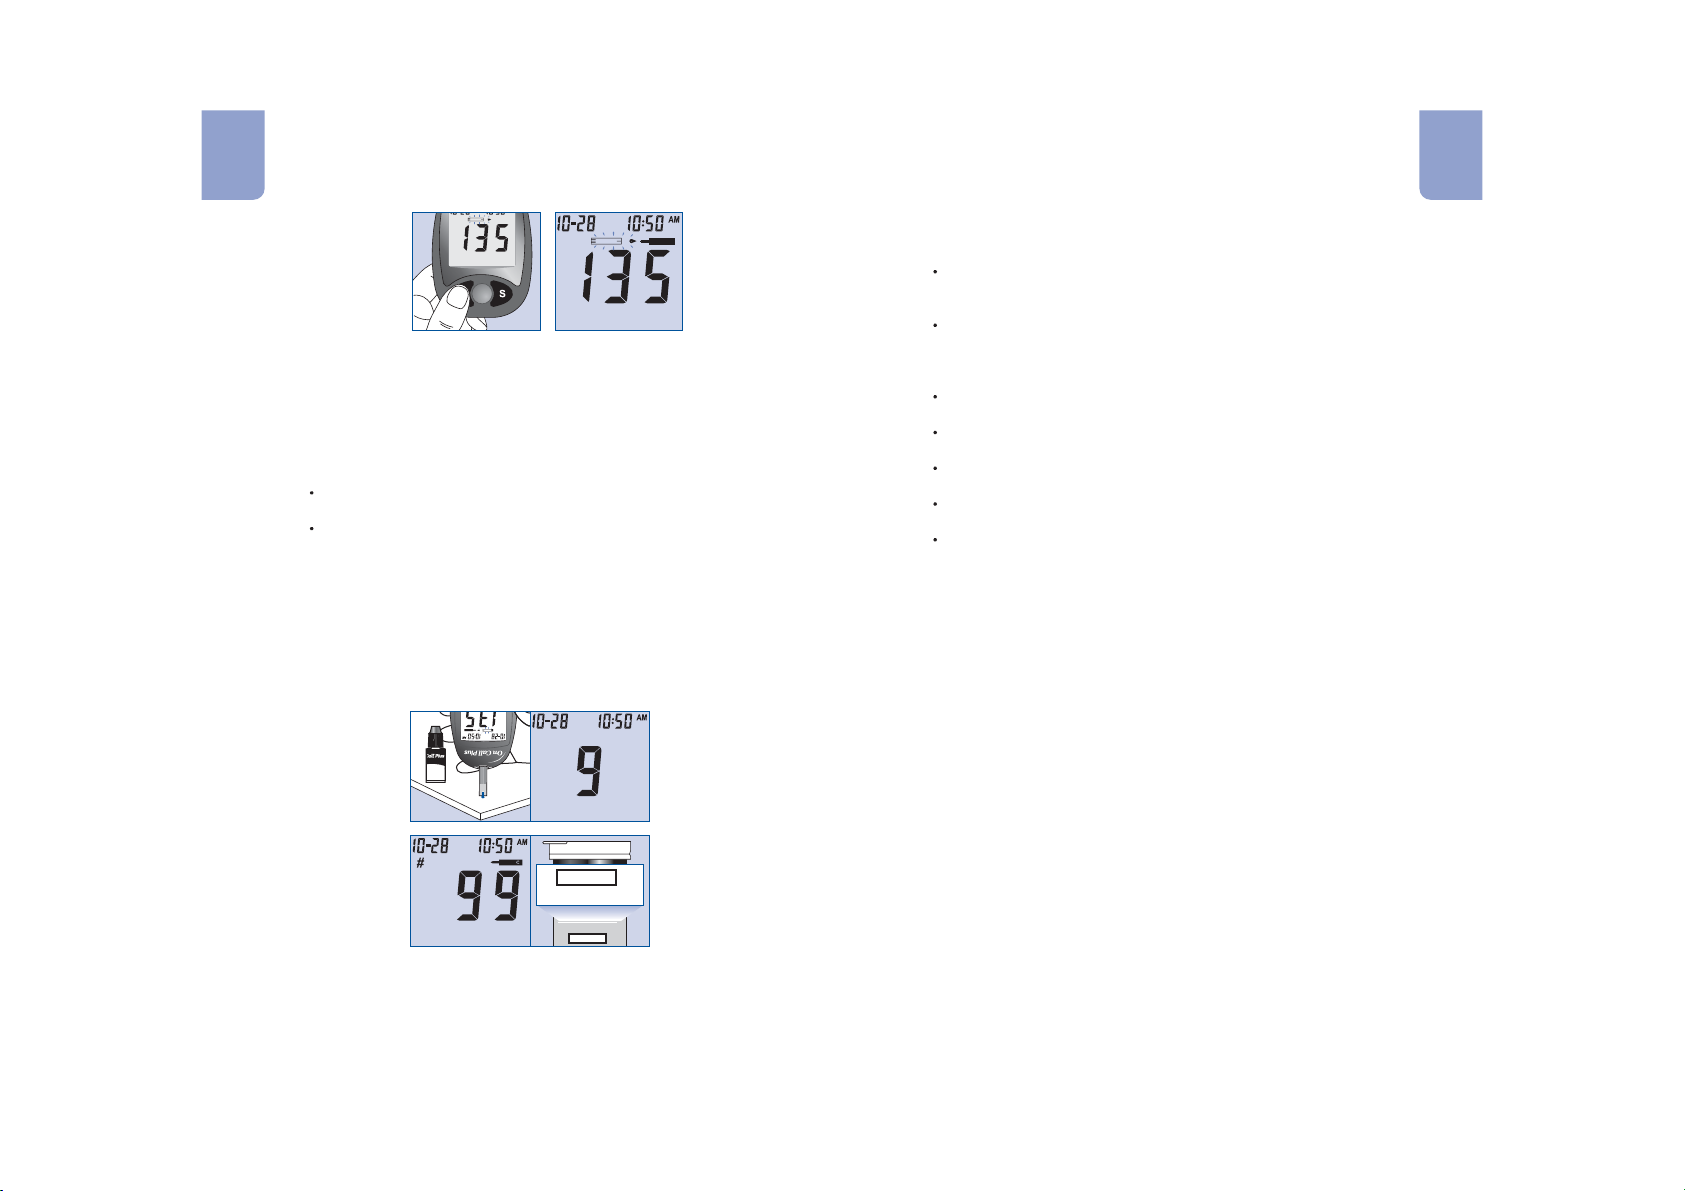
4. Press the M button to mark the test as a control solution test. Once
y
9
En En
the M button is pressed, the control solution symbol will appear on
the display.
7. Remove and discard the test strip.
The display should also show a pound sign (#) indicating the test is
a control solution test. This shows that the number will not be
counted in the 7, 14 and 30-day averages. The pound sign (#) will
also be displayed when reviewing the results stored in memory.
CODE
If the result falls outside the indicated control range:
Confirm you are matching the correct range. Control Solution 1
results should be matched to the CTRL 1 range printed on the
CODE
5. Shake the control solution bottle well, then squeeze it gently and
discard the first drop. If the tip clogs, tap the tip gently on a clean,
hard surface, shake again, and then use. Squeeze out a second
small drop on a clean nonabsorbent surface. Touch the sample tip
of the test strip to the control solution drop. If the audio option is
turned on, the meter will beep to indicate a sufficient sample has
been applied.
Notes:
Do not apply control solution to the test strip directly from the
bottle.
If the control solution sample does not fill the check window, do
not add a second drop. Discard the test strip and start over with
a new test strip.
6. Once sufficient sample has been applied, the meter display will
count down from 9 to 1 and then display the result. The control
solution test results should be within the control range (CTRL1)
printed on the test strip vial (or on the foil pouch). This means that
your blood glucose monitoring system is working properly and that
you are performing the procedure correctly.
test strip vial (or on the foil pouch).
Check the expiration date of the test strip and control solution.
Make sure that the test strip vial and control solution bottle have
not been opened for more than 3 months. Discard any test
strips or control solution that has expired.
Confirm the temperature in which you are testing is between.59
oo
and 104 F (15-40 C)
Make sure that the test strip vial and control solution bottle have
been tightly capped.
Make sure code number on the strip vial label or on the foil
pouch matches the code number appears on the meter display.
Confirm that you are using the same brand of control solution
that was provided with your kit.
Make sure that you followed the test procedure correctly.
After checking all of the conditions listed above, repeat the quality
control test with a new test strip. If your results still fall outside of the
control range shown on the test strip vial (or on the foil pouch), your
meter may be defective. Please contact Customer Support at 1-800838-9502 for help.
Two levels of control solution are available labeled Control Solution 1
and Control Solution 2. Control Solution 1 is sufficient for most all selftesting needs. If you think your meter or strips may not be working
correctly, you may also want to do a level 2 test. The ranges for both
ControlSolution
ióndeControl
G123-311
diagnosticuseonl
-86F
NLaboratories,Inc.
125MesaRimRoad,
Diego,CA92121,USA
rSupport:1-800-838-9502
O
(CTRL 1 and CTRL 2) are displayed on the test strip vial (or on the foil
pouch). Simply repeat step 4 through 6, using Control Solution 2.
For confirmation of results, Control Solution 1 tests should fall within the
CTRL 1 range, and Control Solution 2 tests should fall within the CTRL
2 range. If the control solution test results do not fall within the
respective ranges, DO NOT use the system to test blood, as the system
CTRL 2
mg/dL
81-121
mg/dL
81-121
dL
mg
l
CTRL 2
may not be working properly. If you cannot fix the problem, please
contact Customer Support at 1-800-838-9502 for help.
Please contact Customer Support at 1-800-838-9502 for more
information on obtaining the control solution kit, which
®
On Call Plus
contains Control Solution 1 and Control Solution 2.
Test results are displayed either in mmol/L or mg/dL depending on the
unit of measure most common in your country. The meter will be set to
mg/dL by default when sold in the United States.
15 16
Page 12
En En
Testing Your Blood
Fingertip Testing
The following steps show how to use the meter, test strips, lancing
device and sterile lancets together to measure your blood glucose
concentration.
Step 1 - Getting a Drop of BloodStep 1 - Getting a Drop of Blood
®
On Call Plus
The Blood Glucose Monitoring System requires a very
small sample of blood which may be obtained from the fingertip, palm
(at the base of the thumb) or forearm. See page 20 for information on
obtaining a blood sample from the palm or forearm. Before testing,
choose a clean, dry work surface. Familiarize yourself with the
procedure and make sure you have all the items needed to obtain a
drop of blood.
IMPORTANT: Prior to testing, wipe the test site with an alcohol swab
or soapy water. Use warm water to increase blood flow if necessary.
Then dry your hands and the test site thoroughly. Make sure there is
no cream or lotion on the test site.
Cocking Barrel
Lancet Holder
Sterile Lancet
Safety Tab
Clear Cap
(for testing on forearm
and palm)
3
4
5
For fingertip sampling, adjust the depth penetration to reduce the
discomfort. You do not need the clear cap for fingertip sampling.
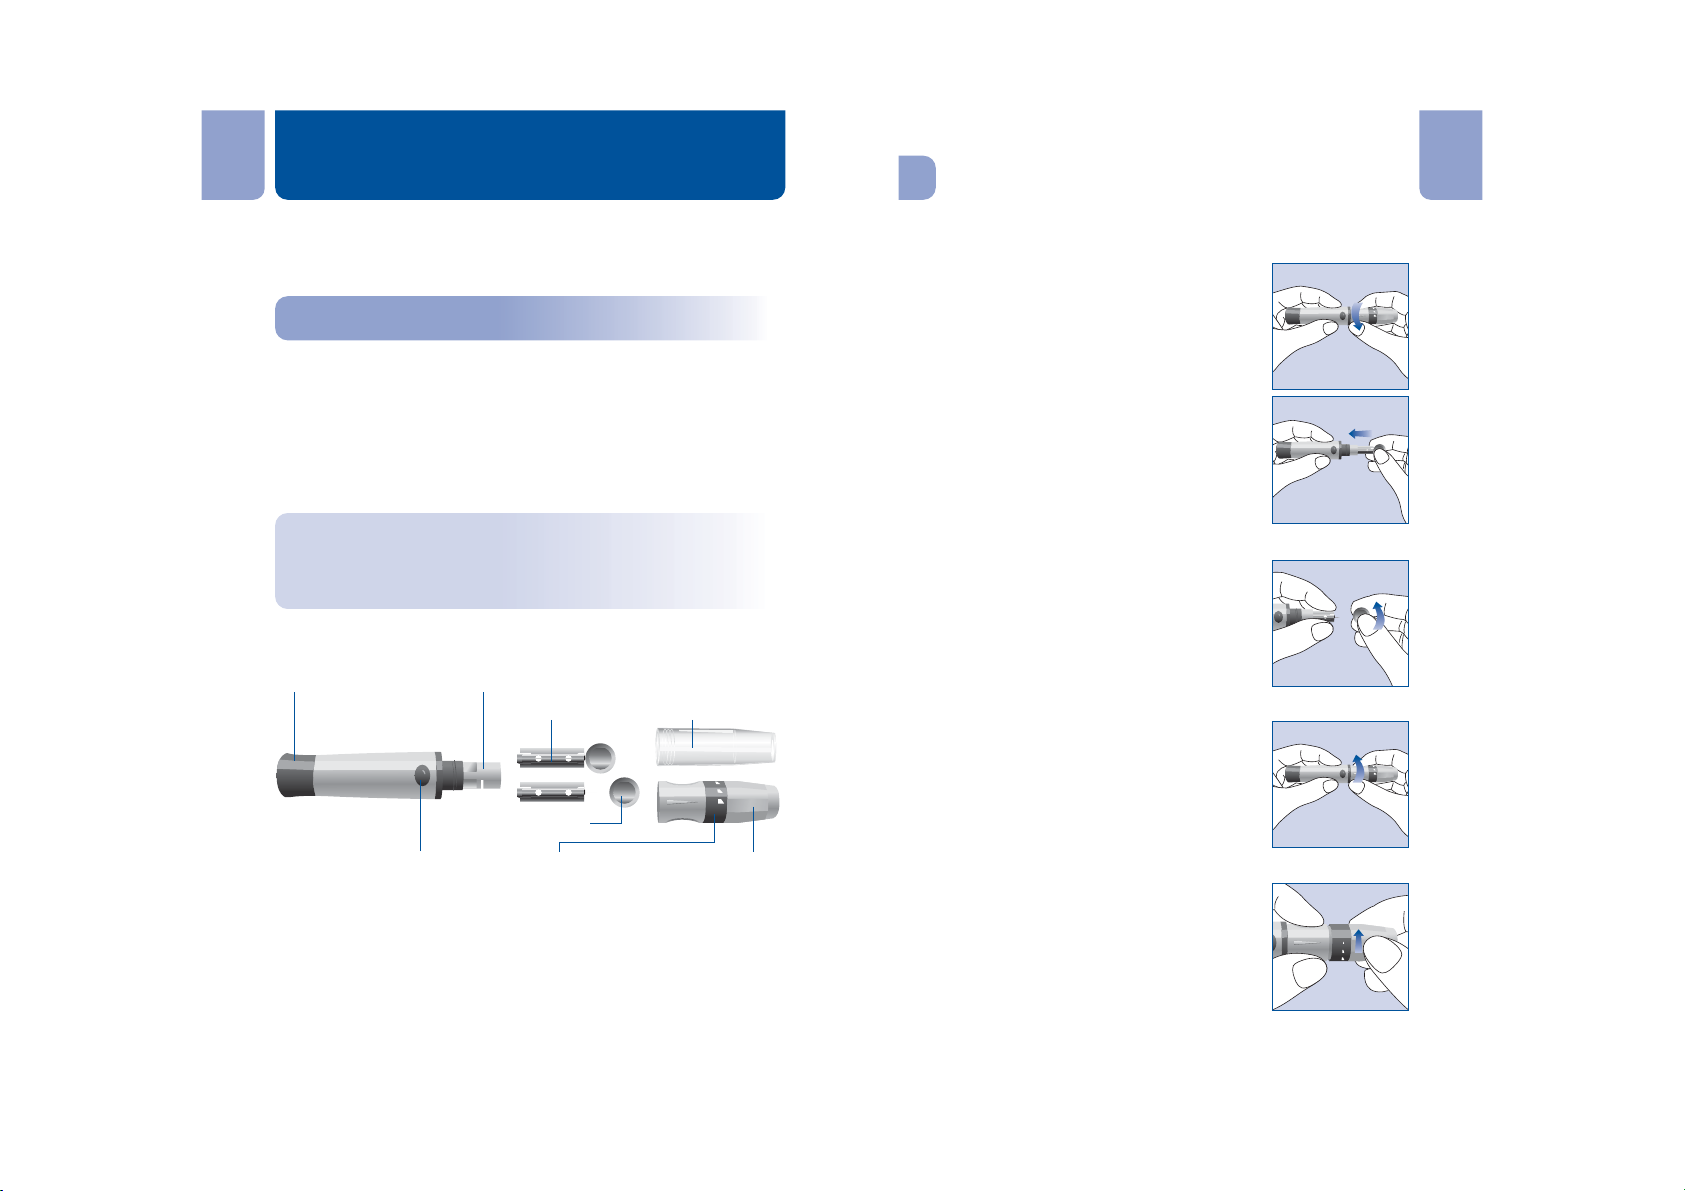
1. Unscrew the lancing device cover from the
body of the lancing device. Insert a sterile
lancet into the lancet holder and push it until
3
4
5
the lancet comes to a complete stop in the
lancet holder
2. Hold the lancet firmly in the and
.
lancet holder
twist the safety tab of the lancet until it
loosens, then pull the safety tab off the
lancet. Save the safety tab for lancet
disposal.
.
3 Carefully screw the cover back onto the
lancing device. Avoid contact with the
exposed needle. Make sure the cover is fully
3
4
5
sealed on the lancing device.
Release Button
Puncture Depth
Settings
Lancing Device
Cover
.
4 Adjust the puncture depth by rotating the
lancing device cover. There are a total of 5
puncture depth settings. To reduce the
discomfort, use the lowest setting that still
17 18
1
2
3
Page 13
En En
produces an adequate drop of blood.
Adjustment:
1 and 2 for delicate skin
3
4
5
3 for normal skin
4 and 5 for calloused or thick skin
Note: Greater pressure of the lancing device
against the finger will also increase the
puncture depth.
5
4
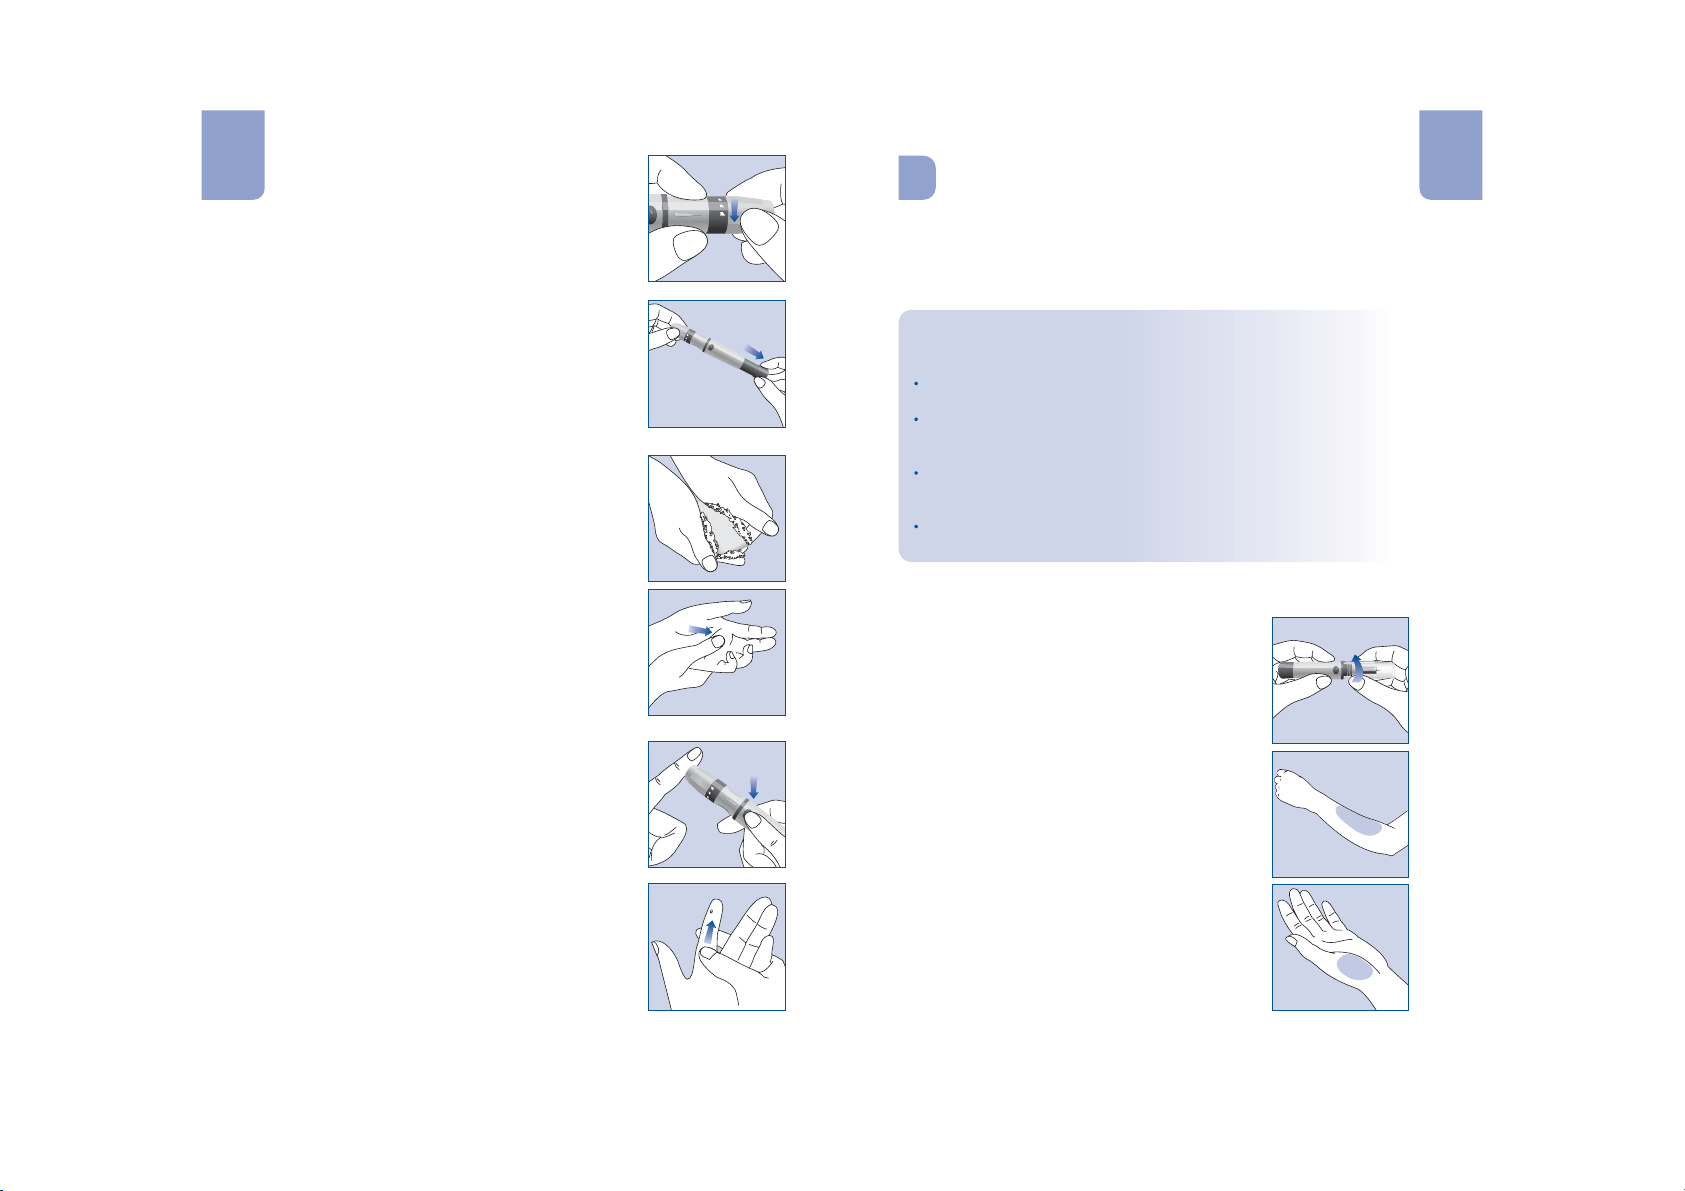
5. Pull the cocking barrel back to set the lancing
3
device. You may hear a click. The device is
now loaded and ready for obtaining a drop of
blood.
Forearm or Palm (at the base of the thumb) Testing
The forearm and palm areas have fewer nerve endings than the
fingertip so you may find that obtaining blood from these sites is less
painful than from the fingertip. The technique for forearm and palm
sampling is different. You need the clear cap to draw blood from these
sites. The clear cap is not adjustable for puncture depth.
IMPORTANT: There are important differences between forearm,
palm and fingertip samples that you should know. Important
information about forearm and palm glucose testing:
You should talk to your healthcare professional before doing
forearm or plam glucose testing.
When blood levels are changing rapidly such as after a meal,
insulin dose or exercise, blood from the fingertips may show
these changes more rapidly than blood from other areas.
Fingertips should be used if testing is within 2 hours of a meal,
6. Prior to testing, wipe your hand with an
alcohol swab or wash your hands with soap.
Use warm water to increase blood flow in
your fingers if necessary. Then dry your
hands thoroughly. Massage the hand from
the wrist up to the fingertip a few times to
encourage blood flow.
insulin dose or exercise and any time you feel glucose levels are
changing rapidly.
You should test with the fingertips anytime there is a concern for
hypoglycemia or you suffer from hypoglycemia unawareness.
Please refer to to insert the lancet and load the
Fingertip Testing
lancing device.
1. Screw the clear cap onto the lancing device.
7. Hold the lancing device against the side of
the finger to be lanced with the cover resting
on the finger. Push the release button to prick
your fingertip. You should hear a click as the
lancing device activates. Gently massage
from the base of the finger to the tip of the
finger to obtain the required blood volume.
Avoid smearing the drop of blood.
For the greatest reduction in pain, lance on
the sides of the fingertips. Rotation of sites is
recommended. Repeated punctures in the
same spot can make your fingers sore and
callused.
19 20
2. Choose a puncture site on the forearm or
5
4
3
palm. Select a soft, fleshy area of the
forearm that is clean and dry, away from
bone, and free of visible veins and hair.
To bring fresh blood to the surface of the
puncture site, massage the puncture site
vigorously for a few seconds until you feel it
getting warm.
Page 14
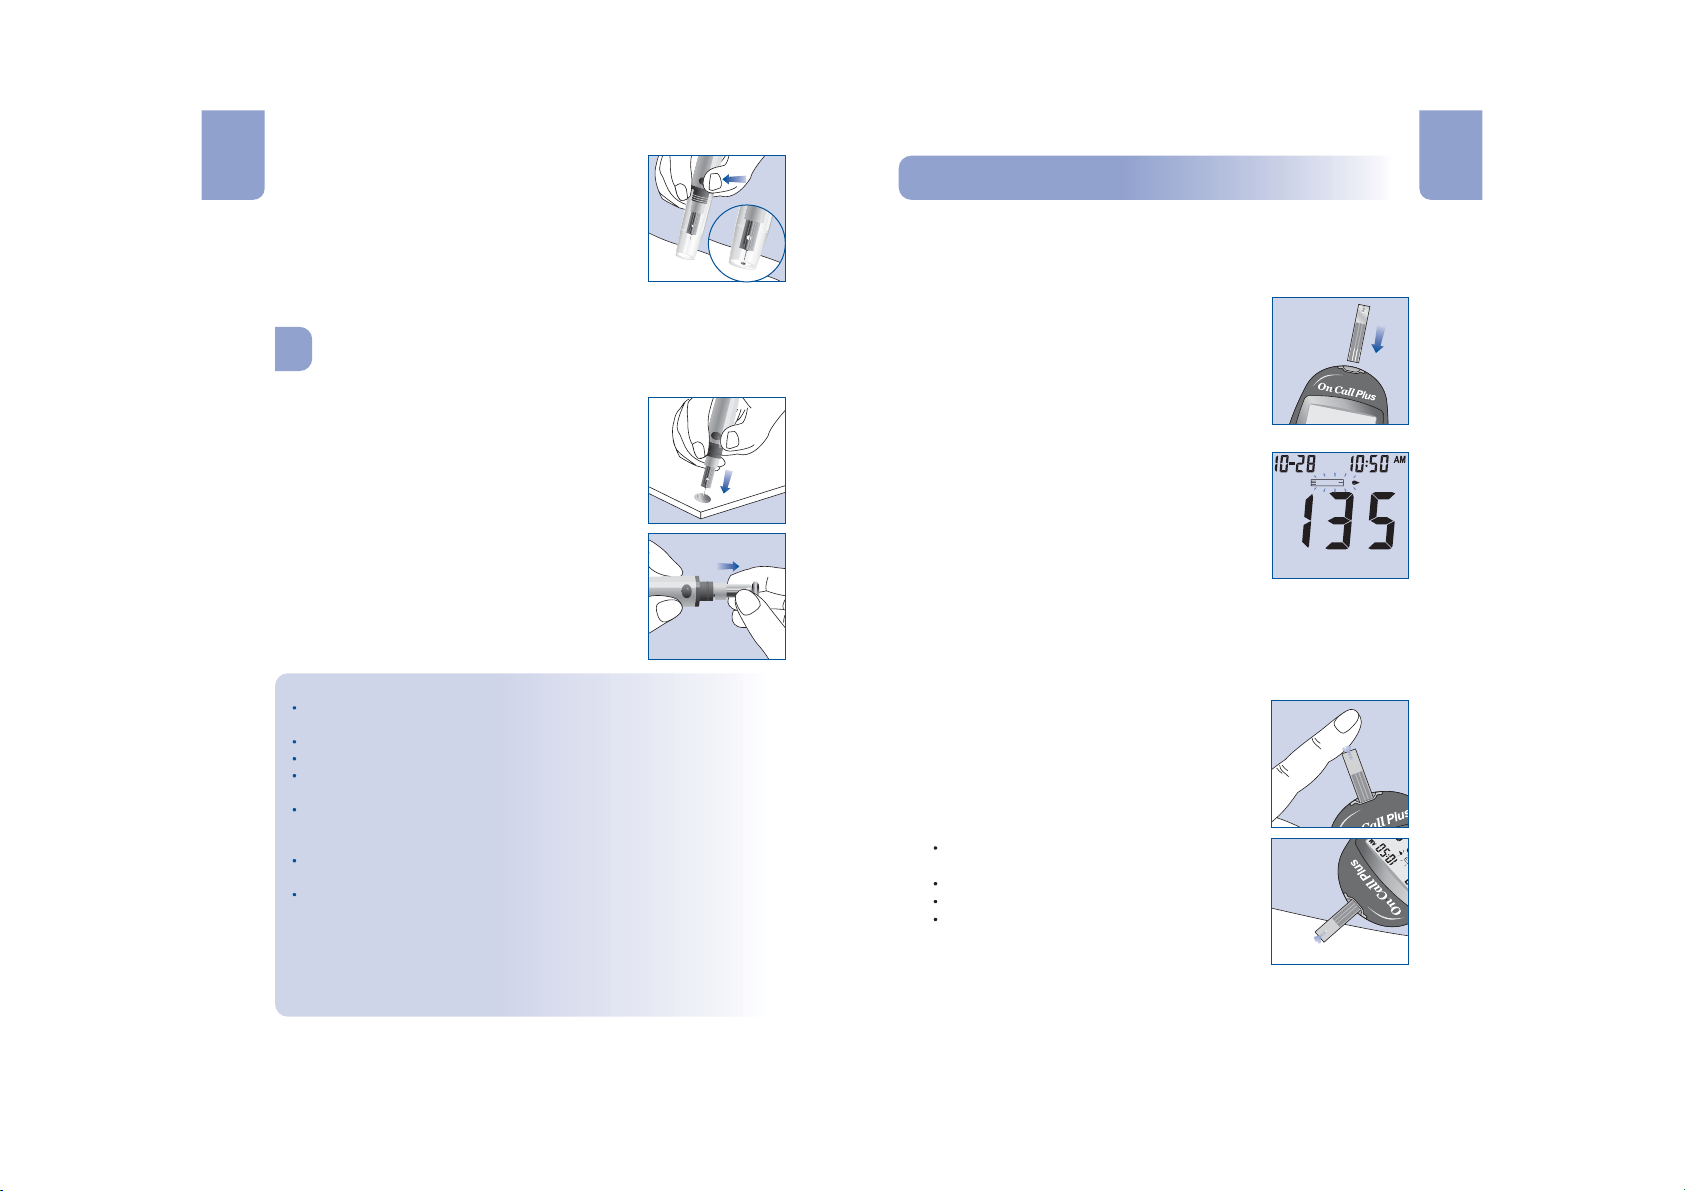
3. Place the lancing device against the puncture
En En
site. Press and hold the clear cap against the
puncture site for a few seconds. Press the
release button of the lancing device, but
not immediately lift the lancing device
from the puncture site. Continue to hold the
lancing device against the puncture site until
you can confirm a sufficient blood sample
has formed.
do
Disposal of the Lancet
1. Unscrew the lancing device cover. Place the
safety tab of the lancet on a hard surface and
carefully insert the lancet needle into the
safety tab.
2. Press the release button to make sure that
the lancet is in the extended position. Pull the
lancet straight out of the lancet holder and
discard it in an appropriate container. Place
the lancing device cover back on the lancing
device.
Step 2 - Testing Blood GlucoseStep 2 - Testing Blood Glucose
Note: Insertion of a new test strip at any time, except while in the
data transfer mode (detailed on page 28) will cause the meter to
automatically enter the test mode.
1. Insert a test strip into the strip port, contact
bars end first and facing up, to turn on the
meter and display all the display segments. If
the audio option is on, the meter will beep,
signaling the meter is turned on.
Make sure that the code number that
appears on the display matches the code
number (CODE) on the test strip vial (or on
the foil pouch). If not, make sure to locate
and insert the code chip that came with the
box of strips. If the codes still do not match,
do not perform a test. You will need a new
package of test strips to perform a test.
CODE
2. The blinking test strip and blood drop icon
will indicate that the test strip is inserted
correctly and a drop of blood can be added.
Lancet Precautions
Do not use the lancet if the safety tab is missing or loose when
you take the lancet out of the bag.
Do not use the lancet if the needle is bent.
Use caution whenever the lancet needle is exposed.
Never share lancets or the lancing device with other people to
prevent possible infections.
In order to reduce the risk of infection from prior use of the
instrument, always use a new, sterile lancet. Do not reuse
lancets.
Avoid getting the lancing device or lancets dirty with hand lotion,
oils, dirt or debris.
For AST testing, if current lancet is not obtaining enough blood
due to skin or other conditions, please contact Customer Support
at 1-800-838-9502 for information on different lancet options.
Specimen collection and preparation by healthcare
professionals
Please refer to test strip insert if applicable.
21 22
3. Touch the blood sample to the sample tip at
the end of the test strip. If the audio option is
turned on, the meter will also beep to
indicate the sample is sufficient and the
measurement has started.
DO NOT:
Apply sample to the front or back of the
test strip.
Smear the blood drop onto the test strip.
Press your finger against the test strip.
Apply a second drop of blood.
Page 15
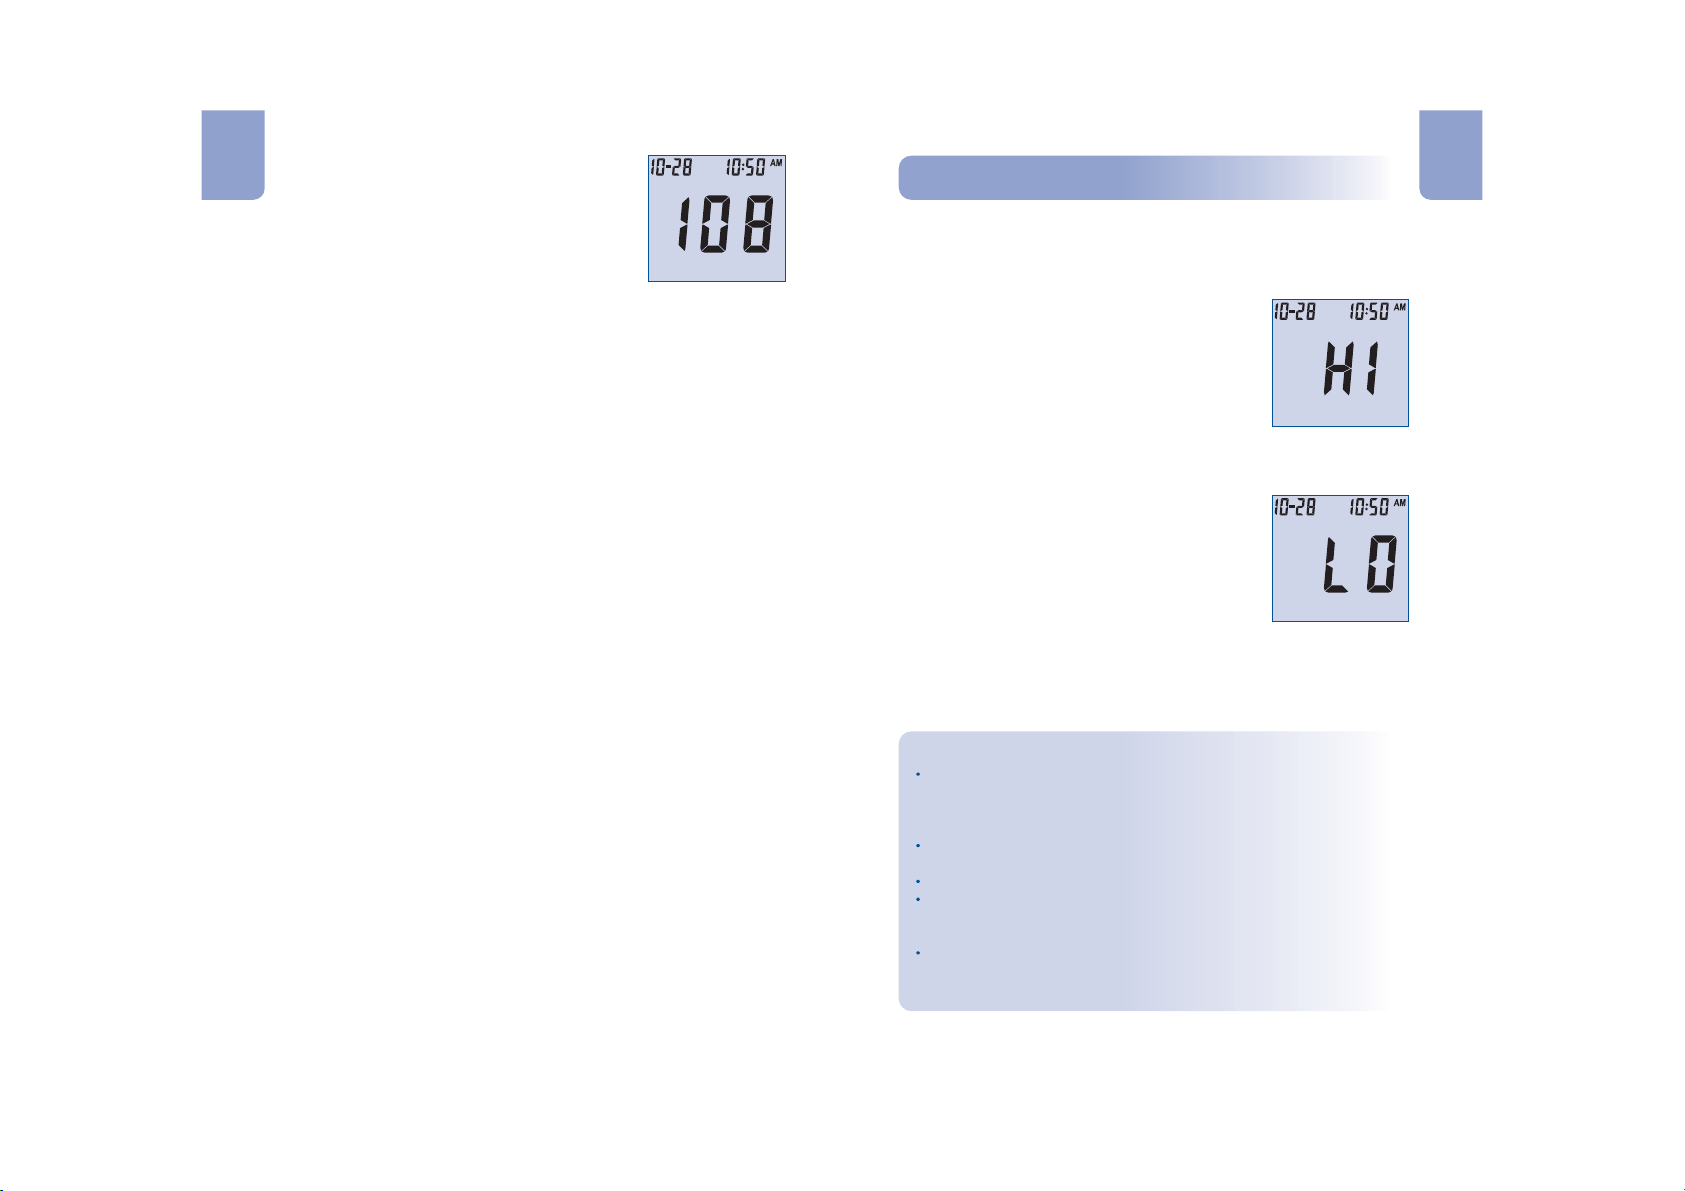
4. The meter will count down from 9 to 1 and
En En
then display the measurement results. The
"HI" and "LO" Messages"HI" and "LO" Messages
meter will also beep to indicate that
measurement is complete.
To mark invalid results and to prevent them
from being included in the 7, 14 and 30 day
averages, press the M and S buttons
together. A pound sign (#) will appear on the
display to show that the result will not be
included when calculating the 7, 14 and 30day averages. If a result is marked by
accident, press the M and S buttons again to
unmark the result. After marking the invalid
result, run the test again with a new test strip.
If an error message appears on the display,
refer to the on page
Troubleshooting Guide
31. If a "HI" or "LO" error appears on the
display, refer to "HI" and "LO" messages
below.
5. After inspection, record valid results in your
logbook with the date and time, and compare
them to the target goals set by your
healthcare professional. Refer to
Testing Times and Target Goals
Suggested
on page
29 and your logbook for more details on your
target blood glucose concentration goals.
dL
mg
l
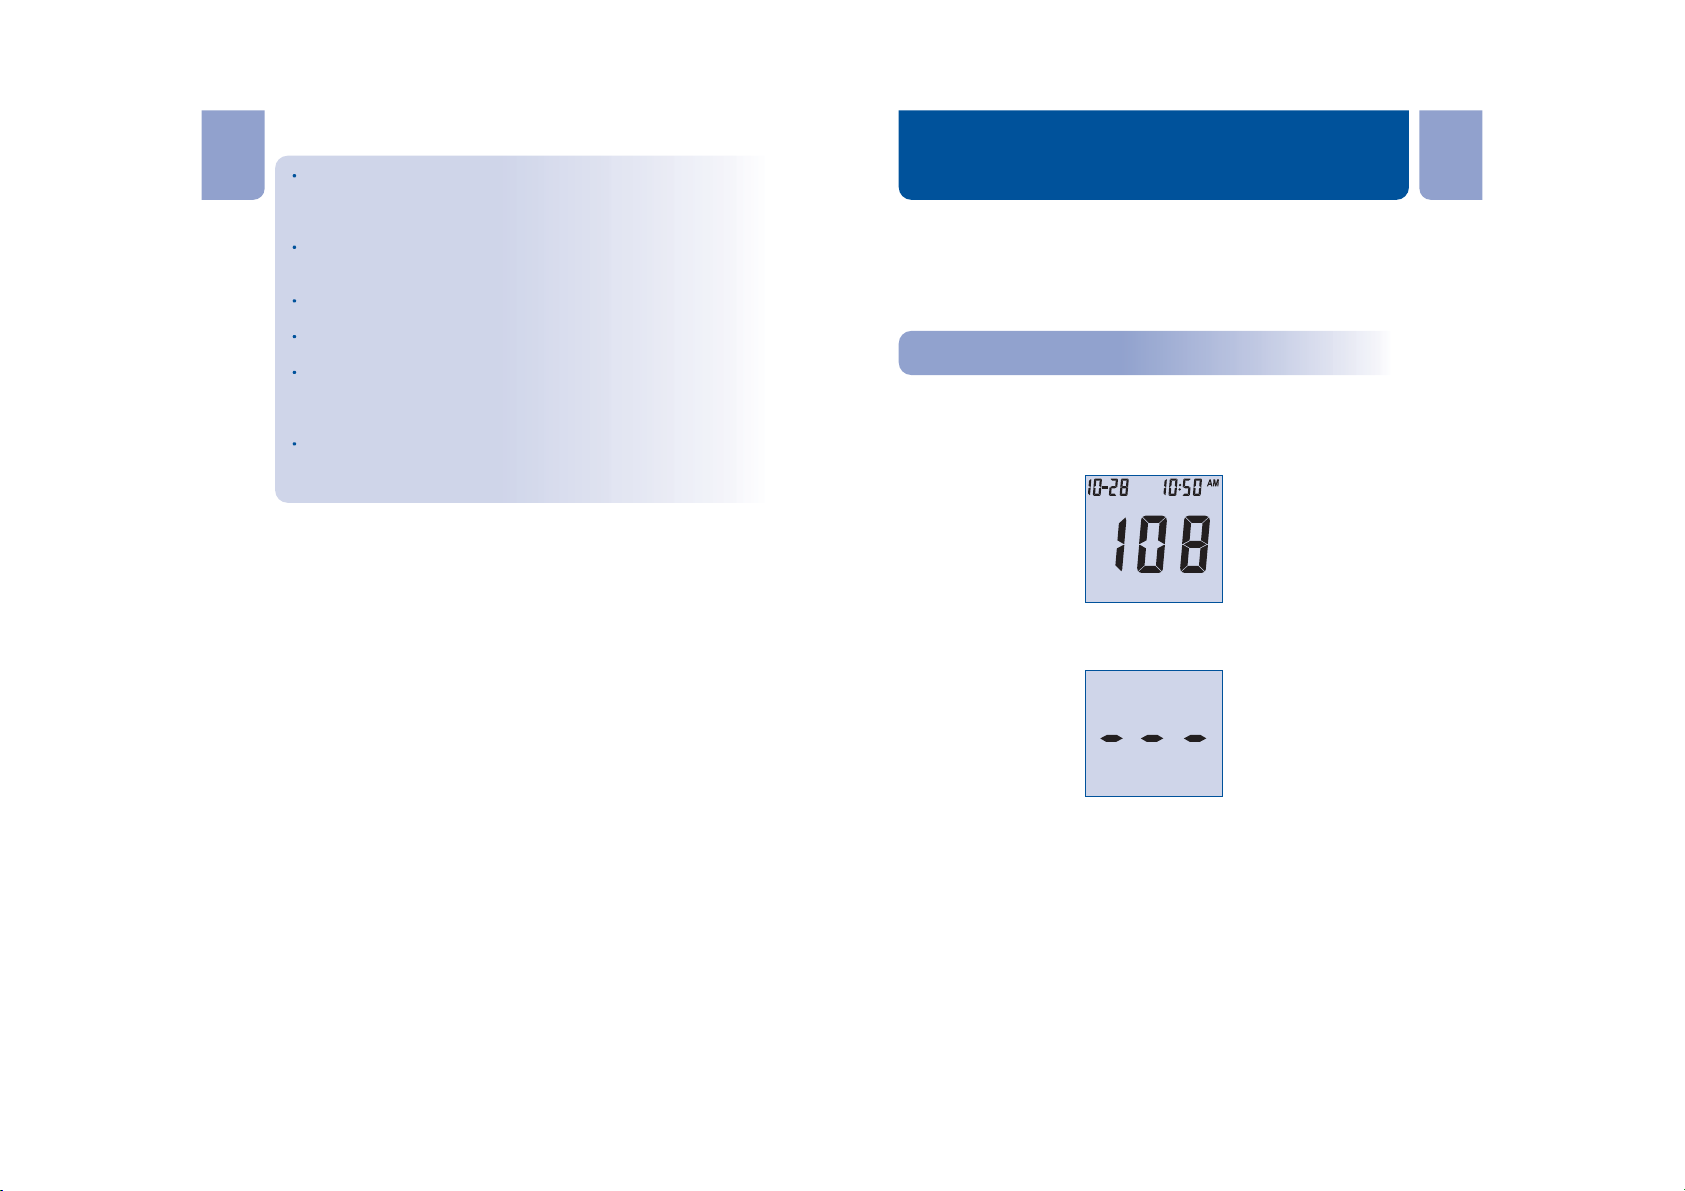
The meter can accurately measure blood glucose concentrations
between 1.1 to 33.3 mmol/L (20 to 600 mg/dL). "HI" and "LO" messages
indicate results outside of this range.
If "HI" appears on the display, the measured
concentration value is above 33.3 mmol/L (600
mg/dL). The test should be retaken to ensure that
no mistake was made in the procedure. If you are
certain the meter is functioning properly and no
mistakes were made in the procedure, and your
blood glucose is still consistently measured as
"HI", it indicates severe hyperglycemia (high
blood glucose). You should contact your
healthcare professional immediately.
If "LO" appears on the display, the measured
concentration value is below 1.1 mmol/L (20
mg/dL). The test should be retaken to ensure that
no mistake was made in the procedure. If you are
certain the meter is functioning properly and no
mistakes were made in the procedure, and your
blood glucose is still consistently measured as
"LO", it may indicate severe hypoglycemia (low
blood glucose). You should treat yourself for
hypoglycemia immediately as recommended by
your healthcare professional.
6. Remove and discard the test strip.
Precautions and Limitations
The meter, test strips and other components have been
designed, tested and proven to work together effectively to
provide accurate blood glucose measurements. Do not use
components from other brands.
Use only with whole blood. Do not use with serum or plasma
samples.
Do not use for testing newborns.
Do not use the meter in any manner not specified by the
manufacturer. Otherwise, the protection provided by the meter
may be impaired.
Very high (above 55%) and very low (below 30%) hematocrit can
cause false results. Talk to your healthcare professional to find
out your hematocrit level.
23 24
Page 16
En En
Abnormally high levels of Vitamin C (ascorbic acid),
Acetaminophen, Uric Acid, L-Dopa, Tolazamide or other
Using the Meter Memory
reducing substances will produce falsely high blood glucose
measurements.
Fatty substances (Triglycerides up to 3,000 mg/dL or Cholesterol
up to 500 mg/dL) have no major effect on blood glucose test
results.
The Blood Glucose Monitoring System has been
®
On Call Plus
The meter automatically stores up to 300 test records. Each record
includes the test result, time and date. If there are already 300 records
in memory, the oldest record will be erased to make room for a new one.
The meter will also calculate the average values of records from the last
7, 14 and 30 days.
tested and shown to work properly up to 8,516 ft (2,595 meters).
Severely ill persons should not run the glucose test with the
®
Call Plus
Blood Glucose Monitoring System.
Blood samples from patients in shock, or with severe
dehydration or from patients in a hyperosmolar state (with or
without ketosis) have not been tested and are not recommended
for testing with Blood Glucose Monitoring System.
®
On Call Plus
Dispose of blood samples and materials carefully. Treat all blood
samples as if they are infectious materials. Follow proper
On
Viewing Stored RecordsViewing Stored Records
To view stored records:
1. Press the M button to turn the meter on and enter memory mode.
The most recent value and the word "MEM" will appear on the
display.
precautions when disposing of materials.
dL
mg
MEM
l
If you are using the meter for the very first time, the meter display
will show three dashed lines (---), the word "MEM" and the unit of
measure. This shows that no data have been stored in memory.
MEM
2. The date and time will be displayed together with the results stored
in memory. A pound sign (#) indicates records that will be omitted
from the 7, 14 and 30 day averages.
3. Press the M button to go through the stored records.
4. Press the S button to view the data averages. The words "DAY
AVG" will appear on the screen.
Note: If you do not wish to view your average glucose measurements,
you can press the S button again to turn off the display.
25 26
dL
mg
l
Page 17
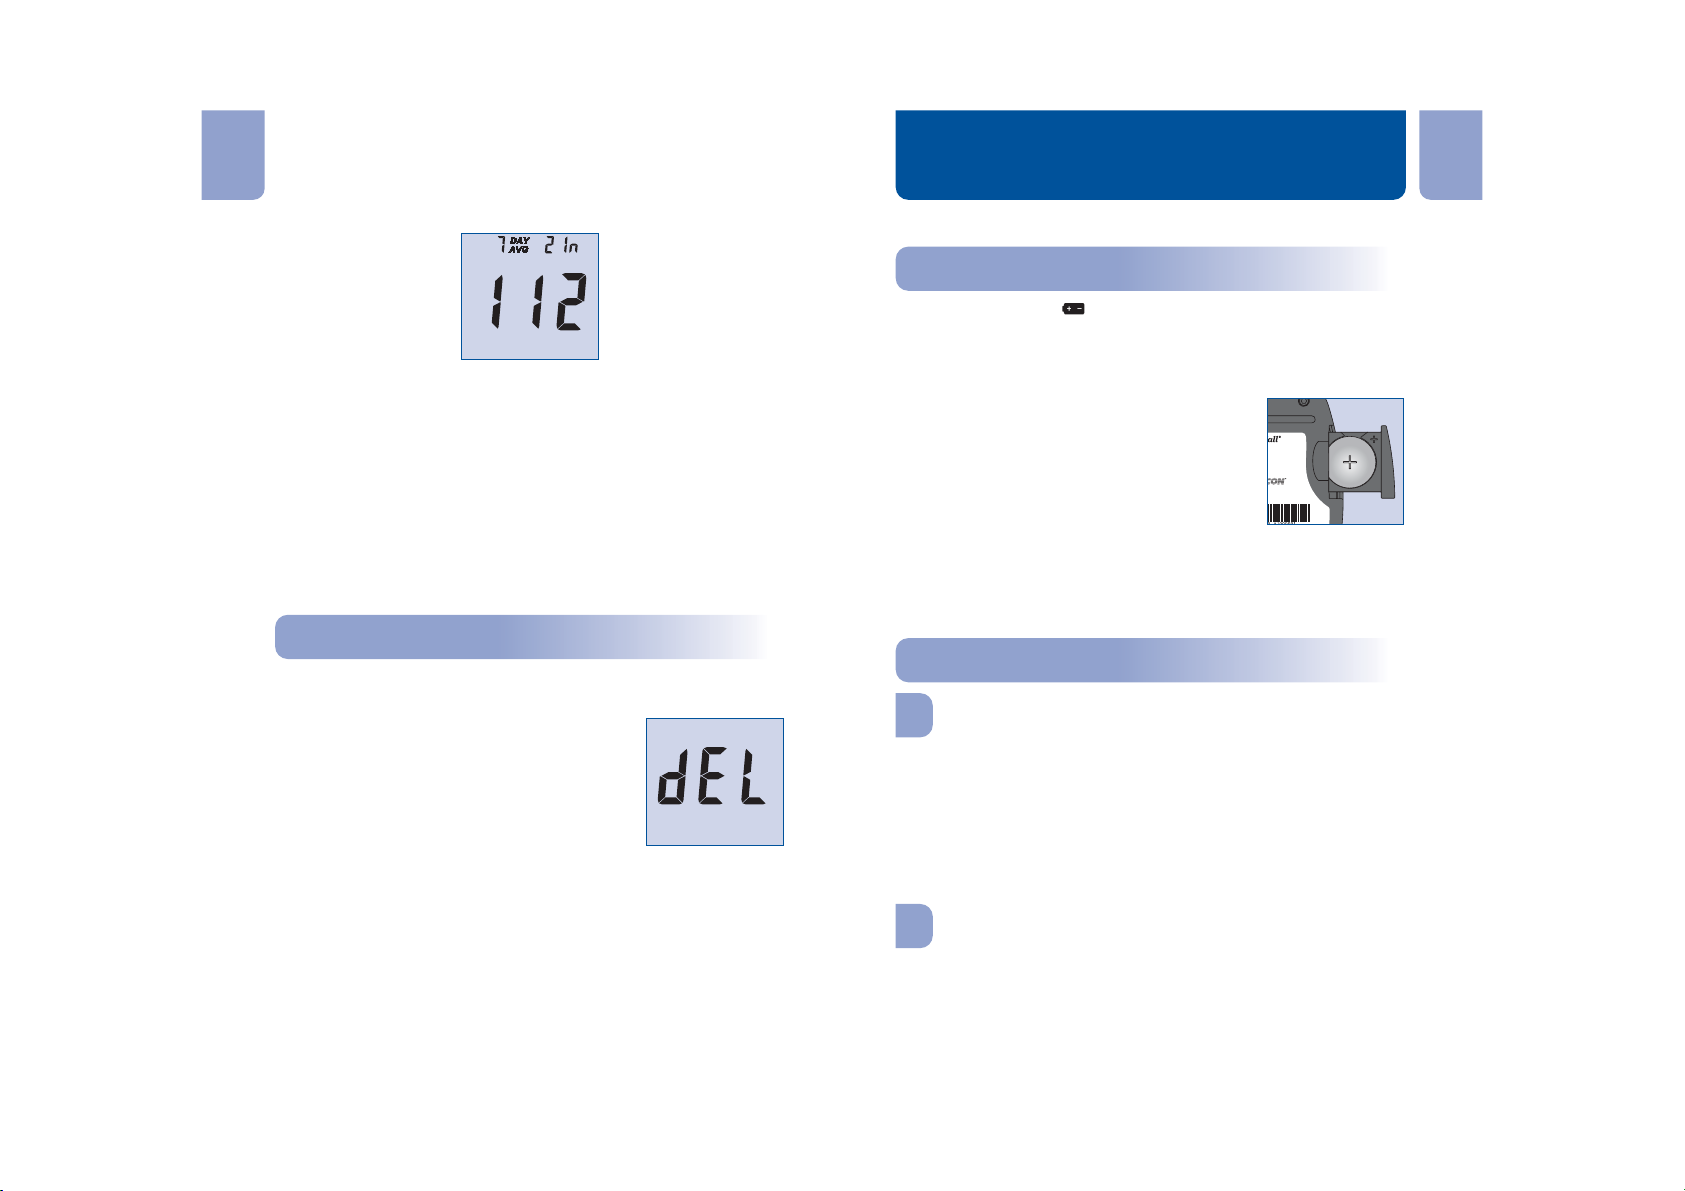
5. While in memory mode, press the M button to switch between the 7,
En En
14 and 30 day averages. The meter will calculate the average that
Maintenance
you selected. The number of records used in the DAY AVG will also
appear in the display.
Proper maintenance is recommended for best results.
Replacing the BatteryReplacing the Battery
When the battery icon ( ) appears, it means the battery is running low
dL
mg
l
6. If there are fewer than 7, 14 or 30 days in memory, all the unmarked
readings currently stored in memory will be averaged instead.
If you are using the meter for the very first time, no value will appear
on the display. This means that no records have been stored in
memory.
7. Press the S button to turn off the display.
Note: Results from quality control tests will not be included in the
averages. When viewing results in memory, these values are
marked with a pound sign (#) to show that they will not be included
in the 7, 14 and 30 day averages.
Clearing the MemoryClearing the Memory
Extreme caution should be used when clearing the memory. This is not
a reversible operation. To clear the memory:
1. With the meter powered off, press and hold
the M button for three seconds. This will turn
on the meter and enter the delete mode.
2. To clear the memory, press and hold both the
M and S buttons for two seconds.
3. The display will show "MEM" and "---", the
meter will clear its memory and after a
moment turn itself off.
MEM
and you should replace the battery as soon as possible. An "E-6" error
message will appear if the battery is too low to perform any more blood
glucose tests. The meter will not function until the battery is replaced.
Instructions:
1. Make sure the meter is off before removing
the battery.
2. Pull the battery carrier on the left side of the
meter. The battery carrier should be easily
opened with you finger.
3. Remove and discard the old battery. Replace
it with a new CR 2032 3.0V coin cell battery.
lucose
Glucosa
Chip
Codificador
iagnosticuse only.
oratories,Inc.
saRimRoad,
CA92121,USA
ort:1-800-838-9502
Plus
Meter
enSangre
Make sure it is aligned with the (+) side
facing up in the battery carrier.
4. Close the battery carrier and make sure that it snaps shut.
5. Recheck and reset the clock setting as necessary after battery
replacement to ensure time is set correctly. To set the meter clock,
Meter Setup Before Testing
see on page 11.
®
®
Caring for Your
Caring for Your
Glucose Monitoring System
Blood
Blood Glucose Monitoring System
On
Call Plus
On Call Plus
Blood Glucose Meter
On Call Plus
Your Blood Glucose Meter does not require special
maintenance or cleaning. A cloth dampened with water and a mild
detergent solution can be used to wipe the outside of the meter. Take
care to avoid getting liquids, dirt, blood or control solution into the meter
through the strip or data ports. It is recommended that you store the
meter in the carrying case after each use.
On Call Plus
The is a precision electronic
instrument. Please handle it with care.
®
®
Blood Glucose Meter
4. If you entered the delete mode but want to
exit without deleting the recorded data, press
the S button. This will turn the meter off
without deleting any data.
27 28
Lancing Device
Use mild soap and warm water to clean with a soft cloth as required.
Carefully dry the device thoroughly. Do not immerse the lancing device.
Please refer to the lancing device insert for more details.
Page 18
Suggested Testing Times
En En
and Target Goals
Tracking your blood glucose concentration through frequent testing is
an important part of proper diabetes care. Your diabetes health care
professional will help you to decide the normal target range for your
glucose levels. They will also help you determine when and how often
to test your blood glucose. Some suggested times are:
When you wake up (fasting level)
Before breakfast
1-2 hours after breakfast
Before lunch
1-2 hours after lunch
Before or after exercise
Before dinner
1-2 hours after dinner
Before bedtime
After a snack
At 2 or 3 AM, if taking insulin
You may need to test more often whenever :
You add or adjust your medication for diabetes.
You think your blood glucose levels may be too low or too high.
You are ill, or feeling uncomfortable over long periods of time.
Expected blood glucose levels for people without diabetes:
Fasting and Before Meals
Talk to your diabetes healthcare professional to set your own daily
target ranges.
Time of Day
Waking up (Fasting level)
Before meals
2 hours after meals
Bedtime
2AMto3AM
Other
Use the logbook to record your blood glucose measurements and
related information. Bring the logbook with you when visiting your
physician so that you can determine how well your blood glucose is
being controlled. This can help you and your health care professional
make the best decisions about your glucose control plan.
1. Jennifer Mayfield and Stephen Havas, "Self-Control: A Physician's Guide to Blood Glucose
Monitoring in the Management of Diabetes An American Family Physician Monograph"
2. ADA Clinical Practice Recommendations, 2010.
Time
2 Hours after Meals
Range, mg/dL
Less than 140
(Note: 1 mmol/L = 18 mg/dL)
1
2
70 - 100
Your Target Range
29 30
Range, mmol/L
3.9 - 5.6
Less than 7.8
Comparing Meter
and Laboratory Results
®
On Call Plus
Your Blood Glucose Monitoring System and laboratory
results both report the glucose concentration in the serum or plasma
component of your blood. However, the results may differ somewhat
due to normal variation. This is expected, but the difference under
normal operating conditions should be no greater than 20%.
Users should make accurate comparisons periodically between meters
and laboratory results. Follow the guidelines below.
Before you go to the lab:
Bring your meter, test strip and control solution with you to the lab.
Make sure your meter is clean.
Perform a quality control test to make sure the meter is working
properly.
Comparisons will be more accurate if you do not eat for at least four
hours (preferably eight hours) before testing.
At the lab:
Wash your hands before obtaining a blood sample.
Obtain blood samples for a laboratory test and for your meter within
10 minutes of each other. This will ensure an accurate comparison
of results.
Never use your meter with blood that has been placed in test tubes
containing fluoride or other anticoagulants. This will cause falsely
low results.
Page 19
En En
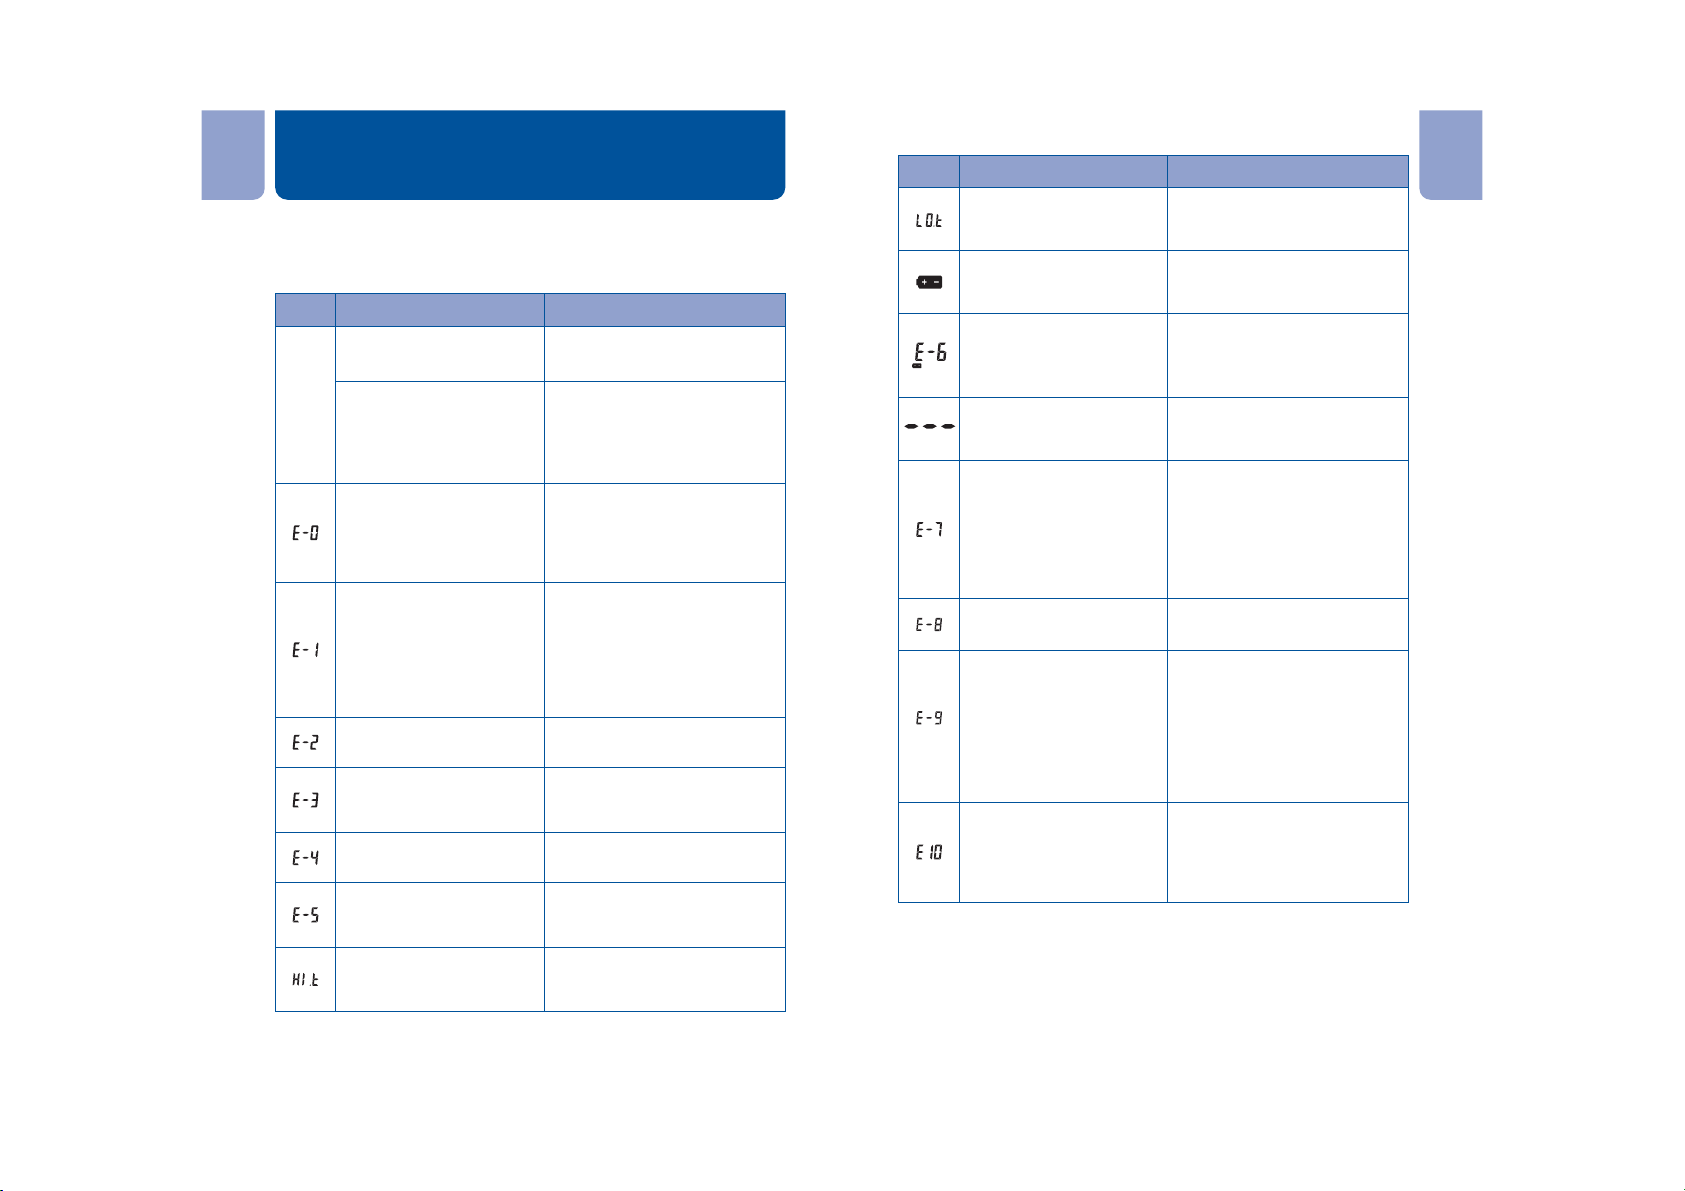
Troubleshooting Guide
Display
Temperature is below the
The meter has built-in messages to alert you of problems. When error
messages appear, note the error number, turn off the meter and then
follow these instructions.
operating temperature
of the system
Battery is discharged but
has enough power to run
Display
Meter
fails to
turn on
Causes Solution
Battery may be damaged
or not be charged
Meter is too cold
Replace battery.
If meter has been exposed to
or stored in cold conditions,
wait 30 minutes to allow meter
to reach room temperature then
10 more tests
Battery has discharged and
meter does not allow more
tests until replacement with
a new battery
No code chip in the meter
CODE
repeat test.
Power On self check error
Remove battery for 30 seconds
and then put battery back and
turn meter on again. If problem
persists, contact customer
Damaged code chip or the
code chip was removed
during a test
support.
If a cell phone, radio frequency
Internal calibration check
error
source or a high power electrical
source is nearby, place more
distance between the meter and
any of these sources then retest.
Meter electronics failure
If the problem persists, contact
Test strip was removed
during the test
Sample was applied to the
test strip too soon
Test strip is contaminated
or used
customer support.
Repeat the test and ensure test
strip remains in place.
Repeat test and apply sample
after blood drop/test strip icon
appears.
Repeat test with a new test strip.
Incorrect code chip
inserted in the meter
Communications failure
Repeat test and apply enough
Insufficient sample
Temperature has exceeded
the operating temperature
of the system
sample to fill the test strip check
window.
Move to a cooler environment
and repeat the test.
For help with any additional questions or issues, please contact
Customer Support at 1-800-838-9502.
Causes Solution
Move to a warmer environment
and repeat the test.
Test results will still be accurate,
but replace the battery as soon
as possible.
Replace the battery and repeat
the test.
Insert the code chip that
accompanied the box of test
strips.
If the code chip is damaged, use
a new code chip with the correct
code number and run the test. If
the chip is removed during a test,
confirm the code chip matches
the test strip code and repeat the
test.
If the problem persists, contact
customer support.
Indicates an incorrect code chip
was inserted in the meter.
Please make sure you use the
®
On Call Plus
with the Blood
brand of test strips
®
On Call Plus
Glucose Meter.
If the problem persists, contact
customer support.
There is an error in transferring
data to the PC.
See the package insert included
with the Data Management Kit
for troubleshooting.
31 32
Page 20
En En
Specifications
Warranty
Feature
Measurement Range
Result Calibration
Sample
Minimum Sample Size
Test Time
Power Source
Battery Life
Glucose Units of Measure
Memory
Meter Size
Display Size
Specification
20 to 600 mg/dL
Plasma-equivalent
Fresh capillary whole blood
1 µL
10 seconds
One (1) CR 2032 3.0V coin cell battery
12 months or approximately 1,000 tests
The meter is pre-set to either millimoles
per liter (mmol/L) or milligrams per
deciliter (mg/dL) depending on the
standard of your country. The meter will
be set to mg/dL by default when sold in
the United States.
Up to 300 records with time and date
85mm x 54mm x 20.5mm
35mm x 32.5mm
Please complete the warranty card that came with this product and mail
it to the following address:
®
10125 Mesa Rim Road,
San Diego, CA 92121-2915, USA
If the meter fails to work for any reason other than obvious abuse within
the first five (5) years from purchase, we will replace it with a new
meter free of charge. For your records, also write the purchase date of
your product here.
Date of purchase:
Note: This warranty applies only to the meter in the original purchase,
and does not apply to the battery supplied with the meter.
Warranty CenterOn Call Plus
Weight
Operating Temperature
Operating Relative Humidity
Hematocrit Range
Approximately 49.5 g
(with battery installed)
oo
41 - 113 F(
20-90% (non-condensing)
30-55%
33
5-45 C)
34
Page 21

En
Index
Averaging Results...................26
Battery, Replacing the.............28
Carrying Case.............................1
Clearing the Memory...............27
Data Port......................................3
Date Format............................7, 9
Guidelines....................................i
Hematocrit..........................24, 33
Install the Battery.....................10
Lancing Device...............1, 17, 28
Lancets..................................1, 17
Logbook................................2, 29
Maintenance and Disposal..5, 28
Measure, Unit of ..................4, 15
Meter............................................3
Audio feature............................13
Cleaning....................................28
Code chip....................................2
Display.........................................4
Error Messages.........................31
"HI" and "LO" Messages...........24
M Button......................................3
Memory......................................26
Meter code................................11
Meter Setup...............................11
Meter Use and Precautions........5
S Button.......................................3
Set the Clock.............................12
Specifications............................33
Procedure
Precautions and Limitations.....24
Testing Your Blood....................17
Quality Control Test.................14
Control Solution..........................8
How to Run...............................14
Results
Blood Glucose..........................23
Control Solution........................15
Meter vs. Lab Results...............30
Target Goals..............................29
Unit of Measure...................15, 29
Suggested Testing Times........29
Test Strip.....................................5
Code............................................6
Expiration.....................................7
Precautions.................................8
Testing Your Blood..................17
Get a Drop of Blood..................17
Test Blood Glucose...................22
Troubleshooting.......................31
Viewing Stored Records.........26
Warranty..............................2, 34
35
 Loading...