

Page 1

i
Blood Glucose Monitoring System
Self-monitoring of blood glucose (SMBG) is an integral part of diabetes care, but
the high cost of testing can make this impossible. At ACON, our goal is to provide
high quality glucose monitoring at a price that allows you to test as often as
necessary. Together, we can better manage your diabetes and help you live a
longer and healthier life.
Welcome, and thank you for choosing the On Call
®
Extra Blood Glucose
Monitoring System. The On Call
®
Extra Blood Glucose Monitoring System will
give you accurate blood glucose results in just a few simple steps.
To ensure accurate results from your On Call
®
Extra Blood Glucose Monitoring
System, please follow these guidelines:
• Read instructions before use.
• Use only On Call
®
Extra Blood Glucose Test Strips with the On Call® Extra
Blood Glucose Meter.
• For in vitro diagnostic use only. Your blood glucose monitoring system is to be
used only outside the body. It’s for monitoring the effectiveness of diabetes
control. It should not be used for the diagnosis of diabetes.
• For self-testing and professional use.
• Test only whole blood samples with the On Call
®
Extra Blood Glucose Test
Strips and On Call
®
Extra Meter.
• For self-testers, consult your physician or diabetes healthcare professional
before making any adjustments to your medication, diet or activity routines.
• Keep out of reach of children.
• Keep this User’s Manual in a safe place, do not discard it.
Following the instructions outlined in this User's Manual. You will be able to use
your On Call
®
Extra Blood Glucose Monitoring System to monitor your blood
glucose and better manage your diabetes.
Page 2

ii
Table of Contents
Getting Started .................................................................................................... 1
Component Descriptions ............................................................................ 2
On Call
®
Extra Blood Glucose Meter .......................................................... 3
Meter Display ............................................................................................. 5
On Call
®
Extra Blood Glucose Test Strips .................................................. 7
On Call
®
Extra Glucose Control Solution .................................................... 9
Installing the Battery ......................................................................................... 11
Meter Setup Before Testing ..............................................................................12
Performing a Quality Control Test ....................................................................17
Testing Your Blood ............................................................................................21
Step 1 – Getting a Drop of Blood ..............................................................21
Step 2 – Testing Blood Glucose ................................................................26
“HI” and “LO” Messages ............................................................................29
“Hypo” and “Hyper” Messages ..................................................................30
“Ketone?” Message ...................................................................................30
Using the Meter Memory ...................................................................................31
Viewing Stored Records ............................................................................31
Clearing the Memory .................................................................................33
Transferring Records.................................................................................33
Maintenance .......................................................................................................35
Replacing the Battery ................................................................................35
Caring for Your On Call
®
Extra Blood Glucose Monitoring System ............36
Suggested Testing Times and Target Goals....................................................37
Comparing Meter and Laboratory Results .......................................................38
Troubleshooting Guide .....................................................................................39
Specifications ....................................................................................................41
Warranty .............................................................................................................42
Index of Symbols ...............................................................................................43
Index ...................................................................................................................44
Page 3
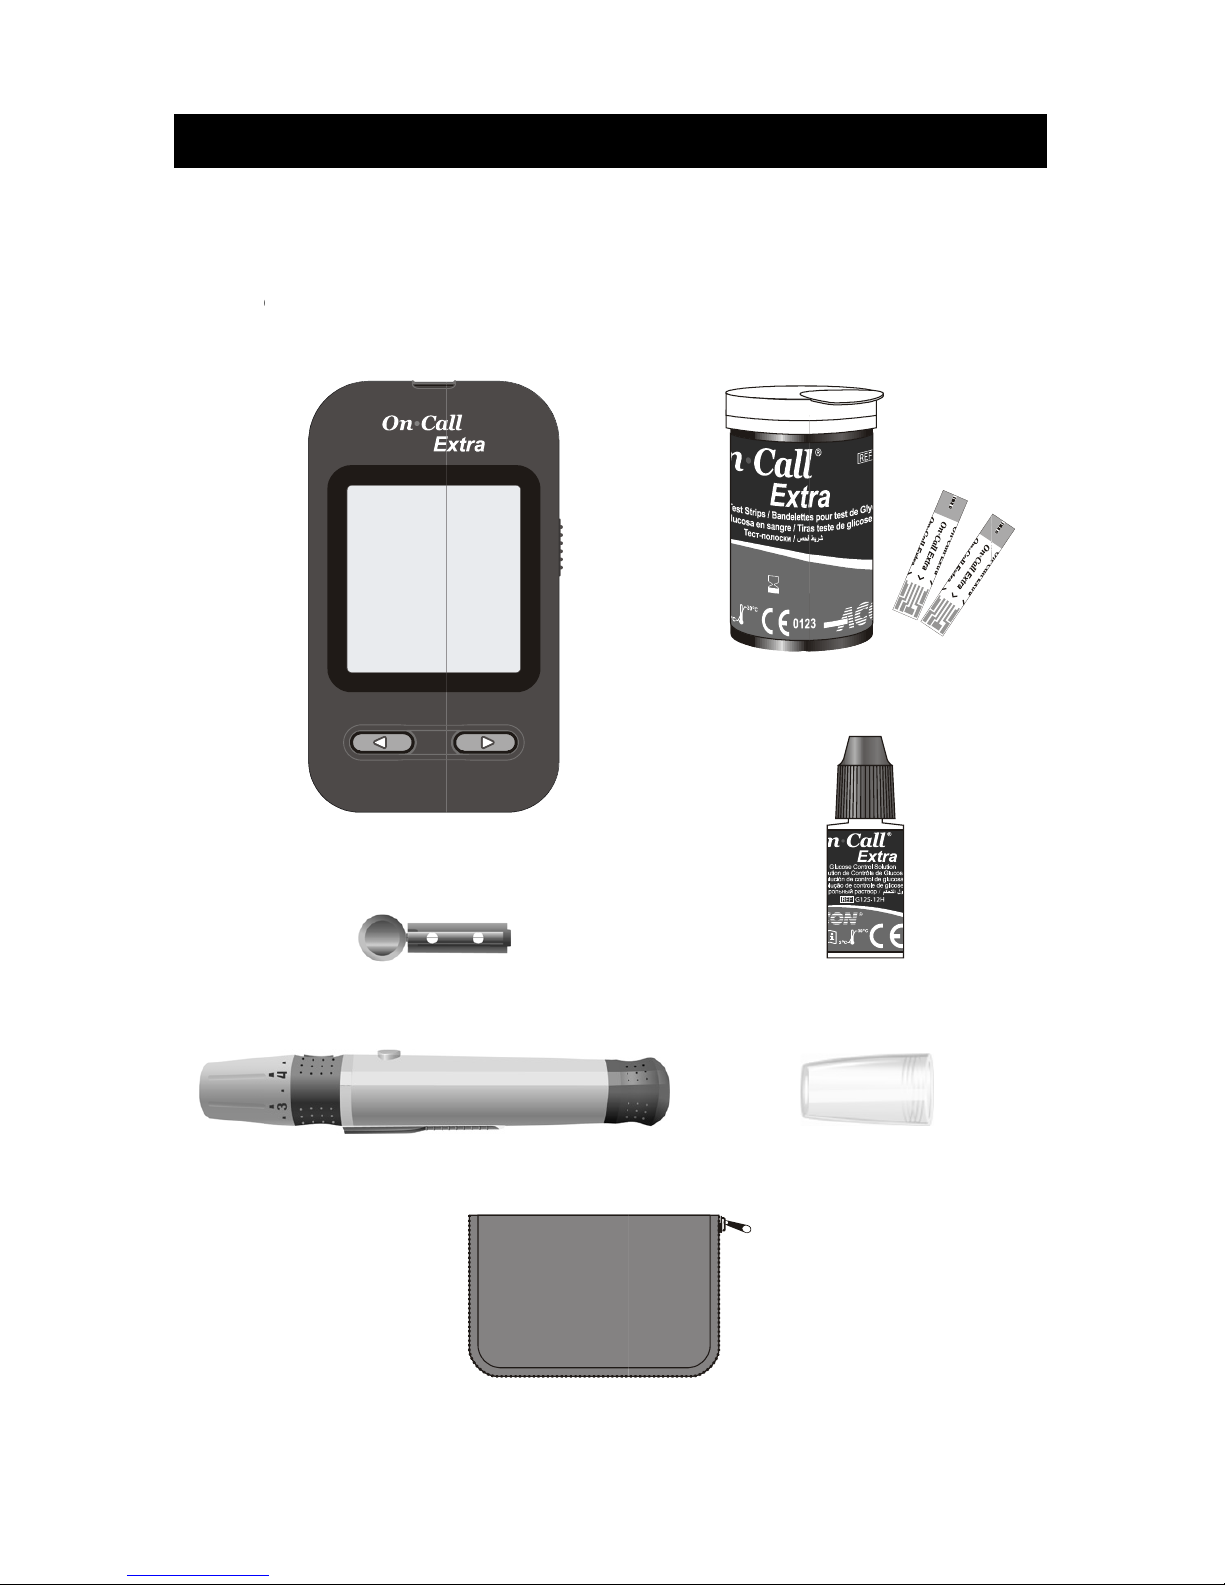
Before t
e
your O
n
On Call
®
purchas
e
on whic
h
sting, read the in
Call® Extra B
l
Extra product y
o
d separately. Pl
e
components ar
e
Blood Gluc
o
Lancing
D
Sterile
L
1
Getting
S
structions careful
l
ood Glucose M
u purchased, so
m
ase check the lis
t
included with yo
u
Carrying
se Meter
evice
ancet
tarted
and learn abou
t
onitoring Syste
m
e of the compo
n
of contents on t
h
r purchase.
Case
TCon
all the compone
n
. Depending on
ents may need
t
e outer box for d
e
est Strips
trol Solution
Clear Cap
ts of
the
o be
tails
Page 4

2
Component Descriptions
1. Blood Glucose Meter: Reads the test strips and displays the blood glucose
concentration.
2. Test Strips: Strips with a chemical reagent system used with the meter to
measure glucose concentration in blood.
3. Lancing Device: Used with sterile lancets to prick the fingertip, palm (at the
base of the thumb) or forearm for blood sample collection. The packaged
lancing device has multiple depth settings, allowing users to adjust the depth
of the puncture and minimize discomfort. It can also eject the used lancets.
4. Clear Cap: Used with the lancing device and sterile lancet to draw a blood
sample from the forearm or palm.
5. Sterile Lancets: Used with the lancing device to draw a blood sample. Sterile
lancets are inserted into the lancing device with each blood draw and
discarded after use.
6. Control Solution: Verifies the proper operation of the blood glucose monitoring
system by checking the test strips and meter against a pre-calibrated control
solution. Control Solution 1 is all you need most of the time. Control Solution 0
and Control Solution 2 are also available if you want to do a level 0 or level 2
test. The three levels of control solution, CTRL 0, CTRL 1 and CTRL 2 are
available in the On Call
®
Extra Glucose Control Solution package which is sold
separately.
7. Carrying Case: Provides portability for blood glucose testing wherever you go.
8. User's Manual: Provides detailed instructions on using the blood glucose
monitoring system.
9. Quick Reference Guide: Provides a brief overview of the blood glucose
monitoring system and testing procedures. This small guide can be kept in
your carrying case.
10. Warranty Card: Should be completed and returned to the distributor to qualify
for the 5-year meter warranty.
Page 5
3
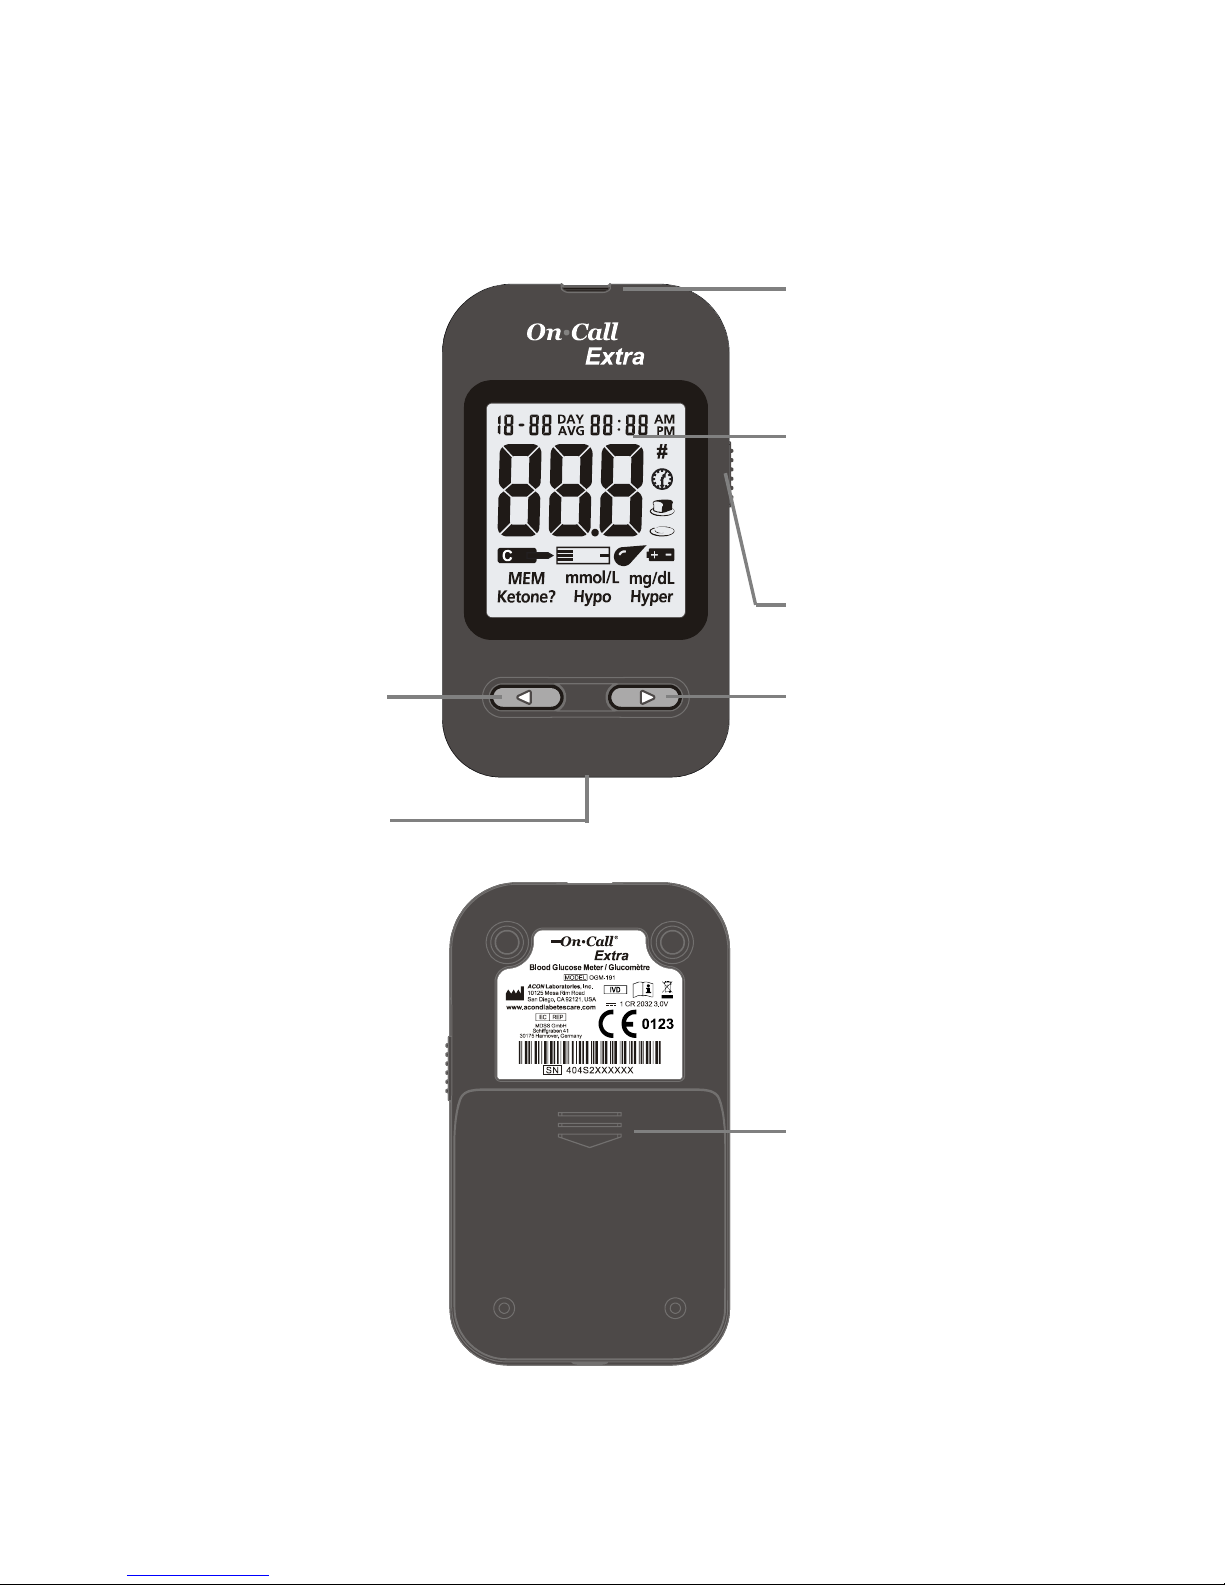
On Call® Extra Blood Glucose Meter
The meter reads the test strips and displays the blood glucose concentration. Use
these diagrams to become familiar with all the parts of your meter.
Battery Cover
Strip Port
Liquid Crystal
Display (LCD)
Strip Ejector
► Button ◄ Button
Data Por
t
Page 6

4
Liquid Crystal Display (LCD): Shows your test results and helps you through the
testing process.
◄ Button: Recalls previous test results from the meter memory and performs
other menu selection functions.
► Button: Selects meter settings and performs other menu selection functions.
Strip Port: Test strips are inserted into this area to perform a test.
Strip Ejector: Slide the ejector forward to discard the used test strip.
Note: Dispose of blood samples and materials with care. Treat all blood samples
as if they are infectious materials. Follow your healthcare provider’s
recommendations for disposal.
Battery Cover: Remove the battery cover to install one CR 2032 coin cell battery.
Data Port: Sends information to a computer via an optional data transfer cable.
Allows you to view, analyze and print stored data in the meter. The data transfer
cable is available for order as an optional add-on.
Page 7
5
Meter Display
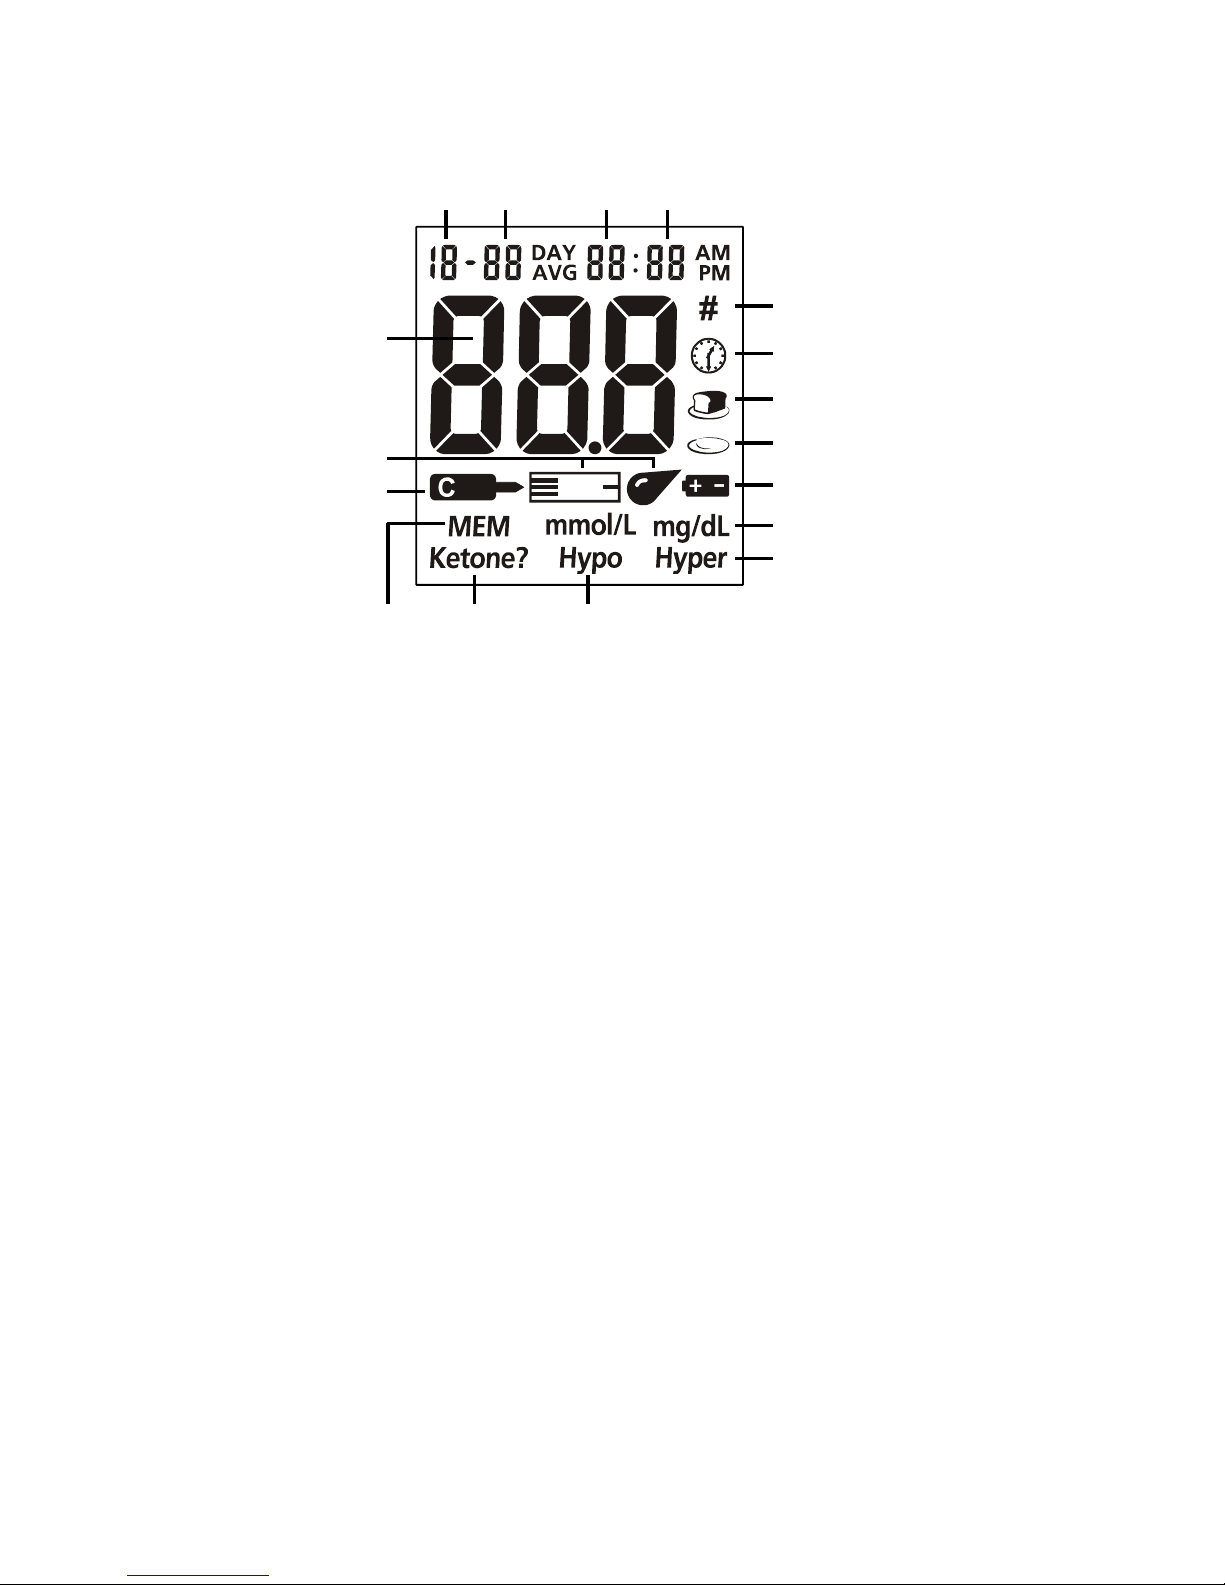
Battery Symbol: Warns when you should replace the battery.
Blood Drop / Strip Symbol: Wait for the Blood Drop / Strip Symbol to appear
before applying the sample. These two symbols appear at the same time.
Pound Sign (#): Appears with the control solution test result or when you mark an
invalid result to prevent it from being included in the average.
Control Solution Symbol: Indicates a control test result. A pound sign (#) will also
be displayed when control solution symbol appears.
Test Result Area: Indicates the test result.
Test Remind Symbol: Appears when reminding you to test blood glucose.
Before Meal Symbol: Appears when before-meal test results are displayed.
After Meal Symbol: Appears when after-meal test results are displayed.
Measurement Unit: Only one unit will be displayed on your meter. It cannot be
adjusted.
Hyper Symbol: Appears when the blood glucose concentration is above the
“Hyperglycemia” (high blood sugar) target level that you have set.
Hypo Symbol: Appears when the blood glucose concentration is below the
“Hypoglycemia” (low blood sugar) target level that you have set.
Ketone: Appears when the blood glucose concentration is above 16.7 mmol/L
(300 mg/dL). This simply suggests that a ketone test is recommended. Consult
your healthcare professional about testing for ketones.
Note: This symbol does not mean that the system has detected ketones. It
recommends that a ketone test should be taken.
MEM: Shows a test result stored in memory.
Month Day Hour Minutes
Pound Sign (#)
Test Remind Symbol
Before Meal Symbol
After Meal Symbol
Battery Symbol
Measurement Unit
Hyper Symbol
Blood Drop
/
Strip Symbol
Memory Ketone Hypo Symbol
Test Resul
t
Area
Control Solution
Symbol
Page 8

6
Meter Use and Precautions
• Wait for the Blood Drop / Strip Symbol to appear before applying the sample.
• The meter is pre-set to display blood glucose concentration in either millimoles
per liter (mmol/L) or milligrams per deciliter (mg/dL) depending on which unit of
measure is standard in your country. This unit of measure cannot be adjusted.
• Meter will shut off by itself after 2 minutes of inactivity.
• Do not get water or other liquids inside the meter.
• Keep the strip port area clean.
• Keep your meter dry and avoid exposing it to extremes temperature or humidity.
Do not leave it in your car.
• Do not drop the meter or get it wet. If you do, check the meter by running a
quality control test. Refer to Quality Control Test on page 17 for instructions.
• Do not take the meter apart. This will void the warranty.
• Refer to the Caring for Your Meter section on page 36 for details on cleaning
the meter.
• Keep the meter and all associated parts out of the reach of children.
Note: Follow proper precautions and all local regulations when disposing of the
meter and used battery.
All Glucose Systems Preventive Warnings with Regard to EMC:
1. This instrument is tested for immunity to electrostatic discharge as specified in
IEC 61000-4-2. However, use of this instrument in a dry environment,
especially if synthetic materials are present (synthetic clothing, carpets, etc.)
may cause damaging static discharges that may cause erroneous results.
2. This instrument complies with the emission and immunity requirements
described in EN61326-1 and EN61326-2-6. Do not use this instrument in close
proximity to sources of strong electromagnetic radiation, as these may interfere
with proper operation of the meter.
3. For professional use, the electromagnetic environment should be evaluated
prior to operation of this device.
Page 9
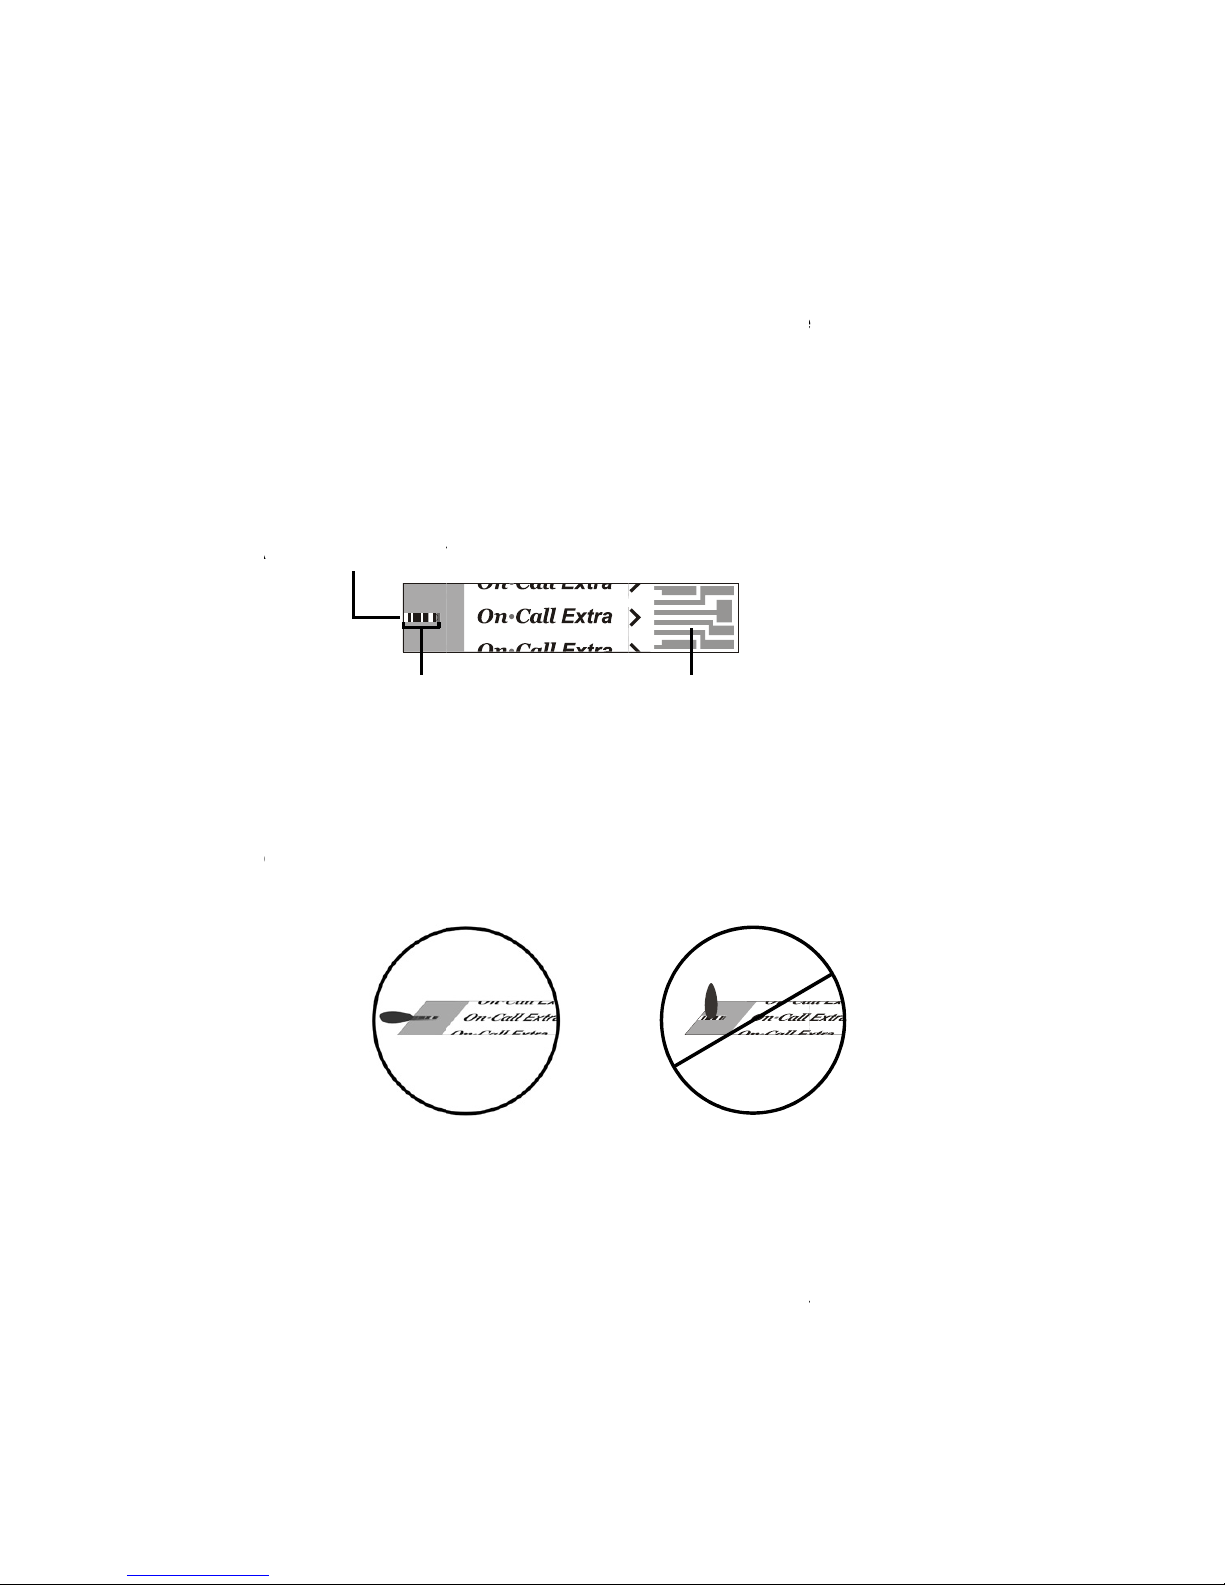
On C
a
The On
chemic
a
to meas
the met
e
automat
transien
t
concent
r
The res
equival
e
IMPOR
T
apply bl
o
inaccur
a
Hold th
e
complet
e
not see
second
s
do not a
or an in
a
check
w
test stri
p
SAC
Csa
l
l
®
Extra Blo
o
Call® Extra Bloo
d
l reagent system.
re the glucose c
o
r, blood is appli
e
ically absorbed i
n
electrical curre
ation is calculat
e
ult is shown on
nt results.
ANT: Apply the
od or control s
o
te reading.
blood drop to t
h
ly full. The mete
r
the countdown
s
. If the check win
d
d more blood to
ccurate test res
u
indow does not f
.
ample Tip
pply blood or con
t
heck Window
heck to confirm t
h
mple has been
a
C
o
7
d Glucose
T
Glucose Tes t
S
They work with t
ncentration in w
h
d to the sample
to the reaction
c
nt is formed du
r
d based on the
e
the meter displa
y
sample only to t
lution to the top
e sample tip of
t
will then begin to
tart, you may re
a
ow does not fill
a
the test strip. If y
o
lt. In this case if t
ill, discard the st
r
trol solution here.
at a sufficient
pplied.
rrect
est Strips
trips are thin stri
he On Call
®
Extr
a
ole blood. After t
h
tip of the test st
r
ell where the r
e
ing the reactio
n
lectrical current
d
. The meter is
s
he sample tip of
of the test strip.
he test strip unti
l
count down. If y
o
pply a second
d
nd the meter sta
r
u do then you m
a
he meter begins
t
ip and begin the
Contact Bars
Insert this end
o
into the meter u
Incorrect
ps. The strips h
a
Blood Glucose
M
e strip is inserte
d
ip. The blood is
action takes pla
c
. The blood glu
etected by the
m
et to display pl
a
the test strip. D
o
This may result i
the check wind
o
u applied blood b
u
rop of blood wit
h
ts to count down,
y get an E-5 mes
s
o count down an
d
test again with a
f the test strip
ntil it stops.
ve a
eter
into
then
e. A
cose
eter.
sma
not
n an
w is
ut do
in 3
then
sage
the
new
Page 10
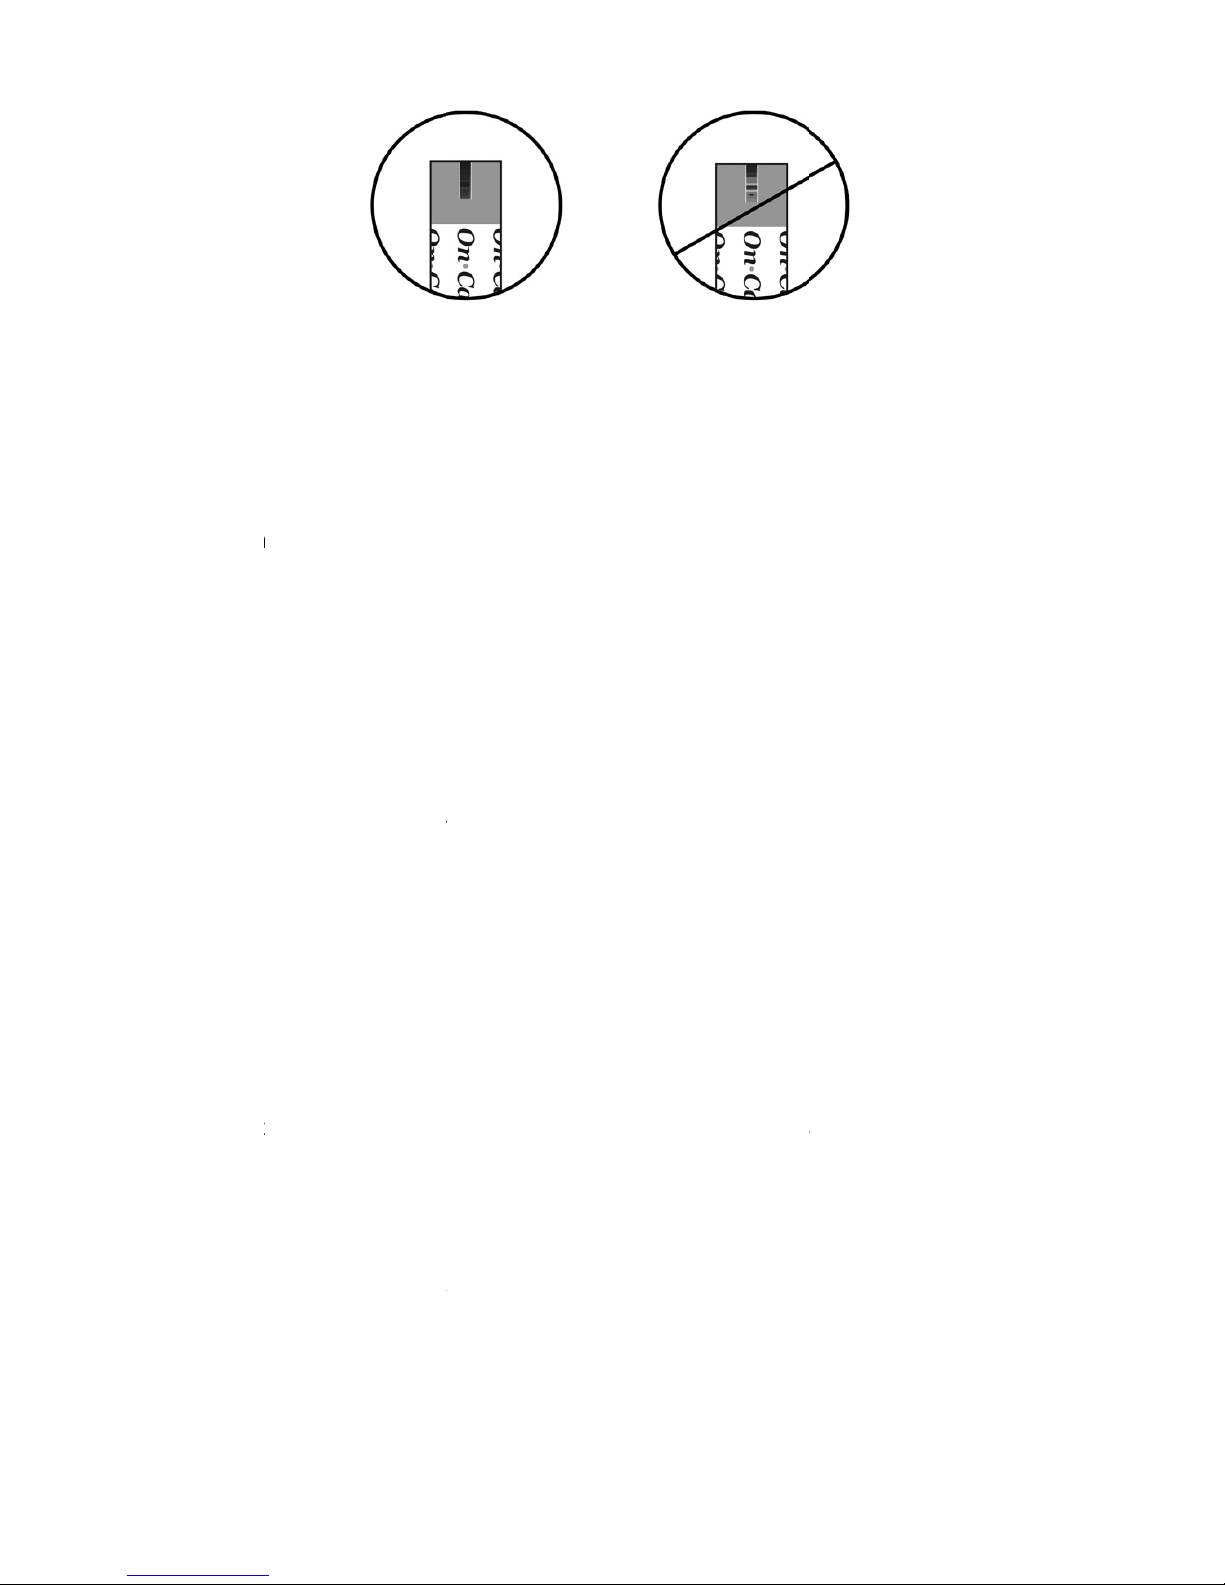
Storag
e
Please
r
• Stor
e
fro
m
• Do
n
• Do
n
• Do
n
clea
n
• The
• Rep
res
u
• Do
n
labe
inco
r
Not
e
Jan
u
Special
• Tes
t
kee
p
• Do
n
• Rep
l
• A n
e
Writ
e
vial
inac
c
and Handling
eview the followi
n
test strips in a
heat and direct
s
ot freeze or refri
g
ot store or use te
ot store the m
e
ers that contain
b
test strip should
b
eated insertion a
lt in reading erro
r
ot use your test
l. Using test str
rect test results.
: The expiration
ary, 2014.
Instructions for
strips must be s
t
s them in good
w
ot transfer test st
ace the cap on t
h
w vial of test str
the opened ex
p
6 months after
y
urate readings.
C
o
8
g storage and h
a
cool, dry place a
t
unlight.
erate.
st strips in a hum
i
ter, the test stri
leach.
e used immediat
e
nd removal of a
s.
strips past the u
n
ips past the un
o
date is printed i
Test strip in the
ored in the origi
n
orking condition.
rips to a new vial
e test strip vial i
m
ips may be used
iration date on t
h
ou first open it.
rrect
ndling instruction
s
2-30 °C (36-86
d place such as
a
ps or control so
ly after removin
g
test strip into th
e
opened expirati
o
pened expiratio
n
n Year-Month fo
r
Vial
al vial with the c
a
or any other cont
a
mediately after r
e
for 6 months af
t
e vial label afte
r
Usage after this
Incorrect
:
°F). Store them
a
bathroom.
ution near blea
c
it from container
.
meter strip port
n date printed o
n
date may pro
d
mat. 2014-01 m
e
p tightly closed.
iner.
moving a test str
i
er being first op
e
opening. Discar
d
period may res
u
way
h or
.
may
the
uce
eans
This
p.
ned.
the
lt in
Page 11
9
Special Instructions for Test Strip in the Foil Pouch
• Tear the pouch carefully starting from the tear gap. Avoid damaging or bending
the test strip.
• Use test strip immediately after removing it from the pouch.
Test Strip Precautions
• For in vitro diagnostic use. Test strips are to be used only outside the body for
testing purposes.
• Do not use test strips that are torn, bent, or damaged in any way. Do not reuse
test strips.
• Keep the test strip vial or the foil pouch away from children and animals.
• Consult your physician or healthcare professional before making any changes
in your treatment plan based on your blood glucose test results.
See the test strip insert for more details.
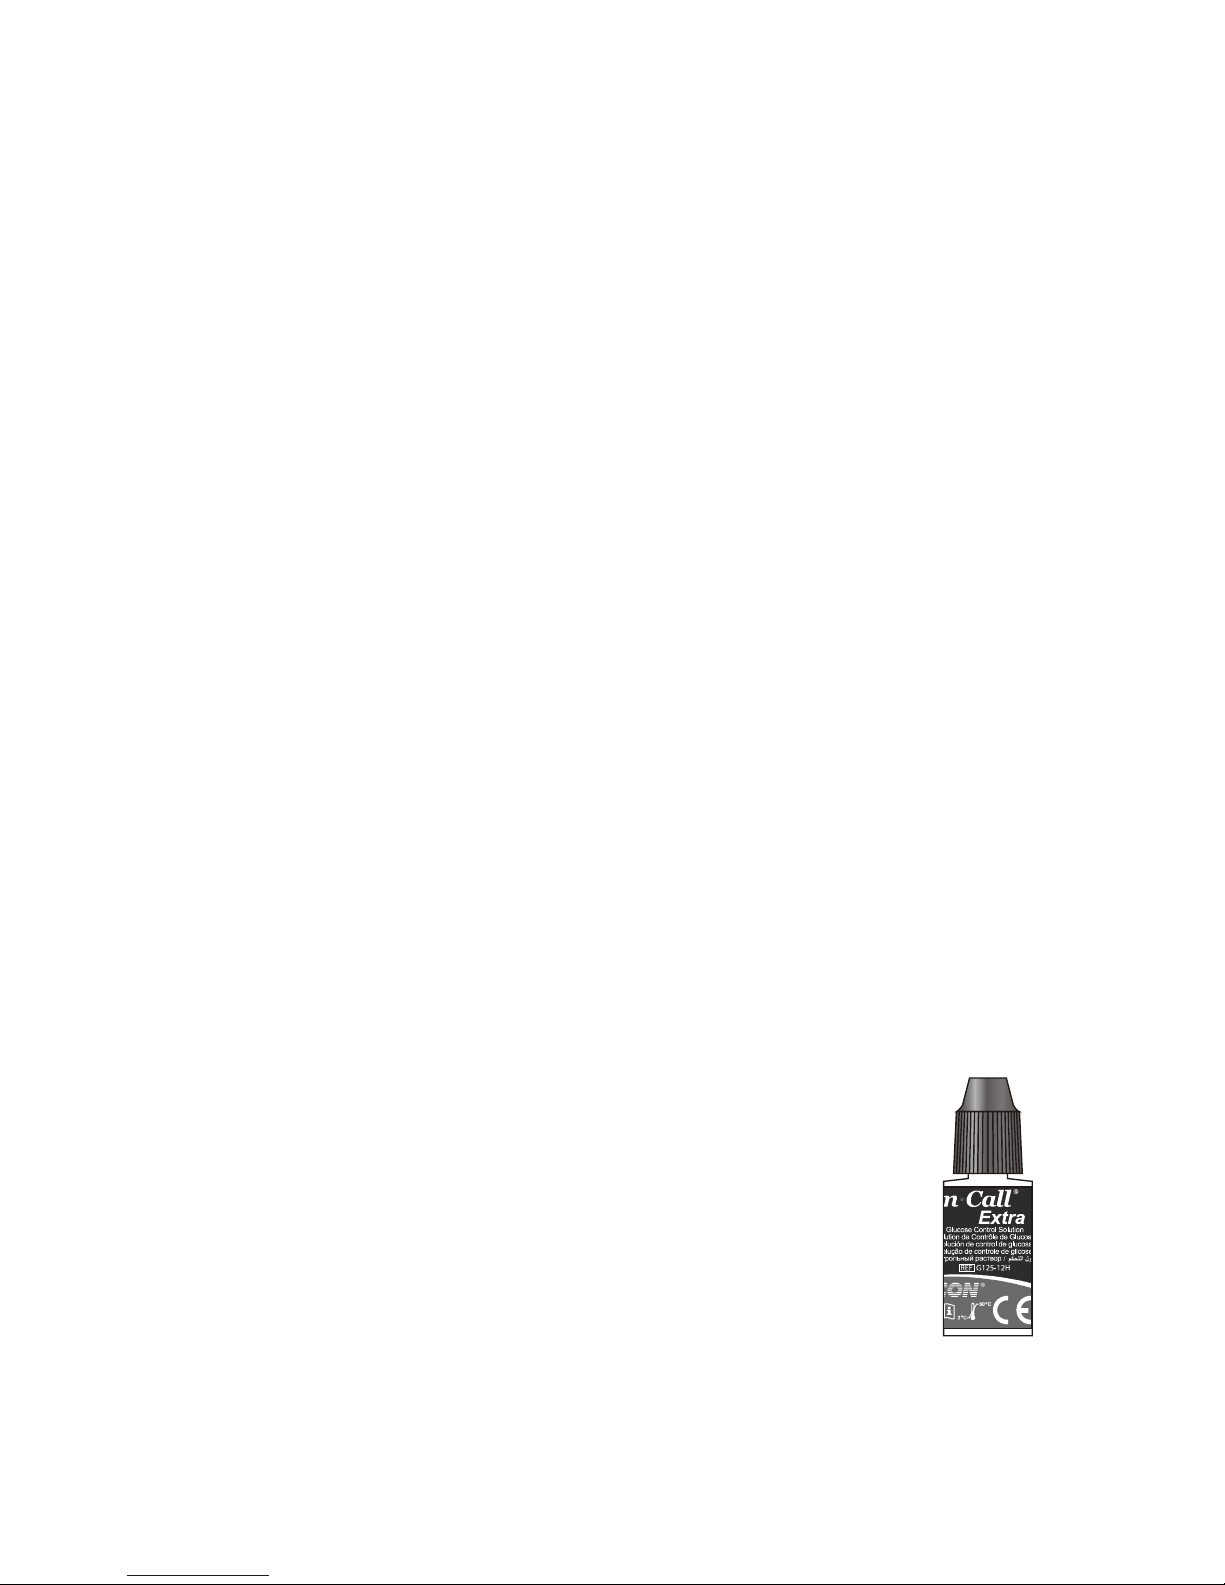
On Call® Extra Glucose Control Solution
The On Call® Extra Glucose Control Solution contains a known concentration of
glucose. It is used to confirm that your On Call
®
Extra Blood Glucose Meter and
test strips are working together properly. It also confirms that you are performing
the test correctly. It is important to run a quality control test regularly to make sure
you are getting correct results.
You should run a quality control test:
• Before you first use your meter, to familiarize yourself with its operation.
• Before using a new box of test strips.
• When you suspect that the meter or test strips are not working
properly.
• When you suspect that your test results are inaccurate, or if they
are inconsistent with how you feel.
• When you suspect your meter is damaged.
• After cleaning your meter.
• At least once a week.
Refer to Quality Control Test on page 17 for instructions on running a quality
control test.
Page 12

10
Storage and Handling
Please review the following storage and handling instructions:
• Store the control solution at 2-30 °C (36-86 °F).
• Do not refrigerate or freeze.
• If the control solution is cold, do not use until it has warmed to room
temperature.
• Use before the unopened expiration date that is shown on the bottle.
Note: The expiration date is printed in Year-Month format. 2014-01 means
January, 2014.
• Each bottle of control solution can be used for 6 months after you first open it.
Record the opened and the resulting expiration date on the bottle label.
Control Solution Precautions
• For in vitro diagnostic use. The control solution is for testing only outside the
body. Do not swallow or inject.
• Shake well before using.
• Control solution tests are designed to be accurate only when tested between
10 and 40 °C (50-104 °F).
• The control ranges shown on the test strip vial (or on the foil pouch) are not
recommended ranges for your blood glucose level. Your personal blood
glucose target ranges should be determined by your diabetes healthcare
professional.
• Do not touch the test strip with the tip of the control solution bottle.
• Use only the same brand of control solution that was provided with your kit.
See the control solution insert for more details.
Page 13
11
Installing the Battery
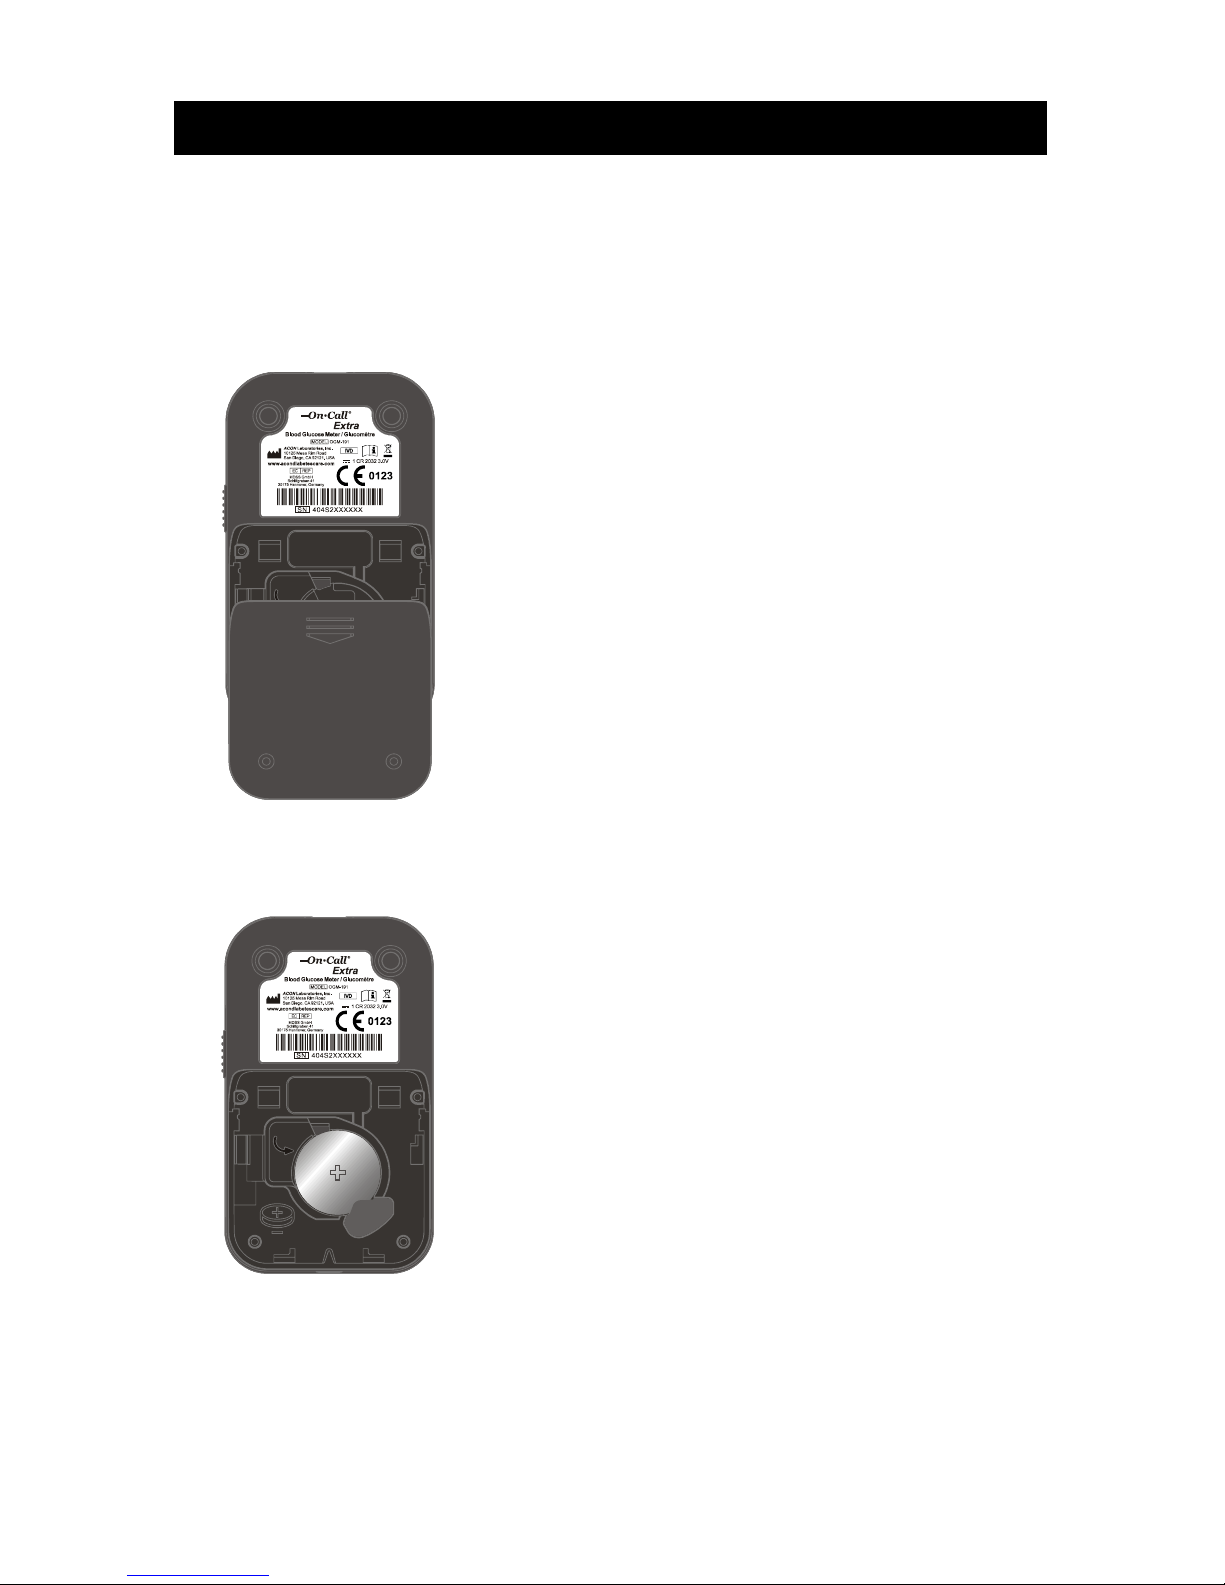
The battery may not be preinstalled in the meter. The meter requires one CR 2032
3.0V coin cell battery. Please find the battery in your carrying case and install it
according to the following steps:
1. Turn over the meter. Slide the battery cover in the direction of the arrow to
open it.
2. Place a fresh CR 2032 3.0 V coin cell battery. Make sure it is aligned with the
plus (+) side facing up in the battery carrier.
3. Close the battery cover and make sure that it snaps shut.
Page 14
12
Meter Setup Before Testing
Before using your meter for the first time, you will need to adjust the settings that
are listed in detail below.
1. Meter Setup Mode: When meter is off, in memory mode or in average mode,
press and hold the ► button for two seconds to eneter meter setup mode. The
meter will automatically enter the setup mode when turned on for the first time
by any method.
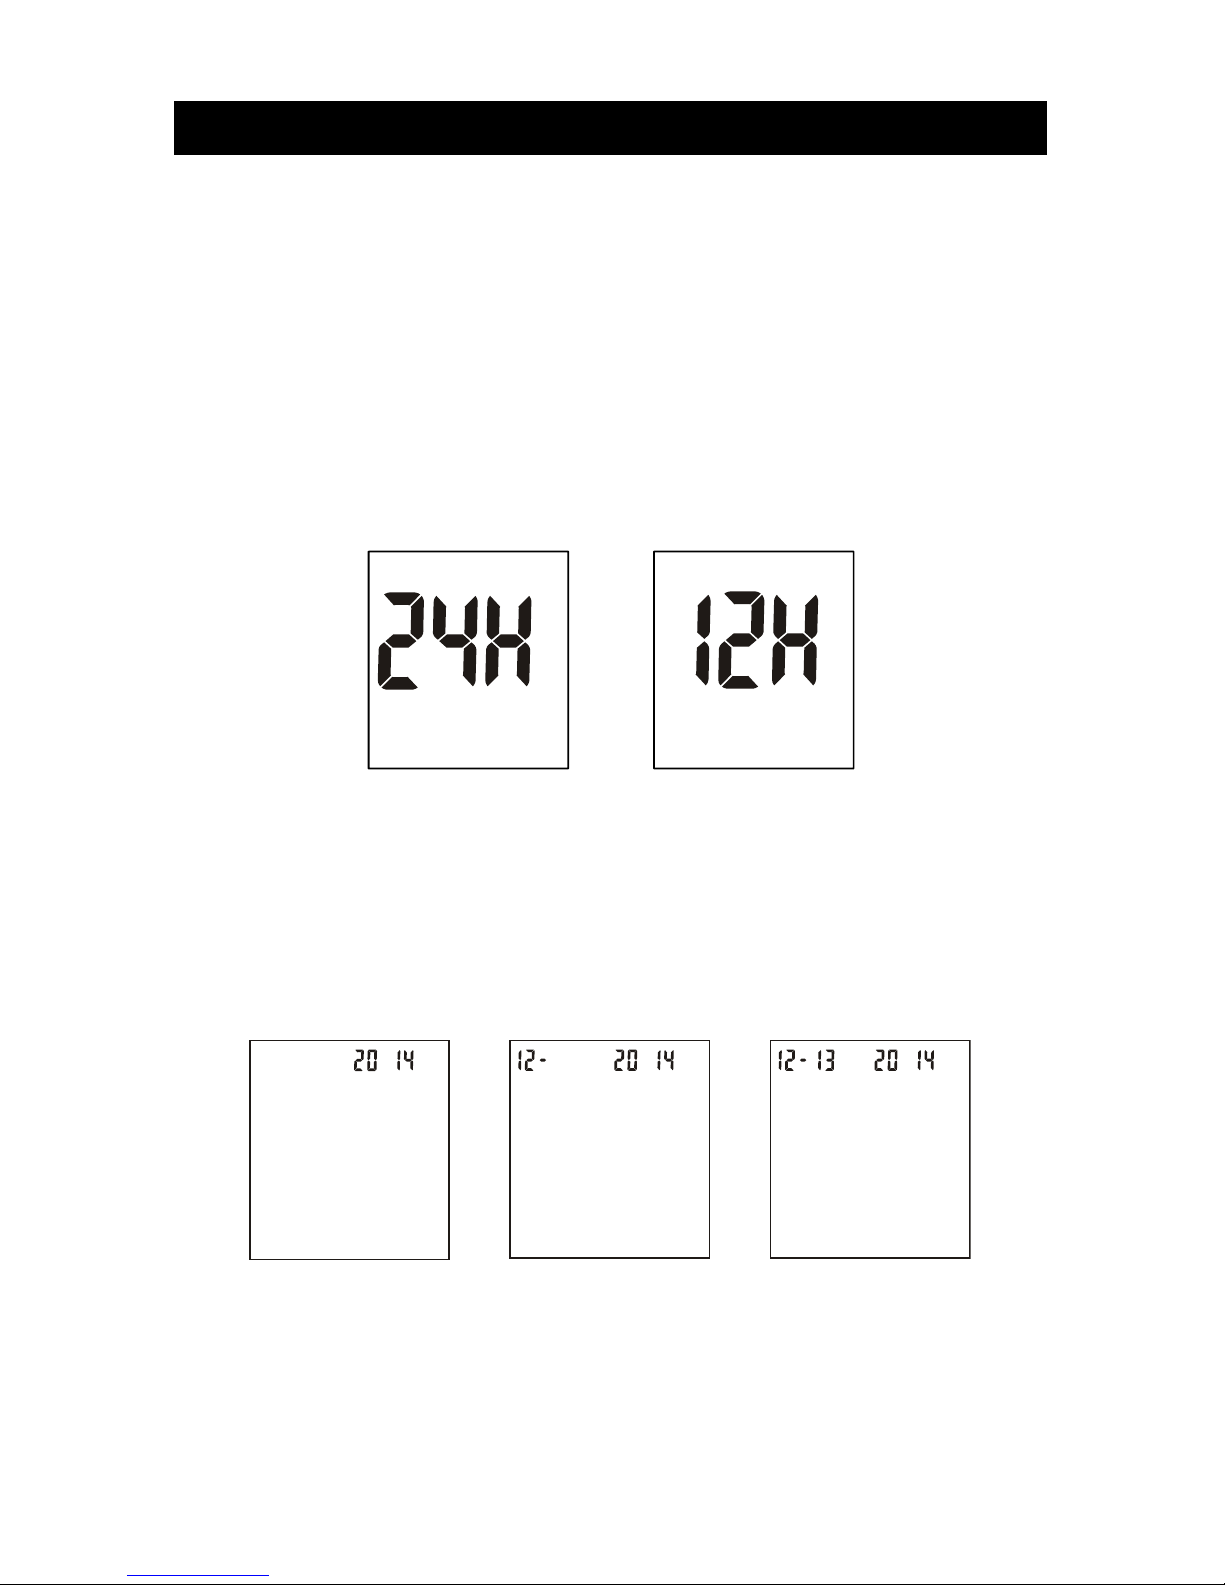
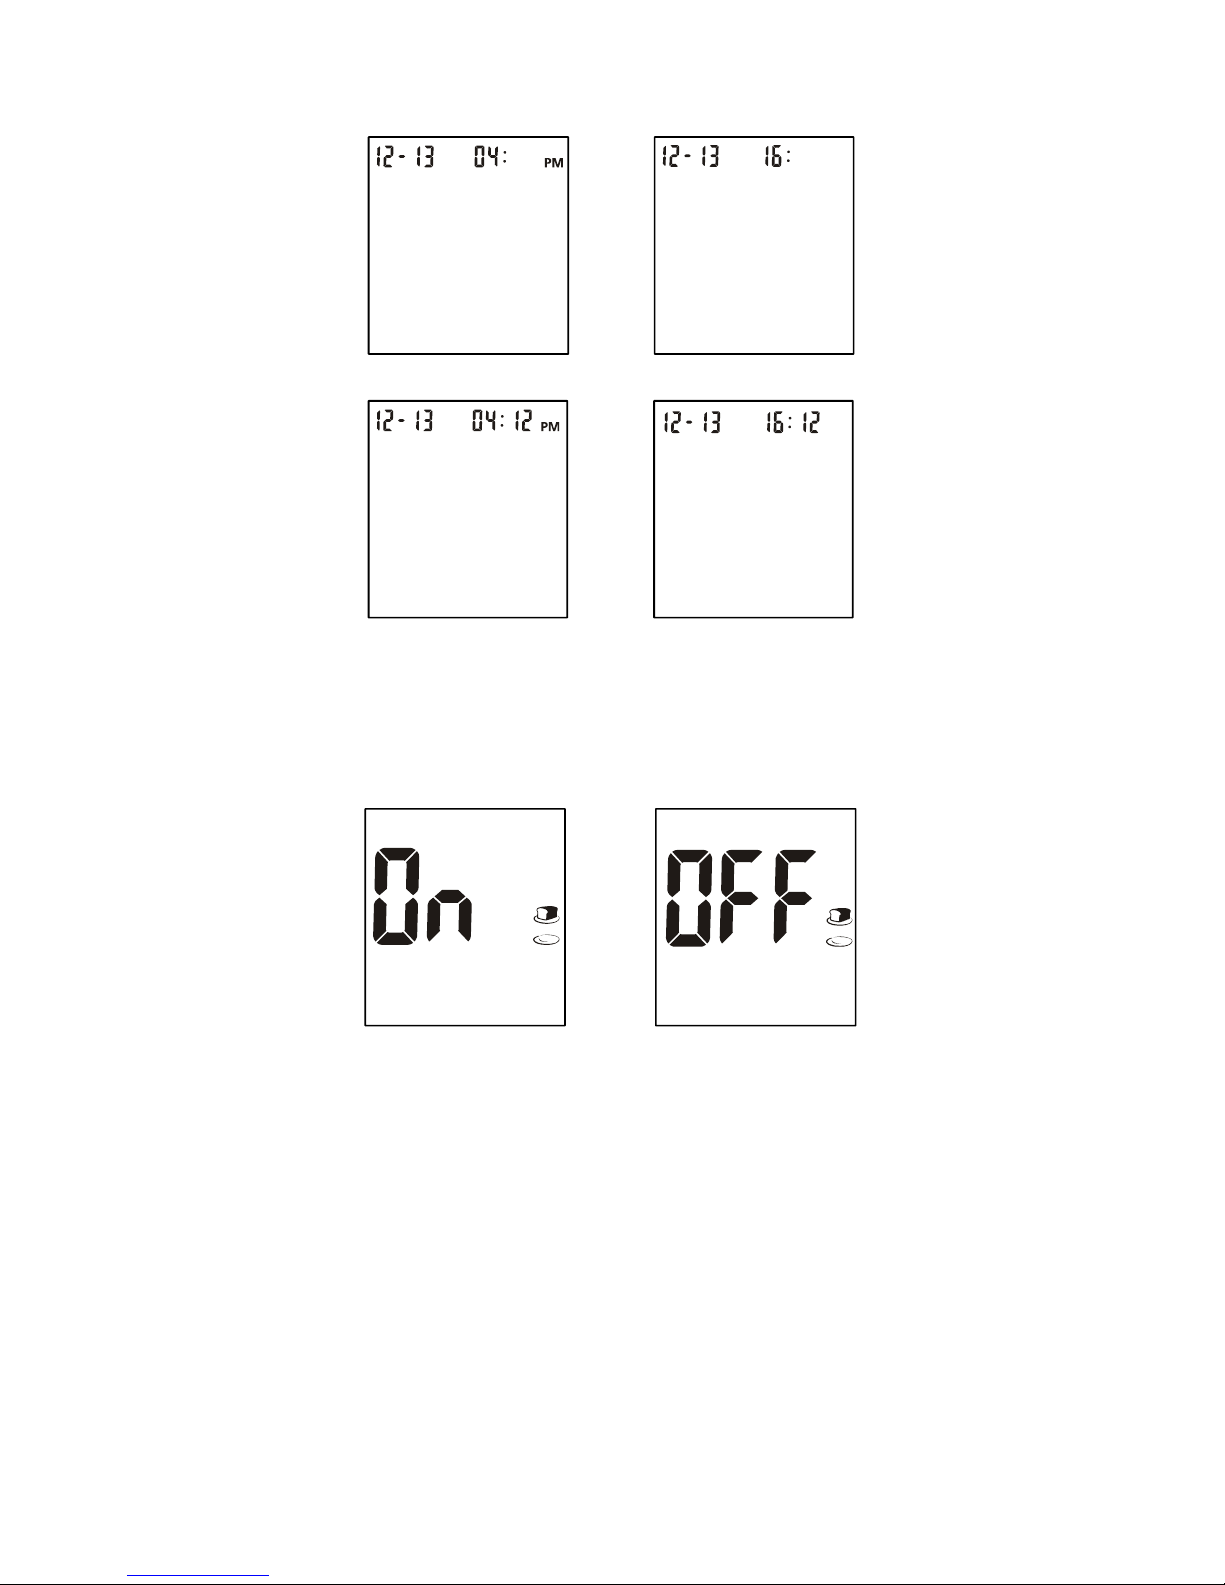
2. Clock: Set the clock to 12 or 24 hour mode. Press the ◄ button to switch
between the two settings. Then press the ► button to save your choice and
then you can start to set the year, month and date.
Note: The clock needs to be reset after replacing the battery.
3. Date: The year will appear at the top of the display. Press the ◄ button to
increase the year. Once you have selected the correct year, press the ►
button to save your choice and start setting the month. Press the ◄ button to
increase the month. Then press the ► button to save your choice and start
setting the date. Press the ◄ button to increase the date. Then press the ►
button to save your choice and start setting the time.
4. Time: The hour will appear at the top of the display. Adjust the hour with the ◄
button until the correct hour is displayed. Press the ► button to save your
choice and set the minutes. Press the ◄ button to change to the correct minute.
Press the ► button to save your choice and move to set the meal marker
feature.
OR
Y
ear Month Date
Page 15
13
5. Meal Marker: The meter comes with the meal marker feature disabled. The
meter allows the user to enable or disable this option. The words “On” or “Off”
will be displayed on the large center segments of the display. The before meal
symbol together with the after meal symbol will be displayed as shown below.
Press the ◄ button to switch between turning the meal marker “On” and “Off”.
Press the ► button to confirm your selection.
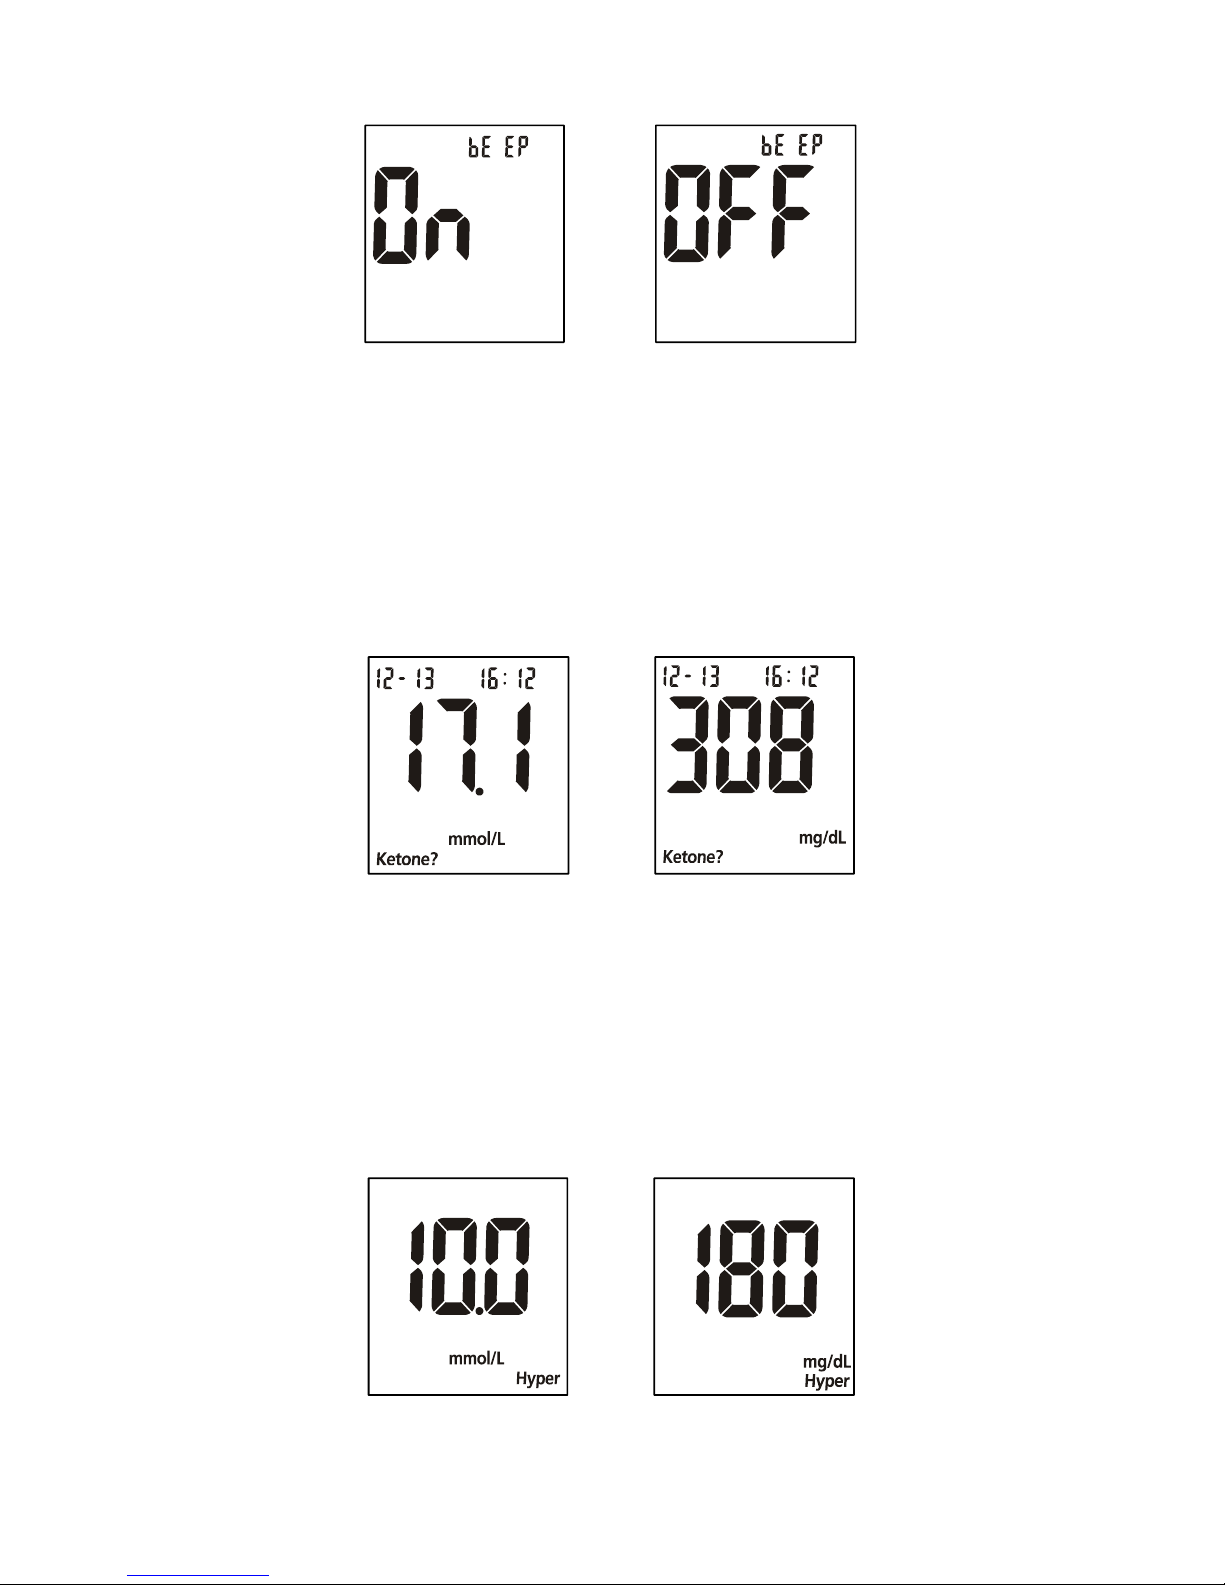
6. Audio Feature: The meter comes with the audio feature enabled. The meter
will give one short beep when it is turned on, after sample detection and when
the result is ready. The meter will sound three short beeps to sound a warning
when an error has occurred. Please check the error number on the display to
determine what kind of error has occurred.
OR
Hou
r
Hou
r
OR
Minute Minute
Page 16
14
Press the ◄ button to turn the meter beep “On” and “Off”. Press the ► button
to confirm your selection.
7. Ketone Indicator: The meter comes with the Ketone indicator feature disabled.
Press the ◄ button to switch between turning the Ketone indicator “On” and
“Off”. Press the ► button to confirm your selection. When the Ketone indicator
is enabled, if the test result is higher than 16.7 mmol/L (300 mg/dL), the symbol
of "Ketone?" will appear on the display.
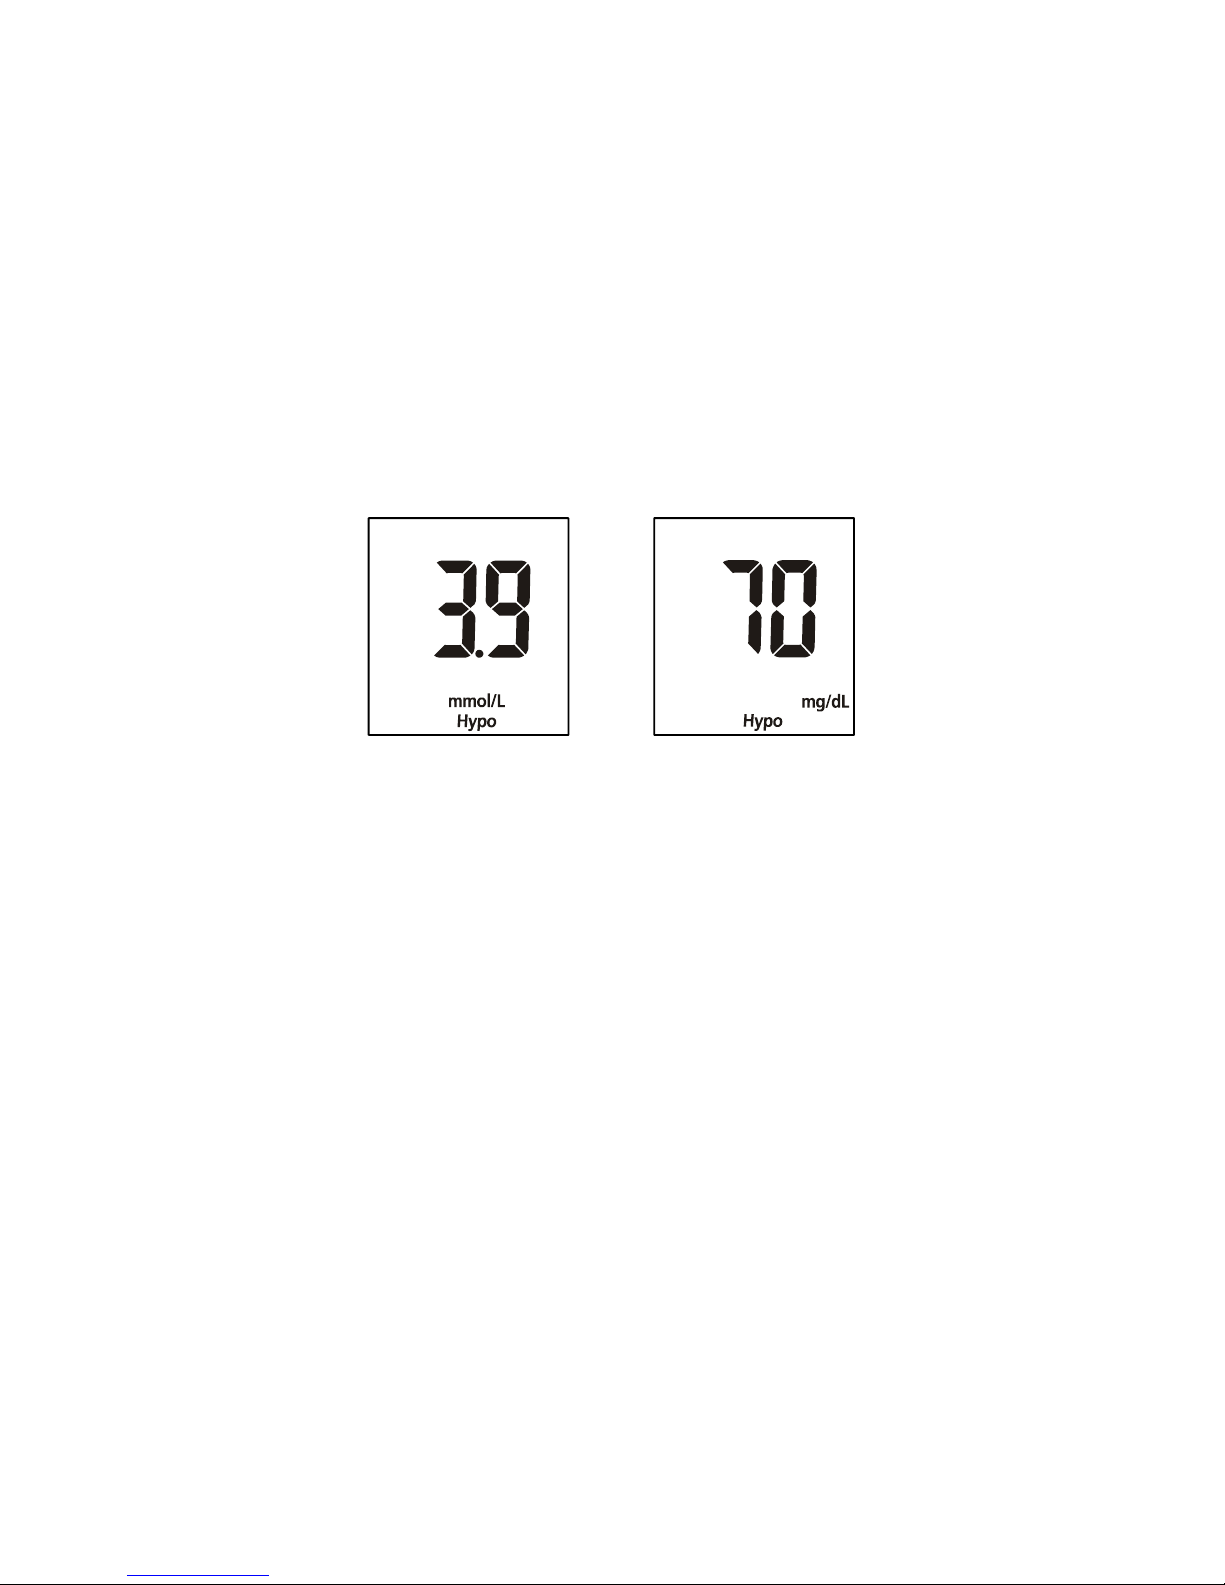
8. Hyper Indicator: The meter comes with the Hyper indicator feature disabled.
Press the ◄ button to turn the Hyper indicator “On” or “Off”. Press the ► button
to confirm your selection. When the Hyper indicator is “Off”, pressing the ►
button will go to the next Hypo indicator set up. When the Hyper indicator is
“On”, pressing the ► button will go to the Hyper indicator level set up. At the
Hyper level set up, press the ◄ button to adjust the Hyper level. Press the ►
button to go to the Hypo indicator set up.
OR
OR
Page 17
15
Note: The meter allows the hyperglycemia level to be as low as 6.7 mmol/L
(120 mg/dL) or higher. The hyperglycemia level should be above the
hypoglycemia level. Consult your diabetes healthcare professional before
determining what your hyper blood glucose level is.
9. Hypo Indicator: The meter comes with the Hypo indicator feature disabled.
Press the ◄ button to turn the Hypo indicator “On” or “Off”. Press the ► button
to confirm your selection. When the Hypo indicator is “Off,” pressing the ►
button will go to the Test Reminder set up. When the Hypo indicator is “On”,
pressing the ► button will go to the Hypo indicator level set up. At the Hypo
level set up, press the ◄ button to adjust the Hypo level. Then press the ►
button to go to the Test Reminder set up.
Note: The meter allows the hypoglycemia level to be as high as 5.6 mmol/L
(100 mg/dL). The hypoglycemia level should be below the hyperglycemia level.
Consult your diabetes healthcare professional before determining what your
hypo blood glucose level is.
10. Test Reminder: Test reminders are a useful way to remind you when to test.
You can set 1 to 5 reminders per day. Your meter is preset with the test
reminder disabled. You must turn it on to use this feature.
• Press the ◄ button to turn the first Test Reminder “On” and “Off”. Press the
► button to confirm your selection. When the Test Reminder is “Off”,
pressing the ► button will go to the setup of the second Test Reminder.
When the Test Reminder is “On”, pressing the ► button will go to the setup
of the time for the first Test Reminder. Press the ◄ button to adjust the first
Test Reminder time (Time is adjusted by every minute). Press the ► button
to confirm the first Test Reminder time and then go to the second Test
Reminder set up.
• When the Test Reminder is “Off” during the second Test Reminder set up,
pressing the ► button will go to the setup of the third Test Reminder. When
the Test Reminder is “On”, pressing the ► button will go to the setup of the
time for the second Test Reminder. Press the ◄ button to adjust the
OR
Page 18
16
second Test Reminder time (Time is adjusted by every minute). Press the
► button to confirm the second Test Reminder time and then go to the third
Test Reminder set up.
• Repeat the same set up procedure for Test Reminder 3, 4 and 5.
• After finishing the fifth Test Reminder set up, it will then end the setup mode
and power off the meter.
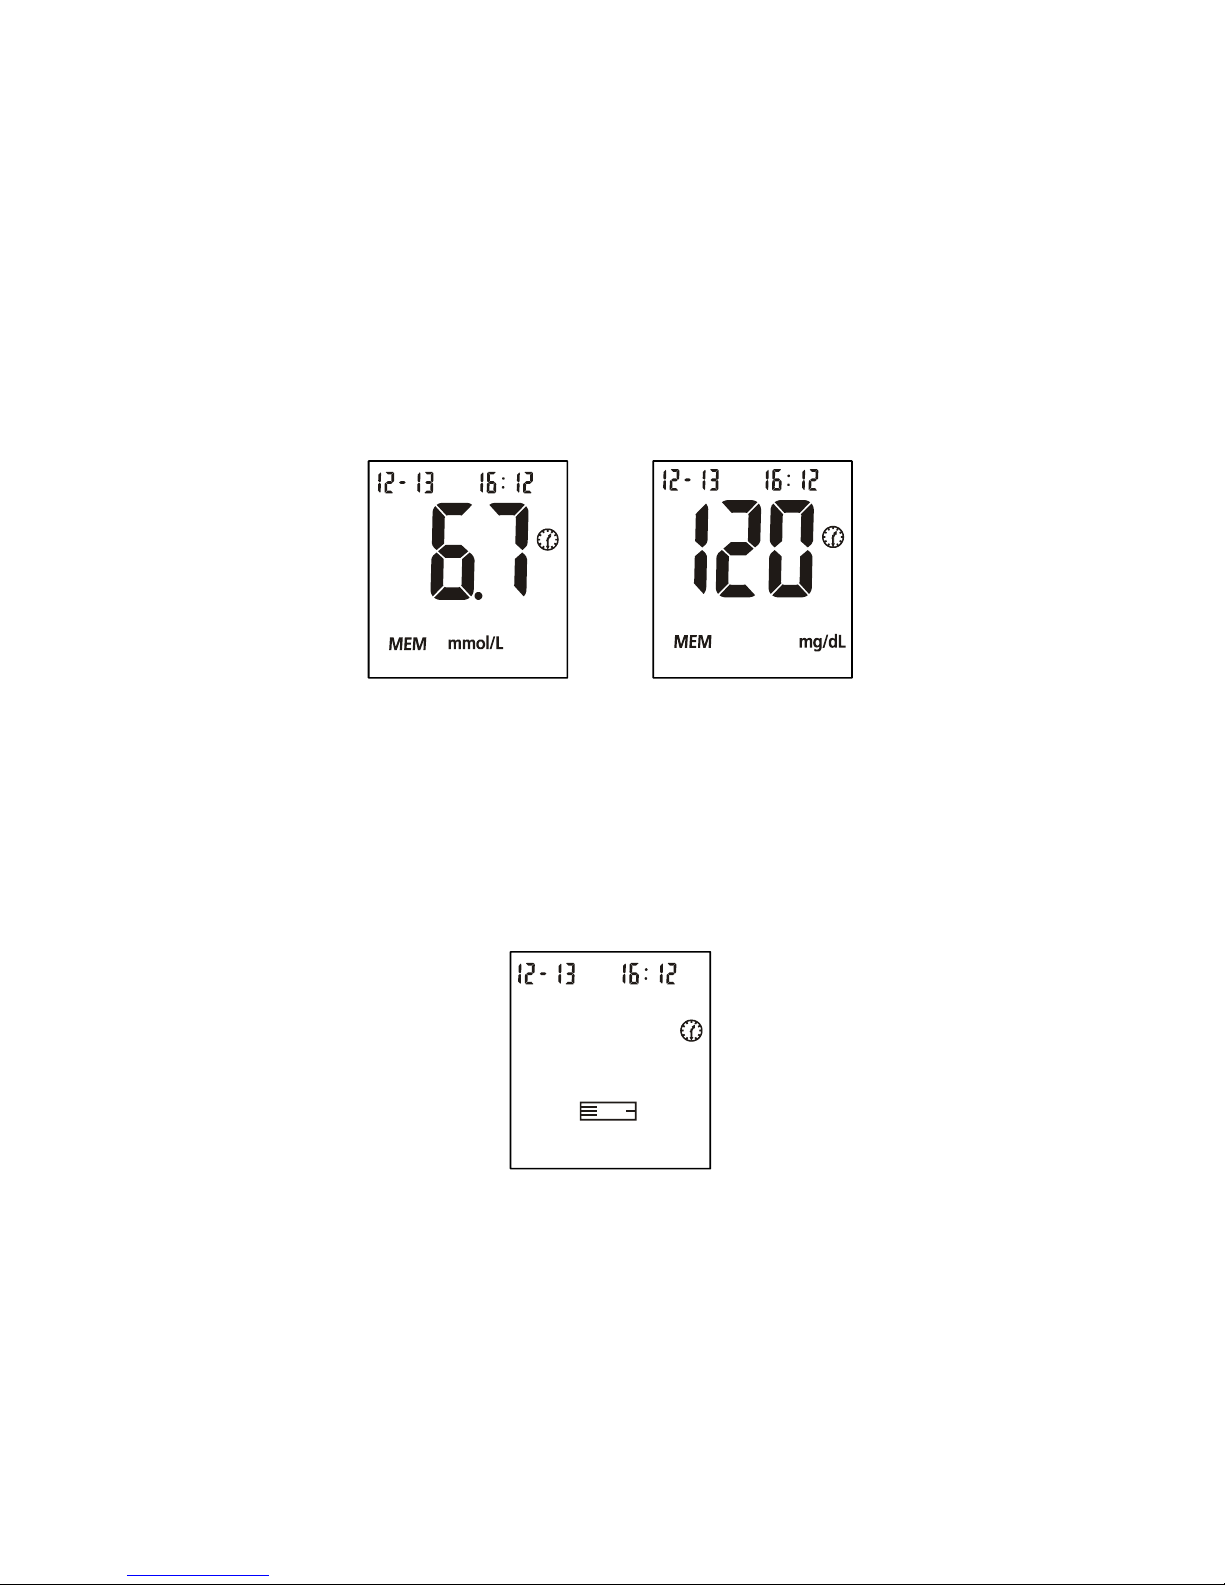
If one or more test reminders have been set, the reminder symbol will always
appear on the LCD screen when the meter is turned on. The display sample is
shown below.
The meter beeps 5 times when it is first set. It will beep again two minutes later,
and two minutes after that unless you insert a test strip or press any button.
This function will still work with Audio feature turned off.
When the meter beeps at the time set by the Test Reminder feature, the date,
time and strip symbol will be displayed. The Test Reminder symbol will also
flash. The display sample is shown below.
Note: For any step of the setup, if the ◄ button is pressed and held, it will allow
a faster adjustment.
OR
Page 19
17
Performing a Quality Control Test
The quality control test confirms that the test strips and meter are working together
properly. It also confirms that you are performing the test correctly. It is important to
perform this test:
• Before you first use your meter.
• Before using a new box of test strips.
• When you suspect that the meter or test strips are not working properly.
• When you suspect that your test results are inaccurate, or if they are
inconsistent with how you feel.
• When you suspect your meter is damaged.
• After cleaning your meter.
• At least once a week.
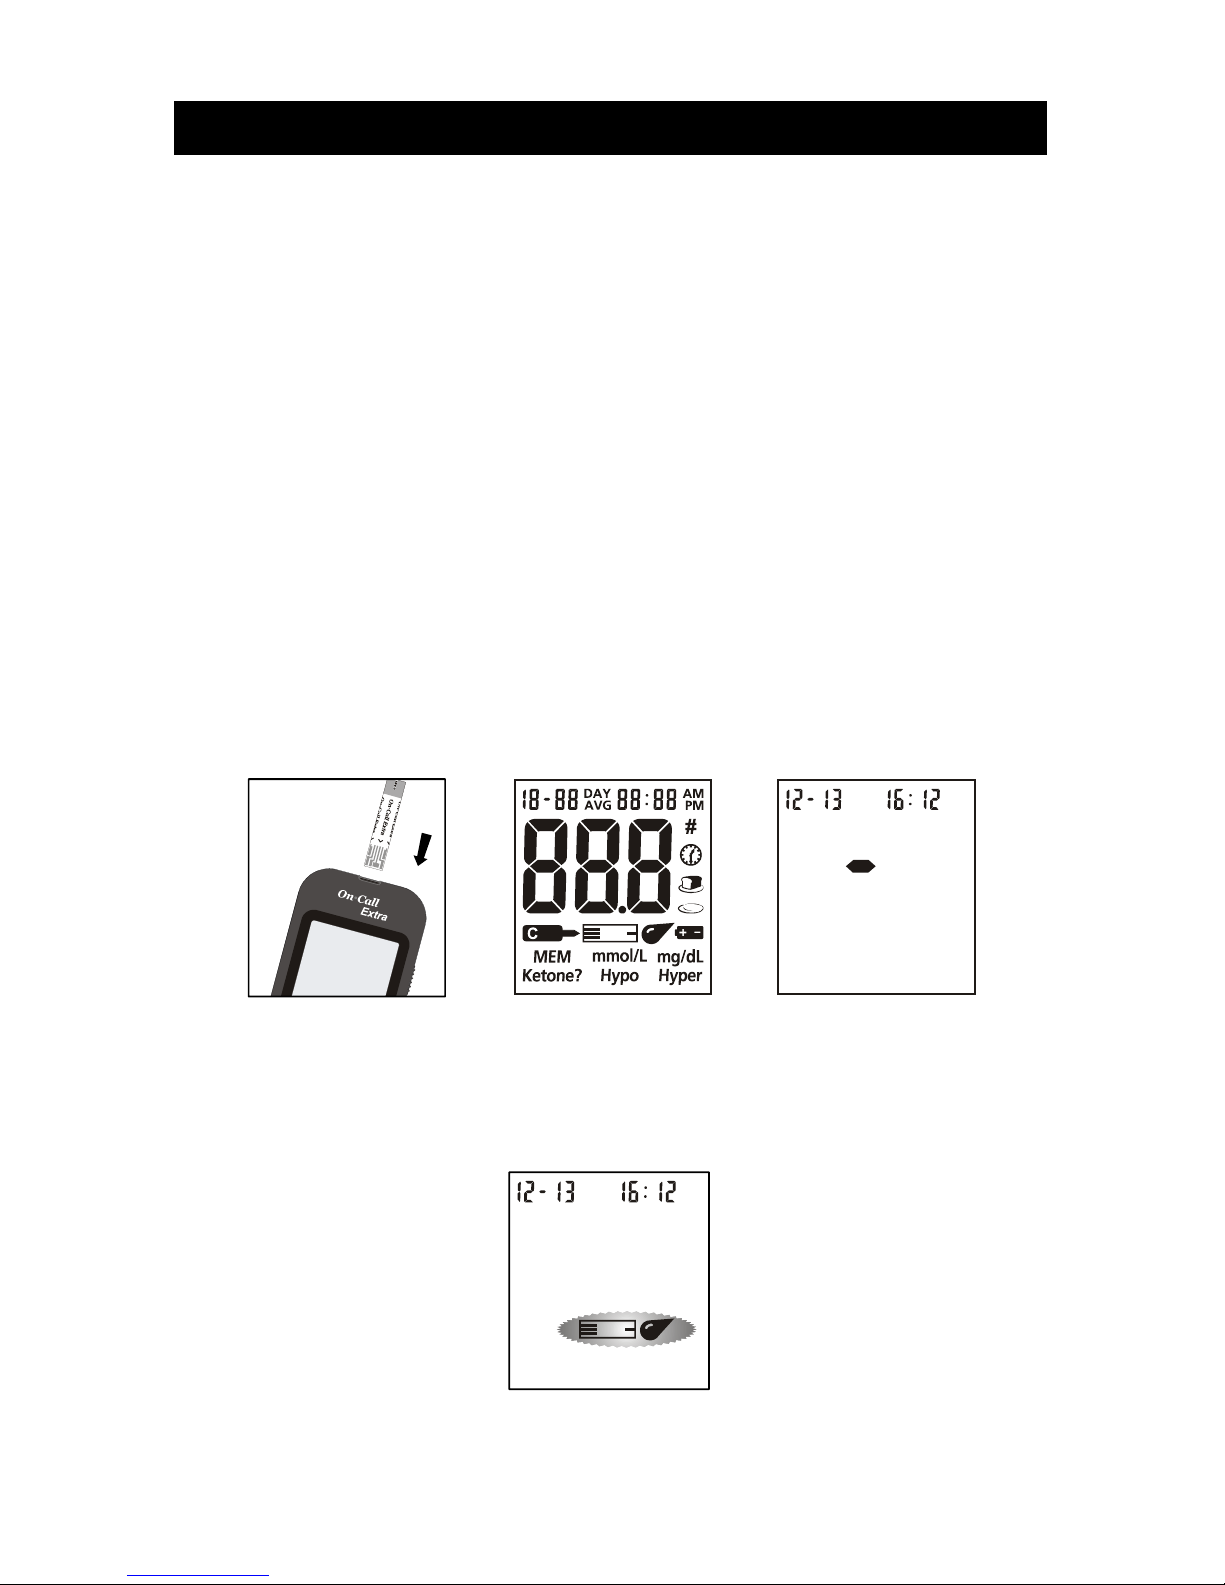
1. Insert a test strip into the strip port, contact bars end first and facing up. It will
turn on the meter and display all the display segments. If the audio option is on,
the meter will beep, signaling the meter is turned on.
2. Check the display to confirm that all the display segments turn on. Next, a dash
will move across the display.
3. Following this display check, the system will enter the test mode. The display
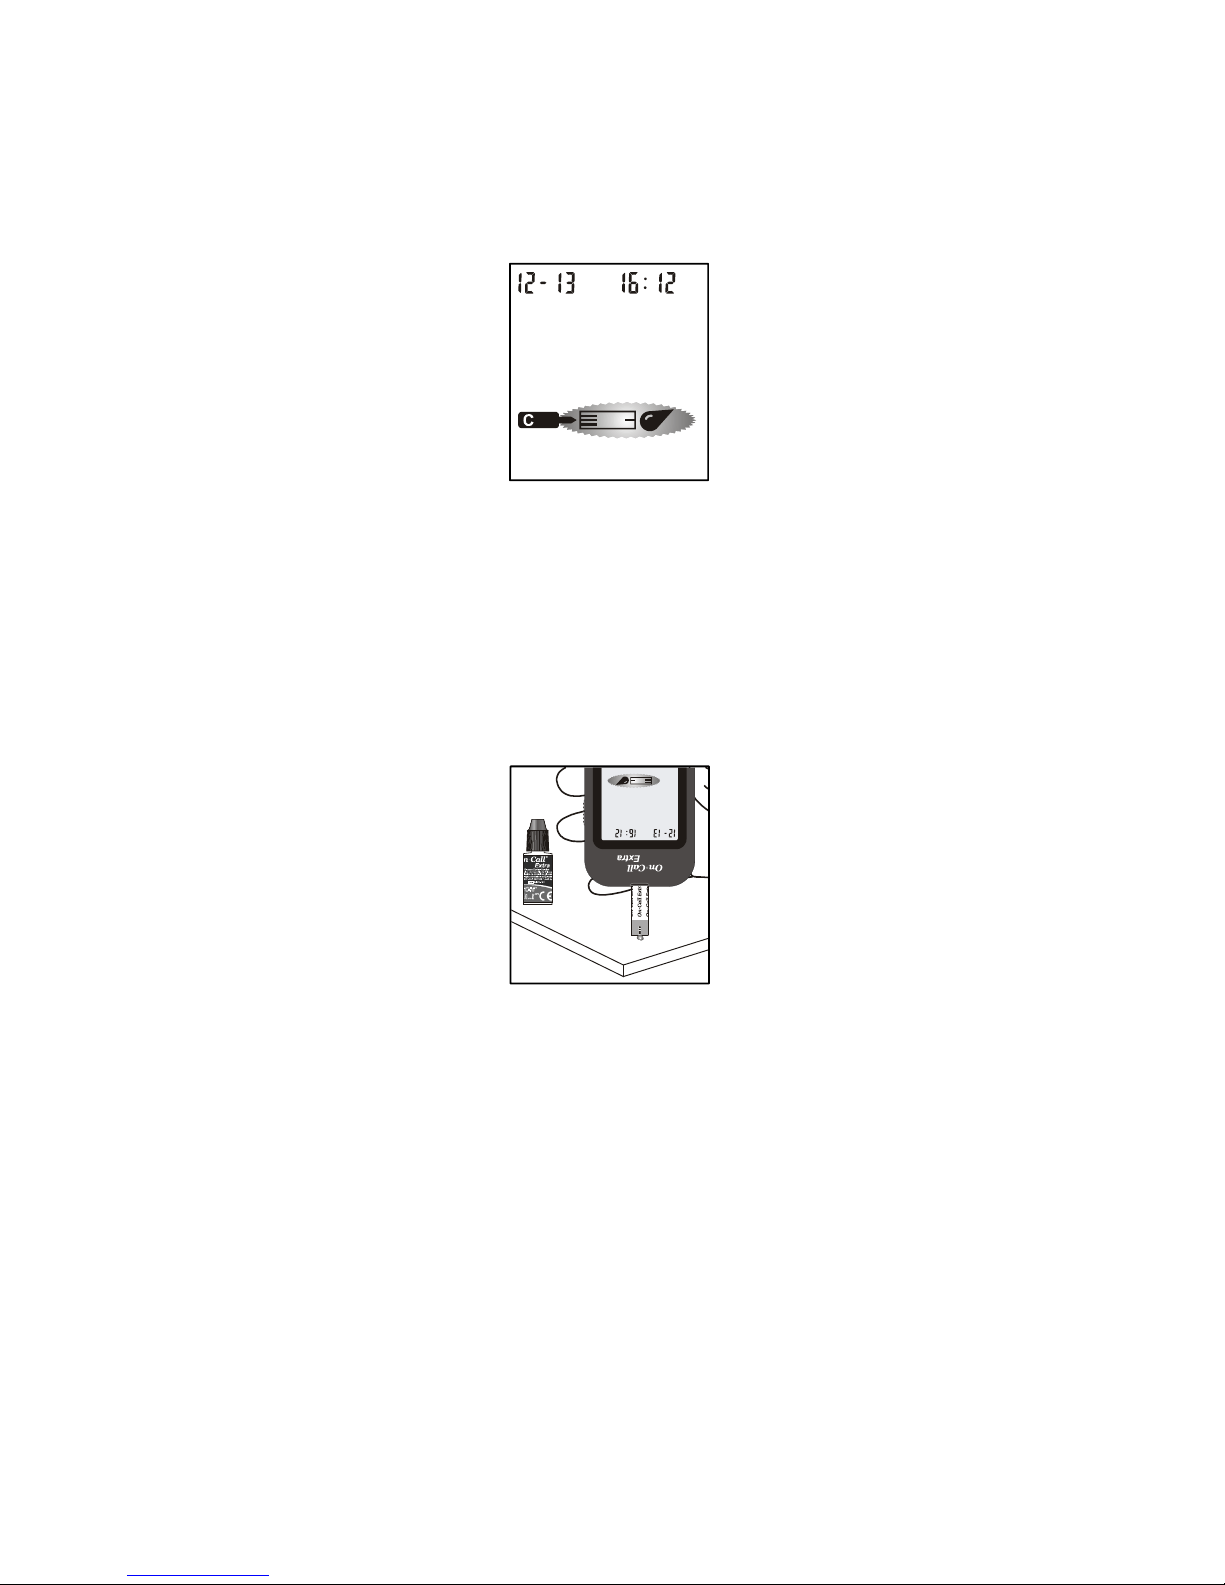
will show the date time and the strip icon with the blood sample icon blinking to
indicate that the test strip is inserted correctly.
NOT READY NOT READY NOT READY
NOT READY
Page 20
18
Note: If the test strip has been inserted incorrectly, the meter will not turn on.
4. Press the ◄ button to mark the test as a control solution test. Once the ◄
button is pressed, the control solution symbol will appear on the display. It
indicates that a drop of control solution can be added.
5. Shake the control solution bottle well. Squeeze it gently and discard the first
drop. If the tip clogs, tap the tip gently on a clean, hard surface. Then shake
again and use. Squeeze out a second small drop on a clean nonabsorbent
surface. Touch the sample tip of the test strip to the control solution drop. If the
audio option is turned on, the meter will beep. It indicates a sufficient sample
has been applied.
Notes:
• Do not apply control solution to the test strip directly from the bottle.
• If you applied the control solution sample but do not see the starting of the
count down, you may reapply a second drop within 3 seconds.
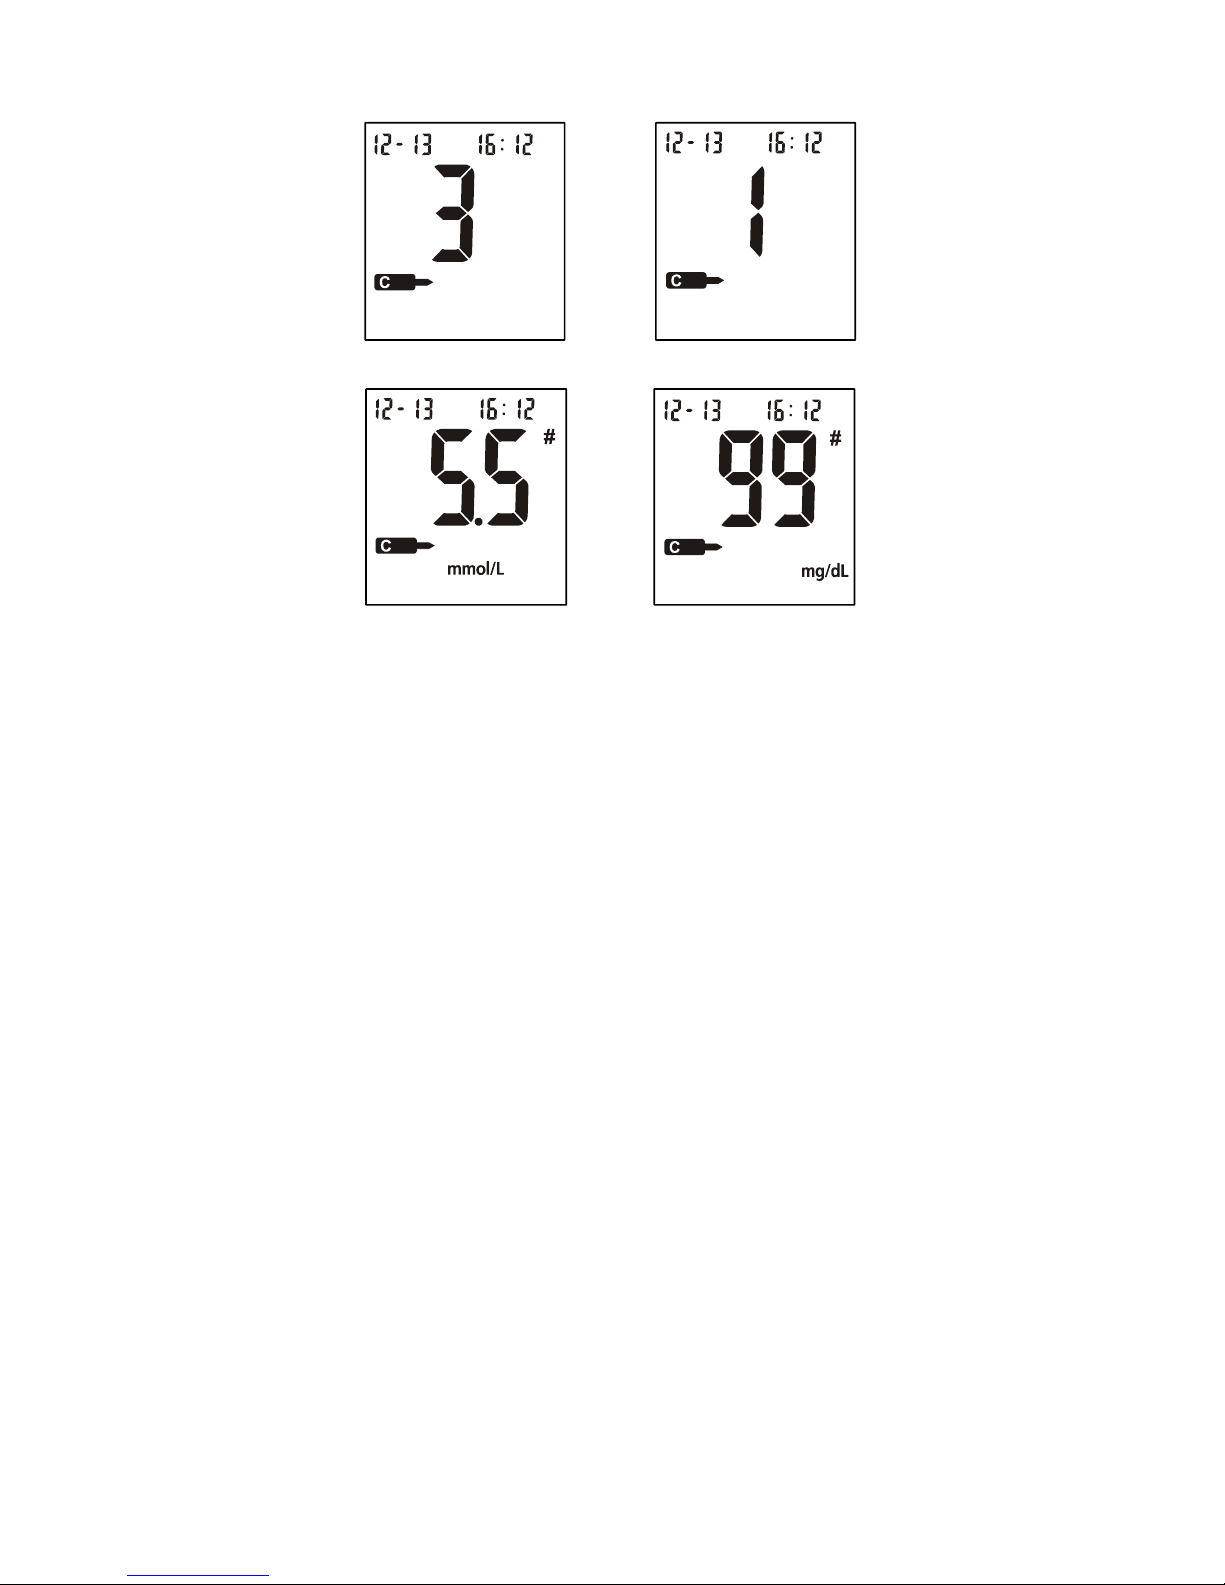
6. Once a sufficient sample has been applied, the meter display will count down
from 3 to 1. Then the result and a control solution symbol will be displayed on
the screen. The control solution test results should be within the control range
(CTRL 1) printed on the test strip vial (or on the foil pouch). This means that
your blood glucose monitoring system is working properly and that you are
performing the procedure correctly.
READY TO TEST
Page 21
19
Test results are displayed either in mmol/L or mg/dL depending on the unit of
measure most common in your country.
Note: The control solution range is the expected range for the control solution
results. It is not a recommended range for a blood glucose level.
7. Slide forward the strip ejector to discard the used test strip.
The display should also show a pound sign (#) indicating the test is a control
solution test. This shows that the number will not be counted in the 7, 14, 30,
60 and 90-day averages. The pound sign (#) will also be displayed when
reviewing the results stored in memory.
If the result falls outside the indicated control range:
• Confirm you are matching the correct range. Control Solution 1 results
should be matched to the CTRL 1 range printed on the test strip vial (or on
the foil pouch).
• Check the expiration date of the test strip and control solution. Make sure
that the test strip vial and control solution bottle have not been opened for
more than 6 months. Discard any test strips or control solution that has
expired.
• Confirm the temperature in which you are testing is between 10 and 40 °C
(50-104 °F).
• Make sure that the test strip vial and control solution bottle have been
tightly capped.
OR
Page 22

20
• Confirm that you are using the same brand of control solution that was
provided with your kit.
• Make sure that you followed the test procedure correctly.
After checking all of the conditions listed above, repeat the quality control test with
a new test strip. If your results still fall outside of the control range shown on the
test strip vial (or on the foil pouch), your meter may be defective. Please contact
your local distributor for help.
Three levels of control solution are available labeled Control Solution 0, Control
Solution 1 and Control Solution 2. Control Solution 1 is sufficient for most all
self-testing needs. If you think your meter or strips may not be working correctly,
you may also want to do a level 0 or level 2 test. The ranges for CTRL 0, CTRL 1
and CTRL 2 are displayed on the test strip vial (or on the foil pouch). Simply repeat
step 4 through 6, using Control Solution 0 or Control Solution 2.
To confirm your results, Control Solution 0 tests should fall within the CTRL 0 range,
Control Solution 1 tests should fall within the CTRL 1 range and Control Solution 2
tests should fall within the CTRL 2 range. If the control solution test results do not
fall within their respective ranges, DO NOT use the system to test blood, as the
system may not be working properly. If you cannot fix the problem, please contact
your local distributor for help.
Please contact your local distributor for information on ordering the On Call
®
Extra
Glucose Control Solution kit. The kit contains Control Solution 0, Control Solution 1
and Control Solution 2.
Page 23
The foll
o
sterile l
a
Step
1
The On
blood w
forearm.
the proc
e
IMPOR
T
water.
U
and the
on the t
e
Fingerti
For fing
e
do not n
1. Uns
c
steri
com
Co
T
wing steps will s
h
ncets together to
– Getting a
Call® Extra Blood
hich may be obt
a
Before testing, c
h
dure and make s
u
ANT: Prior to te
se warm water t
o
test site thoroug
h
st site.
p Testing
rtip sampling, a
d
eed the clear cap
rew the lancing
d
le lancet into th
e
plete stop in the l
a
king Barrel
Ejection B
u
Release
21
esting Y
o
ow how to use t
h
measure your bl
o
Drop of Bloo
Glucose Monitori
ined from the fi
n
oose a clean, dr
y
re you have all th
sting, wipe the t
e
increase blood
f
ly. Make sure th
e
just the depth pe
for fingertip sam
p
evice cover from
lancet holder a
n
ncing device.
tton
Button
Lancet Hol
d
St
e
Safe
t
Pun
S
ur Blood
e meter, test stri
p
od glucose level.
d
ng System requir
e
gertip, palm (at
b
work surface. F
a
e items needed to
st site with an
a
low if necessary.
re is no alcohol,
netration to redu
c
ling.
the body of the l
a
d push it until t
h
e
r
rile Lancet
C
(for te
s
a
y Tab
cture Depth
ettings
s, lancing devic
e
s a very small dr
o
ase of the thum
b
miliarize yourself
obtain a drop of b
lcohol swab or s
o
Then dry your h
a
soap, cream or l
o
e the discomfort.
ncing device. In
s
e lancet comes
lear Cap
ting on forearm
nd palm)
Lancing Devic
e
Cover
and
p of
b) or
with
lood.
oapy
ands
tion
You
ert a
to a
Page 24
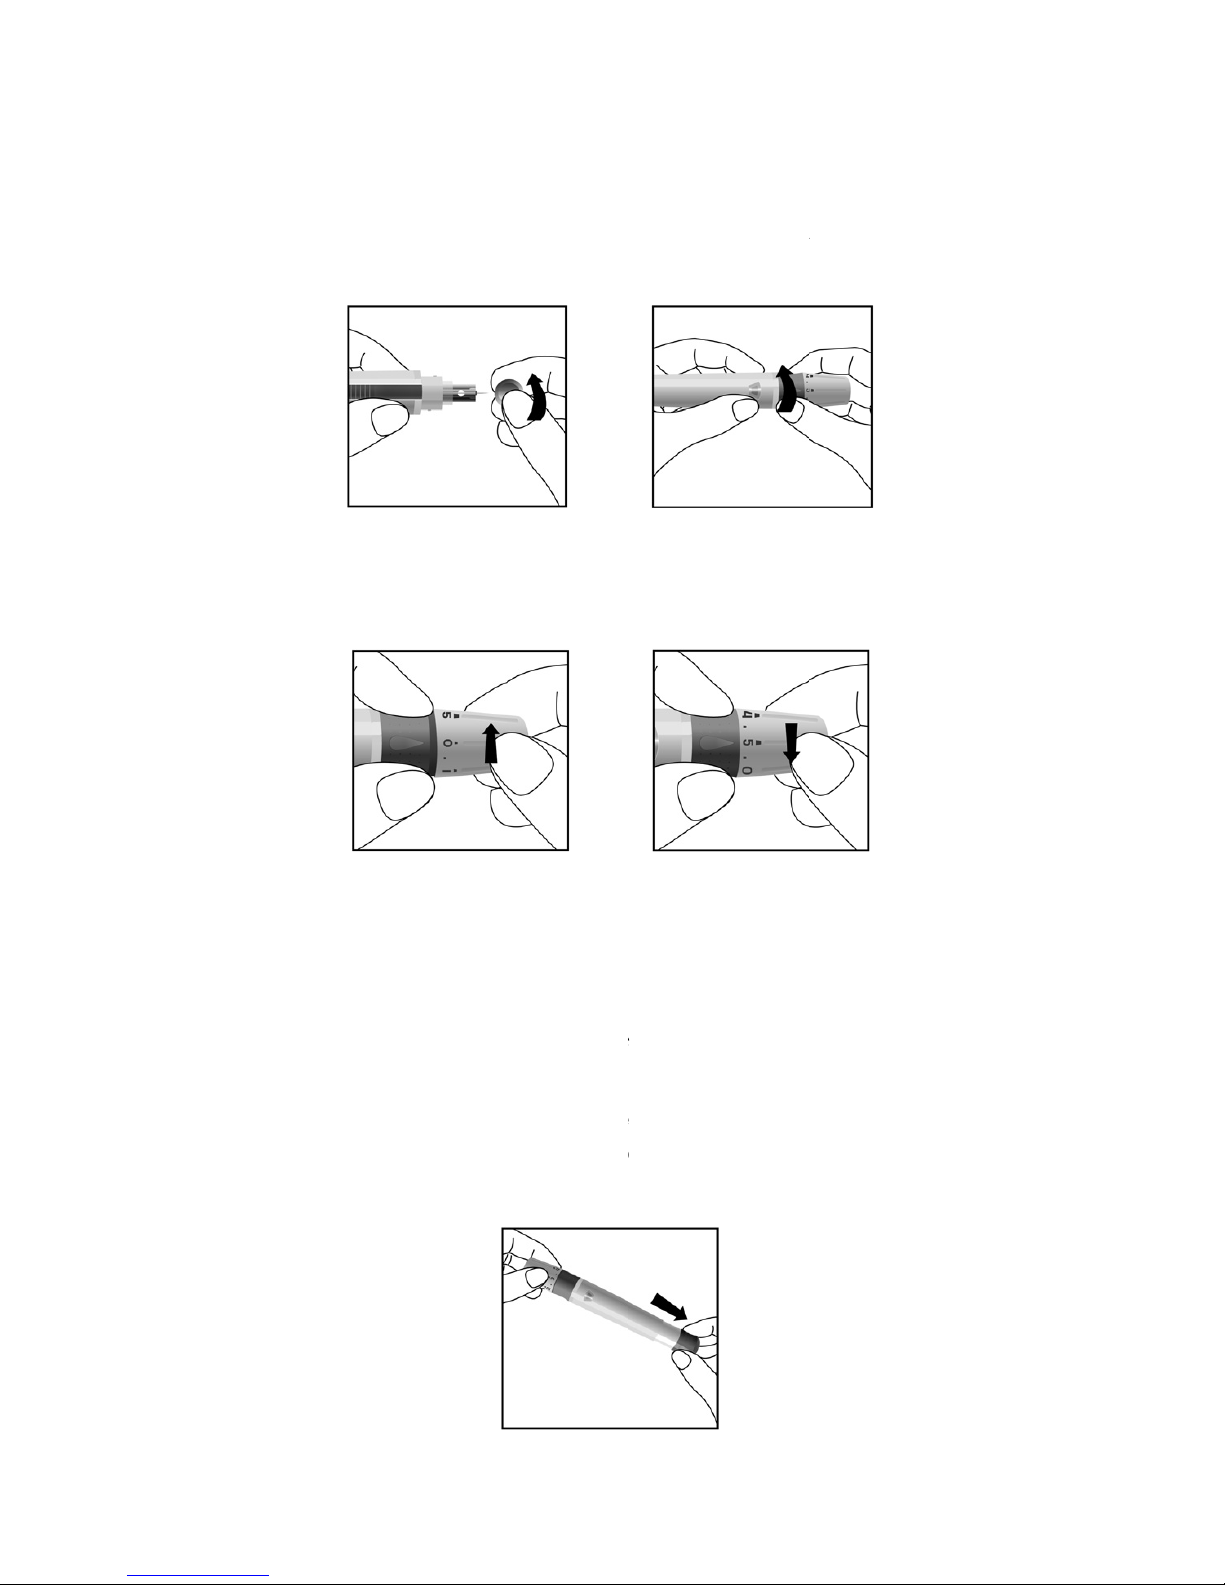
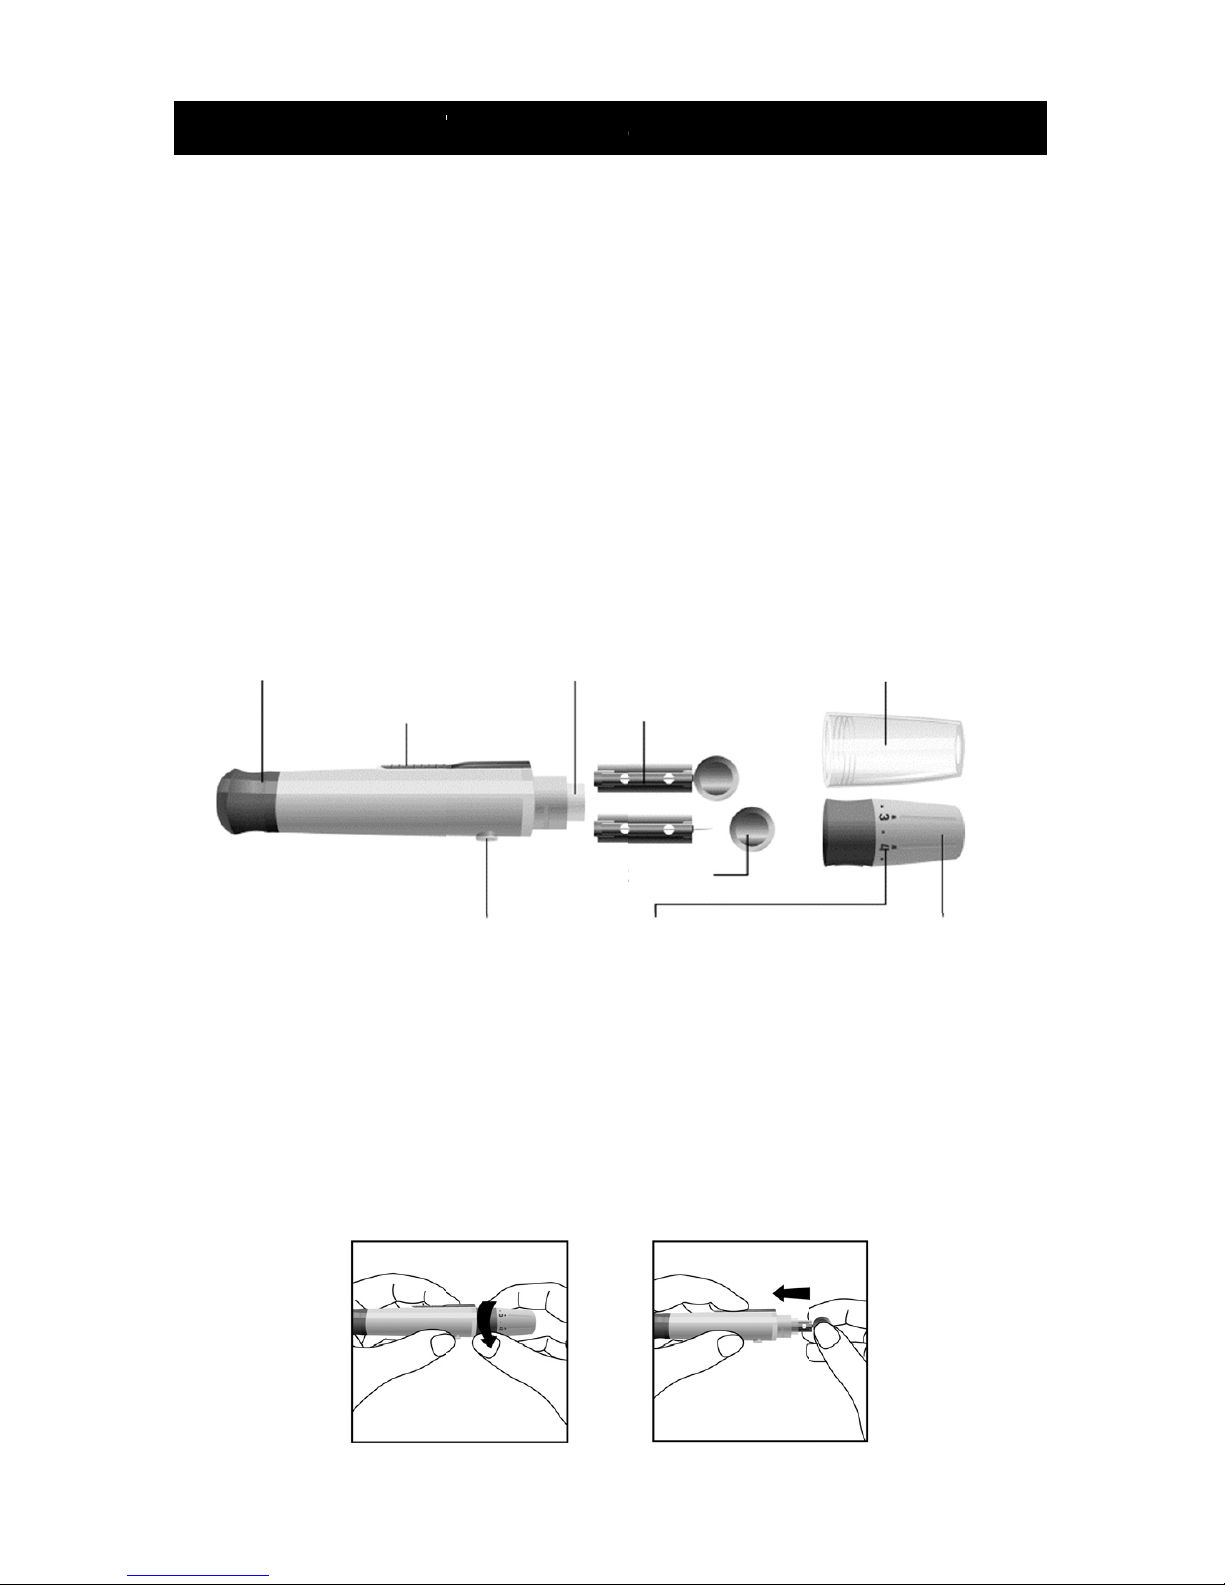
2. Hol
d
until
lanc
e
3. Car
e
exp
o
4. Adj
u
total
setti
n
Adj
u
0 –
1
2 –
3
4 –
5
Not
e
incr
e
5. Pull
whil
e
now
the lancet firmly
it loosens. Then
t disposal.
fully screw the c
o
sed needle. Mak
e
st the puncture
d
of 11 puncture
d
g that still produ
c
stments:
.5 for delicate
.5 for normal
s
for callous
e
: Increased pre
s
ase the puncture
the cocking barr
e
the release but
t
loaded and read
y
22
in the lancing de
v
pull the safety ta
b
ver back onto th
e
sure the cover i
s
epth by rotating
epth settings. T
o
es an adequate
d
skin
kin
d or thick skin
sure of the lan
c
depth.
l back to set th
e
on changes to
o
for obtaining a d
ice and twist the
s
off the lancet.
S
lancing device.
A
fully sealed on t
the lancing devi
c
reduce the disc
o
rop of blood.
ing device again
lancing device.
Y
range to indicate
rop of blood.
afety tab of the l
a
ave the safety ta
void contact wit
h
e lancing device
e cover. There
a
mfort, use the lo
t the finger will
ou may hear a
c
the lancing devi
c
ncet
b for
the
.
re a
west
also
lick;
e is
Page 25
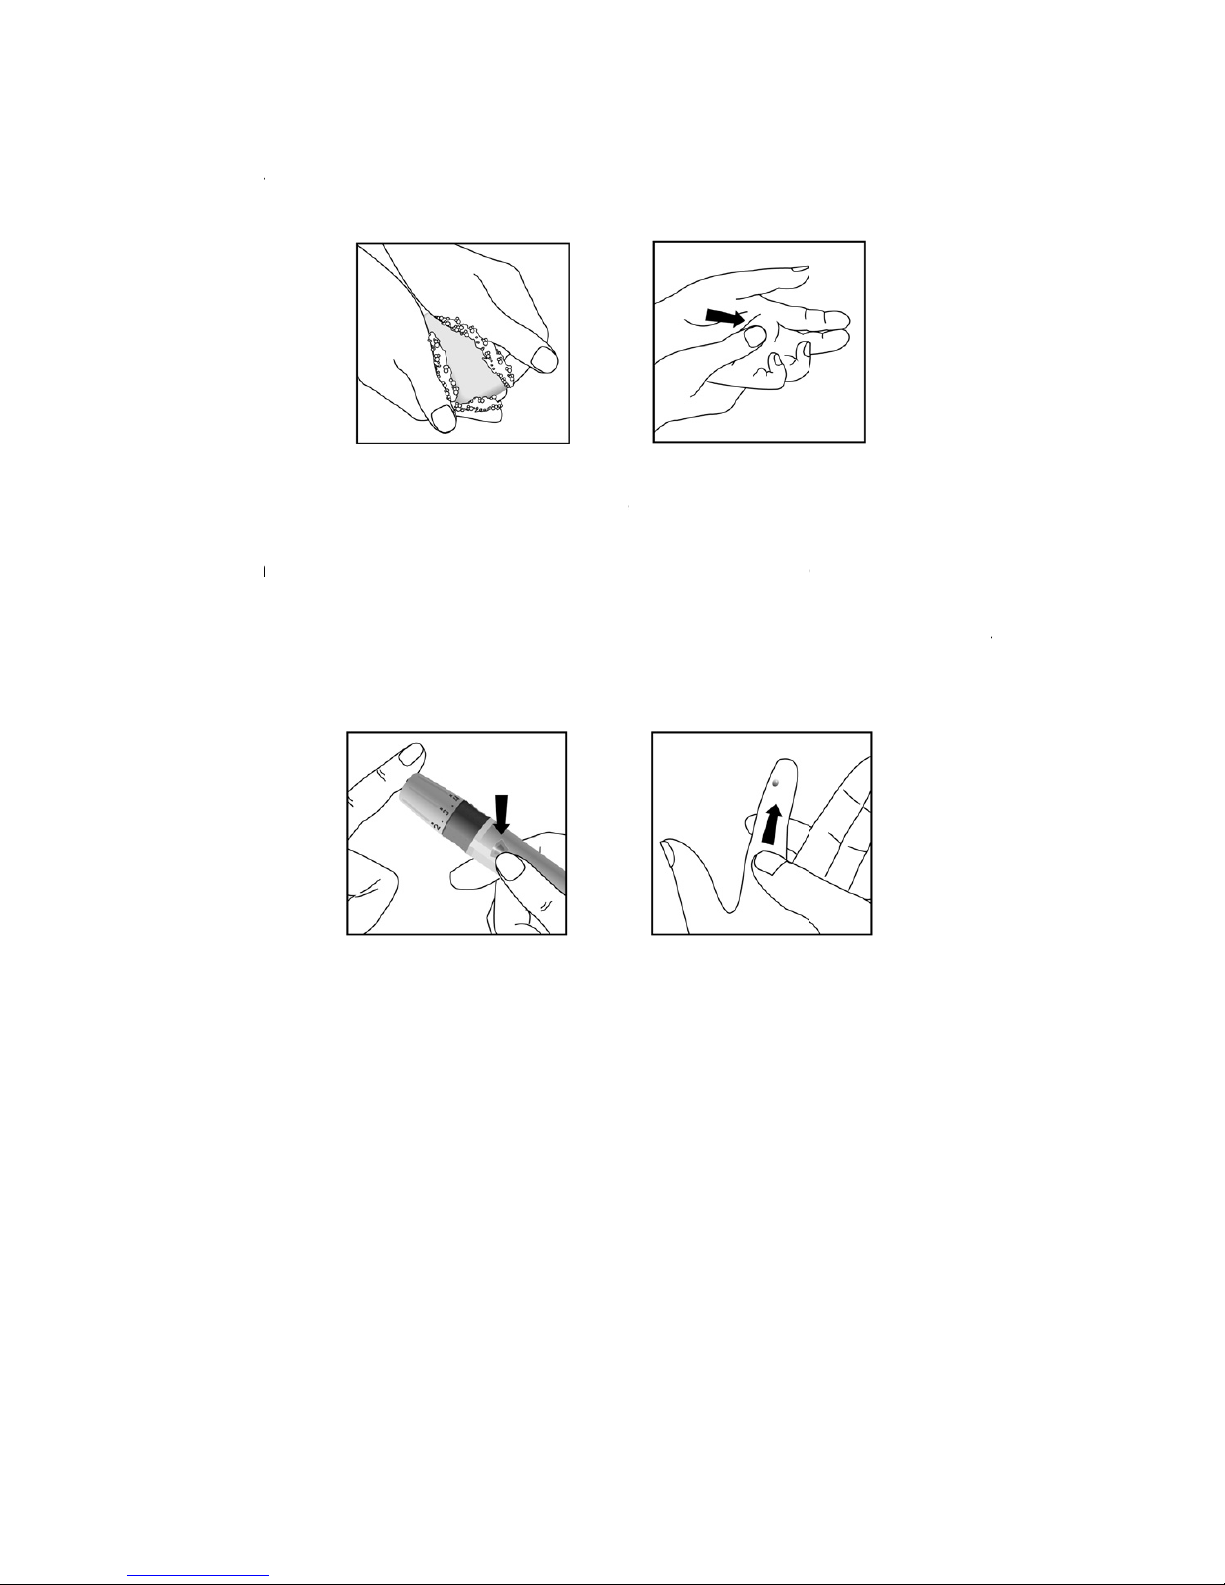
6. Prio
r
soa
p
you
r
few
t
7. Hol
d
cov
e
may
fro
m
sme
For
t
of si
t
fing
e
Forear
m
The for
e
reason,
the fing
e
the clea
punctur
e
IMPOR
T
sample
s
glucose
• You
fore
a
• Wh
e
insu
l
mor
e
to testing, wipe
y
. Use warm wat
e
hands thoroughl
y
imes to encoura
g
the lancing dev
i
r resting on the fi
hear a click as t
h
the base to the ti
ring the drop of
b
he greatest redu
c
es is recommen
d
rs sore and callu
s
and Palm Testi
arm and palm a
r
you may find that
rtip. The proced
u
r cap to draw bl
o
depth.
ANT: There are
that you shoul
d
testing:
should consult y
o
rm or palm testi
n
n blood glucose
in dose or exerc
rapidly than blo
o
23
our hands with a
n
r to increase blo
o
. Massage your
h
e blood flow.
ce against the s
i
nger. Push the r
e
e lancing devic
e
p of the finger to
o
lood.
tion in pain, lanc
e
ed. Repeated pu
n
ed.
ng
eas have less n
e
obtaining blood f
r
re for forearm a
n
od from these si
t
important differe
n
know. Importan
ur healthcare p
r
g.
levels are chan
g
ise, blood from t
h
d from other are
a
alcohol swab or
d flow in your fin
and from the wri
de of the finger
lease button to p
r
activates. Gentl
y
btain the require
d
on the sides of
t
ctures in the sa
m
rve endings than
om these sites is
d palm sampling
es. The clear ca
p
ces among forea
t information ab
o
ofessional befor
e
ing rapidly suc
h
e fingertips may
s.
wash your hands
ers if necessary
st up to the finge
r
to be lanced wit
h
ick your fingertip.
massage your f
i
blood volume.
A
he fingertips. Rot
a
e spot can make
the fingertip. Fo
r
less painful than
is different. You
n
is not adjustabl
rm, palm and fin
g
ut forearm and
p
choosing to pe
r
as after a mea
show these cha
n
with
. Dry
tip a
the
You
nger
void
ation
your
that
from
eed
e for
ertip
palm
form
l, an
nges
Page 26
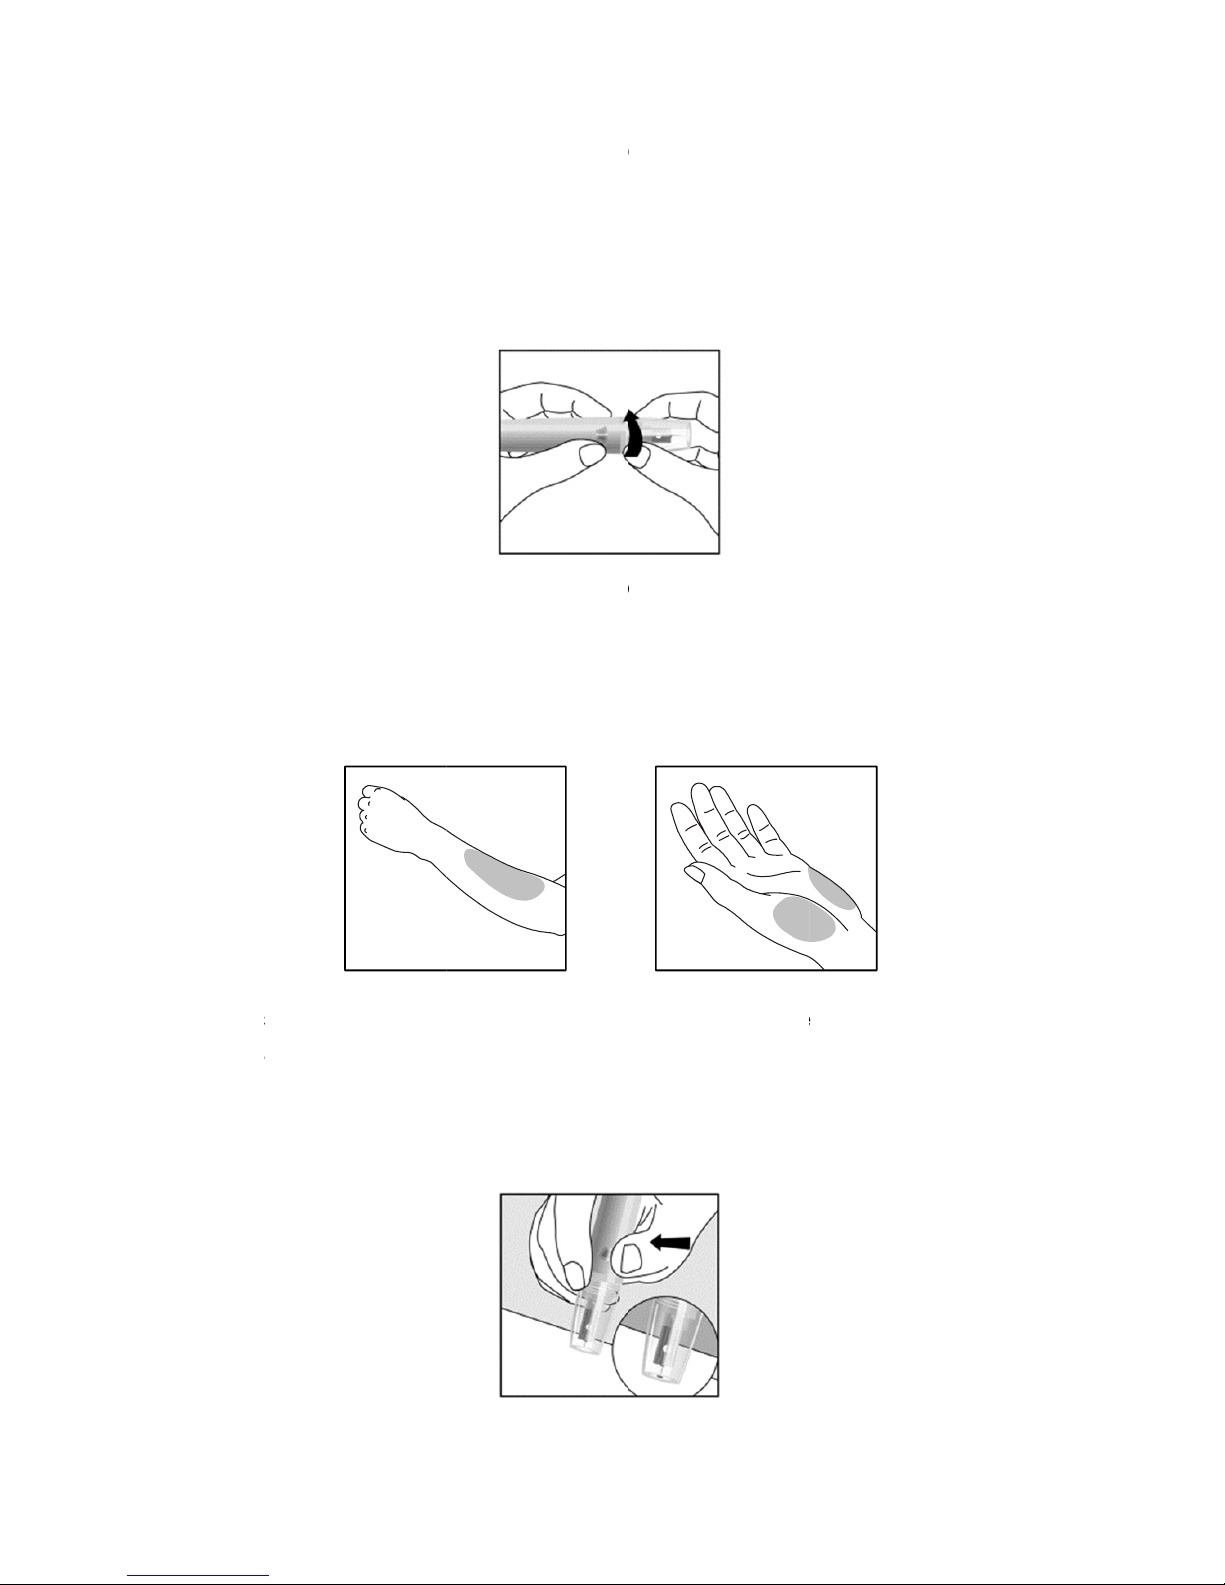
• Fing
or e
x
• You
or y
o
Please
r
1. Scr
e
2. Cho
o
the
f
vein
s
Not
e
punc
3. Pla
c
cap
a
lanc
i
site.
con
f
ertips should be
u
ercise and any ti
m
should test with t
h
u suffer from hy
p
efer to Fingertip
w the clear cap o
se a puncture si
t
orearm or palm t
h
and hair.
: To bring fresh
ture site vigorou
s
e the lancing de
v
gainst the punct
u
ng device. Do n
o
Continue to hold
irm a sufficient bl
o
24
sed if testing is
w
e you feel gluc
o
e fingertips anyti
oglycemia unaw
a
Testing to insert
t
nto the lancing d
e
e on the forearm
o
at is clean and
d
blood to the sur
f
ly for a few seco
n
ice against the
p
re site for a few
s
t immediately li
f
the lancing devic
e
od sample has f
o
ithin 2 hours of
a
se levels are cha
n
me there is a con
reness.
he lancet and lo
a
vice.
r palm. Select a
ry, away from b
o
ace of the punct
u
ds until you feel
i
uncture site. Pr
e
econds. Press th
e
t the lancing de
v
against the pun
c
rmed.
meal, an insulin
d
ging rapidly.
cern for hypoglyc
e
d the lancing de
v
soft and fleshy ar
e
ne, and free of vi
re site, massag
e
t getting warm.
ss and hold the
c
release button
o
ice from the pun
c
ture site until yo
u
dose
emia
ice.
a of
sible
the
clear
f the
ture
can
Page 27
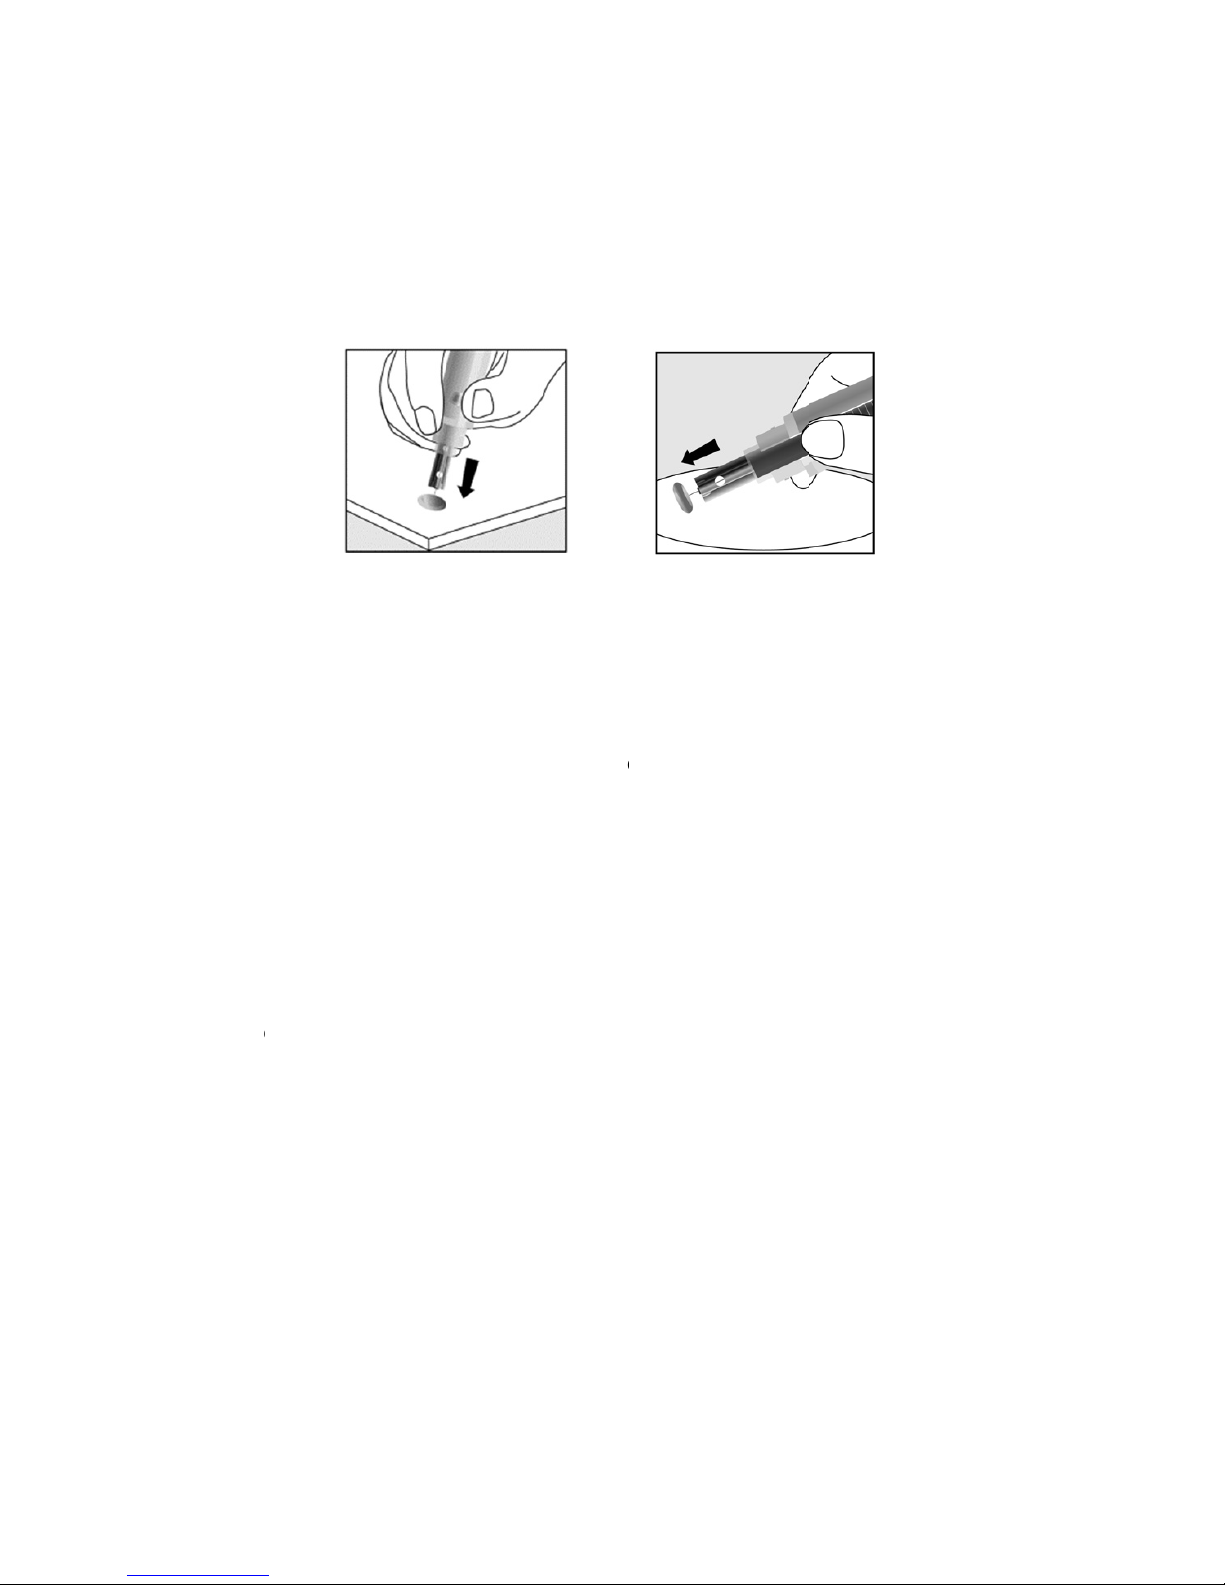
Dispos
a
1. Uns
c
surf
a
2. Pre
s
posi
t
lanc
i
Lancet
P
• Do
n
lanc
e
• Do
n
• Use
• Nev
e
• In o
r
use
• Avoi
deb
r
Specim
e
Please
r
l of the Lancet
rew the lancing
d
ce. Carefully ins
e
s the release b
u
ion. Slide the eje
c
ng device cover
b
recautions
ot use the lance
t
t out of the bag.
ot use the lancet
caution wheneve
r
r share lancets
o
der to reduce th
e
new, sterile lan
c
d getting the lan
c
is.
n collection an
d
efer to test strip i
n
25
evice cover. Pla
c
rt the lancet nee
d
tton to make s
u
tion button forw
a
ack on the lanci
n
if the safety tab
if the needle is b
e
r the lancet needl
e
r the lancing devi
risk of infection
f
et. Do not reuse
ing device or la
n
preparation by
sert
e the safety tab
o
le into the safety
re that the lanc
e
rd to discard the
g device.
is missing or loo
nt.
is exposed.
ce with other peo
rom prior use of
t
lancets.
cets dirty with h
a
healthcare prof
e
f the lancet on a
tab.
t is in the exte
n
sed lancet. Plac
e
se when you tak
e
le.
he instrument, al
w
nd lotion, oils, d
ssionals
hard
ded
the
the
ays
irt or
Page 28
26
Step 2 – Testing Blood Glucose
Note: Insertion of a new test strip at any time, except while in the data
transfer mode (detailed on page 33) will cause the meter to automatically
enter the test mode.
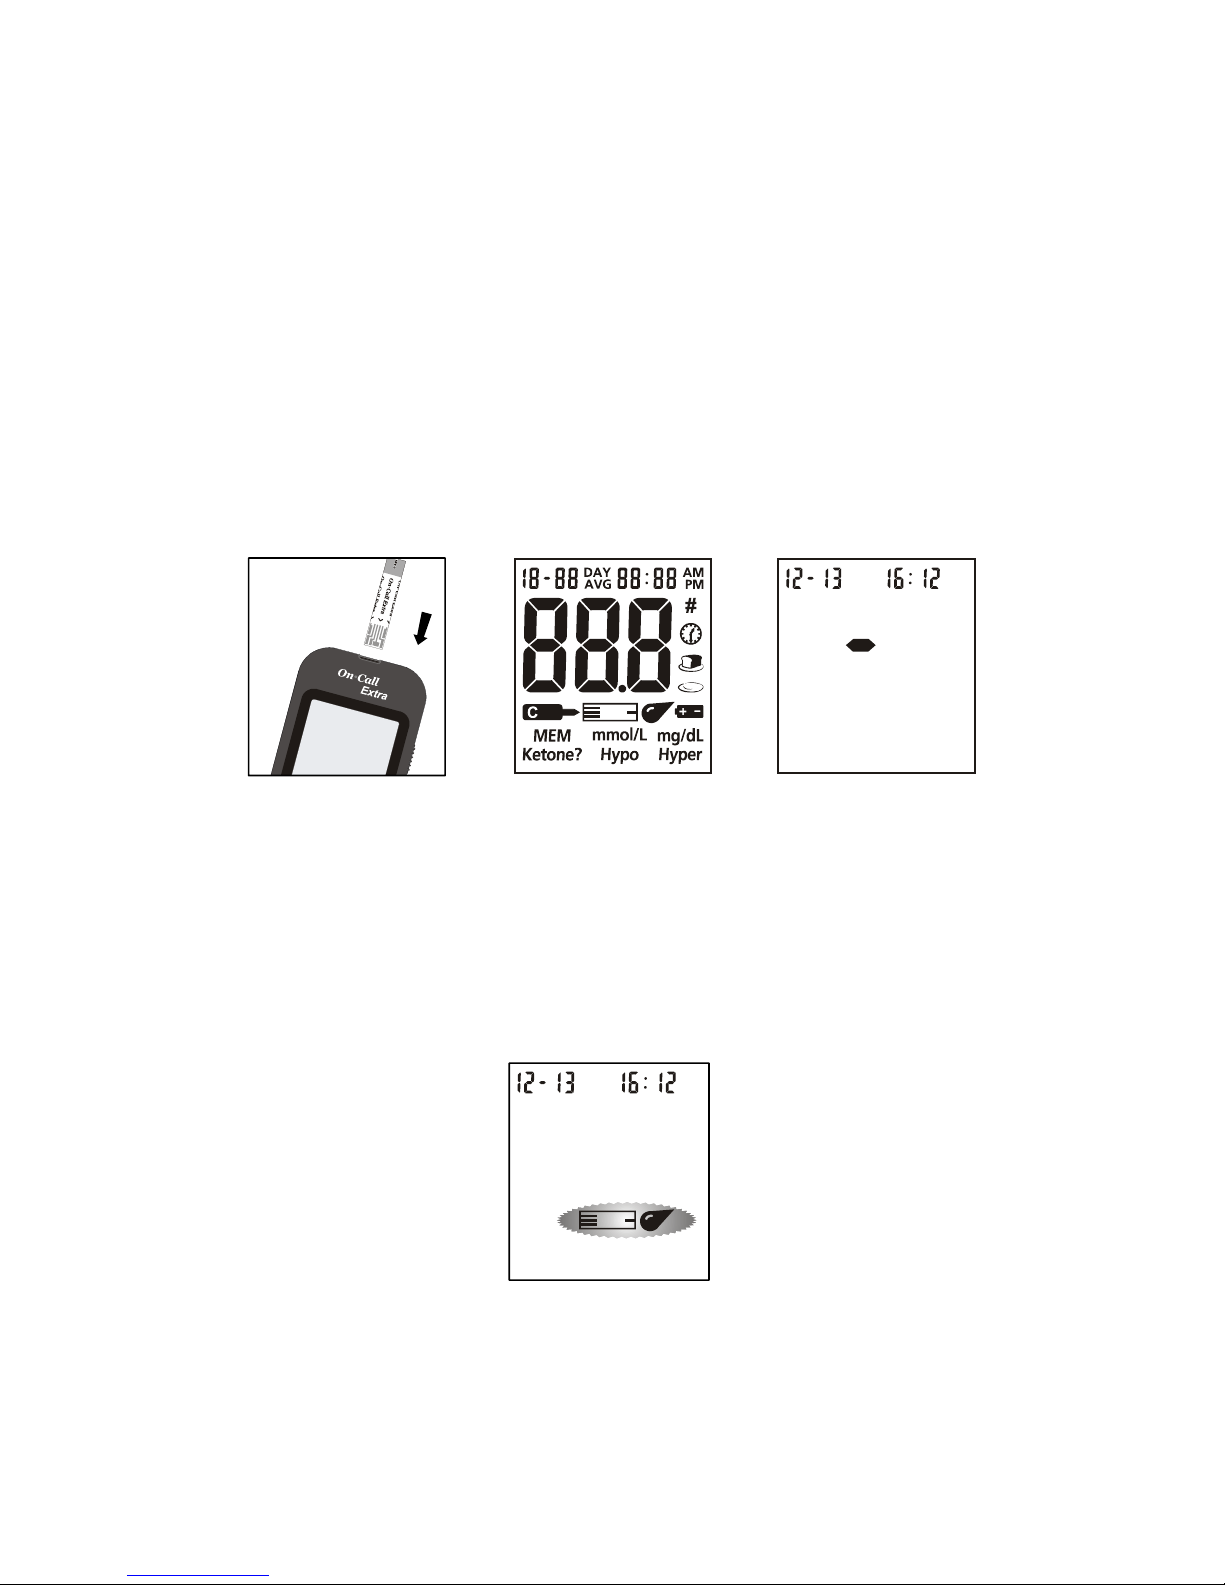
1. Insert a test strip into the strip port, contact bars end first and facing up. This
will turn on the meter and display all the display segments. If the audio option is
on, the meter will beep, signaling the meter is turned on.
2. Check the display to confirm that all the display segments turn on with no
missing components. The display will then show only the date and time, with a
dash moving across the display. Check the display to ensure no inappropriate
segments or icons are permanently turned on.
3. Following this display check, the system will enter the test mode. The display
will show the date and time and the strip icon with the blood sample icon
blinking, to indicate that the test strip is inserted correctly and a drop of blood
can be added. If the test strip has been inserted incorrectly, the meter will not
turn on. The meter is ready for testing when the blinking blood drop and strip
symbol appears. At this time a blood drop can be added.
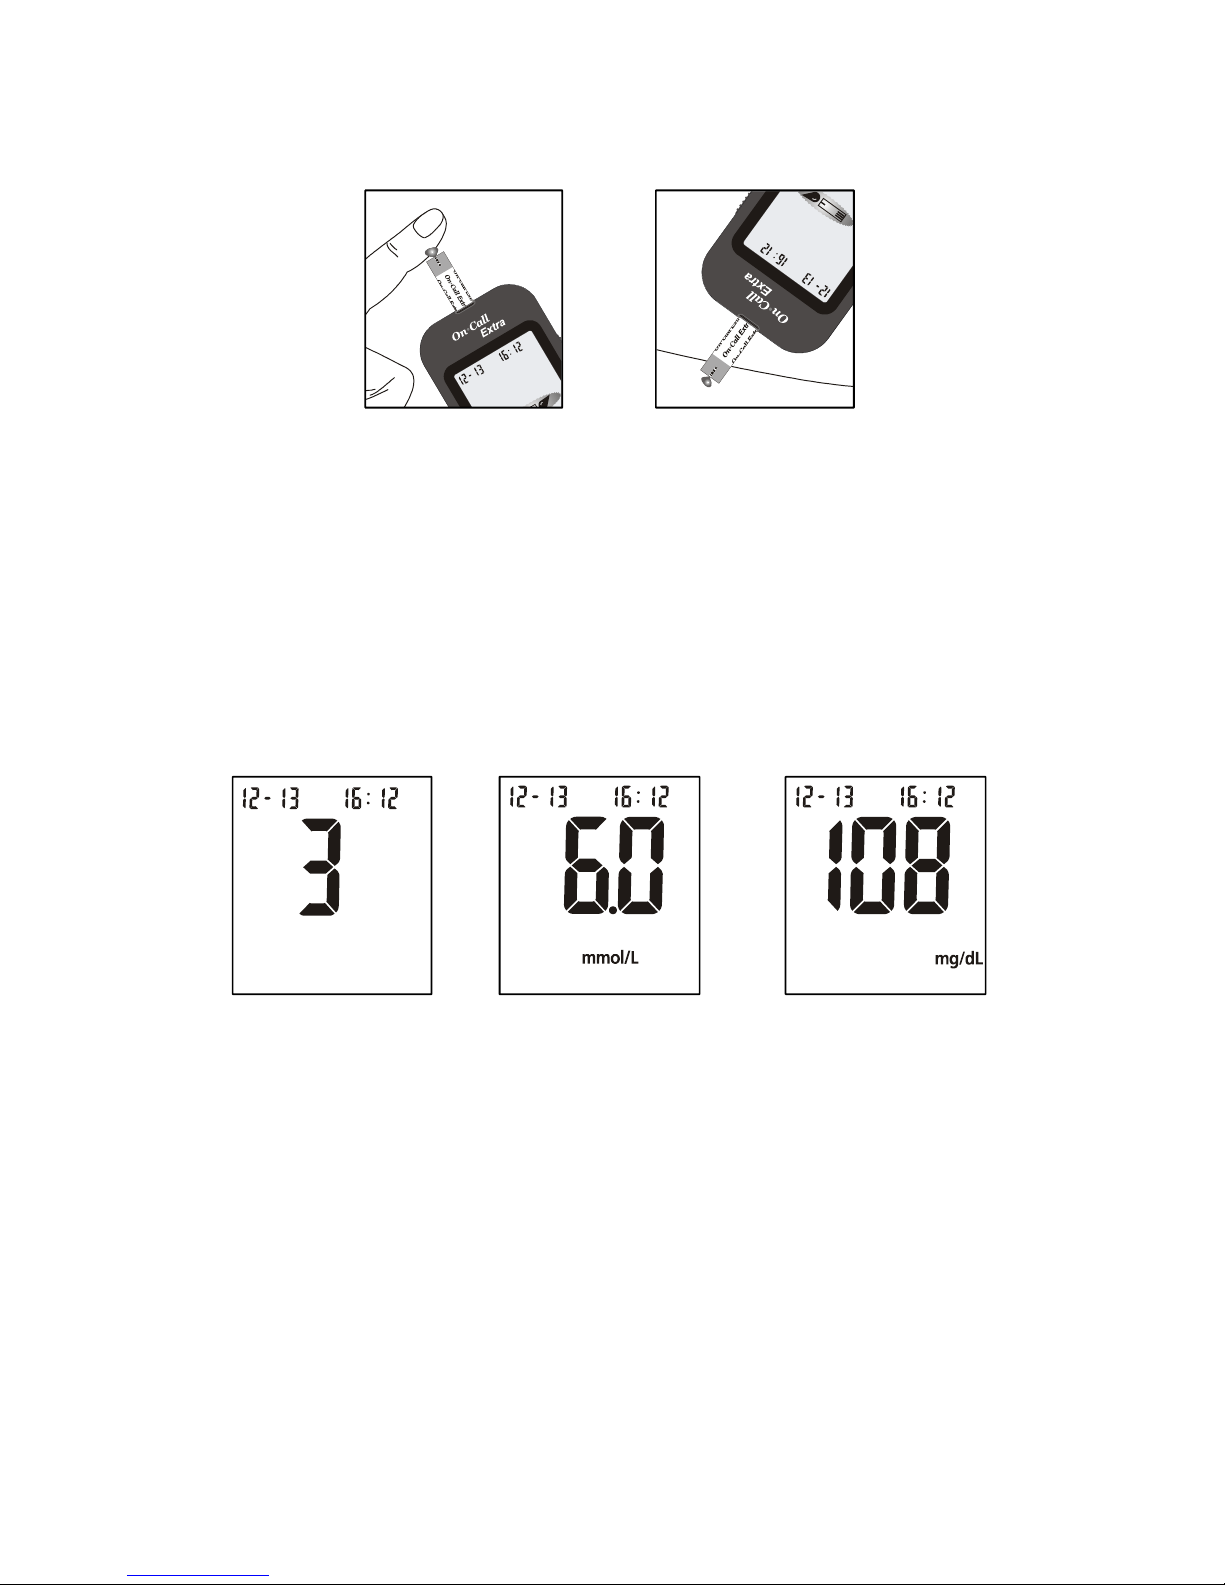
4. Touch the blood sample to the sample tip at the end of the test strip. If the
audio option is turned on, the meter will beep to indicate the sample is sufficient
and the measurement has started. If you applied a drop of blood, but do not
NOT READY NOT READY NOT READY
READY TO TEST
Page 29
27
see the countdown begin, you may reapply a second drop of blood within 3
seconds.
DO NOT:
• Apply the sample to the front or back of the test strip.
• Smear the blood drop onto the test strip.
• Press your finger against the test strip.
5. The meter will count down from 3 to 1 and then display the measurement’s
result. The meter will also beep to indicate that measurement is complete.
Then your blood glucose level will display on the screen. The measurement’s
unit, date, and time of the test will also be displayed.
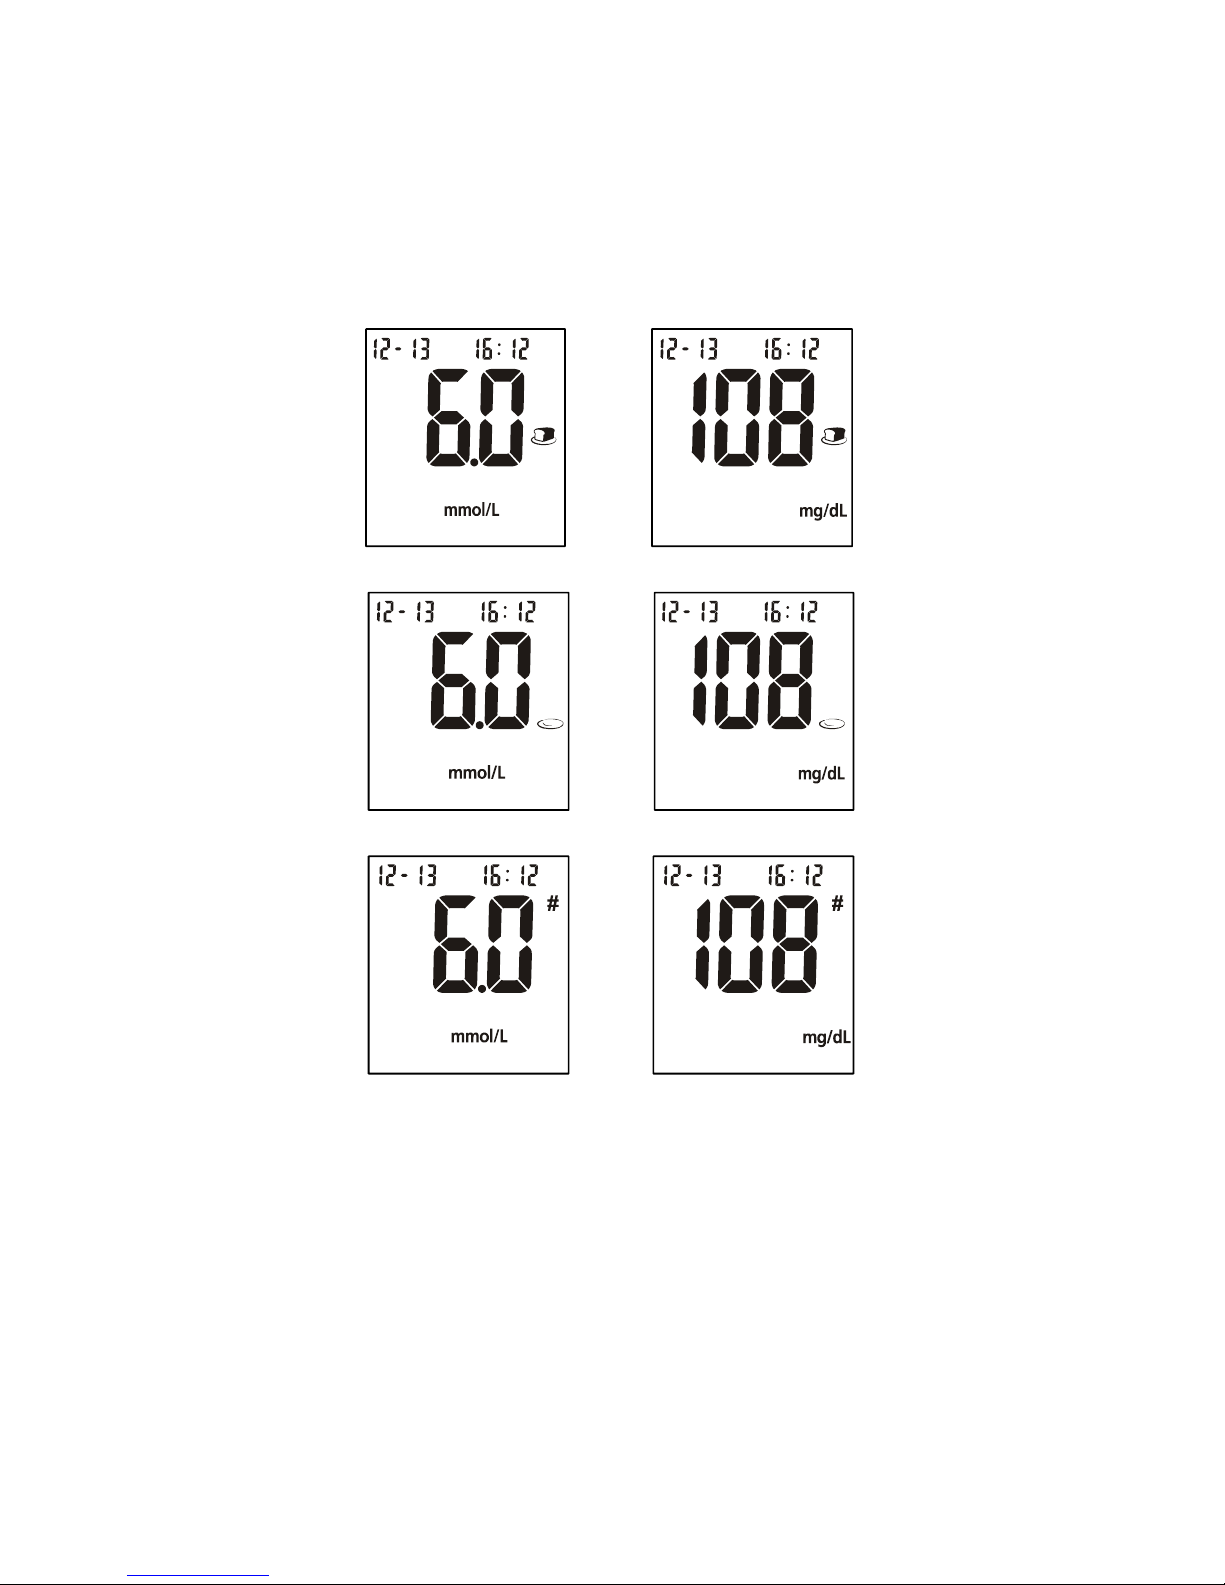
Blood Glucose results are automatically stored in the memory. To mark invalid
results and to prevent them from being included in the 7, 14, 30, 60 and 90-day
averages, press the ◄ and ► button together. A pound sign (#) will appear on
the display to show that the result will not be included when calculating the 7,
14, 30, 60 and 90-day averages. If a result is marked by accident, press the
◄ button to unmark the result. After marking the invalid result with a pound
sign (#), press the ► button to confirm the invalid result. After marking the
invalid result, run the test again with a new test strip.
When the meal marker feature is turned on, the test result is displayed together
with a suggested default meal marker based upon current time. The “before
meal” or “after meal” symbol is flashing until confirmed by pressing the
► button. The meter allows the user to change the meal marker. Press the
OR
Page 30
28
◄ button when meal marker symbol is flashing to switch the marker from
“before meal”, “after meal”, no marker or invalid result. After deciding the
selection, press the ► button to confirm the selection for either “before meal
marker”, “after meal marker”, “invalid result” with pound sign (#) or none of
these three symbols. If an invalid result is marked, run the test again with a
new test strip.
Note:
• The default “before meal” time periods are 5:00-7:59, 10:00-11:59 and
15:00-17:59.
• The default “after meal” time periods are 8:00-9:59, 12:00-14:59 and
18:00-20:59
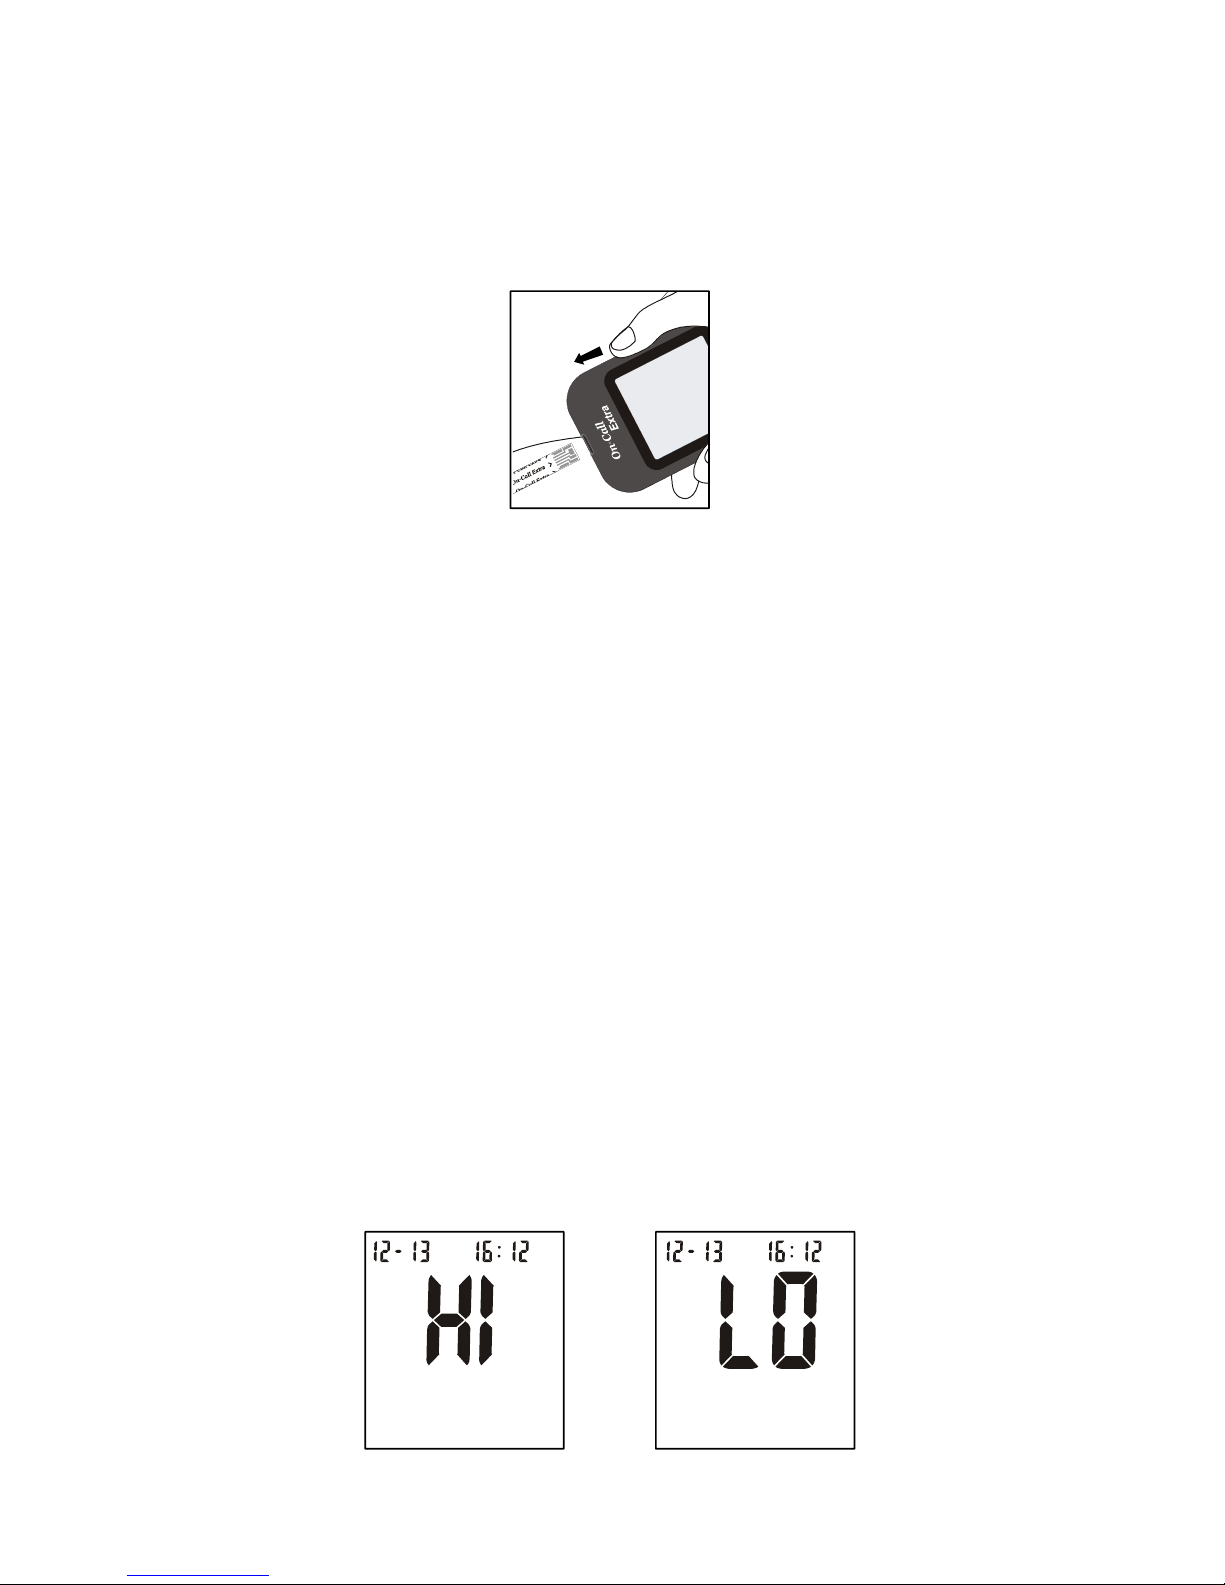
If an error message appears on the display, refer to the Troubleshooting
Guide on page 39. If a “HI” or “LO” error appears on the display, refer to “HI”
and “LO” messages below.
OR
OR
OR
Page 31
29
6. After inspection, record valid results in your logbook with the date and time,
and compare them to the target goals set by your diabetes healthcare
professional. Refer to Suggested Testing Times and Target Goals on page
37 for more details on your target blood glucose level goals.
7. Slide forward the strip ejector to discard the used test strip.
Note: Dispose of blood samples and materials with care. Treat all blood
samples as if they are infectious materials. Follow proper precautions and obey
all local regulations when disposing of blood samples and materials.
“HI” and “LO” Messages
The meter can accurately measure blood glucose concentrations between 0.6 to
33.3 mmol/L (10 to 600 mg/dL). “HI” and “LO” messages indicate results outside of
this range.
If “HI” appears on the display, the measured concentration value is above
33.3 mmol/L (600 mg/dL). The test should be retaken to ensure that no mistake
was made in the procedure. If you are certain the meter is functioning properly and
no mistakes were made in the procedure, and your blood glucose is still
consistently measured as “HI”, it indicates severe hyperglycemia (high blood
glucose). You should contact your healthcare professional immediately.
If “LO” appears on the display, the measured concentration value is below
0.6 mmol/L (10 mg/dL). The test should be retaken to ensure that no mistake was
made in the procedure. If you are certain the meter is functioning properly and no
mistakes were made in the procedure, and your blood glucose is still consistently
measured as “LO”, it may indicate severe hypoglycemia (low blood glucose). You
should treat yourself for hypoglycemia immediately as recommended by your
healthcare professional.
Page 32
30
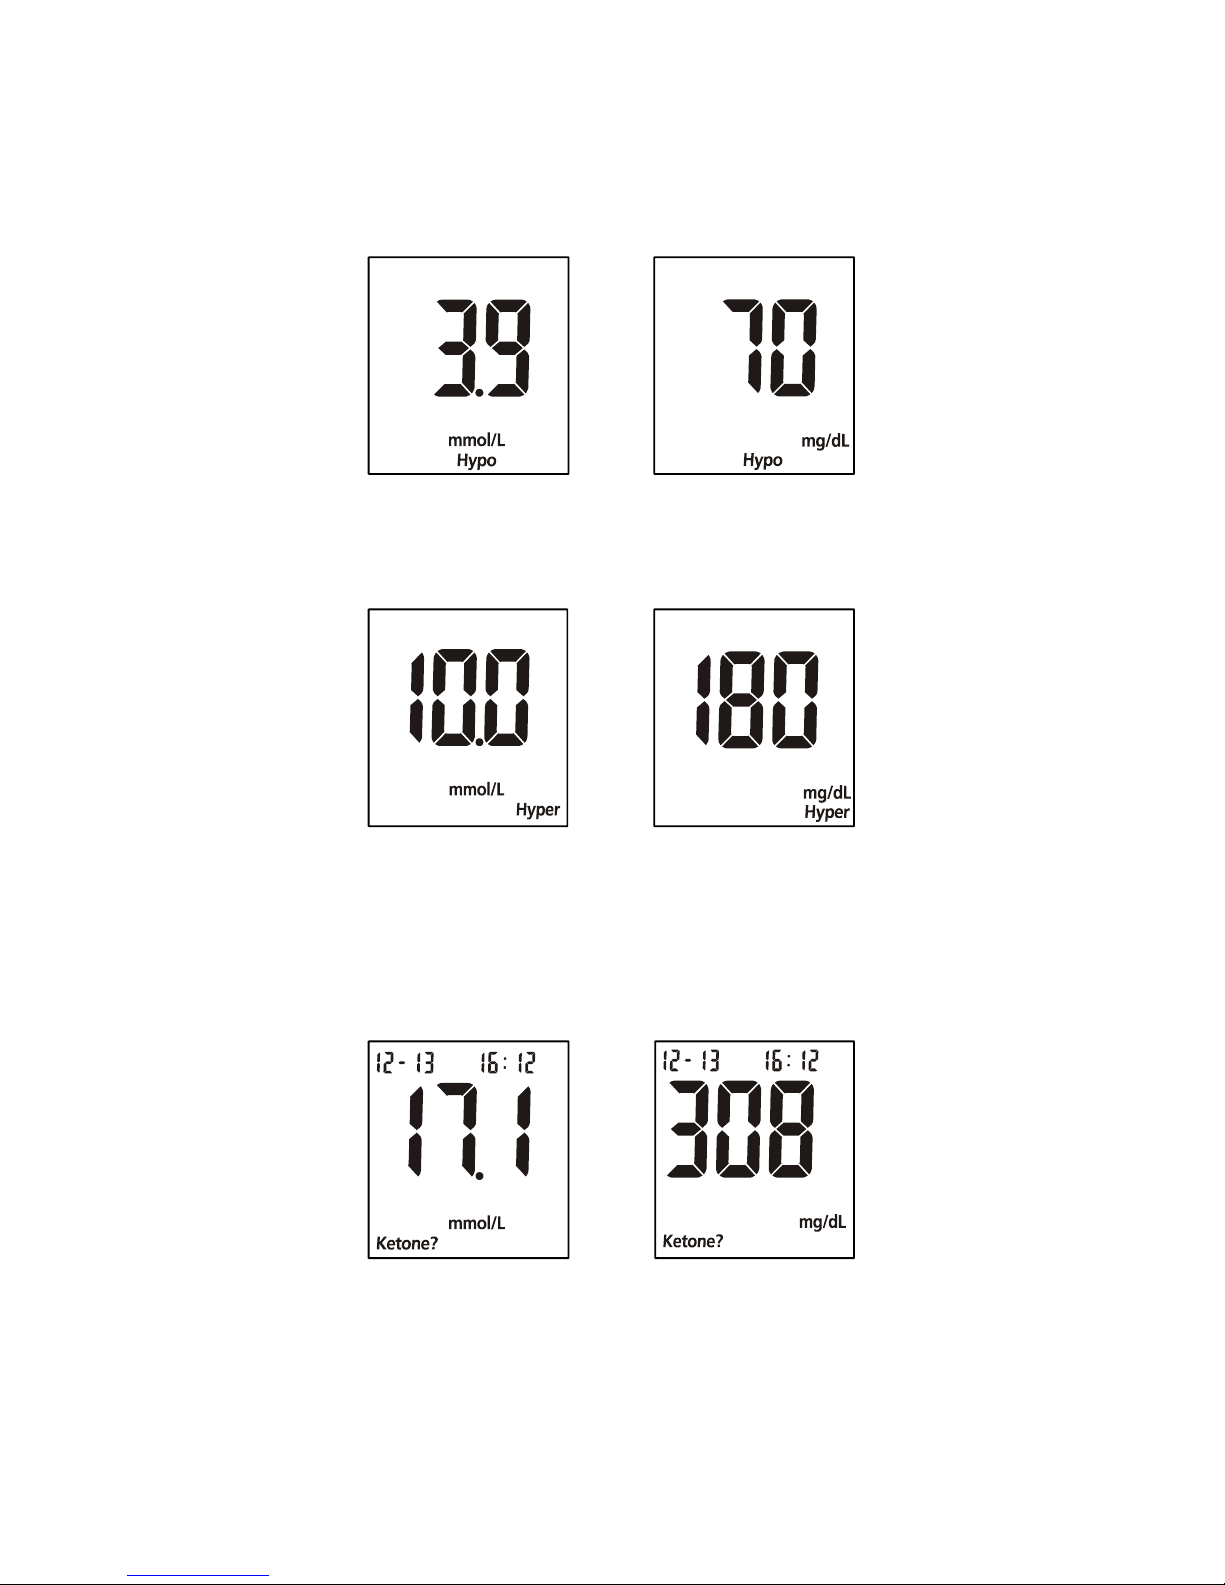
“Hypo” and “Hyper” Messages
If “Hypo” appears on the display, the measured concentration value is below the
“Hypo” (low blood sugar) target level that you have set.
If “Hyper” appears on the display, the measured concentration value is above the
“Hyper” (high blood sugar) target level that you have set.
“Ketone?” Message
If “Ketone?” appears on the display, the measured concentration value is above
16.7 mmol/L (300 mg/dL). This simply suggests that a ketone test is recommended.
Consult your healthcare professional about testing for ketones.
Precautions and Limitations
Please refer to test strip insert.
OR
OR
OR
Page 33
31
Using the Meter Memory
The meter automatically stores up to 300 test records. Each record includes the
test result, time and date. If the memory is full, the oldest record will be erased to
make room for a new one.
The meter will also calculate the average values of records from the last 7, 14, 30,
60 and 90 days.
Viewing Stored Records
To view stored records:
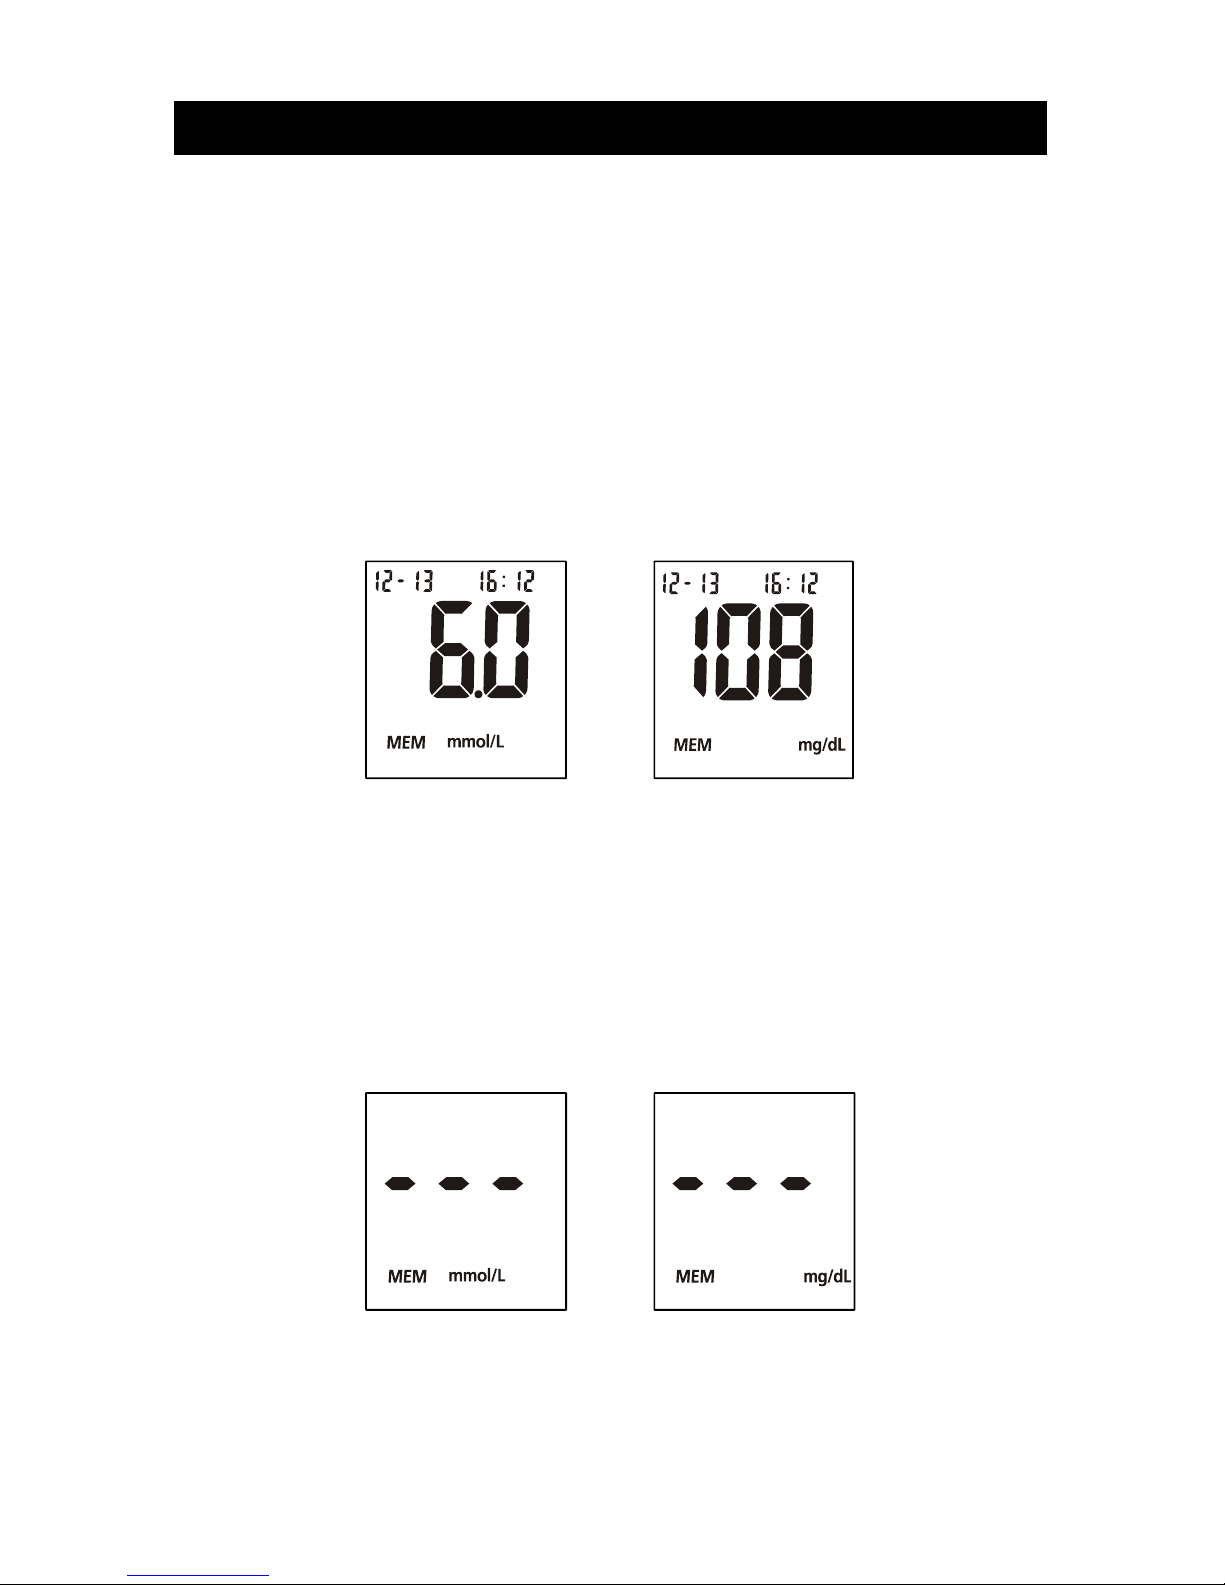
1. Press the ◄ button to turn the meter on and enter memory mode. The most
recent value and the word “MEM” will appear on the display.
When a blood glucose test is completed and the test strip is still inserted in the
meter, press ► button will also enter the memory mode. If you marked the test
result as a “before meal result”, “after meal result” or “invalid result” with pound
sign (#), the word “MEM” will also appear with the symbol on the display.
2. If you are using the meter for the very first time, the meter display will show
three dashed lines (- - -), the word “MEM” and the unit of measure. This shows
that no data have been stored in memory.
3. The date and time will be displayed together with the results stored in memory.
A pound sign (#) indicates records that will be omitted from the 7, 14, 30, 60
and 90-day averages.
OR
OR
Page 34
32
4. Press the ◄ button to go through the stored records.
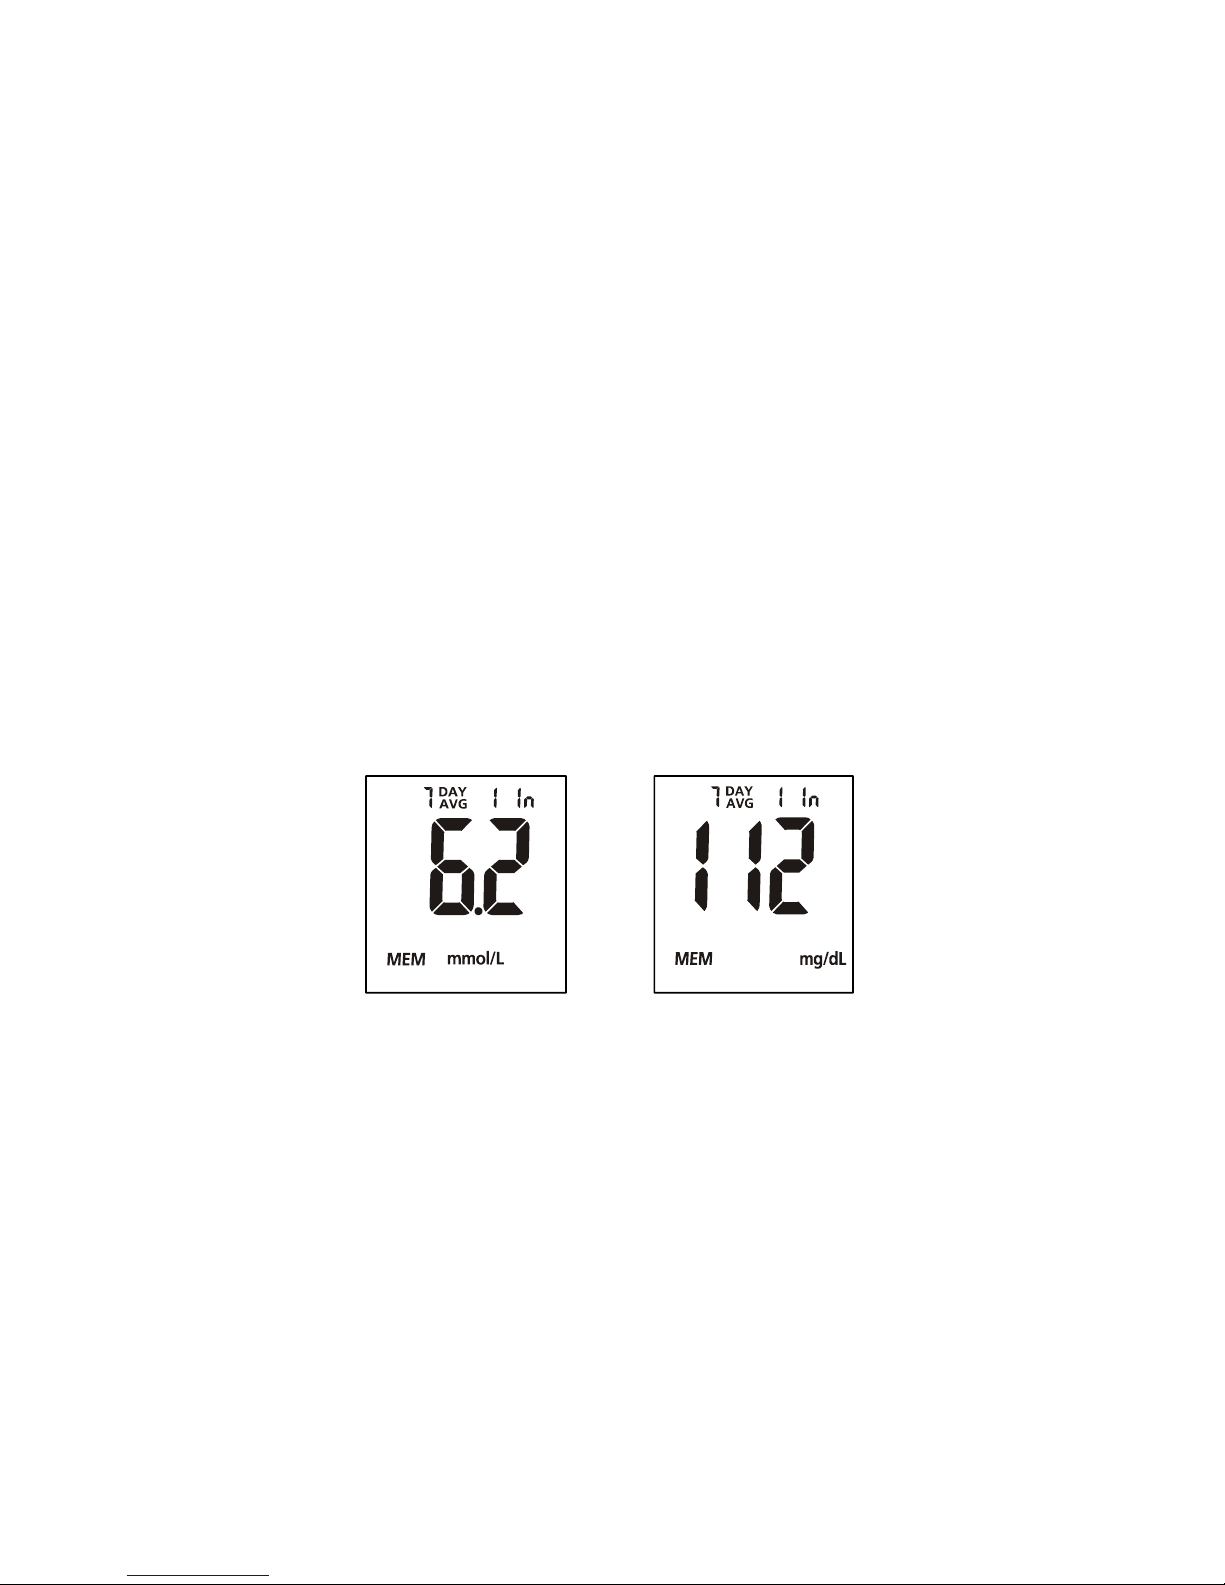
Press the ► button to view the data averages. The words “DAY AVG” will
appear on the screen. You can also view the data averages by pressing the ►
button when the meter is off.
Note: If you do not wish to view your average glucose measurements, you can
press the ► button again to turn off the display.
5. While in data average mode:
• If the meal marker feature is off, press the ◄ button to switch between the
general 7, 14, 30, 60 and 90-day averages.
• If the meal marker feature is on, press the ◄ button to switch between the
general, pre-meal and post-meal 7, 14, 30, 60 and 90-day averages.
The meter will calculate the average that you selected. The number of
records used in the DAY AVG will also appear in the display.
Note: Pre-meal averages only include the test results that have been
marked as “before meal”. Post-meal averages only include the test results
that have been marked as “after meal”. General 7, 14, 30, 60 and 90-day
averages include all blood glucose results.
6. If there are fewer than 7, 14, 30, 60 and 90 days in memory, all the readings
without the pound sign (#) currently stored in memory will be averaged.
If you are using the meter for the very first time, no value will appear on the
display. This means that no records have been stored in memory. If you have
not marked any results as “before meal” or “after meal”, there will be no value
for the pre-meal or post-meal averages. This means that no records have been
stored as “before meal” or “after meal” in memory.
7. Press the ► button to turn off the display.
Note: Results from quality control tests will not be included in the averages.
When viewing results in memory, the values are marked with a pound sign (#)
to show that they will not be included in the 7, 14, 30, 60 and 90-day averages.
OR
Page 35
33
Clearing the Memory
Take extreme caution when clearing the memory. This is not a reversible operation.
To clear the memory:
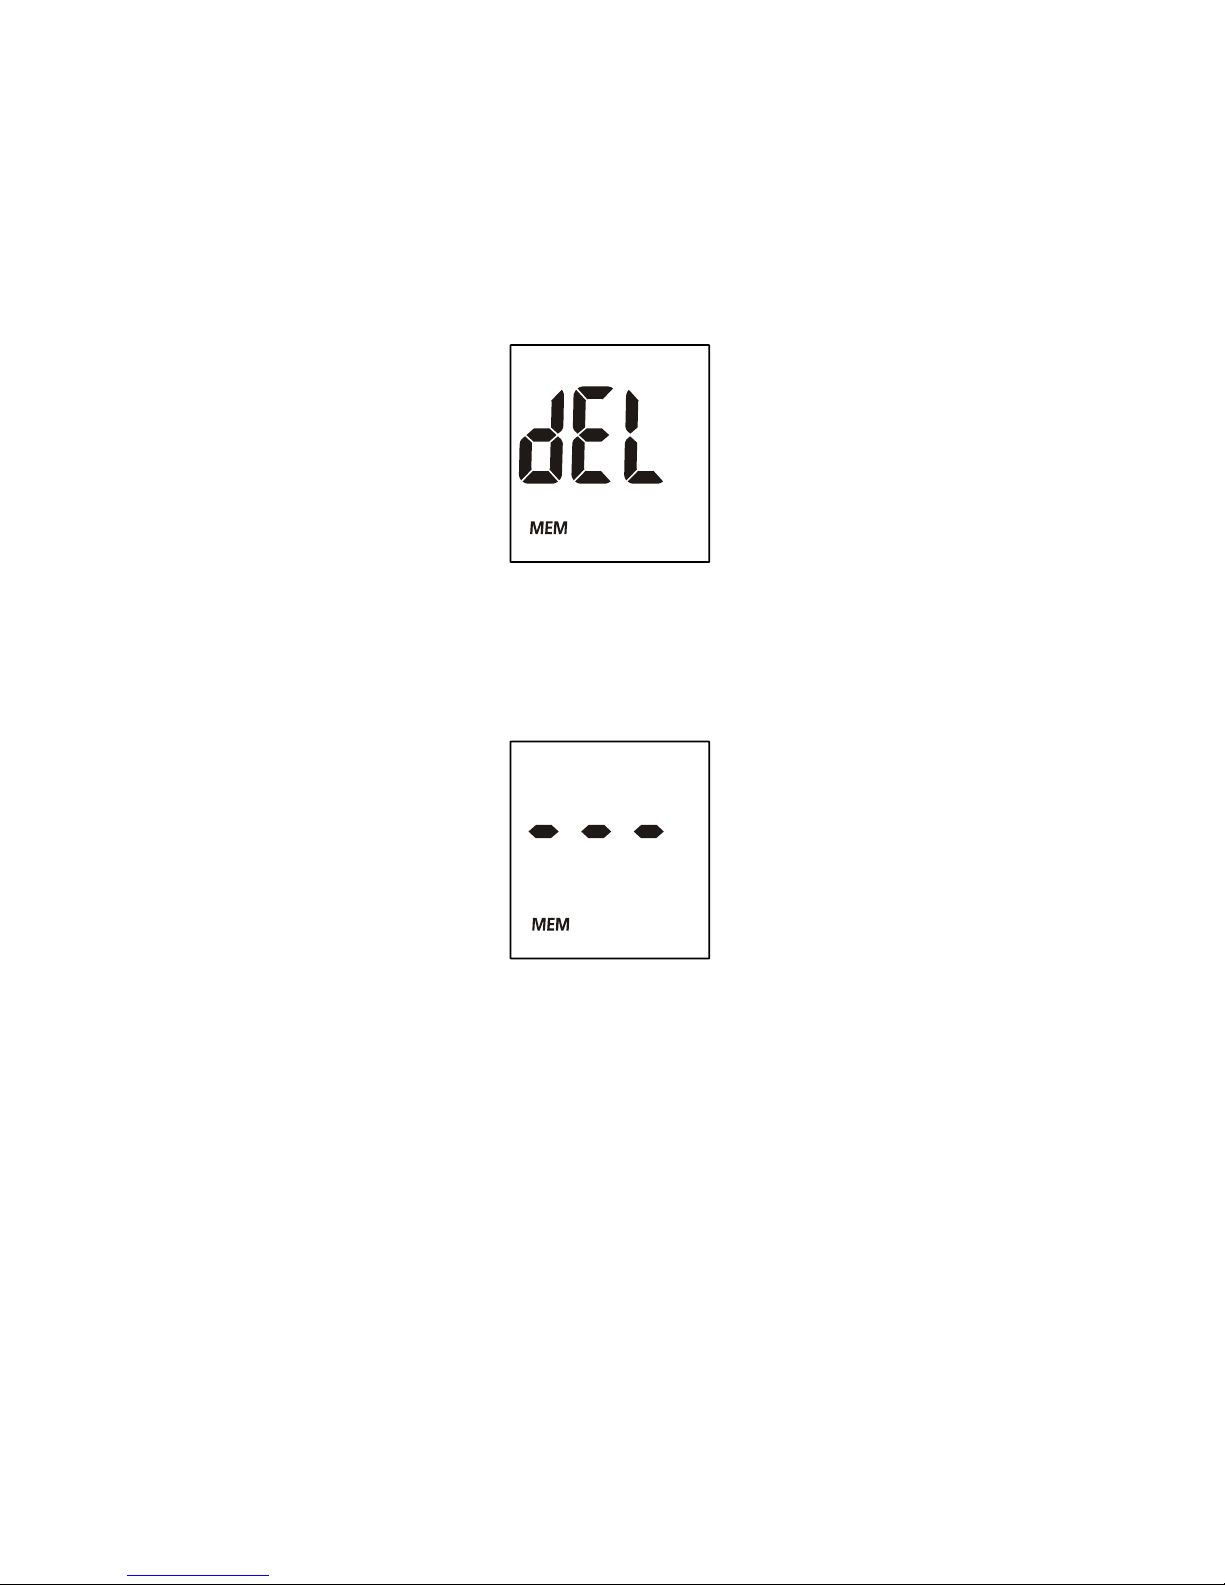
1. With the meter off, press and hold the ◄ button for 2 seconds. This will turn on
the meter and enter the delete mode.
2. To clear the memory, press and hold both the ◄ and ► buttons for 2 seconds.
3. The display will show “MEM” and “- - -”. After a second, the meter will clear its
memory and turn itself off.
4. If you entered the delete mode but want to exit without deleting the recorded
data, press the ► button. This will turn the meter off without deleting any data.
Transferring Records
The meter can transfer stored information to a Windows-based personal computer
(PC) using an optional data transfer cable and software package. To make use of
this feature, you need the On Call
®
Diabetes Management Software and a USB
data transfer cable from ACON.
1. Install the software to your personal computer (PC) according to the
instructions from the On Call
®
Diabetes Management Software Kit.
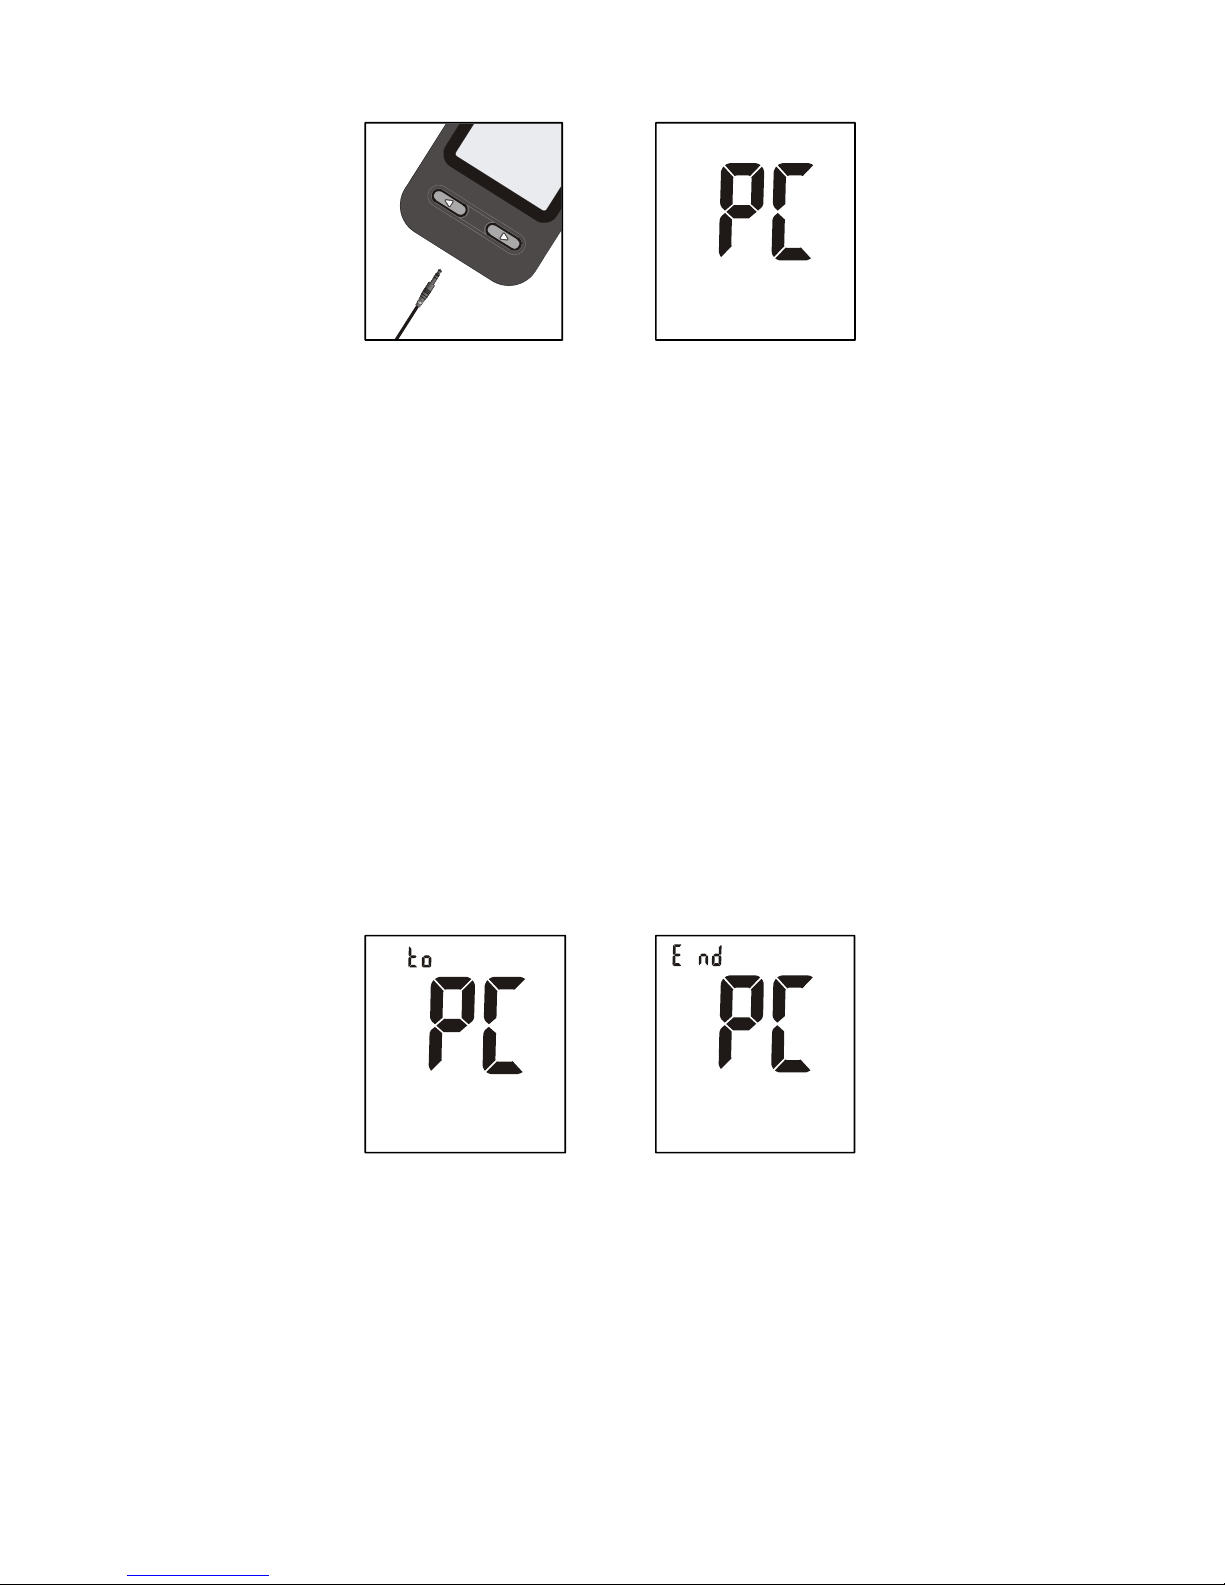
2. Connect the USB cable to your PC and plug the audio jack of the cable into the
meter data port. Meter will automatically turn itself into “PC” mode.
Page 36
34
Notes:
• When a test strip is already inserted into the meter and meter is in the
waiting for sample application mode, at this point if data transfer cable is
plugged into meter data port then meter gives an E-12 error message and
does not automatically turn to “PC” mode.
• When meter is in “PC” mode, meter does not turn to waiting for sample
application mode after strip is inserted into meter.
• Ensure your personal computer (PC) complies with the requirements in IEC
60950.
3. Run the On Call
®
Diabetes Management Software, and refer to the instructions
from the software for how to transfer records.
4. During the data transfer, the meter will display “to” and “PC”. This means the
data is being transferred from the meter to the PC.
5. Once the data transfer is complete, the meter will display “End” and “PC”.
6. After data transfer from meter to PC is completed, press the ► button to turn
off the meter. If nothing else happens to meter 2 minutes after data transfer
from meter to PC is completed, the meter will automatically turn off. In this case,
if you want to enter “PC” mode again, press the ◄ and ► buttons together.
See the User’s Guide included with your On Call
®
Diabetes Management Software
Kit for detailed instructions.
Page 37
35
Maintenance
Proper maintenance is recommended for best results.
Replacing the Battery
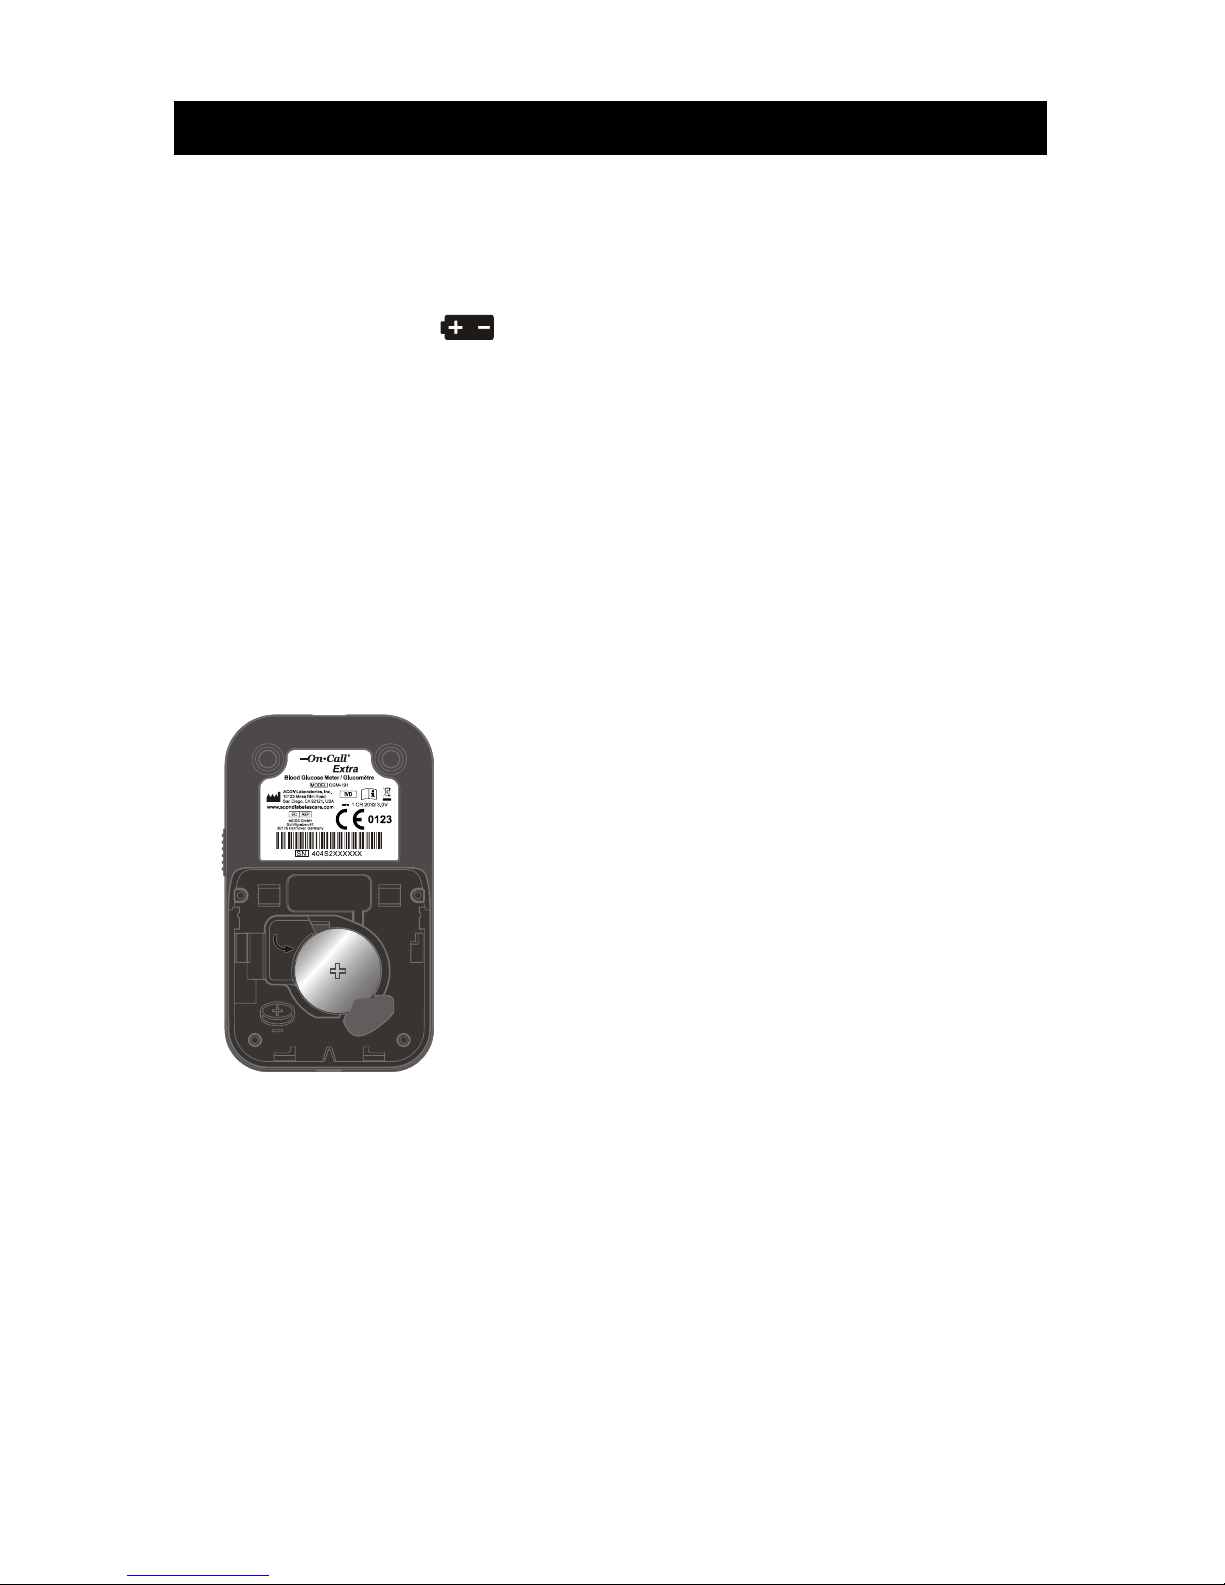
Your On Call® Extra Meter uses one 3.0 Volt CR 2032 lithium battery.
When the battery icon (
) is blinking, it means the meter battery is running
low. You should replace the battery as soon as possible. An “E-6” error message
will appear if the battery is too low to perform any more blood glucose tests. The
meter will not function until the battery is replaced.
Instructions:
1. Turn the meter off before removing the battery.
2. Turn the meter over. And then slide the battery cover in the direction of the
arrow to open it.
3. Remove and discard the old battery. Insert one new CR 2032 3.0 V coin cell
battery in the battery carrier. Make sure the plus (+) side is facing up.
4. Close the battery cover and make sure that it snaps shut.
5. Recheck and reset the clock setting after battery replacement if necessary.
To set the meter clock, see Meter Setup Before Testing on page 12.
Page 38

36
Caring for Your On Call® Extra Blood Glucose Monitoring
System
Blood Glucose Meter
Your On Call
®
Extra Blood Glucose Meter does not require special maintenance or
cleaning. A cloth dampened with water and a mild detergent solution can be used
to wipe the outside of the meter. Take care to avoid getting liquids, dirt, blood or
control solution into the meter through the strip or data ports. It is recommended
that you store the meter in the carrying case after each use.
The On Call
®
Extra Blood Glucose Meter is a precision electronic instrument.
Please handle it with care.
Lancing Device
Use mild soap and warm water to clean with a soft cloth as required. Carefully dry
the device thoroughly. Do not immerse the lancing device.
Please refer to the lancing device insert for more details.
Page 39
37
Suggested Testing Times and Target Goals
Tracking your blood glucose concentration through frequent testing is an important
part of proper diabetes care. Your healthcare professional will help you to decide
the normal target range for your glucose levels. They will also help you to determine
when and how often to test your blood glucose. Some suggested times are:
• When you wake up (fasting level)
• Before breakfast
• 1-2 hours after breakfast
• Before lunch
• 1-2 hours after lunch
• Before or after exercise
• Before dinner
• 1-2 hours after dinner
• Before bedtime
• After a snack
• At 2 or 3 AM, if taking insulin
You may need to test more often whenever
1
:
• You add or adjust your diabetes medication.
• You think your blood glucose levels may be too low or too high.
• You are ill, or feeling uncomfortable over long periods of time.
Expected blood glucose levels for people without diabetes
2
:
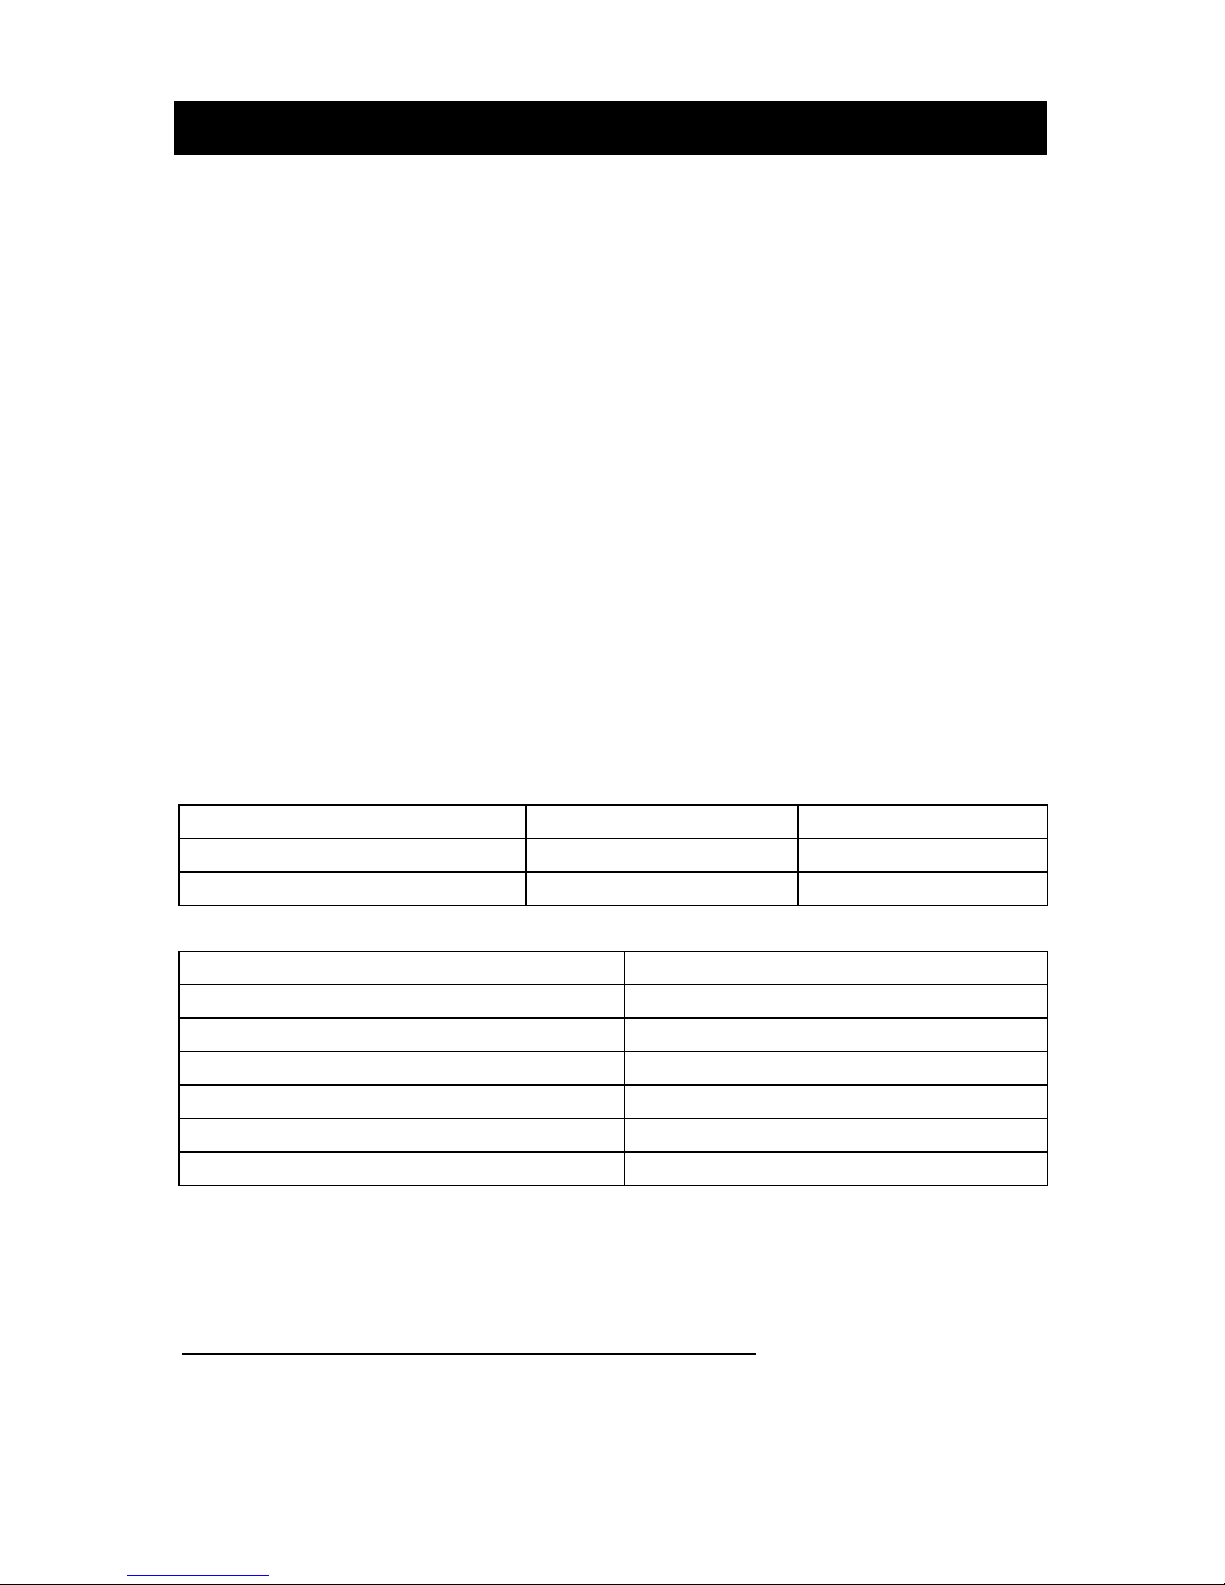
Time Range, mg/dL Range, mmol/L
Fasting and Before Meals 70-100 3.9-5.6
2 Hours after Meals Less than 140 Less than 7.8
Talk to your doctor to set your own daily target ranges.
Time of Day Your Target Range
Waking up (Fasting level)
Before meals
2 hours after meals
Bedtime
2 AM to 3 AM
Other
(Note: 1 mmol/L = 18 mg/dL)
Use the logbook to record your blood glucose measurements and related
information. Bring the logbook with you when you visit your doctor. Together, you
can determine how well your blood glucose is being controlled. This can help you
and your doctor make the best decisions about your glucose control plan.
1. Jennifer Mayfield and Stephen Havas, “Self-Control: A Physician’s Guide to Blood Glucose Monitoring
in the Management of Diabetes – An American Family Physician Monograph”
2. ADA Clinical Practice Recommendations, 2013. Diabetes Care, 2013, Vol.36, Supplement 1, S67-S74
Page 40

38
Comparing Meter and Laboratory Results
Your On Call® Extra Blood Glucose System and laboratory results both report the
glucose concentration in the serum or plasma segment of your blood. However,
the results may differ somewhat due to normal variation. The Meter results can be
affected by factors and conditions that do not affect laboratory results in the same
way. See On Call
®
Extra Test Strips’ package insert for typical accuracy and
precision data, and for important information on limitations.
To ensure a reasonable comparison, follow these guidelines.
Before you go to the lab:
• Bring your meter, test strips and control solution with you.
• Make sure your meter is clean.
• Perform a quality control test to make sure the meter is working properly.
• Comparisons will be more accurate if you do not eat for at least four hours
before testing. Eight hours is preferable.
At the lab:
• Wash your hands before obtaining a blood sample.
• Take blood samples for a laboratory test and for your meter within 10 minutes
of each other. This will ensure an accurate comparison of results.
• Never test blood that has been placed in test tubes containing fluoride or other
anticoagulants which are not suggested. This will cause falsely low results.
Page 41
39
Troubleshooting Guide
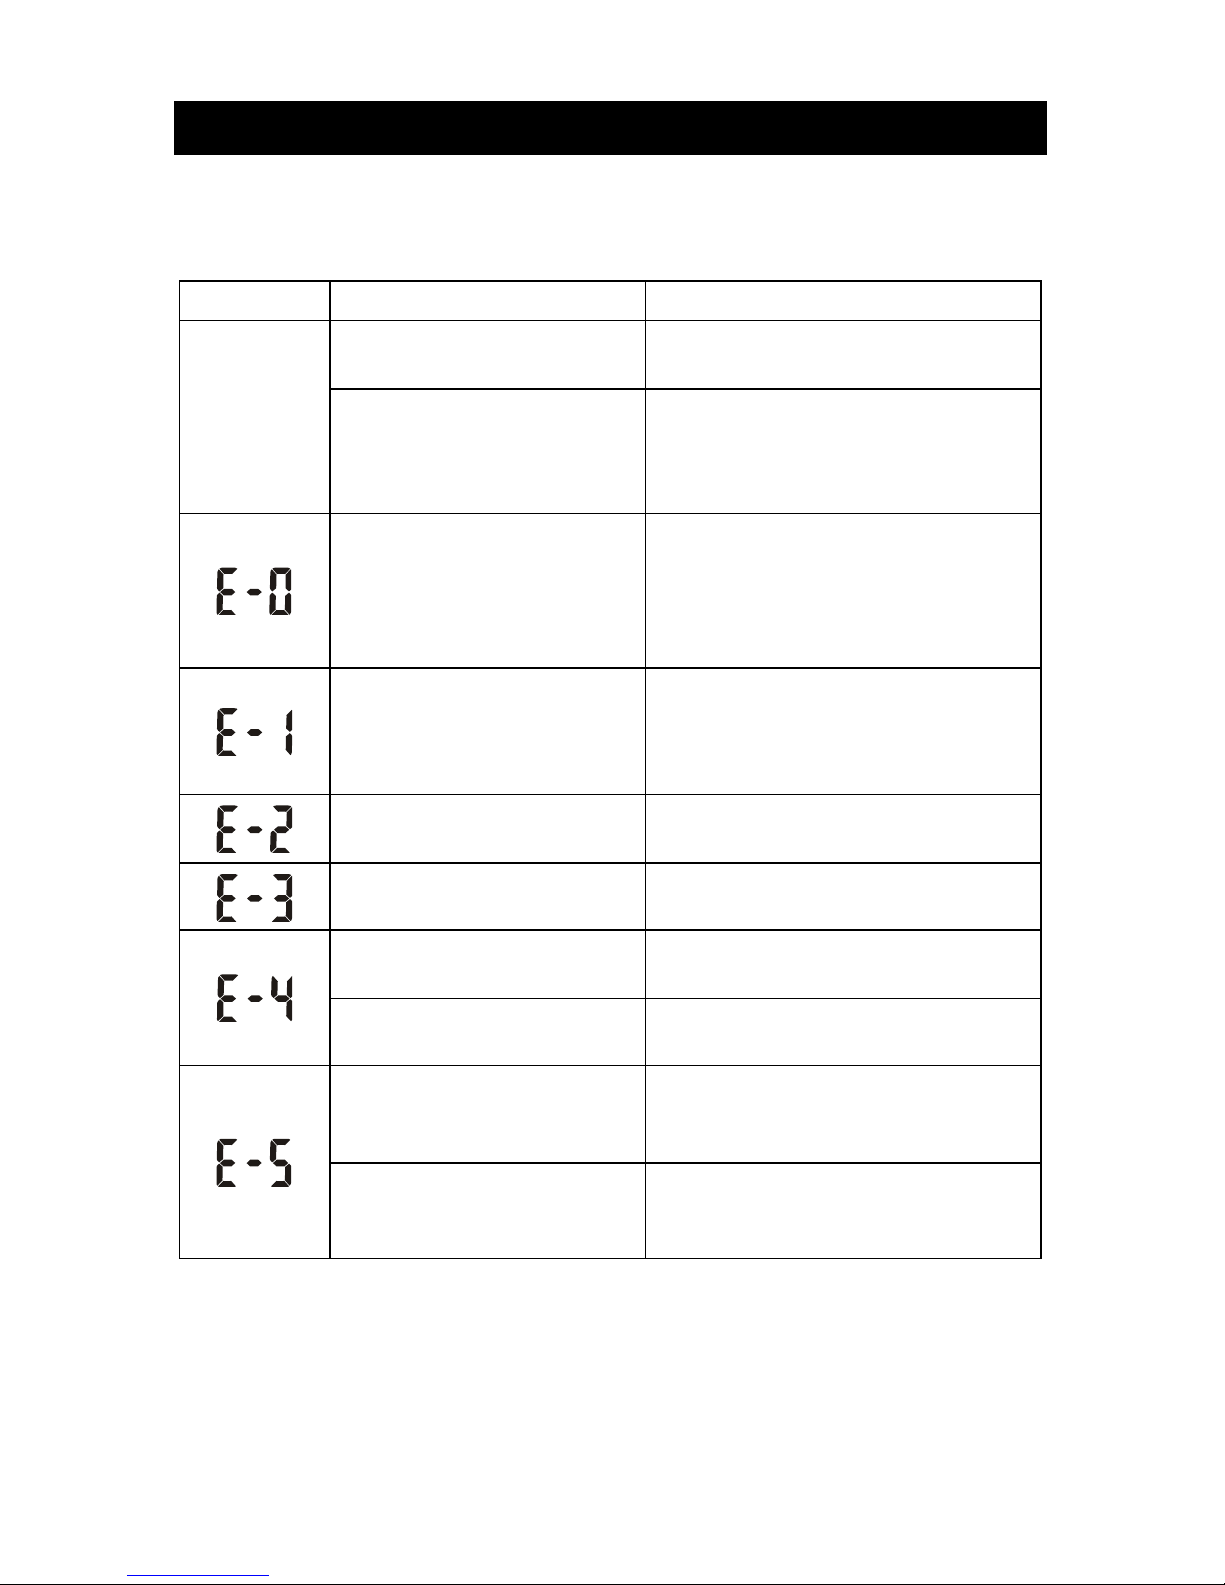
The meter has built-in messages to alert you of problems. When error messages
appear, note the error number. Turn off the meter and then follow these
instructions.
Display Causes Solution
Meter fails to
turn on
Battery may be damaged or
not be charged
Replace battery.
Meter is too cold
If meter has been exposed to or stored
in cold conditions, wait 30 minutes.
Allow the meter to reach room
temperature then repeat the test.
Power On self check error
Remove the battery for 30 seconds
and then put it back in. Turn the meter
on again.
If the problem persists, please contact
your local distributor.
Internal calibration check error
Turn off meter or remove test strip,
and then turn on meter again to retest.
If the problem persists, please contact
your local distributor.
Test strip was removed during
the test
Repeat the test and ensure the test
strip remains in place.
Sample was applied to the test
strip too soon
Repeat the test and apply sample after
blood drop/test strip symbol appears.
Test strip is contaminated or
used
Repeat the test with a new test strip.
Sample was applied to the test
strip too soon
Repeat the test and apply sample after
blood drop/test strip symbol appears.
Insufficient sample
Repeat the test and apply enough
sample to fill the test strip check
window.
Sample application error due
to late sample re-dosing
Repeat the test and apply enough
sample to fill the test strip check
window within 3 seconds.
Page 42
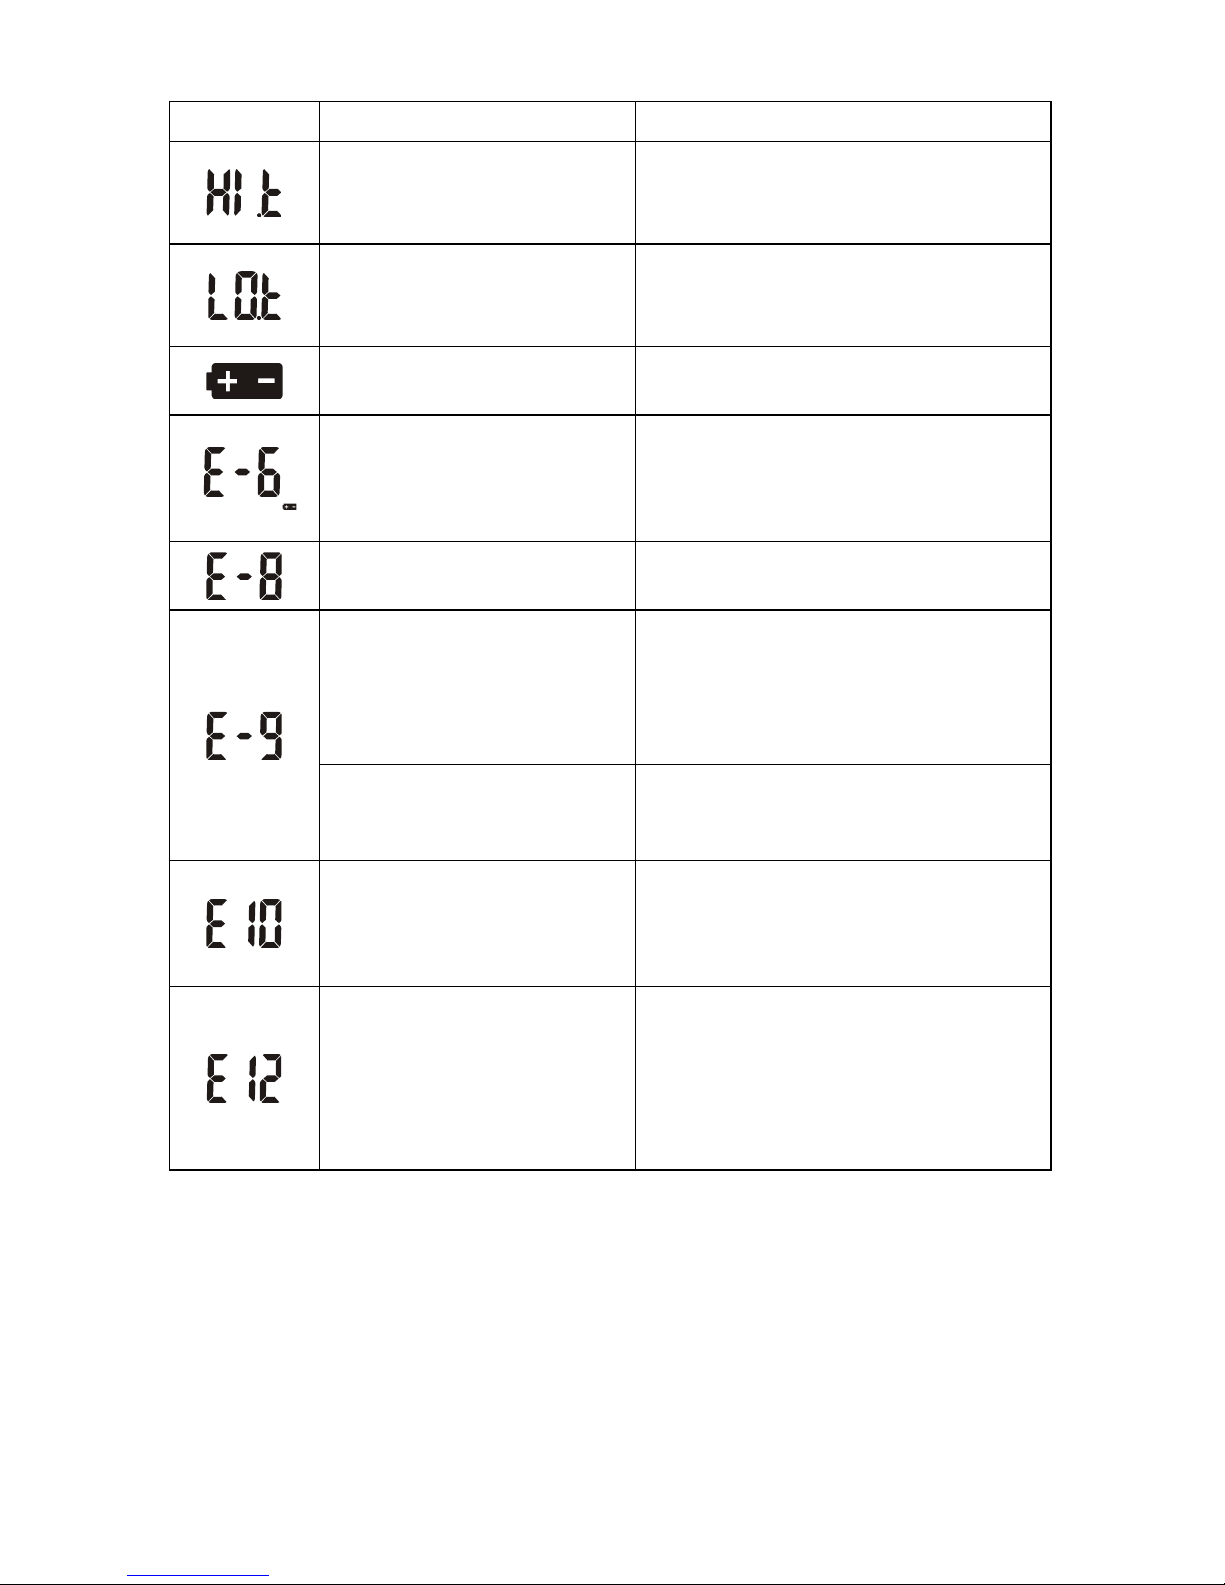
40
Display Causes Solution
Temperature has exceeded
the operating temperature of
the system
Move to a cooler environment and
repeat the test.
Temperature is below the
operating temperature of the
system
Move to a warmer environment and
repeat the test.
Battery is low but has enough
power to run 20 more tests
Test results will still be accurate, but
replace the battery as soon as possible.
Battery is discharged and the
meter does not allow more
tests until replacement with a
new battery
Replace the battery and repeat the test.
Meter electronics failure
If the problem persists, please contact
your local distributor.
Non On Call
®
Extra test strip
inserted in the meter
Please make sure you use the On
Call
®
Extra test strip with the On
Call
®
Extra Blood Glucose Meter.
If the problem persists, please contact
your local distributor.
Test strip damaged or
calibration error
Please test again by using a new strip.
If the problem persists, please contact
your local distributor.
Communications failure
There is an error in transferring data to
the PC. See the package insert included
in the On Call
®
Diabetes Management
Software for troubleshooting.
Meter data port is plugged in
with the data transfer cable
when meter is in waiting for
sample application mode with
strip already inserted into the
meter strip port
Unplug the data transfer cable from the
meter’s data port. Then remove the strip.
Reinsert the strip into the strip port for
testing.
If the problem persists, please contact
your local distributor.
Page 43
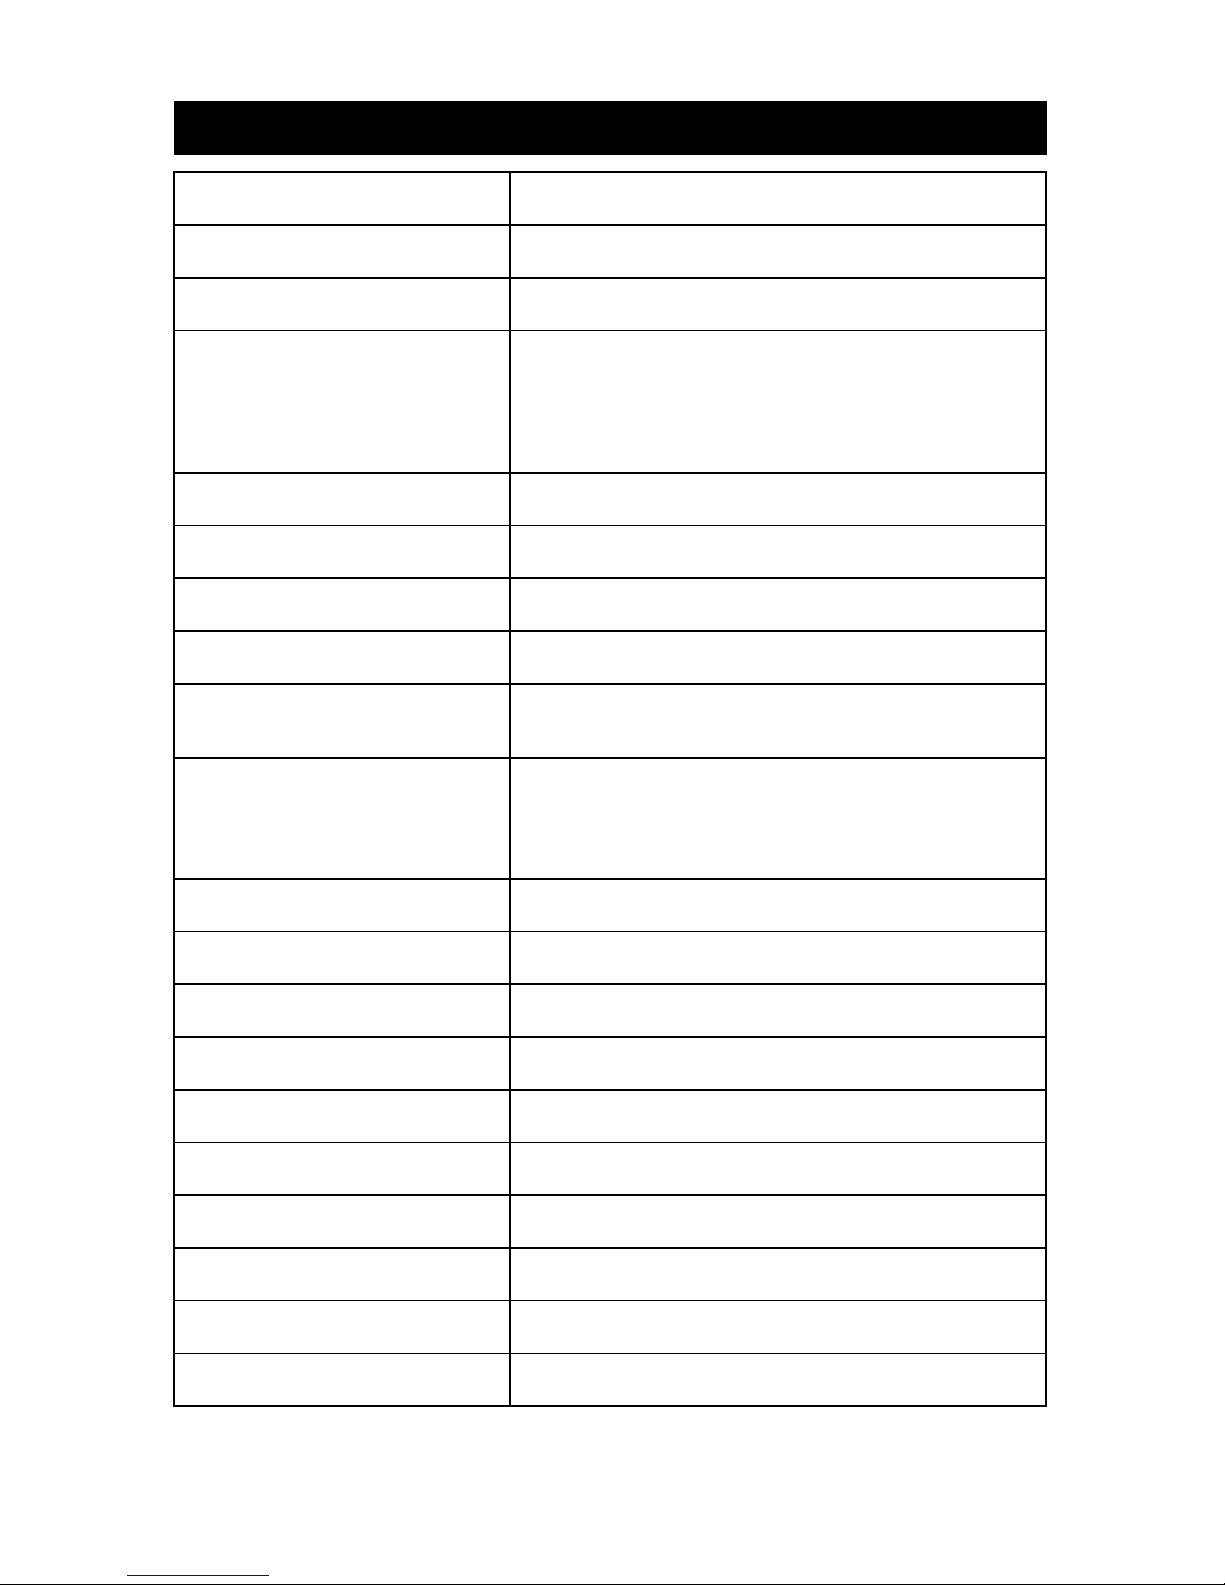
41
Specifications
Feature Specification
Meter Model Number OGM-191
Measurement Range 0.6 – 33.3 mmol/L (10 – 600 mg/dL)
Result Calibration
Plasma-equivalent, calibrated by using YSI
(Model 2300 STAT PLUS) Glucose Analyzer
reference instrument, which is traceable to NIST
reference standard.
Sample Fresh capillary whole blood
Minimum Sample Size 0.4 μL
Test Time 4 seconds
On/Off Source One (1) CR 2032 3.0V coin cell battery
Battery Life
1,000 tests for glucose testing (not considering
data transfer)
Glucose Units of Measure
The meter is preset to either millimoles per liter
(mmol/L) or milligrams per deciliter (mg/dL)
depending on the standard of your country.
Memory Up to 300 records with time and date
Automatic Shutoff 2 minutes after last action
Meter Size 85.0 mm × 49.0 mm × 16.4 mm
Display Size 35.0 mm × 32.0 mm
Weight 50.0 g (with battery installed)
Operating Temperature 5 - 45 ºC (41 - 113 ºF)
Operating Relative Humidity 10 - 90% (non-condensing)
Hematocrit Range 25 - 60%
Degree of Protection IP 20
Data Port 9600 baud, 8 data bits, 1 stop bit, no parity
Page 44

42
Warranty
Please complete the warranty card that came with this product and mail it to your
dealer to register your purchase.
If the meter fails to work for any reason other than obvious abuse within the first
five (5) years from purchase, we will replace it with a new meter free of charge. For
your records, also write the purchase date of your product here.
Date of purchase:
Note: This warranty applies only to the meter in the original purchase, and does
not apply to the battery supplied with the meter.
Page 45
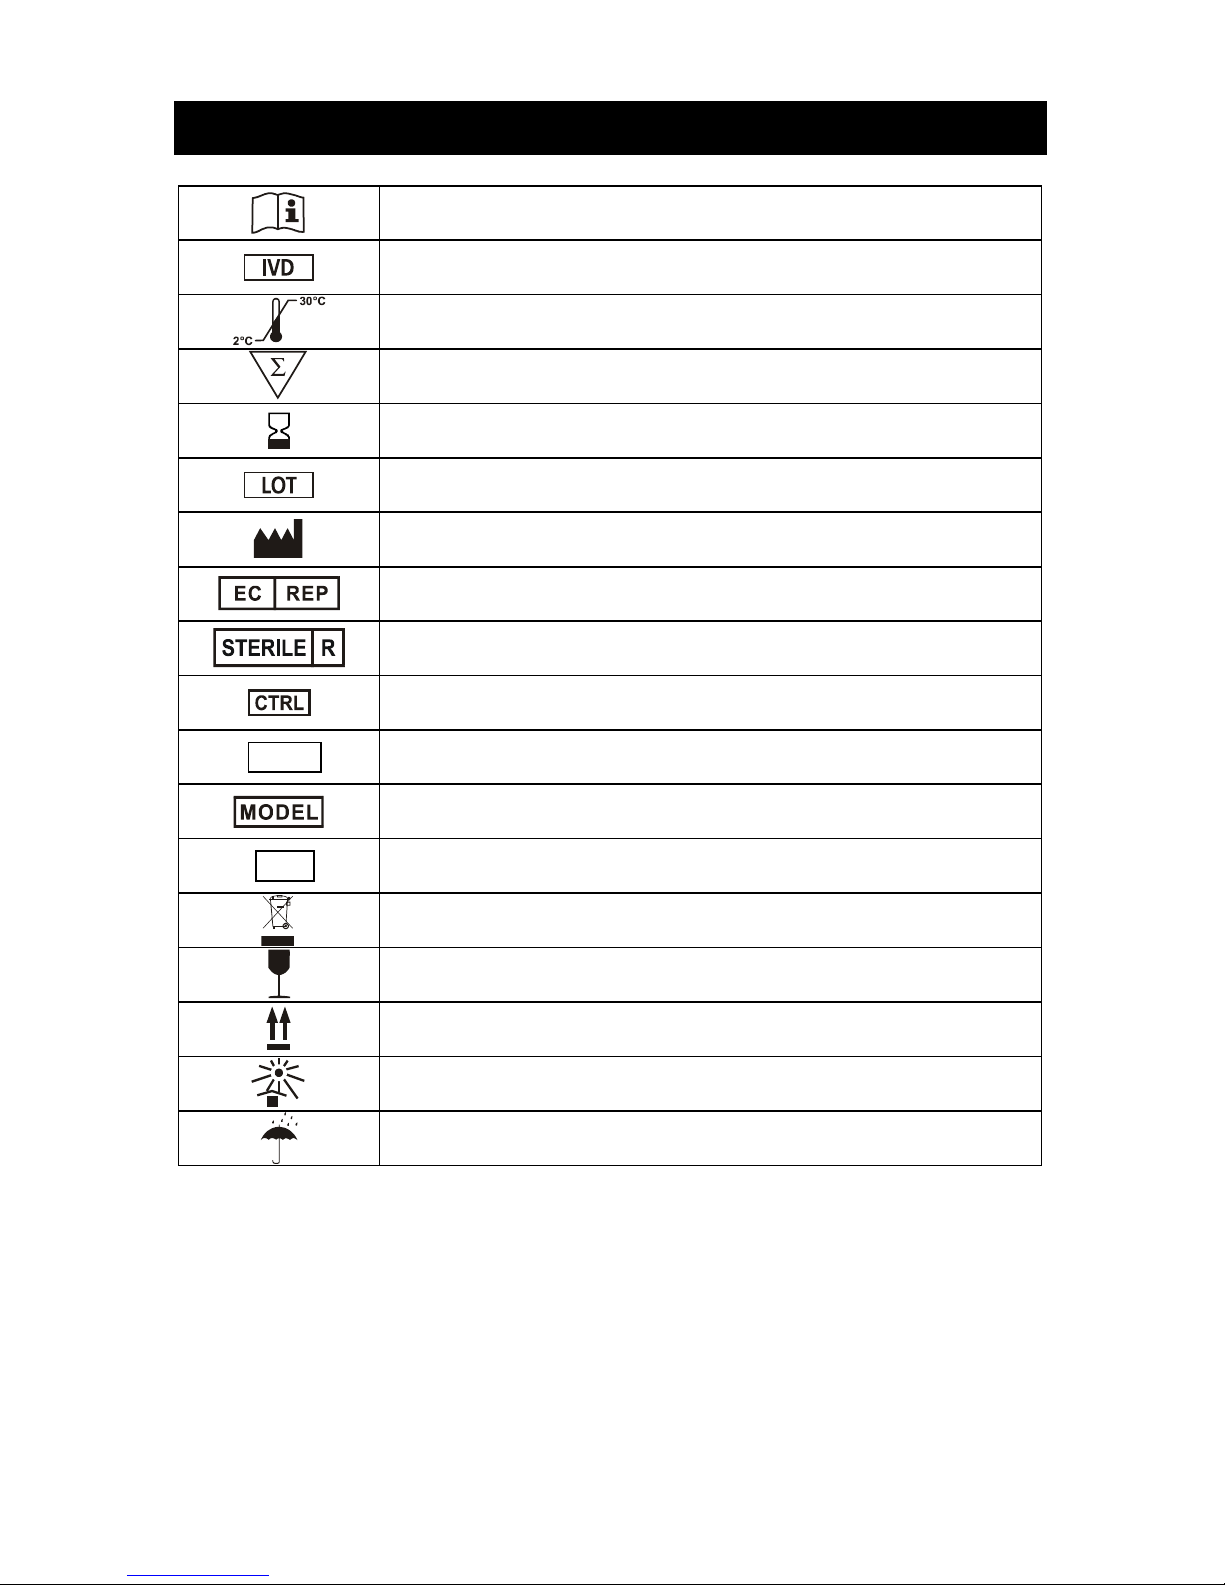
43
Index of Symbols
Consult instructions for use
For in vitro diagnostic use only
Store between 2 – 30 ºC (36 – 86 ºF)
Contains sufficient for <n> tests
Use by
Lot Number
Manufacturer
Authorized Representative
Sterilized using irradiation
Control Range
REF
Catalog #
Model Number
SN
Serial Number
Do not dispose along with household waste
Fragile, handle with care
This Side Up
Keep away from sunlight and heat
Keep Dry
Page 46

44
Index
Averaging Results…………….. 31 Setting the Clock…………
.
12
Battery, Replacing the………... 35 Specifications………….…. 41
Carrying Case…………………
…
1 Strip Ejector…………….… 3,29
Clearing the Memory………..
…
33 Procedure
Data Port...................................
.
3,4 Precautions and Limitations 30
Date Format..............................
.
8,10 Testing Your Blood………
…
21
Guidelines................................. i Quality Control Test………
…
17
Hematocrit................................
.
41 Control Solution…………
…
9
Hyperglycemia.......................... 14,30 How to Run………………
…
17
Hypoglycemia........................... 15,30 Results
Ketones…………..…………....
…
14,30 Blood Glucose……………
…
27
Lancing Device…………….…..
.
1,21,36 Control Solution…………
…
19
Lancets………………………..… 1,21 Meter vs. Lab Results…… 38
Maintenance.............................
.
6,35 Target Goals……………… 37
Measure, Unit of……………..… 6,19 Unit of Measure…………
…
19,37
Meter………………………….…. 3 Suggested Testing Times… 37
Audio Feature………………..
.
13 Symbols, Index of…………. 43
Cleaning………….………..…. 36 Test Strip……………………
…
7
Display…………………….….
.
5 Expiration…………………. 8
Error Messages……………...
.
39,40 Precautions………………
…
9
"HI" and "LO" Messages……. 29 Testing Your Blood………… 21
◄ Button……………………..
.
3 Getting a Drop of Blood…
…
21
Memory…………………….…
.
33 Testing Blood Glucose…
…
26
Meter Use and Precautions… 6 Troubleshooting………….
…
39,40
Meter Setup…………….……. 12
V
iewing Stored Records…
…
31
► Button………………….….
.
3 Warranty……………………
…
2,42
Page 47

Page 48

 Loading...