

Page 1
Quick Start Guide P4500i
Guía de inicio rápido del inversor
TOOLS YOU WILL NEED
HERRAMIENTAS QUE NECESITARÁ
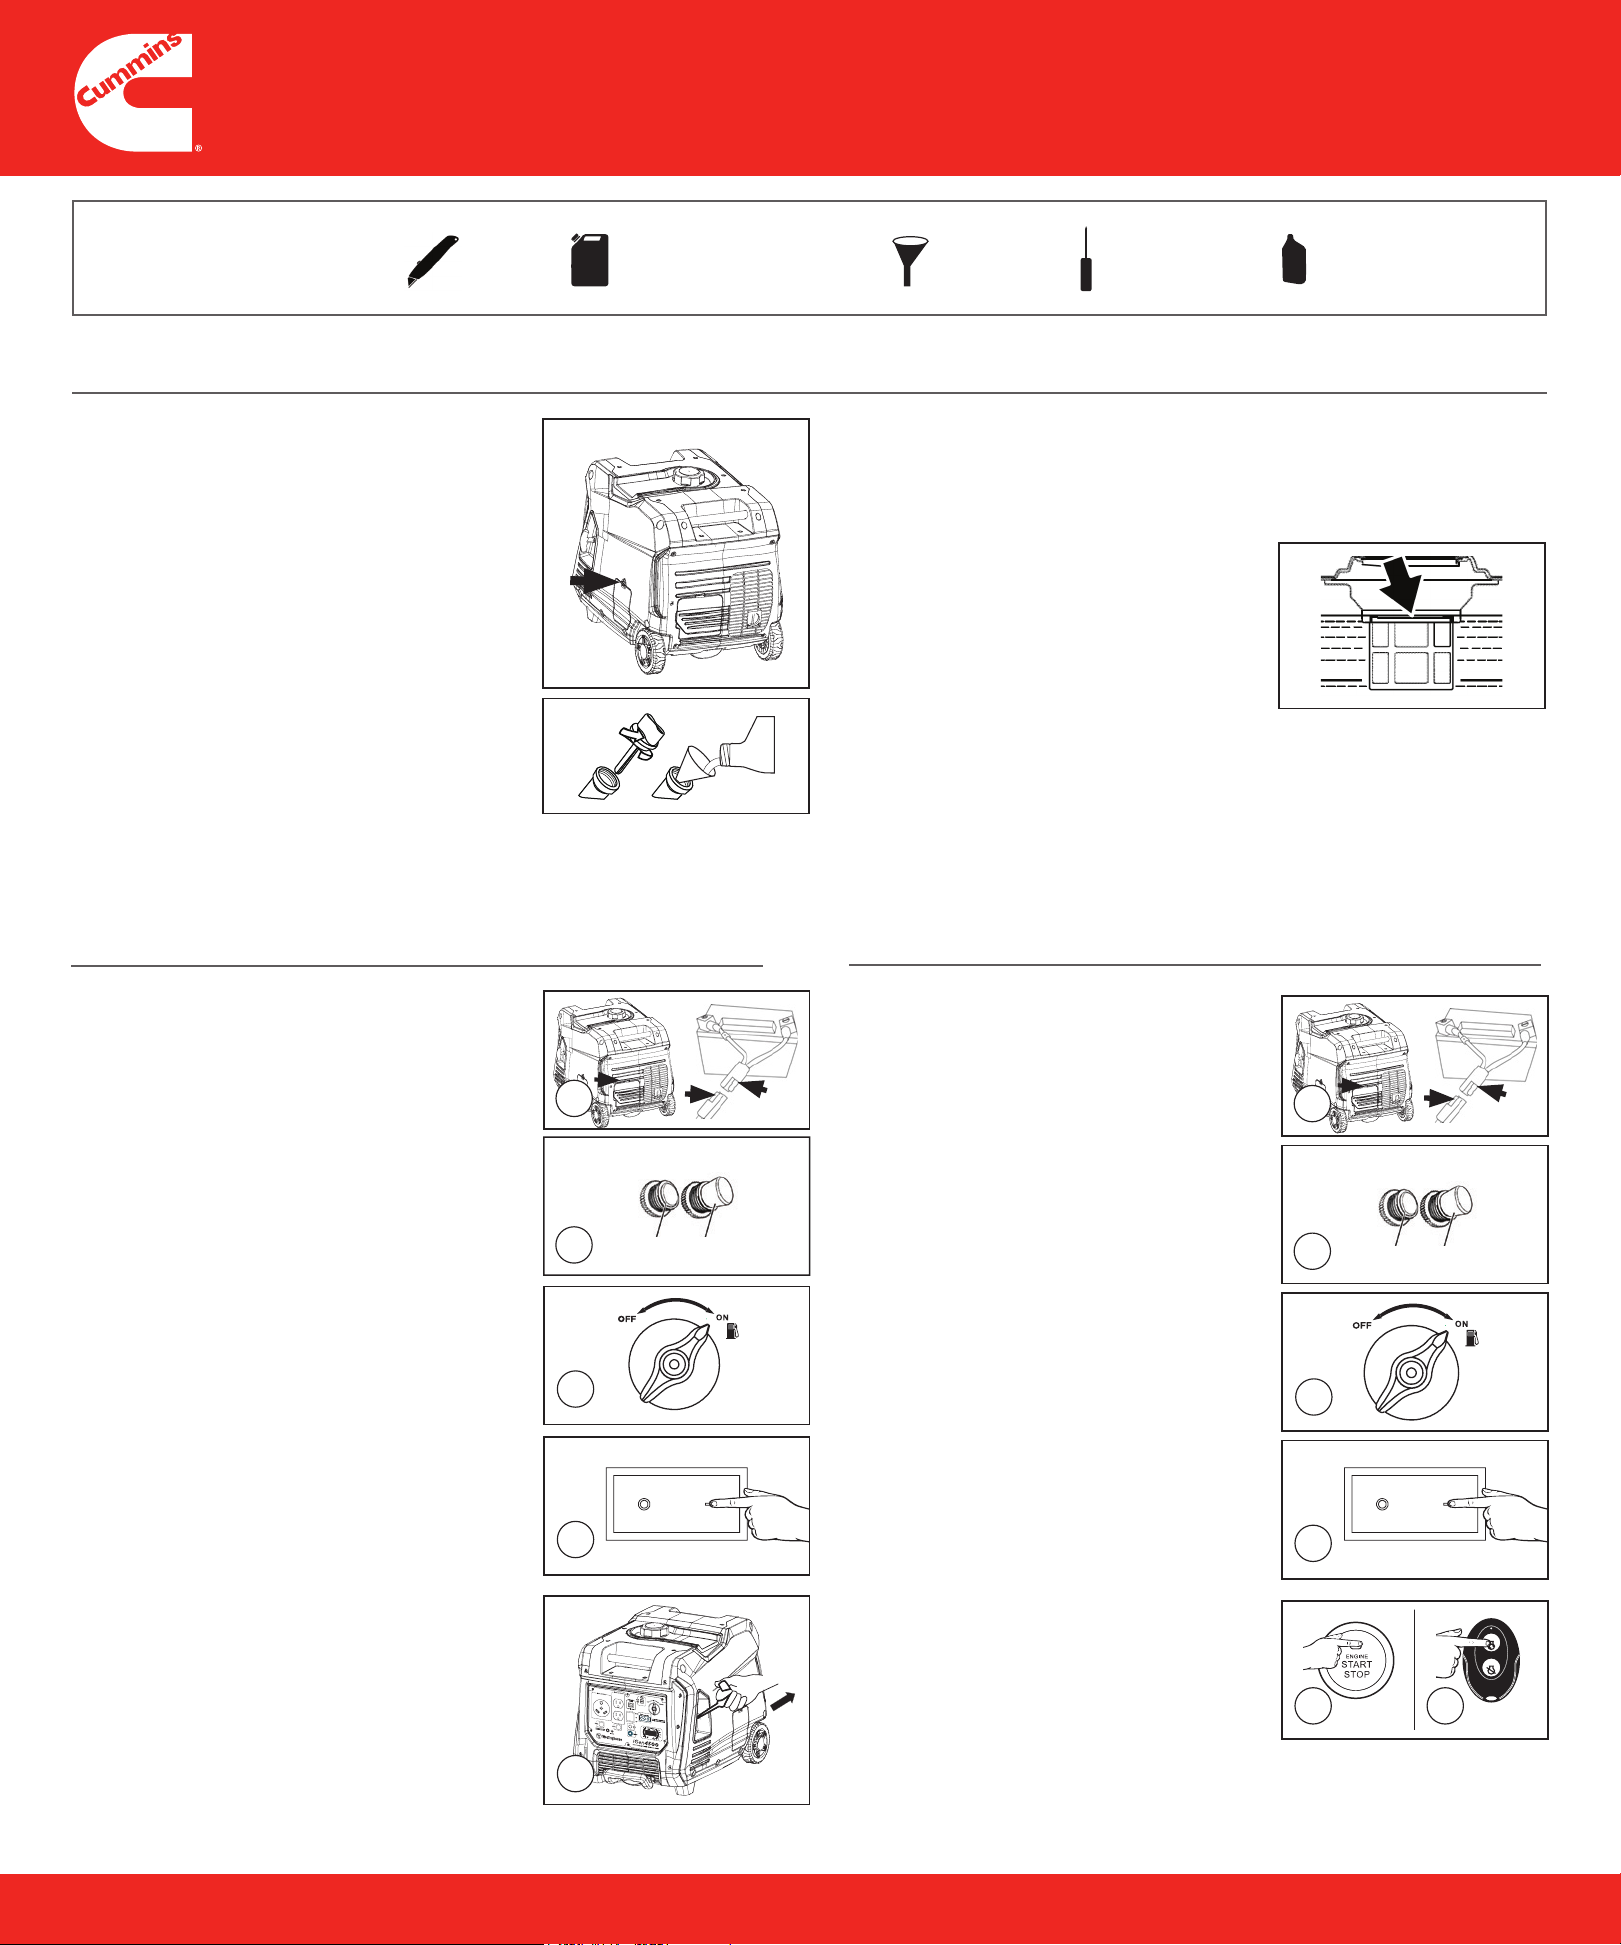
1. Add Engine Oil
Agregar aceite al motor
a. Unclip and remove the oil service panel to access
the oil/ll drain plug.
Desenganche y retire el panel de servicio de aceite para acceder al
tapón de drenaje de aceite / llenado.
b. Remove oil ll plug/dipstick.
Quite el tapón de llenado/varilla de medición.
c. Using the supplied 4-cycle engine oil and
funnel, slowly add engine oil to the engine
until full.
Con el aceite para motor de 4 tiempos que se suministra y el embudo, agregue
lentamente aceite al motor hasta llenarlo.
d. Do not overll, if oil level is too high, oil will
drain out through the ll plug.
No llene demasiado, si el nivel de aceite es demasiado alto, el aceite se
drenará a través del tapón de llenado.
Utility Knife
(not included)
Cúter (no incluido)
Fresh clean unleaded gasoline (not included)
Gasolina sin plomo fresca y limpia (no incluida)
Funnel (included)
Embudo (incluido)
BEFORE STARTING | ANTES EMPEZAR
2. Add Unleaded Gasoline to Gas Tank
Agregar gasolina sin plomo al depósito de gasolina
a. Unscrew gas cap on top of tank and insert a clean funnel into the tank.
Desenrosque el tapón del depósito de gasolina e introduzca el embudo en el oricio.
b. Slowly add gasoline into the fuel tank. The gasoline level should NOT be
higher than the ller neck.
Pae
3. Choose safe location to start generator
Lentamente, agregue gasolina al depósito de gasolina. El nivel de gasolina
NO debe superar el cuello del depósito.
c. Secure gas cap.
Asegure el tapón de la gasolina.
Agregar gasolina sin plomo al depósito de gasolina
a. Make sure you are outside and 15ft (4.5m) away from any doors or windows.
Asegúrese de estar afuera y a una distancia de 15 pies (4,5 m) de cualquier puerta o ventana.
b. Only operate on at, dry surfaces. Do not move the generator while it is
running. Do not rell gas while generator is running.
Operar solo sobre supercies planas y secas. No mueva el generador mientras está funcionando. No rellene el gas
mientras el generador está funcionando.
Screw Driver (not included)
Destornillador (no incluida)
4-stroke engine oil (included)
Aceite para motores de 4 tiempos (incluido)
MANUAL STARTING
ARRANQUE MANUAL
1. Make sure nothing is plugged into power outlets.
Asegúrese de que no haya nada enchufado en los tomacorrientes eléctricos.
2. Remove battery access cover and connect
battery leads.
Retire la cubierta de acceso a la batería y conecte los cables de la batería.
3. Make sure the circuit breakers are properly set to
operating.
Asegúrese de que los disyuntores estén en la posición correcta.
4. Turn the Fuel Control Switch to the
ON position.
Gire el interruptor de control del combustible a la posición ON.
5. Switch Engine Control Switch to RUN.
Cambie el interruptor de control del motor a RUN.
6. Firmly grasp and pull the recoil handle slowly until
you feel increased resistance. At this point, apply a
rapid pull while pulling out from the inverter.
Sujete rmemente la cuerda de arranque y tire de ella lentamente hasta que
sienta resistencia. En este punto, tire rápidamente hacia arriba y alejándose
algo del generador.
7. Plug in electronic devices.
Enchufe los dispositivos electrónicos.
ELECTRIC STARTING
ARRANQUE ELÉCTRICO
1. Make sure nothing is plugged into power outlets.
Asegúrese de que no haya nada enchufado en los tomacorrientes
eléctricos.
2
Operating Tripped
3
4
5
STOP RUN STOP RUN
2. Remove battery access cover and connect
battery leads.
Retire la cubierta de acceso a la batería y conecte los cables de la batería.
3. Make sure the circuit breakers are properly set to
operating.
Asegúrese de que los disyuntores estén en la posición correcta.
4. Turn the Fuel Control Switch to the
ON position.
Gire el interruptor de control del combustible a la posición ON.
5. Switch Engine Control Switch to RUN.
Cambie el interruptor de control del motor a RUN.
6. Push and hold the engine start button for 1
second and release.
Mantenga pulsado el botón de arranque del motor durante 1 segundo y
suelte.
7. For remote start hold the START button on the
wireless remote for 1 second and release.
Para el inicio remoto, mantenga presionado el botón de INICIO en el control
remoto inalámbrico durante 1 segundo y suéltelo.
8. Plug in electronic devices.
Enchufe los dispositivos electrónicos.
2
3
4
5
Operating Tripped
START
STOP
6
English and Spanish, Original Instructions
Questions? Call 1-800-CUMMINS (1-800-286-6467) | Preguntas? Llame al 1 (800) 286-6467
6
7
3-2019
A062T719 (Issue 1)
Copyright © 2019 Cummins Inc.
Pae
Page 2
Maintenance Guide P4500i
Guía de mantenimiento del inversor
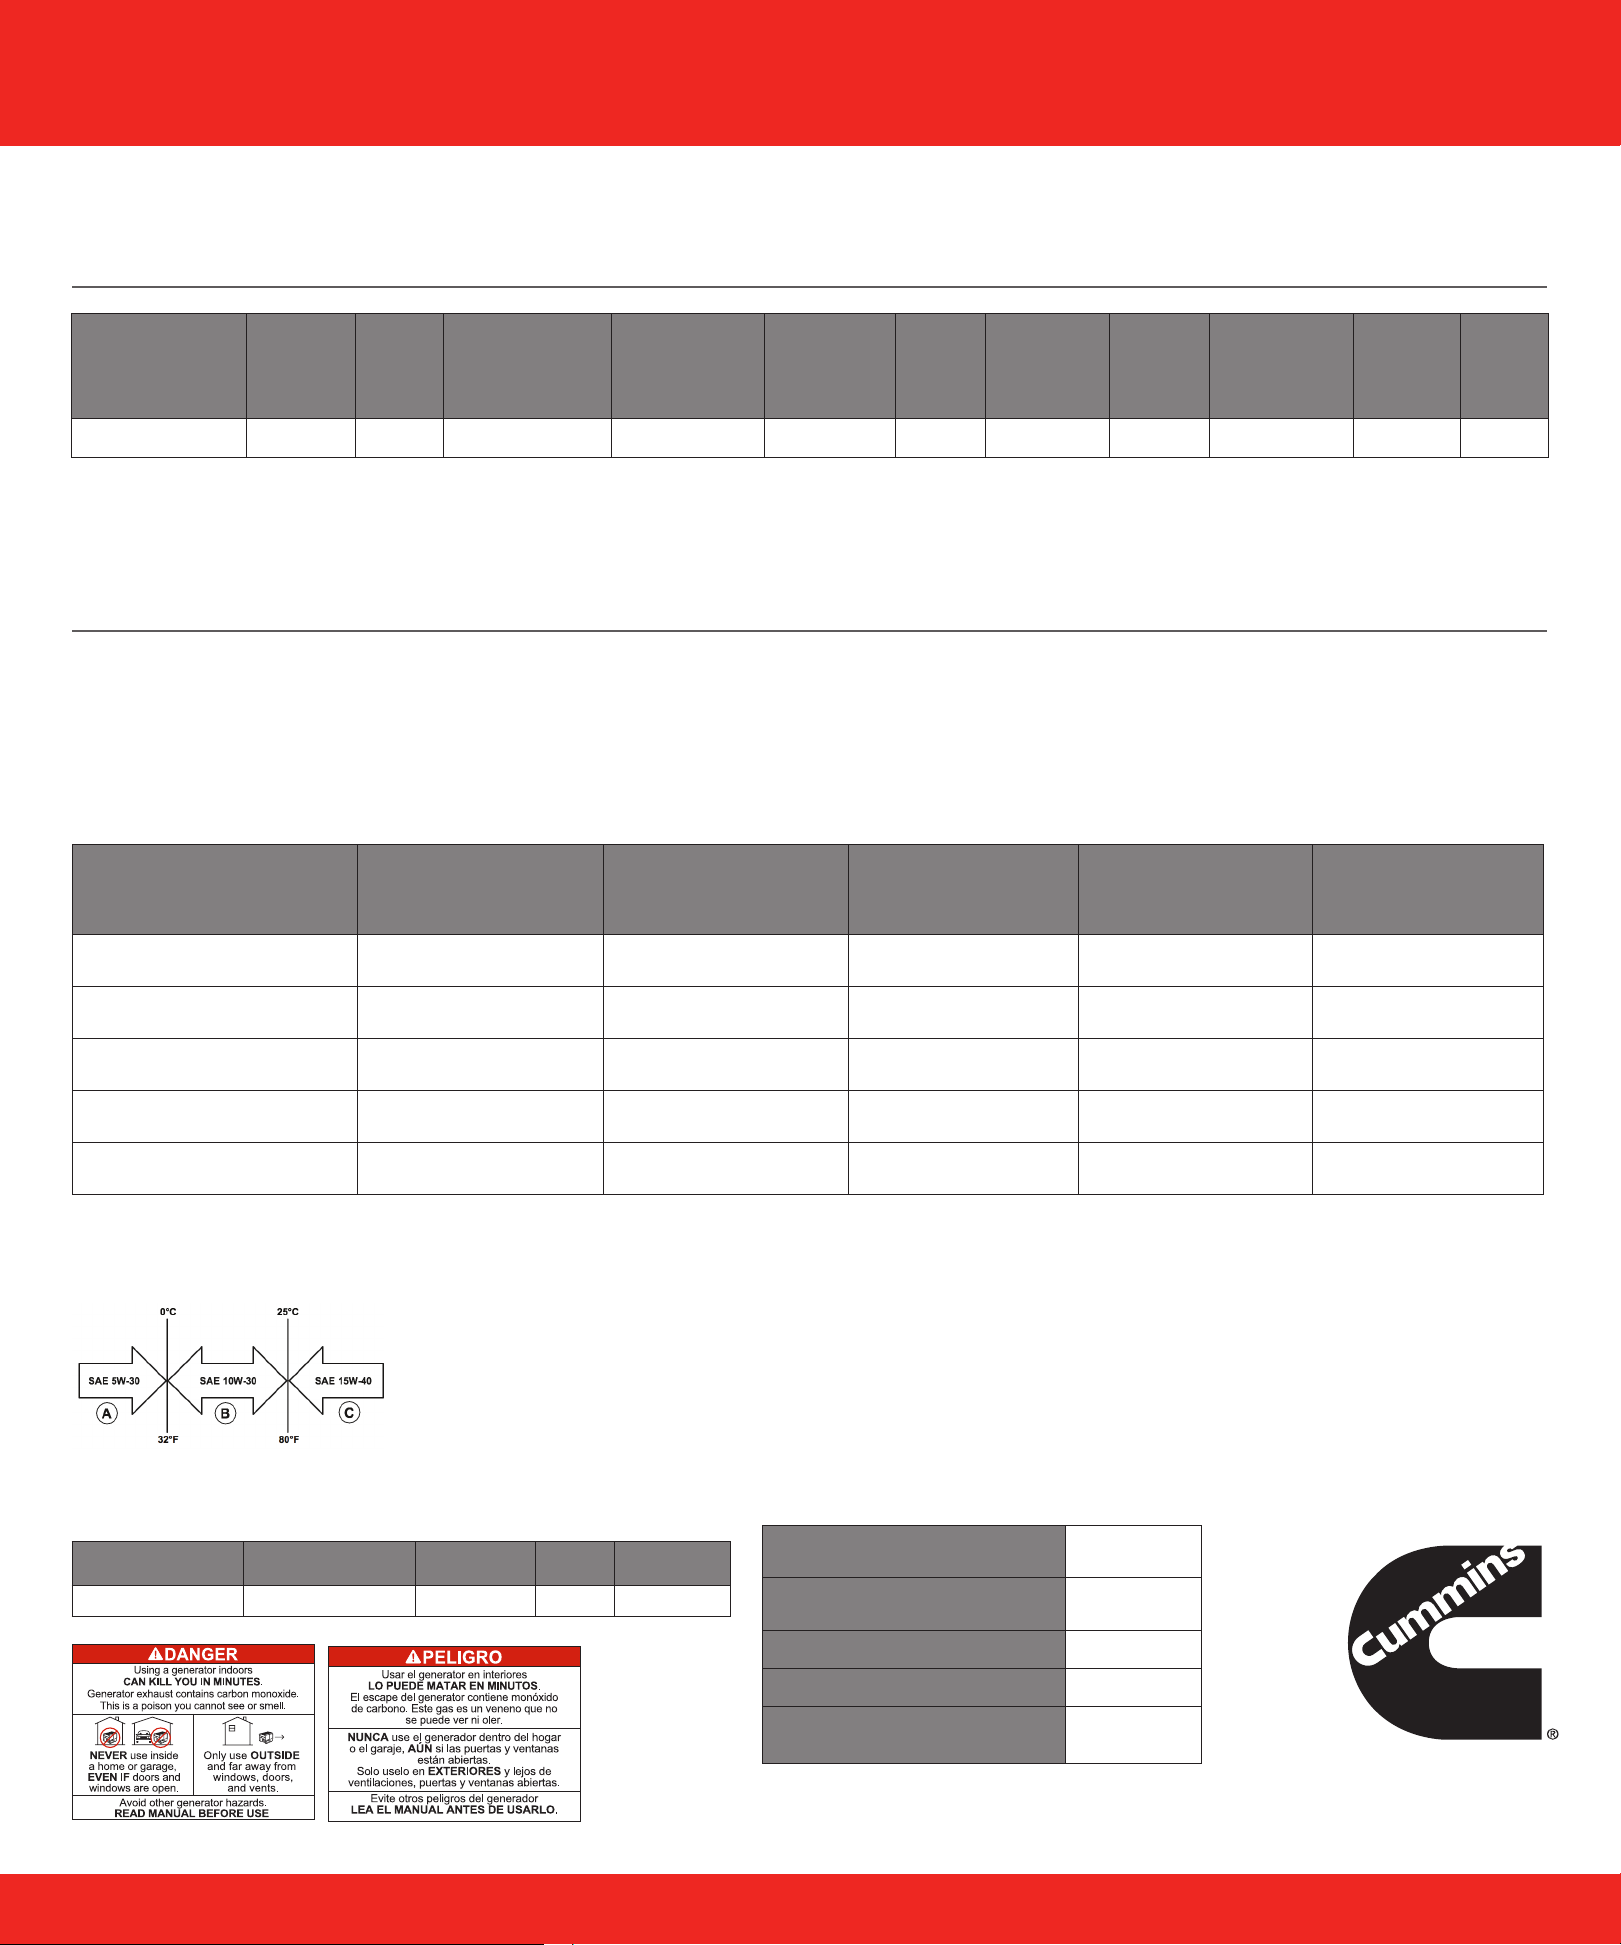
INVERTER MECHANICAL SPECIFICATIONS
ESPECIFICACIONES MECÁNICAS DE INVERTER
Model Number
Número de modelo
Running
Watts
Vatios de
potencia
nominal
Peak
Watts
Vatios de
potencia
pico
Fuel Tank Size
(L/G)
Capacidad del depósito
de combustible (L/G)
Rated Speed
(RPM)
Velocidad nominal
(RPM)
Ignition
Type
Tipo de encendido
Spark
plug
Bujía
Engine
Disp (cc)
Tamaño del
motor (cc)
Stroke
X Bore
Diámetro y
carrera
Oil Capacity
(L)
Capacidad de aceite
(L)
Oil Type
Tipo de aceite THD
OnanP4500i 3700 4500 13L/3.4G 3600 TCI F7RTC 224 70X58 0.60 10W30 <3%
MAINTENANCE SCHEDULE
CALENDARIO DE MANTENIMIENTO
Following the maintenance schedule is important to keep the inverter in good operating condition. The following is a summary of maintenance items by periodic
maintenance intervals. Refer to the Maintenance section in the Owners Manual to nd out how to properly perform maintenance.
Seguir el calendario de mantenimiento es importante para mantener el generador en buen estado de funcionamiento. A continuación se enumeran las tareas de mantenimiento necesarias según los intervalos de mantenimiento. Consulte la sección Mantenimiento del Manual
del propietario para averiguar cómo realizar el mantenimiento correctamente.
TABLE 1: MAINTENANCE SCHEDULE - OWNER PERFORMED
TABLA 1: CALENDARIO DE MANTENIMIENTO: REALIZADO POR EL PROPIETARIO
After First 20 Hours or
Maintenance Item
Tarea de mantenimiento
Engine Oil
Aceite del motor
Cooling Features
Sistema de refrigeración
Air Filter
Filtro del aire
Spark Plug
Bujía
Spark Arrestor
Pantalla antichispas
Before Every Use
Antes de cada uso
Check Level
Comprobar el nivel
Check/Clean
Comprobar/Limpiar
Check
Comprobar
- - -
- - -
First Month of Use
Después de las primeras 20 horas
de uso o el primer mes de uso
Change
Cambiar
- - - -
-
*Service more frequently if operating in dry and dusty conditions
*Aumentar la frecuencia de mantenimiento si se utiliza en condiciones secas y con polvo.
ENGINE OIL | ACEITE DEL MOTOR
Only use 4-stroke/cycle engine oil. NEVER USE 2-STROKE/CYCLE OIL. Synthetic oil is an
acceptable substitute for conventional oil.
Usar aceite para motor de 4 tiempos únicamente. NO USAR NUNCA ACEITE PARA MOTOR DE 2 TIEMPOS. El aceite sintético
es un sustituto aceptable del aceite convencional.
After 50 Hours of Use
or Every 6 Months
Después de 50 horas de uso o
cada 6 meses
Change
Cambiar
Clean*
Limpiar*
After 100 Hour of Use
or Every 6 Months
Después de 100 horas de uso o
cada 6 meses
- -
-
Check/Clean
Comprobar/Limpiar
Check/Clean
Comprobar/Limpiar
After 300 Hours of Use
or Every Year
Después de 300 horas de uso o
cada año
Replace
Reemplazar
Replace
Reemplazar
-
SPARK PLUG REPLACEMENT | SUSTITUCIÓN DE LA BUJÍA
Cummins Torch Spark plug Champion Bosch Autolite
A058V025 F7RTC N9YC W7DC 52
Questions? Call 1-800-CUMMINS (1-800-286-6467) | Preguntas? Llame al 1 (800) 286-6467
BATTERY REPLACEMENT | SUSTITUCIÓN DE LA BATERÍA
Cummins Part Number
Número de parte de Cummins
After Market Battery Model
Modelo de batería de repuesto
| Voltios
Volts
Amp Hr
Dimensions
| Amperios/hora
| Dimensiones
A058U961
YT5AL
12
5
4.63 in by 2.38
in by 5 in
3-2019
A062T719 (Issue 1)
English and Spanish, Original Instructions
Copyright © 2019 Cummins Inc.
Pae 2
 Loading...