

ZEN-SOFT01-V4
Cat.No.Z184-E1-04

ZEN-SOFT01-V4 ZEN Support Software
Operation Manual
Revised December 2008

Preface
OMRON products are manufactured for use according to proper procedures by a
qualified operator and only for the purposes described in this manual.
This manual describes the functions, performance, and application methods needed
for optimum use of the ZEN Programmable Relay.
The ZEN is a compact and highly functional controller that can be used to easily
automate small-scale applications. Its development has drawn on OMRON's
advanced control technology and expertise in manufacturing various types of
controllers.
Before using the ZEN, read this manual carefully so that you can use the ZEN
correctly. Keep the manual close at hand so that you can refer to it whenever
necessary.
Notice
(1) All rights reserved. No part of this manual may be reprinted or copied without
the prior written permission of OMRON.
(2) The specifications and other information in this manual are subject to change
without notice for product improvement.
(3) Considerable care has been taken in the preparation of this manual; however,
OMRON assumes no responsibility or liability for any errors or inaccuracies that
may appear. In the event that a problem is discovered, please contact one of the
OMRON offices or agents listed at the end of the manual, and provide the
catalog number shown on the cover of the manual.
iv

Warranty and Application Considerations
Read and Understand this Manual
Please read and understand this manual before using the product. Please consult
your OMRON representative if you have any questions or comments.
Warranty and Limitations of Liability
Warranty and Limitations of Liability
WARRANTY
OMRON's exclusive warranty is that the products are free from defects in materials
and workmanship for a period of one year (or other period if specified) from date of
sale by OMRON.
OMRON MAKES NO WARRANTY OR REPRESENTATION, EXPRESS OR
IMPLIED, REGARDING NON-INFRINGEMENT, MERCHANTABILITY, OR FITNESS
FOR PARTICULAR PURPOSE OF THE PRODUCTS. ANY BUYER OR USER
ACKNOWLEDGES THAT THE BUYER OR USER ALONE HAS DETERMINED
THAT THE PRODUCTS WILL SUITABLY MEET THE REQUIREMENTS OF THEIR
INTENDED USE. OMRON DISCLAIMS ALL OTHER WARRANTIES, EXPRESS OR
IMPLIED.
LIMITATIONS OF LIABILITY
OMRON SHALL NOT BE RESPONSIBLE FOR SPECIAL, INDIRECT, OR
CONSEQUENTIAL DAMAGES, LOSS OF PROFITS OR COMMERCIAL LOSS IN
ANY WAY CONNECTED WITH THE PRODUCTS, WHETHER SUCH CLAIM IS
BASED ON CONTRACT, WARRANTY, NEGLIGENCE, OR STRICT LIABILITY.
In no event shall the responsibility of OMRON for any act exceed the individual price
of the product on which liability is asserted.
IN NO EVENT SHALL OMRON BE RESPONSIBLE FOR WARRANTY, REPAIR, OR
OTHER CLAIMS REGARDING THE PRODUCTS UNLESS OMRON'S ANALYSIS
CONFIRMS THAT THE PRODUCTS WERE PROPERLY HANDLED, STORED,
INSTALLED, AND MAINTAINED AND NOT SUBJECT TO CONTAMINATION,
ABUSE, MISUSE, OR INAPPROPRIATE MODIFICATION OR REPAIR.
v

Application Considerations
Application Considerations
SUITABILITY FOR USE
OMRON shall not be responsible for conformity with any standards, codes, or
regulations that apply to the combination of products in the customer's application or
use of the products.
At the customer's request, OMRON will provide applicable third party certification
documents identifying ratings and limitations of use that apply to the products. This
information by itself is not sufficient for a complete determination of the suitability of
the products in combination with the end product, machine, system, or other
application or use.
The following are some examples of applications for which particular attention must
be given. This is not intended to be an exhaustive list of all possible uses of the
products, nor is it intended to imply that the uses listed may be suitable for the
products:
• Outdoor use, uses involving potential chemical contamination or electrical
interference, or conditions or uses not described in this manual.
• Nuclear energy control systems, combustion systems, railroad systems, aviation
systems, medical equipment, amusement machines, vehicles, safety equipment,
and installations subject to separate industry or government regulations.
• Systems, machines, and equipment that could present a risk to life or property.
Please know and observe all prohibitions of use applicable to the products.
NEVER USE THE PRODUCTS FOR AN APPLICATION INVOLVING SERIOUS
RISK TO LIFE OR PROPERTY WITHOUT ENSURING THAT THE SYSTEM AS A
WHOLE HAS BEEN DESIGNED TO ADDRESS THE RISKS, AND THAT THE
OMRON PRODUCTS ARE PROPERLY RATED AND INSTALLED FOR THE
INTENDED USE WITHIN THE OVERALL EQUIPMENT OR SYSTEM.
PROGRAMMABLE PRODUCTS
OMRON shall not be responsible for the user's programming of a programmable
product, or any consequence thereof.
vi

Disclaimers
Disclaimers
CHANGE IN SPECIFICATIONS
Product specifications and accessories may be changed at any time based on
improvements and other reasons.
It is our practice to change model numbers when published ratings or features are
changed, or when significant construction changes are made. However, some
specifications of the products may be changed without any notice. When in doubt,
special model numbers may be assigned to fix or establish key specifications for your
application on your request. Please consult with your OMRON representative at any
time to confirm actual specifications of purchased products.
DIMENSIONS AND WEIGHTS
Dimensions and weights are nominal and are not to be used for manufacturing
purposes, even when tolerances are shown.
PERFORMANCE DATA
Performance data given in this manual is provided as a guide for the user in
determining suitability and does not constitute a warranty. It may represent the result
of OMRON's test conditions, and the users must correlate it to actual application
requirements. Actual performance is subject to the OMRON Warranty and Limitations
of Liability.
ERRORS AND OMISSIONS
The information in this document has been carefully checked and is believed to be
accurate; however, no responsibility is assumed for clerical, typographical, or
proofreading errors, or omissions.
Copyright and Copy Permission
Copyright and Copy Permission
COPYRIGHT AND COPY PERMISSION
This document shall not be copied for sales or promotions without permission.
This document is protected by copyright and is intended solely for use in conjunction
with the product. Please notify us before copying or reproducing this document in
any manner, for any other purpose. If copying or transmitting this document to
another, please copy or transmit it in its entirety.
vii

OMRON Product References
All OMRON products are capitalized in this manual. The word “Unit” is also
capitalized when it refers to an OMRON product, regardless of whether or not it
appears in the proper name of the product.
OMRON, 2003
viii

Software License Agreement
Note Read this Agreement prior to using the software.
This software (hereafter called the “Software”) shall be used only after the user
(hereafter called the “User” and referring to either individuals or companies) has agreed
to the following conditions for usage (hereafter called the “Agreement”). This Agreement
is a legal contract that is formed between the User and OMRON Corporation (hereafter
called “OMRON”). The act of installing, copying, or using the Software shall imply that
the User agrees to the items of this Agreement. In the event that the User does not
agree to the items of this Agreement, OMRON shall not grant the right for the User to
install, copy, or use the Software.
1. In this Agreement, Software means the computer program and related
documentation contained in the package of this program. Copyright of the Software
remains the sole property of OMRON or the third party who has licensed the
Software to OMRON and shall not be assigned to the User under this Agreement.
2. OMRON grants the User a non-exclusive, non-transferable, and limited license to
use the Software on one or more computer(s) owned by the User.
3. The User shall not sub-license, assign, nor lease the Software to any third party
without prior written consent of OMRON.
4. The User may copy the Software for backup purposes only. The User may not
decompile, reverse engineer, nor otherwise attempt to discern the source code of the
Software.
5. The user acknowledges that the software is provided on an as is basis and there are
no warranties, expressed or implied, including but not limited to, warranty of
merchantability or fitness for particular purpose. In no event, will OMRON be liable
for any direct, indirect, incidental, special, or consequential damages arising out of
this agreement or use of the software.
6. If the User breaches this Agreement, OMRON may terminate this Agreement upon
notice to the User. In that event, the User shall return the Software and all copies
thereof.
ix

Revision History
A manual revision code appears as a suffix to the catalog number on the front cover of
the manual.
Cat. No. Z184-E1-04
Revision code
The following table outlines the changes made to the manual during each revision. Page
numbers refer to the previous version.
Revision
code
01 May 2003 Original production
02 August 2005 Modifications and additions for Version 3.0 of the ZEN system
03 January 2006 Modifications and additions for Version 3.0 of the ZEN system
04 December 2008 Added Vista for operating system of compatible computers.
Date Revised content
software and Version 4.0 of the ZEN support software.
Applicable models: ZEN-10C3@R-@-V2
software and Version 4.1 of the ZEN support software including
the following:
Added 8-digit counters, 8-digit comparators, and event relays.
Added twin timers.
Added multiple-day operation and pulse-output operation for
weekly timers.
Added daylight saving time settings for Australia and New
Zealand.
Added RS-485 communications settings for models with
communications.
Deleted contrast control settings.
Modified and added to warranty and safety information.
x
About this Manual
This manual describes the installation and operation of the ZEN-SOFT01 ZEN
Support Software and includes the sections described below.
Please read this manual carefully and be sure you understand the information
provided before attempting to install or operate the ZEN Support Software. Be
sure to read the precautions provided in the following section.
Precautions provide general precautions for using the ZEN Support Software
and related devices.
Section 1 describes how to install and start the ZEN Support Software. The
screen configuration is also explained, along with the submenus for the Menu
Bar, Toolbar, and Status Bar.
Section 2 describes how to create, save, edit, and print ladder programs.
Section 3 describes how to connect to the ZEN and how to transfer programs
between the ZEN and the ZEN Support Software.
Section 4 describes the ZEN system settings, how to set passwords to protect
the ZEN ladder programs, and how to clear the ZEN memory.
Section 5 describes the simulation function, which can be used to simulate
ladder program execution without downloading the program to the ZEN.
Section 6 describes errors that may occur while using the ZEN Support
Software and possible countermeasures.
The following two manuals are provided for the ZEN Programmable Relays.
Refer to them as required in operation.
Manual Contents Cat. No.
ZEN Programmable
Relays Operation
Manual
ZEN Programmable
Relays Communications
Manual
ZEN Support Software
Operation Manual
The ZEN specifications,
functions, and operating
methods.
The ZEN-10C4
communications functions
and operation.
Installation and operating
procedures for the ZEN
Support Software
V1 or Pre-V1
CPU Units
V2 CPU Units Z211
Z212
Z184
Z183
Note On the ZEN Support Software displays, bits in ZEN memory are
called “relays,” program input bits are called “contacts,” and
program output bits are called “coils.”
!WARNING Failure to read and understand the information provided in this manual may
result in personal injury or death, damage to the product, or product failure.
Please read each section in its entirety and be sure you understand the
information provided in the section and related sections before attempting
any of the procedures or operations given.
xi

Visual Aids
The following headings appear in the left column of the manual to help you locate
different types of information.
Note Indicates information of particular interest for efficient and
1,2,3... 1. Indicates lists of one sort or another, such as procedures,
convenient operation of the product.
checklists, etc.
Precaution Indicates precautionary information that should be heeded in
using the ZEN.
xii

TABLE OF CONTENTS
Warranty and Application Considerations . . . . . . . . . . . . . . . . . . . . . v
OMRON Product References . . . . . . . . . . . . . . . . . . . . . . . . . . . . . . .viii
Software License Agreement . . . . . . . . . . . . . . . . . . . . . . . . . . . . . . .ix
Revision History . . . . . . . . . . . . . . . . . . . . . . . . . . . . . . . . . . . . . . . . . x
About this Manual . . . . . . . . . . . . . . . . . . . . . . . . . . . . . . . . . . . . . . .xi
Visual Aids . . . . . . . . . . . . . . . . . . . . . . . . . . . . . . . . . . . . . . . . . . . . .xii
PRECAUTIONS . . . . . . . . . . . . . . . . . . . . . . . . . . . . . . . . . . . . . . . .xv
1 General Precautions . . . . . . . . . . . . . . . . . . . . . . . . . . . . . . . . . . . . . . . . . . . . xvi
2 Safety Precautions . . . . . . . . . . . . . . . . . . . . . . . . . . . . . . . . . . . . . . . . . . . . . xvi
3 Application Precautions . . . . . . . . . . . . . . . . . . . . . . . . . . . . . . . . . . . . . . . . . xvii
SECTION 1
Installation and Startup . . . . . . . . . . . . . . . . . . . . . . . . . . . . . . . . . . 1
1-1 Before Operation . . . . . . . . . . . . . . . . . . . . . . . . . . . . . . . . . . . . . . . . . . . . . . 2
1-2 Installing and Uninstalling the ZEN Support Software . . . . . . . . . . . . . . . . . 3
1-3 Starting and Quitting . . . . . . . . . . . . . . . . . . . . . . . . . . . . . . . . . . . . . . . . . . . 5
1-4 Screen Configuration . . . . . . . . . . . . . . . . . . . . . . . . . . . . . . . . . . . . . . . . . . . 6
SECTION 2
Creating Ladder Programs . . . . . . . . . . . . . . . . . . . . . . . . . . . . . . .11
2-1 Circuit Diagrams and Ladder Programs . . . . . . . . . . . . . . . . . . . . . . . . . . . . 12
2-2 Inputting Ladder Programs . . . . . . . . . . . . . . . . . . . . . . . . . . . . . . . . . . . . . . 16
2-3 Checking Ladder Programs . . . . . . . . . . . . . . . . . . . . . . . . . . . . . . . . . . . . . . 23
2-4 Editing Ladder Programs. . . . . . . . . . . . . . . . . . . . . . . . . . . . . . . . . . . . . . . . 24
2-5 Editing Comments . . . . . . . . . . . . . . . . . . . . . . . . . . . . . . . . . . . . . . . . . . . . . 35
2-6 Saving Ladder Programs . . . . . . . . . . . . . . . . . . . . . . . . . . . . . . . . . . . . . . . . 36
2-7 Printing Ladder Programs . . . . . . . . . . . . . . . . . . . . . . . . . . . . . . . . . . . . . . . 37
SECTION 3
Transferring and Monitoring Programs . . . . . . . . . . . . . . . . . . . .41
3-1 Connecting the ZEN and Communications Settings . . . . . . . . . . . . . . . . . . . 42
3-2 Connecting Online . . . . . . . . . . . . . . . . . . . . . . . . . . . . . . . . . . . . . . . . . . . . . 44
3-3 Transferring Programs to the ZEN. . . . . . . . . . . . . . . . . . . . . . . . . . . . . . . . . 45
3-4 Transferring Programs from the ZEN . . . . . . . . . . . . . . . . . . . . . . . . . . . . . . 46
3-5 Verifying Programs with the ZEN . . . . . . . . . . . . . . . . . . . . . . . . . . . . . . . . . 47
3-6 Operating and Stopping the ZEN. . . . . . . . . . . . . . . . . . . . . . . . . . . . . . . . . . 48
3-7 Monitoring Programs. . . . . . . . . . . . . . . . . . . . . . . . . . . . . . . . . . . . . . . . . . . 48
3-8 Setting and Resetting Inputs . . . . . . . . . . . . . . . . . . . . . . . . . . . . . . . . . . . . . 51
3-9 Clearing Errors. . . . . . . . . . . . . . . . . . . . . . . . . . . . . . . . . . . . . . . . . . . . . . . . 52
xiii

TABLE OF CONTENTS
SECTION 4
System Settings . . . . . . . . . . . . . . . . . . . . . . . . . . . . . . . . . . . . . . . . 53
4-1 ZEN Settings . . . . . . . . . . . . . . . . . . . . . . . . . . . . . . . . . . . . . . . . . . . . . . . . . 54
4-2 Setting a Password . . . . . . . . . . . . . . . . . . . . . . . . . . . . . . . . . . . . . . . . . . . . . 57
4-3 Protecting Programs . . . . . . . . . . . . . . . . . . . . . . . . . . . . . . . . . . . . . . . . . . . . 58
4-4 Clearing the ZEN Memory. . . . . . . . . . . . . . . . . . . . . . . . . . . . . . . . . . . . . . . 59
4-5 RS-485 Communications Settings . . . . . . . . . . . . . . . . . . . . . . . . . . . . . . . . . 60
SECTION 5
Simulation Function . . . . . . . . . . . . . . . . . . . . . . . . . . . . . . . . . . . . 61
5-1 Starting and Stopping the Simulation Function . . . . . . . . . . . . . . . . . . . . . . . 62
5-2 ZEN Image Display . . . . . . . . . . . . . . . . . . . . . . . . . . . . . . . . . . . . . . . . . . . . 63
5-3 Present Value List Display . . . . . . . . . . . . . . . . . . . . . . . . . . . . . . . . . . . . . . . 65
5-4 Clock Display. . . . . . . . . . . . . . . . . . . . . . . . . . . . . . . . . . . . . . . . . . . . . . . . . 66
SECTION 6
Troubleshooting. . . . . . . . . . . . . . . . . . . . . . . . . . . . . . . . . . . . . . . . 67
6-1 Online Errors and Warnings. . . . . . . . . . . . . . . . . . . . . . . . . . . . . . . . . . . . . . 68
6-2 Program Check Errors and Warnings. . . . . . . . . . . . . . . . . . . . . . . . . . . . . . . 69
6-3 Protect Setting and Clearing Errors . . . . . . . . . . . . . . . . . . . . . . . . . . . . . . . . 70
Appendices
A Shortcut Keys and Hot Keys . . . . . . . . . . . . . . . . . . . . . . . . . . . . . . . . . . . . . 71
B Support Software Version Upgrades . . . . . . . . . . . . . . . . . . . . . . . . . . . . . . . 73
xiv

PRECAUTIONS
This section provides general precautions for using the ZEN Support Software for the ZEN
Programmable Relays.
The information contained in this section is important for the safe and reliable application
of the ZEN. You must read this section and understand the information contained before
attempting to set up or operate a ZEN.
1 General Precautions . . . . . . . . . . . . . . . . . . . . . . . . . . . . . . . . . . . . . . . . . . . . xvi
2 Safety Precautions . . . . . . . . . . . . . . . . . . . . . . . . . . . . . . . . . . . . . . . . . . . . . xvi
3 Application Precautions . . . . . . . . . . . . . . . . . . . . . . . . . . . . . . . . . . . . . . . . . xvii
xv

General Precautions 1
1 General Precautions
The user must operate the product according to the performance
specifications described in the operation manual.
Before using the product under conditions which are not described in
the manual or applying the product to nuclear control systems,
railroad systems, aviation systems, vehicles, combustion systems,
medical equipment, amusement machines, safety equipment, and
other systems, machines, and equipment that may have a serious
influence on lives and property if used improperly, consult your
OMRON representative.
Make sure that the ratings and performance characteristics of the
product are sufficient for the systems, machines, and equipment, and
be sure to provide the systems, machines, and equipment with
double safety mechanisms.
This manual provides information for installing and operating
OMRON Motion Control Units. Be sure to read this manual before
operation and keep this manual close at hand for reference during
operation.
!WARNING It is extremely important that a PC and all PC Units be used for
the specified purpose and under the specified conditions,
especially in applications that can directly or indirectly affect
human life. You must consult with your OMRON representative
before applying a PC system to the above mentioned
applications.
2 Safety Precautions
Confirm safety before attempting any of the following operations.
• Transferring the user program
• Changing the user program
• Changing the operating mode of the ZEN
• Turning relays ON or OFF
Always perform a program check on any program after writing it and
before transferring it to the ZEN. Also confirm the operation of the
program completely before using it for actual system operation.
Always disconnect the output circuits before performing operating
tests on systems in which the loads connected to the output circuits
can have a serious effect on human life or property if incorrect
operation occurs.
xvi

Application Precautions 3
3 Application Precautions
Observe the following precautions when using the ZEN Support
Software.
• Observe the following precautions before starting the ZEN
Support Software
• Close all software programs not related to the ZEN Support
Software. It is particularly important to close all programs
that start periodically or intermittently, such as screen savers,
virus checkers, email and other communications programs,
and schedulers.
• Do not share hard disks, printers, or other devices with other
network computers while running the ZEN Support Software.
• Some notebook computers set the RS-232C port to modem
or infrared application by default. Change the settings
according to the operating instructions for your computer so
that the RS-232C port can be used as a normal serial
communications port.
• Some notebook computers set the RS-232C port to not
supply power (5 V) to the port to save energy by default.
Change the settings according to the operating instructions
for your computer to provide power to the port. (There are
Windows settings and also possibly settings for computerspecific utilities or BIOS settings to save power.)
• Do not turn OFF the power supply to the ZEN or disconnect the
connecting cable while the ZEN Support Software is online with
the ZEN. The computer may malfunction.
xvii

Application Precautions 3
xviii

SECTION 1
Installation and Startup
This section describes how to install and start the ZEN Support Software. The screen configuration
is also explained, along with the submenus for the Menu Bar, Toolbar, and Status Bar.
1-1 Before Operation . . . . . . . . . . . . . . . . . . . . . . . . . . . . . . . . . . . . . . . . . . . . . . 2
1-1-1 Product Contents . . . . . . . . . . . . . . . . . . . . . . . . . . . . . . . . . . . . . . 2
1-1-2 Compatible Computers . . . . . . . . . . . . . . . . . . . . . . . . . . . . . . . . . 2
1-2 Installing and Uninstalling the ZEN Support Software . . . . . . . . . . . . . . . . . 3
1-2-1 Installation . . . . . . . . . . . . . . . . . . . . . . . . . . . . . . . . . . . . . . . . . . . 3
1-2-2 Uninstalling the ZEN Support Software . . . . . . . . . . . . . . . . . . . . 4
1-3 Starting and Quitting . . . . . . . . . . . . . . . . . . . . . . . . . . . . . . . . . . . . . . . . . . . 5
1-3-1 Starting the ZEN Support Software . . . . . . . . . . . . . . . . . . . . . . . . 5
1-3-2 Quitting the ZEN Support Software . . . . . . . . . . . . . . . . . . . . . . . 6
1-4 Screen Configuration . . . . . . . . . . . . . . . . . . . . . . . . . . . . . . . . . . . . . . . . . . . 6
1

Before Operation Section 1-1
1-1 Before Operation
1-1-1 Product Contents
Check that the package for the ZEN Support Software (ZENSOFT01-V4) contains one CD-ROM setup disk.
1-1-2 Compatible Computers
The following table shows the computers that support the ZEN
Support Software.
Item Conditions
Operating system Windows 98, 98SE, ME, 2000, XP, NT4.0 Service Pack 3, or Vista
CPU Pentium 133 MHz or faster
Memory 64 Mbytes or more
HDD 40 Mbytes or more of available disk capacity
CD-ROM drive Required
Communications 1 serial port (COM port)
Keyboard and mouse Required
Monitor 800 x 600 dots (SVGA) min., 256 colors min.
Pentium 200 MHz or faster recommended.
2
Installing and Uninstalling the ZEN Support Software Section 1-2
1-2 Installing and Uninstalling the ZEN Support
Software
1-2-1 Installation
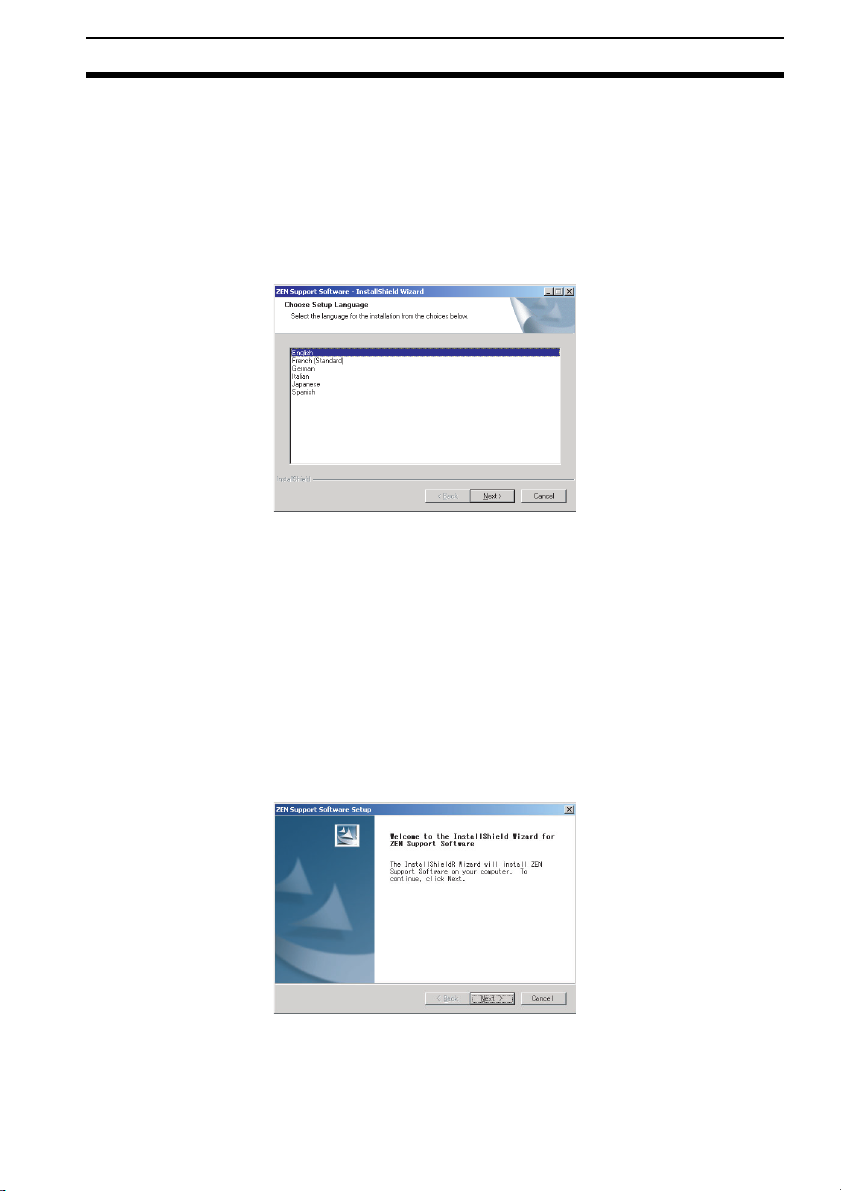
1,2,3... 1. Insert the Setup Disk in the CD-ROM drive of the computer. After
a short while the Language Selection Screen will be displayed.
Select the required language and click the Next Button.
Note • If the Language Selection Screen is not displayed when the
CD-ROM is inserted, go to My Computer, open the Setup Disk
(CD-ROM) icon, and double-click the Setup.exe file.
• If a previous version of the ZEN Support Software is already
installed, a confirmation dialog box for file deletion will appear
when the CD-ROM is inserted. Click the OK Button.
The previous version will be deleted and the maintenance
completion dialog box will be displayed. Click the Finish
Button, insert the CD-ROM again, and install the new version
of the ZEN Support Software.
2. The Setup Screen will be displayed. Check the details, enter the
required information, and click the Next Button.
3

Installing and Uninstalling the ZEN Support Software Section 1-2
3. When the setup operation has been completed, the following
screen will be displayed. Click the Finish Button.
1-2-2 Uninstalling the ZEN Support Software
Use the following procedure to uninstall the ZEN Support Software
from a computer.
1,2,3... 1. Select Settings/Control panel from the Windows Start Menu.
2. Select Add or delete applications from the Windows Control
Panel and then select and delete OMRON ZEN Support
Software.
4

Starting and Quitting Section 1-3
1-3 Starting and Quitting
1-3-1 Starting the ZEN Support Software
This section explains the procedure for starting and quitting the ZEN
Support Software.
1,2,3... 1. Select Program/Omron/ZEN Support Software/ZEN Support
Software from the Windows Start Menu. After a moment the
initial screen will be displayed.
2. When display of the opening screen is finished, the following
screen will be displayed. Select Create a new program and click
the OK Button.
Note a) Click Load programs from files and double-click the
OK Button to open existing ladder programs when
starting up the ZEN Support Software. Refer to 2-6-2
Opening Saved Files for the rest of the procedure for
opening existing ladder programs.
b) If uploading a program from the ZEN is selected, the
following will be performed automatically.
• Using the ZEN online function, the contents of the
property settings (ZEN model and Expansion I/O Unit
configuration) will be read from the ZEN and the
settings will be made.
• The program will be transferred from the ZEN to the
computer.
• The ladder diagram will be displayed.
5
Screen Configuration Section 1-4
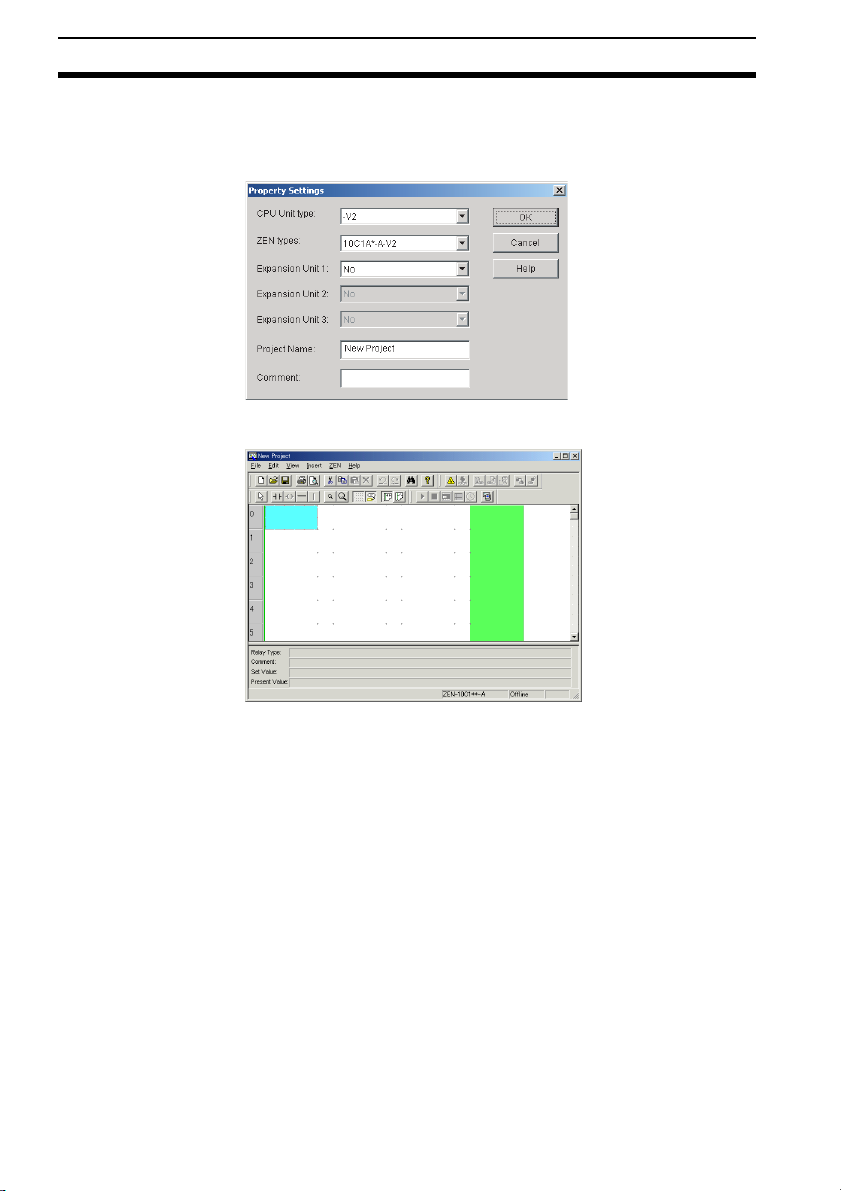
3. The Property Settings Screen will be displayed. Enter the ZEN
model and configuration (i.e., whether or not Expansion I/O Units
are connected), the project name, and a comment and press the
OK Button.
Up to 31 characters
can be entered.
4. The ZEN Support Software will start.
1-3-2 Quitting the ZEN Support Software
Select File(F)/Exit(E) from the Menu Bar to close the ZEN Support
Software.
1-4 Screen Configuration
The ZEN Support Software allows the display to be set to either a
Ladder Diagram Display or an Electric Circuit Display. The
functionality of the ZEN Support Software is the same regardless of
which display is used.
6

Screen Configuration Section 1-4
Ladder Diagram Display
Menu bar
Toolbars
Mouse
cursor
Ladder
view of
program
Bit
information
Status bar
Electrical Circuit Display
Menu bar
Toolbars
Mouse
cursor
Electrical
diagram
Rung
comments
Rung
comments
Bit
information
Status bar
Note To switch between the ladder diagram and electrical diagram
displays, either click on the buttons in the Toolbar or else select
View(V)/Circuit display method/Ladder rung diagram/
Electrical circuit diagram from the File menu.
7

Screen Configuration Section 1-4
Menu Bar The Menu Bar functions are listed in the following menu tree.
File (F)
View (V) Show Symbol
ZEN (Z) Go Online/Offline (W)
New (N)
Open (O)
Save (S)
Save As (A)
Load Symbol Comments
Print Setup (R)
Print Preview (V)
Print (P)
Communications Settings
(ZEN
↔ Computer)
Properties
Recent File
Exit (X)
Comments
Toolbar
Status Bar (S)
Grid
Circuit display
method
Zoom Out
Zoom In
Zoom to
Change operating
mode (M)
Monitor (O)
Start Simulator/Stop Simulator
Program Check
Display Check
Transfer (R)
Protect (P)
Set/Reset
Operation
Error Clear
All Clear Within ZEN
Set Protection (E)
ZEN Information (S)
Edit (E)
Standard
Ladder
ZEN
Simulator
Ladder rung diagram
Electrical circuit diagram
50%
100%
150%
200%
RUN (R)
STOP (S)
Transfer from ZEN (T)
Transfer to ZEN (R)
Compare with ZEN (C)
Release (L)
Set (S)
Set Operation (W)
Reset Operation (F)
Settings (S)
Time Setting (T)
Set Password (P)
Insert (I)
Help (H)
Undo (U)
Redo (R)
Cut (T)
Copy (C)
Paste (P)
Select All (A)
Delete
Delete Rung
Find (F)
Find Next
Replace
Edit (E)
Edit Comments
Edit Rung Comments
Select Objects
Rung (M)
Contact (input bit)/
Coil (output bit)
Horizontal (H)
Vertical (V)
Contents (N)
Find Topics (T)
About ZEN (A)
Note On the ZEN Support Software displays, bits in the ZEN memory
are called “relays,” program input bits are called “contacts,” and
program output bits are called “coils.”
8
Screen Configuration Section 1-4
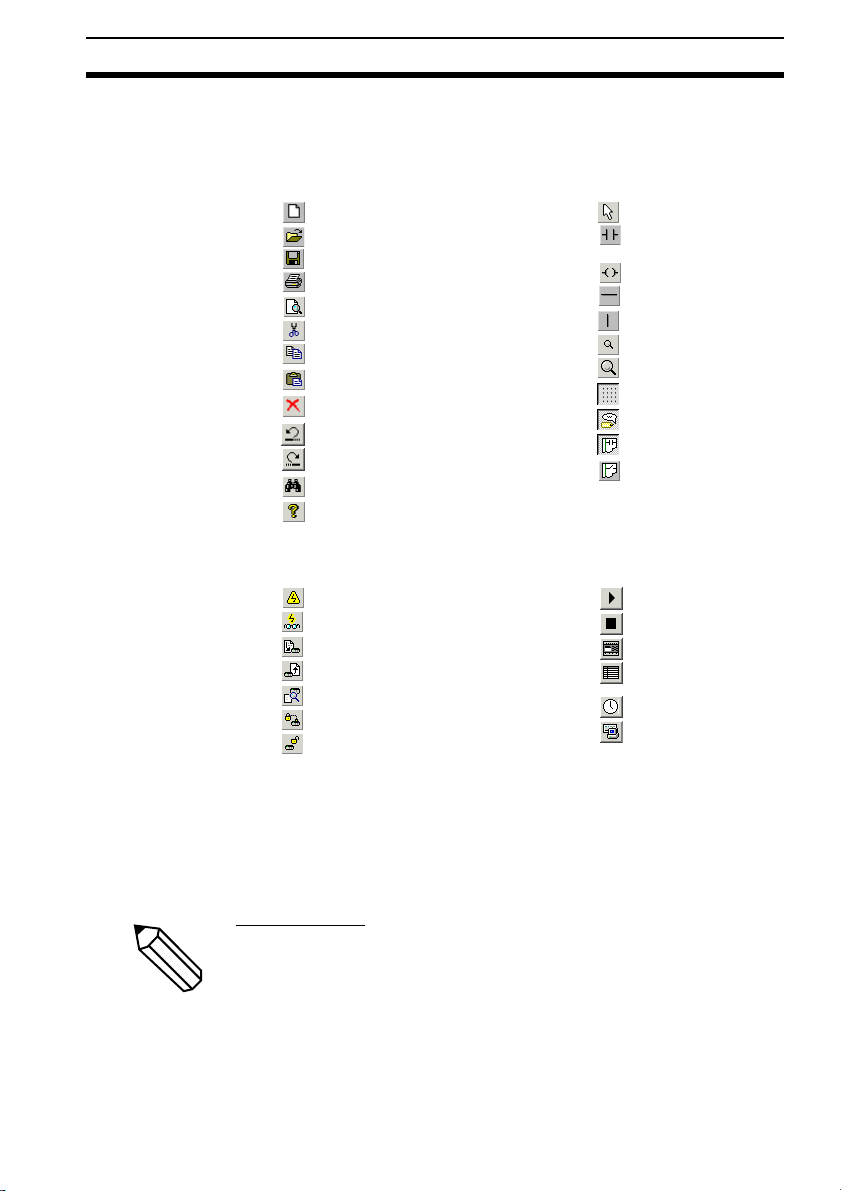
Tool bars The following shortcut keys can be used from the Toolbars. Select
View(V)/Toolbar from the Menu Bar to display or not display the
Toolbars.
Standard
New
Open
Save
Print
Print Preview
Cut
Copy
Paste
Delete
Undo
Redo
Find
About ZEN
ZEN
Go Online/Offline
Toggle Monitoring
Transfer to ZEN
Transfer from ZEN
Compare with ZEN
Set Protection
Release Protection
Ladder
Select objects
Insert Contact (input
condition)
Insert Coil (output)
Insert Horizontal
Insert Vertical
Zoom Out
Zoom In
Show Grid
Show Comments
Ladder rung diagram
Electrical circuit
diagram
Simulator
RUN
STOP
ZEN Image Display
Present Value List
Display
Clock Display
Start/Exit Simulator
Mouse
Cursors
Note On the ZEN Support Software displays, bits in the ZEN memory
are called “relays,” program input bits are called “contacts,” and
program output bits are called “coils.”
There are two types of cursors used with the ZEN. A right-click menu
can be used with either of them.
Pencil Cursor
Appears when performing ladder program input operations.
9
Screen Configuration Section 1-4
Arrow Cursor
Appears when performing operations from the Menu Bar or the
Toolbar. Also used for specifying the range when editing ladder
programs.
Right-click Menu
Edit (E)
Find (F)
Cut (T)
Copy (C)
Paste (P)
Delete (D)
Set/Reset (S)
Rung (L)
Set (W)
Reset (F)
Insert (W)
Remove (R)
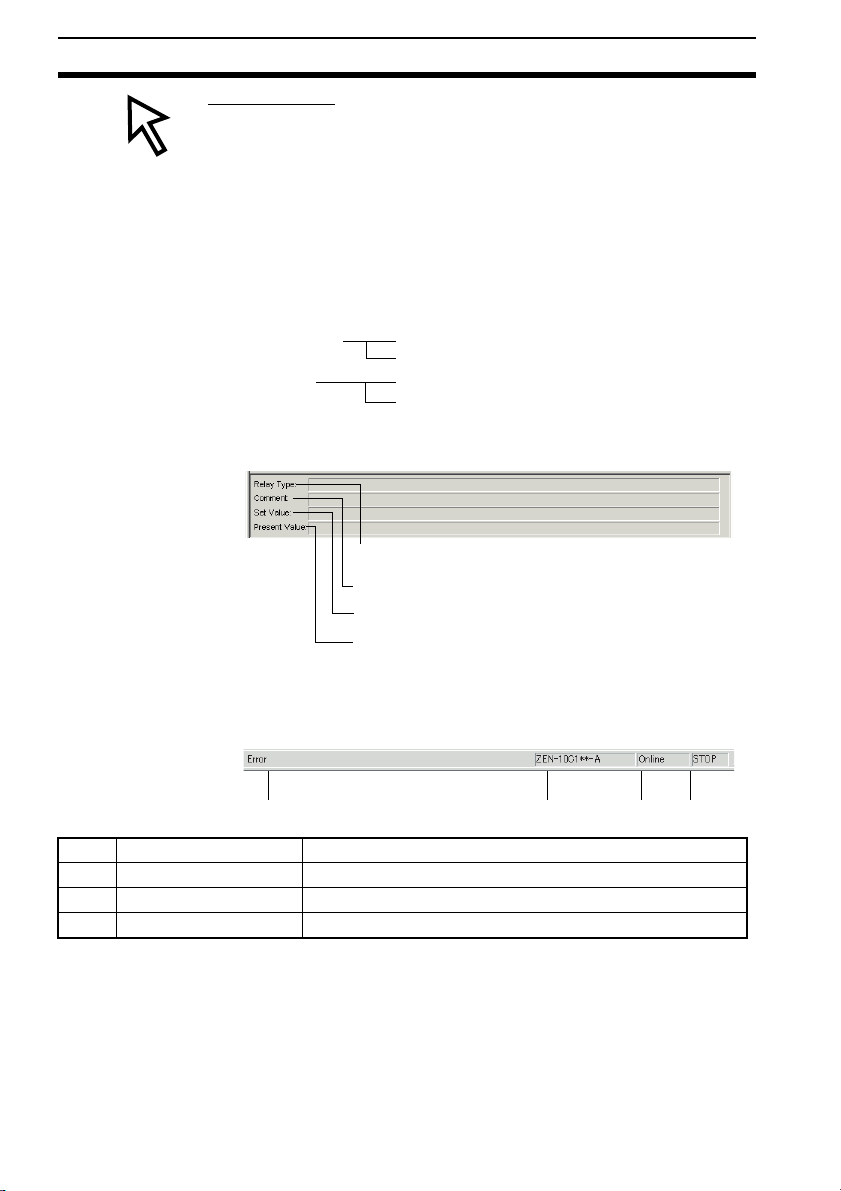
Bit
Information on bits is displayed in the Bit Information Area.
Information
The bit type is displayed here.
Comments are displayed here.
Set values for timers, counters, etc., are displayed here.
Input information and present values for timers, counters,
etc., are displayed here.
Status Bar The Status Bar displays information on the model of the connected
ZEN, the connection status, operating status, and comments.
4123
1 Connected ZEN model Displays the model of the ZEN selected at startup.
2 Connection status Indicates online or offline status.
3 Operating status Indicates RUN or STOP (displayed only when online).
4 Comments Displays operation explanations and online errors.
10

SECTION 2
Creating Ladder Programs
This section describes how to create, save, edit, and print ladder programs.
2-1 Circuit Diagrams and Ladder Programs . . . . . . . . . . . . . . . . . . . . . . . . . . . . 12
2-1-1 Ladder Programs . . . . . . . . . . . . . . . . . . . . . . . . . . . . . . . . . . . . . . 12
2-1-2 Basic Configuration of the ZEN Ladder Programs . . . . . . . . . . . . 12
2-1-3 Memory Areas . . . . . . . . . . . . . . . . . . . . . . . . . . . . . . . . . . . . . . . . 13
2-1-4 Memory Area Differences between Versions . . . . . . . . . . . . . . . . 15
2-2 Inputting Ladder Programs . . . . . . . . . . . . . . . . . . . . . . . . . . . . . . . . . . . . . . 16
2-3 Checking Ladder Programs . . . . . . . . . . . . . . . . . . . . . . . . . . . . . . . . . . . . . . 23
2-3-1 Program Check. . . . . . . . . . . . . . . . . . . . . . . . . . . . . . . . . . . . . . . . 23
2-3-2 Display Check . . . . . . . . . . . . . . . . . . . . . . . . . . . . . . . . . . . . . . . . 23
2-4 Editing Ladder Programs. . . . . . . . . . . . . . . . . . . . . . . . . . . . . . . . . . . . . . . . 24
2-4-1 Searching for Inputs and Outputs . . . . . . . . . . . . . . . . . . . . . . . . . 24
2-4-2 Replacing Inputs . . . . . . . . . . . . . . . . . . . . . . . . . . . . . . . . . . . . . . 24
2-4-3 Changing Inputs, Outputs, and Settings. . . . . . . . . . . . . . . . . . . . . 25
2-4-4 Inserting Inputs . . . . . . . . . . . . . . . . . . . . . . . . . . . . . . . . . . . . . . . 26
2-4-5 Deleting Inputs and Outputs . . . . . . . . . . . . . . . . . . . . . . . . . . . . . 27
2-4-6 Inserting Rungs . . . . . . . . . . . . . . . . . . . . . . . . . . . . . . . . . . . . . . . 28
2-4-7 Editing Connection Lines . . . . . . . . . . . . . . . . . . . . . . . . . . . . . . . 29
2-4-8 Copying, Cutting, and Pasting Inputs and Outputs . . . . . . . . . . . . 30
2-4-9 Deleting Rungs. . . . . . . . . . . . . . . . . . . . . . . . . . . . . . . . . . . . . . . . 35
2-5 Editing Comments . . . . . . . . . . . . . . . . . . . . . . . . . . . . . . . . . . . . . . . . . . . . . 35
2-6 Saving Ladder Programs . . . . . . . . . . . . . . . . . . . . . . . . . . . . . . . . . . . . . . . . 36
2-6-1 Saving to File. . . . . . . . . . . . . . . . . . . . . . . . . . . . . . . . . . . . . . . . . 36
2-6-2 Opening Saved Files . . . . . . . . . . . . . . . . . . . . . . . . . . . . . . . . . . . 37
2-7 Printing Ladder Programs . . . . . . . . . . . . . . . . . . . . . . . . . . . . . . . . . . . . . . . 37
2-7-1 Print Settings . . . . . . . . . . . . . . . . . . . . . . . . . . . . . . . . . . . . . . . . . 37
2-7-2 Print Preview . . . . . . . . . . . . . . . . . . . . . . . . . . . . . . . . . . . . . . . . . 38
2-7-3 Printing. . . . . . . . . . . . . . . . . . . . . . . . . . . . . . . . . . . . . . . . . . . . . . 39
11
Circuit Diagrams and Ladder Programs Section 2-1
2-1 Circuit Diagrams and Ladder Programs
In preparation for creating ladder programs, this section describes the
relationship between relay circuits and ladder programs.
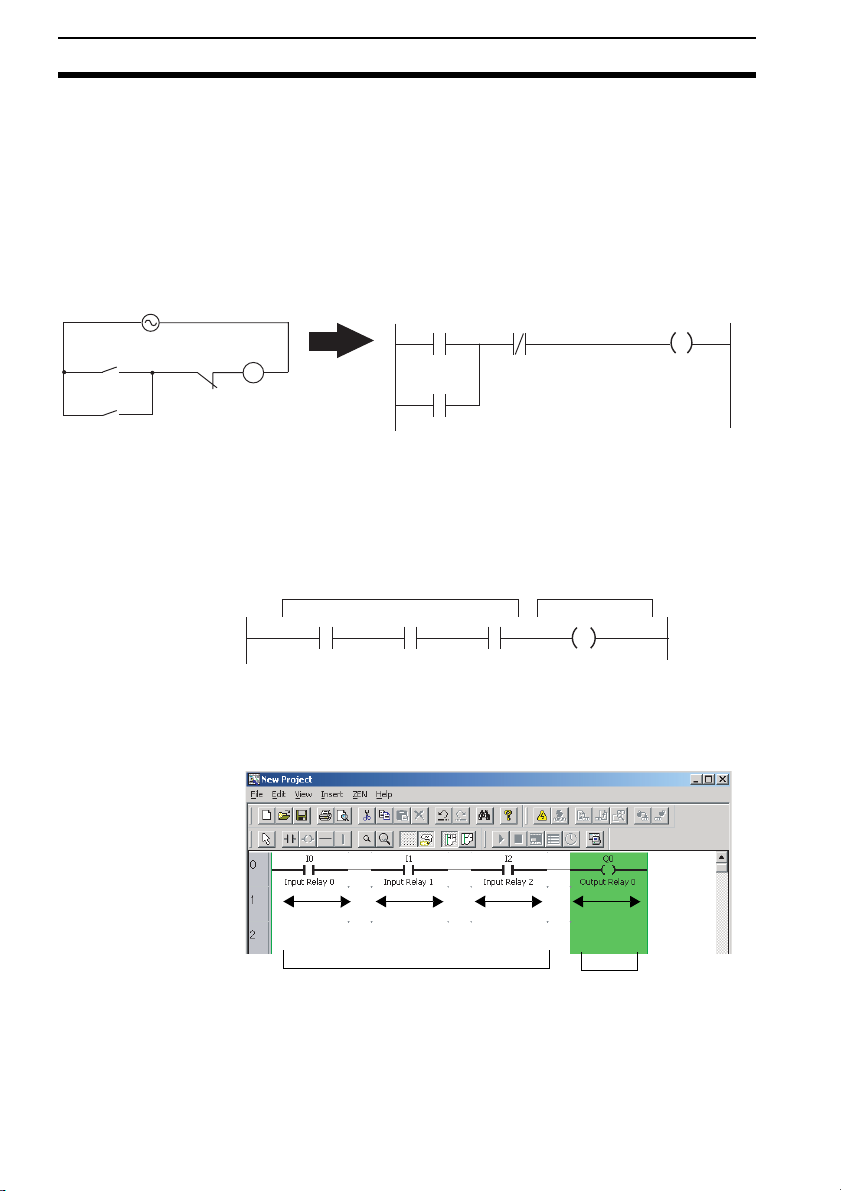
2-1-1 Ladder Programs
The ZEN uses ladder programs that appear like relay circuit
diagrams.
Relay Circuit Ladder Program
I0 I1 Q0
SW1 SW2
Ry
Ry
2-1-2 Basic Configuration of the ZEN Ladder Programs
The ZEN can execute up to 96 lines of programming, with 3 inputs
and 1 output per line. Outputs can be specified at the right ends of
lines only. Inputs cannot be specified after outputs.
3 inputs 1 output
Q0
The ladder program inputs and outputs are displayed on the ZEN
Support Software screen as shown below.
Ladder Diagram Display
12
1st input 2nd input 3rd input Output bit
1st input 2nd input 3rd input Output bit
3 inputs
1 output

Circuit Diagrams and Ladder Programs Section 2-1
Electrical Circuit Display
1st input 2nd input 3rd input
3 inputs
Output bit
1 output
Note On the ZEN Support Software displays, bits in the ZEN memory
are called “relays,” program input bits are called “contacts,” and
program output bits are called “coils.”
2-1-3 Memory Areas
The following table shows the memory areas that can be used in the
ZEN ladder programs.
Symbol Name Function Usable as input
I CPU Unit input
bits
X Expansion I/O
Unit input bits
B Button input
bits
A Analog
comparator
bits
P Timer/counter
comparator
bits
G 8-digit
comparator
bits
@ Weekly timers Turns ON/OFF at the specified
Correspond to CPU Unit input
terminals.
Correspond to Expansion I/O Unit
input terminals.
Turn ON/OFF when operation
buttons are pressed on the CPU
Unit during ZEN operation.
Compares present analog values
to setting values and outputs the
compared results for CPU Units
with DC power supply inputs.
(The analog input terminals
correspond to I4 and I5 in 10-point
CPU Units, and to Ia and Ib in 20point CPU Units.)
Compares timer/counter present
values and timer/counter present
values and settings and outputs
the compared results.
Compares 8-digit counter present
value to preset value and outputs
the compared results.
day/time
condition
Ye s N o
Ye s N o
Ye s N o
Ye s N o
Ye s N o
Ye s N o
Ye s N o
Usable as
output
13

Circuit Diagrams and Ladder Programs Section 2-1
Symbol Name Function Usable as input
∗ Calendar
timers
Q CPU Unit
output bits
Y Expansion I/O
Unit output bits
M Work bits Bits that can be
H Holding bits Bits that
T Timers Timers can be used for ON delay
# Holding timers Timers that maintain the present
C Counters Incremental or decremental
F 8-digit Counter Incremental or decremental
D Display bits Display character strings, month/
Turns ON/OFF between specified
dates.
Correspond to
CPU Unit output
terminals.
Correspond to
Expansion I/O
Unit output
terminals.
used in the
ladder program.
maintain ON/
OFF status at
power
interruptions
and can be used
in the ladder
program.
(X), OFF delay (■), One-shot pulse
(O), Flashing pulse (F), or Twin (W)
operation.
value at power interruptions. (ON
delay operation only.)
counters
counter with 8-digit capacity.
day, time, timer/counter present
value, or analog conversion value
on CPU Unit LCD display.
Can specify
Normal output
([), Set (S)/
Reset (R), or
Alternate (A)
operation.
condition
Ye s N o
Ye s Ye s
Ye s Ye s
Ye s Ye s
Ye s Ye s
Ye s Ye s
Ye s Ye s
Ye s Ye s
Ye s Ye s
No Yes
Usable as
output
14

Circuit Diagrams and Ladder Programs Section 2-1
2-1-4 Memory Area Differences between Versions
The following table shows the differences between different models
and different versions with respect to the memory areas that can be
used.
Symbol Name Bit number (See note 1.)
ZEN-
20C@@@-
@-V2
I CPU Unit input bits 0 to b (12
Q CPU Unit output bits 0 to 7 (8
X Expansion I/O Unit
input bits (See note
2.)
Y Expansion I/O Unit
output bits (See note
2.)
M Work bits 0 to f (16 bits)
H Holding bits 0 to f (16 bits)
B Button input bits
(See note 3.)
A Analog comparator
bits (See note 4.)
P Timer/counter
comparator bits
T Timers 0 to f (16 timers) 0 to 7
# Holding timers 0 to 7 (8 timers) 0 to 3
C Counters 0 to f (16 counters) 0 to 7
@ Weekly timers (See
note 3.)
∗ Calendar timers
(See note 3.)
D Display bits (See
note 3.)
F 8-digit counter 0 (1 counter) ---
G 8-digit comparator
bits
bits)
bits)
0 to b (12 bits max.)
0 to b (12 bits max.)
0 to 7 (8 bits)
0 to 3 (4 bits)
0 to f (16 bits)
0 to f (16 timers) 0 to 7
0 to f (16 timers) 0 to 7
0 to f (16 bits) 0 to 7
0 to 3 (4 bits) ---
ZEN-
10C@@@-
@-V2
0 to 5 (6
bits)
0 to 3 (4
bits) (See
note 5.)
ZEN-
20C@@@-
@-V1
0 to b (12
bits)
0 to 7 (8
bits)
ZEN-
10C@@@-
@-V1
0 to 5 (6
bits)
0 to 3 (4
bits)
ZEN-
10C@@@-
@
0 to 5 (6
bits)
0 to 3 (4
bits)
(8 timers)
(4 timers)
(8 counter
s)
(8 timers)
(8 timers)
(8 bits)
15

Inputting Ladder Programs Section 2-2
Note
1. Bit numbers are specified in hexadecimal (0,1,2,3.... 9, a, b,...e, f).
2. The bit numbers that can be used depend on the Expansion I/O
Unit connection configuration.
3. Supported only by the LCD-type CPU Unit.
4. Supported only by the CPU Units with a DC power supply.
5. Three bits (0 to 2) for CPU Units with Communications.
2-2 Inputting Ladder Programs
This section describes how to input the following simple program
using the ZEN Support Software.
Example Ladder Program
I0 I1 Q0
Q0
1,2,3... 1. If the ZEN Support Software has not been started, select
Programs/Omron/ZEN Support Software/ZEN Support
Software from the Windows Start Menu. Select Create a new
program and press the OK Button.
16
If the ZEN Support Software has already been started, click the
New Button on the Toolbar. Alternatively, select File(F)/New(N)
from the Menu Bar.

Inputting Ladder Programs Section 2-2
2. The Property Settings Screen will be displayed. Enter the ZEN
type, configuration (i.e., Expansion I/O Units), project name, and
comment, and then click the OK Button.
3. An empty screen in ladder-view format will be displayed. Doubleclick the mouse on the position for the first input condition.
Note Input positions for input and output bits can be set by using
the mouse or cursor keys to move to the input or output
position and then use any of the following methods.
• Press the Enter Key.
• Double-click.
• Click the Insert Input or Insert Output Button on the
Toolbar.
• Select Insert(I)/Contact (input bit)/Coil (output bit)
from the Menu Bar.
• Select Edit(E)/Edit(E) from the Menu Bar.
• Right-click and select Edit.
17

Inputting Ladder Programs Section 2-2
4. The Edit Contact Dialog Box will be displayed. Specify the bit
type, type of input, and bit number, and enter a comment if
required.
Bit name: I
Input: Normally open
Bit number: 0
Comment: CPU Unit input 0
(Up to 31 characters can be
entered.)
Comment color
Note Parameter settings for timers and counters are set on the
Edit Contact Dialog Box.
5. Double-click the mouse on the next input position.
18

Inputting Ladder Programs Section 2-2
6. The Edit Input Dialog Box will be displayed again. Specify the bit
type, type of input, bit number, and enter a comment if required,
just as you did in step 4.
Bit name: I
Input: Normally closed
Bit number: 1
Comment: CPU Unit input 1
(Up to 31 characters can be
entered.)
Comment color
7. Move the mouse to the output bit position and double-click the
mouse.
19

Inputting Ladder Programs Section 2-2
8. The Edit Output Dialog Box will be displayed. Specify the bit type,
function, and bit number, and enter a comment if required.
Bit name: Q
Normal output ([), Set (S)/Reset
(R), or Alternate (A): Normal
output ([)
Bit number: 0
Comment: CPU Unit output 0
(Up to 31 characters can be
entered.)
Comment color
9. Move the mouse to the input position on the next line and doubleclick.
20

Inputting Ladder Programs Section 2-2
10. The Edit Input Dialog Box will be displayed. Specify the bit type,
type of input, and bit number, and enter a comment if required,
just as you did in step 4.
Bit name: Q
Input (Normally Open/Normally
Closed): Normally Open
Bit number: 0
Comment: CPU Unit output 0
(Up to 31 characters can be
entered.)
Comment color
Note The comment will be automatically displayed for bit types
and bit numbers that have comments.
11. Drag the mouse vertically to draw the connecting line.
21

Inputting Ladder Programs Section 2-2
Note a) Horizontal connection lines can be drawn by using the
12. The ladder program has now been completed.
mouse or Cursor Keys to move to the connection line
position and then use any of the following methods.
• Pressing the − Key.
• Click the Insert/Horizontal Button on the Toolbar.
•Select Insert(I)/Horizontal(H) from the Menu Bar.
b) Vertical connection lines can also be drawn by using the
mouse or Cursor Keys to move to the connection line
position and then use any of the following methods:
• Press the | Key.
• Click the Insert Vertical Button on the Toolbar.
•Select Insert(I)/Vertical(V) from the Menu Bar. The
vertical line will be drawn down from the cursor
position.
22
13. Double-click in the rung comment area to write rung comments
for the ladder program. It is also possible to write comments by
first using either the mouse or the cursor keys to move to the rung
comment area, and then selecting Edit(E)/Edit rung comments.

Checking Ladder Programs Section 2-3
Enter rung comment.
Rung comment
is displayed.
Note Up to 63 characters can be entered for a rung comment.
2-3 Checking Ladder Programs
2-3-1 Program Check
Select ZEN(Z)/Program Check from the Menu Bar and check the
program. The following dialog box will be displayed if the program
check was completed without finding any errors.
Note For details on error messages during program checking,
refer to 6-2 Program Check Errors and Warnings.
2-3-2 Display Check
Select ZEN(Z)/Display Check from the Menu Bar, and then use the
Display Check Dialog Box to check the display contents for the
display bits D0 to Df that are used in the program. The contents of
23

Editing Ladder Programs Section 2-4
each are displayed in different colors, so overlapping displays can be
checked.
Click to close the Display
Check Dialog Box.
Click with the mouse to toggle between
displaying or not displaying the display
contents for each of the display bits D0 to Df.
2-4 Editing Ladder Programs
This section describes how to edit existing ladder programs.
2-4-1 Searching for Inputs and Outputs
Click the Find Button on the Toolbar or select Edit(E)/Find(F) from
the Menu Bar.
Finding by Rung Number Finding by Bit Type or Bit Number
Rung No.
Rung numbers: 0 to 95 Bit type number
2-4-2 Replacing Inputs
To replace an input, select Edit(E)/Replace from the Menu Bar.
Bit type number
24
Replace the inputs while doing the search.
(As each input is found, confirm whether or
not it is to be replaced.)
Replace all of the inputs in the ladder program
(without confirming them individually).

Editing Ladder Programs Section 2-4
2-4-3 Changing Inputs, Outputs, and Settings
Input positions for input and output bits can be changed by using the
mouse or cursor keys to move to the input or output position and then
use any of the following methods.
• Press the Enter Key.
• Double-click.
• Click the Insert Input or Insert Output Button on the Toolbar.
• Select Insert(I)/Contact (input bit)/Coil (output bit) from the
Menu Bar.
• Select Edit(E)/Edit(E) from the Menu Bar.
• Right-click and select Edit.
1,2,3... 1. For this example, double-click CPU unit output Q0.
2. The Edit Output Dialog Box will be displayed.
25

Editing Ladder Programs Section 2-4
3. Change the bit type in the Edit Output Dialog Box from Q to M
(holding bit), specify the function and bit number, and enter a
comment if necessary.
4. The output change has now been completed.
2-4-4 Inserting Inputs
Input positions for input and output bits can be inserted by using the
mouse or cursor keys to move to the input or output position and then
• Press the Enter Key.
• Double-click.
• Click the Insert Input Button on the Toolbar.
•Select Insert(I)/Contact (input bit)/Coil (output bit) from the
Menu Bar.
•Select Edit(E)/Edit(E) from the Menu Bar.
• Right-click and select Edit.
26

Editing Ladder Programs Section 2-4
1,2,3...
1. Double-click the ladder program connection line.
2. Use the Edit Input Dialog Box to insert a input at the connection
line.
2-4-5 Deleting Inputs and Outputs
To delete an input or output, first use the mouse or the cursor keys to
highlight the input or output that is to be deleted. Then use any of the
following methods.
• Click the Delete Button in the Toolbar.
• Select Edit(E)/Delete from the Menu Bar.
• Right-click and select Delete(D).
• Press the Delete Key on the keyboard.
1,2,3... 1. Move the cursor to the input.
27

Editing Ladder Programs Section 2-4
2. Click the Delete Button on the Toolbar.
3. The input will be deleted.
Note All inputs and outputs within a specified area can be deleted at
once if the method to specify an area outlined under 2-4-8
Copying, Cutting, and Pasting Inputs and Outputs is used.
2-4-6 Inserting Rungs
Using either the mouse or cursor keys, highlight the position where
the rung is to be inserted, and then use any of the following methods
to insert a blank rung.
•Select Insert(I)/Rung(M) from the Menu Bar.
• Right-click and select Rung(L)/Insert(W).
28

Editing Ladder Programs Section 2-4
1,2,3...
1. Highlight the position and then select Insert(I)/Rung(M) from the
Menu Bar.
2. The blank rung will be inserted above the highlighted position.
2-4-7 Editing Connection Lines
Use the following procedure to delete connection lines.
1,2,3... 1. Drag the mouse along the existing line.
2. Use the mouse or Cursor Keys to move to the connection line and
then use any of the following methods.
• Click the Delete Button on the Toolbar.
• Select Edit(E)/Delete from the Menu Bar.
• Press the Delete Key on the keyboard.
29

Editing Ladder Programs Section 2-4
Use the following procedure to create new connection lines.
1,2,3... 1. Drag the mouse from the desired position to create a new line.
2. Use the mouse or Cursor Keys to move to the desired position for
the connection line and then use any of the following methods.
• Click the Insert Horizontal or Insert Vertical Button on the
Toolbar.
•Select Insert(I)/Horizontal(H) or Insert(I)/Vertical(V) from
the Menu Bar.
• Press the − or I Key on the keyboard.
2-4-8 Copying, Cutting, and Pasting Inputs and Outputs
Inputs and outputs within a specified range can be easily copied and
moved if the cut, copy, or paste functions are used.
Copying, Cutting and Pasting Individual Objects
1,2,3... 1. Using the mouse or cursor keys, select the input or output that is
to be copied or cut.
30
2. Use any of the following procedures for copying and moving.

Editing Ladder Programs Section 2-4
When Copying
• Click the Copy Button on the Toolbar.
• Select Edit(E)/Copy(C) from the
Menu Bar.
• Right-click and select Copy.
3. Any of the following methods can be used to paste inputs and
outputs after moving the cursor to desired position with the mouse
or cursor keys.
• Click the Paste Button on the Toolbar.
• Select Edit(E)/Paste(P) from the Menu Bar.
• Right-click and select Paste.
When Copying When Moving
When Moving
• Click the Cut Button on the Toolbar.
• Select Edit(E)/Cut(T) from the Menu
Bar.
• Right-click and select Cut.
Note Either the pencil or arrow cursor can be used to copy, cut,
and paste individual objects.
31

Editing Ladder Programs Section 2-4
Copying, Cutting, and Pasting a Specified Range
1,2,3... 1. Click the Select objects Button on the Toolbar or select Edit(E)/
Select Objects from the Menu Bar.
Note Connection lines cannot be drawn while the Select
objects Button on the Toolbar is pressed. To return to
normal program edit mode, click the Select Objects Button
again or press the Esc Key.
32

Editing Ladder Programs Section 2-4
2. Drag the mouse from the start of the range to the end of the
range.
3. Use any of the following procedures for copying and moving.
33

Editing Ladder Programs Section 2-4
When Copying
• Click the Copy Button on the Toolbar.
• Select Edit(E)/Copy(C) from the
Menu Bar.
• Right-click and select Copy.
4. Any of the following methods can be used to paste inputs and
outputs after moving the cursor to desired position with the mouse
or cursor keys.
• Click the Paste Button on the Toolbar.
•Select Edit(E)/Paste(P) from the Menu Bar.
• Right-click and select Paste.
When Copying When Moving
When Moving
• Click the Cut Button on the Toolbar.
•Select Edit(E)/Cut(T) from the Menu
Bar.
• Right-click and select Cut.
34
Note A program saved in a ladder program file can be pasted
after copying the program and then starting up the ZEN
Support Software in a separate window.

Editing Comments Section 2-5
2-4-9 Deleting Rungs
Using either the mouse or cursor keys, highlight the rung that is to be
deleted. Then use any of the following methods to delete the rung.
• Select Edit(E)/Delete Rung from the Menu Bar.
• Right-click and select Rung(L)/Delete(R).
1,2,3... 1. Highlight the position and then select Edit(E)/Delete Rung from
the Menu Bar.
2. The highlighted rung will be deleted, and the next rung will be
moved up.
2-5 Editing Comments
The comment edit function is used to display or edit all I/O comments
by bit type.
1,2,3... 1. Select Edit(E)/Edit Comments from the Menu Bar.
35

Saving Ladder Programs Section 2-6
2. Edit the comment in the Edit Comment Screen.
Note 1. Programs are easier to understand and manage if actual I/O
device names or names relating to functions are used in the I/O
comments.
2. Click the Show Comments Button on the Toolbar or select
View(V)/Show Symbol Comments from the Menu Bar to display
or not display the I/O comments in ladder view on the screen.
2-6 Saving Ladder Programs
This section describes how to save ladder programs to file.
2-6-1 Saving to File
1,2,3... 1. Select File(F)/Save As(A) from the Menu Bar.
2. The Save As Dialog Box will be displayed. Select the save
destination and enter the file name, and then click the
Save Button.
36
Note 1. When saving existing ladder programs that have been edited
since they were saved, you can also click the Save Button on the

Printing Ladder Programs Section 2-7
Toolbar or select File(F)/Save(S) from the Menu Bar to overwrite
the existing file.
2. The system settings and password set under ZEN/Set
Protection will also be saved with the file.
2-6-2 Opening Saved Files
1,2,3... 1. Click the Open Button on the Toolbar or select File(F)/Open(O)
from the Menu Bar to open saved files.
2. The Open File Dialog Box will be displayed. Specify the file
location and file name and click the Open Button.
2-7 Printing Ladder Programs
2-7-1 Print Settings
This section describes the layout and heading settings that must be
made before printing ladder programs.
1,2,3... 1. Select File(F)/Print Setup(R) from the Menu Bar.
2. The Print Settings Dialog Box will be displayed. Make the settings
for each item.
37

Printing Ladder Programs Section 2-7
Setting Explanation
Program frame display Check this box to print the print frame.
Parameter settings
information
Print title Check this box to print the title.
Drawing name Enter the drawing name.
Figure No. Enter the drawing number.
Revision mark Enter the revision mark.
Prepared by Enter the name of the person who wrote the
Date Enter the date the program was written.
3. Click the OK Button to save the settings as the print settings for
the ZEN Support Software. Click the Cancel Button to discard the
settings.
Note a) To specify whether I/O comments are to be printed,
either click the Show Comments Button on the Toolbar
or select View(V)/Show Symbol Comments from the
Menu Bar.
b) To specify whether a ladder diagram or electrical circuit
diagram is to be printed, either click the Ladder rung
diagram Button or the Electrical circuit diagram
Button on the Toolbar or else select View(V)/Circuit
display method/Ladder rung diagram or Electrical
circuit diagram from the Menu Bar.
Check this box to print the timer, counter,
and other parameter settings. Information
will be printed only for portions of the
memory areas that are being used.
program.
2-7-2 Print Preview
1,2,3... 1. Click the Print Preview Button on the Toolbar or select File(F)/
38
Print Preview(V) from the Menu Bar to check the print layout.

Printing Ladder Programs Section 2-7
2. The Print Preview Screen will be displayed.
2-7-3 Printing
1,2,3... 1. Click the Print Button on the Toolbar or select File(F)/Print(P)
from the Menu Bar.
2. The Print Dialog Box will be displayed. Make settings for each
item and click the OK Button.
39

Printing Ladder Programs Section 2-7
40

SECTION 3
Transferring and Monitoring Programs
This section describes how to connect to the ZEN and how to transfer programs between the ZEN
and the ZEN Support Software.
3-1 Connecting the ZEN and Communications Settings . . . . . . . . . . . . . . . . . . . 42
3-1-1 Connecting to the ZEN . . . . . . . . . . . . . . . . . . . . . . . . . . . . . . . . . 42
3-1-2 Communications Settings for Connecting to the ZEN . . . . . . . . . 43
3-2 Connecting Online . . . . . . . . . . . . . . . . . . . . . . . . . . . . . . . . . . . . . . . . . . . . . 44
3-3 Transferring Programs to the ZEN. . . . . . . . . . . . . . . . . . . . . . . . . . . . . . . . . 45
3-4 Transferring Programs from the ZEN . . . . . . . . . . . . . . . . . . . . . . . . . . . . . . 46
3-5 Verifying Programs with the ZEN . . . . . . . . . . . . . . . . . . . . . . . . . . . . . . . . . 47
3-6 Operating and Stopping the ZEN. . . . . . . . . . . . . . . . . . . . . . . . . . . . . . . . . . 48
3-7 Monitoring Programs. . . . . . . . . . . . . . . . . . . . . . . . . . . . . . . . . . . . . . . . . . . 48
3-7-1 Monitor . . . . . . . . . . . . . . . . . . . . . . . . . . . . . . . . . . . . . . . . . . . . . 48
3-7-2 Displaying Present Values . . . . . . . . . . . . . . . . . . . . . . . . . . . . . . . 49
3-7-3 Changing Settings Online . . . . . . . . . . . . . . . . . . . . . . . . . . . . . . . 49
3-8 Setting and Resetting Inputs . . . . . . . . . . . . . . . . . . . . . . . . . . . . . . . . . . . . . 51
3-9 Clearing Errors. . . . . . . . . . . . . . . . . . . . . . . . . . . . . . . . . . . . . . . . . . . . . . . . 52
41

Connecting the ZEN and Communications Settings Section 3-1
3-1 Connecting the ZEN and Communications
Settings
3-1-1 Connecting to the ZEN
Use a ZEN-CIF01 Computer Connecting Cable to connect the ZEN
and a serial port (COM port) of the computer.
ZEN-CIF01 Computer
Connecting Cable
Note The connector on the computer side of the ZEN-CIF01 Computer
Connecting Cable is a 9-pin D-sub connector. When connecting
to a computer that does not have a serial port, connect an RS232C-USB Conversion Cable to the ZEN-CIF01 Computer
Connecting Cable. An OMRON CS1W-CIF31 Conversion Cable
can be used (cable length: 50 cm).
42

Connecting the ZEN and Communications Settings Section 3-1
3-1-2 Communications Settings for Connecting to the ZEN
Communications settings must be made in the ZEN Support
Software before commencing communications with the ZEN.
1,2,3... 1. Select File(F)/Communications Settings (Computer ↔ ZEN)
from the Menu Bar.
2. The Communications Settings Dialog Box will be displayed. Make
the settings for each item.
a) When using a -V2 CPU Unit
Setting Details Default
Port name Select a COM port that can be
connected to the personal
computer.
Monitor time Specify the communications
monitor time between 1 and 30 s.
b) When using a -V1 or earlier CPU Unit.
COM 1
2
Setting Details Default
Port name Select a COM port that can be
connected to the personal
computer.
Node No. Use 0 for the node number. If the
node number is different from the
node number of the ZEN,
communications will not be
possible.
Monitor time Specify the communications
monitor time between 1 and 30 s.
COM 1
0
2
43

Connecting Online Section 3-2
Specifications Changes from Version 3.0 Support Software
Modem-related settings (Modem, Local information, Connect to)
that could not be used have been deleted.
3. Click the OK Button to save the settings in the project.
Click the Cancel Button to discard the settings.
Click the Defaults Button to return to the default settings.
3-2 Connecting Online
Check communications with the ZEN before transferring or verifying
programs. Connect the computer to the ZEN and perform the check
operation with the project file open.
1,2,3... 1. Select File(F)/Properties from the Menu Bar and make the ZEN
model and Expansion I/O Units 1 to 3 settings in the Properties
Dialog Box to match the system configuration of the ZEN to be
connected online.
2. Turn OFF the ZEN power, connect the ZEN to the computer with
the Computer Connecting Cable, then turn ON the ZEN power
again.
When using a ZEN that supports external communications, a
confirmation message that says, “RS-485 will stop. Y/N” will be
displayed on the ZEN when you turn ON the power. Select Yes,
then click the OK Button
3. Open the project file. Click the Go Online Button on the Toolbar
or select ZEN(Z)/Go Online/Offline(W) from the Menu Bar. A
confirmation dialog box will be displayed. Click the OK Button.
4. Check that the Status Bar display has changed from Offline to
Online. The background color for the ladder view area will change
to gray when the ZEN is online.
Click the Go Online Button on the Toolbar again or select
ZEN(Z)/Go Online/Go Offline(W) from the Menu Bar. The
display on the Status Bar will return from Online to Offline. The
background color for the ladder view area will change back to
white.
44

Transferring Programs to the ZEN Section 3-3
Note
a) Ladder programs cannot be edited when online. Always go
offline before creating or editing ladder programs.
b) Select ZEN/ZEN Information(S) from the Menu Bar while
online to obtain information about the connected ZEN.
3-3 Transferring Programs to the ZEN
This section describes how to transfer ladder programs created using
the ZEN Support Software to the ZEN.
The ZEN must be connected and online and the project file opened
before the program transfer operation can be executed.
Precaution Perform adequate safety checks before transferring the program to
the ZEN.
1,2,3... 1. Click the Transfer to ZEN Button on the Toolbar or select ZEN(Z)/
Transfer(R)/Transfer to ZEN(T) from the Menu Bar. The Transfer
to ZEN Dialog Box will be displayed. Click the OK Button to
transfer the program to the ZEN. Click the Cancel Button to
cancel the transfer.
Settings Details
• Select The settings are downloaded too in the Transfer to ZEN
Dialog Box to download the ZEN settings in the ZEN Support
Software at the same time.
Refer to 4-1 ZEN Settings for information on the various ZEN
settings.
• Select Protection is set in the Transfer to ZEN Dialog Box if the
ZEN is to be protected by the password set in the ZEN Support
Software. Do not select this option if no password has been set.
Refer to 4-2 Setting a Password for information on setting
passwords.
Note 1. With version 4.0 or higher, it is possible to transfer programs to the
ZEN even if the Expansion I/O Units are not connected, so long
45

Transferring Programs from the ZEN Section 3-4
as the CPU Unit is the same type as that specified in the property
settings of the Support Software.
When going online, a confirmation message, such as the
example shown below, will be displayed. Select "Y" (yes) to
connect, and then perform the transfer operation.
"ZEN model in properties settings (10C1A*-A-V2) does not match
model being connected (10C1A*-A-V2+8E1**). Go online? Y/N"
2. Refer to 6-2 Program Check Errors and Warnings for information
on error messages that occur during transfer from the computer
to the ZEN.
3-4 Transferring Programs from the ZEN
This section describes how to transfer the ZEN ladder programs to
the ZEN Support Software.
The ZEN must be connected and online and the project file opened
before the program transfer operation can be executed.
1,2,3... 1. Click the Transfer From ZEN Button on the Toolbar or select
ZEN(Z)/Transfer(R)/Transfer from ZEN(T) from the Menu Bar.
The Transfer From ZEN Dialog Box will be displayed. Click the
OK Button to transfer the program from the ZEN. Click the
Cancel Button to cancel the transfer.
Settings Details
Select The settings are uploaded too in the Transfer From ZEN
Dialog Box to upload the ZEN settings at the same time.
Note a) If a password has been set for the previously opened project
file (see 4-2 Setting a Password), the password will be cleared,
and a comfirmation dialog box will be displayed.
b) Refer to 6-2 Program Check Errors and Warnings for
information on error messages that occur during transfer from
the ZEN to the computer.
46

Verifying Programs with the ZEN Section 3-5
3-5 Verifying Programs with the ZEN
This section describes how to compare the programs in the ZEN and
the ZEN Support Software to verify that they are the same.
The ZEN must be connected and online and the project file opened
before the program verification operation can be executed.
1,2,3... 1. Click the Compare with ZEN Button on the Toolbar or select
ZEN(Z)/Transfer(R)/Compare with ZEN(C) from the Menu Bar.
The Compare With ZEN Dialog Box will be displayed. Click the
OK Button to compare the ZEN and the ZEN Support Software
programs. Click the Cancel Button to cancel the verification.
Settings Details
Select The settings are compared too in the Compare With ZEN
Dialog Box to compare the ZEN and the ZEN Support Software
settings at the same time.
2. A confirmation dialog box will be displayed if the verification has
been completed normally.
When Programs Are the
Same
Note Refer to 6-2 Program Check Errors and Warnings for information
on error messages that occur during verification.
When Programs Are
Different
47

Operating and Stopping the ZEN Section 3-6
3-6 Operating and Stopping the ZEN
This section describes how to operate and stop the ZEN from the
ZEN Support Software.
The ZEN must be connected and online and the project file opened
before these operations can be executed.
Precaution Perform adequate safety checks before changing the operating mode
(RUN/STOP).
1,2,3... 1. Select ZEN(Z)/Change operating mode(M)/RUN(R) from the
Menu Bar.
2. Check that the Status Bar display changes from STOP to RUN.
3. Select ZEN(Z)/Change operating mode(M)/STOP(S) from the
Menu Bar to stop ZEN operation. The Status Bar display will
change from RUN to STOP.
3-7 Monitoring Programs
3-7-1 Monitor
This section describes how to monitor programs being executed by
the ZEN.
The ZEN must be connected and online and the project file opened
before the programs can be monitored. The ZEN and the ZEN
Support Software programs must be the same before programs can
be monitored. Use the procedures outlined under 3-3 Transferring
Programs to the ZEN (page 45), 3-4 Transferring Programs from the
ZEN (page 46), and 3-5 Verifying Programs with the ZEN (page 47)
to transfer and verify the programs.
1,2,3... 1. Use the procedure outlined under 3-6 Operating and Stopping the
ZEN (page 48) to start ZEN operation. Check that the Status Bar
display changes from STOP to RUN.
2. Click the Toggle Monitoring Button on the Toolbar or select
ZEN(Z)/Monitor(O) from the Menu Bar.
48

Monitoring Programs Section 3-7
3. When the mode is changed to MONITOR, the closed circuits of
the ZEN ladder program are highlighted in green.
3-7-2 Displaying Present Values
Present values, the ON/OFF status of inputs, etc., can be displayed
during monitoring of programs being executed by the ZEN.
During monitoring, moving the mouse or cursor to a timer/counter or
other output will cause the present value to be displayed in the Status
Bar.
Present value display
3-7-3 Changing Settings Online
Set values can be changed while connected to the ZEN online.
1,2,3... 1. While online, use either the mouse or the cursor keys to highlight
the output that is to be changed. Then use any of the following
methods to change the setting.
• Press the Enter Key or double-click.
• Select Edit(E)/Edit(E) from the Menu Bar.
49

Monitoring Programs Section 3-7
• Right-click and select Edit(E).
2. The Edit Dialog Box will be displayed. When the settings are
changed and the dialog box closed, the changes will be
transferred to the ZEN and reflected there.
50
Note The following table shows the settings that can be changed
online.
Bit type Content of change
Timer (T) Time setting
Holding timer (#) Time setting
Counter (C) Counter setting
8-digit counter (F) (See note.) Counter setting
Weekly timer (@) Start/stop day of week, time
Pulse output time (See note.)
Calendar timer (*) Start/stop months, days
Analog comparator (A) Constants, operators
Note The 8-digit counters and pulse output time can be used
when using a -V2 CPU Unit.

Setting and Resetting Inputs Section 3-8
3-8 Setting and Resetting Inputs
This section describes how to set (turn ON) and reset (turn OFF) the
ZEN bits from the ZEN Support Software.
The ZEN must be connected and online and the project file opened
before inputs can be set or reset. Also, the ZEN and the ZEN Support
Software programs must be the same before inputs can be set or
reset. Use the procedures outlined under 3-3 Transferring Programs
to the ZEN (page 45), 3-4 Transferring Programs from the ZEN
(page 46), and 3-5 Verifying Programs with the ZEN (page 47) to
transfer and verify the programs.
Precaution Confirm safety before turning relays ON or OFF.
1,2,3... 1. Use the procedure outlined under 3-6 Operating and Stopping the
ZEN to start ZEN operation. Check that the Status Bar display
changes from STOP to RUN.
2. Use the procedure outlined under 3-7 Monitoring Programs to
change to MONITOR mode.
3. Use the mouse or cursor keys to move to the input that is to be
set or reset, and then perform either of the following operations:
• Select ZEN(Z)/Set/Reset Operation and then either Set
Operation(W) or Reset Operation(F) from the Menu Bar.
• Right-click and then select Set/Reset Operation and then
either Set Operation(W) or Reset Operation(F).
Note The following table shows the inputs that can be set or reset.
Bit type Comments
CPU Unit input bits (I) Input terminal ON/OFF status has priority.
CPU Unit output bits (Q) Set/reset possible for inputs only. (Not
Expansion I/O Unit input
bits (X)
Expansion I/O Unit output
bits (Y)
Work bits (M)
Holding bits (H)
possible for outputs.)
Input terminal ON/OFF status has priority.
Set/reset possible for inputs only. (Not
possible for outputs.)
51

Clearing Errors Section 3-9
3-9 Clearing Errors
If an error occurs, use the following procedure to clear the error and
then remove the cause of the error.
The ZEN must be connected and online for this operation.
1,2,3... 1. Select ZEN(Z)/Error Clear from the Menu Bar to clear the error.
2. Repeat this step to clear multiple errors.
Note a) Refer to Section 6 Troubleshooting in the ZEN Operation
Manual (Z183) for information on ZEN errors.
b) ZEN errors that occur while online will be displayed in the
Status Bar.
Error display
52

SECTION 4
System Settings
This section describes the ZEN system settings, how to set passwords to protect the ZEN ladder
programs, and how to clear the ZEN memory.
4-1 ZEN Settings . . . . . . . . . . . . . . . . . . . . . . . . . . . . . . . . . . . . . . . . . . . . . . . . . 54
4-1-1 Settings. . . . . . . . . . . . . . . . . . . . . . . . . . . . . . . . . . . . . . . . . . . . . . 54
4-1-2 Time Settings . . . . . . . . . . . . . . . . . . . . . . . . . . . . . . . . . . . . . . . . . 56
4-2 Setting a Password . . . . . . . . . . . . . . . . . . . . . . . . . . . . . . . . . . . . . . . . . . . . . 57
4-3 Protecting Programs. . . . . . . . . . . . . . . . . . . . . . . . . . . . . . . . . . . . . . . . . . . . 58
4-3-1 Setting Program Protection . . . . . . . . . . . . . . . . . . . . . . . . . . . . . . 58
4-3-2 Removing Program Protection. . . . . . . . . . . . . . . . . . . . . . . . . . . . 58
4-4 Clearing the ZEN Memory . . . . . . . . . . . . . . . . . . . . . . . . . . . . . . . . . . . . . . 59
4-5 RS-485 Communications Settings. . . . . . . . . . . . . . . . . . . . . . . . . . . . . . . . . 60
53

ZEN Settings Section 4-1
4-1 ZEN Settings
This section describes how to change the ZEN settings from the ZEN
Support Software.
4-1-1 Settings
1,2,3... 1. Select ZEN(Z)/Set Protection(E)/Settings(S) from the Menu
Bar.
2. The Settings Dialog Box will be displayed. Make the settings for
each item.
a) When Using a -V2 CPU Unit
Setting Details Default
Daylight saving time
(See note a.)
Display language
(See note a.)
Backlight control
(See note a.)
Input
CPU Unit OFF: No input filter
filter
Expansion I/O Unit 1
(See note b.)
Expansion I/O Unit 2
(See note b.)
Expansion I/O Unit 3
(See note b.)
Send delay time
(See note c.)
Initialize modem
(See note c.)
None, manual, EU Type, US
Type, AU Type, NZ Type
English, Japanese, German,
French, Italian, Spanish
2 min, 10 min, 30 min, always 2 min
ON: With input filter
Send delay time for the
initialization command to the
modem set in the ZEN
Initializes the modem set in
the ZEN.
None
English
OFF
0
---
54
Note a) The display language and background settings can be
used for LCD-type CPU Units.

ZEN Settings Section 4-1
b) Input filters can be set only for Expansion I/O Units that
exist in the system configuration.
c) Do not change these settings. They are for future
functional expansions.(These settings are not displayed
for models with communications.)
b) When Using a -V1 or Earlier CPU Unit
Setting Details Default
Daylight saving time
(See note a.)
Display language
(See note a.)
Contrast control
(See note a.)
Backlight control
(See note a.)
Input
CPU Unit OFF: No input filter
filter
Expansion I/O Unit 1
(See note b.)
Expansion I/O Unit 2
(See note b.)
Expansion I/O Unit 3
(See note b.)
Send delay time
(See note c.)
Initialize modem
(See note c.)
None, manually, EU Type,
US Type
English, Japanese, German,
French, Italian, Spanish
Light, Medium light, Medium,
Medium dark, Dark
2 min, 10 min, 30 min,
always
ON: With input filter
Send delay time for the
initialization command to the
modem set in the ZEN
Initializes the modem set in
the ZEN.
None
English
2 min
OFF
0
---
Note a) The display language and background settings can be
used for LCD-type CPU Units.
b) Input filters can be set only for Expansion I/O Units that
exist in the system configuration.
c) Do not change these settings. They are for future
functional expansions.
55

ZEN Settings Section 4-1
3. Click the OK Button to save the settings.
Click the Cancel Button to discard the settings.
Click the Initialization Button to return to the default settings.
4. Settings can be sent between the ZEN and the ZEN Support
Software if the ZEN is online.
Click the Transfer to ZEN Button to transfer the settings to the
ZEN or the Transfer from ZEN Button to transfer the settings
from the ZEN to the ZEN Support Software.
Press the Compare with ZEN Button to compare the settings on
the computer and the ZEN.
4-1-2 Time Settings
With the LCD-type CPU Units, time and date settings are preformed
online.
1,2,3... 1. Select ZEN(Z)/Set Protection(E)/Time Setting(T) from the
Menu Bar.
2. The Time Settings Dialog Box will be displayed. Set the date and
time for the ZEN internal clock.
Settings Details
ZEN
internal
clock
PC time Date Displays the computer date.
Note To set the date and time display styles, select Settings/Control
Panel/Regional Settings from the Start menu. Select Date to
set a date style or Time to set a time style (when using Windows
2000).
3. Click the OK Button to send the settings to the ZEN.
Click the Cancel Button to discard the settings.
Click the Synchronization Button to use the computer date and
time as the ZEN date and time. When the Synchronization Button
Date Edit the ZEN date. (Date read from the ZEN at
startup or same date as computer)
Time Edit the ZEN time. (Time read from the ZEN at
startup or same time as computer)
Time Displays the computer time.
56

Setting a Password Section 4-2
is clicked, the computer date and time will be shown under the
ZEN date and time on the screen, but these settings will not be
sent to the ZEN. To transfer the computer date and time to the
ZEN, click the Synchronization Button and then click the
OK Button.
4-2 Setting a Password
This section describes how to set a password for the ZEN. This
password is used to set and clear protection for the ZEN programs.
Note 1. Refer to 4-3 Protecting Programs for information on how to set
and clear ZEN program protection.
2. When setting a password, be sure to record it.
If you forget the password, it will not be possible to set or clear
protection for the ZEN program.
1,2,3... 1. Select ZEN(Z)/Set Protection(E)/Set Password(T) from the
Menu Bar.
2. The Set Password Dialog Box will be displayed. Enter the
password and confirm the password.
The password can be
only 4 digits long.
3. Click the OK Button to set the password as entered. Click the
Cancel Button to clear the entered password. Click the Delete
Password Button to delete an existing password.
57

Protecting Programs Section 4-3
4-3 Protecting Programs
This section describes how to protect the ZEN programs from
intentional or unintentional alteration by other users. Protected ZEN
programs cannot be altered until the protection is removed and the
protection can only be removed if the password is input correctly. For
these reasons, care must be taken when using program protection.
The ZEN must be connected and online before program protection
can be executed.
Note a) Refer to 4-2 Setting a Password for information on how to set
and change passwords.
b) If the password is forgotten, it can only be cleared by performing
the ZEN’s memory all clear operation (see 4-4 Clearing the ZEN
Memory).
4-3-1 Setting Program Protection
1,2,3... 1. Click the Set Protection Button on the Toolbar or select ZEN(Z)/
Protect(P)/Set(S) from the Menu Bar. The Set Protection Dialog
Box will be displayed.
2. Enter the 4-digit password set under the password settings.
3. Once the above procedure has been completed, programs
cannot be transferred to or from the ZEN or compared with the
ZEN until the protection is removed.
4-3-2 Removing Program Protection
1,2,3... 1. Click the Release Protection Button on the Toolbar or select
ZEN(Z)/Protect(P)/Release(L) from the Menu Bar. The Release
Protection Dialog Box will be displayed.
2. Enter the 4-digit password set under the password settings.
58
Programs can now be transferred to or from the ZEN or compared
with the ZEN.

Clearing the ZEN Memory Section 4-4
Note Refer to 6-2 Program Check Errors and Warnings for information
on any error messages that appear during setting or removal of
program protection.
4-4 Clearing the ZEN Memory
This section describes how to clear the ZEN memory from the ZEN
Support Software. The ZEN must be connected and online to perform
this operation.
ZEN memory data Status after memory cleared
Ladder programs
(including parameter
settings information)
Password settings The password will be cleared and program
I/O bits All inputs will be reset (turned OFF) and holding
1,2,3... 1. Select ZEN(Z)/All Clear within ZEN from the Menu Bar.
2. Click the OK Button to clear all memory in the ZEN. Click the
Cancel Button to cancel the all clear operation.
Ladder program code is completely cleared. No
ladder programming will remain.
protection removed.
timer and counter present values cleared to 0.
59

RS-485 Communications Settings Section 4-5
4-5 RS-485 Communications Settings
The ZEN-10C4@R-@-V2 is equipped with an RS-485
communications output, supporting external communications using
the CompoWay/F communications protocol.
1,2,3... 1. Select ZEN(Z)/Set Protection(E)/Settings(S) from the Menu
Bar.
2. The Settings Dialog Box will be displayed. Click the RS-485
Button.
3. The RS-485 Communications Settings Dialog Box will be
displayed. Set each item.
Settings Details Default
Data Length 7 or 8 bits 7
Stop Bits 1 or 2 bits 2
Parity None, even, or odd Even
Baud Rate 4800, 9600, or 19200 bps 9,600
Node No. Specify a node number between 0 and 99.
Supports broadcasting (node No.: XX).
1
60
4. To save the settings click the OK Button. To clear the settings click
the Cancel Button. Click the Initialize Button to return the
settings to the default values.

SECTION 5
Simulation Function
This section describes the simulation function and corresponding displays.
5-1 Starting and Stopping the Simulation Function. . . . . . . . . . . . . . . . . . . . . . . 62
5-2 ZEN Image Display . . . . . . . . . . . . . . . . . . . . . . . . . . . . . . . . . . . . . . . . . . . . 63
5-3 Present Value List Display . . . . . . . . . . . . . . . . . . . . . . . . . . . . . . . . . . . . . . . 65
5-4 Clock Display. . . . . . . . . . . . . . . . . . . . . . . . . . . . . . . . . . . . . . . . . . . . . . . . . 66
61

Starting and Stopping the Simulation Function Section 5-1
5-1 Starting and Stopping the Simulation
Function
A ladder program created with the Support Software can be run by
the Support Software without transferring it to the ZEN.
1,2,3... 1. Display the ladder program for which operation is to be simulated
and then click the Start/Stop Simulator Button on the Toolbar or
select ZEN(Z)/Start/Stop Simulator from the Menu Bar.
Note Set values can be changed during simulation. For details,
refer to Changing Settings Online in 3-7 Monitoring
Programs.
2. When the simulator is started, the background color will change
to yellow and the RUN, STOP, ZEN Image Display, Present
Value List Display, Clock Display, and Start/Stop Simulator
Buttons on the Toolbar will be enabled. Also, depending on the
content of the ladder program, the ZEN Image Window, the
Present Value List Window, and the Clock Window will be
opened.
3. To start the simulation, click the
To stop the simulation, click the STOP Button on the Toolbar.
4. To stop the simulator, click the Start/Stop Simulator Button on
the Toolbar or select ZEN(Z)/Start/Stop Simulator from the
Menu Bar. The background color for the simulator view area will
change back to white.
RUN Button on the Toolbar.
Toolbar Button Functions
62
RUN Executes the ladder program.
STOP Stops the ladder program execution.
ZEN Image Display Specifies whether or not the ZEN Image
Window will be displayed.

ZEN Image Display Section 5-2
Present Value List
Display
Clock Display Specifies whether or not the Clock Window
Start/Stop
Simulator
5-2 ZEN Image Display
CPU Unit and Expansion I/O Unit images are displayed according to
the configuration in the property settings, and input switches and
lamps are allocated to the I/O bits used in the ladder program.
Operation button symbols
Input switch symbols
Specifies whether or not the Present Value
List Window will be displayed.
will be displayed.
Starts and stops the Simulator.
Note To display or hide the ZEN Image Window, click the ZEN Image
Input switch specifications can be changed by right-clicking the input
switch symbol.
Input Switch Symbols
Symbol Input
Lamp symbols
Display bit (D) display
Display Button on the Toolbar.
specifications
Momentary: NO
condition
Momentary: NC
condition
Normally OFF.
ON only when left mouse button is held
down.
Normally ON.
OFF only when left mouse button is held
down.
Operation
63

ZEN Image Display Section 5-2
Symbol Input
With LCD-type CPU Units, operation buttons can be used by the
simulator. Either momentary or alternate operation can be selected
by right-clicking the operation button symbols.
Operation Button Symbols
Input specifications Operation
Momentary Normally OFF.
Alternate Remains ON after being clicked.
• External inputs can be turned ON and OFF by clicking the input
symbols. When an external input is turned ON, the color of the
connection line between the input symbol and the ZEN terminal
changes to green.
• The results of ladder program processing can be checked by
observing the status of lamp symbols connected to output
terminals (RUN mode only).
specifications
Alternate: NO
condition
Alternate: NC
condition
Analog input Select when using I4/I5 as analog inputs
Remains ON after being clicked.
Remains OFF after being clicked again.
Remains OFF after being clicked.
Remains ON after being clicked again.
with a DC-type CPU Unit.
ON only when left mouse button is held down.
Remains OFF after being clicked again.
Operation
Lamp Symbols
64
Symbol Status
Output terminal OFF
Output terminal ON
• When a display bit (D) is used in the ladder program, the display
conditions are shown on the ZEN display (RUN mode only).

Present Value List Display Section 5-3
Display Bit (D) Function
Multiple display bits (D) can be executed simultaneously, and their
display conditions monitored.
5-3 Present Value List Display
The present values for timers, holding timers, weekly timers, calendar
timers, counters, analog comparators, comparators, and other
programming elements used in the ladder program are displayed in
list format.
Note To specify whether or not the Present Value List Window is to be
displayed, click the Present Value List Display Button on the
Toolbar.
Present values can be changed by double-clicking on the Present
Value Dialog Box.
65

Clock Display Section 5-4
5-4 Clock Display
When weekly timers or calendar timers are used in the ladder
program, present dates and times can be simulated.
Note 1. To specify whether or not the Clock Display Window is to be
displayed, click the Clock Display Button on the Toolbar.
2. To set the date and time display styles, select Settings/Control
Panel/Regional Settings from the Start Menu. Select Date to
set a date style or Time to set a time style.
Setting the Clock Forward or Back
The present date and time can be set forward or back in whatever
units are set (seconds/minutes/hour/day/month/year) by clicking the
Forward or Reverse Buttons.
Changing the Present Time
The present time can be changed by clicking on Time Setting to
open the Time Settings Dialog Box.
66

SECTION 6
Troubleshooting
This section describes errors that may occur while using the ZEN Support Software and possible
countermeasures.
6-1 Online Errors and Warnings. . . . . . . . . . . . . . . . . . . . . . . . . . . . . . . . . . . . . . 68
6-2 Program Check Errors and Warnings. . . . . . . . . . . . . . . . . . . . . . . . . . . . . . . 69
6-3 Protect Setting and Clearing Errors . . . . . . . . . . . . . . . . . . . . . . . . . . . . . . . . 70
67

Online Errors and Warnings Section 6-1
6-1 Online Errors and Warnings
Error messages: Messages indicating fatal errors
Message Probable cause Countermeasure
Communications Error
has occurred.
Failed to connect to
ZEN. The connected
ZEN type ( ) does not
match the project’s
ZEN type ( ). Cannot
continue.
Operation failed since
ZEN is in RUN mode.
STOP ZEN running.
Operation failed since
ZEN is protected.
Release the protection.
Operation failed since
LCD is operating.
Restore the main
screen of LCD.
Error rung found in the
program. Program
transfer is cancelled.
No response to a
command from the ZEN
Support Software.
Communications timed out.
Online connection
attempted while the ZEN
system configuration and
the ZEN model in the ZEN
Support Software property
settings are not the same.
Command executed from
the ZEN Support Software
while the ZEN is in RUN
mode.
Command executed from
the ZEN Support Software
while the ZEN is protected.
Command executed from
the ZEN Support Software
while LCD operations being
performed on the ZEN.
There is an error in the
program.
Warning messages: Dialog boxes are displayed for determining
processing. Follow the instructions given in the dialog boxes.
Messages
ZEN is in RUN mode; execution not possible. Change to STOP mode? Y/N
Return to RUN mode? Y/N
A circuit in the program generated a warning. Continue program transfer?
ZEN model in properties settings (****) does not match model being connected (****). Go online?
Y/N (See note.)
Check that the Computer Connecting
Cable is connected properly to the ZEN
and the computer serial port.
Check that the communications settings
match the connection configuration of the
ZEN.
Change the ZEN model in the property
settings and the Expansion I/O Unit
settings to match the system configuration
of the ZEN to be connected online.
When only the Expansion I/O Unit
configuration is different, the following
warning message (bottom line) will be
displayed.
Change the ZEN to STOP mode and reexecute the command.
Remove the protection from the ZEN and
re-execute the command.
Return the LCD operations to the Main
Screen and re-execute the command.
Refer to the probable causes and
countermeasures for Program Check error
messages.
68
Note This message is displayed when an attempt is made to go online
with only the CPU Unit specified in the property settings in the
Support Software, without having the Expansion I/O Unit
connected. Select "Y" to connect, and transfer the program.
This is supported for version 4.0 or higher.

Program Check Errors and Warnings Section 6-2
6-2 Program Check Errors and Warnings
Error messages: Message indicating fatal errors
The Program Check Results Dialog Box will be displayed.
Message Probable cause Countermeasure
A bit (“relay”) type
unsupported by the
system is used. Check
the ladder program.
The setting
unsupported in the
connected ZEN is
used.
Bit type used in
ladder program
that cannot be
used with the
system
configuration set
under property
settings.
An operation has
been written that
cannot be set for
this ZEN version.
Revise the system configuration set under property
settings or change the bit types.
Example: The following bit types cannot be used
with the following ZEN models:
LED-type CPU Units
Weekly timers (@)
Calendar timers (
Display bits (D)
CPU Units with AC Power Supply
Analog comparator bits (A)
Designated display bits for analog comparator.
CPU Units with DC Power Supply/NPN Connections
Analog comparators (A)
The following bit types cannot be used when no
Expansion I/O Units are connected:
Expansion I/O Unit input bits (X)
Expansion I/O Unit output bits (Y)
Also, the bit addresses that can be used depend on
the configuration of Expansion I/O Units.
The following operations cannot be used with
versions prior to 1.10:
Setting the date (DAT1) for display with a display bit
(D).
Setting clear (C) as a function.
*)
Warning messages: The Program Check Results Dialog Box will be
displayed with messages to prompt corrective actions.
Message Probable cause Countermeasure
No contact (input) or coil
(output) is connected, or a
connection line is
disconnected.
Duplicated coil (output) The same output is used more
Duplicated timer number
Duplicated counter number
Ladder program input, output,
or connection line not
connected.
than once in the ladder
program.
Check the horizontal connections
for inputs and outputs and the
vertical and horizontal connections
for connection lines in ladder
programs. Correct any breaks.
Check the program and correct
any duplications.
69

Protect Setting and Clearing Errors Section 6-3
6-3 Protect Setting and Clearing Errors
Warning messages: A dialog box will be displayed warning of errors
in the password.
Error message Probable cause Countermeasure
The password is incorrect. A different password has been
The password was set
incorrectly.
entered from the password that
was set under the password
settings or protect settings.
The password and the
reconfirmation of the password
differ or more or less than 4
digits were input as the
password.
Descriptive messages: A dialog box will be displayed prompting
operation. Follow the instructions given in the dialog box.
Error message Probable cause Countermeasure
No password is set. Set a
password, and try again.
The ZEN protect operation has
been attempted while no
password has been set.
Re-enter the correct 4 digits set
under the password settings or
protect settings.
Enter the same 4 digits in both
the password and password
confirmation text boxes.
Enter and reconfirm a
password under the password
settings and re-execute the
protect operation.
70

Appendix A
Shortcut Keys and Hot Keys
Shortcut Keys
Key Function Menu bar equivalent
Ctrl + A Select All Edit (E)
Ctrl + C Copy Edit (E)
Ctrl + F Find Edit (E)
Ctrl + N Create File (F)
Ctrl + O Open File (F)
Ctrl + P Print File (F)
Ctrl + R Edit Rung comments
Ctrl + S Save File (F)
Ctrl + V Paste Edit (E)
Ctrl + W Online Connect/Disconnect ZEN (Z)
Ctrl + X Cut Edit (E)
Ctrl + Y Redo Edit (E)
Ctrl + Z Undo Edit (E)
Ctrl + Alt + DOWN Insert Rung Insert (I)
Alt + LEFT Zoom Out View (V)
Alt + RIGHT Zoom In View (V)
Alt + F4 Quit
I CPU Unit Input Bit Edit Dialog Box Display
Q CPU Unit Output Bit Edit Dialog Box Display
X Expansion I/O Unit Input Bit Edit Dialog Box Display
Y Expansion I/O Unit Output Bit Edit Dialog Box Display
M Work Bit Edit Dialog Box Display
H Holding Bit Edit Dialog Box Display
B Button Switch Edit Dialog Box Display
T Timer Edit Dialog Box Display
# Holding Timer Edit Dialog Box Display
@ Weekly Timer Edit Dialog Box Display
* Calendar Timer Edit Dialog Box Display
C Counter Edit Dialog Box Display
F 8-digit Counter Edit Dialog Box Display
A Analog Comparator Edit Dialog Box Display
P Comparator Edit Dialog Box Display
G 8-digit Comparator Edit Dialog Box Display
D Display Edit Dialog Box Display
Delete Delete
− Select All (A)
− Copy (C)
− Find (F)
− New (N)
− Open (O)
− Print (P)
− Save (S)
− Paste (P)
− Go Online/Offline (W)
− Cut (C)
− Undo (U)
− Redo (Y)
− Rung (M)
− Zoom Out
− Zoom In
71

Shortcut Keys and Hot Keys Appendix A
Key Function Menu bar equivalent
F3 Find Next Edit (E) − Find Next
F1 Help
Hot Keys
Hot keys can be used to insert a programming element into a selected cell. If inputs and
outputs are already set, however, the existing data will be given priority.
Key Function
SHIFT + I Insert Input (Input Edit Dialog Box Display)
SHIFT + O Insert Output (Output Edit Dialog Box Display)
- Insert Horizontal Connection Line
I Insert Vertical Connection Line
72

Appendix B
Support Software Version Upgrades
The following table shows the relationship between the version and functions of
the ZEN Support Software and the ZEN CPU Unit.
Date of
revision
January
2002
April
2003
January
2006
System Software (See note 1.)
The system software was upgraded to
version 1.1.
Main Changes
The following display functions have been
added to LCD-type CPU Units.
• Clear display function
• The display object DAT1 (day/month)
System Software (See note 1.)
The system software was upgraded to
version 2.0.
(“-V1” was added to the CPU Unit model
number.)
Main Changes (See note 2.)
• The number of timers, counters, weekly
timers, calendar timers, and display bits
was increased from 8 to 16. The number of
holding timers was increased from 4 to 8.
• A 20-point CPU Unit was added to the
lineup.
System Software (See note 1.)
The system software was upgraded to
version 3.0 (“-V2” was added to the CPU Unit
model number.)
Main Changes (See note 2.)
• Addition of multiple-day operation and
pulse-output operation to the weekly timers
• Addition of twin time operation to the timers
• Addition of an 8-digit counter and 8-digit
comparators
• Addition of models with communications
(10-point models only) and economy CPU
Units
• Addition of daylight saving time settings for
Australia and New Zealand
• Deletion of contrast control
ZEN CPU Unit ZEN Support Software
Changes Applicable from
Version 2.0 (ZEN-SOFT01-V2)
• Changed to handle additional
display functions.
• Simulation function added.
• Improvements made to
functions, operability, and
display.
Changes Applicable from
Version 3.0 (ZEN-SOFT01-V3)
• Changed to handle the
memory area expansion in
“-V1” CPU Units.
• Changed to handle addition
of 20-point CPU Units.
Support for Version 4.0 or
Higher (ZEN-SOFT01-V4)
• Supports CPU Units with
enhanced functionality (-V2)
• Supports half-sized I/O
Expansion I/O Units (-8E1)
• When the type of the CPU
Unit (the CPU Unit and
Expansion I/O Unit
configuration) is the same as
that specified in the property
settings of the Support
Software, program transfer is
possible even if Expansion I/
O Units are not connected.
Note 1. “System software” is the software for processing the CPU Unit’s program.
With LCD-type CPU Units, the system software version can be read by
selecting Other/System information from the menu. With “-V2” CPU Units,
“V03.00” will be displayed as the system software version.
2. Refer to page 15 for the memory area differences between versions.
73

Support Software Version Upgrades Appendix B
Compatibility between Support Software and Data
Data Version of the ZEN Support Software
Ver. 1.0 Ver. 1.1 Ver. 2.0 Ver. 3.0 Ver. 4.0 or
Data created with
Ver. 1.0
Data created with
Ver. 1.1
Data created with
Ver. 2.0
Data created with
Ver. 3.0
Data created with
Ver. 4.0 or 4.1
Ye s Ye s Ye s Ye s Ye s
Ye s Ye s Ye s Ye s Ye s
No
(See note.)
No
(See note.)
No
(See note.)
No
(See note.)
No
(See note.)
No
(See note.)
Ye s Ye s Ye s
No
(See note.)
No
(See note.)
Ye s Ye s
No
(See note.)
Note A message saying that it was not possible to read the file will be displayed if an
attempt is made to read incompatible data.
Compatibility between the ZEN CPU Unit and the Support Software
Version of CPU
Unit
(See note 1.)
Ver. 1.0 Yes Yes Partial
Ver. 1.1 Partial
Ver. 2.0
(“-V1” CPU Units)
Ver. 3.0
(“-V2” CPU Units)
Ver. 1.0 Ver. 1.1 Ver. 2.0 Ver. 3.0 Ver. 4.0 or
(See note 3.)
Partial
(See notes 3
and 4.)
No No No No Yes
Version of the ZEN Support Software
Partial
(See note 2.)
Ye s Ye s
Partial
(See note 3.)
Partial
(See notes 3
and 4.)
(See note 2.)
Ye s Ye s Ye s
Partial
(See notes 3
and 4.)
4.1
Ye s
4.1
Par tia l
(See note 2.)
Note 1. With LCD-type CPU Units, the system software version can be read by
selecting Other/System information from the menu. With “-V2” CPU Units,
“V03.00” will be displayed as the system software version.
2. The setting for a display bit (D) will appear as follows:
• If “DAT1: day/month” is set for display, the LCD display will show T#
and the display function will not operate.
• If “C (clear)” is set, the LCD display will appear as
[--| |-----------0D0] and the display function will not operate.
Note The above operations were not supported in ZEN versions prior to 1.1.
74

Support Software Version Upgrades Appendix B
3. When reading out the program from the ZEN, the following items will be
determined based on the display function (D) settings contained in the
program.
• If "DAT1: day/month" is set, CHR (character designation) will be set.
• If "C (clear)" is set, the display function (D) will be deleted from the
program.
Note The above operations were not supported by ZEN Support Software
versions lower than 2.0.
4. Cannot be used with 20-point CPU Units.
Restricted to use within the memory area range of Pre-V1 CPU Units.
75

Support Software Version Upgrades Appendix B
76

OMRON Corporation
Industrial Automation Company
Control Devices Division H.Q.
Analog Controller Division
Shiokoji Horikawa, Shimogyo-ku,
Kyoto, 600-8530 Japan
Tel: (81) 75-344-7080/Fax: (81) 75-344-7149
2-2-1 Nishikusatsu, Kusatsu-shi,
Shiga, 525-0035 Japan
Tel: (81) 77-565-5216/Fax: (81) 77-565-5568
Regional Headquarters
OMRON EUROPE B.V.
Wegalaan 67-69-2132 JD Hoofddorp
The Netherlands
Tel: (31)2356-81-300/Fax: (31)2356-81-388
OMRON Industrial Automation Global: www.ia.omron.com
OMRON ELECTRONICS LLC
One Commerce Drive Schaumburg,
IL 60173-5302 U.S.A.
Tel: (1) 847-843-7900/Fax: (1) 847-843-7787
OMRON ASIA PACIFIC PTE. LTD.
No. 438A Alexandra Road # 05-05/08 (Lobby 2),
Alexandra Technopark, Singapore 119967
Tel: (65) 6835-3011/Fax: (65) 6835-2711
OMRON (CHINA) CO., LTD.
Room 2211, Bank of China Tower,
200 Yin Cheng Zhong Road,
PuDong New Area, Shanghai, 200120, China
Tel: (86) 21-5037-2222/Fax: (86) 21-5037-2200
Authorized Distributor:
© OMRON Corporation 2003 All Rights Reserved.
In the interest of product improvement,
specifications are subject to change without notice.
Cat. No. Z184-E1-04
Printed in Japan
1208-0.3M (0503) (C)
 Loading...