

Page 1
INSTRUCTION MANUAL
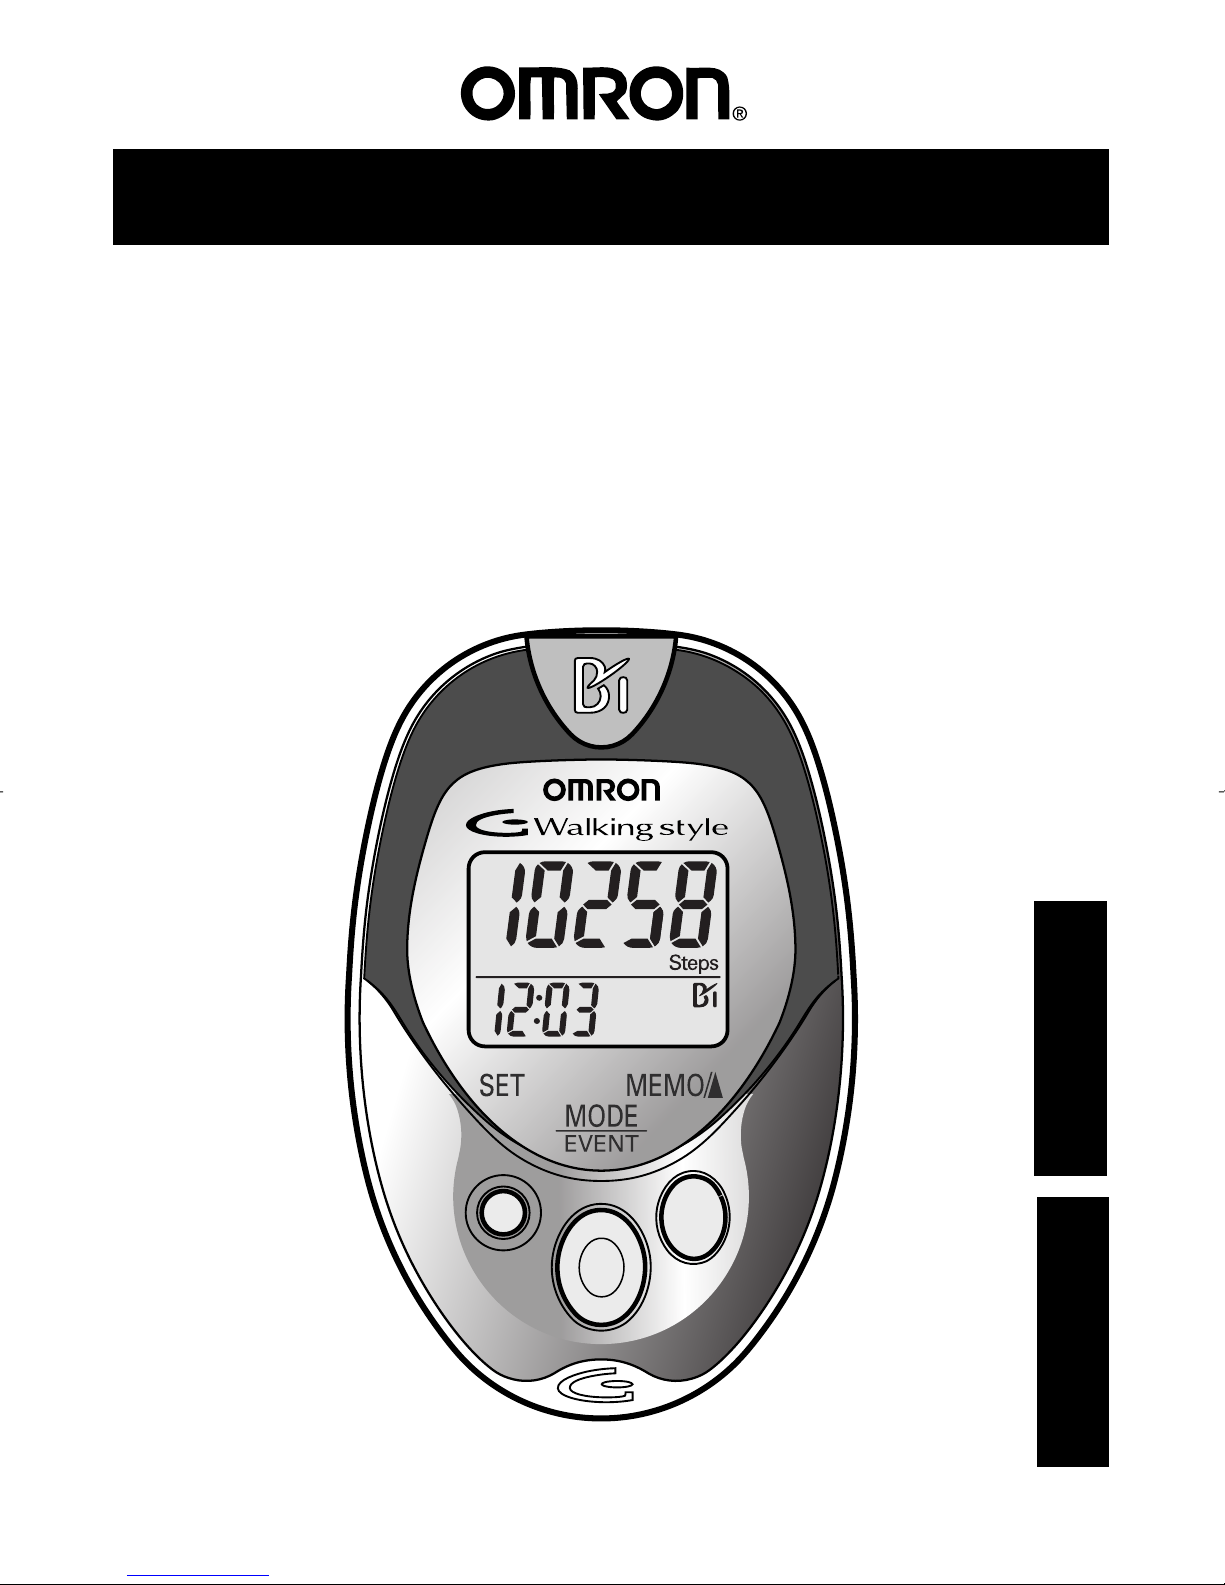
Pedometer with Download Capability
Model HJ-720ITCAN
FRANÇAIS
ENGLISH
Page 2

2
CONTENTS
Before Using the Unit
Introduction......................................................................................3
Important Safety Information...........................................................4
Know Your Unit ...............................................................................6
Main Unit ..............................................................................6
Components...........................................................................7
Aerobic Step Function .....................................................................8
Calorie/Amount of Fat Burned Display...........................................8
Stride Length Measurement.............................................................9
Operating Instructions
Battery Installation.........................................................................10
Battery Replacement ......................................................................11
Setting the Time .............................................................................12
Setting the Weight ..........................................................................14
Setting the Stride Length................................................................15
Attaching the Pedometer................................................................16
Changing the Display.....................................................................18
Using the Event Function...............................................................18
Using the Memory Function ..........................................................19
Using the System Reset Function ..................................................21
Downloading Data to a PC.............................................................22
Care and Maintenance
Care and Maintenance....................................................................23
Troubleshooting Tips .....................................................................24
Specifications.................................................................................25
FCC Statement ...............................................................................26
Warranty Information.....................................................................27
Page 3

3
INTRODUCTION
Thank you for purchasing the Omron®HJ-720ITCAN Pedometer with
download capability.
Fill-in for future reference
DATE PURCHASED: ________________
Staple your purchase receipt here.
SAVE THESE INSTRUCTIONS
A pedometer is a great motivational tool to track your distance, the number
of steps you take and how many calories you burn. The convenient
memory function supports the management of daily walking. You can
easily set and reach your daily goals. This pedometer allows the user to
place the pedometer in a pocket, bag or clip it to a belt when walking for
added flexibility to count steps.
Your HJ-720ITCAN comes with the following components:
Pedometer
Screwdriver
Strap
Clip
Holder
Battery (CR2032)
Instruction Manual
Page 4
4
IMPORTANT SAFETY INFORMATION
4
To assure the correct use of the product basic, safety measures should
always be followed including the warnings and cautions listed in this
instruction manual.
WARNING
Indicates a potentially hazardous situation
which, if not avoided, could result in death or
serious injury.
SAFETY SYMBOLS USED IN THIS INSTRUCTION MANUAL
CAUTION
Indicates a potentially hazardous situation
which, if not avoided, may result in minor or
moderate injury to the user or patient or
damage to the equipment or other property.
OPERATING THE DEVICE
Keep the unit out of reach of young children. If a young child
swallows the battery, battery cover, or screw immediately consult
with a doctor.
Read all information in the instruction book and any other literature
included in the box before using the unit.
Operate the unit only as intended. Do not use for any other purpose.
Properly dispose of used battery. Do not throw the battery into fire.
The battery may explode.
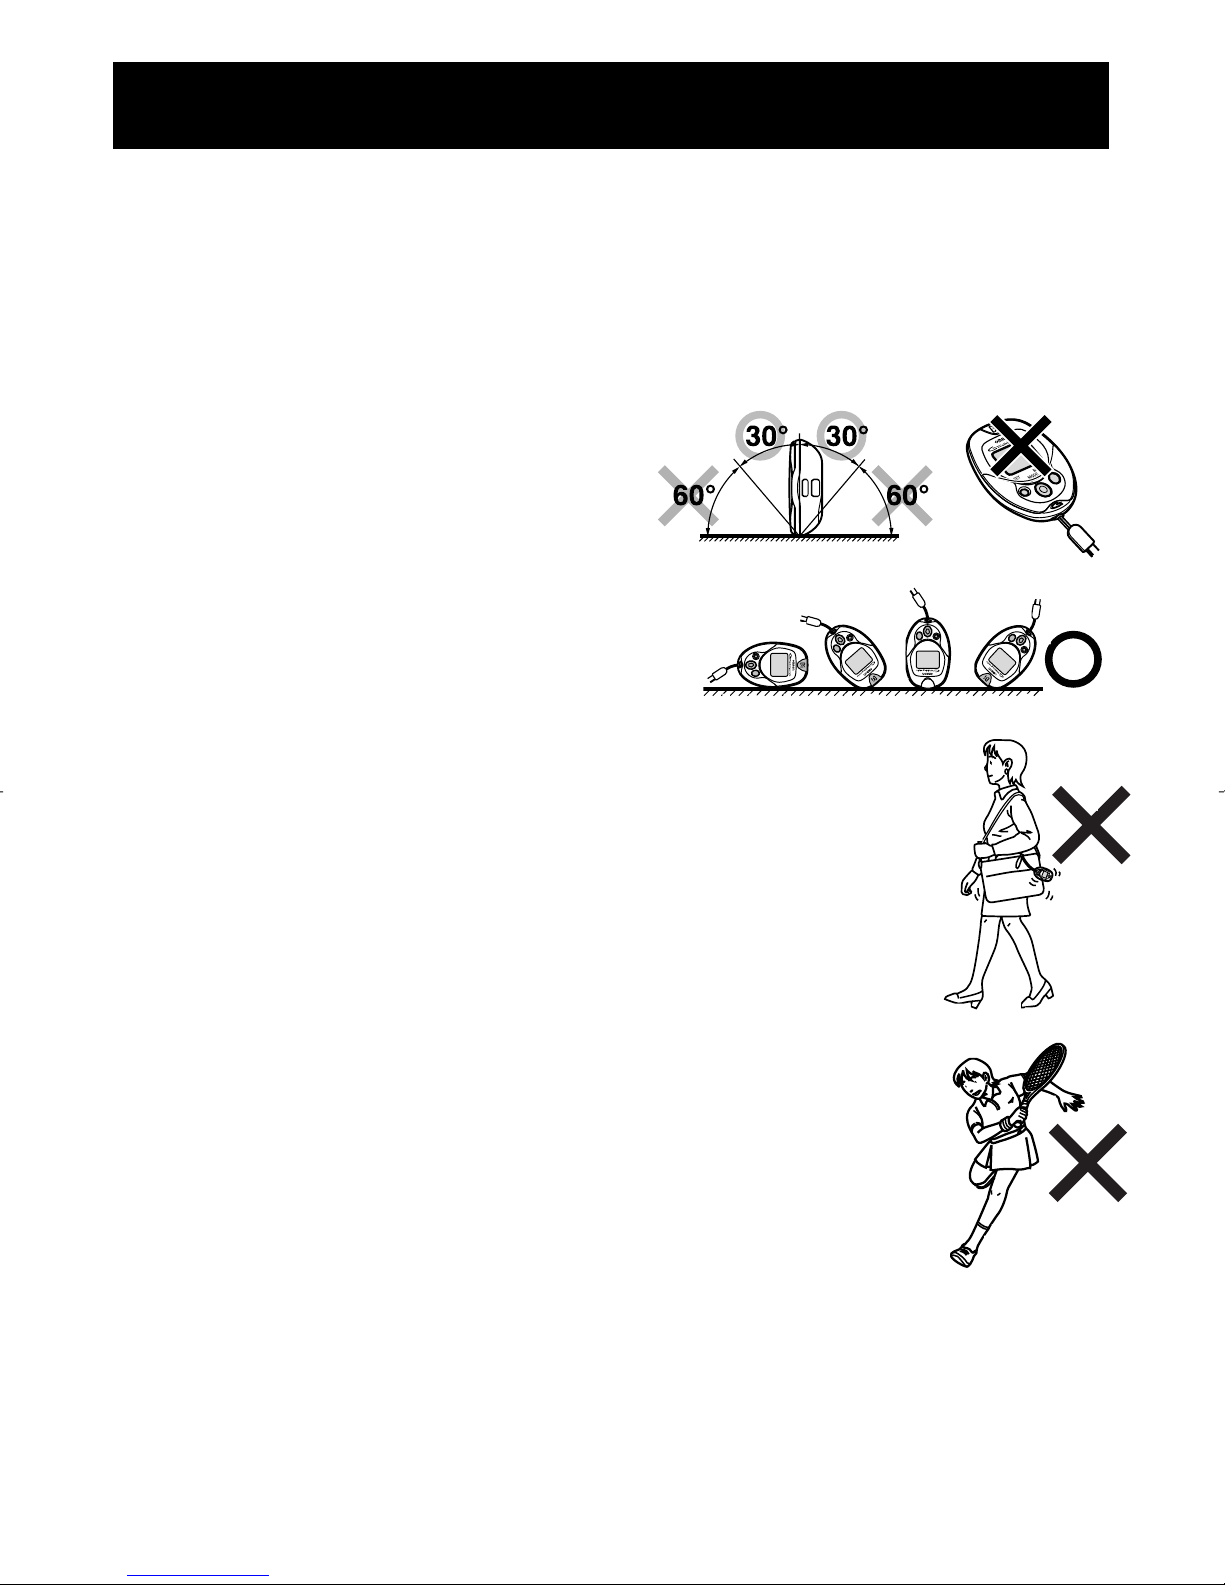
Do not swing the pedometer by holding the strap. This may
cause injury.
Page 5

5
IMPORTANT SAFETY INFORMATION
CARE AND MAINTENANCE
Do not disassemble or modify the unit. Changes or modifications not
approved by Omron Healthcare will void the user warranty.
Consult your physician or healthcare provider before beginning an
exercise program.
Page 6
6
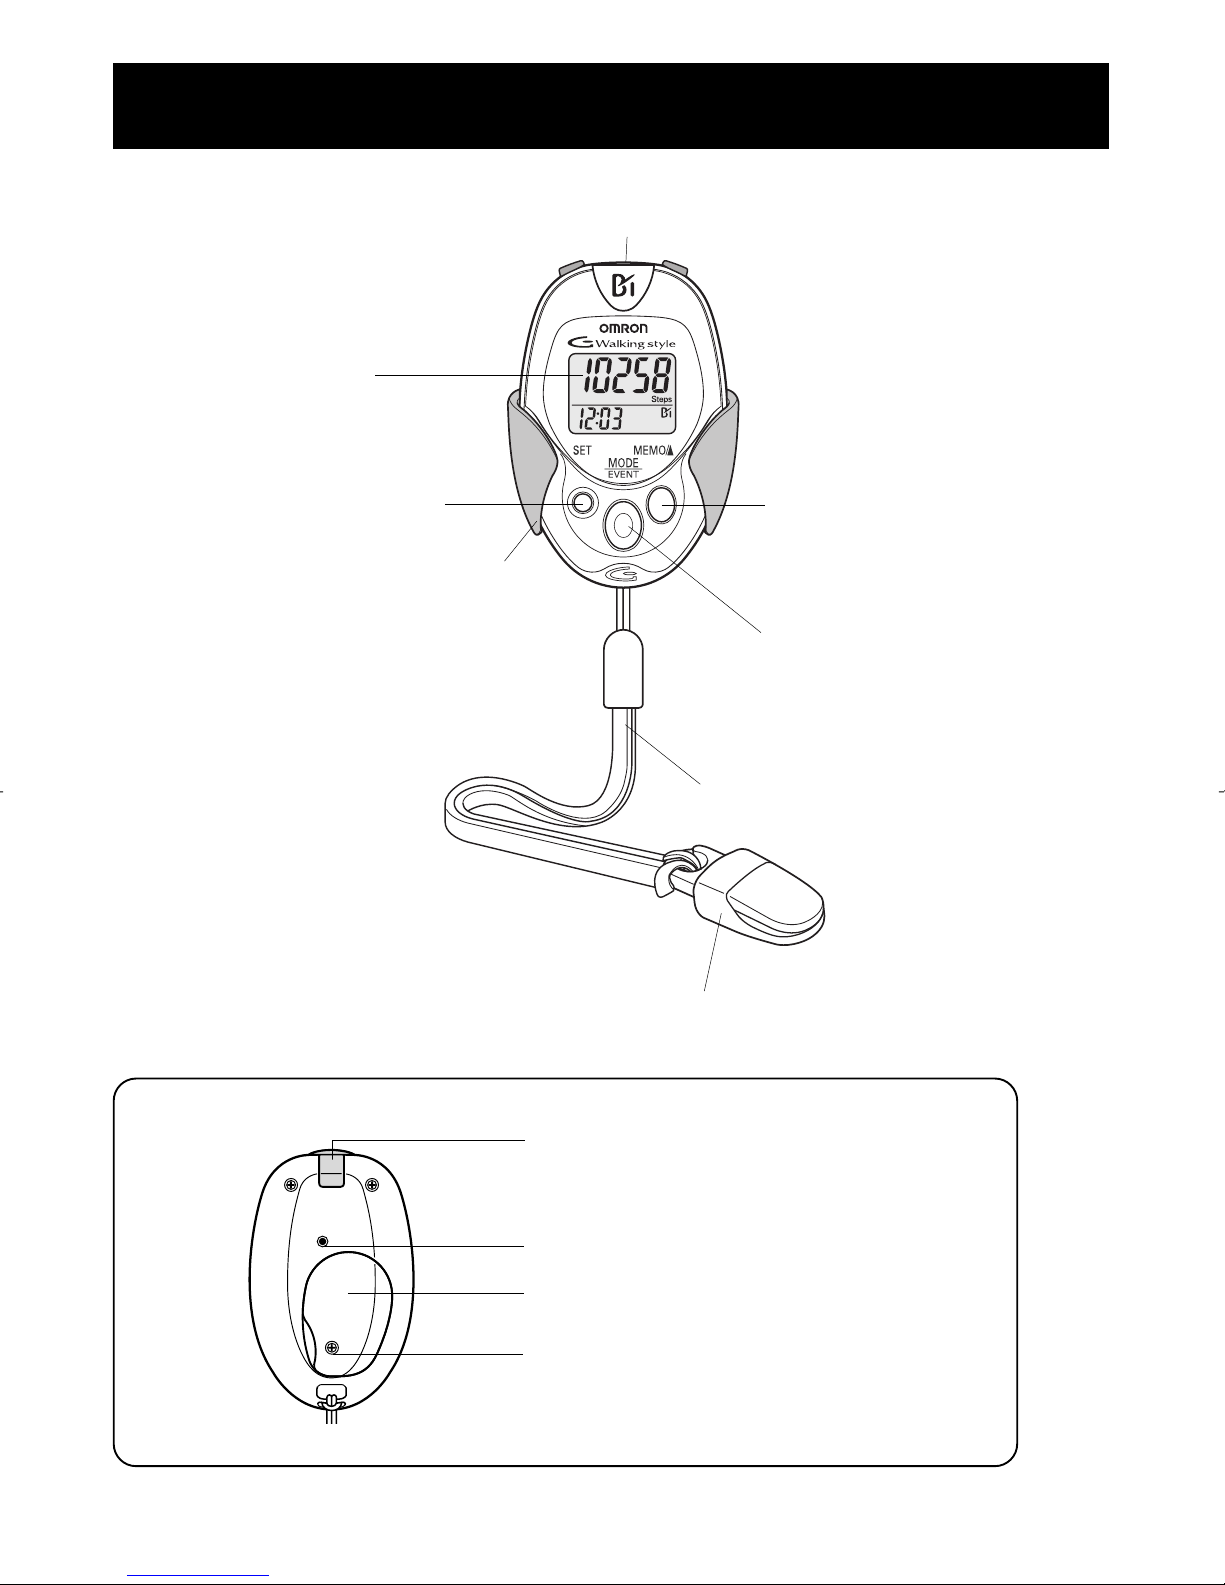
Main Unit
KNOW YOUR UNIT
Display
MODE/EVENT Button
Holder
USB Connector Cover
SYSTEM RESET Button
Battery Cover
Screw of Battery Cover
Strap
Clip
Back of the main unit
MEMO/▲ Button
USB Connector
SET Button
6
KNOW YOUR UNIT
Page 7
7
KNOW YOUR UNIT
Holder
Use this holder when attaching the unit
to your belt or the top of your pants.
1) Attach the main unit
to the holder.
2) Fasten the holder clip
to your pants.
How to attach
the strap to
the main unit
How to connect the
strap and the clip
How to release
from a clip and
fasten with a clip
Hole
to attach
the strap
To fasten
To release
Holder Clip
Components
Page 8
8
CALORIE/AMOUNT OF FAT BURNED DISPLAY
Bbb
AEROBIC STEP FUNCTION
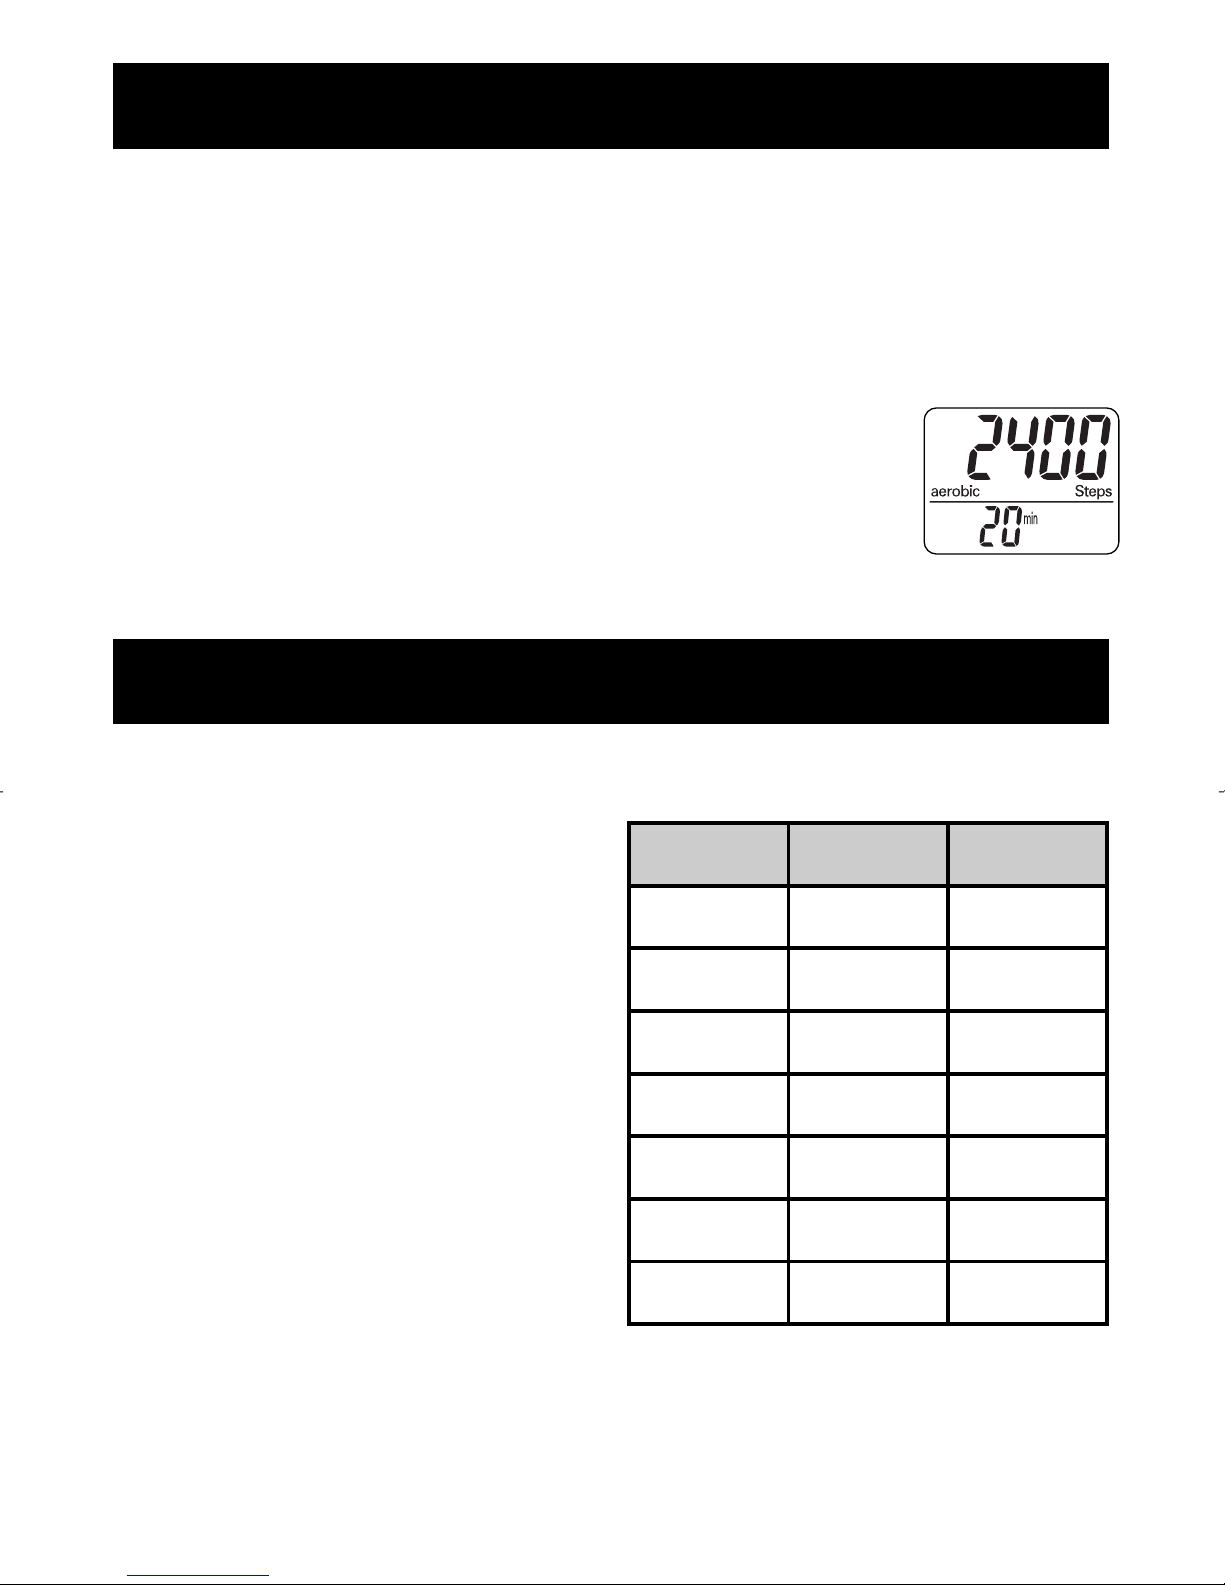
The unit displays the total number of aerobic steps in a day that
satisfies the following two conditions: (The minutes you walked as the
number of aerobic steps is also displayed.)
• Walk more than 60 steps per minute
• Walk for more than 10 minutes continuously
Example: If you walk for 20 minutes at the speed of 120
steps per minute, the number of steady aerobic is 2400.
Note: Taking a rest for less than 1 minute during
continuous walking after 10 minutes is considered
as continuous walking.
The calorie and amount of fat
burned display indicates a calorie
consumed by walking and length
from the weight, stride distance,
number of steps, and walking speed.
The calorie and amount of fat
burned display increment is one
minute.
If you want to know the target
calorie value, multiply the displayed
calorie by the coefficient in the table
shown right.
Example of correction:
For a woman in her 50's with the calorie display of 300,
the consumed calorie is calculated as follows.
300 x 0.95 = 285 kcal
Man Woman
20’s
1.10 1.07
30’s
1.05 1.01
40’s
1.02 .97
50’s
1.01 .95
60’s
1.00 .95
70’s
.98 .96
80’s
.95 .95
8
Correction coefficient
for calorie display
Page 9
9
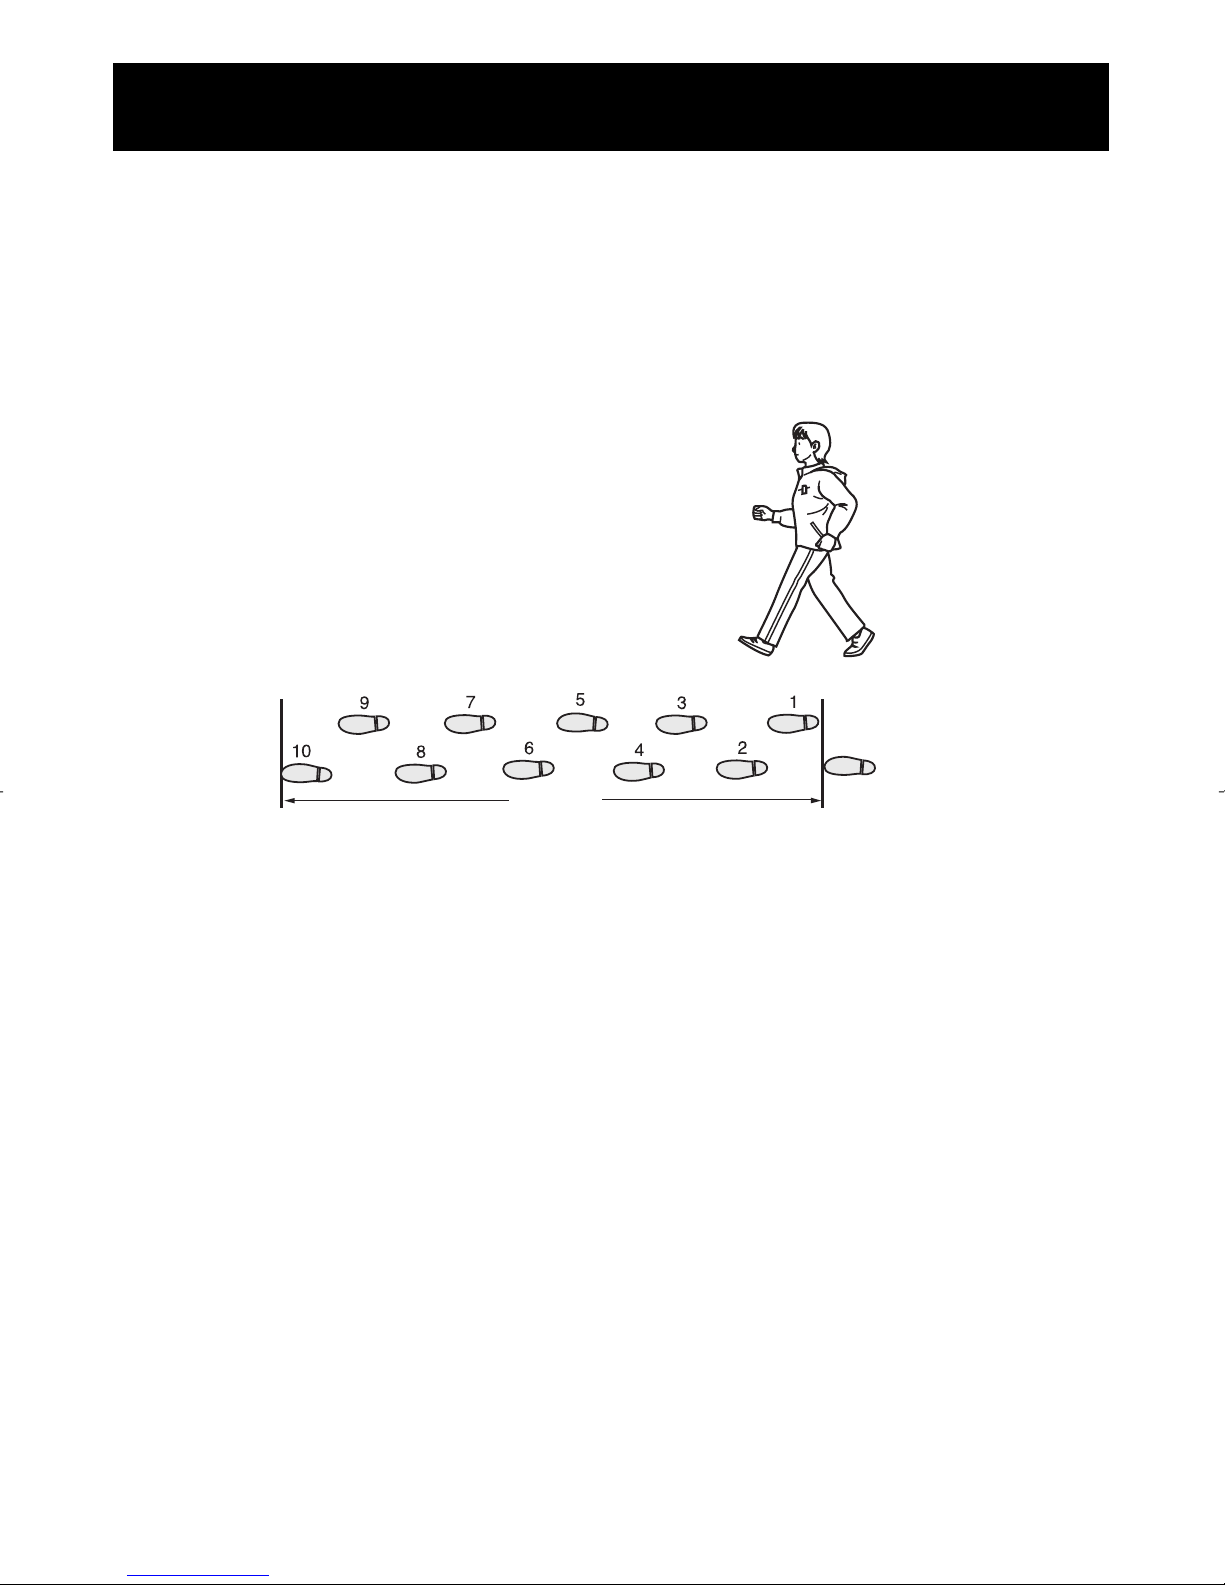
STRIDE LENGTH MEASUREMENT
Measure your stride length before beginning to set the pedometer.
How to measure your stride length
1. Walk 10 steps with your normal stride as illustrated below.
2. Measure the distance from START to END in centimeters.
3. Calculate your stride length by dividing the total
distance by 10.
Example:
Total distance = 800 cm
800 cm ÷ 10 = 80 cm
END START
800 cm
Page 10
10
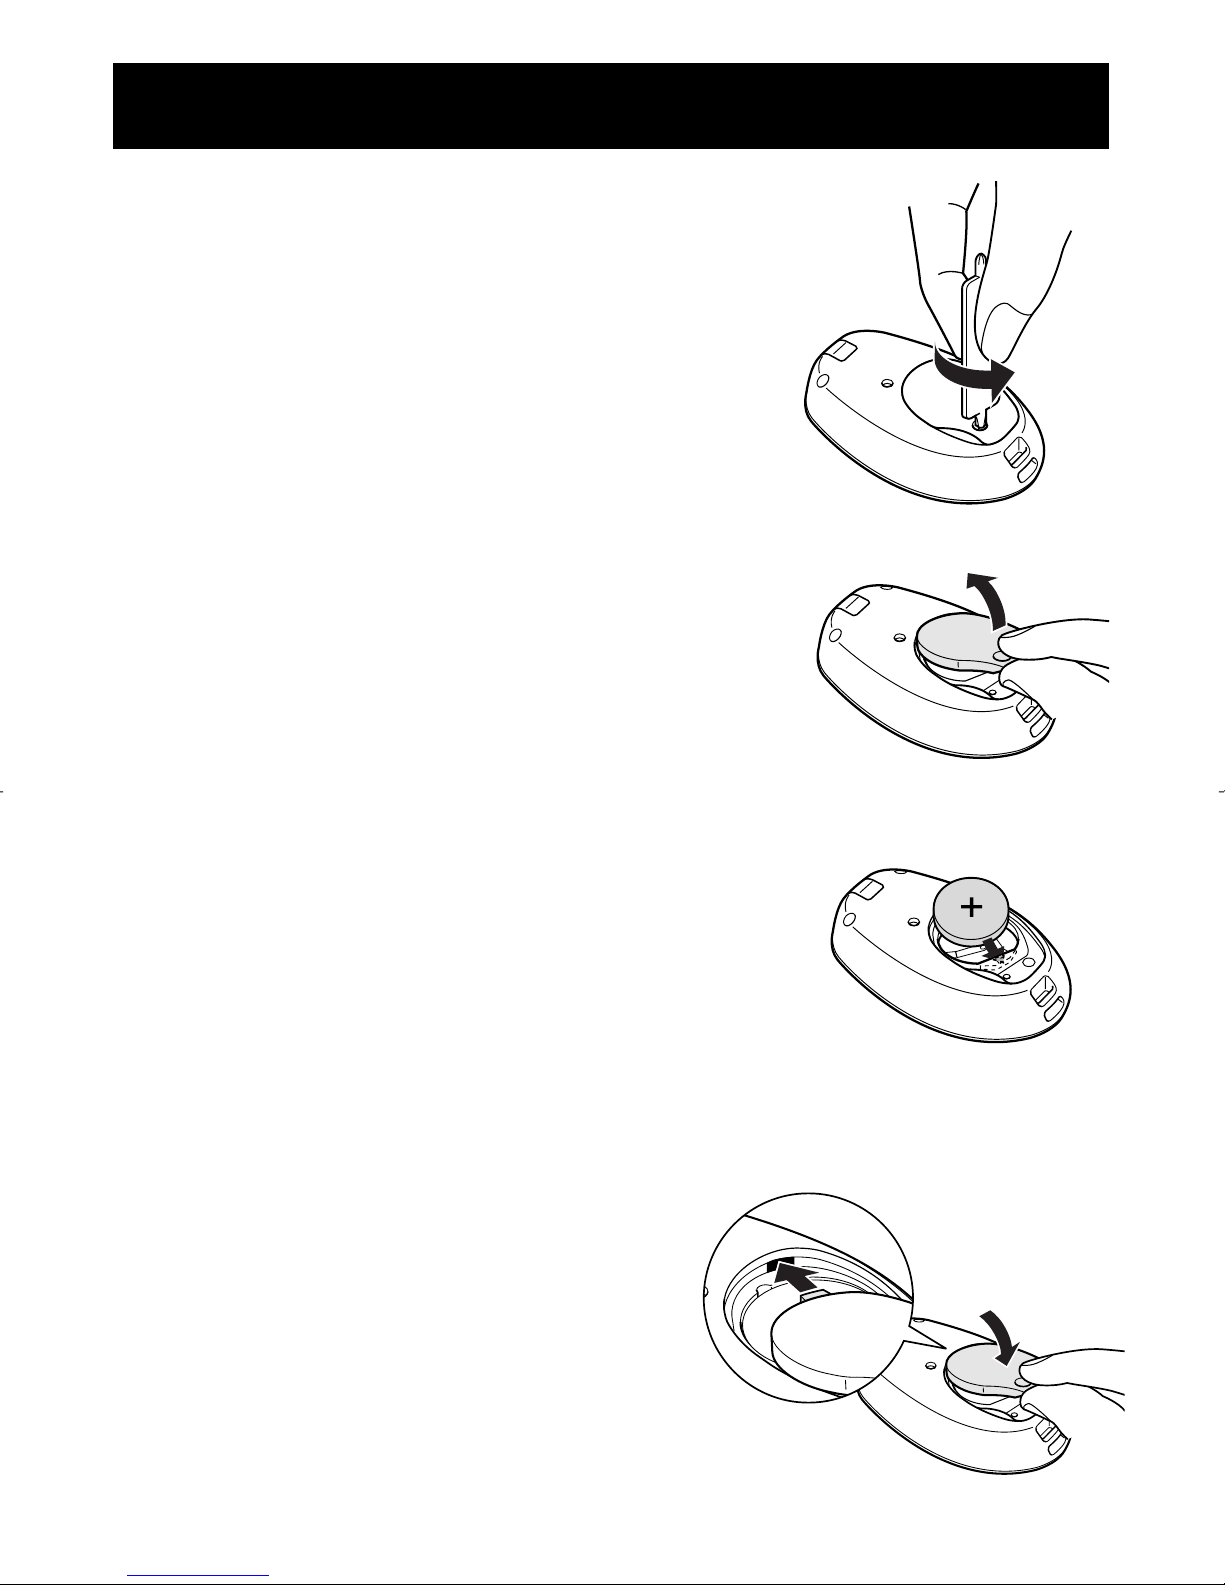
BATTERY INSTALLATION
1. Remove the screw on the battery cover
located on the back of the main unit.
Use the supplied screwdriver or use
a commercially available small screwdriver
to remove the screw on the battery cover.
2. Open the battery cover.
3. Insert the battery.
Place the positive (+) side of the battery
(CR2032) upward. Insert the battery in the
direction of the arrow as illustrated.
4. Close the battery cover.
Insert the projected portion of the
battery cover first.
Page 11
11
BATTERY INSTALLATION
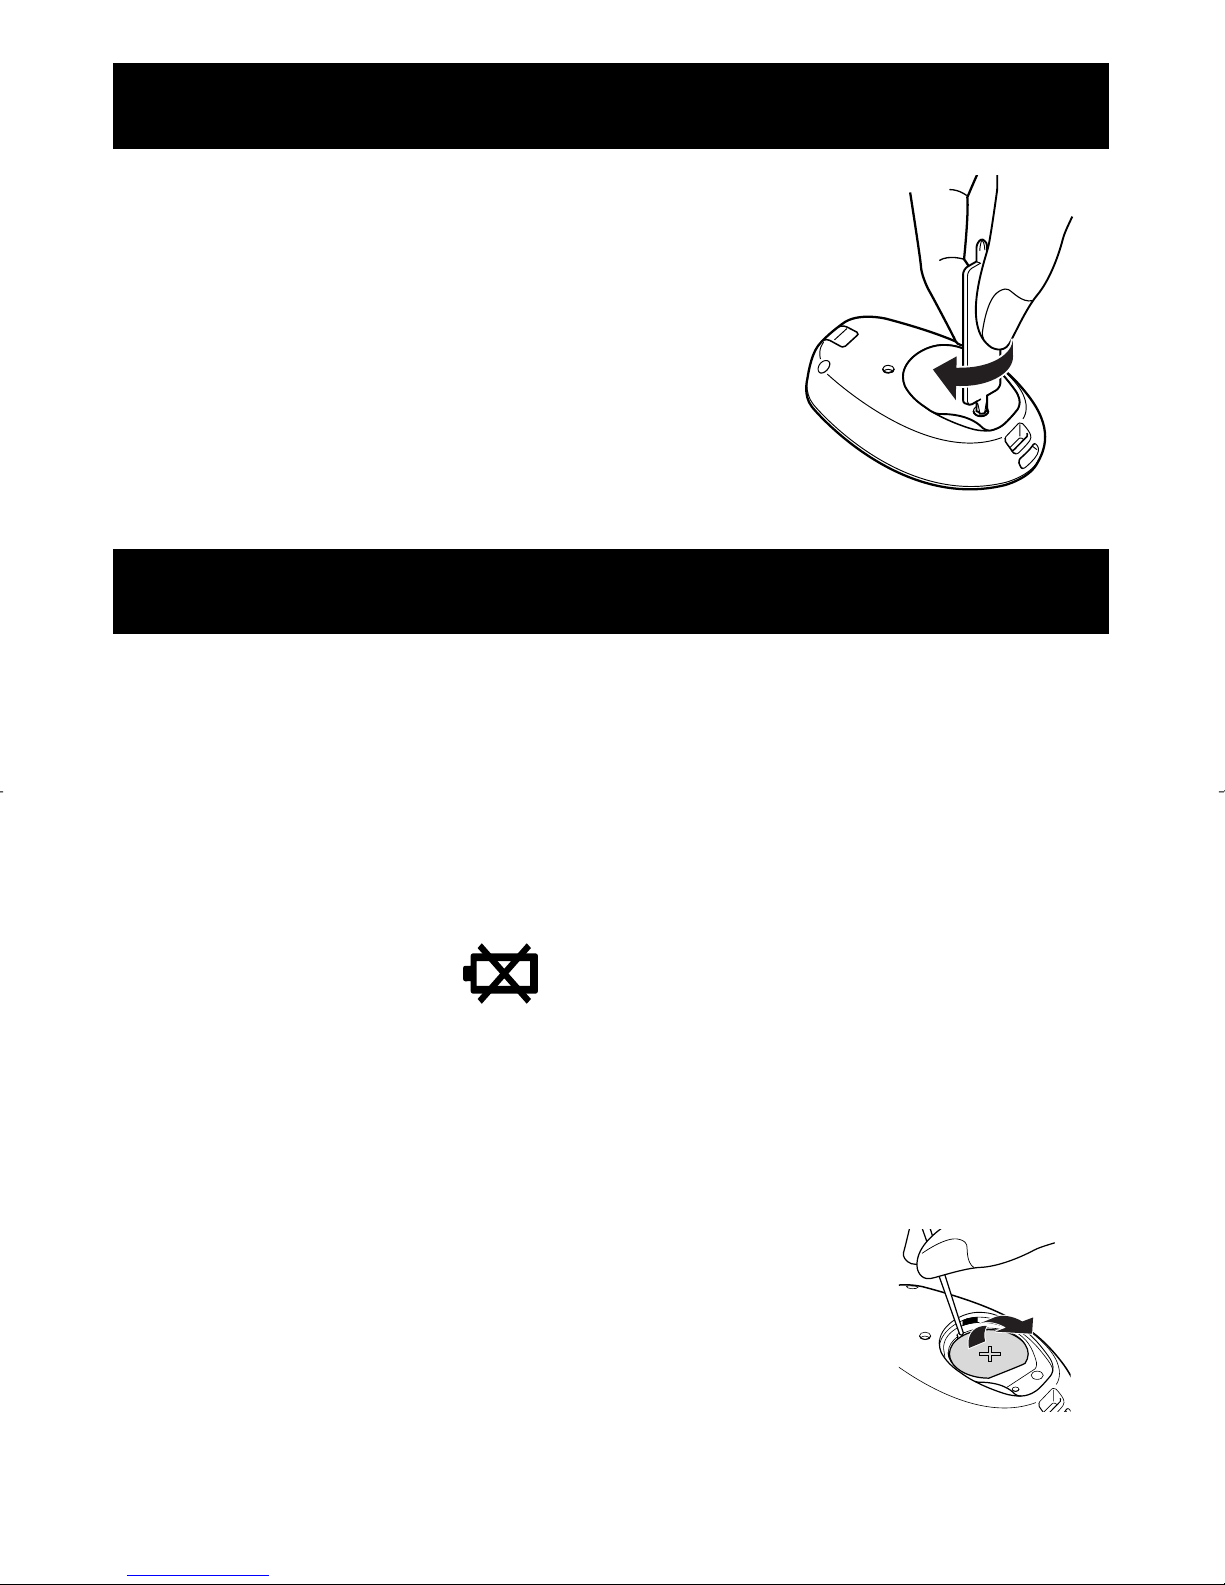
5. Tighten the screw on the battery cover.
NOTES:
• The time setting display will appear on the
screen for approximately 5 minutes after the
battery is inserted.
• After installing the battery, set time of day,
weight and stride length. (Refer to “Setting the
Time” on page 12)
BATTERY REPLACEMENT
Low Battery Indicator
When the Low Battery Indicator appears on the display, remove the old battery.
NOTE:
When the battery indicator starts to blink, the unit stops counting and the time
is displayed as “–:– –”.
Take the battery out with a thin stick that is not easily
breakable.
• DO NOT use a pair of metal tweezers or a screwdriver.
• Replace with a new CR2032 battery.
• Dispose of a battery according to applicable local
regulations.
When the battery is removed from the unit, the time of day and the data stored in
the memory for the current hour will be deleted. The weight, stride length setting
and the data stored in the memory up to the previous hour will not be deleted.
The current day is automatically stored in the memory when the time reaches
0:00. Do not replace the battery at 0:00. For example: If you remove the battery at
23:59 and replace the battery at 0:01 the data for the previous day will be stored
as the current day.
Page 12
12
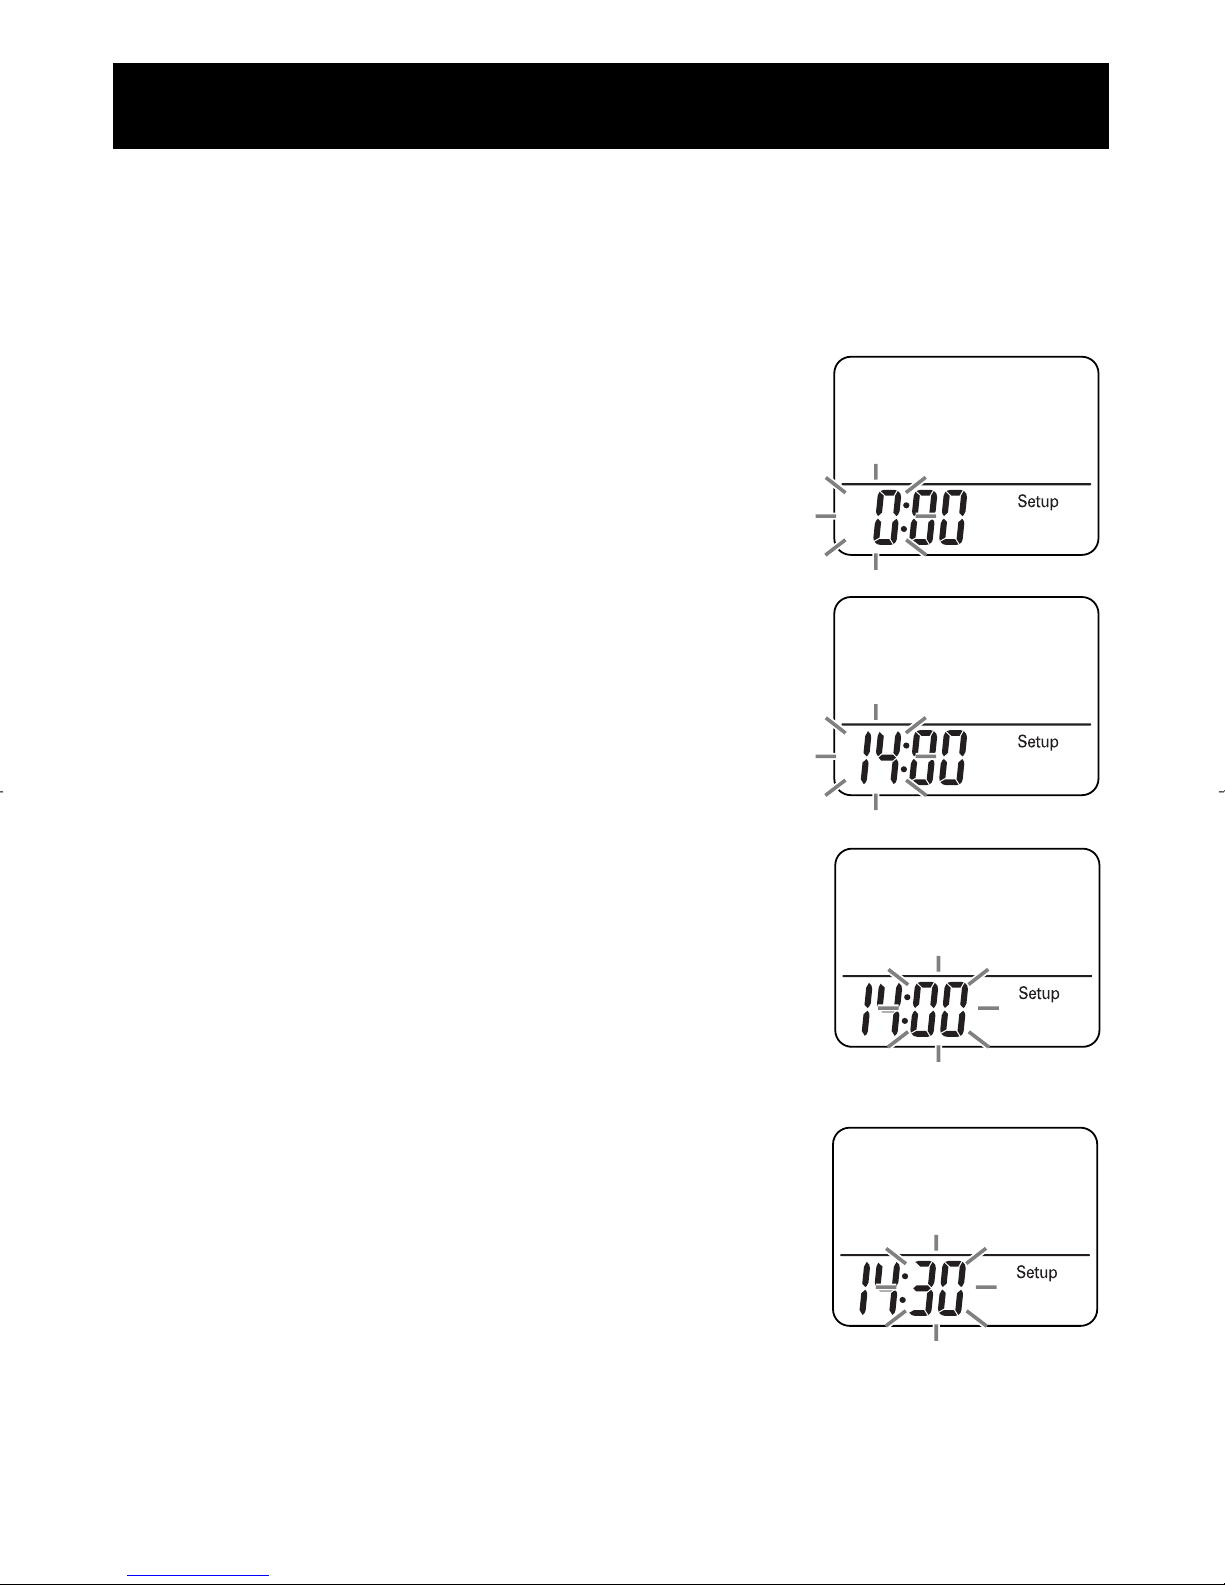
Setting range: 0:00 to 23:59
1. Install the battery.
(Refer to “Battery Installation”on page 10)
The hour flashes on the display.
If the MEMO/▲ or SET Button is not pressed
for 5 minutes, complete setting and display
the number of steps and time.
2. Press the MEMO/▲ Button to advance by
increments of one hour.
NOTE:
Press the MODE/EVENT button to return
the hour to 0.
3. Press the SET Button to set the hour.
The minutes flash on the display.
4. Press the MEMO/▲ Button to advance by
increments of one minute.
Press and hold the button to advance
the time in 10 minute increments.
NOTE:
Press the MODE/EVENT Button to
return the minute to 00.
12
SETTING THE TIME
Page 13

13
5. Press the SET button to set the minute.
The weight flashes on the display.
SETTING THE TIME
Page 14
14
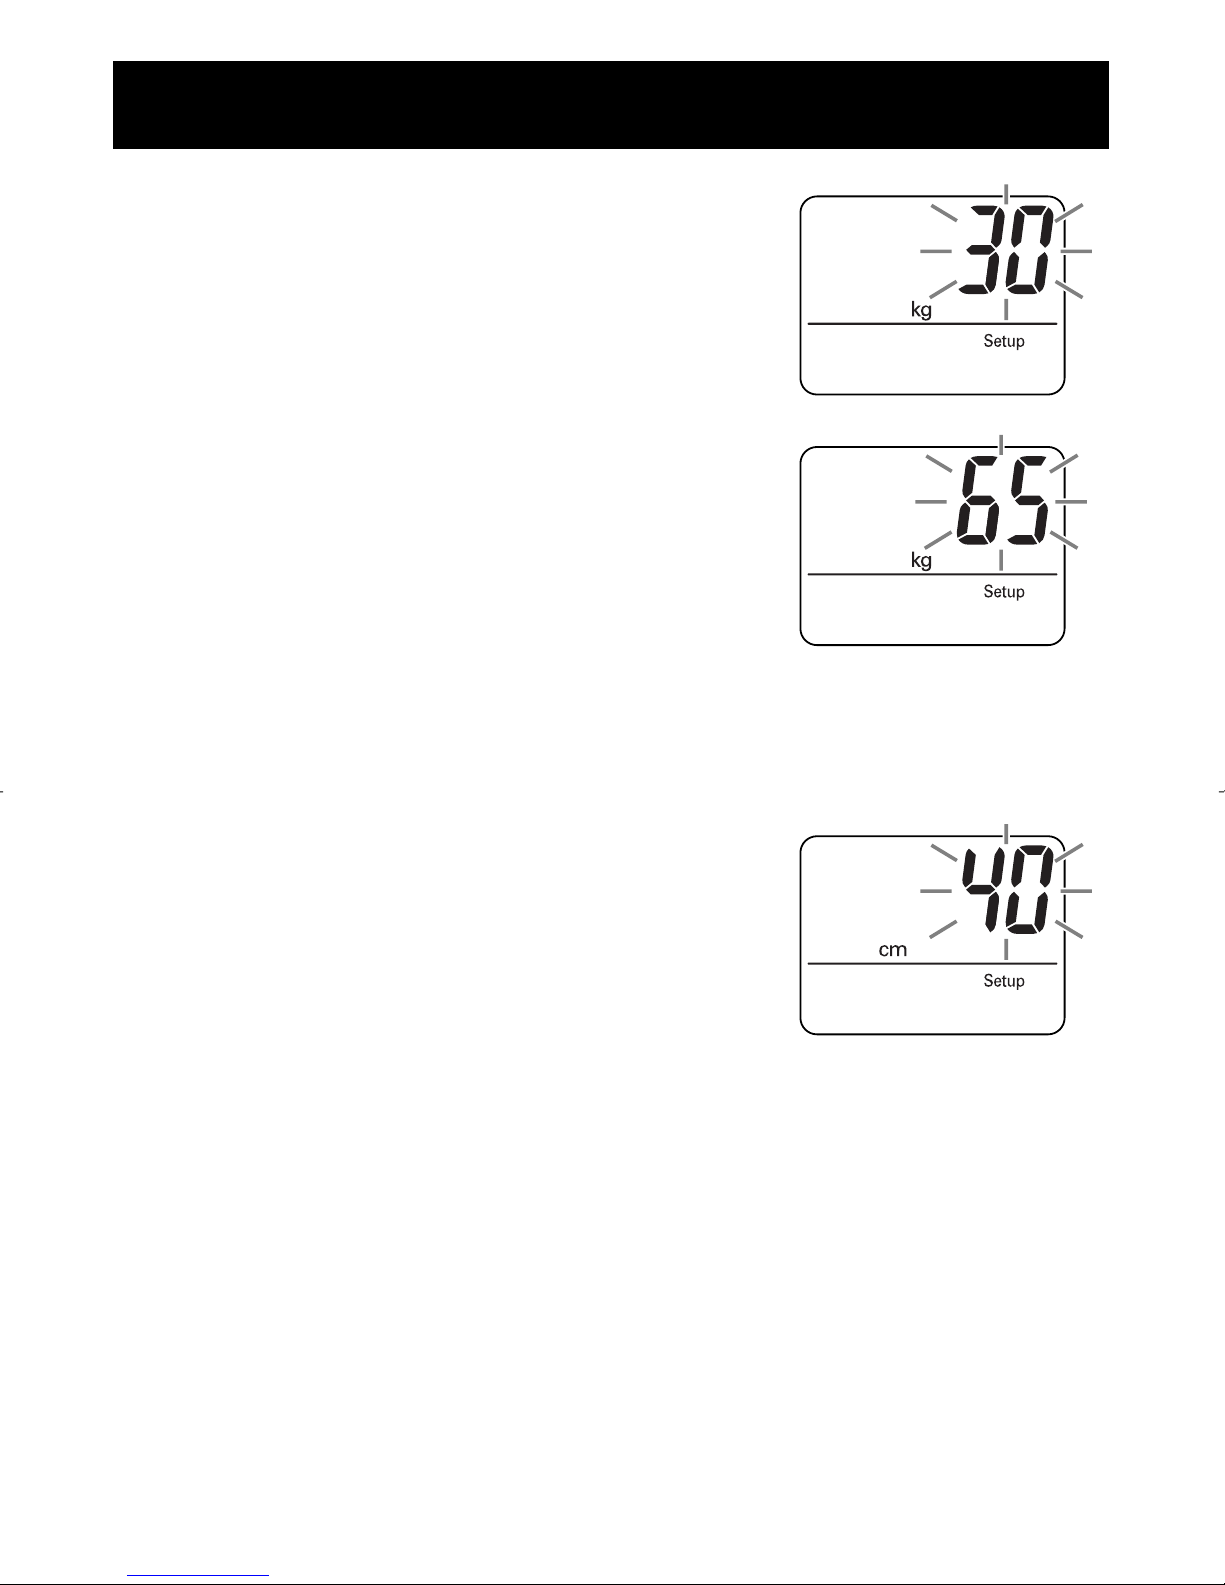
1. Press the MEMO/▲ Button
to advance by increments of 1 kg.
Press and hold the button to advance weight
in 10 kg increments.
NOTE:
Press the MODE/EVENT button to return
the weight to 30.
2. Press the SET Button to set the weight.
The stride length flashes on the display.
14
SETTING THE WEIGHT
Setting range: 30 to 136 kg.
The weight flashes on the display.
Page 15
15
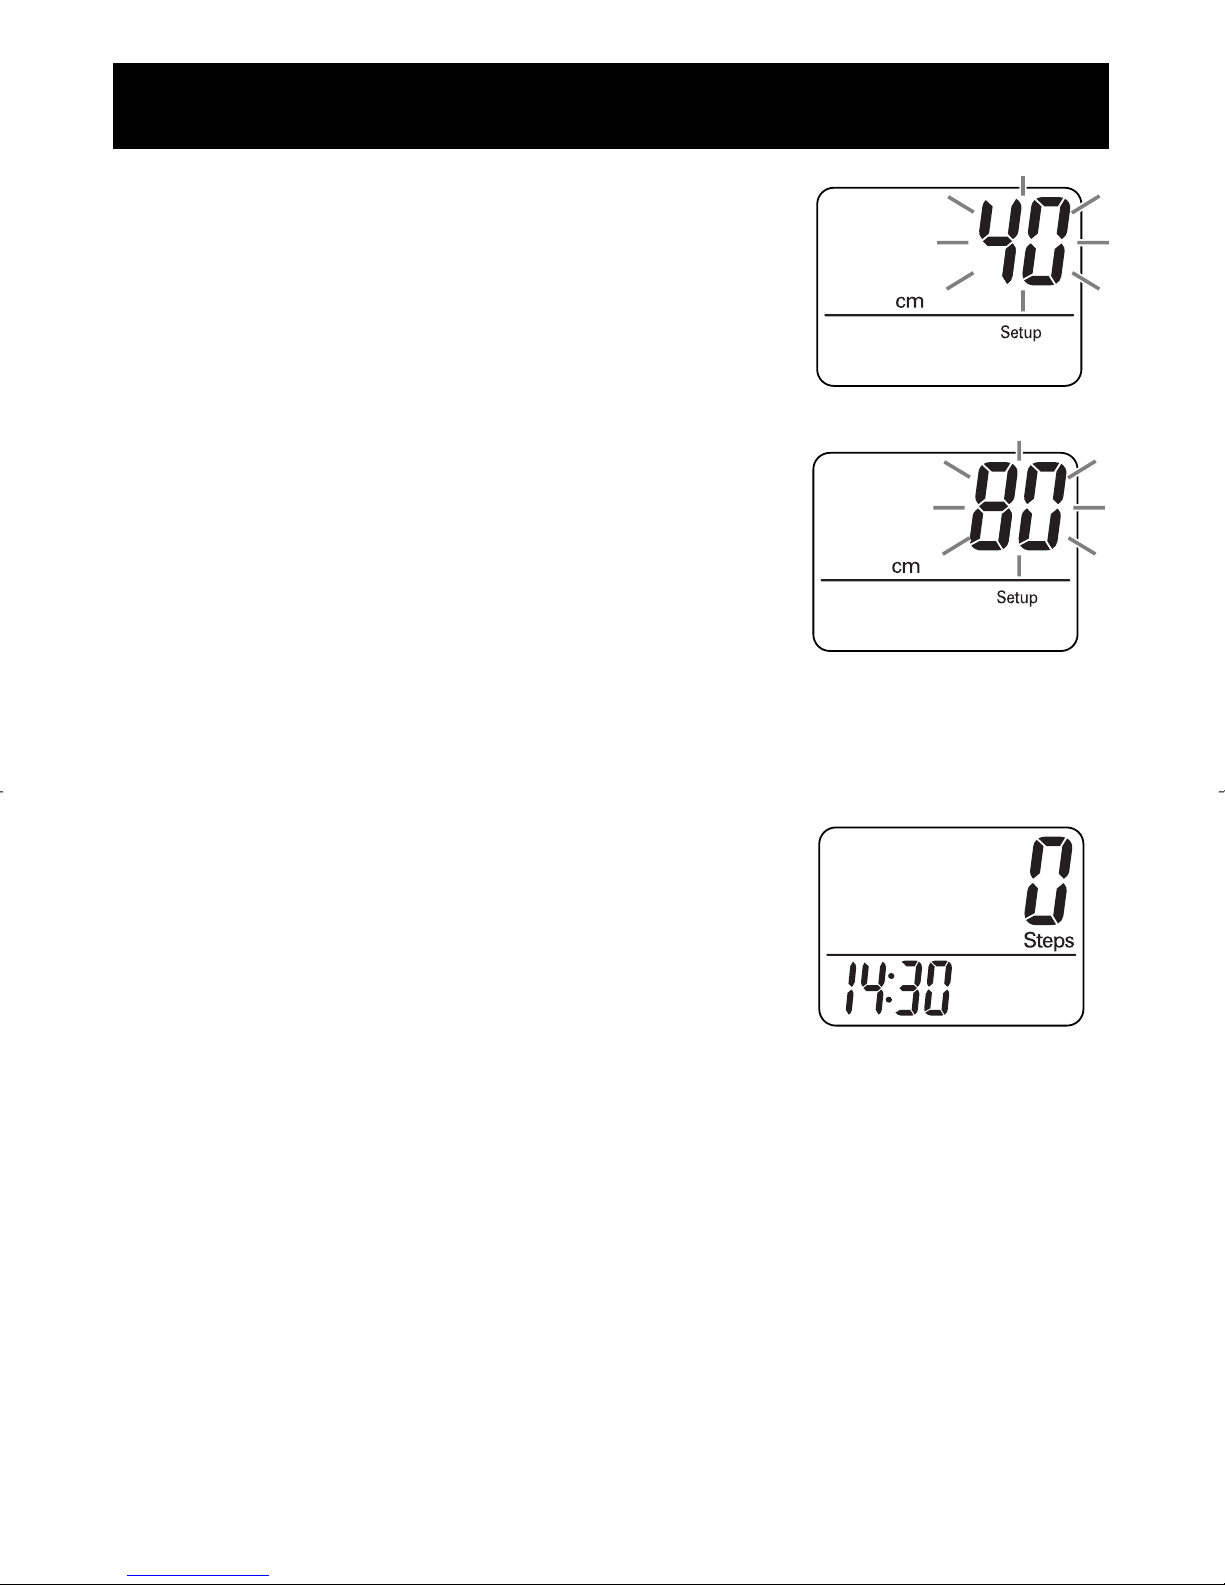
1. Press the MEMO/▲ Button
to advance by increments of 1 cm.
Press and hold the button to advance the
stride in 10 cm inches increments.
NOTE:
Press the MODE/EVENT Button to
return the stride length to 40 cm.
2. Press the SET Button to the stride
length.
The number of steps and time will display.
All the settings are completed.
To change the time, weight, or stride length after the setting is
completed:
1. Press and hold the SET Button for 2 seconds.
2. Change the setting.
NOTE:
If setting does not need to be changed, press the set button to advance
to the next setting.
SETTING THE STRIDE LENGTH
Setting range: 30 to 120 cm
The stride length flashes on the display.
Page 16
16
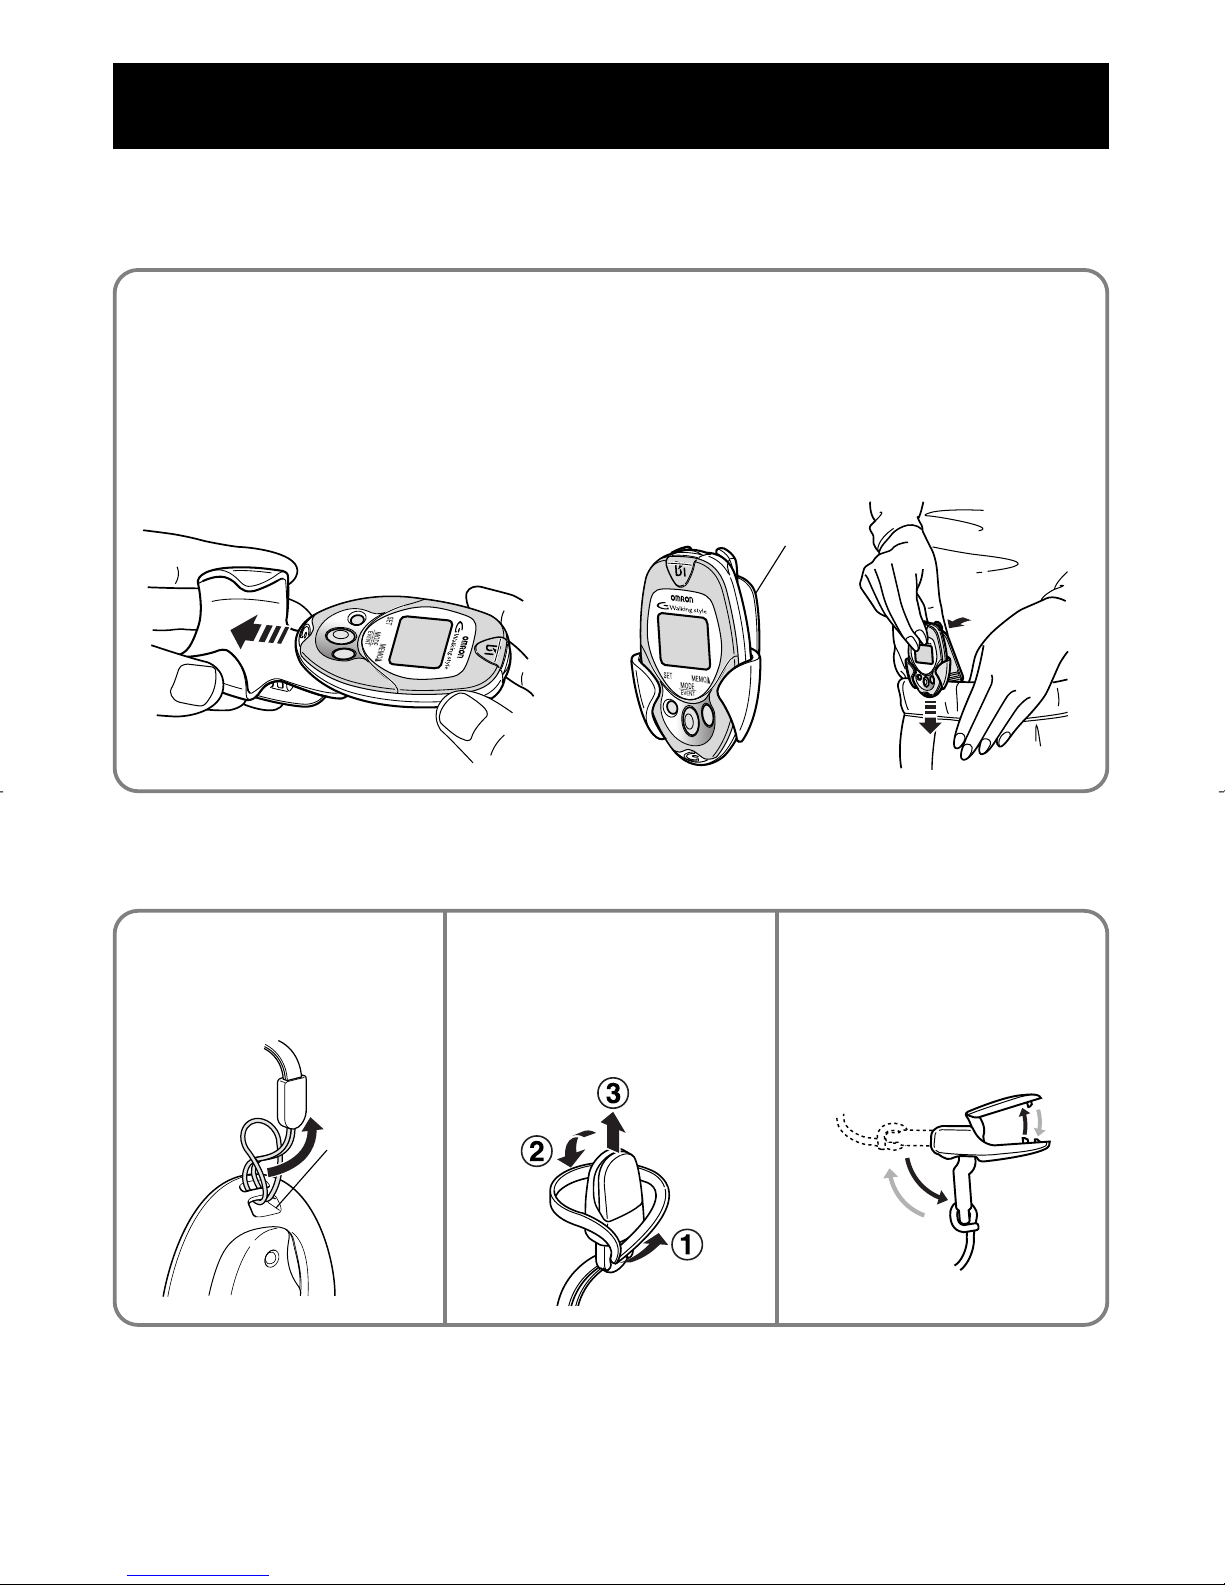
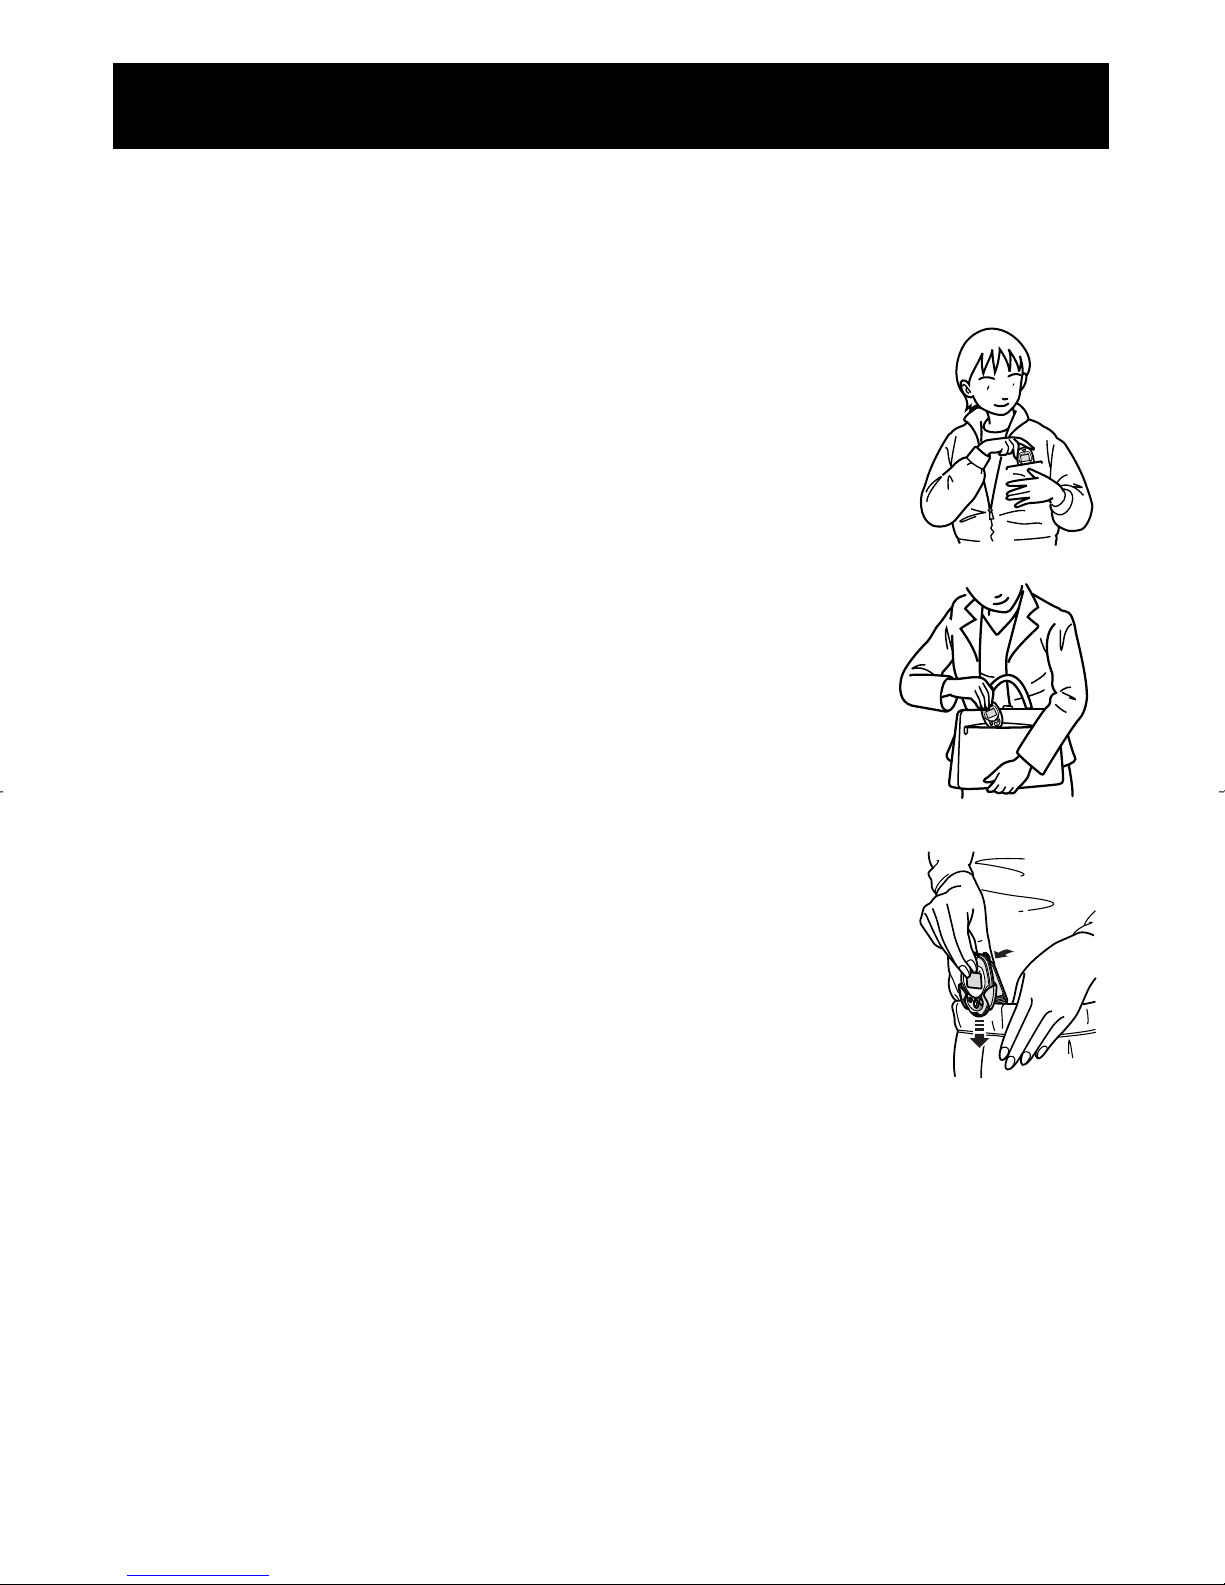
ATTACHING THE PEDOMETER
Place the unit in the upper front pocket of your jacket, in a bag
you hold tightly, or attach unit to your pants or belt.
Place the unit in your pocket.
• Do not place the unit in the back pocket
of your pants.
• Attach the clip on the edge of your pocket
to prevent the unit from dropping.
Place the unit in your bag.
• Place the unit in your pocket or the
partition of your bag.
Attach the unit to your belt or the top
of your pants.
• Use the supplied holder.
• Do not force the holder onto thick or wide.
NOTE:
The display will not change until you have walked for
more than 4 or more seconds.
Page 17
17
ATTACHING THE PEDOMETER
When the memory is being displayed or the unit is being set
When the unit is not vertical to the ground
• When the front of the main unit is
placed in the angle of less than 60°
(shown to the right) or horizontal to the
ground.
NOTE:
The unit can count steps even if it is slanted
or placed upside-down, or if the main unit is
perpendicular to the ground.
When the main unit moves irregularly
• When the main unit is placed in the bag that moves irregularly
because it hits your foot, your belt or the top of your pants.
• When the unit hangs from your belt, the top of your pants or a bag.
When you walk at an inconsistent pace
• When you shuffle or wear sandals
• When you fail to walk consistently in a crowded place
When you use the unit in the place where lots of up
and down movements or vibrations take place
• Standing up and/or sitting down movement
• Playing sports other than walking
• Ascending or descending movement at stairs or in a steep slope
• Vertical or horizontal vibration in the moving vehicle such
as on the bicycle, in the automobile, trains or a bus
When you jog or walk extremely slowly
NOTE:
The unit will count steps during jogging if it is attached to your belt or the top
of your pants with a holder.
NOTE: The unit may not be able to count the steps correctly
in the following cases.
Page 18

18
Press the MODE/EVENT Button
to change the display
Each time you press the MODE/EVENT Button,
the display will change.
Number of steps
Number of
aerobic steps
with minutes
Calories with
amount of fat
burned
Distance
Press the MODE/EVENT Button
for 2 seconds while current day’s data is
displayed.
The times of event in current day is displayed for 2
seconds.
NOTES:
• Follow the direction by instructor or service
provider to use this function.
• Event can be recorded once per hour.
• The unit does not display previous event data.
USING THE EVENT FUNCTION
CHANGING THE DISPLAY
Page 19

19
USING THE MEMORY FUNCTION
This unit can store up to previous 41 days and display the most recent 7
days of data.
The current day’s data is automatically stored in memory when the
time reaches 0:00. The display will return to 0.
NOTE:
The time must be correctly set in the unit.
How to view data stored in the memory
Press the MODE/EVENT Button until the data
you want to see is displayed:
Steps
Aerobic Steps with minutes
Calories with amount of fat burned
Distance
Press the MEMO/▲ Button. The previous day
data is displayed.
Continue to press the MEMO/▲ Button until
all seven days of data is displayed.
NOTE:
If no button is pressed for more than
1 minute, the display will return to the
current day’s data.
Press the MODE/EVENT Button to return to
the current day’s data.
19
Page 20

20
USING THE MEMORY FUNCTION
Full Memory Indicator
NOTES:
• Full memory indicator starts display when there are 35 days
including current day of stored data which has not been
downloaded.
• Follow the direction by instructor or service provider to download
the data. (Refer to “Downloading Data to a PC” on page 22)
Page 21

21
USING THE SYSTEM RESET FUNCTION
Use the SYSTEM RESET function in the following cases:
• When the display becomes unrecognizable
Press the SYSTEM RESET Button on the
back of the main unit with a thin stick that
is not easily breakable.
The time is reset.
NOTE:
The data stored in the memory is not deleted.
After all characters on the displays are turned on, the
initial time setting displays appears. (Refer to
“Setting the Time” on page 12)
Page 22

22
DOWNLOADING DATA TO A PC
Use only the authorized Omron USB cable sold separately, (Model
Number HHX-CABLE-USB2) with this pedometer. Use of any other
cable may cause damage to the pedometer and will void the user
warranty.
1. Open the USB Connector cover.
2. Plug the normal USB Connector (Large
Connector) into the personal computer.
3. Plug the mini USB connector (Small
Connector) into the USB connector.
“PC” will appear on the display when the
USB cable is connected correctly.
NOTE:
Follow the direction by instructor or service
provider to use this function.
(Optional accessory sold separately)
Normal USB Connector
Mini USB Connector
Page 23

23
CARE AND MAINTENANCE
Clean the unit with a soft dry cloth.
• Do not use any abrasive or volatile cleaners.
• The unit is not waterproof. Do not wash it
or touch it with wet hands.
• Never immerse the unit in water.
• Be careful so water does not get into the
unit.
Store the unit in a safe and dry location.
• Avoid the unit being exposed to direct sunlight,
high temperatures, high humidity, water and/or dust.
Do not subject the unit to strong shock, drop, or step
on the unit.
Remove the battery if the unit will not be used for three
months or longer.
Use the unit consistent with the instruction provided
in this manual.
23
Care and Maintenance
Page 24

24
TROUBLESHOOTING TIPS
Problem Probable cause How to correct
The Low Battery
Indicator blinks.
The battery is low
or worn.
Replace the battery with
a new one (CR2032).
Nothing is
displayed.
The displayed
values are
incorrect.
The polarities of
battery (+ and -)
are aligned in the
wrong directions.
Insert the battery in
correct alignment.
The battery is worn.
Replace the battery with
a new one (CR2032).
The unit is
positioned
incorrectly.
Irregular movement.
Inconsistent pace.
Up and down
movement.
Refer to “Attaching the
Pedometer” on page 16.
Check the weight and stride
length settings.
The set values
are wrong.
Page 25

25
Model: HJ-720ITCAN
Power Supply: 3 VDC (1 lithium battery CR2032)
Measurement Range: Steps: 0 to 99,999 steps
Aerobic Steps: 0 to 99,999 steps
Minutes for Aerobic Steps: 0 to 1,440 minutes
Amount of Fat Burned: 0.0 to 199.9 g
Calories: 0 to 99,999 kcal
Distance: 0.00 to 999.99 km
Memory: Previous 41 days (Most recent 7 days on display)
IT Function: USB connector
Operating Temperature / -10°C to +40°C (14°F to 104°F) / 30% to 85% RH
Humidity:
Storage Temperature / -20°C to +60°C (-4°F to 140°F) / 30% to 95% RH /
Humidity / Air Pressure: 700 - 1600 hPa
Precision of Step Counting:
Within +/- 5% (by vibration testing machine)
Time Precision: Within +/- 30 seconds of the average monthly deviation
(under normal temperature)
Battery Life: Approximately 6 months (when used for walking
10,000 steps a day)
External Dimensions: Approximately 47 mm (w) × 73 mm (h) × 16 mm (d)
(1 7/8'' × 2 7/8'' × 5/8'')
Weight: Approximately 37 g (battery included)
Contents: Pedometer, Battery (CR2032), Screwdriver, Strap, Clip,
Holder, and Instruction Manual
UPC: 0 73796 90314 5
• Specifications are subject to change without notice.
25
SPECIFICATIONS
Page 26

26
FCC STATEMENT
NOTE:
POTENTIAL FOR RADIO/TELEVISION INTERFERENCE (for U.S.A. only)
This product has been tested and found to comply with the limits for a Class B digital
device, pursuant to part 15 of the FCC rules.
These limits are designed to provide reasonable protection against harmful interference
in a residential installation. The product generates, uses, and can radiate radio frequency
energy and, if not installed and used in accordance with the instructions, may cause
harmful interference to radio communications. However, there is no guarantee that
interference will not occur in a particular installation. If the product does cause harmful
interference to radio or television reception, which can be determined by turning the
product on and off, the user is encouraged to try to correct the interference by one or
more of the following measures:
• Reorient or relocate the receiving antenna.
• Increase the separation between the product and the receiver.
• Connect the product into an outlet on a circuit different from that to which the receiver
is connected.
• Consult the dealer or an experienced radio/TV technician for help.
POTENTIAL FOR RADIO/TELEVISION INTERFERENCE (for Canada only)
This digital apparatus does not exceed the Class B limits for radio noise emissions from
digital apparatus as set out in the interference-causing equipment standard entitled
“Digital Apparatus”, ICES-003 of the Canadian Department of Communications.
Cet appareil numérique respecte les limites de bruits radioeléctriques applicables aux
appareils numériques de Clase B prescrites dans la norme sur le materiel brouilleur:
“Appareils Numériques”, ICES-003 édictée par le minister des communications.
Changes or modifications not expressly approved by the party responsible for
compliance could void the user’s authority to operate the equipment.
Page 27

2727
WARRANTY INFORMATION
Your Omron HJ-720ITCAN Pedometer, excluding the battery, is warranted to be free
from defects in materials and workmanship appearing within 1 year from the date of
purchase, when used in accordance with the instructions provided with the unit.
The above warranties extend only to the original retail purchaser.
We will, at our option, repair or replace without charge any pedometer covered
by the above warranties. Repair or replacement is our only responsibility and your
only remedy under the above warranties.
To obtain warranty service contact Omron Healthcare’s Customer Service by calling
1-800-634-4350 for the address of the repair location and the return shipping and
handling fee. Information for warranty service is available on our website at
www.omronhealthcare.com.
Enclose the Proof of Purchase. Include a letter, with your name, address, phone
number, and description of the specific problem. Pack the product carefully to
prevent damage in transit. Because of possible loss in transit, we recommend
insuring the product with return receipt requested.
ALL IMPLIED WARRANTIES, INCLUDING BUT NOT LIMITED TO
THE IMPLIED WARRANTIES OF MERCHANTABILITYAND FITNESS
FOR PARTICULAR PURPOSE, ARE LIMITED TO THE DURATION OF
THE APPLICABLE WRITTEN WARRANTYABOVE. Some states do not
allow limitations on how long an implied warranty lasts, so the above limitation
may not apply to you.
OMRON SHALL NOT BE LIABLE FOR LOSS OF USE OR ANY OTHER
INCIDENTAL, CONSEQUENTIAL OR INDIRECT COSTS, EXPENSES
OR DAMAGES. Some states do not allow the exclusion or limitation of incidental
or consequential damages, so the above exclusions may not apply to you.
This warranty gives you specific legal rights, and you may also have other rights
which may vary from state to state.
FOR CUSTOMER SERVICE
Visit our web site at: www.omronhealthcare.com
Call toll free: 1-800-634-4350
Limited Warranty
Page 28

Distributed by:
Omron Healthcare Canada
5500 N. Service Road Penthouse
Burlington, ON L7L 6W6
Copyright © 2006 OMRON HEALTHCARE, INC.
720ITCAN INST Rev
Page 29

GUIDE DE L'UTILISATEUR
Pédomètre à capacité
de téléchargement
Modèle HJ-720ITCAN
FRANÇAIS
Page 30

F2
TABLES DES MATIÈRES
Avant d’utiliser l’appareil
Introduction......................................................................................3
Renseignements de sécurité importants ...........................................4
Familiarisez-vous avec l’appareil. ...................................................6
Unité principale ....................................................................6
Composants ...........................................................................7
Fonction de pas aérobiques..............................................................8
Affichage des calories et de la quantité de gras brûlés ....................8
Mesure de la longueur des foulées...................................................9
Mode d’emploi
Installation de la pile......................................................................10
Remplacement de la pile ................................................................11
Réglage de l’heure .........................................................................12
Réglage du poids............................................................................14
Réglage de la longueur des foulées................................................15
Fixation du pédomètre ...................................................................16
Changement de l’affichage ............................................................18
Utilisation de la fonction séance ....................................................18
Utilisation de la fonction mémoire.................................................19
Utilisation de la fonction réinitialisation........................................21
Téléchargement de données vers un PC.........................................22
Entretien
Entretien.........................................................................................23
Conseils de dépannage...................................................................24
Spécifications.................................................................................25
Conformité FCC.............................................................................26
Renseignements sur la garantie......................................................27
Page 31

F3
INTRODUCTION
Merci d’avoir acheté le pédomètre Omron®HJ-720ITCAN à capacité
de téléchargement.
Veuillez inscrire les renseignements demandés à
des fins de référence.
DATE D’ACHAT:
Agrafez votre reçu d’achat ici.
CONSERVEZ CES DIRECTIVES
Le pédomètre est un excellent outil de motivation pour mesurer la distance
parcourue et compter le nombre de pas ainsi que le nombre de calories
brûlées. La fonction de mémoire pratique gère la marche quotidienne.
Vous pouvez facilement fixer et atteindre vos objectifs quotidiens.
Ce pédomètre se glisse dans une poche ou un sac, ou se fixe à la
ceinture, ce qui vous donne encore plus de souplesse pour
compter les pas.
Votre HJ-7201TCAN est livré avec les composants suivants:
Pédomètre
Tournevis
Courroie
Pince
Support
Pile (CR2032)
Guide de l'utilisateur
INTRODUCTION
Page 32

F4
RENSEIGNEMENTS DE SÉCURITÉ IMPORTANTS
Il est important de toujours respecter les mesures de sécurité de base
ainsi que les avertissements et les mises en garde de ce guide de
l'utilisateur afin d’assurer une utilisation appropriée du produit.
AVERTISSEMENT
Indique une situation potentiellement
dangereuse qui, si elle n’est pas évitée,
pourrait causer la mort ou une blessure grave.
SYMBOLES DE SÉCURITÉ UTILISÉS DANS CE GUIDE DE L'UTILISATEUR
MISE EN
GARDE
Indique une situation potentiellement dangereuse qui,
si elle n’est pas évitée, pourrait causer une blessure
superficielle ou légère à l’utilisateur ou au patient, ou
endommager l’équipement ou d’autres objets.
UTILISATION DE L’APPAREIL
Garder l’appareil hors de la portée des jeunes enfants. Si un jeune
enfant avale la pile, le couvercle de la pile ou une vis, veuillez
consulter immédiatement un médecin.
Lire tous les renseignements fournis dans le guide de l'utilisateur et
dans tout document inclus dans l’emballage avant d’utiliser
l’appareil.
Utiliser l'appareil uniquement pour la fonction pour laquelle il est
destiné. Ne pas l'utiliser à d'autres fins.
Jeter la pile usée comme il convient. Ne pas lancer la pile dans le
feu. Elle pourrait exploser.
Ne pas balancer le pédomètre en le tenant par la courroie. Cela
pourrait causer des blessures.
Page 33

F5
RENSEIGNEMENTS DE SÉCURITÉ IMPORTANTS
ENTRETIEN
Ne pas démonter ni modifier l’appareil. Tout changement ou
altération non approuvés par Omron Healthcare entraînera
l’annulation de la garantie.
Veuillez consulter votre médecin ou votre fournisseur de soins de la
santé avant d’entreprendre un programme d'exercices.
Page 34

F6
Unité principale
FAMILIARISEZ-VOUS AVEC L’APPAREIL.
Écran
Touche mode/séance
(MODE\EVENT)
Support
Couvercle du connecteur USB
Bouton de réinitialisation du
système (SYSTEM RESET)
Couvercle de la pile
Vis du couvercle de la pile
Courroie
Pince
Partie arrière de l’unité principale
Touche mémoire
(MEMO)/▲
Connecteur USB
Touche
réglage (SET)
FAMILIARISEZ-VOUS AVEC L’APPAREIL
Page 35

F7
FAMILIARISEZ-VOUS AVEC L’APPAREIL
Support
Veuillez utiliser ce support lorsque vous fixez l’appareil
à votre ceinture ou à la partie supérieure de votre pantalon.
1) Fixez l’unité principale
au support.
2) Fixez l’agrafe du support
à votre pantalon.
Comment fixer
la courroie à
l’unité principale
Comment raccorder
la courroie et
la pince
Comment dégager
l’appareil de la
pince et l’installer
à celle-ci
Trou
pour fixer
la courroie
Pour installer
Pour dégager
Agrafe du support
Composants
Page 36

F8
AFFICHAGE DES CALORIES ET DE LA QUANTITÉ
DE GRAS BRÛLÉS
Bbb
FONCTION DE PAS AÉROBIQUES
L’appareil affiche le nombre total de pas aérobiques effectués dans une journée
selon les deux conditions suivantes: (Le nombre de minutes pendant lesquelles vous
avez marché, ainsi que le nombre de pas aérobiques, sont également affichés.)
• Marchez plus de 60 pas à la minute
• Marchez pendant plus de 10 minutes en continu
Exemple: Si vous marchez pendant plus de 20 minutes à
raison de 120 pas à la minute, le nombre de pas aérobiques
continus est de 2400.
Remarque: Un repos de moins de 1 minute après 10 minutes de marche
continue est considéré comme de la marche continue.
L’affichage des calories et de la
quantité de gras brûlés indique le
nombre de calories consumées
pendant la marche en fonction de la
durée basé sur le poids, la longueur
des foulées, le nombre de pas et la
vitesse de la marche.
L’intervalle de l’affichage des
calories et de la quantité de gras
brûlés est d’une minute.
Pour connaître la valeur calorique
cible, veuillez multiplier le nombre
de calories affiché par le coefficient
indiqué dans le tableau de droite.
Exemple de correction:
Dans le cas d’une femme dans la cinquantaine dont le nombre de
calories affiché et de 300, les calories brûlées se calculent comme suit.
300 x 0,95 = 285 kcal
Homme Femme
Vingtaine
1,10 1,07
Trentaine
1,05 1,01
Quarantaine
1,02 ,97
Cinquantaine
1,01 ,95
Soixantaine
1,00 ,95
Plus de
soixante-dix ans
,98 ,96
Plus de
quatre-vingts ans
,95 ,95
Coefficient de correction
pour l’affichage des calories
Page 37

F9
MESURE DE LA LONGUEUR DES FOULÉES
Veuillez mesurer la longueur de vos foulées avant de régler
le pédomètre.
Comment mesurer la longueur de vos foulées
1. Faites 10 pas à foulée normale comme l’indique l’illustration ci-dessous.
2. Mesurez en centimètres la distance du DÉBUT à la FIN.
3. Calculez la distance de vos foulées en divisant la distance totale par 10.
Exemple:
Distance totale = 800 cm
800 cm ÷ 10 = 80 cm
FIN DÉBUT
800 cm
Page 38

F10
INSTALLATION DE LA PILE
1. Retirer la vis du couvercle de la pile
situé à l’arrière de l’unité principale.
Utiliser le tournevis fourni avec l’emballage ou
un petit tournevis disponible sur le marché
pour retirer la vis du couvercle de la pile.
2. Ouvrir le couvercle de la pile.
3. Insérer la pile.
Placer la polarité positive (+) de la pile (CR2032)
vers le haut. Insérer la pile dans la direction de la
flèche, tel qu'indiqué.
4. Fermer le couvercle de la pile.
Insérer d’abord la partie en saillie du
couvercle de la pile.
Page 39

F11
INSTALLATION DE LA PILE
5. Serrer la vis du couvercle de la pile.
REMARQUES:
• L’écran de réglage de l’heure sera affiché
pendant environ 5 minutes après que la pile
aura été insérée.
• Après l’installation de la pile, régler l’heure, le
poids et la longueur des foulées. (Consulter «
Réglage de l’heure » à la page 12)
REMPLACEMENT DE LA PILE
Indicateur de piles faibles
Lorsque l’indicateur de pile faible s’affiche à l’écran, retirer la vieille pile.
REMARQUE:
Lorsque l’indicateur de pile se met à clignoter, l’appareil cesse de compter, et
l’heure affiche « –:– – ».
Retirer la pile à l’aide d’un bâton mince qui ne se casse pas
facilement.
• NE PAS utiliser une paire de pincettes métalliques ni un
tournevis.
• Remplacer par une nouvelle pile CR2032.
• Jeter la pile conformément aux règlements locaux applicables.
Lorsque la pile est retirée de l’appareil, l’heure et les données enregistrées en
mémoire au cours de la dernière heure seront effacées. Le poids, le réglage de la
longueur des foulées ainsi que les données enregistrés en mémoire au cours de la
dernière heure ne seront pas effacés.
Le jour en cours est automatiquement enregistré en mémoire lorsque l’heure
atteint 0:00. Ne pas replacer la pile à 0:00. Par exemple : Si vous retirez la pile
à 23:59 et que vous la replacez à 0:01, les données de la journée précédente
seront enregistrées pour la journée en cours.
Page 40

F12
Échelle de réglage : 0:00 à 23:59
1. Installer la pile.
(Consulter « Installation de la pile » à la page 10)
L’heure clignote à l’écran.
Si la touche mémoire (MEMO)/▲ ou la
touche réglage (SET) n'est pas enfoncée
pendant 5 minutes, terminer le réglage et
afficher le nombre de pas et l'heure.
2. Appuyer sur la touche mémoire
(MEMO)/▲ pour faire avancer par
intervalles d’une heure.
REMARQUE:
Appuyer sur la touche mode/séance
(MODE/EVENT) pour remettre l’heure à 0.
3. Appuyer sur la touche réglage (SET) pour
régler l’heure.
Les minutes clignotent à l'écran.
4. Appuyer sur la touche mémoire
(MEMO)/▲ pour avancer par intervalles
d’une minute.
Appuyer sur la touche et la maintenir enfoncée
pour faire avancer l’heure par intervalles de
10 minutes.
REMARQUE:
Appuyer sur la touche mode/séance
(MODE/EVENT) pour remettre les minutes à 00.
RÉGLAGE DE L’HEURE
Page 41

F13
5. Appuyer sur la touche réglage (SET)
pour régler les minutes.
Le poids clignote à l’écran.
RÉGLAGE DE L’HEURE
Page 42

F14
1. Appuyer sur la touche mémoire
(MEMO)/ ▲ pour avancer par intervalles
de 1 kg.
Appuyer sur la touche et la maintenir
enfoncée pour faire avancer le poids par
intervalles de 10 kg.
REMARQUE:
Appuyer sur la touche mode/séance
(MODE/EVENT) pour remettre le poids à 30.
2. Appuyer sur la touche réglage (SET)
pour régler le poids.
La longueur des foulées clignote à l’écran.
RÉGLAGE DU POIDS
Échelle de réglage : 30 à 136 kg.
Le poids clignote à l’écran.
Page 43

F15
1. Appuyer sur la touche mémoire
(MEMO)/ ▲ pour avancer par intervalles
de 1 cm.
Appuyer sur la touche et la maintenir
enfoncée pour faire avancer les foulées par
intervalles de 10 cm.
REMARQUE:
Appuyer sur la touche mode/séance
(MODE/EVENT) pour remettre la
longueur des foulées à 40 cm.
2. Appuyer sur la touche réglage (SET)
pour régler la longueur des foulées.
Le nombre de pas et l’heure s’afficheront.
Tous les réglages sont terminés.
Pour modifier l’heure, le poids ou la longueur des foulées après le réglage:
1. Appuyer sur la touche réglage (SET) et la maintenir enfoncée
pendant 2 secondes.
2. Modifier le réglage.
REMARQUE:
Si le réglage ne doit pas être modifié, appuyer sur la touche réglage
pour passer au réglage suivant.
RÉGLAGE DE LA LONGUEUR DES FOULÉES
Échelle de réglage : 30 à 120 cm
La longueur des foulées clignote à l’écran.
Page 44

F16
FIXATION DU PÉDOMÈTRE
Déposez l’appareil dans la poche supérieure avant de votre
veston ou dans un sac que vous tenez fermement, ou bien fixez
l’appareil à votre pantalon ou à votre ceinture.
Déposez l’appareil dans votre poche.
• Ne placez pas l’appareil dans la poche arrière
de votre pantalon.
• Installez la fixation sur le rebord de votre poche
pour empêcher l’appareil de tomber.
Déposez l’appareil dans votre sac.
• Déposez l’appareil dans votre poche ou dans le
compartiment de votre sac.
Fixez l’appareil à votre ceinture ou à la
partie supérieure de votre pantalon.
• Utilisez le support fourni avec l’emballage.
• Ne fixez pas le support avec force à un objet épais
ou large.
REMARQUE:
L'écran ne changera pas avant que vous n’ayez
marché pendant au moins 4 secondes.
Page 45

F17
FIXATION DU PÉDOMÈTRE
Au moment de l’affichage de la mémoire ou du réglage de l’appareil.
Lorsque l’appareil n’est pas perpendiculaire au sol
• Lorsque le devant de l’appareil se
trouve dans un angle inférieur à 60°
(illustré à droite) ou parallèle au sol.
REMARQUE:
L’appareil peut compter les pas même
s’il est incliné ou à l’envers, ou bien si
l’unité principale est perpendiculaire au sol.
Lorsque l’unité principale bouge de façon irrégulière.
• Lorsque l’unité principale se trouve dans un sac qui bouge de façon
irrégulière parce qu’il entre en contact avec votre pied, votre
ceinture ou la partie supérieure de votre pantalon.
• Lorsque l’appareil est suspendu à votre ceinture, à la partie
supérieure de votre pantalon ou à un sac.
Lorsque vous marchez à un rythme inégal
• Lorsque vous traînez les pieds ou portez des sandales
• Lorsque vous n’arrivez pas à marcher à un rythme constant dans
un endroit bondé
Lorsque vous utilisez l’appareil dans un endroit où les
mouvements de haut en bas et les vibrations sont fréquents
• En vous levant ou en vous assoyant
• En faisant des sports autres que la marche
• En montant ou en descendant un escalier ou une pente prononcée
• En présence de vibrations verticales ou horizontales lorsque vous vous déplacez
à bicyclette, en automobile, en train ou en autobus
Lorsque vous faites du jogging ou que vous marchez extrêmement lentement
REMARQUE:
L’appareil comptera les pas lorsque vous faites du jogging s’il est fixé à votre
ceinture ou à la partie supérieure de votre pantalon à l’aide d’un support.
REMARQUE: Il se peut que l’appareil ne compte pas les pas
correctement dans les cas suivants.
Page 46

F18
Appuyer sur la touche mode/séance
(MODE/EVENT) pour changer l’affichage
L'affichage changera chaque fois que vous appuierez sur
la touche mode/séance (MODE/EVENT).
Nombre de pas
Nombre de pas
aérobiques et
de minutes
Calories et
quantité de
gras brûlés
Distance
Appuyer sur la touche mode/séance
(MODE/EVENT) pendant 2 secondes lorsque les
données du jour en cours sont affichées.
Le temps de la séance du jour en cours s’affiche
pendant 2 secondes.
REMARQUES:
• Suivre les directives de l’instructeur ou du
fournisseur de services pour utiliser cette fonction.
• Il est possible d’enregistrer une séance par heure.
• L’appareil n’affiche pas les données des séances précédentes.
UTILISATION DE LA FONCTION SÉANCE
CHANGEMENT DE L’AFFICHAGE
Page 47

F19
UTILISATION DE LA FONCTION MÉMOIRE
Cet appareil peut enregistrer les données des 41 derniers jours et
afficher les données des 7 derniers jours.
Les données du jour en cours sont automatiquement enregistrées en
mémoire lorsque l’heure atteint 0:00. L’affichage reviendra à 0.
REMARQUE:
L’heure qu’affiche l’appareil doit être correctement réglée.
Comment accéder aux données
enregistrées en mémoire
Appuyer sur la touche mode/séance
(MODE/EVENT) jusqu’à ce que les données
que vous voulez voir s’affichent :
Pas
Pas aérobiques et minutes
Calories et quantité de gras brûlés
Distance
Appuyer sur la touche mémoire
(MEMO)/▲. Les données du dernier jour
s’affichent.
Garder la touche mémoire (MEMO)/▲
enfoncée jusqu’à ce que les données des sept
jours s’affichent.
REMARQUE:
Si aucune touche n'est enfoncée pendant
plus de 1 minute, l’écran réaffichera les
données du jour en cours.
Appuyer sur la touche mode/séance
(MODE/EVENT) pour revenir aux données du
jour en cours.
Page 48

F20
UTILISATION DE LA FONCTION MÉMOIRE
Indicateur de mémoire pleine
REMARQUES:
• L’indicateur de mémoire pleine s’affiche lorsque 35 jours de
données enregistrées, y compris celles du jour en cours, n’ont pas
été téléchargées.
• Suivre les directives de l’instructeur ou du fournisseur de services
pour télécharger les données. (Consultez «Téléchargement de
données vers un OP» à la page 22)
Page 49

F21
UTILISATION DE LA FONCTION RÉINITIALISATION
Utiliser la fonction RÉINITIALISATION DU SYSTÈME dans les
cas suivants:
• Lorsque l’affichage devient illisible
Appuyer sur la touche réinitialisation du
système (SYSTEM RESET) à l’aide d’un
bâton mince qui ne se casse pas facilement.
L’heure est de nouveau réglée.
REMARQUE:
Les données enregistrées en mémoire ne sont
pas effacées.
Une fois que tous les caractères sont apparus, l’écran
initial de réglage de l’heure apparaît. (Consulter
«Réglage de l’heure» à la page 12)
Page 50

F22
TÉLÉCHARGEMENT DE DONNÉES VERS UN PC
Avec ce pédomètre, utiliser uniquement le câble USB autorisé par
Omron (modèle numéro HHX-CABLE-USB2) vendu séparément.
L’utilisation de tout autre câble peut causer des dommages et entraînera
l’annulation de la garantie.
1. Ouvrir le couvercle du connecteur USB.
2. Brancher le connecteur USB normal
(grand connecteur) dans l’ordinateur
personnel.
3. Brancher le mini-connecteur USB (petit
connecteur) dans le connecteur USB.
Les lettres « PC » apparaîtront à l’écran
lorsque le câble USB sera branché
adéquatement.
REMARQUE:
Suivre les directives de l’instructeur ou du
fournisseur de services pour utiliser cette
fonction.
(Accessoire en option vendu séparément)
Connecteur USB normal
Mini-connecteur USB
Page 51

F23
ENTRETIEN
Nettoyer l’appareil avec un linge doux et sec.
• Ne pas utiliser de nettoyants abrasifs ou volatils.
• L’appareil n’est pas étanche. Ne pas le
laver ou le toucher avec les mains
mouillées.
• Ne jamais immerger l’appareil dans l’eau.
• S’assurer qu’il n’y a pas d’eau qui pénètre dans
l’appareil.
Ranger l’appareil dans un endroit sécuritaire et sec.
• Ne jamais exposer l’appareil aux rayons directs du
soleil, aux températures élevées, à l’humidité, à l’eau
ou à la poussière.
Ne jamais exposer l'appareil à des chocs violents,
l'échapper ou marcher dessus.
Retirer la pile si l'appareil n'est pas utilisé pendant au
moins trois mois.
Utiliser l’appareil selon les directives de ce guide de
l'utilisateur.
Page 52

F24
CONSEILS DE DÉPANNAGE
Problème Cause probable
Comment régler le problème
L’indicateur de
pile faible
clignote.
La pile est faible
ou usée.
Remplacer la pile par
une neuve (CR2032).
Rien ne
s’affiche.
Les valeur
affichées sont
inexactes.
Les polarités de la
pile (+ et -)
sont inversées.
Insérer la pile du bon côté.
La pile est usée.
Remplacer la pile par
une neuve (CR2032).
L’appareil est
mal positionné.
Mouvement
irrégulier.
Rythme inégal.
Mouvement de haut
en bas.
Consulter «Fixation du
pédomètre» à la page 16.
Vérifier les réglages du
poids et de la longueur
des foulées.
Les valeurs établies
sont fausses.
Page 53

F25
Modèle: HJ-720ITCAN
Alimentation: 3 V.C.C. (1 pile au lithium CR2032)
Gammes de mesures: Pas: 0 à 99,999 pas
Pas aérobiques: 0 à 99,999 pas
Minutes de pas aérobiques: 0 à 1, 440 minutes
Quantité de gras brûlé: 0,0 à 199,9 g
Calories: 0 à 99,999 kcal
Distance: 0,00 à 999,99 km
Mémoire: 41 derniers jours (Les 7 derniers jours sont affichés)
Fonction TI: Connecteur USB
Température / -10 °C à +40 °C (14 °F à 104 °F) / 30 % à 85 %
humidité d'utilisation:
Température / humidité -20 °C à +60 °C (-4 °F à 140 °F) / 30 % à 95 % /
d'entreposage / pression d’air: 700 - 1600 hPa
Précision du compteur de pas:
+/- 5 % (selon l’appareil de vérification des vibrations)
Précision de l’heure: +/- 30 secondes de la déviation mensuelle moyenne (à
température normale)
Durée des piles: Environ 6 mois (lorsqu’il est utilisé pour marcher
10 000 pas par jour)
Dimensions externes: Environ 47 mm (l) × 73 mm (h) × 16 mm (p)
(1 7/8’’ × 2 7/8’’ × 5/8’’)
Poids: Environ 37 g (incluant la pile)
Contenu: Pédomètre, pile (CR2032), tournevis, courroie, pince,
support et guide de l'utilisateur
CUP: 0 73796 90314 5
• Les spécifications sont sujettes à changements sans préavis.
SPÉCIFICATIONS
Page 54

F26
CONFORMITÉ FCC
REMARQUE:
INTERFÉRENCES POTENTIELLES POUR LA RADIO/TÉLÉVISION
(pour les É.-U. seulement)
Ce produit a été testé et déclaré conforme aux limites de la section 15 du règlement
FCC, applicables aux appareils numériques de classe B.
Ces limites sont conçues pour fournir une protection satisfaisante contre les interférences
dans les installations résidentielles. Ce produit génère, utilise et émet des ondes de
fréquence radio et, s’il n’est pas installé et utilisé conformément aux directives, les
ondes risquent de provoquer des interférences avec les communications radio. Il est
cependant impossible de garantir que des interférences ne surviendront pas dans une
installation particulière. Si ce produit est la cause d’interférences gênant la réception de
programmes radio ou télévisés, ce qui peut être déterminé en mettant l’appareil hors
tension et de nouveau sous tension, l’utilisateur doit tenter de remédier au problème
à l’aide d’une ou plusieurs des mesures suivantes:
• Réorienter l’antenne de réception.
• Augmenter la distance séparant l’équipement et le récepteur.
• Brancher l'équipement à une prise de courant sur un circuit différent de celui auquel
le récepteur est branché.
• Communiquer avec le revendeur ou un technicien radio/TV qualifié.
INTERFÉRENCES POTENTIELLES POUR LA RADIO/TÉLÉVISION
(pour le Canada seulement)
Cet appareil numérique respecte les limites de bruits radioeléctriques applicables aux
appareils numériques de Classe B prescrites dans la norme sur le matériel brouilleur:
«Appareils Numériques», ICES-003 édictée par le ministère des Communications.
Les changements ou modifications non approuvés expressément par l’autorité
responsable de la conformité peuvent annuler l’autorisation accordée à l’utilisateur de
faire fonctionner cet équipement.
Page 55

F27
RENSEIGNEMENTS SUR LA GARANTIE
Votre pédomètre Omron HJ-720ITCAN, à l’exclusion de la pile, est garanti contre
tout défaut de matériaux et de fabrication survenant durant l'année suivant la
date d'achat, lorsqu'il est utilisé selon les directives fournies avec l’appareil.
Les garanties ci-dessus ne sont offertes qu’à l’acheteur au détail original.
À notre discrétion, nous réparerons ou remplacerons sans frais tout pédomètre
Omron couvert par les garanties ci-dessus. La réparation ou le remplacement est
notre seule responsabilité et votre seul recours en vertu des garanties ci-dessus.
Pour obtenir du service en vertu de cette garantie, communiquez avec le service à la
clientèle de Omron Healthcare en composant le 1 800 634-4350 pour obtenir l’adresse
de l’emplacement pour la réparation et des frais d’expédition de retour et de
manutention. Les renseignements au sujet du service en vertu de la garantie sont
disponibles sur notre site Web au www.omronhealthcare.com.
Veuillez joindre une preuve d’achat. Veuillez également joindre une lettre dans
laquelle vous indiquez vos nom, adresse, numéro de téléphone et une description
du problème spécifique. Emballez le produit avec soin afin d’éviter tout risque
d’endommagement au cours du transport. En raison des risques de perte lors du
transport, nous vous recommandons d’assurer le produit et de demander un
accusé de réception.
TOUTES GARANTIES IMPLICITES, INCLUANT MAIS NON LIMITÉES
AUX GARANTIES IMPLICITES DE QUALITÉ MARCHANDE ET
D’ADAPTATION À DES FINS PARTICULIÈRES SONT LIMITÉES À LA
DURÉE DE LA GARANTIE ÉCRITE APPLICABLE CI-DESSUS. Certaines
provinces/états ne permettent pas de limites quant à la durée la garantie implicite; il
se peut donc que les limites ci-dessus ne s’appliquent pas à vous.
OMRON NE SERA PAS TENUE RESPONSABLE DES PERTES DÉCOULANT
DE L’UTILISATION OU D’AUTRES DOMMAGES INDIRECTS OU
ACCESSOIRES OU DE COÛTS INDIRECTS, DE DÉPENSES OU DE
DOMMAGES. Certaines provinces/états ne permettent pas d’exclusions ou de limites de
dommages indirects; il se peut donc que les exclusions ci-dessus ne s’appliquent pas à vous.
Cette garantie vous donne des droits précis reconnus par la loi et vous pouvez
également avoir d’autres droits qui varient d’une province à l’autre.
POUR LE SERVICE À LA CLIENTÈLE
Visitez notre site Web au : www.omronhealthcare.com
Téléphonez sans frais au : 1 800 634-4350
Garantie restreinte
Page 56

Distribué par :
Omron Healthcare Canada
5500 N. Service Road Penthouse
Burlington, ON L7L 6W6
Copyright © 2006 OMRON HEALTHCARE, INC.
720ITCAN INST Rev 9054997-3A
 Loading...