

Page 1

Safety Light Curtain
F3S-B
Suitable for
Detecting Human
Bodies in a
Dangerous Area
Safety Design for Category 2.
Features
• The F3S-B is a type 2 Safety Light curtain intended to be
used as or with the safety related parts of the control system
of a machine to category 2, 1 or B as defined in the European standard EN954-1.
• Compliance with IEC 61496-2, EN 61496-1 standards and
machine and EMC directive.
• Received certificates from Notified Bodies as Type 2 ESPE
(Electro-Sensitive-Protective-Equipment).
• UL/CSA approved.
• Pursuing safety with high level of safety design and FMEA.
• Series configuration of two units is possible.
• Units available with an axis pitch of 25 mm (hand protection), 50 mm (arm protection) or 75 mm (body protection) in
protective height ranging from 300 mm to 1650 mm.
• Human body detection system without a dedicated control
box.
• M12 Connector
F3S-B
G-31F3S-B
Page 2
Ordering Information
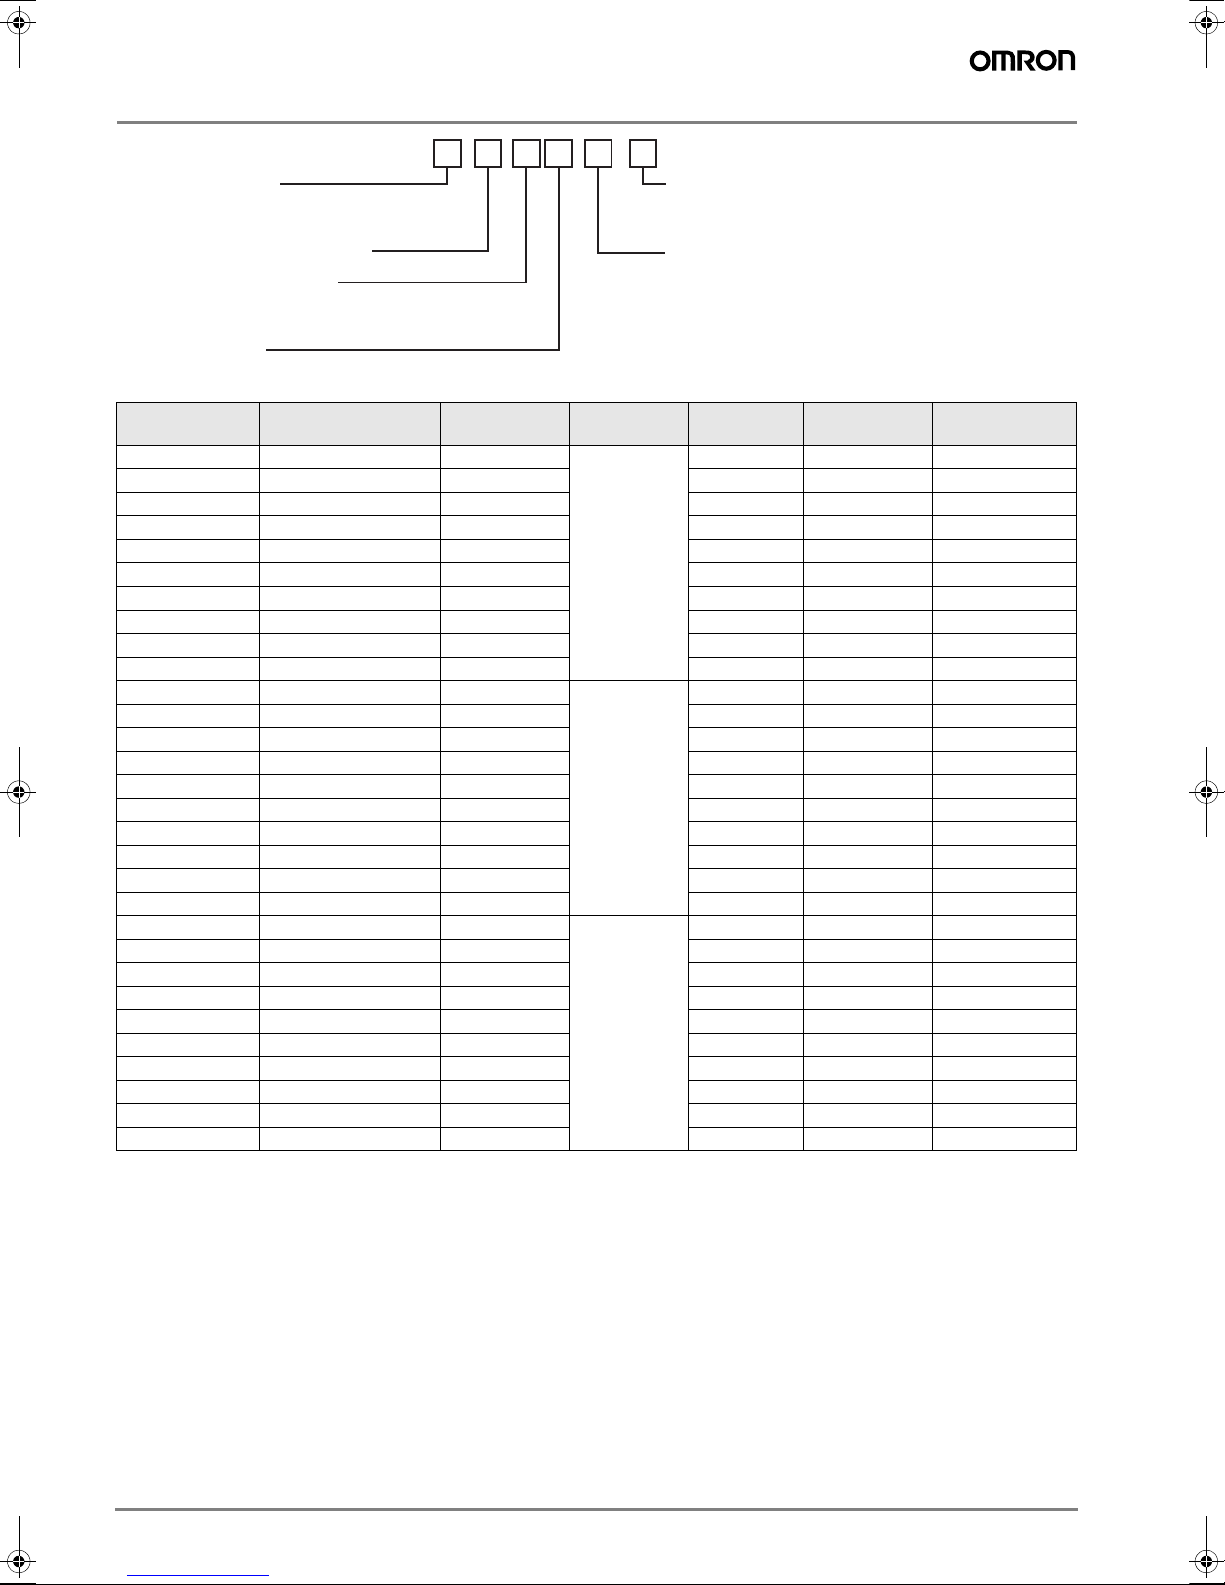
F3S-B M 36 2 P 12 - L
blank Stand-alone
M Master unit for series connection
S Slave unit for series connection
36 No. of optical axis (4-66)
2 25 mm optical pitch
5 50 mm optical pitch
7 75 mm optical pitch
blank Slave unit
P PNP outputs
blank Complete set of emitter and receiver
L Emitter unit only
D Receiver unit only
blank Stand-alone or slave unit
12 No. of optical axis of the connected slave unit
for 25 mm optical pitch type: 12, 18, 24, or 30
for 50 mm optical pitch type: 06, 09, 12, or 15
for 75 mm optical pitch type: 04, 06, 08, or 10
Stand-alone Master unit Slave unit Optical
F3S-B122P F3S-BM122P
F3S-B182P F3S-BM182P
F3S-B242P F3S-BM242P
F3S-B302P F3S-BM302P
F3S-B362P F3S-BM362P
F3S-B422P F3S-BM422P
F3S-B482P F3S-BM482P
F3S-B542P F3S-BM542P
F3S-B602P F3S-BM602P
F3S-B662P F3S-BM662P
F3S-B065P F3S-BM065P
F3S-B095P F3S-BM095P
F3S-B125P F3S-BM125P
F3S-B155P F3S-BM155P
F3S-B185P F3S-BM185P
F3S-B215P F3S-BM215P
F3S-B245P F3S-BM245P
F3S-B275P F3S-BM275P
F3S-B305P F3S-BM305P
F3S-B335P F3S-BM335P
F3S-B047P F3S-BM047P
F3S-B067P F3S-BM067P
F3S-B087P F3S-BM087P
F3S-B107P F3S-BM107P
F3S-B127P F3S-BM127P
F3S-B147P F3S-BM147P
F3S-B167P F3S-BM167P
F3S-B187P F3S-BM187P
F3S-B207P F3S-BM207P
F3S-B227P F3S-BM227P
##
##
##
##
##
##
##
##
##
##
##
##
##
##
##
##
##
##
##
##
##
##
##
##
##
##
##
##
##
##
F3S-BS122 30 mm 12 300 mm 0.9 kg
F3S-BS182 18 450 mm 1.2 kg
F3S-BS242 24 600 mm 1.5 kg
F3S-BS302 30 750 mm 1.8 kg
- 36 900 mm 2.1 kg
- 42 1,050 mm 2.5 kg
- 48 1,200 mm 2.8 kg
- 54 1,350 mm 3.1 kg
- 60 1,500 mm 3.4 kg
- 66 1,650 mm 3.7 kg
F3S-BS065 55 mm 6 300 mm 0.9 kg
F3S-BS095 9 450 mm 1.2 kg
F3S-BS125 12 600 mm 1.5 kg
F3S-BS155 15 750 mm 1.8 kg
- 18 900 mm 2.1 kg
- 21 1,050 mm 2.5 kg
- 24 1,200 mm 2.8 kg
- 27 1,350 mm 3.1 kg
- 30 1,500 mm 3.4 kg
- 33 1,650 mm 3.7 kg
F3S-BS047 80 mm 4 300 mm 0.9 kg
F3S-BS067 6 450 mm 1.2 kg
F3S-BS087 8 600 mm 1.5 kg
F3S-BS107 10 750 mm 1.8 kg
- 12 900 mm 2.1 kg
- 14 1,050 mm 2.5 kg
- 16 1,200 mm 2.8 kg
- 18 1,350 mm 3.1 kg
- 20 1,500 mm 3.4 kg
- 22 1,650 mm 3.7 kg
resolution
No. of
optical axes
Protective height Weight (without
accessories)
G-32 Safety Sensors / Components
Page 3
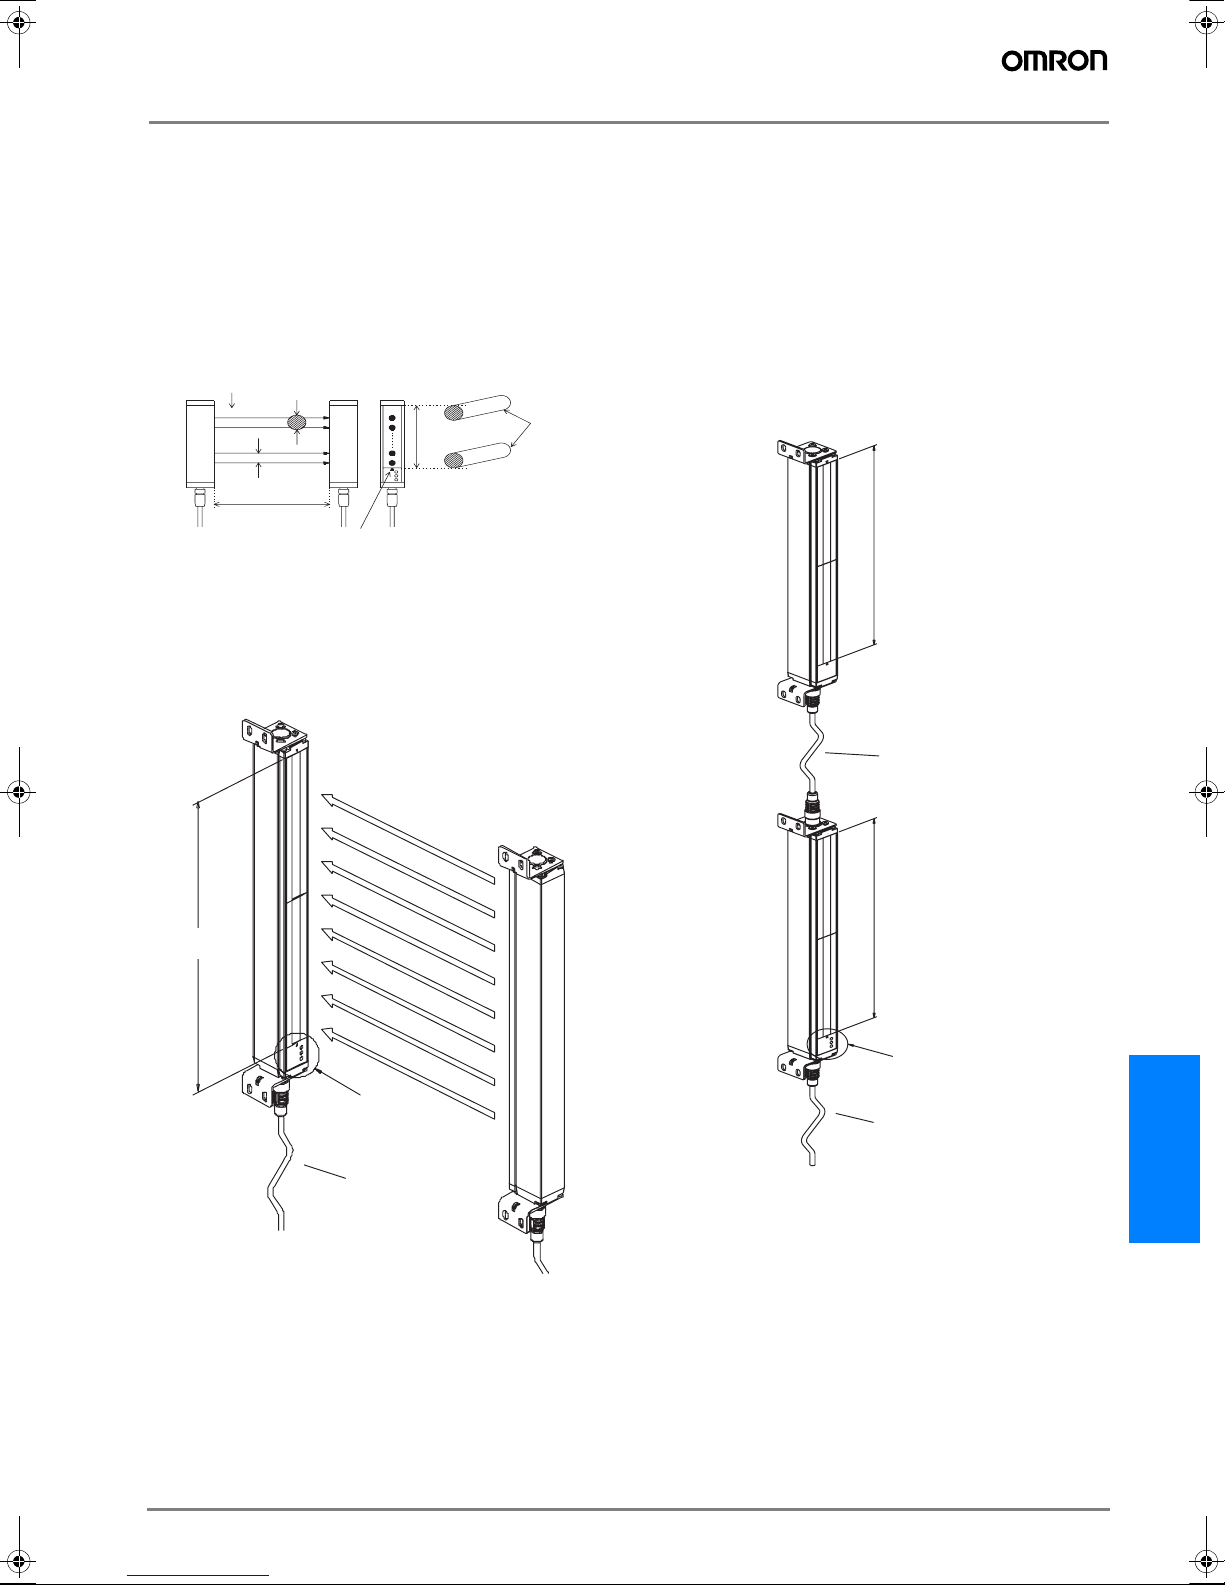
Nomenclature
Protective height
The F3S-B can detect in the area indicated by ”Protective
height” in the figure below. The protective height is from ”the
Optical-axis line mark above the indicator area” to ”the end of
the yellow metal case”.
Optical-axis line mark
The center line for optical axes is indicated by the triangle
mark. This position is a reference line for measuring safety
distance.
No.ofopticalaxes
n-1
Emitter
Detection distance
n
2
1
Optical resolution
Optical- axis
pitch
Receiver
Optical- axis
line mark
Protective
height
Limit position
for detection
Stand-alone type
This is the most common configuration, and it is used to protect a hazardous part of a machine when approached from
one direction only.
Receiver
Series connection types
When your application requires an additional protective zone,
for example, to prevent someone from staying behind a primary detection zone, the F3S-B may be connected in series.
The system consists of a master unit, a slave unit, and a series connection cable, type F39-JB1B.
The series connection allows up to 96 axes and 2.4 m of protective height in total.
Series connection types have the same characteristics as a
stand-alone types. When the detection zone of the master
unit or that of the slave unit is interrupted, the outputs of the
master unit go to the OFF-state.
Protective
Slave unit
height
Protective
height
Indicator area
Extension cable
Emitter
Series connection cable
Protective
Master unit
height
Indicator area
Extension cable
Note: Slave unit does not have indicators.
Master unit and slave unit need to be ordered separately.
F3S-B
G-33F3S-B
Page 4

Rating and Performance
Type
F3S-B
###
Stand-alone
*1
P
F3S-BM
###P##
Master unit for series connection
*1
F3S-BS
Slave unit for series connection
###
*1
No. of optical axes 12 to 66 6 to 33 4 to 22 12 to 66 6 to 33 4 to 22 12 to 30 6 to 15 4 to10
Optical-axis pitch 25 mm 50 mm 75 mm 25 mm 50 mm 75 mm 25 mm 50 mm 75 mm
Optical resolution
(Detection capability)
Protective height 300 / 450 / 600 / 750 / 900 / 1,050 / 1,200 / 1,350 / 1,500 /
Non-transparent: in diameter
30 mm 55 mm 80 mm 30 mm 55 mm 80 mm 30 mm 55 mm 80 mm
300 / 450 / 600 / 750 mm
1,650 mm
Detection distance 0.3 to 5.0 m, up to 8 m on request
Response time ON to OFF: See table “Response Time”
OFF to ON*2: Default 100 ms (selectable with F39-U1E, 80 to 400 ms)
Startup waiting time 2 s max.
Supply voltage: Vs 24 VDC ± 20% (including 5 Vp-p ripple)
Current
400 mA max. (under no-load conditions)
consumption
Light source Infrared LED (880 nm wavelength). Lifetime: 50,000 hrs. at 25 °C.
Effective aperture angle Within ± 5° for the emitter and receiver at a detection distance of at least 3 m according to IEC
61496-2
Operating mode Light ON
Control output Two PNP transistor outputs, load current 200 mA max., residual voltage 2 V max. (except for volt-
age drop due to cable extension)
Instability output PNP transistor output (not safety-related control output),
activated during an insufficient light detection, failure detection and connection with F39-E1,
load current 100 mA max., residual voltage 2 V max. (except for voltage drop due to cable exten-
sion)
Protection circuit Output short-circuit protection, power supply reverse connection protection
Start/restart
interlock function
Mode selection before power ON by connecting ”Interlock selection input” line to:
Active: No connection or 0 to 2.5 VDC, 3 mA max.
Inactive: Instability output line
Reset of start/restart interlock by connecting ”Interlock selection input” line to:
Interlock reset: 17 VDC to Vs, 20 mA max. Duration time 15 to 2,500 ms
External test function Mode selection by connecting ”External test input” line to:
Active: 17 VDC to Vs, 10 mA max. Duration time at least 15 ms
Inactive: No connection or 0 to 2.5 VDC, 2 mA max.
Relay monitoring
function (optional)
Default inactive, selectable with F39-U1E
Relay monitoring input line with NC contact connected,
Available level: 17 VDC to Vs, 10 mA max.
Allowed relay delay time
*3
: Selectable between 20 and 300 ms
Termination when not selected: No connection or 0 to 2.5 VDC, 2 mA max.
Start interlock function
Default inactive, selectable with F39-U1E
(optional)
Blanking function
Default inactive, selectable with F39-U1E
(optional)
Indicator See ”Indicators” No indicators
Connection method For Extension cable: 8 pins, M12 connector
For Series connection cable: 6 pins, M12 connector
Ambient temperature During operation: –10 to 55 °C (with no freezing)
During storage: –25 to 70 °C
Ambient humidity During operation: 35 to 85 %RH (with no condensation)
During storage: 35 to 95 %RH
Insulation resistance 20 MΩ min. (at 500 VDC)
Dielectric strength voltage 1,000 VAC 50/60 Hz for 1 min
Degree of protection IEC60529 IP65
Vibration resistance Normal operation: 10 to 55 Hz, double-amplitude: 0.7mm, X, Y and Z directions 20 sweeps
2
Shock resistance Normal operation: 100 m/s
[10 G], X, Y and Z directions: 1000 times
Materials Case: Aluminum
Front cover: PMMA (acrylic resin)
End caps: PA6
Size (cross section) 30 x 40 mm
G-34 Safety Sensors / Components
Page 5
Type
F3S-B
Stand-alone
Accessories Test rod*3, mounting brackets (top and bottom), mounting brackets (intermediate)*4, mounting
plates
*1
###
P
*5
, Instruction manual
F3S-BM
###P##
Master unit for series connection
*5
*1
F3S-BS
###
*1
Slave unit for series connection
Applicable standard IEC(EN)61496-1 TYPE 2 ESPE (Electro-Sensitive Protective Equipment)
IEC 61496-2 TYPE 2 AOPD (Active Opto-electronic Protective Devices)
Note: 1 . For detailed type names and optical specifications, see „Type Naming Rule“
2 .Nominal value (set time). The accuracy is -0 ... +70% of the ON to OFF response time.
3 .Only with F3S-B
4 .For the 1,050 mm protective height and longer types.
5 .Only with F3S-B
###
2P and BM
###P#
###2P##
and BM##2P##.
.
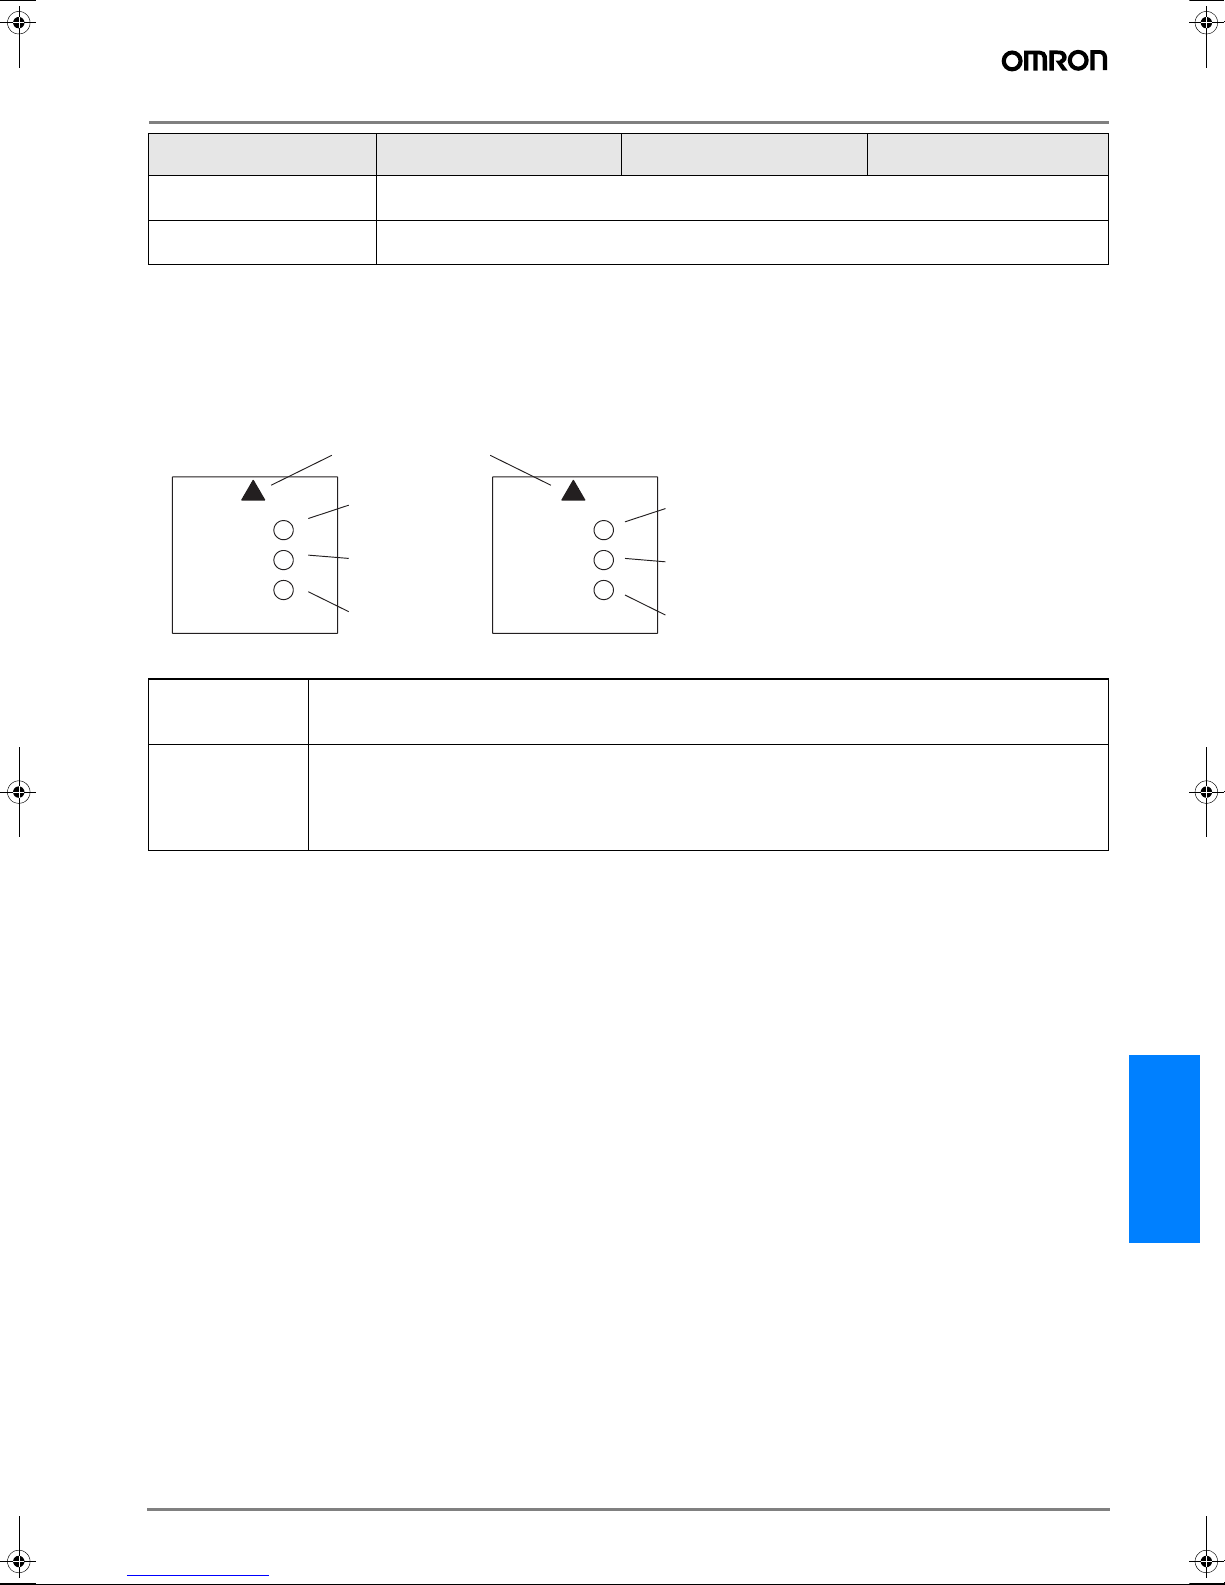
Indicators
<Emitter Indicators>
POWER
INTER-
LOCK
EXT.TEST
BLANKING
Optical- axis
line mark
IR-power indicator
(Orange)
Interlock indicator
(Yellow)
External test /
blanking indicator
(Green)
<Receiver Indicators>
ON
OFF
UNSTAB
ON-state indicator
(Green)
OFF-state indicator
(Red)
Instability indicator
(Orange)
Emitter IR-power indicator: Lit when emitting.
Interlock indicator: Lit during start/restart interlock or start interlock.
External test/ blanking indicator: Lit during external test. / Flashing when using blanking function.
Receiver ON-state indicator: Lit when receiving light.
OFF-state indicator: Lit with interrupted light.
Flashing during connection with F39-E1 or with failure.
Instability indicator: Lit with an insufficient light reception or failure.
Flashing during connection with F39-E1.
F3S-B
G-35F3S-B
Page 6
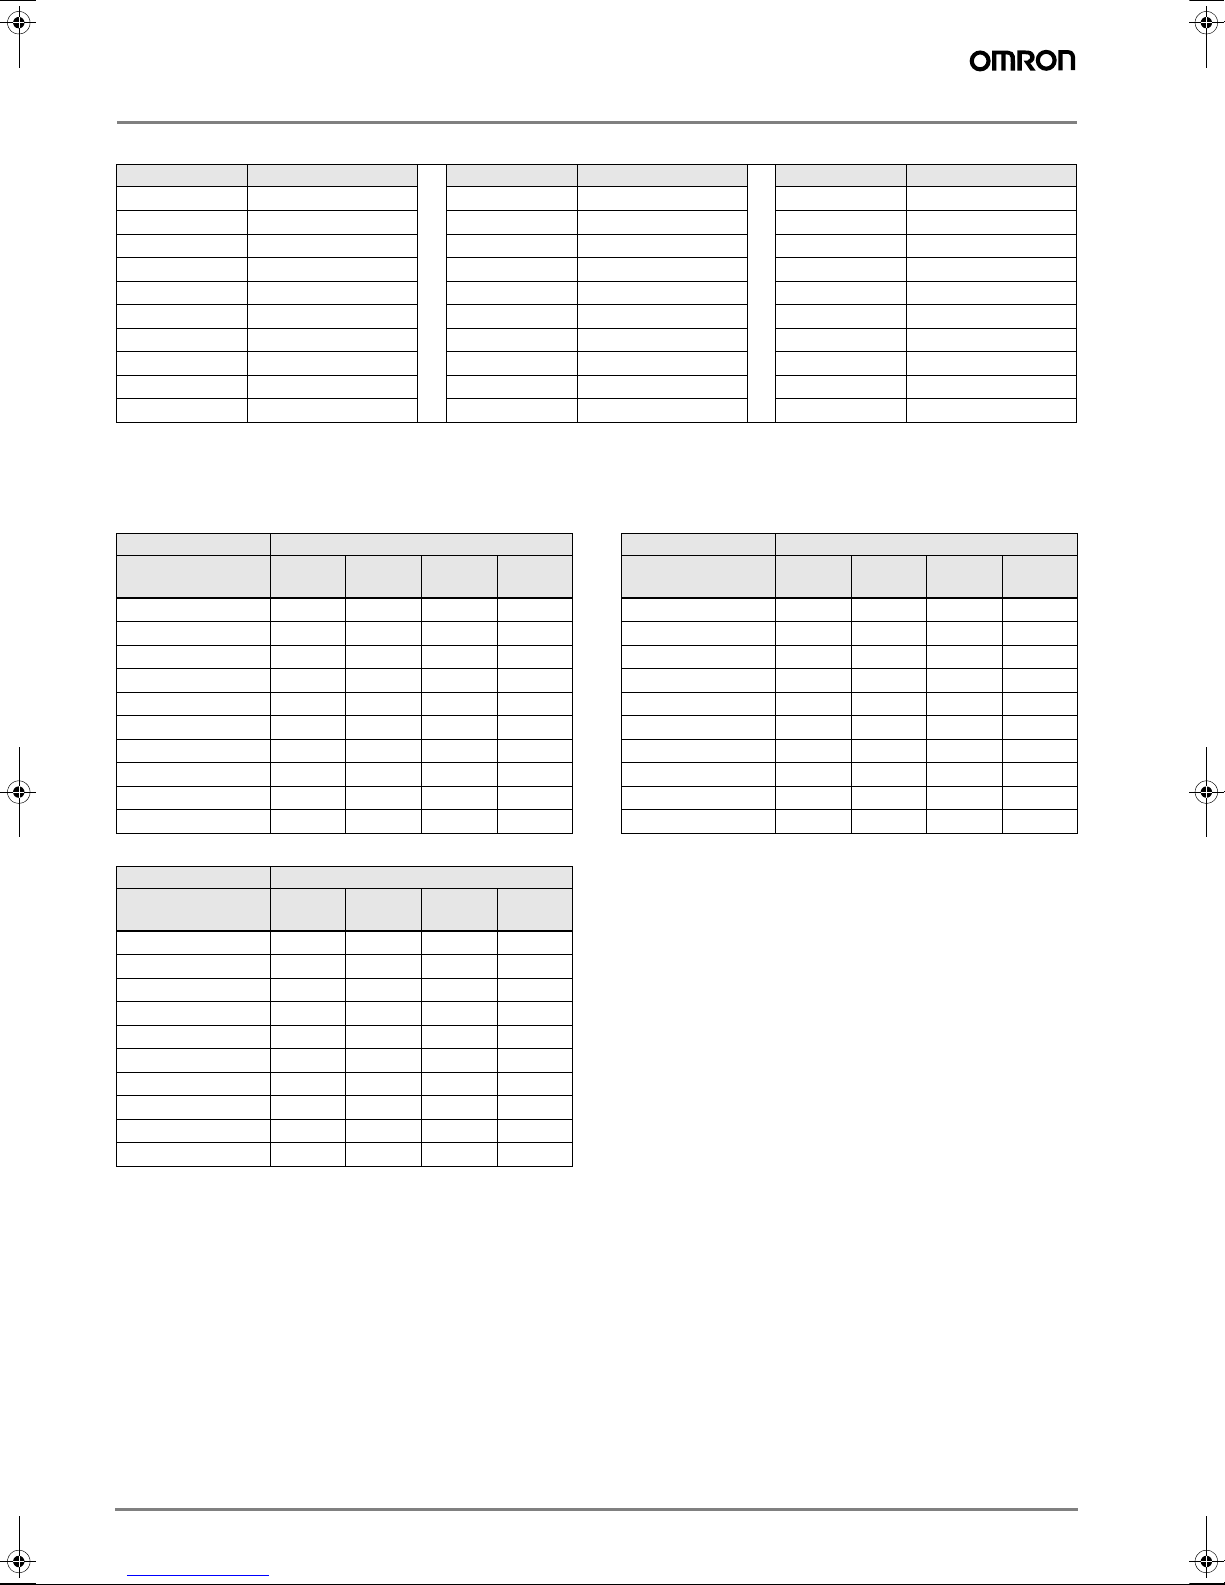
Table of Response Time
Stand-alone type
Response time [ms ] Response time [ms ] Response time [ms ]
F3S-B122P 20 F3S-B065P 20 F3S-B047P 20
F3S-B182P 20 F3S-B095P 20 F3S-B067P 20
F3S-B242P 20 F3S-B125P 20 F3S-B087P 20
F3S-B302P 23 F3S-B155P 20 F3S-B107P 20
F3S-B362P 27 F3S-B185P 20 F3S-B127P 20
F3S-B422P 30 F3S-B215P 21 F3S-B147P 20
F3S-B482P 34 F3S-B245P 22 F3S-B167P 20
F3S-B542P 37 F3S-B275P 24 F3S-B187P 20
F3S-B602P 41 F3S-B305P 26 F3S-B207P 20
F3S-B662P 45 F3S-B335P 28 F3S-B227P 21
Series connection types
The following chart shows the response time of combinations of a master unit and a slave unit connected in series. For example,
the response time of the combination of F3S-BM122P30 and F3S-BS302 is 30 ms.
Slave unit F3S-
Master unit
F3S-BM122P
F3S-BM182P
F3S-BM242P
F3S-BM302P
F3S-BM362P
F3S-BM422P
F3S-BM482P
F3S-BM542P
F3S-BM602P
F3S-BM662P
Slave unit F3S-
Master unit
F3S-BM065P
F3S-BM095P
F3S-BM125P
F3S-BM155P
F3S-BM185P
F3S-BM215P
F3S-BM245P
F3S-BM275P
F3S-BM305P
F3S-BM335P
Response time [ms]
BS122 BS182 BS242 BS302
##
20 23 27 30
##
23 27 30 34
##
27 30 34 37
##
30 34 37 41
##
34 37 41 45
##
37 41 45 49
##
41 45 49 54
##
45 49 54 57
##
49 54 57 61
##
54 57 61 65
Response time [ms]
BS065 BS095 BS125 BS155
##
20 20 20 21
##
20 20 21 22
##
20 21 22 24
##
21 22 24 26
##
22 24 26 28
##
24 26 28 30
##
26 28 30 32
##
28 30 32 34
##
30 32 34 35
##
32 34 35 37
Slave unit F3S-
Master unit
F3S-BM047P
F3S-BM067P
F3S-BM087P
F3S-BM107P
F3S-BM127P
F3S-BM147P
F3S-BM167P
F3S-BM187P
F3S-BM207P
F3S-BM227P
Response time [ms]
BS047 BS067 BS087 BS107
##
20 20 20 20
##
20 20 20 20
##
20 20 20 20
##
20 20 20 20
##
20 20 20 21
##
20 20 21 23
##
20 21 23 24
##
21 23 24 25
##
23 24 25 26
##
24 25 26 27
G-36 Safety Sensors / Components
Page 7

Characteristic data
Operating Range
F3S-B122P
Parapendicular to Center Line of Lenses Parallel to Center Line of Lenses
300
300
200
100
0
-100
Distance Y (mm)
-200
-300
0 2 4 6 8
Distance X (m)
Y
X
200
100
0
-100
Distance Y (mm)
-200
-300
0 2 4 6 8
Distance X (m)
F3S-B662P
Parapendicular to Center Line of Lenses Parallel to Center Line of Lenses
300
200
100
0
-100
Distance Y (mm)
-200
-300
0 2 4 6 8
Distance X (m)
Y
X
300
200
100
0
-100
Distance Y (mm)
-200
-300
0 2 4 6 8
Distance X (m)
Y
X
Y
X
F3S-B
G-37F3S-B
Page 8

I/O Circuit Diagram
IR-light
indicator
Grey
5
Pink
6
ON-state
RS-485(A)
RS-485(B)
indicator
Interlock
indicator
Main emitter
circuit
OFF-state
indicator
Ext. test/blanking
indicator
Instability
indicator
Brown
2
Green
3
External test
input
White
1
Relay monitoring
input
Yellow
4
Blue
7
Brown
2
Interlock selection
input
+24 V
0 V
Pink
Grey
Green
6
Main receiver
5
circuit
3
Control output 1
White
1
Control output 2
Yellow
4
Instability
output
Blue
7
Load
Load
Load
G-38 Safety Sensors / Components
Page 9

Dimensions
Safety Light Curtain
F3S-B
M12 connector
Master unit
9.5
3
B
3
M12 connector
A (Protective height)
34
10.5
40.3
Type A
Protective
height
F3S-B122, -B065, -B047 300 343
F3S-B182, -B095, -B067 450 493
F3S-B242, -B125, -B087 600 643
F3S-B302, -B155, -B107 750 793
F3S-B362, -B185, -B127 900 943
F3S-B422, -B215, -B147 1050 1093
F3S-B482, -B245, -B167 1200 1243
F3S-B542, -B275, -B187 1350 1393
F3S-B602, -B305, -B207 1500 1543
F3S-B662, -B335, -B227 1650 1693
Note:All units are in Millimeters unless otherwise indicated.
B
Full length
30
Accessoires
Mounting Bracket (Top and Bottom) Mounting Plate
Only supplied with types which have a protective height of 1050 mm or longer (Including inter-
5.5
12
16
22
20
20˚
35˚
46
30
2
R1.75
36
R2.75
Ø 25.5
3.5
mediate brackets). Only needed for rear mounting
R4.5
6.25
42.74
36.5
20
3
4
5.5
22.5
R2.75
7
5
F3S-B
28.74
12
G-39F3S-B
Page 10

Intermediate Mounting Bracket
Only needed for types which have a protective height of 1050 mm or longer
Mounting screw for sensor (M6x8)
Flat intermediate bracket
Options (Order Separately)
Extension Cable
(Set of 2: Emitter > gray, Receiver > black)
F39-JB1A (L = 3 m)
F39-JB2A (L = 7 m)
F39-JB3A (L = 10 m)
M12
Series Connection Cable
(Set of 2: Emitter > gray, Receiver > black)
F39-JB1B
Ø 15
Rubber
L-shaped intermediate bracket
42 L
48.5
U-shaped intermediate bracket
Fixing screw for bracket (M4x10)
Round vinyl-insulated cord
5.7 mm dia. (32/0.1 mm dia.) 8 cores
Unit:mm
300
Ø 15
M12
Optional Function Kit
F39-EU1E
This set includes the following items:
· F39-U1E OptionalFunction Software
· F39-E1 Interface Unit
· F39-JB1C Interface Cable
The F39-U1E Optional Function Software is the WINDOWS®
-based software for use with the F39-E1 Interface Unit to program the F3S-B Safety Light Curtain, and provided with one
3.5 inch floppy disk. This software has the following features:
· Set the following functions to the F3S-B
- Start interlock function
- Relay monitoring function
- Blanking function
Display each axis and each input line condition of the F3S-B
·
· Change the ON delay time
Unit: mm
Note: The F3S-B is not in normal operation during connection with the F39-E1.
The control outputs are held in their OFF-state. For detailed information
please refer to “Details of F39-EU1E” in this data sheet.
!WARNING
After setting the blanking function, check that the F3S-B detects a test
rod at any position in the F3S-B detection zone through which a person reaches the hazardous part of the machine. If any positions are
found by check above, install protective structures to there to prevent
intrusion which F3S-B can not detect. Failure to do so may result in
serious injury.
Perform the installation check and the periodical inspection described
in the F3S-B manual.
Disconnect the outputs of the F3S-B from the load when programming it using the F39-U1E software and with F39-E1 interface unit.
Failure to do so may result in serious injury.
Do not connect the F39-E1 to a power supply with a voltage higher than
24 VDC +20 %. Do not connect the F39-E1 to an AC power supply.
G-40 Safety Sensors / Components
Page 11

Installation
Wiring
Disconnect all sources of power before wiring the F3S-B to a
machine.
· Connect the emitter extension cable (F39-JBxA-L optional,
gray color outer jacket) to the emitter. (The emitter uses
gray color plastic caps.)
· Connect the receiver extension cable (F39-JBxA-D optional, black color outer jacket) to the receiver. (The receiver
unit uses black color plastic caps.)
· Connect the 0 V line of the power supply directly to protective earth (PE).
Note: Note:Be sure to wire correctly. Failure to do so may damage the F3S-B.
Front View Pin No.
1 Control output 2 Relay monitoring input White
2 24 VDC 24 VDC Brown
7
1
865
2
4
3
3 Control output 1 External test input Green
4 Instability output Interlock selection input Yellow
5 RS-485 (A) RS-485 (A) Grey
6 RS-485 (B) RS-485 (B) Pink
70 V0 VBlue
8 N.C. / reserved*1 N.C. / reserved Red
*1. N.C. / reserved: do not connect
Emitter
Signal Name
Receiver Emitter
Receiver
RS-485(A) (Grey 5)
RS-485(B) (Pink 6)
Wire Color
of Extension Cable
E1: 24 VDC Power supply
S1: External test switch
K1, K2: Relay
K3: Relay to indicate unstable condition
Relay monitoring (White 1)
Ext. test (Green 3)
S1
0 V (Blue 7)
24 VDC (Brown 2)
E1
Interlock selection (Yellow 4)
Output 2 (White 1)
Output 1 (Green 3)
0 V (Blue 7)
24 VDC (Brown 2)
Instability (Yellow 4)
K1
K2
K3
F3S-B
G-41F3S-B
Page 12

When using START/RESTART FUNCTION When using optional RELAY MONITORING FUNCTION
Emitter
24 VDC (Brown 2)
S2
0 V (Blue 7)
RS-485(A) (Grey 5)
RS-485(B) (Pink 6)
Interlock selection (Yellow 4)
Receiver
Instability (Yellow 4)
24 VDC (Brown 2)
0 V (Blue 7)
k1
k2
Relay monitoring (White 1)
Emitter
Ext. test (Green 3)
24 VDC (Brown 2)
S1
0 V (Blue 7)
E1
S2: Restart interlock reset switch
K3
Details of F39-EU1E Optional Function Kit
1. Installation
1.1 Preparation
!WARNING
Perform the installation check and the periodical inspection
described in the F3S-B manual.
Do not disassemble, repair or modify the F39-E1.
Do not use the F39-E1 in flammable or explosive environments.
To use the F39-U1E software, the following items are necessary.
· Personal Computer (not included)
- Windows® 95, Windows® 98, or Windows NT®
- 133MHz Pentium® processor or better
- 32MB RAM or higher for Windows® 95 and Windows® 98
- 64MB RAM or higher for Windows NT®
- A 115kBd RS-232 serial interface port or better
· F39-E1 Interface Unit
E1
k1, k2: Auxiliary contact to moni
tor the condition of the final relay
· F39-JB1C Interface cable 5 m cable length, M8 connector
(4 pins)
30.5
Ø 15
5000
Round vinyl-insulated cord
5 mm dia. (32/0.1 mm dia.) 4 cores
Unit : mm
· RS-232C cable (not included)
1.2 Component Names and Functions of the F39-E1 Interface Unit
SEND to RS-485 indicator (Red)
SEND to RS-232C indicator (Yellow)
M8 Connector (RS-485)
9pin D-Sub Connector
(RS-232C)
35
60
8
G-42 Safety Sensors / Components
114
Unit : mm
Communication indicator (Green)
SEND to RS-485 Indicator (Red)
Lit when the F39-E1 sends data to the F3S-B via RS-485.
SEND to RS-232C Indicator (Yellow)
Lit when the F39-E1 sends data to the PC via RS-232C.
COMMUNICATION Indicator (Green)
Flashing during communication between the F3S-B and the
F39-E1.
Page 13

1.3 Hardware Connection
!WARNING
Disconnect the outputs of the F3S-B from the load when programming it using the F39-U1E software and with F39-E1 interface unit.
Failure to do so may result in serious injury.
Do not connect the F39-E1 to a power supply with a voltage higher than
24 VDC +20 %.
Do not connect the F39-E1 to an AC power supply.
1.3.1 Wiring Diagram
F39-U1 E
PC
RS-232C
Note 1
Emitter
F3S- B
No. 1 axi s
RS-485(A) (Grey 5)
RS-485(B) (Pi nk 6)
Rece iver
Note 1
Start/Restart interlock is a function which is selected by wiring.
Refer to the instruction manual of the F3S-B for more detailed
information.
2.2 Relay Monitoring
MPCEs (Machine Primary Control Elements) are usually relays or contactors used to control hazardous movement directly. The state of the MPCEs can be checked with the Relay
monitoring function.
A voltage of 17 VDC to Vs (Supplied voltage to F3S-B) has to
be applied to the Relay monitoring input through the NC contacts of the MPCEs when the F3S-B control outputs are in the
OFF-state (see the F3S-B manual for wiring information). To
ensure this logic relation, the MPCEs must be safety approved types, with forcibly guided contacts.
Allowed Relay Delay Time
The allowed relay delay time can be set between 20 and 300
ms. This delay time has to be set at least 20 milliseconds
shorter than the Outputs ON delay time.
F39-E1
0V (Bluie 7)
F39- JB1 C
0V (Bluie 7)
24 VDC (Braun 2)
+24 V (B rown 1)
0V(Blue3)
RS- 485(A) (Black4)
RS- 485(B) (White 2)
Note 1: See thei nstruction manual of F3S-B for wiring
24 VDC (Braun 2)
Open Output 1 (Green 3)
1.3.2 Wiring Procedure
1. Connect the F3S-B (see the instruction manual of the F3SB for wiring.)
2. Connect the Interface cable (F39-JB1C) to the Interface
unit (F39-E1).
3. Connect the 4 wires of the Interface cable to each appropriate line of the F3S-B.
4. Connect an RS-232C cable to the PC and the Interface
unit.
1.4 Software-Installation
Copy the file „F39-U1E_ver#.#.exe“ and F39-U1E_ver#.#dat
from the enclosed 3.5-inch floppy disk onto the hard disk of
the PC.
2. Function Description
2.1 Start Interlock
When the Start interlock function is used, the F3S-B does not
go to the ON-state automatically after power ON. Interrupting
one or more axes resets the start interlock condition of the
F3S-B then starts normal operation. The duration of the interruption must be equal or shorter as defined in the „Max. interruption time (sec)“.
Max. Interruption Time
The max interruption time can be set between 0.3 and 2 s.
Note: In the case both the Start interlock and the Start/restart interlock are se-
lected, only the Start/restart interlock will be activate.
2.3 Outputs ON Delay
You can set the ON delay time of control outputs between 80
and 400 ms. This corresponds to the time which the control
Open Output 2 (White 1)
outputs go to ON-state after the detection zone is not interrupted.
Note: 1 .When the Relay monitoring function is also used, the ON delay time
2.4 Blanking
With the Blanking function, one or more axes can be disabled.
This function is useful in an application where a part of the
F3S-B detection zone is always interrupted. The Manual-setting and the Teaching-setting are available to select the
blanked axes.
Note: 1 . In the case the blanked zone is not filled with structure completely and
must meet the formula below.
2 . ON delay time Allowed relay delay time + 20 ms After the Relay mon-
itoring function is set, if the ON delay time does not meet the above
formula, the ON delay time will be changed automatically into ”Allowed
relay delay time” + 20 ms.
remains some opening, the opening must be filled with the protective
structure.
2 .All axes can not be disabled. At least one axis needs to be active.
F3S-B
G-43F3S-B
Page 14

3. Ratings and Performance
Type F39-E1 Interface unit
Supply voltage 24 VDC ± 20% (including 5 Vp-p ripple)
Current Consumption 120 mA max.
Interface RS-232C interface, RS-485 interface
Indicator See 1-2
Connection method RS-485: 4pins, M 8 connector
RS-232C: D-SUB connector, 9 pins
Protection circuit RS 485 protection against wrong wiring
Ambient Temperature During operation: –10 to 55° C (with no freezing)
During storage: –25 to 70° C
Ambient Humidity During operation : 35 to 85% RH (with no condensation)
Ambient Humidity During storage: 35 to 95% RH
Insulation Resistance 20 MΩ min. (at 500 VDC)
Dielectric strength voltage 500 VAC 50/60 Hz for 1 min.
Degree of Protection IEC60529 IP20
2
Shock resistance Normal operation: 150 m/s
[15 G], ±X, ±Y and ±Z directions: 3 times
Vibration resistance Normal operation: 10 to 55 Hz, double-amplitude: 0.3mm, X, Y and Z directions: 10 sweeps
2
Cable length RS-485 cable: 5 m (4 pin 0.25 mm
)
RS-232C cable: Standard
Materials Case: Aluminum
Size 122 x 60 x 35 mm
Conformity EMC Directive
G-44 Safety Sensors / Components
Page 15

Precautions
!WARNING
1. Do not use the F3S-B on machines that can not be stopped by electrical control in case of an emergency.
2. Do not use the F3S-B in flammable or explosive environments
3. Always maintain the safety distance between F3S-B and a hazardous part of the machine. Serious injury may result if the machine does not stop before someone reaches the hazardous part.
4. Install protective structures around a machine so that you must pass through the detection zone to reach a hazardous part of
the machine.
5. Install F3S-B so that some parts of the operator’s body remain in the detection zone at all times when the operator works in the
hazardous area.
6. Failure to do so may result in serious injury.
Correct installation Incorrect installation
A hazardous part of a machine can be
reached only by passing through the sensor detection zone.
A hazardous part of the machine can be
reached without passing through the sensor detected zone.
Some part of the operator’s body remains
in the detection zone while they are work-
A worker is between the sensor detection
zone and a hazardous part of a machine.
ing.
!WARNING
1. Be sure to install the F3S-B to minimize the effects of reflections from reflective surfaces. Failures to do so will create an inability
to detect and may result in serious injury
2. Install the F3S-B with a minimum distance D as shown below form the reflective surface (highly reflective surfaces) like metal
walls, floors, ceilings, and work pieces.
<Side View>
Reflecting ceiling
Emitter Receiver
D
Detection zone
L
D
Reflecting floor
Emitter Receiver
<Top View>
Reflecting surface
D
5˚
5˚
L
F3S-B
Distance between emitter and receiver (detection distance L) Minimum installation distance D
0.3 to 3 m 0.26 m
3 to 5 m L x tan 5° = L x 0.088 (m)
G-45F3S-B
Page 16

!WARNING
When using multiple sets of the F3S-B, install them so that mutual interference is not incurred.
(Incorrect) (Incorrect)
Emitter 1
Receiver 1
RS-485
Emitter 2
RS-485
(Incorrect)
Emitter 1
Emitter 2
Receiver 1
Receiver 2
Alternate emitters and receivers
Correct installations are shown below to prevent mutual interference.
(Correct)
Receiver 1
Emitter 1
Emitter 2
Receiver 2
Receiver 2
Emitter 1
Emitter 2
Emitter 1
Receiver 1
Receiver 2
RS-485
(Correct)
Receiver 1
RS-485 RS-485
Receiver 1
Emitter 2
Emitter 1
RS-485 RS-485
G-46 Safety Sensors / Components
(Correct)
(Correct)
Receiver 1
Emitter 2
Emitter 1
Receiver 2
Receiver 2
Receiver 2
RS-485
Emitter 2
RS-485
Page 17

!WARNING
1. The F3S-B is a TYPE 2 Electro-sensitive protective equipment, intended to be used as or with the safety related part
of control system to category 2, 1 or B as defined in the European standard EN954-1.
Do not use the F3S-B in category 3 or 4 systems.
2. A qualified person, as determind by local regulations, must
confirm that installation, inspection and maintenance are
implemented correctly.
3. Do not short the output lines to the +24 V line. Doing so will
cause the output to be always ON, creating a hazardous situation.
4. Do not connect the F3S-B to a power supply with voltage
higher than 24 VDC + 20%. Do not connect the F3S-B to an
AC power supply.
5. Be sure to conduct inspections regularly.
6. The F3S-B cannot be used in applications where hazardous projectiles may exit the protected zone.
7. Do not disassemble, repair or modify the F3S-B.
8. DC power supply units must satisfy all of the conditions below so that the F3S-B can comply with the applicable standards IEC 61496-1 and UL 508.
(1.) The power supply voltage must be within rating
(24 VDC ± 20%).
(2.) The power supply is connected only to the F3S-B and
to the electro-sensitive protective function of the F3SB, such as a safety controller and muting sensors, and
it has enough rated current for all the devices.
(3.) The power supply uses double or reinforced insulation
between the primary and secondary circuits.
(4.) The power supply automatically resets overcurrent
protection characteristics (voltage drop).
(5.) The power supply maintains an output holding time of
at least 20 ms.
(6.) FG (frame ground terminal) must be connected to PE
(protective earth) when using a commercially available
switching regulator.
(7.) The power supply must have output characterisitics re-
quired for the power source for Class 2 Circuit or Limited Voltage / Current Circuit as defined in UL508.
(8.) The power supply must conform to regulatory require-
ments and standards, regarding EMC and electrical
equipment safety, of the country where the F3S-B is installed and where machinery will be operated, for example: The EMC Directive (industrial environment)
and the Low Voltage Directive in EU.
9. Do not use the F3S-B in a direct retroreflective configuration. Otherwise detection may fail.
F3S-B
G-47F3S-B
Page 18

ALL DIMENSIONS SHOWN ARE IN MILLIMETERS.
To convert millimeters into inches, multiply by 0.03937. To convert grams into ounces, multiply by 0.03527.
Cat. No. E503-E2-01-X
In the interest of product improvement, specifications are subject to change without notice.
G-48 Safety Sensors / Components
 Loading...