Omron EZ3-900 DATASHEET

22
33
Only Possible with Multi-task System
Industry's Fastest Inspection & Measurement Processing
[ Patent Pending ]
Industry's fastest
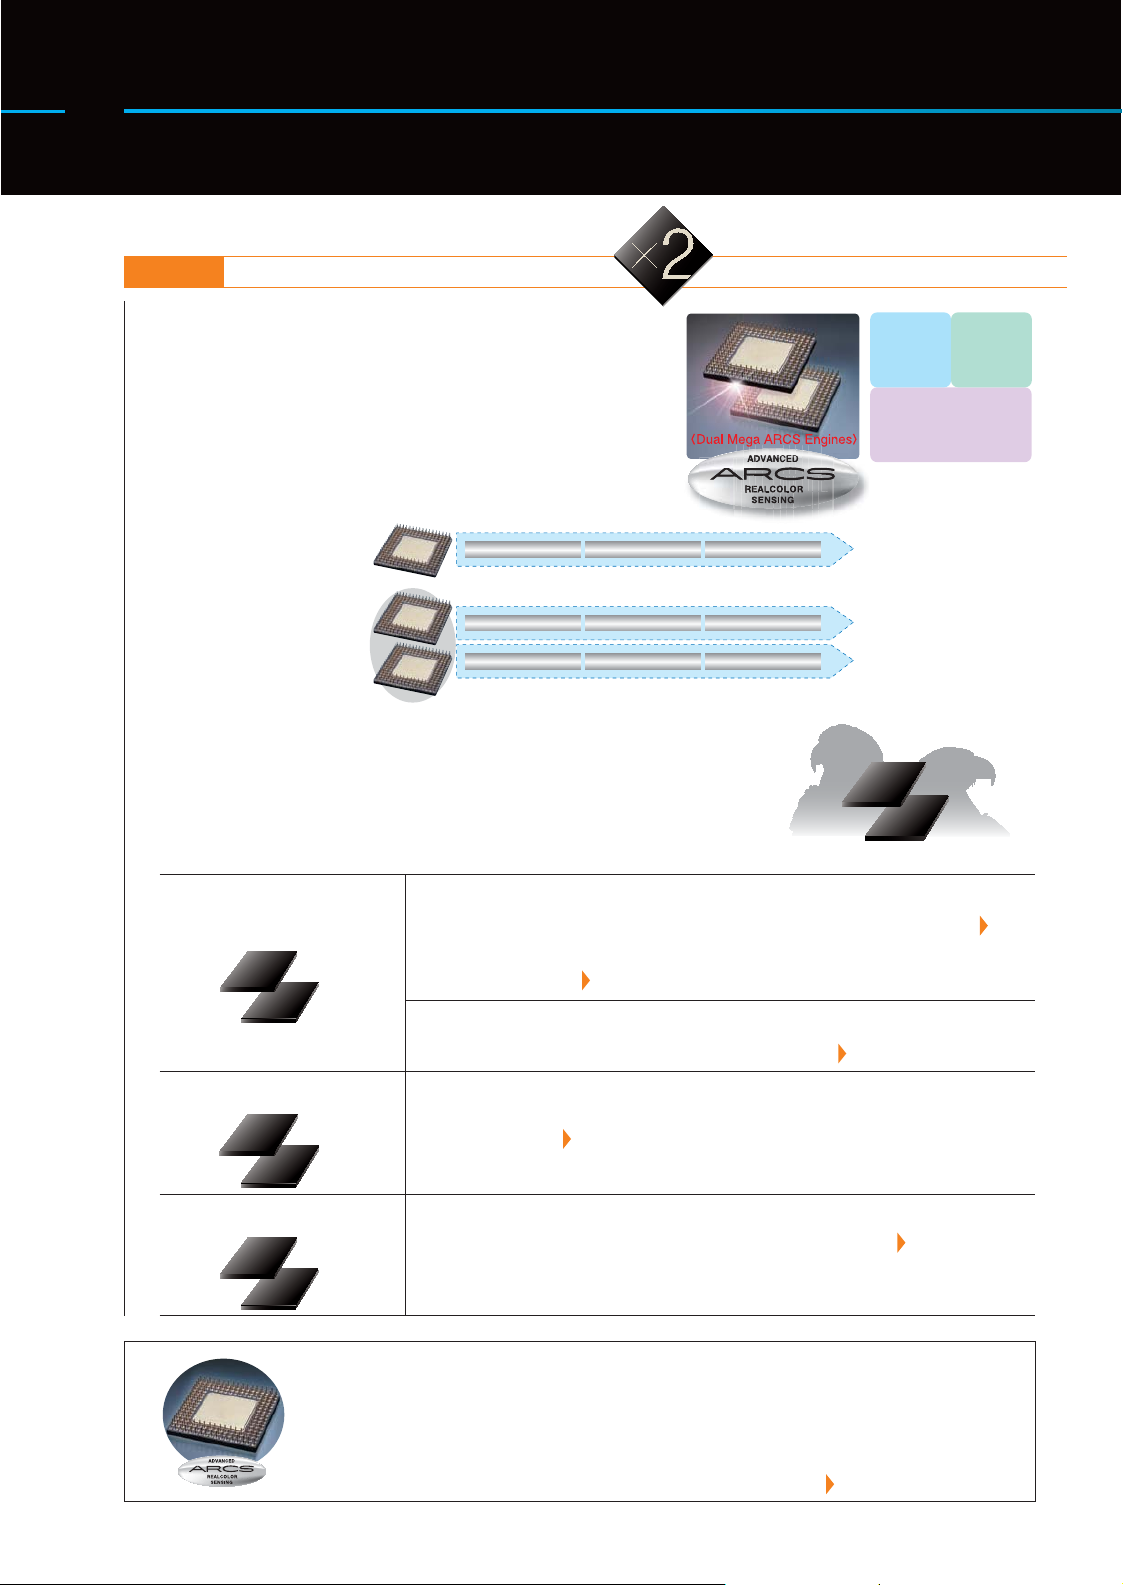
Dual Mega ARCS Engines
The FZ3-900 series is equipped with Dual Mega ARCS Engines
to process data twice as fast as when one Mega ARCS Engine is
used. This engine achieves multi-task, high-speed processing not
heretofore possible.
With conventional serial systems, each process can not be started
until the previous process is completed.Under the Dual Mega ARCS
architecture, two engines perform multiple tasks in parallel to
dramatically reduce the inspection time.As a result, you can process
more data over a shorter time compared to conventional systems.
[Conventional processing]
[Dual processing]
Processing 2 Processing 3Processing 1
Processing 3 Processing 5Processing 1
Processing 4 Processing 6Processing 2
Only the Dual Mega ARCS architecture can realize a completely
parallel processing of measurement, adjustment and logging tasks!
The key feature of Dual Mega ARCS Engines is that they enable completely
parallel processing.
Parallelprocessingnotonlyspeedsupinspection,
butitalsoallowsthesystemtobehavelikehavingtwobrains(heads)
bylettingyouinspecttwocompletelydifferentlineswithasingle
visionsensororadjustparametersduringinspection.
Dual processing of
<measurement x measurement>
Measurement
Measurement
Dual processing of
<measurement x logging>
Measurement
Logging
Perfect for applications requiring inspection speed
[1] High speed mode (parallel operation)
One measurement ow is divided into two to process the two sub-ows in parallel P. 5
[2] High speed mode (single line)
The conventional multi-input function has been improved to achieve even shorter
trigger input intervals P. 5
Two different inspections with a single unit
[3] Multi-line random-trigger mode
Two measurement flows can be processed independently P. 6
Saving all inspection images
[4] High speed logging mode
Measured images can be saved to an external memory device without affecting the
measurement time P. 6
Industry's
fastest CPU
Dual Mega ARCS
Measurement
Measurement
P.B.S.
architecture
Dual processing of
<measurement x adjustment>
Measurement
Adjustment
Adjusting and checking settings without stopping production operation
[5] Non-stop adjustment mode
You can adjust flows and setting parameters during measurement P. 7
What is ARCS?
Short for "Advanced Real Color Sensing," ARCS is OMRON's patented imaging engine capable
of processing images in real colors. The FZ3 series real color processing captures and quickly
processes vast amounts of color information to achieve ideal sensing close to what human eyes
can. It realizes accurate, stable inspection unthinkable with simple filtering. The ARCS processing
capability continues to advance with the progress of the FZ series.
P. 5 Real Color Sensing
4
Fastest measurement Highspeed mode (parallel operation)
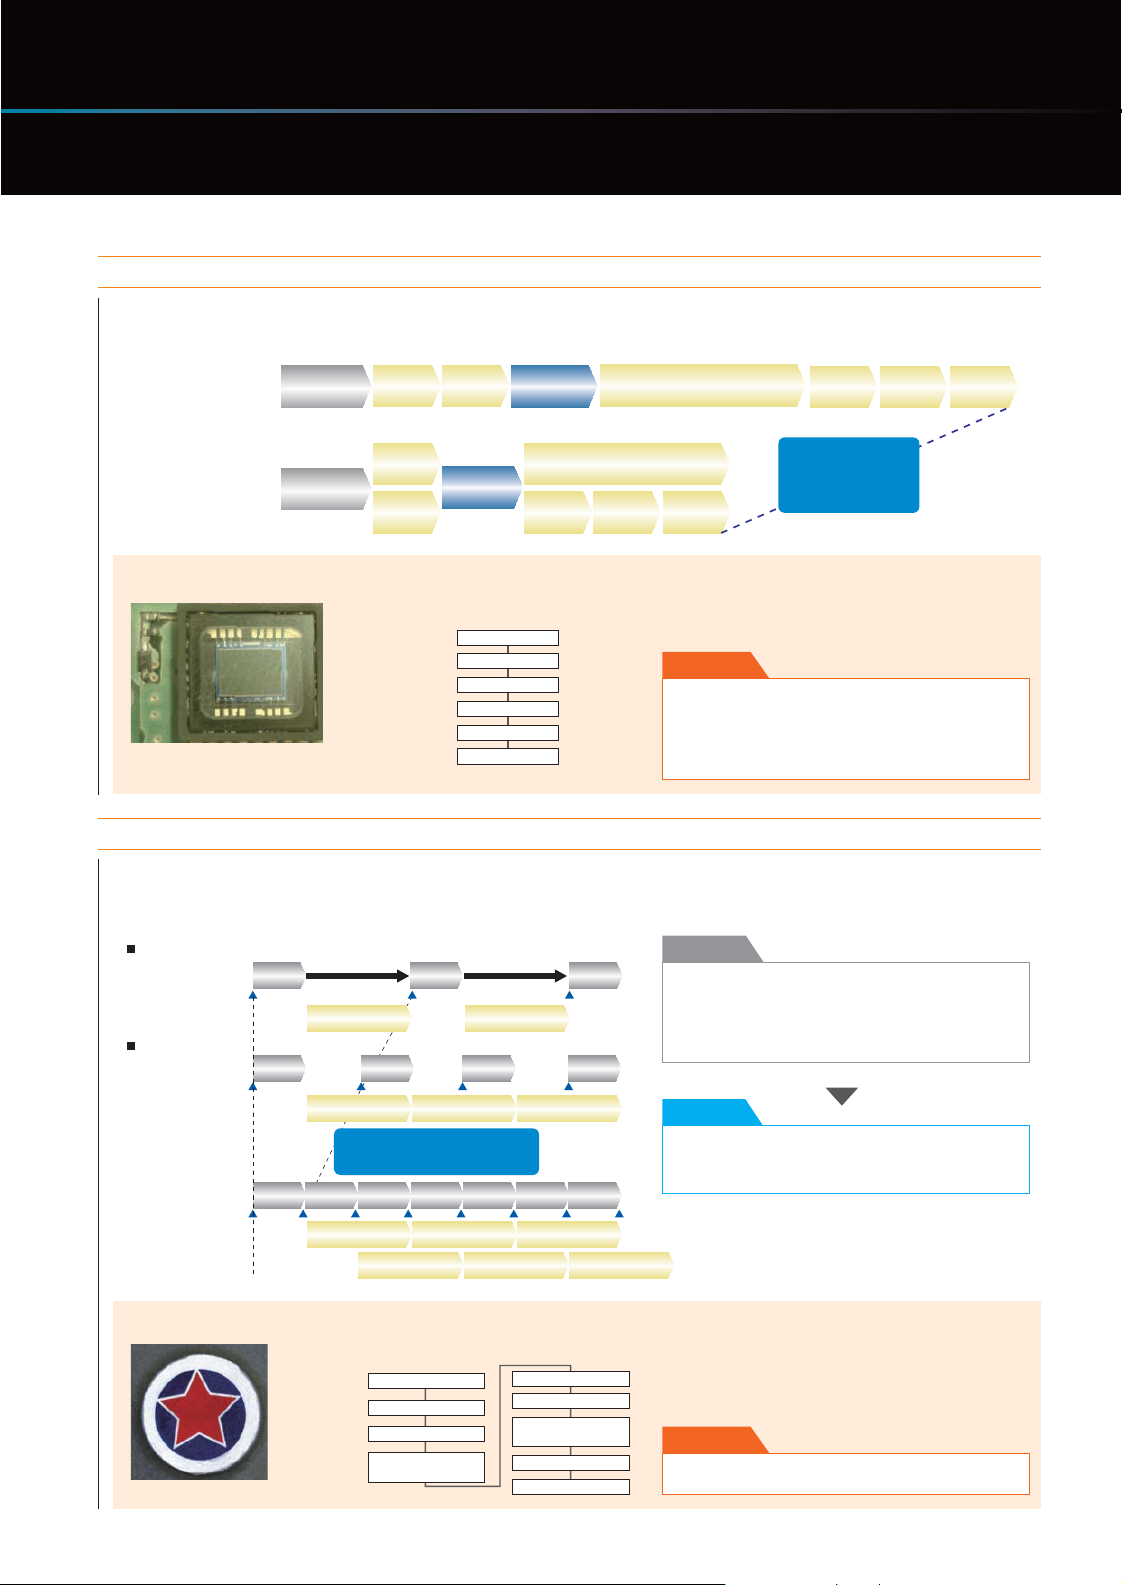
Multiple measurements are processed in parallel with the system making decisions automatically to minimize the total
measurement processing time from image input to result output. This significantly reduces the time to output result following
a trigger input. This feature is ideal for inspections where more data must be processed or higher resolution is needed.
[Conventional flow]
0. Camera
image input
1. Search 2. Search
3. Position
compensation
4. Labeling
Scratch
5.
and soiling
6.
Number
of edges
7. Area
gravity
center
[Flow in high speed mode]
0. Camera
image input
CCD alignment inspection
1. Search
3. Position
2. Search
compensation
(Example) The flow
shown below reduces the
processing time by 47%
Camera image input
ECM search
ECM search
Line regression
Line regression
Operation
Scratch
5.
and soiling
4. Labeling
6.
Number
of edges
7. Area
gravity
center
Parallel measurement flows significantly reduce
the measurement time. This function is particularly
useful in inspections using high-pixel camera that
otherwise take a long measurement time.
Effect
rA shorter tact time can be achieved after consolidating
lines or when the utilization ratio is to be improved at
subsequent production increases.
rAlignment data and other measurement results can be
sent to subsequent processes more quickly.
Signicantly
shorter
processing time!
Short trigger intervals High speed mode (single line)
OMRON's unique multi-input function has become more advanced. Combined with the parallel processing capability
of Dual Mega ARCS Engines, this function halved the trigger intervals of conventional systems. You can add inspection
items without affecting the current processing time, which gives you scalability to meet future needs.
[Conventional system]
Without multi-input
Image capture
Measurement
processing
With multi-input
Image capture
1st
Trigger
1st 2nd 3rd 4th
Standby Standby
1st
2nd 3rd
2nd
Issues
Camera images can also be captured during measurement.
If image inputs exceed the buffer capacity, however,
trigger intervals cannot be shortened because the minimum
trigger interval depends on the measurement processing
time.
Measurement
processing
[
High speed mode
Image capture
Measurement
process 1
Measurement
process 2
]
1st 2nd 3rd 4th 5th 6th 7th
Appearance inspection of caps
1st 2nd
3rd
Trigger intervals have
been halved!
1st 3rd 5th
2nd 4th 6th
(Example) The flow shown below halves the
trigger intervals of conventional system to only
26 ms.
Camera image input
Color gray filter
Shape search+
Processing before
measurement
Position compensation
Background trimming
Processing before
measurement
Color gray filter
Fine matching
Resolution
Parallel measurement processing halves the trigger
intervals of conventional systems. As a result, the
inspection tact time is also reduced to a half.
The processing flows for first and second
triggers are processed in parallel to halve the
trigger interval.
Effect
Shorter trigger intervals shorten the inspection cycle time.
5
Benet of a Multi-task System
Reduce the time and cost for setup and operation
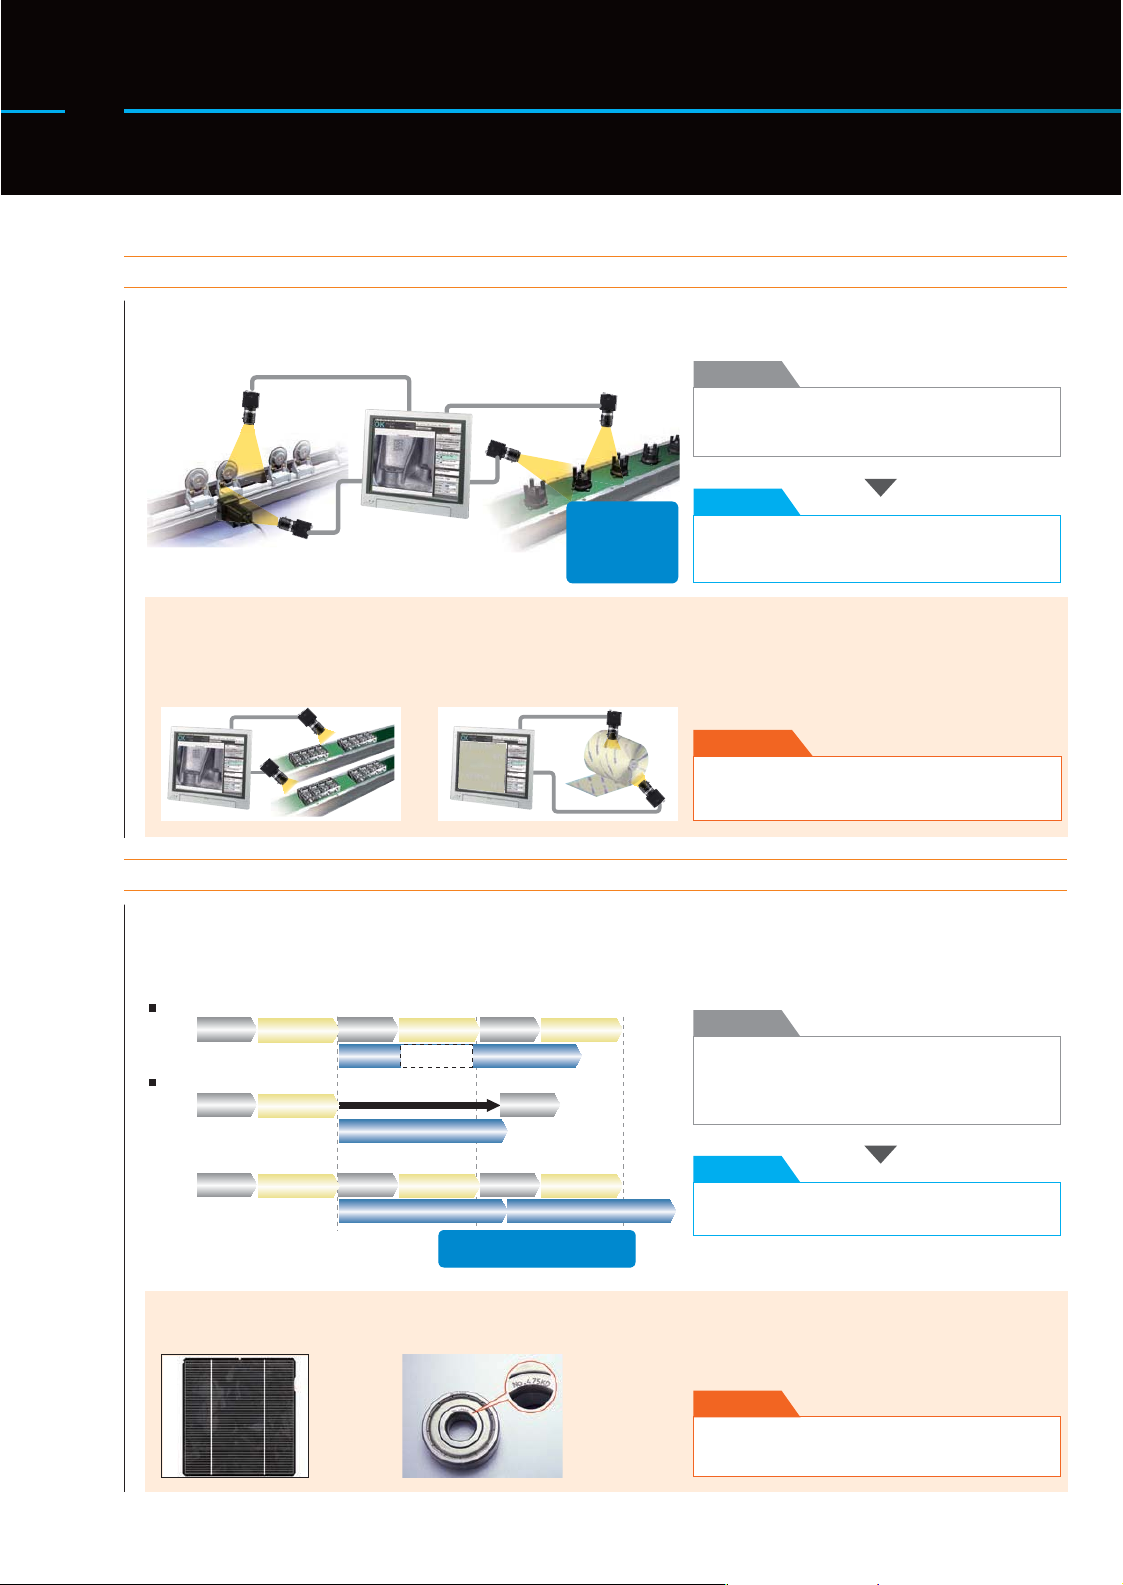
One unit performs inspections that normally require two units Multi-line random trigger mode
Conventional imaging systems cannot perform two inspection processing simultaneously. With Dual Mega
ARCS Engines, one controller accepts two trigger inputs simultaneously or randomly to process two different
setups parallely or independently.
Issues
Before, two controllers were needed to inspect two locations,
processes or lines within the required tact time, which added
to introduction cost.
Resolution
With the FZ3-900 series, on the other hand, two triggers
can be input randomly to run two independent inspection
processing in parallel.
All you need
is one unit
Random inspection of lines
positioned close to each other
Even when the timing of work arrival
is not at constant intervals, they can be
inspected with only one controller.
Introduction
cost
Installation
space Halved!
Simultaneous inspection of two
locations
This mode is ideal for applications where triggers
are not input simultaneously or constantly, such
as when the top surface is inspected with a single
trigger and side faces with four triggers.
Effect
You can reduce the number of controllers to be installed
to save installation space, introduction cost and current
consumption.
All images can be saved even during measurement High speed logging mode
Complete parallel processing of measurement and logging means you can also connect high-speed, largecapacity (up to 2 terabytes) hard disk drives. Accordingly, you can save all images on high-speed tact lines,
which was difficult to do with conventional systems (*1).
[Conventional system]
Priority on measurement processing
Image input
Image input 1 Image input 2 Image input 3
Image logging
Priority on image logging
Image input 1 Image input 2
Image input
Measurement
processing
Measurement
processing
Measurement
processing
Image
logging 1
The next image input is delayed
Image logging 1
[High speed logging]
Image input
Image input 1 Image input 2 Image input 3
Measurement
processing
Measurement
processing
Image logging 1 Image logging 2
Measurement
processing
Interruption
Measurement
processing
All images are saved.
Measurement
processing
Measurement
processing
*1 All images can be saved under the following conditions:
r300,000-pixel camera x 1 unit . Measurement time: 33 ms
rImages can be saved continuously for approx. one week when a 2-terabyte
HDD is used (based on 8 hours of operation a day).
Issues
Since logging was not possible during measurement, the user
had to choose either measurement or logging. Accordingly,
not all images could be saved or image input triggers had to
be delayed depending on the measurement trigger intervals.
Resolution
Measurement and image logging are processed completely in
parallel. As a result, you can save all images.
Defect inspection on a new
product or a line adopting a
new manufacturing method
Printing inspection in
automobile assembly
processes
All images you have saved can be utilized for
trend analysis to help establish an appropriate
manufacturing method quickly for a new product
or a line adopting a new manufacturing method.
Effect
r
When a NG occurs, the cause can be identified and
remedial actions taken quickly.
r
Saving all images leads to more efficient traceability control.
6
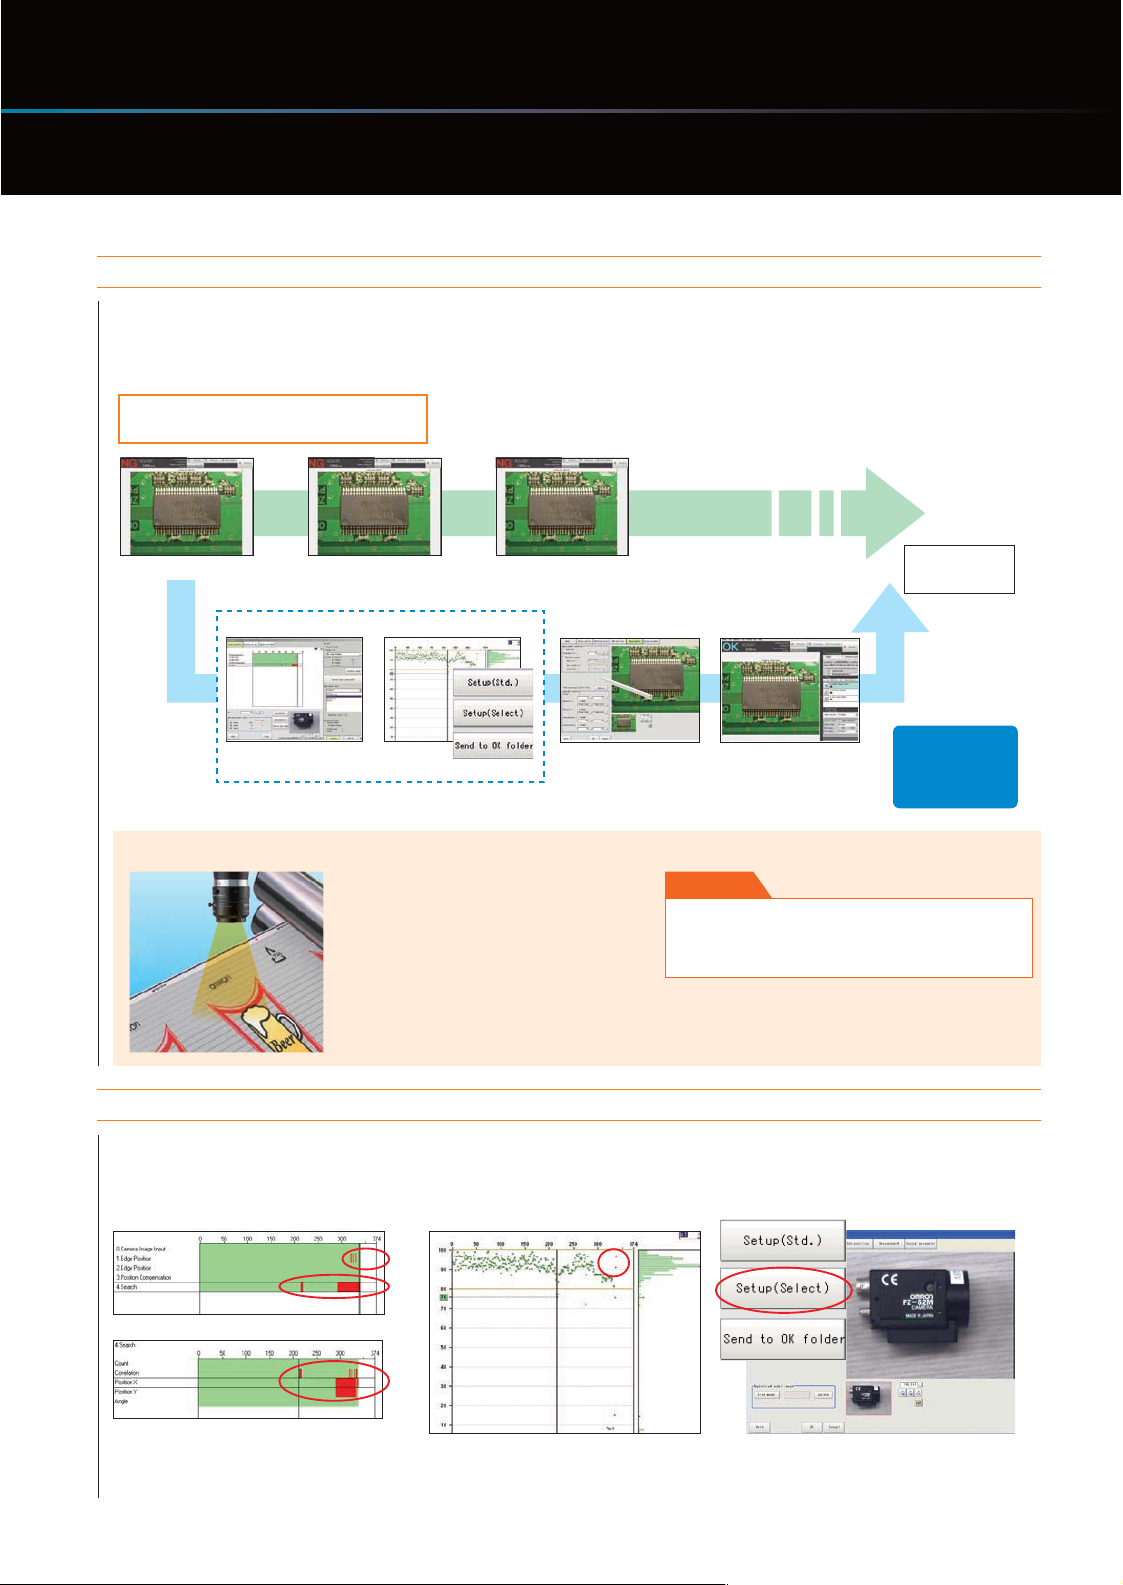
Zero downtime for setting adjustment Non-stop adjustment mode
You can check conditions and reconfigure settings while measurement is still in progress if dimensional
variations of works, changes in external environment, etc., require adjustments and checks. Since adjustment
is possible without stopping the line/inspection, you can eliminate downtime, need to add visual inspections
to identify uninspected products, and cost increase associated with them.
Parallel processing of inspection
and adjustment
Continuous inspection
without stopping line
operation
A NG occurs.
Apply the
new settings.
NG analyzer
Check saved images to
identify the cause.
Change thesettings.
Measure again in a trial
run to conrm the
settings.
Downtime
Loss cost
Zero
Identify the cause and adjust the settings.
Printing / soiling inspection of sheets
Loss cost can be reduced. Ideal for
mass-production processes with a higher
unit production volume or 24-hour lines.
Effect
r3FTVMUTDBOCFDIFDLFEBOEBEKVTUNFOUDBOCFNBEFXJUI
zero downtime.
r#FDBVTFUIFMJOFJTOPUTUPQQFEUIFSFJTMFTTJEMFUJNF
associated with restarting of the line.
Doubly effective when combined with the Non-stop adjustment mode NG analyzer
You can display in a structured manner a graph showing the results measured at once on logging images. This
lets you identify the cause of a given NG much more quickly. You can also measure all images again after
changing a given setting, to check the reliability of the new setting.Adjustment and troubleshooting has never
been so quick, simple and reliable.
Processed items and parameters that
generated an erroneous judgment can be
identified at a glance.
You can check the detailed results of
parameters to identify the cause of the NG.
Select a desired measurement result on the
graph to switch to the adjustment mode.
7
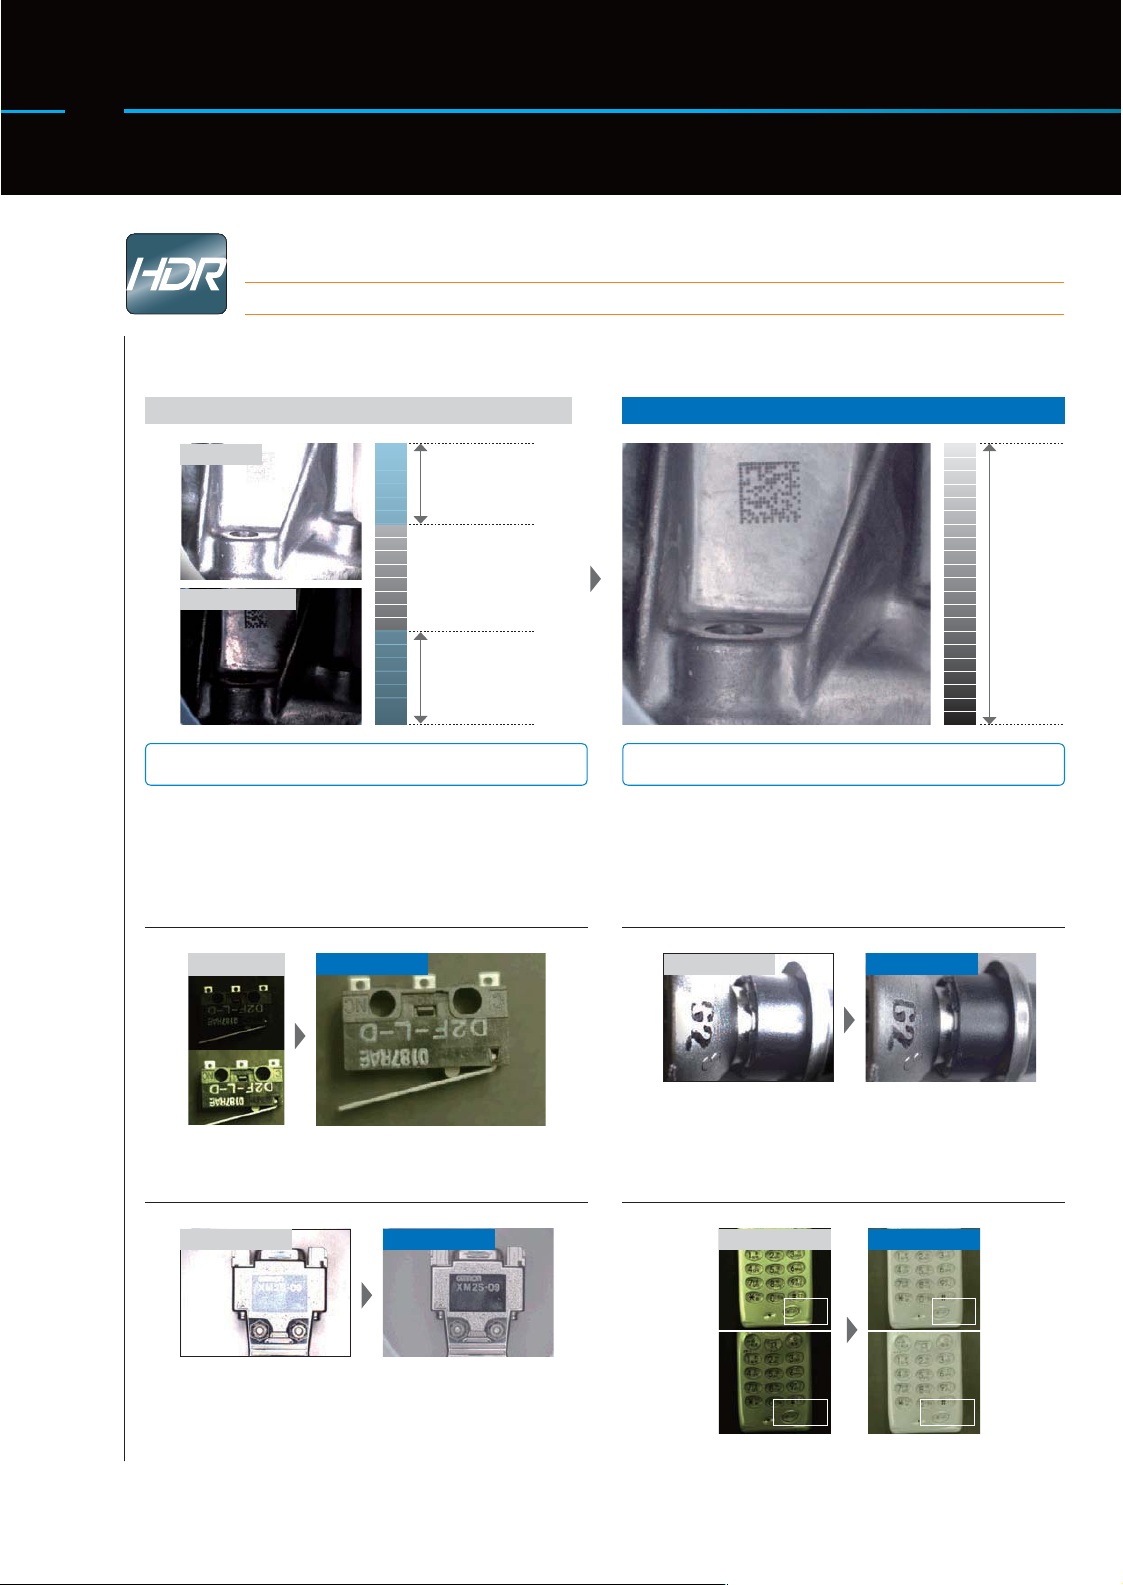
Original HDR Technology
Making it possible!
Eliminate the side effects of lighting
High Dynamic Range Function
FZ3's high dynamic range minimizes the effects of lighting such as halation and allows highly precise
inspections.
Conventional images HDR image
Halation
Underexposure
Dynamic range
of the upper
image
Dynamic range
of the lower
image
Defects Undetectable Due to Overexposure or Underexposure
Any spot outside the dynamic range is blurred by halation
or shadow.
Reflective and shadowy areas can be
reproduced simultaneously under the same
lighting conditions.
Conventional images
HDR image
Dynamic
range
after HDR
processing
Defects Detectable Even on Reective or Shadowy Surfaces
The surface of the workpiece is accurately reproduced and
detected even with overexposure or underexposure.
The reective surfaces of cylindrically-curved
workpieces in which conventional vision
sensors have had difficulty can be reproduced.
Conventional images
HDR image
The surfaces of metal workpieces can be
reproduced accurately.
Conventional images
HDR image
The inuence of changing lighting conditions
from day to night are effectively minimized.
Conventional images
Day Day
Night Night
HDR image
8
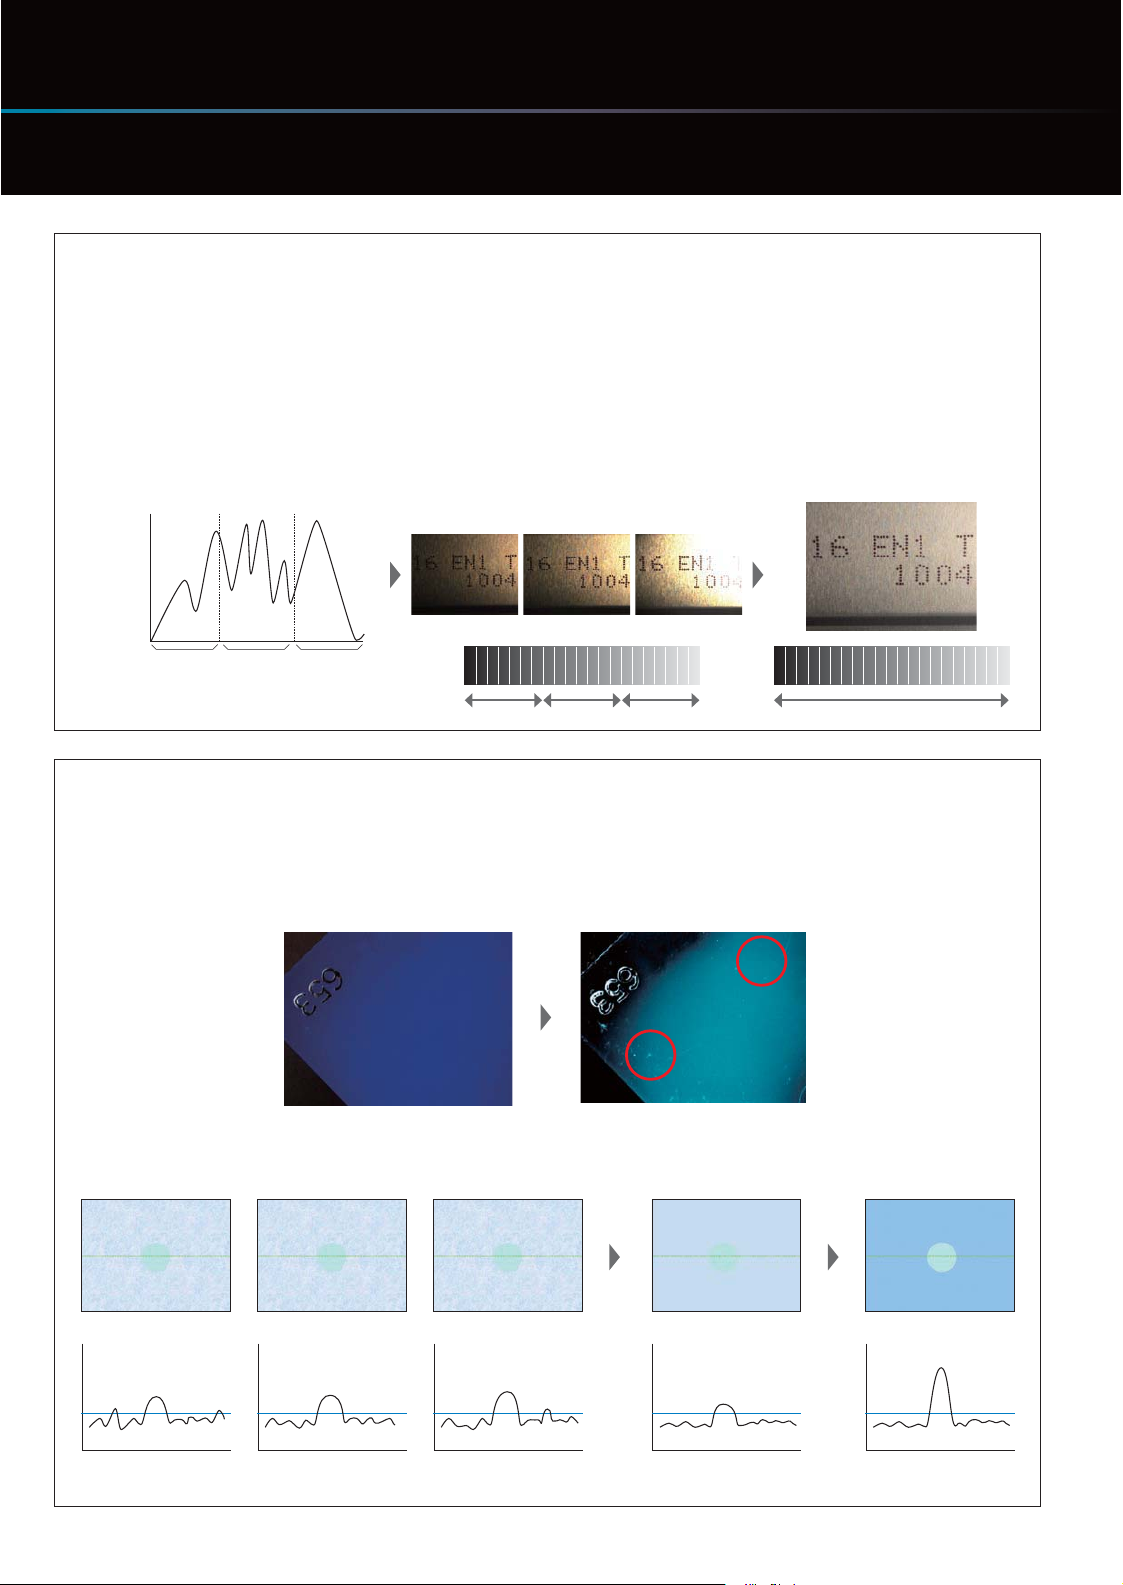
HDR Image Generation Technology
Dynamic range means the imaging hardware's ability to manage differences in lighting. The higher dynamic range the hardware
scores, the clearer images it can generate when imaging objects with a strong contrast in luminosity. Featuring the HDR Image
Generation technology, FZ3 can take two or more images of a workpiece at different levels of luminosity by automatically changing
its shutter speed and synthesizes them into a single image rapidly. As a result, the bright field where image capture is possible
expands 5,000 times in LD ratio compared to a general CCD camera. Accordingly, you can obtain vivid images not possible in
processing flows where images are color-depth filtered one by one in real time.
Contin uous imag ing at diff erent shutter sp eeds. In st an tan eous sy nth es is of di ff er en t
Luminosity
images at different levels of luminosity.
The wid e dynamic ra nge allows yo u
to generate clear images even with
overexposure or under changing lighting
conditions.
Luminosity
distribution
histogram
Instantaneously calculates the
luminosity distribution in the field
of view, and a utomati cally set ting a
number o f images to b e taken an d the
shutt er speed f or each ima ge.
1st i mage
high speed
2nd image
medium speed
3rd image
low speed
HDR High-Contrast Mode
The HDR function that quickly produces multiple composite images offers the high-contrast mode. In this mode, images captured
at a constant shutter speed are layered on top of one another and output. Before, each image had to be enlarged to increase
contrast, and consequently the noise component of the image was also amplified. In the HDR high-contrast mode, on the other
hand, multiple images are combined together and then averaged to reduce their noise component, after which the images are
enlarged. This way, only the contrast of the area of interest and its background can be increased.
Conventional system
Low contrast makes the surface appear uniform.
HDR high-contrast image
Many scratches and soiled areas can be found.
Technology of HDR High-Contrast Mode
Integration
++
Luminosity Luminosity
There i s a low contr ast in brigh tness be tween t he backgr ound noises and the th ing to be
inspected.
The contrast is enhanced by integrating and enlarging two or
more images.
Enlargement
9
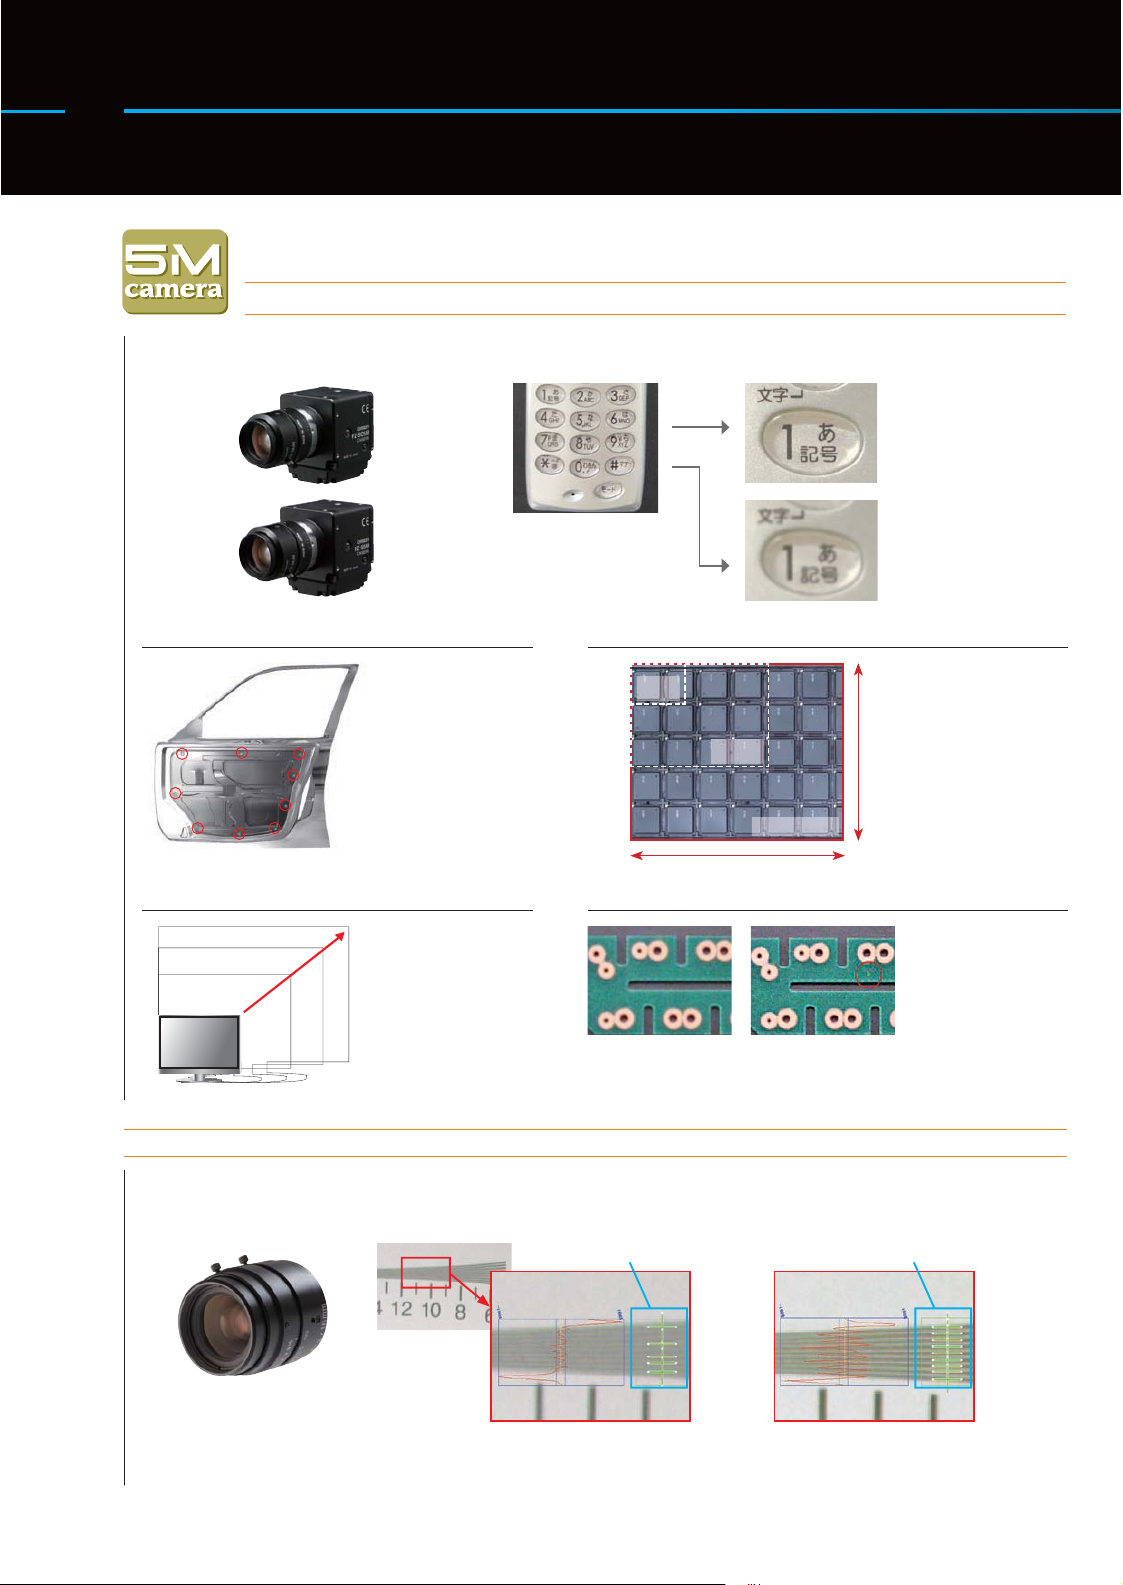
High Resolution Image Generation
Higher Resolutions and Wider Fields of Vision
5 Million-Pixel Cameras
The new 5 million-pixel cameras allow high precision appearance inspections and measurements that cannot be
handled by conventional 2 million-pixel cameras.
5 million pixels
(2448×2044 pixels)
Color Type
FZ-SC5M
2 million pixels
Black and
White Type
FZ-S5M
1.5-times wider eld of vision Reducing Tact Time
(1600×1200 pixels)
Even a large
workpiece can be
imaged at one time
and the details are
very clear
300,000
pixels
2 milion
pixels
2448
5 milion pixels
FZ3 takes a single
wide-view image of a
large workpiece used
be imaged in multiple
pieces and thus
2044
reduces inspection
tact time.
Making Invisible Defects VisibleReducing Set-up Time
Thanks to the
cameras' wider fields
of vision, you don't
have to move their
positions during set
up on a production
line for different
products in different
sizes.
5 million pixels2 million pixels
The improved
resolution of the
system's cameras
allows you to detect
very slight defects
that were impossible
for its predecessor to
catch.
High measurement accuracy Lens of over 5 mega pixels
A lineup of high-accuracy lenses is available to fully utilize the high-resolution camera of 5 million pixels or
more and thereby realize accurate inspection. The resulting greater contrast and higher resolution ensure accurate
positioning check, scratch inspection and other inspection applications where higher accuracy is required.
Only 5 lines can be detected.
All 9 lines are detected.
10
Normal high-resolution lens
Lens of over 5 mega pixels
* Please contact your OMRON sales representative.
 Loading...