

Page 1

Table of Contents
General information. . . . . . . . . . . . . . . . . . . . . . . . . . . . . . . . . . . . . . . . . . 2
Safety precautions . . . . . . . . . . . . . . . . . . . . . . . . . . . . . . . . . . . . . . . . . . 2
Description of OMRONCX
pro
Nebuliser. . . . . . . . . . . . . . . . . . . . . . . . . . . 3
Description of JetAIR
plus
Nebuliser kit . . . . . . . . . . . . . . . . . . . . . . . . . . . . 4
Inhaling with the OMRON CX
pro
Nebuliser . . . . . . . . . . . . . . . . . . . . . . . . 5
Cleaning and disinfection . . . . . . . . . . . . . . . . . . . . . . . . . . . . . . . . . . . . . 7
Storage and maintenance . . . . . . . . . . . . . . . . . . . . . . . . . . . . . . . . . . . . . 7
Filter. . . . . . . . . . . . . . . . . . . . . . . . . . . . . . . . . . . . . . . . . . . . . . . . . . . . . 8
Possible problems and how to solve them . . . . . . . . . . . . . . . . . . . . . . . . . 8
Optional accessories/ parts. . . . . . . . . . . . . . . . . . . . . . . . . . . . . . . . . . . . 8
Technical data . . . . . . . . . . . . . . . . . . . . . . . . . . . . . . . . . . . . . . . . . . . . . . 9
Dear Customer...
Thank you for purchasing this OMRON product.
You can be sure that you have made a wise choice. By buying the OMRON CompAIR CX
pro
Nebuliser, you
have chosen a high-quality, innovative instr ument.
During its development, particular attention was given to reliability, convenient and easy handling.
Before using the nebuliser for the first time , please read through this manual carefully.
If you still have any questions regarding its use, please contact OMRON Customer service at the
address shown on the packaging or in the enclosed instruction manual.They will be pleased to assist you.
OMRON Healthcare Europe
English
1
CompAIR CX
pro
Nebuliser
Page 2

General Information
The OMRON CompAIR CX
pro
is a nebuliser for the inhalation of medical aerosols to treat asthma, chronic
bronchitis and other respiratory tract disorders.This nebuliser is suitable for all commonly used inhalation
solutions. Use only the type and amount of medication prescribed by your doctor.
The advanced nebulisation system of the OMRON CompAIR CX
pro
produces a very low particle size distribution and therefore a medication vapour that will reach effectively and reliably the upper and lower respiratory passages.Due to the inhalation and exhalation valves, the amount of medication deposited into the lungs
is maximized and medication waste is minimized.
The OMRON CompAIR CX
pro
is suitable for inhalation at home, in the hospital or at a doctor's practice.
Safety precautions
Please read the following safety precautions carefully, as they contain important information concerning safe
set up, use and maintenance of your nebuliser.
● Keep this manual for future reference.
● As soon as you have unpacked the nebuliser, check it for visible damages or defects.
In particular check for cracks in the plastic housing, which could expose electr ical components. If this
is the case or if you are in doubt, contact your OMRON dealer directly.
● Only use the nebuliser for its intended purpose; for inhalation therapy. Any other form of use constitutes
an improper use and is therefore dangerous.The manufacturer cannot be held liable
for any damage caused by improper or incorrect use.
● Do not leave the unit unattended with people who require supervision (e.g. people with infirmities or
children).
● The unit does not contain any user serviceable parts and does not require oil. Do not attempt to
lubricate any internal par ts. Never open the unit.
● Make sure that the electrical rating shown on the rating label on the bottom of the unit corresponds to
your mains voltage and frequency before plugging in the nebuliser.
● Always disconnect the nebuliser from the mains supply before you start cleaning it.
● The unit is not protected against water penetration, so: Never touch the unit when your hands are wet
or moist. Do not use the nebuliser while you are in the bath or having a shower.
Never submerge the nebuliser in water. In case this occurs accidentally, always first disconnect the
power supply plug from the wall socket, before reaching for the unit. After having removed the unit from
the water, do not use it again. Contact your OMRON dealer and have your unit checked.
● Always switch the unit off first, before you disconnect the power plug.
● Do not use the unit in the presence of anaeststhetic mixtures which are inflammable when they come
into contact with air, oxygen or nitrous oxide.
● Keep the power cable away from heated or hot surfaces.
● If you discover that the nebuliser or its mains cable is damaged or does not operate properly, switch it
off immediately, disconnect the power plug and stop using it. Contact your OMRON dealer and have your
unit checked.
● Always use original OMRON nebuliser kit and air filter; order no. for replacements can be found in this
manual.
● Do not block the air ventilation holes on left/right side of the compressor unit.
● Place the compressor unit on a flat and stable surface during operation.
● Although this device fulfils the provisions of the EMC (Electromagnetic Compatibility) directive, the use of
it should be avoided in direct vicinity of other electric devices.
English
2
Page 3
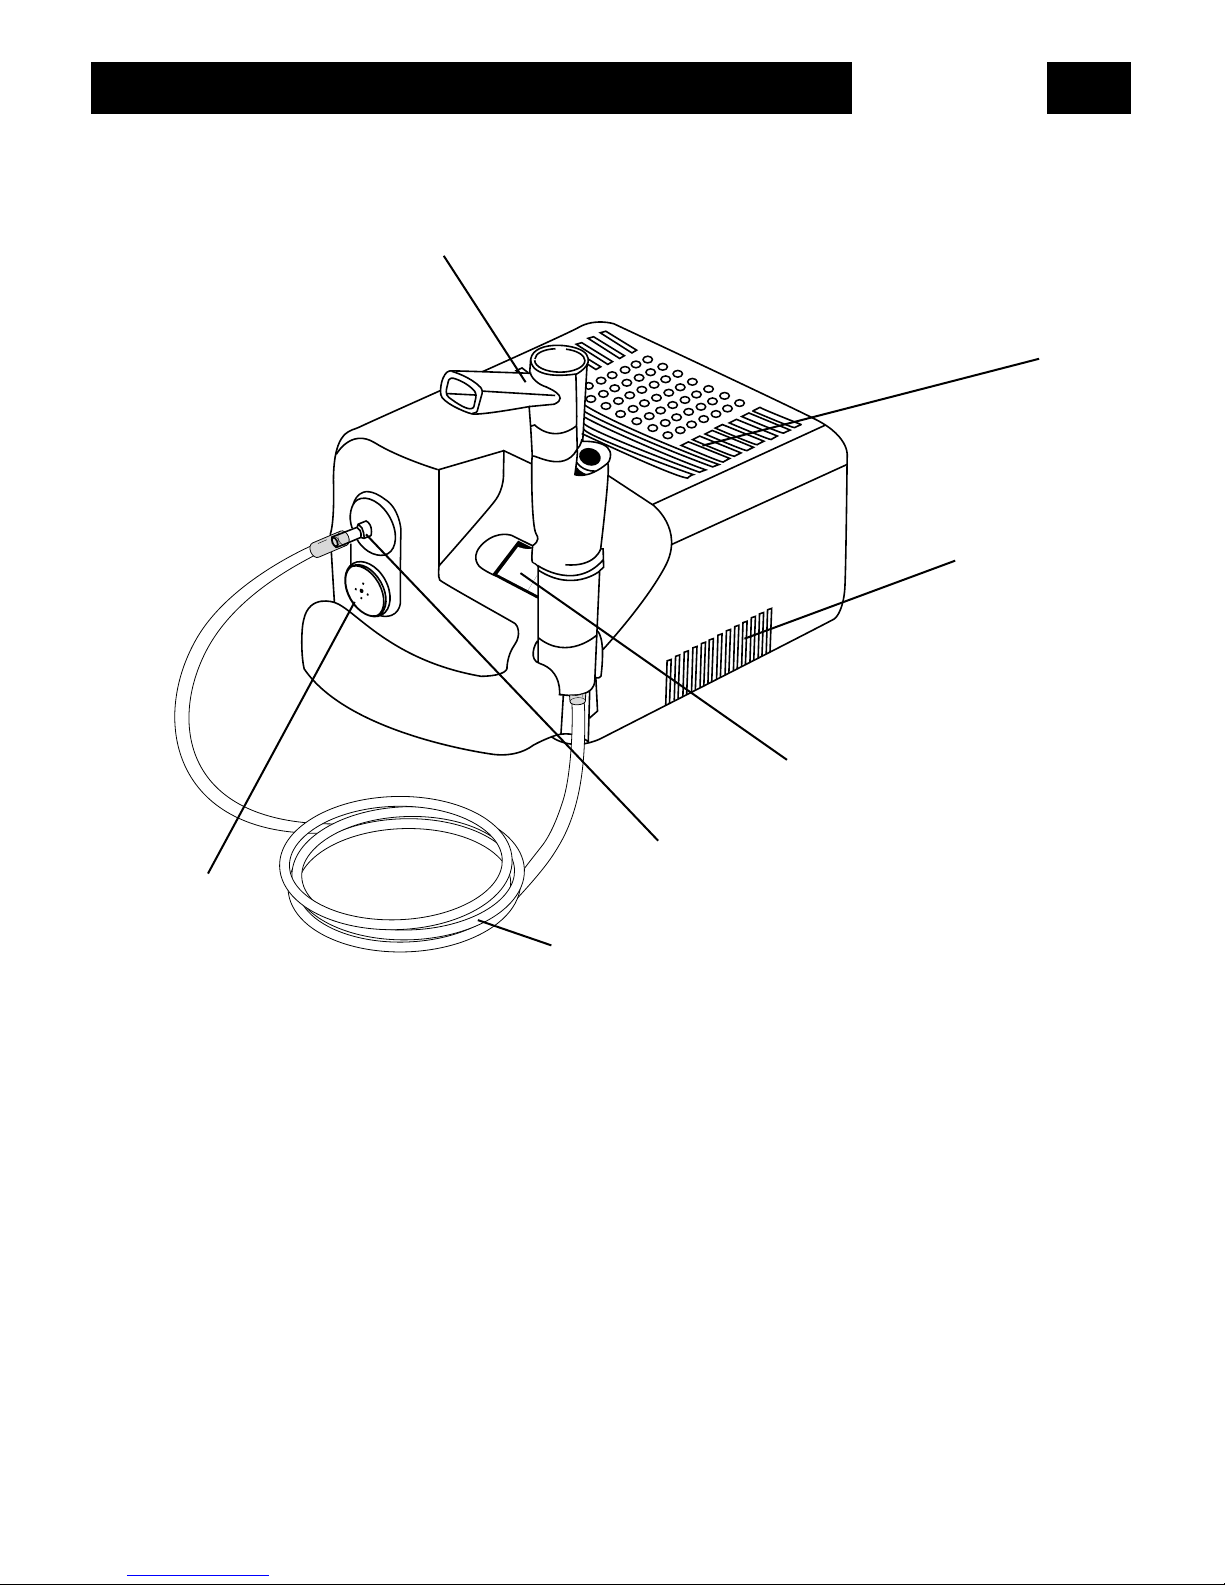
Description of the OMRON CompAIR CX
pro
Nebuliser
1. Nebuliser kit JetAIR
plus
(see also on page 4)
2. Air tube
3. Air filter compartment (air inlet)
4. Air outlet connection
5. Power OFF/ON switch [O/I]
6. Compressor unit
7. Air ventilation holes
English
3
1
7
6
2
3
4
5
Page 4

Description of the nebuliser kit JetAIR
plus
8. Valve cap
9. Exhalation valve
10. Mouthpiece
11. Inhalation valve
12. Nebuliser cap
13. Vapor iser head
14. Jet nozzle (inside medication tank)
15. Medication tank
English
4
1
2
3
4
5
6
9
11
12
13
14
8
10
15
Page 5

Inhaling with the OMRON CompAIR CX
pro
Nebuliser
Before using the nebuliser, the nebuliser kit must be cleaned according to the cleaning and
disinfection instruction within this manual. (see page 7)
1. Make sure that the filter compartment (air inlet) and air ventilation holes are not covered, otherwise the
unit may become overheated.
2. Make sure that the power switch is set to the OFF (O) position
and plug in the mains cable.
For steps 3 ~ 7, refer to the drawing below.
3. Remove the nebuliser cap from the medication tank by tur ning it counterclockwise and lifting it.
Remove the mouthpiece.
4. Remove the vaporiser head.
5. Fill the medication tank with the prescribed amount and type of medication (max 6 ml).
6. Reinsert the vaporisation head.
7. Reconnect the nebuliser cap to the medication tank and fit the mouthpiece.
English
5
1
2
3
4
5
6
1
2
3
4
5
6
1
2
3
4
5
6
1
2
3
4
5
6
Step 3 Step 7
Step 4 Step 5 Step 6
1
2
3
4
5
6
2
1
1
2
3
4
5
6
1
2
3
4
5
6
1
2
Page 6

8. Connect the airtube; one end to the compressor unit and the other end to the bottom of the medication
tank:
9. Hold the nebuliser in the position as shown below and switch the unit to ON (I) position.
10. Although the design of this nebuliser kit enables its use in a tilted position, sit as upr ight as possible
during the inhalation. If you must be treated in bed, support yourself with pillows.
Always be calm and relaxed when you inhale. Breathe in slowly and deeply so that the medication can
reach deep into the bronchial tubes. Hold your breath for a short time.Then breathe out slowly.
It is not necessary to remove the mouthpiece from your mouth; the inhalation- and exhalation valves are
automatically controlled by your breathing.During inhalation, air will enter the nebuliser through the inhalation valve. During your exhalation, exhaled air will leave the nebuliser through the exhalation valve. Do
not try to breathe too quickly. Pause when you feel like having a rest.
Breathe in: Breathe out:
11. When the treatment is finished, set the OFF/ON switch (O/I) to the OFF (O) position and disconnect
the power plug from the wall socket.
12. Clean the nebuliser kit (refer to the cleaning instructions on page 7).
Note: If a mask is used, remove the mouthpiece from the nebuliser cap and connect
the mask instead. Place it with the rubber band onto the face so that the mask will enclose the nose and the
mouth.The tightness of the rubber band can be adjusted.The mask has openings which will enable unrestrained breathing.
English
6
1
2
3
4
5
6
1
2
3
4
5
6
1
2
3
4
5
6
1
2
3
4
5
6
Page 7

Cleaning and disinfection
Disinfect the nebuliser before first use and at least once per day when in use.
Procedure:
Disassemble the nebuliser kit by disconnecting the air tube and mouthpiece or mask.
Remove the nebuliser cap from the medication tank and remove the vaporizer head.
Also refer to the illustrations as shown under step 3 and 4 (page 5).
Disinfect all disassembled nebuliser parts –NOT the air tube and masks- by placing them in boiling water
(max.10 minutes) or in an autoclave (max.121ºC, refer to the autoclave instructions for the duration).
To clean the nebuliser and mask immediately after each treatment, it is sufficient to rinse the disassembled
parts under running war m tap water.
The masks can be disinfected by any commercially available disinfectant, containing hypochloride.
After cleaning/disinfecting of the parts, place them on a clean (paper) towel and let them air dry.
For hygienic reasons, each person should use their own nebuliser kit. It is recommended that the nebuliser
kit is replaced every 6 months (or earlier in case the nebuliser is obstructed) in order to maintain efficient
inhalation. Contact your OMRON dealer for replacements.
The exterior of both the air tube and compressor unit should be cleaned once daily with a clean, damp
piece of cloth. Do not use any volatile fluids. Never submerge the compressor unit in water!
If there is some moisture in the air tube, connect the air tube to the compressor unit and leave the other
end open.Then switch on the compressor unit and blow the tube dr y.
The exterior of both the air tube and compressor unit should be cleaned once daily with a clean, damp
piece of cloth. Do not use any volatile fluids. Never submerge the compressor unit in water!
If there is some moisture in the air tube, connect the air tube to the compressor unit and leave the other
end open.Then switch on the compressor unit and blow the tube dr y.
Storage and maintenance
● Put the nebuliser kit, masks and airtube in a clean bag and place them in the storage pocket of the car-
rying case.
● Wrap the mains cable and place it in its storage compartment at the rear of the compressor unit.
● Do not store the compressor on the floor.
● The unit does not contain any user serviceable parts and does not require oil. Do not attempt to
lubricate any internal par ts. Do not open the compressor unit.
● In case you encounter difficulties with your nebuliser, please contact your local OMRON dealer.
(address on/inside package).
● Disposal of this product should be carried out in accordance with the national regulations for the
disposal of electronic products.
English
7
Page 8

Filter
Check once a month whether the filter in the filter compartment is still white and clean. If it tur ns dir ty,
replace it. However this filter should be replaced at least once a year.
Procedure for replacing:
1. Slide the filter cover open to expose the filter compartment.
2. Remove the dirty filter with a small, pointed object.
3. Replace with a clean OMRON filter (order no.8403).
A set of 5 spare filters is provided with the nebuliser.
4. Slide the filter cover closed.
Caution: Do not use cotton or any other material to replace the filter. Do not wash or clean the filter.
Use only OMRON filters.Do not operate without a filter.
Possible problems and how to solve them
If the OMRON CompAIR CX
pro
does not nebulise, or only very weakly, check the following points:
● Make sure that the power supply plug is firmly fitted onto the wall socket.
● Make sure that the ends of the air tube are fitted tightly onto the compressor unit and onto the
medication tank.
● Check whether the medication tank is empty. If so, and if necessary, refill the medication tank.
● Is the vaporiser head installed correctly in the medication tank? If not, install it and press it down
into the jet nozzle.
● Check whether the air tube is twisted. If so, untwist.
● Check whether the jet nozzle is blocked. If so, unblock it by cleaning the medication tank.
If not possible to unblock, replace the nebuliser kit.
● Check whether the air filter is clean. If not, replace it (refer to section 'Filter' in this manual).
Optional accessories/ parts:
Nebuliserkit JetAIR CX
plus
, (incl. air tube, mouthpiece,
inhalation/exhalationvalves), order no. A040001
Inhalation valve for JetAIR CX
plus
, order no.P040017
Exhalation valve for JetAIR CX
plus
, order no.P040018
Airtube for JetAIR CX
plus
, order no.P040019
Flexible adult mask MAF, order no.A040002
Flexible child mask MPF, order no.A040003
Airfilter (set = 5 pcs), order no.8403
English
8
Page 9

Technical data
This device fulfils the provisions of the EC directive 93/42/EEC (Medical Device Directive).
Type: OMRON CompAIR CX
pro
(NE-C18)
Dimensions: 160 (W) x 90 (H) x 220 (D) mm.
Weight: approx. 2 kg
Nebulisation rate: 0.3* ml/min average
Particle size: 3.8 µm* MMAD** (independantly measured at Bradford
University, UK, Dr.John Dennis, according to the European
nebuliser standard EN13544-1)
Max. air flow: 10 l/m
Max. air pressure: 2.5 bar (250 kPa)
Capacity of medication tank: 6 ml
Sound noise level (at 1 m.distance): 60 dB
Operating conditions: Temperature: 10° C ~ 40° C
Humidity: 10% ~ 95% RH
Storage conditions: Temperature: -25° C ~ 70° C
Humidity: 10% ~ 95% RH
Supply voltage: AC 230 V, 50 Hz
Power consumption: 85 W
Electrical safety: Fuse:T2.5AL250V UR Rit, Class:2, Type:B
Contents of the package: Compressor unit, nebuliser kit JetAIR
plus
, air tube, flexible
child mask, flexible adult mask, carrying case, 5 spare filters,
instruction manual, guarantee card
* value measured with 0.9% NaCl solution.
Please note that specifications may vary with medication type used.
**MMAD = Mean Mass Aerosol Diameter
Symbols:
Manufacturer: OMRON Healthcare Europe B.V.
Kruisweg 577
NL 2132 NA HOOFDDORP
Visit us at www
.omron-healthcare.com
Subject to technical modification without prior notice.
English
9
= War ning: read the instruction manual carefully
= Class II = Type B O/I = power switch OFF/ON
0197
 Loading...