

Page 1
MX2/RX PROFIBUS Option Board
Model: 3G3AX-MX2-PRT-E
3G3AX-RX-PRT-E
USER’S MANUAL
Cat. No. I111E-EN-02
Page 2

Notice:
OMRON products are manufactured for use according to proper procedures
by a qualified operator and only for the purposes described in this manual.
The following conventions are used to indicate and classify precautions in this
manual. Always heed the information provided with them. Failure to heed precautions can result in injury to people or damage to property.
OMRON Product References
All OMRON products are capitalized in this manual. The word "Unit" is also
capitalized when it refers to an OMRON product, regardless of whether or not
it appears in the proper name of the product.
Trademarks and Copyrights
PROFIBUS, PROFIBUS FMS and PROFIBUS DP are trademarks of PROFIBUS International.
Other product names and company names in this manual are trademarks or
registered trademarks of their respective companies.
The copyright of the Option Board Option Board belongs to OMRON Corporation.
Intended Audience
This manual is intended for the following personnel, who must also have
knowledge of electrical systems (an electrical engineer or the equivalent).
• Personnel in charge of installing FA systems.
• Personnel in charge of designing FA systems.
• Personnel in charge of managing FA systems and facilities.
• Personnel in charge of maintaining FA systems.
About this Manual
This manual describes the:
• PROFIBUS 3G3AX-MX2-PRT-E Option Board for OMRON's MX2 Inverter.
• PROFIBUS 3G3AX-RX-PRT-E Option Board for OMRON’s RX Inverter.
It also describes how to install and operate the Unit.
Please read this manual carefully so that you understand the information provided before installing or using the Option Board. Start with the Safety Messages on page ix. They describe the operating environment and application
safety measures which must be observed prior to and when using the Option
Board Option Board.
OMRON, 2011
All rights reserved. No part of this publication may be reproduced, stored in a retrieval system, or transmitted, in
any form, or by any means, mechanical, electronic, photocopying, recording, or otherwise, without the prior written
permission of OMRON.
No patent liability is assumed with respect to the use of the information contained herein. Moreover, because
OMRON is constantly striving to improve its high-quality products, the information contained in this manual is subject to change without notice. Every precaution has been taken in the preparation of this manual. Nevertheless,
OMRON assumes no responsibility for errors or omissions. Neither is any liability assumed for damages resulting
from the use of the information contained in this publication.
Page 3

For the remainder of this manual, both the 3G3AX-MX2-PRT-E PROFIBUS
Option Board as the 3G3AX-RX-PRT-E PROFIBUS Option Board will be
referred as Option Board or Unit. The MX2 and RX Inverters will be referred
as Inverter.
In case information is especially for the MX2 or for the RX Inverter, a clear
notification will be included for which the note is meant.
If information especially is meant for the MX2, this symbol is shown:
If information especially is meant for the RX, this symbol is shown:
Please be sure to read the related user manuals to use the
Option Board Option Board safely and properly. Be sure you are using the
most current version of the manual:
Manual Products Contents Cat No.
MX2 User's Manual MX2 Inverter Describes the installation and operation
of the MX2 Inverter
I570
RX User's Manual RX Inverter Describes the installation and operation
of the RX Inverter
I560
PROFIBUS Installation
Guideline for Cabling and
Assembly
PROFIBUS Provides information on how to properly
install PROFIBUS wiring and to provide
practical guidance on the best ways to
achieve this
PNO Order No. 8.022
PROFIBUS Profile for
Variable Speed Drives
PROFIdrive Provides information on the PROFIdrive
device profile and it's usage
PNO Order No. 3.072
PROFIBUS Master Units CS1W-PRM21
CJ1W-PRM21
Operation manual for PROFIBUS master
units
W409
Page 4

iv
Warranty and Limitations of Liability
Application Considerations
WARRANTY
OMRON's exclusive warranty is that the products are free from defects in materials
and workmanship for a period of one year (or other period if specified) from date of
sale by OMRON.
OMRON MAKES NO WARRANTY OR REPRESENTATION, EXPRESS OR
IMPLIED, REGARDING NONINFRINGEMENT, MERCHANTABILITY, OR FITNESS
FOR PARTICULAR PURPOSE OF THE PRODUCTS. ANY BUYER OR USER
ACKNOWLEDGES THAT THE BUYER OR USER ALONE HAS DETERMINED
THAT THE PRODUCTS WILL SUITABLY MEET THE REQUIREMENTS OF THEIR
INTENDED USE. OMRON DISCLAIMS ALL OTHER WARRANTIES, EXPRESS
OR IMPLIED.
LIMITATIONS OF LIABILITY
OMRON SHALL NOT BE RESPONSIBLE FOR SPECIAL, INDIRECT, OR CONSEQUENTIAL DAMAGES, LOSS OF PROFITS OR COMMERCIAL LOSS IN ANY
WAY CONNECTED WITH THE PRODUCTS, WHETHER SUCH CLAIM IS BASED
ON CONTRACT, WARRANTY, NEGLIGENCE, OR STRICT LIABILITY.
In no event shall the responsibility of OMRON for any act exceed the individual price
of the product on which liability is asserted.
IN NO EVENT SHALL OMRON BE RESPONSIBLE FOR WARRANTY, REPAIR,
OR OTHER CLAIMS REGARDING THE PRODUCTS UNLESS OMRON'S ANALYSIS CONFIRMS THAT THE PRODUCTS WERE PROPERLY HANDLED, STORED,
INSTALLED, AND MAINTAINED AND NOT SUBJECT TO CONTAMINATION,
ABUSE, MISUSE, OR INAPPROPRIATE MODIFICATION OR REPAIR.
SUITABILITY FOR USE
OMRON shall not be responsible for conformity with any standards, codes, or regulations that apply to the combination of products in the customer's application or
use of the products.
At the customer's request, OMRON will provide applicable third party certification
documents identifying ratings and limitations of use that apply to the products. This
information by itself is not sufficient for a complete determination of the suitability of
the products in combination with the end product, machine, system, or other application or use.
The following are some examples of applications for which particular attention must
be given. This is not intended to be an exhaustive list of all possible uses of the
products, nor is it intended to imply that the uses listed may be suitable for the products:
o Outdoor use, uses involving potential chemical contamination or electrical interference, or conditions or uses not described in this manual.
o Nuclear energy control systems, combustion systems, railroad systems, aviation
systems, medical equipment, amusement machines, vehicles, safety equipment,
and installations subject to separate industry or government regulations.
o Systems, machines, and equipment that could present a risk to life or property.
Please know and observe all prohibitions of use applicable to the products.
NEVER USE THE PRODUCTS FOR AN APPLICATION INVOLVING SERIOUS
RISK TO LIFE OR PROPERTY WITHOUT ENSURING THAT THE SYSTEM AS A
WHOLE HAS BEEN DESIGNED TO ADDRESS THE RISKS, AND THAT THE
OMRON PRODUCTS ARE PROPERLY RATED AND INSTALLED FOR THE
INTENDED USE WITHIN THE OVERALL EQUIPMENT OR SYSTEM.
Page 5

v
Disclaimers
PROGRAMMABLE PRODUCTS
OMRON shall not be responsible for the user's programming of a programmable
product, or any consequence thereof.
CHANGE IN SPECIFICATIONS
Product specifications and accessories may be changed at any time based on
improvements and other reasons. It is our practice to change model numbers when
published ratings or features are changed, or when significant construction changes
are made. However, some specifications of the products may be changed without
any notice. When in doubt, special model numbers may be assigned to fix or establish key specifications for your application on your request. Please consult with your
OMRON representative at any time to confirm actual specifications of purchased
products.
DIMENSIONS AND WEIGHTS
Dimensions and weights are nominal and are not to be used for manufacturing purposes, even when tolerances are shown.
PERFORMANCE DATA
Performance data given in this manual is provided as a guide for the user in determining suitability and does not constitute a warranty. It may represent the result of
OMRON's test conditions, and the users must correlate it to actual application
requirements. Actual performance is subject to the OMRON Warranty and Limitations of Liability.
ERRORS AND OMISSIONS
The information in this manual has been carefully checked and is believed to be
accurate; however, no responsibility is assumed for clerical, typographical, or proofreading errors, or omissions.
Page 6

vi
Page 7

vii
Table of contents
Table of contents
Notice: . . . . . . . . . . . . . . . . . . . . . . . . . . . . . . . . . . . . . . . . . . . . . . . . . . . . . . . . . . . . . . . . . . . . . . . . . . . . ii
OMRON Product References . . . . . . . . . . . . . . . . . . . . . . . . . . . . . . . . . . . . . . . . . . . . . . . . . . . . . . . . . . ii
Trademarks and Copyrights . . . . . . . . . . . . . . . . . . . . . . . . . . . . . . . . . . . . . . . . . . . . . . . . . . . . . . . . . . . ii
Intended Audience. . . . . . . . . . . . . . . . . . . . . . . . . . . . . . . . . . . . . . . . . . . . . . . . . . . . . . . . . . . . . . . . . . . ii
About this Manual . . . . . . . . . . . . . . . . . . . . . . . . . . . . . . . . . . . . . . . . . . . . . . . . . . . . . . . . . . . . . . . . . . . ii
Warranty and Limitations of Liability . . . . . . . . . . . . . . . . . . . . . . . . . . . . . . . . . . . . . . . . . . . . . . . . . . . . . iv
Application Considerations . . . . . . . . . . . . . . . . . . . . . . . . . . . . . . . . . . . . . . . . . . . . . . . . . . . . . . . . . . . . iv
Disclaimers . . . . . . . . . . . . . . . . . . . . . . . . . . . . . . . . . . . . . . . . . . . . . . . . . . . . . . . . . . . . . . . . . . . . . . . . v
Safety Messages . . . . . . . . . . . . . . . . . . . . . . . . . . . . . . . . . . . . . . . . . . . . . . . . . . . . ix
1 Hazardous High Voltage . . . . . . . . . . . . . . . . . . . . . . . . . . . . . . . . . . . . . . . . . . . . . . . . . . . . . . . . . ix
2 General Precautions - Read These First! . . . . . . . . . . . . . . . . . . . . . . . . . . . . . . . . . . . . . . . . . . . . . ix
3 Installation Precautions . . . . . . . . . . . . . . . . . . . . . . . . . . . . . . . . . . . . . . . . . . . . . . . . . . . . . . . . . . xi
4 Configuration Precautions . . . . . . . . . . . . . . . . . . . . . . . . . . . . . . . . . . . . . . . . . . . . . . . . . . . . . . . . xi
5 Application Precautions . . . . . . . . . . . . . . . . . . . . . . . . . . . . . . . . . . . . . . . . . . . . . . . . . . . . . . . . . . xi
6 Operating Environment Precautions . . . . . . . . . . . . . . . . . . . . . . . . . . . . . . . . . . . . . . . . . . . . . . . . xiii
7 Handling, Storage and Disposal . . . . . . . . . . . . . . . . . . . . . . . . . . . . . . . . . . . . . . . . . . . . . . . . . . . . xiii
8 Compliance with EC Directives . . . . . . . . . . . . . . . . . . . . . . . . . . . . . . . . . . . . . . . . . . . . . . . . . . . . xiii
SECTION 1
Getting Started . . . . . . . . . . . . . . . . . . . . . . . . . . . . . . . . . . . . . . . . . . . . . . . . . . . . . . 1
1-1 Introduction . . . . . . . . . . . . . . . . . . . . . . . . . . . . . . . . . . . . . . . . . . . . . . . . . . . . . . . . . . . . . . . . . . . . 1
1-2 Option Board Specifications . . . . . . . . . . . . . . . . . . . . . . . . . . . . . . . . . . . . . . . . . . . . . . . . . . . . . . . 3
1-3 Introduction to PROFIBUS . . . . . . . . . . . . . . . . . . . . . . . . . . . . . . . . . . . . . . . . . . . . . . . . . . . . . . . . 4
SECTION 2
Option Board Mounting and Installation . . . . . . . . . . . . . . . . . . . . . . . . . . . . . . . . . 7
2-1 Orientation to Option Board Features . . . . . . . . . . . . . . . . . . . . . . . . . . . . . . . . . . . . . . . . . . . . . . . 7
2-2 Basic System Description . . . . . . . . . . . . . . . . . . . . . . . . . . . . . . . . . . . . . . . . . . . . . . . . . . . . . . . . . 9
2-3 How to mount the Option Board on the Inverter . . . . . . . . . . . . . . . . . . . . . . . . . . . . . . . . . . . . . . . .10
SECTION 3
Configuring Drive Parameters and Option Board . . . . . . . . . . . . . . . . . . . . . . . . . . 23
3-1 Configuring the Option Board . . . . . . . . . . . . . . . . . . . . . . . . . . . . . . . . . . . . . . . . . . . . . . . . . . . . . . 23
3-2 Configuring the Network . . . . . . . . . . . . . . . . . . . . . . . . . . . . . . . . . . . . . . . . . . . . . . . . . . . . . . . . . . 26
SECTION 4
Operations and Monitoring . . . . . . . . . . . . . . . . . . . . . . . . . . . . . . . . . . . . . . . . . . . . 29
4-1 Source Selection . . . . . . . . . . . . . . . . . . . . . . . . . . . . . . . . . . . . . . . . . . . . . . . . . . . . . . . . . . . . . . . 30
4-2 Operating the Motor . . . . . . . . . . . . . . . . . . . . . . . . . . . . . . . . . . . . . . . . . . . . . . . . . . . . . . . . . . . . . 31
4-3 Customising the Process Area . . . . . . . . . . . . . . . . . . . . . . . . . . . . . . . . . . . . . . . . . . . . . . . . . . . . . 33
4-4 Faults and Trips . . . . . . . . . . . . . . . . . . . . . . . . . . . . . . . . . . . . . . . . . . . . . . . . . . . . . . . . . . . . . . . . 38
4-5 Accessing Parameters . . . . . . . . . . . . . . . . . . . . . . . . . . . . . . . . . . . . . . . . . . . . . . . . . . . . . . . . . . . 39
4-6 Flexible Mode . . . . . . . . . . . . . . . . . . . . . . . . . . . . . . . . . . . . . . . . . . . . . . . . . . . . . . . . . . . . . . . . . . 52
4-7 Limitations Caused by Inverter Mode and Rating Selection . . . . . . . . . . . . . . . . . . . . . . . . . . . . . . . 55
SECTION 5
Troubleshooting and Maintenance . . . . . . . . . . . . . . . . . . . . . . . . . . . . . . . . . . . . . 57
5-1 Troubleshooting using the LED indicators . . . . . . . . . . . . . . . . . . . . . . . . . . . . . . . . . . . . . . . . . . . . 57
5-2 Troubleshooting Using PROFIBUS Diagnostics . . . . . . . . . . . . . . . . . . . . . . . . . . . . . . . . . . . . . . . 62
5-3 Maintenance and Inspection . . . . . . . . . . . . . . . . . . . . . . . . . . . . . . . . . . . . . . . . . . . . . . . . . . . . . . 65
5-4 Warranty . . . . . . . . . . . . . . . . . . . . . . . . . . . . . . . . . . . . . . . . . . . . . . . . . . . . . . . . . . . . . . . . . . . . . . 72
Page 8

viii
Table of contents
APPENDIX A
Glossary . . . . . . . . . . . . . . . . . . . . . . . . . . . . . . . . . . . . . . . . . . . . . . . . . . . . . . . . . . . 73
APPENDIX B
Parameter Process Data Object Modules . . . . . . . . . . . . . . . . . . . . . . . . . . . . . . . . 75
B-1 I/O Mapping . . . . . . . . . . . . . . . . . . . . . . . . . . . . . . . . . . . . . . . . . . . . . . . . . . . . . . . . . . . . . . . . . . 76
B-2 Control and Status Words - STW/ZSW . . . . . . . . . . . . . . . . . . . . . . . . . . . . . . . . . . . . . . . . . . . . . . 77
B-3 Frequency Reference and Output Frequency - HSW/HIW . . . . . . . . . . . . . . . . . . . . . . . . . . . . . . . 77
B-4 Parameter Processing Message Area - PKW . . . . . . . . . . . . . . . . . . . . . . . . . . . . . . . . . . . . . . . . . 78
APPENDIX C
Conventional Modules . . . . . . . . . . . . . . . . . . . . . . . . . . . . . . . . . . . . . . . . . . . . . . . . 79
C-1 Basic Data I/O Mapping . . . . . . . . . . . . . . . . . . . . . . . . . . . . . . . . . . . . . . . . . . . . . . . . . . . . . . . . . 79
C-2 Extended Data 1 I/O Mapping . . . . . . . . . . . . . . . . . . . . . . . . . . . . . . . . . . . . . . . . . . . . . . . . . . . . . 79
C-3 Extended Data 2 I/O Mapping . . . . . . . . . . . . . . . . . . . . . . . . . . . . . . . . . . . . . . . . . . . . . . . . . . . . . 80
C-4 Operation Command and Inverter Status Registers . . . . . . . . . . . . . . . . . . . . . . . . . . . . . . . . . . . . 80
C-5 Extended Data 1 Digital Output Register . . . . . . . . . . . . . . . . . . . . . . . . . . . . . . . . . . . . . . . . . . . . 81
C-6 1 Digital Output Register . . . . . . . . . . . . . . . . . . . . . . . . . . . . . . . . . . . . . . . . . . . . . . . . . . . . . . . . . 81
C-7 Modbus Message Area . . . . . . . . . . . . . . . . . . . . . . . . . . . . . . . . . . . . . . . . . . . . . . . . . . . . . . . . . . 82
APPENDIX D
Flexible Module . . . . . . . . . . . . . . . . . . . . . . . . . . . . . . . . . . . . . . . . . . . . . . . . . . . . . 83
APPENDIX E
PROFIdrive DP-V1 Parameter Channel . . . . . . . . . . . . . . . . . . . . . . . . . . . . . . . . . . 85
E-1 Read Parameter Request . . . . . . . . . . . . . . . . . . . . . . . . . . . . . . . . . . . . . . . . . . . . . . . . . . . . . . . . 86
E-2 Read Parameter Response . . . . . . . . . . . . . . . . . . . . . . . . . . . . . . . . . . . . . . . . . . . . . . . . . . . . . . 87
E-3 Change Parameter Request . . . . . . . . . . . . . . . . . . . . . . . . . . . . . . . . . . . . . . . . . . . . . . . . . . . . . . 88
E-4 Change Parameter Response . . . . . . . . . . . . . . . . . . . . . . . . . . . . . . . . . . . . . . . . . . . . . . . . . . . . 89
E-5 Parameter Value Formats . . . . . . . . . . . . . . . . . . . . . . . . . . . . . . . . . . . . . . . . . . . . . . . . . . . . . . . . 90
APPENDIX F
Option Board Parameters . . . . . . . . . . . . . . . . . . . . . . . . . . . . . . . . . . . . . . . . . . . . . 91
APPENDIX G
PROFIdrive Error Numbers . . . . . . . . . . . . . . . . . . . . . . . . . . . . . . . . . . . . . . . . . . . . 93
APPENDIX H
Slave_Diag Message (SAP60) . . . . . . . . . . . . . . . . . . . . . . . . . . . . . . . . . . . . . . . . . . 95
Table index . . . . . . . . . . . . . . . . . . . . . . . . . . . . . . . . . . . . . . . . . . . . . . . . . . . . . . . . . 97
Revision history . . . . . . . . . . . . . . . . . . . . . . . . . . . . . . . . . . . . . . . . . . . . . . . . . . . . . 100
Page 9

ix
Hazardous High Voltage
Safety Messages
Read this manual and the warning labels attached to the Inverter carefully,
before you start to install and operate the Inverter.
Please follow the instructions exactly.
Keep this manual handy for quick reference.
Definitions and Symbols
A safety instruction (message) includes a "Safety Alert Symbol" and a signal
word or phrase such as WARNING or CAUTION. Each signal word has the
following meaning:
!HIGH VOLTAGE Indicates a potentially hazardous situation which, if not avoided, could result
in electric shock. It calls your attention to items or operations that could be
dangerous to you and other persons operating this equipment.
Read the message and follow the instructions carefully.
!WARNING Indicates a potentially hazardous situation which, if not avoided, could result
in death or serious injury. Additionally, there may be severe property damage.
!Caution Indicates a potentially hazardous situation, which, if not avoided, may result in
minor or moderate injury, or property damage.
Step 1 Indicates a step in a series of action steps required to accomplish a goal. The
number of the step will be contained in the step symbol.
Note Notes indicate an area or subject of special merit, emphasizing either the
product's capability or common errors in operation or maintenance.
Tip Tips give a special instruction that can save time or provide other benefits
while installing or using the product. The tip calls attention to an idea that may
not be obvious if you are a first-time user of the product.
1 Hazardous High Voltage
!HIGH VOLTAGE Motor control equipment and electronic controllers are connected to hazard-
ous line voltages. When servicing drives and electronic controllers, there may
be exposed components with housing or protrusions at or above line potential.
Extreme care should be taken to protect against shock.
Stand on an insulating pad and make it a habit to use only one hand when
checking components. Always work with another person in case an emergency occurs. Disconnect power before checking controllers or performing
maintenance. Be sure equipment is properly grounded. Wear safety glasses
whenever working on electronic controllers or rotating machinery.
2 General Precautions - Read These First!
!WARNING Failure to read and understand the information provided in this manual may
result in personal injury or death, damage to the product, or product failure.
Please read each section in its entirety and be sure you understand the information provided in the section and related sections before attempting any of
the procedures or operations given.
Page 10

x
General Precautions - Read These First!
!WARNING This equipment should be installed, adjusted, and serviced by qualified elec-
trical maintenance personnel familiar with the construction and operation of
the equipment and the hazards involved. Failure to observe this precaution
could result in bodily injury.
!WARNING Wiring, maintenance or inspection must be performed by authorized person-
nel. Not doing so may result in electrical shock or fire.
!WARNING Hazard of electrical shock! Disconnect incoming power before working on the
Option Board or the Inverter!
!HIGH VOLTAGE Turn the power supply OFF and wait for the time specified on the Option
Board front cover before performing wiring, maintenance or inspection. Not
doing so may result in electrical shock.
The Option Board is attached to an Inverter.
Dangerous voltage exists until the Inverter power light is OFF.
!HIGH VOLTAGE Do not touch the conductive parts such as the internal PCB, terminals or con-
nector while power is being supplied. Doing so may result in electrical shock.
!WARNING Do not attempt to take an Option Board apart or touch any internal parts while
the power is being supplied. Doing so may result in electric shock.
!WARNING Do not attempt to disassemble, repair, or modify an Option Board. Any
attempt to do so may result in malfunction, fire, or electric shock.
!WARNING Provide emergency stop circuits, interlock circuits, limit circuits and similar
safety measures in external circuits (NOT in the Option Board). This ensures
safety in the system if an abnormality occurs due to malfunction of the Option
Board or another external factor affecting the Option Board operation. Not
doing so may result in serious accidents.
!WARNING Fail-safe measures must be taken by the customer to ensure safety in the
event of incorrect, missing, or abnormal signals caused by broken signal lines,
momentary power interruptions, or other causes. Not doing so may result in
serious accidents.
!Caution Do not touch the Inverter during power on, and immediately after power off.
Hot surface may cause injury.
!Caution The product will be used to control an adjustable speed drive connected to
high voltage sources and rotating machinery that is inherently dangerous if
not operated safely. Interlock all energy sources, hazardous locations, and
guards in order to restrict the exposure of personnel to hazards. The adjustable speed drive may start the motor without warning. Signs on the equipment
installation must be posted to this effect. A familiarity with auto-restart settings
is a requirement when controlling adjustable speed drives. Failure of external
or ancillary components may cause intermittent system operation, i.e., the
system may start the motor without warning or may not stop on command.
Improperly designed or improperly installed system interlocks and permissives may render a motor unable to start or stop on command.
Page 11

xi
Installation Precautions
3 Installation Precautions
!WARNING Always connect the grounding cable to one of the ground terminals of the
Inverter. Failure to abide could lead to serious or possibly fatal injury.
!Caution Failure to observe these precautions could lead to faulty operation of the
Option Board or the Inverter, or could damage either of the two. Always read
these precautions.
• Install external breakers and take other safety measures against short-circuits in external wiring. Not observing this may result in burning.
• Be sure that all cable connector screws are tightened to the torque specified in the relevant manuals. Incorrect tightening torque may result in malfunction.
• Do not allow metal clippings to enter either Option Board or Inverter when
wiring or installing the unit.
• Follow "PROFIBUS Installation Guideline for Cabling and Assembly"
(PNO Order No. 8.022)
• Wire the PROFIBUS cables and connectors correctly. Incorrect wiring
may result in burning.
• Apply termination at both ends of a PROFIBUS cable segment. Do not
apply termination anywhere else.
• Be sure that the Option Board is mounted correctly. Improper mounting
may result in malfunction.
• Disconnect the grounding cable when performing withstand-voltage tests.
Not disconnecting the grounding cable may result in burning.
4 Configuration Precautions
!Caution Failure to observe these precautions could lead to unexpected operation of
the Option Board or the Inverter. Always read these precautions.
• Check the network related Inverter settings regarding PROFIBUS node
address and PROFIBUS map selection. Not doing so may result in unexpected operation.
• When replacing an Inverter be sure that all Inverter settings of the Inverter
being replaced are restored to the replacement.
• Restoring parameters stored in the remote operator also restores the
PROFIBUS node address. Always check the node address and other network related Inverter settings after restore.
5 Application Precautions
!WARNING Before using the product under conditions which are not described in the
manual or applying the product to nuclear control systems, railroad systems,
aviation systems, vehicles, combustion systems, medical equipment, amusement machines, safety equipment, and other systems, machines, and equipment that may have a serious influence on lives and property if used
improperly, consult your OMRON representative.
!WARNING It is extremely important that the Unit is used for its specified purpose and
under the specified conditions, especially in applications that can directly or
indirectly affect human life. You must consult your OMRON representative
before using it in a system in the above-mentioned applications.
Page 12

xii
Application Precautions
!WARNING Failure to observe these precautions could lead to serious or possibly fatal
injury. Always read these precautions.
• Check any user program in the system that acts as a PROFIBUS master
before actually running it. Not checking the program may result in unexpected operation.
• A revision AAAA Inverter allows the motor to run immediately if a trip condition is reset, and at the same time, a run command is active via PROFIBUS. For safe operation clear the run command via PROFIBUS as soon
as a trip condition is detected. Refer to section 1-1-2 Inverter Suppor t to
determine the Inverter revision.
!Caution Failure to observe these precautions could lead to faulty operation of the
Option Board or the Inverter, or could damage to either of the two. Always
read these precautions.
• Check the Inverter settings for proper Inverter behavior before actually
operating the Inverter remotely via the PROFIBUS network.
• Check the Inverter's EzSQ program and its interaction with the PROFIBUS master before actually running it on the Inverter. Not checking the
program may result in unexpected operation.
• Confirm that no adverse effect will occur at the moment the PROFIBUS
master stops communicating with the Inverter or at the moment the PROFIBUS master has not yet started communicating to the Inverter.
• Confirm that no adverse effect will occur in the Inverter before force-setting/force-resetting any bit in the system that acts as a PROFIBUS master.
Page 13

6 Operating Environment Precautions
!Caution Do not operate the Inverter with a mounted Option Board in the following loca-
tions (doing so may result in malfunction, electric shock or burning):
• Locations subject to direct sunlight
• Locations subject to temperatures or humidity outside the range specified
in the specifications
• Locations subject to condensation as the result of severe changes in temperature
• Locations subject to corrosive or flammable gases
• Locations subject to dust (especially iron dust) or salts
• Locations subject to exposure to water, oil, or chemicals
• Locations subject to shock or vibration
!Caution Take appropriate and sufficient countermeasures when installing systems in
the following locations (doing so may result in malfunction):
• Locations subject to static electricity or other forms of noise
• Locations subject to strong electromagnetic fields
• Locations subject to possible exposure to radioactivity
• Locations close to power supplies
!Caution The operating environment of the Inverter with a mounted
Option Board can have a large effect on the longevity and reliability of the system. Improper operating environments can lead to malfunction, failure, and
other unforeseeable problems with the system. Make sure that the operating
environment is within the specified conditions at installation and remains
within the specified conditions during the life of the system.
7 Handling, Storage and Disposal
!Caution Failure to observe these precautions could lead to faulty operation of- or dam-
age to the Option Board. Always read these precautions.
• Before touching the Option Board or Inverter, be sure to first touch a
grounded metallic object in order to discharge any static built-up. Not
doing so may result in malfunction or damage.
• When transporting or storing the Option Board keep the product within the
specified storage temperature range.
!Caution Never dispose electrical components by incineration. Contact your state envi-
ronmental agency for details on disposal of electrical components and packaging in your area.
8 Compliance with EC Directives
This product complies with EC Directives when mounted to an Inverter with
the grounding cable connected.
Page 14

xiv
Compliance with EC Directives
Page 15

1
Introduction Section 1-1
SECTION 1
Getting Started
1-1 Introduction
1-1-1 Main Features
The Option Board 3G3AX-MX2-PRT-E and the 3G3AX-RX-PRT-E allow controlling, monitoring and parameterization of an Inverter via a PROFIBUS network.
The Option Board serves as a gateway that passes communicated register
values from the PROFIBUS network to the Inverter and vice versa.
The following functions are available via PROFIBUS communication by installing the Option Board:
Cyclic Data Exchange The PROFIBUS Master and Option Board can exchange data via a PROFI-
BUS DP-V0 message connection:
• Output data (from PROFIBUS Master to Option Board):
E.g. Run/stop, Reference frequency and Fault reset
• Input data (from Option Board to PROFIBUS Master):
E.g. Inverter status, Output frequency and Output current
Inverter Parameter Access The PROFIBUS Master can read and write parameter data via the
Option Board using the mailboxes provided by some modules, as well as a
PROFIdrive DP-V1 parameter channel.
Simplified Start-up The Option Board can be set up easily, just by wiring the Unit, setting the
PROFIBUS node address (P180) and device profile (P182) and restarting the
unit. The Unit's configuration is read automatically when the power is turned
ON. It is not necessary to make any settings with a special Programming
Device.
Simplified Replacement All parameters required by the Option Board are stored in the Inverter. The
Option Board can be replaced, requiring no re-configuration.
Automatic Baud Rate
Recognition
The Option Board automatically detects the Master's communication baud
rate, and no user configuration is required.
Note The PROFIdrive DP-V1 parameter channel is only available if the PROFIBUS
Master also provides DP-V1 Class 2 (MSAC2) Messaging to the user.
Note If the PROFIBUS Master's baud rate changes, the PROFIBUS Communica-
tion Unit must be turned OFF and then ON to detect the new baud rate.
Page 16
2
Introduction Section 1-1
1-1-2 Inverter Support
1-1-2-1 Inverter support for the MX2
The 3G3AX-MX2-PRT-E Option Board supports the MX2 Inverter with minimum revision of AAAA. An MX2 Inverter that supports the
3G3AX-MX2-PRT-E Option Board can be recognized from the Inverter type
label. Please check that your Inverter type label displays revision characters in
the bottom right corner where the is displayed in this illustration.
Please note if these characters are absent, your Inverter does not support the
3G3AX-MX2-PRT-E, so please contact your local OMRON representative.
1-1-2-2 Inverter support for the RX
The 3G3AX-RX-PRT-E Option Board supports the RX Inverter with minimum
revision of RX-@-E1F or RX-@-V1. An RX Inverter that supports the
3G3AX-RX-PRT-E Option Board can be recognized from the Inverter type
label.
Note If your RX Inverter has no postfix on type label (e.g.RX-A4004) or the EF post-
fix (e.g. RX-A4004-EF) the 3G3AX-RX-PRT-E option is not supported, so
please contact your local OMRON representative.
1-1-3 Inverter Safety (ISO 13849-1)
An Inverter provides a Gate Suppress function to perform a safe stop according to the EN60204-1, stop category 0. The Option Board has been designed
not to interfere with this safety function.
The Option Board is not a safety device and does not implement any safety
protocols.
Note The Option Board is not a safety device and does not implement any safety
protocols such as PROFIsafe.
@@@@
Page 17

3
Option Board Specifications Section 1-2
1-2 Option Board Specifications
Note 1 The derated- or ambient operating temperature of the Inverter takes prece-
dence over that of the Option Board.
Table 1 Option Board Specifications
Item Specification
Installation MX2
Unit type MX2 Series Option Card
Model Option Board
Dimensions (W x H x D) 68 x 58 x 45 mm
Weight 170g (typical)
Installation RX
Unit type RX Series Option Card
Model 3G3AX-RX-PRT-E
Dimensions (W x H x D) 80 x 67 x 49 mm
Weight 170gram (typical)
Environment
Ambient operating temperature
*1
-10 to 55C (no icing or condensation)
Ambient operating humidity 20 to 90%RH
Ambient storage temperature -20 to 65C (no icing or condensation)
Vibration resistance
5.9m/s
2
(0.6G) at 10…55Hz
Dielectric strength 500 VAC (between isolated circuits)
Conformance to EMC and Electrical safety standards
EN61800-3: 2004 (2004/108/EC) Second environment, Category
C3
EN61800-5-1: 2007 (2006/95/EC) SELV
Enclosure rating IP 20
Front Case
Indicators 4 LEDs, indicating Option Board and PROFIBUS status:
Option Board Status: RUN (Green)
ERR(Red)
PROFIBUS Status: BF (Red)
COMM (Green)
PROFIBUS connector 9-pin sub-D female connector (#4/40 UNC thread)
PROFIBUS
Interface
Applicable standards IEC 61158 Industrial communication networks - Fieldbus specifi-
cations
Protocol type supported PROFIBUS DP
PROFIBUS DP-V1, Class 2 (MSAC2 acyclic messaging)
PROFIBUS Unit type PROFIBUS DP-V1 Slave
PROFIBUS Media type RS-485, galvanically isolated from the Inverter
PROFIBUS Connector 9-pin sub-D female connector (#4/40 UNC thread)
Termination according to EN50170 provided by the cable connector
Certificate Test Specification for PROFIBUS DP Slaves, Version 3.0
DP-V0 DP-V1 Physical Layer
Unit device address range 0 ~ 125, set with inverter parameter P180
Baud rates supported Automatically detected from:
9.6 kbit/s 19.2 kbit/s 45.45 kbit/s 93.75 kbit/s
187.5 kbit/s 500 kbit/s 1.5 Mbit/s 3 Mbit/s
6 Mbit/s 12 Mbit/s
Page 18

4
Introduction to PROFIBUS Section 1-3
1-3 Introduction to PROFIBUS
1-3-1 The Purpose of PROFIBUS
PROFIBUS (PROcess FIeldBUS) is an open fieldbus standard for a wide
range of applications in manufacturing, processing and building automation.
The Standard, IEC 61158 (Industrial communication networks), to which
PROFIBUS adheres, guarantees vendor independence and transparency of
operation. It enables devices of various manufacturers to intercommunicate
without having to make any special interface adaptations.
1-3-2 What is PROFIBUS DP
PROFIBUS DP (for Decentralized Periphery) is a variant optimized for high
speed and low-cost interfacing. It is specially designed for communication
between automation control systems and distributed I/O at the device level.
PROFIBUS DP uses the same transmission technology and uniform bus
access protocol as PROFIBUS FMS (for Fieldbus Message Specification).
Consequently, both versions can be operated simultaneously on the same
bus. DP field devices, however, cannot be controlled by FMS masters and
vice versa.
!Caution It is not possible to exchange a PROFIBUS DP device or master for a PROFI-
BUS FMS device or master. This will cause faulty operation.
Table 1 Option Board Specifications (continued)
Item Specification
PROFIBUS DP
Services and
Profiles
Master Class 1 – Slave
cyclic services
Set_Prm Chk_Cfg Slave_Diag Data_Exchange
Get_Cfg Rd_Inp Rd_Outp
Global-Control (SYNC/UNSYNC, FREEZE/UNFREEZE & CLEAR)
Master Class 1 – Slave
acyclic services
Not supported
Master Class 2 – Slave
acyclic services
MSAC2_Initiate MSAC2_Read MSAC2_Write MSAC2_Abort
Profiles supported PROFIdrive V2 (If P182 = 0)
Conventional (If P182 = 1)
Flexible (If P182 = 2)
Supported I/O modules PROFIdrive V2
(If P182 = 0)
PPO Type 1 (4 words PKW + 2 words PZD)
PPO Type 2 (4 words PKW + 6 words PZD)
PPO Type 3 (2 words PZD)
PPO Type 4 (6 words PZD)
PPO Type 5 (4 words PKW + 10 words PZD)
Conventional
(If P182 = 1)
Basic Data
Extended Data 1
Extended Data 2
Flexible
(If P182 = 2)
Flexible (10 words output and input)
I/O Data
I/O data 28 bytes max. input data using PPO Type 5
28 bytes max. output data using PPO Type 5
Diagnostics data size 11 bytes
MX2 GSD file
OC_0C6A.gsd
RX GSD file
OC_0D2F.gsd
Page 19

5
Introduction to PROFIBUS Section 1-3
1-3-3 What is PROFIdrive
The PROFIdrive device profile supplements the PROFIBUS standard. It
defines a unified behavior and technique to access Inverter and drive device
data. All drives supporting the PROFIdrive profile respond the same way to
control instructions.
!Caution For backward compatibility and direct use of the Inverter registers, the Option
Board offers two additional device profiles that are NOT PROFIdrive compliant. For PROFIdrive compliance, ensure that P182 = 0.
Page 20

6
Introduction to PROFIBUS Section 1-3
Page 21
7
Orientation to Option Board Features Section 2-1
SECTION 2
Option Board Mounting and Installation
2-1 Orientation to Option Board Features
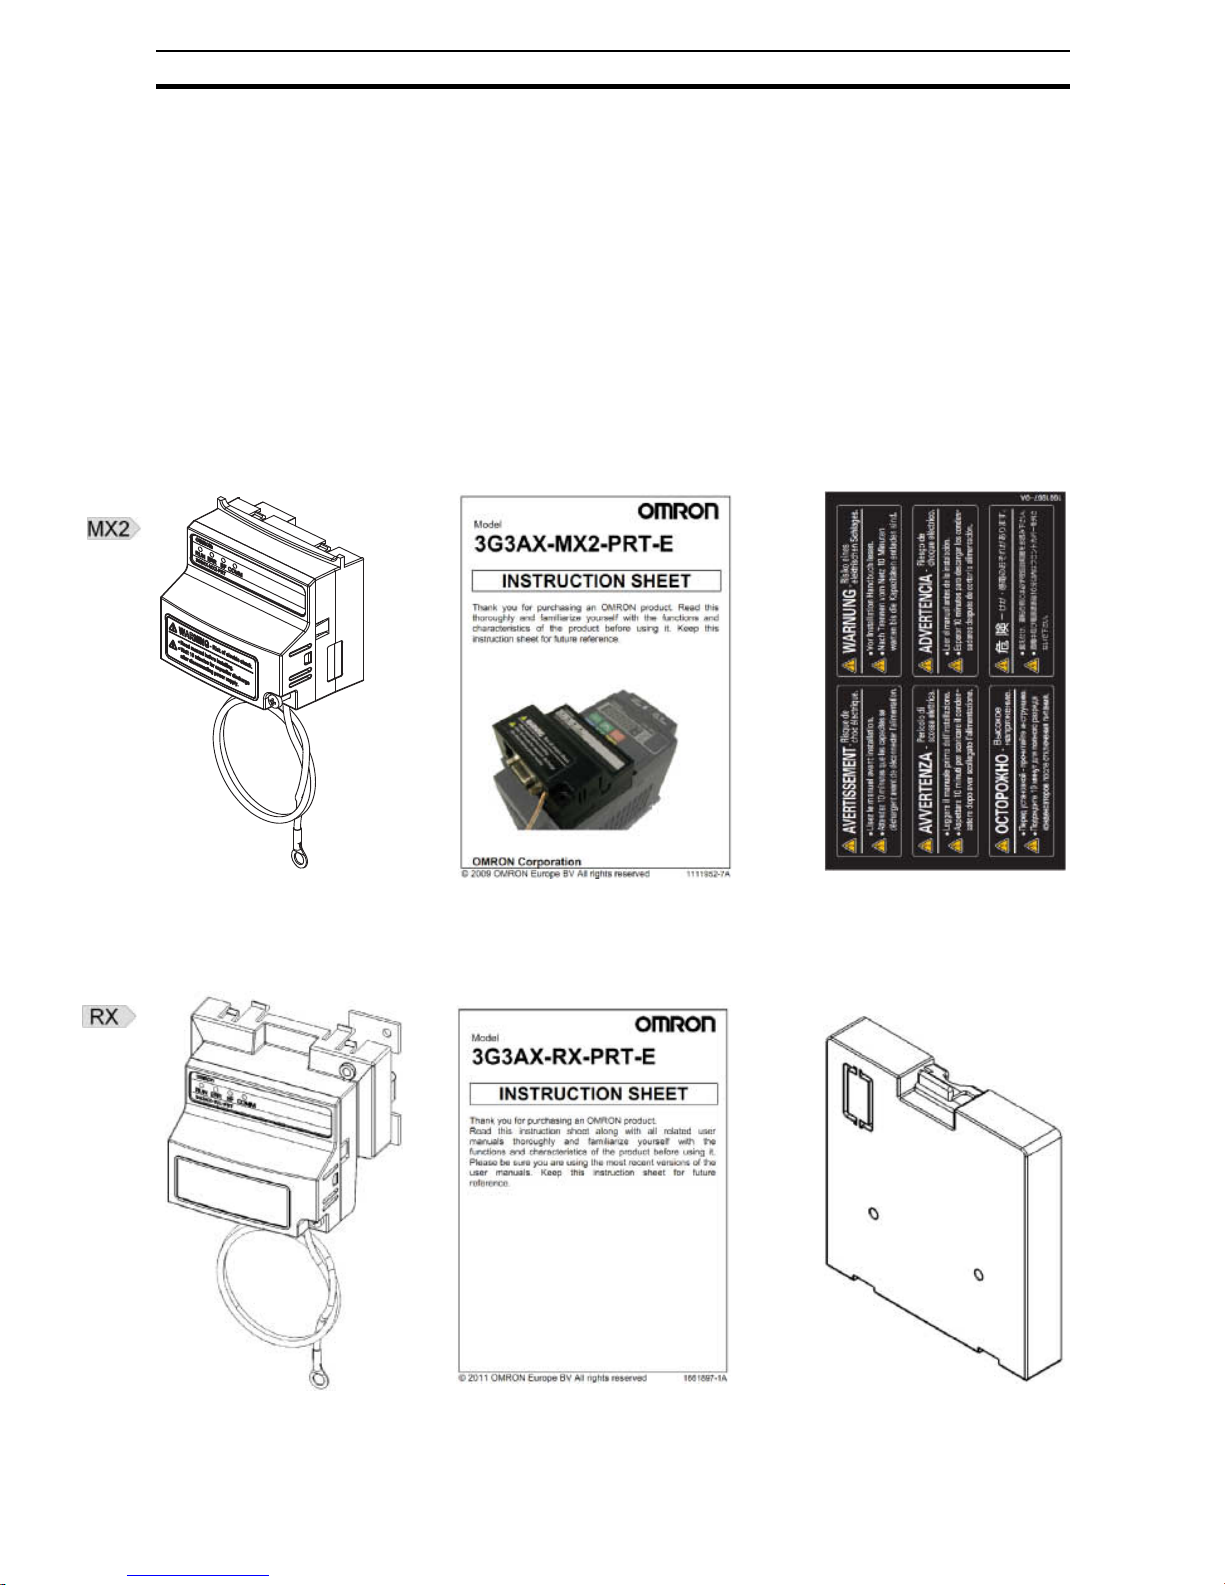
2-1-1 Unpacking and Inspection
Take a few moments to unpack your new Option Board and perform these
steps:
1. Look for any damage that may have occurred during transportation.
2. Verify the contents of the box
3. Inspect the markings on the Option Board. Make sure it matches the product part number you ordered:
Option Board
with Grounding
Instruction Sheet
Warning Labels
Instruction Sheet
Blind cover
Option Board
with Grounding
Cable and Profibus connector
Page 22
8
Orientation to Option Board Features Section 2-1
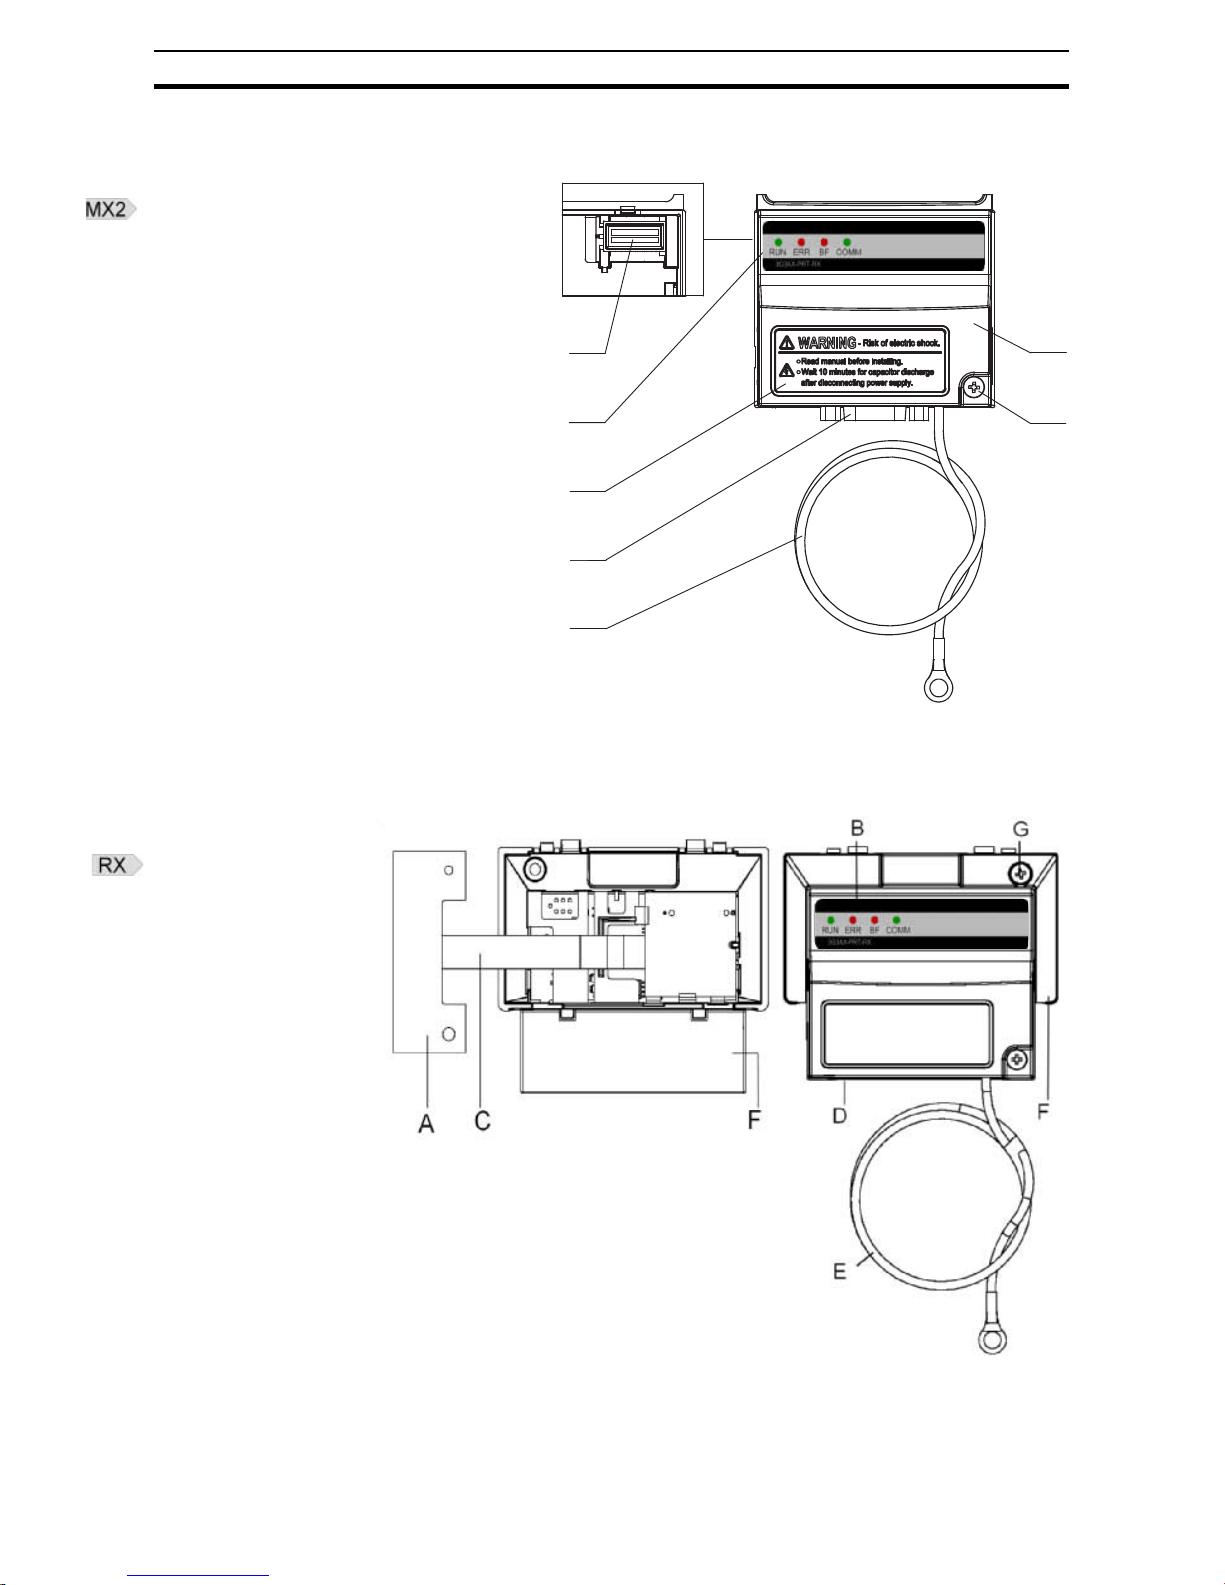
2-1-2 Main Physical Features
G
D
F
B
E
C
A
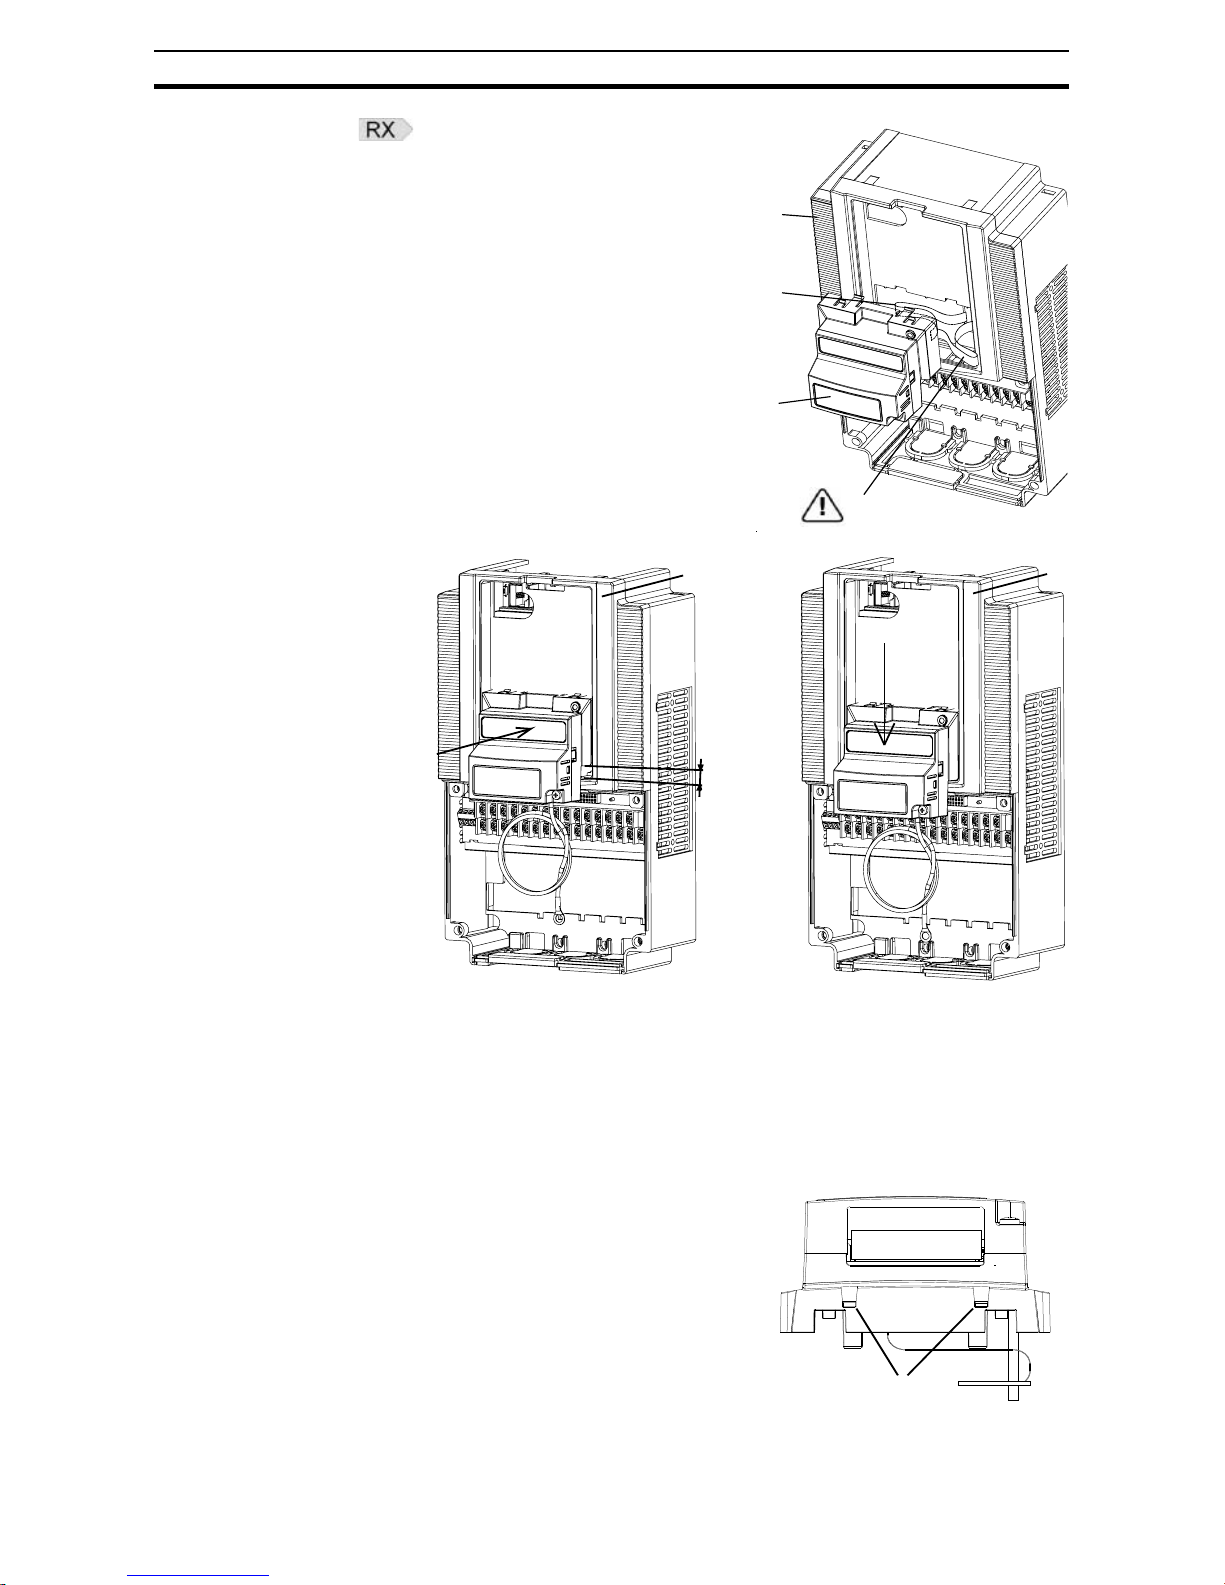
underside
A - Option board connector
B - LED indicators (RUN, ERR, BF, COMM)
C - Warning label
D - Fieldbus connector
E - Grounding cable
F - Housing
G - Mounting screw
A - Option Board Inverter connector
B - LED indicators (RUN, ERR, BF, COMM)
C - Option Board Cable
D - Fieldbus connector
E - Grounding cable
F- Housing
G - Mounting screw
Page 23
9
Basic System Description Section 2-2
Four LED indicators (B) allow easy diagnosis. An attached grounding cable
(E) is sized to reach the ground terminals on all Inverter models. A feature in
the housing (F) will retain the mounting screw (G) when the Option Board is
not mounted to the Inverter. The orientation of the Fieldbus connector (D)
allows unstrained connection and removal of the PROFIBUS connector.
Please pay special attention to the Option Board connector: It must be properly connected with the Inverter when the Option Board is mounted.
2-1-3 LED Indicators
The LED indicators on the front indicate the operational mode and status of
the Option Board and the network.
Refer to Section 5-1 for Troubleshooting using the LED indicators on page 57
2-2 Basic System Description
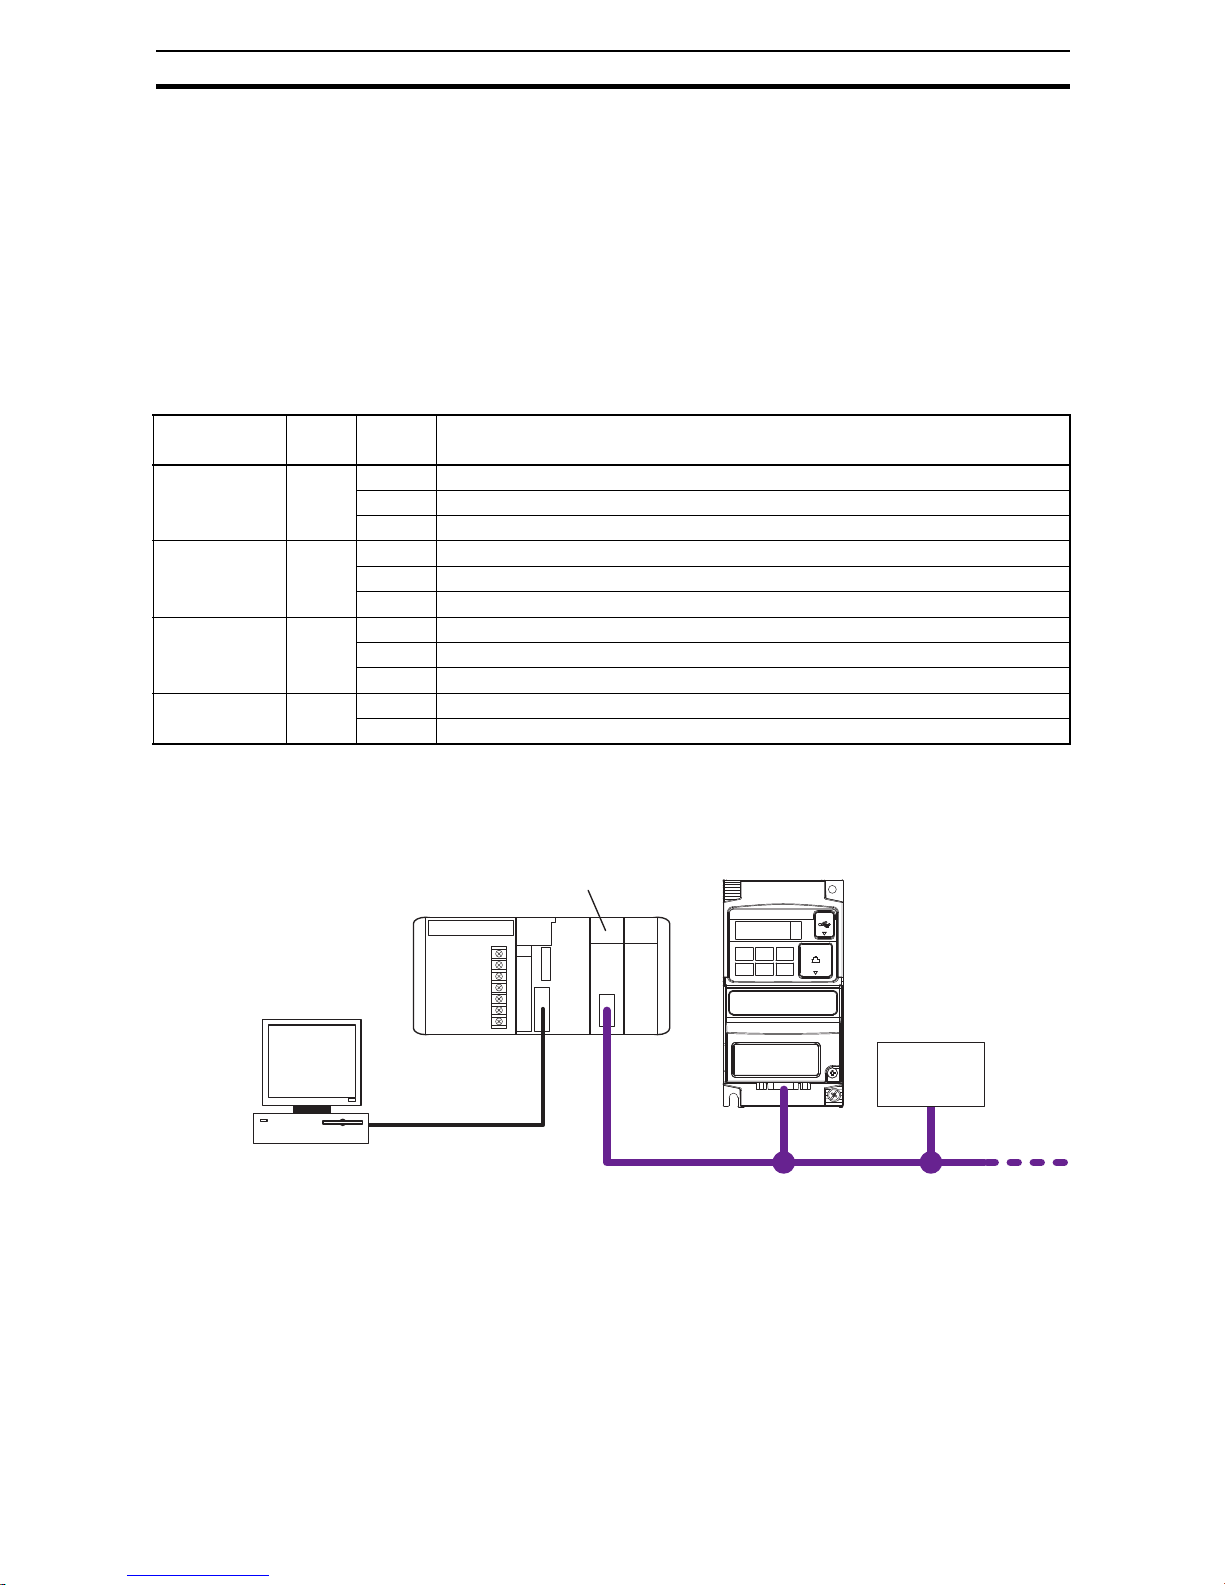
The Option Board connects to the Master via a PROFIBUS network cable.
Inverter I/O data is generally shared with the Master's I/O memory through the
PROFIBUS DP network. Every PROFIBUS communication cycle, Inverter I/O
data is collected by the Option Board and exchanged with the Master. The
Engineering Station allows you to configure, monitor, program, diagnose and
operate the system.
Table 2 LED Indicators
Indicator Colour Status Meaning
RUN
(Unit status)
Green OFF No power or not yet ready for operation
Flashing Operating in commissioning mode
ON Normal operation
ERR
(Unit error)
Red ON Fatal error
Flashing Operational error
OFF No error
BF
(Bus Fail)
Red ON No communication with PROFIBUS Master
Flashing Unsupported parameters or module configuration received from PROFIBUS Master
OFF Communicating with PROFIBUS Master
COMM
(Comms status)
Green ON Cyclic data exchange or PROFIBUS diagnostics operational
OFF No cyclic data exchange or PROFIBUS diagnostics
Slave
PLC
PROFIBUS DP-V1 Master
MX2-A@ Inverter +
Option Board
PROFIBUS
Engineering Station
(For setting, monitoring and operation)
Inverter + Option Board
PROFIBUS
Slave
PROFIBUS DP-V1 Master
PLC
Engineering Station
For setting, monitoring and operation)
Page 24

10
How to mount the Option Board on the Inverter Section 2-3
2-3 How to mount the Option Board on the Inverter
!HIGH VOLTAGE Always Switch OFF the mains power supply to the Inverter before removing
any covers. Wait for the time specified on the Inverter front cover for the
capacitors to discharge. Not doing so may result in electrical shock.
!HIGH VOLTAGE Never operate the Inverter with the terminal block cover or backing plate
removed.
!WARNING Provide emergency stop circuits, interlock circuits, limit circuits and similar
safety measures in external circuits (NOT in the Option Board). This ensures
safety in the system if an abnormality occurs due to malfunction of the Option
Board or another external factor affecting the Option Board operation. Not
doing so may result in serious accidents.
!WARNING Always connect the grounding cable to one of the ground terminals of the
Inverter. Failure to abide could lead to serious or possibly fatal injury.
!Caution Never touch the heat sink during or just after operation; it can be very hot.
!Caution Be sure that the Option Board is mounted correctly. Improper mounting may
result in malfunction.
!Caution Be sure that all cable connector screws are tightened to the torque specified
in the relevant manuals. Incorrect tightening torque may result in malfunction.
Note Illustrations are only provided for one Inverter size. The instructions however
are generic, and may be followed for all Inverter sizes.
Please refer to the MX2 Inverter manual (Cat. No. I570) section 2-1-3 for
details on assembly and disassembly of the Inverter.
Please refer to the RX Inverter manual (Cat. No. I560) section 2 for details on
assembly and disassembly of the Inverter.
Page 25
11
How to mount the Option Board on the Inverter Section 2-3
2-3-1 Mounting sequence of the Option Board on the MX2 Inverter
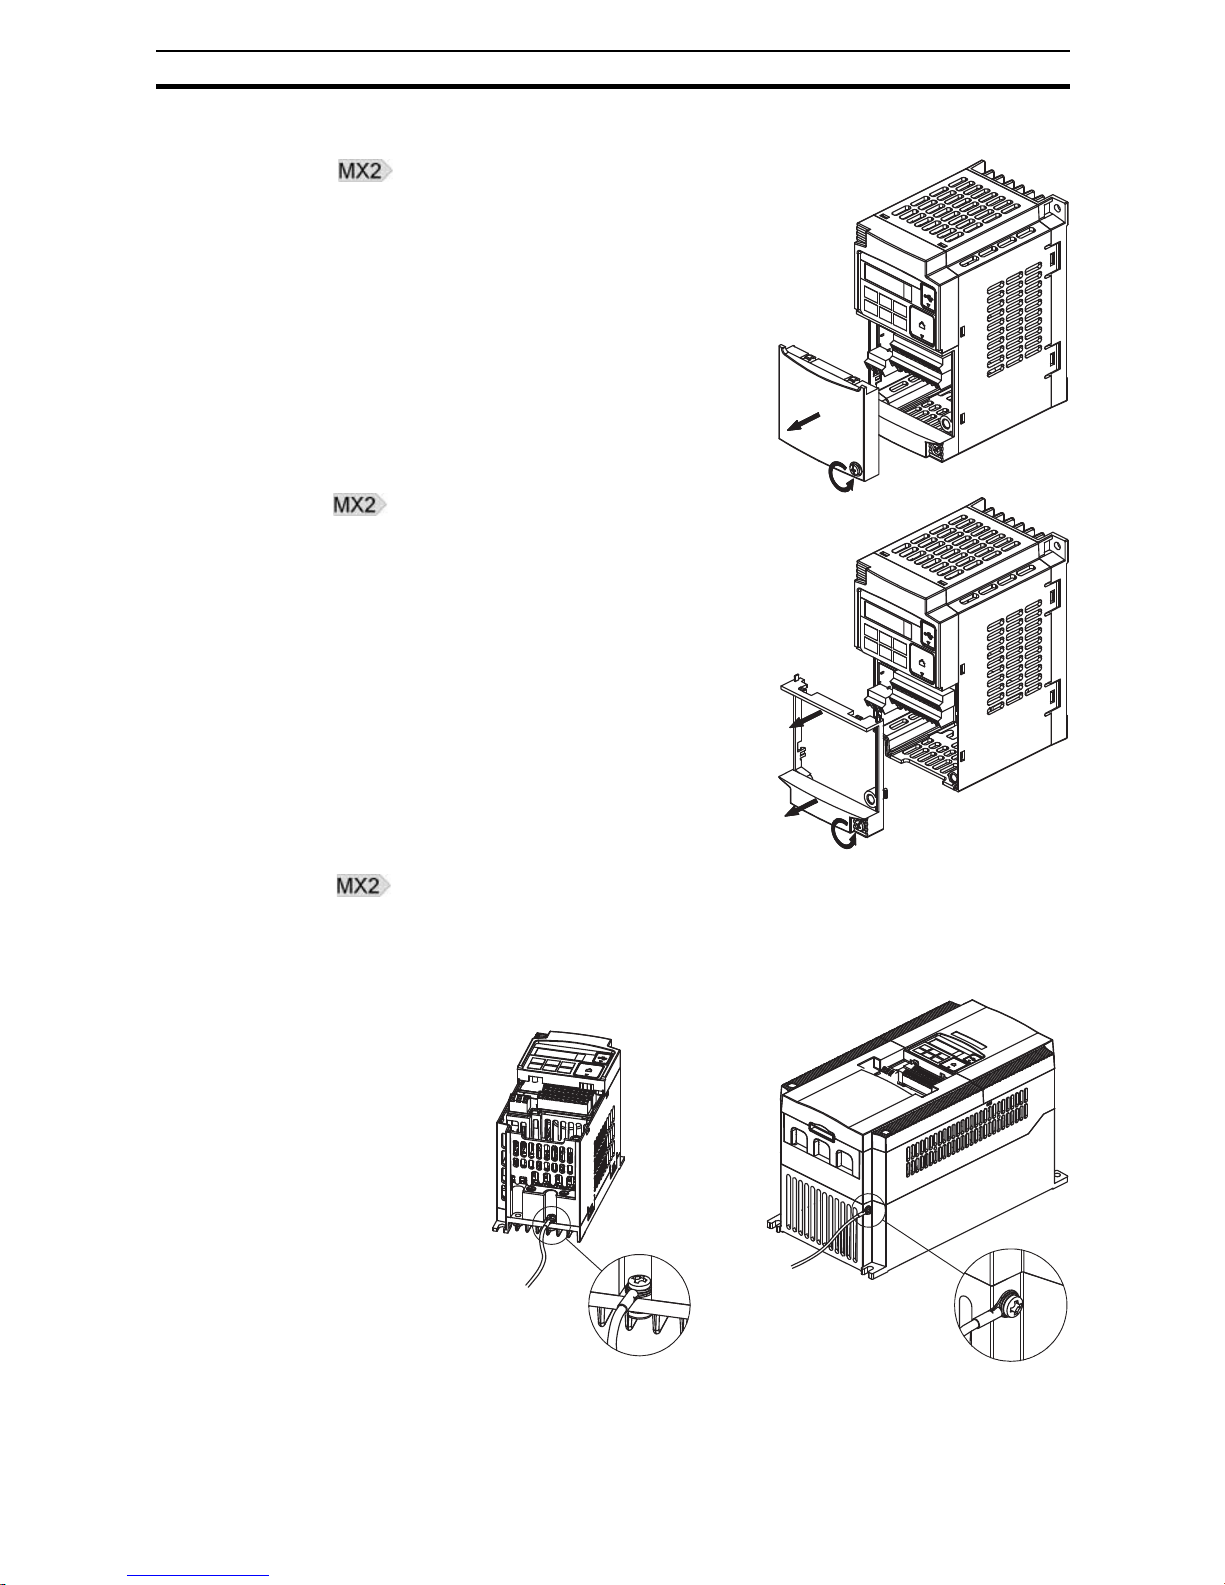
Step 1 Loosen the screw of the option board
cover, remove the cover and put the
cover aside.
Step 2 For Inverters up to 4.0 kW only:
loosen the screws of the terminal
block cover and remove the cover to
enable access to the chassis ground
terminal screws.
Step 3 Secure the Option Board grounding cable to the Inverter with a mounting
screw.
3-phase 200 V 0.1 - 3.7 kW
3-phase 400 V 0.4 - 4.0 kW
1-phase 200 V 0.1 - 2.2 kW
3-phase 200 V 5.5 - 15 kW
3-phase 400 V 5.5 - 15 kW
Page 26

12
How to mount the Option Board on the Inverter Section 2-3
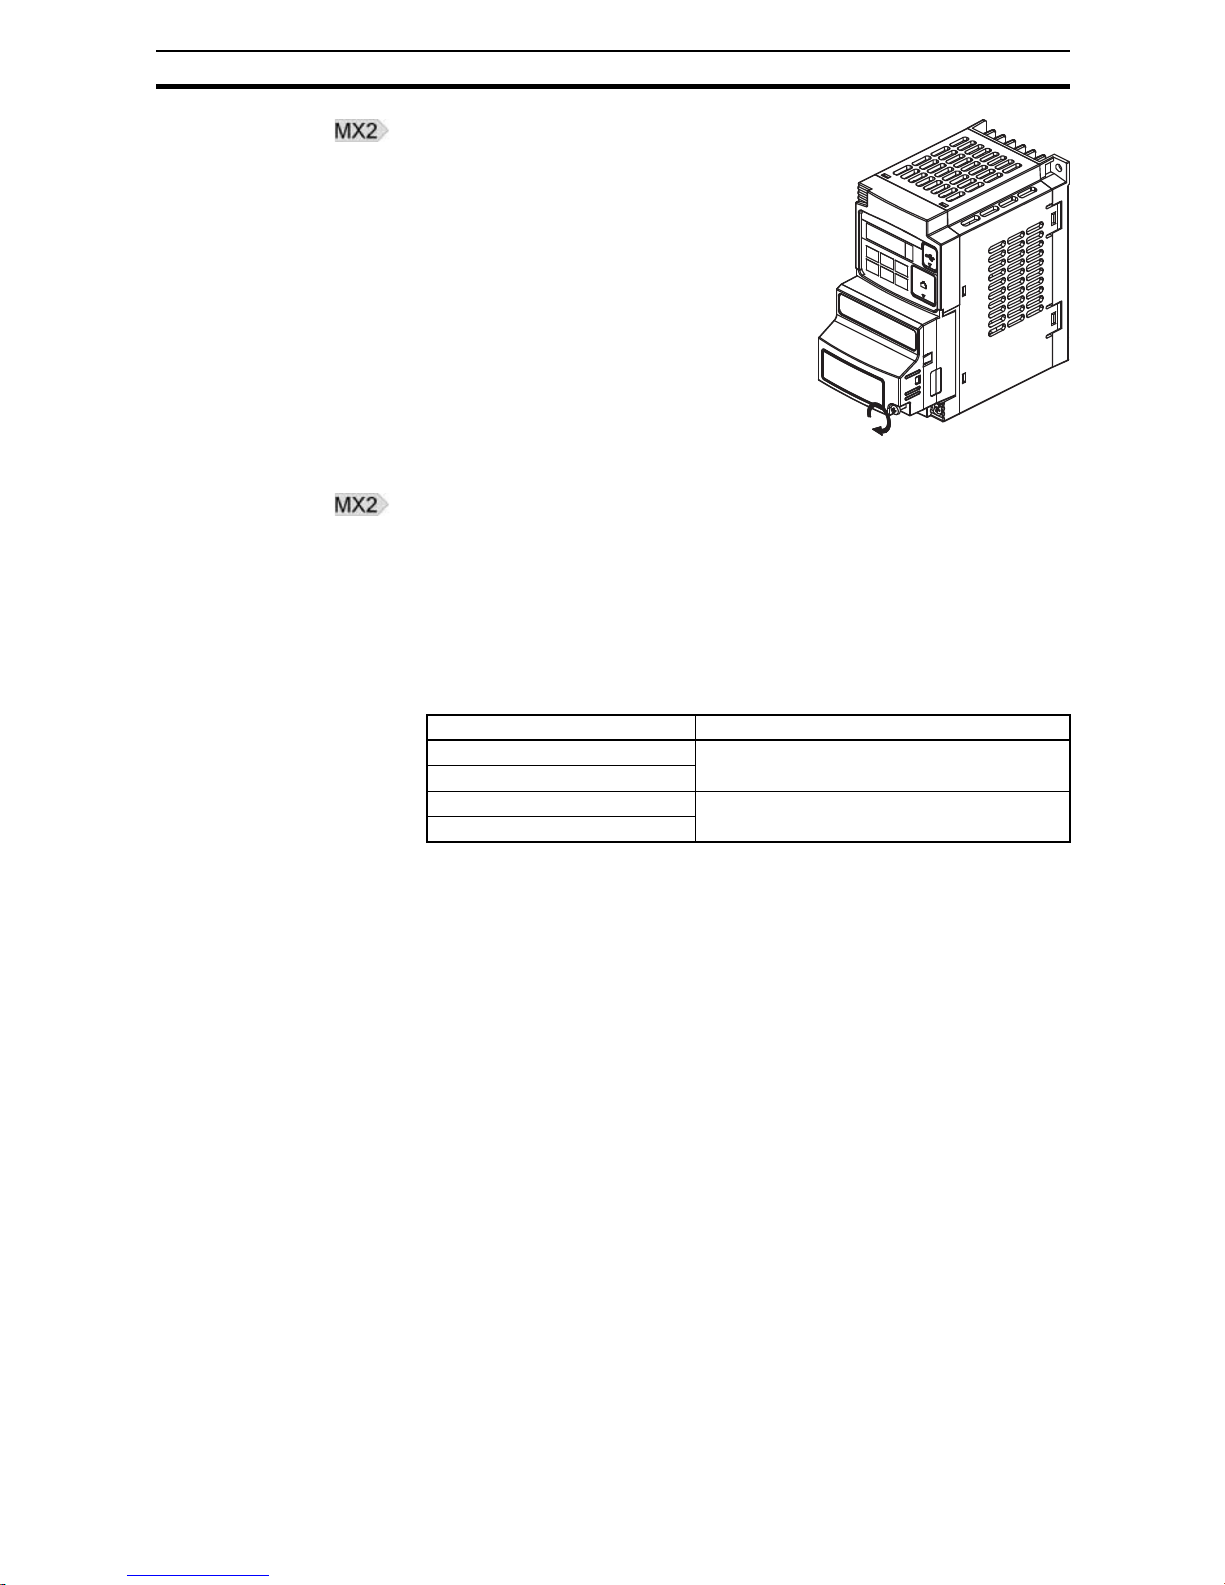
Step 4 If removed in Step 2, mount the termi-
nal cover again and tighten the
screw(s).
Step 5 Push the Option Board into the previ-
ous location of the option board cover
until it clicks into place
Step 6 Press down on the indicated corner
of the Option Board housing to
ensure proper connection of the
Option Board connector
Step 7 Check that there is
no gap between the
top edges of the
Option Board and the
Inverter casing.
Page 27
13
How to mount the Option Board on the Inverter Section 2-3
Step 8 Secure the Option Board in place
with the mounting screw (do not overtighten).
Step 9 Select the right warning language from the warning label sheet and replace
the English warning if appropriate.
Note Refer to section 2-1-3 in the MX2 user’s manual (Cat.-No. I570) for operations
related to assembly and disassembly of the Inverter
Note Some Inverter models do not include a screw for the grounding cable. Please
supply the recommended screw, lock-washer and washer to attach the
grounding cable
Table 3 Ground cable screw selection
Inverter models Grounding Cable Attachment Screw
3-phase 200 V 5.5 – 7.5 kW M4 x 6
3-phase 400 V 5.5 – 7.5 kW
3-phase 200 V 11 – 15 kW M5 x 6
3-phase 400 V 11 – 15 kW
Page 28
14
How to mount the Option Board on the Inverter Section 2-3
2-3-2 How to install the Option Board on the RX Inverter
2-3-2-1 Preparation
When the Option Board is mounted on the RX Inverter, the Digital Operator
Display can not be directly connected back on the RX Inverter.
There are two solutions:
Commissioning with
Digital Operator Display
This option is recommended, however it does require a straight Ethernet
cable.
Step 1 Mount the Option Board according paragraph 2-3-2-2 Mounting sequence of
the Option Board on the RX Inverter on page 14.
Step 2 Connect the Digital Operator Display using the 3G3AX CAJOP300-EE cable
or straight Ethernet cable.
Step 3 Set the desired parameters of the RX Inverter with the Digital Operator Dis-
play.
Commissioning via Profibus
Step 1 Configure the essential Profibus communication parameters before mounting
the Option Board. See also paragraph 3-2 Configuring the Network on page
26:
• Step 1 on page 23: Set the Device Profile using parameter P182.
• Step 3 on page 23: Set the Inverter parameter P180 PROFIBUS
Node Address.
Step 2 Mount the Option Board according paragraph 2-3-2-2 Mounting sequence of
the Option Board on the RX Inverter on page 14. Set the desired parameters
of the Inverter (Also referenced in this paragraph).
Step 3 Configure the Inverter without Digital Operator:
•Use the OMRON CX-Drive tool, or
•Use PROFIdrive DP-V1 Parameter Channel to access the parameters
directly (refer to APPENDIX E PROFIdrive DP-V1 Parameter Chan-
nel).
2-3-2-2 Mounting sequence of the Option Board on the RX Inverter
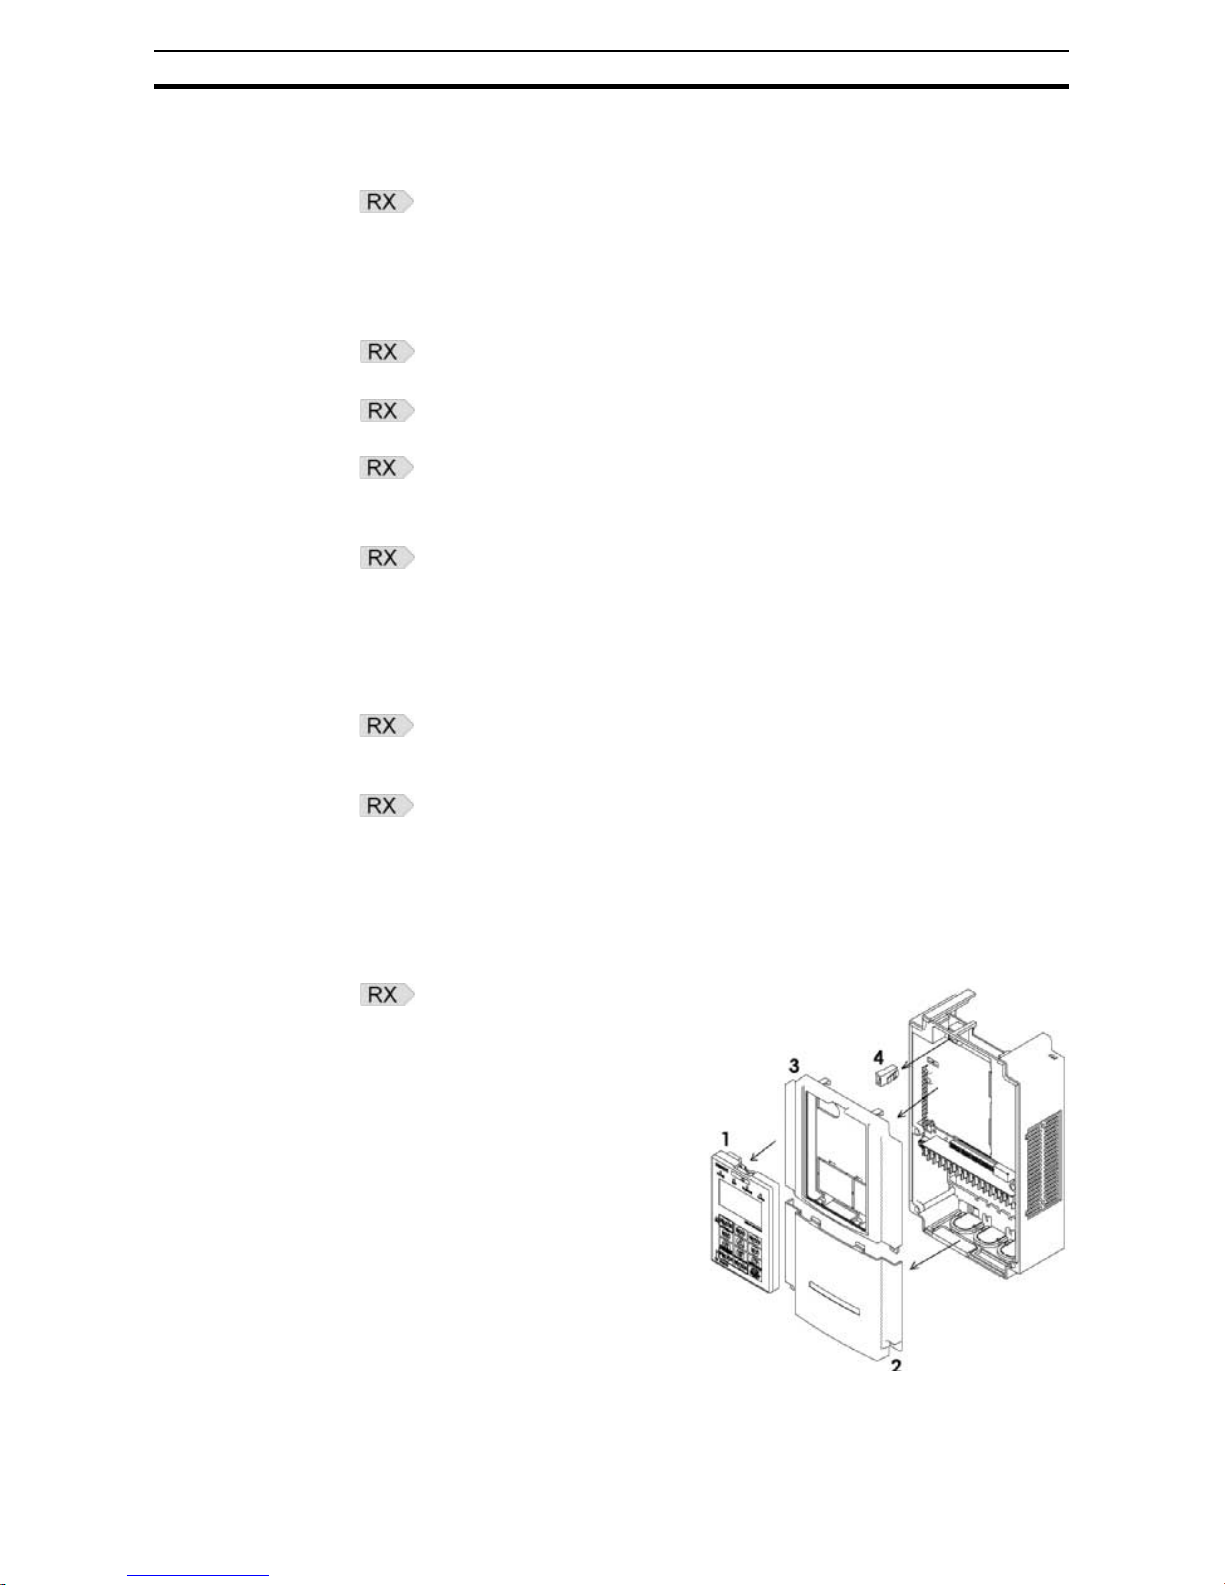
Step 1 Remove from the RX Inverter:
1. Digital Operator Display
2. Terminal cover
3. Front Cover
4. Operator connector.
Page 29

15
How to mount the Option Board on the Inverter Section 2-3
Step 2 Cut out the 2 plastic break-outs
from the Front Cover.
Make sure no sharp edges
remain.
Step 3 Remount the Front Cover and
tighten the screws
Step 4 Purpose
: mount the Inverter
Connector (no.1) of the Option Board
onto the interface connector (no.5) of
the RX Inverter.
How to do
:
First align the small hole of the
Inverter connector (no.2) with the
guide-post (no.4) in the Inverter.
Then align the larger hole on the
Inverter connector (no.3) with the
threaded hole (no.6) in the Inverter.
Push the Inverter connector into
place.
Page 30
16
How to mount the Option Board on the Inverter Section 2-3
Step 5 Move the Option Board Cable (no.2)
to the left with your finger, so the
Option Board Cable is not pinched
between the Option Board and the
Inverter Front Cover.
Note Prevent a pinched Option Board
Cable, as shown in position A.
Note Do not pull on the Option Board
Cable.
Note Do not let the Option Board hang on
the Option Board Cable.
Insert the Option Board approximately 1 cm above the down-position into the
Front cover of the Inverter. See figure 1above.
Slide the Option Board down. See figure 2 above.
The snap-fits of the Option Board
(no.5) will be locked by the snap-fits
in the Front cover (no.4).
A
1
2
3
2
4
1
4
mc1±
3
Connector
Option Board bottom side
5
Page 31

17
How to mount the Option Board on the Inverter Section 2-3
Step 6 Press down carefully the two locking
pins (no. 1) of the Option Board.
Press carefully the top of the Option
Board in the Inverter.
Check the Option Board is being
locked by the locking pins (no.1).
Step 7 Insert the screw (no. 1) into the upper
right hole in the Option Board (no.2).
Tighten the screw into place (do not
over tighten).
Fix the Option Board grounding cable
to the chassis ground of the RXInverter under an already fixed chassis grounding bold.
See the bold with the grounding figure.
The position of the chassis ground
vary from inverter type. Illustrations
are only provided for one Inverter
size. The instructions however are
generic and may be followed for all
Inverter sizes.
1
2
G
Page 32

18
How to mount the Option Board on the Inverter Section 2-3
Step 8 Unscrew the mounting screws of the
Terminal cover nearly completely
from the plastic rings (no.1).
Remount the Terminal cover under
the Option Board onto the Inverter
(no.2).
Tighten the two screws (no.1).
Step 9 Connect the Digital Operator Display
via a 3G3AX CAJOP300-EE cable or
via a straight EtherNet cable with the
RJ45 connector in the Inverter.
Step 10 Define needed and desired parameters of the Inverter and set them according
SECTION 3 Configuring Drive Parameters and Option Board on page 23 and
also according SECTION 4 Operations and Monitoring on page 29.
Page 33

19
How to mount the Option Board on the Inverter Section 2-3
Step 11 If the desired parameters of the Inver-
ter have been set succesfully, disconnect the 3G3AX CAJOP300-EE cable
or straight EtherNet cable from the
Inverter.
Push the blind cover (no.1) into place.
Note Refer to section 2 in the RX User's Manual (Cat. No. I560) for operations
related to assembly and disassembly of the RX Inverter.
2-3-3 Installation Environment Clearance
Please adhere to the requirements of the Inverter for Installation Environment
clearance.
Please refer to the MX2 Inverter manual (Cat. No. I570) section 2-3-2.
Please refer to the RX Inverter manual (Cat. No. I560) section 2-1 Installation
Environment.
In addition to this, provide sufficient clearance to allow connection and
removal of the PROFIBUS Connector. No unnecessary strain should be
placed on the PROFIBUS cable or connector that could be transferred to the
Option Board.
2-3-4 PROFIBUS network connector
The PROFIBUS connector on the bottom of the Unit is a 9-pin female sub-D
connector, as recommended by IEC 61158. Fixtures have #4/40 UNC thread
for compatibility with PROFIBUS-DP connectors. No termination is provided
inside the Option Board.
The signals DGND and VP are used to power the bus terminator located in
the cable connector.
Note 1 The Option Board allows the use of PROFIBUS connectors with a straight
cable outlet.
1
Table 4 PROFIBUS connector pinout
Pin No. Signal Description
1 Shield Functional ground (do not connect)
2NC-
3 B-line Data signal
4 RTS Control signal for repeaters
(direction control)
5 DGND Signal ground
6 VP Termination power
7NC-
8 A-line Data signal
9NC-
9
5
1
6
Page 34

20
How to mount the Option Board on the Inverter Section 2-3
Note 2 The 9-pin sub-D connector uses #4/40 UNC thread for mechanical fixation of
the cable connector. Always use PROFIBUS connectors.
!Caution Do not use PROFIBUS connectors with a 90° cable outlet (Such connectors
place unnecessary strain on the Option Board connector).
2-3-5 Option Board Dimensions
c
d2
w
h1
h
d4
d3
d
d1
Table 5 Option Board Dimensions
Item Dimension Item Dimension Item Dimension
h 63.6 mm c 16.3 mm d2 31.3 mm
h1 57.9 mm d 52.6 mm d3 44.8 mm
w 67.6 mm
d1
1
1. Dimension d1 gives the increase in MX2@ Inverter dimension D when the Option Board is
fitted (Refer to section 2-3 of the Inverter user's manual).
26.4 mm d4 28.4 mm
3G3AX-PRT-MX2
RUN ERR BF COMM
Page 35

21
How to mount the Option Board on the Inverter Section 2-3
Table 6 Option Board Dimensions on the RX Inverter
Item Dimension Item Dimension Item Dimension
p 35.1 mm r 43.9 mm u 31.7 mm
q 79.8 mm s 66.5 mm v 32.7 mm
t 66.1 mm w 48.1 mm
Page 36

22
How to mount the Option Board on the Inverter Section 2-3
Page 37

23
Configuring the Option Board Section 3-1
SECTION 3
Configuring Drive Parameters and Option Board
3-1 Configuring the Option Board
All Option Board parameters are stored in the Inverter. This allows for easy
replacement of the Option Board without the need to re-configure. After connecting the Option Board to an Inverter for the first time however, proceed with
the following steps:
Step 1 The Option Board supports 3 device profiles. Each device profile supports a
subset of the modules listed in the GSD file. The device profile is selected
using Inverter parameter P182. Use the Inverter keypad to adjust P182 to
select the device profile and supported modules.
Step 2 It is recommended to set C102 = 3 to prevent the Inverter reset input and
Stop/reset button from interfering with Option Board during operation (Setting
C102 to another value causes the Option Board to reset when a trip condition
is cleared). Use the Inverter keypad to set C102 to 3.
Step 3 Inverter registers P180, P044, P045 and P181 configure the PROFIBUS net-
work-related parameters. Adjust these to configure the node address, CLEAR
mode behavior and required action when a Fieldbus failure occurs.
Table 7 Configuration of device profile
P182 Device Profile Supported Modules
0
(default)
PROFIdrive
[Appendix B]
PPO Type 1 (4 words PKW + 2 words PZD)
PPO Type 2 (4 words PKW + 6 words PZD)
PPO Type 3 (2 words PZD)
PPO Type 4 (6 words PZD)
PPO Type 5 (4 words PKW + 10 words PZD)
1 Conventional
[Appendix C]
Basic Data
Extended Data 1
Extended Data 2
2 Flexible
[Appendix D]
Flexible (10 words output and input)
Table 8 Configuration of Inverter Reset Mode Selection
Param Description Setting
C102 Reset mode selection Recommended to set to 3 (Reset mode selection
resets trip only, not Option Board)
Table 9 Configuration of PROFIBUS parameters
Param Description Setting
P180 PROFIBUS Node
Address
0 to 125, 0 (default) means node address 126
P044 Network Error Timer Time to wait after a network error occurs before
executing action in P045:
0 to 9999 in 0.1 s units
Page 38

24
Configuring the Option Board Section 3-1
Step 4 Registers A001 and A002 are used by the Inverter to adjust the frequency
source and control source. If the second motor parameter set is used, registers A201 and A202 also have to be set. Adjust these in accordance with the
following table:
Step 5 Registers P033, P036, C021, C022 and C028 are used by the Inverter to
adjust some Inverter function sources. If required (refer to usage examples),
adjust these in accordance with the following table:
Apply the source selection parameters according the following table for the
MX2 Option Board.
P045 Action on Network
Error
Set to 0 for inverter trip
Set to 1 for deceleration and trip
Set to 2 for no action
Set to 3 for stop due to free-run
Set to 4 for deceleration and stop
P181 Output Data Keep
Mode
Define behavior if PROFIBUS master indicates
CLEAR mode or if a network error occurs:
Set to 0 for clearing all output data (stop inverter)
Set to 1 for keeping output data (inverter continues
operating)
Table 9 Configuration of PROFIBUS parameters (continued)
Param Description Setting
Table 10 Configuration of Inverter source selection parameters
Param Description Setting
A001 Motor 1
Frequency Source
For option board as source:
Set to 3 if P182 equals 2
Set to 4 if P182 equals 0 or 1
Set to 5 if P182 equals 0 or 1
A201 Motor 2
Frequency Source
A002 Motor 1 Run
Command Source
A202 Motor 2 Run
Command Source
Table 11 Configuration of Source selection MX2 parameters
Param Description Setting
P033 Torque Command
Source
For Option Board as source:
Set to 6 (Use Option Board register) if P182
equals 1
Set to 3 (Use P034) if P182 equals 0 or 2
P036 Torque Bias Mode For Option Board as source:
Set to 5 (Bias set by Option Board) if P182
equals 1
Set to 0 (Bias according to sign) or 1 (Bias according to rotation direction) if P182 equals 0 or 2
C021 Output Terminal 11
Source
Set to 63 for Option Board as source
C022 Output Terminal 12
Source
Set to 63 for Option Board as source
C026 Alarm Relay Output
Terminal Source
Set to 63 for Option Board as source (Optional)
C028 Analog Output AM
Source
Set to 16 for Option Board as source
Page 39

25
Configuring the Option Board Section 3-1
Apply the source selection parameters according the following table for the
RX Option Board.
Step 6 The PPO modules and Flexible module give you the freedom to select/cus-
tomise the Inverter Modbus registers for Cyclic Data Exchange. Inverter registers P160 - P179 are used to configure and map the exchanged Modbus
registers. If required, adjust these registers to change the default content of
the exchanged data. Please refer to Appendices B-1 I/O Mapping on page 76
and Flexible I/O Mapping on page 83 for more details.
Param Description Setting
P033 Torque Command
Source
For Option Board as source:
Set to 7 (Use Option Board register) if P182
equals 1
Set to 3 (Use P034) if P182 equals 0 or 2
P036 Torque Bias Mode For Option Board as source:
Set to 6 (Bias set by Option Board) if P182
equals 1
Set to 0 (Bias according to sign) or 1 (Bias according to rotation direction) if P182 equals 0 or 2
C021 Output Terminal 11
Source
Set to 63 for Option Board as source
C022 Output Terminal 12
Source
Set to 63 for Option Board as source
C026 Alarm Relay Output
Terminal Source
Set to 63 for Option Board as source (Optional)
C028 Analog Output AM
Source
Set to 20 for Option Board as source
Table 12 Configuration of input and output content
Param Description Setting
P160 Output Register 1
contents
Modbus register mapped into PZD1 or flexible output word 1
P161 Output Register 2
contents
Modbus register mapped into PZD2 or flexible output word 2
P162 Output Register 3
contents
Modbus register mapped into PZD3 or flexible output word 3
P163 Output Register 4
contents
Modbus register mapped into PZD4 or flexible output word 4
P164 Output Register 5
contents
Modbus register mapped into PZD5 or flexible output word 5
P165 Output Register 6
contents
Modbus register mapped into PZD6 or flexible output word 6
P166 Output Register 7
contents
Modbus register mapped into PZD7 or flexible output word 7
P167 Output Register 8
contents
Modbus register mapped into PZD8 or flexible output word 8
P168 Output Register 9
contents
Modbus register mapped into PZD9 or flexible output word 9
P169 Output Register 10
contents
Modbus register mapped into PZD10 or flexible
output word 10
P170 Input Register 1 con-
tents
Modbus register mapped into PZD1 or flexible
input word 1
P171 Input Register 2 con-
tents
Modbus register mapped into PZD2 or flexible
input word 2
P172 Input Register 3 con-
tents
Modbus register mapped into PZD3 or flexible
input word 3
P173 Input Register 4 con-
tents
Modbus register mapped into PZD4 or flexible
input word 4
Page 40

26
Configuring the Network Section 3-2
Step 7 Restart the Inverter for the changes to take effect.
Note When restarting the Inverter, wait for the Inverter power indicator to go out
before switching on again.
!Caution Action on Network Error (P045) is disabled when P181 is set to 1 (Keep the
output data upon a network failure) I.e. when a network error occurs, the
Inverter will continue normal operation with the last received output data.
!Caution Check the network related Inverter settings regarding PROFIBUS node
address and PROFIBUS map selection. Not doing so may result in unexpected operation.
Tip Alternatively, P180 in Step 3 may be performed using the set-slave address
functionality of your PROFIBUS master or diagnostic tool.
Tip Alternatively, Step 2 up to Step 6 may be performed using OMRON CX-Drive.
Tip Alternatively, Step 7 may be performed by resetting the Option Board using
PNU972 (Refer to APPENDIX F Option Board Parameters).
3-2 Configuring the Network
Step 1 Download the GSD file named OC_0C6A for the Option Board via the Omron
website http://industrial.omron.eu.
Download the GSD file named OC_0D2B for the Option Board via the Omron
website http://industrial.omron.eu.
Step 2 Install / add this GSD file to the PROFIBUS master configuration program
used to configure your PROFIBUS master.
(It may be necessary to update the device catalogue before proceeding)
Step 3 Add your PROFIBUS master to the network in the configuration program.
Step 4 Add an Option Board to the network in the configuration program and open
the Option Board's settings.
Step 5 Set the Option Board's node address (also referred to as station address) to
match P180 in the Inverter.
Step 6 Choose a module that is supported by the selected device profile (Inverter
parameter P182).
P174 Input Register 5 con-
tents
Modbus register mapped into PZD5 or flexible
input word 5
P175 Input Register 6 con-
tents
Modbus register mapped into PZD6 or flexible
input word 6
P176 Input Register 7 con-
tents
Modbus register mapped into PZD7 or flexible
input word 7
P177 Input Register 8 con-
tents
Modbus register mapped into PZD8 or flexible
input word 8
P178 Input Register 9 con-
tents
Modbus register mapped into PZD9 or flexible
input word 9
P179 Input Register 10
contents
Modbus register mapped into PZD10 or flexible
input word 10
Table 12 Configuration of input and output content (continued)
Param Description Setting
Page 41

27
Configuring the Network Section 3-2
Step 7 Uncheck the Enable DPV1 option on the DPV1 tab before proceeding to Step
7 if you are using OMRON CX-Configurator.
Step 8 Save and download the configuration to your PROFIBUS master.
Step 9 Once the network is re-started with the new settings, check that the Option
Board LED indicators indicate proper operation: If everything is correctly configured, only the RUN and COMM indicators will be ON (green). Please refer
to section 5-1 Troubleshooting using the LED indicators on page 57 to trouble-
shooting any configuration errors if the LED indicators are displaying a different pattern.
Note Nothing prevents you from selecting an unsupported module in Step 6. If you
are uncertain, check the value of P182 before selecting the module.
Tip Refer to SECTION 5 Troubleshooting and Maintenance on page 57 in case of
errors.
Table 13 Configuration of module support
P182 Device Profile Supported Modules
0
(default)
PROFIdrive
[Appendix B]
PPO Type 1 (4 words PKW + 2 words PZD)
PPO Type 2 (4 words PKW + 6 words PZD)
PPO Type 3 (2 words PZD)
PPO Type 4 (6 words PZD)
PPO Type 5 (4 words PKW + 10 words PZD)
1 Conventional
[Appendix C]
Basic Data
Extended Data 1
Extended Data 2
2 Flexible
[Appendix D]
Flexible (10 words output and input)
Page 42

28
Configuring the Network Section 3-2
Page 43

29
Section
SECTION 4
Operations and Monitoring
This section provides some common usage examples to help you get started.
Unless otherwise specified, all usage examples make use of the PROFIdrive
device profile and associated modules (Refer to section 3-1 Configuring the
Option Board, Step 1). Prepare the Inverter and Option Board before starting
with the usage examples:
Step 1 Initialize the Inverter mode to Induction Motor, Constant Torque:
Set b171 = 1 and then b180 = 1, set b049 = 0.
Refer to MX2 User’s manual (Cat. No. I570) section 3-6-24.
Set b084 = 2 and then b180 = 1, set b049 = 0.
Refer to RX User’s manual (Cat. No. I560) section 4-2 Parameter Initialization).
Step 2 Configure the Option Board and Network as explained in sections 3-1 Config-
uring the Option Board and 3-2 Configuring the Network, but limit the follow-
ing choices:
• When selecting the device profile when configuring the Option Board
(Step 1 of section 3-1 Configuring the Option Board), select the PROFId-
rive device profile by setting P182 to 0.
• When configuring the process area content (of section 3-1 Configuring
the Option Board), set all parameters (P160 - P179 to 0).
• When choosing the module while configuring the network (Step 6 of section 3-2 Configuring the Network), select either the PPO Type 2 or PPO
Type 5 module.
If you configured everything correctly, your output and input process areas
should contain the following data:
Table 14 Output Process Area
!WARNING A revision AAAA Inverter allows the motor to run immediately if a trip condition
is reset, and at the same time, Run (STW) is set. For safe operation clear Run
(STW) when you detect a rising-edge on Flt (ZSW). Refer to section 1-1-2
Inverter Support to determine the Inverter revision.
dec
hex
15 14 13 12 11 10 9 8 7 6 5 4 3 2 1 0
-----Ov
r
JR JF Rst - - Run En---
0000000000000000
En
Run Run operation
Run enable
JF Jog run forward
Rst Fault reset
PKE
IND
Task ID and parameter number
Parameter index
Ovr Control override
JR Jog run reverse
HSW
PWE
STW
Parameter value
Control word
Frequency reference
Value
-
+4
---
+9
STW HSW
+8
INDRegister
Word offset +1+0
PKE
000
PWE
0
+6 +7+2 +3 +5
0
0000000000000000000000000000
0
Value
0
00000000
Name
0
Bit
0
0000
Page 44

30
Source Selection Section 4-1
Table 15 Input Process Area
Note 1 Depending on your source selection, CS may already be 1 on your setup.
Note 2 For compatibility, some unsupported bits in ZSW are always 1.
!Caution Check the Inverter settings for proper Inverter behavior before actually oper-
ating the Inverter remotely via the PROFIBUS network.
!Caution The product will be used to control an adjustable speed drive connected to
high voltage sources and rotating machinery that is inherently dangerous if
not operated safely. Interlock all energy sources, hazardous locations, and
guards in order to restrict the exposure of personnel to hazards. The adjustable speed drive may start the motor without warning.
Signs on the equipment installation must be posted to this effect. A familiarity
with auto-restart settings is a requirement when controlling adjustable speed
drives. Failure of external or ancillary components may cause intermittent
system operation, i.e., the system may start the motor without warning or may
not stop on command. Improperly designed or improperly installed system
interlocks and permissives may render a motor unable to start or stop on command.
4-1 Source Selection
First select the appropriate control and frequency sources, before operating
the Inverter. We will be using the 1
st
motor:
Step 1 Set A001=4 and A002=4 so that the Inverter is controlled by the default PRO-
FIdrive control and frequency references registers.
Set A001=5 and A002=5 so that the Inverter is controlled by the default PROFIdrive control and frequency references registers.
Note The control override bit in the PROFIdrive control word (Section B-2 Control
and Status Words - STW/ZSW) can be used to override A001, A201, A002
and A202. When this bit is set, it has the same effect as temporarily setting
A001, A201, A002 and A202=4. Clearing this bit removes the override, and
the Inverter sources are once again determined by these registers.
If you are using a version AAAA Inverter, the control override bit is always disabled if A002 = 2.
Page 45

31
Operating the Motor Section 4-2
4-2 Operating the Motor
4-2-1 Starting the Motor
Step 1 Set the En bit to enable controlled acceleration and deceleration of the motor.
Step 2 Set the Run bit to put the Inverter in run mode. The RUN indicator on the
Inverter should light up at this point. If this is not the case, check your source
selection (Section 4-1 Source Selection).
Step 3 Set HIW=1000 (10.00 Hz forward).
Table 16 Output Process Area with Motor Started
The motor accelerates until it reaches the desired frequency. Notice that the
FA bit is set once the inverter has reached the desired reference frequency.
Table 17 Input Process Area with Reference Frequency Reached
4-2-2 Changing Direction
Step 4 Set HIW=-1000 (10.00 Hz reverse).
Table 18 Output Process Area with Motor Set to Run Reverse
The motor decelerates, stops and then accelerates in the opposite direction.
The FA bit clears as soon as the reference frequency is changed. Once the
new reference frequency is reached, the FA bit is once again set.
Table 19 Input Process Area with Reverse Frequency Reached
Page 46

32
Operating the Motor Section 4-2
4-2-3 Stopping the Motor - Controlled
Step 5 Clear the Run bit to bring the motor to a controlled stop.
Table 20 Output Process Area for Controlled Stop
The motor decelerates, and comes to a stop. The FA bit clears as soon as the
Run bit is cleared.
Table 21 Input Process Area after Controlled Stop
Before continuing set HSW to 0.
Note The motor can also be brought to a stop by setting HSW to 0 and leaving the
Run bit set. The Inverter will however stay in run mode once the motor has
stopped.
4-2-4 Stopping the Motor - Free-running
An alternative to Step 5 is to clear the En bit to request a free-run stop: The
Inverter stops controlling the motor, and the motor coasts to a stop. During a
free-run stop, you will notice that HIW immediately drops to 0 and the FA bit is
cleared.
4-2-5 Jog Operation
Step 6 Set the JF bit to start the jog operation.
Table 22 Output Process Area with Motor Jogging Forward
The motor immediately starts rotating forward at the pre-set jog frequency.
The Inverter jog frequency can be set by adjusting Inverter parameter A038.
When jogging, the Inverter immediately jumps to the jog frequency. No controlled acceleration is performed and the FA bit is immediately set.
Page 47

33
Customising the Process Area Section 4-3
Table 23 Input Process Area with Motor Jogging Forward
Note 1 To jog the motor in reverse, set the JR bit.
4-2-6 Frequency Reference and Output Frequency Scaling
HSW and HIW are signed word registers. Using normal scaling, you will
therefore not be able to set HSW higher than 327.67 Hz (327.68 Hz in
reverse).
The MX2 Inverter can however be set to operate in HF mode. Refer to the
MX2 User Manual section 3-6-24 for instructions on how to achieve this.
Doing this changes the scaling of HSW and HIW to 0.1 Hz. At 0.1 Hz scaling
you will be able to reach the full frequency range of the inverter by adjusting
HSW.
4-3 Customising the Process Area
The PROFIdrive device profile also gives you the capability to customise the
process area by mapping your choice of Modbus registers. Normally, P160,
P161, P170 and P171 are set to 0 so that STW, HSW, ZSW and HIW are
exchanged. The remaining parameters (P162 - P169 and P172 - P179) are
normally used to map additional Modbus registers into the cyclically
exchanged process areas. User parameters P160 - P169 configure the output
process area mappings where parameters P170 - P179 configure the input
process area mappings.
4-3-1 Double-word Frequency Reference and Output Frequency
HSW and HIW are signed word registers. Using normal scaling, you will
therefore not be able to set HSW higher than 327.67 Hz (327.68 Hz in
reverse) unless you are using the Inverter HF mode. You can however directly
use the Inverter DWORD registers F001 and d001 to increase the usable
range:
These two registers offer fixed 0.01 Hz scaling while still allowing you to control the Inverter through its full frequency range. When using the PROFIdrive
device profile, the F001 and d001 registers are also sign converted by the
Option Board. You can therefore use F001 and d001 as functional substitutes
for HSW and HIW.
Step 1 Set parameters P161 and P162 to 0001h and 0002h to map Modbus registers
0001h and 0002h (Function code F001) into output PZD2 and PZD3.
Step 2 Set parameters P171 and P172 to 1001h and 1002h to map Modbus registers
1001h and 1002h (Function code d001) into input PZD2 and PZD3.
Step 3 Set A001=3 to use F001 as the Inverter frequency source (Note that you can-
not make use of the Ovr bit in STW to take control of the Inverter when using
F001 to control the reference frequency).
Step 4 Restart the Inverter or reset the Option Board for the changes to take effect.
Page 48

34
Customising the Process Area Section 4-3
Tip If the Inverter trips after restarting, check that you correctly set P161, P162,
P171 and P172, and that all other registers in the P160 - P179 range are set
to 0.
Your input and output process areas should now have the following layout:
Table 24 Output Process Area with Double Word F requency Ref e rence
Table 25 Input Process Area with Double Word Output Frequency
Step 5 To turn the motor forward, set the Run and En bits in STW and change F001
(output PZD2 and PZD3) to the desired frequency. (Input PZD2 represents
the most-significant word and input PZD3 the least-significant word)
Table 26 Output Process Area with Forward Rotation Dword Frequency Reference
The output frequency is given by d001 (input PZD2 contains the most-significant and input PZD3 the least-significant word).
Table 27 Input Process Area with Forward Rotation Dword Output Frequency
Step 6 To reverse the motor, change F001 (output PZD2 and PZD3) to a negative
signed double-word frequency.
Table 28 Output Process Area with Reverse Rotation Dword Frequency Reference
The motor decelerates, stops and then accelerates in the opposite direction.
Table 29 Input Process Area with Reverse Rotation Dword Output Frequency
The remainder of the examples do not make use of double-word frequency
registers. Set P160, P161, P170 and P171 back to 0, A001 back to 4 and
restart the Inverter or reset the Option Board before following further examples.
Note If you want to use a DINT to write or read an Inverter double-word register,
you will have to swap the high- and low-word in your PLC program (For double-words, an OMRON PLCs does not use the same word-order convention
than the Inverter).
Page 49

35
Customising the Process Area Section 4-3
4-3-2 Mapping Coil Data 0
Modbus coils 0000h though 000Fh offer a large amount of functionality. The
intelligent input terminal overrides (Coils 0007h though 000Dh) for example
can be used to control any of the Inverter's assignable input terminal functions.
Refer to section 3-7-2 of the MX2 Inverter User's manual.
Refer to section 4-2 ”Multi-function input selection” of the RX Inverter User's
manual.
The following example illustrates how to map Modbus coils 0000h though
000Fh into PZD3:
Step 1 Set parameters P162 to 1F01h to map coil data 0 into output PZD3.
Step 2 Restart the Inverter or reset the Option Board for the changes to take effect.
Table 30 Output Process Area with Modbus Coil Data 0
Note 1 It is not possible or practical to use all the coils contained in Coil data 0 when
the Option Board is using the PROFIdrive device profile:
• The operation (0001h) and rotation direction (0002h) coils are not used by
the Inverter when the run command source (A002) is set to 4 or 5 (Option
Board).
• The trip reset coil (0004h) duplicates the functionality of Rst in STW.
• The operation status coil (000Fh) is not writeable.
Step 3 The Modbus coils 0000h though 000Fh are now available for use via PZD3.
Use parameters C001 to C007 to assign Inverter functions to any of the intelligent input terminals. To activate an assigned function, set the corresponding
input terminal override (bits 7 to 13 in coil data 0).
4-3-3 Controlling Inverter Torque
In addition to frequency control, the Inverter allows direct control of the motor
torque.
!Caution Before following this example, disconnect your motor from any load to prevent
injury or damage to property.
The following example explains how to make use of the Option Board to control the motor torque:
Step 1 Set parameter P162 to 1F01h to map coil data 0 into output PZD3.
Step 2 Set parameter P163 to 1622h to map the torque command level input (P034)
into output PZD4.
Step 3 Set parameter P173 to 1010h to map the torque monitor (d012) into input
PZD4.
dec
hex
15141312111098 7 6543210
- In8
*RX
In7 In6 In5 In4 In3 In2 In1 - - -*1EXT -*1-*1-
0 0 000000 0 0000000
In5
In6
In4 In8
*RX
Intelligent input terminal [8] override
: Is only applicable for the RX Inverter-
*RX
Value
0
00000000
Name
0
Bit
0
000000000 0000 0000 0000 0000 0000 0000
0000
IND
PWE
0
Register PKE
Value
-Coil data 0 --STW HSW
Intelligent input terminal [7] override
EXT External Trip
Intelligent input terminal [6] overrideIn2 Intelligent input terminal [2] override
In1 Intelligent input terminal [1] override Intelligent input terminal [5] override
Intelligent input terminal [4] override
In3 Intelligent input terminal [3] override In7
Page 50

36
Customising the Process Area Section 4-3
Step 4 Set parameter C001=52 (ATR: permission of torque command input) to use
intelligent input terminal 1 as torque enable.
Prepare the Inverter for torque mode:
• Set parameter A044=3 to enable Sensorless Vector Control (SLV).
• Refer to section 4-3 of the RX User manual (I560) to set the torque mode.
Step 5 Set parameter P033=6 to assign Torque command input selection to the
Option Board Interface.
Set parameter P033=7 to assign Torque command input selection to the
Option Board Interface 2.
Step 6 Restart the Inverter or reset the Option Board for the new settings to take
effect.
Restart the Inverter or reset the Option Board for the new settings to take
effect. If the Inverter trips after restarting with an E64 / E74 and parameters
P162, P163 and P172 appear to be configured correctly, it is likely that you
made a mistake in Step 1 or Step 2 (The Inverter will only allow mapping of
torque registers in the process area if it is configured to operate with CT rating
in Std. IM mode).
Note The Inverter will only allow setting of torque related registers if it is configured
to operate with CT rating in Std. IM mode.
Your input and output process areas should now have the following layout:
Table 31 Output Process Area Configured for Torque Control
Table 32 Input Process Area Configured for Torque Control
Step 7 Set the maximum allowable output frequency in torque mode by configuring
P039 and P040 for the forward and reverse run directions. Be careful to select
safe limits for your test setup.
Step 8 Set the En and Run bits in STW to enable controlled acceleration and decel-
eration and put the Inverter in run mode.
Step 9 Set HIW=+1000 (10.00 Hz forward) to accelerate the motor to a constant for-
ward output frequency.
Step 10 Select the desired output torque by setting P034 (output PZD4)=+20 (20%
forward torque).
Step 11 Set the ATR bit in coil data 0 (output PZD3) to enable torque command input.
Page 51

37
Customising the Process Area Section 4-3
Table 33 Output Process Area Configured with Forward Torque Command
The motor either accelerates or decelerates depending on the load. The output frequency is limited by the P039 setting. The output torque is given by
d012 (input PZD4).
Step 12 To change the torque command direction, set both HSW=-1000 (10.00 Hz
reverse) and P034 (output PZD4)=-20 (20% reverse torque).
Table 34 Output Process Area Configured with Reverse Torque Command
The motor decelerates and accelerates in the opposite direction. The output
frequency is limited by the P040 setting. Note that the output torque given by
d012 (input PZD4) now has a negative sign to indicate that the torque direction is reversed.
Tip To keep your application compatible with all revisions of the Inverter, keep the
sign of HIW and P034 the same.
The torque direction is controlled by the sign of HIW when using the Inverter
revision AAAA. On later releases, the sign of P034 controls the torque direction.
4-3-4 Mapping Restrictions
Before you start customizing the process area, it is necessary to note the
Inverter places some restrictions on the customizing.
If your configuration is rejected by the Inverter, you got assist in sections 5-1-
3 Configuration Errors and 5-2-2 Extended Diagnostic Information of this
manual.
If you want to avoid configuration rejection, observe the following rules for the
MX2:
• Set all unused PZDs to default by setting the associated configuration
register to 0.
• Only map Modbus registers listed in appendix B of the MX2 Inverter
user's manual.
• Do not map a Modbus register more than once in the output process
area.
• Always map both high- and low-words of a double-word Modbus register
next to each other in the process area. Also make sure that they are in the
correct sequence (high-word followed by low-word).
Page 52

38
Faults and Trips Section 4-4
• Only map a Modbus registers in the output process area if it is writeable.
A register is writeable if it has an 'R/W' or a 'W' in the 'R/W' column in section B-4-2 of the MX2 Inverter user's manual.
• Only map a Modbus register in the output process area if it is run-mode
editable. Refer to section 3-2-3 of the MX2 Inverter user's manual for an
explanation of run-mode editable registers. Also note that the run-mode
edit requirement can be disabled with b031.
If you want to avoid configuration rejection, observe the following rules for the
RX:
• Set all unused PZDs to default by setting the associated configuration
register to 0.
• Only map Modbus registers listed in section 4.4 Register Number List of
the RX Inverter user's manual.
• Do not map a Modbus register more than once in the output process
area.
• Always map both high- and low-words of a double-word Modbus register
next to each other in the process area. Also make sure that they are in the
correct sequence (high-word followed by low-word).
• Only map a Modbus registers in the output process area if it is writeable.
A register is writeable if it has an 'R/W' or a 'W' in the 'R/W' column in section 4.4 Register Number List of the RX Inverter user's manual.
• Only map a Modbus register in the output process area if it is run-mode
editable. Refer to Appendix 1 of the RX Inverter user's manual for an
explanation of run-mode editable registers. Also note that the run-mode
edit requirement can be disabled with b031.
4-4 Faults and Trips
4-4-1 External Trip
You may want to trip the Inverter from your PLC program. The PROFIdrive
device profile does not provide a standard interface to achieve this, but you
can use the Modbus coil number 0003h to generate an external trip (EXT):
Step 1 Follow the instructions in section 4-3-2 Mapping Coil Data 0 to map Coil data
0 into PZD3.
Step 2 Set bit 3 (EXT) of Coil data 0 which has been mapped into PZD3 to trip the
Inverter.
Table 35 Output Process Area when Using EXT to Trip Inverter
Page 53

39
Accessing Parameters Section 4-5
Table 36 Input Process Area with Inverter Tripped
Note 1 Notice that the Inverter trips with an E12, the Flt bit is set and the Rdy bit
cleared.
4-4-2 Clearing a Trip
!WARNING In the event that the Inverter trips, be sure to investigate the cause of this trip
thoroughly before clearing the trip. Not checking the cause may result in
unexpected operation. Refer to section 5-1 Troubleshooting using the LED
indicators or section 5-2 Troubleshooting Using PROFIBUS Diagnostics.
Step 3 You must always immediately clear the Run bit in your PLC program when a
rising edge is detected on Flt. If the Run bit is set when the trip condition is
cleared, the Inverter will immediately start running!
Step 4 Set the Rst bit in the STW register to clear the trip.
Table 37 Output Process Area when Clearing Trip
!WARNING Always clear the Run bit (STW) in your PLC program on a rising-edge of Flt
(ZSW). Not doing so may result in the motor starting unexpectedly when the
trip is cleared via PROFIBUS or the "Stop/reset" button on the Inverter.
4-5 Accessing Parameters
4-5-1 Parameter Processing Message Area - PKW
Table 38 Input and Output Parameter Processing Message Area-PKW
Page 54

40
Accessing Parameters Section 4-5
You can use the parameter processing message area to read or write parameters via the output- and input process areas. You can use any of the following tasks by writing the task number to AK in the output process area.
Some parameters contain arrays and have to be accessed using array tasks
(Tasks 6, 7 and 8). Array tasks use IND to address the element number in an
array.
When the Option Board completes the task, a task response is written to AK
in the input process area. The size of the parameter is given by the task
response number.
If you executed an array tasks, you will accordingly receive an array task
response ID (Task response 4, 5 or 8).
When a read task succeeds, the Option Board also writes the value to PWE in
the input process area.
When you start a write task, you must also write the new parameter value to
PWE in the output process area.
When a task fails, the Option Board writes a 7 or 8 (Task failed) to AK and an
error number to PWE in the input process area. All error numbers are listed in
APPENDIX G PROFIdrive Error Numbers.
Note If you want to use a DINT to write or read PWE, you will have to swap the
high- and low-word in your PLC program (For double-words, an OMRON
PLCs does not use the same word-order convention than PROFIBUS).
Note The parameter processing message area is only available when using the
PPO Type 1, PPO Type 2 or PPO Type 5 module. To access parameters
when using the PPO Type 3 or PPO Type 4 module, make use of the PRO-
FIdrive DP-V1 parameter channel (Refer to section 4-5-2 PROFIdrive DP-V1
Parameter Channel).
Tip Use the following sequence when starting a read or write task:
1. Set AK=0.
2. Set PNU, IND and PWE.
Table 39 Parameter Processing Tasks
AK Task description
0 Clear the input message area
1 Read parameter value
2 Change WORD parameter value
3 Change DWORD parameter value
6 Read element value in array
7 Change WORD element value in array
8 Change DWORD element value in array
9 Read array size
Table 40 Parameter Processing Task Responses
AK Task description
0 No response
1 Task success (WORD parameter)
2 Task success (DWORD parameter)
4 Task success (WORD element)
5 Task success (DWORD element)
6 Task success (Array size)
7 Task failed (Parameter)
8 Task failed (Element)
Page 55

41
Accessing Parameters Section 4-5
3. Set AK to the desired task.
The parameter processing message mailbox is triggered by a change in the
parameter processing output area. By first setting AK=0, you avoid unintentionally starting a write task when you start changing PNU, IND and PWE.
4-5-1-1 Accessing Option Board Parameters
Option Board parameters are addressed by writing the parameter number to
PNU (Refer to APPENDIX F Option Board Parameters for a list of the avail-
able Option Board parameters). If you are addressing an element in an Option
Board parameter array, you must also write the element index to IND. When
writing an Option Board parameter, the task number specifies the write size.
The following example demonstrates how to use the parameter process message area to access Option Board parameters:
Step 1 Reading an Option Board Parameter: To read Option Board parameter 965
(Unit profile code): First set PNU and then AK as illustrated below. The Option
Board will respond with the illustrated values.
Step 2 Reading an Option Board array element: To read Option Board parameter
element 915.3 (Modbus address mapped into PZD3): Set PNU=393h (915
dec), AK=6 and IND=3.
Step 3 Changing an Option Board array element: To change Option Board param-
eter element 915.3 (Modbus address mapped into PZD3) to 1F01h (Coil data
0):
Table 41 Parameter Processing Message Area -R ea di n g PN U96 5
Read parameter value task
Parameter number 965
Output area [hex] 13C5 00 00 0000 0000
Word offset +0 +1 +2 +3
Function AK PNU IND - PWE
Input area [hex] 13C5 00 00 0000 0302
Task success (WORD parameter) response
Read value (The unit profile code)
Table 42 Parameter Processing Message Area-Reading PNU915.3
Read element value in array task
Parameter number 915
Element at index 3
Output area [hex] 6393 0300 0000 0000
Word offset +0 +1 +2 +3
Function AK PNU IND - PWE
Input area [hex] 4393 0300 0000 0000
Task success (WORD element) response
Read value (Modbus address mapped into PZD3)
Table 43 Parameter Processing Message Area-Changing PNU915.3
Change WORD element value in array task Write value
Parameter number 915
Element at index 3
Output area [hex] 7393 0300 0000 1F01
Word offset +0 +1 +2 +3
Function AK PNU IND - PWE
Input area [hex] 4393 0300 0000 0000
Task success (WORD element) response
Page 56

42
Accessing Parameters Section 4-5
Step 4 Storing changed parameter(s): To store changed parameter(s) in non-vola-
tile memory, write a 1 to Option Board parameter 971:
Step 5 Resetting the Option Board: To reset the Option Board, write a 2 followed
by a 1 to Option Board parameter 972:
Without changing AK or PNU, set PWE=1
The Option Board correctly executes the task and resets before responding.
After the PROFIBUS master has re-connected, the Option Board tries to execute the task a second time. The task fails because parameter 972 may only
be set to 1 if the current value is 2.
4-5-1-2 Accessing Inverter Parameters
When you address Inverter parameters, IND is used to select the parameter
group.
PNU represents the parameter number in that group. To address P160 for
example set IND=10h (P@@@) and PNU=0A0h (160).
Note It is important to use array tasks (6, 7 or 8) when accessing Inverter parame-
ters. IND is only interpreted if the Option Board executes an array task.
Table 44 Parameter Processing Message Area -I ni ti a ti n g N V Store
Change WORD parameter value task Write
Parameter number 971
Output area [hex] 23CB 00 00 0000 0001
Word offset +0 +1 +2 +3
Function AK PNU IND - PWE
Input area [hex] 13CB 00 00 0000 0000
Task success (WORD parameter) response
Table 45 Parameter Processing Message Area-Prepare Reset
Change WORD parameter value task Write
Parameter number 972
Output area [hex] 23CC 00 00 0000 0002
Word offset +0 +1 +2 +3
Function AK PNU IND - PWE
Input area [hex] 13CC 00 00 0000 0000
Task success (WORD parameter) response
Table 46 Parameter Processing Message Area-Initiate Reset
Change WORD parameter value task Write
Parameter number 972
Output area [hex] 23CC 00 00 0000 0001
Word offset +0 +1 +2 +3
Function AK PNU IND - PWE
Input area [hex] 73CC 00 00 0000 0011
Task failed (Parameter) response
Error: Not allowed due to operating state
Table 47 IND Values and Parameter Groups for Parameter Processing
Parameter IND Parameter IND Parameter IND Parameter IND
A@@@ 01h C@@@ 03h F@@@ 06h P@@@ 10h
b@@@ 02h d@@@ 04h H@@@ 08h U@@@ 15h
Page 57

43
Accessing Parameters Section 4-5
The following example demonstrates how to use the parameter process message area to access Inverter Parameters:
Step 1 Reading an Inverter parameter: To read Inverter parameter P180 (PROFI-
BUS node address):
Step 2 Changing an Inverter parameter: To change Inverter parameter A001 (Fre-
quency source) to 3 (Modbus):
Step 3 Reading an Inverter parameter (DWORD): To read Inverter parameter F002
(Acceleration time 1):
Step 4 Changing an Inverter parameter (DWORD): To change Inverter parameter
F002 (Acceleration time 1) to 3.00 sec:
Table 48 Parameter Processing Message Area -R ea di n g P1 80
Read element value in array task
Parameter number 180
Parameter group P@@@
Output area [hex] 60B4 10 00 0000 0000
Word offset +0 +1 +2 +3
Function AK PNU IND - PWE
Input area [hex] 40B4 1000 0000 0003
Task success (WORD element) response
Read value: PROFIBUS node address
Table 49 Parameter Processing Message Area-Changing A001
Change WORD element value in array task Write
Parameter number 1
Parameter group A
Output area [hex] 7001 0100 0000 0003
Word offset +0 +1 +2 +3
Function AK PNU IND - PWE
Input area [hex] 4001 0100 0000 0000
Task success (WORD element) response
Table 50 Parameter Processing Message Area-Reading F002
Read element value in array task
Parameter number 2
Parameter group F
Output area [hex] 6002 0600 0000 0000
Word offset +0 +1 +2 +3
Function AK PNU IND - PWE
Input area [hex] 5002 0600 0000 03E8
Task success (DWORD element) response
Read value: Acceleration time = 000003E8h = 1000 = 10.00 sec
Page 58

44
Accessing Parameters Section 4-5
!Caution Do not access Inverter parameters while the Inverter is being re-initialized.
Refer to the MX2 Inverter manual section 6-3.
Refer to the RX Inverter manual section 4-2.
Accessing parameters during a re-initialization will cause the Inverter to go
into an undefined state.
4-5-2 PROFIdrive DP-V1 Parameter Channel
The Option Board provides Parameter Access in accordance
with the PROFIdrive V4 profile definition. Access is only supported on DP-V1
Class 2 slot 0, index 47. You will therefore have to ensure that all
MSAC2_Initialize, MSAC2_Write, MSAC2_Read and MSAC2_Abort messages make use of slot 0, index 47.
Note The OMRON web-site (http://industrial.omron.eu) provides function blocks
that automate parameter access when using the CJ1W-PRM21 / CS1WPRM21 version 3.0 or newer. These function blocks automate the DP-V1
Class 2 related commands to the PROFIBUS master as well as the DP-V1
parameter channel request and response formats. You can skip this section if
you are using these function blocks.
!Caution Do not access Inverter parameters while the Inverter is being re-initialized.
Refer to the MX2 Inverter manual section 6-3.
Refer to the RX Inverter manual section 4-2.
Accessing parameters during a re-initialization will cause the Inverter to go
into an undefined state.
4-5-2-1 Opening and Closing a DP-V1 Channel
Before the PROFIBUS master can exchange information with the Option
Board, the PROFIBUS master has to open a DP-V1 Class 2 (MSAC2) channel to the Option Board. Please consult the documentation of your PROFIBUS master on how to achieve this.
The Option Board only supports one DP-V1 Class 2 (MSAC2) channel. It is
therefore advisable to close the channel when you are done. Not doing so will
block other users of the parameter channel. Consult the documentation of
your PROFIBUS master on how to achieve this.
Table 51 Parameter Processing Message Area-Changing F002
Write value: 3.00 sec = 300 = 0000012Ch
Change DWORD element value in array task
Parameter number 2
Parameter group F@@@
Output area [hex] 8002 0600 0000 012C
Word offset +0 +1 +2 +3
Function AK PNU IND - PWE
Input area [hex] 5002 0600 0000 0000
Task success (DWORD element) response
Page 59

45
Accessing Parameters Section 4-5
4-5-2-2 DP-V1 read/write sequence
The following illustration demonstrates the DP-V1 read/write sequence.
1. The PROFIBUS master generates an MSAC2_Write request with parameter instructions. The write instructs the Option Board to either read or
change a number of parameters.
2. If the MSAC2_Write request is valid, the Option Board responds with a
positive write response but no data. If the MSAC2_Write request is invalid,
the Option Board responds with a DP error.
3. The Option Board starts processing and executing the parameter instructions:
• While the Option Board is processing read instructions, it fills the result
data with parameter values. If the Option Board encounters an error,
the corresponding value is replaced with a PROFIdrive error number
(Refer to section E-5 Parameter Value Formats).
• While the Option Board is processing change instructions, it generally
does not generate result data. However, if it encounters and error the
result data is filled with either zero-data (no error) or the corresponding
error value and element index (Refer to section E-5 Parameter Value
Formats).
4. The master polls the Option Board with an MSAC2_Read request.
5. While the Option Board is busy executing the instructions, it responds with
a negative read response (state conflict).
6. Once the Option Board is finished with the parameter instructions and the
result is available, it responds with a positive read response, and the instruction result + data.
Note Consult the documentation of your PROFIBUS master to obtain information
on how the above sequence may be automated.
4-5-2-3 Accessing Option Board Parameters
The following example demonstrates how to use the DP-V1 Class 2 (MSAC2)
parameter channel to read an Option Board parameter:
Note It is outside the scope of this manual to explain the DP and DP-V1 headers
and trailers. They are however shown in the illustrations to make the context
of the message data visible.
Step 1 Open a DP-V1 Class 2 (MSAC2) channel to the Option Board (Refer to the
documentation of your PROFIBUS master on how to open and close a DP-V1
channel)
Instruct the Option Board to read parameter 965 (Unit profile code):
Page 60

46
Accessing Parameters Section 4-5
When the Option Board responds with the result, process the response:
Step 2 Instruct the Option Board to read parameter elements 915.1 - 915.4 (Modbus
addresses mapped into PZD1 - PZD4):
When the Option Board responds with the result, process the response:
Step 3 Instruct the Option Board to change parameter elements 915.3 - 915.4 (Mod-
bus address mapped into PZD3 - PZD4) to 1F01h (Coil data 0) and 1622h
(P034 - Torque command level input):
Table 52 DP-V1 Class 2 Write-Parameter Read Instruction PNU965
Word offset
DP Header
MSAC2_Write
+0 +1 +2 +3 +4
DP Trailer
Description Request Header Parameter Address
REF RT DO N PA CA PNU IND
Message
data
[hex] 01 01 01 01 10 01 03C5 0000
[dec] 1111160 965 0
Request reference
(user parameter)
Option Board param 965
Address value (non-array)
Parameter read instruction Addressing a value
1
st
Inverter attached to Option Board
No of parameter addresses to follow
Table 53 DP-V1 Class 2 Read-Result of PNU965 Read Instruction
Word offset
DP Header
MSAC2_Read
+0 +1 +2 +3
DP Trailer
Description Request Header Value data
REF RT DO N FMT CV DATA
Message
data
[hex] 01 01 01 01 42 01 0302
[dec] 1111660 770
Request reference
Parameter 965
Parameter read success
1
st
Inverter attached to Option Board
1 value
1 parameter processed DATA format = WORD
Table 54 DP-V1 Class 2 Write-Array Read Instruction PNU915.1-915.4
Word offset
DP Header
MSAC2_Write
+0 +1 +2 +3 +4
DP Trailer
Description Request Header Parameter Address
REF RT DO N PA CA PNU IND
Message
data
[hex] 02 01 01 01 10 04 0393 0001
[dec] 2111164 915 1
Request reference
(user parameter)
Starting with element 915.1
Address 4 elements
Parameter read instruction Addressing values
1
st
Inverter attached to Option Board
No of parameter addresses to follow
Table 55 DP-V1 Class 2 Read-Result of PNU915.1-915.4 Read Instruction
Word offset
DP Header
MSAC2_Write
+0 +1 +2 +3 +4 +5 +6
DP Trailer
Description Request Value data
RE RT DO N FM CV DATA
Message
data
[hex] 02 01 01 01 42 04 0000 0000 0000 0000
[dec] 2111664 0 0 0 0
Request reference
915.1 915.2 915.3 915.4
Parameter read success
1
st
Inverter attached to Option Board
4 values
Value data
1 parameter processed: values to follow DATA format = WORD
Page 61

47
Accessing Parameters Section 4-5
When the Option Board responds with the result, process the response:
Step 4 Instruct the Option Board to change parameter 971 to 1 to (store changed
parameter(s) in non-volatile memory):
When the Option Board responds with the result, process the response:
Table 56 DP-V1 Class 2 Write-Array Change Instruction PNU915.3-915.4
Word offset
DP Header
MSAC2_Write
+0 +1 +2 +3 +4 +5 +6 +7
DP Trailer
Description Request Parameter Address Value data
RRTD NPAC PNU IND F C DATA
Message
data
[hex] 03 02 01 01 10 02 0393 0003 42 02 1F01 1622
[dec] 3211162 915 3 6627937 5666
Request reference
915.3 915.4
Parameter change instruction Start element
1
st
Inverter attached to Option
2 elements
Value data
No of parameter addresses to follow
DATA format = WORDs
Addressing values 2 values
Table 57 DP-V1 Class 2 Read-Result of PNU915.3-915.4 Change Instruction
Word offset
DP Header
MSAC2_Read
+0 +1
DP Trailer
Description Request Header
REF RT DO N
Message
data
[hex] 03 02 01 01
[dec] 3211
Request reference 1 parameter processed
Parameter change success
1
st
Inverter attached to Option Board
Table 58 DP-V1 Class 2 Write-Parameter Change Instruction PNU971
Word offset
DP Header
MSAC2_Write
+0 +1 +2 +3 +4 +5 +6
DP Trailer
Description Request Parameter Address Value data
RE RT DO N PA CA PNU IND FM CV DATA
Message
data
[hex] 04 02 01 01 10 00 03CB 0000 42 01 0001
[dec] 4211160 971 0 661 1
Request reference
Value
data
Parameter change instruction Parameter 971
1
st
Inverter attached to Option Board
Value (non-array)
1 parameter address and value to follow DATA format = WORD
Addressing a value 1 value
Table 59 DP-V1 Class 2 Read-Result of PNU971 Change Instruction
Word offset
DP Header
MSAC2_Read
+0 +1
DP Trailer
Description Request Header
REF RT DO N
Message
data
[hex] 04 02 01 01
[dec] 4211
Request reference 1 parameter processed
Parameter change success
1
st
Inverter attached to Option Board
Page 62

48
Accessing Parameters Section 4-5
Step 5 Instruct the Option Board to change parameter 972 first to 2, then to 1 (reset
the Option Board):
If the Option Board responds with result data, the reset failed. When the
Option Board is reset, the DP-V1 Class 2 (MSAC2) channel is automatically
closed. The details of the change instruction are therefore lost.
Step 6 Re-open the DP-V1 Class 2 channel to the Option Board before continuing
with further examples (Refer to section 4-5-2-1 Opening and Closing a DP-V1
Channel)
Note The DP-V1 Class 2 (MSAC2) channel parameter channel is automatically
closed when resetting the Option Board. You will therefore have to re-open
the channel before you can perform further parameter accesses.
4-5-2-4 Accessing Inverter Parameters
Step 7 Instruct the Option Board to read Inverter parameter P180 (PROFIBUS node
address):
Table 60 DP-V1 Class 2 Write-Multi-parameter Change Instruction PNU972
Word offset
DP Header
MSAC2_Write
+0 +1
Description Request Header
REF RT DO N
Message
data
[hex] 05 02 01 02
[dec] 5212
Request reference 2 parameter addresses and values to follow
Parameter change instruction
1
st
Inverter attached to Option Board
+2 +3 +4 +5 +6 +7 +8 +9 +10 +11
DP Trailer
Parameter Address Parameter Address Value Value
PA C PNU IND PA CA PNU IND FMT CV DATA FMT CV DATA
10 00 03CC 0000 10 00 03CC 0000 42 01 0002 42 01 0001
16 0 972 0 16 0 972 0 66 1 2 66 1 1
1 value 1 value
Parameter 972 Parameter 972 WORD format WORD format
Value (non-array) Value (non-array)
Addressing a value Addressing a value 1st parameter 2nd parameter
Page 63

49
Accessing Parameters Section 4-5
When the Option Board responds with the result, process the response
Step 8 Instruct the Option Board to change Inverter parameter A001 (Frequency
source) to 3 (Modbus):
When the Option Board responds with the result, process the response:
Step 9 Instruct the Option Board to read Inverter parameter F002 (Acceleration
time 1):
Table 61 DP-V1 Class 2 Write-Parameter Read Instruction P180
Word offset
DP Header
MSAC2_Write
+0 +1 +2 +3 +4
DP Trailer
Description Request Header Parameter Address
REF RT DO N PA CA PNU IND
Message
data
[hex] 06 01 01 01 10 00 3F34 0000
[dec] 611116016180 0
Request reference
(user parameter)
Parameter P180
Address value (non-array)
Parameter read instruction Addressing a value
1
st
Inverter attached to Option Board
1 parameter address to follow
Table 62 DP-V1 Class 2 Read-Result of P180 Read Instruction
Word offset
DP Header
MSAC2_Read
+0 +1 +2 +3
DP Trailer
Description Request Header Value
REF RT DO N FMT CV DATA
Message
data
[hex] 06 01 01 01 42 01 0017
[dec] 6111661 23
Request reference
Value
data
Parameter read success
1
st
Inverter attached to Option Board
1 value
1 parameter processed DATA format = WORD
Table 63 DP-V1 Class 2 Write-Parameter Change Instruction A001
Word offset
DP Header
MSAC2_Write
+0 +1 +2 +3 +4 +5 +6
DP Trailer
Description Request Parameter Address Value data
RE RT DO N PA CA PNU IND FM CV DATA
Message
data
[hex] 07 02 01 01 10 00 03E9 0000 42 01 0003
[dec] 7211160 1001 0 661 3
Request reference
Val ue
Parameter change instruction Parameter A001
1
st
Inverter attached to Option Board
Value (non-array)
1 parameter address and value to follow DATA format = WORD
Addressing a value 1 value
Table 64 DP-V1 Class 2 Read-Result of A001 Change Instruction
Word offset
DP Header
MSAC2_Read
+0 +1
DP Trailer
Description Request Header
REF RT DO N
Message
data
[hex] 07 02 01 01
[dec] 7211
Request reference 1 parameter processed
Parameter change success
1
st
Inverter attached to Option Board
Page 64

50
Accessing Parameters Section 4-5
When the Option Board responds with the result, process the response:
Step 10 Instruct the Option Board to change Inverter parameter F002 (Acceleration
time 1) to 3.00 sec:
When the Option Board responds with the result, process the response:
Step 11 Close the DP-V1 Class 2 (MSAC2) channel (Refer to section 4-5-2-1 Opening
and Closing a DP-V1 Channel)
Table 65 DP-V1 Class 2 Write-Parameter Read Instruction F002
Word offset
DP Header
MSAC2_Write
+0 +1 +2 +3 +4
DP Trailer
Description Request Header Parameter Address
REF RT DO N PA CA PNU IND
Message
data
[hex] 08 01 01 01 10 01 1772 0000
[dec] 8 1 1 1 16 0 6002 0
Request reference
(user parameter)
Parameter F002
Address value (non-array)
Parameter read instruction Addressing a value
1
st
Inverter attached to Option Board
1 parameter address to follow
Table 66 DP-V1 Class 2 Read-Result of F002 Read Instruction
Word offset
DP Header
MSAC2_Read
+0 +1 +2 +3 +4
DP Trailer
Description Request Header Value
REF RT DO N FMT CV DATA
Message
data
[hex] 08 01 01 01 42 01 0000 03E8
[dec] 8 1 1 1 66 1 1000
Request reference
Value = 10.00s
Parameter read success
1
st
Inverter attached to Option Board
1 value
1 parameter processed DATA format = WORD
Table 67 DP-V1 Class 2 Write-Parameter Change Instruction F002
Word offset
DP Header
MSAC2_Write
+0 +1 +2 +3 +4 +5 +6 +7
DP Trailer
Description Request Parameter Address Value data
RRTD NPAC PNU IND F C DATA
Message
data
[hex] 09 02 01 01 10 01 1771 0000 43 01 0000 012C
[dec] 92111616001 0 671 300
Request reference
Value = 3.00s
Parameter change instruction Element 001.0
1
st
Inverter attached to Option
1 element
1 parameter address and value to follow
DATA format=DWORD
Addressing a value
1 value
Table 68 DP-V1 Class 2 Read-Result of F002 Change Instruction
Word offset
DP Header
MSAC2_Read
+0 +1
DP Trailer
Description Request Header
REF RT DO N
Message
data
[hex] 09 02 01 01
[dec] 9211
Request reference 1 parameter processed
Parameter change success
1
st
Inverter attached to Option Board
Page 65

51
Accessing Parameters Section 4-5
4-5-2-5 Processing an Error Response
When the Option Board is unable to execute one of the read parameter
instructions, it adds an error value to the result data. Reading parameters
A001, A166 and P033 for example:
Has the following result:
Note that the value of parameter A166 is replaced with an error value in the
result data. Inverter parameter A166 does not exist, so error number 0000h
(Bad parameter number) is returned. Note that the values of A001 and P033
are returned irrespective of other read errors.
Note If a read on one of the elements in an array fails, an error is returned on the
parameter. Successfully read elements can therefore not be returned.
Table 69 DP-V1 Class 2 Write-Parameter Read Instruction Bad Parameter
Word offset
DP Header
MSAC2_Write
+0 +1
Description Request Header
REF RT DO N
Message
data
[hex] 0A 01 01 03
[dec] 10 1 1 3
Request reference 3 parameters address to follow
Parameter read instruction
1st Inverter attached to Option Board
+2 +3 +4 +5 +6 +7 +8 +9 +10
DP Trailer
Parameter Address Parameter Address Parameter Address
PA CA PNU IND PA CA PNU IND PA CA PNU IND
10 00 03E9 0000 10 00 048E 0000 10 00 3EA1 0000
16 0 1001 0 16 0 1166 0 16 0 16033 0
Parameter A001 Parameter A166 Parameter P033
Non-array Non-array Non-array
Addressing a value Addressing a value Addressing a value
Table 70 DP-V1 Class 2 Read-Result of Read Instruction on Bad Parameter
Word offset
DP Header
MSAC2_Read
+0 +1
Description Request Header
REF RT DO N
Message
data
[hex] 0A 81 01 03
[dec] 10 129 1 3
Request reference 3 error values to follow
Parameter read error
1
st
Inverter attached to Option Board
+2 +3 +4 +5 +6 +7
DP Trailer
Value Va lue Value
FMT CV DATA FMT CV DATA FMT CV DATA
42 01 0004 44 01 0000 42 01 0302
66 1 4 68 1 0 66 1 770
DATA format = WORD DATA format = WORD
DATA format = Error no Bad parameter number
1 value
A001 A166 P033
Page 66

52
Flexible Mode Section 4-6
When the Option Board is unable to execute one of the write parameter
instructions, it adds an error value and the failed element index to the result
data. Changing Option Board parameter elements 915.9 - 915.12 for example:
Has the following result:
Note that the error number is followed by the element number where the
change instruction failed. I.e. The changes to Option Board parameter elements 915.9 and 915.10 were carried out successfully. The attempt to change
915.11 failed and changes to subsequent elements (915.12) were not carried
out.
4-6 Flexible Mode
The Flexible device profile lets you operate the Inverter using the Modbus
registers directly. Parameters P160 - P169 and P170 - P179 can be used to
map Modbus registers into the cyclically exchanged process areas. User
parameters P160 - P169 configure the output process area mappings where
parameters P170 - P179 configure the input process area mappings.
4-6-1 Typical Configuration
Step 1 Configure the Option Board and Network as explained in sections 3-1 Config-
uring the Option Board and 3-2 Configuring the Network, but limit the follow-
ing choices:
Table 71 DP-V1 Class 2 Write-Parameter Change Instruction Bad Parameter
Word offset
DP Header
MSAC2_Write
+0 +1 +2 +3 +4
Description Request Header Parameter Address
REF RT DO N PA CA PNU IND
Message
data
[hex] 0B 02 01 01 10 04 0393 0009
[dec] 11211164 915 9
Request reference
Parameter change instruction Start element 915.9
1
st
Inverter attached to Option Board
4 elements
1 parameter address and value to follow Addressing values
+5 +6 +7 +8 +9
DP Trailer
Val ue data
FMT CV DATA
42 04 0000 0000 0000 0000
6640000
DATA format = WORDs
915.9 915.10 915.11 915.12
4 values
Value data
Table 72 DP-V1 Class 2 Read-Result of Change Instruction on Bad Parameter
Word offset
DP Header
MSAC2_Read
+0 +1 +2 +3 +4
DP Trailer
Description Request Header Values
RE F R T D O N F MT CV D ATA D ATA
Message
data
[hex] 0B 82 01 01 44 02 0003 000B
[dec] 11 130 1 1 68 2 3 11
Request reference Failed
Parameter change error Error no: Faulty
1
st
Inverter attached to Option Board
2 values
1 error value to follow DATA format = Error no
Page 67

53
Flexible Mode Section 4-6
• When selecting the device profile when configuring the Option Board
(Step 1 of section 3-1 Configuring the Option Board), select the Flexible
device profile by setting P182 to 2.
• When choosing the module while configuring the network (Step 6 of section 3-2 Configuring the Network), select the Flexible module.
Step 2 Set parameters P160 to 1F01h to map coil data 0 as the 1st word into the out-
put process area.
Step 3 Set parameters P161 and P162 to 0001h and 0002h to map the Modbus fre-
quency reference (F001) as the 2nd and 3rd words in the output process
area.
Step 4 Set parameter P170 to 0003h to map Inverter status A as the 1st word in the
input process area.
Step 5 Set parameter P171 to 1E01h to map coil data 1 (coil no 0010h to 001Fh) into
the 2nd word in the input process area.
Step 6 Set parameters P172 and P173 to 1001h and 1002h to map the Modbus fre-
quency monitor (d001) as the 3rd and 4th words in the input process area.
Step 7 Restart the Inverter or reset the Option Board for the new settings to take
effect.
If you configured everything correctly, your output and input process areas
should have the following mapping:
Table 73 Flex Mode Output Area with Typical Configuration
Note The operation status coil (000Fh) cannot be used in the output process area
because it is not writeable.
Table 74 Flex Mode Input Area with Typical Configuration
dec
hex
151413121110 9 876543210
- In8
*RX
In7 In6 In5 In4 In3 In2 In1 - - RS EXT Dir Opr -
0 0 0000 0 000000000
Operation command
Rotation direction command In4
External Trip In5
Trip reset In6
Intelligent input terminal [1]
Intelligent input terminal [2] In8
*RX
Intelligent input terminal [4]
Intelligent input terminal [5]
Intelligent input terminal [6]
Intelligent input terminal [8]
Bit
EXT
In7 Intelligent input terminal [7]
In3 Intelligent input terminal [3]
00000000 000000000 0000 0000
0
0000 0000
+2 +3
000
--00
Word offset +1+0
Coil data 0 -
+4
--
+9
-
+8+5 +6 +7
Value
F001 (0001h/0002h)
0
Register
0
0000
In2
In1
0000
RS
Dir
Opr
Value
Name
dec
hex
15 14 13 12 11 10 9 8 7 6 5 4 3 2 1 0
ONT RNT TRQ UV IP
*R
X
OTQ FA3 AL OD OL FA2 FA1 RUN - Rdy Dir
00000 00000000010
FA3
OTQ
UV
RNT
ONT
IP
*RX
(Refer to Inverter MX-2 Manual section B-4-2)
Operation time over
Plug-in time over
Invstat A
OL Overload advance notice
OD Output deviation for PID control
IP during momentary power interruption.
Is only applicable for the RX Inverter,
(Refer to Inverter RX Manual section 4-4
Communication Function)
FA1 Constant-speed reached Undervoltage
FA2 Set frequency overreached TRQ Torque limited
Rdy Inverter ready Set frequency reached
RUN Running Over-torque
Dir Rotation direction AL Alarm signal
-
+4
--
+9
-
+8+5 +7
-
Value
+6+2 +3
Coil data 1Register
Word offset +1+0
Invstat A d001 (1001h/1002h)
0
0000
-
00 0
0002 0000 0000 0000 00000000 0000
00
Value
0
Name
0
Bit
2
0002 0000
Page 68

54
Flexible Mode Section 4-6
!WARNING A revision AAAA MX2 Inverter allows the motor to run immediately if a trip
condition is reset, and at the same time, Opr (Coil data 0) is set. For safe
operation clear Opr (Coil data 0) when you detect that InvStat A changes to 8.
Refer to section 1-1-2 Inverter Support to determine the MX2 Inverter revision.
4-6-2 Operating the Motor
Step 8 Set A001=3 and A002=3 so that the Inverter can be controlled using the Mod-
bus registers.
Step 9 Set the Opr bit to put the Inverter in run mode. The RUN indicator on the
Inverter should light up at this point. If this is not the case, check your source
selection.
Step 10 Change d001 to the desired frequency (E.g. 1000 for 10.00 Hz)
Table 75 Flex Mode Output Area with Motor Running Forward
The motor accelerates until it reaches the desired frequency. Notice that the
FA1 bit is set once the inverter has reached the desired reference frequency.
Table 76 Flex Mode Input Area with Motor Running Forward
Step 11 Set Dir to reverse the direction of the motor. The motor decelerates, stops and
then accelerates in the opposite direction. The FA1 bit clears as soon as the
reference frequency is changed. When the motor starts reversing, the Dir bit
in Coil data 1 is set. Once the new reference frequency is reached, the FA1 bit
is once again set.
Step 12 Clear the Opr bit to stop the motor. The motor decelerates and comes to a
halt.
4-6-3 Faults and Trips
User trips can be generated by setting the EXT bit in coil data 0. You must
always immediately clear the Opr bit in your PLC program when the AL bit in
Coil Data 1 (Tripping) is set by the inverter. If the Opr bit is set when the trip
condition is cleared, the Inverter will immediately start running!
Page 69

55
Limitations Caused by Inverter Mode and Rating Selection Section 4-7
!WARNING Always clear the Opr bit in your PLC program when Inverter status A is set to
8 (Tripping) by the Inverter. Not doing so may result in the motor starting
unexpectedly when the trip is cleared.
Set and clear the RS bit in coil data 0 to clear a trip.
!WARNING Always clear the RS bit after setting it. Not doing so will result in new trip con-
ditions automatically being cleared.
4-6-4 Mapping Restrictions
The Flexible device profile places the same mapping restrictions on your con-
figuration as explained for the PROFIdrive device profile (Refer to section 4-3-
4 Mapping Restrictions).
4-7 Limitations Caused by Inverter Mode and Rating Selection
The Inverter mode and rating selection directly affects several aspects of the
Option Board usage. (Refer to the MX2 Inverter user's manual section 3-6-
24). The following table lists the most common consequences of the various
Inverter modes and ratings:
Note The Inverter will trip due to a cyclic mapping fault if you use torque-related
registers in the process area when not available.
The Inverter mode and rating selection directly affects several aspects of the
Option Board usage. (Refer to the RX Inverter User Manual section 4-2). The
following table lists the most common consequences of the various Inverter
modes and ratings:
Note The Inverter will trip due to a cyclic mapping fault if you use torque-related
registers in the process area when not available.
Table 77 Limitations Caused by Inverter Mode and Rating Selection MX2
Inverter Mode and Rating Standard Induction High
Frequency
Permanent
Magnet
Constant
Torq ue
Var iable
Tor que
d060 0 (1-C) 1 (1-v) 2 (H-1) 3 (P)
HSW and HIW scaling 0.01 Hz 0.1 Hz 0.01 Hz
Torque-related registers
Available
Not available
*1
Table 78 Limitations Caused by Inverter Mode and Rating Selection RX
Inverter Mode and Rating Standard Induction Motor
Constant Torque Variable Torque
d060 0 (1-C) 1 (1-v)
HSW and HIW scaling 0.01 Hz
Torque-related registers
Available
Not available
*1
Page 70

56
Limitations Caused by Inverter Mode and Rating Selection Section 4-7
Page 71

57
Troubleshooting using the LED indicators Section 5-1
SECTION 5
Troubleshooting and Maintenance
5-1 Troubleshooting using the LED indicators
The four LED indicators on the Option
Board provide information on the
Option Board mode and status and the
network status.
When an error occurs, the Option
Board indicator pattern provides troubleshooting information. For certain
errors, additional information can be
obtained from the trip error code given
by the four-digit display of the Inverter.
In the following sections typical LED
indicator and four-digit Inverter display
patterns are provided to assist in troubleshooting. To show the status of the
indicators, the following conventions
are used:
OFF
ON
Flashing
Not important (Ignore)
Inverter error code
Not important (Ignore)
5-1-1 When an error occurs
When an error occurs, the Option Board trips the Inverter.
Step 1 For the MX2 Inverter, an error code is displayed on the Digital Operator Dis-
play.
For the RX Inverter, you need to connect the Digital Operator Display to the
Inverter with an Ethernet cable. Then you can see the error code on the display. Note: if despite the problem it is still possible to communicate with the
unit, the latest error code can also be read in parameter d081.
Step 2 Use the error code to help troubleshoot the error.
In the following sections typical LED indicator and four-digit Inverter display
patterns are provided to assist in troubleshooting. To show the status of the
indicators, the following conventions are used:
OFF Not important (Ignore)
RED Inverter error code
GREEN Not important (Ignore)
Flashing
MSMSMSMSMS
Page 72

58
Troubleshooting using the LED indicators Section 5-1
Tip Do not clear the trip before you are finished troubleshooting an error. When
you clear the trip, the error code is cleared from the four-digit display. The trip
history can however be read back using d080 through d086. This will allow
you to diagnose the error even if you accidentally cleared the trip cause.
5-1-2 Option board or inverter errors
During the Initialization process the RUN indicator will remain OFF. Once the
initialization has been completed correctly, the RUN indicator will be ON and
the ERR indicator OFF. The table below shows the indicator and display patterns caused by Option Board or Inverter Errors.
Table 79 Option board or inverter errors
MX2
Display &
Indicators
RX
Display &
Indicators
Possible Cause(s) Corrective Action
The Inverter does not power up.
Follow the instruction provided in
the MX2-Inverter user's manual
section 6-1-4 to troubleshoot.
Follow the instruction provided in
the RX-Inverter user's manual section 6-1 to troubleshoot.
The Option Board is not mounted properly. Check that the Option Board is mounted
properly and restart the Inverter.
The Option Board connector is damaged. Replace the Option Board.
The Inverter RS input is ON. Switch the Inverter RS input OFF.
The Option Board encountered a fatal error
during Operation.
Check that the Option Board is mounted
properly and restart the Option Board. If the
problem persists, replace the Option Board.
The Inverter does not support an Option
Board (Refer to 1-1-2 Inverter Support)
Replace the Inverter.
The Option Board connector is damaged Replace the Option Board.
The Inverter encountered a fatal error during
Operation.
Restart the Inverter. If the problem persists,
replace the Inverter.
The Option Board node address
was set using the set-slave address
functionality of your PROFIBUS
master or diagnostic tool, but the
Inverter password function is set.
Restart the Option Board. If you
need to set the Option Board node
address, first clear the Inverter
password (Refer to section 3-6-25
in the MX2 Inverter user's manual).
The user program requested a trip by setting
the external trip bit of the conventional module operation command.
Check and correct all items in accordance
with the user program.
Page 73

59
Troubleshooting using the LED indicators Section 5-1
5-1-3 Configuration Errors
If the Option Board is correctly configured, the RUN indicator will be ON and
the ERR indicator OFF. The table below shows the indicator and display patterns caused by configuration errors.
Table 80 Configuration Errors
MX2
Display &
Indicators
RX
Display &
Indicators
Possible Cause(s) Corrective Action
One of the configuration parameters
P160 - P179 has been rejected by the
Inverter.
Check (and correct) the following items:
• Is one of the parameters P160 - P179
specifying a Modbus register that does
not exist?
• If one of the parameters P160 - P169 is
specifying a double-word Modbus register: Are both the high- and low-words
specified in sequence by two consecutive parameters?
• If one of the parameters P170 - P179 is
specifying a double-word Modbus register: Are both the high- and low-words
specified in sequence by two consecutive parameters?
• Is a Modbus register specified twice in
the output parameter registers P160 P169?
• Is one of the output parameters P160 P169 specifying a Modbus register that
is read only? (A register is read-only if it
has an 'R' in the 'R/W' column).
See section B-4-2 of the MX2
Inverter user's manual.
See section 4-4 Register Number List RX Inverter user's
manual.
• Is one of the output parameters P160 P169 specifying a Modbus register of
which the parameter is not run-mode
editable?
Refer to section 3-2-3 of the
MX2 Inverter user's manual.
Refer to Appendix 1 of the RXInverter user's manual.
Your Inverter version has not been prop-
erly verified with this version of the
Option Board (The PROFIBUS node
address in the Inverter is invalid or
absent).
Reset the Inverter to factory defaults. If the
problem persists, contact your local OMRON
representative for assistance.
Your Inverter version has not been properly verified with this version of the
Option Board (Some Option Board
parameters in the Inverter are invalid or
absent).
Reset the Inverter to factory defaults. If the
problem persists, contact your local OMRON
representative for assistance.
Page 74

60
Troubleshooting using the LED indicators Section 5-1
5-1-4 PROFIBUS Errors
If the PROFIBUS master is correctly configured and there are no wiring
errors, the COMM indicator will be ON and the BF indicator OFF. The table
below shows the indicator patterns caused by configuration PROFIBUS
errors.
Table 81 PROFIBUS Errors
MX2
Display &
Indicators
RX
Display &
Indicators
Possible Cause(s) Corrective Action
The PROFIBUS master cannot communi-
cate with the Option Board because the
PROFIBUS configuration is not correct.
Check (and correct) the following items:
• Does the node address in your PROFIBUS master configuration program match
P180?
• Does any other slave device on the PROFIBUS network also have the same node
address?
• Is the PROFIBUS master ON-LINE?
• If you are using OMRON CX-Configurator:
Make sure that the 'Enable DPV1 option'
on the 'DPV1' tab is NOT checked.
The PROFIBUS wiring is not correct. Check (and correct) the following items:
• Are the correct pins wired on the PROFIBUS connector?
• Are there any short circuits or line interruptions?
• Are you using the correct cable type?
• If you have branches from the PROFIBUS
cable main line: Are any of these branches
too long?
The PROFIBUS network has not been
terminated correctly.
Follow the instruction provided in the PROFIBUS Installation Guideline for Cabling and
Assembly to correctly terminate the network.
The Option Board detected too many
communication errors.
Check (and correct) the following items:
• Is the ground cable of the Option Board
connected to a ground terminal on the
Inverter?
Are the MX2 installation guidelines to comply with EMC recommendations properly
implemented (refer to MX2 User's
manual section D-1)?
Are the RX installation guidelines
to comply with EMC recommendations properly implemented
(refer to RX User's manual section “2-1 Installation”)?)
• Are there any excessive EMI sources near
any of the cables or equipment?
Page 75

61
Troubleshooting using the LED indicators Section 5-1
5-1-5 Commissioning Mode
If the Option Board is operating in commissioning mode, the RUN indicator
will flash.
Commissioning mode is NOT an error, but it can influence normal system
operation. During commissioning mode, Inverter parameter access takes priority over cyclic data exchange. Accessing Inverter parameters will therefore
delay cyclic data exchange causing unexpected latencies.
If you are not busy configuring the Option Board or drive parameters, disable
commissioning mode by writing a 0 (zero) to PNU890.
!Caution Make sure that you disable commissioning mode before operating the system.
The PROFIBUS configuration is NOT cor-
rect, but the PROFIBUS master can communicate with the Option Board.
Check (and correct) the following items:
• Does the node address of any OTHER
slave device on the PROFIBUS network
match P180?
• Are you using the correct GSD file in your
PROFIBUS master configuration program?
• Does the device profile (P182) support the
configured module in your PROFIBUS
master configuration program (Refer to
3-1 Configuring the Option Board)?
The network error action (selected with
parameter P045) was executed due to a
PROFIBUS network error.
Check (and correct) the following items:
• Is the PROFIBUS master faulty, switched
off or off-line?
• Are the PROFIBUS connectors on both
the Option Board and master properly
connected?
• Has anything changed on the PROFIBUS
network (devices, termination, connectors,
etc.)?
• Are there any short circuits or line interruptions?
Table 81 PROFIBUS Errors (continued)
MX2
Display &
Indicators
RX
Display &
Indicators
Possible Cause(s) Corrective Action
Page 76

62
Troubleshooting Using PROFIBUS Diagnostics Section 5-2
5-2 Troubleshooting Using PROFIBUS Diagnostics
The Option Board provides PROFIBUS slave diagnostics when used in combination with a PROFIBUS master configuration program (or similar). The
Option Board supports all the pre-defined PROFIBUS diagnostics data. Some
additional (extended) diagnostic data is added to provide you with extensive
means to troubleshoot errors in the Option Board, Inverter and/or network.
Note A properly implemented PROFIBUS master configuration program should be
able to automatically interpret the diagnostic messages generated by the
Option Board using the GSD file. If for some reason you have to manually
interpret the diagnostic messages, refer to Appendix H.
5-2-1 Standard Diagnostic Information
Table 82 Standard diagnostic information
Diagnostic Status Possible Cause(s) Corrective Action
Master lock If you are not in data exchange with the Option
Board: Another PROFIBUS master on the network is in data exchange with the Option
Board.
• Remove the other PROFIBUS master from
the network.
• Remove the Option Board from the configuration of the other PROFIBUS master.
Parameter fault The parameter data sent by the PROFIBUS
master has been rejected by the Option Board.
Check (and correct) the following items:
• Does the node address of any OTHER
slave device on the PROFIBUS network
match P180?
• Are you using the correct GSD file in your
PROFIBUS master configuration program?
• If you are using OMRON CX-Configurator:
Is the 'Enable DPV1 option' on the 'DPV1'
tab checked?
Invalid slave response The PROFIBUS master is not compatible with
the specification of the Option Board.
Check (and correct) the following items:
• Is the PROFIBUS master compatible with
the specification of the Option Board?
• Are there any intermittent cable faults?
The PROFIBUS wiring is not correct. Check (and correct) the following items:
• Are there any intermittent short circuits or
line interruptions?
• Are you using the correct cable type?
• If you have branches from the PROFIBUS
cable main line: Are any of these branches
too long?
The PROFIBUS network has not been terminated correctly.
Follow the instruction provided in the PROFIBUS Installation Guideline for Cabling and
Assembly to correctly terminate the network.
Function not supported The PROFIBUS master has sent an unsup-
ported message to the Option Board.
Check (and correct) the following items:
• Is the PROFIBUS master configured to
send messages that are not supported by
the Option Board?
• Is the PROFIBUS master compatible with
the specification of the Option Board?
Extended Diagnostics The Option Board has sent extended diagnos-
tic information.
Use your PROFIBUS master configuration program to read the extended diagnostic information. Refer to section 5-2-2 for further
troubleshooting.
Configuration fault The selected device profile (P182) does not
support the configured module in your PROFIBUS master configuration program (Refer to
section 3-1).
• Change the device profile to support the
selected module in the PROFIBUS master
configuration program.
• Selected a module in the PROFIBUS master configuration program that is supported
by the selected device profile.
Page 77

63
Troubleshooting Using PROFIBUS Diagnostics Section 5-2
5-2-2 Extended Diagnostic Information
Station not ready The Option Board is still starting up. If the problem persists, replace the Option
Board.
Station not existent The PROFIBUS wiring is not correct. Check (and correct) the following items:
• Are the correct pins wired on the PROFIBUS connector?
• Are there any short circuits or line interruptions?
• Are you using the correct cable type?
• If you have branches from the PROFIBUS
cable main line: Are any of these branches
too long?
The PROFIBUS network has not been terminated correctly.
Follow the instruction provided in the PROFIBUS Installation Guideline for Cabling and
Assembly to correctly terminate the network.
Slave deactivated The Option Board has been deactivated as
slave in the PROFIBUS master
Activate the Option Board as slave in the PROFIBUS master.
Sync Mode The Option Board has been set to SYNC mode
using a global command.
If the Option Board was not intentionally put in
sync mode:
• Restart the Option Board, or
• Use the PROFIBUS master to send an
UNSYNC command to the Option Board.
Freeze Mode The Option Board has been set to FREEZE
mode using a global command.
If the Option Board was not intentionally put in
freeze mode
• Restart the Option Board, or
• Use the PROFIBUS master to send an
UNFREEZE command to the Option
Board.
Watchdog on If OFF: The Option Board network watchdog is
disabled in the PROFIBUS master configuration program.
If the Option Board network watchdog is not
intentionally disabled, enable it using the PROFIBUS master configuration program.
Parameter request A parameter fault occurred or a configuration
check failed.
Refer to the Parameter fault or Configuration
check diagnostic statuses to troubleshoot.
Table 83 Extended diagnostic information
Diagnostic Status Possible Cause(s) Corrective Action
AC power failure The Inverter is not detecting any AC mains
supply voltage.
• Check the AC mains supply voltage.
Follow the instruction provided in
the MX2 Inverter user's manual
section 6-1-4 to troubleshoot.
Follow the instruction provided in
the RX Inverter user's manual
section 6-1to troubleshoot.
The Inverter's fuse is blown. Replace the Inverter fuse.
Inverter communication error
The Inverter encountered a fatal error during
Operation.
Restart the Inverter. If the problem persists,
replace the Inverter.
Table 82 Standard diagnostic information (continued)
Diagnostic Status Possible Cause(s) Corrective Action
Page 78

64
Troubleshooting Using PROFIBUS Diagnostics Section 5-2
Mapped output register
rejected
One of the output configuration parameters
P160 - P169 has been rejected by the Inverter.
Check (and correct) the following items:
• Is one of the parameters P160 - P169
specifying a Modbus register that does not
exist?
• Is a Modbus register specified twice in the
output parameter registers P160 - P169?
• If one of the parameters P160 - P169 is
specifying a double-word Modbus register:
Are both the high- and low-wordss specified in sequence by two consecutive
parameters?
• Is one of the output parameters P160 P169 specifying a Modbus register that is
read only? (A register is read-only if it has
an 'R' in the 'R/W' column)
See in section B-4-2 of the MX2
Inverter user's manual.
See in section “4-4 Register Number List” of the RX Inverter user's
manual.
• Is one of the output parameters P160 P169 specifying a Modbus register of
which the parameter is not run-mode editable?
Refer to section 3-2-3 of the
MX2-A
@ Inverter user's manual.
Refer to Appendix 1 of the RX
Inverter user's manual.
Mapped input register
rejected
One of the input configuration parameters
P170 - P179 specifying a Modbus register that
does not exist.
Check (and correct) the following items:
• Is one of the parameters P170 - P179
specifying a Modbus register that does not
exist?
• If one of the parameters P170 - P179 is
specifying a double-word Modbus register:
Are both the high- and low-words specified
in sequence by two consecutive parameters?
Node storage failed Your Inverter version has not been properly
verified with this version of the Inverter.
Contact your local OMRON representative for
assistance.
Invalid option parameters
Your Inverter version has not been properly
verified with this version of the Inverter.
Contact your local OMRON representative for
assistance.
Commissioning mode
is active
Commissioning mode is NOT an error, but it
can influence normal system operation. During
commissioning mode, Inverter parameter
access takes priority over cyclic data
exchange. Accessing Inverter parameters will
therefore delay cyclic data exchange causing
unexpected latencies.
If you are not busy configuring the Option
Board or drive parameters, disable commissioning mode by writing a 0 (zero) to PNU890.
Table 83 Extended diagnostic information (continued)
Diagnostic Status Possible Cause(s) Corrective Action
Page 79

65
Maintenance and Inspection Section 5-3
5-3 Maintenance and Inspection
5-3-1 How to replace the MX2 Option Board
!HIGH VOLTAGE Always Switch OFF the mains power supply to the Inverter before removing
the Option Board. Wait for the time specified on the Inverter front cover for the
capacitors to discharge. Not doing so may result in electrical shock.
Step 1 Loosen the faulty Option Board
mounting screw.
Step 2 Pull the faulty Option Board straight
out of the Inverter while pushing
down on the indicated sides to
release the snap-fits.
Step 3 For Inverters up to 4.0 kW only:
loosen the screw(s) of the terminal
block cover and remove the cover to
enable access to the chassis ground
terminal screws.
Page 80

66
Maintenance and Inspection Section 5-3
Step 4 Unscrew and remove the faulty Option Board grounding cable. Keep the
screw and washers, but set the faulty Option Board aside.
Step 5 Secure the replacement Option Board grounding cable to the Inverter using
the mounting screw.
Unscrew and remove the faulty Option Board grounding cable.
Keep the screw and washers, but set the faulty Option Board aside.
Step 6 If removed in Step 3, mount the termi-
nal cover again and tighten the
screw(s).
Step 7 Push the replacement Option Board
into Inverter to replace the removed
Option Board until it clicks into place
3-phase 200 V 0.1 - 3.7 kW
3-phase 400 V 0.4 - 4.0 kW
1-phase 200 V 0.1 - 2.2 kW
3-phase 200 V 5.5 - 15 kW
3-phase 400 V 5.5 - 15 kW
Page 81

67
Maintenance and Inspection Section 5-3
Step 8 Press down on the indicated corner
of the replacement Option Board
housing to ensure proper connection
of the Option Board connector
Step 9 Check that there is
no gap between the
top edges of the
replacement Option
Board and the
Inverter casing.
Step 10 Secure the replacement Option
Board in place with the mounting
screw (do not over-tighten).
!Caution When replacing an Inverter be sure that all Inverter settings of the Inverter
being replaced are restored to the replacement.
Page 82

68
Maintenance and Inspection Section 5-3
5-3-2 How to replace the RX Option Board
!HIGH VOLTAGE Always Switch OFF the mains power supply to the Inverter before removing
the Option Board. Wait for the time specified on the Inverter front cover for the
capacitors to discharge. Not doing so may result in electrical shock.
Step 1 Remove the blind cover by pushing
the lip on the top
Step 2 Unscrew the screw on the top-right of
the Option Board.
Step 3 Remove the Terminal cover from the
inverter.
Page 83

69
Maintenance and Inspection Section 5-3
Step 4 Unscrew the Option Board grounding
cable, mounted with an Inverter
grounding bold.
Step 5 Gently pull the Option Board straight
out while pushing down on the indicated spots to release the snap-fits..
Be careful not to stress the flex cable
Step 6 Remove the flex cable from the
inverter by pulling on the indicated
locations.
Step 7 Purpose
: mount the new Inverter
Connector (no.1) of the Option Board
onto the interface connector (no.5) of
the RX Inverter.
How to do
:
First align the small hole of the
Inverter connector (no.2) with the
guide-post (no.4) in the Inverter.
G
A
1
2
3
Page 84

70
Maintenance and Inspection Section 5-3
Then align the larger hole on the
Inverter connector (no.3) with the
threaded hole (no.6) in the Inverter.
Push the Inverter connector into
place.
Step 8 Move the Option Board Cable (no.2) to the left with your finger, so the Option
Board Cable is not pinched between the Option Board and the Inverter Front
Cover.
Note Prevent a pinched Option Board Cable, as shown in position A.
Note Do not pull on the Option Board Cable.
Note Do not let the Option Board hang on the Option Board Cable.
Insert the Option Board approximately 1 cm above the down-position into the
Front cover of the Inverter. See figure 1above.
Slide the Option Board down. See figure 2 above.
The snap-fits of the Option Board
(no.5) will be locked by the snap-fits
in the Front cover (no.4).
2
4
1
4
mc1±
3
Connector
Option Board bottom side
5
Page 85

71
Maintenance and Inspection Section 5-3
Step 9 Press down carefully the two locking
pins (no. 1) of the Option Board.
Press carefully the top of the Option
Board in the Inverter.
Check the replacement Option Board
is being locked by the locking pins
(no.1).
Step 10 Insert the screw (no. 1) into the upper
right hole in the Option Board (no.2).
Tighten the screw into place (do not
over tighten).
Fix the Option Board grounding cable
to the chassis ground of the RXInverter under an already fixed chassis grounding bold.
See the bold with the grounding figure.
The position of the chassis ground
vary from inverter type. Illustrations
are only provided for one Inverter
size. The instructions however are
generic and may be followed for all
Inverter sizes.
1
2
G
Page 86

72
Warranty Section 5-4
Step 11 Unscrew the mounting screws of
the Terminal cover nearly completely from the plastic rings
(no.1).
Remount the Terminal cover
under the Option Board onto the
Inverter (no.2).
Tighten the two screws (no.1).
Step 12 Push the blind cover (no.1) into place.
Note Refer to section 2 in the RX User's
Manual (Cat. No. I560) for operations
related to assembly and disassembly
of the RX Inverter.
5-4 Warranty
OMRON's exclusive warranty is that the products are free from defects in
materials and workmanship for a period of one year (or other period if specified) from date of sale by OMRON.
OMRON MAKES NO WARRANTY OR REPRESENTATION, EXPRESS OR
IMPLIED, REGARDING NONINFRINGEMENT, MERCHANTABILITY, OR
FITNESS FOR PARTICULAR PURPOSE OF THE PRODUCTS. ANY BUYER
OR USER ACKNOWLEDGES THAT THE BUYER OR USER ALONE HAS
DETERMINED THAT THE PRODUCTS WILL SUITABLY MEET THE
REQUIREMENTS OF THEIR INTENDED USE. OMRON DISCLAIMS ALL
OTHER WARRANTIES, EXPRESS OR IMPLIED.
1
Page 87

73
APPENDIX A
APPENDIX A
Glossary
Device Profile A device profile defines a common interface and behavior for a range of
devices that can be grouped under a particular class.
DP-V1 DP-V1 implements PROFIBUS Acyclic data exchange, cyclic data exchange
and alarm handling at the application layer.
DP-V1 Class 2 DP-V1 Class 2 (also known as MSAC2) messaging supports communication
relationships between the PROFIBUS DP slave and multiple PROFIBUS DP
masters.
EMC EMC (ElectroMagnetic Compatibility) defines the extent to which a piece of
hardware will tolerate electrical interference from other equipment, and will
interfere with other equipment.
EMI Electromagnetic Interference - In motor/drive systems, the switching of high
currents and voltages creates the possibility of generating radiated electrical
noise that may interfere with the operation of nearby sensitive electrical instruments or devices. Certain aspects of an installation, such as long motor lead
wire lengths or an ungrounded chassis, tend to increase the chance of EMI.
FA Systems Factory Automation Systems implement control systems in combination with
other applications of information technology to control industrial machinery
and processes. FA Systems are used to reduce the need for human intervention in factory environments.
Fieldbus Fieldbus is the name of a family of industrial computer network protocols used
for real-time distributed control, now standardized as IEC 61158
Free-run Stop A method of stopping a motor, caused when the Inverter simply turns OFF its
motor output connections. This may allow the motor and load to coast to a
stop, or a mechanical brake may intervene and shorten the deceleration time.
Frequency Setting While frequency has a broad meaning in electronics, it refers to motor speed
for motor and drive systems. The output frequency of an Inverter is variable
and proportional to the attained motor speed.
Intelligent Terminal A configurable input or output logic function on the Omron Inverters. Each ter-
minal may be assigned one of several functions.
Inverter A device that electronically changes DC to AC current through an alternating
process of switching the input to the output, inverted and non-inverted. It contains three Inverter circuits to generate 3-phase output to the motor.
Jogging Operation Usually done manually, a jog command from an operator's panel requests the
motor/drive system to run indefinitely at low speed in a particular direction.
This continues until the machine operator ends the jog operation.
PLC A PLC (Programmable Logic Controller) is a digital computer used for the
automation of electromechanical processes.
Process Area The Process Area is a memory area in the controller that allows you to control
and monitor the Unit. The Fieldbus is used to continually refresh the Process
Area to and from decentralized peripherals. A Unit's status- and response to
a change in the Process Area therefore isn't instantaneous (The latencies and
jitter associated with the communication path limit the responsiveness of the
Unit).
Page 88

74
APPENDIX A
PROFIBUS PROFIBUS (PROcess FieldBUS) is a standard for Fieldbus communication in
automation technology
PROFIBUS DP PROFIBUS DP (PROFIBUS for Decentralised Peripherals) is an implementa-
tion of PROFIBUS optimized for distributed I/O applications. PROFIBUS DP
devices can co-exist with non-DP PROFIBUS devices on the same bus.
PROFIBUS FMS PROFIBUS FMS (PROFIBUS Fieldbus Message Specification) is an imple-
mentation of the PROFIBUS tailored for demanding communication tasks.
PROFIBUS FMS devices can co-exist with non-FMS PROFIBUS devices on
the same bus.
PROFIdrive PROFIdrive implements a common PROFIBUS DP device profile for motion
control applications such as drives and Inverters.
Programmable Products Some products allow customisation of their behavior by allowing the execution
of a sequence of user instructions.
Termination Electrical termination of a signal involves providing a terminator at the end of
a wire or cable. Termination prevents an RF signal from causing interference
by being reflected back at the end of the cable.
Torque The rotational force exerted by a motor shaft. The units of measurement con-
sist of the distance (radius from shaft centre axis) and force applied at that
distance. Units are usually given as Newton-meters, pound-feet or ounceinches.
Trip Event An undesired event that causes the Inverter to stop operation is called a "trip"
event (as in tripping a circuit breaker). The Inverter keeps a history log of trip
events. They also require an action to clear.
Unit Within the context of this document, Unit refers to the MX2 or RX Option
Board.
Variable Speed Drive A Variable Speed Drive is a piece of equipment used to control the speed of
machinery.
PROFIdrive Device Profile
Acronyms HIW
The monitored output frequency is called HIW in the PROFIdrive device profile.
HSW The commanded frequency reference is called HSW in the PROFIdrive device
profile.
PKE The combination of the task ID and parameter number in the PKW messaging
area is called PKE in the PROFIdrive device profile.
PKW The parameter processing messaging area is called PKW in the PROFIdrive
device profile.
PNU The parameter number is called PNU in the PROFIdrive device profile.
PWE The parameter value in the PKW messaging area is called PWE in the PRO-
FIdrive device profile.
PZD The process data (cyclically transferred) is called PZD in the PROFIdrive
device profile.
STW The control word is called STW in the PROFIdrive device profile.
ZSW The status word is called ZSW in the PROFIdrive device profile.
Page 89

75
APPENDIX B
APPENDIX B
Parameter Process Data Object Modules
The Parameter Process Data Object (PPO) modules implement the cyclic
data exchange mapping for the PROFIdrive device profile. Five modules are
supported (PPO1 - PPO5) allowing you to select the number of exchanged
registers and PKW messaging support. All modules provide two default output words: STW (Control word) and HSW (Frequency Reference), provide
control over the Inverter. All modules additionally provide two default input
words: ZSW (Status Word) and HIW (Output Frequency) provide feedback on
the Inverter status. STW and ZSW are explained in more detail in appendix B-
2. HSW and HIW are explained in appendix B-3. The exchanged Modbus reg-
isters are configured by setting Inverter registers P160 - P179 to the appropriate Inverter Modbus addresses. If P160, P161, P170 or P171 are set to 0,
STW, HSW, ZSW and HIW are used.
Note Set P182 = 0 for the Option Board to support the PPO modules
Note The Inverter places some restrictions on the Modbus register selection. For a
Modbus Register to be mapped for output data exchange, it must be a runmode edit register that provides write-access. Double-word Modbus registers
must be mapped in sequence: high-word following low-word. It is not allowed
to map the same register more than once in the output area.
Tip
Refer to section B-4-2 of the MX2 Inverter user’s manual for a list
of the Inverter registers that provide write access.
Tip Refer to section 5 of the RX2 Inverter user’s manual for a list of the
Inverter registers that provide write access.
Tip
Refer to section 3-2-3 of the MX2 Inverter user’s manual for an
explanation on run-mode edit registers. Also note that the run-mode
edit requirement can be disabled with b031.
Tip Refer to section 5 of the RX Inverter user’s manual for an explanation on run-mode edit registers. Also note that the run-mode edit
requirement can be disabled with b031.
Page 90

76
I/O Mapping APPENDIX B
B-1 I/O Mapping
Note 1 If no Word Offset is specified for a Register, the Register does not exist in the
Input and Output Areas for the Module Type:
The Modbus addresses for the MX2 Inverter are listed in section B-4-2 of the
MX2 user's manual.
The Modbus addresses for the RX Inverter are listed in section 5 of the RX
user's manual.
P160-P169 can also be accessed as PNU915.1 - PNU915.10
P170-P179 can also be accessed as PNU916.1 - PNU916.10
Table B-1 PPO format I/O Mapping
Word Offset
*1
Content
*2
PPO1 PPO2 PPO3 PPO4 PPO5 Output Area Input Area
+0 +0 +0 PKE Task ID and Parameter num-
ber
PKE Task ID and Parameter num-
ber
+1 +1 +1 IND PNU index / Parameter
group in high byte
IND PNU index / Parameter
group in high byte
+2 +2 +2 PWE High word of value PWE High word of value
+3 +3 +3 Low word of value Low word of value or Error
number
+4 +4 +0 +0 +4 PZD1 Modbus register set by P160
or STW if P160 = 0
PZD1 Modbus register set by P170
or ZSW if P170 = 0
+5 +5 +1 +1 +5 PZD2 Modbus register set by P161
or HSW if P161 = 0
PZD2 Modbus register set by P171
or HIW if P171 = 0
+6 +2 +6 PZD3 Modbus register set by P162
or ignored if P162 = 0
PZD3 Modbus register set by P172
or always 0 if P172 = 0
+7 +3 +7 PZD4 Modbus register set by P163
or ignored if P163 = 0
PZD4 Modbus register set by P173
or always 0 if P173 = 0
+8 +4 +8 PZD5 Modbus register set by P164
or ignored if P164 = 0
PZD5 Modbus register set by P174
or always 0 if P174 = 0
+9 +5 +9 PZD6 Modbus register set by P165
or ignored if P165 = 0
PZD6 Modbus register set by P175
or always 0 if P175 = 0
+10 PZD7 Modbus register set by P166
or ignored if P166 = 0
PZD7 Modbus register set by P176
or always 0 if P176 = 0
+11 PZD8 Modbus register set by P167
or ignored if P167 = 0
PZD8 Modbus register set by P177
or always 0 if P177 = 0
+12 PZD9 Modbus register set by P168
or ignored if P168 = 0
PZD9 Modbus register set by P178
or always 0 if P178 = 0
+13 PZD10Modbus register set by P169
or ignored if P169 = 0
PZD10Modbus register set by P179
or always 0 if P179 = 0
Page 91

77
Control and Status Words - STW/ZSW APPENDIX B
B-2 Control and Status Words - STW/ZSW
Note The PZD1 output and input registers will control STW and present ZSW only if
P160 = 0 and P170 = 0
Note 1 When jogging, the output frequency is controlled by A038
Note 2 When the Control Override is not set, the Control- and Frequency Sources are
determined by A001/A002 or A201/A202
Note 3 When the Control Override is set, PROFIBUS takes over as both Control- and
Frequency Source irrespective of A001/A201/A002/A202
B-3 Frequency Reference and Output Frequency - HSW/HIW
The HSW output register controls both the Option Board Frequency Reference and Run Direction. The Run Direction is determined by HSW's sign and
the Frequency Reference by HSW's absolute size. Normally HSW has a scaling of 0.01 Hz. If the Inverter is operated in HF mode, the scaling is 0.1 Hz.
Note The PZD2 output register will control HSW only if P161 = 0
The HIW input register represents both the Inverter Run Direction and Output
Frequency. The Run Direction is represented by HIW's sign and the Output
Frequency by HIW's absolute size. Normally HIW has a scaling of 0.01 Hz. If
the Inverter is operated in HF mode, the scaling is 0.1 Hz.
Note The PZD2 input register will present HIW only if P171 = 0
Table B-2 PPO format STW/ZSW mapping
Bit STW (Control Output Word) ZSW (Status Input Word)
Name Description Name Description
0 (Unused) - (Reserved) Always 1
1 (Unused) - AC Mains 0: AC Mains off
1: AC Mains on
2 (Unused) - Ready for
Operation
0: Inverter Not Ready
1: Inverter Operational
3 Enable to
Run
0: Free Run Stop (Coast to a stop)
1: Controlled Acceleration/Deceleration
Fault 0: No Fault
1: Has Fault
4 Run
Operation
0: Stop
1: Run
(Reserved) Always 1
5 (Unused) - (Reserved) Always 1
6 (Unused) - (Reserved) Always 0
7 Fault Reset 0➞1: Reset Fault Alarm 0: No Alarm
1: Has Alarm
8 Jog Run
Forward
0: Normal Operation
1: Jog Run Forward
*1
Frequency
Arrival
0: Reference Freq. Not Reached
1: Reference Frequency Reached
9 Jog Run
Reverse
0: Normal Operation
1: Jog Run Reverse
*1
Control
Status
0: Other in Control
*2
1: PROFIBUS in Control
*3
10 Control
Override
0: Normal Operation
*2
1: PROFIBUS Takes Control
*3
(Reserved) Always 0
11 (Unused) - (Reserved) Always 0
12 (Unused) - (Reserved) Always 0
13 (Unused) - (Reserved) Always 0
14 (Unused) - (Reserved) Always 0
15 (Unused) - (Reserved) Always 0
Page 92

78
Parameter Processing Message Area - PKW APPENDIX B
B-4 Parameter Processing Message Area - PKW
The PKW Message Area provides an interface to read and change Inverter or
Option Board parameters using the I/O Data Exchange area. Several tasks
support reading and changing different parameter types and sizes. A failed
task is accompanied by error code detail to simplify diagnosis.
Table B-3 PPO format PKW mapping
Word
Offset
Contents
Bit Definitions
1514131211109876543210
+0 PKE AK SPM PNU
+1 IND IND
PNU
, OR (Unused)
IND
group
+2 PWE High word of value
+3 Low word of value or Error number
AK Task ID (Output Area):
0
: Clear the input message area
6
: Read element value in array
1
: Read parameter value
7
: Change WORD element value in array
2
: Change WORD parameter value
8
: Change DWORD element value in array
3
: Change DWORD parameter value
9
: Read array size
Task Response (Input Area):
0
: No response
5
: Task success (DWORD element)
1
: Task success (WORD parameter)
6
: Task success (Array size)
2
: Task success (DWORD parameter)
7
: Task failed (Parameter)
4
: Task success (WORD element)
8
: Task failed (Element)
SPM Unused (Always 0)
PNU Parameter number:
0
: Reserved
1..889
: Inverter parameter (Use IND for parameter group)
890..999
: Option Board parameter
[Appendix F]
>999
: Unsupported
IND
PNU
Index in Option Board parameter array (Only evaluated if Task ID is 6, 7 or 8):
IND
group
Inverter parameter group (Only evaluated if Task ID is 6, 7 or 8):
1
: Parm group 'A'
3
: Parm group 'C'
6
: Parm group 'F'
16
: Parm group 'P'
2
: Parm group 'b'
4
: Parm group 'd'
8
: Parm group 'H'
21
: Parm group 'U'
PWE Parameter value (If Task Response is 1, 2, 4, 5 or 6)
Error code (If Task Response is 7 or 8): Refer to Appendix G
Page 93

79
Basic Data I/O Mapping APPENDIX C
APPENDIX C
Conventional Modules
Conventional modules are provided for backward-compatibility with previous
OMRON Inverter products. Three modules are supported: Basic Data,
Extended Data 1 and Extended Data 2.
Note Set P182 = 1 for the Option Board to support the Conventional modules
C-1 Basic Data I/O Mapping
The Torque Reference only becomes effective if: P033 = 6, A044 = 3 and ATR
is assigned to a digital input and turned on. Refer to MX2 User Manual section
3-9-4.
The Torque Reference only becomes effective if: P033 = 7. Refer to RX User
Manual section 4-3 Torque Control.
C-2 Extended Data 1 I/O Mapping
Note The Torque Reference only becomes effective if: P033 = 6, A044
= 3 and ATR is assigned to a digital input and turned on. Refer to
MX2 User Manual section 3-9-4.
Table C-1 Basic data format I/O mapping
Word Offset Input Area Output Area
+0 Operation Command*1
(Section C-4)
*1.
Refer to section C-4 Operation Command and Inverter Status Registers on page 80 for the Operation Command and Inverter Status register definitions
Inverter Status*1 (Section C-4)
+1 Frequency Reference Output Frequency
+2 Torque Reference [1 %] Output Torque [1 %]
Table C -2 Ext1 d at a format I/O mapping
Word Offset Output Area Input Area
+0 Operation Command
*1
(Section C-4)
*1.
Refer to section C-4 Operation Command and Inverter Status Registers on page 80 for the Operation Command and Inverter Status register definitions
Inverter Status*1 (Section C-4)
+1 Frequency Reference Speed (Scaled Frequency)
+2 Torque Reference [1 %] Output Torque [1 %]
+3 Torque Compensation [1 %] Encoder Speed
+4 (Reserved) Frequency Reference
+5 Analog Output Channel 1 Output Frequency
+6 (Reserved) Output Current [0.1 A]
+7 Digital Outputs Analog Input Channel 1
+8 Modbus
Message Area
(Section C-5)
Instruction Modbus
Message Area
(Section C-5)
Result
+9
+10 Data Data
+11
+12
+13
+14 (Unused) (Unused)
+15 Control Status
Page 94

80
Extended Data 2 I/O Mapping APPENDIX C
Note The Torque Compensation only becomes effective if: P036 = 5,
A044 = 3 and ATR is assigned to a digital input and turned on. Refer to MX2 User Manual section 3-9-4.
Note The Analog Output Channel 1 only becomes effective if: C028 =
16. Refer to MX2 User Manual section 3-7.
Note A Digital Output only becomes effective if the associated register
(C021, C022 or C026) is set to 63. Refer to MX2 User Manual section 3-7.
Note The Torque Reference only becomes effective if: P033 = 7. Refer
to RX User Manual section 4-3 Torque Control for details.
Note The Torque Compensation only becomes effective if: P036 = 5.
Refer to RX User manual 4-3 Torque Bias.
Note The Analog Output Channel 1 only becomes effective if: C028 =
20. Refer to RX User Manual section 4-2 Analogue Output AM/
AMI Terminals.
Note A Digital Output only becomes effective if the associated register
(C021- C026) is set to 63. Refer to RX User Manual section 4-2
Multi-function Output Terminal Selection.
C-3 Extended Data 2 I/O Mapping
C-4 Operation Command and Inverter Status Registers
Table C -3 Ext2 d at a format I/O mapping
Word Offset Output Area Input Area
+0 Operation Command
*1
(Section C-4)
*1.
Refer to section C-4 Operation Command and Inverter Status Registers on page 80 for the Operation Command and Inverter Status register definitions
Inverter Status*1 (Section C-4)
+1 Frequency Reference Output Frequency
+2 Modbus
Message Area
(Section C-5)
Instruction Modbus
Message Area
(Section C-5)
Result
+3
+4 Data Data
+5 Control Status
Table C-4 Conventional control status regs
Bit Operation Command Inverter Status
Name Description Name Description
0 Forward Run/Stop (FW) 1: Run forward
0: Stop run forward
Operation Status 1: Inverter is running
0: Inverter is stopped
1 Reverse Run/Stop (RV) 1: Run reverse
0: Stop run reverse
0 Hz Detection
Signal (ZS)
1: ON
0: OFF
2 Intelligent Input
Terminal override [3]
1: ON
0: OFF
Rotation Direction 1: Reverse rotation
0: Forward rotation
3 Intelligent Input
Terminal override [4]
1: ON
0: OFF
Trip Reset Status 1: Trip reset (RS) is active
0: Trip reset (RS) not active
4 Intelligent Input
Terminal override [5]
1: ON
0: OFF
Set Frequency Reached
(FA3)
1: ON
0: OFF
5 Intelligent Input
Terminal override [6]
1: ON
0: OFF
Inverter Ready 1: ON
0: OFF
6 Intelligent Input
Terminal override [7]
1: ON
0: OFF
Alarm Signal (AL) 1: ON
0: OFF
Page 95

81
Extended Data 1 Digital Output Register APPENDIX C
C-5 Extended Data 1 Digital Output Register
C-6 1 Digital Output Register
7
Intelligent Input
Terminal
override [8]
1: ON
0: OFF
Trip Status 1: Inverter is tripped
0: Inverter not tripped
8 External Trip (EXT) 0 to 1: Trip inverter (Reserved) Always 0
9 Trip Reset (RS) 1: ON
0: OFF
(Reserved) Always 0
10 (Reserved) - PROFIBUS Control Sta-
tus
1: PROFIBUS is control
source
0: PROFIBUS not control
source
11 (Reserved) - Alarm Relay Output Ter-
minal Status
1: ON
0: OFF
12 (Reserved) - Intelligent Output Termi-
nal [11]
1: ON
0: OFF
13 (Reserved) - Intelligent Output Termi-
nal [12]
1: ON
0: OFF
14 Clear Error Log 0 to➞1: Clear error log 2nd Motor Selected
(SETM)
1: 2nd motor selected
0: 1st motor selected
15 Free-run Stop (FRS) 1: Coast to a halt
0: Normal operation
(Reserved) Always 0
Table C-4 Conventional control status regs (continued)
Bit Operation Command Inverter Status
Name Description Name Description
Table C-5 Ext1 digital output reg for MX2
Bit
Digital Outputs
Name Description
0 Output Terminal 11 1: ON
0: OFF
1 Output Terminal 12 1: ON
0: OFF
2 Alarm Relay Output Terminal 1: ON
0: OFF
3(Reserved) -
4(Reserved) -
5(Reserved) -
Table C-6 Ext1 digital output reg for RX
Bit
Digital Outputs
Name Description
0 Output Terminal 11 0: OFF
1: ON
1 Output Terminal 12 0: OFF
1: ON
2 Output Terminal 13 0: OFF
1: ON
3 Output Terminal 14 0: OFF
1: ON
Page 96

82
Modbus Message Area APPENDIX C
C-7 Modbus Message Area
4 Output Terminal 15 0: OFF
1: ON
5 Alarm Relay Output Terminal 0: OFF
1: ON
Table C-6 Ext1 digital output reg for RX
Bit
Digital Outputs
Name Description
Table C-7 Conventional modbus mailbox
Byte Offset Output Area Input Area
Ext.
Data 1
Ext.
Data 2
Bit Definitions Bit Definitions
76543210 76543210
+16 +4
Instruction
FUNC
Result
FUNC
+17 +5 REG REG
+18 +6
+19 +7 SIZE SIZE
+20 +8
Data
WORD1
Data
WORD1
+21 +9
+22 - WORD2 WORD2
+23 +24 - WORD3 WORD3
+25 +26 - WORD4 WORD4
+27 +30 +10
Ctrl
(Reserved)
Stat
(Reserved)
+31 +11 HS (Unused) CL HS STATUS COUNTER -
FUNC Command function code (Output Area):
03h
: Read
10h
:Write
Response function code (Input Area):
03h
: Read success
10h
: Write success
83h
: Read error
90h
: Write error
00h
: Waiting for response
REG Modbus register address start
SIZE Size of data (Number or words read / write)
2
:1 word
6
: 3 words (Ext. Data 1 only)
4
: 2 words (Ext. Data 1 only)
8
: 4 words (Ext. Data 1 only)
HS Handshake bit (Output Area):
Toggle 0➞1 or 1➞0 to trigger execution of instruction
Handshake bit (Input Area):
Toggles 0➞1 or 1➞0 every time an instruction has been triggered
CLR Clear status
0
: Normal operation
1
: Clear HS, STATUS and COUNTER to 0
STATUS Instruction status
00b
:Idle
10b
: Waiting for Inverter response
01b
: Instruction sent to Inverter
11b
: Response received
COUNTER Status counter
4 bit counter that increments once every 64 ms
Page 97

83
APPENDIX D
APPENDIX D
Flexible Module
The Flexible Format implements I/O data exchange that supports direct mapping of Inverter Modbus registers in the I/O area. This offers fieldbus- and profile-independent control of the Inverter. The exchanged registers are
configured by setting Inverter registers P160 - P179 to the appropriate
Inverter Modbus addresses.
Note Set P182 = 2 for the Option Board to support the Flexible module
Note The Inverter places some restrictions on the Modbus register selection. For a
Modbus Register to be mapped for output data exchange, it must be a runmode edit register that provides write-access. Double-word Modbus registers
must be mapped in sequence: low-word following high-word. It is not allowed
to map the same register more than once in the output area.
Refer to Section B-4-2 of the MX2 Inverter user's manual for a list of the
Inverter registers that provide write access.
Refer to Section “4-4 Register Number List” of the RX Inverter user's manual
for a list of the Inverter registers that provide write access.
Refer to Section 3-2-3 of the MX2 Inverter user's manual for an explanation on
run-mode edit registers. Also note that the run-mode edit requirement can be
disabled with b031.
Refer to Appendix 1 of the RX Inverter user's manual for an explanation on
run-mode edit registers. Also note that the run-mode edit requirement can be
disabled with b031.
Tip When using Flexible Format, the Inverter is controlled via Modbus registers.
I.e. set A001/A002 = 3 and A201/A202 = 3 to make use of the Modbus control
registers for typical Flexible Module use.
Flexible I/O Mapping
Table D-1 Flexible format I/O mapping
Word
Offset
Content
Output Area Input Area
+0 Modbus register set by P160
Ignored if P160 = 0
Modbus register set by P170
Ignored if P170 = 0
+1 Modbus register set by P161
Ignored if P161 = 0
Modbus register set by P171
Ignored if P171 = 0
+2 Modbus register set by P162
Ignored if P162 = 0
Modbus register set by P172
Ignored if P172 = 0
+3 Modbus register set by P163
Ignored if P163 = 0
Modbus register set by P173
Ignored if P173 = 0
+4 Modbus register set by P164
Ignored if P164 = 0
Modbus register set by P174
Ignored if P174 = 0
+5 Modbus register set by P165
Ignored if P165 = 0
Modbus register set by P175
Ignored if P175 = 0
+6 Modbus register set by P166
Ignored if P166 = 0
Modbus register set by P176
Ignored if P176 = 0
+7 Modbus register set by P167
Ignored if P167 = 0
Modbus register set by P177
Ignored if P177 = 0
Page 98

84
APPENDIX D
The Modbus addresses for the MX2 Inverter are listed in section B-4-2 of the
MX2 user's manual.
The Modbus addresses for the RX Inverter are listed in “Section 4-4 Register
Number List” of the RX user's manual.
P160 - P169 can also be accessed as PNU915.1 - PNU915.10
P170 - P179 can also be accessed as PNU916.1 - PNU916.10
Note Irrespective of the user configuration, the size of the module is fixed to 10
words in and 10 words out.
Tip Set the following register values:
• P160 = 1F01h: This gives you control over Modbus Coils 0000h through
000Fh using the first output word. These coils implement all the important
control functions of the Inverter.
• P161 = 0001h and P162 = 0002h: This gives you control over the frequency reference using output words 2 and 3.
• P170 = 1E01h: This allows you to monitor Modbus Coils 0010h through
001Fh as the first input word. These coils implement the most important
status information of the Inverter.
• P171 = 1001h and P172 = 1002h: This allows you to monitor the output
frequency using input words 2 and 3.
The Modbus coil definitions for the MX2 Inverter are listed in section
B-4-1 of the MX2 user's manual.
The Modbus coil definitions for the RX Inverter are listed in Section B-4-1 of
the RX user's manual.
+8 Modbus register set by P168
Ignored if P168 = 0
Modbus register set by P178
Ignored if P178 = 0
+9 Modbus register set by P169
Ignored if P169 = 0
Modbus register set by P179
Ignored if P179 = 0
Table D-1 Flexible format I/O mapping
Word
Offset
Content
Output Area Input Area
Page 99

85
APPENDIX E
APPENDIX E
PROFIdrive DP-V1 Parameter Channel
The Option Board provides Parameter Access in accordance with the PROFIdrive V4 profile definition (DP-V1 Slot 0, Index 47). PROFIdrive DP-V1
parameter channel allows reading or changing a number of registers using a
highly flexible frame format.
Note PROFIdrive DP-V1 parameter channel is only available via a DP-V1 Class 2
(MSAC2) Messaging connection. Please consult the documentation of your
PROFIBUS Master with regard to support for- and usage of a DP-V1 Class 2
Messaging connection. (Version 3.0 and newer of the OMRON CJ1W-PRM21
and CS1W-PRM21 supports this. Special instructions can be obtained from
an Omron representative.)
Note This appendix purely describes the PROFIdrive DP-V1 parameter channel
Message content.
Page 100

86
Read Parameter Request APPENDIX E
E-1 Read Parameter Request
Note 1 The request header is preceded by the DP and MSAC2 headers. Describing
these however is outside the scope of this manual.
Note 2 Please refer to APPENDIX F Option Board Parameters on page 91
Table E-1 PROFIdrive V4 Parameter read request
Word Offset Contents High byte Low byte
+0 Request Header
*1
REF RT
+1 DO N
+2 1
st
Parameter Address PA
1
CA
1
+3 PNU
1
+4 IND
1
+ (LEN-3) Nth Parameter Address PA
N
CA
N
+ (LEN-2) PNU
N
+ (LEN-1) IND
N
REF Request reference (Typically incremented by user program)
RT Request type:
01h
: Parameter read instruction
DO Drive object:
01h
: Inverter number (Only one attached to Option Board)
N The number of parameter addresses to follow
PAx Parameter attribute:
10h
: Read value(s)
CAx The number of elements:
0
: Single value read (Non array)
1..255
: Number of elements to read
PNUx Parameter number:
0..889
:Reserved
4001..499
9: Parameters d001 to d999
890-999
: Option Board parameters
*2
6001..6999
: Parameters F001 to F999
1001..1999
: Parameters A001 to A999
8001..8999
: Parameters H001 to H999
2001..2999
: Parameters b001 to b999
16001..16999
: Parameters P001 to P999
3001..3999
: Parameters C001 to C999
21001..21999
: Parameters U001 to U999
INDx Index to start reading from:
0
: Single value read (Non array)
1..65535
: Specified array index
LEN Parameter request frame size in words
 Loading...