

Page 1
©
Reproduction prohibited!
BEDIENUNGSANLEITUNG
USER MANUAL
FAD-9
MIDI CONTROLLER
Für weiteren Gebrauch aufbewahren!
Keep this manual for future needs!
Copyright
Nachdruck verboten!
Page 2

Inhaltsverzeichnis/Table of contents
1. EINFÜHRUNG............................................................................................................................................... 3
Lieferumfang .................................................................................................................................................. 3
Download ....................................................................................................................................................... 3
2. SICHERHEITSHINWEISE............................................................................................................................. 3
3. BEDIENELEMENTE UND ANSCHLÜSSE................................................................................................... 4
4. COMPUTER ANSCHLIESSEN..................................................................................................................... 4
5. SOFTWARE-EDITOR ................................................................................................................................... 5
Allgemeine Bedienschritte.............................................................................................................................. 6
Einstellbare Parameter................................................................................................................................... 6
6. TECHNISCHE DATEN .................................................................................................................................. 7
1. INTRODUCTION ........................................................................................................................................... 8
Box Contents.................................................................................................................................................. 8
Download ....................................................................................................................................................... 8
2. SAFETY INSTRUCTIONS ............................................................................................................................ 8
3. CONTROL ELEMENTS AND CONNECTIONS............................................................................................ 9
4. CONNECTING A COMPUTER ..................................................................................................................... 9
5. SOFTWARE EDITOR.................................................................................................................................. 10
Basic Operation............................................................................................................................................ 11
Editing Parameters....................................................................................................................................... 11
6. TECHNICAL SPECIFICATIONS................................................................................................................. 12
Diese Bedienungsanleitung gilt für die Artikelnummer/This user manual is valid for the article
number: 11045070
Das neueste Update dieser Bedienungsanleitung finden Sie im Internet unter:
You can find the latest update of this user manual in the Internet under:
www.omnitronic.com
2/12
00068724.DOC, Version 1.0
Page 3

BEDIENUNGSANLEITUNG
FAD-9 MIDI-Controller
Lesen Sie vor der ersten Inbetriebnahme zur eigenen Sicherheit diese Bedienungsanleitung sorgfältig durch!
Alle Personen, die mit der Aufstellung, Inbetriebnahme, Bedienung, Wartung und Instandhaltung dieses
Gerätes zu tun haben, müssen
- entsprechend qualifiziert sein
- diese Bedienungsanleitung genau beachten
- die Bedienungsanleitung als Teil des Produkts betrachten
- die Bedienungsanleitung während der Lebensdauer des Produkts behalten
- die Bedienungsanleitung an jeden nachfolgenden Besitzer oder Benutzer des Produkts weitergeben
- sich die letzte Version der Anleitung im Internet herunter laden
1. EINFÜHRUNG
Der OMNITRONIC FAD-9 ist ein leichter und handlicher MIDI-Controller zur Steuerung von Musiksoftware.
Er besitzt 9 Kanäle mit je einem Drehregler, Fader und Schalter und ist kompatibel mit Mac und PC. Die
Stromversorgung erfolgt über den USB-Anschluss des Computers und macht ein lästiges Netzteil
überflüssig. Mit dem beiliegenden Software-Editor können Sie den Controller an Ihre Bedürfnisse anpassen.
_______________________________________
Lieferumfang
• FAD-9
• USB-Kabel
• CD-ROM
• Bedienungsanleitung
_______________________________________
Download
• Der Editor steht auch zum Download zur Verfügung:
http://download.showtechnic.de/?id=00069060
2. SICHERHEITSHINWEISE
• Wartungs- und Servicearbeiten sind ausschließlich dem autorisierten Fachhandel vorbehalten. Schäden,
die durch manuelle Veränderungen an diesem Gerät verursacht werden, fallen nicht unter den Garantieanspruch. Wird das Gerät zweckentfremdet oder falsch angeschlossen, kann dies zu Schäden führen und
der Garantieanspruch erlischt.
• Schützen Sie das Gerät vor Feuchtigkeit und Hitze. Die Umgebungstemperatur muss zwischen -5° C und
+45° C liegen.
• Verwenden Sie zur Reinigung des Geräts ein trockenes Tuch. Verwenden Sie niemals Chemikalien oder
Wasser
3/12
00068724.DOC, Version 1.0
Page 4
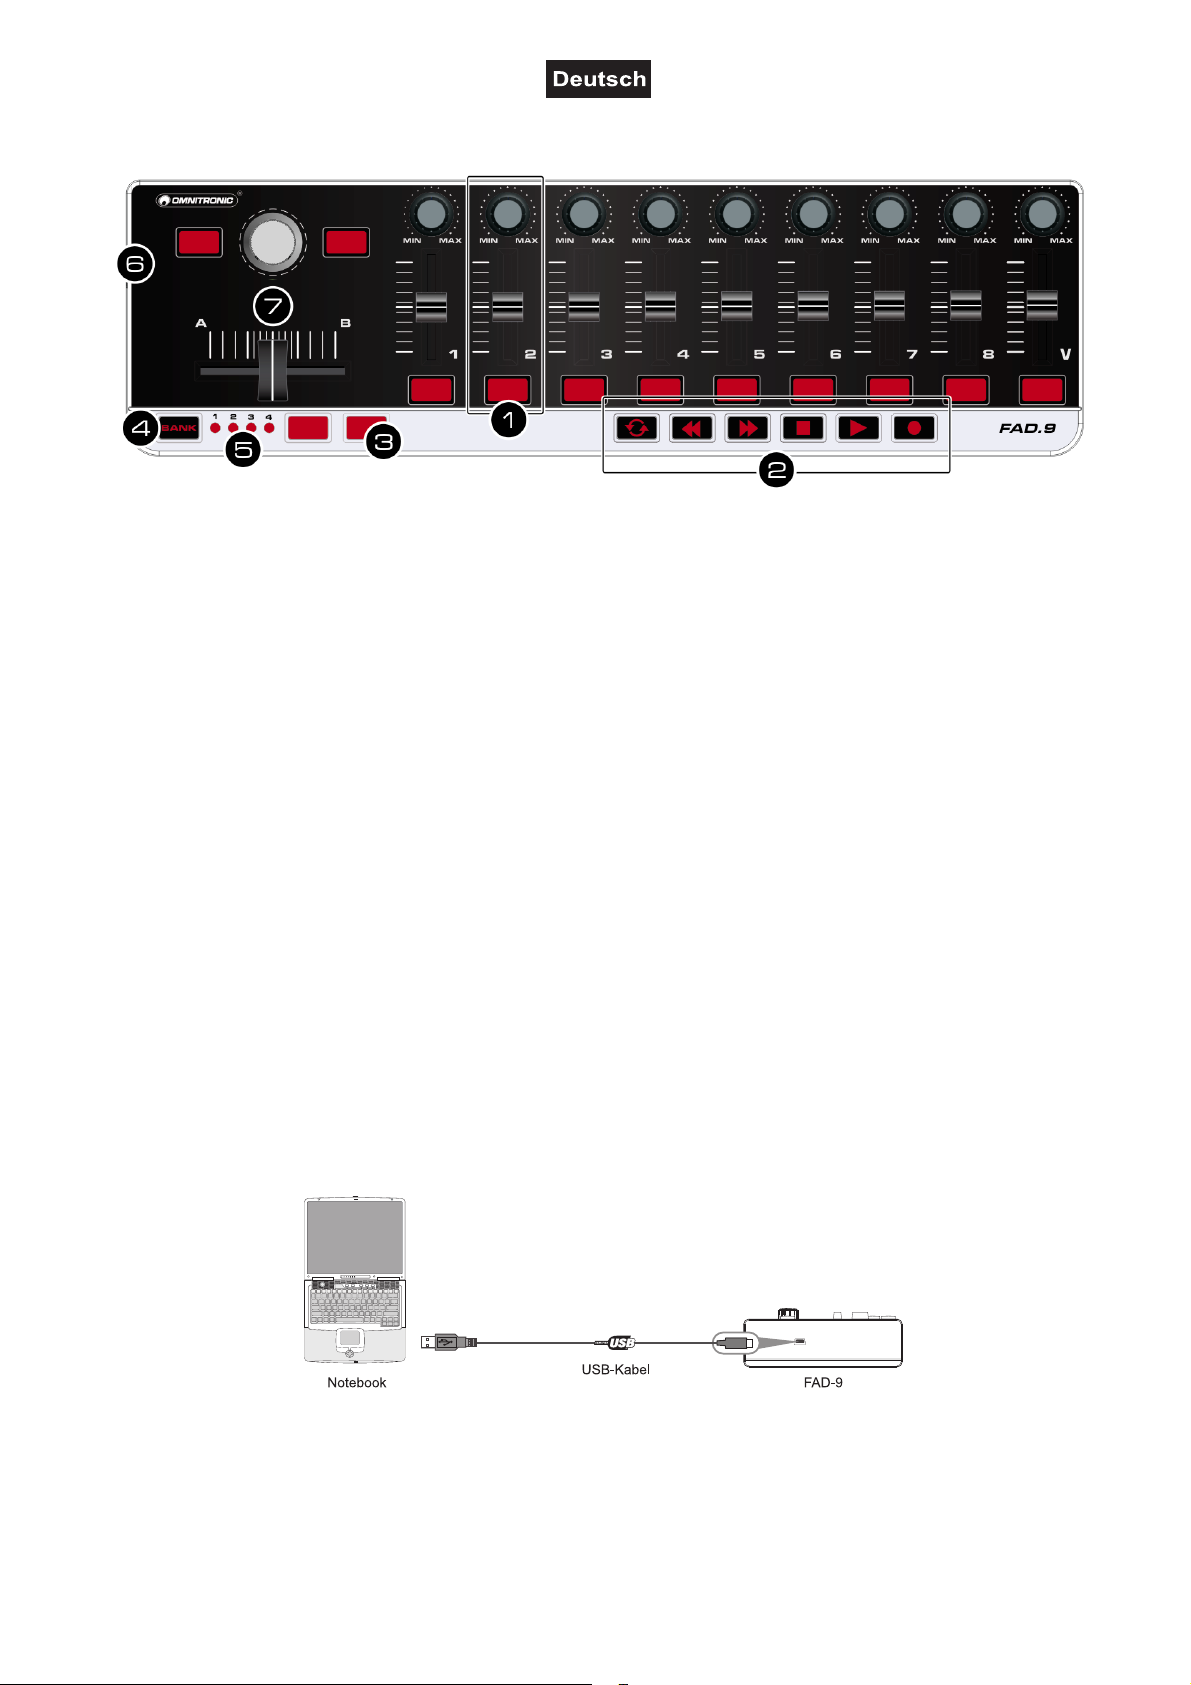
3. BEDIENELEMENTE UND ANSCHLÜSSE
1 MIDI-Steuergruppe
Der FAD-9 bietet neun Steuergruppen. Jede
Gruppe enthält einen Drehregler und einen
Fader zum Senden von Control-ChangeBefehlen und eine Taste zum Senden von
Control-Change- oder Notenbefehlen.
2 Transporttasten
Mit den sechs Transporttasten können die
Funktionen [LOOP], [REW], [FF], [STOP],
[PLAY] und [REC] bedient werden. Die Tasten
senden Control-Change- oder MMC-Befehle
(MIDI Machine Control).
3 Frei zuweisbare Tasten
Zum Senden von Control-Change- oder
Notenbefehlen.
4 Taste BANK
Zum Anwählen von Szenenspeichern. Die
Parametereinstellungen für den MIDIController können in Szenen gespeichert
werden. Das Gerät bietet 4 Szenenspeicher,
die sich mit dem Software-Editor einstellen
lassen.
5 Szenenanzeige
Die Nummer des gewählten Szenenspeichers
leuchtet.
6 USB-Anschluss
Zum Anschluss an einen Computer über das
mitgelieferte USB-Kabel. Über die USBVerbindung werden MIDI-Daten gesendet und
empfangen. Zusätzlich wird das Gerät mit
Strom versorgt.
7 Festgelegte MIDI-Steuergruppe
Diese Controller sind nicht editierbar.
• Drehregler: Zum Senden des ProgramChange-Befehls.
• Tasten: Zum Senden des Steuerbefehls
CC64/CC67.
• Fader: Zum Regeln der Gesamtlautstärke.
4. COMPUTER ANSCHLIESSEN
Schließen Sie den MIDI-Controller über das
mitgelieferte USB-Kabel an einen USB-2.0Anschluss an Ihrem Computer an.
Das Gerät wird eingeschaltet und die
Szenenanzeige leuchtet.
Wenn Sie das Gerät zum ersten Mal anschließen,
wird automatisch der USB-MIDI-Standardtreiber
installiert.
Wählen Sie den FAD-9 als MIDI-Controller in Ihrer
Musiksoftware an und Sie sind startbereit.
4/12
00068724.DOC, Version 1.0
Page 5

5. SOFTWARE-EDITOR
Mit dem Editor können Sie allen editierbaren
Bedienelementen individuell MIDI-Befehle
zuordnen, Presets erstellen, speichern und laden.
1 Menüleiste
• File: Zum Anwählen eines Geräts und
Anlegen, Laden und Speichern einer
Datei.
• Edit: Editierfunktionen für das Bearbeiten der
Parameter.
• Communication: Zum Einlesen der Parameter
eines Geräts und zum Übertragen Ihrer
Einstellungen auf ein Gerät.
• Help: Anzeige der Version des Programms.
2 Scene 1 bis 4
Zum Anwählen der Szene, die Sie editieren
wollen.
3 Geräteabbildung
Abbildung des angewählten Geräts.
4 Umschaltung Parameteranzeige
Zum Umschalten der Parameter, die auf den
Bedienelementen in der Geräteabbildung
angezeigt werden.
5 Control-Auswahlmenü
Zum Anwählen der Bedienelemente, deren
Parameter Sie editieren wollen.
6 Bearbeitungsbereich
Hier werden die Parameter des angewählten
Bedienelements zum Bearbeiten angezeigt.
5/12
00068724.DOC, Version 1.0
Page 6

_______________________________________
Allgemeine Bedienschritte
1 Verbinden Sie vor dem Öffnen des Editors
immer den MIDI-Controller mit Ihrem
Computer.
2 Zum Öffnen des Editors legen Sie die
mitgelieferte CD-ROM in Ihr Laufwerk ein
bzw. laden Sie die Dateien aus dem Internet
herunter und entpacken Sie sie. Starten je
nach Betriebssystem die entsprechende
Anwendung.
3 Wählen Sie nach dem Öffnen den FAD-9 im
Auswahlmenü.
4 Die Benutzeroberfläche wird geöffnet und Sie
können die Parameter des Geräts editieren.
5 Es stehen vier Szenenspeicher für Ihre
Parametereinstellungen zur Verfügung.
Verwenden Sie hierfür die Scene-Buttons im
oberen Bereich des Editors. Mit der BANKTaste am FAD-9 können Sie "on the fly"
zwischen den Szenen umschalten.
6 Übertragen Sie im Anschluss Ihre
Einstellungen auf das Gerät mit dem
Menübefehl Communication > Send Scene
Data.
_______________________________________
Einstellbare Parameter
Globale Einstellungen [Common]
Hier lassen sich allgemeine Parameter einstellen, die den gesamten MIDI-Controller beeinflussen.
Transport-MIDI-Kanal
[Transport Common]
Hier wählen Sie den MIDI-Kanal, auf dem die
Transporttasten ihre MIDI-Befehle senden.
Ihre angesteuerte Musiksoftware muss auf diesem MIDI-Kanal empfangen.
In der Einstellung [Scene MIDI Channel]
werden die MIDI-Befehle auf dem globalen
Szenen-MIDI-Kanal gesendet.
Regler [Knob 1 bis 9]
Wenn Sie an einem Regler drehen, wird der
eingestellte Steuerbefehl übertragen. Jeder
Regler kann separat aktiviert/gesperrt werden.
Sie können einem Regler einen Steuerbefehl
zuordnen und einstellen, welcher Wert
gesendet werden soll, wenn Sie den Regler
komplett nach links bzw. rechts drehen.
Enable/Disable
Hier kann der Regler aktiviert oder gesperrt
werden. Wenn Sie [Disable] wählen, sendet
der Regler keinen MIDI-Befehl.
CC Number
Hier kann die Nummer des Steuerbefehls (CC)
gewählt werden, der gesendet werden soll.
Left Value
Hier wählen Sie den Wert, den der Regler
sendet, wenn Sie ihn ganz nach links drehen.
Right Value
Hier wählen Sie den Wert, den der Regler
sendet, wenn Sie ihn ganz nach rechts drehen.
Scene MIDI Channel
Hier wählen Sie den globalen MIDI-Kanal, auf dem der Controller seine MIDI-Befehle sendet, wenn Sie eine Taste drücken oder Fader und Regler verwenden.
Ihre angesteuerte Musiksoftware muss auf
diesem MIDI-Kanal empfangen.
Steuergruppen-MIDI-Kanal
[Global Common 1 bis 9]
Der Controller bietet neun Steuergruppen.
Jede Gruppe enthält einen Drehregler, einen
Fader und eine Taste. Hier wählen Sie den
MIDI-Kanal, auf dem die betreffende
Steuergruppe ihre MIDI-Befehle sendet.
Ihre angesteuerte Musiksoftware muss auf
diesem MIDI-Kanal empfangen.
In der Einstellung [Scene MIDI Channel]
werden die MIDI-Befehle auf dem globalen
Szenen-MIDI-Kanal gesendet.
Fader [Slider 1 bis 9]
Wenn Sie einen Fader bewegen, wird der
eingestellte Steuerbefehl übertragen. Jeder
Fader kann separat aktiviert/gesperrt werden.
Sie können einem Fader einen Steuerbefehl
zuordnen und einstellen, welcher Wert
gesendet werden soll, wenn Sie ihn vollständig
hochschieben bzw. nach unten ziehen.
Enable/Disable
Hier kann der Fader aktiviert oder gesperrt
werden. Wenn Sie [Disable] wählen, sendet
der Fader keinen MIDI-Befehl.
CC Number
Hier kann die Nummer des Steuerbefehls (CC)
gewählt werden, der gesendet werden soll.
Upper/Right Value
Hier wählen Sie den Wert, den der Fader
sendet, wenn Sie ihn ganz hochschieben.
6/12
00068724.DOC, Version 1.0
Page 7

Lower/Left Value
ier wählen Sie den Wert, den der Fader
H
sendet, wenn Sie ihn ganz nach unten ziehen.
Tasten [Mod 1, 2 und Button 1 bis 9]
Bei Betätigen einer dieser Tasten wird
entweder ein Steuer- (CC) oder ein
Notenbefehl gesendet (abhängig von der
Einstellung unter [Assign Type]). Sie können
für die Tasten wählen, welchen Befehlstyp sie
senden sollen, wie sie sich beim Betätigen
verhalten, welchen Steuerbefehl bzw. welche
Notennummer sie senden und welcher Wert
beim Ein- und Ausschalten gesendet wird. Die
Tasten können aktiviert und gesperrt werden.
Die MIDI-Befehle werden auf dem globalen
Szenen-MIDI-Kanal gesendet.
Assign Type
ier ordnen Sie der betreffenden Taste einen
H
Befehlstyp zu. Sie kann einen Steuerbefehl
(CC) bzw. einen MMC-Befehl (MIDI Machine
Control) senden oder gesperrt werden.
Button Behavior
ier wählen Sie das Verhalten der Taste.
H
• Momentary: Bei Drücken der Taste wird der Steuerbefehl mit dem Wert 127 gesendet. Wenn Sie die Taste lösen, wird der Wert 0 gesendet.
• Toggle: Bei jedem Drücken der Taste wird abwechselnd der Wert 127 und 0 übertragen.
Dieser Parameter ist nicht belegt, wenn Sie
unter [Assign Type] den Befehlstyp auf [MMC]
gestellt haben. Dann sendet die Taste bei
jedem Drücken einen MMC-Befehl.
Assign Type
Hier ordnen Sie der betreffenden Taste einen
Befehlstyp zu. Sie kann einen Steuerbefehl
(CC) bzw. eine Notennummer senden oder
gesperrt werden.
Button Behavior
Hier wählen Sie das Verhalten der Taste.
• Momentary: Bei Drücken der Taste wird der
gewählte Befehl mit dem An-Wert bzw. NoteAn-Wert gesendet. Wenn Sie die Taste
freigeben, wird der Aus-Wert bzw. Note-AusWert gesendet.
• Toggle: Bei jedem Drücken der Taste werden abwechselnd der An-Wert bzw. Note-An-Wert und der Aus-Wert bzw. Note-Aus-Wert übertragen.
CC/Note Number
Hier kann die Nummer des Steuerbefehls (CC)
bzw. des Notenbefehls gewählt werden, der
gesendet werden soll.
On Value
Hier wählen Sie den Wert des Befehls, der bei Aktivieren der Taste gesendet wird.
Off Value
Hier wählen Sie den Wert des Befehls, der bei
Deaktivieren der Taste gesendet wird.
Dieser Parameter ist nur belegt, wenn Sie
unter [Assign Type] den Befehlstyp auf [Control
Change] gestellt haben.
CC Number
Hier kann die Nummer des Steuerbefehls (CC)
gewählt werden, der gesendet werden soll.
Dieser Parameter ist nur belegt, wenn Sie
unter [Assign Type] den Befehlstyp auf [Control
Change] gestellt haben.
MMC Command
Hier wählen Sie einen von 13 MMC-Befehlen,
der gesendet werden soll: Stop, Play, Deferred
Play, Fast Forward, Rewind, Record Strobe,
Record Exit, Record Pause, Pause, Eject,
Chase, Command Error Reset, MMC Reset.
MMC Device ID
Hier wählen Sie die Device ID des MMCBefehls. In der Regel wählen Sie 127, dann
erhalten alle Devices den MMC-Befehl.
6. TECHNISCHE DATEN
Spannungsversorgung:..... 5 V DC über USB-Bus
Gesamtanschlusswert:...... <100 mA
USB-Anschluss: ................ 2.0, Typ Mini-B
Maße (LxBxH): .................. 345 x 97 x 39 mm
Gewicht: ............................ 430 g
Betriebssystem: ................ Windows XP, Vista, 7
.......................................... Mac OS X 10.3.9 und
.......................................... höher
Bitte beachten Sie: Technische Änderungen ohne
vorherige Ankündigung und Irrtum vorbehalten.
03.04.2012 ©
Transporttasten
Die Transporttasten senden wahlweise Steueroder MMC-Befehle (abhängig von der
Einstellung unter [Assign Type]). Sie können
für diese sechs Tasten wählen, welchen
Befehlstyp sie senden sollen, wie sie sich beim
Betätigen verhalten und welchen Steuerbefehl
bzw. welchen MMC-Befehl sie senden.
7/12
00068724.DOC, Version 1.0
Page 8

USER MANUAL
FAD-9 MIDI Controller
For your own safety, please read this user manual carefully before you initially start-up.
Every person involved with the installation, operation and maintenance of this device has to
- be qualified
- follow the instructions of this manual
- consider this manual to be part of the total product
- keep this manual for the entire service life of the product
- pass this manual on to every further owner or user of the product
- download the latest version of the user manual from the Internet
1. INTRODUCTION
The OMNITRONIC FAD-9 is an ultra-compact and light-weight MIDI controller which serves to control music
software. It is equipped with 9 channels, each offering a rotary control, a fader and a button. The controller
connects both PC and Mac. You can do without a bulky power adapter as power supply is via the USB bus.
The included software editor lets you customize the FAD-9 to your own requirements.
_______________________________________
Box Contents
• FAD-9
• USB cable
• CD-ROM
• User manual
_______________________________________
Download
• The editor is also available for download:
http://download.showtechnic.de/?id=00069060
2. SAFETY INSTRUCTIONS
• Maintenance and service operations are only to be carried out by authorized dealers. Damage, caused by
manual modifications on this device is not subject to warranty. If the device is used for other purposes than
originally intended or if it is not correctly connected, it may suffer damages and the guarantee becomes
void.
• Protect the device against humidity and heat. The ambient temperature must always be between -5° C and
+45° C.
• For cleaning the controller only use a dry cloth. Never use chemicals or water.
8/12
00068724.DOC, Version 1.0
Page 9

3. CONTROL ELEMENTS AND CONNECTIONS
1 MIDI control group
The FAD-9 offers 9 control groups. Each group has one rotary control and one fader to transmit control change messages, and one button for control change or note messages.
2 Transport buttons
There are six transport buttons: [LOOP], [REW], [FF], [STOP], [PLAY] and [REC]. These buttons transmit control change messages or MMC messages (MIDI machine control).
3 Freely assignable buttons
Transmit control change messages or note messages.
4 BANK button
For switching between scenes. You can save
the parameter assignments for the MIDI
controller as scenes. The unit offers 4 scenes
which can be edited with the software editor.
4. CONNECTING A COMPUTER
5 Scene indicators
The LED of the selected scene will light up.
6 USB port
For connecting a computer. The MIDI
controller sends and receives MIDI data via
the USB connection and is supplied with
power.
7 Fixed MIDI control group
These controllers cannot be edited.
• Rotary control: Adjusts the program change
message.
• Buttons: Transmit the control message
CC64/CC67.
• Fader: Adjusts the master volume.
Use the included USB cable to connect the FAD-9
to a USB 2.0 port on your computer.
The power will turn on and the scene LED will
light up.
When you first connect the MIDI controller to your
computer, the standard USB MIDI driver will be
installed automatically.
Now select the FAD-9 as MIDI controller within
your music software and you are ready to go!
9/12
00068724.DOC, Version 1.0
Page 10

5. SOFTWARE EDITOR
The software editor will let you customize all
editable controllers, and create, save and load
presets.
1 Menu bar
• File: For selecting a device and creating,
saving and loading a data file.
• Edit: Functions for editing parameters.
• Communication: For reading data from your
controller and for transferring settings to your
controller.
• Help: Displays the software version of the
editor.
2 Scene 1 to 4
Click the Scene button of the scene you would
like to edit.
3 Device
This area shows an image of the device
selected in the device select screen.
4 Parameter display switch
Switches the parameters that are shown over
each control in the device image.
5 Control menu
For selecting the control elements whose
parameters you would like to edit.
6 Parameter edit area
This area enables you to view and edit the
parameters of the selected control.
10/12
00068724.DOC, Version 1.0
Page 11

_______________________________________
Basic Operation
1 Always connect the FAD-9 to your computer
before opening the editor.
2 To open the editor insert the supplied CD-
ROM into your CD drive or download and
extract the files. Depending on your operating
system, start the corresponding application.
3 After opening the editor, select the FAD-9
from the opening device select screen.
4 In the main screen, click the control you would
like to modify and edit its assignments in the
lower right pane.
5 You can customize four different scenes by
using the four SCENE buttons near the top of
the editor. Then, you can switch the scenes
on the fly using the BANK button on your MIDI
controller.
6 In order for your adjustments to be reflected in
your MIDI controller you will need to write the
data into the controller. For this, select
Communication > Send Scene Data from the
top menu bar.
_______________________________________
Editing Parameters
Global settings [Common]
The global section lets you can make overall settings for your MIDI controller for each scene.
Scene MIDI Channel
This specifies which MIDI channel your controller will use to transmit note messages, as well as MIDI messages that are sent when you press a button or move sliders and rotary controls.
Set this to match the MIDI channel of the MIDI application you are controlling.
Group MIDI Channel
[Global Common 1 to 9]
The controller offers nine control groups. Each
group has one rotary control, one fader and
one button. This specifies the MIDI channel on
which each MIDI control group will transmit
MIDI messages.
Set this to match the MIDI channel of the MIDI
application you are controlling.
If you set this to [Scene MIDI Channel],
messages will be transmitted on the global
Scene MIDI Channel.
Transport MIDI Channel
[Transport Common]
Specifies the MIDI channel on which MIDI
messages will be transmitted when you
operate transport buttons.
Set this to match the MIDI channel of the MIDI
application you are controlling.
If you set this to [Scene MIDI Channel],
messages will be transmitted on the global
Scene MIDI Channel.
Rotary controls [Knob 1 to 9]
Operating a rotary control will transmit a control
change message. You can enable/disable each
control, specify its control change number, and
specify the values transmitted when the control
is turned fully left or fully right.
Enable/Disable
Enables or disables the control. If you have
disabled a knob, turning it will not transmit a
MIDI message.
CC Number
Specifies the control change number of the
control change message that is transmitted.
Left Value
Specifies the value of the control change
message transmitted when you turn the control
all the way to the left.
Right Value
Specifies the value of the control change
message transmitted when you turn the control
all the way to the right.
Faders [Slider 1 to 9]
Operating a fader will transmit a control change
message. You can enable/disable each fader,
specify its control change number, and specify
the values transmitted when the fader is moved
fully upward or fully downward.
Enable/Disable
Enables or disables the fader. If you have
disabled a fader, moving it will not transmit a
MIDI message.
CC Number
Specifies the control change number of the
control change message that is transmitted.
Upper/Right Value
Specifies the value of the control change
message transmitted when you move the fader
all the way upward.
11/12
00068724.DOC, Version 1.0
Page 12

Lower/Left Value
pecifies the value of the control change
S
message transmitted when you move the fader
all the way downward.
assign a control change message or MMC
essage.
m
Button Behavior
Selects one of the following two modes:
Buttons [Mod 1, 2 and Button 1 to 9]
These buttons transmit a control change
message. You can choose whether these
buttons will be enabled, the type of button
operation, the control change or note number,
and the values that will be transmitted when
the button is pressed. These MIDI messages
are transmitted on the global Scene MIDI
Channel.
Assign Type
This specifies the type of message that will be
assigned to the button. You can disable the
button (no assignment), or assign a note
message or a control change.
Button Behavior
Selects one of the following two modes:
• Momentary: The Note On or On Value will be transmitted when you press the button, and the Note Off or Off Value will be transmitted when you release it.
• Toggle: The Note On or On Value will be transmitted alternately with the Note Off or Off Value each time you press the button.
CC/Note Number
Specifies the CC number or note number of the
control change message that will be
transmitted.
• Momentary: A control change message with
a value of 127 will be transmitted when you
press the transport button, and with a value of
when you release the button.
0
• Toggle: Each time you press the transport button, a control change message with a value of 127 or 0 will be transmitted alternately.
You cannot specify the button behavior if the assign type is [MMC]. If you have specified [MMC], an MMC command will be transmitted each time you press the button.
CC Number
Specifies the control change number of the
control change message that is transmitted.
You can set this only if the assign type is
[Control Change].
MMC Command
Selects one of the following 13 types of MMC
commands as the MMC message that will be
transmitted: Stop, Play, Deferred Play, Fast
Forward, Rewind, Record Strobe, Record Exit,
Record Pause, Pause, Eject, Chase,
Command Error Reset, MMC Reset.
MMC Device ID
Specifies the device ID of the MMC message.
Normally you will specify 127. If the device ID
is 127, all devices will receive the MMC
message.
On Value
Specifies the On value of the control change or note on message.
Off Value
Specifies the Off value of the control change
message.
You can set this only if the assign type is
[Control Change].
Transport buttons
Operating the transport buttons will transmit
either control change messages or MMC
messages, depending on the assign type. For
each of these six buttons, you can specify the
message that is assigned, the way in which the
button will operate when pressed, the control
change number, or an MMC command.
Assign Type
Specifies the type of message assigned to the
transport button. You can disable the button or
6. TECHNICAL SPECIFICATIONS
Power supply:.................... 5 V DC via USB bus
Power consumption: ......... <100 mA
USB port:........................... 2.0, type mini-B
Dimensions (WxDxH):....... 345 x 97 x 39 mm
Weight: .............................. 430 g
Operating system: ............. Windows XP, Vista, 7
.......................................... Mac OS X 10.3.9 and
.......................................... better
Please note: Every information is subject to
change without prior notice. 03.04.2012 ©
12/12
00068724.DOC, Version 1.0
 Loading...