

Page 1
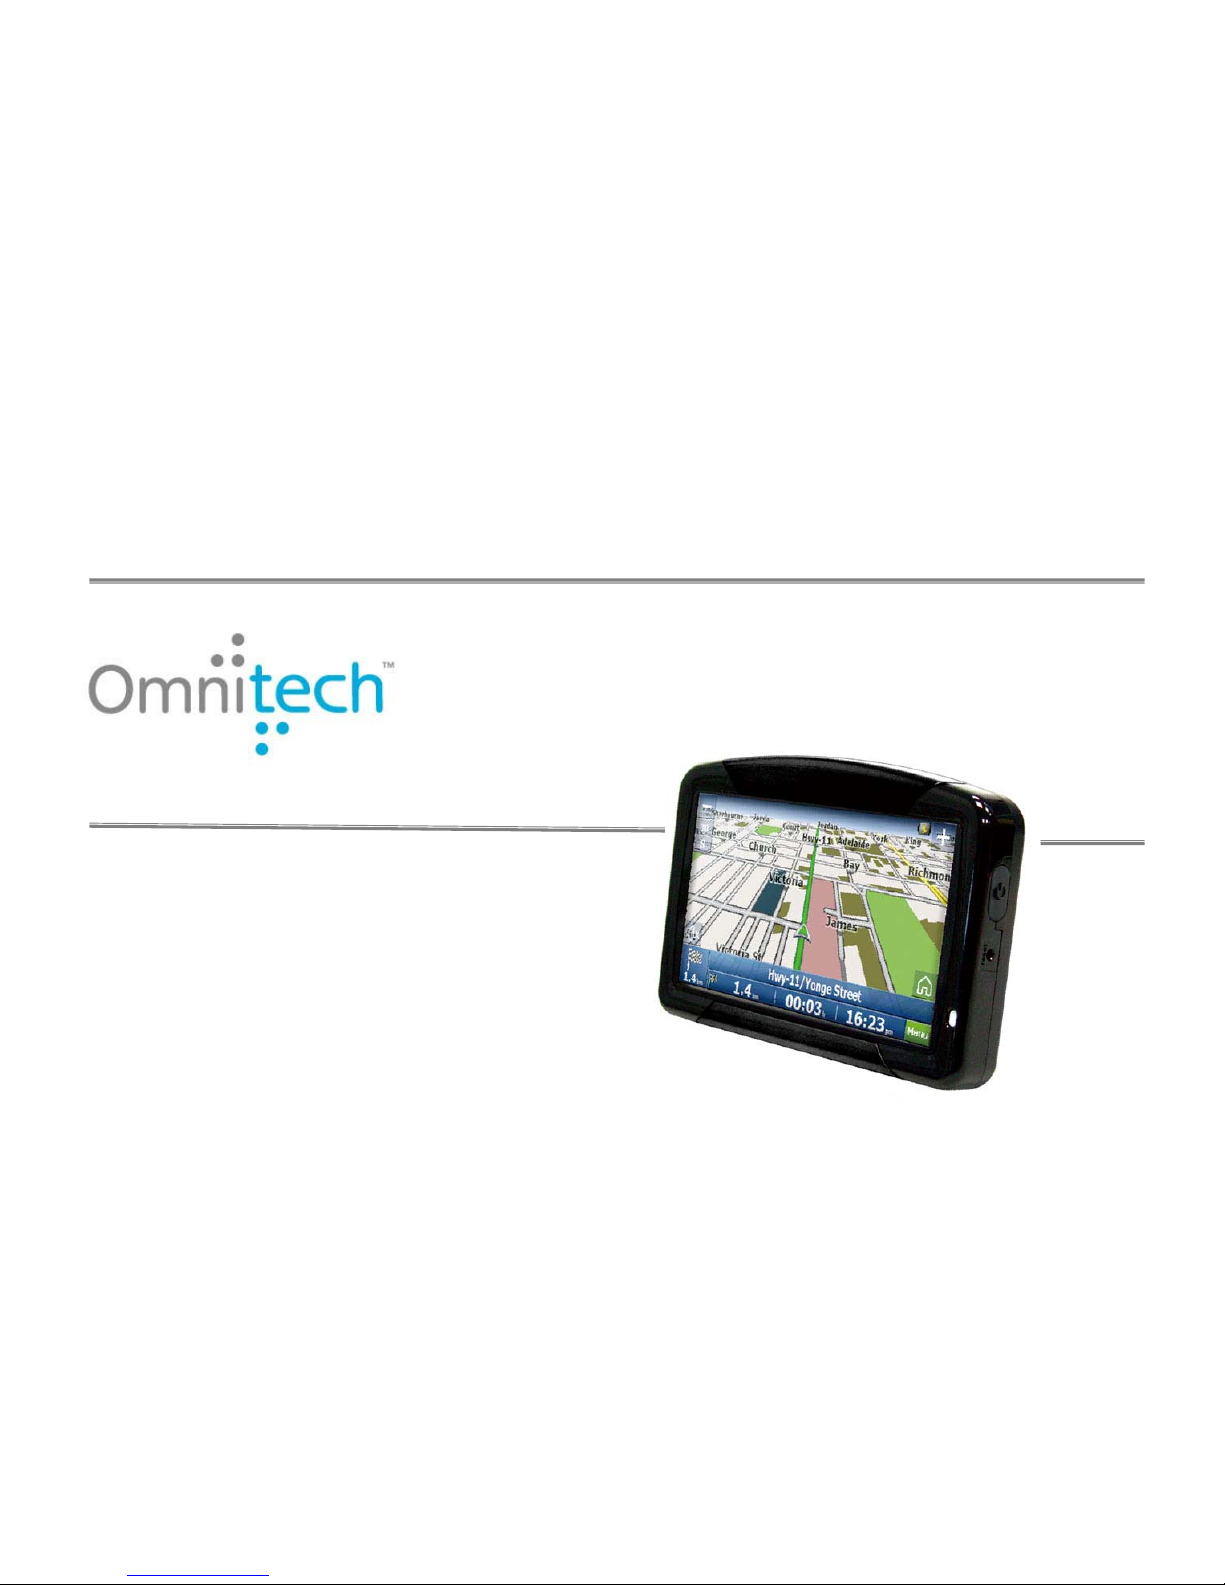
Omnitech GPS
User Manual
Model Number: 16877-CA
Model Number: 16878-US
V.1.0
Page 2

Omnitech GPS User Manual
i
Warranty Conditions
Manufacturer is not responsible for any product defects due to misuse, abuse, or usage of product in way that is not in compliance with the written product instructions.
To use this product other than expressed in the instructions will void customer's product warranty.
Precautions and Notices
¾ Do not attempt to operate the GPS Personal Navigation Device (PND) in a vehicle while the vehicle is in motion or in anyway that interferes with safe driving.
¾ Secure your device to the vehicle in such a way so as to not endanger the driver or passengers while driving or during operation.
¾ Be attentive to roadway signage, all posted roadway information, and the condition of the road itself. Calculated routes are for reference only; users must obey all
traffic signs and local regulations.
¾ GPS positioning is intended for use as reference, not precise measurement of direction, distance or topography.
¾ Do not place the device where it will block the driver’s vision.
¾ Do not place the device where the airbags are located or where the airbags could deploy.
¾ Do not place the device anywhere in the vehicle without securing it in the holder.
¾ Do not place your device in any area of the vehicle where the use of electronic displays is prohibited in motor vehicles.
¾ Do not use the device in a wet location.
¾ Do not use the device close to hot areas such as radiators, stoves, or other products that produce heat.
¾ Do not leave the product in direct sunlight or heat for extended periods of time. Overheating the battery can be dangerous and/or cause malfunctions.
¾ Do not push objects of any kind into cabinet slots or other openings in product. Slots provided for ventilation must not be blocked or covered.
¾ Do not use product on unstable table, cart, stand, tripod or bracket. Any mounting of the product should follow manufacturer’s instructions, and should use a
manufacturer-recommended mounting accessory.
¾ Use the correct external power source indicated on the electrical ratings label.
¾ Handle battery packs carefully. Battery pack could burn or explode if handled improperly. Do not open, crush, or puncture battery pack. Do not dispose of battery
pack in fire or water, or expose battery pack to direct sunlight.
¾ GPS signals cannot pass through opaque solid materials. Obstacles, such as tall buildings, tunnels, dense trees and bad weather can affect signal reception.
Window tint that contains metallic material can affect GPS signal as well. Cordless phones, radar detectors, satellite radio receivers, and other wireless devices
may also interfere with GPS reception.
¾ It may take a few minutes to successfully acquire GPS signals when turning on the GPS device for the first time. Complete this procedure in an outdoor open
space.
¾ Map database may not cover one hundred percent of all areas and/or addresses listed.
¾ This GPS PND may not be used for any purpose in which failure could lead to personal injury, physical, or environmental damage.
¾ Software version and user manual contents are subject to change without notices.
Page 3

Omnitech GPS User Manual
ii
FCC Statement
Omnitech GPS Model Number 16877-CA and 16878-US: It is herewith confirmed and found to comply with the requirements set up by ANSI C63.4 & FCC Part 15
regulations for the evaluation of electromagnetic compatibility. This device complies with Part 15 of the FCC rules; operation is subject to the following two conditions:
(1) This device may not cause harmful interference and, (2) This device must accept any interference received, including interference that may cause undesired
operation.
Product Support: 1-888-554-6628
Soutien au produit: 1-888-334-6628
Website: www.navsupport.net/gps/16877
www.navsupport.net/gps/16878
Page 4
Omnitech GPS User Manual
iii
Contents
1. Package Contents 1
2. Controls and Indicators 2
3. Mounting Hardware 3
4. Installation Instructions 4
5. Powering the GPS 5
6. Introduction 5
7. Menus 6
8. Creating a Route 7
Address…………………………………………………………………. 7
Selecting Address Intersection…………………………………… 9
Changing State or In Other Countries………………………….. 10
Traveling To Options………………………………………………10
POI………………………………………………………………………11
Searching by POI Categories…………………………………….11
Searching by POI Name………………………………………..... 12
Browsing the Entire POI List…………………………………….. 13
Traveling To Options……………………………………………... 13
Recent Locations………………………………………………….......14
Traveling To Options………………………………………………14
Favorite Locations…………………………………………………..... 14
Saving a Location……………………………………………….....14
Traveling to a Favorite Location……………………………........15
Creating Groups for Favorite Locations…………………………16
Traveling To Options………………………………………………16
9. Additional Destinator Features 17
Driving Directions……………………………………………………...17
Showing Entire Route and Next Turn Maps…………………….18
Road Type and Route Mode………………………………………… 19
Detours………………………………………………………………... 20
10. Maps 21
Map Icons……………………………………………………………... 22
Travel by Tapping the Map………………………………………….. 23
Night Map View……………………………………………………….. 24
Browse Map…………………………………………………………… 24
Map Display…………………………………………………………... 25
Map Selection…………………………………………………………. 26
11. Settings 27
Configuration Wizard………………………………………………… 27
POI Display…………………………………………………………… 28
Voice Prompts……………………………………………………….. 28
Units of Measure…………………………………………………….. 30
Language…………………………………………………………….. 30
Time Display…………………………………………………………. 31
QuickNav……………………………………………………………… 31
Look & Feel…………………………………………………………… 32
Demo Route………………………………………………………….. 32
GPS Signal…………………………………………………………… 33
Help……………………………………………………………………. 34
About…………………………………………………………………... 34
Index 35
Page 5
1. Package Contents
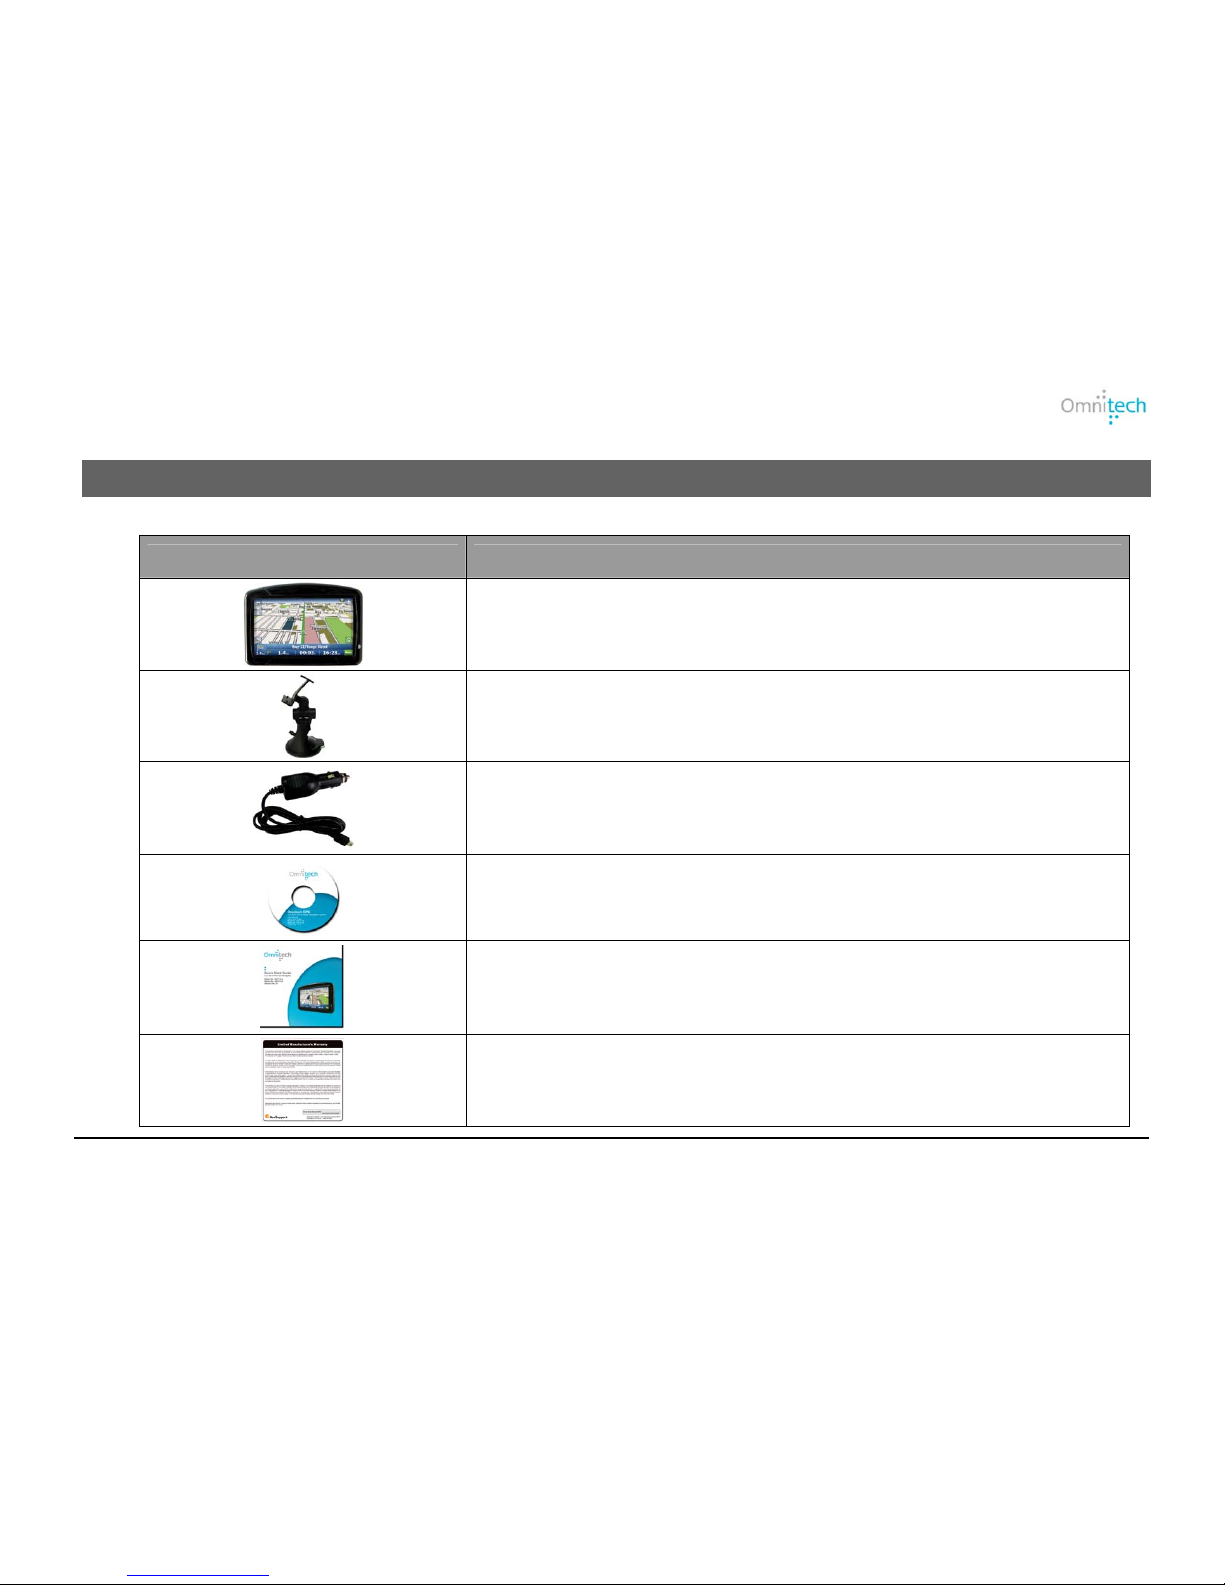
ITEM NAME
GPS with 4.3” LCD screen
Car mount
Car charger
User Manual CD
Quick Start Guide
Warranty Card
Omnitech GPS User Manual 1
Page 6
2. Controls and Indicators
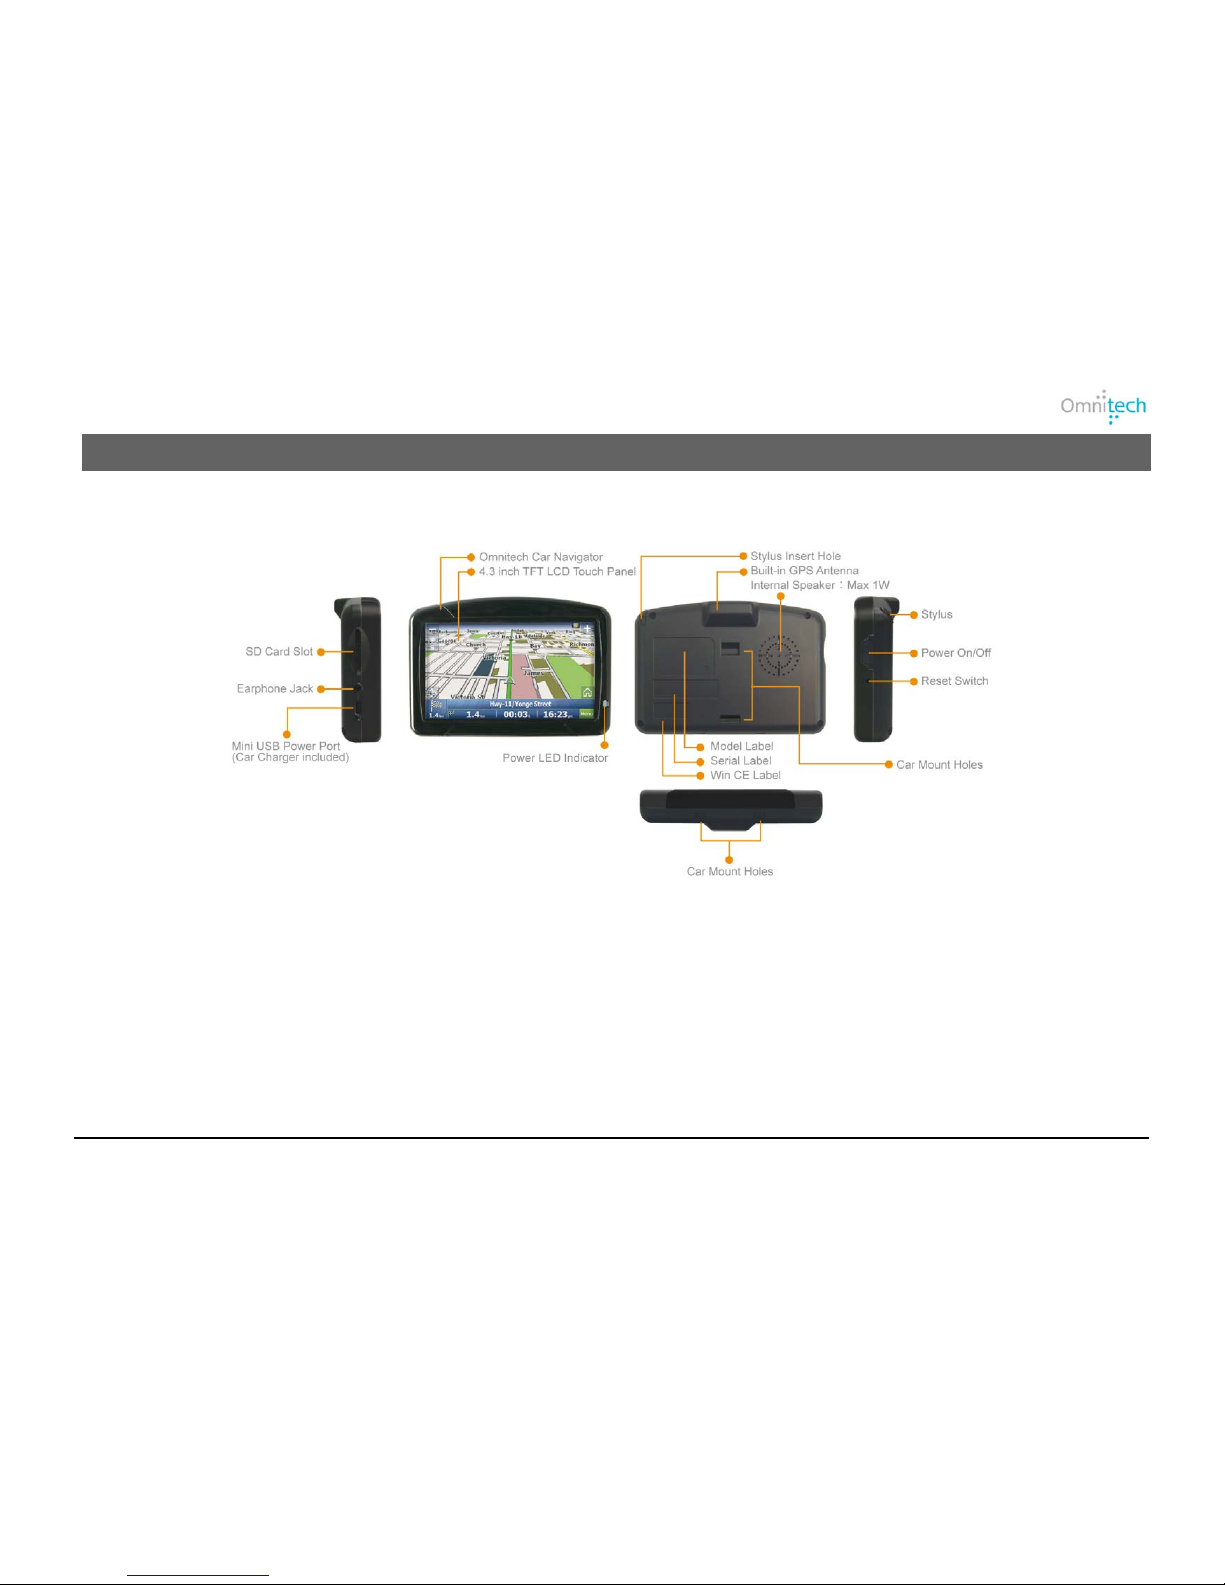
On/Off Power button
Press and hold this button for 2 seconds to turn the device On/Off.
Press for 1 second to switch the device into/back from Standby Mode. The GPS still draws a small amount of power while in Standby
Mode.
Press the reset switch to restore the system default setting and to shut down the device.
Pressing the reset switch will not delete any records in the software.
Omnitech GPS User Manual 2
Page 7
3. Mounting Hardware
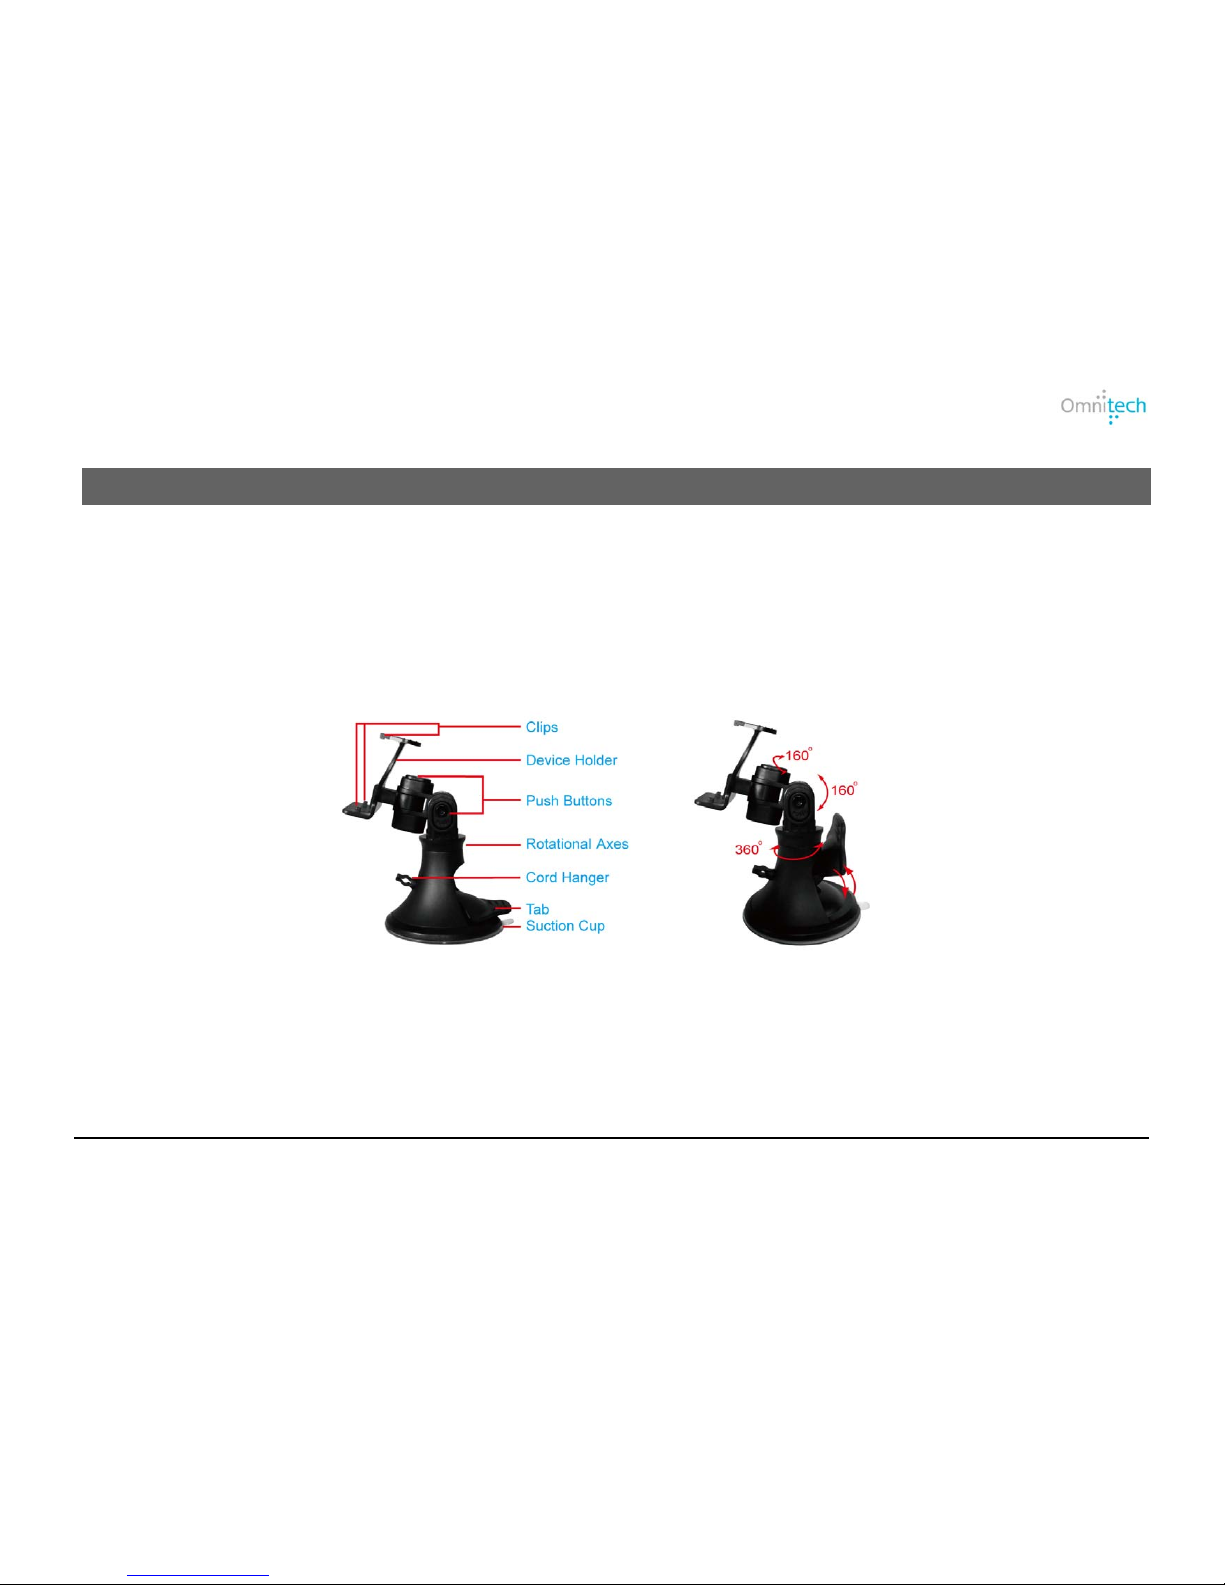
Car Mount
The car mount keeps your GPS unit secured to the windshield giving you an optimal satellite signal reception.
Use the push buttons to adjust viewing angles; up/down and left/right.
IMPORTANT:
The car mount should be mounted at least 6” from the vehicle’s airbag system.
Omnitech GPS User Manual 3
Page 8
4. Installation Instructions
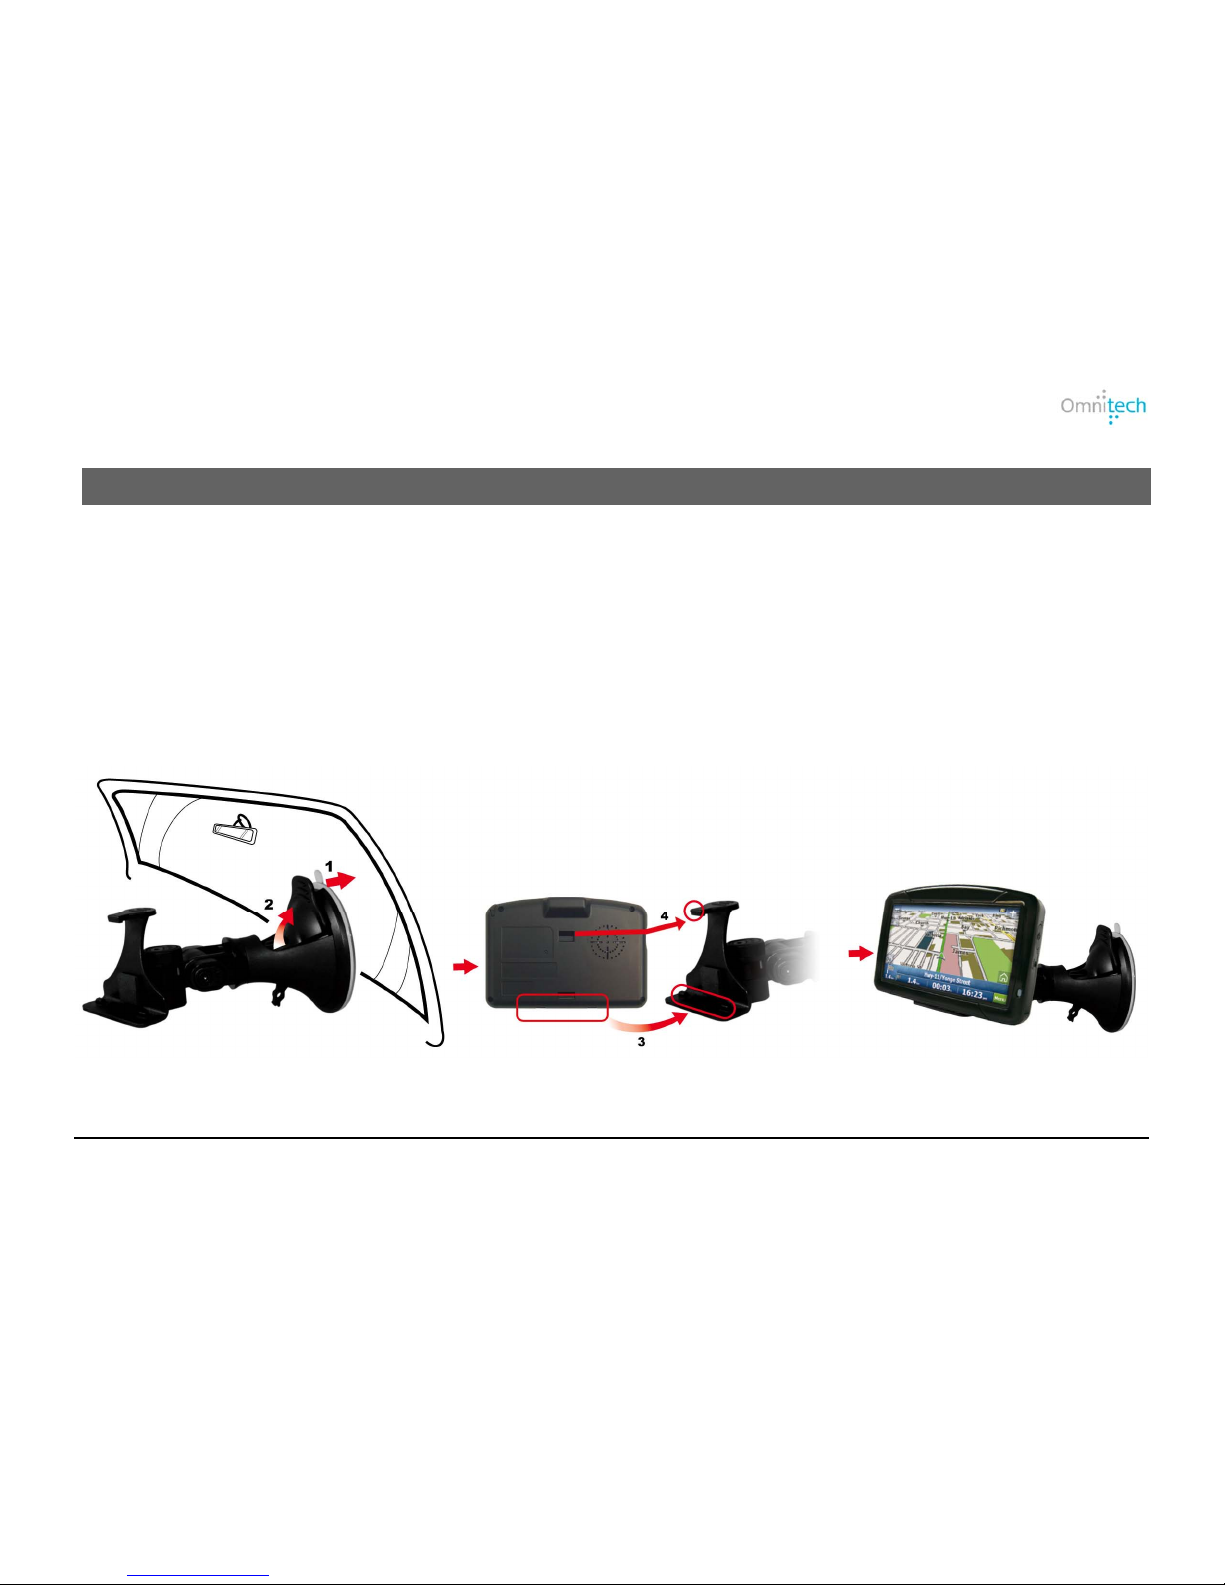
Suction Mount Instructions
1. Find a place to position the suction cup where it doesn't interfere with your vision of the road.
2. With the suction cup lever in the up or off position, push the suction cup against the glass, then push the suction cup lever to the down or
on position. Doing so creates the suction needed to secure the car mount to the glass.
3. Once the car mount is secured to the windshield, attach the car mount attach the GPS device to the device holder slots. You will hear a
“click” when the GPS device is securely attached to its holder.
4. To release the car mount from the windshield, simply pull the suction cup lever up to it’s off position.
Omnitech GPS User Manual 4
Page 9
Omnitech GPS User Manual 5
Welcome to the world of mobile navigation! Simple operation, clear maps in 2D or 3D mode as well as numerous
innovative features and functions have made Destinator the essential guide for every traveler.
5. Powering the GPS
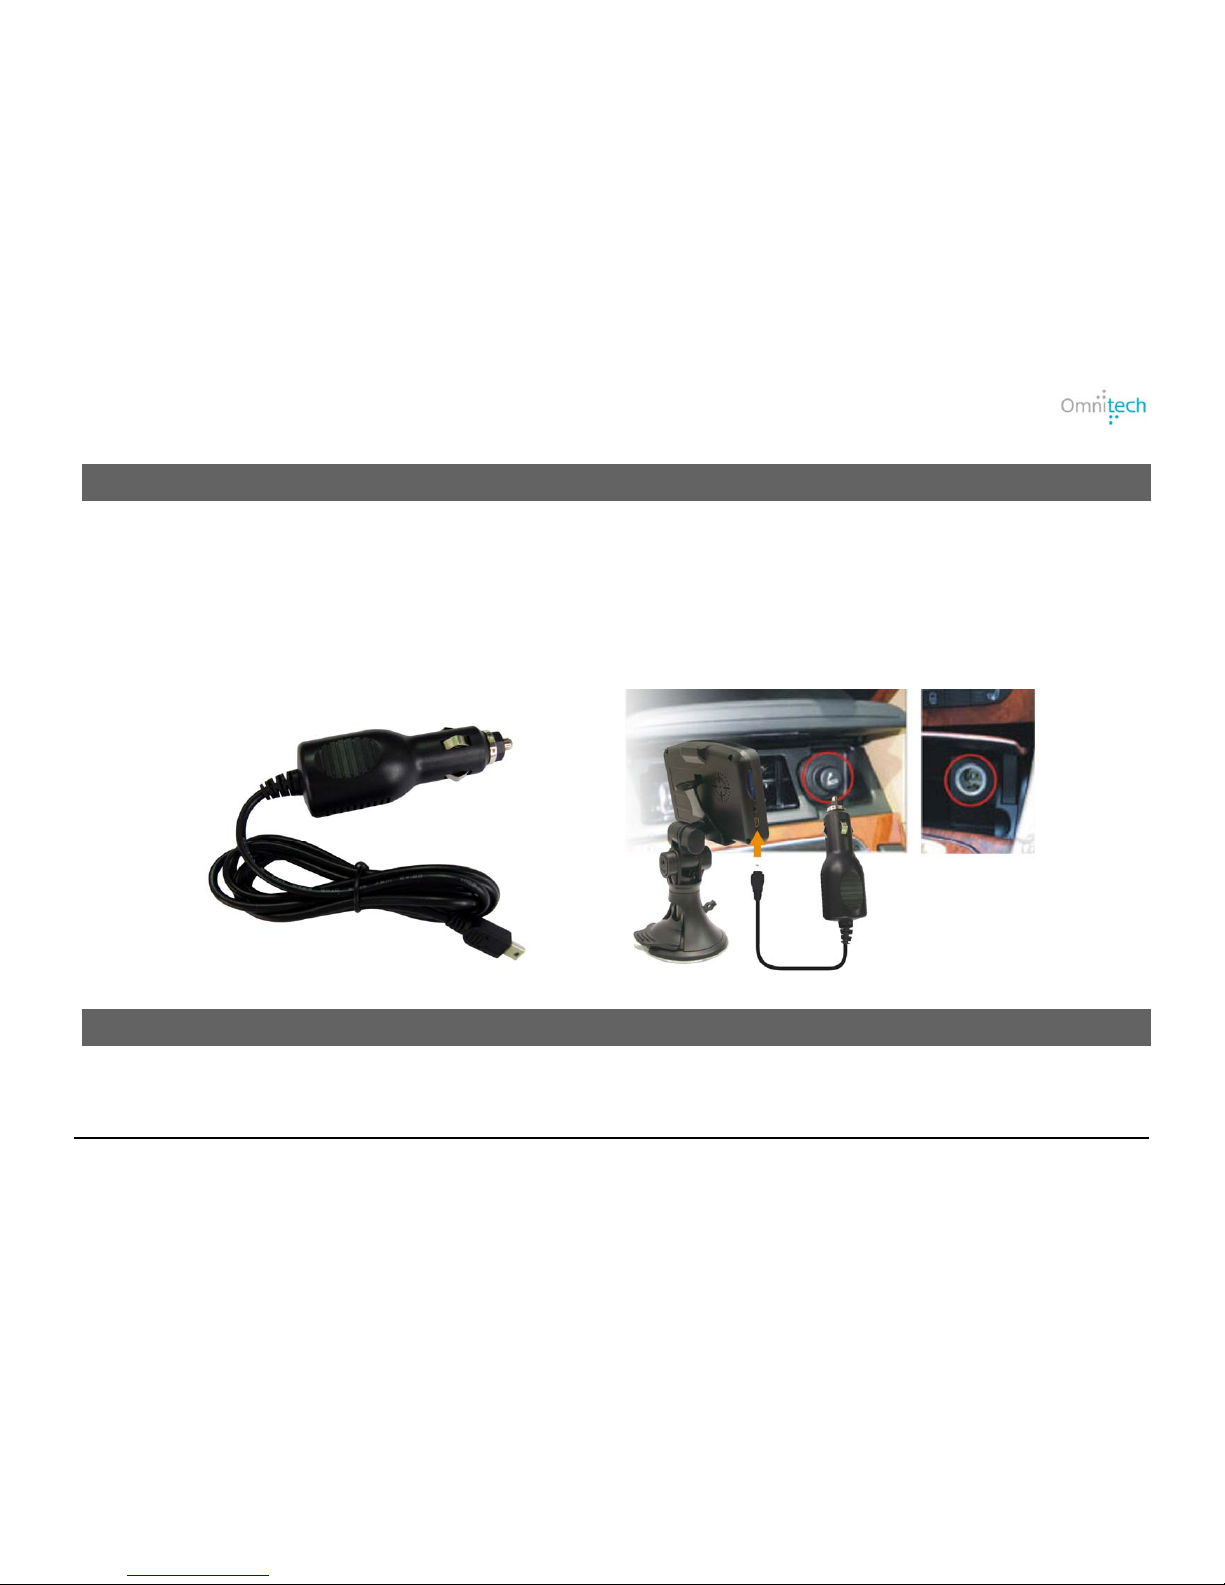
Using the car charger in your vehicle
After starting your vehicle, do the followings:
1. Plug the car charger into the mini USB connector (USB port) on left side of the GPS device.
2. Plug the other end of the car charger into your vehicle's DC Power receptacle.
6. Introduction
Page 10
7. Menus
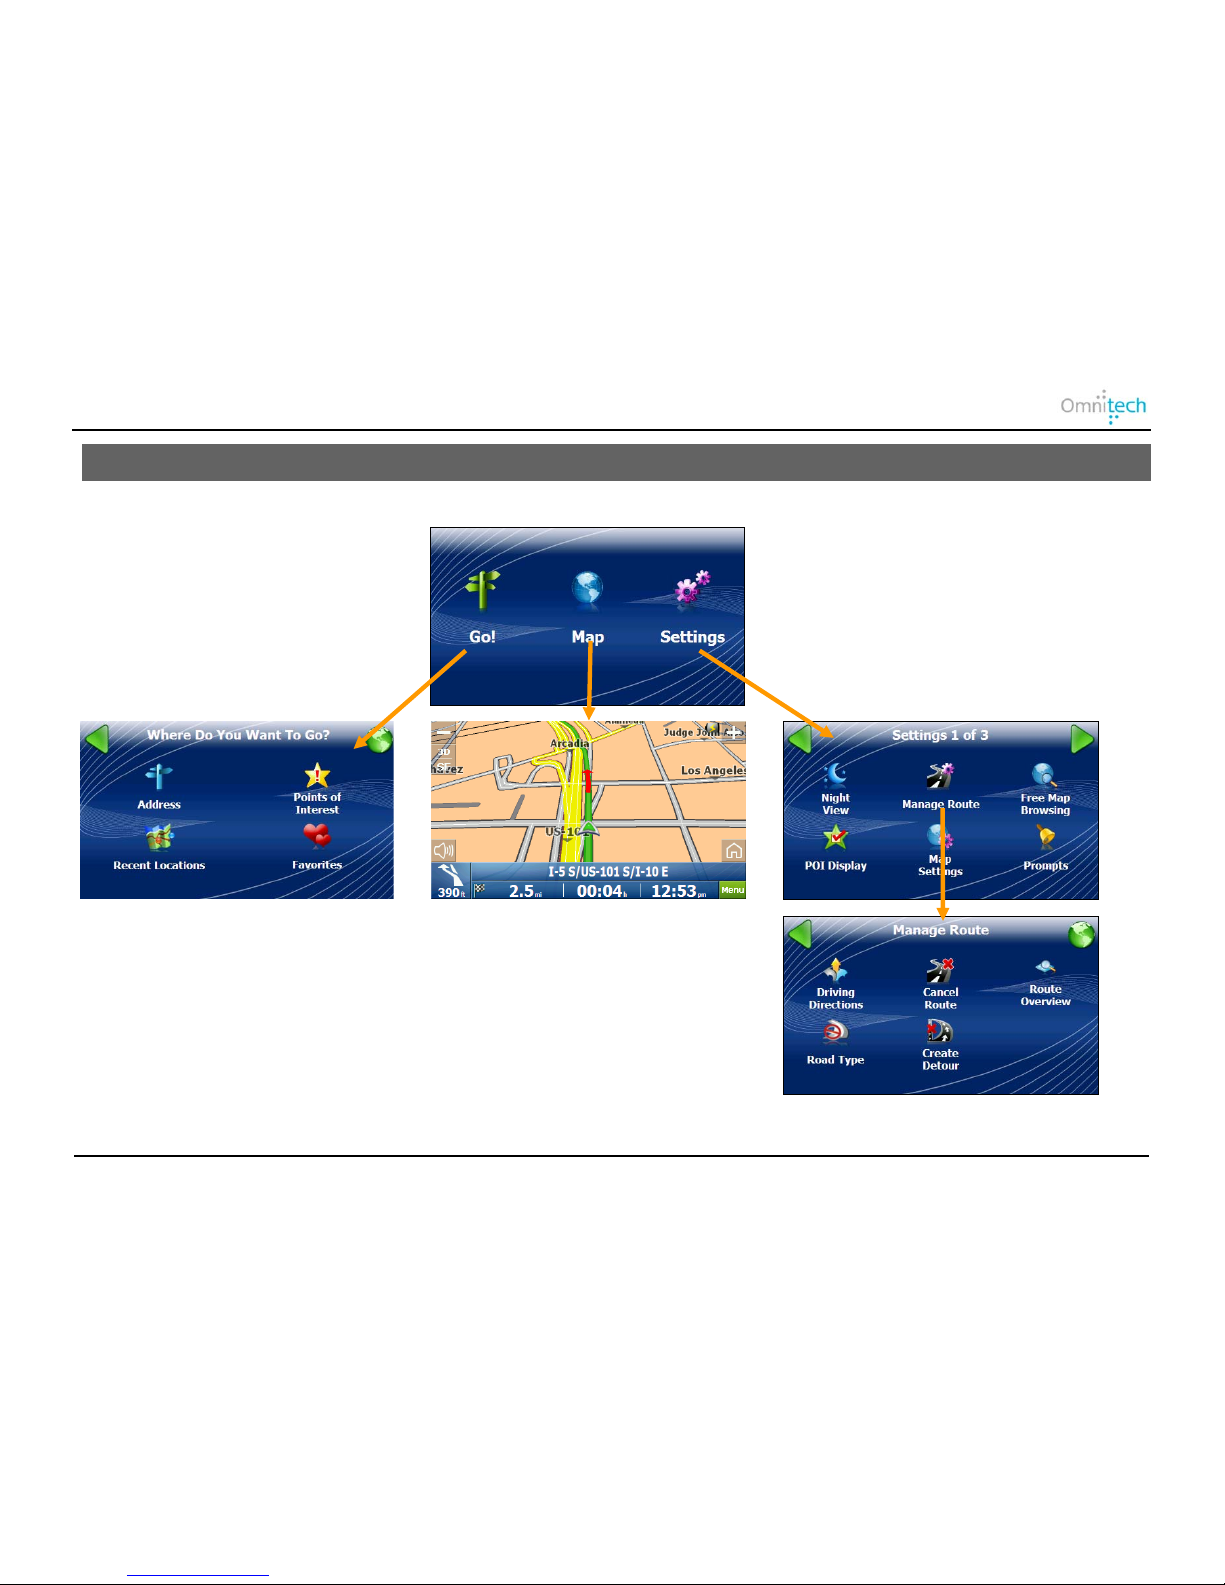
Displayed below are Destinator’s main menus.
Go – Lets you select a location to travel to.
Map – Displays route and map options.
Settings – Lets you choose setting options.
Manage Route – Additional features that determine the route.
Omnitech GPS User Manual 6
Page 11
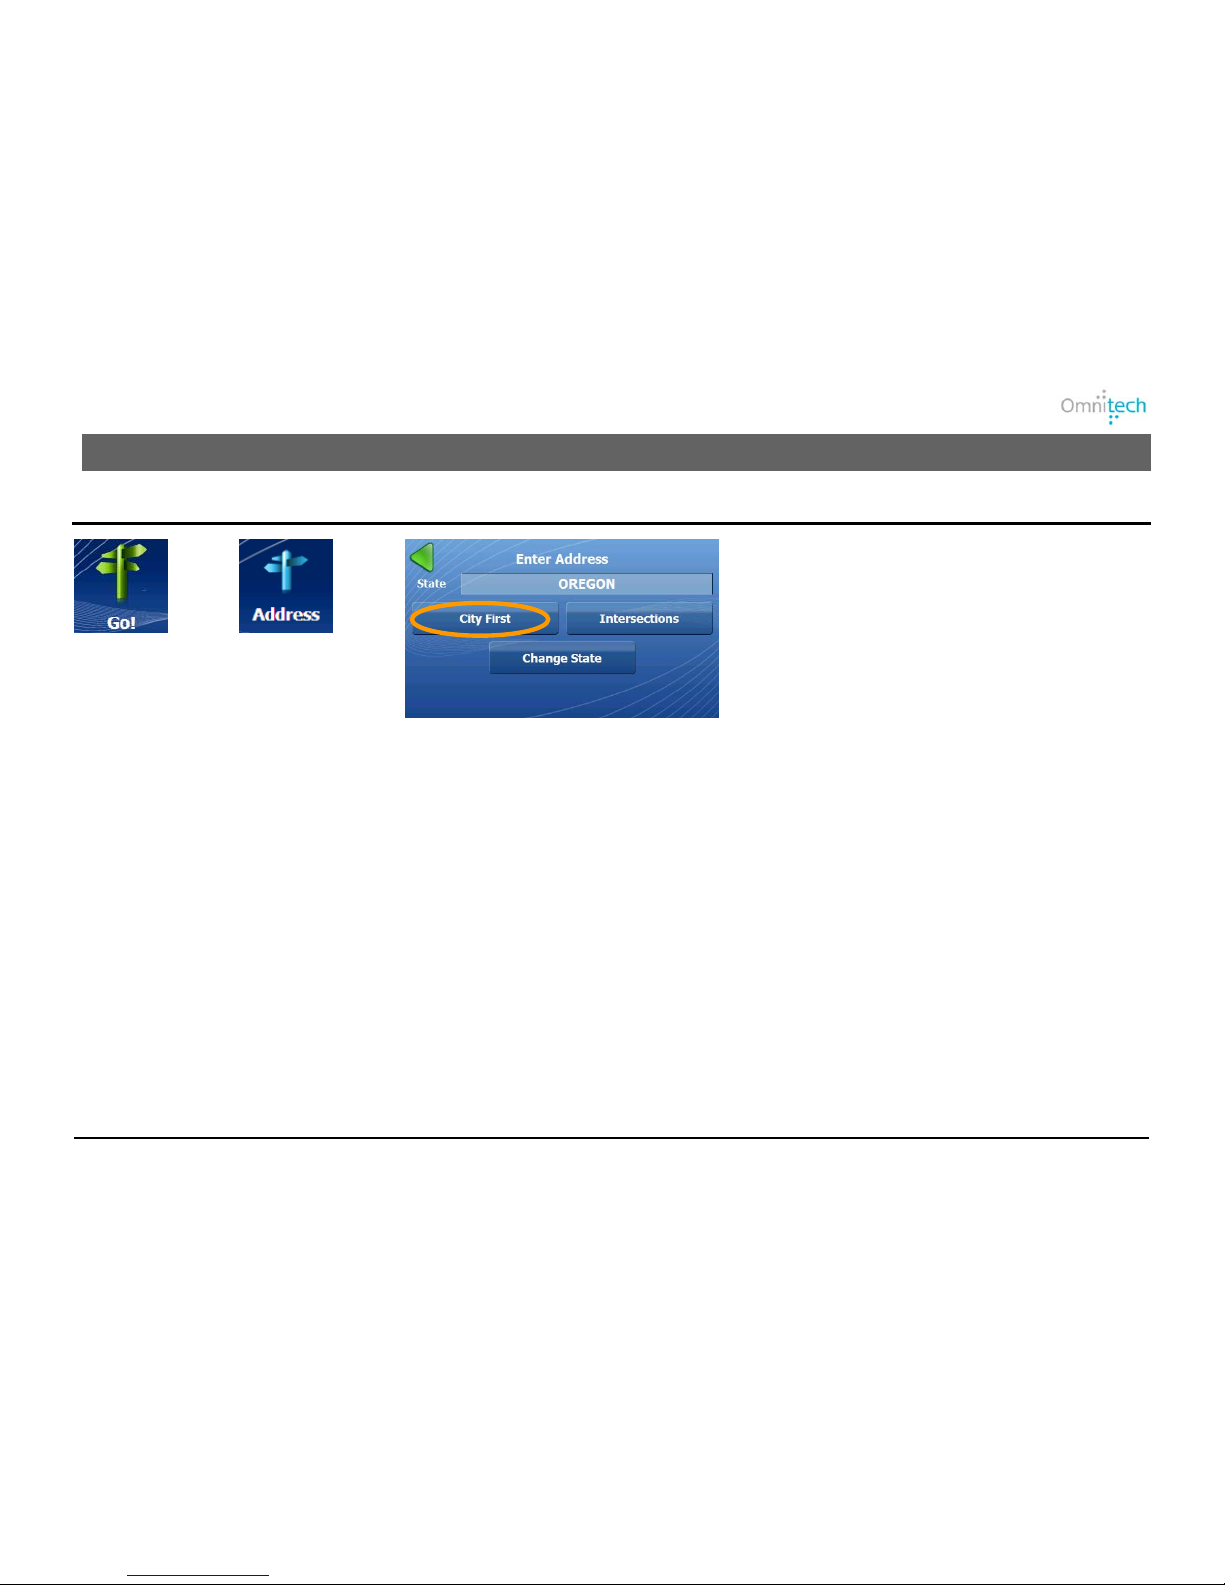
8. Creating a Route
Address
1. Tap
2. Tap
3. Select an address entry mode:
Town/City First displays cities first and is most
commonly-used.
Intersections or Road Junctions lets you travel
to a designated cross-street location.
Change State lets you change the map to
another state.
Omnitech GPS User Manual 7
Page 12
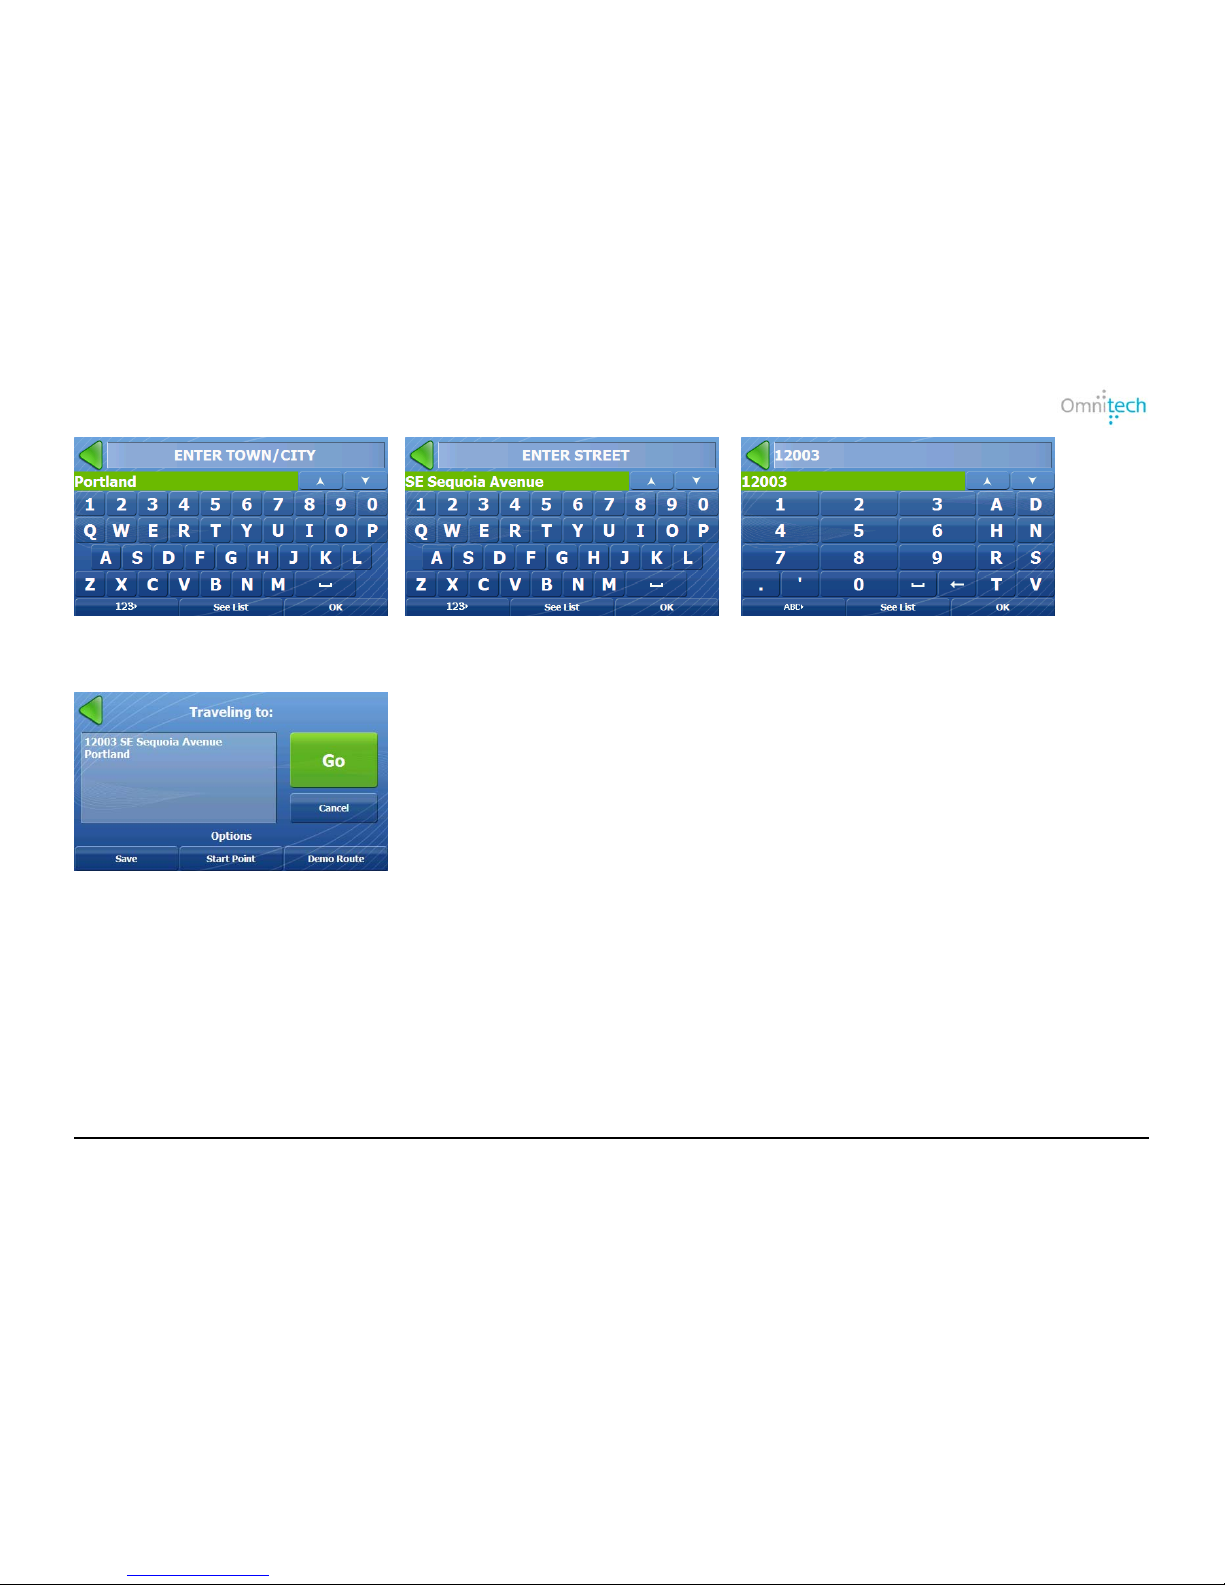
4. Enter City.
5. Enter Street.
6. Enter Address Number or Street Midpoint.
7. Tap Go.
Omnitech GPS User Manual 8
Page 13
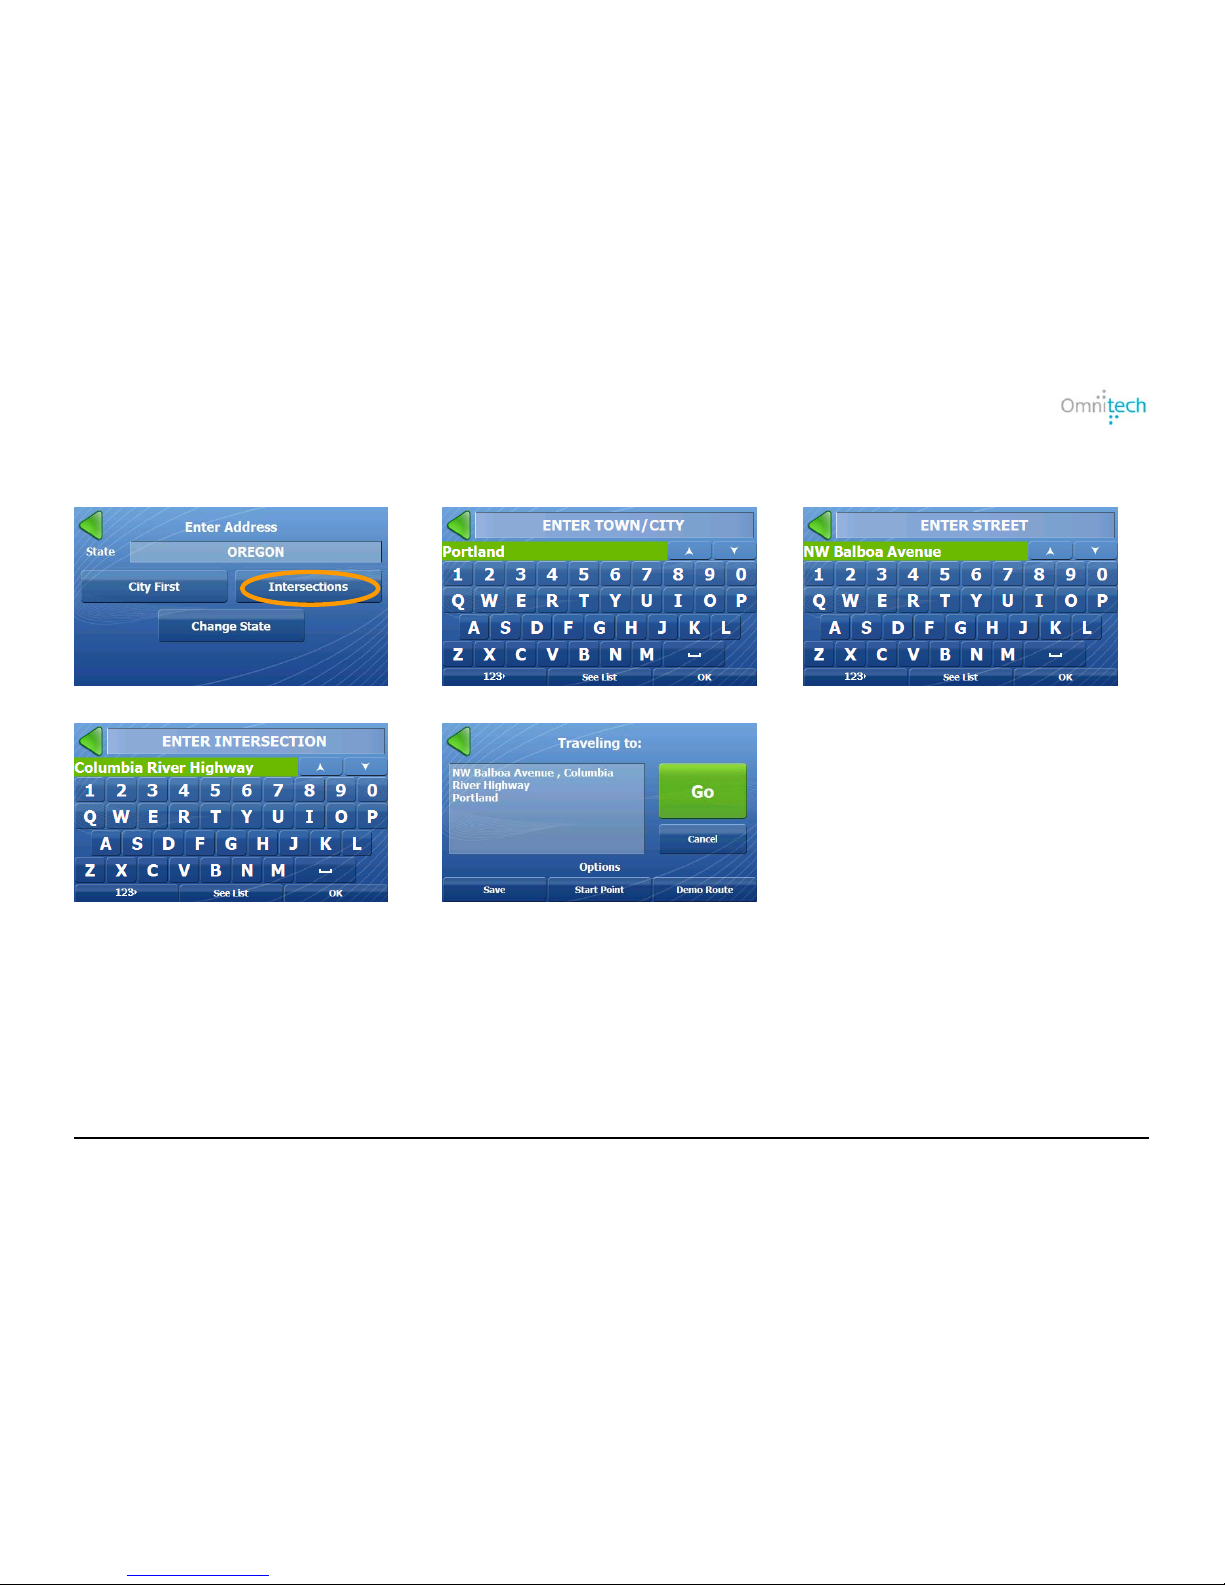
Selecting Address Intersection
You can instruct Destinator to create a route to a selected intersection.
1. Tap Intersections.
2. Select city and tap OK.
3. Select a street and tap OK.
4. Select a cross street and tap OK.
5. Tap Go.
Omnitech GPS User Manual 9
Page 14
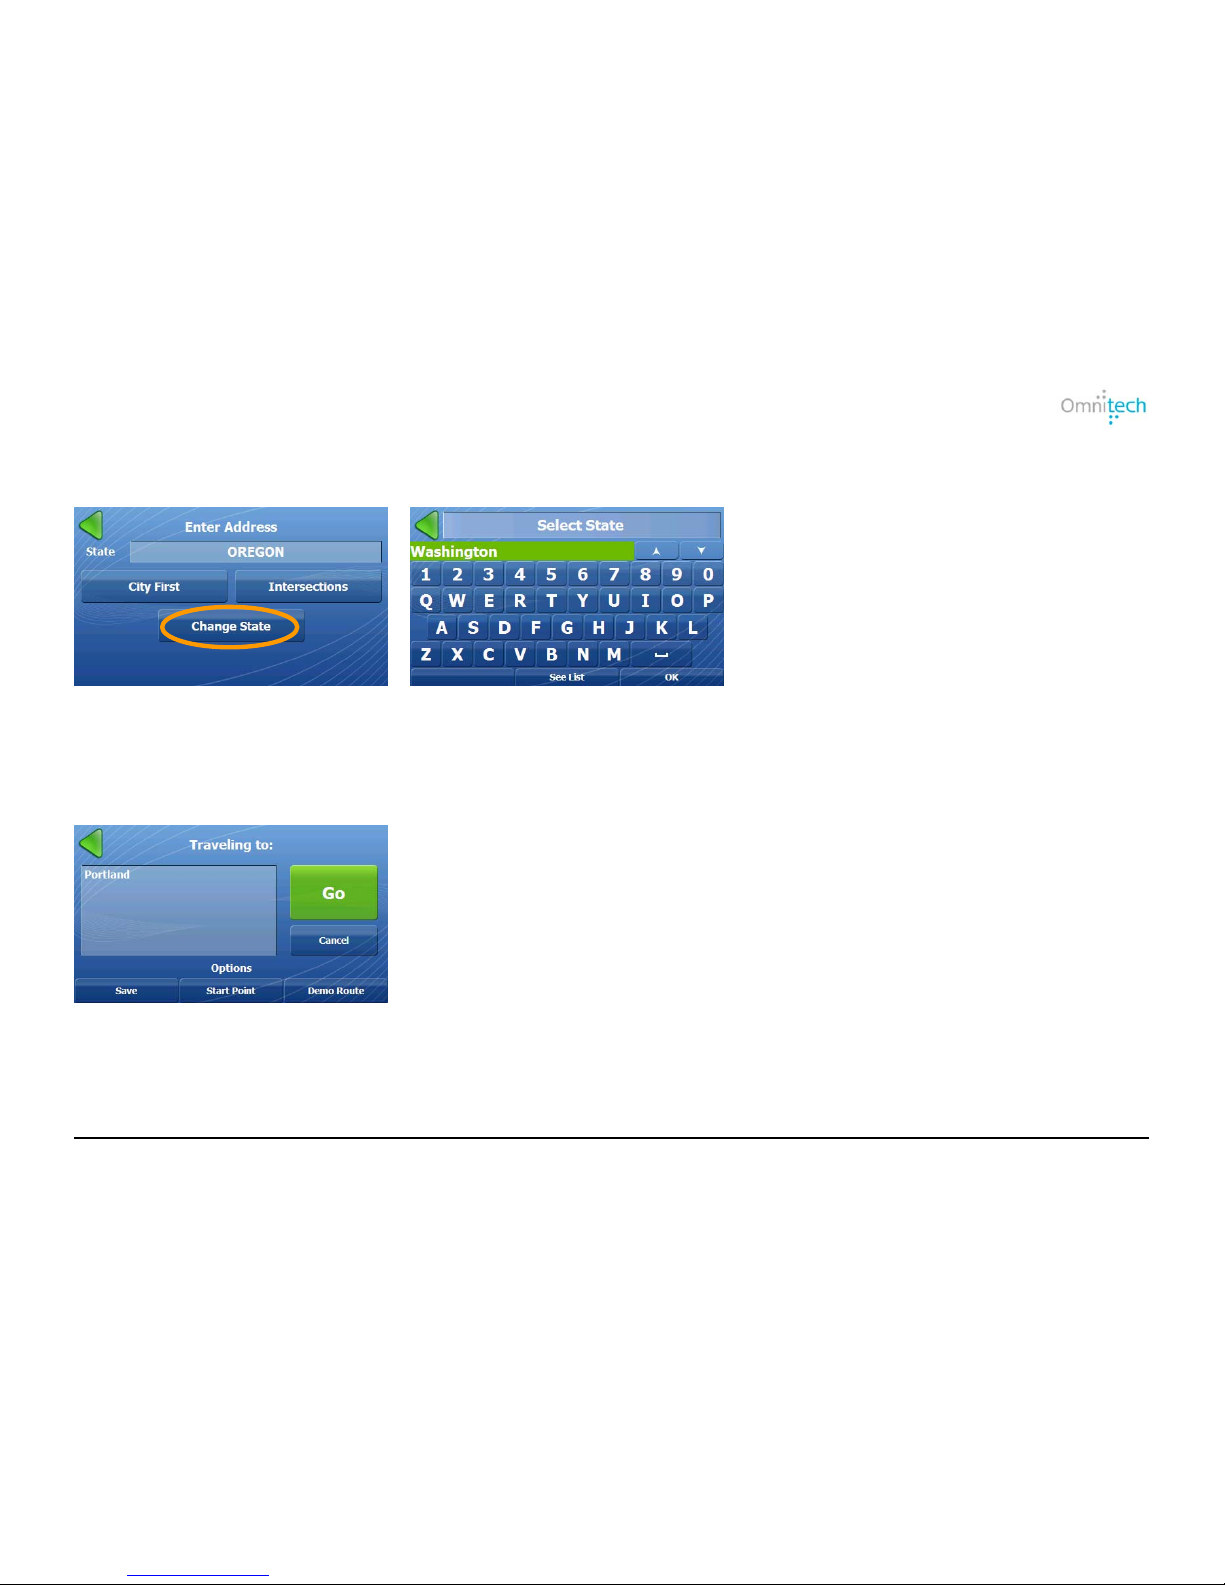
Changing State or In Other Countries (where available)
You can change from one state to another. The State screen shows the states that are available in the current map.
1. Tap Change State.
2. Select state and tap OK.
Omnitech GPS User Manual 10
Traveling To Options
You can select from the following options:
• Save – Store address to a selected folder.
• Start Point – Designate address as the starting point.
• Demo Route – Run simulated route to selected address.
Page 15
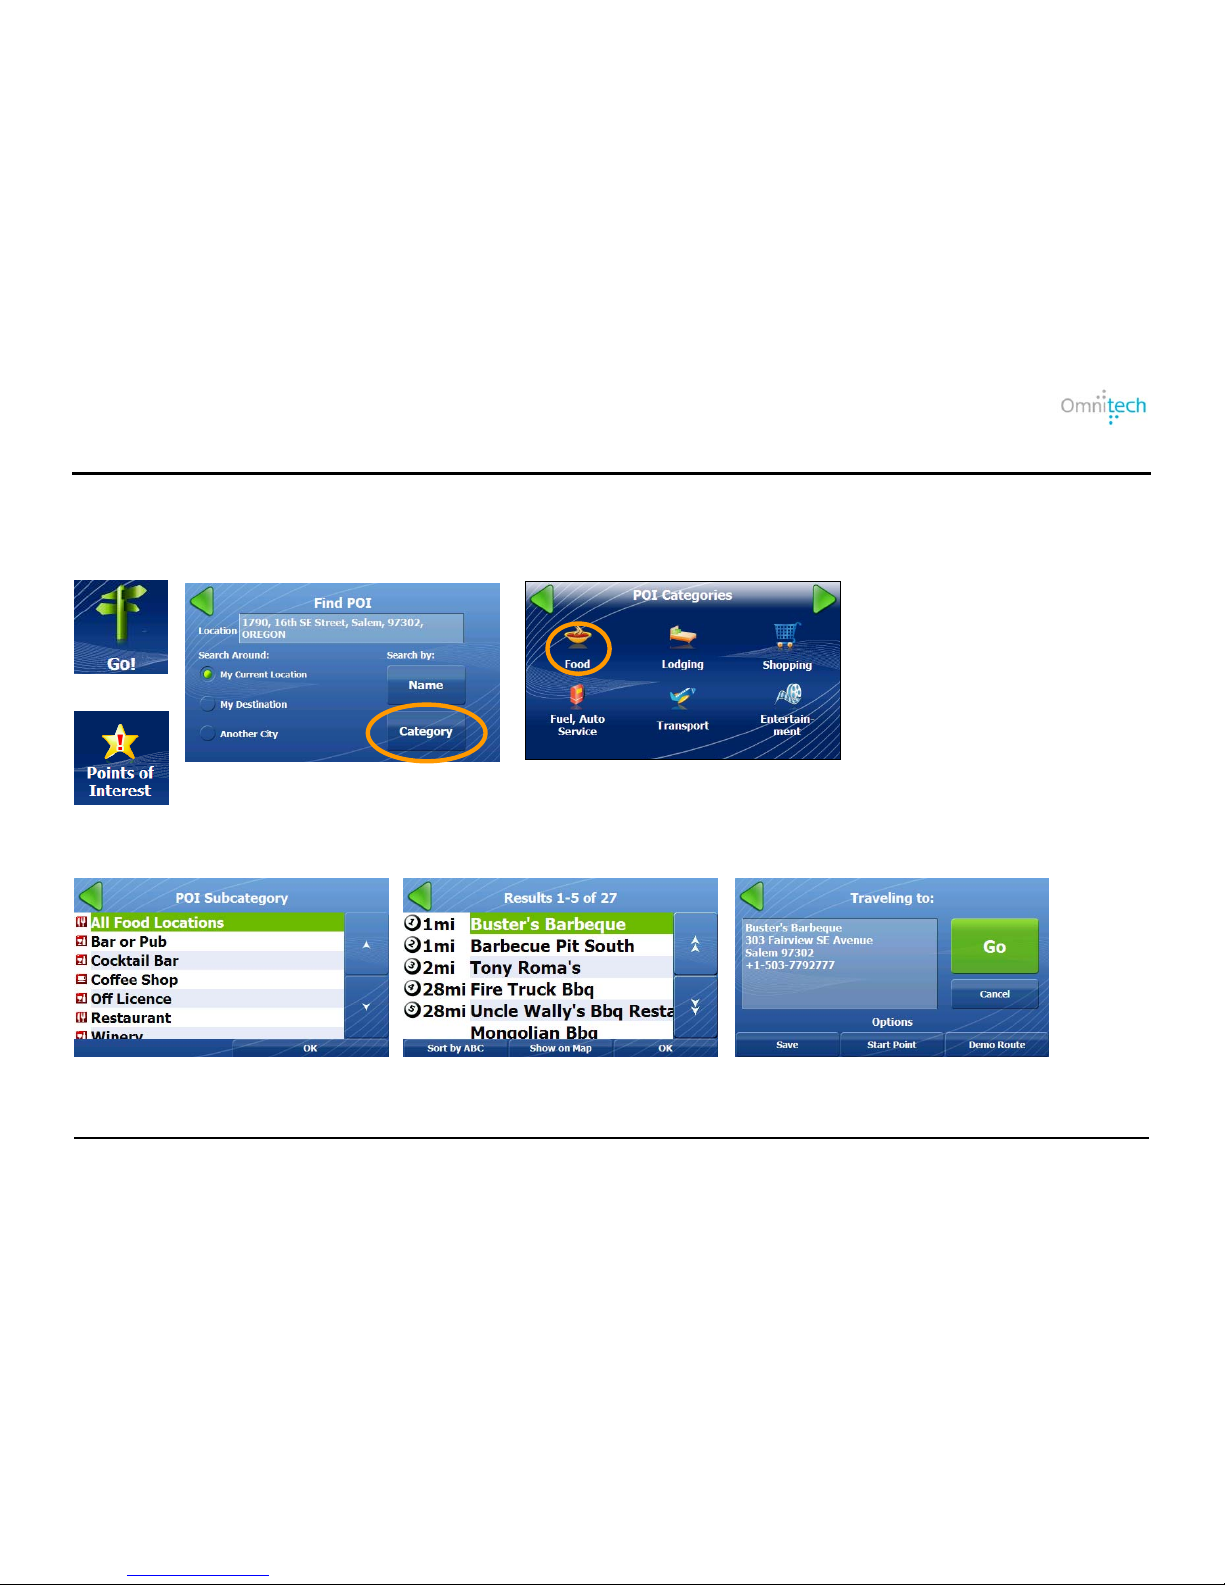
POI
Points of Interest (POI) are a collection of thousands of interesting or useful places organized into easy-to-find categories
and subcategories.
Searching by POI Categories
1. Tap
2. Tap
3. Tap a Search Around option (My
Current Location is selected by
default) and the Category button.
4. Tap a category.
Search-Around Options:
My Current Location – Search
near your current location.
My Destination – Search near
your destination.
Another City – Search in another
city.
5. Tap a subcategory.
6. Tap the location and OK.
7. Tap Go.
Omnitech GPS User Manual 11
Page 16
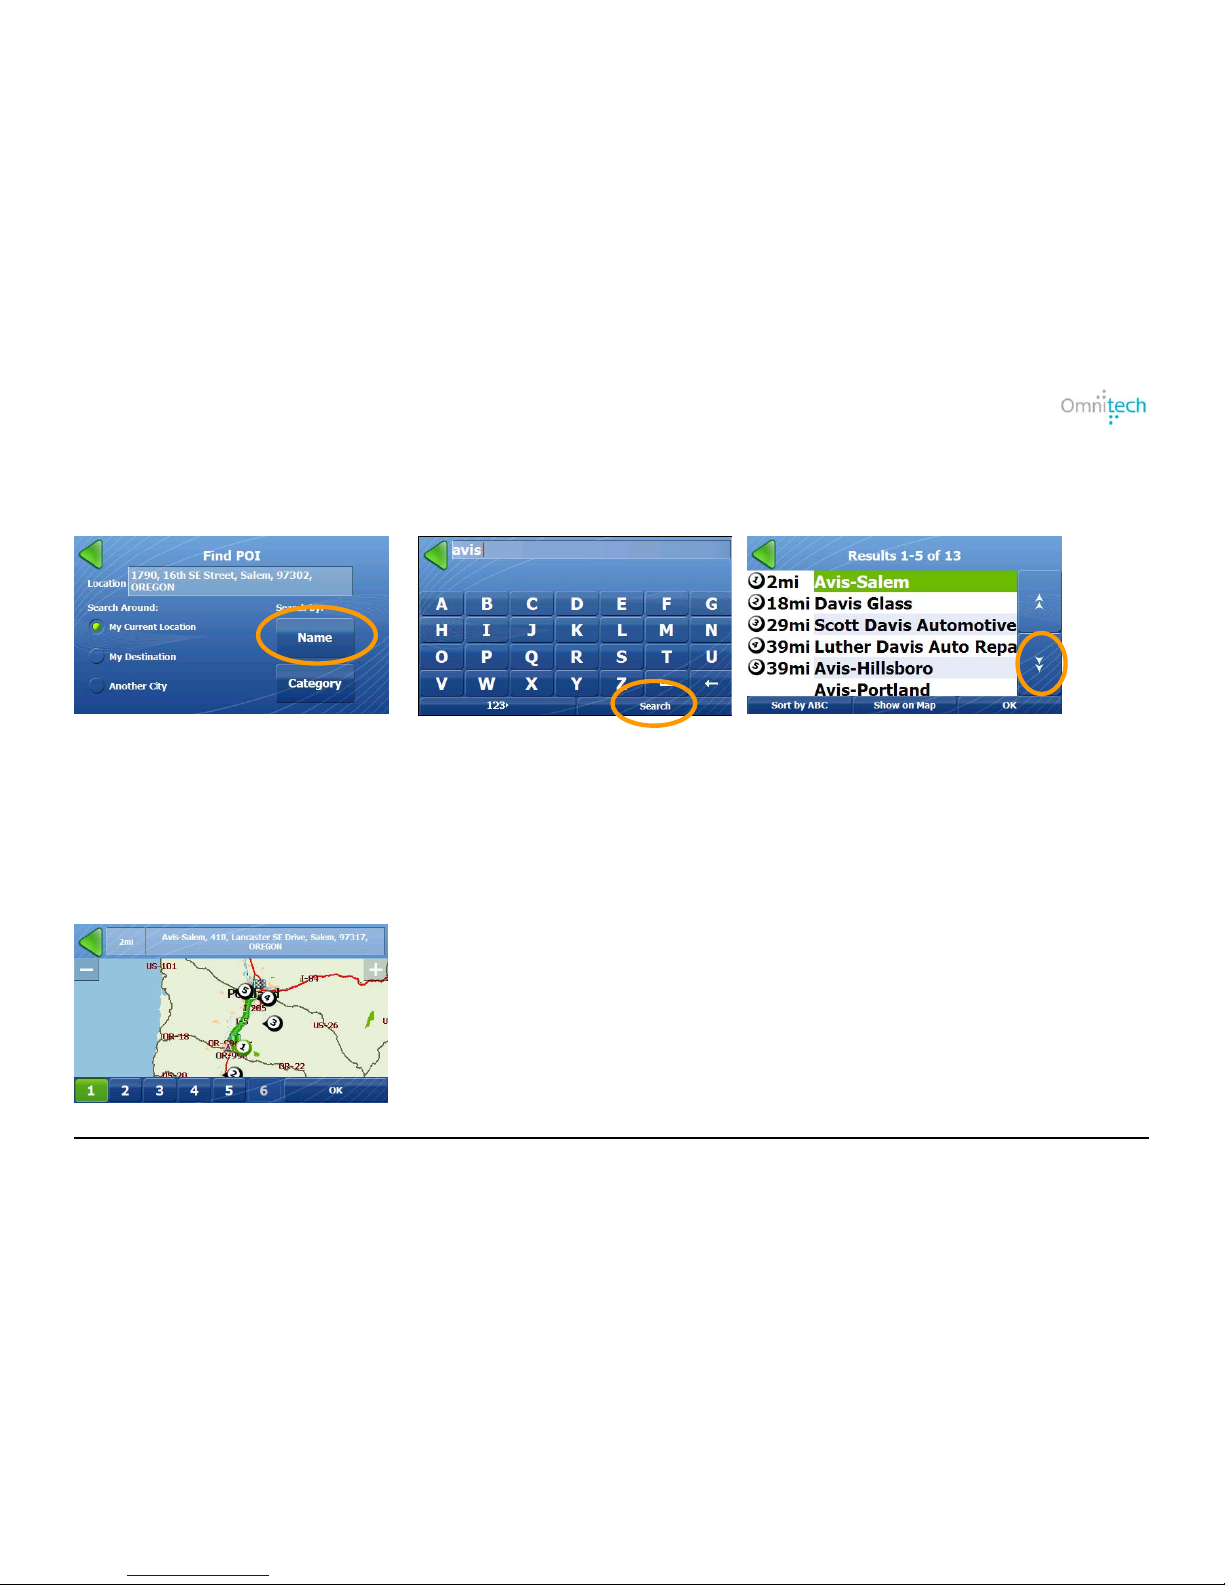
Searching by POI Name
You can search for a POI by entering the entire name, individual words in the name, or letters in the words.
Here, enter “avis” for example.
1. Tap the Name button.
2. Enter a search string and tap the
Search button.
3. Select location and tap OK to Traveling To
screen. Tap the Scroll Down key to see the
next six results.
Sort by ABC – Shows locations alphabetically and not by distance from your location.
Sort by Distance – Shows locations by distance from your current location, and not alphabetically.
Show on Map – Tap to show the stations on the Show on Map screen. The Result Number buttons correspond to the
screen results.
Omnitech GPS User Manual 12
Page 17
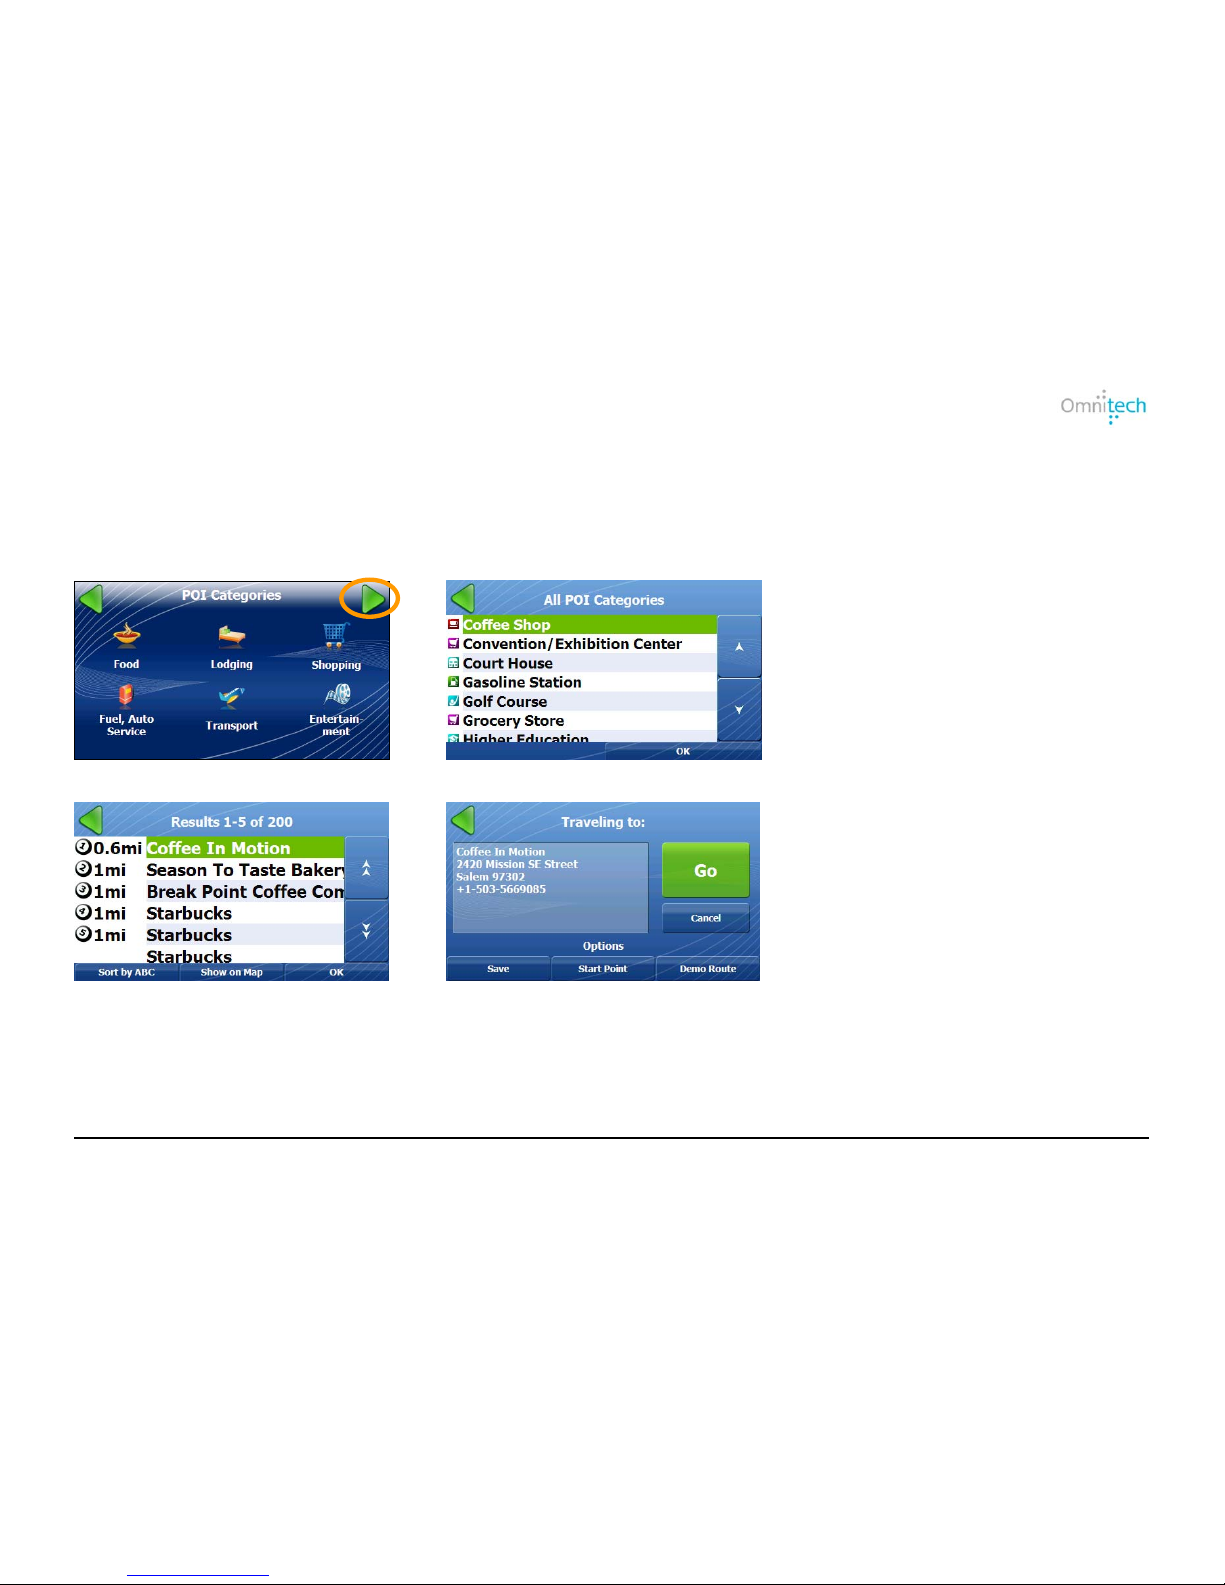
Tap the button to display the station address and to center the station on the map . When you have selected a station, click OK to
the Traveling To screen.
Browsing the Entire POI List
You can display the entire POI Category list.
1. Tap
2. Select a POI category and tap OK.
3. Select a POI location and tap OK.
4. Tap Go.
Traveling To Options
For information, see the Traveling to Options on page 10.
Omnitech GPS User Manual 13
Page 18
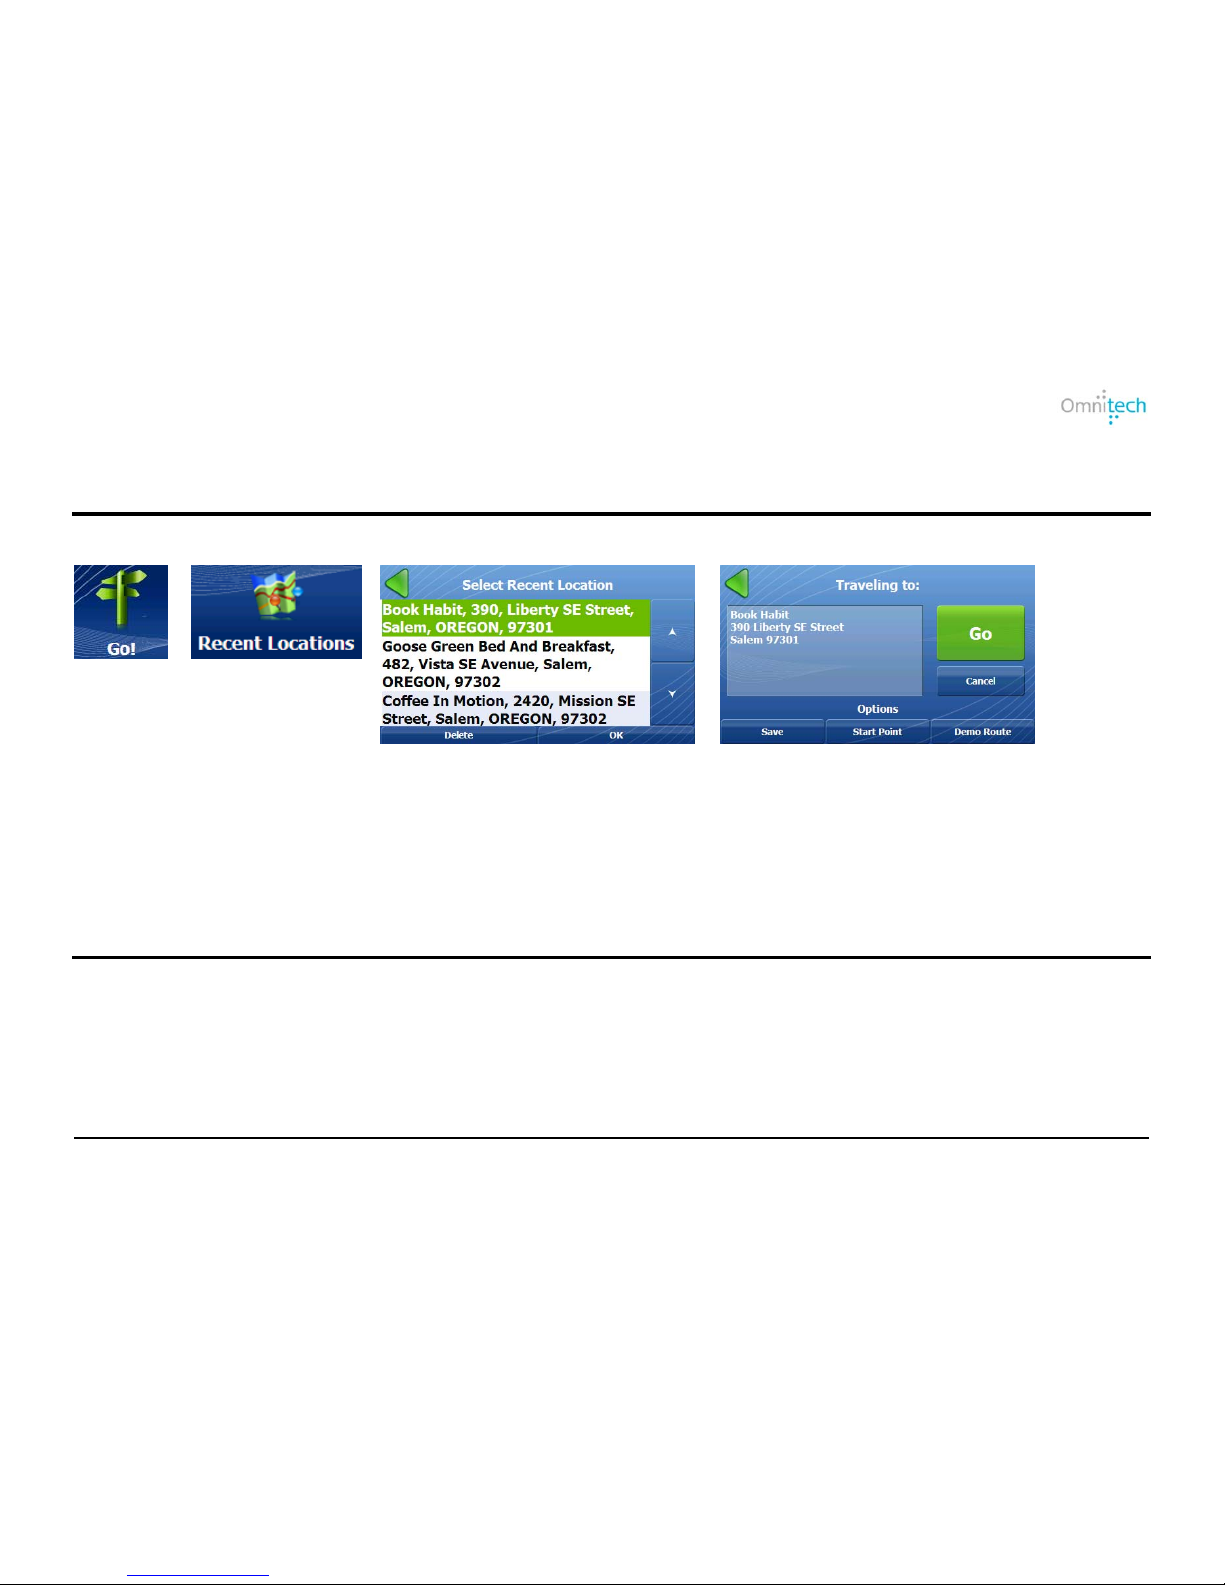
Recent Locations
You can select from a list of recent locations that you have traveled to.
1. Tap
2. Tap
3. Select a location.
4 .Tap Go.
Traveling To Options
For information, see the Traveling to Options on page 10.
Favorite Locations
A Favorite location is a destination that you have stored for easy retrieval.
Saving a Location
From the Save Location screen, you can tap the right and left arrow keys to select a group to where you want to save
your location. To create a group, see Creating Groups for Favorite Locations on page 16.
Omnitech GPS User Manual 14
Page 19
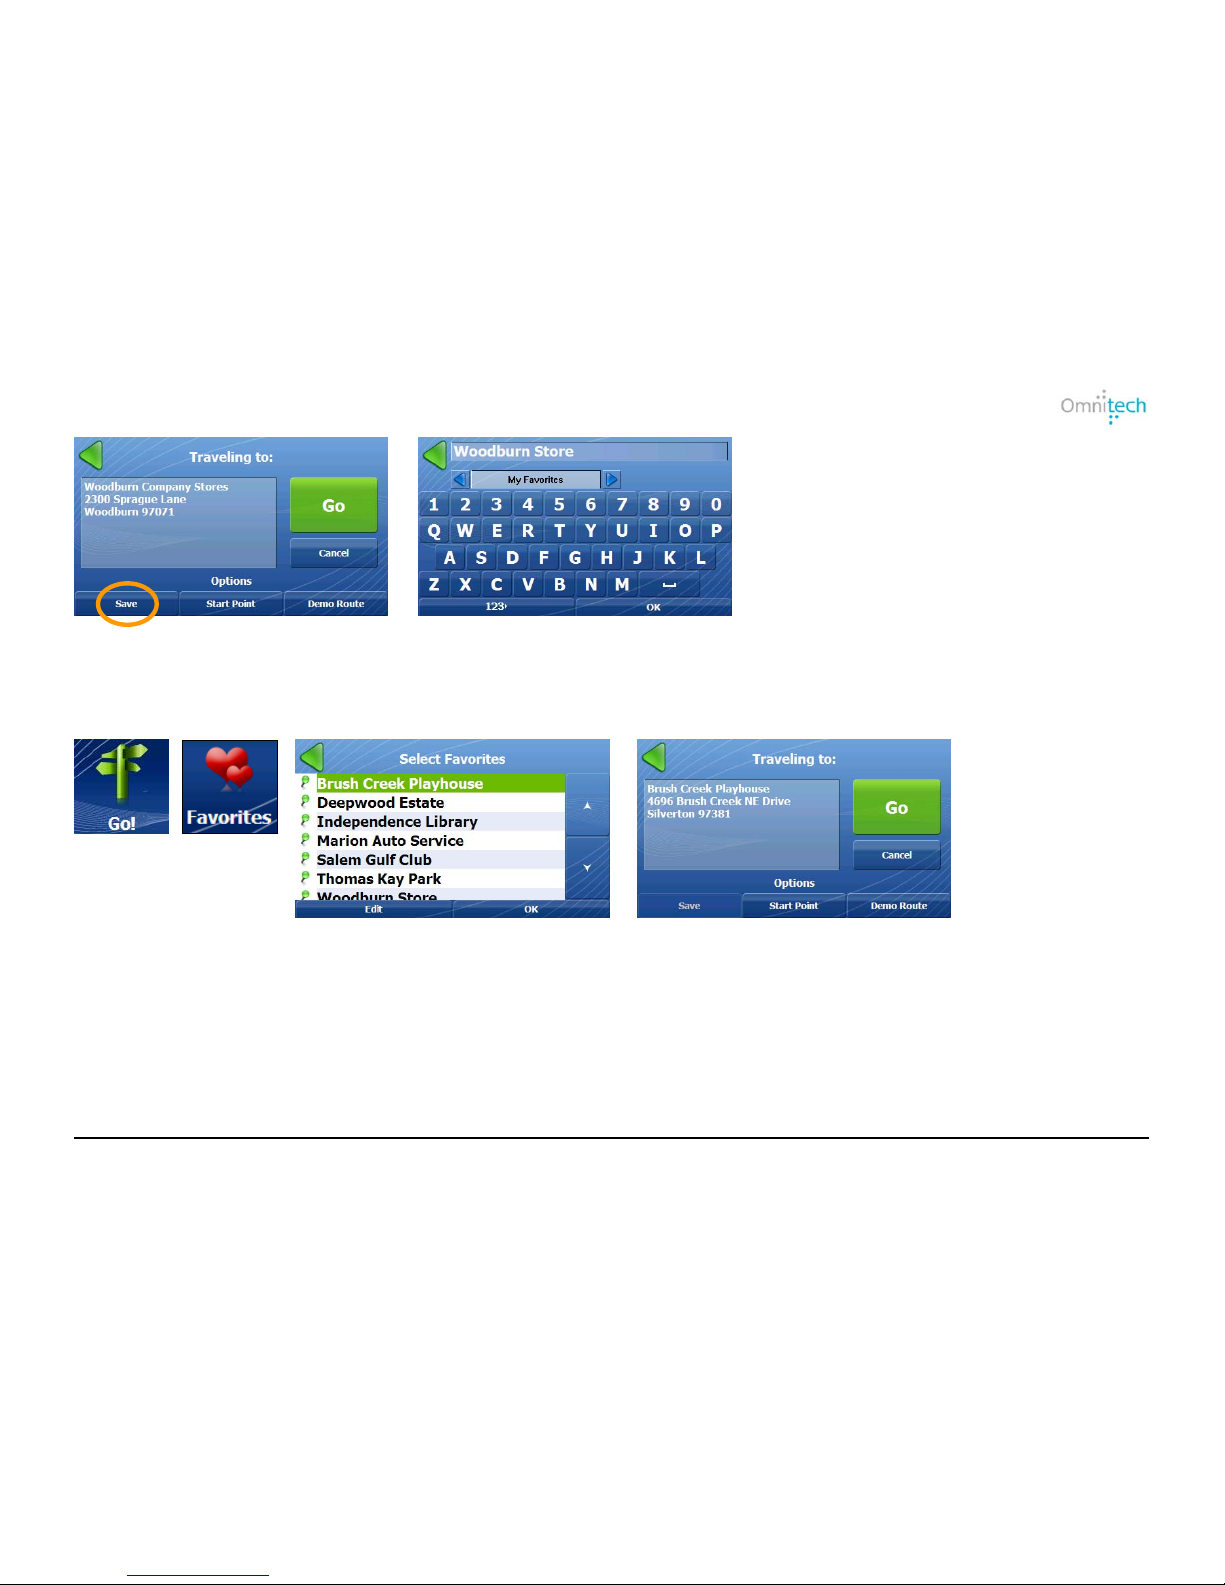
1. Tap Save.
2. Enter a name for the location, select a group (optional), and tap OK. The
location is automatically saved in My Favorites if a group is not selected.
Traveling to a Favorite Location
1. Tap
2. Tap
3. Select the location and tap OK.
4. Tap Go.
Omnitech GPS User Manual 15
Page 20
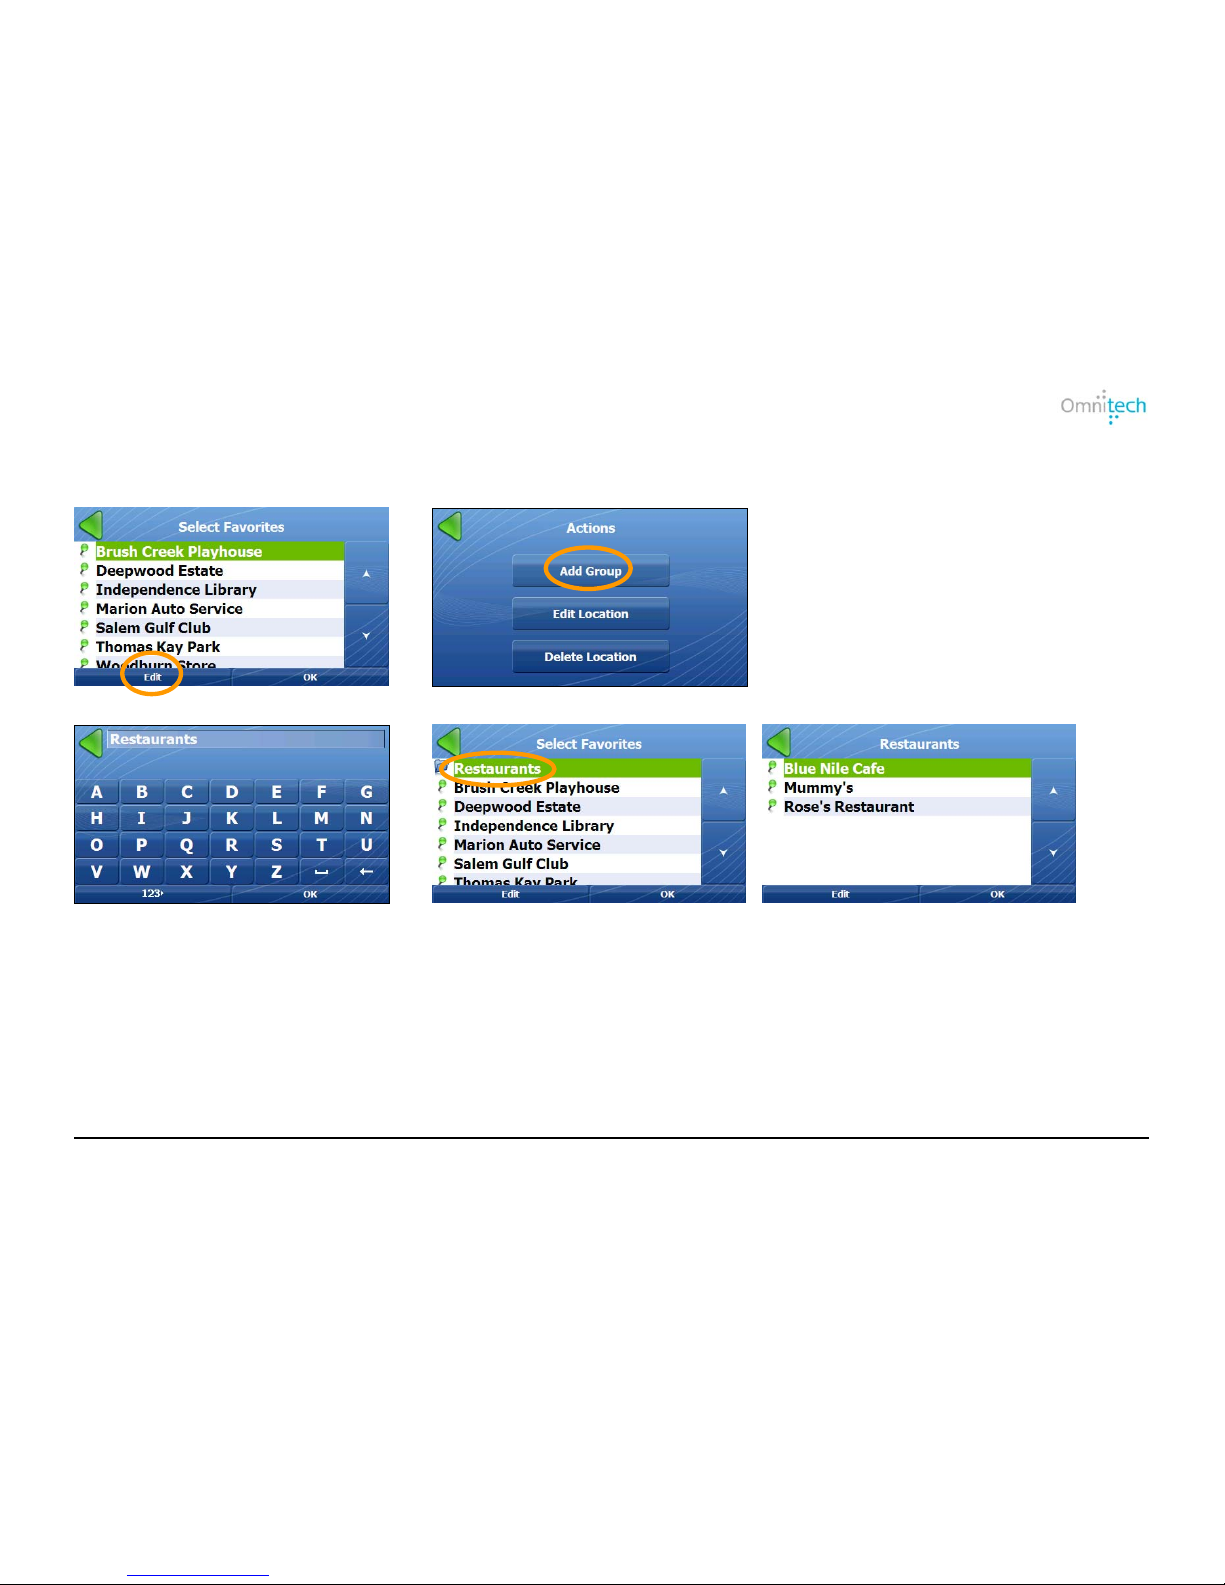
Omnitech GPS User Manual 16
1. Tap
2. Tap
Additional Commands:
• Tap Edit Location to rename a
selected group.
• Tap Delete Location to remove
a selected group.
3. Enter a group name and tap OK.
4. The group appears.
5. Save favorites in group.
For information, see the Traveling to Options on page 10.
Creating Groups for Favorite Locations
You can use groups to organize your favorite locations.
Traveling To Options
Page 21
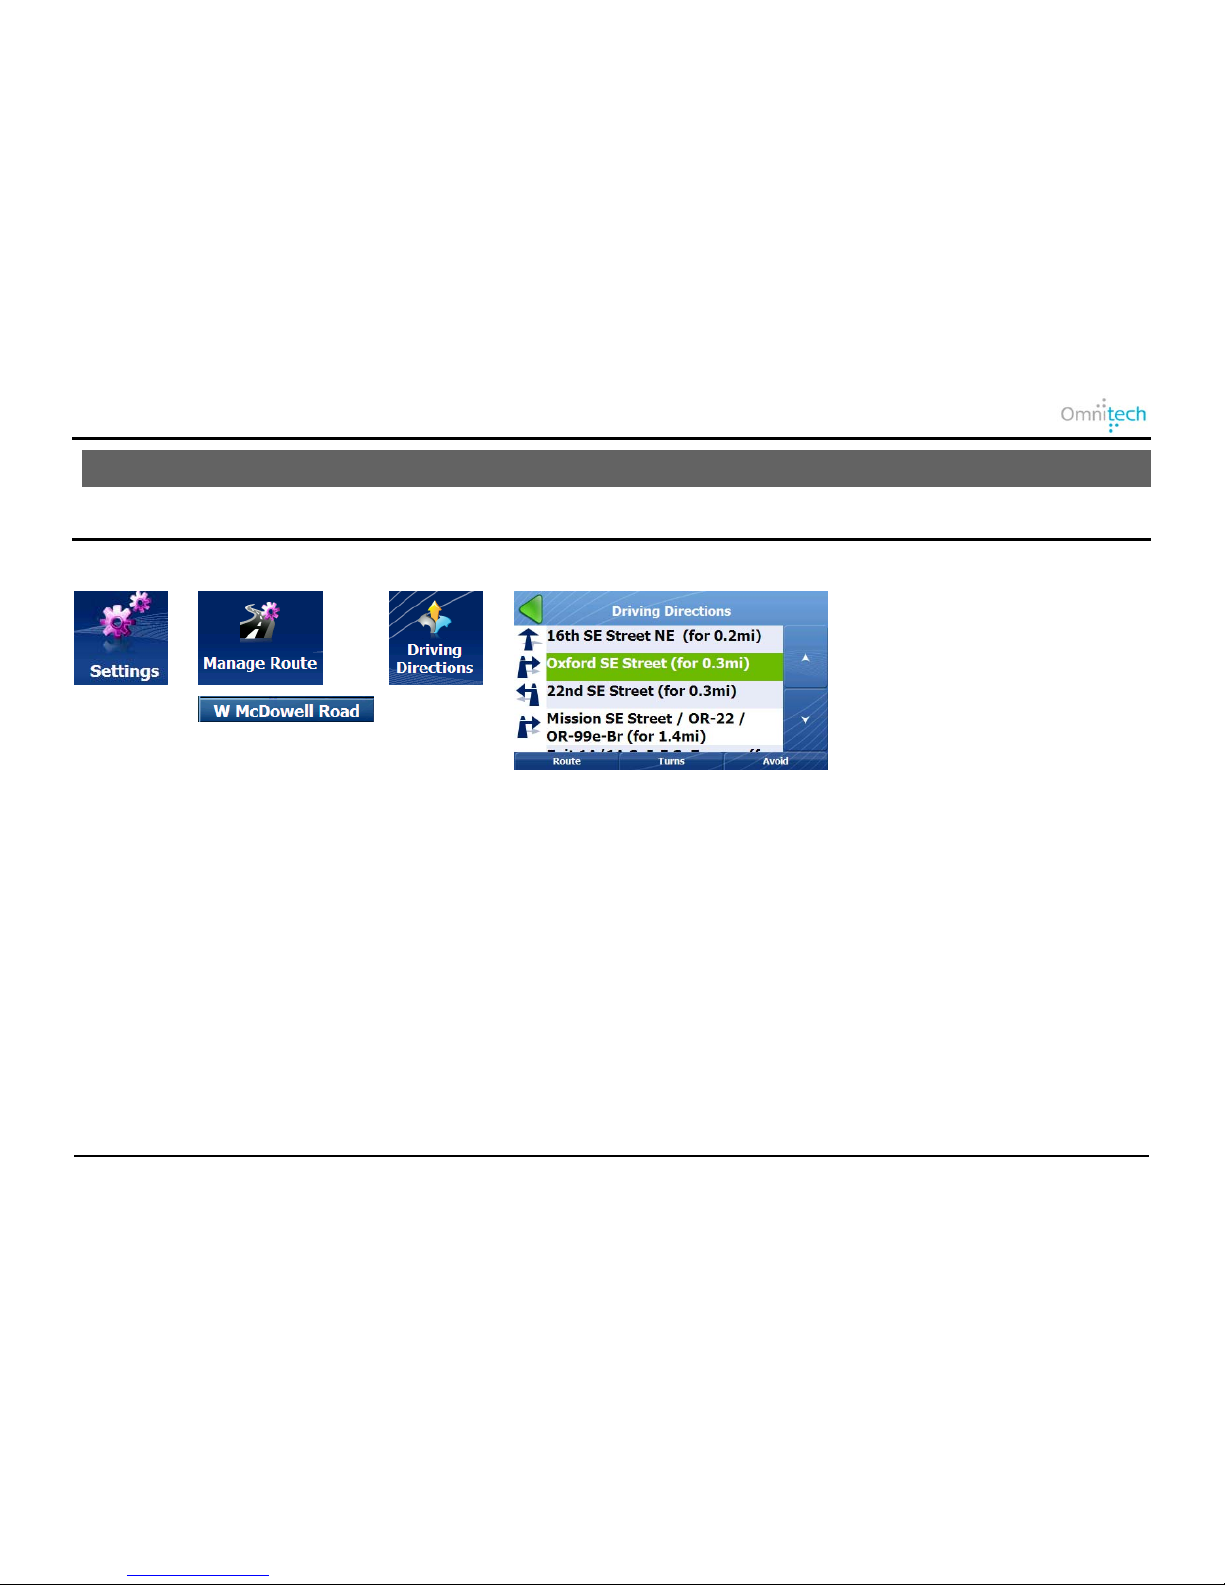
9. Additional Destinator Features
Driving Directions
The Driving Directions screen displays travel instructions as you navigate the route.
1. Tap
or
(on map)
2. Tap
3. Tap
4. Displays travel instructions from starting
point to ending point.
Omnitech GPS User Manual 17
Page 22
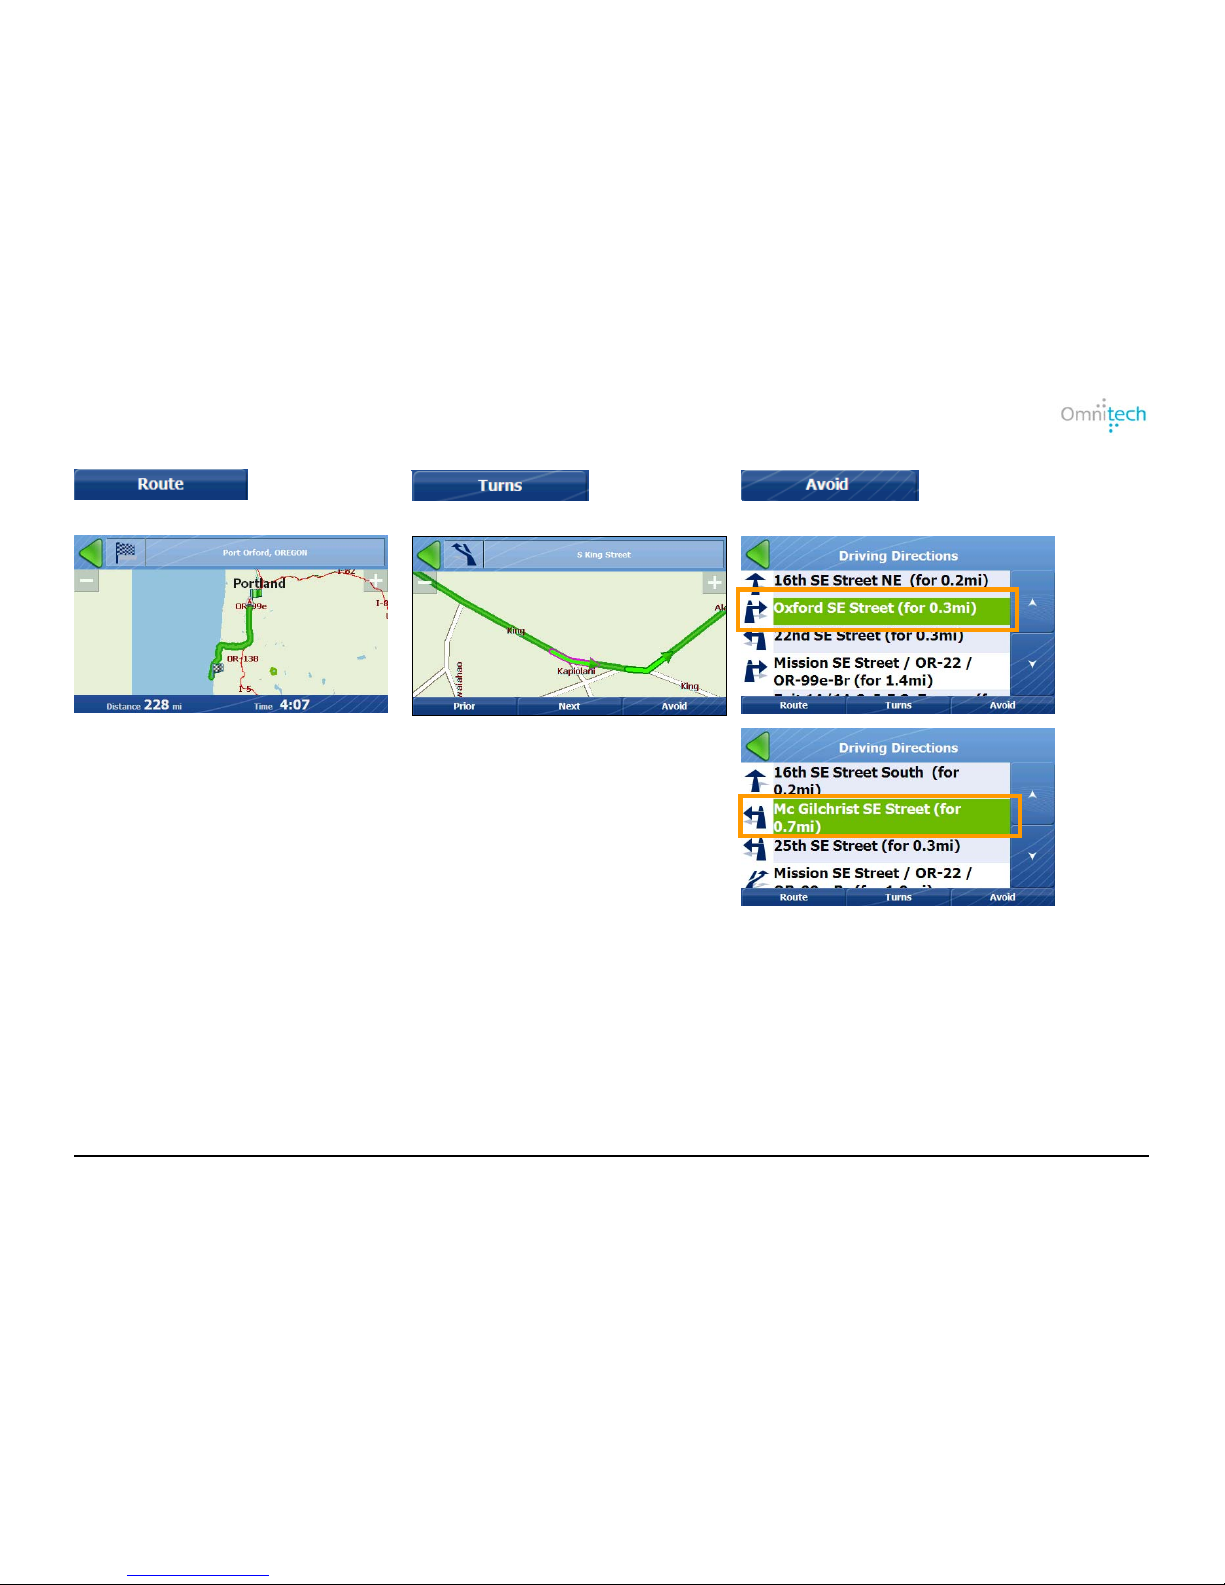
Omnitech GPS User Manual 18
Showing Entire Route and Next Turn Maps
Displays the entire route.
Display the selected turn.
Tap Prior to show the previous
turn.
Tap Next to show the next turn.
Removes the turn and recalculates the route.
Page 23
Omnitech GPS User Manual 19
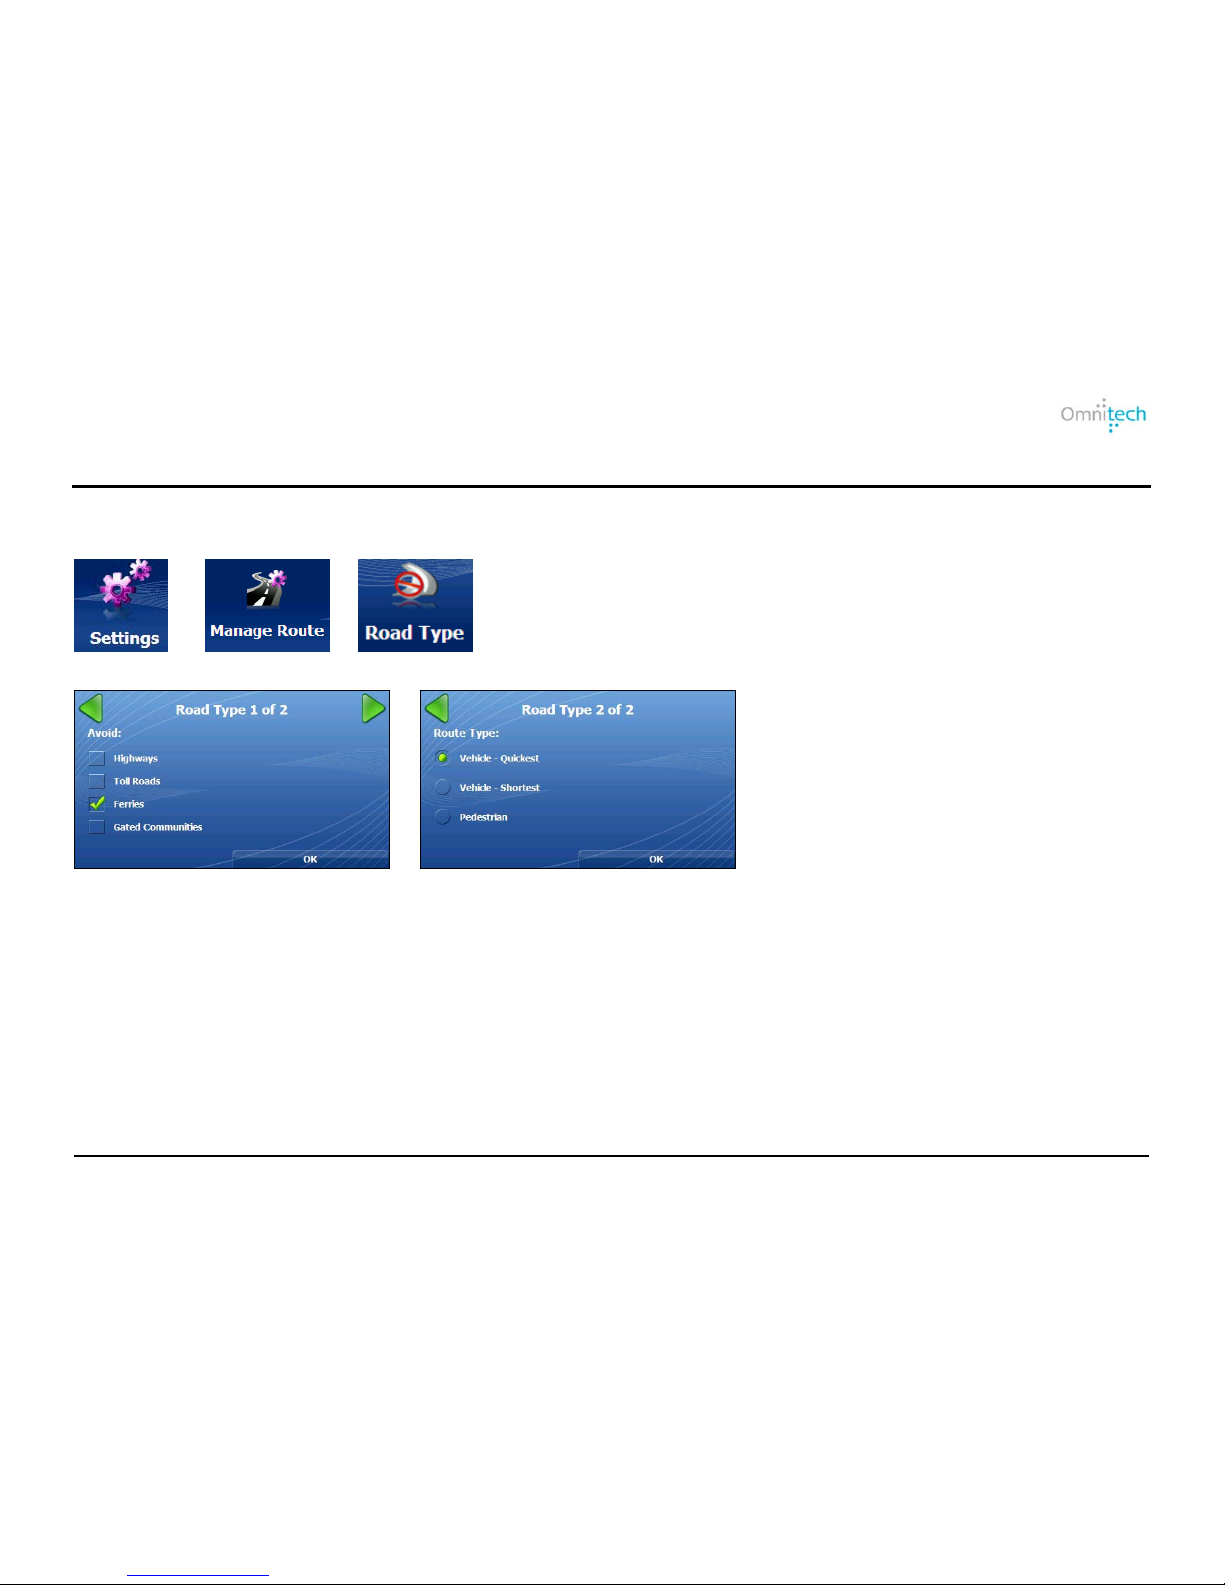
Road Type and Route Mode
You can select roads to be excluded from your route calculations. Use this feature when you want to avoid congested
roads, toll roads, or unsafe streets. You can also select a route type for generating routes.
1. Tap
2. Tap
3. Tap
4. Select the road types to avoid.
5. Select one of the following: Quickest
(default), Shortest, or Pedestrian (on
foot or bike).
Route Types:
Quickest – Instructs Destinator to
calculate the speediest route.
Shortest – Instructs Destinator to
calculate the shortest route. The shortest
route could be on city streets, which
would make the route slower.
Pedestrian – Generates a route up to ten
kilometers (approximately 6 miles),
which is not limited by vehicle
constraints, such as one way streets.
When creating a pedestrian route.
Destinator avoids highways or other roads
where pedestrians would not travel. Voice
prompts are deactivated in this mode.
Page 24
Omnitech GPS User Manual 20
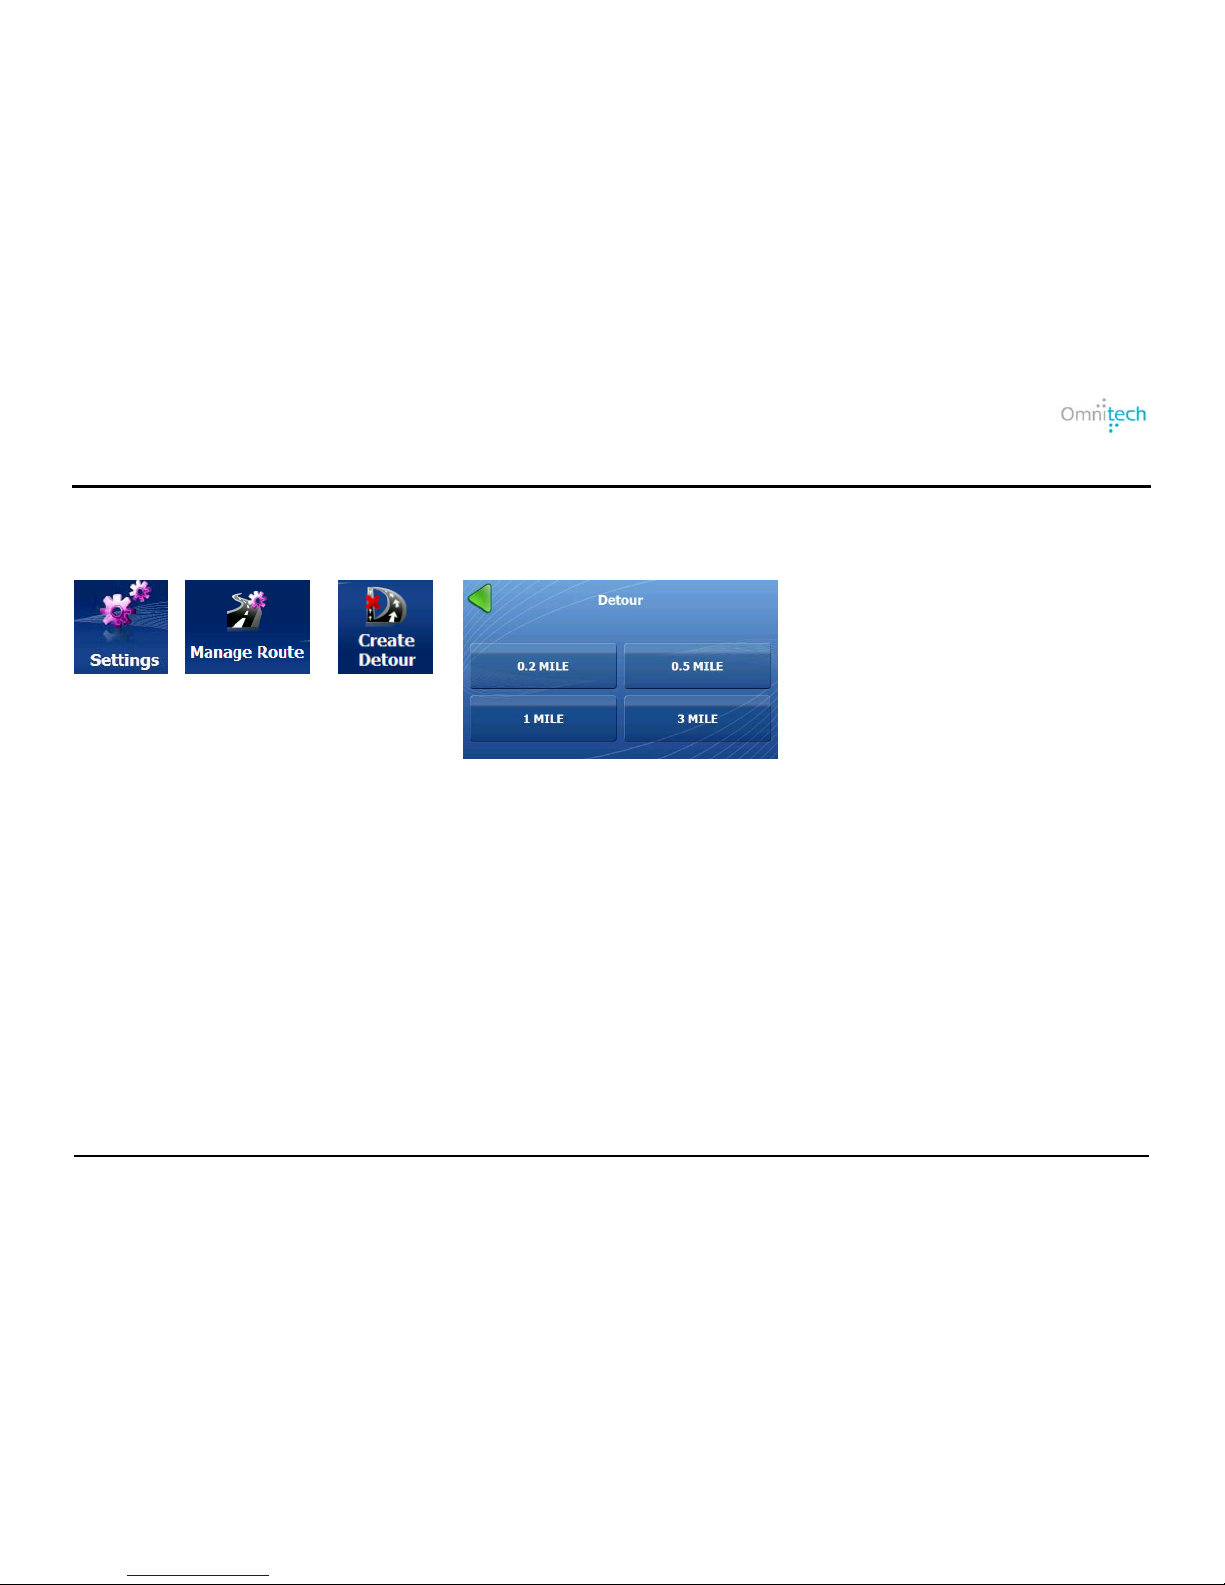
Select a detour distance to instruct Destinator to calculate an alternate route. For example, if you know there is traffic for
the next three miles, you can have Destinator calculate a detour that takes you off your current route and then returns
you back to that route after a distance of three miles.
1. Tap
2. Tap
3. Tap
4. Tap a button to set the detour
distance.
Detours
Page 25
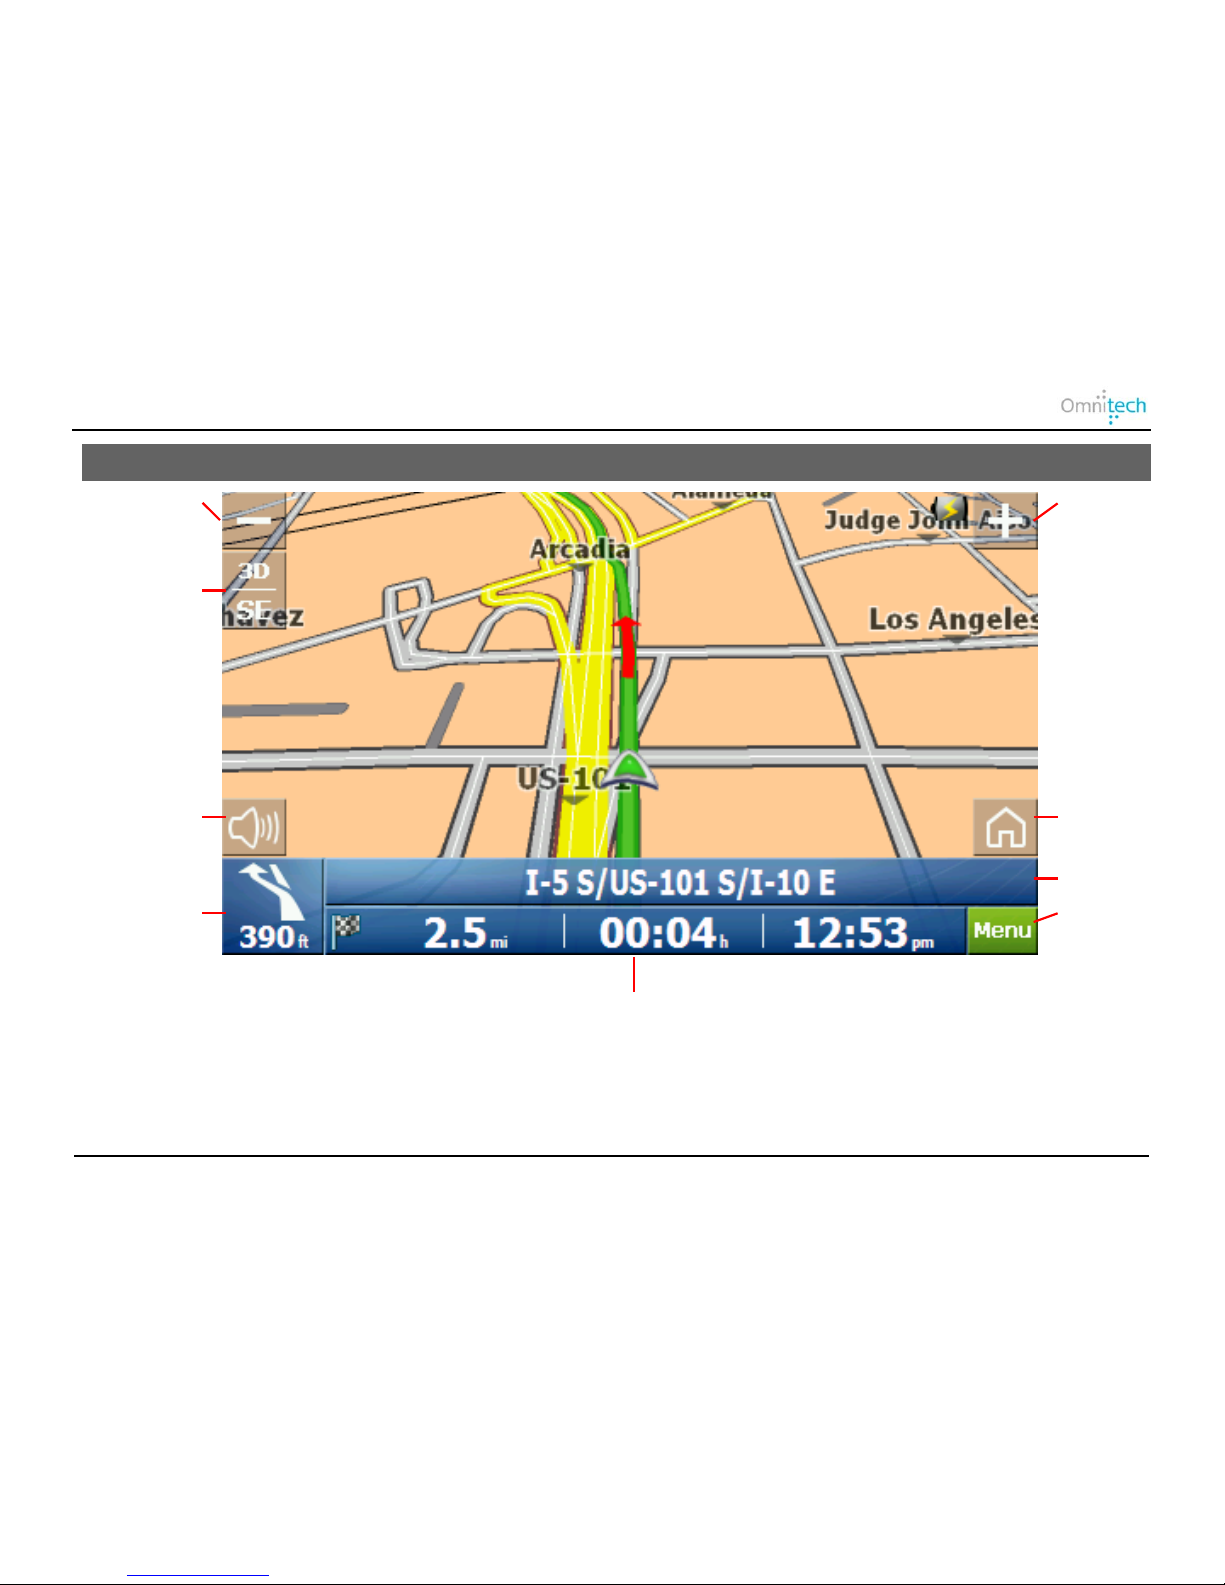
10. Maps
Zoom Out
Zoom In
Compass
Volume
QuickNav
Turn Information
Directions Bar
Menu button
GPS Bar
Omnitech GPS User Manual 21
Page 26
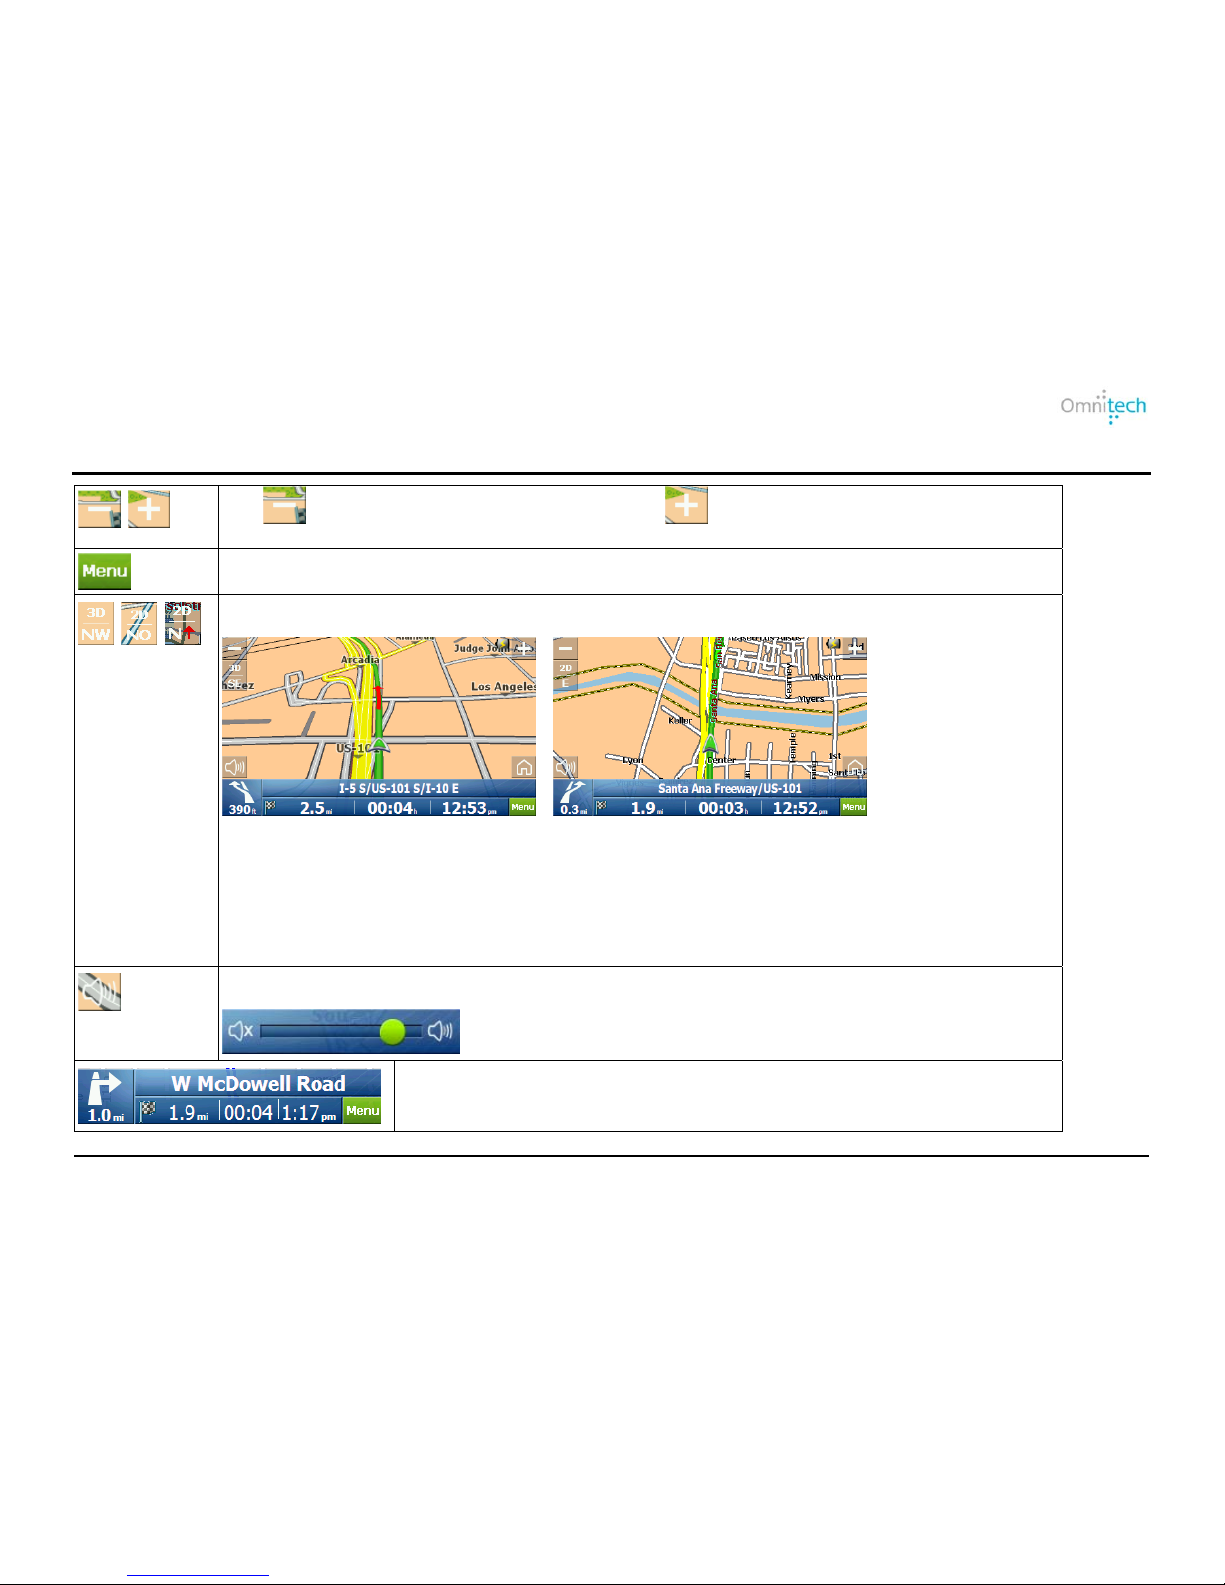
Map Icons
Tap to view a larger area in less detail. Tap to view a smaller area in greater
detail.
Tap to show the Main menu.
Tap the Compass to change the Map View display.
Compass Type:
3D – 3D map view with the forward direction at the top.
2D – 2D map view with the forward direction at the top.
2D N – 2D map view with North at the top.
Use the Volume bar to adjust or mute the volume.
Next turn information. Tap for turn-by-turn directions.
Omnitech GPS User Manual 22
Page 27
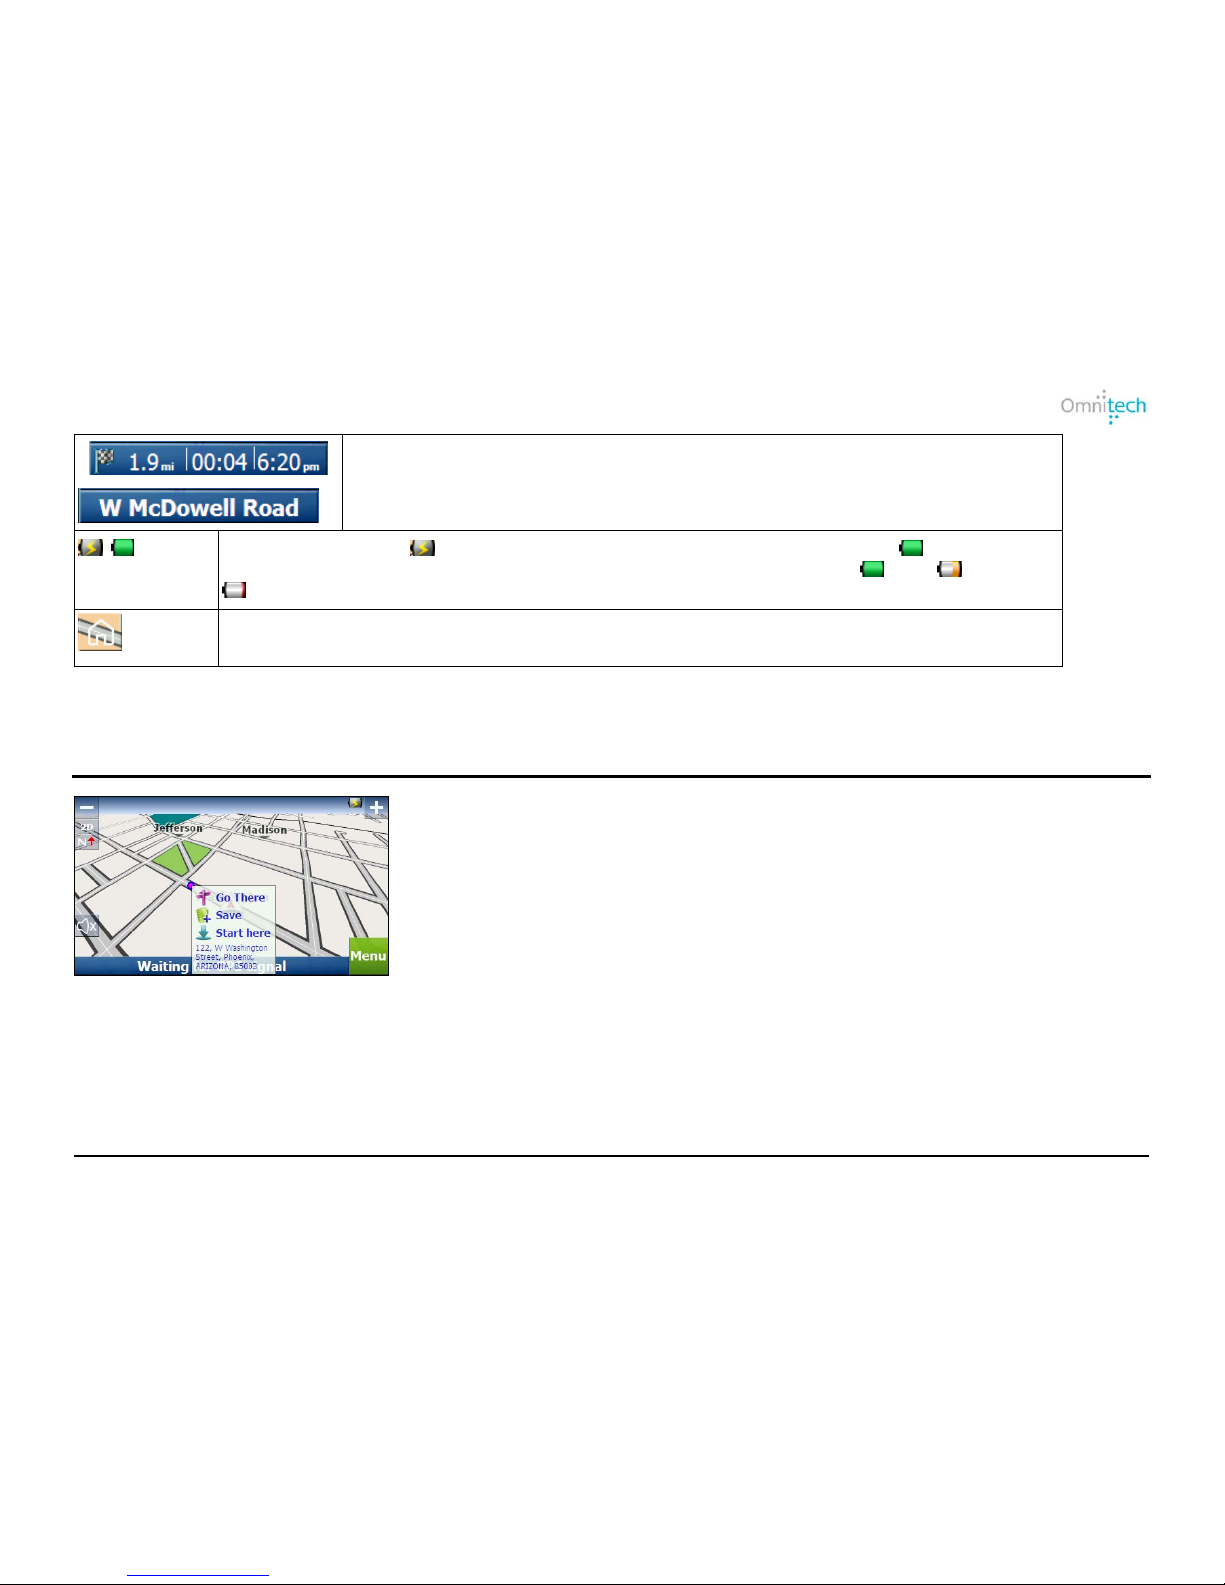
Tap the toggle button for different GPS information:
• Travel Distance, Remaining Time, Arrival Time.
• Current Street.
Destinator displays when the device is connected to a power source or when the
device is running on battery. The battery status is displayed as follows: Full, Half fu ll,
Empty.
Tap to set your QuickNav location. When set, Destinator automatically calculates a route to
the location.
Travel by Tapping the Map
When you tap on the Map screen (enable the “Allow screen tap” option in Map Settings), the pop-up box is displayed,
providing options to:
• Navigate to the selected map location.
• Save the map location.
• Start from the selected map location.
Omnitech GPS User Manual 23
Page 28
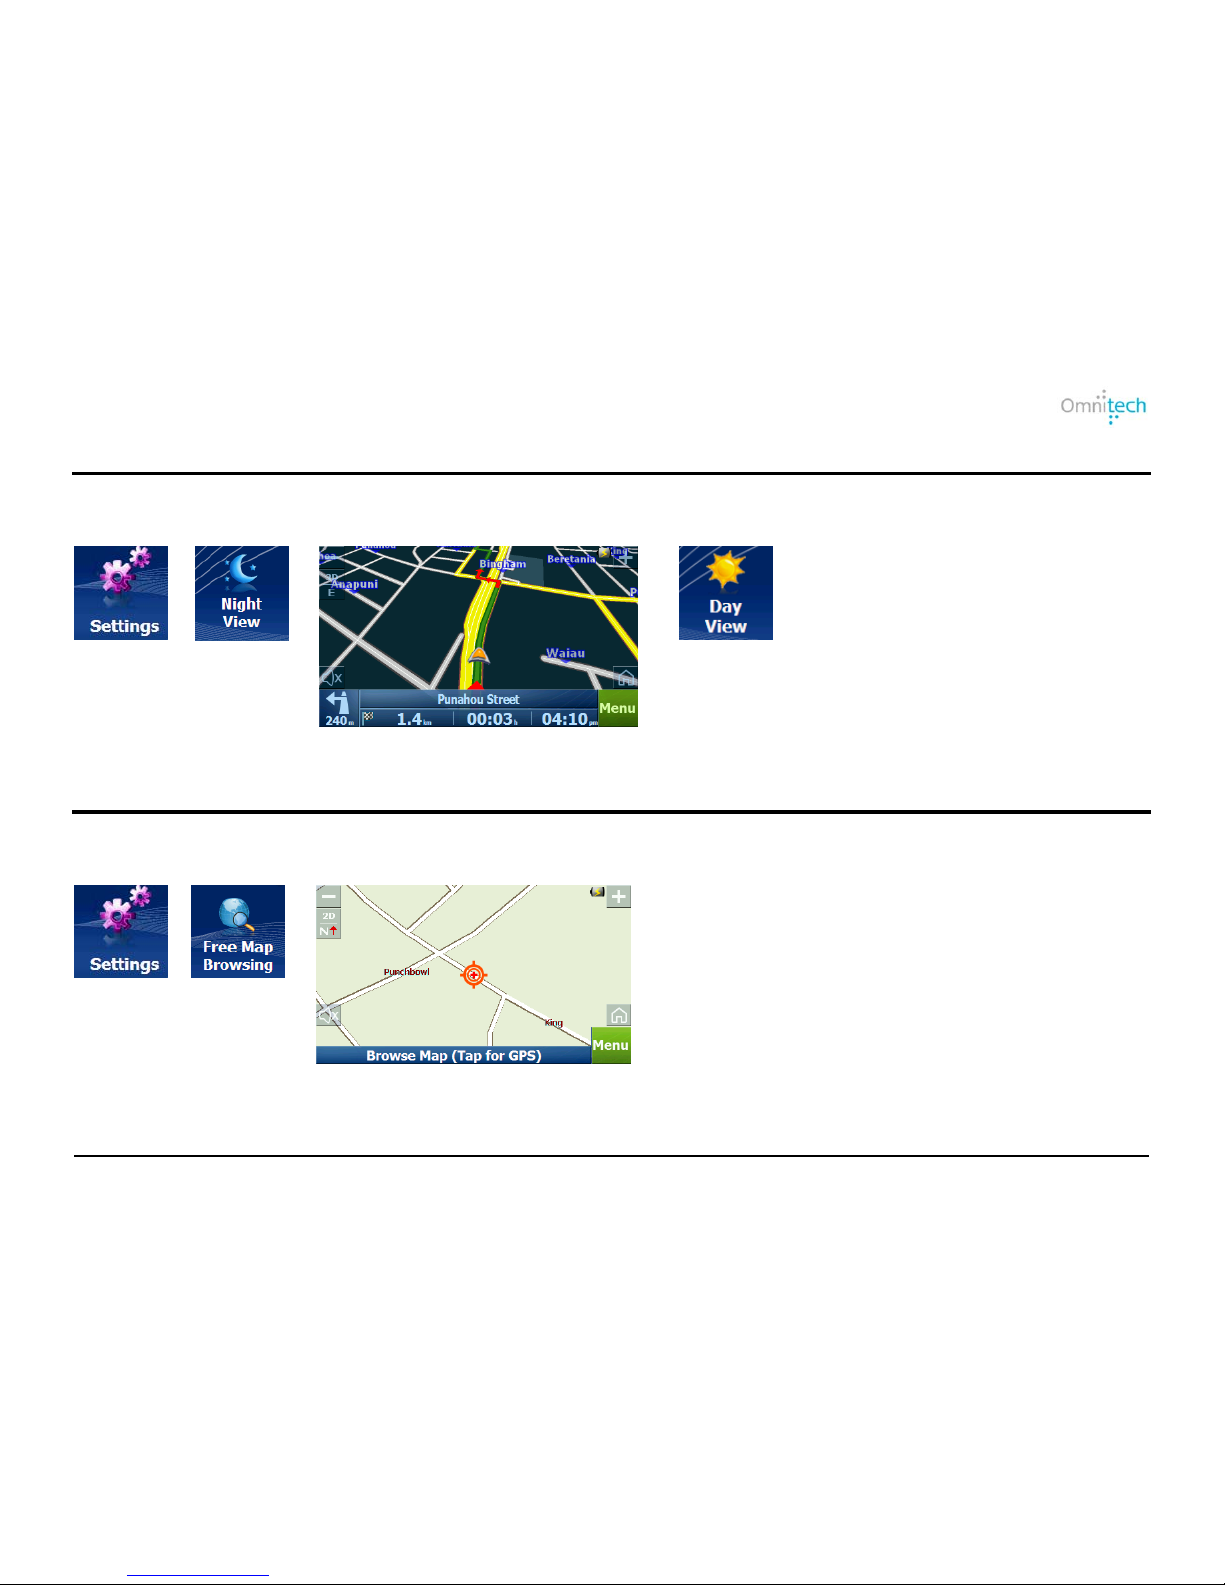
Night Map View
Destinator provides day and night views. It is preferable to use the night view when traveling at night or in overcast
weather.
1. Tap
2. Tap
3. Displays night view
Note: Tap Day View to change to day
Browse Map
You can disconnect the GPS receiver, so that you can search for a location on the Map screen without Destinator
centering the map to your current location.
1. Tap
2. Tap
3. Tap, hold, and drag the map.
Omnitech GPS User Manual 24
Page 29
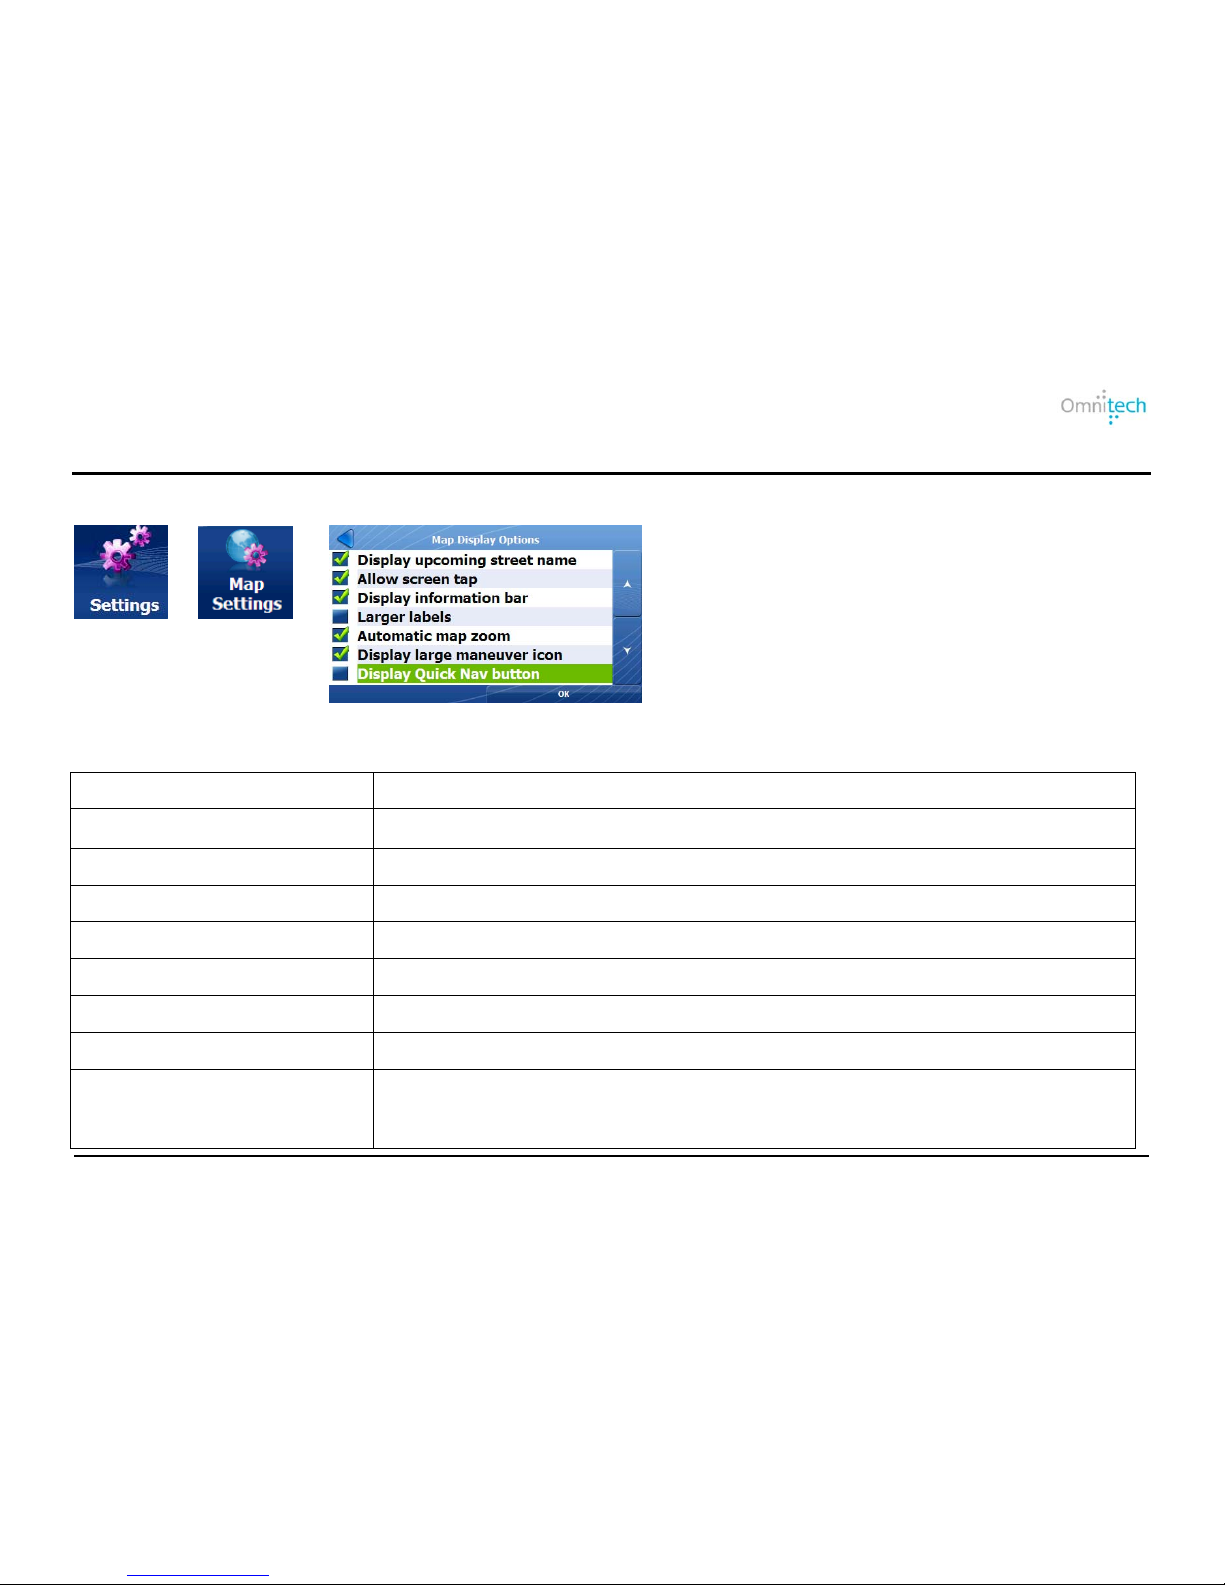
Map Display
Select the buttons, bars, and icons that you want displayed on the Map screen.
1. Tap
2. Tap
3. Select the options you want to show on the map.
Tap the following options to display on map:
Allow zoom control
Shows Zoom Out and Zoom In buttons.
Display compass
Displays the compass, which lets you change the map view.
Display volume control
Shows the Volume button.
Display power indicator
Reveals an icon indicating whether your device is plugged in or running on battery.
Display upcoming street name
Shows the next street name.
Allow screen tap
Displays the navigation popup menu when tapping on a map location.
Display information bar
Displays estimated time of arrival.
Larger Labels
Increases the size of street names to make the map easier to read.
Automatic map zoom
When selected, the zoom is speed dependent. The map zooms out at higher speeds,
displaying a larger map area, and zooms in at slower speeds, displaying a smaller
map area.
Omnitech GPS User Manual 25
Page 30
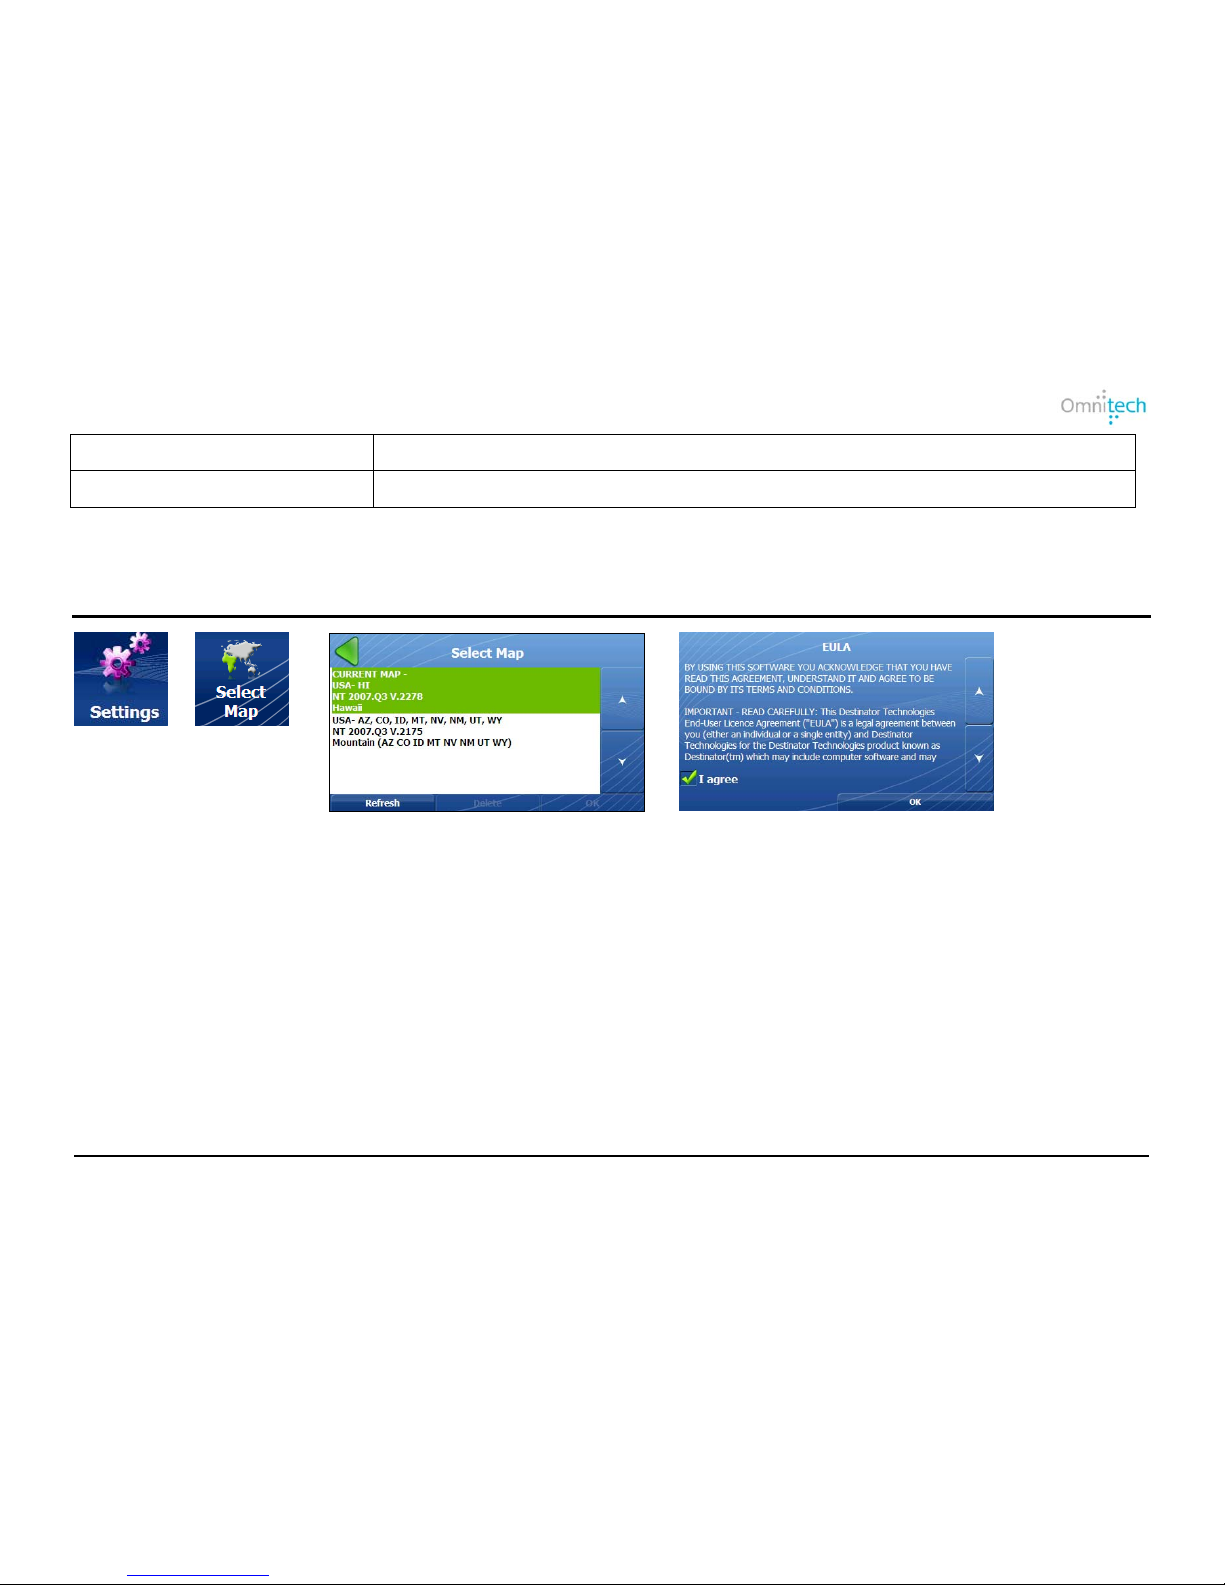
Omnitech GPS User Manual 26
Display large maneuver icon
To display larger maneuver icon.
Display QuickNav button
Displays the QuickNav button, which you tap to navigate to a pre-selected location.
1. Tap
2. Tap
3. Select map and tap OK.
4. You must agree to use the selected map.
From the Select Map screen, you can also choose from the following options:
• Refresh – Tap to update the map list.
• Delete – Tap to remove a map.
Map Selection
Page 31
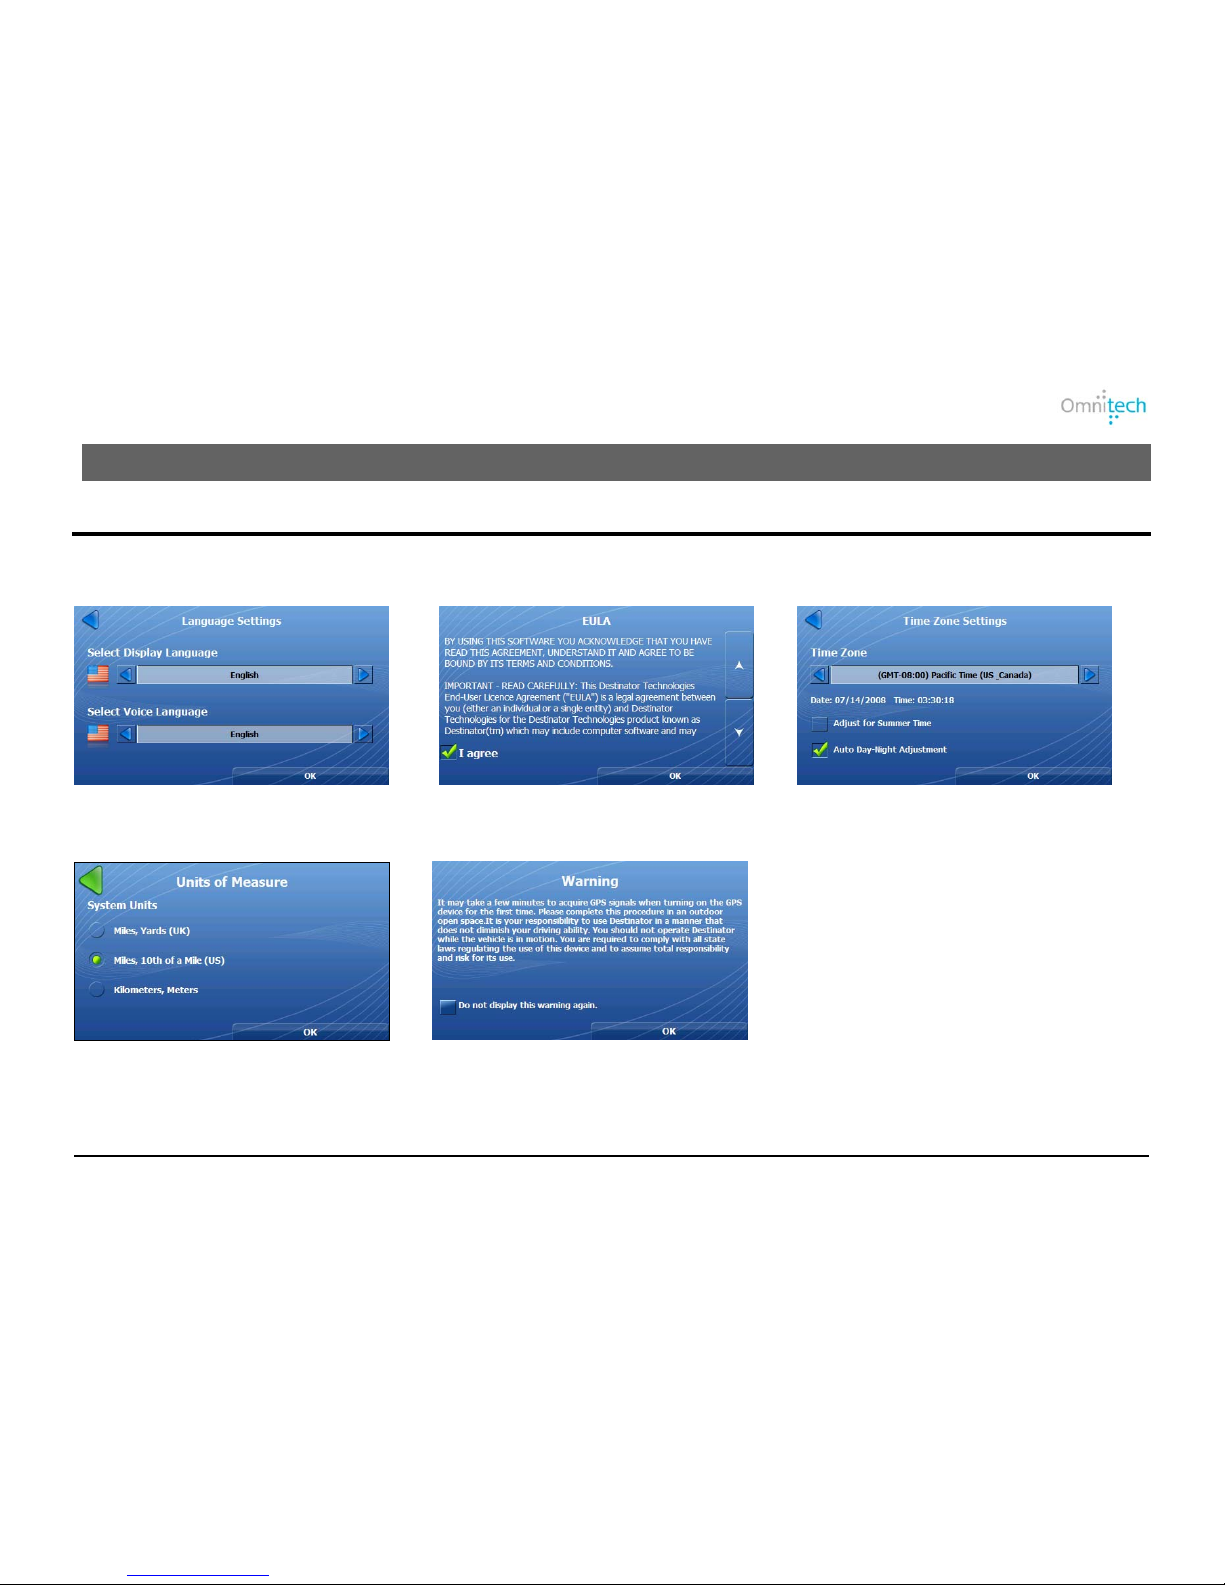
11. Settings
Configuration Wizard
This wizard, which automatically starts the first time you use Destinator, lets you easily configure the system settings by
providing a step-by-step setup process.
1. Set your language preference.
2. Review the map license agreement.
3. Select time and daylight savings.
4. Select your units of measure.
5. Review driver warning.
Note: You can also change these configurations from the Setting menus.
Omnitech GPS User Manual 27
Page 32
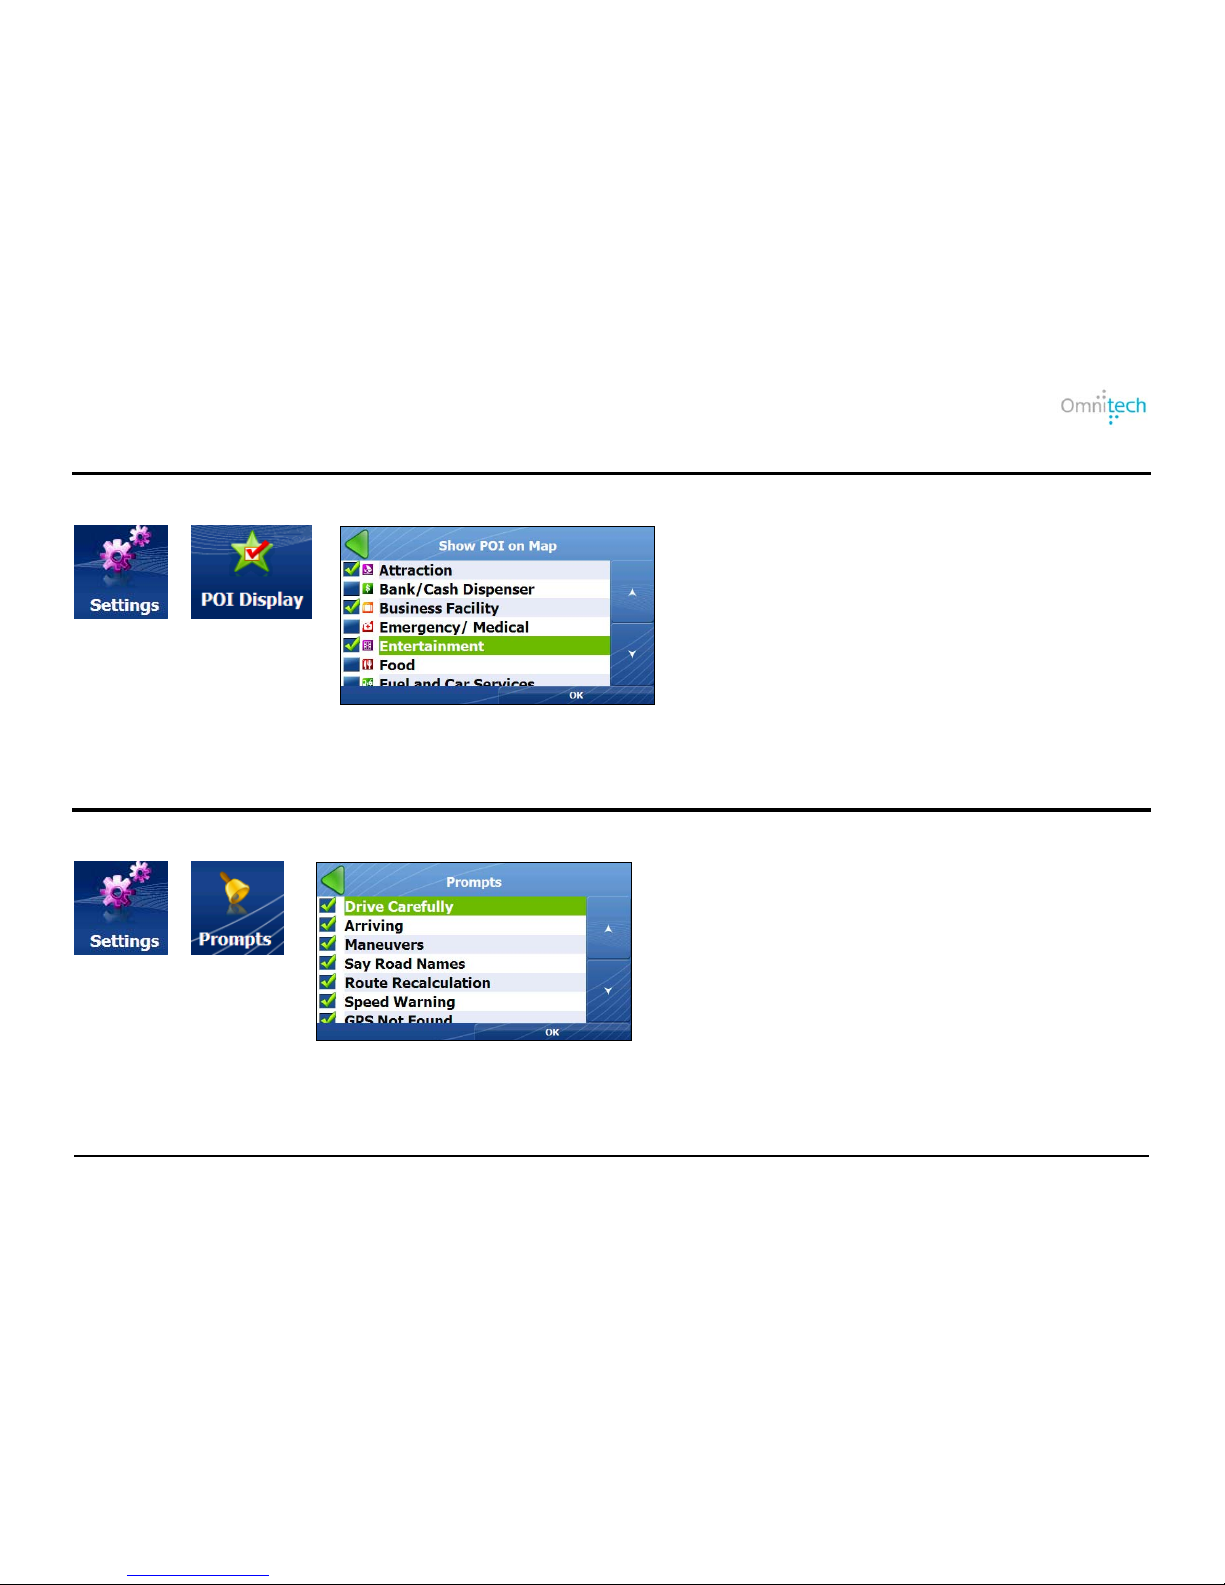
POI Display
Select from the list to display POI categories on the map.
1. Tap
2. Tap
3. Select the POI categories to display on the
Map screen and tap OK.
Voice Prompts
Select from the list of voice prompts.
1. Tap
2. Tap
3. Select the voice prompts to be used
and tap OK.
Omnitech GPS User Manual 28
Page 33
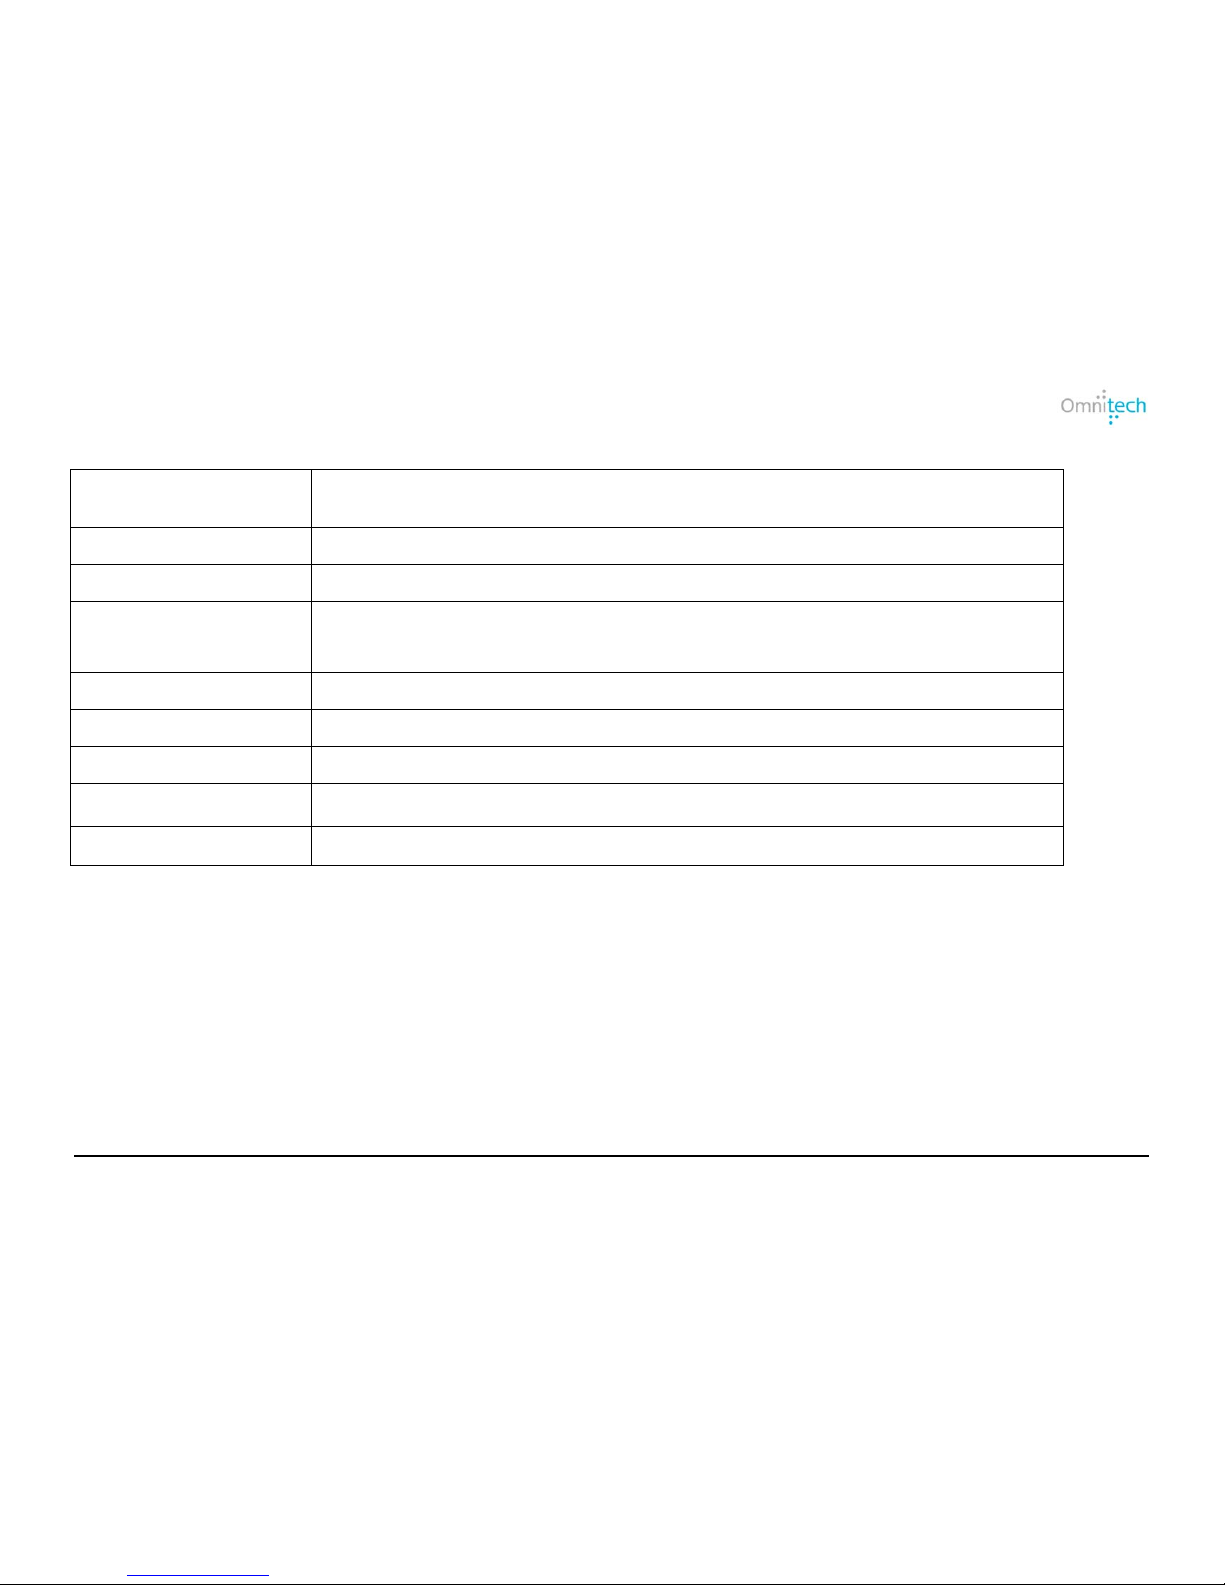
Tap the following prompt options:
Drive Carefully
Destinator recognizes your route by announcing the destination you are traveling
to.
Arriving
Lets you know that Destinator has arrived at your destination.
Maneuvers
Destinator announces the next turn.
Say Road Names
Destinator announces the road name that you are turning onto.
Note: This option requires Text-To-Speech functionality.
Route Recalculation
Notifies you of route recalculations. For example, when you miss a turn.
Speed Warning
Warns you when your car exceeds the speed limit.
GPS Not Found
Warns that no GPS signal was found.
Unreliable GPS Signal
Warns that the GPS signal is too low and unreliable for navigation.
Button Click
Lets you here a click when tapping a button or a point on the map.
Omnitech GPS User Manual 29
Page 34
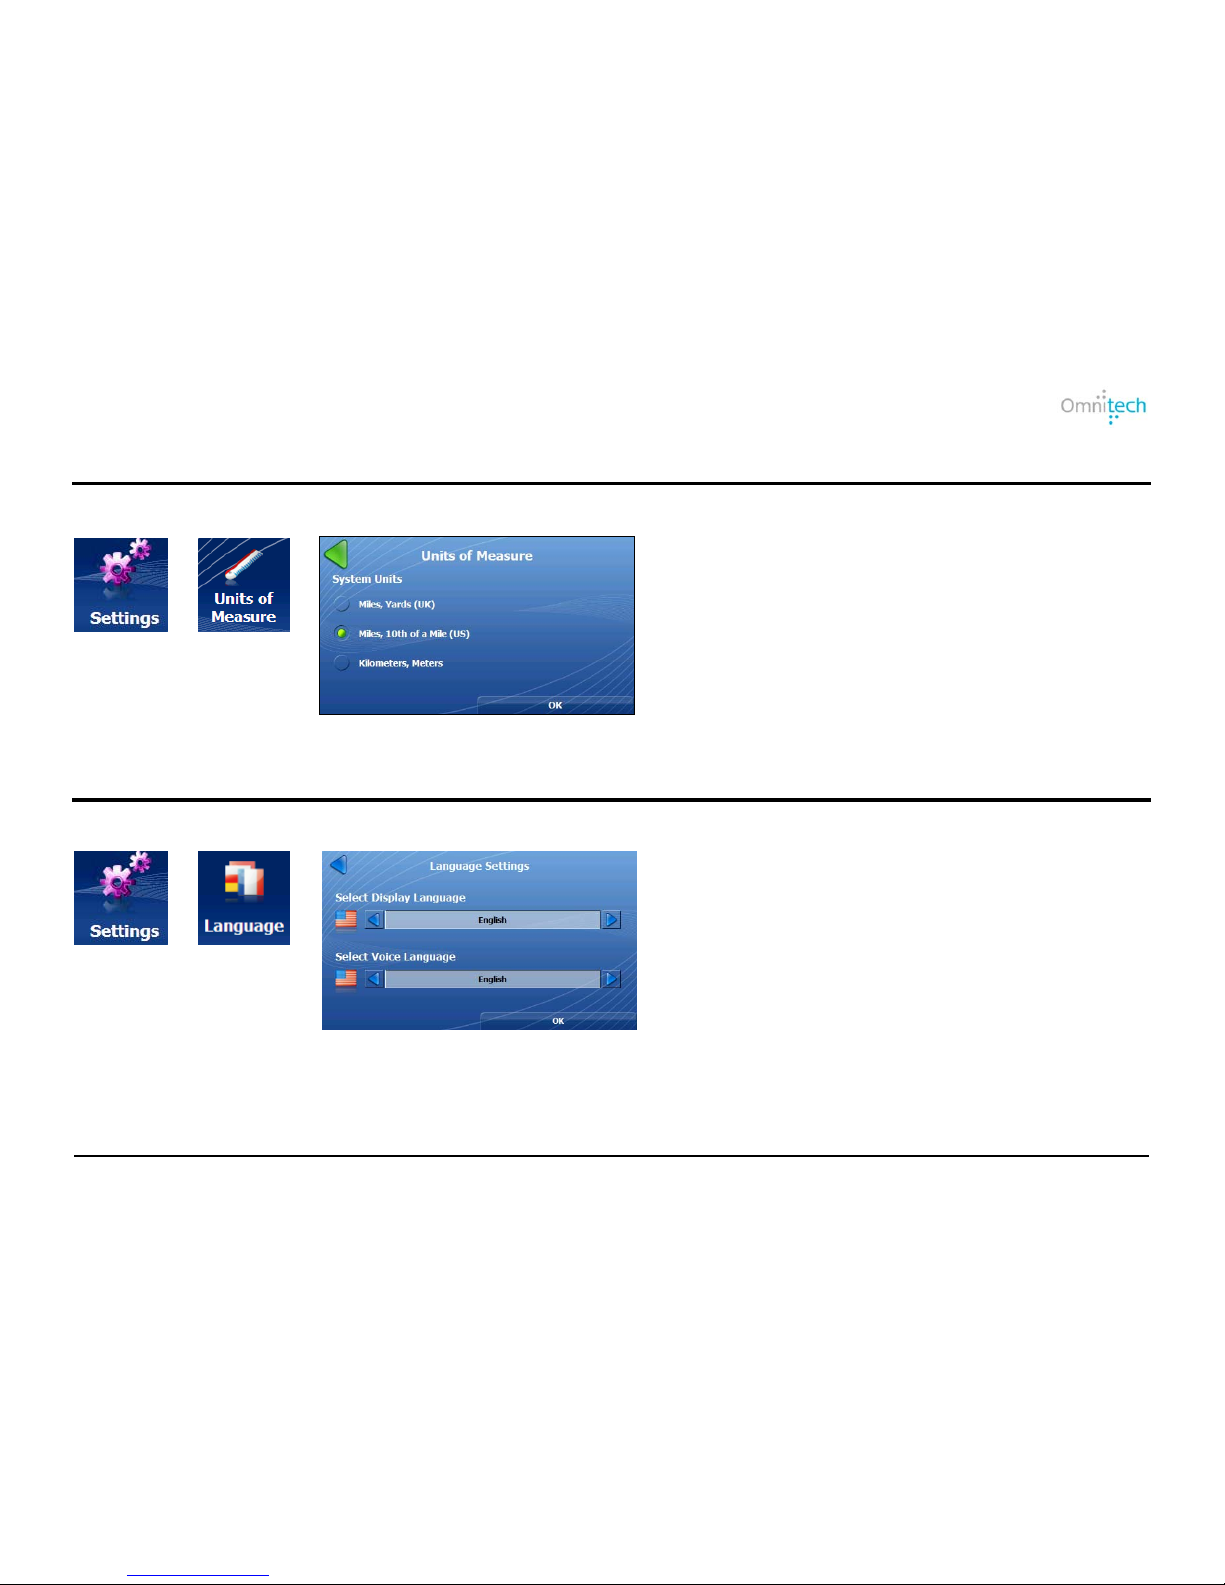
Units of Measure
Select from the list of units of measure.
1. Tap
2. Tap
3. Select the units of measure and tap OK.
Language
Select the language for the user interface and voice prompts.
1. Tap
2. Tap
3. Select and the text display and voice
languages. Tap OK.
Omnitech GPS User Manual 30
Page 35
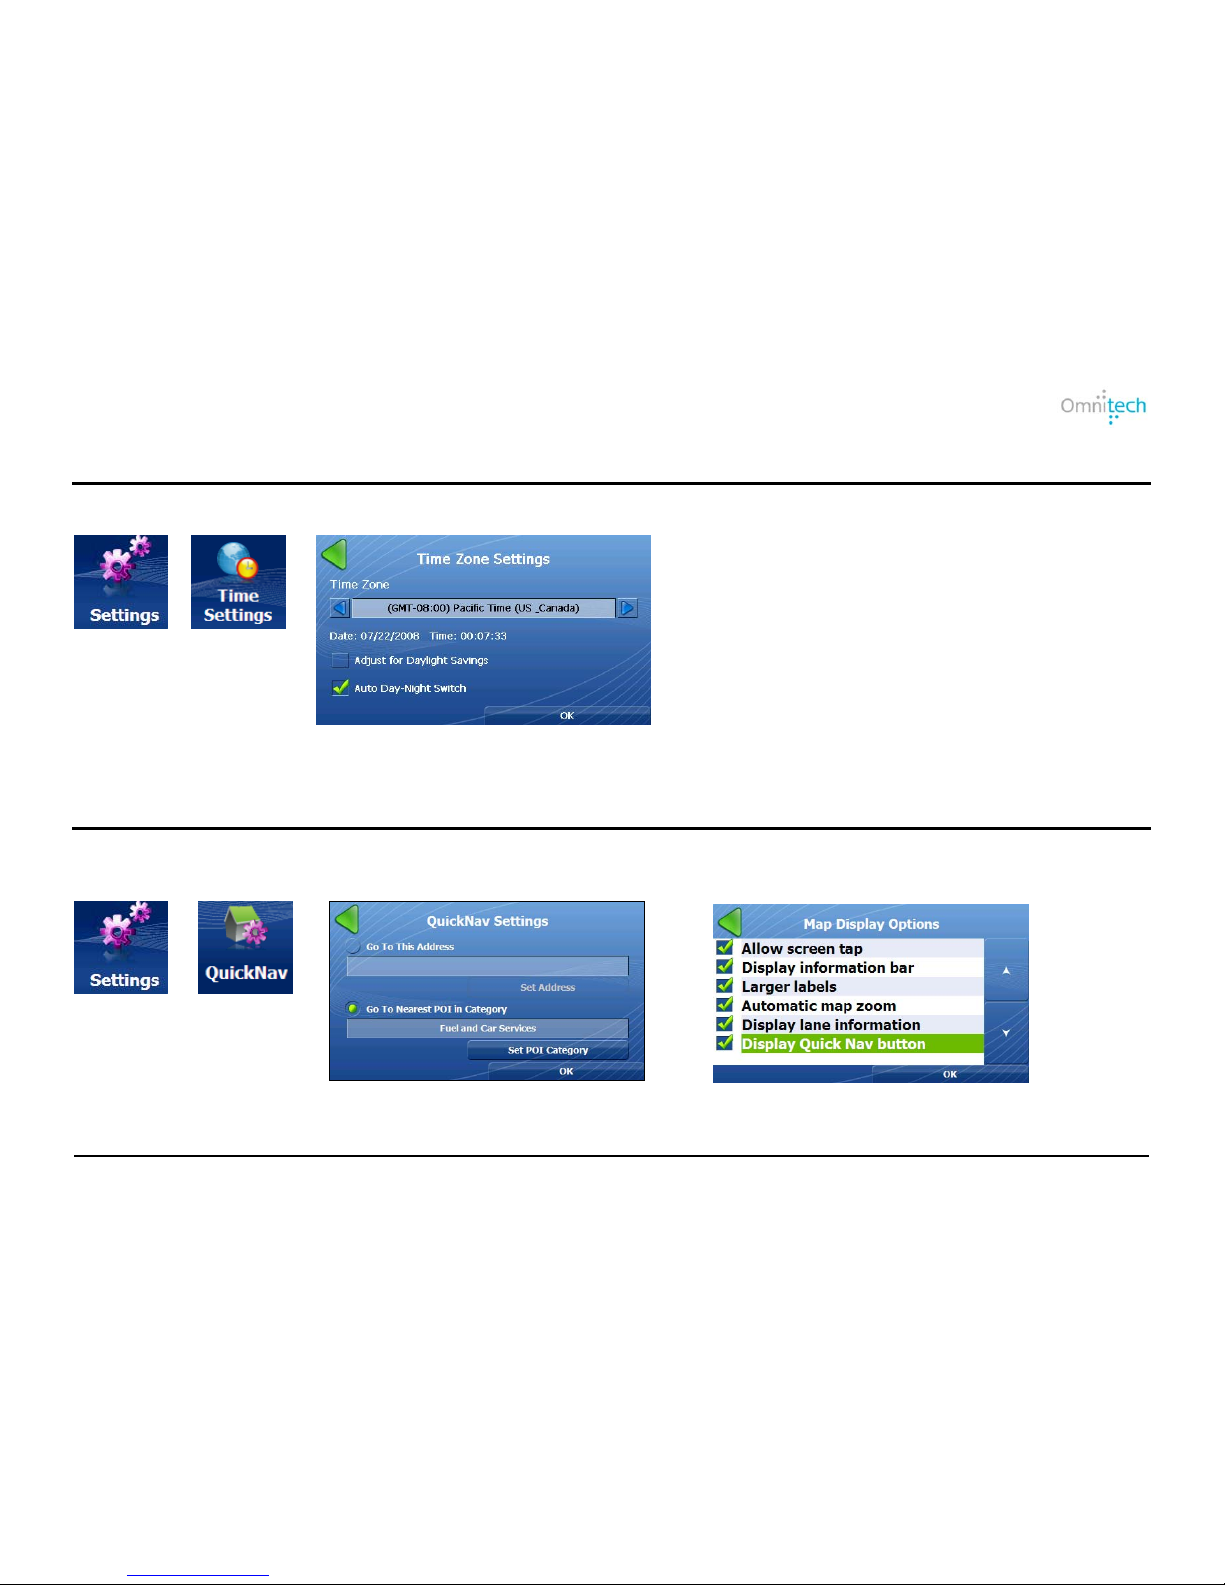
Time Display
Select the time zone and whether you want Destinator to adjust time for Daylight Savings.
1. Tap
2. Tap
3. Select the time zone and adjust time for
Daylight Savings. Tap OK.
QuickNav
You can set a location so that every time you tap the icon on the Map screen, Destinator calculates the route to this
location.
1. Tap
2. Tap
3. Set an Address or POI Category and tap
OK.
Make sure that the icon appears on the Map screen
by selecting it from Map Settings.
Omnitech GPS User Manual 31
Page 36
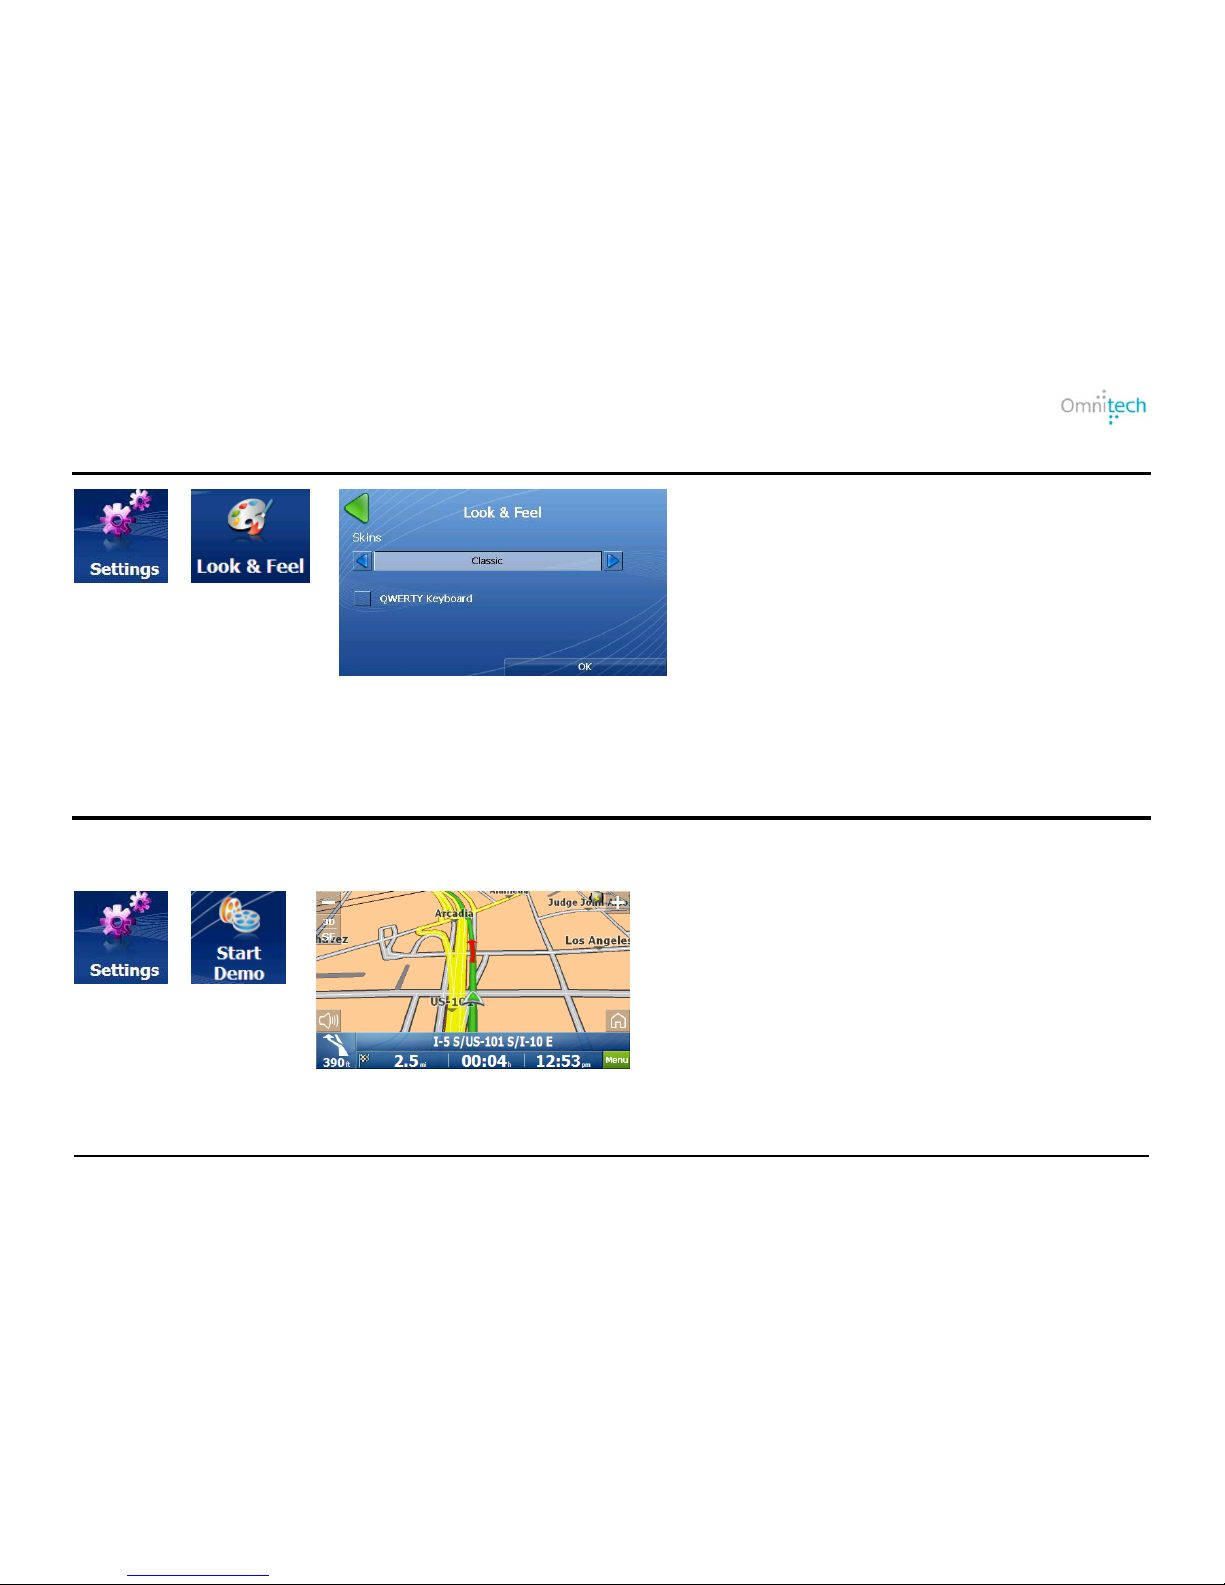
Look & Feel
1. Tap
2. Tap
3. Displays the Look & Feel screen.
Look & Feel Options:
Skins – Select a predefined skin.
QWERTY Keyboard – Display the
navigation keyboard as QWERTY.
Demo Route
You can get the feel of how Destinator navigates a route by launching a navigation demo. Tap the Start Demo button to
start the navigation demo. Tap the Stop Demo button to end the navigation demo.
1. Tap
2. Tap
3. Destinator runs the navigation demo.
Omnitech GPS User Manual 32
Page 37
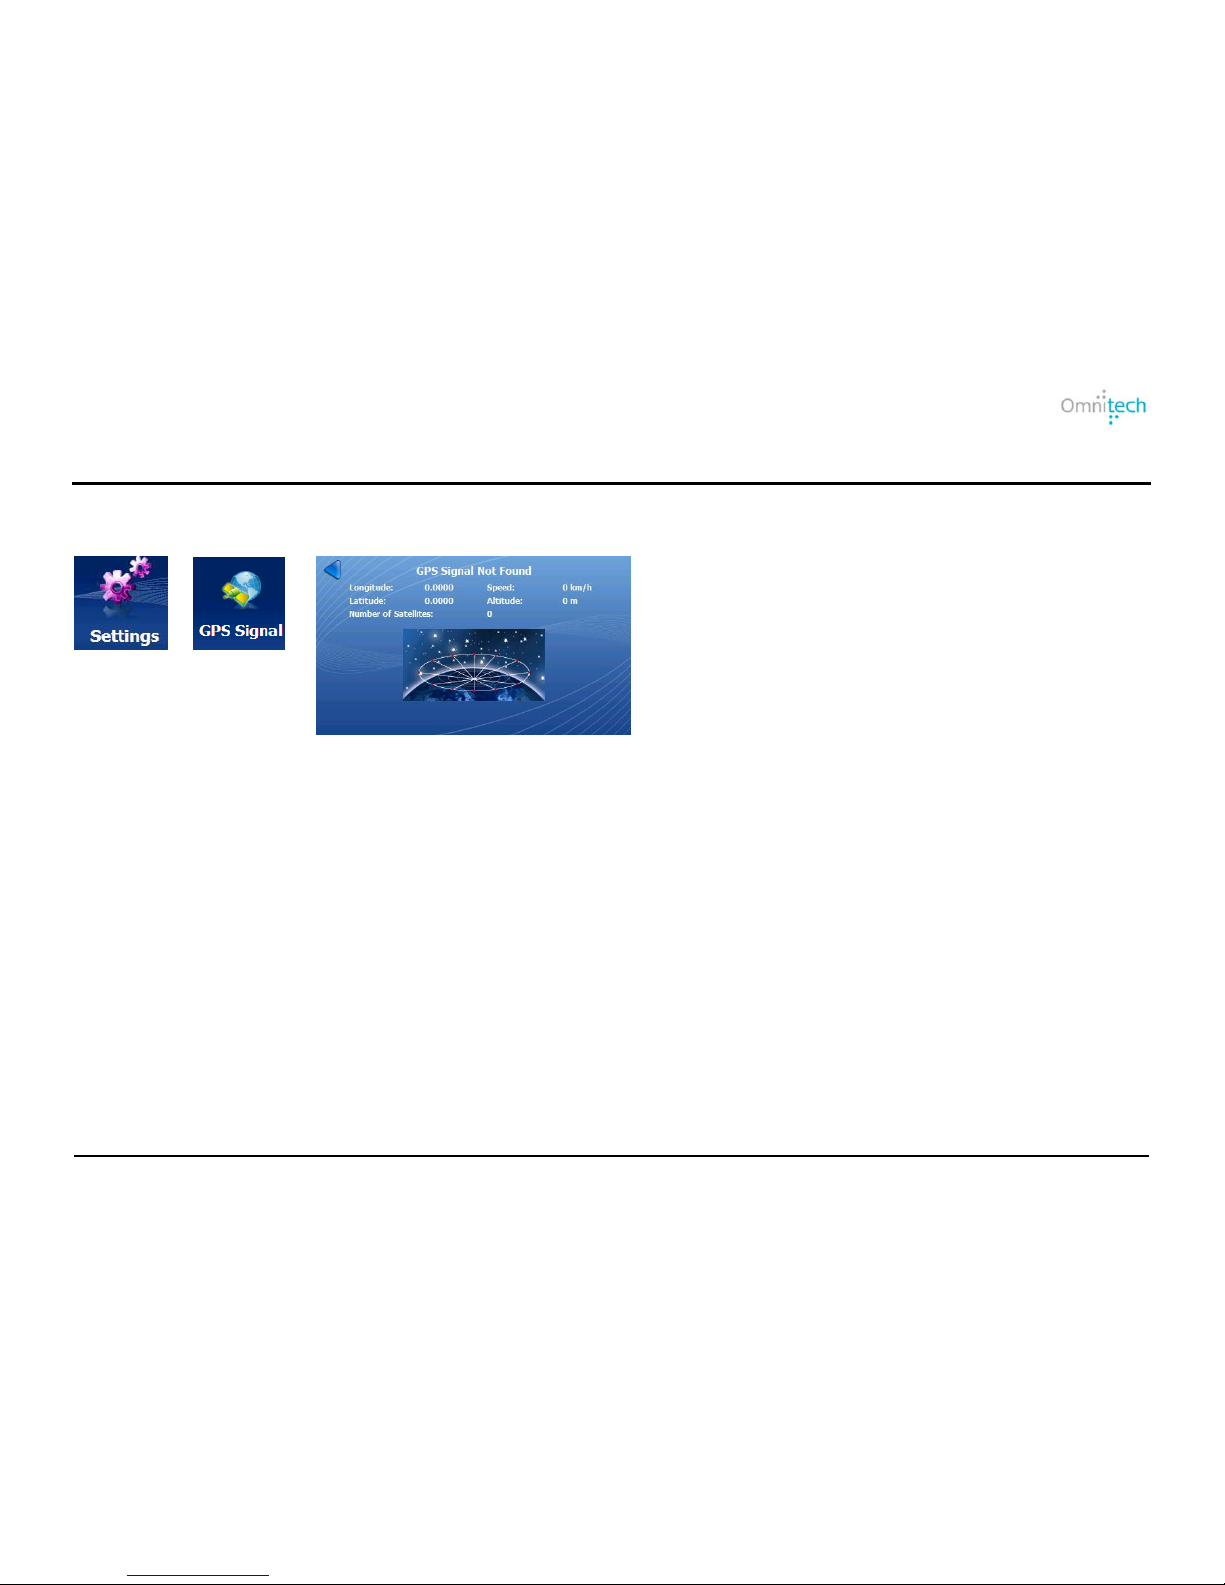
GPS Signal
Destinator receives the GPS signal from a built-in GPS receiver or an external GPS receiver. Your vehicle's location and
position are constantly updated unless you are working in the Browse Map mode.
1. Tap
2. Tap
3. Displays GPS Signal information.
The GPS receiver may take a few minutes to find your initial location. For best results, ensure that the GPS receiver has a
clear view of the sky.
Omnitech GPS User Manual 33
Page 38
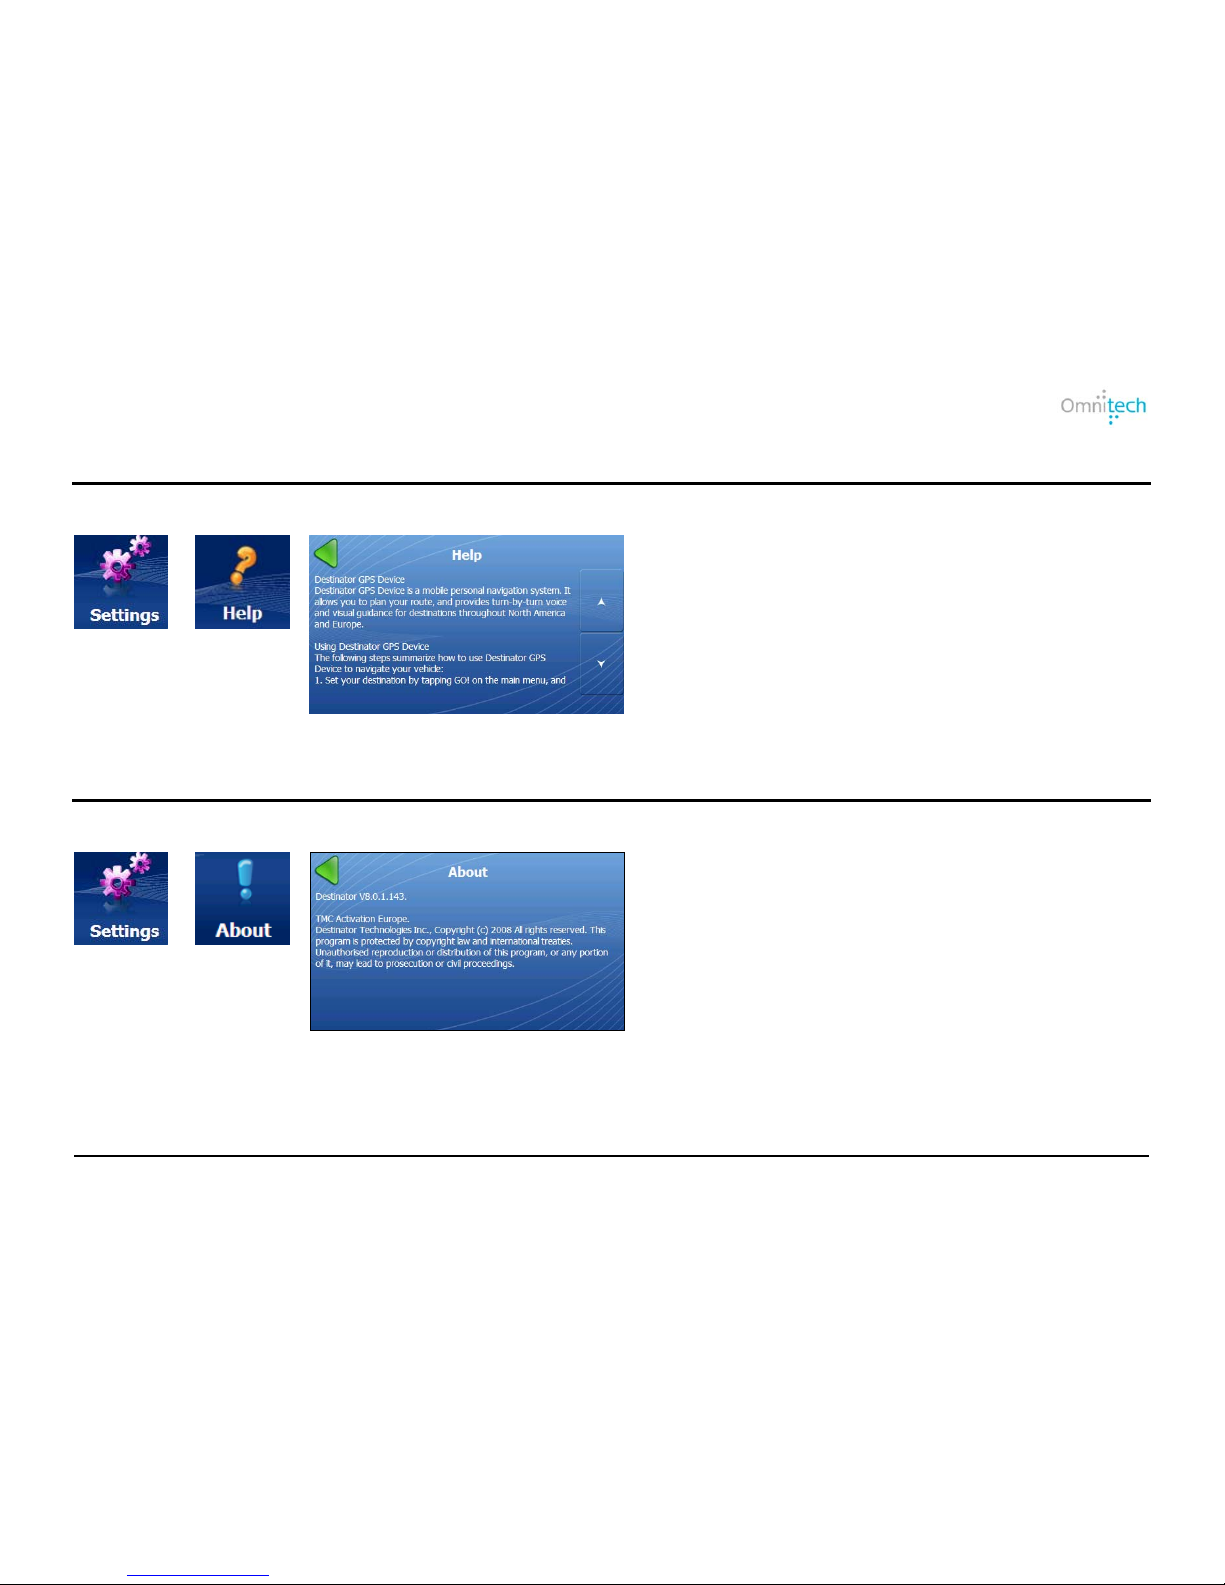
Omnitech GPS User Manual 34
1. Tap
2. Tap
3. Technical support information is displayed.
1. Tap
2. Tap
3. Destinator copyright and version
information is displayed.
Tap this button to display technical support information.
You can display version and copyright information.
About
Help
Page 39

Index
display POI on map • 28
2
display route • 18
display turn • 18
2D map view • 22
Driving Directions
3
bar • 21
list • 17
3D
3D map view • 22
F
A
Favorite Locations
groups • 16
Address
save • 14
change state • 7
travel to • 15
city first • 7
in other countries • 10
G
intersections • 7
go menu • 6
travel to • 10
GPS
arrival data • 23, 25
bar • 21
auto zoom • 25
low GPS signal message • 29
avoid road • 19
not found message • 29
B
satellite signal info • 33
groups • 16
battery • 23, 25
browse map • 24
L
button click • 29
language settings • 27
C
larger labels • 25
look and feel • 32
compass • 21, 22
configuration wizard • 27
M
countries • 10
Maps
Creating Groups for Favorite Locations • 16
2D view • 22
D
3D map view • 22
buttons • 25
day view • 24
day view • 24
daylight savings • 27
delete map • 26
delete map • 26
icons • 22
demo route • 10
map bars • 25
detours • 20
night view • 24
display map buttons and bars • 25
Omnitech GPS User Manual
Page 40

Omnitech GPS User Manual
refresh • 26
select • 26
measurements • 30
N
next turn information • 22
night view • 24
P
pedestrian route • 19
POI
browse entire list • 13
search by category • 11
search by name • 12
search in another city • 11
search near current location • 12
search near destination • 11
show on map • 12
sort by abc • 12
sort by distance • 12
travel to • 13
power icons • 23
prompts • 28
Q
quickest route • 19
quicknav settings • 23, 26, 31
QWERTY keyboard • 32
R
Recent Locations • 14
travel to • 14
refresh • 26
remove turn • 18
route menu • 6
route recalculation • 29
Route Types
pedestrian • 19
quickest • 19
shortest • 19
S
satellite signal info • 33
save location • 10
say next turn • 29
say road names • 29
screen tap popup • 23, 25
search by POI categories • 11
search by POI name • 12
settings menu • 6
shortest route • 19
simulated route to selected location • 10
skin • 32
speed warning • 29
start route point • 10
states • 10
T
time zone settngs • 31
travel to destination • 7
Traveling To Options • 10, 13
U
units of measure • 30
V
version information • 34
voice prompts • 28
volume • 22
Z
zoom • 25
Page 41

Omnitech Portable GPS Navigation System (ITEM#s 16877 & 16878) Limited 1 Year Warranty
"
Staples the Office Superstore, LLC (“Staples”) warrants to the original purchaser that this Omnitech Portable GPS Navigation System shall be free of defects in design, assembly,
material, or workmanship for 1 year from the date of purchase. In the event of a defect in the design, assembly, materials or workmanship of this product within 1 year from the date of
purchase, Staples will either replace any such product with the same or equivalent product free of charge or refund 100% of the purchase price at Staples’ sole option. To claim your
replacement or refund, contact product support at 1-888-554-6628.
If replacement is necessary as determined by Staples, you will be required to pack the product and ship it (at your expense) with the original sales receipt to the address you are provided
by product support. No product will be accepted without first obtaining a Return Authorization Number from product support. You are responsible for the proper packaging of the product,
for any and all damage resulting from shipping, and for all shipping charges to return the product to Staples.
This warranty does not apply to normal wear or damage from misuse, abuse, improper storage or handling, installation, accident, repair or alteration or other circumstances not d ire ctly
attributable to manufacturing or material defects.
This warranty is exclusive and in lieu of all others, whether oral or written, express or implied. Staples specifically disclaim any and all implied warranties, including without limitation,
warranties of merchantability and fitness for a particular purpose. In no event will staples be liable for any incidental, dir ect, indirect, special, punitive, or consequential damages (such as
but not limited to, damages for loss of profits, business, savings, data or records) related to this product.
This warranty gives you specific legal rights, and you may also have other rights that vary depending upon the state, province, territory or country. Some states, provinces and territories
do not allow the exclusion or limitation of incidental or consequential damages or limitation on how long an implied warranty lasts.
Except as stated herein, no other warranties shall apply.
Product Support: 1-888-554-6628
Soutien au produit: 1-888-334-6628
Website: www.navsupport.net/gps/16877
www.navsupport.net/gps/16878
Omnitech GPS User Manual
 Loading...