

Page 1

SIMPLE, NONSTOP INSULIN
DELIVERY FOR PEOPLE WITH
DIABETES WHO INSIST LIFE
STILL COMES FIRST.
*Up to 72 hours of continuous insulin delivery
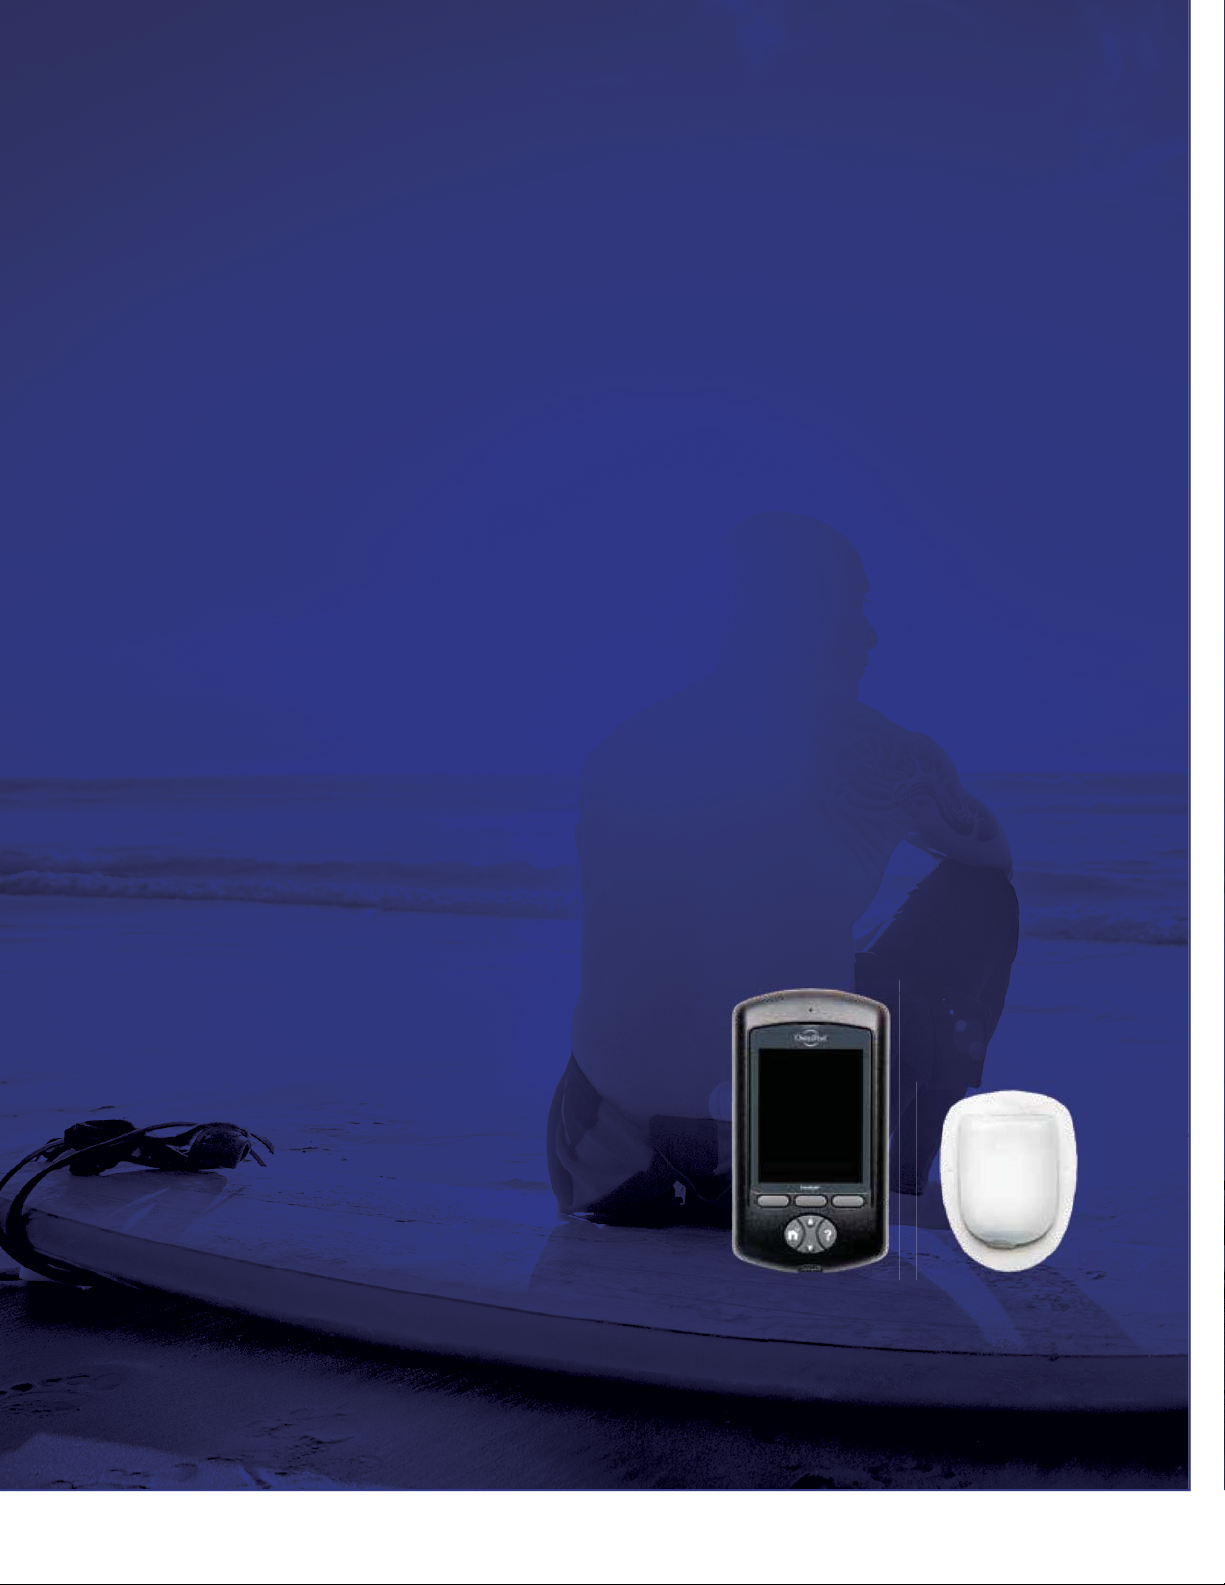
Katie R.
SINCE 2015
RESOURCE GUIDE
™
TM
Insulin Management System
®
Omnipod
PODDER
Page 2

Lexi B.
SINCE 2013
TM
Page 3
INTRODUCTION | Welcome
WELCOME
Dear Podder™,
®
Welcome to your new Omnipod
We are delighted to have you on board.
What’s different about the Omnipod® System? Simple. Most insulin pumps have tubes. The Omnipod®
System, however, is tubeless. But that’s just a part of what makes the Omnipod
makes people become dedicated Podders™.
®
The Omnipod
Personal Diabetes Manager (PDM) – that you keep nearby to programme your insulin delivery wirelessly*.
Made to be convenient and discreet, the Pod can provide up to 3 days of non-stop insulin delivery**. It can
be worn anywhere you would inject and it’s waterproof***, meaning you can shower and swim as you please,
wear what you want, and do what you want. The Omnipod
you can live your life and manage diabetes around it.
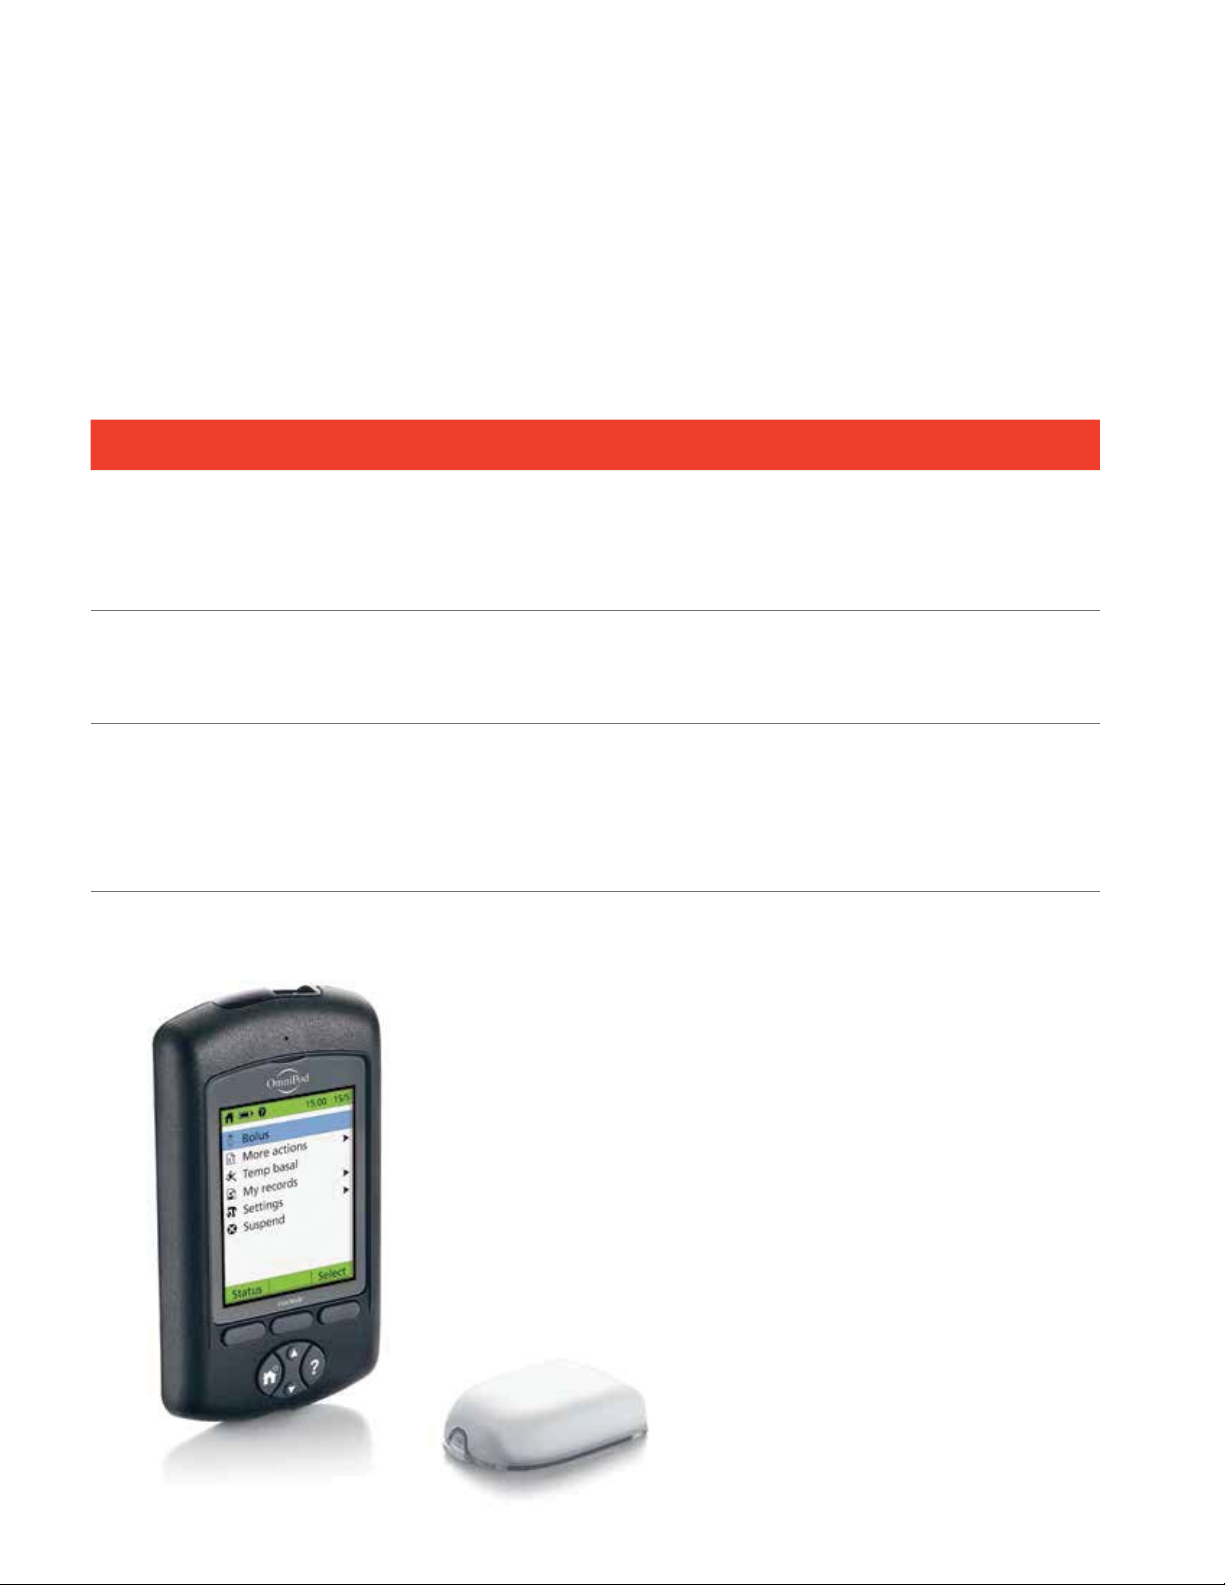
System is a simple system consisting of just 2 primary parts – the tubeless Pod and the handheld
Insulin Management System.
®
System different and
®
System helps simplify insulin delivery, so that
®
Please take time to read through this Podder™ resource guide and take it with you to your Omnipod
System training session, where your healthcare professional will assist you with the initial set up of your
®
Omnipod
System.
It contains step-by-step instructions to help you activate,
place and change Pods, guide you through the key functions
and explore the advanced features on your PDM. There are also
troubleshooting sections and tips and reminders to help you
®
get the most out of your Omnipod
System.
If you need help or have further questions, you can contact
your local Insulet Customer Care Team 24/7,
or visit us at myomnipod.com.
Yoursincerely,
The Insulet Team
The PodPDM
*At start up, the PDM and Pod should be adjacent and touching, either in or out of tray to ensure proper communication during priming. At least 1.5 metres during normal operation.
**Up to 72 hours of continuous insulin delivery.
***IPX8: 7.6 metres for up to 60 minutes for the Pod. The PDM is not waterproof.
This resource guide will help you learn more about the Omnipod® System and how to use it, but if you have any questions about the Omnipod® System, please ask your healthcare
professional. This resource guide is not intended to provide you with medical advice about your condition or treatment. Your healthcare professional should provide you with
medical advice about your condition and treatment. You must always ask your healthcare professional to decide the Omnipod
This Resource Guide is for PDM models ATT400, DET400, DET450, DET456, ENT450, FRT400, FRT456, ITT456 and NLT450. The PDM model number is written on
®
System setting which is the most suitable for you.
Page 4
INTRODUCTION | The Pod
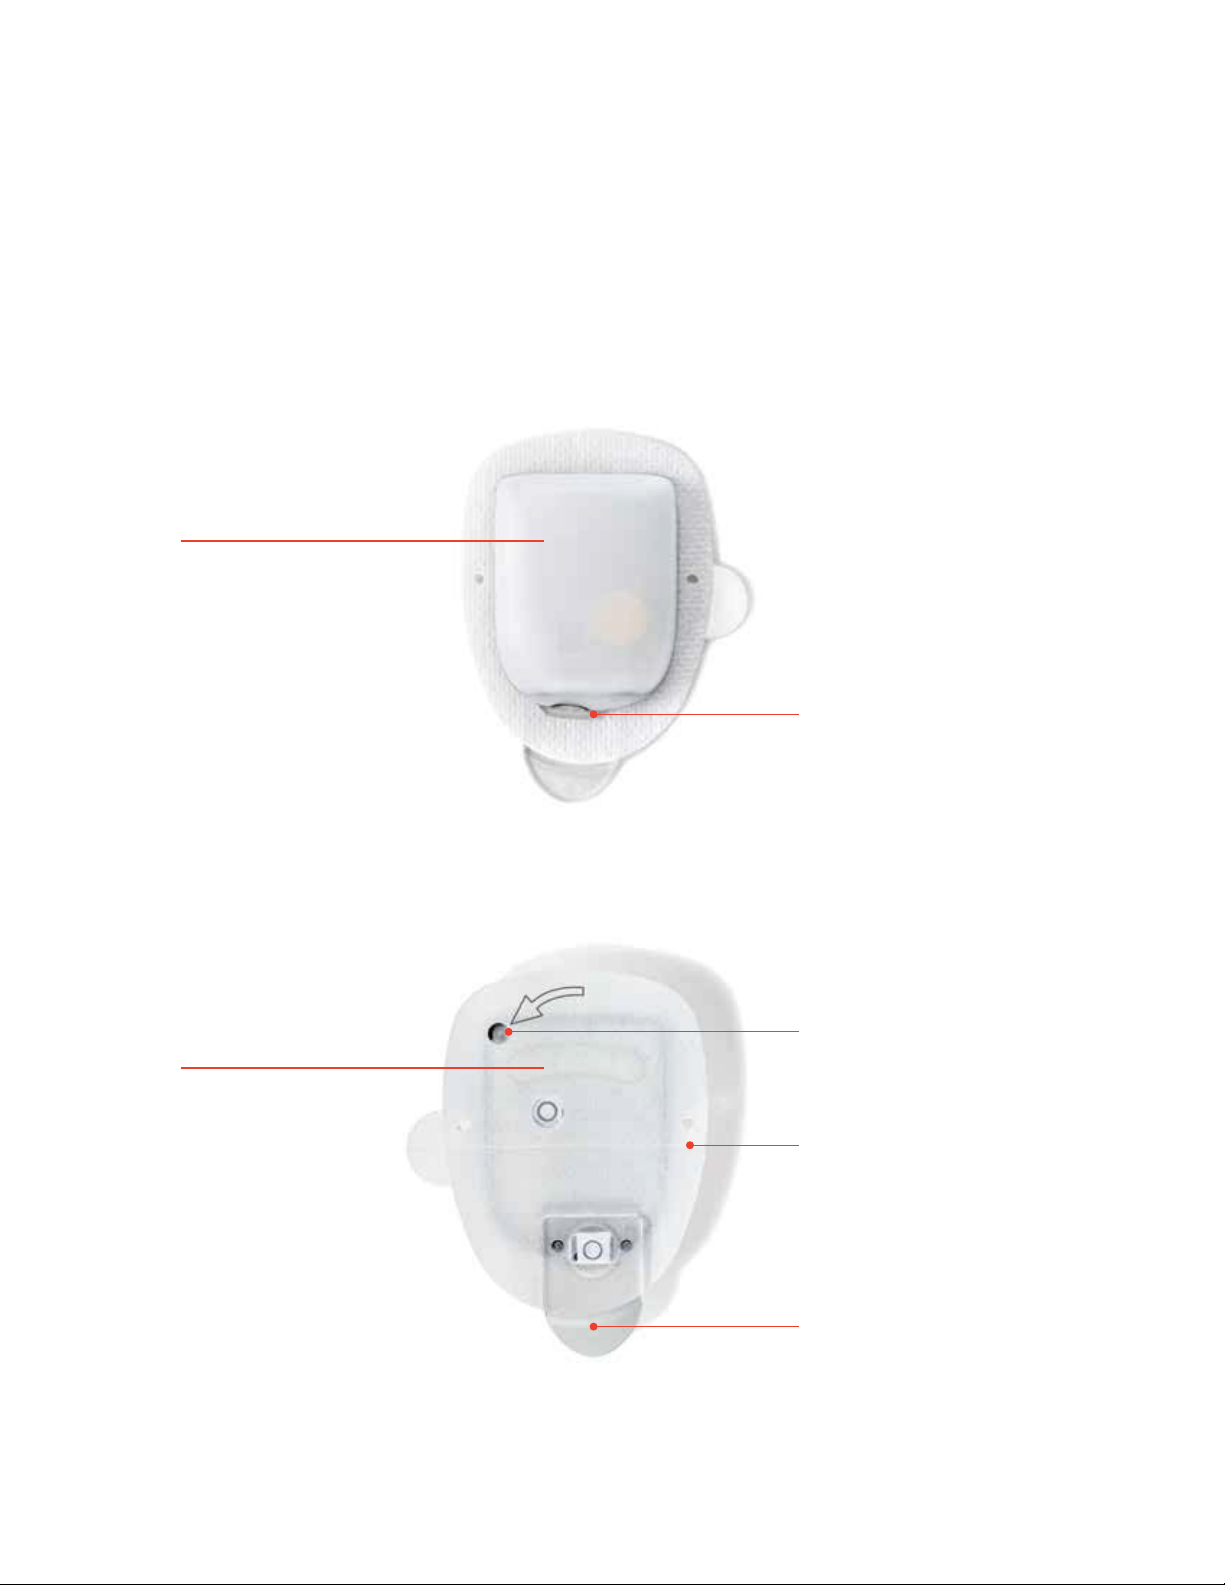
THE POD
A small, lightweight and tubeless Pod that’s easy to apply and wear.
TOP
BOTTOM
Viewing window
Fill port
Adhesive backing
Needle cap
Page 5
INTRODUCTION | Basal/Bolus
BASAL INSULIN DELIVERY
What is a basal rate?
Your body needs a small amount of insulin that’s constantly delivered throughout the day, which is called
basal insulin. The exact amount of insulin your body needs changes often depending on the following:
+ The things you’re doing throughout the day
+ The amount of stress you have
+ Your meal timings
+ Whether you’re ill
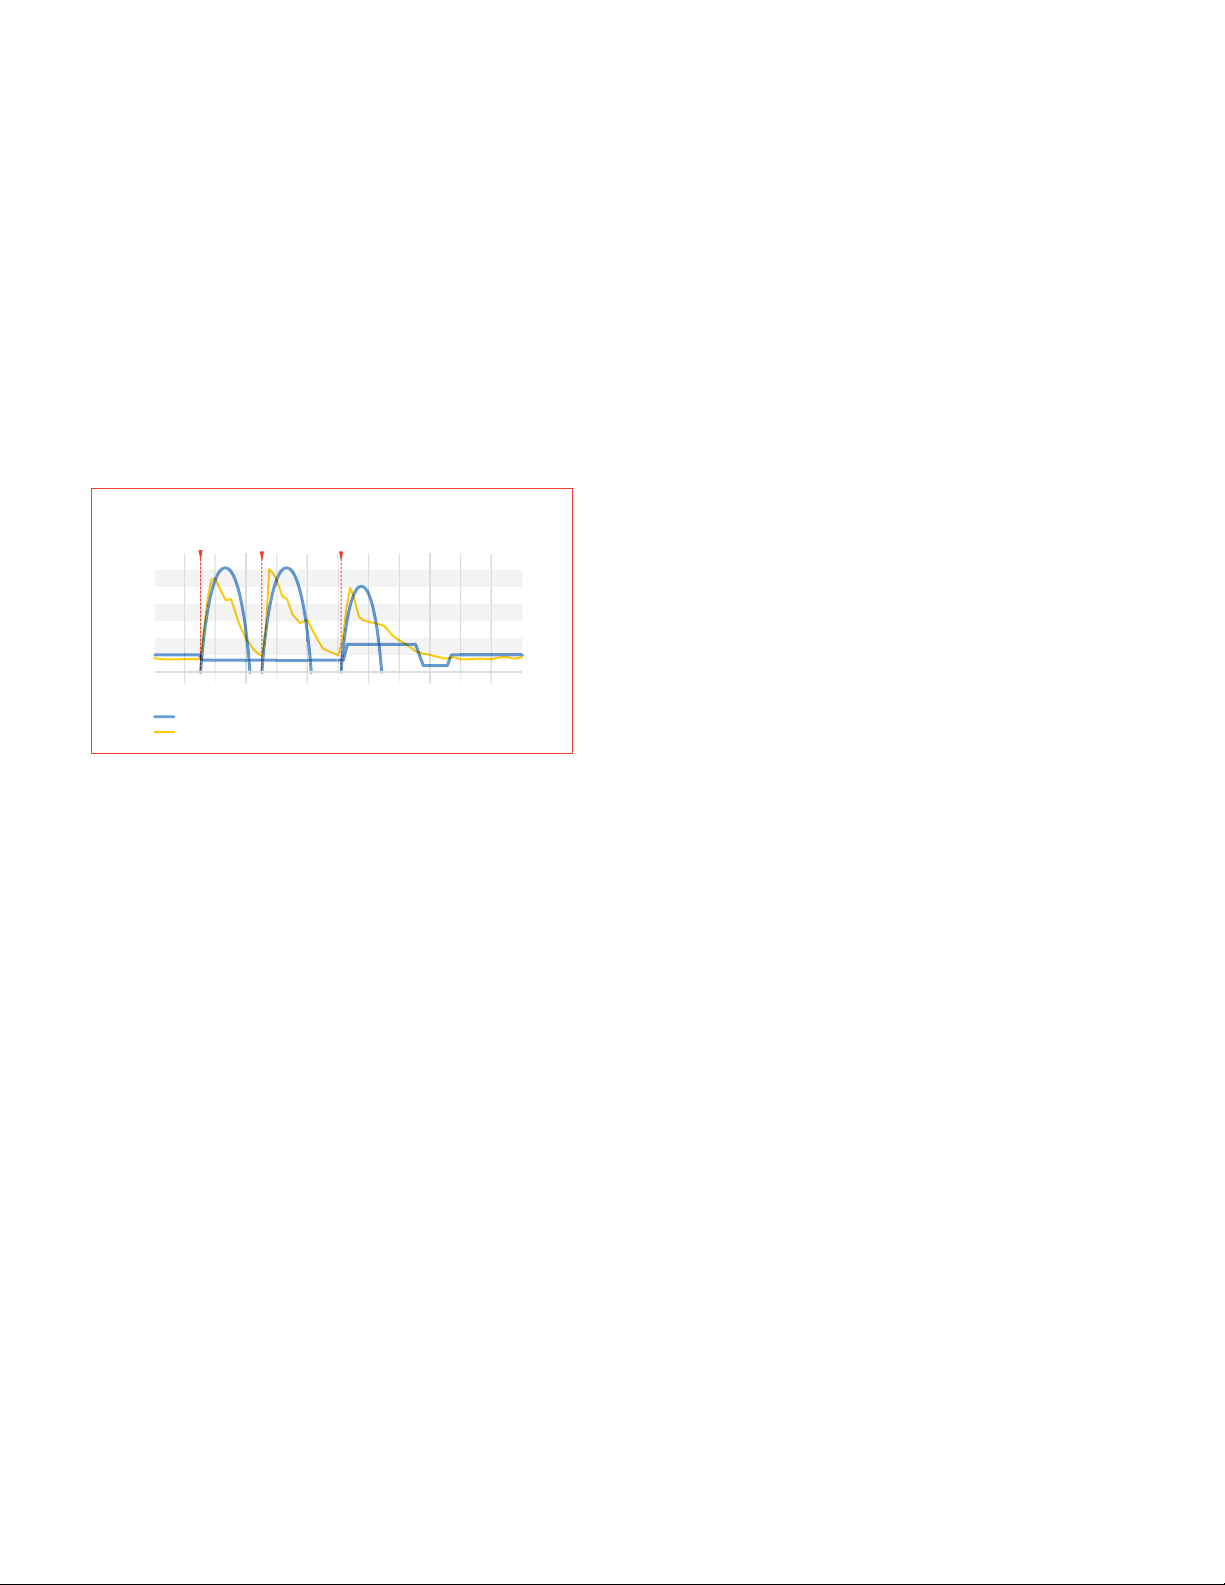
Insulin Delivery with an Insulin Pump vs Normal Insulin Release**
LD
BOLUSBBOLUS BOLUS
The Omnipod® System lets you
personalise your basal rates.
When you first set up your Omnipod® System,
Insulin
Levels
BASAL
your healthcare professional will assist you in
programming your PDM to deliver your required
basal rates. If you need to adjust your settings, you
Noon
Rapid-acting Insulin
Diagram of Natural Insulin Release
Midnight
have up to 24 time intervals per basal programme.
You can have up to 7 basal programmes*.
DELIVERING BOLUS INSULIN DOSES
What is a bolus dose?
A bolus is an extra dose of insulin, delivered when
needed to match the carbohydrates in a meal or
snack and/or to lower your blood glucose when it
gets too high. There are two types of bolus doses:
+ Meal bolus
®
With the Omnipod
either a normal or an extended meal bolus.
– A normal meal bolus usually delivers enough
insulin for a meal or snack you are about to eat.
– An extended meal bolus delivers insulin over
a longer period of time. When you eat foods
high in fat and/or protein or are eating them
over a long period of time, such as at a party,
you might need an extended meal bolus.
System, you can deliver
The Omnipod® System will help
to deliver your bolus doses.
Your healthcare professional will assist you in
programming your PDM to deliver predetermined
bolus doses when you first set up your Omnipod
System. As your insulin needs change, you can
later adjust these settings.
Calculate bolus insulin doses.
The Omnipod® System also features a Suggested
Bolus Calculator. It helps you deliver an accurate
bolus dose. The calculator uses your current blood
glucose, carbs entered and your insulin on board
(IOB) to determine a suggested bolus dose.
®
+ Correction bolus
A correction bolus can be delivered with or
without a meal bolus if you need to lower your
blood glucose level.
*Be sure to check with your healthcare professional before adjusting these settings.
Page 6
OMNIPOD® SYSTEM INSTRUCTIONS | Activate a new Pod
ACTIVATE A NEW POD
+ Assemble the following supplies:
– Vial of insulin at room temperature
®
(U-100, rapid-acting). See the Omnipod
Insulin Management System User Guide for
the insulins that are recommended for use
®
with the Omnipod
System
– One sealed Pod
– PDM
– Alcohol prep swab
+ Wash your hands.
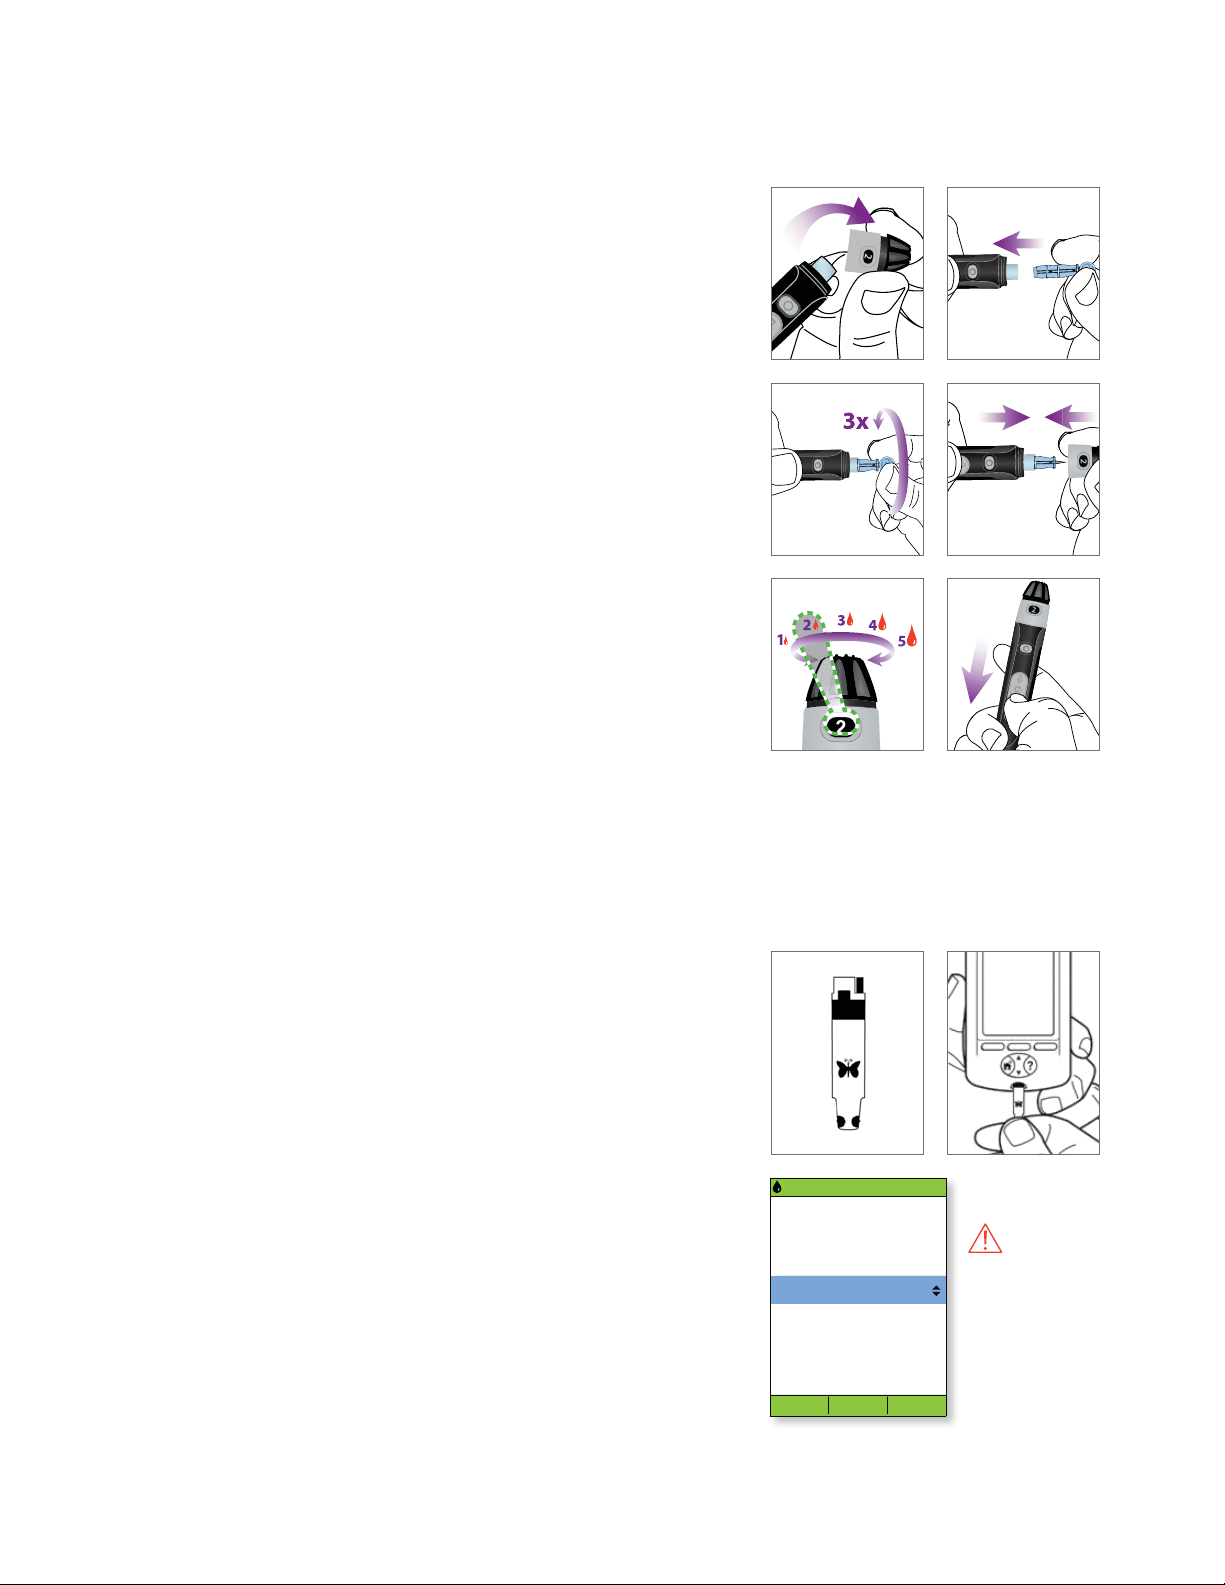
1. Fill the Pod
1.1 1.2 1.3 + Remove the Pod from its
sterile packaging.
+ Use the alcohol prep swab
to clean the top of the
insulin vial.
+ Assemble the fill syringe
by twisting the needle onto
the syringe.
+ Remove the protective cap. + Draw air into the fill syringe
equal to the amount of insulin
indicated in your Diabetes
Management Plan.
+ Depress air into the vial
of insulin.
+ Turn the vial and syringe
upside down.
WARNING:
+ NEVER inject air into the fill port. Doing so may result in unintended or interrupted insulin delivery
+ NEVER use a Pod if you hear a crackling noise or feel resistance when you depress the plunger.
+ Withdraw insulin from the
vial and fill the syringe
with the amount of insulin
determined by your healthcare
professional; fill it at least to
the MIN line.
+ Remove any air bubbles
from the syringe.
CAUTION:
Do not use any other type of needle or filling device besides
the fill syringe provided with each Pod.
Page 7
t
OMNIPOD® SYSTEM INSTRUCTIONS | Activate a new Pod
+ Remove and discard the
2.4 2.5
white paper backing from
the adhesive.
3. Press Start
15:00 15/5
Press “Start” to insert
cannula and begin basal
delivery.
15:00 15/5
Pod is active.
“basal 1” has been
programmed.
Check infusion site and
cannula.
Is cannula properly
inserted?
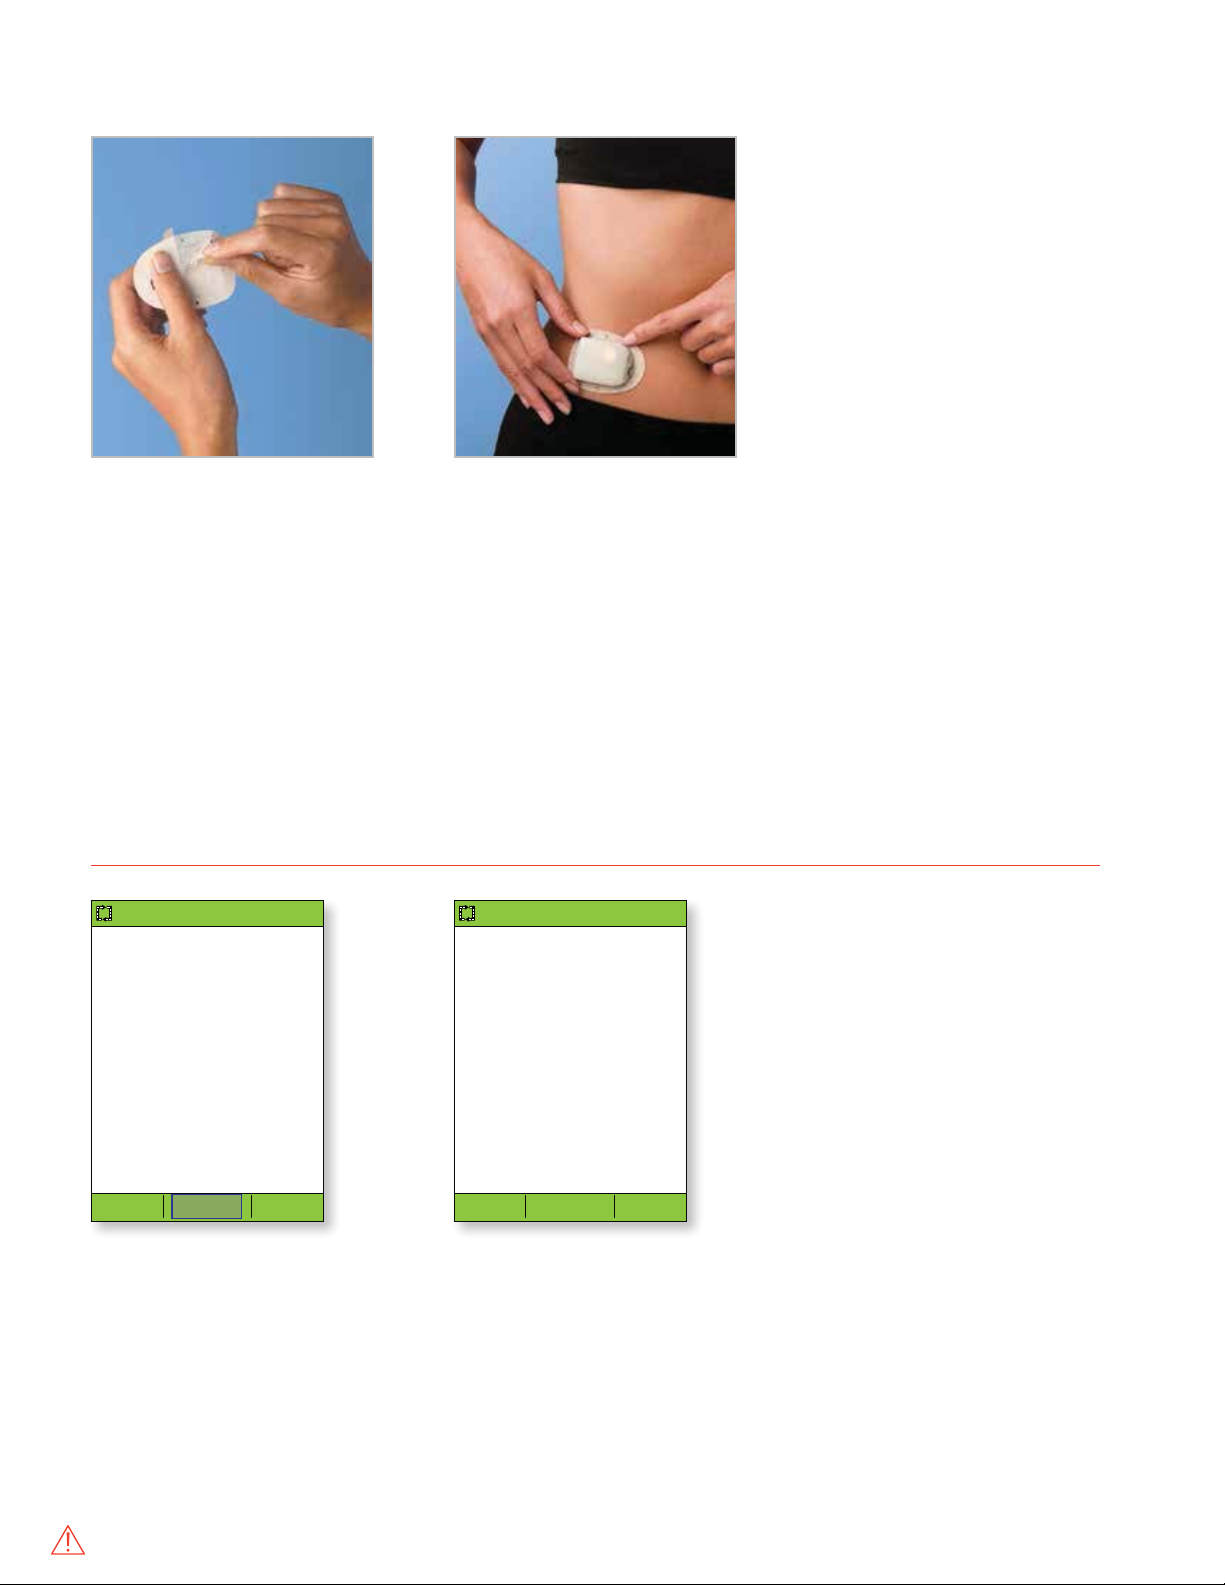
+ Apply the Pod to the
selected site.
+ Secure the adhesive using
your fingers.
+ Press Next on the PDM.
+ To facilitate insertion,
place one hand over the
Pod and make a wide pinch
around the skin surrounding
the viewing window; this
step is critical if the insertion
site does not have much
fatty tissue.
+ If the PDM screen times out
during the process, press
and hold the Home/Power
button to continue.
Start
Star
3.1 3.2
+ The Pod automatically inserts
the cannula and delivers a
prime bolus to fill the cannula
with insulin. It takes a few
seconds to complete this
process. Release the skin
after the cannula inserts.
WARNING:
+ The PDM will generate an automatic reminder to check your blood glucose 1.5 hours after each Pod change. If the cannula is not properly inserted,
hyperglycaemia may result. Verify there is no wetness or odour of insulin, which may indicate the cannula has dislodged.
+ NEVER inject insulin (or anything else) into the fill port while the Pod is on your body. Doing so may result in unintended or interrupted insulin delivery.
No Yes
+ Once complete, the PDM
indicates that the Pod is
active and asks you to check
the infusion site.
+ Look through the Pod’s
viewing window, if properly
inserted, press Yes. Press
No if you see a problem with
the cannula.
Page 8
OMNIPOD® SYSTEM INSTRUCTIONS | Pod placement/prep/tips
FEEL COMFORTABLE
AND CONFIDENT
Prepping for your Pod.
Remember to stay cool and be cool (dry and not sweating) when it’s time to change your Pod.
Here are more potential sticking points:
Trouble with… Problem Solutions
Oily skin Residue from soap, lotion, shampoo or
conditioner can prevent your Pod from
staying secure.
Damp skin Dampness gets in the way of adhesive. Towel off and allow your skin to air-dry;
Body hair A lot of hair will prevent the Pod from
sticking securely.
Clean the area thoroughly with alcohol
before applying your Pod – and be sure
to let your skin air-dry.
do not blow on it.
Clip or shave the area with a razor to
create a smooth surface for your Pod to
stick to. Do this 24 hours before putting
on your Pod to prevent irritation.
Page 9

ADDITIONAL NOTES
Page 10
OMNIPOD® SYSTEM INSTRUCTIONS | Checking blood glucose
Prepare your lancing device in 3 easy steps.
1. Snap off the cap of the lancing device at an angle, and
insert a new lancet firmly into the white holder cup. This action
may cock the device, which is fine.
2. With one hand, hold the lancet in place while twisting
the rounded top with your other hand. Then, replace the cap
until it snaps back into place. Make sure you do not touch the
exposed needle.
3. Adjust the depth setting; the lancing device offers 9 different
settings (including half settings). Level 1 is the shallowest depth
and Level 5 is the deepest. Use a lower number to lance. Pull back
the the grey slider until it clicks. (You may have already cocked
the device in step 1)
You’re now ready to test!
Lancing device depicted is representative only. Please follow the instructions included with your specific lancing device.
Testing your blood glucose level.
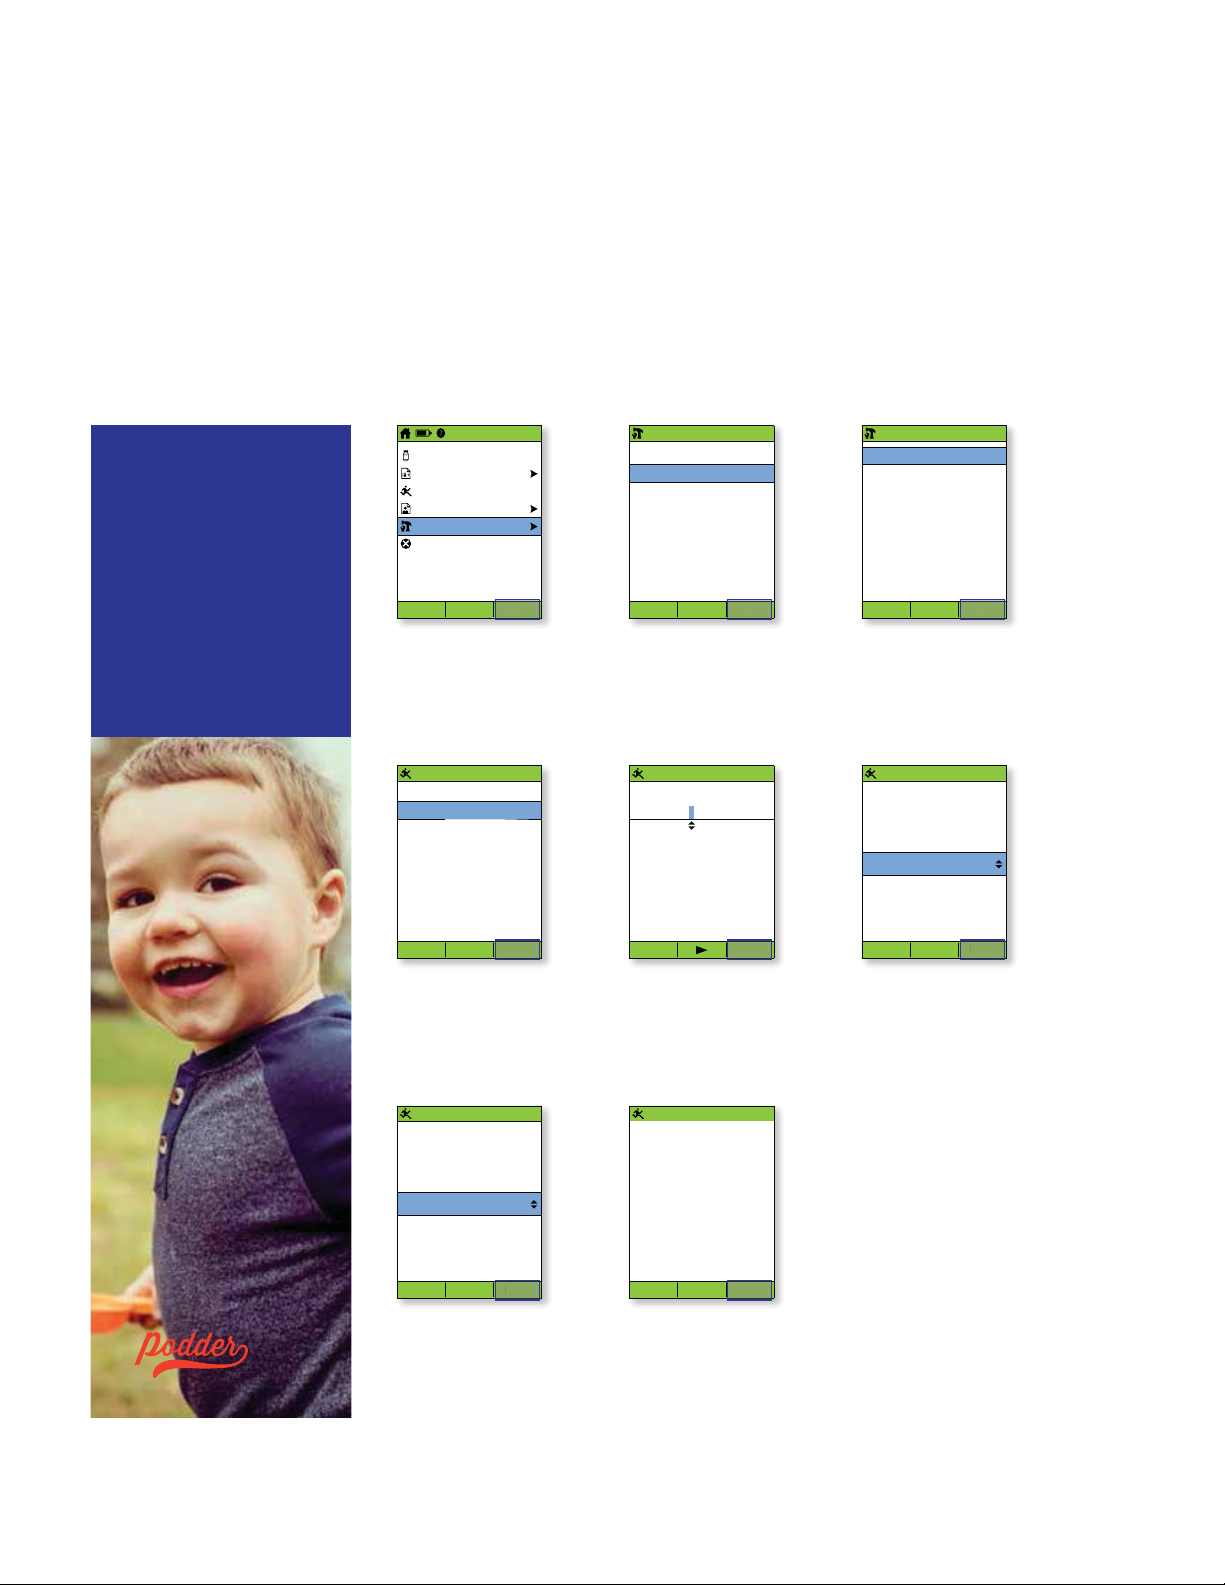
1. Insert your FreeStyle test strip and set the code*
a. Insert a new test strip into the test strip port at the bottom
of the PDM until it stops. Make sure you insert only the top
end of the strip.
+ To help you see the test strip port in reduced lighting,
press the middle soft key labelled Light. To turn the light off,
press Light again.
b. The PDM will display a code number once you insert the strip.
This code must match the code on the side of the test strip vial
to ensure test accuracy. To change this code, just press the
Up/Down controller to change the numbers until they match.
To p
Bottom
15:00 15/5
Enter code.
16
Light
WARNING:
The code number on
the screen must match
the code number on the
side of your test strip
vial. They must always
match or your results
will be inaccurate.
*From some PDM screens, you cannot access the FreeStyle blood glucose meter. For example, you cannot use the meter while you are activating a Pod or when an alert,
alarm or communication error screen is displayed. In these cases, if you insert a test strip, the PDM beeps to alert you. If you do not start the test within 2 minutes, the
PDM powers off. To restart the PDM, take out the unused strip and reinsert it, or simply press and hold the Power button to turn on the PDM. If you need to adjust the
code number after the PDM has moved to the next screen, just press Up/Down Controller buttons. The code screen reappears and you can adjust the number. The
code number remains on the PDM screen for your reference until you have completed the BG test.
Page 11

0
Close
Co
OMNIPOD® SYSTEM INSTRUCTIONS | Delivering a bolus
DELIVERING A BOLUS
15:00 15/5
Apply a blood sample
to the strip.
Calibration code: 16
Light
1. Wash the finger with soap and water or an
alcohol wipe and dry it completely. Prick the
finger with the lancing device. Press Light to
illuminate the test strip in low-light situations.
Apply the blood sample to the test strip.
15:00 15/5
Enter carbs.
0 g
15:00 15/5
8.3
mmol/L
Calibration code: 16
Done Tag Next
2. When the blood glucose reading appears,
press Next to continue.
15:00 15/5
Suggested bolus: 5.00U
15:00 2/11
Suggested bolus: 5.00U
Carbs: 60
BG: 8.3mmol/L
5.00 U
Meal: (60/15)= 4.00U
Correction:
g
(8.3 - 5.6)/2.8= 1.00
Meal IOB:
(0.00U)= -0.00
Correction IOB:
(0.00U)= -0.00
Total= 5.00U
U
U
U
15:00 15/5
Are you going to eat
now?
Cancel No Yes
3. If you are going to eat now, press Ye s.
OR
If you are not going to eat now, press No.
15:00 15/5
Suggested bolus: 5.00U
Carbs: 60 g
BG: 8.3 mmol/L
5.00 U
Close
Back Enter
4. If you are eating, press the
Up/Down controller button to
enter the correct number of carbs
and then, press Enter.
15:00 15/5
Start bolus?
Enter
Back Extend Enter
5. Press the User info/support button
to view how the suggested bolus is
calculated. Then, press Close.
15:00 15/5
Delivering bolus
5.00 U
5.00 U
Back Confirm
7. Press Confirm to start the bolus. 8. The PDM screen will indicate when the
nfirm
Cancel
bolus delivery has begun. If necessary, you
may press Cancel to stop a bolus while it is
being delivered. You do not need to remain
near the PDM during delivery. The delivery
time varies based on the size of the bolus
dose. Once the bolus delivery begins, you
may press and hold the Home/Power
button to turn off the PDM screen.
Back Extend Enter
6. Press Enter to accept the suggested bolus.
OR
Press Extend and follow the on-screen
instructions to deliver a portion/percentage
of the bolus immediately and the rest over
a set period of time. Only use the Extend
option when directed by your healthcare
provider. If extended boluses are not part of
your Diabetes Management Plan, the Extend
option will not appear on the screen.
Page 12

Enter
Save
Save
t
Sel
Select
N
t
Sel
T
ds
t
Sel
OMNIPOD® SYSTEM INSTRUCTIONS | Important tips and reminders
Important PDM tips and reminders.
These tips are intended for use only with PDM models ATT400, DET400,
DET450, DET456, ENT450, FRT400, FRT456, ITT456 and NLT450. The PDM
model number is found on the back of the PDM next to the REF symbol.
How to view insulin records.
15:00 15/5
Bolus
More actions
Temp basal
My records
Settings
Suspend
Status Select
Selec
1. On the home screen,
select My records.
Insulin delivery
BG history
Alarm history
Carb history
All history
My info
Back Select
2. Select Insulin delivery. 3. The PDM provides a summary of
15:00 15/5
ect
Insulin totals: 15/5/18
Bolus (52%) 23.90
Basal (48%) 22.30 U
Total daily 46.20U
Back Bolus Basal
15:00 15/5
U
today’s information including total
boluses, total basal and total daily doses.
Use the Up/Down controller buttons
to view the summary for previous.
How to view multiple-day BG trends.
15:00 15/5
Bolus
More actions
Temp basal
My records
Settings
Suspend
Status Select
Selec
1. On the home screen,
select My records.
Insulin delivery
BG history
Alarm history
Carb history
All history
My info
Back Select
2. Select BG history. 3. Press Trends to show
15:00 15/5
ect
1-day (n=7) 15/5/18
Avg BG: 6.1
Min/max: 2.1/8.4 mmol/L
BG goal: 4.4-7.8 mmol/L
Within goal: 57%
Above goal: 29%
Below goal: 14%
Back Trends List
15:00 15/5
mmol/L
ren
the BG data for the
past 7 days.
Important reminder
During the activation
and priming of the Pod,
the PDM and the Pod
should be adjacent and
in contact. Please refer
to the Omnipod
Management System
User Guide for a full set
of instructions.
7 day (n=52)
Avg Reads/day: 7
Avg BG: 7.5
Min/Max: 2.1/19.4 mmol/L
BG goal: 4.4-7.8 mmol/L
Within goal: 48%
Above goal: 33%
Below goal: 19%
Back 14 day Graph
4. Continue pressing the
middle soft key to show
the trends for previous
14, 30, 60 and 90 days.
15:00 15/5
mmol/L
®
Insulin
How to change existing basal rate.
NOTE: Insulin delivery must be suspended before changing basal rates.
15:00 15/5
Bolus
More actions
Temp basal
My records
Settings
Suspend
Status Select
Selec
1. On the home screen,
select Settings.
15:00 15/5
Segment: 15:00-24:00
Enter basal rate.
0.75 U/hr
Back Enter
5. Enter the basal rate
for the edited segment and
then, press Enter.
15:00 15/5
Basal Programs
Presets
System setup
Vibration
Back Select
ect
15:00 15/5
Basal Programs
basal 1
basal 2
[add new]
Back Enable Select
2. Select Basal Programs. 3. Select the basal programme
to be edited. On next screen,
select the segment to be edited
and then, press Edit.
15:00 15/5
basal 2:
Segment U/hr
[add new]
00:00-08:00 0.60
08:00-15:00 0.80
15:00-24:00
Daily basal: 17.15
Cancel New Save
0.75
U
15:00 15/5
Press “Save” to update
“basal 2.”
1.00
0.50
0.00
12a 12a12p 6p6a
Daily basal: 17.15
Cancel Save List
6. Press Save. 7. Press Save. For additional edits,
repeat steps 3-8.
15:00 15/5
Enter start time for this
basal Segment.
15:00
Back Next
4. Enter the start time and
then, press Next and repeat
for end time.
U
ext
The values shown here are for illustrative purposes only. Actual screens may vary based on user settings and country. Consult with your healthcare professional before
Page 13

Select
Confirm
d
Enter
ter
OMNIPOD® SYSTEM ADVANCED FEATURES | Bolus
OMNIPOD® SYSTEM ADVANCED FEATURES
How to use the extended bolus feature.
When to use:
This feature is most commonly used for high-fat and/or high-protein meals such as pizza, burgers or fried
foods when the digestion of carbohydrates could be delayed.
Important reminders:
Extended bolus and
Temporary basal must
be selected in % or U/h in
System Setup> Bolus/basal/
calcs. Each example is shown
with the PDM set to %.
Once you have set an Extended
bolus or Temp basal, you
can cancel it from the Home
Screen>Suspend/Cancel.
15:00 15/5
Bolus
More actions
Temp basal
My records
Settings
Suspend
Status Select
1. From the home
screen, select
Bolus.
15:00 15/5
Enter carbs.
30 g
Back Enter
4. Enter the grams of
carbs you are about
to eat and then,
press Enter.
En
15:00 15/5
Enter current BG.
8.3 mmol/L
Use for bolus calcs?
Back No Yes
2. Check or manually
enter your current
blood glucose and
then, press Ye s .
15:00 15/5
Suggested bolus: 3.00 U
Carbs: 30 g
BG: 8.3 mmol/L
3.00 U
Back Extend Enter
Exten
5. A suggested
bolus will appear
on the screen.
Press Extend.
15:00 15/5
Are you going to
eat now?
Back No Yes
3. Press Ye s.
(Only meal boluses
can be extended.)
15:00 15/5
Enter amount of meal
bolus to deliver now.
U
Meal: 2.00
Correction: 1.00 U
+50%
Back Enter
6. Enter the amount
of meal bolus to
deliver now and
then, press Enter.
Enter
15:00 15/5
Extended bolus: 1.00 U
Extend for how long?
2.0 hr
15:00 15/5
Start bolus?
Now:
(50%)
Ext:
(50%,2.0 hr)
Total:
2.00 U
1.00 U
3.00 U
Correction boluses
will always be delivered
‘Now’ and cannot be
extended with the
meal bolus.
Back Enter
Kelly L.
7. Enter the duration
of time to extend
your bolus and then,
SINCE 2014
WARNING:
When using the extended bolus function the user should check their blood glucose levels more frequently to avoid hypoglycaemia or hyperglycaemia.
press Enter.
Back Confirm
8. A final confirmation
will show the entire
breakdown of the
extended bolus.
Press Confirm.
Page 14
Next
t
S
Save
New
Select
Select
Select
OMNIPOD® SYSTEM ADVANCED FEATURES | Presets
OMNIPOD® SYSTEM ADVANCED FEATURES
How to use the temp basal presets.
When to use:
It is best used for ‘temporary’ routine activities, such as an exercise class that occurs twice a week. The
PDM can store up to 7 temporary basal presets. You will be able to access your temp basal presets when
you select Temp basal from your home screen.
Important reminders:
Presets are a quick way to
get many of your Pod actions
complete. If you find yourself
eating the same foods or
setting the same temp basal
rates, presets can be a real
time saver.
On any preset, you will have
the option to rename your entry
for even more personalisation.
15:00 15/5
Bolus
More actions
Temp basal
My records
Settings
Suspend
Status Select
1. From the home
screen, select
Settings.
15:00 15/5
Temp basal presets:
[add new]
Back New
4. Select [add new]
and then, press New.
15:00 15/5
Enter duration for
Exercise.
Change: -15%
1.0 hr
15:00 15/5
Basal Programs
Presets
System setup
Vibration
Back Select
15:00 15/5
Temp basal presets
Carb presets
Bolus presets
Back Select
2. Select Presets. 3. Select Temp
basal presets.
15:00 15/5
Edit name.
Exercise
15:00 15/5
Enter change for
Exercise.
-15%
This will temporarily
decrease your basal
rate.
Back Save
5. Keep the default
name or rename,
for example, Exercise.
Press Save.
15:00 15/5
Exercise
Change: -15%
Duration: 1.0
hr
Back Next
6. If temp basals are configured
as percentages (%), select
Increase or Decrease to
specify whether this preset will
deliver more or less insulin than
the active basal programme.
Use the Up/Down button to set
the desired % or U/h change
for the temporary basal present.
Press Next.
Frank C.
Back Next
7. Enter the duration for
Nex
the temp basal preset
and then, press Next.
SINCE BEFORE
HE COU LD EVEN WALK
Back Save
ave
8. A summary of the
temp basal preset
you just created will
appear on the screen.
Press Save.
Page 15

TROUBLESHOOTING | Hypoglycaemia
TROUBLESHOOTING
Hypoglycaemia.
Blood glucose (BG) reading of less than 70 mg/dL / 3.9 mmol/L or ≤ 80 mg/dL / 4.5
mmol/L with symptoms.
Always follow your healthcare professional’s recommendations on how to manage hypoglycaemia, including
how to best manage your sick days and emergency situations.
Never leave a person who is hypoglycaemic unattended!
Tips for troubleshooting.
Check PDM settings.
+ Is the correct basal programme active?
+ Is the PDM time set correctly?
+ Is the temp basal (if active) correct?
+ Are target blood glucose levels correct?
+ Is the insulin sensitivity factor (or correction
factor) correct?
+ Is the insulin-to-carb ratio correct?
50+U 15:00 15/5
Last BG 10.9 mmol/L
Last bolus 2.90
IOB 2.90
X
Temp basal
0.25
Pod exp 13:47 18/5
Home
15:00 15/5
15:00 15/5
U
U/hr 0:30 remains
Consult your healthcare
professional for guidance
regarding adjusting
U
settings on your PDM.
Review recent activity.
Physical activity
+ Has your exercise been unusually long
or strenuous?
+ Have you been unusually physically active?
(e.g., extra walking, housework, heavy or
repetitive tasks, lifting or carrying?)
+ Did you use a decreased temp basal during
this activity?
+ Did you consume carbs before, during
and/or after activity?
Meals/snacks
+ Did you count the carbs correctly – including
subtracting significant fibre?
+ Did you bolus with food?
+ Did you consume alcohol?
®
Consult your Omnipod
System User Guide for
additional information.
IMPORTANT NOTES:
Make sure your blood glucose is at least 100mg/dL / 5.5 mmol/L before driving or working with dangerous machinery or equipment. Even if you cannot check BG,
do not wait to treat symptoms of hypoglycaemia. Avoid hypoglycaemia unawareness by checking your BG more frequently.
Page 16

TROUBLESHOOTING | Customising reminders and alerts
CUSTOMISING REMINDERS AND ALERTS
Get to know your Omnipod®
System reminders.
A reminder is a notification you can turn on
or off at any time and customise to fit your
®
needs. Your Omnipod
of different reminders:
+ Blood glucose (BG) reminders
Programme your Personal Diabetes Manager
(PDM) to remind you to check your blood sugar
levels every time you deliver a bolus dose.
+ Bolus reminders
Your PDM can remind you if you haven’t delivered
a meal bolus within a specific time frame.
+ Programme reminders
Your Pod will automatically beep to let you know
that a temporary basal and/or extended bolus
programme is in process.
+ Confidence reminders
Your PDM is preset to beep and therefore,
you can know when certain programmes have
started and finished, including:
– Bolus delivery
– Extended bolus
– Temporary basal
+ Custom reminders
Enter text reminders into your PDM to be
delivered when you want them.
System has a number
Get to know your Omnipod®
System alerts.
An alert is a notification you can adjust based on
your needs. There are 4 different kinds of alerts on
®
your Omnipod
+ Pod expiration alerts
When your Pod is about to expire (nearing the
72 hour expiration time), you’ll hear 2 sets of
beeps every minute for 3 minutes. This pattern
will repeat every 15 minutes until you press
OK on your PDM.
+ Low reservoir alerts
So you can plan ahead to change your Pod
and make sure you have enough insulin; your
Pod will alert you when your insulin reaches
a certain level.
+ Auto-off alerts
Programme your PDM to alert you if it hasn’t
received a Pod status within 1 to 24 hours.
+ Blood glucose meter alerts
If there is an error with your blood glucose meter,
test strip, sample or results, your PDM will beep
and display an error message number. To learn
more about addressing specific error messages,
Alerts and Alarms, refer to your Omnipod
System User Guide.
System:
®
WARNING:
+ The Low reservoir alert will escalate to an Empty reservoir hazard alarm when insulin is depleted. Be sure to respond to alert when it first occurs.
+ The Auto-off alert will escalate to a hazard alarm if ignored, and will result in the deactivation of your active Pod. Be sure to respond to the alert when it occurs.
Page 17

TROUBLESHOOTING | Making the most of your PDM
MAKING THE MOST OF YOUR PDM
What happens if…?
You already know that your PDM enables you to live a tubeless life,
delivering basal and bolus insulin doses remotely and wirelessly*
to your Pod. However, from time to time, you may find yourself asking
the question ‘Why does my PDM do that?’.
The Insulet Customer Care Team has heard it all, and we’ve compiled
the top 3 areas our Podders™ ask or comment about the most. Read on
to understand how to use your PDM to its maximum potential.
Your PDM battery.
The PDM requires two AAA alkaline batteries
15:00 15/5
Low PDM batteries
Check batteries soon.
to perform at the optimal level. If you are using
another type of battery, your battery life could
suffer and ultimately damage the PDM. AAA
alkaline batteries are readily available at most
OK
pharmacies, supermarkets or electrical shops.
Your PDM automatically takes steps to maximise the battery life when
running low. You’ll first see the Low PDM battery alert and then, your PDM will:
+ Turn off your vibration alert (if set)
+ Disable the bright mode
+ Disable the test strip port light
Once you replace your battery, these functions resume.
PDM communication.
One of the key benefits of the Omnipod® System is the wireless*, tubeless communication between the PDM
and the Pod. This means that you don’t have to keep your PDM next to you all the time. However, there are a
few actions that require your PDM and Pod to be in close proximity to communicate.
Here are a few ways you can help that ‘conversation’:
+ When you deactivate a Pod, it can take a few moments for the Pod to fully
15:00 15/5
deactivate. Often you’ll see the ‘Please Wait’ screen while your Pod and PDM
communicate. Make sure you wait until the Pod is fully deactivated before you
attempt to activate a new Pod.
+ If you are helping deliver a bolus to someone in your care (or changing the basal
Delivering bolus
2.90 U
rate), remember that the PDM and Pod need to keep communicating until the Bolus
is confirmed. Make sure you keep both the Pod and the PDM in close proximity to
each other – within 1.5 metres – until you see the confirmation screen.
*At start up the PDM and Pod should be adjacent and touching, either in or out of tray to ensure proper communication
during priming. At least1.5 metres during normal operation.
The values shown here are for illustrative purposes only. Actual screens may vary based on user settings and country. Consult with your healthcare professional before
Page 18

TROUBLESHOOTING | Travelling with your Omnipod® System
TRAVELLING WITH YOUR
OMNIPOD
Going on a holiday with your Omnipod® System is easy. The following information will help you plan
your trip.
Holiday Checklist.
Medical supplies and equipment
Sealed Pods – enough to cover your whole holiday, including spares, just in case
Insulin vials – as above (remember to place in a clear plastic bag if you are carrying in your hand luggage)
PDM
Extra, new PDM batteries (AAA alkaline)
Spare PDM
Plenty of alcohol prep swabs
Back-up insulin pens (for long and short-acting insulin)
Insulin cartridges/vials for your back-up insulin pens
Spare syringes or pens/needles
Back-up blood glucose meter (in addition to the one integrated into the PDM)
Blood glucose test strips, for both meters
Ketone testing devise and strips
Lancing device and lancets
Glucose tablets or another fast-acting source of carbohydrate
Glucagon emergency kit and written instructions for administering an injection if you are unconscious
®
SYSTEM
Documentation
Travel letter from your healthcare professional (see example below) covering the medical supplies and
equipment you are required to travel with
Prescriptions for all the medical supplies that you are carrying
List of your latest Omnipod® System settings – basal rates/target BG/ratios
Travel insurance
Emergency contact details
Other
If traveling to a different time zone, ensure you have adjusted your basal rate profile
accordingly – ask your doctor for guidance
Further travel advice.
Your Pod is waterproof*, so you are free to go swimming and even to dive without disrupting your insulin
delivery. Remember to rinse your Pod with fresh water afterwards and gently pat dry. You should check
regularly that the Pod is still firmly attached and in place.
It is important to protect your insulin from extreme temperatures that can impact its effectiveness. Remember
to keep your Pod out of direct sunlight and avoid saunas, steam rooms and jacuzzis.
Page 19

OMNIPOD® SUPPORT PROGRAMME
OMINPOD® SUPPORT
PROGRAMME
The Omnipod® Support Programme has been designed to make your transition to the Omnipod®
System as simple as possible. The programme offers a range of value added services to help
®
you make the most of what the Omnipod
For more information about the individual services and their availability in your country, please visit
myomnipod.com or give your local Insulet Customer Care Team a call.
System has to offer.
+ Pod Sample Kit
A free, non-functioning* sample Pod for people
that want to try it out.
®
+ Omnipod
System Training
Available to all new Podders™ – speak to your
healthcare professional.
+ Educational and Training Resources
How-to videos, resource guides, troubleshooting
and tips, lots of educational and training support
always available on myomnipod.com.
+ PDM Holiday Loaner Programme
Supporting you wherever you are in the world.
Contact your local Insulet Customer Care Team
for more information.
+ Reordering consumables**
For guidance on how to reorder Pods and
other consumable items in your country, please
contact your local Insulet Customer Care Team.
+ Insulet Pod Disposal Programme
Insulet’s Pod Disposal Programme provides
Podders™ with an alternative way to dispose
of used Pods. Please contact your local Insulet
®
Customer Care Team or current Omnipod
System provider for more information.
+ Insulet partnering with
®
Glooko
With Glooko + diasend
+ diasend®
®
,
you and your healthcare
professional have access
to all of your diabetes
information in one easy-to-
®
use platform. Glooko + diasend
allows you
to review your blood glucose patterns on your
smartphone or personal computer, understand
the impact of your activities on your blood
glucose and easily share your diabetes data with
your healthcare professional.
Important reminders:
Always talk to your healthcare professional
about what insulin pump options are best
suited for you and your needs.
*Pod shell only, no automatic cannula activation (insertion).
Page 20

ADDITIONAL NOTES
Page 21

Clare F.
TM
SINCE 2013
Insulet International Ltd.
1 King Street, 5th Floor, Hammersmith, W6 9HR
Phone: 0800 011 6132
myomnipod.com
*Up to 72 hours of continuous insulin delivery
 Loading...