

Page 1
*Up to 72 hours of insulin delivery
USER GUIDE
ENT450
USER GUIDE
ENT450
Podder’s handbook
INSULIN MANAGEMENT SYSTEM
™
Page 2

i
Contacts and Important Information
Customer Care
From the UK: 0-800-011-6132
From Ireland: +44-800-011-6132
24 hours/7 days
Web sit e: www.myomnipod.com
Address: Insulet Corporation, 600 Technology Park Drive, Ste 200
Billerica, MA, 01821, USA
PDM Model: ENT450
Serial Number: __________________________________________________
Omnipod® Insulin Management System Start Date: _____________________
Healthcare Provider Nurse/Educator
Name Name
Address Address
Phone Phone
Email Email
Health Insurance Pharmacy
Name Name
Address Address
Phone Phone
Policy Number Email
Page 3

ii
© 2012-2017 Insulet Corporation. Omnipod and the Omnipod logo are
trademarks or registered trademarks of Insulet Corporation in the United States
of America and other various jurisdictions. All rights reserved.
Patent information at www.insulet.com/patents.
FreeStyle and related brand marks are trademarks of Abbott Diabetes Care Inc. in
various jurisdictions and used with permission.
All other trademarks are the property of their respective owners. e use of third
party trademarks does not constitute an endorsement or imply a relationship or
other aliation.
17845-5C-AW Rev A 09/17
Page 4

Contents
iii
Introduction ...............................................................ix
About This User Guide
..........................................................ix
Indications and Contraindications
..............................................x
General Warnings and Cautions
................................................xi
Safe Use
.........................................................................xii
Safety Features
................................................................ xiii
Getting Started
1 Your Omnipod® Insulin Management System .......................... 1
Welcome
........................................................................1
The Pod and PDM
...............................................................2
Screen Navigation
...............................................................4
The Home/Power button
.....................................................4
The Up/Down button
.........................................................4
Soft keys and soft key labels
..................................................4
The Info button
...............................................................5
Screen brightness
.............................................................5
Navigation shorthand
........................................................5
Data Entry
.......................................................................6
Entering numbers
. . . . . . . . . . . . . . . . . . . . . . . . . . . . . . . . . . . . . . . . . . . . . . . . . . . . . . . . . . . . . 6
Entering text
..................................................................6
The Header Bar
..................................................................7
PDM battery level indicator
...................................................7
More info indicator
............................................................7
Insulin level indicator
.........................................................7
Time and date
.................................................................7
The PDM's Top-level Screens
....................................................8
ID screen
......................................................................8
Home screen and More actions screen
.......................................9
Status screen
.................................................................10
IOB screen
....................................................................11
2 Initial PDM Setup ......................................................13
PDM Setup
.....................................................................13
Insert the batteries
...........................................................14
Personalize your PDM
........................................................14
Page 5

iv
Contents
Basal and BG settings ........................................................15
Bolus Calculator settings
.....................................................17
Adding time segments
......................................................19
Other bolus settings
.........................................................20
Pod settings
..................................................................21
Activate Your First Pod
..........................................................21
User Guide
3 Changing Your Pod ....................................................23
Begin the Pod Change Process
.................................................23
Preliminary steps
.............................................................23
Prepare the PDM and deactivate the old Pod
...............................24
Fill the Syringe with Insulin
.....................................................26
Fill and Activate a Pod
..........................................................27
Select the Pod Site
..............................................................29
Prepare the Infusion Site
.......................................................29
Apply the Pod
..................................................................30
Check the Infusion Site
.........................................................32
Avoid Infusion Site Infections
..................................................33
More Information about Pod Use
..............................................34
4 Checking Your Blood Glucose ..........................................35
About Blood Glucose Testing
..................................................35
Using the Built-in BG Meter
....................................................37
Insert a test strip into the PDM
..............................................37
Test your blood glucose or control solution
.................................39
Control solution results
......................................................41
Blood glucose results
........................................................42
Using BG Meter
................................................................44
Tagging the Blood Glucose Results
............................................45
5 Delivering a Bolus of Insulin ...........................................47
Why Bolus?
.....................................................................47
Bolusing with the Bolus Calculator
.............................................47
Enter your BG and meal information
........................................47
Deliver the bolus
.............................................................48
Manually-calculated Bolus
.....................................................50
Altering an Ongoing Bolus
.....................................................51
Cancel an immediate bolus
..................................................52
Cancel an extended bolus
...................................................52
Replace an extended bolus
..................................................53
Page 6

v
ContentsContents
6 Modifying Basal Insulin Delivery ......................................55
Using Temporary Basal Rates
. . . . . . . . . . . . . . . . . . . . . . . . . . . . . . . . . . . . . . . . . . . . . . . . . . .55
Activate a temp basal
........................................................55
Activate a temp basal preset
.................................................57
Cancel a temp basal
. . . . . . . . . . . . . . . . . . . . . . . . . . . . . . . . . . . . . . . . . . . . . . . . . . . . . . . . . .58
Use beeps to monitor temp basal progress
.................................58
Switching to a Dierent Basal Program
........................................58
Suspending and Resuming Basal Insulin Delivery
.............................59
7 Adjusting Settings .....................................................61
General PDM Settings
..........................................................61
Date and time
................................................................61
Username and screen color
. . . . . . . . . . . . . . . . . . . . . . . . . . . . . . . . . . . . . . . . . . . . . . . . . .62
Storing brief notes
...........................................................62
Vibrate and sound options
..................................................62
Lock or unlock the PDM buttons
............................................63
Screen time-out
..............................................................63
Backlight time-out
...........................................................63
Factory defaults settings
.....................................................64
Basal and Temp Basal Settings
.................................................64
Maximum Basal Rate
........................................................64
Basal Programs
...............................................................65
Temp basal conguration
...................................................68
Temp basal presets
..........................................................68
Bolus Calculator Settings
.......................................................70
Turn the Bolus Calculator on or o
..........................................70
Target BG and Correct Above value
.........................................70
Minimum BG for Calcs
.......................................................71
IC Ratio
.......................................................................71
Correction Factor
............................................................72
Reverse Correction
...........................................................72
Duration of insulin action
....................................................72
Carb presets
..................................................................73
Bolus Delivery Settings
.........................................................75
Extended bolus conguration
...............................................75
Maximum Bolus
.............................................................75
Bolus increment
. . . . . . . . . . . . . . . . . . . . . . . . . . . . . . . . . . . . . . . . . . . . . . . . . . . . . . . . . . . . . .75
Bolus presets
.................................................................76
Reminder and Notication Settings
...........................................77
BG reminders
................................................................77
Pod expiration
...............................................................77
Low reservoir level
...........................................................78
Pod Auto-o
.................................................................78
Bolus reminders
..............................................................78
Page 7

vi
Contents
Program reminders ..........................................................80
Condence reminders
.......................................................80
Custom reminders
...........................................................80
BG Readings Settings
..........................................................82
Upper limit and lower limit of the BG Goal Range
..........................82
BG tags
.......................................................................82
Built-in BG meter sound
.....................................................83
8 Browsing Your Records ................................................85
Overview of the Records Screens
..............................................85
The Records menu
...........................................................85
Selecting list items or dates
..................................................86
Meaning of icons used on record screens
...................................87
Insulin Delivery Records
........................................................88
Combined basal and bolus summary
.......................................88
Bolus history
.................................................................88
Basal history
..................................................................89
BG History Records
.............................................................90
View BG records for one day
.................................................90
View BG records for multiple days
...........................................91
Alarm History Records
..........................................................92
Carbohydrate History Records
.................................................92
Combined Listing of All History Data
..........................................93
My Info
..........................................................................93
Reference
9 Alarms, Notications, and Other Messages ............................95
Overview
.......................................................................95
Hazard Alarms
..................................................................96
Advisory Alarms
................................................................98
Notications
....................................................................99
Informational Beeps
.......................................................... 101
Pod Communication Failures
................................................102
Failure to receive a Pod status
.............................................102
Failure when activating or sending a command to a Pod
................103
Failure when canceling a bolus
............................................ 104
Failure when deactivating a Pod
..........................................105
Errors in the Built-in BG Meter
................................................ 106
Silencing an Alarm
...........................................................108
10 Taking Care of Your PDM and Pod ....................................109
Pod and Insulin Care
.........................................................109
Pod and insulin storage
.................................................... 109
Page 8

vii
ContentsContents
Pods and the environment ................................................109
PDM Care
.....................................................................110
PDM storage
...............................................................110
PDM and the environment
................................................111
Replacing the PDM's batteries
............................................. 112
PDM cleaning and disinfecting
............................................ 113
If you drop the PDM
.......................................................115
11 Living with Diabetes ..................................................117
Daily Activities
................................................................117
Infusion site checks
........................................................117
Check your blood glucose frequently
.....................................118
Prepare for Emergencies
.....................................................118
Traveling and Vacations
......................................................119
Plan for changing time zones
.............................................. 119
Take enough supplies
. . . . . . . . . . . . . . . . . . . . . . . . . . . . . . . . . . . . . . . . . . . . . . . . . . . . . . 119
Airport issues
...............................................................120
Keep supplies accessible
................................................... 121
Avoid Lows, Highs, and DKA
.................................................121
General precautions
.......................................................121
Hypoglycemia (low blood glucose)
.......................................121
Hyperglycemia (high blood glucose)
...................................... 126
Diabetic ketoacidosis (DKA)
...............................................129
Handling Special Situations
..................................................130
Sick days
....................................................................130
Exercising, playing sports, or working hard
...............................131
X-rays, MRIs, and CT scans
.................................................131
Surgery or hospitalization
.................................................131
12 Understanding PDM and Pod Function ...............................133
PDM and Pod Interactions
...................................................133
Pod actions controlled by the PDM
.......................................133
What the Pod can do between PDM instructions
......................... 136
PDM's self-checks
..........................................................137
Auto-o
....................................................................137
Basal Insulin Delivery
.........................................................138
Basal Programs
............................................................. 138
Temporary basal rates
.....................................................139
Methods to temporarily stop insulin delivery
.............................142
Immediate and Extended Boluses
.........................................143
Manually-calculated Boluses
................................................. 143
The Bolus Calculator
.......................................................... 144
Bolus Calculator boluses
................................................... 144
When the Bolus Calculator does not work
................................145
Factors used in the Bolus Calculator's calculations
........................145
Page 9

viii
Contents
Bolus Calculator equations ................................................148
Bolus Calculator examples
................................................. 150
Bolus Calculator rules
......................................................154
Appendix
................................................................155
Summary of Settings and Options
........................................... 155
Pod Specications
............................................................ 156
PDM Specications
........................................................... 158
Built-in BG Meter Specications
.............................................. 158
Protection from Over-infusion or Under-infusion
...........................159
System Accuracy according to International Standard
ISO 15197:2013
............................................................160
PDM Icons
....................................................................161
Omnipod® System Label Symbols
...........................................162
Medical Device Directive
.....................................................163
Omnipod® System Notice Concerning Interference
.........................163
Warranty for the PDM and Pods
.............................................168
WARRANTY FOR THE OMNIPOD® INSULIN MANAGEMENT SYSTEM
PERSONAL DIABETES MANAGER AND PODS
(United Kingdom and Ireland)
............................................. 168
WARRANTY COVERAGE
....................................................168
Glossary
.................................................................173
Index
.....................................................................177
Page 10

ix
Introduction
About This User Guide
Caution: is User Guide is intended for use only with PDM model ENT450 To
learn which version of the PDM you have, turn it over. On the back of the PDM,
look for "ENT450." If you see it, this is the correct User Guide. If you do not see it,
please call Customer Care.
Note: Screen images shown in this User Guide are examples only and are not
suggestions for user settings. Consult with your healthcare provider to determine
the appropriate settings for you.
Health care and treatment are complex subjects requiring the services of qualied
health care providers. is user Guide is informational only and not intended
as medical or health care advice or recommendations to be used for diagnosis,
treatment or for any other individual needs. is user guide is not a substitute
for medical or health care advice, recommendations and/or services from a
qualied health care provider. is user guide may not be relied upon in any way
in connection with your personal health care, related decisions and treatment.
All such decisions and treatment should be discussed with a qualied health care
provider who is familiar with your individual needs.
is User Guide is periodically updated. Visit the Learning Center section of
www.myomnipod.com to see the most recent version and to nd other helpful
information.
Ter m Meaning
Warning Alerts you to the possibility of injury, death, or other serious adverse
reactions associated with the use or misuse of the device.
Caution Alerts you to the possibility of a problem with the device associated
with its use or misuse. Such problems include device malfunctions,
device failure, damage to the device or damage to other property.
Note Provides helpful information.
Tip Oers a suggestion for successful use of the device.
Page 11

x
Introduction
Indications and Contraindications
Caution: is device is for prescription use only.
Indication
e Omnipod® Insulin Management System is intended for subcutaneous
(below the skin) delivery of insulin at set and variable rates for the management
of diabetes mellitus in persons requiring insulin and for the quantitative
measurement of glucose in fresh capillary whole blood (in vitro).
Abbott FreeStyle and FreeStyle Lite test strips are used with the built-in FreeStyle
meter for the quantitative measurement of blood glucose in fresh whole capillary
blood from the nger, upper arm and palm.
Abbott FreeStyle Control Solutions are used to verify that the meter and test strips
are working together properly and that the test is performed correctly.
Contraindications
Insulin pump therapy is NOT recommended for people who are:
• Unable to perform at least four (4) blood glucose tests per day
• Unable to maintain contact with their healthcare provider
• Unable to use the System according to instructions
Do not use the built-in blood glucose meter for:
• Testing on newborns
• Testing arterial blood
• Diagnosing of or screening for diabetes mellitus
Note: Unless stated otherwise, references to FreeStyle Blood Glucose Test Strips
or FreeStyle Test Strips include both FreeStyle and FreeStyle Lite Test Strips.
Page 12

xi
IntroductionIntroduction
General Warnings and Cautions
Warnings:
Rapid-acting U-100 insulin: e Omnipod® System is designed to use
rapid-acting U-100 insulin. e following U-100 rapid-acting insulin
analogs have been tested and found to be safe for use in the Pod: NovoRapid®,
Humalog®, or Apidra®. NovoRapid®, Humalog, and Apidra are compatible
with the Omnipod® System for use up to 72 hours (3 days). Before using a
dierent insulin with the Omnipod® System, check the insulin drug label to
make sure it can be used with a pump. Refer to the insulin labeling and follow
your healthcare provider’s directions for how oen to replace the Pod.
Read all the instructions provided in this User Guide and practice the
blood glucose testing procedures before using the System. Monitor your
blood glucose with the guidance of your healthcare provider. Undetected
hyperglycemia or hypoglycemia can result without proper monitoring.
Warnings:
Personal health considerations
Not recommended for individuals with hearing loss. Always verify your
ability to hear Pod/PDM alarms and notications.
If you are unable to use the System according to instructions, you may be
putting your health and safety at risk. Talk with your healthcare provider if
you have questions or concerns about using the System properly.
Parts of the device are considered biohazardous and can potentially transmit
infectious diseases, even aer you have performed cleaning and disinfection.
e glucose meter and lancing device are for single-patient use. Do not share
the device with anyone including other family members. Do not use on
multiple patients.
Page 13

xii
Introduction
Warnings:
Environments to avoid
e Pod and PDM may be aected by strong radiation or magnetic elds.
Before having an X-ray, MRI, or CT scan (or any similar test or procedure),
remove your Pod and put it and the PDM outside the treatment area. Check
with your healthcare provider for Pod removal guidelines.
e Omnipod® System should NOT be used at low atmospheric pressure
(below 696 hPA). You could encounter such low atmospheric pressures at
high elevations, such as when mountain climbing or living at elevations above
3,000 meters (10,000 feet).
e Omnipod® System should NOT be used in oxygen rich environments
(greater than 25% oxygen) or at high atmospheric pressure (above 1062 hPA),
both of which can be found in a hyperbaric chamber. Hyperbaric, or high
pressure chambers are sometimes used to promote healing of diabetic ulcers,
or to treat carbon monoxide poisoning, certain bone and tissue infections,
and decompression sickness.
Caution: is device is intended for self-testing by the user.
Caution: If you are having symptoms that are not consistent with your blood
glucose test results and you have followed all instructions described in this
User Guide, call your healthcare provider.
Safe Use
Pump therapy requires substantial caregiver involvement, especially with
children. Work with your healthcare provider to establish diabetes management
guidelines and settings that best t your, or your child’s, needs. ese may include:
Insulin-to-Carbohydrate (IC) Ratio: Number of grams of carbohydrate covered
by one unit of insulin. For example, if your Insulin-to-Carbohydrate Ratio is
1:15, then you need to deliver one unit of insulin to cover every een grams of
carbohydrate you eat.
Correction (or Sensitivity) Factor: How much one unit of insulin lowers your
blood glucose. For example, if your Correction Factor is 2.8, one unit of insulin
lowers your blood glucose by 2.8 mmol/L.
Target Blood Glucose (Target BG): e blood glucose level you want to achieve.
For example, you may want to keep your blood glucose close to 5.6 mmol/L.
Page 14

xiii
IntroductionIntroduction
Duration of Insulin Action: e length of time that insulin remains active and
available in your body aer a correction or meal bolus.
Your healthcare provider is a valuable resource. You will rely on him or her for a lot
of critical information about your Omnipod® System, especially during the rst
few weeks and months. When you have questions about diabetes management
aer starting on the Omnipod® System, do not hesitate to talk with your
healthcare provider.
For technical questions about your Omnipod® System setup or operation, or to
order Omnipod® System products and supplies, you can call Customer Care 24
hours a day, 7 days a week. See the front page of this User Guide for your Customer
Care contact information.
Your healthcare provider will give you all the tools and training you need to be
successful with the Omnipod® System. However, in the end, your success depends
on YOU. You must become actively involved in your own diabetes management
to enjoy the control, freedom and exibility that is possible with the Omnipod®
System.
Being actively involved means:
• Frequently monitoring your blood glucose levels
• Learning how to operate your Omnipod® System and practicing proper
techniques
• Visiting your healthcare provider
Safety Features
e Omnipod® System’s built-in safety features include:
Automatic priming, safety checks, and insertion
Every time you activate a new Pod, the Omnipod® System automatically primes
and performs a safety check on the Pod, then inserts and primes the cannula.
ese safety checks take only a few seconds.
e Omnipod® System also performs safety checks on the PDM each time you
turn on your PDM. If it detects any problems in the PDM or the Pod—or in
the communication between them—it informs you with beeps and on-screen
messages.
Alarms and notications
For your safety, the Omnipod® System provides a range of alarms and notications
to tell you that your attention is needed or to warn you of hazardous situations. For
a description of the PDM's alarms and notications, see Chapter 9.
Page 15

xiv
Introduction
Warning: You need to press Conrm on the ID screen before you can read
the alarm or notication message.
Note: Activate your PDM periodically to conrm that there are no notications
or alarms that require a response.
Warning: Do NOT attempt to use the Omnipod® System before you
receive training from your Omnipod® System Trainer or healthcare provider.
Inadequate training could put your health and safety at risk.
Page 16

1
CHAPTER 1
Your Omnipod® Insulin
Management System
Welcome
e Omnipod® Insulin Management System is an innovative continuous insulin
delivery system that provides all the proven benets of continuous subcutaneous
insulin infusion (CSII) therapy. Features of the Omnipod® Insulin Management
System include:
No tubing: ere is no tubing connecting the Pod to the Personal Diabetes
manager (PDM). You can wear the Pod under your clothes and carry the PDM
separately. You can swim wearing the Pod and leave the PDM on dry land. e
Pod is waterproof to 7.6 meters (25 feet) for up to 60 minutes (IP28).
Bolus Calculator: If your blood glucose is high or if you plan to eat, the PDM's
Bolus Calculator can suggest a bolus dose based on your individual settings.
Built-in blood glucose meter: e PDM contains a built-in blood glucose meter.
You can also use a separate blood glucose meter and enter the results manually
into the PDM.
Record keeping: e data storage system in the PDM displays up to 90 days of
information. is includes blood glucose results, basal rates and bolus doses,
carbohydrates, and alarms.
e Getting Started section of this book explains the basic operation and setup of
the Omnipod® System. e User Guide section gives step-by-step instructions for
using the System. e Reference section explains the System in detail.
Terms and conventions
Bold text Buttons that you press, so keys, menus, and screens are in bold.
Screen Area of the PDM that displays menus, instructions, and messages.
Menu List of options. Options allow you to perform tasks.
Icon An image on the PDM screen that indicates a menu option or item
of information (see "PDM Icons" on page 161).
Button Physical button on the PDM, such as the Home/Power button.
So keys Row of three buttons directly beneath the screen. e so key's label
or function appears on the screen directly above the button.
Press Press and release a button or so key.
Hold Keep pressing a button until its function is complete.
Page 17
Your Omnipod® Insulin Management System 1
2
1 Your Omnipod® Insulin Management System
The Pod and PDM
e Omnipod® System is made up of two parts: e Pod, which delivers insulin
to your body, and the Personal Diabetes Manager (PDM), which allows you to
control the Pod.
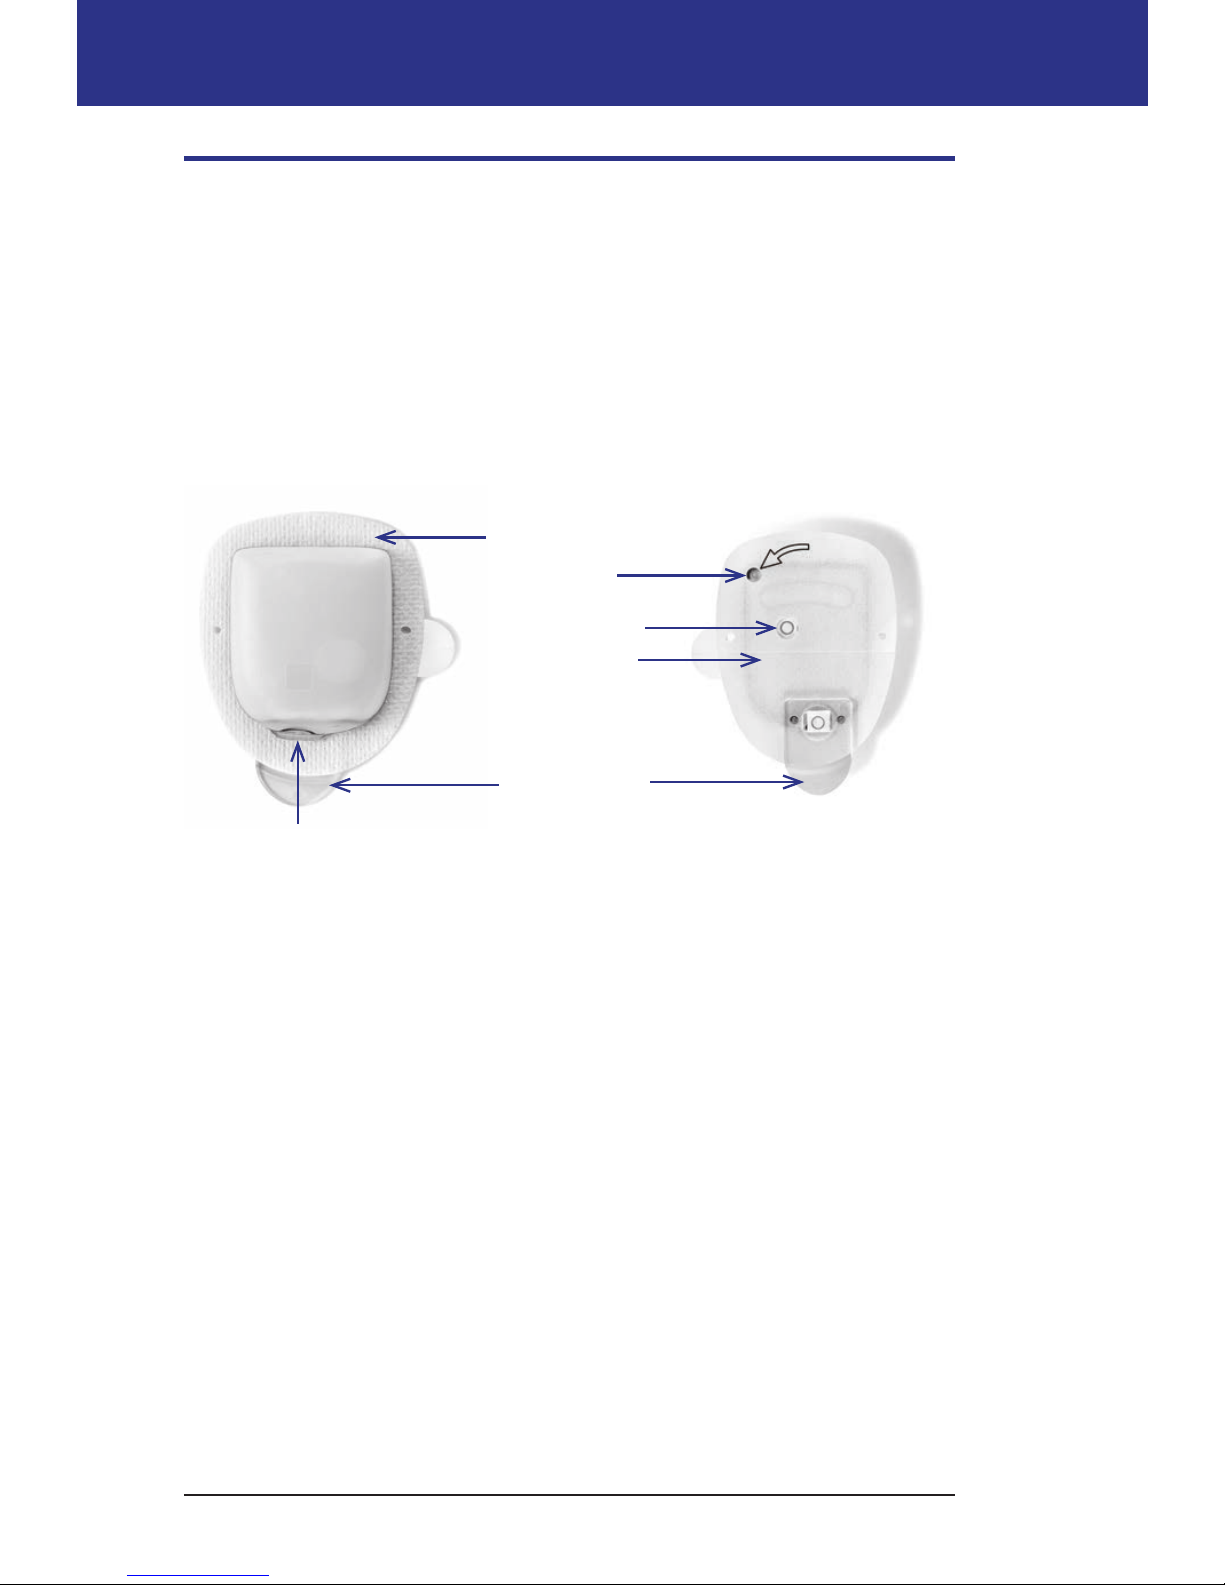
e Pod: e Pod is a lightweight, self-adhesive device that you ll with insulin
and wear directly on your body. e Pod delivers insulin into your body through a
small exible tube called a cannula, based on instructions from the PDM.
e Pod is applied to your skin with an adhesive, similar to an adhesive bandage.
Pod needle cap
Viewing window
Paper cover for
adhesive backing
Housing vent
Fill port
Adhesive backing
BottomTop
Page 18
3
Your Omnipod® Insulin Management System 11 Your Omnipod® Insulin Management System
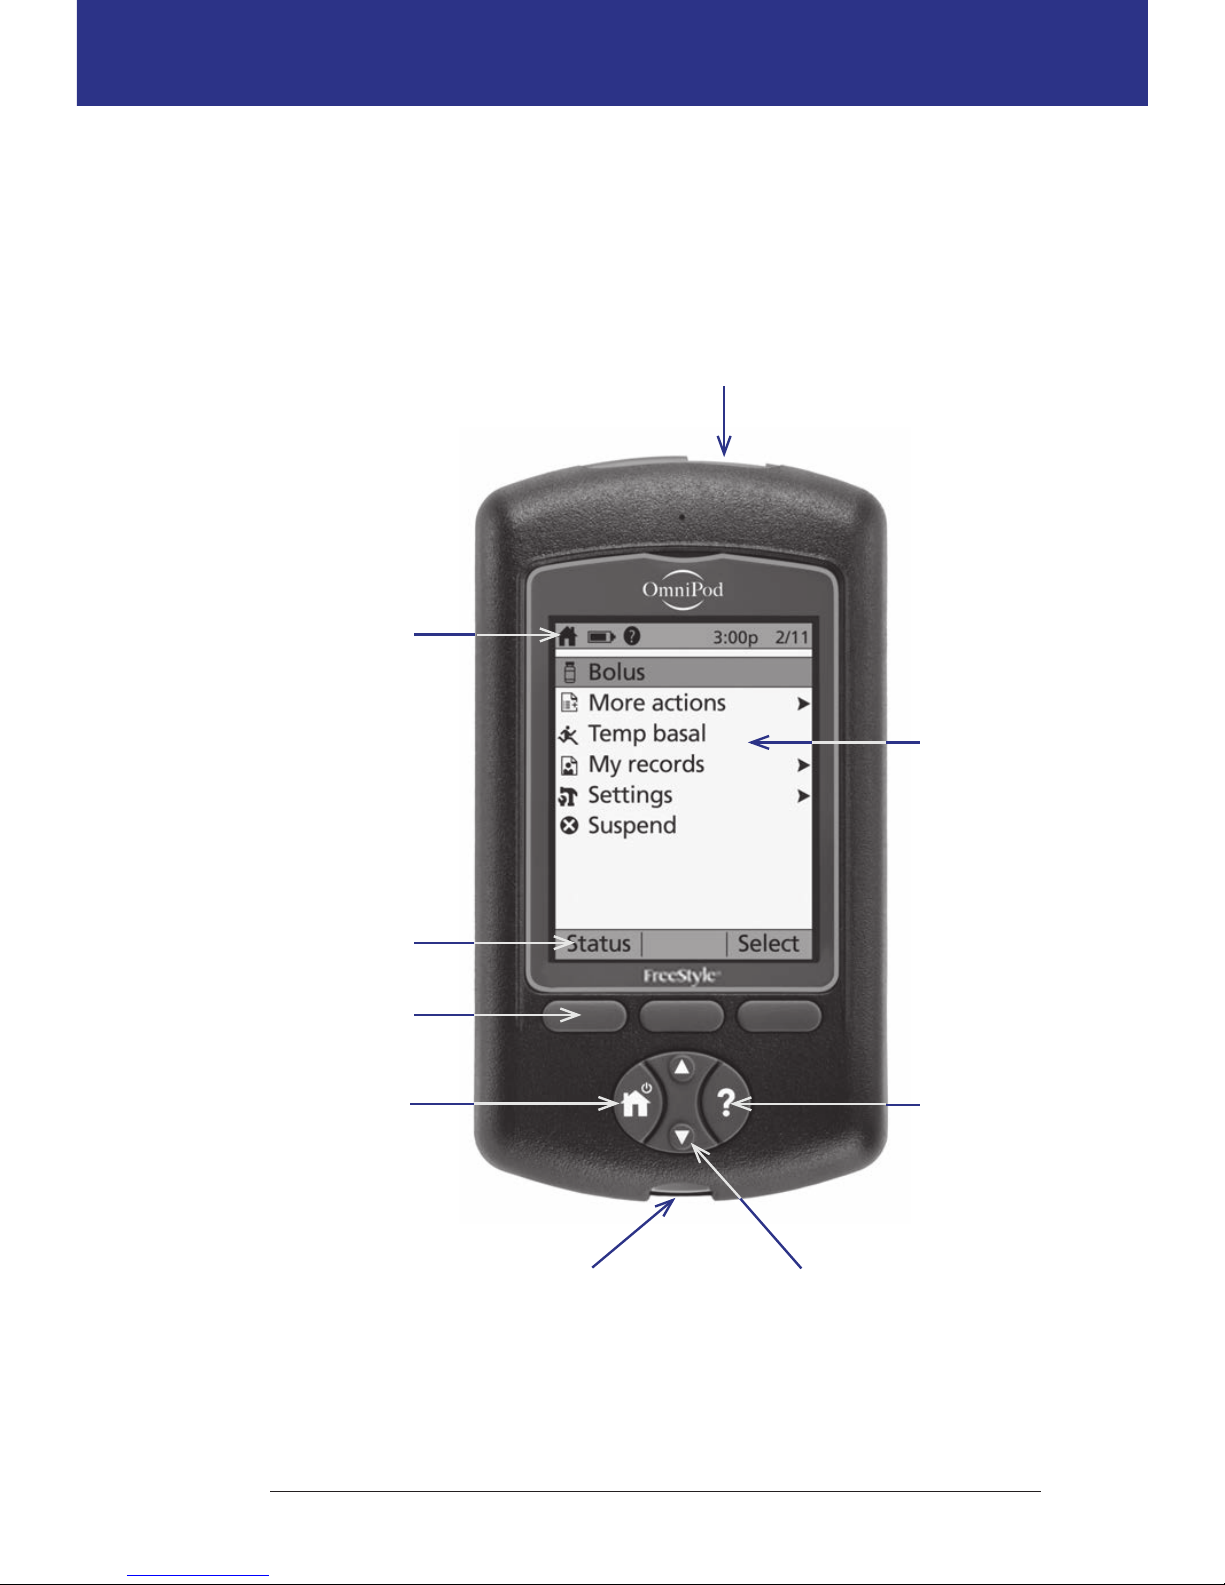
e PDM: e PDM is a handheld device that:
• Wirelessly programs the Pod with your personalized insulin-delivery
instructions
• Wirelessly monitors the Pod's operation
• Includes a built-in blood glucose meter
Up/Down buttonTest strip port
Home/Power
button
Info
button
Soft key
Soft key label
Home
Screen
USB port
Header bar
Page 19

Your Omnipod® Insulin Management System 1
4
1 Your Omnipod® Insulin Management System
Screen Navigation
e PDM communicates with you by displaying images on its screen. You
communicate with the PDM by pressing buttons and so keys.
The Home/Power button
Press and hold the Home/Power button to turn the PDM on or o.
When the PDM is on, briey press this button to return to the Home
screen from any other screen.
The Up/Down button
e Up/Down button is used in the following ways:
• Press and release to increase or decrease a number. Holding the
button down changes the number more rapidly.
• Press and release to scroll through a list of available menu options.
Holding the button down scrolls faster.
• Some screens have text that continues below what is visible on
the screen. Use the Up/Down button to scroll down to view any
o-screen text.
Press the Up arrow (the upper part of the Up/Down button) to increase a number
or to move up on a screen. Press the Down arrow (the lower part of the Up/Down
button) to decrease a number or move down on a screen.
Soft keys and soft key labels
So key labels appear on the screen directly above the so key buttons. e so
key labels dier on dierent PDM screens. Press a so key to select an action or
to navigate between screens. For example, on the Home screen shown on the
previous page, the two so key labels are "Status" and "Select."
• Press the right-hand so key, directly below the "Select" so key label, to select
the highlighted "Bolus" menu item. e Bolus screen appears.
• Press the le-hand so key, beneath the word "Status," to bring up the Status
screen.
Tip: Pressing a so key that has no so key label above it prevents the PDM from
going to sleep but has no other action.
Page 20

5
Your Omnipod® Insulin Management System 11 Your Omnipod® Insulin Management System
The Info button
Some screens have a "more info" icon in the header bar (see
page 7) or displayed to the right of an item in a list. When the "more
info" icon is present, press the Info button to display a screen with
additional details.
Screen with icon
Pressing the Info button displays
Home screen Username, other personalized entries (if any),
Insulet Corporation contact information, device
serial number
Status screen Insulin on board (IOB) details
Suggested bolus screen Bolus calculation details
History screen Details about a tagged event
Screen brightness
e Info button can also be used to make your PDM screen brighter or less bright.
Press and hold the Info button for two seconds to toggle the “bright mode" on or
o. To control the dimming of the screen, see "Backlight time-out" on page 63.
Navigation shorthand
e User Guide uses the ">" symbol to indicate navigating from one screen to
another. For example, the following notation:
Home > Settings > Presets > Carb presets
tells you to:
1. Turn on the PDM and conrm your ID, if necessary.
2. Press the Home/Power button.
3. Use the Up/Down button to highlight the Settings option, then press the so
key under Select to bring up the Settings menu.
4. Use the Up/Down button to highlight the Presets option, then press the so
key under Select to bring up the Presets menu.
5. Use the Up/Down button to highlight the Carb presets option, then press the
so key under Select to bring up the Carb presets menu.
Page 21

Your Omnipod® Insulin Management System 1
6
1 Your Omnipod® Insulin Management System
Data Entry
is section explains how to enter numbers or text into the PDM. Refer back to
this section as needed while you are learning to use your PDM.
Entering numbers
Use the Up/Down button to increase or decrease a number.
Initial settings for numerical values are oen “---.” Press the Up/Down button
once, either up or down, to display the default value. Continue to press the Up
button or the Down button to increase or decrease the number.
Entering text
During setup, you will enter a username for your PDM's ID screen and,
optionally, a name for your rst Basal Program. Later on, you can add names for
other settings or edit existing names.
To enter text:
1. Use the Up/Down button to scroll through the alphabet and other characters.
A blank character or space precedes the "a" and follows the "Z" of the alphabet.
Numbers and a few other characters, such as - and @, are found following the
alphabet and the space character.
2. Press the middle so key (labeled with the right arrow) to move the
underscore to the next character.
3. Enter each character one at a time. An up-and-down-arrow symbol on the
screen indicates the character you are currently changing.
For example, to enter a username of "MKC 2-5-10", use the Up/Down button and
the middle so key to enter M. K. C, [space], 2, -, 5, -, 1, 0.
e PDM considers capital and lowercase letters to be the same. In other words,
the PDM considers "myFavoriteFood" and "myfavoritefood" to be the same name,
and it will not allow you to use both of them as the name of two dierent presets.
Note: Many settings provide a default naming system consisting of a generic
description of the item being named followed by a number. Each subsequent item
ends with the next higher number. For example, the default naming system for
custom reminders is reminder 1, reminder 2, reminder 3, and reminder 4.
Page 22
7
Your Omnipod® Insulin Management System 11 Your Omnipod® Insulin Management System
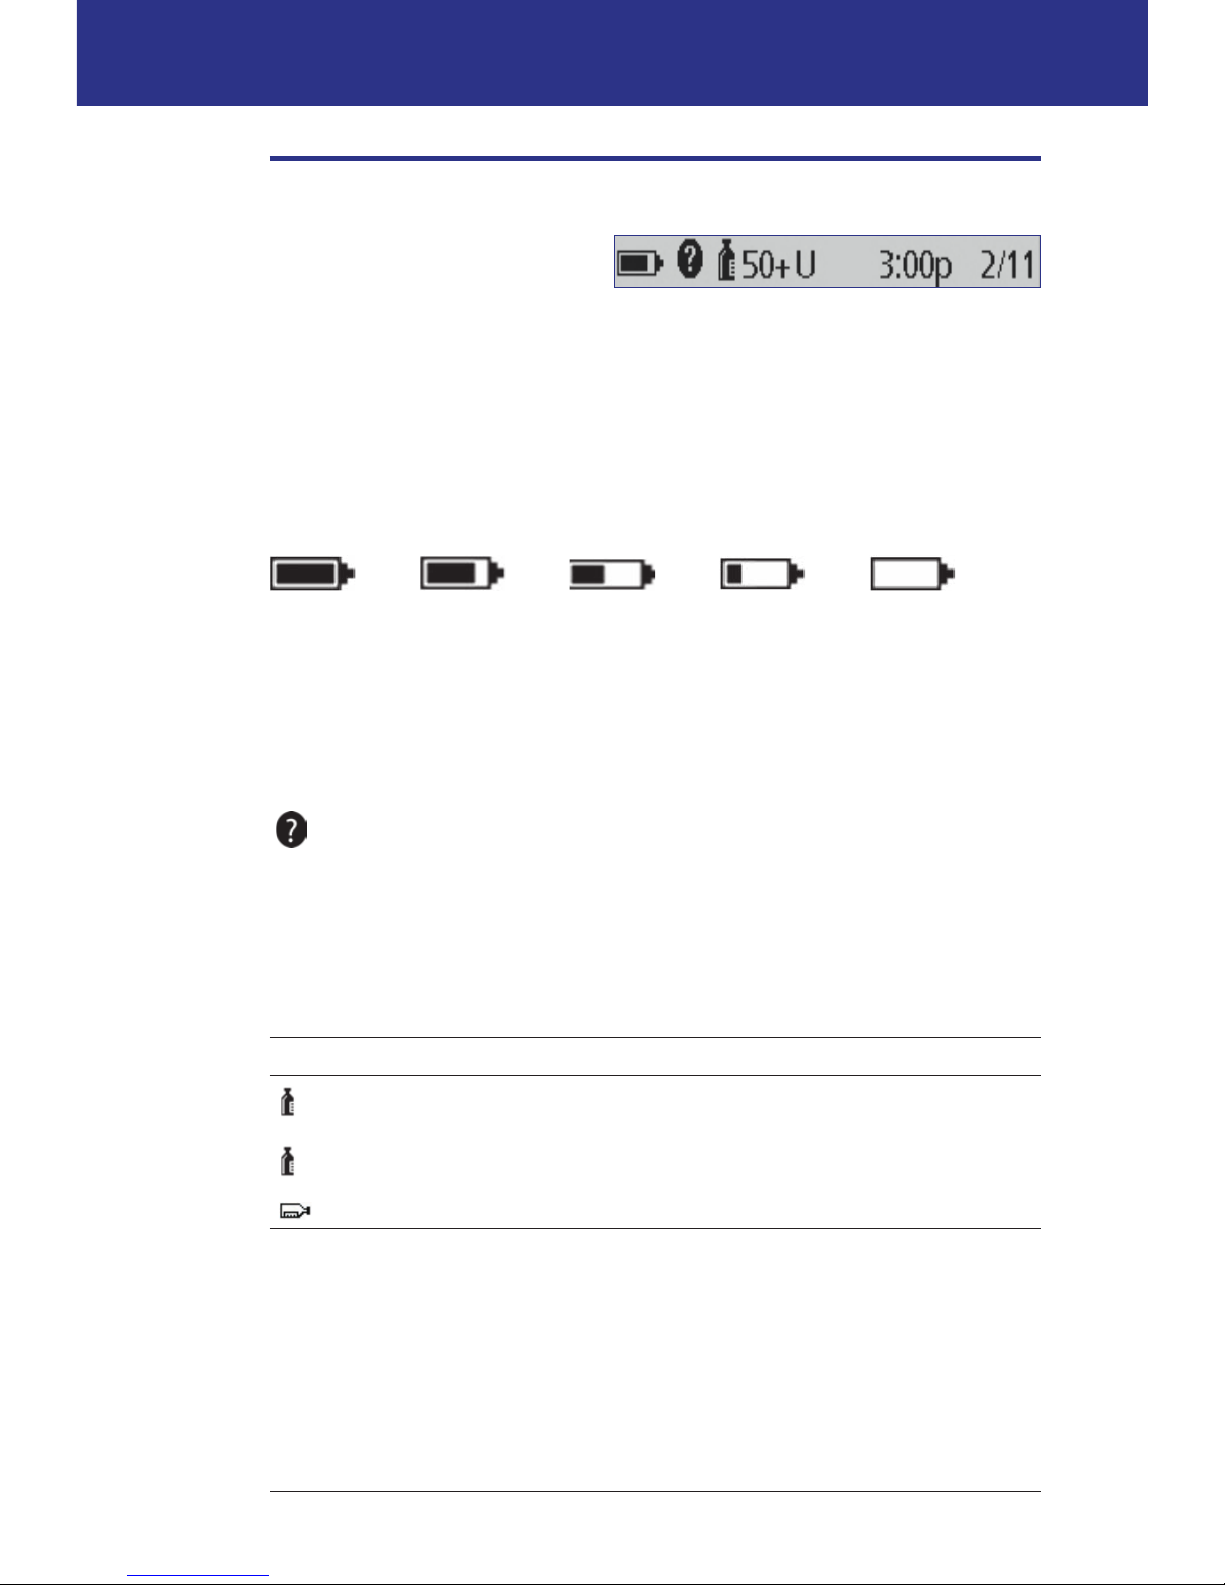
The Header Bar
A screen's header bar gives useful
information that is not found
anywhere else. e information on
the header bar varies according to
each screen's purpose.
PDM battery level indicator
e batteries in your PDM should last about three weeks. e header bar on the
Status screen displays the amount of battery life le as follows:
Full 3/4 full Half full 1/4 full Empty
See "Replacing the PDM's batteries" on page 112 for more information.
More info indicator
e "more info" indicator is found on the header bar of some screens (see
"e Info button" on page 5).
Insulin level indicator
e insulin level indicator is found on the Status screen's header bar only. e
header bar displays the amount of insulin remaining as follows:
Display in header bar Units of insulin remaining
50+U
Any amount above a 50 unit threshold
50U (to 5U)
Number displayed (counts down 1 unit at a time
between 50 units to 5 units)
LOW Less than 5 units
Time and date
e time and date appear in the header bar of all screens.
Page 23
Your Omnipod® Insulin Management System 1
8
1 Your Omnipod® Insulin Management System
The PDM's Top-level Screens
is section introduces you to the PDM's top-level screens:
• e ID screen identies the PDM as being yours.
• e Home screen and the More actions screen are the main menus. ey
provide the entry point to the PDM's functions.
• e Status screen shows the Pod and PDM's status, lists current or recent
basal, bolus and blood glucose information, and displays messages.
• e IOB screen gives details about how much insulin is active in your body.
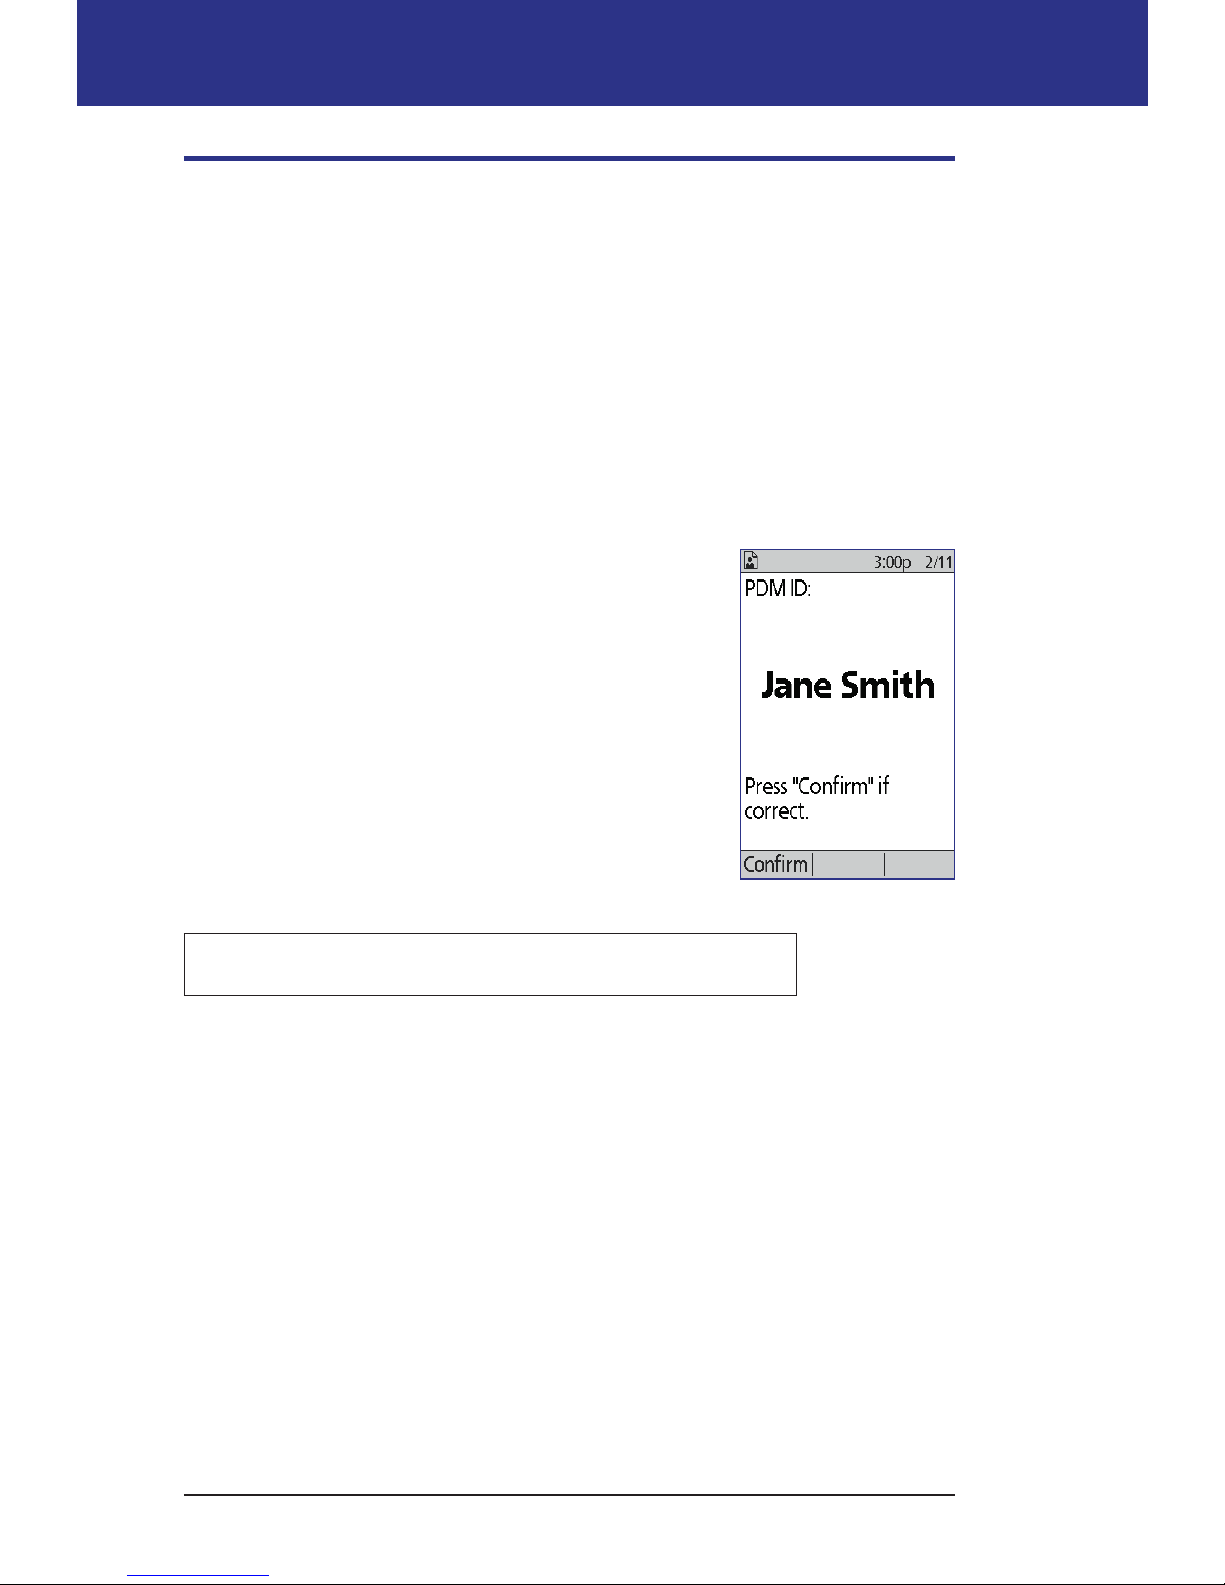
ID screen
e ID screen performs a very important function: It
allows you to identify the PDM as yours.
To conrm that the PDM is yours:
1. Press the Home/Power button to turn on your
PDM. e ID screen appears. Verify that the
username is yours.
2. Press Conrm. e Status screen appears.
In the remainder of this User Guide, instructions to "turn
on the PDM" indicate both pressing the Home/Power
button and conrming the ID screen.
Warning: Always identify the PDM as yours before using it.
Page 24
9
Your Omnipod® Insulin Management System 11 Your Omnipod® Insulin Management System
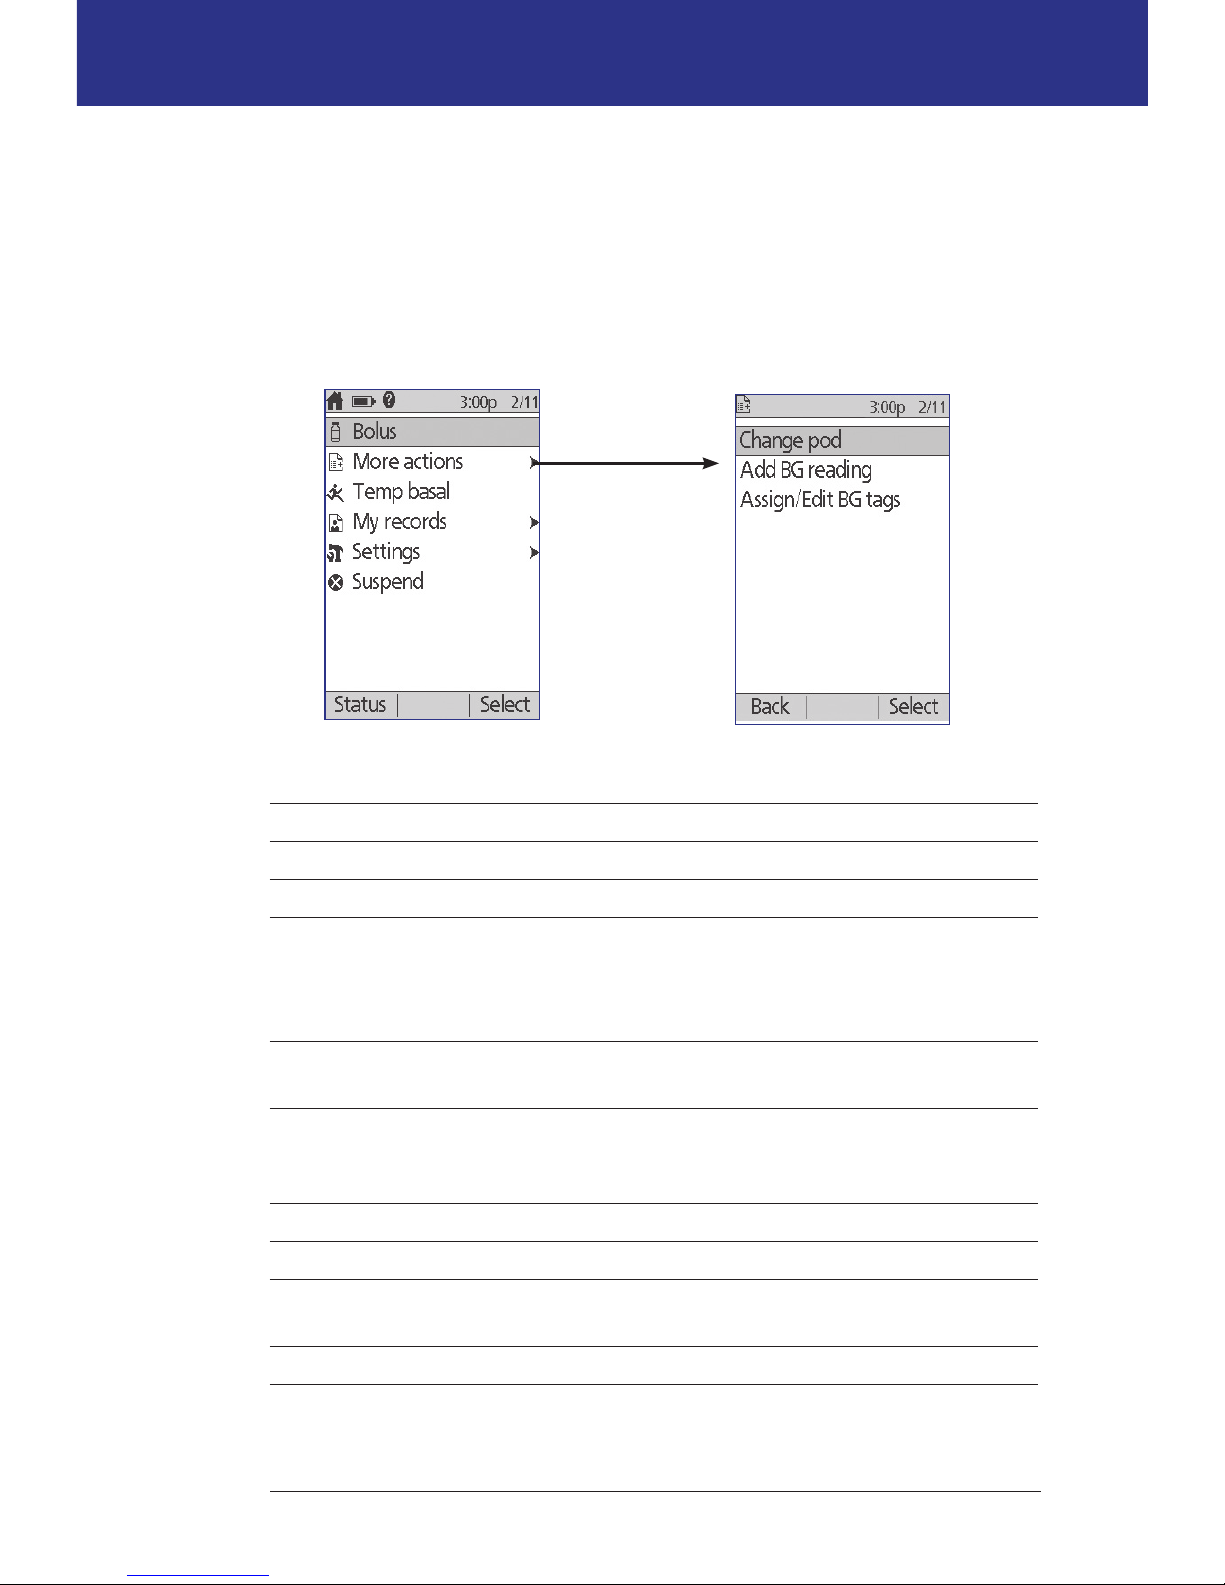
Home screen and More actions screen
e menu items on the Home screen and its More actions submenu give you
access to the Omnipod® System's features.
e Home screen can be accessed from most screens by pressing the Home/
Power button. Select More actions on the Home screen to see other useful menu
choices.
Menu item Allows you to ... See ...
Bolus Deliver boluses page 47
More actions Bring up the More actions screen page 9
Temp basal Dene a temporary basal rate (this menu
item does not appear if the temp basal
feature is turned o, see "Temp basal
conguration" on page 68)
page 55
My records View history of insulin delivery, blood
glucose readings, carbs eaten, and alarms
page 85
Settings Create and edit Basal Programs and presets,
and customize your settings, including
sound or vibration
page 61
Suspend Suspend, cancel, or resume insulin delivery page 59
Change pod Deactivate and activate a Pod page 23
Add BG reading Enter a BG reading taken with a separate BG
meter
page 44
Assign/Edit BG tags Label a BG reading for future reference page 45
The Home screen
The More actions screen
Page 25
Your Omnipod® Insulin Management System 1
10
1 Your Omnipod® Insulin Management System
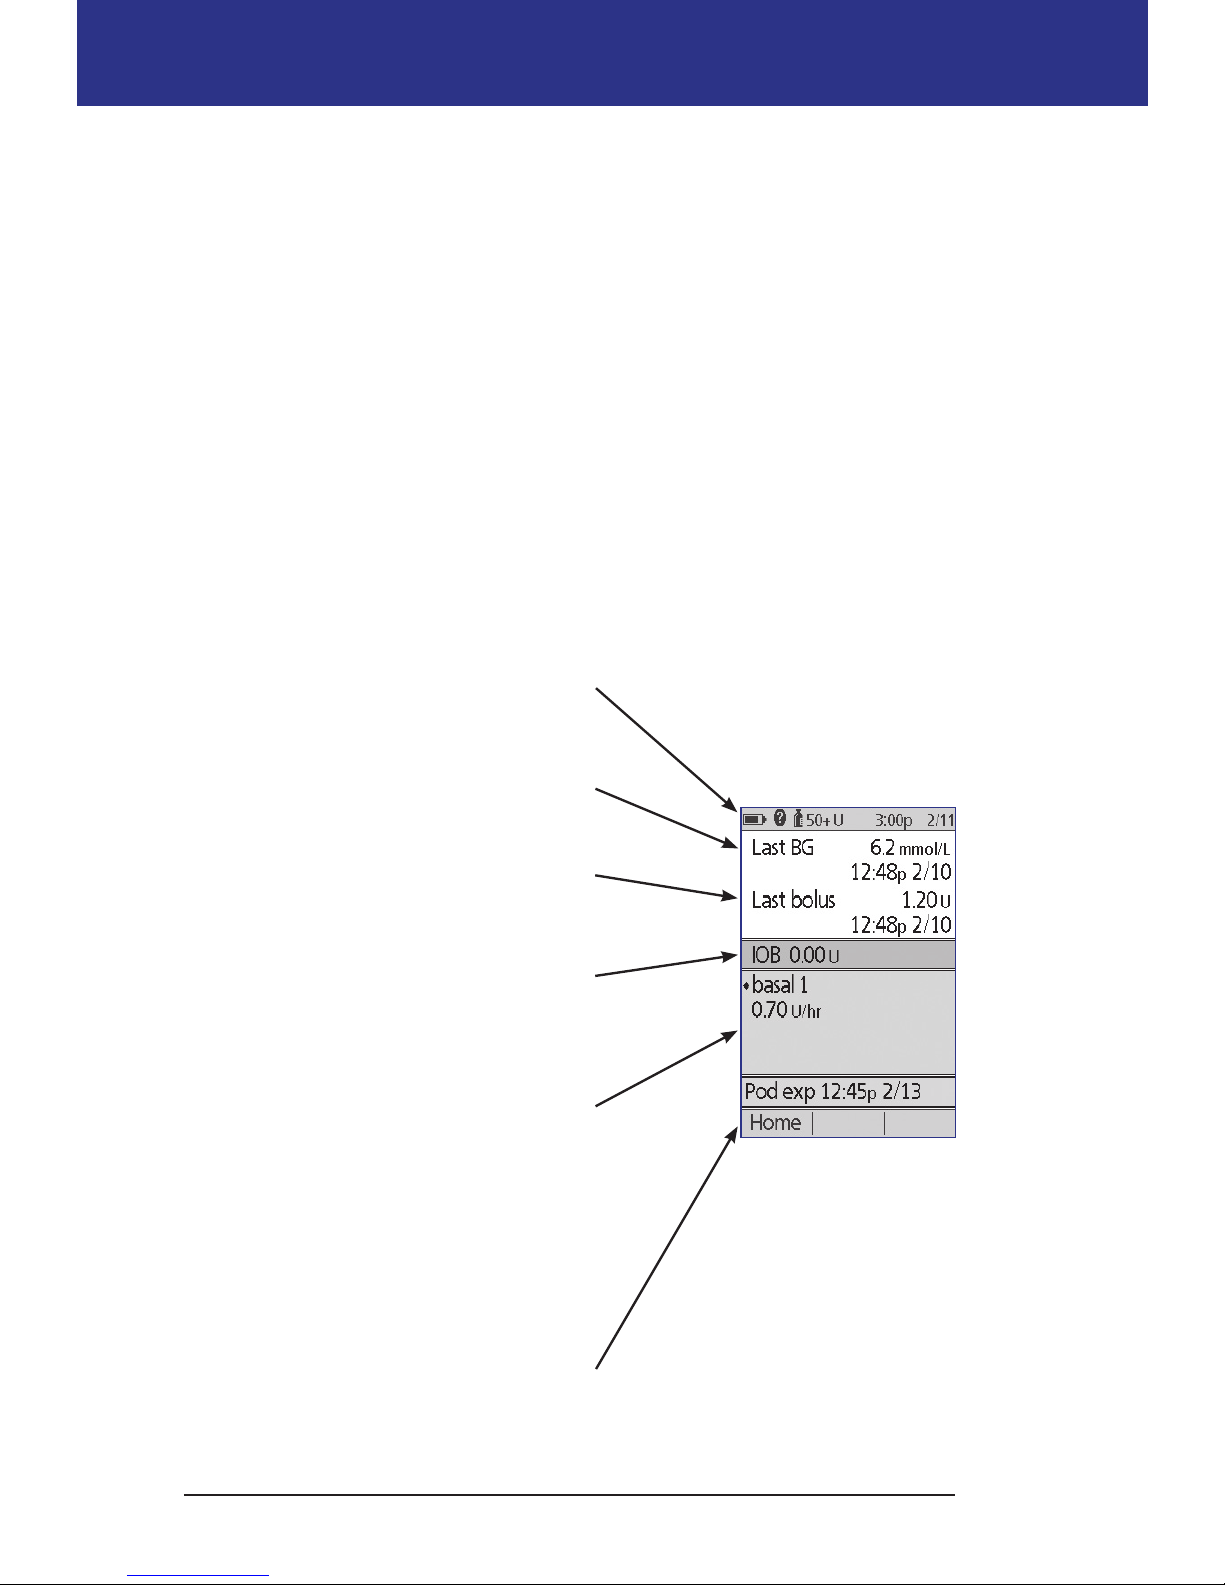
Status screen
e Status screen is an important screen. Navigating to the Status screen causes
the PDM to ask the Pod about its (the Pod's) current state. For details, see "Status
checks: How the PDM checks Pod function" on page 134.
You can navigate to the Status screen in two ways:
• Turn on your PDM by pressing-and-holding the Home/Power button. e
Status screen appears aer you conrm your ID.
• If the PDM is on, briey press the Home/Power button and then press
Status.
Tip: Visit your Status screen oen to make sure the Pod is working properly. If the
Status screen says it is unable to communicate with the Pod, see "Failure to receive a
Pod status" on page 102.
e Status screen shows:
e header bar (see "e Header Bar" on
page 7).
Your most recent BG reading and the time
and date it was recorded.
Your most recent bolus and the time and
date delivery began.
Your insulin on board, or IOB (insulin
from boluses still active in your body), if
the Bolus Calculator is on (see "Turn the
Bolus Calculator on or o" on page 70).
Message about the Pod's current activity.
is area usually shows the active Basal
Program and the current basal rate.
However, a dierent message appears
if insulin delivery is suspended, a temp
basal or extended bolus is running, you
have no active Pod, or if the PDM cannot
communicate with the Pod.
e time and date that your Pod will
expire. If the Pod has already expired, "Pod
exp: change Pod" appears instead.
Page 26
11
Your Omnipod® Insulin Management System 11 Your Omnipod® Insulin Management System
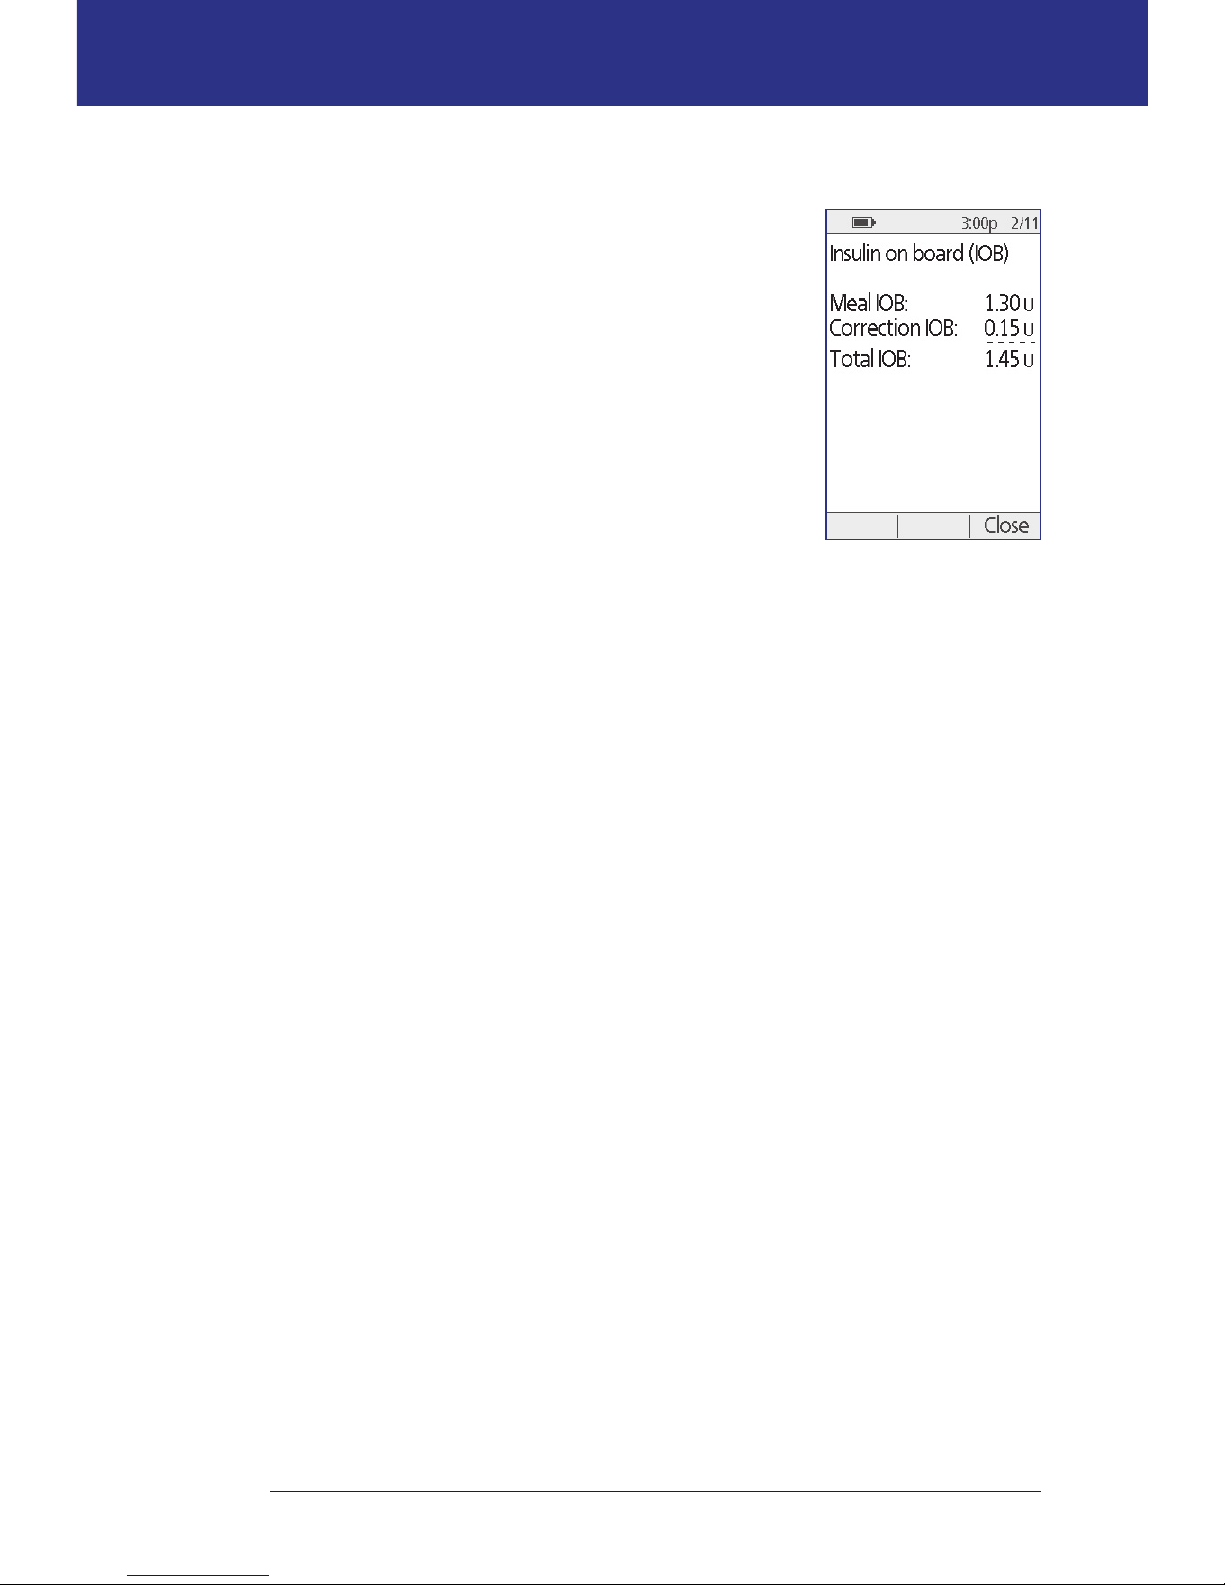
IOB screen
For details about your insulin on board (IOB), navigate
to the Status screen and press the Info button.
e IOB screen shows you how much of your total IOB
is from a meal IOB and how much is from a correction
IOB.
For more information about the IOB calculation and
how the Bolus Calculator uses IOB, see page 145.
Page 27

12
is page intentionally le blank.
Page 28

13
CHAPTER 2
Initial PDM Setup
Preparing for Your Training
If you are a rst-time Omnipod® System user, you need to meet with your
Omnipod® System Trainer to set up your Personal Device Manager (PDM) and
rst Pod.
To get a head start on learning about the Omnipod® System, review this User
Guide prior to meeting with your Omnipod® System trainer, including the
"Introduction" on page ix, "Your Omnipod® Insulin Management System" on page
1, and "Taking Care of Your PDM and Pod" on page 109.
Warning: Do NOT use the Omnipod® System until you have been trained
by your Omnipod® System Trainer. He or she will help you initialize the PDM
based on your individual needs. Inadequate training or improper setup could
put your health and safety at risk.
Note: Keep an emergency kit with you at all times to quickly respond to a diabetes
emergency.
Items to bring to the meeting with your Omnipod® System trainer
• Your PDM
• Tw o Pod s
• FreeStyle Test Strips and Control Solution, and a lancing device (available
from many pharmacies)
• is User Guide
• Instructions from your healthcare provider about PDM settings tailored
to your needs. ese settings include Basal Program, IC Ratio, Correction
Factor, Target BG values, and duration of insulin action.
PDM Setup
Although PDM setup is easy, if you are a rst-time user, your Omnipod® System
trainer must guide you through the process. You can adjust these settings later as
needed.
Page 29
14
2 Initial PDM Setup
Avoid taking a long break during the setup process. If the PDM is idle for 60
minutes during the setup process, you must begin the setup process from the
beginning.
Tip: Use the pages at the end of this User Guide to write down all of your settings.
is list will be helpful if you ever need to reset or replace your PDM.
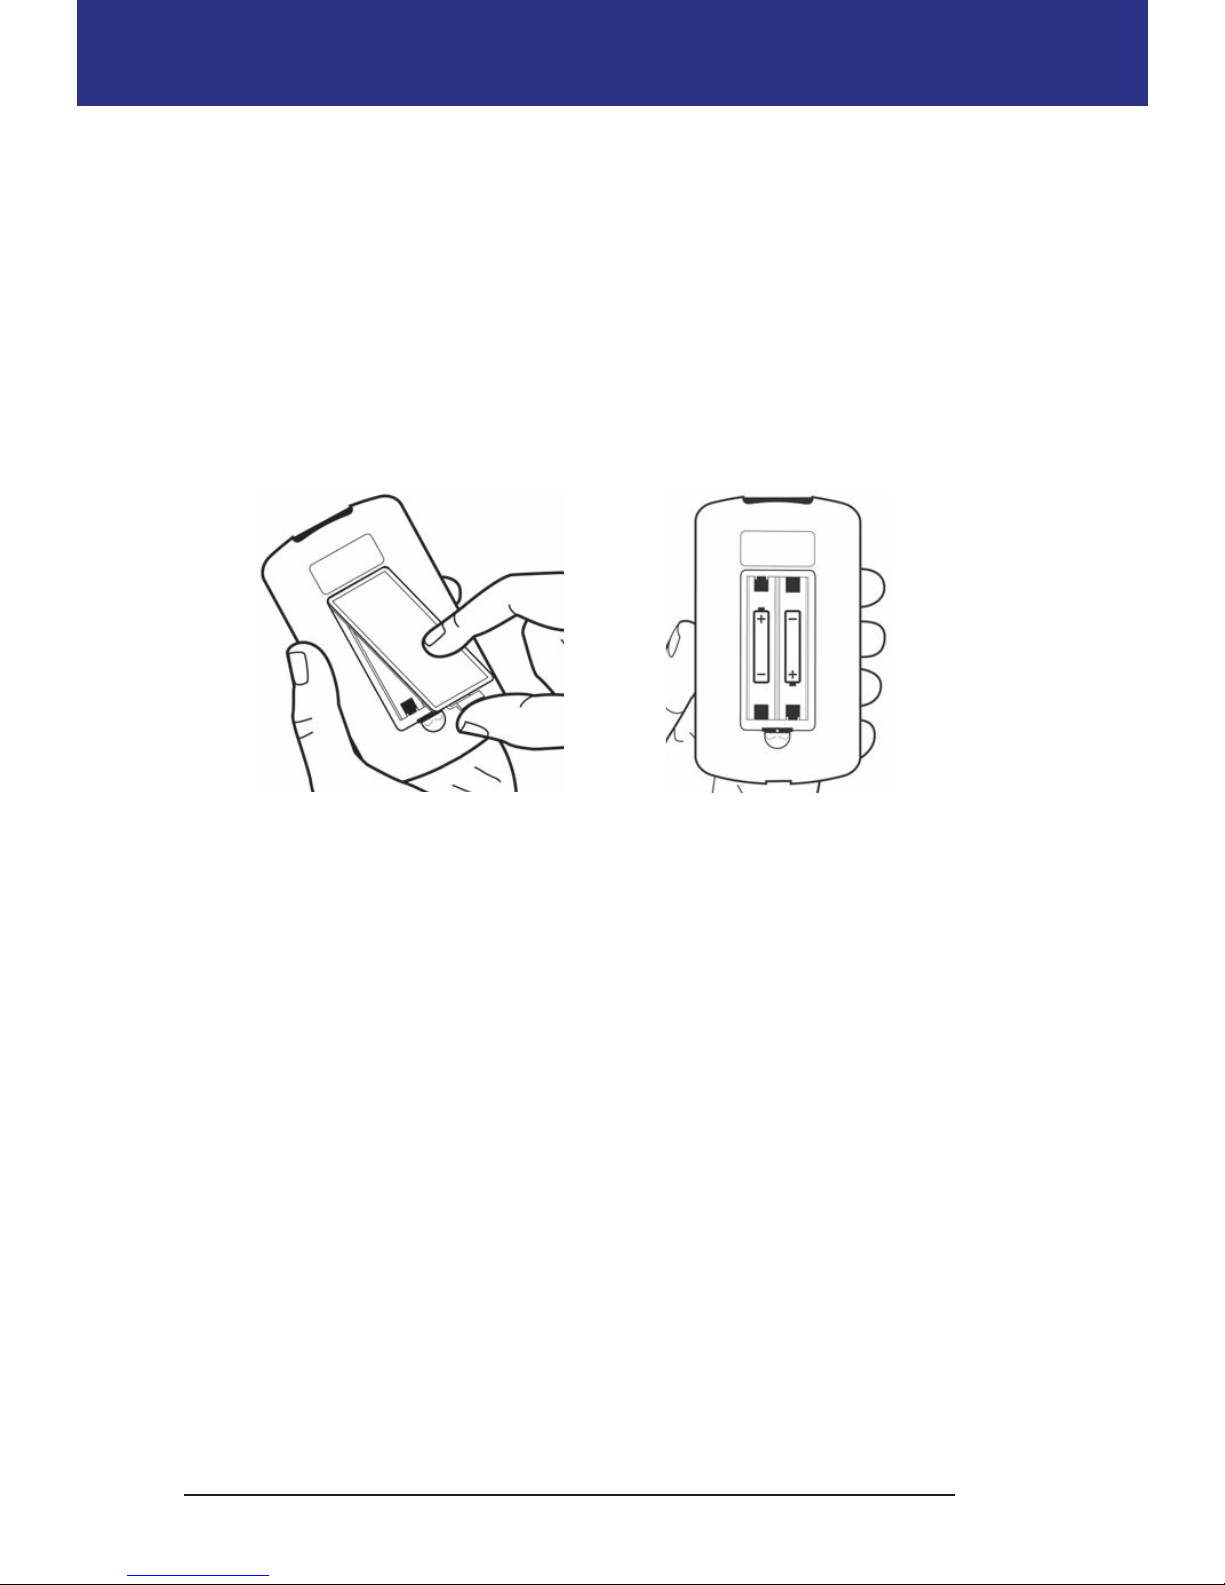
Insert the batteries
1. Open the battery compartment on the back of the PDM by pushing the
compartment latch and liing upward. No special tools are necessary.
2. Insert two new AAA alkaline batteries into the compartment. e diagram
inside the compartment shows you which direction to insert the batteries.
Caution: Only use AAA alkaline batteries to power the PDM. Never use old,
used, or non-alkaline batteries; the PDM may not work properly. Do not use
rechargeable batteries.
3. Replace the battery door.
4. Turn the PDM face up. e PDM powers on automatically.
Personalize your PDM
Username and screen color
1. Aer inserting the batteries, a Welcome message appears on the screen. Press
Next.
2. Use the Up/Down button and the middle so key to enter your user name
(see "Entering text" on page 6).
Note: You must enter at least one letter or number.
3. When nished entering your username, press Next.
4. Use the Up/Down button to choose a background color for your ID screen.
Page 30

15
Initial PDM Setup 22 Initial PDM Setup
5. Press Next.
Note: Each time you turn on your PDM, you will see your username and your
selected screen color. Always identify the PDM as yours before using it.
Time and date
1. Press 12 / 24 hr to choose your preferred time display. For example, six hours
before midnight is:
• "6:00 PM" in 12 hr display
• "18:00" in 24 hr display
2. Use the Up/Down button to set the current time. Press Next.
3. Use the Up/Down button to set the current year, month, and day, pressing
Next between each setting.
4. Use the Up/Down button to choose your preferred date format. Press Next.
Basal and BG settings
Maximum Basal Rate
e Omnipod® System cannot deliver insulin at a basal rate that exceeds your
Maximum Basal Rate. You can adjust your Maximum Basal Rate later, if your
needs change.
1. Use the Up/Down button to choose a Maximum Basal Rate.
2. Press Next.
Dene a Basal Program
Your Basal Program denes your daily schedule for continuous insulin delivery.
e initial Basal Program is named “basal 1” and covers the full 24-hour period
from midnight to midnight. For an explanation of basal rates, basal segments and
Basal Programs, see page 138.
1. Use the Up/Down button to choose the basal rate for the time segment that
begins at midnight, then press Next.
Note: Initially , this time segment spans the 24-hour period from midnight
to midnight. You can segment the day into smaller periods of time in the
following steps. e rst segment of your Basal Program will always start at
midnight, and the nal segment will always end at midnight.
Page 31

16
2 Initial PDM Setup
2. To set dierent values for dierent times of day, you must sub-divide the day
by dening new time segments. To add a time segment:
a. Choose [add new] and press New.
Note: You can edit an existing segment by using the Up/Down button to
select a segment you wish to change and pressing Edit.
b. Enter a start time for the segment, then press Next.
c. Enter an end time for the segment, then press Next.
d. Enter the basal rate for the segment, then press Next.
e. To add another time segment, return to step a.
3. When the desired number of time segments exist, press Done.
4. Review your Basal Program:
• To see the Basal Program as a list, press List.
• To return to the graph, press Graph.
5. Press Save to store the Basal Program.
Note: You can rename this Basal Program or create additional Basal Programs
aer setup is complete (see "Basal Programs" on page 65).
Temp basal conguration
For an explanation about using temporary basal rates, called temp basals, see
"Temporary basal rates" on page 139.
1. Choose a conguration for your temp basals:
% To dene your temp basals as a percentage of the currently active
Basal Program.
U/hr To dene temp basals as a at rate for the duration of the temp basal.
O To turn o the ability to use temp basals.
2. Press Next.
BG sound
If BG sound is turned on, the PDM beeps to alert you when a test strip is full. is
lets you keep your eyes on your nger and the test strip, relying on your ears to tell
you when the test strip is full.
1. Choose a BG sound setting:
• Select On if you want to hear a beep when the test strip is full.
• Select O if you do not want to hear a beep when the test strip is full.
2. Press Next.
Page 32

17
Initial PDM Setup 22 Initial PDM Setup
Upper and lower limits for BG Goal Range
To dene the upper and lower limits of your BG Goal Range:
1. Use the Up/Down button to select the lower limit. Press Next.
2. Use the Up/Down button to select the upper limit. Press Next.
3. e next screen shows the selected upper and lower limits on a graph. Press
Save to accept the limits.
Caution: Check with your healthcare provider before adjusting these settings.
Bolus Calculator settings
e Bolus Calculator suggests boluses for you based on your current blood
glucose value and any food you are about to eat (see "e Bolus Calculator" on
page 144 for a detailed explanation).
Turn the Bolus Calculator on or o
1. Choose your Bolus Calculator setting:
• Select On to have the Bolus Calculator suggest boluses.
• Select O to do your own bolus calculations.
2. Press Next. If you turned the Bolus Calculator o, skip to "Other bolus
settings" on page 20.
Target BG and Correct Above values
e Bolus Calculator aims to bring your blood glucose to the Target BG value. You
can establish up to eight dierent blood glucose targets at dierent times of day.
For each Target BG that you set, you also set an accompanying Correct Above
value. e Correct Above value can range from the Target BG to 11.1 mmol/L.
e Bolus Calculator only suggests a correction bolus if your blood glucose is
above the Correct Above value.
1. Use the Up/Down button to enter the Target BG for the time segment that
starts at midnight. Initially, this segment covers 24 hours. Your Target BG
must be between 3.9 - 11.1 mmol/L. Press Next.
2. Use the Up/Down button to enter the Correct Above value for the segment
that starts at midnight. Press Next.
3. If desired, add more time segments to your Target BG prole (for step-bystep instructions, see "Adding time segments" on page 19).
Page 33

18
2 Initial PDM Setup
4. When the desired number of time segments exist, press Done.
5. Review the graph of your Target BG and Correct Above prole. Press List for
a listing. Press Graph to see the graph again.
6. Press Save to store the prole.
Minimum BG for Calcs
If your blood glucose level is below the Minimum BG for Calcs that you specify,
the Bolus Calculator is disabled (see "e Bolus Calculator" on page 144).
1. Use the Up/Down button to choose a Minimum BG for Calcs value. is
value must be between 2.8 - 3.9 mmol/L.
2. Press Next.
IC Ratio
Your Insulin-to-Carbohydrate Ratio (IC Ratio) denes how many carbohydrates
can be handled by one unit of insulin. e Bolus Calculator uses the IC Ratio to
calculate the meal portion of a suggested bolus. You can create up to eight IC Ratio
segments per day.
1. Use the Up/Down button to enter the IC Ratio for the time segment that
starts at midnight. Your IC Ratio must be between 1 - 150 g carb/unit insulin.
Press Next.
2. If desired, add more time segments to your IC Ratio prole (for step-by-step
instructions, see "Adding time segments" on page 19).
3. When the desired number of time segments exist, press Done.
4. Review the graph of your IC Ratio prole. Press List for a listing. Press Graph
to see the graph again.
5. Press Save to store the prole.
Page 34

19
Initial PDM Setup 22 Initial PDM Setup
Correction Factor
Your Correction Factor denes how much one unit of insulin lowers your blood
glucose level. e Bolus Calculator uses the Correction Factor to calculate the
correction portion of a suggested bolus. You can create up to eight Correction
Factor segments per day.
1. Use the Up/Down button to enter the Correction Factor for the time segment
that starts at midnight. Your Correction Factor must be between 0.1 - 22.2
mmol/L. Press Next.
2. If desired, add more time segments to your Correction Factor prole (for
step-by-step instructions, see "Adding time segments" on page 19).
3. When the desired number of time segments exist, press Done.
4. Review the graph of your Correction Factor prole. Press List for a listing.
Press Graph to see the graph again.
5. Press Save to store the prole.
Adding time segments
1. Choose [add new] and press New.
Note: You can edit an existing segment by using the Up/Down
button to select a segment you wish to change and pressing Edit.
2. Enter a start time for the segment, then press Next.
3. Enter an end time for the segment, then press Next.
4. Enter a desired value for the segment, then press Enter. If setting a
Target BG value, enter a Correct Above value for the segment and
press Next.
5. To dene more time segments, return to step 1.
Page 35

20
2 Initial PDM Setup
Reverse correction
ere may be times when you are about to eat and your blood glucose level is
below your Target BG level. If Reverse Correction is on, the Bolus Calculator
decreases a suggested meal bolus to help counteract your low blood glucose
reading.
1. Choose a setting for the Reverse Correction feature:
• Select On if you want the Bolus Calculator to reduce its suggested meal
bolus when your blood glucose is below your Target BG.
• Select O if you do not want the Bolus Calculator to adjust its suggested
meal bolus according to your current blood glucose value.
2. Press Next.
Duration of insulin action
e duration of insulin action is the length of time that insulin stays active in
your body. e Bolus Calculator uses this setting to determine how much insulin
remains in your body from previous boluses (called insulin on board).
1. Use the Up/Down button to select your duration of insulin action.
2. Press Next.
Other bolus settings
Bolus increment
e bolus increment denes how much a single up or down click of the Up/Down
button changes the bolus amount listed on the screen.
1. Use the Up/Down button to select your desired bolus increment.
2. Press Next.
Maximum Bolus
e Maximum Bolus sets the upper limit on the size of a bolus.
1. Use the Up/Down button to select your desired Maximum Bolus.
2. Press Next.
Page 36

21
Initial PDM Setup 22 Initial PDM Setup
Extended bolus setting
Extending a bolus means that a meal bolus can be delivered over a prolonged
period of time. For an explanation of extended boluses, see page 143.
1. Select a conguration for your extended bolus:
% To specify the amount of the immediate portion of the bolus as a
percent of the total bolus.
Units To specify how many units of insulin should be delivered
immediately.
O To turn o the ability to extend a bolus.
2. Press Next.
Pod settings
e next step is to choose how much advance notice you would like about the Pod
running low on insulin or an upcoming Pod expiration.
1. Use the Up/Down button to select the insulin level at which you would like to
receive a 'low reservoir' message. is volume can range from 10 to 50 units.
Press Next.
2. Use the Up/Down button to specify how much advance warning you want
about an upcoming Pod expiration. is setting can be from 1 to 24 hours.
Press Next.
Activate Your First Pod
Congratulations! Your PDM is now ready for use. To activate a Pod now, press
Yes and skip ahead to "Fill the Syringe with Insulin" on page 26 for step-by-step
instructions for lling and activating your rst Pod. If necessary, review Chapter 1
for an introduction to the PDM's screens and screen navigation shorthand.
Tip: To adjust the PDM screen time-out and backlight time-out, see page 63.
Page 37

22
is page intentionally le blank.
Page 38

23
CHAPTER 3
Changing Your Pod
Begin the Pod Change Process
Your Pod should be replaced at least once every 72 hours (3 days) or aer
delivering 200 units of insulin. Consult with your healthcare provider and refer to
the insulin labeling to determine if you should replace your Pod more oen.
Warnings:
Do NOT use a Pod if you are sensitive to or have allergies to acrylic adhesives,
or have fragile or easily damaged skin.
If you are a rst-time Omnipod® System user, your Omnipod® System Trainer
will guide you through the steps for initializing and applying your rst Pod.
Do NOT attempt to apply or use a Pod until you have been trained by your
Omnipod® System Trainer. Use of the System with inadequate training or
improper setup could put your health and safety at risk.
Because the Pod uses only rapid-acting U-100 insulin, you are at increased
risk for developing hyperglycemia if insulin delivery is interrupted. Severe
hyperglycemia can quickly lead to diabetic ketoacidosis (DKA). DKA can
cause symptoms such as breathing diculties, shock, coma, or death. If
insulin delivery is interrupted for any reason, you may need to replace the
missing insulin usually with an injection of rapid-acting insulin. Ask your
healthcare provider for instructions for handling interrupted insulin delivery,
which may include an injection of rapid-acting insulin.
Keep the Pod and its accessories, including the needle cap, away from young
children, as they contain small parts that may be dangerous if swallowed.
Preliminary steps
1. Gather the necessary supplies:
• A vial of rapid-acting U-100 insulin approved for use in the Omnipod®
System
• An unopened Pod
• Alcohol prep swabs
• Your PDM
Page 39

24
3 Changing Your Pod
2. Wash your hands before starting and keep them clean throughout the Pod
change process.
3. Check the insulin for signs of deterioration.
4. Check the Pod's packaging for damage, then open it and inspect the Pod for
signs of damage.
5. If the insulin or Pod is below 10°C (50°F), allow it to warm up to room
temperature before proceeding.
Warnings:
NEVER use insulin that is cloudy; it may be old or inactive. Check the insulin
manufacturer’s instructions-for-use for the expiration date. Failure to use
rapid-acting U-100 insulin, or using insulin that has expired or is inactive,
could put your health at risk.
Do NOT apply or use a Pod if the sterile packaging is open or damaged, or
if the Pod has been dropped aer removal from the package, as this may
increase the risk of infection. Pods are sterile unless the packaging has been
opened or damaged.
Do NOT apply or use a Pod that is damaged in any way. A damaged Pod may
not work properly.
Do NOT use a Pod if it is past the expiration date on the package.
To minimize the possibility of site infection, do NOT apply a Pod without rst
using aseptic technique. is means to:
• Wash your hands
• Clean the insulin vial with an alcohol prep swab
• Clean the infusion site with soap and water or an alcohol prep swab
• Keep sterile materials away from any possible germs.
Prepare the PDM and deactivate the old Pod
To begin the Pod change process:
1. Navigate to the Pod change screen:
Home > More actions > Change pod
2. If you are not wearing an active Pod, skip to step 6.
Page 40

25
Changing Your Pod 33 Changing Your Pod
3. If a Pod is active, press Conrm to deactivate your
Pod.
If a temp basal or extended bolus is running, it is
canceled when you press Conrm.
Warning: Do NOT apply a new Pod until
you have deactivated and removed the old
Pod. A Pod that has not been deactivated
properly can continue to deliver insulin as
programmed, putting you at risk of over
infusion and possible hypoglycemia.
4. When deactivation is complete, remove the
deactivated Pod.
a. Gently li the edges of the adhesive tape from
your skin and remove the entire Pod.
Tip: Remove the Pod slowly to help avoid possible
skin irritation.
b. Use soap and water to remove any adhesive that
remains on the skin, or, if necessary, use an
adhesive remover.
c. Check the infusion site for signs of infection. See
"Avoid Infusion Site Infections" on page 33.
d. Dispose of the used Pod according to local waste
disposal regulations.
5. Aer removing the old Pod, press Next.
Page 41

26
3 Changing Your Pod
6. e screen asks if you'd like to activate a Pod now.
Press Ye s. en put your PDM down without
pressing any more buttons yet.
If you see a communication error message when you
attempt to deactivate your Pod, see "Failure when
deactivating a Pod" on page 105.
Fill the Syringe with Insulin
e next step is to ll the syringe that came with the Pod (the "ll syringe") with
insulin:
1. Use an alcohol prep swab to clean the top of the
insulin vial.
2. Securely twist the ll needle onto the ll syringe.
3. Pull outward to remove the protective cap from
the needle. Save the cap; you will need it later.
4. Determine how much insulin you will put into
the Pod. For example, to use the Pod for 48
hours, determine how much insulin you will
use over the next 48 hours. Your healthcare
provider can help you determine the correct amount.
Note: e Pod requires a minimum of 85 units of U-100 insulin to begin
operation. e Pod can hold up to 200 units of U-100 insulin.
5. Draw air into the ll syringe up to the amount of insulin you want.
6. Insert the needle into the insulin vial and inject the air. Injecting air makes it
easier to withdraw insulin from the vial.
Pull apart
Page 42

27
Changing Your Pod 33 Changing Your Pod
7. Turn the vial of U-100 insulin and the ll
syringe upside down. Pull down on the plunger
to withdraw the desired amount of insulin from
the vial into the ll syringe.
8. With the needle still in the vial, ick the side
of the syringe with your ngertip to dislodge
any air bubbles so they collect at the top of the
syringe. en push in the plunger to expel
any air bubbles out of the syringe and into the
insulin vial. Pull down on the plunger again, if
necessary, to rell the ll syringe to the desired
amount of insulin. Fill the syringe at least to the MIN (minimum) ll line.
Warning: Make sure there are no air bubbles or pockets of air in the
ll syringe before lling a Pod with insulin. Air transferred from the ll
syringe into the Pod may result in interrupted insulin delivery.
9. Remove the needle from the vial.
Fill and Activate a Pod
Warning: Before lling a Pod, ensure that no other Pods are being activated
within 61 cm (24 inches) of your PDM. is prevents activation of the wrong
Pod.
Caution: Be sure to insert the ll syringe into the ll port and not at any other
location on the Pod. Do not insert the ll syringe more than once into the ll port.
Only use the ll syringe and needle that came with your Pod. e ll syringe is
intended for single use only and should only be used with the Omnipod® System.
To ll the Pod with insulin:
1. Locate the arrow on the underside of the Pod. e arrow points
to the insulin ll port.
Tip: You can leave the Pod in its tray during lling and
activation.
2. Insert the ll syringe straight down—not at an
angle—into the ll port.
3. Depress the ll syringe plunger to completely
empty the insulin into the Pod.
MIN
ll line
Fill
port
Page 43

28
3 Changing Your Pod
4. Listen for two beeps from the Pod during the lling process. Be sure to
completely empty the ll syringe, even aer hearing the two beeps.
Note: e Pod must contain a minimum of 85 units of insulin in order to
function. e Pod beeps twice aer it has been lled with 85 units of insulin.
If you have lled the Pod with more than 85 units and still do not hear the two
beeps, please call Customer Care.
Warnings:
NEVER use a Pod if you feel resistance when you depress the plunger.
is condition can result in interrupted insulin delivery.
NEVER inject air into the ll port. Doing so may result in unintended or
interrupted insulin delivery.
5. Remove the needle from the insulin ll port. e port is self-sealing; insulin
will not leak aer the needle is removed.
6. Place the protective cap back on the needle and remove the needle from the
ll syringe.
7. Place the PDM next to the Pod so they are
touching. e Pod can be in its plastic tray
during this process.
8. Press Next. A screen appears telling you that
the Pod is priming.
9. e Omnipod® System performs a series of safety
checks and automatically primes the Pod. Listen for
the beeps that indicate that the Pod is successfully
activated.
Note: e communication distance between the Pod
and PDM is reduced during activation. Once activated,
the Pod can receive commands only from the PDM that
activated it.
Note: Aer lling the Pod with insulin, apply the
Pod immediately. e Pod beeps every 5 minutes as a
reminder. If you do not apply the Pod within 60 minutes, you must deactivate and
dispose of it.
If you see a communication error message when you attempt to activate your Pod,
see "Failure when activating or sending a command to a Pod" on page 103.
Page 44

29
Changing Your Pod 33 Changing Your Pod
Select the Pod Site
Discuss suitable Pod placement sites with your healthcare provider
using the following
guidelines:
• Ideal sites have a
layer of fatty tissue.
• Ideal sites oer
easy access and
viewing.
• e site should
be at least 2.5 cm
(1 inch) away from
the previous site
to avoid skin
irritation.
• e site should be
at least 5 cm (two inches) away from your navel.
• Avoid sites where belts, waistbands, or tight clothing may rub against or
dislodge the Pod.
• Avoid sites where the Pod will be aected by folds of skin.
• Avoid placing the Pod over a mole, tattoo or scar, where insulin absorption
may be reduced.
• Avoid areas of the skin with an active infection.
Prepare the Infusion Site
To reduce the risk of infection at the infusion site:
1. Wash your hands with soap and water.
2. Wash your selected Pod site with soap and water.
Note: Antibacterial soap may irritate skin, especially at the infusion site. Ask
your healthcare provider how to treat any skin irritation.
3. Dry the site with a clean towel.
4. Use an alcohol prep swab to disinfect the site. Start at the center of the site and
gently rub outward in a circular motion.
5. Let the site air-dry thoroughly. Do not blow on the site to dry it.
Front Back
Back
Front
Page 45

30
3 Changing Your Pod
Apply the Pod
e next step is to apply the Pod to your body:
1. Remove the Pod's plastic needle cap on the
underside of the Pod by placing your thumb on
the bottom (at edge) of the Pod’s plastic cap and
pulling the cap upwards. e cap snaps o. row
the cap away.
When you remove the Pod needle cap, a drop of
insulin may be visible at the end of the cannula or in
the well.
2. If any of the following apply, press Discard, and then dispose of the Pod and
begin again with a new Pod:
a. e Pod is accidentally dropped, as this may compromise sterility
b. e Pod or its adhesive pad is wet, dirty or damaged
c. e cannula extends beyond the adhesive backing when the Pod needle
cap is removed
Warning: Verify that the cannula does not extend beyond the adhesive
backing once the needle cap is removed.
3. Using the pull tabs, remove and discard the white
paper backing from the adhesive tape.
4. Press Discard and dispose of the Pod if the adhesive
pad is folded, torn or damaged, and begin again
with a new Pod.
Page 46

31
Changing Your Pod 33 Changing Your Pod
5. Orient the Pod so it is:
• Horizontal or diagonal on your abdomen, hip, or buttocks.
• Up and down or at a slight angle on your upper arm or thigh.
6. Apply the Pod to your selected site, pressing down rmly to secure the Pod to
your skin.
e adhesive is designed for one-time use. Once a Pod is placed on your body,
you cannot move that Pod to another site.
Note: e Pod’s adhesive keeps it securely in place
for up to 3 days. However, if necessary, several
products are available to enhance adhesion. Ask
your healthcare provider about these products.
Avoid getting body lotion, creams, or oils near
the infusion site as these products may loosen the
adhesive.
7. Press Next.
Up, down, or slight angle
Horizontal or diagonal
Suggested Pod orientation
Up, down, or slight angle
Page 47

32
3 Changing Your Pod
Warning: If you are applying a Pod in a place
that does not have a lot of fatty tissue, squeeze
the skin around the Pod throughout the next
step. Occlusions may result if you do not use
this technique for lean areas.
8. Press Start. Aer a few seconds, you hear a click as
the cannula is inserted into your skin. If you were
squeezing your skin, you can stop squeezing it aer
the cannula inserts.
Once the cannula is inserted, the Pod automatically lls
the cannula with insulin. e Pod then begins delivering
the basal rate of insulin according to the active Basal
Program.
e cannula can be inserted only once with each Pod.
Caution: Be sure to check the alarm function at every
Pod change (see "Check the alarms and vibration" on
page 63).
Check the Infusion Site
Following insertion of the cannula, check the infusion site:
1. Look through the viewing window to check that
the cannula is inserted into the skin. e cannula
is tinted light blue.
2. Check for pink coloring in the area on the top of
the Pod shown in the gure. is is an additional
check that the cannula was extended.
3. Check for wetness or the scent of insulin at
the insertion site. e presence of either may
indicate that the cannula has dislodged.
Check for
pink here
Viewing
window
Page 48

33
Changing Your Pod 33 Changing Your Pod
Warning: Check the infusion site aer insertion to ensure that the cannula
was properly inserted. If the cannula is not properly inserted, hyperglycemia
may result.
4. If there is a problem with the cannula, press No and
follow the on-screen instructions for deactivating
your Pod. en restart the process with a new Pod.
5. Press Ye s if the cannula was properly inserted. e
PDM shows the Status screen.
6. Aer 1.5 hours, the PDM prompts you to check your blood glucose level and
to recheck the infusion site.
Warning: NEVER inject insulin (or anything else) into the ll port while
the Pod is on your body. Doing so may result in unintended or interrupted
insulin delivery.
Avoid Infusion Site Infections
Check the infusion site at least once a day:
• Be aware of signs of infection, including pain, swelling, redness, discharge, or
heat at the site. If you suspect an infection, immediately remove the Pod and
apply a new one in a dierent location. en call your healthcare provider.
• If you observe any problems with the Pod, replace it with a new Pod.
Page 49

34
3 Changing Your Pod
Warnings:
Check oen to make sure the Pod and so cannula are securely attached
and in place. A loose or dislodged cannula may interrupt insulin delivery.
Verify that there is no wetness or scent of insulin, which may indicate that the
cannula has dislodged.
If you observe blood in the cannula, check your blood glucose frequently
to ensure that insulin delivery has not been aected. If you experience
unexpectedly elevated blood glucose levels, change your Pod.
If an infusion site shows signs of infection:
• Immediately remove the Pod and apply a new one at a dierent site.
• Contact your healthcare provider. Treat the infection according to
instructions from your healthcare provider.
More Information about Pod Use
Tip: You should change your Pod whenever you have used approximately 200 U of
insulin or every 72 hours, whichever comes rst. Develop a routine so you can change
your Pod at a convenient time. If you know of an upcoming break in your routine
that could interfere with changing your Pod, you can change your Pod early to avoid
disruption in insulin delivery.
For additional information on using your Pods as eectively as possible, see the
following sections:
• For care of your Pod, see "Pod and Insulin Care" on page 109.
• To learn about the Pod alarms, see "Alarms, Notications, and Other
Messages" on page 95.
• If your Pod sounds an alarm, rst attempt to silence it with your PDM. If that
is not successful, you can manually turn o the Pod alarm (see "Silencing an
Alarm" on page 108.
• To understand the Pod's informational and notication beeps, including
which ones are optional, see "Notications" on page 99 and "Informational
Beeps" on page 101.
• To understand how to handle situations where the PDM cannot
communicate with your Pod, see "Pod Communication Failures" on page
102.
• For an explanation of the how the PDM communicates with the Pod, see
"PDM and Pod Interactions" on page 133.
Page 50

35
CHAPTER 4
Checking Your Blood Glucose
About Blood Glucose Testing
Warnings:
Keep the blood glucose testing accessories away from young children, as they
contain small parts that may be dangerous if swallowed.
Only use FreeStyle and FreeStyle Lite test strips and FreeStyle control solution
with the Omnipod® System. Using other brands of test strips and control
solutions with the System can produce inaccurate results.
Never attempt to test your blood glucose while your PDM is connected via a
USB cable to a computer. Doing so could result in electrical shock.
If you are experiencing symptoms that are not consistent with your blood
glucose reading and you have followed all instructions described in this User
Guide, call your healthcare provider immediately.
Blood circulation is dierent between the nger and other test sites such as
the forearm, upper arm and hand. You may see dierences in blood glucose
measurements between the other test sites and your nger aer eating, taking
insulin medication, or exercise.
You may see changes in blood glucose in blood samples from the nger
sooner than in blood samples from alternate sites. Vigorous rubbing of the
alternate test sites before lancing helps to minimize these dierences.
Measurements obtained from sites other than the nger, palm or upper arm
should not be used to calculate insulin doses with the Omnipod® System.
Do not use during xylose-absorption testing.
Objects that may be soiled with blood may then transmit pathogens. See
"PDM cleaning and disinfecting" on page 113 for instructions on how to
disinfect your PDM.
Follow the guidance of your healthcare provider for proper blood glucose
monitoring.
Severe dehydration and excessive water loss can cause falsely elevated blood
glucose results. If you believe you are suering from severe dehydration,
consult your healthcare provider immediately.
Page 51

36
4 Checking Your Blood Glucose
Warnings:
Test results below 3.9 mmol/L mean low blood glucose (hypoglycemia).
Test results greater than 13.9 mmol/L mean high blood glucose
(hyperglycemia).
If you get results below 3.9 mmol/L or above 13.9 mmol/L, but do not have
symptoms of hypoglycemia or hyperglycemia (see "Living with Diabetes" on
page 117), repeat the test. If you have symptoms or continue to get results that
fall below 3.9 mmol/L or above 13.9 mmol/L, follow the treatment advice of
your healthcare provider.
Note: Wash your hands thoroughly with soap and water aer handling the meter,
lancing device, or test strips.
Note: Unless stated otherwise, references to FreeStyle Blood Glucose Test Strips
or FreeStyle Test Strips include both FreeStyle and FreeStyle Lite Test Strips.
Control solution
e FreeStyle Control Solution is a red liquid containing a xed amount of
glucose. It is available in Low, Normal, and High concentrations. Use control
solution to ensure that your meter and test strips are working together properly
and to practice testing without having to use your own blood. See the control
solution instructions for information about handling and storing the control
solution.
You should perform a control solution test when:
• You suspect that the built-in BG meter or test strips are not working properly.
• You think your BG readings are not accurate or are not consistent with how
you feel.
• You drop or damage your PDM or expose it to liquids.
• Your healthcare provider advises you to do so.
When you perform a control solution test, if the reading is within the control
solution acceptable range, the built-in BG meter is working properly.
With the built-in BG meter, checking your blood glucose requires a very small
sample size, 0.3 microliters of blood.
Caution: Results from FreeStyle Control Solution tests do not reect your blood
glucose level.
Page 52

37
Checking Your Blood Glucose 44 Checking Your Blood Glucose
You may want to test for low blood glucose when:
• You feel symptoms such as weakness, sweating, nervousness, headache, or
confusion.
• You have delayed a meal aer taking insulin.
• Your healthcare provider advises you to do so.
Using the Built-in BG Meter
If you plan to use a separate BG meter, skip to "Using BG Meter" on page 44.
FreeStyle Control Solutions and Test Strips must be purchased separately. Contact
your pharmacy or call Customer Care.
Caution: Complete information on the FreeStyle Test Strips (such as
interferences and performance) can be found in the test strip package insert.
Please read all instructions provided on the test strip package insert before using
the Omnipod® System and FreeStyle accessories.
Insert a test strip into the PDM
1. Turn on your PDM by pressing the Home/
Power button. Identify the PDM as yours and
press Conrm.
Tip: You can also turn on the PDM by
inserting the test strip into the test strip port.
Caution: If Auto-o is enabled, you should
always turn on the PDM with the Home/
Power button prior to inserting a test strip
(see "Auto-o " on page 137).
2. Insert a test strip into the PDM's test strip
port. To do so, hold the bottom of the test strip
and gently insert it into the test strip port until
it stops.
Note: e PDM will not perform a blood glucose test during Pod activation
or while an alarm is sounding.
... or here
Insert test
strip here
Sample can
be applied
here ...
Page 53

38
4 Checking Your Blood Glucose
3. When the PDM detects the test strip, the screen
displays a code number for two seconds. Check that
the code number matches the number on the test
strip vial. If necessary, use the Up/Down button to
adjust the code.
Warning: Always verify that the code on the
PDM matches the code on the test strip vial.
Failure to do so will result in an inaccurate
reading. It is important to always enter a code
whether using FreeStyle or Freestyle Lite with
the Omnipod® System, even if some FreeStyle
Lite products indicate that no coding is
required. No coding only applies when these
strips are used with certain Abbott meters, and
does not apply to the Omnipod® System.
Note: If you need to adjust the code number aer
the PDM has moved to the next screen, press the
Up/Down button. e code screen reappears and
you can adjust the number.
Note: It is important to always enter a code
whether using FreeStyle or FreeStyle Lite with the
Omnipod® System, even if some FreeStyle Lite
products indicate that no coding is required. No
coding only applies when these strips are used with
certain Abbott meters, and does not apply to the
Omnipod® System.
4. Wait for the screen that says, "Apply a blood sample
to the strip," along with an image of a blinking drop of blood.
Page 54

39
Checking Your Blood Glucose 44 Checking Your Blood Glucose
Test your blood glucose or control solution
Warnings:
Do not:
• Press the test strip against the test site
• Scrape the blood onto the test strip
• Apply blood to the at side of the test strip
• Apply blood to the test strip when it is out of the BG meter
• Put blood or foreign objects into the test strip port
If the device is being operated by a second person who is providing testing
assistance to the user, the BG meter and lancing device should be disinfected
prior to use by the second person (see the instructions that came with your
lancing device and also see "PDM cleaning and disinfecting" on page 113).
Warnings:
To ensure accurate results, wash your hands and the test site (for example,
your upper arm) with soap and water. Do not leave any cream or lotion on the
test site. oroughly dry your hands and the test site.
Measurements obtained from alternate site testing should not be used to
calculate insulin doses with the Omnipod® System.
To test your blood glucose or to perform a control solution test:
1. Prepare a drop of blood or control solution:
Blood:
a. Lance the test site, following your lancing device instructions.
b. Gently squeeze or massage the test site until a round drop of blood
forms.
Note: If the blood smears or runs, do not use that sample. Dry the area
and gently squeeze another drop of blood, or use the lancing device at a
new site.
Control solution: Prepare the control solution according to its instructionsfor-use.
2. If necessary, turn the PDM back on.
3. To light up the test strip area, select the Light option. To turn the light o
again, press the Light option again.
Page 55

40
4 Checking Your Blood Glucose
4. Position the PDM so the test strip's sample area meets the blood or control
solution at a slight angle.
Note: If you do not apply
a drop of blood or control
solution within two
minutes of inserting the test
strip, the PDM powers o.
To restart the PDM, take
out the unused strip and
reinsert it, or press-and-hold the Home/Power button.
5. Gently touch the drop of blood or control solution to the
sample area. e test strip wicks the drop inside.
Note: Apply blood to one side of the test strip only.
6. Continue to hold the test strip to the sample until the
Checking screen appears. You will hear the PDM beep
once if BG sound is set to on.
If the PDM does not display “Checking” aer ve
seconds, the sample may be too small. You can add
more blood to the same edge of the strip up to 60
seconds aer the rst application.
7. Continue to watch the PDM screen. When the
blood glucose reading is complete, the result is displayed on the screen. Also,
if BG sound is on, the PDM beeps twice.
Note: e higher your blood glucose level, the
longer the test takes.
Note: If the built-in BG meter is too cold or too hot,
a thermometer symbol appears in the header bar of
the screen indicating that the result
is unreliable. e Bolus Calculator is
temporarily disabled until the PDM
returns to the proper temperature range. e blood
glucose reading is saved in the BG history records,
but it is tagged with a note saying that the meter
temperature was out of range.
Page 56

41
Checking Your Blood Glucose 44 Checking Your Blood Glucose
Note: If you receive a "Meter Error" message when checking your BG, see
"Errors in the Built-in BG Meter" on page 106.
8. Remove and dispose of the test strip (see the test strip instructions for use for
disposal information). You can use a test strip only once. Used test strips are
considered biohazardous material.
Note: Wash your hands thoroughly with soap and water aer handling the
meter, lancing device, or test strips.
9. If this is a blood glucose reading (that is, not a control solution test), go to
"Blood glucose results" on page 42.
Control solution results
If this is a control solution test, you must verify the results and tag it as a control
solution.
Caution: If you fail to tag a control solution properly, its value is averaged into
your blood glucose history records.
1. Compare the number displayed on the PDM screen
to the range printed on the control solution vial.
2. If the number displayed is outside the range on the
vial, follow the control solution instructions about
retesting or call Customer Care.
3. If the number displayed is within the range on the
vial, tag the reading as a control solution reading
by pressing Tag. With Control highlighted, press
Select and then OK.
4. Press Done to return to the Status screen.
Page 57

42
4 Checking Your Blood Glucose
Blood glucose results
When the PDM displays your blood glucose result, it adds an on-screen message
if the result is especially high or low (see "How the PDM reports blood glucose
results" on page 44).
To bolus or not to bolus?
1. To add an informational tag to your blood glucose reading, see "Tagging the
Blood Glucose Results" on page 45.
2. If you do not want to deliver a bolus, press Done.
3. If you want to deliver a bolus and:
a. e Bolus Calculator is on, press Next and go to step 4 on page 48.
Note: If your blood glucose reading is below your Minimum BG for Calcs
or reads HIGH, the Bolus Calculator, even if turned on, is temporarily
disabled. Follow your healthcare provider's treatment suggestions.
b. e Bolus Calculator is o, press Bolus and go to step 4 on page 50.
Note: If your blood glucose reading is below 3.9 mmol/L or reads HIGH,
follow your healthcare provider's treatment suggestions.
Note: e blood glucose reading is automatically saved in your BG history
records.
Page 58

43
Checking Your Blood Glucose 44 Checking Your Blood Glucose
Low and high blood glucose readings
Warnings:
Blood glucose readings that are especially low or high can indicate potentially
serious condition requiring immediate medical attention. If le untreated,
this situation can quickly lead to diabetic ketoacidosis (DKA), shock, coma,
or death.
Low readings
If your reading is below 3.9 mmol/L , the PDM displays: “Treat your low
BG!” is indicates severe hypoglycemia (low blood glucose). If “LOW” also
appears on the PDM, this indicates BG readings below 1.1 mmol/L.
Low reading with symptoms
If you get a “Treat your low BG!” reading and feel symptoms such as
weakness, sweating, nervousness, headache, or confusion, follow your
healthcare provider’s recommendation to treat hypoglycemia.
Low reading without symptoms
If you get a “Treat your low BG!” reading, but have no symptoms of low blood
glucose, then retest using a new test strip. If you still get a “Treat your low BG!”
reading, perform a control solution test to ensure your system is working
properly. If the system is working properly, follow your health care provider’s
recommendation to treat hypoglycemia.
High readings
If your reading is at or above 13.9 mmol/L, the PDM displays “Check for
ketones!” is indicates severe hyperglycemia (high blood glucose). If
“HIGH” also appears on the PDM, this indicates BG readings above 27.8
mmol/L.
High reading with symptoms
If you get a “Check for ketones!” reading and feel symptoms such as fatigue,
thirst, excess urination, or blurry vision, follow your healthcare provider’s
recommendation to treat hyperglycemia.
High reading without symptoms
If you get a “Check for ketones!” reading, but have no symptoms of high
blood glucose, then retest using a new test strip. If you still get a “Check for
ketones!” reading, perform a control solution test to ensure your system is
working properly. If the system is working properly, follow your healthcare
provider’s recommendation to treat hyperglycemia.
Page 59

44
4 Checking Your Blood Glucose
How the PDM reports blood glucose results
When the PDM displays your blood glucose reading, it adds a warning message
for high and low results.
Blood glucose result Screen display Screen warning message
Above 27.8 mmol/L HIGH Check for ketones!
13.9-27.8 mmol/L BG reading Check for ketones!
3.9-13.9 mmol/L BG reading
1.1-3.9 mmol/L BG reading Treat your low BG!
0-1.1 mmol/L LOW Treat your low BG!
e PDM records BG readings above 27.8 as "HIGH" and BG readings below 1.1
as "LOW." HIGH and LOW readings are saved in your BG history, but are not
used in averages or other numerical calculations.
Warning: "LOW" or "HIGH" blood glucose readings can indicate a
potentially serious condition requiring immediate medical attention. If le
untreated, these situations can quickly lead to diabetic ketoacidosis (DKA),
shock, coma, or death. Consult your healthcare provider for how to treat high
and low blood glucose levels.
Using BG Meter
You can measure your blood glucose using a separate BG meter and then use the
PDM to deliver a bolus. You can also save this blood glucose reading in the PDM's
BG history records.
To bolus
If you want to deliver a bolus when using a separate BG meter, go to "Delivering a
Bolus of Insulin" on page 47. e blood glucose value you enter during the bolus
process will be saved to your history records at that time.
To enter your blood glucose reading without bolusing
1. Check your blood glucose following the instructions included with your
separate BG meter.
2. Turn on your PDM, if necessary, and navigate to:
Home > More actions > Add BG reading
Page 60

45
Checking Your Blood Glucose 44 Checking Your Blood Glucose
3. Use the Up/Down button to enter your measured blood glucose value.
4. Press Ta g to add an informational note to your blood glucose reading (see
"Tagging the Blood Glucose Results" on page 45).
5. Press Save to save the reading in the BG history records.
See "How the PDM reports blood glucose results" on page 44 for a description of
the messages displayed by the PDM for dierent ranges of blood glucose values.
Tagging the Blood Glucose Results
You can add an informational tag to your blood glucose reading for future
reference. For example, you may tag the result as a pre- or post-meal test, or to
indicate a level of exercise. You can add or change tags on your blood glucose
results up to two hours aer you enter the blood glucose value. To access the tags:
1. If necessary, bring up the tag screen by navigating to:
Home > More actions > Assign/Edit BG tags
2. Use the Up/Down button to choose the rst item
you'd like to tag, and press Tag.
3. Use the Up/Down button to scroll along the list of
potentials tags. Highlight a tag and press Select.
4. You can highlight and select up to two tags. You can
remove a tag by highlighting it and pressing Clear.
5. Press OK when nished.
Note: You can add or edit tags for LOW and HIGH
blood glucose readings just as you would for any other reading.
For information about adding custom tags or managing the tags list, see "BG tags"
on page 82.
Page 61

46
is page intentionally le blank.
Page 62

47
CHAPTER 5
Delivering a Bolus of Insulin
Why Bolus?
You can deliver a bolus of insulin when you need to lower a high blood glucose
level and when you are about to eat.
e Omnipod® Insulin Management System allows you to:
• Have the System's Bolus Calculator suggest a correction or meal bolus (see
"Bolusing with the Bolus Calculator" on page 47).
• Calculate your own bolus (see "Manually-calculated Bolus" on page 50).
Caution: Always measure your blood glucose prior to delivering a bolus.
For an explanation of boluses and the Bolus Calculator, see page 144.
Bolusing with the Bolus Calculator
To change your personal settings, or to turn the Bolus Calculator on or o, see
"Bolus Calculator Settings" on page 70.
Enter your BG and meal information
To deliver a bolus using the Bolus Calculator:
1. Measure your blood glucose. If using a separate BG meter, follow the
instructions included with your BG meter. If you used the built-in BG meter,
skip to step 4. For more information, see "Checking Your Blood Glucose" on
page 35.
Note: When your blood glucose result reads “HIGH” or is below your
Minimum BG for Calcs, the Bolus Calculator is disabled.
2. Navigate to the bolus screen:
Home > Bolus
Page 63

48
5 Delivering a Bolus of Insulin
3. Enter your blood glucose reading:
• To enter a reading from a separate BG meter, use
the Up/Down button to enter the blood glucose
value, then press Yes.
• If you recorded a blood glucose value within
the past 10 minutes, the screen automatically
displays it. Press Yes to use this value in the
calculations.
• Press No to tell the Bolus Calculator to perform
the calculation without accounting for your
current BG value.
4. e next screen asks if you are going to eat no w.
• If you are not going to eat, press No.
• If you are going to eat, press Yes. en enter the
grams of carbohydrates you are going to eat:
• Use the Up/Down button to enter the grams
of carbs in your meal, then press Enter.
• Or, if you have dened one or more carb
presets, either (1) select a carb preset, or (2)
select [enter manually], use the Up/Down
button to enter the grams of carbs in your
meal, and press Enter.
To create a carb preset, see "Carb presets" on
page 73.
Deliver the bolus
e Bolus Calculator calculates a suggested bolus and
displays the result. It is called a suggested bolus because
you must either conrm it or modify it.
1. Review the suggested bolus. If you wish, press
the Up/Down button to increase or decrease the
suggested bolus.
Note: e "Carbs" entry and the "Extend" so key
label only appear if you are going to eat. In addition,
if the extended bolus option is o, the "Extend" so
key label does not appear on the screen. If insulin on
board is a factor in the calculation, the screen shows "adjusted for IOB."
Page 64

49
Delivering a Bolus of Insulin 55 Delivering a Bolus of Insulin
Warning: If the suggested bolus exceeds your Maximum Bolus,
"Exceeds max bolus" appears below the bolus. If you select Enter or
Extend, a screen warns you that the suggested bolus exceeds your
Maximum Bolus. Press Conrm to allow a one-time override of the
limit or Cancel to disallow it. Allowing this override does not change
your Maximum Bolus setting.
2. To deliver the entire bolus immediately, press Enter, then skip to step 4. (See
"Immediate and Extended Boluses" on page 143 for more information.)
3. To extend the delivery of part or all of the meal bolus:
a. Press Extend.
b. Use the Up/Down button to enter the amount or percent of the bolus to
deliver immediately. Press Enter.
c. Use the Up/Down button to enter the duration of the extended portion.
Press Enter.
Note: Your "extended bolus" setting determines whether the screen displays
percent (%) or units (U).
Note: You can only extend the meal portion of the bolus, and the extended
bolus option must be turned on. To view the correction bolus and meal bolus
portions of the suggested bolus, press the Info button.
4. If the BG reminder option is turned on and you want a reminder to check
your blood glucose, press Yes. Use the Up/Down button to enter the time for
the reminder. Press OK.
See "BG reminders" on page 77 if you want to turn
on or o the BG reminder. It is o by default.
5. Review the bolus and press Conrm to begin
delivery.
Aer the bolus has started, the bolus amount and any
entered BG and carb values are stored in your history
records.
e screen displays a Delivering bolus message
throughout the delivery of an immediate bolus.
Tip: Once a bolus is started, the Pod nishes delivering
the bolus whether or not it is in range of the PDM.
During the extended portion of a bolus, check the
Status screen to see how much of the extended bolus remains to be delivered.
With extended bolus
Page 65

50
5 Delivering a Bolus of Insulin
If you want to cancel or replace a bolus, see "Altering an Ongoing Bolus" on page
51.
To add an informational tag to the BG value used for this bolus, see "Tagging the
Blood Glucose Results" on page 45.
Manually-calculated Bolus
If the Bolus Calculator is disabled or turned o, you must calculate a bolus amount
yourself. is is called a manually-calculated bolus.
To deliver a manually-calculated bolus:
1. Measure your blood glucose. If using a separate BG meter, follow the
instructions included with your BG meter. If you used the built-in BG meter,
skip to step 4. For more information, see "Checking Your Blood Glucose" on
page 35.
2. Calculate the combined correction and meal bolus.
3. Navigate to the bolus screen:
Home > Bolus
4. Enter your calculated bolus amount:
• Use the Up/Down button to enter the bolus amount, then press Enter.
• Or, if you have dened one or more bolus presets, either (1) select a bolus
preset, or (2) select [enter manually], use the Up/Down button to enter
the desired bolus amount, and press Enter.
To create a bolus preset, see "Bolus presets" on page 76.
Note: You can only give a bolus at or below the Maximum Bolus you have
set. See "Maximum Bolus" on page 75 for information on resetting your
Maximum Bolus. Consult your healthcare provider before changing this
setting.
5. To deliver the entire bolus immediately, press Enter, and skip to step 7. (See
"Immediate and Extended Boluses" on page 143 for more information):
6. To extend the delivery of part or all of a meal bolus:
a. Press Extend.
b. Use the Up/Down button to enter the amount or percent of the bolus to
deliver immediately. Press Enter.
c. Use the Up/Down button to enter the length of time for the extended
portion. Press Enter.
Page 66

51
Delivering a Bolus of Insulin 55 Delivering a Bolus of Insulin
Note: Your "extended bolus" setting determines whether the screen displays
percent (%) or units (U). If the extended bolus option is o, the "Extend" so
key label does not appear on the screen.
7. If the BG reminder option is turned on and you want a reminder to check
your blood glucose, press Yes. Use the Up/Down button to enter the time for
the reminder. Press OK.
See "BG reminders" on page 77 to turn on or o the BG reminder. It is o by
default.
8. Review the details of the bolus and press Conrm to begin the bolus delivery.
At this point, the bolus amount is stored in your history records.
e screen displays a Delivering bolus message throughout the delivery of an
immediate bolus.
Tip: Once a bolus is started, the Pod nishes delivering the bolus whether or not it is
in range of the PDM.
During the extended portion of a bolus, check the Status screen to see how much
of the extended bolus remains to be delivered. You can use your PDM for other
tasks during the extended portion of a bolus.
To add an informational tag to the BG value used for this bolus, see "Tagging the
Blood Glucose Results" on page 45.
Altering an Ongoing Bolus
You can cancel an immediate or extended bolus, deliver an immediate bolus
without canceling an ongoing extended bolus, or replace one extended bolus with
a new extended bolus.
Note: You can give a new (immediate) bolus during an extended bolus without
canceling the extended bolus. However, if you want to extend the new bolus, you
must cancel the current extended bolus.
Note: If you get a communication error message when you attempt to cancel a
bolus, see "Failure when canceling a bolus" on page 104.
Page 67

52
5 Delivering a Bolus of Insulin
Cancel an immediate bolus
To cancel an active bolus while
it is being delivered:
1. If necessary, turn on your
device and conrm your
ID.
2. If bolus delivery has not
nished yet, press Cancel
on the "Delivering bolus"
screen. e Pod beeps to
conrm that the bolus is
canceled.
3. Press OK.
Cancel an extended bolus
To cancel an extended bolus:
1. If necessary, turn on your device and conrm your ID.
2. Choose Home > Suspend/cancel.
3. Choose Cancel extended bolus, then press Select.
4. Press Conrm to cancel the bolus. e Pod beeps when the bolus is canceled.
Page 68

53
Delivering a Bolus of Insulin 55 Delivering a Bolus of Insulin
Replace an extended bolus
To replace an extended bolus with a new extended bolus:
1. Follow the instructions in "Bolusing with the Bolus Calculator" on page 47 or
"Manually-calculated Bolus" on page 50 to specify the amount of the new
bolus.
2. Aer entering the new
bolus amount, press
Extend. A screen appears
telling you that an
extended bolus is active.
3. Press Ye s to cancel the
extended bolus.
4. Press Conrm.
5. e next screen displays
the undelivered amount of
the old extended bolus. Write this number down if
you want to add it to the new extended bolus.
6. Press Next.
7. To add the undelivered amount of the old bolus, use
the Up/Down button to increase the bolus amount.
8. Press Extend and follow the on-screen instructions
to begin delivery of the new extended bolus.
Page 69

54
is page intentionally le blank.
Page 70

55
CHAPTER 6
Modifying Basal Insulin Delivery
is chapter describes how to modify your basal insulin delivery using temporary
basal rates or switching to a dierent Basal Program.
Using Temporary Basal Rates
Use a temporary basal rate, or “temp basal,” to handle a temporary change in your
routine. For example, a temp basal can be used when you are exercising or when
you are sick. To understand how temp basals work, see "Temporary basal rates" on
page 139.
Note: If temp basals are set to "o," you cannot activate a temp basal. To enable
temp basals, see "Temp basal conguration" on page 68.
Tip: If you nd yourself repeatedly using the same temp basal settings, create a temp
basal preset for speedy activation (see "Temp basal presets" on page 68).
Activate a temp basal
Temp basals can last up to 12 hours. When they end, the PDM automatically
reverts to delivering the scheduled Basal Program.
If you have already dened one or more temp basal presets and would like to
activate one, go to "Activate a temp basal preset" on page 57.
1. Navigate to the Temp basal screen:
Home > Temp basal
2. If you have not dened any temp basal presets, skip to step 4.
3. Select [enter manually]. Or, to activate a temp basal preset, go to "Activate a
temp basal preset" on page 57.
Page 71

56
6 Modifying Basal Insulin Delivery
4. If temp basals are congured as a at rate (U/h), skip to step 6. If temp
basals are congured as a percent change (%), select Increase or Decrease
depending on whether you want more or less insulin delivery in the near
future.
5. Press Next.
If temp basals are
congured as a percent
change (%), the screen on
the le appears. If temp
basals are congured as a
at rate (U/hr), the screen
on the right appears.
6. Use the Up/Down button
to specify the amount by
which you would like to
increase or decrease the
basal rate.
Note: Decreasing a temp basal to OFF turns o insulin delivery for the
specied time period. For more information, see "Temp basal limitations"
on page 141. For a comparison of methods to stop insulin delivery, see
"Methods to temporarily stop insulin delivery" on page 142.
7. When the screen shows the desired temp basal rate, press Enter.
8. Use the Up/Down button to specify how long you want the temp basal to last.
9. Press Enter.
10. Aer reviewing the specied temp basal rate and duration, press Conrm to
activate it.
Aer conrmation, the Status screen indicates that the temp basal is running
and how much time remains. At the end of the temp basal time period you do not
need to take any action, the Pod automatically switches back to the active Basal
Program.
Temp basal set to U/hr
Temp basal set to %
Page 72

57
Modifying Basal Insulin Delivery 66 Modifying Basal Insulin Delivery
Activate a temp basal preset
A temp basal preset stores the details of a temp basal that you use frequently. Temp
basal presets can be activated rapidly. To create or modify a temp basal preset, see
"Temp basal presets" on page 68.
1. Navigate to the Temp basal screen:
Home > Temp basal
2. e list of existing temp basal presets appears. Use
the Up/Down arrow to highlight the desired temp
basal preset.
If you do not want to use one of the temp basal
presets, select [enter manually] and go to step 4 on
page 55.
3. Press Select.
4. If you want to change the duration of the temp basal,
use the Up/Down button to change the duration.
5. Aer reviewing the specied temp basal rate and duration, press Conrm to
activate it.
Page 73

58
6 Modifying Basal Insulin Delivery
Cancel a temp basal
A temp basal stops automatically at the end of its time
period. To cancel a running temp basal:
1. From the Home screen, select Suspend/cancel.
2. Highlight Cancel temp basal and press Select.
3. Press Conrm.
e PDM cancels the temp basal and restarts the active
Basal Program.
Use beeps to monitor temp basal progress
You can, optionally, have the PDM or Pod beep at the beginning and end of a
temp basal (see "Condence reminders" on page 80). You can also, optionally,
have the Pod beep every 60 minutes while a temp basal is running (see "Program
reminders" on page 80).
Switching to a Dierent Basal Program
Some days have dierent routines than others, and so the PDM lets you create
dierent Basal Programs to match the dierent routines. For example, you may
use one Basal Program on weekdays and a dierent one on weekends.
To switch to a dierent Basal Program:
1. Navigate to:
Home > Settings > Basal programs
e active Basal Program is marked with a small
diamond (◆).
2. Use the Up/Down button to highlight the Basal
Program that you would like to activate.
3. Press Enable.
Page 74

59
Modifying Basal Insulin Delivery 66 Modifying Basal Insulin Delivery
4. Review the program's details. To see a graph of the program, press Graph.
5. Press Enable to activate the selected Basal Program. e Home screen
displays the name of the newly activated Basal Program.
Note: You must cancel a running temp basal prior to switching to a dierent Basal
Program (see "Cancel a temp basal" on page 58).You can, however, switch Basal
Programs when an extended bolus is running.
For instructions for adding or editing Basal Programs, see "Basal Programs" on
page 65.
Suspending and Resuming Basal Insulin Delivery
Sometimes you may need to stop insulin delivery briey. For example, you must
suspend insulin delivery prior to editing an active Basal Program or resetting the
time or date. e Omnipod® System lets you suspend all insulin delivery for up to
two hours.
To help understand the dierence between stopping insulin delivery using the
suspend feature or the temp basal feature, see "Methods to temporarily stop
insulin delivery" on page 142.
Suspend insulin delivery
1. From the Home screen, press Suspend.
2. Use the Up/Down button to specify the duration
of the suspension. e suspension can last from
30 minutes up to 2 hours and can be adjusted in
30-minute increments.
3. Press Enter.
4. Press Conrm to conrm that you want to halt all
insulin delivery.
e basal insulin delivery is suspended. e Status
screen displays INSULIN SUSPENDED until you
resume insulin delivery.
e Pod beeps every 15 minutes throughout the
suspension period. At the end of the suspension period,
the PDM and Pod sound two sets of beeps every three
minutes, repeating every 15 minutes until you have
resumed insulin delivery.
Note: Temp basals or extended bolus are automatically
canceled when you suspend insulin delivery.
Page 75

60
6 Modifying Basal Insulin Delivery
Resume insulin delivery before the suspension period ends
1. From the Home screen, choose Resume.
2. Press Conrm to restart the Basal Program
scheduled for the current time.
Resume insulin delivery after the suspension
period ends
1. Turn on your PDM.
2. Press OK to resume insulin delivery.
3. e PDM activates the Basal Program that is
scheduled for the current time and beeps to alert
you that insulin delivery has resumed.
If you do not resume insulin delivery immediately when
the suspension period ends, the PDM and Pod beep
every 15 minutes until insulin delivery is resumed.
Warning: Insulin delivery does not automatically resume at the end of the
suspension period. You must press OK to resume insulin delivery. If you do
not resume insulin delivery, you could develop hyperglycemia.
Page 76

61
CHAPTER 7
Adjusting Settings
As your needs change, you may want to adjust various settings on your PDM.
Tip: Some settings have
defaults, but all settings can
be changed.
e screens shown here are
the two main menu screens
that give you access to your
Omnipod® System settings:
the Settings menu and the
System setup menu.
General PDM Settings
General PDM settings include your identication and general device settings.
Date and time
You may need to reset the date and time to adjust for daylight-savings time or
changing time zones.
1. If you have an active Pod, you must suspend it rst: Home > Suspend
2. Navigate to: Home > Settings > System setup > Date / time
3. Choose the time, and press Edit. Use the Up/Down button to enter the new
time. To change between AM/PM and a 24-hour clock, press 12/24hr. Press
Enter, then press Conrm.
4. Choose the date, and press Edit. Change the year, month, day as desired,
pressing Next between each screen. Choose the date format and press Select.
en press Conrm.
5. If you suspended your Pod, press Home and Resume to resume insulin
delivery.
Home > Settings> System setup
Home > Settings
Page 77

62
7 Adjusting Settings
Username and screen color
e ID screen settings are used to identify your PDM. Identifying the PDM as
yours prior to using it helps ensure that you use the PDM that is tuned to control
your Pod and that is programmed with your personal settings.
To change your ID screen settings:
1. Home > Settings > System setup > PDM options > ID screen
2. Choose ID and press Select. Enter the username you would like the PDM to
display on the ID screen (see "Entering text" on page 6). Press Save.
3. Choose Screen color and press Select. Highlight the desired screen color and
press Select.
Storing brief notes
You can store up to 20 lines of personal notes in the PDM, such as phone numbers,
addresses, or prescription information. To view these notes, press the Info button
from the Home screen.
1. Home > My records > My info
2. Highlight [My info] and press Edit. Enter the information you would like to
store (see "Data Entry" on page 6), then press Save.
Vibrate and sound options
e PDM treats alarms and notications dierently. For safety reasons, alarms
are always audible and cannot be set to vibrate; however, you can control whether
certain notication beep or vibrate.
To change how the PDM issues BG reminders, missed bolus reminders, custom
reminders, and "No active Pod" reminders:
1. Home > Settings > Vibration
2. Highlight your preferred option:
Vibrate Vibration only
Vibrate then beep If you do not respond aer two rounds of vibrating
reminders, the PDM beeps for subsequent reminders
O (Beep only) No vibration, just beeps
3. Press Select.
Page 78

63
Adjusting Settings 77 Adjusting Settings
Check the alarms and vibration
To reassure yourself that your PDM and Pod's alarms and vibration functions are
working properly, you can test them as follows:
1. If you have an active Pod, you must suspend it rst: Home > Suspend
2. Go to: Home > Settings > System setup > Diagnostics > Check alarms
3. Press Select and then press OK to initiate the alarm check.
4. Listen and feel: e PDM beeps three times and vibrates three times. en, if
you are wearing a Pod, the Pod beeps several times and sounds the alarm tone
for several seconds.
Warning: If the PDM fails to beep, call Customer Care immediately. If an
activated Pod fails to beep, change the Pod immediately. Continuing to use the
Omnipod® System in these situations may put your health and safety at risk.
Lock or unlock the PDM buttons
You can lock the PDM to prevent accidentally changing Basal Programs or giving
boluses. When the PDM is locked, you can still use the built-in BG meter, check
your history records, and unlock the PDM.
1. Home > Settings > System setup > PDM options > PDM lock
2. Choose On to lock the PDM or O to unlock it. en press Select.
Screen time-out
To preserve battery power, the PDM screen turns o if you have not pressed a
button for the specied time interval. To change the amount of time before the
PDM's screen goes blank:
1. Home > Settings > System setup > PDM options > Screen time-out
2. Select a screen time-out interval, then press Select.
Tip: Set this time-out interval to the lowest setting to preserve battery life.
Backlight time-out
e PDM's screen can dim prior to going blank. To change the amount of time
before the PDM's screen dims:
1. Home > Settings > System setup > PDM options > Backlight time-out
2. Select a backlight time-out interval, then press Select.
Tip: Set this time-out interval to the lowest setting to preserve battery life.
Page 79

64
7 Adjusting Settings
Factory defaults settings
Reset PDM is a rarely-used function that returns all of the PDM's settings to the
default factory settings.
Caution: Resetting the PDM deletes your Basal Programs, temp basal presets,
bolus presets, carb presets, and all Bolus Calculator settings. Before using
this feature, be sure you have a written record of the information you need to
reprogram your PDM. You will also need to activate a new Pod aer resetting your
PDM.
To reset your PDM:
1. Prepare a list of your personalized settings so you can re-enter them aer you
reset your PDM. Consult with your healthcare provider to ensure that the
settings are appropriate for you.
Tip: e pages at the end of this User Guide can be used to record your settings.
2. If you have an active Pod, deactivate it: Home > More actions > Change pod.
3. Go to: Home > Settings > System setup > Diagnostics > Reset PDM
4. Press Conrm to delete your current user settings and return all user settings
to the factory default values.
Note: History records and IOB data are not deleted.
5. Follow the PDM setup directions starting at "Username and screen color" on
page 14 to re-enter your personalized information.
Basal and Temp Basal Settings
e following sections describe how to change the settings that control basal
insulin delivery—Maximum Basal Rate, Basal Programs, and temp basals .
Maximum Basal Rate
e Maximum Basal Rate denes an upper limit for any basal rate in your Basal
Programs and temp basals. Consult your healthcare provider before changing this
setting.
Page 80

65
Adjusting Settings 77 Adjusting Settings
To change your Maximum Basal Rate:
1. Home > Settings > System setup > Bolus/basal/calcs > Max basal
2. Use the Up/Down button to specify your the Maximum Basal Rate, then
press Enter.
Note: You cannot set a Maximum Basal Rate that is lower than the highest basal
rate of an existing Basal Program, temp basal preset, or currently running temp
basal.
Basal Programs
You can have between one and seven Basal Programs. Each Basal Program can
contain from 1 to 24 basal rates.
Caution: Check with your healthcare provider before adjusting these settings.
e Basal Programs screen displays your existing Basal Programs. A diamond
icon () appears next to the active Basal Program.
Create a new Basal Program
Tip: If your new Basal Program is similar to an existing
Basal Program, you can save time by using the "copy"
feature and modifying the copied program (see "Make a
new Basal Program from an existing Basal Program" on
page 67).
To create a new Basal Program:
1. Home > Settings > Basal programs > [add new]
Note: e [add new] option is not available if you
already have seven Basal Programs. In this case,
you must rst delete an existing Basal Program
before you can create a new one (see "Delete a Basal
Program" on page 67).
2. Press New.
3. Enter a meaningful name (see "Entering text" on page 6). Press Next.
Alternately, you can use the default naming system, which assigns names in
numerical order, such as basal 1, basal 2, basal 3.
Page 81

66
7 Adjusting Settings
4. e next steps are the
same as those you
performed when you
set up your rst Basal
Program. Follow the onscreen instructions or see
"Dene a Basal Program"
on page 15 for step-bystep instructions.
Aer you conrm your new
Basal Program, the PDM
stores it for your future use.
Review a Basal Program
To review the details of a Basal Program:
1. Home > Settings > Basal programs
2. Highlight the Basal Program you would like to view,
and press Select.
3. Highlight View and press Select.
4. A non-editable screen appears displaying the basal
segments for the selected Basal Program. Press List
or Graph to see the Program as text or a graph.
Modify a Basal Program
To modify a Basal Program:
1. Home > Settings > Basal programs
2. Highlight the Basal Program you would like to edit, and press Select.
Note: To edit the active Basal Program, you must either suspend insulin
delivery (Home > Suspend) or edit it when you have no active Pod during a
Pod change.
3. Highlight Edit and press Select. A screen appears showing all of the basal
segments for the selected Basal Program.
4. To add or edit segments, follow the on-screen instructions, or see "Adding
time segments" on page 19 for step-by-step instructions.
Basal Program as list
Basal Program as graph
Page 82

67
Adjusting Settings 77 Adjusting Settings
5. To delete a segment:
a. Select an adjacent segment and press Edit.
b. Change the start time or end time so the adjacent segment covers the
segment you are deleting.
c. Optionally, change the value for the resulting longer segment.
d. Press Save, then Save, then Done.
Rename a Basal Program
To rename a Basal Program:
1. Home > Settings > Basal programs
2. Highlight the Basal Program you would like to rename and press Select.
3. Highlight Rename and press Select.
4. Enter the new name (see "Entering text" on page 6) and press Save.
Make a new Basal Program from an existing Basal Program
To create a new Basal Program by copying an existing one:
1. Home > Settings > Basal programs
2. Highlight the Basal Program you would like to copy, and press Select.
3. Highlight Copy and press Select.
Note: If you already have seven Basal Programs, you must rst delete an
existing Basal Program before you can create a copy (see "Delete a Basal
Program" on page 67).
4. Enter a unique name for the new Basal Program (see "Entering text" on page
6) and press Next. A screen appears showing the renamed Basal Program
with the original basal segments.
5. To edit or add new segments to create the new Basal Program follow the onscreen instructions or see "Adding time segments" on page 19.
Delete a Basal Program
You can only delete a Basal Program that is not running; you cannot delete the
active Basal Program. To delete a Basal Program:
1. Home > Settings > Basal programs
2. Highlight the Basal Program you would like to delete, and press Select.
3. Highlight Delete, then press Select, then press Delete
Page 83

68
7 Adjusting Settings
Temp basal conguration
To turn o the temp basal feature or change your temp basal conguration:
1. Home > Settings > System setup > Bolus/basal/calcs > Temp basal
2. Select a conguration for your temp basal:
% Specify temp basals as a percentage of the currently active Basal
Program.
U/hr Specify temp basals as a at rate for the duration of the temp basal.
O Turn o the ability to use temp basals or temp basal presets.
3. Press Select.
See "Temporary basal rates" on page 139 for a description of how temp basals
work.
Temp basal presets
If there is a temp basal that you use oen, you can create a "Temp basal preset" for
rapid activation in the future. To activate a temp basal preset, see "Activate a temp
basal preset" on page 57.
Create a new temp basal preset
1. Home > Settings > Presets > Temp basal presets
2. Use the Up/Down button to scroll down to [add new] at the bottom of the
list. Press New.
Note: You can only have seven temp basal presets. If you already have seven,
[add new] does not appear. If necessary, you can delete an existing one.
3. Enter a name for the new temp basal preset (see "Entering text" on page 6).
Press Next.
4. If temp basals are congured as percentages (%), select Increase or Decrease
to specify whether this preset will deliver more or less insulin than the active
Basal Program.
5. Use the Up/Down button to set the desired temporary change in the insulin
delivery rate. Press Next.
6. Use the Up/Down button to set the duration for the temp basal preset. Press
Next.
Note: You will be able to modify the duration of a temp basal preset when
you invoke it.
7. Press Save.
Page 84

69
Adjusting Settings 77 Adjusting Settings
Edit or rename a temp basal preset
Note: You cannot edit a temp basal preset that is actively
running.
1. Home > Settings > Presets > Temp basal presets
2. Highlight the temp basal preset you would like to
change, scrolling down as needed if there is a long
list. Press Edit.
3. To rename the temp basal preset, select Rename,
then enter the new name (see "Entering text" on
page 6). Press Save.
4. To edit the temp basal preset:
a. Select Edit.
b. Change the temporary basal rate, if desired. Press Next.
c. Change the duration of the temp basal, if desired. Press Save.
5. Press Done to return to the temp basal preset screen.
Delete a temp basal preset
Note: You cannot delete a temp basal preset that is actively running.
1. Home > Settings > Presets > Temp basal presets
2. Highlight the temp basal preset you would like to delete, scrolling down as
needed if there is a long list. Press Edit.
3. Highlight Delete, and press Select.
4. Press Delete. e temp basal preset is deleted.
Page 85

70
7 Adjusting Settings
Bolus Calculator Settings
Warning: e Bolus Calculator displays a suggested bolus dose based on the
personalized settings you have programmed into the PDM. Check with your
healthcare provider before adjusting your Bolus Calculator settings.
e following sections describe
how to edit individual Bolus
Calculator settings.
Note: To review all of the
Bolus Calculator settings
sequentially, navigate to
Home > Settings
> System setup
> Bolus/basal/calcs
> Ratios/factors/targets
> Review all settings
and follow the on-screen
instructions.
Turn the Bolus Calculator on or o
To turn the Bolus Calculator on or o:
1. Home > Settings > System setup > Bolus/basal/calcs > Bolus calcs
2. To turn the Bolus Calculator o, select O and press Done.
3. To turn the Bolus Calculator on, select On and press Next. e following
screens guide you through the personalized Bolus Calculator settings. For
detailed instructions, see the following pages or go to "Target BG and Correct
Above values" on page 17.
Note: If you have not previously set up the Bolus Calculator refer to "Bolus
Calculator settings" on page 17 for step-by-step instructions.
Target BG and Correct Above value
e Bolus Calculator aims to bring your blood glucose to your Target BG
value when calculating a correction bolus. However, the Bolus Calculator only
calculates a correction bolus if your blood glucose is above your Correct Above
setting. Your Target BG can range from 3.9 to 11.1 mmol/L, and your Correct
Above setting can range from your Target BG to 11.1 mmol/L.
Page 86

71
Adjusting Settings 77 Adjusting Settings
You can set dierent Target BG and Correct Above values for dierent times of
day. To edit or add Target BG or Correct Above segments:
1. Home > Settings > System setup > Bolus/basal/calcs
> Ratios/factors/targets > Target BG
2. Follow the on-screen instructions, or, for detailed instructions see "Adding
time segments" on page 19.
3. Press Done, then Save when nished modifying the time segments.
Minimum BG for Calcs
Minimum BG for Calcs is a threshold that you set. If your BG reading is below
your Minimum BG for Calcs, the Bolus Calculator is disabled and does not
calculate a bolus. is value can range from 2.8 - 3.9 mmol/L and is a xed value
throughout the day.
1. Home > Settings > System setup > Bolus/basal/calcs
> Ratios/factors/targets > Min BG for calcs
2. Use the Up/Down button to specify the minimum blood glucose for use by
the Bolus Calculator, then press Next.
IC Ratio
e IC Ratio (Insulin to carbohydrate ratio) denes how many grams of
carbohydrates are handled by one unit of insulin. e Bolus Calculator uses your
IC Ratio to calculate a meal bolus when you are going to eat. Your IC Ratio can
range from 1 to 150.
You can set dierent IC Ratios for dierent times of day, up to a total of eight. To
edit existing time segments or add segments:
1. Home > Settings > System setup > Bolus/basal/calcs
> Ratios/factors/targets > IC ratio
2. Follow the on-screen instructions, or, for detailed instructions see "Adding
time segments" on page 19.
3. Press Done, then Save when nished modifying the time segments.
Page 87

72
7 Adjusting Settings
Correction Factor
e Bolus Calculator uses your Correction Factor to calculate a correction bolus
when your blood glucose value is above your Correct Above setting (see "e
Bolus Calculator" on page 144). Your Correction Factor can range from 0.1 to 22.2
mmol/L.
You can set dierent Correction Factors for dierent times of day, up to a total of
eight. To edit existing time segments or add segments:
1. Home > Settings > System setup > Bolus/basal/calcs
> Ratios/factors/targets > Correction factor
2. Follow the on-screen instructions, or, for detailed instructions see "Adding
time segments" on page 19.
3. Press Done, then Save when nished modifying the time segments.
Reverse Correction
e reverse correction setting determines how the Bolus Calculator handles meal
boluses when your blood glucose value is below your Target BG (see "Reverse
Correction" on page 146 for more details).
1. Home > Settings > System setup > Bolus/basal/calcs
> Ratios/factors/targets > Reverse correction
2. Choose On or O, and press Next.
Duration of insulin action
e Bolus Calculator uses your duration of insulin action setting to calculate the
amount of insulin on board (IOB) from a previous bolus (see "Insulin on board"
on page 146 for more details). Your duration of insulin action can range from 2 to
6 hours in 30-minute increments and is a xed value throughout the day.
1. Home > Settings > System setup > Bolus/basal/calcs
> Ratios/factors/targets > Insulin action
2. Use the Up/Down button to specify your duration of insulin action, then
press Done.
3. If you have been reviewing all of the Bolus Calculator settings, the screen
informs you that the setup is complete and the Bolus Calculator is On. Press
OK.
Page 88

73
Adjusting Settings 77 Adjusting Settings
Carb presets
Carbs presets are used to store the carbohydrate content of snacks or meals that
you eat oen. You can quickly select a carb preset when the Bolus Calculator asks
how many carbs you are about to eat. You can create up to 36 carb presets.
Create a new carb preset
To save a frequently eaten food as a carb preset:
1. Home > Settings > Presets > Carb presets
2. Choose either Favorites, Snacks or Meals as the category for this carb preset,
then press Select.
3. Choose [add new] and press New.
4. Enter a unique name to help you recognize this carb preset in the future (see
"Entering text" on page 6), and press Next.
Alternatively, you can choose to use the default name by pressing Next.
5. Enter the grams of carbohydrates in the food, then press Next.
6. e next step is to, optionally, specify the grams of ber in the meal. Consult
with your healthcare provider about whether or not to enter the ber
information.
Note: If you enter the grams of ber into your carb preset, the Bolus
Calculator subtracts the grams of ber from the grams of carbohydrates.
Alternately, in step 5 above, you can enter the total grams of carbs minus the
ber yourself.
7. Press Next.
8. If you want, you can enter the grams of fat and protein and the total calories
in the meal. Press Next aer each entry. Entering these additional numbers is
optional. e Bolus Calculator does not use them.
9. Press Save to add the new carb preset to the selected category.
Change the category for a carb preset
1. Home > Settings > Presets > Carb presets
2. Choose the category that contains the carb preset you want to change, then
press Select.
3. Highlight the carb preset that you want to move, then press Tag .
4. Choose the new category, then press Select.
Page 89

74
7 Adjusting Settings
Edit or rename a carb preset
1. Home > Settings > Presets > Carb presets
2. Choose the category containing the preset you want to edit, then press Select.
3. Highlight the carb preset that you want to edit, then press Edit.
4. Press Edit again on the next screen.
5. To rename the preset, enter a new name (see "Entering text" on page 6).
6. Enter the grams of carbohydrates in the food, then press Next.
7. e next step is to, optionally, specify the grams of ber in the meal. Consult
with your healthcare provider about whether or not to enter the ber
information.
Note: If you enter the grams of ber into your carb preset, the Bolus
Calculator subtracts the grams of ber from the grams of carbohydrates.
Alternately, in step 6 above, you can enter the total grams of carbs minus the
ber yourself.
8. Press Next.
9. If you want, you can enter the grams of fat and protein and the total calories
in the meal. Press Next aer each entry. Entering these additional numbers is
optional.
10. Press Done to save the changes.
Delete a carb preset
1. Home > Settings > Presets > Carb presets
2. Choose the category containing the preset you want to edit, then press Select.
3. Highlight the carb preset that you want to edit, then press Edit.
4. Press Delete.
5. Press Delete again to permanently delete the carb preset.
Page 90

75
Adjusting Settings 77 Adjusting Settings
Bolus Delivery Settings
Extended bolus conguration
An extended bolus is delivered over a prolonged period of time. Only the meal
portion of a bolus can be extended. A correction bolus cannot be extended.
To turn o the extended bolus feature or to change your extended bolus
conguration:
1. Home > Settings > System setup > Bolus/basal/calcs > Extended
2. Select a conguration for your extended bolus:
% Specify the amount of the immediate portion of the bolus as a
percent of the total bolus. e remainder will be extended.
Units Specify how many units of insulin should be delivered
immediately. e remainder will be extended.
O Turn o the ability to extend a bolus.
3. Press Select.
Maximum Bolus
e Maximum Bolus denes the upper limit for a manually-calculated bolus. e
Bolus Calculator warns you if it calculates a bolus that is over this amount. e
largest allowed value of the Maximum Bolus is 30 units.
Caution: e Maximum Bolus default is 10 units. Check with your healthcare
provider before adjusting this setting.
1. Home > Settings > System setup > Bolus/basal/calcs > Max bolus
2. Use the Up/Down button to specify the Maximum Bolus, then press Enter.
Bolus increment
e bolus increment setting denes how much one press of the Up/Down button
changes the bolus amount shown on the screen. is determines how nely you
can tune the specied bolus amount. e setting options are 0.05, 0.1, 0.5, or 1.0 U.
For example, setting this to 1.0 U means that you will be able to request a bolus of
2U or of 3 U, but not of 2.5 U.
1. Home > Settings > System setup > Bolus/basal/calcs > Bolus increment
2. Highlight the desired bolus increment, and press Select.
Page 91

76
7 Adjusting Settings
Bolus presets
Bolus presets allow you to store commonly used bolus amounts for quick retrieval
in the future. Bolus presets are only used if the Bolus Calculator is o.
A bolus preset only stores the total number of units of insulin in a bolus. You will
specify whether the bolus should be extended or not when you activate it.
You can set up to seven bolus presets. A bolus preset cannot exceed your
Maximum Bolus.
Create a new bolus preset
1. Home > Settings > Presets > Bolus presets
2. Highlight [add new] and press New.
3. Enter a name for the new bolus preset (see "Entering text" on page 6), and
press Next.
4. Use the Up/Down button to enter the amount of the bolus, and press Next.
5. Press Save.
Edit or rename a bolus preset
1. Home > Settings > Presets > Bolus presets
2. Highlight the bolus preset that you want to edit, then press Edit.
3. To rename the preset, highlight Rename, and press Select. en enter a new
name (see "Entering text" on page 6), and press Next.
4. To change the value of the preset, highlight Edit, and press Select.
5. Use the Up/Down button to enter the new value for the bolus, and press Save.
Delete a bolus preset
1. Home > Settings > Presets > Bolus presets
2. Highlight the bolus preset that you want to delete, then press Edit.
3. Highlight Delete, and press Select.
4. Press Delete.
Page 92

77
Adjusting Settings 77 Adjusting Settings
Reminder and Notication Settings
Reminders and notications are used to bring items
related to system function to your attention (see
"Notications" on page 99 and "Informational Beeps" on
page 101).
BG reminders
If BG reminders are on, a screen is inserted into the bolus
ow that asks if you would like to set a reminder to check
your blood glucose. You can answer yes or no at that
time.
To set a BG reminder:
1. Home > Settings > System setup > Alerts/reminders > BG reminder
2. Choose On to include the BG reminder query in the bolus ow. Choose O
to skip the BG reminder.
3. Press Select.
Pod expiration
e Pod expiration notication tells you when the Pod is nearing its expiration
so you can plan for a Pod change at a convenient time. is notication can
range from 1 to 24 hours before the Pod expiration advisory alarm sounds. At the
selected time, the Pod and PDM beep and the PDM generates a message.
To set the timing of the Pod expiration notication:
1. Home > Settings > System setup > Alerts/reminders > Expiration
2. Use the Up/Down button to specify how long before your Pod expires that
you would like to be notied, then press Enter.
Page 93

78
7 Adjusting Settings
Low reservoir level
e Pod and PDM sound an advisory alarm when the insulin level in your Pod
reaches the low reservoir setting. is setting can range from 10 to 50 units.
1. Home > Settings > System setup > Alerts/reminders > Low reservoir
2. Use the Up/Down button to specify the level of Pod insulin at which you
would like to be notied, then press Enter.
Pod Auto-o
Consult your healthcare provider prior to changing the Auto-o setting. is
feature requires active participation on your part. See "Auto-o " on page 137 to
familiarize yourself with how this feature works.
To enable or disable Auto-o:
1. Home > Settings > System setup > Alerts/reminders > Auto-o
2. To disable Auto-o, select O and press Enter.
3. To enable Auto-o, use the Up/Down button to specify the length of time for
the countdown timer. is setting can range from 1 to 24 hours.
Example: If you choose three hours, you must activate your PDM once every
three hours, day and night, to prevent the Auto-o alarm.
4. Press Enter.
Warning: You must use the PDM within 15 minutes of hearing the Auto-o
advisory alarm. If you do not, the PDM and Pod sound a hazard alarm and
your Pod stops delivering insulin.
Bolus reminders
Bolus reminders prompt you to eat. If bolus reminders are enabled and the PDM
has not delivered a bolus during a specied time interval, the PDM beeps and
generates a message. e time interval can range from 1 to 4 hours, and you can
set up to six separate bolus reminder time intervals.
Enable or disable bolus reminders
1. Home > Settings > System setup > Alerts/reminders > Bolus reminders
2. To enable all bolus reminders, choose On and press Select.
3. To disable all bolus reminders, choose O and press Select. e PDM
remembers any previously set bolus reminders for later use.
Page 94

79
Adjusting Settings 77 Adjusting Settings
Add a new bolus reminder
1. Home > Settings > System setup > Alerts/reminders > Bolus reminders
2. Highlight On and press Select.
3. Highlight [add new] and press New.
4. Use the Up/Down button to enter the start time for the interval, and press
Next.
5. Use the Up/Down button to enter the end time for the interval, and press
Save.
6. Press Done, and then press Save.
Edit a bolus reminder
1. Home > Settings > System setup > Alerts/reminders > Bolus reminders
2. Highlight On and press Select.
3. Highlight the time interval you would like to edit, and press Edit.
4. Highlight Edit and press Select.
5. Use the Up/Down button to enter the start time for the interval, and press
Next.
6. Use the Up/Down button to enter the end time for the interval, and press
Save.
7. Press Done, and then press Save.
Delete a bolus reminder
1. Home > Settings > System setup > Alerts/reminders > Bolus reminders
2. Highlight On and press Select.
3. Highlight the time interval you would like to delete, and press Edit.
4. Highlight Delete and press Select.
5. Press Delete, then press Done, then press Save.
Page 95

80
7 Adjusting Settings
Program reminders
If program reminders are on, the Pod beeps every 60 minutes while a temp
basal or extended bolus is in progress. See page 101 for more information about
program reminders.
1. Home > Settings > System setup > Alerts/reminders >Program reminders
2. To enable program reminders, choose On and press Select.
3. To disable program reminders, choose O and press Select.
Exception: You cannot turn o beeps that occur during an ongoing temp basal set
to deliver no (zero) insulin.
Condence reminders
Turn on condence reminders to have the Pod beep at the start and end of a bolus,
an extended bolus, and a temp basal. Condence notications are especially
useful when you are getting familiar with your PDM and Pod. See page 101 for
more information about condence reminders.
1. Home>Settings>System setup>Alerts/reminders>Condence reminders
2. To enable condence reminders, choose On and press Select.
3. To disable condence reminders, choose O and press Select.
Exception: You cannot turn o beeps that occur at the start of a temp basal set to
deliver no (zero) insulin.
Custom reminders
A custom reminder consists of a name and a time of day. You can set a one-time
custom reminder or have the reminder repeat daily. Custom reminders repeat
every 15 minutes until acknowledged. You can set up to four custom reminders.
See page 101 for more information about custom reminders.
Page 96

81
Adjusting Settings 77 Adjusting Settings
Add a new custom reminder
1. Home > Settings > System setup > Alerts/reminders > Custom reminders
2. Highlight [add new] and press New.
3. If desired, enter a unique name for the custom reminder (see "Entering text"
on page 6). Press Next.
4. Use the Up/Down button to enter the time you would like the reminder to
occur, and press Next.
5. Choose Daily or One time only to specify whether the reminder repeats,
then press Select.
View, edit or turn o a custom reminder
1. Home > Settings > System setup > Alerts/reminders > Custom reminders
2. Highlight the reminder of interest, and press Edit.
3. e next screen displays the details of that reminder.
a. To make no changes, press Done.
b. To rename, highlight Rename and press Select. Enter the new name or
time for the reminder (see "Entering text" on page 6), and press Next.
c. To change the time or frequency of a reminder, or to turn a reminder on or
o, highlight Edit and press Select. Enter the time for the reminder, and
press Next. Choose a frequency or set to O, then press Select.
4. Press Done.
Delete a custom reminder
1. Home > Settings > System setup > Alerts/reminders > Custom reminders
2. Highlight the reminder that you want to delete, and press Edit. e next
screen displays the details of that reminder.
3. Highlight Delete, and press Select.
4. Press Delete.
Page 97

82
7 Adjusting Settings
BG Readings Settings
Upper limit and lower limit of the BG Goal Range
e upper and lower limit of your BG Goal Range are
used in the history graphs and statistics to determine
which blood glucose readings are within goal and which
are above or below your goal.
Caution: Check with your healthcare provider before
adjusting these settings.
1. Home > Settings > System setup > BG meter
2. Highlight BG goal, press Select, then press Edit.
3. Enter the desired lower limit for the BG Goal Range,
and press Next.
4. Enter the desired upper limit for the BG Goal
Range, and press Next.
5. Press Save.
BG tags
BG tags are used to convey useful information about blood glucose readings. You
can create up to 15 custom tags (which appear at the bottom of the tags list) and
hide any of the standard tags you do not plan to use.
1. Home > Settings > System setup > BG meter
2. Highlight Manage BG tag list, and press Select.
3. To show or hide a standard tag on the Standard BG
tags list, highlight the tag of interest and press Show
or Hide. You may need to scroll down to nd the tag
or interest. Press Done when nished.
A checkmark indicates the tags that will appear in
the tags list used for tagging BG readings.
4. To add a custom BG tag, use the Up/Down button
to scroll down to the Custom BG tags section,
highlight [add new] and press New. Enter a name
(see "Entering text" on page 6), and press Save. en
press Done.
5. To delete a custom BG tag, scroll down to highlight the tag of interest, and
press Delete. en press Delete again, then press Done.
Page 98

83
Adjusting Settings 77 Adjusting Settings
Built-in BG meter sound
You can control whether the built-in BG meter beeps when the test strip is full of
blood or control solution.
1. Home > Settings > System setup > BG meter
2. Highlight BG sound, and press Select.
3. Choose On to enable the beeps or O to disable the beeps. en press Select.
Page 99

84
is page intentionally le blank.
Page 100

85
CHAPTER 8
Browsing Your Records
e PDM history records contain information about your blood glucose readings,
insulin delivery, carbohydrate entries, and alarms history. e history records can
store over 90 days of information. Once the memory is full, new records begin to
replace the oldest records. You can browse but not edit the information in your
records.
Note: e data in memory is not at risk if the PDM battery runs out. e date and
time may need to be reset, but the history records are unaected.
Overview of the Records Screens
is section describes how to navigate your records and understand the meanings
of the symbols used on the history screens.
The Records menu
To access the Records menu, navigate to:
Home > My records
e Records menu allows you to select a category of
history records to view (insulin delivery, BG readings,
alarms, or carbohydrates). You can also view all of your
history records in one long chronological list.
e Records menu also gives you access to any personal
notes you have stored.
 Loading...