

Page 1
Thank you for purchasing an OmniMount product.
Specifications are subject to change without prior notice.
Every effort has been made to provide accurate and error-free assembly and installation. OmniMount Systems disclaims liability for any difficulties arising from
the interpretation of information contained in these instructions. If OmniMount products are used for purposes other than their original intent, OmniMount, its
distributors and retailers shall not be held responsible or liable for injuries or property damage, direct, indirect, or consequential, which may arise from the inability to use this product safely, properly, and in the manner for which it has been designed and manufactured. Warranty does not apply to products which have
been lost, damaged by misuse, abuse, or accident.
Les spécifications sont susceptibles d’être modifiées sans préavis.
Tous les efforts ont été mis en œuvre pour fournir des instructions de montage et d’installation précises et sans erreur. OmniMount Systems décline toute responsabilité pour toute difficulté éventuelle liée à l’interprétation des informations contenues dans ces instructions. Si des produits OmniMount sont utilisés à d’autres
fins que celles pour lesquelles ils ont été conçus, OmniMount, ses distributeurs et ses revendeurs ne peuvent être tenus responsables des blessures ou dommages
directs, indirects ou consécutifs pouvant résulter de l’incapacité à utiliser ce produit correctement, dans de bonnes conditions de sécurité et de la manière prévue.
La garantie ne s'applique pas aux produits perdus ou endommagés suite à une mauvaise utilisation, à une utilisation abusive ou à un accident.
Las especificaciones pueden cambiar sin previo aviso.
Se ha hecho un especial esfuerzo para facilitar un montaje y una instalación correctos y sin errores. OmniMount Systems no se hace responsable de problemas o
contratiempos que pudieran tener lugar como consecuencia de la interpretación de la información contenida en estas instrucciones. Si los productos OmniMount
se usan para propósitos distintos a los intencionados originalmente, OmniMount, así como sus distribuidores y vendedores, no serán responsables de posibles
daños físicos o a la propiedad, ya sean directos o indirectos, que puedan derivarse de un uso imprudente, inseguro o incorrecto de este producto o de una forma
distinta para la cual ha sido diseñado y fabricado. La garantía no cubre productos que se hayan perdido o dañado por un mal uso, abuso o por accidente.
Die Spezifikationen können ohne vorherige Benachrichtigung geändert werden.
Es wurden alle Bemühungen unternommen, um den Aufbau und die Montage korrekt und fehlerfrei zu ermöglichen. OmniMount Systems übernimmt für
Schwierigkeiten oder Schäden, die aus einer Fehlinterpretation der sich in dieser Anweisung befindlichen Informationen entstehen, keine Haftung. Wenn
Produkte von OmniMount für andere als die ursprünglichen Zwecke verwendet werden, tragen weder OmniMount noch die das Produkt vertreibenden oder
verkaufenden Parteien die Verantwortung für eventuelle Personen- oder Sachschäden, die direkt, indirekt oder in Folge der Unmöglichkeit entstehen, das
Produkt sicher, korrekt und entsprechend dem in Planung und Fertigung angestrebten ursprünglichen Zweck zu verwenden. Die Gewährleistung gilt nicht für
Produkte, die verloren gegangen sind oder durch unsachgemäßen Gebrauch, Missbrauch oder unbeabsichtigt beschädigt wurden.
I dati tecnici sono soggetti a modifica senza preavviso.
Ogni sforzo è stato fatto per fornire informazioni accurate e senza errori per il montaggio e l’installazione. OmniMount Systems non sarà responsabile di
eventuali problemi derivanti dall’interpretazione delle informazioni qui contenute. Qualora i prodotti OmniMount vengano utilizzati per finalità diverse da quelle
originariamente previste dal costruttore, OmniMount, i suoi distributori e i rivenditori non saranno responsabili per danni alle persone o alle cose, diretti, indiretti
o conseguenti, imputabili al mancato utilizzo del prodotto in modo sicuro, appropriato e nelle modalità previste dal costruttore. La garanzia non è applicabile al
prodotto qualora sia stato perso o danneggiato a seguito di uso errato, uso improprio o incidente.
Specificaties zijn onderhevig aan wijzigingen zonder voorafgaande verwittiging.
Alle inspanningen werden geleverd om een nauwkeurige en foutenvrije montage en installatie te leveren. OmniMount Systems wijst elke aansprakelijkheid af
voor moeilijkheden die voortkomen uit de interpretatie van de informatie in deze instructies. Als OmniMount-producten gebruikt worden voor doeleinden die
anders zijn dan hun originele bedoeling, zullen OmniMount, zijn dealers en kleinhandelaars niet verantwoordelijk of aansprakelijk worden gehouden voor letsels
of schade aan eigendommen, directe, indirecte of gevolgschade die kan voortvloeien uit de onmogelijkheid om dit product veilig, correct en op de manier te
gebruiken waarvoor het ontworpen en geproduceerd werd. De garantie is niet van toepassing op producten die verloren geraakten, of beschadigd door verkeerd
gebruik, misbruik, of accident.
Installation Instructions:
G3FP Shelf
G3 Shelf
Технические характеристики могут быть изменены без предварительного уведомления.
Были предприняты все возможные меры для обеспечения аккуратной и правильной сборки и установки. Компания не несет ответственности за какиелибо возможные затруднения, связанные с истолкованием содержания настоящих инструкций. При использовании изделий OmniMount не по их
прямому назначению компания OmniMount, а также ее дистрибьюторы и торговые
косвенный или опосредованный материальный ущерб, которые могут возникнуть вследствие невозможности безопасного и правильного
использования изделия по его прямому назначению. Гарантия не распространяется на изделия, которые были утрачены, а также повреждены
вследствие неправильной эксплуатации, использования не по назначению или несчастного случая.
агенты не несут ответственности за травмы, а также за прямой,
G3FP Shelf PN:1002851—Rev A 82006
Page 2
English
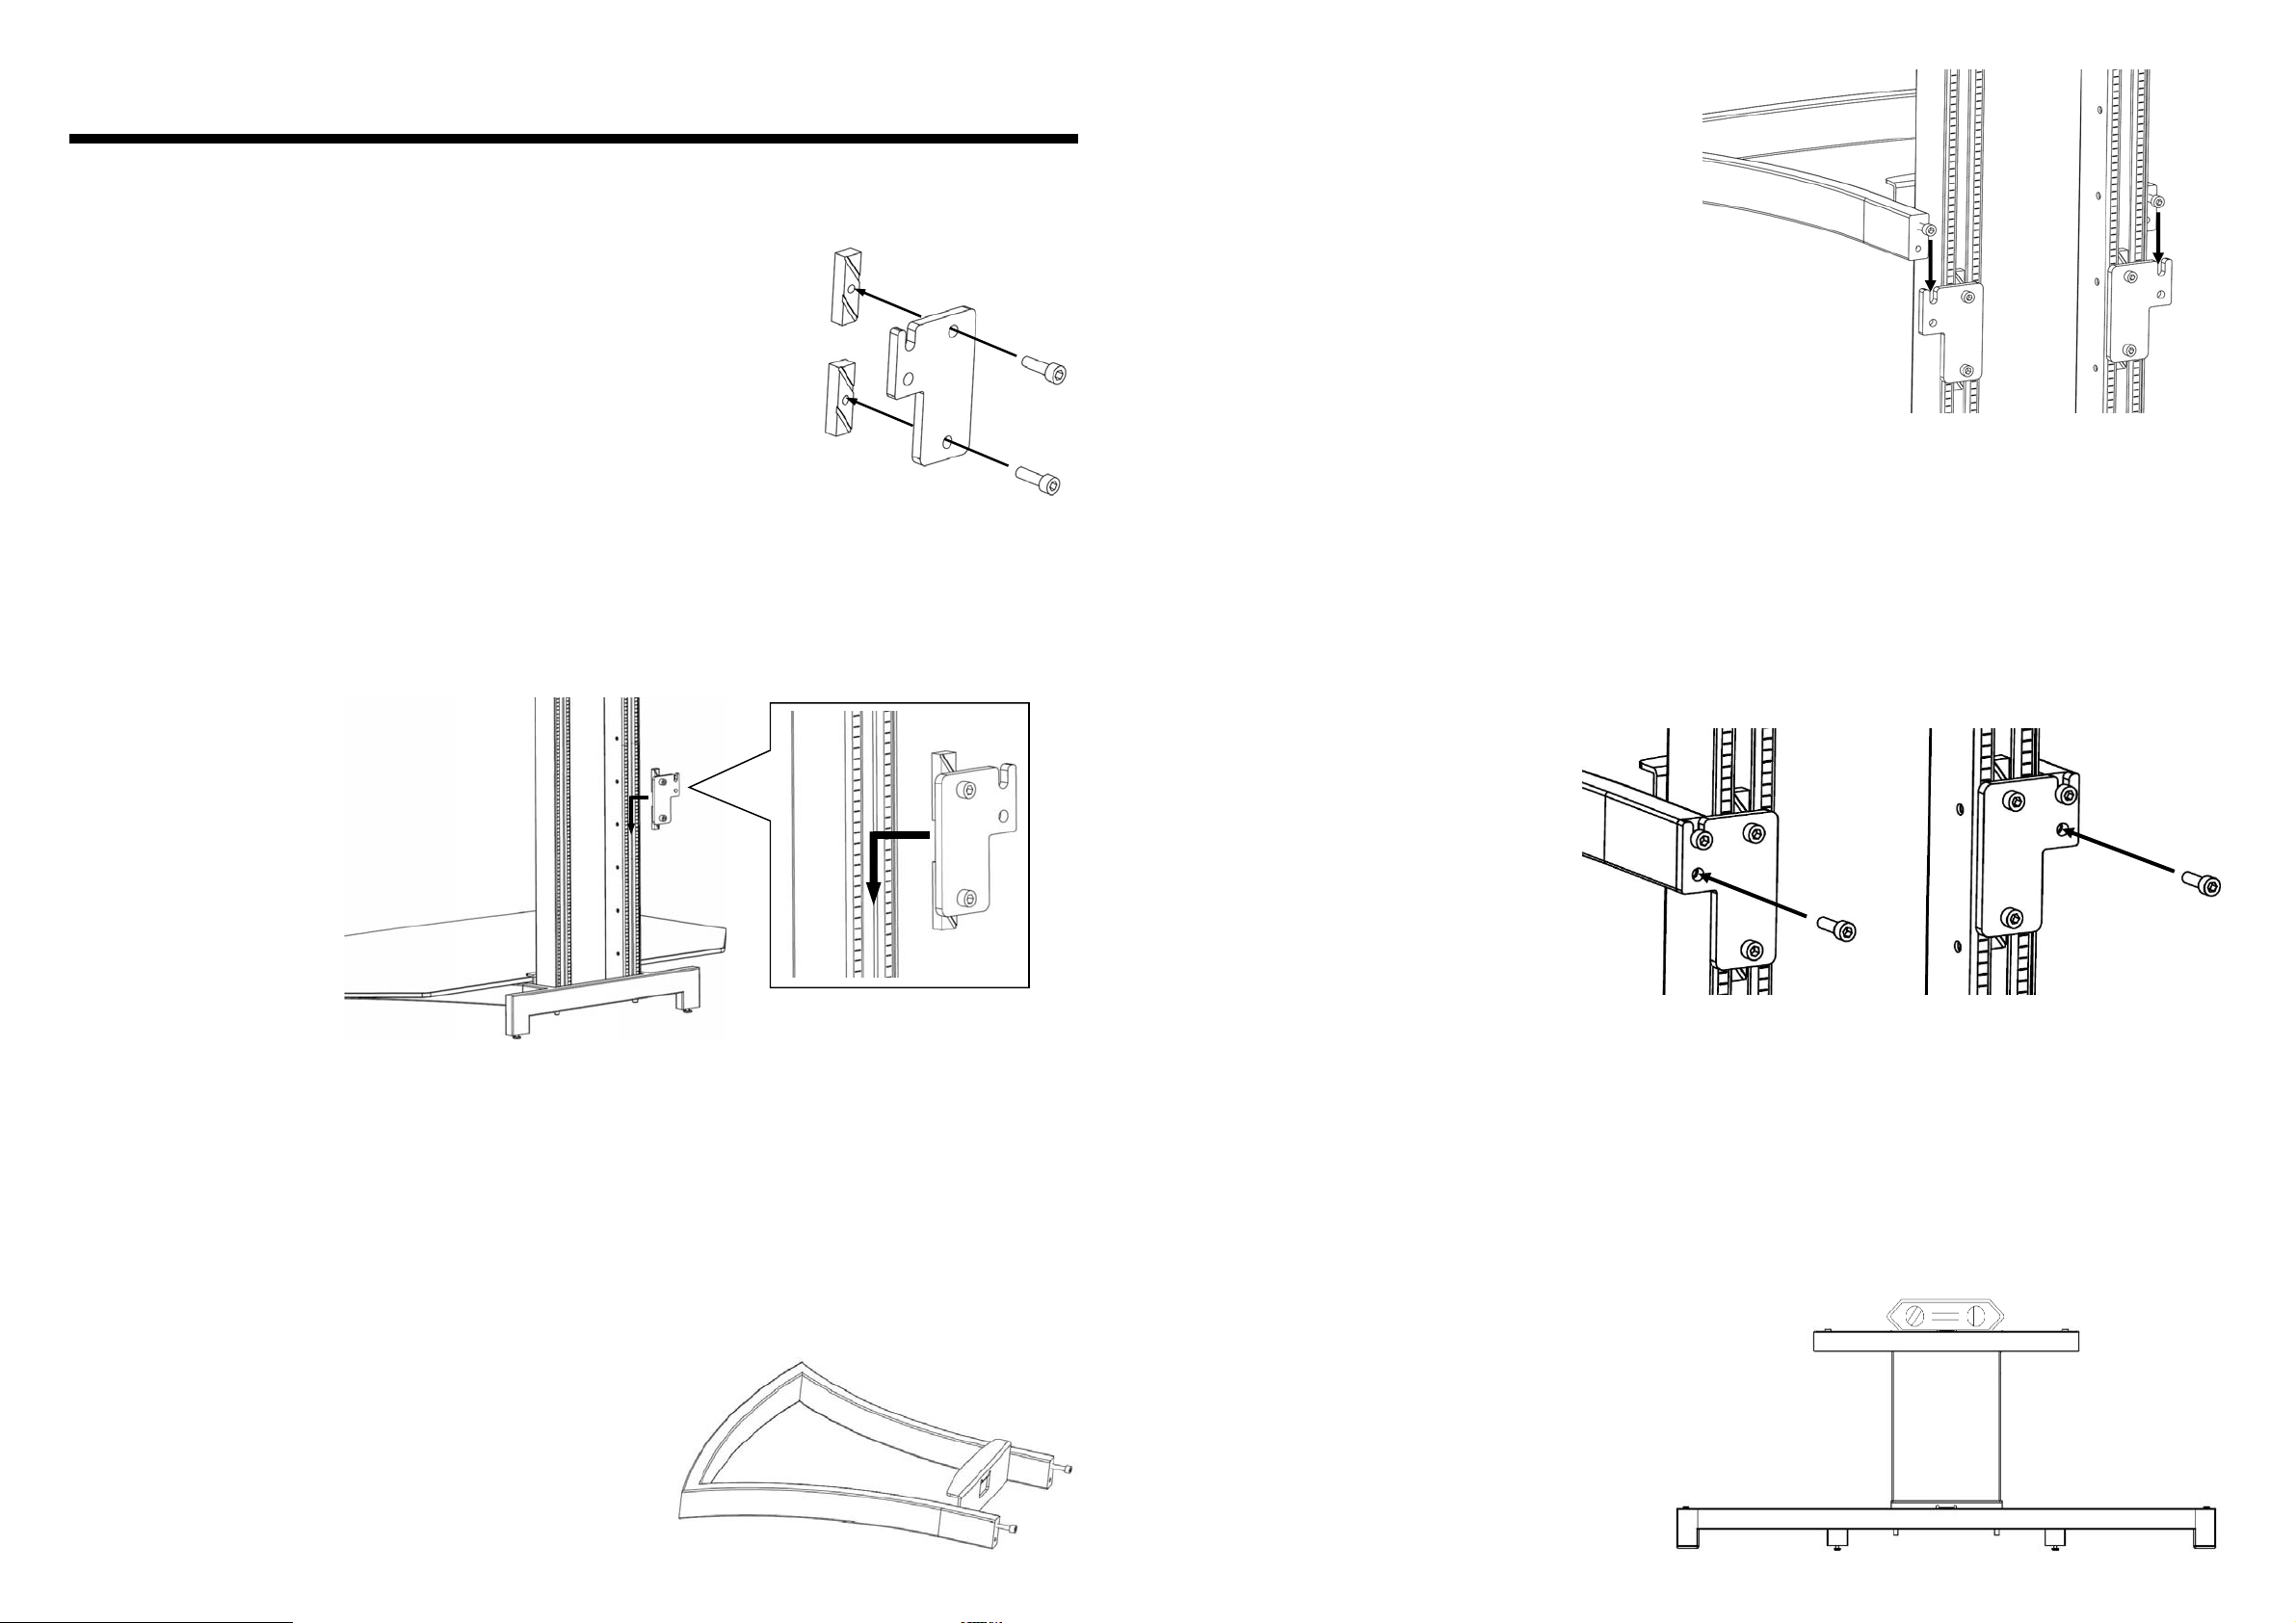
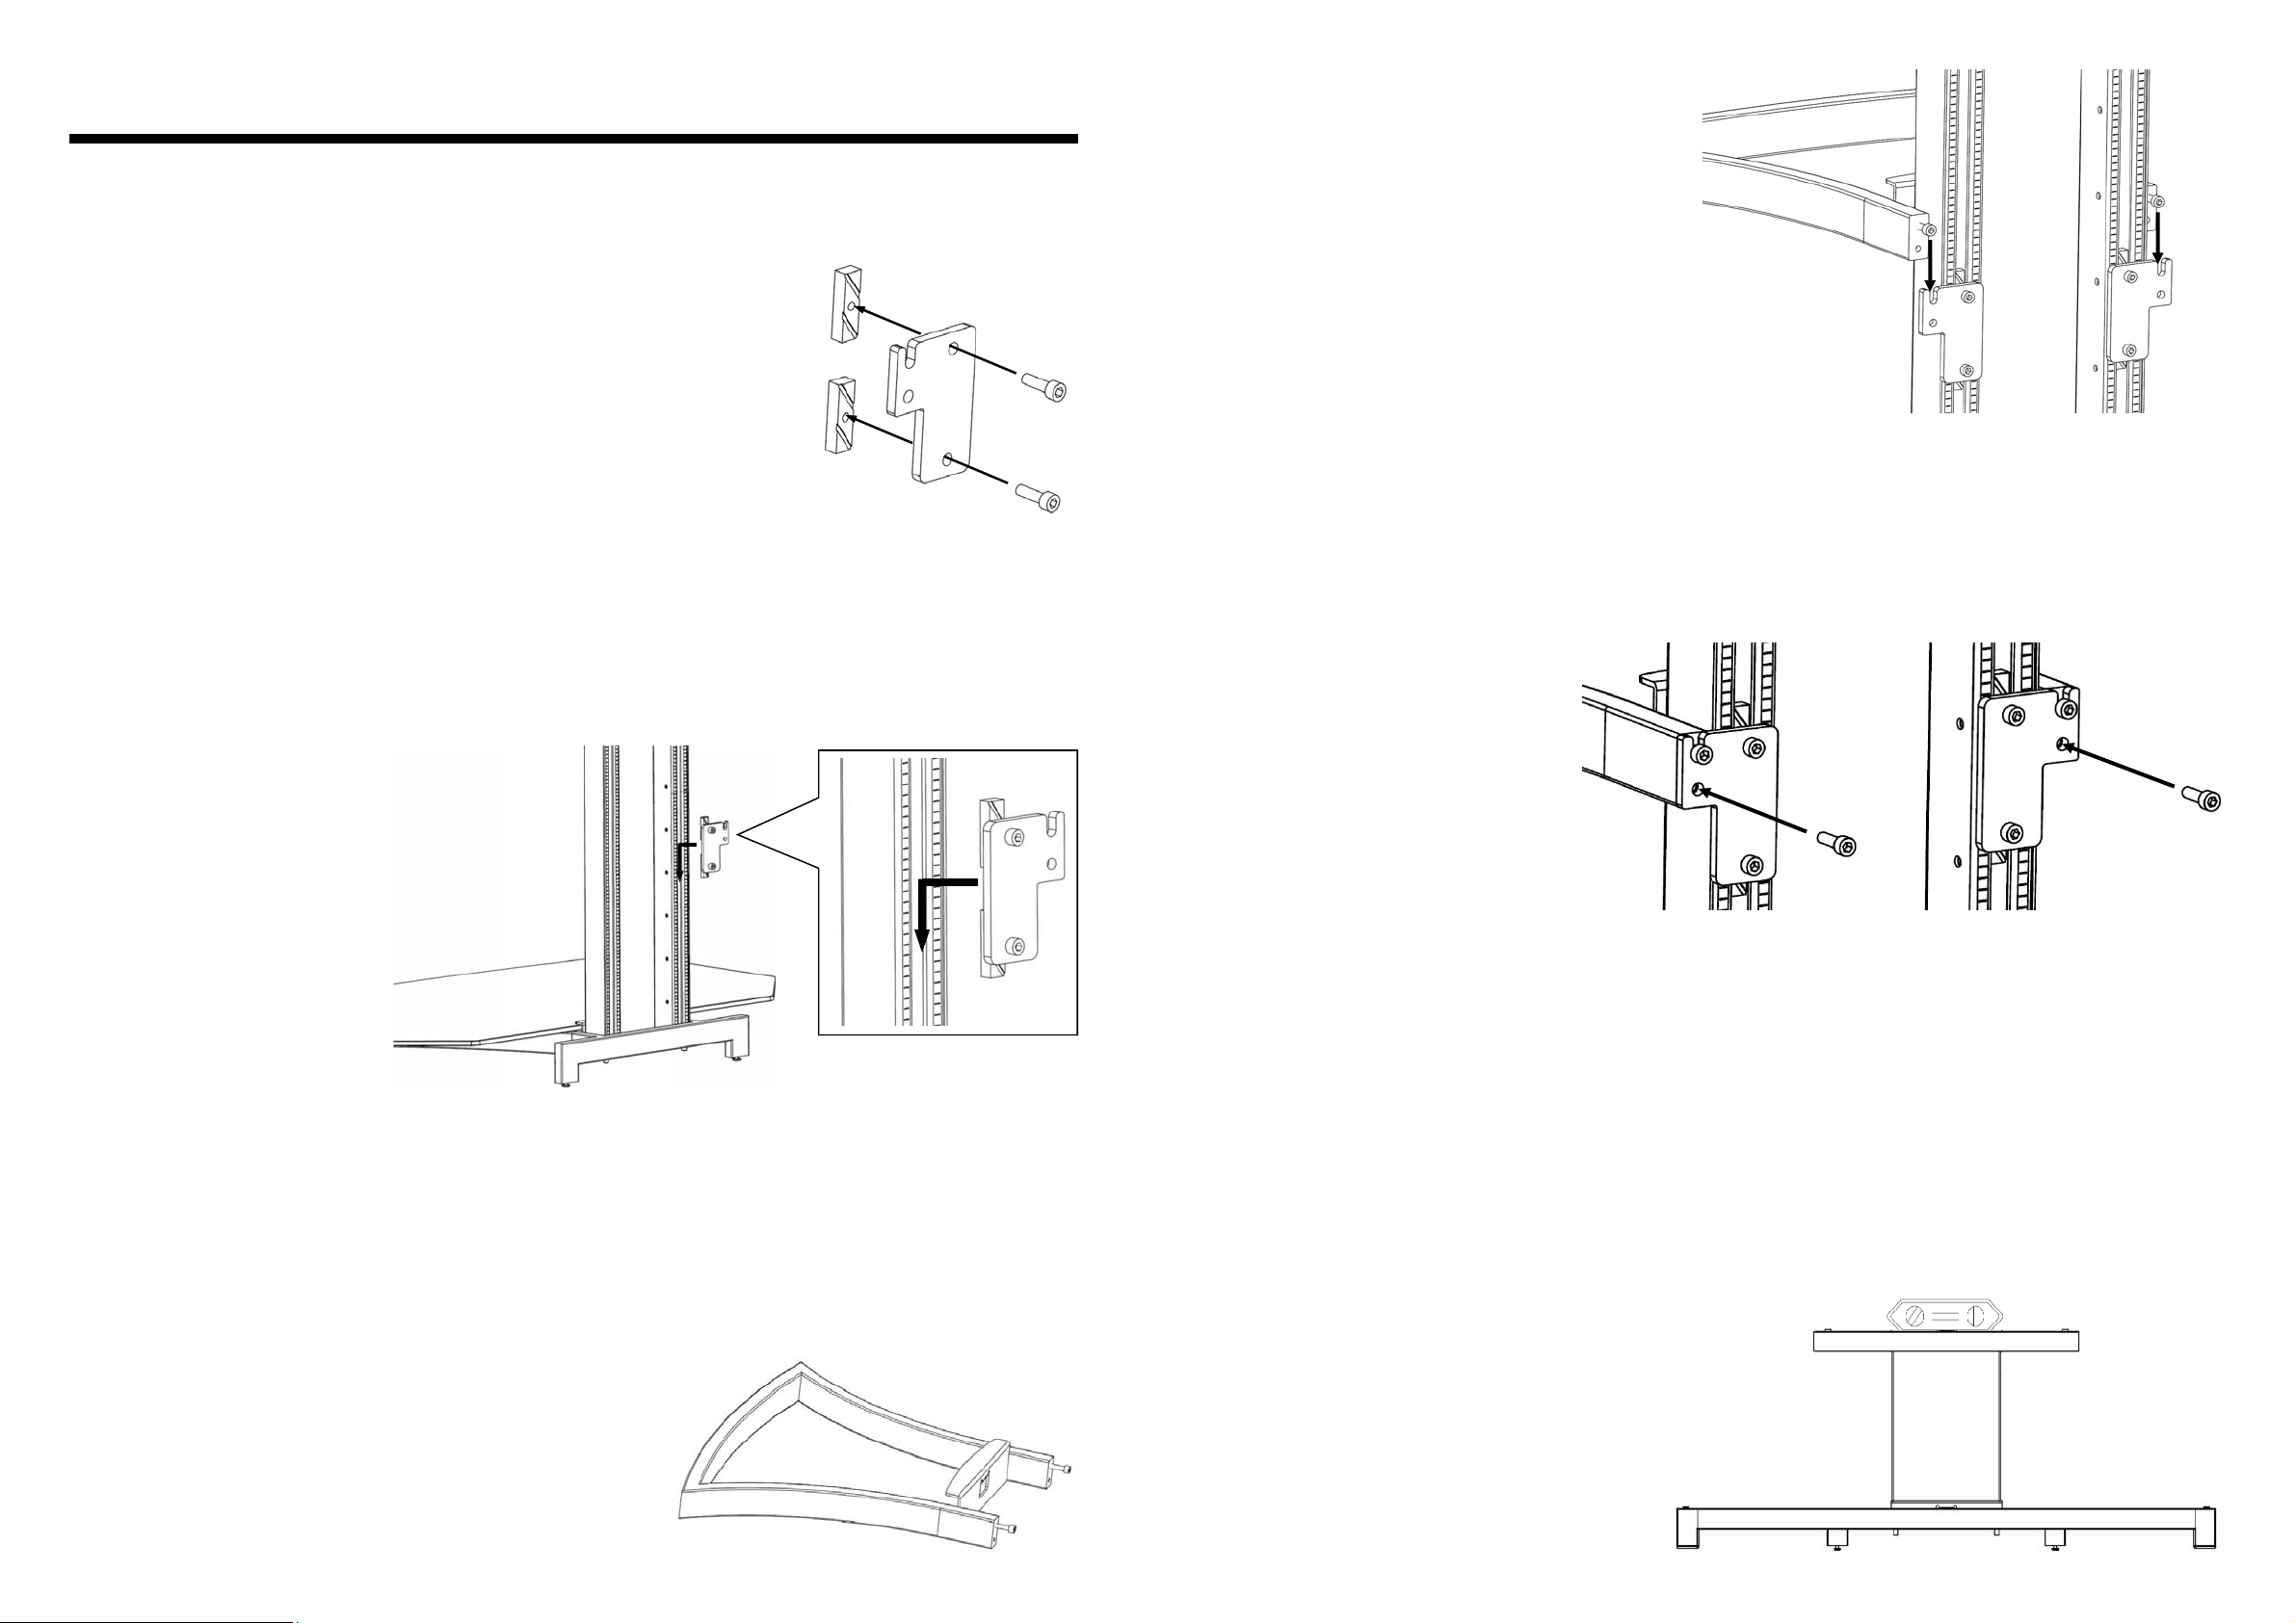
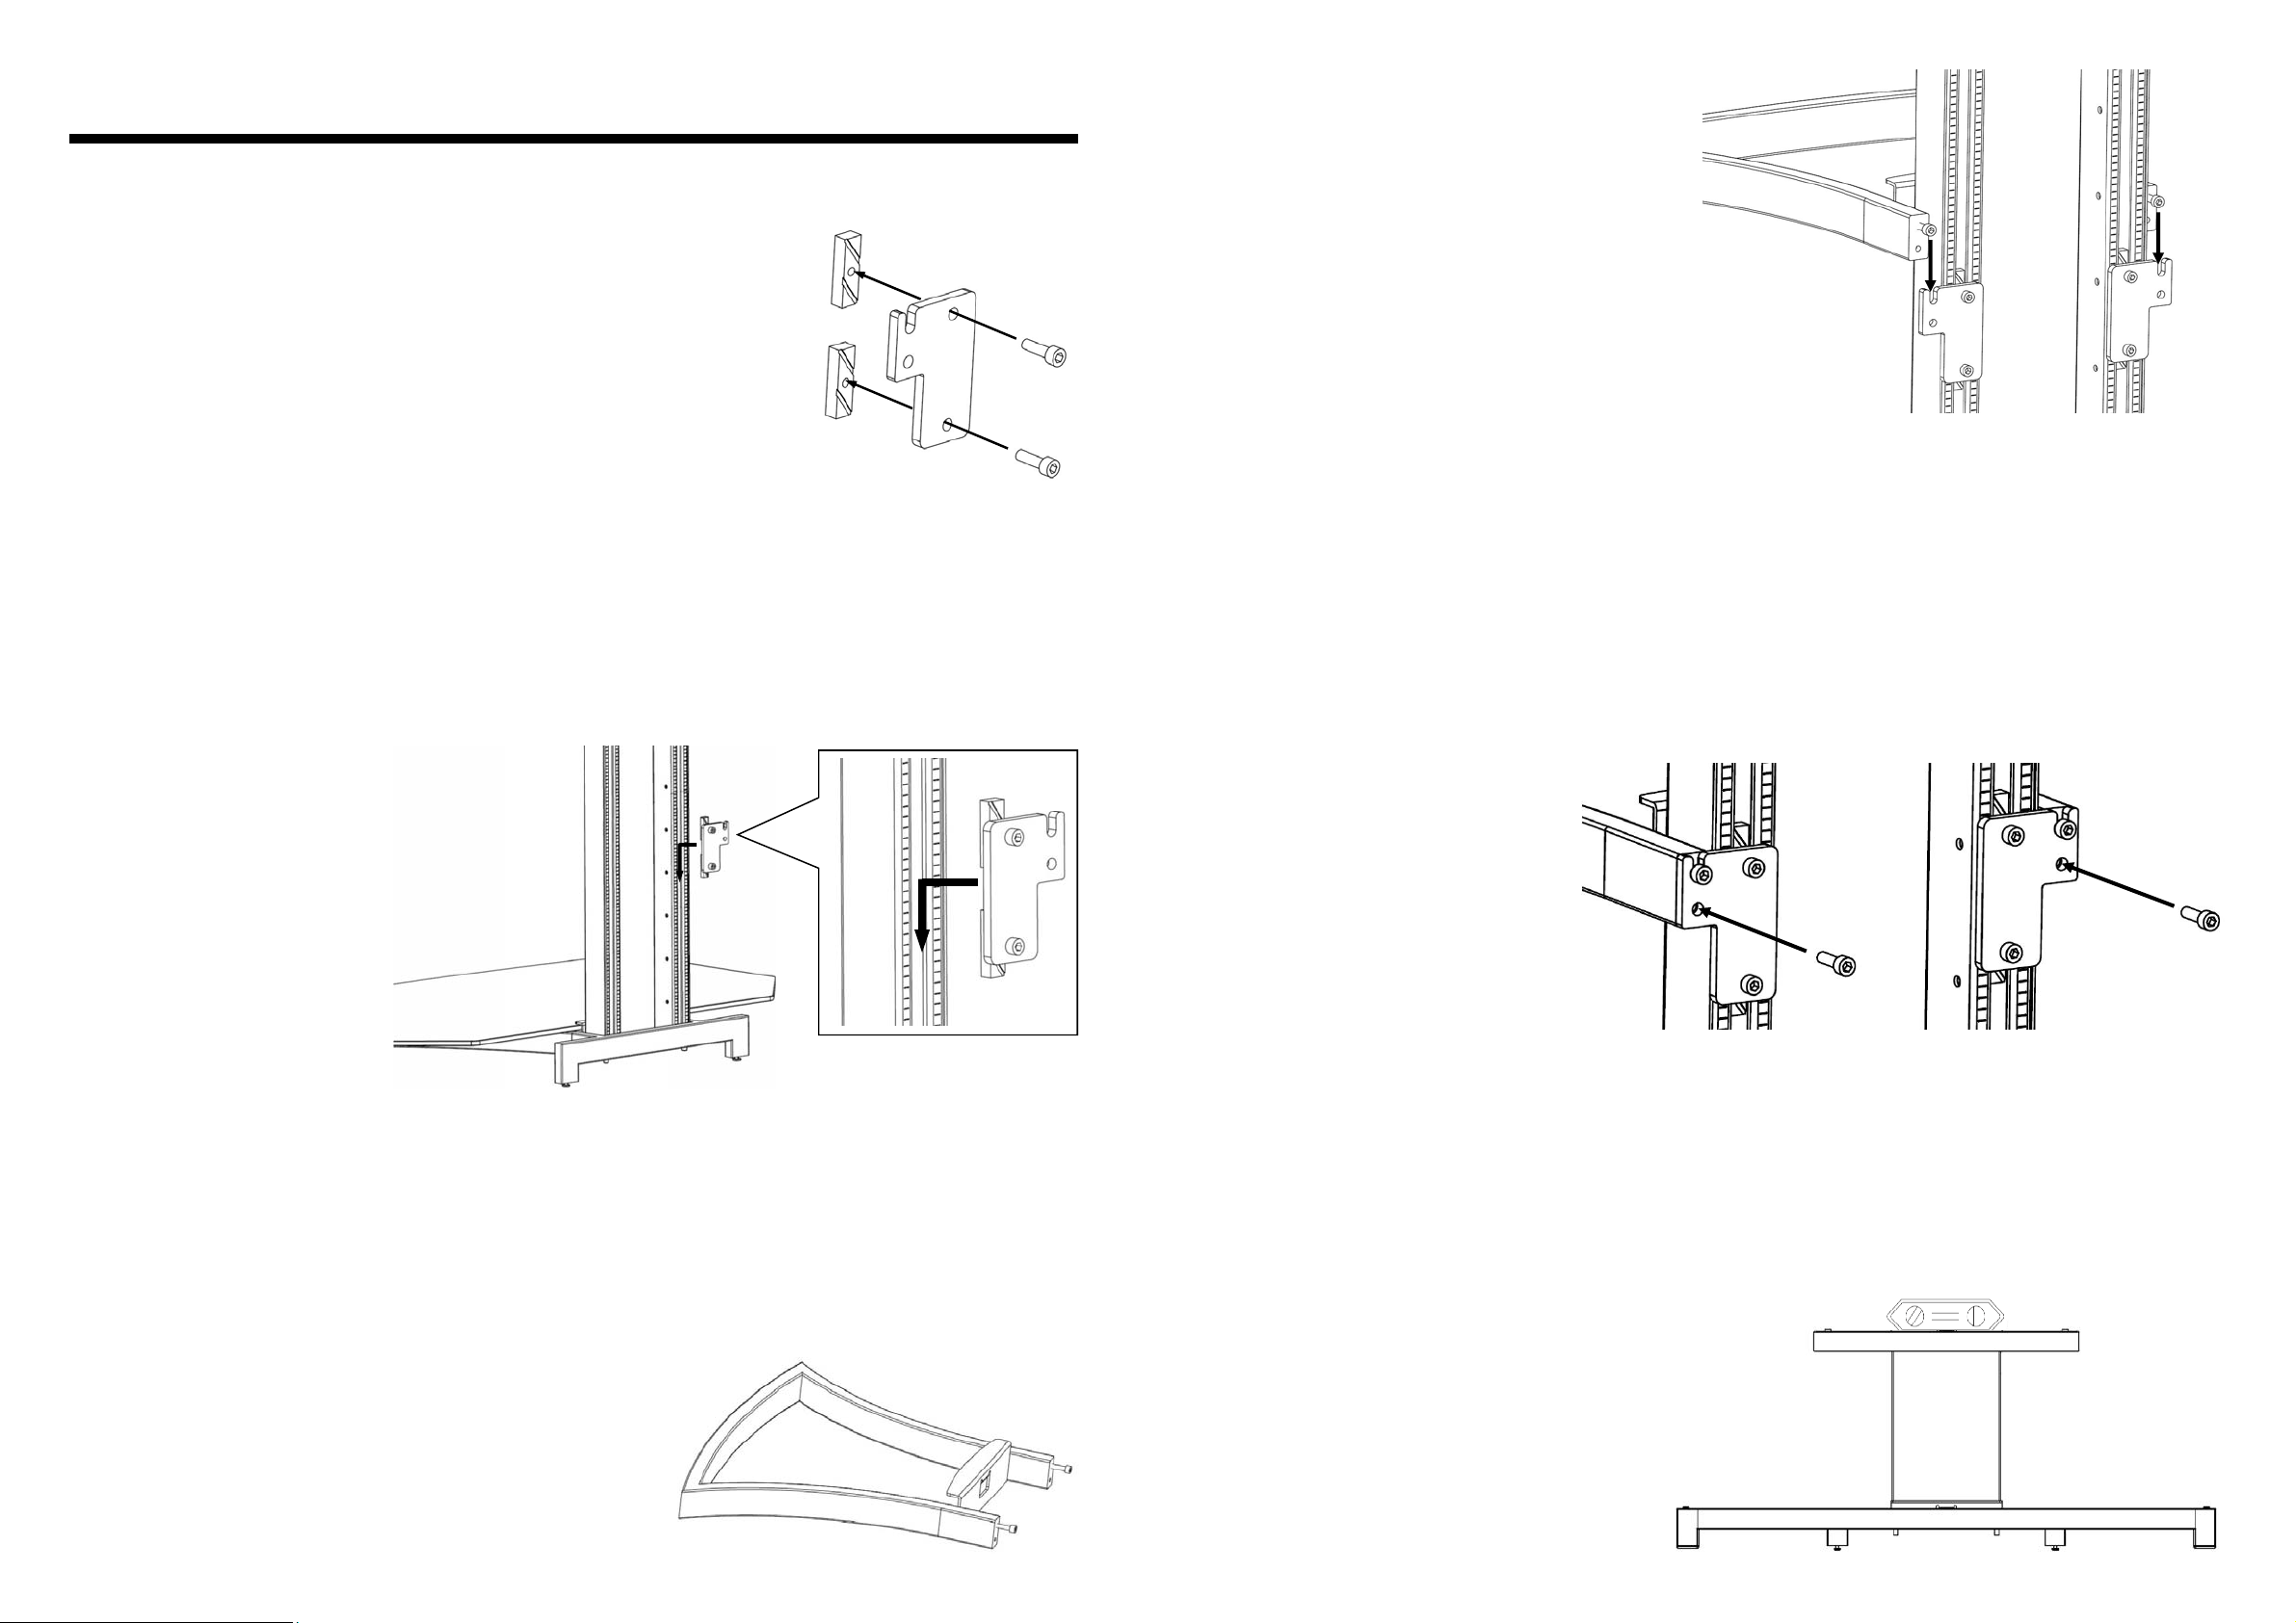
Shelf Assembly
A. Loosely thread two Shelf Screws through each Shelf Bracket and into two Shelf
T-Bars.
D.
D. Установите полку на кронштейн.
A.
B. Slide both Shelf Bracket Assemblies
into the Mounting Post. Then slide them
into the desired position, and, using the
supplied Hex Wrench, tighten both Shelf
Bracket Assemblies. (The Shelf T-Bars
will turn to the right once they are inside the
Mounting Post and you begin tightening
the Screws. When they tighten, they will
grab the inside rails of the Mounting Post
Channel.)
NOTE: Ensure that the Shelf
Bracket is installed with the
notched hole on top and facing
the outside.
B.
E.
E. Затяните верхние винты, затем
вставьте и затяните еще один винт в
нижнее отверстие.
C. Insert a Shelf Screw into each of the Shelf’s top screw holes.
F.
C.
F. Отрегулируйте положение полки с помощью уровня.
Page 3
Русский
D.
Сборка полки
A. Прикрутите кронштейны полки к двум T-образным стержням с
помощью двух винтов.
B. Установите оба кронштейна в сборе на
крепежную стойку. Переместите их в
желаемое положение, а затем, используя
торцевой ключ, входящий в комплект
поставки, надежно закрепите кронштейны.
(Оказавшись внутри крепежной стойки,
T-образные стержни переместятся вправо
после того, как вы начнете затягивать
винты. Когда стержни будут надежно
закреплены, они войдут в зацепление
внутренними направляющими канала
крепежной стойки.)
с
B.
D. Slide the Shelf onto the Shelf Brackets.
A.
E.
E. Tighten the top Shelf Screw, then
insert and tighten another Shelf Screw
into the bottom hole.
ПРИМЕЧАНИЕ. Убедитесь,
что кронштейн полки
установлен таким образом,
что отверстие-метка
расположено сверху и
обращено наружу.
C. Вставьте винты полки в соответствующие отверстия,
расположенные в верхней части полки.
F.
C.
F. Place a level on the Shelf and adjust accordingly.
Page 4

Français
D.
Assemblage de la tablette
A. Visser sans serrer deux vis de tablette dans chaque support de tablette et
dans les deux barres en T de tablette.
B. Glisser les deux supports de tablette assemblés dans la barre de montage.
glisser les supports à la position désirée, puis avec
la clé hexagonale incluse, serrer les deux sup-
ports de tablette assemblés. (Lorsque les barres en T de tablette sont à l'intérieur de la barre
de montage et que les vis commencent à être ser-
rées, les barres en T tournent vers la droite. Lors-
qu'elles sont serrées, elles maintiennent les traverses intérieures dans la rainure de la barre de
montage.)
Ensuite,
B.
D. Schuif het schap op de schapbeugels.
A.
E.
E. Draai de bovenste schapschroef
vast en draai dan een andere
schapschroef in het onderste gat.
REMARQUE : Ne pas oublier
de vérifier que le support de
tablette est installé avec le trou
à encoche sur le dessus et tourné
vers l'extérieur.
C. Insérer une vis de tablette dans chacun des trous de vis de
tablette supérieurs.
F.
C.
F. Plaats een waterpas op het schap en pas aan indien nodig.
Page 5

Nederlands
D.
Montage van schap
A. Draai twee schapschroeven losjes door elke schapbeugel en in twee T-Bars
voor schappen.
B. Schuif de beide schapbeugels in de
montagepaal. Schuif ze in de gewenste
positie en met behulp van de meegeleverde
zeskantsleutel, zet de beide
schapbeugels goed vast. (De schap-TBars zullen naar rechts draaien wanneer ze
in de montagepaal zijn en u begint de
schroeven vast te draaien. Wanneer ze
vast worden gedraaid, grijpen ze de rails in
het montagepaalkanaal vast.)
B.
D. Glisser la tablette sur les supports de tablette.
A.
E.
E. Serrer la vis de tablette supérieure, puis insérer et serrer une autre
vis de tablette dans le trou inférieur.
OPMERKING: Zorg ervoor
dat de schapbeugel
geïnstalleerd is met het gat met
inkepingen bovenop en naar
buiten gericht.
C. Plaats een schapschroef in elk van de bovenste schroefgaten
van het schap.
C.
F. Placer un niveau sur la tablette et effectuer les
réglages nécessaires.
F.
Page 6
Español
D.
Montaje del estante
A. Enrosque dos tornillos del estante a través de cada abrazadera del estante y
en las dos barras en forma de T del estante
B. Deslice ambos soportes de abrazade-
ra del estante en el poste de montaje.
Luego deslícelos hasta la posición deseada y
con la llave hexagonal suministrada, ajuste ambos soportes de abrazadera del
estante. (Las barras en forma de T del
estante girarán hacia la derecha una vez
dentro del poste de montaje y usted comenzará a apretar los tornillos. Una vez
ajustados, agarrarán las guías internas del
canal del poste de montaje).
.
B.
A.
D. Far scivolare il ripiano sulle staffe.
E.
E. Stringere la vite per ripiano
superiore, quindi inserire un’altra vite
per ripiano nel foro inferiore e
stringere.
NOTA: Cerciórese de que la
abrazadera del estante esté
instalada con el agujero rayado
en la parte superior y apuntando
hacia fuera.
C. Introduzca un tornillo del estante en cada uno de los agujeros
para tornillos superiores del estante.
C.
F. Appoggiare una bolla sul ripiano e regolarlo come
necessario.
F.
Page 7

Italiano
Montaggio del ripiano
A. Avvitare senza stringere due viti per ripiano in ogni staffa del ripiano quindi
nelle due traverse stabilizzatrici.
D.
D. Deslice el estante sobre las abrazaderas del estante.
A.
B. Far scorrere entrambe le staffe del ripiano
assemblate nel montante. Farle quindi scivolare
nella posizione desiderata e, usando la chiave
esagonale fornita, stringere entrambe le staffe
del ripiano assemblate. (Le traverse
stabilizzatrici gireranno verso destra quando
vengono inserite nei montanti e si stringono le
viti. Quando si serrano, fanno presa sulle guide
interne del canale del montante).
NOTA: assicurarsi che la
staffa del ripiano sia installata
con il foro scanalato in alto e
rivolto all’esterno.
B.
E.
E. Ajuste el tornillo del estante supe-
rior, luego inserte y ajuste otro tornillo
del estante en el agujero inferior.
C. Inserire una vite per ripiano in ognuno dei fori superiori del
ripiano.
F.
C.
F. Coloque un nivel en el estante y ajuste según corresponda.
Page 8

Deutsch
D.
Zusammenbau des Regals
A. Zwei Regalschrauben durch die Regalhalterung in die zwei Regal-T-
Stahlleisten schrauben, jedoch nicht festziehen.
B. Beide Regalhalterungen in die
Montagestange schieben.
anschließend in die gewünschte Stellung
bringen und beide Regalhalterungen mit dem
im Lieferumfang enthaltenen
Sechskantschlüssel festziehen. (Die Regal-TStahlleisten drehen sich nach rechts, sobald sie
sich in der Montagestange befinden und die
Schrauben festgezogen werden. Beim
Festziehen greifen sie in die inneren Schienen
der Montagestangenführung ein.)
Die Halterungen
B.
D. Das Regal auf die Regalhalterungen schieben.
A.
E. Die obere Regalschraube
festziehen und eine weitere
Regalschraube in die untere Bohrung
einführen und festziehen.
E.
HINWEIS: Es muss
sichergestellt werden, dass beim
Anbringen der Regalhalterung
die Kerbe nach oben und außen
weist.
C. Eine Regalschraube in jede obere Bohrung des Regals einsetzen.
C.
F. Eine Wasserwaage auf das Regal legen und die
erforderlichen Einstellungen am Regal vornehmen.
F.
 Loading...