


PAG000726-02 072016
Omni-ID Sato CL4NX Guide
Omni-ID office locations: US | UK | China | India | Germany

2
Please refer to Sato and NiceLabel user guides for detailed instructions
CONTENTS
PRINTER SETUP ...................................................................................................................................... 3
RIBBONS ................................................................................................................................................ 5
PRINTER SETTINGS ................................................................................................................................. 6
OPTIMIZED ENCODING SETTINGS FOR OMNI-ID LABELS .......................................................................... 9
SOFTWARE SETUP ................................................................................................................................ 11
PRINT TROUBLESHOOTING ................................................................................................................... 14
ENCODING TROUBLESHOOTING ........................................................................................................... 14
LABEL ORIENTATION ............................................................................................................................ 15
ENCODING STANDARDS ....................................................................................................................... 17

3
PRINTER SETUP
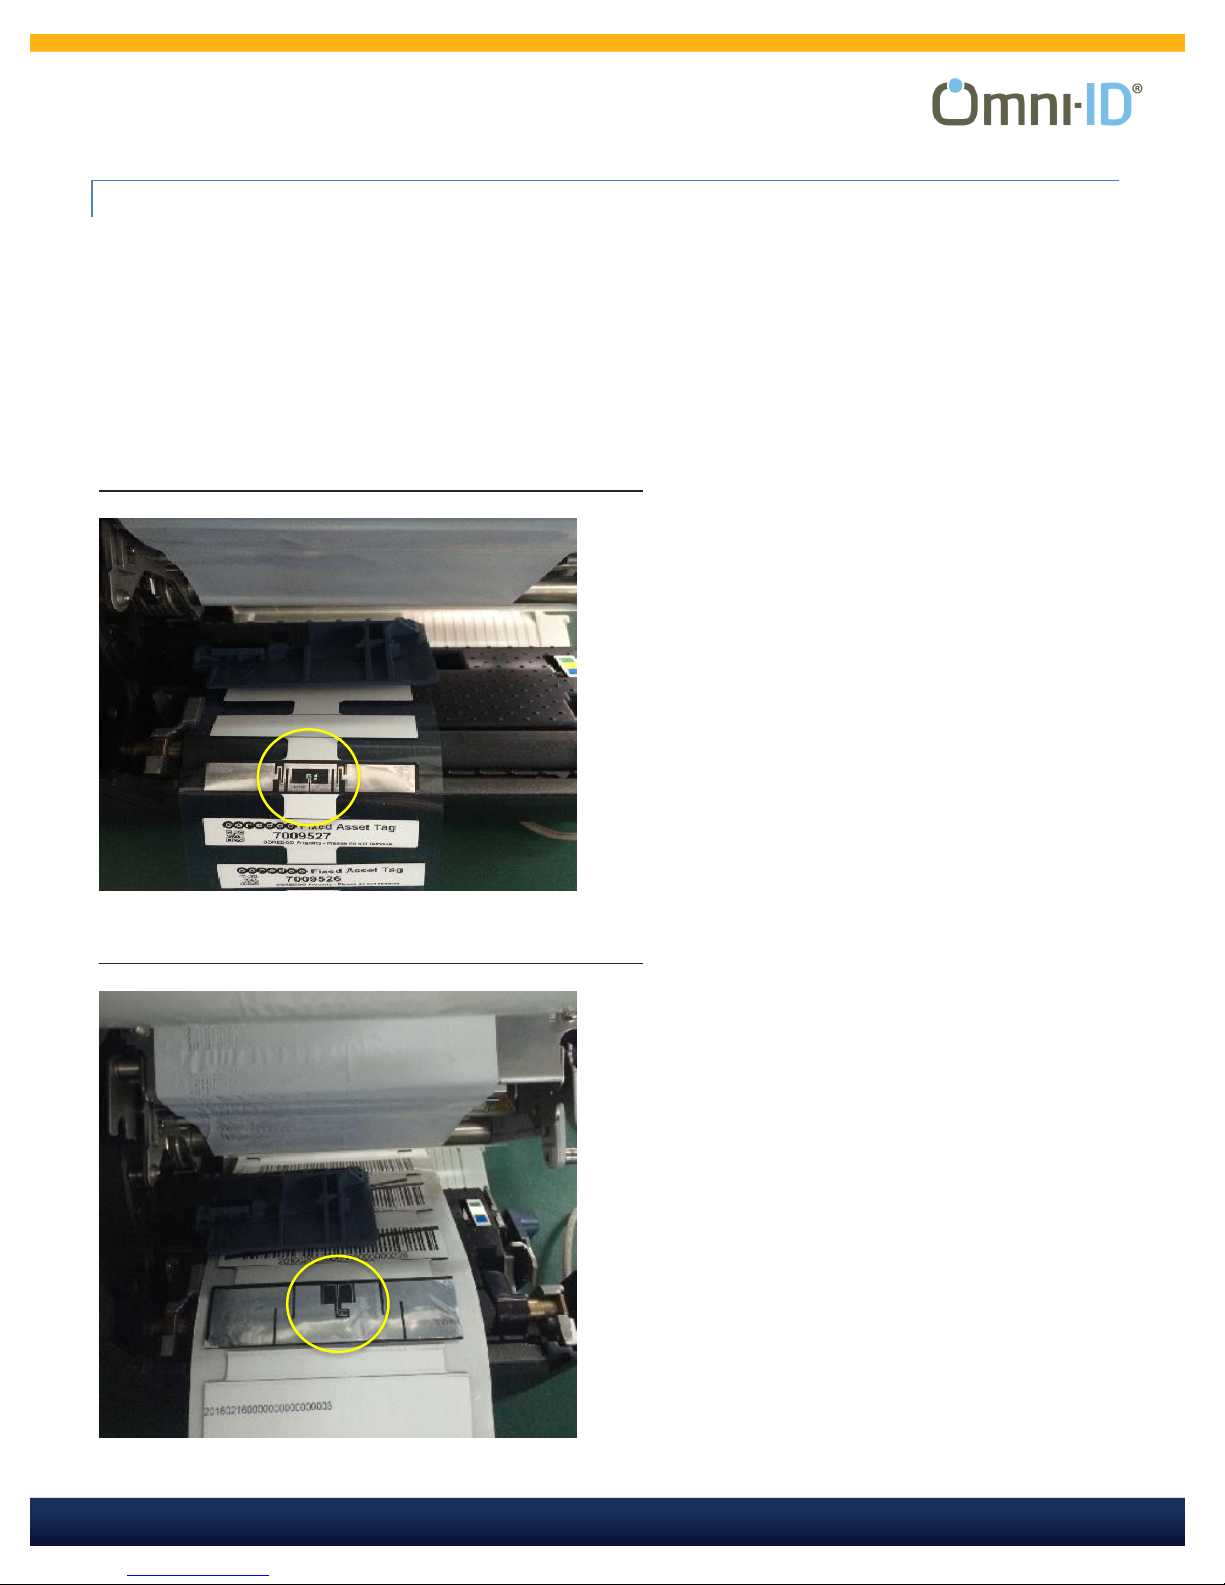
The following photographs will help you to load label rolls in the printer correctly.
1. Load label spool and lock in place with the Guide Arm.
2. Slide Guide 2 to the rightmost position and then move it back left to secure the label.
Note: The Sato CL4NX has a sliding Gap and I-Mark sensor arm.
3. Locate the Gap Sensor to a position where it is able to detect the start and end of the RFID label.

4
4. Feed the labels under the Print Head
Head pressure dials are located on top of the print head; these should be adjusted so that the
print quality is consistent without applying excessive pressure.
5. Final result

5
RIBBONS
Omni-ID has validated ribbon compatibility with:
Manufacturer
Product
Type
SATO
Y70110200720
Full resin carbon ribbon
Load the ribbon into the printer so that the matt surface is visible to the human eye from the front of the
printer.
The matt surface is the printing side and correct positioning will ensure correct printing onto the media.

6
PRINTER SETTINGS
This section provides specific details and guidelines associated with encoding Omni-ID labels.
1. Setup RFID functionality of the printer, using the main control panel.

7
Printer must be calibrated for each label correctly
Gap sensing: Gap sensing must be used at all times; this will use the
leading edge of the frame label to align the print with the commands sent
from your software. Calibration of the Gap levels is required each time a
different label type is used. This can be found under advanced printer
settings, Gap Levels.
Important Settings
Darkness: Darkness should be adjusted to achieve optimal print quality.
Slowest speed: The slowest print speed that is available should be used to print
Compound labels: This is typically 2 inches per second.
Advanced printer adjustments: Pitch and offset should be set to 0mm.
Print Mode: Print Mode should be set to continues, with No Back feed. This is to avoid causing damage
to the printer. The thicker IQ labels can damage the RFID antenna bracket if the off mode is used. This
is due to the labels catching on the bracket as they back feed.
Printer Antenna
Sato CL4NX offers two antennas for RFID encoding: Standard and Short. Only one antenna can be used
for encoding, not both at the same time. For encoding Omni-ID labels the Short antenna is
recommended.

8
Prioritize
The printer settings can be prioritized to override the command settings and we do recommend you
do this to avoid any erroneous settings in the command reaching the printer.
Command settings are those created in the label design software and the default setting on the
printer.
On the printer menu screen:
• Printing
• Advanced
• Prioritize
• Settings
• when complete

9
OPTIMIZED ENCODING SETTINGS FOR OM NI -ID LABELS
To achieve the best performance when encoding, the power should be set to the certified level. This level
has been validated to ensure that adjacent labels are not programmed in error (*).
(*) due to the size of the small IQ Label tags the sensor in the print head can sometimes detect the
information from the tag behind, so it is necessary to change the sensor pitch to read the right tag and
print the associated information.
The maximum pitch
offset on the Sato
CL4NX printer menu
system is -3.75mm so if
the pitch offset is more
than that, you must set
it in the NiceLabel
software:
Print Mode
Backfeed
Pitch offset

10
The table below provides the optimal settings for all variants of Omni-ID IQ Label tags:

11
SOFTWARE SETUP
Recommended software for Sato CL4NX is NiceLabel Pro, Please Refer to NiceLabel Designer Pro user
guide for detailed instructions (link is on Page 2)

12

13

14
PRINT TROUBLESHOOTI NG
Issue
Possible Cause
Solution
Labels won’t feed
Sensor location
Sensor setting
Re-locate sensor
Check gap sensing in menu
Re-calibrate sensor if necessary.
Barcode not straight
Labels slipping
Increase head pressure or change
roller under head
No print at all
Ribbon in upside down
Wrong ribbon
Turn ribbon around
Change ribbon to known good ribbon.
Partial print on one side
Head pressure
Re-balance
Print blurring
Too much ink
Reduce darkness
Print too light
Too little ink
Increase darkness
Slow print speed
Increase head pressure both sides
ENCODING TROUBLESH OO TING
Issue
Possible Cause
Solution
Multi tag error
Reading more than one tag
Turn the read power down
Tag not found
Cannot read or write the ag
Adjust the read and/or write power
Read only error
Calibration is wrong
Turn the write power up
Encoding adjacent label
The distance between
labels is too small
Adjust Tag offset
Printer missing tag between
each printed tag
Gap Levels Incorrect
Re calibrate Gap Levels
Print without RFID encoding
‘Write data to RFID tag’
deselected
Select ‘write data to RFID tag’ in s/w
WRITE TAG ERROR
displayed on label and
RFID tag error code
# 1018 displayed
Encoding data type is set to
ASCII string
Select HEX encoded string in data type
menu
15
LABEL ORIENTATION
Omni-ID IQ Label tags are supplied on the roll with the media facing out and the antenna facing up. This
is the position the labels should be retained in for successful encoding and printing.
If in any instance you unroll the labels (i.e. to split a large roll into a smaller roll), you must ensure to reroll them in the correct orientation.
The images below show the antenna exposed and in the correct orientation:
IQ 150 in printer – media facing out, antenna facing up
IQ 600 in printer – media facing out, antenna facing up

16
IQ 100 in printer – media facing out, antenna facing up
IQ 400 in printer – media facing out, antenna facing up

17
ENCODING STANDARDS
Omni-ID tags can be encoded with any hexadecimal code, however GS1 have interoperability
standards which can be used to help in situations where multiple organizations need to read the tag.
Examples of such standards include: SGTIN-96, GIAI-96 and GID-96
It is the Users responsibility to define the code if Omni-ID is providing service bureau.
See “Omni-ID Standard Service Bureau reference guide” for assistance with sequencing compliance
Example of GID-96bit scheme:
Header – This is a static binary number (which is converted into hexadecimal) that identifies that the
coding system being used is GID-96bit.
General Manager Number – This is a number which identifies the Company which is responsible for
allocating the object class and the serial number, this is assigned by GS1/EPC global.
Object Class – This number defines the type of item that is being tagged, this might be a type of
hardware, or a component in a larger assembly.
Serial Number – This is the unique number used to identify the specific item, typically this is the part
of the EPC number that this serialized.
 Loading...