

Page 1

OmniOutliner
PRO
Manual
Page 2

OmniOutliner
PRO
Manual
Version 3.0
Page 3

Copyright © 2000-2006 The Omni Group. All
rights reserved. OmniOutliner, the OmniOutliner
icon/logo, and the Omni logo are trademarks
of The Omni Group. Apple, the Apple logo,
AppleScript, Mac, Macintosh, the Mac logo, and
the QuickTime logo are trademarks of Apple
Computer, Inc., registered in the U.S.A. and
other countries. Microsoft and Microsoft Word
are either registered trademarks or trademarks of
Microsoft Corporation in the United States and/
or other countries. Other names and trademarks
mentioned herein may be trademarks of their
respective companies.
Page 4

Contents
Chapter 1
Chapter 2
Chapter 3
Chapter 4
Chapter 5
5 Hello!
5 Welcome to OmniOutliner
5 Welcome to This Manual
7 What’s New
7 Interface Improvements
7 Document Improvements
8 Printing Improvements
8 Pro Features
11 Installation
11
How to get OmniOutliner on your Mac so you can start working
13 Let’s Try It
13 Meet the Outliner: an overview of OmniOutliner’s interface
16 Mini-tutorial: Essential Keys
17 Tutorial: Selecting, Moving Around, and Styling
24 Tutorial: Columns, Notes, and Sorting
31 An In-Depth Look
31 Inspectors
37 Toolbar
38 Utility Drawer
40 Particularly Useful Features
43 Preferences
46 Import, Export, Save, Print
Chapter 6
49 Help
49 Try the Online Help
49 Keyboard Commands
50 Further Help
Page 5

Page 6

Hello!
Welcome to OmniOutliner
We all have ideas knocking around in our heads. OmniOutliner is for getting
those ideas out into the open where you can see them, shufe them around, neatly
present them, and share them with other people. With it, you can quickly jot down
notes into a list, or you can forge monumental masses of information into shape
with pixel-by-pixel precision.
Hierarchical lists and tables can be used to express nearly any idea you have.
You probably already write them all the time on paper or with word processors
and spreadsheet programs. But OmniOutliner is specically built for list and table
creation, so it’s more powerful than a word processor, while being lighter and
cleaner than a spreadsheet.
OmniOutliner is designed to be fast and simple, so you can jump in, start getting
things done right away, and worry about the intricacies later. But it’s also powerful,
so that once you are ready, you can exert a nearly supernatural level of control
over your data. We’re not kidding; it’s spooky.
Welcome to This Manual
OmniOutliner seems simple at rst, and you can actually use it quite happily
without delving into its innermost features. But then you’d be missing out on much
of the fun. This manual is here to introduce you to some of the things you might
not discover on your own; not everyone is the rash, adventurous type who goes
selecting every menu item just for amusement.
You can refer back to this manual for general guidance and ideas. If you have
a question about a specic detail, try the searchable help les in OmniOutliner’s
Help menu.
Page 7

Page 8

What’s New
This is just a list of the most prominent new features; for actual explanations of how
they work, check the appropriate sections of this manual or use OmniOutliner’s
Help menu.
Interface Improvements
• Inspectors
The Info panel has been replaced by ve Inspectors you can arrange around
the screen however you like. They let you control every aspect of your out-
line, from whether you want the le to be compressed on your hard drive,
to setting each letter’s underline to a different color thus making a rainbow
underline, just because you can.
• Batch Find
You can now search your whole outline at once. All of the matching results
will show up in the Utility drawer and update with each letter you type, so you
get results now now NOW.
• Inline Notes
Now you have the option of displaying notes right beneath the items they’re
associated with, rather than in a pane at the bottom of the window. This way
you can see all of your notes without having to select each item in turn, opening up all sorts of new uses for the notes feature.
Document Improvements
• File Attachments
You can now put any kind of le right inside your outline. Images are viewable,
audio and movie les are playable, and any other kind of le will open in the
appropriate application when clicked.
Continued on next page
Page 9

8 � Document Improvements
• Styles
OmniOutliner 3 has a hugely improved style system with which you can apply
styles on several different levels, with attributes cascading into lower levels.
• Automatic Backup
Your outlines can be automatically backed up at regular intervals, so that you
don’t lose data in the event of a power outage or (horror!) a crash.
Printing Improvements
• Filtering
You can choose to print only certain columns, only checked or unchecked
items, only selected rows, or any combination thereof.
• Scaling
Outlines can be automatically scaled to t within the printed page’s width.
Pro Features
The new Professional edition of OmniOutliner includes these additional features,
as if it weren’t already cool enough.
• Clippings
You can use OmniOutliner as a clipboard by sending useful or interesting text
clippings to it from other applications. Say you’re reading some web page
and you come across a brilliant joke, or a tasty-looking recipe, or a practical
and renewable clean energy source. Just highlight it and use the Services
menu send it to OmniOutliner, where it’ll be stored away in a special outline
of your choice, organized by date.
• Multiple document templates
Create several different document templates that have all of the formatting
and preliminary structure set up just how you like them for different kinds of
work.
Page 10

Pro Features � 9
• Audio recording
Pro users will nd a Record button in their toolbars, with which audio les
can be recorded and placed right into the outline. Save an audio version of
the lecture you’re taking notes for, hum the melody of the song you’re writing,
or just record your extraordinarily vocal cat’s yowling.
• Named styles
Combine several attributes into custom named styles, then use them across
and between documents.
• Row folding
Multi-line rows can have their text folded into one line until you select them,
compressing your outline down to a more viewable size.
• Microsoft® Word export
Now you can associate with people who use Microsoft Word again.
• Multi-column sorting
The Professional edition can sort items based on values in several different
columns at the same time.
• Headers and footers
You can set up custom headers and footers for your printed outline, with
different settings for the rst page and the rest of the pages. Headers and
footers can contain page numbers, modication dates, and other bits of in-
formation that automatically update themselves as you work.
Page 11

Page 12
Installation
1. Mount the Disk
If you have a physical OmniOutliner disk that came in a box, put the disk in
your Mac’s CD or DVD drive. If you have downloaded an OmniOutliner disk
image, double-click it (the .dmg le) to mount it.
2. Copy the Application
Drag the OmniOutliner application icon from the disk into your Applications
folder. This can be the Applications folder in the top level of your hard drive
(so that all users on your Mac can use it) or the one in your home folder (so
that only you can use it).
3. Run OmniOutliner
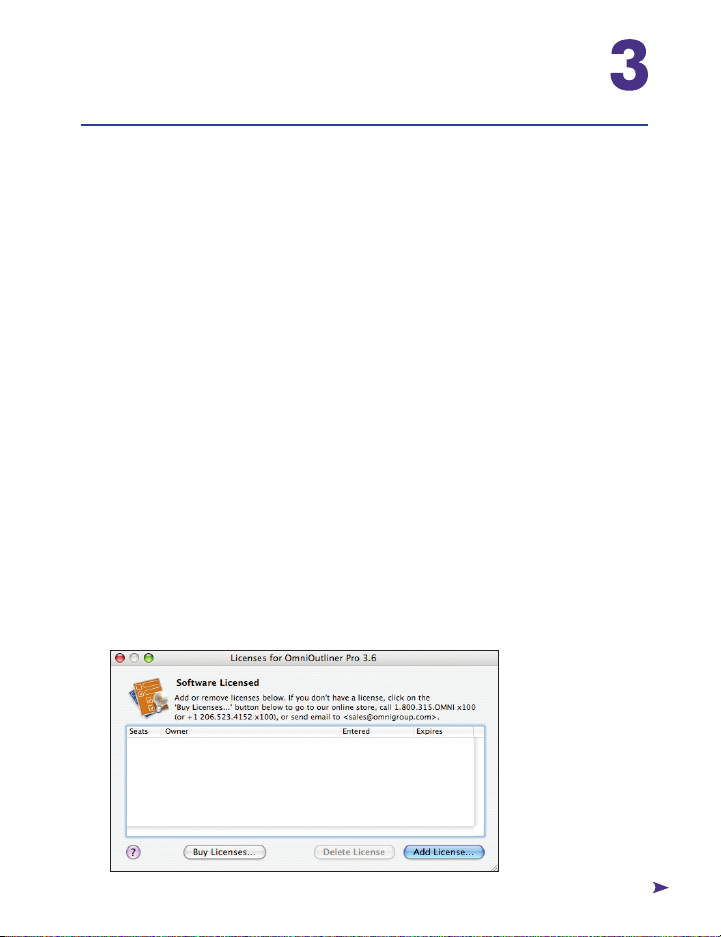
Double-click OmniOutliner to run it; if this is the rst time you’ve used it,
and you don’t have any licenses installed yet, you’ll see the Licenses dialog.
If you don’t see it, and you want to install a license, select Licenses from the
OmniOutliner menu.
4. Add a License
Click the Add License button. In the sheet that appears, type your name into
the Owner eld, and your license key into the License Key eld. If you bought
OmniOutliner in a physical box, your license key should be printed on the CD
sleeve. If you bought OmniOutliner online, you can copy the license key from
the e-mail receipt into the License Key eld.
Continued on next page
Page 13

12 � Installation
Choose from the three different types of OmniOutliner licenses:
• A Computer license can be used by you and any other user on your computer. This is the most basic type of license.
• A Personal license can only be used by you, the user who installed it. You
can, however, install and use it on any number of different computers.
• A Network license is for settings such as companies and schools, to allow
a certain number of users on the network to use the software at once.
Once your license key is accepted, click the Save button and you’re set!
Page 14
Let’s Try It
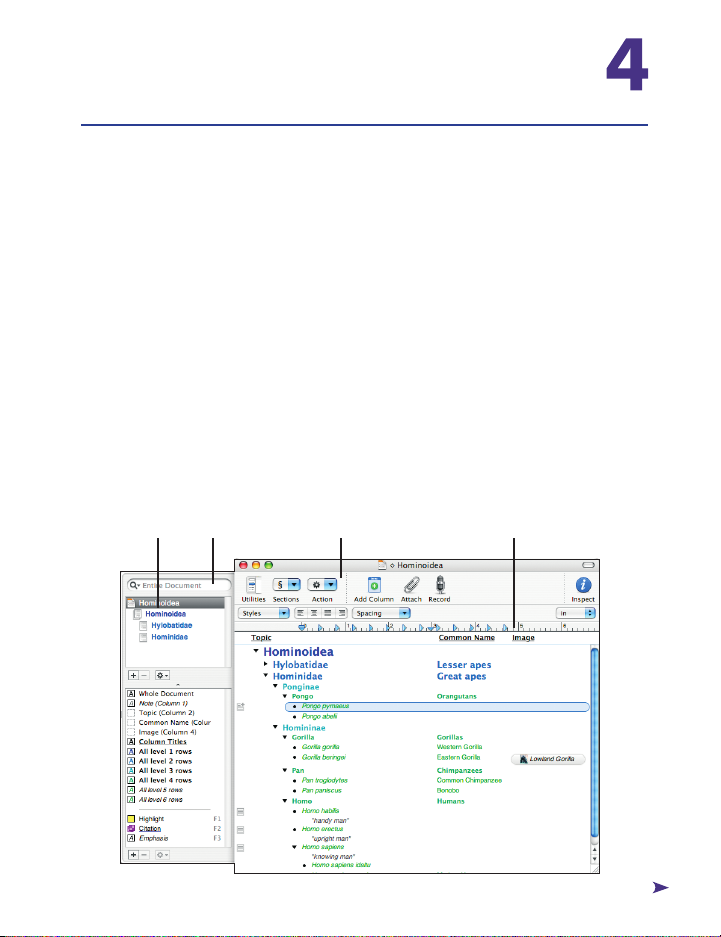
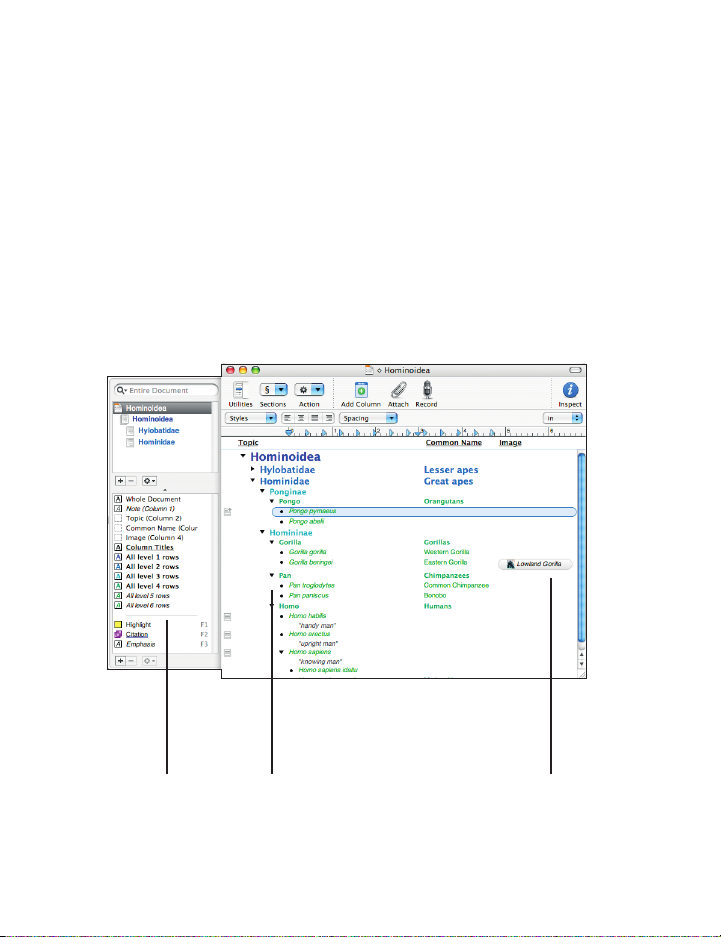
Meet the Outliner
Sections list
OmniOutliner Pro’s sections list gives you an overview of your outline and a quick
way to focus on one portion of it.
Batch nd
Use the batch nd eld to search your entire outline instantly.
Toolbar
The customizable toolbar. You’ve probably seen this on a lot of ne Mac OS X
applications; it works just as you’d expect.
Ruler
OmniOutliner fully supports Rich Text formatting; use the controls on the ruler to
whip that text into shape.
Sections list
Batch nd
Toolbar
Ruler
Continued on next page
Page 15
14 � Meet the Outliner
Meet the Outliner
Attachments
Attach les and view them directly from within the outline.
Outline
Your outline can have as many items, columns, and levels of indentation as you
like.
Styles palette
Ah, the styles palette. Set up custom styles based on row, column, and level, or
use OmniOutliner Professional to create your own named styles for use wherever
you like.
Styles palette
Outline
Attachments
Page 16
Meet the Outliner � 15
Inspectors
Five friendly inspectors contain a cornucopia of controls, and politely go away
when you don’t need them.
Appearance
Row
Column Type
Document
Style Attributes
Page 17

16 � Mini-tutorial: Essential Keys
Mini-tutorial:
OmniOutliner is colossally useful right away. For the most part you can start typing
an outline just as you would in, say, a word processor.
There are just a few special keys you should know about:
• Return
Hitting return will create a new item below the currently selected one.
Shift-return will create one above it instead.
• Tab
Hitting tab will indent the selected item, making it a child of the item above
it. Shift-tab will outdent it.
• Escape
Escape (probably esc on your keyboard) will switch between selecting a row
and editing the text of that row.
That’s all you really need to know right off the proverbial bat (but note that the behavior
of Return and Tab can be customized in the Keyboard preferences). Armed with this
knowledge, you can make all sorts of nicely organized lists and outlines. Feel free to
experiment; you can always Undo all the way back to the last time you saved. Coming
up are some more detailed tutorials; you can read them later if you’d like to play
around with the program for a while rst.
Essential Keys
About familial relationships
When outlining, we use familial terms to refer to the relationship between
items. Think of your outline as a family tree; if you have an item that “contains”
other items, it is their “parent”, and they are its “children”. So in your shoppinglist outline, the parent item “Cereal” might contain the child items “Corn
OO3 TIP
Flakes” and “Chocolate Frosted Sugar Bombs”. This metaphor extends to the
use of words like “grandparent” and “cousin” as well. Furthermore, an item’s
children, grandchildren, and so on are collectively called its “descendants”,
while its parent, grandparent, and so on are called its “ancestors”. Remember,
though, that while an item can have multiple children, it can only have one
parent, grandparent, or any other level of ancestor.
Page 18

Tutorial: Selecting, Moving Around, and Styling � 17
Tutorial: Selecting, Moving Around, and Styling
1. Welcome
We’re going to write a little story, and in the process learn about some of the
basics of OmniOutliner. Create a new, empty outline by selecting File ‣ New.
Type “CHAPTER I” and hit return. This puts your cursor at the beginning of a
new bulleted item on its own row. Are you excited yet!?
2. Creating Items
Go ahead and type some paragraphs, hitting return after each one just like
you would in a word processor. Each time you hit return, a new row will be
created below the one you were just editing.
Continued on next page
Page 19

18 � Tutorial: Selecting, Moving Around, and Styling
3. Selecting Multiple Items
Let’s put the paragraphs you typed inside the chapter heading. Select all of
the paragraphs by clicking in the rst row’s gutter, that is, the empty area just
to the left of its bullet, and dragging down through the gutters of all the rows
you want to select.
4. Indenting Rows
With all of your paragraphs selected, press Tab and they will all be indented,
becoming children of the chapter heading row above them. The chapter
heading’s handle will change from a bullet to a triangle, showing that you can
now expand or collapse it as you please.
Page 20

Tutorial: Selecting, Moving Around, and Styling � 19
5. The Appearance Inspector
You can use Rich Text formatting to style your documents. On your screen you
should see the Appearance inspector, which lets you control the formatting of
any text in your outline. If someone closed the Appearance inspector on you,
just select it from the Inspectors menu.
6. Styling text
In one of your paragraphs, highlight some text you’d like to italicize. In the
Appearance inspector’s Font section, click the Italic checkbox. Congratulations,
you have set the style of that particular text to italic.
Continued on next page
Page 21

20 � Tutorial: Selecting, Moving Around, and Styling
7. Styling a Row
Particular bits of text within a row are the most specic place to which you can
apply styles, but by no means are they the only place. You can, for example,
set the style of a whole row. Select the parent row that contains your chapter
heading. That is, don’t just select the text inside, but select the row itself by
clicking its gutter. Then click the Weight pop-up menu in the Appearance
inspector and select Bold. Okay, great, the chapter heading row is now bold.
But it gets better.
Page 22

Tutorial: Selecting, Moving Around, and Styling � 21
9. Automatic Level Styles
Put your cursor at the end of your last paragraph and hit return to create a new
row. Type “CHAPTER II”. Outdent this new row by hitting shift-tab or dragging
its handle to the left. Something cool has happened! The row automatically
becomes bold, just like the other chapter heading. See, OmniOutliner watches
as you create rows, and if all of the rows on a certain indentation level have
the same style, it creates a level style that gets applied to any new rows at that
level. Yes, a level style. Not only can individual pieces of text or whole rows
have styles, but so can indentation levels.
Turning Off Our Helpful Features
OmniOutliner is set up so that most people will be able to get most of
their work done without ever having to ddle with any controls. That’s
why things like Automatic Level Styles are on by default. If you’d rather
OmniOutliner didn’t automatically create level styles for you, just deselect
OO3 TIP
the Automatic Level Styles item in the Format menu.
Continued on next page
Page 23

22 � Tutorial: Selecting, Moving Around, and Styling
10. The Style Palette
Let’s visit the style palette and learn more. Open up the utility drawer by
clicking its toolbar icon or by selecting it from the View menu. At the bottom
of the utility drawer is a style palette that contains all sorts of styles you can
set up for your outline. For each style there is a little square chit that approximates what the style looks like. You should see your bold style already
set for All level 1 rows; this was automatically set because all of your level
1 rows were bold.
You can explicitly set these styles, too, instead of just letting them happen
automatically. Try clicking the All level 1 rows entry and then increasing the
font size with the Appearance inspector. All of your level 1 rows will obey the
new style. We’re really cooking now!!
Okay, more styles. If you haven’t noticed yet, styles are a major part of this
application. Say you don’t care for the default font and you’d like to see your
story in a different one. You could click Whole Document in the style palette
and then set a new font that would apply to every bit of text in the whole le.
That’s another place where we can set styles: the whole document.
Page 24

Tutorial: Selecting, Moving Around, and Styling � 23
11. The End
You can continue on like this and OmniOutliner will automatically format
any new items according to the styles you have set up. That about wraps up
this tutorial.
Page 25

24 � Tutorial: Columns, Notes, and Sorting
Tutorial: Columns, Notes and Sorting
1. Document Settings
Great, now let’s balance your monthly budget. “Whoa,” you say, “the same
application I use to write the Great American Novel can also be used to keep track
of my cheese-snack-cracker purchasing habits?” Absolutely. Open up a fresh,
new outline and let’s get started. Just to make it look all ofcial and stuff, turn on
alternate row coloring in the Document inspector and pick a nice nancial-looking
color. While you’re at it, turn on the horizontal and vertical grid, and turn off status
checkboxes since you won’t be needing them.
Status Checkboxes
The little boxes between an item’s handle and its text are called status
checkboxes. They are just there for your convenience, if you’re making
something like, say, a to-do list. They don’t have any inherent meaning,
so you can use them however you see t. You can also turn them off in
OO3 TIP
the Document inspector. By the way, parent items’ checkboxes automatically update based on the values of the child items’ checkboxes, and vice
versa.
Page 26

Tutorial: Columns, Notes, and Sorting � 25
2. Adding Columns
It’s time to enter the second dimension! Or, the second-and-a-half dimension!
Or something. You can use columns to keep track of several different types of
information about the same item. Add a column by clicking the Add Column
button in the toolbar or by selecting it from the Reorganize menu.
3. Naming Columns
When you rst add a column, the insertion point moves into its title so you can
come up with some brilliant name for it. Go ahead and call this new column
“Amount”. While you’re at it, double-click the title of the Topic column and rename
it something like “Transaction”.
Continued on next page
Page 27

26 � Tutorial: Columns, Notes, and Sorting
3. The Column Type Inspector
Let’s set up your Amount column. Click the column title to select the whole
column, and then open the Column Type inspector from the Inspectors menu
if it’s not open yet. In the Column Type inspector, change the type to Number.
This makes OmniOutliner realize that you want to put numbers in this column,
that it might be doing some math with the numbers, and that it shouldn’t let
you put any other kind of data in there. When you change the type, another
pop-up menu appears for setting the number format. Go ahead and set the
format to whatever your currency is (this can be set in System Preferences, in
the International pane). This will automatically format any number you enter to
look like a monetary amount.
4. Entering Values
Now enter some items in the Transaction column, perhaps things you’ve spent
money on so far this month, or income sources. Group some things together;
you can make an item for a category and then make child items for the specic
transactions within that category. For each specic transaction, put a value in
the Amount column. Make sure you enter expenses as negative numbers and
income as positive numbers.
Page 28

Tutorial: Columns, Notes, and Sorting � 27
5. Column Summaries
See the Summary pop-up menu on the Column Type inspector? You can use
this to have parent items calculate their own values based on their descendants’ values. With your Amount column selected, click Summary and choose
Total. This will make items with children display the total value of all of their
descendants added together. Summaries will be slightly darkened so you can
tell them apart from individual editable values.
Continued on next page
Page 29

28 � Tutorial: Columns, Notes, and Sorting
6. Adding Notes
Perhaps you’d like to add a note to one of your items, some text that you’d like to
include but that you can tuck away when you don’t need it. A little “add note” icon
appears on the far left of whichever row you have selected; click it and you can
type in some text for your note. When you’re done, a note icon remains to let you
show and hide the note, so you can write pages and pages of text about each item
and then hide them away until you want to read them.
The New Document Template
Say you nd yourself using notes a lot, and there is a certain way you
always like your notes to be styled. You could use the Note entry in the
styles palette to set the style every time you create a new document, but
there’s a better way: click the Edit New Document Template button in the
OO3 TIP
General preferences. The document that shows up is a template that will
be used any time you create a new document. You can set up your styles
palette, your Document inspector, window size, utility drawer placement,
and just about anything else in the document, however you see t. Then
once you save it, any new document will be born looking just like the
saved template. OmniOutliner Professional even lets you easily set up
multiple templates with the Save As Template... and New From Template
commands in the File menu.
Page 30

Tutorial: Columns, Notes, and Sorting � 29
7. Grouping Rows
Let’s see the grand total. Select all of your existing rows and choose Group
from the Reorganize menu. This moves them all in one level as children of
a new item. Name the new parent item after this month, and its value in the
Amount column will be the total of all its descendent items.
Continued on next page
Page 31

30 � Tutorial: Columns, Notes, and Sorting
8. Sorting Rows
You’re on a roll!! How about sorting our rows by amount? No problem — select all of your rows, and from the Reorganize menu, choose Sort Selected
Rows ‣ Amount, Lowest to Highest. All of the selected rows will keep their
hierarchy but rearrange themselves into numerical order. Now you can see
where your biggest money drains are — whoa, $3.23 on mayonnaise!? You’d
better go for the generic one next time, buddy.
9. The End
That’s all for this tutorial; now you know of several ways to organize your
information.
Page 32

An In-Depth Look
Inspectors
The inspectors are little windows with which you can control every aspect of your
outline. You can drag them around by their title bars like any other window, but
they also have some other useful features. If you drag them near each other or
near the edge of the screen, they will snap to the edges for easy and neat positioning. You can collapse or expand them by clicking their title bar once or by typing
their key combination. Dragging the top inspector in a stack of attached ones will
move them all, and clicking its close button will close all attached inspectors as
well. Inspectors with icons across the top have several different sections you can
view; just click an icon to switch to its section. If you want to view more than one
section at the same time, just Command-click the icons of the sections you want.
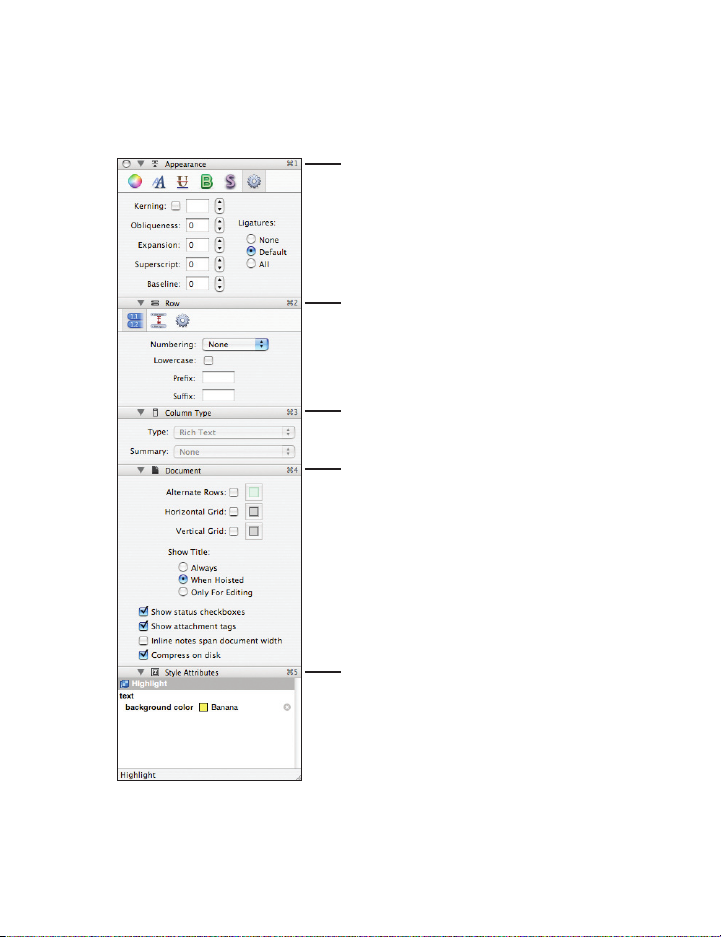
Appearance inspector
Whenever you have something selected in your outline, be it text, rows, style chits,
or columns, the controls on this inspector will affect the appearance of whatever
is selected.
• Color
Set the color of your text and its background, or use an image as a
background.
• Font
Change the font face or size and make text bold or italic.
Continued on next page
Page 33

32 � Inspectors
• Underline
Lavender dotted double-underlines, umber dashed heavy strikethroughs; get
‘em in here.
• Border
Put an outline around your text.
• Shadow
Drop a shadow behind your text. You can use the slider to control the blurriness
of the shadow’s edges. To set the shadow’s offset from the text, you can drag
the cross around or enter numbers in the elds on the right.
• Advanced
All sorts of advanced typographical settings can be changed here: Kerning,
Ligatures, Obliqueness, and so on. These are for controlling the shape and
positioning of characters.
Row inspector
This inspector is for customizing how rows behave in your outline. Obviously, you’ll
want to have some rows selected to use it.
• Numbering
Rows with numbering turned on will automatically assign themselves a number
or letter as you create them and move them around. These are particularly
useful when you assign different numbering schemes to different levels of your
document with the styles palette.
• Lowercase
Check this to make any letters in the numbering scheme you chose
lowercase.
Page 34

Inspectors � 33
• Prex and Sufx
The prex and sufx will be added to each number or letter in your
numbering scheme. Some people like to put periods or right-parentheses
after their numbers; this option is for them.
•
Spacing
Here you can set the distance between rows and other rows, rows and their
children, or rows and their notes.
•
Advanced
• Show handles
If the little dots and triangles are bothering you, hide them until the mouse
is over them or get rid of them altogether.
• Gutter color
The gutter can be a little easier to nd when it’s a different color; this helps
to quickly determine a row’s indentation level.
• Sort Children
This checkbox controls whether the selected row’s children will be allowed to
be sorted by the Reorganize menu’s sorting commands.
• Pro feature: Page break before row
In OmniOutliner Pro you can stick a page break just before the selected
row; whenever you print your outline, this row will be at the top of a new
page regardless of what was before it.
Continued on next page
Page 35

34 � Inspectors
Column Type inspector
Here you can set up what kind of data each column will hold, and how it will treat
that data. Select a column by clicking its title, or at least position the insertion point
inside the column you want to edit.
•
Type
Columns contain Rich Text by default, but you can set them up to deal with
more specic kinds of data.
• Rich Text
This is text that can be styled however you like.
• Number
This column type is for... numbers. When you select this, a pop-up list
appears for formatting the numbers as decimals, percentages, currency,
and so on.
• Pop-up List
When you select this type, a eld appears to let you compose a list of
possible choices. Then each cell in the column gets a pop-up list containing
those choices.
• Duration
You can enter spans of time in this column type. Durations can be repre-
sented by their rst letters, so you could type “2w1d17h” and the column
would understand that you mean 2 weeks 1 day 17 hours. You can also
choose what kind of time system you would like with the Setting pop-up, or
enter your own values.
• Date
Keep track of dates and times in a variety of different formats.
• Checkbox
This gives you a checkbox for each item, which you can turn on or off.
Page 36

Inspectors � 35
•
Summary
When you turn on summaries, parent items’ values in this column become
dependent on their children’s values.
• None
This is the default; parents’ values ignore their children’s values.
• Total
Parent rows’ values will be a cumulative total of all of their children’s
values.
• Minimum
Parent rows’ values will be equal to the lowest value among all of their
children.
• Maximum
Parent rows’ values will be equal to the highest value among all of their
children.
• Average Leaves
Parent rows’ values will be an average of all leaves among their descendants.
When we say “leaves”, we mean items that have no descendants, like the
leaves of a tree are at the ends of its branches.
• Hidden
Parents’ values, whatever they are, simply won’t appear in the outline.
Continued on next page
Page 37

36 � Inspectors
Document inspector
This inspector has settings that affect your whole document rather than certain
parts of it. With it you can set up coloring and a grid to make the outline easier to
read, change how the document appears, and choose whether to compress the
le when saving it to the disk.
Style Attributes inspector
This inspector shows all of the different styles that are being applied to whatever
you have selected at the moment. The style attributes are grouped under headings
that indicate where they come from. Styles with higher priority will be listed above
lower-priority styles. In general, locally-dened attributes (such as row styles) have
precedence over more generally-dened attributes (such as whole-document
styles). You can remove styles with the little X button next to each one.
Page 38

Toolbar � 37
Toolbar
Just like in other Mac OS X applications, you can customize the toolbar to contain
whichever controls you like, or hide it completely. Use the View ‣ Customize
Toolbar command to set up the toolbar however you like it, and use the white
lozenge on the right side of the title bar to show or hide the toolbar.
Most toolbar items are just analogs of menu items, available for one-click access.
One exception is the Action pop-up menu. It replicates the menu you get from
right-clicking or Control-clicking in the outline, in case you don’t have a multibutton mouse or you don’t like Control-clicking.
Page 39

38 � Utility Drawer
Utility Drawer
Batch Find
Batch Find Results/ Sections list
Styles Palette
Batch Find
At the top of the utility drawer is a batch nd eld, which you can use to nd all
occurrences of a certain bit of text. You can search in the whole outline or just in
the currently hoisted section. (See the page 40 for more about hoisting.)
Batch Find Results / Sections List
Below the batch nd eld is an area where its results show up.
• Pro feature
In OmniOutliner Professional, this area doubles as a Sections list; click a
section to quickly hoist that section to the top level.
Page 40

Utility Drawer � 39
Styles Palette
The bottom part of the utility drawer is occupied by the styles palette. The top
bit of the styles palette is for setting styles on a large scale: contents of a certain
column, all rows on a certain level, all notes, and so on. The bottom bit contains
named styles, which you can drag onto parts of your outline or turn on and off
with the function keys. To edit any style in the styles palette, click it and then use
the Appearance inspector.
• Pro feature
With OmniOutliner Professional you can create and edit as many named
styles as you’d like. To create or delete named styles, use the little + and
- controls underneath the styles palette.
About Style Chits
The little squares next to any style in the styles palette, the Style Attributes
inspector, or the styles view, are called style chits. They serve a couple
of purposes: First, they try their darndest to actually display the style they
represent. When there is just too much style information to be displayed in
OO3 TIP
such a tiny square, they resort to a generic checkerboard pattern. Second,
they can be dragged around to add their style to other things. Drag a chit
onto some text, some rows, a column, or another chit, and its style will be
applied there. If you apply a named style, any subsequent changes to the
named style itself will also be applied to wherever you dragged it.
Page 41

40 � Particularly Useful Features
Particularly Useful Features
Templates
From the General preference pane, you can set up a default template for your documents.
You can then use that template as a starting point when creating new documents.
• Pro feature
With OmniOutliner Professional you can create as many templates as you
like with the File ‣ Save As Template... and File ‣ New From Template
commands; the standard edition is limited to the default one.
• Pro feature: Clippings
OmniOutliner Professional puts a new item in your system-wide Services
menu (under the application menu) for sending the currently highlighted
text from any application into an outline. You can create clipping les in
the Clippings pane of the OmniOutliner Professional preferences, and then
when you use the service you’ll be able to choose into which le you’d like
to send the text.
Hoisting and Sections
If you’d like to concentrate on one part of your outline for a while, you can
temporarily move it up to the top level by selecting it and choosing Hoist from the
View menu. This hides all of the other sections of your document so that you can
treat the hoisted section as its own outline. Remember, hoisting doesn’t change
your outline, just your view of it.
• Pro feature
In OmniOutliner Professional you can quickly hoist a section by just clicking
it in the utility drawer’s sections list.
Page 42

Particularly Useful Features � 41
Notes
People use notes for all sorts of things. Notes can be used in a large outline to
remind yourself how you plan to expand certain parts. They can be used to offer
corrections and suggestions when editing someone else’s outline. Some people
writing whole books in OmniOutliner make an item for each section or chapter
and then write the actual text in the note elds.
You can set the way notes are displayed in the View menu, under Notes. The
Display inline command puts the notes in the outline directly below the items they
are associated with, and you can see multiple notes at once. The Display in Pane
command puts a pane at the bottom of the document window; select an item and
its note will appear in the pane.
When viewing notes inline, clicking the gray note icon to the left of an item will
show or hide that item’s note, or add a note if it doesn’t have one yet. You can
press Command-apostrophe or Enter to move the insertion point between an item
and its note.
File Attachments
You can insert les of any kind right into your outline. Just drag them from the
Finder, your web browser, or any other application and drop them on the outline.
Images, movies, and audio les can be viewed or played right inside the outline.
Click the triangle on the left side of an attachment to expand or collapse it, and
click the arrow on the right side to open the le in its associated application. To
create a link to a le instead of inserting it, just hold Control while you drag and
drop.
Continued on next page
Page 43

42 � Particularly Useful Features
Sorting
There are two main ways to sort rows in your outline; both of them are available
from the Reorganize menu.
You can use the Keep Sorted submenu to set rules for sorting your whole
document. The rules continue to be in effect, automatically sorting each row you
create, until you turn them off. A small triangle icon will appear by the sorted
column’s title to indicate the sorting direction. You can temporarily turn off sorting
by selecting Reorganize ‣ Keep Sorted ‣ Postpone Sorting.
• Pro feature
OmniOutliner Professional can follow multiple sorting rules which are
honored in the order you set them.
Sort Selected Rows will sort only once and then leave your rows alone.
Page 44

Preferences � 43
Preferences
The preferences are general application settings; that is, they are not specic to
the document you are working on. To see them, Select Preferences from the
OmniOutliner menu.
Open documents...
If you tend to work on the same documents across a few sessions, this option lets
you pick up right where you left off the last time you used OmniOutliner.
Edit New Document Template
Click this button and the default new document template appears. Change it as
much as you like, then save it; whenever you create a new document it will look
just like the template.
Open documents
Edit New Document Template
Continued on next page
Page 45

44 � Preferences
Backup
Once you have saved your outline to a le, OmniOutliner will periodically save a
backup version to the le as well. Then, if you have a crash or otherwise lose your
document without saving it, the next time you open the le, you’ll have the choice
of using either the backup version or the last saved version.
There are some tricky implications to this feature, so if you plan to use it extensively
you should probably consult OmniOutliner’s Help menu for more information.
Automatically create attachments from typed URLs
OmniOutliner can turn anything you type that looks like an URL (web site addresses,
FTP addresses, and so on) into a location attachment. That way you can click the
attachment to open the address in the appropriate application. Of course, you can
always just drag addresses into your outline from other applications as well.
Backup
Automatically create attachments from typed URLs
Page 46

Preferences � 45
Keyboard
Use this pane if you’d like to customize the behavior of certain keys and key
combinations. For example, people accustomed to word processors might expect
the tab key to indent a row, while people accustomed to spreadsheets might expect
it to move to the next column. You can choose which you prefer here, and set other
keys’ behaviors as well.
Text
The controls in this pane are for setting up how OmniOutliner imports and exports
text les. The Bullets, Checkboxes, and Spacing sections control how outline
elements are represented when exporting to plain text format. Many different
encoding schemes exist for storing text. The Encoding setting determines how
OmniOutliner should interpret text les when importing, and how it should write
them when exporting.
RTF Export
This is just like the export settings on the Text pane, except that these control
exporting to rich text rather than plain text. Rich text supports more precise
formatting so you will generally get a better result than with plain text.
Update
You can always be sure that your copy of OmniOutliner is up to date by letting it
automatically check for new versions of itself. Of course, OmniOutliner will only
check when you have an active internet connection.
• Pro feature: Clippings
In this pane you can set up clippings les for use with OmniOutliner Pro’s
system-wide clippings service.
• Pro feature: Sound Capture
Here you can set up OmniOutliner Pro’s behavior for recording audio.
Keyboard
RTF Export UpdateClippings
Text
Sound Capture
Continued on next page
Continued on next page
Page 47

46 � Import, Export, Save, Print
Import, Export, Save, Print
Importing from other formats
OmniOutliner can import lots of le types; all you have to do is open the le just
like you would normally with File ‣ Open. You can view les from the applications
MORE, Acta, Concurrence, and Keynote, among others. Remember that when you
import a le you get a copy of it converted to OmniOutliner 3 format, so going
back to another format requires you to export the le.
Exporting to other formats
OmniOutliner can export to a variety of formats. Just choose File ‣ Export and
choose whichever format you’d like. Settings for Plain Text, Rich Text, and Keynote
formats are available in OmniOutliner’s preferences. Remember that when
exporting, OmniOutliner will create a new copy of your document in the selected
format, leaving the one on your screen as it is.
OmniOutliner can export to a
variety of formats.
Page 48

Import, Export, Save, Print � 47
Saving
Saving in OmniOutliner is pretty straightforward. Just select File ‣ Save or File
‣ Save As like you would in any other application. Generally you’ll be saving in
OmniOutliner 3 format. You can also save in OPML format if necessary, but this
will cause you to lose any formatting that isn’t supported by OPML.
Printing
Both Page Setup and Print in the File menu have an OmniOutliner pane that you
can use to set up how you want your document to look on paper. You can create
headers and footers (in OmniOutliner Pro), set the page margins, choose which
columns you’d like to print, and plenty more.
Page 49

Page 50

Help
Try the Online Help
When you’ve got a specic question that goes beyond the scope of this manual, you
need the nitty and/or gritty details of how a feature works, or you simply feel like
learning more, check out OmniOutliner’s online help. Just select OmniOutliner
Help from the Help menu; it’s a searchable, browsable veritable treasure-trove
of information.
Keyboard Commands
Many commands have keyboard equivalents; they can save you a lot of time and
mouse-work. For a list of all the keyboard commands available in OmniOutliner,
select Keyboard Commands from the Help menu. Next thing you know, you’ll
have cobwebs on your mouse.
Continued on next page
Page 51

50 � Further Help
Further Help
Our web site is a nice rst place to look for the latest information about
OmniOutliner.
http://www.omnigroup.com/applications/omnioutliner/
There’s a OmniOutliner users’ mailing list, and you’re invited! Someone in the
community just might be able to help you.
http://www.omnigroup.com/mailman/listinfo/omnioutliner-users
If you’re really stuck, or if you just want to let us know what you think, go ahead and
e-mail us. Select Send Feedback from the Help menu to conjure up a message
addressed to us, or just write to
omnioutliner3@omnigroup.com.
We’ll do our best to help you out.
Page 52

Page 53

the omni group
www.omnigroup.com
 Loading...