

Page 1
A
AUTOMATIC VOICE LOGGING
RECORDER
standard speed models VLR-1 and VLR-1CT
one quarter speed models VLR-4 and VLR-4CT
one eighth speed models VLR-8 and VLR-8CT
OWNER’S REFERENCE MANUAL
5K07028099 K-2000
Page 2

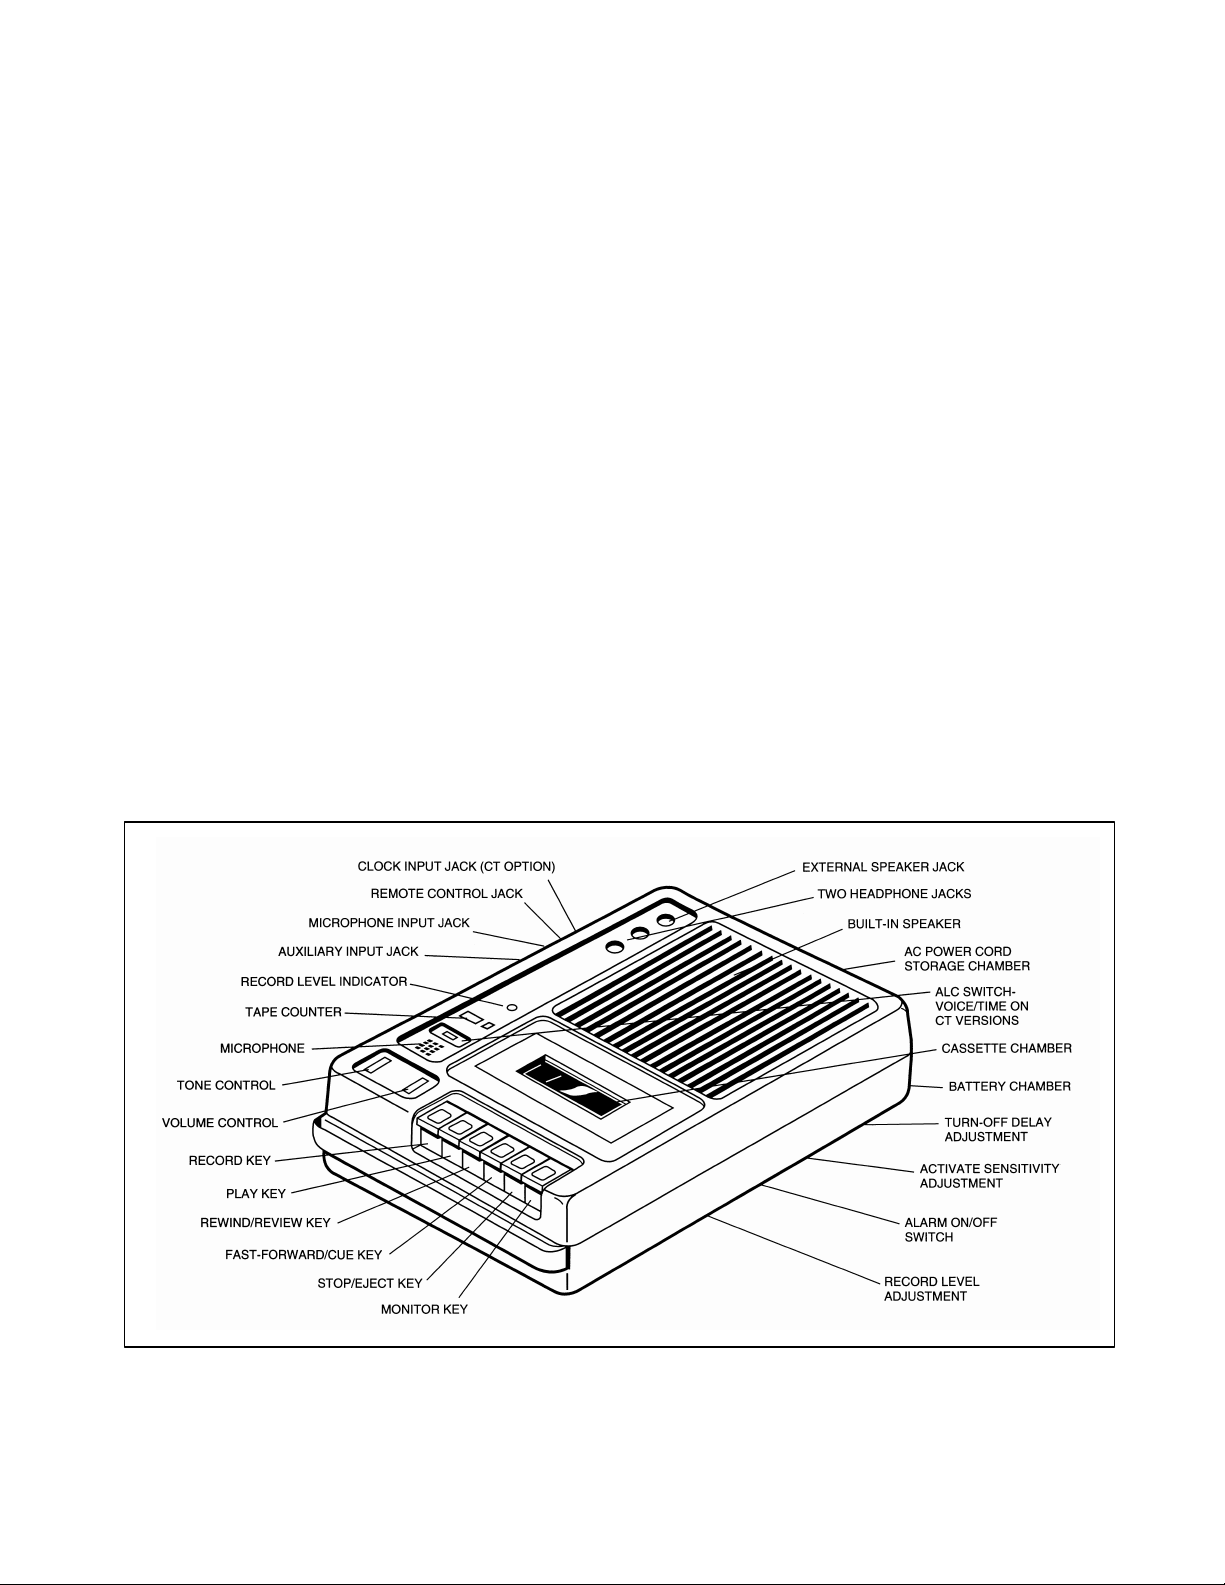
FEATURES
The Omnicron VLR recorder
is a versatile solid-state unit
featuring voice-activated recording.
This feature permits you to record
conversations without having to
turn the recorder on
and off manually. You can make
recordings directly from the built-in
microphone, or you can use an optional interface coupler or cable to
connect the recorder to telephone
or radio circuits.
Other important features include
an end-of-tape alarm, review and
cue capability, digital tape counter,
and monitor while recording. The
VLR-4 and VLR-8 recorders include slow speed drive circuitry.
The VLR-4 provides up to four
hours of recording time on each
side of a tape. The VLR-8 provides
up to 8 hours per side. Automatic
level control recording assures the
best performance with reduced
back-ground noise and distortion.
A second recording channel for
use with the Omnicron Talking
Clock can be found on models
VLR-1CT, VLR-4CT, and VLR-8CT.
The clock provides documentation
of the time and date each recording takes place.
When you reach the end of tape
in either play, record, fast-forward,
or fast-rewind, the function keys
will pop up turning the power off.
If the End-Of-Tape Alarm switch
is ON, the recorder will emit a continuous beep tone from its speaker
whenever all function keys (Play,
Review, and Cue)
are up.
PREPARATION FOR USE
AC POWER
The recorder uses standard 120volt 60 Hz AC power. On the bottom of your recorder you will find
the AC power cord storage compartment. Remove the cord and
plug it into an AC outlet.
BATTERY POWER
The recorder uses six C-size
cells. To install batteries, remove
the lid of the battery compartment
which is on the bottom of the recorder. Insert the six batteries
to match the polarity of the “+”
and “-” symbols shown inside of
the battery compart ment. After the
batteries are installed and seated
correctly, replace the battery compartment lid.
Incorrectly inserted batteries will
not work and could cause damage
to the batteries and the recorder.
The recorder will trickle charge rechargeable batteries and a built-in
relay will automatically switch over
to battery power whenever AC
power is lost. Non rechargeable
batteries should be removed prior
to operating the recorder on AC
power.
Batteries are not required for
operation on AC power.
CASSETTE INSERTION
Open the cover of the cassette
compartment by depressing the
STOP-EJECT key. Insert the cassette with the tape edge toward
you and the full reel to the left.
Now close the cover and the
recorder is ready to operate.
OPERATION
GENERAL
You control all tape mechanism
functions with the push buttons.
The tape will stop, and power
is off when all buttons are up.
Depressing one of the PLAY,
REVIEW (rewind), or CUE (fastforward) buttons turns on the
power and places the tape recorder into the selected mode.
You can stop the tape by pushing
the STOP-EJECT key. Depress
this key again to eject the cassette. The recorder has an aut omatic power-off circuit. When you
reach the end of tape, the buttons
will pop-up and power will turn off.
A tape COUNTER helps you
quickly locate recorded material for
playback. Depress the button next
to the counter to reset the numerals to “000”.
RECORDING
When recording, the tape drive
motor will run only when audio is
present at one of the recorder's
audio input sources. You can use
either the built-in microphone, an
external microphone, or an auxiliary audio source. You will aut omatically turn off the built-in microphone when you use either
the external microphone jack
(MIC), or the auxiliary input jack
(AUX). Audio fed into the CLOCK
jack on recorders with the CT
option goes directly to the time
track on the recording head and
will not start the recorder's voice
activation circuit. You must depress both the RECORD and the
PLAY keys for the recorder to be
in the RECORD mode.
RECORD LEVEL
ADJUSTMENT
On the bottom of the recorder
you will find the record level control. You may increase the record
level and make weak sounds
louder by turning this control
clockwise. If you set the control
too high, your recordings could
be distorted and the recorder will
boost background noise excessively. Line up the blade of a small
screwdriver with the slot in the
control. Adjust it up or down as required for the best sound quality.
DO NOT FORCE THE CONTROL.
To set the level correctly, watch
the Record Level
indicator light. When you are recording, set the record level adjustment only as high as required
to cause the red light to come on
during voice peaks. If the light
does not flash during convers ations, the record level is too low.
If it is on continuously, the record
level is too high.
1
Page 3

CASSETTE INSERTION
Before inserting a cassette, take
up any slack in the tape by insert ing a pencil into the hub of the cassette and turning it a few times.
Press the STOP/EJECT key to
open the cassette door. Insert the
cassette into the chamber with the
exposed edge of the tape facing
you and the full reel to your left.
Close the door by pressing downward until it latches shut.
To remove a cassette, press the
STOP/EJECT button once to stop
the recorder. Press the button a
second time to open the cassette
door.
RECORDING WITH BUILT-IN
MICROPHONE
Insert a tape and simultaneously
depress both the RECORD and
PLAY keys. The tape will begin
to move, and the machine will be
recording. The recorder will continue
to record as long as there is sufficient audio in the amplifier to trigger
the voice-activation circuit.
It stops after it is quiet for a few
seconds and starts recording when
you speak within a few feet of the
microphone.
The volume control is inoperative
in the record mode. The MONITOR
function should be off (MONITOR
key UP) to prevent feedback during
microphone recording. To end the
recording, depress the STOP/
EJECT key. Depress this key a
second time to EJECT the cassette. If you reach the end of the
tape while recording, the recorder
will shut off and the PLAY and
RECORD buttons will pop up.
RECORDING WITH
EXTERNAL
MICROPHONE
Plug a suitable microphone
(such as the OMNICRON RMC-8 or
PZ-2LA) into the MIC or MIC and
REM jacks on the left side of the
recorder. The large jack (MIC) is the
microphone circuit. It is also used
to connect other low level audio
sources to the recorder.
The small jack next to the MIC
jack is the remote switch circuit
(REM). When the remote jack is
used, the tape will not move in the
RECORD mode unless the external
remote switching circuit is on. The
voice activation circuit also must
have sufficient audio to start the
motor. Operate the recorder as described in the instructions for builtin microphone recording.
Increase or decrease the record
level as nec essary.
RECORDING FROM OTHER
SOURCES: RADIO, PHONE,
ETC.
Your recorder receives audio either by placing a microphone near
the speaker of your audio source, or
by connecting directly
to the speaker or audio output of
the device you wish to monitor. If
possible, use a direct connection
to prevent unnecessary noise
pickup. A direct connection also will
produce clearer recordings.
Most telephone and some twoway radio installations require the
use of an interface coupler or
adapter (such as the TSA-3,
LIC-390, or LIC-100) between
the recorder and the audio circuit.
Couplers provide isolation and
a balanced line input. They also
help to prevent the noise on telephone lines from reaching the
recorder between conversations.
Check with your Omnicron dealer or
telephone company to see if you
require a coupler for your application. Do not connect the recorder
directly to telephone lines without
a coupler. Improper operation of
both your recorder and the telephone circuit could result. The recorder could also be damaged.
An accessory patch cord is available (AUX-6S) for use if you will be
connecting the recorder to your audio source without a coupler. It has
a miniature phone plug on one end
to match the auxiliary
audio input jack on the recorder
(AUX) and spade lugs on the other
end. It is six feet long. You can
shorten or lengthen it if necessary.
The spade lugs can be changed, if
required, to match the audio connections on your signal source
(two-way radio, tone alert receiver,
scanner, tape recorder, pocket
pager, etc.). The cable may be
special ordered to match your
specific application.
VOICE ACTIVATION
SENSITIVITY
If the recorder does not record
weak conversations properly after
adjusting the RECORD LEVEL, you
can adjust the recorder so it will be
more sensitive and start recording
with weaker sound levels by turning
the ACTIVATE SENSITIVITY control
clockwise. You will find this screw
driver adjustment on the bottom of
the recorder. You can also adjust
this control to make the recorder
less sensitive if it runs with noise
that is weaker than the normal conversation level. To make the voice
activation less sensitive, turn the
control counter-clockwise with a
small screwdriver.
Adjusting the ACTIVATE SENSITIVITY control too far in the
clockwise direction can turn off the
voice activation circuit. This will
cause the unit to run continuously
when it is in the record mode.
Adjusting the control too far in the
counter-clockwise direction will
cause the recorder to remain
stopped in the record mode even
if there are loud sounds in the amplifier. DO NOT FORCE THE
CONTROL.
Since the sensitivity of the voice
activation circuit is also affected
by the setting of the record level
adjustment, you should adjust the
record level for best sound quality.
Then adjust the ACTIVATE SENSITIVITY if necessary to insure that
the recorder does not run when it
should be stopped, or if it stops
when it should be recording.
2
Page 4

TURN-OFF DELAY
You can adjust the length of time
between the end of a conversation
and the moment when the recorder
stops with the TURN-OFF-DELAY
control. This screw driver adjus tment is on the bottom of the recorder. Adjust this control by inserting a small screwdriver in the hole
indicated. If the recorder turns off
too quickly during pauses, turn the
control clockwise to increase the
turn-off-delay.
If the recorder runs too long after
a conversation is over, adjust the
control counter-clockwise to decrease the turn-off-delay. When
you are recording room conversations, it is advisable to set this control for a long turn-off-delay. This will
help to prevent the recorder from
stopping during low level conversations. DO NOT FORCE THE
CONTROL.
PLAYBACK
Insert a recorded cassette with
the full reel to the left and the side
you wish to play up. If the cassette
you are playing was just recorded
and is still in the recorder, rewind it
to the beginning of the recording.
Press the PLAY key. Then set the
volume for the desired listening level
from the speaker. To end the playback, press the STOP/EJECT key.
Depress this key a second time to
eject the cassette.
TONE CONTROL
You can use the TONE control
to limit the frequency response
when the recorder is in the play
mode. With this control set to the
low position, it will cut down on the
level of high frequency sounds.
Turning it to a higher position
produces more high frequency
sounds. Adjust the TONE control
for best sound quality.
MONITORING
The monitor circuit lets you listen
to conversations while you are recording. To activate the monitor
function, depress the MONITOR
key. Depress this key a second
time to turn off the monitor feature.
Feedback or an echo could pre-vent
you from using this feature
if your sound source is a microphone in the same room as the recorder.
During playback, you use the
VOLUME control to adjust for a
comfortable listening level. The
VOLUME control has no effect
while recording. You can also
connect an external speaker to
the recorder's speaker jack. Two
headphone jacks are also available
for priva te listening. When you use
either headphone jack, the built-in
speaker will be disconnected.
END-OF-TAPE ALARM
The end-of-tape alarm switch is
also located behind a hole on the
bottom of your recorder. When this
switch is in the ON position, a beep
tone will automatically start whenever all function keys are up. It will
also beep if you do not place the
unit back into the auto-record mode
after reviewing a recording. To deactivate the alarm, use a small screwdriver to place the switch into the
OFF position. DO NOT FORCE
THE SWITCH.
CUE / FAST-FORWARD
The CUE (fast-forward) key is a
dual function key. When you depress this key while the unit is in
the play mode, the tape will run
forward at high speed. When you
remove pressure on the key, the
recorder will return to the play
mode. If you depress the CUE key
when the recorder is not in the play
mode, the key will lock down and
the tape will run forward at high
speed until it reaches the end of
tape, or you press the STOP key.
To prevent possible tape damage,
you should always depress the
STOP key after locked in fast winding prior to going into the PLAY,
RECORD, or REWIND modes.
REVIEW / REWIND
The REVIEW (rewind) key is
also a dual function key. To repeat
something that was just played,
depress the REVIEW key. The
recorder will rewind the tape.
Removing pressure from the key will
return the recorder to playback.
If you depress the REVIEW key
when the recorder is off, the key will
lock down, and the tape will rewind
until either you press the
STOP/EJECT key or you reach the
beginning of the tape.
COUNTER
The tape counter is helpful in finding certain portions of the tape or in
determining how much tape you
have left. You can set it to “000” at
any time by depressing
the small button to the right of
the counter.
ALC SWITCH
On recorders that do not have the
CT option (Clock Track) there is a
switch to turn off the Automatic
Level Control. You should normally
set this switch to the ON position. If
you set it to the OFF position, the
internal ALC circuit will be off and
the recorder will not automatically
adjust for sounds that are too loud.
Use the record level adjustment on
the bottom of the recorder to set the
recording level.
When the ALC switch is on, you
must still turn the record level up
if the sound is too weak and the
record level light does not flash
while recording. The ALC circuit will
prevent sounds that are too loud
from over driving the recorder.
On recorders with the Clock
Track option, this switch is used
to select the time track during playback.
CLOCK TRACK
On recorders that have the CT
Clock Track option (VLR-1CT, VLR4CT, or VLR-8CT), there is a jack
on the side for connecting to a talking clock and a switch on top for
selecting either conversation
3
Page 5

(VOICE), or time and date (TIME)
playback.
Connect the audio from the clock
(Omnicron TCC-14 or equivalent) to
the CLOCK jack on the recorder
and adjust the clock's output level
following the instructions supplied
with the clock. When you have
the clock properly connected to
the recorder, the time and date announcements from the clock
will be recorded on the time track
whenever you are recording. When
you play back the tapes, you must
switch the PLAYBACK switch to
the TIME position to listen to recorded time announcements. If
you did not have the clock connected to the recorder when you
made the recording, no time announcements will be on the time
track. It will be silent.
TAPE ERASING
When recording, you will erase
the previous recording on the tape
and replace it with the new recording. Only the sections of the tape
where you made new recordings will
be erased. Your old recordings will
remain on the other sections.
SAFEGUARD AGAINST
ACCIDENTAL ERASING
Every time you make a recording,
you will erase previously recorded
portions of the tape. To prevent you
from accidentally erasing recordings, the cassette and the recorder have interlock devices. On
the back of each cassette are two
little flaps. If you want to be sure
that the recorder will not erase a
previously recorded tape, break out
these flaps with a small screwdriver
or key. You cannot depress the
RECORD key unless there is a
cassette in place that has an intact
record interlock flap.
PERIODIC MAINTENANCE
With use, the record/playback
head, erase head, capstan, and
rubber pinch roller in your recorder
will gather dirt and material trans-
ferred from the tapes as they pass
through. This could reduce the reliability of the recorder and result in
weak or distorted sound.
To expose the heads and tape
drive components for cleaning,
press the STOP/EJECT key to
open the cassette door. If there is
a tape in the unit, remove the tape.
With the door open, press the
PLAY button to expose the parts
that need cleaning.
Use a cotton swab and a commercial tape head cleaning agent to
clean the heads and rollers. Follow
the instructions on the cleaner container. DO NOT try to install a cassette with the heads in the forward
position. If the recordings are still
distorted or weak after cleaning,
you could have a badly worn or
damaged head that will require replacement.
You can clean the cabinet with a
soft cloth. If necessary, dampen the
cloth with water. Never use polish,
solvents, abrasives, or strong detergents since these
can damage the finish.
The recorder is designed to be
trouble free in normal use. If problems do occur, contact a qualified
service technician or call Omnicron
Electronics for help.
GENERAL REMINDERS
DO NOT push the RECORD button if you do not have a cassette in
the recorder, or if the knockout tabs
on the cassette are missing. DO
NOT use excessive pressure on the
function keys or adjus tments.
DO NOT touch the recording head
with metal or magnetic objects
such as a screwdriver. Remove all
batteries if the recorder is not in use
for an extended period. Leaking
batteries could damage the recorder.
Remove the AC line cord from the
wall outlet if you are not going to
use the recorder for an extended
period.
WARRANTY
This Omnicron product is warranted
against defects in materials and wor kmanship for one year from the date of
shipment. Omnicron will, at its option,
repair or replace products that prove to
be defective during the warranty period provided they are returned to Omnicron Electronics. Repairs necessitated by misuse, accident, improper
installation, unauthorized modifications, or use in violation of the operating instructions, are not covered by
the factory warranty, nor are cases
where the serial number has been removed, defaced,
or changed.
No other warranties are expressed or
implied, including but not limited to the
implied warranties of merchantability
and fitness for a particular purpose.
Omnicron Electronics is not liable for
consequential damages.
Should your recorder become defective within the warranty period, we will
repair it without charge. Should it require service that is not covered by the
warranty, Omnicron will repair it for a
nominal service charge plus the cost of
parts and transportation.
REPAIR
If factory service is required,
pack securely and forward by
United Parcel Service (UPS),
FEDEX, or insured parcel post to:
OMNICRON ELECTRONICS
581 Liberty Highway
P.O. Box 623
Putnam, CT 06260-0623
Enclose a note explaining
what is wrong. Include your
name, address, and telephone
number. Omnicron Electronics
also offers telephone, web site,
and E-mail help:
VOICE: (860) 928-0377
FAX: (860) 928-6477
Web Site:
www.omnicronelectronics.com
E-mail:
support@omnicronelectronics.com
4
Page 6

5
Page 7

GENERAL
OMNICRON VLR recorders are professional loggers
designed to provide you with complete documentation of
your important telephone conversations, two-way radio
messages, or dictation. They have unique features which
allow virtually unlimited use in a wide range of applications
with top performance and minimal maintenance.
Built-in voice activation circuitry expands the recording
time by automatically stopping the recorder between
conversations. The recorders can be ordered for either
standard speed or slow speed operation. The VLR-1
recorders run at the standard cassette speed allowing you
to record and play back tapes which are compatible with
recorders that do not have slow speed capability.
Advanced slow speed drive circuits in the VLR-4 and
VLR-8 recorders expand the recording time even further
to provide 8 or 16 hours of solid talk time on each cassette
tape. The VLR-4 provides four times more recording and
playback time per tape than the VLR-1. It packs 8 hours of
conversation on each MLC-120 cassette tape. The super
slow speed VLR-8 runs at 1/8 speed for 16 hours per tape
FEATURES
ALARM — Beeps when the cassette needs to be changed,
or if the recorder is turned off either accidentally or by the
built-in all mode motion sensing circuit. The tape
automatically turns off and sounds the alarm if the tape
stops when it should be moving in record, play, fastforward, or fast -rewind.
MONITOR WHILE RECORDING — Lets you listen to
conversations while they are being recorded through the
built-in speaker, through either of two 1/4" headphone
jacks, or through the 1/4" external speaker jack (8 ohm).
CUE AND REVIEW — For rapidly finding and repeating
recorded messages.
AUTOMATIC RECORD LEVEL CONTROL — Prevents
overload on strong signals. Manually adjustable record
level, activate sensitivity, and turn-off delay permit you to
adjust the recorder’s voice activation circuit to match
your particular application.
MONITOR AND ALARM ON/OFF SWITCHES
with little loss in voice quality (8 hours per side with an
MLC-120 cassette tape).
VLR recorders with the Clock (CT) Track option (VLR-1CT,
VLR-4CT, and VLR-8CT) are designed for use with the
OMNICRON TCC-14 Talking Clock/Calendar. They have
a second track for recording the verbal time and date
announcements provided by the clock. When playing back
the recorded conversations, simply switch to the Time
Track and you will know exactly when that moment of
conversation was recorded. One Talking Clock can
provide time and date announcements for over 50
recorders.
OMNICRON recorders are used in a wide variety of voice
logging applications. A standard or custom audio adapter,
coupler, or cable should be be ordered with the recorder
to match your audio source. Contact your OMNICRON
representative for assistance in selecting the equipment
best suited to your application. Factory help is also
available by calling (860) 928-0377.
AUTOMATIC END-OF-TAPE SHUT-OFF — In record,
fast-forward, and rewind.
AUTOMATIC BATTERY CHARGING — For optional
rechargeable batteries (RBC-6), unit automatically
switches to battery power if external AC power is lost.
INPUT/OUTPUT JACKS — Microphone, remote on/off,
auxiliary audio input, remote speaker, two headphone
jacks, and Talking Time Clock (with CT option).
ROTARY VOLUME AND TONE CONTROLS
DIGITAL INDEX COUNTER WITH RESET
AC BIAS RECORDING — For optimum voice frequency
recording.
EASY, SELF-INSTALLATION — In most applications
with optional adapter.
SPECIFICATIONS
POWER — 120 VAC 50/60 Hz, 10 Watts, six “C” cell
batteries, or optional RBC-6 rechargeable battery pack.
SIZE — 7-3/4" W x 11-1/2" D x 2-3/4" H, 4-1/2 lbs.
INPUTS — Microphone, 2k ohms, -70dB
Auxiliary, 200k ohms, -20 dB
AUDIO OUTPUT — 1 Watt
Clock, 600 ohms, -10 dB
SIGNAL TO NOISE RATIO — VLR-1 is 50 dB, VLR-4 is
42 dB, VLR-8 is 34 dB.
TAPE SPEED — VLR-1 is 1-7/8 I.P.S., VLR-4 is 15/32
I.P.S., VLR-8 is 15/64 I.P.S.
TAPE SIZE — Standard Compact Audio Cassette.
ERASE SYSTEM — AC
RECORD SYSTEM — AC bias.
MAXIMUM RECORDING TIME — With MLC-120 tape:
VLR-1 records 1 hour per side at 1-7/8 I.P.S., VLR-4
records 4 hours per side at 15/32 I.P.S., VLR-8 records 8
hours per side at 15/64 I.P.S.
BUILT-IN SPEAKER — 5", 8 ohm, 5 Watts.
Each VLR recorder comes with an MLC-120 cassette
tape, AC power cord, owner’s manual and a limited 1 year
warranty. Recorders with the CT option are also supplied
with a cable for connection to the optional TCC -14 time &
date source. You will also need an adapter, coupler, or
cable to connect the recorder to your audio source. Order
it as a separate item to match your specific requirements.
Specifications are subject to change without notice.
 Loading...